

Page 1

Megaplex II 4U
Chassis Guide
MAN-782-CH4
1/28/00
Page 2

© Copyright 2000 American Megatrends, Inc
All rights reserved
All rights reserved.
American Megatrends, Inc.
6145F Northbelt Parkway
Norcross, GA 30071
This publication contains proprietary information which is protected by copyright. No part of this publication can be reproduced, transcribed,
stored in a retrieval system, translated into any language or computer language, or transmitted in any form whatsoever without the prior written
consent of the publisher, American Megatrends, Inc. American Megatrends, Inc. acknowledges the following trademarks:
Sun, SunOS, and SPARCstation are trademarks of Sun Microsystems, Inc.
LSI Logic is a trademark of LSI Logic Corp.
Intel is a trademark of Intel Corp.
UNIX is a trademark of AT&T.
HP and Laserjet are registered trademarks of Hewlett Packard Company.
MicroVAX, DEC and DSSI are trademarks of Digital Equipment Corporation.
All other product names are trademarks of their respective companies.
Information contained in this document is current at time of print and is subject to change without notice.
Revision History
1/28/00 Initial release.
ii Megaplex II 4U Chassis Guide
Page 3

Table of Contents
Safety Summary......................................................................vi
1 General Information.....................................1
General Description of Chassis..............................................1
Front of Chassis........................................................................2
Back of Chassis.........................................................................2
Specifications............................................................................3
Cooling Fans..............................................................................6
Connectors on Back of Chassis..............................................7
Drive Bays on Front of Chassis.............................................8
2 Installation......................................................9
Unpacking and Inspection.......................................................9
Drive Installation.....................................................................10
Rack-Mount Installation........................................................13
3 Field Replaceable Units............................15
Replacing a Power Supply....................................................16
Replacing a Fan Module........................................................17
Index..........................................................................19
Preface iii
Page 4

Preface
Limited Warranty The buyer agrees if this product proves to be defective, that American Megatrends is obligated only to repair
Limitations of Liability American Megatrends, Inc. shall in no event be held liable for any loss, expenses, or damages of any
or replace this product at American Megatrends’ discretion according to the terms and conditions of the
warranty registration card that accompanies this product. American Megatrends shall not be liable in tort or
contract for any loss or damage, direct, incidental or consequential resulting from the use of this product.
Please see the Warranty Registration Card shipped with this product for full warranty details.
kind whatsoever, whether direct, indirect, incidental, or consequential (whether arising from the design or use
of this product or the support materials provided with the product). No action or proceeding against American
Megatrends may be commenced more than two years after the delivery of product to Licensee of Licensed
Software.
Licensee agrees to defend and indemnify American Megatrends from any and all claims, suits, and liabilities
(including attorney’s fees) arising out of or resulting from any actual or alleged act or omission on the part of
Licensee, its authorized third parties, employees, or agents, in connection with the distribution of Licensed
Software to end-users, including, without limitation, claims, suits, and liability for bodily or other injuries to
end-users resulting from use of Licensee’s product not caused solely by faults in Licensed Software as
provided by American Megatrends to Licensee.
Technical Support If you need help installing, configuring, or using the Megaplex II system, call your American
Megatrends OEM Technical Support representative.
Web Site We invite you to access the American Megatrends world wide web site at:
http://www.ami.com.
FTP Site The address of the American Megatrends FTP site is:
ftp://ftp.megatrends.com
Cont’d
iv Megaplex II 4U Chassis Guide
Page 5

Preface, Continued
Disclaimer This manual describes the operation of the American Megatrends Megaplex II 4U chassis. Although efforts
have been made to assure the accuracy of the information contained here, American Megatrends expressly
disclaims liability for any error in this information, and for damages, whether direct, indirect, special,
exemplary, consequential or otherwise, that may result from such error, including but not limited to the loss
of profits resulting from the use or misuse of the manual or information contained therein (even if American
Megatrends has been advised of the possibility of such damages). Any questions or comments regarding this
document or its contents should be addressed to American Megatrends at the address shown on the cover.
American Megatrends provides this publication “as is” without warranty of any kind, either expressed or
implied, including, but not limited to, the implied warranties of merchantability or fitness for a specific
purpose.
Some states do not allow disclaimer of express or implied warranties or the limitation or exclusion of liability
for indirect, special, exemplary, incidental or consequential damages in certain transactions; therefore, this
statement may not apply to you. Also, you may have other rights which vary from jurisdiction to jurisdiction.
This publication could include technical inaccuracies or typographical errors. Changes are periodically made
to the information herein; these changes will be incorporated in new editions of the publication. American
Megatrends may make improvements and/or revisions in the product(s) and/or the program(s) described in
this publication at any time.
Requests for technical information about American Megatrends products should be made to your American
Megatrends authorized reseller or marketing representative.
Preface v
Page 6
Safety Summary
The following text describes the WARNINGS, CAUTIONS, and NOTES used throughout this
document. Each description is followed by an example. You should become familiar with these
procedures and always observe standard safety practices.
Warning Used to describe potential hazards to personnel. Follow directions carefully to avoid injury.
Warning
High voltage used in this equipment. To avoid injury or
electrical shock, do not remove cover or reach into the unit
when the power cord is connected.
Caution Used to describe hazards to equipment. Failure to comply with instruction may result in damage to
the equipment.
Caution
Support the drive canister with both hands when removing
it from the chassis. Failure to support the canister can
result in the unit falling and striking the chassis causing
damage to the canister or to the chassis.
Note: Provides information that will aid you in the interpretation of systems operations, procedures, or
functions.
Note: Do not duplicate ID numbers within the same SCSI bus.
vi Megaplex II 4U Chassis Guide
Page 7

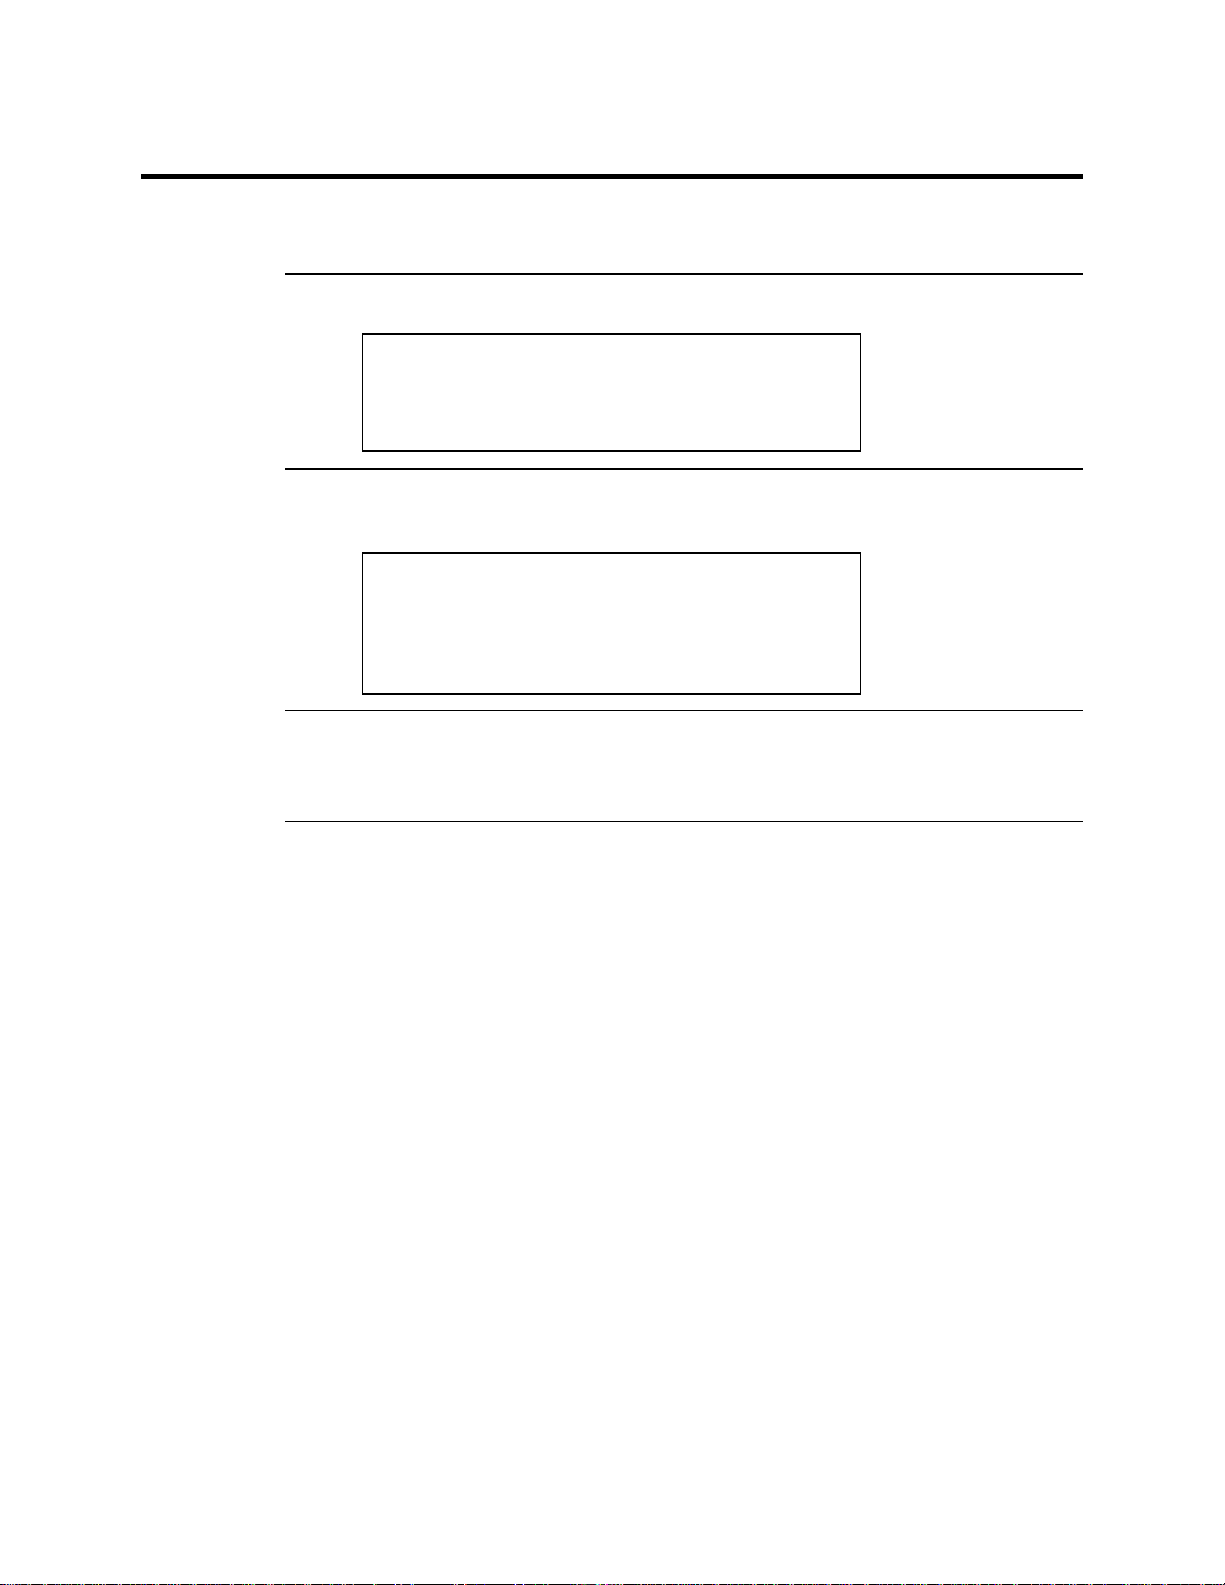
1 General Information
This manual provides general installation and maintenance information, including drive
installation and power supply replacement for the Megaplex II 4U chassis.
General Description of Chassis
The Megaplex II rack-mount chassis supports up to three 3.50" SCA (Single Connector
Attachment) Low Voltage Differential (LVD) 16-bit SCSI drives. SCA drives provide simple
installation via pluggable canisters. The SCA “no cable” design allows you to simply mount the
drive into the canister and plug into the chassis. The Megaplex II chassis includes:
• mounts for up to three drives,
• mounts for up to three power supplies,
• five cooling fans,
• four CPU activity LEDs
• three SCSI activity LEDs, and
• an Alarm Mute switch.
Peripheral Drives System peripherals include mountings for:
• one 5.25" half-high CD-ROM drive,
• one 3.5" floppy drive, and
• one 3.5" IDE (internal system drive.)
Power Supplies The chassis is supported by three 440W hot-pluggable power supplies. The N+1 redundant
arrangement allows the chassis to continue operation when one power supply fails. The power
supply is a modular, pluggable design. Power supplies are mounted from the rear of the chassis.
Each power supply plugs into the chassis power distribution board via a blind mate connector. The
power supplies are hot-pluggable units that can be replaced while the system remains operational.
Cooling Cooling is provided by three fans in the front of the chassis, and two fans in the middle (in an
assembly.)
Chapter 1 General Information 1
Page 8
Front of Chassis
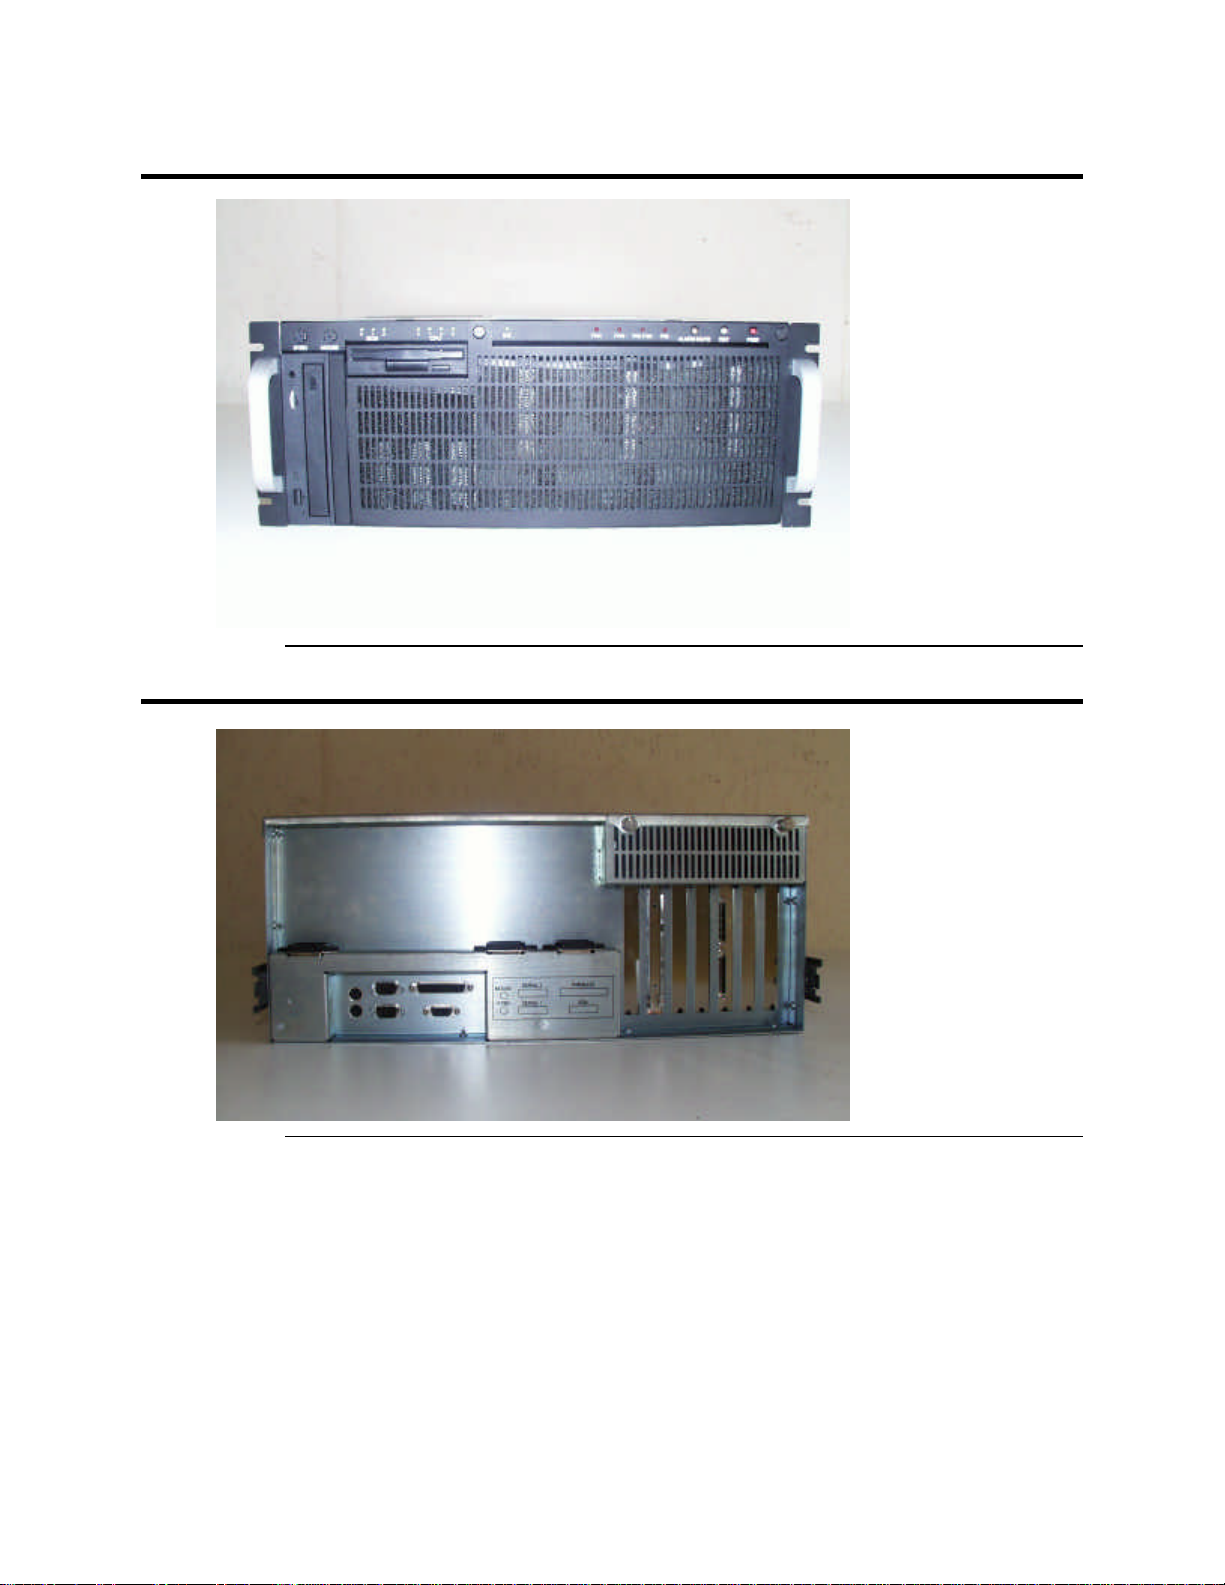
Back of Chassis
2 Megaplex II 4U Chassis Guide
Page 9

3
Specifications
This chassis is designed to be used in 19” rack configurations. This chassis has been designed to
hold the Megaplex II motherboard configured with up to 2 GB of memory. The specifications of
the chassis are:
Dimensions Height: 7”, Width: 19”, Depth: 28”
Weight: Approximately 50 pounds.
Controller I/O Seven expansion slots in the rear of the chassis.
Power Supplies This chassis supports three 440W power supplies arranged in N+1 redundant configuration.
• A minimum of two power supplies are required.
• The power supplies are hot plug and accessible from the front of the case.
• Each power supply has its own AC input plug.
• Power supplies are auto-ranging and have PFC
• All three power supplies are handled by the built-in power distribution board that allows hot
plug and redundancy.
AC Input:
• 100 – 120 VAC @ 60 Hz (nominal 110 VAC) (Autoswitch) 10.0 Amps
• 220 – 240 VAC @ 50 Hz (nominal 220 VAC) (Autoswitch) 5.0 Amps
DC Output: Each power supply provides:
50A @ 5V
30A @ 3.3V
27A @ +12V
1A @ -12V
1A @ -5V
Cont’d
Chapter 1 General Information
Page 10

Specifications, Continued
SCSI Drives The 4U chassis supports three hot plug 3.5” 16-bit single-ended SCA LVD SCSI drives.
• These drives are accessible from the front.
• Each drive bay can take a 1” SCSI LVD drive.
• The three drives are arranged on one back plane. The back plane supports three drives. The
default IDs of these drives are 1, 2, and 3.
• Access to the back plane is through one Wide SCSI cable. This cable can be connected, for
example, to one channel on a RAID controller.
Cooling There are two fans mounted in the middle of the chassis. These fans are hot plug and are
monitored by the Megaplex II system BIOS Health screen and the management software shipped
with Megaplex II.
• There are three blower fans in the power supply assemblies.
• For cooling the CPU area, the CPU top plate must be installed and the Top Chassis cover
must be closed.
Chassis Intrusion There is a chassis intrusion switch that detects when the top system cover is open. This switch is
monitored through the management software provided with Megaplex II.
Chassis Alarm Indication There are some LEDs and alarms that are displayed on the chassis:
Each of the three power supplies has an alarm. When one of the power supply fails, the RED LED
for that power supply comes on and the buzzer goes off.
Each of the two middle fans has an alarm. When one of the fans fail, the RED LED for that fan
comes on and the buzzer goes off.
Note: There is an Alarm Mute switch that will turn off the buzzer.
Cont’d
4 Megaplex II 4U Chassis Guide
Page 11

5
Specifications, Continued
LEDs and Switches There are fan failure LEDs for both fans.
There is an IDE Activity LED, a power-on LED, a reset switch, and a power-on switch.
There are four CPU Activity LEDs.
There are three SCSI LEDs.
There is an Alarm Mute switch.
Temperature: Operating: 0º C to 40º C
Storage: -20º to 75º C
Humidity: 0% to 95% non-condensing
Altitude: Operating: 0 feet to 10,000 feet
Storage: 0 feet to 40,000 feet
Chapter 1 General Information
Page 12

Cooling Fans
There are three fans in the front of the of the Megaplex II chassis. They are located on the right
side of the front grill.
There are two fans in the middle of the of the Megaplex II chassis. They slide down into the slot in
the middle of the chassis.
6 Megaplex II 4U Chassis Guide
Page 13

7
Connectors on Back of Chassis
The back of the chassis has connectors for the keyboard, mouse, serial ports (1 and 2), parallel
port, and VGA port.
The Megaplex II has two sets of keyboard and mouse ports. The primary keyboard and mouse
ports are located on the front of the chassis, to the left of the floppy disk drive. The keyboard and
mouse ports on the back of the Megaplex II are maintenance ports.
In the picture below, the mouse and keyboard ports are on the left, the serial ports in the middle,
and the parallel port and VGA port on the right.
Chapter 1 General Information
Page 14

Drive Bays on Front of Chassis
There are three drive bays on the front of the chassis. The drive bays are located beneath the
floppy disk drive on the left side of the chassis.
8 Megaplex II 4U Chassis Guide
Page 15

2 Installation
Unpacking and Inspection
Unpack the Megaplex II chassis and visually inspect it for damage that might have occurred
during shipment. Retain the shipping carton in case reshipment is necessary.
Remove the top cover of the chassis and inspect for component damage. If any damage has
occurred, notify American Megatrends immediately. See page ii of this manual for details.
Each shipping carton should contain the following:
• a Megaplex II chassis,
• three drive slides,
• this manual,
• three power cords, and
• mounting hardware
Chapter 2 Installation 9
Page 16

Drive Installation
Before installing drives make sure that the chassis is powered down.
Step 1 Unscrew the thumbscrews on the front cover to access the drive bays.
Step 2 Unscrew the thumbscrew at the top of the mounting bracket where the new drive is to be installed.
Step 3 Flip the black latch at the bottom of the bracket down.
Cont’d
10 Megaplex II 4U Chassis Guide
Page 17

11
Drive Installation, Continued
Step 4 Slide the bracket out.
Step 5 Mount the disk drive on the front side of the mounting bracket.
Cont’d
Chapter 2 Installation
Page 18

Drive Installation, Continued
Step 6 Line up the holes in the brackets and the screw holes in the back of the drive. The back of the
bracket is shown below.
Step 7 Insert the screws through the screw holes and the brackets and tighten all four screws.
Step 8 After the drive is securely attached to the bracket, slide the bracket into the slot in the drive bay.
Step 9 Tighten the thumbscrew and flip the black latch up into a vertical position.
12 Megaplex II 4U Chassis Guide
Page 19

Rack-Mount Installation
Before the unit is installed into a rack the following items should be taken into consideration:
• The maximum ambient temperature of this unit is 40°C. Internal temperatures of the rack
assembly should be considered for safe operation.
• Do not block power supply vents or otherwise restrict airflow when installing the unit into the
rack.
• Mechanical loading of the rack should be considered so that the rack remains stable and
unlikely to tip.
• Consideration to the overall loading of the branch circuit should be given before installing any
equipment in a rack environment.
Note: For an add-on system, the system must be mounted in a rack with four toll removable
screws.
Installation Steps Use the following procedure to install the Megaplex chassis into a standard 19" RETMA rack
and apply the AC input power.
Step 1 Remove the slides from the chassis by sliding the slides out until the rear retaining spring buttons
engage. Depress the buttons and slip the slides completely free from the chassis. Set the chassis
aside.
Step 2 Remove the small claw brackets from the package and loosely fasten them, with the teeth facing
out, to the front and rear of the outer slides using 10-32 x 1/2" screws. Notice that the bracket has
slotted holes for adjustment. Use the locking hex nuts provided to secure the screws.
Cont’d
Chapter 2 Installation 13
Page 20

Rack-Mount Installation, Continued
Step 3 Position the outer rails in the rack, adjusting the claw brackets and marking the intended position
of the mounting holes both on the front and rear of the rack. Tighten the screws on the claw
brackets.
Step 4 Bolt the front of the slides into place using 10-32 x 1/2" pan head screws. Flat head screws are
also provided for racks with countersunk holes.
Step 5 Bolt the rear of the slides to the rack side rails using four 10-32 x 3/8" screws. A threaded bracket
is provided in case the rack does not have threaded holes. Hex nuts are often difficult to use at the
rear of a rack to secure screws.
Step 6 Install the chassis slides into the outer slides in the rack. Push the chassis into the rack until the
rear retaining spring engages. Then press the retaining buttons and push the chassis the rest of the
way into the rack.
Step 7 Plug the AC power cord into the AC receptacle on the power supply module.
14 Megaplex II 4U Chassis Guide
Page 21

3 Field Replaceable Units
The field replaceable subassemblies within the Megaplex II chassis are described below. The
subassemblies in this section are:
• the power supply assemblies and
• the fan module assemblies.
These assemblies can be ordered as spares from AMI.
Warning
The 4U chassis has three power inlets; each one must be
removed to completely disconnect the power supply.
The 4U chassis contains a 5x20mm 250V 5A slow fuse
in the power supply.
Power Supply Modules Three 440 watt power supplies support the Megaplex II chassis. The power supplies are
located at the rear of the chassis. Each power supply has a power sharing board, which interfaces
to the power distribution board located internally in the chassis. DC power is distributed from the
power supply module to the power distribution board inside the enclosure and throughout the
chassis. Each power supply has an integrated fan.
These fans along with the additional chassis fans provide cooling for the chassis. Only the chassis
mounted fans are replaceable. Failure of a power supply fan requires replacement of the affected
power supply. To replace a power supply follow the procedure below.
Chapter 3 Field Replaceable Units 15
Page 22

Replacing a Power Supply
The power supply module is hot pluggable. You do not have to shut down the system to replace a
power supply.
Step 1 Unplug the AC power cord connected to the failed power supply module.
Step 2 Loosen the thumbscrews that secure the power supply module.
Step 3 Using the handle, remove the power supply module from the chassis.
Step 4 Replace the failed power supply module with a new power supply module and tighten the
thumbscrews.
Step 5 Plug in the AC power cord.
16 Megaplex II 4U Chassis Guide
Page 23

Replacing a Fan Module
The chassis mounted fan assembly is easily removed and replaced. Should the fan assembly need
replacement use the following procedure. The fan assembly is hot pluggable. You do not have to
shut down the system to replace a fan.
Step 1 Open the top cover.
Step 2 Disconnect the wires and remove the fan assembly.
Step 3 Unscrew the fan to be replaced.
Step 4 Insert the new fan assembly into place and reconnect the wires.
Step 5 Install the top cover.
Chapter 3 Field Replaceable Units 17
Page 24

18 Megaplex II 4U Chassis Guide
Page 25

Index
A
AC Input, 3
Alarm Mute switch, 4
Altitude, 5
B
Back of Chassis, 2
C
Chassis Alarm Indication, 4
Chassis Intrusion, 4
chassis slides, 14
claw brac, 14
claw brackets, 13
Connectors on Back of Chassis, 7
Controller I/O, 3
Cooling, 1, 4
Cooling Fans, 6
CPU Activity LEDs, 5
D
DC Output, 3
Dimensions, 3
Drive Bays on Front of Chassis, 8
Drive Installation, 10
L
LEDs and Switches, 5
O
outer rails, 14
P
pan head screws, 14
Peripheral Drives, 1
Power Supplies, 1, 3
Power Supply Modules, 15
R
rack side rails, 14
Rack-Mount Installation, 13
RED LED, 4
Replacing a Fan Module, 17
Replacing a Power Supply, 16
RETMA rack, 13
S
SCSI Drives, 4
SCSI LEDs, 5
Specifications, 3
F
field replaceable subassemblies, 15
Field Replaceable Units, 15
Front of Chassis, 2
FTP Site, iv
G
General Description of Chassis, 1
H
Humidity, 5
I
IDE Activity LED, 5
Installation, 9
T
Technical Support, iv
Temperature, 5
threaded bracket, 14
Index 19
Page 26

U
Unpacking, 9
W
Web Site, iv
Weight, 3
20 Megaplex II 4U Chassis Guide
 Loading...