

Page 1

StorTrends® 3200 Set Up Guide
(StorTrends iTX version 2.7)
MAN-3200-SG
06/21/07
Thank You
Thank you for purchasing the StorTrends® 3200 storage appliance. Please take a few
minutes to review this set up guide before beginning the installation process. If you
require a further explanation of any item covered in this guide, please refer to the
installation instructions on your CD.
This manual is written for the end-user to get up and running with the unit as quickly as
possible. Installation and maintenance should be performed by experienced technicians
only.
Hardware Installation
This section provides a quick setup checklist to get your StorTrends® 3200 Storage
Appliance up and running. Following the steps in the order given should enable you to
have the system operational within a minimal amount of time.
Note: Follow the steps in the order given to complete the installation process in a minimal
amount of time. Read this section in its entirety before you begin the installation
procedure outlined in this section.
Unpack the StorTrends® 3200 Storage Appliance
You should inspect the box the StorTrends® 3200 Storage Appliance was shipped in and
note if it was damaged in any way. If the server itself shows damage, you should file a
damage claim with the carrier who delivered it.
Decide on a suitable location for the rack unit that will hold the StorTrends® 3200
Storage Appliance. It should be situated in a clean, dust-free area that is well ventilated.
Avoid areas where heat, electrical noise and electromagnetic fields are generated. You
will also need it placed near a grounded power outlet. Read the Rack and Server
Precautions in the next section.
StorTrends® 3200 Set Up Guide (StorTrends iTX version 2.7)
1
Page 2

Preparing for Setup
The box the StorTrends® 3200 Storage Appliance was shipped in includes the following:
• a 3200 Chassis
• Two Power Cords
• Rails
• Rail Screws
Note: Your StorTrends® 3200 may or may not ship with everything listed in the Retail Packing
List. Contact your AMI authorized reseller to find out what is shipped with your
StorTrends® 3200 storage appliance if the contents do not match the ones listed in this
document.
Choosing a Setup Location
• Leave enough clearance in front of the rack to enable you to open the fro nt door
completely (~25 inches).
• Leave approximately 30 inches of clearance in the back of the rack to allow for
sufficient airflow and ease in servicing.
Warning
Rack Precautions
• Ensure that the leveling jacks on the bottom of the rack are fully extended to the
floor with the full weight of the rack resting on them.
• In a single rack installation, stabilizers should be attached to the rack.
• In multiple rack installations, the racks should be coupled togeth er.
• Always make sure the rack is stable before extending a component from the rack.
• You should extend only one component at a time - extending two or more
simultaneously may cause the rack to become unstable.
Server Precautions
• Review the General Safety Precautions.
• Determine the placement of each component in the rack before you install the
rails.
• Install the heaviest server components on the bottom of the rack first, and then
work up.
• Use a regulating uninterruptible power supply (UPS) to protect the server from
power surges, voltage spikes and to keep your system operating in case of a
power failure.
• Allow the power supply units and hot plug Serial ATA drive to cool before
touching them.
• Always keep the rack's front door and all panels and components on the servers
closed when not servicing to maintain proper cooling.
2
StorTrends® 3200 Set Up Guide (StorTrends iTX version 2.7)
Page 3

General Safety Precautions
General Safety Precautions
• Keep the area around the StorTrends® 3200 Storage Appliance clean and
• The StorTrends® 3200 Storage Appliance w e i ghs a ppr oximately 38 lbs. (17.3
• Do not open the chassis top cover.
• While working on the system, do not wear loose clothing such as neckties and
• Remove any jewelry or metal objects from your body, which are excellent
Warning
free of clutter.
kg) when fully loaded. When lifting the system, two people at either end
should lift slowly with their feet spread out to distribute the weight. Always
keep your back straight and lift with your legs.
unbuttoned shirt sleeves, which can come into contact with electrical circuits
or be pulled into a cooling fan.
metal conductors that can create short circuits and harm you if they come
into contact with printed circuit boards or areas where power is present.
StorTrends® 3200 Set Up Guide (StorTrends iTX version 2.7)
3
Page 4
Rack Mounting Considerations
Feature Description
Ambient Operating
Temperature
Reduced Airflow Equipment should be mounted into a rack so that the amount of
Mechanical Loading Equipment should be mounted into a rack so that a hazardous
Circuit Overloading Consideration should be given to the connection of the equipment to
Reliable Ground A reliable ground must be maintained at all times. To ensure this, the
If installed in a closed or multi-unit rack assembly, the ambient
operating temperature of the rack environment may be greater than
the ambient temperature of the room. Therefore, consideration
should be given to installing the equipment in an environment
compatible with the manufacturer’s maxi mum rated ambient
temperature (Tmra).
airflow required for safe operation is not compromised.
condition does not arise due to uneven mechanical loading.
the power supply circuitry and the effect that any possible
overloading of circuits might have on over current protection and
power supply wiring. Appropriate consideration of equipment
nameplate ratings should be used when addressing this concern.
rack itself should be grounded. Particular attention should be given
to power supply connections other than the direct connections to the
branch circuit (for example, the use of power strips, and so on.).
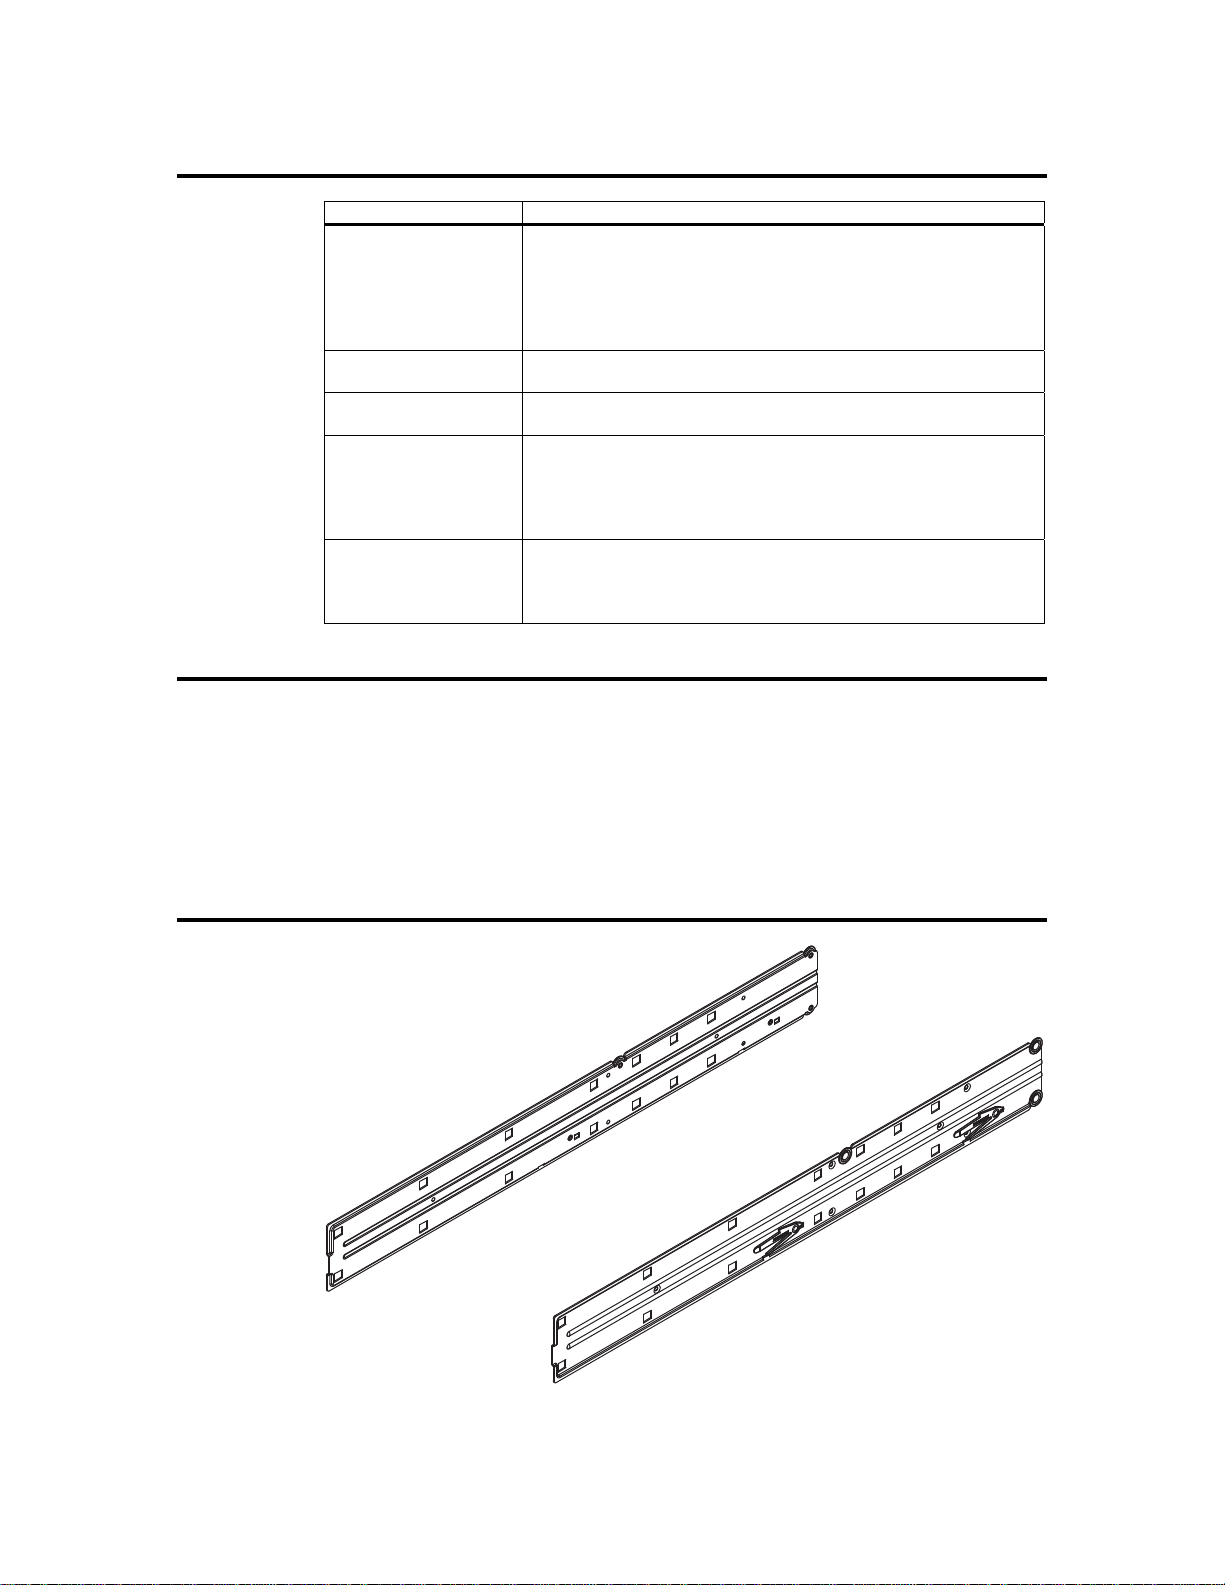
Installing the System into a Rack
This section provides information on installing the StorTrends 3200 into a rack with the
rack rails provided. If the StorTrends 3200 has already been mounted into a rack, you can
skip this step.
There are a variety of rack units on the market that may mean the assembly procedure
will differ slightly. You should also refer to the installation instructions that came with
the rack unit you are using.
Inner Rack Rails
4
StorTrends® 3200 Set Up Guide (StorTrends iTX version 2.7)
Page 5
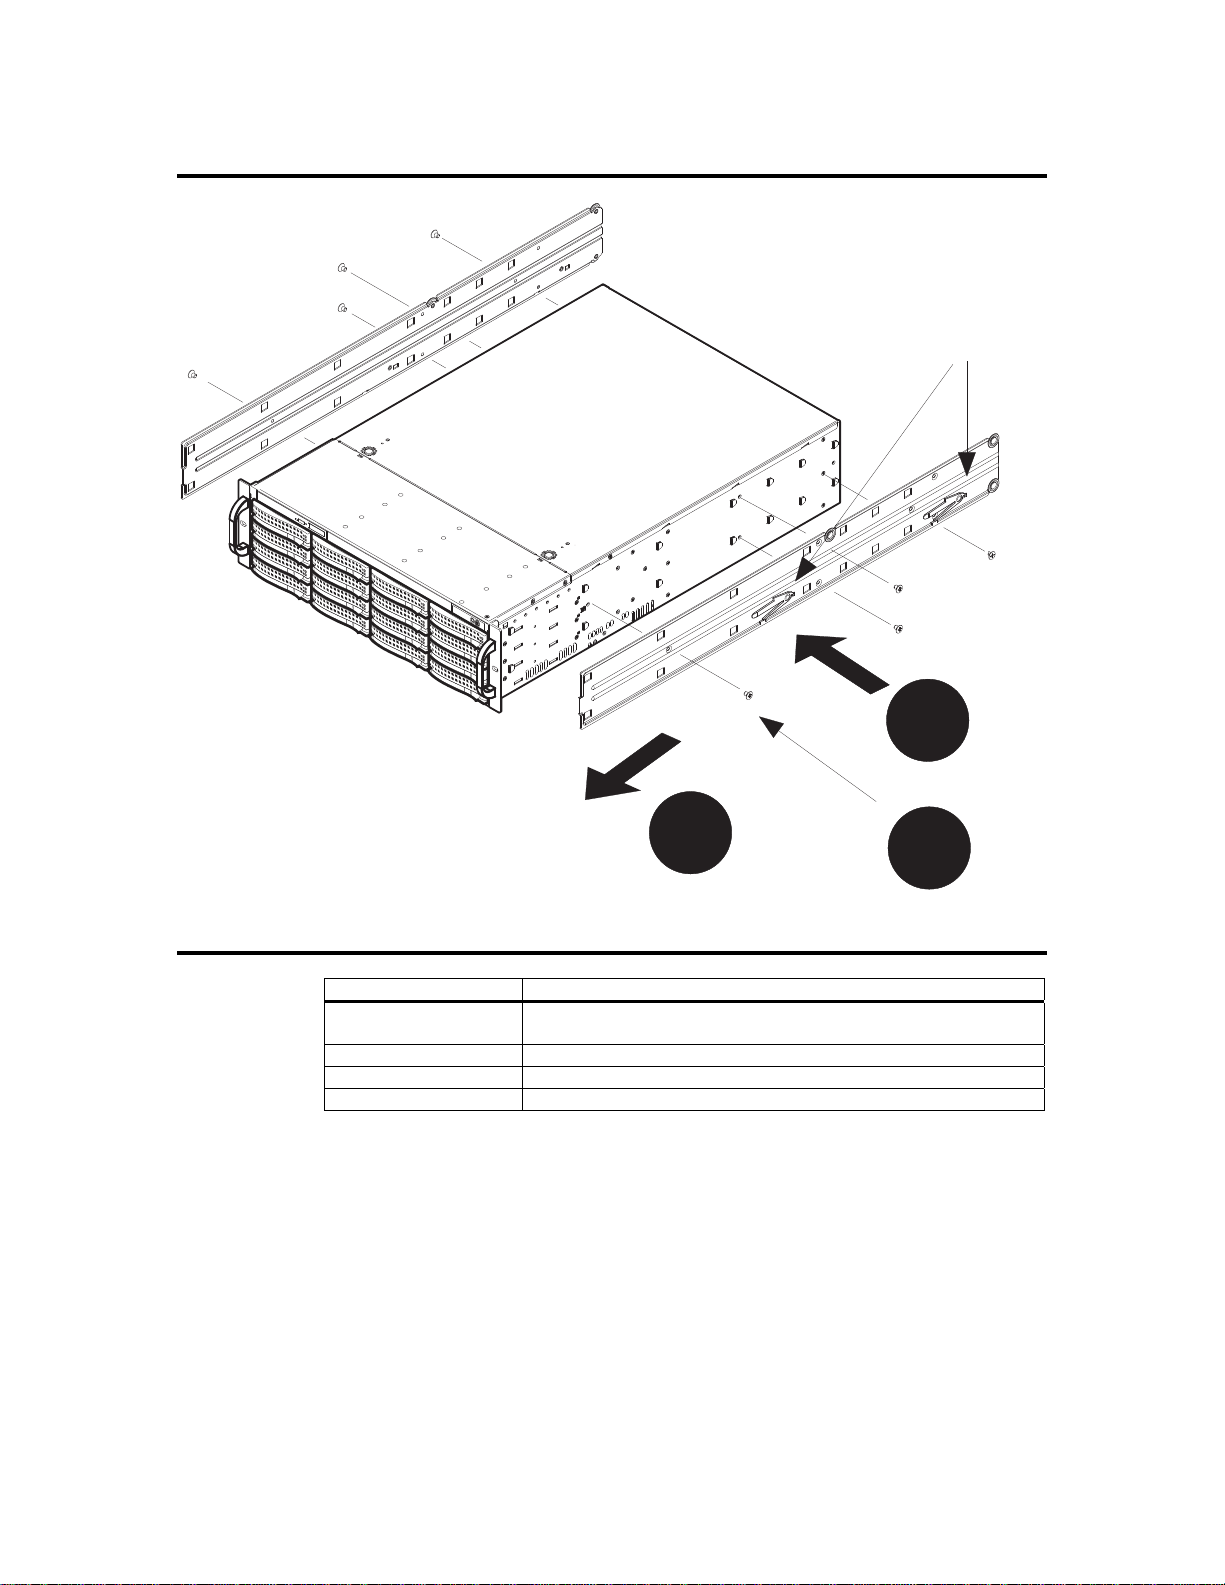
Installing the Inner Rack Rails
Locking Tabs
1
To install the rack rails
Steps Description
1 Place the inner rack extensions on the side of the chassis aligning the
2 Slide the extension toward the front of the chassis.
3 Secure the chassis with 4 screws as illustrated.
4 Repeat steps 1-3 for the other inner rail.
2
hooks of the chassis with the rail extension holes.
3
StorTrends® 3200 Set Up Guide (StorTrends iTX version 2.7)
5
Page 6
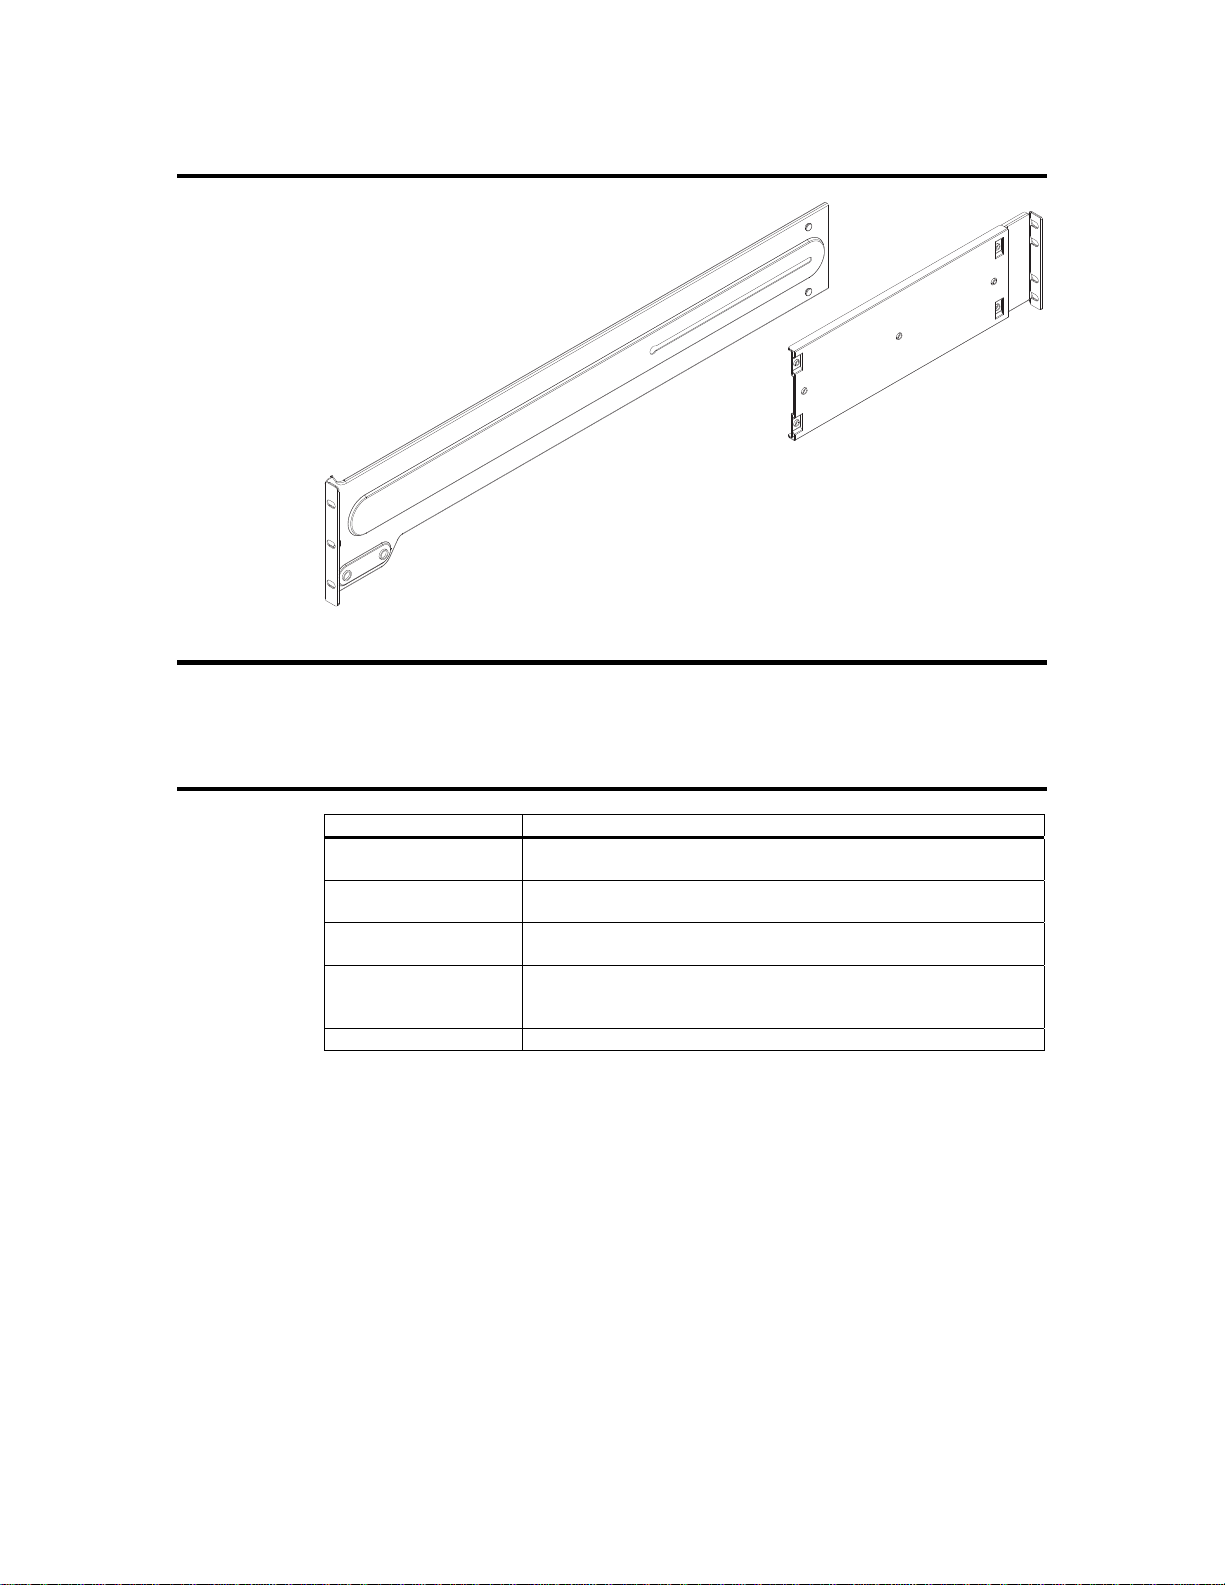
Installing the Chassis into the Server Rack
Outer Rack Rails
Outer rails attach to the server rack and hold the server in place. The outer rails for the
StorTrends 3200 chassis extend between 30 inches and 33 inches.
To install the Outer Rack Rails
Steps Description
1 Begin by measuring the distance from the front rail to the rear rail of
2 Attach a short bracket to the front side of the right outer rail and a
3 Adjust both the short and long brackets to the proper distance so that
4 Secure the short bracket to the front side of the outer rail with two
5 Repeat these steps for the left outer rail.
the rack.
long bracket to the rear side of the right outer rail.
the rail can fit snugly into the rack.
M4 screws and the long bracket to the rear side of the outer rail with
three M4 screws.
6
StorTrends® 3200 Set Up Guide (StorTrends iTX version 2.7)
Page 7

Installing the Chassis into the Server Rack
Installing the chassis into a rack
Steps Description
1 Confirm that the inner and outer rails are installed on the rack.
2 Line chassis rails with the front of the rack rails.
3 Slide the chassis rails into the rack rails, keeping the pressure even
on both sides (you may have to depress the locking tabs when
inserting). When the server has been pushed completely into the
rack, you should hear the locking tabs "click".
4 (Optional) Insert and tightening the thumbscrews that hold the front
of the server to the rack.
StorTrends® 3200 Set Up Guide (StorTrends iTX version 2.7)
7
Page 8
Completing the Hardware Installation
Next, you should check to make sure that the hard disk drives have been properly inserted
and have not come loose in transit.
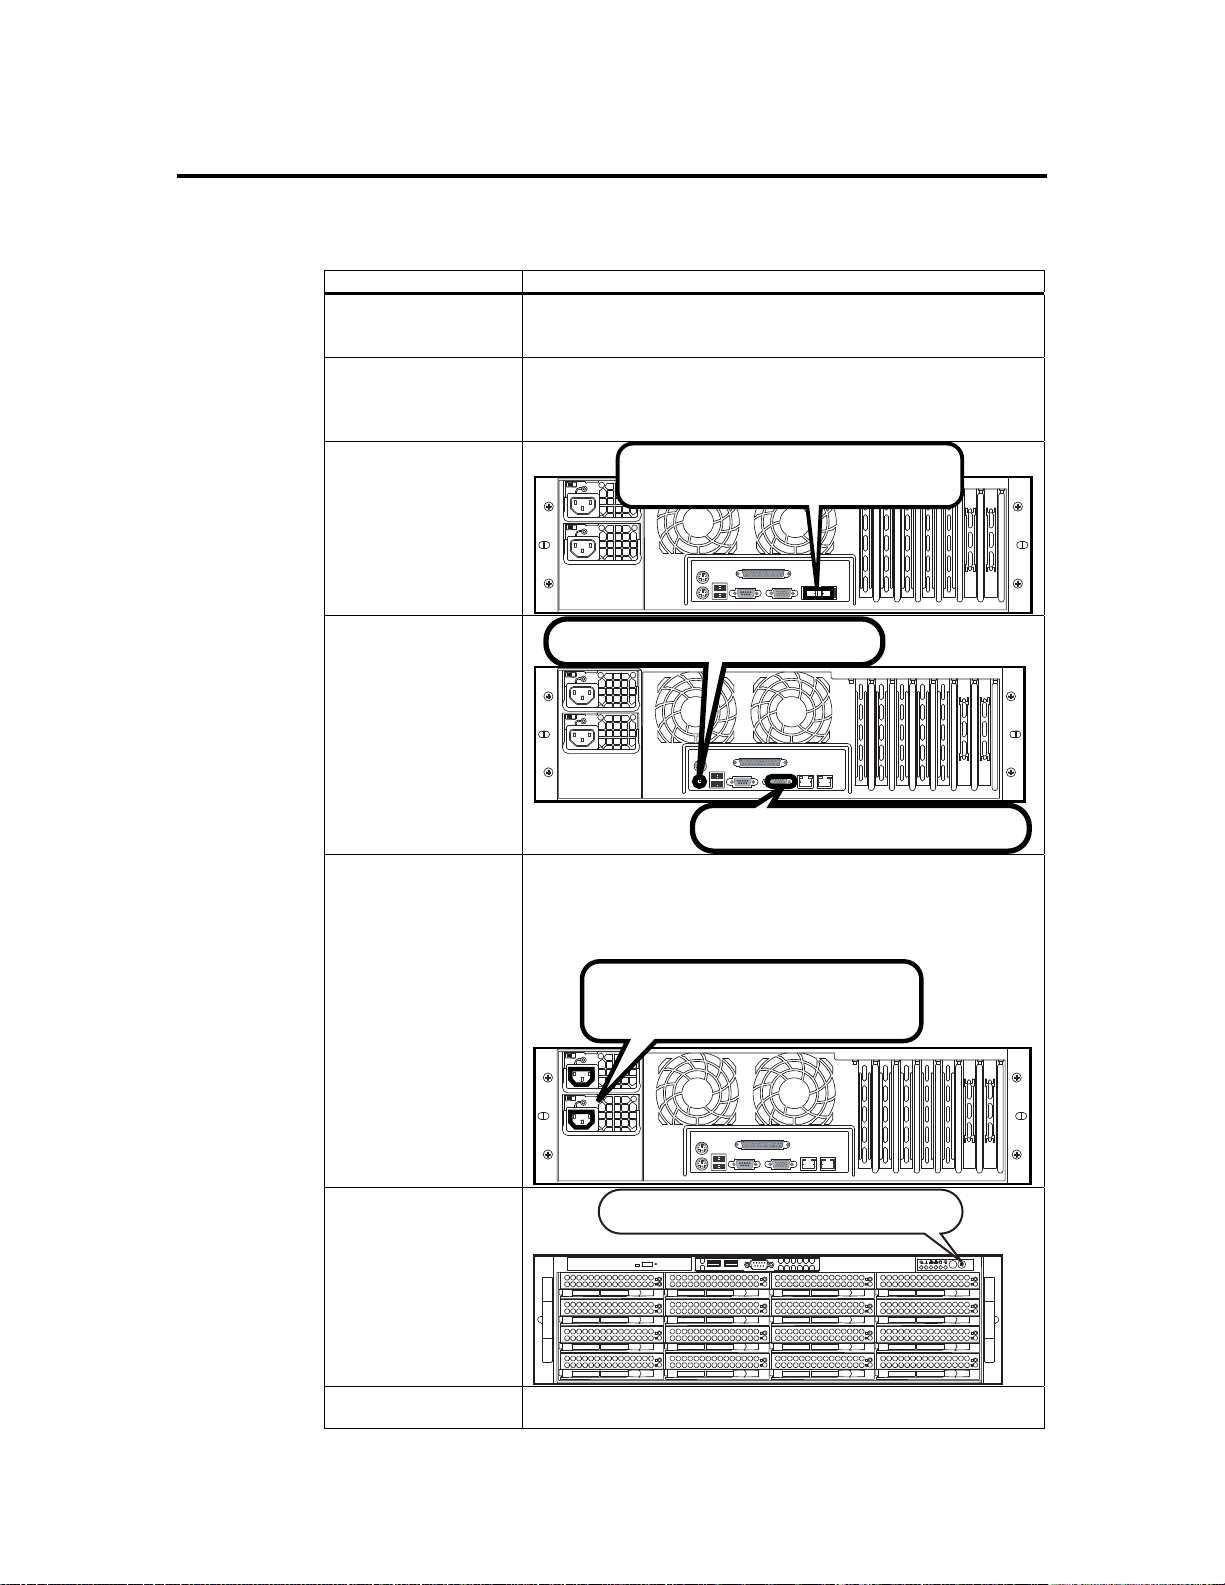
Step Description
1. Checking the drive
bays
2. Check the airflow Airflow is provided by five high-performance fans. The system
3. Connect your
network cable(s)
All hard disk drives can be accessed from the front of the server.
Verify that the hard disk drive trays are inserted all the way into its
bay.
component layout was carefully designed to promote sufficient
airflow through the 3U rack mount space. Verify that all cables in
your rack are not obstructing the chassis’s airflow.
Plug your Network Cable to both of
these ports or just one of them.
4. Connect your
keyboard and monitor
5. Supply power to the
system
6. Power your system
on
Plug your Keyboard Here
Plug your Monitor Here
The last thing you must do is to provide input power to the system.
Plug the two power cords from the power supply units into a highquality power strip that offers protection from electrical noise and
power surges. It is recommended that you use an uninterruptible
power supply (UPS).
Plug your Power into each of
these two power sockets.
Power on by pressing this button.
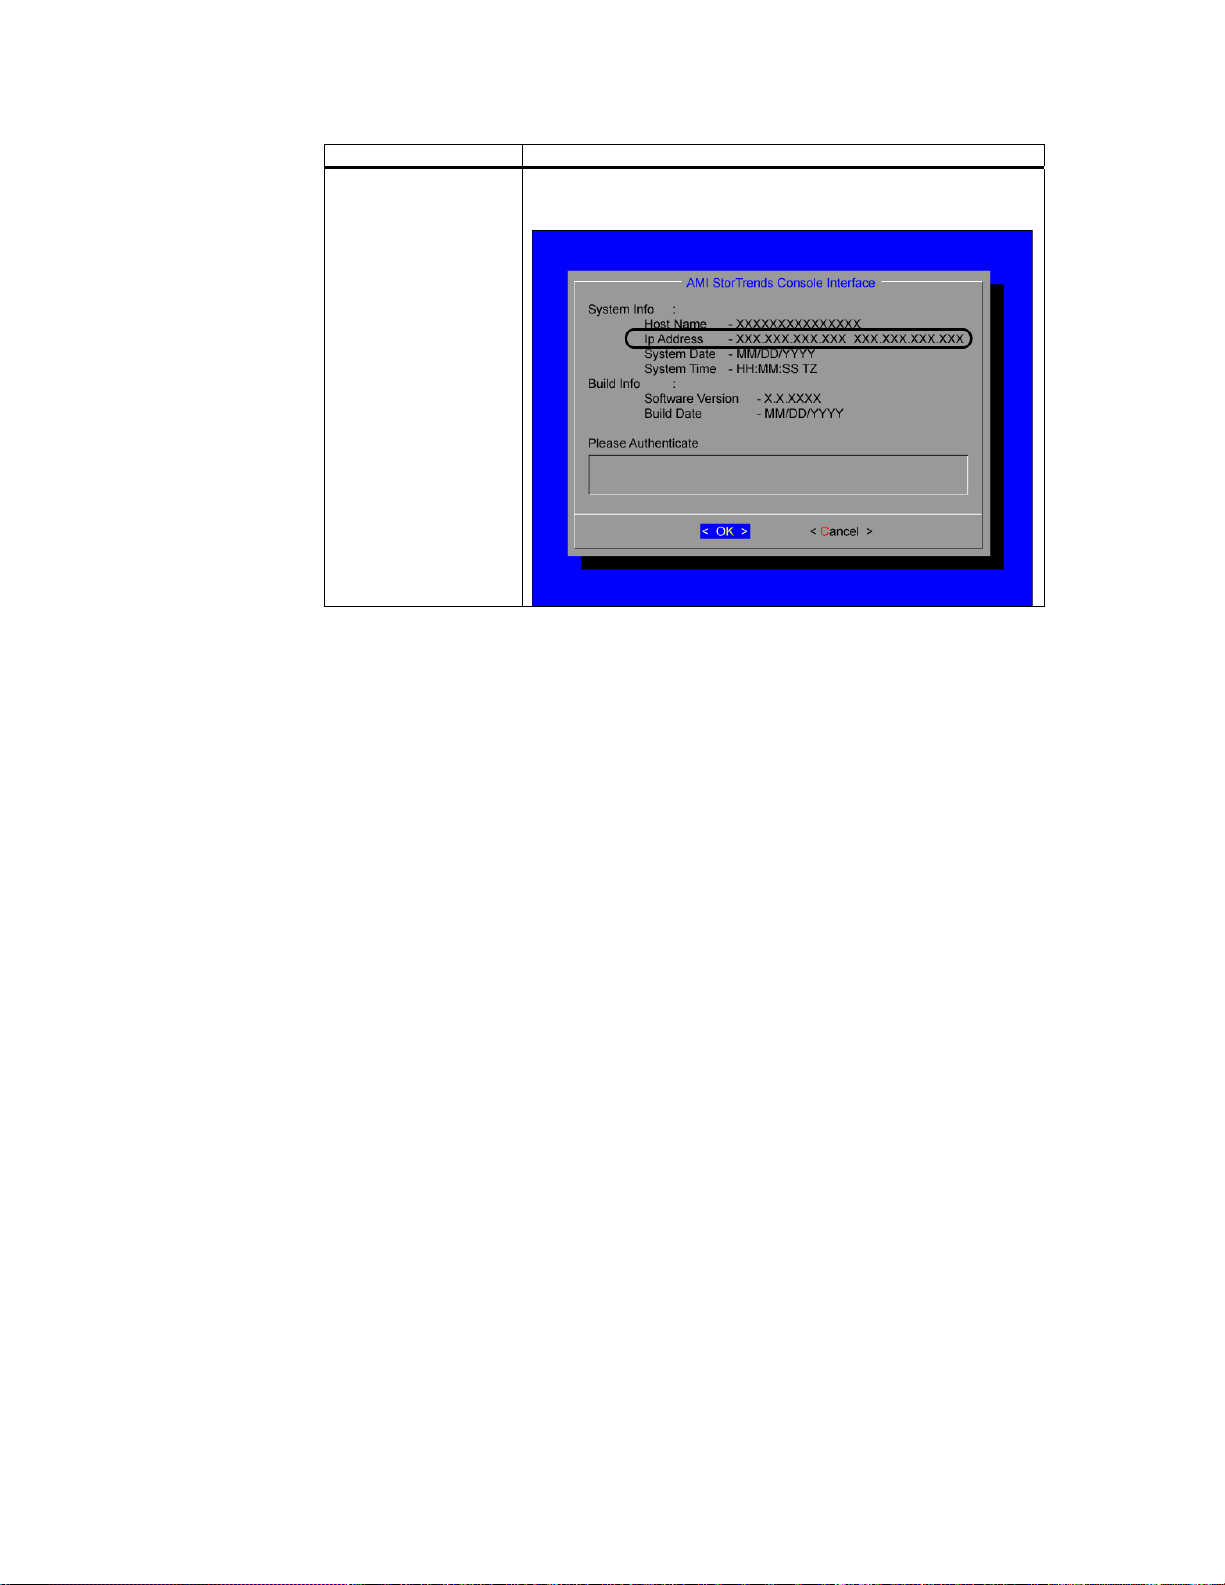
7. Get the IP address Once the StorTrends® Storage Appliance is fully operational, you
will see the following screen. Write down the IP Address listed in the
8
StorTrends® 3200 Set Up Guide (StorTrends iTX version 2.7)
Page 9
Step Description
“Ip Address” field. If you have both NICs connected to your
network, there will be two IP Addresses.
StorTrends® 3200 Set Up Guide (StorTrends iTX version 2.7)
9
Page 10
Connect to the StorTrends® Appliance
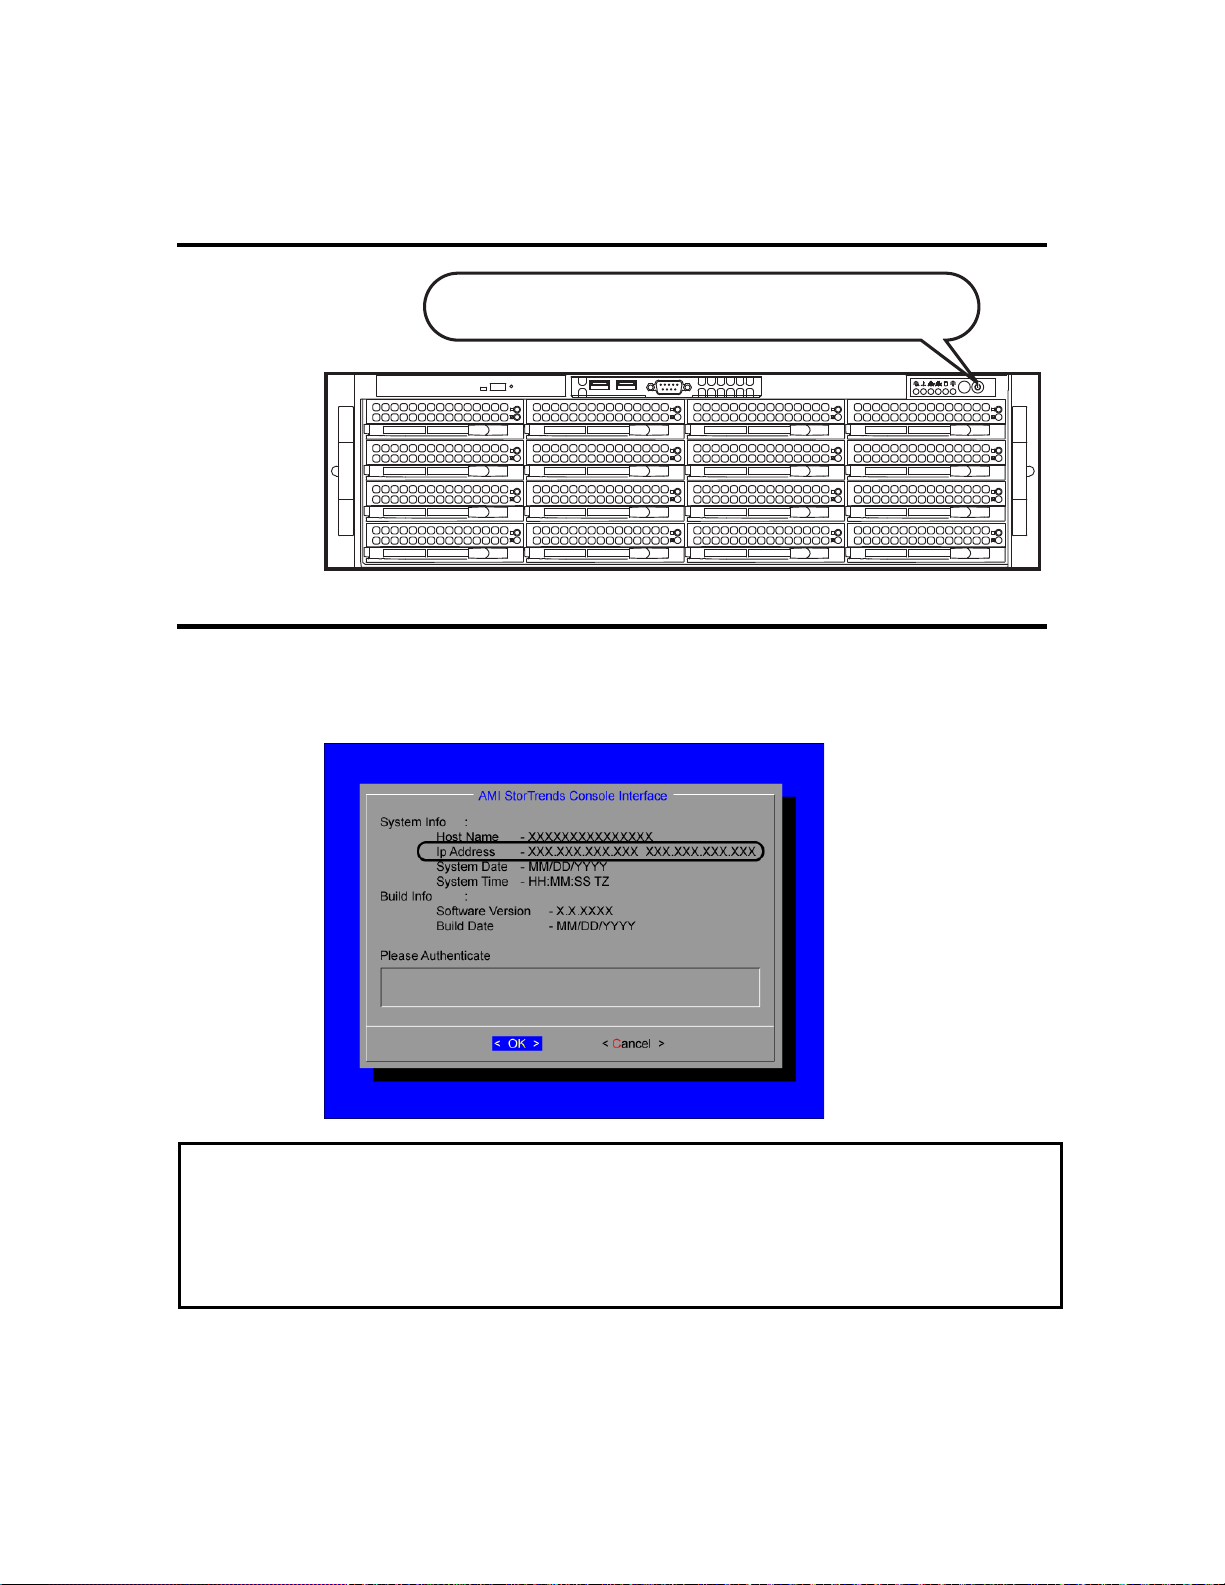
Step One: Power your system on
Power on by pressing this button.
Step Two: Get the IP address
Once the StorTrends® Storage Appliance is fully operational, you will see the following
screen. Write down the IP Address listed in the “Ip Address” field. If you have both NICs
connected to your network, there will be two IP Addresses.
10
STOP!
Once again, WRITE DOWN the IP Address listed in the “Ip Address” field. Go to
ANOTHER COMPUTER on the same network to continue with the installation.
StorTrends® 3200 Set Up Guide (StorTrends iTX version 2.7)
Page 11

Step Three: Connecting to the StorTrends® Storage Appliance from
another system
Type the IP Address of the StorTrends® Storage Appliance that you just wrote down into
your Internet Browser.
Step Four: Logging on to the StorTrends® Storage Appliance
You will be prompted to provide a username and password before you can gain access to
it. Enter your username and password.
Default user name: itxadmin
Default password: password
Note: When you login using the default itxadmin password, you have full administrative
powers. It is advised that once you login, you change the password.
Note: Both the user name and password are case sensitive.
Note: StorTrends® iTX has a built in feature that logs you out in the event that it detects no
activity for 20 minutes and will display a message that states, “Your session has expired.”
StorTrends® 3200 Set Up Guide (StorTrends iTX version 2.7)
11
Page 12

Using the Quick and Easy Setup Wizard
If the storage has not been configured on your StorTrends® iTX Storage Appliance, you
will be prompted to run the Wizard. The Quick and Easy Setup Wizard will get your
StorTrends® iTX Storage Appliance up and running in less than five minutes.
STOP!
If you would like more control of these settings, you can enter the
Advanced Setup Wizard. Jump to the next section for more information on
the Advanced Setup Wizard.
Use the following instructions as a basis.
Note: The Quick and Easy Setup Wizard will select all the physical hard disk drives present in
the StorTrends® iTX Storage Appliance to create the RAID array. SAN and NAS
volume names are automatically generated. A default NAS Share is also automatically
created. In the Quick and Easy Setup Wizard the SAN and NAS Volumes are configured
to use Exact Provisioning. Twenty percent of the physically available hard disk space
should be reserved if you are planning to use snapshot storage.
12
StorTrends® 3200 Set Up Guide (StorTrends iTX version 2.7)
Page 13

Step One: Quick and Easy Wizard
If the storage has not been configured on your Storage Appliance, you will be prompted
to run the Wizard. Click the Quick and Easy option, and then click Next.
StorTrends® 3200 Set Up Guide (StorTrends iTX version 2.7)
13
Page 14

Step Two: RAID Level
Once you initiate the Quick and Easy Setup Wizard, you are provided the following
options:
• RAID 0
• RAID 1
• RAID 5
This step will create a Logical disk and a storage pool from all the physical hard disk
drives available in the system/controller with the RAID type you specify. Once you select
Next, you cannot come back to this step.
14
You will be prompted to wait while it configures the box. Do not close the window or
click anywhere else.
StorTrends® 3200 Set Up Guide (StorTrends iTX version 2.7)
Page 15

Step Three: SAN or NAS or Both
Once an array has been created in the box, you can select how you want to use your
Storage Appliance. You are provided with the following options:
• Only SAN
• Only NAS
• Both SAN and NAS
If you want your Storage Appliance to be used for block-level storage only, select Only
SAN. If you want your Storage Appliance to be used for file-level storage only, select
Only NAS. Select Both SAN and NAS if you want your Storage Appliance to support both
block-level and file-level storage.
StorTrends® 3200 Set Up Guide (StorTrends iTX version 2.7)
15
Page 16

Step Four: Allocating Space
Enter the size of your desired Volume. The default volumes cannot exceed the available
physical space due to the fact that they are both using Exact Provisioning by default.
Click Next.
Note: You can use the slider bar to adjust the size of each Volume type. If you have selected
Only NAS or Only SAN, then you will only be able to adjust the slider for that type of
Volume.
16
StorTrends® 3200 Set Up Guide (StorTrends iTX version 2.7)
Page 17

Step Five: Summary View
A summary will appear. Click the Finish button. Your Storage Appliance will be
automatically configured based on the values that you have entered.
Note: You can change the default names for volumes and containers at this point. Also note that
uppercase characters are not allowed in target names.
Additionally, if you are planning to use the snap-assisted replication feature, uppercase
characters should be avoided in both the container and volume names. Because of this,
you must change the default names.
StorTrends® 3200 Set Up Guide (StorTrends iTX version 2.7)
17
Page 18

Do not close the window or click anywhere else until the operation completes.
18
StorTrends® 3200 Set Up Guide (StorTrends iTX version 2.7)
Page 19

Step Six: All Done No Errors
STOP!
YOU SHOULD NOW BE UP AND RUNNING. ALL THE OTHER SECTIONS CAN BE
SKIPPED.
StorTrends® 3200 Set Up Guide (StorTrends iTX version 2.7)
19
Page 20

Using the Advanced Setup Wizard
The Advanced Setup Wizard allows you to have more control of the storage being
configured.
Step One: Advanced Wizard
If the storage has not been configured on your Storage Appliance, you will be prompted
to run the Wizard. Click the Advanced option and then click Next.
20
StorTrends® 3200 Set Up Guide (StorTrends iTX version 2.7)
Page 21

Step Two: Create a New Storage Pool
Select Create new storage pool and then click Next.
StorTrends® 3200 Set Up Guide (StorTrends iTX version 2.7)
21
Page 22

Step Three: Select Pool
Select the Disks
Select the Disks that you want to use in your Storage Pool.
22
StorTrends® 3200 Set Up Guide (StorTrends iTX version 2.7)
Page 23

Set the RAID Levels
Select the RAID Level, Capacity, Cache Option type, Stripe Size and Spare type (if
applicable).
StorTrends® 3200 Set Up Guide (StorTrends iTX version 2.7)
23
Page 24

Type in your Storage Pool’s name
Type in a Storage Pool Name.
Note: The Storage Pool Name must be alphanumeric, not have any spaces and be between one
and 63 characters in length.
Note: If you are planning to use the snap-assisted replication feature, uppercase
characters should be avoided in container and volume names as well.
Click the Next button to continue.
24
StorTrends® 3200 Set Up Guide (StorTrends iTX version 2.7)
Page 25

You will be prompted to wait while it configures the box. Do not close the window or
click anywhere else.
StorTrends® 3200 Set Up Guide (StorTrends iTX version 2.7)
25
Page 26

Step Four: Configure SAN Volume
STOP!
This section allows you to configure a SAN Volume and a SAN Target on to
the Storage Appliance. If you have configured this storage appliance as a
NAS Only unit, SKIP THIS STEP and go to Step Five: Configure NAS
Volume.
The next page allows you to Create SAN Volume and Target.
26
StorTrends® 3200 Set Up Guide (StorTrends iTX version 2.7)
Page 27

Enter Volume Name
In the Enter Volume Name field, enter a name for your SAN Volume. The SAN Volume
Name must be alphanumeric, not have any spaces and be between one and 63 characters
in length.
Enter Volume Size
In the Enter Volume Size field, enter the size that you want to use for your SAN Volume.
The field is measured in Giga-Bytes GB.
Select Thin or Exact Provisioning
Select the type of provisioning that you want to use.
If you select Thin, the volume can be assigned a size greater than the actual physical size
of the storage device. For example, if the storage device has an actual physical size of
500 GB, the user can assign a size of up to 8 TB per box. Based on the consumption of
the storage device’s physical capacity, more physical drive capacity can be added later as
desired.
If you select Exact, the volume size cannot exceed the actual physical space available in
the storage device.
Note: It is recommended to leave 20% of the physical space free for snapshots.
StorTrends® 3200 Set Up Guide (StorTrends iTX version 2.7)
27
Page 28

Select SAN as the Dialect Type
Select SAN as the Dialect Type.
Create Target and Target Name
Place a check next to the Create New Target field. Enter a name for your Target. The
Target Name must be alphanumeric, not have any spaces and be between one and 63
characters in length. Uppercase characters are not allowed in target names.
Note: If you are planning to use the snap-assisted replication feature, uppercase characters
should be avoided in both the Container and Volume names as well
Click the Add button to continue.
28
StorTrends® 3200 Set Up Guide (StorTrends iTX version 2.7)
Page 29

Step Five: Configure NAS Volume
This section allows you to configure a NAS Volume and a NAS Share on to
the Storage Appliance. If you only want to configure this storage appliance
as a SAN Only unit, SKIP THIS STEP by clicking the Finish button and go
to Step Six: Summary View and Status.
The next page allows you to Create NAS Volume and Share.
STOP!
StorTrends® 3200 Set Up Guide (StorTrends iTX version 2.7)
29
Page 30

Enter Volume Name
In the Enter Volume Name field, enter a name for your NAS Volume. The NAS Volume
Name must be alphanumeric, not have any spaces and be between one and 63 characters
in length.
Enter Volume Size
In the Enter Volume Size field, enter the size that you want to use for your NAS Volume.
The field is measured in Giga-Bytes GB.
Select Thin or Exact Provisioning
Select the type of provisioning that you want to use.
If you select Thin, the volume can be assigned a size greater than the actual physical size
of the storage device. For example, if the storage device has an actual physical size of
500 GB, the user can assign a size of up to 8 TB per box. Based on the consumption of
the storage device’s physical capacity, more physical drive capacity can be added later as
desired.
If you select Exact, the volume size cannot exceed the actual physical space available in
the storage device.
Note: It is recommended to leave 20% of the physical space free for snapshots.
30
StorTrends® 3200 Set Up Guide (StorTrends iTX version 2.7)
Page 31

Select NAS as the Dialect Type
Select NAS as the Dialect Type.
Create Share and Share Name
Place a check next to Create New Share if you wish to create a NAS Share at this time,
otherwise click the Add button and continue on to the next step. If you want to create a
NAS Share now, in the Share Name field, enter a unique name for your NAS S hare. The
NAS Share Name must be alphanumeric and be between one and 63 characters in length.
If you want to use spaces be sure to use quotation marks around the entire name you type
in.
Click the Add button to continue.
StorTrends® 3200 Set Up Guide (StorTrends iTX version 2.7)
31
Page 32

Step Six: Summary View and Status
When you are finished adding your Volumes, click the Finish button.
A summary will appear. Your Storage Appliance will be automatically configured based
on the values that you have entered.
Do not close the window or click anywhere else until the operation completes.
32
StorTrends® 3200 Set Up Guide (StorTrends iTX version 2.7)
Page 33

Step Seven: All Done No Errors
STOP!
YOU SHOULD NOW BE UP AND RUNNING.
StorTrends® 3200 Set Up Guide (StorTrends iTX version 2.7)
33
 Loading...