

Page 1
RHYME Recessed Downlight120V
INSTALLATION INSTRUCTIONS
RHYM Series
WARNING
These products may represent a possible shock or
fire hazard if improperly installed or attached in any
way. Products should be installed in accordance
with these instructions, current electrical codes,
and/or the current National Electric Code (NEC).
WARNING
The electrical rating of this product is 120V AC,
60Hz. The installer must determine whether power
supply is appropriate at the luminaire before
installation. Ensure power supply is turned o at
the fuse box or circuit breaker prior to attempting
installation or servicing of the fixture.
SAFETY INFORMATION
• Read all instructions before beginning; save these instructions for future use.
• To reduce the risk of fire, electric shock, or injury to persons, pay close attention
to this manual and stay within its guidelines when using this product.
• Installation of this fixture requires knowledge of recessed lighting luminaires and
their electrical systems. If not qualified or uncertain, do not attempt installation;
contact a qualified electrician.
• Supply conductors (power wiring) connecting the fixture must be rated for a
minimum of 90°C (194°F).
• Do not make or alter any open holes in wiring enclosures, nor in any electrical
components during installation.
• Do not alter, relocate, or remove wiring, lamp holders, power supply, or any
other electrical component.
• To prevent wiring damage or abrasion, do not expose wiring to edges of sheet
metal or other sharp objects.
• To avoid electrical shock, do not turn on fixture with missing or damaged lens.
• There are no serviceable parts inside of the LED module.
• This fixture is suitable for use in dry, damp, or wet locations.
• This fixture is suitable for use in dimming circuits: TRIAC/CL/ELV
PRE-INSTALLATION FOR NEW-CONSTRUCTION:
For new-construction installation, an aluminum rough-in plate is available. Position rough-in plate across two joists and secure it using its hangar
bars. Run electrical wire from the switch (power supply) and anchor nearby appropriately.
PRE-INSTALLATION FOR REMODELS:
For remodel installation, no mounting plate or can is required.
1. Turn power OFF from the electrical panel before starting installation.
2. Locate a suitable location for the fixture and trace the outline of the cut-out template on the drywall or ceiling tile (for a suspended T-Bar type
ceiling). Cut the hole following the outline. If needed, refer to Hole Cut Sizes Table below for appropriate cut-out sizes.
3. Run electrical wire from the switch (power supply) through the mounting hole; use NMD90 Romex or BX cable.
HOLE CUT
SIZES
3” Round 3” Square
3-3/8” (86mm) Diameter 3-3/8” (86mm) x 3-3/8” (86mm)
NEW CONSTRUCTION AND REMODEL INSTALLATION DRIVER WIRING (See Figures 1-2):
Make sure power is turned o at the source before proceeding.
1. Open the hardwire box swing cover and remove the appropriate knockout(s).
2. Insert the electrical supply cable through the knockout and secure with a cable connector (sold separately). Use NMD90 Romex or BX cable.
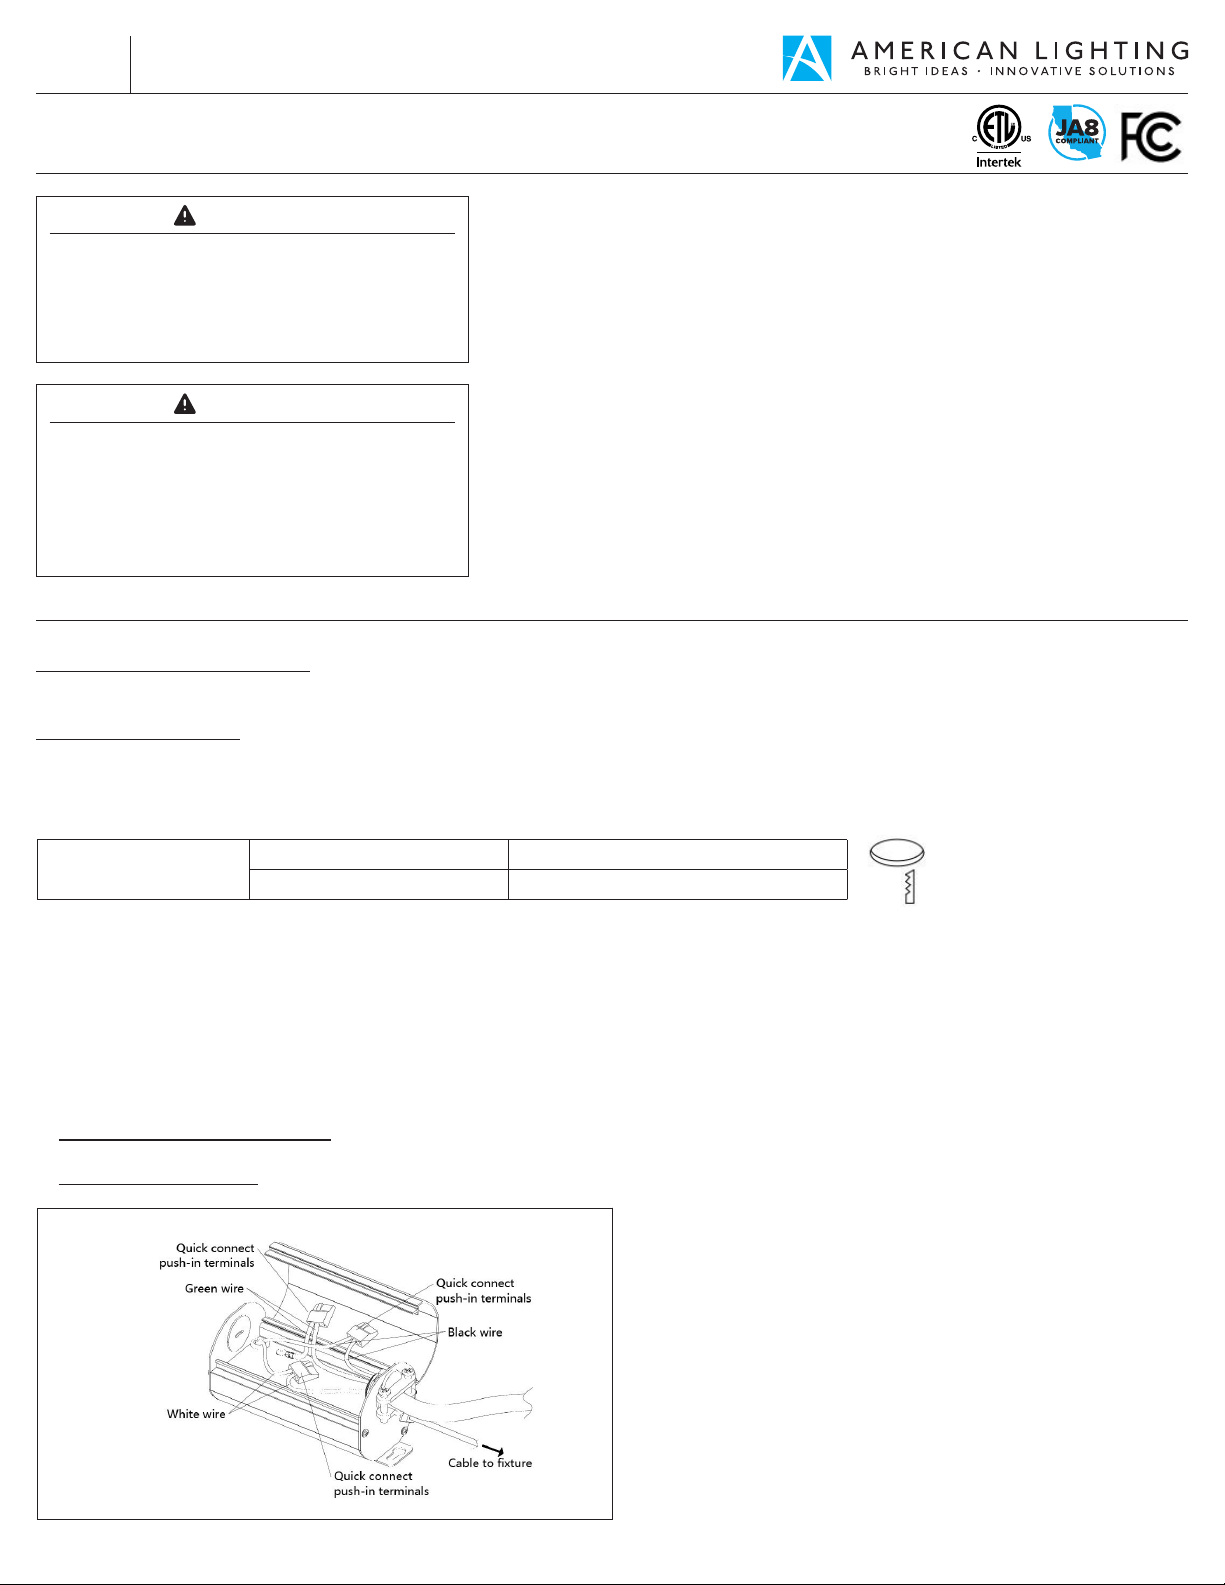
3. Using quick-connect push-in terminals, connect green/ground wire of cable to green wire in junction box, connect white wire of cable to white
wire in junction box, connect black wire of cable to black wire of box (See Figure 1).
4. Place all wiring and connections back in to the box and close the cover, making sure wires are not pinched in any way.
For new construction applications: Hardwire box shall be firmly secured to studs, joists, or similar fixed structural units. The rough-in plate is
designed with tabs to enable mounting directly to the plate.
For remodel applications: Hardwire box is not required to be secured after the plates, studs, joists, or structural units have been concealed.
FIGURE 1
Page 1 of 3©2024 American Lighting, Inc. REV2430 www.AmericanLighting.com 11775 E. 45th Ave. Denver, CO 80239 Ph: 1-800-880-1180 Fax: 303-695-7633
Page 2
RHYME Recessed Downlight120V
INSTALLATION INSTRUCTIONS
RHYM Series
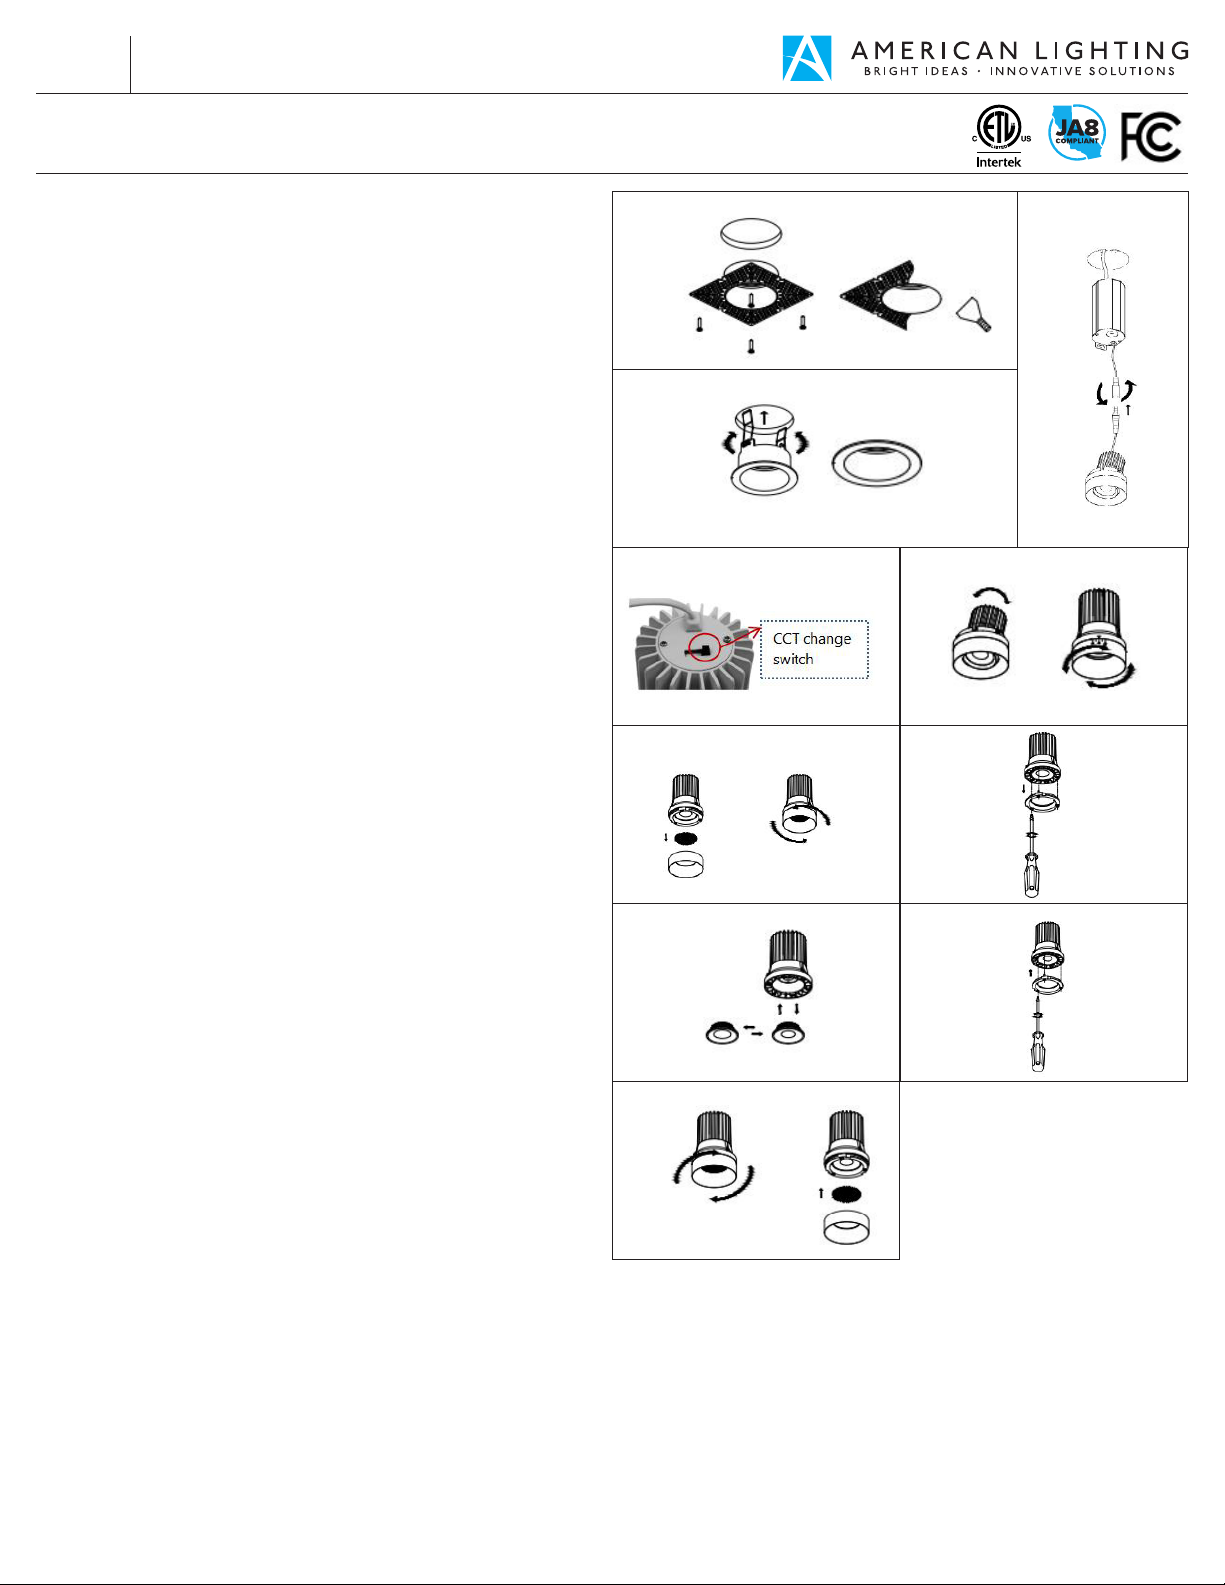
FIXTURE INSTALLATION (See Figures 2-6):
1. Install the trim:
A. For Trimless Mud-Ring: Fasten the trim to ceiling with screws,
then patch over the seamless trim with drywall joint compound
or spackle. Let dry completely, then paint with desired color.
See Figure 2.
B. For Trim-Ring: Push up the butterfly springs and install the
round trim into the ceiling so the clips grab the drywall. See
Figure 3.
2. Place all wiring and connections back into the driver box, close
the cover, and place the driver box into the ceiling (if not
already completed during rough-in plate installattion for new
construction). See Figure 4.
3. Select the desired color temperature (CCT) by using the switch
on the backside of the light module. See Figure 5. If using the
gimble module or the beam angle adjustable module, set the
desired angle and/or direction. See Figure 6.
4. Connect the light module to the driver using the twist lock
connector. Once connected, turn clockwise to lock into place.
5. Using two hands press the light module upwards into the trim.
Push and press until the light module “clicks” into place. The
same ‘push and press’ action may be utilized to remove the
light module from the trim also.
OPTIC LENS REPLACEMENT (See Figures 7-11)
For THNC SKUs Only (not applicable for gimbal or beam
angle adjustable SKUs):
1. Remove the module ring by turning it counterclockwise. If using
honeycomb louver, remove this piece. See Figure 7.
2. Use a screwdriver to unscrew the inner ring screws.
See Figure 8.
3. Change the lens to the desired version. Ensure the lens is fully
seated and facing the correct direction. See Figure 9.
4. Replace the inner ring and fasten the screws. See Figure 10.
5. If using the honecomb louver, replace the piece before placing
the module ring. Turn the module ring clockwise and lock in
place.
FIGURE 2
FIGURE 3
FIGURE 5
FIGURE 7 FIGURE 8
FIGURE 9
FIGURE 6
Gimbal Beam Angle
FIGURE 10
FIGURE 4
Adjustable
FIGURE 11
CARE AND MAINTENANCE:
1. Use only a mild soap and water with soft cloth to clean the fixture. Harsh chemicals will damage the finish. Do not wipe the fixture with a
rough cloth that may scratch the finish or the lens.
Page 2 of 3©2024 American Lighting, Inc. REV2430 www.AmericanLighting.com 11775 E. 45th Ave. Denver, CO 80239 Ph: 1-800-880-1180 Fax: 303-695-7633
Page 3

RHYME Recessed Downlight120V
INSTALLATION INSTRUCTIONS
RHYM Series
FCC Compliance Statement
This device complies with part 15 of the FCC Rules. Operation is subject to the following two conditions:
1. This device may not cause harmful interference, and
2. This device must accept any interference received, including interference that may cause undesired operation.
FCC WARNING
This equipment has been tested and found to comply with the limits for a Class B digital device, pursuant to Part 15 of the FCC Rules. These limits are designed to
provide reasonable protection against harmful interference in a residential installation. This equipment generates, uses and can radiate radio frequency energy
and, if not installed and used in accordance with the instructions, may cause harmful interference to radio communications. However, there is no guarantee that
interference will not occur in a particular installation. If this equipment does cause harmful interference to radio or television reception, which can be determined by
turning the equipment o and on, the user is encouraged to try to correct the interference by one or more of the following measures:
• Reorient or relocate the receiving antenna.
• Increase the separation between the equipment and the receiver.
• Connect the equipment into an outlet dierent from that to which the receiver is connected.
• Consult the dealer or an experienced radio/TV technician for help.
Any changes or modications not expressly approved by the party responsible for compliance could void the user’s authority to operate the equipment.
5-YEAR LIMITED PRODUCT WARRANTY
This product is warranted to be free from defects in material and workmanship for a period of five (5) years from the date of purchase. Products that prove to be defective during this period
will be either repaired (i.e. replacement of defective electronics, defective parts of the fixture housing, lens, wiring, switching or lamp sockets; excluding the lamp) or replaced, at the discretion of American Lighting, Inc claims for defective products must be submitted to the retail location from which the product was purchased withing the warranty period. Upon submission
of proper return claim documentation and product to American Lighting, Inc by the retailer, American Lighting, Inc reserves the right to inspect the product for misuse or abuse. Claims for
indirect or consequential damages or for product that, in American Lighting, Inc’s opinion has bee misused, will be denied. This is a warranty of product reliability only and not a warranty
of merchantability or fitness for a particular purpose. American Lighting, Inc shall have no liability whatsoever in any event for payment of incidental or consequential damages, including,
without limitations, installation costs and damages for personal injury and property. These products may represent a possible shock or fire hazard if improperly installed or altered in any
way. This warranty applied only to product that has been properly installed in accordance with instruction sheet and current local codes and/or the National Electrical Code. Warranty does
not apply to any product that has been improperly installed or in situation where components have been altered in any way. This warranty: (1) excludes expendable parts including but not
limited to light bulbs, batteries; (2) carries a 2-year finish warranty protecting finish against tarnishing, flaking, and discolorations; (3) shall be void if this lighting fixture is not installed in the
U.S.A.; and (4) does not cover any losses, labor, injuries to persons/property or costs. This warranty does give you specific legal rights and you may have other rights, which vary from state
to state, Be careful, it is recommended that installation be done by a qualified professional; the purchaser has sole responsibility for proper installation in compliance with all state and local
code requirements. Seller’s employees are not qualified to advise you on the use of this Merchandise. Any oral representation(s) made will not be binding on seller or its employees. The
rights under this limited warranty are to the original purchaser of the Merchandise and may not be transferred to any subsequent owner. This limited warranty is in lieu of all warranties,
expressed or implied including warranties or merchantability and fitness for a particular purpose. Seller shall not be liable for any special, incidental, or consequential damages. The sold
exclusive remedy against the seller will be for the replacement of any defects as provided herein, as long as the seller is willing or able to replace this product or is willing to refund the
purchase price as provided above.
For questions/comments, technical assistance, or repair parts - Please call toll free at 1-800-285-8051 (M-F 8am-5pm), CST)
Page 3 of 3©2024 American Lighting, Inc. REV2430 www.AmericanLighting.com 11775 E. 45th Ave. Denver, CO 80239 Ph: 1-800-880-1180 Fax: 303-695-7633
 Loading...