

Page 1

Illustra Pro 12MP Fisheye
Quick Start Guide
8200-1485-01 C0
Page 2

Notice
The information in this manual was current when published. The manufacturer reserves the right to revise and improve its products. All
specificationsare therefore subject to change without notice.
Copyright
Under copyright laws, the contents of thismanualmay not be copied, photocopied, reproduced, translated or reduced to anyelectronic
medium or machine-readable form, in whole or in part, without prior written consent of Tyco Security Products.
© 2017 Tyco Security Products. AllRightsReserved.
Tyco Security Products
6600 Congress Avenue
Boca Raton, FL 33487 U.S.A.
Customer Service
Thank you for using Illustra products. We support our products through an extensive worldwide networkof dealers. The dealer through
whom you originally purchased this product is your point of contact if you need service or support. Our dealers are empowered to provide the
very best in customer service and support. Dealers should contact Tyco Securitry Products sat(800) 507-6268 or (561) 912-6259 or on the
Web atwww.illustracameras.com.
Trademarks
Windows®is a registered trademark of Microsoft Corporation. PS/2® is a registered trademarkof International BusinessMachines
Corporation.
The trademarks, logos, and service marks displayed on thisdocument are registered in the United States [or other countries]. Any misuse of
the trademarks is strictly prohibited and Tyco Security Products willaggressivelyenforce its intellectual propertyrights to the fullest extent of
the law, including pursuit of criminal prosecution wherever necessary. Alltr ademarks not owned by Tyco Security Products are the property
of their respective owners, and are used with permission or allowed under applicable laws.
Product offerings and specifications are subject to change without notice. Actualproducts may vary from photos. Not allproductsinclude all
features. Availability varies by region; contact your sales repr esentative.
License Information
Your use of this product is governed bycertain terms and conditions.
Notice of Use
• This manual isdesigned for administrators and users of the network camera.Please read it carefully before use. All requirements
should be followed before using this camera.
• We are not responsiblefor any technical or typographical errorsand reserve the right to change the product and manuals without
notice.
• Keep thisdocument for future reference.
• It isintended that this camera utilizesa PoE power source that complies with LPS requirements.
• The camera must be installed on a solid mounting surface.
• Keep the camera and other accessories dry.
• We are not responsiblefor any damage caused by inappropriate use.
ii
Illustra Pro 12MP Fisheye Quick Start Guide
Page 3

Safety No tice
The recessed indoor camera models are rated as suitable for use in environmentalair handling spaces, except inside air ducts or furnace
plenums.
CAUTION: Riskof explosion if the battery isreplaced by an incorrect type. Dispose of used batteries according to the instructions.
ESD Precaut ions:
With the covers removed during installation and allignment this product is sensitive to electrostatic discharge. The installer should take
appropriate ESD control measures such asthe use of a ESD wrist strap connected to the chassis of the camera.
Note:
PoE networks that are connected to IP Encoders should not be routed to the exterior or outside of the installed plant location.
iii
Page 4

Contents
Product Features 1
Features 1
Dimensions 2
What's in the Box 3
Mounting the Camera 4
Mounting the Fisheye Camera 4
Cable Sealing 6
Connecting the Camera 7
Powering the Camera 8
Ethernet Cable Connection 8
Desiccant Bag Installation 9
Accessing the Camera for the First Time 12
Illustra Connect 12
Key functions of Illustra Connect 12
Discovering the Illustra Camera 13
lllustra Connect 13
Configuring the Illustra Camera using a Static IP Address 14
Physical Reset of the Camera 15
Resetting the Camera to Factory Default Settings Using the Reset Button 15
Technical Specifications 16
Technical Specifications 16
MJPEG/JPEG Compressor Key Functionality 16
H.264 Compressor Key Functionality 16
Resolution 17
Base Protocol and Underlying Layers 19
Network Access Configuration 19
Network Name Resolution 20
Email 20
Time Synchronization and Configuration 20
Authentication and Security 20
iv
Illustra Pro 12MP Fisheye Quick Start Guide
Page 5

Firewall 20
Illustra API Version 21
Discovery 21
UPnP Discovery 21
ONVIF Video and Control Interface 22
Interface Technical Specifications 22
ONVIF Functions Supported 23
microSD Card 23
Environmental 23
Power 23
Regulatory Compliance 24
Appendix A: Camera Defaults for Fisheye Camera 25
v
Page 6

Features
• Mega pixel HD up to 12MP Resolution
• Supports three independently configurable streams
• Edge Dewarping,
• Three Stream Compression: Baseline / Main /H264 high only supported/ MJPEG
• Multiple Dewarping modes: Active Image (ePTZ) / Panorama View / Quad View / Combi
• Unicast and Multicast Streaming capability
• Motion detection analytics & metadata event generation
• Supports one Alarm in and one alarm Out
• Support for Events action on DIO & analyctics
• Audio In and bidirectional Audio out support
• PoE powering capability
• Supports configuration of Privacy Zones
• Supports configuration of Presets, Scans and Sequences on Dewarped Active Images ePTZ
Product Features
• Supports IPv4 which supports DHCP
• DynamicDNS
• Supports FTP, SMTP, SNMP, and CIF
• microSD Recording Support
• Enhanced security, https & 802.1 support
• Wide Dynamic Range
• Day / Night (ICR –infrared cutfilter removal)
• Smart Picture Quality / 3D Noise Reduction
• Weatherproof (IP66 International)
• ONVIF Support
• No plugin or third party dependencies
1
Page 7
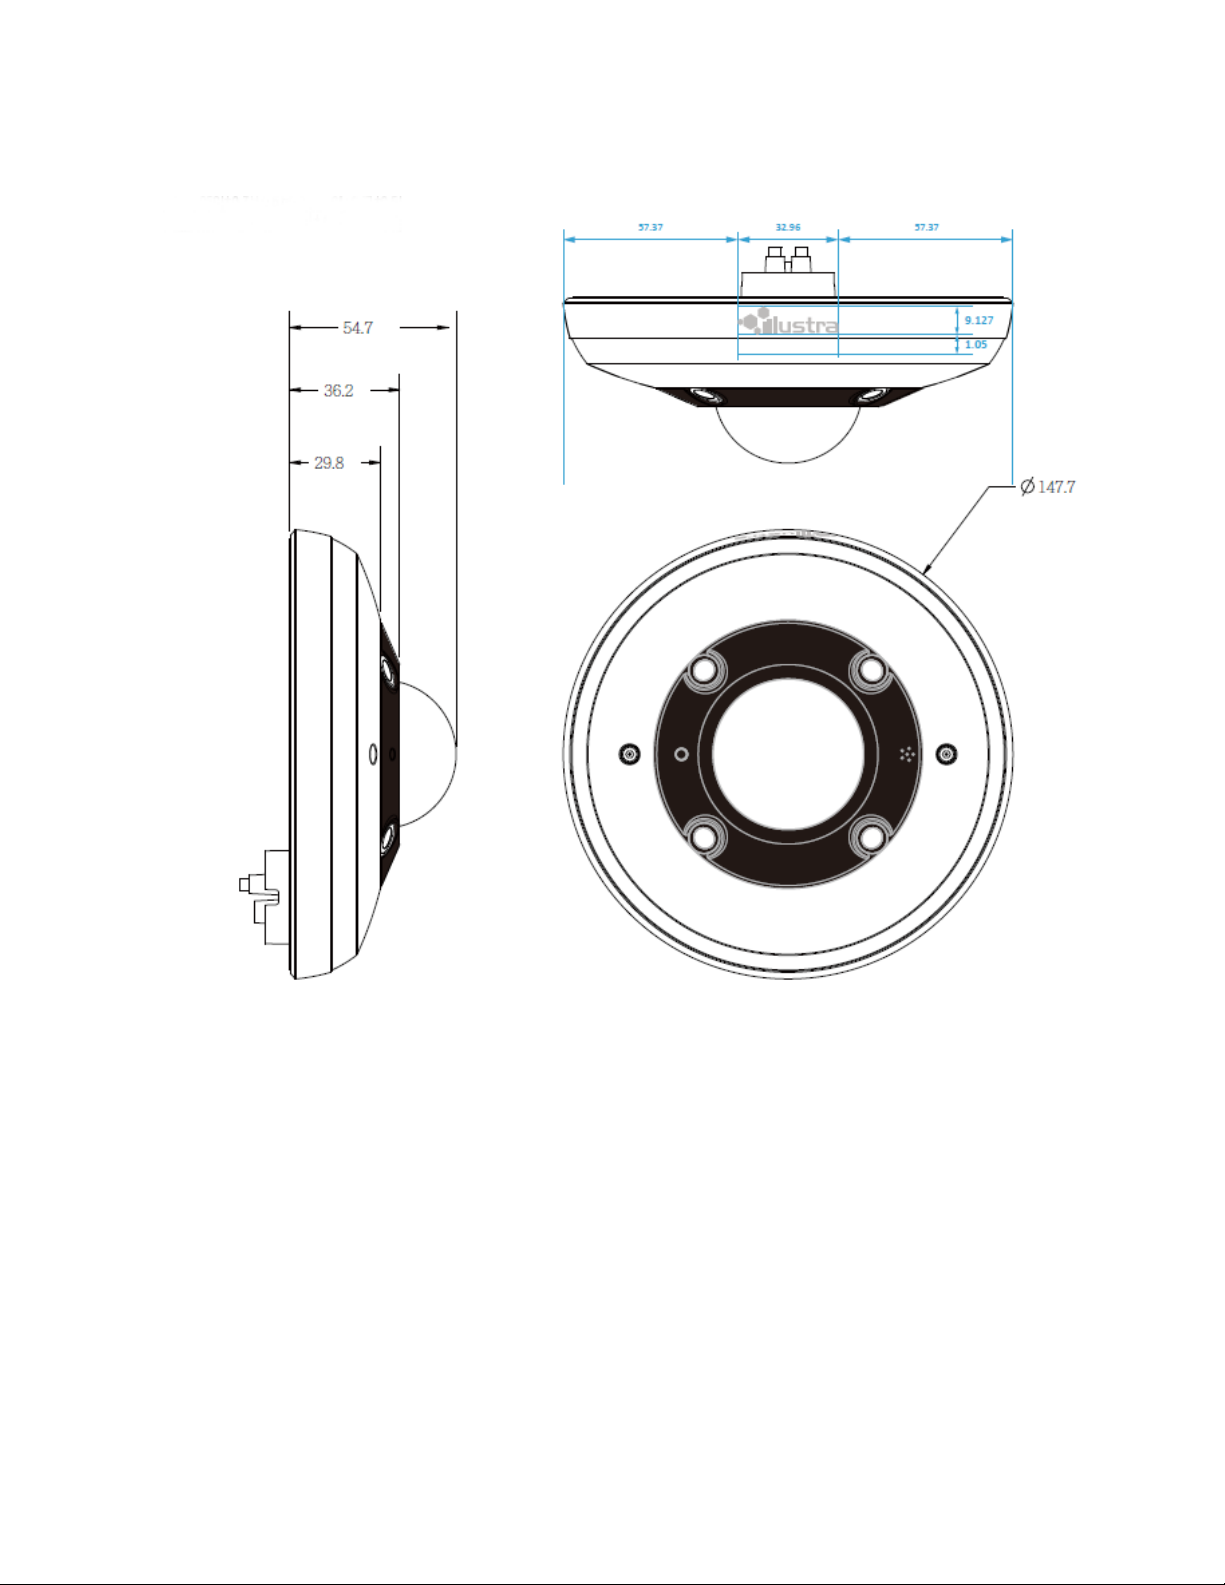
Dimensions
Figure 1 Fisheye Camera dimensions
2
Illustra Pro 12MP Fisheye Quick Start Guide
Page 8
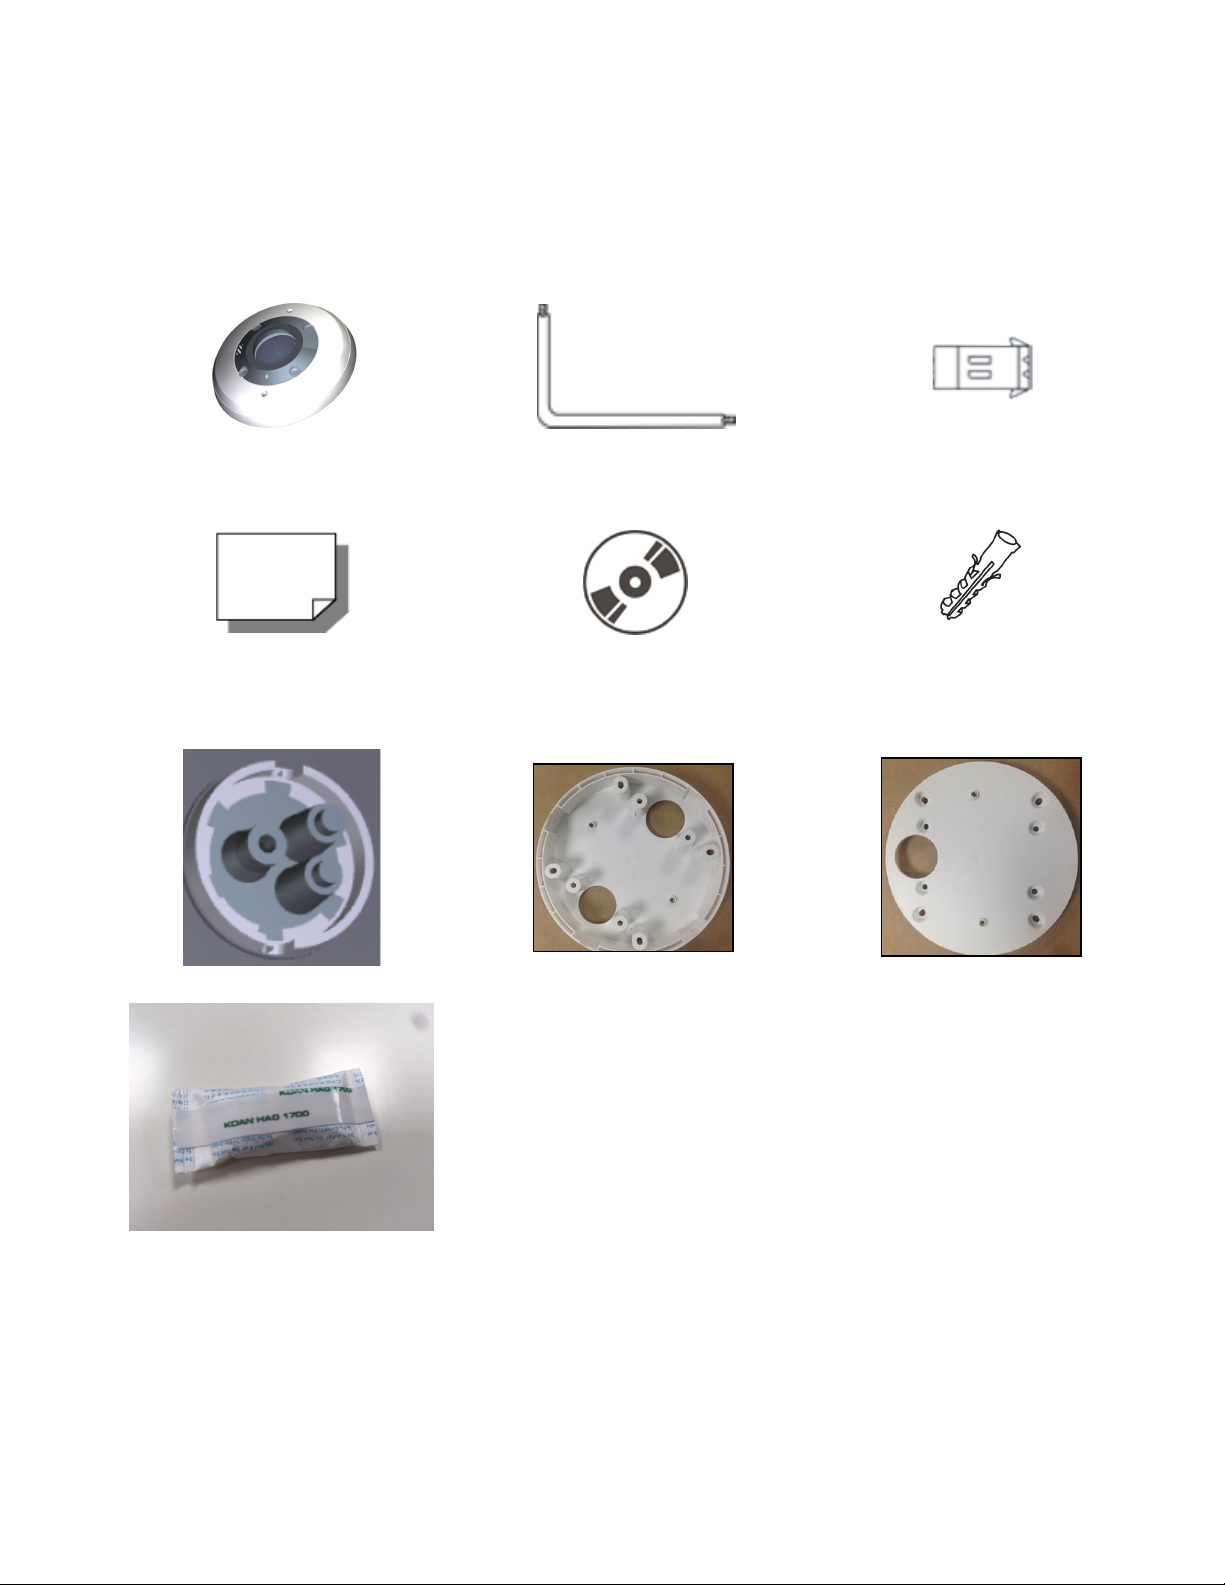
What's in the Box
Please caheck the box contains the items listed here. If any item is missing or has defects do not install or
operate the product and contact the dealer for assistance.
Illustra Pro 12MP Fisheye Camera Security Torx Power Terminal Block
Quick Start Guide
Cable Seal Standoff Ring Adaptor plate
CD containing User Manual and Illustra
Connect discovery tool
Plastic Anchor (x3)
Desiccant Bag
Figure 2 Package Contents
The package should also contain the following items:
M3 Standard screw with washer (x6), M3 Standard Screw without washer (x3), 2500-0053-01 O-ring (x1),
3200-0456-01 3M tape (12cm/5") (x1), Standoff ring (x1), Regulatory document (x1).
3
Page 9
Mounting the Camera
Select the type of mounting required and refer to the relevant procedure.
Use the mounting template provided below to guide you where to drill the holes.
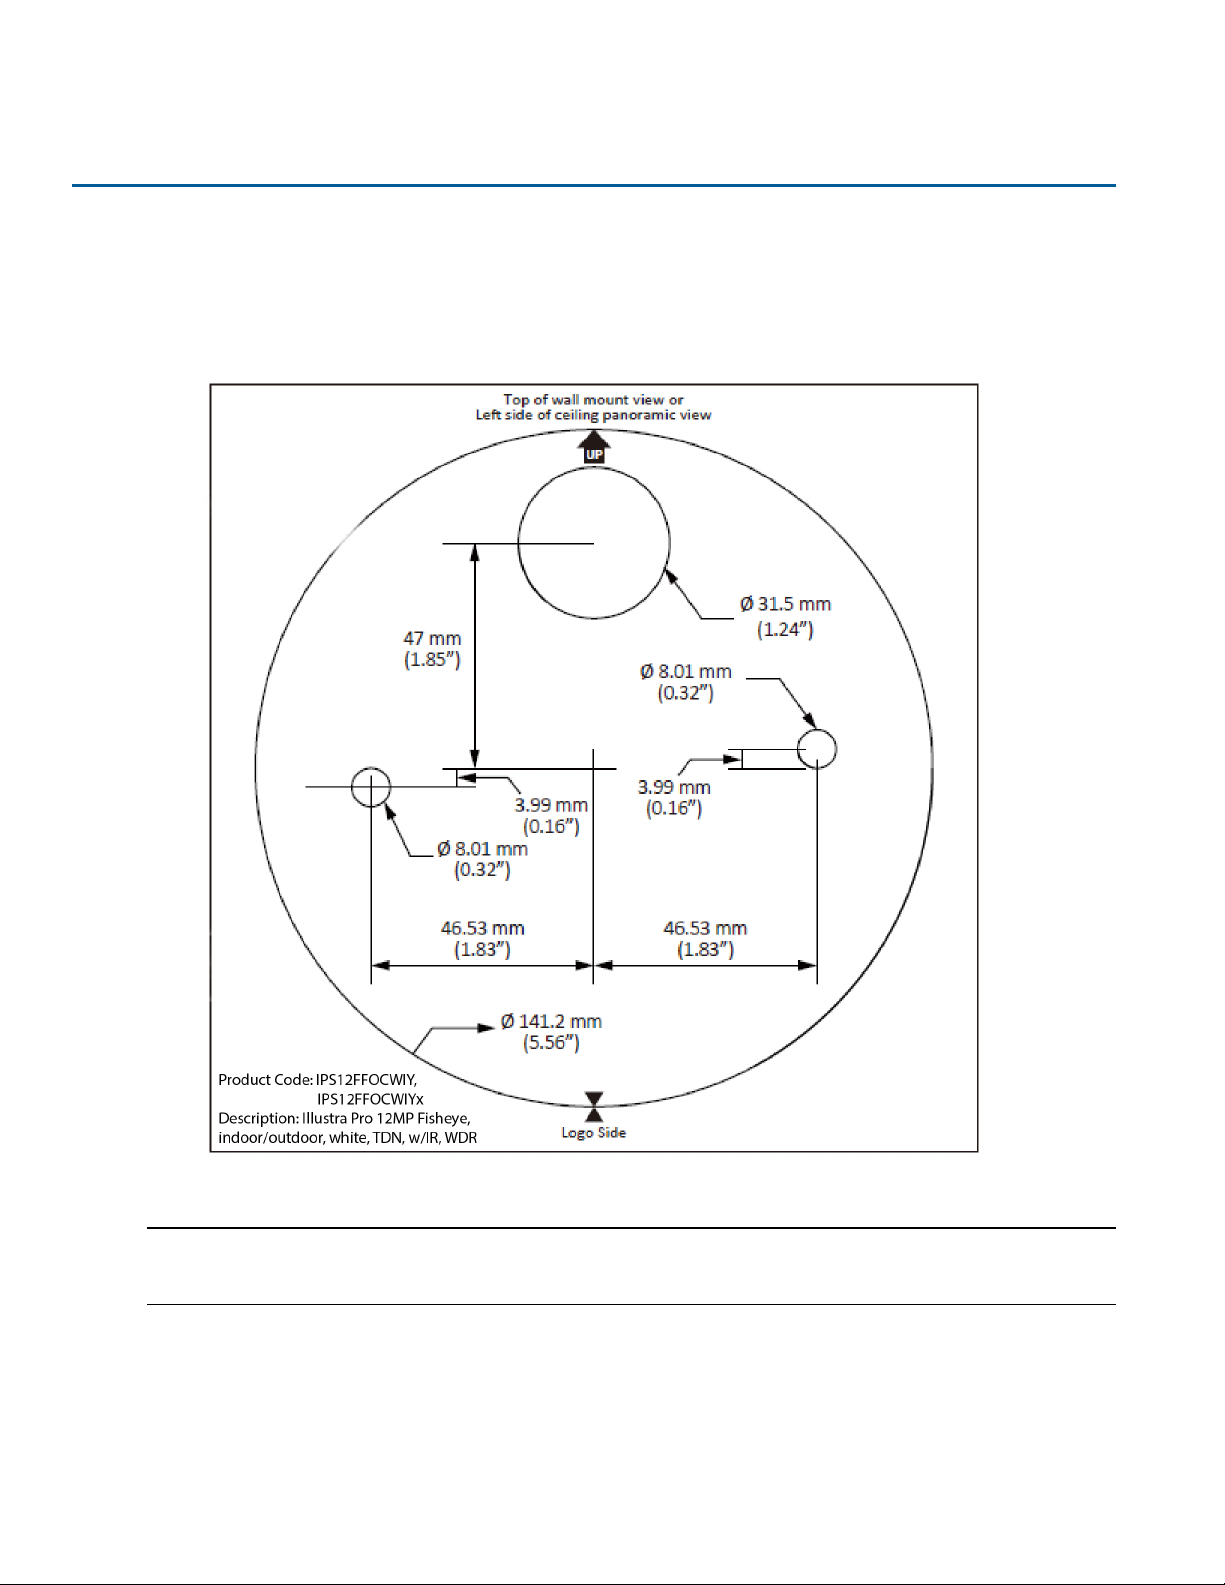
Mounting the Fisheye Camera
Figure 3 Mounting Installation Template
Note:
• You can also print and use the template provided on the disk in the box when mounting the camera.
• Size of actual template on disc is 150mm x 150mm.
4
Illustra Pro 12MP Fisheye Quick Start Guide
Page 10
The camera may be mounted according to your installation needs using the included standoff ring or the included
adaptor plate.
You can mount the camera (inside or outside) using the included standoff ring onto the following surfaces:
a Hard surface
b Standard double gang box
c 4s electrical box
Figure 4 Standoff Ring
OR
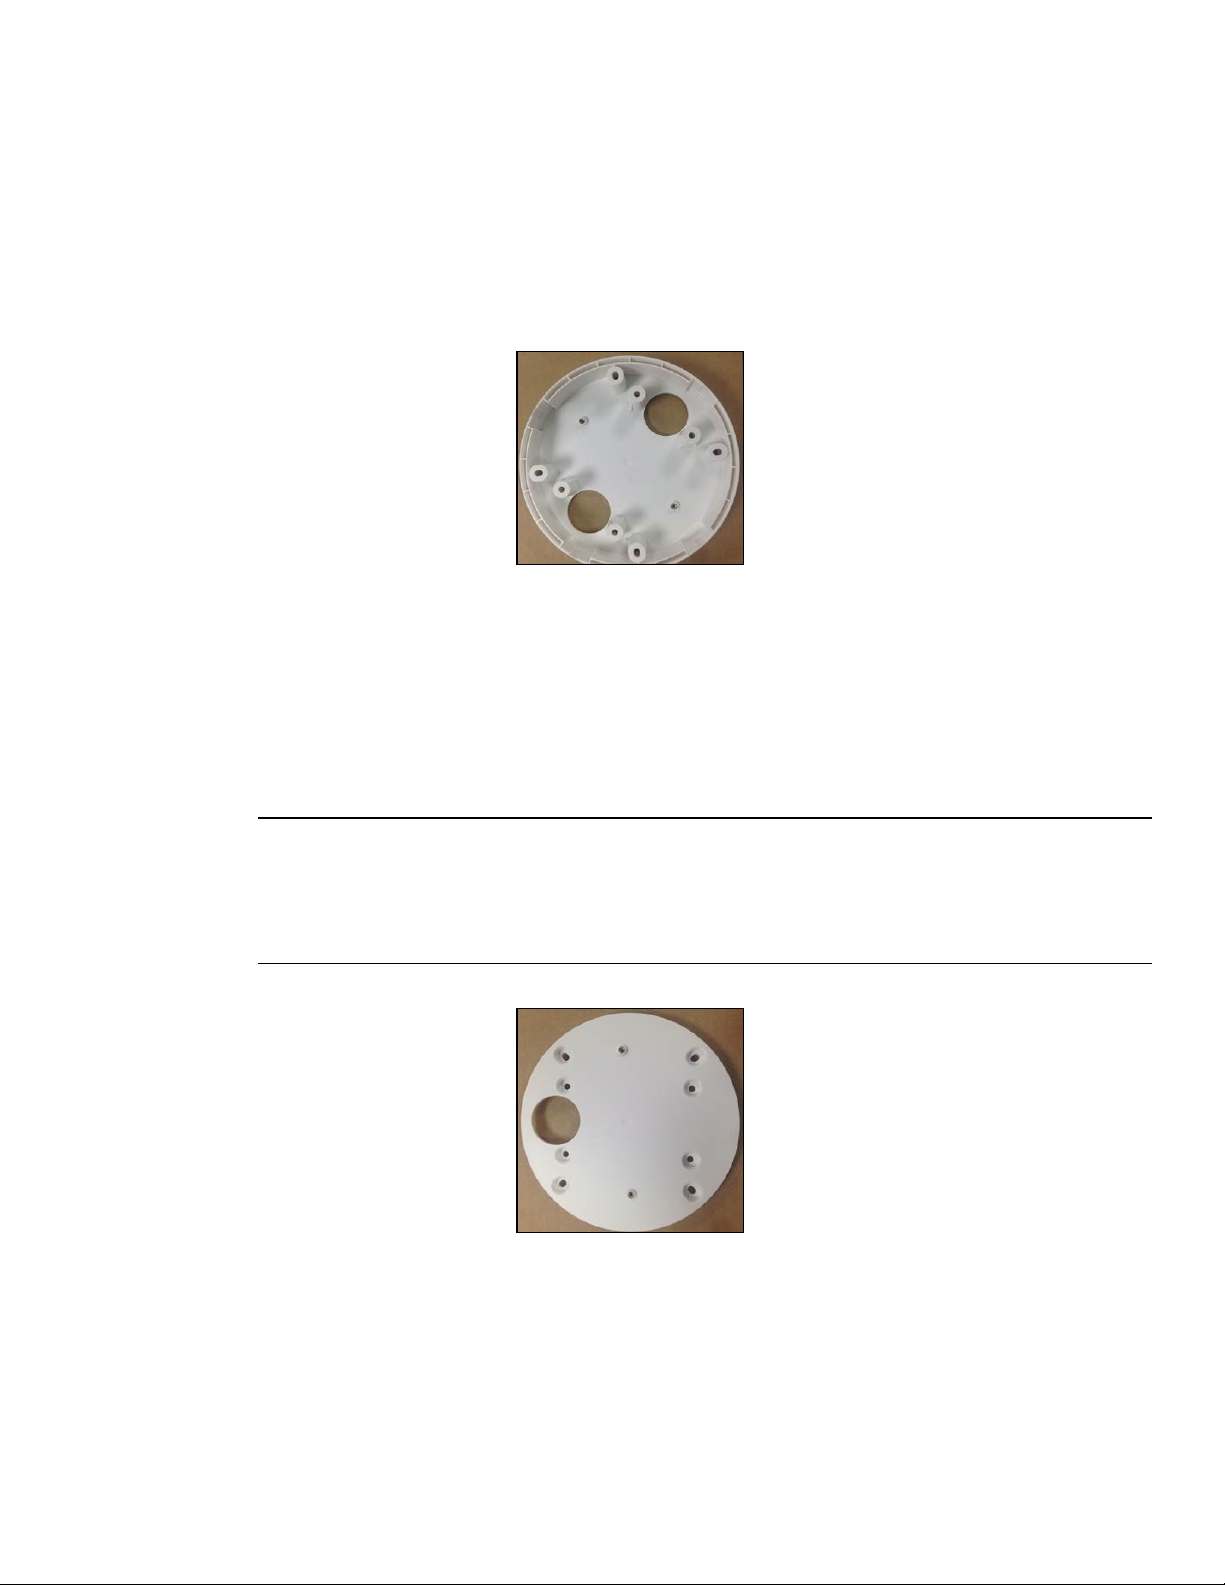
You can mount the camera using the included adaptor plate onto the following surfaces:
a Standard double gang box (inside)
b 4s electrical box (inside)
c Pendant mounts
Note:
To mount the camera onto pendant mounts, one of the following will be required:
• Illustra Pendant Cap outdoor white, 3/4 "NPT (ADC16DPCAPOW)
OR
• Illustra Pendant Cap outdoor black kit,3/4" NPT (ADCI6DPCAPOB)
Figure 5 Adaptor Plate
5
Page 11

Mounting the camera
Step Action
1 Place the paper mounting template on the desired installation surface.
2 Drill holes in the correct positions based on the paper mounting template, and insert the plastic
anchors into the holes.
3 Connect the required cables to the device.
4 Place the camera body on the mounting surface to match its alignment holes with the corresponding
plastic anchors.
5 Tighten the plastic anchors with the screws through the camera's alignment holes.
- End -
Cable Sealing
Where a conduit is not being used, sealing the cables that are fed through the cable seal is required. This is to
protect the camera and maintain camera performance.
Cable sealing
Step Action
1 Turn the camera so that you can see the cable
seal on the camera underside. You will see that
the cable seal contains three tubes (one open,
two closed).
2 Insert the cable through the open tube in the
cable seal. If you require further cabling, do not
cut off the tubes. Instead, snip the tops off the
closed tubes using a scissors and feed the
cables through the now open tubes, ensuring
that there is not excess space around the
cables.
3 It is required to use the self-fusing tape.Cut the
tape off in lengths to wrap around each cable and
remove the backing from each side
4 Apply the self-fusing tape where each cable
enters the tubes making sure it overlaps itself,
the tube, and the cable.
6
Illustra Pro 12MP Fisheye Quick Start Guide
Page 12

Connecting the Camera
Loosen the security screws by twisting the security torx and open the cover to reach the connectors.
Figure 6 Location of security screws
Figure 7 Camera connectors
No. Connector Definition
1
2 RJ-45 For network and PoE connections
3 microSD Card Slot Insert the microSD card into card slot to store videos and snapshots.
4 Alarm and Audio I/O
5 Reset Button Press the button for at least 20 seconds to restore the system
1=Power
2=GND
Power Connection
Pin 1: Alarm Out + (alarm connection)
Pin 2: Alarm Out - (alarm connection)
Pin 3: Alarm In + (alarm connection)
Pin 4: Alarm In - (alarm connection)
Pin 5: GND (Ground connection)
Pin 6: Audio Out (two-way audio transmission)
Pin 7: Audio In (two-way audio transmission)
7
Page 13

To power up the camera, connect a DC 12V power adaptor to the power connector of the camera and the power
outlet. Alternatively, users can use an Ethernet cable and connect it to the RJ-45 connector of the camera and a
Power Sourcing Equipment (PSE) switch / Power over Ethernet (POE) switch.
Figure 8 Cable Connection Point
Ethernet Cable Connection
Powering the Camera
Connect one end of the Ethernet cable to the RJ-45 connector of the camera, and plug the other end of the cable
to the network switch or PC. Check the status of the Link Light.
Green Link Light indicates good network connection.
Orange Activity Light flashes for network activity indication.
Note:
• If the LEDs are unlit, please check the LAN connection.
• In some cases, Ethernet crossover cable might be needed when connecting the camera directly to the
PC.
8
Illustra Pro 12MP Fisheye Quick Start Guide
Page 14

Desiccant Bag Installation
You can install the desiccant bag (IP12FEDESIBAG: Pro 12MP Fisheye Desiccant Bag) into the camera by
performing the following procedure.
Installing the desiccant bag
Step Action
1 Unscrew both top cover screws and remove the top cover.
Figure 9 : Camera top cover and screws
2 Remove the desiccant bag from the sealed bag and remove the protective membrane from the double-
sided tape.
Figure 10 : Sealed bag (left side) Protective membrane (right side)
9
Page 15

3 Fold both ends of the desiccant bag under the bag.
Figure 11 : Ends folded under the bag
4 Place the desiccant bag in the camera in the location indicated in the red circle in the image below.
10
Figure 12 : Desiccant bag placement location (left side) Desiccant bag in the camera (right side)
5 Place the top cover on the camera and secure both screws.
Note:To help provide maximum protection against condensation you should replace the desiccant bag
each time you remove the top cover.
Illustra Pro 12MP Fisheye Quick Start Guide
Page 16

Figure 13 : Top cover securely fitted
- End -
11
Page 17

Accessing the Camera for the First Time
The camera comes with a web-based setup utility, allowing you to view the video of the camera and configure the
camera for optimal use in your environment.
To access the camera's web-based control utility, you need a PC that uses one of the following browsers:
Internet Explorer 10 or later, Firefox, Chrome or Safari.
Accessing the camera for the first time
Step Action
1 Make appropriate network and power connection (typically PoE).
The camera will automatically get an IP address if connected to a DHCP network. If DHCP addressing
is not available, the camera will use its default fixed address: 192.168.1.168.
2 Find camera(s) on the network using Illustra Connect or another utility; or if using fixed addresses,
connect to the camera on its default address.
3 Enter the default ID and password when prompted—ID: admin, Password: admin.
4 Select security type: standard or enhanced.
Note:
Both security types ask the user to change the username and password, this is advised in standard security mode
and required when selecting enhanced security. Creating a new username at this stage automatically replaces the
default admin/admin.
Illustra Connect
Illustra Connect is the camera discovery tool created by Tyco Security Products and can be downloaded at
illustracameras.com
Connecting to IP cameras and configuring them can be a time-consuming and error-prone process. Typing static
IP addresses, or naming cameras without seeing where they are pointed, often results in longer installations.
Illustra Connect eliminates all of these issues with a unique feature set that includes a one-touch IP conflict
resolver and snapshot tool . Simply bring up all of the cameras out of the box, enter the IP range provided by the
customer's IT department and click OK.
Key functions of Illustra Connect
• Resolve All Conflicts button instantly alerts you to all IP addresses that are the same and provides a
number of options to fix issues
• Reduces installation time by automatically supplying static IP addresses from a configurable range of IP
addresses
• Snapshot views of all the cameras
• "Save Device List" allows you to create a .csv' file of all information regarding the camera settings
- End -
12
Page 18

• Set IP addresses to DHCP
• Configure IP settings and rename cameras
• Upload firmware to individual or selectable group of cameras
• Set date and time or direct the cameras to a specific NTP server
• Assign user name and password
• Uses icons common to victor unified client to display camera status
• Compatible with Illustra IP cameras
Discovering the Illustra Camera
The following information states how to install and access the camera.
lllustra Connect
The following information states how to install and access the camera on your network using the Illustra Connect
discovery tool.
Illustra Connect enables automatic discovery of compliant devices on IP networks and is the recommended
method for installation and detection of the camera on the network.
Discovering the Illustra Camera using Illustra Connect
Step Action
1 Connect the camera to the computer or network which will be used for the configuration and power on.
The camera will begin its initial boot up sequence which will take approximately 1 to 2 minutes. Out of the
box, or when using a DHCP Server the camera will automatically be assigned a Network IP address.
2 Install the Illustra Connect software that is provided with the camera. Refer to the Illustra Connect
manual for more information.
3 When the installation is complete, run Illustra Connect. It will search the network and display all devices.
4 Select the camera you wish to configure, locating it by its unique MAC address. Illustra Connect allows
basic configuration of the camera. Refer to the Illustra Connect manual for more information.
5 Right-click the camera and select Launch Web GUI Configuration.
- End -
Configure the Illustra Camera using DHCP Server Logs
Step Action
1 Connect the camera to the computer or network which will be used for the configuration and power on.
The camera will begin its initial boot up sequence which will take approximately 1 to 2 minutes.
13
2 Out of the box or when using a DHCP Server the camera will automatically be assigned a Network IP
Address.
3 View the DHCP Server system logs and make note of the IP address assigned to the camera.
Illustra Pro 12MP Fisheye Quick Start Guide
Page 19

4 Open Microsoft Internet Explorer and enter the URL of the camera as shown in the DHCP Server log.
Note:
At factory default, after enabling DHCP manually or if it is the first time the camera has been configured; the
camera will reboot using the Failover IP of the last known static IP address until a DHCP address request is
authorised by the DHCP server. The DHCP requests will remain active unless cameras are changed to Static IP.
- End -
Configuring the Illustra Camera using a Static IP Address
The following information states how to install the camera on your network when no DHCP Server is available. In
this situation the camera will be assigned a Static IP Address.
Connect the camera to the computer or network which will be used for the configuration and power on.
Note:
• We recommend that once you are logged into the Web Configuration pages you change the Static IP
Address of the camera so that conflicts can be avoided when using the same Static IP Address to setup
additional cameras.
• In a situation where IP address conflicts arise, Illustra Connect can be used to discover the device.
14
Page 20

Physical Reset of the Camera
It is possible to perform a physical reset to factory defaults using the reset button located on the underside of the
camera.
Resetting the Camera to Factory Default Settings Using the Reset Button
The reset button can be used to restore the camera to the factory default settings.
Note:
It is not possible to retain network settings, presets, patterns or sequences when using this procedure. If you need
to maintain these settings it is recommended to reset the camera using the GUI.
Reset the Camera to Factory Default Settings Using the Reset Button
Step Action
1 Locate the reset button on the underside of the camera.
2 Press and hold the reset button for at least 20 seconds.
3 Release the reset button.
It may take up to 2 minutes for the camera to restart.
Note:
It is also possible to reset the camera through the Maintenance tab located in the System menu.
- End -
15
Page 21

Technical Specifications
This section provides information on the technical, environmental and operating specifications for the Illustra Pro
Fisheye Camera.
Illustra Fisheye Product Description Product Code
Illustra Pro 12 MP Fisheye, indoor/outdoor, white TDN w/IR, WDR
Technical Specifications
Specification Detail
Privacy Zones 5
Language Selection
Motion Detection Yes
Browser Compatibility IE 10-11, Safari, Firefox, and Chrome.
English (default), Arabic, Czech, Danish, German, French, Spanish, Italian,
Korean, Japanese, Dutch, Polish, Portuguese (Brazilian), Turkish, Chinese
Traditional, Chinese Simplified, Russian.
MJPEG/JPEG Compressor Key Functionality
The JPEG codec supports the JPEG baseline DCT encoding process with the following additional configuration
option:
IPS12FFOCWIY/
IPS12FFOCWIYx
• Quality: 1-100
H.264 Compressor Key Functionality
The H.264 codec supports the JPEG baseline DCT encoding process with the following additional configuration
options:
Category Details
GOP Length 1-255
Rate Control
Bit Rate (CBR) Selectable 64-20480Kbps
Quality (VBR) Highest, High, Medium, Low, Lowest
CBR
VBR
CVBR
16
Page 22

Category Details
Bit Rate (CVBR)
Resolution
Image
Source
Fisheye 15 fps
Symbol Max fps
Selectable 64-20480Kbps
OR
Highest, High, Medium, Low, Lowest
Client Dewarp Mode
1st
3rd
2nd Stream
Stream
Stream
H.264 or MJPEG H.264 or MJPEG MJPEG (locked)
(2992x2992) 1:1
(2048x2048) 1:1
(1408x1408) 1:1
(1072x1072) 1:1
(960x960) 1:1
(720x720) 1:1
(640x640) 1:1
(1072x1072) 1:1
(960x960) 1:1
(720x720) 1:1
(640x640) 1:1
(480x480) 1:1
(384x384) 1:1
(720x720) 1:1
(640x640) 1:1
(480x480) 1:1
(384x384) 1:1
Note:
• When resolution width or height larger than 2040 (resolution marked red), MJPEG can't be set (there is
no 2048x2048 MJPEG, but you can set 2048x2048 H.264)
• Each stream can have an independent frame rate (fps), but they must be equal to or less than the max
fps listed
• Stream resolutions are independent; each stream can operate at any resolution in the column below
• On stream 1, 640x640, and on streams 2 and 3, 352x352 are the lowest resolutions Fisheye view can be
operated with when using Edge Dewarp
• Out of the box, the default mode is Client Dewarp
• You can view dewarped view in Client mode using Internet Explorer Viewer, which provides a GUI
stream dewarping feature
• The following mount image source combinations are possible:
Ceiling mount view modes:
Fisheye Ceiling panorama
Quad Active Image (4x ePTZ) Active Image
Wall mount view modes:
Fisheye Wall panorama
17
Combi (panorama + 2 ePTZ) Active Image
Illustra Pro 12MP Fisheye Quick Start Guide
Page 23

• Dewarping will apply to only GUI stream and does not affect RTSP or Server connected stream
Edge Dewarp
1st
Stream
Image
Source
Ceiling
Panoramic
Wall
Panoramic
4xActive Image
(4 ePTZ)
ceiling mount
Combi image
(180 +2 ePTZ)
wall mount
Active Image
(ePTZ)
Fisheye 15 (2048x2048) 1:1
Symbol Max fps H.264 or MJPEG H.264 or MJPEG H.264 or MJPEG
(2688x1512) 16:9
(1920x1080) 1080p 16:9
(1664x936) 16:9
15
20
20
(1280x720) 720p 16:9
(1024x576) PAL 16:9
(960x544) 16:9
(640x360) nHD 16:9
(384X216) 16:9
(1920x1080) 1080p 16:9
(1664x936) 16:9
(1280x720) 720p 16:9
(1024x576) PAL 16:9
(960x544) 16:9
(640x360) nHD 16:9
(384x216) 16:9
(960X544) 16:9
(640x360) nHD 16:9
(384x216) 16:9
2nd Stream
(960x544) 16:9
(640x360) nHD 16:9
(480x360) 480 4:3
(384x288) 4:3
(384x216) 16:9
(960x544) 16:9
(640x360) nHD 16:9
(480x360) 480 ) 4:3
(384x288) 4:3
(384x216) 16:9
(960x544) 16:9
(640x360) nHD 16:9
(480x360) 480 4:3
(384x288) 4:3
(384x216) 16:9
(1408x1408) 1:1
(1072x1072) 1:1
(960x960) 1:1
(720x720) 1:1
(640x640) 1:1
(480x480) 1:1
(352x352) 1:1
3rd
Stream
(960x544) 16:9
(640x360) nHD 16:9
(480X360) 480 4:3
(384x288) 4:3
(384x216) 16:9
(960x544) 16:9
(640x360) nHD 16:9
(480x360) 480 4:3
(384x288) 4:3
(384x216) 16:9
(960x544) 16:9
(640x360) nHD 16:9
(480x360) 480 4:3
(384x216) 16:9
(720x720) 1:1
(640x640) 1:1
(480x480) 1:1
(352x352) 1:1
Fisheye 20
Fisheye 30
(1408x1408) 1:1
(1072x1072) 1:1
(960x960) 1:1
(720x720) 1:1
(640x640) 1:1
(1408x1408) 1:1
(1072x1072) 1:1
(960x960) 1:1
(720x720) 1:1
(640x640) 1:1
(480x480) 1:1
(352x352) 1:1
(1408x1408) 1:1
(1072x1072) 1:1
(960x960) 1:1
(720x720) 1:1
(640x640) 1:1
(480x480) 1:1
(352x352) 1:1
(720x720) 1:1
(640x640) 1:1
(480x480) 1:1
(352x352) 1:1
(720x720) 1:1
(640x640) 1:1
(480x480) 1:1
(352x352) 1:1
18
Page 24

Note:
• When resolution width or height is larger than 2040 (resolution marked red), MJPEG codec cannot be set
• Streams 1, 2, and 3 fps can be set from 1 to maximum fps. Maximum fps is dependent on the resolution
of stream 1
• Each stream can have an independent frame rate (fps), but they must be equal to or less than the max
fps listed
• 640x640 on steam 1 and 352x352 on streams 2 and 3 are the lowest resolution fisheye possible in Edge
Dewarp
• The image source set on stream 1 is replicated on stream 2 and 3
• Once image source, resolution, and max fps is selected for stream 1,possible resolution selections for
streams 2 and 3 will update accordingly
• Changing image source will automatically reset all stream configurations to their default values.
• The following mount image source combinations are possible:
ceiling mount view modes: Ceiling panorama Quad Active Image (4x ePTZ) Active Image
wall mount view modes: Wall panorama Combi (panorama + 2 ePTZ) Active Image
Base Protocol and Underlying Layers
• The camera is an IP camera compatible with TCP/IP protocol.
• The camera supports both IPv4 and IPv6, running either in single stack mode or dual stack mode
(supporting both IP versions at the same time).
• TCP is used for two way communication and UDP will be used for broadcasting protocols.
• HTTP is used for the ONVIF protocol as transport mechanism for SOAP calls.
• FTP can be used to push alarm buffer video clips to a specified remote FTP server. The camera can use
anonymous FTP or a specified username and password. There is no incoming FTP service.
Network Access Configuration
•DHCP (Dynamic Host Configuration Protocol) will is enabled by default on the camera. During the boot
process, the camera will attempt to acquire a network address via DHCP. The DHCP client will be configured to
do 3 attempts with a 20 second timeout.
•Static IP can be used if the camera cannot be found on the network using DHCP. In this mode, the static IP
address, subnet mask, default router and primary and secondary DNS server can be configured. This will be used
by the camera when turned on. It is possible to assign a static IPv4 address while still allowing the IPv6
addressing to be Link Local (automatically assigned).
•Dynamic DNS or DDNS Dynamic Domain Name System is supported for updating, in real time a changing
IP address on the Internet to provide a persistent domain name for a resource that may change location on the
19
Illustra Pro 12MP Fisheye Quick Start Guide
Page 25

network. RFC 2136 Dynamic Updates in the Domain Name System. In this situation the camera talks only to the
DHCP server and the DHCP server is responsible for updating the DNS server. The camera sends its hostname
to the DHCP server when requesting a new lease and the DHCP server updates the DNS records accordingly.
This is suitable for an intranet style configuration where there is an internal DHCP and DNS service and the user
wants only to access their camera within their own network.
By default, when making a DHCP request the camera will transmit its hostname as part of the DHCP request.
This option is not user configurable. The cameras hostname matches the configurable parameter “camera name”
on the web GUI. Any DHCP request will contain the cameras hostname for use of the DHCP server to forward to
an appropriate DNS server.
Network Name Resolution
The camera uses DNS protocol to resolve network names. DNS server address will be acquired via DHCP or
manually set for static IP configuration. Camera configuration supports symbolic names for all remote end-points
(except DNS servers) but in this mode will depend on a working and correctly configured remote DNS server.
The camera can send email alerts via SMTP to one specified mailbox using a specified SMTP server. Support is
provided for basic authenticated SMTP using username and password for login on the SMTP server.
Time Synchronization and Configuration
The camera supports NTP for time synchronization. The NTP server will have to be configured by the user.
Alternatively, time can be manually configured via the Web GUI or ONVIF.Time synchronization has 1/day poll
rate.
Authentication and Security
• HTTPS (HTTP over TLS) is used for the Web GUI. HTTP connections to the camera IP will
automatically be redirected to the HTTPS login page.
• The camera will automatically create a SSL certificate file to use for HTTPS. It is possible to upload a
custom SSL certificate if validation is desired.
• The ONVIF service uses WS-Security Username Token Digest.
Firewall
The camera will provide a firewall, which is disabled by default. The firewall will be able to block ICMP and allow
RP filtering and SYN Cookie Verification.The firewall will offer the ability to block selected IP or MAC addresses
and allow access exclusively to selected IP and MAC addresses.
20
Page 26

Note: Using the “Deny all” mode, could result in a mis-configuration and require resetting the camera via the
physical reset button.
Illustra API Version
AD iAP13
Discovery
The product supports WS-Discovery and UPnP discovery.
A copy of illustra Connect is supplied with the camera, this is a MS-Windows based discovery application, which
will allow discovering any illustra camera on a network.
For each camera found on the network, the discovery tools will report:
• Serial number.
• Model Name.
• Product Code (Hardware ID).
• MAC address.
• Current IP address.
• Firmware version.
This tool will allow configuration of:
• DHCP.
• Static IP configuration.
• Select a number of cameras and push a firmware update via ONVIF.
• Bulk configuration of specific setting via iAP13.
UPnP Discovery
UPnP (Universal Plug and Play) broadcasts information about the camera to other devices on the network.
The information broadcasted about the camera includes:
• Device Name: <Product Code><Serial Number>
• Manufacturer and manufacturer URL
• Model (product code) and model URL ( same as manufacturer URL)
• Device webpage (camera homepage)
• Serial number
21
• MAC address
• Unique Identifier: uuid<unique id for that camera type><serial number
• IP address
Illustra Pro 12MP Fisheye Quick Start Guide
Page 27

Supported:
• Windows XP,Windows 7, Windows 8 and Windows 10
• HTTP and HTTPS
Unsupported:
• Video Streaming
• Audio Streaming
• API command to enable and disable UPnP feature
ONVIF Video and Control Interface
The primary video and control interface to the camera is the Open Network Video Interface Forum global standard
for the interface of network video products. This uses SOAP over HTTP. The camera provides ONVIF for
integration to internal and external systems.
Interface Technical Specifications
Category Details
Description Language WSDL
Web Services Specification DPWS
Web Services Tool Kit WS4D
Web Services Protocol SOAP
Message Format XML
Discovery
Security WS-Security
Video Transport RTP/RTSP
Audio Transport RTP/RTSP
WS Discovery, ONVIF discovery, Illustra Connect discovery, uPnP
discovery
• WS-Eventing
Event Handling (alarms)
• WS-Base Notification
• WS-Topics
Service Connection WS-Addressing
Security Permissions WS-Policy
Data Object Exchange Specification WS-Transfer
22
Page 28

ONVIF Functions Supported
The following ONVIF functions are supported on the camera:
• Quality priority and maximum AGC settings adjustable via user GUI, IAP13, or and ONVIF
• Manual Red and Blue adjustments available via user GUI, IAPI3, and ONVIF
• The product can interwork with Genetec via ONVIF
• ONVIF GetSnapshotUri command
• Auto-discovery
• Ws-discovery
• Automatic addressing
• SetDiscoveryMode
• Default and Reset functions
microSD Card
External access is provided for a microSD for video alarm storage and audio output pre-recorded clips.
The following microSD cards can be used with the camera:
• 2GB, 8GB, 16GB AND 32GB with class 2 or 10 support
• 64GB with class 10 support
Caution
If you wish to use the SD card, it must be present when the camera boots up or it will require mounting manually
via the WebGUI.
Environmental
The product is designed to meet the following environmental conditions:
• PoE power (802.3af, 15.4w) with an operating temperature range of -30°C to +50°C and a cold start
temperature range of -25°C to +50°C.
• IP-66 water intrusion rating.
• DC12.
Power
Usable with PoE and DC12 sources with up to 100m (300 feet) of cable; with compliance verification including
power over Ethernet compliant to POE IEEE 802.3afTM and power over Ethernet Plus compliant to POE IEEE
802.3atTM.
23
Power consumption is capped at 12.95Watts.
Illustra Pro 12MP Fisheye Quick Start Guide
Page 29

Regulatory Compliance
The Illustra Pro Fisheye Camera meets the following regulatory requirements:
USA (FCC): CFR 47 Part 15
Canada: ICES-003/NMB-003 Issue 5
European Union: EN 55022:2010
European Union: EN 61000-3-2:2006/A2:2009
European Union: EN 61000-3-3:2008
Australia/New Zealand: AS/NZS CISPR 22:2009
EN50130-4:2011
CB Scheme: IEC 60950-1:2005/A1:2009
European Union: EN 60950-1:2006/ A11:2009 +
A1:2010 + A12:2011
USA: UL 60950-1:2007/A1:2011
d. Canada: CAN/CSA-C22.2 NO. 60950-1A-07/A1:2011
Outdoor Housing: United States: UL 60950-22
Canada: CAN/CSA-C22.2 NO. 60950-22-07
Global: IEC 60529
Recessed housing:
United States: UL 2043
Vandal Resistant
Rating
IK10
24
Page 30

Appendix A: Camera Defaults for Fisheye Camera
Image Settings
Codec H.264
Resolution 2992x2992 max
Frame Rate 15 fps max
Video Codec
Primary Stream
Secondary Stream
Third Sream
GOP Length 15fps
Rate Control CVBR High
Bit Rate 8192 Kbps
Max Bit Rate (CVBR) 8192 Kbps
Image quality (QP Settings) High
Codec H264
Resolution 1072x1072 max
Frame Rate 30 fps max
GOP Length 15fps
Rate Control CVBR
Quality
Codec MJPEG
Resolution 720x720 max
Quality 70
Frame Rate 7fps
High
4096 Kbps
Codec G.711
Audio In
Audio
Audio out
Privacy Zone Privacy Zone Disabled
Audio In Enable OFF
Input Volume 10dB
Output Enable off
Output Volume 15
Network Settings
IP & Ethernet Camera name Same as camera friendly name
User management Default account
25
Authority: administrator
Username/Password: admin/admin
Illustra Pro 12MP Fisheye Quick Start Guide
Page 31

Network Settings
Language Basic Settings English
DHCP Enabled
IP v4 Always on
IPv6 Enabled
IP v6 address Camera specific
IP Settings
FTP
SNMP
IP v4 address 192.168.1.168
IP v4 Subnet Mask 255.255.255.0
Default Gateway 192.168.1.254
DNS 0.0.0.0
HTTP Port 80
Enabled Off
FTP Server IP Address 0.0.0.0
FTP Server Port 21
Username Null
Password Null
File Upload Path Default folder Null
SNMP Server IP Address 0.0.0.0
SNMP Port # 161
SNMP TRAPS Port # 160
SMTP Server Requires Authorization Disabled
SMTP Server IP Address 0.0.0.0
Server Port 25
User Name Null
SMTP
User Authentication off
Password Null
Sender Null
Receiver Null
NTP Server IP Address pool.ntp.org
Time Zone GMT-5:00 Eastern Time (US & Canada)
Date and Time
Date and Time Manual
NTP Off
RTSP Primary Video Stream Port
rtsp://CAMERAIP/videoStreamId=1&audioStreamID=1
26
Page 32

Secondary Video Stream Port rtsp://CAMERAIP/VideoStreamId=2&audioStreamId=2
Tertiary Video Stream Port rtsp://CAMERAIP//videoStreamId=3&audioStreamId=1
Discovery via ONVIF Enabled
ONVIF
Dynamic DNS off
Address Filtering off
Motion Detection
User Authentication Enabled
Network Settings
Event Settings
Profile 1
Enable Motion detection Off
Sensitivity High
Size 20
Hysteresis 10
Action None
Picture Settings
Auto White Balance Auto
White Balance
Picture Adjustment
WDR Disabled
IR/DayNight
Dewarp Method Client
Dewarp Mount Ceiling
Red 50%
Blue 50%
Brightness 50%
Sharpness 18%
Contrast 50 %
Saturation 25%
IR Mode Enabled
Day Night Mode Auto Mid
PTZ Settings
Scan Limits
27
Left 0
Right 359
Illustra Pro 12MP Fisheye Quick Start Guide
 Loading...