

Page 1
Page 2

Congratulations
On purchasing our high quality product.
Please read the manual carefully to find out all features and how your telephone works, so you
can get the best out of your new phone.
Safety Precautions
To reduce the risk of electrical shock and injury, please follow these basic safety precautions
before using the phone.
1. Carefully read and observe the instructions in this manual.
2. Follow all warnings marked on the unit.
3. When cleaning, unplug the phone first, then use a damp cloth to wipe. Do not use liquid or
aerosol cleaners.
4. Do not place objects on the line cord that may cause damage.
5. Do not use this phone in wet surroundings or environments where there is a risk of
explosion.
6. Avoid spilling of any liquid on the phone.
7. Unplug this phone from the wall outlet and refer servicing to qualified service personnel only.
8. If you are sure you will not be going to use the handset over a month, please take out the
battery pack from battery compar tment.
Use only the power supply indicated in the User's Manual.
9.
10. Keep the phone out of the reach of children.
11. Use the phone only in the described manner.
12. Stop using the phone if it becomes damaged.
13. The phone is designed to work with in a temperature range from 5 to 45 only.
Page 3

Contents
Before Using
Package Contents
Location and Function of Controls
Connecting Lines
Installing Battery
Charging Handset
Display
Turning Handset On/Off
Basic Function
Making a Call
Receiving a Call
Last Number Redial
Using Speakerphone
Muting Microphone
Out of Range Operation
Adjusting Voice Volume
Paging
Setting External Ring Melody and Volume
Setting Internal Ring Melody and Volume
Setting Key Tone
Setting LDS Code
Setting Area Code
Setting silence function
Key Lock
Switch
Menu
Menu Navigation
Menu Map
Phone Book
Storing a Phone Number
Viewing Stored Entries
Character Map
Deleting Numbers from Phonebook
1
1
3
3
4
5
6
7
8
9
9
10
10
10
10
11
11
12
13
13
13
14
14
15
15
16
16
17
18
Page 4

Dialing a Number in Phonebook
Updating Phonebook and Setting VIP Numbers
Caller ID
Viewing Caller ID Numbers
Storing a Caller ID Number to Phonebook
Caller ID on call waiting
Deleting Caller ID Numbers
Dialling a Caller ID Number
Insert 1 to call back number
A Multi-handsets System
Making an Internal Call
Transferring an External Call
Setting Up a Three-Way Conference Call
Registering a New Handset
De-registering a Handset
Choosing a Base Unit
Handset Setting
Setting Handset Name
Changing Handset PIN
Setting Direct Call
Choosing Language
Setting Date & Time
Resetting Handset
Base Setting
Choosing Dialing Mode
Changing Pause Time
Changing Flash Time
Changing Base PIN
Special Function
Feature List
Troubleshooting
Warranty
IC Information
18
19
21
21
21
22
22
22
23
23
24
24
26
28
29
29
30
31
31
32
33
33
34
34
35
36
37
38
39
Page 5
Before Using
Package Contents
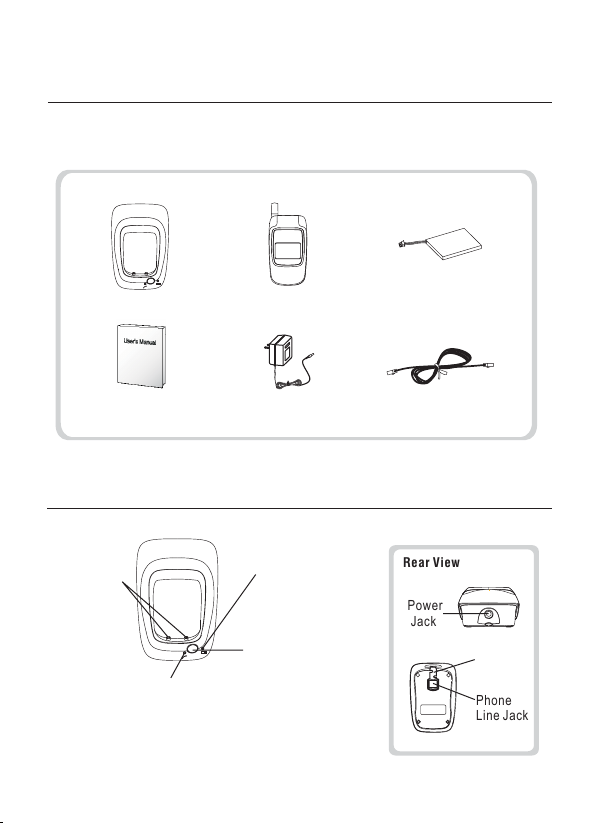
Once you have unpacked your phone, make sure that you have all the parts shown
below are available. If any piece is missing or broken, please promptly call your
dealer.
PAGE
Base
User's manual
*The shapeof the plugscan vary accordingto each country'sspecification.
Handset
Power adapter*
Location and Function of Controls
Base
Charge
pins
In useand message
waiting indicator
lights steadilywhen
a callis in progress.
Also blinkswhen
a voicemail is left.
PAGE
Charge indicator
steadily
lights
while thehandset
is beingcharged.
Page button
Pages thehandsets.
Also usedto register
a newhandset.
Rechargeable
Ni-MH battery
Line cord*
Rear View
Power
Jack
Routing
groove
Phone
Line Jack
1
Page 6
Location and Function of Controls (continued)
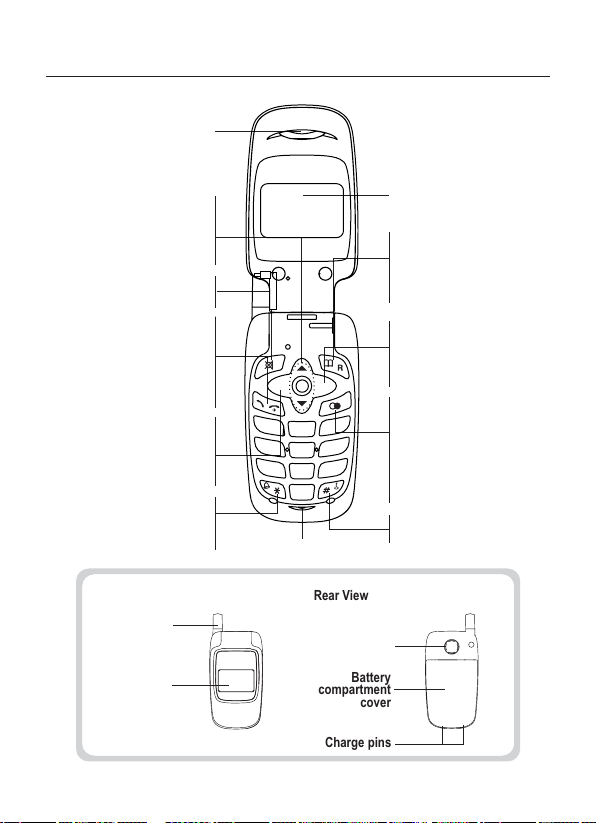
Handset
Earpiece
In thestandby mode, press
to enterthe menu andscroll
through theitems.
Also adjustvolume
during acall.
In talkingmode, press to
mute themicrophone.
Makes oranswers a call.
During acall,
press andhold to activate
the speakerphone.
In standbymode, press and
hold toturn the handset
Confirms aprogramming
step.
communications. During
a call,transfers a call
Turns on/off function.
Changes thecharacter from
upper caseto lower case
on oroff.
Activates intercom
to anotherhandset.
silence
or viceversa.
Front Viewal
Antenna
External LCD
INT
ABC
1
GHI
JKL
4
PQRS
TUV
7
OPER
Microphone
C
DEF
3
2
MNO
6
5
WXYZ
9
8
0
Rear View
Speakerphone
Battery
compartment
cover
Charge pins
Internal LCD
In standbymode, press
to enterphonebook.
During acall, press to
get anew dial toneor
switch tocall waiting caller.
Clears charactersfrom the
display.Also used togo to
the previousmenu or standby
mode. a
During call, press to
mute themicrophone.
In standbymode, press
repeatedly toview the
outgoing numbers.
Redials thelast number
you dialled.
When enteringa number,
inserts apause between
numbers.
key lockTurns on/off
function.
2
Page 7
Connecting Lines
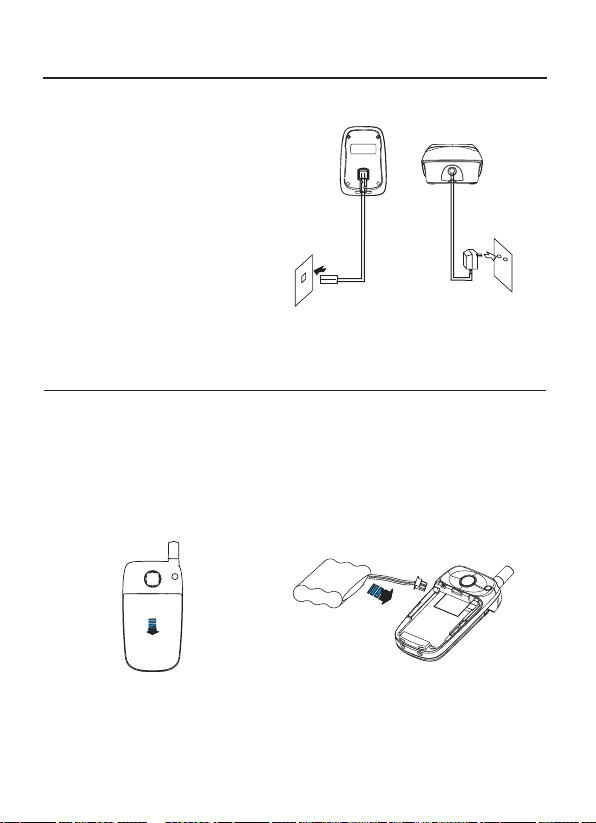
Connect one end of the phone line
1.
cord to the phone line jack to the
underside of the base, and the other
end to a standard phone wall jack.
2.
Connect the modular end of the
power adapter to the power jack of
the base, and plug the other end into
a standard AC wall outlet.
3.
Route the cord through the routing
groove as show.
Installing Battery
Tophone wall jack
ToAC wall outlet
The rechargeable Ni-MH battery comes
with your phone. Install the battery
before using your phone.
1.
Slide the battery cover in the
direction of the arrow and pull it out.
2.
Insert the battery into the battery
compartment. Plug the battery
connector intothe receptacle in the
battery compartment.
-
3
Page 8
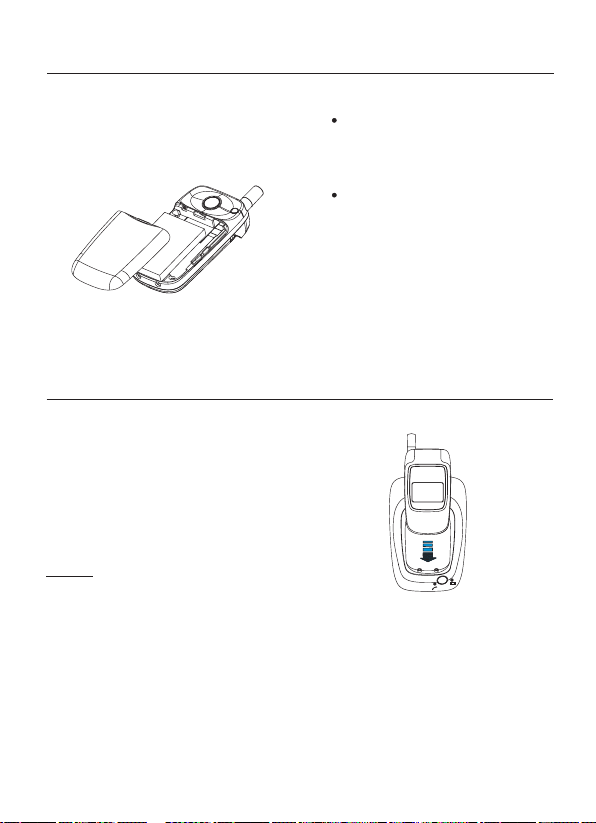
Installing Battery(continued)
3.
Replace the battery cover, slide the
cover up until it snaps shut.
Charging Handset
Important Note: YOU
SHOULD FULLY CHARGE THE HANDSET
about 14-16 hours.
To charge the handset, simply place it on the
base, then you will hear a confirmation beep
(charging beep).
Result: When charging, the handset is
Before initial operation,
automatically turned on and the
CHARGE indicator on the base lights up.
Notes:
The battery needs to be replaced if it
does not recover its full storage
capacity after recharging.
When replacing the battery, always
use a good quality Ni-MH rechargeable battery. Never use other
battery types especially conventional
alkaline battery.
for
PAGE
4
Page 9
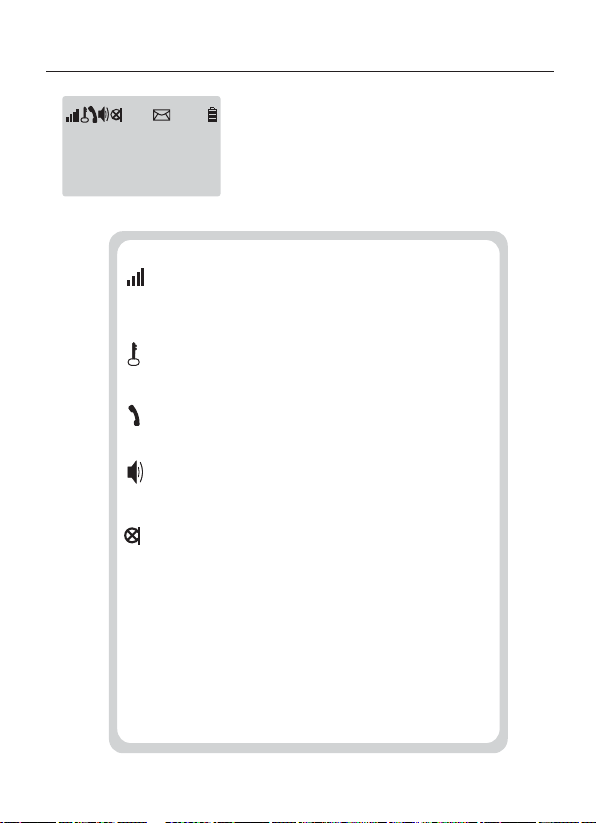
Display
L1
INT
HS 1
01:00. Jan-01
Signal strength icon
This icon is always displayed when your phone is
on, and shows the current signal strength. More
bars indicate more signal strength.
Lock icon
This icon indicates that the key lock function is
activated. See p 14.
In use icon
This icon indicates that the phone is in use mode.
Speakerphone icon
This icon indicates that the phone is in
speakerphone mode.
Mute icon
This icon indicates that the phone is in mute
conversation mode.
Line icon
L1
The icon is displayed when the line is engaged.
Intercom icon
INT
This icon indicates that the phone is in theintercom
conversation mode.
In any mode, the external and the internal
display the same information.
In-use, they display such as the caller's number, call
duration, menus, etc.
In Standby mode, they display
handset number, battery status icon and the current time.
.
LCD
signal strength icon,
LCD
5
Page 10
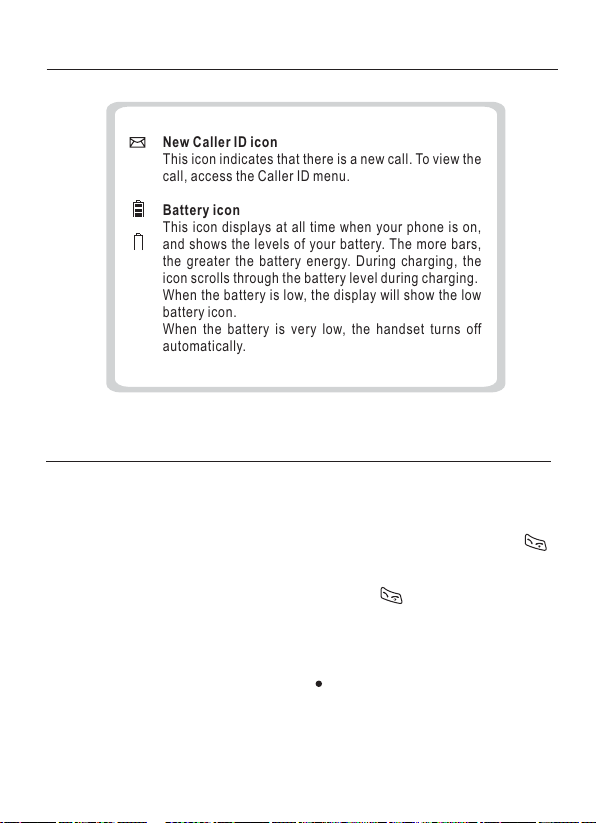
Display (continued)
New Caller ID icon
This icon indicates that thereis a newcall. To viewthe
call, access the Caller ID menu.
Battery icon
This icon displays at all time when your phone is on,
and shows the levels of your battery. The more bars,
the greater the battery energy. During charging, the
icon scrolls through the battery level during charging.
When the battery is low, the display will show the low
battery icon.
When the battery is very low, the handset turns off
automatically.
Turning Handset On/Off
When you place the handset on the
base to charge, the handset is
automatically
is now ready for use.
The first time the phone turns on,
the display shows the handset
number, the date and the time.
You can set the phone to display
your name and the handset number.
See p 29.
turned on. The phone
.
6
To turn the handset on or off in standby
mode.
1.
To turn the handset on when the
display is off, press and hold the
button.
2.
To turn the handset off, press and
hold the button until "
" displays. Then the display will
Bye
turn off.
Note:
Nothing will appear on the display
when the battery power is very low.
You should fully charge the handset
before using it.
Good
Page 11
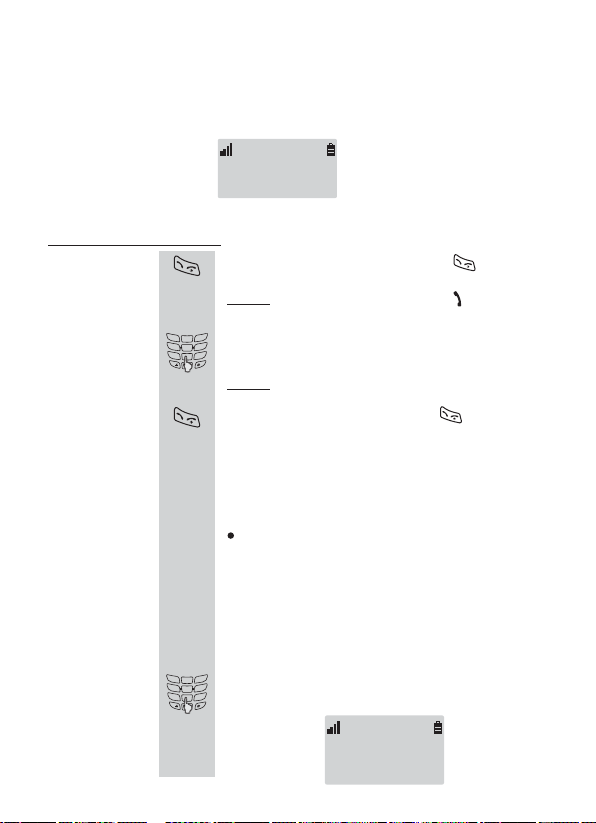
Basic Function
Standby mode will appear on the screen when you first turn on the handset. You will
also see the standby mode display as the pix below.
Here is how the functions work.
Making a
1.
Call
DEF
ABC
3
1
2
GHI
MNO
JKL
4
6
5
2.
PQRS
WXYZ
TUV
7
9
8
OPER
0
3.
DEF
ABC
3
1
2
GHI
MNO
JKL
4
6
5
1.
PQRS
WXYZ
TUV
7
9
8
OPER
0
01:49. DEC-12
HS 1
Open the handset up and press the button.
Result:
You hear a dial tone and the and L1 icons
appear on the display.
Dial a phone number.
Result: The display shows the number you enter.
To end the call, either press the button again
or replace the handset on the base. (You can close
the cover to end the call directly, if you have
activated the " " function. For details please
refer to " " on p.14.)
Note:
To make a call to the last number you dialed, use
the Redial feature. For details please refer to
Number Redial p.9
You can enter the desired phone number in standby
mode, which allows you to make corrections before
dialing out. You can follow these steps to make a
correction.
Enter a phone number. Check the number on the
display.
Switch
Switch
on .
Last
0123456
7
Page 12
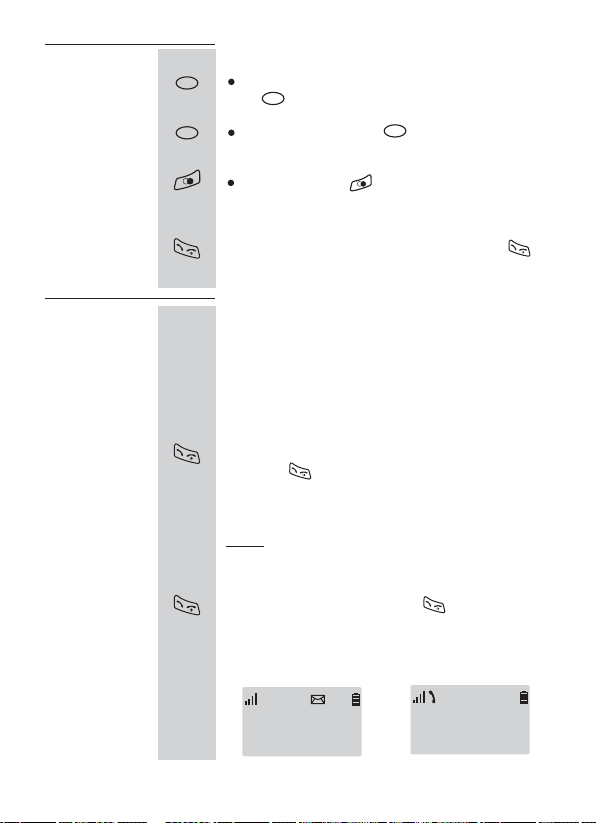
Making a
Call
(continued)
Notes:
If you make a mistake while entering a number, press
C
C
C
the button to clear the last digit and re-enter a new
digit.
If you press and hold the button for more than one
C
second, all digits you have entered will be deleted and
the phone returns to standby mode.
You can press the button to insert a pause to a
dialing sequence.
Receiving
aCall
8
2.
After entering the numbers correctly, press the
button to dial out.
When a call is received, the phone rings and the icon on
L1
the display blinks.
If the caller can be identified, the caller's phone number
displays. If the caller name is currently stored in your
internal phonebook, the caller name displays while the
phone rings.
1.
When a call is received, open the handset up then
press the button to answer it.
see Figure 1.
( You can open the
cover to receive the call directly, if you have activated
the "Switch" function. For details please refer to
" "on p.14.)
Switch
Result:
During the conversation, the timer is displayed in
the follow sequence hours-minutes-seconds, see
Figure 2.
2.
To end the call, just press the button again
replace the handset on the base (You can close the
.
or
cover to end the call directly, if you have activated the
" " function. For details please refer to " "
Switch Switch
on p.14)
L1
1-234-5678
Figure 1
L1
00:03:05
Figure 2
Page 13
Last
Number
Redial
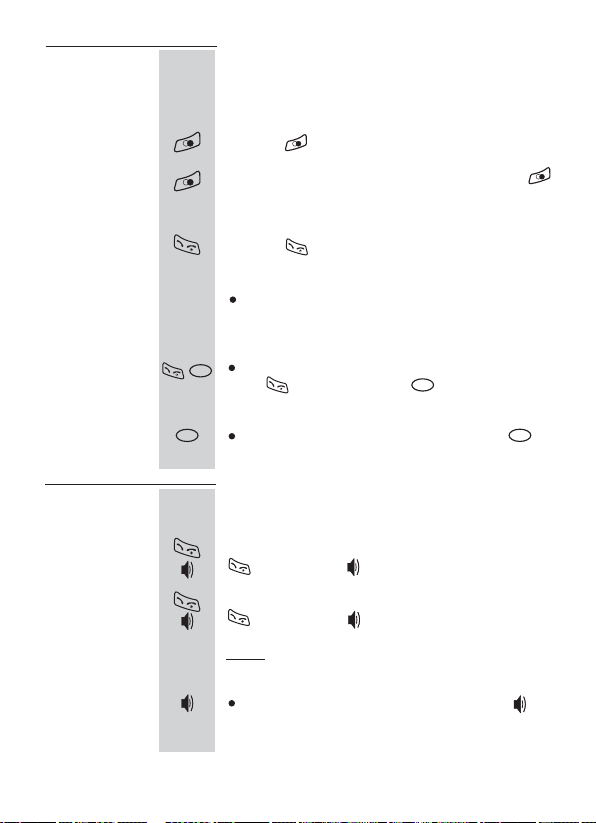
Your phone allows you to retrieve the last 10 numbers you
dialed.
To view and dial the numbers:
1.
Press the button in standby mode.
Using
Speaker
phone
2.
3.
1.
2.
If you want to scroll through the memory, press the
button re
peatedly to view and find the number you
want to call.
Press the button to dial the number.
Notes:
Each time you dial a new number, the oldest number
stored in the redial memory is automatically deleted,
and the redial memory is updated.
You can modify the displayed number before pressing
C
the button by using the button and numeric
buttons.
C
In the viewing state, you can press and hold the
button to go back to standby mode.
During a call, you may turn the speakerphone on or off at
any time.
To turn the speakerphone on, press and hold the
button until the icon appears on the display.
To turn the speakerphone off, press and hold the
button until the icon disappears on the display.
Result: You can resume a normal conversation using the
handset.
Note:
In the speakerphone mode, the display shows the
icon.
C
C
9
Page 14
Muting
Microphone
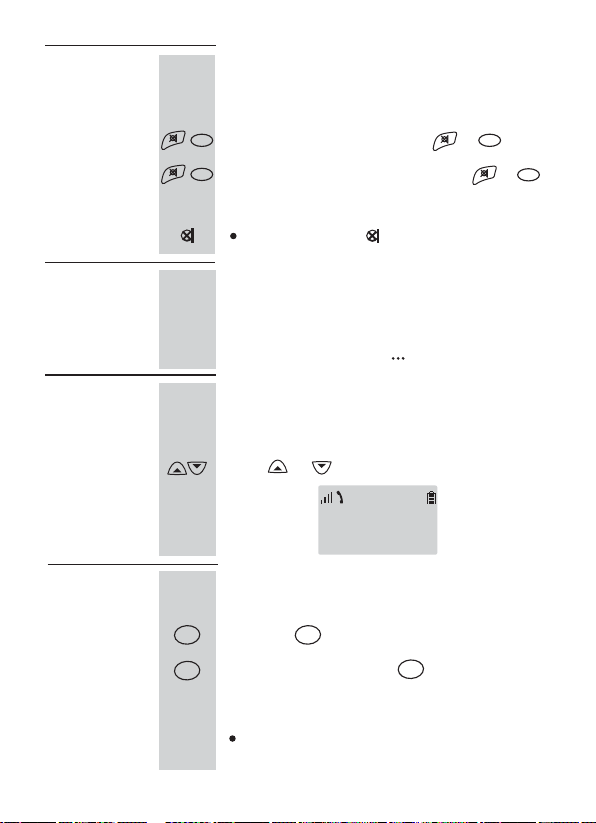
During a call, if you want to talk with a person next to you
and don't wish the party on the line to hear, you can mute
the microphone.
C
1.
2.
To mute the microphone, press the or button.
/
C
To go back to the normal mode press the or
/
button again.
Note:
In the mute mode, the icon will appear on the display.
,
C
C
Out ofRange
Operation
Adjusting
Voice
Volume
Paging
10
PAGE PAGE
1.
PAGE
2.
If the handset is too far away from the base, the voice will
be unclear.
You should move the handset closer to the base.
Otherwise, the conversation might be disconnected and
he display shows "
t".Searching
During a call, you can adjust the receiving volume
from level 1 to 4. The larger number indicates the
higher volume.
Press or button toadjust the volumelevel.
L1
HSvol:4
You can page the handset from the base unit. Using
this feature, you can locate your handset easily.
Press the button on the base.
To stop paging, press the button on the base
again or press any button on the handset.
Note:
If a call comes in while the handset is being paged,
the handset stops paging and the bell rings.
PAGE
Page 15
Setting
External
Ring
Melody
and
Volume
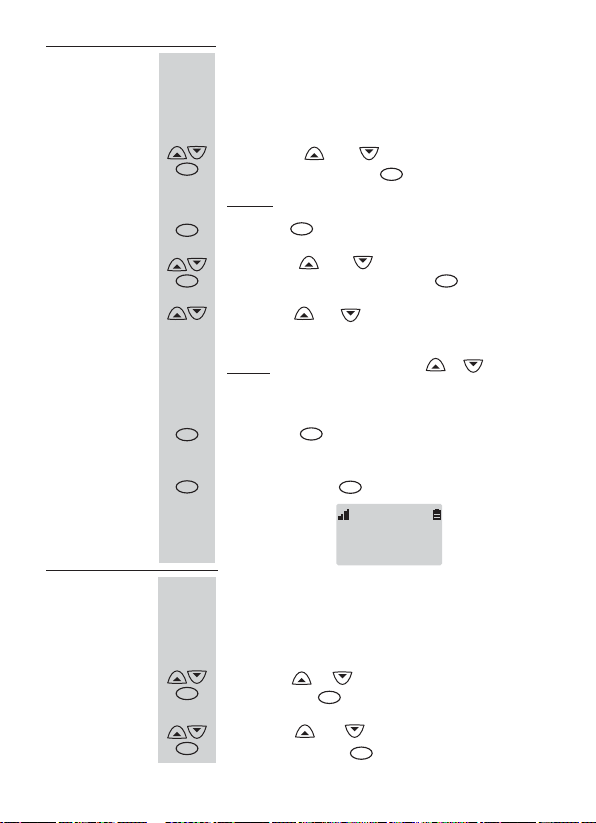
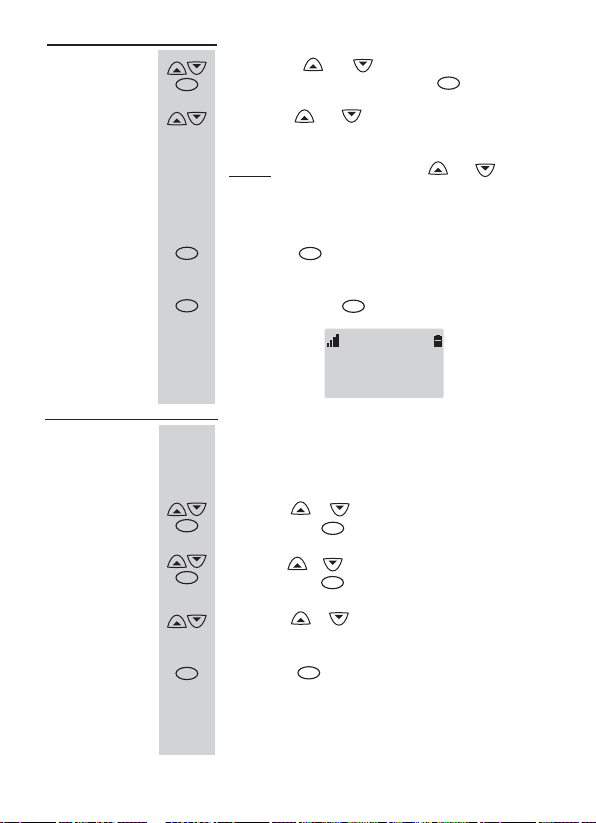
You can select your own ringing sound and
external
volume. For ring melodies, there are 9 types and 9
volume levels; For polyphonic ring tones, there are 16
types and 4 volume levels.
1.
2.
Press the or button to choose
INT
and press the button.
etting
S,
INT
Result: The cursor is in front of
INT
Press the button toconfirm.
INT
Melody Ext.
HS
Setting
Internal
Ring
Melody
and
Volume
3.
4.
Press the or button to choose the ring
melody you want, then press the button.
INTINT
Press the or button to choose the volume
level you want.
Result:
Each time you press the or button, the
handset sounds the ring and volume chosen.
The higher level, the louder the volume.
INT
5.
Press the button to save the setting and a
INT
confirmation tone will be heard.
C
6.
To exit, press the button.
C
Ext Ring: 9
1
You can select your own in ringing sound and
volume.
For ring melodies, there are 9 types and 9
volume levels; For polyphonic ring tones, there are 16
types and 4 volume levels.
1.
2.
Press the or button to choose
INT
and press the button.
Press the or button to choose
INT
Int
,
and press the button.
INT
ternal
HS ettingS,
Melody
INT
11
Page 16
Setting
Internal
Ring Melody
and
Volume
(continued)
3.
4.
Press the or button to choose the ring
INT
melody you want, then press the button.
Press the or button to choose the volume
INT
level you want.
Each time you press the or button,
Result:
the handset sounds the ring and volume you
have chosen. The higher level, the louder the
volume.
INT
5.
Press the button to save the setting and a
INT
confirmation tone will be heard.
C
6.
To exit, press the button.
C
Int Ring: 9
1
Setting
Keytone
12
Normally, whenever you press a button on the handset,
you can hear a beep tone. You can deactivate this
function if you like.
1.
2.
3.
Press the or button to choose
INT
and press the button.
Press the or button to choose
INT
and press the button.
INT
INT
Press the or button to choose
HS Setting,
Set Keytone,
ON OFFor
to activate or deactivate this function.
INT
4.
Press the button to save the setting and a
INT
confirmation tone will be heard.
Page 17
Setting
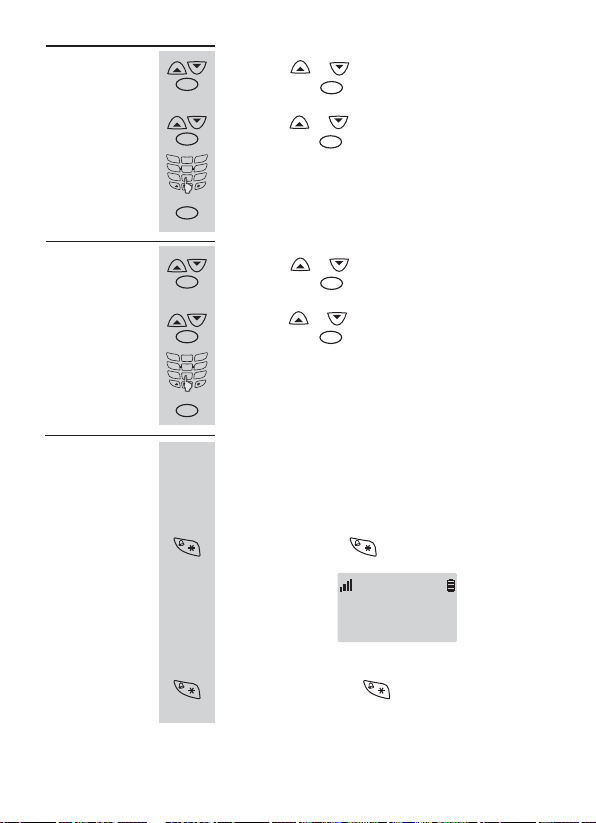
LDS Code
1.
Press the or button to choose
INT
and press the button.
INT
HS Setting
Setting
Area Code
Setting
Silence
Function
2.
3.
4.
1.
2.
3.
4.
Press the or button to choose
INT
and press the button.
DEF
ABC
3
1
2
GHI
MNO
JKL
4
6
5
PQRS
WXYZ
TUV
7
9
8
Enter the LDS Code number 0~9(up to 1 digit).
OPER
0
Press to confirm.
INT
Press the or button to choose
INT
and press the button.
Press the or button to choose
INT
and press the button.
DEF
ABC
3
1
2
GHI
MNO
JKL
4
6
5
PQRS
WXYZ
TUV
7
9
Enter the AreaCode number 0~9(upto 4 digits).
8
OPER
0
Press to confirm.
INT
INT
INT
INT
LDS Code,,
HS Setting
Area Code,,
The features allows the phone to keep silent during
any operations. Even if a call is received, the phone
will not ring.
Toactivate the feature
1.
Press and hold the button until display shows
Silence
"".
Silence
2.
Todeactivate the feature
Press and hold the button until the phone
returns to standby mode.
13
Page 18
Key Lock
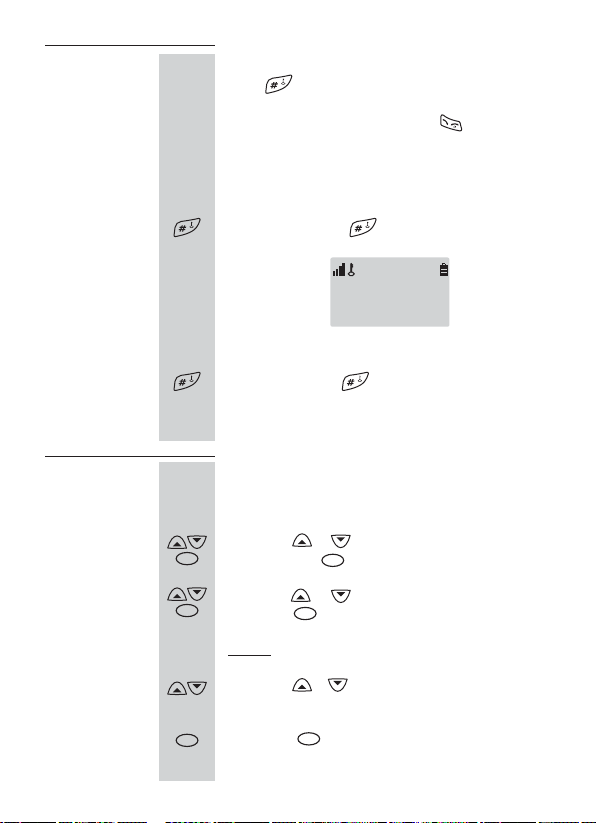
If you activate this feature, in standby mode, all buttons
except button will be locked and will not function.
You can answer incoming calls, and dial the emergency
number "112" or "911", then press the button to make
a call, but when you hang up, the phone returns to the lock
mode. This feature is useful to avoid accidental key press.
To activate the feature
Press and hold the button until display shows
Locked
"".
Locked
To deactivate the feature
Press and hold the button until the phone returns
to standby mode.
14
Switch
If you activate this function, you can receive calls by
opening the cover when your phoneis closed, and end
calls by closing the cover directly.
1.
2.
3.
4.
Press the or button to choose
INT
and press the button.
Press the or button to choose and
INT
press the button.
Result:
INT
INT
The display shows or .ON OFF
Press the or button to choose
to activate or deactivate this function.
INT
Press the button to save the setting and a
INT
HS Setting,
Switch,
ON OFFor
confirmation tone will be heard.
Page 19

Menu
Menu Navigation
Youcan scan throughall menu optionsavailable, then selectthe option youwant.
Press the or button to scroll through the main menu. The button is for
confirming a setting or for entering a submenu. The button is for cancelling a
setting or for exiting.
C
INT
Menu Map
The following is the menu of your phone and show the page on which you can find details of
each feature.
1. Phone Book
2. Caller ID
3. HS Setting
Search
(p.16)
Edit
(p.18)
Add
(p.16)
Delete
(p.18)
Delete All
Read
Delete
Delete All
Melody Ext )
Melody Int
Set Keytone
Switch
User Name
Set PIN
Direct Call
Language
Set Clock
LDS Code
Area Code
Set Default
(p.18)
(p.21)
(p.22)
(p.22)
(p.11
(p.11)
(p.12)
(p.14)
(p.29)
(p.29)
(p.30)
(p.31)
(p.31)
(p.13)
(p.13)
(p.32)
4. BS Setting
5. Select BS
6. HS Register
(p.27)
p.24)(
Dial Mode
Flash Time
Pause Time
New HS
(p.25)
Remove HS
Change PIN
(p.33)
(p.34)
(p.33)
(p.26)
(p.34)
15
Page 20
Phone Book
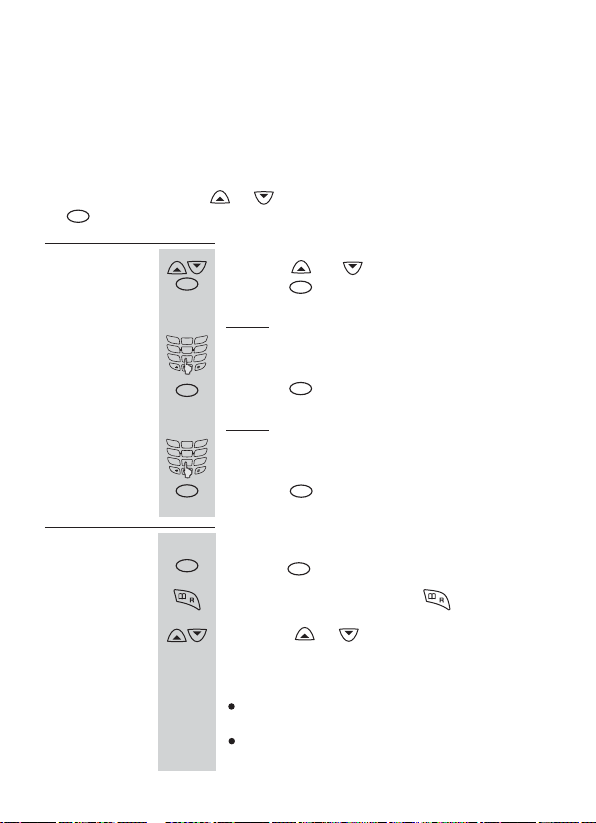
The phone book allows you to store frequently used phone numbers and their names
in your personal directory so that you can easily make a call without having to
remember or enter the phone number.
You can store up to numbers (up to digits) with name (up to characters) in
the phone book.
In standby mode, pressthe or button to access , and press
INT
the button to enter thesubmenu.
Then:
Storing a
Phone
Number
50 16 12
Phone Book
1.
2.
3.
4.
5.
Press the or button to choose
INT
press the button toconfirm.
Result: The display shows " ".Name:
DEF
ABC
3
1
2
GHI
MNO
JKL
4
6
5
PQRS
WXYZ
TUV
7
9
Enter the name.
8
OPER
0
INT
Press the button toconfirm.
INT
(see p.17).
INT
Result: The display shows " ".Number:
DEF
ABC
3
1
2
GHI
MNO
JKL
4
6
5
Enter the number.
PQRS
WXYZ
TUV
7
9
8
OPER
0
INT
Press the button toconfirm and aconfirmation
INT
tone will be heard and the display shows " ".Stored !
Add, then
Viewing
Stored
Entries
16
The cursor is in front of
INT
1.
Press the button to confirm.
INT
Search.
Or
In the standby mode, press the button.
2.
Press the or button to scroll through the
phonebook entries.
Notes:
If the memory is empty, the display shows " ",
Empty
and exits after 2 seconds.
During viewing the stored entries, you can press the
first character of the name for viewing quickly.
Page 21
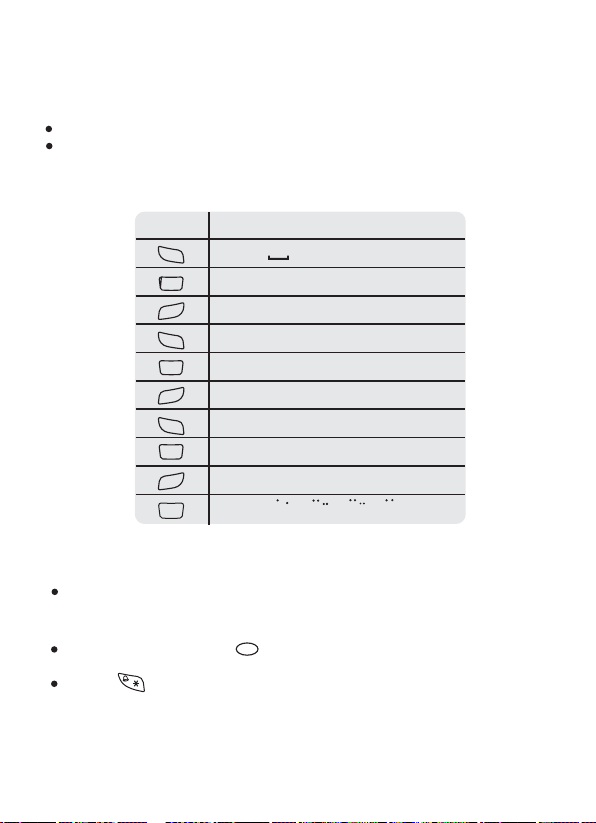
Character Map
Operation method:
Press the key labeled with the required character.
Once for the first character
Twice for the second character and so on
The list of characters is shown below:
4X
Ss
>
2
3
4
5
6
8
Zz
Oo
5X
6X
.
-
s
:
+
*
#
7
9
U
3X
2X
1X
1
ABC
2
DEF
3
GHI
4
JKL
5
MNO
6
PQRS
7
TUV
8
WXYZ
9
OPER
0
1
Aa
Dd
Gg
Jj
Mm
Pp
Tt
Ww
0
<
Cc
Bb
Ff
Ee
Ii
Hh
Ll
Kk
Oo
Nn
Rr
Qq
Vv
Uu
Yy
Xx
Aa Aa
Notes:
When entering the same character twice (or a different character on the same button),
wait for a few seconds to select the next character.
To delete the entries, press the button. To exit to standby mode, press and hold it.
C
Press the button to change a character from upper case to lower case or vice versa.
17
Page 22
Deleting
Numbers
from
Phonebook
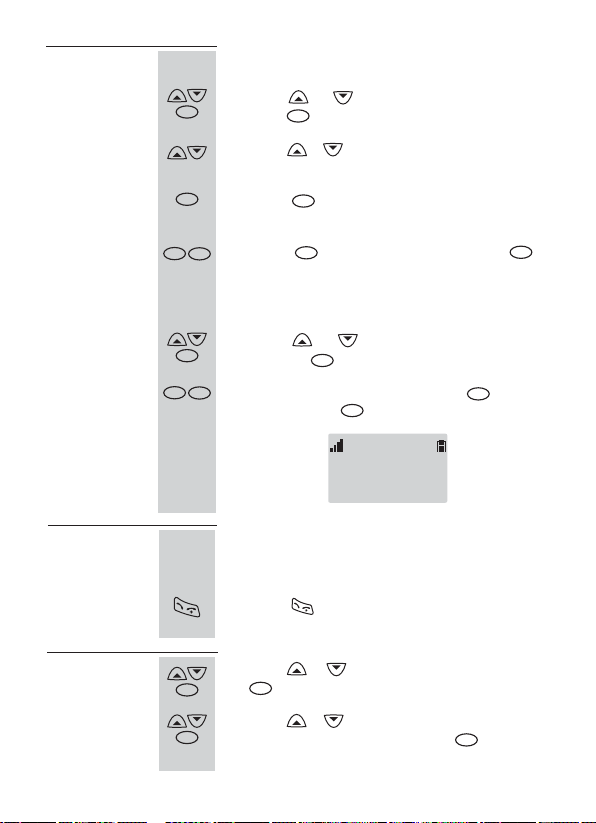
Deleting a single entry from phonebook
1.
2.
Press the or button to choose , and
INT
press the button.
INT
Press the or button to find the phonebook entry
Delete
that you want to delete.
INT
3.
Press the button to confirm, and the display will
show " ".
INT
C
4.
Press the button to delete or press the
Sure?
INT
INT
C
button to cancel.
Deleting all entries from phonebook
Dialing a
Number in
Phonebook
Updating
Your
Phonebook
and Setting
a VIP
number
18
1.
2.
Press the or button to choose
INT
and press the button.
INT
C
The display shows " ", press the button to
delete or press the button to exit.
INT
Sure?
C
Delete All,
INT
Sure ?
1.
2.
1.
2.
Find the phonebook entry that you want to dial.
Refer to Viewing Stored Entries for details.
p.16).
Press the button todial it.
Press the or button to choose and press
INT
INT
INT
the button.
Press the or button to find the phonebook entry
that you want to change and press the button.
(see
Edit,
INT
Page 23
Updating
Your
Phonebook
and Setting
a VIP
number
(continued)
3.
4.
5.
Change the name when the desired entry displays,
INT
then press the button.
INT
Change the number when the desired entry displays,
then press the button.
INT
Press the button to confirm. And the entry has
INT
INT
INT
(see p.17).
(see p.17).
been updated.
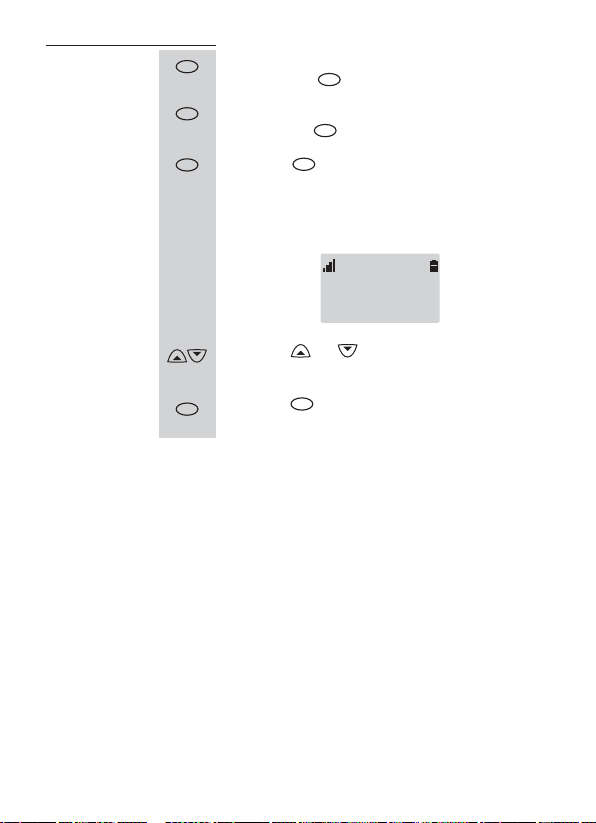
You can set a special melody rings for the VIP call.
After step 4, the display show as below:
Ext Ring: X
5.
6.
Press the or button to choose your desired
melodies Ext Ring:1~25.
Press the button to confirm. A confirmation tone
INT
will be heard and the display shows" !".
INT
Stored
19
Page 24

Caller ID
If you subscribe to your local telephone company's Caller ID Service, the caller's
phone numberdisplays when you receive a call. The last 50 received calls are stored
in the Caller ID list, and you can use the list to dial the numbers.
The Caller ID icon appears when there is a new received call which you are
missed. Once you view the number, theicon will disappear.
0123456
If the caller has exercised the option to prevent his name and number from been sent by
the Call ID Service, the display will show " ". And it will be stored in the Caller ID
list.
If the caller is from an area where the telephone company is not offering the Caller ID
service or an area that is not yet providing name and number on the long distance net
work, the display will show " ".
If you have a voice mail service from your telephone company and a message is left, the
message waiting indicator light on the base will flash, and the display will show
" " until you check your voice mail from your telephone company.
Message Waiting
To deactivate the voice message indicator on the base unit as follow:
Press button and enter " ". Once you hear a engaged tone, please press
button again, then the LED ( ) on base unit will stop flashing.
If a number has been stored in the phonebook, when the call is received, the display will
show the matching name.
Unavailable And it will be stored in the Caller ID list.
133
L1 L1 L1
Private Unavailable
L1
Private
Message
Waiting
20
Page 25
Viewing
Caller ID
Numbers
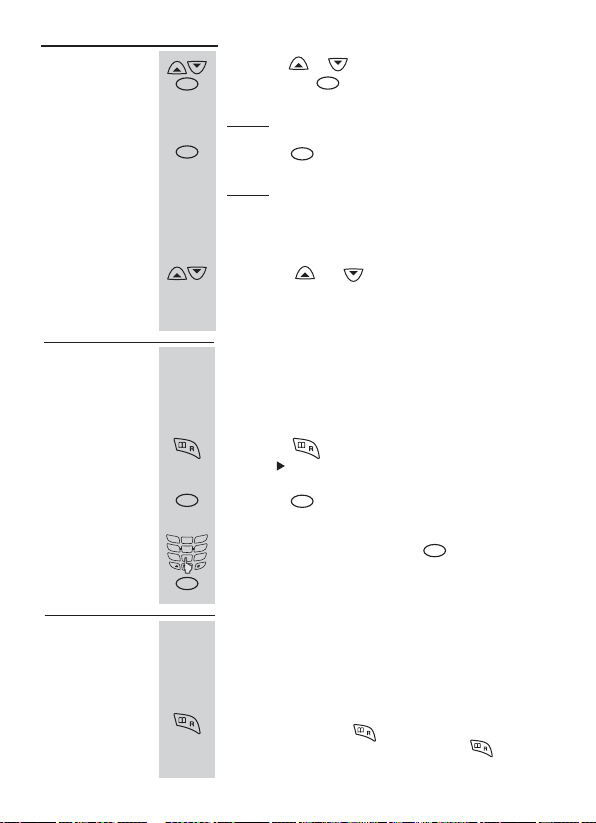
1.
Press the or button to choose
INT
and press the button.
INT
Result: The cursor is in front of .
INT
2.
Press the button toconfirm.
Result:
INT
The display shows the latest caller's number,
Caller ID,
Read
the date and time (or the caller's name, date
and time). If there is no Caller ID received,
" "displays.Empty
3.
Press the or button to scroll through the
numbers in the list.
Storing a
Caller ID
Number to
Phonebook
Caller ID
on Call
Waiting
Find out the Caller ID number that you want to add
to phonebook.
Refer to Viewing Caller ID Numbers for details.
(see p.21).
1.
Press the button to confirm, and the display
shows " Phone Book".
INT
2.
Press the button to confirm, and the display
INT
shows "Name:".
DEF
ABC
3
1
2
GHI
MNO
JKL
4
6
5
3.
Enter the name, then press the button to store,
PQRS
WXYZ
TUV
7
9
8
OPER
0
and the display shows "Stored!". A confirmation
INT
tone will be heard.
When you have subscribed to call waiting service from
your local company, this telephone will indicate the
name or number of the second caller while you are
having a conversation with the first caller.
INT
When you are having a conversation and a second call
is received, press the button to answer the second
caller. When you finish the call, press the button to
continue your conversation with the first caller.
21
Page 26
Deleting
Caller ID
Numbers
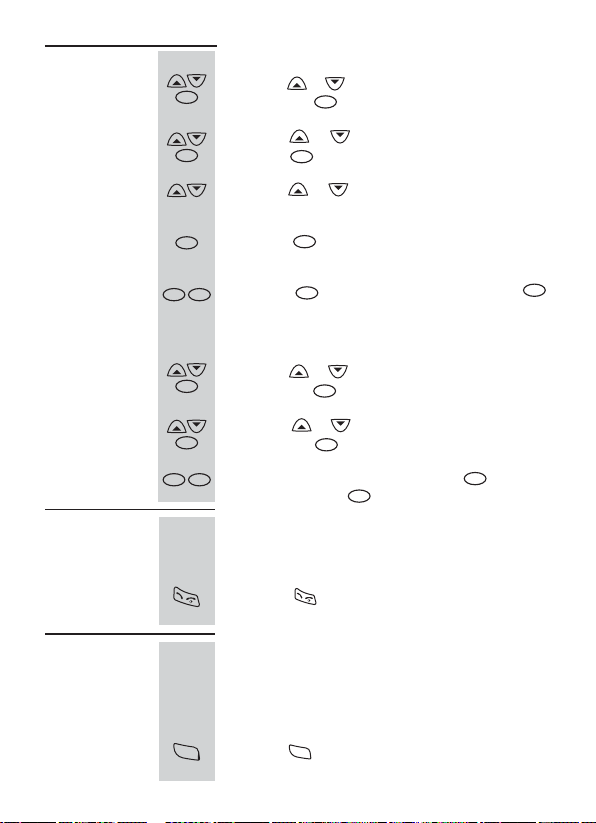
Todelete a singleCaller ID number.
1.
2.
3.
Press the or button to choose
INT
and press the button.
Press the or button to choose ,and
INT
press the button.
INT
INT
Press the or button to find the number that
Caller ID,
Delete
you want to delete.
INT
4.
Press the button to confirm, and the display
shows" ".
INT
5.
C
Press the button to delete or press the
INT
Sure?
INT
C
button to cancel.
Deleting all Caller ID numbers
1.
Press the or button to choose
INT
and press the button.
INT
Caller ID,
Dialling a
Caller ID
Number
Insert1to
call back
number
22
2.
3.
1.
Press the or button to choose
INT
and press the button.
INT
The display shows" ", press the button to
C
delete or press the button to exit.
INT
Sure?
C
Find the Caller ID number that you want to dial.
Refer to Viewing Caller ID Numbers for details.
Delete All,
INT
(see
p. 21).
2.
Press the button to dial it.
If you want to call back a long distance call from the
Caller ID list, please do as follow:
1.
2.
Find your desired caller ID number (Refer to Viewing
Caller ID Numbers for details.
1
Press the button once, then LDS code "1" will be
1
see p.21).
added automatically before the desired number.
Page 27
A Multi-handset System
Youcan register additionalhandsets (up to ) to your base unit.
5
With 2 or more handsets registered, you can:
Make an intercom call
Transfer an external call
from one handset to another
from one handset to another
Set up a three-way conference call
Making an
INT INT
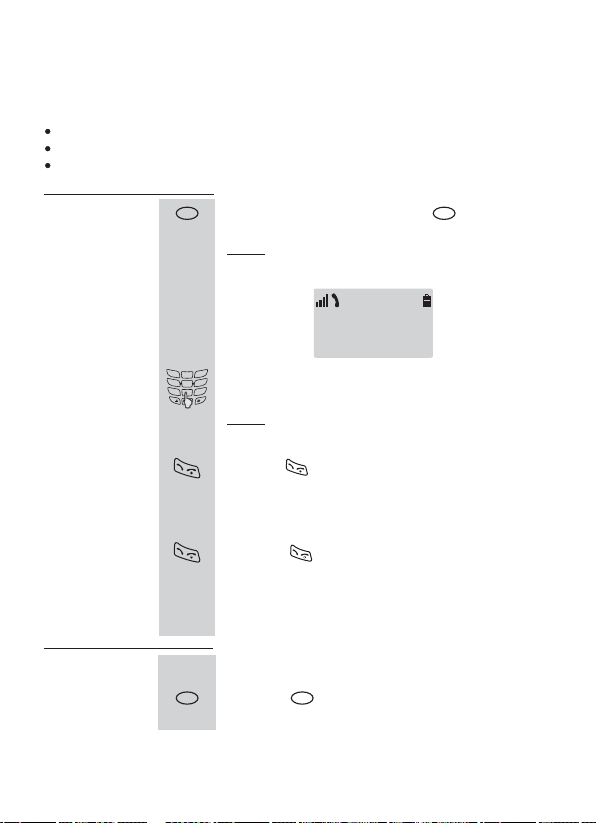
1.
Pick up the handset and press the button.
Internal
Result:
Call
You hear a dial tone and these icons appear
on the display.
INT
Intercom
DEF
ABC
3
1
2
GHI
MNO
JKL
4
6
5
Enter the desired handset's number.
PQRS
WXYZ
TUV
7
9
8
OPER
0
Result:
The display shows the number you entered,
and the desired handset starts to ring.
Press the button of the desired handset to answer
the internal call. (You can open the cover to answer
the call directly, if you have activated the " "
function. For details please refer to " " on p.14.)
Press the button when you want to end the call.
(You can close the cover to end the call directly, if you
have activated the " " function. For details
please refer to " " on p.14.)
Switch
Switch
When you are making or answering an external call, you
can transfer it to another handset.
INT INT
Press the button and enter the desired handset
number.
Transferring
an External
Call
2.
3.
4.
1.
L1
Switch
Switch
23
Page 28
Transferring
an External
Call
(continued)
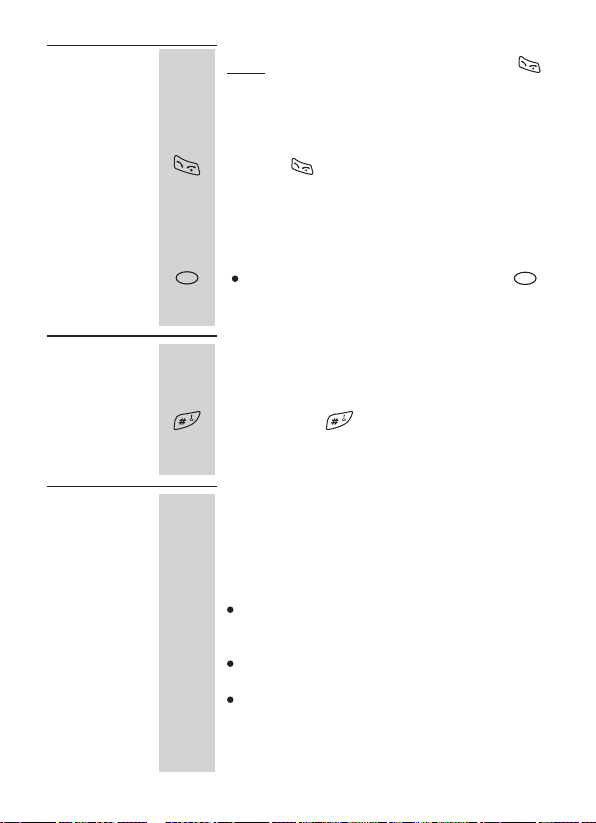
Result: The desired handset starts to ring, press the
button of desired handset to answer the call (You
can open the cover to answer the call directly, if
you have activated the " " function. For
details please refer to" "on p.14).
2.
Press the button of the calling handset (You can
close the cover directly, if you have activated the
"Switch" function. For details please refer to " "
on p.14), then the desired handset enters into the
external call.
Note:
INT
If the desired handset doesn't answer, press the
button to cancel the transfer. Then the calling handset
will be connected to the external call again.
Switch
Switch
Switch
INT
Setting Up
a Three-Way
Conference
Call
Registering
a New
Handset
24
When you have both an outside call and an intercom call
in progress( ), you can set up a three-way
conference call, like this:
Press and hold button of the calling handset for
more than two seconds to set up a three-way
conference call.
The original handset came with base unit from the factory
is already registered as the handset number 1. Each
additional handset with GAP compatible you purchased
can be registered to the base unit.
Notes:
see p.23
A handset can be registered up to 4 different base
units. And a total of 5 handsets can be registered to
a base unit.
GAP is the standard for the interworkingof handsets
and base stations of different manufacturers.
This modelof digital phone supports GAP. When it is
used with other manufacture GAP-supported
phones, functions except conversation could not
always be available.
Page 29
Registering
a New
Handset
(continued)
There are two ways for registering a new handset.
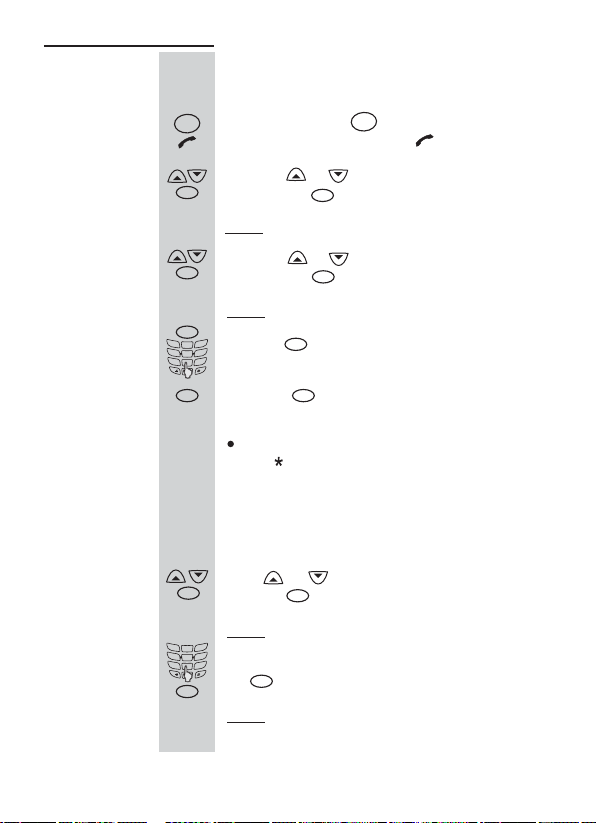
Way 1: To register a new handset with the base:
PAGE
1.
Press and hold the button on the base unit for
more than 10 seconds until the lamp blinks.
PAGE
2.
Press the or button to choose
INT
and press the button.
INT
HS Register,
Result: The display shows the base number.
3.
Press the or button to choose a base number,
INT
and press the button.
INT
Result: The display shows the register code it receives.
INT
DEF
ABC
3
1
2
4.
5.
Press the button and the display shows " ".
GHI
MNO
JKL
4
6
5
PQRS
WXYZ
TUV
7
9
8
Enter the base pin (the default base pin is 1590).
OPER
0
INT
Press the button to confirm and a confirmation
INT
INT
PIN :
tone will be heard.
Note:
If it is not the first base unit you are registering to, there
is a " " in front of the base number, you had better to
select another base number.
Way 2: To register a new handset using a already
registered handset.
1.
2.
Press or button to choose and
INT
press the button.
Result:
DEF
ABC
3
1
2
GHI
MNO
JKL
4
6
5
PQRS
WXYZ
TUV
7
9
8
Enter the base pin ( the default pin is 1590), and press
OPER
0
the button.
INT
Result:
INT
The display shows " " then " "
INT
Waiting... Base PIN: .
A confirmation tone is heard, and the display shows
BS Setting,
the submenu.
25
Page 30
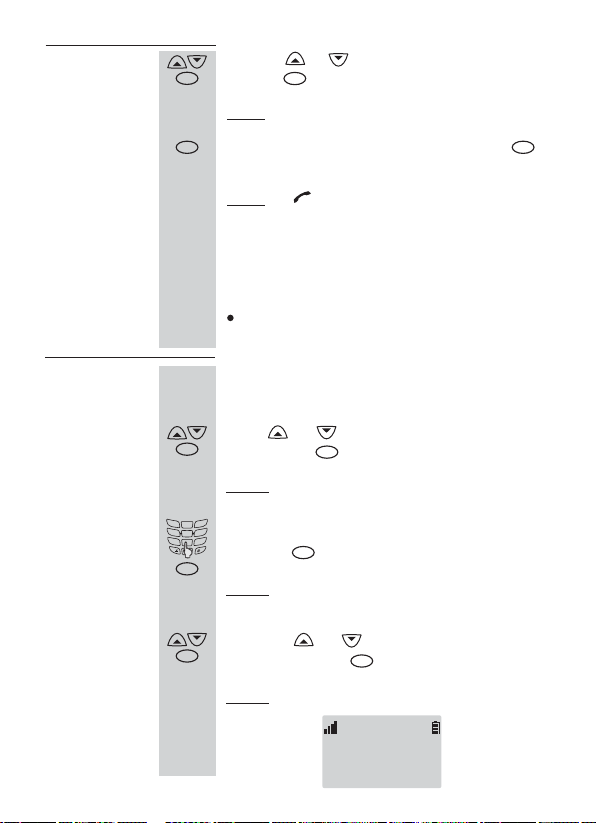
Registering
aNew
Handset
(continued)
3.
4.
Press the or button to choose , and
INT
press the button.
Result:
INT
Enter the sub pin you want to set, and press the
INT
The display shows " ".
Subsc PIN:
New HS
INT
button.
Result:
The indicator lamp on the base blinks.
De-Registering
a Handset
26
5.
Pick up the new handset you want to register, then do
the same steps 2~5 as "To register a new handset with
the base" to register it.
Note:
In the step 4 of "To register a new handset with the
base", you must enter the you have set.
Subsc PIN
You can de-register a handset with the registered handset.
(All handsets be in standby mode.)
1.
Press or button to choose
INT
and press the button.
Result:
DEF
ABC
3
1
2
GHI
MNO
JKL
4
6
5
2.
Enter the base pin ( the default pin is 1590), and
PQRS
WXYZ
TUV
7
9
8
OPER
0
press the button.
INT
Result:
must
BS Setting,
INT
The display shows " " then "
"
PIN: .
INT
A confirmation tone is heard, and the display
Waiting... Base
shows the submenu.
3.
Press the or button to choose
INT
, and press the button.
HS
The display shows as follow:
Result:
INT
Remove
Remove HS:?
M
----
Page 31
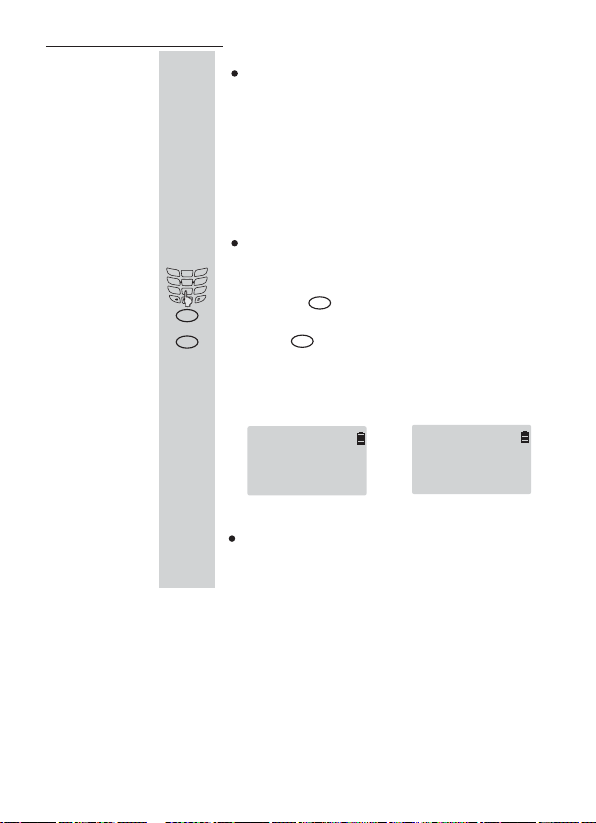
De-Registering
a Handset
(continued)
5.
Notes:
The current status will be shown as the following format:
"-----".Each position of the cursor stands for the
status of the matching handset working with the
base." " means this handset is in setting mode. " "
M-
means not registered yet. (For example: " " means:
M23--
There are up to 3 handsets working with this base and
the HS 1 is in setting mode.)
The handset in setting can not be de-registered.
DEF
ABC
3
1
2
GHI
MNO
JKL
4
6
5
4.
PQRS
Enter the handset number you want to de-register,
WXYZ
TUV
7
9
8
OPER
0
or press the button to cancel.
C
INT
Press the button to confirm and a confirmation
C
INT
tone will be heard. The display of the de-registered
handset shows " " or "Searching...".No Base
No Base
Searching...
Note:
If you de-register the handset whose power is off, you
must repeat steps 3~5 once time to de-register the
handset.
27
Page 32
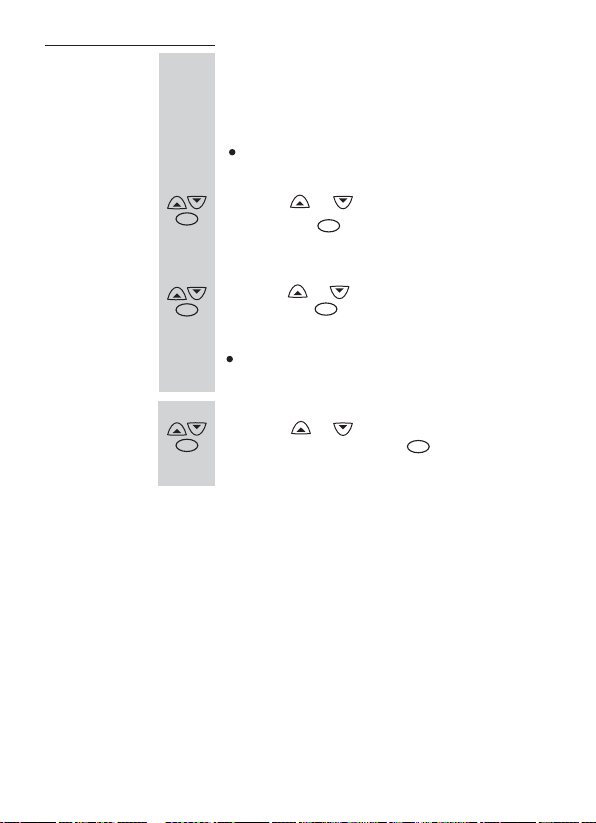
Choosing a
Base Unit
Your handset can be registered up to 4 different base
units. This menu option allows you to select the base
you want to use.
Note:
To use the handset with more than one base unit, you
must register the handset to each base unit (See p.24).
1.
Press the or button to choose
INT
and press the button.
INT
Select BS,
Then:
Toselect the baseautomatically:
2.
Press the or button to choose
INT
and press the button.
INT
Base auto,
Note:
In this mode, the handset will automatically select the
base unit that received the strongest signal.
Toselect the basemanually:
2.
Press the or button to select your desired
INT
base number, and press the button to confirm.
INT
28
Page 33
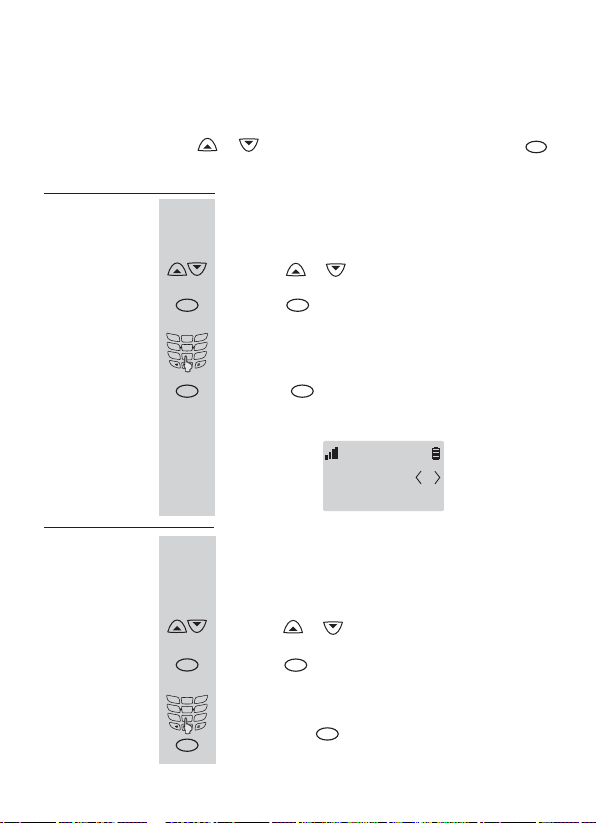
Handset Setting
Using the menu, you can customize various settings for the handset such as
HS setting
the handset name, display language, direct call etc.
In standby mode, press the or button to access , and press the
HS Setting
button to enter the submenu.
Then:
Setting
Handset
Name
1.
2.
3.
4.
This option allows you to set your handset name. The
handset name displays in standby mode.
Press the or button to choose
Press the button to confirm and the display shows
"".
DEF
ABC
3
1
2
GHI
MNO
JKL
4
6
5
PQRS
WXYZ
TUV
7
9
8
Enter the name, up to 8 characters.
OPER
0
Press the button to confirm and a confirmation
INTINT
Name:
INTINT
User Name.
(see p.18).
tone will be heard.
John 1
10:00. Jan-01
INT
Changing
Handset
PIN
A handset PIN is required to protect your handset against
unauthorized formatting. The default PIN is 1590, you can
change the handset PIN.
1.
2.
3.
Press the or button to choose
INT
Press the button to confirm and the display shows
"".
DEF
ABC
3
1
2
GHI
MNO
JKL
4
6
5
PQRS
WXYZ
TUV
7
9
8
Enter the current handset PIN (the default is 1590),
OPER
0
and press the button.
INT
INT
HS PIN:
INT
Set PIN .
29
Page 34
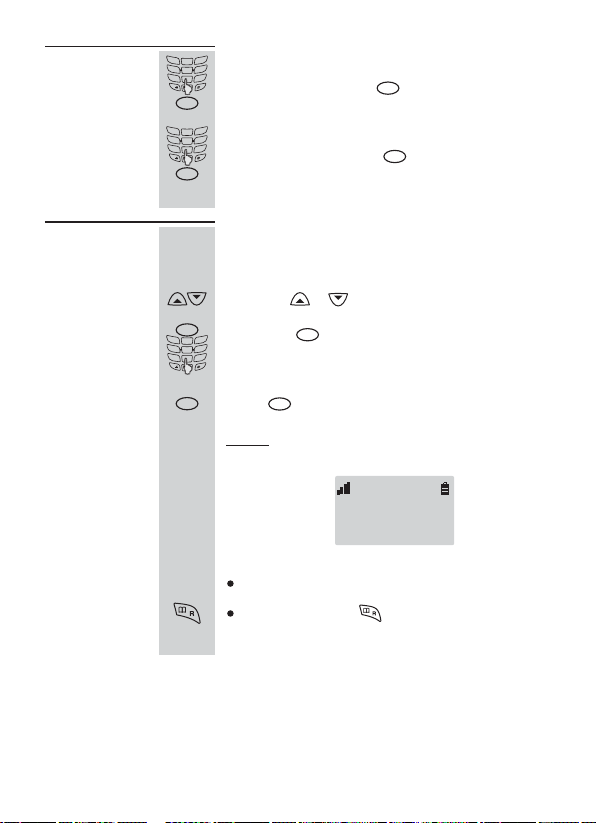
Changing
Handset
PIN
(continued)
DEF
ABC
3
1
2
GHI
MNO
JKL
4
6
5
4.
5.
The display shows " ", enter the desired
PQRS
WXYZ
TUV
7
9
8
OPER
0
new PIN , and press the button.
INT
DEF
ABC
3
1
2
GHI
MNO
JKL
4
6
5
The display shows " ", enter the new
PQRS
WXYZ
TUV
7
9
8
OPER
0
PIN again, and press the button.
INT
A confirmation tonewill be heard.
NEW PIN:
INT
Retype PIN:
INT
Setting
Direct Call
30
You can set one specific number that will be dialled
automatically no matter which key has been pressed.
1.
2.
3.
Press the or button to choose
INT
Press the button, and enter the number you
DEF
ABC
3
1
2
GHI
MNO
JKL
4
6
5
want.
PQRS
WXYZ
TUV
7
9
8
OPER
0
INT
Press button to confirm.
Result:
INT
INT
A confirmation tone will be heard and the
Direct Call.
displayshowsasfollow:
Direct Call
Notes:
One direct call number can be set per handset only.
If you wish, press the button twice quickly in standby
mode, this function will be deactivated.
Page 35
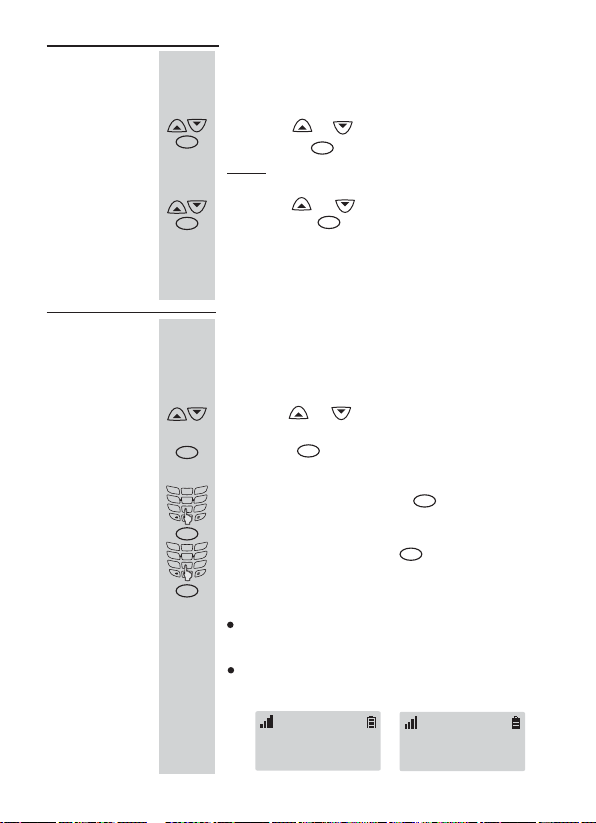
Choosing
Language
You can select a display language. 3 different languages
are available. They are English, French and Spanish.
1.
Press the or button to choose
INT
and press the button.
Result:
INT
The current setting displays.
Language,
Setting
Date & Time
2.
Press the or button to selectthe language
INT
and press the button to confirm. A confirma-
INT
,
tion tone will be heard.
After setting the date and time, the phone will display the
date & time and record automatically when you receive a
call.
1.
2.
3.
4.
Press the or button to choose
INT
Press the button to confirm and the display
shows
DEF
ABC
3
1
2
GHI
MNO
JKL
4
6
5
Enter the time and press the button to confirm
PQRS
WXYZ
TUV
7
9
8
OPER
0
then the display shows " ".
INT
DEF
ABC
3
1
2
GHI
MNO
JKL
4
6
5
Enter the date and press button to confirm.
PQRS
WXYZ
TUV
7
9
8
OPER
0
Then a confirmation tone will be heard.
INT
INT
""
Input Time:
.
Input Date:
Set Clock.
INT
INT
Notes:
The time setting sequence is Hour-Minute-Day-MonthYear.
The LCD displays the time in 12h mode. For example,
" "indicates 01:49PM, " " indicates 01:49Am.01:49. 01:49
HS 1
01:49. DEC-12
.
HS 1
.
01:49 DEC-12
31
Page 36
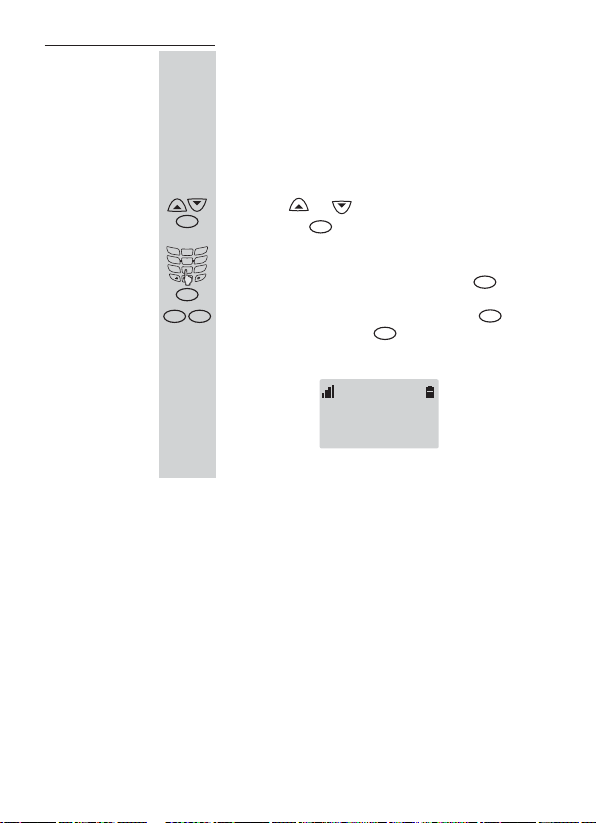
Resetting
Handset
If handset be reset, the follow items will return to the default
mode.
Redial Memory, External Melody/Volume, Internal Melody/
Volume, Receiving Volume, All Caller ID and Phone Book
Numbers.
To reset the handset
1.
2.
3.
Press the or button to choose
INT
and press the button.
DEF
ABC
3
1
2
GHI
MNO
JKL
4
6
5
The display shows " ", enter the handset PIN
PQRS
WXYZ
TUV
7
9
8
OPER
0
(the default PIN is 1590), and press the button.
INT
INT
C
The display shows " ", press the button
to confirm or press the button tocancel.
INT
HS PIN:
Sure?
C
Set Default,
INT
INT
Sure ?
32
Page 37
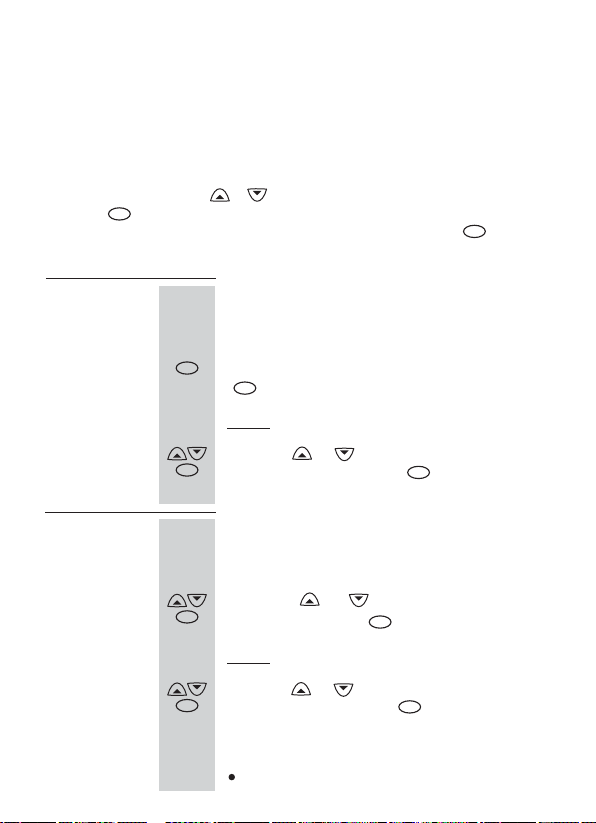
Base Setting
You can customize your base unit to suit your preferences using the
BS Setting
menu. The base PIN (Personal Identification Number) is required to access this menu.
When customizingthe base, other handsetsregistered to the base can not enter
Setting
In standby mode, p
press the button to confirm. The display shows " " then " ",
enter the last valid base PIN (The default PIN is ). Press the button to
menu to set the base.
ress the or button to access the menu, then
INT
BS Setting
Waiting... Base PIN:
1590
BS
INT
confirm.
Then:
Choosing
Dialing
Mode
1.
2.
In order to provide compatibility with other telephone
systems, your phone can be set to either pulse-dialing
(rotary), or tone dialing (DTMF).
INT
The cursor is in front of , press the
INT
button.
The current setting displays.
Result:
Press the or button to choose your desired
INT
dialing mode, and press the button to confirm.
Dial Mode
INT
A confirmation tone will be heard.
Changing
Pause
Time
1.
2.
The function allows adequate time for the phone number to
register with the telephone company's system and
complete the call.
Press the or button to choose
INT
Time,
and press the button.
Result:
The current setting displays.
Press the or button to choose your desired
INT
pause time, and press the button to confirm.
INT
INT
Pause
A confirmation tone will be heard.
Note:
Youcan choose or
2sec, 3sec 4sec.
33
Page 38
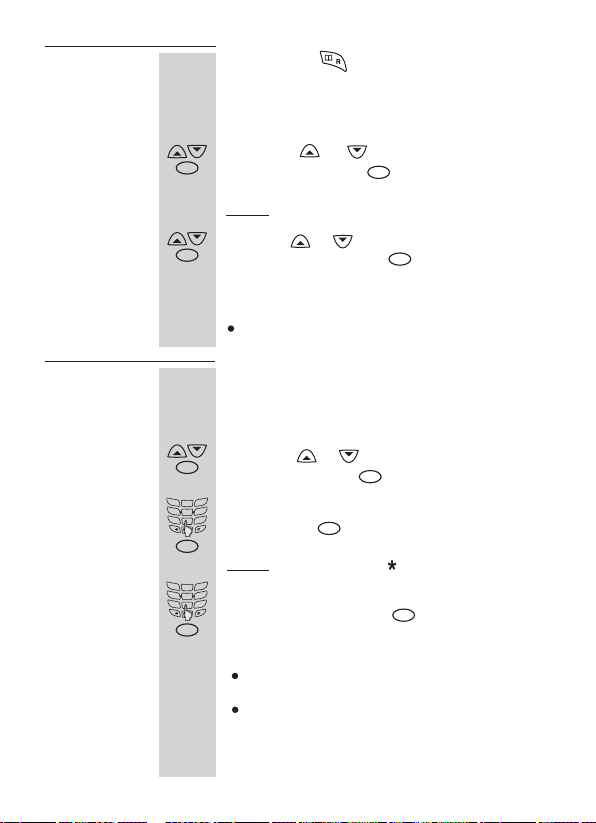
Changing
Flash
Time
During a call, the button allows you to transfer a call to
another extension such as call waiting caller. The flash
time varies in different country, please check with your
local telephone office before setting.
1.
Press the or button to choose
INT
and press the button.
Time,
Result:
The current setting displays.
INT
Flash
Changing
Base
PIN
34
2.
Press the or button to choose your desired
INT
flash time,and press the button to confirm. A
INT
confirmation tone will be heard.
Note:
Youcan choose or .
100ms, 120ms, 300ms 600ms
A base PIN is required to protect your base against
unauthorized user. The default PIN is . You can
1590
change the base PIN.
1.
2.
3.
Press the or button to choose
INT
PIN,
and press the button.
DEF
ABC
3
1
2
GHI
MNO
JKL
4
6
5
The display shows " ", enter the new PIN,
PQRS
WXYZ
TUV
7
9
8
OPER
0
and press the button.
INT
Result:
DEF
ABC
3
1
2
GHI
MNO
JKL
4
6
5
PQRS
WXYZ
TUV
7
9
8
OPER
0
INT
The display show " " to maintain secrecy.
The display shows " ", enter the new
PIN again, and press the button to confirm. A
confirmation tone will be heard.
INT
INT
New PIN:
Retype PIN:
INT
Change
Notes:
If you enter the wrong PIN, you will hear a rejective
warning tone.
If there are several handset registered to the base
unit, the other handset users can't access the
menu without having the newly changed
Setting
BS
Base PIN.
Page 39
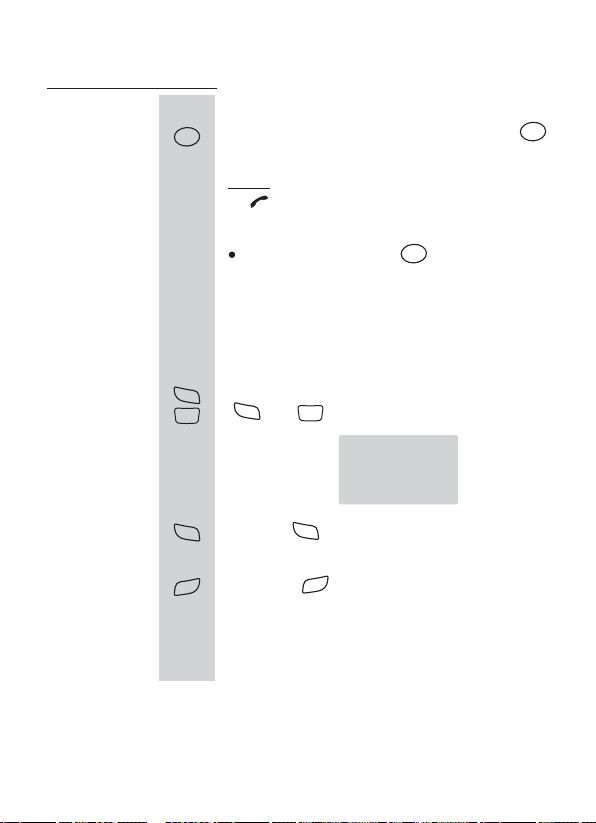
Special Function
Clearing the
Information
of Baseand
Handset
Toclear the informationof base
1.
While connecting adapter, pressand hold the
PAGE
button more than 10 seconds.
PAGE
Result: All information of base has been cleared and
the lamp on the base starts to blinks.
Note:
If you press and hold the button less than 10
PAGE
seconds while connecting the adapter, the phone
will perform the function.PAG ING
2.
You can do the same steps 2~5 as "To register a
new handset with the base" to register again.
Toclear the informationof handset
1
1.
While inserting the batteries, press and hold the
OPER
0
below:
OPER
1
0
and buttons until the display shows as
7 Clear Base
9ClearAll
PQRS
PQRS
7
2.
Press the button to clear the handset register
information.
Or
Press the button to clear all the handset
WXYZ
9
information.
7
WXYZ
9
35
Page 40

Feature List
FSK and DTMF dual mode CLIP (Calling Line Identification Presentation)
Stores up to 50 calling numbers, up to 16 digits for each number
Stores up to 10 last dialled numbers, up to 24 digits for each number
Stores up to 50 phonebook numbers, up to 12 characters for each name and
16 digits for each number
Up to 5 handsets for optional for one base
Up to 4 bases for optional for one handset
Dual LCD screens display calling and dialling number
Real time clock
Key lock setting
Direct call setting
Area Code and LDS Code selection
Call transfer of external calls (when using two or more handsets)
Internal calls
Three-way conference call
Ringer melody selection (9 melodies and 16 polyphonic ringtones)
Ringer volume adjusting
Receiving volume setting (4 levels)
Silence and microphone mute functions
Talking time display
Deleting single or all records from phonebook
Redialing and preparation dialing functions
Page on base unit to look for the handset easily
Clicking Key tone on or off
3 languages selection (English, French and Spanish)
Storing Caller ID number to phone book
Setting VIP numbers
Supports GAP function
LCD back light
Caller ID on call waiting
36
Page 41
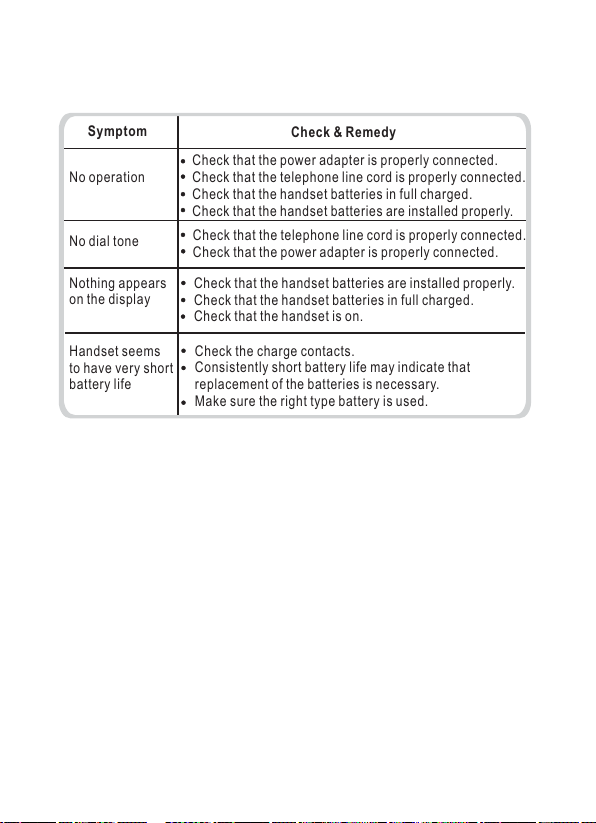
Troubleshooting
Symptom
No operation
No dial tone
Nothing appears
on the display
Handset seems
to have very short
battery life
Check & Remedy
Check that the power adapter is properly connected.
Check that the telephone line cord is properly connected.
Check that the handset batteries in full charged.
Check that the handset batteries are installed properly.
Check that the telephone line cord is properly connected.
Check that the power adapter is properly connected.
Check that the handset batteries are installed properly.
Check that the handset batteries in full charged.
Check that the handset is on.
Check the charge contacts.
Consistently short battery life may indicate that
replacement of the batteries is necessary.
Make sure the right type battery is used.
37
Page 42

Warranty
One-Year Limited Warranty
Important
ELEMENTS OF WARRANTY
original owner, this Xingtel Product to be free from defects in material
and craftsmanship with only the limitations or exclusions set out below.
WARRANTY DURATION
and be of no further effect 12 months after the date of original sale. The
warranty is invalid if the Product is (A) damaged or not maintained as
reasonable or necessary, (B) modified, altered, or used as part of any
conversion kits, subassemblies, or any configurations not sold by Xingtel
Canada
than an authorized Xingtel service center for a defect or malfunction
covered by this warranty, (E) used in conjunction with equipment or parts or
as part of any system not manufactured by Xingtel , or (F) installed or
programmed by anyone other than as detailed by the owner's manual for this
product.
STATEMENT OF REMEDY
to this warranty at any time while this warranty is in effect, warrantor will
either, at its option, repair or replace the defective unit without charge for
parts, service or any other costs (except shipping and handling) incurred by the
warrantor or its representatives in connection with the performance of this
warranty. Warrantor, at its option, may replace the unit with a new or
refurbished unit.
THE LIMITED WARRANTY SET FORTH ABOVE IS THE SOLE AND ENTIRE
WARRANTY PERTAINING TO THE PRODUCT AND IS LIEU OF AND
EXCLUDES ALL OTHER WARRANTIES OF ANY NATURE WHATSOEVER,
WHETHER EXPRESS, IMPLIED OR ARISING BY OPERATION OF LAW,
INCLUDING, BUT NOT LIMITED TO ANY IMPLIED WARRANTIES OF
MERCHANTABILITY OR FITNESS FOR A PARTICULAR PURPOSE. THIS
WARRANTY DOES NOT COVER OR PROVIDE FOR THE
REIMBURSEMENT OR PAYMENT OF INCIDENTAL OR CONSEQUENTIAL
DAMAGES.
LEGAL REMEDIES
warranty is void outside of Canada.
TO OBTAIN WARRANTY SERVICE
original carton, box or equivalent, properly packed, fully insured with shipping
charges prepaid, together with a copy of your bill of sale or other proof of
purchase and a description of the problem to any of the Xingtel Canada
Service Facilities in Canada.
38
: Evidence of original purchase is required for warranty service.
: Xingtel Canada warrants, for one year, to the
Canada
: This warranty to the original user shall terminate
, (C) improperly installed, (D) serviced or repaired by someone other
Canada
Canada
: In the event that the products does not conform
: This warranty gives you specific legal rights. This
: Ship your Ame-Link DECT Phone in its
Page 43

IC Information
This product meets the applicable Industry Canada technical specification.
1. The Industry Canada label identifies certified equipment. This certification
means that the equipment meets telecommunications network protective,
operational and safety requirements as prescribed in the appropriate
Terminal Equipment Technical Requirements documents(s). The
department does not guarantee the equipment will operate to the user's
satisfaction.
2. Before installing this equipment, users should ensure that it is permissible
to be connected to the facilities of the local telecommunications company.
The equipment must also be installed using an acceptable method of
connection. The customer should be aware that compliance with the above
conditions may not prevent degradation of service in some situations.
3. Repairs to certified equipment should be coordinated by a representative
designated by the supplier. Any repairs or alterations made by the user to
this equipment, or equipment malfunctions, may give the
telecommunications company cause to request the user to disconnect the
equipment.
4. Users should ensure for their own protection that the electrical ground
connections of the power utility, telephone lines and internal metallic water
pipe system, if present, are connected together. This precaution may be
particularly important in rural areas.
Caution
: Users should not attempt to make such connections themselves,
but should contact the appropriate electric inspection authority, or
electrician, as appropriate.
5. The Ringer Equivalence Number (REN) assigned to each terminal device
provides an indication of the maximum number of terminals allowed to be
connected to a telephone interface. The termination on an interface may
consist of any combination of devices subject only to the requirement that the
sum of the ringer equivalence Numbers of all the devices does not exceed
5.
6. Operation of this device is subject to the following two conditions: (1) this
device may not cause interference, and (2) this device must accept any
interference, including interference that may cause undesired operation of
the device.
7. Privacy of communications may not be ensured when using this
telephone.
39
Page 44

8. Should you experience trouble with this equipment, please contact:
The Canadian Service Center is:
Company Name: Xingtel Canada Ltd.
Address: 55 West Beaver Creek, Unit 16
Tel: 416-840-6383 Fax: 416-915-4800
Free help line:1-877-714-9331
Email: [email protected]
Richmond Hill, Ontario
L4B 1K5, Canada
40
 Loading...