

Page 1

YMB
Reference Manual
Page 2

Page 3

1
Table of Contents
Chapter 1. Basic
1.1. Preparation ・・・・・・・・・・・・・・・・・・・・・・・・・・・・・・・・・・・・・・・・・・・・・・・・・・・・・・・・・ 3
1.2. Preparation ・・・・・・・・・・・・・・・・・・・・・・・・・・・・・・・・・・・・・・・・・・・・・・・・・・・・・・・・・ 3
1.3. Scan a Printed Material ・・・・・・・・・・・・・・・・・・・・・・・・・・・・・・・・・・・・・・・・・・・・・・・ 4
1.4. Toggle Reading ・・・・・・・・・・・・・・・・・・・・・・・・・・・・・・・・・・・・・・・・・・・・・・・・・・・・・・ 5
1.5. Navigate in a Document ・・・・・・・・・・・・・・・・・・・・・・・・・・・・・・・・・・・・・・・・・・・・・・・ 5
1.6. Change Reading Speed ・・・・・・・・・・・・・・・・・・・・・・・・・・・・・・・・・・・・・・・・・・・・・・・ 6
1.7. When You Get Lost ・・・・・・・・・・・・・・・・・・・・・・・・・・・・・・・・・・・・・・・・・・・・・・・・・・ 6
1.8. Listen to CD or DVD ・・・・・・・・・・・・・・・・・・・・・・・・・・・・・・・・・・・・・・・・・・・・・・・・・ 7
Chapter 2. How to Read Various Types of Printed Material
2.1. How to Correctly Place the Material to Read ・・・・・・・・・・・・・・・・・・・・・・・・・・・・・ 8
・In Case of Books ・・・・・・・・・・・・・・・・・・・・・・・・・・・・・・・・・・・・・・・・・・・・・・・・・・・ 8
・In Case of Invoices and Receipts ・・・・・・・・・・・・・・・・・・・・・・・・・・・・・・・・・・・・・・ 9
・In Case of Newspapers ・・・・・・・・・・・・・・・・・・・・・・・・・・・・・・・・・・・・・・・・・・・・・・・ 10
2.2. How to Use Page Correction ・・・・・・・・・・・・・・・・・・・・・・・・・・・・・・・・・・・・・・・・・・・ 11
Chapter 3. Preservation and Management of Printed Material
3.1. How to Read Previously Scanned Contents ・・・・・・・・・・・・・・・・・・・・・・・・・・・・・・・ 12
・How to Go to a Certain Page ・・・・・・・・・・・・・・・・・・・・・・・・・・・・・・・・・・・・・・・・・ 12
・How to Move to a Document ・・・・・・・・・・・・・・・・・・・・・・・・・・・・・・・・・・・・・・・・・・ 13
3.2. How to Delete the Acquired Contents ・・・・・・・・・・・・・・・・・・・・・・・・・・・・・・・・・・・ 14
3.3. How to Use YMB's Documents with a PC ・・・・・・・・・・・・・・・・・・・・・・・・・・・・・・・・ 15
3.4. How to Use Bookmarks ・・・・・・・・・・・・・・・・・・・・・・・・・・・・・・・・・・・・・・・・・・・・・・・ 16
3.5. How to Go to a Specified Document or Page ・・・・・・・・・・・・・・・・・・・・・・・・・・・・・ 17
Chapter 4. How to Listen to the Contents of a CD, DVD Or USB Drive
4.1. How to Change YMB's Operating Modes ・・・・・・・・・・・・・・・・・・・・・・・・・・・・・・・・・ 18
4.2. Flow of the CD/USB Mode ・・・・・・・・・・・・・・・・・・・・・・・・・・・・・・・・・・・・・・・・・・・・ 20
4.3. How to Listen to an Audio CD ・・・・・・・・・・・・・・・・・・・・・・・・・・・・・・・・・・・・・・・・・・ 21
4.4. How to Listen to a DAISY Book ・・・・・・・・・・・・・・・・・・・・・・・・・・・・・・・・・・・・・・・・ 22
4.5. How to Watch a DVD Video ・・・・・・・・・・・・・・・・・・・・・・・・・・・・・・・・・・・・・・・・・・・・ 23
・Operations in the DVD Menu ・・・・・・・・・・・・・・・・・・・・・・・・・・・・・・・・・・・・・・・・・・ 23
・How to Switch Audio Tracks and Subtitles ・・・・・・・・・・・・・・・・・・・・・・・・・・・・・・・ 24
4.6. How to Listen to the Contents of a Data CD Or a Data USB Drive ・・・・・・・・・・・・ 25
Chapter 5. How to Use YMB as a Magnifier
5.1. Connecting a Screen to YMB ・・・・・・・・・・・・・・・・・・・・・・・・・・・・・・・・・・・・・・・・・・ 26
・How to Connect a PC screen ・・・・・・・・・・・・・・・・・・・・・・・・・・・・・・・・・・・・・・・・・ 26
・Switching on YMB ・・・・・・・・・・・・・・・・・・・・・・・・・・・・・・・・・・・・・・・・・・・・・・・・・・・ 27
・How to Change the Size of Characters ・・・・・・・・・・・・・・・・・・・・・・・・・・・・・・・・・ 27
・How to Change Display Colors ・・・・・・・・・・・・・・・・・・・・・・・・・・・・・・・・・・・・・・・・ 27
5.2. How to Display Magnified Acquired Images ・・・・・・・・・・・・・・・・・・・・・・・・・・・・・・・ 28
・How to Change Magnification ・・・・・・・・・・・・・・・・・・・・・・・・・・・・・・・・・・・・・・・・・ 29
・How to Change Image Color/Contrast ・・・・・・・・・・・・・・・・・・・・・・・・・・・・・・・・・・ 29
Page 4

2
5.3. How to Read Multimedia DAISY Books ・・・・・・・・・・・・・・・・・・・・・・・・・・・・・・・・・・・ 30
Chapter 6. Functions for Advanced Users
6.1. Multiple Page Scan ・・・・・・・・・・・・・・・・・・・・・・・・・・・・・・・・・・・・・・・・・・・・・・・・・・ 31
6.2. Advanced Text Management ・・・・・・・・・・・・・・・・・・・・・・・・・・・・・・・・・・・・・・・・・・・ 33
・Creation of a New Document ・・・・・・・・・・・・・・・・・・・・・・・・・・・・・・・・・・・・・・・・・ 33
・How to Name a Document ・・・・・・・・・・・・・・・・・・・・・・・・・・・・・・・・・・・・・・・・・・・・ 34
・Text Search ・・・・・・・・・・・・・・・・・・・・・・・・・・・・・・・・・・・・・・・・・・・・・・・・・・・・・・・ 35
・How to Search for Numbers Appearing in a Document ・・・・・・・・・・・・・・・・・・・・・ 35
・Page Moving ・・・・・・・・・・・・・・・・・・・・・・・・・・・・・・・・・・・・・・・・・・・・・・・・・・・・・・・ 36
6.3. Scanner Calibration ・・・・・・・・・・・・・・・・・・・・・・・・・・・・・・・・・・・・・・・・・・・・・・・・・・ 37
6.4. Changing YMB Settings ・・・・・・・・・・・・・・・・・・・・・・・・・・・・・・・・・・・・・・・・・・・・・・・ 38
・Recognition Language ・・・・・・・・・・・・・・・・・・・・・・・・・・・・・・・・・・・・・・・・・・・・・・・ 38
・Document Export Format ・・・・・・・・・・・・・・・・・・・・・・・・・・・・・・・・・・・・・・・・・・・・ 39
・Scan Mode ・・・・・・・・・・・・・・・・・・・・・・・・・・・・・・・・・・・・・・・・・・・・・・・・・・・・・・・・ 39
・Date and Time Settings ・・・・・・・・・・・・・・・・・・・・・・・・・・・・・・・・・・・・・・・・・・・・・・ 39
Chapter 7. Troubleshooting
・YMB Does Not Turn On ・・・・・・・・・・・・・・・・・・・・・・・・・・・・・・・・・・・・・・・・・・・・・・ 40
・No Sound Comes Out of YMB ・・・・・・・・・・・・・・・・・・・・・・・・・・・・・・・・・・・・・・・・・ 40
・Nothing Appears on the Screen ・・・・・・・・・・・・・・・・・・・・・・・・・・・・・・・・・・・・・・・ 40
・It Does Not Read CDs Or DVDs ・・・・・・・・・・・・・・・・・・・・・・・・・・・・・・・・・・・・・・・ 41
・The Scan Quality is Poor ・・・・・・・・・・・・・・・・・・・・・・・・・・・・・・・・・・・・・・・・・・・・・ 41
・YMB Does Not Turn Off ・・・・・・・・・・・・・・・・・・・・・・・・・・・・・・・・・・・・・・・・・・・・・・ 42
Appendix A. Key Operation List ・・・・・・・・・・・・・・・・・・・・・・・・・・・・・・・・・・・・・・・・・・・・・・・・・・ 43
Appendix A-1. Key Operations in Text Reading Mode ・・・・・・・・・・・・・・・・・・・・・・・・・・・・・ 43
Appendix A-2. Key Operations in Magnifier Mode ・・・・・・・・・・・・・・・・・・・・・・・・・・・・・・・・・ 46
Appendix A-3. Key Operations in CD/USB Mode ・・・・・・・・・・・・・・・・・・・・・・・・・・・・・・・・・ 47
Appendix B. Key Operations in Advanced Menu ・・・・・・・・・・・・・・・・・・・・・・・・・・・・・・・・・・・・・ 49
Appendix B-1. Advanced Menu in Reading Mode ・・・・・・・・・・・・・・・・・・・・・・・・・・・・・・・・・ 49
Appendix B-2. Advanced Menu in CD/USB Mode ・・・・・・・・・・・・・・・・・・・・・・・・・・・・・・・・・ 50
Appendix C. List of Configuration Items ・・・・・・・・・・・・・・・・・・・・・・・・・・・・・・・・・・・・・・・・・・・ 51
Appendix C-1. Configuration Items in Reading/Magnifier Mode ・・・・・・・・・・・・・・・・・・・・・・ 51
Appendix C-2. Configuration Items in CD/USB Mode ・・・・・・・・・・・・・・・・・・・・・・・・・・・・・ 53
Appendix D. List of File Formats Supported by YMB ・・・・・・・・・・・・・・・・・・・・・・・・・・・・・・・・・ 54
Glossary 55
Page 5
3
Chapter 1. Basics
In this chapter, we cover the basic usage of this reading machine.
1.1. Preparation
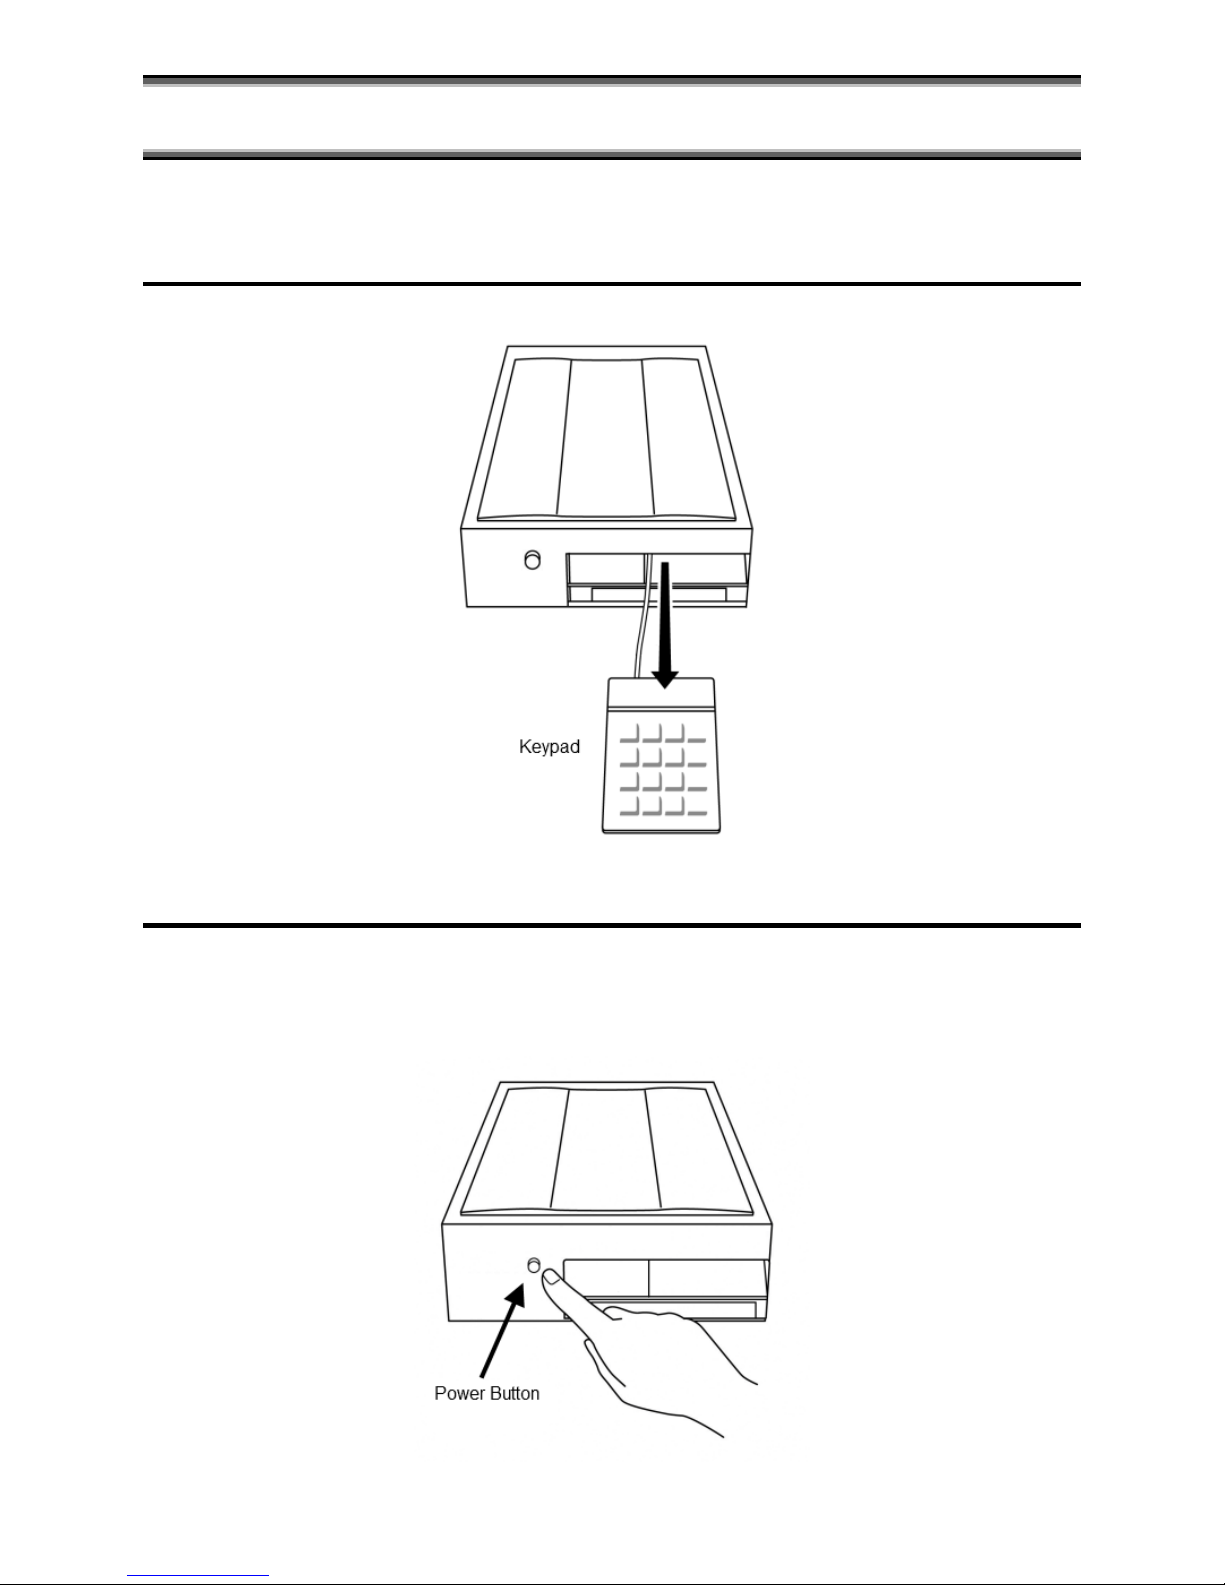
Before using "YMB", pull out the keypad that is stored in the hollow part on the front panel.
1.2. Start and Shutdown
Press the power button on the front panel to boot up "YMB". When the power is on, you can hear a
subtle noise of a fan from the rear side of the machine. It takes about one minute for the machine to
be fully initialized. When it's ready, it plays a startup jingle. To turn off the machine, press the power
button again.
Page 6
4
Caution
Always use the power button to shutdown the machine. Unplugging the power cord while
the power is on might cause damage to the machine. Do not press and hold the power
button. The machine may take some time before shutdown to properly finish processing.
Speakers
"YMB" has a built-in speaker. You can adjust the audio volume with the volume dial on the front
panel. The headphone jack is also located on the front panel.
1.3. Scan a Printed Material
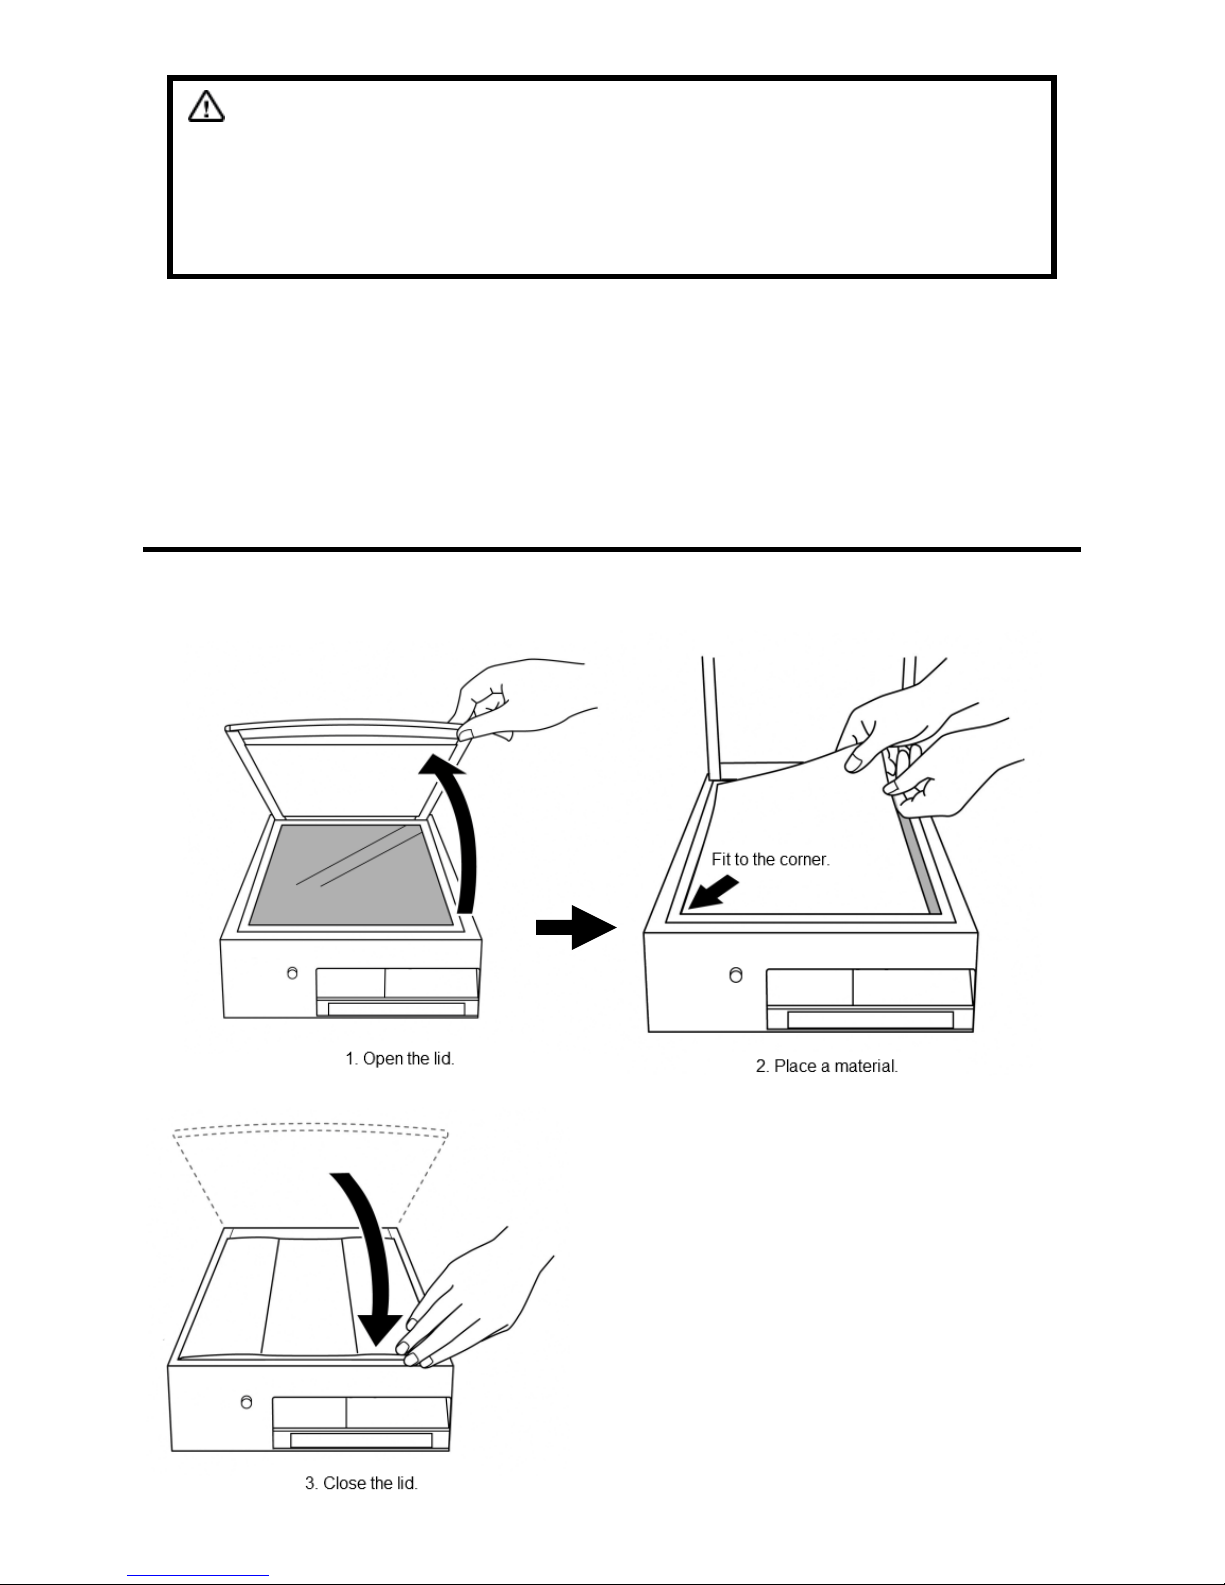
To scan and read a printed material, first open the scanner lid and place the material with its face
down. Then close the scanner lid.
Page 7
5
Operation
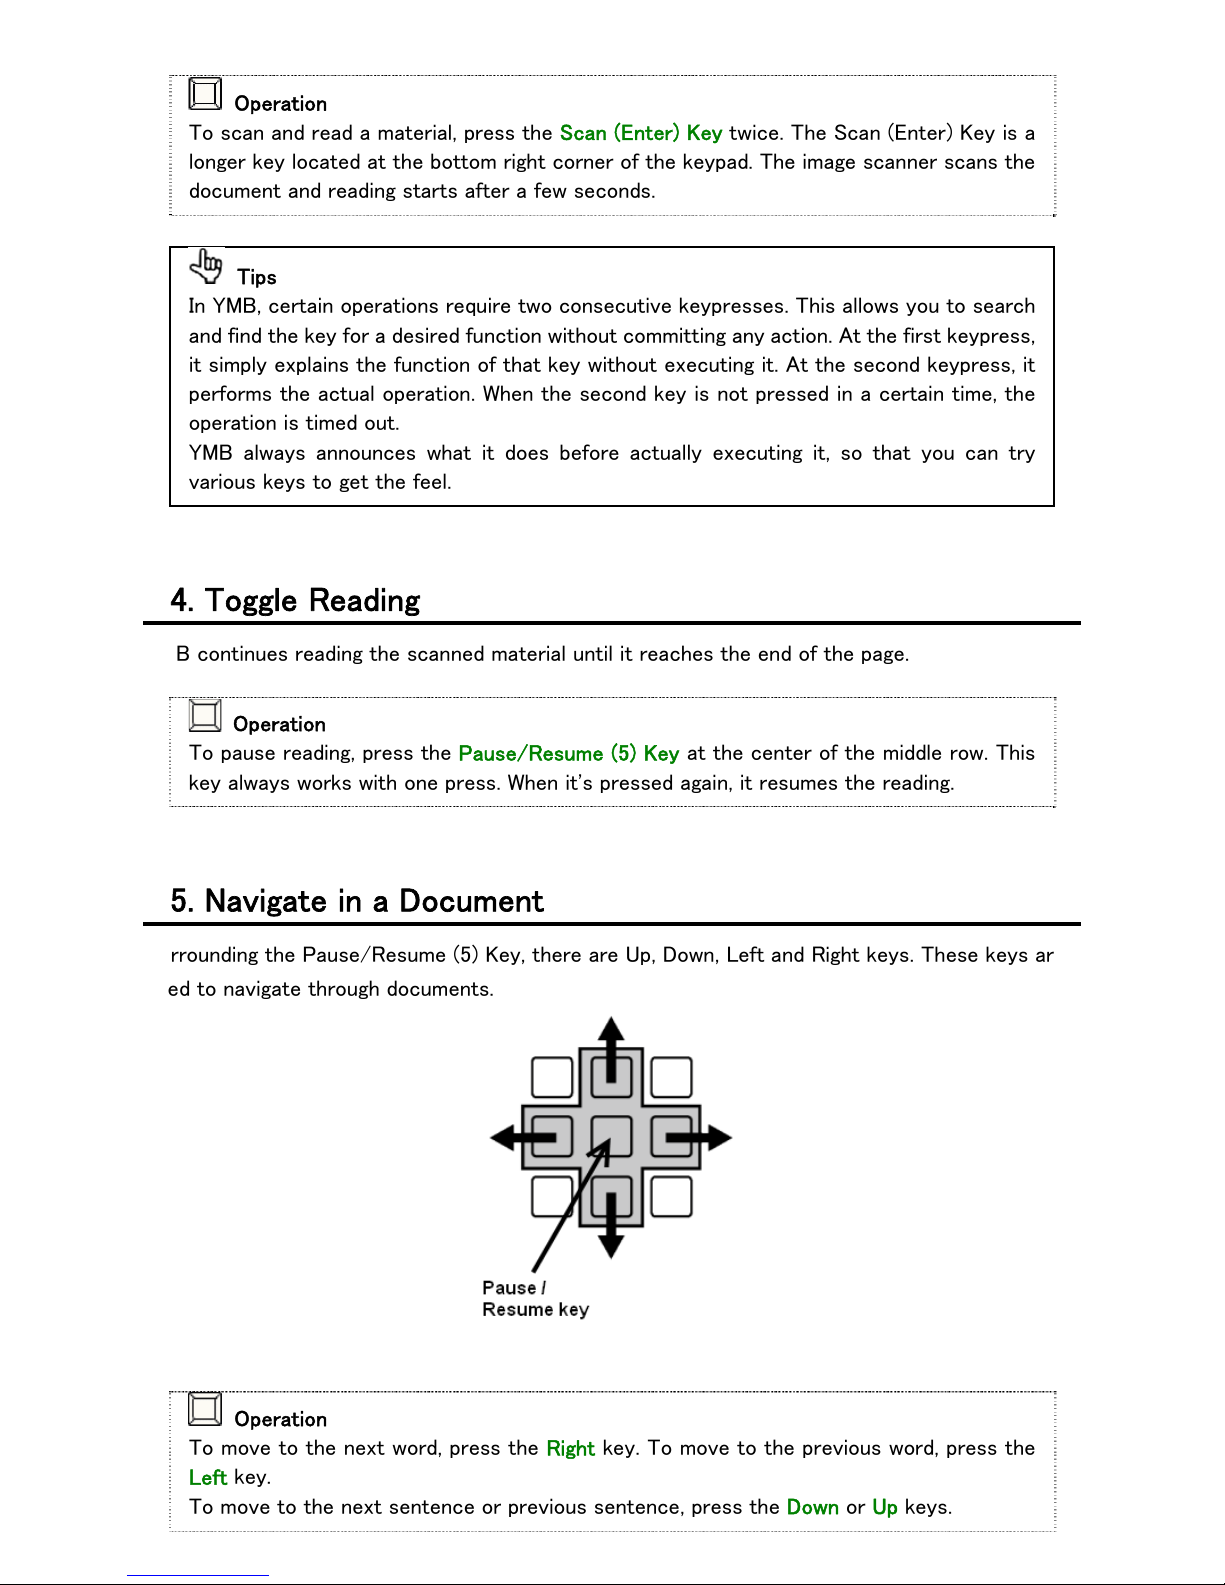
To scan and read a material, press the Scan (Enter) Key twice. The Scan (Enter) Key is a
longer key located at the bottom right corner of the keypad. The image scanner scans the
document and reading starts after a few seconds.
Tips
In YMB, certain operations require two consecutive keypresses. This allows you to search
and find the key for a desired function without committing any action. At the first keypress,
it simply explains the function of that key without executing it. At the second keypress, it
performs the actual operation. When the second key is not pressed in a certain time, the
operation is timed out.
YMB always announces what it does before actually executing it, so that you can try
various keys to get the feel.
1.4. Toggle Reading
YMB continues reading the scanned material until it reaches the end of the page.
Operation
To pause reading, press the Pause/Resume (5) Key at the center of the middle row. This
key always works with one press. When it's pressed again, it resumes the reading.
1.5. Navigate in a Document
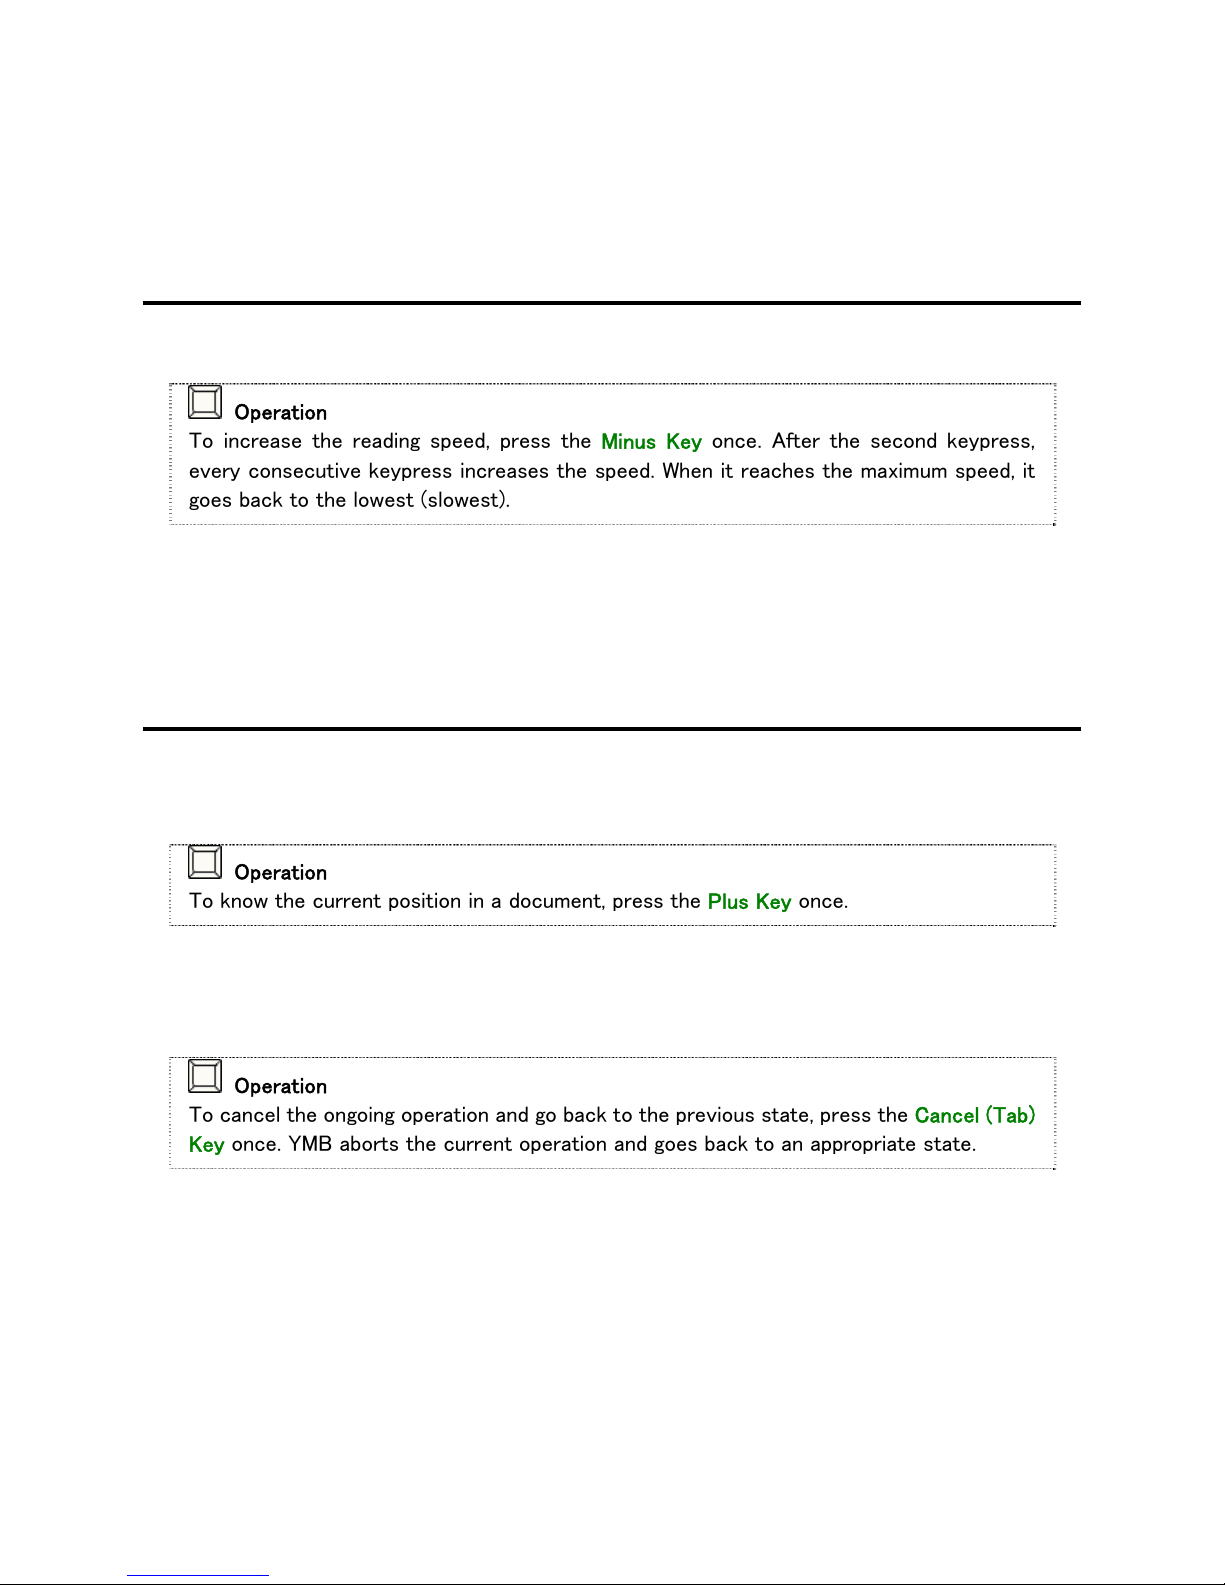
Surrounding the Pause/Resume (5) Key, there are Up, Down, Left and Right keys. These keys are
used to navigate through documents.
Operation
To move to the next word, press the Right key. To move to the previous word, press the
Left key.
To move to the next sentence or previous sentence, press the Down or Up keys.
Page 8
6
As a general rule in YMB, Left and Right keys move a short amount, while Up and Down keys move a
longer amount. Up and Down keys are also used for choosing a menu item.
1.6. Change Reading Speed
You can change the reading speed with the Minus Key.
Operation
To increase the reading speed, press the Minus Key once. After the second keypress,
every consecutive keypress increases the speed. When it reaches the maximum speed, it
goes back to the lowest (slowest).
By default, the reading speed is set to level 3.
1.7. When You Get Lost
When you get lost, you can always use the Plus Key to get a report about the current status or
position.
Operation
To know the current position in a document, press the Plus Key once.
The Cancel (Tab) Key is located at the top left corner on the keypad. This key is often used for
canceling a significant operation.
Operation
To cancel the ongoing operation and go back to the previous state, press the Cancel (Tab)
Key once. YMB aborts the current operation and goes back to an appropriate state.
Page 9
7
1.8. Listen to CD or DVD(※Screen is required when playing DVD)
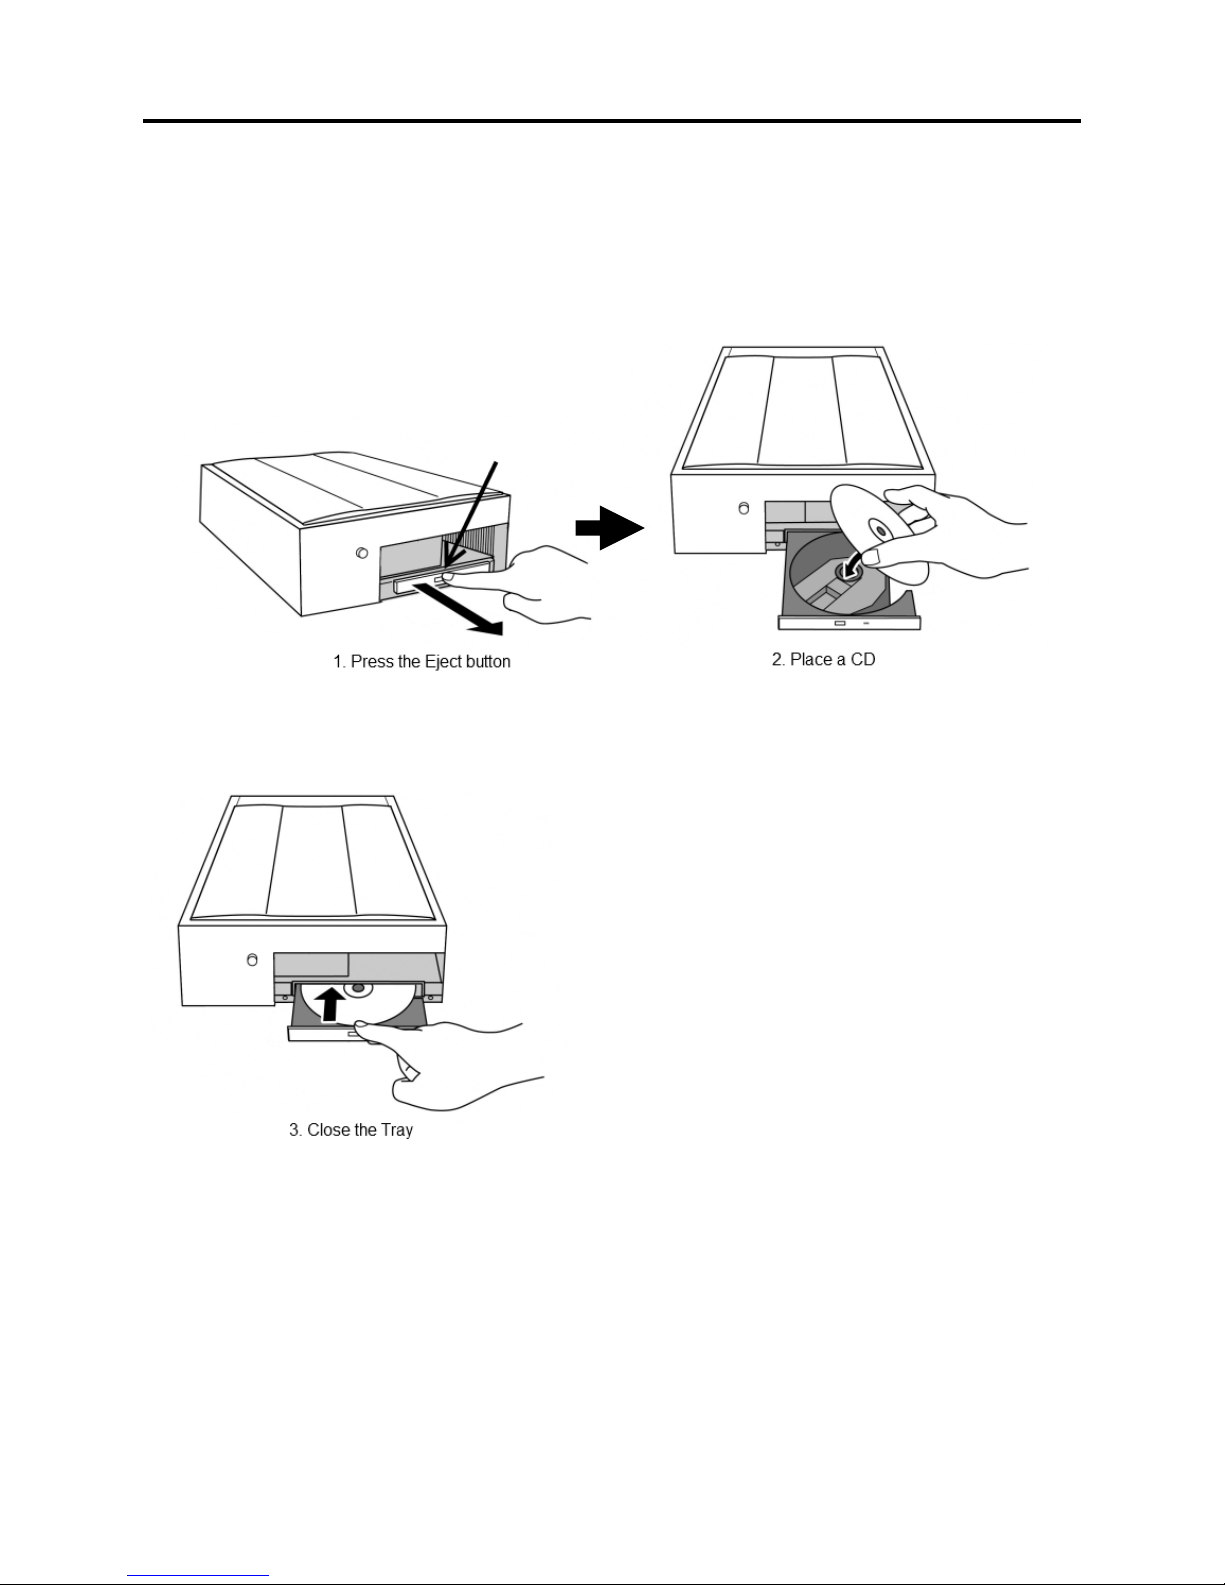
YMB has a built-in CD/DVD player. The CD tray is located at the bottom of the hollow on the front
panel.
To listen to CD or DVD, press the eject button attached at the middle of the tray. The tray will be
unlocked and open ajar. Pull the tray out and place the disk at the spinner so that it does not move.
Push the tray until you hear a clicking sound. In a few seconds, the disk will be played automatically.
To stop playing a CD or DVD, simply press the eject button on the CD tray.
Page 10
8
Chapter 2. How to Read Various Types of Printed Material
In this chapter, we explain how to read various types of printed material with YMB.
2.1. How to Correctly Place the Material to Read
Depending on the material, higher accuracy of recognition can be obtained by improving the
placement of the material on the scanner window. To make YMB read correctly, first get familiarized
to this basic practice.
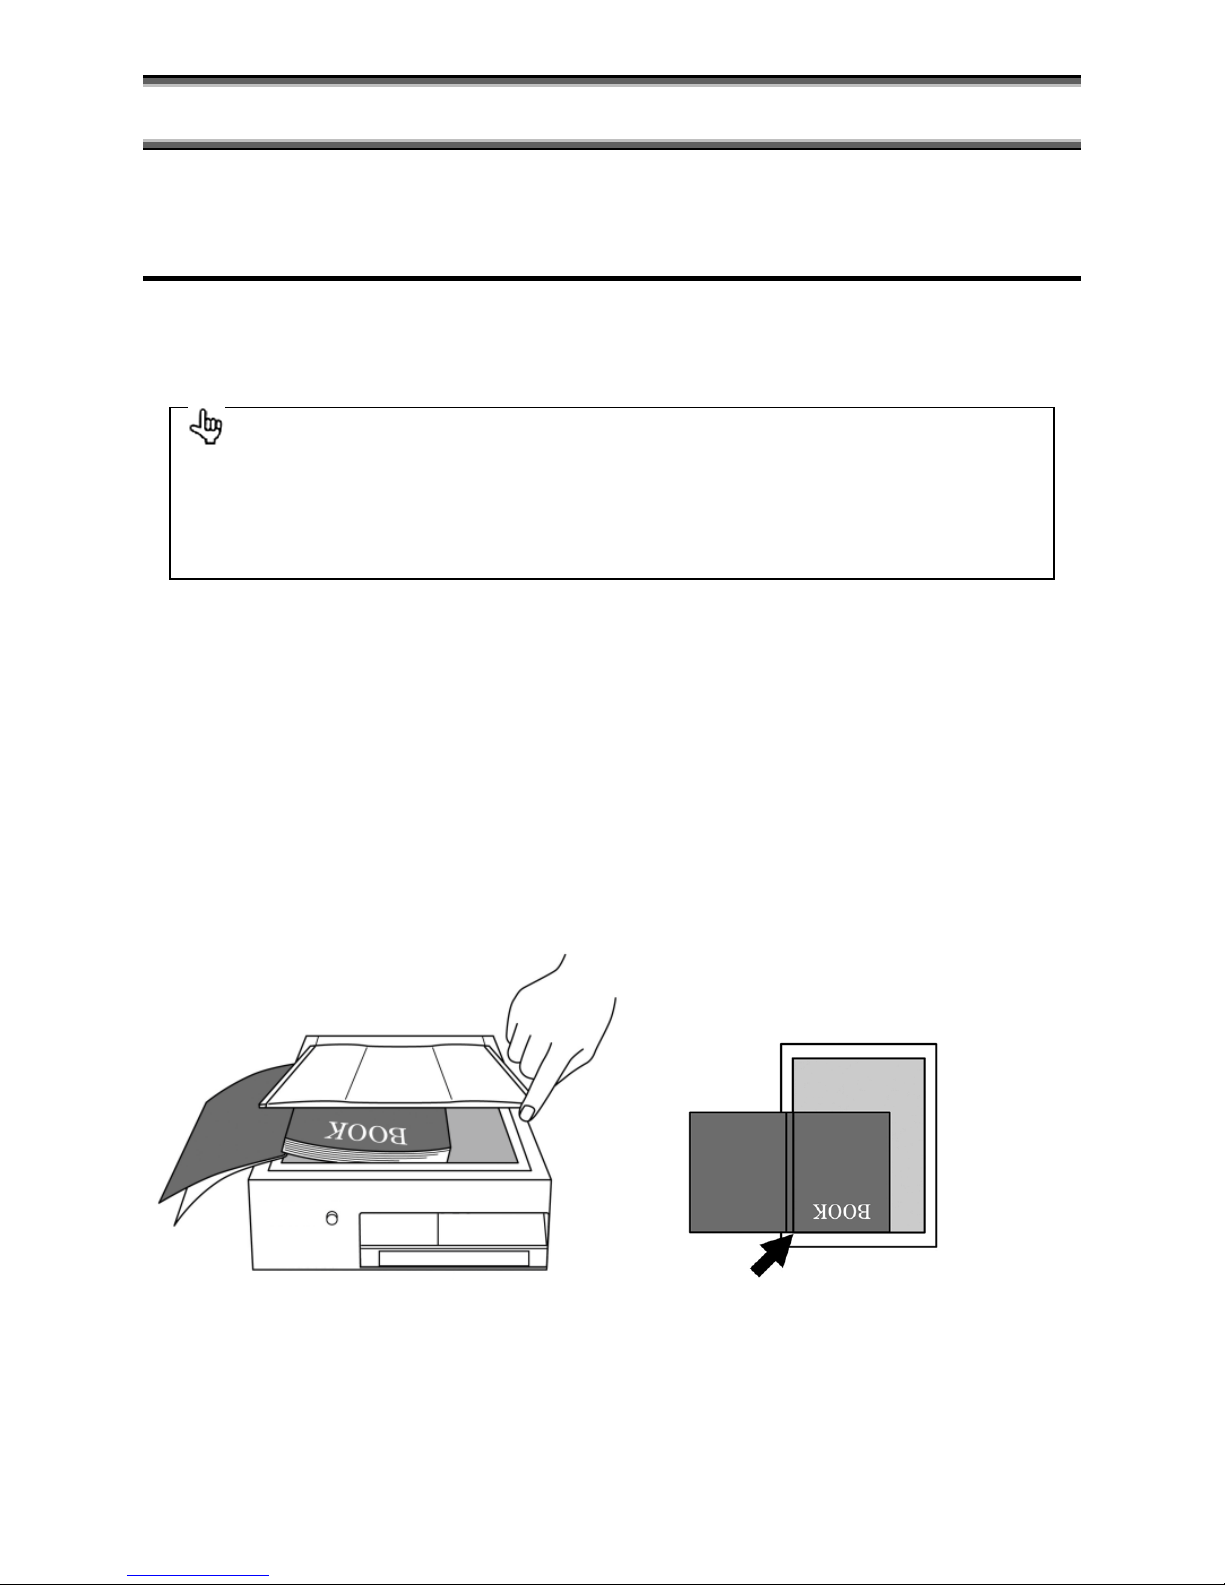
The way to place the material on the scanner window
Adjust the edge of the material to the nearest to you and the left side of the image
scanner.
Close the lid of the image scanner so that interfering light does not enter.
Press the lid in a uniform manner so that part of the document does not go up.
Next, we explain important points to get a good reading of all types of material.
In Case of Books
"Books", like novels, is one of the types of material that YMB is best at recognizing. Therefore, the
accuracy of recognition is very high and you will understand the contents just by listening to them.
However, it might not be able to correctly read some parts in case of textbooks with diagrams or
numerical formulas or in case of books with many technical words.
To read a book, scan the pages one by one. YMB will read correctly, no matter the material is written
horizontally or vertically, since it recognizes the direction of writing.
Page 11
9
You can scan two pages at once in case of pocket books or duodecimo-sized books. If you do so,
after placing a book, close the lid of the image scanner and keep pressing it down until the scanning
finishes, because the lid will not close completely. Also, be careful because the central part of the
book tends to separate from the glass window.
Tips
When reading a book of tens of pages at once, Multiple Page Scan (explained in 6.1. Multiple
Page Scan(p.31)) is convenient.
In Case of Invoices and Receipts
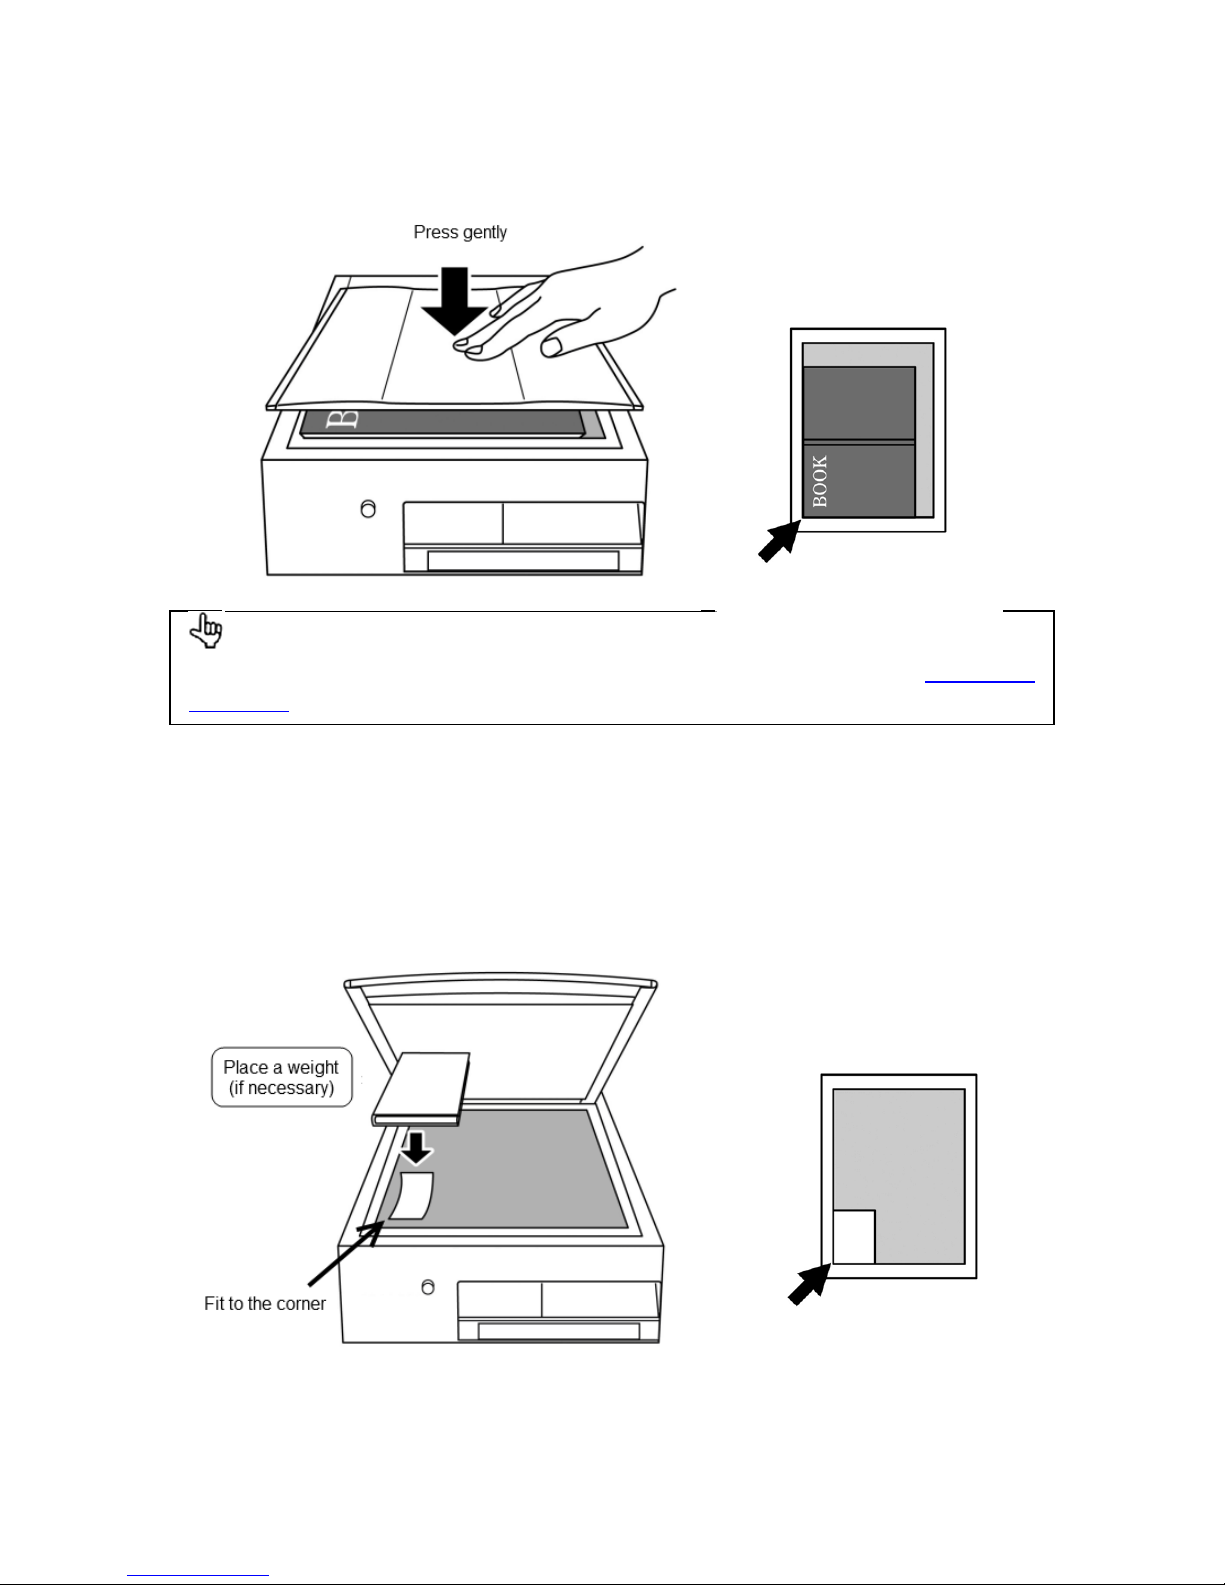
In case of invoices and receipts, it's important to adjust their corner to the nearest left corner of the
image scanner in order to get the highest possible accuracy of recognition, because, generally, not
much is written on them and the paper is small. When the paper tends to fold, you might want to put
something heavy on it if necessary.
Generally, not much is written on invoices and receipts, except for numbers. So sometimes, you
might not understand their contents just by listening to YMB reading them. When this happens, you
will need to infer the meaning from the context, using the Up, Down, Left and Right keys. In addition,
depending on the type of printer used to print invoices and receipts, some of them can not be
correctly read by YMB.
Page 12
10
In Case of Newspapers
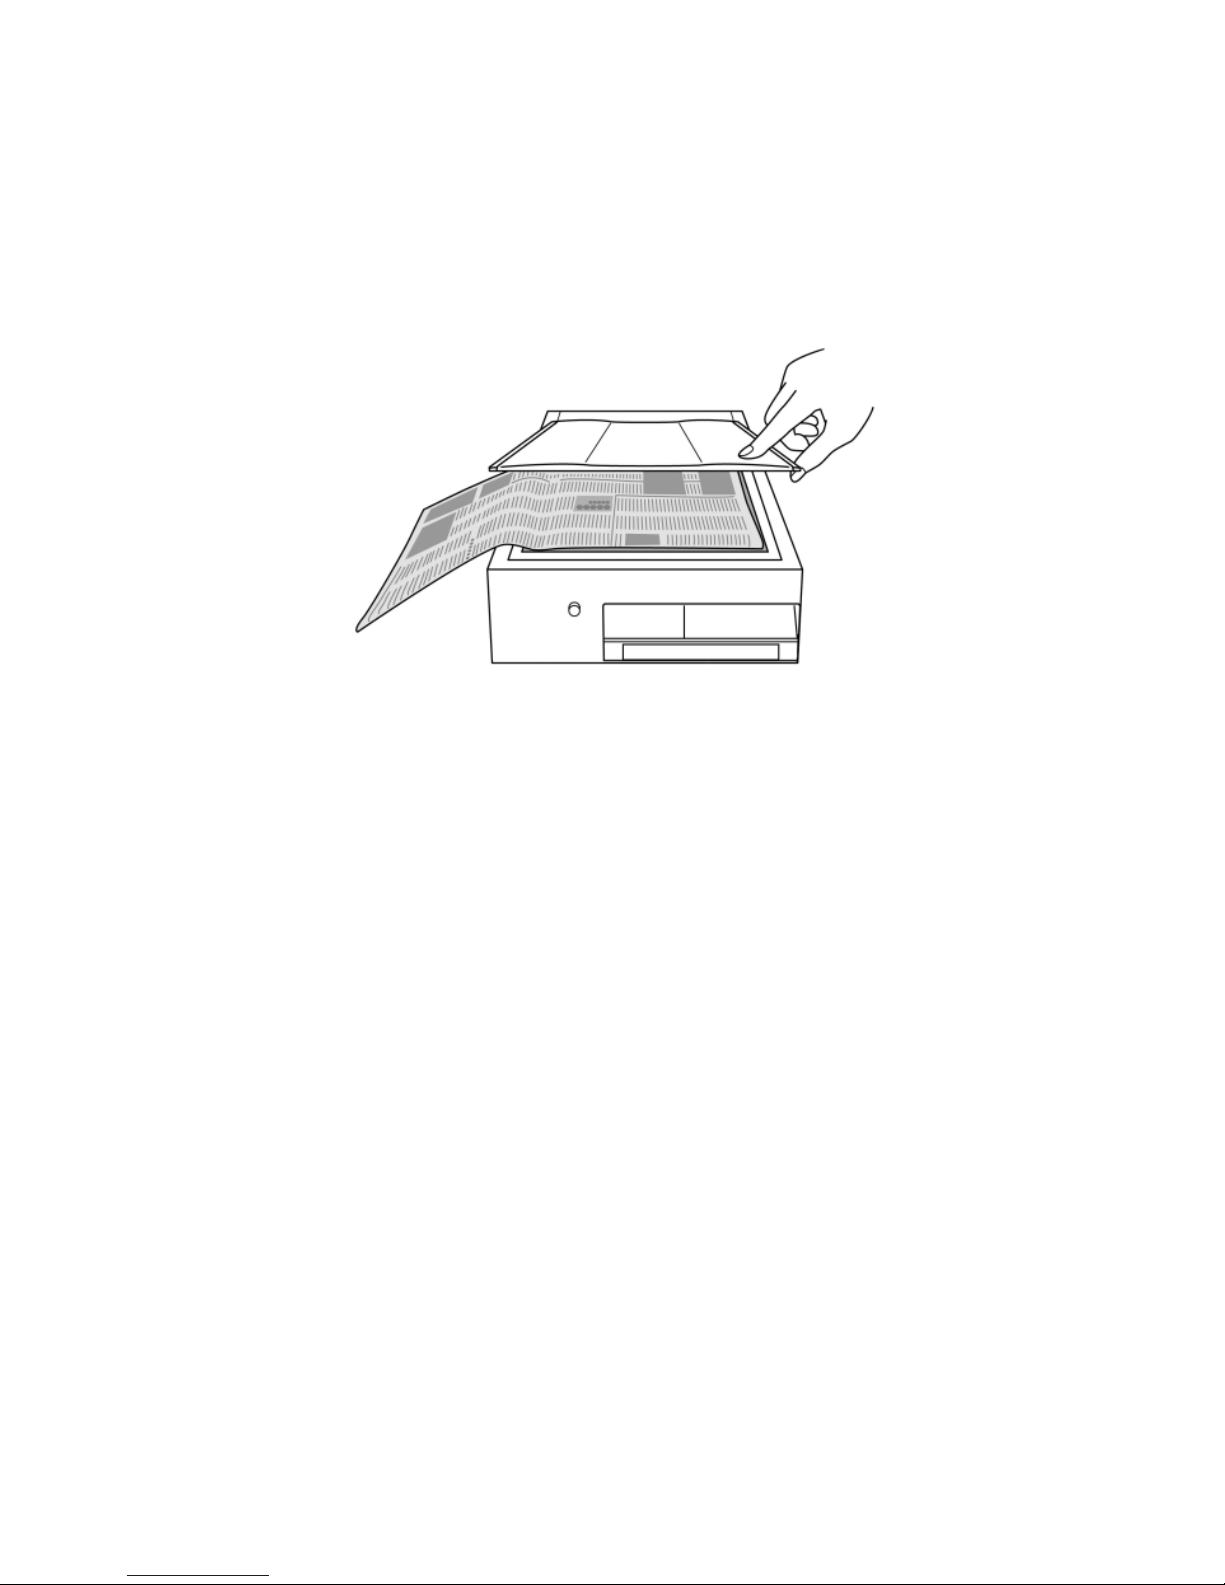
One thing to be careful of when making YMB read newspapers is that the paper might wrinkle
because it's thin. Also, in case of paper folded in a bundle, it is better to separate and scan sheets
one by one when possible, because the folded area might separate from the glass window of the
image scanner. The tip is to put something big on the sheet to scan and slowly extend the paper
where there are wrinkles like if you were ironing something and close the lid.
YMB will read newspapers almost correctly when scanned under ideal conditions. However, it might
not read correctly when there are folded parts that separate from the scanner window, or parts
where the ink blurs. Besides, depending on the layout, it might make some mistakes in the reading
order.
Page 13
11
2.2. How to Use Page Correction
YMB reads in a manner that tries to support all types of generally available material, but it's
sometimes difficult to understand the material type when using this way of reading. In this case,
YMB can read the page in question more clearly using the function Page Correction performed by a
specific method.
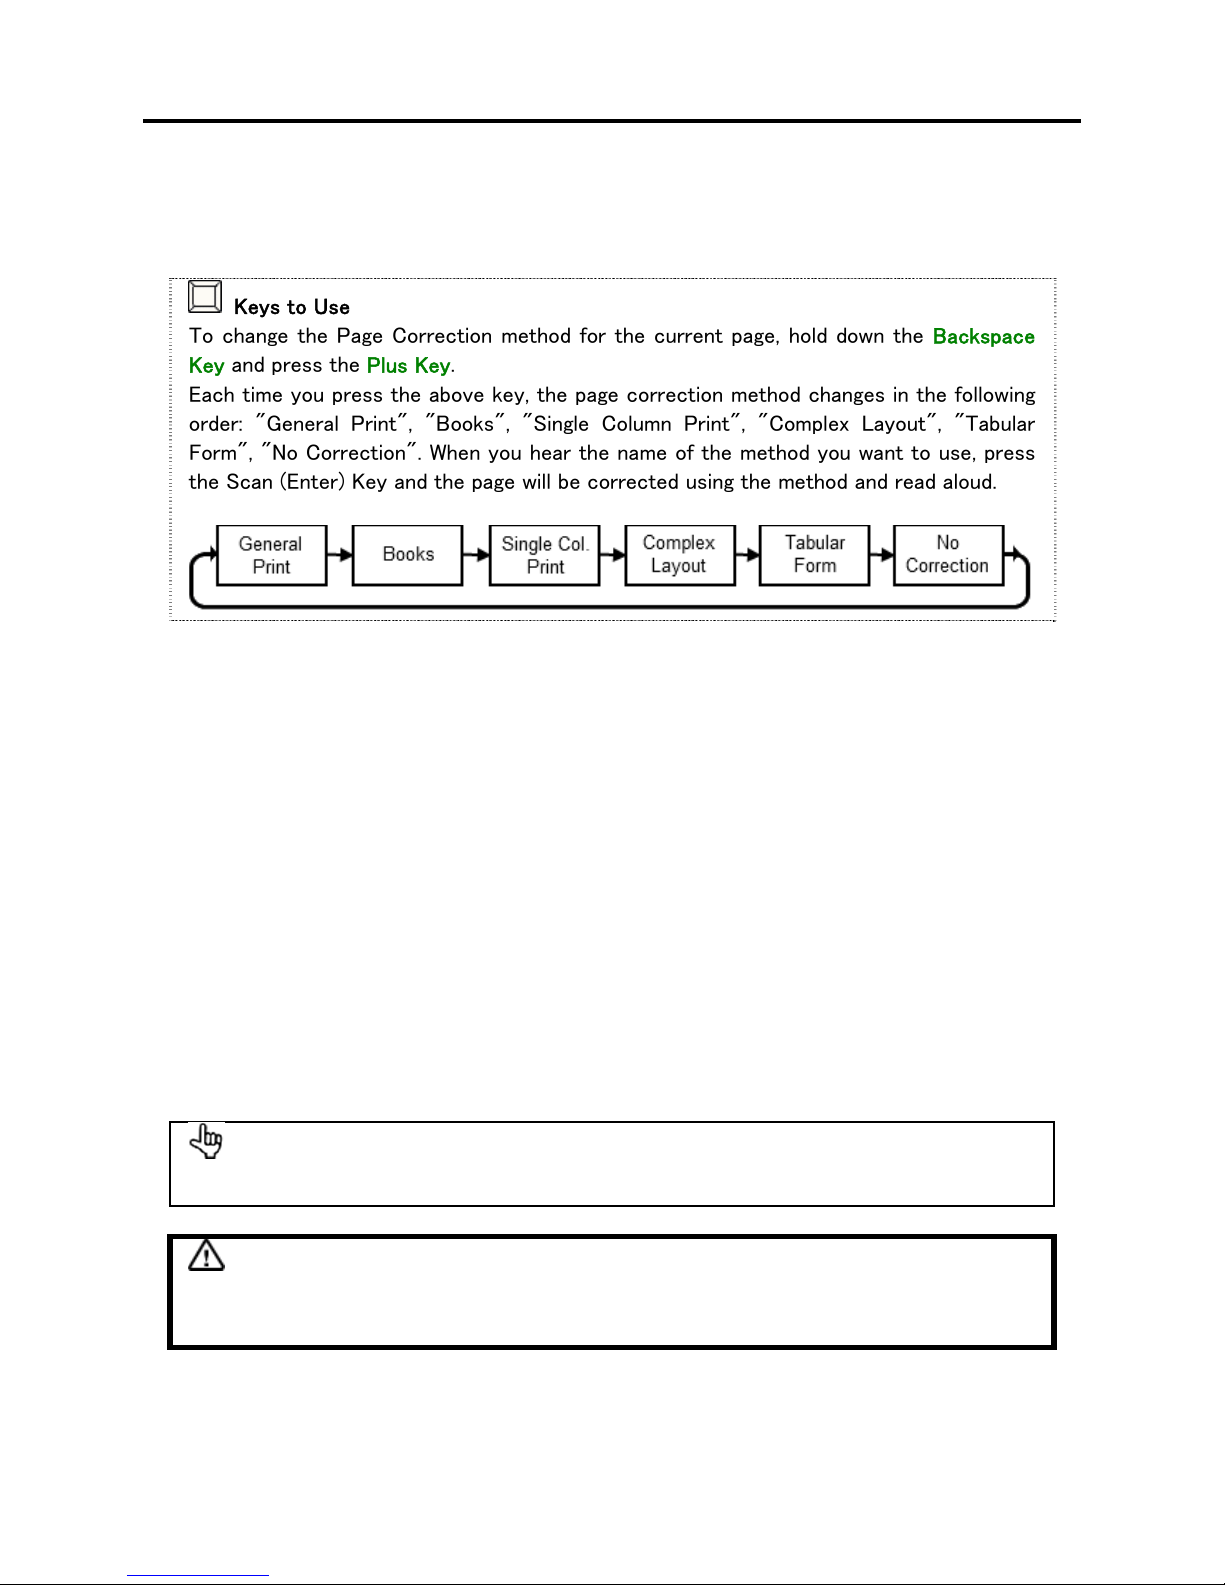
Keys to Use
To change the Page Correction method for the current page, hold down the Backspace
Key and press the Plus Key.
Each time you press the above key, the page correction method changes in the following
order: "General Print", "Books", "Single Column Print", "Complex Layout", "Tabular
Form", "No Correction". When you hear the name of the method you want to use, press
the Scan (Enter) Key and the page will be corrected using the method and read aloud.
The ways of Page Correction are as follows:
General Print: It's the ordinary way of Page Correction in YMB. YMB will read in the order it
recognizes the material, regardless of the type of material.
Books: This is used for print mainly consisting of text, such as novels, etc. YMB will read the
contents of each page except its page number and heading.
Single Column Print: It's good to read print written in one column, such as itemized writing of
menus, poetry, etc.
Complex Layout: YMB will analyze and read print with complex layout, such as newspapers,
etc.
Tabular Form: It's used for cases where many numbers are written and for writing in a table
format.
No Correction: It reads the original recognition results without correcting anything.
Caution
When using "Complex Layout" as the Page Correction way, it might take time to start
reading. This is not a technical issue. Please wait until it starts reading.
Tips
When reading is not accurate using a certain page correction way, try another way.
Page 14
12
Chapter 3. Preservation and Management of Printed Material
In this chapter, we explain various ways to utilize the scanned material.
3.1. How to Read Previously Scanned Contents
How to Go to a Certain Page
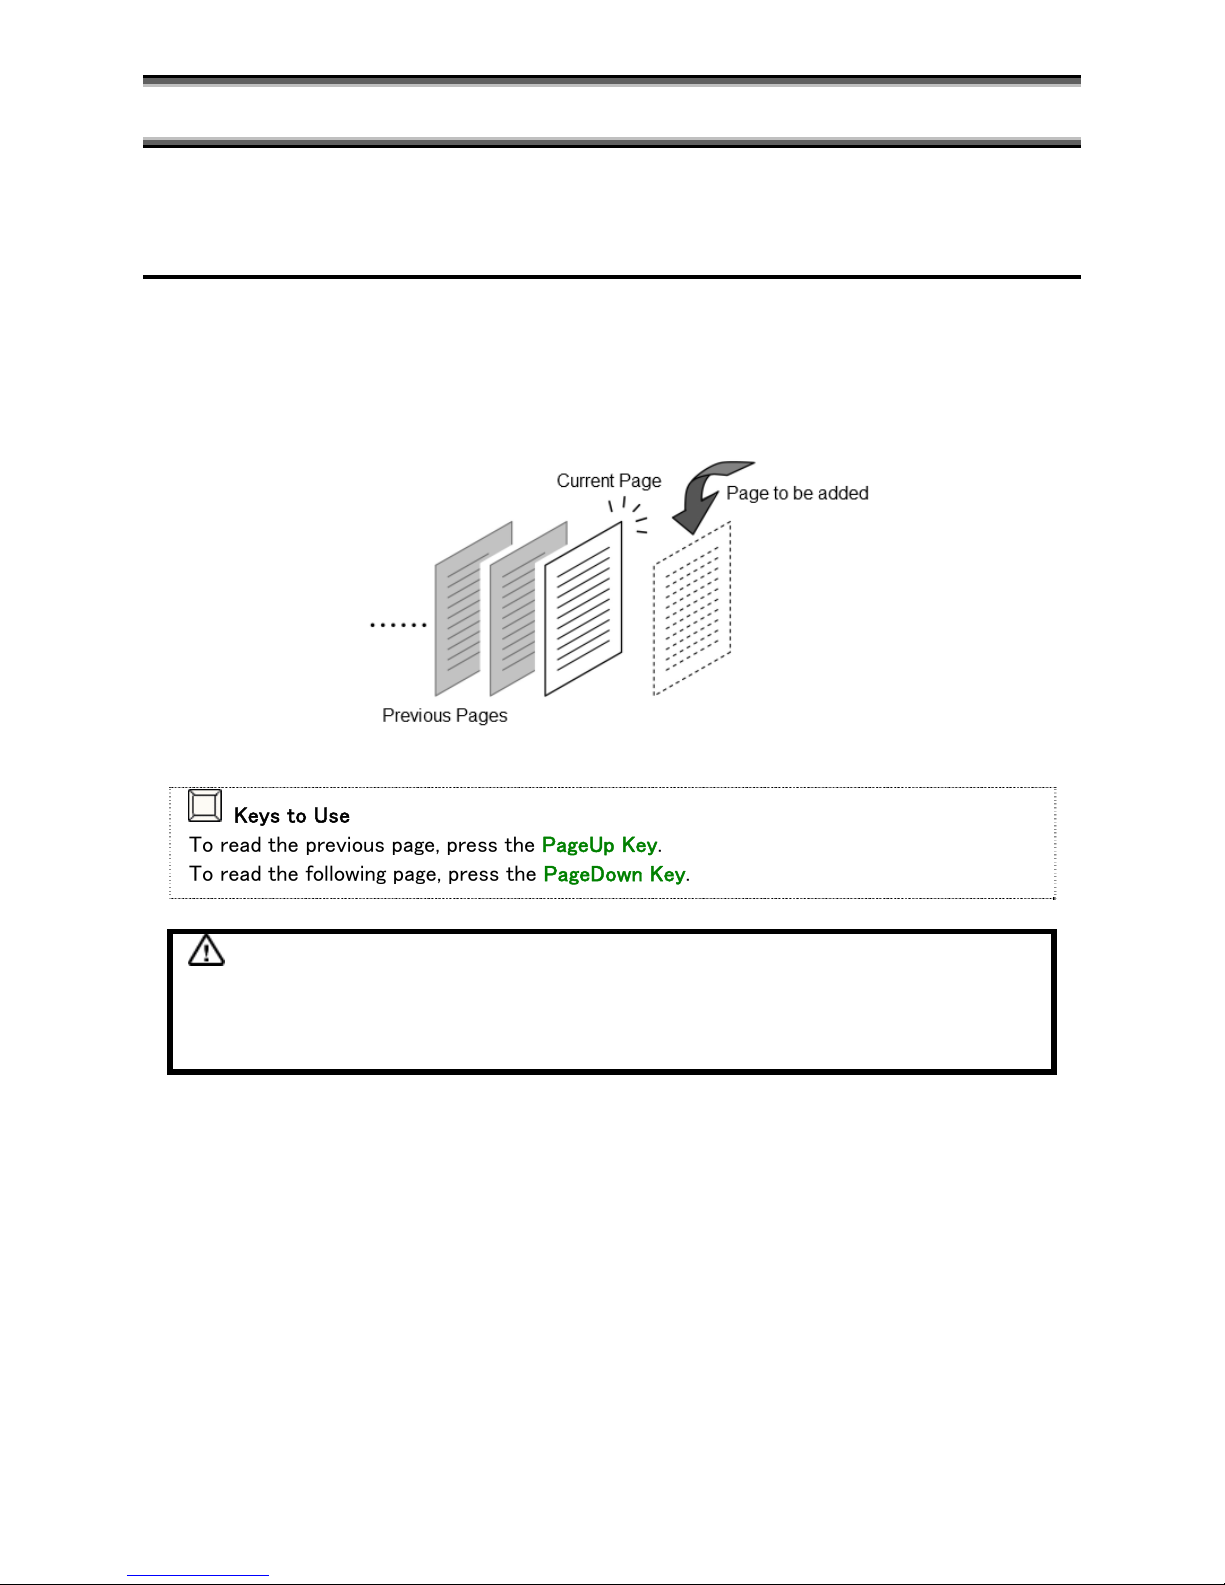
In YMB, all the contents of a printed material acquired by scanning are stored in page units. Each
time you scan something, a new page is added. When you want to listen again to contents scanned
before, use the operation called "Go to a page". In this manner, you can switch the page YMB is
currently reading.
Keys to Use
To read the previous page, press the PageUp Key.
To read the following page, press the PageDown Key.
Caution
With "Go to a page", you can go to pages only within the current document (explained
below). To read the pages of a different document, use the operation called "Move to a
document".
Page 15
13
How to Move to a Document
YMB stores all the contents of scanned printed material (pages). You can read any page afterwards,
but it becomes complicated as the number of stored pages increases. Therefore, in YMB, each page
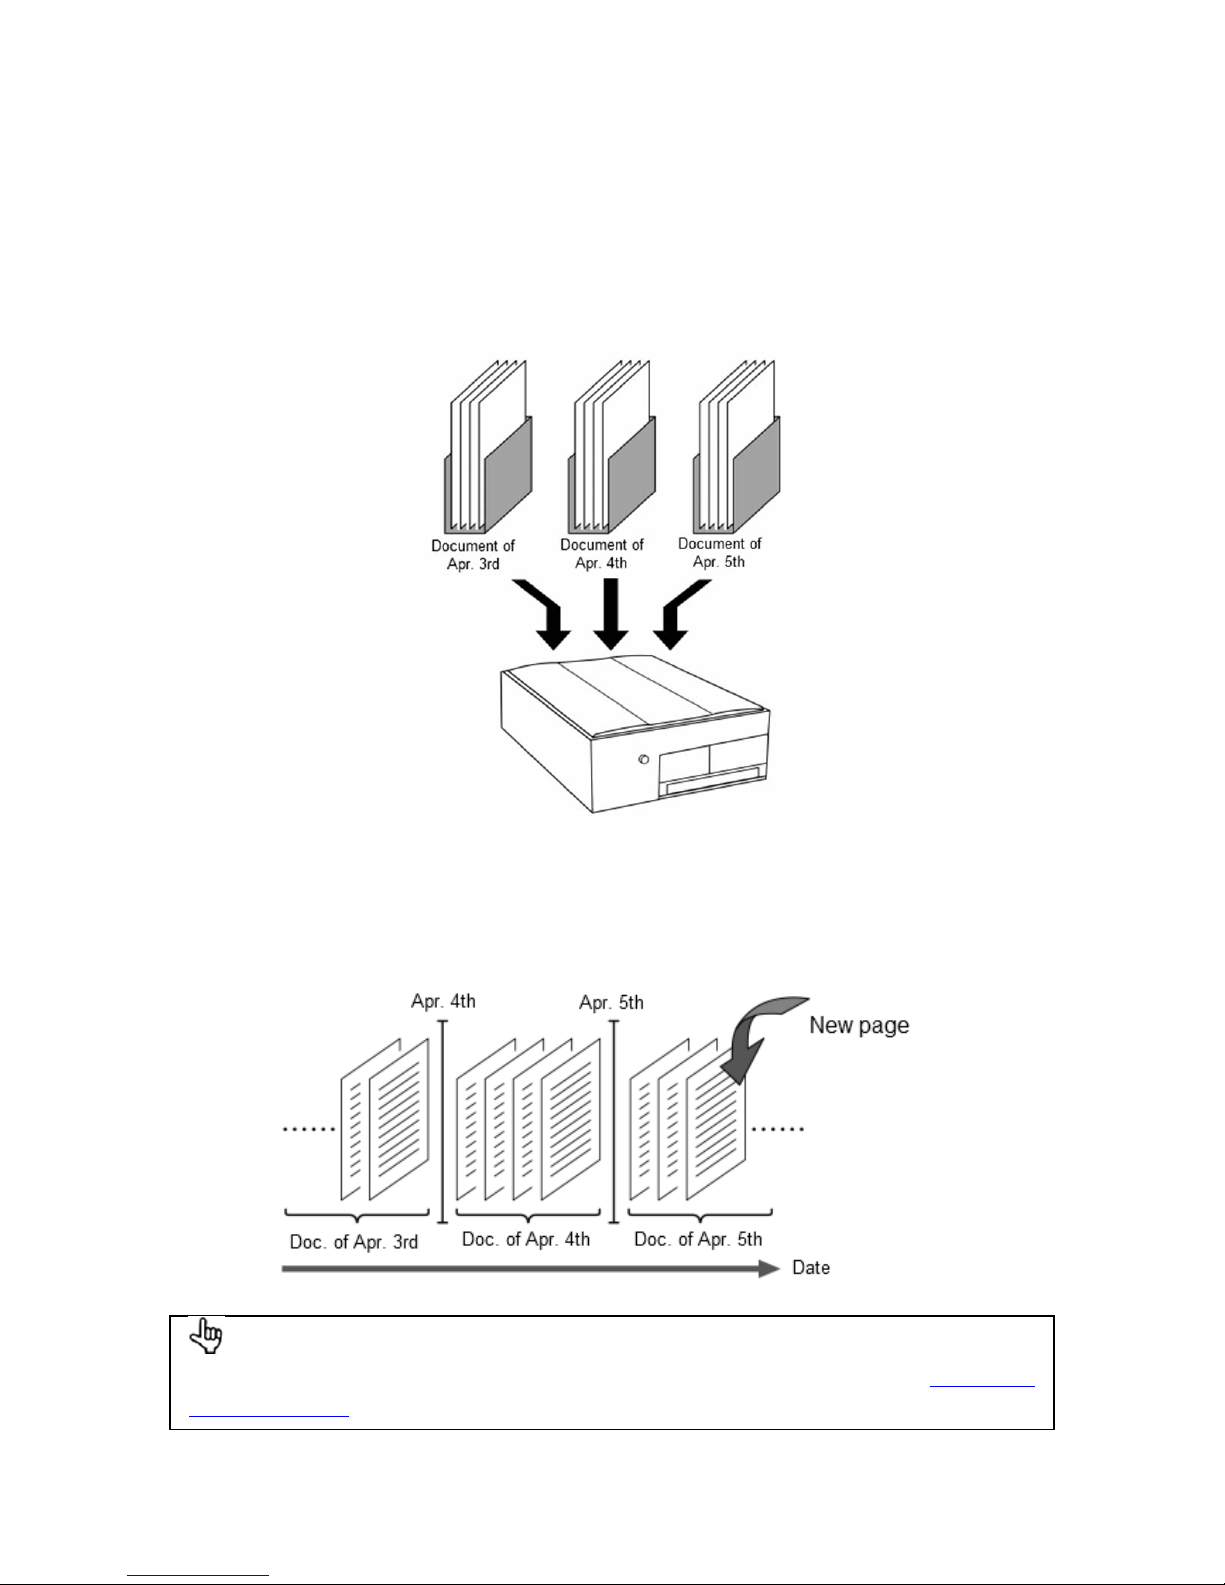
is arranged in bigger units called: documents. Please think of a document as a bunch of pages. Each
document is named after its creation date, and called "Document of (the date)". For example, if you
switch on YMB on April 4, scan 5 pages (the contents of 5 fliers) and switch it off, these 5 pages are
stored in "Document of April 4th". Thus, by saving the printed material scanned on one day as a
document in YMB, you can read it together later.
Once a day, before scanning the first page, it announces: "A new document has been created". At
that time a new document is prepared and pages scanned after that will be arranged in this
document. Generally, this document is in the open state until YMB is switched off. Scanned pages
are always added to the open document.
Tips
In YMB, documents can be made based on a method other than date. Refer to Creation of
a New Document(p.33)for details.
Page 16
14
You can read the pages of the currently open document, using the "go to a page" operations,
explained before. But you can not read the pages of different documents, using such operations. To
read the pages of other documents, you need to close the current document and open another one.
This is called: "Moving to another document". For example, if you move to the previous document
when "Document of April 5th" is open, "Document of April 5th" will close and "Document of April
4th" will open. After that, you can read the contents of "Document of April 4th" and add pages to it.
Keys to Use
To move to the previous document, hold down the Cancel (Tab) Key and press the PageUp
Key.
To move to the next document, hold down the Cancel (Tab) Key and press the PageDown Key.
Caution
In YMB, newly scanned pages are placed at the end of the currently opened document. Be
careful, because, if you scan a page after opening another document, that page will be added
to the currently opened document.
3.2. How to Delete the Acquired Contents
Generally, acquired pages do not need to be deleted because a lot of information can be stored in
YMB. However, if the page is not needed anymore, you can delete its contents using Page Deletion.
Keys to Use
To delete the page you are currently reading, press the PageUp Key twice while holding
down the Backspace Key. It will announce: "Page Deletion" the first time you press the
PageUp Key and it will delete the page when you press it for the second time.
After you delete the page, the previous page will be displayed. When there are no more
pages in the document, it will announce "No Page".
Page 17
15
3.3. How to Use YMB's Documents with a PC
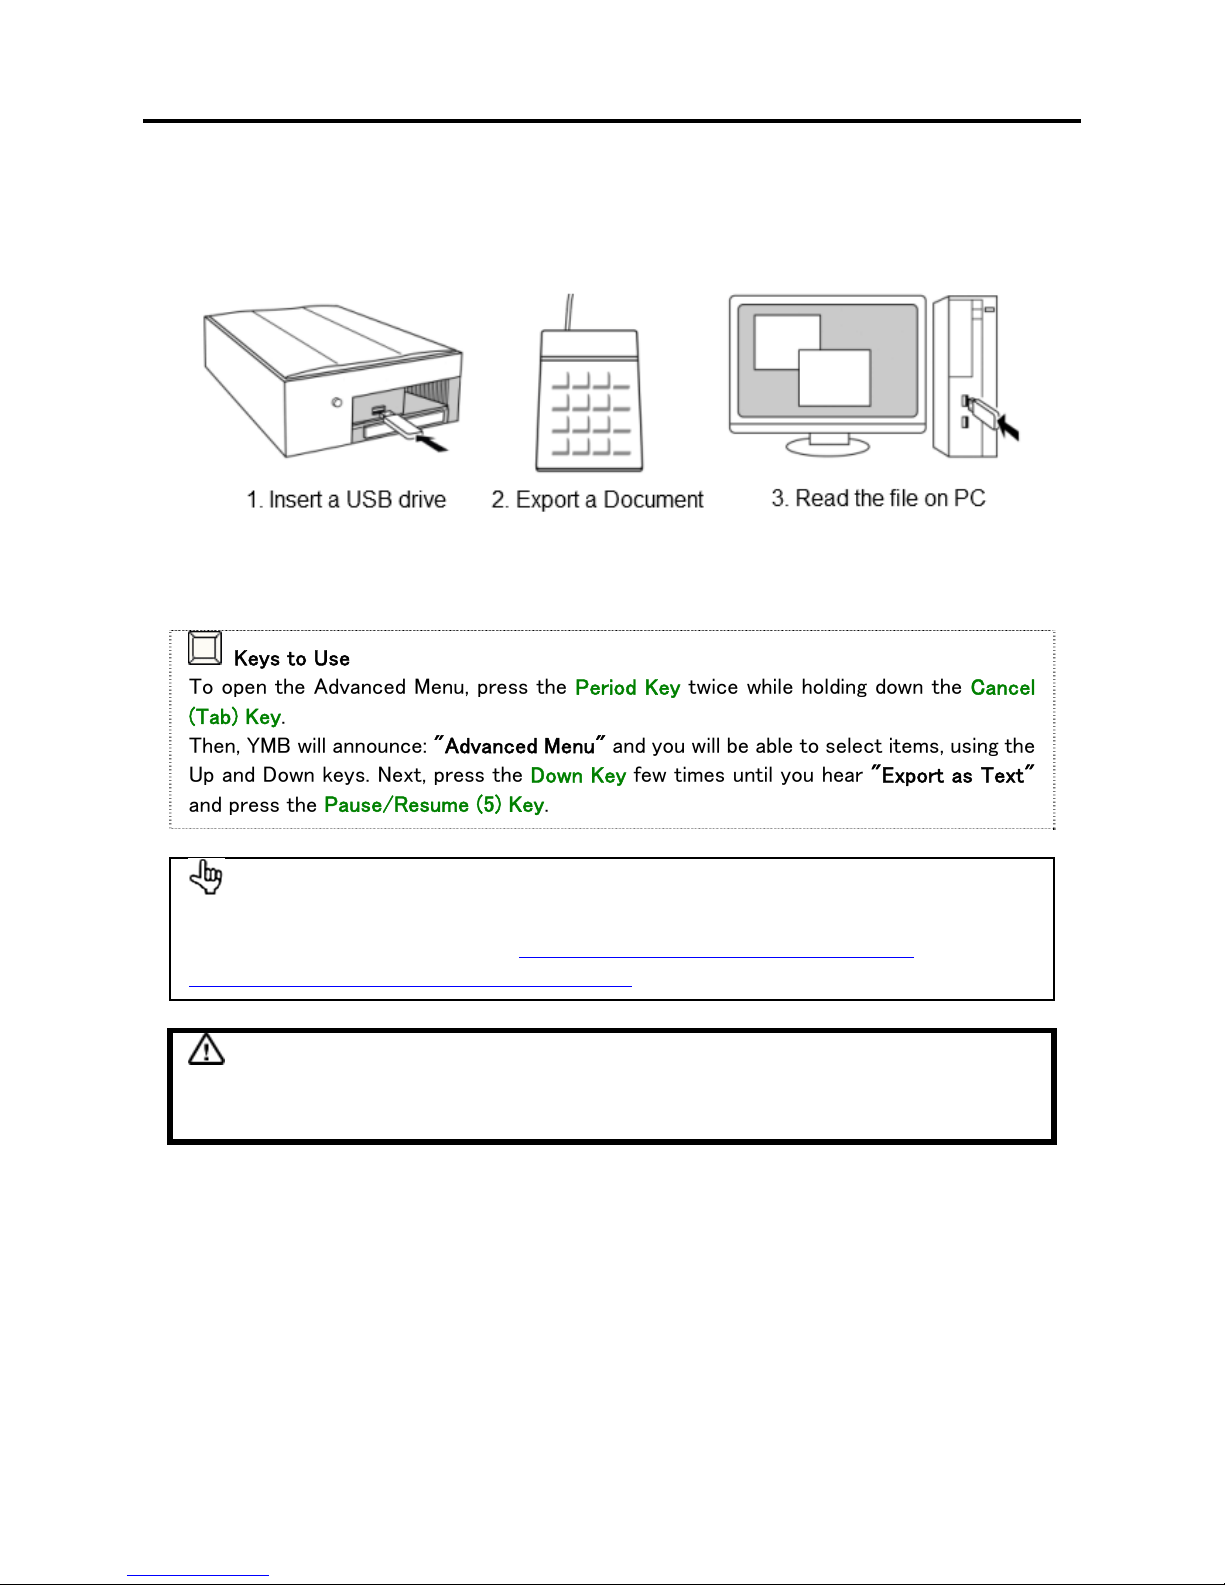
If you have a computer, you can use the contents acquired by YMB on your computer. To do this,
you will need a USB drive. First insert the USB drive in YMB's USB port and select the operation
called "Export as Text". Then, if you insert the USB drive in your PC, you can open the saved
contents as a text format file, using applications such as Notepad.
To export a document, use the Advanced Menu. In YMB, when you want to perform an operation
that is not used very often, use the Advance Menu.
Keys to Use
To open the Advanced Menu, press the Period Key twice while holding down the Cancel
(Tab) Key.
Then, YMB will announce: "Advanced Menu" and you will be able to select items, using the
Up and Down keys. Next, press the Down Key few times until you hear "Export as Text"
and press the Pause/Resume (5) Key.
Tips
Advanced Menu is a list of operations that are not used often. For other functions not
discussed in this chapter, refer to Chapter 6. Functions for Advanced Users(p.31)and to
Appendix B. Key Operations in Advanced Menu.(p.49)
Caution
To read files in text format with voice, using a PC or other software is needed. Consult with
your distributor for details.
Page 18
16
3.4. How to Use Bookmarks
If you have scanned an important document and want to read a certain passage of it later, you can
use bookmarks. If you place a bookmark on a page in YMB, you can later return to it very easily.
Keys to Use
To place a bookmark at the current reading passage, press the Slash Key twice.
You can place as many bookmarks as you like on the same document and bookmarks are not lost
when you switch YMB off. You can quickly jump to a passage containing a bookmark from any
position in the document.
Keys to Use
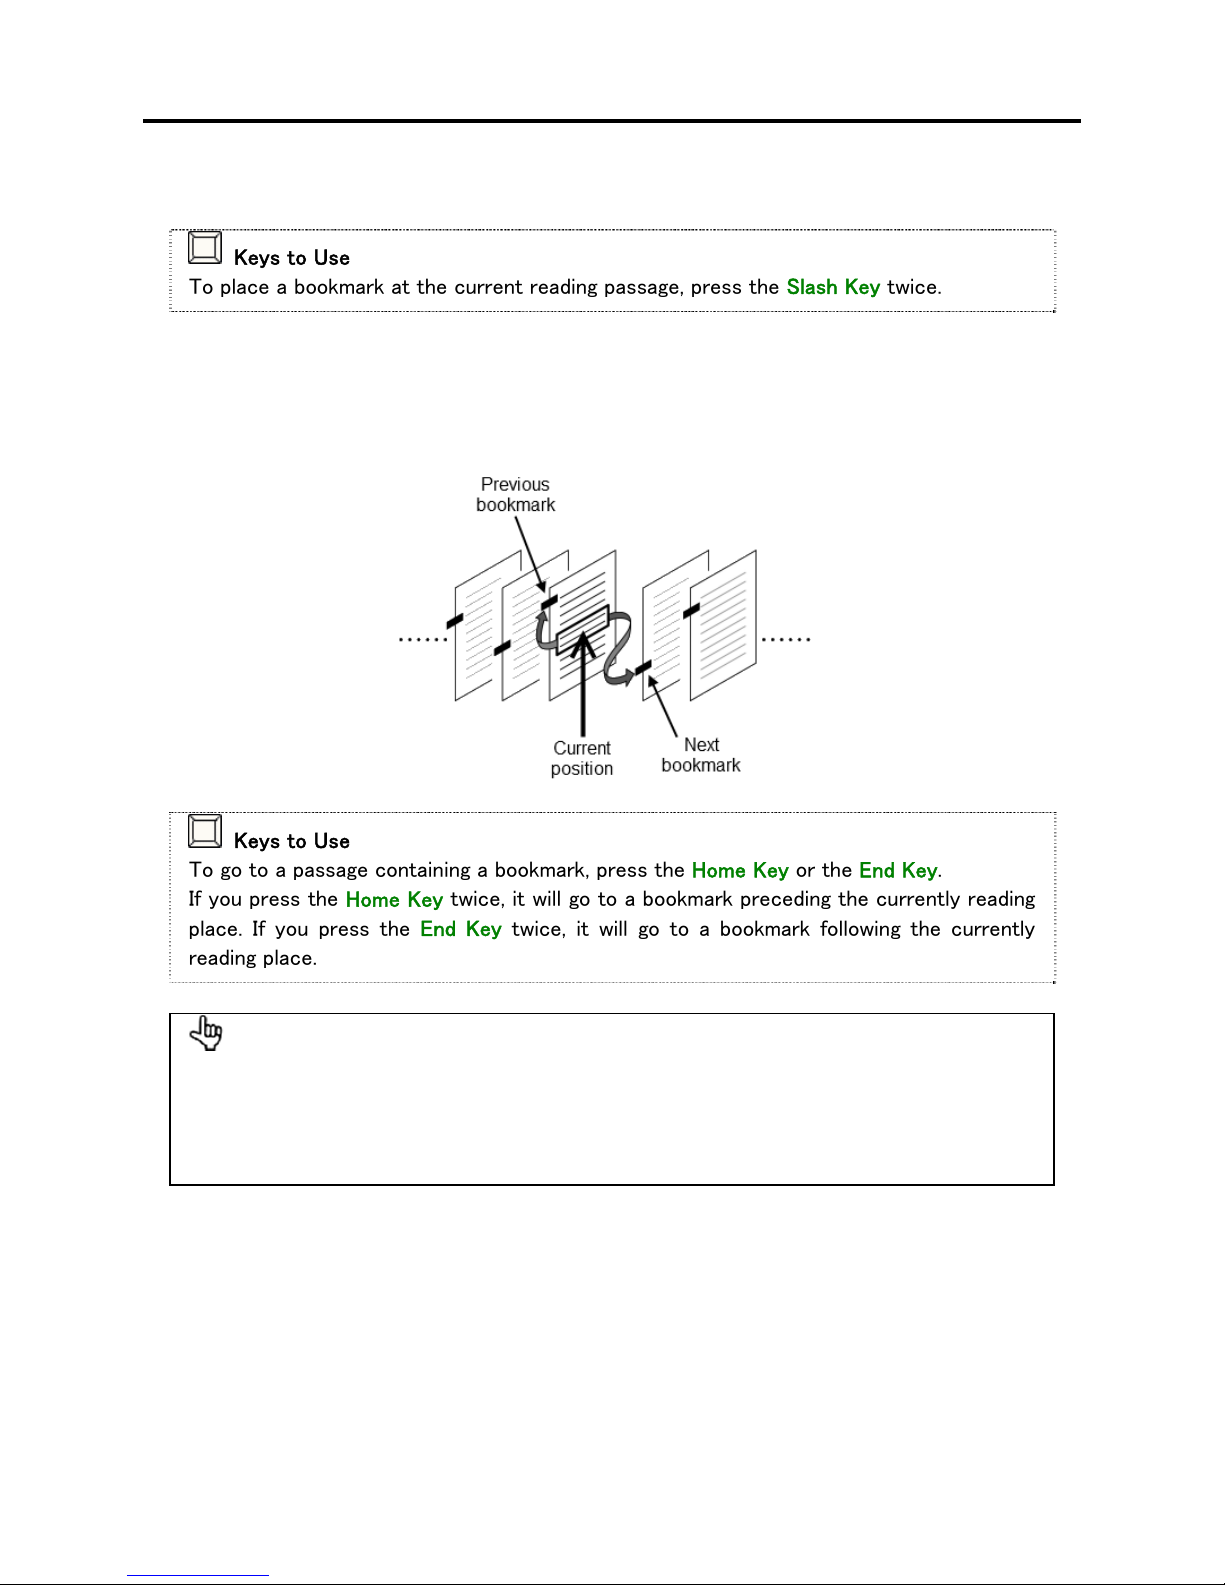
To go to a passage containing a bookmark, press the Home Key or the End Key.
If you press the Home Key twice, it will go to a bookmark preceding the currently reading
place. If you press the End Key twice, it will go to a bookmark following the currently
reading place.
Tips
In YMB, different from general books, bookmarks can be placed on specific clauses, not on
pages. Therefore, it is also possible to place multiple bookmarks on one page.
If you press the Slash Key at a position where there is already a bookmark, the bookmark
will be deleted.
Page 19
17
3.5. How to Go to a Specified Document or Page
When YMB is used for a long time, many documents are saved on it and it becomes difficult to go to
a desired document, using "Move to the previous document" or "Move to the next document"
operations. Here, we explain how to find the document one wishes to read among many documents.
Keys to Use
To choose a document, press the Plus Key for about two seconds. When it announces:
"Document Catalog", you can select documents.
In this case, use the Up Key or the Down Key to select the previous or the next document,
respectively. For each document, YMB announces the name and the time the document
was last updated. When you find the document you want to read, press the Pause/Resume
(5) Key to move to the document.
Also, there is a function to go to a specific page by typing its page number for cases where there are
several pages in a document. You need to perform this operation, using the Advanced Menu.
Keys to Use
To go to a specific page by number, first open the Advanced Menu. Press the Period Key
twice while holding down the Cancel (Tab) Key.
YMB will announce: "Advanced Menu" and you will be able to select items, using the Up
and Down keys. Next, press the Down Key few times until you hear "Go to a Page" and
press the Pause/Resume (5) Key.
After that, you can type in the page number using the number keys. After typing the page
number, press the Scan (Enter) Key to go to the intended page.
Caution
The rows of number keys on the keyboard of YMB are arranged in the opposite order to the
rows of the keyboard of a standard telephone. In YMB, the number keys are arranged as
follows: The left key of the nearest row is the Zero Key; the
keys of the next (upper) row are 1, 2, 3; the keys on the second next row to the nearest
row are 4, 5, 6, and so forth.
Page 20
18
Chapter 4. How to Listen to the Contents of a CD, DVD Or USB Drive
In this chapter, we explain how to listen to the contents of CDs, DVDs and USB drives with YMB.
4.1. How to Change YMB's Operating Modes
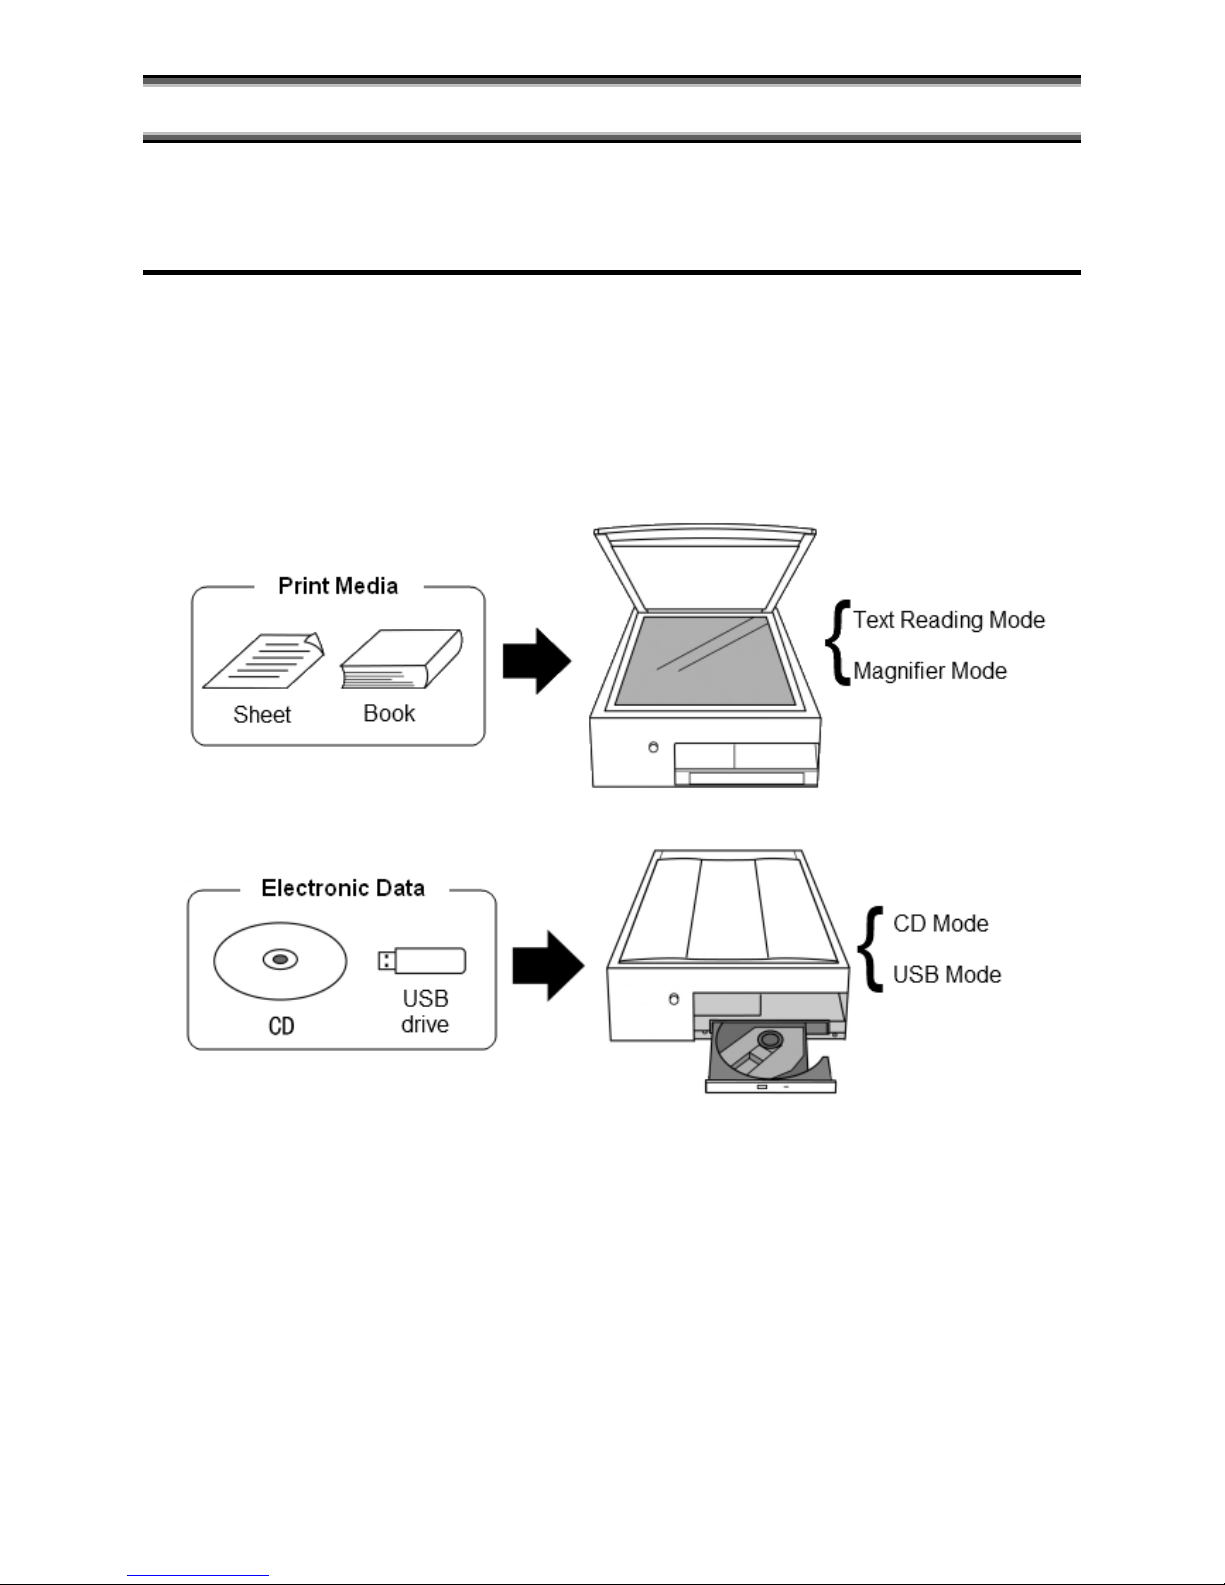
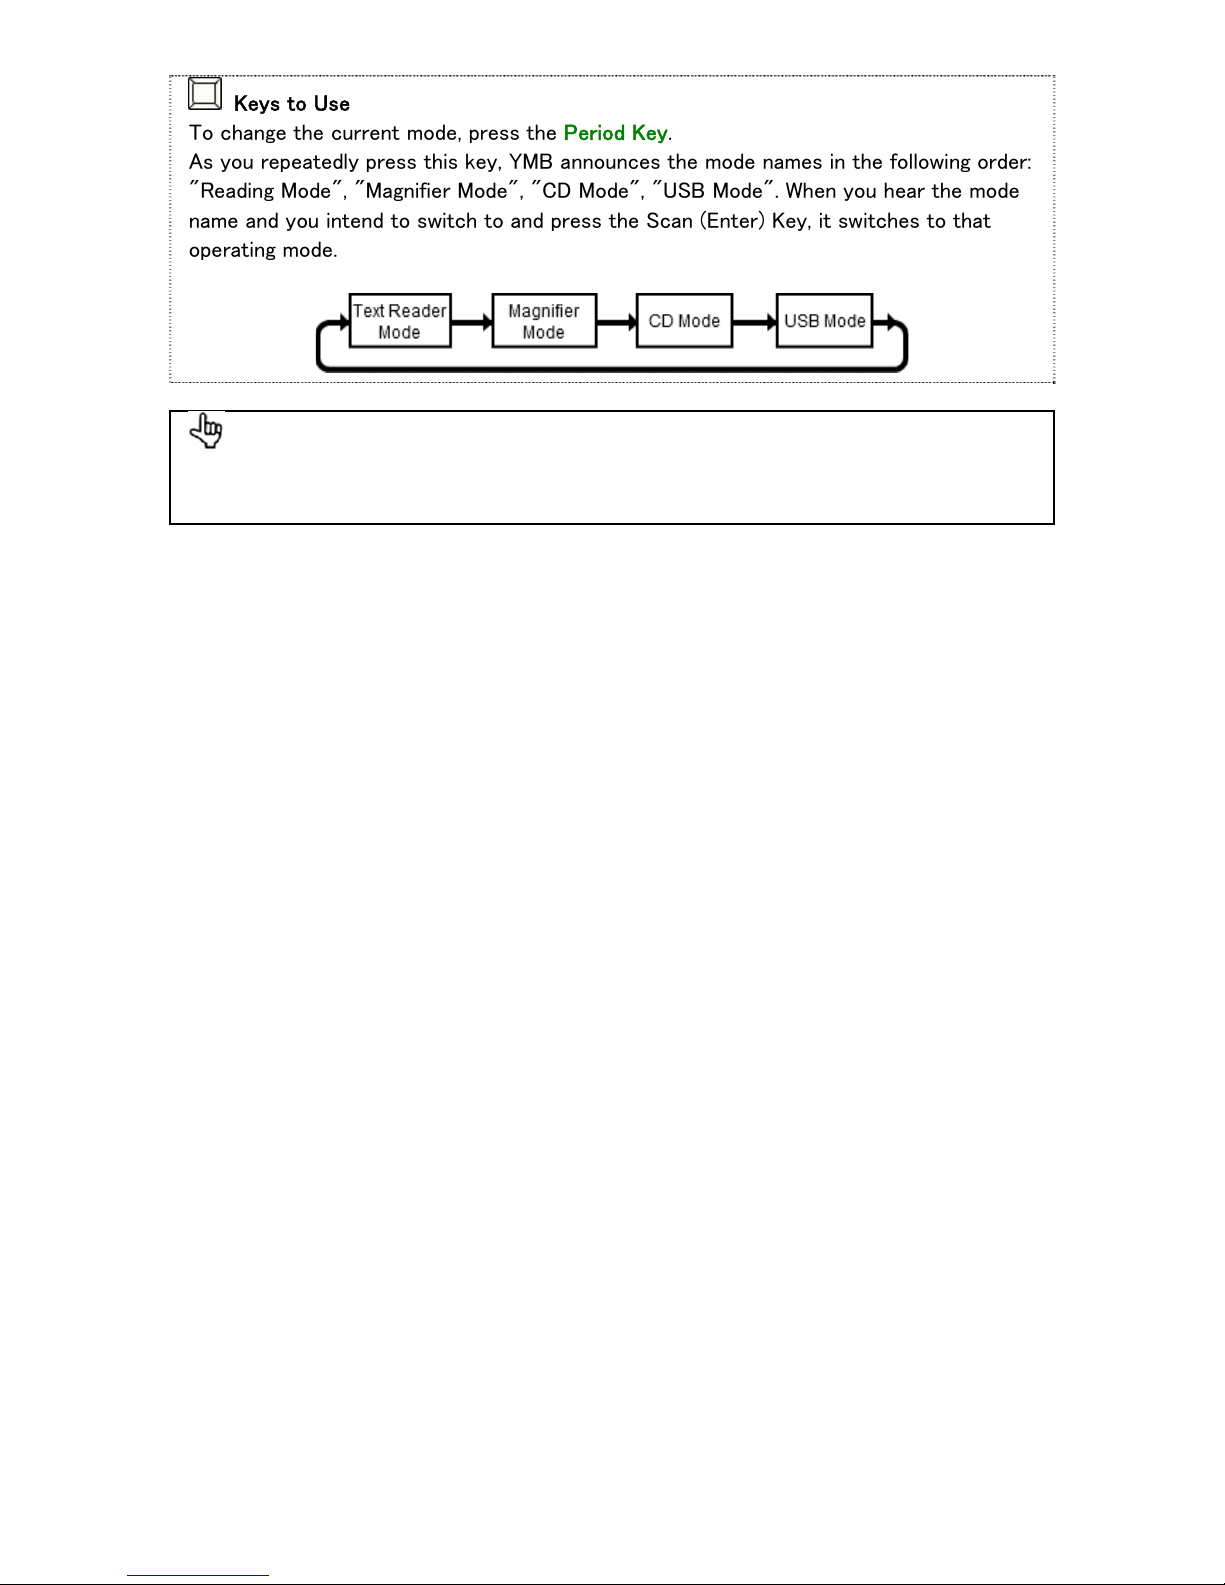
There are 4 operating modes in YMB. The "Reading Mode", the "Magnifier Mode", the "CD Mode"
and the "USB Mode". You should switch among these modes in YMB according to your
requirements. YMB will normally be in Reading Mode when its switched on. When the reading material
is acquired with the image scanner, the "Reading Mode" or the "Magnifier Mode" is used. On the
other hand, when playing the contents stored in a CD, DVD or USB drive, etc, the "CD Mode" or the
"USB Mode" is used (In this chapter, we call these two modes together as "CD/USB Mode").
YMB is either in Reading Mode or in Magnifier Mode when its switched on. To listen to the contents
of a CD, DVD, or USB drive with YMB, you first need to switch to "CD Mode" or "USB Mode".
Page 21
19
Keys to Use
To change the current mode, press the Period Key.
As you repeatedly press this key, YMB announces the mode names in the following order:
"Reading Mode", "Magnifier Mode", "CD Mode", "USB Mode". When you hear the mode
name and you intend to switch to and press the Scan (Enter) Key, it switches to that
operating mode.
Tips
If you insert a CD or DVD in the tray, YMB will automatically switch to the CD Mode even
if you do not press any key.
Page 22
20
4.2. Flow of the CD/USB Mode
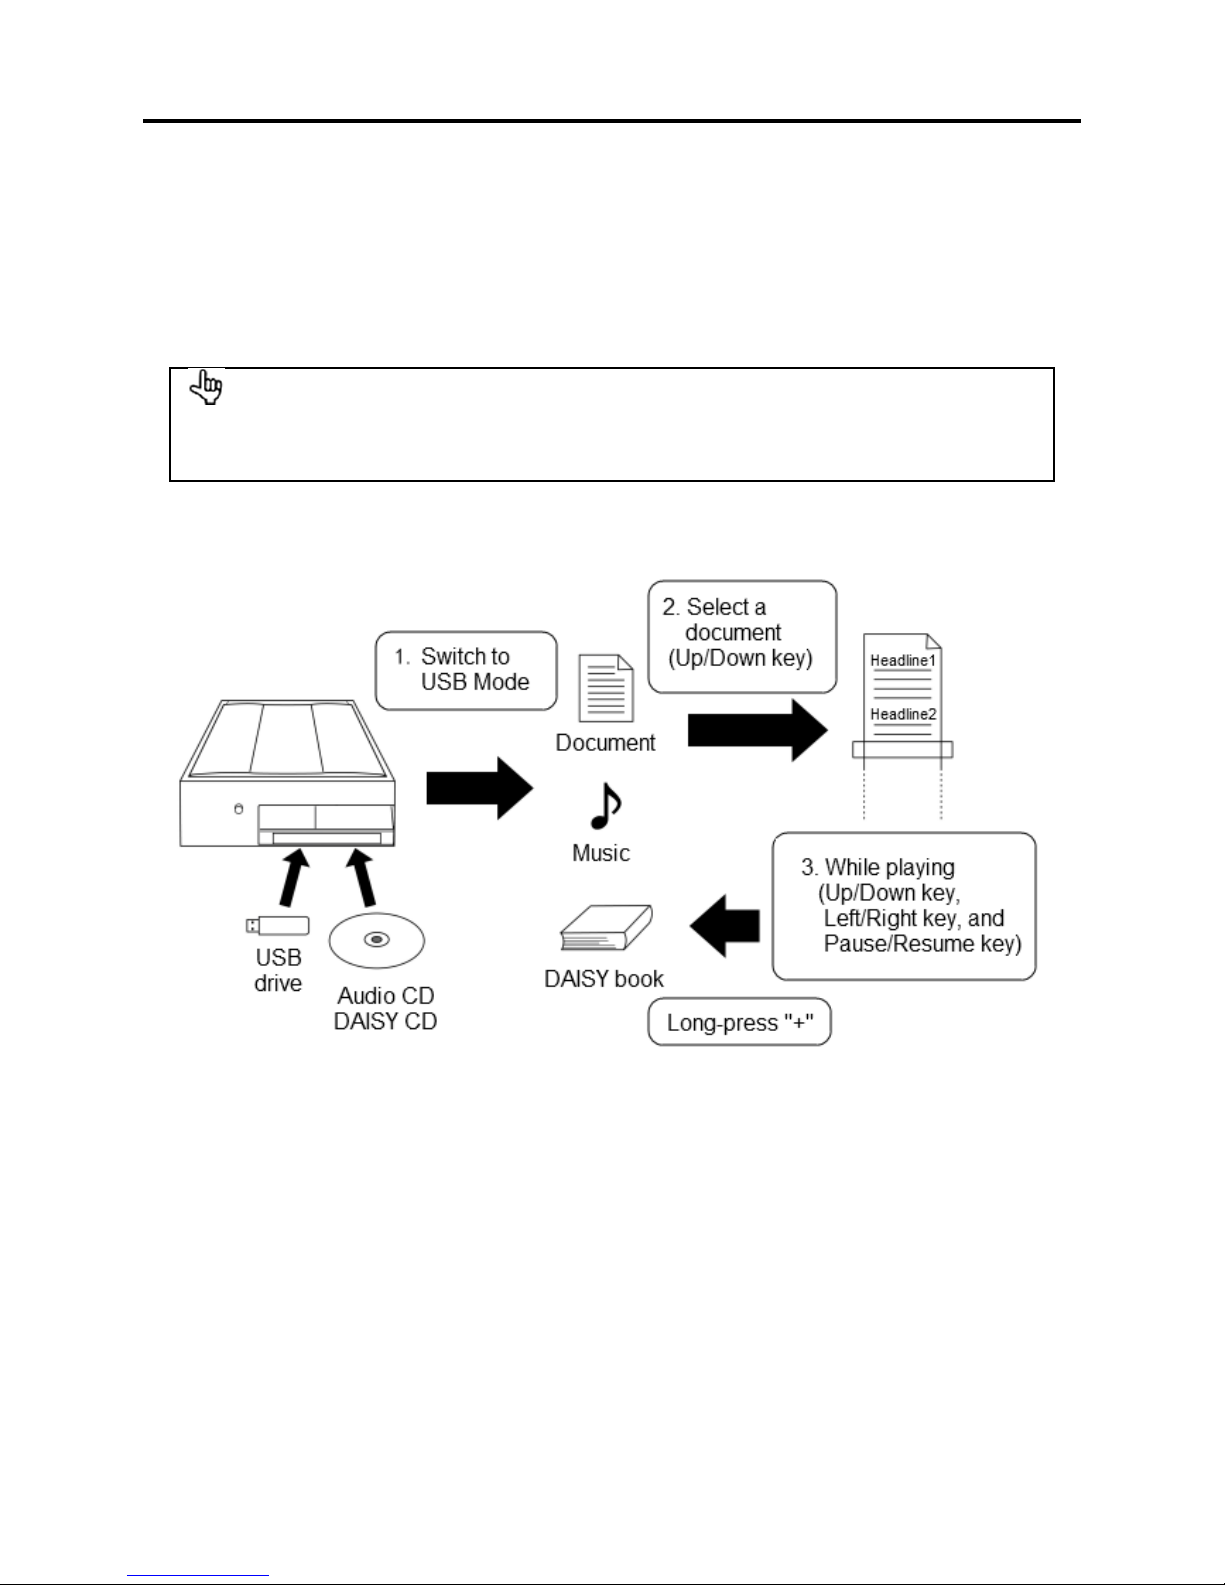
In CD/USB Mode, YMB automatically distinguishes the type of CD, DVD or USB drive inserted. At
present, YMB supports the following types of CD, DVD and USB drive.
Audio CDs
DVD Videos (Except for the ones recorded at home)
DAISY Books (stored in CDS and USB drives)
PC data (stored in CDs and USB drives)
Tips
Some portable DAISY players can be recognized by YMB as USB drives. In this case, if you
connect those DAISY players to YMB, you can play the DAISY books stored there.
In CD/USB Mode, the way of operation differs somehow, depending on the contents of the cd/USB
drive inserted, but the basic run is mainly as follows:
1. First insert a Cd, DVD or USB drive in YMB and change thus to CD/USB Mode.
2. Select the document, track or DAISY book that you want to listen to, using the Up Key and
the Down Key and comfirm it using the Pause/Resume (5) Key.
3. Then, use the Up, Down, Left or Right keys and the Pause/Resume (5) Key to go to the part
of the track or document you want to listen to.
4. If you hold down the Plus Key for about two seconds, playing stops and it returns to the
Document/Book selection list.
5. When playing finishes, take out the CD, DVD or USB drive from YMB.
Page 23
21
4.3. How to Listen to an Audio CD
When you insert an audio CD in YMB, it announces: "Audio CD". Afterwards, it announces the
number of tracks and total time, and then automatically starts playing.
Tips
When you play an audio CD that has been played before by YMB, YMB resumes playing
from the previous stop position.
While an audio CD is being played, you can change the playing position with the following keys:
Up Key/Down Key: Return to the previous track/advance to the next track.
Right Key/Left Key: Fast forward/Rewind (only while pressing)
Pause/Resume (5) Key: Stop or resume playing.
To finish playing the audio CD, press the button to eject the CD and remove it.
Tips
Even when YMB is playing a CD or DVD, if you press the Scan (Enter) Key twice, YMB
returns to the Reading Mode and starts scanning.
Page 24
22
4.4. How to Listen to a DAISY Book
DAISY books are recorded books in a CD format that can be borrowed from places such as Braille
libraries.
When you insert a DAISY book in YMB, it first announces: "Daisy book". If the inserted CD contains
more than one DAISY book, you need to select the book you wish to listen to. If there is only one
DAISY book in the CD or USB drive, YMB automatically starts playing the book.
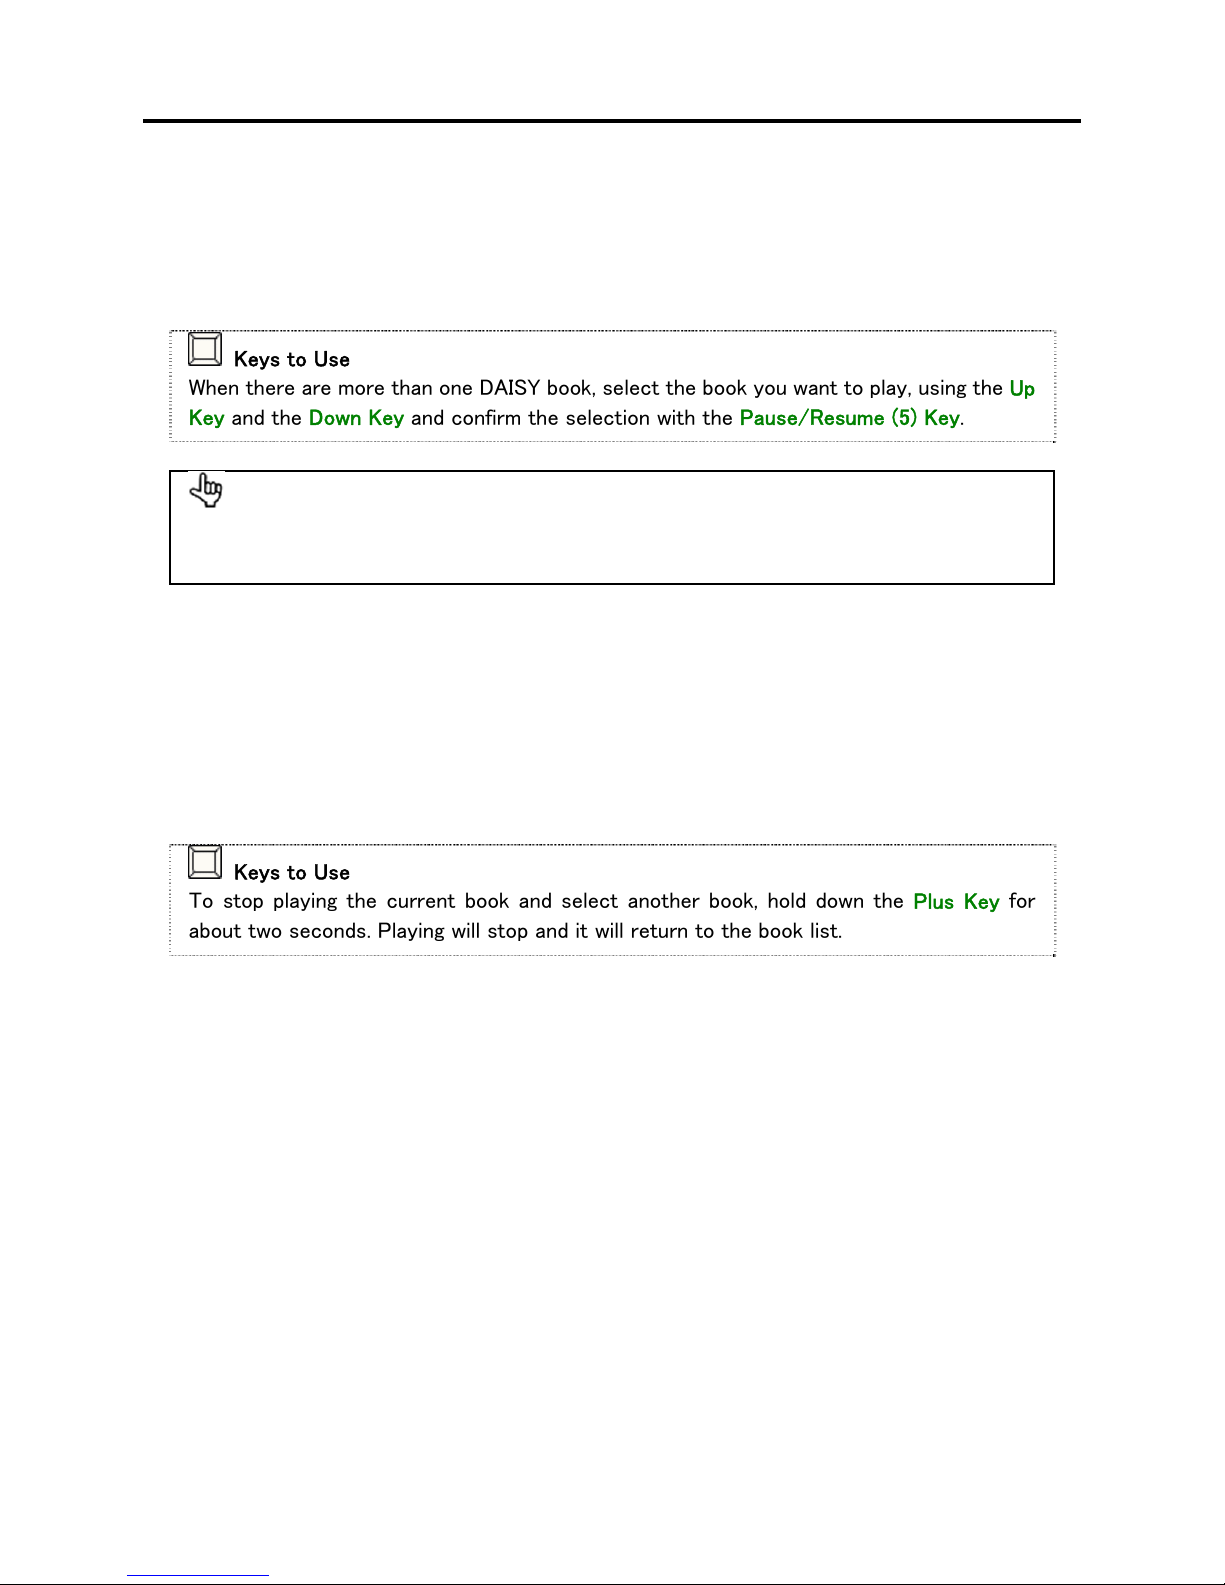
Keys to Use
When there are more than one DAISY book, select the book you want to play, using the Up
Key and the Down Key and confirm the selection with the Pause/Resume (5) Key.
Tips
When you insert a DAISY book that has been previously played by YMB before, it resumes
playing from the previous stop position.
While a DAISY book is being played, you can change the playing position with the following keys:
Up Key/Down Key: Return to the previous heading/advance to the next heading.
Left Key/Right Key: Return to the previous phrase/Advance to the next phrase.
Pause/Resume (5) Key: Stop or resume playing.
To finish playing the DAISY book, press the button to eject the CD and remove it. When the CD
contains more than one DAISY book, you can play another book using the Plus Key.
Keys to Use
To stop playing the current book and select another book, hold down the Plus Key for
about two seconds. Playing will stop and it will return to the book list.
Page 25
23
4.5. How to Watch a DVD Video
When you insert a video DVD in YMB, it announces: "DVD video" and automatically starts playing it.
Caution
It is required to plug a monitor into YMB when playing a DVD. Please see 5.1. Connecting a
Screen to YMB(p.26)for how to connect a monitor.
Caution
YMB can only play DVD software produced for the target region. It cannot play DVDs
produced for other regions and DVDs with recorded TV programs (DVD-VR).
Films contained in DVDs generally consist of more than one title and, sometimes, there are chapters
in each title. While a DVD is being played, you can change the playing position with the following
keys:
Up Key/Down Key: Return to the previous chapter/Advance to the next chapter.
Right Key/Left Key: Fast forward/Rewind (only while pressing)
Pause/Resume (5) Key: It stops when playing or it resumes playing.
Plus Key (long press): It displays the DVD Menu.
Tips
When a screen is connected to YMB, the DVD images are displayed on it.
Operations in the DVD Menu
DVDs generally contain a DVD Menu. DVD Menus consist of some "buttons", and most of the DVD
software on the market select the place to play and change the language of voice or of the subtitles
according to the selected button. You can use YMB's keyboard to operate the menu using the voice
guidance.
When the DVD Menu is displayed, YMB first announces: "Menu". Then, the number of buttons is
announced along with the number of the currently selected button, such as "1", "2", etc. In this
state, you can use the following keys to select the buttons:
Up Key/Down Key: Select next button/Select previous button
Pause/Resume (5) Key: It confirms the currently selected button.
When a button is selected, an action corresponding to it is performed such as to start playing from a
certain position among the titles, or to switch voice or subtitles between the currently available
languages. Another menu might appear as a result of selecting a certain button.
Page 26
24
Caution
The contents of DVD menus differs depending on the contents producer. There are several
differences in the order of buttons and their functions, depending on the software. Because
it's impossible for YMB to read the contents of the buttons of DVD menus with voice, there
is no way to know which button performs which function. On how to use the menu of each
DVD software, please consult with DVD software producers.
How to Switch Audio Tracks and Subtitles
Depending on the DVD software, audio tracks and subtitles in more than one language might be
stored. In this case, you can switch the audio currently used and the subtitles currently shown, using
the Advanced Menu.
Keys to Use
To change the voice currently being used, open the Advanced Menu. Then hold down the
Cancel (Tab) Key and press the Period Key twice.
YMB will announce: "Advanced Menu" and then you will be able to select items with the Up
and Down keys. Press the Down Key few times until you hear "Select an Audio Track" and
press the Pause/Resume (5) Key. To change the subtitles, select "Select a Subtitle",
which is the next item.
Then, the voice or subtitle options are shown and, when you select one of them, the
current voice or subtitle is changed.
Page 27
25
4.6. How to Listen to the Contents of a Data CD Or a Data USB Drive
In YMB's CD Mode or USB Mode, in addition to DAISY CDs and audio CDs, you can also play PC
data in CDs and USB drives. There are many formats of PC data, but YMB recognizes the contents
stored in CDs and USB drives and automatically uses the play mode suitable for that data. Thus, you
can play all kinds of data with almost the same operations. For the list of the PC data file formats
currently supported in YMB, consult Appendix D. List of File Formats Supported by YMB.(p.54)
When you insert a CD containing PC data in YMB, YMB announces: "Generic data". Then, select the
file you want to play from the files stored in the CD.
Keys to Use
Use the Up Key and the Down Key to select a file to play. If you press the Pause/Resume
(5) Key, it will start playing the selected file.
While a file is being played, you can change the playing position with the following keys:
PageUp Key/PageDown Key: Return to the previous page/advance to the next page.
Up Key/Down Key: Return to the previous heading/advance to the next heading.
Left Key/Right Key: Return to the previous phrase/Advance to the next phrase.
Pause/Resume (5) Key: Stop or resume playing.
To finish playing the file, press the button to eject the CD and remove it or press the Plus Key long
enough to return to the file list.
Tips
When there are characters drawn in an image file, YMB recognizes and reads them with
voice.
Page 28
26
Chapter 5. How to Use YMB as a Magnifier
In this chapter, we explain how to use YMB as a magnifier, connecting a screen to it.
5.1. Connecting a Screen to YMB
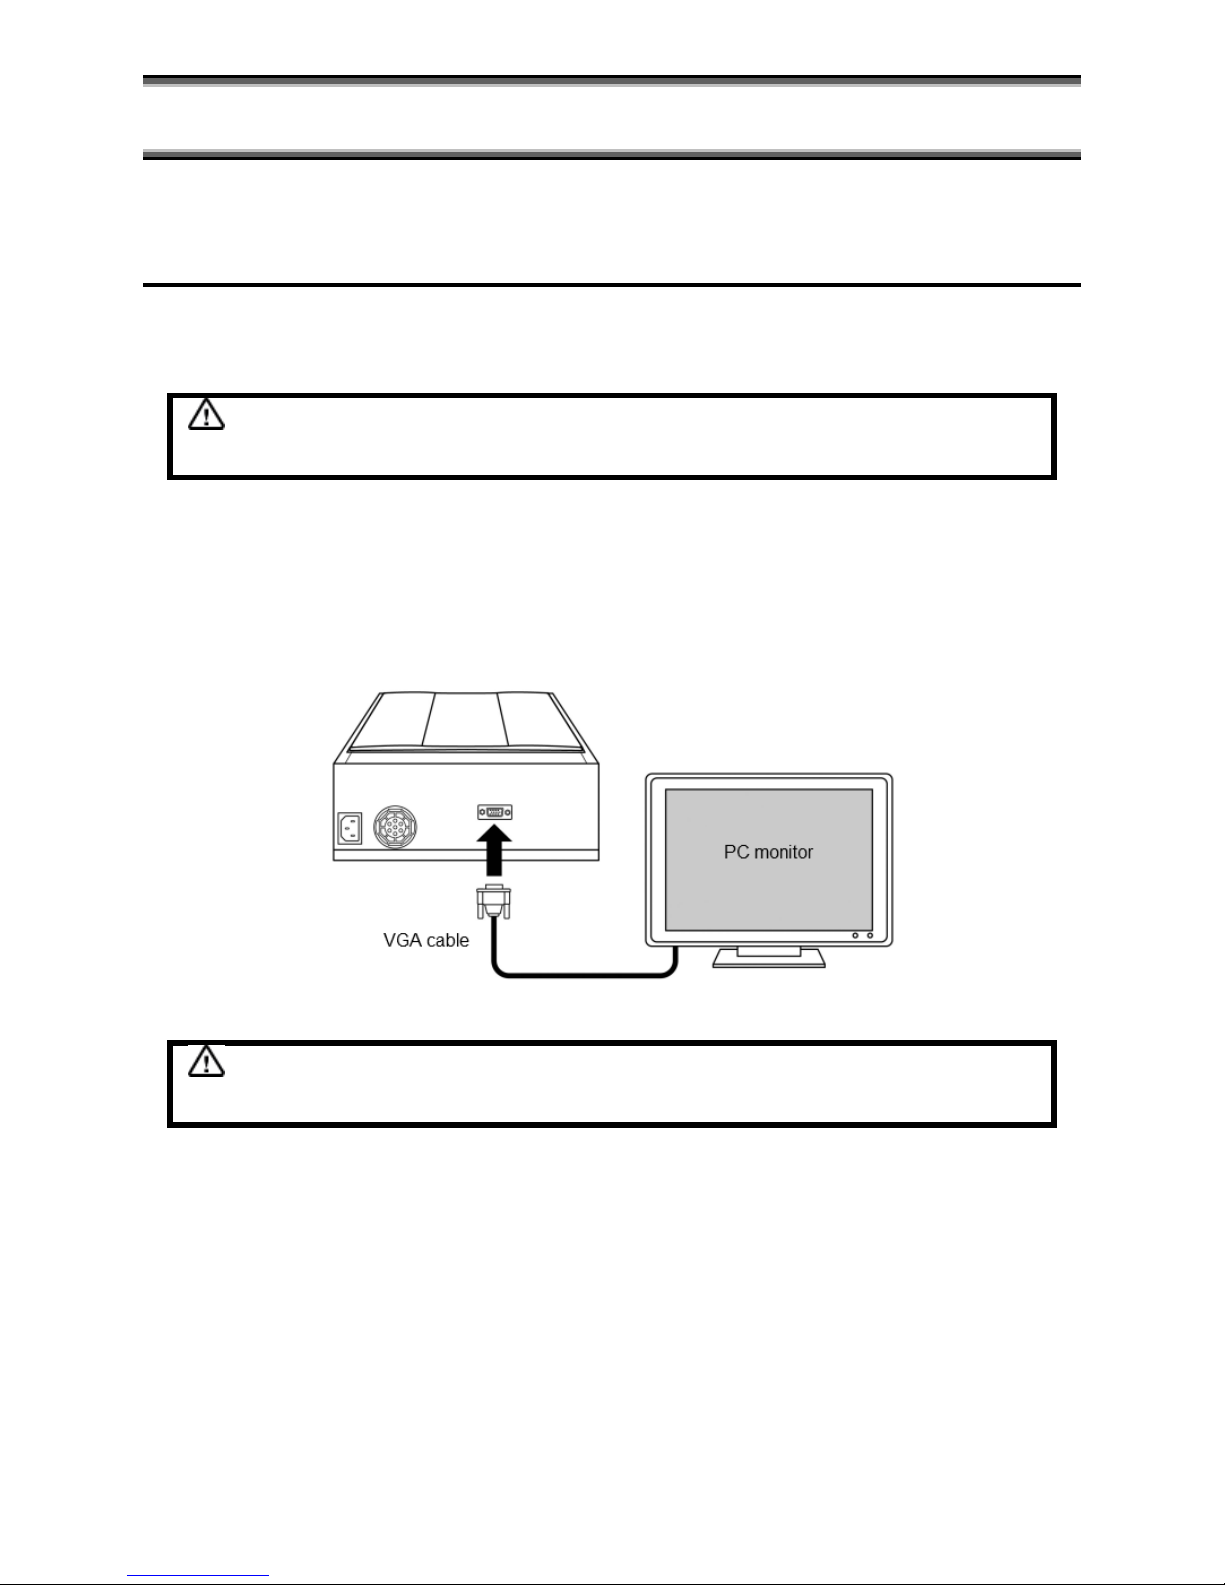
At the back of YMB, there is a screen output port. If you connect a screen to this port, you can see
what is being read by YMB displayed on the screen.
Caution
You can not connect a laptop PC screen to YMB.
How to Connect a PC screen
You can easily connect a PC screen to YMB using the VGA Cable (the cable that connects the
screen to your PC).
Caution
Do not forget to switch on the screen before switching on YMB.
Page 29
27
Switching on YMB
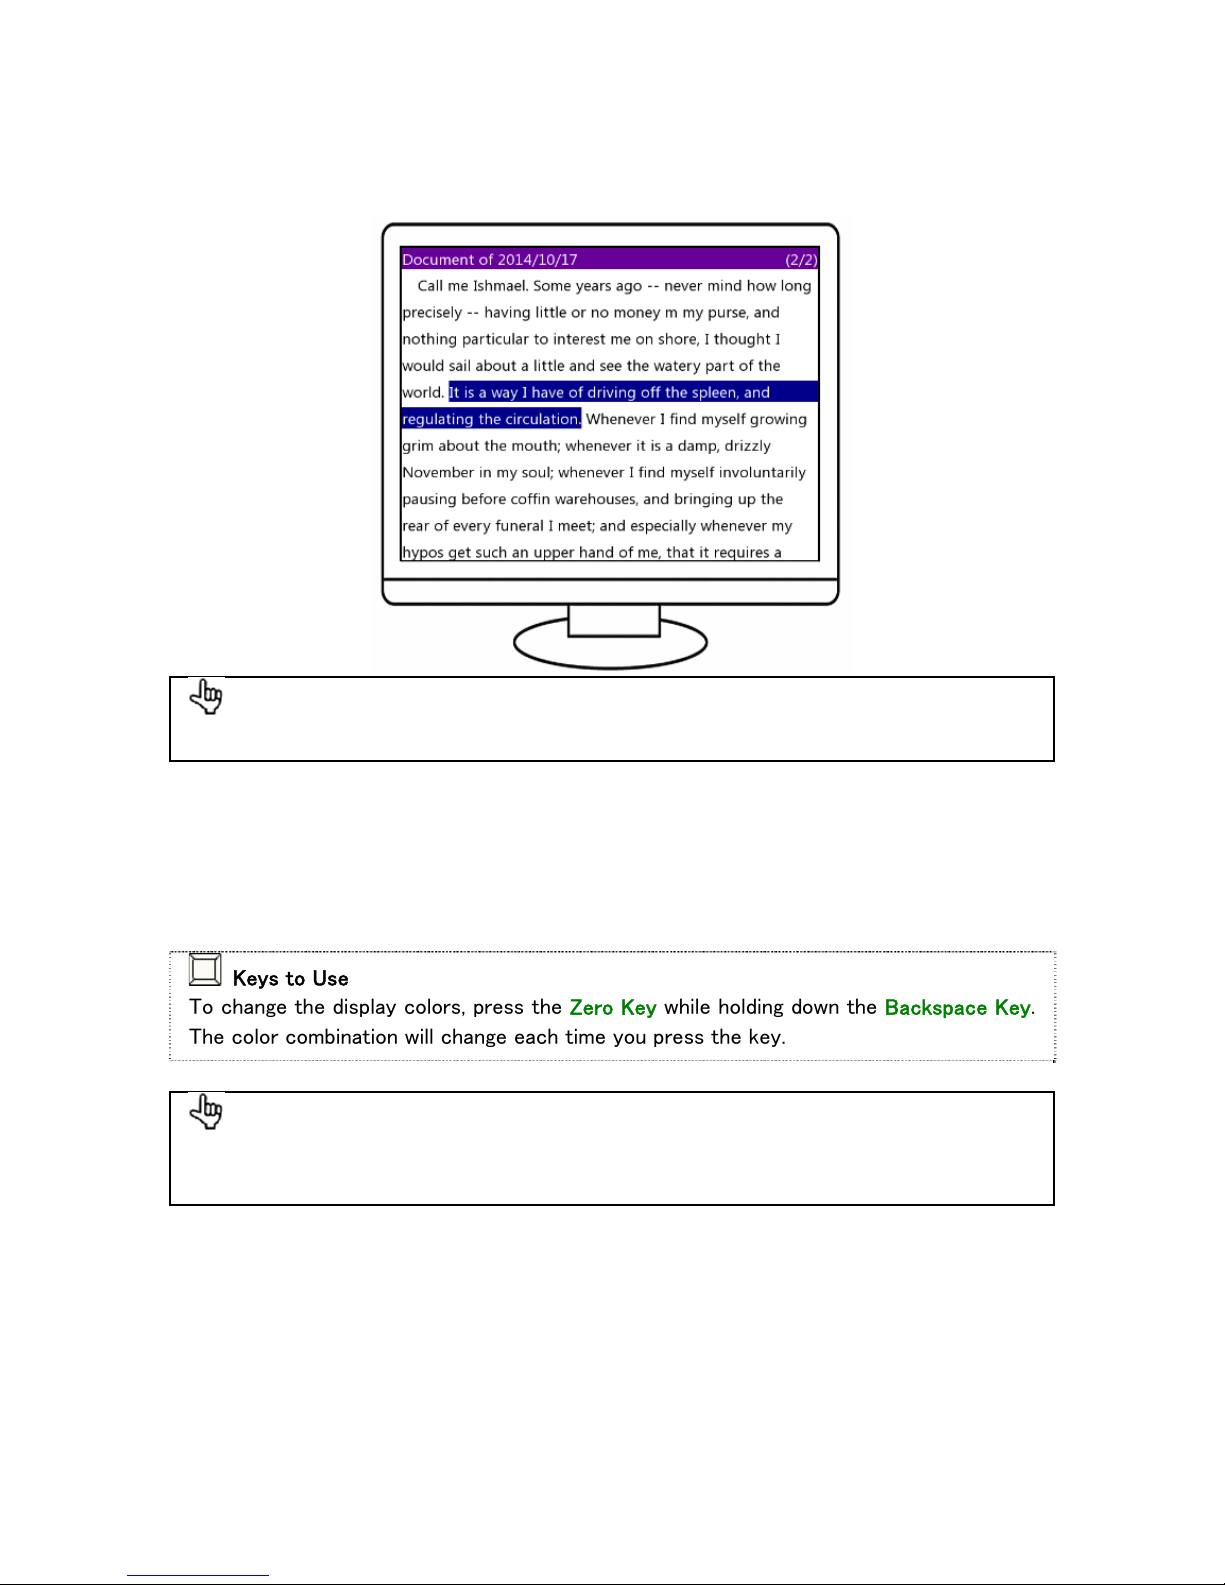
Switch YMB on after the screen is on. One minute later, YMB's screen will be displayed. Then, when
you operate YMB, the contents being read will be displayed on the screen.
Tips
You will operate YMB in the same manner as when the screen is not connected.
How to Change Display Colors
You can choose among 4 display color combinations in YMB: "Black on White", "White on Black",
"Blue on Yellow" and "Yellow on Blue".
Keys to Use
To change the display colors, press the Zero Key while holding down the Backspace Key.
The color combination will change each time you press the key.
Tips
To return screen settings to the factory settings, press the Asterisk Key twice. The voice
and screen will be reset to their original state.
Page 30
28
5.2. How to Display Magnified Acquired Images
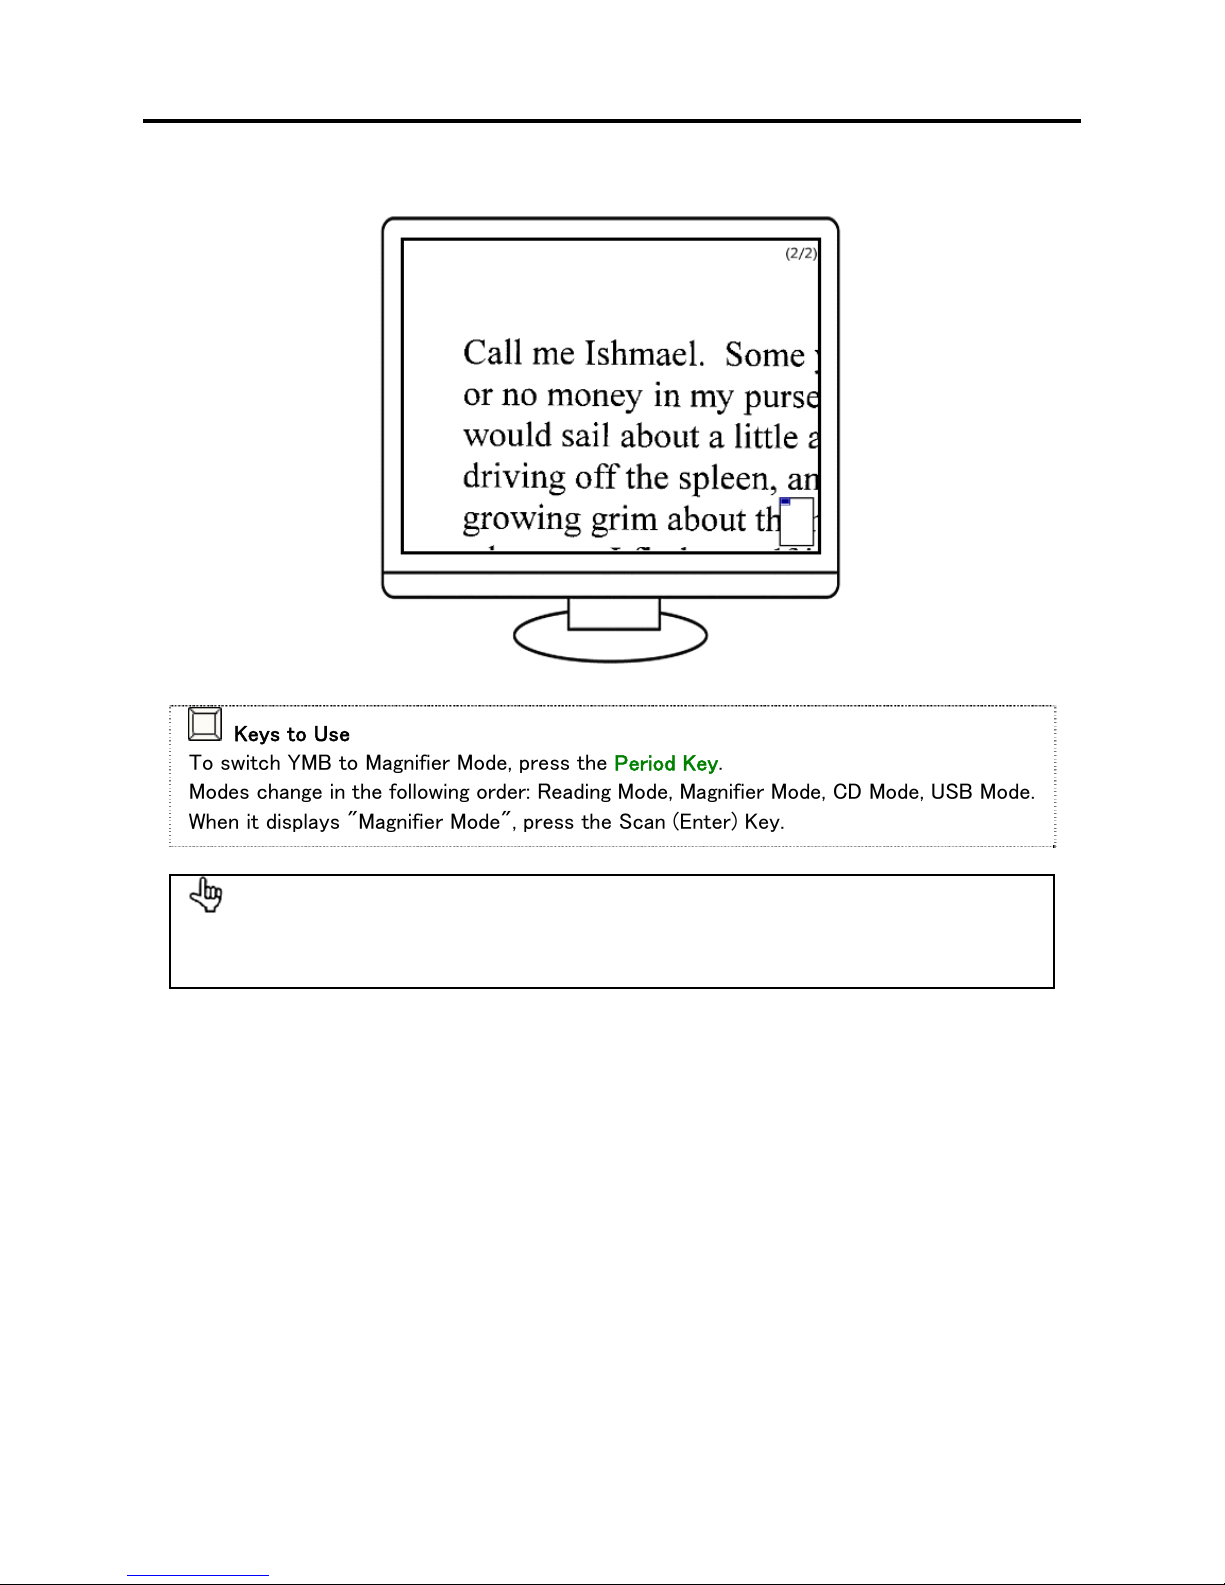
When a screen is connected to YMB, you can use the Magnifier Mode. In Magnifier Mode, acquired
images are displayed on the screen as they are.
Keys to Use
To switch YMB to Magnifier Mode, press the Period Key.
Modes change in the following order: Reading Mode, Magnifier Mode, CD Mode, USB Mode.
When it displays "Magnifier Mode", press the Scan (Enter) Key.
Tips
The way to operate YMB in Magnifier Mode is almost the same as in Reading Mode, except
for the Left, Right, Up and Down keys.
Page 31
29
How to Change Magnification
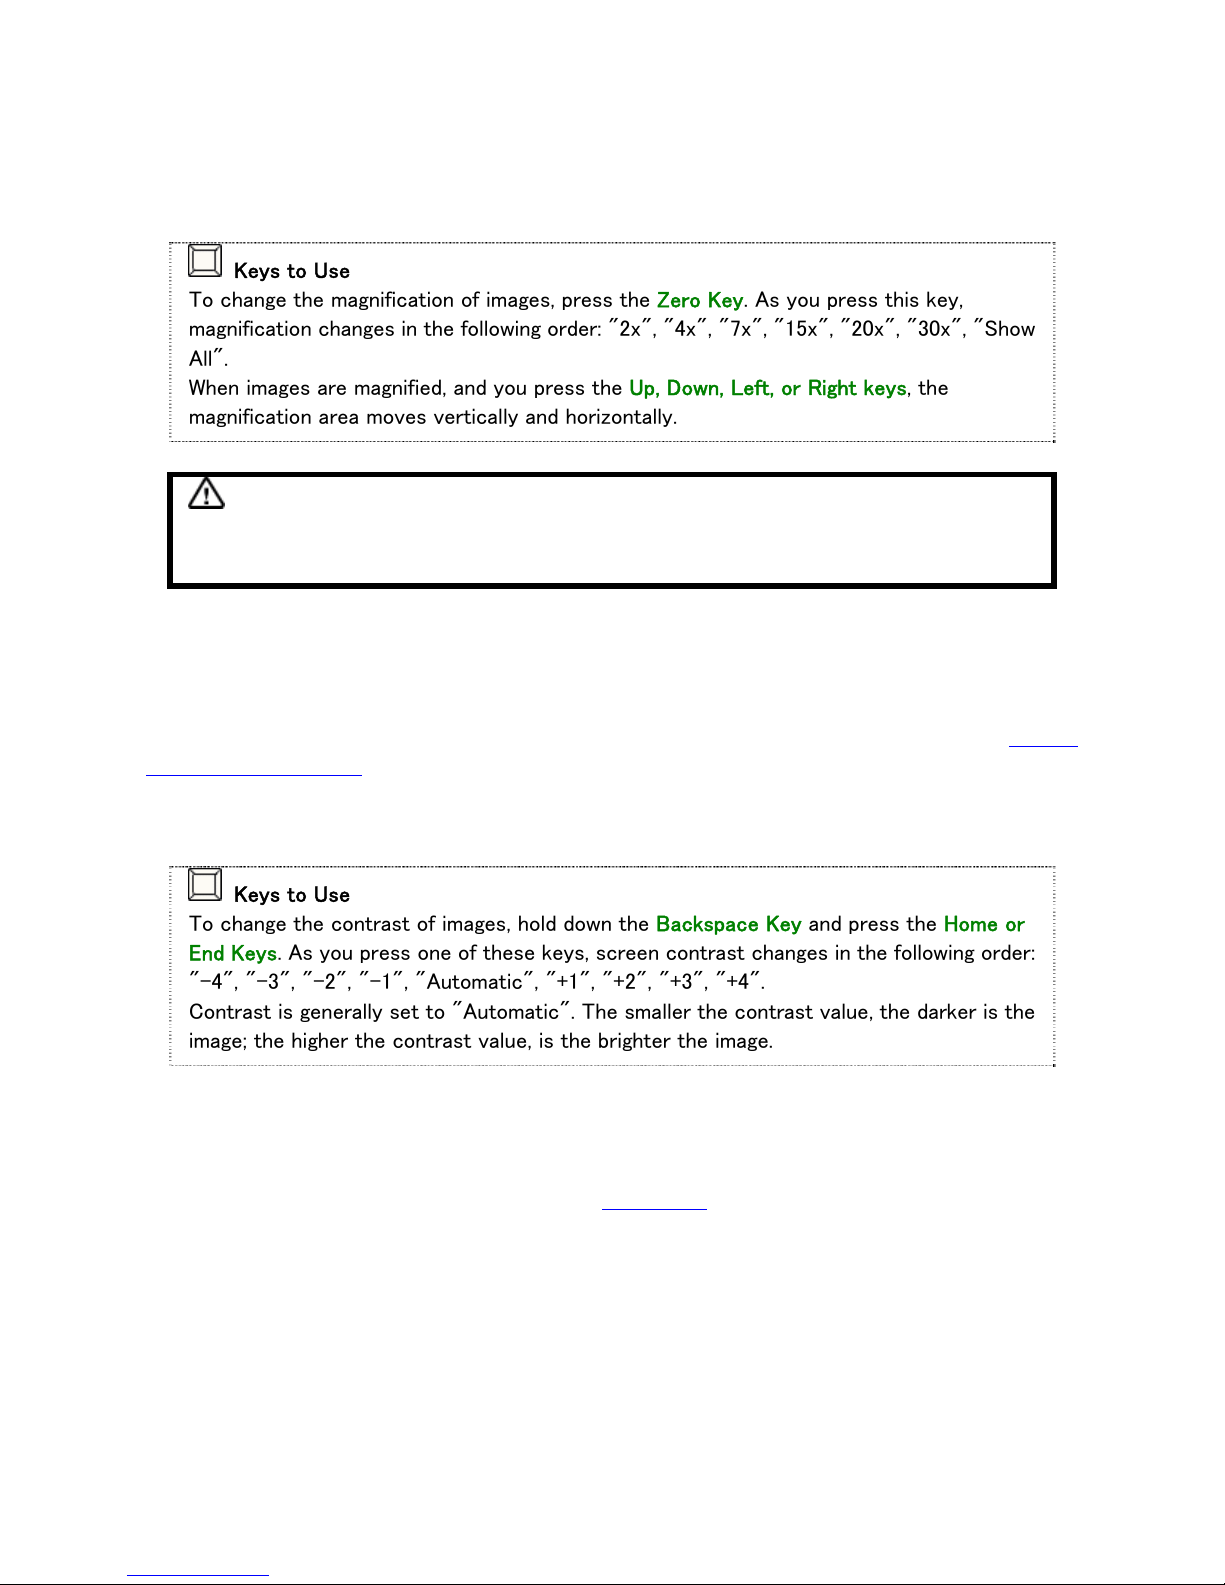
When you scan a new page in Magnifier Mode, the scanned page is displayed on the entire screen.
After, you can magnify a certain position, and using the Up, Down, Left, or Right keys, you can shift
the magnifying area vertically and horizontally, respectively.
Keys to Use
To change the magnification of images, press the Zero Key. As you press this key,
magnification changes in the following order: "2x", "4x", "7x", "15x", "20x", "30x", "Show
All".
When images are magnified, and you press the Up, Down, Left, or Right keys, the
magnification area moves vertically and horizontally.
Caution
YMB's magnification scale is based on a 19" screen. The actual magnification depends on
the size of the screen in use.
How to Change Image Color/Contrast
You can change the image colors in Magnifier Mode in the same manner as explained in How to
Change Display Colors(p.27). In Magnifier Mode, all the acquired images are changed to black on
white and clearness is automatically adjusted so that they can be seen clearly and images are
displayed. However, you can manually change the contrast of images.
Keys to Use
To change the contrast of images, hold down the Backspace Key and press the Home or
End Keys. As you press one of these keys, screen contrast changes in the following order:
"-4", "-3", "-2", "-1", "Automatic", "+1", "+2", "+3", "+4".
Contrast is generally set to "Automatic". The smaller the contrast value, the darker is the
image; the higher the contrast value, is the brighter the image.
In Magnifier Mode, there are cases where you can also choose "Picture Display", in addition to the
normal color modes. In these cases, scanned images are not changed to black on white images and
are displayed as they are. When you scan in color, images are magnified and displayed using the
original colors. On how to scan in color, refer to Scan Mode.
(p.39)
Page 32
30
5.3. How to Read Multimedia DAISY Books
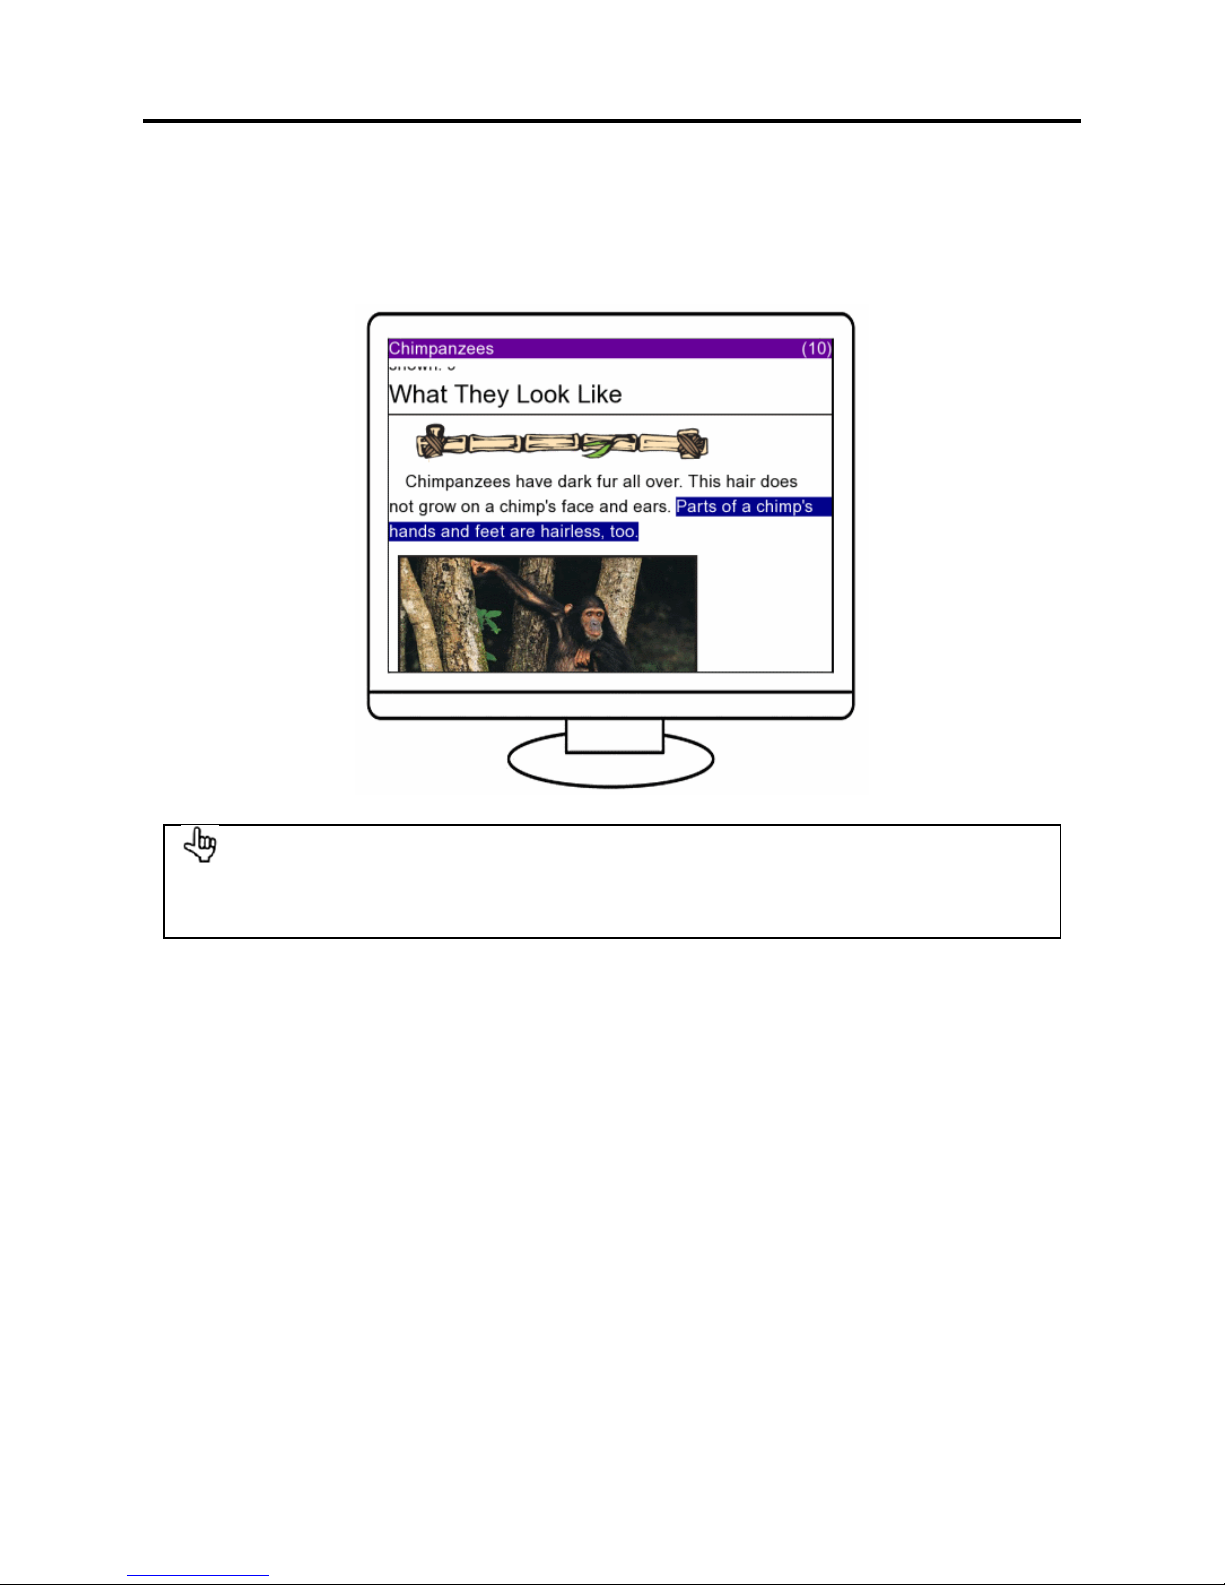
Multimedia DAISY books are DAISY books (which are generally recorded books) containing
character and picture information.
When a screen is connected to YMB and you play a multimedia DAISY book, text and images related
to the current reading passage are displayed on the screen.
Tips
When reading a multimedia DAISY book, you can operate YMB in the same manner as when
reading a general DAISY book.
Page 33
31
Chapter 6. Functions for Advanced Users
In this chapter, we explain about the functions for advanced users.
6.1. Multiple Page Scan
When you want to scan the pages of a book at once, you can use the function called Multiple Page
Scan. When you start Multiple Page Scan, the machine will repeat the scanning process until it
receives a new command. During this, you can consecutively scan the pages of a book just by
turning the pages and placing them one by one on the glass window at the appropriate time.
Keys to Use
To start Multiple Page Scan, first open the Advanced Menu. Press the Period Key twice,
while holding down the Cancel (Tab) Key.
After it announces "Advanced Menu", you can choose items by using the Up or Down keys.
Press the Down Key some times until you hear "Multiple Page Scan". Then press the
Pause/Resume (5) Key, and Multiple Page Scan will start.
To stop Multiple Page Scan, press the Cancel (Tab) Key. Multiple Page Scan will also
automatically stop when the machine detects that nothing is placed on the glass window.
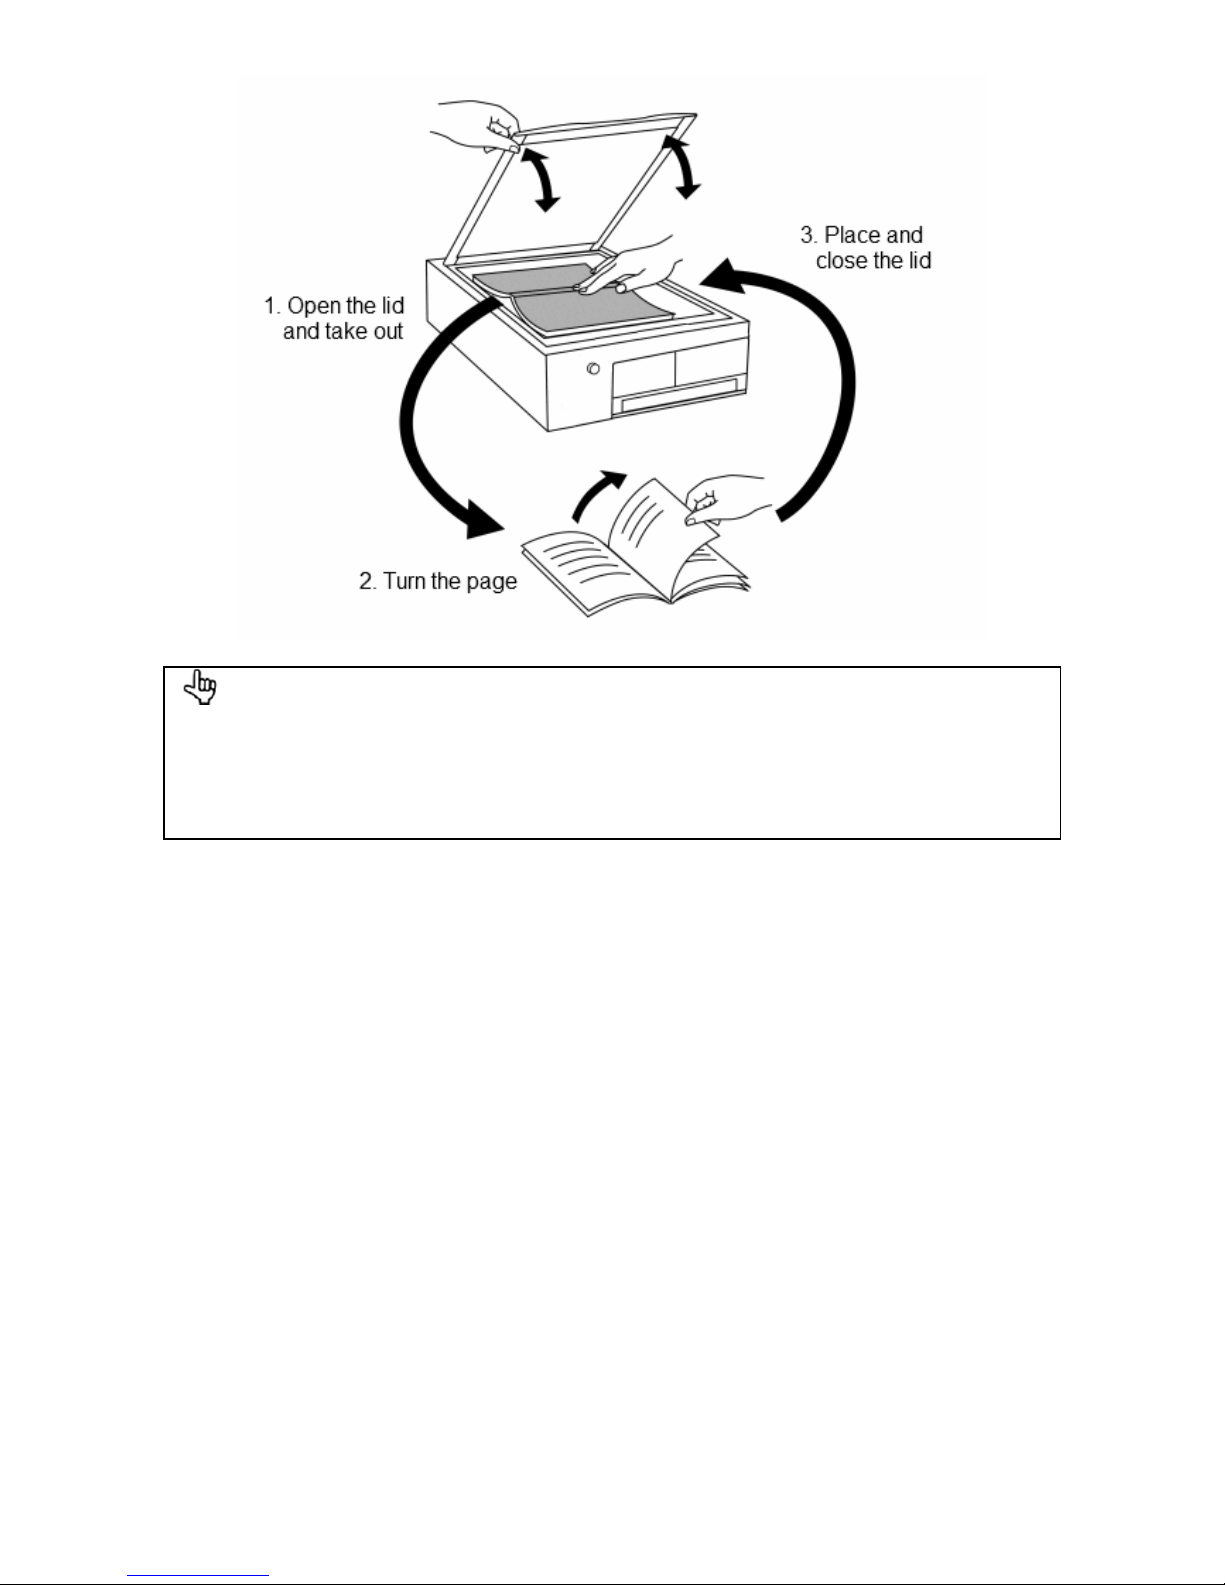
When performing Multiple Page Scan, the machine scans one page every 30 seconds. After Multiple
Page Scan starts, the machine will repeat the same operation until it stops. So it is necessary to
turn the pages of the book after the scanning of one page finishes and before the scanning of the
next page starts.
1. After the announcement "Scanning complete", immediately open the scanner lid and take
the book out.
2. Turn to the next page.
3. Place the book on the glass window and close the lid.
4. The next scanning starts after it announces "Scanning is starting".
These 4 steps will repeat until the execution of this function stops.
Page 34
32
Tips
To correctly scan pages using Multiple Page Scan, getting used to it might be necessary. If
you use Multiple Page Scan, because it's impossible to know if a page was correctly scanned
at when the scanning finishes, when you feel that a page could not be correctly scanned,
scan that page again and delete all unnecessary pages afterwards.
Page 35
33
6.2. Advanced Text Management
As shown in How to Move to a Document(p.13) the machine saves the pages arranged within
"documents". Here we deal with the functions for advanced text management.
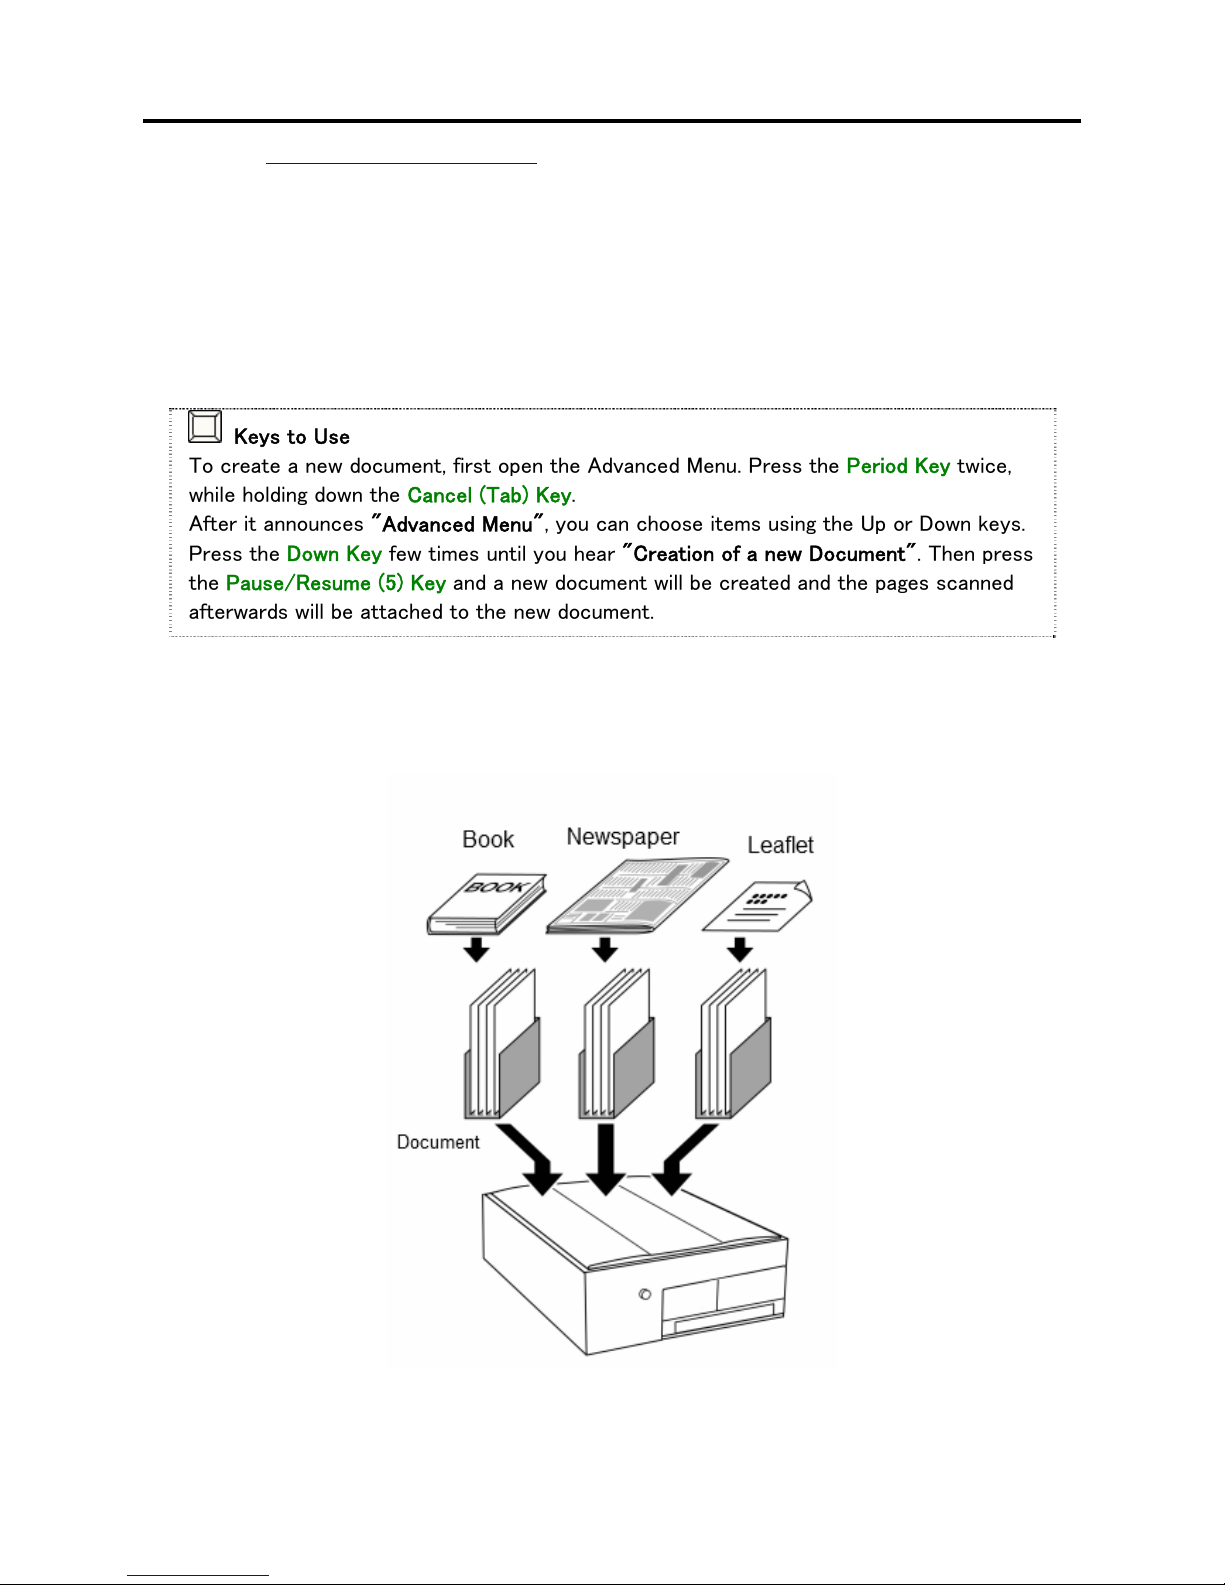
Creation of a New Document
This machine generally creates a new document once everyday. However, when you scan many
different documents on the same day, you can assort a new document to each material you read,
which makes it possible to easily manage documents.
Keys to Use
To create a new document, first open the Advanced Menu. Press the Period Key twice,
while holding down the Cancel (Tab) Key.
After it announces "Advanced Menu", you can choose items using the Up or Down keys.
Press the Down Key few times until you hear "Creation of a new Document". Then press
the Pause/Resume (5) Key and a new document will be created and the pages scanned
afterwards will be attached to the new document.
You can organize documents as you desire. You can organize all the pages belonging to a specific
book in a single document. You can also organize newspapers, fliers and letters of one day in three
different documents.
Page 36
34
How to Name a Document
When a new document is created, it's named as "Document of (Month, Day)". However, the name
can be changed by using some text from the same document.
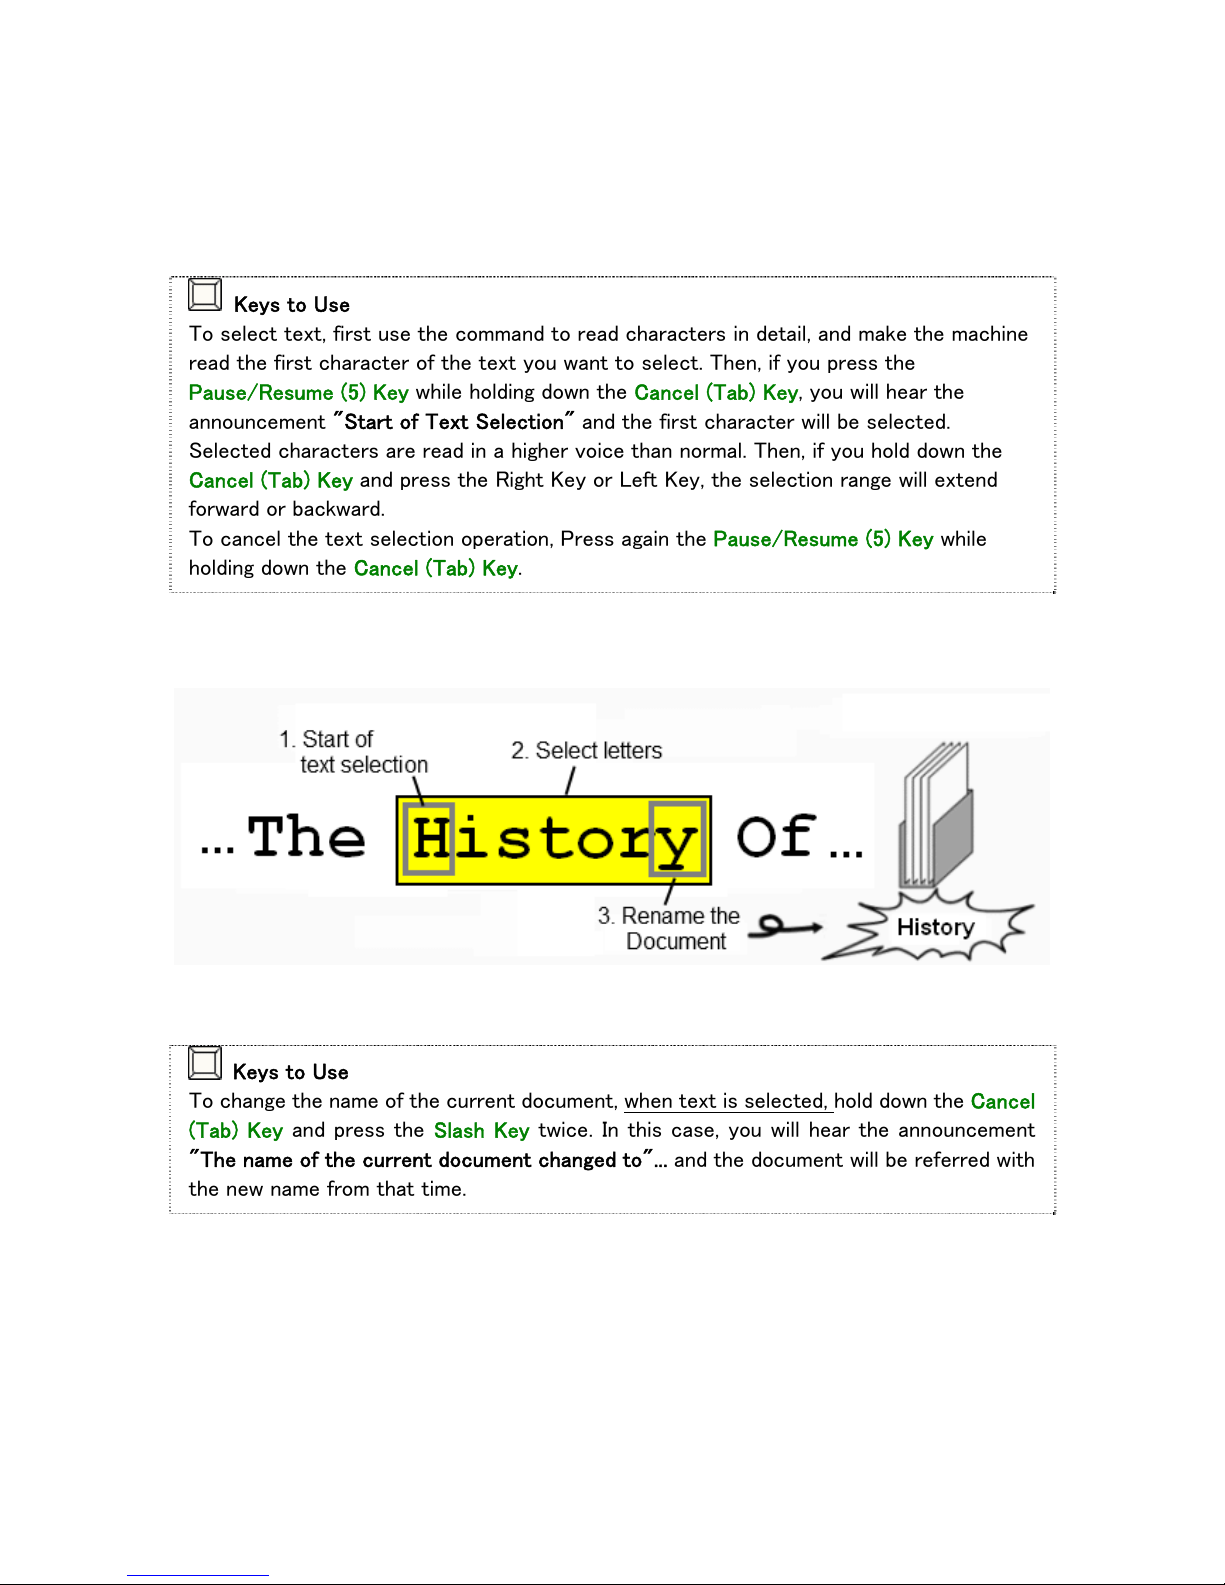
To name a document, first use the Text Selection Function to extract the desired part of text from
the document.
Keys to Use
To select text, first use the command to read characters in detail, and make the machine
read the first character of the text you want to select. Then, if you press the
Pause/Resume (5) Key while holding down the Cancel (Tab) Key, you will hear the
announcement "Start of Text Selection" and the first character will be selected.
Selected characters are read in a higher voice than normal. Then, if you hold down the
Cancel (Tab) Key and press the Right Key or Left Key, the selection range will extend
forward or backward.
To cancel the text selection operation, Press again the Pause/Resume (5) Key while
holding down the Cancel (Tab) Key.
After completing the text selection, if you execute the command Document Rename, the name of
the document will be changed.
Keys to Use
To change the name of the current document, when text is selected, hold down the Cancel
(Tab) Key and press the Slash Key twice. In this case, you will hear the announcement
"The name of the current document changed to"... and the document will be referred with
the new name from that time.
Page 37
35
Text Search
When a word or place name appears several times in a document, you can search for these
words/names in the document, using YMB.
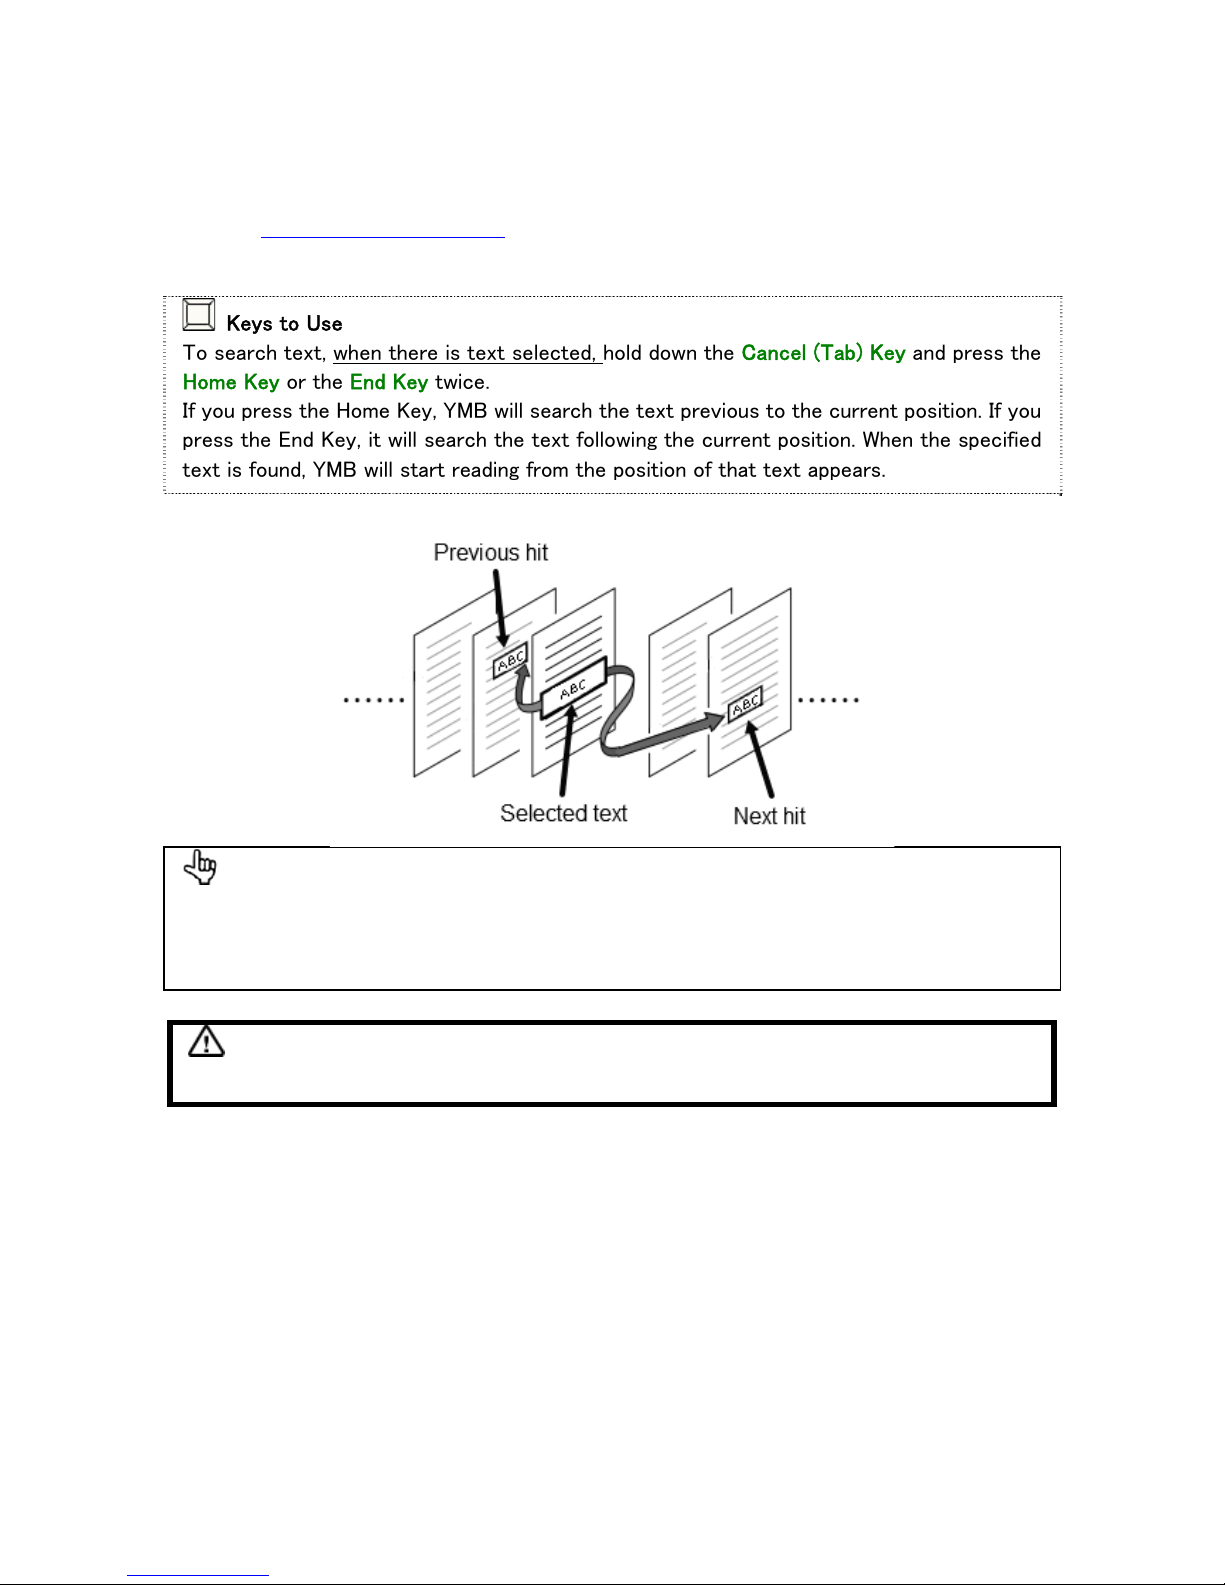
To perform the search, first go to the position where the word/name you want to search appears, as
explained in How to Name a Document(p.34)and select the word/name you want to search with the
function Text Selection. It will jump to the position of the next occurrence of the word under search.
Keys to Use
To search text, when there is text selected, hold down the Cancel (Tab) Key and press the
Home Key or the End Key twice.
If you press the Home Key, YMB will search the text previous to the current position. If you
press the End Key, it will search the text following the current position. When the specified
text is found, YMB will start reading from the position of that text appears.
Tips
When the specified text is found, the text continues to be selected even after jumping to the
page where it appeared. Therefore, if you hold down the Cancel (Tab) Key and press the
Home Key or the End Key twice, you can search for the same text again.
Caution
You can only search in the pages of the same document.
Page 38
36
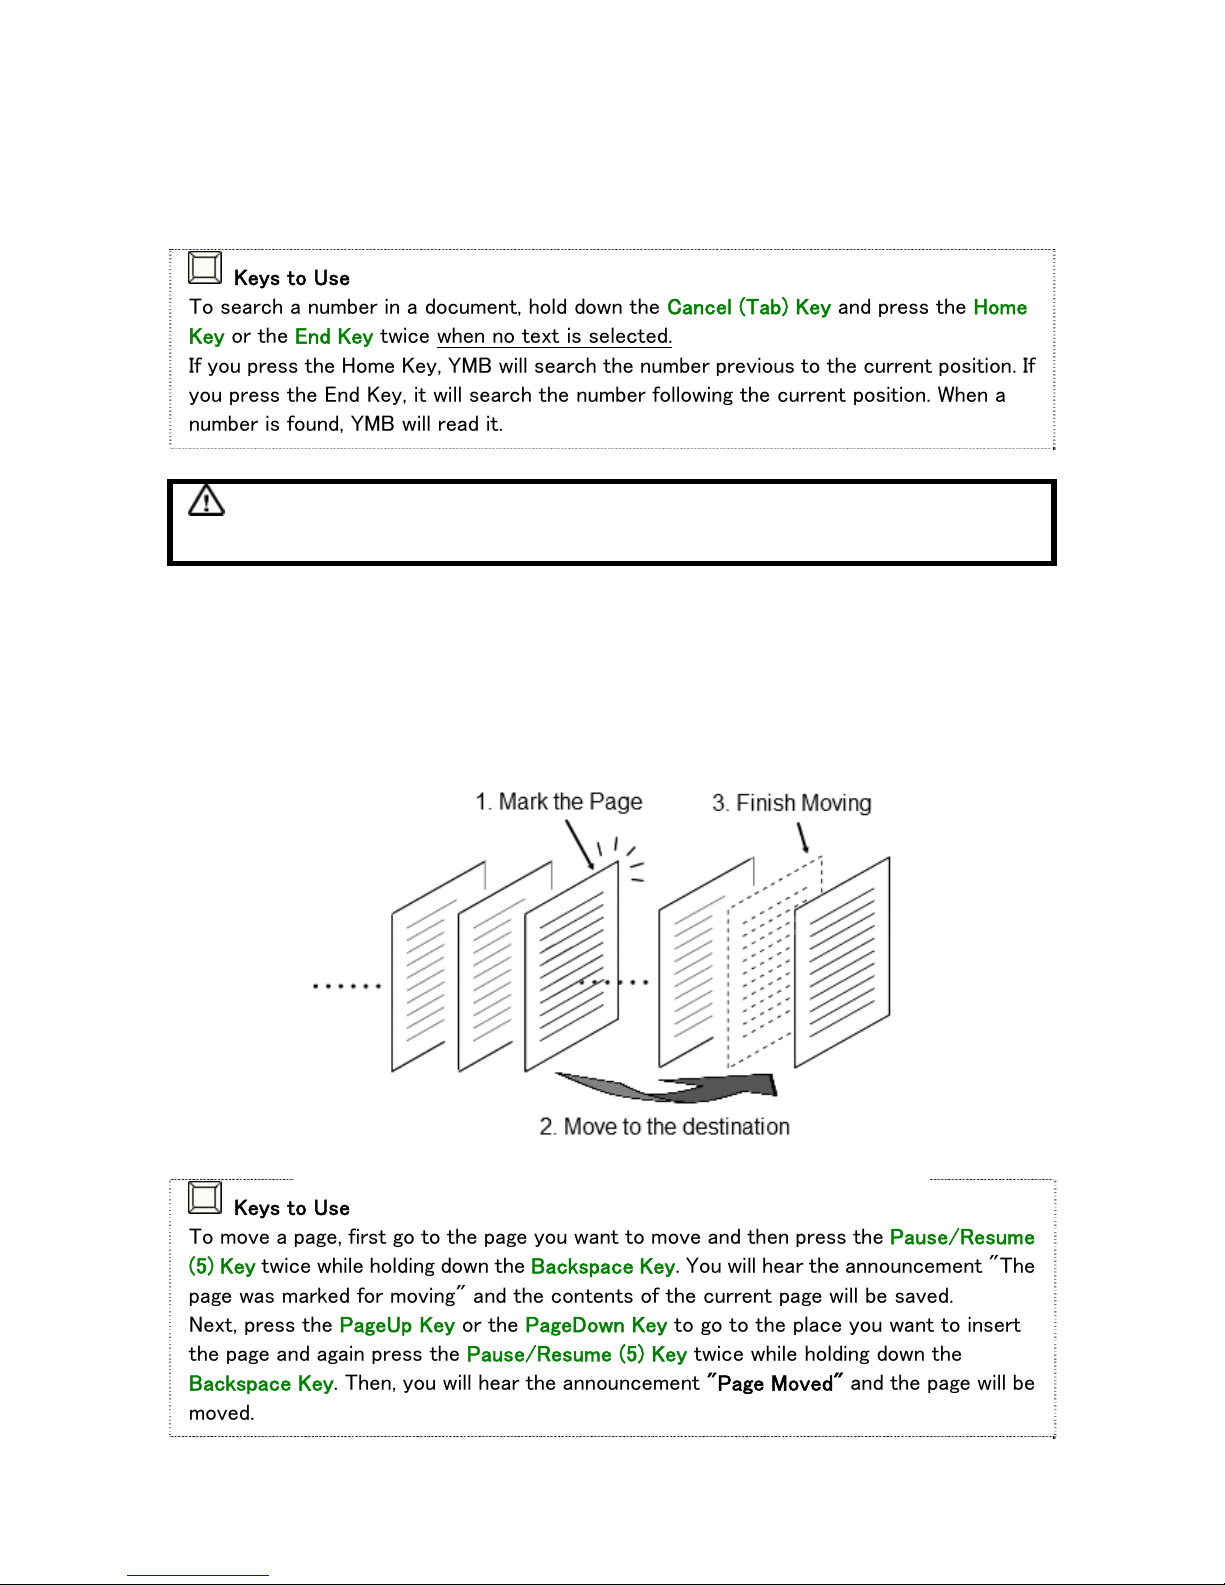
How to Search for Numbers Appearing in a Document
YMB can retrieve a sequence of numbers written in a document and read them. For example, when
you are reading a page that contains a telephone number, you can quickly locate the number in the
middle of the page.
Keys to Use
To search a number in a document, hold down the Cancel (Tab) Key and press the Home
Key or the End Key twice when no text is selected.
If you press the Home Key, YMB will search the number previous to the current position. If
you press the End Key, it will search the number following the current position. When a
number is found, YMB will read it.
Caution
You can only search in the pages of the same document.
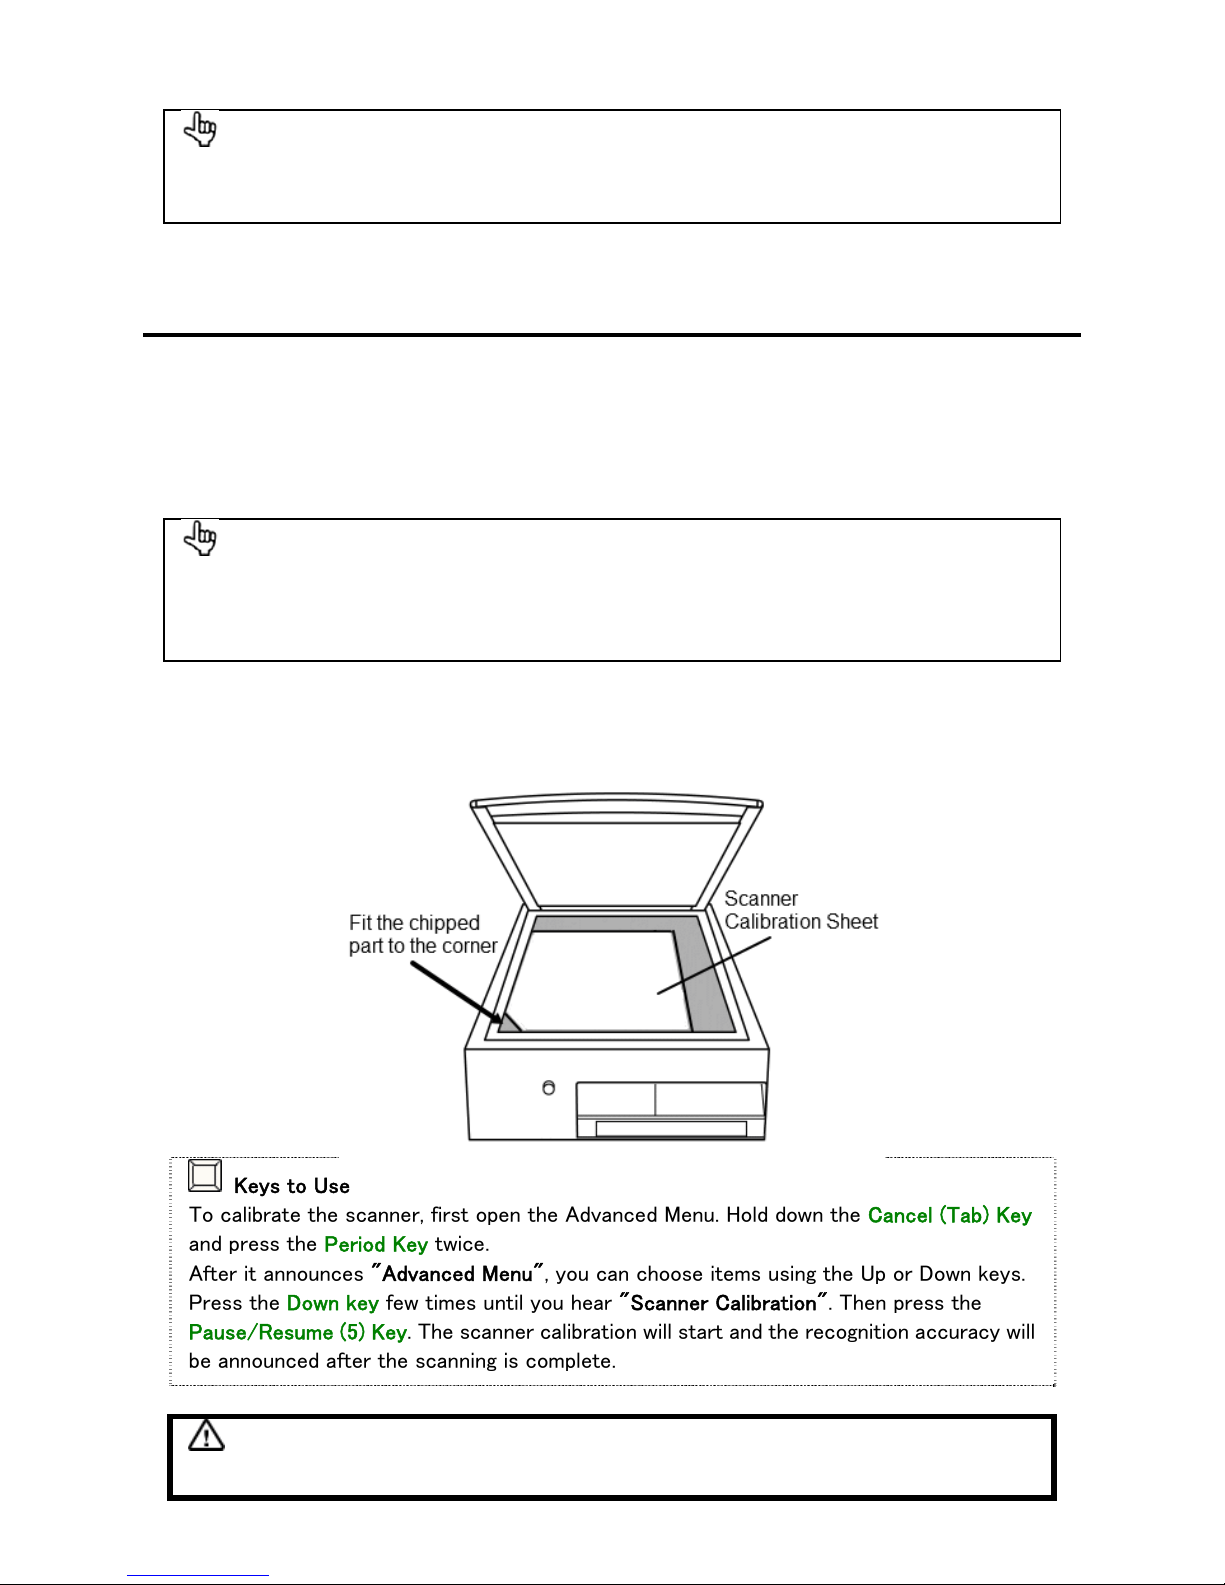
Page Moving
In YMB, pages are added in the order they are scanned. To change the page order after scanning or
to move a page to a different document, use the Page Moving function.
Keys to Use
To move a page, first go to the page you want to move and then press the Pause/Resume
(5) Key twice while holding down the Backspace Key. You will hear the announcement "The
page was marked for moving" and the contents of the current page will be saved.
Next, press the PageUp Key or the PageDown Key to go to the place you want to insert
the page and again press the Pause/Resume (5) Key twice while holding down the
Backspace Key. Then, you will hear the announcement "Page Moved" and the page will be
moved.
For example, to insert the content of Page 10 in Page 5, go to Page 10 and mark it for moving. Then
go to Page 5 and "finish moving the page".
Page 39
37
Tips
You can move a page to a different document by going to the page, marking it for moving,
move to a different document and "finishing moving the page".
6.3. Scanner Calibration
The image scanner mounted on YMB is calibrated at the time of shipment from factory, but when it
is used for a long time the scanner glass gets dirty or there are changes in the inner state of the
scanner. In that case, by performing the Scanner Calibration function, you can bring it back to its
optimal state.
Tips
Because YMB automatically calibrates the scanner after a certain time, normally it is not
necessary to calibrate the scanner using this function. Use this function only when you feel
that reading precision has decreased.
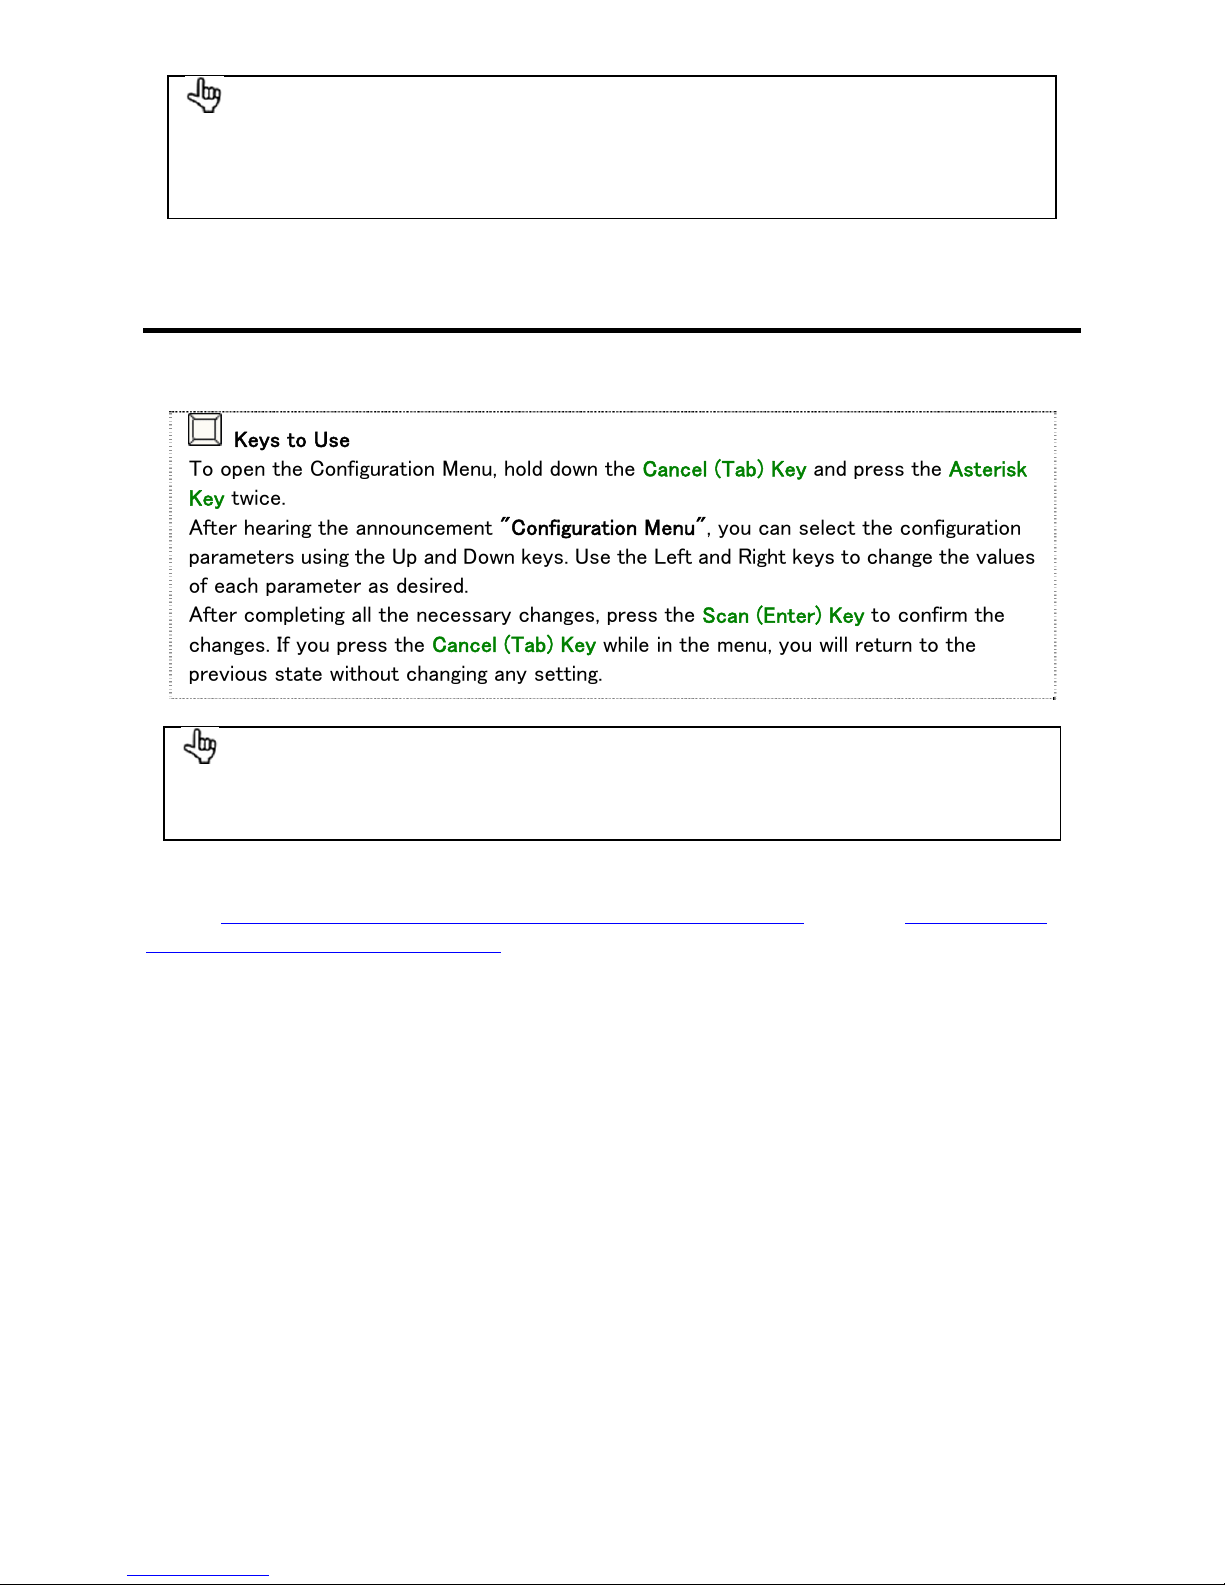
Should you calibrate the scanner, use the Scanner Calibration Sheet. Place the Scanner Calibration
Sheet on the scanner glass window with the chipped part facing the front left corner. Then perform
the Scanner Calibration from the Advanced Menu.
Keys to Use
To calibrate the scanner, first open the Advanced Menu. Hold down the Cancel (Tab) Key
and press the Period Key twice.
After it announces "Advanced Menu", you can choose items using the Up or Down keys.
Press the Down key few times until you hear "Scanner Calibration". Then press the
Pause/Resume (5) Key. The scanner calibration will start and the recognition accuracy will
be announced after the scanning is complete.
Caution
Do not open the lid of the image scanner during the scanner calibration process.
Page 40
38
Tips
It's possible to calibrate the scanner without the Scanner Calibration Sheet, but, in that
case the recognition accuracy cannot be measured and you will hear an announcement
saying: "This is not the Scanner Calibration Sheet".
6.4. Changing YMB Settings
To change the details of the behavior of YMB, use the Configuration Menu.
Keys to Use
To open the Configuration Menu, hold down the Cancel (Tab) Key and press the Asterisk
Key twice.
After hearing the announcement "Configuration Menu", you can select the configuration
parameters using the Up and Down keys. Use the Left and Right keys to change the values
of each parameter as desired.
After completing all the necessary changes, press the Scan (Enter) Key to confirm the
changes. If you press the Cancel (Tab) Key while in the menu, you will return to the
previous state without changing any setting.
Tips
To return all the settings to their factory defaults, select the item called "Reset to Factory
Defaults" at the bottom of the menu and press the Scan (Enter) Key.
There are several items in the Configuration Menu. For a list of all the configuration items, please
consult Appendix C-1. Configuration Items in Reading/Magnifier Mode(p.51)and Appendix C-2.
Configuration Items in CD/USB Mode.(p.53) In this section, we only deal with some important
configuration items.
Recognition Language
Use this setting to set the language that YMB should use for character recognition. There are nine
options: English, Japanese, Korean, Simplified Chinese, Traditional Chinese, Mixed English and
Japanese, Mixed English and Korean, Mixed English and Simplified Chinese, and Mixed English and
Traditional Chinese. If you set it to English, YMB will correctly recognize English characters and will
pronounce them according to the English pronunciation Rules. If you set it to Japanese, YMB will
correctly recognize Latin Characters, but it will read them according to the Japanese "Latin
character pronunciation rules". When a document contains a mixture of English and Japanese, for
example, you can improve the recognition accuracy by setting it to Mixed English and Japanese and
scanning the document again.
At the time of shipment, it's set to English.
Page 41
39
Caution
If you set it to English, YMB will not recognize Japanese characters. Also, it normally takes
more time for processing when this is set to one with mixed languages. Therefore, it is
recommended to normally set it to a single language, and only switch it to mixed languages
when necessary.
Document Export Format
This function is used to determine the export format of YMB documents when saving them on a USB
drive. The saved documents can be used with personal computers or DAISY portable players. The
following exporting formats are available:
Text Format: the document will be saved as a text (.txt) file. Each page will be delimited by a
"page code".
DAISY Format: the document will be saved as a DAISY book. In this case, all the files related
to a DAISY book will be saved in one folder.
HTML Format: the document will be saved as an HTML (.htm) file. At the beginning of the file,
you'll find a list of links to go to the beginning of each page.
MP3 Format: the document will be saved as an MP3 (.mp3) audio file. In this case, all the
pages of the document will be saved together in an audio file.
When you change this setting, the name of the text saving operation in the Advanced Menu changes
accordingly. At the time of YMB's shipment, it's set to "Text Format".
Scan Mode
YMB generally scans documents by ignoring colors. If you change the Scan mode in the
Configuration Menu from Grey Scale to Color, you can acquire the colors of the scanned documents.
Material scanned in color mode will be displayed in colors in magnifier mode.
At the time of shipment, it's set to Grey Scale mode.
Tips
When a print has multiple colors or has watermark on its background, you might get better
recognition results if you use the Color Scan mode instead of the normal scan mode.
Caution
Color mode scan takes longer than normal scan. Be sure not to move the material until you
hear the announcement "Scanning complete".
Page 42
40
Date and Time Settings
YMB has an internal clock, which it uses to register the time when documents are read. To adjust it,
first press the Pause/Resume (5) Key. Next, input the current date or time with numbers using the
keyboard. After inputting the year, month, and day (or hour and minute), press the Scan (Enter) Key
to confirm the changes.
Caution
The rows of the number keys on the keyboard of YMB are arranged in the opposite order to
the rows of the keyboard of a standard telephone. In YMB, the number keys are arranged
as follows: The left key of the nearest row is the Zero Key; the keys of the next (upper) row
are 1, 2, 3; the keys on the second next row to the nearest row are 4, 5, 6, and so forth.
Page 43
41
Chapter 7. Troubleshooting
In this chapter, we deal with YMB's problems and solutions. When you think YMB has broken down,
please first check the following possible solutions. If the problem is not solved, please contact your
distributor.
? YMB Does Not Turn On
In the back side of YMB, there is a small outlet to release heat. When YMB is on, the fan inside the
outlet tube turns and you can feel a small breeze coming out of it. When there is no sound from the
fan or air does not come out from it, the following causes are possible.
Cause The power cable is not properly connected.
Solution Press the end of the cable into YMB and make sure the other end is plugged in.
? No Sound Comes Out of YMB
When the fan is working but no sound comes out of YMB, the following causes are possible:
Cause the speaker volume is low.
Solution Adjust the volume by turning the volume round button on the front face of
YMB.
Cause An earphone is plugged in the earphone jack in the front face of YMB.
Solution Unplug the earphone from YMB.
? Nothing Appears on the Screen
If you connect a screen to YMB and nothing appears on the screen or the reading contents is not
properly displayed, check the following possible causes:
Cause The screen is not properly connected.
Solution Make sure that YMB and the screen are properly connected with the cable.
Cause The screen turned on after YMB.
Solution Check out the power of the screen. If YMB is already on, switch it off and on
again.
Page 44
42
Cause The input switch of the screen or the display configuration does not work
properly.
Solution Check the Input switch or the display configuration of the screen. Refer to the
manual of your screen for details.
? It Does Not Read CDs Or DVDs
If YMB does not do anything after you insert a CD or DVD, check the following causes:
Cause The disk is not correctly inserted.
Solution Insert the CD/DVD correctly and push the tray to close it until it clicks once.
Cause The disk is inserted upside down.
Solution Insert the CD/DVD with the front face facing up.
Cause The lens of the CD drive is dirty.
Solution
Take the dirt off the lens, which is inside the CD drive using cleaning CD, etc.
When you open the CD tray, be careful not to touch the lens.
Cause A blank CD (a CD with nothing written on it) or a disk other than a CD/DVD
(E.G. a Blu-ray disk).
Solution
Check out the type of the disk.
If you have a plextalk CD which is not yet finalized, finalize it first before
using it in YMB.
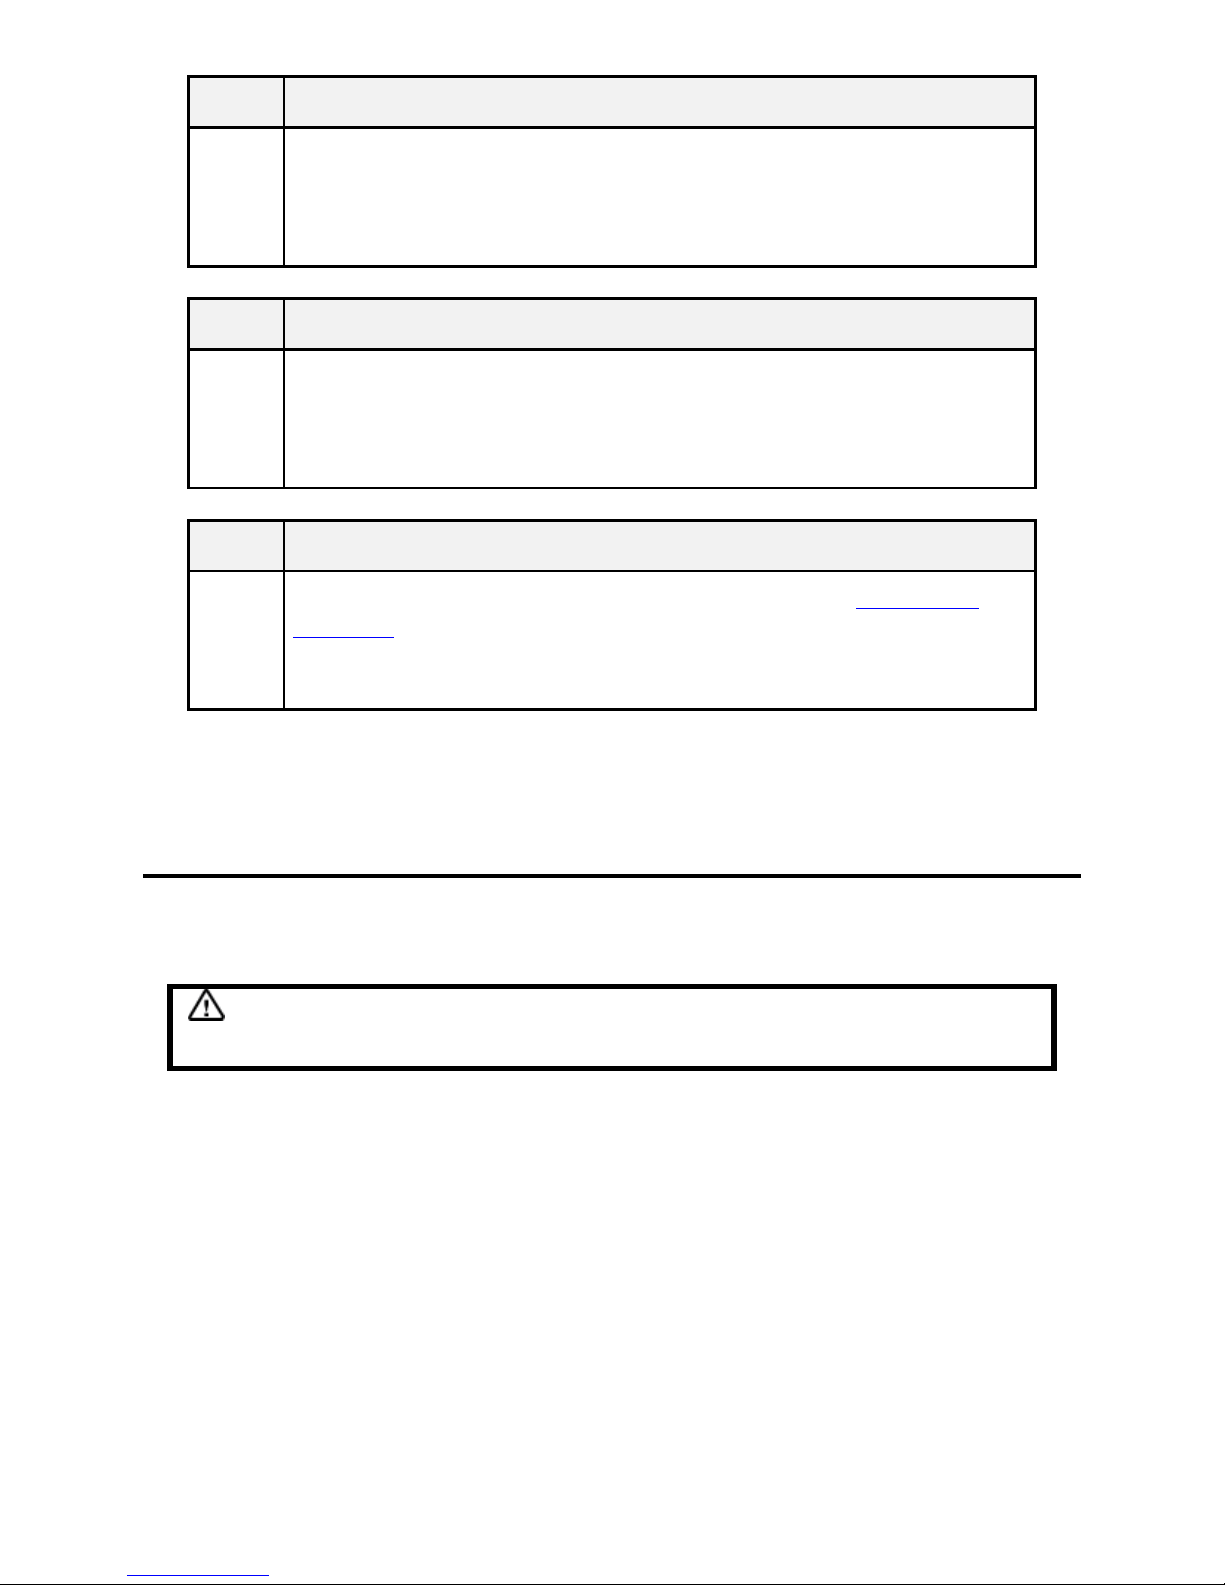
? The Scan Quality is Poor
When material is not properly scanned, the following causes are possible.
Cause The glass window of the image scanner is dirty.
Solution Wipe the glass window of the image scanner with a dry cloth and remove the
dirt.
Cause The lid of the image scanner is not properly closed.
Solution Ensure that the lid of the image scanner is properly closed during the scanning
process.
Page 45
43
Cause The material is not touching the glass window.
Solution In case of thin material, bankbooks, etc, the material does not touch the glass
window even if you press down the lid. If you scan in this condition, the
recognition accuracy might be low. In such cases, if you place something like a
pocket book between the material and the lid, the accuracy might improve.
Cause You are scanning in a dark room without closing the lid.
Solution In cases where you can not properly close the scanner lid, like when you scan
a very thick book, recognition accuracy becomes low, because YMB can not
recognize the background around the material. In such cases, scan with room
lights on.
Cause The scanner needs to be calibrated.
Solution Try Scanner Calibration from the Advanced Menu. Refer to 6.3. Scanner
Calibration(p.37)for details.
This operation is generally not required, because the scanner automatically
calibrates after having been used for a certain period of time.
? YMB Does Not Turn Off
It takes some time for YMB to turn off after you press the power button. YMB is preparing to finish
during that time. So, please wait until the power goes off.
Caution
Do not unplug YMB while it's turned on. It can cause malfunction.
Page 46
44
Appendix
Appendix A. Key Operation List
Appendix A-1. Key Operations in Text Reading Mode
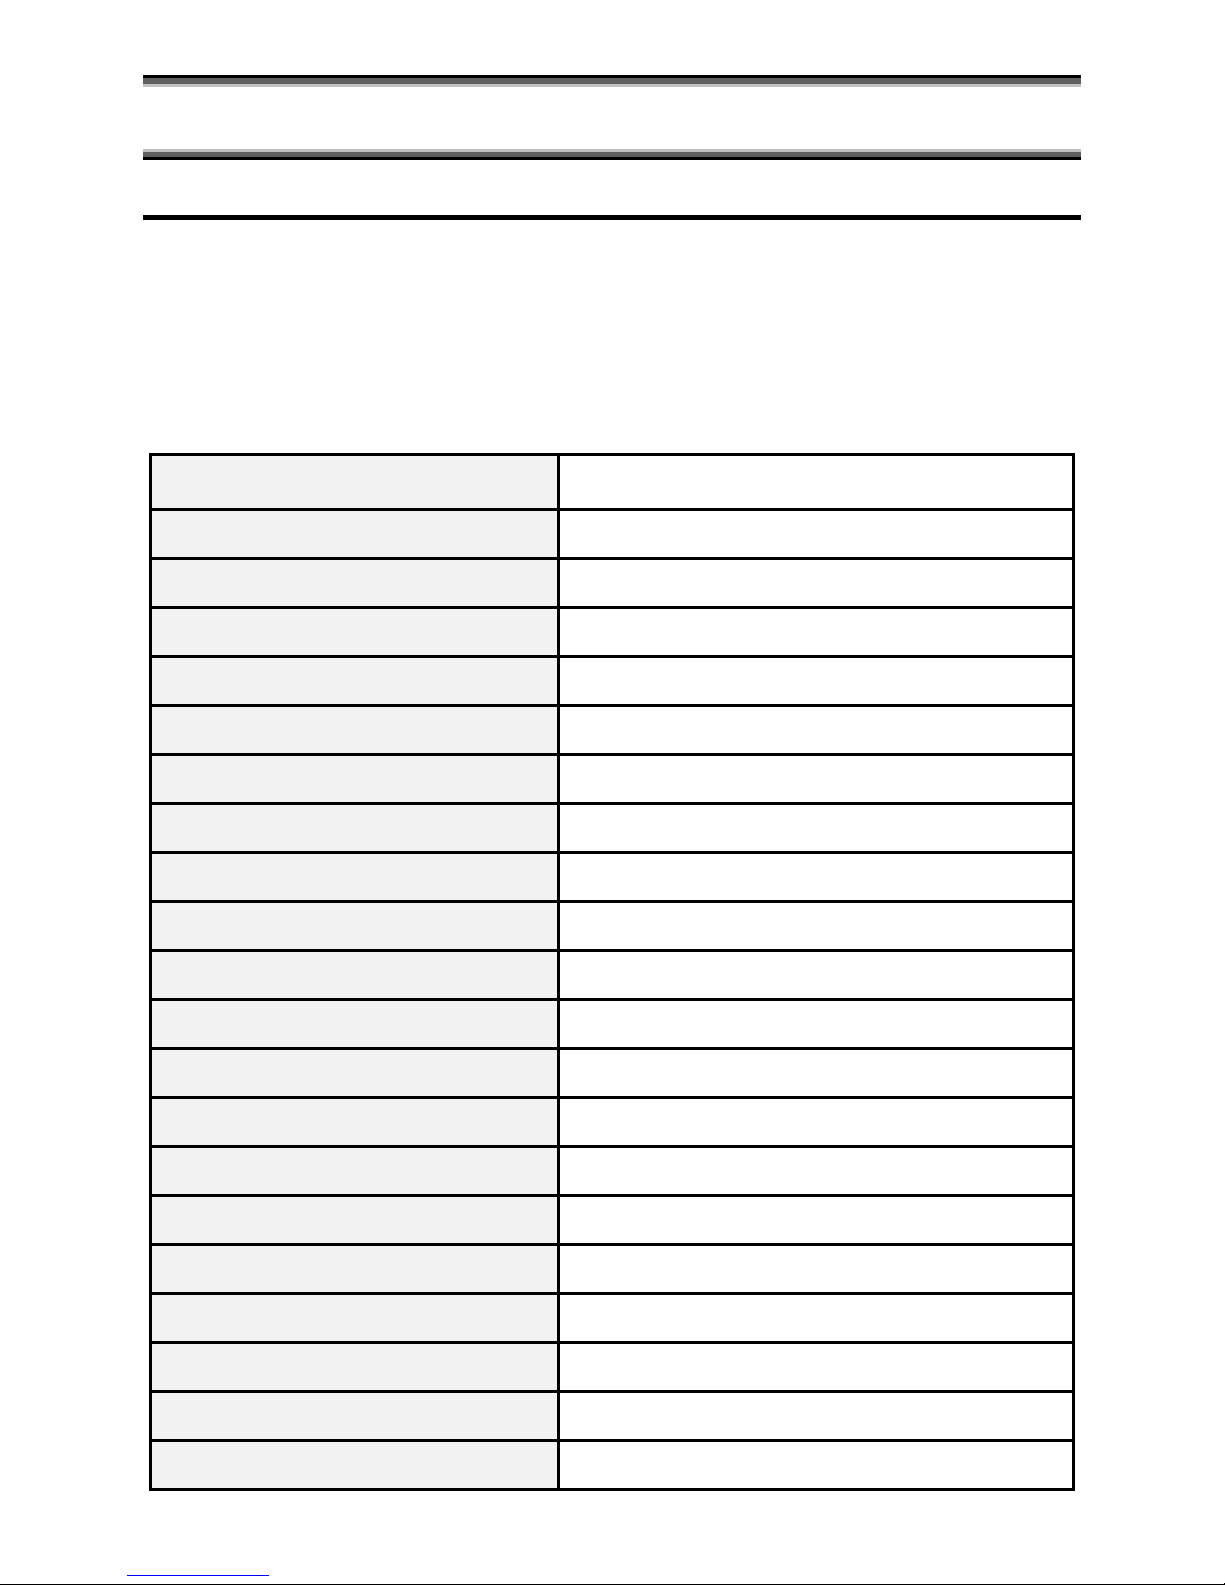
Below is the list of YMB's Key Operations in Text Reading Mode. For the name of the keys, see the
annexed table.
TABLE. Key Operations in Reading Mode
Scanning Scan (Enter) Key twice
Pause and Resume Reading Pause/Resume (5) Key
Reading of Previous Sentence Up Key
Reading of Next Sentence Down Key
Reading of Previous Phrase Left Key
Reading of Next Phrase Right Key
Reading of Previous Paragraph Cancel (Tab) Key + Up Key
Reading of Next Paragraph Cancel (Tab) Key + Down Key
Detailed Reading of Previous Character Cancel (Tab) Key + Left Key
Detailed Reading of Next Character Cancel (Tab) Key + Right Key
Reading of Upper Region Backspace Key + Up Key
Reading of Lower Region Backspace Key + Down Key
Reading of Left Region Backspace Key + Left Key
Reading of Right Region Backspace Key + Right Key
Going to Page Top or Previous Page PageUp Key
Going to Next Page PageDown Key
Placing/Removing Bookmark Slash Key twice
Going to Previous Bookmark Home Key twice
Going to Next Bookmark End Key twice
Search of Previous Number Cancel (Tab) Key + Home Key twice
Search of Next Number Cancel (Tab) Key + End Key twice
Page 47
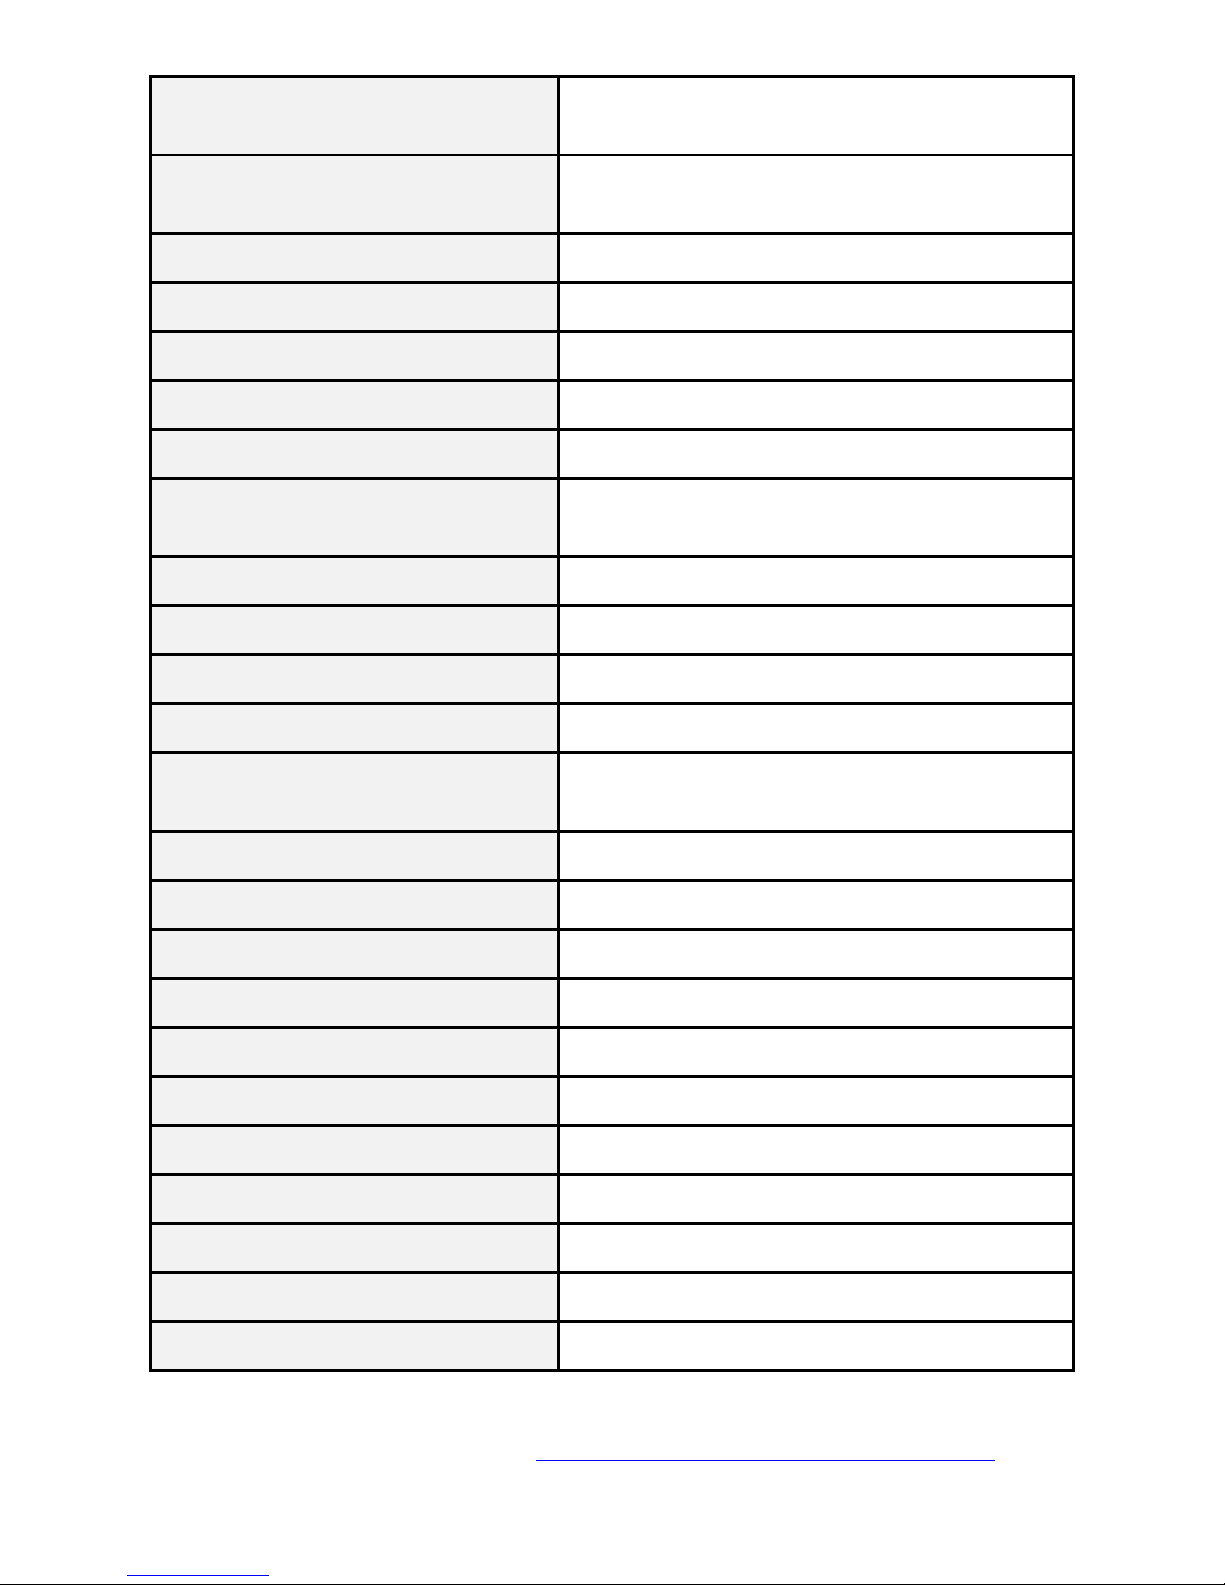
45
Backward Search Cancel (Tab) Key + Home Key twice (after selecting
text)
Forward Search Cancel (Tab) Key + End Key twice (after selecting
text)
Start of Text Selection Cancel (Tab) Key + Pause/Resume (5) Key
"Where We Are" Plus Key
Change of Page Correction Mode Backspace Key + Plus Key
Page Deletion Backspace Key + PageUp Key twice
Display of Recycle Bin Backspace Key + PageDown Key twice
Page Recovery Backspace Key + PageUp Key twice (when in the
recycle bin)
Start/Completion of Page Moving Backspace Key + Pause/Resume (5) Key twice
Display of Document Catalog (*1) Plus Key (long press)
Going to Previous Document Cancel (Tab) Key + PageUp Key twice
Going to Next Document Cancel (Tab) Key + PageDown Key twice
Naming a Document Cancel (Tab) Key + Slash Key twice (after selecting
text)
"About This Document" Cancel (Tab) Key + Plus Key
Increase of Reading Speed Minus Key
Decrease of Reading Speed Cancel (Tab) Key + Minus Key
Increase of Reading Volume Backspace(BS)+Minus Key
Decrease of Reading Volume Cancel(Tab)Key+ Backspace(BS)+Minus Key
Return to Default Settings Asterisk Key twice
Open Configuration Menu (*2) Cancel (Tab) Key + Asterisk Key twice
Open Advanced Menu (*2) Cancel (Tab) Key + Period Key twice
Change of Display Mode Zero Key
Change of Display Colors Backspace Key + Zero Key
Change of Mode Period Key
*1 You can use the following key operations in the Document Catalog Menu: On how to use the
Document Catalog Menu, Please refer to 3.5. How to Go to a Specified Document or Page. (p.17)
Page 48
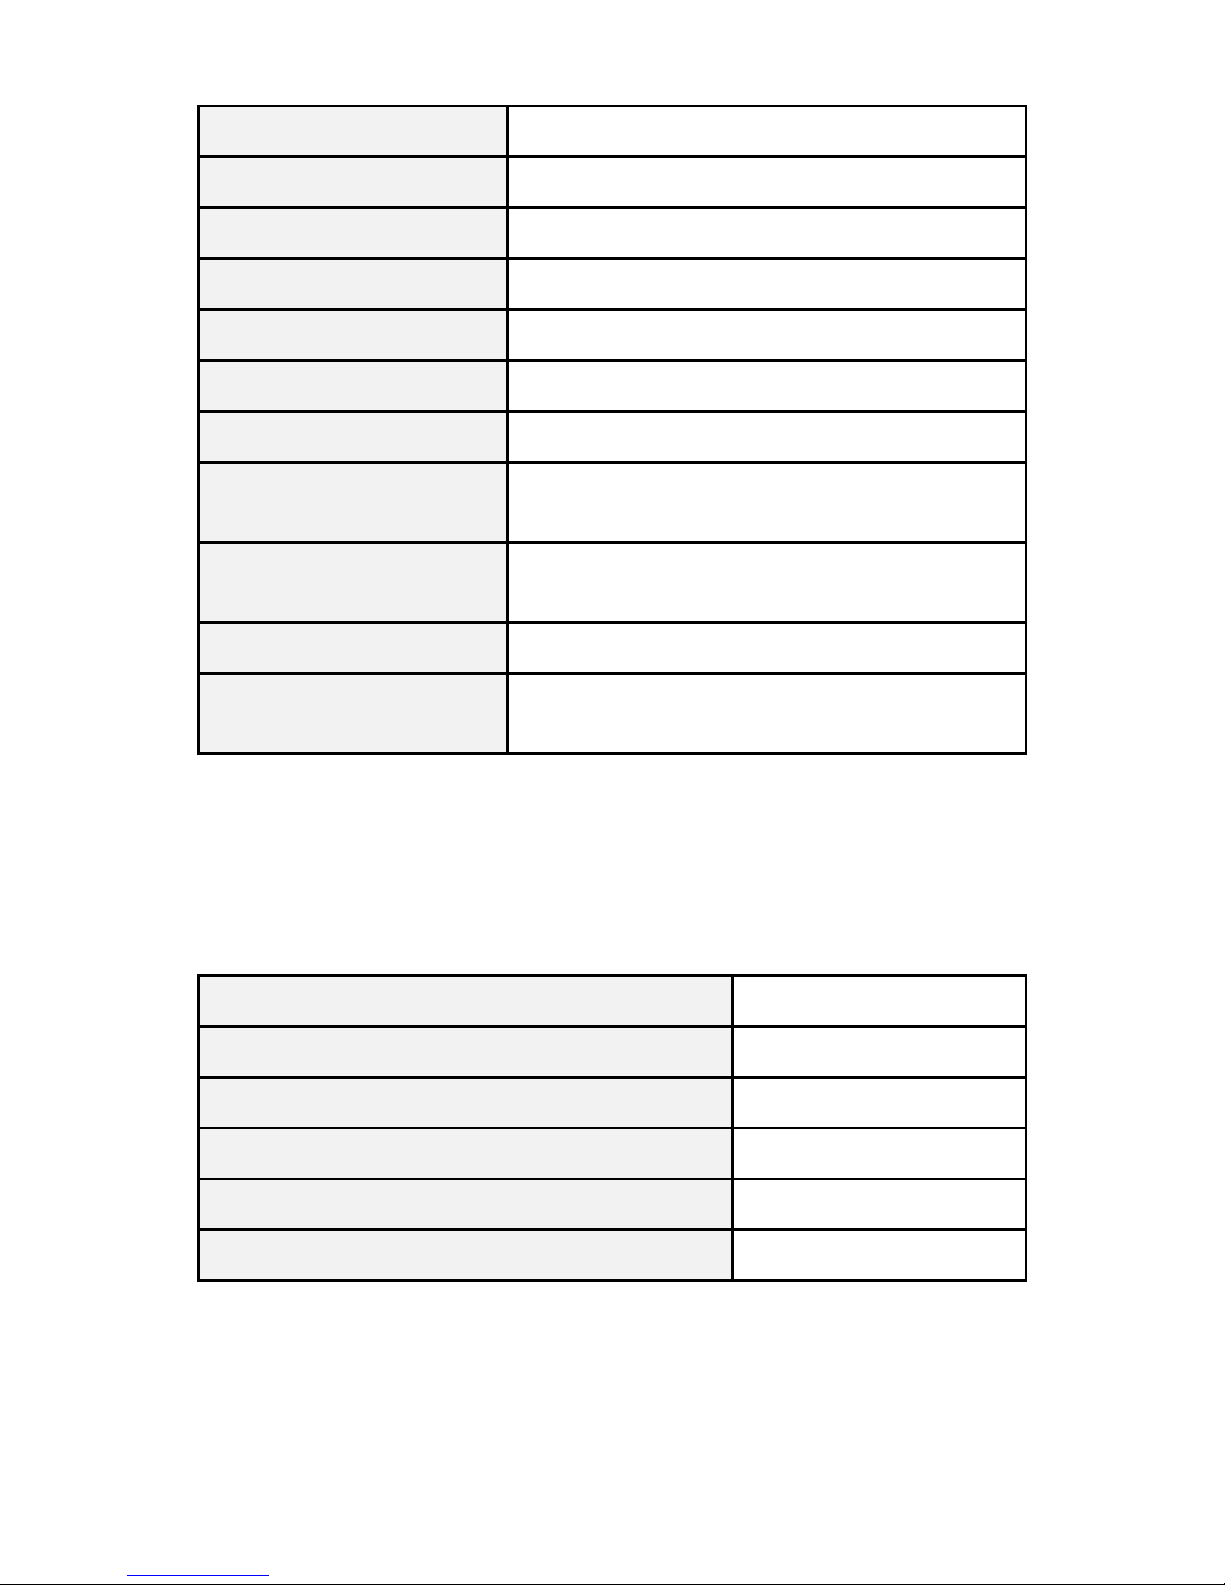
46
TABLE. Key Operations in the Document Catalog Menu
One Item Back Up Key
One Item Forward Down Key
Ten Items Backward PageUp Key
Ten Items Forward PageDown Key
Going to First Document Slash Key
Going to Last Document Asterisk Key
Going to Selected Document Pause/Resume (5) Key
Detailed Reading of Document
Name
Left/Right keys
Change of Document List
Order
Period Key
Closing of Document Catalog Cancel (Tab) Key
Selection of Documents with
Bookmarks
Home Key or End Key
*2 In some operations of the Configuration Menu and the Advanced Menu, it's necessary to type in
numbers such as page number or date and time. In this case, the keys used in YMB to go to a
different position are used as number keys. The following operations are valid:
Key Operations when typing in numbers
Typing in numbers Number Keys 0-9
Confirmation Scan (Enter) Key
Cancel All the Input Cancel (Tab) Key
Deletion of the last-typed character Backspace Key
Type in Value Corresponding to First Position Slash Key
Type in Value Corresponding to Final Position Asterisk Key
Page 49
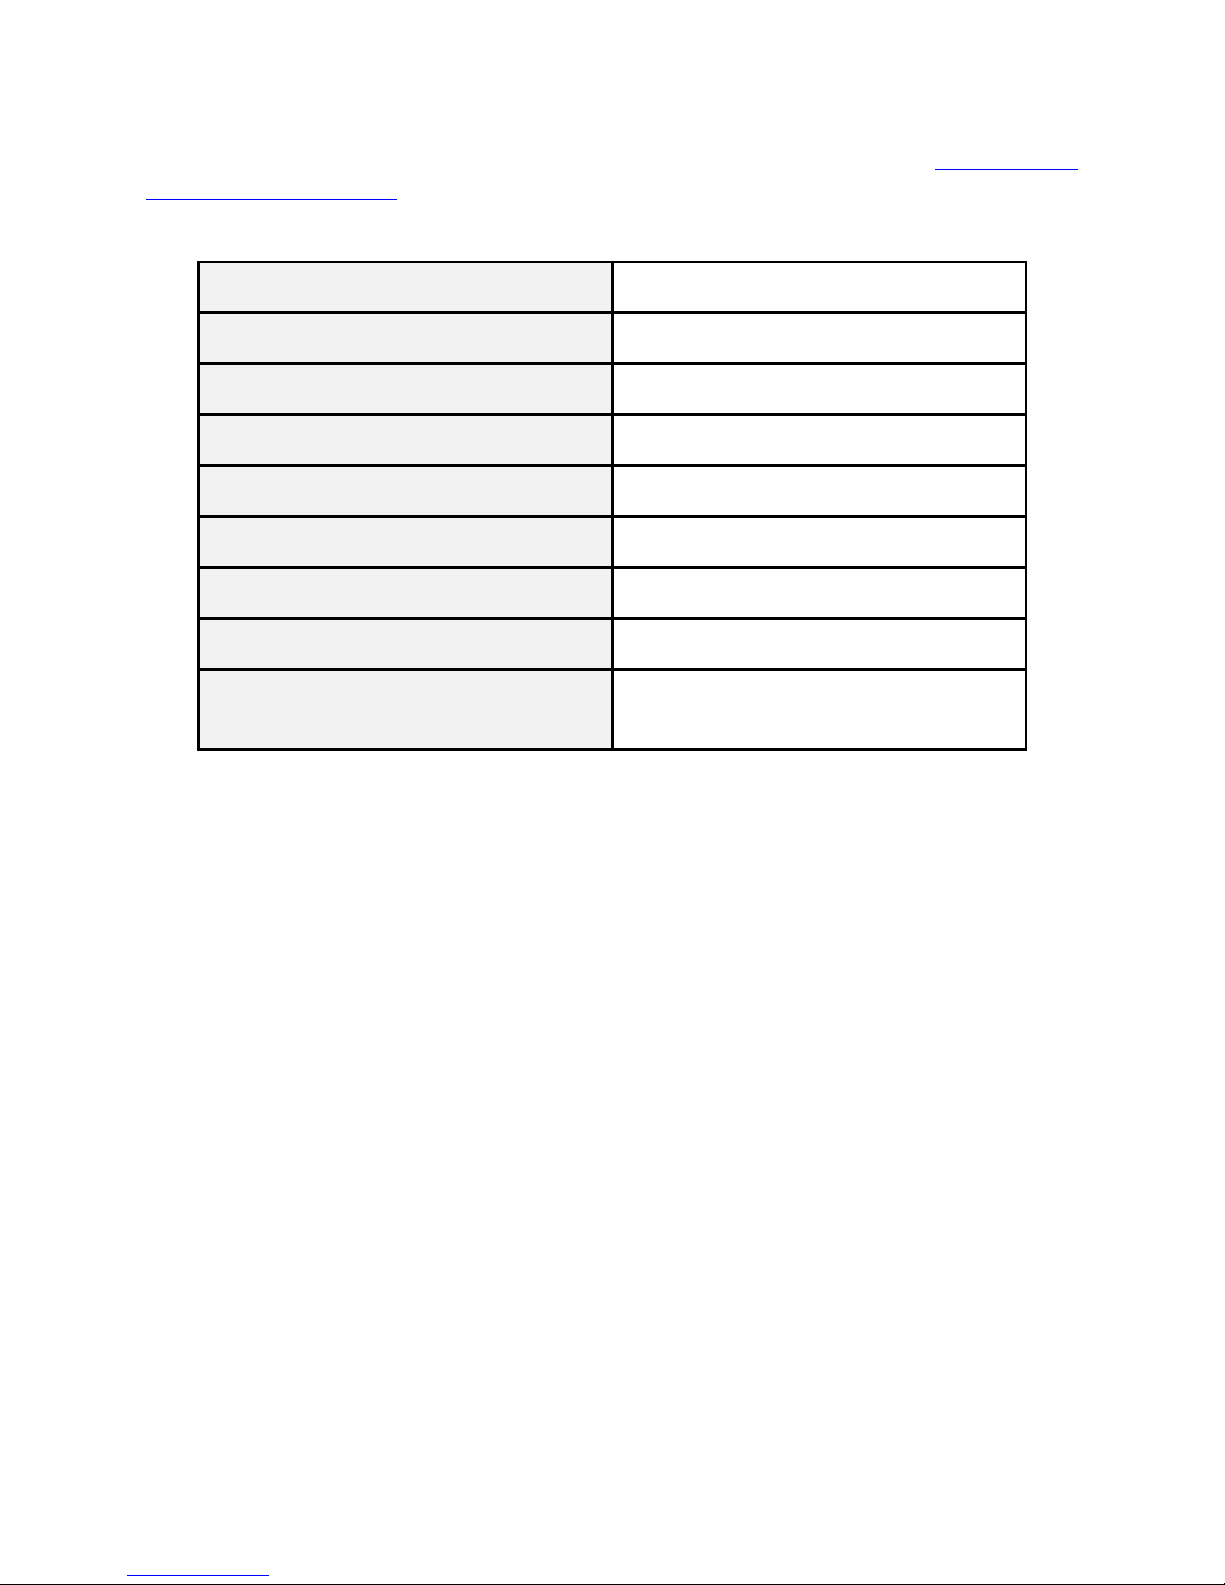
47
Appendix A-2. Key Operations in Magnifier Mode
In YMB's Magnifier Mode, the following particular key operations can be used: (Other operations are
the same as in the Reading Mode) On how to use the Magnifier Mode, please refer to Chapter 5. How
to Use YMB as a Magnifier.(p.26)
TABLE. Key Operations in Magnifier Mode
View Position Upward Up Key (when magnifying)
View Position Downward Down Key (when magnifying)
View Position to Left Left Key (when magnifying)
View Position to Right Right Key (when magnifying)
Change of Magnification Level (increase) Zero Key
Change of Magnification Level (decrease) Cancel (Tab) Key + Zero Key
Decrease of Contrast Backspace Key + PageUp Key
Increase of Contrast Backspace Key + PageDown Key
90-Degree Image Rotation Cancel (Tab) Key + Pause/Resume (5)
Key twice
Page 50

48
Appendix A-3. Key Operations in CD/USB Mode
The list of key operations in YMB's CD/USB Mode is as follows: On how to use the CD/USB Mode,
please refer to Chapter 4. How to Listen to the Contents of a CD, DVD Or USB Drive.(p.18)Even if
you are in the CD/USB Mode, if you press the Scan (Enter)Key twice, YMB returns to the Reading
Mode and scans printed material.
TABLE. Key Operations in CD/DVD/DAISY-book (file) Playing Mode
Pause/Resume Playing Pause/Resume (5) Key
Going Back a little Left Key
Going forward a little Right Key
Going to Previous Track, Heading or
Menu Item
Up Key
Going to Next Track, Heading or Menu
Item
Down Key
Reading of Previous Paragraph Cancel (Tab) Key + Up Key
Reading of Next Paragraph Cancel (Tab) Key + Down Key
Detailed Reading of Previous Character Cancel (Tab) Key + Left Key
Detailed Reading of Next Character Cancel (Tab) Key + Right Key
Going to Page Top or Previous Page PageUp Key
Going to Next Page PageDown Key
Placing/Deletion of Bookmark Slash Key twice
Going to Previous Bookmark PageUp Key twice
Going to Next Bookmark PageDown Key twice
"Where We Are" Plus Key
Return to Book (file) List (*3) Plus Key (long press)
Book (file) Information Cancel (Tab) Key + Plus Key
Going back a little while Backspace Key + Up Key
Going forward a little while Backspace Key + Down Key
Making Play Fast Minus Key
Making Play Slow Cancel (Tab) Key + Minus Key
Increase of Reading Volume Backspace(BS)+Minus Key
Page 51
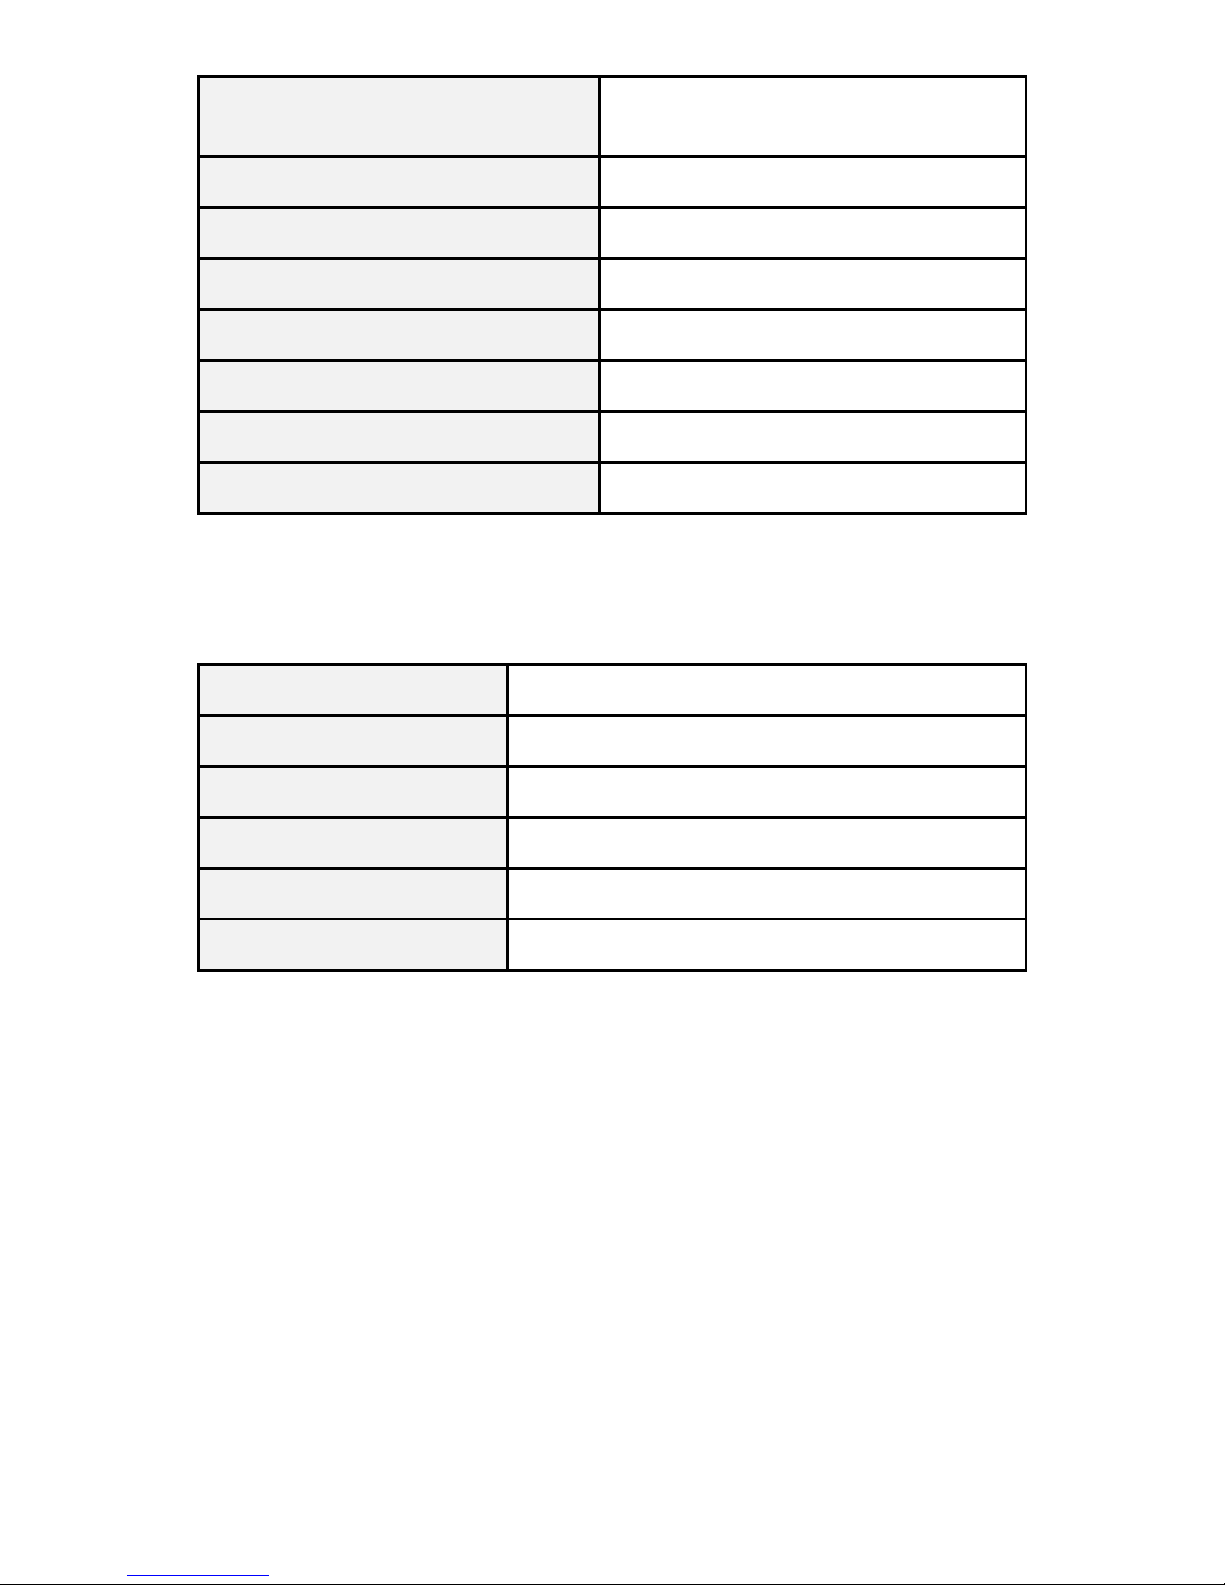
49
Decrease of Reading Volume Cancel(Tab)Key+ Backspace(BS)+Minus
Key
Return to Default State Asterisk Key twice
Open Configuration Menu Cancel (Tab) Key + Asterisk Key twice
Open Advanced Menu Cancel (Tab) Key + Period Key twice
Change of Display Mode Zero Key
Change of Display Colors Backspace Key + Zero Key
Change of Mode Period Key
Scanning Scan (Enter) Key twice
*3 The following key operations can be used when the DAISY book (file) list is shown:
TABLE. Key Operations in DAISY Book (file) List State
One Item Back Up Key
One Item Forward Down Key
Ten Items Back PageUp Key
Ten Items Forward PageDown Key
Playing of File or Book Pause/Resume (5) Key
Detailed Reading of File Name Left Key or Right Key
Page 52
50
Appendix B. Key Operations in Advanced Menu
The functions of YMB that are not often needed are gathered in the Advanced Menu. The items of
the Advanced Menu differ according to the Reading Mode and the CD/USB Mode.
Appendix B-1. Advanced Menu in Reading Mode
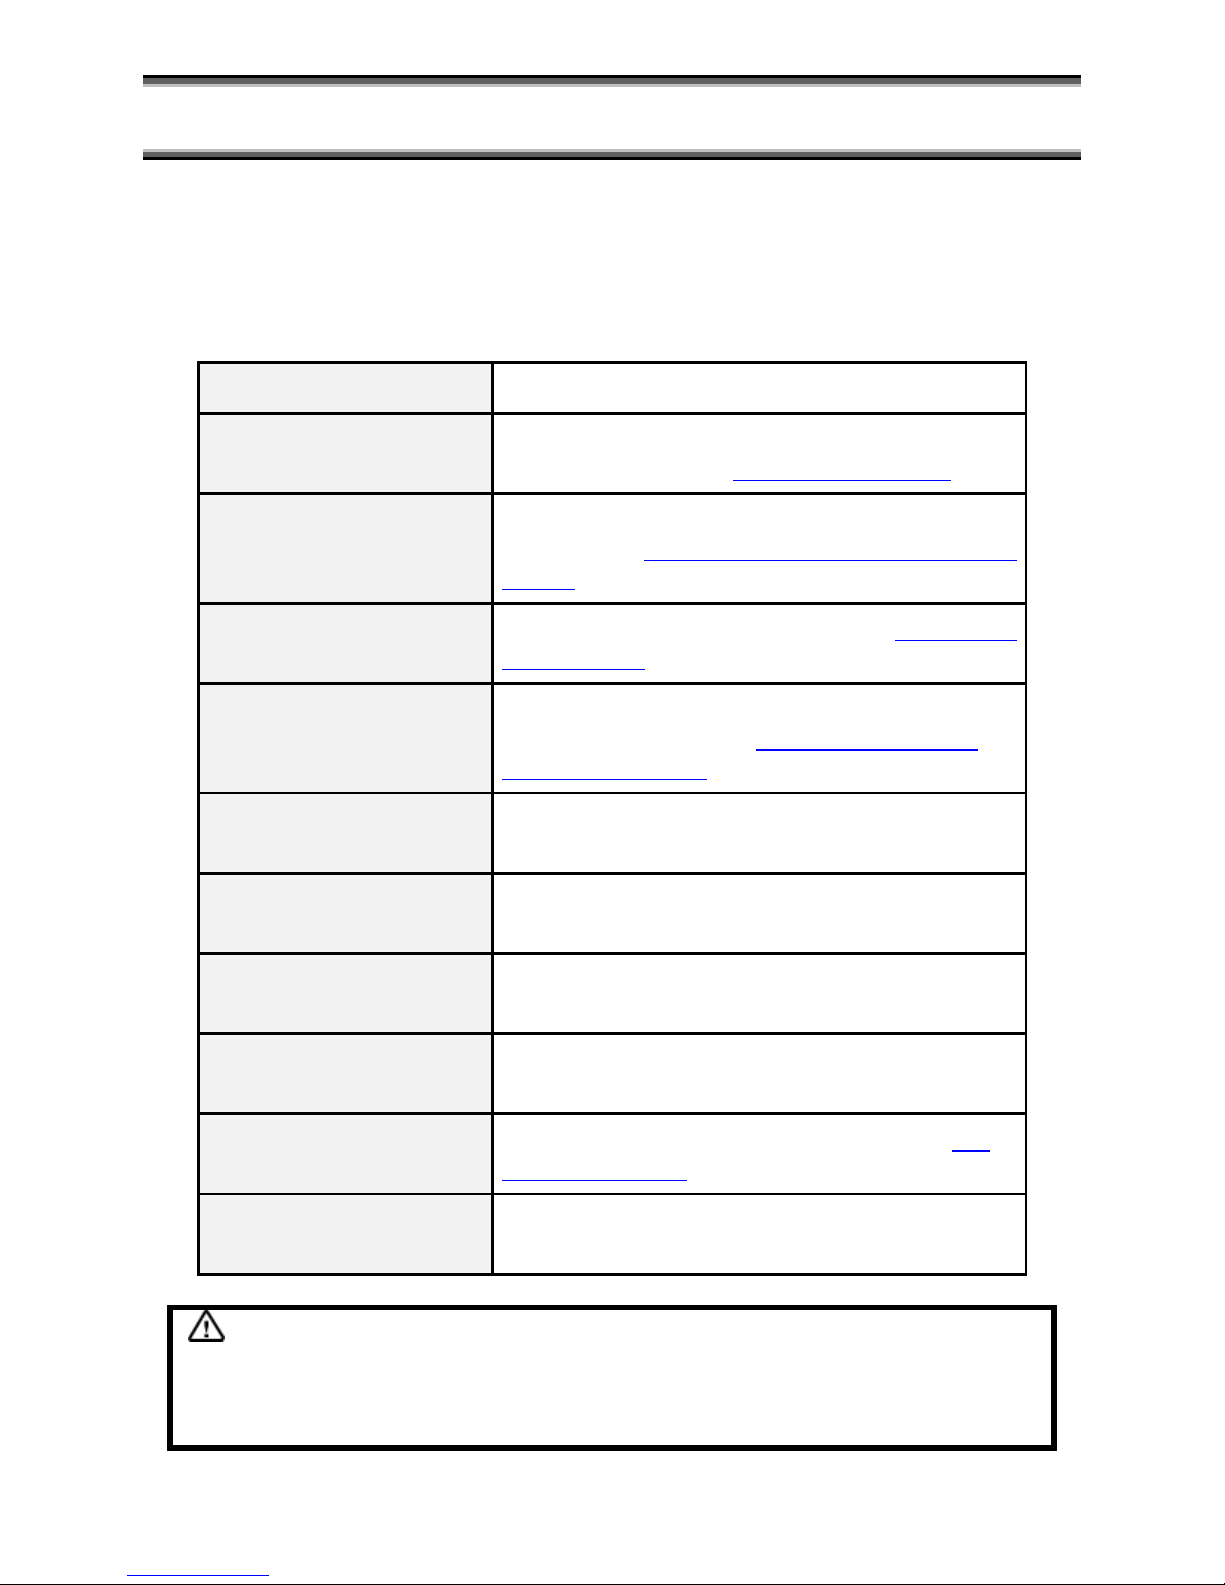
TABLE. Advanced Menu Functions in Reading/Magnifier Mode
Online Help It displays YMB's online help.
Multiple Page Scan It starts Multiple Page Scan. On how to use this
function, please refer to 6.1. Multiple Page Scan.(p.31)
Go to a Page It goes to a page specified by its number. For details,
please refer to 3.5. How to Go to a Specified Document
or Page.(p.17)
Creation of New Document It makes a new document. Please refer to Creation of a
New Document (p.33)for details.
Export of Documents (txt,
DAISY, HTML or MP3)
It exports the contents of the current document to a
USB drive. Please refer to 3.3. How to Use YMB's
Documents with a PC(p.15)for details.
Deletion of All Bookmarks After confirmation, it deletes all the bookmarks placed
on the current document.
Document Deletion After confirmation, it deletes the entire content of the
current document.
Backup to a USB drive It backs up the content of all the documents stored in
YMB to a USB drive.
Recovery from USB It restores YMB's documents according to the data
stored by the function "Backup to a USB drive".
Scanner Calibration It calibrates the image scanner. Please refer to 6.3.
Scanner Calibration(p.37)for details.
Deletion of All Documents It deletes all the documents internally stored in YMB
and returns all settings to their default values (*4).
Caution
In case of "Backup to a USB drive" or of "restoration from a USB drive", bookmarks
placed on all the pages are not stored. Also, these operations take some time when many
pages are stored in YMB.
Page 53
51
*4 For security reasons, this function is not shown in the usual Advanced Menu. To display this item,
you need to open the Advanced Menu pressing the Backspace Key together with the Cancel (Tab)
Key. And to execute this function, you need to type in 8, 2, 4, 6 in this order.
Appendix B-2. Advanced Menu in CD/USB Mode
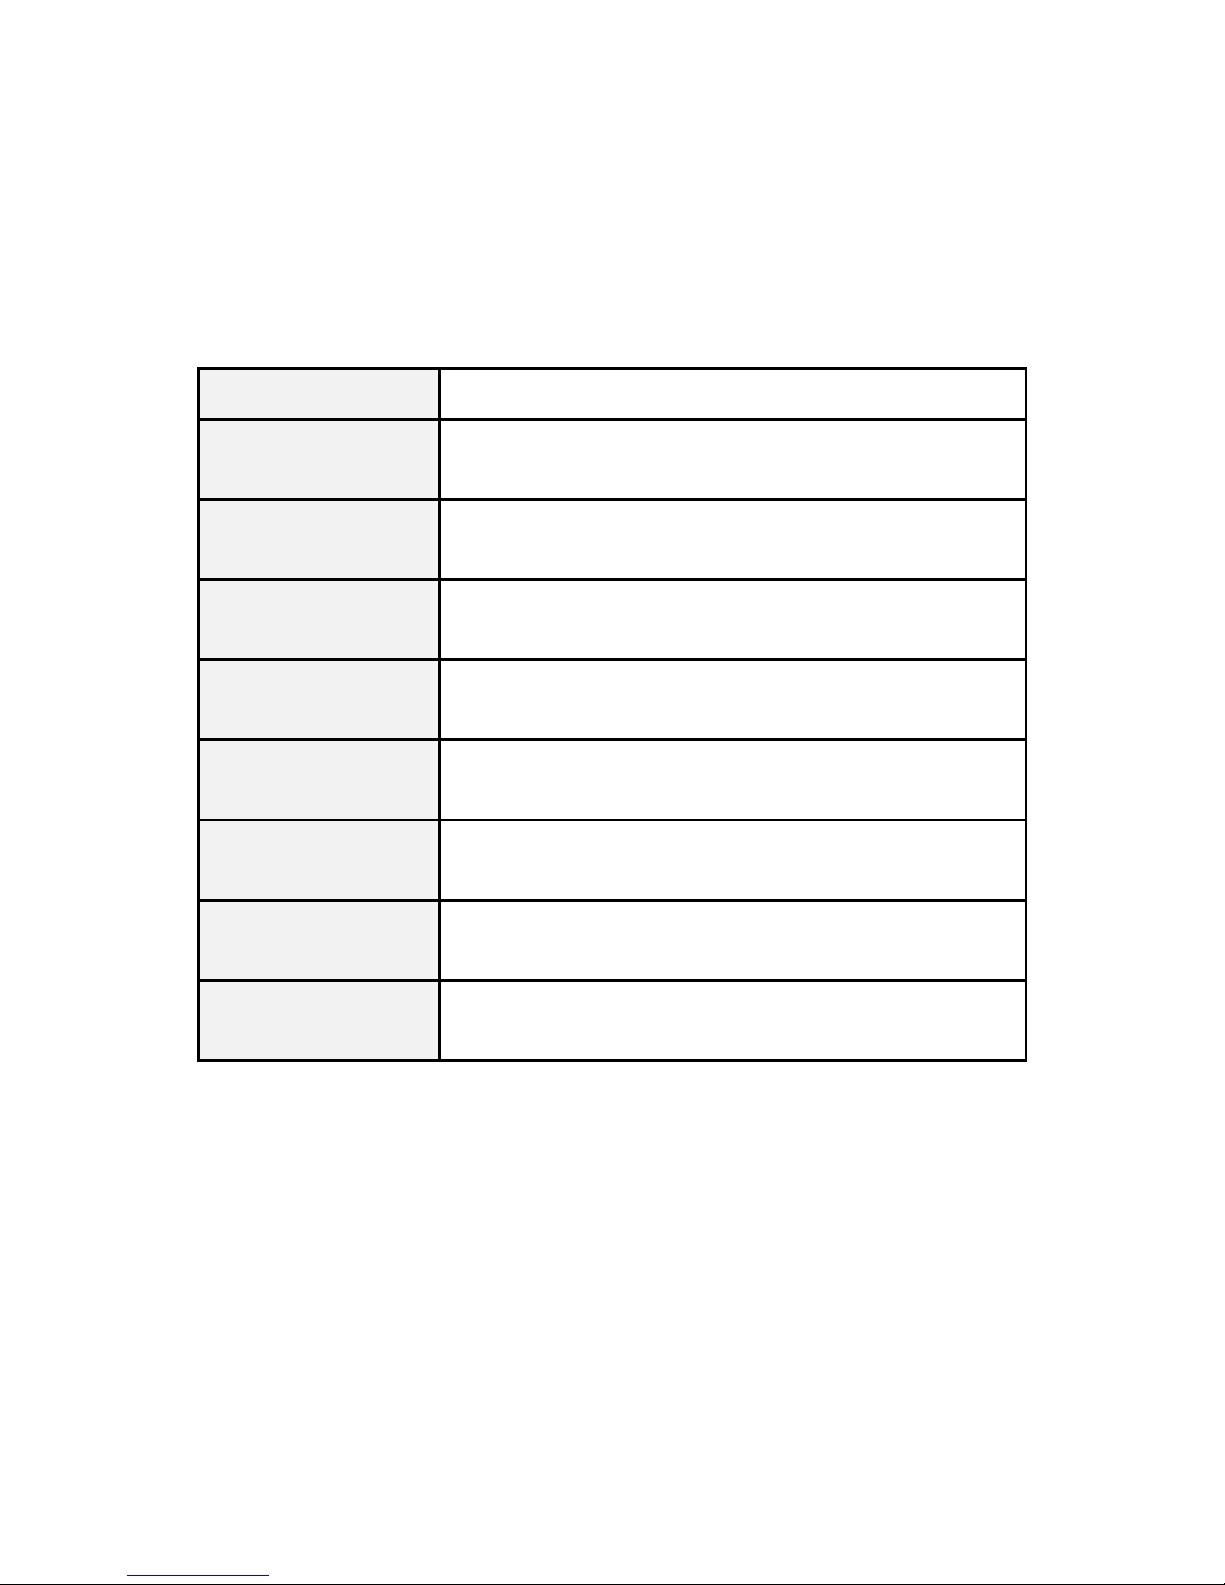
TABLE. Advanced Menu in CD/USB Mode
About this device It displays information on the inserted CD or USB drive.
Go to a Page It goes to a page specified by its number (in case of a text
file). *5
Go to a Time Position It goes to the time position specified with numbers (in case
of a DAISY book, Music CD or an MP3 file). *5
Go to a Track It goes to the track specified with numbers (in case of a
music CD). *5
Go to a Title It starts to play the title specified with numbers (in case of a
DVD). *5
Select an Audio Track When it's playing a DVD video with multiple languages, it
changes the voice language in use.
Select a Subtitle When it's playing a DVD video with subtitles, it changes the
type of subtitles under current display.
Deletion of All
Bookmarks
After confirmation, it deletes all the bookmarks placed on the
current document.
DAISY Book Transfer After confirmation, it transfers the selected DAISY book to a
portable DAISY player or to a USB drive (only DAISY books).
*5 These operations change depending on the media currently played. In case of audio files, such as
music CDs and MP3 files, which do not have pages, you can go to a specified time position instead of
to a specified page. In this case, instead of typing in a page number, type in the time in minutes.
Page 54
52
Appendix C. List of Configuration Items
The list of configuration items, which change YMB's behavior, is shown below. For details, please
refer to 6.4. Changing YMB Settings.(p.38)
Appendix C-1. Configuration Items in Reading/Magnifier Mode
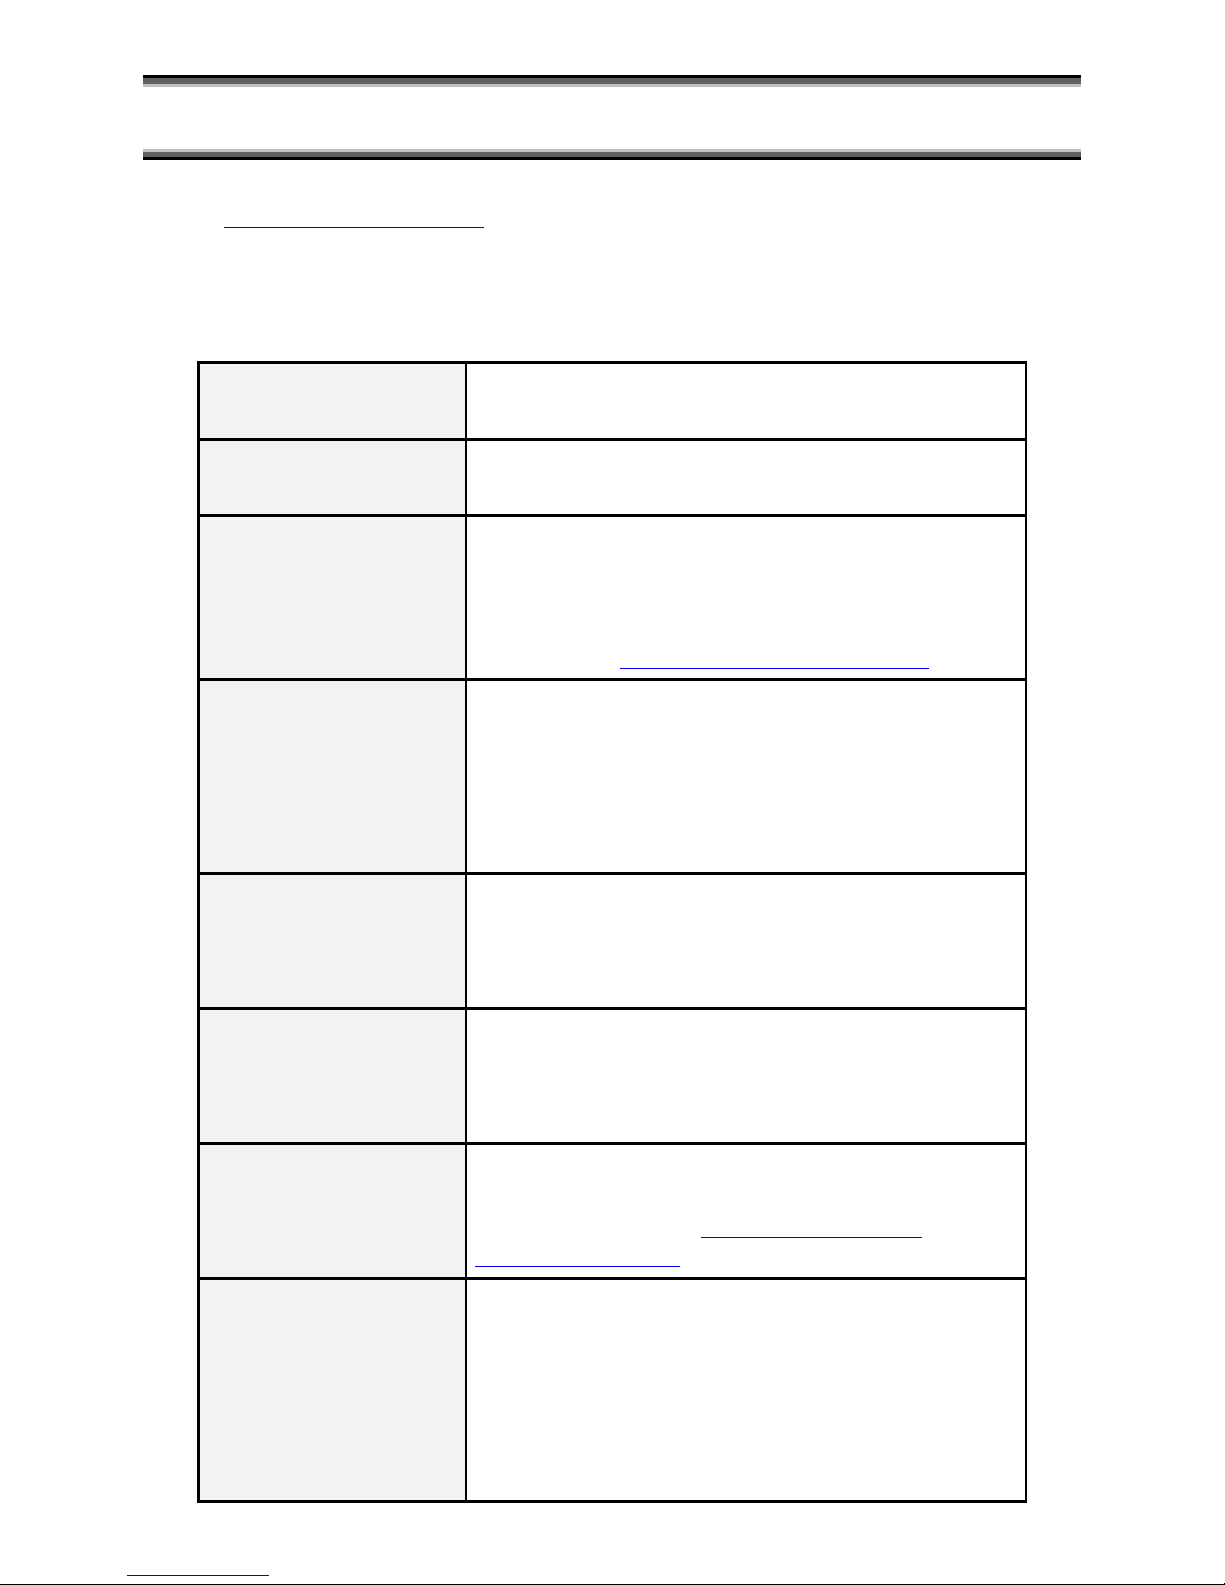
TABLE. Configuration Items in Reading/Magnifier Mode
Voice This selects the type of synthetic voice to use when
reading and for guidance.
Sound Effects when
Reading
It determines the use of sound effects when reading
(Select sound effects on or off).
Page Correction With this item, you can select the average page correction
mode for newly scanned pages as follows: "General
Print", "Books", "Single Column Print", and "Complex
Layout", "Tabular Form", "No correction". For details,
please refer to 2.2. How to Use Page Correction.(p.11)
Recognition language As the recognition language, select one of the following
options: "English" "Japanese" "Korean" "Simplified
Chinese" "Traditional Chinese" "Mixed English and
Japanese" "Mixed English and Korean" "Mixed English
and Simplified Chinese" "Mixed English and Traditional
Chinese"
Page Rotation It specifies the rotation of a scanned image when
performing OCR. Select one of the following options:
"Automatic" "No Rotation" "90 degrees" "180 degrees"
"270 degrees"
Automatic creation of new
document
It determines if automatically making a new document or
not when the date changes. Select one of the following
options: "Automatic creation: ON" "Automatic creation:
OFF"
Exporting file format Select one of the following options as the exporting file
format: "Text format" "DAISY format" "HTML format"
"MP3 format" Refer to 3.3. How to Use YMB's
Documents with a PC(p.15)for details.
Document preservation
time
It selects the preservation time for acquired texts and
images. Select one of the following options: "Save neither
pictures nor text" "Save text only" "Save the text of all
documents and keep images during a month" "Save the
text of all documents and keep images for six months"
"Save the text of all documents and keep images for one
year" "Save the text and images of all documents"
Page 55
53
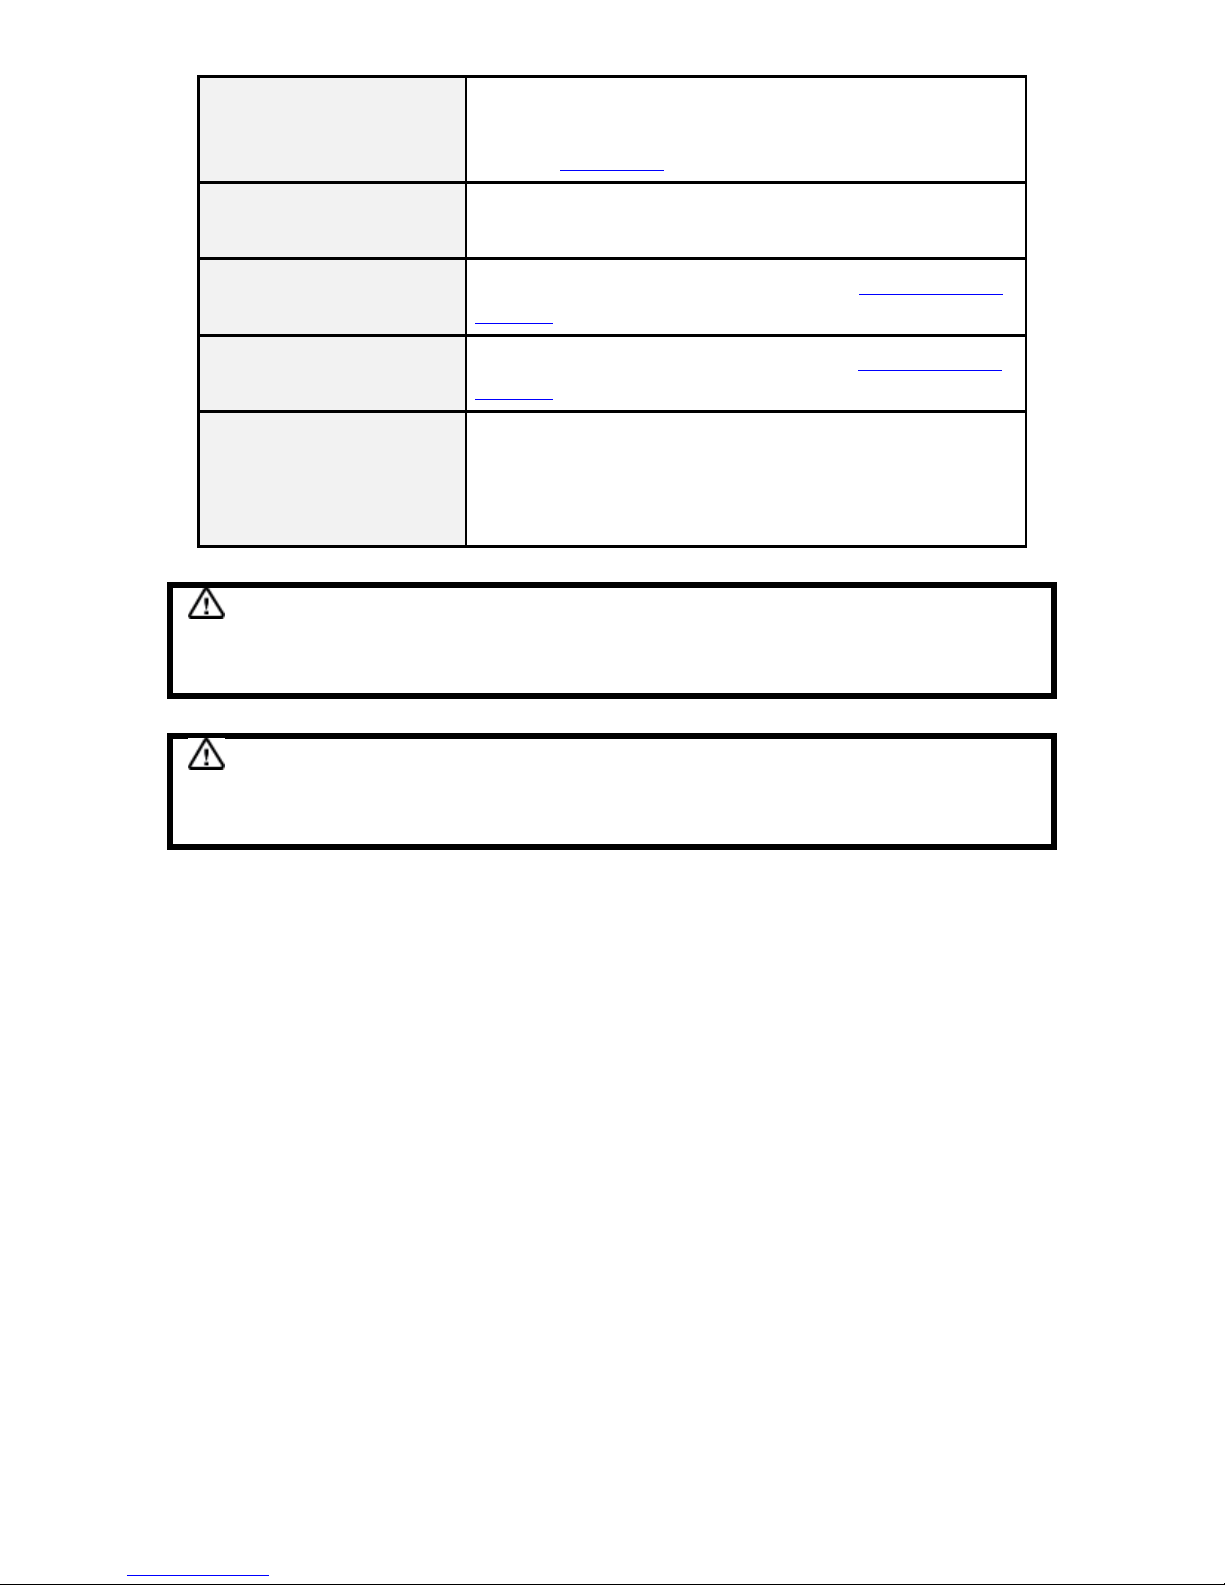
Scan mode As the scan mode for the image scanner, select one of the
following options: "Black and White" "Grayscale" "Color"
Refer to Scan Mode(p.39)for details.
Initial Mode Select one of the following modes as YMB's initial mode.
"Reading Mode" "Magnifier Mode"
Current date It changes YMB's current date. Refer to Date and Time
Settings(p.39)for details.
Current time It changes YMB's current time. Refer to Date and Time
Settings(p.39)for details.
Interface Language It specifies the interface language of YMB. Select one of
the following options: "English", "Japanese", "Simplified
Chinese", or "Traditional Chinese". This setting only
becomes effective after rebooting.
Caution
If you change the default page correction mode to Complex Layout, it sometimes takes
time between scanning completion to start reading.
Caution
When the Interface Language is changed, the entire set of messages from YMB is changed
to another language.
Page 56
54
Appendix C-2. Configuration Items in CD/USB Mode
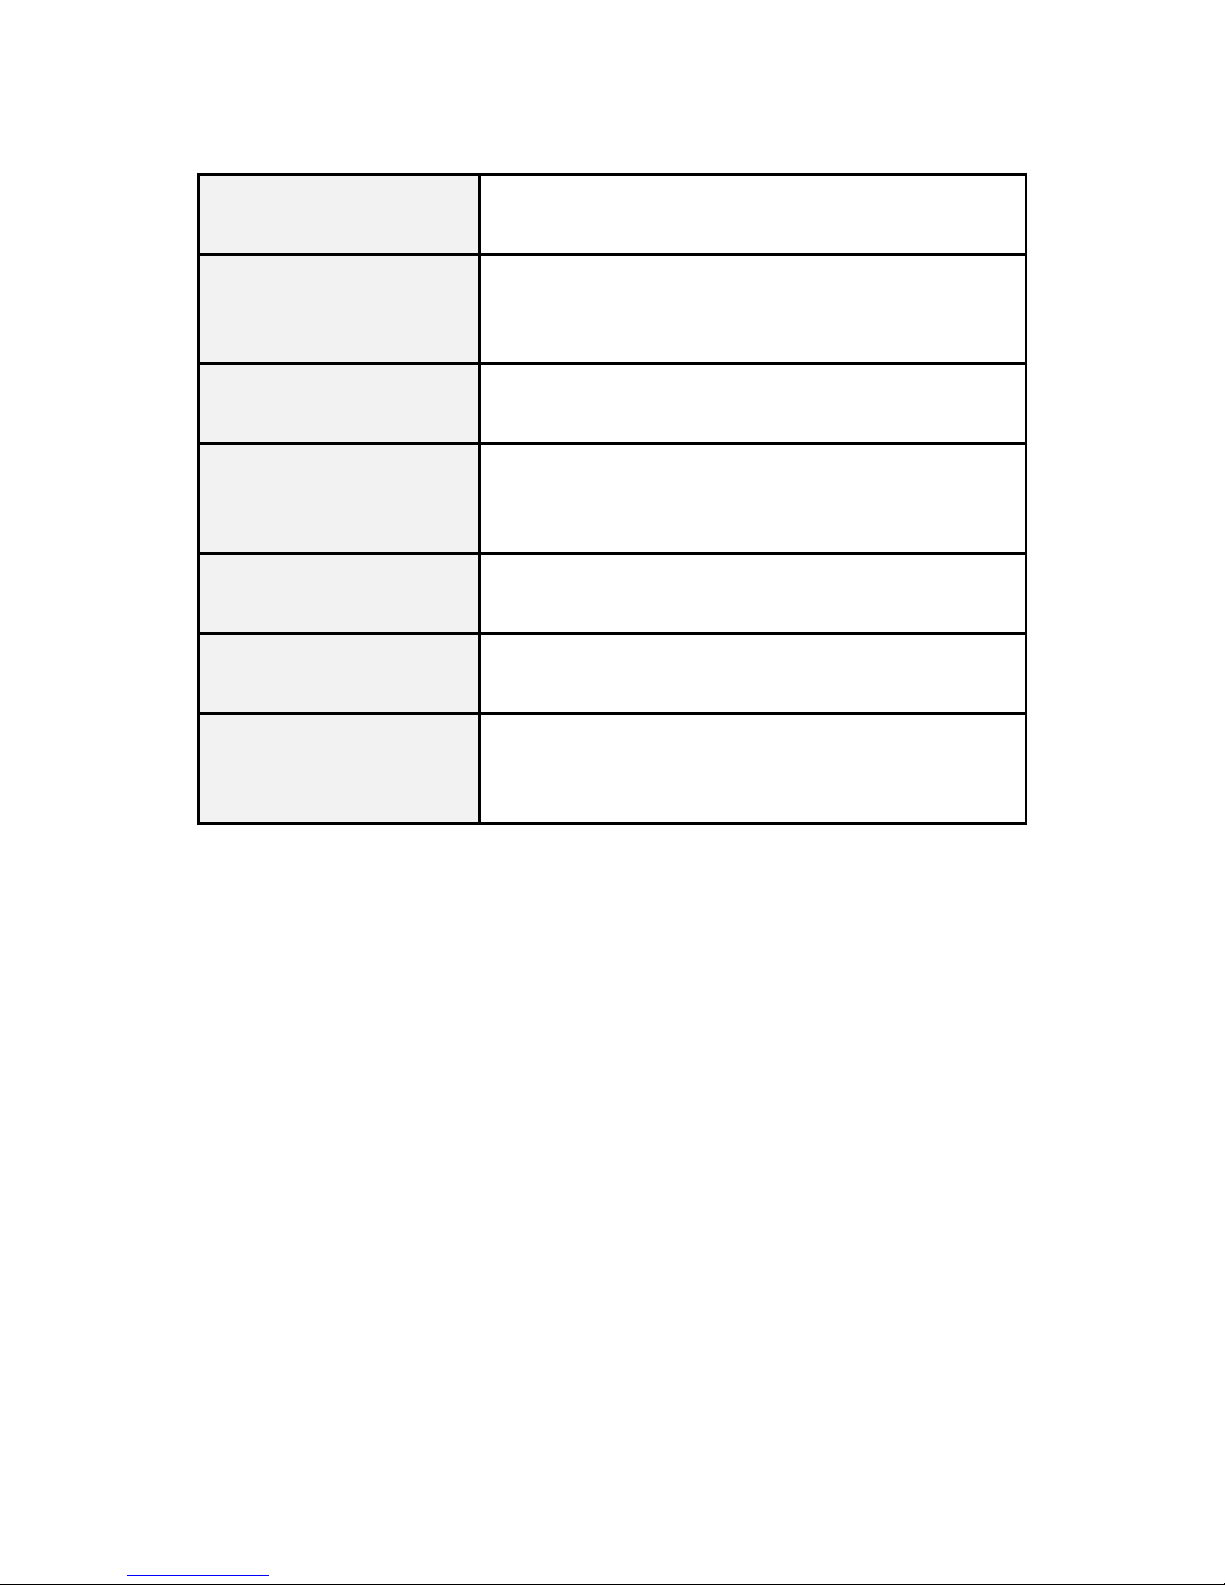
TABLE. Configuration Items in CD/USB Mode
Voice This selects the type of synthetic voice to use when
reading and for guidance.
Guidance volume It determines the volume of the synthetic voice as
opposed to the recorded human voice. Select one
volume from "Volume 1" to "Volume5".
Sound Effects when Playing It determins the use of sound effects when playing
(Select sound effects on or off).
Reading Language It selects the language to read text files. Select
"English", "Japanese", "Simplified Chinese" or
"Traditional Chinese".
File List Mode For the file list mode, select "Hierarchical view" or "Flat
view".
Order of File List For the order of the file list, select "By type", "By
name" or "By date".
PDF Recognition It determines if to use OCR (character recognition) or
not when displaying PDF files. Select "Always" or
"When necessary".
Page 57
55
Appendix D. List of File Formats Supported by YMB
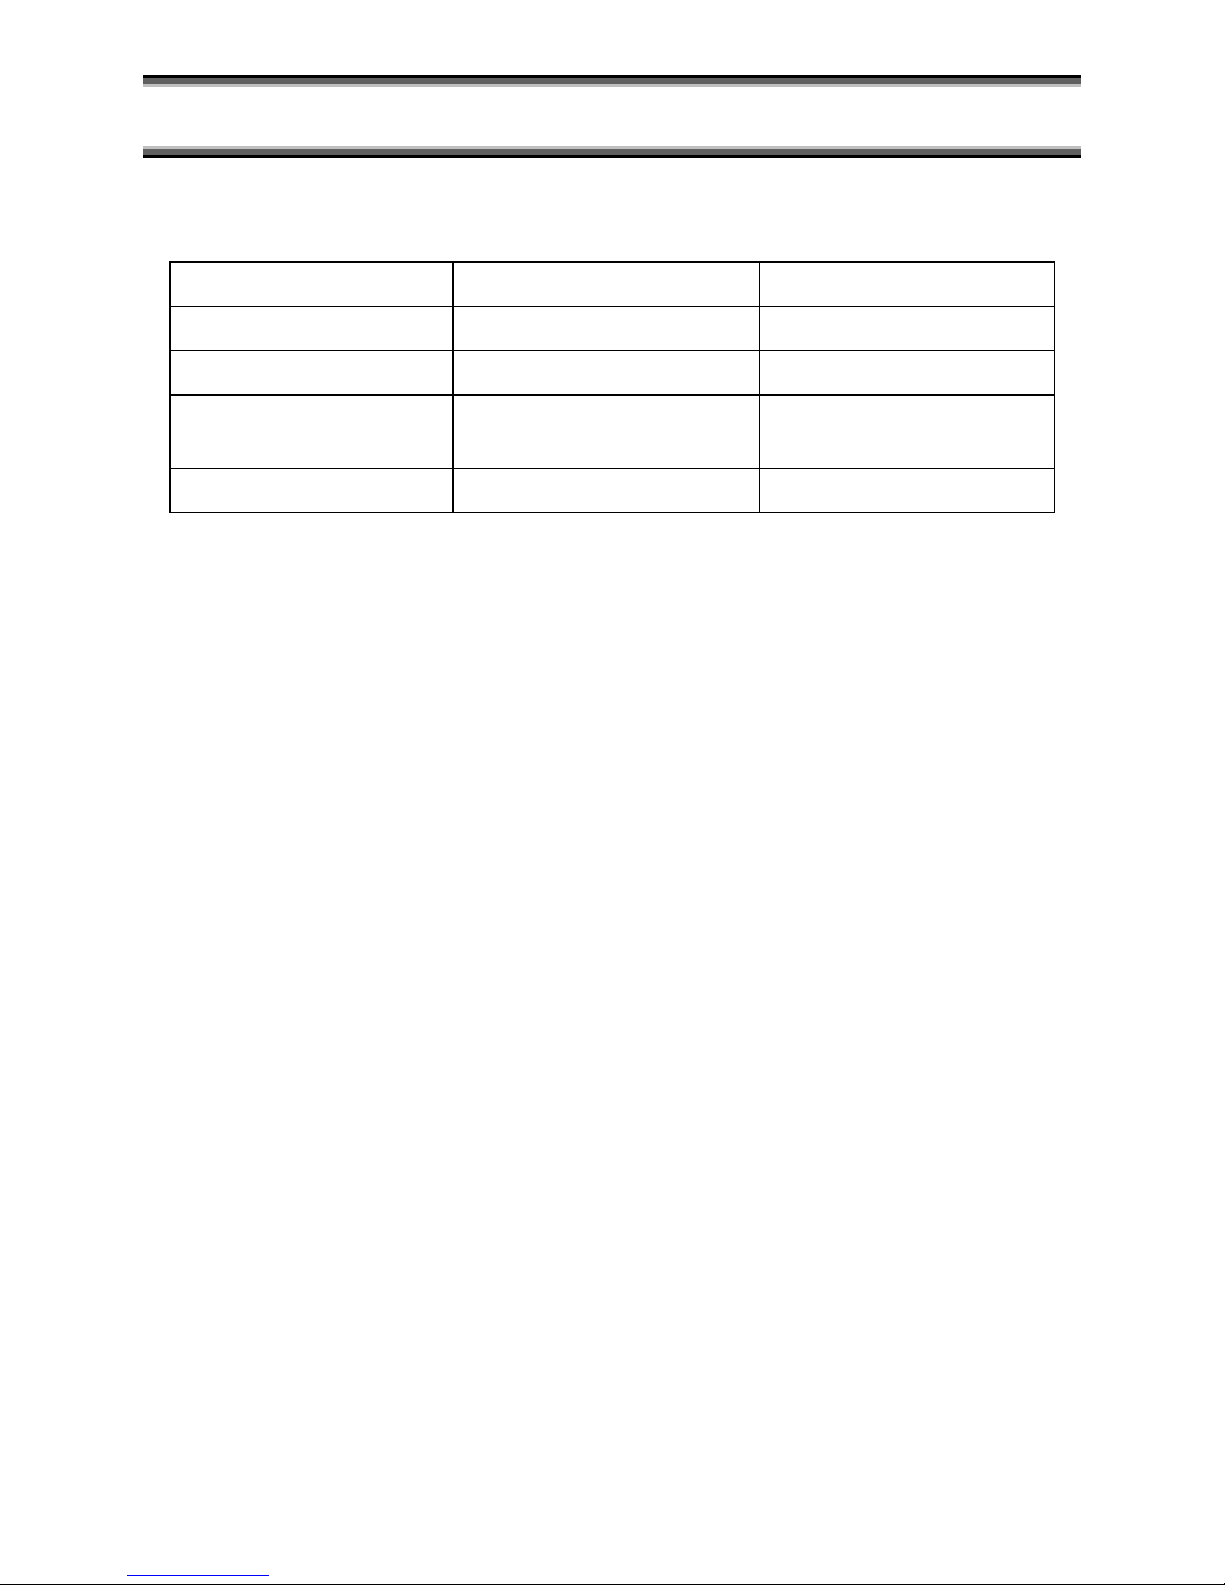
You can play the following file formats in YMB's CD/USB Mode.
TABLE. File Formats Supported in CD/USB Mode
Text files (.txt) Word documents (.doc, .docx) PDF documents (.pdf)
Excel Documents (.xls, .xlsx) HTML documents (.htm, .html) Rich Text documents (.rtf)
MP3 files (.mp3) Midi files (.mid) Windows Media files (.wma)
CSV files (.csv)
Other audio files (.wav, .ogg
and .avi)
Image files (.bmp, .png and .gif)
EPUB books (.epub)
Page 58

56
Glossary
A O
Advanced Menu 15
Operation Mode
18
B Operation Panel 3
Book 8 P
Bookmark 16 Page 12
Braille Scan Page Deletion 14
C Page Moving 36
CD Eject Button 7 Power Button 3
CD Mode 18 R
CD Tray
7 Reading Mode 18
Configuration Menu
38 Recognition Language 38
D Ruby Reading
DAISY Book
22 S
DAISY Format 39 Scanner Calibration 37
Detailed Reading 44 Scanner Calibration Sheet 37
Document 5 Scanning 9
Document Deletion 49 Screen Cable * VGA Cable 26
Document Rename 34 Screen Output Connector 26
E Single Column Print 11
Earphone Jack 4 T
Easy-Use Plate Text Format 39
Export as Text 15 Text Selection 34
Exporting File Format
39 U
G
USB Drive 15,20
Go to a Page 12 USB Mode 20
General Print 11
USB Port
15
H
V
Headphone Jack * Earphone jack
4 VGA Cable 26
HTML Format
39 Voice Control Round Button 3
I
Image Scanner 8
Invoices and Receipts 9
M
Magnifier Mode 18,28
Moving to a Document 13
MP3 Format 39
Multimedia DAISY Book 30
Multiple Page Scan 31
Page 59

57
Technical Information
This equipment is a reading machine with a built-in scanner and uses the following:
- CanoScan manufactured by Canon Inc. for the scanner,
- Printed Document OCR Library provided by Media Drive Corporation for the OCR engine,
- Microsoft Speech Platform for the speech synthesis engine, and
- the MP3 recording technology and software provided by Fraunhofer Gesellschaft zur Förderung der
Angewandten Forschung.
All company names and product names mentioned in this manual are trademarks or registered trademarks of
their respective companies.
Free Software Credits
Part of this equipment uses the following free software:
- Pygame
- XPDF (developed by Glyph & Cog, LLC)
- LAME
Pygame is distributed under GNU LGPL. For more information please visit http://www.pygame.org/
XPDF is distributed under GNU GPL. For more information please visit http://www.foolabs.com/xpdf/
LAME is distributed under GNU LGPL. For more information please visit http://lame.sourceforge.net/
For more information on GNU LGPL and GNU GPL, please visit Free Software Foundation's website
http://www.fsf.org/licensing/
We would like to thank those who have developed the technologies which this equipment is made based upon.
Copyrights
-Pygame
Version 1.9.1 release Python Game Development by Pete Shinners
-Python version 2.5.4
Copyright (c) 2001, 2002, 2003, 2004, 2005, 2006, 2007, 2008 Python Software Foundation. All rights reserved.
Copyright (c) 2000 BeOpen.com. All rights reserved.
Copyright (c) 1995-2001 Corporation for National Research Initiatives. All rights reserved.
Copyright (c) 1991-1995 Stichting Mathematisch Centrum. All rights reserved.
-Py2exe 0.6.6
Copyright (c) 2000-2008 Thomas Heller, Mark Hammond, Jimmy Retzlaff
-Xiph OpenCodecs
Copyright (c) 1994-2004 Xiph.org Foundation
-XPDF
The XPDF software and documentation are copyright 1996-2007 Glyph & Cog, LLC.
--
Page 60

 Loading...