

Page 1
Installation Guide
3ware
®
SA TA RAID Controller
Supports the 9000 Series
PN 720-0117-01
March 2005
Page 2

Copyright
©2004-2005 AMCC. All rights reserved. No part of this
publication may be reproduced, stored in a retrieval system, or
transmitted in any form by any means, electronic, mechanical,
photocopying, recording or otherwise, without the proper written
consent of AMCC, 455 West Maude Ave., Sunnyvale, CA 94085.
Trademarks
3ware, Escalade, and 3DM are all registered trademarks of AMCC.
The 3ware logo, 3BM, StorSwitch , TwinStor, and R5 Fusion are all
trademarks of AMCC. All other trademarks herein are property of
their respective owners.
Disclaimer
AMCC assumes no responsibility for errors or omissions in this
document, nor does AMCC make any commitment to update the
information contained herein.
Page 3

Table of Contents
About this Guide . . . . . . . . . . . . . . . . . . . . . . . . . . . . . . . . . . . . . v
Conventions Used in This Guide . . . . . . . . . . . . . . . . . . . . . . . . . . . . . . . . v
About the 3ware RAID Controller . . . . . . . . . . . . . . . . . . . . . . . 1
Product Features . . . . . . . . . . . . . . . . . . . . . . . . . . . . . . . . . . . . . . . . . . . . 1
What’s New With the 3ware 9000 Series Controllers . . . . . . . . . . . . . . . . 2
System Requirements . . . . . . . . . . . . . . . . . . . . . . . . . . . . . . . . . . . . . . . . 2
Package Contents . . . . . . . . . . . . . . . . . . . . . . . . . . . . . . . . . . . . . . . . . . . 4
Installation Overview . . . . . . . . . . . . . . . . . . . . . . . . . . . . . . . . . 5
Installing the Hardware . . . . . . . . . . . . . . . . . . . . . . . . . . . . . . . 7
Before You Begin. . . . . . . . . . . . . . . . . . . . . . . . . . . . . . . . . . . . . . . . . . . . 8
Installation Considerations . . . . . . . . . . . . . . . . . . . . . . . . . . . . . . . . . 8
What You Need: Tools and Equipment. . . . . . . . . . . . . . . . . . . . . . . 10
Safety Factors . . . . . . . . . . . . . . . . . . . . . . . . . . . . . . . . . . . . . . . . . . . . . 10
Personal Safety . . . . . . . . . . . . . . . . . . . . . . . . . . . . . . . . . . . . . . . . 10
Protecting Equipment and Data . . . . . . . . . . . . . . . . . . . . . . . . . . . . 10
Installing a Serial ATA RAID Controller . . . . . . . . . . . . . . . . . . . . . . . . . . 12
To connect serial cables to the controller . . . . . . . . . . . . . . . . . . . . . 16
To install the controller in the computer . . . . . . . . . . . . . . . . . . . . . . 17
To connect the interface cables to the drives . . . . . . . . . . . . . . . . . . 18
Installing a Serial ATA RAID Controller
with Multi-lane Internal Connectors . . . . . . . . . . . . . . . . . . . . . . . . . 19
To connect the multi-lane cables . . . . . . . . . . . . . . . . . . . . . . . . . . . 20
To install the controller in the computer . . . . . . . . . . . . . . . . . . . . . . 21
To install the drives. . . . . . . . . . . . . . . . . . . . . . . . . . . . . . . . . . . . . . 21
Finishing Up. . . . . . . . . . . . . . . . . . . . . . . . . . . . . . . . . . . . . . . . . . . . . . . 22
Check your Installation and Close the Case. . . . . . . . . . . . . . . . . . . 22
Configure your RAID Arrays. . . . . . . . . . . . . . . . . . . . . . . . . . . . . . . 22
Moving Units from an 8000 Controller to a 9000 Controller . . . . . . . . . . . 23
Moving Legacy JBOD Units to a 9000 Controller. . . . . . . . . . . . . . . 24
Configuring Units . . . . . . . . . . . . . . . . . . . . . . . . . . . . . . . . . . . 27
Understanding RAID Concepts and Levels. . . . . . . . . . . . . . . . . . . . . . . 28
Other Important Concepts . . . . . . . . . . . . . . . . . . . . . . . . . . . . . . . . 31
Determining What RAID Level to Use . . . . . . . . . . . . . . . . . . . . . . . . . . . 31
www.3ware.com i
Page 4

Working with the 3ware BIOS Manager (3BM) . . . . . . . . . . . . . . . . . . . . 34
Starting 3BM. . . . . . . . . . . . . . . . . . . . . . . . . . . . . . . . . . . . . . . . . . . 34
Exiting 3BM . . . . . . . . . . . . . . . . . . . . . . . . . . . . . . . . . . . . . . . . . . . 36
Working in the 3BM Screens . . . . . . . . . . . . . . . . . . . . . . . . . . . . . . 37
Specifying the Unit Configuration . . . . . . . . . . . . . . . . . . . . . . . . . . . . . . 40
Basic Steps for Creating a Unit . . . . . . . . . . . . . . . . . . . . . . . . . . . . 40
Specifying a Hot Spare. . . . . . . . . . . . . . . . . . . . . . . . . . . . . . . . . . . 46
Enabling Auto-Carving for Units Larger Than 2 TB . . . . . . . . . . . . . 47
Leaving Individual Drives as JBODs . . . . . . . . . . . . . . . . . . . . . . . . . . . . 48
Initializing Units . . . . . . . . . . . . . . . . . . . . . . . . . . . . . . . . . . . . . . . . . . . . 49
RAID 0 Units. . . . . . . . . . . . . . . . . . . . . . . . . . . . . . . . . . . . . . . . . . . 49
For RAID 5 and RAID 50 Units. . . . . . . . . . . . . . . . . . . . . . . . . . . . . 49
For RAID 1 and RAID 10 . . . . . . . . . . . . . . . . . . . . . . . . . . . . . . . . . 50
Checking the Motherboard Boot Sequence. . . . . . . . . . . . . . . . . . . . . . . 51
Installing Drivers and Making the Units Available For Use . . . . . . . . . . . 52
Driver Installation Under Windows . . . . . . . . . . . . . . . . . . . . .53
Materials Required . . . . . . . . . . . . . . . . . . . . . . . . . . . . . . . . . . . . . . . . . 54
Creating a 3ware Driver Diskette. . . . . . . . . . . . . . . . . . . . . . . . . . . . . . . 54
Installing the 3ware Driver and Windows on a New Unit. . . . . . . . . . . . . 55
Installing the Driver on a System that Boots from a Different Device . . . 56
Making Units Managed by a 3ware Controller Available to Windows . . . 63
Finishing Up. . . . . . . . . . . . . . . . . . . . . . . . . . . . . . . . . . . . . . . . . . . . . . . 64
Driver Installation Under Linux . . . . . . . . . . . . . . . . . . . . . . . .65
Obtaining 3ware Linux Drivers . . . . . . . . . . . . . . . . . . . . . . . . . . . . . . . . 66
Be Sure to Use the Correct Drivers . . . . . . . . . . . . . . . . . . . . . . . . . 66
Determining the Current Version of your 3ware Driver . . . . . . . . . . . . . . 68
Driver Installation Under Red Hat Linux . . . . . . . . . . . . . . . . . . . . . . . . . 68
Materials Required. . . . . . . . . . . . . . . . . . . . . . . . . . . . . . . . . . . . . . 68
Creating a Red Hat Linux Driver Diskette . . . . . . . . . . . . . . . . . . . . 69
Installing the 3ware Driver and Red Hat Linux on a New Unit . . . . . 69
Installing the 3ware Driver on a Red Hat
Linux System that Boots From a Different Device . . . . . . . . . . 70
Compiling a 3ware Driver for Red Hat Linux . . . . . . . . . . . . . . . . . . 77
Driver Installation Under SuSE Linux . . . . . . . . . . . . . . . . . . . . . . . . . . . 80
Creating a SuSE Linux Driver Diskette . . . . . . . . . . . . . . . . . . . . . . 80
Installing the 3ware Driver and SuSE
Linux with YaST2 on a New Unit. . . . . . . . . . . . . . . . . . . . . . . . 81
Installing the 3ware Driver on a SuSE Linux
System that Boots from a Different Device . . . . . . . . . . . . . . . . 81
Compiling a 3ware Driver for SuSE Linux . . . . . . . . . . . . . . . . . . . . 83
ii 3ware 9000 Series Serial ATA RAID Controller Installation Guide
Page 5

Driver Installation Under FreeBSD . . . . . . . . . . . . . . . . . . . . . 87
Obtaining 3ware FreeBSD Drivers. . . . . . . . . . . . . . . . . . . . . . . . . . . . . . 88
Materials Required. . . . . . . . . . . . . . . . . . . . . . . . . . . . . . . . . . . . . . . . . . 88
Installing the Driver While Installing
FreeBSD on the 3ware RAID Controller. . . . . . . . . . . . . . . . . . . . . . 88
Installing the 3ware Driver on a FreeBSD System that Boots from a
Different Device . . . . . . . . . . . . . . . . . . . . . . . . . . . . . . . . . . . . . . . . 92
Compiling the Driver as a Loadable Module . . . . . . . . . . . . . . . . . . . 94
Troubleshooting: Problems and Solutions . . . . . . . . . . . . . . 97
Hardware installation . . . . . . . . . . . . . . . . . . . . . . . . . . . . . . . . . . . . . . . . 97
Appendix A. Installing the Battery Backup Unit . . . . . . . . . . . 99
Tools and equipment required . . . . . . . . . . . . . . . . . . . . . . . . . . . . . . . . 100
Installation Overview . . . . . . . . . . . . . . . . . . . . . . . . . . . . . . . . . . . . . . . 100
Installation Instructions . . . . . . . . . . . . . . . . . . . . . . . . . . . . . . . . . . . . . 102
Replacing the Battery . . . . . . . . . . . . . . . . . . . . . . . . . . . . . . . . . . . . . . 107
Appendix B. Compliance and Conformity Statements . . . . 109
Federal Communications Commission Radio Frequency Interference
Statement . . . . . . . . . . . . . . . . . . . . . . . . . . . . . . . . . . . . . . . . . . . . 109
Microsoft Windows Hardware Quality Lab (WHQL). . . . . . . . . . . . . . . . 110
European Community Conformity Statement. . . . . . . . . . . . . . . . . . . . . 110
Appendix C. Warranty, Technical Support, and Service . . . 112
Limited Warranty . . . . . . . . . . . . . . . . . . . . . . . . . . . . . . . . . . . . . . . . . . 112
Exclusions . . . . . . . . . . . . . . . . . . . . . . . . . . . . . . . . . . . . . . . . . . . . . . . 113
State Law Provisions . . . . . . . . . . . . . . . . . . . . . . . . . . . . . . . . . . . . . . . 113
Obtaining Warranty Protection. . . . . . . . . . . . . . . . . . . . . . . . . . . . . . . . 114
AMCC’s Technical Support and Services for 3ware RAID Controllers . 114
Sales and Ordering Information . . . . . . . . . . . . . . . . . . . . . . . . . . . . . . . 115
Feedback on this manual. . . . . . . . . . . . . . . . . . . . . . . . . . . . . . . . . . . . 115
Index . . . . . . . . . . . . . . . . . . . . . . . . . . . . . . . . . . . . . . . . . . . . . 117
www.3ware.com iii
Page 6

iv 3ware 9000 Series Serial ATA RAID Controller Installation Guide
Page 7

About this Guide
This guide describes how to install the 3ware 9000 series RAID
controller, configure arrays, and make the arrays available to your
operating system—Microsoft Windows, Red Hat Linux, SuSE
Linux, or FreeBSD.
For more complete information about managing and using arrays
connected to the 3ware RAID controller, see 3ware 9000 Series
Serial ATA RAID Controller User Guide.
You may also want to refer to the Knowledgebase available at the
3ware website at http://www .3ware.com/support/
Conventions Used in This Guide
The following conventions are used throughout this guide:
3BM refers to the 3ware BIOS Manager
3DM refers to the 3ware Disk Manager, version 2.
Unit refers to one or more disks configured through 3ware
software to be treated by the operating system as a single drive.
Also known as an array. Array and unit are used
interchangeably throughout this manual.
Boldface is used for buttons, fields, and settings that appear on
the screen.
Monospace font is used for code and to indicate things you
type.
www.3ware.com v
Page 8

About this Guide
vi 3ware 9000 Series Serial ATA RAID Controller Installation Guide
Page 9

About the 3ware RAID Controller
This section includes the following topics:
Product Features
What’s New with the 3ware 9000 Series Controllers
About 3ware Driver Versions
System Requirements
Package Contents
Product Features
The 3ware 9000 Series Serial ATA family includes 9500S-4LP,
9500S-8, 9500S-12, 9500S-8MI, and 9500S-12MI.
Features of the 3ware 9000 series controllers include:
Advanced RAID features for greater data protection and
management.
Support for battery backup provides added data protection in
the event of a power outage. (Battery Backup Unit sold
separately.)
Support for RAID units greater than 2 terabytes with 64-bit
LBA support.
www.3ware.com 1
Page 10

About the 3ware RAID Controller
An enhanced firmware platform allows future upgrades.
Anticipated upgrades include Enclosure Management Services
(EMS).
AMCC’s remote management software, 3ware Disk Manager 2
(3DM®2) simplifies storage configuration and management via
a Web browser.
What’s New With the 3ware 9000 Series Controllers
Enhancements and changes from the 7000/8000 Series controllers
to the 9000-series controllers include the following:
MultiLUN support with auto-carving of units greater than 2
terabytes into 2 terabyte volumes.
RAID Level Migration (RLM) and Online Capacity Expansion
(OCE)
Unit naming and unit serial number support.
Improved write performance in writes with multiple concurrent
streams using Stream Fusion technology.
Extended drive and unit status information.
System Requirements
3ware RAID controllers require the following:
A workstation-class or server-class motherboard which
meets the following criteria:
PCI slots comply with PCI 2.2 or above standards.
PCI slot that meets the Plug and Play
specifications.
Note: For all 3ware 9000 series models, install the card in a 64-
bit, 66MHz PCI or PCI-X slot for best performance.
2 3ware 9000 Series Serial ATA RAID Controller Installation Guide
and PC99
Page 11

System Requirements
Drives
Depending on the particular model, the 3ware RAID controller
may be connected to up to, four, eight, or twelve SATA drives
using the supplied interface cables.
Drives must meet serial ATA 150 (SATA I) or serial ATA 300
(SATA 2) Gb/s standards. Drives may be of any capacity or
physical form factor.
The length of both shielded and unshielded interface cables
may not exceed 1M (39”) for serial ATA controllers.
Operating System
3ware RAID controllers may be used with:
Windows 2000 (Professional, Server, Advanced Server)
(SP3 or newer), Windows XP Professional (SP1 or newer),
Windows Server 2003 (Standard, Enterprise), Windows XP
x64 Edition, Windows Server 2003 x64 Edition.
Red Hat Linux, 32-bit and 64-bit x86
SuSE Linux, 32-bit and 64-bit x64
Other versions of Linux using the open source Linux driver
FreeBSD
Other Requirements
Adequate air flow and cooling
Adequate power supply for drives
For a complete listing of features and system requirements, refer to
the 9000 Series Datasheet, available from the website at
www.3ware.com/products/serial_ata9000.asp.
www.3ware.com 3
Page 12

About the 3ware RAID Controller
Package Contents
If your package is missing any of the items listed below, contact
3ware before proceeding with installation (disk drives and disk
mounting brackets are not included).
3ware Serial ATA RAID Controller in an ESD-protective bag
Serial ATA interface cables (one per port). (Cables are not
included in 9500S-8MI and 9500S-12MI.)
3ware installation CD with the following: 3DM 2, drivers,
Command Line Interface (CLI) and 3ware 9000 Series Serial
ATA RAID Controller User Guide (.pdf format)
3ware Release Notes
3ware 9000 Series Serial ATA RAID Controller Installation
Guide (this guide)
4 3ware 9000 Series Serial ATA RAID Controller Installation Guide
Page 13

Installation Overview
Details about each step in the installation process are included in
this guide.
For your reference, the list below provides an overview of the main
steps required.
If you have a Battery Backup Unit (BBU), install it on the
controller. (For details, see “Appendix A. Installing the Batt ery
Backup Unit” on page 99.)
Install the controller, cables, and drives.
The basic steps are listed here. For details, see “Installing the
Hardware” on page 7.
a Connect the interface cables to the controller card.
b Turn off power switches and unplug power cords for the
equipment with which you are working.
c Make sure you are grounded, to avoid electrostatic dis-
charge, which could damage computer components or
accessories.
d Insert the controller card into the computer.
e If the drives are not already installed in the computer,
install them.
f Connect the interface cables to the drives.
g Close up the case.
Power on the system.
www.3ware.com 5
Page 14

Installation Overview
Check the motherboard boot sequence. Refer to your system
BIOS guide for more details.
Configure RAID units.
The basic steps are listed here. For details, see “Configuring
Units” on page 27.
a Start 3BM (the 3ware BIOS Manager).
b Select the drives to be included and indicate that you want
to create a disk array.
c Select the desired RAID configuration.
d Set other parameters, depending on the type of RAID con-
figuration.
e Confirm the array configuration.
f Save your changes and exit.
Specify a hot spare (optional).
Install the 3ware driver and make the units available to the
operating system.
For details see one of the following:
“Driver Installation Under Windows” on page 53
“Driver Installation Under Linux” on page 65
“Driver Installation Under FreeBSD” on page 87
6 3ware 9000 Series Serial ATA RAID Controller Installation Guide
Page 15

Installing the Hardware
This section describes the physical installation of the 3ware 9000
RAID controllers. It contains the following topics:
“Before You Begin” provides important information about
things you should consider before starting installation, and
tools and equipment you will need.
“Safety Factors” describes important precautions for your
personal safety and to protect your equipment and data. Be sure
to read this section.
“Installing a Serial ATA RAID Controller” and “Installing a
Serial ATA RAID Controller with Multi-lane Internal
Connectors”
serial ATA RAID controller.
“Finishing Up” describes the final steps required when
installing a serial controller .
“Moving Units from an 8000 Controller to a 9000
Controller”
from one controller to another.
provide step-by-step instructions for installing a
describes the process to follow when you change
Note: If you have a BBU (Battery Backup Unit),
install it first. For details, see “Appendix A. Installing
the Battery Backup Unit” on page 99.
www.3ware.com 7
Page 16

Installing the Hardware
Before You Begin
The next few pages describe some factors you may want to consider
during installation, and the tools and equipment you will need.
Installation Considerations
Cable Length, Routing Space , and Air Flow
When you are installing multiple drives with a controller, make sure
there is adequate space in the chassis for the required cables. It is
important that the cables do not obstruct the air flow or prevent
proper ventilation of the system.
Selecting the Slot in Which to Install the Controller
Consider these factors when deciding on the slot in which to insert
the controller:
Cable routing may be easier if you install the 3ware RAID
controller next to an open slot.
The amount of clearance you need will depend on the number
of drives you will be connecting to the controller.
While the 3ware RAID Controller runs properly in any PCI or
PCI-X slot, not all slots give equal performance due to the
architecture of the PCI bus.
These slots typically give the best performance:
Slots closest to the Accelerated Graphics Port (AGP), if
included.
64-bit PCI slots
Although the controller fits in both 32-bit and 64-bit PCI or
PCI-X slots with 5V as well as with 3.3V, install it in a 64-
bit slot to take full advantage of the controller’s
performance.
8 3ware 9000 Series Serial ATA RAID Controller Installation Guide
Page 17

Before You Begin
Whether to Use the LED Status Co nnector
3ware RAID controllers include two types of LED status
connectors:
Overall indicator, which lights when any drive is active.
Individual LED indicators, for each drive. (Not supported on
chassis that have a common ground.)
If you are building a system from scratch, you may want to consider
using a chassis or drive carrier that is compatible with the 3ware
RAID controller activity LEDs, such as the AMCC RDC-400 drive
carrier, available through AMCC. Please check the 3ware web site
(www.3ware.com) for chassis and drive carrier compatibility list.
For more information, see “Additional Details About the LED
Status Connectors” on page 13.
Most chassis have a single drive activity cable that you can connect
to the overall activity indicator on the 3ware 9000 controller. For
the location of the overall drive activity connector, see the figure for
the appropriate controller in the installation sections starting on
page 12, and refer to Table 1, “LED Indicator Pin Positions,” on
page 14.
Drive Installation Considerations
Selecting an enclosure. If you are planning to use RAID 1, 5,
10, or 50, you may want to consider installing drives into hotswappable enclosures, so that they can be easily removed in the
event of a drive failure.
When to install the drive. If the drives are not already installed
in your computer, you can choose to install them either before
or after connecting the interface cables to them.
www.3ware.com 9
Page 18
Installing the Hardware
What You Need: Tools and Equipment
Tools Required
You will need the following tools during installation:
An ESD grounding strap or mat
Standard hand tools to open your system’s case and install the
3ware RAID controller into an available PCI expansion slot.
Safety Factors
Be sure to follow the guidelines presented on the next few pages to
insure your own safety, and that of your equipment.
Personal Safety
Warning! High voltages may be found inside computer
equipment.
Before installing any of the hardware in this package or
removing the protective covers of any computer
equipment, turn off power switches and disconnect
power cords. Do not reconnect the power cords until you
have replaced the covers.
Protecting Equipment and Data
Backing Up Your Data
Back up your data! Creating or deleting disk arrays
destroys existing files on the member drives. If your
drives contain valuable data, back them up and save the
data elsewhere before attaching the drives to the
controller.
10 3ware 9000 Series Serial ATA RAID Controller Installation Guide
Page 19

Safety Factors
ESD (Electrostatic Discharge) Precautions
To avoid damaging computer components and ac cessories when
installing or removing the 3ware RAID controller, follow standard
electrostatic discharge (ESD) precautions:
When your computer case is open and its internal parts are
exposed, do not touch any internal part unnecessarily.
Always wear a grounded strap or work on an ESD-protective
mat.
Do not remove the 3ware RAID controller from its protective
bag until you are properly grounded.
Handle the 3ware RAID controller by its edges or by the black
rail and metal bracket at its two ends.
Do not touch any pin, contact, lead or component on the 3ware
RAID controller.
Things to Watch Out For
Be careful when installing the 3ware RAID controller into your
system. Excessive force can damage the board or your system.
Be sure the board is aligned with its slot on the motherboard
before installing. Do not flex the board excessively.
Interface cable connectors must be mated carefully with the
connectors in the controller.The connectors p rovided are keyed
to prevent you from inserting them upside-down.
Interface cables are fragile and must not be crimped or pinched.
Ensure that they do not impede the flow of cooling air from
fans or heat sinks in the system case.
www.3ware.com 11
Page 20
Installing the Hardware
Installing a Serial ATA RAID Controller
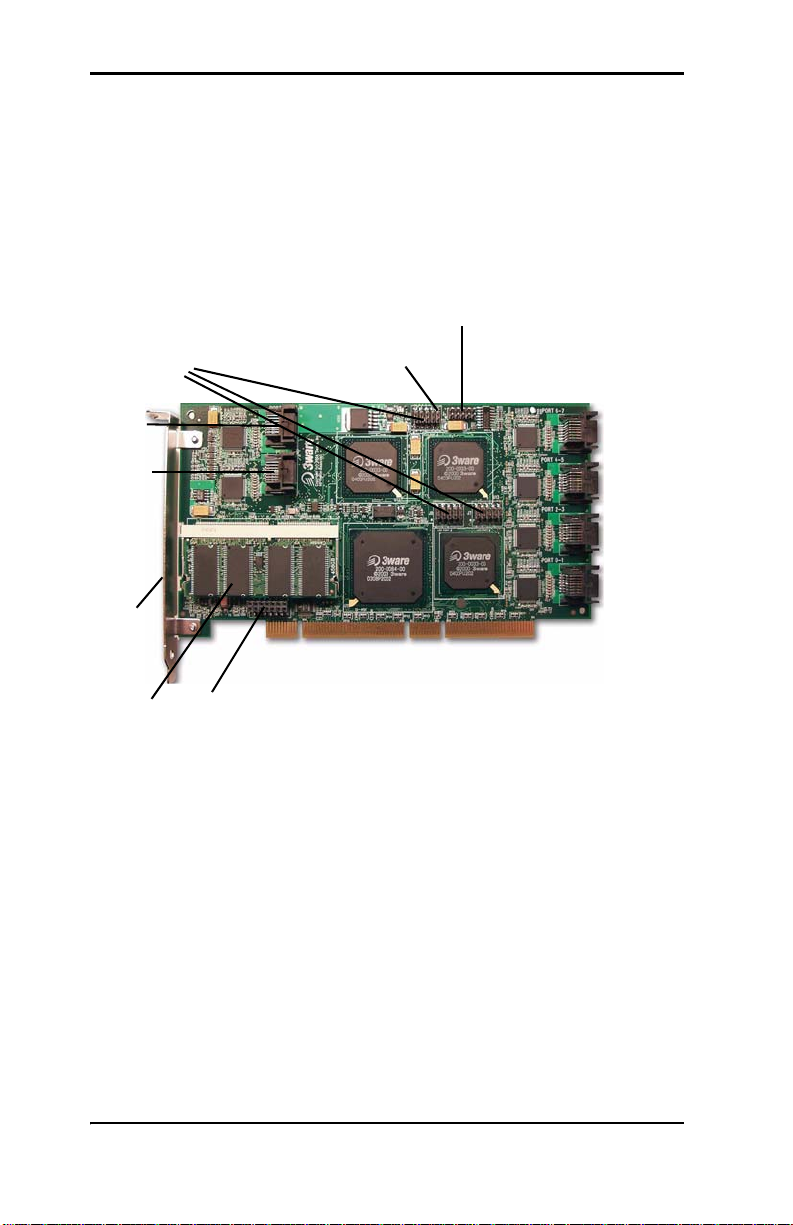
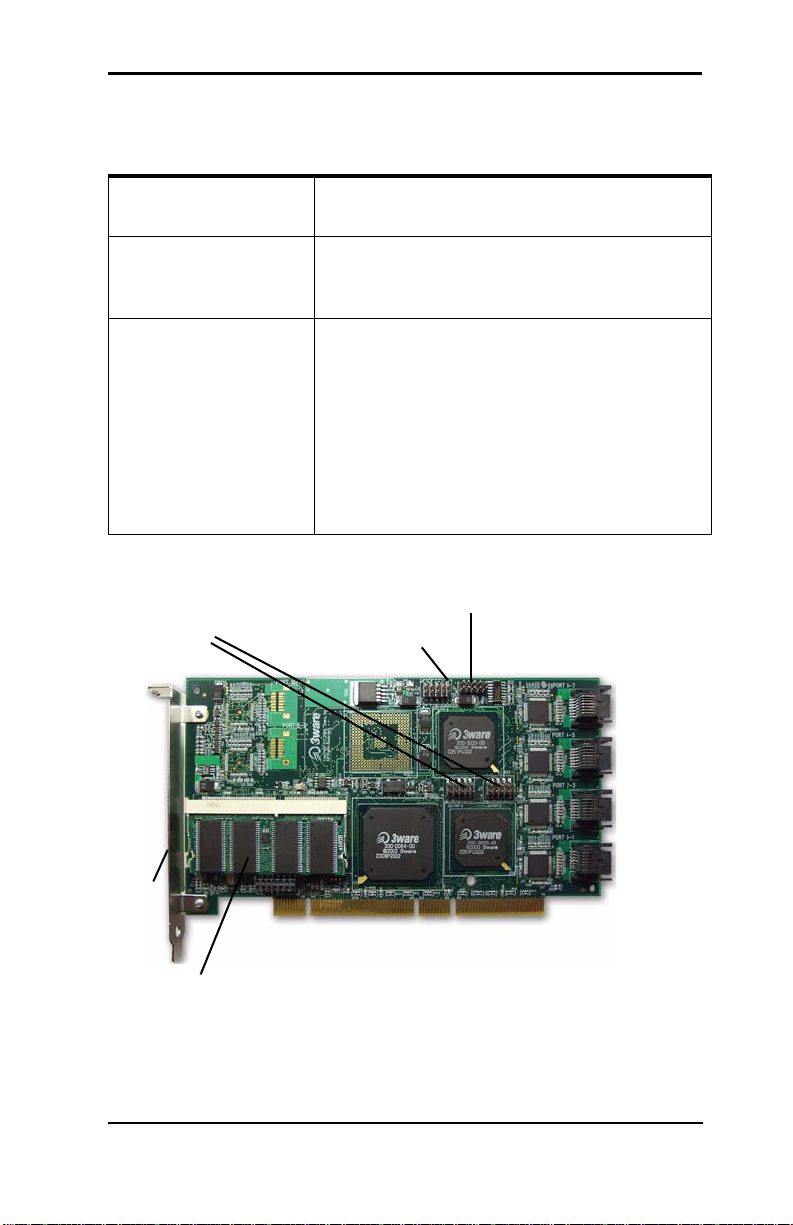
Figure 1 shows a 3ware Serial ATA RAID controller with twe l ve
ports. Up to twelve drives can be attached to this particular
controller, through serial ATA cables.
Serial ports are doublestacked connectors.
Odd-numbered ports 1
through 11 are located
below even-numbered ports
0 through 10.
Ports:
6 and 7
4 and 5
2 and 3
0 and 1
The last two pins on
J7 and J8 are unused.
LED indicators for
individual drives on
J7, J8, and J9
Ports 10
and 11
Ports 8
and 9
Serial
number
(on plate)
SODIMM
(memory
module)
BBU (Battery
Backup Unit )
connector
Overall LED drive status
indicator: the last two pins
of J9. The anode is the
lower of the two pins an d
the cathode is the upper.
LED connector details
J7 is for drives 0, 1, 2, 3 (left to right)
J8 is for drives 4, 5, 6, 7 ( le ft to right)
J9 is for drives 8, 9, 10, 11 (left to right)
For more details, see page 13.
I2C
connector
Figure 1. 12-Port 3ware 9500S-12 Serial ATA RAID Controller
Figures 2 and 3 show 3ware Serial ATA RAID controllers with 8
ports (there are two versions of the 9500S-8 controller). The earlier
models use Pchip v1.4 and are not BBU-compatible. The more
recent models use Pchip v1.5 and are BBU-compatible. Although
the controllers look very similar, the location of the overall LED
drive status indicator is different on the two versions, as shown in
the respective figures. If you are not certain which version you
have, you can use the 3ware CLI to determine the Pchip version
tw_cli c0 show pchip).
(
12 3ware 9000 Series Serial ATA RAID Controller Installation Guide
Page 21
Installing a Serial ATA RAID Controller
LED indicators
for individual
drives on J7
and J8
Serial
number
(on plate)
SODIMM
(memory
module)
BBU (Battery
Backup Unit)
connector
Overall LED drive status
indicator: the last two pins
of J7. The anode is the
lower of the two pins and
the cathode is the upper.
LED connector details
J7 is for drives 0, 1, 2, 3 (left to right)
J8 is for drives 4, 5, 6, 7 (left to right)
I2C
connector
Serial ports are doublestacked connectors.
Odd-numbered ports 1
through 7 are located
below even-numbered
ports 0 through 6.
Ports:
6 and 7
4 and 5
2 and 3
0 and 1
The last two pins on
J7 and J8 are unused.
Figure 2. 8-Port 3ware 9500S-8 Seria l ATA RAID Co ntroller, Pchip
v1.5 (BBU-compatible)
Additional Details About the LED Status Connectors
As shown in Figures 1 through 5, LED connectors for individual
drives are on J7, J8, and J9 for the full size cards, and on J3 for the
half-size 4-port card.
Pin 1 is located in the lower left-hand corner of each 10-pin
connector. The odd-numbered pins, located on the bottom row, are
3.3V for the anode side of each LED to be connected. The evennumbered pins are the return or cathode side.
Table 1 summarizes the LED indicator pin positions for the
different controllers.
www.3ware.com 13
Page 22

Installing the Hardware
Warning: A common or shared LED ground on a chassis is not
supported and can damage the 3ware controller. Check with your
chassis documentation before connecting.
Table 1: LED Indicator Pin Positions
Controller
9500S-4LP J3 : : : : : Orientation Horizontal
9500S-8
(Pchip v1.4)
9500S-8
(Pchip v1.5)
LED
Header
J7 : : : : : Orientation Horizontal
J8 : : : : : Orientation Horizontal
J9 : : : : : Orientation Horizontal
J7 : : : : : Orientation Horizontal
J8 : : : : : Orientation Horizontal
Pin Pair Comment
0 1 2 3 All Port number/All
(all activity indicator)
k-cathode-minus is on the top
a-anode-plus is on the bottom
0 1 2 3 NU Port number/NU (Not Used)
4 5 6 7 NU Port number/NU (Not Used)
NU NU NU NU All Not used/All
(all activity indicator)
k-cathode-minus is on the top
a-anode-plus is on the bottom
0 1 2 3 All Port number/All
(all activity indicator)
4 5 6 7 NU Port number / NU
(Not Used)
k-cathode-minus is on the top
a-anode-plus is on the bottom
14 3ware 9000 Series Serial ATA RAID Controller Installation Guide
Page 23
Installing a Serial ATA RAID Controller
Table 1: LED Indicator Pin Positions
Controller
LED
Header
Pin Pair Comment
9500S-12 J7 : : : : : Orientation Horizontal
0 1 2 3 NU Port number/NU (Not Used)
J8 : : : : : Orientation Horizontal
4 5 6 7 NU Port number/NU (Not
Used)
J9 : : : : : Orientation Horizontal
8 9 10 11 All Port number/All (all activity
indicator)
k-cathode-minus is on the top
a-anode-plus is on the bottom
LED indicators
for individual
drives on J7
and J8
Overall LED drive status
indicator: the last two pins
of J9. The anode is the
lower of the two pins and
the cathode is the upper.
I2C
connector
Serial ports are doublestacked connectors.
Odd-numbered ports 1
through 7 are located
below even-numbered
ports 0 through 6.
Ports:
6 and 7
4 and 5
2 and 3
Serial
number
(on plate)
SODIMM (memory
module)
LED connector details
J7 is for drives 0, 1, 2, 3 (left to right)
J8 is for drives 4, 5, 6, 7 (left to right)
The last two pins on
J7 and J8 are unused.
0 and 1
Figure 3. 8-Port 3ware 9500S-8 Seria l ATA RAID Co ntroller, Pchip
v1.4 (Non-BBU Compatible)
www.3ware.com 15
Page 24
Installing the Hardware
LED indicators for
individual drives
on J3: 0, 1, 2, 3
(left to right)
Serial
number
(on plate)
SODIMM (memory
module)
Overall LED drive status
indicator: the last two pins
of J3. The anode is the
lower of the two pins and
the cathode is the upper.
BBU (Battery Backup
Unit) connector
I2C
connector
Serial ports are
double-stacked
connectors. Odd-
numbered ports 1
and 3 are located
below evennumbered ports 0
and 2.
Ports:
2 and 3
0 and 1
Figure 4. 4-Port 3ware 9500S-4 Serial ATA RAID Co ntroller
To connect serial cables to the controller
1 Take out the serial cables provided with the 3ware SAT A RAID
controller.
3ware serial controllers are supplied with serial interface
cables, one for each port on the controller.
One edge of each interface cable connector is keyed so that it
can only be inserted in one direction. This helps to ensure
proper orientation and installation
2 Align the cable connector with the connector on the controller,
matching the slotted key and carefully mate the connectors.
16 3ware 9000 Series Serial ATA RAID Controller Installation Guide
Page 25

Installing a Serial ATA RAID Controller
Note: The connectors on the end of the serial
controller and the drive are susceptible to damage
from excessive bending. Be careful not to insert or
remove the serial cable connector at an angle.
3 Repeat steps 2 and 3 for each additional interface cable. (You
will connect one cable for each hard drive you will attach.)
To install the controller in the computer
1 If the computer is running, shut it down. Turn off power to the
computer and disconnect the power cord from the outlet.
2 Make sure you are properly grounded. (For details about safety
precautions, see
page 10.)
3 Open the computer case according to the manufacturer’s
instructions.
4 Find the PCI slot you want to use for the serial 3ware RAID
controller.
For a discussion of which slot to use, see “Selecting the Slot in
Which to Install the Controller” on page 8
5 Remove the metal filler bracket for the slot.
Save this screw; it will be used to secure the serial 3ware RAID
controller after you have seated it in the slot.
6 Position the card in the slot so that the contacts will mate with
the grooves in the slot, and all pins make proper contact with
the PCI slot pins when pushed into place.
The 3ware RAID controller is keyed to ensure proper
installation into a full-sized PCI slot.
Make sure that the contacts will mate with the grooves in the
slot.
www.3ware.com 17
Page 26

Installing the Hardware
7 Press down gently on the edge of the 3ware RAID controller
directly above the slot until it is fully seated.
8 Check that the 3ware RAID controller’s metal bracket covers
the hole in the case and secure the bracket with the screw that
was used to secure the filler bracket in step 5.
To connect the interface cables to the drives
1 If your drives are not already installed in the computer chassis
or hot swap carriers, install them now. Be sure that the drives
are connected to the power supply, either by cable or through
the drive cage.
2 For each drive, select the end of an interface cable not
connected to the 3ware RAID Controller and plug it into the
drive or drive carrier.
One edge of each interface cable connector is keyed to ensure
proper installation.
3 (Optional) Connect the drive activity LED connectors. See the
connection details on
Figure 1.
For a discussion of whether to make these connections, see
“Whether to Use the LED Status Connector” on page 9 and “To
connect serial cables to the controller” on page 16.
4 (Optional) If staggered spinup is desired (and supported by
your hard drives), set the appropriate jumpers on your hard
drives to enable staggered spinup.
Later, you will need to enable staggered spinup and specify the
staggered method (ATA-6 or SATA OOB) in the 3ware BIOS
Manager (3BM). For more information, see the 3ware 9000
Series Serial ATA RAID Controller User Guide.
5Turn to “Check your Installation and Close the Case” on
page 22.
18 3ware 9000 Series Serial ATA RAID Controller Installation Guide
Page 27

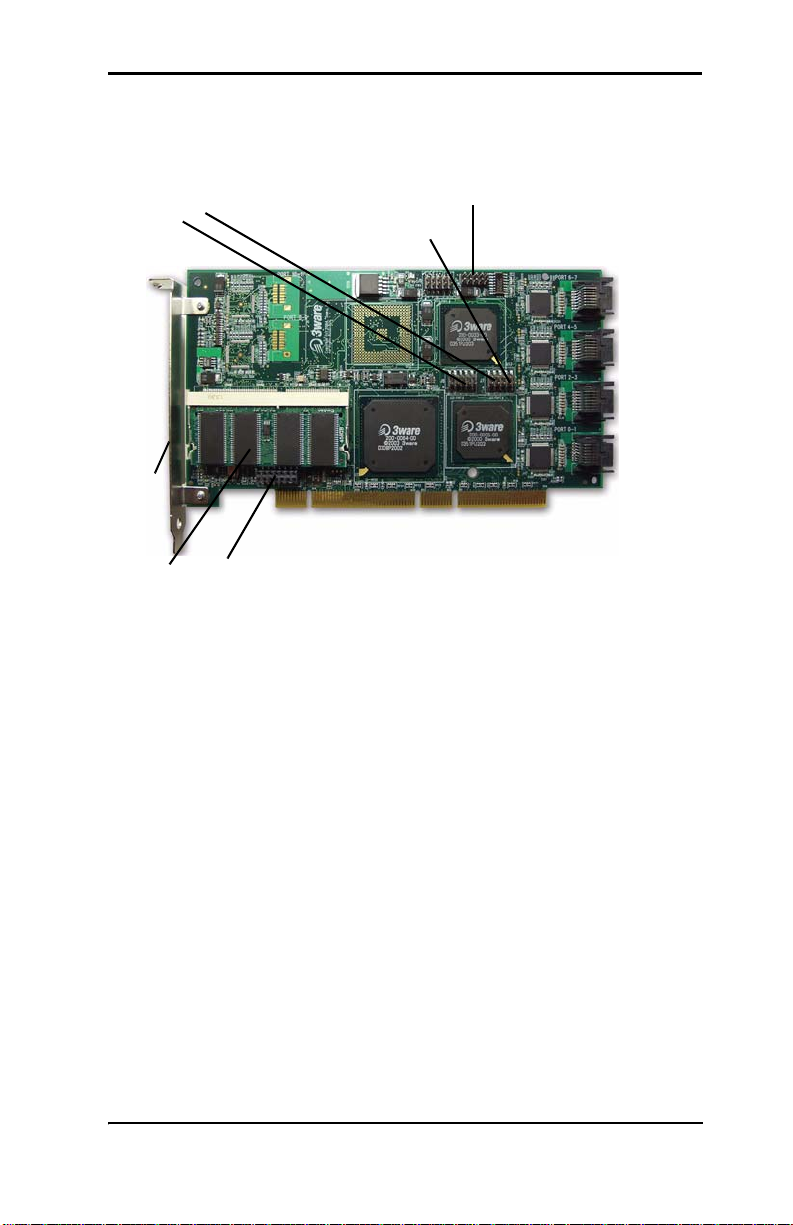
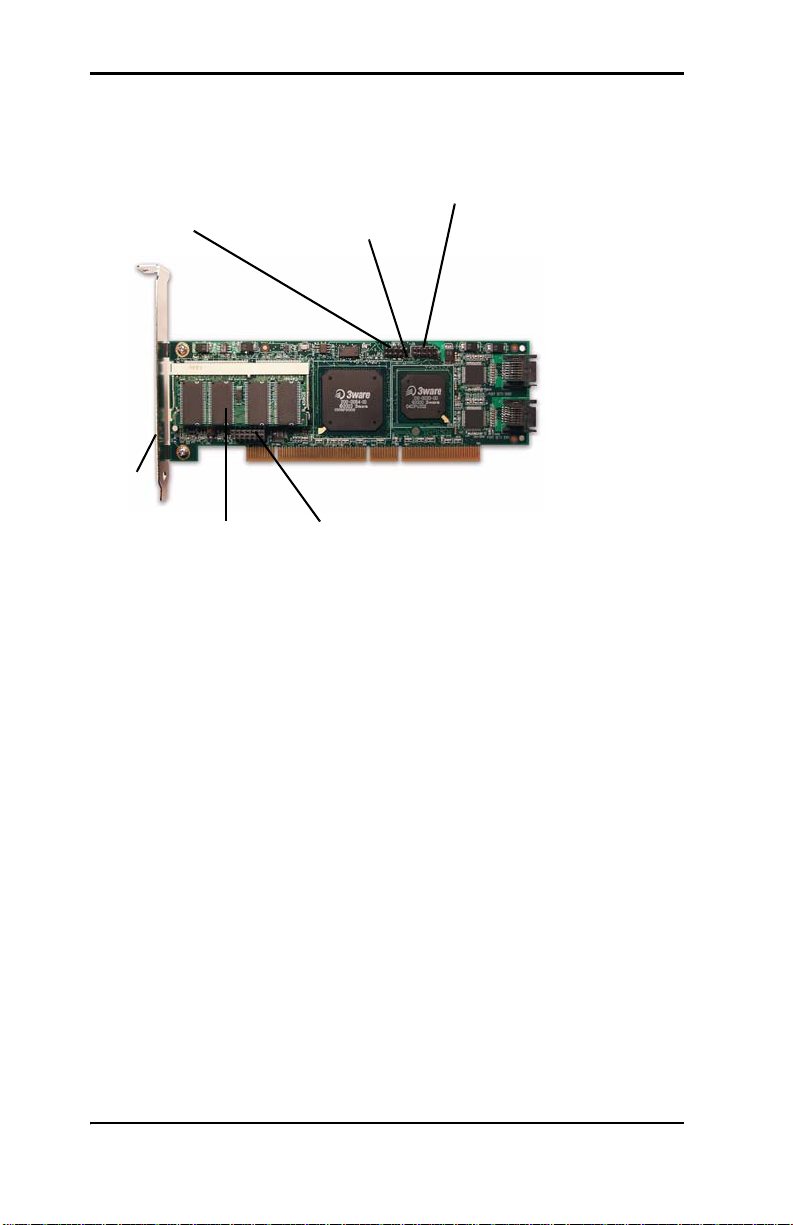
Installing a Serial ATA RAID Controller with Multi-lane Internal Connectors
Installing a Serial ATA RAID Controller
with Multi-lane Internal Connectors
I2C
connector
Serial
number
(on plate)
SODIMM (memory
module)
LED indicators for
individual drives on
J7, J8, and J9.
BBU (Battery
Backup Unit )
connector
The overall LED drive status
indicator is on the last two
pins of J7.
LED connector details
J7 is for drives 0, 1, 2, 3 (top to bottom)
J8 is for drives 4, 5, 6, 7 (top to bottom)
J9 is for drives 8, 9, 10, 11 (top to bottom)
For more details, see page 16.
Ports
8 to 11
Ports
4 to 7
Ports
0 to 3
The last two
pins on J8 and
J9 are unused.
Figure 5. 12-Port 3ware 9500S-12MI Serial ATA RAID Contro ller
Models 9500S-12MI and 9500S-8MI, have multi-lane internal
connectors, each of which can handle up to four drives. These
controllers can be installed in an enclosure with a backplane. The
type of cable you need will depend on the type of enclosure you
have:
For use with a backplane that has the InfiniBand 4x connectors
(SFF-8470), use the InfiniBand 4x cable, which has multi-lane
connectors on each end, as shown in Figure 6.
www.3ware.com 19
Page 28

Installing the Hardware
Figure 6. Multi-lane Cable (InfiniBand 4x, SFF-8470)
For use with a backplane that has individual SATA connec tors
or individual serial ATA drives, use the break-out cable, which
has a multi-lane connector on one end, and four individual
SATA connectors on the other end.
To connect the multi-lane cables
Depending on the model of the controller and the number of drives
you will be connecting, you will connect two or three multi-lane
cables. Each cable supports up to four serial ATA ports.
1 Connect each interface cable to a multi-lane connector on the
controller. See
Figure 5.
When the cable is inserted correctly, you will feel it click into
place.
2 If your enclosure has a backplane, connect the other end of each
interface cable to the backplane.
If you are using a standard enclosure, connect each of the
individual SATA connectors to a drive.
20 3ware 9000 Series Serial ATA RAID Controller Installation Guide
Page 29

Installing a Serial ATA RAID Controller with Multi-lane Internal Connectors
To install the controller in the computer
1 If the computer is running, shut it down. Turn off power to the
computer and disconnect the power cord from the outlet.
2 Open the computer case according to the manufacturer’s
instructions.
3 Fin d the PCI slot you want to use for the serial RAID controller.
4 Remove the metal filler bracket for the slot.
Save this screw; it will be used to secure the 3ware RAID
Controller after you have seated it in the slot.
5 Position the card in the slot so that the contacts will mate with
the grooves in the slot and all pins make proper contact with the
PCI slot pins when pushed into place.
The 3ware controller is keyed to ensure proper installation into
a full-sized PCI slot.
Make sure that the contacts will mate with the grooves in the
slot.
6 Press down gently on the edge of the 3ware RAID controller
directly above the slot until it is fully seated.
7 Check that the 3ware RAID controller’s metal bracket covers
the hole in the case and secure the bracket with the screw that
was used to secure the filler bracket in step 4.
To install the drives
1 If your drives are not already installed, install them now, either
by attaching them to the backplane, or by installing them in the
computer chassis.
2 Be sure that the power supply is connected to either the
backplane or the individual drives.
www.3ware.com 21
Page 30

Installing the Hardware
3 Power down the system, disconnect the drives from the 7/8000
controller and remove the controller from the system.
4 Attach the drives to the 9000 controller, as described earlier in
this section.
Finishing Up
After you have installed the controller in the computer and attached
appropriate cables to the controller and drives, complete the
following steps to complete the hardware installation.
Check your Installation and Close the Case
1 Verify that the cables do not interfere with the operation of any
other components in the case or block the flow of cooling air.
2 Close the case and reconnect the power cables.
Configure your RAID Arrays
Turn to “Configuring Units” on page 27 for information about
configuring the RAID arrays.
22 3ware 9000 Series Serial ATA RAID Controller Installation Guide
Page 31

Moving Units from an 8000 Controller to a 9000 Controller
Moving Units from an 8000 Controller
to a 9000 Controller
It is possible to move your 8000 storage units to a 9000 series
controller. You will then have the advantages of the 9000 series
controller.
The drive units must be in normal mode before moving the units.
Incomplete, degraded, rebuilding, or initializing units cannot be
converted. In addition, RAID 0, 10, and 5 units must use a standard
64 KB stripe size.
The procedure to move from the 8000 to the 9000 series depends on
the type of storage unit that you have. For most units, follow the
steps below. For units using JBOD, see
8000 Controller to a 9000 Controller” on page 23.
Note: In order to preserve the data that is on the units
attached to the 8000, you will need to run a special
utility, available from 3ware Technical Support, to
convert the units to a format that the 9000 controller can
use. Contact Technical Support to obtain the utility.
(This utility is not required for legacy JBOD units.)
“Moving Units from an
Do not remove the 8000 board from your system until
you have converted the units. The units must be attached
to the 8000 controller when you run the utility.
Warning: Drives config ured on the 9000 cannot be used
with older 3ware controllers, non-3ware controllers, or
directly on the motherboard without first deleting the
existing configuration to unlock the drive in read only
mode.
www.3ware.com 23
Page 32

Installing the Hardware
To move units under Linux or FreeBSD
1 Upg rade your driver to the 9000 series driver. (For details, refer
to the Linux or FreeBSD Driver Installation section.)
2 Run the conversion utility to convert the units.
3 Power down the system, disconnect the drives from the 8000
controller and remove the controller from the system.
4 Install the 9000 controller and attach the drives to the 9000
board, as described earlier in this section.
To move units under Windows
1 Install the 9000 controller in your system, while leaving the
8000 controller installed.
2 Inst all the Windows driver. (For details, see “Driver Installation
Under Windows” on page 53.)
3 Run the conversion utility to convert the units.
4 Power down the system, disconnect the drives from the 7/8000
controller and remove that controller from the system.
5 Attach the drives to the 9000 board.
Moving Legacy JBOD Units to a 9000 Controller
To move legacy JBOD units under Linux or FreeBSD
1 Upgrade your driver to the 9000 series driver.
2 Power down the system, disconnect the drives from the 8000
controller and remove the controller from the system.
3 Install the 9000 controller and attach the drives to the 9000
board, as described earlier in this section.
24 3ware 9000 Series Serial ATA RAID Controller Installation Guide
Page 33

Moving Units from an 8000 Controller to a 9000 Controller
4 Reboot the system and enter the 3ware 9000 series BIOS
(3BM) by pressing Alt-3. Enable the Export JBOD policy on
the Policy screen. (The next section in this guide,
“Configuring
Units”, describes how to work in 3BM. Additional information
about 3BM is available in 3ware 9000 Series Serial ATA RAID
Controller User Guide.)
5 Press the F8 or Esc key to save and exit.
To move legacy JBOD units under Windows
1 Install the 9000 controller in your system, while leaving the
8000 controller installed.
2 Inst all the Windows driver. (For details, see “Driver Installation
Under Windows” on page 53.)
3 Power down the system, disconnect the drives from the 8000
controller and remove that controller from the system.
4 Attach the drives to the 9000 board.
5 Reboot the system and enter the 3ware 9000 series BIOS
(3BM) by pressing Alt-3. Enable the Export JBOD policy on
the Policy screen. (The next section in this guide,
“Configuring
Units”, describes how to work in 3BM. Additional information
about 3BM is available in 3ware 9000 Series Serial ATA RAID
Controller User Guide.)
6 Press the F8 or Esc key to save and exit.
www.3ware.com 25
Page 34

Installing the Hardware
26 3ware 9000 Series Serial ATA RAID Controller Installation Guide
Page 35

Configuring Units
After you have physically installed your 3ware RAID controller
and connected it to your disk drives, you configure how the drives
connected to the controller will be used in RAID arrays.
This section includes the following topics:
“Understanding RAID Concepts and Levels” on page 28
“Determining What RAID Level to Use” on page 31
“Working with the 3ware BIOS Manager (3BM)” on page 34
“Specifying the Unit Configuration” on page 40
“Initializing Units” on page 49
“Checking the Motherboard Boot Sequence” on page 51
“Installing Drivers and Making the Units A vailable For Use” on
page 52
If you already know the RAID configuration you want, turn to
“Specifying the Unit Configuration” on page 40.
www.3ware.com 27
Page 36

Configuring Units
Note: This section describes how to configure your
RAID arrays as part of the installation process. For
complete information about using 3ware BIOS Manager
(3BM), including how to use it to change existing
configurations, and for information about how to define
and change the configuration using 3ware Disk Manager
(3DM 2), see the 3ware 9000 Series Serial ATA RAID
Controller User Guide.
Note: You must attach drives before you can configure
RAID arrays. If no drives are attached to the 3ware
RAID controller, the 3ware BIOS will not be installed.
Understanding RAID Concepts and Levels
The following concepts are important to understand when selecting
the appropriate RAID level for a system:
Arrays and Units. In the storage industry, the term “array” is
used to describe two or more disk drives that appear to the
operating system as a single unit. When you work with 3ware
software, “unit” is the term used to refer to an array of disks
that is configured and managed through the 3ware software.
Single-disk units can also be configured in the 3ware software.
Mirroring. Mirrored arrays write data to paired drives
simultaneously . If one drive fail s, the da ta is preserved on the
paired drive. Mirroring provides data protection through
redundancy. In addition, mirroring using a 3ware RAID
controller provides improved performance because 3ware’s
TwinStor technology reads from both drives simultaneously.
Striping. Striping across disks allows data to be written and
accessed on more than one drive, at the same time. Striping
combines each drive’s capacity into one large volume. Striped
28 3ware 9000 Series Serial ATA RAID Controller Installation Guide
Page 37

Understanding RAID Concepts and Levels
disk arrays achieve highest transfer rates and performance at
the expense of fault tolerance.
Distributed Parity. Parity works in combination with striping
on RAID 5 and RAID 50. Parity information is written to each
of the striped drives, in rotation. Should a failure occur, the data
on the failed drive can be reconstructed from the data on the
other drives.
Hot Spare. A single drive that is not used for user data, but
rather as an extra drive that is online and available to
automatically take the place of any drive that fails in a
redundant unit. Used with RAID 1, 5, 10 and 50.
Hot Swap. The process of exchanging a drive without having
to shut down the system. This is useful when you need to
exchange a degraded drive. It is also useful if you want to add
disk drives to configure into a unit without shutting down the
system first.
Configurations Available with the 3ware RAID Controller
The following RAID levels and configurations are available for
drives attached to a 3ware RAID controller:
RAID 0. Provides striping, but no mirroring or redundancy of
any kind. Striped disk arrays achieve high transfer rates
because they can read and write data on more than one drive
simultaneously. The stripe size is configurable in 3ware BIOS
Manager (3BM). Requires a minimum of two drives.
When drives are configured in a striped disk array, large files
are distributed across the multiple disks using RAID 0
techniques.
Striped disk arrays give exceptional performance, particularly
for data intensive applications such as video editing, computeraided design and geographical information systems.
RAID 0 arrays are not fault tolerant; the loss of any drive
results in the loss of all the data in that array, and can even
www.3ware.com 29
Page 38

Configuring Units
cause a system hang, depending on your operating system.
RAID 0 arrays are not recommended for high availability
systems unless additional precautions are taken to prevent
system hangs and data loss.
RAID 1. Also known as a mirrored array. Mirroring is done on
pairs of drives. Mirrored disk arrays write data to two drives
using RAID 1 algorithms. This gives your system fault
tolerance by preserving the data on one drive if the other drive
fails. Fault tolerance is a basic requirement for mission critical
systems like web and database servers.
RAID 5. Combines striping data with parity (exclusive OR) to
restore data in case of a drive failure. This array type provides
performance, fault tolerance, high capacity, and storage
efficiency. Requires a minimum of three drives.
RAID 10. This array is a combination of RAID 1 with RAID 0.
Striped and mirrored arrays for fault tolerance and high
performance. Requires a minimum of four drives to use both
RAID 0 and RAID 1 techniques.
RAID 50. This array is a combination of RAID 5 with RAID 0.
This array type provides fault tolerance and high performance.
Requires a minimum of six drives.
Single Disk. A single drive that has been configured as a unit
through 3ware software (3BM, 3DM 2, or CLI). Like disks in
other RAID configurations, single disks contain 3ware Disk
Control Block (DCB) information and are seen by the OS as
available units.
Single drives are not fault tolerant and therefore not
recommended for high availability systems unless additional
precautions are take to prevent system hangs and data loss.
JBOD. A JBOD is an unconfigured disk attached to your 3ware
RAID controller. JBOD configuration is no longer supported in
the 3ware 9000 series. AMCC recommends that you use Single
30 3ware 9000 Series Serial ATA RAID Controller Installation Guide
Page 39

Determining What RAID Level to Use
Disk as a replacement for JBOD, to take advantage of advanced
features such as OCE, and RLM.
JBOD units are not fault tolerant and therefore not
recommended for high availability systems unless additional
precautions are taken to prevent system hangs and data loss.
Hot Spare. A single drive, available online, so that a redundant
array can be automatically rebuilt in case of drive failure.
For additional information about RAID levels, see the article
“RAID Primer” on the 3ware website, at: http://www.3ware.com/
products/pdf/RAID_Primer.pdf.
Other Important Concepts
Write Cache. Used to store data locally on the drive before it is
written to the disk, allowing the computer to continue with its
next task. Enabling write cache results in the most efficient
access times for your computer system. However, there may be
instances when you always want the computer to wait for the
drive to write all the data to disk before going on to its next
task. In this case, you must disable the write cache.
Determining What RAID Level to Use
The RAID configurations available to you are determined by the
number of ports on your controller, and the number of drives
attached to those ports. You can configure all drives in one array, or
you can configure multiple arrays, if you have enough drives.
Table 2: Possible Configurations Based on Number of Drives
# Drives
1 Single drive or hot spare
www.3ware.com 31
Possible Configurations
Page 40

Configuring Units
Table 2: Possible Configurations Based on Number of Drives
# Drives
2 RAID 0 or RAID 1
3RAID 0
4 RAID 5 + hot spare
5 RAID 5 + hot spare
6 or more RAID 50
Possible Configurations
RAID 1 with hot spare
RAID 5
RAID 10
Combination of RAID 0, RAID 1, single disks
RAID 10 + hot spare
Combination of RAID 0, RAID 1, hot spare, or single disks
Depending on the number of drives, a RAID 50 may
contain from 2 to 4 subunits. For example, with 12
drives, possible RAID 50 configurations include 2
subunits of 6, 3 subunits of 4, or 4 subunits of 3. With
10 drives, a RAID 50 will contain 2 subunits of 5
drives each.
Combination of RAID 0, 1, 5, 10, hot spare, or single disks
Drive Capacity Considerations
The capacity of each drive is limited to the capacity of the smallest
drive in the array. The total array capa city is defined as follows:
Table 3: Drive Capacity
RAID Level Capacity
RAID 0 (number of drives) X (capacity of the smallest drive)
RAID 1 capacity of the smallest drive
32 3ware 9000 Series Serial ATA RAID Controller Installation Guide
Page 41

Determining What RAID Level to Use
Table 3: Drive Capacity
RAID Level Capacity
RAID 5 (number of drives - 1) X (capacity of the smallest drive)
Storage efficiency increases with the number of disks:
storage efficiency = (number of drives -1)/ (number of
drives)
RAID 10 (number of drives / 2) X (capacity of smallest drive)
RAID 50 (number of drives - number of subunits) X (capacity of
the smallest drive)
Through drive coercion, the capacity used for each drive is rounded
down so that drives from differing manufacturers are more likely to
be able to be used as spares for each other. The capacity used for
each drive is rounded down to the nearest GB for drives under 45
GB (45,000,000,000), and rounded down to the nea re st 5 GBytes
for drives over 45 GB. For example, a 44.3 GB drive will be
rounded down to 44 GBytes, and a 123 GB drives will be rounded
down to 120 GBytes.
Support for Over 2 Terabytes
Windows 2000, Windows XP, Linux 2.4, and FreeBSD 4.x, do not
currently recognize unit capacity in excess of 2 TB.
If the combined capacity of the drives to be connected to a unit
exceeds 2 Terabytes (TB), you can enable auto-carving when you
configure your units.
Auto-carving divides the available unit capacity into multiple
chunks of 2 TB or smaller that can be addressed by the operating
systems as separate volumes.
For more information, see “Enabling Auto-Carving for Units
Larger Than 2 TB” on page 47, and in 3ware 9000 Series Serial
ATA RAID Controller User Guide, see “Multi LUN Support and
Auto-Carving.”
www.3ware.com 33
Page 42

Configuring Units
Working with the 3ware BIOS Manager (3BM)
This section describes the basics of working with the 3ware BIOS
Manager (3BM) configuration utility. It includes the following
sections:
Starting the 3BM configuration utility
Exiting the 3BM configuration utility
Working in the 3BM configuration screens
Starting 3BM
You access the 3BM configuration utility during the start-up
process for your computer.
To start 3BM
1 Power up or reboot your system.
2 While the system is starting, watch for a screen similar to
Figure 7.
3ware ATA RAID Controller: Escalade 9500S-12
BIOS: BE9X X.XX.XX.XXX Firmware: FE9X X.XX.XX.XXX
Unit 0 - Mirror 111.74GB
Port 0 - IC35L120AVVA07-0 115.03 GB
Port 1 - IC35L120AVVA07-0 115.03 GB
Following drives will not be exported to OS:
Port 2 - IC35L120AVVA07-0 115.03 GB Unconfigured Disk
Port 3 - IC35L120AVVA07-0 115.03 GB Unconfigured Disk
----Press <Alt-3> to access 3ware BIOS Manager ----
Figure 7. 3ware BIOS Screen
3 Press Alt-3 immediately to bring up the 3BM configuration
utility display.
34 3ware 9000 Series Serial ATA RAID Controller Installation Guide
Page 43

Working with the 3ware BIOS Manager (3BM)
A message warns you that changing your disk array
configuration may overwrite data on the disks.
Figure 8. Warning Message When you Start 3BM
4 If you need to backup data before continuing, press ESC and do
so now. Otherwise, press any key to continue.
www.3ware.com 35
Page 44

Configuring Units
Exiting 3BM
When you are ready to exit the 3BM configuration utility, you have
the option to save the configuration changes you have made, or to
discard the changes.
To save your configuration modifications
1 Press the F8 or Esc key.
A list of affected drives appears, and a message asks you to
confirm the configuration.
2Type Y.
3BM closes and the booting process resumes.
To exit without saving changes
1 Press Esc.
If you have made changes that you have not saved, you are
asked whether to save them, or not.
2 Select No to discard your changes.
Note: If you make changes on the Policy screen,
those changes are saved when you leave the Policy
screen. Whether you press F8 or Esc to leave 3BM
will not have an effect on those changes. For more
information, see the 3ware 9000 Series Serial ATA
RAID Controller User Guide.
36 3ware 9000 Series Serial ATA RAID Controller Installation Guide
Page 45

Working with the 3ware BIOS Manager (3BM)
Working in the 3BM Screens
Figure 9. 3BM Configuration Utility Main Display
The main 3BM screen shows a list of available drives. After you
have configured one or more drives, it also lists the existing
configuration.
Available Drives lists the drives that are available to create
units and hot spares.
Exportable Units lists any existing units along with the drives
contained in the units.
Incomplete Drives and Others. If you connected drives to the
controller that were previously used on a 7000/8000-series
3ware RAID controller, they may appear in a section titled
Incomplete Drives and Others. Before you can use these drives,
they must be deleted. For more information, see the discussion
of Deleting Units in 3ware 9000 Series Serial ATA RAID
Controller User Guide.
www.3ware.com 37
Page 46

Configuring Units
Unusable Units. Any unit that is missing too many drives to be
constructed properly will be listed here.
T able 4 lists how to move around and select information in the 3BM
screens.
Table 4: Working in 3BM
To do this Use these keys
Move between units or drives in a
list, and between fields and buttons
Select (or unselect) what is currently
highlighted.
A selection may be a drive in a list of
drives, a button at the bottom of the
screen, or a field in the middle of the
screen.
In lists, an asterisk appears to the
left of selected drives or units.
Display a drop-down list of available
choices in a field
Move between choices in a field list Up and Down Arrow Keys
Select all available drives Alt+A
Highlight one of the primary buttons
on the main screen:
Create
Delete
Maintain
Rebuild
Policy
BBU
Up and Down Arrow Keys
OR
Left and Right Arrow Keys
OR
Tab and Shift+Tab
Enter or the Spacebar
Enter
Alt+C
Alt+D
Alt+M
Alt+R
Alt+P
Alt+B
38 3ware 9000 Series Serial ATA RAID Controller Installation Guide
Page 47

Working with the 3ware BIOS Manager (3BM)
Table 4: Working in 3BM
To do this Use these keys
Specify (or unspecify) a drive as a
hot spare
Unlock the drives in a unit, so that
they can be removed and used with
a controller other than a 9000-series
controller.
Return to starting values for this
session in the 3ware BIOS Manager
Display the Advanced Detail screen,
where you can see the software
versions (BIOS, Firmware, monitor),
serial number, controller and model
number, cache memory size, slot #
of the 3ware card, and whether or
not BBU-support is available.)
Return to the main 3ware BIOS
Manager screen, from the Advanced
Details screen
Move a highlighted unit up or down
in the list of exportable units
(The top-most unit will become the
bootable unit, if you install the OS.)
S
R (Remove)
F6
Note: F6 cannot bring back
previous policy settings; they
are saved when you exit the
Policy screen.
Shift+F5
Any key
Page Up
Page Down
[Available only when there are
multiple units and a unit is
highlighted.]
Display context sensitive help F1 or Alt+F1
If you have multiple 3ware
controllers in your system, return to
the board selection screen.
www.3ware.com 39
Esc
Page 48

Configuring Units
Table 4: Working in 3BM
To do this Use these keys
Exit the utility and save or abandon
all changes.
Exit the utility and save all changes F8
Esc
Specifying the Unit Configuration
You can implement one or more units of supported RAID levels on
a single controller, depending on the number of drives that the
specific 3ware RAID controller supports and the number of drives
attached.
Basic Steps for Creating a Unit
The process of configuring your RAID units includes these main
steps, which are detailed in the step-by-step example:
Select the drives to be included and indicate that you want to
create a disk unit
Choose the desired RAID configuration
Set other parameters, depending on the type of RAID
configuration
Confirm the unit configuration
Save your changes
To select the drives and create a disk unit
1 Select the drives to be included by highlighting each one and
pressing Enter to select it.
When you select a drive, an asterisk appears next to it in the
left-most column (see Figure 10).
40 3ware 9000 Series Serial ATA RAID Controller Installation Guide
Page 49

Specifying the Unit Configuration
You may include from one to twelve drives in the unit,
depending on the number available. (For information about
how many drives to select for a given RAID level, see Table 2
on page 31.)
Note: To include drives that are part of an existing unit you
must first delete the other unit. Be cautious in doing this, as any
existing data on that unit will be overwritten.
Figure 10. Asterisks Next to Selected Drives
2 After all drives for the unit are selected, use the Tab or Right
Arrow key to move to the Create Unit button and press Enter.
The Create Disk Array screen appears (see Figure 11 and
Figure 12 for examples).
3 Make sure that the proper drives are listed.
www.3ware.com 41
Page 50

Configuring Units
Figure 1 1. Create Disk Array Di splay, RAID 0 Example
Figure 12. Create Disk Array Display, RAID 5 Example
42 3ware 9000 Series Serial ATA RAID Controller Installation Guide
Page 51

Specifying the Unit Configuration
To select the desired RAID configuration
1 Press Enter in the RAID Configuration field to display the
available RAID levels for the number of drives you selected.
Figure 13. List of Configuration Choices for Four Drives
2 Use the arrow keys to highlight the desired RAID
configuration and press Enter.
For information about the different RAID levels and when to
use each, see “Understanding RAID Concepts and Levels” on
page 28.
To enable or disable write cache and set striping size
The write cache and striping size parameters depend on the type of
RAID level you selected.
Note: You can enable or disable the write cache again
later without affecting the configuration. However, you
cannot change the stripe size later without reconfiguring
the unit.
1 Use the arrow keys or press Tab to move to the field Array’s
Write Cache State.
2 Select whether you want the write cache to be enabled or
disabled for this unit.
The default is for write cache to be enabled. For more
information about write cache, see page 31.
3 Press Tab to move to the field S tripe Size and select the desired
stripe size (16KB, 64KB, or 256KB).
www.3ware.com 43
Page 52

Configuring Units
Note: Striping size is not applicable for RAID 1, because it is a
mirrored array without striping.
In general, use smaller stripe sizes for sequential access (such
as video access) and larger stripe sizes for random access (such
as a database).
Figure 14. Stripe Sizes for a RAID 5
For information about the field “Continue on Source Error,” see
the 3ware 900 0 Series Serial ATA RAID Controller User Guide.
To confirm unit configuration
1 Press Tab to select the OK button and press Enter to confirm
creation of the unit.
Or, if you want to cancel the creation of the unit, tab to Cancel
and press Enter.
The unit is not actually created and no data is overwritten until
you have finished making all your changes and press F8.
44 3ware 9000 Series Serial ATA RAID Controller Installation Guide
Page 53

Specifying the Unit Configuration
2 If you have additional drives, go ahead and configure an
additional RAID unit or designate a hot spare. Then continue
on with the next section. (For details about hot spares, see
page 46.)
3 If you configured more than one unit, and you plan to install the
operating system on one of them, make that unit be the first unit
(Unit 0) in the list of Exportable Units.
T o mo ve a unit up in th e list, hig hlight it and p ress the Page Up
key.
4 When you are finished configuring units, press F8 to save the
changes and exit 3BM.
A warning message asks you to confirm that all existing data on
the drives will be deleted.
Figure 15. Confirmation Me ssage when Saving and Exiting
5Type Y to continue, delete any existing data on the drives, and
create the unit.
www.3ware.com 45
Page 54

Configuring Units
Depending on the RAID configuration you are creating,
initialization of the unit may begin immediately . For details, see
“Initializing Units” on page 49.
Specifying a Hot Spare
You can designate one of the Available Drives as a hot spare in
3BM. If a hot spare is specified and a redundant unit degrades, an
event notification will be generated. The hot spare will
automatically replace the failed drive without user intervention.
To sp ec if y a ho t spare
1 In the list of Available Drives, highlight the drive to use.
2Type s to specify that the selected drive will be the hot spare.
You’ll see the words “Hot Spare” appear next to the drive in the
Available Drives list.
Figure 16. Hot Spare Indicated
46 3ware 9000 Series Serial ATA RAID Controller Installation Guide
Page 55

Specifying the Unit Configuration
If a hot spare is already enabled, you can disable it by following the
same process.
Note: In order to replace a failed drive in a degraded
unit, a hot spare drives must have the same or larger
storage capacity than the failed drive.
Enabling Auto-Carving for Units Larger Than 2 TB
If the capacity of your unit exceeds 2TB and you are using one of
the following operating systems, you will need to enable autocarving in order to make use of the full capacity:
Windows 2000
Windows XP
Linux 2.4
FreeBSD 4.x
You must turn on the 2TB Auto-Carving policy before creating the
unit. Units created with this policy turned off will not be affected. If
the policy is turned off later, units that have been carved into
volumes will retain their individual volumes; existing data is not
affected.
To enable auto-carving
1 At the main 3BM screen, tab to Policy and press Enter.
2 On the Policy screen, tab to 2TB Auto-Carving, and change
the setting to “Enabled.”
www.3ware.com 47
Page 56

Configuring Units
3Tab to OK and press Enter.
After you start your system, you will see multiple volumes
available in the operating system: 2 TB each, plus one volume
with any remaining storage beyond the multiple of 2TB. (In this
release, 3BM does not show individual volumes.)
Leaving Individual Drives as JBODs
By default, if you leave individual drives unconfigured (JBODs),
they will not be available to the operating system. If you want to be
able to use individual drives, configure them as single-disk units.
If you have JBODs attached to an 8000 controller that you want to
use with the 9000 controller, see
Controller to a 9000 Controller” on page 23.
48 3ware 9000 Series Serial ATA RAID Controller Installation Guide
“Moving Units from an 8000
Page 57

Initializing Units
Initializing Units
Performance of RAID 5 units with 5 or more disks, and RAID 50
units with 10 or 12 disks configured into two subunits will improve
after the unit has been initialized. For these configurations,
foreground initialization (also known as “zeroing”) starts
immediately. If you want to begin using the units right away, you
can halt the zeroing process and initialize them in the background
later, after the operating system is booted. (The initialization
process can take several hours, depending on the size of your
drives.) The disadvantage of initializing the units later in the
background is that the performance RAID 5 and RAID 50 arrays
will be lower until initialization is complete.
Information about initialization for each of the different RAID
types is described below.
RAID 0 Units
RAID 0 units do not need to be initialized and are immediately
available for use with full performance when created.
For RAID 5 and RAID 50 Units
RAID 5 units with 3 or 4 disks do not need to be initialized and are
fault tolerant upon creation. Similarly, RAID 50 units with 6, 8, or 9
disks, and RAID 50 with 12 disks configured into 3 subunits of 4 or
4 subunits of 3, do not need to be initialized. This is because these
configurations use an optimized writing technique which does not
have to be valid to provide fault tolerance.
RAID 5 units with 5 or more disks, and RAID 50 units with 10 or
12 disks configured into two subunits do need to be initialized for
full performance. For these configurations, initialization begins
automatically after you create them in the 3BM utility. Zeroes are
written to all unit members.
www.3ware.com 49
Page 58

Configuring Units
If you want to use a RAID configuration which has started
initializing, press Esc to cancel the progress box. You can then exit
3BM and boot to the operating system before the process of writing
zeroes to the drives is complete. Once you have booted to the
operating system, initialization of the RAID 5 or RAID 50 unit will
begin after a delay of up to ten minutes.
When initializing is done after booting to the operating system, the
process of initializing takes longer than it does if initialization is
done by writing zeroes to the array in the BIOS. Consequently, it
will be a longer period of time until the performance of the unit is
fully optimal. Data remains intact when initialization is done in the
operating system.
For RAID 1 and RAID 10
RAID 1 and RAID 10 units are not initialized when they are created
and are immediately available for use with full performance when
created.
Initialization of RAID 1, RAID 10, RAID 5 with 3 or 4 disks,
RAID 50 with 6, 8, or 9 drives, and RAID 50 with 12 drives
configured in 3 subunits of 4 each or 4 subunits of 3 each will take
place the first time the array is verified, either via 3BM, through
3ware 3DM 2, or through the 3ware CLI. The steps below describe
how to do this through the BIOS (3BM). For information about
using 3DM 2, see 3ware 9000 Series Serial ATA RAID Controller
User Guide. For information about using the CLI, see 3ware
Escalade 9000 Series Serial ATA RAID Controller CLI Guide.
To start initialization through Verify in 3BM
1 Reboot and restart 3BM.
2 Select the array you want to verify. (Highlight it and press
Enter.)
3 Tab to Maintain Array and press Enter.
50 3ware 9000 Series Serial ATA RAID Controller Installation Guide
Page 59

Checking the Motherboard Boot Sequence
4 On the Maintain Disk Array screen, Tab to Verify Array and
change the selection to Yes.
5 Tab to OK and press Enter.
Initialization of the unit begins.
Initialization of a RAID 1 unit results in data from one disk (the
disk on the lower channel number) being copied to the other disk.
In RAID 10 units, data from one half of the array is copied to the
other half.
After the initial verification, subsequent verifies to a RAID 1 or 10
unit check for data consistency by comparing the data from one
drive (or set of drives) to the other drive (or set of drives).
Checking the Motherboard Boot
Sequence
Using your computer’s Setup utility, ensure that it shows the
appropriate boot device.
After installing the 3ware 9000 controller in your system, go into
the BIOS for your computer system to check and change the boot
order. This is necessary because most systems automatically change
the boot order when they detect a newly installed controller and
device. Refer to the documentation for your system for information
about starting the system BIOS.
If the OS is already installed on a unit connected to the
system, be sure that device precedes the 3ware RAID controller
in the boot sequence. If you have other disks installed on the
motherboard, the 3ware RAID controller should precede them
in boot order.
If you will install your OS on a disk or array attached to the
3ware RAID controller, specify the controller as the boot
device. (Note that if you configured more than one unit, the
drive(s) specified as Unit 0 will be treated as the boot disk.)
www.3ware.com 51
Page 60

Configuring Units
Installing Drivers and Making the Units Available For Use
The final steps in setting up your RAID arrays are to load the 3ware
drivers and make the units available to your operating system.
Will the unit you have created be your system's boot device?
If so, you will install the driver for the controller as you install
the operating system.
Is the OS already installed on a unit connected to another
controller or to the motherboard?
If so, you will start the OS and then install the driver.
Details for both situations are described in the next sections of this
guide, under Wi ndows Installation (see
(see page 65), and FreeBSD Installation (see page 87).
page 53), Linux Installation
52 3ware 9000 Series Serial ATA RAID Controller Installation Guide
Page 61

Driver Installa tion Under Windows
Note: Before installing the 3ware driver, you must have
already installed your 3ware RAID controller in the
system.
The 3ware RAID controller can be used with Microsoft Windows
2000 (SP3 or newer), Windows XP (SP1 or newer), and Windows
Server 2003. Windows 2003 64-bit for AMD Opteron is also
supported. It is recommended that you upgrade to the latest service
pack available.
A drive or unit managed by the 3ware RAID controller may be
configured to be your system’s boot device. Or , you can use another
device as your boot device, such as a disk attached to the
motherboard.
This chapter contains instructions for how to:
Create a driver diskette for the 3ware RAID controller
Install the 3ware driver and Windows on a new drive or unit.
Install the 3ware driver when Windows is already installed on a
different device.
Note: You must have administrator priv ileges for your system to
install the Windows operating system and the 3ware driver.
www.3ware.com 53
Page 62

Driver Installation Under Windows
Materials Required
3ware software CD-ROM
Microsoft Windows 2000, XP, or Server 2003 installation CD-
ROM. (Not required if Windows is already install ed on another
drive.).
Floppy diskette, to create a driver diskette.
If you are installing Windows, you must create a 3ware driver
diskette. If Windows is already installed on another device, you
may install the 3ware driver from either the 3ware software
CD-ROM or from a diskette.
Creating a 3ware Driver Diskette
If you are installing Windows on a new unit or drive managed by
the 3ware RAID controller, you must create a 3ware driver diskette.
To create a driver diskette
1 Insert the 3ware software CD into your system.
2 When the 3ware Escalade Menu appears, click Driver and
Firmware Disks.
54 3ware 9000 Series Serial ATA RAID Controller Installation Guide
Page 63

Installing the 3ware Driver and Windows on a New Unit
3 In the 3ware Driver & Firmware Images menu, click the
appropriate button to create the driver diskette that you need.
Note that there are both 32-bit and 64-bit AMD drivers
available for Windows. Be sure to select the correct one.
4 When the confirm message appears, insert a blank diskette into
a floppy drive and click the Yes button to begin the process.
Installing the 3ware Driver and
Windows on a New Unit
If you want to install Windows on a new drive configuration
managed by the 3ware RAID controller, follow the instructions in
this section.
If Windows is already installed on another drive, turn to “Installing
the Driver on a System that Boots from a Different Device” on
page 56.
To install Windows and the 3ware driver
1 Boot from the Windows 2000, Windows XP, or Windows
Server 2003 CD and press F6 when you see the message:
“Press F6 if you need to install a 3rd party SCSI or RAID
driver” at the bottom of the display.
2 When you see the message: “Setup could not determine the
type of one or more mass storage devices or you have chosen to
manually specify an adapter…”
Type S to specify that you have an additional 3ware RAID
controller.
3 Insert the 3ware driver diskette and press Enter.
4 When a box with AMCC 3ware Series A TA RAID Controller
appears, press Enter to select it.
www.3ware.com 55
Page 64

Driver Installation Under Windows
5Type S if you have additional devices to add. Otherwise, press
Enter.
6 If the “Digital Signature Not Found” message appears, click
Yes to continue the installation.
(If there are multiple controllers in the system, you will see this
message once for each controller.)
7 Continue with the normal Windows installation at this point.
There are no instructions after installing the driver that are
specific to 3ware. If you need additional instructions, refer to
the Windows 2000, Windows XP, or Windows Server 2003
documentation supplied by Microsoft.
8Turn to page 56 and follow the instructions for “Making Units
Managed by a 3ware Controller Available to Windows”.
Installing the Driver on a System that Boots from a Different Device
If you are installing the 3ware RAID controller on a system that
already has the operating system installed on another drive, follow
the instructions in this section, depending on the version of
Windows installed on your system:
“To install the 3ware driver under Windows 2000” on page 57
“To install the 3ware driver under Windows XP or 2003” on
page 60
56 3ware 9000 Series Serial ATA RAID Controller Installation Guide
Page 65

Installing the Driver on a System that Boots from a Different Device
To install the 3ware driver under Windows 2000
When you start Windows after installing a 3ware RAID controller,
Windows recognizes it as a Plug and Play device, and brings up the
Found New Hardware Wizard. This wizard guides you through
installing the 3ware drivers (see
Figure 17). Note that you will see
screens for the installation of two drivers during this process.
Figure 17. Found New Hardware Wizard, Windows 2000
1 Click the Next button and respond to the questions the Wizard
displays using the default selections.
2 When the Wizard prompts you to select a device driver, click
Have Disk, and then indicate that it is on the CD or floppy.
3 If the “Digital Signature Not Found” message appears, click
Yes to continue the installation.
www.3ware.com 57
Page 66

Driver Installation Under Windows
4 When the Completing the Found New Hardware W izard screen
appears (
Figure 18. Completing Found New Hardware Wizard
Figure 18), click Finish.
5 If the “Completing” screen similar to Figure 18 indicates that
you should restart your computer, do so now.
58 3ware 9000 Series Serial ATA RAID Controller Installation Guide
Page 67

Installing the Driver on a System that Boots from a Different Device
6 When the Install Hardware Device Drivers screen appears
Figure 19), click Next and follow the prompts on the screen to
(
install the second driver.
Figure 19. Install Hardware Device Drivers
7 When the second Completing the Found New Hardware screen
appears, click Finish.
Figure 20. Completing Foun d New Hardware Wizard
www.3ware.com 59
Page 68

Driver Installation Under Windows
After the driver has been installed, continue with the instructions
under
“Making Units Managed by a 3ware Controller Available to
Windows” on page 63.
To install the 3ware driver under Windows XP or 2003
When you start Windows after installing a 3ware RAID controller,
Windows recognizes it as a Plug and Play device, and brings up the
Found New Hardware Wizard. This wizard guides you in
installing the 3ware drivers (see
Figure 21). Note that you will see
screens for the installation of two drivers during this process.
Figure 21. Found New Hardware Wizard, Windows XP and 2003
1 Click the Next button and respond to the questions the Wizard
displays.
2 When the Wizard prompts you to select a device driver, click
Have Disk, and then indicate that it is on the CD or floppy.
3 If the “Digital Signature Not Found” message appears, click
Yes to continue the installation.
60 3ware 9000 Series Serial ATA RAID Controller Installation Guide
Page 69

Installing the Driver on a System that Boots from a Different Device
4 When the Completing the Found New Hardware W izard screen
appears (
Figure 22. Completing Foun d New Hardware Wizard
Figure 22), click Finish.
5 If the “Completing” screen similar to Figure 22 indicates that
you should restart your computer, do so now.
6 When the Welcome to the Found New Hardware Wizard screen
appears again (
Figure 23), click Next and follow the prompts
on the screen to install the second driver.
www.3ware.com 61
Page 70

Driver Installation Under Windows
Figure 23. Welcome to the Foun d New Hardware Wizard
7 When the second Completing the Found New Hardware screen
appears, click Finish.
Figure 24. Completing Found New Hardware Wizard
After the driver has been installed, continue with the instructions
below under
“Making Units Managed by a 3ware Controller
Available to Windows” on page 63.
62 3ware 9000 Series Serial ATA RAID Controller Installation Guide
Page 71

Making Units Managed by a 3ware Controller Available to Windows
Making Units Managed by a 3ware
Controller Available to Windows
After the 3ware driver has been installed, you need to partition and
format the new units or disks.
1 Remove the driver diskette or CD, reboot the system, and log in
as the system administrator.
2Use Disk Administrator to partition and format the new arrays
or disks:
aFrom the Start menu, choose Administrative Tools >
Computer Management.
b In the Computer Management window, under Storage,
select Disk Management.
Figure 25. Computer Managemen t Screen
3 Follow the steps that appear on the screen to write a signature
to the drive.
4 Right-click on the drive and select Create Volume.
5 Follow the steps the appear on-screen to create a volume and to
assign a drive letter.
www.3ware.com 63
Page 72

Driver Installation Under Windows
Finishing Up
Your RAID unit is now ready for use.
You may also want to install 3ware’s browser-based Disk
Management tool, 3DM
(CLI). With 3DM 2 and CLI, you can maintain your RAID units
while running Windows. For more information, see the 3war e 9000
Series Serial ATA RAID Controller User Guide and the 3ware
Escalade 9000 Series Serial ATA RAID Controller CLI Guide.
2, or the 3ware Command Line Interface
64 3ware 9000 Series Serial ATA RAID Controller Installation Guide
Page 73

Driver Installa tion Under Linux
Note: Before installing the 3ware driver, you must have
already installed your 3ware RAID controller in the
system.
A drive or unit managed by the 3ware RAID controller may be
configured to be your system’s boot device. Or , you can use another
device as your boot device, such as a disk attached to the
motherboard.
The steps you follow to install the driver and make your RAID unit
available depend on which version of Linux you are using, and
whether it will be your boot device. This chapter provides step-bystep instructions for the following situations:
Red Hat Linux Installation
Installing the 3ware driver and Red Hat Linux on a new
drive or unit (page 68).
Installing the 3ware driver on a system that boots Red Hat
Linux from a different device (page 70).
SuSE Linux Installation
Installing the 3ware driver and SuSE Linux with YaST2 on
a new drive or unit (page 81).
Installing the 3ware driver on a system that boots SuSE
Linux from a different device (page 81).
www.3ware.com 65
Page 74

Driver Installation Under Linux
If you are using a Linux distribution for which there is not a
compiled driver available from 3ware, you can copy the source
from the 3ware software CD or download the source from the
3ware website and compile a new driver . For more information, see
“Compiling a 3ware Driver for Red Hat Linux” on page 77 and
“Compiling a 3ware Driver for SuSE Linux” on page 83.
For information about upgrading a driver that is alread y loaded, see
3ware 9000 Series Serial ATA RAID Controller User Guide.
Obtaining 3ware Linux Drivers
Obtain the 3ware driver for Linux from one of these two sources:
3ware software CD-ROM. Compiled and tested drivers for Red
Hat and SuSE Linux are included on this CD.
3ware web site. You can download the latest compiled and
tested driver for RedHat or SuSE Linux from the 3ware web
site at http://www.3ware.com. Included in these downloads is
the Linux driver source, which you can use to compile the latest
driver for RedHat, SuSE, and other versions of Linux.
Although the drivers are also available in external Linux
distributions and from open source at www .kernel.org, those drivers
do not include the firmware image, which updates the BIOS in the
controller. It is recommended that you use the drivers from the
3ware CD or web site, because they have a bundled firmware
image.
Be Sure to Use the Correct Drivers
The Linux 3w-9xxx drivers included on the 3ware CD are only for
3ware 9000 series controllers. 3ware 7/8000 series controllers use a
Linux driver labeled 3w-xxxx. The drivers for the 9000 series
controllers and the 7/8000 series controllers are not
interchangeable, but can be used together when both controller
types are installed in the same system. The examples in this manual
66 3ware 9000 Series Serial ATA RAID Controller Installation Guide
Page 75

Obtaining 3ware Linux Drivers
refer only to the 9000 series driver . For informat ion about using the
7/8000 driver and controller, refer to the user guide or installation
procedure for the 7/8000-series controller.
Warning: Be sure to use the correct driver for your
processor.
Be sure you load the correct driver on your system. It
is possible to load the wrong driver onto a system,
however when you boot such systems, they will not
work.
For Red Hat, AMCC offers the following drivers:
x86 32-bit for Intel x86
x86 32-bit for AMD Athlon
amd 64-bit, used for both AMD Opteron and
Intel 64-bit Xeon (EM64T)
For SuSE, AMCC offers the following drivers:
x86 32-bit, for Intel x86 and AMD Athlon
amd 64-bit, for AMD Opteron and Intel 64-bit Xeon
(EM64T)
www.3ware.com 67
Page 76

Driver Installation Under Linux
Determining the Current Version of your 3ware Driver
If you already have a 3ware controller installed, you can check the
current driver version.
If you have a 2.4 kernel or earlier, type the following command:
cat /proc/scsi/3w-9xxx/*
where the asterisk (*) represents SCSI host ID and “9xxx”
represents the family of the controller. For example:
cat /proc/scsi/3w-9xxx/0
If you have a 2.6 kernels with sysfs, type the following command:
cat /sys/class/scsi_host/<hostid>/stats
where <hostid> is usually host0, unless other SCSI devic es are
available, in which case it may be host1 or higher.
If you have a 2.6 kernel without sysfs, type the following
command:
dmesg | grep 3w
(dmesg can also be used with earlier kernel versions.)
Driver Installation Under Red Hat Linux
Materials Required
3ware software CD-ROM
Floppy diskette, if you need to create a driver diskette.
Red Hat Linux installation CD-ROM and boot disk. (Not
required if Red Hat Linux is already installed on another drive.)
68 3ware 9000 Series Serial ATA RAID Controller Installation Guide
Page 77

Driver Installation Under Red Hat Linux
Creating a Red Hat Linux Driver Diskette
If you are installing Linux on the new drive or unit managed by the
3ware RAID controller, you must create a 3ware driver diskette. If
Linux is already installed on another device, you may install the
3ware driver from either the 3ware software CD-ROM or make a
driver diskette.
To create a driver diskette
1 Insert the 3ware software CD into your system.
2 When the 3ware Escalade Menu appears, click the Driver &
Firmware Disks button.
3 In the 3ware Driver & Firmware Disk Images menu, click the
button for the driver disk you want to create.
A confirmation window opens.
4 Insert a blank diskette into a drive and click the Yes button to
begin creating the driver floppy diskette.
Installing the 3ware Driver and Red Hat Linux on a New Unit
Note: If Red Hat Linux is already installed and bootable on another
drive, turn to “Installing the 3ware Driver on a Red Hat Linux
System that Boots From a Different Device” on page 70.
Note: We have tested some older systems where an IDE
drive connected to the motherboard interfered with using
a drive or unit managed by the 3ware RAID controller as
a boot device. Disconnecting the IDE drive while
installing Linux will eliminate this problem. After Linux
is installed, the drive can be reconnected.
www.3ware.com 69
Page 78

Driver Installation Under Linux
1 Boot with the Red Hat CD or diskette:
a Insert either the Red Hat CD-ROM disk or a Red Hat boot
diskette into your computer.
b Start or reboot your computer.
c When the Welcome to Red Hat display appears, type
expert at the boot prompt.
boot: expert
A number of files will load and then a message will prompt you
to insert your driver disk.
2 Inst all the driver:
Insert the driver diskette containing the 3ware driver for Red
Hat and press Enter.
The system automatically reports:
Loading 3w-9xxx driver
3 When prompted, select the proper language and keyboard types
for your locality.
4 If asked for what type of media, select Local CD-ROM since
you are installing from the Red Hat CD-ROM.
Installing the 3ware Driver on a Red Hat Linux System that Boots From a Different Device
The steps for installing the 3ware driver vary slightly , depending on
your specific installation requirements. Select the appropriate set of
steps below, based on whether:
You want to update the RAM disk
You prefer to load the driver manually or from a script, instead
of updating the RAM disk
70 3ware 9000 Series Serial ATA RAID Controller Installation Guide
Page 79

Driver Installation Under Red Hat Linux
About Variables In the Driver Installation Instructions
These conventions are used for variable text for kernel strings and
module names in the instructions on the following pages.
Kernel String Conventions
<kernel string> refers to the kernel version.
The kernel string will have different endings, depending on the
kernel you are using.
For an SMP kernel (multi-processor), the kernel string will end
smp. For example: 2.4.18-14smp.
in
For an Enterprise kernel, the kernel string will end in
enterprise. For example: 2.4.18-14enterprise
For a Bigmem kernel, the kernel string will end in bigmem. For
example:
For a Hugemem kernel, the kernel string will end in hugemem.
For example:
Module Naming Conventions
2.4.18-14bigmem
2.4.18-14hugmem
3w-9xxx.* refers to the specific module you will copy in the
examples shown in steps 3 and 4.
The name of the module you will copy (3w-9xxx.*) varies,
depending on the kernel; however you will always copy it to a file
named 3w-9xxx.o for 2.4 kernels, or 3w-9xxx.ko for 2.6 kernels.
The available module files are:
For UP kernels: 3w-9xxx.o
For SMP kernels: 3w-9xxx.smp
For Enterprise kernels: 3w-9xxx.ent
For Bigmem kernels: 3w-9xxx.big
For Hugemem kernels: 3w-9xxx.hug
For IA32E kernels: 3w-9xxx.i32
www.3ware.com 71
Page 80

Driver Installation Under Linux
To install the 3ware driver and update the RAM disk
1 Log in as root and open a console window.
2 Mount the CD which contains the 3ware driver:
To mount the CD, type: mount /dev/cdrom
and press Enter.
3 Copy the driver:
For Redhat workstation on Intel x86, type:
cp /mnt/cdrom/packages/drivers/linux/redhat/
ws3_u3/x86_intel/3w-9xxx.* /lib/modules/
<put kernel string here>/kernel/drivers/scsi/
3w-9xxx.o
If prompted to overwrite, type y.
For Redhat workstation on AMD Athlon 32-bit, type:
cp mnt/cdrom/packages/drivers/linux/redhat/
ws3_u3/x86_athlon/3w-9xxx.*
<put kernel string here>/kernel/drivers/scsi/
3w-9xxx.o
If prompted to overwrite, type y.
For Redhat workstation on AMD Opteron and
Intel EM64T
cp /mnt/cdrom/packages/drivers/linux/redhat/
ws3_u3/x86_64/3w-9xxx.*
, type:
<put kernel string here>/kernel/drivers/scsi/
3w-9xxx.ko
If prompted to overwrite, type y.
72 3ware 9000 Series Serial ATA RAID Controller Installation Guide
Page 81

Driver Installation Under Red Hat Linux
4 If yo u installed a previous driver when you installed your
operating system, then perform this step to copy the driver into
the update directory, as well. Otherwise, go on to Step 5.
For Redhat workstation on Intel x86, type:
cp /mnt/cdrom/packages/drivers/linux/redhat/
ws3_us/x86_intel/3w-9xxx.* /lib/modules/
<put kernel string here>/update 3w-9xxx.o
If prompted to overwrite, type y.
For Redhat workstation on AMD Athlon 32-bit, type:
cp /mnt/cdrom/packages/drivers/linux/redhat/
ws3_us/x86_athlon/3w-9xxx.*/lib/modules
<put kernel string here>/update 3w-9xxx.o
If prompted to overwrite, type y.
For Redhat workstation on AMD Opteron and EM64T, type:
cp /mnt/cdrom/packages/drivers/linux/redhat/
ws3_us/x86_64/3w-9xxx.* /lib/modules/
<put kernel string here>/update 3w-9xxx.ko
If prompted to overwrite, type y.
Note: Use the appropriate module name and kernel string, as
described under “About Variables In the Driver Installation
Instructions” on page 71.
5 For 2.4 Kernels, add the following line to
/etc/modules.conf:
alias scsi_hostadapter 3w-9xxx.o
For 2.6 Kernels, add the following line to
/etc/modprobe.conf
alias scsi_hostadapter 3w-9xxx.ko
www.3ware.com 73
Page 82

Driver Installation Under Linux
6 Upd ate the modules. dep file , by issuing the following
command:
Run /sbin/depmod -a
7 Run mkinitrd by entering the following:
/sbin/mkinitrd -v -f /boot/initrd-<kernel string>.img
<kernel string1>
where <kernel string1> is the /lib/modules directory from
which to copy the 3w-9xxx driver.
Example:
/sbin/mkinitrd –v –f /boot/initrd-2.4.18-14.img
2.4.18-14
8 If you are using the GRUB boot loader, skip to Step 5.
If you are using the LILO boot loader, run LILO to update the
boot record on disk by typing the following:
/sbin/lilo
The output should be similar to:
Added linux *
9Reboot.
The 3ware driver will be loaded from the ram disk
automatically at boot time.
T o inst all the 3ware driver an d load the driver manua lly instead
of using a RAM disk
1 Log in as root and open a console window.
2 Mount the CD which contains the 3ware driver:
To mount the CD, type: mount /dev/cdrom
and press Enter.
74 3ware 9000 Series Serial ATA RAID Controller Installation Guide
Page 83

Driver Installation Under Red Hat Linux
3 Copy the driver:
For Redhat workstation on Intel x86, type:
cp /mnt/cdrom/packages/drivers/linux/redhat/
ws3_u3/x86_intel/3w-9xxx.* /lib/modules/
<put kernel string here>/kernel/drivers/scsi/
3w-9xxx.o
If prompted to overwrite, type y.
For Redhat workstation on AMD Athlon 32-bit, type:
cp /mnt/cdrom/packages/drivers/linux/redhat/
ws3_u3/x86_athlon/3w-9xxx.* /lib/modules/
<put kernel string here>/kernel/drivers/scsi/
3w-9xxx.o
If prompted to overwrite, type y.
For Redhat workstation on AMD Opteron and EM64T, type:
cp /mnt/cdrom/packages/drivers/linux/redhat/
ws3_u3/x86_64/3w-9xxx.* /lib/modules/
<put kernel string here>/kernel/drivers/scsi/
3w-9xxx.ko
If prompted to overwrite, type y.
Note: Use the appropriate module name and kernel string, as
described under “About Variables In the Driver Installation
Instructions” on page 71.
4 If yo u installed a previous driver when you installed your
operating system, then perform this step to copy the driver into
the update directory, as well. Otherwise, go on to Step 5.
For Redhat workstation on Intel x86, type:
cp /mnt/cdrom/packages/drivers/linux/redhat/
ws3_u3/x86_intel/3w-9xxx.* /lib/modules/
<put kernel string here>/update 3w-9xxx.o
If prompted to overwrite, type y.
www.3ware.com 75
Page 84

Driver Installation Under Linux
For Redhat workstation on AMD Athlon 32-bit, type:
cp /mnt/cdrom/packages/drivers/linux/redhat/
ws3_u3/x86_athlon/3w-9xxx.* /lib/modules/
<put kernel string here>/update 3w-9xxx.o
If prompted to overwrite, type y.
For Redhat workstation on AMD Opteron and EM64T, type:
cp /mnt/cdrom/packages/drivers/linux/redhat/
ws3_u3/x86_64/3w-9xxx.* /lib/modules/
<put kernel string here>/update 3w-9xxx.ko
If prompted to overwrite, type y.
Note: Use the appropriate module name and kernel string, as
described under “About Variables In the Driver Installation
Instructions” on page 71.
5 Add the following line to
/etc/modules.conf:
alias scsi_hostadapter 3w-9xxx
6 Upd ate the modules. dep file , by issuing the following
command:
Run /sbin/depmod -a
7 Lo ad the driv er ma nu ally.
Type: modprobe 3w-9xxx
You can also incorporate the insmod command into a startup
script.
76 3ware 9000 Series Serial ATA RAID Controller Installation Guide
Page 85

Driver Installation Under Red Hat Linux
Compiling a 3ware Driver for Red Hat Linux
For Experts Only
If necessary, you can compile the 3ware driver yourself. (For
example, if you are running a different kernel version.)
Notes:
You must have a full Linux kernel source tree in /usr/src/linux
in order to do the compile.
In addition, you must boot to the UP kernel to use the make targets.
Otherwise errors will result that will cause the driver build to fail.
The instructions below are for compiling the driver under a 2.4
kernel. For information about compiling the driver under a 2.6
kernel, see the Knowledgebase on the website at www.3ware.com
1 Download the 3ware driver source from 3ware’s website.
2 Copy the driver source into a working directory. (The latest
3ware driver source is bundled with the latest firmware.)
3 Untar the driver source with this command:
tar zxfv 3w-9xxx.tgz
The driver source will be output to a directory called driver.
4 Change directory to driver.
cd driver
5 Red Hat 7.2 and later support multiple build targets from
makefile.
Boot to UP version of kernel to build all
modules.
www.3ware.com 77
Page 86

Driver Installation Under Linux
Note: In the commands below , re member that the text you enter
is case sensitive. (Be sure to type
makefile.rh.)
Makefile.rh, not
To build UP module, type:
make -f Makefile.rh
The file created is 3w-9xxx.o for 2.4 kernels, and 3w-9xxx.ko
for 2.6 kernels.
To build SMP module, type:
make smp -f Makefile.rh
The file created is 3w-9xxx.smp
To build Enterprise module, type:
make ent -f Makefile.rh
The file created is 3w-9xxx.ent
To build Bigmem module, type:
make big -f Makefile.rh
The file created is 3w-9xxx.big
To build Hugemem module, type:
make hug -f Makefile.rh
The file created is 3w-9xxx.hug
To build Boot module
(this is used when creating a driver for the 32-bit driver
diskette), type:
make bot -f Makefile.rh
The file created is 3w-9xxx.bot
78 3ware 9000 Series Serial ATA RAID Controller Installation Guide
Page 87

Driver Installation Under Red Hat Linux
To build IA32E module
(this is used when creating a driver for the x86_64/EM64T
64-bit driver diskette), type:
make ia32e -f Makefile.rh
The file created is 3w-9xxx.i32
6 Copy the module as follows:
For 2.4 kernels, copy module to:
/lib/modules/<kernel string>/kernel/drivers/scsi/
3w-9xxx.o
7 If yo u installed a previous driver when you installed your
operating system, then perform this step to copy the driver into
the update directory, as well.
/lib/modules/<kernel string>/update/3w-9xxx.o
www.3ware.com 79
Page 88

Driver Installation Under Linux
Driver Installation Under SuSE Linux
Materials required
3ware software CD-ROM
Floppy diskette, if you need to make a driver diskette.
SuSE Linux Installation CD-ROM/DVD (Not required if SuSE
Linux is already installed on another drive.)
Creating a SuSE Linux Driver Diskette
If you are installing Linux on the new drive or unit managed by the
3ware RAID controller, you must create a 3ware driver diskette. If
Linux is already installed on another device, you may install the
3ware driver from the 3ware software CD-ROM.
To create a driver diskette
1 Insert the 3ware software CD into your system.
2 When the 3ware Escalade Menu appears, click Driver and
Firmware Disks.
3 In the 3ware Driver and Firmware Disk Images menu, click the
button for the driver disk you want to create.
A confirmation window opens.
4 Insert a blank diskette into a drive and click the Yes button to
begin copying the driver to the floppy diskette.
80 3ware 9000 Series Serial ATA RAID Controller Installation Guide
Page 89

Driver Installation Under SuSE Linux
Installing the 3ware Driver and SuSE Linux with YaST2 on a New Unit
Note: If SuSE Linux is already installed on another drive,
turn to “Installing the 3ware Driver on a SuSE Linux
System that Boots from a Different Device” on page 81.
1 Boot directly from the SuSE installation CD #1 or DVD.
2 When installing SuSE, press the F6 key
You will then be prompted to insert the driver disk.
3 Insert the 3ware Linux driver installation diskette.
4 Click OK and continue with installation.
Installing the 3ware Driver on a SuSE Linux System that Boots from a Different Device
1 Log in as root.
2 Edit /etc/sysconfig/kernel and ma ke sure the file contains the
following line:
INITRD_MODULES="reiserfs 3w-9xxx"
Note: Other modules may be listed before or after 3w-
9xxx, depending on the installation. You may see
entries like reiserfs, ext3 or scsi_mod. If present, leave
them (ensuring there is a space between each module
name), since the system needs them to boot properly.
www.3ware.com 81
Page 90

Driver Installation Under Linux
Note about variables: In the instruction below, replace
<kernel string> with the kernel version you are using (i.e.
2.6, etc.), replace *** with your version of SuSE.
In addition, replace 3w-9xxx.* with the appropriate
module file for your kernel. The available module files
are:
For UP kernels: 3w-9xxx.ko
For SMP kernels: 3w-9xxx.smp
For BigSMP (high memory) kernels: 3w-9xxx.big
3 If you are using SuSE 9.1 or earlier, after the existing 3w-xxx
entry, add
3w-9xxx to /lib/modules/<kernel string>/modules.dep
file
4 Mount the CD-ROM, copy and install the appropriate driver for
your system.
Note: The AMD 64-bit driver is also used for 64-bit Intel Xeon
systems.
mount /dev/cdrom /cdrom
cp /cdrom/packages/drivers/linux/suse/***/3w-9xxx.* /
lib/modules/<kernel string>/kernel/drivers/scsi/
/sbin/insmod /lib/modules/
kernel/drivers/scsi/3w-9xxx.ko
<kernel string>/
If the driver installation fails, confirm that the correct driver
was installed from the CD-ROM. If a driver is not available for
your system, you will need to compile your own driver, as
described below.
5Run /sbin/depmod -a
6Type /sbin/mkinitrd
82 3ware 9000 Series Serial ATA RAID Controller Installation Guide
Page 91

Driver Installation Under SuSE Linux
7 If you are using the GRUB boot loader, you are finished.
If you are using the LILO boot loader, run LILO to update the
boot record on disk by typing the following:
/sbin/lilo
The output should be similar to:
Added linux *
Compiling a 3ware Driver for SuSE Linux
For Experts Only
If you wish to compile the driver yourself (for a different kernel
version that you are running), then perform the following steps.
(Note that the steps vary somewhat for 2.4 kernels and 2.6 kernels;
instructions are provided for each.)
You must have a full Linux kernel source tree in /usr/src/linux
in order to do the compile.
To compile a 3ware driver for SuSE Linux 2.4 kernels
1 Download the 3ware 2.4 driver source from the 3ware website
(www .3ware.com) or copy the driver source from the CD into a
working directory.
2 Install the Kernel source under /usr/src.
3 Create a symbolic link.
ln -s /usr/src/<Kernel Src Dir > /usr/src/linux
4 Change the directory to
cd /usr/src/linux
www.3ware.com 83
Page 92

Driver Installation Under Linux
5 Copy the config file for the kernel you want to build module for
from the appropriate /usr/src/linux/arch directory (listed below)
to /usr/src/linux/.config.
kernel directory
x86 UP
x86 SMP
x86 ATHLON
/usr/src/linux/arch/i386/defconfig.default
/usr/src/linux/arch/i386/defconfig.smp4g
/usr/src/linux/arch/i386/defconfig.athlon
6 Make oldconfig
7 Untar the driver source with this command:
tar zxfv 3w-9xxx.tgz
The driver source will be output to a directory called “driver”.
8 Change directory to driver.
cd driver
9 To build UP module boot to desired UP kernel, type:
make -f Makefile.oth
The created file is 3w-9xxx.o
10 To build SMP module boot to desired SMP kernel, type:
make smp -f Makefile.oth
The created file is 3w-9xxx.smp
11 Copy the module 3w-9xxx.o to the scsi directory.
/lib/modules/<kernel string>/kernel/drivers/scsi/
3w-9xxx.o
12 Edit /etc/modprobe.conf and add
alias scsi_hostadapter 3w-9xxx
13 Load the module
modprobe 3w-9xxx
84 3ware 9000 Series Serial ATA RAID Controller Installation Guide
Page 93

Driver Installation Under SuSE Linux
To compile a 3ware driver for SuSE Linux 2.6 kernels
1 Download the 3ware 2.6 driver source from the 3ware website
(www.3ware.com).
2 Copy the driver source into a working directory. (The latest
3ware driver source is bundled with the latest firmware and is
in the /src sub-directory.)
3 Install the Kernel source under /usr/src
4 Create a symbolic link.
ln -s /usr/src/<Kernel Src Dir > /usr/src/linux
5 Change the directory to
cd /usr/src/linux
6 Copy the config file for the kernel you want to build module for
from the appropriate /usr/src/linux/arch directory (listed below)
to /usr/src/linux/.config.
kernel directory
x86 UP
x86 SMP
x86 Big SMP
x86_64 UP
x86_64 SMP
/usr/src/linux/arch/i386/defconfig.default
/usr/src/linux/arch/i386/defconfig.smp
/usr/src/linux/arch/i386/defconfig.bigsmp
/usr/src/linux/arch/x86_64/defconfig.default
/usr/src/linux/arch/x86_64/defconfig.smp
7 Make oldconfig
8 Untar the driver source with this command:
tar zxfv 3w-9xxx.tgz
The driver source will be output to a directory called “driver”.
www.3ware.com 85
Page 94

Driver Installation Under Linux
9 Change directory to driver.
cd driver
10 To build the module, type
make
The 3w-9xxx.ko module will be built and output to the driver
directory created when you untared the 3w-9xxx.tgz file.
This will take a while, since the 2.6 build process exports our
module to the kernel module list and then builds all kernel
modules.
11 Copy the module 3w-9xxx.ko to
/lib/modules/<kernel string>/kernel/drivers/scsi/
3w-9xxx.ko
12 Edit /etc/modprobe.conf and add
alias scsi_hostadapter 3w-9xxx
13 Load the module
modprobe 3w-9xxx
86 3ware 9000 Series Serial ATA RAID Controller Installation Guide
Page 95

Driver Installa tion Under FreeBSD
Note: Before installing the 3ware driver, you must have
already installed your 3ware RAID controller in the
system.
A drive or unit managed by the 3ware RAID controller may be
configured to be your system’s boot device. Or , you can use another
device as your boot device, such as a disk attached to the
motherboard.
The steps you follow to install the driver and make your RAID unit
available depend on whether it will be your boot device. This
chapter provides step-by-step instructions for the following
situations:
“Installing the Driver While Installing FreeBSD on the 3ware
RAID Controller” on page 88
“Installing the 3ware Driver on a FreeBSD System that Boots
from a Different Device” on page 92
www.3ware.com 87
Page 96

Driver Installation Under FreeBSD
Obtaining 3ware FreeBSD Drivers
FreeBSD 4.10 and later have 9.xxx driver support built in. No
driver installation is required.
If you are using FreeBSD 4.8 or 4.9, you will need to install the
3ware FreeBSD driver as described below.
The 3ware software CD-ROM that came with the 3ware RAID
controller includes compiled and tested drivers for FreeBSD 4.8
and 4.9. To see if a more recent driver is available, please see the
3ware web site.
Materials Required
3ware driver
The driver and the corresponding source files can be found on
the 3ware CD-ROM, at
/packages/drivers/freebsd/<OS version>
and
/packages/drivers/freebsd/src/<OS version>
where OS version is either 4.x or 5.x
You can also download the FreeBSD driver from the 3ware
web site (http://www.3ware.com).
FreeBSD installation CD-ROM or diskette
Installing the Driver While Installing FreeBSD on the 3ware RAID Controller
Note: Some versions of FreeBSD cannot boot to arrays
larger than 1 TByte. If you want to create an array lar ger
than 1 TByte, check to make sure that the version of
FreeBSD you have supports it.
88 3ware 9000 Series Serial ATA RAID Controller Installation Guide
Page 97

Installing the Driver While Installing FreeBSD on the 3ware RAID Controller
To install the driver as a module
1 Boot with the FreeBSD CD-ROM or diskette.
2 In the sysinstall menu, select Configure > Load KLD module.
Note: Immediately after the OS starts booting from the CD,
insert an MS-DOS floppy with the 3ware driver,
twa.ko, into
the floppy drive. If you do not insert it immediately, sysinstall
may fail to recognize the floppy drive.
3 Load the driver from the floppy drive.
4 Run the FreeBSD installation and reboot.
For instructions on how to install FreeBSD, see the FreeBSD
website, at
http://www.freebsd.org/
5 Remo ve the flop py disk an d the CD.
6 On reboot, escape to the loader menu.
Note: Once again, immediately after the OS starts booting,
insert an MS-DOS floppy with the 3ware driver,
twa.ko, into
the floppy drive. If you do not insert it immediately, the loader
may fail to recognize the floppy drive.
7 At the loader prompt, run 'lsdev' to make sure the floppy drive
has been discovered.
8 Load the driver from the floppy. For example, if the floppy
drive is disk0, type
load disk0:twa.ko
9 Run 'boot'.
The system should now be able to boot.
10 After the system boots up, do the following:
a Create a directory for the floppy.
mkdir /floppy
www.3ware.com 89
Page 98

Driver Installation Under FreeBSD
b Mount the floppy.
mount -t msdos /dev/fd0 /floppy
c Copy the driver file to the appropriate directory.
For FreeBSD 4.x, copy the files to:
cp /floppy/twa.ko /modules/twa.ko
For FreeBSD 5.x, copy the files to:
cp /floppy/twa.ko /boot/kernel/twa.ko
d Add line 'twa_load="YES"' to the file
/boot/loader.conf
5 Eject the flop py disk and reboot.
The 3ware driver , twa .ko , sho uld be automatically loaded at
reboot time.
To make the driver part of the kernel
1 Boot with the FreeBSD CD-ROM or diskette.
2 In the sysinstall menu, select Configure > Load KLD module.
Note: Immediately after the OS starts booting from the CD,
insert an MS-DOS floppy with the 3ware driver,
twa.ko, into
the floppy drive. If you do not insert it immediately, the
sysinstall may fail to recognize the floppy drive.
3 Load the driver from the floppy drive.
4 Remo ve the flop py disk an d the CD.
5 Go through OS installation. Make sure you install the kernel
sources during this step.
6 On reboot, escape to the loader menu.
Note: Immediately after the OS starts booting, insert an MS-
DOS floppy with the 3ware driver,
90 3ware 9000 Series Serial ATA RAID Controller Installation Guide
twa.ko, into the floppy
Page 99

Installing the Driver While Installing FreeBSD on the 3ware RAID Controller
drive. If you do not insert it immediately , the loader may fail to
recognize the floppy drive.
7 At the loader prompt, run ‘lsdev’ to make sure the floppy drive
has been discovered.
8 Run ‘load disk0:twa.ko’ (assuming disk0 is the floppy drive)
9 Run ‘boot’.
The system should now be able to boot.
10 After the system boots up, change the kernel build
infrastructure to include the 3ware driver sources.
a Change to the following directory:
cd /usr/src/sys/i386/conf
bCopy the configuration file to a custom file. For exam-
ple, if the configuration file is GENERIC, type
cp GENERIC custom
c Edit the custom file and add the lines shown below under
RAID controllers
device twa # 3ware Escalade 9000 series
d Save the file.
e Change to the following directory:
cd /sys/conf
f Edit the file “files.i386” and add the lines shown below
dev/twa/tw_cl_fwimg.c optional twa
dev/twa/w_cl_init.c optional twa
dev/twa/tw_cl_intr.c optional twa
dev/twa/tw_cl_io.c optional twa
dev/twa/tw_cl_misc.c optional twa
dev/twa/tw_osl_cam.c optional twa
dev/twa/tw_osl_freebsd.c optional twa
g Save the file.
h Add the following line to “Makefile.i386’
CFLAGS+=-I/sys/dev/twa
i If you intend to bundle the firmware image with the driver,
add the following line to /sys/conf/options:
www.3ware.com 91
Page 100

Driver Installation Under FreeBSD
TWA_FIRMWARE_FLASH opt_twa.h
and the following line to your kernel configuration file
(“custom” in the example above):
options TWA_FLASH_FIRMWARE
j If you intend to enable printing of debug messages in the
driver, add the following line to /sys/conf/options:
TWA_DEBUG opt_twa.h
and the following line to your kernel configuration file
(“custom” in the example above):
options TWA_DEBUG=<number from 0 to 10>
Specifying 0 in the above line prints no debug messages,
whereas specifying 10 prints a LOT of debug messages.
11 Rebuild the kernel and install the new kernel.
12 Reboot with the rebuilt kernel.
Installing the 3ware Driver on a FreeBSD System that Boots from a Different Device
To install the 3ware driver as a module
1 Copy the driver from the 3ware CD-ROM at
/packages/drivers/freebsd/<OS version>
For FreeBSD 4.x, copy the driver into
For FreeBSD 5.x, copy the driver into
2 Load the driver
kldload twa.ko
If units are present, you should see unit information in the
system log (usually,
92 3ware 9000 Series Serial ATA RAID Controller Installation Guide
/var/log/messages).
/modules
/boot/kernel.
 Loading...