

Page 1
Page 2

CE Conformity and FCC Statement ………………………………….
This equipment has been test ed and found to comply with the limits of the European Coun cil
Directive on the approximation of the member states relating to electromagnetic compatibility
according to EN 55022/55024 Part 15 B.
This equipment has been tested and found to comply with the limits for a Class B digital device,
pursuant to Part 15 of the FCC Rules. These limits are designed to provide reasonable protection
against harmful interference in a residential energy and, if not installed and used in accordance
with the instructions, may cause harmful interference to radio communications.
However, there is no guarantee that interference will not occur in a particular installation. If this
equipment does cause harmful interference to radio or television reception, which can be
determined by turning the equi pment off and on, the user is encouraged to try to correct the
interference by one or more of the following measures:
Trademarks
Windows, Windows Me, 2000, XP, Vista, 7 and Microsoft are the registered trademarks of Microsoft
Corporation. Adobe Acrobat and AmbirScan are registered trademarks or trademarks of Adobe Systems
Incorporated and Ambir Technology, Inc. in the United States and/or other countries.
Package Contents:
Ambir Scanner
USB 2.0 Cable
Carrying Case
2 Photo/Document Sleeves
1 Cleaning Sheet
2 Calibration Sheets
Installation CD
User Guide (printable from CD)
Quick Start Guide
• Reorient the receiving antenna
• Increase the separation between the equipment and recei ver
• Move the computer away from the r eceiver
• Connect the equipment into an outlet on a circuit different from that to which the receiver
is connected
- 1 -
Page 3

Contents ………………………………….
CE Conformity and FCC Statement.......................................1
Welcome ....................................................................................2
Installation of Software & Hardware ......................................3
®
Initial Calibration with AmbirScan
Using Your Scanner ...................................................................9
Tips & Cautions...........................................................................11
Technical Support .....................................................................12
Product Warranty Information.................................................12
2.0...................................7
Welcome………………………………….
Thank you for purchasing an Ambir scanner. We have designed this product to
provide the user with a simple but effective tool to capture, manage and archive
documents of many types. We encourag e you to read this short, but important
User Guide carefully.
Your Ambir scanner has the latest technology and compatible drivers. Th ese
drivers have been tested to be in compliance with Windows
Windows XP (SP2), Windows Vista
feature a TWAIN 1.9 compatible driver that will work with thousands of imaging
applications. If you experience any difficulty with these drivers, please check our
website at www.ambir.com to verify you are using the latest version.
®
2000 (SP4),
®
, and Windows 7 operating systems. We also
- 2 -
Page 4
Installation of Software & Hardware
FOR BEST RESULTS PLEASE INSTALL THE SOFTWARE FROM THE
CD PROVIDED BEFORE PLUGGING IN YOUR SCANNER.
Note:
As a precaution, a RED warning label has been placed over th e large en d of th e US B
plug to remind you to install the software from the CD first. Please remove this
warning label prior to plugging in the scanner cable.
STEP 1- Install Software
Driver Installation
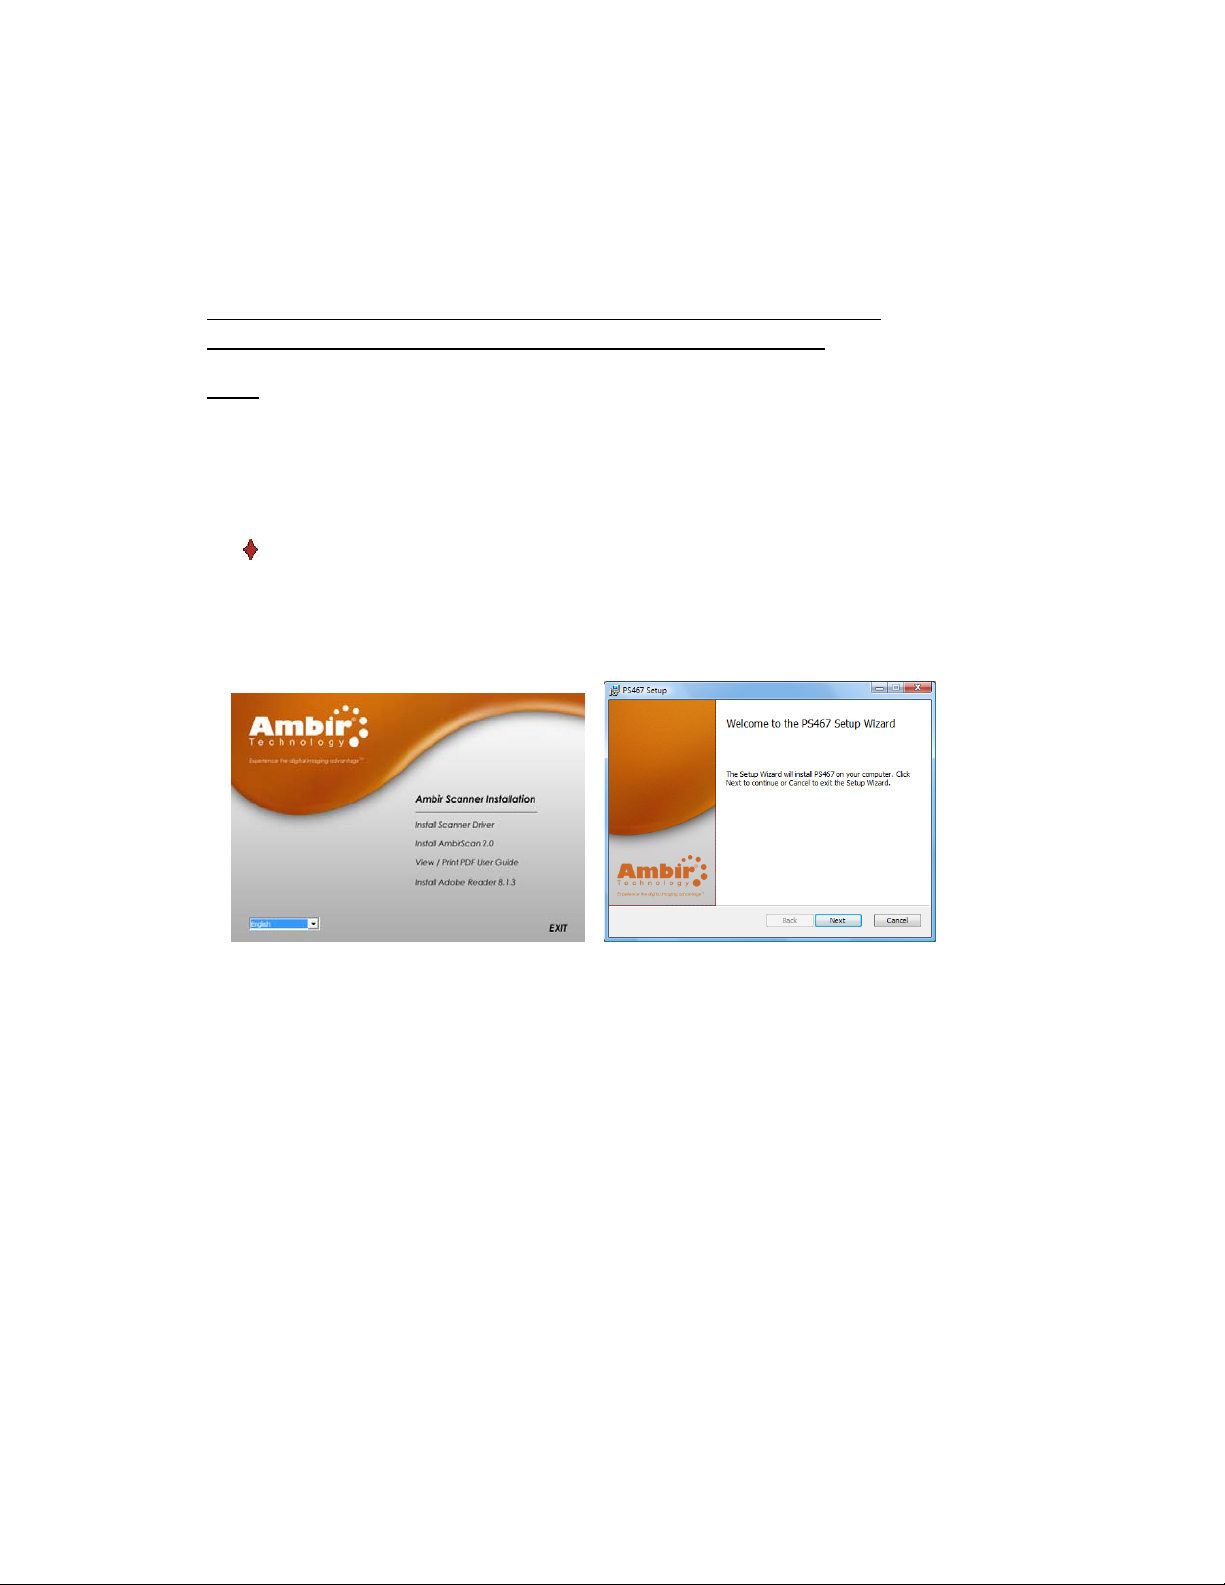
a) Insert the installation CD that came with your Ambir scanner.
The installation program will begin automatically.
b) In Windows XP, if your CD does not start automatically, please double-click the
MY COMPUTER icon on your Windows desktop, then double-click the CD icon.
In Widows Vista, click Start Æ Computer, then double-click the CD icon. If the
installation program does not begin, double-click the SETUP icon.
c) Click the Install Scanner Driver button to begin installation. Follow the on
screen step-by-step instructions. Choose the “Co mplete” Setup Type option
(see below).
- 3 -
Page 5
AmbirScan Installation
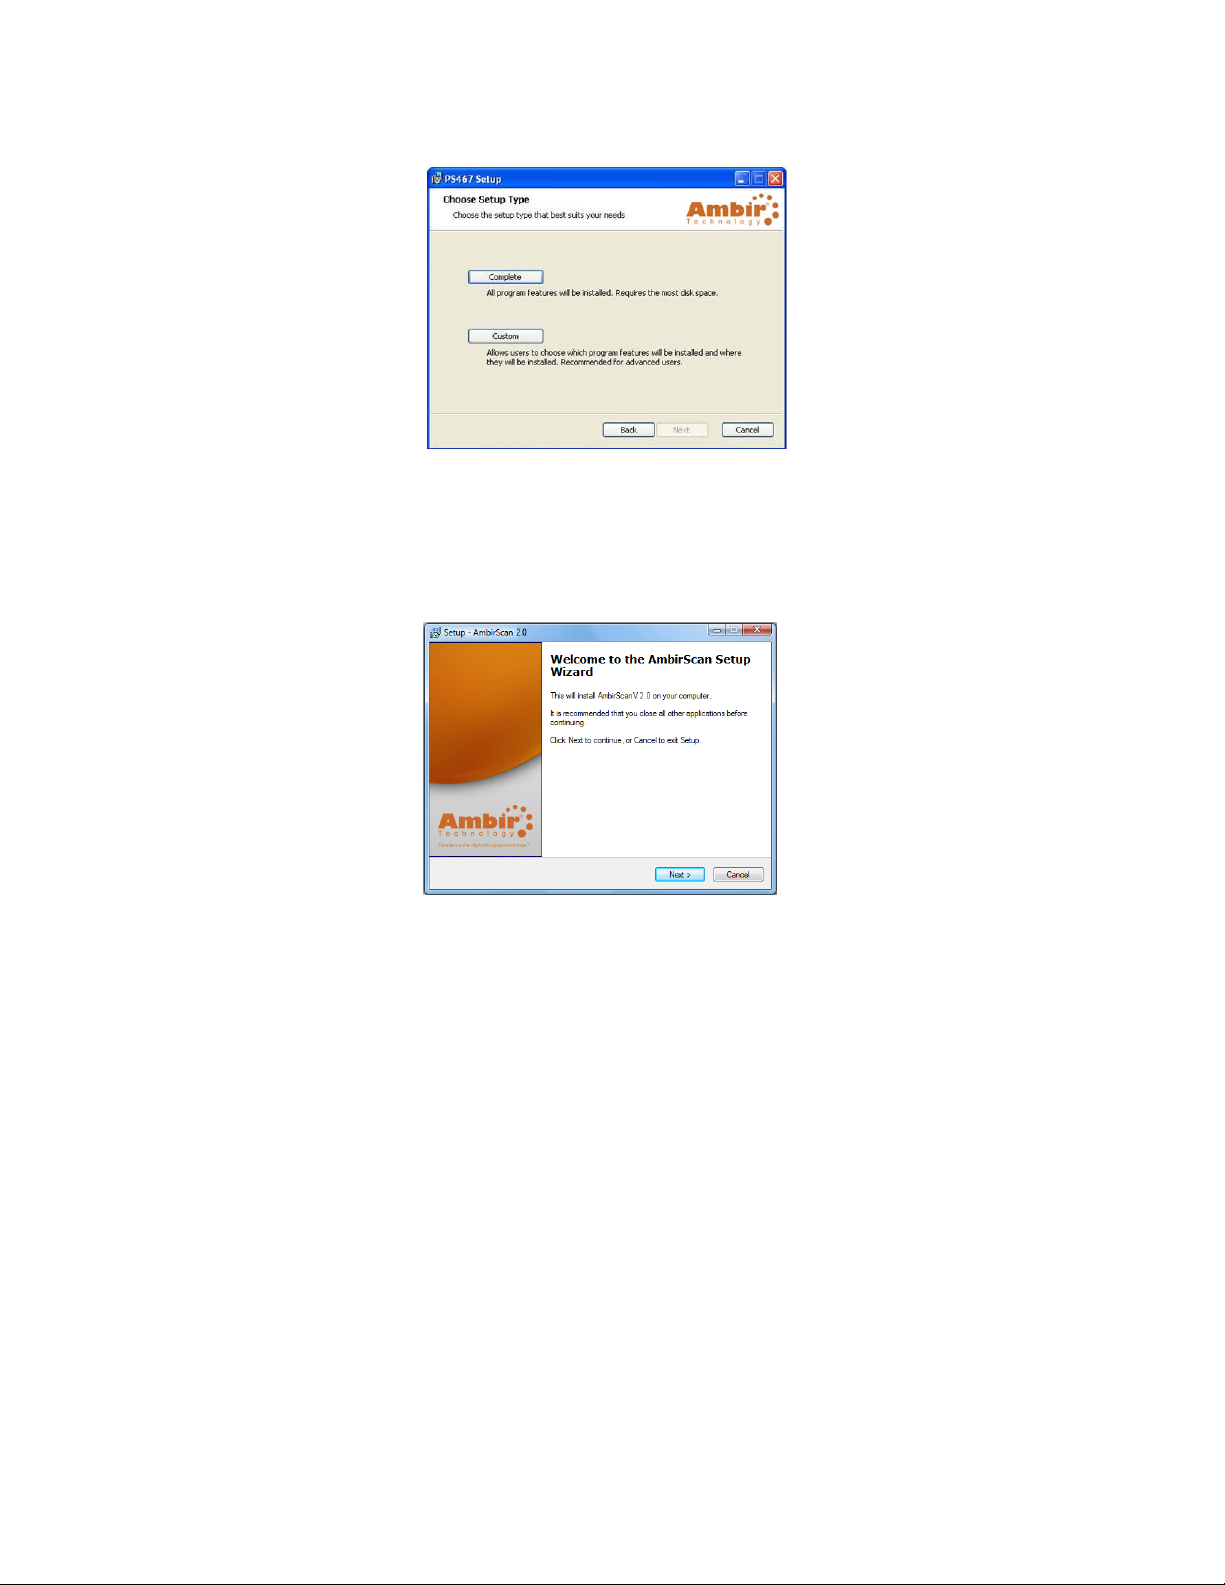
d) Click “Install AmbirScan” on the CD menu screen. Follow the on screen
step-by-step InstallShield Wizard instructions to install the AmbirScan 2.0
software.
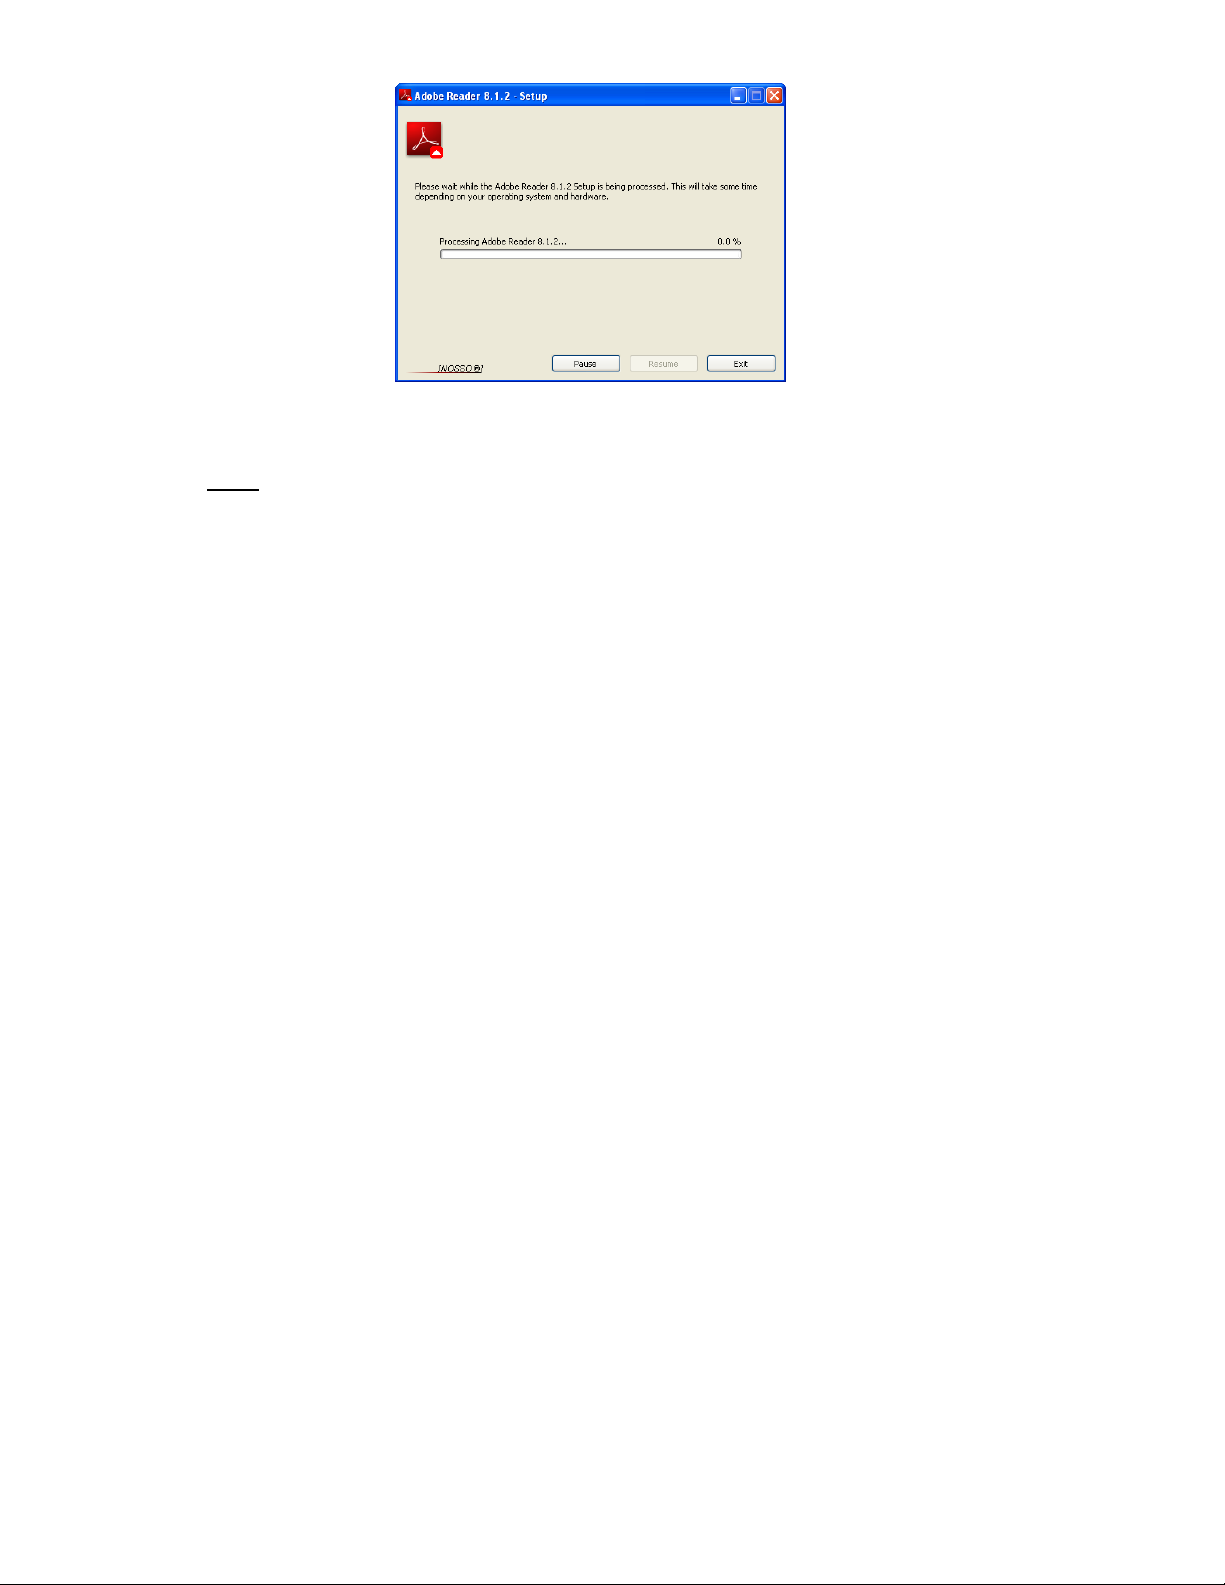
e) If you do not already have Adobe Reader installed, you should select the “Install
Adobe Reader” button on the CD menu. You may also print out the User Guide
after installing the Adobe Reader for your future reference. If you choose to install
Adobe Reader, you will see the screen below. Please follow the instructions to
install the software.
- 4 -
Page 6
Note:
After you have completed all software installations, we strongly recommend you
restart your computer even if you are not prompted by Windows to do so.
Uninstalling Software/Hardware
f) To remove your scanner, AmbirScan 2.0 or the Adobe program you need to go to
Start Æ Control Panel ÆAdd or Remove Programs (Windows XP) or Start ÆControl
Panel ÆPrograms & Features (Windows Vista). To remove a sc anner, you will ha ve
to select it from the list of programs. Make sure the scanner is connected to your
computer when performing the uninstall function.
- 5 -
Page 7
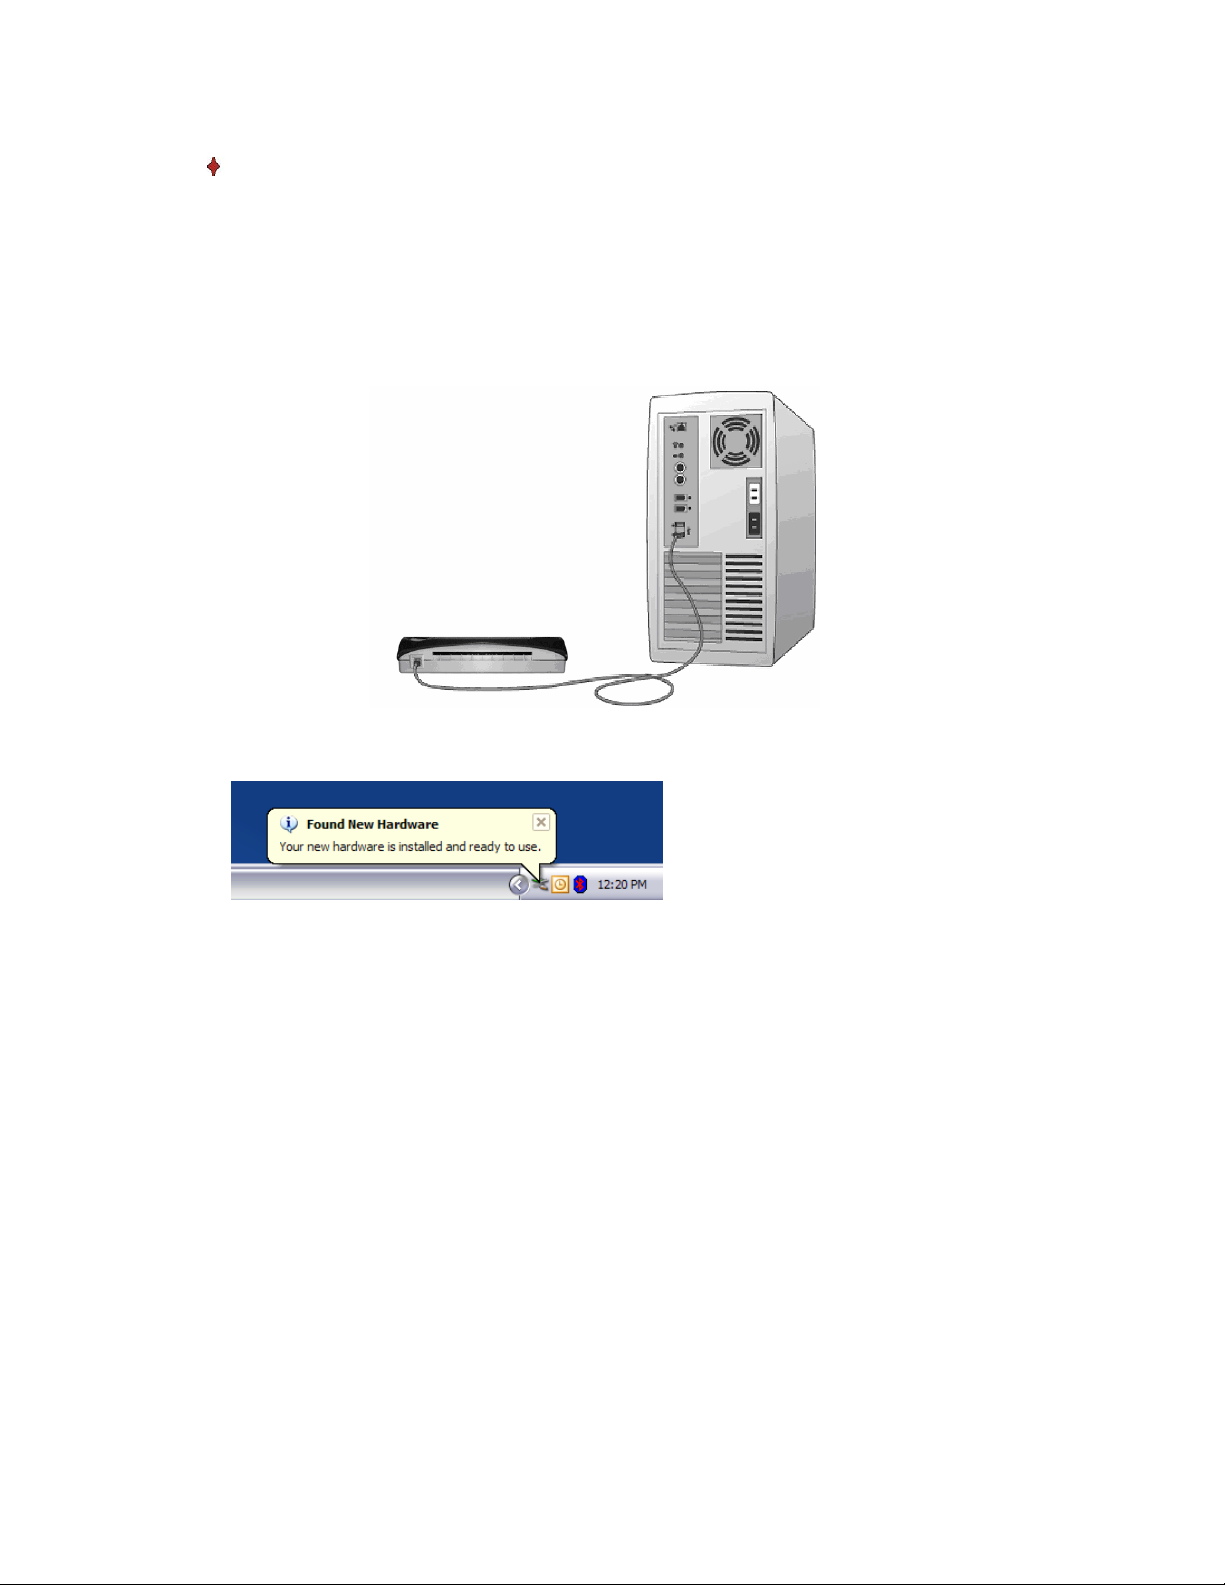
STEP 2- Install Hardware
After you have installed the software and restarted your computer:
a) Connect the USB cable from the scanner to the USB port on your computer
as shown below. If necessary, please check your computer’s user guide to
identify the USB ports available and thei r locations.
b) Under Windows XP, Vista, and Windows 7 operating system, the computer will
automatically detect the new hardware device and install the driver. (See
above)
c) Under Windows 2000, ME, and 98SE you may be required to browse to the
installation CD where Windows will retrieve additional driver components to
complete the installatio n . Follow the step-by-step Found New Hardware Wizard
installation instructions and finish your installation. (See above)
- 6 -
Page 8
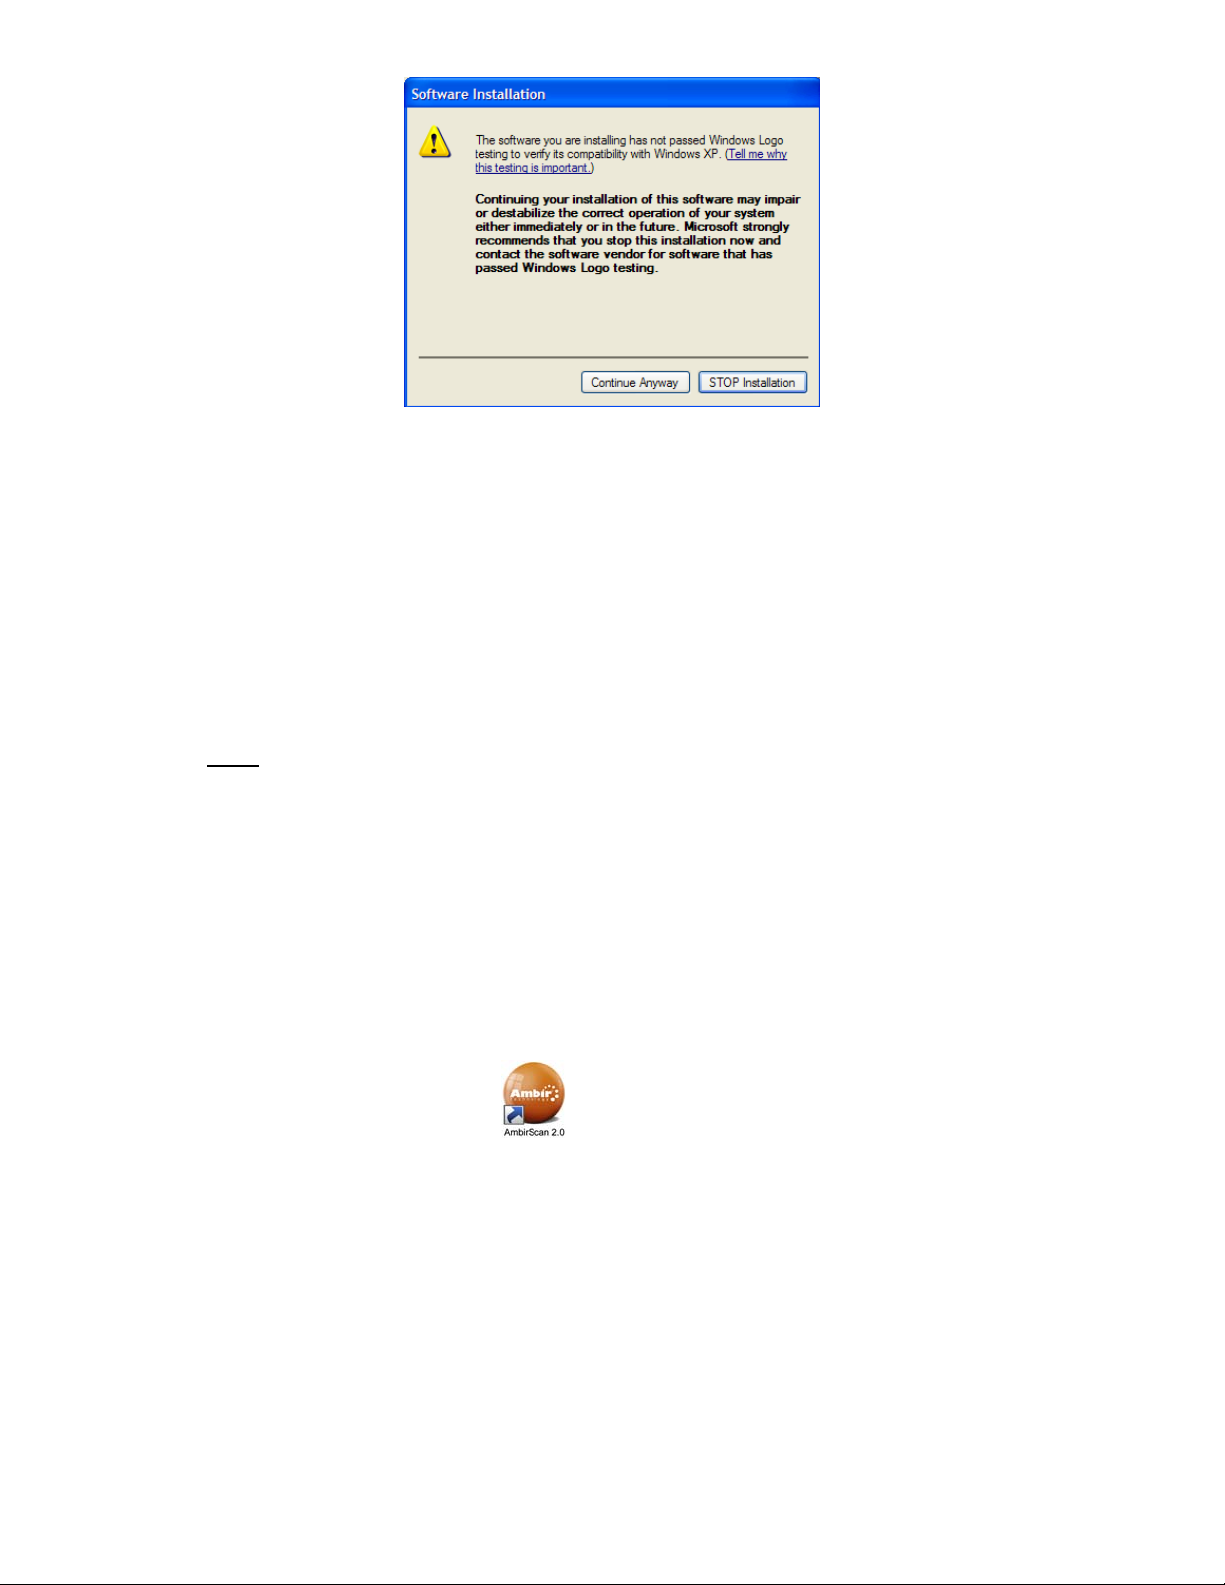
d) Users with Windows 2000, ME, and 98SE operating systems may see the “Windows
Logo” compatibility warning screen when installing the driver/hardware. We
assure you that your scanner has been fully tested and is compatible with these
systems. Simply click the “Continue Anyway” button and proceed with the final
installation.
Initial Calibration with AmbirScan 2.0
Note:
Calibration is a critical step in setting up your scanner. It allows the image quality to
be “balanced” for your computer and scanner combination. If at any time you
switch the computer that you use with your scanner, or change scanners, you will be
required to calibrate again.
Launch AmbirScan 2.0 to begin.
a) To open the AmbirScan 2.0 application double-click the AmbirScan 2.0 shortcut
icon on your desktop.
b) Once you have launched AmbirScan 2.0, select the SCAN button and the
step-by-step calibration instructions will appear in a succession of prompts.
- 7 -
Page 9
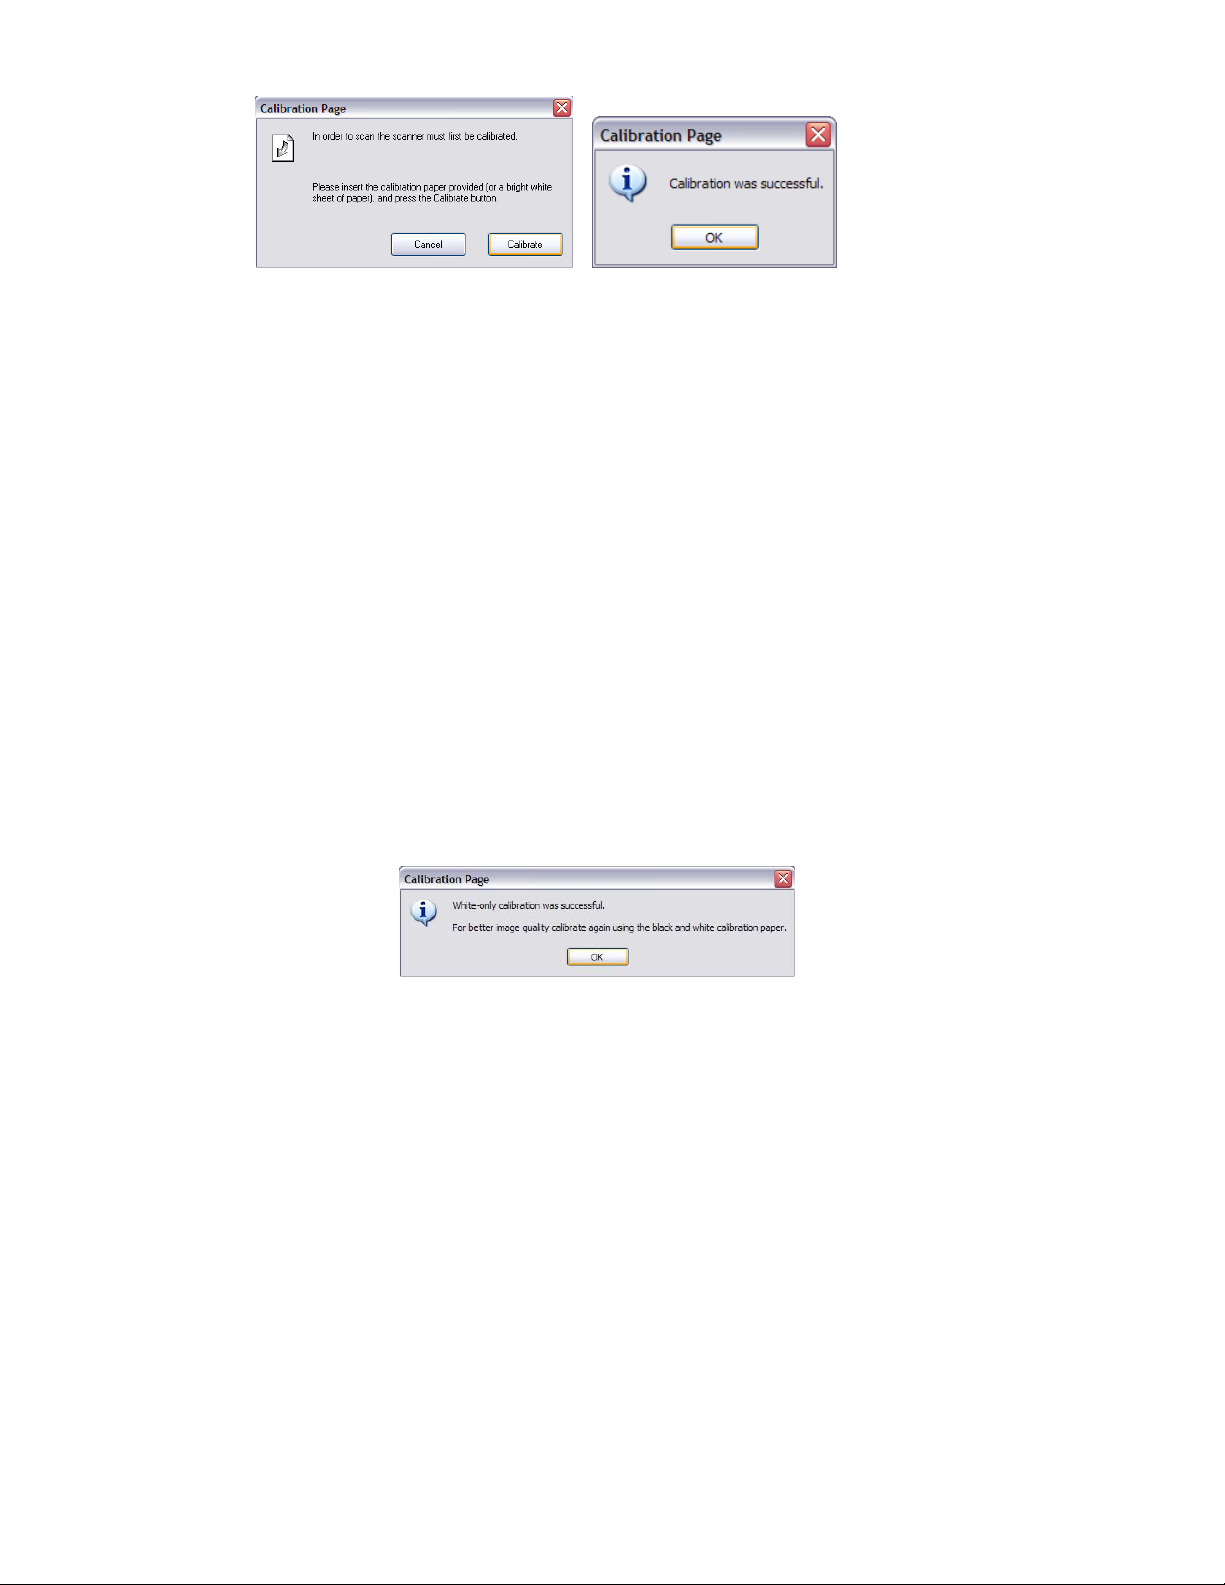
This calibration process will require the special black and white calibration
sheet that was included with your scanner. When calibrating, make sure th e
page with the black bars are facing down and no te the dir ection of the arrows
for proper insertion. When the calibration process has been completed
successfully, you will see the message above; otherwise you would need to
re-calibrate.
If you switch scanners or your image quality has become unsatisfactory, you
can first clean your scanner with the provided cleaning sheet, and then
re-calibrate your scanner. To calibrate the scanner simply click the Custom
button in the AmbirScan 2.0
Should you lose the calibration paper that was included with your scanner, you
can simply use any plain “white” (the brighter the “white” the better) piece of
letter size printer paper and cut it to a dimensio n of (4 1/8 x 7 1/4) to perform
the calibration. The following m essage will be displayed.
window and select Calibrate.
- 8 -
Page 10
Using your Scanner
There are two easy ways for you to scan and manage yo ur documents and
images with your Ambir scanner.
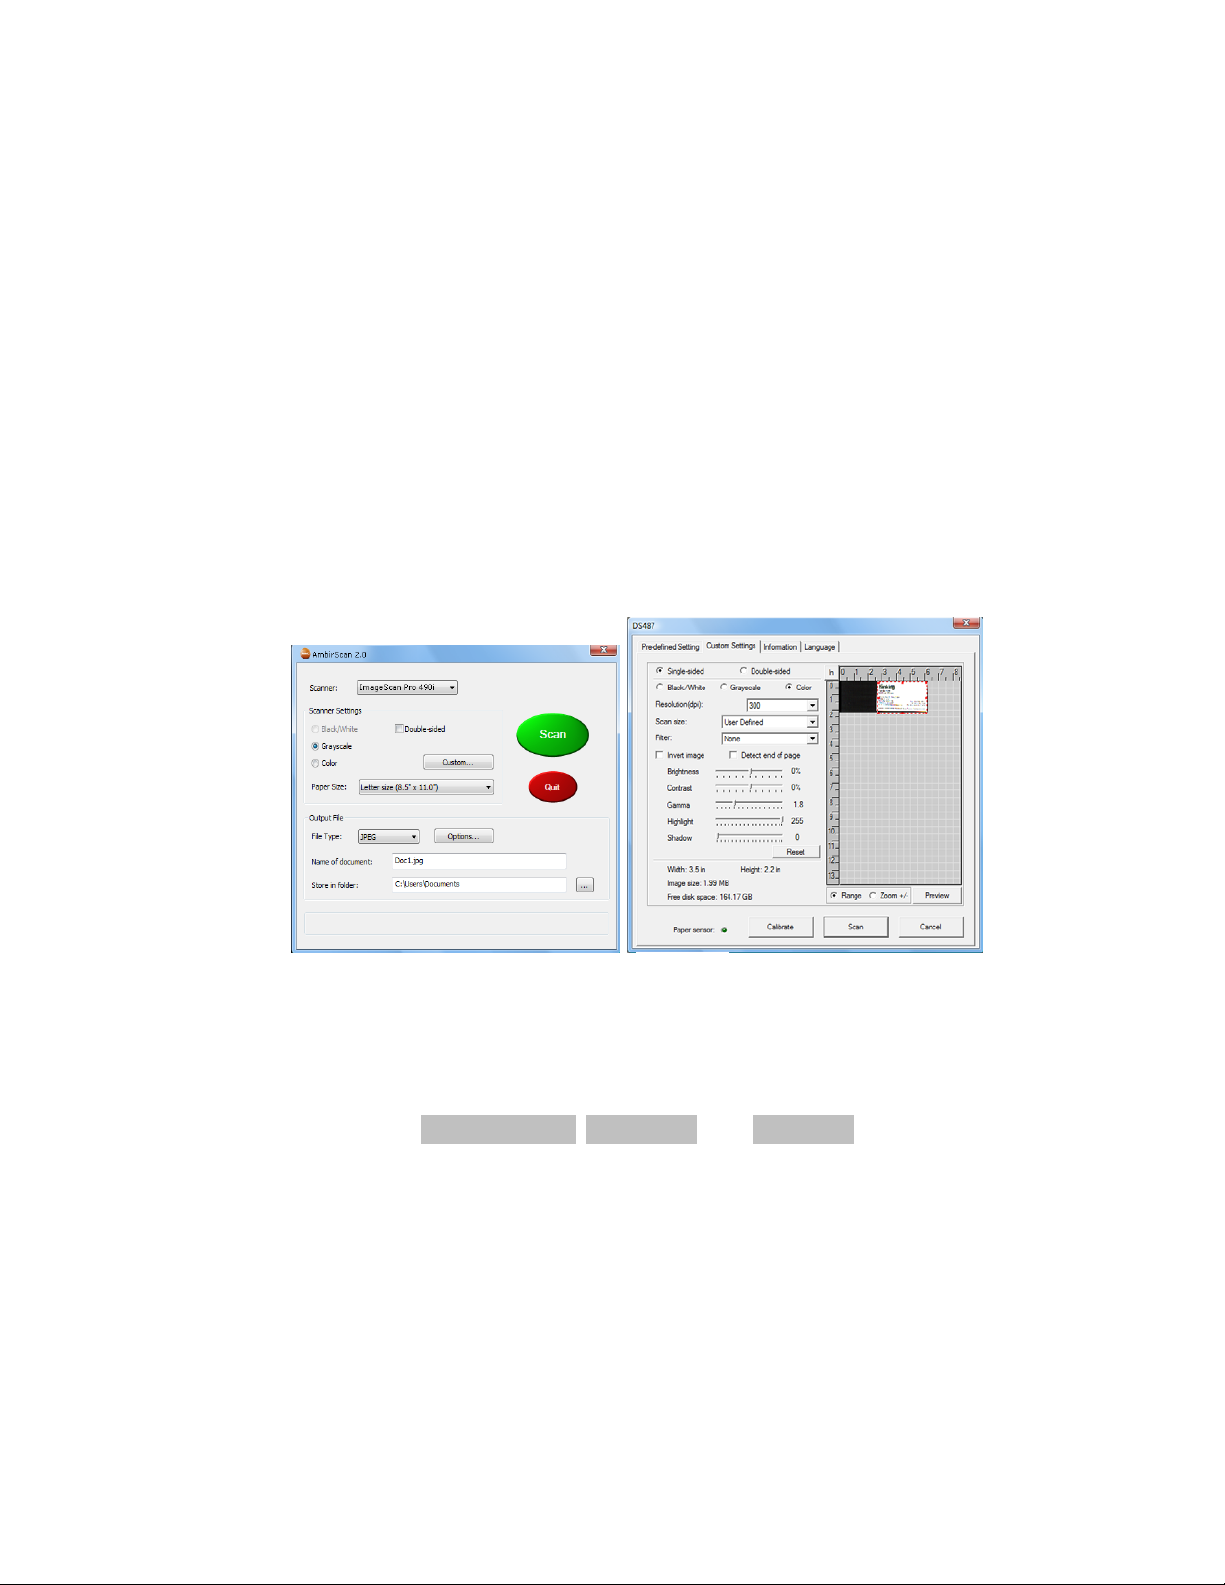
1) The first is by utilizing the AmbirScan 2.0 control panel (Figure 1) that allows
you to select from the most common paper sizes, image settings and basic
file output information (location & name of your document). These files can
be saved in multiple file formats. If you need to scan multi-page documents
please select PDF format.
2) The second way is through the TWAIN user interface, which you can find by
pressing the Custom button on the AmbirScan 2.0 control panel. The TWAIN
user interface (Figure 2) allows you to control all details and settings of the
scanner. This type of “fine-tuning” of your scans may be required for some
of your document needs.
Figure 1
Figure 2
• When scanning documents m a ke sure the image side to be
captured is inserted face down.
• Notice the Page Tabs at the top of the TWAIN user interface; they
are: Custom Settings, Information, and Language. Take a moment
to explore these tabs and their function:
o The Custom Settings Tab allows you to change the settings to
the detailed specifications that you feel are required. You can
- 9 -
Page 11

adjust the Mode, Resolution, Filter (None or De-sc reen) togeth er
with scanning size. You can also adjust the Brightness, Contrast,
Color (Gamma), Highlight and Shadow of the image with the
five slider-bar controls. In case you forget the original settings of
these slider-bar controls, you can click the Reset button, which
restores these settings to the scanner default settings. Once
your settings are defined, select either Pre view bu tton to tak e a
quick look at how your image will look in the scanning window
or you can press Scan to perform final scanning.
o The Information Tab provides important information regarding
the software driver version. This may be required if you want to
know if the software you are using is the latest version.
o The Language Tab allows you to change the language of the
tabs and menus in the TWAIN interface.
Using an Ambir Scanner with other application programs
Your Ambir scanner is fully TWAIN compliant, so you can use it with literally
thousands of applications that use TWAIN device input. From desktop
publishing and games, to faxing and business card scanning, you will
discover many useful applications for your scanner. Simply select the
scanner source from your program’s “source” options and look for your
Ambir scanner in the list. Sometimes these “source” scanner options may be
found under TWAIN devices available.
- 10 -
Page 12
Tips & Cautions
Your Ambir Scanner will provide you with productive service for a long time. We
encourage you to follow the suggestions below to prolong your investment and
improve the convenience and quality of your scanning and document
management experience.
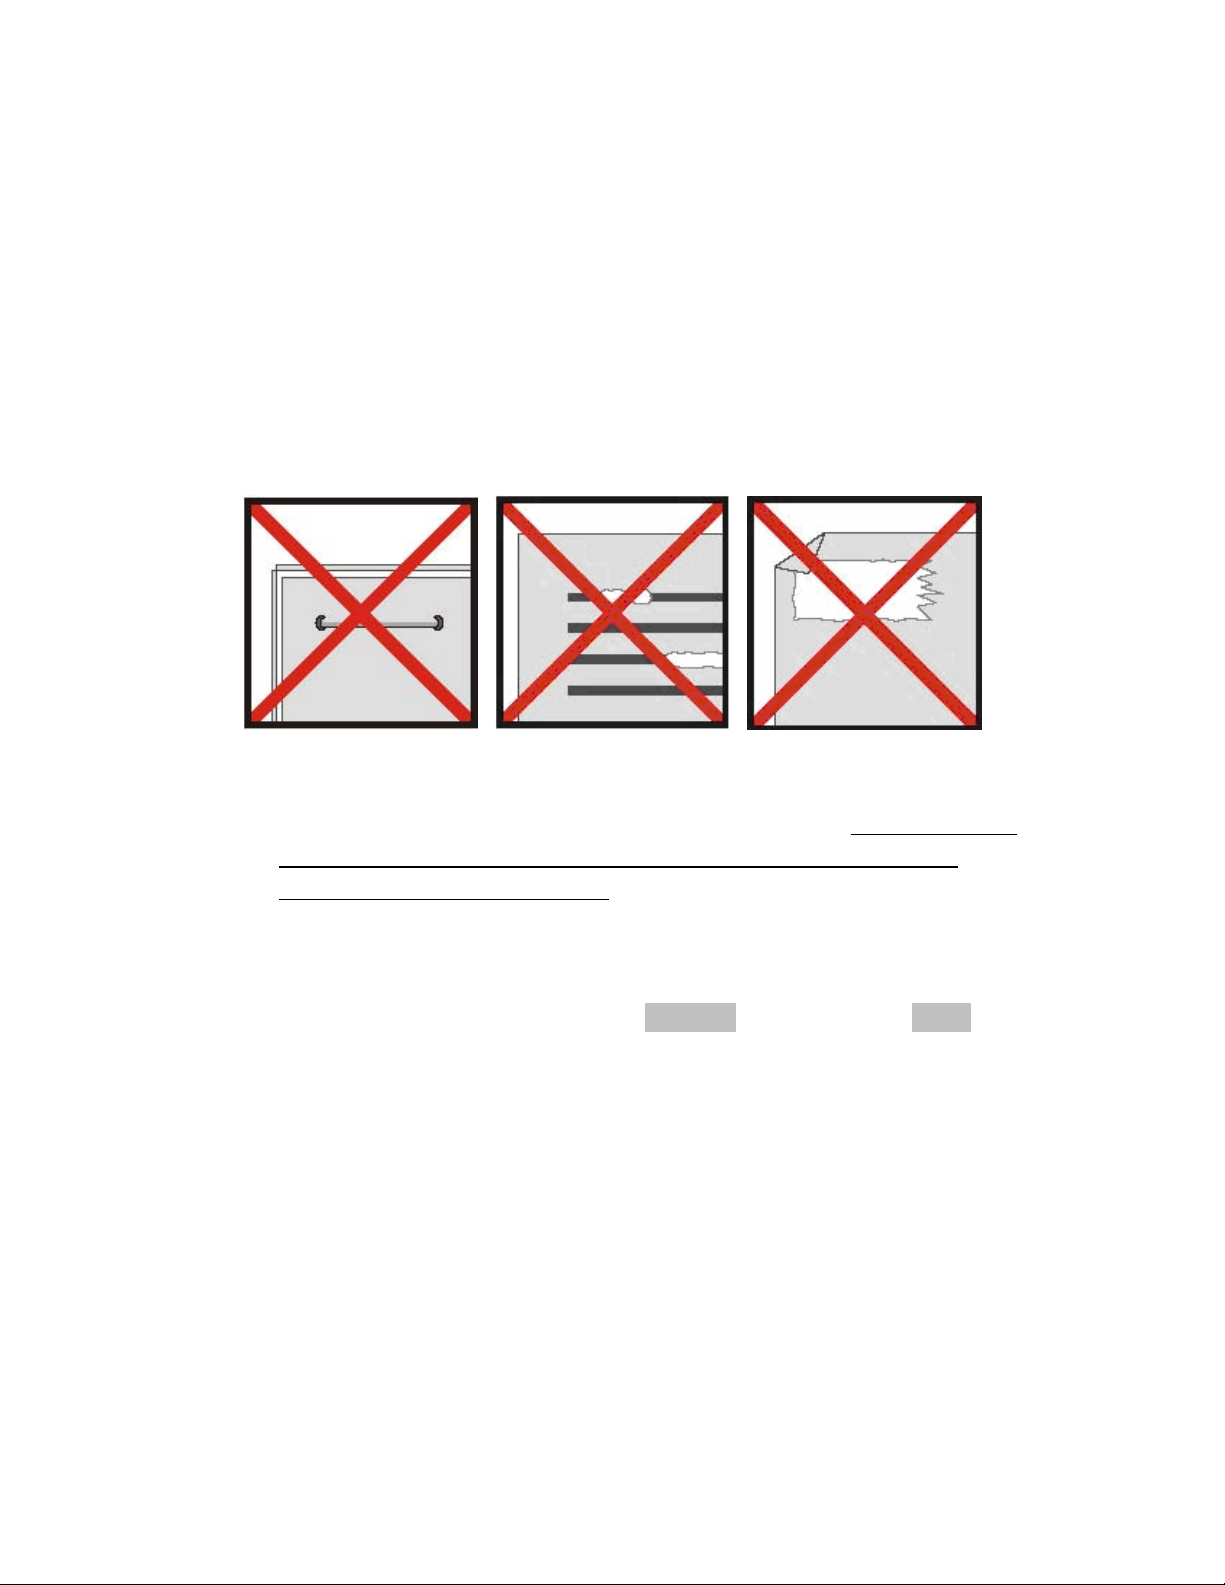
• Please do not introduce stapled items or pages into your Ambir scanner.
• Please do not scan documents that have chipped or wet White-Out.
• Please do not insert any type of adhesive material, including POST-IT paper.
• Make sure the leading edge of your documents are very straight (not
wrinkled or folded) and are inserted leve l to the intake slot. If your documen t
has a fold, sharp-bend or is wrinkled, please use the document sleeve
included in the scanner package.
• Clean the scanner with the included cleaning sheet and 70% isopropyl
alcohol (not included). Place a few drops of the alcohol in the middle of the
cleaning material and proceed to the Calibrate menu and select Clean.
Your scanner will automatically pass the cleaning material over the internal
image sensor to clean it.
- 11 -
Page 13

Technical Support
FREE SUPPORT THROUGH EMAIL & WEB
Visit Ambir’s website at www.ambir.com for online access to technical support
information including: installation guides, FAQs, troubleshooting tips, and driver
downloads. Contact email addresses and a chat feature are also available online
for your convenience in reaching us should you need further assistance.
ECHNICAL SUPPORT BY TELEPHONE
T
Support is available from 9:00 a.m. – 6:00 p.m. Central Time Monday-Friday by
dialing (630) 530-5400 or (800) 915-9930, option 3.
speak directly to a technical support representative or leave a messag e for a call
back. You will be connected to a highly trained, friendly and professional suppor t
agent who will work with you to resolve your issue. For expediency when you call
please be in front of your system with your software and documentation handy for
troubleshooting.
*We will make every effort to respond to telephone support calls within 1 business
day. However, we strongly suggest that you make initial contact via email with an
explanation of the problem you are experiencing and a call-back number should
we need to speak to you directly.
For all Ambir scanners you can
Product Warranty Information
Statement of Limited Warranty for the United States, Canada and European
Economic Community:
Products – PS467, PS667, DS487, DS687, TravelScan
Warranty Period – 1 year
*Contact your place of purchase for warranty service information
- 12 -
®
Pro, ImageScan™ Pro 490i
 Loading...