

Page 1

ACN-ML/ACN-MLP experience quality.
Rev. 6.00
www.ambient.de/en
1
Table of contents page
1. Introduction 3
2. Package Contents 3
3. Powering 3
4. Unit Description 4
5. Connectors 5
6. Physical Specifications 6
7. Quick Start Guide 7
8. Web Interface 8
Title Bar: Timecode and System Menu 8
The gear wheel on the right opens 8
WiFi Settings 9
System Reset 10
Firmware Update 10
About 10
Shutdown 10
Help 10
Tabs of the Web interface 11
Timecode 11
ACN Radar 13
Local MasterLockit 13
Add Device 13
Other Lockits in ACN Channel xx: 14
Clear Radar Screen and Tune Slaves 15
Orphaned Devices 15
Sound Recorder 16
Transport Control 16
Tracks 16
Next and Last Clip Quick Edit 17
History 17
Import More Clips for Sound Report 17
Editing Clips from the History 18
Clip Metadata 19
Sound Report 19
Lens Metadata 21
9. Menu Description 22
Main Menu 24
Mode Menu 24
FPS Menu 25
Page 2

ACN-ML/ACN-MLP
Rev. 6.00
©2019, Ambient Recording GmbH
2
TC Menu 27
Set 27
Jam 27
Output 27
Level 27
Mute 28
Offset 28
UB 28
Show 28
Jam 28
Sync Menu 29
Video 29
Audio 29
PPF 29
Off 29
Slate Menu 30
Display 30
LEDs 30
Sensor 30
Tilt 30
Brightness 30
ACN Menu 31
Ch 31
SYS Menu 32
Menu 32
Config 32
Display 32
RF 33
USB / LemoACN 33
Bat 33
IR 34
Reset 34
Info 34
10. LED Blink Codes 34
11. ACN 36
C-Jam 36
TRX 37
12. Firmware Update 38
13. Application Notes 39
Timecode, Sync, and the importance of Genlock 39
Choosing the correct TC frame rate and video sync format 39
Lockit Stays on Camera! 39
There is no double rate 40
2 worlds with 2 frame rates each 40
One Frame Base across the Set 40
The Camera is Always Right 40
Page 3

ACN-ML/ACN-MLP experience quality.
Rev. 6.00
www.ambient.de/en
3
1. Introduction
The ACN-ML MasterLockit combines the state of the art, high-accuracy Lockit timecode technology by
Ambient with advanced metadata administration and sharing over the Lockit Network.
It implements a dual-system design through a full-featured ACN Lockit circuitry with adapted software
for no-compromise, fail-safe timecode integrity and a powerful multi-core CPU platform for
unsurpassed mobile metadata processing. Providing local and set-spanning, line-level accurate
timecode and metadata over ACN plus WiFi routing for Lockit Network apps and certified devices it can
work both autonomously as hub or satellite in your timecode and metadata network.
An integrated backup cell with automatic charge-when-supplied will keep both systems alive for even
lengthy set reconstructions or breaks and secure a coordinate shutdown on power drain.
2. Package Contents
• ACN-ML MasterLockit
• ACN Antenna (attached to ACN-ML)
• USB WiFi Stick (attached to ACN-ML)
• Manual
3. Powering
The ACN-ML can be powered by 6 to 24 Volts DC via either indicated Hirose 4-pin connectors, pin 1
carrying GND pin 4 positive voltage. The connectors are configured loop-through. Only apply power
through one socket.
Upon applying external power the internal battery will automatically be charged. The power source
must be capable of supplying 1.5A for charging the internal battery.
While in operation, the active power source is indicated in the upper right corner of the display, EXT
means external power is applied with appropriate voltage and current, whereas INT indicates that the
unit is running on its integrated backup cell.
Typical values in operation with backup cell charged/in charging:
~ 500mA/850mA @ 6V DC
~ 250mA/400mA @ 12V DC
~ 150mA/200mA @ 24V DC
The MasterLockit must only be powered from either of its 4-pin Hirose sockets. The operating voltage
range is 6-24V DC regulated, with pin 1 being GND and pin 4 carrying V+ per the industry standard.
Note: The two power sockets are wired in parallel for loop through of voltage. It is mandatory that only
one socket must carry supply voltage at any given time!
With power applied, red LED over the display will slowly blink to indicate charging of the integrated
backup cell. Fully charged, red and green LED will be lit permanently. The battery will keep the unit
powered for a couple of hours, depending on the processing load of the unit.
Page 4
ACN-ML/ACN-MLP
Rev. 6.00
©2019, Ambient Recording GmbH
4
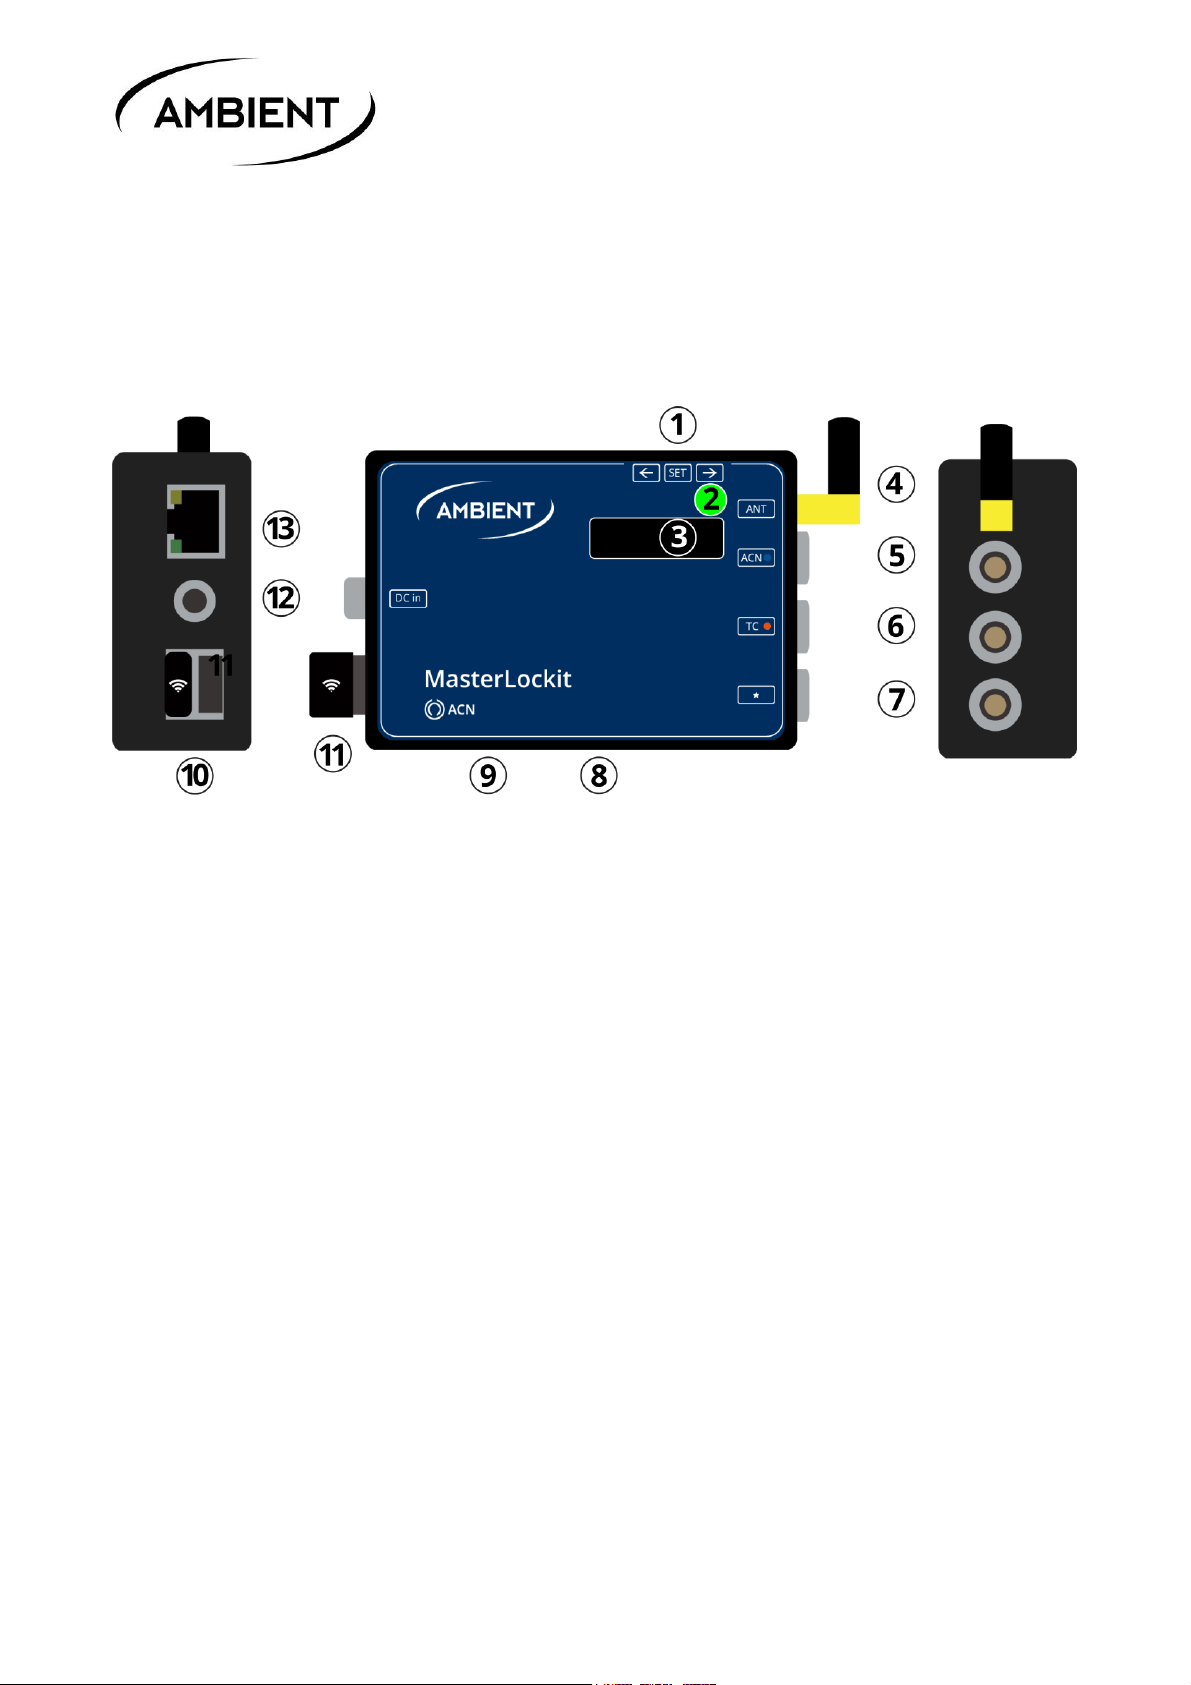
4. Unit Description
① Configuration wheel (↓ push, ↔ toggle left/right)
② Status LEDs (see page 26)
③ OLED display (see page 14 ff)
④ ACN antenna (do not remove, only substitute with original replacement)
⑤ ACN A, blue socket (see page 5)
⑥ TC, red socket (see page 5)
⑦ MasterLockitPlus: ACN B, grey socket with DC through (see page 5)
⑦ MasterLockit: DC through port (see page 6)
⑧ 1/4"/ 3/8” thread mount
⑨ Reset button (see page 13)
⑩ WiFi adapter, only substitute with original replacement
⑪ USB A ports (see page 6)
⑫ DC IN (see page 6)
⑬ RJ45 Ethernet port (see page 6)
Page 5
ACN-ML/ACN-MLP experience quality.
Rev. 6.00
www.ambient.de/en
5
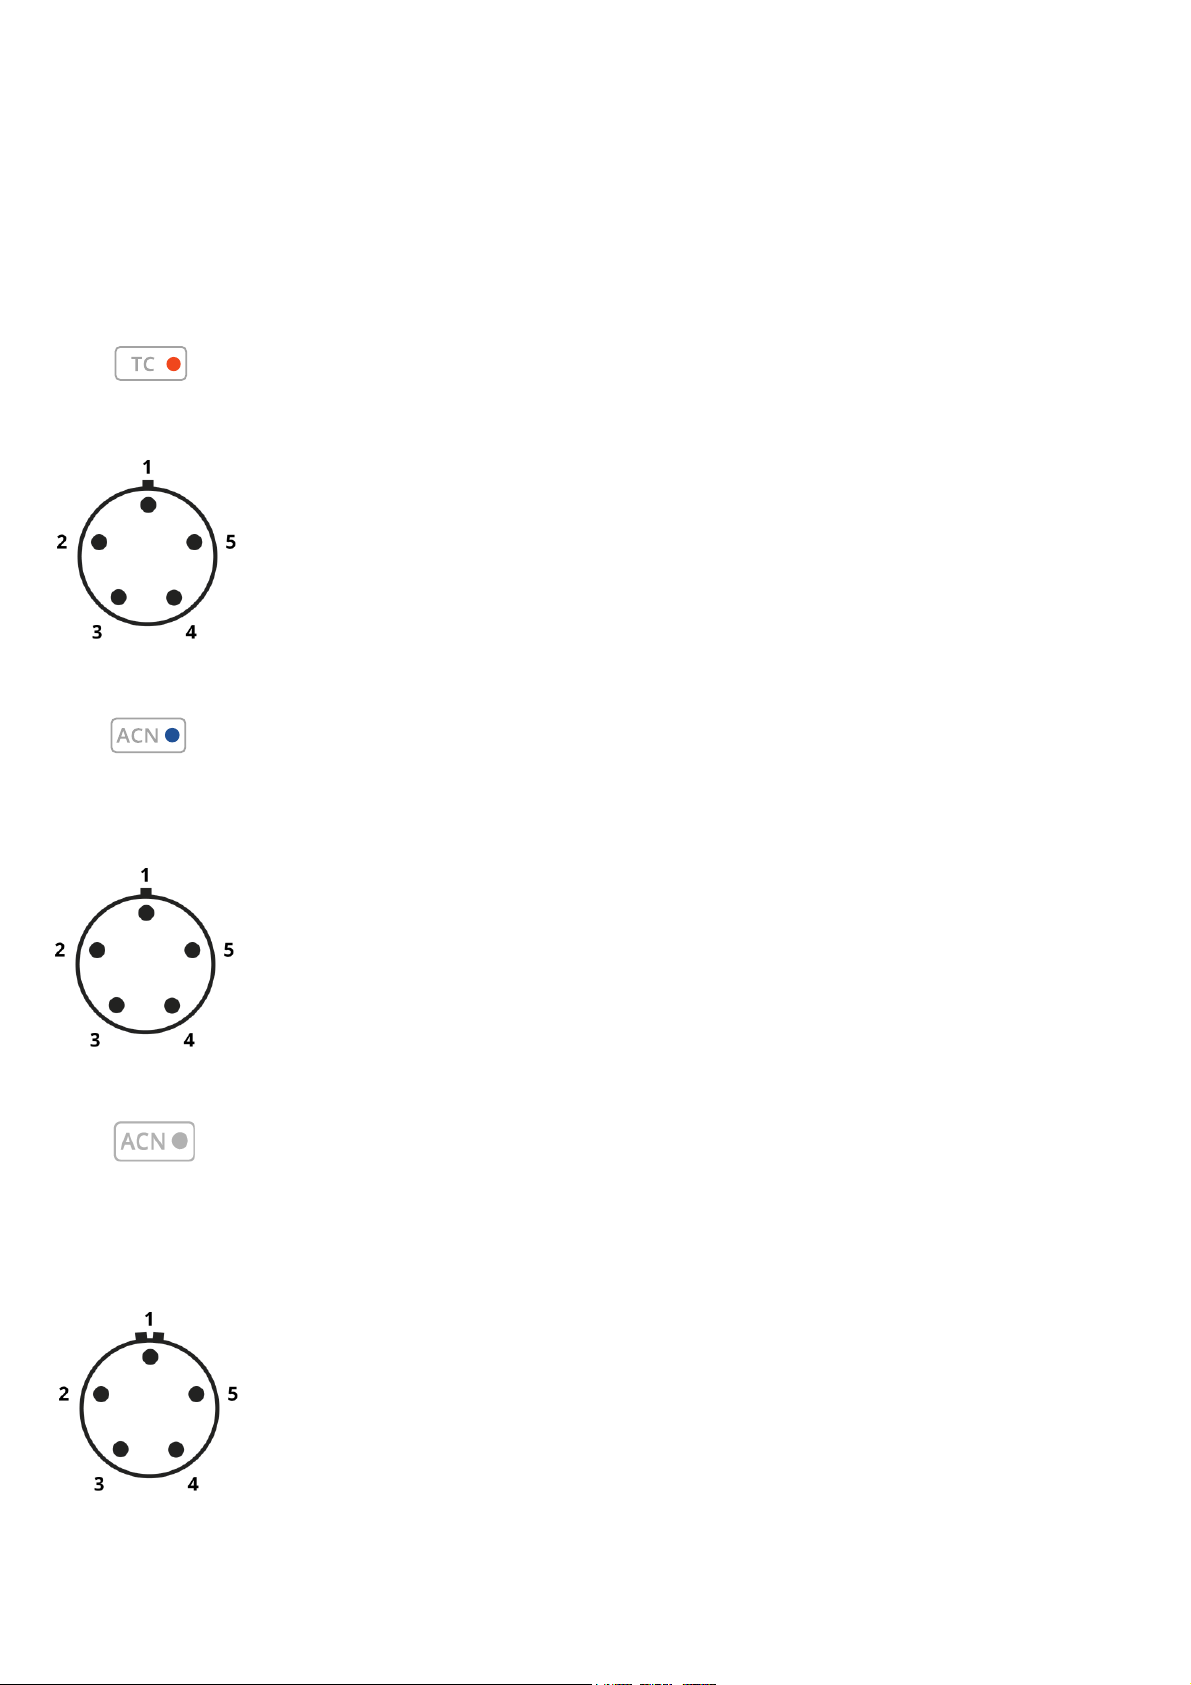
5. Connectors
⑥
“Red” socket,
SMPTE 12M Timecode in/out
Lemo series FGG/JGG.0B.305 or compatible
pin 1: GND
pin 2: TC in
pin 3: ACC com
pin 4: Reference out, ext DC In 6-18V on ACL204, ACN-TL and ACN-LS
pin 5: TC out (SMPTE 12M)
⑤
“Blue” socket, connect blue coded cables here
SMPTE 12M Timecode in/out
Metadataport for RED cameras and Sound Devices 788T and 6series
Lemo series FGG/JGG.0B.305 or compatible
pin 1: GND
pin 2: TC IN
pin 3: ACN A TX (RS232)
pin 4: ACN A RX (RS232)
pin 5: TC OUT (SMPTE 12M, 3Vpp)
⑦
“Grey” socket, connect grey coded cables here.
SMPTE 12M Timecode out
Metadataport for ZEISS CP.3 XD
Lemo series FGA/JGA.0B.305 or compatible
only available on MasterLockitPlus,
pin 1: GND
pin 2: ext. DC through
pin 3: ACN B TX (RS232)
pin 4: ACN B RX (RS232)
pin 5: TC OUT
Page 6
ACN-ML/ACN-MLP
Rev. 6.00
©2019, Ambient Recording GmbH
6
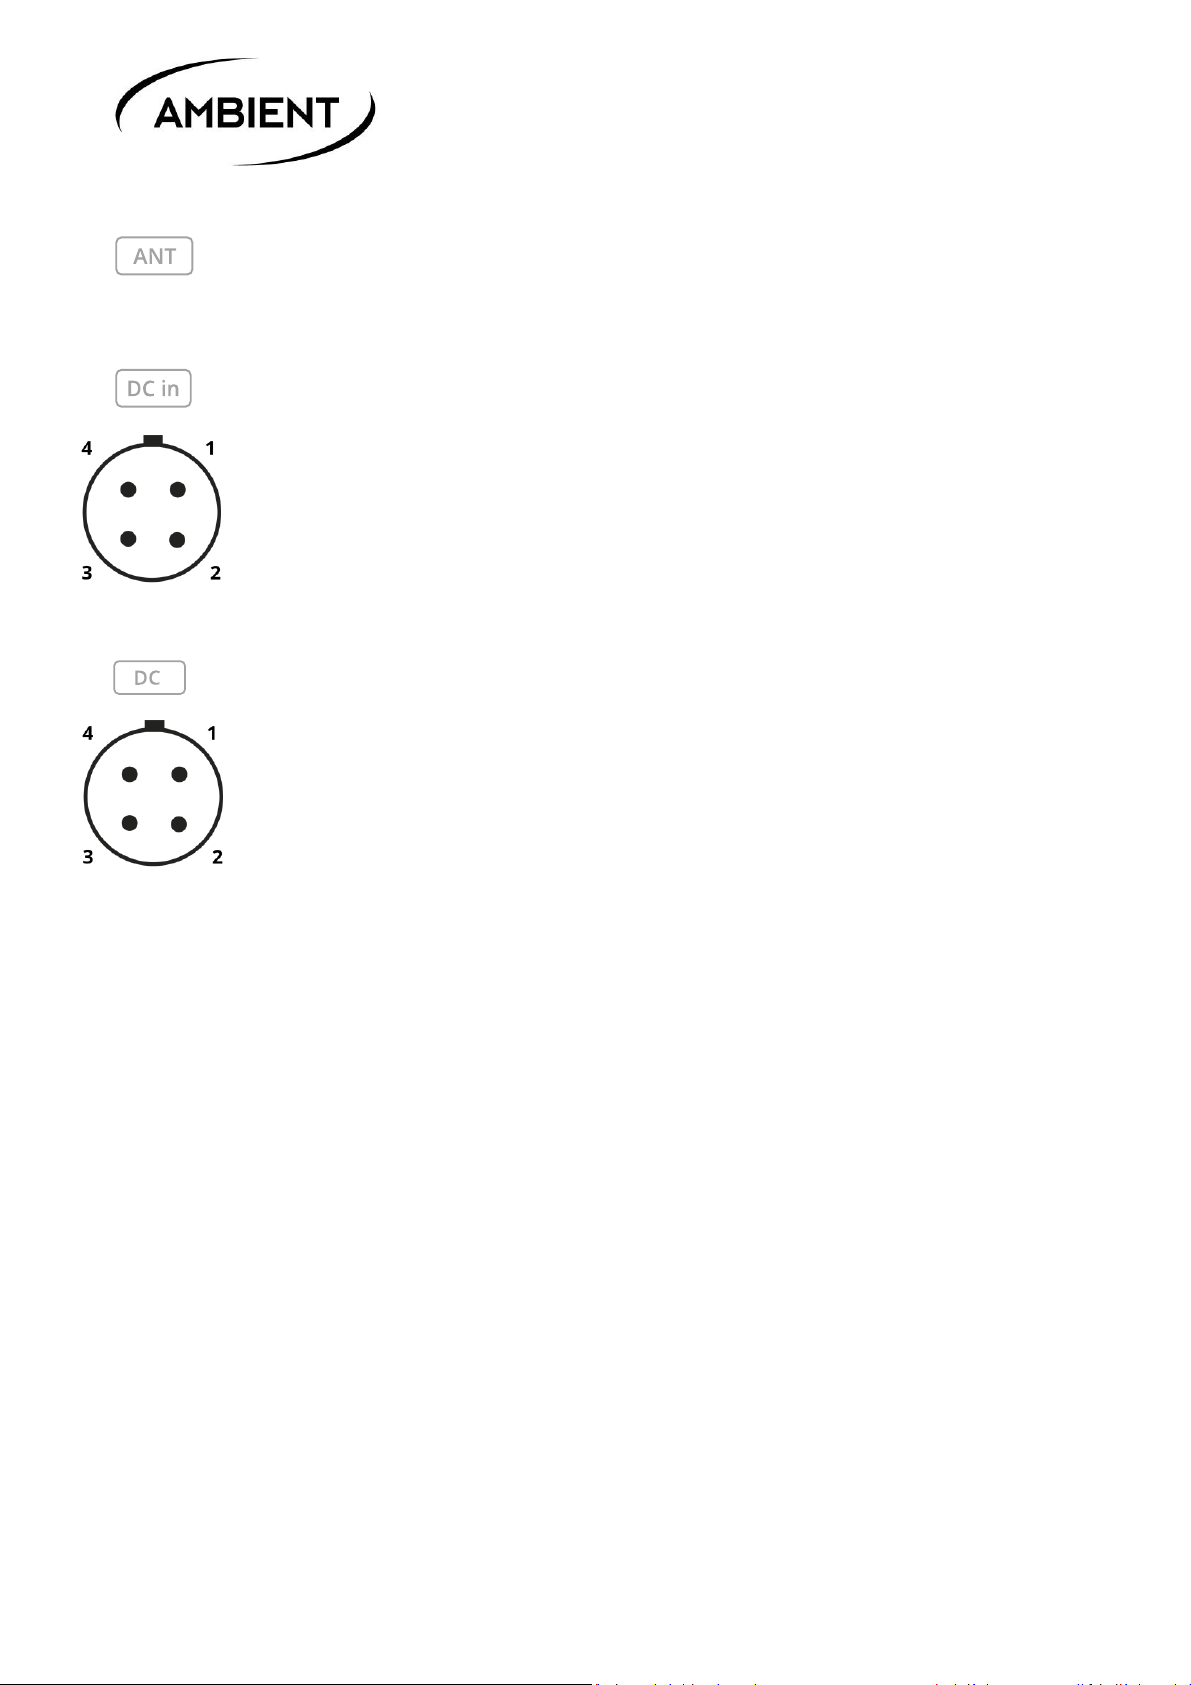
④
SMA type F, leave supplied antenna attached, only substitute with original
replacements ANT-2.4-SMA-M(90)
⑫
Primary DC port, connect your external power supply here
Hirose HR10-7P-4P or compatible
pin 1: GND
pin 2: NC
pin 3: NC
pin 4: 6 -24V DC
⑦
DC through socket, only available on MasterLockit
Hirose HR10-7P-4P or compatible
Use to daischain recorders and accessories
Unfused and in parallel to DC IN
Warning: always apply power through either socket only!
⑪ USB A ports, 1 populated with WiFi Stick, 2nd to download reports and logs
to USB sticks
⑬ Ethernet port, RJ45, metadata interface to ARRI ALEXA classic
6. Physical Specifications
Dimensions: (L / W / H): 91 x 64.5 x 33 mm
(overall length with WiFi and SMA antenna detached: 102.5mm)
Weight: 275g
Page 7

ACN-ML/ACN-MLP experience quality.
Rev. 6.00
www.ambient.de/en
7
7. Quick Start Guide
Prepare for a new project
When preparing for a project with multiple MasterLockits it is advised to start with the unit that is
planned to become the timecode and metadata Master. As only one device is allowed as Master, units
will only allow activation of Master if not receiving C-Jam broadcasts from another device.
1. Supply adequate power source. The internal battery is for backup purpose only and not suited for
operating the unit over longer time. The red LED should blink slowly in a 2 seconds interval. This
indicates charging of the internal backup battery is in progress. If battery is fully charged red and
green LED will come on solid.
2. Switch on the MasterLockit by pressing down the 3-function wheel and holding it until the OLED
display comes on. If unsure about the configuration and you’re starting for a new project/production
it is advised to perform a system reset first. Using the navigation wheel navigate to Sys/Reset and select
“All"
3. Wait approx. 40 seconds until the square indicator on the left bottom of the display has turned
from outlined to solid blue to indicate the metadata server has completed booting.
4. Log in to the MasterLockit’s WiFi using a smartphone, tablet or computer. On factory default, this
SSID is in the format ml-rssss (where “r” indicates the hardware revision and “s” consists of the last 4
digits of the unit’s serial number). This can be changed by the user, so your WiFi Name will be
different. However, the password for log is always the same as the WiFi name. If you do not see any
WiFi it may be the unit has been configured as WiFi client. You can find the configuration under
Sys/WiFi
5. Open a browser and enter http://10.0.0.1 (or http://masterlockit.local) in the address bar.
Tip: you may want to create a favorite for this IP or make this your browser’s homescreen.
6. If the unit has been used previously in a project it is recommended to purge the database. Go to the
system menu (gear wheel in the upper right corner) and select “System Reset”. Note that the WiFi
name may now have been changed to default as per 4. Log back in and proceed with 6.
7. Select the Timecode tab. If your unit is new or has been reset it is configured as ACN slave, indicated
by a blue title bar. If this is the device to become your timecode masterclock click on Master. The unit
will change its state and the titlebar will become orange and immediately send out C-Jam broadcasts
with current timecode. Now check the Frame Rate (FPS). If you need to change from current, unlock
by clicking the pencil, select the desired rate from the drop down list and confirm by clicking the orange
OK tickbox. Finally, you may Set Timecode manually or to Time of Day.
Note: the generator will reset when switching between integer (A.K.A “PAL”) and non-integer (A.K.A. “NTSC”)
frame rates. Hence it is advised to select FPS first on a new project before setting the generator.
8. Power on your other Lockit devices. ACN enabled Lockit devices on the same channel will
automatically jam to the hub’s TC value and framerate and listed in the ACN Radar tab for link and
battery status.
Page 8
ACN-ML/ACN-MLP
Rev. 6.00
©2019, Ambient Recording GmbH
8
Note: default channel is 18. Slaves will try to follow a channel change of their Master. However, if the
Master’s channel has been changed while Slaves were powered down or out of range you may need to
change their channels manually. Slaves will be loyal to their Master even if another ACN set on the same
channel is in range, so it will be very rarely necessary to go from default to another channel.
9. Congratulations, you have successfully configured your ACN! If you switch on the units every
morning, the Master will remember its state and automatically start to send out timecode. All you
need to do is set TC again to time of day and occasionally monitor the battery status of the remote
units within the ACN Radar to know when replacement is required.
8. Web Interface
The interface of the MasterLockit can be accessed through any WiFi equipped device using a common
browser. Log in to your MasterLockit’s WiFi. The required password always reflects the SSID. Default
SSID follows pattern ml-rssss where “r” indicates the hardware revision and “s” consists of the last 4
digits of the unit’s serial number.
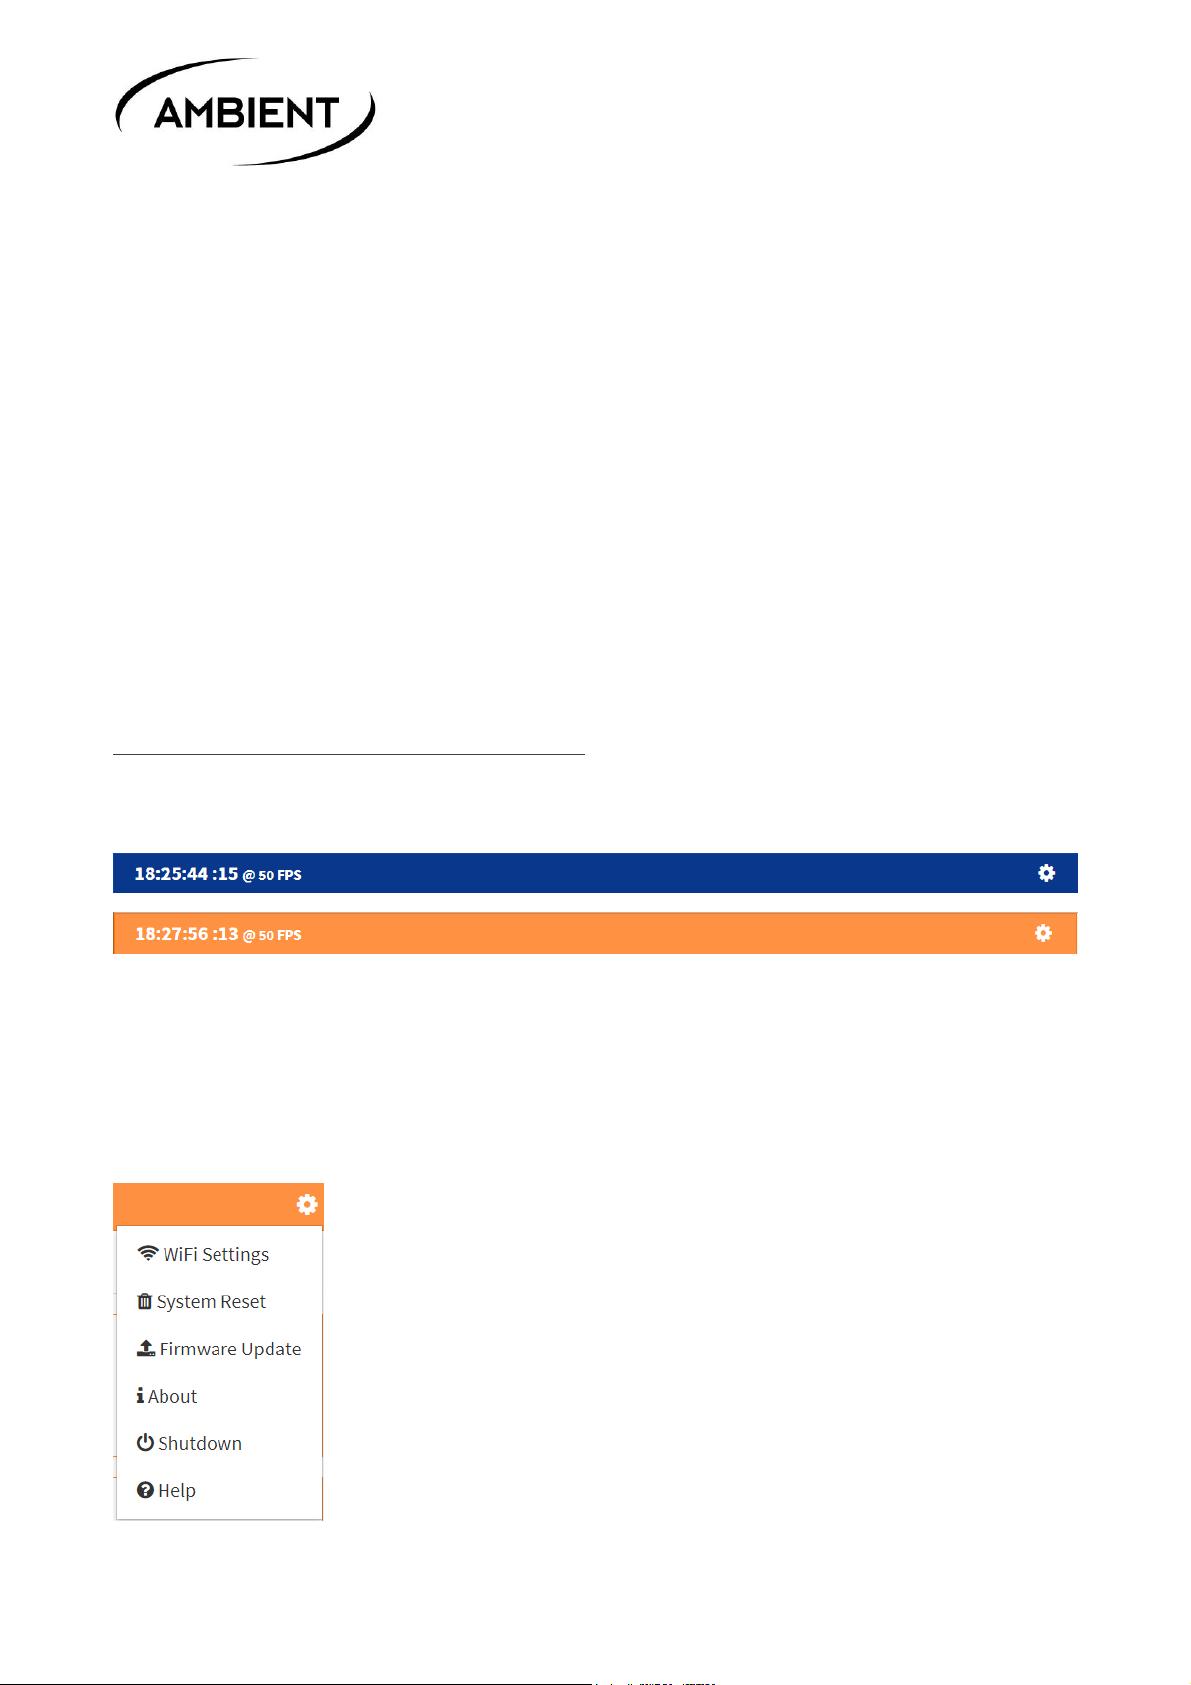
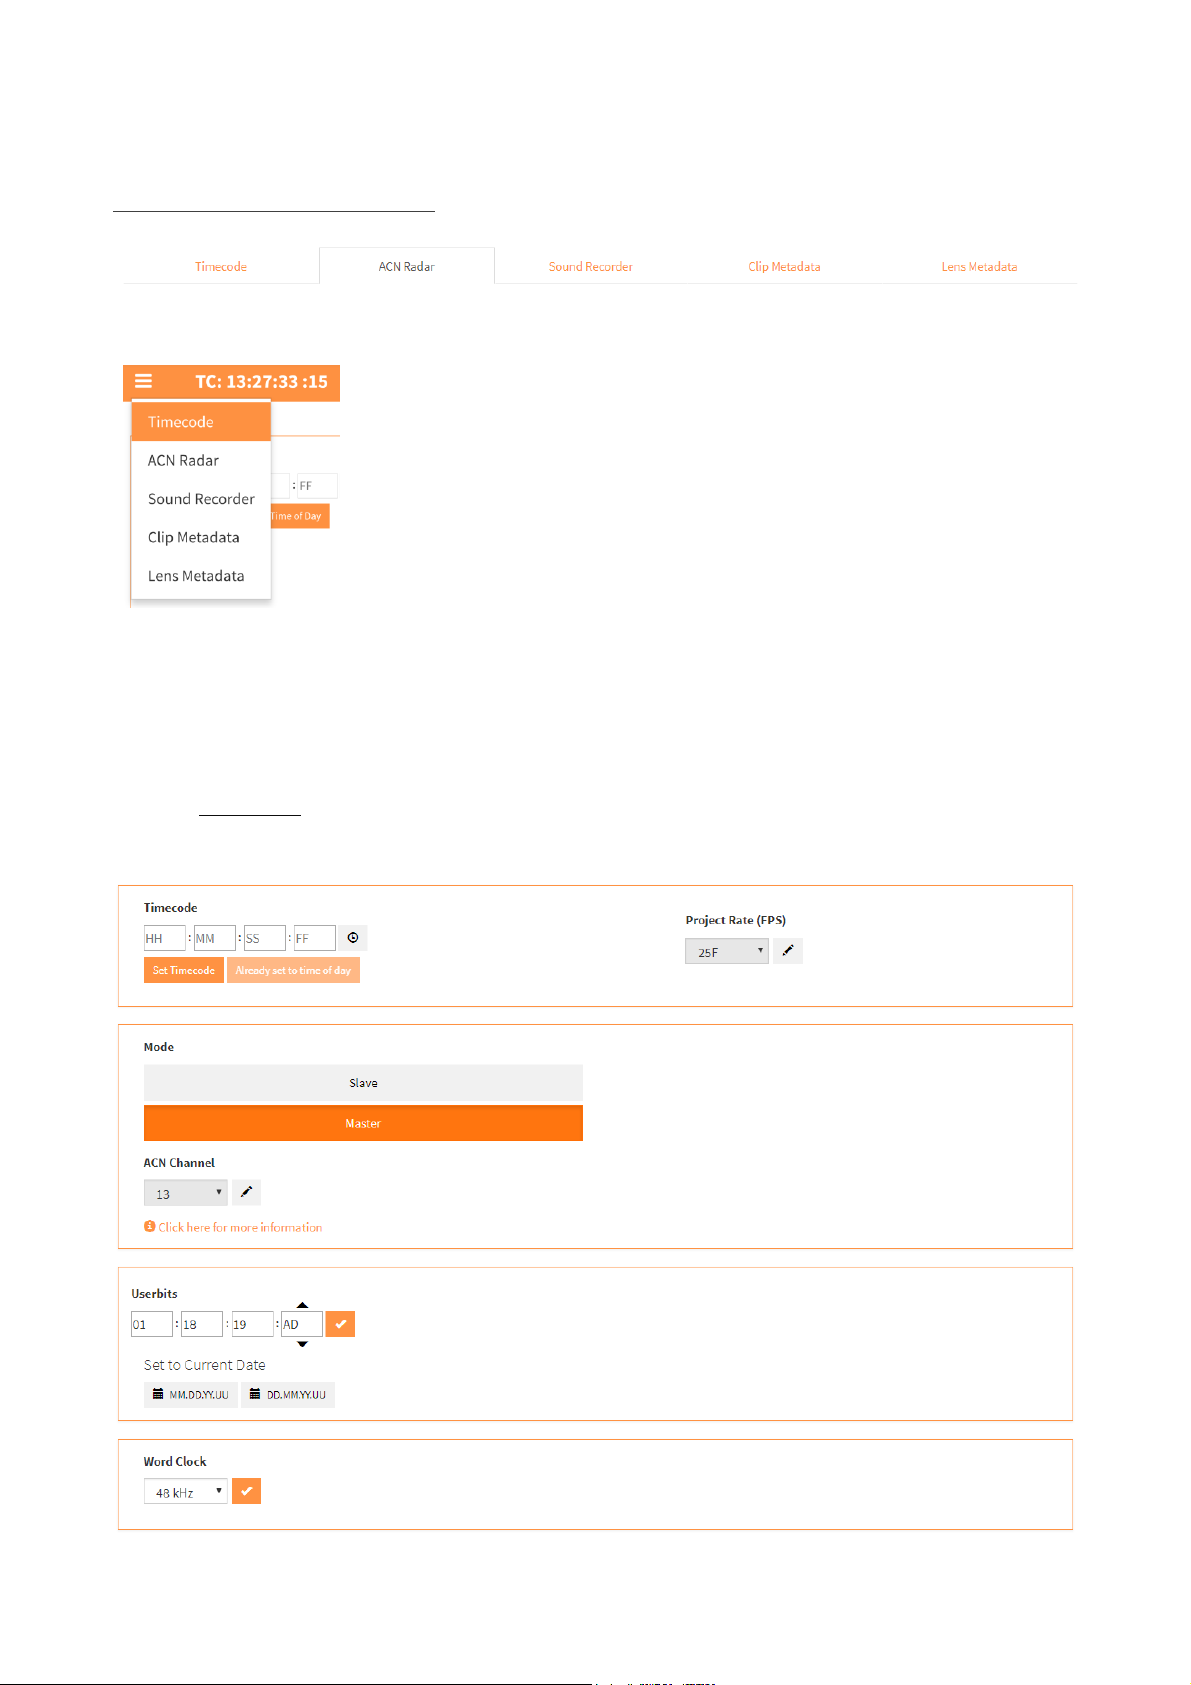
Title Bar: Timecode and System Menu
Color depend on the MasterLockit’s configuration as Slave (blue) or Master (orange). The setting also
determines accessible features of the interface.
While Slaves are basically limited to configuring the nature and access of a physical connected devices
including metadata and remote control functions, a Master additionaly serves as global metadata and
timecode hub to all Slaves. As it is mandatory only one Master is present within an ACN, default setting
is Slave. When changing this to Master, A unit will always remember its state on next boot. So, if
changed to Master, it will become Master again and start sending timecode jams. If another unit is
already present as suchthe status will automatically revert to Slave.
The gear wheel on the right opens a drop down menu for maintenance.
Page 9

ACN-ML/ACN-MLP experience quality.
Rev. 6.00
www.ambient.de/en
9
WiFi Settings
Shows info of the current WiFi configuraton. When running as host you can rename WiFi SSID and
change the channel. After hitting reconfigure WiFi, the MasterLockit will immediately apply the new
SSID so you will lose connection and need to log in again with new credentials.
Note: The password always coincides with the SSID. As such, it must be at least 8 digits long. Make sure
you use a name that identifies the unit uniquely. Names like “soundcartHUB”, “camera-1”, or simply
ascending numbers can later greatly help to better identify the individual units. This works well with the
option to assign unit names in the ACN Radar.
Alternatively, you can join existing WiFis as client. The host can be another MasterLockit(Plus) or any
DHCP host/access point/router. Scan for available networks using the circle icon, selct from the drop
down list and enter the credentials. You need now to reconnect by logging into the host WiFi and
entering the IP briefly displayed. Info on the joined network is also available on the device OLED menu
under Sys/WiFi.
Page 10
ACN-ML/ACN-MLP
Rev. 6.00
©2019, Ambient Recording GmbH
10
System Reset
This will purge the database, reset the metadata server and restart in Satellite mode with default of 25
FPS and ACN Channel 18. This can be indicated when the unit needs to be attached to a different
camera or was in use before on a different set. We recommend to do a reset at the start of a project
especially when using the metadata network.
Note: This will also reset your WiFi to the default SSID
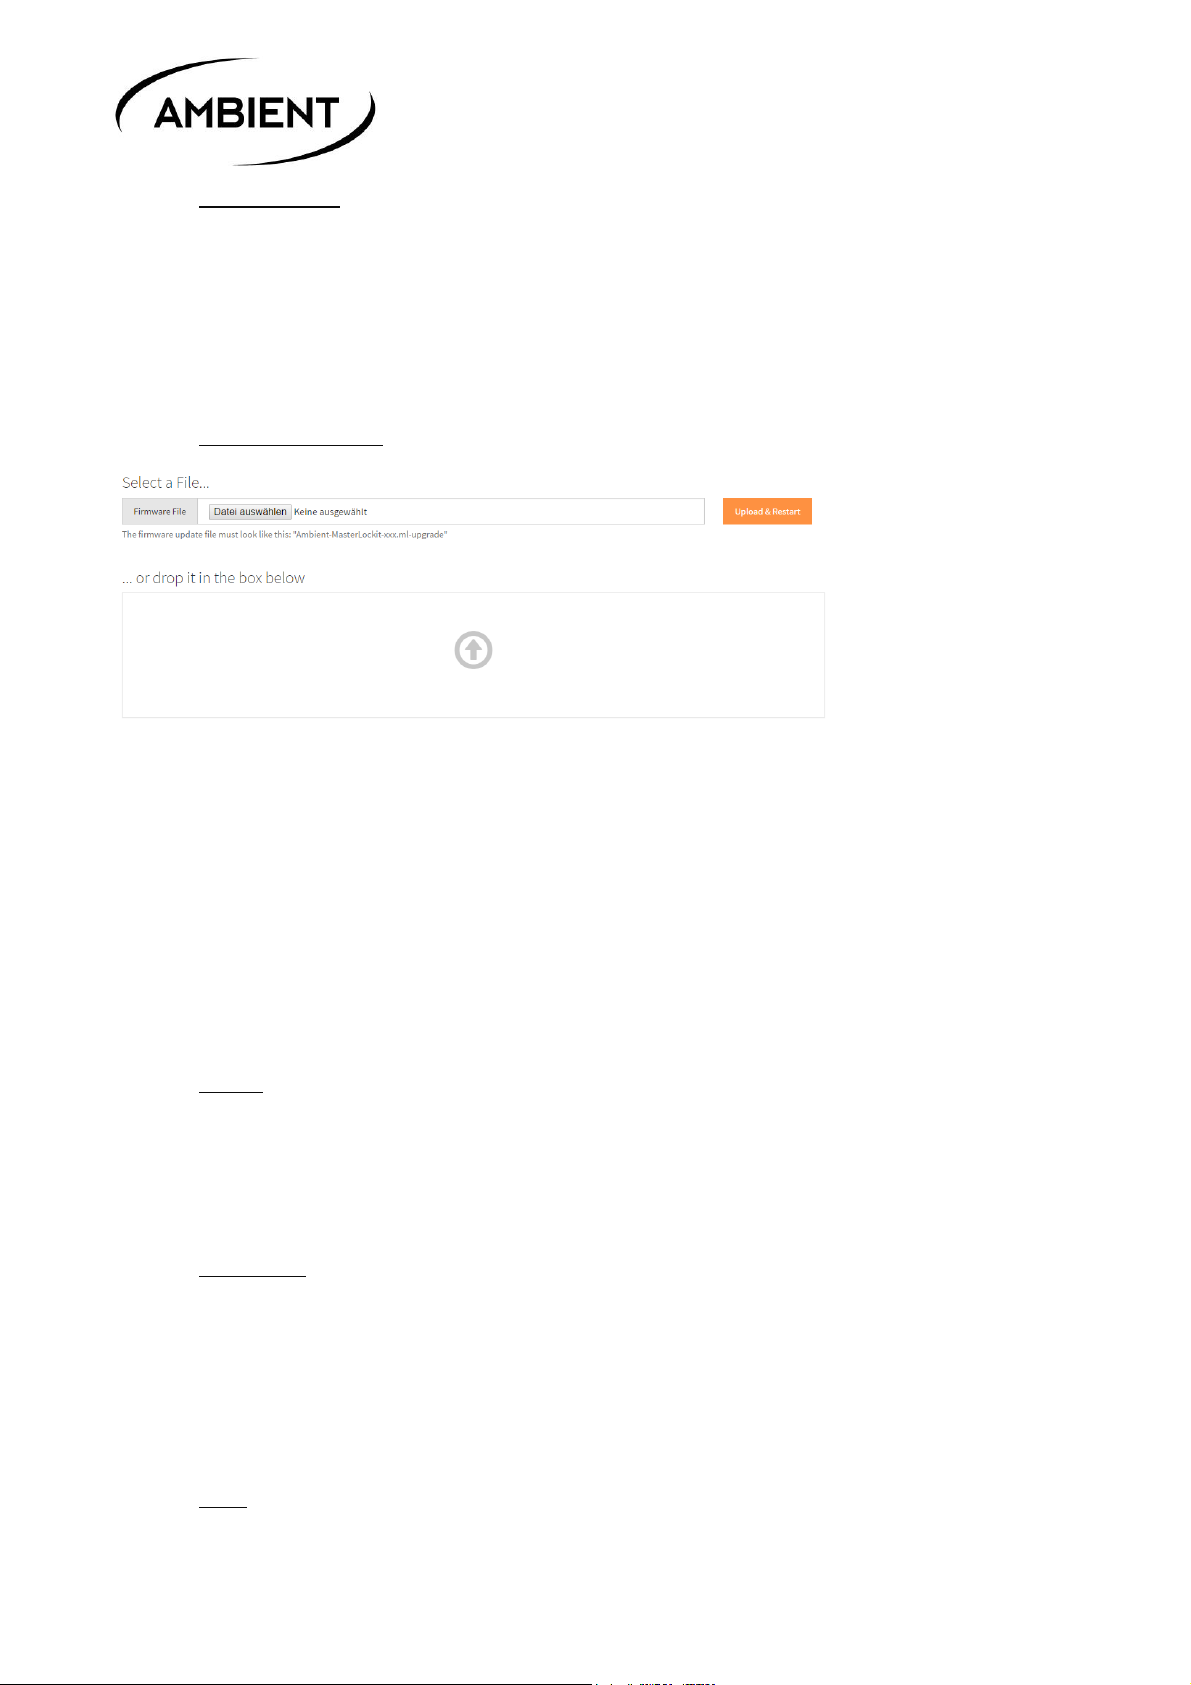
Firmware Update
Important: Always make sure your unit is powered from a reliable external source. A brownout may
render your Master Lockit a service case.
Select File through your local file browser or drag ‘n’ drop a file through open explorer/finder. Navigate
the update file, then click Upload & Restart. A 5 minute countdown will initialize after successful
upload after which you need to log back in to the WiFi. If the page doesn’t refresh automatically, hit the
reload button on your browser. If the firmware update involves an update to the Lockit firmware (which
will be the case mostly) the unit will automatically power down after a while. Press and hold the config
wheel until the LEDs rapidly flash alternating, then release and let the Master Lockit boot through.
About
See detailed information of your system environment such as code revisions and the unit’s serial
number. Debug logging for diagnostics and testing can be activated.
Shutdown
Which will completely shutdown the unit.
Note: thje server will take about 30 seconds to claose the database, leave unit connected to power
until the blink code changes to charge mode.
Help
Clicking here will open this very file
Page 11
ACN-ML/ACN-MLP experience quality.
Rev. 6.00
www.ambient.de/en
11
Tabs of the Web interface
On mobile devices tabs are replaced by a “burger menu” on the outmost left side of the title bar.
Some functions functions rely on the unit being in Master mode. Slaves purely serve as metadata
collectors/transceivers jammed and remotely to the master’s TC. Hence options are restricted to local
control.
Note: “Lens Metadata“ tab only available on ACN-MLP MasterLockitPlus
Timecode
Note: you can also access this tab by clicking directly on the running timecode in the title bar.
Page 12

ACN-ML/ACN-MLP
Rev. 6.00
©2019, Ambient Recording GmbH
12
Most importantly, you can switch the state between Slave and Master. On enabling “Master”, the
generator will be set and the unit will send out C-Jam broadcasts indicated by a green flash on each
second followed by a double blink every 6th second. Please refer to chapter “LED Blink Codes” for
detailed description. A Master will remember it’s state and attempt to retain that state on reboot.
Note: only one unit within the ACN is allowed to be Master. The algorthms of the ACN will assist you to
effectively prevent to enable this on more than one unit, if a Master is detected on boot, the unit will
revert to “Slave” also multiple ACNs can coexist on one channel as Slaves will only listen to their initial
Master as long as receiving it’s C-Jam broadcasts.
“Master” also gives access to setting the Frame Rate (FPS) and manually Set Timecode of the
generator to a deliberate value or automatically Set to Time of Day synchronized by the system clock
of the device through which accessing the interface. Setting to Time Of Day will also insert the current
date in the Userbits and set the realtime clock of NanoLockits on the channel. If using the Userbits for
displaying the date e.g. on a LockitSlate, you can switch here between American (MM.DD.YY.AD) and
European (DD.MM.YY.ED) date scheme. To make any changes, first click on the pencil symbol, apply
desired settings and confirm by ticking the orange mark. The same way you can change the ACN
Channel (also availbale on “Slave”).
Note: When connected Slaves will follow a channel change of their Master, so this will only be required
when connecting to a Master which cannel has been previously edited from default.
Word Clock will switch pin 4 of TC (red) Lemo from Tune to 48KHz when a sound recorder is activated
in ACN Radar Tab. If you want to tune your device via ACC501, disable the sound recordr channel or
switch to Tune here.
Page 13

ACN-ML/ACN-MLP experience quality.
Rev. 6.00
www.ambient.de/en
13
ACN Radar
This is the “ground control” over your ACN. On the top level you can configure the device currently
logged into. This is also the only option if the MasterLockit runs in Slave mode.
Local MasterLockit
Add Device
Click on the appropriate button and select from drop down list and optionally rename it. With 6.00
MasterLockit supports ARRI ALEXA classic range, ARRI CAP2 (ALEXA Mini and Amira), RED DSMC 1 & 2,
and Sound Devices’ 788T and 6 series audio recorders. On ARRI ALEXA you will need to enter the last 4
digits of the serial number found on the top-mounted plate or within the camera’s system menu while
on CAP2 the password may need to be changed from the default “arri”.
This will require special cables to physically link MasterLockit to the respective device over the blue ACN
port. On physical connection the device will now show up active and green on the “Local MasterLockit”
frame. Supported lenses (Cooke /i and Zeiss XD) connected to the grey ACN socket di not need
configusation and will appear automatically on connection.
Page 14

ACN-ML/ACN-MLP
Rev. 6.00
©2019, Ambient Recording GmbH
14
Note: When connected to a supported audio recorder you can access the “Remote Control” subpage
which will offer extensive access for remote rec roll, take history metadata editing, and sound report
export. This is the same as the “Sound Recorder” menu available through tab or burger menu. See next
chapter.
Other Lockits in ACN Channel xx:
All Lockit devices in C-Jam mode on the same ACN channel in range will automatically appear in this
section. The color of the header indicates the status: units on the same or direct compliant frame rate
will appear green, units in cross jam yellow, units with wrong frame rate configuration red, offline. You
may rename active units for better identification, on units with OLED screen this name will be displayed
there. To clear that indication edit and erase the name or perform a reset on the respective unit.
Note: The hub will remember all Lockits ever logged in. To remove individual units that are not or no
longer in your active setup click on the trash can, or purge the complete list via the “Clear ACN Radar
Screen” after unlocking.
Frame rate must be consistent on all units on a set. Full Jam will automatically take care of this on initial
jam with the only exception being Lockits with enabled video sync. Still, you can easily check these units
and make changes accordingly.
Note: If known present units do not show up, check the Master is actively broadcasting C-Jam and ACN
channel is consistent on all units.
Page 15

ACN-ML/ACN-MLP experience quality.
Rev. 6.00
www.ambient.de/en
15
Clear Radar Screen and Tune Slaves
These 2 buttons need to be unlocked to be operated and will relock after action.
Ckear Radar Screen lets you conveniently purge the list of all current and previous connected ACN
devices. This is helpful when shifting Master to another unit that has multiple orphaned Lockits listed.
Tune Slaves is a special function to further improve accuracy. Based on the former tuning using the
ACC controller via cable, calibration can now be done over ACN and tune multiple units simultaneously.
The process will take approx. 2 minutes during which the slaves will rapidly blink red green. After
tuning the LEDs will revert to nrmal blink and you can start syncing connected devices again. This
process is intended for preparing productions and only needs to be performed very occasionally in a
fixed setup. Tune value will be overwritten by the factory value on a factory reset.
Attention: Contrary to the gentle C-Jam units will alter their clock speed rapidly during tuning, also,
there will be a hard reset of the sync pulse when the process is finished. This will potentially bring
cameras in operation out of clock and compromise active recordings NEVER initiate wth active shoots
or when on standby for a take.
Orphaned Devices
The MasterLockit will preserve previous connected cameras and sound recorders for convenient
reconnection. In case you want to remove those without a complete reset, you can delete them here.
Page 16

ACN-ML/ACN-MLP
Rev. 6.00
©2019, Ambient Recording GmbH
16
Sound Recorder
Soundmixers working with either 788T or 6 series recorders from Sound Devices have a convenient
remote control and sound reporting tool with the MasterLockit.
Note: For consistency, the recorder must be set to external timecode and slaved to the MasterLockit. A
respective warning will show if the MasterLockit reads different timecode from the recorder.
When configured correctly you can prepare and edit scene, take, notes, arm and rename tracks, remote
roll your recorder, circle takes and in the end create comprehensive sound reports without losing
control over your timecode setup.
Note: the available options and behavior strictly depend on the protocol made available by Sound
Devices. E.g. reading meter status is only available for 788T.
Transport Control
Remote roll your recorder with record start and stop. On hitting record the button will change color
from grey to red.
Tracks
By expanding this tab you can arm tracks by clicking on the track index and rename them by clicking on
the pencil. On 788T the tracks will also show the current signal level.
Note: Naming tracks will only apply for the “Next Clip” and not be available during record. If
you need to make corrective changes you can do so by editing the take in the “History” after
finishing the recording.
Page 17

ACN-ML/ACN-MLP experience quality.
Rev. 6.00
www.ambient.de/en
17
Next and Last Clip Quick Edit
You can enter slating information, apply notes, and circle the last clip or mark it as false take.
During record “Next Clip” will change to “Recording Clip” and “Last Clip” move into “History”.
History
In this section you will find previous recorded takes. To edit, click on the pencil icon of the respective
take and apply the changes.
Import More Clips for Sound Report
On connecting a recorder, the last 18 clips will be loaded into the History. If you require more clips top
be included in the daily report you can manually increase the number here.
Page 18

ACN-ML/ACN-MLP
Rev. 6.00
©2019, Ambient Recording GmbH
18
Editing Clips from the History
Clicking on a clip will expand it for retrospective editing. After finishing your shooting day, you can
export your daily sound report by clicking the button at the bottom. This will automatically open the
Clip Metadata tab with clips created by your audio recorder preselected.
Page 19

ACN-ML/ACN-MLP experience quality.
Rev. 6.00
www.ambient.de/en
19
Clip Metadata
This is your gateway for all kind of reports and logs like camera shot logs, slate logs etc. You can narrow
your reporting choiceby selecting devices, shooting day, timecode range and download or export to an
USB stick attached to the MastertLockit.
Sound Report
Note: that when coming from “Sound Recorder” tab, the correct files have already been preselected. Just
pick your current date or narrow in by timecode and click “Sound report (Excel)” this will open your
reports cover sheet template, where you can fill in the desired information.
Page 20

ACN-ML/ACN-MLP
Rev. 6.00
©2019, Ambient Recording GmbH
20
Creating a sound report will give you the tiotle sheet. Permanent values once entered will be stored
and the date automatically filled, so you just need to aplly minimal choices every day. Download the
Excel file directly to your accessing device for immediate editing and emailing or to a USB stick attached
to the free USB port of your MasterLockit.
Page 21

ACN-ML/ACN-MLP experience quality.
Rev. 6.00
www.ambient.de/en
21
Lens Metadata
Only Available on MasterLockitPlus. Export data from supported Cooke /i and ZEISS XD lenses and
enable live recording to an atrtached USB media.
Note: this requires a dedicated cable, MLC-CP between ACN (grey) Lemo and lens. On PL mounts,
powering will be either through MasterLockitPlus with external power or camera. On cameras with EF
mounts, power to the lens will only be through looped through power applied to. Supply voltage must
range between 12 and 24 V to ensure reliable power to the lens.
Page 22

ACN-ML/ACN-MLP
Rev. 6.00
©2019, Ambient Recording GmbH
22
9. Menu Description
The graphical interface of the Lockit Menu combines ease of use with maximum flexibility for
experienced users and mostly consistent through all devices. Consecutive, interactive menus ease fail
safe configuration, guiding the user step by step through initial configuration.
Each menu pane with submenus features a “Home” symbol which will be preselected, allowing the user
to quickly move up one level when pressing the wheel erratically or just checking the settings.
Adjustments are available in 2 complexity levels which can be set from the System setting Menu.
“Standard” is reduced to settings that have proven practical for the vast majority of productions. We
highly recommend leaving it sitting here unless you run in apparent limitations to your required
configuration.
“Extended” discloses additional, complex configuration options to suffice even the most avid TC and
Sync Supervisor.
Depending on the devices capability this includes PAL, NTSC SD, and 720P sync formats, sync output for
3D rigs, PPF, and applying an offset to the TC output for compensation of frame processing delay.
Clearly, these are options not required for most applications and there will be hardly reason to unleash
this level.
Note: Settings are persistent through a level change which allows you to start off with guided default
depth and tweak in “Extended” if required.
“Lock” select this after applying desired settings will prevent from accidentally making changes to the
preconfiguration. To unlock, keep the wheel held left for 3 seconds until the notification that the menu
has been unlocked again.
Note: Due to the power logic on ACN-TL, ACN-LS, and ACN-ML, this message will also pop up when
shutting down these units with the required long press to the configuration wheel. It is however not
necessary to unlock the menu to power down. Just keep the button pressed for 3 seconds and the unit
will shut down as desired.
Description below will use these conventions:
Underlined: marks a (sub) menu, pressing the navigation wheel will open the next lower level, which
may contain submenus or parameters.
“Quoted Italic”: marks a parameter setting. This is the lowest level of a menu. Depending on the
available options these will be listed visible or can be scrolled (separated by “/” in the explanation
below). Active values will be highlighted. To change use the navigation wheel to select and press to
Page 23

ACN-ML/ACN-MLP experience quality.
Rev. 6.00
www.ambient.de/en
23
apply, to keep current settings just press. Both will automatically jump up one menu level with “Home”
selected. So, intentionally or accidentally, you will always quickly find your way back home.
Default settings are marked Bold in the menu bar. These values are restored after performing a
Sys/Reset.
(E): Only available when “Extended” is selected in Sys/Menu.
Some menus, parameters, or settings will also be exclusive to different devices and marked accordingly
L: Lockit ACL204, TL: TinyLockit ACN-TL, LS: LockitSlate ACN-LS, ML: MasterLockit(Plus) ACN-ML(P)
Page 24

ACN-ML/ACN-MLP
Rev. 6.00
©2019, Ambient Recording GmbH
24
Main Menu
↑
Mode
FPS
TC
Sync (L, TL(E)) / Slate (LS)
ACN
Sys
Sync menu only available on Lockit and TinyLockit (“Extended”), Slate Menu only on LockitSlate
To open the Main Menu press the 3-directional configuration wheel in home screen, navigate by
toggling left/right. Menus are rotational, so you can go from the first to the last setting by moving left.
Pressing the highlighted selection will open its submenu, pressing the arrow up/house symbol will take
you back again. When there is no further submenu the current active setting will be highlighted. If you
do not want to apply changes just press on the highlighted selection and you will fall back to main
menu without alterations.
Mode Menu
↑
C-Jam
TRX
Reader (LS)
Selecting the operation Mode will allow for one step configuration when initializing your Lockits for a
new project. Just pick your application and all necessary adjustments will be performed automatically
under the hood. Together with the “Full” Jam mode and auto frame rate setting there is hardly anything
left to do but choose your sync option on ACL204 if applicable and Jam sync your units via cable or ACN
after having put one unit into C-Jam Master mode. Each mode has a dedicated LED blink code of the
two colored LEDs above the OLED display, which will also show selected mode and active transmission
direction.
“C-Jam”: This default setting combines the “classic” Lockit mode with ACN functions. Jammed once via
cable or ACN the unit will run as autonomous TC generator with standalone accuracy of .1ppm.
With a C-Jam Master in the network the devices will automatically adopt their pace to a “Master” unit for
unprecedented zero drift accuracy and divergence down to 10uS.
Jamming over ACN:
On powering up, Lockit devices will generally start up in idling slave mode with a red flashing LED and
output muted. You can jam the units now via cable, a single ACN Jam or a continuous master
broadcast. This can be triggered from the ACN menu of any unit. While a single “Jam” will absolutely
suffice for frame accurate sync over 30hrs and beyond, assigning one deliberate unit as “Master” you’ll
never have to worry about TC for the rest of the day as long as this Master keeps running. The other
units will automatically jam their generators and follow as “Slaves” indicated by “S” and an according
blink code. The intelligent C-Jam algorithm will automatically improve the accuracy and establish zero
latency, zero drift lock between units within the ACN.
“Slaves” will also automatically re-jam after powering on or a battery swap. As ACN broadcasts only
happen every 6 seconds, it may take this long for a freshly booted “Slave” to pull in. If “Slaves” lose
Page 25

ACN-ML/ACN-MLP experience quality.
Rev. 6.00
www.ambient.de/en
25
connection to a previously present “Master” they will keep their loyalty for 30 seconds and then switch
over to “(S)” which means you can assign another unit as “Master”.
For more detailed information please refer to the dedicated ACN background chapter.
Note: the system only allows one unit set to “Master”. If two sets bump into each other, timecode
consistency will be preserved by the units keeping “faith” to their last known Master.
“TRX” transforms the unit into an ACN based TC radio link with a twist. Without TC source the units will
idle slowly blinking red and wait for either physical TC injection or signal via ACN. On detection of an
external SMPTE LTC or MIDI TC source the device will automatically transform into transmitter
(indicated by “TX” on OLED and according blink code) and send TC status and frame rate to other units
(now marked “RX”) which will again automatically follow. Source detection is fully automated, including
bidirectional MTC/LTC conversion: No TC output with no TC connected or stopped, “standing” TC
(repeating frame at frame rate) with standing TC on TX input and running TC with TC source running.
This combines the transparent action of a “classic” timecode radio link with the drop-out proof concept
of a freewheeling generator and the intelligent, adjustment-free ACN algorithm.
In this mode the devices also serve as a bidirectional LTC to MIDI TC convertor. TC will be displayed on
LED display of Lockit Slate. Useful in studio environments to sync TC between external equipment and
digital audio workstation where ACN is a not required feature.
Note: with no “Master” or “TX” there is no RF activity and no further steps required to comply with
situations that do not allow for radio presence. If you still want to disengage the ACN functionality you
can do so by selecting “Off” under ACN/RF.
“Reader”: Only available on LockitSlate, this mode allows to visualize external LTC. No MTC conversion,
no output, no ACN, but in return the slate will follow TC playback in low speed, high speed and even
reversed which makes it the preferred mode for special effect shots.
FPS Menu
FPS: 23.98/24/25/29.97/29.97 DF/30/47.95/48/50/59.94/59.94 DF/60
Toggle to select the project framerate and press. When changing an existing setting you will be asked to
confirm or discard the new selection. As with firmware 6.xx Lockits now support double project rates to
be synchronized via ACN and automatically select double frame sync settings with genlock/PPF
activated. However, as not part of the SMPTE specification, this will have no effect on timecode frame
rate and also cannot be transferred via cable.
Page 26

ACN-ML/ACN-MLP
Rev. 6.00
©2019, Ambient Recording GmbH
26
CAUTION! Switching between PAL and NTSC or Non-Drop and Drop rates will restart the generator from
zero with the new time base and interrupt the video or audio sync signal. Also genlock output will be
changed or even disabled on selecting an incompatible frame rate for SD genlock (only available on
ACL 204 in Extended menu). While the ACN or cable jam effectively prevents these critical changes
applying these manually while recording may result in a corrupted file. Important: When using Drop
frames make sure the whole set does. NEVER run a setup with units mixed on non-drop and drop!
29.97DF will neither sync with 29.97, 30, or any other non-drop rate.
Page 27

ACN-ML/ACN-MLP experience quality.
Rev. 6.00
www.ambient.de/en
27
TC Menu
↑
Set
Jam
Output
UB
Set
Sets the generator timecode. To edit hh:mm:ss:ff successively change the blinking value, press to
confirm, and proceed. TC generator will start on from selected value after confirmation, so you can
exactly trigger a certain TC start. After confirming the edited timecode you can also start a C-Jam
Master if desired.
Jam
Auto
Man
Determines how the generator can be jammed.
“Auto”: Automatic setting, suitable for most applications. With video sync disabled, the unit will initially
jam timecode value and frame rate form source. When video sync is activated, frame rate will be locked
and only timecode will be jammed from compatible frame rates. This method effectively prevents
misadjusting the unit during operation while bringing maximum of ease on initial configuration.
When the generator has been jammed already, applying external timecode will display the aberration
of the 2 devices with the option to manually force a full rejam or timecode value only.
“Man”: Basically the same behavior as “Auto” with video sync enabled, the frame rate will be locked
and only compatible frame rates are accepted for jam over ACN. Cable jam always requires
confirmation to jam only TC, TC and frame rate or quit.
Note: If the mode prohibits a change of frame rate an “X” will be displayed before the frame rate
indicating compatible frame rates allowed for jam. On jamming with a coherent FPS the “X” will
disappear.
Output
Level (TL)
Mute (E)
Offset (E)
This menu configures the TC output signal. In Standard view Output is only available on TinyLockit and
will directly access the Level setting.
Level
Select TC level: 0/-3/--6/-9/-12/-15/-18/-21/-24/-27/-30/-33/-36/-42 dB
Only available on TinyLockit
Adjusts TC level on the “TC” socket in -3dB steps from 0 to -36dB plus -42dB. Useful when recording
timecode to audio tracks of DSLRs or non-TC capable recorders with mic sensitivity.
Note: a reduced level will prevent a successful jam of regular timecode devices.
Page 28

ACN-ML/ACN-MLP
Rev. 6.00
©2019, Ambient Recording GmbH
28
Mute
Mute on Gen Not Set: No/Yes
On default the physical output does not supply a signal if the generator has not been set (flashing red
every 2 seconds). This is most useful to leave the Lockit connected to your audio recorder with a
bidirectional cable and jam it to time of day from the recorder after start up and then seamlessly
becoming the timecode source. Also, while one won’t necessarily notice a non-synced TC a non-present
TC will give you a clear warning on the targets display for immediate indication of an
incomplete/incorrect configuration.
Note: Inconsistent TC is as good or bad as no TC at all. There is practically no use in having a unit
supplying a non-synchronized timecode.
Offset
Offset: +/-00.00
Shifts the TC output up to +/- 10 frames in .05 increments on physical outputs and also LED display on
ACN-LS LockitSlate against the generator. This allows for compensation of frame processing delay on
cameras and TC offset to 3rd party equipment (e.g. delayed TC out from audio track on playback).
UB
↑
Show
Jam
Show
Toggles userbits to be displayed in main screen below the TC reduced in size.
Jam
Auto
Man
“Auto”: Userbits will be continuously jammed. This will happen on TC Jam but also on change of user
bits only without the TC generator being interrupted. This can e.g. be used to increment scene/take on
the fly or insert the date from an ACN master.
Note: Update will occur with up to 6 seconds delay on the next C-Jam broadcast.
“Man”: Use this mode to apply fixed userbits eg. a unit ID. On selecting you can load the 8 userbit slots
with hex-code values 0-F.
Note: selecting manual userbits will automatically enable “Show” for display underneath the timecode.
Page 29

ACN-ML/ACN-MLP experience quality.
Rev. 6.00
www.ambient.de/en
29
Sync Menu
↑
Video (L)
Audio (L)
PPF (TL (E))
Off
Only available on Lockit and TinyLockit (Extended mode)
Video
480i(E)/576i(E)/720P(E)/1080i/Psf/P
Single/Dual/3D(E)
Only available on Lockit
Enables Genlock video sync output on BNC. Standard menu only offers 2 options applicable for current
cameras: 1080P or i/PsF with i/PsF being automatically selected depending on FPS. Extended mode also
allows for 720p and SD formats 480i (NTSC) or 576i (PAL). Also only in Extended you can match the
level/impedance for single or dual camera load (required for 3D rigs).
Selecting either PAL or NTSC will possibly override previous FPS selections , as it automatically applies
the only matching frame rates of 50i or 59.94i with the only option to switch between non drop and
drop timecode in case of the latter.
Note: activating Video sync will also enable PPF shutter sync on pin 3 of the “TC” Lemo port.
Audio
Only available on Lockit
Activates a 48.000 KHz wordclock signal on the BNC to sync audio recorders.
PPF
Only available on TinyLockit
Pulse Per Frame is a shutter sync at the selected framerate and used to clock some industrial cameras.
Available on pin 3 of the “TC” Lemo connector.
Off
If not required, it is recommended to disable sync output to reduce current draw and allow for
automatic setting of the frame rate on jam. Also, this must be selected to allow tuning via the now
obsolete controller ACC101 or 501.
Page 30

ACN-ML/ACN-MLP
Rev. 6.00
©2019, Ambient Recording GmbH
30
Slate Menu
↑
Display
LEDs
Sensor
Only available on LockitSlate
Display
Userbits: 0*...20s →
Clapped TC: 0…10s…20s →
Running TC: 0*...20s/inf
Defines the slate displaying on clap. Successively apply 0 to 20 seconds for Userbits, Clapped TC and
Running generator TC. Selecting a time will automatically move on to the next parameter and the
selected value will display in the line above, led by the parameter indicator (“UB”, “CT”, “TC”).
LEDs
Flash LED: Clap/Clap+Seconds/Off
Configures the flash LEDs on front.
“Clap” will light up the 2 bright LEDs only when the slate is operated, allowing for clear identification of
the slated frame.
“Clap+Seconds” also flashes LEDs on every second transition.
“Off” defeats the flash LEDs.
Sensor
↑
Tilt
Brightness
Tilt
Enabling will revert the 7 digit display when the slate is operated upside down for special markers like
end slate e.g.
Brightness
“Manual” lets you adjust the display brightness in 9 steps during operation by flicking the 3-function
wheel. Looking from the back, flicking left will de- and moving right increase brightness.
“Low” enables the environment light sensor with a dim setting useful for late night shoots. Still, when
light falls on the slate it will increase brightness for better reading and dim down to not interfere with
the shoot.
“Med” is automatic dimming with maximum medium brightness.
“High” is applicable for outdoor shoots in bright light but still with a concern about battery life.
Page 31

ACN-ML/ACN-MLP experience quality.
Rev. 6.00
www.ambient.de/en
31
ACN Menu
↑
Slave
Jam
Master
Ch
“Slave”, “Jam”, and “Master” options are only available in C-Jam mode and with Ch not set to “Off”
“Slave”: is the default operation and on power cycling in C-Jam it will fall back to this. If the unit once
had been jammed from a “Master” and initiated the dynamic C-Jam tune this will be indicated by “S” on
the main screen lower right. If that master is lost but C-Jam tune is still in operation “S” will alter to “(S)”.
Keep this mode for all units but the dedicated C-Jam master.
“Jam” fires off a One-Time-Jam burst, used best when only setting the free running TC generator is
required. Quite similar to the classic jam using a cable, you will need to re-jam units after battery
change or power cycle. As the unit will fall back to the “Slave” mode after this this is rather an action
than a setting.
“Master”: The unit will resend timecode pulses every couple of seconds. “Slaves” will automatically
rejam their generator if not set and dynamically adjust their clock reference to best match the speed of
the “Master”. Thus, an accuracy window of 10us is achieved, reflecting synchronicity on video line level.
After replacing the batteries on either slave it will automatically jam to the set TC.
Note: Sending out single or continuous jams requires the generator to be set. If not done so already
you will be prompted to either accept the current TC (additionally to edit to preference for Master)
before sending out the jam. Also, as just one unit is allowed as Master within ACN, enabling will be
blocked with an according message if the unit receives broadcasts from another Master. Master is
exclusive to C-Jam mode, switching to TRX or Reader will immediately stop C-Jam broadcasts.
Ch
Select ACN channel: Off/11…18…26
Select the RF channels 11 through 26 according to IEEE 802.15.4 (see Appendix for details). Although
ACN is not generating any RF signal when not triggered by a C-Jam Master or TX, radio can be
completely defeated for autonomous generator mode by selecting “Off”. This will hide all other ACN
parameters until an active channel has been reassigned.
Note: in general it should not be necessary to make adjustments. Exceeding the preselected channel 18
is not used by wireless focus remotes using the same protocol, the ACN strictly follows the IEEE 802.15.4
standard which allows for friendly coexistence of multiple systems even on the same carrier. The ACN
cannot cause interference with a wireless remote control or other radio.
Page 32

ACN-ML/ACN-MLP
Rev. 6.00
©2019, Ambient Recording GmbH
32
SYS Menu
↑
Menu
Config
Reset
Info
Menu
Lock/Standard/Extended
Defines the level depth and sophistication of available options.
“Lock” prevents unwanted alterations to the settings. It is recommended to lock the unit after
configuration. To unlock you will be prompted to hold the configuration wheel left for 3 seconds after
which a unlock message will appear.
Note: Due to the power logic on ACN-TL, ACN-LS, and ACN-ML, this message will also pop up when
shutting down these units with the required long press to the configuration wheel. It is however not
necessary to unlock the menu to power down. Just keep the button pressed for 3 seconds and the unit
will shut down as desired.
“Standard” will only show valid settings that have proven practical for the majority of productions: We
highly recommend leaving it sitting here unless you run in apparent limitations to your required
configuration.
“Extended” unlocks additional configuration options. This mode will unlock sync output for 3D rigs,
more uncommon video and sync formats such as PAL, NTSC, or apply an Offset to the TC output for
compensation of frame processing delay.
Config
Display
RF
USB (L, LS) / LemoACN (TL)
Bat (L, TL, LS)
IR (E )
Display
Brightness: 1…3…10 →
AutoOff:5sec…30sec... never
Consecutively adjusts the OLED in brightness and timeout.
Page 33

ACN-ML/ACN-MLP experience quality.
Rev. 6.00
www.ambient.de/en
33
RF
LNA: Auto/On →
Ant: Int/Ext (L (E), TL(E))→
Power (E , PIN protected): 8 dBm
The adaptive RF menu offers additional tweaks to the ACN radio.
“LNA: Auto/On” LNA is a Low Noise Amplifier. While it may improve receiving range it comes with some
impact on the current consumption. Default setting “Auto” enables the LNA when the unit is powered
from external and switch off when running off batteries. If the last bit of range is essential, you may
permanently enable this feature by selecting “On”.
“Select ACN Antenna: Int/Ext” only available to earlier revisions of Lockit and TinyLockits did not
include the SMA antenna. Retrofitting an external SMA antenna is highly recommended as it will give
you the most noticeable range boost of all available tweaks at no cost of battery life. This choice will be
permanently stored and be maintained through a factory default restore.
“Select ACN tx power: 8dBm” restricted to Extended mode and additionally PIN protected. As per
default the ACN is set below the globally maximum allowed ERP level for LR-WPAN of +10dBm. Consult
your supplier only if your application legitimizes higher settings. Increasing output power will strongly
affect battery life time, so even if applicable use with good consideration.
USB / LemoACN
MTC
COM
Not available on MasterLockit (Plus)
Sets the data port mode this is a dedicated USB port on ACL204 and ACN-LS (hence labelled “USB”) and
available on pins 3 & 4 on the Lemo “ACN” connector on ACN-TL, see pin out appendix for reference.
ACN-ML Master Lockit has no USB option for ACN and does not show this menu.
“MTC” puts USB into MIDI mode. Connected to a computer the device will be mounted as a standard
USB audio/MIDI device and recognized by supporting software. No drivers or configuration required on
both, PC or MAC.
“COM” sets the data port to USB serial. This is usually only necessary for updating.
Note: Although the setting is mode dependent and default to “COM” on “C-Jam” for easy firmware
update, you can enable “MTC” in this mode to make the device a MIDI TC generator. If you just want to
convert LTC to MTC and vice versa, simply select “TRX” as Mode without alterations here.
Bat
Li
Alk
NiMH
Not available on MasterLockit (Plus)
Matches the battery telemetry to the cell type in use. Pick from Lithium, Alkaline primary cells, and
NiMH rechargeables. Readout follows typical discharge curve and accuracy may vary over different
manufacturers and battery types, so take with grain of salt.
Page 34

ACN-ML/ACN-MLP
Rev. 6.00
©2019, Ambient Recording GmbH
34
IR
Off
On
Legacy feature, pre ACN, only useful in combination with ACC501 controller. Enables the infrared port
above the OLED. Leaving the IR port open can compromise reliability of the unit in normal operation, so
only to be enabled through “Extended” mode.
Reset
Here you can restore the factory settings.
On ACN-ML(P) you have a wider selection of options:
↑
WiFi
Metadata
All
“WiFi”: resets the devices SSID and password to ml(p/0)sssss, where “sssss” reflects the last 5 digits of
the serial number.
“Metadata”: will keep all settings but purges the database. This may take up to 5 minutes.
“All”: resets WiFi, database and local settings to factory defaults as marked bold in this description.
Info
DEV info
Debug1
Debug2
Screen test
First screen will show critical device information for serial number, firmware and FPGA software
revision, and MAC address, followed by 3 debug screens for developer use only.
10. LED Blink Codes
Code Legend
●
flash (generator sync)
●●
double flash (low batt warning every 2 seconds)
● ●
double blink (active ACN transmission)
●-●
blink (generator free lock)
●--●
long blink (ACN reception)
Red: Generator Not Set, no ext TC present
Green: Generator Set, running ext/ACN TC detected
Orange / Red & green simultaneously: standing ext/ACN TC detected
Page 35

ACN-ML/ACN-MLP experience quality.
Rev. 6.00
www.ambient.de/en
35
Mode/Seconds
1
2
IntTC/C-Jam
Gen Not Set Mute
●
Gen Not Set Mute, lo Bat
●●
Generator Not Set
●
●
Generator Not Set, loBat
●●
Generator Set
●
●
Generator Set, loBat
●●
Additionally active C-Jam shows the following codes every 6 sec:
C-Jam Master
● ●
C-Jam Slave, Master present
●--●
C-Jam Slave, Master lost
●--●
C-Jam Slave, incompatible FPS to Master
●--●
TRX
no TC
●-●
●-●
no TC, loBat
●-●
●●
TX (ext. LTC/MTC detected)
TC running
● ●
●
TC running, lo Bat
● ●
●●
TC standing
● ●
●
TC standing, loBat
● ●
●●
RX (TC over ACN detected)
TC running
●-●
●
TC running, loBat
●-●
●●
TC standing
●-●
●
TC standing, loBat
●-●
●●
Reader (Ext TC)
no TC
●-●
●-●
no TC, loBat
●-●
●●
TC running
●---------
---------●
TC running, loBat
●---------
--●●●●--
TC standing (Ext TC)
●---------
●-●
---------●
●-●
TC standing Lo Bat (Ext TC)
●---------
●---------
--●●●●--
--●●●●--
Page 36

ACN-ML/ACN-MLP
Rev. 6.00
©2019, Ambient Recording GmbH
36
11. ACN
Aside time code and sync, ACN is the key feature of the current Ambient Lockit range. It is a proprietary
wireless protocol, specifically engineered for highest reliability, data integrity, and range. It operates on
2.4GHz using channels 11-26 of the IEEE 802.15.4 LR-WPAN standard. This standard is designed to
allow for friendly coexistence of different systems on the same channel. Still, equivalent ARRI remote
focus equivalents listed to further help avoiding interferences.
ACN
ARRI EMIP WRS
Channel
Center Frequency [MHz]
Channel
11
2405
12
2410
0
13
2415
1
14
2420
15
2425
16
2430
2
17
2435
3
18
2440
19
2445
20
2450
4
21
2455
5
22
2460
23
2465
24
2470
6
25
2475
7
26
2480
The ACN features 2 operation modes, the standard “C-Jam” and “TRX”.
C-Jam
Building up on the tunable oscillator C-Jam dynamically adjusts the accuracy from better than frame
accurate down to video line level grade.
All that is needed is an arbitrary number of Lockit devices set to C-Jam mode and one of them
configured to be the C-Jam master. The C-Jam master will then send out broadcast pulses which the
slaves will respond to and in case they detect a discrepancy automatically correct their pace. This will,
however, in no way sacrifice the unparalleled, self-contained accuracy. In case the radio cuts out, all
units will continue to operate as used to.
C-Jam can additionally be used to set up a metadata network on the set to collect, con- and distribute
metadata between different units and departments. At the core will be at least one MasterLockit(Plus)
Page 37

ACN-ML/ACN-MLP experience quality.
Rev. 6.00
www.ambient.de/en
37
acting as server and used to monitor and control all other ACN enabled devices remotely via a web
interface that is accessible from any modern unit with internet browser.
TRX
This special mode will allow the units to operate as an enhanced TC radio link. Again, this is not your
ordinary timecode over wireless, neither is it suited for standard synchronization purposes. Instead the
transmitting unit will jam its free running generator to incoming TC with auto frame setting and then
send information whether the source is running, stopping with standing TC or has stopped altogether.
The receiving unit(s) will then duplicate the TC source’s status as it would directly be connected without
danger of drop outs compromising the desired functionality. This not only works with “classic” SMPTE
TC but also MIDI timecode (MTC) with the Lockit device connected to MAC or PC via USB acting as a USB
MIDI interface.
As all current products including the Lockit Slate come equipped with ACN transceiver any device can
serve as transmitter or receiver. This dramatically cuts down costs for additional equipment at a
maximum of flexibility.
However, as the transmitter is only jammed but not synchronized by the source and also the receiving
units may stop their timecode and sync outputs this is not suited to reliably sync a system and only
recommended for 2 applications. One being playback where you need to display pre-recorded
timecode on a slate and the second being documentaries to remote roll an audio recorder via rec run
timecode of a camera.
Note: Always leave supplied antenna attached. In case of lost only substitute with original genuine
manufacturer replacements parts ANT-2.4-SMA-M (straight) and ANT-2.4-SMA-M90 (angled).
Page 38

ACN-ML/ACN-MLP
Rev. 6.00
©2019, Ambient Recording GmbH
38
12. Firmware Update
Available under http://ambient.de/en/downloads/ , LockitToolbox is a program for PC or Mac to upand downgrade firmware and additional configuration.
On Windows simply unzip to a location of your choice, on MAC run the .dmg installer (note that the
program needs to be granted additional rights on first run). Connect your Lockit via USB (TinyLockit
requires ACN-USB cable, ACL204 and ACN-LS use Mini USB, ACN-NL Micro USB) with the tool launched.
If it doesn’t show up as available device load factory settings under Sys/Reset. Once listed click
“Connect”.
You will now see current loaded and available firmware and available configuration options depending
on device and/or revision.
On clicking “Update” the unit will upload the firmware with red and green LEDs flashing alternating
while the progress bar fills up until it reaches 100% after which the unit will reboot with new firmware
and a success message will appear in the status window.
Note: As of 6.0 LockitToolbox also include the preceeding firmware for easy up- and downgrade. The
dropdown list will show compatible firmware for the connected device.
Page 39

ACN-ML/ACN-MLP experience quality.
Rev. 6.00
www.ambient.de/en
39
13. Application Notes
Basics of TC, Sync, ACN, and their use cases
Please also watch our video tutorials online: www.ambient.de/en/university
and join the Lockit Timecode User Group: https://www.facebook.com/groups/lockitusersgroup/
Timecode, Sync, and the importance of Genlock
One of the most common misconceptions is that timecode is sync but in fact they are both essential
components of synchronization.
“Synchronous” means same time. Now, while timecode is a required information to jam sync several
units together and hence make them synchronous, it will not take care to keep them synchronous over
a longer time as it will not affect the speed the camera is generating frames. To achieve this a blank
signal commonly referenced to as genlock is required. This is essentially a blank video signal and
regardless of the recording resolution all cameras accept either 1080P or 1080i/PsF. Still, the
importance of genlock must not be overrated. As cameras have evolved so has their accuracy. While
external timecode helps to keep the time during power down sequences and avoids the necessity to
frequently check and rejam, in typical scene based productions using genlock is no longer an obligation
with file based cameras. They will hold frame sync long enough typically up to 30 minutes and only
when shooting longer takes such as live events that need to be edited the use of genlock and thus the
Lockit ACL204 becomes obligatory.
What also continuously leads to confusion is the fact, that there are no TC framerates that match 47.94,
48, 50, 59.94 or 60 video rates. This lies in the historic and physical nature of the SMPTE TC signal which
doesn’t allow for higher frame rates than 30 FPS. To simplify configuration, Lockits since firmware 6.00
allow selecting double rates. This doesn’t change the fact, though, that on those settings the timecode
frame rate always will be the corresponding single rate.
Choosing the correct TC frame rate and video sync format
Timecode and Sync always have been a cause of confusion and irritation. However there are just a few
rules that, when understood and considered greatly help to get things right and with the intelligent
algorithms of the Lockit system and ACN it’s even easier.
First and upmost:
Lockit Stays on Camera!
This may sound trivial, but it is the most common cause of issues when post gets back with TC
consistency errors. Just jamming a camera and then remove the Lockit may appeal AC but it just
doesn’t cut it. Also, camera department likes to think timecode being a concern of the sound guy only.
It is not. It is a concern of keeping everything in sync – sure, this one sound recorder, but these 2, 3, or
more cameras none the less - even more. Cameras drift, lose timecode unnoticed on power cycling and
so forth. There is a reason Lockits have been around for the quarter of a century and are still going
strong. If size is a crucial issue, ditch the genlock, opt for a NanoLockit, but external timecode stays on
cam.
Page 40

ACN-ML/ACN-MLP
Rev. 6.00
©2019, Ambient Recording GmbH
40
There is no double rate
What continuously leads to confusion is the fact, that there are no TC framerates that match 47.94, 48,
50, 59.94 or 60 video rates. This lies in the historic and physical nature of the SMPTE TC signal which
doesn’t allow for higher frame rates than 30 FPS. To simplify configuration, Lockits since firmware 6.00
allow selecting double rates. This doesn’t change the fact, though, that on those settings the timecode
frame rate always will be the corresponding single rate.
2 worlds with 2 frame rates each
Basically the video world is split in 2: PAL and NTSC.
PAL uses 24 FPS TC for film and 25 for video/TV, NTSC productions take place in 23.976 for scene based
work and also TV and 29.97 for broadcast/sports.
23.976 mostly is also referred to as 23.98 and sometimes even reduced to 23 in writing. No matter how,
it’s all the same, there is no other “23” format than this one and as of today it is THE format for scripted
productions you will find yourself working with most of the time when you live in the NTSC part of the
world.
29.97 again may use 29.97 “Drop” (also “D” or “DF”) in some cases. Without going down to the nasty bits
of this pesky format it is enough to know that 29.97 Drop is the ONLY drop format that exists and it is
only consistent within itself. So, if asked to use Drop, make sure EVERYTHING is set to that, which can
be a challenge, as RED DSMCs do not even support this.
The last frame rate, 30 FPS have become more or less obsolete in the meantime except some industrial
cameras.
One Frame Base across the Set
Terms like system rate may also apply. This is not only the frame rate the camera is internally working
at but also post production and editing will be performed at.
There are negligible few cases that you really would need to cross sync a camera to an audio recorder
using a different TC frame rate. If you have to handle such situations, you will know your stuff, if not
just set everything to run on the same frame base.
In any case, do NEVER mix and match DROP with NON DROP or NTSC area with PAL area rates!
The Camera is Always Right
Whatever the frame base is going to be, you will never succeed in trying to sync to a camera to a signal
that does not match its requirements. So, in general, the Lockit just needs to be set at the cameras
system/project rate. This may become tricky as e.g. some Sony cameras will effectively operate on
23.976 when set to 24, some Panasonics on 29.97 when set to 23.976. So, it is important to know your
camera system rate and sync format.
Page 41

ACN-ML/ACN-MLP experience quality.
Rev. 6.00
www.ambient.de/en
41
To ease the setup process we have condensed a little guideline for the most common camera types.
However, camera market is moving fast and the latest technology of today may be obsolete by
tomorrow. Also, manufacturers frequently update the firmware on their products (see Panasonic), so it
is nearly impossible to give a comprehensive and bullet prove advice which setting is 100% correct for a
specific production. So, we cannot not claim or grant any liability this to be complete or correct and if in
doubt, always refer to the specific camera’s manual and should you find inconsistencies or can provide
additional information, we would welcome your input to further improve this list.
ARRI: TC only. Being the one and only camera brand currently on the market that can actually sync to
external TC, it doesn’t have or require genlock input. In TC/Options select “Free Run” as Run Mode and
“Regenerate” as Mode. On Amira and Alexa Mini additionally navigate to System/Sensor/Genlock Sync
select “TC In”.
Blackmagic Ursa: As these cameras only support either TC or genlock, TC is the only option.
Canon C Series: 1080P. XF legacy cameras or mode will require 59.97i/60i when shooting at 23.98/24.
Panasonic: 1080i/PsF. Newer models/firmware have been reported to support 1080P.
Panavision DXL: Lockit inbuilt, no external TC/Sync required. Set to the same ACN channel and run a C-
Jam Master to ensure TC is rejammed after power breaks.
RED DSMC 1&2: 1080P. Set HDSDI out to “Auto”
Sony: 1080i/PsF
Note: Sony won’t operate at 24 but 23.98, so always use 1080i 47.95 on cinematic productions.
DSLRs and non-timecode cameras: These require timecodde to be recorded on one of the audio
tracks. As most of these cameras only provide mic level inputs, the line or TTL level TC signal needs to
be padded down before going into the camera. TinyLockit and NanoLockit have built-in padding
circuitries, other units will require padding via cable. The correct level varies from the application. While
-10dB FS (below maximum) is ideal, this may still lead to the TC signal bleeding into the adjacent
channel with nasty noise if a (guide) audio track should be recorded on the second track of a DSLR. In
this case go as low as necessary but keep as high as possible. AVID and BMD daVinci Resolve natively
support handling TC on audio track while others like FinalCut or Premiere require external tools to
prepare the material for proper ingest.
 Loading...