

Page 1
TheLockit
ACN-CL
ACN
SYNC
Lockit
14:49:32:22
50P
18
Handbook
Page 2

Safety Instructions
- READ CAREFULLY -
For your own safety and trouble-free use please observe the instructions below.
Always keep a copy and hand them out with the unit to other users.
This unit is exclusively intended for indoor use. Keep it safe and away from water, rain,
humidity and dry under all circumstances also when powered off . Never let water,
detergents or liquids of any kind get into the unit as this will cause risk of short circuits
and electrical hazard.
Keep distant from sources of heat and never expose to direct sunlight. Admissible
ambience temperature is from +5° to +50° Celsius.
Do not throw or expose to mechanical impact and keep it safe from hard vibrations.
Only use genuine accessories supplied by an authorized dealer. Always observe
integrity and the pertinent compatibility with all units connected to.
Do not perform software updates in situations the integrity of power supply cannot
be granted such as thunderstorms and remove connections to all devices directly or
indirectly connected to mains.
Page 3

Only use certifi ed power sources compliant with Battery Charging 1.2 of the USB
standard to charge or power. On mains adapter, pay attention to the use of LPS
sources only in compliance to EN 62368-1. Disregard may cause battery damage and
risk of fi re.
When using the wireless connection place it centrally and keep it distant from sources
of possible interference such as microwaves or electrical devices with large metal
surfaces.
Never open the unit. Inappropriate and unauthorized access will void the warranty
and imply possible risk of harm to the user.
Dispose the unit following the legal requirements for recycling electronic equipment.
Page 4
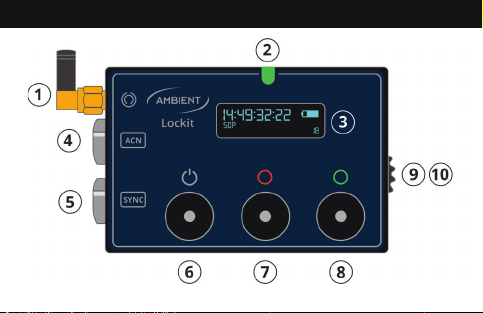
Knowing Your Lockit
Page 5

1. ACN antenna, SMA RP 2.4GHz, keep attached to unit
2. RGB Status LED
3. OLED Display
4. TC & ACN Socket
5. TC & Sync Socket
6. Power Button
7. Red Button
8. Green Button
9. Battery Door, NP-50 Li-Ion type batteries only
10. USB-C socket
Page 6
Powering Your Lockit
Only use certifi ed NP-50 compatible Li-Ion batteries
and power sources in compliance with USB BC1.2 and
EN 62368-1 for external power and charging.
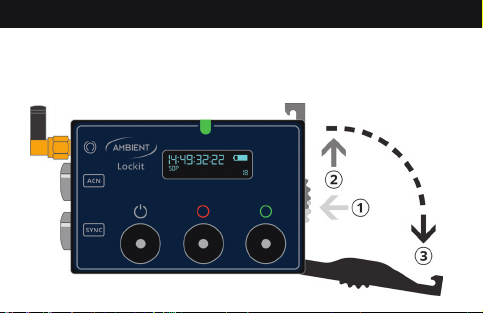
Page 7

Insert battery with key on lower side.
Connected to a USB source the internal NP-50 battery will
be charged in the unit while switched off and in operation.
Page 8

Socket on Your Lockit
ACN
SYNC (yellow cable)
1
GND
GND
2
TC In
TC In
3
ACN TX
PPF Out
4
ACN RX
Sync Out
5
TC Out
TC Out
Connectors carry TC in and out as per industry standard,
plus sync on one and ACN metadata on the
other.
Accept Lemo FGG.0B.305 and compatible
push-pull plugs
Page 9

Getting Started with Your Lockit
Although not necessary, it is recommended to download
LockitToolbox from ambient.de/en/downloads for Mac or
PC and make initial adjustments. Connect via the supplied
USB-C to A cable and click on “connect”.
Select the desired project frame rate, set the internal
RTC* to local time and load current date formatted either
DD.MM.YY.ED or MM/DD/YY.AD into userbits.
LNA** enhances reception at the cost of battery life.
You can also select to Auto Power on the unit with USB
power applied. Once on, you must power down manually.
Adjust LED brightness and TC Level (ACN port only).
* Real Time Clock, keeps approximate time of day (ToD) and date
** Low Noise Amplifi er
Page 10

Operating Your Lockit
POWER BUTTON
Press and hold until LED lights green to start unit in
Standard Mode.
Hold 10s until LED
lights red to reset
unit to default.
In operation brief
press toggles
display on/off .
Press long to initiate
power down sequence.
Page 11

RED AND GREEN BUTTONS
Press and hold green to start Master Mode, red to start
TRX Mode.
In operation: Hold green for 3 seconds to jam the genera-
tor and send out a jam signal over ACN (single jam in Standard, repetitive in Master Mode).
Press both simultaneously to enter menu. Red decre-
ments, green increments parameter value. Press simulta-
neous again to confi rm and proceed.
Hold green and tap red to dim the LEDs.
Hold red and tap green to increase brightness. This can be
changed to altering TC level within LockitToolbox.
Page 12

Operating Your Lockit
1. STANDARD MODE
Press & hold power
Regular setting for syncing
cameras and recorders.
The Lockit will start with muted
TC and Sync. To enable the generator with time of day,
press the green button on one unit for 3 seconds until the
green LED lights up twice. This will also jam other Lockits
and thanks to the unrivaled accuracy, this single jam will
suffi ce to run all of them frame sync over days. Additionally
you can select to shift the TC reference by 12 hours or start
at zero via the local menu.
Page 13

2. MASTER MODE
Press & hold green, tap power
Same as Standard but the
jamming unit will repeat
the signal every couple of
seconds. This increases accuracy
to video line level and lets you add Lockits at any time or
replace batteries with automatic re-jam.
Note that only one Master must be active. If an active
Master is detected, the unit will fall back to Standard mode
and slave to the existing Master before you can set the
generator.
Page 14

3. TRX MODE
Press & hold red, tap power
The Lockit follows an external
timecode source incl. frame
rate and transmits to other
units in TRX. This can be linear timecode on either 5-pin
input or MIDI timecode over USB-C. This mode is exclusive-
ly intended for playback applications or to remote roll a
suited recorder from e.g. a camera in record run.
As the source camera is not synced to the Lockit this is
NOT recommended for regular use.
Page 15

Confi guring Your Lockit
Once started you can make all adjustments necessary
Tap red and green simultaneously: enter, confi rm, proceed.
in the fi eld via the graphical menu.
Red or green: decrease or increase parameter.
Page 16

Parameters
1. Project Frame Rate (FPS). Options: 23.976, 24, 25,
29.97, 29.97 Drop, 30, 47.95, 48, 50, 59.94, 59.94 Drop,
and 60. Adjust to match your cameras setting, press
red and green simultaneously to accept and proceed.
Note: SMPTE TC only supports single rates, so a project rate of e.g.
50 will result in a 50 FPS sync but 25 FPS TC.
2. Sync Format. Options: off , i/PsF, P.*
3. ACN Channel. Options: 11 through 26, “off ”.
* more options through LockitToolbox
Page 17

4. Generator Reference. Options: RTC, 12hrs off set, 00.
5. Apply Settings. Review changes to confi rm or discard.
Leave menu by tapping red and green simultaneously.
Sync and ACN channel will be persistent over a reboot
until reset or changed. The unit will always start with RTC
as reference. To check the current reference, briefl y tap
the green button. To set the generator, press and hold for
3 seconds. The Led will go from alternating blinking red/
green to green and TC will be running on the display.
Page 18

Jamming the Generator
You can jam the generator either via cable, over ACN, or
using the internal reference.
Jam via cable: simply plug in a cable carrying timecode on
pin 2. The LED will light on green and start fl ashing after-
wards.
Jam from ACN: if a jam is received on the set ACN channel,
the unit will automatically jam to the source.
Jam to internal reference and send out ACN jams: press
and hold the green button for approx. 3 seconds until the
LED lights up green 2 times.
Page 19

In standard mode, a single jam broadcast will be sent out,
so to jam other units these must be already switched on.
In Master, the jam will be repeated every couple of seconds
indicated by a green double blink. Slaves powered on later
will sync to the next jam broadcast.
A jammed generator will be indicated with LED fl ashing
green every second. Re-jamming via cable is prevented
until confi rmation, and when slaved to a master, units will
reject also ACN jams form other units than the Master.
Page 20

Display
Toggle screen on/off with power button
Page 21

1. Generator Timecode (dashes on output mute)
2. Project Frame Rate (FPS)
3. Video Sync Format (shows only when applied)
4. Local TC Output Off set (shows only when applied
5. TC output level (shows only when applied)
6. Unit ID (shows only when applied)
7. Active Mode. Blank: Standard, unslaved,
S: Standard, slaved to master, (S): Standard, Master lost
(M): Master, generator unset, M: Master, active
8. ACN Channel, dotted with active LowNoiseAmplifi er
9. Battery Level, alternates “Ext” with power over USB
Page 22

ACN Channels
Specifi cation including channel assignment follows
IEEE 802.15.4 LR-WPAN Standard on 2.4GHz band.
The standard allows for friendly coexistence of
diff erent systems on the same channel.
Still, equivalent ARRI remote focus channels listed
to further help avoiding interference.
Page 23

Page 24

LED Blink Codes
Page 25

Keeping Your Lockit up to Date (and Time)
Check ambient.de/en/downloads for fi rmware updates.
Your Lockit has an internal buff er battery for the RTC. It will
only deplete when the unit is off with no NP-50 loaded and
last you a long time. Once the Lockit doesn’t hold time it’s
time to replace.
First, get a CR2016 type battery. Remove NP-50 battery,
slightly losen the nut of the antenna socket by a half turn,
and remove the 4 Torx 6 screws on the back. Take off back
cover, and slide out the covering lid as per print. Replace
battery and reassemble in reverse order.
Page 26

Warranty
Ambient Recording GmbH warrants against defects in materials and workmanship for
a period of ONE (1) year from date of original retail purchase. This is a non-transferable warranty that extends only to the original purchaser. Ambient Recording GmbH
will repair or replace the product at its discretion at no charge. Warranty claims due
to severe service conditions will be addressed on an individual basis. THE WARRANTY
AND REMEDIES SET FORTH ABOVE ARE EXCLUSIVE. AMBIENT RECORDING GMBH DISCLAIMS ALL OTHER WARRANTIES, EXPRESS OR IMPLIED, INCLUDING WARRANTIES OF
MERCHANTABILITY AND FITNESS FOR A PARTICULAR PURPOSE. AMBIENT RECORDING GMBH IS NOT RESPONSIBLE FOR SPECIAL, INCIDENTAL, OR CONSEQUENTIAL
DAMAGES ARISING FROM ANY BREACH OF WARRANTY OR UNDER ANY OTHER LEGAL
THEORY. Because some jurisdictions do not permit the exclusion or limitations set
forth above, they may not apply in all cases.
For all service, including warranty repair, please refer to your original retailer. If not
applicable obtain a return authorization through the contact form on our website to
be included with the unit when sending in to the address next page.
Page 27

Ambient Recording GmbH
Schleissheimer Str. 181c
DE - 80797 Munich
GERMANY
+49 89 360 55 10 - 0
info@ambient.de
www.ambient.de
rev. 1.0 © 2019, Ambient Recording GmbH
Page 28

 Loading...