

Page 1
SA-SM14 – Quick Start Guide
For an English version of this Quick
Start Guide please go to page 31
Inhoudsopgave
1. Technische specificaties ............................................ 2
2. Verklaring over inhoud en eigendom ........................ 3
3. Uw SA-SM14 Smartphone ......................................... 7
4. Beginnen ................................................................. 14
5. Applicaties & widgets .............................................. 17
6. Bijgeleverde accessoires ......................................... 21
7. Problemen en oplossingen ...................................... 23
8. Aanvullende veiligheidsinformatie .......................... 27
Page 2
SA-SM14 – Quick Start Guide
IP68 Waterdicht (1,2 m diep, 40 min.)
4.5" High Impact Resistant LCD screen
Android 4.2 (Jelly Bean)
MT6589T 1,5 GHz Quad-Core processor
GSM 850/900/1800/1900 MHz
WCDMA/UMTS 850/1900/2100 MHz
Dual SIM: Dual-Standby / One-Talk
8 Mpx AF-camera (incl. LED flash)
2 Mpx FF-camera (voorzijde)
1 GB werkgeheugen (RAM)
4 GB opslaggeheugen (1,7 GB beschikbaar voor
eindgebruiker)
Micro-SD poort (ondersteunt max. 32 GB)
Wi-Fi b/g/n met tethering-functie
Bluetooth 4.0
GPS / A-GPS / EPO
Accelerometer, Gyro, Compass, Auto light sensor
2200 mAh batterij
1. Technische specificaties
2
Page 3
SA-SM14 – Quick Start Guide
2. Verklaring over inhoud en
eigendom
De fabrikant heeft de inhoud van deze documentatie
gecontroleerd op juistheid, maar zij kan nog steeds
fouten bevatten of onvolledig zijn.
Bluetooth is een geregistreerd handelsmerk van
Bluetooth SIC, Inc. JAVA is een geregistreerd
handelsmerk van Sun Microsystems, Inc.
Enkele functies waarnaar dit document verwijst kunnen
netwerkservices zijn en vereisen ondersteuning van uw
netwerk- of serviceprovider. Wij vragen u voor meer
informatie contact met één van hen op te nemen.
Dit apparaat kan onderdelen, technologie of software
bevatten waarop uitvoerbepalingen en wetten van
bepaalde landen van toepassing zijn. Export,
tegenstrijdig met de wet, is verboden.
Leest u a.u.b. aandachtig de direct hierna volgende
"instructies voor uw veiligheid en het gebruik" alsmede
het hoofdstuk "Aanvullende veiligheidsinformatie"
zorgvuldig door voordat u dit apparaat gebruikt.
Dit symbool geeft aan dat het toestel
beantwoordt aan de Europese richtlijnen
betreffende veiligheid en elektrische
interferentie.
3
Page 4
SA-SM14 – Quick Start Guide
VERKEERSVEILIGHEID
Volg de lokale
wetgeving. Houd uw
handen te allen tijde
vrij om het voertuig
tijdens het rijden te
besturen. Uw eerste
aandachtspunt dient
verkeersveiligheid te
zijn.
ALARMNUMMERS
Zorg ervoor dat de
telefoon
ingeschakeld en
operationeel is.
Toets het
alarmnummer in en
druk op de
zendtoets. Geef uw
locatie op. Beëindig
het gesprek niet
zonder
toestemming.
INTERFERENTIE
Alle draadloze
apparatuur kan
gevoelig zijn voor
elektromagnetische
storingen die de
prestatie kunnen
beïnvloeden.
UITSCHAKELEN IN
ZIEKENHUIZEN
Schakel uw telefoon
uit in de buurt van
medische
apparatuur.
SOS
Instructies voor uw veiligheid en h et
geb ruik
4
Page 5
SA-SM14 – Quick Start Guide
UITBREIDINGEN EN
BATTERIJEN
Gebruik uitsluitend
goedgekeurde
uitbreidingen en
batterijen. Sluit geen
incompatibele
producten aan.
UITSCHAKELEN IN
VLIEGTUIGEN
Draadloze
apparatuur kan
elektromagnetische storing in
vliegtuigen
veroorzaken.
AANSLUITEN OP
ANDERE
APPARATUUR
Lees voordat u een
verbinding maakt met
enig ander apparaat
eerst deze
gebruikershandleiding
of het mogelijk is.
BESCHERM HET
MILIEU
Werp batterijen
niet in vuur of het
bij het
huishoudelijk afval.
Volg regelgevingen
betreffende
hergebruik van
batterijen op.
BACK-UP KOPIEËN
Vergeet geen kopieën
of een geschreven
notitie te maken van
alle belangrijke
informatie, zoals
wachtwoord(en) of
parameters van
netwerk providers.
BESCHERM
KINDEREN
Bewaar geen enkel
klein onderdeel van
het apparaat, zoals
een
geheugenkaart,
binnen het bereik
van kinderen.
5
Page 6
SA-SM14 – Quick Start Guide
Lees voordat u het toestel in gebruik neemt alle
veiligheids- en werkingsinstructies goed door.
Bewaar deze handleiding zorgvuldig zodat u
hem achteraf gemakkelijk kunt raadplegen.
Volg de waarschuwingen die vermeld zijn in
deze handleiding nauwlettend op. Volg alle
instructies over het gebruik en de werking ervan
nauwgezet op.
Koppel het toestel los van het stroomnet vóór u
het schoonmaakt.
Volg voor het monteren van de batterij, SIM-
kaart(en) en accessoires de instructies van de
fabrikant op en gebruik alleen accessoires die
door de fabrikant worden aanbevolen.
IP68
Uw toestel is IP68-gecertificeerd en kan tot 40 minuten
op een diepte van 1,2 meter ondergedompeld worden.
De garantie vervalt als u het toestel op grotere diepte
gebruikt, langer dan de gestelde 40 minuten onder
dompelt, of uw toestel open maakt (uitgezonderd voor
het plaatsen van de SIM-kaart(en) en/of SD-kaart).
6
Page 7
SA-SM14 – Quick Start Guide
3. Uw SA-SM14 Smartphone
Klaarmaken voor gebruik
Voordat u begint dient u er zeker van te zijn dat de
telefoon is uitgeschakeld en de oplader niet is
aangesloten.
Volg vervolgens de stapsgewijze instructies op zoals
hieronder beschreven voor het aanbrengen van de
SIM-kaart(en) en/of Micro-SD-kaart.
> Let op: Schade die voortvloeit uit het niet zorgvuldig
plaatsen van de SIM-kaart(en) en/of Micro-SD-kaart
valt niet onder de garantie.
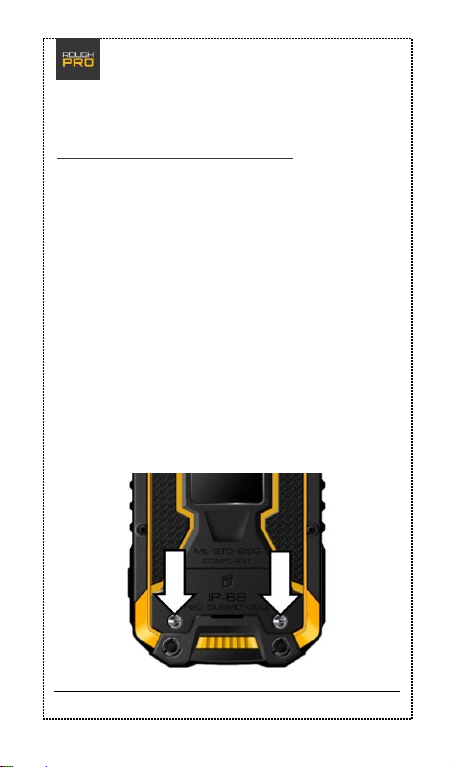
Stap 1: Draai de tw ee hieronder
gemarkeerde schroeven achterop het toestel
los. G ebruik hiervoor het b ijgeleverde
gereedschap.
7
Page 8
SA-SM14 – Quick Start Guide
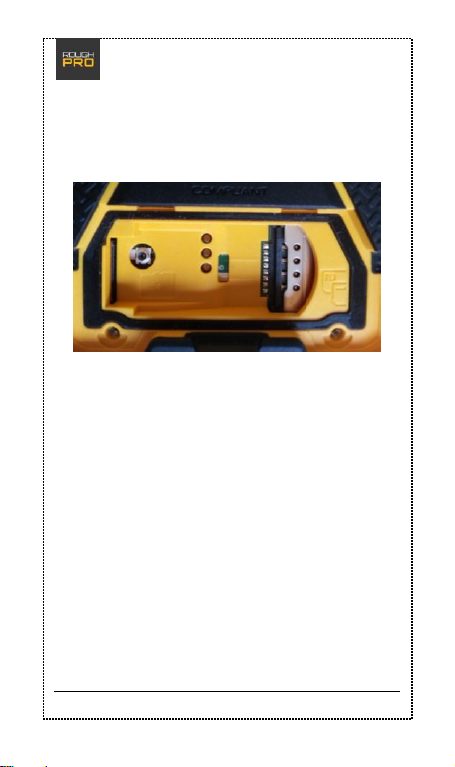
Stap 2: Open het compartiment.
> Let op: Boven de t wee SIM -sloten vind t u e en
ruimte waar gemakke lijk een SIM -kaart in pas t.
Deze ruimte is niet geschikt voor SIM-kaarten.
8
Page 9
SA-SM14 – Quick Start Guide
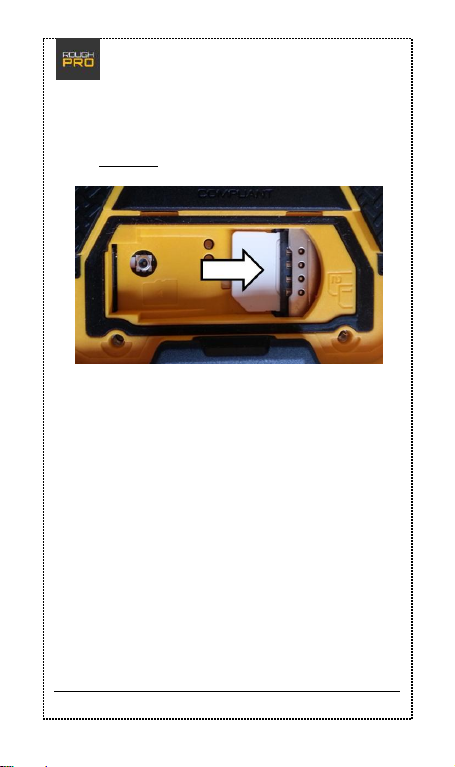
Stap 3: Ind ien beschikbaar, plaa ts SIM 2 (met
het k operen plaatje naar beneden ) in het
onderste SIM-slot, als v olgt:
9
Page 10
SA-SM14 – Quick Start Guide
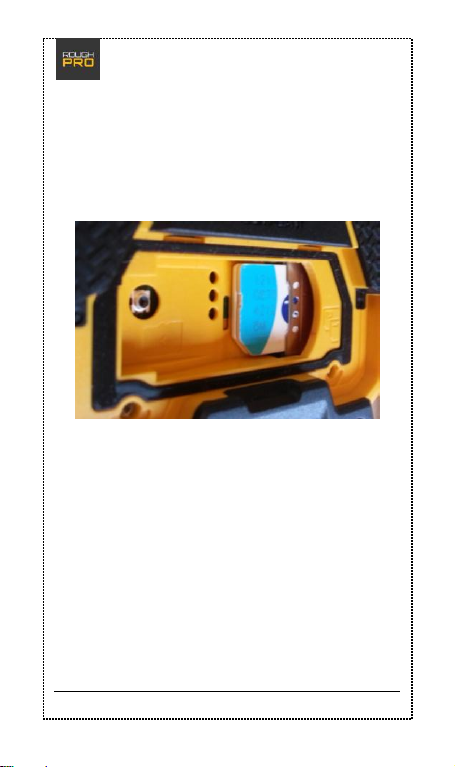
Stap 4: Plaats SIM 1 (met het koperen
plaatje naar beneden) in het bovenste SIMslot, a ls volgt:
> Let op: Om de snelste verbinding tot stand te
brengen, kiest u SIM 1 voor uw dataverbinding.
10
Page 11
SA-SM14 – Quick Start Guide
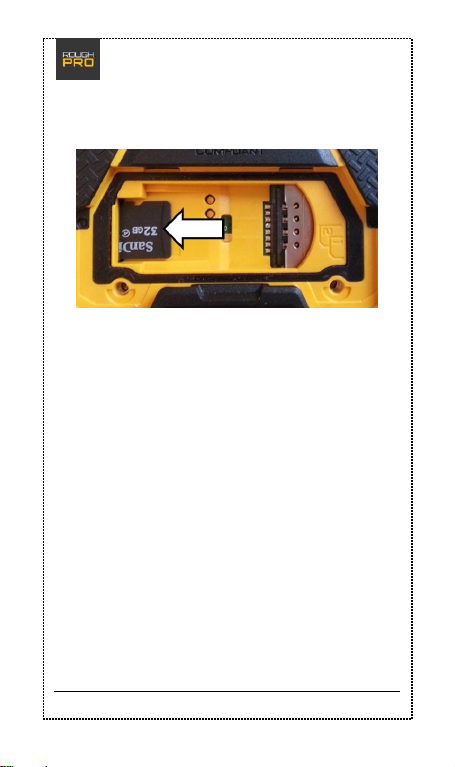
Stap 5: Een micro-SD-kaart plaatst u als volgt:
>Let op: Draai bij de sluiting van he t compartiment
beide schroeven om en om een paar slagen vast. Een
goede sluiting van het compartiment is belangrijk voor
de waterdichtheid van het toestel.
11
Page 12
SA-SM14 – Quick Start Guide
Uw toestel
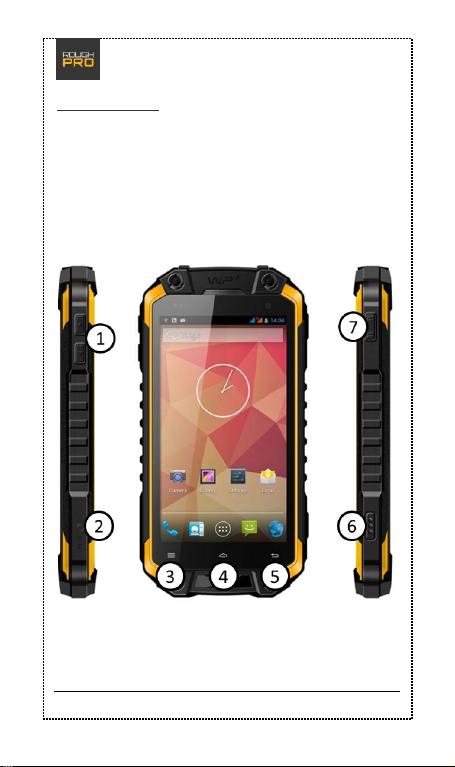
Hieronder ziet u (van links naar rechts) het linker
zijaanzicht, het vooraanzicht en het rechter zijaanzicht
van uw SA-SM14. De 4 'on-device' knoppen en 3 'ondevice' soft buttons zijn gemarkeerd met de cijfers 1
t/m 7:
12
Page 13
SA-SM14 – Quick Start Guide
De knoppen
(1) Volumeknoppen: Met deze knoppen bepaalt u de
verschillende volumeniveaus van de telefoon.
(2) Reset-knop: Door op deze knop te drukken wordt
uw toestel opnieuw gestart.
(3) Menu-knop: Afhankelijk van waar u zich in de
telefoon bevindt, worden met deze knop de extra
functies zichtbaar.
(4) Thuis-knop: Door op deze knop te drukken keert u
altijd terug naar het beginscherm. Wanneer u deze
knop ingedrukt houdt, zullen uw recent geopende apps
tevoorschijn komen om snel te kunnen wisselen.
(5) Terug-knop (Back key): Hiermee keert u terug naar
het vorige scherm.
(6) Alarm-knop: Indien u gebruik maakt van
bijvoorbeeld de Man Down oplossing van BCom
Solutions kunt u met deze knop een alarmering plegen.
Zonder additionele software heeft deze knop geen
functie.
(7) Aan/uitknop (Power key): Gebruik de aan/uitknop
om de telefoon in- of uit te schakelen. Als de telefoon
aan staat en u drukt kort op de knop zal het scherm uit
zichzelf in de stand-by-modus gaan. Als u hem
ingedrukt houdt, verschijnt er een keuzemenu.
13
Page 14
SA-SM14 – Quick Start Guide
4. Beginnen
Wanneer u de telefoon voor het eerst inschakelt, wordt
u een aantal vragen gesteld om het toestel naar uw
wensen te configureren. Volg deze stappen
nauwkeurig. Aan het eind zal Android u enkele tips
geven ten aanzien van het gebruik van de telefoon.
> Let op: Mocht u later iets in de instellingen willen
veranderen, kan dit altijd door in het Beginscherm op
de Menu-knop te drukken en "Instellingen" te kiezen.
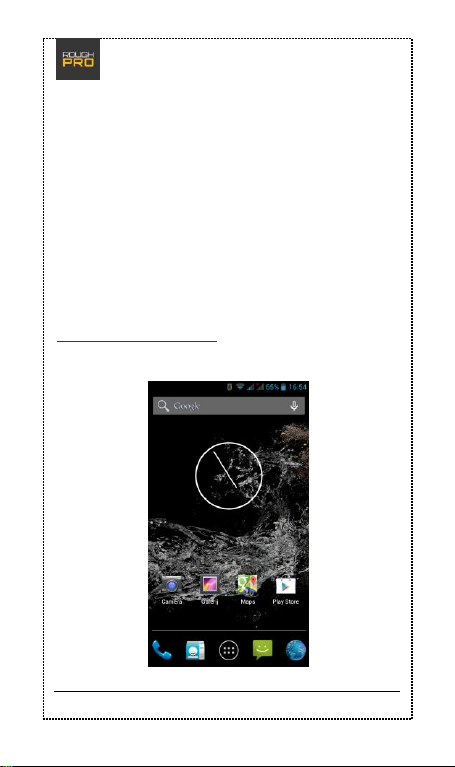
Het Beginscherm
Het beginscherm ziet er als volgt uit:
14
Page 15
SA-SM14 – Quick Start Guide
Het "Beginscherm" of "Home Screen" is het
basisscherm van uw smartphone. Vanuit hier kunt u
altijd 'met een schone lei' beginnen en alle functies
gemakkelijk bereiken. Onderaan vindt u altijd in het
midden de hoofdmenu-toets en uw meest gebruikte
apps. Deze balk kunt u overigens naar eigen smaak
inrichten, net als de rest van het beginscherm.
In totaal zijn er vijf beginschermen. Wanneer u van
links naar rechts sleept krijgt u toegang tot deze
schermen.
Als u in een beginscherm op een lege plek uw vinger
houdt, kunt u de achtergrond wijzigen.
Om sneltoetsen toe te voegen aan uw beginschermen
kunt u het scherm vasthouden op een lege ruimte,
hierna zal een menu verschijnen wat u in staat stelt om
een snelkoppeling toe te voegen aan uw beginscherm.
Als u een icoontje lang ingedrukt houdt, kunt u deze
verplaatsen of onder in het scherm verwijderen.
Door op de hoofdmenu-toets te drukken komt u in het
hoofdmenu van de smartphone, waar u alle
geïnstalleerde applicaties kunt vinden. Als u aldaar lang
op een icoontje drukt, kunt u dit in het beginscherm
plaatsen.
15
Page 16
SA-SM14 – Quick Start Guide
Het scherm ontgrend elen
Wanneer uw telefoon in de standby-stand staat, dient
u het scherm te ontgrendelen voordat u de telefoon
weer kunt gebruiken. U doet dit als volgt:
Druk op knop 7 (power key)
Zet uw vinger op het slotje in het midden van
het scherm en laat het scherm niet los.
Er zal een cirkeltje om het slotje verschijnen,
alsmede een geopend slotje rechts in het
scherm.
Trek het cirkeltje naar het geopende slotje en
laat het los. De telefoon is nu ontgrendeld.
16
Page 17
SA-SM14 – Quick Start Guide
5. Applicaties & widgets
App licaties
Uw telefoon is voorzien van een aantal standaard
applicaties, tegenwoordig beter bekend als "apps". In
dit hoofdstuk leggen we uit wat de belangrijkste apps
voor u kunnen betekenen.
Telefoon
Linksonder op uw beginscherm ziet een telefoonicoontje. Door hier op te drukken komt u in de
telefoon-app waarmee u kunt bellen.
U hebt nu drie hoofdmogelijkheden om een gesprek te
starten:
1 | U klikt op het telefoon-icoon linksboven in de app
en draait direct het telefoonnummer van de persoon
die u wenst te spreken.
2 | U klikt op het klok-icoon in het midden bovenin en
u krijgt een overzicht van alle geplaatste, ontvangen e n
gemiste oproepen. Door op de telefoon-icoontjes naast
de afgebeelde oproepen te klikken, belt u de
desbetreffende persoon.
3 | U klikt op het contactpersoon-icoon rechtsboven en
u komt u in uw telefoonboek / contactenlijst terecht.
>Tip: Als u bij optie 1 een nummer begint in te voeren
komen de nummers die in uw telefoonboek staan en die
17
Page 18
SA-SM14 – Quick Start Guide
met dezelfde cijfers beginnen boven in uw scherm te
staan.
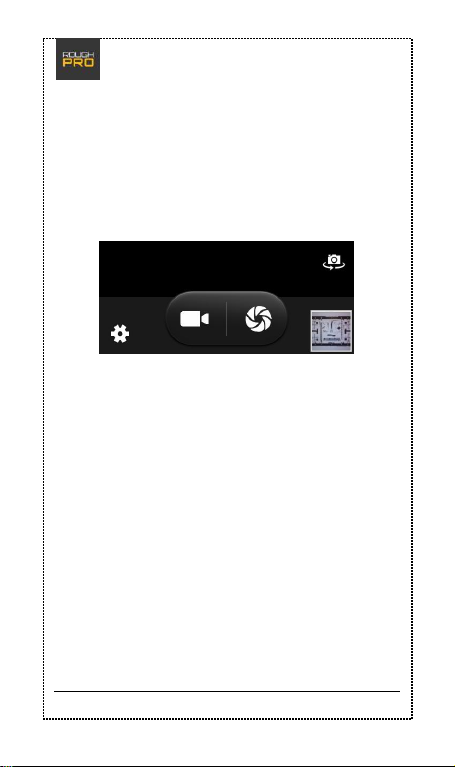
Camera
Door op het fotocamera-icoontje te drukken start u de
camera app op.
Aldaar kiest u voor de video- of foto-modus door op
respectievelijk het videocamera-icoontje of het sluitericoon te drukken.
Rechts van deze keuze-knop ziet u een verkleinde
versie van de laatst gemaakte foto of video, ook wel
"thumbnail" genoemd . Door hier op te drukken kunt u
deze bekijken en eventueel direct delen met anderen.
Boven de thumbnail ziet u een klein cameraatje met
een ronddraaiend pijltje eronder. Hier kunt u switchen
tussen de voor- en achter-camera.
Links van de keuze-knop bevindt zich het "Instellingen"icoontje. Hier kunt u de camera aan uw wensen
aanpassen.
18
Page 19
SA-SM14 – Quick Start Guide
Berichten
Als u op het Berichten-icoontje drukt, komt u in het
Berichten-menu.
Door op het tekstwolk-icoontje linksonder te drukken
begint u een nieuwe conversatie. Het toetsenbord
verschijnt automatisch.
>Tip: Android maakt geen gebruik van losse berichten,
alle berichten worden als een gesprek weergegeven. U
ziet dus ook wat er al besproken is.
>Tip: Om een conversatie (uit de lijst) te verwijderen
houdt u uw vinger op de conversatie, wacht u tot
onderin het scherm een prullenbak-icoon verschijnt, en
drukt u vervolgens op dit icoon.
U kunt op de bovenste regel een nummer invoeren.
Wilt u één of meerdere contacten uit uw telefoonboek
invoeren, druk dan op het poppetje rechts van de regel.
Door op de grote pijl-naar-rechts (het 'gevouwen
vliegtuigje') te drukken verzendt u het bericht.
>Tip: Als u linksboven op de paperclip drukt kunt u
foto's, geluid en ander media meesturen. Hierdoor zal
de SMS veranderen in een MMS. Let er op dat hier extra
kosten voor in rekening kunnen worden gebracht.
Neem contact op met uw provider om dit te
controleren.
19
Page 20
SA-SM14 – Quick Start Guide
Widgets
Android 4.2 heeft een groot aanbod aan "widgets".
Widgets zijn een soort applicaties welke op uw
hoofdscherm geplaatst kunnen worden. Druk hiervoor
op de menu-toets en vervolgens bovenin het
hoofdmenu op tab "Widgets". Door met uw vinger naar
links en rechts te bewegen (swipen) kunt u alle widgets
bekijken.
Door een willekeurige widget lang ingedrukt te houden
kunt u hem naar het hoofdscherm slepen en bepalen
waar deze komt te staan.
>Let op: In sommige gevallen hebben gedownloade
apps ook een widget. In dat geval komen deze ook op
de widget-tab te staan.
20
Page 21
SA-SM14 – Quick Start Guide
6. Bijgeleverde accessoires
USB-kabel
Met deze kabel laadt u de telefoon op en kunt u een
verbinding tot stand brengen met een computer.
Opladen: Sluit eerst de oplader aan op de USB-
kabel, steek de micro-USB-plug vervolgens in de
daarvoor bestemde poort op uw toestel en
steek als laatste de lader in het stopcontact.
De micro-USB aansluiting bevindt zich aan de
bovenkant van uw toestel onder de rubbere
afdichting. Sluit de rubere afdichting na het
opladen zorgvulding om de wachterdichtheid
van uw toestel te garanderen.
Computerverbinding: Steek de micro-USB-plug
in de daarvoor bestemde poort op uw toestel en
de USB-plug in een USB-poort op uw computer.
Zet vervolgens uw telefoon aan. Als u de
telefoon wilt loskoppelen, raden wij u aan altijd
eerst uw toestel "veilig te verwijderen" op de
computer voordat u de USB -kabel eruit haalt.
Doet u dit niet, loopt u kans dat informatie op
de telefoon beschadigd raakt en onbruikbaar
wordt.
Terwijl de telefoon is aangesloten op uw computer via
de USB-kabel, wordt uw telefoon ook opgeladen.
21
Page 22
SA-SM14 – Quick Start Guide
>Let op: Laat het geheugen van uw mobiele telefoon
nooit door Windows formatteren. U loopt de kans dat
uw geheugen onherstelbaar beschadigt (het betreft hier
het interne geheugen van uw telefoon, niet uw
geheugenkaart).
Oplader en batterij
Gebruik alleen de meegeleverde lader en altijd in een
droge omgeving. Kortsluiting kan leiden tot brand,
persoonlijke verwondingen en zelfs explosiegevaar.
Wilt u toch een andere lader gebruiken, neem dan
eerst contact op met uw leverancier.
Deze mobiele telefoon wordt met een originele batterij
geleverd. Neem bij een defecte batterij a.u.b. contact
op met uw dealer.
>Tip : Zie ook het ho ofdstuk "Aanvul lende
veiligheidsinformatie" voor extra inform atie ov er
het gebruik van uw batterij.
22
Page 23
SA-SM14 – Quick Start Guide
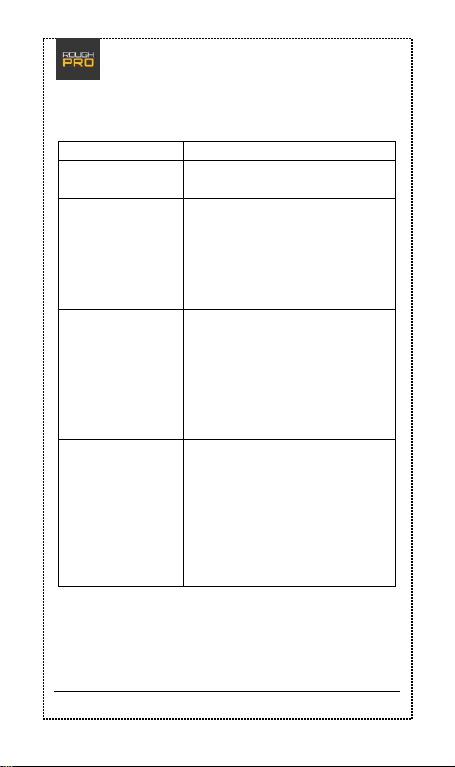
Probleem
Mogelijke oorzaken
Het toestel gaat
niet aan
- De batterij is niet opgeladen.
De batterij wil
niet opladen /
lijkt niet op te
laden
- De batterij is te leeg en zal
eerst voor langere tijd moeten
worden opgeladen.
- De oplader en/of USB-kabel is
defect.
- De batterij is defect.
Er treedt een
SIM-fout op, er
is geen SIMkaart
gedetecteerd
- De SIM-kaart is niet schoon.
- De SIM-kaart is verkeerd
geplaatst (zie hoofdstuk 3 voor
het plaatsen van de SIM).
- De SIM-kaart is
beschadigd/defect.
>Let op: Geldt ook voor SIM2.
Ik heb slecht
signaal
- Kijk of uw signaal-indicator
op uw scherm meer dan 2
balkjes aangeeft. Indien dit
niet het geval is, bevindt u zich
in een gebied met slechte
dekking of is er een defect aan
uw toestel.
>Let op: Geldt ook voor SIM2.
7. Problemen en oplossingen
23
Page 24
SA-SM14 – Quick Start Guide
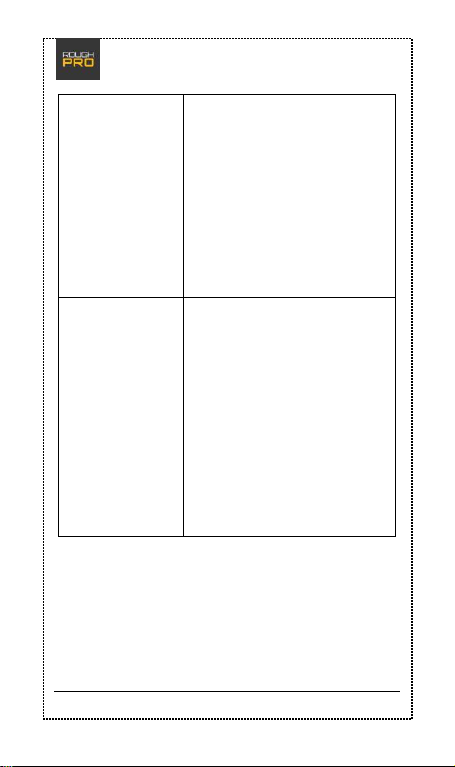
Het is niet
mogelijk te
bellen
- De nummerweergave staat
uit en uw provider laat
anoniem bellen niet toe.
- Er is een sterke storingsbron
in de directe omgeving
aanwezig.
- U hebt een beperking
aangezet in de instellingen
voor bellen.
- U SIM-kaart is nog niet
geactiveerd door uw provider.
Het is niet
mogelijk contact
te maken met
het netwerk
- Het netwerk geeft een slecht
signaal af of er is een sterke
storing in de buurt.
- De SIM-kaart is niet goed
geplaatst.
- De SIM-kaart is
beschadigd/defect.
- Het toestel staat in
"Vliegmodus", waardoor alle
zend-apparatuur wordt
uitgeschakeld. Er staan een of
twee vliegtuigsymbolen in de
statusbalk naast de tijd.
24
Page 25
SA-SM14 – Quick Start Guide
3G-internet
werkt niet
- Controleer bij uw provider of
u een internetbundel heeft.
Sommige prepaid-aanbieders
vereisen dit.
- Controleer of
"gegevensverbinding" aan
staat.
- Controleer of de APNinstellingen goed staan
ingesteld (zie ook de website
van de netwerk-provider). Doe
dit via Instellingen > Meer >
Mobiele netwerken > Acces
Point Names.
- Controleer of u "Roaming"
aan heeft staan indien u
gebruik maakt van een MVNO
provider. Doe dit via
Instellingen > SIM-beheer >
Roaming.
Mijn foto's zijn
te donker
- Controleer uw instellingen.
- De omgeving is te donker.
Mijn foto's zijn
onscherp
- Neem altijd foto's van een
stilstaand object.
- Zorg dat u de telefoon goed
stil houdt.
- De omgeving is te donker.
25
Page 26
SA-SM14 – Quick Start Guide
De accu is snel
leeg
- Een smartphone is een
grootverbruiker op het gebied
van energie. Het is dan ook
sterk afhankelijk van het
gebruik hoelang de lading
meegaat. Bij gemiddeld
gebruik is het gebruikelijk dat
een smartphone aan het einde
van de dag weer opgeladen
moet worden.
De GPSfunctionaliteit
werkt niet, ik
krijg geen GPSfix
- Controleer of de GPS-functie
is ingeschakeld.
- Een warmte-werende
(voor)ruit,
voorruitverwarming,
hoogbouw of dichte bebossing
kunnen de GPS-functie
verstoren of zelfs geheel
blokkeren.
- Probeer de GPS-functie
buiten op een open veld. Na
ca. 5 minuten zou u GPSverbinding moeten hebben.
26
Page 27
SA-SM14 – Quick Start Guide
8. Aanvullende
veiligheidsinformatie
Lokale wetten en regels
Vergeet niet eventuele speciale regelgevingen te
volgen die van toepassing zijn op de plek waar u uw
telefoon gebruikt.
Volume
Stel het volume tijdens gebruik van een oortelefoon
niet te hoog in, om gehoorbeschadiging te voorkomen.
Pacemakers
Personen met pacemakers dienen onderstaande
aanwijzingen te volgen:
Houd de telefoon altijd verder dan 15 cm
verwijderd van de pacemaker wanneer de
telefoon ingeschakeld is.
Draag de telefoon nooit in een borstzakje.
Houd de telefoon tegen het rechteroor
(tegenovergestelde kant van de pacemaker.)
Gehoorapparaten
Uw telefoon kan storingen veroorzaken in bepaalde
gehoorapparaten. Mocht dit het geval zijn, adviseren
wij u contact op te nemen met de fabrikant van het
gehoorapparaat.
Het gebruik van batterij en oplader
27
Page 28
SA-SM14 – Quick Start Guide
Hoe lang u zonder opladen met het toestel kunt
werken hangt af van het gebruikte netwerk, de
telefooninstellingen en de omstandigheden van uw
telefoon. Uw SA-SM14 is ontworpen voor een minimale
gebruiksduur van 24 uur.
Gebruik geen enkele oplader die op enige wijze
beschadigd is.
Als u de telefoon gebruikt in de buurt van een
basisstation van een netwerk, verbruikt deze minder
stroom. Stand-by- en gesprekstijden worden sterk
beïnvloed door de signaalsterkte op het mobiele
telefoonnetwerk, door het gebruik van o.a. GPS, door
de schermhelderheid en door de gebruiker
geïnstalleerde applicaties.
De oplaadtijd van batterijen hangt af van de resterende
batterijcapaciteit, het batterijtype en de gebruikte
batterijlader. De batterij kan honderden keren
opgeladen en ontladen worden maar zal geleidelijk aan
verslijten.
Haal de stekker van de oplader uit het stopcontact
wanneer deze niet in gebruik is. Laat de batterij niet
langer dan 48 uur aangesloten op de lader. Te hoog
opladen kan de levensduur van de batterij verkorten.
Zelfs wanneer een volledig opgeladen batterij
ongebruikt blijft, zal hij geleidelijk aan capaciteit
verliezen.
28
Page 29
SA-SM14 – Quick Start Guide
Indien uw telefoon of oplader nat wordt, probeer deze
dan niet te drogen in een verwarmingsapparaat, zoals
een droger of magnetronoven. Als u dit wel doet, kan
dit brandwonden veroorzaken of leiden tot uitzetting
of explosie van de telefoon, batterij, oplader of van het
gebruikte verwarmingsapparaat.
>Let op: De fabrikant verklaart hierbij niet aansprakelijk
te zijn of te kunnen worden gehouden voor enige
directe of indirecte schade, voortvloeiende uit één of
meer van de bovengenoemde fout uitgevoerde
handelingen.
Straling en SAR
De SA-SM14 voldoet aan de richtlijnen voor CEmarkering, ook op het gebied van straling. Uw
smartphone is uitgerust met meerdere zenders en
ontvangers (GSM/UMTS/Wi-Fi). Het ontwerp van het
toestel is zodanig dat de CE-normen niet worden
overschreden.
Radiogolven hebben invloed op het menselijk lichaam,
ze worden in het lichaam geabsorbeerd en omgezet in
warmte. De mate waarin dit gebeurt, wordt
aangegeven met een SAR-waarde. SAR staat voor
"Specific Absorption Rate".
Om een zo objectief mogelijk beeld van de SAR-waarde
te krijgen, wordt op diverse manieren gemeten. Daarbij
wordt gekeken naar het aantal watts dat per kilogram
29
Page 30
SA-SM14 – Quick Start Guide
Frequentie
Locatie
W/Kg
900 Mhz
Hoofd
0,372
900 Mhz
Lichaam
0,458
1800 Mhz
Hoofd
0,142
1800 Mhz
Lichaam
0,192
3G
Hoofd
0,109
3G
Lichaam
0,145
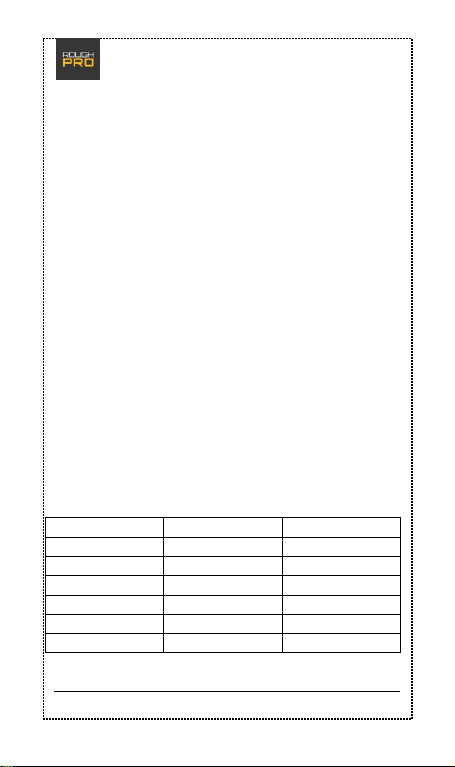
lichaamsgewicht wordt geabsorbeerd, gemiddeld over
10 gram lichaamsweefsel. Volgens de CE-norm moet
deze waarde onder de 2,0 W/kg liggen.
Het testen van de SAR-waarde vind plaats onder de
volgende condities:
Op maximaal toegestaan zendvermogen dat de
ingebouwde zender kan leveren op de
verschillende frequenties.
Onder de meest ongunstige omstandigheden die
bij normaal gebruik kunnen voorkomen,
bijvoorbeeld als het toestel vlak bij het hoofd is.
Uw toestel is zo ontworpen dat alleen het vermogen
wordt gebruikt dat nodig is om het netwerk te
bereiken. Omdat het SAR-testprotocol voorschrijft dat
het testen van de SAR-waarde moet plaatsvinden op
maximaal zendvermogen zal in de praktijk de
hoeveelheid straling lager zijn dan de opgegeven SARwaarde. Dit is sterk afhankelijk van het ontvangst op de
plaats waar u zich bevindt.
SAR waarden:
30
Page 31
SA-SM14 – Quick Start Guide
Table of contents
1. Technical specifications… ……….……………………………..32
2. Notice of content and ownership……………………….…33
3. Your SA-SM14 Smartphone…………………………………..38
4. Getting started ........................................................ 45
5. Applications & widgets ............................................ 50
6. Accessories in the box ............................................. 48
7. Common issues and solutions ................................. 54
8. Additional safety instructions.................................. 58
31
Page 32
SA-SM14 – Quick Start Guide
IP68 Waterproof (1.2 m deep, 40 min.)
4.5" High Impact Resistant LCD screen
Android 4.2 (Jelly Bean)
MT6589T 1.5 GHz Quad-Core processor
GSM 850/900/1800/1900 MHz
WCDMA/UMTS 850/1900/2100 MHz
Dual SIM: Dual-Standby / One-Talk
8.0 Mpx AF camera (incl. LED flash)
2.0 Mpx FF camera (front)
1 GB memory (RAM)
4 GB storage memory (1.7 GB free for end user)
Micro-SD slot (supports 32 GB max.)
Wi-Fi b/g/n with Tethering
Bluetooth 4.0
GPS / A-GPS / EPO
Accelerometer, Gyro, Compass, Auto light sensor
2200 mAh battery
1. Technical specifications
32
Page 33
SA-SM14 – Quick Start Guide
2. Notice of content and
ownership
The manufacturer has reviewed the contents of this
documentation with regard to accuracy, but they may,
nevertheless, contain errors or unintentional
omissions.
Bluetooth is a registered trademark of Bluetooth SIC,
Inc. JAVA is a registered trademark of Sun
Microsystems, Inc.
Several functionalities described within this document
refer to network services and require support by your
network- or service provider. Please refer to either of
them for specific information regarding these
functionalities.
This device may contain parts, technology or software
upon which the export regulations and local laws of
specific countries apply. Exporting, when in
contradiction with local laws, is prohibited.
Before using this device, please thoroughly acquaint
yourself with the contents of the following "Safety and
user instructions" and the chapter "Additional safety
instructions".
This symbol states that the device meets
the European directives with regards to
33
Page 34
SA-SM14 – Quick Start Guide
safety and electric interference.
34
Page 35
SA-SM14 – Quick Start Guide
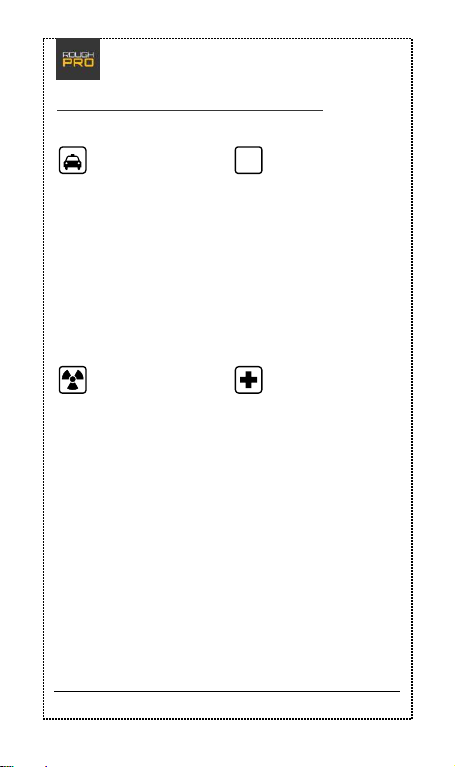
SAFETY ON THE
ROAD
Adhere to local laws.
Keep your hands
available to operate
the vehicle at all
times. Your primary
responsibility is road
safety.
EMERGENCY
NUMBERS
Have the phone
switched on and
functioning. Dial the
emergency number
and press the callbutton. State your
location. Do not
terminate the call
without permission.
INTERFERENCE
Every wireless device
may be susceptible
to electromagnetic
disturbances that
could influence
performance.
POWER DOWN IN
HOSPITALS
Switch off your
device when near
medical appliances.
SOS
Safety and user instru ctions
35
Page 36
SA-SM14 – Quick Start Guide
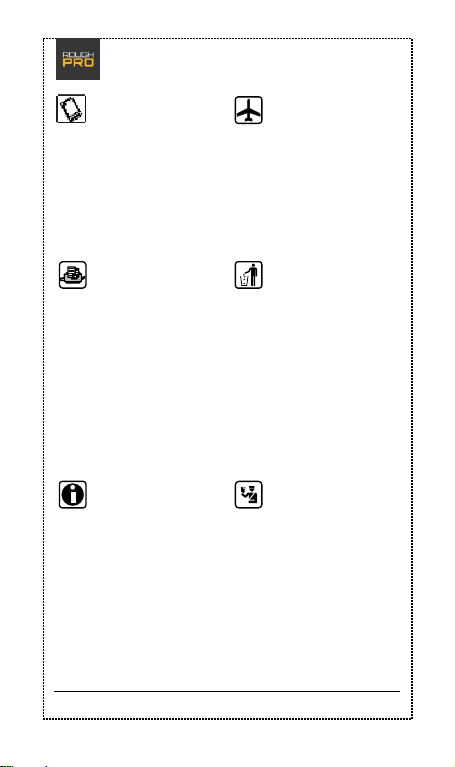
EXPANSIONS AND
BATTERIES
Only use approved
expansions and
batteries. Do not
connect any
incompatible
products.
POWER DOWN
ABOARD
AIRPLANES
Wireless devices
may cause
electromagnetic
disturbances in
airplanes.
CONNECTING TO
OTHER DEVICES
Before connecting to
another device,
always refer to its
user manual to
determine whether
this is at all possible.
SAVE THE
ENVIRONMENT
The battery must be
recycled or disposed
of properly
according to local
laws and
regulations and
always kept
separate from
household waste.
BACK-UP COPIES
Remember to make
copies or written
notes of important
information, such as
passwords or
parameters of
network providers.
KEEP CHILDREN
SAFE
Keep every small
item of the device,
such as memory
cards, out of reach
of children.
36
Page 37
SA-SM14 – Quick Start Guide
Prior to using this device for the first time, make
yourself acquainted with all safety- and user
instructions.
Keep this manual stored properly so that you
may consult it easily at a later time. Carefully
follow the notifications supplied within this
manual.
Follow all instructions for use and operation
carefully.
Before cleaning the device, unplug it from any
and all electrical outlets.
To insert the battery, SIM card and accessories,
follow the instructions of your vendor and only
use accessories that were recommended by the
vendor of this device.
IP68
Your device is IP68 certified and therefore can be
submerged in water for 40 minutes, 1.2 m deep. When
you use the device in water deeper than 1.2 m, for
more than 40 minutes, or open the device (except for
inserting the SIM(s) and/or SD card), the warranty will
be voided.
37
Page 38
SA-SM14 – Quick Start Guide
3. Your SA-SM14 Smartphone
Preparing for first use
Before you begin, make sure the phone is switched off
and the charger is not connected.
Now follow all steps described below to insert the SIM
card(s) and/or micro-SD card.
>Please note: Damage caused by not carefully inserting
the SIM card(s) and/or micro-SD card is not covered by
warranty.
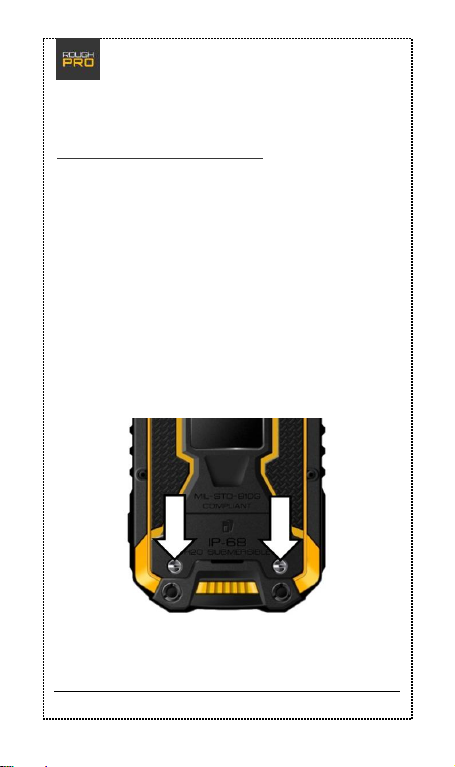
Ste p 1: Loosen the screws indicated below,
using the special tool in the box.
38
Page 39
SA-SM14 – Quick Start Guide
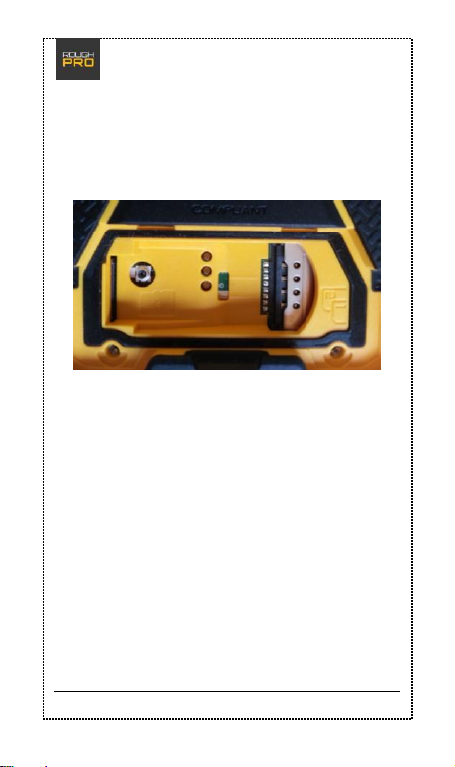
Step 2: Open the lid.
>Please note: On top of the two dedica ted SIM slots
you'll find a 'slot' in whic h a SIM card also easily
fits. This space should not be used for SIM car ds.
39
Page 40
SA-SM14 – Quick Start Guide
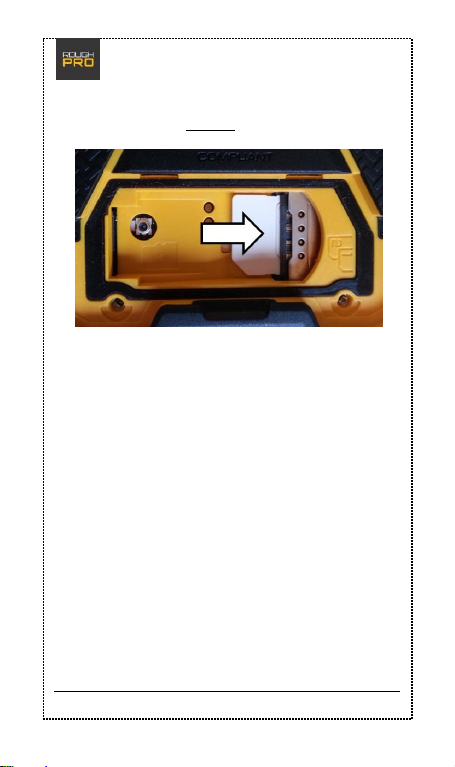
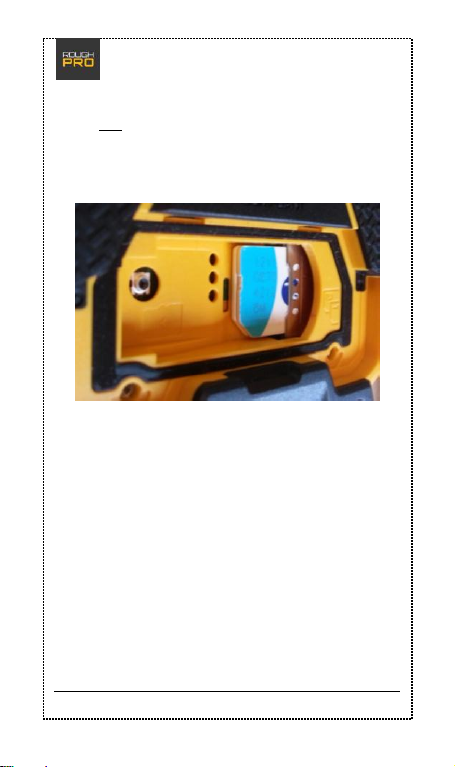
Step 3: If ava ilable, i nsert SIM 2 (chip facing
down) in the bottom slot, as shown here:
40
Page 41
SA-SM14 – Quick Start Guide
Step 4: Inser t SIM 1 (chip facing d own) in the
top slot, as shown here:
>Please note: To get the fastest connection, SIM 1
should be used for data.
41
Page 42
SA-SM14 – Quick Start Guide
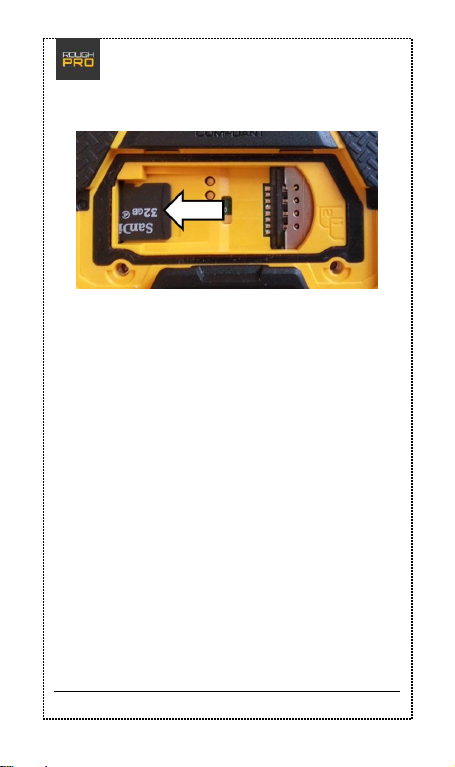
Step 5: Insert a micr o-SD card as follows:
>Please note: When closing the lid, make sure to
carefully tighten the screws turn by turn. A well-closed
lid is crucial for keeping the device waterproof.
42
Page 43
SA-SM14 – Quick Start Guide
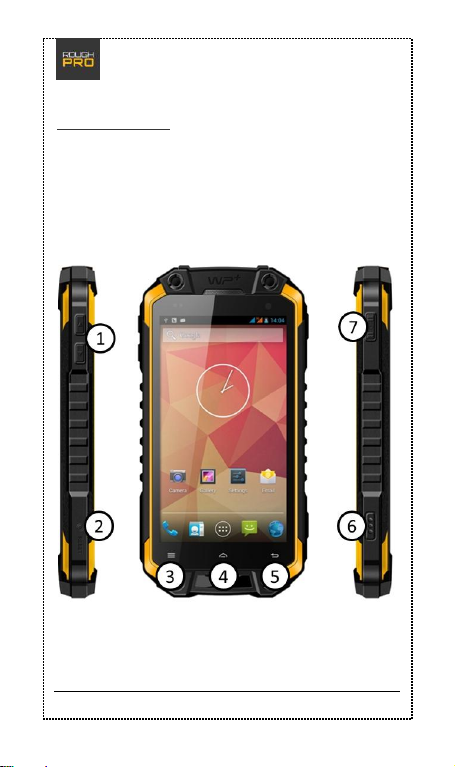
You r device
Below you'll find a picture of the left side view, the
front view and the right side view of your SA-SM14. The
4 on-device buttons and 3 on-device soft buttons are
marked with numbers 1 through 7:
43
Page 44
SA-SM14 – Quick Start Guide
The bu ttons
(1) Volume buttons: The volume buttons adjust all the
different sound levels of the phone.
(2) Reset button: By pushing this button you'll restart
the device.
(3) Menu button: Depending on 'where you are' or
what application you are using, the menu button will
bring up the extra functionalities and/or actions.
(4) Home button: Pressing this button will bring you
back to the default (home) screen at all times. Keeping
the button pressed, brings up your recently used apps,
allowing you to switch between apps rapidly.
(5) Back button: This one always leads you back to the
previous screen.
(6) Alarm button: If you're using for instance BCom's
"Man Down" application, you can press this button to
set off the alarm. Without additional software this
button has no function.
(7) Power button: Use the power button to switch the
phone on or off. If the phone is switched on, a quick
press on the power button will automatically put the
device in standby mode (or bring it back to active
mode). Keep the power button pressed and a menu will
appear.
44
Page 45
SA-SM14 – Quick Start Guide
4. Getting started
When you switch on your phone for the first time, you
will be given a number of questions in order to
configure the device to your liking. Follow these steps
carefully. At the end Android will show you how to use
the phone and give you a couple of usability tips.
>Please note: You can always change things later by
pressing the Menu button while in the Home screen
(see below) and choose "System settings".
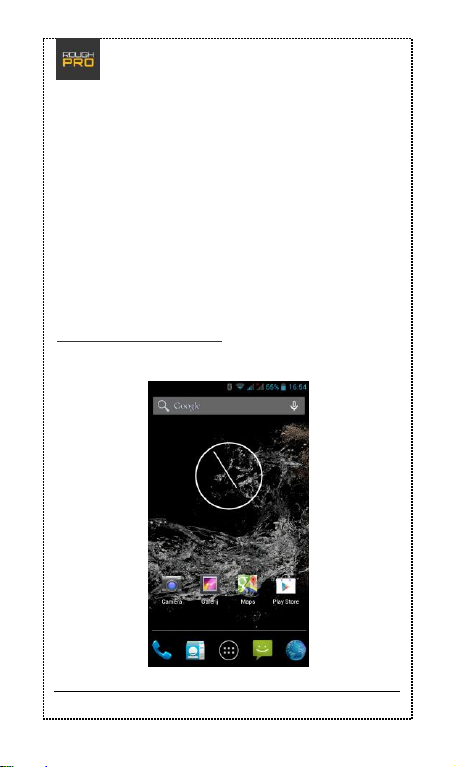
The Home screen
This is how your Home screen will look:
45
Page 46
SA-SM14 – Quick Start Guide
The Home screen is the default screen of your
smartphone. Here you can 'start fresh' and easily reach
all applications. In the bottom bar you will always find
the main menu button in the middle, surrounded by
the most popular apps. As with so many things on this
device, you can customize this bar and adjust it to your
preference.
In total there are five Home screens, which you can
access by swiping from left to right and vice versa.
You can change the background image by placing your
finger on an empty spot and holding it there for a
moment.
You can add shortcuts to the Home screen by touching
and holding your finger on an empty spot in the screen.
A sub-menu will appear which will allow you to add any
shortcut of an app to the Home screen.
By touching and holding your finger on an icon (rather
than tapping it), you can move the icon, or delete it by
dragging it to the appearing trash can icon top of the
screen.
Tapping the main menu button will bring you to the
main menu of your phone, showing all installed
applications. You can transfer an icon to your home
screen by touching and holding it for a couple of
seconds.
46
Page 47
SA-SM14 – Quick Start Guide
Unlockin g the screen
When the smartphone is in standby mode, you'll need
to unlock the screen before you can use it. Here's how:
Press the power button
Place your finger on the closed padlock in the
middle of the screen.
A circle around the lock and an icon of an
opened padlock on the right-hand side will
appear.
Drag the circle to the right, place it around the
opened padlock and let it go. The screen should
now be unlocked.
47
Page 48
SA-SM14 – Quick Start Guide
5. Applications & widgets
App lication s
Your phone comes with a number of standard
applications, better known as "apps". In this chapter
we will explain to you what the most important apps
can do for you.
Phone
In the bottom left corner of your home screen you will
find the telephone icon. Tapping it will open the phone
app through which you can make calls.
You now have three ways to place a call:
1 | By tapping the phone icon on the top-left you will
enter the standard telephone screen that allows you to
enter a phone number directly.
2 | Tapping the clock symbol will bring up the call
history. By tapping the phone icon next to an entry, the
phone will dial the number listed.
3 | Tapping the contact icon on the right will bring up
all your saved contacts with their respective phone
numbers.
>Tip: Once you start dialing a number, the
corresponding sequence of numbers in your contact list
will appear in the top of your screen. You may also
enter a name, like 5646 for "JOHN".
48
Page 49
SA-SM14 – Quick Start Guide
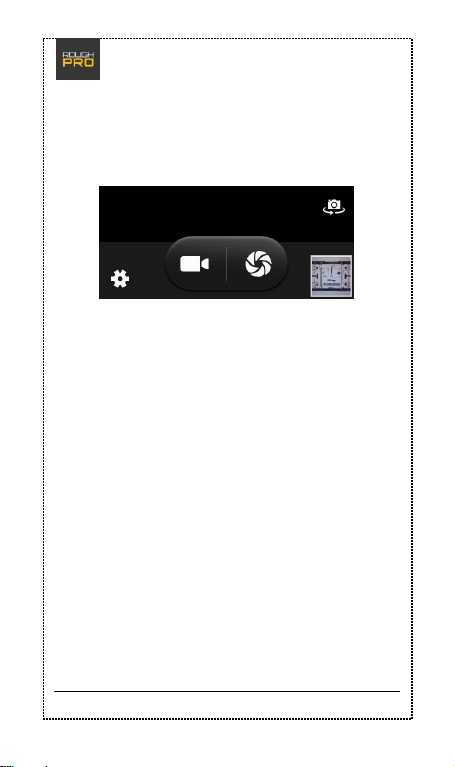
Camera
Tapping to camera icon will open the camera
application.
Here you can select the video or photo camera.
Next to the 'camera options' (i.e. main) button, you will
see a thumbnail of the latest picture or vide oclip
made. Tapping this picture lets you view and possibly
share the picture.
Above the thumbnail you will find a small camera icon
with circling arrow below it. Tapping it lets you switch
between rear and front camera.
On the left-hand side a "Settings" icon is located. Tap
this to view and change the camera settings.
Messages
The 'text balloon' icon brings up the "Messages" menu.
49
Page 50
SA-SM14 – Quick Start Guide
Tapping the icon in the bottom-left corner starts a new
conversation. A keyboard will appear automatically.
>Tip: Android does not deal with individual messages –
all messages are displayed as if they form a
conversation. Therefore, you see what has already been
discussed before.
>Tip: To delete a conversation, simply put your finger
on the conversation, hold it there until a trash can icon
appears, then tap that icon.
At the line on top of your screen, you can enter a
phone number. If you wish to add one or more
contacts out of your phone book, tap the contact icon
on the right-hand side of the top line.
By tapping the icon of a folded paper plane, the
message will be sent.
>Tip: Tapping the paperclip icon in the top-right corner
enables you to attach photos, sound and other media to
your message. This action will transform the SMS into
an MMS. Please note that because of this, additional
charges may apply. Verify this by contacting your
provider.
Widgets
Android 4.2 offers a huge amount of widgets – a kind of
app that can be put on your main screen. To put a
widget there, tap the menu button to enter the main
50
Page 51
SA-SM14 – Quick Start Guide
menu, then hit "Next" and tap "Widgets". By sliding
your finger left and right, you can scroll through all
widgets. Tapping and holding a widget for some
seconds enables you to drag it to the main screen and
determine where to place it.
>Please note: In some cases, an app has its own widget.
If this is so, these Widgets will be shown in this menu as
well.
51
Page 52
SA-SM14 – Quick Start Guide
6. Accessories in the box
USB cable
With the included USB cable you can charge the battery
of your device or connect your phone to a computer.
Charging the battery: First connect the
(included) wall plug charger to the USB
connector of the cable and insert the micro-USB
connector into the USB port of your phone.
Lastly, plug the charger into a wall socket.
Connecting to a computer: Before you start,
make sure your phone is switched off. Now
insert the micro-USB connector into the USB
port of your phone, then plug the standard USB
connector at other end of the cable into the
appropriate USB port of a computer. Lastly,
switch on your phone. When you want to
disconnect, we strongly advise you to make sure
the hardware (phone) is removed safely, i.e.
through the "remove hardware safely" option of
your computer. Doing it differently, might
damage the data on your phone.
While your phone is connected to a computer, the
battery is being charged as well.
>Please note: Never allow Windows to format the
memory of your smartphone. This could damage the
internal memory of your phone beyond repair. The
52
Page 53
SA-SM14 – Quick Start Guide
same goes for formatting your SD card: use your
smartphone to do this, or use a compatible SD card
reader.
Charger and battery
Only use the included charger and always in a dry
environment. Short-circuiting may cause fire, personal
injuries and increases the risk of an explosion. If you
still would like to use a different charger, please consult
your retailer first.
This smartphone comes with an original battery. In case
of a defective battery, please contact your retailer.
>Please note: The chapter "Additional s afe ty
instructions" contain s more information about the
battery and how to use it.
53
Page 54
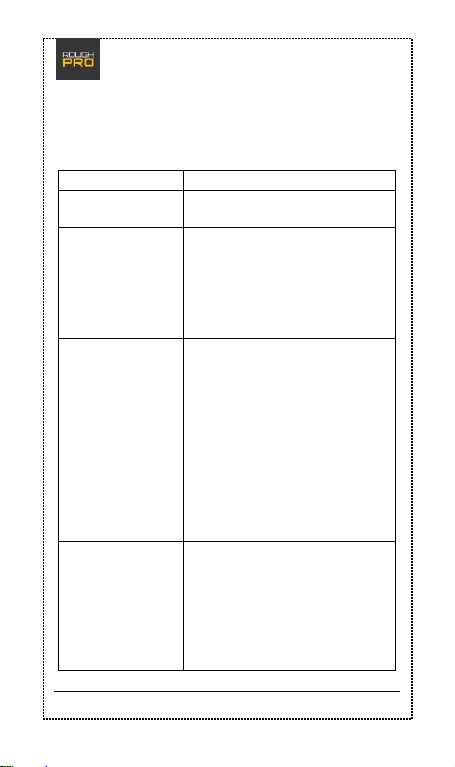
SA-SM14 – Quick Start Guide
Issue
Potential causes and solutions
The device does
not switch on
- The battery is not charged.
The battery
does not charge
- The battery is depleted and
needs to be charged for a
prolonged period of time.
- Charger or USB cable is
defective.
- Battery is defective.
A SIM error
occurs
- The SIM card has gotten dirty
and therefore cannot be read
properly.
- The SIM card is not properly
inserted (see also chapter 3 for
proper SIM insertion).
- The SIM card is
damaged/defective. Please
contact your provider.
>Please note: This also applies
to SIM2.
The signal is
poor
- Check whether the on-screen
signal indicator shows more
than two bars. If this is not the
case, you are in a location with
poor reception.
> Please note: This also applies
to SIM2.
7. Common issues and
solutions
54
Page 55
SA-SM14 – Quick Start Guide
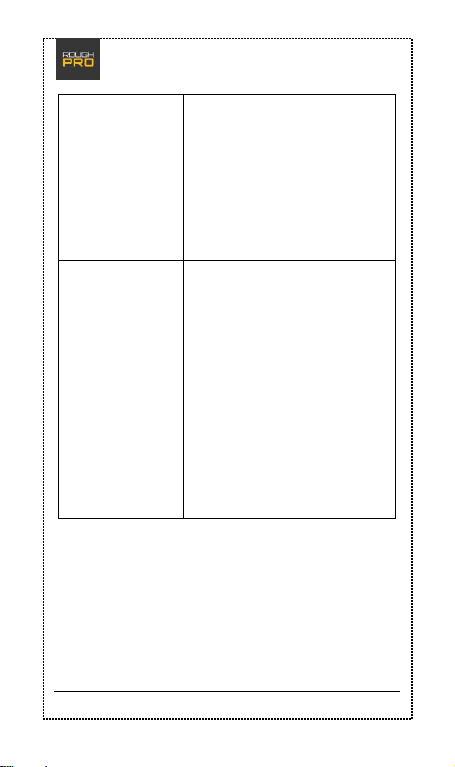
It is not possible
to make a call
- "Caller ID" is disabled and
your provider does not allow
anonymous calling.
- There is a strong source of
disruption in the vicinity.
- You may have set limitations
in the settings for calling.
- Your provider has not yet
activated your SIM card.
It is not possible
to connect to a
network
- The network's signal is poor
or there are strong disruptions
nearby.
- The SIM card is not properly
inserted (see also chapter 3 for
proper SIM insertion).
- The SIM card is
damaged/defective. Please
contact your provider.
- "Airplane mode" is activated,
all wireless communications
are disabled. Next to the time
indicator, one or two airplane
icons are displayed.
55
Page 56
SA-SM14 – Quick Start Guide
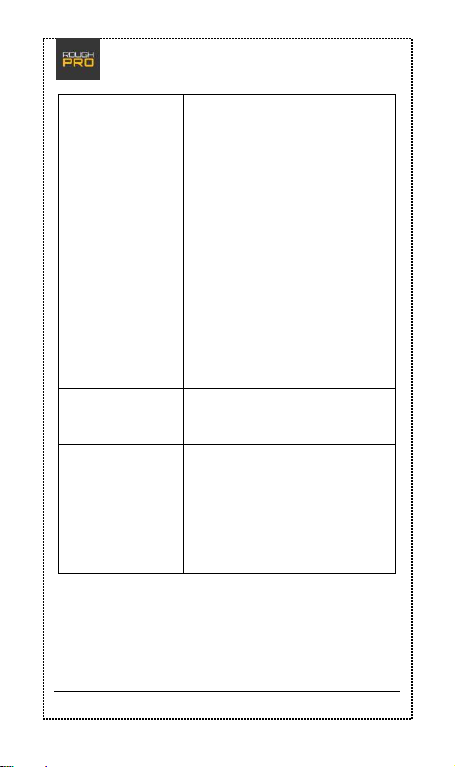
The phone is not
able to establish
a (3G) internet
connection
- Check with your provider if
"data" is part of your bundle.
- Make sure "data connection"
is enabled on your phone.
- Obtain the correct APN
settings (on the website of
your network provider) and set
your phone accordingly. Go to:
Settings > More > Mobile
networks > Access Point
Names.
- In case you use the services
of an MVNO provider, make
sure "roaming" is activated. Go
to: Settings > SIM
management > Roaming.
My pictures are
too dark
- Check your camera settings.
- The environment does not
have sufficient light.
My pictures are
blurry.
- Make sure the object you're
trying to take a picture of does
not move.
- While taking a picture, hold
your phone still.
- The environment does not
have sufficient light.
56
Page 57
SA-SM14 – Quick Start Guide
The battery
drains too
quickly
Smartphones are heavy
consumers when it comes to
energy. Therefore, the
operational battery time is
highly dependent on how the
phone is used. On average, it's
not uncommon a smartphone
needs be recharged by the end
of the day.
The GPSfunctionality is
not working
properly / I do
not get a GPS fix
- Check if "GPS" is enabled.
- Windshields with heat
protection, windshield heating,
multi-storey buildings or heavy
forestation are known to
scramble GPS or block it
altogether.
- Try to establish a GPS
connection outside, in an open
field. After approximately 5
minutes, you should have a fix.
57
Page 58
SA-SM14 – Quick Start Guide
8. Additional safety
instructions
Local laws and regulations
Take into account possible special laws and regulations
that might apply to the place in which you use your
smartphone.
Volume
To prevent hearing impairment, make sure to keep the
volume of earphones to a responsible level.
Pacemakers
People carrying a pacemaker need to follow these
instructions:
When the phone is switched on, always
maintain a distance of at least 15 cm from the
pacemaker.
Never carry the phone a breast pocket.
When making calls, hold the phone to your right
ear (opposite the pacemaker).
Hearing aid devices
Your phone may cause interference with certain
hearing aid devices. If this is the case, please contact
the manufacturer of the hearing device.
Precautions for using your battery and charger
The battery charge depends on the network you use,
the phone settings and the environment in which the
58
Page 59
SA-SM14 – Quick Start Guide
phone is used. You SA-SM14 is designed for normal
operation during 24 hours.
Under no circumstance use a charger that is damaged
in any way.
When using the phone in the vicinity of a base-station
of a network, power usage will decrease. The battery
time in which a device can remain in standby mode or
be operational for calling is strongly affected by the
strength of the signal of the mobile network.
Charging time depends on the remaining battery
power, the type of battery and the charger used for
charging the battery. A battery may be charged and
discharged hundreds of time, but it will become worn
out over time.
Unplug the charger when it is not being used. Do not
leave the smartphone attached to the charger for a
period exceeding 48 hours straight. Overcharging may
drastically decrease battery life. Even when unused, a
fully charged battery will slowly get depleted.
In case your phone or charger gets wet, do not attempt
to dry it in a heating device, such as a dryer or a
microwave oven. Doing so, may cause burn wounds or
lead to swelling or even explosion of the phone,
battery, charger, or the heating device used.
>Please note: The manufacturer hereby declares to
repudiate all responsibility for any direct or collateral
59
Page 60
SA-SM14 – Quick Start Guide
damage that results from failure to comply to one or
more of the instructions above or incorrectly executed
procedures.
Radiation and SAR
The SA-SM14 meets the requirements for the CE
marking, also with regard to radiation. Your
smartphone is equipped with multiple senders and
receivers (GSM/UMTS/Wi-Fi). The design of your device
is such, that it meets CE-requirements.
Radio waves influence the human body, they are
absorbed within the body and converted to warmth.
SAR values express the extent to which this takes place.
SAR is the acronym for Specific Absorbtion Rate.
In order to obtain the most objective frame of SARvalues, different means of measuring are employed.
The object is to determine the amount of Watts that
are absorbed per Kg of body mass, averaged over 10
grams of body-tissue. The CE-marking requires this
value to not exceed 2.0 W/Kg. The SAR limitations in
the United States, established by the FCC, are even
lower, at 1.6 W/Kg.
Testing for SAR-values is performed under the
following conditions:
60
Page 61
SA-SM14 – Quick Start Guide
Frequency
Location
W/Kg
900 Mhz
Head
0,372
900 Mhz
Body
0,458
1800 Mhz
Head
0,142
1800 Mhz
Body
0,192
3G
Head
0,109
3G
Body
0,145
At the highest permitted level of transmitter
power output that the equipped sender is
capable to transmit on the various frequencies.
At the least favorable circumstances possible in
everyday normal use, for example when the
device is held close to the head.
Your device was designed to use only the power
necessary to remain in contact with the network. Since
SAR-test protocol regulations require testing and
measuring SAR-values at maximum transmitter power
output, the actual amount of radiation will be lower
than the SAR-value that this device is specified with.
This value is strongly influenced by the network
reception on your location.
SAR values:
61
Page 62

FCC RF EXPOSURE INFORMATION:
WARNING!! Read this information before using your phone
In August 1986 the Federal Communications Commission (FCC) of the United States with its
action in Report and Outer FCC 96-326 adopted an updated safety standard for human exposure
to radio frequency (RF) electromagnetic energy emitted by FCC regulated transmitters. Those
guidelines are consistent with the safety standard previously set by both U.S. and international
standards bodies. The design of this phone complies with the FCC guidelines and these
international standards. Use only the supplied or an approved antenna. Unauthorized antennas
modifications, or attachments could impair call quality, damage the phone, or result in violation
of FCC regulations. Do not use the phone with a damaged antenna. If a damaged antenna comes
into contact with the skin, a minor burn may result. Please contact your local dealer for
replacement antenna.
BODY-WORN OPERATION:
This device was tested for typical body-worn operations with the back of the phone kept 10mm
from the body. To comply with FCC RF exposure requirements, a minimum separation distance
of 10mm must be maintained between the user's body and the back of the phone, including the
antenna. Third-party belt-clips, holsters and similar accessories containing metallic components
shall not be used. Body-worn accessories that cannot maintain 10mm separation distance between
the user’s body and the back of the phone, and have not been tested for typical body-worn
operations may not comply with FCC RF exposure limits and should be avoided.
For more information about RF exposure, please visit the FCC website at www.fcc.gov
Your wireless handheld portable telephone is a low power radio transmitter and receiver. When
it is ON, it receives and also sends out radio frequency (RF) signals. In August, 1996, the Federal
Communications Commissions (FCC) adopted RF exposure guidelines with safety levels for
hand-held wireless phones. Those guidelines are consistent with the safety standards previously
set by both U.S. and international standards bodies:
<ANSIC95.1> (1992) / <NCRP Report 86> (1986) / <ICIMIRP> (1996)
Those standards were based on comprehensive and periodic evaluations of the relevant
scientific literature. For example, over 120 scientists, engineers, and physicians from universities,
government health agencies, and industry reviewed the available body of research to develop
the ANSI Standard (C95.1). Nevertheless, we recommend that you use a hands-free kit with
your phone (such as an earpiece or headset) to avoid potential exposure to RF energy. The
design of your phone complies with the FCC guidelines (and those standards).
Use only the supplied or an approved replacement antenna. Unauthorized antennas,
modifications, or attachments could damage the phone and may violate FCC regulations.
NORMAL POSITION:
Hold the phone as you would any other telephone with the antenna pointed up and over your
shoulder.
RF Exposure Information:
This product is compliance to FCC RF Exposure requirements and refer to FCC website search for FCC
ID: 2ADJFJ5 to gain further information include SAR Values.
This device complies with part 15 of the FCC rules. Operation is subject to the following two
conditions:
(1) this device may not cause harmful interference, and
Page 63

(2) this device must accept any interference received, including interference that may
cause undesired operation.
NOTE: The manufacturer is not responsible for any radio or TV interference caused by
unauthorized modifications to this equipment. Such modifications could void the user’s
authority to operate the equipment.
NOTE: This equipment has been tested and found to comply with the limits for a Class B
digital device, pursuant to part 15 of the FCC Rules. These limits are designed to provide
reasonable protection against harmful interference in a residential installation. This equipment
generates uses and can radiate radio frequency energy and, if not installed and used in
accordance with the instructions, may cause harmful interference to radio communications.
However, there is no guarantee that interference will not occur in a particular installation. If
this equipment does cause harmful interference to radio or television reception, which can be
determined by turning the equipment off and on, the user is encouraged to try to correct the
interference by one or more of the following measures:
- Reorient or relocate the receiving antenna.
- Increase the separation between the equipment and receiver.
-Connect the equipment into an outlet on a circuit different from that to which the receiver is
connected.
-Consult the dealer or an experienced radio/TV technician for help
Do not use the device with the environment which below minimum -10℃ or over maximum
50℃, the device may not work.
Changes or modifications to this unit not expressly approved by the party responsible for
compliance could void the user’s authority to operate the equipment.
Ad Hoc function is supported but not able to operate on non-US frequencies.
 Loading...