

Page 1
KINDLE USER’S GUIDE 4th EDITION
Page 2

Table of Contents
WELCOME 8
CHAPTER 1:
Getting Started with Your Kindle 18
1.1 Views of Kindle . . . . . . . . . . . . . . . . . . . . . . . . . . . . . . . . . . . . . . . . . . . . . . . . . . . . . . . 18
Front View . . . . . . . . . . . . . . . . . . . . . . . . . . . . . . . . . . . . . . . . . . . . . . . . . . . . . . . . . . . 18
Top View . . . . . . . . . . . . . . . . . . . . . . . . . . . . . . . . . . . . . . . . . . . . . . . . . . . . . . . . . . . . . 22
Bottom View . . . . . . . . . . . . . . . . . . . . . . . . . . . . . . . . . . . . . . . . . . . . . . . . . . . . . . . . . . 23
1.2 Getting Around . . . . . . . . . . . . . . . . . . . . . . . . . . . . . . . . . . . . . . . . . . . . . . . . . . . . . . . 24
Using the Buttons . . . . . . . . . . . . . . . . . . . . . . . . . . . . . . . . . . . . . . . . . . . . . . . . . . . . .24
Using the Menus . . . . . . . . . . . . . . . . . . . . . . . . . . . . . . . . . . . . . . . . . . . . . . . . . . . . . . 24
The Application Menu . . . . . . . . . . . . . . . . . . . . . . . . . . . . . . . . . . . . . . . . . . . . . . . . . . 26
1.3 Entering Text . . . . . . . . . . . . . . . . . . . . . . . . . . . . . . . . . . . . . . . . . . . . . . . . . . . . . . . . . 27
Lowercase and Uppercase Letters . . . . . . . . . . . . . . . . . . . . . . . . . . . . . . . . . . . . . . . . 27
Numbers, Punctuation, and Symbols . . . . . . . . . . . . . . . . . . . . . . . . . . . . . . . . . . . . . 27
1.4 Screen Rotation . . . . . . . . . . . . . . . . . . . . . . . . . . . . . . . . . . . . . . . . . . . . . . . . . . . . . . .29
1.5 Status Indicators . . . . . . . . . . . . . . . . . . . . . . . . . . . . . . . . . . . . . . . . . . . . . . . . . . . . . . 30
Whispernet Status Indicators . . . . . . . . . . . . . . . . . . . . . . . . . . . . . . . . . . . . . . . . . . . .30
Battery Status Indicators . . . . . . . . . . . . . . . . . . . . . . . . . . . . . . . . . . . . . . . . . . . . . . . .31
Activity Indicator . . . . . . . . . . . . . . . . . . . . . . . . . . . . . . . . . . . . . . . . . . . . . . . . . . . . . .31
CHAPTER 2:
Getting to Know Kindle Content 32
2.1 The Home Screen . . . . . . . . . . . . . . . . . . . . . . . . . . . . . . . . . . . . . . . . . . . . . . . . . . . . . 32
Home Screen Features . . . . . . . . . . . . . . . . . . . . . . . . . . . . . . . . . . . . . . . . . . . . . . . . . 34
Show Options . . . . . . . . . . . . . . . . . . . . . . . . . . . . . . . . . . . . . . . . . . . . . . . . . . . . . . . .36
Sort Options . . . . . . . . . . . . . . . . . . . . . . . . . . . . . . . . . . . . . . . . . . . . . . . . . . . . . . . . . . 38
The Home Screen Menu . . . . . . . . . . . . . . . . . . . . . . . . . . . . . . . . . . . . . . . . . . . . . . . .40
2.2 Managing Your Content . . . . . . . . . . . . . . . . . . . . . . . . . . . . . . . . . . . . . . . . . . . . . . . . 41
Removing Kindle Content . . . . . . . . . . . . . . . . . . . . . . . . . . . . . . . . . . . . . . . . . . . . . . . 41
More about Managing Items . . . . . . . . . . . . . . . . . . . . . . . . . . . . . . . . . . . . . . . . . . . . 42
International Wireless Delivery . . . . . . . . . . . . . . . . . . . . . . . . . . . . . . . . . . . . . . . . . .42
Contents · 2KINDLE USER’S GUIDE 4th EDITION
Page 3

CHAPTER 3:
Reading on Kindle 43
3.1 Types of Content . . . . . . . . . . . . . . . . . . . . . . . . . . . . . . . . . . . . . . . . . . . . . . . . . . . . . . 43
Books . . . . . . . . . . . . . . . . . . . . . . . . . . . . . . . . . . . . . . . . . . . . . . . . . . . . . . . . . . . . . . . 43
Newspapers . . . . . . . . . . . . . . . . . . . . . . . . . . . . . . . . . . . . . . . . . . . . . . . . . . . . . . . . . .43
Magazines . . . . . . . . . . . . . . . . . . . . . . . . . . . . . . . . . . . . . . . . . . . . . . . . . . . . . . . . . . .43
Blogs . . . . . . . . . . . . . . . . . . . . . . . . . . . . . . . . . . . . . . . . . . . . . . . . . . . . . . . . . . . . . . . . 44
Personal Documents . . . . . . . . . . . . . . . . . . . . . . . . . . . . . . . . . . . . . . . . . . . . . . . . . . .44
Audiobooks . . . . . . . . . . . . . . . . . . . . . . . . . . . . . . . . . . . . . . . . . . . . . . . . . . . . . . . . . . 45
Background Music . . . . . . . . . . . . . . . . . . . . . . . . . . . . . . . . . . . . . . . . . . . . . . . . . . . . . 45
3.2 Content Formatting on Kindle . . . . . . . . . . . . . . . . . . . . . . . . . . . . . . . . . . . . . . . . . . . 46
Progress Indicator . . . . . . . . . . . . . . . . . . . . . . . . . . . . . . . . . . . . . . . . . . . . . . . . . . . . . 47
Changing the Text Size . . . . . . . . . . . . . . . . . . . . . . . . . . . . . . . . . . . . . . . . . . . . . . . . . 47
Adjusting the Number of Words per Line . . . . . . . . . . . . . . . . . . . . . . . . . . . . . . . . . .49
Increasing the Size of a Picture . . . . . . . . . . . . . . . . . . . . . . . . . . . . . . . . . . . . . . . . . .49
3.3 Moving from Place to Place . . . . . . . . . . . . . . . . . . . . . . . . . . . . . . . . . . . . . . . . . . . . . 50
Using the Menu to Get Around . . . . . . . . . . . . . . . . . . . . . . . . . . . . . . . . . . . . . . . . . . 50
Navigating within a Periodical . . . . . . . . . . . . . . . . . . . . . . . . . . . . . . . . . . . . . . . . . . . 54
Selecting Internal Links . . . . . . . . . . . . . . . . . . . . . . . . . . . . . . . . . . . . . . . . . . . . . . . . . 56
Viewing a Table . . . . . . . . . . . . . . . . . . . . . . . . . . . . . . . . . . . . . . . . . . . . . . . . . . . . . . . 57
Reading Across Multiple Kindles . . . . . . . . . . . . . . . . . . . . . . . . . . . . . . . . . . . . . . . . .57
3.4 Looking Up Definitions . . . . . . . . . . . . . . . . . . . . . . . . . . . . . . . . . . . . . . . . . . . . . . . . . 58
The Lookup Feature . . . . . . . . . . . . . . . . . . . . . . . . . . . . . . . . . . . . . . . . . . . . . . . . . . . .58
3.5 Annotations and Clippings . . . . . . . . . . . . . . . . . . . . . . . . . . . . . . . . . . . . . . . . . . . . . .58
Using Bookmarks . . . . . . . . . . . . . . . . . . . . . . . . . . . . . . . . . . . . . . . . . . . . . . . . . . . . . . 59
Using Highlights . . . . . . . . . . . . . . . . . . . . . . . . . . . . . . . . . . . . . . . . . . . . . . . . . . . . . . 61
Using Notes . . . . . . . . . . . . . . . . . . . . . . . . . . . . . . . . . . . . . . . . . . . . . . . . . . . . . . . . . . 62
Using Clippings . . . . . . . . . . . . . . . . . . . . . . . . . . . . . . . . . . . . . . . . . . . . . . . . . . . . . . . 64
3.6 Reading PDF Files . . . . . . . . . . . . . . . . . . . . . . . . . . . . . . . . . . . . . . . . . . . . . . . . . . . . . 66
3.7 Listening to Audio Materials . . . . . . . . . . . . . . . . . . . . . . . . . . . . . . . . . . . . . . . . . . . . . 69
Audiobooks . . . . . . . . . . . . . . . . . . . . . . . . . . . . . . . . . . . . . . . . . . . . . . . . . . . . . . . . . . 69
Background Audio . . . . . . . . . . . . . . . . . . . . . . . . . . . . . . . . . . . . . . . . . . . . . . . . . . . . . 71
Text-to-Speech . . . . . . . . . . . . . . . . . . . . . . . . . . . . . . . . . . . . . . . . . . . . . . . . . . . . . . . . 72
Contents · 3KINDLE USER’S GUIDE 4th EDITION
Page 4

CHAPTER 4:
Searching on Kindle 74
4.1 Introduction to Search . . . . . . . . . . . . . . . . . . . . . . . . . . . . . . . . . . . . . . . . . . . . . . . . . . 74
Types of Searches . . . . . . . . . . . . . . . . . . . . . . . . . . . . . . . . . . . . . . . . . . . . . . . . . . . . . 74
Performing a Search . . . . . . . . . . . . . . . . . . . . . . . . . . . . . . . . . . . . . . . . . . . . . . . . . . . 75
4.2 Search Results Page . . . . . . . . . . . . . . . . . . . . . . . . . . . . . . . . . . . . . . . . . . . . . . . . . . . 76
Search Results for a Specific Item . . . . . . . . . . . . . . . . . . . . . . . . . . . . . . . . . . . . . . . . 77
Search Results for a Definition . . . . . . . . . . . . . . . . . . . . . . . . . . . . . . . . . . . . . . . . . . . 79
4.3 Performing Remote Searches . . . . . . . . . . . . . . . . . . . . . . . . . . . . . . . . . . . . . . . . . . . . 80
Searching Wikipedia . . . . . . . . . . . . . . . . . . . . . . . . . . . . . . . . . . . . . . . . . . . . . . . . . . . 80
Searching the Web . . . . . . . . . . . . . . . . . . . . . . . . . . . . . . . . . . . . . . . . . . . . . . . . . . . . 80
Searching the Kindle Store . . . . . . . . . . . . . . . . . . . . . . . . . . . . . . . . . . . . . . . . . . . . . . 80
CHAPTER 5:
The Kindle Store 82
5.1 Getting Started at the Store . . . . . . . . . . . . . . . . . . . . . . . . . . . . . . . . . . . . . . . . . . . . .82
Connecting to the Kindle Store . . . . . . . . . . . . . . . . . . . . . . . . . . . . . . . . . . . . . . . . . .82
5.2 Kindle Store Pages . . . . . . . . . . . . . . . . . . . . . . . . . . . . . . . . . . . . . . . . . . . . . . . . . . . .82
The Kindle Storefront . . . . . . . . . . . . . . . . . . . . . . . . . . . . . . . . . . . . . . . . . . . . . . . . . . 83
The Store Menu . . . . . . . . . . . . . . . . . . . . . . . . . . . . . . . . . . . . . . . . . . . . . . . . . . . . . . . 84
Browsing the Store . . . . . . . . . . . . . . . . . . . . . . . . . . . . . . . . . . . . . . . . . . . . . . . . . . . .85
Getting the Details . . . . . . . . . . . . . . . . . . . . . . . . . . . . . . . . . . . . . . . . . . . . . . . . . . . . . 87
Saving Items for Later . . . . . . . . . . . . . . . . . . . . . . . . . . . . . . . . . . . . . . . . . . . . . . . . . . 89
5.3 Recommendations, Reviews, and Ratings . . . . . . . . . . . . . . . . . . . . . . . . . . . . . . . . . 89
Recommended for You . . . . . . . . . . . . . . . . . . . . . . . . . . . . . . . . . . . . . . . . . . . . . . . . . 89
Looking Up Reviews . . . . . . . . . . . . . . . . . . . . . . . . . . . . . . . . . . . . . . . . . . . . . . . . . . .89
Writing Your Own Ratings and Reviews . . . . . . . . . . . . . . . . . . . . . . . . . . . . . . . . . . .90
Entering a Rating and Review . . . . . . . . . . . . . . . . . . . . . . . . . . . . . . . . . . . . . . . . . . .91
5.4 Making Purchases . . . . . . . . . . . . . . . . . . . . . . . . . . . . . . . . . . . . . . . . . . . . . . . . . . . . . 92
Trying a Sample Book . . . . . . . . . . . . . . . . . . . . . . . . . . . . . . . . . . . . . . . . . . . . . . . . . . 92
Buying Your Selections . . . . . . . . . . . . . . . . . . . . . . . . . . . . . . . . . . . . . . . . . . . . . . . . . 92
Returning an Item . . . . . . . . . . . . . . . . . . . . . . . . . . . . . . . . . . . . . . . . . . . . . . . . . . . . . 92
Contents · 4KINDLE USER’S GUIDE 4th EDITION
Page 5

CHAPTER 6:
Accessing the Web 93
6.1 Using Basic Web . . . . . . . . . . . . . . . . . . . . . . . . . . . . . . . . . . . . . . . . . . . . . . . . . . . . . .93
Entering a URL . . . . . . . . . . . . . . . . . . . . . . . . . . . . . . . . . . . . . . . . . . . . . . . . . . . . . . . . 94
Using Bookmarks and Adding Your Own . . . . . . . . . . . . . . . . . . . . . . . . . . . . . . . . . . 94
Using Next Page and Previous Page . . . . . . . . . . . . . . . . . . . . . . . . . . . . . . . . . . . . . . 95
Selecting Links, Buttons, and Boxes . . . . . . . . . . . . . . . . . . . . . . . . . . . . . . . . . . . . . . 95
Using History . . . . . . . . . . . . . . . . . . . . . . . . . . . . . . . . . . . . . . . . . . . . . . . . . . . . . . . . .97
The Basic Web Menu . . . . . . . . . . . . . . . . . . . . . . . . . . . . . . . . . . . . . . . . . . . . . . . . . . . 97
6.2 Other Features . . . . . . . . . . . . . . . . . . . . . . . . . . . . . . . . . . . . . . . . . . . . . . . . . . . . . . . .98
Text Size . . . . . . . . . . . . . . . . . . . . . . . . . . . . . . . . . . . . . . . . . . . . . . . . . . . . . . . . . . . . . 98
Downloading Files . . . . . . . . . . . . . . . . . . . . . . . . . . . . . . . . . . . . . . . . . . . . . . . . . . . . . 98
Basic Web Settings . . . . . . . . . . . . . . . . . . . . . . . . . . . . . . . . . . . . . . . . . . . . . . . . . . . .99
CHAPTER 7:
Settings and Experimental 101
7.1 Adjusting Your Kindle Settings . . . . . . . . . . . . . . . . . . . . . . . . . . . . . . . . . . . . . . . . . . 101
Registering or Deregistering Kindle . . . . . . . . . . . . . . . . . . . . . . . . . . . . . . . . . . . . . .103
Personalizing Your Kindle . . . . . . . . . . . . . . . . . . . . . . . . . . . . . . . . . . . . . . . . . . . . . . 104
Choosing Your Primary Dictionary . . . . . . . . . . . . . . . . . . . . . . . . . . . . . . . . . . . . . . . 105
Changing Automatic Backup . . . . . . . . . . . . . . . . . . . . . . . . . . . . . . . . . . . . . . . . . . . 105
The Settings Menu . . . . . . . . . . . . . . . . . . . . . . . . . . . . . . . . . . . . . . . . . . . . . . . . . . .105
7.2 Experimental . . . . . . . . . . . . . . . . . . . . . . . . . . . . . . . . . . . . . . . . . . . . . . . . . . . . . . . . 107
Contents · 5KINDLE USER’S GUIDE 4th EDITION
Page 6

CHAPTER 8:
Kindle and Your Computer 108
8.1 Getting Started . . . . . . . . . . . . . . . . . . . . . . . . . . . . . . . . . . . . . . . . . . . . . . . . . . . . . . . 108
System Requirements . . . . . . . . . . . . . . . . . . . . . . . . . . . . . . . . . . . . . . . . . . . . . . . . . 108
Making the Connection . . . . . . . . . . . . . . . . . . . . . . . . . . . . . . . . . . . . . . . . . . . . . . . . 108
8.2 Transferring Files When Whispernet is Unavailable. . . . . . . . . . . . . . . . . . . . . . . . . 110
Managing Your Documents . . . . . . . . . . . . . . . . . . . . . . . . . . . . . . . . . . . . . . . . . . . . 110
Transferring Your Clippings . . . . . . . . . . . . . . . . . . . . . . . . . . . . . . . . . . . . . . . . . . . . 110
8.3 Converting and Transferring Your Documents . . . . . . . . . . . . . . . . . . . . . . . . . . . . . 111
Supported Formats for Conversion . . . . . . . . . . . . . . . . . . . . . . . . . . . . . . . . . . . . . .111
Sending Your Documents for Conversion . . . . . . . . . . . . . . . . . . . . . . . . . . . . . . . . . 112
8.4 Audiobooks and MP3s . . . . . . . . . . . . . . . . . . . . . . . . . . . . . . . . . . . . . . . . . . . . . . . .113
Audiobooks from Audible.com . . . . . . . . . . . . . . . . . . . . . . . . . . . . . . . . . . . . . . . . .113
Audiobook Formats for Kindle . . . . . . . . . . . . . . . . . . . . . . . . . . . . . . . . . . . . . . . . . .113
Transferring MP3s . . . . . . . . . . . . . . . . . . . . . . . . . . . . . . . . . . . . . . . . . . . . . . . . . . . . 114
CHAPTER 9:
Your Kindle and Amazon.com 115
9.1 Shopping for Kindle Content on Amazon.com . . . . . . . . . . . . . . . . . . . . . . . . . . . . . 115
Browsing the Kindle Store . . . . . . . . . . . . . . . . . . . . . . . . . . . . . . . . . . . . . . . . . . . . . 115
Searching the Kindle Store . . . . . . . . . . . . . . . . . . . . . . . . . . . . . . . . . . . . . . . . . . . . . 115
Getting the Details . . . . . . . . . . . . . . . . . . . . . . . . . . . . . . . . . . . . . . . . . . . . . . . . . . . . 116
Ordering Content . . . . . . . . . . . . . . . . . . . . . . . . . . . . . . . . . . . . . . . . . . . . . . . . . . . . . 116
9.2 Managing Your Kindle on Amazon.com . . . . . . . . . . . . . . . . . . . . . . . . . . . . . . . . . . 117
Managing Your Device . . . . . . . . . . . . . . . . . . . . . . . . . . . . . . . . . . . . . . . . . . . . . . . . 117
Managing Your Orders . . . . . . . . . . . . . . . . . . . . . . . . . . . . . . . . . . . . . . . . . . . . . . . . 118
Downloading Content from Your Computer . . . . . . . . . . . . . . . . . . . . . . . . . . . . . . .119
9.3 Contacting Kindle Support . . . . . . . . . . . . . . . . . . . . . . . . . . . . . . . . . . . . . . . . . . . . . 119
Contents · 6KINDLE USER’S GUIDE 4th EDITION
Page 7

CHAPTER 10:
Migrating Content to Your New Kindle 120
10.1 Transferring Books . . . . . . . . . . . . . . . . . . . . . . . . . . . . . . . . . . . . . . . . . . . . . . . . . . 120
10.2 Transferring Periodical Subscriptions . . . . . . . . . . . . . . . . . . . . . . . . . . . . . . . . . . .121
10.3 Transferring Personal Documents . . . . . . . . . . . . . . . . . . . . . . . . . . . . . . . . . . . . . .122
10.4 Transferring Audiobooks . . . . . . . . . . . . . . . . . . . . . . . . . . . . . . . . . . . . . . . . . . . . . 123
10.5 Transferring MP3s . . . . . . . . . . . . . . . . . . . . . . . . . . . . . . . . . . . . . . . . . . . . . . . . . . . 124
CHAPTER 11:
Troubleshooting 125
APPENDIX 130
Safety and compliance Information . . . . . . . . . . . . . . . . . . . . . . . . . . . . . . . . . . . . . .130
Servicing Your Device . . . . . . . . . . . . . . . . . . . . . . . . . . . . . . . . . . . . . . . . . . . . . . . . . 130
Headphone Safety . . . . . . . . . . . . . . . . . . . . . . . . . . . . . . . . . . . . . . . . . . . . . . . . . . . . 131
Compliance Information for Kindle Users Outside the US . . . . . . . . . . . . . . . . . . . 134
UL Certification Number . . . . . . . . . . . . . . . . . . . . . . . . . . . . . . . . . . . . . . . . . . . . . . . 134
Product Specifications . . . . . . . . . . . . . . . . . . . . . . . . . . . . . . . . . . . . . . . . . . . . . . . . . 135
KINDLE LICENSE AGREEMENT AND TERMS OF USE . . . . . . . . . . . . . . . . . . . . . . 136
Wireless Connectivity . . . . . . . . . . . . . . . . . . . . . . . . . . . . . . . . . . . . . . . . . . . . . . . . .136
Digital Content . . . . . . . . . . . . . . . . . . . . . . . . . . . . . . . . . . . . . . . . . . . . . . . . . . . . . . . 137
Software . . . . . . . . . . . . . . . . . . . . . . . . . . . . . . . . . . . . . . . . . . . . . . . . . . . . . . . . . . . . 138
General . . . . . . . . . . . . . . . . . . . . . . . . . . . . . . . . . . . . . . . . . . . . . . . . . . . . . . . . . . . . . 139
Patent Notices . . . . . . . . . . . . . . . . . . . . . . . . . . . . . . . . . . . . . . . . . . . . . . . . . . . . . . . 145
Copyright and Trademark Notices . . . . . . . . . . . . . . . . . . . . . . . . . . . . . . . . . . . . . . . 145
Other Language Versions . . . . . . . . . . . . . . . . . . . . . . . . . . . . . . . . . . . . . . . . . . . . . . 145
Contents · 7KINDLE USER’S GUIDE 4th EDITION
Page 8

Welcome to
Thank you for purchasing Amazon Kindle. You are reading the Welcome section of the
Kindle User’s Guide. This section provides an overview of Kindle and highlights a few
basic features so you can start reading as quickly as possible.
You can leave this guide at any time by pressing the Home button on your Kindle.
To turn to the next page, press one of the Next Page buttons.
If your Kindle was a gift, you will need to register your device. Please look at the
Getting Started instructions that came with your Kindle for information on registering
your device.
Welcome · 8KINDLE USER’S GUIDE 4th EDITION
Page 9
Congratulations!
You are reading on your new Kindle.
If you haven’t done so already, please follow the Getting Started instructions that
came with your Kindle and plug in your Kindle to charge the battery. The charge
indicator light on the bottom edge of your Kindle turns yellow and a lightning bolt
appears on the battery icon at the top of the display. Charging the battery fully should
take less than three hours and you can continue reading while it charges.
Tip: The charge indicator light will turn green when the battery is fully charged.
If you prefer to read the Kindle User’s Guide side-by-side with the device, you can
download and print a PDF copy of the Kindle User’s Guide at:
http://www.amazon.com/kindledocuments
Getting Around
You navigate Kindle using the 5-way controller; the Home, Menu, Back, and
Next/Previous Page buttons; and the keyboard:
Welcome · 9KINDLE USER’S GUIDE 4th EDITION
Page 10

To select a particular item such as a menu option or a specific word in your reading
material, move the 5-way controller up, down, left, or right to highlight your choice
and then press to select.
You can press the Next or Previous Page buttons to move forward or backward in your
reading material and press the Back button to retrace your steps on your Kindle. Use
the keyboard to type words or phrases when searching your reading material or items
in the Kindle Store. You can also use the keyboard to create notes while reading. All of
these are covered in more detail later in this guide.
Easy-to-Read Display
Kindle uses a high-resolution display technology called electronic paper. It works
using ink just like books and newspapers, but it displays the ink particles electronically.
The page flash you see when you turn the page is part of the ink placement process.
The electronic paper display is reflective, which means unlike most displays, you can
read it clearly even in bright sunlight. Also, electronic paper does not need power to
hold the ink in place, which extends your Kindle’s battery life.
Wireless Access with Whispernet
Using the wireless Amazon Whispernet service, Amazon delivers content to your
Kindle whenever and wherever you want it, within the wireless coverage area, using
the same technology as a cell phone. By default, your Kindle ships with Whispernet
already turned on. To turn Whispernet on or off, press the Menu button, move the
5-way controller up to underline “Turn Wireless On/Off,” and then press the 5-way.
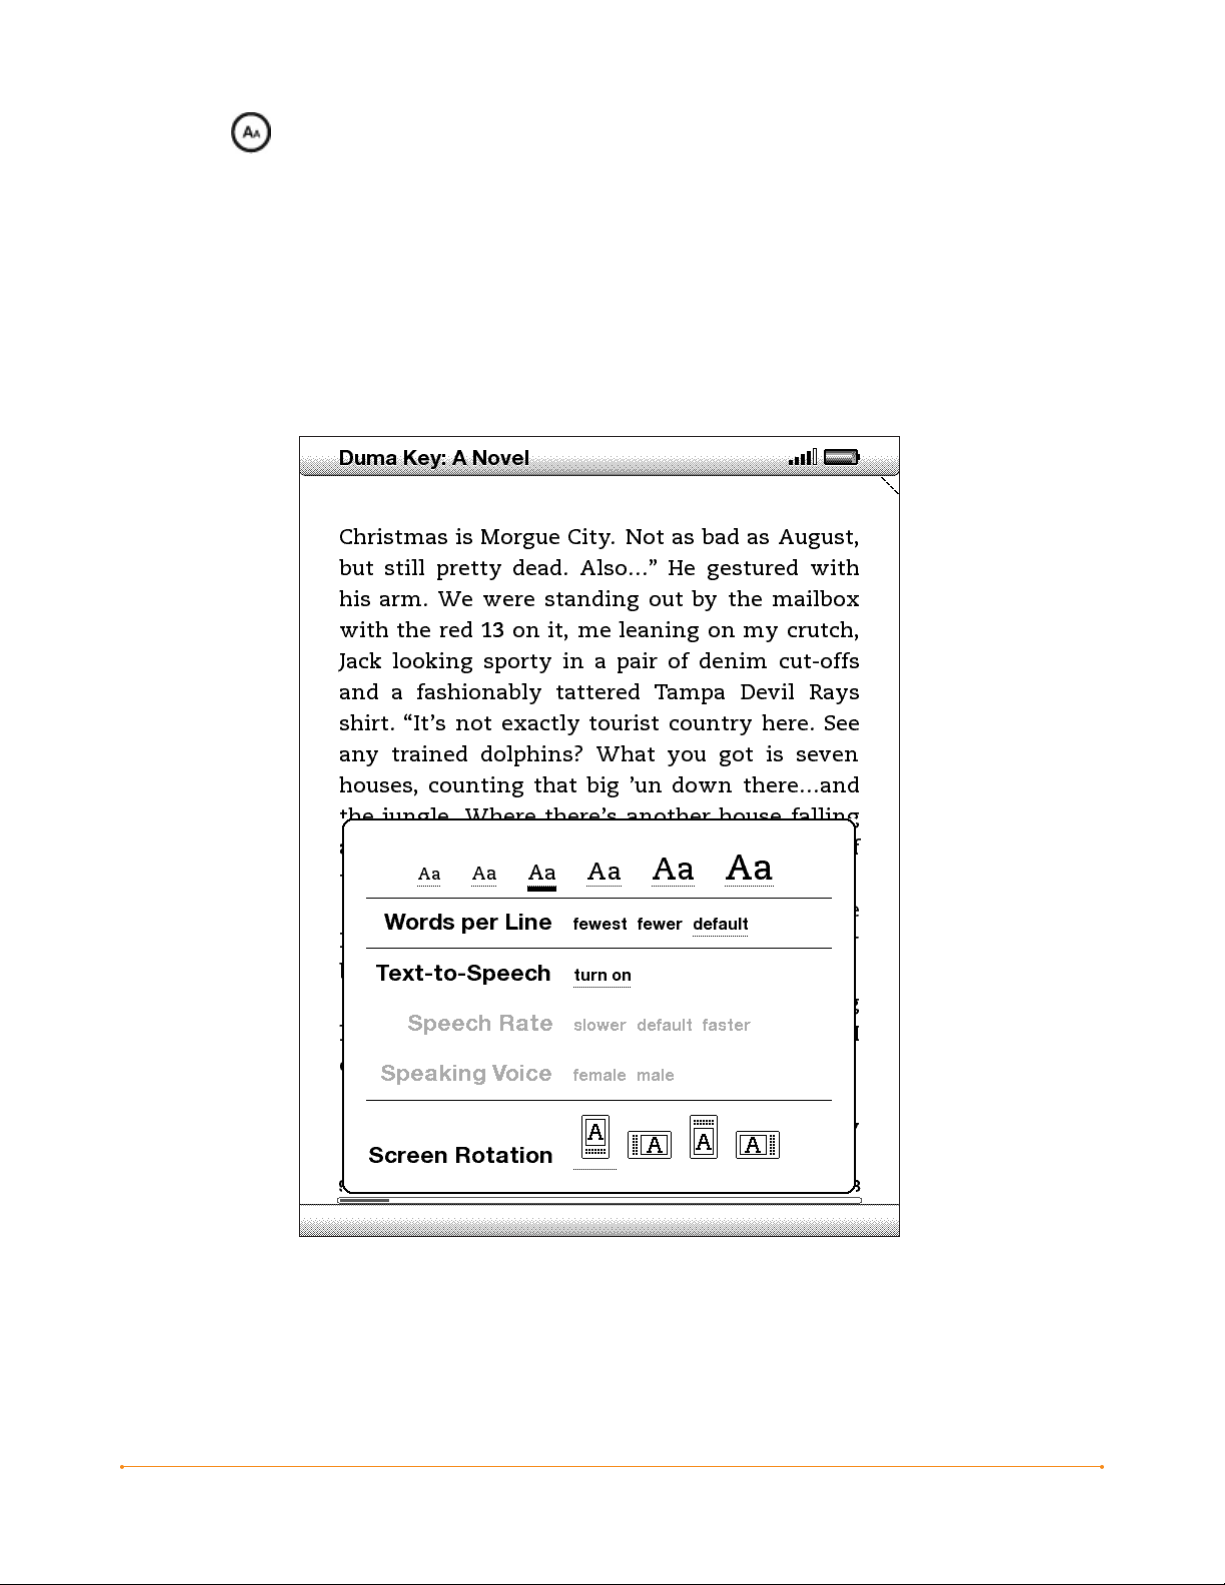
Your Choice of Text Size
To optimize your reading experience, Kindle provides a quick way to adjust the size of
the reading text among six sizes.
Welcome · 10KINDLE USER’S GUIDE 4th EDITION
Page 11
To try it now, press the Text key , move the 5-way controller to choose the size you
prefer and press the 5-way to select. The text changes to the new size. Repeat the
same steps to change the text size back or to change it to a size comfortable for you
to read.
Welcome · 11KINDLE USER’S GUIDE 4th EDITION
Page 12

Your Choice of Number of Words per Line
You can also change the number of words per line in the book or periodical you are
currently reading. Press the Text key , move the 5-way controller to choose the
number of words per line you prefer and press the 5-way to select. This changes
the width of the margins. You may find you read faster with fewer words per line.
Experiment to see what works best for you.
Adjust Screen Rotation
The Kindle screen image can be rotated so you can see the entire width of a web page
or magnify the page of a PDF file. You can lock your Kindle screen to a portrait or
landscape orientation to fit your reading position. Press the Text key , then move
the 5-way controller to select the screen rotation you want. Press the 5-way to select.
Read PDF Files
Kindle can display a PDF document without losing the formatting of the original file.
Just drag PDF files over USB or e-mail them to your dedicated Kindle e-mail address
(found on the Settings page on Kindle or the Manage Your Kindle page on Amazon.
com). We will wirelessly deliver the original file directly to your Kindle via Whispernet
for a fee. For details, click on the “Learn more” link on the “Your orders and individual
charges” section of your Manage Your Kindle page for your Kindle on Amazon.com.
Let Kindle Read to You
You can also choose to turn on the experimental application, Text-to-Speech, which
will read aloud your books (where allowed by the rights holder), newspapers, blogs,
and personal documents. You can either listen through your Kindle’s external speakers
or plug in earphones into the headphone jack. While Text-to-Speech is playing, the
screen will turn the pages automatically so you can follow along while the audio is
playing. You have the choice of hearing your content spoken with a male or female
voice and can also further optimize the listening experience by slowing down or
increasing the rate of speech.
Welcome · 12KINDLE USER’S GUIDE 4th EDITION
Page 13

Look It Up
Your Kindle includes The New Oxford American Dictionary. You can easily look up
a particular word without leaving the content. Simply use the 5-way controller to
navigate the cursor in front of the word you want defined. A definition of the word
appears at the bottom of the screen. To view the full definition, press the Return key
on the keyboard. To return to the text you were reading, press the Back button.
Take It All with You
Although Kindle is about the size of a paperback book, it can store over a thousand
digital books, newspapers, blogs, and magazines, which are referred to collectively
as “content” throughout this guide. A copy of all your books and recent issues of
newspapers and magazines purchased from the Kindle Store are kept on Amazon.com.
To open content on your Kindle, press the Home button. This displays a list of the
content on your Kindle. Move the 5-way controller up or down to underline the item
you want to open and then press the 5-way to open the item. To delete content on
your Kindle, move the 5-way controller up or down to underline the item you want to
delete. Move the 5-way to the left and then press the 5-way to complete the removal
of the item.
To move previously deleted content from Amazon.com back to your Kindle,
Whispernet must be on. From Home, select “Archived Items.” This shows all of the
content stored at Amazon.com. Underline the item you want to move back to your
Kindle and move the 5-way to the right and then press the 5-way to start the transfer.
In under a minute, the item re-downloads into your Kindle and appears in the list of
content in Home.
Shop Anytime, Anywhere
If you have Whispernet on and you select “Shop in Kindle Store” from any menu,
Kindle connects you to a broad offering of reading material including books,
newspapers, blogs, and magazines. You can browse by category or check out the
latest bestsellers, new and noteworthy items, or your personalized recommendations.
You can see details about an item, read customer reviews, and even download free
samples of books you are interested in. If you want to buy an item, Kindle uses secure
Amazon 1-Click and then Whispernet delivers the item to your Kindle generally in
under a minute.
Welcome · 13KINDLE USER’S GUIDE 4th EDITION
Page 14

Automatic Delivery
Since Kindle connects to the Whispernet network, we deliver your favorite periodicals
over the air to your device as soon as they are published, often before they are even
available in print. For example, if you subscribe to the Kindle edition of The New
York Times, the latest edition is wirelessly delivered overnight so you can read it each
morning. Your favorite periodicals follow you wherever you go in Whispernet’s broad
coverage area, whether you are at home or on the road.
Peruse Your Periodicals
Just as you would thumb through a physical newspaper or magazine to locate an
article of interest, your Kindle supplies you with navigation shortcuts so that you can
quickly zero in on an article of interest. By moving the 5-way controller right or left
you can advance to the next or previous article and pushing the 5-way brings up the
periodical’s section list.
Search Your World
While you are in Home, the Kindle Store, or reading content, you can use your Kindle’s
search feature. From the keyboard, begin typing what you’d like to search for and then
using the 5-way controller, select the range of your search. If you begin your search
while in Home or with open content, you have the option to search for that item in
all of your books, newspapers, blogs, personal documents, and annotations. You
also have the option to focus your search to the built-in dictionary, the Kindle Store,
Wikipedia, and the Web.
Clip Your Favorite Passages
Have you ever been reading a book or a newspaper and wanted to clip and save
a few words to refer to later? With Kindle, simply select “Add a Note or Highlight”
from the menu and use the 5-way to highlight the content you want to clip and then
press the 5-way to save your selection. The clipping is added to a file in Home called
“My Clippings.” You can review your clippings later, search for words or terms you
clipped, and transfer the “My Clippings” file to your computer. This is a great way to
capture your favorite quotations to share with others.
Welcome · 14KINDLE USER’S GUIDE 4th EDITION
Page 15

Bookmark Your Reading
Kindle automatically saves your place in whatever book you are reading, but you
can also add a bookmark to any page by pressing the Menu button and selecting
“Add a Bookmark.” You can see that the upper right corner of the page is dog-eared.
Kindle stores all your bookmarks for the current content in your annotations.
You can view them at any time by pressing the Menu button and selecting
“My Notes & Marks.”
Add Your Own Notes
Do you like to take notes and make comments while reading? You can add notes
to any of the content on Kindle. Amazon automatically stores all of your book
annotations in the “My Clippings” file and backs them up on Amazon servers so they
will not be lost.
As an example, this sentence is highlighted and has a note attached as indicated
by the superscripted number one to the right of this text.1 Using the 5-way controller,
move the cursor over the notation number to see the note. To add your own note,
move the cursor to the word where you want to add your thoughts, and begin typing
your note. Then use the 5-way again to highlight the “save note” button onscreen and
press the 5-way to select. You can later view, edit, or remove a note, or see all of your
annotations by pressing the Menu button and selecting “My Notes & Marks.”
Stay in Sync
Whispersync technology saves and synchronizes your reading location across your
Kindle(s) and your iPhone. Now you can read a few pages on your iPhone and pick
up right where you left off when you return to your Kindle.
Convert Your Own Documents
In addition to all of the great reading material you can get from the Kindle Store,
Amazon can also convert your own documents so you can read them on Kindle.
You can e-mail Microsoft Word, TXT, HTML, RTF, or image files like JPEGs and GIFs
to your dedicated Kindle e-mail address (found on the Settings page on Kindle or the
Manage Your Kindle page on Amazon.com). We will convert the document into Kindle
format and wirelessly provide it directly to your Kindle via Whispernet for a fee or
back to your computer for free. If you e-mail a PDF to your Kindle, it will be sent to
your device with no conversion.
Welcome · 15KINDLE USER’S GUIDE 4th EDITION
Page 16

Learning More
This ends your brief introduction to just some of the capabilities on Kindle.
The chapters that follow give a more complete overview of these and other features.
Remember, you can always search on a particular feature or learn more about
how to do a particular task by opening this guide and typing on the keyboard to
activate Search.
The Table of Contents for the Kindle User’s Guide shows you all of the topics covered
in this guide. You can get to the table of contents by pressing the Menu button from
any page. Move the 5-way down until you underline “Table of Contents” and press the
5-way to go to it.
You can also navigate by clicking an underlined word or words like the “Table of
Contents” above. Underlined words indicate a link to somewhere else in the material
you are reading, like a footnote, a chapter, or a web site. In the example above, when
you navigate the 5-way controller over one of the underlined words, a hand icon
will appear. Pressing the 5-way will take you to the beginning of the table of contents.
Press the Back button to go back to where you were reading.
If you bought your Kindle with your Amazon account, it is already registered with your
account information and you are ready to go. When you go to the Home screen, check
the top left corner of the screen to see if your Amazon name (the same one you see
when you are shopping on Amazon.com) is shown. If it says “My Kindle” instead of
your Amazon account name, you need to register your Kindle. To register, first press
Home to display the Home screen and then press the Menu button. Select “Settings”
and then select “register” on the page that appears to enter your Amazon user name
and password. If your Amazon user name or password contains characters not present
on the Kindle keyboard, press the Symbol key on the bottom of the keyboard to
see a menu of the extended characters and use the 5-way to select the character you
require. Alternatively, you can register your Kindle by visiting the Manage Your Kindle
page on Amazon.com at: http://www.amazon.com/manageyourkindle
Welcome · 16KINDLE USER’S GUIDE 4th EDITION
Page 17

You can leave the Kindle User’s Guide, or any item you are reading, at any time by
pressing the Home button. If you are done reading, you can put your Kindle to sleep
by sliding and releasing the power button located at the top of your Kindle (you wake
up Kindle the same way). Sleeping your Kindle will extend battery life and also lock
all of the keys and buttons so you don’t inadvertently press one while not using your
Kindle. When your Kindle is asleep, you will see an image on the screen. To turn off
your Kindle completely, slide and hold the power switch for four seconds, then release.
The Kindle screen will blank and the device will turn off. If you ever need assistance,
you can use the Web or your telephone to contact us. See Chapter 9 for all of the
Kindle Support contact options.
Welcome · 17KINDLE USER’S GUIDE 4th EDITION
Page 18
CHAPTER 1: Getting Started with Your Kindle
In the Welcome chapter of the Kindle User’s Guide, you read about many of the things
you can do with your Kindle. This chapter reviews all of the physical features of Kindle
and covers the basics of using the Kindle buttons, menus, and keyboard.
1.1 Views of Kindle
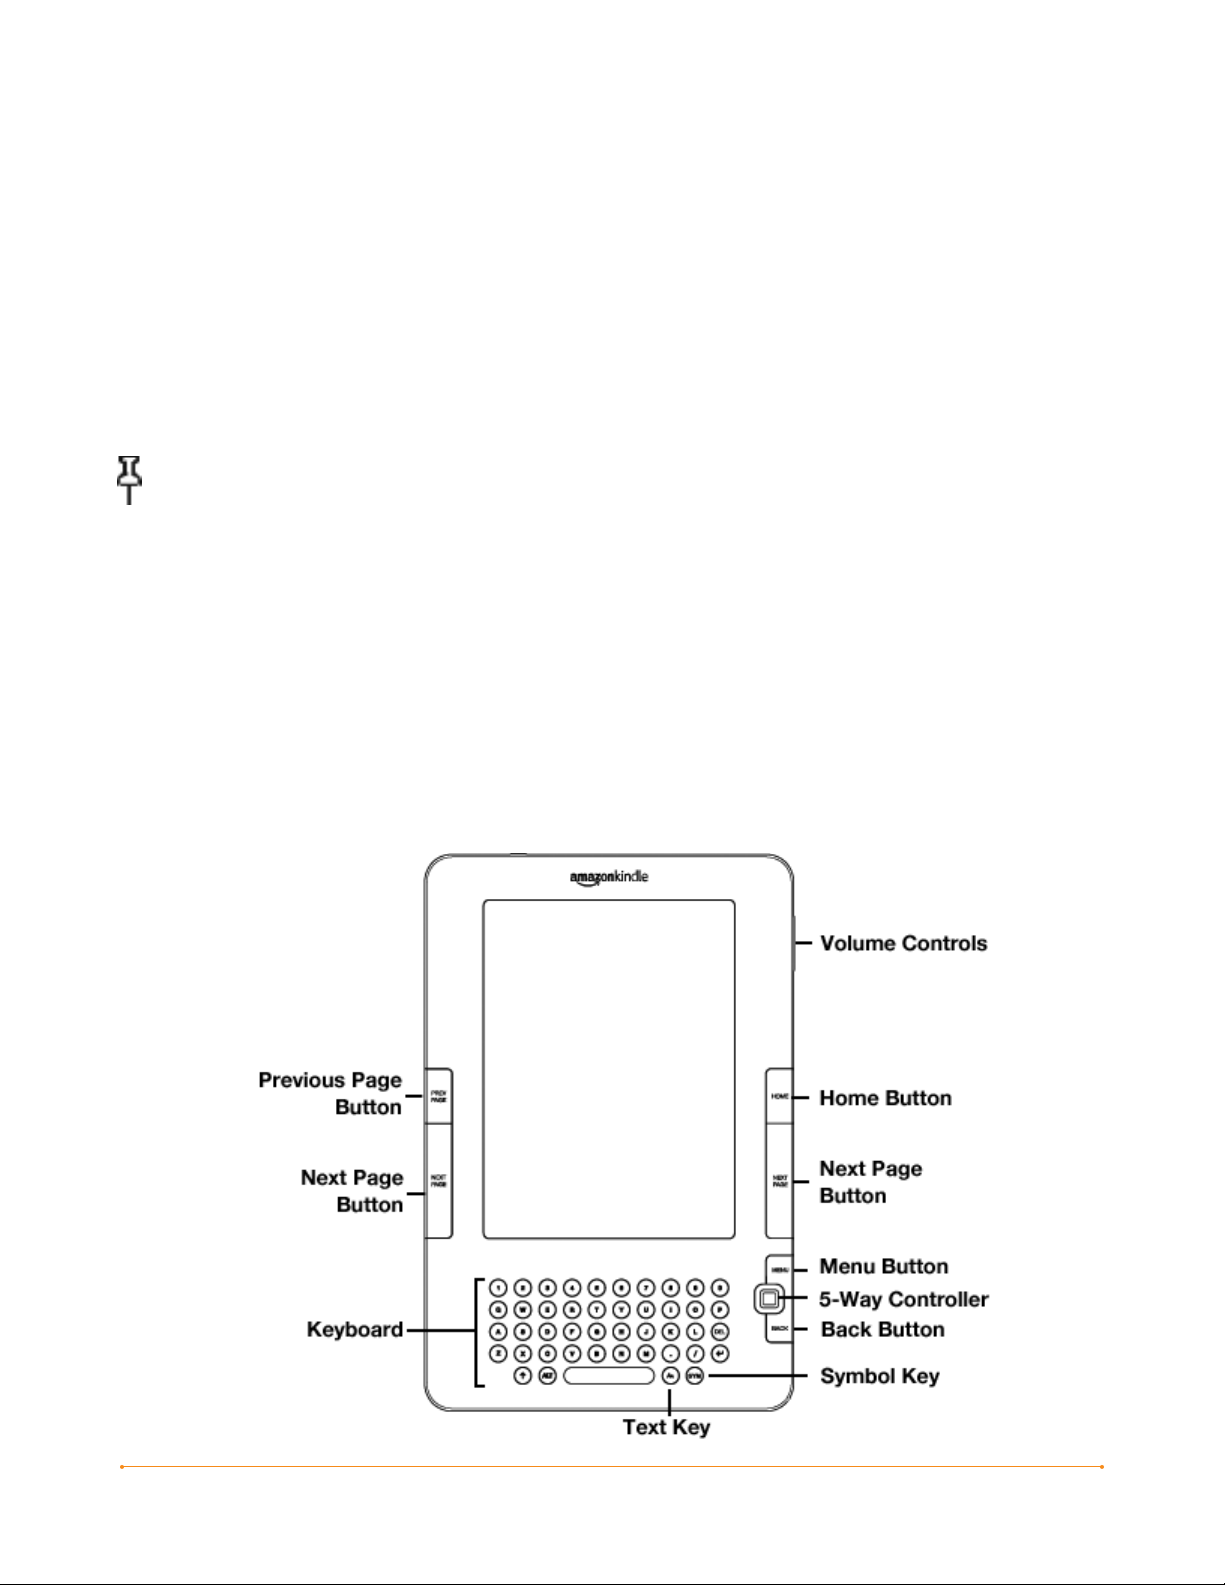
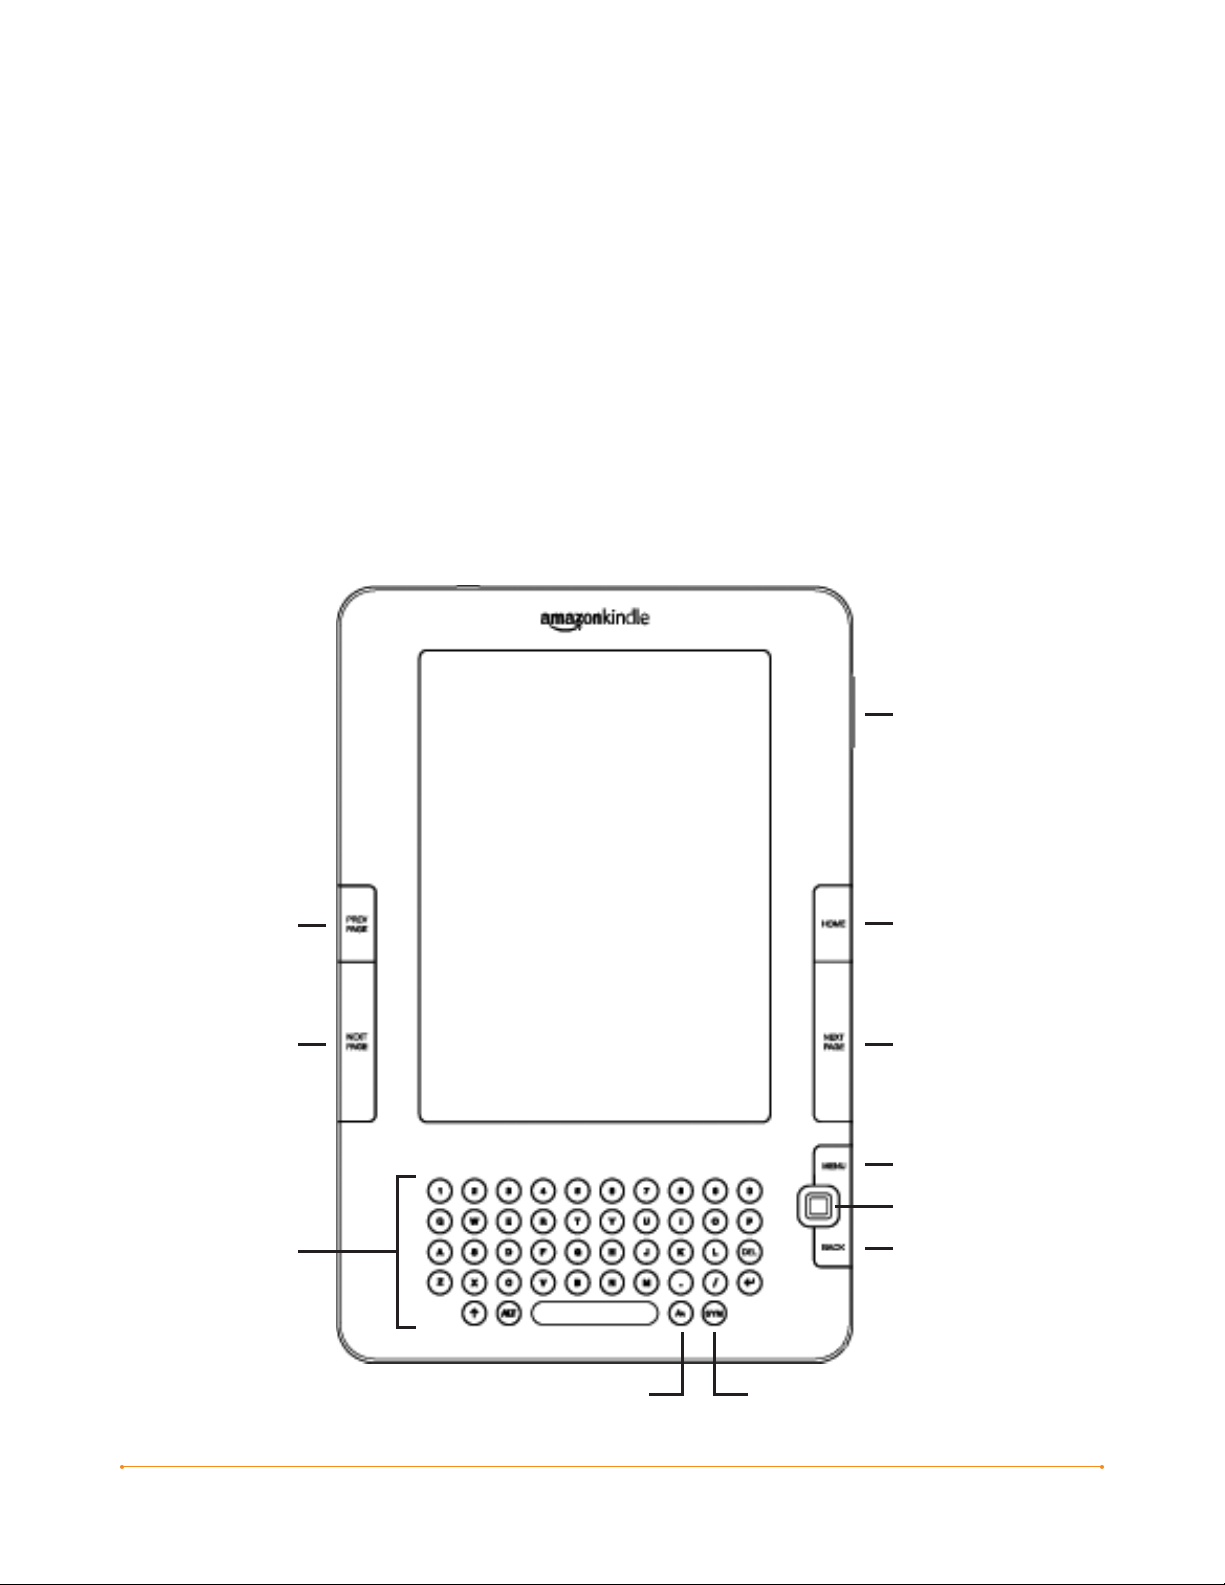
FRONT VIEW
The front of your Kindle contains the screen the keyboard, and the navigation controls.
These features are illustrated below and explained in the list that follows.
Previous Page
Button
Next Page Button
Keyboard
Volume Controls
Home Button
Next Page Button
Menu Button
5-Way Controller
Back Button
Text Key
Symbol Key
Chapter 1 · 18KINDLE USER’S GUIDE 4th EDITION
Page 19

Volume controls — controls the headphone or speaker volume for audiobooks,
background music, and text-to-speech.
Previous Page button — takes you to the previous page in your reading material.
Home button — shows content stored on your Kindle as well as content archived
at Amazon.
Next Page button — takes you to the next page in your reading material.
To accommodate different ways of holding the Kindle, there is a Next Page button
on both sides.
Menu button — displays application and navigation choices that are related to the
screen you are viewing.
5-way controller — selects an item or action when pressed down. Moves the
on-screen highlight or cursor up and down when moved up and down.
Moves the on-screen highlight or cursor side-to-side when moved left or right.
Holding the 5-way controller up or down without releasing it accelerates the cursor
movement, making it faster to navigate through lists or text.
Keyboard — use to enter search terms, notes in your content, URLs for Web sites, etc.
Back button — retraces your steps on Kindle just like the back button on a web
browser. For example, you can follow a link in a book and then press the Back button
to return to your place.
Symbol key — presents a menu of punctuation marks and symbols. Move the
5-way controller to select the desired symbol and press the 5-way to select.
Chapter 1 · 19KINDLE USER’S GUIDE 4th EDITION
Page 20
Text key — adjusts font size and number of words per line to suit your reading
preference. Also allows you to turn on/off Text-to-Speech and to change the screen
rotation settings.
Chapter 1 · 20KINDLE USER’S GUIDE 4th EDITION
Page 21
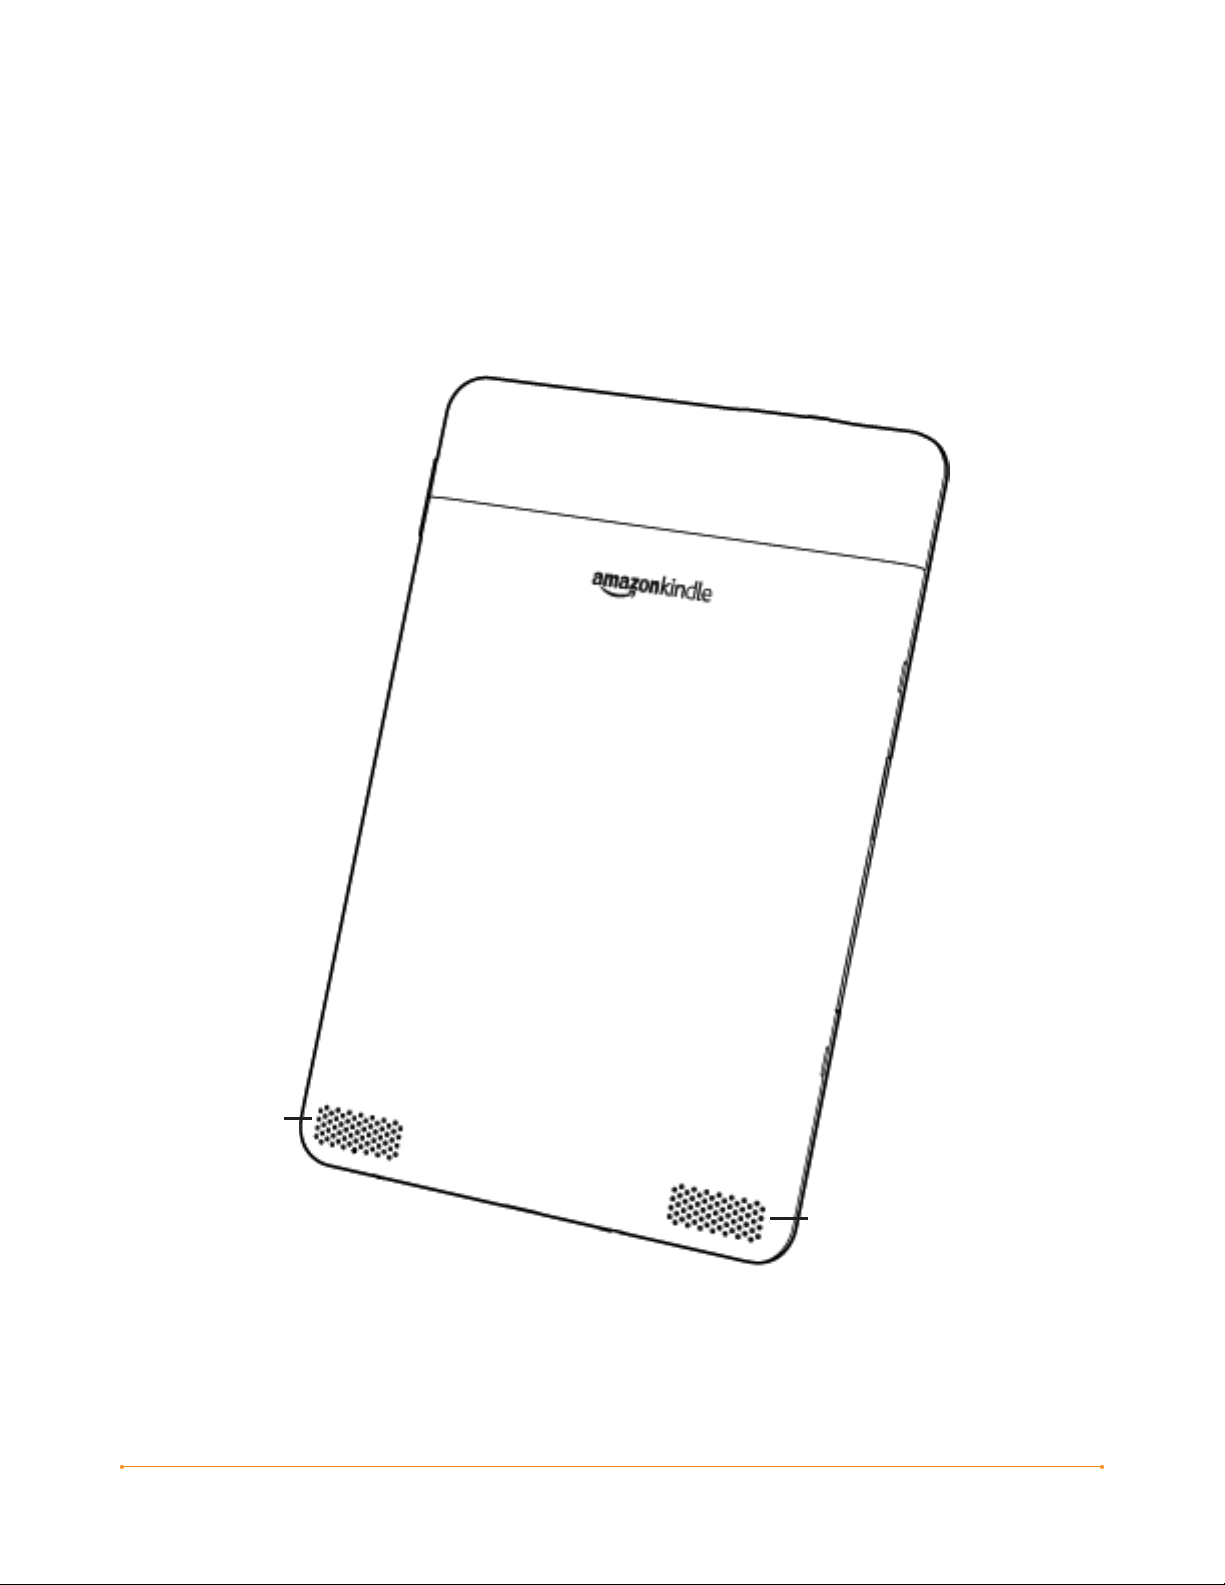
BACK VIEW
The back of your Kindle contains stereo speakers for audio content.
Speaker
Speaker
Chapter 1 · 21KINDLE USER’S GUIDE 4th EDITION
Page 22
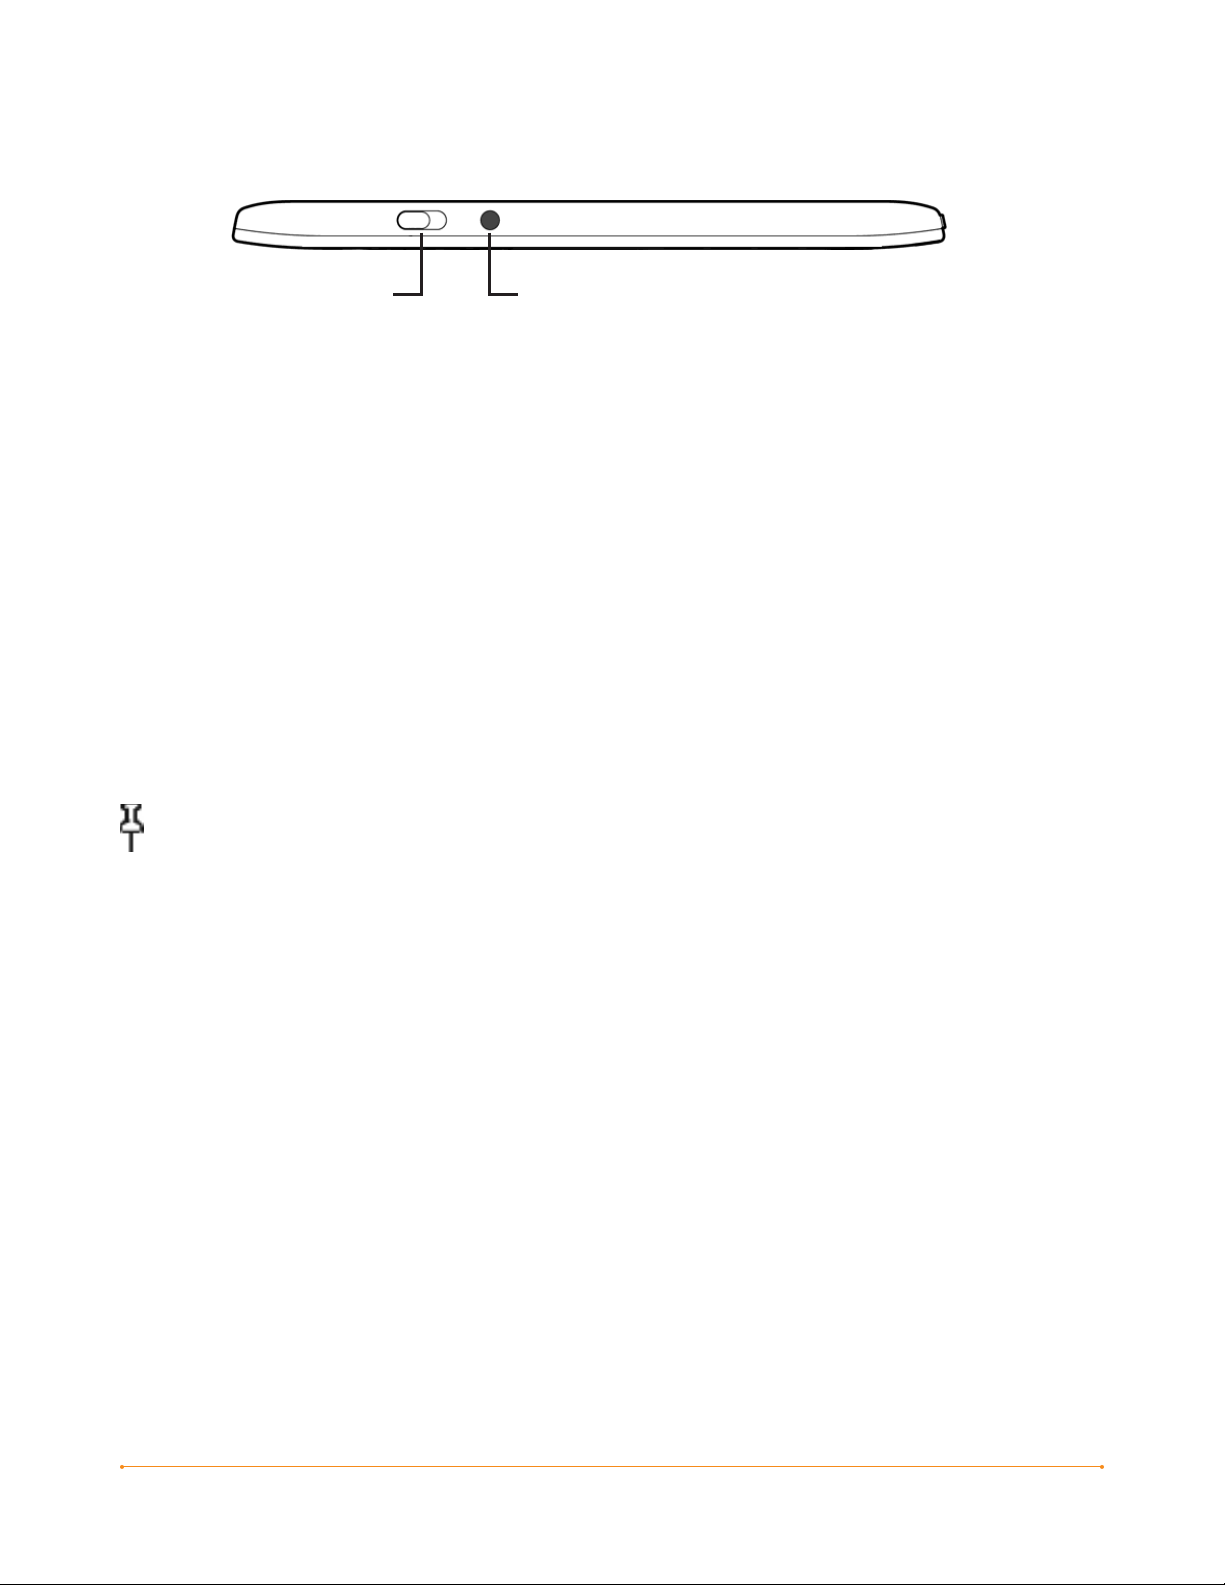
TOP VIEW
Power
Switch
Power switch — puts your Kindle to sleep, wakes it up, and turns your Kindle on
or off. To put your Kindle to sleep, slide and release the power switch; a full screen
image appears on the display. While your Kindle is asleep, other keys and buttons
are locked so that you don’t accidentally change the place in your reading. To turn
your Kindle off, slide and hold the power switch for four seconds until the screen
goes blank and then release. To wake up or turn on your Kindle, slide and release the
power switch again.
If your Kindle does not power on or is unresponsive during use, try resetting the
device by disconnecting your Kindle from any power source, and then sliding and
holding the power switch for 15 seconds before releasing.
Tip: Your Kindle will also go to sleep by itself after ten minutes if you are not using
it. If your Kindle had wireless on prior to going to sleep, it will continue to receive your
regularly scheduled subscriptions while in sleep.
Headphone
Jack
Headphone jack — plug in headphones to listen to an audiobook, background music,
or content read aloud through text-to-speech. Attaching headphones turns off the
built-in speakers.
Chapter 1 · 22KINDLE USER’S GUIDE 4th EDITION
Page 23
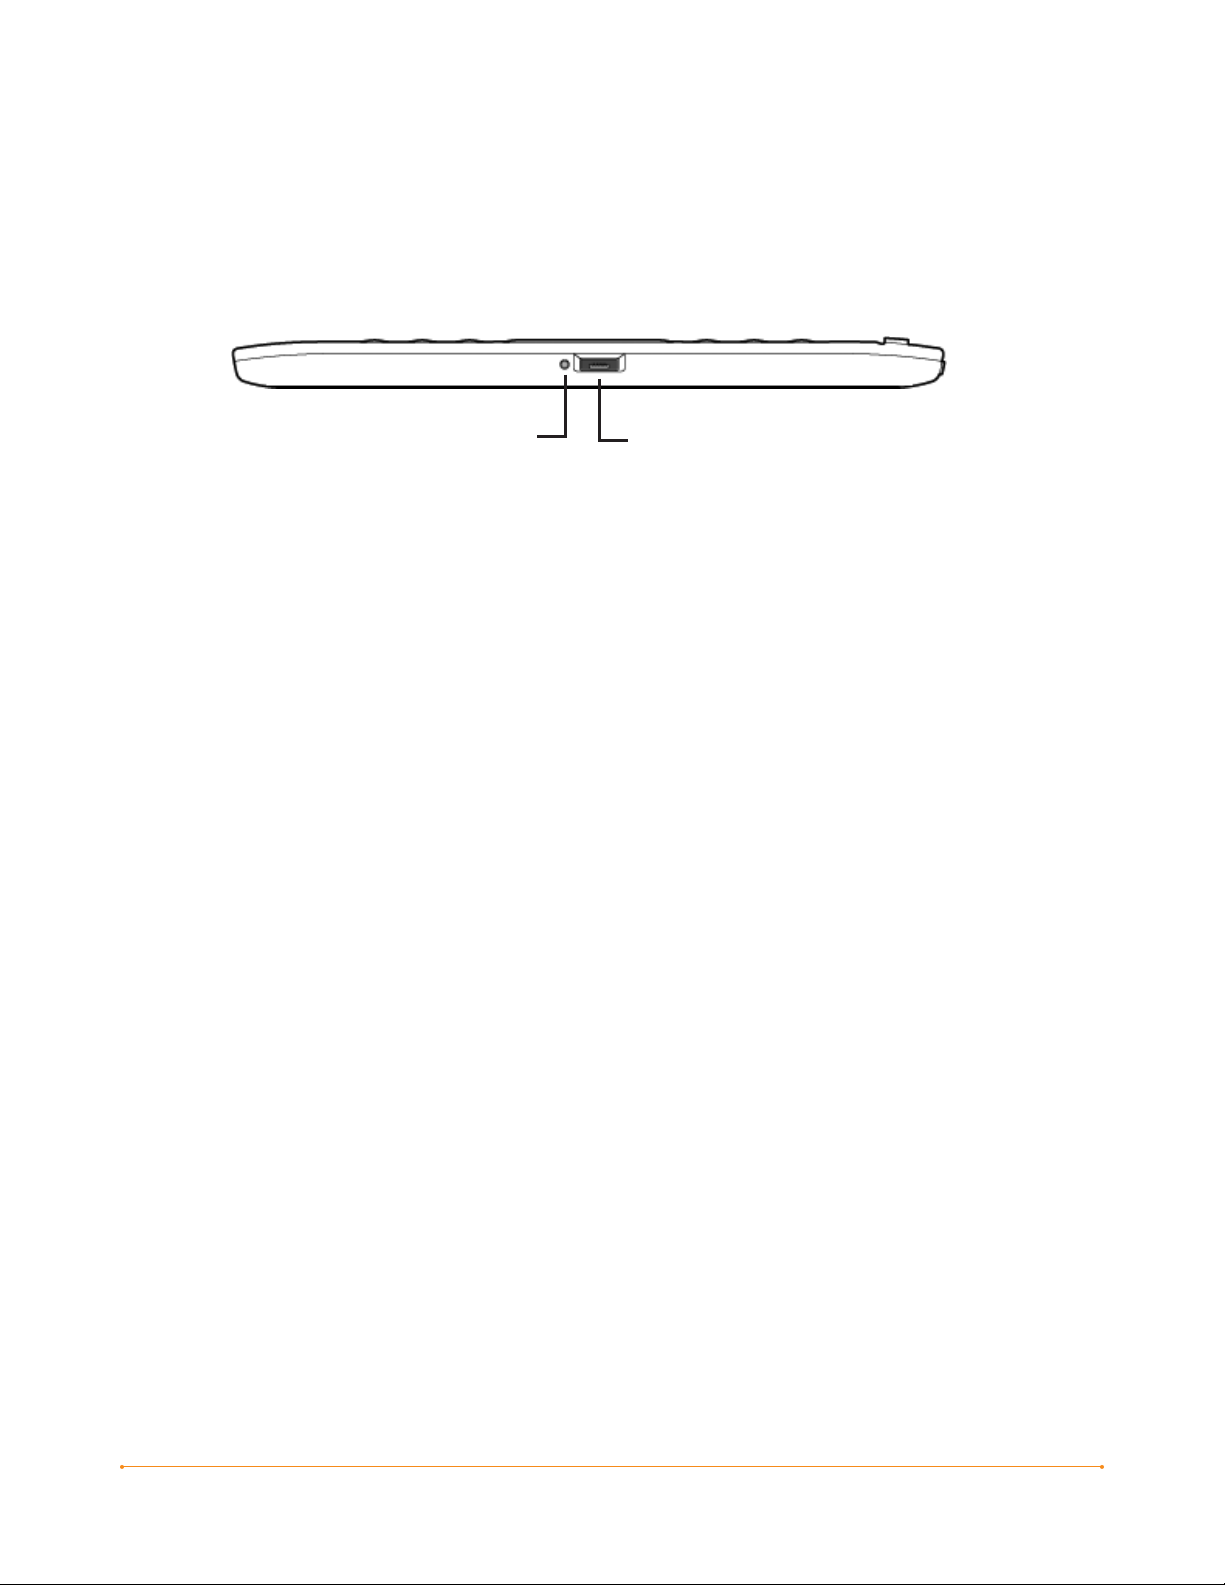
BOTTOM VIEW
The bottom of your Kindle contains the charge indicator light and a micro-USB port.
Charge
Indicator
USB/Power
Port
Light
Micro-USB/power port — attach the USB cord that came with your Kindle into the
micro-USB/power port and into the Kindle power adapter*. Plug the adapter into
a U.S.-compatible electrical outlet to charge the Kindle battery. You can also charge
your Kindle by detaching the USB cord from the power adapter and connecting
it to a computer’s USB port or powered USB hub. The charging status light will turn
yellow, indicating that the battery is charging; you can continue to use your Kindle
while it charges. A green light indicates that the battery is fully charged.
Check to make sure the power adapter is not covered by anything that could cause
it to overheat. If the charge indicator light does not light up, make sure that the USB
cable is fully inserted into your Kindle and the power adapter or USB port. If Kindle
still is not charging, try another electrical outlet or USB port.
To transfer content between your computer and your Kindle, connect the provided
USB cable to the Kindle and to the computer’s USB port.
* Not all configurations ship with a power adapter.
Chapter 1 · 23KINDLE USER’S GUIDE 4th EDITION
Page 24

1.2 Getting Around
To get around on your Kindle, you use the buttons, menus, and the keyboard—
all of which are explained here.
USING THE BUTTONS
In the Welcome section you learned about the navigation buttons (Previous Page,
Next Page, and Back). For an explanation of what each button does, see Front View
of Kindle.
USING THE MENUS
In addition to the physical buttons, you also navigate Kindle using the menus. Kindle’s
menus are context sensitive, but they all work the same way.
You use the 5-way controller to navigate within the menu and press the 5-way to
select an item.
Chapter 1 · 24KINDLE USER’S GUIDE 4th EDITION
Page 25
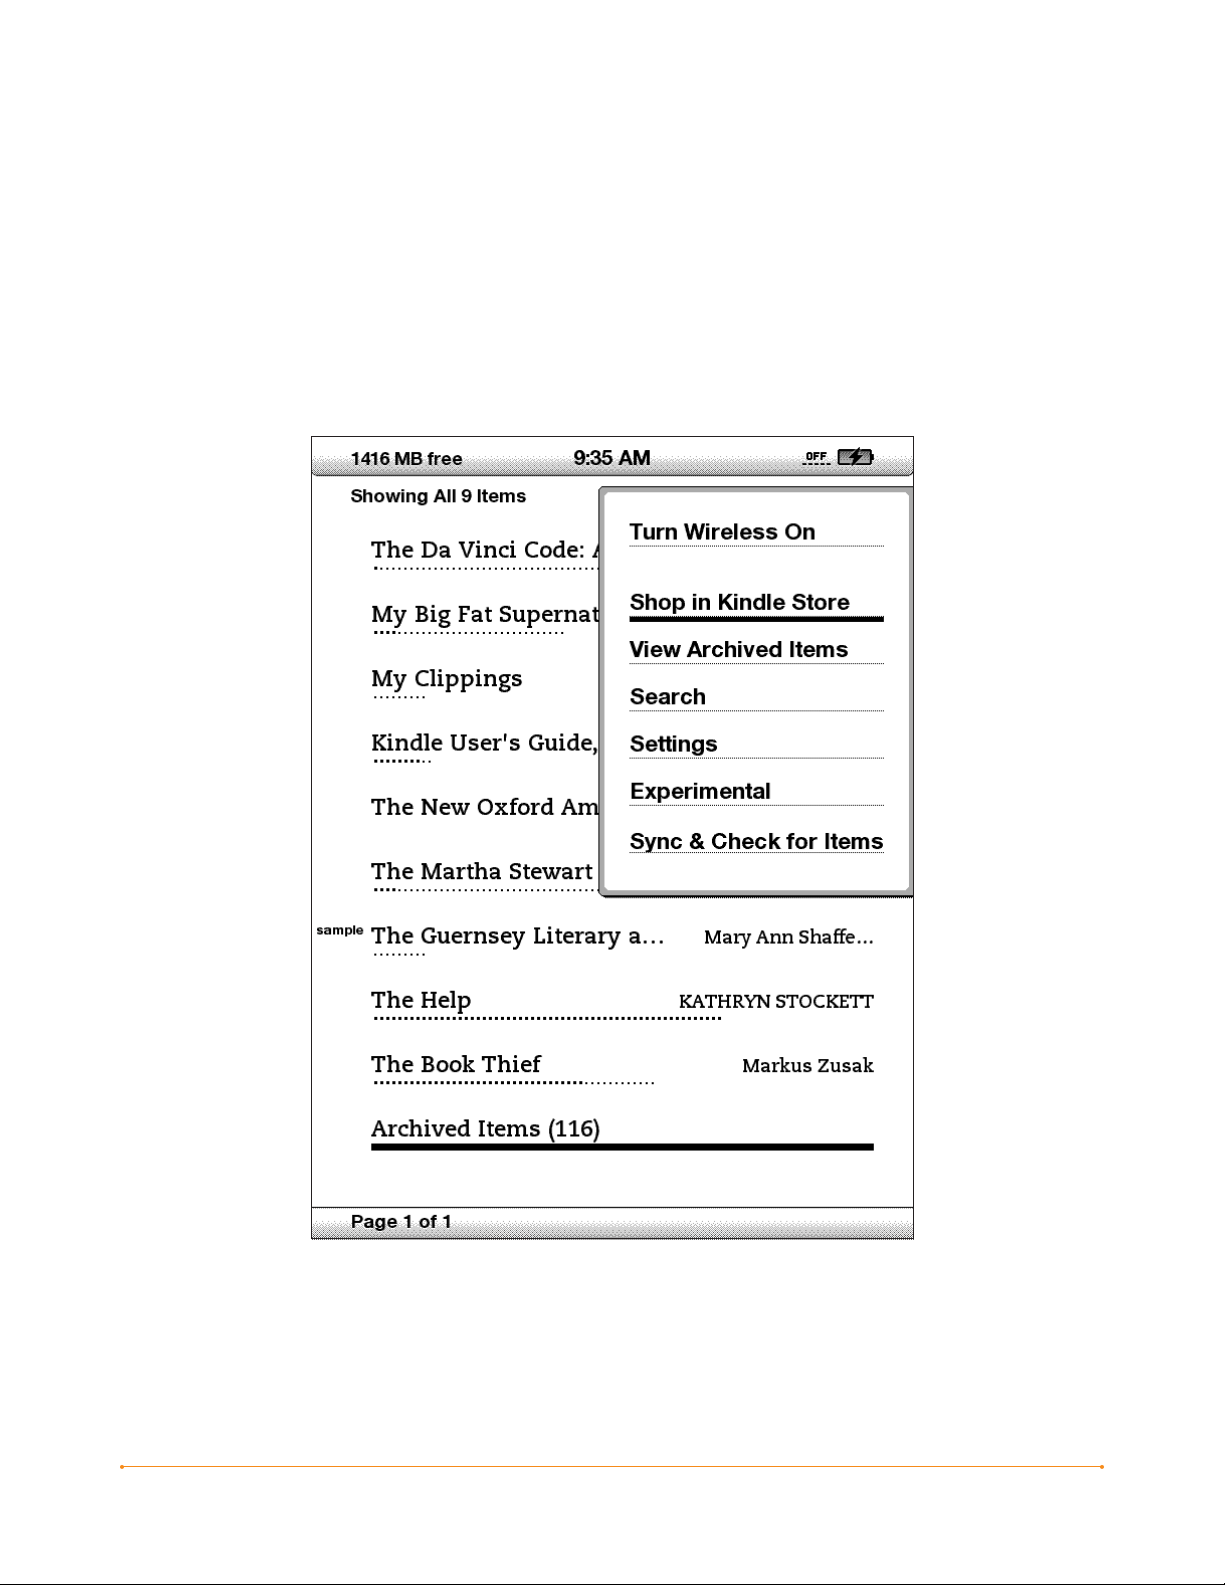
The illustration below shows the Home menu; the bold line under “Shop in Kindle
Store” indicates that it is ready to be selected.
Chapter 1 · 25KINDLE USER’S GUIDE 4th EDITION
Page 26
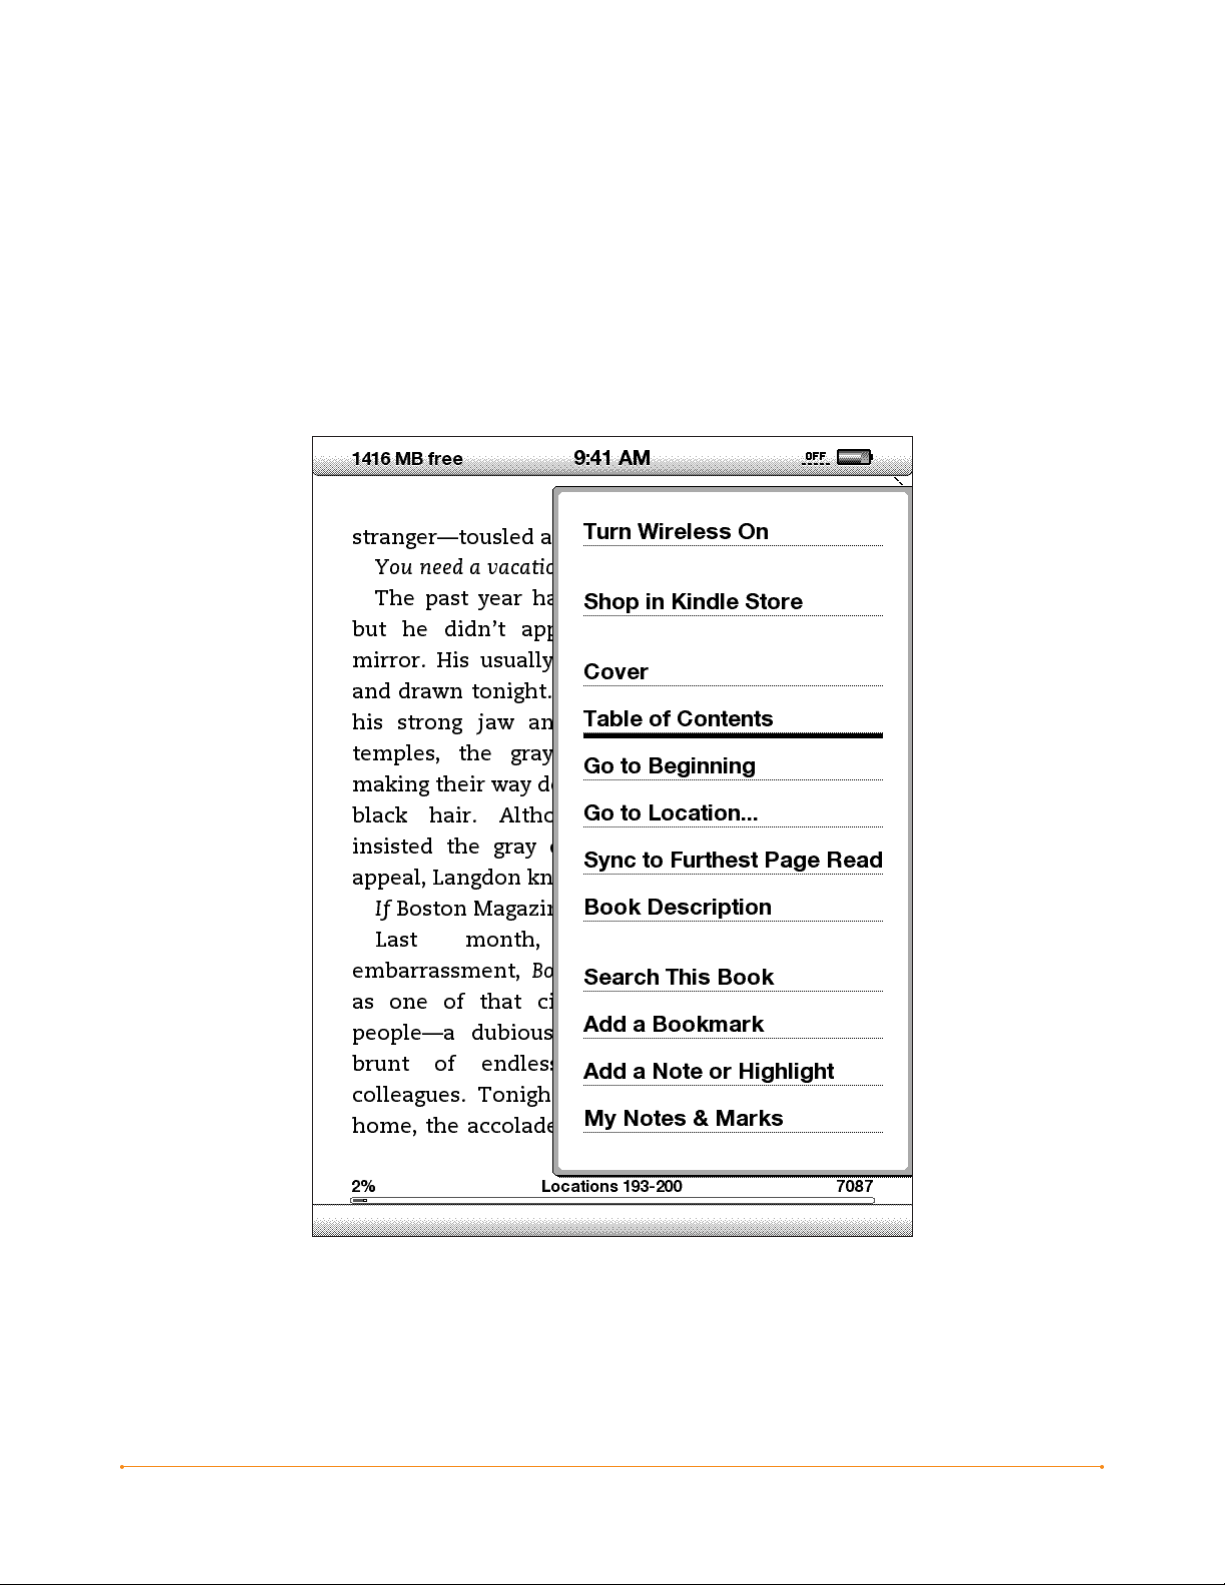
THE APPLICATION MENU
You can display a menu from any screen on your Kindle. When you press the Menu
button, it displays choices related to the screen you are viewing. The sample screen
below shows you the screen you would typically see when you press the Menu button
from within a book.
Chapter 1 · 26KINDLE USER’S GUIDE 4th EDITION
Page 27
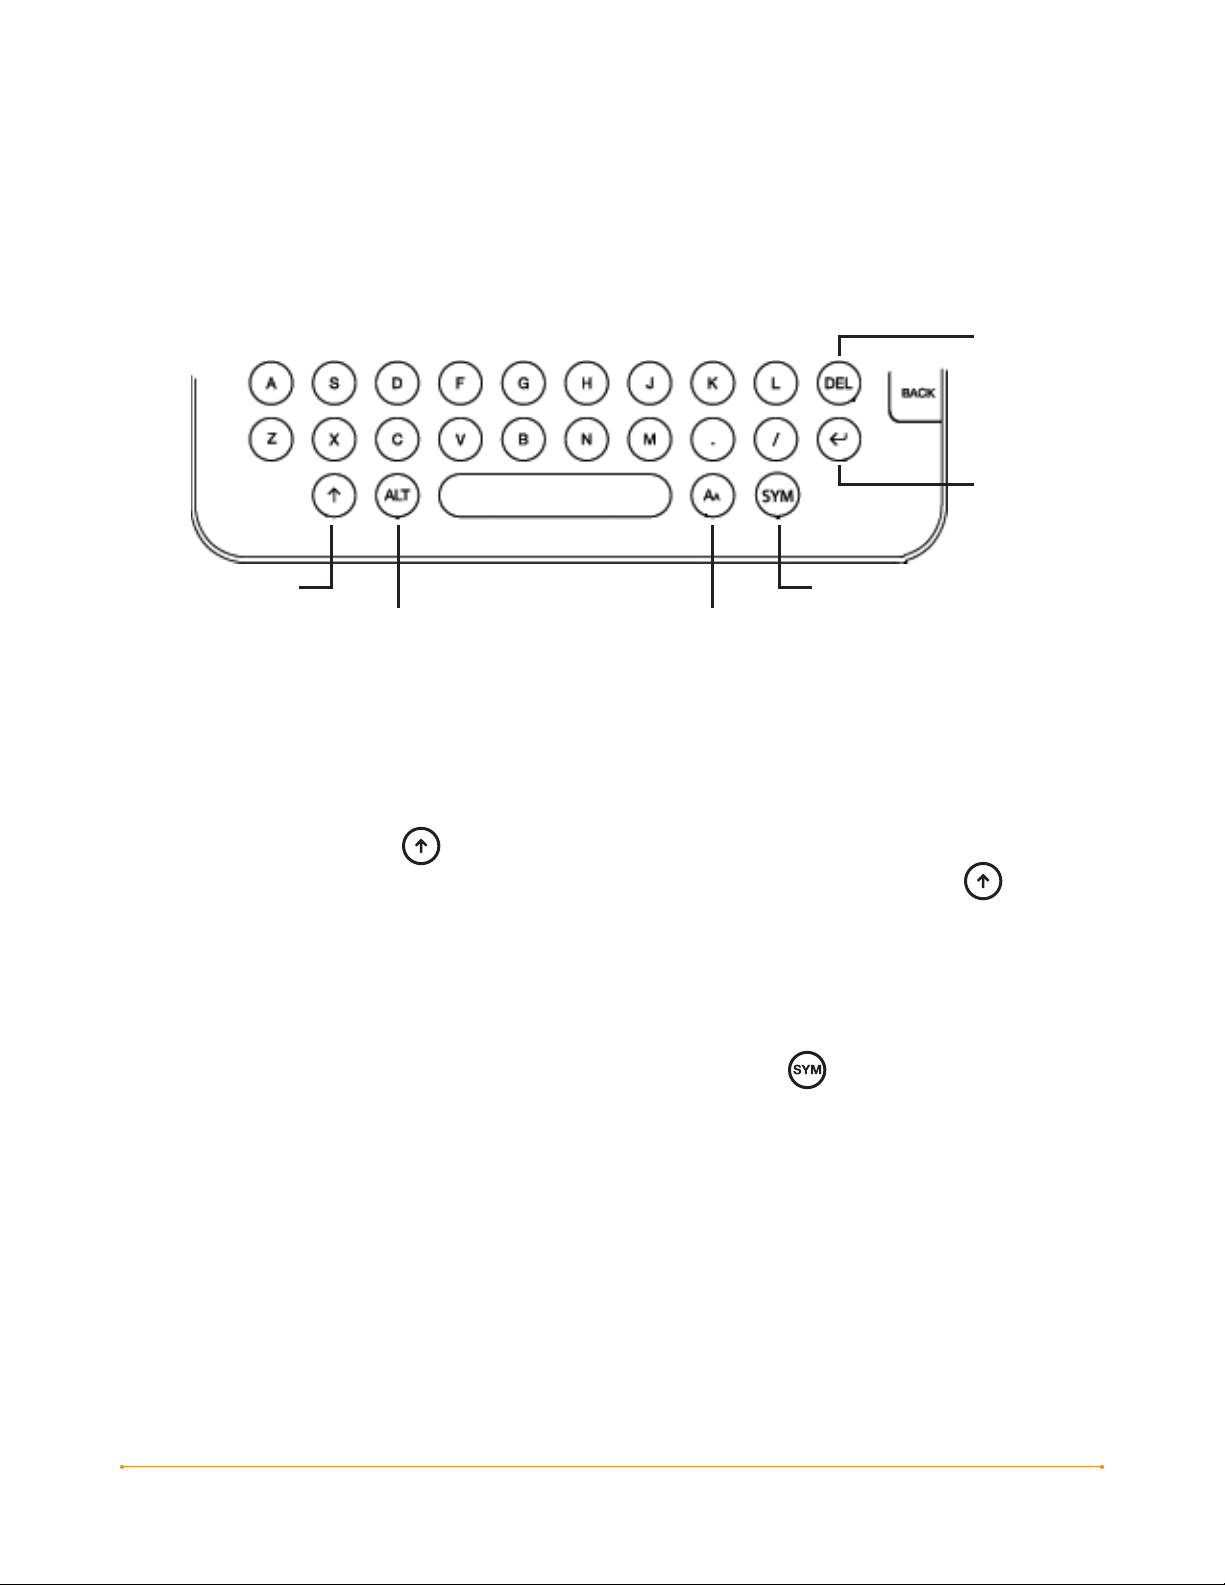
1.3 Entering Text
To use the Kindle keyboard, most people find it easiest to hold the device in both
hands, and use the tips of their thumbs to press the keys.
Delete/
Backspace
Return
Shift Key
Symbol Key
ALT Key Text Key
LOWERCASE AND UPPERCASE LETTERS
To enter lowercase letters, press the appropriate letter key. To enter uppercase letters,
hold down the Shift key , and then press the desired letter key like you do on your
computer keyboard. Alternatively, you can press and release the Shift key and
then press the desired letter. Only the next letter will be capitalized.
NUMBERS, PUNCTUATION, AND SYMBOLS
The number keys are located at the top of the keyboard. If you need a punctuation
mark or a symbol that is not shown, press the Symbol key on the bottom row of
the keyboard. You will see a menu of punctuation marks and symbols.
Chapter 1 · 27KINDLE USER’S GUIDE 4th EDITION
Page 28
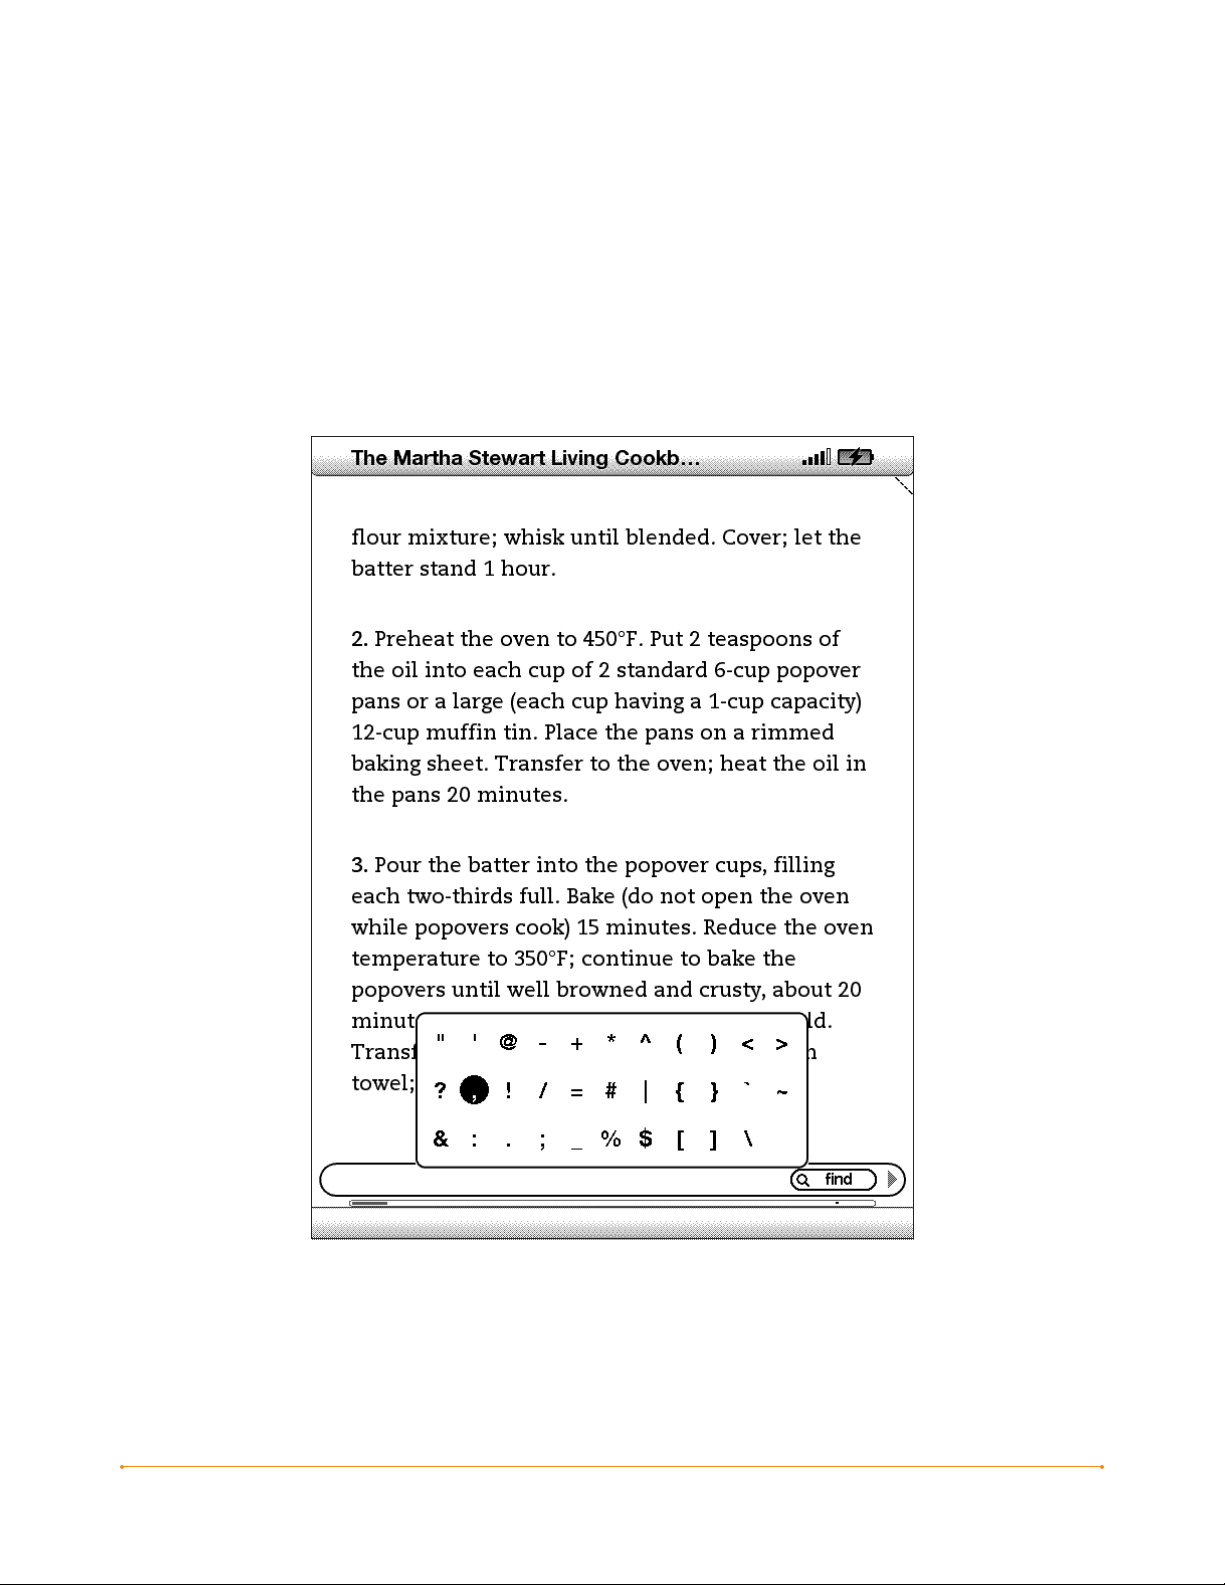
Use the 5-way controller to choose the character you want and it will appear in your
text entry box.
Chapter 1 · 28KINDLE USER’S GUIDE 4th EDITION
Page 29

1.4 Screen Rotation
The Kindle screen image can be rotated so you can see the entire width of a web page
or magnify the page of a PDF file. The buttons work the same in either rotation, but
the 5-way controller movements are switched to match the rotation.
To lock your screen into portrait or landscape mode, follow these steps:
1. Press the Text key located on the bottom row of the keyboard.
Screen Rotation is displayed at the bottom of the menu.
2. Move the 5-way to select one of the four options to lock the display in a set
orientation: portrait , landscape with the keyboard on the left, portrait with the
keyboard at the top, and landscape with the keyboard on the right.
3. Press the 5-way to confirm your choice.
Note — You can view Kindle Store pages only in portrait mode.
Chapter 1 · 29KINDLE USER’S GUIDE 4th EDITION
Page 30
1.5 Status Indicators
At the top of every screen, you also see Whispernet and battery life status indicators
to keep you in the know.
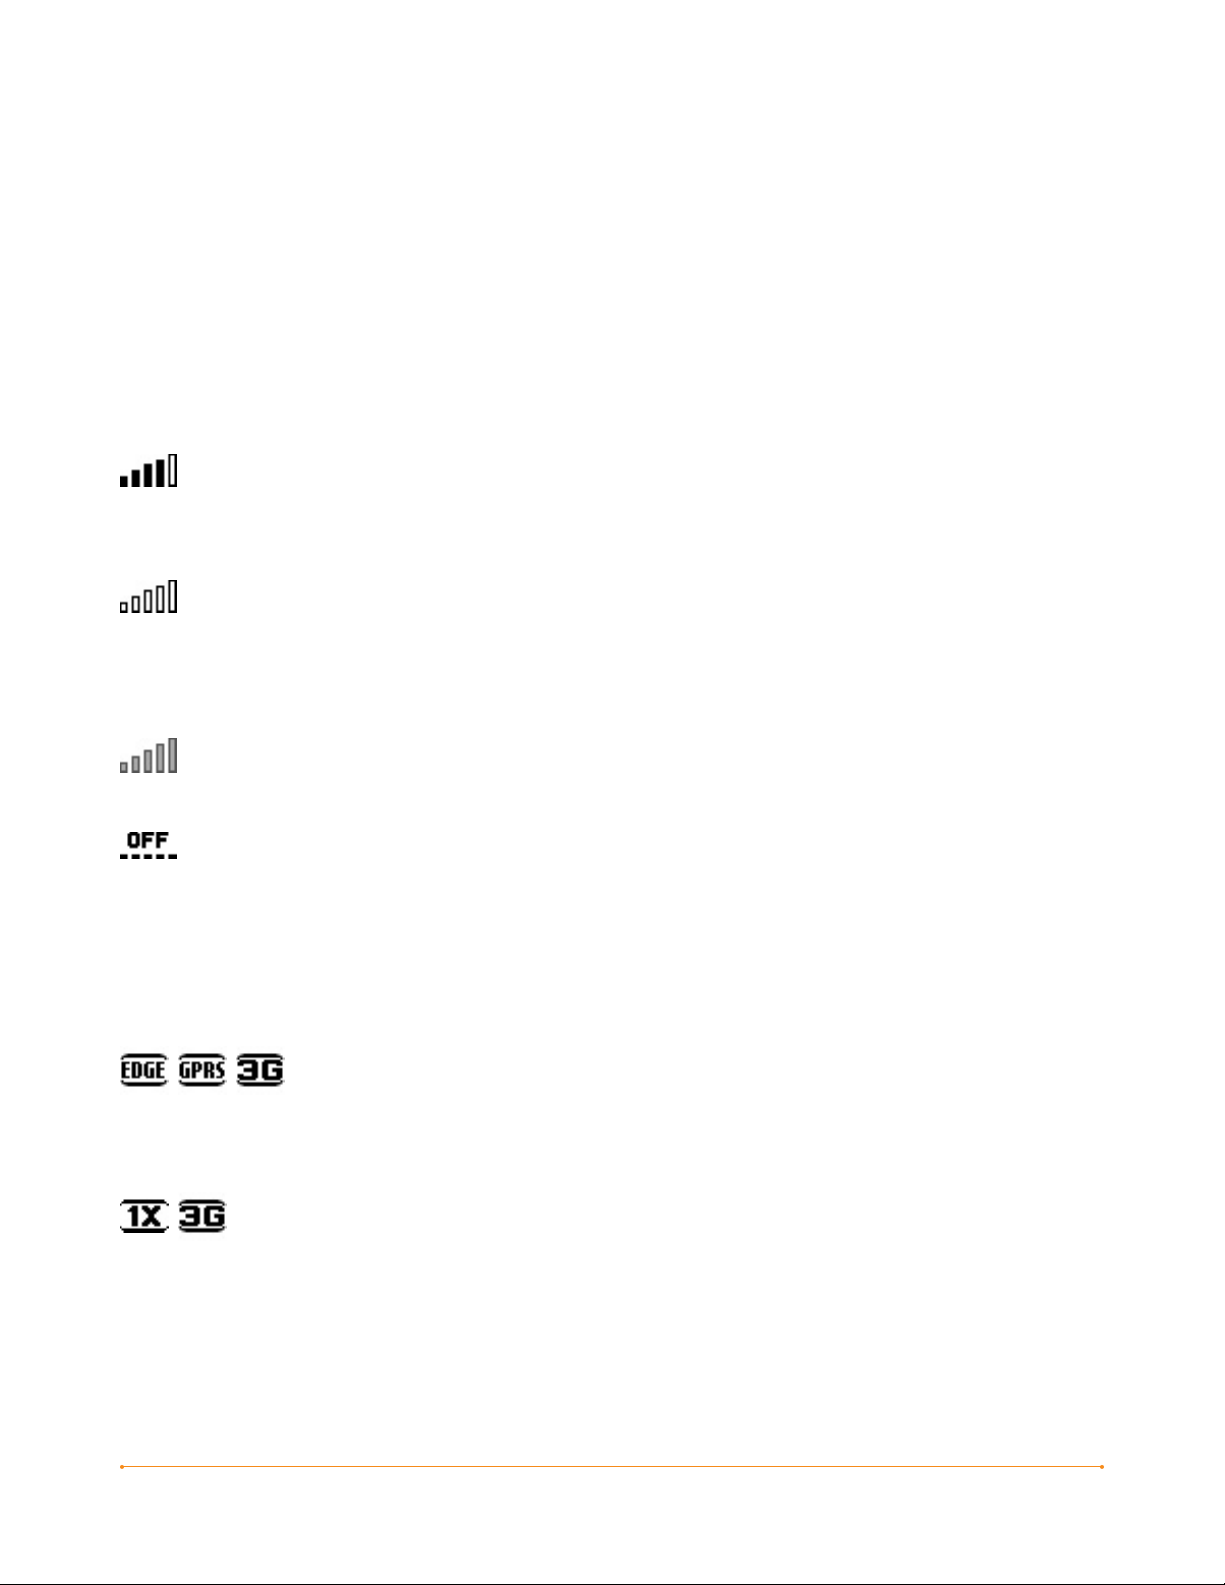
WHISPERNET STATUS INDICATORS
The Whispernet status indicator shows you whether the wireless radio is turned
on or off, the signal strength of your Whispernet service, and the connection speed.
Here are the possible indicators and their meanings.
The Whispernet service is active and your Kindle has a strong signal. The more
bars that are filled in with black, the stronger the wireless signal. Note that a weak
signal can increase power consumption.
None of the bars are filled in. This means the wireless signal strength is too low
to connect. You will not be able to connect to the Kindle Store, Basic Web, register
your device, retrieve content from Archived Items, receive your subscriptions, or sync
to furthest page read.
The bars are filled in grey. This means Whispernet is checking for signal
strength. This usually lasts less than 30 seconds.
The Whispernet service is turned off. You can turn on the wireless by pressing
the Menu button, and using the 5-way controller to navigate to “Turn Wireless On.”
When you activate a menu, icons indicating the speed of your Whispernet service
appear to the left side of the signal bars.
Kindle with international wireless
EDGE and GPRS wireless networks are slower than the 3G Whispernet service. Your
Kindle World Edition will automatically switch to the faster 3G network when available.
Kindle
The 1X icon indicates that your Kindle is connected to the 1XRTT wireless network.
Your Kindle will automatically switch to the faster 3G network when available.
Chapter 1 · 30KINDLE USER’S GUIDE 4th EDITION
Page 31

BATTERY STATUS INDICATORS
You have your Kindle plugged into power and the battery is charging.
The charge indicator light on the bottom of your Kindle also lights up. Note that
if your Kindle is plugged into a low powered USB port such as those found
on some keyboards or older computers, you will only derive enough charge
to avoid depleting the battery but not enough to recharge it.
The images above show the various states of the
battery as it discharges. As you deplete the battery, less of the battery indicator will be
filled in.
The battery is too low to power the Whispernet service. You must charge your
Kindle battery to restore wireless service.
Keep in mind that subscribing to multiple blogs that update frequently may increase
power consumption and decrease the battery life. Weak signal coverage can also
increase power consumption
ACTIVITY INDICATOR
Appears in the top left corner of your Kindle screen when the device is busy
downloading new content, checking for new items, searching for an item, opening a
large PDF file, or loading a web page.
Chapter 1 · 31KINDLE USER’S GUIDE 4th EDITION
Page 32

CHAPTER 2: Getting to Know Kindle Content
The Kindle Home screen gives you an overall picture of what you currently have
on your Kindle. It shows you what has arrived recently, what you are reading, and
where you are in your reading. It also allows you to remove content from your Kindle
and to move content from Amazon.com to your Kindle. Read below for more details.
2.1 The Home Screen
Your Home screen displays a list of all of your Kindle reading materials — books,
newspapers, magazines, blogs, PDF files, personal documents, as well as audiobooks.
It serves as a personal bookshelf for all of your reading material, as well as a starting
point to access other Kindle features.
To display the Home screen, press the Home button on the right edge of your Kindle.
By default, the Home screen lists all of the items that you have on your Kindle
beginning with the most recently viewed (or acquired) items. Each type of content has
a slightly different description and label. You can read more about the types of content
available in Chapter 3.
KINDLE BOOKS
Books are shown by title and author. Below the book title are a series of dots which
give you an approximation of how long the book is. Bold dots within the series
indicate how far along you are in the book based on the last page you viewed.
PERIODICALS
Periodicals include newspapers and magazines that can be purchased as a single
issue or as a subscription delivered on a regular basis. Your Home screen lists the
most recent issue of each periodical you have on your Kindle. Older issues appear
inside a grouping called Periodicals: Back Issues. Selecting the grouping takes you to
a screen that displays the back issues of all the periodicals you have on your Kindle.
Note that Kindle automatically deletes issues that are more than seven issues old to
free up space for new content. An exclamation point next to an issue indicates
that it will be deleted within 24 hours.
Chapter 2 · 32KINDLE USER’S GUIDE 4th EDITION
Page 33

BLOGS
Blogs are subscription-based and appear on the Home screen as a single entry like
books. As additional blog content arrives, it is added to the item and older entries are
rolled off, much like a blog works on a computer.
AUDIOBOOKS
Audiobooks look similar to books, but they will be labeled in the Home screen as
audio content. Like regular books, they have a progress indicator that shows where
you are in the audiobook.
PDF FILES
PDF files also look similar to books, but they will be labeled in the Home screen
as “pdf.” Like regular books, they have a progress indicator that shows where you
are in the file.
Chapter 2 · 33KINDLE USER’S GUIDE 4th EDITION
Page 34

HOME SCREEN FEATURES
What you see on your Home screen varies depending on what reading materials you
have purchased, and how you choose to show and sort this list. The screen sample
and list below explain the features that you may find on your Home screen.
Device Name
Show Options
Title
Unread Title
Archived Item
Audiobook
PDF Title
Progress Indicator
Periodicals:
Back Issues
Sort Options
Author or
Date
Sample Title
Pages In Home
Device name —the name of your Kindle. You can edit this name on the
Settings screen.
Show options — choose which types of content you want displayed in Home.
Chapter 2 · 34KINDLE USER’S GUIDE 4th EDITION
Page 35

Sort options — choose the order you want content displayed in Home.
Title — the title of the item.
Author or Date — for books, the author of the item is listed. For periodicals and blogs,
the date is listed.
Progress indicator — the series of dots below the item shows how long the book
is and bold dots show how far you have read in a particular item.
Unread title — the “new” label indicates the item has never been opened and is less
than 24 hours old. Once you open a new document or more than 24 hours has passed
since the item arrived on your Kindle, the “new” label is removed.
Archived Items — items stored at Amazon.com that you can re-download to
your device.
Audiobook title — the “audio” label indicates the book is an audiobook.
PDF title — the “pdf” label indicates the file is a PDF.
Periodicals: Back Issues — stores older issues of newspapers and magazines.
Sample title — the “sample” label indicates the book is a sample. If you like it,
you can purchase the full book from within the sample.
Pages — indicates the total number of pages in Home. Use the Next Page or
Previous Page button to navigate the pages.
Chapter 2 · 35KINDLE USER’S GUIDE 4th EDITION
Page 36

SHOW OPTIONS
The following screen sample shows the location of the Show options and the list
below explains each of the options. Moving the 5-way controller to the left lets you
select what items to show in Home.
Show Options
Chapter 2 · 36KINDLE USER’S GUIDE 4th EDITION
Page 37

Personal Docs — shows only the Personal Documents you have stored on your Kindle,
including PDF files.
Subscriptions — shows only the periodicals and blogs you have stored on your Kindle.
Books — shows only the books and audiobooks you have stored on your Kindle.
All My Items — shows all of the content you have stored on your Kindle.
CHANGING WHAT YOUR HOME SCREEN SHOWS
By default, the Home screen shows all of your content. To change the type of content
displayed, follow these steps:
1. If you are not already on the Home screen, press the Home button.
2. Move the 5-way up until the Show and Sort options are underlined.
3. Move the 5-way to the left to see the Show options.
4. Move the 5-way to underline the type of content you want to display.
5. Press the 5-way to select it. The new display option changes immediately.
Chapter 2 · 37KINDLE USER’S GUIDE 4th EDITION
Page 38

SORT OPTIONS
The following screen shows the location of the Sort options and the list below
explains each of the options. Moving the 5-way to the right lets you change how
to sort these items.
Sort Options
Most Recent First — sorts your content by the most recently added or recently
opened items first.
Title — sorts your content alphabetically by title of the item.
Author — sorts your content alphabetically by the author’s last name or publisher’s
name. If you choose this option, periodicals will be sorted by their dates.
Chapter 2 · 38KINDLE USER’S GUIDE 4th EDITION
Page 39

CHANGING HOW THE HOME SCREEN IS SORTED
By default, your content is sorted by most recent first, meaning all of the new items
and the content you are currently reading are at the top. To change this option, follow
these steps:
1. If you are not already on the Home screen, press the Home button.
2. Move the 5-way up until the Show and Sort Options are underlined.
3. Move the 5-way to the right to see the Sort options.
4. Move the 5-way to underline how you want the items sorted.
5. Press the 5-way to select it. The sort order on the Home screen
changes immediately.
Chapter 2 · 39KINDLE USER’S GUIDE 4th EDITION
Page 40

THE HOME SCREEN MENU
The Home screen menu allows you to navigate to other places in Kindle or to perform
specialized tasks. To display the Home screen menu, press the Menu button when
your Home screen is displayed. The list below explains the menu.
Current Time Whispernet
Memory Battery
Chapter 2 · 40KINDLE USER’S GUIDE 4th EDITION
Page 41

Turn Wireless Off/On — turns the Whispernet service off or on.
Shop in Kindle Store — takes you to the Kindle Storefront.
View Archived Items — takes you to Archived Items where you can view and
wirelessly re-download content you are storing at Amazon.com.
Search — brings up the Search text entry page for submitting a word or phrase
to search for.
Settings — takes you to the Settings screen.
Experimental — takes you to the Experimental page where you can see and use some
of the experimental prototypes we are working on.
Sync & Check for Items — connects to Amazon.com to download any newly available
items and sync the furthest page read and bookmarks for all the books on your device.
2.2 Managing Your Content
All books you purchase are automatically backed up on Amazon.com. When you
remove a book that you have purchased, it appears in your Archived Items.
You access your Archived Items from your Home screen. To move content between
Archived Items and Home, Whispernet needs to be on.
REMOVING KINDLE CONTENT
To remove content, follow these steps:
1. If you are not already on the Home screen, press the Home button.
2. In the list of the content already on your device, move the 5-way to underline the
item you want to remove.
3. Move the 5-way to the left to remove the item.
4. For books purchased from the Kindle Store you will see “remove from device” and
for all other content you will see “delete.” Press the 5-way to remove the content.
To change your mind, move the 5-way up or down to cancel. Note that Kindle
books are backed up for you at Amazon.com even if removed from the device.
5. For content other than books purchased from the Kindle Store, you will need to
confirm the deletion of the content by selecting “ok.”
Chapter 2 · 41KINDLE USER’S GUIDE 4th EDITION
Page 42

MORE ABOUT MANAGING ITEMS
Amazon also stores the seven most recent issues of your newspapers and magazines.
If you’d like to keep a copy of an issue indefinitely, open the issue, press the Menu
button, and select “Keep this Issue”; you will then see the word “keep” to the left
of the issue title in Home.
You can download items stored at Amazon.com any time you are within Whispernet
coverage. If you are not within coverage, Kindle will automatically download the item
when you re-enter Whispernet wireless service.
Personal documents (including PDF files) sent to your Kindle are not backed up
at Amazon.com.
When you remove a Kindle book you bought from Amazon, we automatically save
all of your annotations for the book in case you ever want to download it again.
However, if you remove a subscription issue that is older than seven days, a blog
of any age, or an item you did not get from Amazon, any annotations you created
on Kindle for those items do not get saved. Your “My Clippings” file will still remain
as a separate file containing all the clippings you added regardless of whether the
content is a book, subscription, or blog or was purchased from Amazon or not.
See Chapter 3 for more information.
INTERNATIONAL WIRELESS DELIVERY
(Kindle with international wireless only) If you wirelessly receive or download content
to your Kindle via Whispernet while outside the U.S., additional fees may apply.
For further information go to: http://www.amazon.com/kindlewhispernetroaming
Chapter 2 · 42KINDLE USER’S GUIDE 4th EDITION
Page 43

CHAPTER 3:
Reading on Kindle
Kindle retains the best qualities of printed books, but adds many features that are
available only through digital technologies such as word look up, changeable text size,
and clippings. This chapter explains more about Kindle’s reading features.
3.1 Types of Content
There are many types of reading material available for your Kindle such as books,
newspapers, magazines, and blogs. If you want to begin purchasing and downloading
reading material, you can learn more in Chapter 5. You can also purchase audiobooks
from Audible.com and even have Amazon convert and deliver personal documents
to your Kindle. The different types of supported content are described below.
BOOKS
Thousands of books — both popular and hard-to-find — are available in the Kindle
Store. Once you buy a book, it usually arrives wirelessly in under a minute. Because
you can’t always judge a book by its cover, you can download and read a sample of
most Kindle books for free. If you like it, simply buy it from within the sample and
continue reading. You can learn more about this feature in Chapter 5.
NEWSPAPERS
The Kindle Store offers a selection of U.S. and international newspapers.
Subscriptions are delivered wirelessly to your Kindle overnight so that the latest
edition can arrive on your device every morning, and every newspaper subscription
starts with a free trial.
MAGAZINES
The Kindle Store offers an expanding selection of magazines to meet every interest.
As with newspapers, all periodical subscriptions are delivered wirelessly and start
with a free trial.
Chapter 3 · 43KINDLE USER’S GUIDE 4th EDITION
Page 44

BLOGS
The Kindle Store offers thousands of Kindle blogs, including up-to-the-minute news
feeds and topical blogs. Blog categories include business, technology, sports, politics,
culture, entertainment, humor, and science. Kindle blogs are sent to you wirelessly
throughout the day, allowing you to keep current. Unlike traditional feeds, which often
only provide headlines, Kindle downloads the complete feed onto the device so you
can read them even when you are not wirelessly connected. All blog subscriptions are
delivered wirelessly and start with a free trial.
PERSONAL DOCUMENTS
In addition to purchased content, you can read your personal documents on Kindle.
Kindle can display a PDF document without losing the formatting of the original
file. You can either drag PDF files over USB to your device or e-mail them to your
dedicated Kindle e-mail address (found on the Settings page on Kindle or the
Manage Your Kindle page on Amazon.com). When you choose to e-mail a PDF, we
will wirelessly provide it directly to your Kindle via Whispernet for a fee. You can
also press the Text key to change the orientation of your display to widescreen
viewing. For more information on the unique aspects of reading PDF files on Kindle,
see Section 3.6.
Additionally, if you have files formatted as text, Microsoft Word, HTML, PDF, or image
files like GIF or JPEG, you can e-mail the files as attachments to your Kindle e-mail
address. Amazon will convert the files if necessary and send them back to your
computer for free or via Whispernet to your Kindle for a fee, whichever you prefer.
For more information on transferring, converting, and e-mailing your personal
documents, see Chapter 8.
For details on fees, see the “Your individual charges” section of your Manage Your
Kindle page on Amazon.com.
Chapter 3 · 44KINDLE USER’S GUIDE 4th EDITION
Page 45

AUDIOBOOKS
You can download and enjoy thousands of audiobooks from Audible.com. Due to their
large file size, audiobooks must be downloaded to your PC or Mac over your existing
Internet connection and then transferred to Kindle over USB. Listen to audiobooks
through Kindle’s speakers or plug in your headphones for private listening. For more
information on transferring and listening to audiobooks, see Chapter 8.
BACKGROUND MUSIC
If you like to listen to music while you use your Kindle, use your computer to transfer
MP3 files to the “music” folder on your Kindle. When you select “Play MP3” from
the Experimental page, each of the songs will play in the order they were added to
your Kindle.
Chapter 3 · 45KINDLE USER’S GUIDE 4th EDITION
Page 46

3.2 Content Formatting on Kindle
When you read a book on Kindle, you will find that the formatting generally follows
the printed version of the book. If the book has a table of contents, it will appear in
Kindle. If the book has chapters, a preface, an illustrated cover, and so forth, these will
be displayed.
While you are reading, each page displays a header showing the content title and/or
issue date. The top of the page shows the battery and Whispernet status indicators.
Progress
Indicator
Locations
Chapter 3 · 46KINDLE USER’S GUIDE 4th EDITION
Page 47

PROGRESS INDICATOR
At the bottom of every page of your reading material, you can see where you are by
glancing at the progress indicator. As you progress further into the content, you will
see a solid bar growing longer. The progress indicator also shows structural marks
within content such as chapters, articles, bookmarks, notes, or highlights.
In books, the progress indicator also shows you the overall percentage of the book
you have read and a numeric location of where you are reading, so you can easily find
a particular passage or reference it to your friends. Locations are the digital answer
to page numbers. Changing the text size on Kindle also changes the page numbering,
but with locations, you return to the same place every time regardless of the text size.
CHANGING THE TEXT SIZE
You can adjust the size of the text to suit your preference. You have a choice of six
sizes for reading content on Kindle. (You cannot change the text size on menus, in PDF
files, or on Kindle screens, such as the Home screen or the Kindle Store.)
Chapter 3 · 47KINDLE USER’S GUIDE 4th EDITION
Page 48

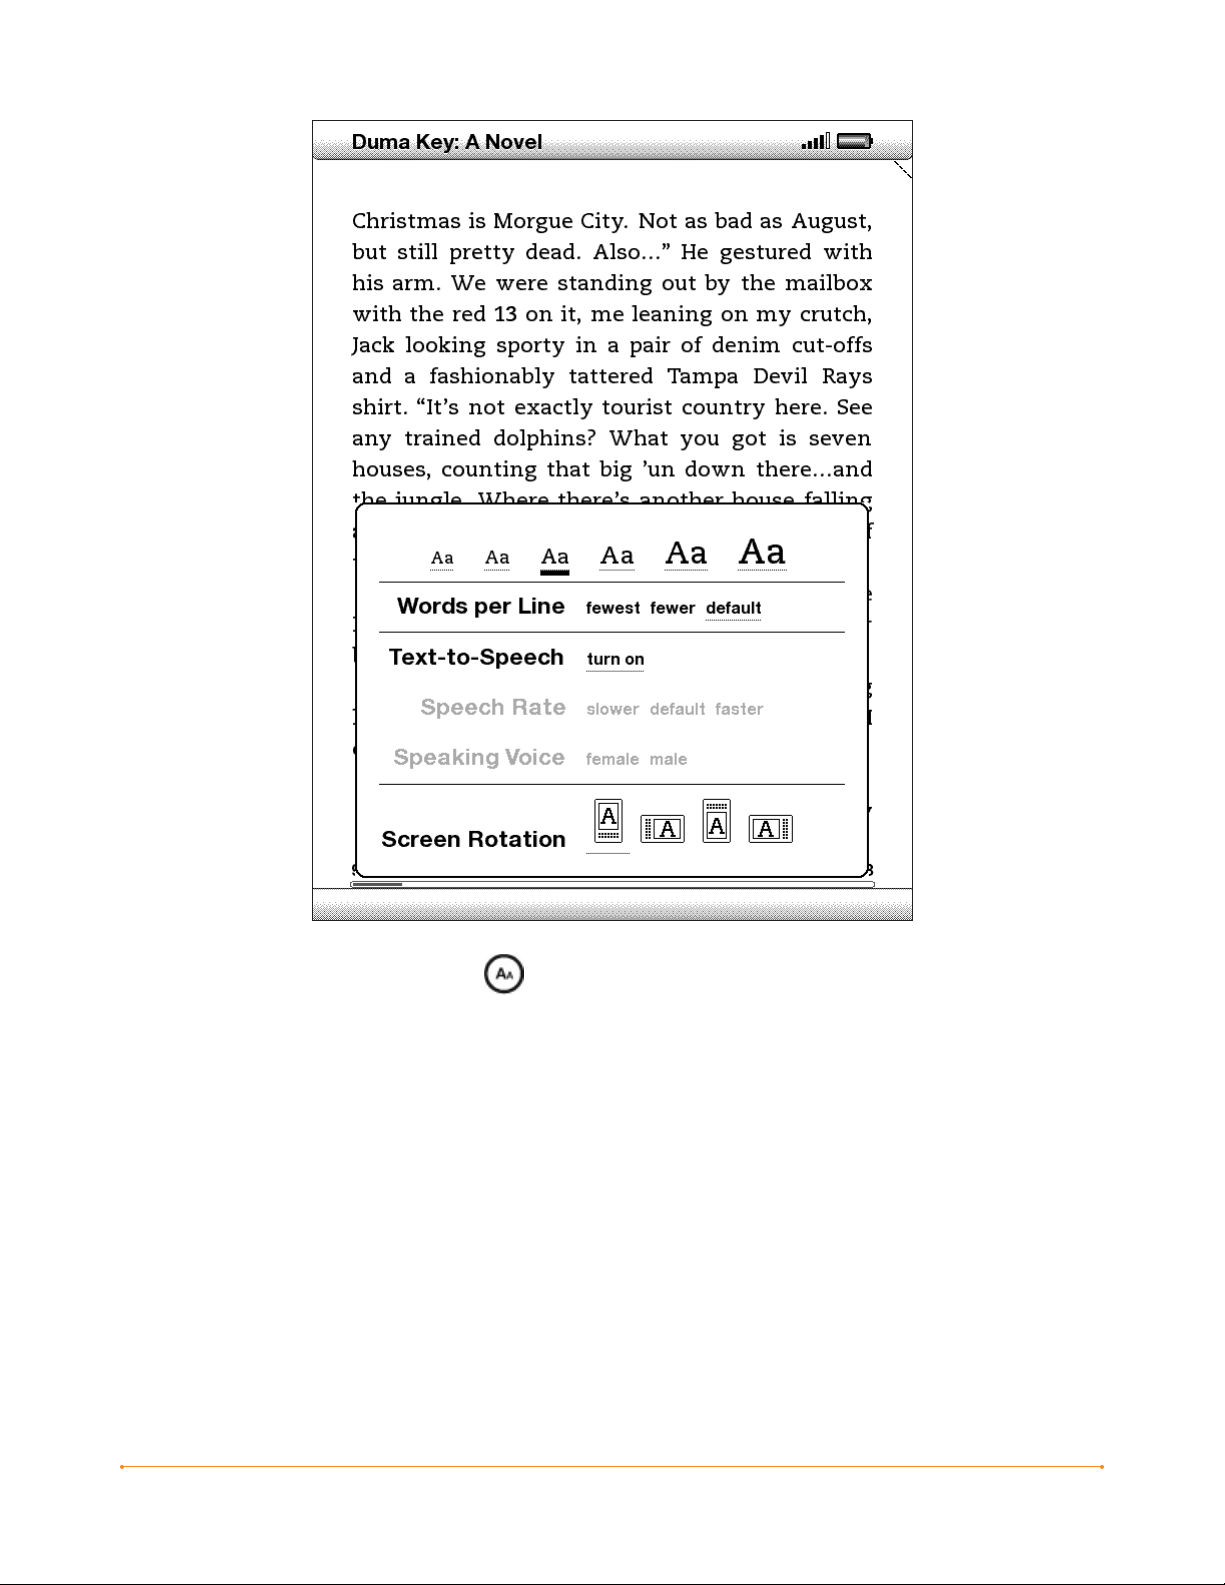
To pick the text size that you want to use while reading, follow these steps:
1. Press the Text key located on the bottom row of the keyboard. The text size
choices are displayed as well as controls for Text-to-Speech.
2. Move the 5-way left or right to the new text size that you want to use (you see the
new text size immediately).
3. Press the 5-way or the Text key to confirm your choice.
Chapter 3 · 48KINDLE USER’S GUIDE 4th EDITION
Page 49

ADJUSTING THE NUMBER OF WORDS PER LINE
You can change the number of words per line in the book. periodical, or personal
document you are currently reading to suit your reading preference. Adjusting the
number of words increases or decreases the size of the margins. You may find you
read faster with fewer words per line. Experiment to find what works best for you.
To pick the number of words per line you prefer, follow these steps:
1. Press the Text key located on the bottom row of the keyboard. The Words per
Line choices are displayed below the text size choices.
2. Move the 5-way down to underline the Words per Line options.
3. Move the 5-way left or right to choose the option you want to use (you see the
change immediately).
4. Press the 5-way or the Text key to confirm your choice.
Note: You cannot change the number of words per line in PDF files or in Basic Web.
INCREASING THE SIZE OF A PICTURE
If you’d like to see a larger size of a picture or image you encounter in your reading
material, simply follow these steps to zoom temporarily on the image.
1. Use the 5-way controller to position the cursor over the picture.
2. An image of a magnifying glass with a plus sign will appear on top
of the picture.
3. Press the 5-way to zoom the image. You will see a expanded view of the picture
that rotates if necessary to maximize the use of the display.
4. Press the 5-way (or any key or button, except the Home button) to return
to your content.
Chapter 3 · 49KINDLE USER’S GUIDE 4th EDITION
Page 50

3.3 Moving from Place to Place
There are several ways for you to get from place to place once you have opened your
reading material. Most often you will turn pages using the Next Page and Previous
Page buttons (described in Chapter 1). You can also get around inside your book or
periodical by selecting locations from the item’s Menu, clicking on links in the content,
or by moving the 5-way controller left or right to advance to another article or chapter.
USING THE MENU TO GET AROUND
To go to the menu, press the Menu button when reading a book or periodical. You will
have slightly different options depending on the content you are reading. Examples of
the menu options are described below.
Chapter 3 · 50KINDLE USER’S GUIDE 4th EDITION
Page 51

If you are reading a Kindle book, the menu shows the following options:
Turn Wireless Off — turns off Whispernet. When Whispernet is off, this option will
change to “Turn Wireless On.”
Shop in Kindle Store — takes you to the Kindle Storefront.
Buy This Book Now — connects to the Kindle Store, purchases, and downloads
the full book to your Kindle. Only appears if you are reading a sample from the
Kindle Store.
Cover — takes you to the cover page of the item you are reading. This is usually the
cover of the book.
Table of Contents — takes you to the Table of Contents for the item you are reading.
Go to Beginning — takes you to the place in the book the publisher considers to be
the beginning. This is usually the first chapter, but may be a foreword, the table of
contents, or other point the publisher chooses.
Go to Location… — displays at the bottom of the screen, a text entry box that allows
you to specify a location to jump to in the content.
Sync to Furthest Page Read — connects to Amazon.com and compares your current
reading location with the one saved at Amazon. If you are further along in your book
using another device, Kindle gives you the choice to go to the furthest page read.
Book Description — connects to the Kindle Store and displays the book’s detail page.
Search This Book — displays the Search line at the bottom of the screen. Additional
details on how to conduct a search are provided in Chapter 4.
Add a Bookmark — bookmarks the page you are currently on. After selecting this
option, the upper right corner of the book will be dog-eared and this menu option will
change to “Delete Bookmark.”
Add a Note or Highlight — puts you into annotation mode. Additional details on how
to create a note or highlight are provided later in this chapter.
My Notes & Marks — displays a page containing all of your current item’s notes,
highlights, and bookmarks.
Chapter 3 · 51KINDLE USER’S GUIDE 4th EDITION
Page 52

If you are reading a newspaper or magazine, you will see the following
different options:
Clip This Article — makes a copy of the entire article and adds it to your
“My Clippings” file.
Keep This Issue — designates the newspaper or magazine issue as one to be stored in
your Kindle until you remove it.
Chapter 3 · 52KINDLE USER’S GUIDE 4th EDITION
Page 53

If you are reading a blog, you will see the following options:
Chapter 3 · 53KINDLE USER’S GUIDE 4th EDITION
Page 54

NAVIGATING WITHIN A PERIODICAL
At the bottom of a newspaper or magazine you will see options for quickly navigating
within an issue. When viewing a blog, you will see similar options for navigation.
Previous Article — takes you to the previous article when you move the 5-way
controller to the left.
View Sections List — takes you to the sections list of a newspaper or magazine when
you press the 5-way.
View Articles List —takes you to the articles list of a blog when you press the 5-way.
Next Article — advances you to the next article when you move the 5-way controller
to the right.
By default, “View Sections List” for newspapers and magazines is highlighted and
when you press the 5-way, a list of the sections will appear. If you are viewing
a blog, “View Articles List” is highlighted and pressing the 5-way shows a list of the
blog’s articles.
Chapter 3 · 54KINDLE USER’S GUIDE 4th EDITION
Page 55

To navigate to a particular section, use the 5-way controller to underline the section
title and then press the 5-way to select. To dismiss this view and return to where you
were last reading in the magazine or newspaper, select “Close Sections List” located
at the bottom of the screen. Selecting the number to the right of the section title will
take you to a list of articles found within that section.
Chapter 3 · 55KINDLE USER’S GUIDE 4th EDITION
Page 56

To navigate to a particular article within a section or blog, simply move the 5-way
controller to underline the article title and press to select. To dismiss this view, select
“Close Articles List” located at the bottom of the screen.
SELECTING INTERNAL LINKS
Your reading material may also contain links to other places in the document.
For example, in many books, the table of contents is set up to link to the content
pages. Links are easy to spot because they are underlined.
Chapter 3 · 56KINDLE USER’S GUIDE 4th EDITION
Page 57

To select a link:
1. Move the 5-way over the link.
2. The cursor changes to look like this:
3. Press the 5-way to select the link.
4. Kindle takes you to the linked location.
5. Press the Back button to go back to where you were.
Your reading material may also contain external links that take you to locations on the
Web (if you have Whispernet turned on and are in range).
VIEWING A TABLE
Your reading material may contain a large table that is not entirely contained within
the screen. To see the rest of the table, move the 5-way controller up or down to bring
up the cursor and then place the cursor to the left of the table. Move the 5-way to the
right to scroll through the rest of the table.
READING ACROSS MULTIPLE KINDLES
If you read the same Kindle Store book across multiple Kindles (including Kindle
for iPhone), you’ll find Whispersync makes it easy for you to switch back and forth.
Whispersync synchronizes the bookmarks, notes, highlights and furthest page read
among devices registered to the same account.
Whispersync is on by default to ensure a seamless reading experience for a book read
across multiple Kindles. If you would like to turn Whispersync off, follow these steps:
1. Go to http://www.amazon.com/manageyourkindle
2. At the bottom of the page, click on the link, “Manage synchronization
between devices.”
3. Select “Turn Synchronization off.”
Once you turn synchronization off, your books will still open to the last page read
on that device, but Whispersync will no longer sync bookmarks or the furthest page
read with other devices. If you would like to sync the book manually, press the
Menu button and select “Sync to Furthest Page Read.”
Chapter 3 · 57KINDLE USER’S GUIDE 4th EDITION
Page 58

3.4 Looking Up Definitions
While reading a book, periodical, or personal document (except PDF), you can see a
brief definition of a word using the Lookup feature. You can choose the dictionary you
want to use when you look up words while you are reading. The default is
The New Oxford American Dictionary included on your Kindle, but you can change
your dictionary choice by purchasing a different dictionary from the “Kindle Default
Dictionary” category in the Kindle Store. See Chapter 7 for details on how to change
your default dictionary.
THE LOOKUP FEATURE
To see the definition of a particular word in your reading content, follow these steps:
1. Move the 5-way controller up or down to display the cursor.
2. Move the 5-way in front of the word you want to look up.
3. If the word is found in the dictionary, a definition extract appears at the bottom
of the screen.
4. To see the complete definition, press the Return key . You will now be
placed in the dictionary and can use Previous Page and Next Page to view
other word definitions.
5. Press the Back button to return to your reading.
Tip: If you want to expand your search beyond the dictionary on your device,
you can use the Search feature to look for the word on Wikipedia or the Web.
See Chapter 4 for more information.
3.5 Annotations and Clippings
You can add annotations to all of your books, periodicals, and personal documents
(except PDF). Annotations can include notes you have written, highlights you’ve
marked, and bookmarks you’ve created. Annotations are specific to the content you
are reading, so each book or periodical has its own annotations. When you view the
annotations, you see only those for the content you are currently reading. Note that
when you create an annotation in a newspaper or magazine, you will see the word
“keep” to the left of the issue title in Home, indicating that the issue will be stored
on your Kindle until you remove it.
Chapter 3 · 58KINDLE USER’S GUIDE 4th EDITION
Page 59

Kindle also gathers the annotations you’ve made across all your various books,
magazines, newspapers, and personal documents and places them in the
“My Clippings” file in your Home screen. See Using Clippings for more information
on My Clippings.
The list below explains the types of annotations:
Bookmarks — mark an entire page for later reference.
Highlights — mark a passage on a page for later reference.
Notes — add your thoughts about a passage.
The sections below explain how to add annotations.
Tip: All of your annotations on a Kindle book are backed up on Amazon servers
in case you transfer your Kindle to another person or lose or break the device.
When you download a previously annotated book from Amazon.com, your
annotations and last location read will come down with it. When you open the book,
you will be right where you were the last time you read the book and all of your
annotations will be included. Note that your “My Clippings” file is not listed
as a separate downloadable item.
USING BOOKMARKS
Although Kindle automatically saves your place whenever you stop reading, you
may also want to add additional bookmarks. You can place a bookmark at any location,
and you can have multiple bookmarks in whatever book you are reading. When you
add a bookmark, it is associated with the first location on the page. If you change text
size, the bookmark will still be associated with that location. You can return to
a bookmarked location at any time.
Kindle stores all your bookmarks for the current content in your annotations.
You can view them at any time by pressing the Menu button and selecting
“My Notes & Marks.”
Chapter 3 · 59KINDLE USER’S GUIDE 4th EDITION
Page 60

PLACING A BOOKMARK
To place a bookmark:
1. Go to the page that you want to bookmark.
2. Press the Menu button.
3. Move the 5-way controller down until “Add a Bookmark” is underlined. Press the
5-way to select.
4. A dog-ear icon in the upper right corner of the page will appear, indicating that the
page is bookmarked.
Tip: You can quickly create a bookmark by either holding down the Alt key and
pressing the ‘B’ key, or by moving the 5-way up or down to go into cursor mode and
then pressing the 5-way controller twice.
VIEWING YOUR BOOKMARKS
To view your bookmarks, press the Menu button and select “My Notes & Marks.”
Bookmarks are listed in the order they occur in the content. Each bookmark entry
shows a location number and the first line of the bookmarked location.
To go to a bookmark location, navigate to the bookmark and press the 5-way.
There is no limit to the number of bookmarks that you can set.
REMOVING A BOOKMARK
To remove a bookmark:
1. Go to the bookmarked page.
2. Press the Menu button.
3. Move the 5-way controller down until “Delete Bookmark” is underlined. Press the
5-way to select. The bookmark is removed.
Tip: You can also remove a bookmark on the page by holding down the Alt key
and pressing the ‘B’ key.
Chapter 3 · 60KINDLE USER’S GUIDE 4th EDITION
Page 61

To remove several bookmarks at one time:
1. Press the Menu button.
2. Move the 5-way controller down until “My Notes & Marks” is underlined. Press the
5-way to select it.
3. Using the 5-way, navigate to the bookmark you want to remove.
4. Press the Delete key
5. Repeat steps 3 and 4 until you have removed all unwanted bookmarks.
6. Move the 5-way down until the “Close Notes & Marks” button is highlighted and
press the 5-way to exit. You can also exit this view by pressing the Back button.
USING HIGHLIGHTS
You can highlight text in Kindle like you would use a highlighter pen on paper. Kindle
stores all your highlights for the current content in your annotations. You can view
them at any time by pressing the Menu button and selecting “My Notes & Marks.”
See Viewing Your Annotations for more information.
Kindle also stores everything you highlight in your “My Clippings” file.
HIGHLIGHTING A PASSAGE
To highlight one or more lines, follow these steps:
1. Use the 5-way to position the cursor where you want to start highlighting.
2. Press the 5-way.
3. Move the 5-way right (or left) to where you want your highlight to end. You can
turn pages if you want to highlight text across multiple pages.
4. Press the 5-way at the place where you want the highlight to end.
5. Notice that the text you highlighted appears with a gray underline.
Chapter 3 · 61KINDLE USER’S GUIDE 4th EDITION
Page 62

DELETING A HIGHLIGHT
To remove a highlight, follow these steps:
1. Navigate the cursor over the highlight you want to remove.
2. Press the Delete key
Or,
1. Press the Menu button.
2. Move the 5-way controller down until “My Notes & Marks” is underlined. Press the
5-way to select it.
3. Using the 5-way, navigate to the highlight you want to remove.
4. Press the Delete key
5. Move the 5-way down until the “Close Notes & Marks” button is highlighted and
press the 5-way to exit. You can also exit this view by pressing the Back button.
USING NOTES
To add a note, follow these steps:
1. Using the 5-way, move the cursor to the left of the word where you want to add
your thoughts.
2. Type your note.
3. Using the 5-way navigate the cursor over “save note” and press the 5-way.
Notice the superscripted number where you inserted your note. Notes are numbered
in the order they appear in the content, so if you later create another note on an
earlier page, the numbering of the previously created notes will change.
To edit a note, follow these steps:
1. Use the 5-way to move the cursor over the note’s number.
2. The note appears at the bottom of the screen.
3. Press the Return key to edit the note.
4. Use the keyboard to make your changes.
5. Navigate the 5-way over “save note” and press the 5-way.
Chapter 3 · 62KINDLE USER’S GUIDE 4th EDITION
Page 63

To delete a note, follow these steps:
1. Use the 5-way to move the cursor over the note’s number.
2. The note appears at the bottom of the screen.
3. Press the Delete key to delete the note.
Tip: You can also view the notes and highlights you’ve created for each of your
Kindle books at http://kindle.amazon.com.
VIEWING YOUR ANNOTATIONS
To view your bookmarks, highlights, and notes, press the Menu button and select
“My Notes & Marks.”
Chapter 3 · 63KINDLE USER’S GUIDE 4th EDITION
Page 64

Each entry has a location number followed by the bookmark, highlighted passage,
or note. Your annotations are listed in the order that they occur in the content.
There is no limit to the number of annotations you can have. Use the Next Page
and Previous Page buttons to turn the pages just as you would in a book.
To go to a location, move the 5-way up or down to select the bookmark, highlighted
passage, or note and press the 5-way to go there.
Your annotations are also stored in your “My Clippings” file for later reference.
See below for more information.
USING CLIPPINGS
In addition to annotations, you can “clip” an entire periodical article to the
“My Clippings” file. The “My Clippings” file contains all of the bookmarks, highlights,
notes, and clippings you have made across all your content. Later, you can view
the file or copy it to your computer; it will download to your computer as TXT file.
Once on your computer, you can edit it or send your clippings to someone else.
Clipping and highlighting are a great way to capture your favorite quotes and share
with others.
To clip an article:
1. Go to the article you want to clip.
2. Press the Menu button.
3. Move the 5-way controller down until “Clip this Article” is underlined. Press the
5-way to select.
Kindle adds your clipping to the “My Clippings” file. You can review your clippings
later, search for words or terms you clipped, and transfer the “My Clippings” file
to your computer.
To view your clippings, press the Home button to display the Home screen. Move the
5-way down until “My Clippings” is underlined. Press the 5-way to open it. While
viewing the file, you cannot navigate through to the materials referenced in the file.
Chapter 3 · 64KINDLE USER’S GUIDE 4th EDITION
Page 65

MORE ABOUT MY CLIPPINGS
You cannot edit the “My Clippings” file from within Kindle, but you can edit the file on
your computer.
To edit the “My Clippings” file:
1. Connect your Kindle to your computer using the USB cable.
2. Your Kindle should appear on your computer in the same location you would
normally find an external USB drive.
3. Open your Kindle. You should see a folder entitled Documents. Transfer the
“My Clippings” file out of this folder.
4. Open the “My Clippings” file on your computer using an application that can read
or import a .txt file.
5. Make the changes and save the edited file.
6. Transfer the “My Clippings” file back to the “Documents” folder on your Kindle.
7. Unmount your Kindle from your computer before removing the USB cable.
Changing your “My Clippings” file does not affect any notes, bookmarks, or highlights
you’ve made in the actual content. The next time you read the content, you can still
use them for navigation and reference.
To remove the “My Clippings” file from your Kindle:
1. Press the Home button and move the 5-way down until “My Clippings”
is underlined.
2. Move the 5-way to the left.
3. Press the 5-way to select “delete.”
4. Press the 5-way to select “ok.”
Kindle adds a new “My Clippings” file the next time you add a clipping or annotation
to any content.
The amount of text you can add to the “My Clippings” file from each item may be
limited. The “My Clippings” file will include a note informing you if a clipping limit
has been reached for a given item.
Chapter 3 · 65KINDLE USER’S GUIDE 4th EDITION
Page 66

3.6 Reading PDF Files
Your Kindle is able to display most PDF documents. (Note that password-protected
PDF files are not supported.)
When your Kindle is set to portrait orientation, PDF documents are displayed in
their original layout and fit the entire screen of the device. White margins of PDF
documents are automatically cropped to maximize the amount of content shown
on the screen.
Chapter 3 · 66KINDLE USER’S GUIDE 4th EDITION
Page 67

In landscape orientation, Kindle automatically magnifies your document to fit the
width of the screen to improve readability.
A black outline defines the limit of the page of the PDF document. In both portrait and
landscape orientations, the bottom of the screen shows how far you have read in a
particular item as a percentage, and displays the current page number, as well as the
total number of pages of the current document.
Chapter 3 · 67KINDLE USER’S GUIDE 4th EDITION
Page 68

USING THE PDF MENU
The options available while reading a PDF file are slightly different than when reading
a book or a periodical on Kindle. Options that are not available in PDF files are grayed
out in the menu.
Chapter 3 · 68KINDLE USER’S GUIDE 4th EDITION
Page 69

Cover — takes you to the cover page of the item you are reading.
Go to Beginning — takes you to the beginning of the PDF file.
Go to Page… — displays a text entry box at the bottom of the screen, so you can
specify a page to jump to in the content.
Search This Document — displays the Search line at the bottom of the screen. This
allows you search for a word or a combination of words inside the currently opened
PDF document. This feature doesn’t work in cases where a PDF document was created
using image files.
Add a Bookmark — bookmarks the page you are currently on. After selecting this
option, the upper right corner of the PDF will be dog-eared and this menu option will
change to “Delete Bookmark.”
My Bookmarks — displays a page containing all of your current item’s bookmarks.
3.7 Listening to Audio Materials
There are three types of audio materials that you can listen to on your Kindle. You can
purchase, transfer, and listen to audiobooks from Audible.com, transfer MP3 files from
your computer to play as background music while you read, or turn on Text-to-Speech
in any of your reading material (where allowed by the rights holder). (For information
about transferring audiobooks or MP3 files to your Kindle, see Chapter 8.)
AUDIOBOOKS
On your Home screen, your audiobooks list the title and author, but they also have the
word “audio” next to the title to indicate that they are audiobooks.
To listen to one of your audiobooks, select it from your Home screen. You will see
a page similar to the one shown below. Kindle provides a standard set of controls that
are explained below.
Chapter 3 · 69KINDLE USER’S GUIDE 4th EDITION
Page 70

Book Title
Description
Progress
Indicator
Beginning Next Section
Previous
Section
Back
Pause/Play
Forward
30 Seconds
30 Seconds
Progress Indicator — indicates how far you have come in the audiobook, the elapsed
time, and the section you are in.
Pause/Play — pauses or plays the audiobook (there is no Stop control).
Forward 30 Seconds — moves ahead thirty seconds from the current location.
Beginning — takes you back to the beginning of the audiobook.
Chapter 3 · 70KINDLE USER’S GUIDE 4th EDITION
Page 71

Previous Section — moves backwards in the audiobook to the previous section.
Back 30 Seconds — moves backwards thirty seconds from the current location.
Next Section — moves ahead to the next section in the audiobook, which is usually
the next chapter.
BACKGROUND AUDIO
To play background audio (MP3 files) that you have transferred to your Kindle, follow
the steps below:
1. If you are not already on the Home screen, press the Home button.
2. Press the Menu button.
3. Move the 5-way down until “Experimental” is underlined and press the 5-way to
select it.
4. Move the 5-way down until “Play MP3” is underlined and press down to select it.
The songs are played in order, by the date you added them to your Kindle. You can
adjust the volume of the music using the volume controls on the right side of your
Kindle. You can continue to listen to the audio while reading content; the background
audio continues to play unless you open an audio book, turn on text-to-speech, all
of the files have been played, or if you stop the playback as indicated below.
To turn off background audio:
1. If you are not already on the Home screen, press the Home button.
2. Press the Menu button.
3. Move the 5-way down until “Experimental” is underlined. Press the 5-way to select.
4. Move the 5-way down until “Play MP3” is underlined. Press the 5-way to select.
Tip: You can also play or stop background audio by holding down the ALT key
and pressing the space bar. You can forward to the next track by holding down the
ALT key and pressing the ‘F’ key.
Chapter 3 · 71KINDLE USER’S GUIDE 4th EDITION
Page 72

TEXT-TO-SPEECH
Your Kindle can read aloud your books (where allowed by the rights holder),
newspapers, magazines, blogs, and personal documents with the Kindle Experimental
application Text-to-Speech.
To turn on Text-to-Speech, follow these steps:
1. Press the Text key
Chapter 3 · 72KINDLE USER’S GUIDE 4th EDITION
Page 73

2. Move the 5-way down so that “turn on” is underlined. Press the 5-way to select.
In a few moments, you will hear your content spoken aloud. You can either
listen to it through the Kindle’s external speakers or plug in earphones into the
headphone jack.
3. By default, content is spoken with a male voice, but using the 5-way, you can select
a female speaking voice. You can also slow down or increase the rate of speech
as well as pause or turn off Text-to-Speech
4. While Text-to-Speech is playing, the screen will update to the corresponding page
of text.
For PDF files and books which the rights holder does not allow Text-to-Speech to read
aloud, Text-to-Speech will be grayed out and you will not be able to select it.
By default, Text-to-Speech starts reading at the beginning of the page currently
displayed. To start reading at a particular spot, move the cursor where you’d like the
reading to begin before starting Text-to-Speech.
Tip: You can also play or stop Text-to-Speech by holding down the Shift key
and pressing the Symbol key . You can pause and resume Text-to-Speech by
pressing the Spacebar.
Chapter 3 · 73KINDLE USER’S GUIDE 4th EDITION
Page 74

CHAPTER 4: Searching on Kindle
Kindle allows you to take advantage of powerful search capabilities. You can search
locally on Kindle or remotely at the Kindle Store, Wikipedia, or the Web.
4.1 Introduction to Search
This section describes the types of searches that you can perform using Kindle and
how to use search.
TYPES OF SEARCHES
Kindle supports several types of search as summarized below.
SEARCHING WHAT YOU ARE CURRENTLY READING
You can limit a search to only what you are currently reading. You enter your search
term or phrase and Kindle searches in the body of the text in the current item.
SEARCHING ALL YOUR CONTENT
You can alternatively search all the reading material that you have stored on Kindle,
including books, newspapers, magazines, and other items. You enter your search term
or phrase and Kindle searches in the body of the text, in the metadata (for example,
the title or author), and in your “My Clippings” file. For PDFs, Kindle searches for the
term in the metadata only (author’s name and file name). Additionally, Kindle also
keeps and searches the metadata for the content you have stored on Amazon.
SEARCHING REMOTELY
Kindle can perform remote searches in several different locations using Whispernet.
Each of these remote location searches are described in the final section of this
chapter. See Searching the Kindle Store, Searching the Web, or Searching Wikipedia.
Chapter 4 · 74KINDLE USER’S GUIDE 4th EDITION
Page 75

SEARCHING FOR DEFINITIONS
You can limit a search to the dictionary. Kindle searches your default dictionary for
definitions of the word you have entered.
PERFORMING A SEARCH
To perform a search, follow these steps:
1. Type in your search term; the Search line will automatically appear. You can use
whole words, and no distinction is made between lower and upper case.
2. To find the word or phrase in the content you are currently reading, move the
5-way to the right to highlight “find.” Or, to choose the type of search, continue
moving the 5-way right. You can search all your items, the Kindle Store, Google,
Wikipedia, or the dictionary.
3. Press the 5-way to submit your search.
If you select “Search” from the Home page menu, the screen will display a full
Search page.
Chapter 4 · 75KINDLE USER’S GUIDE 4th EDITION
Page 76

4.2 Search Results Page
When searching all your content, Kindle looks in the reading materials you have
on your Kindle and the metadata (like title and author) of the materials you have in
Archived Items. This includes purchased items, personal documents, and annotations
that you have created.
The example below shows a typical Search Results page.
Chapter 4 · 76KINDLE USER’S GUIDE 4th EDITION
Page 77

The screen shows the titles of the items that contain your search term and indicates
how many times the term occurs. The list is ordered by the number of occurrences of
the search term in each item. If the term appears in a title of an archived item, then
that item is listed first and does not include the number of occurrences.
Use the Next Page and Previous Page buttons if there are more results than fit on the
current page.
SEARCH RESULTS FOR A SPECIFIC ITEM
To see the results for one of the items listed:
1. Use the 5-way to underline the item.
2. Press the 5-way to view the matches.
3. A page appears showing all instances of the search term in that particular title.
Each occurrence lists its location number and is shown in context so you can see
how the search term is used.
Chapter 4 · 77KINDLE USER’S GUIDE 4th EDITION
Page 78

To go to a specific location in the content where the search term occurs, use the
5-way to underline the location and press the 5-way to select. If the search results
encompass multiple pages, then use the Next Page and Previous Page buttons
to navigate between pages.
To close the Search Results page, move the 5-way to highlight “Close Search Results”
and press the 5-way.
Chapter 4 · 78KINDLE USER’S GUIDE 4th EDITION
Page 79

SEARCH RESULTS FOR A DEFINITION
When you want to look up the meaning of a word, you can limit a search to the
dictionary. Kindle searches your default dictionary for definitions of the word
you enter.
To find a definition, follow these steps:
1. Type in the word you want defined.
2. Move the 5-way right to highlight “dictionary.”
3. Press the 5-way to submit your search.
You will see a complete definition of the word.
Chapter 4 · 79KINDLE USER’S GUIDE 4th EDITION
Page 80

4.3 Performing Remote Searches
To search remotely, you must have Whispernet switched on. You can select any of the
remote searches described in this section.
If Whispernet is not already on, press the Menu button. Move the 5-way controller
to underline “Turn Wireless On” and press the 5-way controller to select and turn
on Whispernet.
SEARCHING WIKIPEDIA
To search Wikipedia, enter your term and move the 5-way to select “wikipedia.”
This opens Basic Web and displays the Wikipedia page.
SEARCHING THE WEB
To search the Web, enter your term and move the 5-way to select “google.”
This opens Basic Web and submits your search term to Google.
SEARCHING THE KINDLE STORE
To search the Kindle Store, enter your term and move the 5-way to select “store.”
Your Kindle connects to the Kindle Store and displays the search results page for the
store sorted by relevance, as shown in the example below. You can page through
the results just like you would do in the content on your Kindle.
Chapter 4 · 80KINDLE USER’S GUIDE 4th EDITION
Page 81

You can narrow results by categories by clicking on the drop-down list located in the
upper right corner of the Search Results page.
Tip: You can also narrow a search in the Kindle Store to an author’s name by
typing “@author” followed by the author’s name. For example, to search the
Kindle Store for books by Agatha Christie, enter “@author Agatha Christie” in the
Search line. This will narrow your Kindle Store search to find only books written
by Agatha Christie.
Chapter 4 · 81KINDLE USER’S GUIDE 4th EDITION
Page 82

CHAPTER 5:
The Kindle Store
The Kindle Store is the place to purchase your Kindle books, newspapers, magazines,
and blogs. Find an item in the store, select “Buy,” and you will typically receive your
item wirelessly in under a minute. All of your Kindle purchases use Amazon 1-Click for
easy purchasing and Amazon automatically backs up all of your purchases in case you
lose your Kindle or want to download a title again. To help other Amazon users decide
what to buy, you can also add your own ratings and reviews.
5.1 Getting Started at the Store
This section tells you how to connect to the Kindle Store on your Kindle, and provides
some ideas about the best ways to look for content once you are connected.
CONNECTING TO THE KINDLE STORE
You connect to the Kindle Store using your device’s built-in Whispernet service. To go
to the Kindle Store, follow these steps:
1. If Whispernet is not already on, press the Menu button, move the 5-way controller
up so that “Turn Wireless On” is underlined, and then press the 5-way controller to
turn on Whispernet.
2. Press the Menu button and move the 5-way controller down to underline “Shop in
Kindle Store.”
3. Press the 5-way controller to select “Shop in Kindle Store.”
You will see this icon in the upper left corner of the page, if you are not already
connected. The Kindle Storefront will appear as shown later in this chapter and serves
as a launch point for all of the Kindle Store services.
5.2 Kindle Store Pages
This section describes the different pages you will find at the Kindle Store, like the
Kindle Storefront, the Browse pages, and the product detail pages for individual
pieces of content.
Note: Kindle Store pages can only be viewed in portrait mode.
Chapter 5 · 82KINDLE USER’S GUIDE 4th EDITION
Page 83

THE KINDLE STOREFRONT
When you select “Shop in Kindle Store” from any menu, you will be taken to the
Kindle Storefront. An example is shown below, the storefront you see may be
different as we update it often.
Search Store — enter your search criteria here and Amazon will search the entire
Kindle Store for matches and return the search results.
Once you are in the Kindle Store, you can move around using links on the pages
of the store such as New & Noteworthy Books or Top Sellers, by using the Store menu,
or by searching the Kindle Store for specific titles.
Chapter 5 · 83KINDLE USER’S GUIDE 4th EDITION
Page 84

THE STORE MENU
The menu you see while you are connected to the Kindle Store allows you to go to
other places in the store easily and includes the selections listed below.
Chapter 5 · 84KINDLE USER’S GUIDE 4th EDITION
Page 85

Turn Wireless Off — turns the Whispernet connection off. If you turn wireless off,
you will not be able to access the Kindle Store.
Kindle Storefront — takes you to the Kindle Storefront.
Books — displays the books currently available in the Kindle Store.
Newspapers — displays the newspapers currently available in the Kindle Store.
Magazines — displays the magazines currently available in the Kindle Store.
Blogs — displays the blogs currently available in the Kindle Store.
Top Sellers — displays a list of Amazon best sellers. Outside the U.S., Kindle with
international wireless will display Kindle Best Sellers instead.
New & Noteworthy — displays a list of new or noteworthy content on the Kindle
Store. Outside the U.S., Kindle with international wireless will display Kindle Best
Sellers instead.
Recommended for You — displays items recommended for you by Amazon based on
your previous digital and physical purchases.
“Save For Later” Items — displays items you have previously noted as something that
might be of interest to you.
BROWSING THE STORE
Another way to find reading material in the Kindle Store is to browse through the
different content categories such as books or newspapers. Once inside a category, you
can further refine your browse by topic. For example, within “Books,” you can refine
listings to “Fiction,” “Nonfiction,” “Advice & How-to,” etc. Each browse page shows
the path that you have taken at the top so you can easily retrace your steps.
Chapter 5 · 85KINDLE USER’S GUIDE 4th EDITION
Page 86

BROWSE LISTINGS SAMPLE
The example below shows you the type of listings you will see on the Books
browse page.
Browse path — shows the steps on the path you used to get to the current page.
Number of titles in the category — shows the number of items available in the
particular category.
Categories — groups the content by topics of interest to make browsing easier.
Select the category you are interested in to show only items in that particular
subject. You can also select subcategories within the main category by selecting
“View subcategories within…” in the upper right corner of the screen.
Browse Path
Category
Number of Titles
in Category
Chapter 5 · 86KINDLE USER’S GUIDE 4th EDITION
Page 87

GETTING THE DETAILS
The product detail page for books and periodicals provides the most pertinent
information about an item. To get to the product detail page for a particular item,
use the 5-way controller to select it.
PRODUCT DETAIL PAGE EXAMPLE
The example below shows you a product detail page for a book available at the
Kindle Store. The features on this page are explained in the list below.
Title
Author
Description
Buy
Reviews
Try a Sample
Save for Later
Text-to-Speech
Recommendations
Chapter 5 · 87KINDLE USER’S GUIDE 4th EDITION
Page 88

Author — searches the Kindle Store for other books by the author when selected.
Description — describes the item. Select “more” to see the full text.
Buy — purchases the item using your default Amazon 1-Click payment method and
sends it wirelessly to your Kindle.
Reviews — displays the customer reviews for this item. Provides links to editorial
reviews and for writing your own review.
Try a Sample — downloads the beginning of the book for free so you can sample it
before buying.
Save for Later — adds the item to your “Save for Later Items” list so you can peruse
or purchase it later.
Text-to-Speech — indicates whether Text-to-Speech is allowable by the book’s
rights holder.
Customers who bought this book also bought: — displays a list of items purchased
by Amazon customers who also bought this item.
ADDITIONAL DETAILS FOR PERIODICALS
The product detail page for newspapers, magazines, and blogs is similar to the
product detail page for books, but it contains different purchasing options:
Subscribe now with 14-day Free Trial —select this to start your subscription. All
newspapers, magazines, and blogs come with a free trial to start your subscription,
and you can cancel your subscription on the Manage Your Kindle page on Amazon
at any time during this period. After the trial period, your subscription will
automatically be delivered at the regular monthly price.
Buy Current Issue — purchases the current issue of the newspaper or magazine and
sends it to your Kindle.
Note that if you have already subscribed to or purchased an item, you will see
the word “Already Subscribed” in gray letters next to the periodical on the product
detail page.
Chapter 5 · 88KINDLE USER’S GUIDE 4th EDITION
Page 89

SAVING ITEMS FOR LATER
The Kindle Store provides a “Save for Later Items” page for you to save items that
you want to look at or purchase later. This page lists the item’s title, author, and
average customer rating.
To add an item to your list, select “Save for Later” from the product detail page for the
item. You will see a confirmation message that your addition was successful. To see
your list of saved items, select “Save for Later Items” from the Store menu. To display
the product detail page for this item, select “Details.” To remove the item from your
list, select “Delete.”
5.3 Recommendations, Reviews, and Ratings
The Kindle Store provides several features to help you decide which reading materials
you may want to purchase. This section describes the various ways you can find what
is available.
RECOMMENDED FOR YOU
The Recommendations page provides a list of things that you might enjoy based on
the types of materials (digital and printed) you have purchased in the past either
on Kindle or on Amazon.com. To get to this page, select “Recommended for You”
from the Kindle Storefront or from the Kindle Store menu.
LOOKING UP REVIEWS
The Reviews page lists Customer Reviews for items. To get to the Reviews page for
a specific item, select “Customer Reviews” from the product detail page for that item.
To see Editorial Reviews from publications, select “Editorial Reviews” from the
Reviews page. For the complete text of a particular review, select the review excerpt
using the 5-way controller.
Chapter 5 · 89KINDLE USER’S GUIDE 4th EDITION
Page 90

WRITING YOUR OWN RATINGS AND REVIEWS
You can share your opinions with other readers by rating and reviewing the materials
that you have read. To get to this page, select “Customer Reviews” from the product
detail page for the item you want to critique, and then select “Write a Review”
Chapter 5 · 90KINDLE USER’S GUIDE 4th EDITION
Page 91

The sample screen below shows you the type of information you can enter.
ENTERING A RATING AND REVIEW
1. Indicate the rating you think this item deserves by selecting the line with the
appropriate number of stars.
2. Select “Title” and enter a title for your review. Select “ok” to submit your title.
3. Select “Review” and type your review on the lines provided. Select “ok.”
4. To submit your rating and review, select “Submit.” If you want to close this page
without submitting your rating or review, select “Cancel.”
Chapter 5 · 91KINDLE USER’S GUIDE 4th EDITION
Page 92

5.4 Making Purchases
This section explains various aspects of purchasing items from the Kindle Store.
TRYING A SAMPLE BOOK
Most Kindle books allow you to download a sample before you decide to buy the
item. The end of the sample book has a link to revisit the product detail page for the
item or a link to purchase the item directly. In addition, while reading a sample, the
Menu shows “Buy this Book Now” so you can purchase the book at any time during
your reading.
BUYING YOUR SELECTIONS
All of your Kindle Store purchases use Amazon 1-Click, which allows you to purchase
reading materials with a single selection. To make your purchase, select “Buy” from
any product detail page for the item you want. Your item will be auto-delivered
wirelessly to your Kindle and also added to the Manage Your Kindle page on Amazon.
com. You will see an “items downloaded” message at the top of the screen when your
item has arrived on your Kindle.
Tip: Once your item has been downloaded, the original is retained in the
Manage Your Kindle page on Amazon.com. If the download is not successful,
or if it is interrupted, Kindle will attempt to download again without any action
required from you.
RETURNING AN ITEM
All of your Kindle Store purchases present an order cancellation feature at the time
of purchase in case you change your mind or made a mistake. Just select “Purchase
by Accident? Cancel this Order” on the order confirmation page. If you are a U.S.
customer, you can also contact Kindle Support using Amazon’s Click-to-Call service on
the Web at: http://www.amazon.com/kindlesupport
For customers outside the U.S., Kindle Support can be reached via e-mail at:
kindle-cs-support@amazon.com or by phone at 1-206-266-0927(charges will apply).
U.S. customers can reach Kindle Support by phone at 1-866-321-8851.
Chapter 5 · 92KINDLE USER’S GUIDE 4th EDITION
Page 93

CHAPTER 6:
Accessing the Web
Your Kindle comes with an Experimental application called Basic Web, which is
a Web browser optimized to read Web sites that are primarily text-based. It supports
JavaScript, SSL and cookies but does not support media plug-ins (Flash, Shockwave,
etc.) or Java applets. You can also change your Kindle screen orientation from portrait
to landscape to see the entire width of a web page.
6.1 Using Basic Web
There are four ways to open the Basic Web browser. The two main ways are to
select “Basic Web” from the Experimental screen or to follow a link from within your
reading material. Many of the blogs that you subscribe to from the Kindle Store have
links to Web sites. Selecting these links will open Basic Web and take you to the URL
associated with the link. If you select “Basic Web” from the Experimental page, you
will open to the last Web site you were viewing in your browser.
One other way of accessing the Basic Web browser is to type in a word anytime
from Home or any book, blog, newspaper, or magazine you happen to be reading.
When you begin typing, a search box will pop up at the bottom of the screen, and
you can move the 5-way controller to the right and select “google” or “wikipedia”
from the menu to search those sites directly for the word you typed.
You can also enter a URL in the Search bubble from the Home page. Type the URL and
move the 5-way to select “go to” and then press the 5-way.
Chapter 6 · 93KINDLE USER’S GUIDE 4th EDITION
Page 94

Back and
Forward
One Page
Loading
Progress
Viewing
Mode Location
Search
Google
URL Text
Field
ENTERING A URL
To enter the URL for a Web site, navigate to the top of the screen or press Menu and
select “Enter URL” from the menu options. Begin typing when the cursor is located
in the URL text field. When you are done typing, press the 5-way controller to view
that Web site.
The URL text field retains the last URL you entered in case you want to quickly edit the
same address and submit it again. If you want to enter a secure site with an “https”
address, use the backspace key to delete the automatically entered “://” and type the
address you want.
The URL text field is embedded in a navigation bar with a few other key shortcuts.
To the right of the URL text field there is a button to stop loading or reload the current
page. From there, move your 5-way to the right, and you can select the Google search
engine or Wikipedia for searching on the text entered in the URL text field. Above the
URL text field are shortcuts to navigate back and forward one page, an indication
of how much of the page has been loaded, whether you are viewing the page in Basic
or Advanced Mode, and where you are in the web page.
Reload or
Stop Loading
USING BOOKMARKS AND ADDING YOUR OWN
Bookmarks let you easily access a Web page without needing to type the address
every time. When you open Basic Web from the Experimental page for the first time,
you will see a list of default bookmarks with links to information such as daily news
and weather. While browsing, you can also access the same list of bookmarks by
selecting “Bookmarks” from the browser menu (just press the Menu button).
Chapter 6 · 94KINDLE USER’S GUIDE 4th EDITION
Page 95

To add a Web site to the Bookmarks page, simply navigate to the site that you want to
bookmark and press the Menu button. Move the cursor to “Bookmark this page” and
press the 5-way controller. Any new bookmarks that you select will be added to the
existing list on your Kindle.
You can remove a bookmark by going to your Bookmarks lists and moving the 5-way
controller until the item you want to delete is underlined. Move the 5-way left to
display “delete bookmark.” Press the 5-way and the site will be deleted from your
Bookmarks. From the Bookmarks list, moving the 5-way to the right lets you edit the
name of the bookmark.
USING NEXT PAGE AND PREVIOUS PAGE
Most Web pages you find on the Internet will have more content than can be
displayed on one page. Use the Next Page and Previous Page buttons to move
through these pages. This is equivalent to using your mouse on a computer to move
up and down through a Web page. You can also move the cursor down with the 5-way
controller until it reaches the bottom of the page.
SELECTING LINKS, BUTTONS, AND BOXES
You can navigate the links on a Web page by using the 5-way controller to move the
cursor around the page. Links in Basic Web are shown as underlined words, just like
in the Reader. Below is a Web page with multiple selectable links.
Chapter 6 · 95KINDLE USER’S GUIDE 4th EDITION
Page 96

Using the 5-way controller, highlight the link you want to go to and press the 5-way.
The browser will open that page.
If you want to enter information in an input field in a Web page to search that site,
for example, you should move the cursor to that input field and begin typing. When
you finish typing, press down on the nearby Go or Enter or Search button to retrieve
the results. If there are radio buttons embedded within a Web page, you can change
the input by maneuvering the cursor to the button you want to change and press the
5-way to “push” this button.
Chapter 6 · 96KINDLE USER’S GUIDE 4th EDITION
Page 97

USING HISTORY
You can easily return to Web sites you recently viewed by pressing the Menu button
and selecting “History.” You will then see a list of recently visited Web sites to select
from. As noted above, you can also use this list to add a site to your Bookmarks by
moving the 5-way to the right.
THE BASIC WEB MENU
The Basic Web menu contains other items you can select, many of which also appear
in the Browser’s navigation bar. To view the menu, press the Menu button when the
Basic Web browser is on the screen.
Chapter 6 · 97KINDLE USER’S GUIDE 4th EDITION
Page 98

Turn Wireless Off — turns the Whispernet connection off. If you turn the wireless off,
you will not be able to use the browser.
Shop in Kindle Store — takes you to the Kindle Storefront.
Enter URL — takes you directly to the URL field where you can enter a web address
to visit.
Go to Top — returns you to the top of the current Web page.
Bookmarks — displays your list of Web bookmarks.
Bookmark This Page — adds the current page to the bottom of your list of bookmarks.
History — displays your History page, which keeps track of the sites you have visited.
Settings — displays your list of settings where you can change the options for
Basic Web.
Use Advanced Mode — for complex Web sites. This mode squeezes pages down to
fit the width of the Kindle screen. In this mode, JavaScript can also be enabled. When
this mode is selected, the menu selection then changes to “Use Basic Mode” which
optimizes the Kindle’s browser for viewing most pages.
6.2 Other Features
As you become more familiar with the Basic Web browser, the following topics may
be of interest to you.
TEXT SIZE
Just like when you are reading a book or periodical, you can adjust the size of the text
when viewing Web pages. See Chapter 3 for details on how to change text size.
DOWNLOADING FILES
Some Web sites may have books or documents you can download and read on
your Kindle. When you select these books or documents using Basic Web, you will
be asked to confirm if you want to download these to your Kindle Home.
The types of files you can download include Kindle content (.AZW, .AZW1),
unprotected Mobipocket books (.MOBI, .PRC) and text files (.TXT).
Chapter 6 · 98KINDLE USER’S GUIDE 4th EDITION
Page 99

BASIC WEB SETTINGS
You can modify the default browser behaviors and perform simple maintenance
procedures using Basic Web Settings. To display the Settings screen, press the
Menu button while in the browser and then use the 5-way to select “Settings.”
Chapter 6 · 99KINDLE USER’S GUIDE 4th EDITION
Page 100

Switch to Advanced Mode — switches between Basic and Advanced modes, when
you view Basic Web.
Clear Cache — removes temporary Internet files from your Kindle. Move the on-
screen highlight to “Clear Cache” and press the 5-way controller to clear the cache.
Clear History — removes cached Internet address entries from your Kindle. Move the
on-screen highlight to “Clear History” and press the 5-way to clear this list.
Clear Cookies — removes cookies from your Kindle. Move the on-screen highlight to
“Clear Cookies” and press the 5-way to remove the cookies.
Enable Javascript — enables or disables Javascript to be executed on the pages you
visit. Note that if Javascript is disabled, Web pages will load faster. The view mode
must be set to Advanced Mode to use this feature.
Disable Images — select whether you want images to appear when you load a Web
page. Note that if you do not show images, Web pages will load faster.
Chapter 6 · 100KINDLE USER’S GUIDE 4th EDITION
 Loading...