

Page 1
Page 2

Kindle Voyage User’s Guide 3rd Edition
2
Contents
Contents
Chapter 1 Getting Started .................................................................................................. 5
Registering your Kindle .................................................................................................... 5
Kindle controls .................................................................................................................. 5
Touchscreen interface ...................................................................................................... 6
Keyboard ............................................................................................................................. 7
Tap zones ............................................................................................................................ 7
Toolbars............................................................................................................................... 9
Status indicators .............................................................................................................. 12
Wireless status indicators .................................................................................................. 12
Battery status indicator ...................................................................................................... 13
Activity indicator ............................................................................................................... 13
Parental Controls indicator ................................................................................................ 13
Setting up your Kindle Voyage ....................................................................................... 13
Network connectivity ......................................................................................................... 14
Special Offers and Sponsored Screen Savers ................................................................. 14
Screen Saver....................................................................................................................... 14
Special Offer banners ......................................................................................................... 14
Chapter 2 Acquiring & Managing Kindle Content ........................................................ 16
Shop in the Kindle Store anytime, anywhere ................................................................ 16
Recommended content ................................................................................................... 16
Device and Cloud storage ............................................................................................... 17
Removing items from your Kindle ................................................................................. 17
Periodicals ......................................................................................................................... 17
Managing your Kindle Library ....................................................................................... 18
Cloud Collections............................................................................................................... 19
Chapter 3 Reading Kindle Documents .......................................................................... 21
Understanding Kindle display technology .................................................................... 21
Customising your text display ........................................................................................ 21
Comic and manga books ................................................................................................. 21
Children's books .............................................................................................................. 21
Images .............................................................................................................................. 22
Tables ............................................................................................................................... 22
Interacting with your documents .................................................................................. 22
About This Book ................................................................................................................ 23
Dictionary .......................................................................................................................... 23
Page 3

Kindle Voyage User’s Guide 3rd Edition
3
Contents
Search ................................................................................................................................ 23
Notes and highlights .......................................................................................................... 24
Bookmarks ......................................................................................................................... 25
Footnotes, endnotes and chapter notes .............................................................................. 26
Before You Go... ................................................................................................................. 26
X-Ray ................................................................................................................................ 26
Word Wise ........................................................................................................................ 26
Vocabulary Builder .......................................................................................................... 27
Kindle for Kids ................................................................................................................ 27
Setting up Kindle for Kids .................................................................................................. 27
Using Kindle for Kids ......................................................................................................... 28
Managing your Amazon household ............................................................................... 28
Goodreads on Kindle ...................................................................................................... 29
Time to Read .................................................................................................................... 31
Navigating a book............................................................................................................ 31
Kindle Page Flip ................................................................ ................................................. 32
Go To button ................................................................ ..................................................... 32
Chapter 4 Getting More From Your Kindle Voyage ..................................................... 33
Carrying and reading personal documents ................................................................... 33
Reading Kindle content on other devices ..................................................................... 33
Sharing comments via social networks ......................................................................... 33
Using your Kindle with your computer ......................................................................... 34
Using the Experimental Web Browser ........................................................................... 34
Web Browser Menu ........................................................................................................... 34
Bookmarks ......................................................................................................................... 35
Downloading files .............................................................................................................. 35
Chapter 5 Settings ........................................................................................................... 36
Customising your Kindle settings .................................................................................. 36
The Settings contextual menu ........................................................................................ 38
Chapter 6 Finding Additional Assistance ..................................................................... 39
Appendix A Product Information .................................................................................. 40
Safety and Compliance Information .............................................................................. 40
Maintaining Your Kindle Device .................................................................................... 40
Device Service .................................................................................................................. 40
Battery Safety ................................................................................................................... 40
Other Safety Considerations .......................................................................................... 41
Page 4

Kindle Voyage User’s Guide 3rd Edition
4
Contents
Wireless Safety and Compliance .................................................................................... 41
Turn Off Wireless When Flying ...................................................................................... 41
Using Your Kindle Around Other Electronic Devices .................................................. 41
Steps to Minimise Interference ...................................................................................... 42
Look Out For Signs .......................................................................................................... 42
FCC Compliance Statement ............................................................................................ 42
Information Regarding Exposure to Radio Frequency Energy .................................... 43
Canadian Compliance Statement ................................................................................... 43
IEEE 1725 Battery Safety Statement ................................................................................ 43
EU Conformity ................................................................................................................. 44
CE SAR Compliance ................................ ................................................................ ......... 44
Recycling Kindle Properly .............................................................................................. 44
Product Specifications .................................................................................................... 44
LEGAL TERMS .................................................................................................................. 45
ONE-YEAR LIMITED WARRANTY .................................................................................. 45
Warranty Provider ............................................................................................................. 46
Additional Information ...................................................................................................... 47
Patent Notices ................................................................................................................. 47
Copyright, Trademark and Other Notices ..................................................................... 47
Page 5
Kindle Voyage User’s Guide 3rd Edition
5
Chapter 1
Getting Started
Chapter 1
Getting Started
Welcome to your new Kindle Voyage. This short guide will familiarise you with all of the
features and functionality of your Kindle. Some Kindle features may not be available based
on your country of residence or location. Please visit www.amazon.com/devicesupport for
more information about specific features.
Registering your Kindle
If you bought your Kindle online using your Amazon account, it is already registered to you.
To verify, tap the Home button and look for your Amazon user name in the upper left corner
of the Home screen. If it says My Kindle or shows the name of a previous owner instead of
your own Amazon account name, you'll need to register it. See Setting up your Kindle Voyage
in this chapter for instructions on setting up and registering your Kindle.
Kindle controls
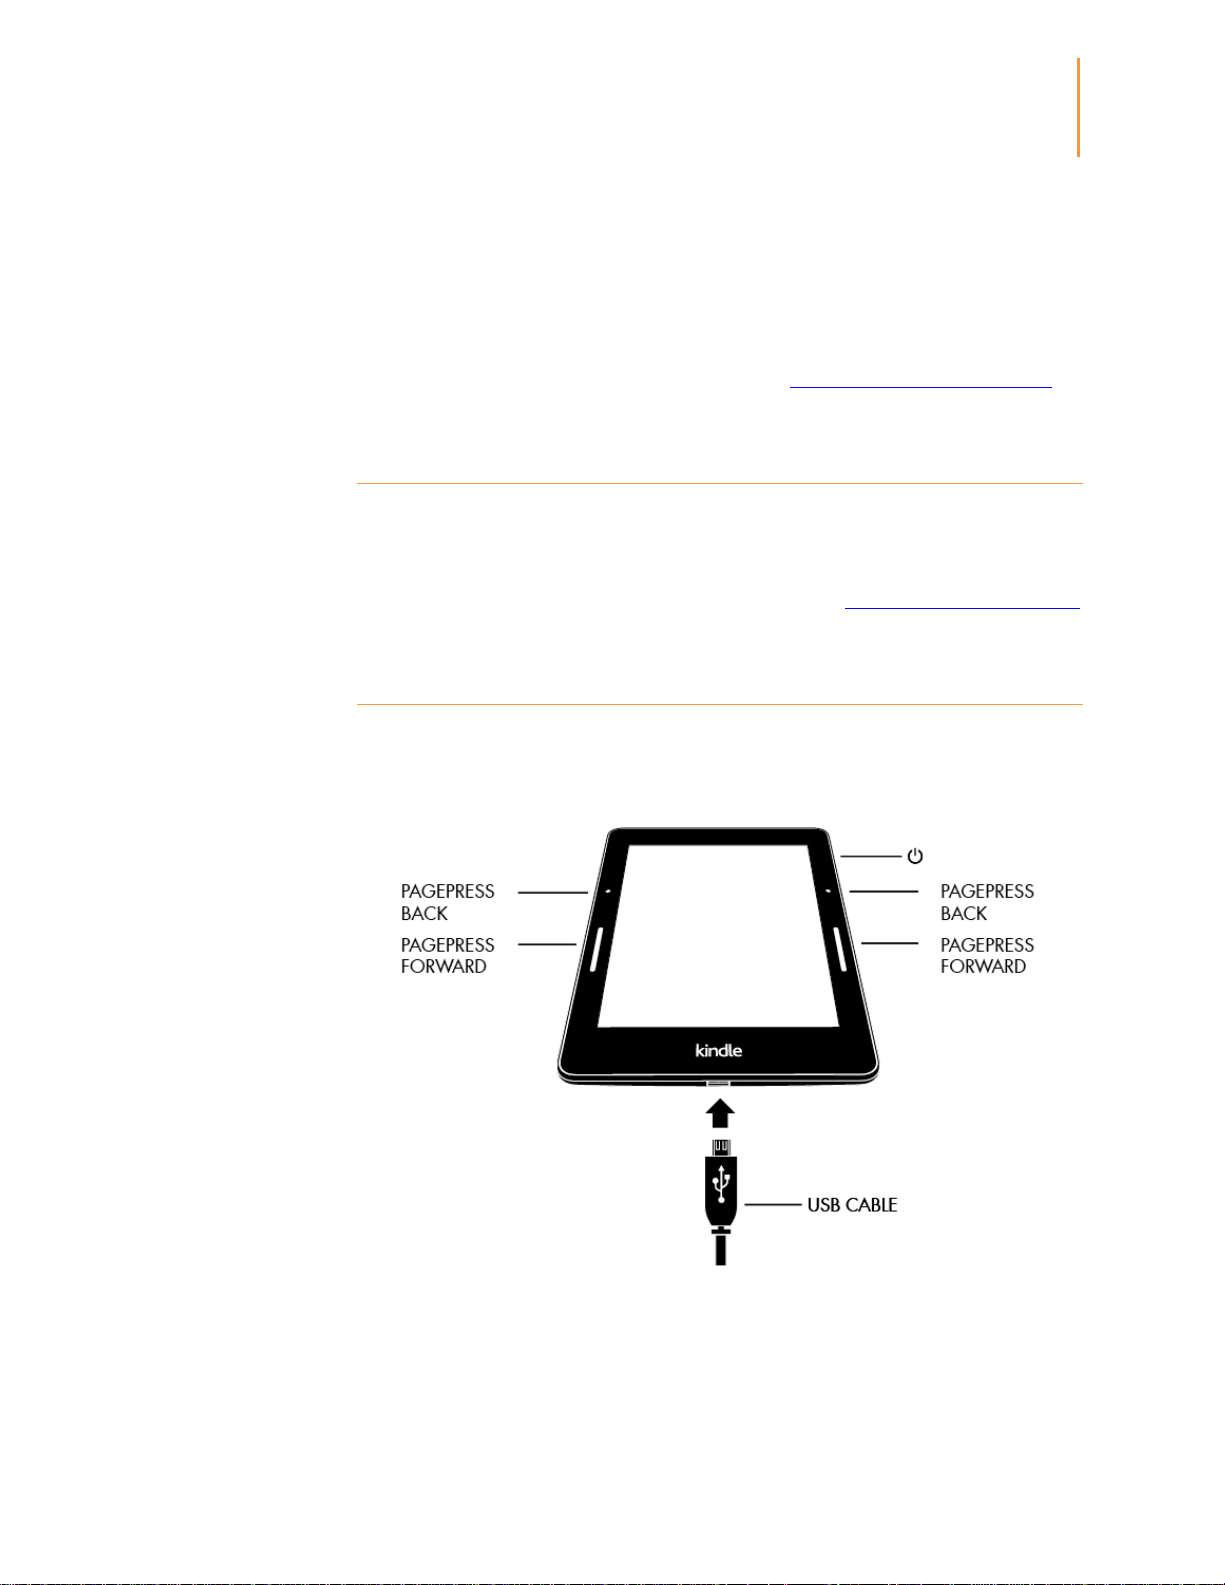
You need to learn only a few simple controls to use your Kindle Voyage.
PagePress: To page forward or back in a book, squeeze either side of the screen. Use the line
to page forward and the dot to page back. You can keep your right or left thumb resting on
the pressure-sensitive controls. To adjust the pressure required to turn a page or the feedback
you receive when a page turns, go to Settings, Reading Options, then PagePress. You can also
Page 6

Kindle Voyage User’s Guide 3rd Edition
6
Chapter 1
Getting Started
use PagePress to navigate your library on the Home screen. Your Kindle must be in portrait
mode to use PagePress.
Power button: To turn your Kindle on, press the Power button located on the back. If you
need to turn off your Kindle screen, press and hold the Power button for 7 seconds until the
Power dialog displays and then select Screen Off.
Your Kindle will go into sleep mode automatically after a few minutes of inactivity and a
screen saver will display. This static screen saver uses no battery power. To put your Kindle
in sleep mode, press and release the Power button. To wake up your Kindle, press and release
the Power button.
If your Kindle does not power on or is unresponsive during use and you need to restart it,
press and hold the Power button for 7 seconds until the Power dialog displays and then select
Restart. If the Power dialog does not display, press and hold the Power button for 40 seconds
or until the LED light stops blinking.
Micro-USB/power port: You can use the USB cable supplied to connect your Kindle to a
computer for charging the battery and transferring files. To charge your Kindle from a power
outlet, you will need a compatible AC adaptor (sold separately) for the USB cable.
When your Kindle is charging, a lightning bolt appears on the battery status indicator at the
top of the Home screen. The indicator light on the bottom edge will turn amber while the
battery is charging and green when it is fully charged. Charging should take less than four
hours using a Kindle AC adaptor. Charging using third-party adaptors or via USB should take
less than four hours, but may take longer depending on the capability of the hardware.
You can still use your Kindle whilst it is connected to your computer and charging via USB.
To do so, dismount or eject it so that your Kindle exits USB drive mode.
Windows: Right-click on the "Safely remove hardware" icon in the task bar and follow the
onscreen instructions to remove your Kindle.
Mac OS X: Click the Eject button next to the Kindle in any Finder window, or drag it from
the Desktop to the Trash.
Your Kindle will then exit USB drive mode, but will continue to charge. If the charge indicator
light on the bottom edge of the Kindle does not come on, make sure that the USB cable is
fully inserted into your Kindle and into the USB port of the computer. If your Kindle is still
not charging, try another USB port or electrical socket.
Note that if your Kindle is plugged into a low-powered USB port — such as those found on
some keyboards and older computers — it will not receive enough power to charge.
Touchscreen interface
Your Kindle Voyage features a touchscreen interface that enables you to perform many tasks
with just a tap or swipe of a finger. To select an item, simply tap it. For example, tap a book
cover or title on your Home screen to open the book, or tap a button to perform that button's
action.
Page 7

Kindle Voyage User’s Guide 3rd Edition
7
Chapter 1
Getting Started
Keyboard
Your Kindle Voyage has an onscreen keyboard. When you tap within the Search field or begin
other actions that require you to type in information, the keyboard automatically displays at
the bottom of the screen. Tap the keys to enter your selection and use the appropriate buttons
to continue on to the next action. As you type, word suggestions based upon your entries will
appear above the keyboard. Tap the word you want to select.
Keyboard tips:
Tap the Number and Symbol key to enter numbers and symbols.
Tap the Letter key to return to the regular keyboard.
Tap the Shift key to enter uppercase characters. Tap the Shift key twice to enter
all caps mode and tap it once to exit the mode.
To select a keyboard for a different language, tap the Menu button and select Settings. On
the Settings page, select Device Options, Language and Dictionaries, then Keyboards.
To enter diacritics and special characters using the keyboard, press and hold the base
letter’s key. For example, press and hold the n to display ǹ, ñ or ň.
A Globe key is added to your keyboard when you have selected multiple languages. To
select a different keyboard, tap the Globe key.
Tap zones
The EasyReach feature of your Kindle lets you effortlessly turn pages in a book or periodical
while holding the device in just one hand. Tapping almost anywhere in the display area will
take you to the next page; the area is large enough to be tapped no matter whether you hold
the device in your left or right hand. Tap the left side of the screen to go to the previous page.
The EasyReach tap zones differ depending on whether your Kindle is in portrait or landscape
mode. When reading, you can change the screen orientation by tapping the Menu button and
selecting Portrait or Landscape Mode. Note that the option displayed depends upon the
current orientation of your Kindle.
Page 8

Kindle Voyage User’s Guide 3rd Edition
8
Chapter 1
Getting Started
Portrait Mode
Landscape Mode
If you prefer, you can change pages by swiping the screen with your finger. To go to the next
page, swipe your finger from right to left across the screen. To go to the previous page, swipe
your finger from left to right across the screen.
Page 9
Kindle Voyage User’s Guide 3rd Edition
9
Chapter 1
Getting Started
You can also turn pages using PagePress, by squeezing either side of the screen when in
Portrait Mode. Use the line to page forward, and the dot to page back.
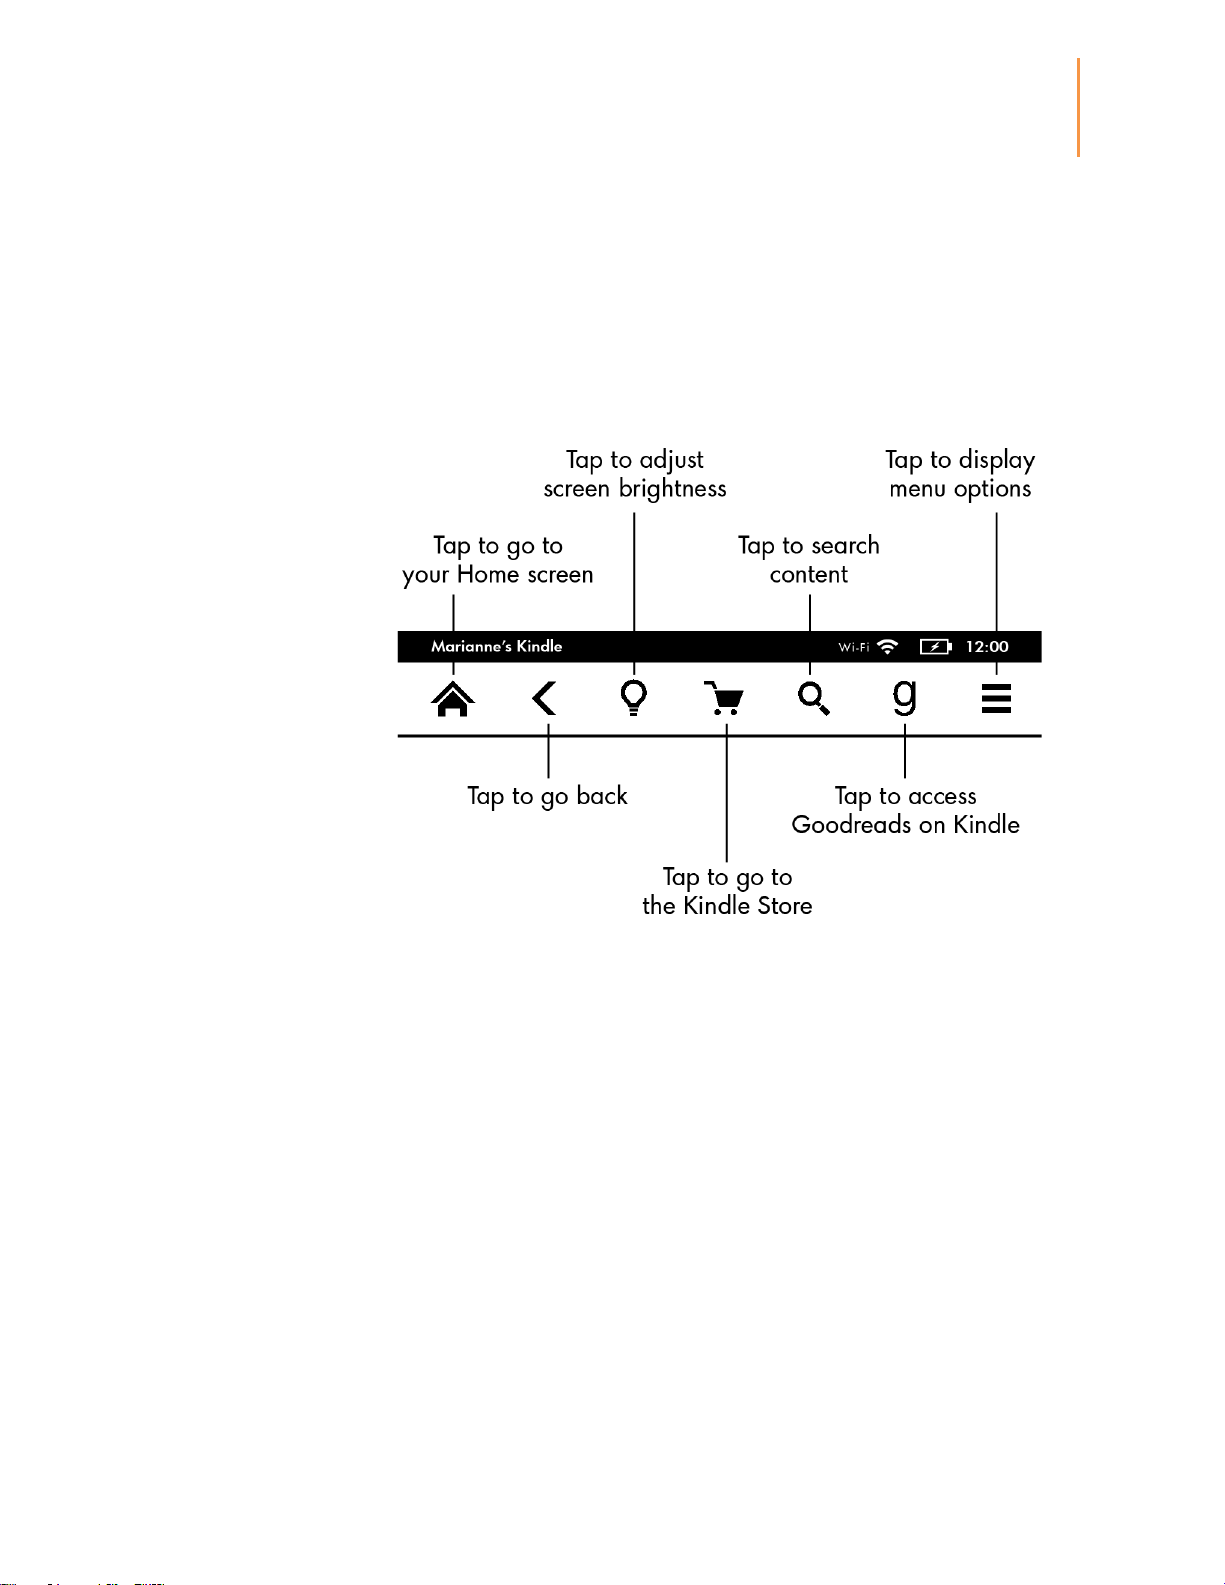
Toolbars
EasyReach also lets you tap the top of the screen to display a toolbar. Toolbar options vary
depending on what you are viewing.
Standard toolbar
Home: Tap to return to the Home screen, where you'll find a list of books and other content
stored on your Kindle.
Back: Tap to retrace your steps. For example, you can follow a link from a book, then tap the
Back button to return to your place in the book.
Screen Light: Tap to access screen light controls. There are several ways to adjust screen
brightness:
Drag your finger along the slider until you reach the desired setting.
Tap anywhere on the slider to select a specific setting.
Tap the + sign to use a higher light setting, and tap the - sign to use a lower light setting.
Press and hold the "+" sign to select the maximum brightness setting. Press and hold the "-"
sign to choose the minimum brightness setting.
Select Auto Brightness to enable the screen light to adjust automatically based on
surrounding light. When Auto Brightness is enabled, you can still adjust the light using the
slider and your Kindle uses that adjustment in the future. When reading or using your Kindle
Page 10
Kindle Voyage User’s Guide 3rd Edition
10
Chapter 1
Getting Started
in the dark, use the Nightlight feature to gradually reduce the screen brightness over time as
your eyes adjust. To enable Nightlight, go to Settings, Device Options then Screen Light.
Kindle Store: Tap to go to the Kindle Store. Your Kindle must have an active Wi-Fi or 3G
connection to use this feature.
Search: Tap to bring up the search field. To exit search, tap the X on the right side of the
search bar.
Goodreads on Kindle: Tap to connect to the Goodreads community on your Kindle to see
what your friends are reading, find book recommendations and keep track of what you’ve
read and want to read. For more information, see Goodreads on Kindle. The Goodreads
button will not display if:
It is not available in your country of residence or location.
Your device is not yet registered.
Menu: Tap to display a list of options. The menus are contextual, which means they change
to offer appropriate options depending on what you're currently doing with the device. For
example, on the Home screen of a Kindle with Special Offers, menu options may include Shop
in Kindle Store, Kindle for Kids, Vocabulary Builder, Experimental Browser, Settings, View
Special Offers, List or Cover View, Create New Collection, Sync and Check for Items and
About Collections. Note that you can view content on the Home screen using the default
cover view or by list view.
When you're reading a book, menu options may include Shop in Kindle Store, Vocabulary
Builder, Settings, Notes, Portrait or Landscape Mode, About This Book, About the Author,
Sync to Furthest Page Read, Reading Progress and Word Wise. Note that About the Author
is only available for books that support an author profile.
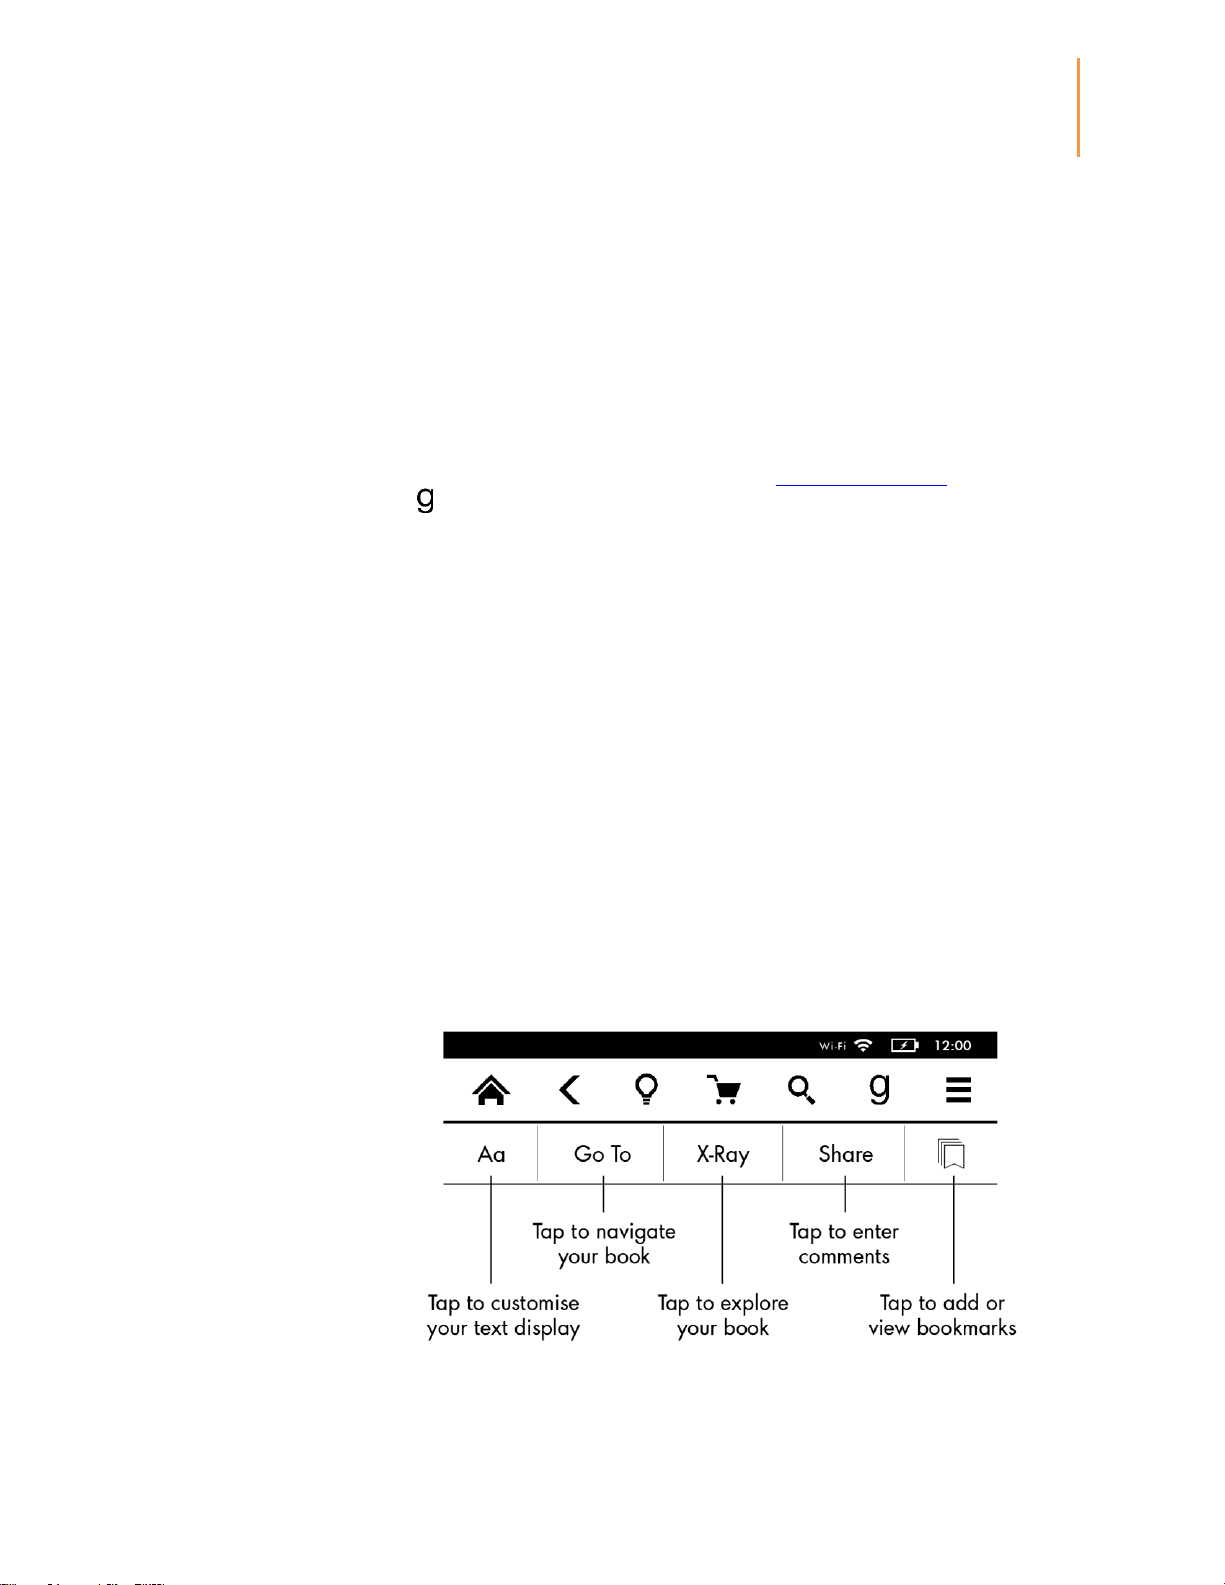
Reading toolbar
A secondary toolbar displays when you're reading a book and tap the top of the screen.
Page 11
Kindle Voyage User’s Guide 3rd Edition
11
Chapter 1
Getting Started
Text (Aa): Tap to display font and text options for your Kindle books, including font size,
typeface, publisher font, line spacing and margins.
Go To: The Contents tab displays the book's contents, including Beginning and chapter titles.
Use the Page or Location option to further navigate your book. The options displayed will
vary depending on the content you're reading. Tap the Notes tab to access your notes and
highlights. You can also view Popular highlights and Public notes by selecting the
corresponding options under the Notes tab.
X-Ray: The X-Ray feature lets you explore the “bones” of the book with a single tap. For
example, you can see all of the passages in a book that mention specific ideas, fictional
characters, historical figures, places, topics and terms. You can also view notable clips and
images from a book in a stack of digital cards organised on a timeline, enabling you to quickly
skim through the clips and view all of the images in one place. For more information, see X-
Ray.
Share: Tap to share your thoughts with friends on Goodreads on Kindle and other social
networks.
Bookmarks: Tap to add or delete a bookmark on the current page, and view previously added
bookmarks. The Bookmark button on the toolbar changes from white to black on
bookmarked pages. A preview pane displays when you tap a bookmark in the list. To go to
the selected location, tap the preview pane. To exit the bookmark feature, tap outside the
bookmark drop-down.
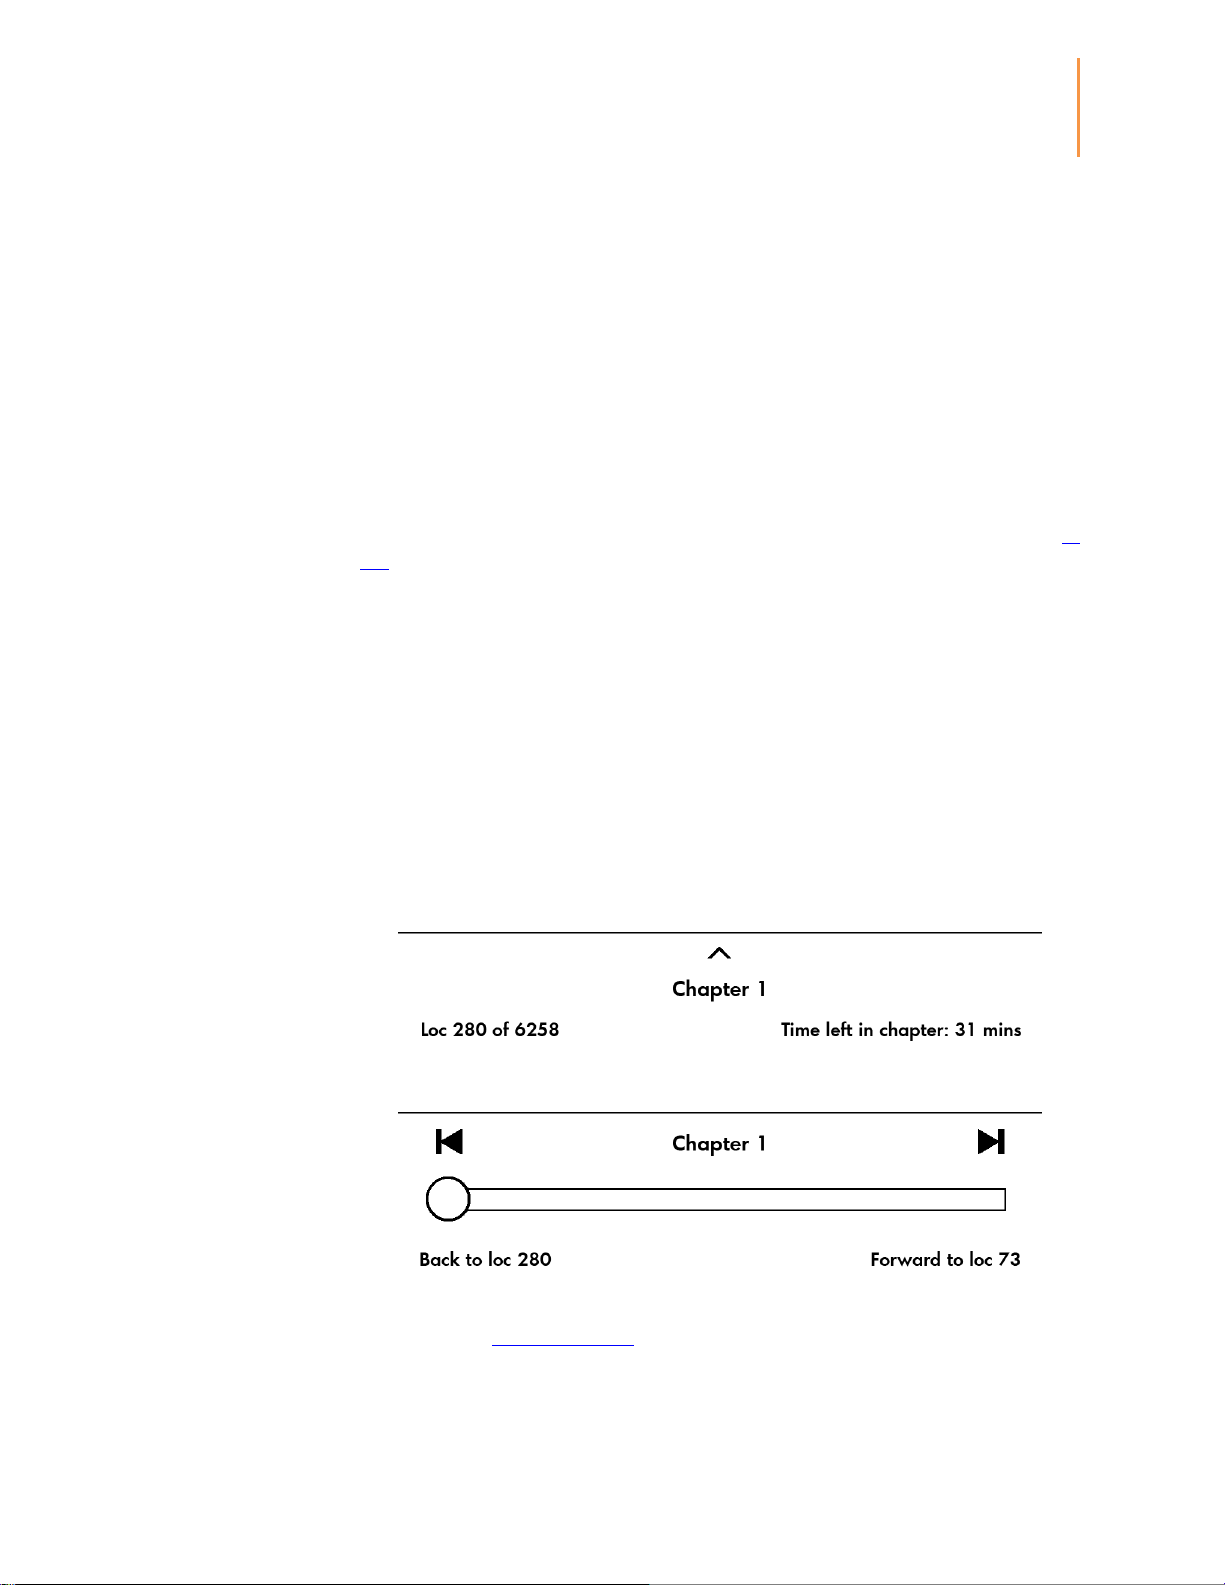
Reading Navigation and Page Flip toolbars
When reading, tap the top of the screen to display the Reading Navigation toolbar. This
toolbar displays the chapter name (if available) and reading progress options.
Tap the caret to access the Page Flip toolbar.
Use this toolbar to navigate a book and preview a new page or location in the book. For more
information, see Navigating a book.
Page 12
Kindle Voyage User’s Guide 3rd Edition
12
Chapter 1
Getting Started
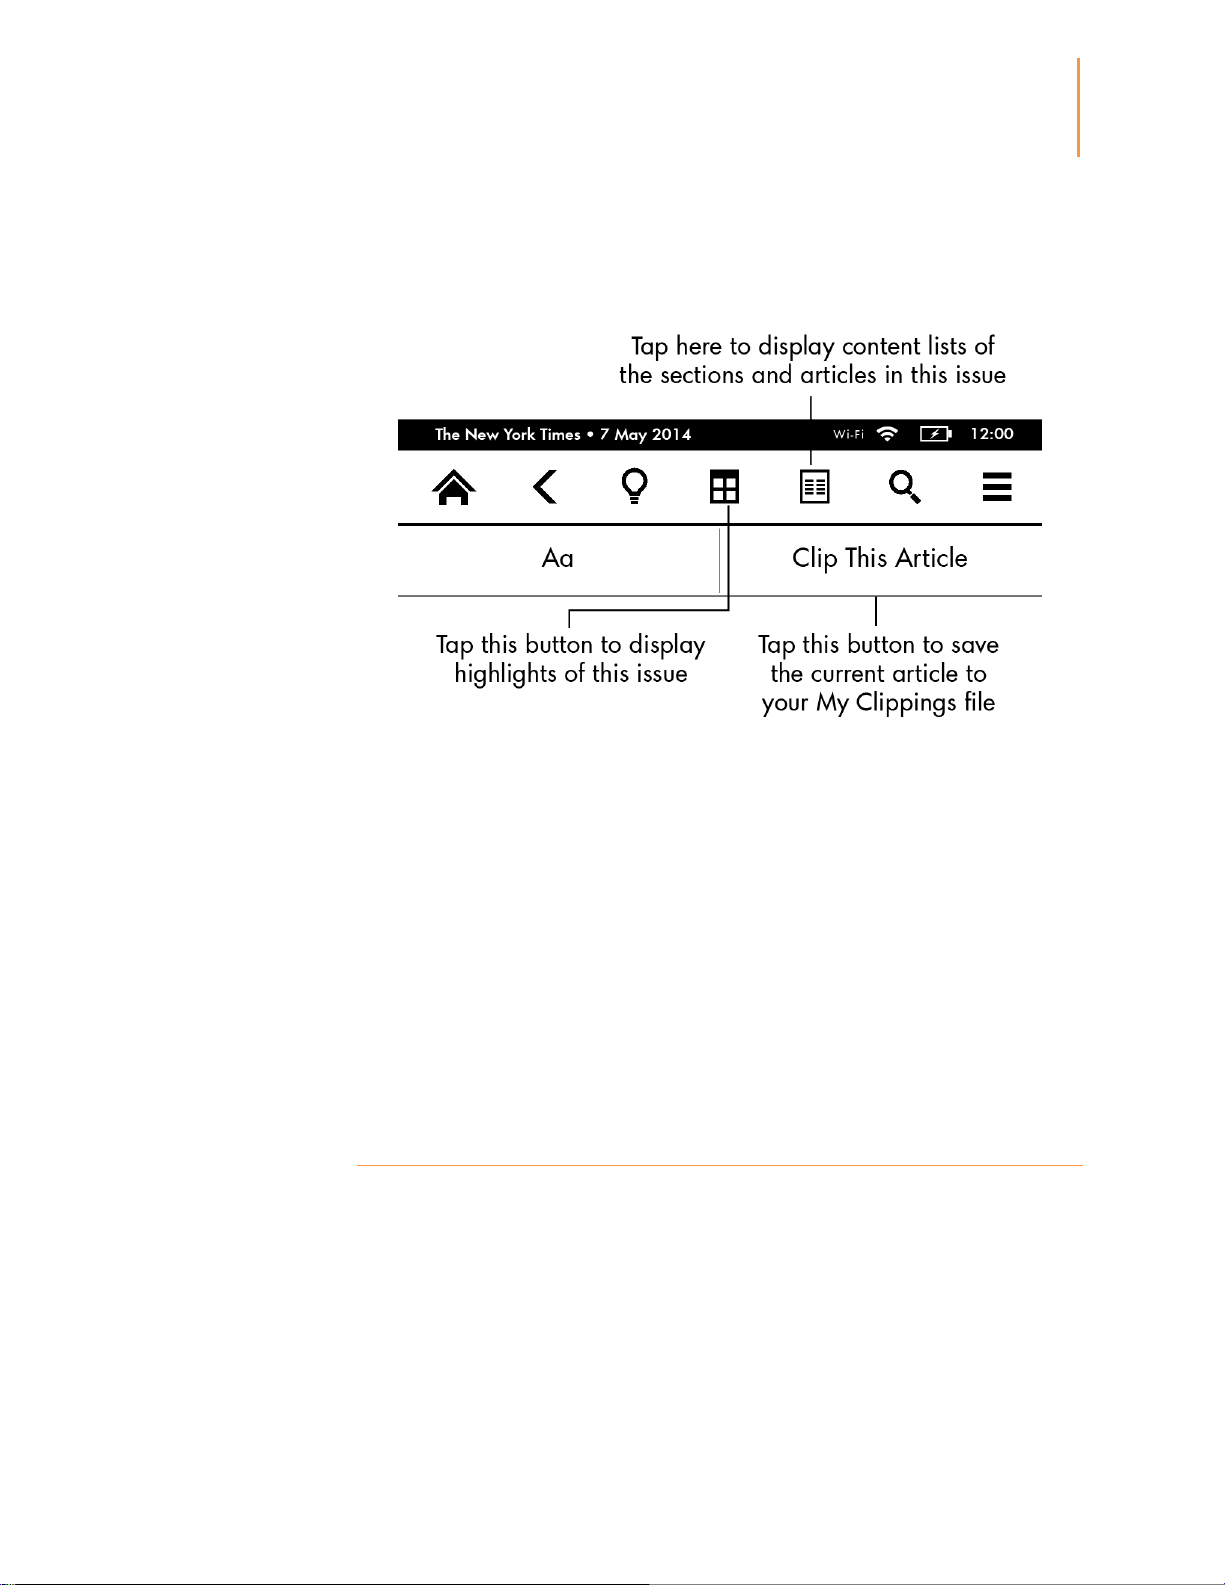
Periodicals toolbar
When you're reading a periodical, the toolbars are configured specifically for that purpose.
To display the toolbar, tap the top of the screen.
Periodical Home: Tap to display highlights of the issue you're reading.
Sections and Articles: Tap to go to the content list of sections and articles in a newspaper
or magazine. This option is not available in blogs.
A secondary toolbar is available when you're reading a periodical and are on the article detail
page. Options include:
Text (Aa): Tap to display font and text options for your periodicals, including font size,
typeface, line spacing and margins.
Clip This Article: Tap to clip an entire periodical article to the My Clippings file. The My
Clippings file is located on your Home screen and stores your notes, bookmarks, highlights
and clipped articles.
Status indicators
At the top of the Home screen, you'll see indicators that inform you about the status of your
Kindle Voyage. To view these indicators within a book or document, tap the top of the screen
to display the toolbars.
Wireless status indicators
The Amazon Whispernet service delivers content wirelessly to your Kindle whenever and
wherever you want it. Your Kindle can connect to Whispernet via its built-in Wi-Fi capability;
Page 13

Kindle Voyage User’s Guide 3rd Edition
13
Chapter 1
Getting Started
some models also include free 3G wireless connectivity to Whispernet. The more bars on the
Wi-Fi or 3G status indicator that are filled, the stronger the signal.
Your Kindle is connected to Whispernet using Wi-Fi.
Your Kindle is connected to Whispernet using a 3G mobile network. Alternatively,
you may see an icon for an EDGE or GPRS network next to the signal-strength bars (applies
only to Kindle 3G).
Your Kindle is in Aeroplane Mode and you have no wireless connectivity.
Battery status indicator
The Kindle battery indicator shows the various states of the battery as it discharges.
When your Kindle is charging, a lightning bolt appears on the battery icon. Note that a weak
wireless signal can increase power consumption.
Activity indicator
This indicator appears in the top left corner of your Kindle screen when it is scanning or
connecting to a network, busy downloading new content, syncing and checking for new
items, searching for an item, opening a large PDF file or loading a web page.
Parental Controls indicator
This indicator appears when Parental Controls are enabled, either because you have
turned on specific restrictions or because a Kindle for Kids profile is active. For more
information, see Parental Controls.
Setting up your Kindle Voyage
If you're reading this guide, you've probably completed the Kindle setup process, which
includes selecting your device language, connecting to a wireless network, registering your
Kindle with your Amazon account, and optionally linking your Kindle to your social network
accounts. If you haven't done these steps yet, go to the Home screen now, select Set Up Your
Kindle, and follow the onscreen prompts. If you have difficulty connecting to your wireless
network, please contact your Network Administrator or the individual responsible for
maintaining the network you are trying to access. Once you have completed the setup
process, Set Up Your Kindle will no longer appear on your Home screen.
To register a Kindle that has been previously registered, tap the Menu button and select
Settings. On the Settings page, select Registration and Household, then Register/Deregister
Device. If you have enabled Sign-in Approval, you will need to enter your passcode followed
by the security code sent to your phone when you register the device.
Page 14

Kindle Voyage User’s Guide 3rd Edition
14
Chapter 1
Getting Started
Network connectivity
Books, magazines and other content are delivered directly to your Kindle via its built-in
network connectivity. If your Kindle offers both Wi-Fi and 3G connectivity, use Wi-Fi
whenever possible for faster downloads. You can connect to a Wi-Fi network at home or at
hotspots around the world.
To view available Wi-Fi networks, tap the Menu button and select Settings. On the Settings
page, select Wi-Fi Networks and the name of the network you want to use. If you see a lock
symbol next to the network name, it requires a password. Tap the Rescan button to recheck
for available Wi-Fi networks. Please note that your Kindle does not support connecting to ad
hoc (or peer-to-peer) Wi-Fi networks.
Your Kindle will recognise Wi-Fi networks with a WPS-compatible router. To connect via
WPS, from your Kindle select the wireless network you want to use. Next, press the WPS
button on your router, then select the WPS button on your Kindle during the Wi-Fi setup
process. Once you have successfully connected to a network, the Wi-Fi status indicator will
display the network's signal strength.
Kindle Voyage 3G models use the same technology as mobile phones, so they are dependent
on mobile coverage areas. By default, a 3G device will connect to a 3G network automatically.
If there isn't sufficient 3G signal strength, it will connect to a slower GPRS or EDGE network.
Your Kindle turns off 3G automatically when you connect using Wi-Fi. If you disconnect from
a Wi-Fi network or move out of Wi-Fi range, your Kindle will switch back to 3G automatically.
To turn wireless off, tap the Menu button and select Settings, then toggle Aeroplane Mode
on. Any periodical downloads or other pending updates that require a wireless connection
will occur the next time you turn it back on. Turning on Aeroplane Mode disables both 3G
and Wi-Fi connections.
Special Offers and Sponsored Screen Savers
For Kindle with Special Offers devices, you will receive Special Offers and Sponsored Screen
Savers that display only on the Home screen or screen saver — not within a book. Note that
Special Offers and Sponsored Screen Savers are not available in all countries.
Screen Saver
When your device is sleeping, a Special Offer will be displayed on your screensaver. To see
more details on the offer, wake up your Kindle, then tap the Tap for Details area. To unlock
your Kindle without viewing offer details, swipe your finger to unlock. Special Offers and
Sponsored Screensavers are updated regularly when your Kindle is connected to a network.
Special Offer banners
Special Offer banners are displayed at the bottom of the Home screen. To view additional
details, tap the banner.
To view all available Special Offers:
Page 15

Kindle Voyage User’s Guide 3rd Edition
15
Chapter 1
Getting Started
1. Tap the Home button, then tap the Menu button.
2. Tap View Special Offers.
3. Tap on any available offer to view details about it.
Note that if you buy a Special Offer when your Kindle is offline, your order will not be
processed immediately. The purchase will be queued and the transaction will be
automatically completed the next time you connect to a network. To manage Special Offers,
tap the Menu button and select Settings. On the Settings page, select Device Options,
Personalise your Kindle, Advanced Options, then Special Offers.
Page 16

Kindle Voyage User’s Guide 3rd Edition
16
Chapter 2
Acquiring & Managing Kindle Content
Chapter 2
Acquiring & Managing Kindle
Content
Shop in the Kindle Store anytime, anywhere
The Kindle Store offers a wide selection of Kindle books, Kindle Singles (novella-length
narratives), newspapers, magazines and blogs. To access the store, tap the top of the screen
to display the toolbars, then tap the Shopping Basket button. You can also select Shop in
Kindle Store from some menus.
To navigate within the Kindle Store, simply tap on any area of interest, then swipe left and
right or up and down to move around pages and lists. You can search for a title, browse by
category, check out the latest bestsellers, or view recommendations personalised just for you.
The Kindle Store lets you see details about titles, read customer reviews and even download
book samples.
When you're ready to make a purchase, the Kindle Store securely uses your Amazon 1-Click
payment method. After you order, the Amazon Whispernet service delivers the item directly
to your Kindle via your wireless connection. Books are downloaded to your Kindle
immediately, generally in less than 60 seconds. The download progress will display below the
book’s cover or title on the Home screen. A New banner on the book indicates when the book
is ready to be opened. Newspapers, magazines and blogs are sent to your device as soon as
they're published — often even before they're available in print. If your Kindle is in Aeroplane
Mode when a new issue of a periodical becomes available, the issue will be delivered
automatically the next time you have a wireless connection.
Whispersync synchronises your Kindle device so that purchases and book samples
downloaded in Kindle apps or on other Kindle devices registered with your account are always
available to you. This enables you to read a few pages using the Kindle application on your
iPhone, iPad or Android device and then pick up exactly where you left off when you return
to your Kindle device. For more information, see Reading Kindle content on other devices.
Kindle Unlimited is an optional monthly subscription that enables you to read as much as
you want on any device, and choose from over 700,000 titles and thousands of audiobooks.
You can freely explore new authors, books and genres from mysteries and romance to sci-fi
and more. To learn more, visit the Kindle Store.
Recommended content
When in cover view, your Kindle Home screen displays recommended content from the
Kindle Store, such as Editors’ Picks. In addition, you will see Goodreads Want to Read shelf
content if you have shelved enough qualified books to your Goodreads on Kindle Want to
Read shelf. Tapping an item will direct you to the Kindle Store, where you can view additional
details, read customer reviews and complete purchases. Swipe or tap to view additional
Page 17

Kindle Voyage User’s Guide 3rd Edition
17
Chapter 2
Acquiring & Managing Kindle Content
content. To hide recommended content, tap the Menu button and select Settings. On the
Settings page, select Device Options, Personalise your Kindle, Advanced Options and then
Cover View Recommendations.
Device and Cloud storage
Content that is purchased from the Kindle Store is securely stored and available in the
Amazon Cloud. This includes copies of all your books along with recent issues of newspapers
and magazines. To view your Cloud content, tap Cloud in the top left of the Home screen.
Cloud tips:
If you wish to download content that you have in the Cloud, tap Cloud on the Home screen,
then tap on the item(s) you want to download to your Kindle. You can cancel a download by
tapping on the item's title.
Cloud items that have been downloaded to your Kindle display a tick on the upper right
corner of the cover image when in cover view and on the right side of the screen when in
list view.
Once you have downloaded an item, you can either open it from the Home screen or
directly from the Cloud.
Your personal documents are saved in the Cloud if they have been e-mailed to your Kindle
and if you have enabled Personal Document Archiving on the Manage Your Content and
Devices page, accessible from www.amazon.com/devicesupport.
To view content stored on your Kindle, tap On Device. If you are preparing to go offline, tap
Cloud and download to your Kindle any content that you want to have available when offline.
The Manage Your Content and Devices page, accessible from
www.amazon.com/devicesupport, offers a handy way to view and manage your Kindle
content, settings, and account using a web browser.
Removing items from your Kindle
To free up space on your Kindle, you can remove items by pressing and holding the item's
name or cover on the Home screen. When the dialog box displays, tap Remove from Device.
Your content will remain stored securely in the Cloud for downloading at a later time. Note
that files transferred to your Kindle using the USB cable will be deleted permanently when
you remove them because they are not stored in the Cloud.
Your personal documents are saved in the Cloud if they have been e-mailed to your Kindle
and if you have enabled Personal Document Archiving on the Manage Your Content and
Devices page, accessible from www.amazon.com/devicesupport. For information on personal
document management, see Carrying and reading personal documents.
Periodicals
Newspapers and magazines are stored in folders by periodical name. When you open the
folder, you can select either Cloud or On Device view and download and open periodicals.
Page 18

Kindle Voyage User’s Guide 3rd Edition
18
Chapter 2
Acquiring & Managing Kindle Content
Issues that are more than eight issues old will be deleted from your device automatically to
free up space for new content. Newspapers that are more than 14 issues old and magazines
that are more than 40 issues old will be deleted from the Cloud automatically. "Expiring" next
to an issue indicates that it will be deleted soon. Press and hold on a periodical folder to view
the following options: Download Latest Issue and Remove All Back Issues.
You can view more options when you press and hold on a single issue. Options include Add
to Collection, Go To First Page, Go To Sections & Articles, Search This Issue, Keep This Issue,
View Notes & Marks, View Back Issues and Delete This Issue.
There are two ways to keep a copy of an issue on your device:
On the Home screen tap On Device, then press and hold on the name or cover of the issue
you wish to keep. Select Keep This Issue from the options.
From within the issue, tap the Menu button and select Keep This Issue.
You can access all of your back issues, regardless of age, on the Manage Your Content and
Devices page, accessible from www.amazon.com/devicesupport.
Managing your Kindle Library
Your Kindle Voyage can store thousands of books, personal documents, newspapers, blogs
and magazines, which are referred to collectively as "content" throughout this guide. To
display a list of content on your Kindle Voyage, tap the Home button, then the On Device
option.
To view how much free space your Kindle has available for storing content:
1. Tap the Menu button and select Settings.
2. On the Settings page, tap the Menu button, then Device Info.
You can view content on the Home screen using the default cover view or by the traditional
list view. To change the appearance of the Home screen, tap the Menu button and select List
or Cover View.
By default, your content is sorted by Recent, meaning that new items and the content you're
currently reading are at the top. To change the sort option, on the Home screen tap the name
of the existing sort order, located under the toolbar. You can also sort items that you have
stored in the Cloud.
To filter your content by type, on the Home screen tap All Items, located under the toolbar.
Filtering options include:
All Items
Books
Periodicals
Docs
Collections
Page 19

Kindle Voyage User’s Guide 3rd Edition
19
Chapter 2
Acquiring & Managing Kindle Content
If you have set up an Amazon household and enabled sharing, two new filtering options will
appear under Books:
My Books
Shared Books
To view just your books, select the My Books filter option. To view just the books that the
other adult in your household has shared, select the Shared Books filter option.
You can also filter items that you have stored in the Cloud.
To jump to a specific title or page, go to the Home screen and tap the page number control.
For example, 1/2 indicates you are on page 1 and have 2 pages of content on your Kindle. When
the dialog box displays, enter the page number you want to go to or the first letter of the title
or author (depending on your current sort option).
To view more information about an item and access a menu of applicable options, go to the
Home screen and press and hold on the item’s cover (or name if using list view). Menu options
vary, but may include Add to Kindle for Kids Library, Add to Collection, Go To..., Search This
Book, View Bookmarks, Remove from Device, View on Goodreads, and Add to Goodreads
Shelf. Note that you must be signed into Goodreads on your Kindle to see Add to Goodreads
Shelf.
Cloud Collections
Cloud Collections enables you to organise the content on your Kindle Voyage into customised
categories that are stored in the Cloud. Your collections are synced between other devices
and reading apps that are registered to the same Amazon account and that support Cloud
Collections. You can add as many items as you like to each collection, including books and
personal documents. Items can also be added to more than one collection. For information
on devices and apps that support Cloud Collections, go to www.amazon.com/devicesupport.
To create a new collection:
1. On the Home screen, tap the Menu button.
2. Select Create New Collection.
3. Use the keyboard to type a name for the collection, then tap OK. A list of the items on your
Kindle that can be added to a collection is displayed.
4. Tap the checkbox next to an item's title to add it to the collection, then tap Done when
finished.
You can add or remove items at a later time by tapping on the Menu button when in a
collection and selecting Add/Remove Items. Other options include Rename Collection,
Delete Collection, and visibility settings. To exit a collection, tap the Home or Back button.
To filter the content on your Home screen by collection, tap All Items or the currently
selected filter, and select Collections.
Collections downloaded to the device appear in your All Items, Books, Periodicals and Docs
views. To download a collection, just press and hold on a collection cover or collection title
Page 20

Kindle Voyage User’s Guide 3rd Edition
20
Chapter 2
Acquiring & Managing Kindle Content
and tap Add to Device. Note that this setting is device-specific and will not be saved when
you deregister your Kindle. To remove a collection from your device, press and hold on a
collection cover or collection title and then tap Remove from Device.
Tips for using Cloud Collections:
Deleting a collection that was created on a device or in a reading app that supports Cloud
Collections, such as your Kindle, will delete it from the Cloud and other devices or reading
apps that support Cloud Collections and are registered with the same Amazon account.
Deleting a collection from your Kindle does not remove the content stored on your device
or in the Cloud. Items stored on your Kindle that were previously placed into the collection
will appear on the Home screen and in the Cloud after the collection is deleted.
Page 21

Kindle Voyage User’s Guide 3rd Edition
21
Chapter 3
Reading Kindle Documents
Chapter 3
Reading Kindle Documents
Understanding Kindle display technology
Your Kindle uses a high-resolution display technology called electronic paper. The display is
reflective, which means you can read it clearly even in bright sunlight. Electronic paper uses
ink just like books and newspapers, but it displays the ink particles electronically.
Your screen may occasionally appear to flash. This is part of the process of refreshing the ereader page display. By default, your Kindle features fast, smooth page turns, minimising the
number of flashes. To refresh the page with every page turn, tap the Menu button and select
Settings. On the Settings page, select Reading Options and use the Page Refresh setting to set
your preference. For manga refresh settings, tap the Menu button when reading a manga
book and select the Page Refresh On/Off setting.
Customising your text display
Your Kindle provides a quick way to adjust the appearance of books and periodicals. To access
those settings when reading, tap the top of the screen to bring up the toolbars, then tap the
Text button (Aa). A dialog box will appear that lets you change the font size, typeface, line
spacing, and margins of the content on the Kindle screen. You can now select Bookerly, a new
font created exclusively for Kindle and designed for digital screens. The Publisher Font option
is available on selected books that include the ability to view the fonts embedded by the
publisher. You may be prompted to update your Kindle if new fonts are available. Note that
your Kindle also applies kerning, optimises large fonts, and automatically optimises line
spacing for faster, easier reading across all fonts.
Comic and manga books
Comic and manga books come alive with Kindle Panel View. To enter Kindle Panel View,
double-tap the screen. To navigate through the panels, swipe your finger across the screen or
tap the sides of the screen. To exit Kindle Panel View, double-tap the screen again. For manga
refresh settings, tap the Menu item when reading a manga book and select the Page Refresh
On/Off setting.
Children's books
Some Kindle books for children feature Kindle Text Pop-Up for reading text over images. You
can navigate between Text Pop-Up sections by swiping your finger across the screen or
tapping the sides of the screen. Select children's books will open in this view automatically.
To exit Text Pop-Up and return to normal reading, double-tap the screen.
Page 22

Kindle Voyage User’s Guide 3rd Edition
22
Chapter 3
Reading Kindle Documents
Images
When you press and hold on an image and then release, a magnifying glass icon displays on
the image and a series of options display below the image. Options include Highlight, Note,
Share and Search. Tap the ellipsis (…) to view more options, such as Report Content Error.
To increase the size of an image in a Kindle book for easier viewing, tap the magnifying glass
icon. To return the image to normal size, tap on it.
For selected Kindle books, you can zoom in further by placing two fingers close together on
the centre of the screen and moving them apart. To zoom out, place two fingers slightly apart
on the screen and pinch them together. While zoomed, drag your finger across the image to
move to the area of interest. To return to reading, tap the X in the top right corner of the
image.
Tables
Enhanced viewing is available for tables that are interactive, enabling you to both pan and
zoom. Tap on the table to display the panning and magnifying glass icons.
To pan, tap the panning icon and then drag your finger across the screen in the direction you
want to pan. You can select text in the table by pressing and holding on the text, then dragging
your finger across the screen to select it. To edit the range of your highlight after you have
selected it, press and hold on the handle at the start or end of the highlight and drag your
finger across the screen to the desired location. For most device languages, handles only
appear when you have selected two or more words. A dialog box will appear with options to
highlight the text, add a note, share and more. To exit panning mode, tap the Done button.
To zoom, tap the magnifying glass icon. To zoom in further, place two fingers close together
on the centre of the screen and move them apart. To zoom out, place two fingers slightly
apart on the screen and pinch them together. While zoomed, drag your finger across the table
to move to the area of interest. To return to reading, tap the X in the top right corner of the
table.
When you press and hold on a table and then release, a series of options display. Options
include Highlight, Note, Share and Search. Tap the ellipsis (…) to view more options, such as
Wikipedia, Translation and Report Content Error.
Interacting with your documents
Your Kindle gives you access to features that are not available with printed materials, such as
instantly viewing word definitions, easy access to footnotes, and end-of-book actions. Just as
with a traditional book, you can also highlight favourite passages, add notes and create
bookmarks. Smart Lookup lets you select a word or multiple words and view a number of
options, such as Highlight, Note, Share, Search and X-Ray (if available). Information from XRay, Wikipedia, the dictionary, Word Wise and Bing Translate is shown above or below your
selection. To switch between cards, simply swipe from side to side.
Page 23

Kindle Voyage User’s Guide 3rd Edition
23
Chapter 3
Reading Kindle Documents
About This Book
Before starting a new book, you can get valuable information and perform actions to improve
your reading experience. Options vary by book, but may include:
Typical time to read
Mark as currently reading on Goodreads
About the author
More by author
Popular Highlights
Mentioned in this book
Customers who read this book also bought
Manage this feature in Settings
Send us feedback
To enable or disable this feature, tap the Menu button and select Settings. On the Settings
page, select Reading Options, Notes & About This Book, then About This Book.
Dictionary
Your Kindle includes one or more dictionaries for each supported language. After you have
registered your Kindle successfully, all of your dictionaries will be available in the Dictionaries
collection either on the Home screen or in the Cloud. The dictionaries available will differ
depending on the language you select.
To change your default dictionary:
1. On the Home screen or when reading, tap the Menu button and select Settings.
2. On the Settings page, select Device Options, then Language and Dictionaries.
3. Select the Dictionaries option.
4. The currently selected dictionary displays below the dictionary language. An arrow to the
right of the language indicates that there are multiple dictionary options for that language.
Tap the dictionary language to view all of the available dictionaries for that language.
5. Use the radio buttons to select the dictionary that you want to use, then tap the OK button.
To look up the definition of a word while reading, press and hold to select the word. A dialog
box displays the definition of the word. You can change your dictionary by tapping on the
name of the current dictionary in the dialog box. An option to select a new dictionary will
display.
The Smart Lookup feature integrates a full dictionary with X-Ray, Wikipedia, Word Wise and
Bing Translate so you can access definitions, characters, settings and more without leaving
your page. To switch between cards, simply swipe from side to side and select Word Wise or
Wikipedia from the dropdown menu. If the selected word is also an X-Ray topic, Smart
Lookup will display the X-Ray tab. For more information, see X-Ray.
Search
To perform a search, tap the Search button to display the search field and onscreen
keyboard. When you search from the Home screen, the default search is everywhere,
Page 24

Kindle Voyage User’s Guide 3rd Edition
24
Chapter 3
Reading Kindle Documents
including results from your library, Kindle Store, Goodreads, Text in Books, Dictionary and
Wikipedia. To initiate a full search, tap the Return key on the keyboard or click on the Search
Everywhere option in the dropdown menu that appears as you type in search criteria.
The Search option also displays when you select a table or image and highlight a word or
passage.
To search within a book or document when reading, tap the top of the screen to bring up the
toolbars, then tap the Search button and enter the text you want to search for.
Search tips:
For results from All Items, your Kindle will actively display title/author matches in a
dropdown menu as you type in the search criteria. To go directly to an item, tap the match
in the dropdown. If a match is found for a book, it will take you to the most recent page
read or download the book if you have it in the Cloud.
For results from the Kindle Store, your Kindle will actively display the suggestions in a
dropdown menu as you type in the search criteria. When you tap a match in the dropdown,
it shows the results in the Kindle Store. Tap the Search Everywhere button to broaden your
search, including results from your library, Kindle Store, Goodreads, Text in Books,
Dictionary and Wikipedia.
From the Experimental Web Browser, tap to the left of the address field to display all of the
search filter options: Web Address, Google and Kindle Search.
Searching will be limited if Parental Controls are enabled and will not include results from
the Kindle Store, Goodreads and Wikipedia.
Tap the Clear History link to delete your search history.
When searching while using Goodreads on Kindle, the default search is by title and author
within the Goodreads catalogue. To add a book to your Goodreads shelves, tap Want to
Read or the Shelf icon next to the book in the search results. Tap on a book cover to read
reviews and view details in the Kindle Store. For more information, see Goodreads on
Kindle.
To exit search, tap the X on the right side of the search bar.
Notes and highlights
You can add notes and highlights by pressing and holding on text, then dragging your finger
across the screen to select it. Highlighting tips:
To highlight over to the next page, drag your finger to the bottom right corner of the screen
and the page will turn. You can highlight across multiple pages by continuing to drag your
finger to the bottom right corner of the screen.
To highlight to the previous page, drag your finger to the top left corner of the screen and
the page will turn. You can highlight across multiple pages by continuing to drag your
finger to the top left corner of the screen.
To edit the range of your highlight after you have selected it, press and hold on the handle
at the start or end of the highlight and drag your finger across the screen to the desired
location. For most device languages, handles only appear when you have selected two or
more words.
Page 25

Kindle Voyage User’s Guide 3rd Edition
25
Chapter 3
Reading Kindle Documents
If you select a single word and want to add a note, tap Note. Additional options include
highlighting the selected text, sharing with friends on Goodreads on Kindle and other social
networks, and searching the book, all text, or the Kindle Store. Tap the ellipsis (…) to view
more options, including opening the dictionary and reporting an error with the content. You
can also swipe through the different cards to view the X-Ray topic (if available), dictionary
definition, Wikipedia entry, and an option to translate the selected word.
If you select a sentence or multiple words, options include highlighting the selected text,
adding a note, sharing with friends on Goodreads on Kindle and other social networks and
searching the book, all text or the Kindle Store. Tap the ellipsis (…) to view more options,
including searching Wikipedia, an option to translate the selected passage and reporting an
error with the content.
Notes will appear as superscripted numbers within the text. To view a note the next time you
visit that page, simply tap on the number. You can view all of your notes and highlights by
tapping the Go To option on the secondary toolbar when reading, then tapping the Notes tab.
The notes and highlights closest to your current reading location will display first in the list.
You can also view notes by tapping the Menu button and selecting Notes.
If several other Kindle users have highlighted a particular passage in the book you are reading,
you will see that passage underlined. To turn off these highlights, tap the Menu button and
select Settings. On the Settings page, select Reading Options, Notes & About This Book, and
change the Popular Highlights setting. You can also display notes and highlights from people
that you follow on https://kindle.amazon.com. To turn off this option, tap the Menu button
and select Settings. On the Settings page, select Reading Options, Notes & About This Book,
and change the Public Notes setting. The Popular Highlights and Public Notes features are
not supported in all countries.
Notes and highlights are added to a file on the Home screen called My Clippings. When
Whispersync for Books is set to Enabled, these items are stored in the Cloud for you so they
won't be lost. To manage the Whispersync for Books setting, tap the Menu button and select
Settings. On the Settings page, select Device Options, Personalise your Kindle, Advanced
Options, then Whispersync for Books.
Bookmarks
Amazon's Whispersync technology automatically saves your place in whatever content you
are reading. To bookmark a page, tap the Bookmark button on the reading toolbar and tap
the plus sign next to the location or page information. A black bookmark will appear in the
top right corner of the page. The Bookmark button on the toolbar changes from white to
black on bookmarked pages.
Bookmark tips:
You can view a list of all of your bookmarks within a book by tapping the Bookmark button
on the reading toolbar or by tapping the top right corner of the page.
To preview a bookmarked page or location, tap any bookmark in the list. To go to the
selected location, tap inside the preview pane. To remain on the current page and exit the
bookmark feature, tap outside of the preview pane.
Page 26

Kindle Voyage User’s Guide 3rd Edition
26
Chapter 3
Reading Kindle Documents
To delete a bookmark, tap the Bookmark button on the reading toolbar, find the bookmark
you want to delete in the list, tap the bookmark to select it, then tap the X next to it.
Bookmarks are added to a file on the Home screen called My Clippings. When Whispersync
for Books is set to Enabled, these items are stored in the Cloud for you so they won't be lost.
Footnotes, endnotes and chapter notes
To quickly preview a footnote, endnote or chapter note without losing your place in the book,
tap the note. These notes are displayed in a pop-up panel either at the bottom of the page
when the note will fit in the bottom-third of the page or full screen if the note will not fit in
the bottom-third of the page. To go to the selected location, scroll to the bottom of the
preview pane and tap the "Go to" option. To return to your original location, tap the preview
pane. Please note that not all books support this feature.
Before You Go...
The Before you go... dialog appears when you reach the end of a book or after you swipe past
the final page of a book. It enables you to rate the book using stars and purchase the next
book in a series.
X-Ray
The X-Ray feature lets you explore the "Bones of the Book" with a single tap, enabling you to
see all of the passages in a book that mention specific ideas, fictional characters, historical
figures, places, topics and terms. X-Ray also extracts notable clips and images from a book
and presents them in a stack of digital cards organised on a timeline, enabling you to skim
through the clips quickly and view all of the images in one place.
When you're reading a book, press and hold on a character’s name or a place mentioned in
the book to view the corresponding X-Ray topic, then tap the Open X-Ray link to view the
full X-Ray topic. You can also tap the top of the screen to display the secondary reading
toolbar and then tap the X-Ray button. If X-Ray is not available for a book, the button will be
disabled. X-Ray will scan your entire book and a dialog box will display. Tap the timeline to
view notable clips in other parts of the book. Additional excerpts beyond your furthest page
read are hidden until you tap to show all excerpts. Note that X-Ray is not available for all
Kindle books or in all countries. Look for X-Ray Enabled in the Kindle Store description of
the book to find out if a book has X-Ray.
Word Wise
Word Wise, available on many popular English-language titles, makes it easier for readers
learning English and kids reading their first chapter books to understand challenging books
more quickly. When Word Wise is on for an enabled title, short and simple definitions display
above difficult words automatically so you can keep reading without the need to look up
words. To learn more or see the various meanings the same word can have in a different
context, tap the word to display a card with definitions, synonyms and more. Tap Word Wise
Page 27

Kindle Voyage User’s Guide 3rd Edition
27
Chapter 3
Reading Kindle Documents
in the bottom right corner of the screen and use the slider to adjust the number of hints you
see. To turn on Word Wise, tap the Menu button and select Word Wise.
You may also see multiple choice hints for words with more than one possible meaning when
we’re not quite sure which is the right one. For those words, we show you our best guess
above the word. When you tap the hint, all possible meanings of the word display and you
can let us know which one is most helpful in the given sentence. To turn off multiple choice
hints, tap the Menu button and select Word Wise, then disable Show Multiple Choice Hints.
Vocabulary Builder
Words you look up in the dictionary are added to Vocabulary Builder automatically. To view
your word list and quiz yourself with flashcards, tap the Vocabulary Builder item on the Home
screen, or select it from the menu either on the Home screen or whilst reading a book.
To view your word list, tap Words in the top left of the screen. Tap a specific word to view its
definition and a usage example. To view your words by book, tap the Books link.
When you tap Flashcards at the bottom of the screen, Vocabulary Builder selects a set of
words from the current list and displays them as flashcards. To view a word’s definition, tap
See Definition in the top left corner of the flashcard. Tap the Learning link on the Vocabulary
Builder main screen to see how many words you are currently learning and how many you
have already mastered.
To turn Vocabulary Builder off, press and hold on the Vocabulary Builder item on the Home
screen and select Turn Off Vocabulary Builder. You can also turn it off or on by tapping the
Menu button and selecting Settings. On the Settings page, select Reading Options, Language
Learning, then Vocabulary Builder. Note that words you look up are not added to Vocabulary
Builder when it is off.
Kindle for Kids
Kindle for Kids lets you create a personalised experience for up to four children, giving you
complete control over what content each child can access. Kids earn achievements that help
them keep track of their personal reading accomplishments. Access to the Kindle Store, the
Experimental Web Browser, Goodreads and Wikipedia is automatically blocked. Children can
only read books that you have added to their library.
Setting up Kindle for Kids
Tap the Kindle for Kids item on the Home screen to get started. You will be prompted to set
a Parental Controls password if you do not already have one. To create a profile for your child,
enter your child’s first name, date of birth and gender. An introduction page will display.
Next, a list of the titles in your Kindle Library displays. Tap the checkbox next to an item’s
title to add it to your child’s Kindle for Kids library, then tap OK. To add or remove books
from your child’s reading list later, tap the profile icon next to your child’s name on the
Kindle for Kids main screen, then select Library.
Page 28

Kindle Voyage User’s Guide 3rd Edition
28
Chapter 3
Reading Kindle Documents
Set Access Achievements to On to enable your child to view earned achievements. Use the
Daily Reading Goal option to specify the number of minutes your child should read for each
day.
You can create up to four Kindle for Kids profiles. Once you have completed the profile setup
process, simply tap the Kindle for Kids item on the Home screen to access profiles. To manage
a profile later, tap the profile icon next to a child’s name. Options include Progress, Library,
Edit, Delete and Subscription. Choosing the Delete option will delete the profile permanently,
including that child's reading statistics and any achievements they may have earned.
To exit, tap the Menu button on the Home screen and select Exit Kindle for Kids. You will be
prompted to enter your Parental Controls password. To access it again or turn it back on, tap
the Menu button on the Home screen and select Kindle for Kids. To start a session for your
child, tap on your child’s name.
Using Kindle for Kids
To view your child’s progress, tap the profile icon next to their name, then select Progress.
Tap the Books link in the top left of the screen to view the percentage of each book read, total
reading time, average reading time per session and the number of words that your child
looked up in the dictionary.
Tap the Activity link in the top left corner to view the number of achievements, progress
towards the daily reading goal, pages read, hours read, books finished and the total number
of looked-up words. Use the arrows to view progress within the last week. Tap the date to
view achievements by day, month and total. Tap the Achievements link in the top left corner
to see which achievements your child has earned.
Your child will see a customised Home screen, including the books you selected and a new
Progress button on the toolbar. Tapping the Progress button displays the same Book and
Activity links that you can see, and the Achievements link if you elected to turn on the Access
Achievements option.
Managing your Amazon household
You can now set up a household with another adult in your family, enabling both of you to
jointly manage up to four Kindle for Kids child profiles. Family Library lets you share books
with each other across Amazon devices and Kindle apps. This will not impact your
annotations, most recent page read and last page read in books. Please read this section prior
to creating a household to familiarise yourself with the process and terms.
To add a second adult to your household:
1. Tap the Menu button and select Settings. On the Settings page, select Registration and
Household, then Household and Family Library.
2. Tap Add a New Person, then Add Adult. You will be prompted to pass your Kindle to the
adult you would like to add to your household.
3. The second adult must enter a unique Amazon account ID and password. If they do not
have one, they can follow the link to create one.
Page 29

Kindle Voyage User’s Guide 3rd Edition
29
Chapter 3
Reading Kindle Documents
4. The second adult will be given the opportunity to enable sharing. They can choose if they
want to share all of their purchased books or just individual books with you. By choosing to
enable sharing, they are authorising you to use credit cards associated with their Amazon
account for purchases on Amazon.
5. The second adult will be prompted to pass your Kindle back to you.
6. You will also be given the opportunity to enable sharing. You can choose if you want to
share all of your purchased books or just individual books with the second adult. By
choosing to enable sharing, you are authorising the second adult to use credit cards
associated with your Amazon account for purchases on Amazon.
To add a child to your household:
1. You will be prompted to set a Parental Controls password if you do not already have one.
2. To create a profile for your child, enter your child’s first name, date of birth and gender.
This will create a Kindle for Kids profile for your child. For more information on setting up
and managing this profile, see Kindle for Kids.
To edit attributes associated with people in your household, tap the Menu button and select
Settings. On the Settings page, select Registration and Household, then Household and
Family Library. Tap the name of the individual to:
Manage Family Library
Manage Share All Books
Select devices that show shared content
Manage payment methods
Remove that individual from the household on all devices
Note that leaving a household will result in both adults not being allowed to join or start a
household for 180 days, and the household cannot have another adult added for 180 days.
Your digital content and payment methods will no longer be shared with the other adult in
the household. You will also no longer be able to administer child accounts that are part of
the household. You can manage individual books for sharing on the Manage Your Content
and Devices page, accessible from www.amazon.com/devicesupport.
Goodreads on Kindle
Connect to the world's largest community of readers with Goodreads on Kindle, where you
can find personalised book recommendations, keep track of what you've read and want to
read, and see what your friends are reading. Tap the Goodreads button on the toolbar to
get started. You will be prompted to sign into Goodreads or create a new account if you did
not do so when setting up your Kindle.
When you create a new account, you will have the opportunity to add Facebook friends. If
you connect using your Facebook account, any Facebook friends who are also on Goodreads
will be automatically added to your Goodreads friend list. The more friends and readers you
follow, the more book recommendations you will see in your Updates.
Page 30

Kindle Voyage User’s Guide 3rd Edition
30
Chapter 3
Reading Kindle Documents
When you log in with an existing Goodreads account, your account data will sync with your
Kindle, including your Friends list and your Want to Read, Currently Reading and Read
shelves.
Keep track of what you're reading by adding books to your Goodreads shelves. When setting
up your account, you will be directed to a list of your Amazon book purchases, both digital
and physical. You can rate books you've read from one to five stars. Rating a book adds it to
your Read shelf. You can also tap the Shelf icon to shelve the book as Currently Reading or
Want to Read. Shelved and rated books are publicly visible on your Goodreads profile. You
can always remove a shelved book later by tapping the Shelf icon and selecting Remove
from Shelf.
You can also add a book to your Goodreads shelves from the Home screen of your Kindle.
Press and hold on the book's cover (or name if using list view) and select Add to Goodreads
Shelf. From the Select Goodreads Shelf pane, you can then shelve the book as Read, Currently
Reading or Want to Read.
Goodreads on Kindle has three tabs located in the top corner:
Updates: View recent updates from friends and readers you follow, including book reviews
and what they're currently reading. You can like and comment on any review. You can also
rate and shelve books in your Updates feed. Tap on a book cover to read more reviews. Tap
on a reader's name to view their Goodreads profile and more books on their shelves.
Shelves: View all books on your shelves. You can filter by shelf type (Read, Currently Reading
and Want to Read), move books to different shelves, and add Amazon books to your shelves.
Friends: View all readers in your Goodreads network. You can filter by friends, readers you
follow and readers following you. You can also select Find Readers to Follow to expand your
network. Tap on a reader's name to view their Goodreads profile and books on their shelves.
There is also a profile icon that you can tap to view your Goodreads profile, including your
shelved books, friends and recent updates.
Goodreads on Kindle tips:
Tap Want to Read when you find a book that interests you. You can also tap the Shelf icon
to mark a book as Read, Currently Reading or Want to Read.
Tap stars to rate a book from one to five stars.
Tap on a book cover to read reviews, make a 1-Click purchase for select popular titles, and
view details in the Kindle Store.
Search for your friends, approve friend requests and view personalised book
recommendations on www.goodreads.com.
You must have a Wi-Fi connection to use most Goodreads on Kindle features. Note that
Goodreads is not available in all countries.
Page 31

Kindle Voyage User’s Guide 3rd Edition
31
Chapter 3
Reading Kindle Documents
Time to Read
Your Kindle Voyage includes Time to Read, a feature that helps you know how long it will
take to finish a chapter or book. You can customise this feature to display location numbers,
time left in chapter, time left in book, percentage of content read or actual page numbers.
(Not all Kindle books include page numbers.)
As Kindle books can be read on devices with different screen sizes, locations identify specific
places in a book, just like a page number would for a print book. Location numbers allow you
to direct a friend to the exact same place in a Kindle book you are reading. Many Kindle books
also contain page numbers that correspond to the real page numbers in an actual print book.
The Time to Read feature uses a unique algorithm to estimate the amount of time it will take
you to complete the chapter or book based on your past and current reading speed. Your
specific reading speed is stored only on your Kindle; it is not stored on Amazon servers.
When reading, select Reading Progress from the menu, then choose the option you want to
display on the Reading Navigation toolbar located at the bottom of the page. Options may
include:
Location in book
Page in book
Time left in chapter
Time left in book
None
To hide Reading Progress, select the None option.
When you tap the top of the screen, the chapter name (if available) also displays on the
Reading Navigation toolbar.
Tap the caret to access the Page Flip toolbar. For more information, see Navigating a book.
On the Home screen, dots below the book title indicate how long the book is, with bold dots
showing how far you have read.
Navigating a book
There are multiple ways to navigate quickly through a book:
Kindle Page Flip
Go To button
Page 32

Kindle Voyage User’s Guide 3rd Edition
32
Chapter 3
Reading Kindle Documents
Kindle Page Flip
Kindle Page Flip lets you preview other pages in a book without leaving your current page or
losing your place. To navigate a book quickly, tap the top of the screen to display the Reading
Navigation toolbar, then tap the caret to access the Page Flip toolbar.
Press, hold and drag the circle forward or back or tap on the progress bar to preview a new
page or location in the book. Use the arrows or swipe within the preview pane to flip through
your book page by page. Navigation tips:
To skim through chapters, tap the arrows.
To return to your original location, tap the X on the preview pane.
To go to the selected location, tap the page you are previewing.
Go To button
You can also navigate through your book using the Go To button on the reading toolbar,
accessible by tapping the top of the screen. The Contents tab displays the book’s contents,
including Beginning, End, and Chapters. Use the Page or Location option to further navigate
to a specific page or location in your book. The options displayed will vary depending on the
content you're reading. Tap the Notes tab to access your notes and highlights.
Once you have used the progress bar or the Go To button to navigate through your book, you
can also navigate through your previous reading history. To access this history, swipe up from
the bottom of the screen to display the Reading Navigation toolbar. Options include:
Back to page/loc x
Forward to page/loc x
Note that this history is cleared when you exit the book.
Page 33

Kindle Voyage User’s Guide 3rd Edition
33
Chapter 4
Getting More From Your Kindle Voyage
Chapter 4
Getting More From Your Kindle
Voyage
Carrying and reading personal documents
Your Kindle makes it easy to take your personal documents with you, eliminating the need to
print them. You and your approved contacts can e-mail documents to your Kindle. To locate
your Send-to-Kindle e-mail address, tap the Menu button and select Settings. On the Settings
page, select Device Options, Personalise Your Kindle, then Send-to-Kindle E-mail. Your emailed personal documents will be backed up in your Kindle Library and ready to download
at any time when Personal Document Archiving is enabled. To learn more about this feature
and enable Personal Document Archiving, go to the Manage Your Content and Devices page
(accessible from www.amazon.com/devicesupport).
You can send Microsoft Word (DOC, DOCX), PDF, HTML, TXT, RTF, JPEG, GIF, PNG, BMP,
PRC and MOBI files to your Kindle and read them in Kindle format. You can add notes,
highlights and bookmarks, which are synchronised across devices, together with the last page
you read, via our Whispersync technology. Synchronisation of notes, highlights, bookmarks
and last page read is available only for personal documents archived in Kindle format. You
can also read documents in PDF and TXT format natively.
Reading Kindle content on other devices
You can synchronise your Kindle books with other supported devices you own and Kindle
reading applications. Amazon's Whispersync technology keeps track of the last reading
location in each book. For example, you can read a few pages using the Kindle application on
your iPhone, iPad or Android device and then pick up right where you left off when you return
to your Kindle. For a complete list of supported devices and Device Synchronisation settings,
go to www.amazon.com/devicesupport.
Sharing comments via social networks
The share feature enables you to share books, Kindle highlights and comments with friends
via social networks, including Goodreads on Kindle. To link your Kindle to your social
network accounts and enable sharing, tap the Menu button and select Settings. On the
Settings page, select Reading Options, then Social Networks.
Once you have set up the sharing feature, from within a book you can select Share from the
secondary toolbar and enter a message and share it with your social network. To share an
excerpt from a book, simply press, hold and drag your finger across the screen to select the
desired text. If you select a sentence or multiple words, a dialog box will appear with an option
to Share. If you select a single word, a definition of the word displays and options include
Search and More. Tap the More button to share the selected text.
Page 34

Kindle Voyage User’s Guide 3rd Edition
34
Chapter 4
Getting More From Your Kindle Voyage
Using your Kindle with your computer
Your Kindle uses Amazon Whispernet to deliver books, periodicals, personal documents,
Kindle Singles and blogs to your Kindle without the need for a computer.
When you first connect the Kindle to a computer's USB port, it will appear as an external
storage drive or volume on the computer's desktop. You'll see a directory or folder called
"Documents". You can add Kindle-compatible files to this directory, and you can copy, move
or delete the files that are already there. See the Kindle Support website
(www.amazon.com/devicesupport) for more information on supported file types.
Your Kindle is not usable as a reading device while in USB drive mode. To read a book whilst
charging the battery, you must eject the Kindle from your computer's desktop.
Using the Experimental Web Browser
Your Kindle includes an experimental web browser that enables you to surf the web and view
most Amazon web pages. Web Browser supports JavaScript, SSL and cookies, but does not
support media plug-ins. You must have a Wi-Fi connection to access most websites.
To launch the Web Browser, tap the Menu button, then select Experimental Browser. The
first time you access this page, you will find a list of default bookmarks for commonly used
sites. You can access these bookmarks later by selecting Bookmarks from the Web Browser
menu.
To enter a URL, tap the search field at the top of the screen. Use the onscreen keyboard to
enter the web address. A ".com" key is added to the keyboard when you are entering URLs.
The address field will retain the last URL you entered.
The following tips will help you get the most out of the Kindle Web Browser:
To zoom in on a web page or image, place two fingers close together on the center of the
screen and move them apart. To zoom out, place two fingers slightly apart on the screen
and pinch them together.
Tap links to open a web page.
Drag your finger left/right and up/down to navigate a web page.
Tap the Back button in the upper left corner to return to the previous page you were
viewing.
Scroll down a web page by dragging your finger up the screen.
To enter information in a field on a web page, select the field and the onscreen keyboard
will display.
To return to previously viewed web pages, tap the Menu button and select History.
Web Browser Menu
From within the Web Browser, tap the Menu button to view other options, including Article
Mode, Bookmarks, Bookmark this Page, History, and Browser Settings. Browser Settings
include Clear History, Clear Cookies, Disable JavaScript and Disable Images. Note that web
pages will load faster if you disable JavaScript.
Page 35

Kindle Voyage User’s Guide 3rd Edition
35
Chapter 4
Getting More From Your Kindle Voyage
When reading an article, there is also an option to switch to Article Mode which changes the
page layout and displays the article in a simple text column, eliminating surrounding images
and ads.
Bookmarks
To bookmark a web page, tap the Menu button and select Bookmark this Page. To delete a
bookmark, tap the Menu button and select Bookmarks. Tap the Remove button at the bottom
of the page, tap to select the checkbox next to the URL(s) you want to remove, then tap the
Remove button.
Downloading files
Some websites may have books or documents that you want to download and read on your
Kindle. You will be asked to confirm if you want to download these items to your Kindle
Home screen. Supported file types for downloading include Kindle content (.AZW, .AZW1,
.AZW2, and .AZW3), unprotected Mobipocket books (.MOBI, .PRC), and text files (.TXT).
Page 36

Kindle Voyage User’s Guide 3rd Edition
36
Chapter 5
Settings
Chapter 5
Settings
Customising your Kindle settings
To go to the Settings page, tap the Menu button and select Settings. Your Kindle must be
registered to view all settings. The available settings are:
Aeroplane Mode: Allows you to enable or disable wireless connectivity.
Wi-Fi Networks: Use this option to connect to a Wi-Fi network, display a list of available
networks and view the name of the Wi-Fi network you are currently connected to, if any.
Registration and Household: Enables you to manage your household and displays the
Amazon account name to which your Kindle is registered. Use this option to register and
deregister your Kindle.
Household and Family Library: Add individuals to your household to share content. For
more information, see Managing your Amazon household. This feature is not available in all
countries.
Register/Deregister Device: Use this option to register and deregister your device.
Device Options: Lets you set a passcode, enable Parental Controls, personalise your Kindle
and select languages and dictionaries.
Device Passcode: Enables you to restrict access to your Kindle by setting a passcode. You'll
subsequently be prompted to enter the passcode whenever you turn on the device or wake
it from sleep. If you can't remember your passcode, you will have to contact Kindle
Customer Service.
Parental Controls: Choose between Kindle for Kids and Restrictions. Use Kindle for Kids
to create personalised profiles for your child, select books from your library to share and set
daily reading goals while automatically blocking access to places you may not want your
child to go, such as the Kindle Store, Goodreads on Kindle or the Experimental Web
Browser. Use Restrictions to manually block the Experimental Web Browser, Kindle Store,
Amazon Cloud and/or Goodreads on Kindle. When you set up Kindle for Kids or turn on a
restriction for the first time, you will be prompted to create a password. Note that this
password will be required to make changes to settings within Parental Controls. To change
the password, select Change Password from the Parental Controls screen. If you forget your
password, reset it by visiting www.amazon.com/devicesupport and deregistering your
device or by contacting Kindle Customer Service. When restrictions are enabled or a Kindle
for Kids profile is active, you will see a lock icon at the top of the screen next to the WiFi/3G status indicator, and the Deregistration and Reset Device options will be disabled.
Screen Light: Lets you manage the Nightlight setting.
Nightlight: Enable this setting to gradually reduce the screen brightness over time as your
eyes adjust while reading or using your Kindle in the dark. To use this feature, Auto
Page 37

Kindle Voyage User’s Guide 3rd Edition
37
Chapter 5
Settings
Brightness must also be turned on. Tap the screen light button on the toolbar to access the
Auto Brightness setting.
Personalise your Kindle: Lets you manage your device name, add personal and contact
information, set the device time, manage recommended content, change the Next in Series
option, manage Whispersync for Books and view your Send-to-Kindle e-mail address.
Device Name: Allows you to change the name displayed at the top of the Home screen.
Personal Info: Use this field to add personal or contact information, such as an address or
phone number, to help identify your Kindle in the event of its being lost.
Device Time: Lets you set the current local time to be displayed on your Kindle. The time
displays at the top of the screen. On Kindle models that include 3G, you can have your
Kindle keep the current time updated by choosing Set Automatically. To view the time from
within a book, tap the top of the screen.
Advanced Options: Lets you manage cover view recommendations, next in series options,
Whispersync for Books and Special Offers.
Cover View Recommendations: When in cover view, this option allows you to display or
hide recommended content from the Kindle Store on your Home screen.
Next in Series: Select to display an option to buy the next title in the series when nearing
the end of a book.
Whispersync for Books: Enable and disable the automatic backup of your annotations,
most recent page read, last page read and collections to Amazon’s servers.
Special Offers: Manage how Special Offers appear on your Kindle
Send-to-Kindle E-mail: Indicates the address to which documents should be e-mailed so
that they can be sent to your Kindle. Document formats supported by the conversion
service will be converted to Kindle format. (Charges may apply.) To learn more about this
feature, go to www.amazon.com/devicesupport.
Language and Dictionaries: Lets you select a language for your Kindle, add keyboards for
different languages, and select default dictionaries.
Language: Displays the current language for menus, alerts and dialog boxes, and lets you
change to a different language.
Keyboards: Enables you to add keyboards for different languages. If you have multiple
keyboards, a Globe key is added to your keyboard. Simply tap to select a different
keyboard.
Dictionaries: Use to set the default dictionary for each language.
Reading Options: Lets you manage Word Wise, Vocabulary Builder, page refresh, social
networks, annotations, public notes and popular highlights.
Language Learning: Enable Word Wise word hints in books and Vocabulary Builder.
Word Wise: Display hints above challenging words in many popular English-language
titles. To turn off multiple hints for a word, disable the Show Multiple-Choice Hints option.
Vocabulary Builder: Allows you to toggle Vocabulary Builder on and off. Selecting Off will
remove Vocabulary Builder from the Home screen. Note that words you look up are not
added to Vocabulary Builder when it is off.
Page Refresh: Configure your Kindle to refresh the display every time you turn the page.
Page 38

Kindle Voyage User’s Guide 3rd Edition
38
Chapter 5
Settings
PagePress: Enable the page turn controls on either side of the screen, and manage
feedback provided and pressure sensitivity.
Feedback Settings: Select the level of feedback provided when a page turns or set feedback
to off. Test the selected setting using the lines and dots located on either side of the screen.
If your Kindle is in a cover, we recommend the High setting.
Pressure Settings: Select the amount of pressure required to turn a page. To test each
setting, use the lines and dots located on either side of the screen. Select Low if you want to
apply the least amount of pressure.
Social Networks: Allows you to link your Kindle to your social network accounts so you
can share highlights with your friends.
Notes & About This Book: Select to manage public notes, popular highlights and About
This Book.
Popular Highlights: Toggle on and off the display of passages that are most frequently
highlighted by others.
Public Notes: Toggle on and off the display of notes and highlights made by people you
follow on https://kindle.amazon.com.
About This Book: Toggle on or off the display of information about the book when you
open it.
The Settings contextual menu
When you're on the Settings page, tapping the Menu button displays additional options:
Shop in Kindle Store: Takes you to the Kindle Store.
Update Your Kindle: Installs the latest software for your Kindle. This option is disabled if
there aren't currently any software updates available on your Kindle.
Restart: Restarts your Kindle. You will not lose the books, clippings or other files stored on
your Kindle. In the event your Kindle freezes, press and hold the Power button for 7 seconds
until the Power dialog displays and then select Restart. If the Power dialog does not display,
press and hold for 40 seconds or until the LED light stops blinking.
Reset Device: Resets your Kindle to its original settings and restarts it. You should select this
action only if instructed to do so by Kindle Customer Service. Before you reset your Kindle to
default settings, you must back up any personal documents that you'd like to keep. Once your
Kindle restarts, you will need to register and download your items from the Cloud. If you
want to passcode-protect your Kindle, you must also set up a passcode again.
Device Info: Displays your device's Wi-Fi MAC address, serial number, network capability,
firmware version and free space available.
Legal: Provides trademark, copyright, and notices about the software installed on your
Kindle.
Sync and Check for Items: Tap to sync your Kindle with your online content.
Page 39

Kindle Voyage User’s Guide 3rd Edition
39
Chapter 6
Finding Additional Assistance
Chapter 6
Finding Additional Assistance
The Kindle Customer Service website at www.amazon.com/devicesupport has helpful
information, including frequently asked questions and how-to videos.
Page 40

Kindle Voyage User’s Guide 3rd Edition
40
Appendix A
Product Information
Appendix A
Product Information
Safety and Compliance Information
Use Responsibly. Read all instructions and safety information before use.
FAILURE TO FOLLOW THESE SAFETY INSTRUCTIONS COULD RESULT IN FIRE,
ELECTRIC SHOCK, OR OTHER INJURY OR DAMAGE.
Maintaining Your Kindle Device
Do not use your Kindle device or its accessories in rain or near sinks or other wet locations.
Take care not to spill any food or liquid on your Kindle. If your device does get wet, unplug
all cables, turn off the wireless connection (tap the Menu button, select Settings and enable
Aeroplane Mode) and let the screen revert to the screensaver. Wait for the device to dry
completely before pressing the power button to wake it again. Do not attempt to dry your
Kindle with an external heat source, such as a microwave oven or hairdryer. Clean the screen
with a soft cloth; be careful not to wipe it with anything abrasive. When carrying your Kindle
in a bag or briefcase, keep a cover on it to avoid any scratches.
Do not expose your Kindle to extreme heat or cold. For example, do not leave it in the boot
of your car in sub-zero or high-heat conditions.
The use of third-party accessories may affect your Kindle's performance. In limited
circumstances, the use of third-party accessories may void your Kindle's limited warranty.
Read all safety instructions for any accessories before using them with your Kindle.
Device Service
If your device needs service, please contact Amazon Customer Support. Contact details can
be found at www.amazon.com/devicesupport.
Improper service may void the warranty.
Battery Safety
The rechargeable battery in your Kindle should not be repaired or replaced except by qualified
personnel. For more information about batteries, go to www.amazon.com/devicesupport.
Your Kindle should only be charged using the USB cable included with the device, or another
Page 41

Kindle Voyage User’s Guide 3rd Edition
41
Appendix A
Product Information
USB cable approved for use with your Kindle, with a compatible USB charger or USB port that
meets the following requirements: USB-IF Battery Charging Spec, Rev 1.2.
Other Safety Considerations
Engaging in repetitive motions such as pressing keys or playing some games may cause you
to experience occasional discomfort in your hands, arms, shoulders, neck, or other parts of
your body. Stop using your device and consult a doctor if you experience headaches,
blackouts, seizures, convulsion, eye or muscle twitching, loss of awareness, involuntary
movement, disorientation, or other discomfort. To reduce the risk of these symptoms, avoid
prolonged use, hold your device some distance from your eyes, use your device in a well-lit
room, and take frequent breaks.
Small parts contained in your device and its accessories may pose a choking hazard to small
children.
Using your Kindle while operating a vehicle is not recommended and may be prohibited or
restricted in some areas. If you are in an area where using your Kindle while operating a
vehicle is allowed, always give full attention to the operation of the vehicle and stop using
your Kindle if it becomes a distraction.
Personal medical devices, such as pacemakers, may be sensitive to magnetic and
electromagnetic fields. Since Kindle and certain Kindle accessories contain magnets and
emit electromagnetic fields, they should be kept at least 6 inches (approximately 15 cm)
from any personal medical device. If any interference is observed, consult with your doctor
before resuming use. Items with magnetically-stored data, such as credit cards and hard
drives, may also be sensitive to magnetic or electromagnetic fields, and should not be
placed near these Kindle products.
Wireless Safety and Compliance
Turn off your wireless connection in areas where wireless use is forbidden or when it may
cause interference or danger. Some specific situations are described below. In general, you
should not use your Kindle with your wireless connection turned on anywhere where you are
not allowed to use a mobile device.
Turn Off Wireless When Flying
To prevent possible interference with aircraft systems, the U.S. Federal Aviation
Administration regulations and many other aviation agencies require you to have permission
from a crew member to use your device's wireless service.
Using Your Kindle Around Other Electronic Devices
Kindle generates, uses, and can radiate radio frequency (RF) energy and, if not used in
accordance with its instructions, may cause harmful interference to radio communications
and electronic equipment. External RF signals may affect improperly installed or inadequately
shielded electronic operating systems, entertainment systems, and personal medical devices.
Page 42

Kindle Voyage User’s Guide 3rd Edition
42
Appendix A
Product Information
While most modern electronic equipment is shielded from external RF signals, if in doubt,
check with the manufacturer. For personal medical devices (such as pacemakers and hearing
aids), consult your doctor or the manufacturer to determine whether they are adequately
shielded from external RF signals.
Steps to Minimise Interference
If your Kindle does cause interference to radio or television reception (which you can
determine by turning your Kindle off and on), you can try to correct the interference by one
or more of the following measures: reorient or relocate the receiving antenna for the radio or
television; increase the separation between the radio or television and your Kindle; connect
equipment and receivers to different outlets; or consult the radio or television manufacturer
or an experienced radio/TV technician for help.
Look Out For Signs
There are some places where RF signals could constitute a hazard, such as health-care
facilities and construction sites. If you are not sure, look around for signs indicating that twoway radios or mobile phones should be turned off.
In addition, turn off and do not charge your device if you are in any area with a potentially
explosive atmosphere, as sparks in such areas could cause an explosion or fire. Such areas are
usually, but not always, clearly identified, and include areas where you would normally be
advised to turn off your vehicle engine.
FCC Compliance Statement
This device and its related accessories like the adaptor (the "Products") comply with part 15
of the FCC Rules. Operation of each Product is subject to the following two conditions: (1)
each Product may not cause harmful interference, and (2) each Product must accept any
interference received, including interference that may cause undesired operation.
Note: The Products have been tested and found to comply with the limits for a Class B digital
device or external switching power supply, pursuant to part 15 of the FCC Rules. These limits
are designed to provide reasonable protection against harmful interference in a residential
installation. The Products generate, use and can radiate radio frequency energy and, if not
installed and used in accordance with the instructions, may cause harmful interference to
radio communications. However, there is no guarantee that interference will not occur in a
particular installation. If a Product does cause harmful interference to radio or television
reception, which can be determined by turning the Product off and on, the user is encouraged
to try to correct the interference by one or more of the following measures:
Reorient or relocate the receiving antenna.
Increase the separation between the equipment and receiver.
Connect the equipment to an outlet on a circuit different from that to which the receiver is
connected.
Consult the dealer or an experienced radio/TV technician for help.
Page 43

Kindle Voyage User’s Guide 3rd Edition
43
Appendix A
Product Information
Changes or modifications not expressly approved by the party responsible for compliance
could void the user's authority to operate the Product.
The device meets the FCC Radio Frequency Emission Guidelines and is certified with the FCC
as the FCC ID number found on the back of the device.
Information Regarding Exposure to Radio Frequency Energy
Your Device is designed and manufactured not to exceed the emission limits for exposure to
RF energy set by the Federal Communications Commission of the United States (FCC).
Information on your Device is on file with the FCC and can be found by inputting your
Device’s FCC ID (which can be found on the back of your Device) into the FCC ID Search
form available at transition.fcc.gov/oet/ea/fccid.
Canadian Compliance Statement
This device complies with the Canadian ICES-003 Class B specifications. CAN ICES3(B)/NMB-3(B)
This device complies with RSS210 of Industry Canada. This Class B device meets all the
requirements of the Canadian interference-causing equipment regulations.
This device complies with Industry Canada license exempt RSS standard(s). Operation is
subject to the following two conditions:
1. this device may not cause interference, and
2. this device must accept any interference, including interference that may cause undesired
operation of the device.
This device is compliant with general population/uncontrolled RF exposure limits pursuant
to IC RSS-102.
IEEE 1725 Battery Safety Statement
Do not disassemble or open, crush, bend or deform, puncture or shred.
Do not modify or remanufacture, attempt to insert foreign objects into the battery, immerse
or expose to water or other liquids, expose to fire, explosion or other hazard.
Only use the battery with a charging system that has been qualified with the system as per
CTIA Certification Requirements for Battery System Compliance to IEEE 1725. Use of an
unqualified battery or charger may present a risk of fire, explosion, leakage or other hazard.
Promptly dispose of used batteries in accordance with local regulations.
Avoid dropping the device or battery. If the device or battery is dropped, especially on a
hard surface, and the user suspects damage, do not attempt repair. Contact Amazon
Customer Service for assistance.
The host device shall only be connected to CTIA-certified adapters, products that bear the
USB-IF logo or products that have completed the USB-IF compliance programme.
Page 44

Kindle Voyage User’s Guide 3rd Edition
44
Appendix A
Product Information
EU Conformity
Hereby, Amazon Fulfillment Services, Inc., declares that this device is in compliance with the
essential requirements and other relevant provisions of RTTE Directive 1999/5/EC. A copy of
the EU Declaration of Conformity is available at:
www.amazon.com/kindle_eu_compliance
Applicable CE Marking:
CE SAR Compliance
This device meets the EU requirements (1999/519/EC) on the limitation of exposure of the
general public to electromagnetic fields by way of health protection.
The limits are part of extensive recommendations for the protection of the general public.
These recommendations have been developed and checked by independent scientific
organisations through regular and thorough evaluations of scientific studies. The unit of
measurement for the European Council's recommended limit for mobile devices is the
"Specific Absorption Rate" (SAR), and the SAR limit is 2.0 W/ kg averaged over 10 grams of
tissue. It meets the requirements of the International Commission on Non-Ionizing Radiation
Protection (ICNIRP).
Recycling Kindle Properly
In some areas, the disposal of certain electronic devices is regulated. Make sure you
dispose of or recycle your Kindle in accordance with your local laws and regulations. For
information about recycling your Kindle, go to www.amazon.com/devicesupport.
Product Specifications
Display — 6" diagonal display, 1448 x 1072 pixels, 300 dpi resolution, 16-level grey scale.
Size — Kindle Voyage Wi-Fi: 6.4 inches by 4.5 inches by 0.30 inches (162 mm by 115 mm by
7.6 mm);
Kindle Voyage 3G+Wi-Fi: 6.4 inches by 4.5 inches by 0.30 inches (162 mm by 115 mm by 7.6
mm).
Weight — Kindle Voyage Wi-Fi: 6.3 ounces (180 g);
Kindle Voyage 3G+Wi-Fi: 6.6 ounces (188 g).
Actual size and weight may vary by configuration and manufacturing process.
Page 45

Kindle Voyage User’s Guide 3rd Edition
45
Appendix A
Product Information
Storage — 4 GB internal storage, with approximately 3 GB available to the user.
Power — AC power adaptor (sold separately) and rechargeable lithium polymer battery.
Connectivity — USB 2.0 (micro-B connector). 802.11b/g/n wireless modem in Kindle.
Operating temperature — 0 °C to 35 °C (32 °F to 95 °F).
Storage temperature — -10 °C to 45 °C (14 °F to 113 °F).
Wi-Fi — 802.11b/g/n.
LEGAL TERMS
Please read the applicable Licence Agreement and Terms of Use found at:
www.amazon.com/devicesupport
ONE-YEAR LIMITED WARRANTY
This Warranty for the Kindle Device (the "Device") is provided by the entity set forth in the
table below. The provider of this warranty is sometimes referred to herein as "we".
We warrant the Device against defects in materials and workmanship under ordinary
consumer use for one year from the date of original retail purchase. During this warranty
period, if a defect arises in the Device, and you follow the instructions for returning the
Device, we will, at our option, to the extent permitted by law, either (i) repair the Device
using either new or refurbished parts, (ii) replace the Device with a new or refurbished Device
that is equivalent to the Device to be replaced or (iii) refund to you all or part of the purchase
price of the Device. This limited warranty applies, to the extent permitted by law, to any
repair, replacement part or replacement device for the remainder of the original warranty
period or for ninety days, whichever period is longer. All replaced parts and Devices for which
a refund is given shall become our property. This limited warranty applies only to hardware
components of the Device that are not subject to accident, misuse, neglect, fire or other
external causes, alterations, repair or commercial use.
Instructions. For specific instructions about how to obtain warranty service for your Device,
please contact Customer Service using the contact information provided below. In general,
you will need to deliver your Device in either its original packaging or in equally protective
packaging to the address specified by Customer Service. Before you deliver your Device for
warranty service, it is your responsibility to back up any data, software, or other materials you
may have stored or preserved on your Device. It is possible that such data, software or other
materials will be lost or reformatted during service, and we will not be responsible for any
such damage or loss.
Limitations. TO THE EXTENT PERMITTED BY LAW, THE WARRANTY AND REMEDIES
SET FORTH ABOVE ARE EXCLUSIVE AND IN LIEU OF ALL OTHER WARRANTIES AND
REMEDIES, AND WE SPECIFICALLY DISCLAIM ALL STATUTORY OR IMPLIED
Page 46

Kindle Voyage User’s Guide 3rd Edition
46
Appendix A
Product Information
If you purchased your Device:
This Warranty is provided by:
From Amazon.co.uk, Amazon.de,
Amazon.fr, Amazon.it, Amazon.es or from
authorised resellers located in Europe
Amazon EU S.à r.l., 5 rue Plaetis, L-2338,
Luxembourg
From Amazon.ca
Amazon.com.ca, Inc., 410 Terry Ave. North,
Seattle, WA 98109-5210, United States
From Amazon.in or authorised resellers
located in India
Amazon Seller Services Private Limited,
8th Floor, Brigade Gateway, 26/1 Dr.
Rajkumar Road, Bangalore, Karnataka560055, India
WARRANTIES, INCLUDING, BUT NOT LIMITED TO, WARRANTIES OF
MERCHANTABILITY, FITNESS FOR A PARTICULAR PURPOSE AND AGAINST HIDDEN
OR LATENT DEFECTS. IF WE CANNOT LAWFULLY DISCLAIM STATUTORY OR IMPLIED
WARRANTIES, THEN TO THE EXTENT PERMITTED BY LAW, ALL SUCH WARRANTIES
SHALL BE LIMITED IN DURATION TO THE DURATION OF THIS EXPRESS LIMITED
WARRANTY AND TO REPAIR OR REPLACEMENT SERVICE.
SOME JURISDICTIONS DO NOT ALLOW LIMITATIONS ON HOW LONG A STATUTORY
OR IMPLIED WARRANTY LASTS, SO THE ABOVE LIMITATION MAY NOT APPLY TO
YOU. WE ARE NOT RESPONSIBLE FOR DIRECT, SPECIAL, INCIDENTAL OR
CONSEQUENTIAL DAMAGES RESULTING FROM ANY BREACH OF WARRANTY OR
UNDER ANY OTHER LEGAL THEORY. IN SOME JURISDICTIONS THE FOREGOING
LIMITATION DOES NOT APPLY TO DEATH OR PERSONAL INJURY CLAIMS, OR ANY
STATUTORY LIABILITY FOR INTENTIONAL AND GROSS NEGLIGENT ACTS AND/OR
OMISSIONS, SO THE ABOVE EXCLUSION OR LIMITATION MAY NOT APPLY TO YOU.
SOME JURISDICTIONS DO NOT ALLOW THE EXCLUSION OR LIMITATION OF DIRECT,
INCIDENTAL OR CONSEQUENTIAL DAMAGES, SO THE ABOVE EXCLUSION OR
LIMITATION MAY NOT APPLY TO YOU. THIS “LIMITATIONS” SECTION DOES NOT
APPLY TO CUSTOMERS IN THE EUROPEAN UNION.
This limited warranty gives you specific rights. You may have additional rights under
applicable law, and this limited warranty does not affect such rights.
FOR AUSTRALIAN CONSUMERS: Our goods come with guarantees that cannot be excluded
under the Australian Consumer Law. You are entitled to a replacement or refund for a major
failure and for compensation for any other reasonably foreseeable loss or damage. You are
also entitled to have the goods repaired or replaced if the goods fail to be of acceptable quality
and the failure does not amount to a major failure. Goods presented for repair may be
replaced by refurbished goods of the same type rather than being repaired. Refurbished parts
may be used to repair the goods.
Warranty Provider
Page 47

Kindle Voyage User’s Guide 3rd Edition
47
Appendix A
Product Information
From Amazon.co.jp or from authorised
resellers located in Japan
Amazon.com Int’l Sales, Inc., 410 Terry
Ave. North, Seattle, WA 98109-5210, United
States
From Amazon.cn or from authorised
resellers located in the People’s Republic of
China
Amazon Joyo Co. Ltd., 26F, Bldg A, Ocean
International Center, No. 56 East 4th Ring
Road, Chaoyang District, Beijing, China
From Amazon.com.br
Amazon Serviços de Varejo do Brasil Ltda.,
Av. Presidente Juscelino Kubitschek, 2041 Torre E - 18º andar, São Paulo - SP, 04543000, Brazil
From any other Amazon website or from
authorised resellers located in other
countries
Amazon Fulfillment Services, Inc., 410
Terry Ave. North, Seattle, WA 98109-5210,
United States
Updates to this table may be posted on www.amazon.com/devicesupport.
Additional Information
You can find the Kindle Terms of Use, Kindle Store Terms of Use, One-Year Limited
Warranty, customer service contact information and other applicable terms, limited warranty
and Kindle information at http://www.amazon.com/devicesupport.
Patent Notices
The Kindle device and/or methods used in association with the Kindle device may be covered
by one or more patents or patents pending.
Copyright, Trademark and Other Notices
Amazon, Kindle, Kindle Singles, Kindle for Kids, Goodreads, Sponsored Screensavers, X-Ray,
Mobipocket, Whispernet, Whispersync, Person Under Tree logo and 1-Click are trademarks
of Amazon.com, Inc. or its affiliates.
Amazon, 1-Click, Kindle, Kindle Singles, Kindle Voyage, Kindle for Kids, Goodreads,
Sponsored Screensavers, X-Ray, Mobipocket, Whispernet, Whispersync, and Person Under
Tree logo are trademarks of Amazon.com, Inc. or its affiliates.
Java and all Java-based trademarks and logos are trademarks or registered trademarks of Sun
Microsystems, Inc. in the U.S. and other countries.
XT9® Smart Input © 2008 Nuance Communications, Inc. XT9® and Nuance® are trademarks
or registered trademarks of Nuance Communications, Inc. and/or its licensors and are used
under licence.
Page 48

Kindle Voyage User’s Guide 3rd Edition
48
Appendix A
Product Information
Contains iType™ from Monotype Imaging Inc. “Monotype” is a trademark of Monotype
Imaging Inc. registered in the U.S. Patent & Trademark Office and may be registered in
certain jurisdictions. Monotype® The Monotype Corporation.
All other brands, product names, company names, trademarks and service marks are the
properties of their respective owners.
JM20150611-B
 Loading...