

Page 1

Installing
Am
nd
A
Installer’s Guide Edition 7/01
@Work.Place
A
Version 3.xx
Page 2

ii Installing Amanda@Work.Place
Copyright and Trademark Notices
Copyright 1992–2 001 The Aman da Co mpan y. All Rights Reserved. This guide and the
software described herein are copyrighted with all rights reserved. No part of this
publication may be reproduced, transmitted, stored in a retrieval system, or translated into
any language in any form by any means without the prior written permission of The
Amanda Company.
Amanda and Amanda@ are registered trademarks and sales trademarks of The Amanda
Company . Other b rand names and product n ames mentioned in th is manual are trademarks
or registered trademarks of their respective owners.
Limited Warranty on Software
The Amanda Company warrants the media on which the software is recorded to be free
from defects in materials and faulty workmanship for a period of 90 days from the date the
software is delivered. If a defect in the media should occur during this period, you may
return the media to The Amanda Company and The Amanda Company will replace the
media without charge.
THE AMANDA COMPANY MAKES NO WARR ANTIES (OTHER THAN THOSE
SET FORTH ABOVE) TO ANY PERSON OR ENTITY WITH RESPECT TO THE
PRODUCT OR ANY DERIVATIVES THEREOF OR ANY SERVICES OR LICENSES
AND DISCLAIMS ALL IMPLIED WARRANTIES, INCLUDING WITHOUT
LIMITATION WARRANTIES OF MERC HANTABILITY, PERFORMANCE,
NONINFRINGEMENT, AND FITNESS FOR A PARTICULAR PURPOSE. THE
AMANDA COMPANY WILL NOT BE LIABLE FOR ANY BUG, ERROR,
OMISSION, DEFECT, DEFICIENCY, OR NONCONFORMITY IN ANY SOFTWARE.
THE SOFTWARE IS LICENSED “AS IS,” AND THE PURCHASER ASSUMES THE
ENTIRE RISK AS TO ITS QUALITY AND PERFORMANCE.
IN NO EVENT AND NOTWITHST ANDING ANY DOCUMENT , REPRESENTA T ION,
OR OTHERWISE, SHALL THE AMANDA COMPANY BE LIABLE TO YOU FOR
DIRECT, INDIRECT, SPECIAL, INCIDENTAL, CONTINGENT, OR
CONSEQUENTIAL DAMAGES, INCLUDING DAMAGES FROM LOSS OR
CORRUPTION OF DATA, INTERRUPTED USE, LOST PROFITS, COST OF
PROCURING SUBSTITUTE GOODS, TECHNOLOGY OR SERVICES, EVEN IF THE
AMANDA COMP ANY OR AN AUTHORIZED AMANDA COMPANY DEALER HAS
BEEN ADVISED OF THE POSSIBILITY OF SUCH DAMAGES. YOU AGREE THAT
THE AMANDA COMPANY’S LIABILITY ARISING OUT OF CONTRACT,
NEGLIGENCE, STRICT LIABILITY, WARRANTY, OR OTHER LEGAL OR
EQUIT ABLE T HEORY SHALL NOT EXCEED ANY AMOUNTS PAID BY YOU FOR
THIS PRODUCT. Any written or oral information or advice given by Amanda Company
dealers, distributors, agents, or employees will in no way increase the scope of this
warranty, nor may you rely on such oral or written communication. Some states do not
allow the exclusion or limitation of implied warranties or liability for incidental or
consequential damages, so the above limitation or exclusion may not apply to you. This
warranty gives you specific legal rights, and you may also have other rights which vary
from state to state. This Agreement shall be govern ed by the laws of the State of California
without regard to the conflicts of laws or provisions thereof.
Page 3

Fraudulent Usage Advisory
Although the Amanda software is designed to resist fraudulent usage, including
unauthorized access to a long distance network, no product, including the Amanda
software, is able to prevent such unauthorized usage. The Amanda software is likewise
unable to prevent such uses as may constitute an invasion of privacy or other tort. THE
AMANDA COMP ANY MAKES NO EXPRESS OR IMPLIED W ARRANTY AGAINST
UNLAWFUL OR UNAUTHORIZED USE OF YOUR AMANDA SYSTEM OR ITS
CAPABILITIES AND HEREBY DISCLAIMS ALL LIABILITY ARISING FROM
SUCH USE. YOU AGREE TO INDEMNIFY, DEFEND, AND HOLD THE AMANDA
COMPANY HARMLESS FOR ANY UNAUTHORIZED OR FRAUDULENT USE OF
YOUR LICENSED AMANDA SOFTWARE.
THE AMANDA COMP ANY
13765 ALTON PARKWAY, UNIT F
IRVINE, CA 92618
TELEPHONE (949) 859–6279 FAX (949) 859–4380
Conventions
iii
This manual uses the following terminology and conventions:
Amanda
caller
user
fixed-space type
The name by which this manual refers to
the Amanda@Work.Place system to
make reading about the system easier.
Because of the name Amanda, the system is also referred to as “she.”
Someone who calls into Amanda. A caller often obtains information, leaves a
message for someone, and/or provides
information. Because Amanda is referred to as “she,” callers and users are
referred to as “he.”
Someone with an extension that Amanda
transfers calls to and/or stores messages
for. A user can access Amanda to play,
delete, and send messages as well as set
personal options su ch as Do Not Distu rb.
This guide displ ays information that you
must type and messages from Amanda in
fixed-space type.
Page 4

iv Installing Amanda@Work.Place
Page 5

Contents
Copyright and Trademark Notices. . . . . . . . . . . . . . . . . . . . . . . . . . . . . . . . . . . . . . . .ii
Limited Warranty on Software. . . . . . . . . . . . . . . . . . . . . . . . . . . . . . . . . . . . . . . . . . .ii
Fraudulent Usage Advisory . . . . . . . . . . . . . . . . . . . . . . . . . . . . . . . . . . . . . . . . . . . . iii
Conventions . . . . . . . . . . . . . . . . . . . . . . . . . . . . . . . . . . . . . . . . . . . . . . . . . . . . . . . . iii
Chapter 1:
Introducing Amanda. . . . . . . . . . . . . . . . . . . . . . . . . . . . . . . . . . . . . . . . . . . . . . . . . . . . .1
Specification. . . . . . . . . . . . . . . . . . . . . . . . . . . . . . . . . . . . . . . . . . . . . . . . . . . . . . . . . 1
Environmental Requirements . . . . . . . . . . . . . . . . . . . . . . . . . . . . . . . . . . . . . . . .1
Electrical Requirements . . . . . . . . . . . . . . . . . . . . . . . . . . . . . . . . . . . . . . . . . . . .1
Amanda@Work.Place Features . . . . . . . . . . . . . . . . . . . . . . . . . . . . . . . . . . . . . .2
General Uses . . . . . . . . . . . . . . . . . . . . . . . . . . . . . . . . . . . . . . . . . . . . . . . . . . . . . . . . 2
Purpose of This Guide . . . . . . . . . . . . . . . . . . . . . . . . . . . . . . . . . . . . . . . . . . . . . . . . . 3
Customer Service and Support. . . . . . . . . . . . . . . . . . . . . . . . . . . . . . . . . . . . . . . . . . .3
End User Support . . . . . . . . . . . . . . . . . . . . . . . . . . . . . . . . . . . . . . . . . . . . . . . . .4
System Administration Support . . . . . . . . . . . . . . . . . . . . . . . . . . . . . . . . . . . . . . 4
Installation Support. . . . . . . . . . . . . . . . . . . . . . . . . . . . . . . . . . . . . . . . . . . . . . . .4
Application Support . . . . . . . . . . . . . . . . . . . . . . . . . . . . . . . . . . . . . . . . . . . . . . .4
Chapter 2:
Installing Your Amanda System . . . . . . . . . . . . . . . . . . . . . . . . . . . . . . . . . . . . . . . . . . .5
Installation Checklist . . . . . . . . . . . . . . . . . . . . . . . . . . . . . . . . . . . . . . . . . . . . . . . . . . 5
Connecting the Ports . . . . . . . . . . . . . . . . . . . . . . . . . . . . . . . . . . . . . . . . . . . . . . . . . .5
Attaching a Monitor or a Remote Computer . . . . . . . . . . . . . . . . . . . . . . . . . . . . . . . . 6
Connecting the Monitor and Keyboard. . . . . . . . . . . . . . . . . . . . . . . . . . . . . . . . .6
Connecting a Remote Computer. . . . . . . . . . . . . . . . . . . . . . . . . . . . . . . . . . . . . .7
Using a UPS. . . . . . . . . . . . . . . . . . . . . . . . . . . . . . . . . . . . . . . . . . . . . . . . . . . . . . . . .7
Chapter 3:
Running the Setup Utility. . . . . . . . . . . . . . . . . . . . . . . . . . . . . . . . . . . . . . . . . . . . . . . . .9
Running Setup . . . . . . . . . . . . . . . . . . . . . . . . . . . . . . . . . . . . . . . . . . . . . . . . . . . . . . .9
Chapter 4:
Defining Dial Codes. . . . . . . . . . . . . . . . . . . . . . . . . . . . . . . . . . . . . . . . . . . . . . . . . . . . .11
Defining Dial Codes. . . . . . . . . . . . . . . . . . . . . . . . . . . . . . . . . . . . . . . . . . . . . . . . . . 11
Chapter 5:
Defining Tone Patterns. . . . . . . . . . . . . . . . . . . . . . . . . . . . . . . . . . . . . . . . . . . . . . . . . .17
Using GetTones . . . . . . . . . . . . . . . . . . . . . . . . . . . . . . . . . . . . . . . . . . . . . . . . . . . . . 17
Using AccuCall Plus . . . . . . . . . . . . . . . . . . . . . . . . . . . . . . . . . . . . . . . . . . . . . . . . .18
Chapter 6:
Defining Integration Patterns . . . . . . . . . . . . . . . . . . . . . . . . . . . . . . . . . . . . . . . . . . . .25
Using the Trace File for Integration. . . . . . . . . . . . . . . . . . . . . . . . . . . . . . . . . . . . . .25
Setting Up the Trace File . . . . . . . . . . . . . . . . . . . . . . . . . . . . . . . . . . . . . . . . . . . . . .25
Creating Test Patterns . . . . . . . . . . . . . . . . . . . . . . . . . . . . . . . . . . . . . . . . . . . . . . . .27
Page 6

vi Installing Amanda@Work.Place
Running the Tests. . . . . . . . . . . . . . . . . . . . . . . . . . . . . . . . . . . . . . . . . . . . . . . . . . . .27
Reading the Trace File . . . . . . . . . . . . . . . . . . . . . . . . . . . . . . . . . . . . . . . . . . . . . . . .28
Adding Integration Strings. . . . . . . . . . . . . . . . . . . . . . . . . . . . . . . . . . . . . . . . . . . . .30
Using Character Codes. . . . . . . . . . . . . . . . . . . . . . . . . . . . . . . . . . . . . . . . . . . . . . . .32
Running Integration Helper . . . . . . . . . . . . . . . . . . . . . . . . . . . . . . . . . . . . . . . . . . . . 34
Placing Test Calls . . . . . . . . . . . . . . . . . . . . . . . . . . . . . . . . . . . . . . . . . . . . . . . .35
Forward from Ring No Answer Example. . . . . . . . . . . . . . . . . . . . . . . . . . . . . .36
Direct Call Example . . . . . . . . . . . . . . . . . . . . . . . . . . . . . . . . . . . . . . . . . . . . . .36
Forward from Busy Example . . . . . . . . . . . . . . . . . . . . . . . . . . . . . . . . . . . . . . .36
Chapter 7:
Configuring Amanda. . . . . . . . . . . . . . . . . . . . . . . . . . . . . . . . . . . . . . . . . . . . . . . . . . . .37
Using This Chapter. . . . . . . . . . . . . . . . . . . . . . . . . . . . . . . . . . . . . . . . . . . . . . . . . . .37
Using the Questionnaire. . . . . . . . . . . . . . . . . . . . . . . . . . . . . . . . . . . . . . . . . . . . . . . 37
Configuring a New Installation . . . . . . . . . . . . . . . . . . . . . . . . . . . . . . . . . . . . . . . . .45
Selecting a Type of Notification. . . . . . . . . . . . . . . . . . . . . . . . . . . . . . . . . . . . . . . . .47
Sharing Amanda. . . . . . . . . . . . . . . . . . . . . . . . . . . . . . . . . . . . . . . . . . . . . . . . . . . . .48
Using Default and Recommended Mailboxes . . . . . . . . . . . . . . . . . . . . . . . . . . . . . .49
Chapter 8:
Faxing . . . . . . . . . . . . . . . . . . . . . . . . . . . . . . . . . . . . . . . . . . . . . . . . . . . . . . . . . . . . . . . .53
Using This Chapter. . . . . . . . . . . . . . . . . . . . . . . . . . . . . . . . . . . . . . . . . . . . . . . . . . .53
Using a Fax Modem. . . . . . . . . . . . . . . . . . . . . . . . . . . . . . . . . . . . . . . . . . . . . . . . . .53
Suggested Settings. . . . . . . . . . . . . . . . . . . . . . . . . . . . . . . . . . . . . . . . . . . . . . . .56
Detecting a Fax Machine Automatically . . . . . . . . . . . . . . . . . . . . . . . . . . . . . . . . . .57
Modifying the PCPM Tone Table. . . . . . . . . . . . . . . . . . . . . . . . . . . . . . . . . . . .57
Creating the Hot Box Mailbox . . . . . . . . . . . . . . . . . . . . . . . . . . . . . . . . . . . . . .58
Setting the Hot Box Options. . . . . . . . . . . . . . . . . . . . . . . . . . . . . . . . . . . . . . . .58
Sending Faxes. . . . . . . . . . . . . . . . . . . . . . . . . . . . . . . . . . . . . . . . . . . . . . . . . . . . . . .59
Chapter 9:
Using Serial Integration . . . . . . . . . . . . . . . . . . . . . . . . . . . . . . . . . . . . . . . . . . . . . . . . .61
Serial Integration Overview . . . . . . . . . . . . . . . . . . . . . . . . . . . . . . . . . . . . . . . . . . . .61
Bellcore Standard SMDI . . . . . . . . . . . . . . . . . . . . . . . . . . . . . . . . . . . . . . . . . . . . . .61
NEC 2000 and NEC 2400 . . . . . . . . . . . . . . . . . . . . . . . . . . . . . . . . . . . . . . . . . . . . .65
AT&T System 75 or Definity-G3. . . . . . . . . . . . . . . . . . . . . . . . . . . . . . . . . . . . . . . .67
Ericsson MD-110 . . . . . . . . . . . . . . . . . . . . . . . . . . . . . . . . . . . . . . . . . . . . . . . . . . . .69
Generic . . . . . . . . . . . . . . . . . . . . . . . . . . . . . . . . . . . . . . . . . . . . . . . . . . . . . . . . . . . .71
Chapter 10:
Accessing Amanda Remotely . . . . . . . . . . . . . . . . . . . . . . . . . . . . . . . . . . . . . . . . . . . . .73
Accessing Amanda from Another Computer. . . . . . . . . . . . . . . . . . . . . . . . . . . . . . .73
Setting Up Amanda’s Computer as a Host. . . . . . . . . . . . . . . . . . . . . . . . . . . . . . . . .73
Setting Up the Remote Computer. . . . . . . . . . . . . . . . . . . . . . . . . . . . . . . . . . . . . . . .74
Connecting by Cable . . . . . . . . . . . . . . . . . . . . . . . . . . . . . . . . . . . . . . . . . . . . . . . . .75
Connecting by Modem. . . . . . . . . . . . . . . . . . . . . . . . . . . . . . . . . . . . . . . . . . . . . . . .75
Chapter 11:
Programming Amanda . . . . . . . . . . . . . . . . . . . . . . . . . . . . . . . . . . . . . . . . . . . . . . . . . .77
Using Tokens . . . . . . . . . . . . . . . . . . . . . . . . . . . . . . . . . . . . . . . . . . . . . . . . . . . . . . .77
Mailbox Settings . . . . . . . . . . . . . . . . . . . . . . . . . . . . . . . . . . . . . . . . . . . . . . . . .78
Success and Failure. . . . . . . . . . . . . . . . . . . . . . . . . . . . . . . . . . . . . . . . . . . . . . .78
Tracing Token Execution . . . . . . . . . . . . . . . . . . . . . . . . . . . . . . . . . . . . . . . . . .79
Kinds of Tokens . . . . . . . . . . . . . . . . . . . . . . . . . . . . . . . . . . . . . . . . . . . . . . . . . . . . .79
Literals. . . . . . . . . . . . . . . . . . . . . . . . . . . . . . . . . . . . . . . . . . . . . . . . . . . . . . . . .79
Variables . . . . . . . . . . . . . . . . . . . . . . . . . . . . . . . . . . . . . . . . . . . . . . . . . . . . . . .80
Assignment. . . . . . . . . . . . . . . . . . . . . . . . . . . . . . . . . . . . . . . . . . . . . . . . . .80
Page 7

Commands. . . . . . . . . . . . . . . . . . . . . . . . . . . . . . . . . . . . . . . . . . . . . . . . . . . . . .81
Parameters . . . . . . . . . . . . . . . . . . . . . . . . . . . . . . . . . . . . . . . . . . . . . . . . . .82
Syntax. . . . . . . . . . . . . . . . . . . . . . . . . . . . . . . . . . . . . . . . . . . . . . . . . . . . . . . . . . . . .82
Files and Directories. . . . . . . . . . . . . . . . . . . . . . . . . . . . . . . . . . . . . . . . . . . . . . . . . .84
Flow of Control: Branching and Looping . . . . . . . . . . . . . . . . . . . . . . . . . . . . . . . . .85
Examples . . . . . . . . . . . . . . . . . . . . . . . . . . . . . . . . . . . . . . . . . . . . . . . . . . . . . . . . . .86
Customizing the Employee Directory. . . . . . . . . . . . . . . . . . . . . . . . . . . . . . . . .86
Application. . . . . . . . . . . . . . . . . . . . . . . . . . . . . . . . . . . . . . . . . . . . . . . . . .86
Translating to Amanda’s Tokens. . . . . . . . . . . . . . . . . . . . . . . . . . . . . . . . .87
Token Reference. . . . . . . . . . . . . . . . . . . . . . . . . . . . . . . . . . . . . . . . . . . . . . . . . . . . .89
Troubleshooting . . . . . . . . . . . . . . . . . . . . . . . . . . . . . . . . . . . . . . . . . . . . . . . . . . . .123
Chapter 12:
Programming Examples . . . . . . . . . . . . . . . . . . . . . . . . . . . . . . . . . . . . . . . . . . . . . . . .125
System Paging of a User for Special Callers . . . . . . . . . . . . . . . . . . . . . . . . . . . . . .125
Application . . . . . . . . . . . . . . . . . . . . . . . . . . . . . . . . . . . . . . . . . . . . . . . . . . . .125
Translating to Amanda’s Tokens . . . . . . . . . . . . . . . . . . . . . . . . . . . . . . . . . . .125
Result. . . . . . . . . . . . . . . . . . . . . . . . . . . . . . . . . . . . . . . . . . . . . . . . . . . . . . . . .126
Switching and Maintaining Languages . . . . . . . . . . . . . . . . . . . . . . . . . . . . . . . . . .126
Application . . . . . . . . . . . . . . . . . . . . . . . . . . . . . . . . . . . . . . . . . . . . . . . . . . . .126
Using Amanda’s Tokens. . . . . . . . . . . . . . . . . . . . . . . . . . . . . . . . . . . . . . . . . .127
Another Consideration . . . . . . . . . . . . . . . . . . . . . . . . . . . . . . . . . . . . . . . . . . .128
Using Amanda’s Tokens. . . . . . . . . . . . . . . . . . . . . . . . . . . . . . . . . . . . . . . . . .128
Order Shipment Information . . . . . . . . . . . . . . . . . . . . . . . . . . . . . . . . . . . . . . . . . .129
Application . . . . . . . . . . . . . . . . . . . . . . . . . . . . . . . . . . . . . . . . . . . . . . . . . . . .129
Translating to Amanda’s Tokens:. . . . . . . . . . . . . . . . . . . . . . . . . . . . . . . . . . .130
Summary . . . . . . . . . . . . . . . . . . . . . . . . . . . . . . . . . . . . . . . . . . . . . . . . . . . . . .130
One-call and Two-call Faxbacks . . . . . . . . . . . . . . . . . . . . . . . . . . . . . . . . . . . . . . .131
Sending Faxes to Amanda. . . . . . . . . . . . . . . . . . . . . . . . . . . . . . . . . . . . . . . . .131
One-call Faxback. . . . . . . . . . . . . . . . . . . . . . . . . . . . . . . . . . . . . . . . . . . . . . . .131
Two-call Faxback . . . . . . . . . . . . . . . . . . . . . . . . . . . . . . . . . . . . . . . . . . . . . . .132
IVR and Voice Form Applications. . . . . . . . . . . . . . . . . . . . . . . . . . . . . . . . . . . . . .135
Making the User Comfortable. . . . . . . . . . . . . . . . . . . . . . . . . . . . . . . . . . . . . .135
Using Greetings. . . . . . . . . . . . . . . . . . . . . . . . . . . . . . . . . . . . . . . . . . . . . . . . .136
Using Menus . . . . . . . . . . . . . . . . . . . . . . . . . . . . . . . . . . . . . . . . . . . . . . .136
Making Requests . . . . . . . . . . . . . . . . . . . . . . . . . . . . . . . . . . . . . . . . . . . .136
Providing Information and Feedback. . . . . . . . . . . . . . . . . . . . . . . . . . . . .137
Using the Telephone Keypad . . . . . . . . . . . . . . . . . . . . . . . . . . . . . . . . . . . . . .138
Choosing Tokens. . . . . . . . . . . . . . . . . . . . . . . . . . . . . . . . . . . . . . . . . . . . . . . .138
Using Tokens. . . . . . . . . . . . . . . . . . . . . . . . . . . . . . . . . . . . . . . . . . . . . . . . . . .139
Gathering Testing Information. . . . . . . . . . . . . . . . . . . . . . . . . . . . . . . . . .140
vii
Appendix A:
Troubleshooting Amanda . . . . . . . . . . . . . . . . . . . . . . . . . . . . . . . . . . . . . . . . . . . . . . .143
New Problems . . . . . . . . . . . . . . . . . . . . . . . . . . . . . . . . . . . . . . . . . . . . . . . . . . . . .143
Resetting a Port from the Main Screen. . . . . . . . . . . . . . . . . . . . . . . . . . . . . . . . . . .143
What to Do When… . . . . . . . . . . . . . . . . . . . . . . . . . . . . . . . . . . . . . . . . . . . . . . . . .143
Amanda Does Not Transfer the Call. . . . . . . . . . . . . . . . . . . . . . . . . . . . . . . . .144
Caller Doesn’t Hear the Busy Message or RNA Greeting . . . . . . . . . . . . . . . .144
Notification Does Not Work Correctly. . . . . . . . . . . . . . . . . . . . . . . . . . . . . . .145
Host/Remote Programs Do Not Work . . . . . . . . . . . . . . . . . . . . . . . . . . . . . . .146
Message: RDSP Not Located at Any Interrupt Vector . . . . . . . . . . . . . . . . . .146
System Halts . . . . . . . . . . . . . . . . . . . . . . . . . . . . . . . . . . . . . . . . . . . . . . . . . . .147
Page 8

viii Installing Amanda@Work.Place
Appendix B:
Adding a Voice Board . . . . . . . . . . . . . . . . . . . . . . . . . . . . . . . . . . . . . . . . . . . . . . . . . .149
Adding an RDSP/x32 Voice Board . . . . . . . . . . . . . . . . . . . . . . . . . . . . . . . . . . . . .149
ShowJump Utility . . . . . . . . . . . . . . . . . . . . . . . . . . . . . . . . . . . . . . . . . . . . . . .151
Installing Voice Boards . . . . . . . . . . . . . . . . . . . . . . . . . . . . . . . . . . . . . . . . . . . . . .151
Connecting Ports . . . . . . . . . . . . . . . . . . . . . . . . . . . . . . . . . . . . . . . . . . . . . . . . . . .152
Appendix C:
Configuration Reference. . . . . . . . . . . . . . . . . . . . . . . . . . . . . . . . . . . . . . . . . . . . . . . .153
General Options . . . . . . . . . . . . . . . . . . . . . . . . . . . . . . . . . . . . . . . . . . . . . . . . . . . .153
Fax Options . . . . . . . . . . . . . . . . . . . . . . . . . . . . . . . . . . . . . . . . . . . . . . . . . . . . . . .176
Hot Box Options. . . . . . . . . . . . . . . . . . . . . . . . . . . . . . . . . . . . . . . . . . . . . . . . . . . .179
Outdial Options . . . . . . . . . . . . . . . . . . . . . . . . . . . . . . . . . . . . . . . . . . . . . . . . . . . .179
Per Port Options . . . . . . . . . . . . . . . . . . . . . . . . . . . . . . . . . . . . . . . . . . . . . . . . . . . .180
Serial Port Options . . . . . . . . . . . . . . . . . . . . . . . . . . . . . . . . . . . . . . . . . . . . . . . . . .181
SMDI Options . . . . . . . . . . . . . . . . . . . . . . . . . . . . . . . . . . . . . . . . . . . . . . . . . . . . .182
T1/DID Options . . . . . . . . . . . . . . . . . . . . . . . . . . . . . . . . . . . . . . . . . . . . . . . . . . . .184
Index . . . . . . . . . . . . . . . . . . . . . . . . . . . . . . . . . . . . . . . . . . . . . . . . . . . . . . . . . . . . . . . .187
Page 9

Chapter 1: Introducing Amanda
Specification
The PC on which your Amanda system is installed has:
• MS-DOS version 6.22 in the directory C:\DOS.
• A 386DX processor running at 40MHz.
• A VGA card.
• 4MB of RAM.
• A 3.5-inch, 1.44MB floppy disk drive and appropriate controller.
• A 540MB IDE hard disk drive with an appropriate IDE controller.
• One or two Rhetorex voice boards.
• COM1, using IRQ 4, and COM2, using IRQ 3, which are available for fax modems or SMDI integration.
• Modem for remote access using the Host/Remote programs.
OTE
N
: Within the CMOS settings, all adapter ROM shadowing should be dis-
abled except for system ROM shadowing at address F000. Don’t change
the BIOS configuration without consulting an Amanda Company marketing partner or solution provider or an Amanda Company technical
support representative.
Environmental Requirements
• Locate the unit in an area free of excess moisture, dust, corrosive gases, and chemicals.
• Install Amanda securely on a table or desk at least 2 feet (.6 meters) above the
floor or mount the system on a wall.
• Use a properly grounded electrical outlet which is not controlled by a switch.
• Ensure that the operating temperature is 40 to 95 degrees Fahrenheit (2 to 35 degrees Centigrade), away from direct sunlight.
• Ensure that the humidity is 15% to 90%, noncondensing.
• For proper ventilation and servicing of the unit, provide at least 1 foot (0.3 meters)
clearance on all sides and above the unit.
Electrical Requirements
The electrical requirements are:
• 90 to 130 VAC, 50 to 60 Hz, 3-prong outle t with separate ground, separatel y fused
at 15 amps.
• Outlet not controlled by an on/off switch.
Page 10

2 Installing Amanda@Work.Place
• Use of electrical line conditioning equipment such as a surge protector and an uninterruptible power supply (UPS) is strongly recommended.
• Grounding to comply with Underwriters Laboratories (UL) 1459.
Amanda@Work.Place Features
Amanda@Work.Place supports:
• 1 telephone switching system
• 4 ports with one voice board; 6 or 8 ports wit h two boar ds (by adding a 2-port or
4-port board)
• 2 serial ports
• 99,999 mailboxes, each of which have:
- 3 personal greetings
- 3 personal mailing lists
- 4 notification records
- 10 scheduling records
- 128 messages
• Support for SMDI (a serial interface to your telephone switching system)
• Support for sending and receiving faxes
• Host and remote programs for communicating remotely with the computer running Amand a
• 33 hours of voice storage
• The Token Programming Language
General Uses
Amanda@Work.Place is an automated attendant and voice processing system designed
especially for ease of use and flexibility. As a PC-based product, Amanda takes advantage
of the technical innovations in the personal computer market. In addition, Amanda’s
standard hardware components can be repaired or replaced by any PC service company.
The computer on which Amanda is installed must be used only for Amanda.
Depending on what lines from your telephone switching system are connected to Amanda
and when calls are sent to Amanda to be processed, Amanda can serve you or your
customer in a variety of ways.
Configured as a primary attendant: Amanda answers all your incoming calls on the
lines you designate and allows the callers to direct their calls to a specific person or
department without being placed on indefinite hold. If a specific person is unavailable,
Amanda can take a private message for that person without missing any details.
In this case, the telephone switching system sends all incoming calls to Amanda.
Configured as a secondary attendant: Amanda assists your regular operator when call
volume is heavy, allowing callers to direct their own calls or hold for the operator. Some
companies provide specific incoming lines for Amanda as a backdoor attendant for calls
from vendors, family members, friends, and special clients who prefer to have Amanda
process their calls.
Page 11

Chapter 1: Introducing Amanda 3
In this case, the telephone switching system sends incoming calls to Amanda only when
the regular operator’s extension is busy or not answered.
Configured as an off-duty attendant: Amanda provides 24-hour access to your
company and its employees when an operator is unavailable.
In this case, the telephone switching system sends all incomin g calls to Aman da wh ile the
office is closed.
Configured as a voice messaging center: Amanda takes messages and allows users to
send, store, and forward messages, increasing productivity and enhancing inter-office
communication.
In this case, the telephone switching system transfers any incoming call to Amanda if the
extension being called is busy or not answering.
Configured as an information system: Amanda provides answers to your callers’ most
frequently asked questions (so you can avoid costly interruptions and provide a higher
level of customer service 24 hours a day). Information such as your address, available
hours, directions to your offices, and so forth, might be better handled by Amanda.
Amanda’s serial ports can access databases and other information stored in other
computers, allowing Amanda to give callers information on account balances, train
schedules, and so forth.
In this case, the telephone switching system or even an op erator can send inco ming calls to
Amanda. Then automatically, or if selected, Amanda plays out the requested information.
Purpose of This Guide
This guide explains how to set up Amanda@Work.Place for the first time. It covers:
• Connecting and configuring Amanda to work with your telephone switching system
• Configuring Amanda to provide the voice mail services that the owner selects
Customer Service and Support
The Amanda Company provides customer service and support Monday through Friday
from 8:00
Customer Support:
(800) 800–9822
For sales, contact The Amanda Company at the East Coast office.
Dealer Sales:
Telephone: (800) 410-2745
A.M
. to 8:00 P.M. Eastern Time, except holidays
.
Distribution Sales:
Telephone: (800) 410-2745
International Sales:
Telephone: (203) 744-3600
Page 12

4 Installing Amanda@Work.Place
International Support:
Telephone: (203) 744-0860
Web Sit e:
http://www.taa.com
End User Support
End user support covers the actual usage of Amanda through the telephone, such as
picking up messages, sending messages, changing greetings, and using distribution lists.
Registered Amanda sites receive free end user sup port for the life of th eir systems. Be sure
to send in your registra tion card!
System Administration Support
System administration support covers the configuration of Amanda; such as setting up
mailboxes, programming notification, scheduling automatic changes, and creating reports.
Registered Amanda sites receive free system administration support for up to six months
after the installation. Be sure to send in your registration card!
Installation Support
Installation support covers the initial connection of Amanda to a telephone switching
system as well as solutions to problems that occur when the system is reconfigured or
Amanda is upgraded.
The Amanda Company now offers installation support to any dealer who buys a turnkey
system.
Qualified Amanda marketing partners and solution providers, who are in good standing,
receive installation support for any system.
Application Support
Application support covers extended features that can be added to Amanda using
Amanda’s powerful Token Programming Language. The Amanda Company can write
custom applications for you. All Amanda Solution Providers, who are in good standing,
receive application support. Please contact your Amanda sales representative for more
information.
Page 13

Chapter 2: Installing Your Amanda System
Installation Checklist
Follow this checklist or use it to verify that you have completed all the necessary steps for
connecting Amanda to the telephone switching system.
Be sure to…
1. Program the telephone switching system for voice mail integration.
2. Connect the line cords from the voice board to the telephone switching system.
3. Connect a monitor and keyboard or a remote computer—if necessary.
4. Run Setup to define Amanda system configuration options.
5. Test each voice board port for answering.
6. Run Setup to identify the PBX, dial codes, and tone patterns.
7. Use the trace file to add integration information to your 1001.PBX file.
Connecting the Ports
The next figure shows you the back of the computer for a four-port system that uses one
four-port voice b oard . Each b oard h a s fou r RJ-11 connectors providi n g connection to four
loop-start trunks or station line interfaces.
Com1
Com2
VGA
Empty Slot
(Upgrade Voice Board)
Voice Board
Modem
Page 14

6 Installing Amanda@Work.Place
The next figure shows how to connect the telephone switching system to the voice ports
on the computer.
Voice Ports
1 & 2
Voice Ports
3 & 4
Telephone
Phone Switch
tline-R.cad
Attaching a Monitor or a Remote Computer
To control and configure Amanda@Work.Place, you must have one of the following kits
(or its equivalent):
• Video Administration Kit (con tain i ng a mo ni tor an d a keyboard). This gives you
access to Amanda at any time using the monitor and keyboard.
• Remote Administration Kit (containing a null modem cable and an Amanda Remote Software diskette). You supply another computer, such as a laptop or notebook. You connect the other computer, referred to as the remote computer,
whenever you need to control Amanda.
Connecting the Monitor and Keyboard
To add a monitor and keyboard:
1. Unpack the keyboard and monitor.
2. Plug the keyboard cable into the keyboard port on the back of the computer.
3. Attach the video signal cable (the end with the D-shell connector) to the VGA video
port on the back of the computer. (Consult the legend sticker on the back of the computer to find the port.)
4. Examine the power cord connector on the monitor. Plug it into either the back of the
computer or a 110 volt outlet as applicable.
Page 15

Chapter 2: Installing Your Amanda System 7
5. Plug in the computer and turn it on.
6. Now you can run Setup and other progra ms, monitor Amanda’s operation, and so f orth.
Connecting a Remote Computer
You can control Amanda from a remote computer by doing all of the
following:
• Connecting the two computer wit h eit her a nu ll mo dem cab le o r by
means of modems (and, of course telephone lines).
• Running a Host prog ram (either HOS T.COM or HOST30.COM) on
Amanda’s computer.
• Running a Remote program (either REMOTE.COM or WINREM.EXE) on the remote computer.
For more details, see “Setting Up the Remote Computer” on page 74.
Using a UPS
The Amanda Company strongly recommends the installation of an
uninterrupted power supply (UPS) with every Amanda system. It provides
clean power to Amanda and keeps the probab ility of a compu ter lockup (an d
the resulting loss of data or even loss of the system) as low as possible.
According to some reports, power problems are the primary reason why
computers lose data (45.3%). The next closest cause is storm damage at
9.4%. (Human error and sabotage rank eighth with 3.2%.)
According to a Bell Laboratories study entitled “The Quality of US
Commercial AC Power,” the main categories of AC power irregularities
across the nation are sags (or brownouts), power surges, blackouts, and
overvoltages. The best solution is a UPS, which can handle 99.3% of these
power problems.
A UPS is a special type of AC power line conditioner. When compared to
the other devices available, such as surge suppressors, filters, isolation
transformers, tap changing regulators, and voltage regulating transformers,
the UPS is rated highest by Bell Laboratories and is relatively inexpensive.
Page 16

8 Installing Amanda@Work.Place
The cost of installing a UPS is nominal when compared to the cost of repairing a damaged
Amanda system or compared to the loss of confidence from callers and internal Amanda
users.
For more information about what causes power irregularities and what damage they can
do to Amanda, call to be faxed Technical Note 10, “The Importance of a UPS.”
Page 17

Chapter 3: Running the Setup Utility
Running Setup
You must configure Amanda to work properly with your telephone switching system and
to let Amanda know your customer’s voice mail and other preferences. The Amanda
Company provides the Setup utility to make configuring Amanda easier.
You run Setup to configure dial codes, tone patterns, DTMF integration patterns, and
Amanda’s system configuration options.
To run Setup:
1. If Amanda i s running, sh ut down the Amanda system:
a. Press Alt+S.
b. Type in the password. (The default is AMandA with only the first two and the
last letter capitalized.)
c. Press Enter.
d. Press Y (to confirm the shutdown).
e. Press Y again (to reconfirm).
2. Change to the AMANDA directory—unless you are there already. At the DOS
prompt, type:
CD C:\AMANDA
Then press Enter.
3. Now that the DOS prompt reads C:\AMANDA, type:
SETUP
Then press Enter.
The Amanda Configuration Utility menu appears.
4. From this menu, you define the following for your telephone switching system and
Amanda:
• Telephone System Dial Codes
• Telephone System Tone Patterns
• System Integration Patterns
• System Configuration Options
Page 18

10 Installing Amanda@Work.Place
System Configuration Options contains two sections:
General Configuration Displays dialog boxes that guide you through
the options that are most often changed,
whether they appear in the INST ALL.CFG file
or the Default Template for mailboxes (normally mailbox 997).
These dialog boxes are explained in “Chapter
7: Configuring Amanda.”
Advanced Configuration Allows you to change any configuration set ting
in INSTALL.CFG. The options are divided
into categories to make it easier to locate the
options you need to change. The options are
parameter lists. Each option is explained in
“Appendix C: Configuration Reference.”
Page 19

Chapter 4: Defining Dial Codes
Defining Dial Codes
To communicate with the telephone switching system, Amanda must know the switching
system’ s dial codes.
By default, the 1001.PBX file is used to store dial codes. You can change this if you
choose, but The Amanda Company recommends using 1001.PBX. If you use another
name, do not use any number in the range 1002 to 2001 (reserved by The Amanda
Company).
As part of a new installation, the file 1001.PB X is created for you bas ed on t he Pan ason i c
KX-T308/616/1232 telephone switching system.
OTE
N
: Instead of using Setup, you can edit your .PBX file in the C:\AMAN-
DA\PBX.DB directory using the JOVE utility. See “Chapter 10: Utilities,” in Administering Amanda@Wor k.Place for information about
JOVE.
To define dial code s:
1. Run Setup as explained in “Running Setup” on page 9.
2. From the Configuration Utility menu, press 1 to select Telephone System Dial Codes.
The Telep hone Switch Type screen lists 1001.PBX along with the name of the switch-
ing system it is based on or identifies the switching system as not defined.
Page 20

12 Installing Amanda@Work.Place
3. From the Telephone Switch Type screen, do one of the following:
• If the telephone switching system is the correct one (or if the telephone switching
system is the one you have used in the past—even though it is identified as not
defined):
•Select the file to be edited then press Enter.
Setup displays the dial codes and their descriptions.
• If the telephone switching system is not the one listed:
a. Select one of the .PBX files.
b. Press F2 to display a list of switching systems.
c. Use the arrow keys to select the name of your system or the name of a
system which has codes similar to yours then press Enter.
d. Press Enter again to display the dial codes and their descriptions.
4. To change any dial codes that do not apply to your system:
a. Use the following Dial Codes Table to understand each of the codes dis played
on the screen.
b. Use the Up Arrow, Down Arrow, Tab, or Enter keys to select the code you
want to change.
c. Type the new code over the current code (if there is one).
(You can also use Backspace, Delete, spacebar, and the Right Arrow and Left
Arrow keys to edit the code.)
d. When you are finished, press F10 to save your changes.
(To return to the Telephone System Dial Codes screen without saving your
changes, press Esc.)
e. Repeat steps A through D for any other codes to be changed.
5. When you have finished defining the dial codes, press Esc to return to the Amanda
Configuration Utility menu.
Page 21

Chapter 4: Defining Dial Codes 13
Dial Codes Table
Dial Code Label Description
What to dial to put the caller
on transfer hold:
What to dial when there is no
transfer dial tone:
What to dial to return to the
caller after ring no answer:
The code Amanda dials to ask the telephone switching system to put the caller on
transfer hold before she transfers a caller to an extension.
Usually, this code is “F-” (a hookflash followed by a half-second pau se). This may
need to be changed to “F--” (a hookflash followed by a one-second pause) or “F,”
(a hookflash follow ed by a two-secon d pause) for te lephone sw itching systems that
are slow to provide a transfer dial tone after a hookflash. (Don’t use the quotation
marks in the dial code.)
If tmo_dtwait is greater than 0, the number of dashes set for this option is irrelevant.
Use the value 0 for tmo_dtwait for faster call processing. For more information
about tmo_dtwait, see “What to dial to put the caller on transfer hold:” on page 13.
If you are editing C:\AMANDA\PBX.DB\1001.PBX instead of using Setup, this is
the dl_dtwait option.
The code Amanda dials to return to the caller if both of the following are true:
You configure Amanda to wait for a transfer dial tone before transferring a call to
an extension
There is no transfer dial tone
In this case, Amanda treats the attempted trans fer as though the extension was b usy.
Some telephone switching systems use “F-”, o thers use “-”. (Don’t use the quo tation
marks in the dial code.)
If you are editing C:\AMANDA\PBX.DB\1001.PBX instead of using Setup, this is
the dl_ndtret option.
During supervised transfers, if the extension r ings the specified number of times but
is not answered, Amanda dials this code to ask the telephone switching system to
reconnect the caller to Amanda. (See “Using the Questionnaire” on page 37 for
more information about configuring the number of rings.)
Usually, this code is “F-”. (Don’t use the quotation marks in the dial code.)
If you are editing C:\AMANDA\PBX.DB\1001.PBX instead of using Setup, this is
the dl_rnaret option.
What to dial to return to the
caller after busy:
What to dial after a call
screening reject:
During supervised transfers , Amanda dials t his code to ask the t elephone sw itching
system to reconnect the caller to Amanda if the extension is busy.
Usually, this code is “F-”. (Don’t use the quotation marks in the dial code.)
If you are editing C:\AMANDA\PBX.DB\1001.PBX instead of using Setup, this is
the dl_bsyret option.
The code Amanda dials to reconnect to the caller if all of the following are true:
Amanda is performing a supervised transfer
Call screening is ON
The user at the extension that was called rejects the caller
In this case, Amanda plays the mailbox’s current greeting.
Usually, this code is “F-”. (Don’t use the quotation marks in the dial code.)
If you are editing C:\AMANDA\PBX.DB\1001.PBX instead of using Setup, this is
the dl_hupret option.
Page 22

14 Installing Amanda@Work.Place
Dial Codes Table (Continued)
Dial Code Label Description
What to dial to connect a
caller to an extension:
What to dial before the mailbox extension:
What to dial after the mailbox extension:
What to dial on each port after the system starts:
During supervised transfers, Amanda dials this code to complete the call transfer after detecting an answer at the called extension . If call screening is ON, Amanda dials
this code only after the user at the extension accepts the call.
Usually, this code is “H” (for Hang up). (Don’t use the quotation marks in the dial
code.)
If you are editing C:\AMANDA\PBX.DB\1001.PBX instead of using Setup, this is
the dl_connect option.
If Amanda needs to dial something after dial tone detection, but before dialing the
extension number, enter that code here.
Usually this is left blank.
If you are editing C:\AMANDA\PBX.DB\1001.PBX instead of using Setup, this is
the dl_prefix option.
If Amanda needs to dial something after dialing the extension number, enter that
code here.
Don’t use an “H” for a blind tran sfer here b ecause this setting is global. Sometimes
you need “1-” to bypass the hands-free answer feature (voice announce) on some
telephone systems. (Don’t use the quotation marks in the dial code.)
If you are editing C:\AMANDA\PBX.DB\1001.PBX instead of using Setup, this is
the dl_suffix option.
If you want Amanda to dial some initialization codes when she firs t starts up, define
those codes here. For example, you may want to remove call forwarding on the
ports.
Usually this is left blank.
If you are editing C:\AMANDA\PBX.DB\1001.PBX instead of using Setup, this is
the dl_init option.
What to dial on each port before shutdown:
What to dial when a port
goes off-hook:
If you want Amanda to dial certain codes when she shuts down, define those codes
here. For example, enabling call forwarding on the ports lets a live operator take the
calls when Amanda shuts down.
Usually this is left blank.
If you are editing C:\AMANDA\PBX.DB\1001.PBX instead of using Setup, this is
the dl_stop option.
If Amanda must dial some special codes as she goes off-hook to enable a special
feature, define those special codes her e. For example, you may enable s pecial types
of SMDI integration over a serial port.
Usually this is left blank.
If you are editing C:\AMANDA\PBX.DB\1001.PBX instead of using Setup, this is
the dl_pickup option.
Page 23

Chapter 4: Defining Dial Codes 15
Dial Codes Table (Continued)
Dial Code Label Description
What to dial to create or
record a conference call:
Number of seconds to wait
for dial tone detection:
Number of 1/100 seconds t o
use for Flash time:
Controls how to do a conference call when the called party answers the telephone.
You provide the digits used to conference the caller, called party , and Amanda (f or
example, “*3”). (Don’t use the quotat ion mark s in the dial code.) If yo ur teleph one
switching system does not have this capability, leave it blank.
For example, if the Extension field for a mailbox contains 127KM, Amanda dials
127. When an answer is detected, Amanda dials the conference dial code (such as
“*3”) which conferences the caller, the called party, and Amanda. Instead of hanging up when she connects the two parties, Amanda records the conversation as a
message in mailbox 127.
If you are editing C:\AMANDA\PBX.DB\1001.PBX instead of using Setup, this is
the dl_conference option.
This is the number of seconds Amanda waits for your telephone switching system
to provide a continuous dial t one for one full second. If your system has few DTMF
receivers or intercom paths for call tran sfers, one may n ot be immediately available
for Amanda to transfer a call. In this case, this number should be greater than 0.
Use 0 when Amanda does not wait for a dial tone (as when the telephone switching
system returns stutter dial tone or silence on a transfer). A go od value is 4 (seconds)
when she does wait for a dial tone. The range is 0–127.
If you are editing C:\AMANDA\PBX.DB\1001.PBX instead of using Setup, this is
the tmo_dtwait option.
Determines how long Aman da remains on- hook while pe rforming a hookfl ash. The
value is in hundredths of seconds.
The usual value is 55 (just over half a second).
When set too short, the hookflash does not happen; when set too long, it hangs up.
If you are editing C:\AMANDA\PBX.DB\1001.PBX instead of using Setup, this is
the flashtm option.
Which DTMF tone to listen
to for hangup detection:
What to dial to turn on the
message waiting indicator:
If your telephone switching sys tem plays a specific DTMF tone or sequence of tones
when a caller hangs up (to make hangup detection faster), enter that DTMF digit
here.
If your telephone switching system has this capability, the code is usually the letter
“d” which represents DTMF D. This may be a sequence of DTMF digits rather than
a single DTMF digit. The maximum length is 10 characters. If y our system does no t
support this feature, leave it blank.
If you are editing C:\AMANDA\PBX.DB\1001.PBX instead of using Setup, this is
the dt_hangup option.
Controls what DTMF digits are dialed by Amanda to enable message notification
automatically when a new message is left. This value is used only with the KA(1)
token.
Most popular telephone sw itching systems have a default val ue. If this field is blank
for your switching system, enter the DTMF digits which enable a message waiting
indicator on your telephone sets. To have Amanda dial these digits, use KA(1) in
the notify method field. Amanda replaces KA(1) with these digits. For more information, see “KA(on_off)” on page 147 for more information.
OTE
N
ing indicators on an d off. using the KA(1) token.
If you are editing C:\AMANDA\PBX.DB\1001.PBX instead of using Setup, this is
the dl_light_on option.
New installations automatically h ave notification templates that turn message wait-
:
Page 24

16 Installing Amanda@Work.Place
Dial Codes Table (Continued)
Dial Code Label Description
What to dial to turn off the
message waiting indicator:
Controls what DTMF digits are dialed by Amanda to disable message notification
automatically when a new message is played or deleted. This value is used only with
the KA(0) token.
Most popular telephone sw itching systems have a default val ue. If this field is blank
for your switching system, enter the DTMF digits which disable a message waiting
indicator on your telephone sets. To have Amanda dial these digits, use KA(0) in
the notify method field. Amanda replaces KA(0) with these digits. For more information, see “KA(on_off)” on page 147 for more information.
OTE
N
ing indicators on an d off. using the KA(0) token.
If you are editing C:\AMANDA\PBX.DB\1001.PBX instead of using Setup, this is
the dl_light_off opt ion.
New installations automatically h ave notification templates that turn m essage wait-
:
Page 25

Chapter 5: Defining Tone Patterns
Using GetTones
Amanda must recognize telephone switching system tone patterns when performing
supervised transfers. The Setup utility runs another utility, n amed GetTones, to “learn” the
tone patterns for ringing, busy, hang-up, and reorder (also called fast busy).
Before running the GetTones utility, you must have satisfied all of the following
requirements:
• Define the dial codes. See “Defining Dial Codes” on page 11.
• Connect ports 1 and 2 (the top RJ-14 jack of the first Rhetorex board) to valid,
working single-line extensions on the telephone switching system.
• Know the extension number to which port 1 is connected.
• Verify that the extension to which port 1 is connected is not in any hunt group, and
does not have any call forwarding programmed.
• Verify that the extension to which port 2 is connected has outside line access and
can dial a test telephone number that is answered and does not hang up after answering (time or weather lines are good choices to call).
• Define a non-Amanda extension that has a telephone connected, is not forwarded,
and will not be answered. This becomes your Ring No Answer (RNA) test station.
To define telephone switching system tone patterns:
1. Make sure that you have satisfied all the above requirements.
2. Run Setup as explained in “Running Setup” on page 9.
3. From the Configuration Utility menu, press 2 to select Telephone System Tone Patterns.
The GetTones for Rhetorex Voice Boards screen appears.
Page 26

18 Installing Amanda@Work.Place
4. By default, the output file has the same name as your .PBX file. However, it ends with
the extension .TON.
5. Enter the out dial co de, por t 1’s station number, the reorder code, and the RNA stat ion
number. Use the Up Arrow, Down Arrow, Tab, or Enter key to move from one entry
to the next.
outdial code Type the outside line access and telephone
numbers for a connection to test for tone patterns (such as the time or weather number).
For example:
9,5551111
Then press Enter.
port 1 station number Type the extension for a standalone (no call
hunting or forwarding) s ingle-line (analog) ex-
tension connected to port 1.
Then press Enter.
reorder code T ype any dial code that g enerates a reorder tone
pattern on the telephone switching system.
Typically, invalid extension numbers work
well, for example, 555 generally works. If not,
try 444 or 777 or any number that generates a
fast busy tone pattern.
Then press Enter.
Ring No Answer
station number
6. Press F4 to run GetTones.
GetTones obtains the ring, busy, reorder, and han gup patterns of the telephone switch-
ing system. Messages appear on your screen as the utility gets and tests these patterns.
OTE
N
: If you have problems with the GetTones utility, such as not getting good
patterns or not being able to verify a tone pattern, try using AccuCall
Plus, a Rhetorex utility that also captures tone patterns. See “Using AccuCall Plus” on page 18.
Using AccuCall Plus
The C:\AMANDA\PBX.DB\1001.TON file defines the tone patterns that the telephone
switching system returns to Amanda. Amanda recognizes these tones and uses her
knowledge of them when she transfers calls. AccuCall Plus is a Rhetorex utility that
allows you to set up ring, busy, reorder/fast busy/error, and special tone (such as a fax
CNG tone) definitions.
Type a non-Amanda extension that has a tele-
phone connected and is not answered or call
forwarded. If voice-announce or call-announce is enabled, remember to enter the extension plus the additional digit or digits that
force the extension to ring. For example, if the
RNA test station is 112, type:
1121Then press Enter.
This section is primarily for running tests that create new .TON files. If your telephone
switching system performs inband signaling integration, you may not need the Ring No
Answer (RNA) or ringback pattern.
Page 27

Chapter 5: Defining Tone Patterns 19
You might edit an existing file to adjust the cadence or the percentage of variation. For
example, suppose a ring is usually one second on followed by three seconds off. However ,
sometimes it is a bit shorter or longer. You may want to increase the percentage of
variation to allow for the differences. If the busy and reorder tones are very similar, you
might need to reduce the percentage of variation to differentiate between them.
Amanda must be shut down before you run AccuCall Plus.
To shut down Amand a:
1. If Amanda is running, press Al t+S.
2. Type in the password. (The default is AMandA with only the first two and the last letter capitalized.)
3. Press Enter.
4. Press Y (to confirm the shutdown).
5. Press Y again (to reconfirm).
When the C:\AMANDA prompt appears, you can start running AccuCall Plus.
To run AccuCall Plus:
1. Change dir ectory to C:\ACCUCALL by typing:
cd c:\accucall
2. Press Enter.
3. You can create a new 1001.TON file or edit an existing file.
To create a new 1001.TON file, run AccuCall by typing:
accucall
To edit an existing 1001.TON file, run AccuCall by typing:
accucall C:\AMANDA\PBX.DB\1001.TON
4. Press Enter.
The AccuCall Plus main screen has several options. The list of function keys at the
bottom of the screen indicate which keys go with each option.
Page 28

20 Installing Amanda@Work.Place
5. Select “AUTO RUN” by pressing F6.
To define the Ring No Answer (RNA) tone pattern:
1. Type a telephone number for an extension in the Phone No. field. This extension
number must not be forwarded, not in a hunt group, not in hands free/speaker phone
mode, and not be answered by anyone.
2. T ype 3 in the Verification Count field. This is the number of times you want to run the
test.
3. Type 10 in the Minimum Cycles field. This is the number of rings AccuCall Plus will
listen to before completing the test cycle.
4. Select Full (the default) as the value for the Frequency Range field.
The possible values are:
Full (300 Hz to 1700 Hz)
High (800 Hz to 1700 Hz)
This is the range of frequencies that AccuCall Plus listens to.
5. The Frequencies Detected Window displays the frequencies detected by AccuCall
Plus to characterize the tone.
6. The Cadence Detected Window displays the cadence that AccuCall Plus detected to
characterize the tone. (This is displayed as a horizontal bar graph.)
7. Press F9 to begin the test.
Page 29

Chapter 5: Defining Tone Patterns 21
8. After AccuCall Plus has determined the system tone pattern, you can customize the
tone description using the Edit Tones box:
Name: Example: Panasonic Double Ring
Type: Ring1 if single ring, single pause
Ring2 if double ring, single pause
Terminating: NO
Cadence: NO
Frequency1: Determined by test
Frequency2: Determined by test
PCPM Code: 8 (always for ring tones)
Quick Count: None
On Time: Determined by test
On Max Variation: Determined by test
On Min Variation: Determined by test
Off Time: Determined by test
Off Max Variation: Determined by test
Off Min Variation: Determined by test
9. Save the tone by pressing F8 (twice).
10. From the main screen, press F3 to go to the Filters screen. The Undefined Tone Frequencies box on the right side of the screen lists any undefined frequencies that were
found by the test.
11. Add these frequencies to the Filter table on the left side. Write each frequency in the
Filter table, replacing the word “none” with the frequency.
12. Then press F10 to save this information and return to the main screen.
OTE
N
: All the listed frequencies must be at least 40 Hz ap art so Amanda can
distinguish them.
To define the Busy tone pattern:
1. Fill in the telephone number for an extension that is offhook and connected to either
another internal extension or to an outside line.
2. T ype 3 in the Verification Count field. This is the number of times you want to run the
test.
3. Type 10 in the Minimum Cycles field. This is the number of rings AccuCall Plus will
listen to before completing the test cycle.
4. Select Full (the default) as the value for the Frequency Range field.
The possible values are:
Full (300 Hz to 1700 Hz)
High (800 Hz to 1700 Hz)
This is the range of frequencies that AccuCall Plus listens to.
Page 30

22 Installing Amanda@Work.Place
5. The Frequencies Detected Window displays the frequencies detected by AccuCall
Plus to characterize the tone.
6. The Cadence Detected Window displays the cadence that AccuCall Plus detected to
characterize the tone. (This is displayed as a horizontal bar graph.)
7. Press F9 to begin the test.
8. After AccuCall Plus has determined the system tone pattern, you can customize the
tone description using the Edit Tones box:
Name: Example: Panasonic Busy
Type: Busy1 if regular busy cadence
Busy2 if double busy cadence
Terminating: YES (always)
Cadence: NO
Frequency1: Determined by test
Frequency2: Determined by test
PCPM Code: 7 (always for busy tones)
Quick Count: None
On Time: Determined by test
On Max Variation: Determined by test
On Min Variation: Determined by test
Off Time: Determined by test
Off Max Variation: Determined by test
Off Min Variation: Determined by test
OTE
N
: A normal single busy tone is approximately 500 msec on and 500
msec off.
9. Save the tone by pressing F8 (twice).
10. Press F8 to add the tone.
11. From the main screen, press F3 to go to the Filters screen. The Undefined Tone Frequencies box on the right side of the screen lists any undefined frequencies that were
found by the test.
12. Add these frequencies to the Filter table on the left side. Write each frequency in the
Filter table, replacing the word “none” with the frequency.
Make sure that the busy frequencies are listed in the first four positions in the table
(these positions are for terminating tones). When a tone is a terminating tone,
Amanda does not wait for it to be repeated before taking control of the call.
13. Then press F10 to save this information and return to the main screen.
Page 31

Chapter 5: Defining Tone Patterns 23
To define the Reorder/Fast Busy/Error tone pattern:
1. Type a telephone number for an invalid extension in the Phone No. field. This
extension number must return the reorder tone. For example, you might use 777 or
888. Test this tone from a single-line telephone before you run this test.
2. T ype 3 in the Verification Count field. This is the number of times you want to run the
test.
3. Type 10 in the Minimum Cycles field. This is the number of rings AccuCall Plus will
listen to before completing the test cycle.
4. Select Full (the default) as the value for the Frequency Range field.
The possible values are:
Full (300 Hz to 1700 Hz)
High (800 Hz to 1700 Hz)
This is the range of frequencies that AccuCall Plus listens to.
5. The Frequencies Detected Window displays the frequencies detected by AccuCall
Plus to characterize the tone.
6. The Cadence Detected Window displays the cadence that AccuCall Plus detected to
characterize the tone. (This is displayed as a horizontal bar graph.)
7. Press F9 to begin the test.
8. After AccuCall Plus has determined the system tone pattern, you can customize the
tone description using the Edit Tones box:
Name: Example: Panasonic Reorder Tone
Type: Busy if normal reorder
Terminating: YES
Cadence: NO
Frequency1: Determined by test
Frequency2: Determined by test
PCPM Code: 7 (always for busy tones)
Quick Count: None
On Time: Determined by test
On Max Variation: Determined by test
On Min Variation: Determined by test
Off Time: Determined by test
Off Max Variation: Determined by test
Off Min Variation: Determined by test
9. Save the tone by pressing F8 (twice).
10. From the main screen, press F3 to go to the Filters screen. The Undefined Tone Frequencies box on the right side of the screen lists any undefined frequencies that were
found by the test.
Page 32

24 Installing Amanda@Work.Place
11. Add these frequencies to the Filter table on the left side. Write each frequency in the
Filter table, replacing the word “none” with the frequency.
Make sure that the reorder frequencies are listed in the first four p ositio ns in the table
(these positions are for terminating tones).
12. Then press F10 to save this information and return to the main screen.
To finish AccuCall Plus:
1. Press F7 to save the tone file.
2. Type the file name C:\AMANDA\PBX.DB\1001 .TON.
3. Press F8 to save the file.
AccuCall Plus will not allow you to save to file unless you have defined all the filters.
It will also refuse to save to file if any two frequencies are within 40Hz of each other.
If you have two frequencies that are closer than 40Hz, the best strategy is to select a
value that is between them and then go back to edit every tone pattern that contains
the two frequencies and replace them with that value. To edit tones press <F8> from
the main menu.
4. Exit the AccuCall Plus pro gram by pressing F10.
Page 33

Chapter 6: Defining Integration Patterns
Using the Trace File for Integration
If your telephone switching system supports DTMF integration (also called inband
integration), you can:
1. Perform tests that add integration information to the TRACE.OUT file.
2. Convert that information to a set of integration strings.
3. Add the integration strings to the 1001.PBX file in the C:\AMANDA\PBX.DB directory using the Setup or JOVE utilities.
OTE
N
: See “Chapter 12: Utilities,” in Administering Amanda@Work.Place
for information about JOVE.
Depending on the telephone switching system you selected when you defined dial codes
(see “Defining Dial Codes” on page 11), some of the in tegrati on patt erns migh t be alread y
filled in. Many telephone switching systems are programmable, so existing patterns on the
System Integration Patterns screen may still need modification.
Make sure you define dial codes before performing the procedures in this chapter.
Otherwise you will overwrite all the integration information as the Setup utility creates the
1001.PBX file for you using The Amanda Company’s predefined .PBX file for the PBX
that you select.
Setting Up the Trace File
To check that trace files are being created:
1. Shut down Ama nda if it is runn ing
2. At the DOS prompt, type the following to go to the root directory:
CD\
3. Then press Enter.
4. Edit the Amanda.bat file by typing:
JOVE AMANDA.BAT
5. Then press Enter.
The JOVE editor appears on the screen. Towards the bottom of the page is a line that
starts RAMANDA. You are ready to proceed if the line reads:
Page 34

26 Installing Amanda@Work.Place
RAMANDA /t5 /s1300 %1 %2 %3
If not, edit the line so that it is identical to this line.
6. To save and close the file, press the four following key combinations in order:
Ctrl+X
Ctrl+S
Ctrl+X
Ctrl+C
7. At the DOS prompt, change directories to the pbx database by typing:
CD\AMANDA\PBX.DB
Then press Enter.
8. Edit the Pbx file by typing:
JOVE 1001.PBX
9. Then press Enter.
10. Press Page Down display the lower portion of the file where the integration (if any) is
displayed.
11. Use Down Arrow to move the cursor to the bottom of the file to a blank line.
12. Type the following:
integration 10 ‘rrrrrrrrrr’
This new integration string will capture up to 10 digits of In Band Signaling that will
be displayed in the trace file for later inclusion in 1001.PBX.
13. To save and close the file, press the four following key combinations in order:
Ctrl+X
Ctrl+S
Ctrl+X
Ctrl+C
14. At the DO S prompt, type:
CD\
15. Then press Enter.
16. Start Amanda by typing:
AMANDA
17. Then press Enter.
Page 35

Chapter 6: Defining Integration Patterns 27
Creating Test Patterns
After enabling the Trace capability and restarting Amanda, the telephone switching
system must be programmed to perform the following capabilities:
• Select an extension that forwards on Ring No Answer to Amanda.
• Select another extension that for wards to the ab ove extension on Ring No Ans wer.
• Select a third extension that forwards on Busy to Amanda.
• Select a fourth extension that forwards to the third extension on Busy.
• Select a fifth extension that forwards all calls to Amanda.
• If applicable, create a hunt group that will forward back to Amanda if the hunt
group is busy or rings without answer.
• Create a Direct Inward Line by having an outside CO trunk line ring at an extension that will forward on Ring No Answer and Busy to Aman da. Tests 5 and 6 below do not have CO line iden tification enabled. Tests 7 a nd 8 do.
Running the Tests
To run the tests:
1. Start Amanda by typing the following at the DOS prompt:
amanda
2. Then press Enter.
Test 1
• Place a call to the extension that forwards on Ring No Answer to Amanda. Once
Amanda has received the forwarded call, hang up.
Test 2
• Place a call to the second extension that is forwarded to the first extens ion. When
Amanda has received the call, hang up.
Test 3
• Place a call to the third extension that forwards on Busy to Amanda. Make sure
that the extension is offhook and connected to another extension or outside line.
Once Amanda has received the busy forwarded call, hang up.
Test 4
• Place a call to the fourth extension that is busy forwarded to the third extension.
Make sure that both extensions are offhook and either connected to each oth er, or
to outside lines. Once Amanda has received the busy forwarded call, hang up.
Test 5
• Call in on the CO line that is directed to an extension that is forwarded to Amanda
on Ring No Answer. Make sure that CO Line ID is disabled. Once Amanda receives the call, hang up.
Test 6
• Call in on the CO line that is directed to an extension that is forwarded to Amanda
on Busy. Make sure that the CO Line ID is disabled. Once Amanda receives the
call, hang up.
Page 36

28 Installing Amanda@Work.Place
Test 7
• Repeat test 5 with CO Line ID enabled.
Test 8
• Repeat test 6 with CO Line ID enabled.
Test 9
• Call directly into Amanda from any extension. When Amanda answers the call,
hang up.
Reading the Trace File
To read the trace file:
1. Shut down Amanda.
2. At the C:\AMANDA> prompt, type:
JOVE TRACE.OUT
3. Then press Enter.
The first line should read similar to:
Oct 09 15:51:00 Begin trace of Amanda…
4. Press Ctrl+S to perform a search.
5. Type the following search text:
Using dtmf
6. Then press Enter.
The JOVE editor searches for the first call’s integration string. The cursor should
move to the trace line that reads similar to:
Oct 09 15:53:00 ichan01: Using dtmf data: #123
The # sign indicates a Ring No Answer forwarded call, and the 123 (for example) is
the extension that forwarded the call to Amanda. These digits could be any combination of DTMF digits. For example, the AT&T Partner sends:
#03##123#
The #03## is the Ring No Answer code, and the 123# is the extension number that
forwarded. Different telephone switching systems (and often different models) send
different digi ts.
7. WRITE DOWN THE INTEGRATION INFORMATION FOR THIS CALL.
8. Press Ctrl+S again.
9. Keep the same search string by just pressing Enter.
You should progress to the next call’s digits.
10. WRITE DOWN THE INTEGRATION INFORMATION FOR THIS CALL.
Page 37

Chapter 6: Defining Integration Patterns 29
11. Repeat steps 8 through 10 until all 9 integration stings have been recorded. Some of
the strings may be identical (although the extension may be different if you tested
from different stations ).
12. To return to the C:\Amanda> prompt, press the following key combinations:
Ctrl+X
Ctrl+C
To decide what integration strings to add to 1001.PBX:
1. Look at the integration string from Test 1. This represents a Ring No Answer call that
forwarded to Amanda. Locate the characters that match the extension number that
forwarded. On your notepad, rewrite the string so that the extension number is
replaced by the lower case letter r’s. For example, if your string was “#123”, then
your new string would be “#rrr”. In the case of the Partner example, the “#03##123#
would be changed to “#03##rrr#.
OTE
N
: You may have 2, 3, 4 or more digits in your extension numbers. The
number of r’s will match the number of digits in you r extensio n dial
plan.
2. Go to the integration string for Test 2. It may be similar to the one above, or it may
contain a more complex string that has both the first and second extensions listed. If
the string is identical to the previous string (for example, #03##123#), draw a line
through it on your notepad.
If both extensions are listed, determine which number was the first extension (originally called) and which was the second extension. If your string looks similar to
“#122123”, then the 122 was the second extension, and 123 was the first extension.
On your string, replace the first extension with the lower case r ’s and the first extension with lower case s’s. Our example would look like “#sssrrr”. The Partner would
change from “#03##122#123#” to #03## sss #rrr#”.
3. The integration string from Test 3 may be identical to the string from Test 1 (except
for the extension number). If so, draw a line through it.
If not, then your switch sends a unique busy forwarded integration to Amanda. For
example, the string may look like “*123 ”. The “*” denotes a bu sy for warded call, and
the “123” is the extension that forwarded. Replace the “123” with lower case b’s.
Your string would now look like “*bbb”.
4. The integration string from Test 4 may be identical to the on e fr om Test 3. If so, draw
a line through it.
If not, then identify the first extension number and replace the number with lower
case b’s. Identify the second extension number and replace the number with lower
case s’s . Your string may have l ooked like “*12 2123” an d shou ld now lo ok lik e “*sssbbb”.
5. The integration string from Test 5 is to differentiate a trunk based call from a station
based transfer if the switch offers this level of differentiation. If this string is identical
to string one or three, draw a line through it.
If not, evaluate the new string to see what other information was sent in addition to
“123” which is the forwarding extension. If the integration string contains the trunk
ID number (even though it is supposed to be disabled), replace the numbers with
either x’s (if the trunk ID is insignificant).
Page 38

30 Installing Amanda@Work.Place
6. Repeat step 5 for the string from Test 6, but replace the extension number with b’s
rather than r’s.
7. Repeat step 5 for Test 7. If the string is identical to the one from Test 5, draw a line
through it.
8. Repeat step 5 for Test 8, but replace the extension number with b’s rather than r’s. If
the string is identical to the one from Test 6, draw a line through it.
9. Test 9 captures the signaling for a direct call into voice mail. The integration strin g
probably includes a prefix (usually 1 digit—but it could be several digits) and the
extension number of the calling user. Replace the extension number with e’s.
10. It is extremely important that there are no duplicate integration patterns. To make sure
that each pattern is different, list them on a piece of paper , then rewrite them chan ging
all character codes to zeros. What is left are dial code masks which must all be different. For example, using the following dial codes:
#03##rrr#
which are all different. If any dial code masks are the same, you must modify the
duplicates or delete them.
, the dial code masks are
1***000, #02#000#000#
1***eee, #02#sss#rrr#
#03##000#
, and
, and
,
Adding Integration Strings
You can define integration patterns using either one of the following:
• The Setup utility
• The JOVE editor to edit 1001.PBX.
To define DTMF integration patterns using the Setup utility:
1. Run Setup as explained in “Chapter 3: Running the Setup Utility.”
2. From the Configuration Utility menu, press 3 to select Telephone System Integration
Patterns.
The Telephone Switch Type screen appears.
3. From the T elep hone Switch Type screen, select the name of your .PBX file then press
Enter.
Page 39

Chapter 6: Defining Integration Patterns 31
The Integration Patterns screen appears. Its first line tells the name and code (a number between 1001 and 2001) for your switching system (if they appear in the .PBX
file). The following example shows a Toshiba model.
4. Type a number of tenths of seconds in the Timeout box.
A value of 0 prevents integration. Any other val ue is the amount of t ime that Amanda
will wait for information from the telephone switching system. A suggested value for
this timeout is 10 (which equals 1 second ). In some cases you may need a value of 15
or 20.
Depending on the telephone switching system you selected when you defined dial
codes (See “Defining Dial Codes” on page 11), some of the integ ration patterns might
be already filled in.
OTE
N
: To move from the timeout field to the integration patterns and vice
versa, press Ctrl+Home.
5. Many telephone switching systems are programmable, so existing patterns on the
System Integration Patterns screen may still need modification.
Do one or more of the following:
• Verify that the existing patterns are accurate by checking the manual for your
telephone switching system.
• Edit the existing patterns manually. (Select one, use the arrow keys to move
around, and type over anything that needs to be changed.)
For example, if the Ring No Answer pattern is #6rr, the rr stands for any two-
digit extension. If the #6 is accurate, but you plan to have three or four-digit
extension numbers, you must do some editing. For three-digit numbers, change
the Ring No Answer pattern to #6rrr instead of #6rr. (See “Using Character
Codes” on page 32 for more information about rrr and other codes.)
• Delete a pattern by deleting all the characters in it.
To add integration strings to 1001.PBX using JOVE:
1. At the prompt, type:
CD PBX.DB
2. Then press Enter.
Page 40

32 Installing Amanda@Work.Place
3. Type:
JOVE 1001.PBX
4. Then press Enter. This is the same file we edited earlier.
5. Press Down Arrow until you select the line that reads:
integration 10 ‘rrrrrrrrrr’
6. Press Delete to remove this line.
7. T ak e the integration strings you created in the previou s procedure. Type each one on a
separate line in 1001.PBX. For example:
integration 10 ‘#03##rrr#
integration 10 ‘#03##sss#rrr#
integration 10 ‘#00#ee#
OTE
N
: The 10 is a suggested value for the timeout. 10 equals 1 second. Any
other value is the amount of time that Amanda will wait for information from the telephone switching system. In some cases you may
need a value of 15 or 20. A value of 0 prevents integration.
These are in addition to the dial codes and any other integration strings that may have
been in the original file. Enter them at the end of the file. Do not duplicate lines, but
do remove any lines that are inaccurate.
8. To save and close the file, press the four following key combinations in order:
Ctrl+X
Ctrl+S
Ctrl+X
Ctrl+C
To restart Amanda:
1. At the DOS prompt, type:
CD\
2. Then press Enter.
3. Type:
AMANDA
4. Then press Enter.
Using Character Codes
You must modify the DTMF patterns so that the integration patterns become general (not
specific to extensions 111 and 127). Call states and extension information are defined by
using one of the character codes shown below. Each character code represents a call state,
the position of the extension number in the pattern, and the number of digits in the
extension. When inband signaling strings come from the telephone switching system,
Amanda compares them to the defined integration patterns and decides how to handle the
calls.
Page 41

Chapter 6: Defining Integration Patterns 33
The character codes in the integration patterns are defined as follows:
Code Description
b Busy call state
When bbb (or bbbb) appears in the integration pattern, Amanda checks the
Busy Chain. If the Busy Chain is blank, she plays the custom busy messag e for
mailbox bbb (or bbbb) or the system busy message.
c ANI or Calle r ID digits
When a string of c’s appears in the integration pattern, Amanda stores the
DTMF characters at those locations in the port variable %H. With token programming the %H can be used to identify callers and so forth.
e Direct dial call state (used to access a mailbox directly b y Amanda asking for a
security code)
When eee (or eeee) appears in the integration pattern, Amanda assumes the
caller wants to log in to mailbox eee (or eeee) and asks for the security code.
i Immediate record call state (plays the record tone and starts recording a mes-
sage)
When iii (or iiii) appears in the integration pattern, Amanda begins recording a
message for mailbox iii (or iiii) without playing a prompt first.
r Ring- no-answer call state that indicates who the call was for and that it was not
answered
When rrr (or rrrr) appears in the integration pattern, Amanda checks the Ring
No Answer (RNA) Chain. If the RNA Chain is blank, she plays the current
greeting for mailbox rrr (or rrrr) or the system greeting.
See the configuration option “integration_greeting” on page 162 for informa-
tion about how the system greeting can be played when an integrated call has
both the rrr and sss (or rrrr and ssss) fields set.
s Information regarding where the call came from (for handling message replies)
If sss (or ssss) is found in the integration pattern along with b’s or r’ s, Amanda
recognizes mailbox sss as the sender of the message—if one is left.
IP
T
: When using s’s, the integration requires User
IDs for all telephones, even those in the file room and lobby.
t Trunk call or CO line ID; this can also be used for dynamic port allocation
When ttt (or tttt) appears in the integration pattern, Amanda processes mailbox
ttt (or tttt) normally. Wh enever a call comes in on trunk line 3, for example,
mailbox 3 is processed. If trunk lines 1 to 20 support two companies that share
an Amanda system, mailbox’s 1–10 can have @G(990) in their Extension
fields—causing Amanda to play one co mpany’ s greeting. mailbox’ s 1 1–20 can
have @G(880) in their Extension fields—causing Amanda to play the other
company’s greeting.
x Wild card that matches anything (use this carefully)
For example 6xxxx wo uld match every inb and signal ing st ring that had a 6 fol-
lowed by four other characters.
Realize that the character codes you use define not only the placement of the extension
information in the pattern, but also the call state, that is, Ring No Answer, Busy, Direct,
and so forth. Therefore, you can control Amanda’s behavior based upon your specific
requirements. For example, if your customer does not wish to allow for Busy call states,
then modify the integration character codes and replace the b’s with r’s.
Page 42

34 Installing Amanda@Work.Place
Some telephone switching systems have timing problems that cause the first DTMF digit
to be missed. In such cases, it is useful to add integration patterns that are variations of the
current patterns. For example, you might add a second pattern for Direct calls (
in our example) as
second pattern. You can also try reducing the delay time (Delay option on SMDI tab in
Setup utility).
Never remove leading digits froma pattern if they differentiate this pattern from another or
if they are “active” digits (such as r’s and b’s).
***eee. These are identical—except the first digit is missing in the
1***eee
Running Integration Helper
If you know that your telephone switching system supports DTMF integration, the
Integration Helper utility also allows you to determine the integration patterns.
Before running the Integration Helper be sure that you:
• Enable your telephone switching system for voice mail integration.
• Program a test extension for call coverage, o r call forwarding on Ring No Answer
and Busy, to Amanda. The following procedure assumes that this extens ion is 111,
but it can be any extension.
• Make another extension available for placing test calls. The following procedure
assumes that this extension is 127.
To run Integration Helper:
1. Press F4 to run the Integration Helper utility.
The following appears on the screen:
Integration Helper—Waiting for a call on any port…To
abort press ESC…
2. Place sample calls by calling from the available extension (127) to your test extension
(111). Use these calls to generate DTMF tones so Integration Helper can capture
them. You can capture Ring No Answer, Busy, and Direct call codes—using extensions and CO trunk lines. See “Placing Test Calls” on page 35.
3. As a code is captured, it appears on the Edit Integration Pattern screen. You see the
captured pattern on two lines, one that is for display only and the other which you
edit. For example, you need to replace extension numbers with patterns such as rrr for
ring no answer. (See “Using Character Codes” on page 32 for more information.)
4. When you have finis hed, press Esc to return to the Sys tem Integration Patterns s creen.
The screen should be filled with the captured DTMF digits (per your edits) and the
descriptions of those codes.
Page 43

Chapter 6: Defining Integration Patterns 35
Placing Test Calls
You can place test calls of the following types:
Available extension (127) calls the test extension (111) for Ring No Answer:
After a Ring No Answer condition occurs, the call should be forwarded to the Integration
Helper program which answers the call and captures the DTMF digits played by the
telephone switching system. You define what type of test call you made.
Available extension (127) calls the test extension (111) while the test extension is
Busy:
Verify that the test extension (111) has been call forwarded Busy to the single-line ports
you have programmed for Amanda. Make the test extension (111) Busy. From the
available extension (127), call the test extension (111). The test extension (111) should
forward to the single-line ports immediately after the Integration Helper captures the
DTMF digits (if any).
Test extension (111) calls directly to Integration Helper:
From the test extension (111), call the single-line ports. Integration Helper captures the
DTMF digits (if any). Note that some telephone switching systems use different codes
depending upon whet her thi s direct call was made by diali ng an ext ension or by pr essing a
message light. You should run both tests if you suspect this to be true of your system.
Available extension (127) using a CO line calls in and rings the test extension (111)
for Ring No Answer:
From the available extension (127), select an outside CO line and call in to where you are
installing Amanda. When the receptionist answers, ask to be blind transferred to the test
extension (111), which should forward to the Integration Helper after a certain number of
rings.
Available extension (127) using a CO line calls in while the test extension (111) is
Busy:
Make the test extension (111) busy. From the available extension (127), select an outside
CO line and call the company where you are installing Amanda. When the receptionist
answers, ask to be blind transferred to the test extension (111), which should forward to
the Integration Helper immediately.
Page 44

36 Installing Amanda@Work.Place
Forward from Ring No Answer Example
You may have two patterns la beled “Forw ard from R ing No Answ er . ” Both shou ld contain
the extension number (111) that was call forwarded to the Integration Helper. This is the
extension that did not answer. One of the patterns may contain the available extension
number you called from (127).
For example, suppose the integration patterns were:
#02#127#111#
and
#03##111
Y o u replace the digits of the test extension (1 1 1, the extens ion that did not answer) with r’ s
and the digits of the telephone from which the call was made, 127, with s’s:
#02#sss#rrr#
and
#03##rrr
This takes care of extensions that have exactly three digits (such as 111 and 127). To
handle four-digit extensions, for example, you would have used:
#02#ssss#rrrr#
and
#03##rrrr
Direct Call Example
As a result of the Direct test call, one pattern should be labeled “Direct call…” and contain
the extension number for the telephone from which you called (111).
Replace the extension number with e’s. For example, change:
1***111
to:
1***eee
This takes care of extensions that have exactly three digits (such as 111 and 127). To
handle four-digit extensions, for example, you would have used:
1***eeee
Forward from Busy Example
For patterns labeled “Forward from Busy,” you replace the extension number that was
busy with b’s. If there is a pattern that contains the extension from which the call was
made, replace the extension number with s’s.
Page 45

Chapter 7: Configuring Amanda
Using This Chapter
This chapter contains a questionnaire that helps you determine exactly how your customer
needs his Amanda system to be set up. It also guides you as you configure an Amanda
system for the first time. Fortunately, The Amanda Company has configured Amanda so
that over 90% of the configuration options need no change whatsoever.
For a complete list of the configuration options, see “Appendix C: Configuration
Reference.”
Using the Questionnaire
Use this “First Use” questionnaire to find out how your customers prefer to use their
Amanda system. Use the results as you run Setup, selection 4, to set configuration options,
and as you create the mailbox template (usually mailbox 997). Then create mailboxes for
users.
Question Column
The questions address:
• How Amanda handles all callers.
• How Amanda interacts with most users. You assign new users the options that
give them an initial, usable mailbox configuration. After each mailbox has been
created, the System Administrator can change these options, and the users themselves can change some options.
• System Administration issues.
During your interview with the client, you will use the Question and Circle Response
columns in this questionnaire to select the Amanda features for this site.
Location Column
You will use the Location and Action columns to implement these features on Amanda.
The Location column uses this symbol
menu level to select the feature from the correct Amanda screen. For example, “In the
Setup utility, select System Configuration Options
Calls” means “In the Setup utility, first select Configuration Options, then select General
Configuration, then select Incoming Calls.”
→
to separate the choices you must make at each
→
General Configuration→Incoming
Page 46

38 Installing Amanda@Work.Place
The Location column includes the name of the configuration option (called a parameter)
for each feature. The options and their current settings are stored in
C:\AMANDA\INSTALL.CFG. You can review them using the Setup utility. From Setup,
select System Configuration Options
→
Advanced Configuration→General.
First Use Questionnaire
Question
1) Amanda normally says “Plea se hold while I try
that extension” as she transfers a call. This feature can
be turned off.
Do you want Amanda to say “Please hold….?”
2) Do you want Amanda to verify that a caller is still
on the telephone before transferring the call to an operator?
(Amanda asks th e caller to “Say yes at the tone” before transferring the call.)
3) Do you want callers to be able to hold for busy extensions?
Circle
Response
YES In the Setup utility, select
NO Amanda parameter is
YES In the Setup utility, select
NO Amanda parameter is
YES In the Setup utility, select
NO Set the Caller Can Hold ch eck box to
Location and Amanda
Parameter (if applica-
System Configuration
Options→General
Configuration
Incoming Calls.
please_hold
System Configuration
Options→General
Configuration
Incoming Calls.
dtmf_gate
System Configuration
Options→General
Configuration
Incoming Calls.
Amanda parameter is
cancel_busy_hold
ble)
→
→
→
Action
Set the Amanda Says “Please Hold
While…” check box to T for True,
which is the default.
Set the Amanda Says “Please Hold
While…” check bo x to F for False
You can also bypass this message for
individual mailboxes using the Token
Programming Langua ge (a lt hough
only blind transfers are supported).
Set the Amanda Says “Please Say
‘Yes’…” check box to T for True.
Set the Amanda Says “Please Say
‘Yes’…” check box to F for False,
which is the default.
Set the Caller Can Hold ch eck box to
T for True, which is the default.
F for False.
4) If YES to 3, do you want active or inactive hold?
On active hold, th e caller is promp ted to press * to re-
main on hold.
On inactive hold, the caller takes no action to stay on
hold.
(800 numbers benefit from using active hold, because
the caller cannot le ave the telephone unat te nded.)
5) Do you want direct messages to play the Na me/
Extension recording instead of the mail box’s greeting?
(A direct message is left in a user’s mail box without
attempting to ring that user. By default, A m anda
plays the mailbox’s greeting. The Name/Ext recording is shorter than the mailbox’s gree ting. )
ACTIVE In the Setup utility, select
INACTIVE Set the Active Hold check box to F for
YES In the Setup utility, select
NO Select the Play User ’s Gr eeti ng op tion
System Configuration
Options→General
Configuration
Incoming Calls.
Amanda parameter is
active_hold
System Configuration
Options→General
Configuration
Incoming Calls.
Amanda parameter is
short_direct_send
→
→
Set the Active Hold check box to T for
True, whic h i s the default.
False.
Select the Play User’s Name and Extension Recording option.
(which is the default).
Page 47

Chapter 7: Configuring Amanda 39
First Use Questionnaire (Continued)
Question
6) Do you want Amanda to answer all incoming calls
or only answer when the operator cannot get to the
phone within a certain number of rings?
(This decision can vary from port t o port . )
7) Do you want callers who use the company directory (411) to press * to transfer to the mailbox being described?
8a) Do you want users and callers to be able to listen
to, rerecord, or cancel messages and greetings that
they create?
8b) Do you want users and callers to hear a prompt
before they star t recording or just the beep?
The prompt is “Begin recording at the tone. Finish by
pressing # or hanging up.”
Circle
Response
ALL CALLS In the Setup utility, select
AFTER x
RINGS
What is x?
YES Global settings parameter
NO Set tmo_dir_transfer to 0.
YES In the Setup utility, select
NO Set the Allow Listen ing To… check
PROMPT and
BEEP
BEEP ONLY Set
Location and Amanda
Parameter (if applica-
System Configuration
Options→Advanced
Configuration
Per Port.
Amanda parameter is
n_rings
is
transfer
System Configuration
Options→General
Configuration
Messages.
Amanda parameter is
end_rec_menu
record_menu
In the Setup utility, select
System Configuration
Options→Advanced
Configuration
General.
Amanda parameters are
begin_rec_prompt
record_menu
ble)
→
tmo_dir_
.
→
→
Action
Set N_RINGS to 1 for each port.
This is a per port setting. The default is
one ring on each port.
(Amanda is being set up as a primary
attendant.)
Set N_RINGS to x for each po rt,
where x in the number of rings. This is
a per port setting.
(Amanda is being set up as a secondary attendant.)
Set tmo_dir_transfer a number greater
than 0. The default is 2.
Set the Allow Listen ing To… check
box to T for Tr ue, whic h is th e de fault.
box to F for False.
begin_rec_prompt
Set
True, which is the default. Se t
record_menu
is the default .
begin_rec_prompt
False. Set
True, whic h i s the default.
to T for True, which
record_menu
to T for
to F for
to T for
9) When users listen to messages, Amanda normally
plays the messages in chronological order.
Do you want users to hear urgent message s first ?
10) When a user listens to messages, should Amanda
start with his first new (unheard) message or the first
message in his message list (whether heard or unheard)?
11) What time stamp should a forwarded message
have? You can use the time the message was recorded
or the time the message was forwarded.
(When you use the time that the message was recorded, the person receiving the forwarded message may
think delivery was slow and be confused—unless the
person forwarding the message adds a com m en t.)
YES In the Setup utility, select
NO Set the Urgent Messages First check
NEXT NEW
MESSAGE
FIRST MESSAGE IN
LIST
TIME RECORDED
TIME FORWARDED
System Configuration
Options→General
Configuration
Messages.
Amanda parameter is
urgent_to_front
In the Setup utility, select
System Configuration
Options→General
Configuration
Messages.
Amanda parameter is
play_new_first
In the Setup utility, select
System Configuration
Options→General
Configuration
Messages.
Amanda parameter is
timestamp_
forwards
→
→
→
Set the Urgent Messages First check
box to T for Tr ue, whic h is th e de fault.
box to F for False.
Set the Play Next New Message check
box to T for True.
Set the Play Next New Message check
box to F for False, which is the default.
Select the Time Originally Recorded
option, which is the default.
Select the Time Forwarded optio n.
Page 48

40 Installing Amanda@Work.Place
First Use Questionnaire (Continued)
Question
12) Do you want Amanda to tell the user the date and
time a message was re corde d be fore play ing t he message?
This option can be modifie d for each user.
13) If YES to 12, do you want Amanda to say ‘today’
and ‘yesterday’ instead of the exact date? This option
is set for all users.
14) How many times should the telephon e ring before Amanda decides the user is unavailable?
(After these rings, Amanda takes a message, reroutes
the call, or does whatever she is config ured to do for
Ring No Answer.)
15) Do you want users to be able to turn Do Not Disturb on and off?
Circle
Response
YES In Amanda, select Users
NO Set the D/T option to NO.
YES In the Setup utility, select
NO Select the Amanda Always Says Full
1 2 3
4 5 6
7 8 9
YES In Amanda, select Users
NO Set Do Not Disturb’s Lock to ON.
Location and Amanda
Parameter (if applica-
menu, then enter 997 in
mailbox.
System Configuration
Options→General
Configuration
Messages.
Amanda parameter is
abbreviate_dates
In Amanda, sele ct Users
menu, then enter 997 in
mailbox.
menu, then enter 997 in
mailbox.
ble)
→
Action
Set the D/T option to YES.
OTE
:
N
Select the Amanda Says “Tod ay” A nd
“Yesterday” F or Date s op t ion, (w hich
is the default ) .
Date option.
Set the Set Maximum Rings val ue to
the circled number. Th e current default is 0, which means 4 rings.
C
ken in Extension fields (to per form a
partially supervised tran sfer), Maximum Rings must be set to 1.
Set Do Not Disturb’s Lock to OFF.
A user can always get th e
message date/time by pre ss ing 74 during the message
even if this op tion is set to
NO.
AUTION
:
If you are using the U to-
16) Do you want Do Not Disturb initially ON or initially OFF?
17) Do you want users to be able to turn call screening on and off?
(Call screening allows users to accept or reject calls
based on who is calling.)
18) Do you want call screen in g ini ti ally ON or initially OFF?
19) Do you wan t cal lers to lea ve mess ages fo r the users they call?
ON In Amanda, sele ct Users
OFF Set Do Not Disturb to OFF.
YES In Amanda, select Users
NO Set Screen Calls’ Lock to ON.
ON In Amanda, sele ct Users
OFF Set Screen Calls to OFF.
YES In Amanda, select Users
NO Set Store Messages to NO;
menu, then enter 997 in
mailbox.
menu, then enter 997 in
mailbox.
menu, then enter 997 in
mailbox.
menu, then enter 997 in
mailbox.
Set Do Not Disturb to ON.
Set Screen Calls’ Lock to OFF.
Set Screen Calls to ON.
Set Store Messages to YES.
Set Store Messages’s Max to a number
of seconds for each message.
make sure Copy Messages To is blank.
Page 49

Chapter 7: Configuring Amanda 41
First Use Questionnaire (Continued)
Question
20) Do you want everyone to use the same greeting
(and in the same voice) when the telephone is not answered?
(NO allows each user to create his own gre et i ng. )
21) If YES to 20, do you want to use Amanda’s system greeting or a company-wide custom greeting
when a telephone is not answered?
(The system gr eet in g is “ Ple ase le ave a mes sage f or ”
followed by the system or custom Name/Extension
recording.)
Circle
Response
YES In Amanda, select Users
NO Set Current Greetin g to 0;
SYSTEM In Amanda, select Us ers
CUSTOM Set Current Greeting to 1. Record a
Location and Amanda
Parameter (if applica-
ble)
menu, then enter 997 in
mailbox.
menu, then enter 997 in
mailbox.
Action
Set Current Greeting’s Max to 0.
set Current Greeting’s Max to a number of seconds for each user’s recording.
Each user should record a greeting and
a Name/Extension record ing. Until a
user records these, the system greeting
and Name/Extension recording are
used. When the user records Greeting
1, the Current Greeting setting changes from 0 to 1 aut oma ti ca ll y. The us er
may also control what greeting is used.
(Amanda@Work.Place provides 3
greetings per mailbox.)
Set Current Greetin g to 0, which is the
default.
greeting for some mailbox (e.g., 445),
then use DOS to copy it (e.g.,
C:\VMB.DB\5\445\GRT1.VOX
as GRT1.VOX for each mailbox assigned to a user. For 3-digit extensions
that start with 2, u s e:
COPY
custom_grt
C:\VMB.DB\?\2??\GRT1.VOX
For 4-digit extensions that end with 5,
use:
COPY
custom_grt
C:\VMB.DB\?\4???\GRT1.VOX
(Here, custom_grt is
C:\VMB.DB\5\445\GRT1.VOX
Update the mailbox template (997) before you create the other mail boxes.
Use the COPY com mand shown
above after the IDs have been created.
)
.)
22) If callers are permi tted to ho ld when a u ser extension is BUSY (see Question 3), do you want everyone
to use the same greeting (and in the same voice)?
(NO allows each user to create his own busy greeting.)
YES In Amanda, select Users
NO Set Busy Message’s Max to a number
menu, then enter 997 in
mailbox.
Set Busy Message’s Max to 0.
greater than zero, such as 45.
Each user should record a busy greeting. Until a user records his busy
greeting, the system busy greeting is
used. The user ma y also control what
busy greeting is used.
Page 50

42 Installing Amanda@Work.Place
First Use Questionnaire (Continued)
Question
23) If YES to 22, do you want to use Amanda’s system busy greeting or a custom busy greeting?
(The system busy greeting explains to the caller how
to hold for the extension. If the caller presses *,
Amanda plays music, then r etr ies the extension. If it
is still busy, Amanda changes the prompt: the caller
can hold, enter another exte nsi on, or le ave a message.)
24) Do you want Amanda to let the user know who
the call is for?
(This is primarily for people who an swer calls for
more than one person or share a telephone.)
25) If YES to 24, do you want Amanda to let the user
accept or reject the call based on who it is for?
Circle
Response
SYSTEM In Amanda, select Us ers
CUSTOM Set Busy Message to CUS. Record the
YES In Amanda, select Users
NO Set ID Call? to NO.
YES In Amanda, select Users
NO Use the settings already specified for
Location and Amanda
Parameter (if applica-
ble)
menu, then enter 997 in
mailbox.
menu, then enter 997 in
mailbox.
menu, then enter 997 in
mailbox.
Action
Set Busy Message to SYS.
busy message for a mailbox (e.g. ,
445), then use DO S to copy that message (e.g.,
\BUSY.VOX
each user’s mailbox. For 3-digit extensions that start with 2, use:
COPY
C:\VMB.DB\?\2??\BUSY.VOX
For 4-digit extensions that end with 5,
use:
COPY
C:\VMB.DB\?\4???\BUSY.VOX
(Here, custom_bsy is
C:\VMB.DB\5\445\BUSY.VOX
Update the mailbox template (997) before you create the other mail boxes.
Use the COPY com m and shown
above after the IDs have been created.
Set ID Call? to YES.
Set Screen Calls to ON and ID Call ? to
YES.
Screen Calls and ID Call? in questions
17, 18, and 24.
C:\VMB.DB\5\445
) as BUSY.VOX for
custom_bsy
custom_bsy
.)
26) If YES to 25, do you want users to hear:
• Both who is calling and wh o th e call is for.
• Only who the call is for.
27) Do you want to use a system or custom N a me/
Extension recording?
(The system recording says the ma ilbox number instead of the user’s name. For example, if the user’s
mailbox is 143, Amanda says “F or m ai lbox 1-4-3.”)
OTE
:
N
It is a good idea to have someone w ith a
good voice make a Name/Extension recording for each user, so Amanda identifies users by name on the first day, even if you
allow custom name/ extension recording.
28) Do you want to log information about messages?
If YES, the MSG.LOG file will store:
• The date and time every message is rece ived
• The date an d time every mailbox is checked for
messages along with the DTMF the user entered
BOTH In the Setup utility, select
ONLY WHO
CALL IS FOR
SYSTEM In Amanda, select Us ers
CUSTOM Set Name/Ext. to YES. Each user
YES In the Setup utility, select
NO Set the Log Info About Messages
System Configuration
Options→Advanced
Configuration
General (Settings).
Amanda parameter is
modified_call_
screening
menu, then enter 997 in
mailbox.
System Configuration
Options→General
Configuration
Messages.
The Amanda parameter is
msg_log
→
→
modified_call_
Set
screening
modified_call_
Set
screening
Set Name/Ext to NO. The users cannot
make recordings.
should make a recording. Until a user
makes his recording, the system recording is used.
Set the Log Info About Messages
check box to T for True.
check box to F for False, which is the
default.
to F for False.
to T for True.
Page 51

Chapter 7: Configuring Amanda 43
First Use Questionnaire (Continued)
Question
29) Do you want to log information about accesses to
mailboxes? If YES, the USER.LOG file will store the
date, time, and mailbox whe n any mailbox is accessed by DTMF. This file can be analyzed for call distributions and accesses by dates, days, and tim es.
30) What password does the administ rat or want to
use for Amanda?
(You may not want to write this down , bu t be sure
that it gets rese t. The defaul t is AMandA with th e first
two and the last letter capitalized.)
31) What language should Amanda use for prompts,
such as “Please hold…?”
(You can offer information in more than one language, ask for details.)
32) Will Amanda be connected to a printer so that
you can print reports?
Circle
Response
YES In the Setup utility, select
NO Set the Log Info About User Access
Write password here.
ENGLISH
SPANISH
FRENCH
YES In the Setup utility, select
NO Set the Printer Atta ched To LPT value
Location and Amanda
Parameter (if applica-
System Configuration
Options→General
Configuration
Messages.
The Amanda pa r ameter is
user_log
In the Setup utility, select
System Configuration
Options→General
Configuration
Password.
Amanda parameter is
password
In the Setup utility, select
System Configuration
Options→General
Configuration
General Defaults.
Amanda parameter is
prompt_file
System Configuration
Options→General
Configuration
General Defaults.
Amanda parameter is
lpt_port
ble)
→
→
→
→
Action
Set the Log Info About User Access
check box to T for True.
check box to F for False, which is the
default.
Enter a password which conta i ns no
more than eight lett er s. Pas swo rds ar e
case-sensitive.
Press F2 and select a language from
the drop down list i n the Lan guage list
box. ENGLISH is the default. If yo u
do not select English, you must also
install the prompts for the language.
Set the Printer Atta ched To LPT value
to 1.
to 0, which is the default.
33) Do you want to shut down Aman da for disk
maintenance and/or tape backups?
34) If YES to 33), do you want Amanda to shutdown
once a week or everyday?
35) What words do you want the screen saver to display on the Amanda computer?
(Write the words. The defa ul t is “Buy mor e Amandas.”)
YES In the Setup utility, select
NO Set the Shutdown For Maintenance
WEEKLY
Write a day
and a time.
DAILY
Write down
the time.
Write a phrase. In the Setup utility, select
System Configuration
Options→General
Configuration
General Defaults.
Amanda parameter is
shutdown
In the Setup utility, select
System Configuration
Options→General
Configuration
General Defaults.
Amanda parameter is
shutdown
System Configuration
Options→General
Configuration
General Defaults.
Amanda parameter is
advertising
→
→
→
Set the Shutdown For Maintenance
And Backups check box to T for True.
And Backups check box to F for False.
Select the Onc e A Week On [TUE] At
[01:30] option. The default is Tuesday
at 1:30 A.M. You can specify a different day from the TUE drop down list
box. You can enter a different time in
the 01:30 text box. Time value uses the
24-hour format (HHMM).
Select the Everyda y at <HHMM> option and enter the time at HHMM, using the 24-hour format.
At the Screen Saver Phrase text box,
enter the phrase. Reco mmended
length is up to 30 characters, but maximum length is 80.
Page 52

44 Installing Amanda@Work.Place
First Use Questionnaire (Continued)
Question
36) When users don’t delete messages, they accumu-
late. Do you want to get rid of messages that have
been listened to and hav e be en around for a long
time?
Be aware that deleted messa ges are gone forever.
37) If YES to 36, write a number of days (from 1 to
99) after which a message that has been heard should
be deleted.
38) Do you want to use the hold music provided by
The Amanda Company or hold music and messages
of your own?
Circle
Response
YES In the Setup utility, select
NO Set Amanda parameter
Write a number (1-99).
The Amanda
Company
YOUR OWN
Location and Amanda
Parameter (if applica-
System Configuration
Options→Advanced
Configuration
General (Settings).
Amanda parameter is
purge
In the Setup utility, select
System Configuration
Options→Advanced
Configuration
General (Settings).
Amanda parameter is
purge
N/A Amanda plays C:\AMAN-
ble)
See Action for Question 37.
→
→
which is the default.
purge
Set
ber of days (1-90) after being heard
that a message is purg ed .
DA\HOLD.VOX by default.
There is no config option or mai lbox
field for this.
To rerecord HOLD.VOX:
1. Shut down Amanda.
2. At the DOS prompt (C:\AMANDA), type:
COPY HOLD.VOX MUSIC.VOX
so you can use this file later. If
you already have a MUSIC.VOX file, use another
name.
3. Restart Amand a.
4. Using the telephone, log in to
the system administrator mailbox (999), select 8 for the System Administration menu, then
3 to record the busy-hold music.
5. Make your recording. It becomes the file C:\AMANDA\HOLD.VOX and is played
by Amanda to callers on hold.
6. If you create HOLD0.VOX,
HOLD1.VOX, etc. Amanda
plays them after HOL D.VOX if
the extension remains busy.
Each one is created as
HOLD.VOX, and must be
changed to HOLDx.VOX with a
DOS command:
COPY HOLD.VOX
HOLDx.VOX
Do the recording for the real
HOLD.VOX (the first music/
message the caller hears) last.
Action
to x, where x is the num-
purge to 0,
Page 53
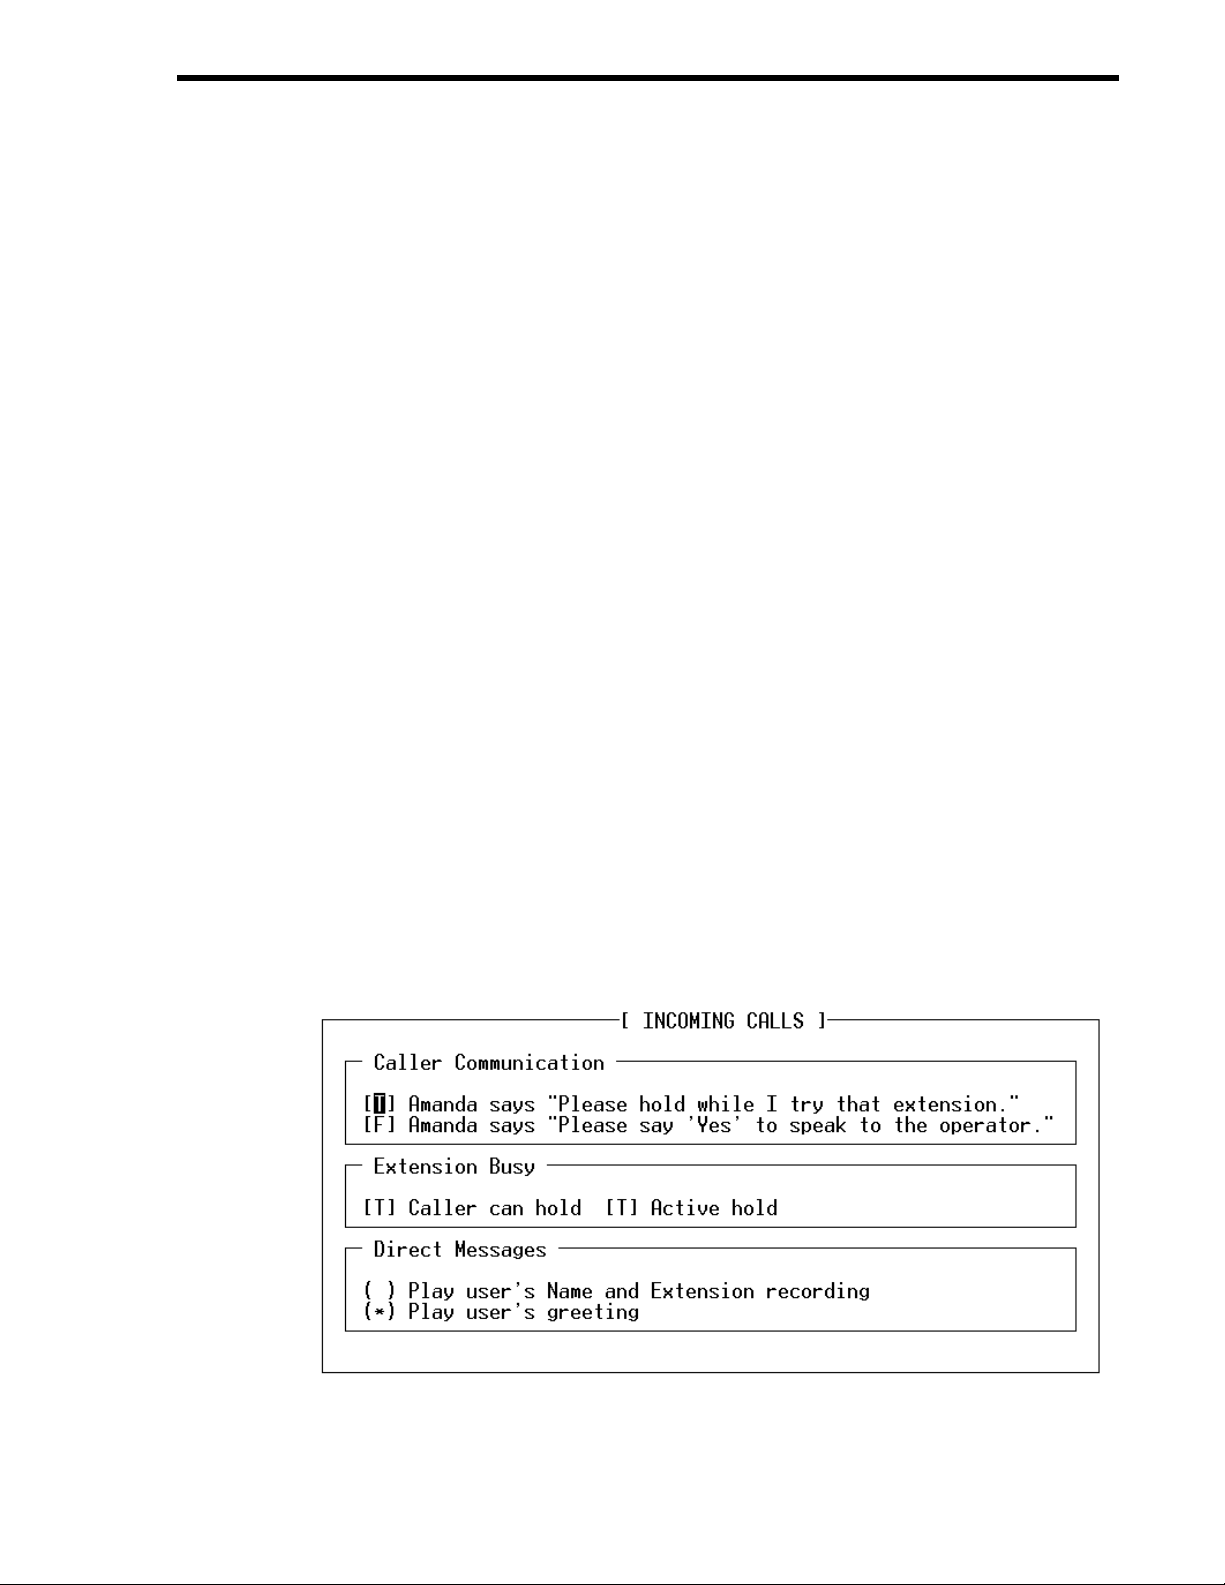
Chapter 7: Configuring Amanda 45
Configuring a New Installation
Amanda has over 200 configuration options. They are what make Amanda so powerful
and flexible. You will probably leave over 90% of those options set to their default
settings. However, armed with the answers to the First Use Questionnaire, you should
review the most commonly changed options (those in the General Configuration section
of the Setup utility).
To set a new Amanda system’s general configuration options:
1. Run Setup as explained in “Chapter 3: Running the Setup Utility.”
The Work.Place Configuration Utility screen appears.
2. To select System Configuration Options, press 4.
The System Configuration menu appears.
3. To select General Configuration, press Enter.
The General Configuration menu provides easy access to the configuration options
you are most likely to change.
4. Press I for Incoming Calls.
The Incoming Calls screen appears.
Options with bracketed settings [T] or [F] are like Windows check boxes. Using T for
True is like checking a check box. Using F for False is like clearing a check box.
Pressing the space bar toggles between T and F. Sometimes one check box is dependent on your selection for an earlier check box. For example, in the Incoming Calls
screen, if you do not allow the caller to hold, the setting for active hold is ignored.
Options with settings that are in parentheses (*) or ( ) are like Windows option buttons. You make a selection from the group of opt ion s by ty ping an ast eri s k in fro nt of
any one of the options. (Typing a space removes an asterisk from one option; if there
are only two options, the asterisk automatically moves to the other option.)
5. For each check box, select T for True or F for False.
Page 54

46 Installing Amanda@Work.Place
Type an asterisk (*) to select an option button.
(Press F1 for help with any setting you aren’t sure about.)
6. Press F10 to save your settings and Esc to return to the General Configuration screen.
7. Press M for Messages.
The Managing Messages screen appears.
8. For each check box, select T for True or F for False.
Type an asterisk (*) to select an option button.
(Press F1 for help with any setting you aren’t sure about.)
9. Press F10 to save your settings and Esc to return to the General Configuration screen.
10. Press P for Password.
The Password screen appears. Current Password is display-only.
11. Type the new password for Amanda in the Enter New Password text box.
12. Press F10 to save your settings and Esc to return to the General Configuration screen.
13. Press G for General Defaults.
The General Defaults screen appears.
Page 55

Chapter 7: Configuring Amanda 47
Language is an example of a list. Pressing F2 displays a list of choices from which
you select the language to be used.
Sometimes options are dependent on your select ion for other optio ns. For example, in
the General Defaults screen, only if you select the Restricted option button can you
access the Port text box and type the number of the port to which notification is
restricted. Likewise, only if you select the Shutdown For Maintenance And Backups
check box is it important what days or time the shutdown occurs.
For more information about notification, see “Selecting a Type of Notification” on
page 47.
14. For the check box, select T for True or F for False.
Type an asterisk (*) to select an option button.
Select the day of the week from a list.
Type numbers for the ports and times.
Type a phrase for the screen saver. (You can use up to 79 characters, but the screen
saver phrase is more readable if you use fewer than 30 characters.)
Press F1 for help with any setting you aren’t sure about.
15. Press F10 to save your settings and Esc to return to the General Configuration screen.
Selecting a Typ e of Noti f ica t io n
Many telephones have message lights (also called message waiting lights) to let users
know that they have unheard messages. You use notification records to turn the lights on
and off. You can also notify users about waiting messages by paging them, calling their
extensions, or calling them at an outside number.
Part of installing Amanda is selecting the type of notification:
• Roving
• Dedicated
• Restricted
With roving notification, Amanda tries to use the last port in the hunt group (for
example, port 4 on a 4-port system) for notification. If the last port is busy, Amanda tries
the second-to-last port (for example, port 3), and so forth.
Page 56

48 Installing Amanda@Work.Place
If, on your telephone switching system, the port that turns on the message light must also
turn it off, you must have only one port perfo rm notification (contro l voice notify , message
lights, paging, and so forth). You must use dedicated or restricted notification, rather than
the default roving notification.
With dedicated notification, one port is used:
• Only for notification
BUT that port
• Cannot take incoming calls
Dedicated notification eliminates glare (the collisions between incoming calls and
notifications). However, you have one less port for receiving calls.
With restricted notification, one port is used:
• Only for notification
AND that port
• Can take incoming calls
With restricted notification, glare can still occur. However, all your ports can be used for
receiving calls.
See Administering Amanda@Work.Place for more information on notification records.
If you are using JOVE to edit INSTALL.CFG, for roving notificati on, set both n_ochan
and notify_restriction to 0. For dedicated notification, set n_ochan to 1 and
notify_restriction to 0. For restricted notification, set n_ochan to 0 and
notify_restriction to a specific port number.
OTE
N
: When using roving or r estricted notification, program your phone system
to have the ports in a linear hunt group (not a circular hunt group). In a
linear hunt group, port 1 always rings first, port 2 rings only if port 1 is
busy, and port 3 only r ings if p ort 1 and port 2 are both bus y. Then when
Amanda’s last port rings, all the other ports must be busy.
If a caller hears DTMF and then a hangup instead of the company greeting, a collision has occurred.
Sharing Amanda
Sometimes more than one company or department share an Amanda system. Specific
ports are assigned to specific groups. For example, on a two-port system shared by two
companies, one company receives calls on port 1 and another on port 2. This affects the
configuration options that determine which mailbox is used for:
• The company or initial greeting that callers hear when they call one of the companies.
• The employee directory that contains the names of all the users as they appear in
the Directory Name 1 and Directory Name 2 fields.
• The direct message mailbox that allows you to record a message for a mailbox
without having to transfer to that extension. You hear either the mailbox’s greeting or the name and extension recording (depending on the setting for the
short_direct_send configuration option). For example, you can leave a message
for someone that you know is out of the office or not to be disturbed.
Page 57
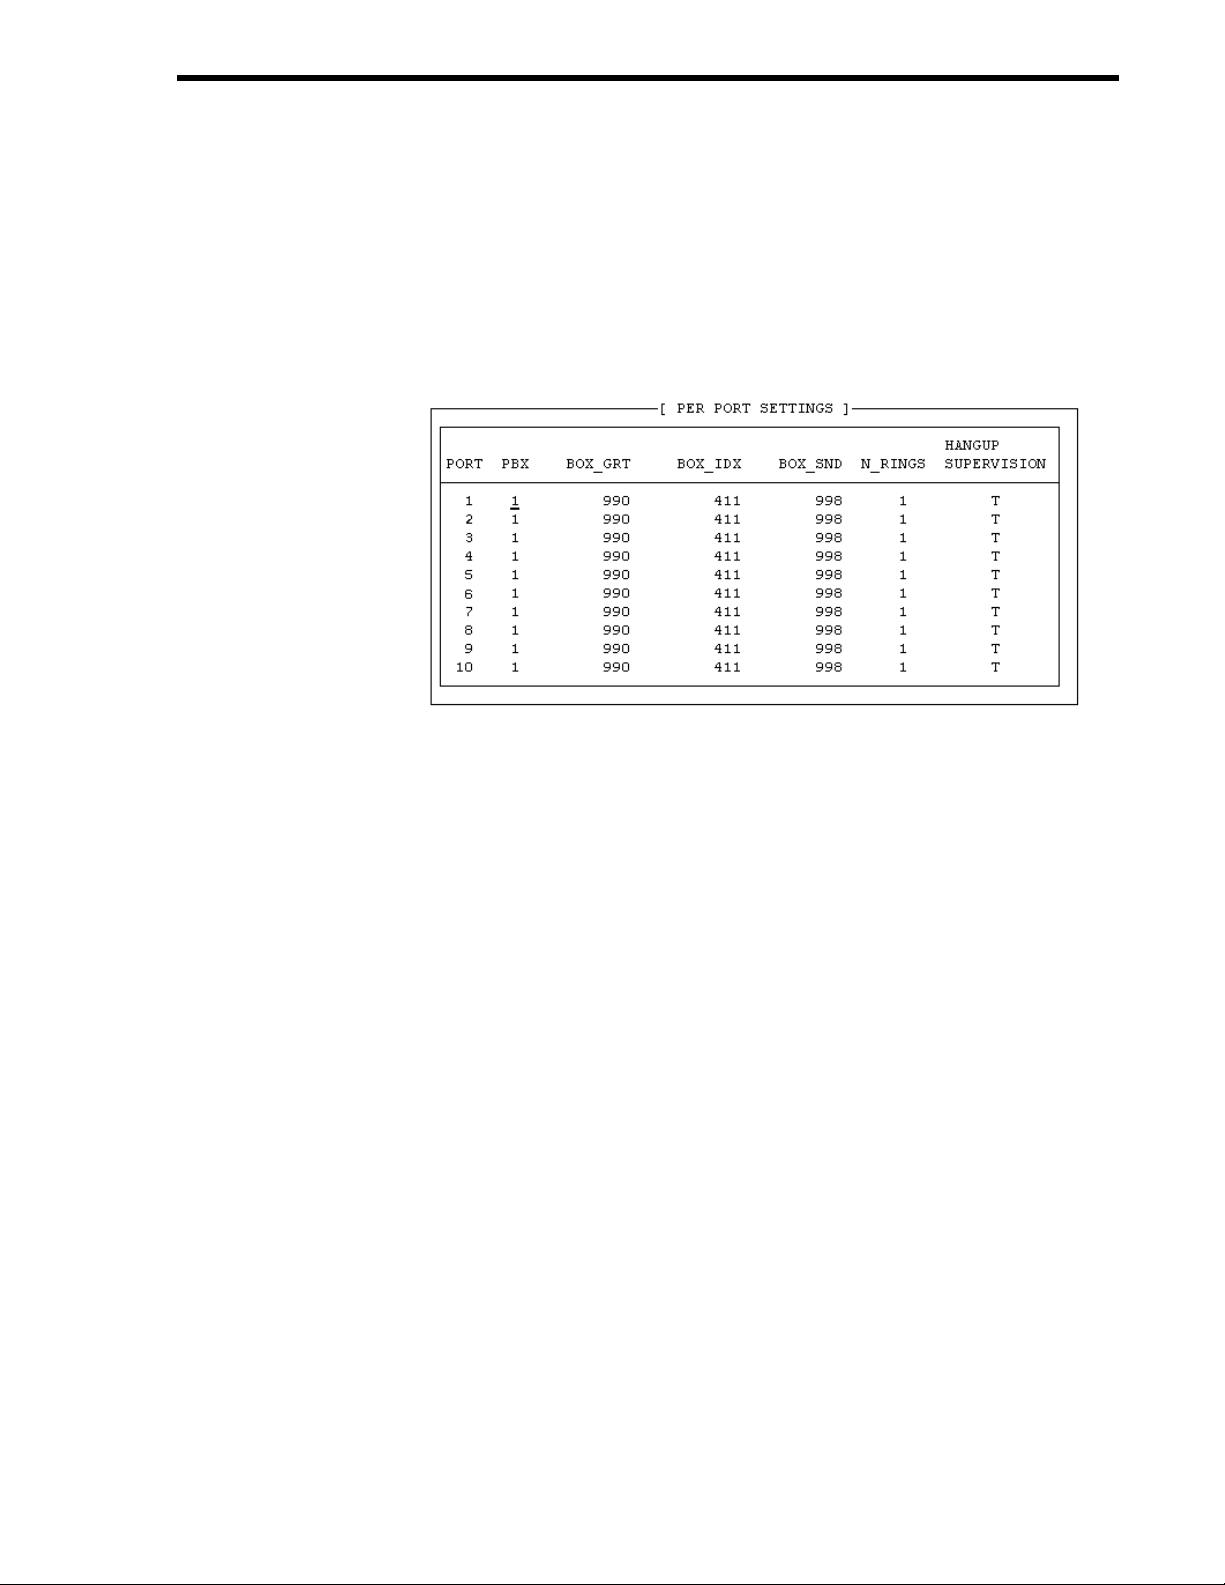
Chapter 7: Configuring Amanda 49
The following procedures are based on a four-port Amanda system shared by two
companies.
To have different company greetings:
• In the Per Port section of Advanced Configuration, change the mailbox for the
company greeting on a per port basis.
Suppose the first company uses ports 1 and 2, and the second company uses ports 3
and 4. Then box_grt for ports 1 and 2 might be set to mailbox 990, while box_grt for
ports 3 and 4 might be set to mailbox 880.
To have different employee directories:
• In the Per Port section of Advance d Configuration, chang e the mailbox for the employee directory on a per port basis.
For example, box_idx for ports 1 and 2 might be set to mailbox 411, while box_idx
for ports 3 and 4 might be set to mailbox 311.
To use different mailboxes for direct messaging:
• In the Per Port section of Ad vanced Co nfig uration , change the m ailbox f or the di rect messaging on a per port basis.
For example, box_snd for ports 1 and 2 might be set to mailbox 998, while box_snd
for ports 3 and 4 might be set to mailbox 888.
If two departments share an Amanda system, you might use the default mailbo xes for one
department and create another set for the other department. If you intend to use the
defaults, don’t overwrite these mailboxes when you create new mailboxes for employees.
For more information about default mailboxes, see “Using Default and Recommended
Mailboxes” on page 49.
Using Default and Recommended Mailboxes
The following is a complete list of the default (and recommended) mailboxes in case you
need to change (or set) them. If two departments share an Amanda system, you might use
these mailboxes for one department and create another set for the other department. (For
more information about sharing an Amanda system, see “Sharing Amanda” on page 48.)
If you intend to use the defaults, don’t overwrite these mailboxes when you create new
mailboxes for employees.
Page 58

50 Installing Amanda@Work.Place
Default and Recommended Mailboxes
Configuration
Mailbox
0 (n o option) Mailbox for operator or receptionist. Mailbox 0 has been created for you.
Option
Purpose
By default, this mailbox has Do Not Disturb locked OFF, call screening
locked OFF, Greeting 0 as the current greeting, 999 in the Done Chain,
stores messages, and is set to ring six times.
8
411 box_idx Mailbox for employee directory. Mailbox 411 has been created for you.
990 box_grt Mailbox for Company Greeting. Mailbox 990 has been created for you.
991 (no option) Mailbox for Caller Instructions. Mailbox 991 has been created for you.
994 hot_box Mailbox for use with PCPM codes. For example, you can set up a hot_box
(no option) Mailbox that acts as a shortcut to mailbox 998. Mailbox 8 makes it easier
to send callers directly to voice mail. Live operators press transfer, call
Amanda, dial 8# followed by the mailbo x number, and hang up. The caller
goes directly to voice mail.
By default, this mailbox has Do Not Disturb locked ON, call screening
locked OFF , Greeting 1 as the current g reeting, an empty Done Chain, and
does not store messages.
By default, this mailbox has Do Not Disturb locked ON, call screening
locked OFF , Greeting 1 as the cur rent greeting, 991 in the Done C hain, and
does not store messages.
By default, this mailbox has Do Not Disturb locked ON, call screening
locked OFF, Greeting 1 as the current greeting, 0 in the Done Chain, and
does not store messages.
to detect calls from modems. As you create a hot box mailbox, make sure
that the mailbox does NOT store mes sages and that Do Not Disturb is off .
In addition, the Extension field must transfer the ca ller to the fax mach ine
or whatever device is to be used by this box.
In most cases, only one hot_box is defined to detect fax tones and the re-
mainder are unused. However , you cann ot separate these for comp anies or
departments that share Amanda.
995 future_delivery Mailbox that stores messages to be delivered at some time in the future.
Mailbox 995 has been created for you.
By default, this mailbox has Do Not Disturb locked ON, call screening
locked OFF , Greeting 0 as the current greeting, nothing in the Done Chain,
and stores messages.
You don’t need to (and cannot) separate these for companies or depart-
ments that share Amanda.
996 guest_defaults Mailbox which is the template for all new guest mailboxes. Mailbox 996
has been created for you.
By default, this mailbox has Do Not Disturb OFF, call screening OFF,
Greeting 0 as the current greeting, nothing in the Done Chain, and stores
messages.
You cannot separate these for companies or departments that share Aman-
da.
997 defaults_box Mailbox which is the template for all new mailboxes. Mailbox 997 has
been created for you.
You cannot separate these for companies or departments that share Aman-
da.
Page 59

Chapter 7: Configuring Amanda 51
Default and Recommended Mailboxes (Continued)
Configuration
Mailbox
998 box_snd Mailbox for direct messaging. Mailbox 998 has been created for you.
999 (no option) Mailbox for system administration and for a quick hangup. Mailbox 999
Option
Purpose
By default, this mailbox has Do Not Disturb locked ON, call screening
locked OFF, an empty Done Chain, and does not store messages.
has been created for you.
You cannot separate these for companies or departments that share Aman-
da.
By default, this mailbox has Do Not Disturb locked OFF, call screening
locked OFF , an empty Do ne Chain, and an H in th e Extension field. Never
change or delete this mailbox.
Page 60

52 Installing Amanda@Work.Place
Page 61

Chapter 8: Faxing
Using This Chapter
This chapter:
• Explains how to set up a fax modem for use with Amanda.
• Explains how to detect a fax machine automatically.
Using a Fax Modem
You can use a fax modem on any Amanda@Work.Place system.
The fax modem used in Amanda may be internal or external as long as it meets all of the
following requirements:
• Class 2 or Class 2.0 compliant. (Be aware that Class 2 is d ifferent from C lass 2.0.)
• Internal fax modems must have a UART 16550 serial interface, and external fax
modems must be connected to UART 16550 serial ports.
The MSD.EXE program in DOS can verify whether or not your PC has these high speed
serial ports. So can IS16550. (The syntax is IS16550 / x where x is the number of the COM
port.)
OTE
N
: If you have a Class 2 modem, the default configuration settings for fax
options should work well with your mod em. If you have a Class 2.0 modem, change the setting for fax_send_reverse to F for False.
You must configure the fax modem for one of the following:
COM1 with IRQ4 and no other devices on COM1 or using IRQ4
COM2 with IRQ3 and no other devices on COM2 or using IRQ3
COM3 with IRQ11 and no other devices on COM3 or using IRQ11
We recommend using COM1 and/or COM2 for fax modems. This por t must be dedicated
to the fax modem.
OTE
N
: If you have a turnkey Amanda sys tem, it comes with an in ternal mo dem
which uses COM4 and IRQ5. This is used only by the host software on
the Amanda computer that allows you to control Amanda from a remote
site using the remote program. Non e of Amanda’s configuration options
have anything to do with this modem, but the fax modem cannot be set
to COM4 or IRQ5. Even if your system is not a turnkey system, we recommend that you install an internal data modem using the same COM
port and IRQ so you can contact Amanda remotely. If you ever need customer support from The Amanda Company, this modem will make it
Page 62

54 Installing Amanda@Work.Place
possible to solve your problem much more quickly. See “Chapter 10: Accessing Amanda Remotely” for more inform ation about host and remote
software.
To configure a fax modem for Amanda:
1. Run the Setup utility.
2. From the Work.Place Configuration Utility menu, select System Configurati on
Options or pr ess 4.
3. From the System Configuration menu, press A for Advanced Configuration.
4. From the Advanced Configuration menu, press S for Serial.
The Serial Port Definition dialog box appears.
(If you type a space, the Setup utility interprets it as a zero.)
5. Change:
serial_portn 0
To:
serial_portn
The option maps Amanda's logical port to a physical port on the PC.
The n is the number of the logical serial port and the y is the physical serial port (for
example, COM1). It is best to make n and y the same number. For example, map logical port 2 to COM2.
6. Modify the
values for the serial integration link you are receiving.
The n is the number you used for n in step 5.
7. Press F10 to save your changes.
The Save All Data? dialog box appears.
baud
y
n,
databits
n,
stopbits
n, and
parity
n to match the correct
Page 63

Chapter 8: Faxing 55
8. Press Y for Yes.
9. From the Advanced Configuration menu, press F for Fax.
The Fax Configuration screen appears.
(If you type a space, the Setup utility interprets it as a zero.)
10. (Skip this step if you dial 9 to access an outside line.) In the Fax section on Advanced
Configuration, change:
fax_dl_init 9,
To:
fax_dl_init
replace n with the outside access code for the telephone switching system. (Adding a
comma causes a 2-second pause.)
11. (Skip this step if you have a Zoom modem.) Change:
fax_flow_control &K3
For Aceex modems, use:
fax_flow_control \Q3 X3 &K3
For Practical Peripherals modems, use:
fax_flow_control X3 &K3
This option has the Class 2 command for the type of flow control used by your fax
modem.
12. Change:
fax_id
n
To:
fax_id
where
fax
'FAXA')
fax
is a number or a name used to identify your fax modem (for example,
Page 64

56 Installing Amanda@Work.Place
13. Many older Class 2 fax modems need a string of leading digits ‘1111’ for their fax_id.
By default, Amanda adds these digits.
However, if they appear on the receiving fax machine, change:
fax_id_pad T
To:
fax_id_pad F
14. Change:
faxn
To:
faxn
ext
where n is the number for the logical serial port and ext is the extension number
where the fax modem is connected on the telephone switching system (this must be a
single line extension).
15. This defines the maximum number of digits for a l o cal extension. This is used when
the “72” Fax retrieve command is selected so that fax_dl_init (usually ‘9,’) will be
applied only for outside calls.
Change:
max_local_extension 6
To:
max_local_extension
where n is the maximum number of digits in a telephone extension on your telephone
switching syst em .
OTE
: You don’t need to change the default values for the oth er serial port and
N
Suggested Settings
The following modems have been used with Amanda with the following settings. This is
not a comprehensive list, and many other modems work with Amanda. The followi ng
settings are not even guaranteed to work wi th you r mod e m (even if your modem i s one of
those listed) because modem manufactures produce a variety of models and change their
firmware from time to time. However, you may want to try them.
n
fax configuration options.
To use the fax modem effectively, you must also use tokens to program
the Extension fields for one or more mailbox. For more information, s ee
the sections on one and two-call faxbacks in “Ch apter 11: Programmin g
Examples,” in
Administering Amanda@Work.Place.
Zoom Modems
fax_flow_control &K3
fax_dl_init -
Aceex Modems
fax_flow_control \Q3 &K3
Practical Peripherals Modems
fax_flow_control X3 &K3
Page 65

Chapter 8: Faxing 57
SmartOne 1442 Faxmodems
fax_flow_control &K4
fax_direct_connect H1O0
fax_receive_reverse T
fax_reset &D3
fax_send_reverse F
Boca modem M144EW
fax_flow_control &K3
Detecting a Fax Machine Automatically
Amanda can detect and accept incoming faxes automatically.
To automatically detect and accept an incoming fax:
• The fax connect tone must be in the PCPM tone table.
The tone information is stored in C:\AMANDA\PBX.DB\1001.TON.
The tone must be one of the first four tones or frequencies defined, and it must be
marked as a terminating tone. The PCPM code associated with the tone must be in the
range 13-36.
• A mailbox (usually 994) must be set up to process faxes. To learn how to create
and program that mailbox, see Administering Amanda@Work.Place.
• That mailbox must be specified in the hot_box configuration option.
Modifying the PCPM Tone Table
To modify the tone table for Rhetorex voice boards:
1. Run AccuCall Plus.
For more information about AccuCall Plus, see “Using AccuCall Plus” on page 18.
2. To detect a FAX tone, use the following:
NAME: FAX CNG TONE
TYPE: OTHER
TERMINATING: YES
CADENCE: NO
FREQ1: 1100
FREQ2: NONE
PCPMCODE: 13 (13 through 36 are acceptable)
QUICKCOUNT: 400
ON TIME: 528
OFF TIME: 2976
All other values can remain at their defaults.
Page 66

58 Installing Amanda@Work.Place
OTE
N
: Remember to insert the FREQ1 value of 1100 into the filter table in one
of the first four positions. Only frequencies in the first four positions are
used for terminating tones.
Creating the Hot Box Mailbox
The Amanda Company recommends using mailbox 994 as the first hot_box, but you can
use any valid mailbox. Use Amanda’s Mailbox screen to create the mailbox that will
process the PCPM tone. See Administering Amanda@Work.Place for information about
creating mailboxes.
After calling Amanda, the caller presses the Start button on his fax machine during the
Company greeting (or some other greeting). Amanda recognizes the tone and processes
mailbox 994. Mailbox 994 performs a blind transfer to the fax machine. The Extension
field for mailbox 994 must contain the extension connected to the fax machine followed
by an H (hangup).
Example Extension field:
1000H
where extension 1000 is connected to the fax machine
Setting the Hot Box Options
You must let Amanda know the mailbox that will p rocess the PCPM tone by setting the
hot_box configuration option.
To designate a mailbox to accept incoming faxes:
1. Run the Setup utility. At the DOS prompt, from the directory C:\AMANDA, type:
SETUP
Then press Enter.
2. From the main menu, press 4.
The System Configuration Options menu appears.
3. From the System Configuration menu, type:
A
(for Advanced Configuration).
4. From the Advanced Configuration menu, type:
H
(for Hot Boxes).
5. Select the number that corresponds to the PCPM code.
6. Type the mailbox number next to the c ode.
Your typing replaces previous setting (by default -1 for no mailbox).
7. Press F1 0 to sa ve.
Page 67

Chapter 8: Faxing 59
Sending Faxes
Faxes that you send to customers must be stored on Amanda in fax fo rmat. You create the
documents, then fax them to Amanda u sing the J() token to receive them. For more details,
see “Sending Faxes to Amanda” on page 131.
Page 68

60 Installing Amanda@Work.Place
Page 69

Chapter 9: Using Serial Integration
Serial Integration Overview
Serial integration is a type of digital integration in which the telephone switching sy stem
uses the computer’s serial port to communicate to Amanda. A data line from the central
office or telephone switching system sends information and instructions (about the caller
and called party) to your on-site voice mail box.
For example, if you call Amanda from an internal extension, Amanda recognizes you and
asks only for your security code. Serial integration makes getting your messages faster.
Amanda can support the following types of serial integration on Rhetorex voice boards:
• Bellcore Standard
• NEC 2000 and NEC 2400
• AT&T System 75 or Definity-G3
• Generic which can apply to other types of serial integration when the options are
set correctly
OTE
N
: The Amanda Company recommends using a us er’s teleph one ex tens ion
number as his mailbox in all cases, but, with digital integration, this oneto-one correspondence is required.
Bellcore Standard SMDI
This section covers serial integration for any telephone switching system that uses
Bellcore Standard Simplified Message Desk Interface (SMDI). For example, Centrex,
Northern Telecom SL-1 with a VoiceBridge, and Fujitsu F-9600 use SMDI.
To modify configuration options for use with Bellcore Standard SMDI:
1. Choose an available serial port on the computer. The serial port you use must be
COM1, COM2, COM3, or COM4.
Whatever serial port you use, make sure nothing else is configured to use that port or
the IRQ (hardware interrupt) configured for use with that port.
2. Run Setup as explained in “Chapter 3: Running the Setup Utility.”
OTE
N
: As an alternative, you can use the JOVE utility to access the config-
uration options in C:\AMANDA\INSTALL.CFG.
3. From the Work.Place Configuration Utility menu, select System Configurati on
Options. You press 4.
Page 70

62 Installing Amanda@Work.Place
4. From the System Configuration menu, press A for Advanced Configuration.
5. From the Advanced Configuration menu, press S for Serial.
The Serial Port Definition dialog box appears.
(If you type a space, the Setup utility interprets it as a zero.)
6. Change:
serial_portn 0
To:
serial_portn
The option maps Amanda's logical port to a physical port on the PC.
The n is the number of the logical serial port and the y is the physical serial port (for
example, COM1). It is best to make n and y the same number. For example, use
serial_port1 1
7. Modify the
values for a serial integration link you are receiving.
The n is the number you used for n in step 6.
8. Press F10 to save your changes.
The Save All Data? dialog box appears.
9. Press Y for Yes.
10. From the Advanced Configuration menu, press I for SMDI.
The SMDI Configuration screen appears.
(If you type a space, the Setup utility interprets it as a zero.)
baud
y
or
serial_port2 2
n,
databits
n,
stopbits
, and so forth.
n, and
parity
n to match the correct
Page 71

Chapter 9: Using Serial Integration 63
11. In the SMDI section of Advanced Configuration, change
smdi_port 0
To:
smdi_port
n
where n is the number for n in step 6.
12. Verify that the smdi_type option is:
smdi_type 'smdi'
Change it if necessary.
13. Modify
smdi_base_port 1
if the first port on the telephone switching system is
not identified as the logical port 1. For example, some telephone switching systems
use the port’s extension or another logical terminal number to identify the port. The
first port may be extension 241, with t he second por t 242, etc. These numbers must
be consecutive. For example, if the first or base port is 241, you use
smdi_base_port 241
14. You can also set
smdi_pretimeout
.
n, where n is the maximum number of sec-
onds that an SMDI packet can precede the forwarded call. The default is 50.
15. You can also set
smdi_delay
n, where n is the number of tenths of seconds that
Amanda waits after the call is answered before looking for integration information.
This allows more than one packet to be sent to a port per telephon e call. Amanda uses
the last (most recent) packet. The default is 0. The range is 0 to 255.
16. Press F10 to save your changes.
The Save All Data? dialog box appears.
17. Press Y for Yes.
OTE
N
: The smdi_max, smdi_ start , s mdi_s t op , an d smdi_term configuration op-
tions do not apply to telephone switching systems that use Bellcore Standard SMDI.
Page 72

64 Installing Amanda@Work.Place
You must also modify your C:\AMANDA\PBX.DB\1001.PBX file to include the SMDI
information. Using the Amanda Setup utility (selection 3) or the JOVE utility, verify that
your integration lines are as follows. When using Setup, type 30 in the Timeout field. (30
equals 30 tenths of seconds or a total of 3 seconds.) Then enter the integration strings in
the column for the extension plan your system uses.
Use an <available> entry for each string you are adding. (See “Us ing Character Codes” on
page 32 for more information about the codes such as rrr or rrrr.)
4-digit Extension
Plan
3-digit Extension
Plan
Forward no answer Axxxrrrr0000000 Axxxxrrr0000000
Forward no answer Bxxxbbbb0000000 Bxxxxbbb0000000
Forward no answer Nxxxrrrr0000000 Nxxxxrrr0000000
Forward no answer Axxxrrrrxxxssss Axxxxrrrxxxxsss
Forward busy Bxxxbbbbxxxssss Bxxxxbbbxxxxsss
Forward busy Nxxxrrrrxxxssss Nxxxxrrrxxxxsss
Direct station access Dxxxxxxxxxxeeee Dxxxxxxxxxxxeee
If you are using the JOVE utility, the integratio n ti meout precedes each integration string
as follows. This example is only for 4-digit station pl ans.
4-digit Station Plan
integration 30 'Axxxrrrr0000000'
integration 30 'Bxxxbbbb0000000'
integration 30 'Nxxxrrrr0000000'
integration 30 'Axxxrrrrxxxssss'
integration 30 'Bxxxbbbbxxxssss'
integration 30 'Nxxxrrrrxxxssss'
integration 30 'Dxxxxxxxxxxeeee'
OTE
N
: To modify the above for another digit plan, use the appropriate number
of r's, b's, s's, e's, and x's. Also, while 30 is used in the example (causing Amanda to timeout after 3 seconds if the packet has not been received), you may use some other number. The number is in tenths of
seconds.
Page 73

Chapter 9: Using Serial Integration 65
T o program the message waiting lights, use the following in the Method field
of the two notification records used for Light ON and Light OFF:
4-digit Station Pla n
Light ON: @S(1,'OP:MWI 000%U!\D')
Light OFF: @S(1,'RMV:MWI 000%U!\D')
3-digit Station Pla n
Light ON: @S(1,'O P :MWI 0000% U!\D')
Light OFF: @S(1,'RMV:MWI 0000%U!\D')
OTE
N
: The message codes above are for a 4-digit and 3-digit sta-
tion plan. To modify t o another digit pl an, use the approp riate number of 0's. These examples use
for other ports, the 1’s would have to be replaced.
NEC 2000 and NEC 2400
This section covers serial integration for NEC 2000 and NEC 2400 systems.
logical serial port 1
;
To set confi guration options for serial integration on NEC 2000 or NEC
2400:
1. Follow steps 1 through 11 in the Bellcore Standard SDMI procedure “T o
modify configuration o pt i ons for use with Bellcore Standard SMDI:” in
the “Bellcore Standard SMDI” section.
2. Change the smdi_type option to:
smdi_type 'necmci'
3. Modify
ing system is not identified as the logical port 1. For example, some telephone switching systems use the port’s extension or another logical
terminal number to identify the port. The first port may be extension
241, with the second port 242, etc. These numbers must be consecu-
tive. For example, if the fi rst or base port is 241, you use
smdi_base_port 241
smdi_base_port 1
if the first port on the telephone switch-
.
Page 74

66 Installing Amanda@Work.Place
4. You can also set
smdi_pretimeout
x, where x is the maximum number of sec-
onds that a packet can precede the forwarded call. Start with 50, the default, but you
may need to experiment to determi ne the bes t setting. On t he NEC 200 0, one so lution
provider reports that 15 is a good setting.
5. Set smdi_start option to the number that indicates the position in the integration
packet sent by the telephone switching system where the field containing the port
number starts. Start counting positions in the packet with the number 1. The default is
8.
smdi_start 8
6. Set the smdi_stop option to the number that indicates the position in the integration
packet sent by the telephone switching system where the field containing the port
number ends. Start counting positions in the packet with the number 1. The default is
11.
smdi_stop 11
7. You can also set
smdi_delay
x, where x is a number of tenths of seconds.
Amanda waits that long after the call is answered before looking for integration information. This allows more than one packet to be sent to a port per telephone call.
Amanda uses the last (most recent) packet. The default is 0.
OTE
N
: The smdi_max and smdi_term configuration options do not apply to
NEC telephone switching systems.
You must also modify your C:\AMANDA\PBX.DB\1001.PBX file to include the SMDI
information. Using the Amanda Setup utility (selection 3) or the JOVE utility, verify that
your integration lines are as follows. When using Setup, type 20 in the Timeout field. (20
equals 20 tenths of seconds or a total of 2 seconds.) Then enter the integration strings in
the column for the station plan your system uses.
Use an <available> entry for each string you are adding. (See “Us ing Character Codes” on
page 32 for more information about the codes such as rrr or rrrr.)
4-Digit Station Plan 3-Digit Station Plan
Forward no answer: 40xxxssssxxxxxrrrrxx 40xxxsssxxxxxxrrrxxx
Forward busy: 41xxxssssxxxxxbbbbxx 41xxxsssxxxxxxbbbxxx
Forward all: 42xxxssssxxxxxrrrrxx 42xxxsssxxxxxxrrrxxx
Direct station access: 43xxxeeeexxxxxxxxxxx 43xxxeeexxxxxxxxxxxx
Direct station access
432xxttttxxxxxxxxxxx 432xxtttxxxxxxxxxxxx
from trunk:
If you are using the JOVE utility, the integratio n ti meout precedes each integration string
as follows. This example is only for 4-digit station pl ans.
4-Digit Station Plan
integration 20 '40xxxssssxxxxxrrrrxx'
integration 20 '41xxxssssxxxxxbbbbxx'
integration 20 '42xxxssssxxxxxrrrrxx'
integration 20 '43xxxeeeexxxxxxxxxxx'
Page 75

Chapter 9: Using Serial Integration 67
integration 20 '432xxttttxxxxxxxxxxx'
OTE
N
: To modify the above for another digit plan, use the appropriate number
of r’s, b’s, s’s, e’s, and x’s. In the example, 20 is used (causing Amanda
to timeout after 2 seconds if the packet has not been received) because it
works for all serial integration. The number is in tenths of seconds.
To program the message waiting lights for NEC 2000, use the following in the Method
field of the two notification records used for Light ON and Light OFF:
Light ON: @S(1,’\002’)S(1,’0!A1’)S(1,’%U’)S(1,’\003’)
Light OFF: @S(1,’\002’)S(1,’0!A5’)S(1,’%U’)S(1,’\003’)
To program the message waitin g lights for NEC 2400 IMG, use the following in the
Method field of the two notification records used for Light ON and Light OFF:
Light ON: @S(1,’\002’)S(1,’0!B2’)S(1,’%U’)
S(1,’0000000001’)S(1,’\003’)
Light OFF: @S(1,’\002’)S(1,’0!B6’)S(1,’%U’)
S(1,’0000000001’)S(1,’\003’)
OTE
N
: These examples uses
have to be replaced.
logical serial port 1
AT&T System 75 or Definity-G3
If you use AT&T System 75 or Definity-G3 (smdi_type s75), call Amanda Company
customer support for more information. Call to be faxed Technical Note 14, “Serial
Integration for System 75 and Definity-G3.”
To set configuration options for use with System 75 and Definity-G3:
1. Follow steps 1 through 11 in the Bellcore Standard SDMI procedure “To modify
configuration options for use with Bellcore Standard SMDI:” in the “Bellcore
Standard SMDI” section.
2. Change the smdi_type option to:
smdi_type 's75'
OTE
N
: Type 's75' with a lower case 's'. This option is case sensitive.
3. Modify
not 1. For example, some telephone switching systems use the port’s extension or
another logical terminal number to identify the port. The first port may be extension
210, with the second port 211, etc. (These numbers must be consecutive.) For example, if the first or base port is 210, you use
smdi_base_port 1
if the first port on the telephone switching system is
; for other ports, the 1’s would
smdi_base_port 210
.
4. You can also set
Amanda to wait that long after the call is answered before looking for integration
information. This allows more than one packet to be sent to a port per telephone call.
Amanda uses the last (most recent) packet. The default is 0.
5. Press F10 to save your changes.
The Save All Data? dialog box appears.
smdi_delay
x, where x is a number of tenths of seconds causes
Page 76

68 Installing Amanda@Work.Place
6. Press Y for Yes.
OTE
: The smdi_max, smdi_pr etimeout, smdi_s tart, smdi_stop, and smdi_term
N
configuration options do not apply to AT&T System 75 and Definity- G3
telephone switching systems.
You must modify your C:\AMANDA\PDX.DB\1001.PBX file to properly integrate the
7404D set information. Using either the Amanda Setup utility or the JOVE utility, verify
that your integration lines are:
integration 10 'xxxxxxxxxxxxxx*xxxxxxxxxxxxxxxxrrr D
integration 10 'xxxxxxxxxxxxsssxxxxxxxxxxxxxxxxrrr D
integration 10 'xxxxxxxxxxxxxx*xxxxAxxxxxxxxxxxrrr C
integration 10 'xxxxxxxxxxxxeeexxxxAxxxxxxxxxxxxxx C
integration 10 'xxxxxxxxxxxxxx*xxxxxxxxxxxxxxxxbbb B
integration 10 'xxxxxxxxxxxxsssxxxxxxxxxxxxxxxxbbb B
integration 10 'xxxxxxxxxxxxxx*xxxxxxxxxxxxxxxxrrr S
integration 10 'xxxxxxxxxxxxsssxxxxxxxxxxxxxxxxrrr S
integration 10 'xxxxxxxxxxxxxx*xxxxxxxxxxxxxxxxrrr x
integration 10 'xxxxxxxxxxxxsssxxxxxxxxxxxxxxxxrrr x
OTE
N
: The integration lines above are for a three (3) digit station plan. When
'
'
'
'
'
'
'
'
'
'
you have a mixed dialing plan, (for example, 3 and 4 digit extensions)
you must have integration string s t o handl e ALL possible combinations.
To modify to another digit plan, use the appropriate number of r’s, b’s,
s’s, e’s, and x’s. The proper integration lines vary depending on your
System 75 software release, digital teleph one set model, and the data cartridge that you use in the digital set. If you experience problems with the
integration strings defined above, run option 3 in the Setup utility (Integration Helper) to assist you, or contact Amanda Company customer
support.
Also, you need to defined the telepho nes syst em dial cod e “What t o dial when a port go es
off-hook” with the code you defined above in FEATURE ACCESS CODE Call Pickup
Access Code.
Finally, you must create mailboxes for each extension number where Amanda’s ports are
connected. The parameters must be defined as follows:
Extension: @G(990)
Do Not Disturb: OFF LOCK: ON
Store Messages? NO
Chains RNA: 990
Chains Busy: 990
Mailbox 990 is the default Company Greeting mailbox. If you have redefined the
Company Greeting mailbox for any of the ports, use that mailbox instead of 990.
Light ON: *4%U
Light OFF: #4%U
OTE
N
: The examples use %U (for mailbox), but you may p refer %E (for Ex ten-
sion field) or %V (for Variable field). You can use %E when the Extension field contains only the extension number. (For example, if the
Extension field contains an H for a blind transfer or starts with a @, %E
is unusable.) You can use %U only if the mailbox is the same as the extension number. If you use %V, the Variable field in the notification
record must contain the extension number.
Page 77

Chapter 9: Using Serial Integration 69
The *4 and #4 are the AT&T default values, often left as the standard, but fully
configurable. Watch out for dialplan conflicts if you change them because the conflicts
can slow down system operation if a needed wait for dial timeout (that is, a four-digit
speedial code) has the same first few digits as the message waiting light feature.
Ericsson MD-110
This section covers serial integration for the Ericsson MD-110 system.
To set configuration options for serial i n tegration on Ericsson MD-110:
1. Follow steps 1 through 11 in the Bellcore Standard SDMI procedure “To modify
configuration options for use with Bellcore Standard SMDI:” in the “Bellcore
Standard SMDI” section.
2. Change the smdi_type option to:
smdi_type 'md110'
3. Modify
not identified as the logical port 1. For example, some telephone switching systems
use the port’s extension or another logical terminal number to identify the port. The
first port may be extension 241, with t he second por t 242, etc. These numbers must
be consecutive. For example, if the first or base port is 241, you use
smdi_base_port 241
4. You can also set
onds that a packet can precede the forwarded call. Start with 50, the default, but you
may need to experiment to determine the best setting.
5. Set the smdi_start option to the number of digits in your extension plan. For example,
the following indicates that you have three-digit extensions.
smdi_start 3
6. (Optional) Set the smdi _stop op tion to t he number of digits in your por t numb er information that the telephone switching system will send. This number will usually be 2.
smdi_stop 2
7. You can also set
Amanda waits that long after the call is answered before looking for integration information. This allows more than one packet to be sent to a port per telephone call.
Amanda uses the last (most recent) packet. The default is 0.
smdi_base_port 1
smdi_pretimeout
smdi_delay
if the first port on the telephone switching system is
.
x, where x is the maximum number of sec-
x, where x is a number of tenths of seconds.
OTE
N
: The smdi_max and smdi_term configuration options do not apply to
Ericsson MD-110 telephone switching systems.
You must also modify your C:\AMANDA\PBX.DB\1001.PBX file to include the SMDI
information. Using the Amanda Setup utility (selection 3) or the JOVE utility, verify that
your integration lines are as follows. When using Setup, type 10 in the Timeout field. (10
equals 10 tenths of second s or a to tal of 1 s econd.) Then ente r the i ntegra tion st rings i n the
column for the station plan your system uses.
Page 78

70 Installing Amanda@Work.Place
Use an <available> entry for each string you are adding. (See “Us ing Character Codes” on
page 32) for more information about the codes such as rrr or rrrr.)
4-Digit Station Plan 3-Digit Station Plan
Forward no answer: 80rrrrxx 80rrrxx
Direct station access: 81eeeexx 81eeexx
Direct station access: 82eeeexx 82eeexx
Forward no answer: 83ssssrrrrxx 83sssrrrxx
Forward no answer: 85rrrrxx 85rrrxx
Forward no answer: 86rrrrxx 86rrrxx
Forward no answer: 91ssssrrrrxx 91sssrrrxx
Forward busy
: 92ssssbbbbxx 91sssbbbxx
Forward no answer: 94rrrrxx 94rrrxx
Forward busy
: 95bbbbxx 95bbbxx
If you are using the JOVE utility, the integratio n ti meout precedes each integration string
as follows. This example is only for 4-digit station pl ans.
3-Digit Station Plan
integration 10 '80rrrxx'
integration 10 '81eeexx'
integration 10 '82eeexx'
integration 10 '83sssrrrxx'
integration 10 '85rrrxx'
integration 10 '86rrrxx'
integration 10 '91sssrrrxx'
integration 10 '92sssbbbxx'
integration 10 '94rrrxx'
integration 10 '95bbbxx'
OTE
N
: The number of x’s in the above str ings is equal to the value of smdi_stop,
while the number of r’s, e’s, b’s, and s’s is equal to the value of
smdi_start. To modify the above for another digit plan, use the appropriate number of r’s, b’s, s’s, e’s, and x’s. In the example, 10 is used (caus ing Amanda to timeout after 1 second if the packet has not been received)
because it works for all serial integration. The number is in tenths of seconds.
Page 79

Chapter 9: Using Serial Integration 71
To program the message waiting lights for NEC 2000, use the following in the Method
field of the two notification records used for Light ON and Light OFF:
Light ON: @S(3,’\B06%E01\N’)
Light OFF: @S(3,’\B07%E01\N’)
\B represents Ctrl+B, the start of transmission (STX) character. %E should be the same
number of digits and smdi_start specifies.
Generic
OTE
: These examples uses
N
have to be replaced.
This section covers a generic serial integration . It is designed for any t ele pho ne swi tc hing
system using serial integration other than those that:
• Use Bellcore Standard SMDI
• Are NEC 2000 or NEC 2400 systems
• Are AT&T System 75 or Definity-G3 systems
To set configuration options for generic serial integration:
1. Follow steps 1 through 11 in the Bellcore Standard SDMI procedure “To modify
configuration options for use with Bellcore Standard SMDI,” in the “Bellcore
Standard SDMI” section.
2. Change the smdi_type option to:
To:
smdi_type 'generic'
3. Modify
not identified as the logical port 1. For example, some telephone switching systems
use the port’s extension or another logical terminal number to identify the port. The
first port may be extension 241, with t he second por t 242, etc. These numbers must
be consecutive. For example, if the first or base port is 241, you use
smdi_base_port 241
smdi_base_port 1
logical serial port 3
if the first port on the telephone switching system is
.
; for other ports, the 3’s would
4. You can also set
onds that an SMDI packet can precede the forwarded call. The default is 50.
5. You must set
by the telephone switching system where the field containing the port number starts.
Start counting positions in the packet with the number 1. The default is 8.
6. You must set
by the telephone switching system where the field containing the port number ends.
Start counting positions in the packet with the number 1. The default is 11.
7. You must set
expected/accepted per packet. The default is 143.
smdi_pretimeout
smdi_start
smdi_stop
smdi_max
n, where n is the position in the integration packet sent
n, where n is the position in the integration packet sent
n, where n is the maximum number of characters
n, where n is the maximum number of sec-
Page 80

72 Installing Amanda@Work.Place
8. You must set
one). Leave this option empty if the packets are terminated only by receiving
smdi_max characters.
9. You can also set
Amanda waits after the call is answered before looking for integration information.
This allows more than one packet to be sent to a port per telephon e call. Amanda uses
the last (most recent) packet. The default is 0. The range is 0 to 255.
You must also modify the system integration patterns (stored in
C:\AMANDA\PBX.DB\1001.PBX) using the Amanda Setup utility (selectio n 3) or the
JOVE utility. You may need to write appropriate notification records to turn message
lights on and off. Consult your PBX manual for this information.
smdi_term
smdi_delay
n, where n is the termination character set (if there is
n, where n is the number of tenths of seconds that
Page 81

Chapter 10: Accessing Amanda Remotely
Accessing Amanda from Another Computer
You can control and configure Amanda@Work.Place remotely from another computer
using the Host and Remote programs. Host runs on Amanda (server or standalone) and
Remote runs on the computer that is accessing Amanda remotely. You also need either a
null modem cable to connect the computers or a modem on each computer.
These programs allow the remote computer’s monitor and keyboard to take over for
Amanda’s monitor and keyboard. You should see whatever is (or would be) visible on
Amanda’s monitor, and you can use Amanda as though you were operating her keyboard.
You can run Setup and other programs on Amanda’s computer while sitting at the remote
computer.
OTE
N
: DOS programs that u se g raph i cs and pop-up decision windows may not
be controllable or appear correctly on the screen while y ou are us ing the
Remote program. Examples are Edit, MSD, Scandi sk, and Defrag (when
run in interactive, rather than batch, mode).
Never use Edit remotely. When you press Alt+X to close the file, you become disconnected. Use JOVE instead.
Setting Up Amanda’s Computer as a Host
It is a good idea to run the Host program automatically whenever Amanda’s computer
starts. The AUTOEXEC.BAT file already contains lines that you can us e fo r this pur pos e.
However, you must remove the REM at the beginning of the line to be used and at the
beginning of the line above it (that line starts REM ECHO…) You might also have to
change the number of the COM port to be used by the null modem cable or by the mod em
in Amanda’s computer. If the line is missing, add it as the first line of the
AUTOEXEC.BAT file.
Then reboot the computer to load the Host program.
The line for the null modem cable is:
REM LH HOST /2 /f /n >>%LOGN%
Page 82

74 Installing Amanda@Work.Place
This lines for the modem and null modem cabled can be explained as follows:
REM Indicates that the line is currently ignored. Remove the
REM to use the line.
LH HOST Tells the computer to load this program in high memory.
/2 The 2 is for COM2. You can change this number to the
number of the COM port the null modem cable or modem
will use.
/f Indicates that the cable or modem is faster than 2400 bps.
/n Indicates that a null modem cable will be connected to
both computers.
>>%LOGN% Sends information about loading the Host program to ei-
ther the C:\BOOTLOG file or to the screen, depending
whether your AUTOEXEC.BAT file contains t he line
SET LOGN=C:\BOOTLOG or the line SET
LOGN=CON:
The line for the modem is:
REM LH HOST /4 >>%LOGN%
Use the list above (for the null modem) to understand each part of this line.
Change the /4 to the number of the COM port us ed by the mo dem on Amanda ’s computer,
and add a /f if your modem can handle data speeds of higher than 2400 bps.
Setting Up the Remote Computer
The remote computer must have a copy of the Remote program. Then you can run the
Remote program from that computer (for example, a notebook).You can copy
REMOTE.COM from C:\AMANDA to a floppy disk using the following command at the
DOS prompt:
copy c:\amanda\remote.com a:\remote.com
(Your floppy disk drive may be b: rather than a:. ) Then y ou can i nse rt t he flop py di s k int o
the remote computer and copy the file to that computer.
REMOTE.COM is also on one of your installation disks. You can use that floppy disk if
you prefer .
If Amanda is running as a standalone, you can copy the file using the Alt+F (Filecopy)
command from the Main screen. Simply answer the Copy From: and Copy To: prompts.
Page 83

Chapter 10: Accessing Amanda Remotely 75
Connecting by Cable
To connect over a null modem cable:
1. Attach one end of the null modem cable to the correct serial port (for example,
COM2) on Amanda’s computer and to a serial port on the remote computer.
2. Turn on both comp ut ers.
3. From the remote computer, use the following command to start the Remote program.
remote /x /n /f
where x is 1 or 2, depending on what COM port the cable is connected to on the
remote computer. For COM1, you can use /1 or nothing at all because COM1 is the
default.
You execute the command from the directory in which the Remote program is stored
or you add the path name to the command. For example, if the program is stored in
the UTIL directory on your C: drive, C :\UTIL\REMOTE would r eplace R EMOTE in
the command. If the computer runs a version of Windows, run the command from a
DOS box.
4. Press Enter.
The following appears on the screen:
Remote Version 2.0
You can run Setup and other programs on Amanda’s computer while sitting at the
remote computer. (If the screen is blank because of Amanda’s screen saver, press the
spacebar to exit the screen saver.)
5. To end the Remote session, press Alt+X.
The program asks you to confirm your decision to exit by typing Y.
The remote computer disconnects from Amanda.
Connecting by Modem
To connect via data modem, both Amanda’s computer and the computer that will be
accessing Amanda remotely must be running and have a modem that is connected to both
a serial port and a telephone line. Th e data mo dem mus t be con nected to e ither a ded icated
telephone number (this works best) or station separate from the telephone system.
The Host program can use COM1 through COM4. The Amanda Company recommends
that Amanda’s computer use one of the following for the data modem:
COM1 with IRQ4 and not other devices on COM1 or using IRQ4
COM2 with IRQ3 and not other devices on COM2 or using IRQ3
COM3 with IRQ11 and not other devices on COM3 or using IRQ11
COM4 with IRQ5 and not other devices on COM4 or using IRQ5
Page 84

76 Installing Amanda@Work.Place
The Remote program works only with COM1 or COM2, with industry standard IRQ and
I/O port addressing. That is:
COM1 with IRQ4 and not other devices on COM1 or using IRQ4
COM2 with IRQ3 and not other devices on COM2 or using IRQ3
To control Amanda via modem:
1. Use the following command to start the Remote program:
remote /x
where x is 1 or 2, depending on what COM port the cable is connected to on the
remote computer. (For COM1, you can use /1 or nothing at all because COM1 is the
default.)
You execute the command from the directory in which the Remote program is stored
or you add the path name to the command. For example, if the program is stored in
the UTIL directory on your C: drive, C :\UTIL\REMOTE would r eplace R EMOTE in
the command. If the computer runs a version of Windows, run the command from a
DOS box.
2. Press Enter.
The following appears on the screen:
Remote Version 2.0
Enter phone number:
3. Type the telephone number for Amanda, then press Enter.
For example, if both modems are on the station side of the telephone switching sys-
tem, you might use 9,17147530414,,,,,102 where the commas are two-second pauses
and the 102 is for mailbox 102. In this example, the Extension field for mailbox 102
would have to be 102H to achieve a blind transfer to extension 102.
Enter password:
4. Type
5. When you have finished, type Alt+X to end the connection.
JENNIFER
You can run Setup and other programs on Amanda’s computer while sitting at the
remote computer. (If the screen is blank because of Amanda’s screen saver, press the
spacebar to exit the screen saver.)
The program asks you to confirm your decision to exit by typing Y.
The remote computer disconnects from Amanda.
appears on the screen.
in uppercase letters, then press Enter.
Page 85

Chapter 11: Programming Amanda
Using Tokens
The Token Programming Language allows you to write programs for Amanda. These
programs consist of tokens entered in Extension fields (defined per mailbox using the
Users screen) and/or in Method fields (defined per mailbox using the Notify Screen). This
section describes the language and introduces you to common programming terms.
Understanding these terms can help you understand any programming language.
A token is a sequence of one or more characters that repres ents an action that Amand a can
perform. The tokens that you use most often are simple and perform routine actions such
as dialing an extension. However, a program can be much more complicated than that.
With the Token Programming Language, you can use tokens to do either of the following:
• Enhance Amanda’s normal processing of the Extension and Method fields. Normally, she uses Programmed Call Progress Monitoring (PCPM).
In this case, you add the tokens where appropriate within the field.
For example,
digits 147 (for extension 147) and then hang up. Notice that the tokens are not separated by spaces (or any other characters). You write tokens one right after the other.
• Stop Amanda’s normal processing of the fields and tell her what to do.
In this case, the first character in the field is @. Then you add the tokens that tell
Amanda what to do.
For example,
R(G1,%S1)
@
assigns the DTMF digits entered by the caller to a variable named %S1. This starts
with an @ to indicate that you are NOT processing this Extension field normally.
Normal processing for the Extension field: Amanda plays “Please hold while I try that
extension,” puts the caller on transfer hold, then evaluates the tokens in the field. Unless
told to do otherwise, she listens for call progress tones and an answer.
The @ stops Amanda from performing the dial code that puts a caller on transfer hold
(also known as the dl_dtwait dial cod e). As exp lained in Installing Amanda@Work.Place,
you use the Setup utility (selection 1) to set or view the dial codes. The codes are stored in
C:\AMANDA\PBX.DB\1001.PBX, which you can view or edit using the JOVE utility.
Normal processing of the Notify Method field: Amanda tries to access a port for an
outbound notification call. The @ stops Amanda from going off-hook.
is a sequence of four tokens that tells Amanda to dial the DTMF
147H
Page 86

78 Installing Amanda@Work.Place
When most people think of a program, they think of a series of lines, each of which
contains a single action or command. The Token Programming Language is similar, but
each line become the contents of a different field, using the Extension field of a mailbox.
If the program contains only a few lines, sometimes you can use just one Extension or
Method field for the entire program. However, when you need more fields, you use the
Extension fields from ad ditional mai lboxes . Even if a Met hod field mu st b e extend ed, you
extend it to the Extension field in another mailbox.
You use additional fields for any of the following reasons:
• The logic of the program branches or repeats. You use a G() co mmand or I() co mmand to create the branch or loop. See “Flow of Co ntrol: Branching and Looping”
on page 85 for more details.
• The length of the string of tokens exceeds 65 char acters, so yo u are forced to co ntinue in another field. You u se a G() command to ex tend the to ken string to a new
Extension field.
Mailbox Settings
If you are using a mailbox’s Extension field for token programming, you must use all of
the following settings:
• Do Not Disturb must be off . Amand a ignores the Ex tensio n field altogether if Do
Not Disturb is on.
• Call screening must be off.
Success and Failure
Amanda evaluates tokens from left to right. If Amand a perf orms a tok en su ccessfu lly, she
goes on to the next token.
When all the tokens have been p erformed successfu lly in an Extension field, Aman da goes
to the RNA Chain field. If the RNA field is blank, she go es to the Done C hain field for the
company greeting mailbox (usually mailbox 990).
When all the tokens have been performed successfully in the Notify Method field,
Amanda goes to the next Notify Method field (if there is one). If there are n o more Notify
Method fields, Amanda goes to the Done Chain field for the current mailbox.
If the token is unrecognized (because of a syntax error or a typographical error) or fails,
Amanda immediately goes to the Done Chain field without processing the rest of the
tokens in the field. If the last successful token gives Amanda an invalid mailbox, she
processes the Done Chain field for the mailbox associated with the current port because
she cannot locate a Done Chain field for the invalid mailbox. (The mailbox associated
with the port is usually 990, the Company Greeting mailbox.)
For a literal or system variable, there is no such thing as failure. The token always
succeeds. Some tokens define almost any behavior as successful. For example, you can
have Amanda spell an empty string. Amanda doesn’t say anything, but no failure occurs
either.
Page 87

Chapter 11: Programming Amanda 79
Tracing Token Execution
Amanda’s trace files can let you know where and how a token program is failing. This is
an invaluable debugging tool.
Amanda creates trace files as she runs, because the following trace command should be in
the AUTOEXEC.BAT file.
amanda /t5 /s1300
Like the default trace command, this command creates C:\AMANDA\TRACE.OUT file
and limits its size to the last 1.3MB of data. (A file this size will fit on a 3 1/2-inch floppy
disk.) What is different about this command is that it writes to the trace file every 10 lines .
In this way, if Amanda crashes while running your token program, no more than ten lines
of trace information can be lost. You can use /t with a number less than 10 if you need to,
but it will slow down the system.
You can also display trace information on-screen.
To display trace information:
1. Press Ctrl+Home.
2. Press Alt+T.
Pressing any key stops the display. On-screen traces are stored by default in
C:\AMANDA\SCREEN.OUT. To change the name of this file, use the Setup utility to
change the setting for the configuration option screen_save.
Kinds of Tokens
Tokens fall into the following categories:
• Literals
•Variables
• Commands
Literals
A literal is an exact value such as the whole numbers 4 or 1144. Notice that you do not use
commas within numbers. You use 1144—not 1,144.
The DTMF digits and most single-character tokens are literals. For example, the comma
(,) that causes a pause is a literal.
Another type of literal is the string. In the Token Programming Language (as in most
programming languages), a string is a sequences of characters. For example, JAMES
DOLE is a 10-character string that starts with the letter J and ends with the letter E. To
clearly show where a string begins and ends, programming languages require delimiters
(characters that enclose the string, but are not part of it. In the Token Programming
Language, you use single or double quotation marks as string delimiters. So JAMES
DOLE becomes
'JAMES DOLE'
or
"JAMES DOLE"
.
Page 88

80 Installing Amanda@Work.Place
"9," is a string that Amanda might dial for an outside line. It consists of the DTMF digit 9
followed by the comma for a pause.
A string that has no characters is called the empty string. It often occurs in programming
and is written as '' or "".
If you use one kind of qu ot at ion mark within a string, you should use t he o t her kind as the
string’s delimiters: "Amanda's" or 'Do not use " (the double quotation character)'.
Variables
Each variable is the name of a storage location within the computer that can store a string
or a whole number. After you store something in a variable, you can use that variable’s
name instead of typing the string or the number. This is useful because:
• Amanda’s variables have simple names (no more than four characters) and save
you typing time. (You are less likely to make a mistake typing a short variable
name than a long string.)
• You can change the contents of the storage location and still use the same variable.
• Amanda can perform the same set of toke ns over and over again with differen t values because the tokens use the variables rather than the values . For example, if you
change the telephone number stored as a variable, Amanda dials the new number
without you having to change any tokens.
Assignment
The Token Programming Language has system, port, and global variables. Each of them
starts with a percent sign (%).
System variables are controlled by Amanda. For example, %D contains the amount of
available disk space, and %C contains the number of the port currently in use.
Port variables are control led by you. Th eir names rang e from %S0 to %S19. Port variables
provide 20 locations in which to store information on a per-port basis. The %S0 accessed
by Amanda while using one port is not the same location as the %S0 accessed by Amanda
while using another port .
Global variables are also controlled by you. Their names range from %G0 to %G9. These
10 locations are used by all the ports. The %G2 accessed by Amanda while using one port
is exactly the same location as the %G2 accessed by Amanda while using another port.
You control port and global variables. For example, you can assign numbers or strings to
them and later change those numbers or strings. For example, you might assign the value
of 65 to %G4 and the value "Amanda" to %S9. As signing a value to a variable copies that
value to the variable’s storage location.
Initially, each port and global variable has the empty string as its value. Assignment is
done in the Token Programming Language using the assignment command, which starts
with the equal sign (=). When the variable contains a number, you can add to that number
or subtract from it using the command that starts with a plus sign (+).
For example, =(%S1,24) puts the number 24 in the variable named %S1.
+(%S1,15) adds 15 to the 24 in %S1 and then stores the sum 39 in %S1.
+(%S1,-10) subtracts 10 from the 39 in %S1 and then stores the difference 29 in %S1.
Page 89

Chapter 11: Programming Amanda 81
Commands
Commands are more complex than literals and variables. Commands perform actions. For
example, a command may tell Amanda to play a particular message or go to another
mailbox.
Each command has a name followed by a series of parts called parameters. Some
parameters contain information that Amanda needs to perform the command. Others
contain information that Amanda obtains for you as she performs the command. Each
parameter is a literal, variable, or another command.
The parameters are delimited (surrounded) by parentheses and separated by commas. For
example, P(M8) tells Amanda to play message number 8. T he command name is P, and its
only parameter is M8, which is surrounded by parentheses.
The command P(0745,T) tells Amanda to say the number 0745 as a time. It also has the
command name P, but it has two parameters: the number 0745 and the literal T.
When a command is referred to by name in this guide, the parentheses appear after the
command’s name. For example, the command named P is referred to as th e P() comm and,
which is read as “the P command.”
Page 90

82 Installing Amanda@Work.Place
Parameters
Parameters can be required or optional. The syntax places brackets […] around optional
parameters.
Parameters can also be for input or for output. Input parameters provide the information
that Amanda needs in order to perform the action that you requested. For example,
Amanda might need the name of the file in which to store a fax or the telephone number
for a pager. You supply the input parameters and make sure that the information in them is
correct. Input parameters can be literals, variables, or other commands.
Output parameters are parameters that store information you asked Amanda for. Output
parameters are always variables because Amanda must store the information you
requested in a storage location. Usually one command asks for the information, Amanda
stores the information in a variable, and another command uses that variable. For example,
you might use the V() command to retrieve a telephone number from a file. If the output
parameter for the telephone number is %S5, Amanda stores the telephone number in the
variable %S5. Then you use %S5 in a T() command to send a fax using that telephone
number.
The syntax in the guide does not indicate which parameters are input and which are
output. This is clear from the descriptions of the command and parameters.
Syntax
When a string is used as a parameter, you don’t always need the quotation marks, becaus e
the commas and parentheses serve as delimi ters. You must use the quotati on marks when a
variable is part (but not all) of the string. For example, if %S0 is MARY and %S5 is HU,
the string "MARY HU" can be used as a parameter with or without quotation marks, but
the strings "%S0 HU", "%S0 %S5", and "%S0 %S5" must have quotation marks. Most
programming languages do not allow you to put variables within strings. The Token
Programming Language allows this, but it only checks for variables within a string if you
delimit that string with quotation marks. You cannot use a number from 0 to 9 after %S1
in a string because Amanda assumes that you meant the variable %S10 or %S11, etc.
Most system variables do not have parameters. However, a couple of system variables
have parameters that affect the contents of that system variable. For example, to use %I,
the system variable that retrieves data from specific fields of specific messages, you use
parameters to indicate which field, message number, and mailbox you want the data from.
The exact sequence of characters for each token is defined by its syntax, so you have to
learn to read syntax. The following table shows the conventions used in this guide. They
are similar to the syntax conventions used for other programming languages.
Syntax Convention Meaning
bold
Bold is used for characters that must be
used by you exactly as they appear—if
you use them at all.
italics Italics are used for characters that you
must replace with real strings, numbers,
variables, or other commands.
Page 91

Chapter 11: Programming Amanda 83
[ ] The syntax inside the brackets is optional.
If you don’t use this sy ntax, its default is
used.
{ } The syntax inside braces can be rep eated.
For example, the following is the syntax for %I:
Syntax:
%I(
field,msg_no
%I() has three parameters: field, msg_no and mailbox.
Because the %I and parentheses are bold, you know that you have to include them in the
command. The commas are bold, but the one in front of mailbox is inside brackets […],
which surround optional parts of the syntax. If you use the bracketed part of the syntax,
you must use the comma.
,
[
mailbox
)
]
Because field is italicized, you know that it is a place holder for information that you must
provide. Field can be any one of the following fields associated with messages:
D for the Date field
T for the Time field
F for the From field
Page 92

84 Installing Amanda@Work.Place
Because msg_no is also italicized, you know that it is a place holder for information that
you must provide. For example, to find out the date for message number 8, you replace
msg_no with the number 8. Because mailbox is inside brackets, you replace it only if you
use that part of the syntax. For example, you may want to delete a message belonging to
mailbox 151.
Whenever a parameter is optional, such as mailbox, it has a default. A default is the value
that is used for the parameter whenever the parameter is missing. The default for mailbox
is the current mailbox.
Using the syntax, you can create any number of %I() commands. For example, %I(D,8)
provides the date for message 8 for the current mailbox, and %I(T,6,151) provides the
time for message 6 for mailbox 151.
Both the Extension and Notify Method fields can contain up to 65 characters. If you need
more than 65 characters for your program, you use:
• A command that reads additional tokens from a file
• The G() command to tell Amanda to go to the Extension field for another mailbox
and process the tokens she finds there
Files and Directories
This section points out what you need to know about files and file names when using the
T o ken P ro gramm i ng Lan guag e . It as su mes t h at you already know the following and other
facts about files and directories:
• DOS files are stored in directories.
• The complete name for a file starts with the root directory (usually C:), lists the
subdirectories leading to the file, and ends with the name of the file, each of which
is separated by a backslash (\).
When you use a DOS file name as a parameter, you must replace each backslash (\) foun d
in the name with either two backslashes (\\) or one forward slash (/). For example,
C:\AMANDA\FOOBAR.TXT must become either C:\\AMANDA\\FOOBAR. TXT or C:/
AMANDA/FOOBAR.TXT.
You can use variable names as parts of the file name. For example, if %S1 is C:, and %S2
is Amanda, you can use "%S1\\%S2\\FOOBAR.TXT".
Amanda can read text files (also called ASCII files) as well as files in dBase format. The
former have file names that usually end with .TXT, and the latter have file names that end
with .DBF . Amanda can read from, write to, and search files that contain database record s.
A record is a way to group pieces of information. For example, your name and address is a
Page 93

Chapter 11: Programming Amanda 85
record in a database for an y comp any that se nds you s upplie s. The indiv idual parts o f your
name and address are fields of that record. In a database, another name for a record is a
row, and another name for a field is a column.
Sample Address Record:
First Name: MARY Last Name: HU
Street Address: 28291 HOOVER ST.
City: WINTER FALLS State: MI
Zip: 48444
T ex t files that con tain databas e recor ds should h ave comm as separating each field o f each
record and a carriage return/linefeed separating one record from another. (A carriage
return/linefeed is the pair of ASCII characters placed in a file when you press Enter on
your keyboard.)
Sample Address Record as a line in a text file:
MARY,HU,28291 HOOVER ST.,WINTER FALLS,MI,48444
When Amanda reads records from a text file, you tell her the number of the fields you
want to read or change the data in. The fields are numbered starting with 1. In our
example, First Name is 1, and Last Name is 2.
dBase files are created using dBase, a database software product. For dBase files, you tell
Amanda the name of the field instead of its number. When Amanda reads data from a
dBase file, she deletes any spaces at the end of the data as she stores the data into a
variable. For example, if the field contains "MARY ", Amanda reads only
"MARY".
Flow of Control: Branching and Looping
When programming Amanda, you often type the tokens for a program in more than one
field. This is not because you have exceeded the 65-character limit for the Extension or
Notify Method field, but because you want to control the flow of token processing. For
example, the only way to have Amanda perform different actions based on the value of a
variable, is to put the tokens for one set of actions in another Extension field.
The commands that control the flow of tokens are:
• The I() command which compares two valu es. (Notice that this is no t the same as
the %I() command/system variable discussed earlier in this chapter.) This command is similar to the If command or If statement in other programming languages. It is used to branch in either of two directions, depending on whether the
comparison is true or false. If the comparison is true, Amanda goes to another
mailbox’s Extension field and processes the tokens there. If the comparison is
false (for example, %S1 is not equ al to th e empty s t ring), Amanda continues processing tokens where she is.
For example, I(%S1,=,'',101) can be read as “If the variable %S1 equals the empty
string, go to mailbox 101. If not, go to the next token in this mailbox.”
I(%G0,>,5,2000) can be read as “If the variable %G0 is greater than 5, go to mailbox
2000. If not, go to the next token in this mailbox.”
Page 94

86 Installing Amanda@Work.Place
• The G() command which tells Amanda to go to another mailbox’s Extension field
right now. (Notice that this is not the same as the %G0 through %G9 global variables.) There is no comparison made—just an immediate branch to a new mailbox.
For example, G(2000) can be read as “Go immediately to mailbox 2000.”
A loop is the name given to a set of tokens that are repeated. For example, if the last token
in the Extension field for mailbox 151 is G(151), Amanda returns to the beginning of the
Extension field for mailbox 151. This forms a loop. It forms an infinite loop unless
Amanda can branch to another mailbox’s Extension field before performing the G()
command. Sometimes you want an infinite loop, but usually an I() command appears
within the loop (somewhere between the b eginni ng of the loo p and the G() command) an d
allows Amanda a way out of the loop.
For example, if you want Amanda to process the tokens for 151 exactly three times, you
use a variable as a counter. You add 1 to the variable every time through the loop and
branch when the I() command determines that the variable is equal to 3.
If you want Amanda to process the tokens for 151 until a certain value is entered by the
caller, you store the caller’s input in a variable and use the I() command to branch when
the variable finally contains the value you are waiting for.
The examples in this section shows a loop in which Amanda repeats the tokens in one
Extension field over an d over—until stopped. You can make more complicated loops . For
example, you can use the G() command to go from mailbox 151 to mailbox 152 to
mailbox 153, before returning to mailbox 151. This is still a loop because eventually
Amanda returns to mailbox 151. It is just a longer, more complicated loop than the earlier
examples.
Examples
This section provides practical examples using some of the available tokens.
Customizing the Employee Directory
The default operation of the employee directory minimizes the work you have to do as a
system administrator. All you have to do is put values in the Dir Name 1 and Dir Name 2
fields for each employee’s mailbox. A little extra work on your part can make it easier for
the caller to use the employee directory.
Application
This example explains how to streamline the functionality of the employee directory (by
default, mailbox 411) so that the caller does not have to dial the extension.
The default use of the employee directory:
1. A caller enters 411 for the employee directory.
2. The caller enters three digits representing the first three letters in either the first or last
name of the person he wants to call.
3. Amanda reads the extension for each person whose name matches the digits.
Page 95

Chapter 11: Programming Amanda 87
4. The caller dials the correct extension.
The customized use of the employee directory:
1. A caller enters 411 for the employee directory.
2. The caller enters three digits representing the first three letters in either the first or last
name of the person he wants to call.
3. If more than one employee matches the digits, Amanda asks the caller to choose.
For example, Amanda might say “For Steve Smith, press 1; for Stella Clark, press 2.”
4. Amanda dials the extension.
Translating to Amanda’s Tokens
This example shows the use of the G() command, which stops Amanda from processing
the current mailbox and goes directly to the specified mailbox. It also illustrates the M()
command that causes Amanda to play a greeting and wait for a single-digit number from
the menu as a response.
To customize the employee directory:
1. Make a list of everyone’s first and last names (as they will appear in the Dir Name 1
and Dir Name 2 fields in their mailboxes).
Example:
Steve Forest Mailbox 105
JoAnn Johnson Mailbox 106
Bob Knapp Mail box 107
2. Determine what three digits would match each name:
Example:
Steve Forest Mailbox 105
783 367
JoAnn Johnson Mailbox 106
562 564
Bob Knapp Mailbox 107
262 562
3. Create mailboxes for each of the sets of three-digits.
Example:
Create mailboxes 783, 367, 562, 564, and 262.
4. For each of these mailboxes, make sure that:
Do Not Disturb is locked OFF. (Do Not Dis turb: OFF Lo ck: ON)
Call screening is locked OFF. (Screen Calls? OFF Lock: ON)
Page 96

88 Installing Amanda@Work.Place
5. Fill in the Extension fields for mailboxes that only match one of the employees with
@G(
employee_mailbox
)
Example:
Because 783 and 367 match Steve Forest, the Extension fields for mailbox 783 and
mailbox 367 should be:
@G(
105
)
Because 564 matches JoAnn Johnson, the Extension field for mailbox 564 should be:
@G(
106
)
Because 262 matches Bob Knapp, the Extension field for mailbox 262 should be:
@G(
107
)
or
@P(G1)P(N,
107
)G(
107
)
6. For mailboxes that match more than one of the employees:
a. Record G1 (Greeting 1) as “For first matching name, press 1; for second
matching name, press 2; …” substituting the real names of employees for the
italicized words.
b. In the Menus fields, put the mailbox for the first matching name in 1; the mail-
box for the second in 2, and so forth.
c. In the Extension field, puts:
@M(G1,1,30)
This command causes Amanda to play Greeting 1 and waits for the caller to enter a
digit indicating a choice from the menu. If the caller does not enter a digit within 30
seconds, Greeting 1 repeats.
Example:
Because 562 matches both JoAnn Johnson and Bob Knapp, the Menus for mailbox
562 would be:
1106
2107
The greeting would be:
“For JoAnn Johnson, press 1; for Bob Knapp, press 2.”
IPS
T
: To make this better yet, use:
@P(G1)P(N,
G(
employee_mailbox
employee_mailbox
)
)
instead of:
@G(
employee_mailbox
)
Record a Greeting 1 for each of the new mailboxes that says “You are
being transferred to” after which Amanda plays the Name and Extension
recording for the employee’s mailbox. For mailbox 564 in the ex ample,
this would look like:
@P(G1)P(N,
106
)G(
106
)
The P() command plays greetings and so forth. In this case, the first P()
command plays Greeting 1; the second p lays the Name and Extension recording.
Page 97

Chapter 11: Programming Amanda 89
If the matching digits conflict with existing mailboxes (for example, 564
matches JoAnn Johnson, but it is already the mailbox for another employee), use 99564 or some other variation that does not conflict with
employee mailboxes.
When more than one employee matches the digits that the caller enters,
you can add 9 to the menu (with mailbox 411) and append the greeting
to end with: “…press 9 to return to the employee directory.” Then, if the
caller doesn’t want any of the people mentioned in the greeting, he can
try another name.
Token Reference
This section contains two tables, each of which lists all of the tokens in the Token
Programming Language:
•A quick token reference table, which lists each token by its function or pu rpose.
The functions are in alphabetical order so that you can easily find all the tokens
that perform similar functions. For example, the J() and T() comman ds both deal
with faxes so they are grouped under Fax. This table provides only the syntax for
each token. For a full description of the token, you must look in the alphabetical
reference.
•An alphabetical token reference table, which lists the tokens in alphabetical or-
der based on the first letter in the token’s name. For examp le, %I and I ar e fou nd
under I. Tokens whose names do n ot con tain a lett er are listed in ASCII order before the letters. This table provides complete descriptions and examples of each
token.
Quick Token Reference
Function/Purpose of Token Syntax
absolute value
Add
ANI (Automatic Number Identification)
Append, file
Assignment
Boards, serial numbers
Caller hang-up
Caller ID
Comment
Condition
Conference call
Creating message notification file
P
[
repetition
+(
variable
%H
|(
=(
%B1 %B2 %B3
%B4 %B5 %B6
H(
%H
%F(
I(
ext_no
X[(
)
file
variable,value
mailbox
field
value,operator,value,mailbox
KM
)
file
,
[
)
,
[
mailbox
]
(
]
number
value
,N)
)
]
,
[
start,end
)
]
)
]
)
Currency
Current connect time
P
[
repetition
%T
(
]
amount,currency
)
Page 98

90 Installing Amanda@Work.Place
Quick Token Reference (Continued)
Function/Purpose of Token Syntax
Current date in American format
Current port number
Current time
Current mailbox
Current mailbox’s Extension field
Date
Days of week
Deleting file
Deleting, message
Dial (pulse dial)
Dial codes
%Y
%C
%Z
P
[
repetition
%U
%E
%I(
field,msg_no
P
[
repetition
%Y
%W
Y[(
KD(
~
F
)
file
msg_no
]
,
[
] (U[
,
[
(
]
date
mailbox
,
mailbox
mailbox
,D)
)
]
)
]
)
]
dial tone
dial tone, wait for
Directory Name field
Disk space
Dollars
DTMF digits
DTMF for relay paging
DTMF, save caller’s entry
Exit for ca ller hang up
%X
W(n,T[,
%F(
%D
P
[
repetition
P
[
repetition
P
[
repetition
P
[
repetition
01 2 3
45 6 7
89 A B
CD * #
P
[
repetition
%R
R(
greeting
H(
mailbox
field
mailbox
,
[
mailbox
[
)
)
]
)
]
(D)
]
(
]
amount,currency
(
DTMF
(R)
(R)
)
,
]
variable
]
]
]
#
mailbox
)
,
[
timeout
)
]
Exit for mailbox
[
ext_no
H
]
Page 99

Chapter 11: Programming Amanda 91
Quick Token Reference (Continued)
Function/Purpose of Token Syntax
Extension field
*Extensions, partially supervised transfer
Fax, incremental
Fax, initialization
Fax, receive
Fax, send
Fields, process extension or Notify fi eld as
tokens
Fields, returns number of characters in a
string
Fields, values in mailbox record
Fields, Variable field in notification record
ext_no
@
%E
U-
ext_no
<(
phone_no
>(
file
)
)
%A
J(
file_or_box,phone_no
T(
file,phone_no
,
[
@
LEN[
%F(
string
field
[
]
,
mailbox
%V
tokens
)
]
,
[
tokens
)
]
)
]
Fields, Extension
Fields, information
Files, append
Files, as indicators
Files, delete record
Files, from recordings
Files, import
Files, read
Files, search
%E
%I(
field,msg_no
|(
X[(
Y[(
Z[(
KV(
KR(
{
file
{
file
V(
[(
N(
?(
)
file
)
]
file
)
]
file
)
]
file
file,field,value
,
file_or_box
[
}
}
file,field,value
)
file
file,field,value
line,file,mailbox
,
[
mailbox
)
]
)
recording_info
,
{
field,variable
,
{
field,variable
)
)
]
)
}
)
}
Files, voice
P
[
repetition
]
(X,
file
)
Page 100

92 Installing Amanda@Work.Place
Quick Token Reference (Continued)
Function/Purpose of Token Syntax
Files, write
Francs
Free disk space
Frequency
From
Goto
Greeting
Hang-up
Hang-up, cleanup
Hang-up, partially supe rvised
Hookflash
](
N(
P
P
)
file
file,field,value
[
repetition
[
repetition
]
]
%D
KB(
frequency,msecs
%I(
field,msg_no
G(
mailbox
P
[
repetition
[
ext_no
O(
time
H(
mailbox
U-
ext_no
)
)
]
H
]
)
F
,
{
field,variable
(
amount,currency
(D)
)
,
[
mailbox
(
greeting
)
]
,
[
mailbox
)
)
}
)
]
If
Import, file
Information mailboxes
IVR
Languages, c hange
Length
Letters and spaces
LIGHT.ON
See also message waiting indicators.
Menu
Messages
Messages, by number
O(
I(
{
M(
%I(
L(
LEN[
P
X[(
Y[(
Z[(
M(
%I(
P
)
time
value,operator,value,mailbox
}
file
greeting
[
field,msg_no
)
file
string
[
repetition
file
file
file
greeting
]
)
]
)
]
)
]
[
field,msg_no
[
repetition
#
mailbox
(A,
]
#
mailbox
(M
]
,
[
mailbox
string
,
[
mailbox
,
[
n
mailbox
,
]
repetition,delay
)
,
]
repetition,delay
]
)
)
)
]
)
)
)
]
Messages, delete
Messages, from recordings
KD(
msg_no
KR(
file_or_box
,
[
mailbox
[
)
]
,
recording_info
)
]
 Loading...