

Page 1
Use and Care Guide
Guide d’utilisation et d’entretien
Electronic Dryer
Sécheuse électronique
If you have any problems or questions, visit us at www.amana.com
Pour tout problème ou question, consulter www.amana.com
Para obtener acceso
al Manual de uso y
cuidado en español, o para
obtener información adicional
acerca de su producto, visite:
www.amana.com.
W11184584A
Page 2
TABLE OF CONTENTS
DRYER SAFETY .......................................................................2
ACCESSORIES ........................................................................4
CHECK YOUR VENT SYSTEM FOR GOOD AIRFLOW ............ 5
CONTROL PANEL AND FEATURES ......................................... 6
CYCLE GUIDE .......................................................................... 8
USING YOUR DRYER ............................................................10
ADDITIONAL FEATURES ....................................................... 12
DRYER CARE .........................................................................12
TROUBLESHOOTING ............................................................14
WARRANTY ............................................................................17
ASSISTANCE OR SERVICE ..................................... Back Cover
DRYER SAFETY
TABLE DE MATIÈRES
SÉCURITÉ DE LA SÉCHEUSE ............................................... 18
ACCESSOIRES ......................................................................20
VÉRIFICATION D’UNE CIRCULATION D’AIR ADÉQUATE
POUR LE SYSTÈME D’ÉVACUATION .................................... 21
TABLEAU DE COMMANDE ET CARACTÉRISTIQUES ..........22
GUIDE DE PROGRAMMES .................................................... 24
UTILISATION DE LA SÉCHEUSE ...........................................27
CARACTÉRISTIQUES SUPPLÉMENTAIRES .......................... 29
ENTRETIEN DE LA SÉCHEUSE ............................................. 30
DÉPANNAGE ..........................................................................32
GARANTIE .............................................................................. 35
ASSISTANCE OU SERVICE ........................... Couverture arrière
2
Page 3
In the State of Massachusetts, the following installation instructions apply:
■ Installations and repairs must be performed by a qualified or licensed contractor, plumber, or gas fitter qualified or licensed by
the State of Massachusetts.
■ Acceptable Shut-off Devices: Gas Cocks and Ball Valves installed for use shall be listed.
■ A flexible gas connector, when used, must not exceed 4 feet (121.9 cm).
WARNING:
FIRE OR EXPLOSION HAZARD
Failure to follow safety warnings exactly could result in serious injury, death, or property
damage.
–
Do not store or use gasoline or other ammable vapors and liquids in the vicinity of this
or any other appliance.
–
WHAT TO DO IF YOU SMELL GAS:
Do not try to light any appliance.
•
Do not touch any electrical switch; do not use any phone in your building.
•
Clear the room, building, or area of all occupants.
•
Immediately call your gas supplier from a neighbor’s phone. Follow the gas supplier’s
•
instructions.
If you cannot reach your gas supplier, call the re department.
•
–
Installation and service must be performed by a qualied installer, service agency, or
the gas supplier.
3
Page 4
ACCESSORIES
INSTALLATION & MAINTENANCE
ACCESSORIES
FACTORY CERTIFIED PARTS – these three
words represent quality parts and accessories
designed specically for your appliance.
Time tested engineering that meets
our strict quality specications.
FACTORY CERTIFIED PARTS
Accessories designed for your appliance:
Customize your new washer and dryer with the following
genuine Whirlpool accessories. For more information on
options and ordering, call 1-800-442-9991, or visit us at:
www.amana.com/help.
In Canada, call 1-800-807-6777 or visit us at:
www.amana.com/help
4
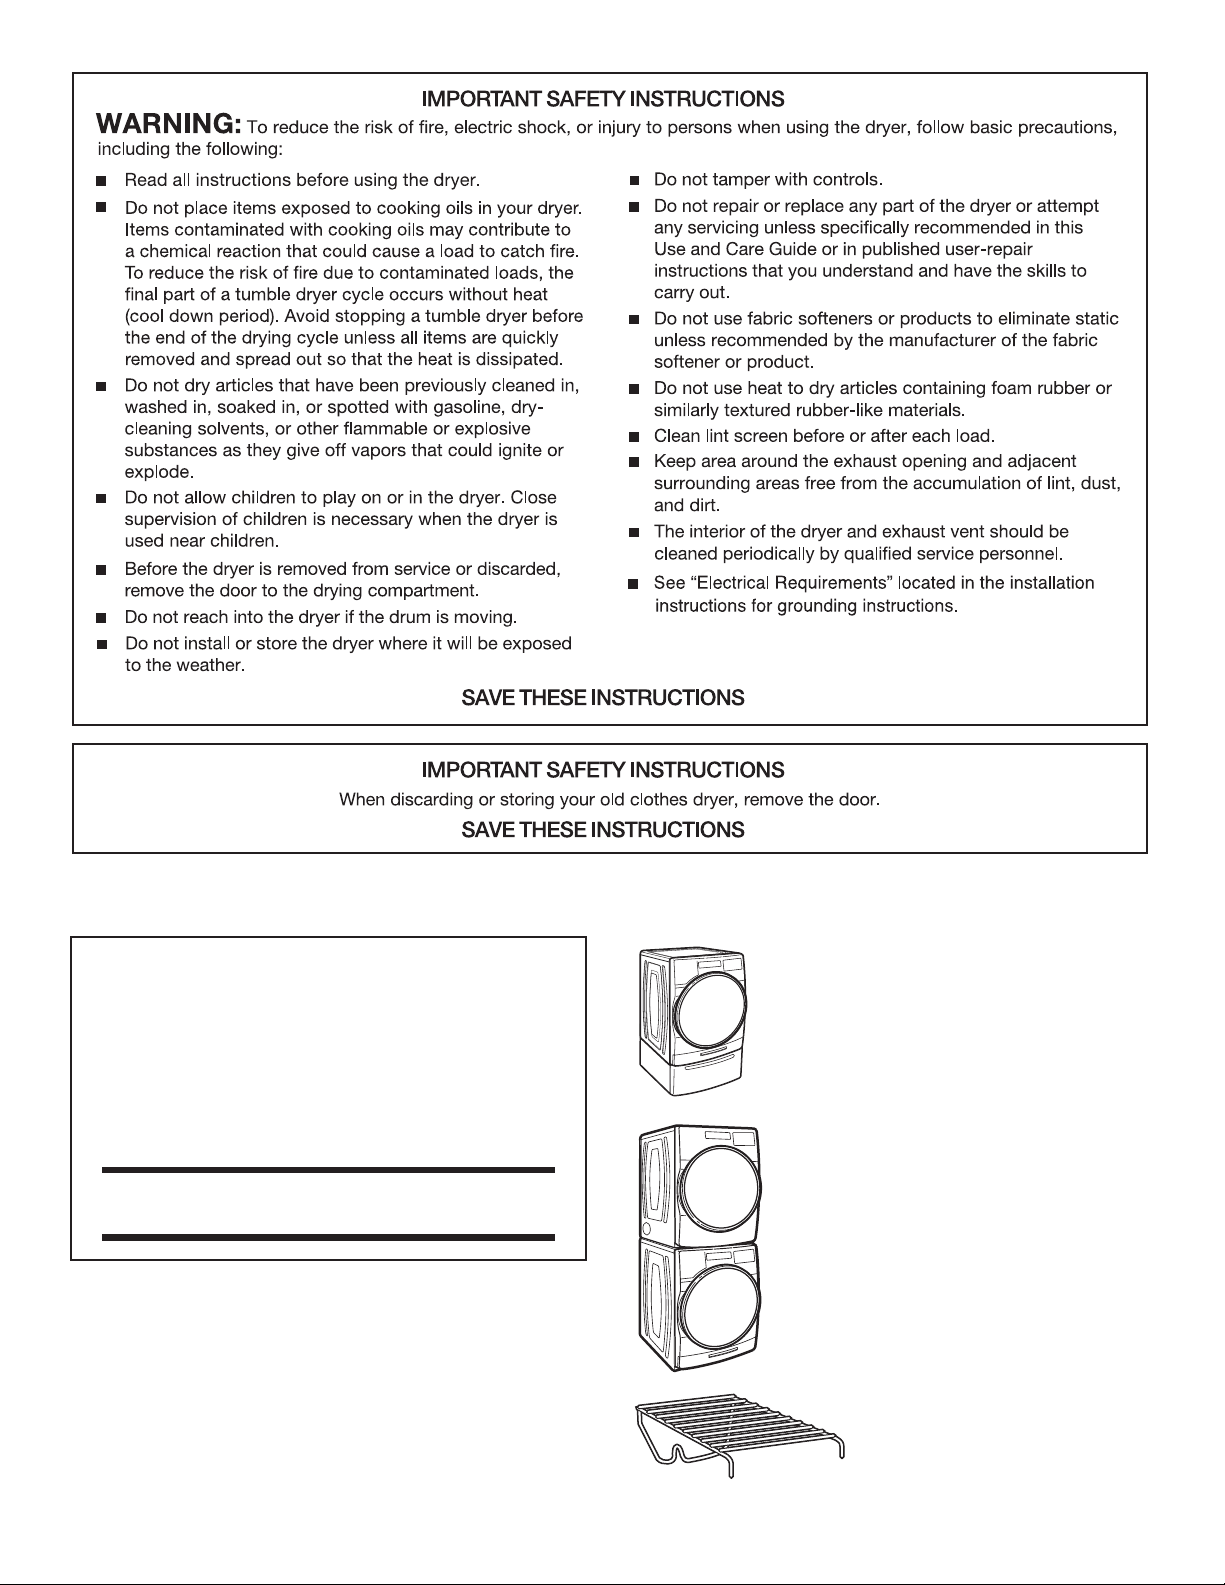
15" Pedestal
Color-matched pedestals raise the washer
and dryer to a more comfortable working
height. The large drawer provides convenient
storage.
Stack Kit
If space is at a premium, the stack kit allows
the dryer to be installed on top of the washer.
Drying Rack
The Drying Rack provides a
stationary drying surface for
items such as sweaters and tennis
shoes. See the “Additional Features”
section for more information.
Page 5
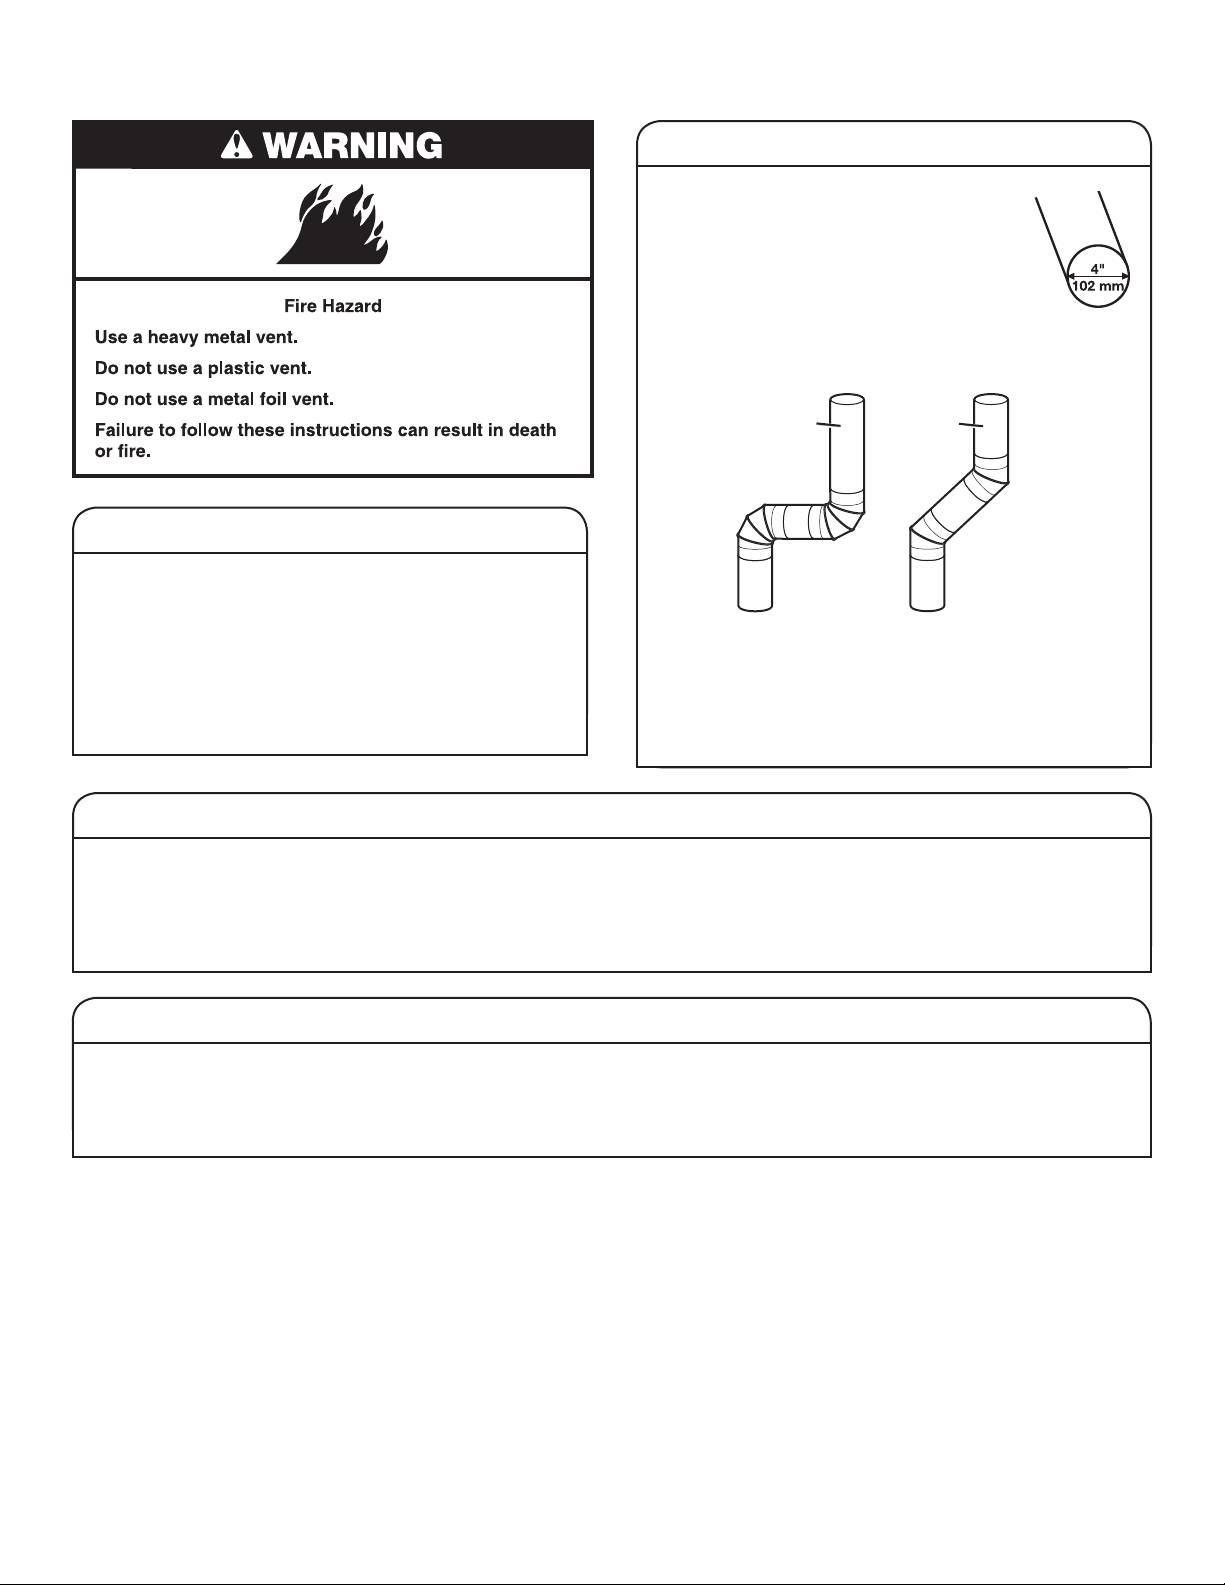
CHECK YOUR VENT SYSTEM FOR GOOD AIRFLOW
Maintaining good airow
n
Clean your lint screen before each load.
n
Replace plastic or foil vent material
with 4" (102 mm) diameter heavy, rigid
vent material.
n
Use the shortest length of vent possible.
n
Use no more than four 90° elbows in a vent system.
Each bend and curve reduces airow.
Good
Better
Good airow
Along with heat, dryers require good airow to efciently
dry laundry. Proper venting will reduce your drying times
and improve your energy savings. See Installation
Instructions.
The venting system attached to the dryer plays a big role
in good airow.
Service calls caused by improper venting are not covered
by the warranty and will be paid by the customer, regardless
of who installed the dryer.
Use Sensor Cycles for better fabric care and energy savings
Use the Sensor Cycles to provide the most energy savings and enhanced fabric care from the dryer. During Sensor Cycles, drying
air temperature and moisture level are sensed in the load. This sensing occurs throughout the drying cycle and the dryer shuts off
when the load reaches the selected dryness. Use the Normal dryness level to provide optimal energy savings.
With Timed Dry, the dryer runs the amount of time set and sometimes results in shrinkage, wrinkling, and static due to overdrying.
Use Timed Dry for the occasional damp load that needs a little more drying time or when using the drying rack.
n
Remove lint and debris from the exhaust hood.
n
Remove lint from the entire length of the vent system
at least every 2 years. When cleaning is complete, be
sure to follow the Installation Instructions supplied with
your dryer for nal product check.
n
Clear away items from the front of the dryer.
Eco Dry option
The Eco Dry option will default on only for the Normal cycle and is only available on that cycle.
This option allows you to increase your energy savings by using a slightly lower heat level. The Eco Dry option will increase
drying times by approximately 40 minutes, which will be reected on the LED Display. If optimal time is desired, touch ECO DRY
to turn off this option.
5
Page 6

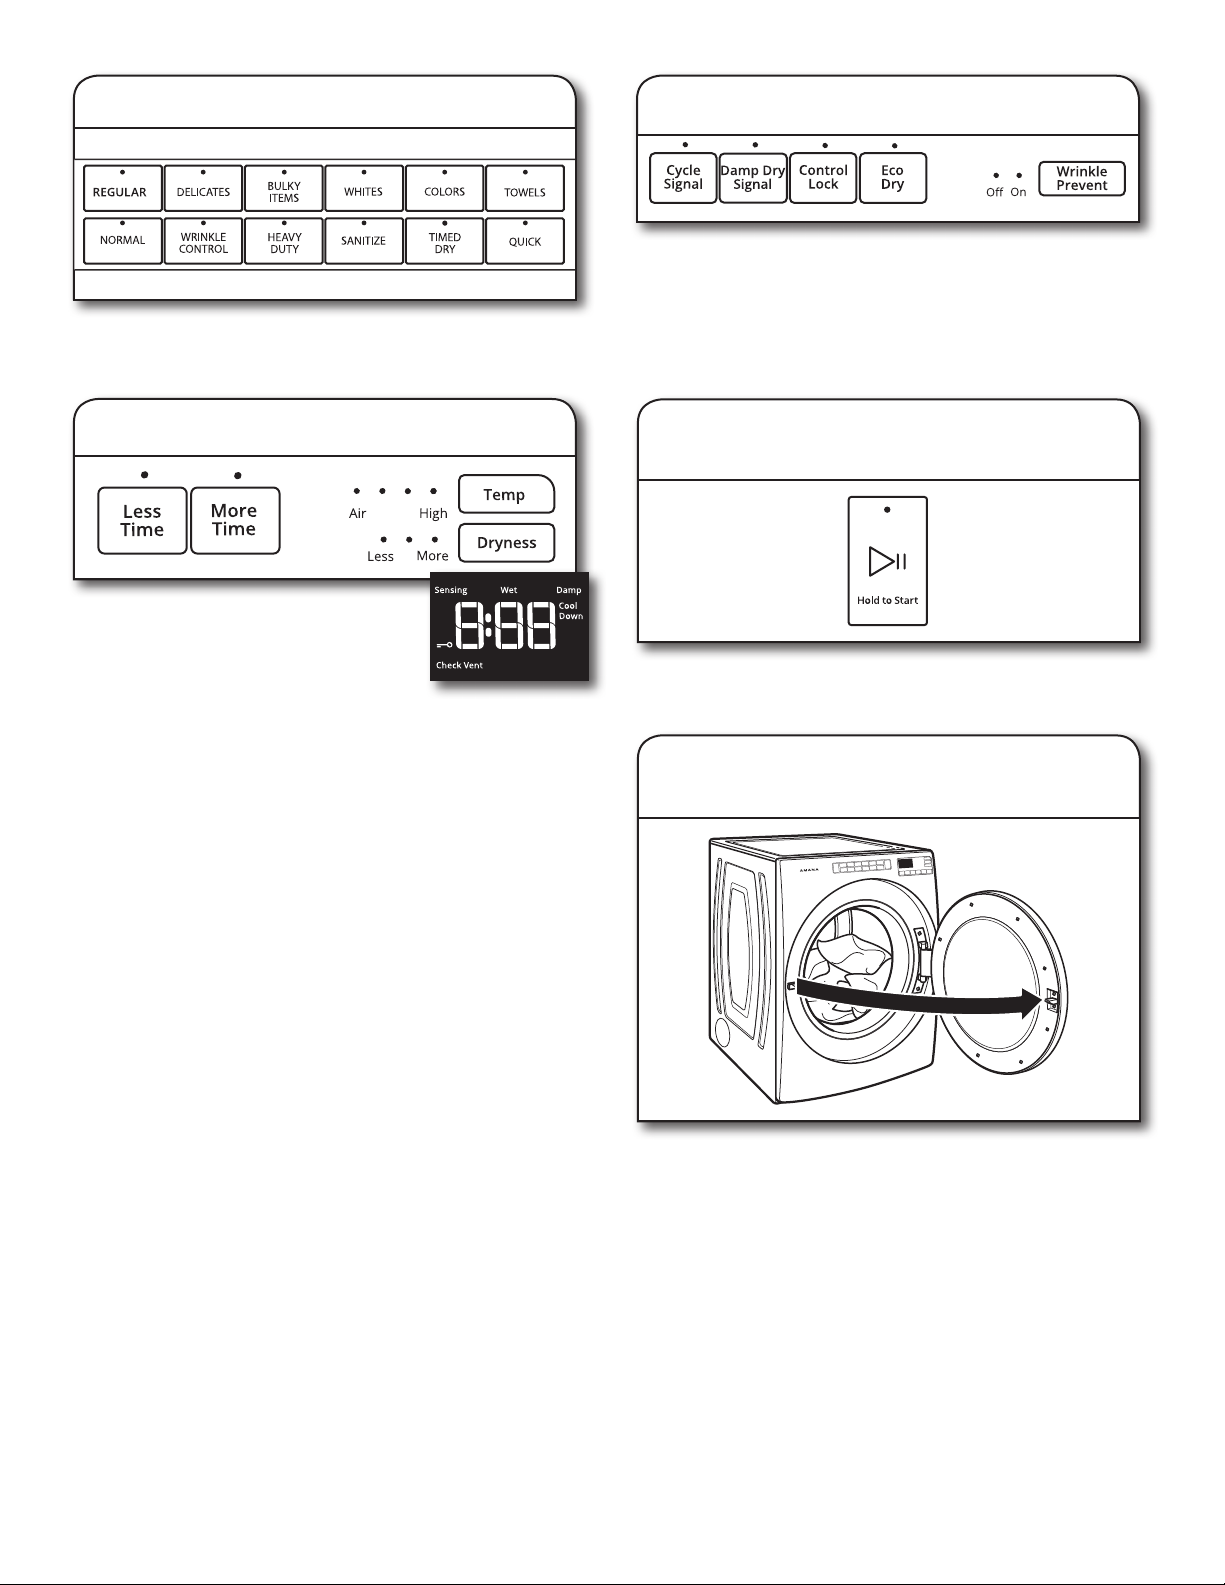
CONTROL PANEL AND FEATURES
Not all features and cycles are available on all models.
NOTE: The control panel features a sensitive surface that responds to a light touch of your nger. To ensure your selections are
registered, touch the control panel with your ngertip, not your ngernail. When selecting a setting or option, simply touch the
appropriate button.
1
1
POWER
Touch to turn the dryer on and off. Touch to stop/cancel
a cycle at any time.
2
CYCLES
Touch a button for the desired drying cycle. See “Cycle
Guide” for cycle details.
3
START/PAUSE
Touch and hold until LED counts down “3-2-1” and the
dryer starts; then let go to start a cycle, or touch once
while a cycle is in process to pause it.
4
MODIFIERS
Use to select available modiers for your dryer. Not all
cycles and options are available on all models.
Temp
When using Timed Dry/Quick Cycle, you may select
a dry temperature based on the type of load you are
drying. Use the warmest setting that is safe for the
garments in the load. Follow garment label instructions.
Dryness
You may adjust the Dryness on Sensor cycles (except
for the Sanitize cycle), if desired.
NOTE: Dryness is for use with Sensor cycles only.
More Time/Less Time Timed Dry Adjust
Touch MORE TIME or LESS TIME with the Timed Dry/
Quick cycle to increase or decrease the length of the
cycle.
5
OPTIONS
Use to select available options for your dryer. Not all cycles
and options are available on all models.
Wrinkle Prevent
If you will be unable to remove a load immediately,
touch WRINKLE PREVENT to add up to 150 minutes
of periodic tumbling to help reduce wrinkling.
NOTE: If you open the dryer door prior to the end
of the Wrinkle Prevent option, the dryer will go into
standby.
Cycle Signal
Use this option to turn the signal indicating the end
of a drying cycle to low, medium, high, or off. The
volume you select here will also be applied to the
Damp Dry Signal.
Option
2
NOTE: You may also turn off the tones that sound
when a feature, setting, or option is touched. Touch
and hold CYCLE SIGNAL for about 3 seconds to turn
sounds to low, medium, high, or off.
Damp Dry Signal
Touch to turn the Damp Dry Signal on or off. When
selected, a series of beeps will sound when the load
is damp, but not completely dry. This will allow you to
take clothes out of the load that do not need to dry
completely. This option is available on some cycles.
The Damp Dry signal is selected as a default for the
Bulky Items/Normal, Bulky Items/Wrinkle Control,
and Bulky Items/Heavy Duty cycles, as a reminder
to manually reposition bulky loads midway through
the cycle.
Control Lock
Use this option to lock the controls of the dryer
and avoid an accidental change in cycle options
or preferences during a drying cycle.
Touch and hold CONTROL LOCK for 3 seconds to
lock or unlock the controls of the dryer. During this
time, the LED Display will count down “3-2-1.”
Once the controls are locked, the LED Display
will display “Loc.”
NOTE: The Control Lock function may be enabled
when recovering from a power failure. To unlock the
control, touch and hold CONTROL LOCK for at least
3 seconds.
Eco Dry
The Eco Dry option will default on only for the Normal
cycle and is only available on that cycle. This option
allows you to increase your energy savings by using
a slightly lower heat level. The Eco Dry option will
increase drying times by approximately 40 minutes,
which will be reected on the LED Display. If optimal
time is desired, touch ECO DRY to turn off this option.
6
LED DISPLAY
When you select a cycle, its default settings will light up
and the Estimated Time Remaining (for Automatic Cycles)
will vary depending on the cycle selection, or actual time
remaining for Timed Dry cycles (for Manual Cycles) will be
displayed.
3 6
Option
4
5
4
5
6
Page 7

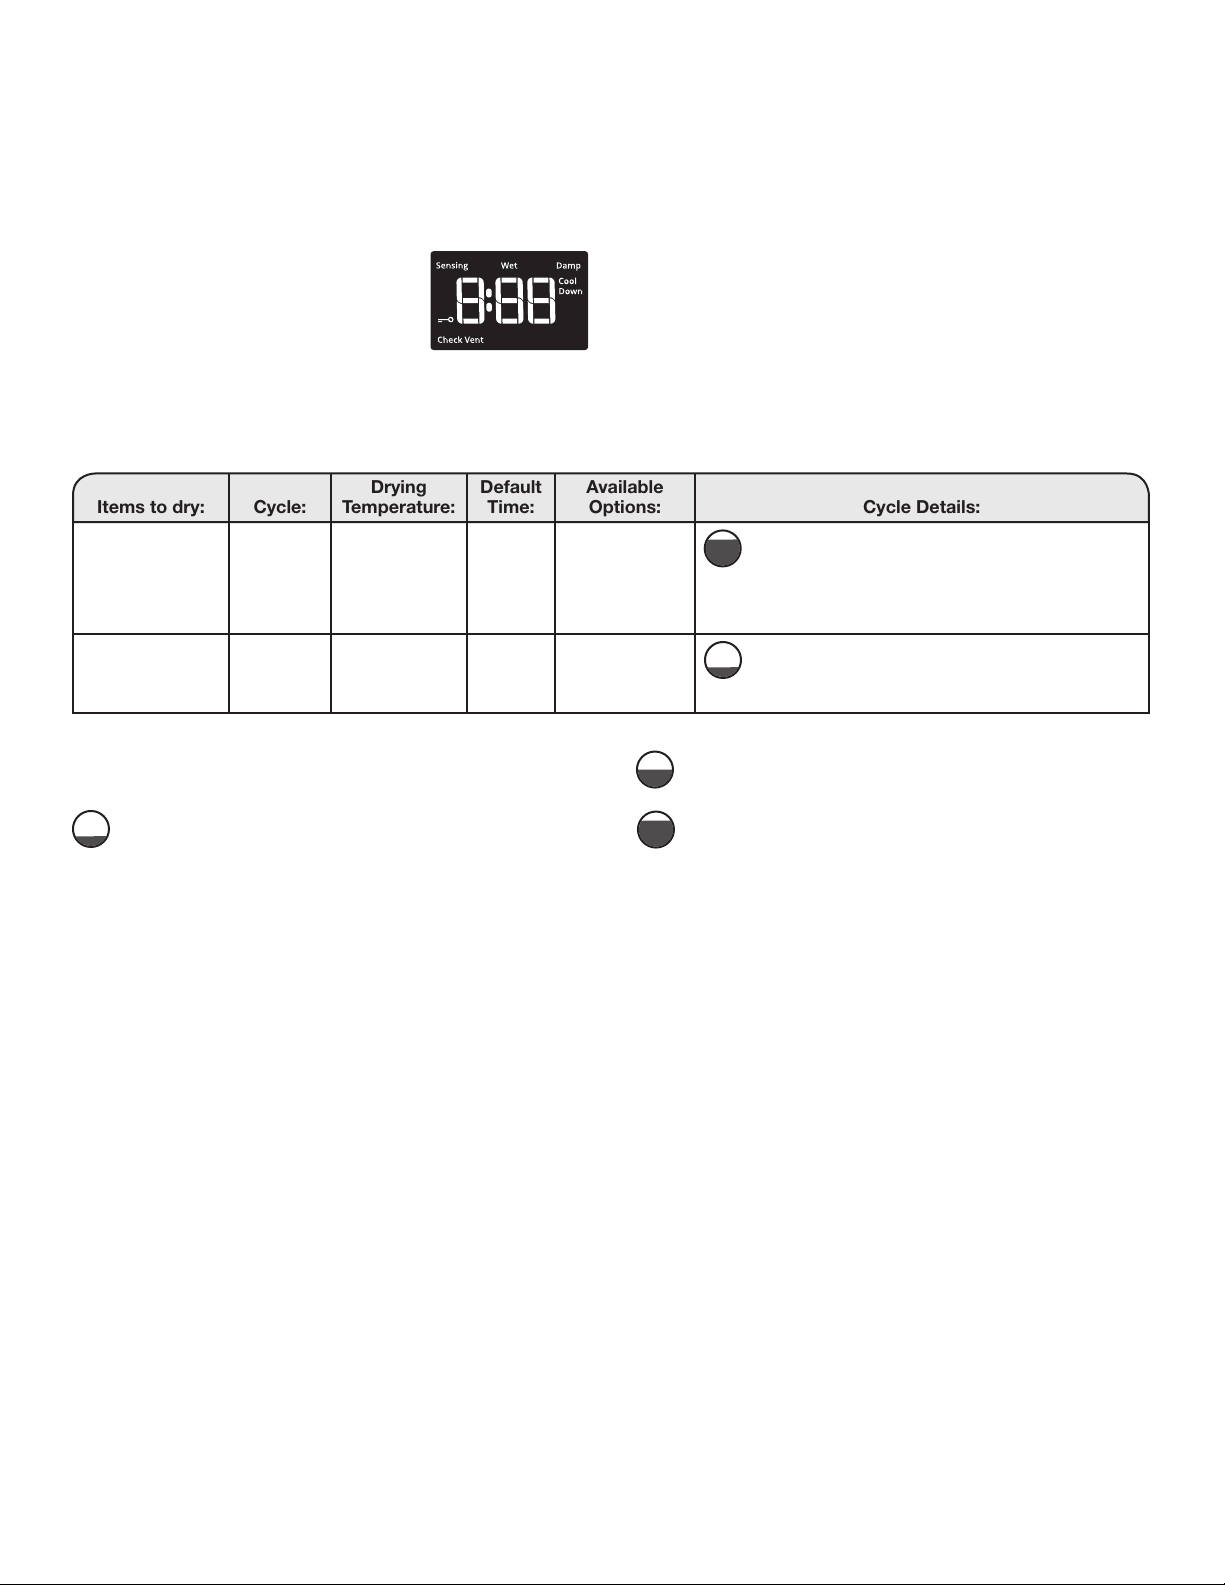
CYCLE STATUS INDICATORS
The Cycle Status Indicators show the progress of a cycle.
Not all indicators are available on all models.
Sensing
The Sensing indicator will light periodically during Sensor
Cycles to indicate that the moisture sensor on the dryer is
operating. This indicator will not light during Timed Cycles
or options such as Wrinkle Prevent.
Wet
The load is still wet and/or the cycle just started.
Damp
This indicator shows that the load is partially dried and
items that you may wish to hang up or iron while still damp
may be removed.
Cool Down
The dryer has nished drying with heat and is now
tumbling the load without heat to cool it down.
Check Vent
The Check Vent indicator is a feature available for
Automatic cycles only. This indicator will show the status
of airow through the dryer and the dryer vent system
for the dryer’s life. During the sensing phase at the
beginning of the cycle, the Check Vent light will come on
if a blocked vent or low airow issue is detected. This light
will stay on for the entire cycle. Should the Check Vent
light illuminate, refer to the “Troubleshooting” section for
potential solutions to the issue.
The light will be cleared upon completion of the cycle,
touching Power, or opening the door. The Check Vent light
will continue to illuminate during the cycle unless the root
cause is resolved.
REMEMBER: The dryer will continue to operate even
while the indicator is lit, but poor airow can impact dry
times and overall performance. For more information on
maintaining good airow, see “Check Your Vent System
for Good Airow.”
NOTE: If there are other error issues during a cycle,
the Check Vent indicator will not light up. See the
“Troubleshooting” section.
End
This will indicate that the selected cycle has ended
and the load may be removed from the dryer. If Wrinkle
Prevent has been selected, the dryer may continue to
tumble the load, even if “End” is displayed.
Control Lock
This will illuminate once the controls are locked.
7
Page 8
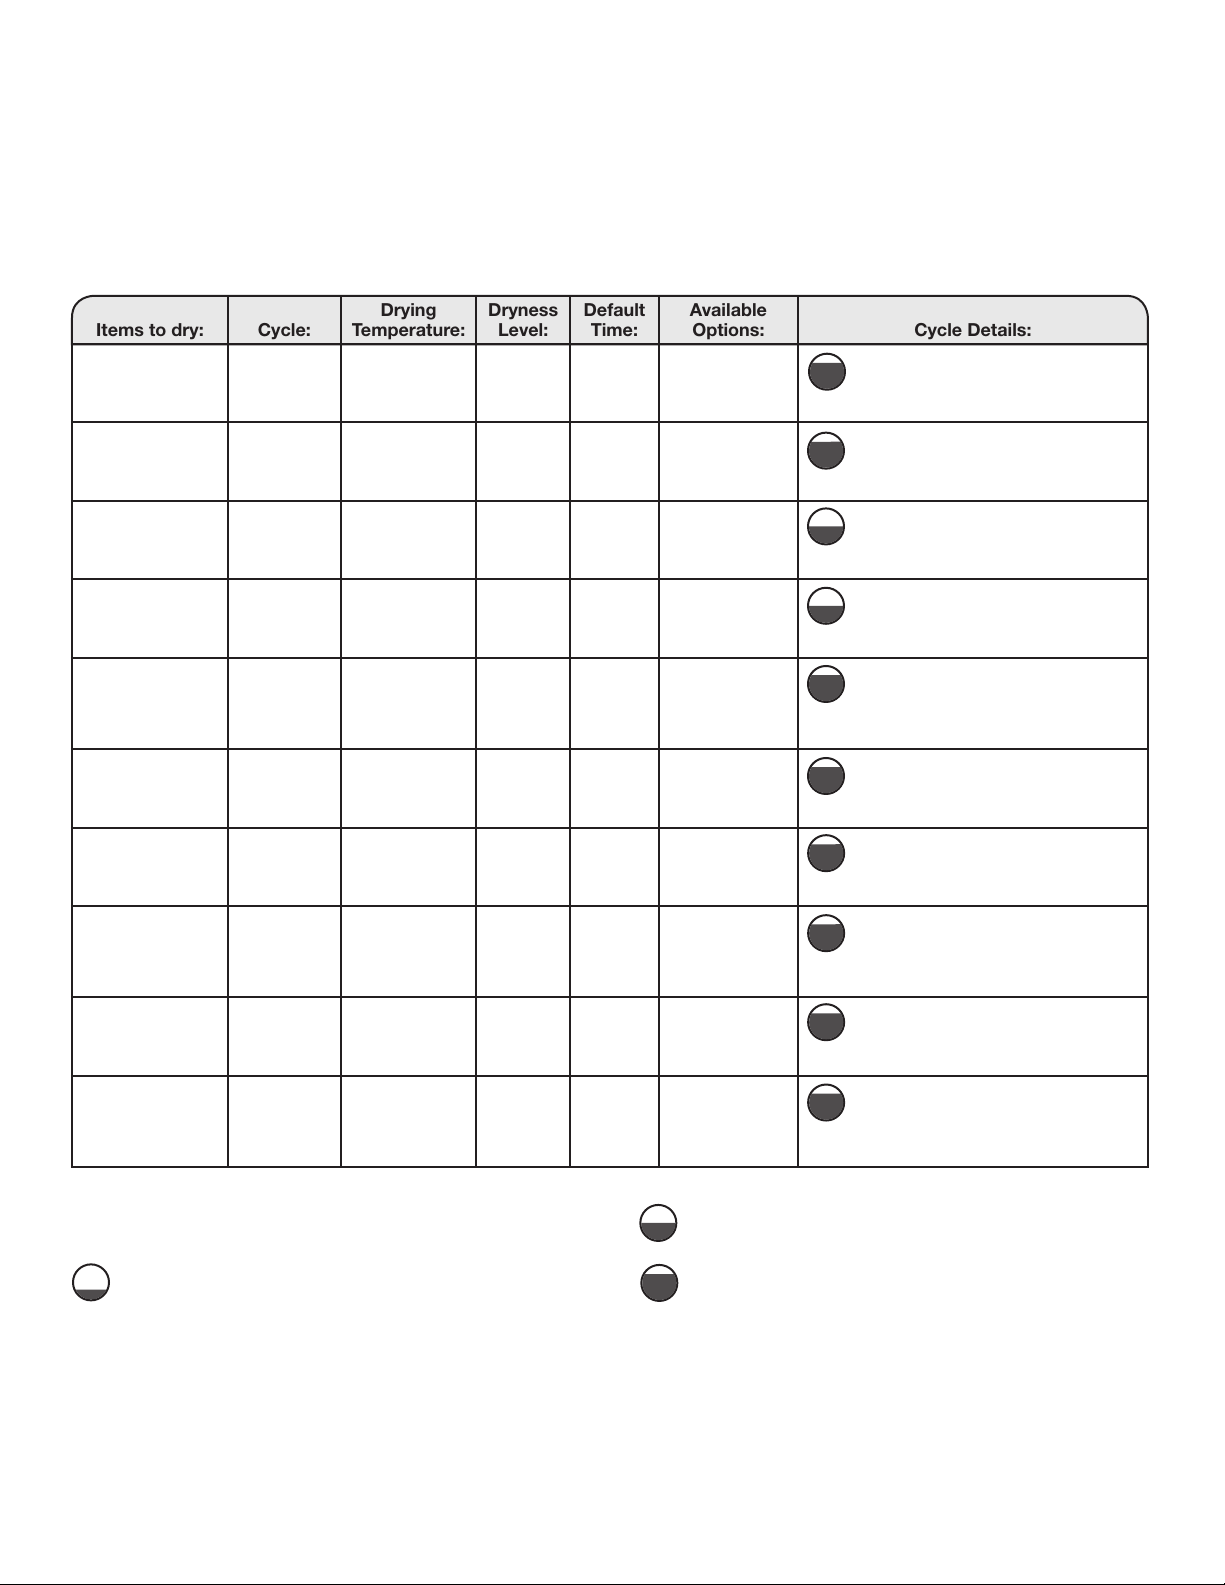
CYCLE GUIDE — SENSOR CYCLES
Settings and options shown in bold are default settings for that cycle.
If settings are changed, the new settings will be remembered. If there is a power failure, settings will return to the default.
Not all features and cycles are available on all models.
Not all settings and options are available on each cycle.
Use Sensor Cycles for better fabric care and energy savings
The dryer senses moisture in the load or air temperature and shuts off when the load reaches the selected dryness level.
Use the Normal dryness level to provide optimal energy savings.
Items to dry: Cycle:
Shirts, blouses,
permanent
press, synthetics,
lightweight items
Work clothes,
casual wear,
mixed cottons,
sheets, corduroys
Undergarments,
blouses, lingerie,
performance wear
Shirts, blouses,
permanent
press, synthetics,
lightweight items
Jackets,
comforters,
pillows
Heavyweight
items such as
towels or heavy
work clothes
White, sturdy
items
Large loads of
heavyweight items
Bright or darkly
colored cottons,
linens, casual and
mixed loads
Large loads of
cotton towels,
heavyweight items
Regular High
Normal High
Delicates High
Wrinkle
Control
Bulky Items High
Heavy Duty High
Whites High
Sanitize High More 1:30 Wrinkle Prevent This is a long cycle with high heat,
Colors High
Towels High
Drying
Temperature:
Medium
Low
Air
Medium
Low
Air
Medium
Low
Air
High
Medium
Low
Air
Medium
Low
Air
Medium
Low
Air
Medium
Low
Air
Medium
Low
Air
Medium
Low
Air
Dryness
Level:
More
Normal
Less
More
Normal
Less
More
Normal
Less
More
Normal
Less
More
Normal
Less
More
Normal
Less
More
Normal
Less
More
Normal
Less
More
Normal
Less
Default
Time:
48 Wrinkle Prevent
1:25 Wrinkle Prevent
28 Wrinkle Prevent
35 Wrinkle
52 Wrinkle Prevent
57 Wrinkle Prevent
45 Wrinkle Prevent
53 Wrinkle Prevent
1:00 Wrinkle Prevent
Available
Options: Cycle Details:
Cycle Signal
Cycle Signal
Eco Dry
Cycle Signal
Prevent
Cycle Signal
Cycle Signal
Cycle Signal
Cycle Signal
Cycle Signal
Cycle Signal
Uses Medium heat to dry large loads
of mixed fabrics and items.
Uses Medium heat to dry large loads
of mixed fabrics and items. Normal
is the most efcient cycle.
Uses Low heat to gently dry delicate
items.
Uses a stepped drying temperature
from Medium to Low for improved
moisture removal and enhanced
fabric care.
Use for drying large, bulky items; do
not overll dryer drum. Partway through
the cycle, the signal will sound for 2
minutes to indicate when it is time to
rearrange items for optimal drying.
Offers stepped drying starting with
High heat followed by Medium heat
for enhanced fabric care and energy
savings.
Uses High heat to dry large loads
of white, sturdy fabrics and items.
which has been proven to reduce
household bacteria. This cycle is not
recommended for all fabrics. Use for
large loads of heavyweight fabrics.
Uses Medium heat to gently dry bright
or darkly colored items.
This is a long cycle with high heat,
which has been proven to reduce
household bacteria. This cycle is not
recommended for all fabrics. Use for
large loads of heavyweight fabrics.
Load Size Recommendations
For best results, follow the wet load size recommendations
noted for each cycle.
Small load: Fill the dryer drum with 3–4 items, not more
than 1/4 full.
8
Medium load: Fill the dryer drum up to about 1/2 full.
Large load: Fill the dryer drum up to about 3/4 full.
Do not tightly pack. Items need to tumble freely.
Page 9
CYCLE GUIDE — TIMED CYCLES
Settings and options shown in bold are default settings for that cycle.
If settings are changed, the new settings will be remembered (except on Quick). If there is a power failure, settings will return
to the default.
Not all features and cycles are available on all models.
Not all settings and options are available on each cycle.
Adjusting drying time on Timed Cycles
When you select a Timed Cycle, the time
appears in the display. Use More Time
and Less Time to increase or decrease
the time in 5-minute increments.
The maximum dry time is 150 minutes.
Items to dry: Cycle:
Any load
NOTE: Select Air
to dry foam,
rubber, plastic,
or heat-sensitive
fabrics.
Small loads
and sportswear
Timed Dry High
Quick High
Temperature:
Medium
Low
Air
Medium
Low
Air
Load Size Recommendations
For best results, follow the load size recommendations noted
for each cycle.
Drying
Default
Time:
40 Wrinkle Prevent Use to dry items to a damp level for items that do
15 Wrinkle Prevent For small loads of 3–4 items.
Selecting the Drying Temperature
A High heat setting may be used for drying heavyweight items
such as towels and work clothes.
A Low to Medium heat setting may be used for drying
mediumweight items such as sheets, blouses, dresses,
underwear, permanent press fabrics, and some knits.
Use a no heat (air) setting for foam, rubber, plastic,
or heat-sensitive fabrics.
Line dry bonded or laminated fabrics.
NOTE: If you have questions about drying temperatures
for various loads, refer to the care label directions.
Available
Options: Cycle Details:
not require an entire drying cycle. Select a drying
temperature based on the type of fabrics in your load.
If you are unsure of the temperature to select for a
load, select the lower setting rather than the higher
setting.
Medium load: Fill the dryer drum up to about 1/2 full.
Small load: Fill the dryer drum with 3–4 items, not more
than 1/4 full.
Large load: Fill the dryer drum up to about 3/4 full.
Do not overload. Items need to tumble freely.
NOTE: Government energy certications for this model were based on the Normal Cycle, Highest Temperature Setting, Normal
Dryness Level, Eco Dry On. The as-shipped defaults were the same as the Government Energy Certication Settings except the
default Temperature Setting of Medium was adjusted to the Highest Temperature Setting.
9
Page 10
USING YOUR DRYER
WARNING: To reduce the risk of re, electric shock, or injury
to persons, read the Important Safety Instructions before
operating this appliance.
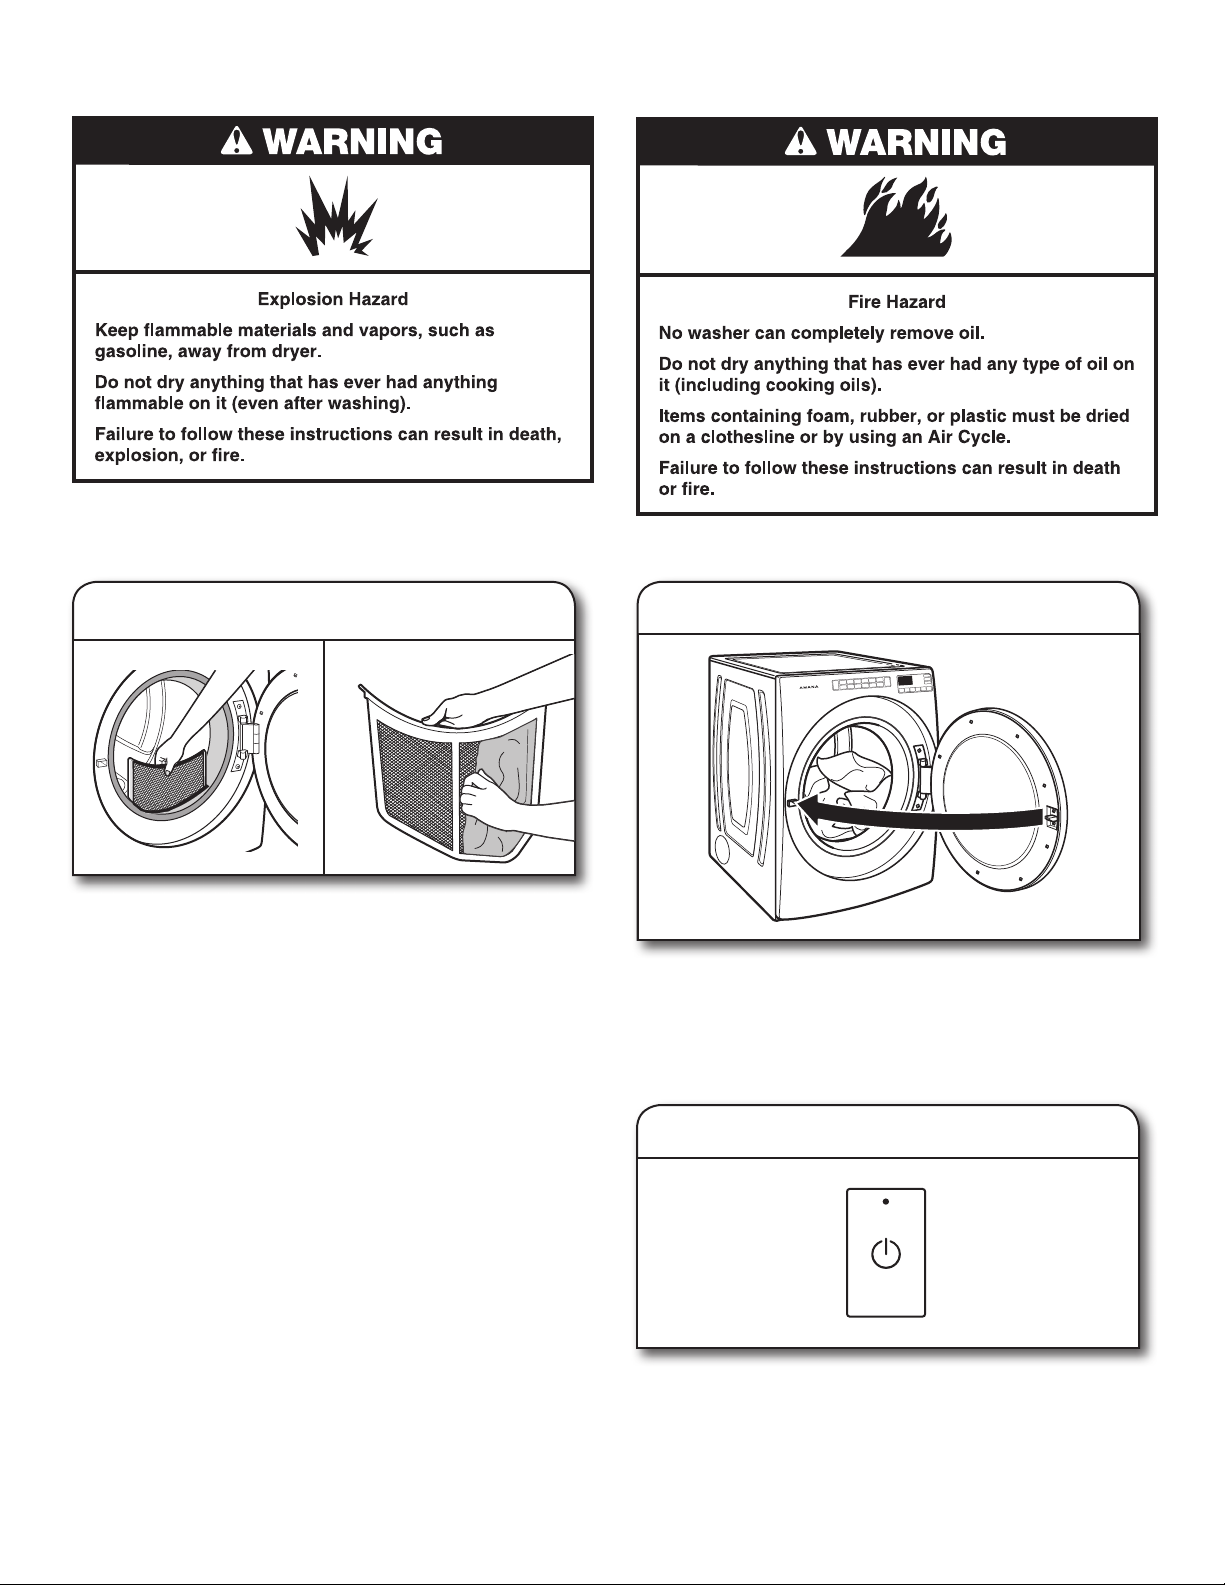
1.
Clean the lint screen
2.
Load the dryer
Clean the lint screen before each load. Pull the lint screen
straight up. Roll lint off the screen with your ngers. Do
not rinse or wash screen to remove lint. Wet lint is hard
to remove. Push the lint screen rmly back into place.
For additional cleaning information, see “Dryer Care.”
Open the door by pulling on the handle. Place laundry in the
dryer. Add a dryer sheet to wet load, if desired. Close the door.
IMPORTANT: Do not tightly pack the dryer. Items need
to tumble freely. Tightly packing can lead to poor drying
performance and may increase wrinkling and tangling.
3.
Touch POWER
Touch POWER to turn on the dryer.
10
Page 11
4.
Select desired cycle
Select the desired cycle for your load. See the “Cycle Guide”
for more information about each cycle.
5.
Adjust cycle modiers, if desired
You may adjust different settings,
depending on whether you have selected
a Sensor Cycle or Timed Cycle. See the
“Cycle Guide” for detailed information.
NOTE: Not all options and settings are available with all cycles.
Not all cycles are on all models.
Sensor Cycles:
The temperature may be changed by touching Temp until
the desired dry temperature is lit. Once a cycle has started,
the temperature can be changed during the rst 5–8 minutes
of the cycle.
You can select a different dryness level, depending on
your load. Touch DRYNESS to scroll from Less to More to
automatically adjust the dryness level at which the dryer will
shut off. Once a dryness level is set, it can be changed during
the rst 5–8 minutes of the cycle.
Sensor cycles give the best drying in the shortest time.
Drying time varies based on fabric type, load size, and dryness
setting. Drying time is estimated and may change throughout
the cycle. Drying time cannot be changed on Sensor Cycles.
Timed Cycles:
When you select a Timed Cycle, the time appears in the
display. Touch MORE TIME or LESS TIME to increase or
decrease the time in 5-minute increments.
The temperature may be changed by touching Temp until
the desired dry temperature is lit. The temperature cannot
be changed if the temperature is started with Air.
6.
Select any additional options
Add additional options such as Wrinkle Prevent and/or Eco
Dry by touching that option. If you will be unable to remove
the load promptly, select Wrinkle Prevent before touching
Start/Pause.
NOTE: Not all options and settings are available with all
cycles.
7.
Touch and hold START/PAUSE
to begin cycle
To begin the cycle, touch and hold START/PAUSE until the
display counts down “3-2-1” and the dryer starts.
8. Remove garments promptly
after cycle is nished
Promptly remove garments after cycle has completed
to reduce wrinkling. If you will be unable to remove the load
promptly, select the Wrinkle Prevent option.
11
Page 12

ADDITIONAL FEATURES
DRYER CARE
USING THE DRYING RACK
To purchase a drying rack for your dryer, see “Accessories”
for more information. You will need your model and serial
number and the purchase date. Remove and discard any
packing material before use.
Use the drying rack for items that you do not want to tumble
dry, such as sweaters and tennis shoes. When you use the
drying rack, the drum continues to turn, but the rack remains
stationary.
The drying rack is intended for use with the Timed Dry cycle
only. The drying rack cannot be used with Sensor Cycles.
To use the drying rack:
IMPORTANT: Do not remove the lint screen.
1. Open dryer door.
2. Align the two hooks on the front of the drying rack with
the holes in the dryer door opening and press down fully
into holes. Rest the rear support on the dryer back ledge.
CLEANING THE DRYER LOCATION
Keep dryer area clear and free from items that would
block the airow for proper dryer operation. This includes
clearing piles of laundry in front of the dryer.
CLEANING THE DRYER INTERIOR
To clean dryer drum:
1. Use a mild hand dish detergent mixed at a low
concentration with very warm water, and rub with
a soft cloth.
2. Rinse well with a wet sponge or towel.
3. Tumble a load of clean clothes or towels to dry drum
OR
Use a microber cloth and hot water in a spray bottle
to clean the drum and a second microber towel to dry.
NOTE: Garments that contain unstable dyes, such as
denim blue jeans or brightly colored cotton items, may
discolor the rear of the dryer interior. These stains are not
harmful to your dryer and will not stain future loads of
clothes. Dry unstable dye items inside out to avoid transfer
of dye.
3. Place wet items on top of the drying rack. Allow space
around items for air to circulate. The drying rack does
not move, but the drum will rotate; be sure to leave
adequate clearance between items and the inside
of the dryer drum. Make sure items do not hang
over the edges or between drying rack grille.
4. Close the door.
5. Select a Timed Dry cycle. Items containing foam, rubber,
or plastic must be dried on a clothesline or by using the
Air setting.
6. When the cycle is selected, the display shows the
default time. You can change the actual time in the cycle
by increasing or decreasing the cycle time.
7. Start the dryer.
NOTE: Check the lint screen and remove any lint
accumulated from items dried on the drying rack
after the cycle is nished.
12
REMOVING ACCUMULATED LINT
From Inside the Dryer Cabinet
Lint should be removed every 2 years, or more often,
depending on dryer usage. Cleaning should be done
by a qualied appliance servicer.
From the Exhaust Vent
Lint should be removed every 2 years, or more often,
depending on dryer usage.
Page 13

CLEANING THE LINT SCREEN
NON-USE, STORAGE, AND MOVING CARE
Every load cleaning
The lint screen is located in the door opening of the dryer.
Clean the lint screen before each load. A screen blocked
by lint can increase drying time.
To clean:
1. Pull the lint screen straight up. Roll lint off the screen
with your ngers. Do not rinse or wash screen to remove
lint. Wet lint is hard to remove.
2. Push the lint screen rmly back into place.
IMPORTANT:
n
Do not run the dryer with the lint screen loose,
damaged, blocked, or missing. Doing so can cause
overheating and damage to both the dryer and fabrics.
n
If lint falls off the screen into the dryer during removal,
check the exhaust hood and remove the lint. See
“Venting Requirements” in the Installation Instructions.
Non-Use or Storage Care
Operate your dryer only when you are at home. If you will
be on vacation or not using your dryer for an extended
period of time, you should:
1. Unplug dryer or disconnect power.
2. Clean lint screen. See “Cleaning the Lint Screen.”
Moving Care
For power supply cord-connected dryers:
1. Unplug the power supply cord.
2. Gas models only: Close shut-off valve in gas supply line.
3. Gas models only: Disconnect gas supply line pipe and
remove ttings attached to dryer pipe.
4. Gas models only: Cap the open gas supply line.
5. Make sure leveling legs are secure in dryer base.
6. Use tape to secure dryer door.
AS-NEEDED CLEANING
Laundry detergent and fabric softener residue can build
up on the lint screen. This buildup can cause longer drying
times for your clothes, or cause the dryer to stop before
your load is completely dry. The screen is probably clogged
if lint falls off while the screen is in the dryer.
Clean the lint screen with a nylon brush every 6 months,
or more frequently, if it becomes clogged due to a residue
buildup.
To wash:
1. Roll lint off the screen with your ngers.
2. Wet both sides of lint screen with hot water.
3. Wet a nylon brush with hot water and liquid detergent.
Scrub lint screen with the brush to remove residue
buildup.
4. Rinse screen with hot water.
5. Thoroughly dry lint screen with a clean towel.
Reinstall screen in dryer.
For direct-wired dryers:
1. Disconnect power.
2. Disconnect wiring.
3. Make sure leveling legs are secure in dryer base.
4. Use tape to secure dryer door.
Reinstalling the Dryer
Follow the Installation Instructions to locate, level, and
connect the dryer.
13
Page 14

TROUBLESHOOTING
First try the solutions suggested here or visit our website at www.amana.com/owners
If you experience Possible Causes Solution
Dryer Operation
Dryer will not run Door not closed completely. Make sure the dryer door is closed completely.
Start/Pause touched with ngernail. Touch START/PAUSE with pad of nger.
Household fuse is blown or circuit
breaker has tripped.
Incorrect power supply. Electric dryers require 240 volt power supply. Check with a
Wrong type of fuse. Use a time-delay fuse.
Dryer will not turn off Dryer door was opened prior to the
Dryer will not heat Household fuse is blown or circuit
Unusual Noise
Thumping noise Dryer hasn’t been used in a while. This is normal. The thumping sound should diminish after a few
Rattling or vibrating noise A small object caught between the
Clicking noise Gas valve operating. On gas dryers, you may hear the gas valve clicking as it opens
Dryer Results
Drying times are too
long and clothes are
not getting dry
end of the Wrinkle Prevent option.
breaker has tripped.
Incorrect power supply. Electric dryers require 240 volt power supply. Check with a
Supply line valve not open. For gas dryers, make sure that the valve on the gas supply line
edges of dryer drum.
Dryer isn’t properly leveled. The dryer may vibrate if not properly installed. See the
Clothing is balled up in dryer. When balled up, the load will bounce, causing the dryer to
Lint screen is clogged with lint. Clean lint screen before each load.
Eco Dry option is on. For optimal dry times, turn off the Eco Dry option.
The exhaust vent or outside exhaust
hood is clogged with lint, restricting
air movement.
The exhaust vent is not the correct
length.
The exhaust vent diameter is not the
correct size.
for assistance and to possibly avoid a service call.
There may be two household fuses or circuit breakers for the
dryer. Check that both fuses are intact and tight, or that both
circuit breakers have not tripped. Replace the fuses or reset
the circuit breaker. If the problem continues, call an electrician.
qualied electrician.
If you open the dryer door prior to the end of the Wrinkle Prevent
option, the dryer will go into the Pause mode. You will need to
touch Power to turn off or touch Start/Pause to continue the
Wrinkle Prevent option.
The drum may be turning, but you may not have heat. Electric
dryers use two household fuses or circuit breakers. Replace the
fuses or reset the circuit breaker. If the problem continues, call
an electrician.
qualied electrician.
is open.
minutes of use.
Check the front and rear edges of the drum for small objects.
Clean out pockets before laundering.
Installation Instructions. All four dryer feet should be in rm
contact with the oor.
vibrate. Separate the load items and restart the dryer.
and closes. This is normal.
Run the dryer for 5–10 minutes. Hold your hand under the
outside exhaust hood to check air movement. If you do not feel
air movement, clean exhaust system of lint or replace exhaust
vent with heavy metal or exible metal vent. See the Installation
Instructions.
Check that the exhaust vent is not too long or has too
many turns. Long venting will increase drying times.
See the Installation Instructions.
Use 4" (102 mm) diameter vent material.
14
Page 15

TROUBLESHOOTING
First try the solutions suggested here or visit our website at www.amana.com/owners
If you experience Possible Causes Solution
Dryer Results (cont.)
Drying times are too
long and clothes are not
getting dry (cont.)
Cycle time is too short The load may not be contacting the
Lint on load Lint screen is clogged with lint. Clean lint screen before each load.
Stains on load Improper use of fabric softener. Add dryer fabric softener sheets at the beginning of the cycle.
Stains on drum Loose dyes in clothes. Drum stains are caused by dyes in clothing (usually blue jeans).
Loads are wrinkled The load was not removed from dryer
Odors Recent painting, staining, or
Load too hot Load removed before cooldown
The dryer is not level. Clothes not contacting the moisture sensors during Sensor
The load is too large and heavy to dry
quickly.
Fabric softener sheets are blocking
the grille.
The dryer is located in a room with
temperature below 45ºF (7ºC).
The dryer is located in a closet. Closet doors must have ventilation openings at the top and
sensor strips on Sensor cycles.
The Sensor cycle is ending early. Change the dryness level setting on Sensor Cycles. Increasing
at the end of the cycle.
The dryer was tightly packed. Dry smaller loads that can tumble freely. Results may also vary
varnishing in the area where your
dryer is located.
The electric dryer is being used for
the rst time.
portion of cycle complete.
Using Timed Dry cycle with a high
temperature setting.
for assistance and to possibly avoid a service call.
cycles. See “Level Dryer” in the Installation Instructions.
Separate the load to tumble freely.
The air outlet grille is just inside the door, behind the lint screen.
Check that it is not blocked by a fabric softener sheet.
Use only one fabric softener sheet, and use it only once.
Proper operation of dryer cycles requires temperatures above
45ºF (7ºC).
bottom of the door. The front of the dryer requires a minimum of
1" (25 mm) of airspace, and, for most installations, the rear of the
dryer requires 5" (127 mm). See the Installation Instructions.
Level the dryer. See the Installation Instructions. All four dryer
feet should be in rm contact with the oor.
or decreasing the dryness level will change the amount of drying
time in a cycle.
Fabric softener sheets added to a partially dried load can stain
your garments.
These will not transfer to other clothing.
NOTE: Refer to garment care label instructions. Dry-clean-only
garments are not recommended.
depending on fabric type.
Ventilate the area. When the odors or fumes are gone from the
area, rewash and dry the clothing.
The new electric heating element may have an odor.
The odor will be gone after the rst cycle.
Allow the dryer to complete the cooldown portion of the cycle
before removing the load.
Select a Sensor cycle with a lower heat setting to avoid
overdrying the load.
15
Page 16

TROUBLESHOOTING
First try the solutions suggested here or visit our website at www.amana.com/owners
If you experience Possible Causes Solution
Dryer Displaying Code Message or Indicator Is Lit
“PF” (power failure) The drying cycle has been interrupted
“L2” Diagnostic Code
(low or no line voltage
condition)
“F# E#” (F1 E1, F3 E1,
etc.) variable service
codes
Check Vent indicator is lit The lint screen or vent is clogged;
“Loc” The Control Lock is enabled. Touch and hold CONTROL LOCK for 3 seconds to unlock the
by a power failure.
There may be a problem with your
home power supply, keeping the
dryer’s heater from turning on.
The dryer is in need of service. If a code beginning with an “F” appears in the display, alternating
the vent is crushed or kinked or has
too many turns.
for assistance and to possibly avoid a service call.
Touch and hold START/PAUSE to restart the dryer cycle or touch
POWER to clear the display.
The dryer will continue to run when this diagnostic code is
present. Touch any pad to clear the code from the display and
return to the estimated time remaining.
NOTE: This error will only show during the initial installation.
Try the following:
•
Check to see if a household fuse has blown or circuit breaker
has tripped. Electric dryers use two household fuses or
breakers. Replace the fuse or reset the circuit breaker.
•
Conrm that the power cord is properly installed. Refer to
the Installation Instructions for details.
•
Select a Timed Dry heated cycle, and restart the dryer.
If the message persists, consult a qualied electrician.
between F# and E#, the dryer control has detected a problem
that requires service. Call for service.
The dryer will continue to run when this indicator is lit. Try the
following:
• Clean lint screen.
• Check to see if the vent run from the dryer to the wall is
crushed or kinked.
• Conrm that the vent run from the dryer to the wall is free of
lint and debris.
• Conrm that the exterior vent exhaust hood is free of lint and
debris.
• Conrm that your vent system falls within the recommended
run length and number of elbows for the type of vent you
are using. Refer to “Plan Vent System” in the Installation
Instructions for details.
• Select a Timed Dry heated cycle, and restart the dryer.
• If the indicator remains lit, have your entire home venting
run cleaned.
controls of the dryer. During this time, the LED Display will count
down “3-2-1.” When the Control Lock is disabled, the LED
Display will clear.
16
Page 17

WHIRLPOOL CORPORATION LAUNDRY WARRANTY
LIMITED WARRANTY
For one year from the date of purchase, when this major appliance is installed, operated, and maintained according to instructions
attached to or furnished with the product, Amana, Admiral, Estate, Inglis, or Roper brands of Whirlpool Corporation or Whirlpool
Canada LP (hereafter “Whirlpool”) will pay for Factory Specied Replacement Parts and repair labor to correct defects in materials or
workmanship that existed when this major appliance was purchased.
YOUR SOLE AND EXCLUSIVE REMEDY UNDER THIS LIMITED WARRANTY SHALL BE PRODUCT REPAIR AS PROVIDED
HEREIN. Service must be provided by a company designated by Whirlpool to service Amana, Admiral, Estate, Inglis, or Roper brand
appliances. This limited warranty is valid only in the United States or Canada and applies only when the major appliance is used in
the country in which it was purchased. This limited warranty is effective from the date of original consumer purchase. Proof of original
purchase date is required to obtain service under this limited warranty.
ITEMS EXCLUDED FROM WARRANTY
This limited warranty does not cover:
1. Replacement parts or repair labor if this major appliance is used for other than normal, single-family household use or when it is
used in a manner that is inconsistent to published user or operator instructions and/or installation instructions.
2. Service calls to correct the installation of your major appliance, to instruct you on how to use your major appliance, to replace or
repair house fuses, or to correct house wiring or plumbing.
3. Service calls to repair or replace appliance light bulbs, air lters, or water lters. Consumable parts are excluded from warranty
coverage.
4. Damage resulting from accident, alteration, misuse, abuse, re, ood, acts of God, improper installation, installation not in
accordance with electrical or plumbing codes, or use of products not approved by Whirlpool.
5. Cosmetic damage, including scratches, dents, chips or other damage to the nish of your major appliance, unless such damage
results from defects in materials or workmanship and is reported to Whirlpool within 30 days from the date of purchase.
6. Pick up and delivery. This major appliance is intended to be repaired in your home.
7. Repairs to parts or systems resulting from unauthorized modications made to the appliance.
8. Expenses for travel and transportation for product service if your major appliance is located in a remote area where service by an
authorized company designated by Whirlpool to service Amana, Admiral, Estate, Inglis, or Roper brands is not available.
9. The removal and reinstallation of your major appliance if it is installed in an inaccessible location or is not installed in accordance
with Whirlpool’s published installation instructions.
10. Replacement parts or repair labor on major appliances with original model/serial numbers that have been removed, altered, or
cannot be easily determined.
The cost of repair or replacement under these excluded circumstances shall be borne by the customer.
DISCLAIMER OF IMPLIED WARRANTIES
IMPLIED WARRANTIES, INCLUDING ANY IMPLIED WARRANTY OF MERCHANTABILITY OR IMPLIED WARRANTY OF FITNESS
FOR A PARTICULAR PURPOSE, ARE LIMITED TO ONE YEAR OR THE SHORTEST PERIOD ALLOWED BY LAW. Some states and
provinces do not allow limitations on the duration of implied warranties of merchantability or tness, so this limitation may not apply
to you. This warranty gives you specic legal rights, and you also may have other rights that vary from state to state or province to
province.
DISCLAIMER OF REPRESENTATIONS OUTSIDE OF WARRANTY
Whirlpool makes no representations about the quality, durability, or need for service or repair of this major appliance other than the
representations contained in this Warranty. If you want a longer or more comprehensive warranty than the limited warranty that comes
with this major appliance, you should ask Whirlpool or your retailer about buying an extended warranty.
LIMITATION OF REMEDIES; EXCLUSION OF INCIDENTAL AND CONSEQUENTIAL DAMAGES
YOUR SOLE AND EXCLUSIVE REMEDY UNDER THIS LIMITED WARRANTY SHALL BE PRODUCT REPAIR AS PROVIDED HEREIN.
WHIRLPOOL SHALL NOT BE LIABLE FOR INCIDENTAL OR CONSEQUENTIAL DAMAGES. Some states and provinces do not allow
the exclusion or limitation of incidental or consequential damages, so these limitations and exclusions may not apply to you. This
warranty gives you specic legal rights, and you also may have other rights that vary from state to state or province to province.
If outside the 50 United States and Canada, contact your authorized Whirlpool, Amana, Admiral, Estate, Inglis, or Roper dealer to
determine if another warranty applies.
If you think you need repair service, rst see the “Troubleshooting” section of the Use & Care Guide. If you are unable to resolve
the problem after checking “Troubleshooting,” additional help can be found by checking the “Assistance or Service” section or by
calling the following numbers for assistance: In the U.S.A., call 800-843-0304 for Amana brand products; 800-688-9920 for Admiral
brand products; 800-253-1301 for Estate brand products, or 800-447-6737 for Roper brand products. For assistance In Canada,
call: 800 -807- 6777 for Amana, Admiral, Estate, Inglis, or Roper brand products. 1/12
Keep this book and your sales slip together for future
reference. You must provide proof of purchase or installation
date for in-warranty service.
Write down the following information about your major appliance
to better help you obtain assistance or service if you ever need
it. You will need to know your complete model number and serial
number. You can nd this information on the model and serial
number label located on the product.
Dealer name _____________________________________________
Address __________________________________________________
Phone number ____________________________________________
Model number ____________________________________________
Serial number ____________________________________________
Purchase date ____________________________________________
17
Page 18

SÉCURITÉ DE LA SÉCHEUSE
18
Page 19

Dans l’État du Massachusetts, les instructions d’installation suivantes sont applicables :
Les travaux d’installation et réparation doivent être exécutés par un plombier ou tuyauteur qualifié ou licencié, ou par le
■
personnel qualifié d’une entreprise licenciée par l’État du Massachusetts.
Remplacer par des dispositifs de fermeture acceptables : Les robinets de gaz et robinets à bille installés pour l'utilisation
■
devraient être indiqués.
■ Si un conduit de raccordement flexible est utilisé, sa longueur ne doit pas dépasser 4 pi (121,9 cm).
AVERTISSEMENT :
RISQUE D'INCENDIE OU D'EXPLOSION
Le non-respect des avertissements de sécurité peut causer des dommages à la propriété,
des blessures graves, voire la mort.
– Ne pas entreposer ou utiliser de l’essence ou d’autres vapeurs ou liquidesinflammables
à proximité de cet appareil ou de tout autre appareil électroménager.
– QUE FAIRE DANS LE CAS D’UNE ODEUR DE GAZ :
Ne pas tenter d’allumer un appareil.
•
Ne pas toucher à un commutateur électrique; ne pas utiliser le téléphone se trouvant
•
sur les lieux.
Évacuer tous les gens de la pièce, de l’édifice ou du quartier.
•
Appeler immédiatement le fournisseur de gaz d’un téléphone voisin. Suivre ses
•
instructions.
À défaut de joindre votre fournisseur de gaz, appeler les pompiers.
•
– L’installation et l’entretien doivent être effectués par un installateur qualifié, uneagence
de service ou le fournisseur de gaz.
IMPORTANT : L'installation du gaz doit se conformer aux codes locaux, ou en l'absence de codes locaux, au code d'installation
du gaz naturel ou du propane, CSA B149.1.
La sécheuse doit être électriquement reliée à la terre conformément aux codes locaux, ou en l'absence de codes locaux, au Code
canadien de l'électricité, partie 1, CSA C22.1.
19
Page 20

ACCESSOIRES
ACCESSOIRES D’INSTALLATION
ET D’ENTRETIEN
Piédestal de 15"
Les piédestaux aux coloris assortis surélèvent
la laveuse et la sécheuse pour les amener à
une hauteur d’utilisation plus confortable. Le
grand tiroir offre une capacité de rangement
pratique.
PIECES AGRÉÉS PAR LE FABRICANT, ces mots
désignent des pieces de qualité et des accessoires
conçus spécialement pour votre appareil. Une
ingénierie qui a fait ses preuves, pour répondre
a nos normes de qualité les plus strictes.
PIECES AGRÉÉS PAR LE FABRICANT
Accessoires conçus pour votre appareil :
Personnalisez votre nouvelle laveuse et sécheuse grâce
aux authentiques accessoires Whirlpool suivants. Pour plus
d’informations sur les options et sur les possibilités de
commande, appeler au 1-800-442-9991 ou consulter
www.amana.com/help.
Au Canada, composer le 1-800-807-6777 ou consulter :
www.amana.com/help.
20
Ensemble de superposition
Si l’espace disponible est restreint,
l’ensemble de superposition permet
à la sécheuse d’être installée par dessus
la laveuse.
Grille de séchage
La grille de séchage fournit une
surface de séchage stationnaire
pour les articles tels que les
chandails et les chaussures
de tennis. Voir la section
“Caractéristiques supplémentaires”
pour l’information supplémentaire.
Page 21

VÉRIFICATION D’UNE CIRCULATION D’AIR ADÉQUATE
POUR LE SYSTÈME D’ÉVACUATION
Maintenir une bonne circulation d’air
en effectuant les opérations suivantes :
n
Nettoyer le ltre à charpie avant chaque
charge.
n
Remplacer le matériau de conduits
d’évacuation en plastique ou en aluminium
par des conduits d’évacuation lourds et
rigides de 4" (102 mm) de diamètre.
n
Toujours employer les conduits d’évacuation les plus
courts possible.
n
Ne pas utiliser plus de quatre coudes à 90° dans
un circuit d’évacuation car chaque inclinaison et courbe
réduit le ux d’air.
Bonne
Meilleur
Circulation d’air adéquate
Une sécheuse a besoin de chaleur et d’une circulation
d’air adéquate pour sécher efcacement le linge. Une
ventilation adéquate réduit les durées de séchage et accroît
les économies d’énergie. Voir les Instructions d’installation.
n
Le système d’évacuation xé à la sécheuse joue un rôle
important dans la circulation de l’air.
Les interventions de dépannage causées par une ventilation
incorrecte ne sont pas couvertes par la garantie et seront
à la charge du client, quel que soit l’installateur de la sécheuse.
Retirer la charpie et les résidus du clapet d’évacuation.
n
Retirer la charpie sur toute la longueur du circuit
d’évacuation au moins tous les 2 ans. Après le
nettoyage, veuillez suivre les instructions d’installation
fournies avec la sécheuse pour une vérication nale
de l’appareil.
n
Dégager tout article qui se trouverait devant la sécheuse.
Utiliser les programmes de détection pour un meilleur soin du tissu et davantage
d’économies d’énergie
Utiliser les programmes de détection pour que la sécheuse permette de réaliser davantage d’économies d’énergie et d’apporter
un soin supérieur aux tissus. Durant les programmes de détection, la température de séchage de l’air et le niveau d’humidité
sont détectés dans la charge. Cette détection se produit tout au long du programme de séchage et la sécheuse s’éteint lorsque
la charge atteint le degré de séchage sélectionné. Utiliser le niveau de séchage Normal pour pouvoir réaliser un maximum
d’économies d’énergie.
Avec l’option de séchage minuté, la sécheuse fonctionne pendant la durée réglée, ce qui peut parfois entraîner le rétrécissement ou
le froissement du linge, et l’accumulation d’électricité statique due au séchage excessif. Utiliser le séchage minuté pour une charge
encore humide nécessitant un peu de temps supplémentaire ou lorsqu’on utilise la grille de séchage.
Option Eco Dry (séchage écologique)
L’option Eco Dry (séchage écologique) s’active par défaut avec le programme normal et ne peut être activée qu’avec
ce programme.
Cette option permet d’accroître vos économies d’énergie en utilisant un niveau de chaleur légèrement plus faible. L’option
Eco Dry (séchage écologique) augmente le temps de séchage d’environ 40 minutes, ce qui paraîtra sur l’afchage à DEL.
Pour obtenir un temps de séchage optimal, toucher ECO DRY (séchage écologique) pour désactiver l’option.
21
Page 22

TABLEAU DE COMMANDE ET CARACTÉRISTIQUES
Certains programmes et options ne sont pas disponibles sur certains modèles.
REMARQUE : La surface du tableau de commande est très sensible et il suft d’un léger toucher pour l’activer. Pour s’assurer que
vos sélections ont été sauvegardées, toucher le tableau de commande du bout du doigt et non avec l’ongle. Pour sélectionner un
réglage ou une option, il suft de toucher le nom qui lui correspond.
1
2
3 6
4
5
1
ALIMENTATION
Toucher ce bouton pour mettre la sécheuse en marche et
pour l’éteindre. Toucher ce bouton pour arrêter/annuler un
programme à tout moment.
2
PROGRAMMES
Toucher un bouton pour obtenir le programme de séchage
désiré. Voir le “Guide de programmes” pour plus de détails.
3
MISE EN MARCHE/PAUSE
Maintenir enfoncé jusqu’à ce que la DEL effectue un
compte à rebours “3-2-1” et que la sécheuse se mette en
marche; laisser ensuite le programme se poursuivre ou
toucher une fois pendant que le programme est en cours
pour le mettre sur pause.
4
MODIFICATEURS
Utiliser ces boutons pour sélectionner les modicateurs
offerts sur la sécheuse. Les programmes et options ne sont
pas tous offerts sur tous les modèles.
Temp (température)
Lorsque l’on utilise les programmes Timed Dry
(séchage minuté) et Quick Dry (rapide), il est possible de
sélectionner une température de séchage en fonction du
type de charge à sécher. Utiliser le réglage le plus chaud
possible qui reste sans danger pour les vêtements de
la charge. Suivre les instructions gurant sur l’étiquette
des vêtements.
Dryness (niveau de séchage)
Le niveau de séchage peut au besoin être réglé
si désiré pour le programme avec capteur (sauf pour
le programme Sanitize [assainissement]).
REMARQUE: Le niveau de séchage ne peut être
utilisation qu’avec le programme avec détection.
Réglage More Time/Less Time (plus de temps/moins
de temps) du programme de séchage minuté
Toucher MORE TIME (plus de temps) ou LESS TIME
(moins de temps) lors des programmes de séchage
minuté ou rapide pour augmenter ou réduire la durée
du programme.
5
OPTIONS
Utiliser ces boutons pour sélectionner les options offertes
sur la sécheuse. Les programmes et options ne sont pas
tous offerts sur tous les modèles.
Option Wrinkle Prevent (antifroissement)
Si l’on n’est pas en mesure de retirer la charge
immédiatement, toucher WRINKLE PREVENT
(antifroissement) pour ajouter jusqu’à 150 minutes
de culbutage périodique an d’aider à réduire le
froissement.
REMARQUE: Si la porte de la sécheuse est ouverte
avant la n de l’option antifroissement, la sécheuse
passe en mode attente.
22
4
Cycle Signal (signal de programme)
Toucher ce bouton pour régler le signal sonore de n
d’un programme de séchage sur faible, moyen, élevé
ou désactivé. Le volume sélectionné ici s’applique
aussi au signal de séchage humide.
REMARQUE: Il est également possible de désactiver
les signaux sonores qui retentissent lorsqu’on touche
un bouton de caractéristique, de réglage ou d’option.
Toucher sans relâcher CYCLE SIGNAL (signal de
programme) pendant environs 3 secondes pour régler
le volume sur faible, moyen, élevé ou désactivé.
Damp Dry Signal (signal de séchage humide)
Toucher pour activer ou désactiver le Damp Dry Signal
(signal de séchage humide). Lorsque cette option est
sélectionnée, plusieurs signaux sonores retentissent
lorsque la charge est humide, mais pas complètement
sèche. Ceci vous permettra de retirer les vêtements
dans la charge qui n’ont pas besoin d’être séchés
complètement. Cette option est disponible sur
certains programmes. Le Damp Dry Signal (signal
de séchage humide) est sélectionné par défaut
pour les programmes Bulky Items/Normal (articles
volumineux/normal), Bulky Items/Wrinkle Control
(articles volumineux/antifroissement) et Bulky Items/
Heavy Duty (articles volumineux/intense) pour rappeler
à l’utilisateur de réagencer les articles volumineux à la
main vers la moitié du programme.
Control Lock (verrouillage des commandes)
Utiliser cette option pour verrouiller les commandes
de la sécheuse et éviter une modication involontaire
d’options ou de préférences au cours d’un programme
de séchage.
Pour verrouiller ou déverrouiller les commandes,
maintenir CONTROL LOCK (verrouillage des
commandes) enfoncé pendant 3 secondes. Pendant
cette période, l’afchage à DEL indiquera un compte
à rebours3-2-1. Une fois les commandes verrouillées,
l’afchage à DEL indiquera “Loc”.
REMARQUE: Il est possible que la fonction de
verrouillage des commandes soit activée après une
panne de courant. Pour déverrouiller le tableau de
commande, toucher CONTROL LOCK (verrouillage
des commandes) pendant au moins 3 secondes.
Option Eco Dry (séchage écologique)
L’option Eco Dry (séchage écologique) s’active par
défaut avec le programme normal et ne peut être
activée qu’avec ce programme. Cette option permet
d’accroître vos économies d’énergie en utilisant un
niveau de chaleur légèrement plus faible. L’option
Eco Dry (séchage écologique) augmente le temps
de séchage d’environ 40 minutes, ce qui paraîtra sur
l’afchage à DEL. Pour obtenir un temps de séchage
optimal, toucher ECO DRY (séchage écologique) pour
désactiver l’option.
5
Page 23

6
AFFICHAGE À DEL
Lorsqu’on sélectionne un programme, ses réglages
par défaut s’allument et la durée restante estimée
(pour les programmes avec capteur) variera en fonction
du programme sélectionné ou la durée restante réelle
(pour les programmes manuels) s’afche.
TÉMOINS LUMINEUX DE PROGRAMME
Les témoins lumineux de programme indiquent la
progression d’un programme. Les témoins ne sont pas
tous présents sur tous les modèles.
Sensing (détection)
Le témoin de détection s’allume périodiquement lors
du fonctionnement des programmes avec détection
pour indiquer que le capteur d’humidité de la sécheuse
est en cours de fonctionnement. Ce témoin ne s’allume
pas durant les programmes minutés ou les options telles
que Wrinkle Prevent.
Wet (mouillé)
La charge est encore mouillée et/ou le programme vient
de commencer.
Damp (humide)
Ce témoin indique que la charge est partiellement sèche
et que les articles que l’on souhaite suspendre ou repasser
pendant qu’ils sont encore humides peuvent être retirés.
Cool Down (refroidissement)
La sécheuse a terminé le séchage avec chaleur et fait
maintenant culbuter la charge sans chaleur pour la refroidir
et pour réduire le froissement.
Check Vent (vérier le conduit d’évacuation)
Le témoin Check Vent (vérier le conduit d’évacuation)
n’est accessible qu’avec les programmes avec détection.
Ce témoin indique la qualité de la circulation de l’air dans
la sécheuse et le système d’évacuation de la sécheuse
durant le cycle de vie de la sécheuse. Durant la phase
de détection au début du programme, le témoin Check
Vent (vérier le conduit d’évacuation) s’allume si un
évent est obstrué ou si un faible débit de ventilation
est détecté. Cet indicateur reste allumé pendant toute
la durée du programme. Si le témoin de vérication du
conduit d’évacuation s’illumine, consulter la section
“Dépannage” pour obtenir des solutions possibles
et résoudre le problème.
Le témoin s’éteint à la n du programme, si on touche
le bouton d’alimentation ou si la porte est ouverte.
Le témoin Check Vent (vérier le conduit d’évacuation)
reste allumé pendant le programme si le problème n’est
pas réglé.
NE PAS OUBLIER: La sécheuse continue à fonctionner
même si le témoin est allumé, mais une mauvaise
circulation de l’air peut avoir une incidence sur le
temps de séchage et le rendement. Pour plus de
renseignements sur le maintien d’une bonne circulation
de l’air, voir la section “Vérication d’une circulation
adéquate de l’air dans le système d’évacuation”.
REMARQUE: Si d’autres erreurs surviennent au cours
d’un programme, le témoin Check Vent (vérication du
conduit d’aération) ne s’allume pas. Voir la section
“Dépannage”.
End (terminé)
Ceci indique que le programme sélectionné est terminé et
que l’on peut retirer la charge de la sécheuse. Si l’option
Wrinkle Prevent (antifroissement) a été sélectionnée, il est
possible que la sécheuse poursuive le culbutage de la
charge, même si “End” (terminé) est afché.
Control Lock (verrouillage des commandes)
Ce témoin s’allume lorsque les commandes sont
verrouillées.
23
Page 24

GUIDE DE PROGRAMMES — PROGRAMMES DE DÉTECTION
Les réglages et options indiqués en gras sont les réglages par défaut pour ce programme.
Si les réglages sont modiés, l’appareil garde en mémoire les nouveaux réglages. Dans le cas d’une panne de courant, les réglages
sont rétablis aux réglages par défaut.
Certains programmes et caractéristiques ne sont pas disponibles sur certains modèles.
Tous les réglages et options ne sont pas disponibles sur tous les programmes.
Utiliser les programmes de détection pour un meilleur soin du tissu et davantage d’économies d’énergie
Détecte l’humidité présente dans la charge ou la température de l’air et s’éteint lorsque la charge atteint le degré de séchage
sélectionné. Utiliser le niveau de séchage Normal pour permettre de réaliser un maximum d’économies d’énergie.
Articles
à sécher :
Chemises,
chemisiers,
tissus à pressage
permanent,
articles
synthétiques et
articles légers
Vêtements de
travail, vêtements
ordinaires,
mélanges de
coton, draps,
articles en
velours
Sous-vêtements,
chemisiers,
lingerie,
vêtements
d’athlétisme
Chemises,
chemisiers,
tissus à pressage
permanent,
articles
synthétiques et
articles légers
Vestes, couettes,
oreillers
Programme :
Regular
(régulière)
Normal High (élevé)
Delicates
(articles
délicats)
Wrinkle
Control
(commande
anti-
froissement)
Bulky Items
(articles
volumineux)
de séchage :
High (élevé)
Medium
(moyen)
Low (bas)
Medium
(moyen)
Low (bas)
High (élevé)
Medium
(moyen)
Low (bas)
High (élevé)
Medium
(moyen)
Low (bas)
High (élevé)
Medium
(moyen)
Low (bas)
Température
Air
Air
Air
Air
Air
Niveau de
séchage :
More (plus)
More (plus)
More (plus)
More (plus)
More (plus)
Normal
Less
(moins)
Normal
Less
(moins)
Normal
Less
(moins)
Normal
Less
(moins)
Normal
Less
(moins)
Durée
par défaut :
48 Wrinkle Prevent
1:25 Wrinkle Prevent
28 Wrinkle Prevent
35 Wrinkle Prevent
52 Wrinkle Prevent
Options
disponibles :
Cycle Signal
Cycle Signal
Eco Dry
Cycle Signal
Cycle Signal
Cycle Signal
Détails du programme :
Utilise un niveau de chaleur
modéré pour le séchage de
grandes charges composées
de tissus et d’articles mixtes.
Utilise un niveau de chaleur
modéré pour le séchage de
grandes charges composées de
tissus et d’articles mixtes. Normal
est le programme le plus efcace.
Utilise un niveau de chaleur faible
pour sécher en douceur les articles
délicats
Utilise une température de
séchage échelonnée de moyenne
à faible pour une extraction
améliorée de l’humidité et
un soin amélioré du tissu.
À utiliser pour le séchage de
gros articles volumineux; ne
pas surcharger le tambour de la
sécheuse. À mi-programme, le
signal retentit pendant 2 minutes
pour indiquer à l’utilisateur le
moment où il doit ré-agencer les
articles pour un séchage optimal.
Options disponibles :
Wrinkle Prevent (antifroissement)
Cycle Signal (signal de programme)
Eco Dry (séchage écologique)
Recommandations concernant le volume de la charge
Pour de meilleurs résultats, suivre les recommandations
concernant la taille de la charge mouillée indiquées.
Petite charge : Remplir le tambour de la sécheuse avec 3
ou 4 articles, à pas plus d’un quart de sa capacité.
24
Charge de taille moyenne : Remplir le tambour de la
sécheuse à environ la moitié de sa capacité pour chaque
programme.
Grande charge : Remplir le tambour de la sécheuse
environ aux trois-quarts de sa capacité. Ne pas emballer
étroitement. Les articles doivent pouvoir se déplacer
librement.
Page 25

Articles
à sécher : Programme :
Articles lourds
tels que
serviettes ou les
vêtements de
travail lourds
Articles robustes
blancs
Charges grandes
d’articles lourds
Vêtements
en coton de
couleurs vives
ou foncées, lin,
vêtements toutaller et charges
mixtes
Charges grandes
composées de
serviettes en
coton, d’articles
lourds
Heavy Duty
(service
intense)
Whites
(blancs)
Sanitize
(assainissement)
Colors
(couleurs)
Towels
(serviettes)
Température
de séchage :
High (élevé)
Medium
(moyen)
Low (bas)
Air
High (élevé)
Medium
(moyen)
Low (bas)
Air
High (élevé) More
High (élevé)
Medium
(moyen)
Low (bas)
Air
High (élevé)
Medium
Low
Air
Niveau de
séchage :
More (plus)
Normal
Less
(moins)
More (plus)
Normal
Less
(moins)
(plus)
More (plus)
Normal
Less
(moins)
More (plus)
Normal
Less
(moins)
Durée
par défaut :
57 Wrinkle Prevent
45 Wrinkle Prevent
1:30 Wrinkle Prevent Il s’agit d’un programme de longue
53 Wrinkle Prevent
1:00 Wrinkle Prevent
Options
disponibles : Détails du programme :
Cycle Signal
Cycle Signal
Cycle Signal
Cycle Signal
Offre un séchage échelonné avec
un niveau de chaleur élevé au
début suivi d’un niveau de chaleur
modérément élevé pour un meilleur
soin des tissus et davantage
d’économies d’énergie.
Utilise un niveau de chaleur élevée
pour le séchage de grandes
charges composées de tissus et
d’articles blancs et robustes.
durée avec niveau de chaleur
élevé dont l’efcacité de réduction
des bactéries domestiques est
prouvée. Ce programme n’est pas
recommandé pour tous les tissus.
À utiliser pour les grosses charges
de tissus lourds.
Utilise le niveau de chaleur
moyen pour sécher en douceur
les vêtements de couleurs vives
ou foncée.
Il s’agit d’un programme de longue
durée avec niveau de chaleur
élevé dont l’efcacité de réduction
des bactéries domestiques est
prouvée. Ce programme n’est pas
recommandé pour tous les tissus.
À utiliser pour les grosses charges
de tissus lourds.
Options disponibles :
Wrinkle Prevent (antifroissement)
Cycle Signal (signal de programme)
Recommandations concernant le volume de la charge
Pour de meilleurs résultats, suivre les recommandations
concernant la taille de la charge mouillée indiquées.
Petite charge : Remplir le tambour de la sécheuse avec 3
ou 4 articles, à pas plus d’un quart de sa capacité.
Charge de taille moyenne : Remplir le tambour de la
sécheuse à environ la moitié de sa capacité pour chaque
programme.
Grande charge : Remplir le tambour de la sécheuse
environ aux trois-quarts de sa capacité. Ne pas emballer
étroitement. Les articles doivent pouvoir se déplacer
librement.
25
Page 26

GUIDE DE PROGRAMMES — PROGRAMMES MINUTÉS
Les réglages et options indiqués en gras sont les réglages par défaut pour ce programme.
Si les réglages sont modiés, l’appareil garde en mémoire les nouveaux réglages (à l’exception de Quick [rapide]).
Dans le cas d’une panne de courant, les réglages sont rétablis aux réglages par défaut.
Certains programmes et caractéristiques ne sont pas disponibles sur certains modèles.
Tous les réglages et options ne sont pas disponibles sur tous les programmes.
Ajustement de la durée de séchage
sur les programmes minutés
Lorsqu’on sélectionne un programme
minuté, la durée apparaît sur l’afchage.
Appuyer sur More Time (plus de temps)
et Less Time (moins de temps) pour
augmenter ou diminuer la durée par
tranches de 5 minutes.
La durée maximum de séchage est de 150 minutes.
Articles à
sécher :
N’importe quelle
charge
REMARQUE :
Sélectionner
Air pour sécher
la caoutchouc,
le plastique et
les tissus
sensibles
à la chaleur.
Petits charges et
articles de sport
Programme :
Timed Dry
(séchage
minuté)
Quick
(rapide)
Température
de séchage :
High (élevé)
Medium
(moyen)
Low (bas)
Air
High (élevé)
Medium
(moyen)
Low (bas)
Air
Sélection de la température de séchage
On peut utiliser un réglage de chaleur élevée pour sécher les
articles lourds tels que les serviettes et les vêtements de travail.
Un réglage de chaleur faible à moyenne peut être utilisé
pour sécher les articles moyennement lourds tels que draps,
chemisiers, robes, sous-vêtements, tissus à pressage
permanent et certains tricots.
Utiliser un réglage sans chaleur (air seulement) pour la mousse,
le caoutchouc, le plastique ou les tissus sensibles à la chaleur.
Sécher sur une corde à linge les tissus doublés ou multicouche.
REMARQUE : Si vous avez des questions au sujet des
températures de séchage pour diverses charges, se référer
aux directives sur l’étiquette du produit.
Durée par
défaut :
40 Wrinkle Prevent À utiliser pour sécher les articles jusqu’à un niveau
15 Wrinkle Prevent Pour les petites charges de 3 à 4 articles.
Options
disponibles :
Détails du programme :
humide pour les articles qui ne nécessitent pas
un programme de séchage complet. Choisir la
température de séchage en fonction du type de tissus
de votre charge. Si vous éprouvez une incertitude à
l’égard du choix d’une température pour une charge,
choisir le réglage plus bas plutôt que le réglage plus
élevé.
Options disponibles :
Wrinkle Prevent (antifroissement)
Recommandations concernant le volume de la charge
Pour de meilleurs résultats, suivre les recommandations
concernant la taille de la charge mouillée indiquées.
Petite charge : Remplir le tambour de la sécheuse avec 3
ou 4 articles, à pas plus d’un quart de sa capacité.
REMARQUE : Les certications de performance énergétique du gouvernement pour ce modèle sont fondées sur le programme
Normal, le réglage de température le plus élevé, un niveau de séchage normal, séchage écologique activée. Les valeurs par défaut
étaient identiques aux réglages de certications de performance énergétique du gouvernement, sauf pour le réglage de température
par défaut moyen qui était placé au réglage de température le plus élevé.
Charge de taille moyenne : Remplir le tambour de la
sécheuse à environ la moitié de sa capacité pour chaque
programme.
Grande charge : Remplir le tambour de la sécheuse
environ aux trois-quarts de sa capacité. Ne pas emballer
étroitement. Les articles doivent pouvoir se déplacer
librement.
26
Page 27

UTILISATION DE LA SÉCHEUSE
AVERTISSEMENT : Pour réduire le risque d’incendie, de choc
électrique ou de blessures corporelles, lire les Instructions
Importantes de sécurité avant de faire fonctionner cet
appareil.
1.
Nettoyer le ltre à charpie
2.
Charger la sécheuse
Nettoyer le ltre à charpie avant chaque charge. Enlever le
ltre à charpie en le tirant tout droit vers le haut. Enlever la
charpie du ltre en la roulant avec les doigts. Ne pas rincer
ni laver le ltre pour enlever la charpie. Il est difcile de retirer
la charpie humide. Remettre le ltre à charpie fermement en
place.
Pour plus d’informations sur le nettoyage, voir “Entretien
de la sécheuse”.
Ouvrir la porte en tirant sur la poignée. Placer le linge dans
la sécheuse. Ajouter de l’assouplissant textile en feuilles pour
sécheuse à la charge mouillée, si désiré. Fermer la porte.
REMARQUE : Ne pas emballer étroitement la sécheuse;
les vêtements doivent pouvoir culbuter librement. L’emballage
étroitement de la sécheuse peut causer un rendement inférieur
et peut aumenter le froissement et l’emmêlement.
3.
Appuyer sur MISE SOUS TENSION
Toucher MISE SOUS TENSION pour mettre la sécheuse
en marche.
27
Page 28

4.
Sélectionner le programme désiré
Sélectionner le programme souhaité pour la charge. Voir le
“Guide de programmes” pour plus d’informations sur chaque
programme.
5.
Ajuster les modicateurs
de programme, si désiré
On peut ajuster différents réglages, selon
que l’on a sélectionné un programme
de détection ou minuté. Voir le “Guide
de programmes” pour des informations
détaillées.
REMARQUE : Tous les réglages et options ne sont pas
disponibles avec tous les programmes. Certains programmes
ne sont pas disponibles sur certains modèles.
Programmes de détection :
La température peut être modiée en touchant le bouton
Temp (température) jusqu’à ce que la température de séchage
souhaitée s’allume. Une fois qu’un programme a été lancé,
la température peut être modiée durant les 5 à 8 premières
minutes du programme.
Selon la charge, un degré de séchage différent peut être
sélectionné. Toucher Dryness (niveau de séchage) pour
sélectionner un niveau allant de Less (moins) à More (plus) pour
ajuster automatiquement le degré de séchage qui commande
l’arrêt de la sécheuse. Une fois qu’un niveau de séchage est
réglé, il peut être modié durant les 5 à 8 premières minutes
du programme.
Les programmes de détection offrent un séchage idéal en un
temps record. La durée de séchage varie en fonction du type
de tissu, de la taille de la charge et du réglage de niveau de
séchage. La durée de séchage est une estimation, et peut être
modiée tout au long du programme. La durée de séchage ne
peut être modiée avec les programmes de détection.
Programmes minutés :
Lorsqu’on sélectionne un programme minuté, la durée apparaît
sur l’afchage. Toucher MORE TIME (plus de temps) ou LESS
TIME (moins de temps) pour augmenter ou diminuer la durée
par tranches de 5 minutes.
La température peut être modiée en touchant Temp
(température) jusqu’à ce que la température souhaitée
s’allume. La température ne peut être modiée si le réglage
de départ est un séchage à l’air.
6.
Sélectionner les options de programme
supplémentaires
Pour ajouter des options supplémentaires telles que Wrinkle
Prevent (antifroissement) et/ou Eco Dry (séchage écologique),
toucher le bouton correspondant à l’option souhaitée. Si
l’on n’est pas en mesure de retirer rapidement la charge,
sélectionner l’option Wrinkle Prevent (antifroissement)
avant de toucher Mise en marche/pause.
REMARQUE : Tous les réglages et options ne sont pas
disponibles avec tous les programmes.
7.
Toucher sans relâcher MISE EN
MARCHE/PAUSE pour démarrer
le programme
Pour démarrer le programme, toucher sans relâcher MISE EN
MARCHE/PAUSE jusqu’à ce que l’afcheur lance un compte
à rebours “3-2-1” et la sécheuse se mette en marche.
8. Retirer rapidement les vêtements
une fois le programme terminé
Retirer rapidement les vêtements une fois le programme
terminé pour réduire le froissement. Si l’on n’est pas en mesure
de retirer rapidement la charge, sélectionner les options
Wrinkle Prevent (antifroissement).
28
Page 29

CARACTÉRISTIQUES SUPPLÉMENTAIRES
UTILISATION DE LA GRILLE DE SÉCHAGE
Pour acheter une grille de séchage pour votre sécheuse, voir
“Accessoires” pour plus d’informations. Vous aurez besoin
de votre numéros de modèle et de série et la date d’achat.
Enlever et jeter les matériaux d’emballage avant utilisation.
Utiliser la grille de séchage pour les articles que l’on
ne souhaite pas faire sécher par culbutage tels que les
chandails et les chaussures de tennis. Lorsqu’on utilise
la grille de séchage, le tambour continue de tourner mais
la grille reste stationnaire.
L’utilisation de la grille de séchage est recommandée
uniquement avec les programmes Timed Dry (séchage
minuté). La grille de séchage ne peut pas être utilisée avec
les programmes de détection.
Utilisation de la grille de séchage :
IMPORTANT : Ne pas retirer le ltre à charpie.
1. Ouvrir la porte de la sécheuse.
UTILISATION DE LA GRILLE DE SÉCHAGE
(CONT.)
4. Fermer la porte.
5. Sélectionner un programme Timed Dry (séchage minuté).
Les articles contenant de la mousse, du caoutchouc ou
du plastique doivent être séchés sur une corde à linge ou
au moyen du réglage Air.
6. Une fois le programme sélectionné, l’afcheur de la durée
résiduelle estimée indique la durée par défaut. Il est
possible de modier la durée réelle du programme
en augmentant ou en diminuant la durée du programme.
7. Mettre la sécheuse en marche.
REMARQUE : Une fois le programme terminé, examiner
le ltre à charpie et retirer toute charpie accumulée sur les
articles séchés sur la grille de séchage.
2. Aligner les deux crochets situés à l’avant de la grille de
séchage avec les trous situés dans l’ouverture de la
porte de la sécheuse et les insérer complètement dans
les trous en appuyant. Placer le support arrière sur le
rebord arrière de la sécheuse.
3. Placer les articles mouillés sur la grille de séchage.
Laisser sufsamment d’espace entre les articles pour
permettre à l’air de circuler. Le tambour tourne, mais la
grille ne bouge pas; veiller à laisser sufsamment d’espace
entre les articles et à l’intérieur du tambour de la sécheuse.
Veiller à ce que les articles ne pendent pas par-dessus
les bords de la grille de séchage ou entre les barreaux
de la grille.
29
Page 30

ENTRETIEN DE LA SÉCHEUSE
RETIRER LA CHARPIE ACCUMULÉE
NETTOYER L’EMPLACEMENT
DE LA SÉCHEUSE
Éviter de laisser autour de la sécheuse des éléments qui
pourraient obstruer la circulation de l’air et empêcher le
bon fonctionnement de la sécheuse. Ceci implique de
dégager également les éventuelles piles de linge placées
devant la sécheuse.
De l’intérieur de la caisse de la sécheuse
Retirer la charpie tous les 2 ans, ou plus souvent, selon
l’utilisation de la sécheuse. Le nettoyage doit être effectué
par un personnel d’entretien qualié.
Dans le conduit d’évacuation
Retirer la charpie tous les 2 ans, ou plus souvent, selon
l’utilisation de la sécheuse.
NETTOYER LE FILTRE À CHARPIE
Nettoyage avant chaque charge
Le ltre à charpie se trouve dans l’ouverture de la porte
de la sécheuse. Nettoyer le ltre à charpie avant chaque
charge. Un ltre obstrué de charpie peut augmenter la
durée de séchage.
Nettoyage :
1. Enlever le ltre à charpie en le tirant tout droit vers
le haut. Enlever la charpie du ltre en la roulant avec
les doigts. Ne pas rincer ni laver le ltre pour enlever
la charpie. La charpie mouillée s’enlève difcilement.
NETTOYAGE DE L’INTÉRIEUR
DE LA SÉCHEUSE
Nettoyage du tambour de la sécheuse :
1. Utiliser un détergent à vaisselle doux mélangé à une
faible concentration d’eau très chaude et frotter avec un
chiffon doux.
2. Essuyer complètement le tambour avec un linge
humide.
3. Faire culbuter une charge de linge ou de serviettes
propres pour sécher le tambour.
OU
Utiliser un chiffon en microbre et de l’eau chaude dans
un acon de vaporisation pour nettoyer le tambour et
une deuxième serviette en microbre pour le séchage.
REMARQUE : Les vêtements contenant des teintures
instables, tels que jeans en denim ou articles en coton de
couleur vive, peuvent décolorer l’intérieur de la sécheuse.
Ces taches ne sont pas nocives pour votre sécheuse et ne
tacheront pas les vêtements des charges futures. Sécher
ces articles sur l’envers pour éviter de tacher le tambour.
2. Remettre le ltre à charpie fermement en place.
IMPORTANT :
n
Ne pas faire fonctionner la sécheuse avec un ltre à
charpie déplacé, endommagé, bloqué ou manquant.
Ceci peut entraîner une surchauffe et endommager
la sécheuse et les tissus.
n
Si de la charpie tombe dans la sécheuse au moment du
retrait du ltre, vérier le conduit d’évacuation et retirer
la charpie. Voir “Exigences concernant l’évacuation”
dans les Instructions d’installation.
30
Page 31

NETTOYAGE AU BESOIN
Des résidus de détergent ou d’assouplisseur de tissu
peuvent s’accumuler sur le ltre à charpie. Cette
accumulation peut entraîner des temps de séchage plus
longs, ou entraîner l’arrêt de la sécheuse avant que la
charge ne soit complètement sèche. Si de la charpie
tombe du ltre alors qu’il est dans la sécheuse, il est
probablement obstrué.
Nettoyer le ltre à charpie avec une brosse de nylon tous
les six mois ou plus fréquemment s’il se bouche en raison
d’une accumulation de résidus.
Nettoyage :
1. Enlever la charpie du ltre en la roulant avec les doigts.
2. Mouiller les deux côtés du ltre à charpie avec de l’eau
chaude.
3. Mouiller une brosse en nylon avec de l’eau chaude et
du détergent liquide. Frotter le ltre avec la brosse pour
enlever l’accumulation de résidus.
4. Rincer le ltre à l’eau chaude
5. Bien sécher le ltre à charpie avec une serviette propre.
Réinstaller le ltre dans la sécheuse.
Sécheuses avec raccordement direct :
1. Déconnecter la source de courant électrique.
2. Déconnecter le câblage.
3. S’assurer que les pieds de nivellement sont solidement
xés à la base de la sécheuse.
4. Utiliser du ruban adhésif pour xer la porte de la
sécheuse.
Réinstallation de la sécheuse
Suivre les Instructions d’installation pour choisir
l’emplacement, régler l’aplomb de la sécheuse
et la raccorder.
PRÉCAUTIONS À PRENDRE EN CAS
DE NON-UTILISATION, D’ENTREPOSAGE
OU DE DÉMÉNAGEMENT
Entretien en cas de non-utilisation ou
d’entreposage
On ne doit faire fonctionner la sécheuse que lorsqu’on est
présent. Si l’utilisateur doit partir en vacances ou n’utilise
pas la sécheuse pendant une période prolongée, il
convient d’exécuter les opérations suivantes :
1. Débrancher la sécheuse ou déconnecter la source
de courant électrique.
2. Nettoyer le ltre à charpie. Voir “Nettoyer le ltre à
charpie”.
Précautions à prendre avant un déménagement
Sécheuses alimentées par cordon d’alimentation :
1. Débrancher le cordon d’alimentation électrique.
2. Modèles à gaz uniquement : Fermer le robinet d’arrêt
de la canalisation de gaz.
3. Modèles à gaz uniquement : Débrancher le tuyau
de la canalisation de gaz et retirer les raccords xés
sur le tuyau de la sécheuse.
4. Modèles à gaz uniquement : Recouvrir la canalisation
de gaz ouverte.
5. S’assurer que les pieds de nivellement sont solidement
xés à la base de la sécheuse.
6. Utiliser du ruban adhésif pour xer la porte de la
sécheuse.
31
Page 32

DÉPANNAGE
Essayer d’abord les solutions suggérées ici ou consulter le site Web www.amana.com/owners
Si les phénomènes
suivants se produisent
Fonctionnement de la sécheuse
La sécheuse
ne fonctionne pas
La sécheuse
ne s’arrête pas
La sécheuse ne produit
pas de chaleur
Sons inhabituels
Bruit saccadé La sécheuse n’a pas été utilisée
Bruit de grattement
ou de vibration
Bruit de cliquetis Robinet de gaz en cours
Résultats de la sécheuse
Les vêtements ne
sèchent pas de manière
satisfaisante ou le temps
de séchage est trop long
pour obtenir de l’aide et pour éviter une intervention de réparation.
Causes possibles Solution
La porte n’est pas bien fermée. S’assurer que la porte de la sécheuse est complètement fermée.
On a touché Start/Pause (mise en
marche/pause) avec l’ongle.
Un fusible du domicile est grillé
ou le disjoncteur est ouvert.
Alimentation électrique incorrecte. Les sécheuses électriques nécessitent une alimentation
Type de fusible incorrect. Utiliser un fusible temporisé.
La porte de la sécheuse a été
ouverte avant la n de l’option
antifroissement.
Un fusible du domicile est grillé
ou le disjoncteur est ouvert.
Alimentation électrique incorrecte. Les sécheuses électriques nécessitent une alimentation
Robinet de la canalisation de gaz non
ouvert.
pendant un moment.
Un petit objet est coincé dans
le bord du tambour de la sécheuse.
L’aplomb de la sécheuse n’a pas été
correctement établi.
Les vêtements sont en boule dans
la sécheuse.
de fonctionnement.
Le ltre à charpie est obstrué par
de la charpie.
L’option Eco Dry (séchage
écologique) est activée.
Le conduit d’évacuation ou le clapet
d’évacuation à l’extérieur est obstrué
par de la charpie, ce qui restreint
le mouvement de l’air.
Le conduit d’évacuation ne
possède pas la bonne longueur.
Le conduit d’évacuation ne
possède pas le bon diamètre.
Toucher START/PAUSE (mise en marche/pause) en utilisant
le bout du doigt.
Il peut y avoir deux fusibles ou disjoncteurs pour la sécheuse.
Vérier que les deux fusibles sont intacts et bien en place ou que
les deux disjoncteurs ne se sont pas déclenchés. Remplacer
les fusibles ou réarmer le disjoncteur. Si le problème persiste,
appeler un électricien.
électrique de 240V. Vérier avec un électricien qualié.
Si la porte de la sécheuse est ouverte avant la n de l’option
antifroissement, la sécheuse passe en mode pause. Il faudra
toucher le bouton d’alimentation pour l’éteindre ou de mise en
marche/pause pour continuer l’option antifroissement.
Le tambour peut tourner, mais sans chaleur. Les sécheuses
électriques utilisent deux fusibles ou disjoncteurs. Remplacer
les fusibles ou réarmer le disjoncteur. Si le problème persiste,
appeler un électricien.
électrique de 240V. Vérier avec un électricien qualié.
Pour les sécheuses à gaz, s’assurer que le robinet
de la canalisation d’alimentation en gaz est ouvert.
Ceci est normal. Le bruit saccadé s’atténue après quelques
minutes d’utilisation.
Vérier les bords avant et arrière du tambour pour voir si de
petits objets y sont coincés. Vider les poches avant le lavage.
La sécheuse peut vibrer si elle n’est pas correctement installée.
Voir les Instructions d’installation. Les quatre pieds de nivellement
de la sécheuse doivent être bien en contact avec le plancher.
Une charge en boule rebondit, ce qui fait vibrer la sécheuse.
Séparer les articles de la charge et remettre la sécheuse en
marche.
Sur les sécheuses à gaz, on entendra peut-être le cliquetis
du robinet de gaz lorsqu’il se ferme ou qu’il s’ouvre.
Ceci est normal.
Nettoyer le ltre à charpie avant chaque charge.
Pour des durées de séchage optimales, désactiver l’option Eco
Dry (séchage écologique).
Faire fonctionner la sécheuse pendant 5 à 10 minutes. Tenir la
main sous le clapet d’évacuation à l’extérieur pour vérier le
mouvement de l’air. Si aucun mouvement d’air n’est perceptible
ou le mouvement de l’air est minimal, ôter la charpie présente
dans le système d’évacuation ou remplacer le conduit
d’évacuation par un conduit en métal lourd ou exible
en métal. Voir les Instructions d’installation.
Vérier que le conduit d’évacuation n’est pas trop long ou
ne comporte pas trop de changements de direction. Un long
conduit augmentera les durées de séchage. Voir les Instructions
d’installation.
Utiliser un composant de 4" (102 mm) de diamètre.
32
Page 33

DÉPANNAGE
Essayer d’abord les solutions suggérées ici ou consulter le site Web www.amana.com/owners
Si les phénomènes
suivants se produisent
Résultats de la sécheuse (suite)
Les vêtements ne
sèchent pas de manière
satisfaisante ou le temps
de séchage est trop long
(suite)
La durée du programme
est trop courte
Charpie sur la charge Le ltre à charpie est obstrué par
Présence de taches sur
le linge
Présence de taches sur
le tambour
Charges avec faux plis
en V
Odeurs Vous avez récemment employé de la
Charge trop chaude La charge a été retirée avant que
pour obtenir de l’aide et pour éviter une intervention de réparation.
Causes possibles Solution
La sécheuse n’est pas d’aplomb. Les vêtements ne sont pas au contact des détecteurs d’humidité
La charge est trop grosse et trop
lourde pour sécher rapidement.
Des feuilles d’assouplissant pour
tissu obstruent la grille.
La sécheuse se trouve dans une
pièce où la température ambiante
est inférieure à 45°F (7°C).
La sécheuse est placée dans
un placard.
La charge n’est peut-être pas en
contact avec les bandes de détection
(pour les programmes de détection).
Le programme de détection
se termine prématurément.
de la charpie.
Utilisation incorrecte de
l’assouplissant pour tissu.
Teintures instables sur les vêtements. Les taches sur le tambour sont dues aux teintures contenues
La charge n’a pas été retirée de
la sécheuse à la n du programme.
La sécheuse a été emballée
étroitement.
peinture, de la teinture ou du vernis
dans la pièce où votre sécheuse est
installée.
La sécheuse électrique est utilisée
pour la première fois.
la portion de refroidissement du
programme ne soit terminée.
Utilisation d’un programme minuté
avec un réglage de température
élevé.
lors du fonctionnement des programmes de détection. Voir
“Réglage de l’aplomb de la sécheuse” dans les Instructions
d’installation.
Séparer la charge pour qu’elle culbute librement.
La grille de sortie de l’air se trouve à l’intérieur de la porte,
derrière le ltre à charpie. Vérier qu’elle n’est pas obstruée par
une feuille d’assouplissant pour tissu.
Utiliser seulement une feuille d’assouplissant par charge et
l’utiliser une seule fois.
Le bon fonctionnement des programmes de la sécheuse
nécessite une température ambiante supérieure à 45°F (7°C).
Les portes du placard doivent comporter des ouvertures
d’aération au sommet et en bas de la porte. Un espace minimum
de 1" (25 mm) est nécessaire à l’avant de la sécheuse et,
pour la plupart des installations, un espace de 5" (127 mm)
est nécessaire à l’arrière de la sécheuse. Voir les Instructions
d’installation.
Régler l’aplomb de la sécheuse. Voir les Instructions
d’installation. Les quatre pieds de nivellement de la sécheuse
doivent être bien en contact avec le plancher
Modier le réglage de degré de séchage pour les programmes
de détection. L’augmentation ou la diminution du degré de
séchage modiera la durée de séchage d’un programme.
Nettoyer le ltre à charpie avant chaque charge.
Ajouter les feuilles d’assouplissant de tissu au début du
programme. Les feuilles d’assouplissant de tissu ajoutées
à une charge partiellement sèche peuvent tacher les vêtements.
dans les vêtements (les jeans en général). Elles ne se
transmettront pas aux autres vêtements.
REMARQUE : Se reporter aux instructions gurant sur l’étiquette
de soin des vêtements. Les articles avec nettoyage à sec
uniquement sont déconseillés.
Faire sécher de plus petites charges qui peuvent culbuter
librement. Les résultats peuvent varier selon le type de tissu.
Aérer la pièce. Une fois les odeurs ou émanations disparues,
laver et sécher à nouveau les vêtements.
Le nouvel élément de séchage électrique peut émettre une
odeur. L’odeur disparaîtra après le premier programme.
Laisser la sécheuse terminer la portion de refroidissement
du programme avant d’enlever la charge.
Sélectionner un programme de détection avec un réglage de
chaleur inférieur pour éviter que la charge ne soit excessivement
sèche.
33
Page 34

DÉPANNAGE
Essayer d’abord les solutions suggérées ici ou consulter le site Web www.amana.com/owners
Si les phénomènes
suivants se produisent
La sécheuse afche un message codé ou un témoin lumineux de programme s’allume
“PF” (coupure de
courant)
Code de diagnostic
“L2” (tension électrique
faible ou inexistante)
Codes de service
variables “F# E#”
(F1 E1, F3 E1, etc.)
Le témoin Check Vent
(vérier le conduit
d’évacuation) est allumé
“Loc” (verr) Le verrouillage des commandes est
pour obtenir de l’aide et pour éviter une intervention de réparation.
Causes possibles Solution
Le programme de séchage a été
interrompu par une panne de
courant.
Il est possible qu’un problème au
niveau de l’alimentation électrique
du domicile empêche le dispositif
de chauffage de la sécheuse
de se mettre en marche.
La sécheuse doit être réparée. Si un code commençant par un “F” apparaît sur l’afchage,
Le ltre à charpie ou le conduit
d’évacuation est obstrué; le conduit
d’évacuation est écrasé, déformé ou
présente trop de changements de
direction.
activé.
Toucher sans relâcher MISE EN MARCHE/PAUSE pour remettre
la sécheuse en marche ou toucher MISE SOUS TENSION pour
effacer l’afchage.
La sécheuse continue de fonctionner lorsque ce code de
diagnostic est présent. Toucher n’importe quel nom d’un réglage
ou d’une option pour effacer le code de l’afchage et revenir à la
durée résiduelle estimée.
REMARQUE : Cette erreur n’apparaît qu’au moment de
l’installation initiale.
Essayer de résoudre le problème de la façon suivante :
•
Déterminer si un fusible est grillé ou si un disjoncteur s’est
déclenché. Les sécheuses électriques utilisent deux fusibles
ou disjoncteurs domestiques. Remplacer le fusible ou réarmer
le disjoncteur.
•
S’assurer que le cordon d’alimentation est bien installé.
Consulter les Instructions d’installation pour plus de détails.
•
Sélectionner un programme de séchage avec chaleur minuté
et remettre la sécheuse en marche.
Si le message reste afché, consulter un électricien qualié.
alternant entre F# et E#, le module de commande de la
sécheuse a détecté un problème nécessitant une intervention
de dépannage. Demander une intervention de dépannage par
téléphone.
La sécheuse continue de fonctionner lorsque ce code
de diagnostic est présent. Essayer de résoudre le problème
de la façon suivante :
• Nettoyer le ltre à charpie.
• Vérier que le circuit d’évacuation allant de la sécheuse
au mur n’est ni comprimé, ni déformé.
• S’assurer que le circuit d’évacuation allant de la sécheuse
au mur est exempt de charpie ou de résidus.
• S’assurer que la hotte d’évacuation extérieure est exempte
de charpie ou de résidus.
• S’assurer que le système d’évacuation respecte bien la
longueur totale et le nombre de coudes recommandés pour
le type de conduit utilisé. Consulter “Planication du système
d’évacuation” dans les Instructions d’installation pour plus de
détails.
• Sélectionner un programme de séchage avec chaleur minuté
et remettre la sécheuse en marche.
• Si le message reste afché, faire nettoyer la totalité du circuit
d’évacuation du domicile.
Pour désactiver le verrouillage des commandes, maintenir
CONTROL LOCK enfoncé pendant 3 secondes. Pendant
ce temps, l’afchage DEL procède à un compte à rebours de
“3-2-1”. Lorsque le verrouillage des commandes est désactivé,
l’afchage DEL s’efface.
34
Page 35

GARANTIE DES APPAREILS DE BUANDERIE DE WHIRLPOOLCORPORATION
GARANTIE LIMITÉE
Pendant un an à compter de la date d’achat, lorsque ce gros appareil ménager est installé, utilisé et entretenu conformément aux
instructions jointes au produit ou fournies avec, les marques Amana, Admiral, Estate, Inglis, ou Roper de Whirlpool Corporation ou
Whirlpool Canada LP (ci-après désignées “Whirlpool”) paieront pour les pièces de rechange spéciées par l’usine et la main-d’œuvre
pour corriger les vices de matériaux ou de fabrication qui existaient déjà lorsque ce gros appareil a été acheté.
LE SEUL ET EXCLUSIF RECOURS DU CLIENT DANS LE CADRE DE LA PRÉSENTE GARANTIE LIMITÉE CONSISTE EN LA
RÉPARATION PRÉVUE PAR LA PRÉSENTE. Le service doit être fourni par une compagnie désignée par Whirlpool pour l’entretien des
appareils de marque Amana, Admiral, Estate, Inglis ou Roper. La présente garantie limitée est valide uniquement aux États-Unis ou au
Canada et s’applique exclusivement lorsque le gros appareil ménager est utilisé dans le pays où il a été acheté. La présente garantie
limitée entre en vigueur à compter de la date d’achat initial par le consommateur. Une preuve de la date d’achat d’origine est exigée
pour obtenir un service dans le cadre de la présente garantie limitée.
La présente garantie limitée ne couvre pas :
1. Les pièces de rechange ou la main-d’oeuvre lorsque ce gros appareil ménager est utilisé à des ns autres que l’usage unifamilial
normal ou lorsque les instructions d’installation et/ou les instructions de l’opérateur ou de l’utilisateur fournies ne sont pas
respectées.
2. Les visites de service pour rectier l’installation du gros appareil ménager, montrer à l’utilisateur comment utiliser l’appareil,
remplacer ou réparer des fusibles ou rectier le câblage ou la plomberie du domicile.
3. Les visites de service pour réparer ou remplacer les ampoules électriques, les ltres à air ou les ltres à eau de l’appareil. Les
pièces consomptibles ne sont pas couvertes par la garantie.
4. Les dommages imputables à : accident, modication, usage impropre ou abusif, incendie, inondation, actes de Dieu, installation
fautive ou installation non conforme aux codes d’électricité ou de plomberie, ou l’utilisation de produits non approuvés par
Whirlpool.
5. Les défauts apparents, notamment les éraures, les bosses, ssures ou tout autre dommage au ni du gros appareil ménager, à
moins que ces dommages soient dus à des vices de matériaux ou de fabrication et soient signalés à Whirlpool dans les 30 jours
suivant la date d’achat.
6. L’enlèvement et la livraison. Ce gros appareil ménager est conçu pour être réparé à domicile.
7. Les réparations aux pièces ou systèmes résultant d’une modication non autorisée faite à l’appareil.
8. Les frais de transport pour le service du produit si le gros appareil ménager est situé dans une région éloignée où un service
d’entretien par une compagnie autorisée désignée par Whirlpool pour l’entretien des appareils de marque Amana, Admiral, Estate,
Inglis ou Roper n’est pas disponible.
9. La dépose et la réinstallation de votre gros appareil ménager si celui-ci est installé dans un endroit inaccessible ou n’est pas
installé conformément aux instructions d’installation fournies par Whirlpool.
10. Les pièces de rechange ou la main-d’oeuvre pour les gros appareils ménagers dont les numéros de série et de modèle originaux
ont été enlevés, modiés ou qui ne peuvent pas être facilement identiés.
Le coût d’une réparation ou d’un remplacement dans le cadre de ces circonstances exclues est à la charge du client.
CLAUSE D’EXONÉRATION DE RESPONSABILITÉ AU TITRE DES GARANTIES IMPLICITES
LES GARANTIES IMPLICITES, Y COMPRIS LES GARANTIES APPLICABLES DE QUALITÉ MARCHANDE OU D’APTITUDE À UN
USAGE PARTICULIER, SONT LIMITÉES À UN AN OU À LA PLUS COURTE PÉRIODE AUTORISÉE PAR LA LOI. Certains États et
certaines provinces ne permettent pas de limitation sur la durée de garanties implicites de qualité marchande ou d’aptitude à un
usage particulier, de sorte que la limitation ci-dessus peut ne pas être applicable dans votre cas. Cette garantie vous confère des
droits juridiques spéciques, et vous pouvez également jouir d’autres droits qui peuvent varier d’une juridiction à l’autre.
EXONÉRATION DE RESPONSABILITÉ EN DEHORS DE LA GARANTIE
Whirlpool ne prend aucun engagement quant à la qualité ou la durabilité de l’appareil, ou en cas de dépannage ou de réparation
nécessaire sur ce gros appareil ménager, autre que les engagements énoncés dans la présente garantie. Si vous souhaitez une
garantie prolongée ou plus complète que la garantie limitée fournie avec ce gros appareil ménager, renseignez-vous auprès de
Whirlpool ou de votre détaillant à propos de l’achat d’une extension de garantie.
LIMITATION DES RECOURS; EXCLUSION DES DOMMAGES FORTUITS OU INDIRECTS
LE SEUL ET EXCLUSIF RECOURS DU CLIENT DANS LE CADRE DE LA PRÉSENTE GARANTIE LIMITÉE CONSISTE EN LA
RÉPARATION PRÉVUE CI-DESSUS. WHIRLPOOL N’ASSUME AUCUNE RESPONSABILITÉ POUR LES DOMMAGES FORTUITS OU
INDIRECTS. Certains États et certaines provinces ne permettent pas l’exclusion ou la limitation des dommages fortuits ou indirects
de sorte que ces limitations et exclusions peuvent ne pas être applicables dans votre cas. Cette garantie vous confère des droits
juridiques spéciques, et vous pouvez également jouir d’autres droits qui peuvent varier d’une juridiction à l’autre.
Si vous résidez à l’extérieur du Canada et des 50 États des États-Unis, contactez votre marchand Whirlpool, Amana, Admiral, Estate,
Inglis, ou Roper autorisé pour déterminer si une autre garantie s’applique.
Si vous avez besoin d’un service de réparation, voir d’abord la section “Dépannage” du Guide d’utilisation et d’entretien. Si vous êtes
dans l’incapacité de résoudre le problème après avoir consulté la section “Dépannage”, vous pourrez trouver de l’aide supplémentaire
en consultant la section “Assistance ou service” ou en composant les numéros suivants : Aux É.-U., composer le 800-843-0304 pour
les produits de marque Amana, le 800-688-9920 pour les produits de marque Admiral, le 800-253-1301 pour les produits de marque
Estate ou le 800-447-6737 pour les produits de marque Roper. Pour obtenir de l’aide au Canada, composer le : 800-807-6777 pour
les produits de marque Amana, Admiral, Estate, Inglis ou Roper. 1/12
Conservez ce manuel et votre reçu de vente ensemble pour
référence ultérieure. Pour le service sous garantie, vous devez
présenter un document prouvant la date d’achat ou d’installation.
Inscrivez les renseignements suivants au sujet de votre gros
appareil ménager pour mieux vous aider à obtenir assistance ou
service en cas de besoin. Vous devrez connaître le numéro de
modèle et le numéro de série au complet. Vous trouverez ces
renseignements sur la plaque signalétique située sur le produit.
ÉLÉMENTS EXCLUS DE LA GARANTIE
Nom du marchand ________________________________________
Adresse __________________________________________________
Numéro de téléphone _____________________________________
Numéro de modèle _______________________________________
Numéro de série __________________________________________
Date d’achat _____________________________________________
35
Page 36

ASSISTANCE OR SERVICE
Before calling for assistance or service, please check “Troubleshooting” or visit www.whirlpool.com/owners.
When calling, please know the purchase date and the complete model and serial number of your appliance.
It may save you the cost of a service call. If you still need help, follow the instructions below.
This information will help us to better respond to your request.
If you need replacement parts or to order accessories
We recommend that you use only FSP
Amana, Admiral, Estate, Inglis, or Roper brands of Whirlpool Corporation or Whirlpool Canada LP appliance.
To locate FSP® replacement parts, assistance in your area, or accessories:
Whirlpool Corporation Customer eXperience Center
800-843-0304 for Amana, 800-688-9920 for Admiral,
800-253-1301 for Estate, or 800-447-6737 for Roper
800-442-9991 (Accessories)
www.whirlpool.com/accessories
or call your nearest designated service center or refer to your Yellow Pages telephone directory.
Our consultants provide assistance with
In the U.S.A.
Installation information.
Specialized customer assistance (Spanish speaking,
hearing impaired, limited vision, etc.).
You can write with any questions or concerns at:
Whirlpool Corporation
Customer eXperience Center
553 Benson Road
Benton Harbor, MI 49022-2692
Please include a daytime phone number in your correspondence.
®
Whirlpool Canada LP
Customer eXperience Centre
800-807-6777 for
Amana, Admiral, Estate, Inglis, & Roper
www.whirlpoolappliances.ca
In the U.S.A. and Canada
Use and maintenance procedures.
Accessory and repair parts sales.
Referrals to local dealers, repair parts distributors,
and service companies. Whirlpool designated service
provide after-warranty service, anywhere in the United
States and Canada.
Customer eXperience Centre
Whirlpool Canada LP
Unit 200-6750 Century Ave
Mississauga, Ontario L5N 0B7
ASSISTANCE OU SERVICE
Avant de faire un appel pour assistance ou service, veuillez vérier la section “Dépannage” ou consulter
www.whirlpool.ca/owners. Cette vérication peut vous faire économiser le coût d’une visite de réparation.
Lors d’un appel, veuillez connaître la date d’achat et les numéros au complet de modèle et de série de votre appareil.
Si vous avez encore besoin d’aide, suivre les instructions ci-dessous.
Ces renseignements nous aideront à mieux répondre à votre demande.
Si vous avez besoin de pièces de rechange ou pour commander des accessoires
Si vous avez besoin de commander des pièces de rechange ou des accessoires, nous vous recommandons
d’utiliser seulement des pièces FSP
qu’elles sont fabriquées avec la même précision que celle utilisée dans la fabrication de chaque nouvel appareil de
marque Amana, Admiral, Estate, Inglis, ou Roper de Whirlpool Corporation ou Whirlpool Canada LP. Pour localiser des
pièces de rechange FSP
Pour trouver des pièces de rechange FSP,® de l’aide ou des accessoires dans votre région :
Whirlpool Canada LP Centre pour l’eXpérience de la clientèle 800-807-6777 www.whirlpoolappliances.ca
ou contacter votre centre de réparation désigné le plus proche, ou encore consulter les Pages Jaunes.
Nos consultants fournissent
l’assistance pour :
Procédés d’utilisation et d’entretien.
Vente d’accessoires et de pièces de rechange.
Les références aux concessionnaires, compagnies
de service de réparation et distributeurs de pièces de
rechange locaux. Les techniciens de service désignés par
Whirlpool sont formés pour remplir la garantie des produits
et fournir un service après la garantie, partout au Canada.
®
®
ou des accessoires ou pour obtenir de l’aide dans votre région :
Pour plus d’assistance
Vous pouvez nous soumettre toute question ou problème
Dans votre correspondance, veuillez indiquer un numéro de
téléphone où on peut vous joindre dans la journée.
en écrivant à l’adresse ci-dessous :
Centre pour l’eXpérience de la clientèle
Whirlpool Canada LP
Unit 200-6750 Century Ave
Mississauga, Ontario L5N 0B7
W11184584A
06/18
®
/™ ©2018 Amana. All rights reserved. Used under license in Canada.
Tous droits réservés. Utilisé sous licence au Canada.
 Loading...