

Amana SXD25S2, SRD20S4, SBD20TP, SBD20TPS, SX22S Service
...
Service
Side-by-Side “S” Model
Refrigerators
Refer to Technical Sheet
for values and wiring
schematics.
Models and manufacturing
numbers in this manual
SXD25S2 P1303513W
SBD20S4 P1190007W
SBD20TP P1190009W
SBD20TPS P1190008W
SRD20S4 P1190816W
SX22S P1190213W
SGD22T P1303514W
SCD22TB P1303515W
SXD22S2 P1303512W
SRD22S3 P1190327W
SS25T P1194004W
SCD25T P1303516W
SQD25V P1314202W
SRD25S3 P1190325W
SBDE20S4SW P1190906W
SX25S P1190214W
SRD25VP P1190326W
SRD25VPS P1190331W
SBI20TP P1190711W
SBI20TPS P1190712W
SBDE20TP P1190905W
SRD22VPS P1190330W
SSD25T P1314201W
SBI20S2 P1190710W
SXD27T P1302802W
SBIE20TPS P1190709W
SBIE20TP P1190708W
SRD22VP P1190328W
SRD27S2 P1190329W
SCD25TB P1303517W
SM22TB P1190215W
This manual is to be used by qualified appliance technicians
only. Amana does not assume any responsibility for property
damage or personal injury for improper service procedures
done by an unqualified person.
RS1300003
Revision 0
December 1997

!
!
!
!
Important Information
!
Pride and workmanship go into every product to provide our customers with quality products. It is possible,
however, that during its lifetime a product may require service. Products should be serviced only by a qualified
service technician who is familiar with the safety procedures required in the repair and who is equipped with the
proper tools, parts, testing instruments and the appropriate service manual. REVIEW ALL SERVICE
INFORMATION IN THE APPROPRIATE SERVICE MANUAL BEFORE BEGINNING REPAIRS.
To avoid risk of serious injury or death, repairs should not be attempted by unauthorized personnel,
dangerous conditions (such as exposure to electrical shock) may result.
Amana will not be responsible for any injury or property damage from improper service procedures. If
preforming service on your own product, assume responsibility for any personal injury or property
damage which may result.
Important Information
Important Notices for Consumers and Servicers
WARNING
CAUTION
To locate an authorized servicer, please consult your telephone book or the dealer from whom you purchased this
product. For further assistance, please contact:
CONSUMER AFFAIRS DEPT. OR 1-319-622-5511 or (1-800-843-0304)
AMANA REFRIGERATION, INC. CALL and ask for
AMANA, IOWA 52204 Consumer Affairs
If outside the United States contact:
AMANA
ATTN: CONSUMER AFFAIRS DEPT.
AMANA, IOWA 52204, USA
Telephone: (319) 622-5511
Facsimile: (319) 622-2180
TELEX: 4330076 AMANA
CABLE: "AMANA", AMANA, IOWA, USA
Recognize Safety Symbols, Words, and Labels
DANGER
DANGER—Immediate hazards which WILL result in severe personal injury or death.
WARNING
WARNING—Hazards or unsafe practices which COULD result in severe personal injury or death.
CAUTION
CAUTION—Hazards or unsafe practices which COULD result in minor personal injury or product or property
damage.
RS1300003 Rev. 0 2 December 1997

Table of Contents
Important Information .................................................. 2
USER OPERA TION
Electrical Requirements................................................ 5
Model Identification....................................................... 5
Proper Disposal of Your Refrigerator ............................ 5
Installation Instructions ................................................. 6
Controls ........................................................................ 8
Fresh Food Features .................................................... 9
Ice ‘N’ Water™ Dispenser (some models).................. 15
Water Dispenser Operation...................................15
Care and Cleaning...................................................... 16
Light Bulbs............................................................. 17
Normal Operating Sounds .......................................... 18
Before Calling For Service.......................................... 18
TROUBLESHOOTING
Troubleshooting Chart ................................................ 19
System Diagnosis
Pressure and Temperature Relationship Chart .....22
ELECTRONIC UNITS
Display Panel.............................................................. 23
Display Panel Operation
Keyboard Pad Functions
Entry T one............................................................ 24
Command Accepted Tone.................................... 24
Freezer Temp Pad ............................................... 24
Ref Temp Pad ...................................................... 24
Warmer Pad......................................................... 24
Colder Pad ........................................................... 24
Fast Freeze Pad................................................... 24
Max Cool Pad ...................................................... 24
Alarm Off Pad ...................................................... 24
Display Off Pad .................................................... 24
Program Mode ..................................................... 24
V acation ............................................................... 24
Electronic Functional Description
Alarms
Power Up Alarm ................................................... 25
Door Open Alarm ................................................. 25
High Temperature Alarm ...................................... 25
Thermistor Alarm ................................................. 25
Clean Condenser Light......................................... 25
Temperature Control Operation.............................26
Refrigerator and Freezer Thermistor.................... 26
Factory Freezer and Refrigerator Settings ........... 26
Damper Control.................................................... 26
Factory Set Freezer and Refrigerator Settings ..... 26
Adaptive Defrost Operation ...................................27
Program Mode
Accessing Program Mode .....................................28
EEPROM Update in Control Memory ......................... 28
Mode A Functions
Reading Temperature Display .............................. 28
Freezer Thermistor Temperature ......................... 28
Refrigerator Thermistor Temperature................... 28
Mode B Functions
Automatic Keyboard Function .............................. 28
Door Alarm Delay................................................. 28
Max Cool Run Time Duration ............................... 28
Fast Freeze Run Time Duration ........................... 28
Temperature Offset Calibration ............................ 29
Defrost Mode Selection ........................................ 29
Forced Defrost ..................................................... 29
Forced Pulldown (Compressor Start) ................... 29
Exiting Program Mode...........................................29
Electronic T esting
Electronic Testing Mode ........................................30
Forced Defrost Start............................................. 30
Forced Compressor Start..................................... 30
Evaporator Fan Suppression................................ 30
Refrigeration and Defrost Component Checks Made
at High Voltage Board ...........................................32
Freezer Compartment Theory of Operation ..........33
Refrigerator Compartment Theory of Operation....34
Refrigerator and Freezer Compartment Theory of
Operation ..............................................................35
Adaptive Defrost Theory of Operation ...................36
COMPONENT TESTING PROCEDURES
Component Chart ....................................................... 37
SERVICE PROCEDURES
Service Equipment ..................................................... 44
Electronic Control ....................................................... 44
Drier Replacement...................................................... 44
Refrigerant Precautions
Line Piercing Valves..............................................45
Open Lines............................................................45
Compressor Operational Test ..................................... 45
Dehydrating Sealed Refrigeration System .................. 46
Leak Testing
Testing Systems Containing
Refrigerant Charge............................................... 46
Testing Systems Containing No
Refrigerant Charge............................................... 46
Restrictions
Symptoms ............................................................ 47
Testing for Restrictions......................................... 47
Evacuation and Charging ......................................48
Evacuation ...................................................... 48
Charging ......................................................... 49
Refrigerant Charge...........................................49
HFC134a Service Information
Health, Safety , and Handling ................................ 50
Comparison of CFC12/HFC134a Properties ........ 50
Replacement Service Compressor
Compressor Testing Procedures .......................... 51
Brazing ....................................................................... 51
Checking Electric Heater Assembly............................ 51
Refrigerant Flow ......................................................... 52
Air Flow ...................................................................... 54
Water Flow ................................................................. 56
Dispenser Water Temperature Chart .......................... 56
Typical External Sweat Patterns............................57
December 1997 3 RS1300003 Rev. 0

Table of Contents
Electronic Models................................................. 58
Dispenser Models .................................................58
Door Stop and Top Door Closure ......................... 58
Freezer Door Top Hinge ....................................... 58
Combination Door Closure and Lower Hinge ....... 58
Freezer Door Wiring Harness (All Non-electronic
Dispenser Models) ............................................... 59
Freezer Door Water Tube .................................... 59
Refrigerator Door ................................................. 59
Refrigerator Door Handle
(Built-in and Electronic Models)........................... 59
Refrigerator or Freezer Handle
(Free Standing Models)....................................... 59
Handle Side Door Trim Retainers......................... 60
Door Gasket......................................................... 60
Inner Door Liner ................................................... 60
Low Voltage Board ............................................... 60
Cavity Heater ....................................................... 60
Electrical Mounting Bracket.................................. 60
Water Actuator Arm ............................................. 60
Ice Actuator Arm .................................................. 60
Door Closure Delay Mechanism (Ice
and Water Models)............................................... 60
Chute Door (Ice and Water Models)..................... 60
Cabinet Components
Refrigerator Temperature Control......................... 61
Freezer Temperature Control
(Nonelectronic Models) ....................................... 61
Refrigerator Light Switch ...................................... 61
Freezer Light/Auger Motor Interlock Switch.......... 61
Refrigerator Light Lens and Light Bulbs ............... 62
Refrigerator Light Socket ..................................... 62
Freezer Light Bulb, Light Socket. ......................... 62
Center Mullion ...................................................... 62
Freezer Wire Shelf and Shelf Retainers ............... 62
Freezer Basket Slide Retainer ............................. 62
Evaporator ............................................................62
Freezer Thermistor (Electronic Models) ............... 62
Freezer Evaporator Cover.................................... 62
Defrost Thermostat (Terminator) .......................... 62
Evaporator Defrost Heater ................................... 62
Evaporator ........................................................... 63
Evaporator Fan Motor .......................................... 63
Evaporator Fan Blade .......................................... 63
Auger Motor (Ice and Water Models) ................... 63
Front Roller Assembly.......................................... 63
Rear Roller Assembly .......................................... 63
Water Valve......................................................... 64
Water Tank (Ice and Water Models)..................... 64
Shelf Support Ladders ......................................... 64
Machine Compartment
Condensate Drain Pan
(20 Cubic Foot Models Only)............................... 64
Condensate Drain Pan (All Other Models) ........... 64
Compressor ......................................................... 65
Power Switch (Electronic Models Only)................ 65
Compressor Run Capacitor
(Fan Shroud Mounted) ......................................... 65
Compressor Run Capacitor
(Control Housing Mounted) .................................. 66
Overload and Relay.............................................. 66
Condenser Fan Blade .......................................... 66
Condenser Fan Motor .......................................... 66
Condenser ........................................................... 66
ICE MAKER
Operation ..............................................................67
Specifications........................................................67
Testing Procedures ...............................................67
Shunt Connection..................................................68
Disassembly Procedures
Cover ................................................................... 68
Module, Motor , and Support Assembly................. 68
Shut-Off Arm........................................................ 68
Module and Heater Assembly .............................. 68
Fill Cup................................................................. 69
Ejector Blades or Stripper .................................... 69
Accessing Control box ......................................... 69
Water Fill Adjustment............................................70
Water Problems ....................................................70
Temperature Problems..........................................70
Servicing Thermostat ............................................70
Servicing Wire Harness ........................................71
Dual Water Valve ..................................................71
Wiring Harness .....................................................71
Ice Maker Troubleshooting Chart ..........................72
APPENDIXES
Kits
RS1300003 Rev. 0 4 December 1997
User Operation
Electrical Requirements
Recognize this symbol as
a safety precaution.
WARNING
To prevent electrical shock which can cause severe
person injury or death this refrigerator must be
properly grounded.
Electrical Grounding Instructions — This refrigerator
is equipped with a three-prong (grounding) plug for
protection against possible shock hazards. If a twoprong wall receptacle is encountered, contact a
qualified electrician and have the two-prong wall
receptacle replaced with a properly grounded threeprong wall receptacle in accordance with the National
Electrical Code.
Refrigerator is designed to operate on a separate 103
to 126 volt, 15 amp., 60 cycle line.
Do not under any circumstances cut or remove
the round grounding prong from the plug.
Refrigerator must be grounded at all times. Do not
remove warning tag from power cord.
When contacting Amana, provide product information.
Product information is on the serial plate, located on
(upper left corner , ceiling) of Fresh Food section. Record
the following information:
Model Number:
Manufacturing Number:
S/N or Serial Number:
Date of purchase:
Dealer’s name and address:
Amana also has a network of independent authorized
technicians. Locate a Factory Service Center or
independent authorized Amana technician by calling 1-
800-628-5782 inside U.S.A. and 1-319-622-5511 outside
U.S.A. Warranty service must be performed by an
authorized Amana technician. Amana also recommends
contacting an authorized Amana technician if service is
required after warranty expires.
Amana offers a complete line of appliances: cooktops,
dishwashers, dryers, freezers, microwave ovens, ranges,
wall ovens, and washers. Amana also manufactures a
complete selection of high efficiency gas furnaces plus
both central and room air conditioners.
Enjoy this new Amana® refrigerator .
W ARNING
Do not use a two-prong adapter. Do not use an
extension cord.
Model Identification
Thank you for purchasing this Amana® refrigerator .
Please read this Owner's Manual thoroughly . This
manual provides proper maintenance information. Any
questions, call the Consumer Affairs Department at 1-
800-843-0304 inside U.S.A. and 1-319-622-5511 outside
U.S.A.
Complete registration card and promptly return. If
registration card is missing, call the Consumer Affairs
Department. Keep a copy of sales receipt for future
reference.
Proper Disposal of Your
Refrigerator
IMPORT AN T: Child entrapment and suffocation are
not problems of the past. Junked or abandoned
refrigerators are still dangerous—even if they will sit
for “just a few days.” If you are getting rid of your
old refrigerator , please follow the instructions below
to help prevent accidents.
BEFORE YOU THROW AWA Y YOUR OLD
REFRIGERA T OR OR FREEZER:
• Take off the doors.
• Leave the shelves in place so that children may
not easily climb inside.
December 1997 5 RS1300003 Rev. 0

User Operation
Installation Instructions
Proper installation will ensure this refrigerator operates
most efficiently. Amana cannot be responsible for
improper installation.
1. Remove doors if necessary.
W ARNING
To avoid electrical shock which can cause severe
personal injury or death, disconnect power to
refrigerator before removing doors. After replacing
doors, connect power.
a. Remove toe grille.
b. Electronic Models
Unplug wiring harness from voltage box.
d. Remove top hinge covers. (A below)
W ARNING
To avoid electrical shock which can cause severe
personal injury or death, green ground wire must
remain attached to hinge.
e. Electronic and Dispenser Models
Unplug top hinge wire connectors. Do not remove
green ground wire from hinge. Carefully lift and
remove top hinges. Do not disturb position of hinge
shims. (B)
A
C
D
B
F
G
A.Wiring harness
c. Dispenser Models
Loosen water tube clamp screw. Loosen plastic
water tube union nut. Pull water tube away from
union nut and through tube clamp.
A
E
A
C.Hinge cover F.Wire connectors
D.Door hinge screws G.Green ground wire
E.Top hinge
f. Remove doors.
Caution
To avoid property damage, protect soft vinyl or other
flooring with cardboard, rugs, or other protective
material when moving refrigerator.
g. Slide appliance cart under side of refrigerator. W rap
refrigerator with blanket or pad. Thread cart strap
around refrigerator and tighten. Do not overtighten
strap. Move refrigerator in front of final location.
h. Rehang doors by reversing steps a–f. Use a penny
at top of doors to space doors 3/4" (18 mm) from
cabinet.
C
B
A.Plastic water tube union nut
B.Water tube clamp screw
C.Water tube
RS1300003 Rev. 0 6 December 1997

User Operation
2. Connecting Water Supply
A
W ARNING
To avoid electrical shock which can cause severe
personal injury or death, disconnect power to
refrigerator before connecting water supply. After
connecting water supply , connect power .
Caution
To avoid property damage, observe the following:
• Confirm water pressure to water valve is between
20 and 100 pounds per square inch.
• Tighten nut by hand to avoid cross threading.
Finish tightening nuts with pliers and wrenches. Do
not overtighten.
• Check for water leaks and correct if necessary
before returning refrigerator to normal location and
24 hours after connecting.
Important
• Before connecting water supply , contact a plumber to
connect copper tubing to household plumbing in
compliance with local codes and ordinances.
• A self-piercing or 3/16" saddle valve is not
recommended. Both reduce water flow , become
clogged with time and may cause leaks if repair is
attempted. The correct type of shut off valve requires
a 1/4" hole to be drilled in water supply pipe prior to
valve attachment. The manufacturer is not
responsible for property damage caused by improper
water connection.
Materials Required
1
/4" (6 mm) flexible copper tubing. Length of copper
tubing must reach from water supply connection plus an
additional 8' (2 m) for service loop behind refrigerator .
Procedure
1. Remove plastic cap from water valve inlet port.
Place brass nut and brass sleeve on copper
tubing. Insert copper tubing into water valve inlet
port. Connect brass nut on copper tubing to water
valve inlet port. Confirm copper tubing is secure by
pulling on copper tubing.
B
A. “P” clamp B. Copper tubing
C. Brass nut D. Brass sleeve
E. Water valve inlet connection
2. Turn on water supply to refrigerator and check for
leaks. Correct any leaks.
3. Create service loop using extreme care to avoid
kinks. Secure copper tubing to refrigerator cabinet
with a “P” clamp.
4. Plug in power cord.
5. Move refrigerator into final location.
6. Level refrigerator and align doors.
a. Remove toe grille.
b. Turn roller adjustment screw to raise or lower
refrigerator cabinet until refrigerator is stable.
Some models have both front and rear adjustable
rollers.
c. Models with Hinge Adjusting Cam
If tops of doors are not aligned after leveling,
loosen refrigerator door hinge screws 1/2 turn.
Turn cam clockwise 1 increment at a time until
doors are aligned. Open and close doors. Tighten
hinge screws.
A
D
C
D
E
B
C
December 1997 7 RS1300003 Rev. 0
A.Rear roller adjustment screw
B.Door hinge screws
C.Hinge adjusting cam
D.Front roller adjustment screw

User Operation
Controls
This refrigerator is designed to operate at normal
household temperatures of 55° to 1 10°F (13° to 43°C).
Fresh Food and Deepfreeze® Controls
Fresh Food and Deepfreeze® controls are located on
upper rear wall of Fresh Food® section.
A
B
A. Deepfreeze control B. Fresh food
control
When Deepfreeze® control is set to
off
, neither Fresh
Food nor Deepfreeze® sections will cool. Initially , set
both controls to 4. Wait 24 hours for Fresh Food and
Deepfreeze® sections to reach desired temperatures.
After 24 hours, adjust controls, one number at a time, as
desired. 1 is warmest setting and 7 is coldest.
Setting Controls
Set controls with a household thermometer that includes
temperatures between -5° to 50°F (-21° to 10°C).
Put thermometer snugly between frozen packages in
Deepfreeze® section. Wait 5-8 hours. If Deepfreeze
®
temperature is not 0° to 2°F (-17° to -16°C), adjust
control, 1 number at a time. Check again after 5-8 hours.
Put thermometer in a glass of water in middle of Fresh
Food section. Wait 5-8 hours. If Fresh Food temperature
is not 38° to 40°F (3° to 4°C), adjust control, 1 number at
a time. Check again after 5-8 hours.
Touchmatic™ Electronic Controls (some models)
Locate power switch on right side of black box in center
of cabinet behind toe grille. Turn power switch on before
programming.
Touchmatic™ electronic controls are located on
refrigerator between door handles. Press * pad to
activate control panel. All other pads, except for
OFF
pad, remain inactive until * pad is pressed. Once
ALARM
activated, pads remain programmable for at
least 10 minutes.
Fresh Food and Deepfreeze® controls are
preset at 5. Wait 24 hours after connecting
power for Fresh Food and Deepfreeze
®
sections to reach desired temperatures. After
24 hours, adjust controls as desired. 1 is
warmest setting and 9 is coldest. Refer to
“Setting Controls” section to set controls
precisely.
• Adjust Fresh Food or Deepfreeze
®
temperatures by pressing * pad then
REFRIG TEMP
TEMP
pad. Press
COLDER
pad or
FREEZER
WARMER
pad or
pad to adjust temperature
setting 1 level at a time. Holding down
WARMER
pad or
COLDER
pad adjusts
temperature more than 1 level at a time.
Entry Tone
Entry tone indicates a pad was pressed and
command was read and accepted.
• Deactivate entry tone by pressing and
holding * pad for 3 to 5 seconds. Three
short beeps indicate instructions were
accepted.
• Activate entry tone by pressing and
holding * pad for 3 to 5 seconds.
Vacation Mode
Vacation mode defrosts refrigerator less often
during extended non-use periods.
• Activate vacation mode by pressing *
pad then
VACATION
pad. Indicator light
will glow.
• Deactivate vacation mode by pressing *
pad then
VACATION
pad. Opening
Fresh Food or Deepfreeze® door will
also deactivate vacation mode.
Max Cool Mode
Max cool mode adjusts Fresh Food
temperature to coldest setting. After 10
hours, Fresh Food temperature automatically
returns to previous setting.
• Activate max cool mode by pressing *
pad then
MAX COOL
pad. Indicator
light will glow.
• Deactivate max cool mode before
automatic reset by pressing * pad then
MAX COOL
pad.
*
FREEZER
TEMP
REFRIG
TEMP
WARMER
COLDER
FRZR
TEMP
REF
TEMP
DOOR
OPEN
HIGH
TEMP
CLEAN
COIL
VACA TION
MAX
COOL
FAST
FRZ
VACATION
MAX COOL
FAST
FREEZE
ALARM
OFF
DISPLAY
OFF
1
2
3
4
5
6
7
8
RS1300003 Rev. 0 8 December 1997

User Operation
Fast Freeze Mode
Fast freeze mode adjusts Deepfreeze® temperature to
coldest setting. After 24 hours, Deepfreeze® temperature
automatically returns to previous setting.
• Activate fast freeze mode by pressing * pad then
FAST FREEZE
• Deactivate fast freeze mode before automatic
reset by pressing * pad then
Door Open Alarm
Door open alarm sounds and indicator light blinks if
either door is open for more than 3 minutes.
• Deactivate door open alarm by pressing
OFF
pad or by closing either door.
• Activate door open alarm by pressing * pad then
holding
short beeps indicate instructions were accepted.
High T emperature Alarm
High temperature alarm sounds and indicator light glows
if Fresh Food or Deepfreeze® temperature is high for 2
hours. A blinking light signals affected compartment.
Alarm ends when proper temperature is reached.
• Deactivate high temperature alarm by pressing
ALARM OFF
ALARM OFF
pad. Indicator light will glow.
FAST FREEZE
pad for 3 to 5 seconds. Three
pad.
pad.
ALARM
Fresh Food Features
Caution
To avoid property damage, confirm shelf is secure
before placing items on shelf.
Fresh Food Shelves
Models feature either glass or wire shelves. Shelves
adjust up or down to meet individual storage needs.
Some models feature Spillsaver™ shelves. Spillsaver
shelves hold simple spills for easier cleaning.
Caution
To avoid personal injury or property damage, handle
tempered glass shelves carefully . Shelves may break
suddenly if nicked, scratched, or exposed to sudden
temperature change.
• Remove shelves by lifting front, releasing hooks
from metal track then pulling out.
• Replace shelves by inserting hooks into metal
track and lowering front.
™
Thermistor Alarm
Thermistor electronically senses Fresh Food and
Deepfreeze® temperatures. Thermistor alarm sounds
and indicator lights scroll if Fresh Food or Deepfreeze
thermistor is not operating properly .
• Deactivate display by pressing
If thermistor alarm sounds, contact an authorized
Amana® technician immediately .
If
ALARM OFF
to confirm situation has been corrected. Alarm sounds
again if thermistor is still not operating properly .
Display Lights
• Deactivate temperature display lights by pressing *
pad then pressing
• Activate temperature display lights by pressing any
of top 5 pads.
Clean Condenser Coil Light
Clean condenser coil light glows every 3 months as a
reminder to clean condenser coils. Light automatically
cancels in 72 hours.
• Deactivate clean condenser coil light before
automatic reset by pressing
pad is pressed, thermistor control retests
DISPLAY OFF
ALARM OFF
pad.
ALARM OFF
®
pad.
pad.
EasyGlide™ shelves pull forward for easy access of items
in back.
December 1997 9 RS1300003 Rev. 0

User Operation
Chiller Fresh™ System (some models)
Chiller Fresh™ system features a drawer inside a sleeve.
Air circulates between drawer and sleeve. This systems
keeps food fresh longer and up to 5°F (3°C) colder than
Fresh Food temperature.
Chiller Fresh™ control is located below front shelf trim.
Control adjusts amount of air circulating around drawer.
Slide control to
and to
form on drawer or food on
decrease Fresh Food temperature. Fresh Food control
may need to be adjusted.
• Remove drawer by lifting and pulling out. Remove
• Replace shelf by inserting hooks into metal track
coldest
shelf by lifting front, releasing hooks from metal
track then pulling out.
and lowering front. Use slots 8 through 11 only.
Replace drawer by sliding in. Confirm boot is over
air inlet in side wall.
cold
for normal Fresh Food temperature
for colder temperature. Ice crystals may
coldest
setting. Cold air can
Caution
To avoid personal injury or property damage, handle
tempered glass shelves carefully . Shelves may break
suddenly if nicked, scratched, or exposed to sudden
temperature change.
Garden Fresh™ Crispers
Garden Fresh™ crispers keep produce fresh longer.
Wrap produce tightly . Do not wash produce before
placing in crispers. Excess moisture could cause
produce to spoil prematurely . Do not line crispers with
paper towels. Paper towels will retain moisture.
Garden Fresh™ control is located below front shelf trim.
Control adjusts humidity in crispers. Slide control to
for produce with leaves such as lettuce, spinach or
cabbage. Slide control to
as cauliflower, corn or tomatoes.
low
for produce with skins such
high
Remove shelf and garden fresh crispers by completing
the following steps.
1. Open crisper.
2. Remove shelf by gently pushing up from
underneath. Tilt one end up then pull out.
3. Remove crisper by lifting front while supporting
underneath then pulling out.
4. Replace crispers and shelf by reversing steps 1-3.
Storage Rack (some models)
Storage rack provides convenient storage for items such
as a large bottle, eggs, etc.
Depending on location of shelf, hang rack using 1 of the
following methods. Rack cannot be installed next to
lower Fresh Food section light bulb.
• Remove shelf by lifting front, releasing hooks
from metal track then pulling out. Hang rack by
inserting tabs into slots on side of shelf. Replace
shelf by inserting hooks into metal track and
lowering front.
RS1300003 Rev. 0 10 December 1997

User Operation
• Slide rack along side of shelf until tabs are
inserted into slots.
A
A.Storage rack
Covered Storage Bucket (some models)
Storage bucket has a lid and removable egg tray . When
tray is removed, bucket will accept items such as a
standard egg carton, ice, etc.
A
B
C
A.Lid B. Egg tray
C.Storage bucket
Dairy Center (some models)
Dairy center provides convenient storage for items such
as butter, cheese, etc.
Snack Chiller (some models)
Snack chiller provides convenient storage for small items
and snacks. Items are kept cooler with air circulating
from Temperature Controlled Beverage Chiller™.
Temperature Controlled Beverage Chiller
(some models)
Temperature Controlled Beverage Chiller™ keeps
beverages up to 5°F (3°C) colder than Fresh Food
section. Air inlet allows air from Deepfreeze® section to
pass to beverage chiller . Air inlet is located on interior
wall of Fresh Food door.
Beverage chiller control is located on left front wall of
Fresh Food section. Control adjusts amount of air
circulating in beverage chiller . T urn control to
normal Fresh Food temperature and to
temperature.
colder
cold
for colder
™
for
December 1997 11 RS1300003 Rev. 0

User Operation
A
B
A.Fresh food section B. Temperature control
A
A.Tabs
• Remove beverage chiller door by removing lower
door buckets. Remove door buckets by pushing
tabs toward center and pulling out. Slide door
down and out through bottom of door track.
• Replace beverage chiller door by sliding door up
through bottom of door track. Retention glides
must remain in place to replace door. Replace
door buckets by sliding in until tabs lock into place.
A
B
A.Door track B . Beverage chiller door
Door Buckets
Door buckets adjust to meet individual storage needs.
• Remove door buckets by pushing tabs toward
center and pulling out.
• Replace door buckets by sliding in until tabs lock
into place.
Door Shelves
• Remove slide-style door shelves by lifting ends up
andpulling out.
• Replace slide-style door shelves by placing shelf
on glides and sliding down.
A
A.Shelf glide
• Remove hook-style door shelves by lifting ends
and releasing hooks on bottom of shelf.
• Replace hook-style shelves by inserting hooks and
lowering bottom of shelf. Push down on ends.
RS1300003 Rev. 0 12 December 1997

User Operation
Caution
Deepfreeze® Features
Caution
To avoid property damage, confirm shelf is secure
before replacing items on shelf.
Automatic Ice Maker (some models)
• Confirm ice bucket is in place and ice maker arm is
down.
A
To avoid property damage, confirm shelf is secure
before replacing items on shelf.
Adjustable Divider (Some models)
Adjustable divider keeps items in place and adjusts to
meet individual storage needs. Divider fits in any door
bucket or door shelf.
A
A.Adjustable divider
B
A.Off position B. On position
• After Deepfreeze® section reaches normal
temperature, ice maker fills with water and begins
operating. Allow 24-48 hours after installation before
first harvest of ice. Ice maker produces 7 to 9
harvests of ice in a 24-hour period under ideal
conditions.
• After ice is formed, ice maker drops ice cubes into
ice storage bucket. During ice production, ice maker
arm raises and lowers. When ice storage bucket is
full, ice maker arm turns ice maker off. Discard first 3
harvests of ice after initially connecting refrigerator to
household water supply and after extended periods
of non-use.
• Stop ice production by raising ice maker arm. A
definite click is heard when proper position is
reached. Ice maker arm will remain in off position
until pushed down.
December 1997 13 RS1300003 Rev. 0

User Operation
Caution
To avoid damage to ice maker, observe the following:
• Do not force ice maker arm down or up.
• Do not place or store anything in ice storage
bucket.
A
Deepfreeze® Rack (some models)
Deepfreeze® rack holds ice cube trays and provides
additional storage.
• Remove Deepfreeze® rack by lifting rack and
pushing front hooks in to release hooks from shelf.
Pull front of rack down. Push hooks in to release
back hooks from shelf. Slide rack off shelf.
• Replace Deepfreeze® rack by pushing back hooks
in and placing hooks over shelf. Push front hooks
in and place hooks over shelf.
A
B
B
A.Wire shelve B. Wire baskets
Door Dikes (some models)
Door dikes snap out for easy removal of Deepfreeze
shelves and baskets.
• Remove door dike by pulling out.
• Replace door dike by aligning dike with extrusions on
Deepfreeze® door . Push until dike snaps in place.
A
®
A.Freezer shelf B. Deepfreeze
Stor-Mor® System
Wire shelves and baskets slide out for easy access of
items in back and can be rearranged to meet individual
storage needs.
• Remove shelves and baskets by lifting and pulling
out.
• Replace shelves and baskets by placing shelves
and baskets on side rails. Slide shelves and
baskets right and back until round knob is behind
stop on rail.
RS1300003 Rev. 0 14 December 1997
®
B
A.Door dike B. Door dike
User Operation
Tall Package Retainer (some models)
Tall package retainer keeps tall items secure. Retainer
fits in any door bucket or door shelf.
Ice ‘N’ Water™ Dispenser
(some models)
Caution
To avoid personal injury or property damage, observe
following instructions:
• Do not operate dispenser with Deepfreeze® door
open.
• Do not put fingers, hands, or any foreign object into
dispenser opening.
• Do not use sharp objects to break ice.
Water Dispenser Operation
It takes approximately 1 minute after initially pressing
dispenser bar before water dispenses after initial
connection of water supply . Discard first 10 to 14
containers of water after initially connecting refrigerator
to household water supply and after extended periods of
non-use.
• Dispense water by pressing sturdy wide mouthed
container against water dispenser bar.
• Stop water dispensing by releasing pressure on
bar. A small amount of water may continue to fall.
Spill shelf is not self-draining. Large spills should
be wiped dry.
Ice Dispenser Operation
• Select cubed or crushed mode by sliding lever on
dispenser panel. Dispense ice by pressing wide
mouthed container against ice dispenser bar.
Important
Reduce spraying of crushed ice by holding wide
mouthed container directly under ice chute and as
high as possible in dispenser area.
• Stop ice dispensing by releasing pressure on bar
before container is full. Some ice will continue to
fall. Do not remove container until last of ice falls.
If dispensing ice continuously , dispenser motor is
designed to shut off after 3 to 5 minutes. Motor resets
after 3 minutes and dispensing can continue.
A slight delay occurs when switching between cubed and
crushed modes. Pieces of crushed ice will vary in size
and shape. "Snow" may form on door and ice chute
when repeatedly dispensing crushed ice. Allow "snow" to
evaporate or wipe dry .
Dispenser operates only with cubes of proper size and
crescent shape. Do not add purchased ice cubes or
other shaped cubes to ice bucket.
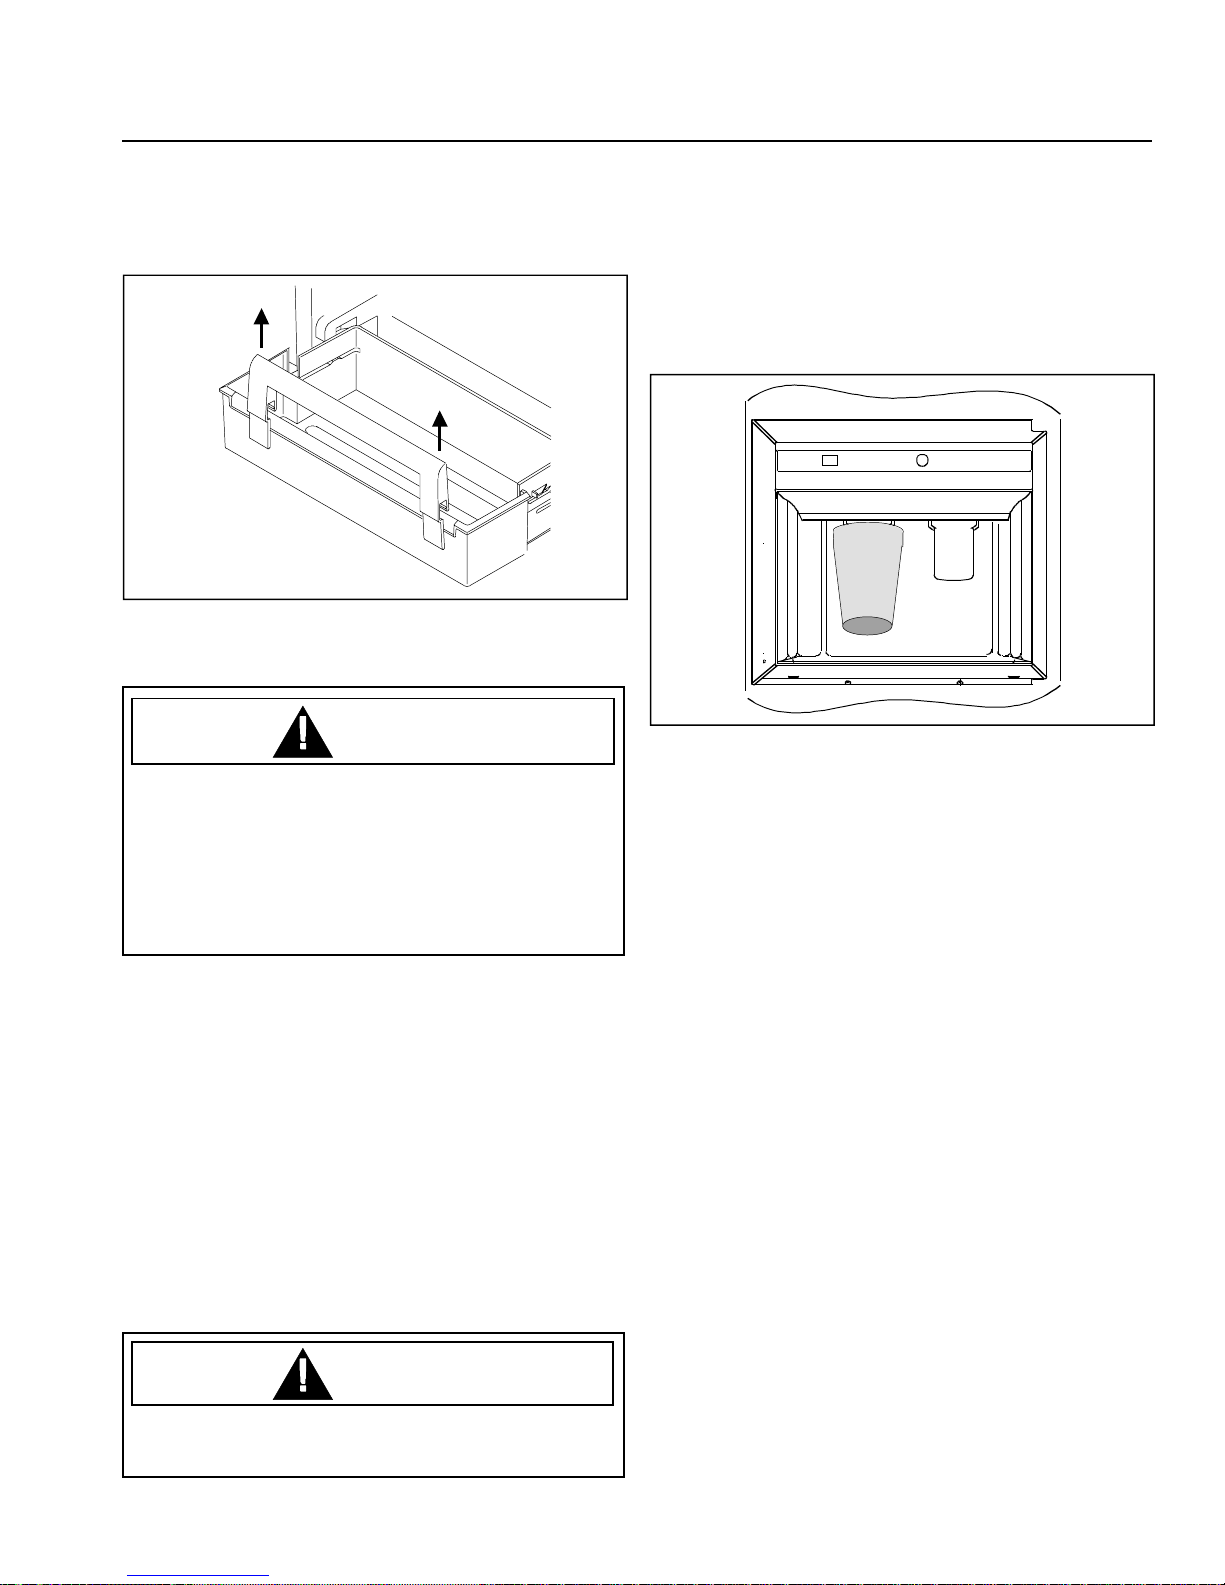
Removing Ice Bucket
• Remove ice bucket by lifting bucket and pulling
out.
• Replace ice bucket by sliding in until bucket locks
in place. Ice bucket must be locked in place for
proper ice dispensing. If Deepfreeze® door does
not close, bucket is not in proper location.
Caution
To avoid property damage, do not dispense ice
directly into thin glass, fine china, or delicate crystal.
December 1997 15 RS1300003 Rev. 0
Dispenser Light (some models)
A light is activated when dispensing ice or water. Some
models feature a night light.
• Activate night light by pushing switch, located
underneath dispenser and left of ice dispenser
bar.

User Operation
Taste and Odor
Observe the following to minimize taste and odor
difficulties:
• Wrap foods in tightly sealed containers or moisture
proof bags.
• Install water filter, part #R0185011 on water line.
• Contact local water treatment company for
specialized help if difficulties persist.
Care and Cleaning
W ARNING
To avoid electrical shock which can cause severe
personal injury or death, disconnect power to
refrigerator before cleaning. After cleaning, connect
power.
Caution
To avoid personal injury or property damage, read and
follow all cleaning product manufacturer's directions.
General
1. Wash surfaces with 4 tablespoons baking soda
dissolved in 1 quart warm water and a soft, clean
cloth.
2. Rinse surfaces with warm water. Dry surfaces with
a soft, clean cloth.
• Do not use the following items:
- abrasive or harsh cleaners, ammonia, chlorine
bleach, etc.
- concentrated detergents or solvents
- metal scouring pads
These items can scratch, crack and discolor
surfaces.
• Do not place buckets, shelves, etc. in dishwasher.
Odor Removal
1. Remove all food and disconnect power to
refrigerator.
2. Clean all interior surfaces including ceiling, floor,
and walls according to “General” instructions. Pay
special attention to corners, crevices, and
grooves. Include all drawers, shelves, and
gaskets.
3. Connect power to refrigerator and return food to
refrigerator. Wash and dry all bottles, containers
and jars. Wrap foods in tightly sealed containers to
prevent further odor. After 24 hours, check if odor
was eliminated.
Complete the following steps if odor was not eliminated.
4. Complete steps 1–2.
5. Place garden fresh crispers on top shelf of Fresh
Food section. Pack Fresh Food and Deepfreeze
sections including doors with crumpled sheets of
black and white newspaper.
6. Place charcoal briquettes randomly throughout
newspaper.
7. Close doors and let stand 24–48 hours.
8. Remove charcoal briquettes and newspapers.
9. Complete steps 2–3.
Contact Consumer Affairs Department if odor was still
not eliminated. Refer to Model Identification section for
phone number .
®
Adhesives
1. Remove glue residue by rubbing toothpaste into
adhesive with fingers until adhesive loosens.
2. Rinse surface with warm water. Dry surface with a
soft, clean cloth.
Door Gaskets
1. Clean door gaskets every 3 months according to
“General” instructions.
2. Apply a light film of petroleum jelly to keep gaskets
pliable.
Condenser Coils
Clean condenser coil every 3 months to ensure
maximum performance of refrigerator. Accumulated
dust and lint may cause the following:
• reduced cooling performance
• increased energy usage
• premature compressor failure
1. Remove toe grille by holding ends and pulling
forward.
2. Clean front surface of condenser coil with a
vacuum cleaner hose nozzle.
3. Replace toe grille by inserting clips in holes and
snapping in.
Caution
To avoid property damage, protect soft vinyl or other
flooring with cardboard, rugs, or other protective
material.
4. Pull refrigerator away from wall. Run a vacuum
brush across condenser fan outlet grille on back
of refrigerator.
RS1300003 Rev. 0 16 December 1997

User Operation
Glass Shelves
Caution
To avoid personal injury or property damage, handle
tempered glass shelves carefully . Shelves may break
suddenly if nicked, scratched, or exposed to sudden
temperature change.
Remove shelf by lifting front, releasing hooks from metal
track then pulling out. Place shelf on a towel. Allow shelf
to adjust to room temperature before cleaning.
Clean crevices by completing the following steps:
1. Dilute mild detergent and brush solution into
crevices using a plastic bristle brush. Let set for 5
minutes.
2. Spray warm water into crevices using faucet spray
attachment.
3. Dry shelf thoroughly and replace shelf by inserting
hooks into metal track and lowering front.
Light Bulbs
W ARNING
To avoid electrical shock which can cause severe
personal injury or death, disconnect power to
refrigerator before replacing light bulb. After replacing
light bulb, connect power.
Lower Fresh Food Section (Some models)
• Remove light bulb cover by removing screw.
Replace bulb with 40-watt tubular bulb.
• Replace light bulb cover by placing cover over
light bulb. Insert and tighten screw.
A
B
C
A.Light bulb B.Light bul cover
C.Screw
Deepfreeze® Section
1. Remove ice bucket by lifting bucket and pulling
out.
2. Remove light bulb cover by removing screw.
Replace bulb with 40-watt appliance bulb.
3. Replace light bulb cover by holding cover in place
over light bulb. Insert and tighten screw.
4. Replace ice bucket by sliding in until bucket locks
in place.
A
Caution
To avoid personal injury or property damage, observe
the following:
• Allow light bulb to cool.
• Wear gloves when replacing light bulb.
Upper Fresh Food Section
• Remove light bulb cover by removing ¼" hex nut
screws. Replace bulb(s) with 40-watt appliance
bulb(s).
• Replace light bulb cover by replacing ¼" hex nut
screws.
A
B
A. Light bulb cover B. Light bulbs
December 1997 17 RS1300003 Rev. 0
B
A. Light bulb cover B. Light bulb
Ice ‘N’ Water™ Dispenser (Some models)
Light bulb is located between dispenser arms.
• Remove light bulb by unscrewing light bulb.
Replace light bulb with a 6-watt, 120-volt bulb.
• Replace light bulb by inserting and tightening bulb.

User Operation
Normal Operating Sounds
This new refrigerator may be replacing a differently
designed, less efficient or smaller refrigerator . Today’s
refrigerators have new features and are more energy
efficient. As a result, certain sounds may be unfamiliar.
These sounds are normal and will soon become familiar.
These sounds also indicate refrigerator is operating and
performing as designed.
1. Deepfreeze® control clicks when starting or
stopping compressor.
2. Deepfreeze® fan air rushes and whirs.
3. Sealed system (evaporator and heat exchanger)
refrigerant flow gurgles, pops or sounds like
boiling water.
4. Defrost heater sizzles, hisses or pops.
5. Condenser fan air rushes and whirs.
6. Compressor has a high pitched hum or pulsating
sound.
7. Ice cubes from ice maker (some models) drop into
ice bucket.
Ice auger (Ice ‘N’ Water™ Dispenser models)
hums as auger agitates ice during dispensing. Ice
auger is located in freezer door. (not shown)
Ice maker water valve hookup (some models)
buzzes when ice maker fills with water. This
occurs whether or not refrigerator is connected to
water supply. If refrigerator is not connected to
water supply, stop sound by raising ice maker arm
to off position. Water valve hook up is located in
back, bottom, left hand corner. (not shown)
Foam insulation is very energy efficient and has
excellent insulating capabilities. However, foam
insulation is not as sound absorbent as previously
used fiberglass insulation. (not shown)
Before Calling For Service
Refrigerator does not operate.
• Confirm Deepfreeze® control is on.
• Confirm refrigerator is plugged in.
• Check fuse or circuit breaker. Plug in another item at
that wall outlet.
• Wait 40 minutes to see if refrigerator restarts. If
Deepfreeze® control is on, lights work but 2 fans
and compressor are not operating, refrigerator
may be in defrost cycle.
Refrigerator still won’t operate.
• Unplug refrigerator. T ransfer food to another unit
or place dry ice in Deepfreeze® section to
preserve food. Warranty does not cover food
loss. Check warranty certificate for specific
coverage.
• Call 1-800-628-5782 inside U.S.A. and
1-319-622-5511 outside U.S.A. to locate an
authorized Amana technician.
Food temperature appears too warm.
• See above sections.
• Allow time for recently added warm food to reach
Fresh Food or Deepfreeze® temperature.
• Check gaskets for proper seal.
• Clean condenser coils.
• Adjust Fresh Food and/or Deepfreeze® control.
• Confirm rear air grille is not blocked. Rear air grille is
located behind left garden fresh crisper.
Chiller fresh system temperature is too warm.
• Slide control to colder setting.
• Adjust Deepfreeze® control to colder setting.
Food temperature is too cold.
• Clean condenser coils.
• Adjust Fresh Food control.
• Adjust Deepfreeze® control to warmer setting. Allow
several hours for temperature to adjust.
RS1300003 Rev. 0 18 December 1997
Refrigerator runs too frequently .
• It may be normal to maintain constant temperature.
• Doors may have been opened frequently or for an
extended period of time.
• Allow time for recently added warm food to reach
Fresh Food or Deepfreeze® temperature.
• Clean condenser coils.
• Adjust Deepfreeze® control.
• Check gaskets for proper seal.
Water droplets form on inside of refrigerator.
• It is normal during high humidity periods or if doors
have been opened frequently .
Water droplets form on outside of refrigerator.
• Check door gaskets for proper seal.

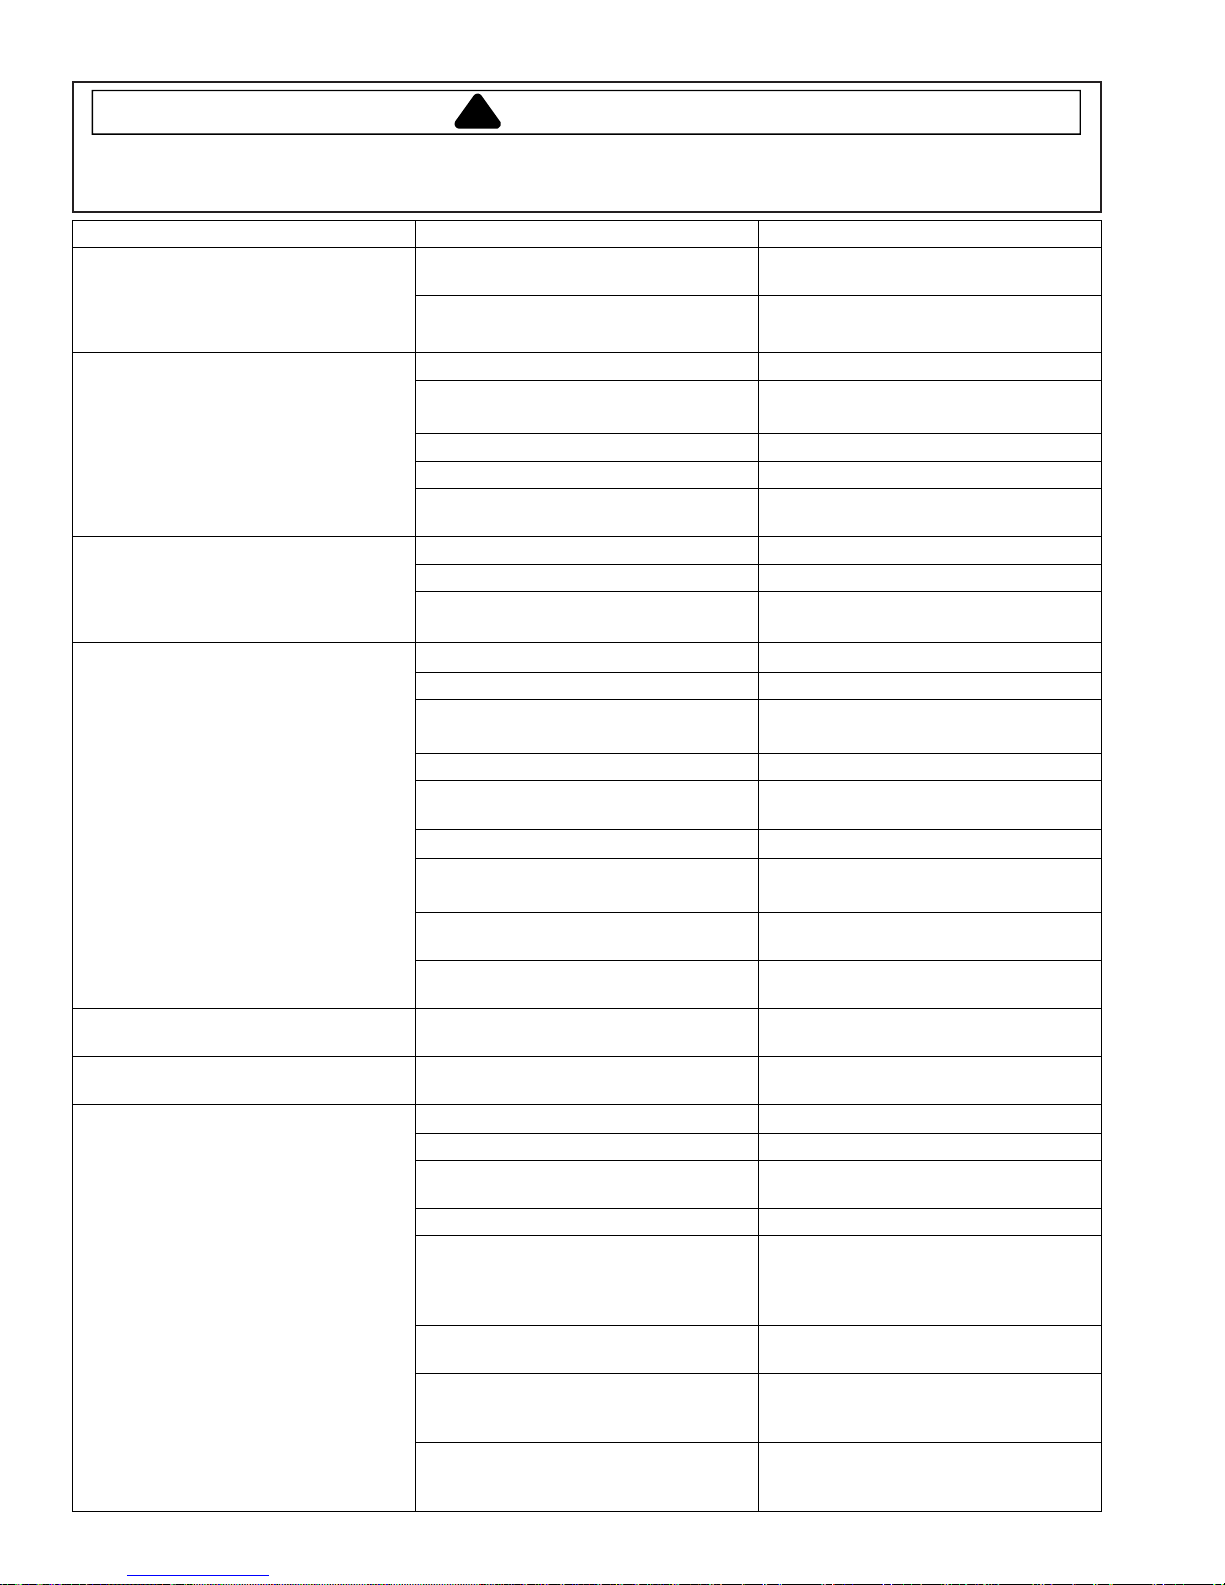
Troubleshooting Chart
!
WARNING
To avoid risk of electrical shock, personal injury, or death, disconnect electrical power source to unit and discharge
capacitor through a 10,000 ohm resistor before attempting to service, unless test procedures require power to be
connected. Ensure all ground wires are connected before certifying unit as repaired and/or operational.
Troubleshooting chart on following pages contains symptoms that may be seen in malfunctioning units. Each
symptom is accompanied by one or more possible causes and by a possible remedy or test to determine if
components are working properly.
Symptom Possible Causes Corrective Action
Unit does not ru n
No power to unit Check for power at outlet. Check
fuse box/circuit breaker for blown
fuse or tripped breaker. Replace or
reset.
Defective service cord Check with test light at unit; if no
circuit and current is indicated at
outlet, replace or repair.
Low voltage Check input voltage for proper
voltage. Take appropriate action to
correct voltage supply problem.
Refrigerator section too warm
Faulty motor or freezer temperature
control
Faulty timer Check with test light. Replace if
Faulty relay Check relay. Replace if necessary.
Faulty compressor Check compressor motor windings
Faulty overload Check overload for continuity.
Excessive door opening Consumer education
Overloading of shelves Consumer education
Warm or hot foods placed in cabinet Consumer education
Cold control set too warm Set control to colder setting.
Poor door seal Level cabinet. Adjust hinges.
Refrigerator airflow Check damper is opening by
Interior light rem ains on Check switch. Replace if necessary.
Faulty condenser fan or evaporator
fan
Faulty compressor Replace compressor.
Check all connections are tight and
secure.
Jumper across terminals of control. If
unit runs, replace control.
necessary.
for opens/shorts.
Perform compressor direct wiring
test.
Replace is necessary.
Note:
Ensure
compressor/overload are below
trip temperature before testing.
Replace if necessary.
Replace gasket.
removing grille. With door open,
damper should open. Replace if
faulty.
Turn control knob to colder position.
Check airflow fan. Replace if faulty.
Check fan switch, fan, and wiring.
Replace if necessary.
December 1997 19 RS1300003 Rev. 0
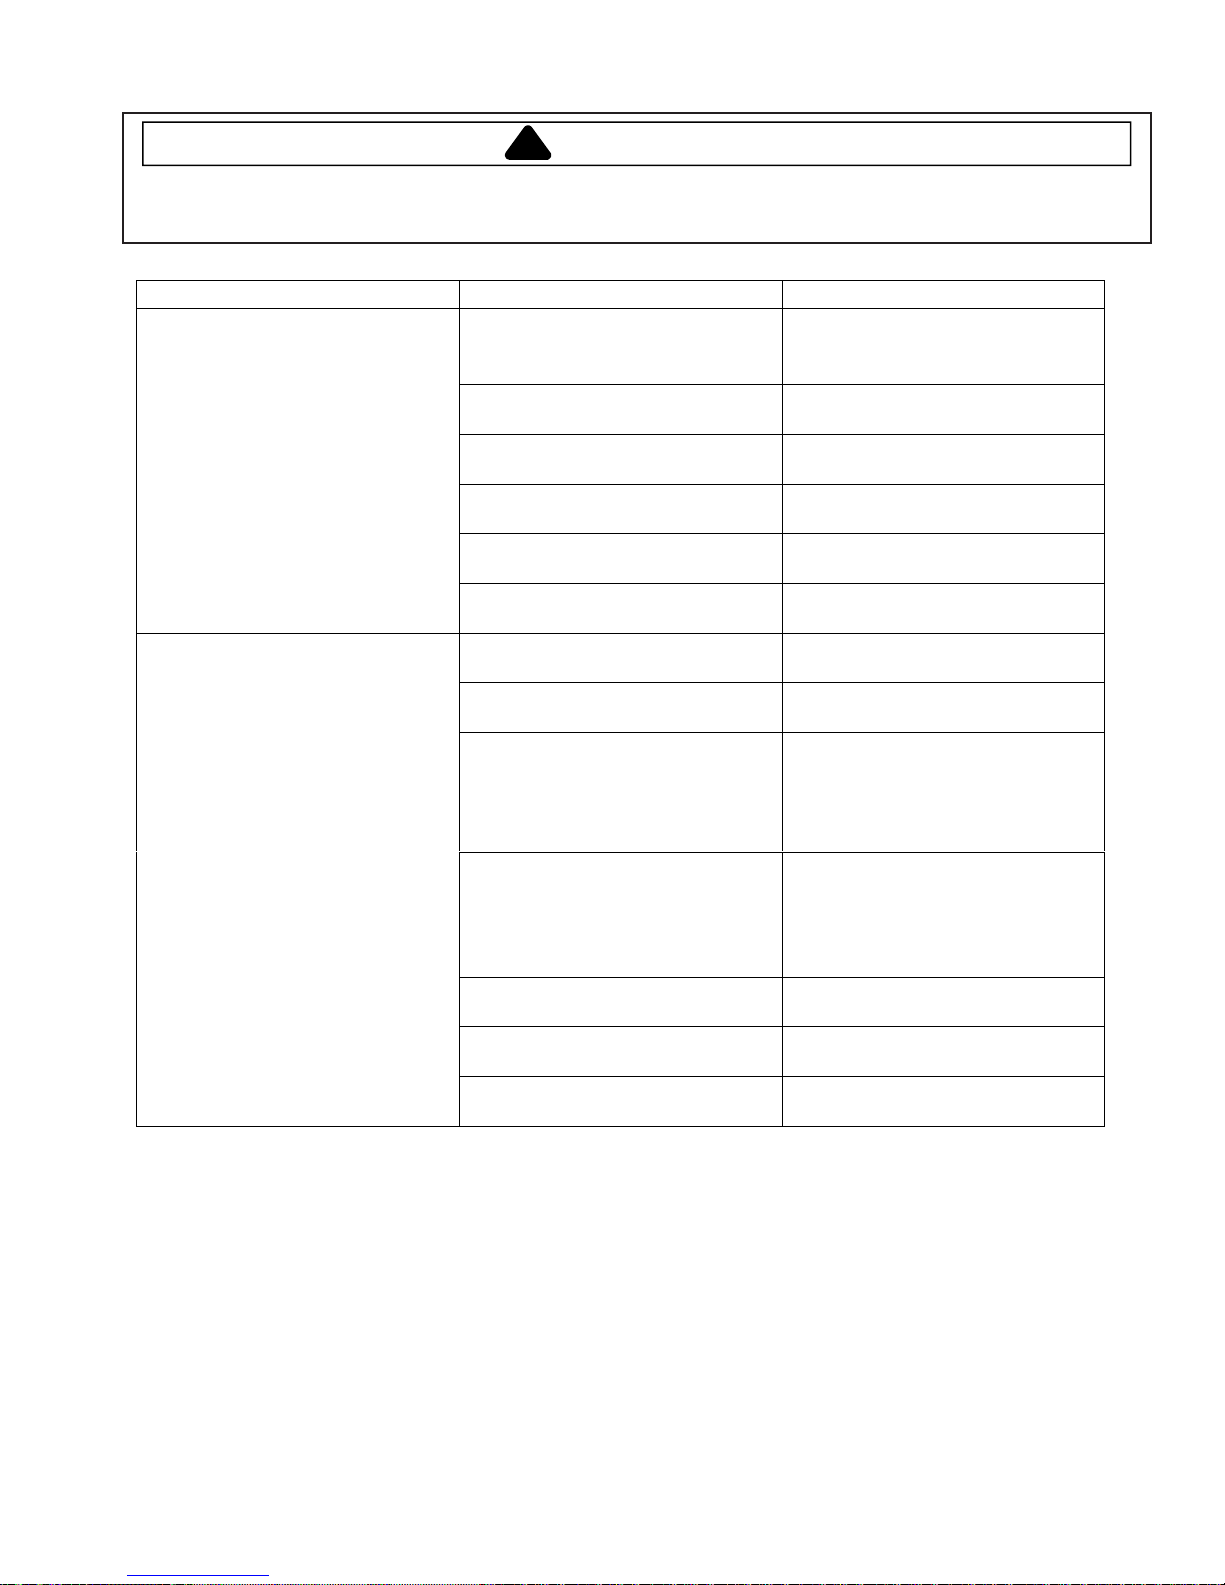
Troubleshooting Chart
!
WARNING
To avoid risk of electrical shock, personal injury, or death, disconnect electrical power source to unit and discharge
capacitor through a 10,000 ohm resistor before attempting to service, unless test procedures require power to be
connected. Ensure all ground wires are connected before certifying unit as repaired and/or operational.
Symptom Possible Causes Corrective Action
Refriger at or section too co ld
Refriger at or t emperature c ontrol set
too co ld
Refriger ator airflo w no t proper ly
adjusted
Adjust refrigerator temperature
control.
Adju st airflow grille to fr e ezer. Adjust
Chef’s pantry temperature control.
Freezer and r efrigera tor sec tions too
warm
Freezer section too cold
Unit runs continuously
Unit runs continuously. Temperature
normal
Unit runs continuously. Temperature
too co ld.
Noisy operation
Tem per ature co ntro ls set too w arm Reset tem pe ratu re co ntrols.
Poor door seal Level cabinet. Adjust hinges.
Replace gasket.
Dirty condenser or o bstructed grille Check cond ens er and gr ille. C lean.
Faulty control Test control. Replace if defective.
Refrigerant shorta ge or restriction Ch eck for le ak or restriction. Repair,
evacuate and recharge system.
Freezer t emp control s et to o cold Adjust fr eezer temperat ur e control.
Faulty control Test control. Replace if defective.
Cold control capillary not properly
clamped to evaporator
Temperature control set too cold Adjust tempe ra tu re control.
Dirty condenser or o bstructed grille Check cond ens er and gr ille. C lean.
Poor door seal Level cabinet. Adjust hinges.
Interior light rema ins on Check switch . Replace if necessary.
Faulty condenser fanor evaporator
fan
Faulty control Test control. Replace if defective.
Refrigerant shorta ge or restriction Ch eck for le ak or restriction. Repair,
Refriger ant ov erc harg e Chec k for over cha rge. Evac ua te an d
Air in system Check for low side leak. Repa ir,
Ice on evapo r ator See “Ic e on evaporator”.
Faulty defrost thermostat Check thermostat. Replace if
Loose flooring or floor not firm Repair floor or brace floor.
Cabinet not level Level c abinet.
Tubing in contact with cabinet, other
tubing, or other metal
Drip tra y vibrating Adjust dra in pan.
Fan hitting another part Ensure fan properly aligned and all
Worn fan motor bearings Chec k mo tor for loss of lubricant or
Compres sor mounting grommets
worn or missing. Mounting hardware
loose or missing
Free or loose parts causing or
allowing noise during operation
Reposi tio n clamp and tighten.
Replace gasket.
Check fan switch, fan, and wiring.
Replace if nec essary.
evacuate and recharge system.
recharge system .
evacuate and recharge system.
necessary.
Adjust tubing.
attaching hardware and brackets are
tight and not worn. Tighten or
replace.
worn bearings. Replace if necessary.
Tighten hardware. Replace
grommets if necessar y.
Inspect unit for parts that may have
worked free or loose or missing
screws. Repair as required.
RS1300003 Rev. 0 20 December 1997
Troubleshooting Chart
!
WARNING
To avoid risk of electrical shock, personal injury, or death, disconnect electrical power source to unit and discharge
capacitor through a 10,000 ohm resistor before attempting to service, unless test procedures require power to be
connected. Ensure all ground wires are connected before certifying unit as repaired and/or operational.
Symptom Possible Causes Corrective Action
Frost or ice on evaporator
Unit starts and stops frequently
(cycles on and off)
Defrost thermostat faulty Check defrost thermostat. Repl ace if
defective.
Evaporator fan faulty Check fan motor. Replace if
defective.
Defrost heater remains open Check defrost heater continuity.
Replace if faulty.
Defrost c ontrol faulty Check contr ol and replace if
defective.
Open wire or connector Check wiring and connections.
Repair as necessary.
Refriger ant shortage or restriction Check for leak or restriction. Repair,
evacuate and recharge system.
Loose wire or thermostat
connections
Supply voltage out of specification Check input voltage. Correct any
Overload protector open Check overload protector for
Fault y compressor motor capacitor Check capacitor f or open/short.
Check wiri ng and connections.
Repair as necessary.
supply problems.
continuity. If open, replace overl oad.
Note:
Ensure
overload/compressor are below
trip tem perature before testing.
Replace if necessary.
Note: Discharge capacitor before
testing.
December 1997 21 RS1300003 Rev. 0
Fault y f an m otor C heck fan mot or. Replace if
defective.
Restricted air flow Check condenser and grille for dirt.
Clean.
Refriger ant shortage or restriction Check for leak or restriction. Repair,
evacuate and recharge system.

System Diagnosis
Pressure and Temperature Relationship Chart
See “Service Procedures” section for additional information items in this chart.
Condition
Refrigerant
Overcharge
Refrigerant
Shortage
Partial
Restriction
Air in
system
Low
Ambient
Installation
(Reverse
from High
Ambient
Installation)
Suction
Pressure
Variation
from Normal
Increase Increase Warmer Warmer Colder Increase
Decrease Decrease or
Decrease Decrease or
Near Normal Increase Warmer Warmer Warmer Increase
Decrease Decrease Colder Warmer Warmer Decrease
Head
Pressure
Variation
from Normal
Increase
(Restriction
Symptoms)
Increase
(Restriction
Symptoms)
T1 Inlet
Temperature
Variation
from Normal
Colder Warmer Warmer Decrease
Colder Warmer Warmer Decrease
T2 Outl et
Temperature
Variation
from Normal
T3 Suction
Temperature
Variation
from Normal
Wattage
Variation
from Normal
Additional
Heat Load
Inefficient
Compressor
Increase Increase Warmer Warmer Warmer Increase
Increase Normal or
Decrease
Warmer or
Colder
Warmer Warmer Decrease
RS1300003 Rev. 0 22 December 1997

Display Panel
*
FREEZER
TEMP
REF
TEMP
WARME R
COL DER
VA C AT IO N
VA CAT ION
MA X
COO L
FRZ
TEMP
COLDEST
REF
TEMP
DOOR
OPEN
HIG H
TEMP
CLEAN
COIL
MAX
REF
MAX
FRZ
TE MP ERATURE
DISPLAY LIGHTS
UNMARKED
INDICATOR
TEMP
COLDEST
TEMP
DOOR
OPEN
TEMP
CLEAN
COIL
VACATION
MAX
COOL
FRZ
REF
HIGH
MAX
FRZ
December 1997 23 RS1300003 Rev. 0
FA ST
FREEZE
ALARM
OFF
DI SPL AY
OFF
Display Panel Keyboard

Display Panel Operation
Keyboard Pad Functions
Entry Tone
Indicates a pad was pressed, command read and
accepted. Turn off entry tone by pressing and holding
pad for 3 to 5 seconds.
*
Command Accepted Tone
Three short tones indicate command accepted.
*
1. Activates control panel. Control panel remains
active at least 10 minutes.
2. Turns off Power Up Alarm (flashing lights) after
power is first plugged in or after power outage.
Note: All pads, except
pressed.
Freezer Temp
Activates freezer temperature setting mode.
1. Freezer indicator light will glow. Freezer
temperature setting will be displayed. Factory
setting is 5.
2. Change freezer temperature setting by pressing
Warmer
Ref Temp
Activates refrigerator temperature setting mode.
1. Refrigerator indicator light will glow. Refrigerator
temperature setting will be displayed. Factory
setting is 5.
2. Change refrigerator temperature setting by
pressing
Warmer
Raises temperature setting one bar at a time. If entry
tone is on, tone will sound at each bar level until top
level is reached.
1. Turn on temperature setting function of control
panel by pressing
2. Press and hold
setting at a faster rate.
Colder
Lowers temperature setting one bar at a time. If entry
tone is on, tone will sound at each bar level until
bottom level is reached.
1. Turn on temperature setting function of control
2. Press and hold
Fast Freeze
Activates Maximum freezer mode setting freezer
temperature to coldest setting for 24 hours or until
Fast Freeze
1. Freezer indicator light will glow.
2. To adjust maximum freezer mode time refer to
Pad
panel by pressing
setting at a faster rate.
Program Mode B functions.
Pad
or
Colder
Pad
Warmer
Pad
Pad
pad is pressed again.
Alarm Off
pad.
or
Colder
Warmer
Warmer
Colder
Colder
, are inactive until * is
pad.
pad.
pad to raise temperature
pad.
pad to lower temperature
Max Cool
Activates Maximum refrigerator mode setting
refrigerator to coldest setting for 24 hours or until
Max Cool
1. Refrigerator indicator light will glow.
2. To adjust maximum refrigerator time refer to Mode
Alarm Off
Turns off alarm signals. See Alarms section to
interpret alarm signals.
1. Press and hold
2. If
Display Off
1. Deactivates control panel.
2. Deactivates temperature indication area of control.
Program Mode
activates Program Mode. See Program Mode
*
section for description of functions available.
1. Open refrigerator door.
2. Press * pad.
3. Within 6 seconds press the following pads in this
4. Tone will sound 3 times and control will be in
Vacation
Defrost unit less often during extended periods of nonuse. To begin Vacation Mode
1. Press * pad.
2. Press
To deactivate Vacation Mode, open either refrigerator
or freezer door or press * and
NOTE: See Adaptive Defrost section for more
Pad
pad is pressed again.
B functions.
Pad
Alarm Off
deactivate Door Open alarm. To reactivate Door
Open alarm, press and hold
seconds.
Alarm Off
alarm is not corrected, alarm will reset.
panel.
sequence:
Freeze.
Program Mode A.
information on Vacation Mode.
pad is pressed and condition causing
Pad
Max Cool, Fast Freeze, Max Cool, Fast
Vacation
pad.
pad for 3 seconds to
Alarm Off
Vacation
pad for 3
pad.
RS1300003 Rev. 0 24 December 1997

Electronic Functional Description
Alarms
Power Up Alarm
After power is initially plugged in, after a power loss,
or if power switch is turned off, all temperature
indicator lights will flash until
pressed.
Note: All settings return to default factory settings.
Door Open Alarm
Alarm tone sounds and indicator lights blink if either
refrigerator or freezer door is open more than 3
minutes.
1. Turn off Door Open alarm by pressing
pad or by closing door.
2. Deactivate door open alarm by pressing * pad and
then press and hold
3. Door alarm delay can be adjusted in Program
Mode B.
High Temperature Alarm
Alarm sounds and indicator light shows if freezer or
refrigerator temperature has gone above critical level
and remained warm for 2 hours. Alarm tone stops if
temperature falls again.
1. Critical temperature for freezer is +15°F; for
refrigerator critical temperature is +60°F.
2. Press
Thermistor Alarm
Alarm sounds and freezer or refrigerator indicator light
shows and temperature indicators 4 through 7 will turn
on in sequence if either thermistor circuit opens. Refer
to Temperature Control Operation Section and
Electronic Testing Section.
1. Press
2. Alarm will retest for normal operation. If condition
Clean Condenser Light
Clean Condenser indicator light comes on after 3
months of elapsed time.
Press Alarm Off pad to turn off Clean Condenser
indicator light.
NOTE: Clean Condenser light will turn off after 72
hours.
Alarm Off
Alarm Off
has not been corrected, alarm will sound again.
pad to turn off alarm.
pad to turn off alarm.
Alarm Off
Alarm Off
or * is
Alarm Off
pad for 3 seconds.
December 1997 25 RS1300003 Rev. 0

Electronic Functional Description
Temperature Control Operation
For any temperature setting, outputs will be turned
off/on based on cut-in/cut-out temperatures
determined by resistance levels of freezer and
refrigerator thermistors.
As the temperature decreases, resistance increases.
As the temperature increases, resistance decreases.
Refrigerator and Freezer Thermistor
Part # C8983701
Temp
°F (°C)
-20 (-29) 495600 36 (2) 87510
-15 (-26) 418200 38 (3) 82740
-9 (-23) 354000 39 (4) 78300
-6 (-21) 300600 43 (6) 74100
-4 (-18) 256200 45 (7) 70170
5 (-15) 218850 46 (8) 66450
10 (-12) 187470 48 (9) 62970
Resistance
Ohms
Temp
°F (°C)
Resistance
Ohms
Factory Set Freezer and Refrigerator Settings
Part #10614401
Frozen Food Fresh Food
Cut-Out
°F ±1.5°
Cut-In
°F ±1.5°
Cut-Out
°F ±1.5°
Cut-In
°F ±1.5°
Level
-10 2 29 34 9
-8431368
-6633387
-5734396
-4835405
-3936414
-2 10 37 42 3
01239442
21441461
Fast
-10 2 — —
Freeze
Max
— — 39 44
Cool
Factory Set Freezer and Refrigerator Settings
Part #10614402
16 (-9) 161040 50 (10) 59670
19 (-7) 138690 55 (13) 52290
25 (-4) 119760 61 (16) 45900
30 (-1) 103680 64 (18) 40410
32 (0) 97920 70 (21) 36540
34 (1) 92550 77 (25) 30000
An open thermistor or thermistor circuit will result in
failure of refrigerator to cool.
Shorted thermistor will cause refrigerator to run 100
percent of time except for defrost.
• Freezer temperature setting and thermistor value
will determine if compressor/condenser fan and
evaporator fan switches are open or closed.
Compressor/condenser fan switch must be open
for 6 minutes before switch can close again
(compressor dwell time).
• Cut-out and cut-in temperature values must be
reached and maintained for 15 seconds before
output state will change (digital delay).
• Refrigerator and freezer control calibration can be
adjusted in Program Mode B.
Frozen Food Fresh Food
Cut-Out
°F ±1.5°
-8439449
-6641468
-4843487
-3944496
-2 10 45 50 5
-1 11 46 51 4
01247563
21449542
41651561
-8 4 — —
— — 39 44
Cut-In
°F ±1.5°
Cut-Out
°F ±1.5°
Cut-In
°F ±1.5°
Level
Fast
Freeze
Max
Cool
Damper Control
• Refrigerator temperature setting and thermistor
value will determine if damper control heater
switch is to be open or closed.
• Damper closes at 48°F.
• Damper opens at least 1/4" when minimum voltage
is applied at 40°F ambient.
Damper Heater
Watt s Volts ( D C)
2.00 Minimum 20.5 Minimum
2.74 Nominal 24.0 Nominal
3.60 Maximum 27.5 Maximum
RS1300003 Rev. 0 26 December 1997

Electronic Functional Description
Adaptive Defrost Operation
Defrost occurs after predetermined length of
compressor run hours. Compressor run time between
defrosts changes, or adapts, depending upon recent
history of defrost lengths (time it takes for defrost
terminator to open after defrost heater has been
turned on).
• Defrost terminator opens at 48°F and closes at
15°F.
• Compressor run time between defrosts (CRTD)
will be one of 3 values under normal operation:
CRTD 1 (8 hours) or CRTD 2 (12 hours) or CRTD
3 (16 hours).
If defrost length is low (DT-LO defined as 21
minutes) indicating small frost load, CRTD for
next defrost cycle is advanced to next level.
If defrost length is high (DI - HI defined as 24
minutes) indicating large frost load, CRTD for
next defrost cycle is lowered to next level.
If defrost length is between 21 and 24 minutes,
CRTD for next defrost cycle remains the same.
Initial value at power up CRTD 0 is 4 hours.
• Vacation Mode CRTD equals 96 hours. Vacation
Mode CRTD is interrupted with door openings.
Defrost interval will revert back to interval before
Vacation Mode. Three things must occur to reach
Vacation Mode CRTD:
1) Defrost interval must be CRTD 3 (16 hours).
2) Both refrigerator and freezer doors must have
remained closed since last defrost cycle.
3) Defrost thermostat must have opened in less
than 21 minutes during last defrost cycle.
• Six minute dwell time occurs after defrost
terminator opens before compressor and
condenser fan motor will operate. Ten minute
dwell time occurs after defrost terminator opens
before evaporator fan motor will operate. Dwell
time can be bypassed by disconnecting power to
the unit for 30 seconds.
• Conventional defrost can be selected in Program
Mode B.
December 1997 27 RS1300003 Rev. 0

Program Mode
Accessing Program Mode
Two programming modes are available. Mode A
allows reading refrigerator and freezer thermistor
temperatures. Mode B is used for all other
programmable functions.
1. Open refrigerator door.
2. Press * pad.
3. Press
4. Press the following sequence of pads within 6
5. When access is granted, tone will sound three
6. Toggle to Program Mode B by pressing * pad.
EEPROM Update in Control Memory
EEPROM is permanent programmable memory of the
control panel.
• Entry tone, door audio alarm and status are stored
• Clean coil status is stored in EEPROM after every
• Information stored in EEPROM memory is not
Mode A Functions
Reading Temperature Display
Temperature display will show thermistor temperature
in binary coded decimal format (BCD). Indicator lights
1 through 4 represent the tens digit with 1 being the
most significant bit. Indicator lights 5 through 8
represent ones digit with 5 being the most significant
bit. Positive and negative are shown by indicator light
9; light glows to show negative value
Indicator
1
2
3
4
5
6
7
8
Coldest
Vacation
seconds:
pad.
Max Cool, Fast Freeze, Max Cool, Fast
Freeze.
time and control will be in Program Mode A.
Unmarked indicator light will illuminate.
Unmarked indicator light is off.
in EEPROM after control panel is deactivated.
defrost cycle as time until clean coil alarm is
activated.
affected by power loss.
Value
8
4
2
1
Add together all lit indicators
1 through 4 according to their
values to obtain tens column digit.
Example: If 3 and 4 are lit the tens
column total is 3 (2 + 1 = 3)
8
4
2
1
+/-
Add together all lit indicators
5 through 8 according to their
values to get ones column digit.
Example: If 6 and 7 are lit the
ones column total is 6 (4+2 = 6).
Freezer Thermistor Temperature
1. Choose freezer thermistor temperature display by
pressing
Freezer Temp
pad.
2. Freezer thermistor temperature displays.
Refrigerator Thermistor Temperature
1. Choose refrigerator thermistor temperature
display by pressing
Ref Temp
pad.
2. Refrigerator thermistor temperature displays.
Mode B Functions
Automatic Keyboard Function
Activate and deactivate keyboard by toggling
Display Off
keyboard will disable after 10 minutes. If high
temperature indicator is off, keyboard is always
enabled. DO NOT LEAVE KEYBOARD IN ENABLED
MODE AFTER PROGRAMMING IS COMPLETE.
Door Alarm Delay
1. Press
glow. One temperature indicator should glow
indicating present delay setting in minutes
(indicator 1 means 1 minute, 2 means 2 minutes,
etc.) Default delay is 3 minutes.
2. Press
3. Press
Max Cool Run Time Duration
1. Press
temperature indicator should glow indicating
present
increments (indicator 1 means 2 hours, 2 means 4
hours, etc.) Default duration is 10 hours.
2. Press
by 2 hours.
3. Press
2 hours.
Fast Freeze Run Time Duration
1. Press
One temperature indicator should glow indicating
present
increments (indicator 1 means 4 hours, 2 means 8
hours, etc.) Default duration is 24 hours.
2. Press
duration by 4 hours.
3. Press
by 4 hours.
pad. If high temperature indicator glows,
Alarm Off
Warmer
Colder
Max Cool
Max Cool
Warmer
Colder
Fast Freeze
Fast Freeze
Warmer
Colder
pad. Door open indicator will
pad to decrease delay by 1 minute.
pad to increase delay by 1 minute.
pad.
Max Cool
light will glow. One
run time duration in 2 hour
pad to decrease
pad to increase
pad.
Fast Freeze
Max Cool
Max Cool
light will glow.
duration
duration by
run time duration in 4 hour
pad to decrease
pad to increase
Fast Freeze
Fast Freeze
duration
The coldest indica tor is not lit
so example is +36 F.
3 6 Degrees F.
RS1300003 Rev. 0 28 December 1997
Program Mode
Temperature Offset Calibration
Offset amount adjusts temperatures for refrigerator
cut-ins and cut-outs by the amount of offset. The
chart below shows the indicator and the amount of
offset from the factory default setting.
INDICATOR OFFSET
1 +8
2 +6
3 +4
4 +2
5 0
6 -2
7 -4
8 -6
Coldest -8
• Setting Refrigerator Temperature Offset
Press
Ref Temp
one indicator will glow. Press
move offset to the next warmer setting. Press
Colder
setting. Factory default refrigerator offset is +2.
• Setting Freezer Temperature Offset
Press
indicator and one indicator will glow. Press
Warmer pad to move offset to the next warmer
setting. Press Colder pad to move offset to the
next colder setting. Factory default freezer offset
is 0.
Defrost Mode Selection
Toggle
conventional defrost mode. Vacation indicator glows
when adaptive defrost has been selected. If Vacation
indicator is off, conventional defrost is selected.
Conventional defrost uses 8 hour CRTD value.
Forced Defrost
Defrost can be forced to start by pressing and holding
the
Alarm Off
will be saved permanently in EEPROM and program
mode will exit to Run Mode.
pad to move offset to the next colder
Freezer Temp
Vacation
pad for 3 seconds. Program changes
pad. Refrigerator indicator and
Warmer
pad. Freezer temperature
pad to select adaptive or
pad to
Forced Pulldown (Compressor Start)
Compressor start can be forced by pressing and
holding
changes will be saved permanently in EEPROM.
Compressor, evaporator fan, damper heater, and
condenser fan will come on.
Fast Freeze
pad for 3 seconds. Program
Exiting Program Mode
Press
*
pad for 3 seconds to exit Program Mode.
Tone will sound three times. Changes made in
Program Mode will be permanently saved in EEPROM.
NOTE: If no pad is pressed for 10 minutes, Program
Mode will be automatically exited. No changes
will be saved if Program Mode exits
automatically .
December 1997 29 RS1300003 Rev. 0
 Loading...