

Page 1

Service
International Side by Side
1997 “T” Model Refrigerators
Refer to Technical Sheet
for values and wiring
schematics.
Models and manufacturing
numbers in this manual
SR520T P1312901W
SB520T P1313001W
SSD522T P1313602W
SXD520T P1313701W
SBDX520T P1313202W
SSD522TB P1313601W
SBDT520T P1313201W
SRD520T P1313101W
SRD522T P1313301W
SRD526T P1313401W
SRDE520T P1312401W
SBDE520T P1312301W
SRDE520TB P1312402W
SRDE528T P1312601W
SRDE528TB P1312602W
SRD325S5 P1313501W
SRD327S3 P1312502W
SXD322 P1313901W
SRDE327S3 P1312501W
SX322S2 P1313801W
This manual is to be used by qualified appliance technicians
only. Amana does not assume any responsibility for property
damage or personal injury for improper service procedures
done by an unqualified person.
RS5290000
Revision 0
April 1998
Page 2
!
!
!
!
Important Information
!
Pride and workmanship go into every product to provide our customers with quality products. It is possible,
however, that during its lifetime a product may require service. Products should be serviced only by a qualified
service technician who is familiar with the safety procedures required in the repair and who is equipped with the
proper tools, parts, testing instruments and the appropriate service manual. REVIEW ALL SERVICE
INFORMATION IN THE APPROPRIATE SERVICE MANUAL BEFORE BEGINNING REPAIRS.
To avoid risk of serious injury or death, repairs should not be attempted by an unauthorized personnel,
dangerous conditions (such as exposure to electrical shock) may result.
Amana will not be responsible for any injury or property damage from improper service procedures. If
performing service on your own product, assume responsibility for any personal injury or property
damage which may result.
Important Information
Important Notices for Consumers and Servicers
WARNING
CAUTION
To locate an authorized servicer, please consult your telephone book or the dealer from whom you purchased this
product. For further assistance, please contact:
CONSUMER AFFAIRS DEPT. OR 1-319-622-5511 or (1-800-843-0304)
AMANA REFRIGERATION, INC. CALL and ask for
AMANA, IOWA 52204 Consumer Affairs
If outside the United States contact:
AMANA
ATTN: CONSUMER AFFAIRS DEPT.
AMANA, IOWA 52204, USA
Telephone: (319) 622-5511
Facsimile: (319) 622-2180
TELEX: 4330076 AMANA
CABLE: "AMANA", AMANA, IOWA, USA
Recognize Safety Symbols, Words, and Labels
DANGER
DANGER - Immediate hazards which WILL result in severe personal injury or death.
WARNING
WARNING - Hazards or unsafe practices which COULD result in severe personal injury or death.
CAUTION
CAUTION - Hazards or unsafe practices which COULD result in minor personal injury or product or property
damage.
RS5290000 Rev. 0 2 April 1998
Page 3

User Operation
Features
Fresh Food Section (Refrigerator)
1. Temp-Assureä Thermostatic Control
2. Spillsaverä Shelves
3. Slide Out Shelves
4. Chiller Fresh System
5. Garden Fresh Drawers
6. Utility Rack
7. Covered Utility Bucket
8. Dairy Center
9. Snack Chiller
10. Beverage Chiller
11. Door Buckets
12. Adjustable Divider
13
16
14
Deepfreeze® Section (Freezer)
13. Deepfreeze® Shelf
14. Automatic Ice Maker
15. Stor-Morä System
16. Door Dike
17. Door Shelves
18. Tall Package Retainer
19. Ice 'N Waterä Dispenser
132184
8
9
19
17
10
7
6
12
11
15
April 1998 5 RS5290000 Rev. 0
SXD20SW
Features vary from model to model.
5
Page 4

User Operation
Electrical Requirements
Refrigerator must be earthed and connected to a
separate 230 volt, 50 hz., 10A circuit.
Model Identification
Locate product information on the nameplate, found in
upper left corner of Fresh Food section. Record the
following information: Model Number, Manufacturing
Number, Serial or S/N Number, Date of purchase,
Dealer’s name and address.
Features
Spillsaverä Shelves
Caution
To avoid personal injury or property damage, handle
tempered glass shelves carefully. Shelves may break
suddenly if nicked, scratched or exposed to sudden
temperature change.
1. Remove shelves by lifting front and releasing
hooks from metal track.
2. Replace shelves by inserting hooks into metal
track and lowering front.
Dairy Center
1. Remove door by opening door, pushing in
slightly near hinges and pulling out.
2. Remove shelf by lifting and pulling out.
3. Replace door and shelf by reversing steps 1-2.
Snack Chiller
1. Remove door by opening door, pushing in
slightly near hinges and pulling out.
2. Remove bucket by removing Beverage Chiller
door then lifting bucket.
3. Replace door and bucket by reversing steps 1-2.
Beverage Chiller
Locate control dial on left front wall of Fresh Food
section to adjust amount of air.
Chiller Fresh System
Cold Coldest
Locate control on front trim to adjust amount of air
circulating between drawer and sleeve.
1. Remove drawer and sleeve by lifting and pulling
out.Refer to "Spillsaverä Shelves" for
instructions on removing and replacing shelf.
Use eighth through eleventh slots.
2. Replace sleeve then drawer by sliding in.
Confirm boot is over air inlet in side wall.
Garden Fresh Crispers
Locate control on front trim to adjust to either high or low
settings.
1. Remove beverage chiller door by removing
lower door buckets. Slide chiller door down and
out through bottom of door track.
2. Replace beverage chiller door by reversingstep
1. Retention glides must remain in place to
install door.
Door Buckets
1. Remove door buckets by pushing tabs toward
center and pulling out.
2. Replace door buckets by sliding in until tabs lock
into place.
Door Shelves
1. Remove slide-style door shelves by lifting
Low High
1. Remove drawers by lifting and pulling out.
Refer to "Spillsaverä Shelves" for instructions
on removing and replacing shelf.
2. Replace drawers by sliding in.
RS5290000 Rev. 0 6 April 1998
and pulling out.
2. Replace slide-style door shelves by reversing
step 1.
1. Remove hook-style door shelves by tapping up
each end. Lift bottom of shelf release hooks.
2. Replace hook-style shelves by inserting hooks
and lowering bottom of shelf. Tap down on
ends.
Page 5
User Operation
Stor-Morä System
1. Remove shelves and baskets by lifting and
pulling out.
2. Replace shelves and baskets by reversing
step 1.
Door Dike
1. Remove door dike by pulling forward and
snapping out.
2. Replace door dike by aligning clips with holes on
Deepfreeze® door. Push until dike locks in place.
Setting Controls
This refrigerator operates most efficiently in normal
household temperatures of 12° to 43°C.
Fresh Food and Deepfreeze® Controls
(nonelectronic models)
Locate Fresh Food and Deepfreeze® controls on
upper rear wall of Fresh Food section. When
Deepfreeze® control is set to
nor Deepfreeze® sections will cool. Initially, set both
controls to 4. Wait 24 hours for Fresh Food and
Deepfreeze® sections to reach desired temperatures.
After 24 hours, adjust controls as desired. 1 is
warmest setting and 7 is coldest.
off
, neither Fresh Food
Touchmaticä Electronic Controls (electronic
models)
Confirm power switch is on before programming.
Remove toe grille and locate black box in center of
cabinet. Power switch is on right side of box.
G
Set temperatures precisely using a household
thermometer that includes temperatures between
-20.5° to 10°C.
Put thermometer snugly between frozen packages in
Deepfreeze® section. Wait 5-8 hours. If Deepfreeze
temperature is not -18° to -17°C, adjust control, one
number at a time. Check again after 5-8 hours.
Put thermometer in a glass of water in middle of
Fresh Food section. Wait 5-8 hours. If Fresh Food
temperature is not 3° to 4°C, adjust control, one
number at a time. Check again after 5-8 hours.
April 1998 7 RS5290000 Rev. 0
®
Page 6
User Operation
Locate Touchmatic® electronic control panel on
refrigerator between handles. Press * pad to
activate control panel. All other pads, except for
Alarm Off pad, remain inactive until * pad is pressed.
Once activated, pads remain programmable for at
least 10 minutes.
Fresh Food and Deepfreeze® controls are preset at 5.
Wait 24 hours for Fresh Food and Deepfreeze
sections to reach desired temperatures. After 24
hours, adjust controls as desired. 1 is warmest
setting and 9 is coldest. Refer to instructions on page
6 to set temperatures precisely.
Adjust Fresh Food or Deepfreeze® temperatures by
pressing * pad then Fresh Food Temp pad or
Deepfreeze® Temp pad. Press Warmer pad or
Colder pad to adjust temperature setting one level at
a time. Holding down Warmer pad or Colder pad
adjusts temperature more than one level at a time.
Vacation Mode
Vacation mode defrosts refrigerator less often during
extended non-use periods. Activate vacation mode
by pressing * pad then Vacation pad. Indicator light
will glow. Repeat above to deactivate vacation mode.
Opening Fresh Food or Deepfreeze® door will also
deactivate vacation mode.
Max Cool Mode
Max cool mode adjusts Fresh Food temperature to
coldest setting. After 10 hours, Fresh Food
temperature automatically returns to previous setting.
Activate max cool mode by pressing * pad then Max
Cool pad. Indicator light will glow. Repeat above to
deactivate max cool mode before automatic reset.
Fast Freeze Mode
Fast freeze mode adjusts Deepfreeze® temperature
to coldest setting. After 24 hours, Deepfreeze
temperature automatically returns to previous setting.
Activate fast freeze mode by pressing * pad then Fast
Frz pad. Indicator light will glow. Repeat above to
deactivate fast freeze mode before automatic reset.
Entry Tone
Entry tone indicates a pad was pressed and
command was read and accepted. Deactivate entry
tone by pressing and holding * pad for three to five
seconds. Three short beeps indicate instructions
were accepted. Repeat above to activate entry tone.
Door Open Alarm
Door open alarm sounds and glowing indicator light
blinks if either door is open for three minutes.
Deactivate door open alarm by pressing Alarm Off
pad or by closing either door. Activate door open
alarm by pressing * pad then holding Alarm Off pad
for three to five seconds. Three short beeps will
sound. Repeat above to deactivate door open alarm
indefinitely.
®
®
Deepfreezeâ Temp
Fresh Food Temp
Warmer
Colder
Vacation
Max Cool
Fast Freeze
Alarm Off
Display Off
RS5290000 Rev. 0 8 April 1998
Page 7

User Operation
High Temperature Alarm
High temperature alarm sounds and indicator light
glows if Fresh Food or Deepfreeze® temperature is
high for two hours. A blinking light signals affected
compartment. Deactivate high temperature alarm by
pressing Alarm Off pad. Alarm discontinues when
proper temperature is reached.
Thermistor Alarm
Thermistor alarm sounds and indicator lights scroll if
Fresh Food or Deepfreeze® thermistor is not operating
properly. Deactivate display by pressing Alarm Off
pad.
If thermistor alarm sounds, contact an authorized
servicer immediately. If Alarm Off pad is pressed,
thermistor control retests to confirm situation has been
corrected. Alarm sounds again if thermistor is still not
operating properly.
Display Lights
Deactivate temperature display lights by pressing
pad then pressing Display Off pad. Activate
temperature display lights by pressing any of top five
pads.
Clean Condenser Coil Light
Clean condenser coil light glows once every three
months as a reminder to clean condenser coil. Light
automatically cancels in 72 hours. Deactivate clean
condenser coil light before automatic reset by pressing
Alarm Off pad.
*
Ice 'N Waterä Dispenser
Caution
To avoid personal injury or property damage, observe
following instructions:
1. Do not operate dispenser with
Deepfreeze® door open.
2. Do not put fingers, hands, or any
foreign object into dispenser opening.
3. Do not use sharp objects to break ice.
Water Dispenser Operation
1. Dispense water by pressing container against
water dispenser bar.
2. Shut off water by releasing pressure on bar.
Slight dripping may occur. Spill shelf is not selfdraining. Large spills should be wiped dry
immediately.
Ice Dispenser Operation
1. Select cubed or crushed mode (some models) by
sliding lever on dispenser panel. Dispense ice
by pressing wide mouthed container against ice
dispenser bar. Hold container close to chute to
minimize spraying ice.
Caution
Automatic Ice Maker
Refrigerator has an electrical connection in
Deepfreeze® section for ice maker installation. Ice
maker, model IC54, and water filter, part #R0183114,
can be purchased separately.
1. Confirm ice storage bucket is in place and ice
maker arm is down.
2. After Deepfreeze® section reaches normal
temperature, ice maker fills with water and
begins operating. Allow 24-48 hours after
installation before first harvest of ice. Ice maker
produces seven to nine harvests of ice in a
24-hour period under ideal conditions.
3. After ice is formed, ice maker drops ice cubes
into ice storage bucket. During ice production,
ice maker arm raises and lowers. When ice
storage bucket is full, ice maker arm turns ice
maker off.
Important: Discard first three harvests of ice so any
impurities are not consumed.
4. Stop ice maker by lifting ice maker arm. A
definite click will be heard when proper position
is reached. Ice maker arm will remain in that
position.
Important: Do not force ice maker arm down or up past
stop position.
To avoid property damage, do not dispense ice directly
into thin glass, fine china or delicate crystal.
2. Shut off ice by releasing pressure on bar
before container is full. Some ice will continue
to fall. Do not remove container until last ofi ce
falls.
If dispensing ice continuously, dispenser motor shuts
off after approximately two minutes. Motor resets
after three minutes and dispensing can continue.
A slight delay occurs when switching between cubed
and crushed modes. Pieces of crushed ice will vary
in size and shape. “Snow” may form on door and ice
chute when repeatedly dispensing crushed ice. Allow
“snow” to evaporate or wipe dry.
Dispenser operates only with cubes of proper size
and crescent shape. Do not add purchased ice
cubes or other cubes.
Dispenser Light
A light is activated when dispensing ice or water.
Some models feature a night light. Deactivate night
light by pushing switch, located underneath dispenser
facade and left of ice dispenser bar.
April 1998 9 RS5290000 Rev. 0
Page 8

User Operation
Water Taste and Odor
Observe the following to minimize taste and odor
difficulties:
1. Throw away first 10 to 14 regular glasses of
water after initially connecting refrigerator to
household water supply.
2. Flush water system and reservoir as above after
extended periods of non-use.
3. Wrap foods in tightly sealed containers or
moisture proof bags.
4. Install water filter, part #R0183114 on water line.
5. Contact local water treatment company for
specialized help if difficulties persist.
Care and Cleaning
WARNING
To avoid electrical shock which can cause severe
personal injury or death, disconnect power to
refrigerator before cleaning. After cleaning, reconnect
power.
Caution
To avoid personal injury or property damage, read and
follow all cleaning product manufacturer's directions.
General
1. Wash surfaces with four tablespoons baking
soda diluted in one quart warm water as needed.
Rinse and dry surfaces thoroughly.
2. Do not use the following items:
• abrasive cleaners such as ammonia, chlorine
bleach, etc.
• solvents
• metal scouring pads
These items can scratch, crack and discolor
surfaces.
Glass Shelves
Light Bulbs
W ARNING
To avoid electrical shock which can cause severe
personal injury or death, disconnect power to
refrigerator before replacing light bulb. After replacing
light bulb, reconnect power.
Caution
To avoid personal injury or property damage, observe
the following:
1. Allow bulb to cool.
2. Wear gloves when replacing light bulb.
Remove light bulb cover. Replace light bulb with
same size and type of appliance bulb.
Door Gaskets
1. Clean door gaskets every three months or
according to "General" cleaning instructions.
2. Rinse and dry gaskets thoroughly.
3. Apply a light film of petroleum jelly to keep door
gaskets pliable.
Condenser Coil
Clean condenser coil every three months.
Accumulated dust and lint may cause the following:
· reduced cooling performance
· increased energy usage
· premature part failure
1. Remove toe grille by pulling forward.
2. Clean coil with a vacuum cleaner hose nozzle.
3. Install toe grille by positioning top and snapping in
bottom. Top is indicated on back of toe grille.
4. Pull refrigerator away from wall. Run a vacuum
brush across condenser fan outlet grille on back
of refrigerator.
Caution
To avoid personal injury or property damage, handle
tempered glass shelves carefully. Shelves may break
suddenly if nicked, scratched or exposed to sudden
temperature change.
Remove glass shelf and place on a towel. Allow shelf
to adjust to room temperature before cleaning.
RS5290000 Rev. 0 10 April 1998
Page 9
User Operation
Vacation Tips
For short vacations, remove perishable foods. If an
ice maker is installed, move ice maker arm to off
position.
For long vacations, do the following:
1. Remove food from refrigerator.
2. Unplug refrigerator.
3. Clean refrigerator.
4. Clean door gaskets.
5. Prop doors open, so air can circulate inside.
6. Turn off water supply to refrigerator if an ice
maker is installed and move ice maker arm to off
position.
Caution
To avoid property damage, turn off water supply to
refrigerator and move ice maker arm to off position
before leaving on vacation.
Normal Operating Sounds
This new refrigerator may be replacing a differently
designed, less efficient or smaller refrigerator.
Today’s refrigerators have new features and are
more energy efficient. As a result, certain sounds
may be unfamiliar. These sounds are normal and will
soon become familiar. These sounds also indicate
refrigerator is operating and performing as designed.
Electronic Control Models
Evaporator fan does not operate when either Fresh
Food or Deepfreeze® door is open.
Before Calling For Service
Refrigerator does not operate.
· Confirm Deepfreeze® control is on.
· Confirm electrical power cord is plugged in.
· Check fuse or circuit breaker. Plug in another item
at that wall outlet.
· Wait 40 minutes to see if refrigerator restarts. If
Deepfreeze® control is on and lights work buttwo
fans and compressor are not operating, refrigerator
may be in defrost cycle.
Refrigerator still won’t operate.
· Unplug refrigerator. Transfer food to another unit
or place dry ice in Deepfreeze® section to preserve
food until refrigerator can be serviced.
Food temperature appears too warm.
· See above sections.
· Allow adequate time for food to reach Fresh Food
or Deepfreeze® temperature if a large supply of
food was recently added.
· Clean condenser coil.
· Adjust Fresh Food and/or Deepfreeze® control.
· Confirm rear air grille is not blocked. Rear air
grille is located behind left crisper.
Chiller fresh system is too warm.
· Slide control to a colder setting.
· Adjust Deepfreeze® control to a colder setting.
Food temperature is too cold.
· Clean condenser coil.
· Adjust Fresh Food control.
· Allow several hours for temperature to adjust.
Refrigerator runs too frequently.
· It may be normal to maintain an even
temperature.
· Doors may have been opened frequently or for an
extended period of time.
· Clean condenser coil.
· Adjust Deepfreeze® control.
· Check gasket for proper seal.
Water droplets form on inside of refrigerator.
· This is normal during periods of high humidity
or ifdoors have been opened frequently.
Water droplets form on outside of refrigerator.
· Check gasket for proper seal.
Crisper drawers or chiller fresh system do not close
freely.
· Check for a package which may prevent drawers
from closing properly.
· Confirm drawers are in proper position.
· Clean drawer channels with warm, soapy water.
Rinse and dry thoroughly.
· Apply a thin layer of petroleum jelly to drawer
channels.
· Confirm refrigerator is level.
Refrigerator has an odor.
· Clean inside of Fresh Food and Deepfreeze
sections.
· Cover all foods tightly and use freezer wrap.
Ice cubes have an odor.
· See above section.
· Discard ice and clean ice bucket or trays more
frequently. Ice cubes are very porous and absorb
odors very easily.
Refrigerator or ice maker make unfamiliar sounds
or seems too loud.
· See "Normal Operating Sounds" section. These
may be normal.
Ice cubes stick together or ‘shrink’.
· Empty ice cube bucket or trays more frequently. If
used infrequently, ice cubes may stick together or
shrink.
Ice forms in inlet tube to ice maker.
· Check water pressure. Low water pressure will
cause valve to leak. Self-piercing valves cause low
water pressure. Do not useself-piercing valves.
®
April 1998 11 RS5290000 Rev. 0
Page 10
Installation Instructions
International Side-by-Side Installation
Instructions
Introduction
A qualified engineer must connect refrigerator in
accordance with these installation instructions.
Measure door opening and depth and width of
refrigerator. Remove handles or doors as required.
Engineer must also do the following:
1. Follow local water and electrical company
connection regulations.
2. Complete water supply connection before
electrical supply connection.
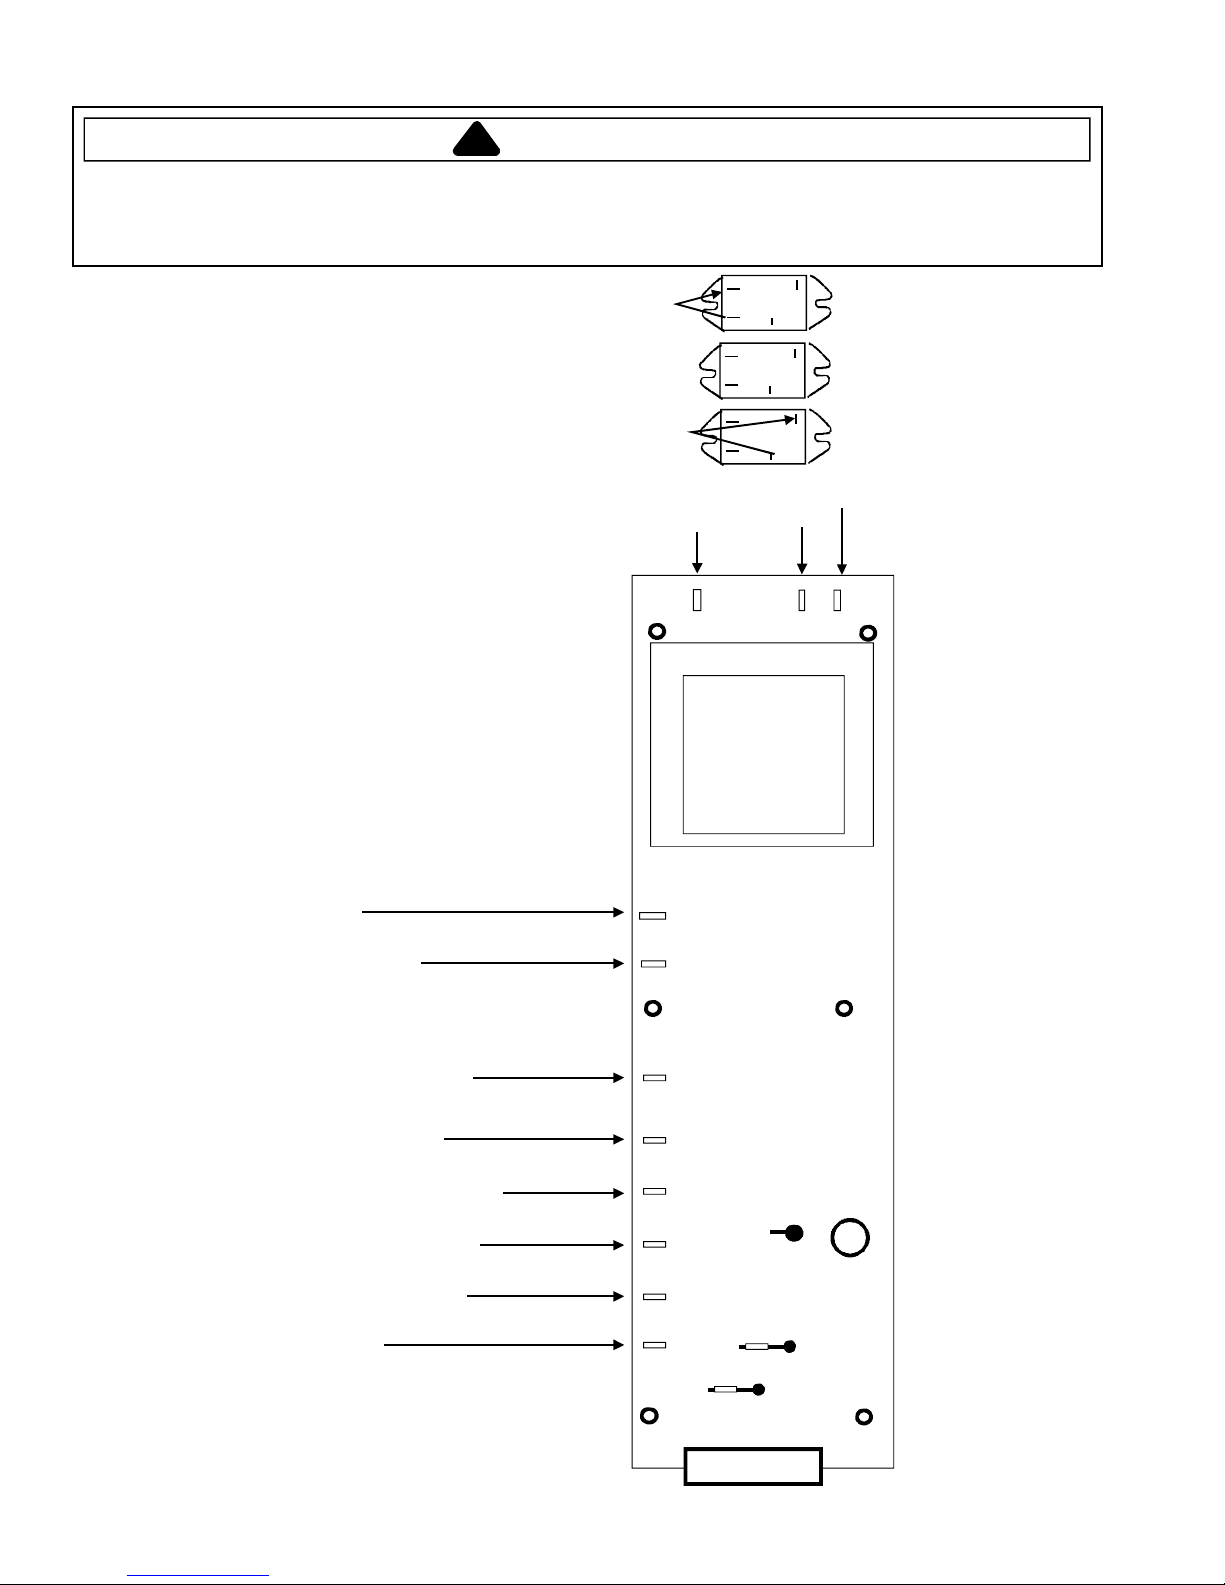
RECOGNIZE THIS
SYMBOL AS A SAFETY
PRECAUTION
Removing Handles
Caution
To avoid personal injury or property
damage, hold handles securely while
removing.
1. Nonextruded Handle Models
Remove top end cap. Remove door handleinsert
by pulling up.
Extruded Handle Models
Remove trim using putty knife covered with tape.
2. Remove door handles by removing screws.
Electronic Control Models
Remove electronic control panel by carefully
disconnecting ribbon cable from socket.
3. Install door handles by reversing steps 1-2.
Installation Requirements
1. Install on an earthed outlet with a separate
230 volt, 50 hz., 10A circuit.
2. Protect soft flooring with cardboard or rugs.
3. Install on a floor which supports up to 429 kg.
4. Provide 25 mm clearance on top and 5 mm on
sides of refrigerator.
5. 20 cubic foot Models
Trim corners of counter top to a 45° angle if
counter top has 25 mm overhang.
Removing Wooden Base
Caution
To avoid personal injury or property
damage, two people must remove
wooden base.
1. Tape doors shut to prevent doors from opening
unexpectedly.
2. Slide appliance cart under side of refrigerator.
3. Wrap refrigerator with blanket or pad. Thread
strap around refrigerator. Put foam shipping
pads, located in shipping carton, under strap.
Tighten strap securely.
4. Lower appliance cart to floor with appliance cart
handles on bottom.
5. Remove top two bolts from skid.
6. Return refrigerator and appliance cart to an
upright position. Remove strap.
7. Slide appliance cart under opposite side of
refrigerator.
8. Repeat steps 3-5.
9. Remove wooden base.
10. Return refrigerator and appliance cart to an
upright position and remove appliance cart.
Important: Do not leave refrigerator on its side longer
than necessary to remove bolts.
RS5290000 Rev. 0 12 February 1998
Removing Doors
Caution
To avoid personal injury or property
damage, two people must remove and
hang doors.
1. Tape doors shut to prevent doors from opening
unexpectedly.
2. Nonextruded Handle Models
Remove top door trim. Leave spacer in place
and slide trim away from end caps. Remove top
hinge covers.
ää
ä
Ice 'N Water
Remove top hinge covers.
All Other Models
Remove top hinge cover by lifting back and
sliding forward.
3. Remove toe grille by lifting and pulling forward.
ää
Dispensing Models
Page 11

Installation Instructions
4. Electronic Control Models
Remove bottom door closure screw. Unplug
wiring harness from high voltage box under
refrigerator. Unplug top hinge wire connectors.
Unscrew green/yellow earthing wire.
5. Remove top Fresh Food hinge by removing
screws.
6. Remove tape from Fresh Food door while
holding door securely.
7. Remove Fresh Food door by lifting while
opening.
Electronic Control Models
Slide wiring harness through slot in bottom
door hinge bracket as door is raised.
Removing Handles
Caution
To avoid personal injury or property
damage, hold handles securely while
removing.
Removing Doors
Caution
To avoid personal injury or property
damage, two people must remove and
hang doors.
1. Tape doors shut to prevent doors from opening
unexpectedly.
2. Nonextruded Handle Models
Remove top door trim. Leave spacer in place and
slide trim away from end caps. Remove top
hinge covers.
Ice 'N Waterä Dispensing Models
Remove top hinge covers.
All Other Models
Remove top hinge cover by lifting back and
sliding forward.
3. Remove toe grille by lifting and pulling forward.
4. Electronic Control Models
Remove bottom door closure screw. Unplug
wiring harness from high voltage box under
refrigerator. Unplug top hinge wire connectors.
Unscrew green/yellow earthing wire.
1. Nonextruded Handle Models
Remove top end cap. Remove door handle
insert by pulling up.
Extruded Handle Models
Remove trim using putty knife covered with tape.
2. Remove door handles by removing screws.
Electronic Control Models
Remove electronic control panel by carefully
disconnecting ribbon cable from socket.
3. Install door handles by reversing steps 1-2.
February 1998 13 RS5290000 Rev. 0
5. Remove top Fresh Food hinge by removing
screws.
6. Remove tape from Fresh Food door while
holding door securely.
7. Remove Fresh Food door by lifting while
opening.
Electronic Control Models
Slide wiring harness through slot in bottom
door hinge bracket as door is raised.
Page 12
Installation Instructions
8. Ice 'N Waterä Dispensing Models
Loosen screw from water tube clamp. Loosen
6.4 mm plastic water tube union nut by hand.
Pull water tube away from union nut and through
tube clamp. Unplug top hinge wire connectors.
W ARNING
To avoid electrical shock which can
cause severe personal injury or death,
green/yellow earthing wire must remain
attached to hinge. Do not dissassemble.
9. Remove top Deepfreezeâ hinge by removing
screws.
10. Remove tape from Deepfreezeâ door while
holding door securely.
11. Remove Deepfreezeâ door by lifting while
opening. This will free Deepfreezeâ door from
bottom hinge pin.
Ice 'N Waterä Dispensing Models
Slide plastic water tube through slot in bottom
door hinge as door is raised.
12. Remove bottom hinge by removing screws.
13. Install doors by reversing steps 1-12.
Connecting Water Supply
Materials Required
2.5 m of 6.4 mm flexible copper tubing
Important: Before installing ice maker, contact a
plumber to connect copper tubing to household
plumbing in compliance with local codes and
ordinances. Warranty will be void if
installation is improper or a self-piercing
valve is used.
Procedure
Caution
To avoid property damage, observe the
following:
1. Check for water leaks prior to
returning refrigerator to normal
location.
2. Start tubing nuts by hand to avoid
cross threading. Finish tightening
nuts using an adjustable wrench.
Do not overtighten.
3. Check carefully for water leaks 24
hours after installation.
1. Turn off water supply to refrigerator.
2. Seal open end of copper tubing with tape.
3. Route copper tubing up to refrigerator. Copper
tubing route must be above 2°C to prevent water
line from freezing.
4. Remove masking tape from end of copper
tubing.
5. Put other end of copper tubing into bucket. Turn
on water supply to refrigerator. Water will be
under considerable pressure. Allow water to run
through copper tubing. Turn off water supply to
refrigerator when flushing is complete.
6. Remove and retain lower cover by removing
screws.
RS5290000 Rev. 0 14 February 1998
Page 13

Installation Instructions
7. Assemble water valve coupling by removing nut
and sleeve from adapter fitting. Slide brass nut
and sleeve over end of copper tubing. Insert
copper tubing completely into adapter fitting.
8 Confirm hose washer is in place by checking
fitting. Tighten adapter fitting by hand. Tighten
an additional 1/2 turn. Connect nut on copper
tubing to adapter fitting. Confirm copper tubing
is secure by pulling on copper tubing.
9. Turn on water supply to refrigerator and check
for leaks. Turn off water supply to refrigerator
and correct leaks. Repeat this process until no
leaks are found, then completely turn on water
supply to refrigerator.
10. Install lower back cover by reversing step 6.
Tuck wires inside cover. Avoid pinching wires.
11. Create service loop avoiding kinks. Secure
copper tubing at back horizontal cover
using “P” clamp.
Leveling Refrigerator
1. Place level side-to-side at top front of
refrigerator.
2. Remove toe grille by lifting and pulling forward.
Important
Some models have both front and rear leveling legs.
3. Adjust leveling wheels by rotating leveling
screws. Raise refrigerator by rotating leveling
screws clockwise.
4. Models with Hinge Adjusting Cam
If tops of doors are not aligned, loosen refrigerator
door hinge screws 1/2 turn. Turn cam clockwise 1
increment at a time until doors are aligned. Open
and close doors. Tighten hinge screws.
Rear roller
adjustment screw
(some models)
Front roller
adjustment screw
5. Install toe grille by positioning top and snapping
in bottom. Top is indicated on back of toe grille.
Hinge adjusting
cam (some
models)
Caution
To avoid property damage, all covers
must be in place.
February 1998 15 RS5290000 Rev. 0
Page 14

Troubleshooting Chart
!
WARNING
To avoid risk of electrical shock, personal injury, or death, disconnect electrical power source to unit and discharge
capacitor through a 10,000 ohm resistor before attempting to service, unless test procedures require power to be
connected. Ensure all earthing wires are connected before certifying unit as repaired and/or operational.
Troubleshooting chart on following pages contains symptoms that may be seen in malfunctioning units. Each
symptom is accompanied by one or more possible causes and by a possible remedy or test to determine if
components are working properly.
Sympto m Possible C auses Corrective Action
Unit does not run
Refrigerator section too warm
No power to unit. Check for power at outlet. Check
fuse box/circuit breaker for blown
fuse or tripped breaker. Replace or
reset.
Power switch shut off or faulty. Check switch at high voltage board
(electronic models only).
Faulty service cord Check with test light at unit; if no
circuit and current is indicated at
outlet, replace or repair.
Low voltage Check input voltage for proper
voltage. Take appropriate action to
correct voltage supply problem.
Faulty motor or freezer temperature
control
Fault y timer Chec k w ith tes t lig ht. R e place if
Faulty high voltage board
compressor/condenser fan relay
Faulty com pressor Check compressor motor windings
Faulty overload Check overload for continuity.
Excessive door opening Consumer education
Overloading of shelves Consumer education
Warm or hot foods placed in cabinet Consumer education
Refrigerator temperature control set
too war m
Poor door seal Level cabinet. Adjust hinges.
Refrigerator airflow Check dam per is opening by
Interior light remains on Check switch. Replace if necessary.
Faulty condenser fan or evaporator
fan
Faulty com pressor Replace compressor.
Check a ll connec tions are tight a nd
secure.
Jumper across terminals of control. If
unit runs, replace control.
necessary.
Check relay. Replace if necessary.
for opens/shorts.
Perform compressor direct wiring
test.
Replace is necessary.
Note:
Ensure
compressor/overload are below
trip temperature before testing.
Replace if necessary.
Set co n tro l to c o ld er setting.
Replace gasket.
removing grille. With door open,
damper should open. Replace if
faulty.
Turn co n tro l k n ob to colder p o s ition .
Check airflow fan. Replace if faulty.
Check fan switch, fan, and wiring.
Replace if necessary
RS5290000 Rev. 0 16 April 1998
Page 15

Troubleshooting Chart
!
WARNING
To avoid risk of electrical shock, personal injury, or death, disconnect electrical power source to unit and discharge
capacitor through a 10,000 ohm resistor before attempting to service, unless test procedures require power to be
connected. Ensure all earthing wires are connected before certifying unit as repaired and/or operational.
Symptom Possible Causes Corrective Action
Refrigerator section too cold
Freezer and refrigerator sections too
warm
Unit runs continuously
Unit runs continuously. Temperature
normal or warm.
Unit runs continuously. Temperature
too cold or too warm.
Noisy operation
Refrigerator tem perature control set
too cold
Refrigerator airflow not properly
adjusted
Temperature controls set too warm Reset temperature controls.
Poor door seal Level cabinet. Adjust hinges.
Dirty condenser or obstructed grille C heck condenser and grille. Clean.
Faulty control Test control. Replace if defective.
Defrost heater remains open Check evaporator.
Refrigerant shortage or restriction Check for leak or restriction. Repair,
Freezer temp control set too cold Adjust freezer tem perature controlFreezer section too cold
Faulty control Test control. Replace if defective.
Temperature control set too cold Adjust temperature control.
Dirty c o n dens e r o r obst ru c te d g rille Chec k condenser and grille. Clean.
Poor door seal Level cabinet. Adjust hinges.
Interior light remains on Check switch. Check door activates
Faulty condenser fanor evaporator
fan
Faulty control Test control. Replace if defective.
Refrigerant shortage or restriction Check for leak or restriction. Repair,
Refrigerant overcharge Check for overcharge. Evacuate and
Air in system Check for low side leak. Repair,
Ice on evaporator See “Ice on evaporator.”
Faulty defrost thermostat Check thermostat. Replace if
Loose flooring or floor not firm Repair floor or brace floor.
Cabinet not level Level cabinet.
Tubing in contact with cabinet, other
tubing, or other metal
Drain pan vibrating Adjust drain pan.
Fan hitting another part Ensure fan properly aligned and all
Worn fan motor bearings Check m otor for loss of lubricant or
Compressor mounting grommets
worn or missing. Mounting hardware
loose or missing.
Free or loose parts causing or
allowing noise during operation
Adjust refrigerator temperature
control
Adju s t airflo w g ri lle to fr e e ze r .
Adju st Bever age chiller and Ch il le r
Fresh temperature controls.
Replace gasket.
evacuate and recharge system.
Replace gasket.
switch. Adjust or replace if switch.
Check fan switch, fan, and wiring.
Replace if necessary
evacuate and recharge system.
recharge system
evacuate and recharge system.
necessary.
Adjust tubing.
attaching hardware and brackets are
tight and not worn. Tighten or
replace.
worn bearings. Replace if necessary.
Tighten hardware. Replace
grommets if necessary.
Inspect unit for parts that m a y have
worked free or loose or missing
screws. Repair as required.
April 1998 17 RS5290000 Rev. 0
Page 16

Troubleshooting Chart
!
WARNING
To avoid risk of electrical shock, personal injury, or death, disconnect electrical power source to unit and discharge
capacitor through a 10,000 ohm resistor before attempting to service, unless test procedures require power to be
connected. Ensure all earthing wires are connected before certifying unit as repaired and/or operational.
Symptom Po ss ible C aus es Corrective A c tion
Frost or ice on evaporator
Unit starts and stops frequently
(cycles on and off)
Defrost thermostat faulty Check defrost thermostat. Replace if
defective.
Evaporator fan faulty Check fan motor. Replace if
defective.
Defrost heater remains open Check defrost heater continuity.
Replace if faulty.
Defrost timer faulty Check timer and replace if defective.
Open wire or connector Check wiring and connections.
Repair as necessary.
Refrigerant shortage or restriction Check for leak or restriction. Repair,
evacuate and recharge system.
Loose wire or thermostat
connections
Supply voltage out of specification Check input voltage. Correct any
Overload protector open Check overload protector for
Faulty compressor motor capacitor Check capacitor for open/short.
Check wiring and connections.
Repair as necessary.
supply problems.
continuity. If open, replace overload.
Note: Ensure
overload/compressor are below
trip temperature before testing.
Replace if necessary.
Note: Discharge capacitor before
testing.
RS5290000 Rev. 0 18 April 1998
Restricted condenser air flow Check condenser and grille for dirt.
Clean
Refrigerant shortage or restriction Check for leak or restriction. Repair,
evacuate and recharge system.
Page 17

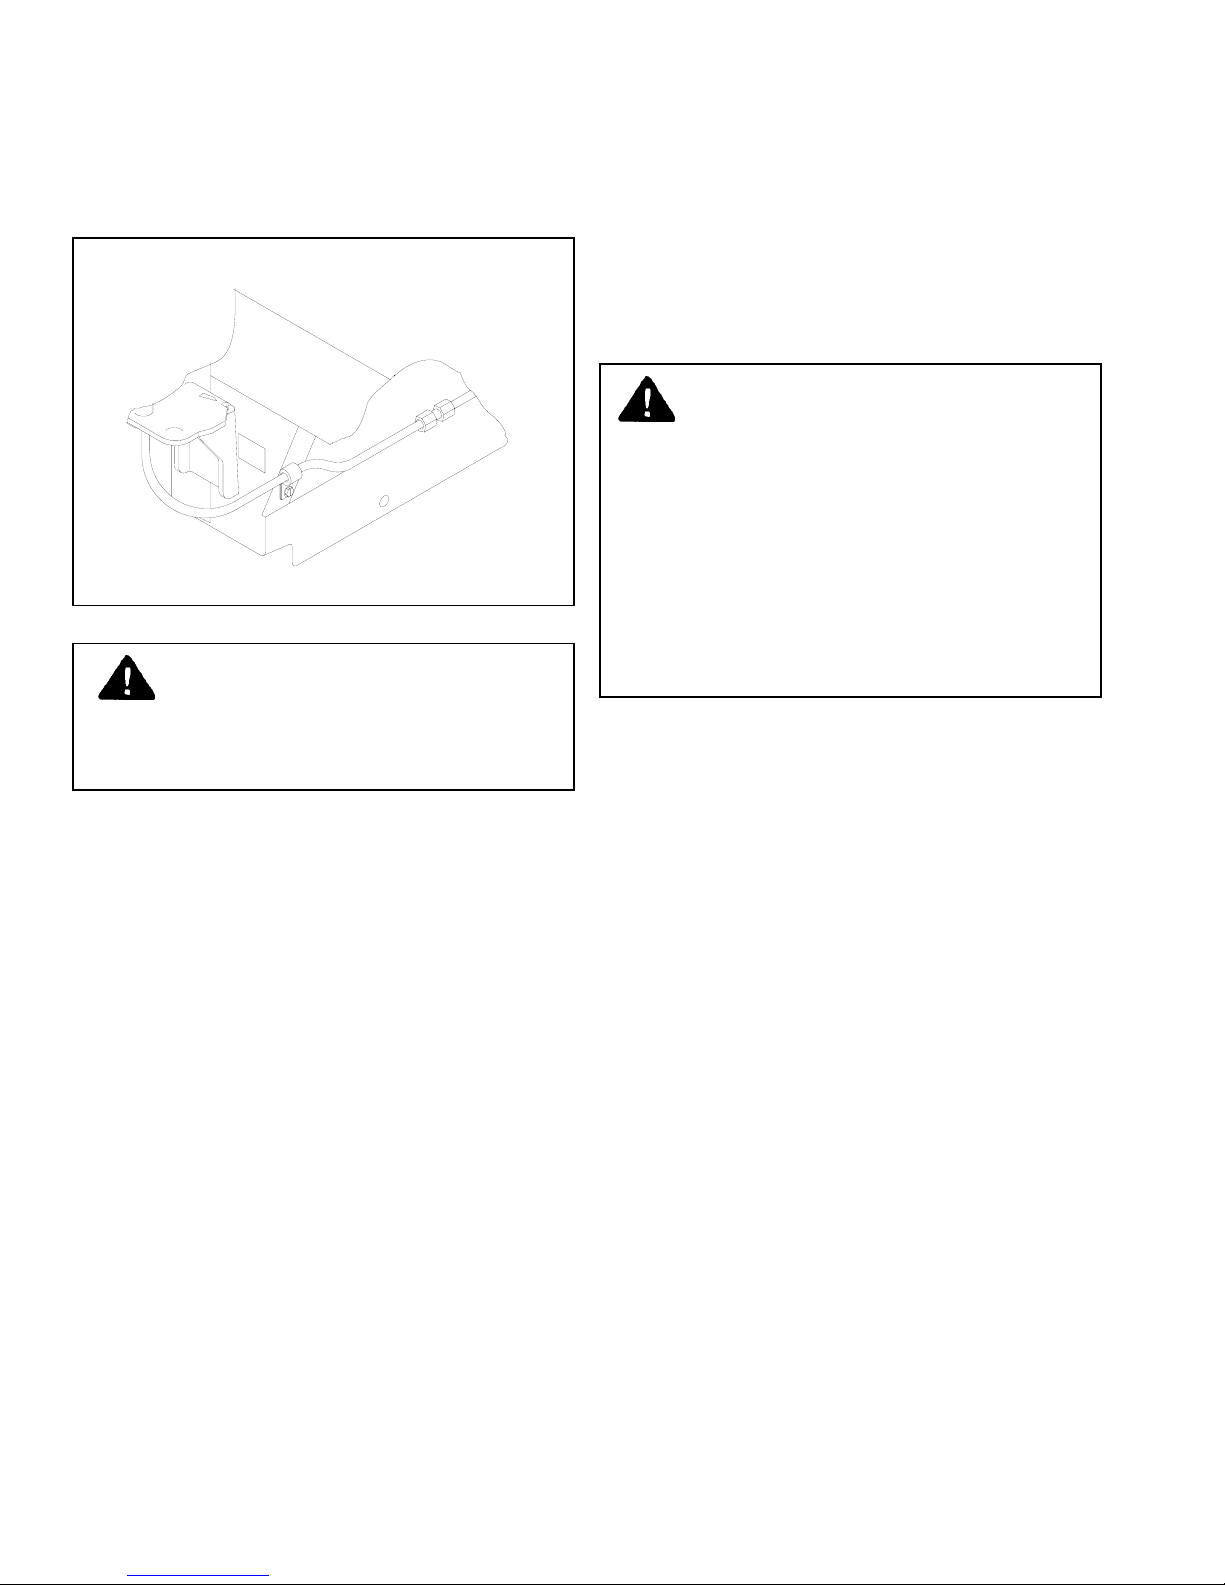
System Diagnosis
Pressure and Temperature Relationship Chart
See “Service Procedures” section for additional information about items in this chart.
Condition
Refrigerant
Overcharge
Refrigerant
Shortage
Partial
Restriction
Air in
system
Low
Ambient
Installation
(Reverse
from High
Ambient
Installation)
Suction
Pressure
Variation
from Normal
Increase Increase Warmer Warmer Colder Increase
Decrease Decrease or
Decrease Decrease or
Near Normal Increase Warmer Warmer Warmer Increase
Decrease Decrease Colder Warmer Warmer Decrease
Head
Pressure
Variation
from Normal
Increase
(Restriction
Symptoms)
Increase
(Restriction
Symptoms)
T1 Inlet
Temperature
Variation
from Normal
Colder Warmer Warmer Decrease
Colder Warmer Warmer Decrease
T2 Outlet
Temperature
Variation
from Normal
T3 Suction
Temperature
Variation
from Normal
Wattage
Variation
from Normal
Additional
Heat Load
Inefficient
Compressor
Increase Increase Warmer Warmer Warmer Increase
Increase Normal or
Decrease
Warmer or
Colder
Warmer Warmer Decrease
April 1998 19 RS5290000 Rev. 0
Page 18

Display Panel
Enable
Freezer Temperature
Fresh Food Temperature
Warmer
Colder
1
2
3
4
5
6
7
8
Temperature Indicators
Freezer Temperature
Fresh Food Temperature
Door Open
High Temperature
Clean Coil
Vacation
Max Cool
Fast Freeze
Vacation
Max Cool
Fast Freeze
Alarm Off
RS5290000 Rev. 0 20 April 1998
Display Off
Display Panel Keyboard
Page 19

Display Panel Operation
Keyboard Pad Functions
Entry Tone
Indicates a pad was pressed, command read and
accepted. Turn off entry tone by pressing and holding
pad for 3 to 5 seconds.
*
Command Accepted Tone
Three short tones indicate command accepted.
*
1. Activates control panel. Control panel remains
active at least 10 minutes.
2. Turns off Power Up Alarm (flashing lights) after
power is first plugged in or after power outage.
Note: All pads, except
pressed.
Freezer Temp
Activates freezer temperature setting mode.
1. Freezer indicator light will glow. Freezer
temperature setting will be displayed. Factory
setting is 5.
2. Change freezer temperature setting by pressing
Warmer
Ref Temp
Activates refrigerator temperature setting mode.
1. Refrigerator indicator light will glow. Refrigerator
temperature setting will be displayed. Factory
setting is 5.
2. Change refrigerator temperature setting by
pressing
Warmer
Raises temperature setting one bar at a time. If entry
tone is on, tone will sound at each bar level until top
level is reached.
1. Turn on temperature setting function of control
panel by pressing * pad.
2. Press and hold
setting at a faster rate.
Colder
Lowers temperature setting one bar at a time. If entry
tone is on, tone will sound at each bar level until
bottom level is reached.
1. Turn on temperature setting function of control
2. Press and hold
Fast Freeze
Activates Maximum freezer mode setting freezer
temperature to coldest setting for 24 hours or until
Fast Freeze
1. Fast Freeze indicator light will glow.
2. To adjust maximum freezer mode time refer to
Pad
panel by pressing
setting at a faster rate.
Program Mode B functions.
Pad
or
Colder
Pad
Warmer
Pad
Pad
pad is pressed again.
Alarm Off
pad.
or
Colder
Warmer
pad.
*
Colder
, are inactive until * is
pad.
pad to raise temperature
pad to lower temperature
Max Cool
Activates maximum refrigerator mode setting
refrigerator to coldest setting for 10 hours or until
Max Cool
1. Max Cool indicator light will glow.
2. To adjust maximum refrigerator time refer to Mode
Alarm Off
Turns off alarm signals. See Alarms Section to
interpret alarm signals.
1. Press and hold
2. If
Display Off
1. Deactivates control panel.
2. Deactivates temperature indication area of control.
Program Mode
activates Program Mode. See Program Mode
*
section for description of functions available.
1. Open refrigerator door.
2. Press * pad.
3. Within 6 seconds press the following pads in this
4. Tone will sound 3 times and control will be in
Vacation
Defrost unit less often during extended periods of nonuse. To begin Vacation Mode
1. Press * pad.
2. Press
To deactivate Vacation Mode, open either refrigerator
or freezer door or press * and
NOTE: See Adaptive Defrost section for more
Pad
pad is pressed again.
B functions.
Pad
Alarm Off
deactivate Door Open alarm. To reactivate Door
Open alarm, press and hold
seconds.
Alarm Off
alarm is not corrected, alarm will reset.
panel.
sequence:
Freeze.
Program Mode A.
information on Vacation Mode.
pad is pressed and condition causing
Pad
Max Cool, Fast Freeze, Max Cool, Fast
Vacation
pad.
pad for 3 seconds to
Alarm Off
Vacation
pad for 3
pad.
April 1998 21 RS5290000 Rev. 0
Page 20

Electronic Functional Description
Alarms
Power Up Alarm
After power is initially plugged in, after a power loss,
or if power switch is turned off, all temperature
indicator lights will flash until
pressed.
Note: All settings return to default factory settings.
Door Open Alarm
Alarm tone sounds and indicator lights blink if either
refrigerator or freezer door is open more than 3
minutes.
1. Turn off Door Open alarm by pressing
pad or by closing door.
2. Deactivate door open alarm by pressing * pad and
then press and hold
3. Door alarm delay can be adjusted in Program
Mode B.
High Temperature Alarm
Alarm sounds and indicator light shows if freezer or
refrigerator temperature has gone above critical level
and remained warm for 2 hours. Alarm tone stops if
temperature decreases again.
1. Critical temperature for freezer is -9°C(+15°F); for
refrigerator critical temperature is
+15.5°C(+60°F).
2. Press
Thermistor Alarm
Alarm sounds and freezer or refrigerator indicator
turns on and temperature indicators 4 through 7 flash
in sequence if either thermistor circuit opens. Refer to
Temperature Control Operation Section and
Electronic Testing Section.
1. Press
2. Alarm will retest for normal operation. If condition
Clean Condenser Light
Clean Condenser indicator light comes on after 3
months of elapsed time as a reminder to clean
condenser coil.
Press Alarm Off pad to turn off Clean Condenser
indicator light.
NOTE: Clean Condenser light will turn off after 72
Alarm Off
Alarm Off
has not been corrected, alarm will sound again.
hours.
pad to turn off alarm.
pad to turn off alarm.
Alarm Off
Alarm Off
or * is
Alarm Off
pad for 3 seconds.
RS5290000 Rev. 0 22 April 1998
Page 21
Electronic Functional Description
Temperature Control Operation
For any temperature setting, outputs will be turned
off/on based on cut-in/cut-out temperatures
determined by resistance levels of freezer and
refrigerator thermistors.
As the temperature decreases, resistance increases.
As the temperature increases, resistance decreases.
Refrigerator and Freezer Thermistor
Part # C8983701 or C8983702
Temp Resistance
°C (°F) Ohms
-29 (-20) 495600 2 (36) 87510
-26 (-15) 418200 3 (38) 82740
-23 (-9) 354000 4 (39) 78300
-21 (-6) 300600 6 (43) 74100
-18 (-4) 256200 7 (45) 70170
-15 (5) 218850 8 (46) 66450
-12 (10) 187170 9 (48) 62970
-9 (16) 161040 10 (50) 59670
-7 (19) 138690 13 (55) 52290
-4 (25) 119460 16 (61) 45900
-1 (30) 103680 18 (64) 40410
0 (32) 97920 21 (70) 36540
1 (34) 92550 25 (77) 30000
Temp Resistance
°C (°F) Ohms
Factory Set Freezer and Refrigerator Settings
Part #10866002
Frozen Food Fresh Food
Cut-Out
°C ± 1 °
(°F ± 1.5°)
-23 (-10) -16.6 (2) -1.6 (29) 1.1 (34) 9
-22 (-8) -15.5 (4) -0.5 (31) 2.2 (36) 8
-21 (-6) -14 (6) 0.5 (33) 3.3 (38) 7
-20.5 (-5) -13.8 (7) 1.1 (34) 3.8 (39) 6
-20 (-4) -13.3 (8) 1.6 (35) 4.4 (40) 5
-19 (-3) -12.7 (9) 2.2 (36) 5 (41) 4
-18.8 (-2) -1 2.2 ( 10) 2.7 (37) 5.5 (42) 3
-17.7 (0) -11.1 (12) 3.8 (39) 6.6 (44) 2
-16.6 (2) -10 (14) 5 (41) 7.7 (46) 1
-23 (-10) -16.6 (2) — —
— — 3 .8 (39) 6.6 (44)
Cut-In
°C ± 1 °
(°F ± 1.5°)
Cut-Out
°C± 1 °
(°F ± 1.5°)
Cut-In
°C ± 1 °
(°F ± 1.5°)
Level
Fast
Freeze
Max
Cool
Damper Control
• Refrigerator temperature setting and thermistor
value will determine if damper control heater
switch is to be open or closed.
• Damper closes at 9°C (48°F).
• Damper opens at least 1/4" when minimum voltage
is applied at 4°C (40°F) ambient.
An open thermistor or thermistor circuit will result in
failure of refrigerator to cool.
Shorted thermistor will cause refrigerator to run 100
percent of time except for defrost.
• Freezer temperature setting and thermistor value
will determine if compressor/condenser fan and
evaporator fan switches are open or closed.
Compressor/condenser fan switch must be open
for 6 minutes before switch can close again
(compressor dwell time).
• Cut-out and cut-in temperature values must be
reached and maintained for 15 seconds before
output state will change (digital delay).
• Refrigerator and freezer control calibration can be
adjusted in Program Mode B.
Damper Heater
Watts Volts (DC)
2.00 Minimum 20.5 Minimum
2.74 Nominal 24.0 Nominal
3.60 Maximum 27.5 Maximum
April 1998 23 RS5290000 Rev. 0
Page 22

Electronic Functional Description
Adaptive Defrost Operation
Defrost occurs after predetermined length of
compressor run time. Compressor run time between
defrosts changes, or adapts, depending upon recent
history of defrost lengths (time it takes for defrost
terminator to open after defrost heater has been
turned on).
• Defrost terminator opens at 9°C (48°F) and closes
at -9°C (15°F).
• Compressor run time between defrosts (CRTD)
will be one of 3 values under normal operation:
CRTD 1 (6 hours) or CRTD 2 (9 hours) or CRTD 3
(12 hours).
If defrost length is low (DT-LO defined as 21
minutes) indicating small frost load, CRTD for
next defrost cycle is advanced to next level.
If defrost length is high (DI - HI defined as 24
minutes) indicating large frost load, CRTD for
next defrost cycle is lowered to next level.
If defrost length is between 21 and 24 minutes,
CRTD for next defrost cycle remains the same.
Initial value at power up CRTD 0 is 3 hours.
• Vacation Mode CRTD equals 72 hours. Vacation
Mode CRTD is interrupted with door openings.
Defrost interval will revert back to interval before
Vacation Mode. Three things must occur to reach
Vacation Mode CRTD:
1) Defrost interval must be CRTD 3 (12 hours).
2) Both refrigerator and freezer doors must have
remained closed since last defrost cycle.
3) Defrost thermostat must have opened in less
than 21 minutes during last defrost cycle.
• Six minute dwell time occurs after defrost
terminator opens before compressor and
condenser fan motor will operate. Ten minute
dwell time occurs after defrost terminator opens
before evaporator fan motor will operate. Dwell
time can be bypassed by disconnecting power to
the unit for 30 seconds.
• Conventional defrost can be selected in Program
Mode B.
RS5290000 Rev. 0 24 April 1998
Page 23

Electronic Functional Description
Program Mode
Accessing Program Mode
Two programming modes are available. Mode A
allows reading refrigerator and freezer thermistor
temperatures. Mode B is used for all other
programmable functions.
1. Open refrigerator door.
2. Press * pad.
3. Press
4. Press the following sequence of pads within 6
5. When access is granted, tone will sound three
6. Toggle to Program Mode B by pressing * pad.
EEPROM Update in Control Memory
EEPROM is permanent programmable memory of the
control panel.
• Entry tone, door audio alarm and status are stored
• Clean coil status is stored in EEPROM after every
• Information stored in EEPROM memory is not
Mode A Functions
Reading Temperature Display
Temperature display will show thermistor temperature
in binary coded decimal format (BCD). Indicator lights
1 through 4 represent the tens digit with 1 being the
most significant bit. Indicator lights 5 through 8
represent ones digit with 5 being the most significant
bit. Positive and negative are shown by indicator light
9; light glows to show negative value
Indicator
1
2
3
4
5
6
7
8
Coldest
Vacation
seconds:
pad.
Max Cool, Fast Freeze, Max Cool, Fast
Freeze.
time and control will be in Program Mode A.
Indicator light will illuminate.
Indicator light is off.
in EEPROM after control panel is deactivated.
defrost cycle as time until clean coil alarm is
activated.
affected by power loss.
Value
8
4
2
1
Add togethe r all lit indicators
1 through 4 according to their
values to obtain tens colum n digit.
Example: If 3 and 4 are lit the tens
colu m n to ta l is 3 (2 + 1 = 3)
8
4
2
1
+/-
Add togethe r all lit indicators
5 through 8 according to their
values to ge t ones co lumn digit.
Example: If 6 and 7 are lit the
ones column total is 6 (4+2 = 6).
Freezer Thermistor Temperature
1. Choose freezer thermistor temperature display by
pressing
2. Freezer thermistor temperature displays.
Refrigerator Thermistor Temperature
1. Choose refrigerator thermistor temperature
display by pressing
2. Refrigerator thermistor temperature displays.
Freezer Temp
Fresh Food Temp
pad.
pad.
Mode B Functions
Automatic Keyboard Function
Activate and deactivate keyboard by toggling
Display Off
keyboard will disable after 10 minutes. If high
temperature indicator is off, keyboard is always
enabled. DO NOT LEAVE KEYBOARD IN ENABLED
MODE AFTER PROGRAMMING IS COMPLETE.
Door Alarm Delay
1. Press
glow. One temperature indicator should glow
indicating present delay setting in minutes
(indicator 1 means 1 minute, 2 means 2 minutes,
etc.) Default delay is 3 minutes.
2. Press
3. Press
Max Cool Run Time Duration
1. Press
temperature indicator should glow indicating
present
increments (indicator 1 means 2 hours, 2 means 4
hours, etc.) Default duration is 10 hours.
2. Press
by 2 hours.
3. Press
2 hours.
Fast Freeze Run Time Duration
1. Press
One temperature indicator should glow indicating
present
increments (indicator 1 means 4 hours, 2 means 8
hours, etc.) Default duration is 24 hours.
2. Press
duration by 4 hours.
3. Press
by 4 hours.
pad. If high temperature indicator glows,
Alarm Off
Warmer
Colder
Max Cool
Max Cool
Warmer
Colder
Fast Freeze
Fast Freeze
Warmer
Colder
pad. Door open indicator will
pad to decrease delay by 1 minute.
pad to increase delay by 1 minute.
pad.
Max Cool
run time duration in 2 hour
pad to decrease
pad to increase
pad.
Fast Freeze
run time duration in 4 hour
pad to decrease
pad to increase
light will glow. One
Max Cool
Max Cool
duration
duration by
light will glow.
Fast Freeze
Fast Freeze
duration
Th e c o ldest in d ic a to r is n ot lit
so example is +36 F.
NOTE: Temperature reads degrees Fahrenheit only .
Use conversion formula °C=5/9(°F-32).
April 1998 25 RS5290000 Rev. 0
3 6 Degrees F.
Page 24
Electronic Functional Description
Program Mode
Temperature Offset Calibration
Offset amount adjusts temperatures for refrigerator
cut-ins and cut-outs by the amount of offset. The
chart below shows the indicator and the amount of
offset from the factory default setting.
INDICATOR OFFSET
1 +8
2 +6
3 +4
4 +2
5 0
6 -2
7 -4
8 -6
Coldest -8
Forced Pulldown (Compressor Start)
Compressor start can be forced by pressing and
holding
changes will be saved permanently in EEPROM.
Compressor, evaporator fan, damper heater, and
condenser fan will come on.
Fast Freeze
pad for 3 seconds. Program
Exiting Program Mode
Press
*
pad for 3 seconds to exit Program Mode.
Tone will sound three times. Changes made in
Program Mode will be permanently saved in EEPROM.
NOTE: If no pad is pressed for 10 minutes, Program
Mode will be automatically exited. No changes
will be saved if Program Mode exits
automatically .
• Setting Refrigerator Temperature Offset
Press
Fresh Food Temp
indicator and one indicator will glow. Press
Warmer
setting. Press
next colder setting. Factory default refrigerator
offset is +2.
• Setting Freezer Temperature Offset
Press
indicator and one indicator will glow. Press
Warmer pad to move offset to the next warmer
setting. Press Colder pad to move offset to the
next colder setting. Factory default freezer offset
is 0.
Defrost Mode Selection
Toggle
conventional defrost mode. Vacation indicator glows
when adaptive defrost has been selected. If Vacation
indicator is off, conventional defrost is selected.
Conventional defrost uses 6 hour CRTD value.
Forced Defrost
Defrost can be forced to start by pressing and holding
the
Alarm Off
will be saved permanently in EEPROM and program
mode will exit to Run Mode.
pad to move offset to the next warmer
Colder
Freezer Temp
Vacation
pad to select adaptive or
pad for 3 seconds. Program changes
pad. Refrigerator
pad to move offset to the
pad. Freezer temperature
RS5290000 Rev. 0 26 April 1998
Page 25
!
!
Electronic Functional Description
Electronic Testing
Electronic Testing Mode
Forced Defrost Start
1. Press * pad to activate control panel.
2. Simultaneously press and hold
Display Off
Forced Compressor Start
1. Press * pad to activate control panel.
2. Simultaneously press and hold
and
Display Off
Open Thermistor Detect
Alarm sounds and freezer or refrigerator indicator light
shows and temperature indicators 4 through 7 will turn
on in sequence if either thermistor circuit opens. Refer
to Temperature Control Operation Section and
Electronic Testing Section.
1. Press
2. Alarm will retest for normal operation. If condition
has not been corrected, alarm will sound again.
Evaporator Fan Suppression
The evaporator fan will turn off every time either
refrigerator or freezer door is open.
To test if this function is operating:
1. Perform forced pull down procedure as noted
above –evaporator fan should be on.
2. Open the refrigerator or freezer door–the fan
should turn off.
3. Push the light switch off–the evaporator fan
should start.
If fan does not toggle off and on when refrigerator
light switch is turned off and on and it has been
determined evaporator fan motor is operational,
perform following tests to determine failure:
pads for 3 seconds.
pad for 3 seconds.
Alarm Off
pad to turn off alarm.
Max Cool
Fast Freeze
and
pad
2. Check for voltage on terminal E7 on high voltage
board. Output voltage should toggle with toggling
of light switch. If output voltage does not toggle,
high voltage board needs replacing.
3. If terminal 7 on high voltage board changes with
opening and closing of door, orange wire in low
voltage harness is broken (check for continuity
between pin 7 on high voltage board and pin 10 on
low voltage board) or low voltage board needs
replacing.
DANGER
To avoid electrical shock, personal injury or death,
avoid contacting high voltage parts. Disconnect power
to unit and discharge capacitor before handling.
1. Check for line voltage on terminal E8 on high
voltage board. With freezer door open, reading
should be 230 VAC. With door closed, reading
should be approximately 0 VAC. If voltage does
not change with light switch and light switch is
turning light off and on, violet/white wire is broken
between switch and high voltage board.
2. Check for voltage on pin 7 on pin connector of high
voltage board. Output voltage should toggle with
toggling of light switch. If it does not toggle, high
voltage board needs replacing.
3. If voltage on pin 7 on pin connector on high voltage
board changes with opening and closing of door,
orange wire in low voltage harness is broken
(check for continuity between pin 7 on high voltage
pin connector and pin 10 on low voltage board) or
low voltage board needs replacing.
DANGER
To avoid electrical shock, personal injury or death,
avoid contacting high voltage parts. Disconnect power
to unit and discharge capacitor before handling.
1. Check for line voltage on terminal E7 on high
voltage board. With refrigerator door open
(refrigerator light ON) reading should be 230 VAC.
With refrigerator door closed (refrigerator light
OFF) reading should be approximately 0 VAC.
If voltage does not change with light switch and
light switch is turning light off and on, red/white
wire is broken between switch and high voltage
board.
April 1998 27 RS5290000 Rev. 0
Page 26
Electronic Functional Description
!
WARNING
To avoid electrical shock which can cause severe personal injury or death, disconnect power to refrigerator using
power switch before servicing. Discharge capacitors through a resistor before handling. Wires removed during
disassembly must be replaced on proper terminals to insure correct earthing and polarization. After servicing,
reconnect power using power switch.
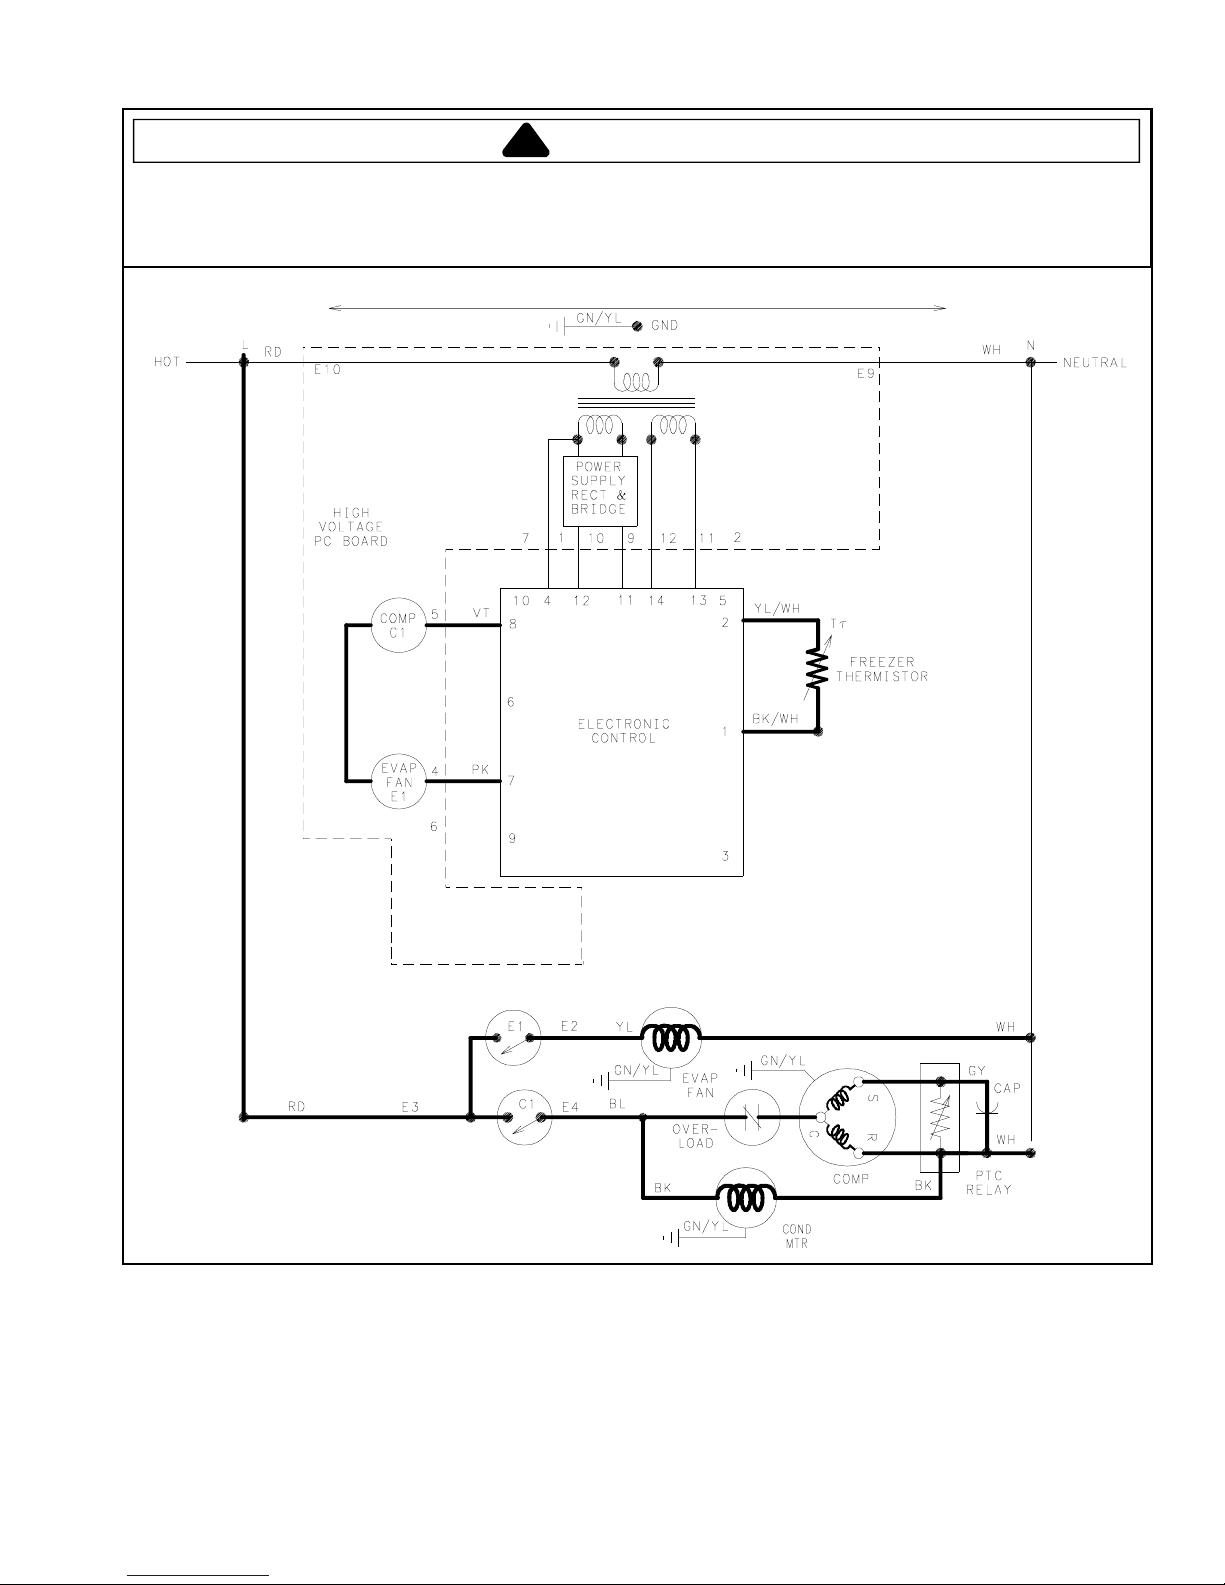
COIL
TERMINALS
SWITCH
TERMINALS
LINE VOLTA GE
X
L1
E10 E11 E12
RELAY COILS
EARTH
COMP/COND
FAN RELAY
DEFROST
RELAY
EVAP FAN
RELAY
X
NEUTRAL (L2)
FREEZER DOOR OPEN
REFRIGERATOR DOOR OPEN
DEF ROST HEAT E R RELAY
COMP/CO N D FA N RELA Y CO IL
DEFROST HEATER RELAY COIL
EVAPORATOR FAN RELAY COIL
DAMPER HE ATER
E9
E8
E7
E6
E4
E3
E2
E1
X
XX
W1
R10
D11
X
12 PIN CO NNECTOR
RS5290000 Rev. 0 28 April 1998
Page 27
Electronic Functional Description
!
WARNING
To avoid electrical shock which can cause severe personal injury or death, disconnect power to refrigerator using
power switch before servicing. Discharge capacitors through a resistor before handling. Wires removed during
disassembly must be replaced on proper terminals to insure correct earthing and polarization. After servicing,
reconnect power using power switch.
Resistance Checks Made at High Voltage Board
E6
E9
E10
E10
E10
E10
Defrost Heat e r
Evaporator Fan Motor
Defrost Term inator
Power Switch
6.5 Ohms
39 8 Ohms
1 Ohm
or less
1 Ohm
or less
1 Ohm
or less
E9
Yellow Wire
Ev a p. Fa n Mot or Relay
Red W ire
Def ros t Re la y
Br own Wir e
Comp ressor Relay
E7
Refrig er ator Light Switch
E10
E9
Freezer Light Switch
Overload
N
Cond ens e r Fan Mot or
Compressor
C
v
1 Ohm
or less
Compressor
Relay
Gray
S
R
Wire
Black
Wire
E8
April 1998 29 RS5290000 Rev. 0
Page 28

Electronic Functional Description
!
WARNING
To avoid electrical shock which can cause severe personal injury or death, disconnect power to refrigerator using
power switch before servicing. Discharge capacitors through a resistor before handling. Wires removed during
disassembly must be replaced on proper terminals to insure correct earthing and polarization. After servicing,
reconnect power using power switch.
Refrigeration and Defrost Component Checks Made at High Voltage Board
Power Swtich Is ON
Low voltage board input W1 to D1 1 -25 VDC
High voltage board input E10 (L)/E9 (N) 220 VA C
Compressor/condenser Blue/White Wire Contacts Closed 220 VAC
Fan motor Comp/Relay to E9 Contacts Open 0 V AC
Compressor/condenser E4 to E12 Contacts Closed 220 VAC
Fan motor Contacts Open 0 VAC
Relay coil
Defrost heater E6 to E9 Contacts Closed 220 VAC
Contacts Open 0 VAC
Defrost heater E3 to E12 Contacts Closed -25 VDC
Relay Coil Contacts Open 0 VDC
Defrost terminator E6 to E9 Contacts Closed 220 VAC
(Klixon) Contacts Open 0 VAC
Damper heater output E1 to E11 Contacts Closed -25 VDC
From high voltage board Contacts Open 0 VDC
Damper heater input R10 to E11 Contacts Closed -11 VDC
From low voltage board Contacts Open -25 VDC
From high voltage board
Evaporator Fan Motor E2 to E12 Contacts Closed -25 VDC
Relay Coil Contacts Open 0 VDC
RS5290000 Rev. 0 30 April 1998
Page 29
Electronic Functional Description
!
WARNING
To avoid electrical shock which can cause severe personal injury or death, disconnect power to refrigerator using
power switch before servicing. Discharge capacitors through a resistor before handling. Wires removed during
disassembly must be replaced on proper terminals to insure correct earthing and polarization. After servicing,
reconnect power using power switch.
230 VAC
Freezer Compartment
As freezer thermistor warms the resistance decreases
allowing low voltage signal to be sent to electronic
control. Electronic control send two low voltage
signals, one to the compressor relay coil (C1) and one
to the evaporator fan relay coil (E1).
When both relay coils are energized and both relay
April 1998 31 RS5290000 Rev. 0
contacts are closed, high voltage circuits to evaporator
fan motor and compressor/condenser fan motor are
complete.
As thermistor cools during refrigeration cycle,
resistance through thermistor increases blocking low
voltage signal to electronic control interrupting circuit.
Page 30
Electronic Functional Description
!
WARNING
To avoid electrical shock which can cause severe personal injury or death, disconnect power to refrigerator using
power switch before servicing. Discharge capacitors through a resistor before handling. Wires removed during
disassembly must be replaced on proper terminals to insure correct earthing and polarization. After servicing,
reconnect power using power switch.
230 VAC
Refrigerator Compartment
As fresh food thermistor warms, resistance decreases
allowing low voltage signal to be sent to the electronic
control. Electronic control sends two low voltage
signals, one to damper heater and one to evaporator
fan relay coil (E1).
Damper heater warms damper control bellows,
opening damper door at the same time relay coil
closes high voltage contacts to evaporator fan motor.
RS5290000 Rev. 0 32 April 1998
With evaporator fan operating and damper door open,
freezer air circulates into fresh food compartment. As
fresh food thermistor cools, resistance increases
blocking low voltage signal to electronic control
interrupting circuit to evaporator fan motor relay coil
and damper heater.
Page 31

Electronic Functional Description
!
WARNING
To avoid electrical shock which can cause severe personal injury or death, disconnect power to refrigerator using
power switch before servicing. Discharge capacitors through a resistor before handling. Wires removed during
disassembly must be replaced on proper terminals to insure correct earthing and polarization. After servicing,
reconnect power using power switch.
230 VAC
Refrigerator and Freezer Compartment
If both freezer and fresh food thermistors are warm,
the electronic control signals for compressor/
condenser fan motor operation and for damper door to
open.
After freezer thermistor cools sufficient to block signal
to electronic control the compressor/condenser fan
motor will shut off. However, evaporator fan motor and
damper heater will continue to run until fresh food
thermistor cools and signal is blocked to electronic
control.
April 1998 33 RS5290000 Rev. 0
If fresh food thermistor cools before freezer
thermistor, electronic control will interrupt circuit to
damper heater closing damper door while evaporator
fan motor will continue to run under control of freezer
thermistor.
Page 32

Electronic Functional Description
!
WARNING
To avoid electrical shock which can cause severe personal injury or death, disconnect power to refrigerator using
power switch before servicing. Discharge capacitors through a resistor before handling. Wires removed during
disassembly must be replaced on proper terminals to insure correct earthing and polarization. After servicing,
reconnect power using power switch.
230 VAC
IMPORT ANT : When the power switch is
isolator see’s line voltage which keeps the
electronic controller from signaling the
evaporator fan motor or the compressor relay
coils and also keeps the damper heater off.
Adaptive Defrost
After designated compressor run time, refrigeration
cycle is interrupted and electronic control sends a low
voltage signal to defrost relay coil (def D1).
Powering the relay coil closed relay contact (D1)
completing high voltage circuit to defrost heater
through closed defrost terminator (closes at -9°C).
Isolator, which is part of high voltage PC board,
recognizes presence of line voltage to defrost heater
and sends low voltage signal to electronic control.
Electronic control keeps count of number of minutes
defrost terminator remains closed (opens at 9°C).
RS5290000 Rev. 0 34 April 1998
Length of time defrost terminator is closed determines
if the next defrost cycle advances by 3 hours of
compressor run, stays at the same interval, or delays
by 3 hours of compressor run.
If defrost terminator does not open before 29 minutes,
defrost cycle is automatically terminated by electronic
control and refrigeration cycles will resume after 6
minute dwell time.
OFF
, the
Page 33

Component Testing
!
Component Description Test Procedures
Capacitor
Run capacitor connects to rel ay
terminal 3 and L side of line.
Auger motor capacitor is i n series with
auger motor. Auger motor capacitor does
not have identified terminals and can be
wired without regard to polarity.
To avoid electrical shock which c an cause severe personal injury or death,
discharge capacitor through a resistor before handling.
1. Disconnect power to refrigerator.
2. Remove capacitor cover and disconnect capacitor wires.
3. Discharge capacitor by shorting across terminals with a resistor for 1
minute.
4. Check resistance across capaci tor terminals with ohmmet er set on “X1K”
scale.
• Good—needle swings to 0 ohms and slowly moves back to i nf i ni ty.
• Open—needle does not move. Replace capacitor.
• Shorted—needle moves to zero and stays. Replace capacitor.
• High resistance leak—needle jumps toward 0 and then moves back to
constant high resistance (not infinity).
WARNING
Capillary tube Capillary is sized in diameter and length
to feed proper amount of refrigerant to
evaporator.
Capillary is soldered to suction line to
transfer heat from capillary and add
additional superheat to gas refrigerant i n
compressor suction line.
Capillary discharges into evaporator.
Restricted or clogged capillary tube mus t be replaced with tube of same inner
diameter and length.
Follow all procedures for evacuation and charging of sealed system and for safe
handling of refrigerant.
April 1998 35 RS590000 Rev. 0
Page 34

Component Testing
o
Component Description Test Procedures
Compressor When compressor elec t ri cal circuit is
energized, the start winding c urrent
causes relay to heat. A fter an amount of
starting time, the start winding circui t
turns off. The relay will switch off the
start winding circuit even though
compressor has not started (for example,
when attempting to rest art after
momentary power interruption).
With “open” relay, compressor will not
start because there i s little or no current
to start windings. Overload protection will
open due to high locked roto r run winding
current.
With “shorted” relay or capacitor,
compressor will start and ov erload
protector will quickly open due to high
current of combi ned run and start
windings.
With open or weak capacitor,
compressor will start and run as normal
but will consume more energy.
Resistance test
1. Disconnect power to unit.
2. Discharge capacitor by shorting across terminals with a resistor for 1
minute.
3. Remove leads from c o mpressor terminals.
4. Set ohmmeter to lowest scale.
5. Check for resistance bet ween
Term i nal s “S” and “C”
Term i nal s “R” and “C”
If either com pressor winding reads open (infinite or very high resistance) or
dead short (0 ohms), repl ace compressor.
Earthing test
1. Disconnect power to refrigerator.
2. Discharge capacitor by shorting terminals thro ugh a res i ster.
3. Remove compressor leads and use an ohmmet er set on highest scale.
4. Touch one lead to compressor body (clean point of contac t ) and the other
probe to each compressor terminal.
If a reading is obtained, compressor is earthed and must be replaced.
Operation test
If voltage, capac i t or, overload, and motor winding tes t s do not show cause for
failure, perform the following test:
1. Disconnect power to refrigerator using power switch.
2. Discharge capacitor by shorting capacitor term i nal s through a resistor.
3. Remove leads from c o mpressor terminals.
4. Wire a test cord to power switch.
5. Place time delayed fuse with UL rating equal to amp rati ng of motor in test
cord socket. (S ee Technical Data Sheet)
6. Remove overload and relay.
7. Connect start, common and run leads of test cord on appropriate terminals
of compressor.
8. Attach capacitor leads of test cord together. If capacitor is used, attach
capacitor lead to a known good capacitor of same c apacity.
To AC supply
Switch
Compress
Fuses
9. Plug test cord into volt -watt meter to determine start and run wattage as well
as check for low voltage which can also be a source of trouble.
10. With power to volt-meter, press start cord switch and release.
• If compressor motor starts and draws normal wattage, compressor i s
okay and trouble is in capacitor, relay/overload, freezer temperature
control, or elsewhere in system.
• If compressor does not start when direct wired, recover s ys tem at high
side. After system is recovered, repeat compressor di rect wire test. If
compressor runs after recovery but would not run when direct wired
before recover, a restric t i on in sealed system is indicated.
• If compressor does not run when wired direct after recover, repla c e
faulty compressor.
CRS
Capacitor
RS590000 Rev. 0 36 April 1998
Page 35

Component Testing
!
Component Description Test Procedures
Condenser Condens er i s a tube and wire
construction and is located in
compressor compartment.
Leaks in condenser can usuall y be det ected by using an electronic leak detector
or soap solution. Look for s i gns of compressor oil when check i ng f or l eaks. A
certain amount of compressor oil is circul ated with refrigerant.
Condenser is on the high pressure
discharge side of com pressor.
Condenser function is to t ransfer heat
absorbed by refrigerant to ambient .
Higher pressure gas is routed to
condenser where, as gas temperature i s
reduced, gas condenses into a hi gh
pressure liquid state. Heat transfer takes
place because discharged gas i s at a
higher temperature than air that i s
passing over condenser. It i s very
important that adequate ai r f l ow over
condenser is maintai ned.
Condenser is air cooled by condenser
fan motor. If efficiency of heat transfer
from condenser to surrounding ai r i s
impaired, condensing temperature
becomes higher. High liqui d t emperature
means the liquid will not remove as much
heat during boiling in evaporator as
under normal conditions. Thi s would be
indicated by higher than normal head
pressures, long run tim e, and high
wattage. Remove any lint accumulation,
etc. that would restrict normal air
movement through condens er.
From condenser the refrigerant flows into
a post condenser loop which helps
control exterior condensation on flange,
center mullion, around freezer door and
then through the drier to the evaporator
and into the compressor through the
suction line.
Leaks in post condenser loop are rare bec ause loop is a one-piece copper tube.
For minute leaks
1. Separate condenser from rest of refri geration system and pressurize
condenser up to a maximum of 16 bars (235 PSI) with a refrigerant and dry
nitrogen combination.
2. Recheck for leaks.
WARNING
To avoid severe personal injury or death observe the f ol l owing:
• Protect against a sudden eruption if hi gh pressures are required
for leak checking.
• Do not use high pressure compressed gas es in refrigeration
systems without a reli abl e pressure regulator and pressure relief
valve in the lines.
Damper Control Damper c ont rol bal ances the air delivery
between refrigerator and freezer
compartments .
Integral capillary activates damper
control and door closes rest ri cting flow of
air from freezer compartment to
refrigerator compartment.
There are no electrical connecti ons to
damper control on non-electronic units.
See Electronic Functi onal Description for
explanation of damper control on
electronic units.
Subject capillary to appropriate temperat ure (see tech sheet for model being
serviced).
Damper door should close to withi n 6 mm of completel y s hut.
If altitude adjustment is required, turn altit ude adj ustment screw 1/8 turn
clockwise for each 305 m et ers increase in altitude.
April 1998 37 RS590000 Rev. 0
Page 36

Component Testing
!
!
Component Description Test Procedures
Control, freezer
temperature
(Non-electronic
units)
Drier Drier is placed at post condenser loop
Freezer temperature control is a capillary
tube operating a single pole, singl e throw
switch.
Altitude Adjustment
When altitude adj us tment is required on
a G.E. control, turn altitude adjustment
screw 1/7 turn clockwise for eac h 305
meters increase in altitude up to 3,050
meters.
In most cases the need for altitude
adjustments can be avoi ded by simply
turning temperature control knob to
colder setting.
outlet and passes liquefi ed refrigerant to
capillary.
Check for proper calibration with thermoc ouple capillary in air supply well by
recording cut-in and cut-out t emperatures in middle setting. See tech sheet for
model being serviced for expected t emperatures.
Check control contacts are opening by disconnecting elect ri cal leads to control
turning control knob to coldest setting and checking f or continuity across
terminals.
Altitude correction must be done on both “cut-in” and “cut-out ” screws.
Altitude Counter in Meters
Meters Cloc kwise Turns
610
915
1220
1525
1830
2135
2440
2745
3050
Drier must be changed every time the system is opened f or t esting or
compressor replacement.
NOTE: Drier used in R12 sealed system is not interchangeable with
drier used in R134a sealed system. Always replace the drier with Amana
part number B2150504.
Before opening refrigeration syst em, recover HFC134a refrigerant for safe
disposal.
Cut drier out of system using the following procedure. Do not unbraze drier.
Applying heat to remove drier will drive moisture into the system.
1. Score capillary tube close to drier and break.
2. Reform inlet tube to drier allowing enough space f or l arge t ube cutter.
3. Cut circumference of drier 3 cm below condenser inlet tube joint to drier.
4. Remove drier.
5. Apply heat trap paste on post condenser tubes to protect grommets from
high heat.
6. Unbraze remaining part of drier. Remove drier from system.
7. Discard drier in safe place. Do not leave drier with customer. If refrigerat or i s
under warranty, old drier must accompany warranty claim.
7/60
13/60
19/60
25/60
31/60
37/60
43/60
49/60
55/60
00
5
10
15
20
25
55
50
45
40
35
30
Evaporator Inner volume of evaporator allows
liquefied refrigerant discharged from
capillary to expand into refrigerant gas.
Expansion cools evaporate tube and fin
temperature to approximately -29° C
(-20°F) transferring heat from freezer
section to refrigerant.
Passing through sucti on l i ne to
compressor, the refrigerant picks up
superheat (a relationship between
pressure and temperature that assures
complete vaporization of l i qui d
refrigerant) as result of capillary on
suction line.
Refrigerant gas is pulled through s uction
line by compressor to complete the
refrigerant cycle.
CAUTION
To avoid death or severe personal injury, cut dri er at correct location.
Cutting drier at incorrect locati on will allow desiccant beads to scatter. If
spilled, complet el y clean area of beads.
Test for leaks in evaporator with electronic leak detector or with soap s ol ution.
Compressor oil is c i rculated with refrigerant; check for oi l when chec king for
leaks.
WARNING
To avoid severe personal injury or death observe the f ol l owing:
• Protect against a sudden eruption i f high pressures are required for
leak checking.
• Do not use high pressure compressed gases in refrigeration systems
without a reliable pressure regulator and press ure rel i ef valve in the
lines.
For minute leaks
1. Separate evaporator from rest of refrigerat i on system and pressurize
condenser up to a maximum of 10 bars (140 PSI) with a refrigerant and dry
nitrogen combination.
2. Recheck for leaks.
RS590000 Rev. 0 38 April 1998
Page 37

Component Testing
Fusible link Fusi bl e l i nk is part of evaporator heater
Heater, door Applied to back of ice and water cavity to
Heater, evaporator
(defrost)
Ice Maker See “Ice Maker” section for service
Motor, auger Located behind ice bucket. Drives helix
wiring harness and is in a series ci rcuit
with defrost terminator, defrost heater,
and evaporator fan motor.
If the defrost terminator fails to open and
temperature increases to fusible link,
fuse will open breaking circuit so defrost
heater will be shut down.
help prevent condensation from forming
on face of cavity.
Activated when defrost thermostat or
adaptive defrost control completes the
circuit through the heater.
information.
auger and cube crusher.
PSC (Permanent Split Capacitor) motor
requiring a run capacitor.
Controlled by ice actuator switch in
series with freezer door auger interlock
switch and cube/crushed ice switch.
If fusible link interrupts opens, evaporator heater wiring harness must be
replaced.
Be sure harness is wire tied against evaporator heater over white mark on
evaporator heater.
Some models have spare heater foamed in place at fact ory. See tech sheet for
model being serviced.
Check resistance across heater (for resistance values see tech sheet for model
being serviced).
Check resistance across heater.
To check defrost system
1. Thermocouple defrost thermostat and plugging refrigerator into wattmeter.
2. Force into defrost mode (see section on electronic testing). Wattmeter
should read specified watts (ac cording to tech sheet).
3. When defrost thermos tat reaches specified temperature (see tech sheet)
±5°F; therm ostat should interrupt power to heater.
Disconnect power and ohm winding and check f or earthing.
Crushed/Cube Dispensing Models:
At room ambient temperature check resistance between wire leads (see
tech sheet for colors on uni t being serviced).
Cube Dispensing Models:
At room ambient temperature check resistance cross motor windings. For
resistance values see t ech sheet for model being servic ed.
Internal overload trips out aft er
approximately 90 second of conti nuous
run and resets in approximately 3
Motor, condenser Condenser fan moves cooling ai r ac ross
Motor,
evaporator fan
Overload/Relay Overload is a temperature and current
minutes.
condenser coil and compressor body.
Condenser fan motor is in parall el circuit
with compressor.
Evaporator motor moves air across
evaporator coil and throughout
refrigerator.
Evaporator fan is in a series c i rcuit with
temperature control, defrost terminator,
and defrost heater.
sensing device.
Overload opens when high current or
high compressor temperature is sensed.
After overload opens, reset c an requi re
up to two hours depending on ambient
temperature and residual heat load i n
compressor.
Relay (See PTC Relay)
Check resistance across winding (for resistance value see t ech sheet for model
being serviced).
1. Disconnect power to unit.
2. Disconnect fan motor leads.
3. Check resistance from earth connection solder. Trace to m otor frame must
not exceed .05 ohms.
4. Check for voltage at connector to motor with terminator and temperature
control closed.
1. Disconnect power to the refrigerator.
2. Remove relay cover and pull relay off compressor. Pull overload protec tor
off compressor common terminal.
3. With ohmmet er, check the resistance between m al e terminal and female
pin receptacle terminal whic h pus hes onto compressor common terminal. A t
ambient room temperature overload protector should have less than 1 ohm
resistance. An open overload protect or will have infinite res i stance.
April 1998 39 RS590000 Rev. 0
Page 38

Component Testing
Relay, PTC When voltage is connected and relay is
cool, current passes through relay to
start winding. After a short time, current
heats the resist or i n rel ay and resistance
will rise blocking current flow through
relay. Start winding remains in the circuit
through run capacitor.
Solid state relay plugs directly on
compressor start and run terminals.
Relay terminals 2 and 3 are c onnected
within relay. Run capacitor is connected
to relay terminal 3. L2 side of 230 VAC
power is connected to relay terminal 2.
Switch, keyboard Semiconductor switch for c ont rol panel
keyboard.
With power off check resistance across terminals 2 and 3:
Normal = 3 to 12 ohms
Shorted = 0 ohms
Open = infinite ohms
Switch Functions
Enable Key S1 1 and 3
Freezer Temperature S2 3 and 6
Refrigerator Temperature S3 3 and 7
Warmer S4 6 and 7
Colder S 5 4 and 6
Vacation S6 4 and 7
Max Cool S7 7 and 8
Fast Freeze S 8 4 and 8
Alarm Off S9 4 and 5
Display Off S10 5 and 8
Keypad
Symbol
Continuity
Test
PERIMETER
STATIC GUARD
Switch, SPDT
icemaker interlo ck
Interrupts connect i on to auger motor and
icemaker when freezer door is open.
Turns freezer light on when door is open.
In series with auger mot or and
cube/crushed switch and freezer light.
Switch,
crushed/cubed
Switch,
refrigerator light,
freezer light,
Selects between cubed or crus hed i ce
feature.
Completes circuit to allow indicated
function. See tech sheet and wiring
diagram for individual switch.
refrigerator fan
Switch, power SPDT
Electronic mo dels only. Disconnect s
power to high voltage board when switch
is off (open.)
Unit shipped with switch on.
Check resistance across terminals.
Continuity across t erminals 1 and 2 – light
Continuity across t erminals 1 and 3 – auger motor
Check resistance across terminals.
Switch left
Middle terminal to left terminal 0 ohms
Middle terminal to right terminal infinite ohms
Switch right
Middle terminal to right terminal 0 ohms
Middle terminal to left terminal infinite ohms
Check resistant across terminals.
Switch arm down
“NC” terminals Cl osed
“NO” terminals Open
Switch arm up
“NC” terminals O pen
“NO” terminals Closed
Check resistance across terminals
Swtch OFF 0 ohms
Switch ON infinite ohms
RS590000 Rev. 0 40 April 1998
Page 39

Component Testing
Switch,
photosensitive
Thermistor Senses temperatures within refrigerator
Thermostat Thermostat is in a series circ ui t with
In series with cavity light switch and
cavity light. Senses low light condition to
complete circuit to cavity light.
Switch must not generate line conducted
noise or radiate inference more than
three feet on the AM, FM, VHF, or USH
Frequency bands.
and freezer compartm ents.
defrost termi nat ors, defrost heater, and
evaporator fan motor. Ci rcuit is compl ete
if evaporator fan mot or operates when
cold.
Controls the circui t from freezer
thermostat t hrough defrost terminator t o
defrost heater. Opens and breaks circuit
when thermostat sens es preset high
temperature.
After defrost t hermostat opens,
thermostat remains open until end of
defrost cycle and refrigerator starts
cooling again and defrost t hermostat
senses a preset low temperature and
closes.
1. To check light sensor with cavity light switch on, cover light sensor eye.
Cavity lamp should light at approximately 50% of full illumination.
2. If lamp fails to illuminat e, activate water or ice dispenser switch. Lamp
should illuminate at full illumination and water or ice should be dispens ed.
3. If light illuminates, dis connect power and replace light sensor.
4. If lamp does not illuminat e, disconnect power and check cavit y lamp and
socket.
Check resistanc e across terminals. See tech sheet for bell c urve resistance chart
at given temperatures .
Test continuity ac ross terminals.
With power off and evaporator coil below freezing, therm ostat should check
continuous when checked wit h ohmmeter. See “Heater, evaporator (defrost)”
section for additi onal tests.
Timer, defrost Timer motor operates only when freezer
control is clos ed. After specified amount
of actual com pressor run time, inner cam
in timer throws the contacts from
terminal 4, the compressor circuit to
terminal 2, and defrost thermostat/ defrost
heater circuit.
After 33 minutes of defrost cycle ti me,
timer cam resets the circuit ry through
terminal 4 to compressor.
Valve, water Cont rol s water flow to the ice mak er and
cavity.
1. To check timer motor winding, check for cont i nuity between terminals 1 and
3 of timer.
2. Depending on the rotation of the c am, terminal 1 of timer is common to both
terminal 2, the defrost modes, or terminal 1, the compres sor mode. There
should never be continuity b etween terminals 2 and 4.
3. With conti nui ty between terminals 1 and 4, rota t e timer knob clock wise unt i l
audible click is heard. When the cl i ck is heard, the reading between
terminals 1 and 4 shoul d be infinite and there should be c ontinuity between
terminals 1 and 2.
4. Continuing to rotate tim e knob until a second cli ck is heard should restore
circuit between term i nal s 1 and 4.
Check resistanc e across coil windings.
April 1998 41 RS590000 Rev. 0
Page 40

Product Design
!
WARNING
To avoid risk of electrical shock, personal injury, or death, disconnect electrical power source to unit and discharge
capacitor through a 10,000 ohm resistor before attempting to service, unless test procedures require power to be
connected. Ensure all earth wires are connected before certifying unit as repaired and/or operational.
Refrigeration System
Compressor forces high temperature vapor into fancooled tube and wire condenser where vapor is cooled
and condensed into high pressure liquid by circulation
of air across condenser coil. (See Refrigerant Flow
Diagram.)
High pressure liquid passes through molecular sieve
drier and into capillary tube. Small inside diameter of
capillary offers resistance decreasing pressure and
temperature of liquid discharged into evaporator.
Capillary diameter and length is carefully designed for
each system.
Capillary enters evaporator at top back. Combined
liquid and saturated gas flows through back to bottom
of coil and into suction line. Aluminium tube evaporator
coil is located in freezer compartment where
circulating evaporator fan moves air through coil and
into fresh food compartment.
Large surface of evaporator allows heat to be
absorbed from both fresh food and freezer
compartments by airflow over evaporator coil causing
some of the liquid to evaporate. Temperature of
evaporator tubing near end of running cycle may vary
from -25° to -32°C.
Saturated gas is drawn off through suction line where
superheated gas enters compressor. To raise
temperature of gas, suction line is placed in heat
exchange with capillary.
Nonelectronic Temperature Controls
Freezer compartment temperature is regulated by air
sensing thermostat at top rear of fresh food
compartment which actuates compressor. Control
capillary is inserted in well which routes capillary into
freezer. Control should be set to maintain freezer
temperature between -17° to -18°C.
Fresh food compartment temperature is regulated an
air damper control governing amount of refrigerated
air entering fresh food compartment from freezer.
Fresh food compartment temperature should be
between 3° and 4°C.
Electronic Control
Electronic control is not repairable. If any component
in control is faulty, entire control must be replaced.
NOTE: Repair or replace all faulty line voltage
components before testing or replacing
electronic control. Do not assume problems are
caused by electronic control system. Opened,
shorted, earthed or otherwise faulty line voltage
components (including power cord and wiring)
can create problems that appear to be caused
by electronic control.
Refrigerated Chiller Fresh Deli Drawer
Chiller Fresh system is a deli drawer in a sleeve.
Control on inner wall of fresh food compartment allows
freezer air to circulate into sleeve maintaining
temperature 4°C ±1° colder than fresh food
compartment.
Boot must be in place over air inlet. Set to maintain
desired temperature in deli drawer.
Beverage Chiller
Control on left inner wall of fresh food compartment
allows freezer air to circulate into beverage chiller
maintaining temperature up to 3°C colder than fresh
food compartment. Valve on outside wall of
refrigerator door allows freezer air to pass to beverage
chiller.
Fresh food compartment temperature can be affected
by additional cold air so freezer temperature control
may need adjustment after beverage chiller
temperature is set.
RS5290000 Rev. 0 42 April 1998
Page 41

Product Design
!
WARNING
To avoid risk of electrical shock, personal injury, or death, disconnect electrical power source to unit and discharge
capacitor through a 10,000 ohm resistor before attempting to service, unless test procedures require power to be
connected. Ensure all earth wires are connected before certifying unit as repaired and/or operational.
Defrost System–Nonelectronic Models
Every 6 or 8 hours of compressor run time defrost
timer activates radiant electric defrost heater
suspended from evaporator. After 33 minutes of
defrost cycle time, timer restores circuit to
compressor.
Defrost terminator (thermostat) and fusible link are
wired in series with defrost heater and evaporator fan
motor. Terminator opens and breaks circuit when
preset high temperature is reached. After defrost
thermostat opens, thermostat remains open until end
of defrost cycle until cooling cycle starts and
terminator senses present low temperature and
closes.
Fusible link opens if terminator fails open and preset
high temperature is reached.
Defrost heater is suspended on left side of evaporator
coil and across bottom to keep defrost drain free
flowing during defrost. Defrost water is caught in
trough under evaporator coil and flows through drain
hole in liner and drain tubing into drain pan. Heated air
circulated by condenser fan over pan evaporates
water.
Defrost System–Electronic Models
See “Electronic Functional Description.”
April 1998 43 RS5290000 Rev. 0
Page 42

!
!
Service Procedures
WARNING
To avoid risk of electrical shock, personal injury, or death, disconnect electrical power source to unit and
discharge capacitor through a 10,000 ohm resistor before attempting to service, unless test procedures require
power to be connected. Ensure all earth wires are connected before certifying unit as repaired and/or operational.
Service Equipment
Listed below is equipment needed for proper servicing
of HFC134a systems. Verify equipment is confirmed
by manufacturer as being compatible with HFC134a
and ester oil system.
Equipment must be exclusively used for HFC134a.
Exclusive use of equipment only applies to italic items.
• Evacuation pump
Check with vacuum pump supplier to verify equipment
is compatible for HFC134a. Robinair, Model 15600, 2
stage, 170 litres (6 cubic feet) per minute pump is
recommended.
• Four-way manifold gauge set, with low loss hoses
• Leak detector
•
Charging cylinder
• Line piercing saddle valve
(Schroeder valves). Seals must be HFC134a and ester
oil compatible. Line piercing valves may be used for
diagnosis but are not suitable for evacuation or
charging, due to minute holes pierced in tubing. Do not
leave mechanical access valves on system. V alves
eventually will leak. Molecules of HFC134a are smaller
than other refrigerants and will leak where other
refrigerants would not.
• Swagging tools
•
Flaring tools
• Tubing cutter
• Flux
• Sil-Fos
• Silver solder
• Oil for swagging and flaring
Use only part #R0157532
• Copper tubing
Use only part #R0174075 and #R0174076
• Dry nitrogen
99.5% minimum purity , with -40°C (-40°F) or lower dew
point
• Crimp tool
• Tube bender
• Micron vacuum gauge
• Process tube adaptor kit
• Heat trap paste
• ICI appliance grade HFC134a
Drier Replacement
Prior to opening refrigeration system, recover
HFC134a refrigerant for safe disposal.
Every time sealed HFC134a system is repaired, drier
filter must be replaced with, part # B2150504.
Cut drier out of system by completing the following
steps. Do not unbraze drier filter. Applying heat to
remove drier will allow moisture into system.
WARNING
To avoid death or severe personal injury, cut drier at
correct location. Cutting drier at incorrect location will
allow desiccant beads to scatter. Completely clean
area of beads, if spilled.
1. Score capillary tube close to drier and break.
2. Reform inlet tube to drier allowing enough space for
large tube cutter.
3. Cut circumference of drier at 3 cm (1-1/4"), below
condenser inlet tube joint to drier.
4. Remove drier.
5. Apply heat trap paste on post condenser tubes to
protect grommets from high heat.
6. Unbraze remaining part of drier. Remove drier from
system.
7. Discard drier in safe place. Do not leave drier with
customer. If refrigerator is under warranty, old drier
must accompany warranty claim.
RS5290000 Rev. 0 44 April 1998
Page 43

!
!
Service Procedures
!
!
WARNING
To avoid risk of electrical shock, personal injury, or death, disconnect electrical power source to unit and discharge
capacitor through a 10,000 ohm resistor before attempting to service, unless test procedures require power to be
connected. Ensure all wires are connected before certifying unit as repaired and/or operational.
Refrigerant Precautions
WARNING
To avoid personal injury, do not allow refrigerant to
contact eyes or skin.
CAUTION
To avoid risk of property damage, do not use refrigerant
other than that shown on unit serial number
identification plate.
NOTE: All precautionary measures recommended by
refrigerant manufacturers and suppliers apply
and should be observed.
Line Piercing Valves
Line piercing valves can be used for diagnosis, but
are not suitable for evacuating or charging due to
holes pierced in tubing by valves.
NOTE: Do not leave line piercing valves on system.
Connection between valve and tubing is not
hermetically sealed. Leaks will occur.
Open Lines
During any processing of refrigeration system, never
leave lines open to atmosphere. Open lines allow water
vapor to enter system, making proper evacuation more
difficult.
Compressor Operational Test
(short term testing only)
If compressor voltage, capacitor, overload, and motor
winding tests are successful (do not indicate a fault),
perform the following test:
1. Disconnect power to unit.
2. Discharge capacitor by shorting capacitor
terminals through a resistor.
3. Remove leads from compressor terminals.
4. Attach test cord to compressor windings.
• Common lead on test cord attaches to C terminal
on compressor.
• Start lead on test cord attaches to S terminal on
compressor.
• Run lead on test cord attaches to M terminal on
compressor.
To AC supply
Switch
Compressor
Fuses
Attaching Capacitor for Compressor Test
5. Connect a known good capacitor into circuit as shown
above. For proper capacitor size and rating, see
Technical Sheet for unit under test.
NOTE: Ensure test cord cables and fuses meet
specifications for unit under test (see Technical
Sheet for unit under test).
6. Replace compressor protector cover securely.
7. Plug test cord into outlet, then press and release start
cord switch.
CRS
Capacitor
CAUTION
To avoid damage to compressor windings, immediately
disconnect (unplug) test cord from power source if
compressor does not start. Damage to compressor
windings occurs if windings remain energized when
compressor is not running.
If compressor runs when direct wired, it is working
properly. Malfunction is elsewhere in system.
If compressor does not start when direct wired, recover
system at high side. After the system is recovered,
repeat compressor direct wire test.
If compressor runs after system is recovered (but
would not operate when wired direct before recovery) a
restriction in sealed system is indicated.
If motor does not run when wired direct after recovery,
replace faulty compressor.
April 1998 45 RS5290000 Rev. 0
Page 44

!
Service Procedures
!
WARNING
To avoid risk of electrical shock, personal injury, or death, disconnect electrical power source to unit and discharge
capacitor through a resistor before attempting to service, unless test procedures require power to be connected.
Ensure all earth wires are connected before certifying unit as repaired and/or operational.
Dehydrating Sealed Refrigeration System
Moisture in a refrigerator sealed system exposed to
heat generated by the compressor and motor reacts
chemically with refrigerant and oil in the system and
forms corrosive hydrochloric and hydrofluoric acids.
These acids contribute to the breakdown of motor
winding insulation and corrosion of compressor
working parts, causing compressor failure.
In addition, sludge, a residue of the chemical reaction,
coats all surfaces of sealed system, and will eventually
restrict refrigerant flow through capillary tube.
To dehydrate sealed system, evacuate system (see
paragraph Evacuation).
Leak Testing
DANGER
To prevent serious injury or death from violent
explosions, NEVER use oxygen or acetylene for
pressure testing or clean out of refrigeration systems.
Free oxygen will explode on contact with oil. Acetylene
will explode spontaneously when put under pressure.
It is important to check sealed system for refrigerant
leaks. Undetected leaks can lead to repeated service
calls and eventually result in system contamination,
restrictions, and premature compressor failure.
Testing Systems Containing a Refrigerant Charge
1. Stop the operation (turn refrigerator off).
2. Holding leak detector exploring tube as close to
system tubing as possible, check all piping, joints,
and fittings.
NOTE: Use soap suds on areas leak detector cannot
reach or reliably test.
Testing Systems Containing No Refrigerant Charge
1. Connect cylinder of nitrogen, through gauge
manifold, to process tube of compressor and liquid
line strainer.
2. Open valves on nitrogen cylinder and gage
manifold. Allow pressure to build within sealed
system.
3. Check for leaks using soap suds.
If a leak is detected in a joint, do not to attempt to repair
by applying additional brazing material. Joint must be
disassembled, cleaned and rebrazed. Capture refrigerant
charge (if system is charged), unbraze joint, clean all
parts, then rebraze.
If leak is detected in tubing, replace tubing. If leak is
detected in either coil, replace faulty coil.
Refrigerant leaks are best detected with halide or
electronic leak detectors.
RS5290000 Rev. 0 46 April 1998
Page 45

Service Procedures
!
!
WARNING
To avoid risk of electrical shock, personal injury, or death, disconnect electrical power source to unit and discharge
capacitor through a 10,000 ohm resistor before attempting to service, unless test procedures require power to be
connected. Ensure all earth wires are connected before certifying unit as repaired and/or operational.
Restrictions
Symptoms
Restrictions in sealed system most often occur at
capillary tube or filter drier, but can exist anywhere on
liquid side of system.
Restrictions reduce refrigerant flow rate and heat
removal rate. Wattage drops because compressor is
not circulating normal amount of refrigerant.
Common causes of total restrictions are moisture,
poorly soldered joints, or solid contaminants. Moisture
freezes at evaporator inlet end of capillary tube. Solid
contaminants collect in filter drier.
If restriction is on low side, suction pressure will be in a
vacuum and head pressure will be near normal
If restriction is on high side, suction pressure will be in
a vacuum and head pressure will be higher than
normal during pump out cycle.
Refrigeration occurs on low pressure side of partial
restriction. There will be a temperature difference at
the point of restriction. Frost and/or condensation will
be present in most case at the point of restriction.
Also, system requires longer to equalize.
Slight or partial restriction can give the same
symptoms as refrigerant shortage including lower than
normal back pressure, head pressure, wattage, and
warmer temperatures.
Total restriction on the discharge side of compressor
when restriction is between compressor and first half
of condenser results in higher than normal head
pressure and wattage while low side is being pumped
out.
Testing for Restrictions
To determine if a restriction exists:
1. Attach gauge and manifold between suction and
discharge sides of sealed system.
2. Turn unit on and allow pressure on each side to
stabilize. Inspect condenser side of system.
Tubing on condenser should be warm and
temperature should be equal throughout (no
sudden drops at any point along tubing).
• If temperature of condenser tubing is consistent
throughout, go to step 4.
• If temperature of condenser tubing drops suddenly
at any point, tubing is restricted at point of
temperature drop (if restriction is severe, frost may
form at point of restriction and extend down in
direction of refrigerant flow in system). Go to step 5.
3. Visually check system for kinks in refrigeration line
which is causing restriction. Correct kink and
repeat step 2.
4. Turn unit off and time how long it takes high and
low pressure gauges to equalize:
• If pressure equalization takes longer than 10
minutes, a restriction exists in the capillary tube or
drier filter. Go to step 5.
• If pressure equalization takes less than 10 minutes,
system is not restricted. Check for other possible
causes of malfunction.
5. Recover refrigerant in sealed system.
NOTE: Before opening any refrigeration system,
capture refrigerant in system for safe disposal.
6. Remove power from unit.
CAUTION
To reduce risk of personal injury or property damage,
take necessary precautions against high temperatures
required for brazing.
7. Remove and replace restricted device.
8. Evacuate sealed system.
9. Charge system to specification.
NOTE: Do not use captured or recycled refrigerant in
Amana units. Captured or recycled refrigerant
voids any Amana and/or compressor
manufacturer's warranty .
NOTE: Charge system with exact amount of refrigerant.
See Technical Sheet or refer to unit nameplate
for correct refrigerant charge. Inaccurately
charged system will cause future problems.
April 1998 47 RS5290000 Rev. 0
Page 46

!
Service Procedures
!
WARNING
To avoid risk of electrical shock, personal injury, or death, disconnect electrical power source to unit and discharge
capacitor through a 10,000 ohm resistor before attempting to service, unless test procedures require power to be
connected. Ensure all earth wires are connected before certifying unit as repaired and/or operational.
Evacuation and Charging
CAUTION
To avoid risk of fire, sealed refrigeration system must be
air free. To reduce risk of air contamination, follow
evacuation procedures exactly.
NOTE: Before opening any refrigeration system, EPA
regulations require refrigerant in system to be
captured for safe disposal.
Proper evacuation of sealed refrigeration system is an
important service procedure. Usable life and
operational efficiency greatly depends upon how
completely air, moisture and other non-condensables
are evacuated from sealed system.
Air in sealed system causes high condensing
temperature and pressure, resulting in increased
power requirements and reduced performance.
Moisture in sealed system chemically reacts with
refrigerant and oil to form corrosive hydrofluoric and
hydrochloric acids. These acids attack motor windings
and parts, causing premature breakdown.
Before opening system, evaporator coil must be at
ambient temperature to minimize moisture infiltration
into system.
Evacuation
To evacuate sealed refrigeration system:
1. Connect vacuum pump, vacuum tight manifold set
with high vacuum hoses, thermocouple vacuum
gauge and charging cylinder as shown in illustration.
Evacuation should be done through I.D. opening of
tubes not through line piercing valve.
2. Connect low side line to compressor process tube.
3. Connect high side line to drier/process tube.
4. Evacuate both simultaneously. With valve “C” and “F”
closed, open all other valves and start vacuum pump.
E
High Side Gauge
D
Valve
Chargi ng Hose
C
B
A
Drier/Process Tube
F
Valve
Charging
Cylinder
Thermistor
Vacuum Gauge
Compressor
Low Side Gauge
Chargi ng Hose
Compressor
Process
Tube
.6 cm Copper
Tubing
Valve
Vacuum Pump
Equipment Setup For Evacuation And Charging
5. After compound gauge (low side) drops to
approximately 29 inches gauge, open valve “C” to
vacuum thermocouple gauge and take micron
reading.
NOTE: A high vacuum pump can only produce a good
vacuum if oil in pump is not contaminated.
6. Continue evacuating system until vacuum gauge
registers 600 microns.
7. At 600 microns, close valve “A” to vacuum pump and
allow micron reading in system to balance. Micron
level will rise.
• If in 2 minutes, micron level stabilizes at 1000
microns or below, system is ready to be charged.
• If micron level rises above 1000 microns and
stabilizes, open valve “A” and continue evacuating.
• If micron reading rises rapidly and does not
stabilize, a leak still exists in system.
Close valve “A” to vacuum pump and valve “C” to
vacuum gauge. Invert charging cylinder and open
charging cylinder valve “F” to add partial charge for
leak checking. With leak detector, check manifold
connections and system for leaks. After locating
leak, capture refrigerant, repair leak, and begin at
step 1.
RS5290000 Rev. 0 48 April 1998
Page 47

Service Procedures
!
WARNING
To avoid risk of electrical shock, personal injury, or death, disconnect electrical power source to unit and discharge
capacitor through a 10,000 ohm resistor before attempting to service, unless test procedures require power to be
connected. Ensure all earth wires are connected before certifying unit as repaired and/or operational.
Charging
NOTE: Do not use captured or recycled refrigerant in
Amana units. Captured or recycled refrigerant
voids any warranty .
NOTE: Charge system with exact amount of refrigerant.
See Technical Sheet or refer to unit serial plate
for correct refrigerant charge. Inaccurately
charged system will cause future problems.
To charge system:
1. Close valves “A” to vacuum pump and “C” to vacuum
gauge and “E” to low side manifold gauge.
2. Set scale on dial-a-charge cylinder for corresponding
HFC134a pressure reading.
3. Open valve “F” to charging cylinder and let exact
amount of refrigerant flow from cylinder into system.
Close valve.
Low side gauge pressure should rise shortly after
opening charging cylinder valve as system pressure
equalizes through capillary tube.
If pressure does not equalize, a restriction typically
exists at capillary/drier braze joint.
4. If pressure equalizes, open valve “E” to low side
manifold gauge and pinch off high side drier process
tube.
5. Start compressor and draw remaining refrigerant
from charging hoses and manifold into compressor
through compressor process tube.
6. To check high side, pinch-off drier process tube.
Close valve “D” to high side gauge. If high side
pressure rises, repeat high side pinch-off and open
valve “D”. Repeat until high side pinch-off does not
leak.
7. Pinch-off compressor process tube and remove
charging hose. Braze stub closed while compressor is
operating.
8. Disconnect power. Remove charging hose and braze
high side drier process tube closed.
9. Recheck for refrigerant leaks.
Refrigerant Charge
Refrigerant charge in all capillary tube systems is
critical and exact amount is required for proper
performance. Factory charges are shown on serial
plate. Do not use refrigerant other than shown on
serial plate.
April 1998 49 RS5290000 Rev. 0
Page 48

Service Procedures
!
!
WARNING
To avoid risk of electrical shock, personal injury, or death, disconnect electrical power source to unit and discharge
capacitor through a 10,000 ohm resistor before attempting to service, unless test procedures require power to be
connected. Ensure all earth wires are connected before certifying unit as repaired and/or operational.
HFC134a Service Information
HFC134a is alternative refrigerant for CFC12.
HFC134a has an ozone depletion potential (ODP)
factor of 0.0 and a global warming potential (GWP)
factor of 0.27. HFC134a is not flammable and has
acceptable toxicity levels. HFC134a is not
interchangeable with CFC12. There are significant
differences between HFC134a and CFC12 which
must be considered when handling and processing
refrigeration system.
Health, Safety, and Handling
Health, safety and handling considerations for
HFC134A are virtually no different than those for
CFC12.
Health, Saf ety, and Handling CFC12 HFC1 34a
Allowable overall exposure limit 1,000 ppm Same
Vapor exposure to skin No effect Same
Liquid exposure to skin Can cause frostbite Same
Vapor exposure to eye Very slight eye irritant Sam e
Liquid exposure to eye Can cause frostbit Same
Above minimum exposure limit Can cause Asphyxiation,
Safety and handling Wear appropriate skin
Spill management Remove or extinguish
Fire explosion hazards May decompose if
Disposal procedures Recycle or reclaim. Same
Tachycardia, and Cardia
Arrhythmias
and eye protection. Use
with adequate
ventilation.
ignition or combustion
sources. Evacuate or
ventilate area.
contact with flames and
heating elements.
Container may explode
if heated due to resulting
pressure rise.
Combustion products
are toxic.
Comparison of CFC12 and HFC134a Properties
Properties/Characteristics CFC12 HFC134a
Ozone Depletion Potential (ODP) 1.0* 0.0*
Global Warming Potential (GPW) 3.2* 0.27*
Molecular weight 121 102
Boiling point at 1 atmosphere -22°F (-30°C) -15°F (-
Vapor pressure at 77°F (25°C) 80 psig 82 psig
Liquid density at 77°F (25°C) 82 lb/ft
Flammability No No
High-side system operating
Pressure at 65°F (18°C)
Low-side system operating
Pressure at 65°F (18°C)
HFC134a approximately 3 psig
higher than CFC12
HFC134a approximately 2 psig
lower than CFC12
3
Same
Same
Same
Same
26°C)
75 lb/ft
Caution
To minimize contamination, exercise extreme
care when servicing HFC134A sealed systems.
• No trace of other refrigerants is allowed in HFC134a
systems. Chlorinated molecules in other refrigerants
such as CFC12, etc. will lead to capillary tube
plugging.
• Ester oil is used in HFC134a systems. Do not use
mineral oil. HFC134a and mineral oils cannot be
mixed. If mineral oils were used in HFC134a systems,
lubricant would not return to compressor and would
cause early compressor failure. If significant amount
of oil has been lost from compressor, replace oil
rather than adding oil.
• Ester oils used in HFC134a systems are so
hydroscopic that by the time an inadequate system
performance is detected, oil will be saturated with
moisture.
• CFC12 has much higher tolerance to system
processing materials, such as drawing compounds,
rust inhibitors, and cleaning compounds, than
HFC134a. Such materials are not soluble in HFC134a
systems. If materials were to be washed from system
surfaces by ester oils, they could accumulate and
eventually plug capillary tube.
• Care must be taken to minimize moisture from
entering HFC134a system. Do not leave compressor
or system open to atmosphere for more than 10
minutes. Excessive moisture in HFC134a system will
react with compressor oil and generate acid.
• Compressor must be replaced when performing low
side leak repair.
• Drier filter must always be replaced with service drier
filter, part #B2150504.
Important: Unbrazing drier filter from tubing will drive
moisture from desiccant and into system, causing
acids to form. Do not unbraze filter drier from tubing.
If CFC12 service drier was installed in HFC134A
system, drier could overload due to excessive
moisture.
• HFC134a compatible copper tubing, part #R0174075
3
and part #R0174076 must be used when replacing
tubing.
• Avoid system contamination by using T owerdraw E610
evaporating oil, part # R0157532, when flaring,
swagging, or cutting refrigeration tubing.
RS5290000 Rev. 0 50 April 1998
Page 49

Service Procedures
!
!
!
WARNING
To avoid risk of electrical shock, personal injury, or death, disconnect electrical power source to unit and discharge
capacitor through a 10,000 ohm resistor before attempting to service, unless test procedures require power to be
connected. Ensure all earth wires are connected before certifying unit as repaired and/or operational.
Replacement Service Compressor
HFC134a service compressors will be charged with
ester oil and pressurized with dry nitrogen. Before
replacement compressor is installed, pull out 1 rubber
plug. A
a
Positive pressure in compressor is vital to keep
moisture out of ester oil. Do not leave compressor
open to atmosphere for more than 10 minutes.
Compressor Testing Procedures
pop
from pressure release should be heard. If
pop
sound is not heard, do not use compressor.
WARNING
To avoid death or severe personal injury, never use
oxygen, air or acetylene for pressure testing or clean
out of refrigeration system. Use of oxygen, air, or
acetylene may result in violent explosion. Oxygen may
explode on contact with oil and acetylene will
spontaneously explode when under pressure.
Refer to “Temperature and Relationship Chart” for
operating watts, test points, and temperature relationship
test.
• T emperature testing is accomplished by using 3 lead
thermocouple temperature tester in specific locations.
Test point T-1 is outlet on evaporator coil and T-2 is
inlet. Test point T-3 is suction tube temperature
midway between where armaflex ends and suction
port of compressor (approximately 12 inches from
compressor).
• Thermocouple tips should be attached securely to
specified locations.
• Do not test during initial
or balanced temperature condition to occur before
proceeding with testing.
• Refrigerator must operate minimum of 20 minutes
after thermocouples are installed.
• Turn control to colder to obtain required on time.
• Wattage reading must be recorded in conjunction with
temperature test to confirm proper operation.
• Suction and head pressures are listed on
“Temperature and Relationship Chart” Normally these
are not required for diagnosis but used for
confirmation on systems which have been opened.
pull down
. Allow one off cycle
Brazing
CAUTION
To reduce risk of personal injury or property damage,
take necessary precautions against high temperatures
required for brazing.
Satisfactory results require cleanliness, experience,
and use of proper materials and equipment.
Connections to be brazed must be properly sized, free
of rough edges, and clean.
Generally accepted brazing materials are:
• Copper to copper joints: SIL-FOS (alloy of 15
percent silver, 80 percent copper, and 5 percent
phosphorous). Use without flux. Recommended
brazing temperature is approximately 760°C (1400°F).
Do not use for copper to steel connection.
• Copper to steel joints: SILVER SOLDER (alloy of 30
percent silver, 38 percent copper, 32 percent zinc).
Use with fluoride based flux. Recommended brazing
temperature is approximately 649°C (1200°F).
• Steel to steel joints: SILVER SOLDER (see copper
to steel joints).
• Brass to copper joints: SILVER SOLDER (see
copper to steel joints).
• Brass to steel joints: SILVER SOLDER (see copper
to steel joints).
Checking Electric Heater Assembly
1. Disconnect power to unit.
2. Ensure heater element is cold, then remove
suspect heater and visually inspect element for
obvious damage (breaks, cracks in element, etc.).
3. Attach ohmmeter to element leads. Check for
continuity (see tech sheet for unit under test).
If element reads open (infinite or very high resistance):
4. Check disc type thermostat for continuity (see tech
sheet for open and close values). If open replace.
April 1998 51 RS5290000 Rev. 0
Page 50

Refrigerant Flow
FLANGE LOOP
CAPILLARY/SUCTION LINE
HEAT EXCHANGER
EVAPORA TOR INLET
(REFRIGERANT LIQUID)
FLANGE LOOP
CENTER
MULL ION LOOP
EVAPORATOR OUTLET
(VAPOR)
EVAPORATOREVAPORATOR
CAPILLARY TUBE
COMPRESSOR
SUCTION LINE
1/4 0.D.
PROCESS TUBE
HIGH SIDE
DRIER
CONDENSER FAN
COMPRESSOR
1/4 0.D.
PROCESS TUBE
CONDENSER OUTLETCONDENSER OUTLET
CONDENSERCONDENSER
COMPRESSOR
DISCHARGE LINE
RS5290000 Rev. 0 52 April 1998
CENTER
MULL ION LOOP
“T” Model Side x Side
Refrigerant Flow Diagram
22/25/27 Cubic Foot Only
Page 51

Refrigerant Flow
EVAPORATOR OUTLET
(VAPOR)
April 1998 53 RS5290000 Rev. 0
“T” Model Side x Side
Refrigerant Flow Diagram
20 Cubic Foot Only
Page 52

Cabinet Air Flow
BEVERAGE CHILLER
AIR SUPPLY
(SOME MODELS)
RS5290000 Rev. 0 54 April 1998
“T” Model Side x Side
Air Flow Diagram
22/25/27 Cubic Foot Only
Page 53

Cabinet Air Flow
April 1998 55 RS5290000 Rev. 0
“T” Model Side x Side
Air Flow Diagram
20 Cubic Foot Only
Page 54

Water Flow
ICE & WATER
DISPENSER
1/4" O.D.
PLASTIC
TUBING
ICE MAKER
1/4" O.D.
PLASTIC
TUBING
INCOMING WATERINCOMING WATER
LINE CONECTIONLINE CONECTION
(HOSE COUPLING(HOSE COUPLING
X 1/4" O.D.X 1/4" O.D.
COPPER TUBECOPPER TUBE
FITTINGFITTING
SOLENOID
VALVE
(DOUBLE)
1/4" O.D. X 5/16" O.D.
PLASTIC COMPRESSION
UNION
Dispenser Water Temperature Chart
18
16
14
12
10
5/16" O.D.
PLASTIC
TUBING
1/4" O.D.
PLASTIC
TUBING
“T” Model Side x Side
Ice & Water Dispenser
Water Flow Diagram
Water Temperature Chart (Approximate)
WATER
RESERVOIR
8
6
Temperature in Celsius
4
2
0
12345
Water temperature has stabilized for at least 12 hours in water reservoir
Fresh food compartment temperature is 3-4 degrees Celsius
RS5290000 Rev. 0 56 April 1998
Number of 8-ounce Glasses of Water
90° Ambient
Normalized 39°
64° Ambient
Normalized 39°
Page 55

Typical External Sweat Pattern
CLASSIFICATION OF CONDENSATION
1=Haze or Fog
2=Beading
3=Beads or small drops
4=Drops running together
BTM
LM
3
3
3
3
3
3
2
2
April 1998 57 RS5290000 Rev. 0
Page 56

!
Disassembly
!
WARNING
To avoid risk of electrical shock, personal injury , or death, disconnect electrical power source to unit and discharge
capacitor through a resistor before attempting to service, unless test procedures require power to be connected.
Ensure all earthing wires are connected before certifying unit as repaired and/or operational.
Freezer or Refrigerator Door
1. Remove toe grille.
Electronic Models
2. Unplug wiring harness from voltage box.
High Voltage Box
Dispenser Models
3. Loosen water tube clamp screw. Loosen plastic
water tube union nut. Pull water tube away from
union nut and through tube clamp.
Plastic water tube
union nut
Water tu b e
Water Tube Connection
Door Stop and Top Door Closure
1. Remove door from cabinet.
2. Remove screw mounting top door closure.
Water tube
clamp screw
Freezer Door Top Hinge
1. Secure freezer door to cabinet in closed position
with strapping tape.
CAUTION
To prevent personal injury or property damage due to
door falling, always secure door to cabinet with
strapping tape before top hinge is removed.
Wire
harness
Hinge
cover
2. Remove freezer hinge cover.
3. Unplug cabinet to freezer door wiring harness
connector blocks.
4. Remove earthing screw and three freezer hinge to
cabinet mounting screws.
5. If present, slide hinge and nylon door bushing out
of door and off freezer door wiring harness.
Combination Door Closure and Lower Hinge
1. Remove door from cabinet.
2. Remove one bottom door closure mounting screw
and remove closure.
3. Remove two hinge mounting screws and door
hinge.
Door
hinge
screws
Top
hinge
connectors
Ground
wire
3. Remove two screws mounting door stop to bottom
edge of door.
RS5290000 Rev. 0 58 April 1998
Page 57

!
WARNING
To avoid risk of electrical shock, personal injury, or death, disconnect electrical power source to unit and discharge
capacitor through a resistor before attempting to service, unless test procedures require power to be connected.
Ensure all earthing wires are connected before certifying unit as repaired and/or operational.
Freezer Door Wiring Harness (All Non-electronic
Dispenser Models)
NOTE: Freezer door wiring harness on electronic
models is foamed into place at factory and is not
replaceable as a separate part.
1. After removing door, remove inner door liner,
cavity styrofoam cavity liner and insulation around
cavity.
2. Locate wiring harness inside place sleeve along
handle flange of door.
3. Attach a string or wire to wiring harness going
through top hinge. Pull string through as harness is
removed.
NOTE: For reassembly , pull new harness into place
through plastic sleeve using string to guide new
harness.
Freezer Door Water Tube
1. Remove freezer door.
2. Remove inner door liner
3. Locate water tube next to left flange of door. Water
tube runs inside large plastic sleeve.
4. Free tube from cavity and slide water tube down
and out through hole in door closure.
Refrigerator Door
Refrigerator door wiring harness on some models is
foamed into place in door and is not replaceable.
1. Remove toe grille.
2. Disconnect 12-pin connector from high voltage
board.
3. Remove refrigerator door top hinge cover and
unplug wire connector.
4. Remove earthing wire screw.
5. With refrigerator door open, remove single screw
mounting door closure to top of bottom hinge.
6. With refrigerator door closed, remove three top
hinge screws and pull wiring harness through
hinge.
7. Lift door about 3 inches to allow lower door closure
to clear hinge pin.
8. Carefully rest bottom edge of door on protective
pad wile removing hinge pin which press fits into
refrigerator bottom hinge bracket.
NOTE: On electronic models when replacing bottom
door bushing, hinge pin, or door extract low
voltage wiring from connector at high voltage
board. The wiring colors and corresponding pin
connector numbers are shown below.
#1 2
#1
BLUE
GRAYWHITE
LT. BLUE
GREE N/YELLOW
#8 SPACE IS OPEN
ORANGE
TAN
VIOL ET
PINK
GRAY
YELLOW
BLUE/WHITE
A straightened standard size paper clip can be
used to push pins down and out of connector to
release wires.
When reinstalling pins, make certain pins lock
into connector. It may be necessary to gently
pry up on pin before reinstalling to assure it
locks into connector when reinstalled.
Refrigerator Door Handle (Built-in and Electronic
Models)
1. Remove top and bottom caps by pulling away from
door handles.
2. Remove plastic insert by sliding insert up and out
of door handle.
3. Remove seven mounting screws from handle and
lift handle away from door.
NOTE: On electronic models, carefully disconnect
control ribbon connector from low voltage board.
Refrigerator or Freezer Handle (Free Standing
Models)
1. Unsnap top and bottom door handle trim by
carefully prying up under outside edge of trim to
release trim from retainer.
NOTE: Be careful to catch trim pieces located between
trim strips and door handle.
2. Remove door handle by removing two screws,
exposed after trim is removed.
April 1998 59 RS5290000 Rev. 0
Page 58

!
WARNING
To avoid risk of electrical shock, personal injury , or death, disconnect electrical power source to unit and discharge
capacitor through a resistor before attempting to service, unless test procedures require power to be connected.
Ensure all earthing wires are connected before certifying unit as repaired and/or operational.
Handle Side Door Trim Retainers
1. Remove door trim by prying up carefully under
outside edge of retainer.
2. Remove phillips mounting screws.
Door Gasket
1. Remove door.
2. Place door face down on a protected surface with
door handle extending beyond the edge of surface.
3. Lift gasket away from door and loosen all
mounting screws.
4. Pull gasket out and away from door liner.
Inner Door Liner
1. Remove door.
2. Place door face down on a protected surface with
door handle extending beyond edge of surface.
Door Position to Remove Inner Door Liner
3. Lifting gasket away from the door, remove all
mounting screws, retainers (freezer door only),
and gasket.
Low Voltage Board
1. Remove door handle.
2. Remove four mounting screws holding circuit
board to refrigerator door.
3 Tilt board and pull board from cavity.
4. Unplug connector from board by inserting flat
blade screwdriver in either end of connector and
pry apart.
NOTE: Do not try to unplug connector by pulling on wire
harness.
Ice and Water Cavity
1. Remove escutcheon by removing two phillips
screws at bottom of escutcheon and lifting
escutcheon off.
2. Remove electric mounting bracket by removing
mounting screws at each side of plate.
3. Remove ten screws securing perimeter of cavity to
door.
4. Pull out top of cavity slightly exposing where
waterline held in notch by washer type clip.
5. Push electrical grommet back and out of cavity
hole in left side of cavity.
6. Tip cavity out at top and lift slightly so cavity sump
clears bottom edge of opening.
Cavity Heater
1. After removing cavity, unplug cavity heater from
door harness.
2. Carefully peel cavity heater off back of cavity.
Electrical Mounting Bracket
1. Remove escutcheon by removing two phillips
mounting screws at bottom of escutcheon and
lifting escutcheon off.
2. Remove mounting screws at each side of plate.
3. Separate bracket from cover to access Ice
Dispenser Switch, Water Dispenser Switch, Cavity
Light Switch, Cavity heater Switch, Cube/Crushed
Switch, and Cavity light bulb.
Water Actuator Arm
1. Remove escutcheon and electrical mounting
bracket.
2. Remove two screws and two retainers.
3. In reassembly, return spring straddles arm and
rides up against top section of arm.
Ice Actuator Arm
1. Remove escutcheon and electrical mounting
bracket.
2. Remove two screws and the two retainers.
3. Slide arm down and out from under chute door
while disconnecting door closure delay
mechanism.
Door Closure Delay Mechanism (Ice and Water Models)
1. Remove one screw.
2. Disconnect from ice actuator arm and remove.
Chute Door (Ice and Water Models)
1. Remove escutcheon, electrical bracket, and ice
actuator arm.
2. Remove two screws to remove chute door, spring,
and hinge from cavity.
3. To separate chute door from hinge, remove pin.
RS5290000 Rev. 0 60 April 1998
Page 59

!
Disassembly
WARNING
To avoid risk of electrical shock, personal injury, or death, disconnect electrical power source to unit and discharge
capacitor through a resistor before attempting to service, unless test procedures require power to be connected.
Ensure all earthing wires are connected before certifying unit as repaired and/or operational.
Cabinet Components
Refrigerator Temperature Control
1. Remove control knobs (nonelectronic models).
2. Loosen bracket on bottom left of cover to allow
cover to be rotated forward.
3. Pull bottom of cover out until it unsnaps. Continue
tilting cover out until top tabs release and remove
cover.
4. Remove insulation over top of damper.
5. Remove styrofoam filler piece from control body
exposing two mounting screws.
6. Remove mounting screws to remove control.
Air Duct
Gasket
Insu la tion
Control
Kno bs
Freezer
Control
Control Cover
Control Co ver
Bracket
Air Duct
Gasket
Damper
Front
Gaske t
Da mper
Gasket
Damper Control
Dampe r Co n tr o l
Ins er t
Spacers
Air Duct
Clamp
Thermistor
Spacer
Damper
Control
Cover
Damper
Front
Gasket
Damper
Control
Insert
Gasket
Damper
Control
Air Duct
Clamp
Electronic Models Temperature Control
Freezer Temperature Control (Nonelectronic Models)
1. Remove control knobs.
2. Loosen brace on bottom left of cover to allow
cover to be rotated forward.
3. Pull bottom of cover out until it unsnaps. Continue
tilting cover out until top tabs release and remove
cover.
4. Remove two control mounting screws.
5. Remove sealer from control capillary well.
NOTE: Replace sealer during reassembly .
6. Pull control out of bracket.
7. Disconnect wiring from rear of control.
8. Remove capillary from well and remove control.
Non-electronic Models Temperature Control
Refrigerator Light Switch
1. Remove two screws on rear corners of lens.
2. Remove two screws located on front of shield,
behind trim piece.
3. Remove two screws on rear of light shield and
slide shield back until released.
4. Slide switch mounting plate back until released
from refrigerator top.
5. Remove wiring to switch.
6. Press in on tab located on the opposite side of
electrical tabs and push switch through mounting
plate.
Freezer Light/Auger Motor Interlock Switch
1. Remove two mounting screws from plate.
2. Slide switch mounting plate back until released.
3. Remove wiring to switch.
4. Press in on tabs and push switch through
mounting plate.
April 1998 61 RS5290000 Rev. 0
Page 60

!
!
!
Disassembly
WARNING
To avoid risk of electrical shock, personal injury , or death, disconnect electrical power source to unit and discharge
capacitor through a resistor before attempting to service, unless test procedures require power to be connected.
Ensure all earthing wires are connected before certifying unit as repaired and/or operational.
Refrigerator Light Lens and Light Bulbs
CAUTION
To avoid risk of burns, be sure bulb is cool before
removing.
1. Remove two mounting bolts on rear corners of
lens.
2. Loosen two mounting bolts on front of lens behind
trim piece.
3. Slide lens back until it releases from mounting
bolts.
NOTE: Bulbs are standard base screw in type 25 watt
appliance bulbs.
Refrigerator Light Socket
1. Remove two mounting bolts on rear corners of
lens.
2. Loosen two mounting bolts on front of lens behind
trim piece.
3. Slide lens back until it releases from mounting
bolts.
4. Remove wiring to socket.
5. Socket snaps out of shield by pressing on two tabs
on top and bottom of socket.
Freezer Light Bulb, Light Socket.
CAUTION
To avoid risk of burns, be sure bulb is cool before
removing.
1. Remove ice bucket (if applicable).
2. Remove lens top mounting screw and remove lens
by lifting up.
NOTE: Bulbs are standard base screw in type 25 watt
appliance bulbs.
3. Remove two plate mounting screws from behind
facade and pull facade and mounting plate away
from freezer ceiling.
4. Disconnect wiring to socket.
5. Remove socket by pressing on tabs on either side
of socket.
Center Mullion
Center mullion is not replaceable.
Freezer Wire Shelf and Shelf Retainers
1. Maneuver stops around retainers and pull wire
shelves or baskets out from retainers.
2. Grasp retainer firmly and slide up until released.
Freezer Basket Slide Retainer
• Remove two mounting screws and remove
retainer.
Evaporator
Freezer Evaporator Cover
1. Remove freezer shelves, freezer basket, ice
service rack, and icemaker.
2. Remove 1/4" hex head mounting screws on
evaporator cover.
3. Push ice maker electrical block through opening in
panel. Remove panel.
Freezer Thermistor (Electronic Models)
1. Remove eight 1/4” hex head screws retaining
evaporator cover.
2. Remove leads.
3. Remove thermistor by removing 2 screws.
Defrost Thermostat (Terminator)
1. Remove eight 1/4” hex head scres retaining
evaporator cover.
2. Unclip thermostat from outlet on evaporator coil.
3. Disconnect leads.
4. Slide clamps from around evaporator tubing and
remove thermostat.
Evaporator Defrost Heater
1. Remove evaporator cover and thermistor, if
necessary.
2. Remove one 1/4" hex head screw from left side of
coil and 2 from right side.
3. Remove defrost thermostat.
4. Tip bottom of evaporator coil out.
5. Remove 2 wire clips.
6. Slide heater down and out from coil.
7. Unplug heater leads.
RS5290000 Rev. 0 62 April 1998
Page 61

!
Disassembly
WARNING
To avoid risk of electrical shock, personal injury, or death, disconnect electrical power source to unit and discharge
capacitor through a resistor before attempting to service, unless test procedures require power to be connected.
Ensure all earthing wires are connected before certifying unit as repaired and/or operational.
Evaporator
NOTE: Evaporator and heat exchanger must be
replaced as an assembly .
Reclaim refrigerant before proceeding with evaporator
removal. To avoid refrigeration system contamination,
do not leave refrigeration system or compressor open
for more than 10 minutes.
1. Remove evaporator cover and thermistor, if
necessary.
2. Remove one 1/4" hex head screw from left side of
coil and 2 from right side.
3. Remove defrost thermostat.
4. Remove defrost heater by removing wire clips
holding heater to bottom of evaporator coils.
5. Remove machines compartment and heat
exchanger covers.
NOTE: On some models special driver (part
#921 13P01) will be necessary to remove screws
securing heat exchanger cover.
6. Shield interior components from heat source and
unbraze suction tube at compressor.
7. Score and break capillary tube at drier.
8. Straighten heat exchanger and pull evaporator out
of plastic clips holding it to back wall of unit. Pull
evaporator and heat exchanger through front of
refrigerator as a unit.
NOTE: If styrofoam block on outer case back wall is
damaged during evaporator removal, seal
damaged area with mastic sealer.
Evaporator Fan Motor
1. Remove ice bucket and freezer shelves.
2. Remove freezer back panel.
3. Remove two 5/16" hex head screws from
evaporator fan motor mounting bracket.
4. Maneuver motor/bracket from housing.
5. Remove lead and earthing wires.
6. Remove two 1/4" hex head screws from brackets.
Fan Blade
Fan Motor
Bracket
Fan Grommet
Fan Motor
Fan Motor
Bracket
Fan Grommet
Evaporator Fan Blade
1. See Evaporator Fan Motor steps 1-4
.
2. Pull fan blade off motor shaft. When replacing fan
blade, 1.2 cm (1/2") of motor shaft should extend
through hub of fan blade.
Auger Motor (Ice and Water Models)
1. Remove ice bucket.
2. Remove left-handed locking nut from motor shaft.
3. Remove motor mounting backet cover by
removing two mounting screws.
4. Remove four bolts securing motor to auger motor
support and back motor out of bracket. Remove
leads from motor.
Auger Motor
Driver
Locking Nut
Capaci tor
Auger Motor
Support
Auger Motor
Cover
Auger Motor
Front Roller Assembly
Refrigerator can not be installed when replacing roller
assembly.
1. Remove toe grille
2. Raise front of refrigerator 10 cm (4”) from floor.
3. Remove two hex head screws mounting roller
brack housing.
4. Remove leveling bolt and disassemble housing
from roller bracket assembly.
Rear Roller Assembly
1. Remove machine compartment cover.
2. Raise left or right side of refrigerator on 10 cm (4”)
block.
3. Remove #27 torx bolt going up through rear rail
and into bottom of cabinet foot.
4. Drop rail slightly and slide roller pin towards
outside of cabinet and out of rail.
April 1998 63 RS5290000 Rev. 0
Evaporator Fan
Page 62

!
Disassembly
WARNING
To avoid risk of electrical shock, personal injury , or death, disconnect electrical power source to unit and discharge
capacitor through a resistor before attempting to service, unless test procedures require power to be connected.
Ensure all earthing wires are connected before certifying unit as repaired and/or operational.
Water Valve
1. Remove machine compartment cover and heat
exchanger cover on rear of unit.
NOTE: On some models special driver (part
#92113P01) will be necessary to remove screws
securing heat exchanger cover.
2. Disconnect water supply.
3. Remove brass nuts at water valve inlet and outlet.
4. Pull copper tubing from water valve. Anti-kink
springs are installed in plastic tubing connecting to
valve.
Water Valve
Water
Valve
Brass Sleeve
Nut
Plastic
Tube
Anti-kink
Spring
Plate
Water Valve
5. Unplug wiring harness.
Water Tank (Ice and Water Models)
Before removing water tank have container available
to catch contents of water tank.
1. Remove shelves and drawers in refrigerator and
unsnap top of tank cover and remove cover. OR
2. Remove four screws mounting machine
compartment air baffle.
3. Remove water lines by loosening two B-nuts
securing water lines to tank.
4. Remove two tank mounting screws at top of tank.
Shelf Support Ladders
1. Remove shelves
2. Remove four #15 torx screws for each ladder.
Machine Compartment
1. Remove machine compartment cover on rear of
unit and heat exchanger cover.
Note: Some models have two tamper resistant screws
and will require special driver part #92113P01 to
remove.
Note: Always recover refrigerants before any sealed
system component repair or replacement.
Replace drier when performing a sealed system
repair with Amana drier.
2. Remove one bolt from left and one bolt from right
of compressor base pan.
3. Pull compressor base pan slowing towards rear
reforming tubing carefully as necessary to avoid
kinking and pinching.
4. Pull pan out a maximum of approximately 20 cm
(8”) from rear. This will allow compressor to be
removed, leak check of all condenser joints, and/
or replacement or cleaning of condensate pan.
Pulling pan out more than 20 cm (8”) will drop base
pan off front glide rail.
Condensate Drain Pan (20 Cubic Foot Models Only)
Before removing drain pan, have towels ready to
absorb condensation.
1. Remove toe grille.
2. Pull pan forward.
Condensate Drain Pan (All Other Models)
1. Remove machine compartment cover on rear of
unit and heat exchanger cover.
2. Remove one bolt from left and one bolt from right
of compressor base pan.
3. Pull compressor base pan slowing towards rear
reforming tubing carefully as necessary to avoid
kinking and pinching.
4. Pull pan out a maximum of approximately 20 cm
(8”) from rear. Reform tubing as necessary to
avoid kinking and pinching.
5. Condensate drain pan clips into place on top of
condenser. Release from tabs on condenser by
pulling drain pan up.
RS5290000 Rev. 0 64 April 1998
Page 63

!
WARNING
To avoid risk of electrical shock, personal injury, or death, disconnect electrical power source to unit and discharge
capacitor through a resistor before attempting to service, unless test procedures require power to be connected.
Ensure all earthing wires are connected before certifying unit as repaired and/or operational.
Compressor
1. See
Machine Compartment, Condenser,
Condenser Fan Access.
Note: Always replace drier when repairing refrigeration
system. Wear eye protection.
2. See
3. Remove two screws securing condenser fan
4. Unclip machine compartment wire harness from
5. Capture refrigerant charge.
6. Remove four 7/16" hex head shoulder bolts
7. Unbraze suction and discharge tubing from
8. Remove earthing wire screw to compressor.
9. Disconnect electrical leads at overload and relay.
Low Voltage Board
1. See
Overload and Relay
shroud to outer case back, if necessary.
condenser fan shroud and drier/filter from its metal
clip.
mounting compressor to machine compartment
floor.
compressor.
Low and High Voltage Board and Showroom
Switch Access.
2. Remove 4 Phillips screws.
3. Disconnect edge connector from right edge of
board.
4. Take readings at low voltage board.
High Voltage Board
1. Remove toe grille.
NOTE: The high voltage board is in the high voltage
board box mounting on the side of condenser on
20 cubic foot models and on front of condenser
on 27 cubic foot models.
2. Remove the mounting screw holding high voltage
board cover to chassis. Mounting screw on 20
cubic foot models is at front of mounting box.
Mounting screw on 27 cubic foot models is on right
of mounting box.
WARNING
To avoid electrical shock which can cause severe
personal injury or death, discharge capacitor before
handling.
3. Slide box foward (20 cubic foot) or to right until box
rear clip disengages from condenser.
4. Pull box out front of unit.
5. Carefully, remove wiring and harness from board.
6. Transfer wiring from old board to replacement
board.
7. Remove mounting screws securing high voltage
board to box.
Power Switch (Electronic Models Only)
Power switch at front of high voltage box interrupts
circuit to high voltage board.
1. See
2. Remove two screws mounting protective flap and
3. Disconnect leads from switch.
Compressor Run Capacitor (Fan Shroud Mounted)
1. Remove compressor compartment rear cover and
NOTE: On some models special driver (part
2. Remove two screws securing condenser fan
3. Unclip machines compartment wire harness from
4. Remove one bolt from left and one bolt from right
5. Pull compressor base pan slowly towards rear
6. Pull pan out a maximum of approximately 20 cm
7. Disconnect wiring to capacitor.
High Voltage Box
switch to high voltage box.
heat exchanger cover.
#921 13P01) will be necessary to remove screws
securing heat exchanger cover.
shroud to out case back.
condenser fan shroud and unclip drier.
of compressor base pan.
reforming tubing carefully as necessary to avoid
kinking and pinching.
(8”) from rear. This will allow compressor to be
removed, leak checking of all condenser joints,
and/or replacement or cleaning of condensate
pan. Pulling pan out more than 20 cm (8”) will drop
base pan off front glide rail.
.
WARNING
To avoid electrical shock which can cause severe
personal injury or death, discharge capacitor before
handling.
8. Remove nut securing capacitor to shroud and
remove capacitor.
April 1998 65 RS5290000 Rev. 0
Page 64

!
WARNING
To avoid risk of electrical shock, personal injury , or death, disconnect electrical power source to unit and discharge
capacitor through a resistor before attempting to service, unless test procedures require power to be connected.
Ensure all earthing wires are connected before certifying unit as repaired and/or operational.
Compressor Run Capacitor (Control Housing
Mounted)
1. Remove toe grille.
2. Remove mounting screw securing timer/capacitor
housing to condenser.
3. Remove top from housing by removing screw
securing top to housing.
4. Disconnect wiring to capacitor.
WARNING
To avoid electrical shock which can cause severe
personal injury or death, discharge capacitor before
handling.
5. Remove nut securing capacitor to housing and
remove capacitor.
Overload and Relay
1. See
2. Remove bale strap from compressor terminal
3. Remove electrical leads from overload and relay.
4. Pull overload lead off compressor common termal
Condenser Fan Blade
1. See
2. Remove nut from motor shaft.
3. Remove fan blade. Replace rubber washer behind
Condenser Fan Motor
1. See
2. Remove compressor electrical cover and remove
3. Remove three hex head screws mounting motor to
Compressor, Condenser, Condenser Fan
Access.
cover and remove cover.
and pull relay off compressor start and run
terminals.
Compressor, Condenser, Condenser Fan
Access.
fan blade when reassembling.
Condenser Fan Blade
both motor leads from overload and relay and
earthing wires.
brackets.
Condenser
1. See
2. See
Note: Condenser is only available as assembly with
Drain Tube
1. Remove machine compartment rear cover and heat
NOTE: On some models special driver (part
2. Remove two screws securing condenser fan
3. Unclip machine compartment wire harness from
4. Remove one bolt from left and one bolt from right
5. Slide compressor compartment out rear of unit
6. Remove “P” clamps attaching drain tube to the
7. Pull drain tube off nipple in machine compartment
Compressor, Condenser, Condenser Fan
Access.
Condenser Fan Motor,
base pan.
exchanger cover.
#921 13P01) will be necessary to remove screws
securing heat exchanger cover.
shroud out case back, if necessary.
condenser fan shroud. Unclip drier.
side of compressor compartment pan.
approximately 8 cm (3”).
ceiling of machine compartment.
ceiling.
steps 1-3.
RS5290000 Rev. 0 66 April 1998
Page 65

Ice Maker
!
Operation
When the thermostat has sensed temperature -8.3°
±1.5° C (17° ±3° F), the thermostat closes. The current now has a path through the thermostat to the motor (see wiring diagram). The motor is linked with the
drive gear. From the module, there are copper contacts that ride on copper strips on backside of drive
gear. As the drive gear rotates, these contacts will
make or break a circuit (tract) to the copper strips to
operate the ice maker.
The design of the ice maker allows all of the components to be tested without removing the ice maker or
moving the refrigerator away from the wall to access
the water valve.
Remove the cover and you will see the test points
identified on the module.
N = Neutral side of line
M = Motor connection
H = Heater Connection
T = Thermostat connection
L = L1 side of line
V = Water valve connection
NOTE: Read this section completely before doing any
testing or adjusting.
The test holes are identified as
N, M, V,
etc.
Specifications
Mold Heater -185 Watts, 264 Ohms
Thermostat -Close -8 ±1°C (17 ±3°F)
(Bimetal) Opens 0° ±1°C (17 ±3°F)
Water Fill -140 cc, 7.5 Sec.
Motor Cycle - Stamped in Circuit, Plug in Connec-
tors,
One Revolution of blades take three
minutes plug stall time on ice. (Eject
and Water Fill)
Testing Procedures
Ice maker plugged into power, shut-off arm down,
freezer cold
1. Test point L and N will verify 230 volts to Ice maker
module. Make sure test probes go into test points
1.3 cm (1/2").
2. Test points T and H will verify the bimetal thermostat is open or closed
Short T and H with an insulated piece of wire to run
motor. If the motor doesn't run, replace module assembly.
If the motor runs, replace the bimetal thermostat.
3. Leave the jumper in for half of a revolution, touch
the heater mold. If the mold feels warm, the heater
is working properly.
Remove jumper and the water valve will be energized in last half of revolution providing mold
heater has not failed.
(Make sure the freezer temperature is cold
enough to close the bimetal thermostat.)
April 1998 67 RS5290000 Rev. 0
CAUTI O N
Damage to ice maker can result if any other contacts
are shorted together other than those specified.
Page 66

(POWER TO ICE MAKER)
VOLT AGE
Ice Maker
!
Shunt Connection
A wire shunt made from an insulated piece of 14gauge wire with the ends stripped back about 5/8 inch
(1.5 cm).
MODULE OHMMETER CHECKS
(NO POWER TO ICE MAKER & EJECTOR
BLADES IN END OF CYCLE POSITION)
TEST POINTS COMPONENT
L - H MOLD HEATER
L - M MOTOR
MODULE
POSITION
ATTACHED TO
SUPPORT
SEPARATED
FROM HEATER
OHMS
264
16,100
Module, Motor, and Support Assembly
Insert phillips driver in access ports in module.
Loosen both screws. Disconnect shut-off arm. Pull
mold from support assembly. To remove module only,
remove three phillips screws and pull module out of
housing.
MODUL E VOLT AGE CHE CKS WIT H MET E R OR T ES T LIGHT
TEST POINTS COMPONENT
L - N MODULE POWE R OK NO POWE R
T - H BIMETAL OPEN CLOSED
L - H HE AT E R ON OFF
L - M MOTOR ON OFF
N - V WATER VALVE ON OFF
LIN E
0 VOLT S
Disassembly Procedures
Cover
Pull water adjustment knob first and snap off cover.
Note knob position and reinstall in same position for
same water fill.
CAUTION
To avoid possible electrical shock always turn off
power before beginning any disassembly.
Shut-Off Arm
Pull out from white bushing. Reinsert to full depth. Follow
steps 1, 2, and 3 below.
1. Push arm into
center slot in bushing bottom out.
Into Bushing
Water adjustmet
knob location
(not on all models)
3. Arm should be
insi d e housin g
edge.
Shut-off arm
Down position
Fill cup
2. Push arm
through fill
cup flange hole
past notch
Module and Heater Assembly
Remove module and support assembly. Install on
new mold and heater assembly.
RS5290000 Rev. 0 68 April 1998
Page 67

Ice Maker
!
Fill Cup
Remove module and support assembly. Remove
ejector blades and shut-off arm. Pull fill cup from
mold.
Remove ap propriate
f ill cu p sl ot .
Ejector Blades or Stripper
Remove module and support assembly. When reinstalling ejector blades, realign "D" coupling with module cam.
F orcefully pull cup up
and out of s l ot.
CAUTION
To avoid damange to main assembly, do not rotate
blades or drive gear.
There are several switches which will jam if manually
turned counterclockwise and gears will be destroyed if
turned clockwise. To advance the ice maker into the
cycle, use a jumper to bridge H to R and unless the
motor is defective, it will run. (The shut-off arm must
be in the on position.)
NOTE: There are several slotted shafts on the motor
assembly board. Do not under any circumstances insert a screwdriver and attempt to turn these shafts.
The slots are to permit assembly only.
NOTE: There are not repairable or replaceable components in the module. Unless you are replacing the
module, there should be no need to remove it when
diagnosing or repairing the ice maker.
Accessing Control box
To remove motor and contact assembly from control box,
take out three screws (arrows) and pull free after disconnecting shut-off arm.
Water valve
energized
7.5 seconds
140cc fill
about 11:00
o'clock
Ejector blade stop position
(about 1:30 o'clock
Start position:
thermost at c loses,
moto r on,
heater on
Mold and Heater Screw Access Ports
April 1998 69 RS5290000 Rev. 0
Thermost at
opens in this
range of
rotation then
heater is off
6:00 o'c loc k
posit io n
Ejector stall on ice,
Motor on (30 seconds
to 5 minutes) about
4:00 o'c loc k
Page 68

Ice Maker
!
Water Fill Adjustment
Turning the water level adjustment screw will move
the contact in its relationship with the contact ring segment. This causes the contact to vary time the water
valve is energized, since the contact ring is tapered at
the end of the fill time.
Turning screw clockwise decreases fill; counterclockwise increase fill amount.
1/2 turn equals 20 cc or 1.2 seconds
Full turn equals 40 cc or 2.4 seconds
CAUTION
Maximum adjustment is one full turn either direction.
Additional rotation could damage module.
If water valve adjustment screw falls out, just put it
back in and align the hole in the hole as shown.
close. Where required, install the ASAP grandular activated carbon, odor, tastes, and sediment filter, Part
Number R0183114.
Mineral contact can also lime up the mold, causing
wicking of water over the mold and poor cube release.
Silicone is applied at the upper edges, around fill cup
and stripper.
Temperature Problems
Temperatures in freezer section which average above
the normal -18°±1°C (0° ±2°F) will slow production of
ice. Complaints of inadequate ice cube production
may be corrected by simply setting the freezer to a
colder temperature. The thermostat cycling temperature in the 1-revolution ice maker is -8° ±1°C (17°
±3°F). Obviously, the ice will be well frozen when
these temperatures are achieved but cycling time will
be slowed if freezer temperature is not cold enough to
achieve these mode temperatures easily.
NOTE: Only the thermostat, mold, with heater and
wiring harness, are replaceable. Any other failure (including the motor) requires replacement of the module
assembly. The service replaceable mold assembly
comes with a new mold heater installed.
External plastic parts are also replaceable.
A failed mold heater requires complete replacement of
the mold and mold heater assembly.
Water
Adjustment
Area
When small hole is centered in larger hole, the water fill
adjus tm e nt is for 7.5 sec ond fill tim e ( normal).
Water Problems
Water quality can cause ice makers to fail, or produce
unacceptable cubes. If mineral content or sand is a
problem, the screen in the fill valve can restrict, or a
particle of sand can keep the valve from seating properly. Results will be small crescents (or no ice) or
flooding of the ice container if the water valve does not
Servicing Thermostat
The thermostat can be removed and replaced having
been diagnosed as inoperative. Remove control box
from mold by taking out two phillips screws.
RS5290000 Rev. 0 70 April 1998
Page 69

Ice Maker
!
Pull (front of Black Housing) free of the mold, and see
the thermostat on mold side.
Using needle nose pliers, grasp one of the thermostat
clips and pull out. Press in new thermostat, making
sure pins are properly indexed. Using this procedure,
it is not necessary to remove the electrical assembly.
If replacing the module, transfer the clips to the new
mold support. (Use new thermal bonding material.)
Servicing Wire Harness
To remove wiring harness, depress retaining tab and
pull plug free.
Dual Water Valve
The dual water valve has two solenoids. When the tan
encapsulated solenoid is energized the amount of water allowed to enter ice maker mold is directly proportional to the length of time the water valve switch is
held closed by the timing cam.
Inside the valve is a flow washer which acts as a water
pressure regulator. Proper ice maker fill is 140 cc ±10
cc at 7.5 seconds of water fill at an inlet pressure
ranging from 1.4 to 8.2 bar (20 to 120 PSI).
When the light blue encapsulated solenoid is energized water flows through the coiled water tank to the
cavity spickett.
The water flow rate is to be 1.7 to 3.5 liter per minute
with 1.4 to 8.2 bar (20 to 120 PSI)pressure drop
across valve.
The valve also incorporates a 80 mesh screen water
strainer.
Wiring Harness
A one-time thermal fuse micro device 78°C (170° F) is
incorporated into the ice maker wiring harness to protect the plastic liner from melting if the ice maker
should overheat. The thermal fuse is spliced into the
red wire of the ice maker harness. The thermal fuse
is a 78° C (170°F) nonresettable fuse. A "No Ice"
complaint could be caused by excessive heat. Replacing only the wiring harness will only temporarily
solve the problem. The ice maker thermostats should
also be replaced
CAUTION
To avoid property damage, always test for water
leaks after repair or replacement of the water valve.
Do not over tighten connection to household water
supply.
April 1998 71 RS5290000 Rev. 0
Page 70

Ice Maker Troubleshooting Chart
I. NO ICE/LOW ICE PRODU CTION
1. Freezer not cold enough 1. Adjust Freezer or Repair Freezer
2. Broken Locking Tab on Vertical Cam 2. Change Ice Maker Module
3. Module Shut-Off Switch And Contacts Shorted & Burned 3. Change Ice Maker Module
4. Motor Stalled or Stripped 4. Change Ice Maker Module
5. Check Ej ector Positio n
A. Park (2:3 0 Ej ector Positio n)
1 Contaminated Modu le (No run when j ump ed
through "T" and "H" probe holes)
2 Open/Missing Thermostat 2. Install or Replace Themostat (Apply Fresh Alumilastic)
3 No Power To Icemaker (Harness) 3. Trace Power to Determine Discontinuity
4 Jammed Cube s (Notice size of Cube, Hollow?) 4. Unjam Cube, Check Fill Tube & Fill-Cup Assembly
5 Little o r No Water to Ice Ma ker (No te Cu be S ize)
a. Frozen Fill Tube (Leaky Water Valve) a. Change Ice Maker Valve
b. Kinked Water Line b. Un-Kink Line, Check for Weak Spots
c. Obstruct ed Water L in e t o Ic e M ake r o r
Refrigerator
d. Clogged Water Valve d. Change Water Valve
e. No Power to Water Valve e. Trace Power to Determine Discontinuity
f. Low Water Pressure (NOTE: Jump Cycle
through "T" & "H" Probe holes for 10 Sec. ,
Then Remove Jumpers)
Catch Water in Glass
g. Open Heater Circuit g. Change Mold and Heater Assembly
h. Closed Thermostat h. Change Thermostat
i. Damaged Heate r Tulips on Module i. Change Module
1. Change Ice Maker Module
c. Water Line Must Be Cleared
f. Water Pressure Must Be Increased (20 -120 psi) (1.4 -
8.2 bar)
Should be About 140 cc's
j. Heater Pins Too Short - Not Contacting
Module
6 Bail Shut-off Arm In Vacation Mode - No Ice 6. Lower Bail Shut-off Arm To Begin Cycle
7 Bail Shut-off Arm Binds When Raised or Lowered
a. Water/Ice in Actuator/Housing Hole a. Remove Module, Dry Actuator and Housing Hole
b. Housing Hole Sma ll or Bu rred b. Repair or Replace Ice Maker
c. Actuator O.D. Large or Burred c. Replace Ice Maker Module
d. Module Housing Damaged d. Replace Ice Maker Mod ule
e. Bail Shut-off Arm Misformed e. Replace Bail Shut-off Arm
8 Little/No Alumila stic o n Th ermo stat 8. Apply Fresh Coat of Alumilastic to Thermostat
9 Housing to Mold Screws Not Seated 9. Tighten Two Screws With Ph illips D river (2 0-2 6 In .lb)
10 Heater Not Staked In Mold 10 Replace Mold/Heater Assembly, Apply fresh Coat of
11 Wrong Heater Temperature 11 Replace Mold/Heater Assembly, Apply fresh Coat of
12 Broken S/O Lever (Mislocated Shut-Off Switch) 12 Replace Ice Maker M odule
j. Change Mold/Heater Assembly
(22.8 - 29 .6 cm/kg )
Alumilastic
Alumilastic
RS5290000 Rev. 0 72 April 1998
Page 71

Ice Maker Troubleshooting Chart
I. NO ICE/LOW ICE PRODUCTION (cont.)
5. Check Ejector Position (cont)
B. 3:00 Ejector Position
Contamination 1. Replace Ice Maker Module
1.
Cube Jammed (Notice Size of Cube, Hollow?) 2. Un-Jam Cubes
2.
Ice Maker or Refrigerator Not Level 3. Level as Needed
3.
No Power To Ice Maker 4. Trace Power to Determine Discontinuity
4.
Excessive Water-Fill Volume (Large Cubes) 5. Adj. Volume Screw on Module, Change Water Valve or
5.
Rack of Cubes Fell Back Into Mold During
Ejection
6.
C. 4:00 Ejector Position
Contamination 1. Change Ice Maker Module
1.
Thermostat out of calibration 2. Change Out Thermostat, Apply Fresh Coat Of Alumilastic
2.
Open Heater Circuit (Motor Should be
Oscillating)
3.
Little/No Alumilastic on Thermostat 4. Apply Fresh Coat Of Alumilastic
4.
Heater Not Staked In Mold 5. Change Mold/Heater Assy, Apply Fresh Coat Of
5.
Broken Locking Tabs on Vertical Cam 6. Change Module
6.
D. 6:00 Ejector Position
Contamination 1. Change Ice Maker Module
1.
Hollow Cubes 2. Refer to Section III, "Hollow Cubes"
2.
Insufficient Water To Ice Maker, Small Cubes 3. Refer to Section III, "Hollow Cubes"
3.
E. 7:30 Ejector Position
Contamination (Motor Will Not Oscillate) 1. Change Ice Maker Module
1.
Bail Arm Stuck in Ice or Obstructed 2. Remove Obstruction, Replace Ice Maker Module
2.
Pac-Man Cubes (Cubes not formed properly) 3. Un-Jam Unit, Check Fill Cup And Fill Tube Assy.
3.
F. 9:00 Ejector Position
Contamination 5. Change Ice Maker Module
1.
Cube Frozen to Fill Cup or Mold 5. Un-Jam Unit, Install New Fill Cup and Module
2.
Lower Pressure
6. Install New Fill Cup, Check Fill Tube Assy.
3. Change Mold/Heater Assy, Apply Fresh Coat Of
Alumilastic
Alumilastic
April 1998 73 RS5290000 Rev. 0
Page 72

Ice Maker Troubleshooting Chart
II. OVER PRODUCTION OF ICE
1. Bail Shut-off Arm Not in Actuator 1. Replace Bail Shut-off Arm in Actuator, Note for Loose
2. Misformed Bail Shut-off Arm 2. Replace Bail Shut-off Arm
3. Shut-Off Lever Broken or Bypassing Vertical Cam 3. Replace Ice Maker Module
4. Broken Module Actuator 4. Replace Ice Maker Module
III. HOLLOW ICE CUBES
1. Water Fill Volume Too Low 1. Adj. Screw On Module, Clear Water Path Or Change
2. Improper Freezer Air-Flow 2. Re-Direct Air Flow Away from Ice Maker Thermostat
3. Thermostat Out Of Calibration 3. Change Thermostat, Apply Fresh Alumilastic
IV. FLOODING OR ICE SLABS IN BUCKET OR FREEZER
1. Thermostat Out Of Calibration 1. Change Thermostat, Apply Fresh Alumilastic
2. Jammed Cube Stalled In Water-Fill Cycle 2. Remove Cube, Determine Reason For Stall
3. Leaky Water Valve 3. Change Water Valve
4. Fill Volume of Water Valve Excessive 4. Change Water Valve
5. Motor Stalled In Water-Fill Cycle (12:00 Ejector Position) 5. Change Ice Maker Module
6. Contaminated Module 6. Change Ice Maker Module
7. Refrigerator or Ice Maker Not Level 7. Level As Necessary
8. Excessive Water Pressure 8. Lower Water Pressure (20-120 psi) (1.4 - 8.2 bar)
9. Module Shut-Off Switch and Contacts Shorted And
Burned
10. Broken Locking Tab On Verticle Cam (Stalled in
Waterfill)
11. Fill-Tube Not Properly Located In Fill Cup 11 Reposition Fill Tube
12. Fill Cup Water Opening Flashed Over/Plugged 12 Change Fill Cup
13. Cubes Fell Over Back Of Ice Maker, Melting Into
Freezer
Fit
Water Valve
9. Change Ice Maker Module
10 Change Ice Maker Module
13 Install New Fill Cup
RS5290000 Rev. 0 74 April 1998
Page 73

Ice Maker Wiring Diagram and Parts Layout
230
April 1998 75 RS5290000 Rev. 0
Page 74

Kit Instructions
HGK300 Black Handle and Toe Grille Kit Installation Instructions
Parts List
Description Quantity Part
Number
Toe grille 1 12321806 Bottom trim, refrigerator door 1 10810512
Top trim, freezer door 1 10810311 Door handle 2 12139306
Center trim, freezer door 1 10810603 Black handle insert (top) 2 10953115
Bottom trim, freezer door 1 10810511 Black handle insert (bottom) 2 10953116
Top trim, refrigerator door 1 10810312 Door stop 2 C8972403
Center trim, refrigerator and
freezer door
2 10810403 Installation Instructions 1 10035710
Description Quantity Part
Number
Introduction
Read entire manual before installing kit. Confirm all
parts listed are included in kit. If parts are missing,
contact source from whom kit was purchased.
Important
• Mechanical experience is required to install trim kit.
• If unable to solve a problem during installation,
contact source from whom kit was purchased.
Procedure
CAUTION
!
Important
Save all screws and reuse in original location.
1. Remove upper and lower handle trim from both
doors by grasping trim along inside edge of door and
pulling foreward. Remove inserts above and below
each handle.
To avoid property damage, protect soft vinyl or
other flooring with cardboard, rugs, or other
protective material.
!
CAUTION
To avoid personal injury, protect hands and arms.
Trim pieces may have sharp edges.
2. Remove door handles by removing screws.
RS5290000 Rev. 0 76 April 1998
Page 75

Kit Instructions
3. Dispenser Models
Remove crushed/cubed ice switch cover on dispenser
by pulling forward. Remove screws from bottom of
dispenser cover. Release bottom clips on dispenser
cover by placing taped edge of putty knife underneath
cover and pulling out. Release top clips by holding
bottom of dispenser cover out and sliding up.
4. Non Dispenser Models
Remove center trim by grasping trim along inside
edge of door and pulling forward.
Dispenser Models
Remove center trim on refrigerator door by grasping
trim along inside edge of door and pulling forward.
Remove center trim on freezer door by removing
screws.
5. Non Dispenser Models
Install new black center trim by snapping in place.
Dispenser Models
Install new black center trim on refrigerator door by
snapping in place. Install new black center trim on
freezer door by placing trim on door. Insert and
tighten screws.
Important
One piece of center trim will not be used.
6. Dispenser Models
Replace dispenser cover by snapping in place.
Insert and tighten screws. Replace switch by
snapping in place.
7. Install new black handles by placing handles on
refrigerator. Insert and tighten screws.
8. Place new black inserts above each handle. Install
new black trim above each handle by snapping in
place. Hold new black inserts below each handle.
Install new black trim below each handle by snapping
in place.
9. Remove toe grille by pulling forward. Install new
black toe grille by inserting clips in holes and
snapping in.
10. Remove door stops by removing screws. Install new
black door stops by placing door stops on doors.
Insert and tighten screws.
April 1998 77 RS5290000 Rev. 0
Page 76

Kit Instructions
DS18 and DS22 1/4" Trim Kits
Introduction
Included in this kit are trim pieces for installing 1/4 inch
(6 millimeter) decorator panels. Read entire manual
before installing panels. Confirm all parts listed are
included in kit. If parts are missing, contact source from
whom kit was purchased.
Important
• Mechanical experience is required to install trim kit.
• Depending on installer’s knowledge and skill,
installation can take from one to three hours.
• T ransfer food to an alternate cooling source. Check
refrigerator warranty certificate for specific
coverage. Warranty does not cover food loss.
• Ensure trim pieces adhere properly by confirming
surfaces are clean, dry and free of adhesive
residue.
• If unable to solve a problem during installation,
contact source from whom kit was purchased.
Decorator Panel Dimensions
Listed below are required height x width dimensions for
decorator panels. Panels are not supplied with this kit
and can be purchased locally .
Caution
To avoid personal injury or property damage,
refrigerator panels should not weigh more than 30
pounds (14 kilograms) and freezer panels should not
weigh more than 15 pounds (7 kilograms).
19 cubic foot Panel Dimensions
Without Dispenser
Refrigerator Door 61 15/16" x 15 13/32"
(1573 mm x 391 mm)
Freezer Door 61 15/16" x 13 1/2"
(1573 mm x 343 mm)
With Dispenser
Refrigerator Door 61 15/16" x 15 13/32"
(1573 mm x 391 mm)
Upper Freezer Door 17 1/4" x 13 1/2"
(438 mm x 343 mm)
Lower Freezer Door 31 13/16" x 13 1/2"
(808 mm x 343 mm)
20, 22, 25 cubic foot Panel Dimensions
Without Dispenser
Refrigerator Door 61 15/16" x 19 5/32"
(1573 mm x 487 mm)
Freezer Door 61 15/16" x 13 1/2"
(1573 mm x 343 mm)
With Dispenser
Refrigerator Door 61 15/16" x 19 5/32"
(1573 mm x 487 mm)
Upper Freezer Door 17 1/4" x 13 1/2"
(438 mm x 343 mm)
Lower Freezer Door 31 13/16" x 13 1/2"
(808 mm x 343 mm)
RS5290000 Rev. 0 78 April 1998
Page 77

Kit Instructions
Parts List
Item Description Qty Length
1 Side Trim, Refrigerator
and Freezer Door
2
Bottom Trim,
Refrigerator Door
3
Bottom Trim,
Freezer Door
4
Top Trim,
Refrigerator Door
5 Top Trim, Freezer Door 1 X X X X X X
6
Top Trim, Dispenser
7
Bottom Trim, Dispenser
8
Panel Trim, Refrigerator
and Freezer Door
9
Panel Trim, Lower Ice
and Water Freezer
Door
10
Panel Trim, Upper Ice
and Water Freezer
Door
2 X X X X X X
1 X X X X X X
1 X X X X X X
1 X X X X X X
1 13 7/8" X X X X X X
1 13 9/16" X X X X X X
2 61 29/32" X X X X X X
1 32 1/8" X X X X X X
1 17 7/32" X X X X X X
DS18E
Black
DS18L
Almond
DS18S
Satin
DS18W
White
DS22E
Black
DS22S
Satin
11
Screw, Bottom Trim
12
Spacer, Refrigerator
Door Bottom Trim
13
Spacer, Freezer Door
Bottom Trim
14
Installation Instructions
5 X X X X X X
1 X X X X X X
1 X X X X X X
1 X X X X X X
April 1998 79 RS5290000 Rev. 0
Page 78

Kit Instructions
Procedure
Caution
To avoid personal injury or property damage, two
people should remove and rehang each door.
Caution
To avoid personal injury or property damage,
temporarily tape doors shut.
Important
Save all screws and reuse in original location.
1. Tape doors shut using masking tape.
WARNING
To avoid electrical shock which can cause severe
personal injury or death, green ground wire must
remain attached to hinge.
2. Remove top hinge covers by removing screws.
Trace around top hinges with a pencil. This helps
alignment when reassembling. On dispenser
models, unplug top hinge wire connectors. Remove
top hinge screws.
Caution
To avoid property damage, drain water from water tube
into small bucket.
5. Dispenser Models
Loosen water tube clamp screw. Loosen plastic
water tube union nut. Gently pull water tube away
from union nut and through tube clamp.
6. Remove tape from freezer door. Grasp freezer
door securely and lift up while opening. This will
free door from bottom hinge pin. On dispenser
models, plastic water tube must slide through slot
in bottom door hinge as door is raised.
7. Remove door stops by removing screws. Install
spacer and bottom trim by placing spacer and trim
on bottom of doors. Insert and tighten bottom trim
screws (Item #1 1). Replace door stops by placing
door stops on bottom of doors. Insert and tighten
screws.
3. Remove tape from refrigerator door. Grasp
refrigerator door securely and lift up while opening.
This will free door from bottom hinge pin. Top hinge
may come off door .
4. Remove toe grille by pulling forward.
RS5290000 Rev. 0 80 April 1998
8. Rehang doors by positioning bottom sockets onto
bottom door hinge pins. Position so doors are flush
with side of refrigerator cabinet. Handle side of
doors should be approximately 1/8 inch (3.2
millimeters) higher than hinge side of doors. Doors
will settle when loaded with food. On dispenser
models, when replacing freezer door, thread water
tube through hinge pin then water tube clamp.
Page 79

Kit Instructions
Caution
To avoid personal injury or property damage,
temporarily tape doors shut.
9. Tape doors shut using masking tape.
10. Replace top hinges by placing top hinges on
refrigerator. Insert and tighten screws. On dispenser
models, reconnect top hinge wire connectors by
snapping together. Replace top hinge covers by
placing hinge covers over hinges. On dispenser
models, carefully place wires under cover to avoid
pinching wires. Insert and tighten screws.
WARNING
To avoid electrical shock which can cause severe
personal injury or death, green ground wire must be
attached to freezer door hinge.
Important
Permanent, double-sided tape is used to attach some
trim pieces to refrigerator. Before removing paper
backing, check placement of trim pieces on refrigerator.
Trim pieces may be damaged if adjustment or removal is
attempted after installation.
1 1 . Install top door trim. There may be some
interference between top trim and top handle trim.
If there is interference, complete the following steps:
• Remove upper and lower handle trim from both
doors by grasping trim along inside edge of trim
and pulling forward.
• Remove inserts above and below each handle.
12. Non Dispenser Models
Remove nameplate by placing putty knife covered
with masking tape under nameplate and pulling
forward. Discard nameplate.
Important
Confirm front surface of decorator door panels and trim
are facing forward when installing trim.
Refrigerator Door
13. Install panel trim (Item #8) by placing trim at an
angle on left edge of refrigerator door panel. Press
trim onto panel. Center trim on side of panel.
Freezer Door -- Non Dispenser Models
14. Install panel trim (Item #8) by placing trim at an
angle on right edge of freezer door panel. Press
trim onto panel. Center trim on side of panel.
Freezer Door -- Dispenser Models
15. Install top dispenser trim (Item #6) by placing trim at
an angle on bottom edge of upper freezer panel.
Press trim onto panel. Install upper ice and water
freezer door panel trim (Item #10) by placing trim on
right edge of upper freezer panel. Press trim onto
panel. Trim pieces must overlap at the corner.
16. Install bottom dispenser trim (Item #7) by placing
trim at an angle on top edge of lower freezer panel.
Press trim onto panel. Install lower ice and water
freezer door panel trim (Item #9) by placing trim on
right edge of lower freezer panel. Press trim onto
panel. Trim pieces must overlap at the corner.
Caution
To prevent property damage, place masking tape on
back of panel at each corner. Tape prevents panel
from damaging doors.
17. Place masking tape on back of panels at each
corner.
18. Slide decorator door panels into place under handle
trim until panels are secure.
Discard inserts.
• Replace upper and lower handle trim by
snapping in place. Confirm trim is flush with
handle.
Peel off 1 1/2 inches (38 millimeters) of backing.
Place trim firmly against inside of door and against
back of door. After checking placement, peel of f
backing and press into place.
April 1998 81 RS5290000 Rev. 0
Page 80

Kit Instructions
19. Install side door trim by peeling off 1 1/2 inches
(38 millimeters) of backing. Place trim against top
corner of refrigerator cabinet over edge of top trim.
After checking placement, peel off backing and
press into place. Place side door trim over edge of
bottom trim.
20. Push water tube into plastic union nut and tighten
union nut by hand. Gently pull on tube to confirm
nut is tight. Tighten water tube clamp screw.
Caution
To avoid property damage, confirm water tube union
nut is secure and check for leaks before replacing toe
grille.
21. Replace toe grille by inserting clips in holes and
snapping in.
RS5290000 Rev. 0 82 April 1998
Page 81

Kit Instructions
DS19, DS20 and DS21 1/16" Trim Kits with 1/4" Retainers
Introduction
Important
• Mechanical experience is required to install trim kit.
• Depending on installer’s knowledge and skill,
installation can take from one to three hours.
• T ransfer food to an alternate cooling source. Check
refrigerator warranty certificate for specific
coverage. Warranty does not cover food loss.
• Ensure trim pieces adhere properly by confirming
surfaces are clean, dry and free of adhesive
residue.
• If unable to solve a problem during installation,
contact source from whom kit was purchased.
Decorator Panel Dimensions
Listed below are required height x width dimensions for
decorator panels. Panels are not supplied with this kit
and can be purchased locally .
Caution
To avoid personal injury or property damage,
refrigerator panels should not weigh more than 30
pounds (14 kilograms) and freezer panels should not
weigh more than 15 pounds (7 kilograms).
21 cubic foot 1/16" (2 mm)
Panel Dimensions
Without Dispenser
Refrigerator Door 61 7/8" x 15 13/16"
(1572 mm x 402 mm)
Freezer Door 61 7/8" x 13 15/16"
(1572 mm x 354 mm)
With Dispenser
Refrigerator Door 61 7/8" x 15 13/16"
(1572 mm x 402 mm)
Upper Freezer Door 17 9/16" x 13 15/16"
(446 mm x 354 mm)
Lower Freezer Door 32 3/16" x 13 15/16"
(818 mm x 354 mm)
21 cubic foot 1/4" (6 mm)
Panel Dimensions
Without Dispenser
Refrigerator Door 61 1/4" x 15 3/16"
(1556 mm x 386 mm)
Freezer Door 61 1/4" x 13 5/16"
(1556 mm x 338 mm)
With Dispenser
Refrigerator Door 61 1/4" x 15 3/16"
(1556 mm x 386 mm)
Upper Freezer Door 16 7/8" x 13 5/16"
(429 mm x 338 mm)
Lower Freezer Door 31 3/8" x 13 5/16"
(797 mm x 338 mm)
27 cubic foot 1/16" (2 mm)
Panel Dimensions
Non Electronic
Refrigerator Door 61 7/8" x 19 9/16"
(1572 mm x 497 mm)
Upper Freezer Door 17 9/16" x 13 15/16"
(446 mm x 354 mm)
Lower Freezer Door 32 3/16" x 13 15/16"
(818 mm x 354 mm)
Electronic
Refrigerator Door 61 7/8" x 17 3/4"
(1572 mm x 451 mm)
Upper Freezer Door 17 9/16" x 13 15/16"
(446 mm x 354 mm)
Lower Freezer Door 32 3/16" x 13 15/16"
(818 mm x 354 mm)
27 cubic foot 1/4" (6 mm)
Panel Dimensions
Non Electronic
Refrigerator Door 61 1/4" x 18 15/16"
(1556 mm x 481 mm)
Upper Freezer Door 16 7/8" x 13 5/16"
(429 mm x 338 mm)
Lower Freezer Door 31 3/8" x 13 5/16"
(797 mm x 338 mm)
Electronic
Refrigerator Door 61 1/4" x 17 3/8"
(1556 mm x 441 mm)
Upper Freezer Door 16 7/8" x 13 9/16"
(429 mm x 344 mm)
Lower Freezer Door 31 3/8" x 13 9/16"
(797 mm x 344 mm)
April 1998 83 RS5290000 Rev. 0
Page 82

Kit Instructions
Parts List
Description Qty Length
Trim, Refrigerator and Freezer Door
Sides
Trim, Refrigerator Door Bottom
Trim, Freezer Door Bottom
Trim, Refrigerator Door Top
Trim, Freezer Door Top
Retainer, Freezer Door Top and
Bottom
Retainer, Freezer Door Top
Retainer, Freezer Door Bottom
Retainer, Refrigerator Door Top and
Bottom
Retainer, Refrigerator Door Top and
Bottom
Retainer, Refrigerator Door Top
DS19E
Black
2 X X X X X
1 X X X X X
1 X X X X X
1 X X X X X
1 X X X X X
4 13 516" X X X
2 13 27/32" X X
2 13 17/32" X X
2 19 9/32" X X
2 15 17/32" X
1 17 5/16" X X
DS19S
Stainless
DS20E
Black
DS20S
Stainless
DS21S
Stainless
Retainer, Refrigerator
Door Bottom
Retainer, Upper Freezer Door Sides
Retainer, Upper Freezer Door Side
Retainer, Lower Freezer Door Sides
Retainer, Lower Freezer Door Side
Retainer, Refrigerator Door Sides
Retainer, Refrigerator and Freezer
Door Sides
Retainer, Refrigerator Door Side
Insert, Refrigerator Door Handle
Insert, Freezer Door Handle
Screw, Bottom Trim
Spacer, Trim
Installation Instructions
1 17 21/32" X X
2 17 7/32" X X X
1 17 7/32" X X
2 31 3/4" X X X
1 31 3/4" X X
2 61 7/32" X X
4 61 7/32" X
1 61 7/32" X X
1 X X
1 X X
6 X X X X X
3 X X X X X
1 X X X X X
RS5290000 Rev. 0 84 April 1998
Page 83

Kit Instructions
Procedure
Extruded Handle Models
Caution
To avoid personal injury, protect hands and arms. Trim
pieces may have sharp edges.
Important
Save all screws and reuse in original location.
1. Remove top handle end caps by removing screws.
3. Remove door handle inserts by placing screwdriver
at top of door handles in area between handle and
insert and pulling out.
4. Pull inserts out along length of handles.
Important
If installing 1/16 inch (2 millimeter) panels, proceed to
step 6. If installing 1/4 inch (6 millimeter) panels, proceed
with step 2.
2. Remove crushed/cubed ice switch cover on
dispenser by pulling forward. Remove screws from
bottom of dispenser cover. Release bottom clips on
dispenser cover by placing taped edge of putty knife
underneath cover and pulling out. Release top clips
by holding bottom of dispenser cover out and sliding
up.
5. Install new handle inserts by reversing steps 3-4.
6. Replace dispenser cover by snapping in place.
Insert and tighten screws. Replace switch by
snapping in place.
7. Remove thin section on top handle end caps to
allow room for panels. Discard section. Replace
top handle end caps by placing end caps on
handles. Insert and tighten screws.
Thin Section
April 1998 85 RS5290000 Rev. 0
Page 84

Kit Instructions
All Models
Important
Use cardboard spacers carefully . Spacers must be
reused to provide correct clearance at top and bottom
edges of each door.
8. Use masking tape to place two cardboard spacers
on front surface of doors flush with top edge. Place
spacers approximately 2 inches (51 millimeters) in
from handle side of door and 2 inches (51
millimeters) from hinge side of door.
Cardboard Spacers
9. On extruded handle models, check top trim fit by
aligning end of top trim against handle cap. On non
extruded handle models, check top trim fit by
aligning end of trim with handle-side edge of door.
10. Install top door trim. There may be some
interference between top trim and top handle trim.
If there is interference, complete the following steps:
• Remove upper and lower handle trim from both
doors by grasping trim along inside edge of trim
and pulling forward.
Important
• Rounded edge of trim must be installed toward front
of door. Channel holds and frames 1/16 inch
(2 millimeter) panels or 1/4 inch (6 millimeter)
retainers.
• Permanent, double-sided tape is used to attach
some trim pieces to refrigerator. Before removing
paper backing, check placement of trim pieces on
refrigerator. Trim pieces may be damaged if
adjustment or removal is attempted after
installation.
• Top trim covers only section of top door surface in
front of hinge.
• Remove inserts above and below each handle.
Discard inserts.
• Replace upper and lower handle trim by
snapping in place. Confirm trim is flush with
handle.
Peel off 1 1/2 inches (38 millimeters) of backing.
Place trim firmly against inside of door and against
back of door. After checking placement, peel off
backing and press into place.
1 1. Remove cardboard spacers and replace spacers on
front surface of doors flush with bottom edge. Place
spacers approximately 2 inches (51 millimeters) in
from handle side of door and 2 inches (51
millimeters) from hinge side of door.
Important
Bottom trim covers only section of bottom door surface in
front of hinge. Do not overtighten screws.
12. Check bottom trim fit by aligning trim with holes in
bottom of door and against handle. Insert screws
and tighten.
13. Remove cardboard spacers from doors.
14. On non dispenser models, remove nameplate by
placing putty knife covered with masking tape under
nameplate and pulling forward. Discard nameplate.
Important
If installing 1/16 inch (2 millimeter) panels, refer to
"1/16 inch (2 millimeter) Panels" section. If installing
1/4 inch (6 millimeter) panels, refer to "1/4 inch (6
millimeter) Panels" section.
RS5290000 Rev. 0 86 April 1998
Page 85

Kit Instructions
DS21S Kit - Non Dispenser Models
Install 1/4 inch (6 millimeter) freezer door top
retainer (Item #6) by placing trim at an angle on top
edge of panel. Align straight end of trim flush with
panel corner. Press trim onto panel. Install freezer
door side retainer (Item #17), freezer door bottom
retainer (Item #6) then freezer door side retainer
(Item #17) on panel. Notched end of trim must
overlap straight end of previously installed trim.
Confirm trim is secure. Remove nameplate by
placing putty knife covered with masking tape under
nameplate and pulling forward. Discard nameplate.
DS21S Kit - Dispenser Models
Install 1/4 inch (6 millimeter) upper and lower
freezer door top retainers (Item #6) by placing trim
at an angle on top edge of panel. Align straight end
of trim flush with panel corner. Press trim onto
panel. Install upper and lower freezer door right
side retainers (Items #12 or #14, respectively),
upper and lower freezer door bottom retainers (Item
#6) then upper and lower freezer door left side
retainers (Items #12 or #14, respectively) on panel.
Notched end of trim must overlap straight end of
previously installed trim. Confirm trim is secure.
All Models
Caution
To prevent property damage, place masking tape on
back of panel at each corner. Tape prevents panel
from damaging doors.
1. Place masking tape on back of panels at each
corner.
2. Slide decorator door panels into place until panels
are secure. On DS19 and DS21 kits, handle side of
panel trim slides under handle trim. On DS20 and
DS20 kits, handle side of panel slides under handle
insert.
3. Install side door trim by peeling off 1 1/2 inches
(38 millimeters) of backing. Place trim against top
corner of refrigerator cabinet over edge of top trim.
After checking placement, peel off backing and
press into place. Place side door trim over edge of
bottom trim.
April 1998 87 RS5290000 Rev. 0
Page 86

Kit Instructions
DS23, DS24, DS25, and DS26 1/4" Trim Kits
Introduction
Important
• Mechanical experience is required to install trim kit.
• Depending on installer’s knowledge and skill,
installation can take from one to three hours.
• T ransfer food to an alternate cooling source. Check
refrigerator warranty certificate for specific
coverage. Warranty does not cover food loss.
• Ensure trim pieces adhere properly by confirming
surfaces are clean, dry and free of adhesive
residue.
• If unable to solve a problem during installation,
contact source from whom kit was purchased.
Decorator Panel Dimensions
Listed below are required height x width dimensions for
decorator panels. Panels are not supplied with this kit
and can be purchased locally .
Caution
To avoid personal injury or property damage,
refrigerator panels should not weigh more than 30
pounds (14 kilograms) and freezer panels should not
weigh more than 15 pounds (7 kilograms).
Without Dispenser
Refrigerator Door 61 15/16" x 19 3/8"
(1573 mm x 492 mm)
Freezer Door 61 15/16" x 13 3/4"
(1573 mm x 349 mm)
With Dispenser
Refrigerator Door 61 15/16" x 19 3/8"
(1573 mm x 492 mm)
Upper Freezer Door 17 1/4" x 13 3/4"
(438 mm x 349 mm)
Lower Freezer Door 31 13/16" x 13 3/4"
(808 mm x 349 mm)
Electronic
Refrigerator Door 61 15/16" x 17 5/8"
(1573 mm x 448 mm)
Upper Freezer Door 17 1/4" x 13 3/4"
(438 mm x 349 mm)
Lower Freezer Door 31 13/16" x 13 3/4"
(808 mm x 349 mm)
RS5290000 Rev. 0 88 April 1998
Page 87

Kit Instructions
Parts List
Description
Quantity
Refrigerator,
Freezer door side
trim, 2
Refri ger ator door
bottom trim, 1
Freezer door
bottom trim,1
Refri ger ator door
top trim, 1
Freezer door top
trim 1,
Dispenser trim, 2 B 8391242 B8391243 B8391240 B8391241 B8391242 B8391240 B8391241
Door handle insert
DS24,26 1
DS23,25 2
Ice and Water
Door handle
insert, 1
Bottom trim
screw, 5
Refri ger ator door
bottom trim
spacer, 1
Freezer door
bottom trim
spacer, 1
Installation
instructions, 1
DS23E
Black
10494518 10494519 10494513 10494517 10494518 10494513 10494517
10602605 10602608 10602609 10602607 10602605 10602609 10602607
10602505 10602507 10602508 10602506 10602505 10602508 10602506
10765207 10765205 10765209 10765203 10765212 10765213 10765211
10765208 10765206 10765210 10765204 10765208 10765210 10765204
10945907 10945906 10945908 10945905 10945907 10945908 10945905
10945931 10945932 10945929 10945930 10945931 10945929 10945930
M0211018M0211018M0211018M0211018M0211018M0211018M021101
10494603 10494603 10494603 10494603 10494603 10494603 10494603
10494604 10494604 10494604 10494604 10494604 10494604 10494604
DS23L
Almond
DS23S
Satin
DS23W
White
DS24E
Black
DS24S
Satin
DS24W
White
8
Description
Quantity
Refrigerator, freezer
door side trim, 2
Refrigerator door
bottom trim, 1
Freezer door bottom
trim, 1
Refrigerator door Top
trim, 1
Freezer door top
trim, 1
Dispenser trim, 2 B8391218 B8391218
Door handle insert
DS25, 2 DS26, 1
Ice and water door
handle insert, 1
Bottom trim screw, 5 M0211018 M0211018
Refrigerator door
bottom trim spacer, 1
Freezer door bottom
trim spacer, 1
Installation
Instructions
DS25S
Stainless Steel
10494522 10494522
10602603 10602603
10602503 10602503
10765216 10765215
10765214 10765214
10945908 10945908
10945929 10945929
10494603 10494603
10494604 10494604
DS26S
Stainless Steel
April 1998 89 RS5290000 Rev. 0
Page 88

Kit Instructions
Procedure
Caution
To avoid personal injury or property damage, two
people should remove and rehang each door.
Caution
To avoid personal injury, protect hands and arms. Trim
pieces may have sharp edges.
Important
Save all screws and reuse in original location.
1. Remove top handle end caps by removing screws.
3. Remove door handle inserts by placing screwdriver
at top of door handles in area between handle and
insert and pulling out.
4. Pull inserts out along length of handles.
2. Dispenser Models
Remove crushed/cubed ice switch cover on
dispenser by pulling forward. Remove screws from
bottom of dispenser cover. Release bottom clips on
dispenser cover by placing taped edge of putty knife
underneath cover and pulling out. Release top clips
by holding bottom of dispenser cover out and sliding
up.
5. Install new handle inserts by reversing steps 3-4.
Important
One door handle insert (Item #7 or #8) will be discarded
on DS23 kits.
6. Remove thin section on top handle end caps to
allow room for panels. Discard section. Replace
top handle end caps by placing end caps on
handles. Insert and tighten screws.
Thin Section
RS5290000 Rev. 0 90 April 1998
Page 89

Kit Instructions
7. Dispenser Models
Replace dispenser cover by snapping in place.
Insert and tighten screws. Replace switch by
snapping in place.
8. Remove toe grille by pulling forward.
9. Electronic Control Models
Unplug wiring harness from voltage box in center of
refrigerator cabinet behind toe grille.
10. Electronic Control Models
Release wiring harness from plastic retainer clips on
bottom of refrigerator cabinet. Open door
approximately 120° and locate screw holding plastic
door closure to top of bottom hinge. Remove screw
and close door.
Plastic Door Closure
Trace around top hinges with a pencil. This helps
alignment when reassembling. On electronic and
dispenser models, unplug top hinge wire
connectors. Remove top hinge screws.
WARNING
To avoid electrical shock which can cause severe
personal injury or death, green ground wire must
remain attached to hinge.
13. Remove tape from refrigerator door. Grasp
refrigerator door securely and lift up while opening.
This will free door from bottom hinge pin. Top hinge
may come off door. On electronic control models,
wiring harness must slide through slot in bottom
hinge.
Screw
Caution
To avoid personal injury or property damage,
temporarily tape doors shut.
1 1 . Tape doors shut using masking tape.
12. Remove top hinge covers by removing screws.
Caution
To avoid property damage, drain water from water tube
into small bucket.
14. Dispenser Models
Loosen water tube clamp screw. Loosen plastic
water tube union nut. Gently pull water tube away
from union nut and through tube clamp.
April 1998 91 RS5290000 Rev. 0
Page 90

Kit Instructions
15. Remove tape from freezer door . Grasp freezer door
securely and lift up while opening. This will free
door from bottom hinge pin. On dispenser models,
plastic water tube must slide through slot in bottom
door hinge as door is raised.
16. Remove door stops by removing screws. Install
spacer and bottom trim by placing spacer and trim
on bottom of doors. Insert and tighten bottom trim
screws (Item #9). Replace door stops by placing
door stops on bottom of doors. Insert and tighten
screws.
20. Remove tape from doors.
Important
Permanent, double-sided tape is used to attach some
trim pieces to refrigerator. Before removing paper
backing, check placement of trim pieces on refrigerator.
Trim pieces may be damaged if adjustment or removal is
attempted after installation.
21. Install top door trim by peeling off 1 1/2 inches
(38 millimeters) of backing. Place cut end of trim
against handle cap and firmly against back of door.
After checking placement, peel off backing and
press into place.
22. Dispenser Models
Install dispenser trim on freezer panels by sliding
trim on bottom edge of upper freezer door panel
and top edge of lower freezer door panel.
23. Non Dispenser Models
Remove nameplate by placing putty knife covered
with masking tape under nameplate and pulling
forward. Discard nameplate.
24. Slide decorator door panels into place until panels
are secure under handle inserts.
17. Rehang doors by positioning bottom sockets onto
bottom door hinge pins. Position so doors are flush
with side of refrigerator cabinet. Handle side of
doors should be approximately 1/8 inch (3.2
millimeters) higher than hinge side of doors. Doors
will settle when loaded with food. On electronic
control models, when replacing refrigerator door,
thread wiring harness in slot in bottom hinge. On
dispenser models, when replacing freezer door,
thread water tube through bottom hinge pin and
water tube clamp.
Caution
To avoid personal injury or property damage,
temporarily tape doors shut.
18. Tape doors shut using masking tape.
19. Replace top hinges by placing top hinges on
refrigerator. Insert and tighten screws. On
electronic control and dispenser models, reconnect
top hinge wire connectors by snapping together.
Replace top hinge covers by placing hinge covers
over hinges. On electronic control and dispenser
models, carefully place wires under cover to avoid
pinching wires. Insert and tighten screws.
25. Install side door trim by peeling off 1 1/2 inches
(38 millimeters) of backing. Place trim against top
corner of refrigerator cabinet over edge of top trim.
After checking placement, peel off backing and
press into place. Place side door trim over edge of
bottom trim.
WARNING
To avoid electrical shock which can cause severe
personal injury or death, green ground wire must be
reattached to refrigerator or freezer door hinge.
RS5290000 Rev. 0 92 April 1998
Page 91

Kit Instructions
26. Dispenser Models
Push water tube into plastic union nut and tighten
union nut by hand. Gently pull on tube to confirm
nut is tight. Tighten water tube clamp screw .
Caution
To avoid property damage, confirm water tube union
nut is secure before replacing toe grille.
27. Electronic Control Models
Plug wiring harness into voltage box in center of
refrigerator cabinet behind toe grille. Snap wiring
harness into plastic retainer clips on bottom of
refrigerator cabinet. Align hole in plastic door
closure with hole in bottom hinge. Insert and tighten
screw.
28. Replace toe grille by inserting clips in holes and
snapping in.
April 1998 93 RS5290000 Rev. 0
Page 92

Kit Instructions
PK201 and PKD201 1/4" Decorator Door Panel Kits
Parts List
Description Qty PK201E
(Black)
Refrigerator door panel 1 1009694 4 10096940 10096944 1009 694 0
Freezer door panel 1 10096943 10096939
Freezer door upper panel 1 10096949 1009694 5
Freezer door lower panel 1 10096986 10096983
Refrigerator door spacer 1 10234611 10234611 1023 461 1 10234613
Freezer door spacer 1 1023461 2 10234612
Freezer door upper spacer 1 10234609 10234609
Freezer door lower spacer 1 10234625 10234625
Installation instructions 1 10599708 10599708 10599708 10599708
PK201W
(White)
PKD201E
(Black)
PKD201W
(White)
Introduction
!
To avoid personal injury and property damage,
observe all safety instructions.
To avoid property damage, protect soft vinyl or other
flooring with cardboard, rugs, or other protective
material.
Read entire manual before installing kit. Confirm all parts
listed are included in kit. If parts are missing, contact
source from whom kit was purchased.
Important
• Mechanical experience is required to install trim kit.
• Depending on installer’s knowledge and skill,
installation can take from one-half to one hour.
• If unable to solve a problem during installation,
contact source from whom kit was purchased.
CAUTION
!
CAUTION
Procedure
!
CAUTION
To avoid personal injury , protect hands and arms. T rim
pieces may have sharp edges.
Important
Save all screws and reuse in original location.
1. Remove top handle end caps by removing screws.
2. Dispenser Models
Remove crushed/cubed ice switch cover on dispenser
by pulling forward. Remove screws from bottom of
dispenser cover. Release bottom clips on dispenser
cover by placing taped edge of putty knife underneath
cover and pulling out. Release top clips by holding
bottom of dispenser cover out and sliding up.
RS5290000 Rev. 0 94 April 1998
Page 93

Kit Instructions
3. Remove door handle inserts by placing screwdriver
at top of door handles in area between handle and
insert and pulling forward.
4. Pull edge of inserts forward along length of handles.
!
CAUTION
To avoid personal injury or property damage, hold
handles when removing.
!
CAUTION
To avoid property damage, place masking tape on
back of panel at each corner. Tape prevents panel
from damaging doors.
7. Cover back edges of cardboard with masking tape.
Place several evenly spaced strips of masking
tape on rear of cardboard.
8. Non Dispenser Models
Open doors. Place bottom of panels in bottom trim
then place top of panels under top trim. Slide panels
into place until panels are seated firmly under side
trim.
Dispenser Models
Open doors. Place bottom of refrigerator panel in
bottom trim then place top of panel under top trim.
Place bottom of lower freezer door panel in bottom
trim then place top of panel under dispenser cavity .
Place bottom of upper freezer door panel in top of
dispenser cavity then place top of panel under top
trim. Slide panels into place until panels are seated
firmly under side trim.
9. Replace door handles by placing door handles on
doors. Insert and tighten screws. Replace handle
inserts by snapping in place.
10. Dispenser Models
Replace dispenser cover by snapping in place. Insert
and tighten screws. Replace switch by snapping in
place.
1 1 . Remove thin section on top handle end caps to allow
room for panels. Discard section. Replace top
handle end caps by placing end caps on handles.
Insert and tighten screws.
5. Remove door handles by removing screws.
Important
Do not remove cardboard from panels. Panels will not fit
properly if cardboard is removed.
6. Dispenser Models
Locate dispenser trim in top crisper drawer. Install
dispenser trim on freezer panels by sliding trim on
bottom edge of upper freezer door panel and top
edge of lower freezer door panel.
April 1998 95 RS5290000 Rev. 0
Thin Section
12. Peel protective wrap off front of panels.
Page 94

Kit Instructions
HTGK200, HTGK220, HTK200 and Conversion Kits
Parts List
Description Qty
Top Cap, Refrigerator Door
Top Cap, Freezer Door
Bottom Cap, Refrigerator Door
Bottom Cap, Freezer Door
Hinge Cover, Right
Hinge Cover, Left
Side Trim, Refrigerator Door
Side Trim, Freezer Door
Top Trim, Refrigerator Door
Top Trim, Freezer Door
Bottom Trim, Refrigerator Door
Bottom Trim, Freezer Door
Trim, Dispenser
HTK200E
Black
1 X X X X X X
1 X X X X X X
1 X X X X X X
1 X X X X X X
1 X X X X X X
1 X X X X X X
1 X X X X X X
1 X X X X X X
1 X X X X X X
1 X X X X X X
1 X X X X X X
1 X X X X X X
2 X X X
HTK200S
Brushed
Aluminum
HTGK200W
White
HTK220E
Black
HTK220S
Brushed
Aluminum
HTGK220W
White
Door Stop
Handle, Freezer Door
Handle, Refrigerator Door
Toe Grille
Handle Insert, Refrigerator
Door
Handle Insert, Freezer Door
Screw, Top Trim
Installation Instructions
Clip, Toe Grille
Tape, Double Back
2 X X X X
1 X X X X X X
1 X X X X X X
1 X X
1 X X X X X X
1 X X X X X X
6 X X
1 X X X X X X
2 X X
122" X X X X X X
RS5290000 Rev. 0 96 April 1998
Page 95

Kit Instructions
Introduction
Important
• Mechanical experience is required to install trim kit.
• Depending on installer’s knowledge and skill,
installation can take from one to three hours.
• T ransfer food to an alternate cooling source. Check
refrigerator warranty certificate for specific
coverage. Warranty does not cover food loss.
• Ensure trim pieces adhere properly by confirming
surfaces are clean, dry and free of adhesive
residue.
• If unable to solve a problem during installation,
contact source from whom kit was purchased.
Decorator Panel Dimensions
Listed below are required height x width dimensions for
decorator panels. Panels are not supplied with this kit
and can be purchased locally .
Caution
To avoid personal injury or property damage,
refrigerator panels should not weigh more than 30
pounds (14 kilograms) and freezer panels should not
weigh more than 15 pounds (7 kilograms).
Procedure
Caution
To avoid personal injury or property damage, two
people should remove and rehang each door.
Caution
To avoid personal injury, protect hands and arms. Trim
pieces may have sharp edges.
Important
Save all screws and reuse in original location.
Without Dispenser
Refrigerator Door 63 3/32" x 19 3/8"
(1603 mm x 492 mm)
Freezer Door 63 3/32" x 13 3/4"
(1603 mm x 349 mm)
With Dispenser
Refrigerator Door 63 3/32" x 19 3/8"
(1603 mm x 492 mm)
Upper Freezer Door 18 3/8" x 13 3/4"
(467 mm x 349 mm)
Lower Freezer Door 31 13/16" x 13 3/4"
(808 mm x 349 mm)
1. Remove top handle end caps by removing screws.
2. Dispenser Models
Remove crushed/cubed ice switch cover on
dispenser by pulling forward. Remove screws from
bottom of dispenser cover. Release bottom clips on
dispenser cover by placing taped edge of putty knife
underneath cover and pulling out. Release top clips
by holding bottom of dispenser cover out and slide
upward.
April 1998 97 RS5290000 Rev. 0
Page 96

Kit Instructions
3. Remove door handle inserts by placing screwdriver
at top of door handles in area between handle and
insert and pulling out.
4. Pull edge of inserts forward along length of handles.
8. Remove trim on sides of doors by placing taped
edge of putty knife underneath trim and pulling out.
Caution
To avoid personal injury or property damage,
temporarily tape doors shut.
9. Tape doors shut using masking tape.
10. Remove top hinge covers by removing screws.
Trace around top hinges with a pencil. This helps
alignment when reassembling. On dispenser
models, unplug top hinge wire connectors. Remove
top hinge screws.
Caution
To avoid personal injury or property damage, hold
handles when removing.
5. Remove door handles by removing screws. Bottom
inserts are removed with handle.
WARNING
To avoid electrical shock which can cause severe
personal injury or death, green ground wire must
remain attached to hinge.
11. Remove tape from refrigerator door. Grasp
refrigerator door securely and lift up while opening.
This will free door from bottom hinge pin. Top hinge
may come off door .
12. Remove toe grille by pulling forward.
6. Remove top door trim by removing screws.
7. If refrigerator has decorator panels, carefully slide
panels out. On dispenser models, remove
dispenser trim.
RS5290000 Rev. 0 98 April 1998
Page 97

Kit Instructions
Caution
To avoid property damage, drain water from water tube
into small bucket.
13. Dispenser Models
Loosen water tube clamp screw. Loosen plastic
water tube union nut. Gently pull water tube away
from union nut and through tube clamp.
14. Remove tape from freezer door. Grasp freezer door
securely and lift up while opening. This will free
door from bottom hinge pin. On dispenser models,
plastic water tube must slide through slot in bottom
door hinge as door is raised. Top hinge will remain
attached to door.
15. Remove bottom door trim by removing screws.
When installing HTK200S, HTGK200W, HTK220S
and HTK220W kits, remove door stops. Confirm
support plate is under door trim. Install new bottom
door trim by placing trim on bottom of doors. Insert
and tighten screws. When installing HTK200S,
HTGK200W, HTK220S and HTK220W kits, install
new door stops by placing door stops on bottom of
doors. Insert and tighten screws.
16. Rehang doors by positioning bottom sockets onto
bottom door hinge pins. Position so doors are flush
with sides of refrigerator cabinet. Handle side of
doors should be approximately 1/8 inch (3.2
millimeters) higher than hinge side of doors. Doors
will settle when loaded with food. On dispenser
models, when replacing freezer door, thread water
tube through bottom hinge pin and water tube
clamp.
Caution
To avoid personal injury or property damage,
temporarily tape doors shut.
17. Tape doors shut using masking tape.
Important
• Ensure trim pieces adhere properly by confirming
surfaces are clean, dry and free of adhesive
residue.
• Discard factory installed trim and handles.
18. Replace top hinges by placing top hinges on
refrigerator. Insert and tighten screws. On
dispenser models, reconnect top hinge wire
connectors. Install new top hinge covers by placing
hinge covers over hinges. On dispenser models,
carefully place wires under cover to avoid pinching
wires. Insert screws and tighten.
WARNING
To avoid electrical shock which can cause severe
personal injury or death, green ground wire must be
attached to freezer door hinge.
19. Install new bottom door handle caps by pushing up
into bottom of new handles until caps snap in place.
20. Install new door handles by placing door handles on
door. Insert and tighten screws. Install new handle
inserts by snapping in place.
April 1998 99 RS5290000 Rev. 0
Page 98

Kit Instructions
21. Remove thin section on top handle end caps to
allow room for panels. Discard section. Replace
top handle end caps by placing end caps on
handles. Insert and tighten screws.
Thin Section
22. Dispenser Models
Replace dispenser cover by snapping in place.
Insert and tighten screws. Replace switch by
snapping in place.
23. Install new top door trim by placing trim on top of
doors. Insert screws but do not completely tighten.
When installing HTK200E and HTK220E, install new
color coordinated screws taped to trim.
24. Dispenser Models
Install new dispenser trim on freezer panels by
sliding trim on bottom edge of upper freezer door
panel and top edge of lower freezer door panel.
25. Slide decorator door panels into place until panels
are secure under door handle inserts.
26. Install side door trim by peeling off 1 1/2 inches
(38 millimeters) of backing. Place trim against
bottom corner of refrigerator cabinet over edge of
bottom trim. After checking placement, peel off
backing and press into place. Place side door trim
under edge of top trim. Tighten top trim screws.
Side Trim
Bottom Trim
27. Push water tube into plastic union nut and tighten
union nut by hand. Gently pull on tube to confirm
nut is tight. Tighten water tube clamp screw .
Caution
To avoid property damage, confirm water tube union
nut is secure before replacing toe grille.
28. Install new toe grille (if supplied) by inserting clips in
holes and snapping in.
Important
Permanent, double-sided tape is used to attach some
trim pieces to refrigerator. Before removing paper
backing, check placement of trim pieces on refrigerator.
Trim pieces may be damaged if adjustment or removal is
attempted after installation.
RS5290000 Rev. 0 100 April 1998
Page 99

Kit Instructions
HTGK100 and HTGK110
Black 1/4" Trim and Handle Conversion Kits
Introduction
Important
• Mechanical experience is required to install trim kit.
• Depending on installer’s knowledge and skill,
installation can take from one to three hours.
• T ransfer food to an alternate cooling source. Check
refrigerator warranty certificate for specific
coverage. Warranty does not cover food loss.
• Ensure trim pieces adhere properly by confirming
surfaces are clean, dry and free of adhesive
residue.
• If unable to solve a problem during installation,
contact source from whom kit was purchased.
Decorator Panel Dimensions
Listed below are required height x width dimensions for
decorator panels. Panels are not supplied with this kit
and can be purchased locally .
Caution
To avoid personal injury or property damage,
refrigerator panels should not weigh more than 30
pounds (14 kilograms) and freezer panels should not
weigh more than 15 pounds (7 kilograms).
Without Dispenser
Refrigerator Door 61 15/16" x 19 3/8"
(1573 mm x 492 mm)
Freezer Door 61 15/16" x 13 3/4"
(1573 mm x 349 mm)
With Dispenser
Refrigerator Door 61 15/16" x 19 3/8"
(1573 mm x 492 mm)
Upper Freezer Door 17 1/4" x 13 3/4"
(438 mm x 349 mm)
Lower Freezer Door 31 13/16" x 13 3/4"
(808 mm x 349 mm)
Parts List
Description Qty
Top Cap, Refrigerator
Door
Top Cap, Freezer Door 1 X X
Bottom Cap, Refrigerator
Door
Bottom Cap, Freezer
Door
Hinge Cover 2 X X
Toe Grille 1 X X
Side Trim, Refrigerator
and Freezer Doors
Door Stop 2 X X
Top Trim, Refrigerator
Door
Top Trim, Freezer Door 1 X X
Bottom Trim,
Refrigerator Door
Bottom Trim, Freezer
Door
Trim, Dispenser 2 X
Handle, Refrigerator
Door
Handle, Freezer Door 1 X X
Handle Insert,
Refrigerator Door
Handle Insert, Freezer
Door Handle
HTGK100E
Black
1 X X
1 X X
1 X X
2 X X
1 X X
1 X X
1 X X
1 X X
1 X X
1 X X
HTGK110E
BLACK
April 1998 101 RS5290000 Rev. 0
Installation Instructions 1 X X
Screw, Bottom Trim 5 X X
Spacer, Refrigerator
Bottom Trim
Spacer, Freezer Bottom
Trim
Clip, Toe Grille 2 X X
Tape, Double Back .032" 28.5" X X
Tape, Double Back .187" 122" X X
1 X X
1 X X
Page 100

Kit Instructions
Procedure
Caution
To avoid personal injury or property damage, two
people should remove and rehang each door.
Caution
To avoid personal injury, protect hands and arms. Trim
pieces may have sharp edges.
Important
Save all screws and reuse in original location.
3. Remove door handle inserts by placing screwdriver
at top of door handles in area between handle and
insert and pulling out.
4. Pull edge of inserts forward along length of handles.
1. Remove top handle end caps by removing screws.
2. Dispenser Models
Remove crushed/cubed ice switch cover on
dispenser by pulling forward. Remove screws from
bottom of dispenser cover. Release bottom clips on
dispenser cover by placing taped edge of putty knife
underneath cover and pulling out. Release top clips
by holding bottom of dispenser cover out and slide
upward.
Caution
To avoid personal injury or property damage, hold
handles when removing.
5. Remove door handles by removing screws. Bottom
inserts are removed with handle.
RS5290000 Rev. 0 102 April 1998
 Loading...