

Page 1
Service Instructions
ACCESSORIES MANUAL
R-22 Package Terminal
Air Conditioners & Heat Pumps
All Models and Manufacturing Numbers For R-22 Amana® Brand Units
This manual is to be used by qualified, professionally trained HVAC technicians only.
Goodman does not assume any responsibility for property damage or personal injury
due to improper service procedures or services performed by an unqualified person.
is a registered trademark of Maytag Corporation or its related companies and is used under
license to Goodman Company, L.P., Houston, TX. All rights reserved.
RS4900003r2
December 2010
© 2001, 2010 Goodman Company, L.P.
Page 2
Table of Contents
When Ordering Parts .................................................................................................................................................... 3
Circuit Breaker Kit......................................................................................................................................................... 4
Condensate Drain Kit .................................................................................................................................................... 6
Condensate Removal Pump .........................................................................................................................................10
Condenser Baffles ........................................................................................................................................................13
Curtain Guard...............................................................................................................................................................14
Duct Kit........................................................................................................................................................................16
Electric Heat ................................................................................................................................................................22
Escutcheon - Hydronic Remote....................................................................................................................................27
Escutcheon - Remote ..................................................................................................................................................28
Fuse Kit .......................................................................................................................................................................29
Hard Wire.....................................................................................................................................................................31
Hydronic Heat ..............................................................................................................................................................33
Hydronic Transformer ...................................................................................................................................................42
Keylock........................................................................................................................................................................43
Power Disconnect Switch ............................................................................................................................................44
Remote T emperature Sensor ........................................................................................................................................46
Subbase ......................................................................................................................................................................48
Remote Thermostat High Fan Kit .................................................................................................................................51
Right Hand Subbase Conversion ..................................................................................................................................53
IMPORTANT INFORMATION
Pride and workmanship go into every product to provide our customers with quality products. It is possible, however,
that during its lifetime a product may require service. Products should be serviced only by a qualified service
technician who is familiar with the safety procedures required in the repair and who is equipped with the proper tools,
parts, testing instruments and the appropriate service manual. REVIEW ALL SERVICE INFORMATION IN THE
APPROPRIATE SERVICE MANUAL BEFORE BEGINNING REPAIRS. FOLLOW CAREFULLY ALL CAUTIONS
AND WARNINGS IN THE SERVICE MANUAL.
IMPORTANT NOTICES FOR CONSUMERS AND SERVICERS
RECOGNIZE SAFETY SYMBOLS, WORDS AND LABELS
HIGH VOLTAGE
D
ISCONNECT ALL POWER BEFORE
SERVICING
M
ULTIPLE POWER SOURCES MAY BE PRESENT
AILURE TO DO SO MAY CAUSE PROPERTY
F
DAMAGE
OR
INSTALLING THIS UNIT
,
PERSONAL INJURY OR DEATH
.
.
.
2
Page 3
WARNING
THIS AIR CONDITIONE R IS NOT ME ANT TO PROV IDE
UNATTENDED COOLI NG OR LIFE S UPPORT FO R
PERSONS OR AN IMALS WHO ARE UNABL E TO
REACT TO THE FAILURE OF THIS PRODUCT.
THE FAILURE OF AN UNATTENDED AIR CONDITIONER MAY RESUL T IN EX TREM E HEAT IN THE CON DITIONED SPACE CAUSING OVERHEATING OR
DEATH OF PERSONS OR ANIMALS.
PRECAUT IONS MUST BE TAKE N TO WARN OF OR
GUARD AGAINST SUCH AN OCCURENCE.
CAUTION
G
OODMAN WILL NOT BE RESPONSIBLE FOR ANY
OR
INJURY
IMPROPER
I
F YOU PERFORM SERVICE ON YOUR OWN
PRODUCT
PERSONAL INJURY OR PROPERTY DAMAGE
ANY
WHICH
PROPERTY DAMAGE ARISING FROM
SERVICE OR SERVICE PROCEDURES
,
YOU ASSUME RESPONSIBILITY FOR
MAY RESULT
.
WARNING
.
When Ordering Parts
All product model and serial nameplates carry an additional number called the
manufacturing number. It is possible to have one or more like products with the
same model number, but that a portion of the parts would not be interchangeable.
The manufacturing number has been added to the product to assist the
service department in identifying any given product.
It is extremely important when looking up service repair parts in the parts list,
or when requesting service information, that the manufacturing, model and
serial numbers be used to properly identify the product.
To locate an authorized servicer, please consult your telephone book or the dealer
from whom you purchased this product. For further assistance, please contact:
CONSUMER INFORMATION LINE -
AMANA® BRAND PRODUCTS TOLL FREE
1-877-254-4729 (U.S. only)
email us at: customerservice@goodmanmfg.com
fax us at: (713) 856-1821
(Not a technical assistance line for dealers.)
Outside the U.S., call 1-713-861-2500.
(Not a technical assistance line for dealers.)
Your telephone company will bill you for the call.
3
Page 4
ACCESSORY INST ALLA TIONS
Circuit Breaker Kit
HIGH VOLTAGE
ISCONNECT ALL POWER BEFORE
D
WIRING
SOURCES
SO
INJURY
HE UNIT
T
CONNECT ALL POWER TO THIS UNIT
ALL
LOCAL
LOCATION
MUST COMPLY WITH ALL APPLICABLE CODES
THE SUBBASE
MAY BE PRESENT
MAY CAUSE PROPERTY DAMAGE, PERSONAL
OR
DEATH
“OFF”
WIRING MUST COMPLY WITH APPLICABLE
AND NATIONAL CODES
OF
FUSED DISCONNECT SWITCH(ES
CAUTION
USE
COPPER CONDUCTORS
ELECTRICAL
TYPES
VANIC CORROSION, OVERHEATING AND RESUL
TANT EQUIPMENT FAILURE
OF
CONNECTIONS
CONDUCTORS MAY RESULT IN GAL
. M
ULTIPLE POWER
. F
AILURE TO DO
.
SWITCH DOES NOT DIS
.
. T
YPE AND
ONLY
. THE
FOR
USE OF OTHER
.
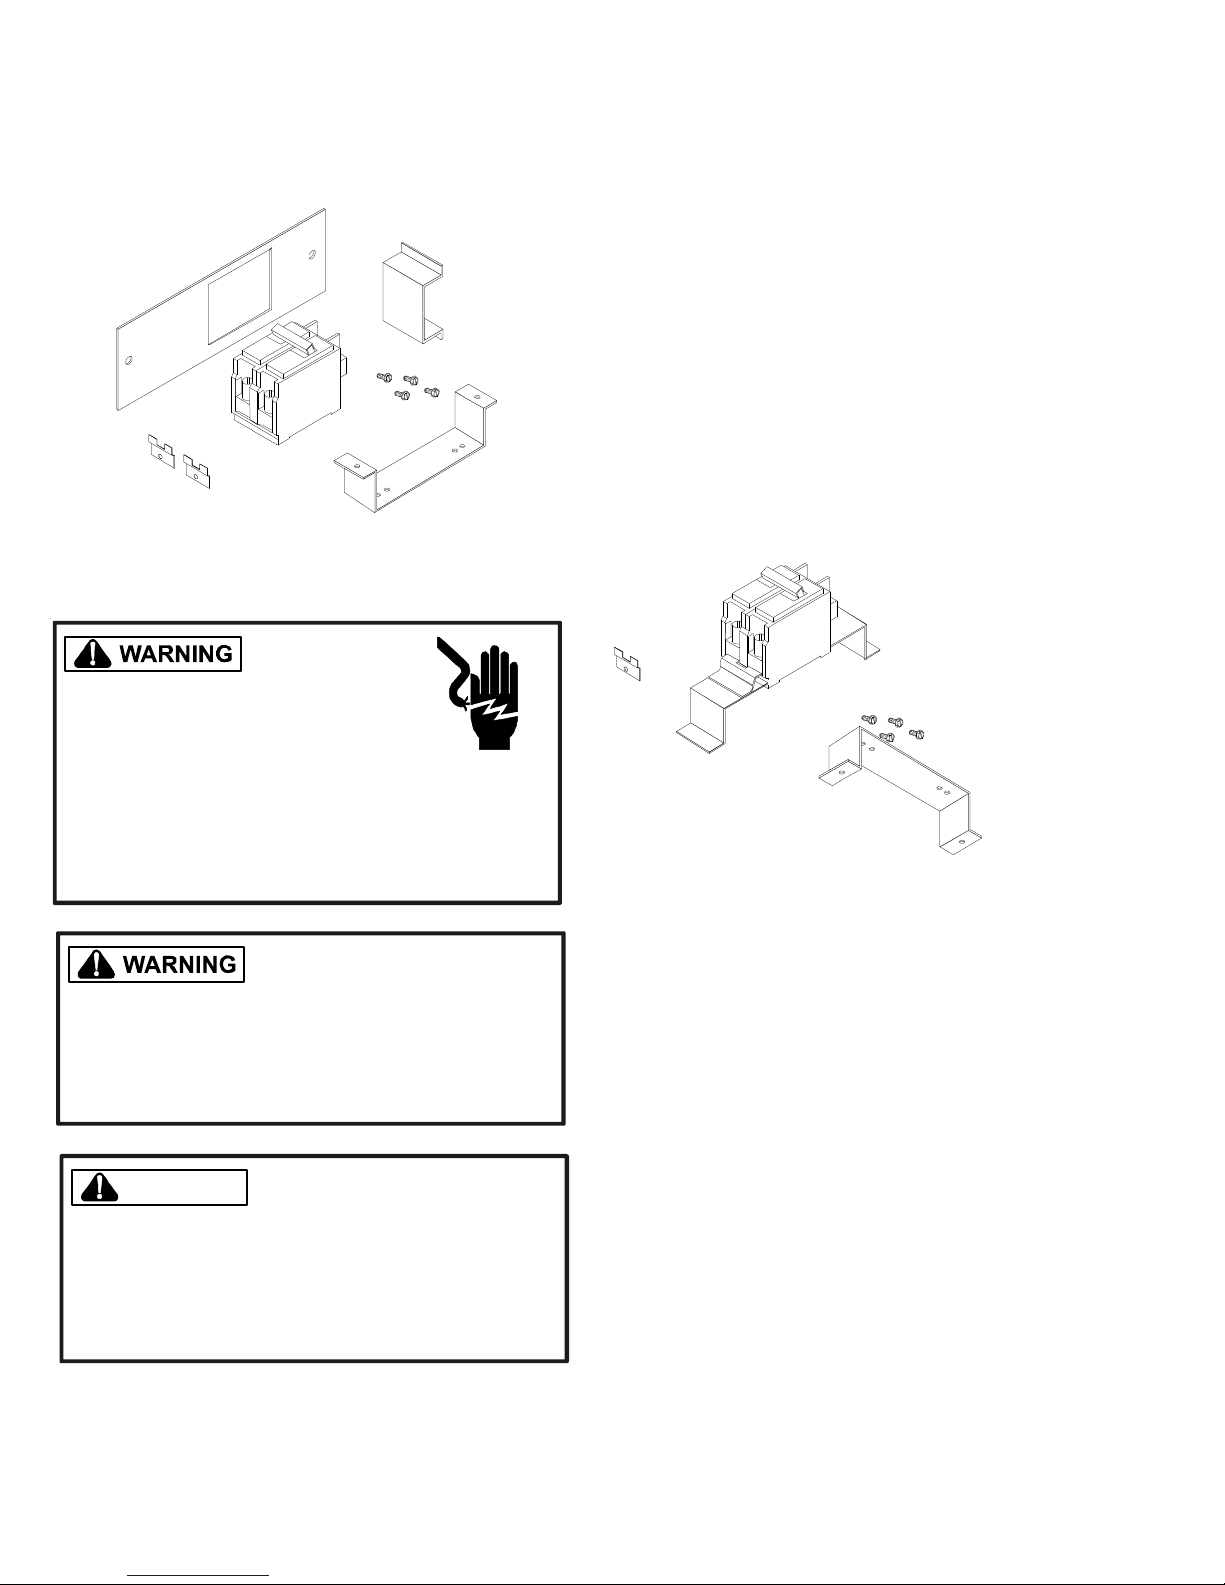
Description
The circuit breaker kit provides POWER ON/OFF and current overprotection function at the unit. The circuit breaker
kit contains the appropriate circuit breaker, replacement
access cover for the high voltage section of the subbase,
mounting bracket and clips, and required hardware. Select
circuit breaker kits according to unit amperage.
Installation
1. Check circuit breaker for manufacturers name. Select
mounting holes in mounting bracket to match part as
indicated in the following figure (GE and Westinghouse
use outer holes). Secure one of the two small mounting
clips to the mounting bracket. Do not fully tighten the
mounting screw at this time.
-
2. Position the circuit breaker on the mounting bracket so
that the locking tabs on the small clip (installed in Step
1) hold the circuit breaker on the mounting bracket.
3. Install the second small clip on the mounting bracket,
locking the circuit breaker on the mounting bracket.
Tighten both mounting screws securely.
)
.
-
-
4. Disconnect electrical power to the unit (if already wired).
5. Remove access cover from subbase.
6. Position the entire circuit breaker assembly in the subbase as shown in Figure 2. Using the two screws provided, secure the assembly to the subbase back wall in
the subbase high voltage section. The large compression connections should be on the left (“ON” to the left,
“OFF” to the right).
7. Connect the line voltage to the large compression terminals (left of breaker). Connect subbase wiring to the
smaller compression connections (right of breaker). If a
ground lug is provided, ground the lug to the unit.
8. Install the circuit breaker guard and the replacement
access cover for the high voltage section. Install the
assembly over the circuit breaker handle using the two
screws removed from the original access cover.
4
Page 5
ACCESSORY INST ALLA TIONS
5
Page 6
ACCESSORY INST ALLA TIONS
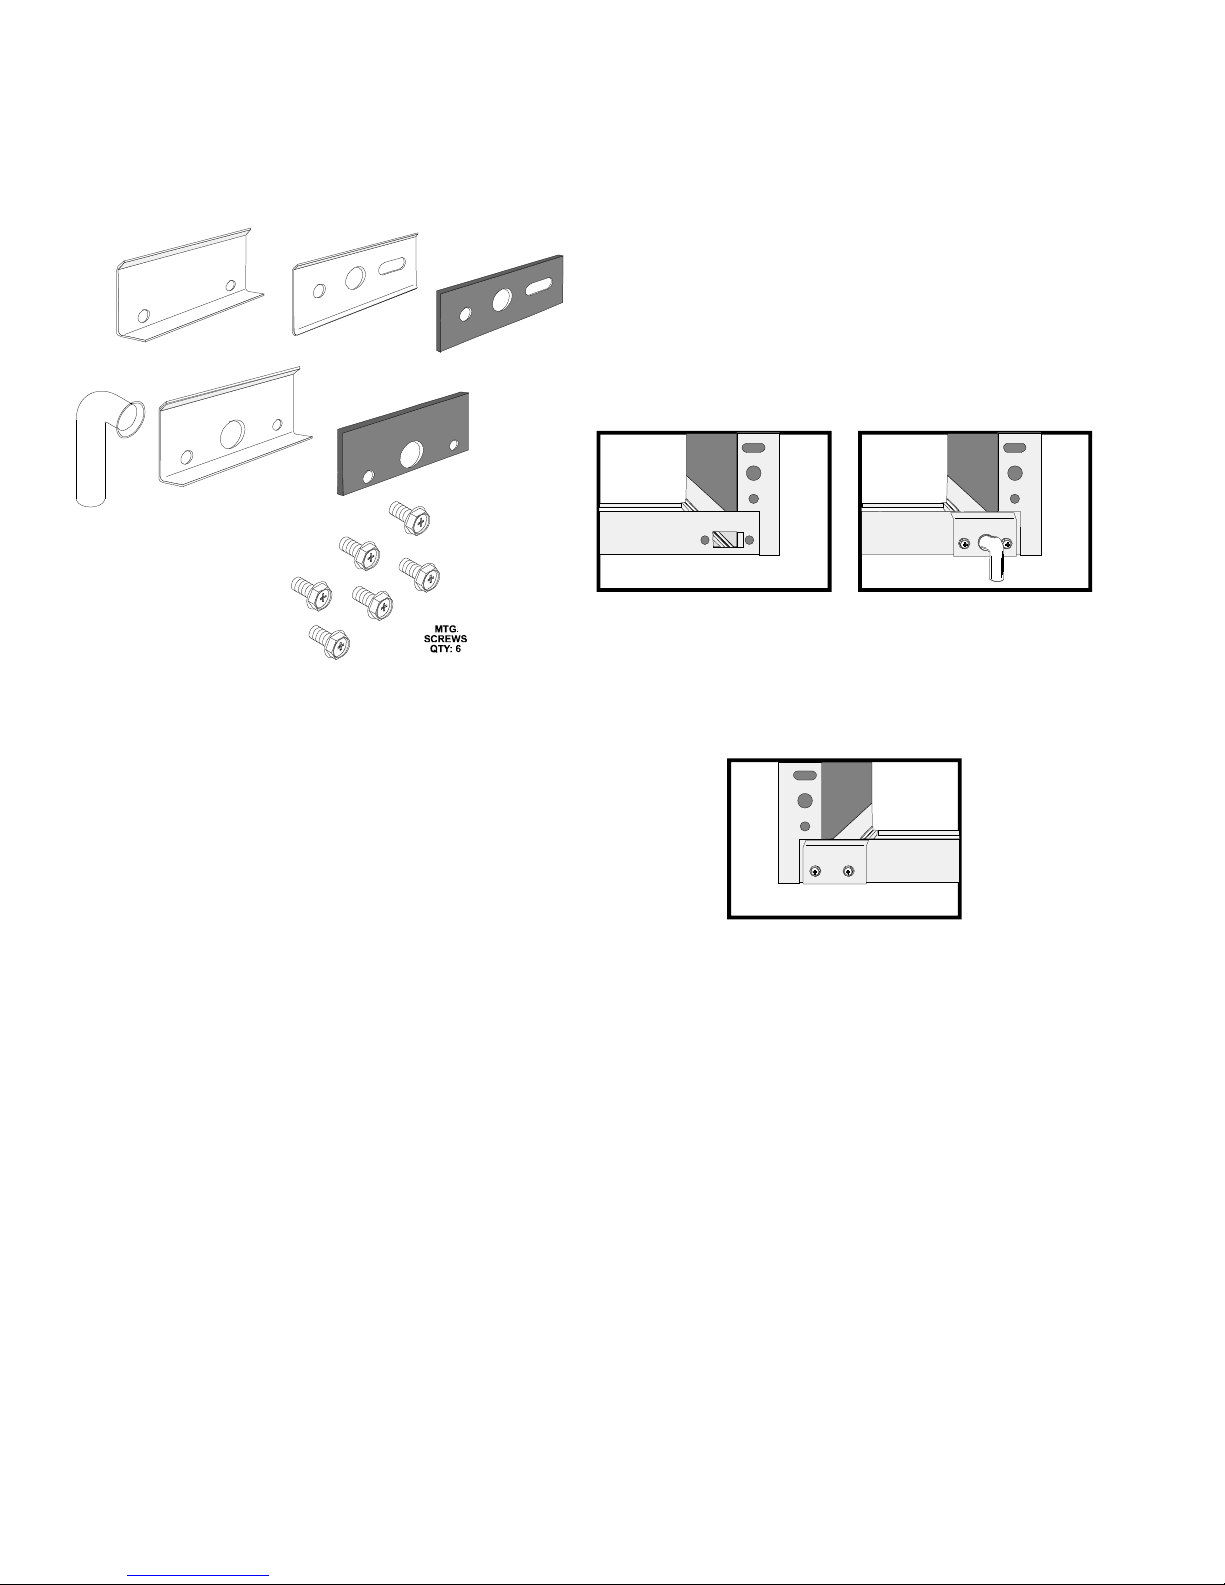
Condensate Drain Kit - DK900-*
1/2" DRAIN FITTING
BLANK-OFF
PLATE C
QTY: 2
DRAIN FITTING
PLATE B
DRAIN FITTING
Figure 1
PLATE D
GASKET A
GASKET E FOR
PLATE D
QTY: 2
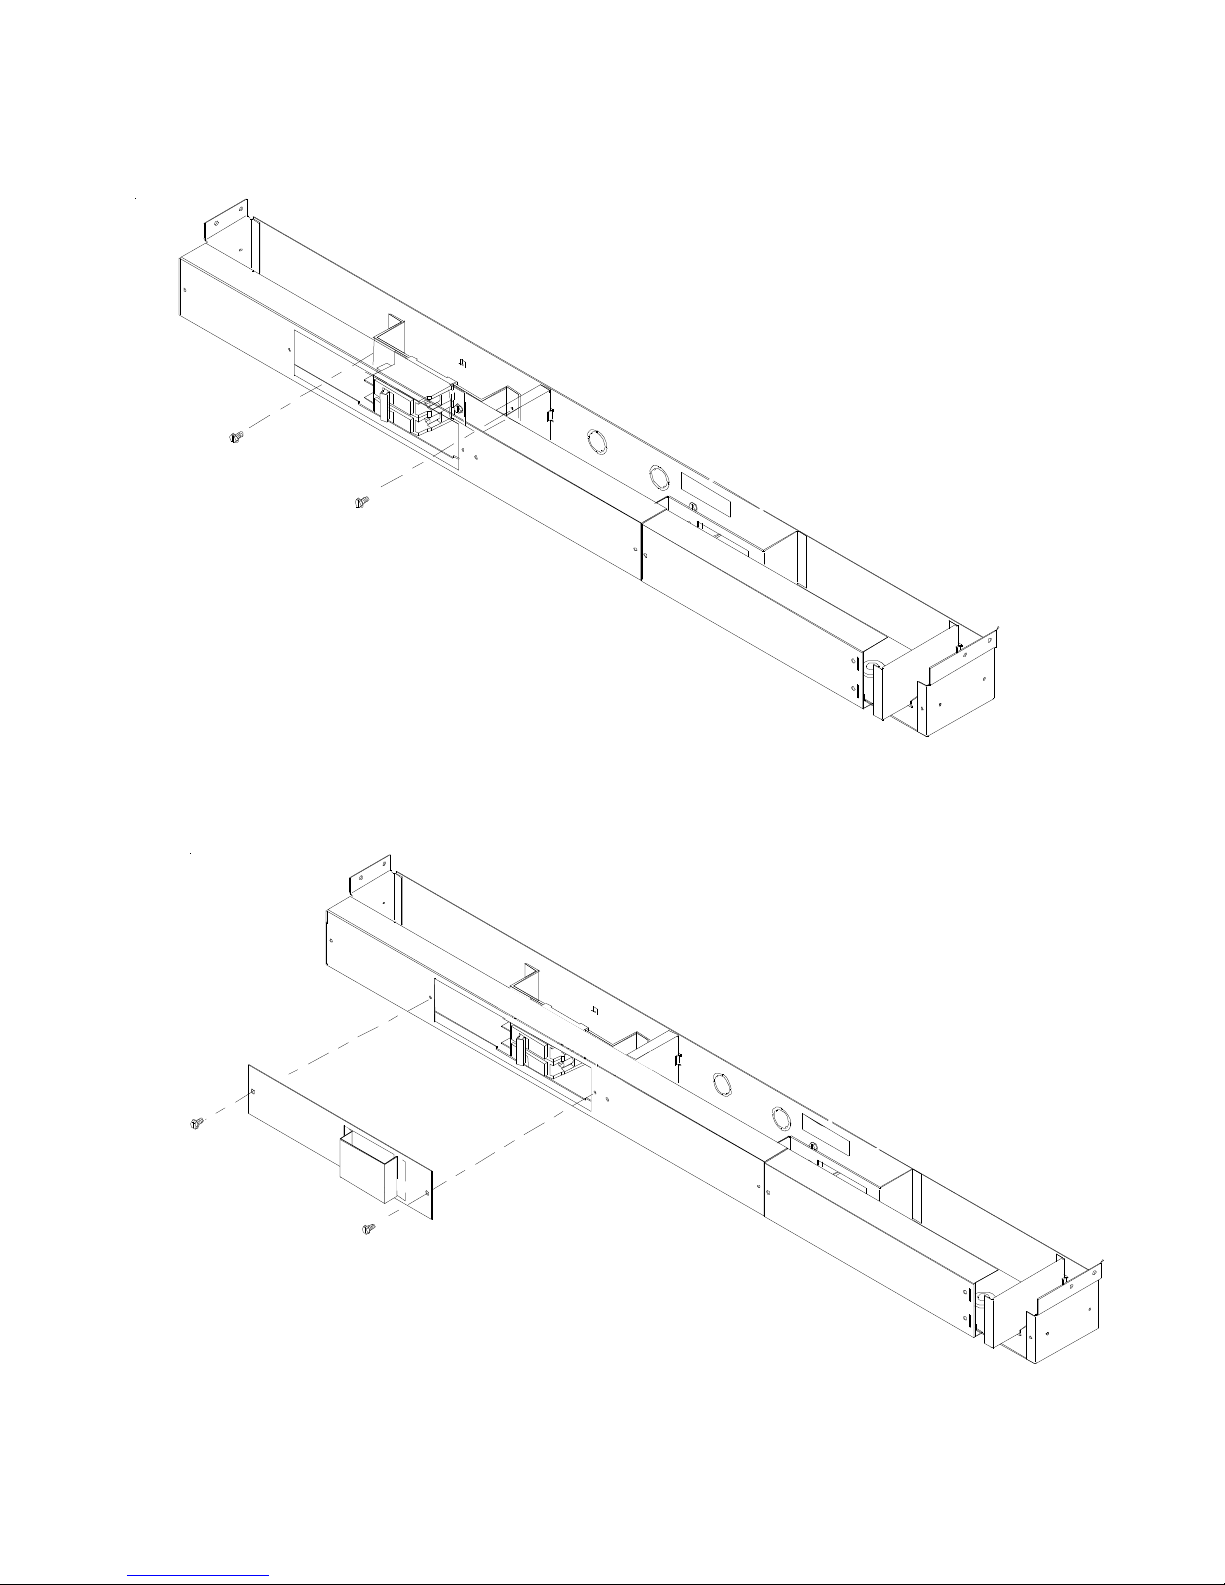
Installation for Outdoor Use
The drain components for outdoor use must be installed before the wall sleeve condenser grille.
1. Remove the rear enclosure panel and the sleeve stiffener. These items can be removed from the inside of
the building.
2. Insert the 1/2” drain fitting in the opening of gasket A
and plate B. Secure this assembly into the holes located on the rear of the wall sleeve using two of the
Phillips mounting screws provided.
Figure 2
3. Place the remaining gasket A on the back of blank-off
plate C and secure the assembly to the left rear of wall
sleeve with the remaining Phillips mounting screws provided.
Description
This kit is used to control condensate from the unit. Condensate water drains from the chassis into the sleeve during
normal heat pump operation and during times of high humidity when the unit is in cooling operation. The drain kit allows
the condensate from the outdoor and indoor coils to be routed
to a suitable area. It can be installed for either outdoor or
indoor use. For outdoor use, the condensate can be drained
from either the right- or left-hand side of the wall sleeve. Local
codes will determine the proper condensate disposal. For
indoor use, the drain components must be installed on the
bottom of the wall sleeve and connected to a drain system
inside the building.
NOTE: This drain kit serves only as a link between the unit
and field-supplied condensate drain system. Installing the
kit without connecting it to a drainage system will result in
inadequate condensate removal, possible leakage and
corrosion.
ALGAECIDE: Some algaecide products may cause damage to the unit basepan or coils and should not be used.
Contact your sales representative when considering the use
of a commercial algaecide.
Figure 3
If unit chassis installed right away
Install the grille to wall sleeve with hardware provided. See
grille installation instructions.
If unit chassis is not installed right away
Replace the rear enclosure panel in the wall sleeve to pro-
tect the inside of the building from weather damage.
6
Page 7
ACCESSORY INST ALLA TIONS
SLEEVE OVERFLOW PORT
DO NOT CLOSE UP THIS PO RT
GASKET (2)
SEE DETAIL A
BLANK-OFF PLATE (2)
Figure 4
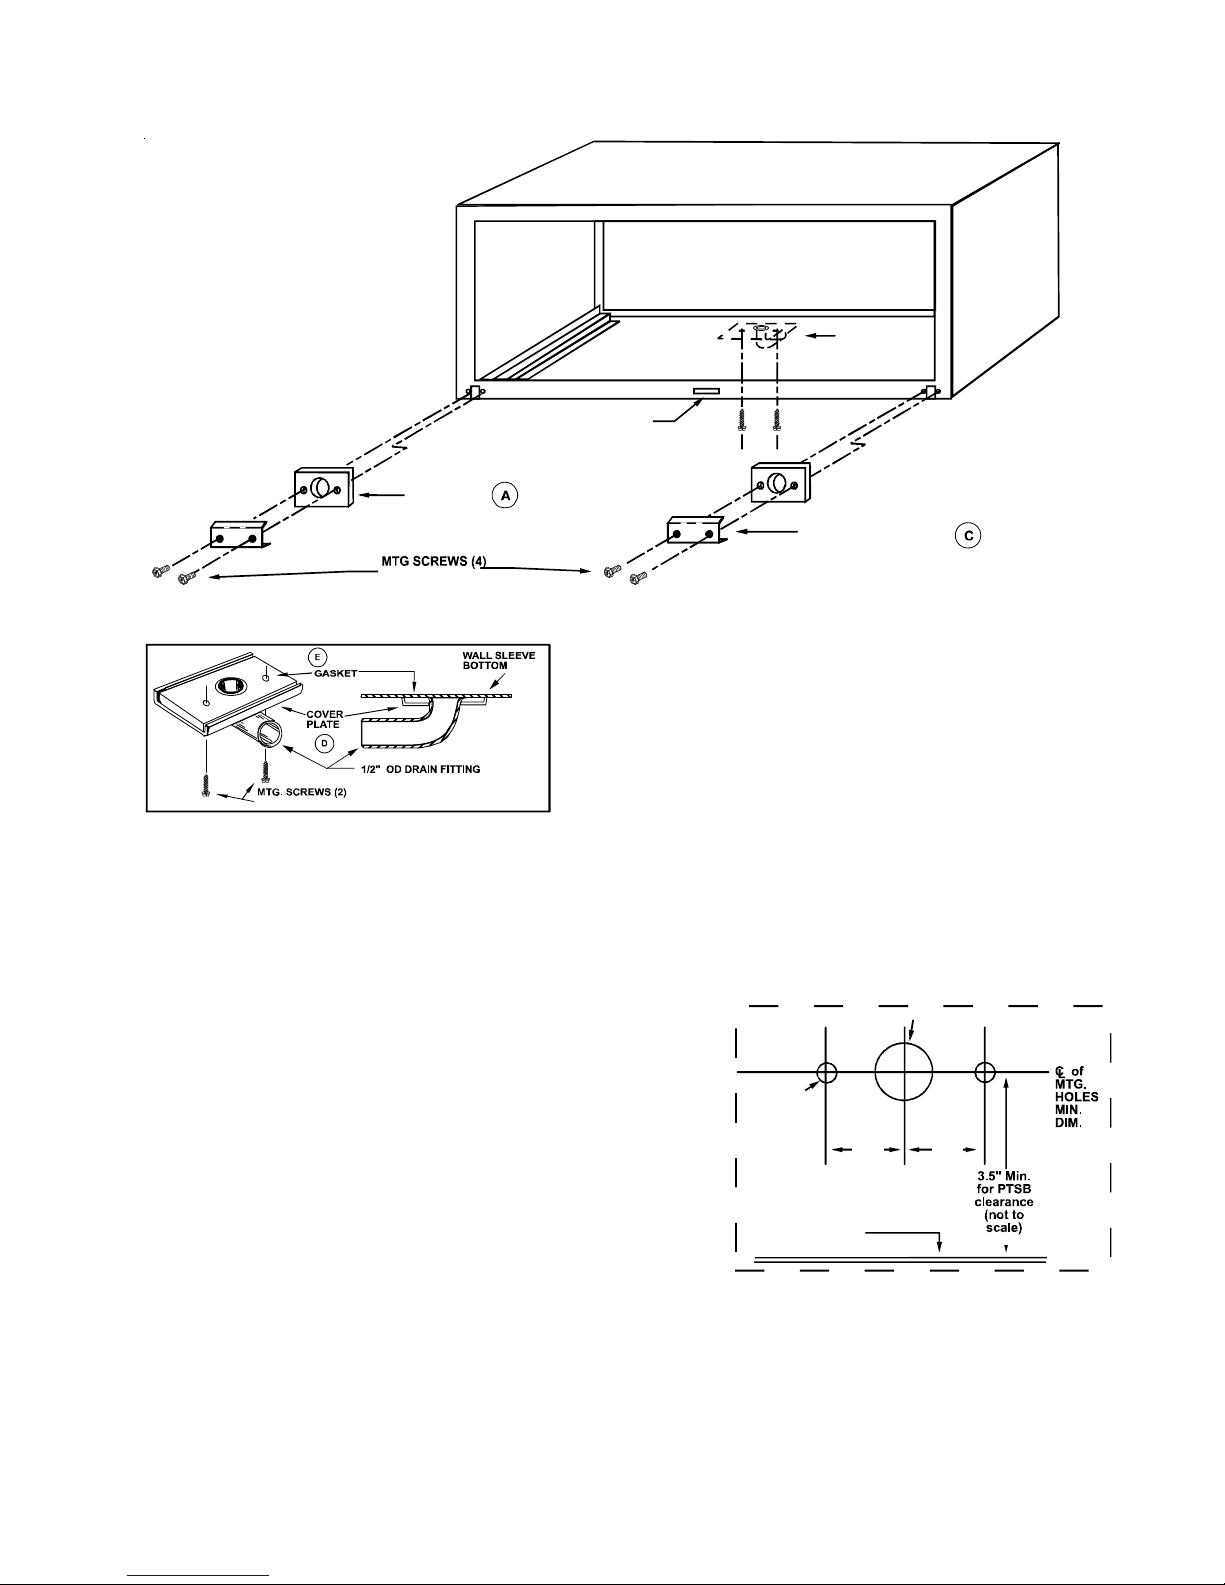
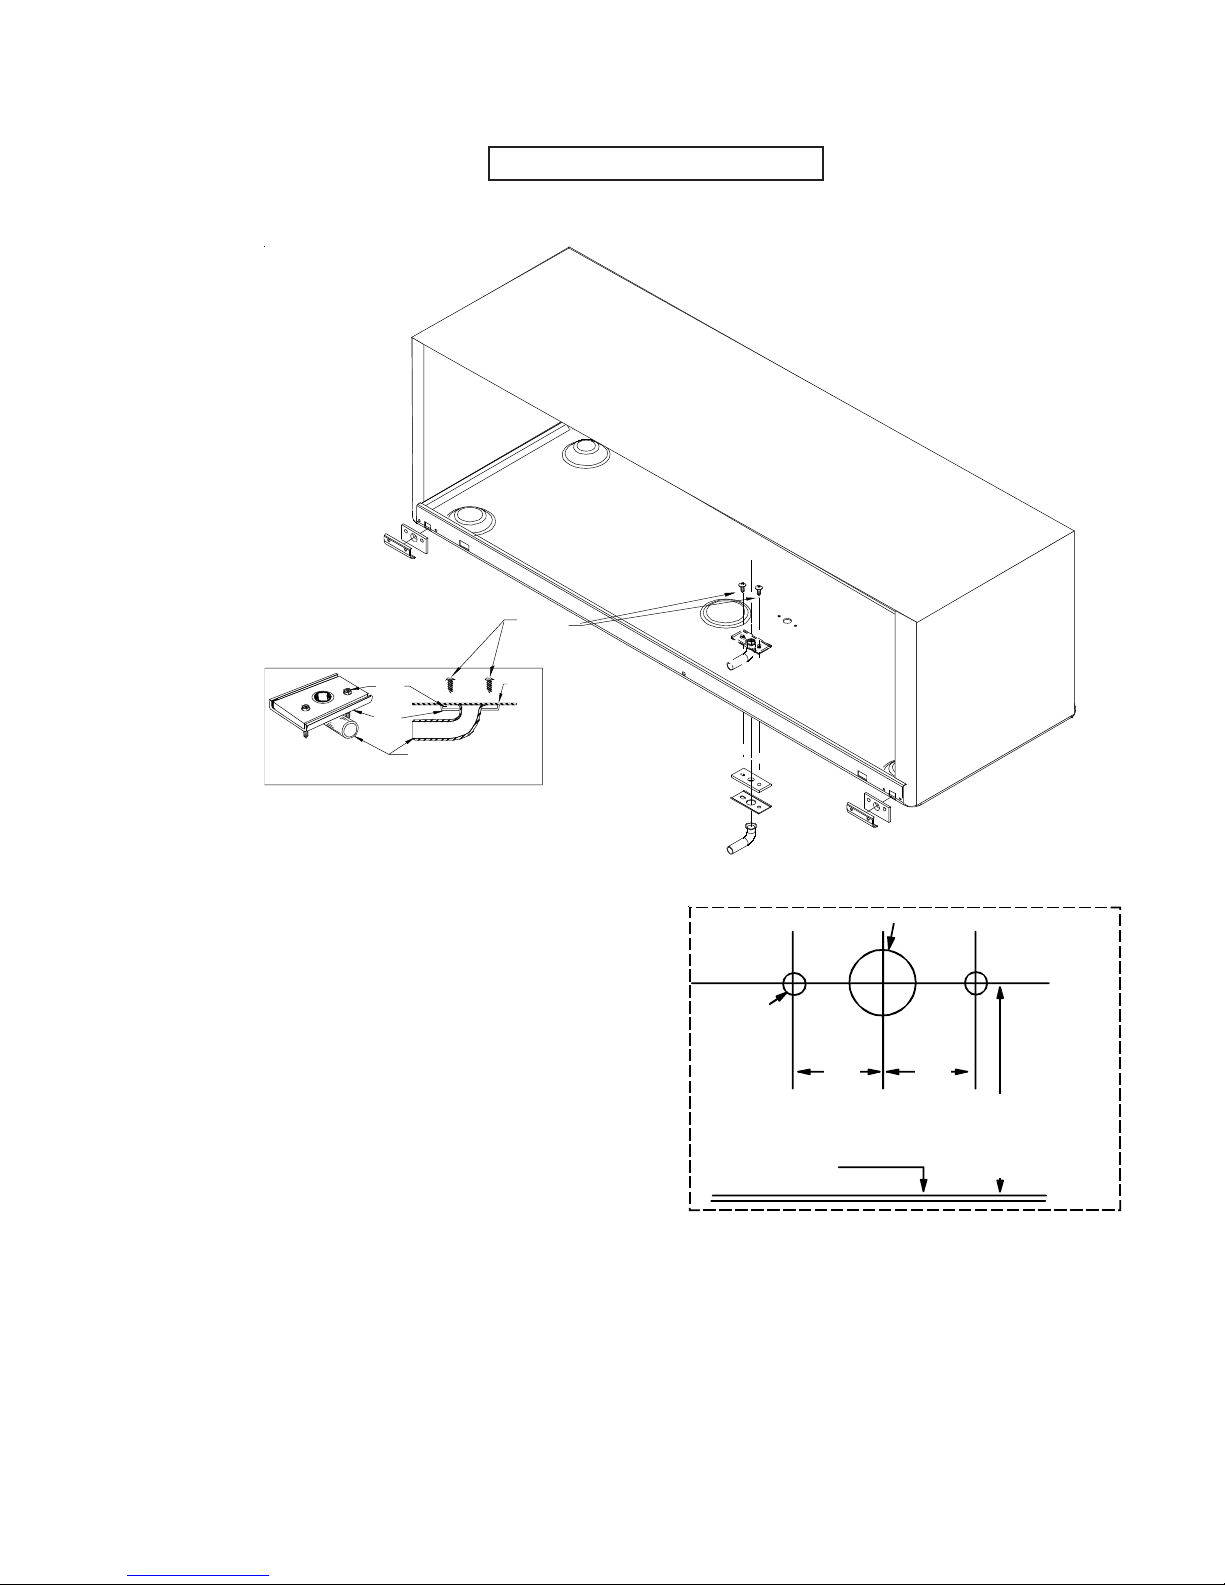
The components of the wall sleeve drain kit for indoor use
are shown in the detail of the figure above. These compo-
nents must be installed prior to the installation of the
wall sleeve.
1. Locate an area on the wall sleeve that will be inside the
room when the sleeve is installed. If a subbase is installed, locate the kit a minimum of 3 1/2” from the front
flange of the wall sleeve. This clearance will provide
adequate clearance for the subbase.
2. Cutout the template in Figure 5. Using this template,
locate and drill the drain kit holes as close to the outside wall as possible.
3. Using detail A in Figure 4 as a guide, assemble the
gasket (E), drain fitting plate (D), and 1/2” drain fitting
together. Install the assembly into the drilled holes and
secure using the two slotted mounting screws included
in the kit. Be sure drain tube is not restricted.
NOTE: If the drain fitting is not connected to an indoor
drainage system immediately after the wall sleeve is
installed; plug the hole with cork (not included) to prevent indoor water damage in case it rains
4. Install a 1/2” ID tube or hose (not included) on the drain
fitting and interconnect it to the drain system inside of
the building. Ensure that there are no kinks or traps in
tube or hose. Kinks or traps can cause improper drainage.
5. Install the two blank-off plates C and gaskets A on the
outdoor portion of the wall sleeve as shown in Figure 4.
These components can be installed after the sleeve is
secured in the wall opening just prior to the installation
of the condenser grille and chassis.
.500" DIA.
.156” DIA.
MTG. HOLES
(2)
.687"
INSID E ED GE OF
FRONT SLEEVE FLANGE
.687"
Figure 5
7
Page 8
ACCESSORY INST ALLA TIONS
Condensate Drain Kit - DK900*
(Combination Drain Kit...for outdoor or indoor sleeve drainage.)
The installation and servicing of the equipment should be done by qualified experienced technicians.
Description
This kit is used to control condensate from the unit. Condensate water drains from the chassis into the sleeve
during normal heat pump operation and during times of
high humidity when the unit is in cooling operation. The
drain kit allows the condensate from the outdoor and
indoor coils to be routed to a suitable area. It can be
installed for either outdoor or indoor use. For outdoor use,
the condensate can be drained from either the right- or lefthand side of the wall sleeve. Local codes will determine the
proper condensate disposal. For indoor use, the drain
components must be installed on the bottom of the wall
sleeve and connected to a drain system inside the building.
Outdoor
Drain
Fitting
Indoor
Mtg. Screws
Qty: 2
Indoor
Drain Fitting
Gasket
Outdoor
Mtg. Screws
Qty: 4
Indoor
Drain
Fitting
Indoor
Drain Fitting
Plate
NOTE: This drain kit serves only as a link between the unit
and field-supplied condensate drain system. Installing the
kit without connecting it to a drainage system will result in
inadequate condensate removal, possible leakage and
corrosion.
ALGAECIDE: Most algaecide products will cause damage to the unit basepan or coils and should not be used.
Contact your sales representative for the recommended
algaecide pan treatment for your unit.
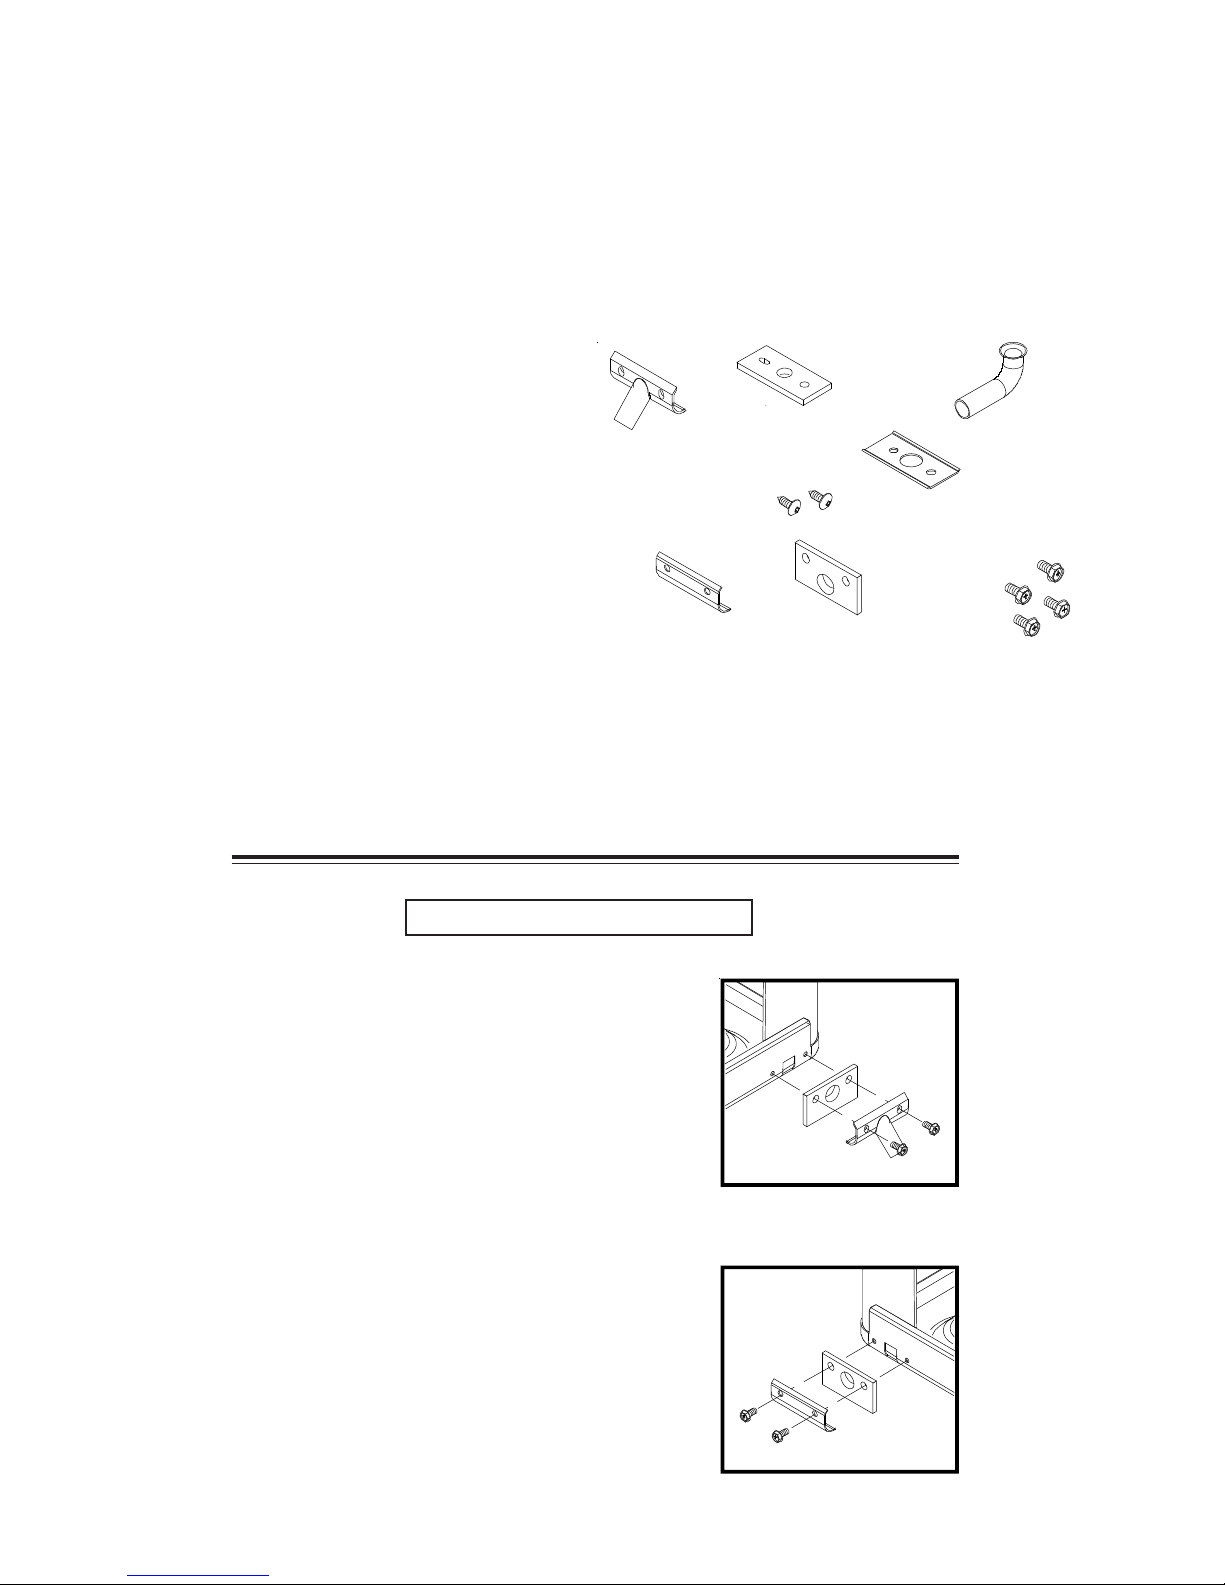
Installation for Outdoor Use
The drain components for outdoor use must be installed
before the wall sleeve condenser grille.
1. Remove the rear enclosure panel and the sleeve
stiffener. NOTE: These items can be removed from
the inside of the building.
2. Install the outdoor drain fitting and one of the outdoor
drain fitting gaskets over one of the drain holes on the
rear of the wall sleeve using two of the provided
outdoor mounting screws.
3. Cover and seal the remaining drain hole using the
remaining outdoor drain gasket, blank-off plate and
outdoor screws.
If unit chassis installed right away
Install the condenser grille to wall sleeve with hardware
provided. See condenser grille installation instructions.
If unit chassis is not installed right away
Replace the rear enclosure panel in the wall sleeve to
protect the inside of the building from weather damage.
Blank-Off
Plate Qty: 2
Outdoor
Drain Fitting
Gasket Qty: 2
Drain Kit Components
Outdoor Drain Fitting Installation
8
Blank-Off Installation
Page 9
ACCESSORY INST ALLA TIONS
Installation for Indoor Use
The components of the wall sleeve drain kit for indoor use are shown in figure below. These components must be
installed prior to the installation of the wall sleeve.
MTG.
SCREWS (2)
WALL
DRAIN
GASKET
DRAIN
FITTING
PLATE
SLEEVE
BOTTOM
Detail A
1. Locate an area on the wall sleeve that will be inside the
room when the sleeve is installed. If a subbase is
installed, locate the kit a minimum of 3 1/2” from the
front flange of the wall sleeve. This clearance will
provide adequate clearance for the subbase.
2. Cutout the template shown to the right. Using this
template, locate and drill the drain kit holes as close to
the outside wall as possible.
3. Using detail A (above) as a guide, assemble the drain
gasket, drain fitting plate, and indoor drain fitting together. Install the assembly into the drilled holes and
secure using the two indoor mounting screws provided. The screws must be inserted INSIDE the wall
sleeve.and TOP driven down into the drain fitting plate.
Ensure drain tube is not restricted. Cover the two
screw heads with a good quality outdoor caulking (not
supplied) for additional corrosion protection.
NOTE: If the drain fitting is not connected to an indoor
drainage system immediately after the wall sleeve is
installed; plug the hole with cork (not included) to
prevent indoor water damage in case it rains.
4. Install a 1/2” ID tube or hose (not included) on the drain
fitting and interconnect it to the drain system inside of
the building. Ensure that there are no kinks or traps in
tube or hose. Kinks or traps can cause improper
drainage.
5. Install the two drain blank-off plates and outdoor drain
gaskets on the outdoor portion of the wall sleeve as
shown in the figure above. These components can be
installed after the sleeve is secured in the wall opening
just prior to the installation of the condenser grille and
chassis.
.500" DIA.
.187" DIA.
MTG. HOLES
(2)
.687"
INSIDE EDGE OF
FRONT SLEEVE F LANGE
.687"
Template
Due to policy of continual product
improvement, the right is reserved to
change specifications and design
without notice.
3.5" Min.
for PTSB
clearanc e
(not to
scale)
C of
L
MTG.
HOLES
MIN.
DIM.
9
Page 10
ACCESSORY INST ALLA TIONS
Condensate Removal Pump
HIGH VOLTAGE
ISCONNECT ALL POWER BEFORE
D
SERVICING
ULTIPLE POWER SOURCES MAY BE PRESENT
M
AILURE TO DO SO MAY CAUSE PROPERTY
F
DAMAGE
Description
The internal condensate pump serves as an effective means
for disposing of condensate generated during heat pump
operation by transferring it to the indoor coil. The warm coil
surface and the warm room air help in evaporation of the
condensate while adding humidity to the room. As with any
equipment of this type, the addition of this kit will decrease
the sensible heating capacity of the unit. This kit is not
intended for use in seacoast or corrosive environments.
NOTE: Under extreme high humidity conditions, the internal
condensate pump may not be able to dispose of all the condensate produced, and condensate would then drip from the
outside of the wall sleeve. If this condensation is unacceptable, then a drain system (including factory approved drain
kit for the wall sleeve) should be installed.
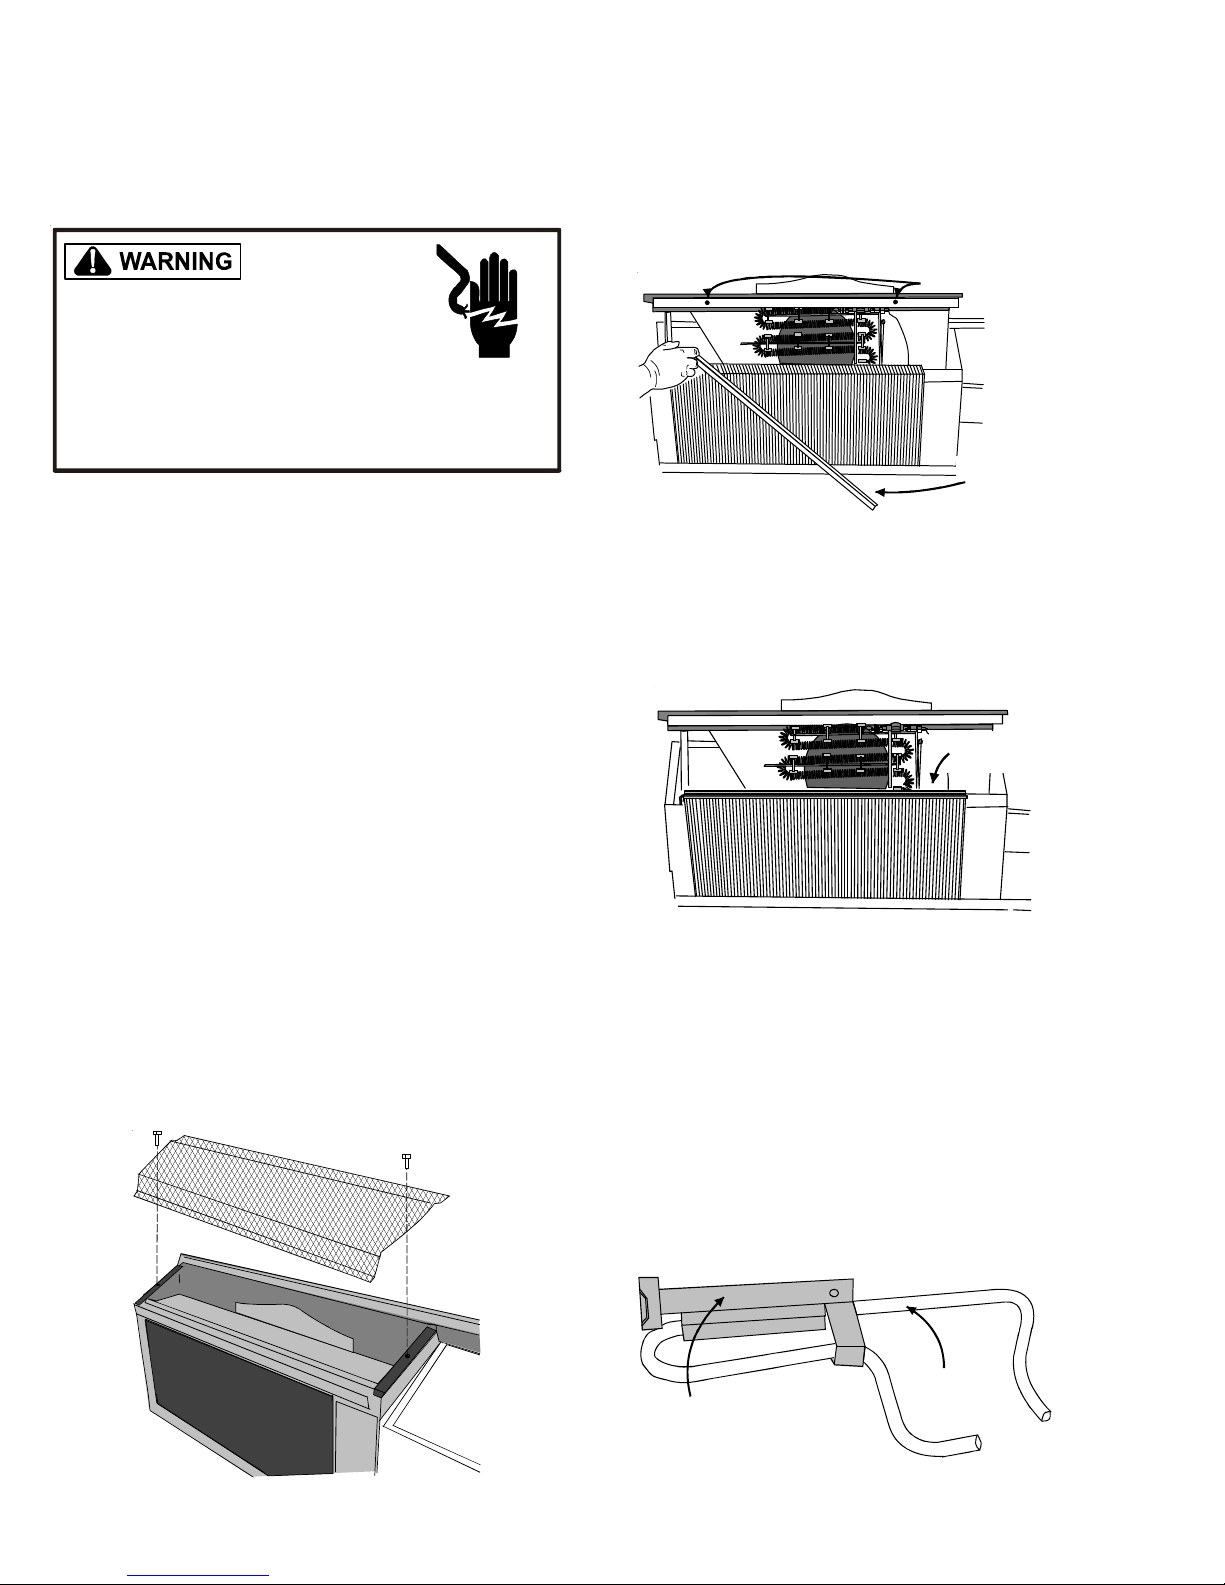
1. Remove front by rotating bottom outward and then lifting
up and out from chassis.
2. Unplug and remove the PTAC chassis from the
wallsleeve. Move the chassis where the front and back
of the chassis can be easily accessed.
3. Remove the discharge screen by unscrewing two screws
holding the screen to the blower panel. Set screen aside.
OR
INSTALLING THIS UNIT
,
PERSONAL INJURY OR DEATH
.
.
.
4. Lift the blower panel approximately 10 inches by unscrewing two screws holding the blower panel to the
chassis and lift upward being careful not to pinch heater
wires.
Mounting Screw
Holes
Condensate
Tube
5. Using the short leg of the condensate tube push out the
1/2 inch diameter knockout on the back wall of the
styrofoam scroll. The condensate tube should protrude
through the partition panel by 1-3/4 inches. Rotate the
condensate tube so the tube lays flat on the coil.
Condensate
Tube
6. Orient the condensate tube on the coil so when the blower
panel is lowered the condensate tube fits snugly into
the raised embossment of the blower panel.
7. Make sure the holes in the condensate tube are facing
downward toward the evaporator coil.
8. Lower the blower panel over the condensate tube and
screw the blower panel to the chassis with the existing
screws. Replace the discharge screen and screw the
screen to the blower panel with the existing screws.
9. Using the overflow tube holder and the overflow tube,
hold the tube with the metal holder and screw the holder
to the partition panel with the provided 1/2 inch #8 screw.
10
Tube
Holder
Page 11
ACCESSORY INST ALLA TIONS
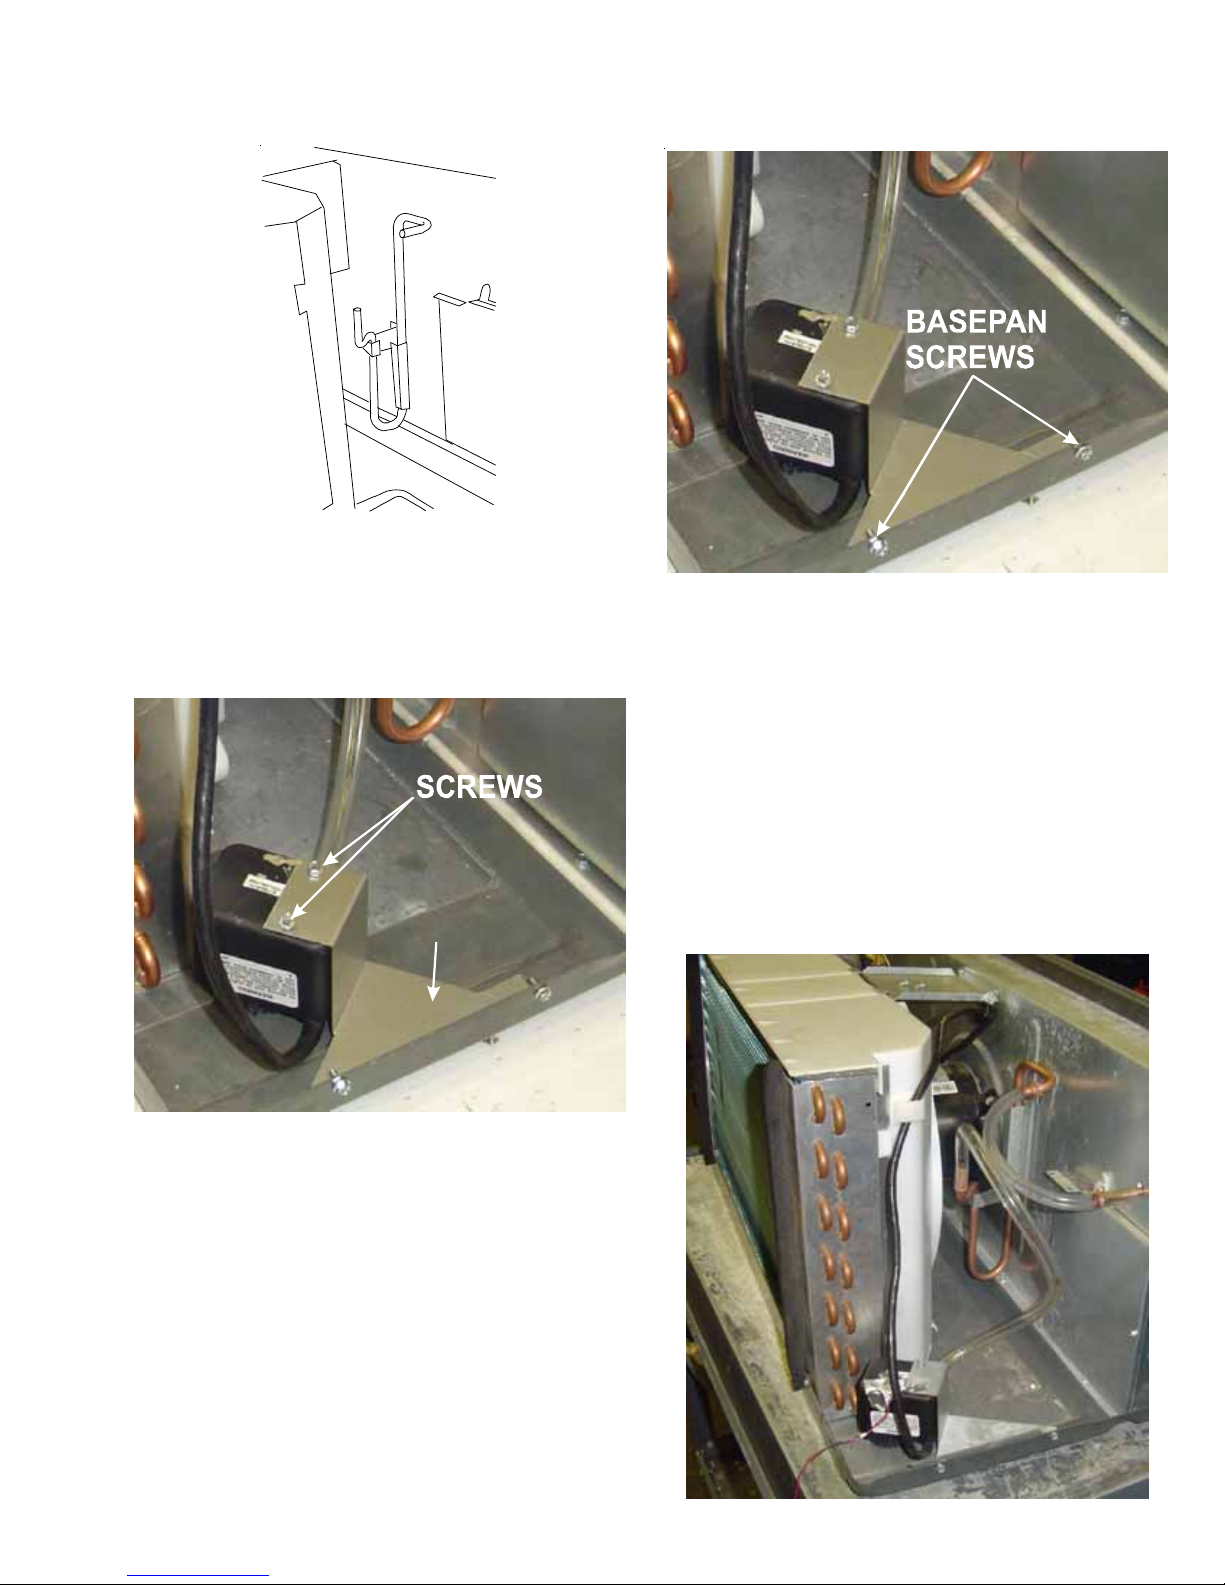
10. Place the pump bracket onto the top of the pump and
screw the pump bracket to the pump with the provided
two (2) 1/2 inch #8 screws so that the bracket is secure
against the pump.
PUMP
12. Remove the protective adhesive backing from the plastic U clip and mount the U clip to the plastic condenser
shroud in approximately the position shown.
13. Attach the p-clamp to the brace with the screw provided (see figure below.
14. Place one of the hose clamps over one end of the 16
inch vinyl hose. Place the same end over the barbed
discharge tube of the pump assembly. Place a hose
clamp on the other end of the 16 inch hose. Place this
same end over the shorter leg of the overflow tube and
secure the hose with the hose clamp.
BRACKET
11. Orient the pump in the back left corner of the basepan
and screw the pump bracket to the basepan with the
provided two 1/2 inch #8 screws.
11
Page 12
ACCESSORY INST ALLA TIONS
15. Place a hose clamp over one end of the 11 inch long
hose. Push this same end over the longer leg of the
overflow tube and secure with the hose clamp. Place
another hose clamp over the other end of the 11 inch
hose. Push this same end over the condensate tube
protruding out from the back of the partition panel and
secure with the hose clamp.
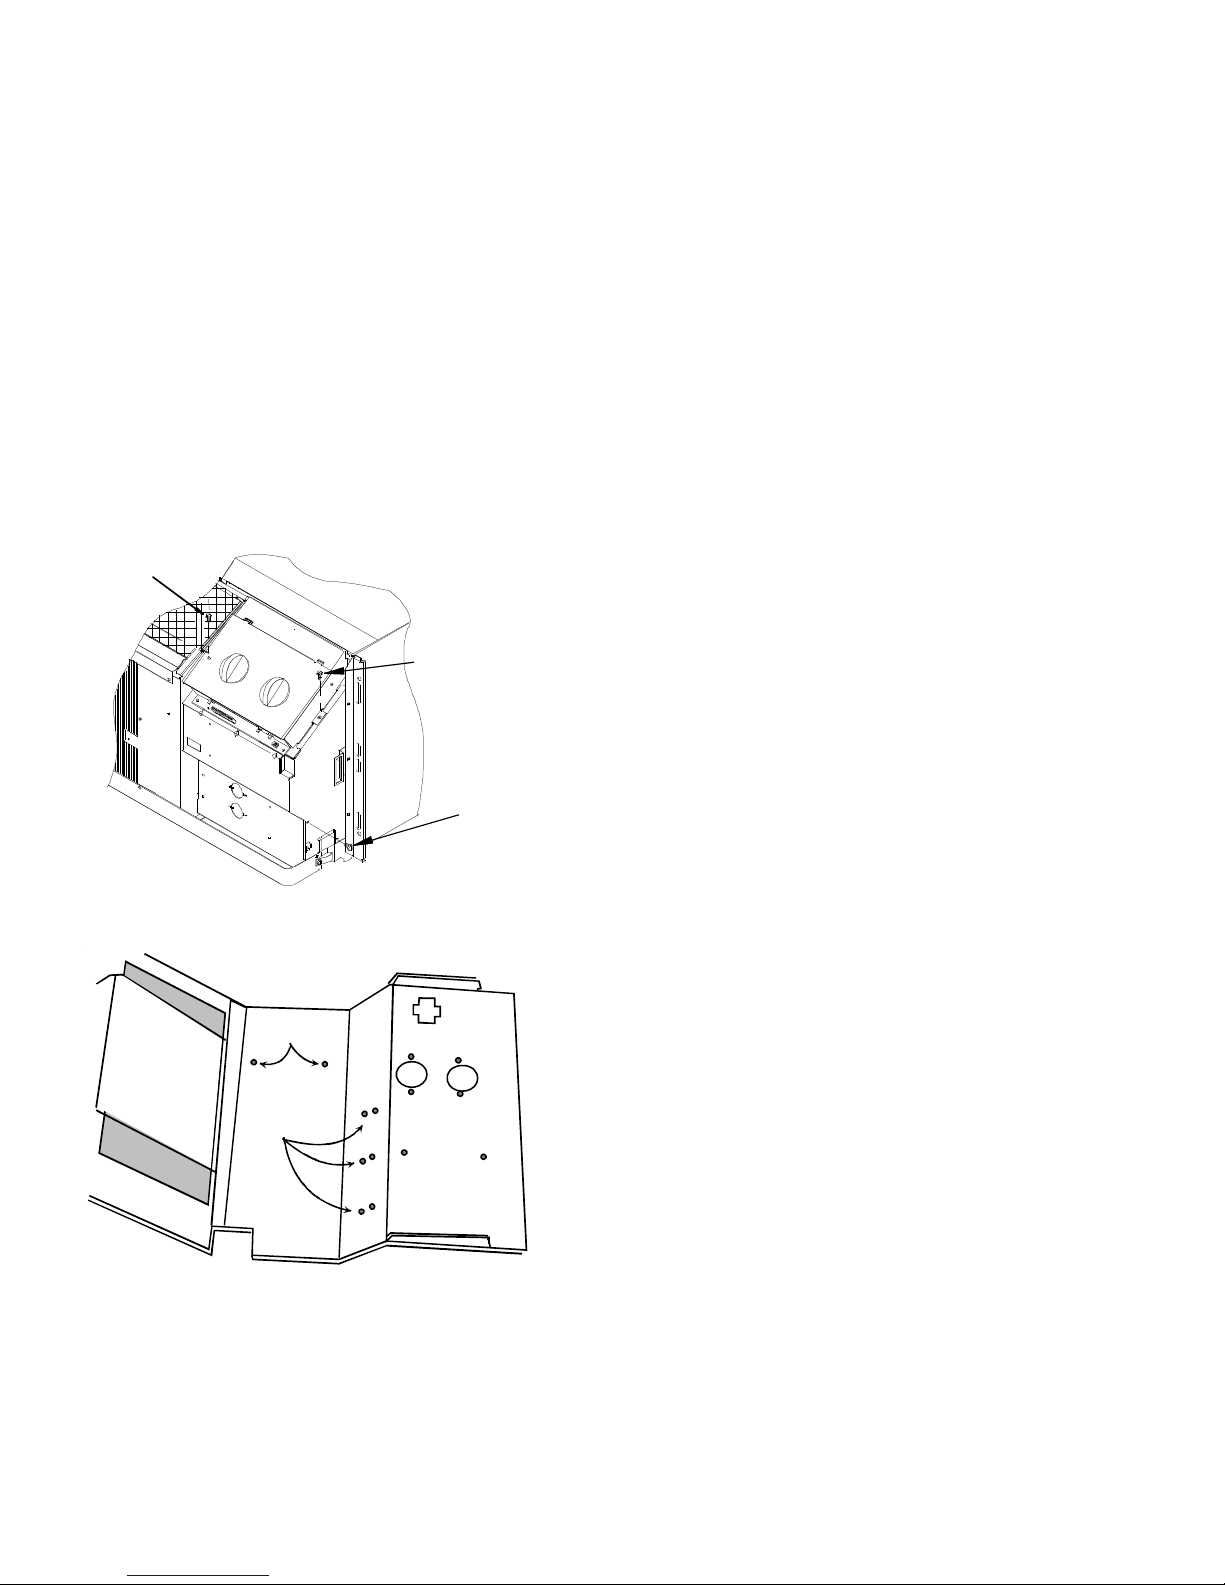
16. Route the condensate pump cord through the U clip on
the condenser shroud, through the p-clamp attached to
the brace, and then through the hole in the panel where
the compressor wires are routed through the panel.
NOTE: The permagum may have to be removed to feed
the wires through the panel, make sure wires have no
slack and replace the permagum back into place to prevent air leaks.
SCREW
SCREW
N
O
3
2
1
SCREW
Back Of Escutcheon
Transformer
Mounting Holes
Relay Mounting
Holes
holes provided in the panel. (See figure above.)
20. Mount the relay in one of the three relay mounting holes
in the control panel making sure that the threaded stud
is in the smaller hole and the metal tab is in the adjacent larger hole. Screw the provided nut onto the threaded
stud from the opposite side of the control panel.
21. Disconnect the RD33, VT12, and BK19 wires from the
control board and connect the YL5 (where RD33 was
connected), YL3 (where VT12 was connected), and YL1
(where BK19 was connected). Connect RD33 to the
piggyback terminal of YL5, VT12 to the piggyback terminal of YL3, and BK19 to the piggyback terminal of
YL1. Make sure the OR8 wire is connected from the #6
terminal of the relay to 24 volt terminal of the transformer.
22. For 208 volt applications move the WH6 wire terminal
from the 240 volt terminal of the transformer to the 208
terminal of the transformer.
23. Units that have a Power Vent or Power Door Kit already
installed in the chassis should refer to the proper wiring
schematic for proper wiring of the condensate pump kit.
Use the second set of transformer holes to mount the
transformer.
24. Units that have a 2 stage heater already installed in the
chassis should refer to the proper wiring schematic for
proper wiring of the condensate pump kit.
25. Units that have a Power Vent or Power Door Kit and a
two stage heater already installed in the chassis should
refer to the proper wiring schematic for proper wiring of
the condensate pump kit.
26. Install the basepan drain plug into the basepan drain
hole by pushing it up into the drain hole from the bottom
of the basepan. This will defeat the thermostatic controlled drain valve. The basepan drain is located left of
the outside coil (as viewed from the back of the unit).
NOTE: When using a condensate removal pump, extra care
must be taken to keep the basepan clean and free of algae
or fungus. Failure to do so may result in the failure of the
condensate removal system.
19. Using two #8 screws that are provided, screw the transformer to the control panel in the transformer mounting
12
Page 13
ACCESSORY INST ALLA TIONS
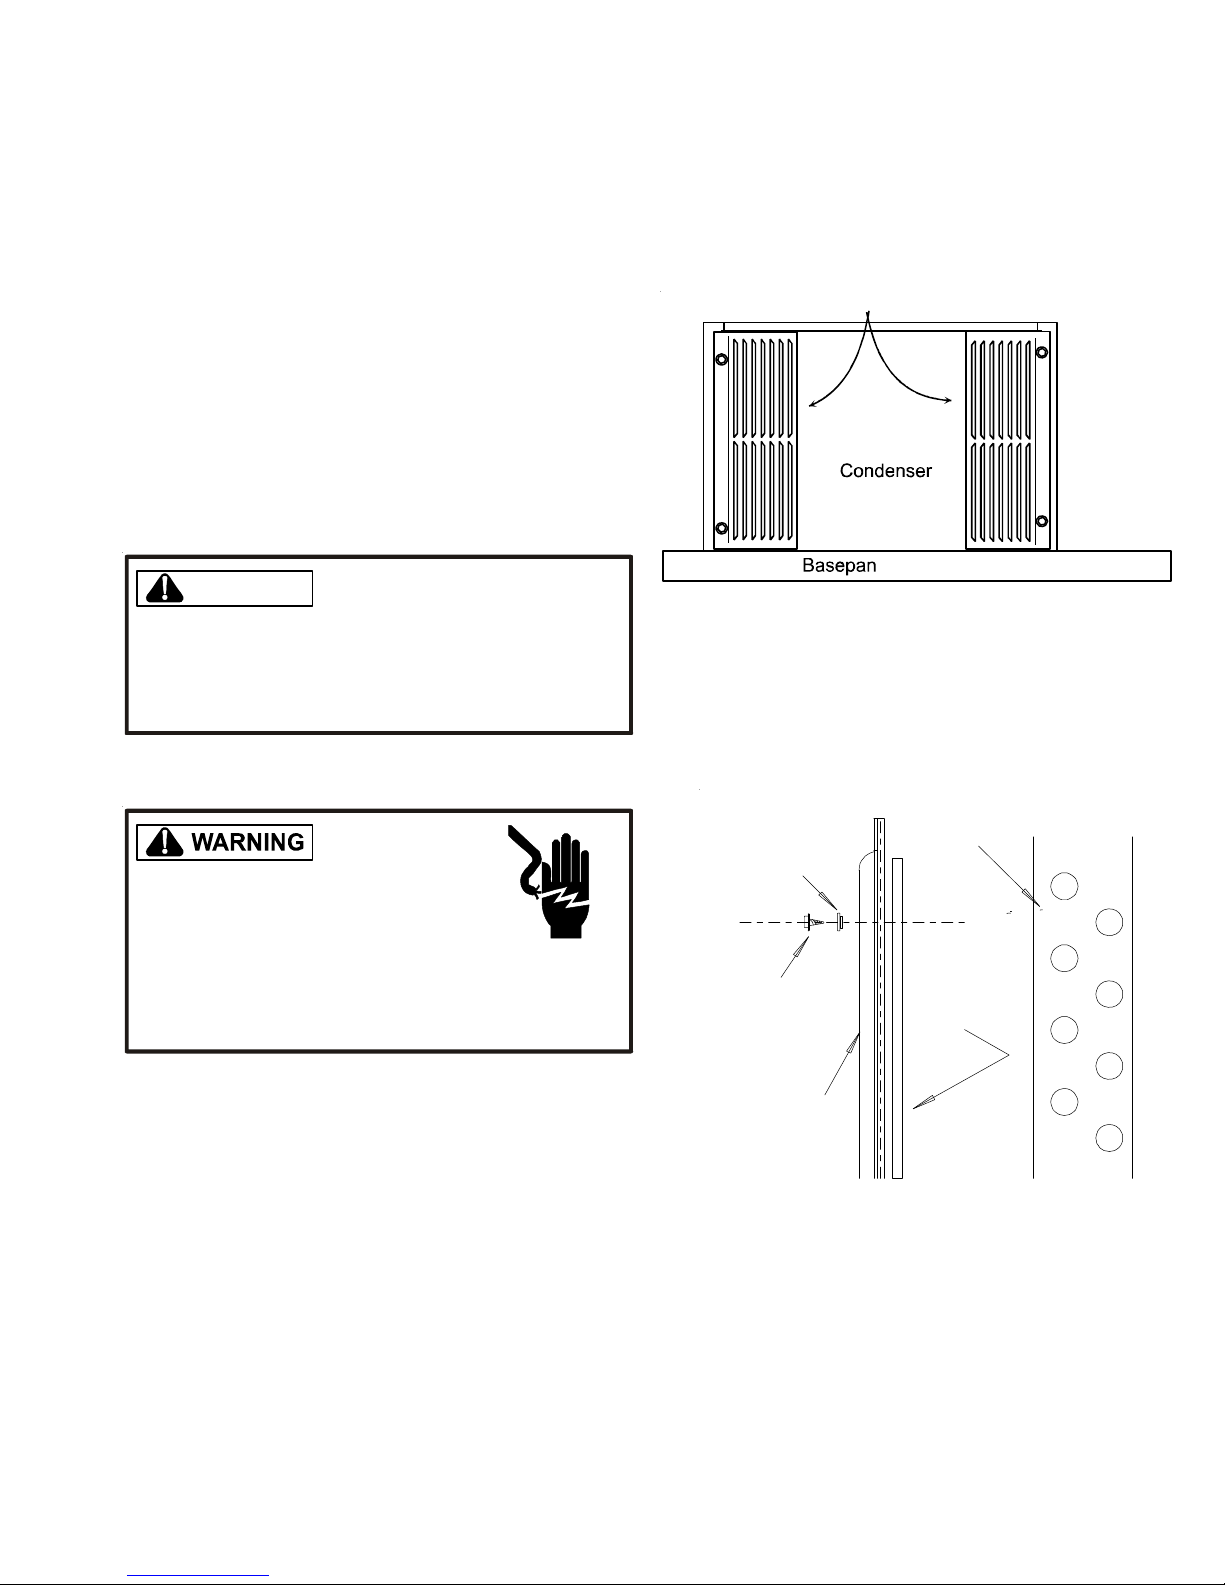
Condenser Baffles
Description
The condenser baffle kit is required when replacing an existing package terminal unit and the original outdoor grille is
not made by the same manufacturer. These baffles are required to deflect discharge air away from the inlet, preventing recirculation of hot condenser air.
This kit is intended to be used with outdoor grilles having
horizontal louvers. If the outdoor grille has vertical louvers,
contact the manufacturer of the package terminal unit.
NOTE: This kit is not to be used when the outdoor grille is
provided by the original manufacturer of the package terminal unit.
CAUTION
TO
PREVENT DAMAGE TO THE UNIT DUE TO
RESTRICTED
OR
DEFLECTORS OF ANY KIND FROM THE
OUTDOOR
AIR FLOW, REMOVE ANY BAFFLES
GRILLE
.
Installation
1. Locate the baffles on the condenser coil flange as shown.
Position the louvers to direct the air toward the center
as the air leaves the coil.
Condenser Baffles
2. Using the screws and shoulder washers provided, secure the grille to the condenser flange. NOTE: Be sure
to install the gasket between the grille and the flange as
shown.
HIGH VOLTAGE
ISCONNECT ALL POWER BEFORE
D
SERVICING
ULTIPLE POWER SOURCES MAY BE PRESENT
M
AILURE TO DO SO MAY CAUSE PROPERTY
F
DAMAGE
OR
INSTALLING THIS UNIT
,
PERSONAL INJURY OR DEATH
.
.
CONDENSER
FLANGE
SHOULDER
WASHER
.
SCREW
BAFFLE
GASKET
GASKET
13
Page 14
ACCESSORY INST ALLA TIONS
PTCB10B Curtain Guard
Description
The PTAC PTCB10B Kit is a curtain guard kit that redirects the
airflow of the PTAC unit to provide added comfort. Each kit
contains 10 guards. Before installing this kit, ensure that the
correct kit has been ordered and received for your unit.
This curtain guard has been designed to work in most curtain
applications, but may NOT work in some applications. If you
are unsure if the curtain guard will work in YOUR application,
please contact your Amana® brand PTAC sales person for assistance before you order guards for the entire property.
IMPORTANT NOTE: This kit is designed for models with R-22
refrigerant and should NEVER be used on models using R410A refrigerant.
Below are two ways to determine if your unit requires PTCB10B
kit:
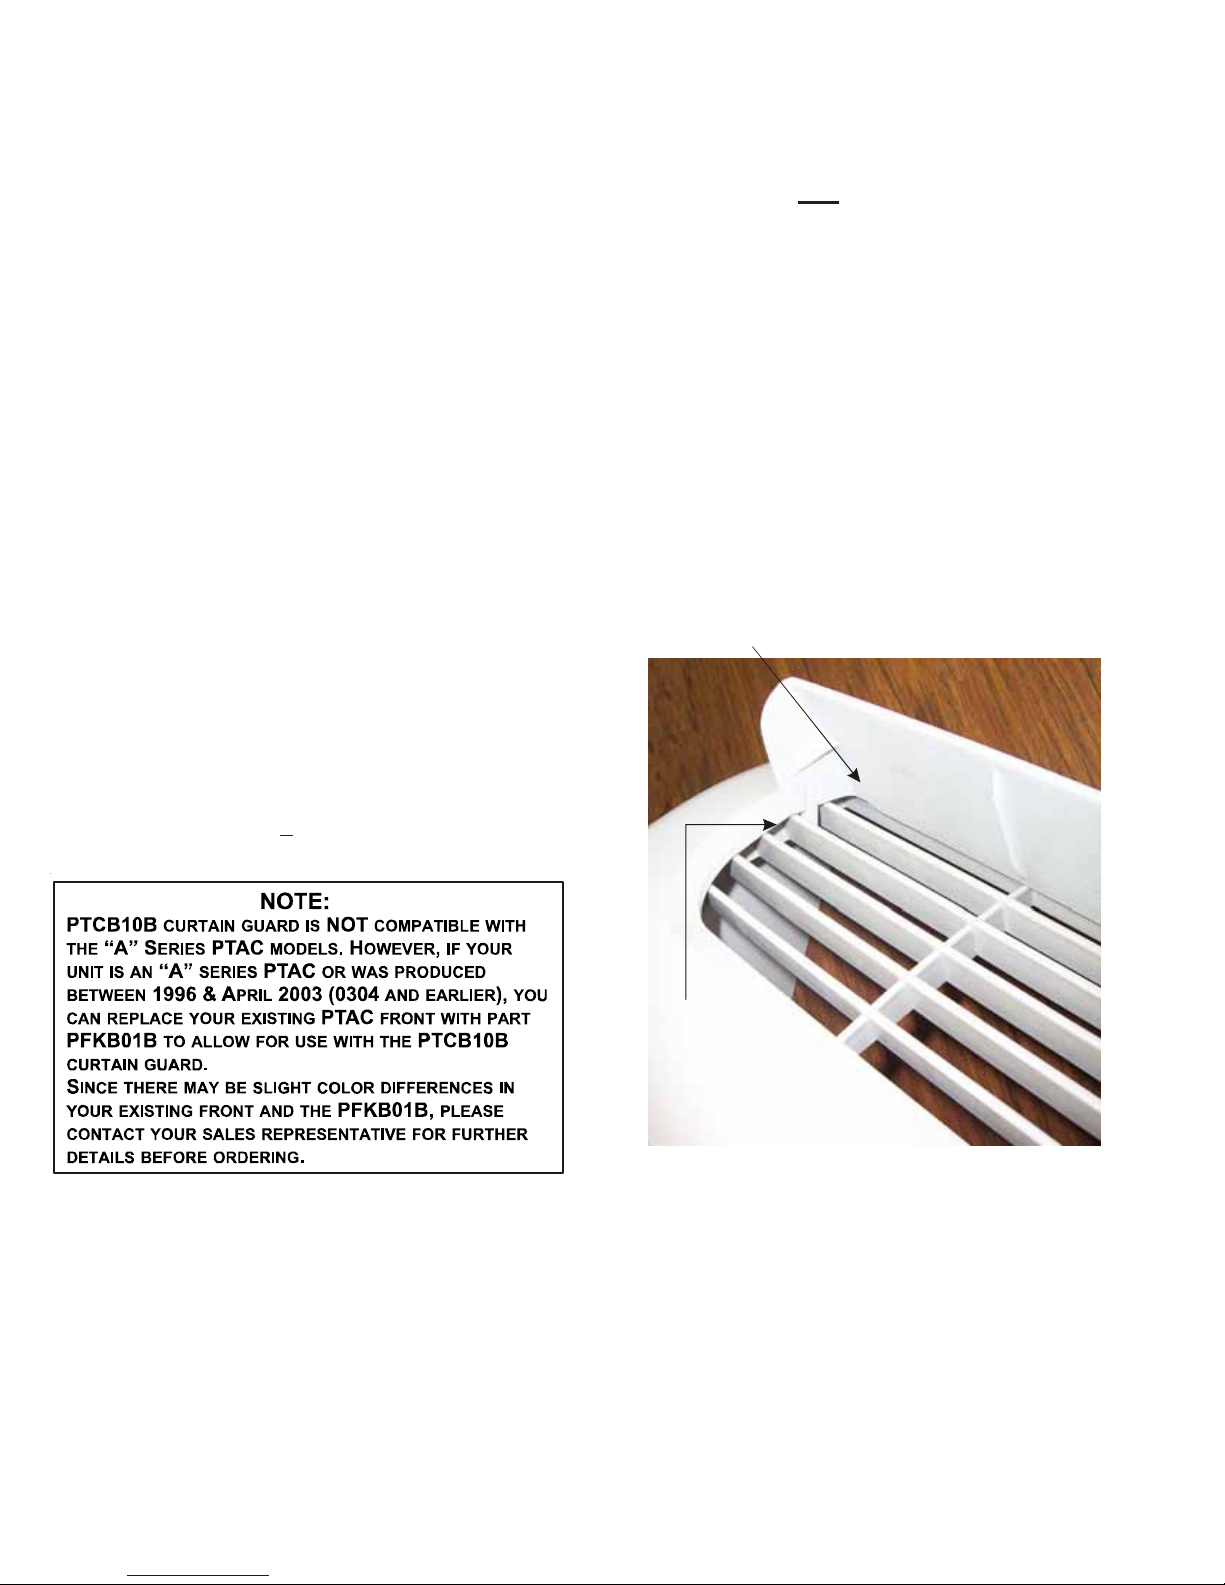
1. Check the underside of the guard next to the side tab for
specific guard/unit compatibility statement. See Figure 1
for location of this statement:
“Install on units with serial numbers starting with 0304******
and less than 1001******”
IMPORT ANT NOTE: Do NOT remove curtain guard until front
is removed from unit. Trying to uninstall the curtain guard
before removing the cabinet front may cause the curtain guard
to break.
1. Position the curtain guard over the cabinet front (tab side
down) so the left and right side tabs on the guard line up
with the 2nd horizontal louver on each side of the cabinet
front. Make sure the 2 middle tabs on the curtain guard
are positioned over the 2nd and 4th vertical louvers on
the cabinet front. Gently snap the left side of the curtain
guard onto the 2nd horizontal louver of the cabinet front
and then gently snap the tab on the right side of the
cabinet front into place. See Figure 1. DO NOT FORCE
CURT AIN GUARD INTO PLACE.
Check here to verify
curtain guard and unit’s compatibility.
2. If your unit’s model number contains LETTERS B, C or D for
the 7th digit (i.e. PTH123
D35AR), PTCB10B is the correct kit
to use (see note below for “A” series information).
If your unit’s model number contains the letter “E” for the
7th digit, DO NOT USE THIS KIT. The correct curtain guard
kit for these units is PTCB10E.
NOTE: Use of the incorrect part may cause the guard to break
and it will not be replaced by Goodman. If you are in doubt
about which kit is needed, please contact your sales representative.
Attach s ide tabs
to 2nd Horizontal Louver
on the left & ri ght sides
of the cabinet front
“
I
n
Figure 1
s
t
a
l
l
o
n
u
n
i
t
s
w
i
t
h
s
e
r
i
a
l
n
u
m
b
e
r
s
s
t
a
r
t
i
n
g
w
i
t
h
0
3
0
4
*
*
*
*
*
*
a
n
d
l
e
s
s
t
h
a
n
1
0
0
1
*
*
*
*
*
*
”
14
Page 15

ACCESSORY INST ALLA TIONS
2. After tabs are secure on the left and right side horizontal
louvers, gently slide the two middle tabs along the bottom of the 2nd & 4th vertical louvers and snap in place.
DO NOT FORCE CURTAIN GUARD INTO PLACE.
When installed, the tabs should point towards the outside of the unit. See Figure 2.
Figure 2
See Figures 3 and 4 for views of correctly installed curtain
guard.
Side Tabs attached on 2nd Horizontal Louver
2nd Louver
View of R-22 Model with Curtain Guard Installed Correctly.
3. T o remove the curt ain guard, remove cabinet front from
the chassis. Rotate the cabinet front so the back of the
cabinet is facing you. Depress the tabs of the curtain
guard while gently pulling the guard away from the front.
4th Louver
Figure 4
2nd Vertical Louver 4th Vertical Louver
Tabs
snapped
into p lace
Figure 3
15
Page 16
ACCESSORY INST ALLA TIONS
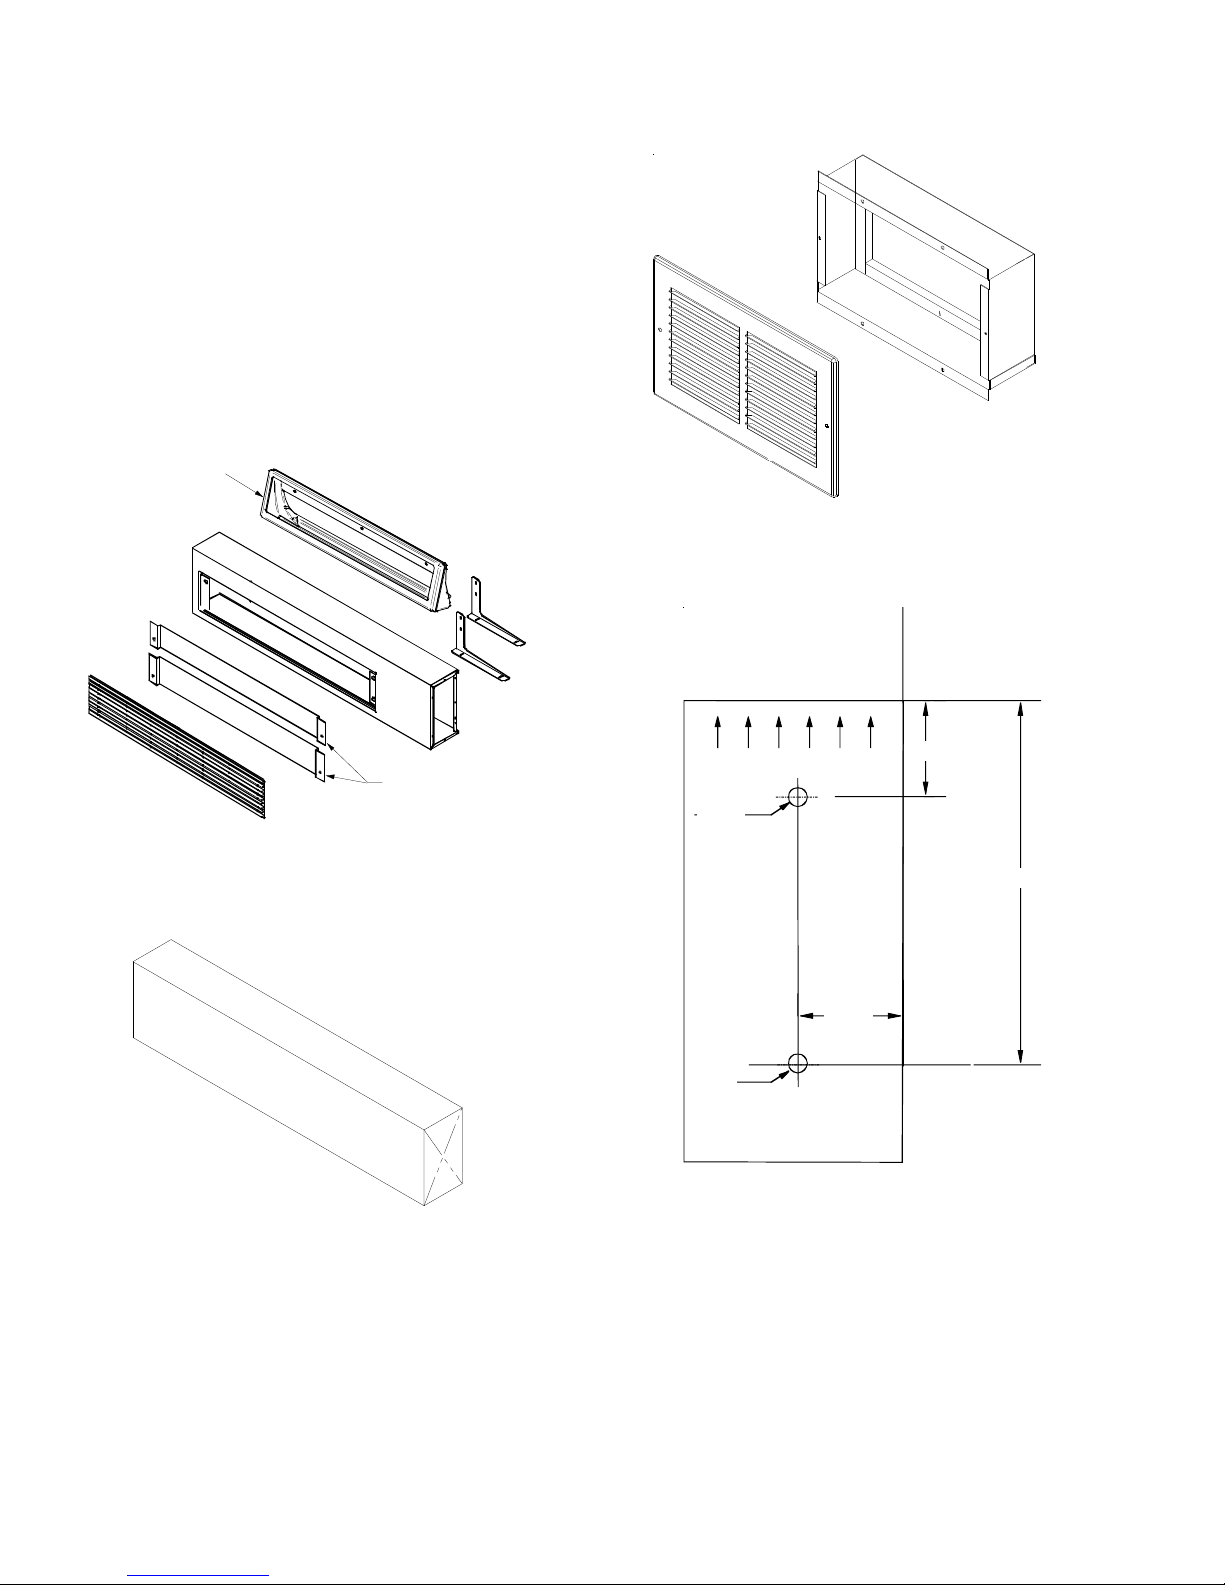
Duct Kit
Description
Extends air distribution to an adjoining room.
Kit Contents
The kit consists of a main duct for the room of origin and an
extension duct to reach the adjoining room, and terminal
duct. NOTE: All required hardware is provided within kit.
TRANSITION
*
*
*
*
Terminal Duct Kit - TDK02B
*
*
*
*
BAFFLES
Main Duct Kit - MDK02*
Extension Duct Kit -EDK02B
5/8"
TOP
Ø 1/8"
2 3/8"
11/16"
Ø 1/8"
Hole Placement Template
16
Page 17

ACCESSORY INST ALLA TIONS
10"
5"
1/2"
18-3/8"
3-1/4" MIN
TRANSITION
UNIT FRONT
7-1/2"
BOTTOM OF
WALL SLEEVE
END OF
DUCT
EXTENSION
INNER WALL
CUT-OUT
1-3/8" MIN
(FOR DUCT KIT)
WALL SLEEVE
2-3/4" MIN
(FOR SUBBASE KIT)
SUBBASE KIT
OUTSIDE
WALL
FLOO R LINE
MDK INSTALLATION INSTRUCTIONS
Disconnect power source before removing the chassis.
PRE-ASSEMBLY (Transition/Front)
1. If the cabinet front is screwed to the chassis, remove the
screw located behind the inlet grille. Pull the inlet grille
forward from the top of the grille to access two screws.
Figure 1.
2. Remove cabinet front from chassis by tilting the bottom
of the front forward, lifting slightly up and forward.
20-1/2" MAX
1/4" MIN
FRONT MOUNTING
HOLE
Figure 1 - Cabinet Front Removal
3. Disengage discharge grille from cabinet front by removing four pal nuts from under the front.
17
Page 18

ACCESSORY INST ALLA TIONS
4. Place transition in air discharge opening of cabinet front
and secure with the provided U-clip. See Figures 2 & 3.
TRANSITION
AIR DISCHARGE
OPENIN G
CABINET
FRONT
Figure 2
PRE-ASSEMBLY
(Wall Sleeve) Hole Dimension and Placement
1. Unplug and remove chassis from wall sleeve. Drill two
1/8” holes on left and right sides of wall sleeve in proper
locations (see template on page 2).
2. Install chassis back into wall sleeve.
3. Install transition/front assembly on to chassis. Make sure
top of cabinet front catches metal flange on chassis.
WALL
2-3/8"
11/16"
5/8"
1/8" HOLES
SLEEVE
INDOOR
`
U-CLIP
Figure 3
5. Using 1/8” drill bit, pre-drill holes in front using the actual
transition as a template. Fasten with three screws. Do
not overtighten. Figure 4.
Figure 4
18
WALL
SLEEVE
1/8" HOLES
5/8"
2-3/8"
11/16"
INDOOR
Figure 5 - Wall Sleeve Hole Placement
NOTE: If there is not enough clearance between sleeve and
partition wall to drill the holes, layout and drill the holes from
inside the sleeve.
MDK ASSEMBLY
Determine if the duct is to be extended to the right of the unit
(where controls are located) or to the left of the unit (opposite the controls). Figure 6.
For left side extensions remove the main duct end cap and
reinstall on the right end of the duct. Using the four painted
sheet metal screws, secure the two mounting brackets to
the main duct.
Page 19

ACCESSORY INST ALLA TIONS
Two mounting slots are provided in each bracket. To mount
extension on right side, adjust bracket so the screws are in
left side of bracket slots; for mounting extension on the left,
adjust brackets so the screws are in right side of slots.
On right side extensions shift the brackets to the right. For
left side extensions shift the brackets to the left.
DISCHARGE
AIR GRILLE
AIR BAFFLE
SUPPORT
BRACKETS
RIGHT SHIFT
Figure 6 - Mounting Brackets installation
AIR BAFFLE INSTALLATION INSTRUCTIONS
1. Determine amount of air desired at main duct and at extension duct. Using the table provided, select the appropriate baffle.
BAFFLE DIMENSIONS
Small 3 11/16" x 31 3/4" 80% 20%
Large 4 5/16" x 31 3/4" 65% 35%
Table 1
2. Place baffle on grille support brackets on main duct. Ensure the two extruded holes of the baffle are on top of the
front bracket holes.
3. Install discharge air grille on top of the air baffle. Secure
the grille to the duct with pal nuts (provided) by reaching
through the opening in the bottom of the duct. See figure
7.
LEFT SHIFT
AIRFLOW
MAIN DUCT EXT. DUCT
Figure 7 - Air Grille Inst allation
4. Place main duct assembly on the transition. Secure the
brackets to the wall sleeve with four #10 hex head screws.
Figure 8. Do not apply pressure on top of duct dur-
ing this installation!
M
D
K
A
S
S
E
M
B
L
Y
T
R
A
N
S
IT
I
O
N
Figure 8
MDK Installation Onto T ransition Assembly
5. Install two Phillips head screws into the top flange of the
main supply duct at extension duct connection. Do not
tighten screws. Leave space for one thickness of the
duct sheet metal between screw head and main duct
flange. Figure 9.
19
Page 20

ACCESSORY INST ALLA TIONS
Figure 9 - Main Supply Duct Top Flange
IMPORTANT NOTE: Total length of duct extension
assembly, including field supplied duct between main and
extension duct, should not exceed 15 effective feet (according
to ASHRAE standards). For additional dimensions, refer to
Main Duct and Duct Extension Dimensions illustration.
7. Measure from the end of the main duct where the extension duct will be connected to the hole in the wall. If
necessary cut the extension duct to a length where the
cut end protrudes into the wall’s inner space and one
inch from the adjoining room’s wall surface.
8. Insert the extension duct into the opening in the wall.
Install the extension duct by placing the slotted flange
over the two screws in the main duct. Using two #8 round
Phillips head screws, mount bottom of extension duct to
mounting bracket through the bracket slot (see Main
Supply Duct T op Flange illustration).
NOTE: The EDK02B can be cut into two sections and used
with two MDK02s if the needed length does not exceed
21-1/4”.
6. In the room where the main duct kit is attached to the
chassis, cut a hole in the wall at the same height from
the floor that the main duct is located. Cut the hole 1/8”
larger than the width and height (10” x 5”) dimensions of
the extension duct.
42-27/32" 6" TO 42-1/2"
AIR FLOW
BRACKET
5"
TRANSITION
DUCT
MAIN DUCT
DUCT EXTENSION
BRACKET
MINIMUM
5"
BOTH SIDES
PARTITION
WALL
DUCT
TERMINATION
KIT
AIR FLOW
1" to
adjoining
wall
surface
Figure 10 - Main Duct and Duct Extension Dimensions
20
Page 21

ACCESSORY INST ALLA TIONS
TDK INSTALLATION INSTRUCTIONS
IMPORTANT NOTE: ANY FIELD-SUPPLIED GRILLE,
MUST HAVE FIXED LOUVERS THAT CANNOT BE
CLOSED.
The sheet metal collar of the terminal duct kit must be
mounted in the wall of the adjoining room opposite the room
where the main duct kit is attached to the PTAC chassis.
1. Cut a hole in the wall of the adjoining room such that the
hole is centered on the extension duct that is currently
in the wall of the opposite room. Figure 1 1. See wall hole
dimensions illustration for sheet metal collar. Figure 12.
11-1/2”
GASKET
Figure 12 - Sheet Metal Collar
3. Center the metal grille over the sheet metal collar and
use two #8 screws (provided) to attach the grille to the
metal collar . Figure 13.
6-1/4"
Figure 1 1 - Wall Hole Dimension
2. Insert the sheet metal collar into the wall so that the
flanges will mount flush to the wall after the collar is
pushed all the way into the wall. While pushing the collar
into the wall make sure the extension duct is inside the
collar. Use four #8 screws to att ach metal collar to wall.
USE
TWO
#8 SCREWS
Figure 13 - Metal Grille
21
Page 22

ACCESSORY INST ALLA TIONS
Electric Heat
Description
The supplemental electric heater kits described in this
manual are available for field installation on heaterless models of packaged air conditioners and heat pumps.
Unit power cords are factory installed for heater kits up to 15
amps on 230/208 volt units and 20 amps on 265 volt units.
When a 20 (230/208 volt units), 25, or 30 amp heater kit is
installed, the corresponding power cord is supplied with the
heater kit.
NOTE: The incoming electrical power on 230/208 volt units
is not fuse protected unless a fuseholder kit has been either
factory or field installed.
Power Cord Installation (HK335E, HK350E, HK450E)
HIGH VOLTAGE
D
ISCONNECT ALL POWER BEFORE
SERVICING
M
ULTIPLE POWER SOURCES MAY BE PRESENT
F
AILURE TO DO SO MAY CAUSE PROPERTY
DAMAGE
OR
INSTALLING THIS UNIT
,
PERSONAL INJURY OR DEATH
.
.
.
Unit Preparation
NOTE: The unit power cord is shown in Figure 1. The power
cord plug configurations are shown in Figure 3.
1. Remove the unit front by tilting the bottom of the front
outward and then lift the front straight up.
2. Remove the control knobs on the control panel cover by
pulling upward on the knobs. Remove the escutcheon.
3. Remove the control panel cover by removing the two
screws holding the control panel cover. Tilt the control
panel forward to gain access to the wires.
Power Cord
4. The incoming electrical power on all 265 volt units is
fuse protected. On all kits, except the 5 kW kit, replace
the fuse with the fuse supplied with the kit. On 5 kW
heater kits replace the existing fuseholder with the
fuseholder (with fuse) supplied with the kit.
1. If the unit has a power cord, remove the power cord
clamp located near the bottom right of the chassis.
Right Side
Power
Cord
Of Unit
Incoming
Power
Opening
Control
Panel
Power Co rd Clamp
Incoming Power Opening
2. On 230/208 volt units disconnect the ribbed lead from
the C terminal on the capacitor and the smooth lead
from LINE 2 terminal on the control board and the green
ground wire from the partition panel. Discard both the
cord and the cord clamp.
22
Page 23

ACCESSORY INST ALLA TIONS
On 265 volt units disconnect the ribbed lead from the C
terminal on the capacitor and the smooth lead from the
fuseholder and the green ground wire from the partition
panel. Discard both the cord and the cord clamp.
3. Push about 20 inches of the power cord shipped in the
kit through the incoming power opening.
4. Secure the cord to the partition panel using the power
cord clamp and #8 screw shipped in the kit.
XX
LINE1 LINE 2 COMP FAN
Ribbed Wire
BK18 on LINE 2 with fuse shown
connected is for 265 volt units. For
BK18
230/208 volt units, connect power
cord to LINE 2.
Control Panel
Capacitor
HIGH
FAN
LOW
R-VAL VE
Power Cord Connections
5. Connect the ribbed lead to the C terminal on the capacitor.
6. On 230/208 volt units connect the smooth lead to LINE
2 terminal on the control board.
On 265 volt units connect the smooth lead to the
fuseholder.
7. Connect the power cord’s green ground wire to the partition panel using the ground screw provided in the kit.
8. If the unit is mounted on a subbase with a power receptacle, remove the right front cover plate of the subbase,
connect the plug end of the power cord into the subbase
power receptacle, and route the cord up out of the subbase through the cord slot in the right side of the subbase. Replace the subbase right front cover panel.
Subbase Power Cord
Electric Heater Installation.
CAUTION
TO
AVOID CUTS FROM SHARP EDGES OF SHEET
METAL, USE GLOVES
IMPORTANT NOTE: To prevent component failure, do
not install HK350E or HK450E (5 Kw) heater kits into
7,000 or 9,000 BTU air conditioners (PTC07, PTC09) or
heat pumps (PTH07, or PTH09).
1. Remove the two mounting screws holding the screen
above the indoor coil in place. Remove the screen.
2. Remove the two screws holding the blower inlet panel in
place. Lift the blower inlet panel out of the unit and set
aside.
.
3. Attach heater to the blower inlet panel with two #8 screws
provided with the kit
23
Page 24

ACCESSORY INST ALLA TIONS
#8 Screw
#8 Screw
4. While placing the blower inlet panel back into the chassis, insert the heater wires through the clip and into the
hole located on the mid partition panel.
Clip
Outdoor Section
Heater Wires
Control Panel
For single Stage Heaters Follow Step 6 then skip to
Step 16.
6. Connect brown 34 and brown 35 heater wires to the 1/4
inch terminals on the control board marked HEATER.
5. Lower the blower inlet panel down into the chassis.
Secure the blower inlet panel to the chassis with the
screws removed in Step 1 and replace the screen removed in Step 2.
24
Single Stage Heater Schematic
For two stage heaters Follow Steps 7 through 15
7. Mount the heater relay supplied with the heater kit to
the middle section of the control panel. Place the studs
on the heater relay through the respective holes on the
control panel and tighten the nut onto the threaded stud.
NOTE: All wiring required for this kit is preconnected to the
heater relay or the heater assembly.
Page 25

ACCESSORY INST ALLA TIONS
A
Relay Mounted
Inside of Control
Panel
Control Panel
8. After disconnecting the BK16 wire from the FAN HIGH
terminal on the control board, connect it to the heater
relay 3 terminal.
9. On the LINE 1 terminal of the control board:
A. Disconnect the RD33 wire.
B. Connect VT19 from the heater relay A terminal.
C. Reconnect the RD33 wire to the piggyback terminal
of VT19.
10. Connect BR34 from the heater 34 terminal to the HEATER
terminal next to the LINE 1 terminal on the control board.
11. Connect VT17 from the heater relay 6 terminal to the
HEATER terminal next to the LINE 2 terminal on the
control board.
12. Connect BR35 from the heater 35 terminal to the
HEATER terminal next to the piggyback terminal of VT17
on the L2 terminal on the control board.
13. Connect VT18 from the heater relay B terminal (as
shipped from the factory) to the FAN HIGH terminal on
the control board.
14. On the LINE 2 terminal of the control board:
A. Disconnect the power wire (BK18 on 265 volt units,
power cord on the 230/208 volt units).
B. Connect VT20 from the heater relay 5 terminal.
C. Reconnect the power wire to the piggyback terminal
of VT20.
BR34
BR35
BR36
Two Stage Heater
Wire Connections
15. Connect wire BR36 from the heater 36 terminal to the
heater relay 4 terminal.
1
4
3
5
6
B
36
35
HEATERHEATER
2 Stage Heater Schematic
6. Find the auxiliary “electric heater” data plate label on the
PTAC unit near the serial plate. Check mark the appropriate box on the data plate to indicate data for the heater
installed in the unit.
17. Replace the control panel, control panel cover, escutcheon plate and the unit front.
25
Page 26

ACCESSORY INST ALLA TIONS
Electric Electrical Heater kW Heater Total Total Mini mum Overcurrent
Heater 230/208 V BTU/HR Watts Amps Circuit Protection**
Size (kW) Ord. No. Stage 1 Stage 2 230V 208V 230V 208V 230V 208V Ampacity
1.5 HK315E 1.5/1.2 - 5100 4100 1580 1280 7.1 5.8 8.8 15A
2.5 HK325E 2.5/2.0 - 8500 6800 2580 2080 11.5 11.5 14.2 15A
3.5 HK335E 3.5/2.9 - 12000 9900 3580 2980 15.8 15.8 19.6 20A
5.0* HK350E 3.5/2.9 1.5/1.2 17100 14000 5080 4180 22.3 22.3 27.8 30A
*On two stage heater kit “High Heat” = both stages ON; “Low Heat” = stage 1 on only.
**Recommended field supplied time delay fuses or HACR type circuit breaker.
230/208 Volt Electric Heater and Power Cord Data
Electric Electrical Heater kW Heater Total Total Minimum Overcurrent
Heater 230/208 V BTU/HR Watts Amps Circuit Protection**
Size (kW) Ord. No. Stage 1 Stage 2 265V 265V 265V Ampacity
1.5 HK415E 1.5 - 5100 1580 6.3 7.7 15A
2.5 HK425E 2.5 - 8500 2580 9.9 12.3 15A
3.7 HK435E 3.7 - 12600 3780 14.5 18 20A
5.0* HK450E 3.5 1.5 17100 5080 19.4 24.1 25A
*On two stage heater kit “High Heat” = both stages ON; “Low Heat” = stage 1 on only.
**Recommended field supplied time delay fuses or HACR type circuit breaker.
265 Volt Electric Heater and Power Cord Data
LISTED ACCESSORIES - PACKAGE TERMINAL AIR CONDITIONER
AUXILIARY HEATERS - 230/208 VOLT
INSTALLER TO MARK HEATERS INSTAL LED:
NONE
HEATER HEATER MAX MIN. CIR. MAX. FUSE
KW P/N AMPS AMPACITY SIZE
1.5/1.2 20252001 7.1 8.8 15
2.5/2.0 20252002 11.5 14.2 15
3.5/2.9 20252003 15.8 19.6 20
5.0/4.1 20257501 22.3 27.8 30
(SA5810)
230/208 Volt Electric Heat Auxiliary Data Label
LISTED ACCESSORIES - PACKAGE TERMINAL AIR CONDITIONER
AUXILIARY HEATERS - 265 VOLT
INSTALLER TO MARK HEATERS INSTAL LED:
NONE
HEATER HEATER MIN. CIR. CIRCUIT MAX. FUSE
KW P/N AMPACITY BRKR. SIZE
1.5 20252006 7.7 15 15
2.5 20252007 12.4 15 15
3.7 20252008 18.1 N/A 20
5.0 20257502 24.2 N/A 25
(SA5810)
26
265 Volt Electric Heat Auxiliary Data Label
Page 27

ACCESSORY INST ALLA TIONS
Escutcheon - Hydronic Remote
Description
This kit provides an attractive replacement escutcheon, allowing the removal of control knobs and graphics no longer
required when a wall thermostat is used to control the unit.
R
T
O
Z
F
O
M
N
E
O
C
Standard Escutcheon
THIS UNIT IS CONTROLLED BY
WALL MOUNTED THERMOSTAT
Low
Heat
High
Heat
Fan
Only
High
Cool
Off
Low
Cool
O
R
F
T
M
Z
O
O
C
N
E
B-Nut
4. Reaching below the hydronic top, remove the extensions
from the chassis by pulling the extensions off the control shafts. Pull the extensions out of the hydronic top.
Hydronic Escutcheon
Extension Shafts
Hydronic Top
Control Board
Cover
Remote Escu tch eon
HIGH VOLTAGE
ISCONNECT ALL POWER BEFORE
D
SERVICING
ULTIPLE POWER SOURCES MAY BE PRESENT
M
AILURE TO DO SO MAY CAUSE PROPERTY
F
DAMAGE
Installation Instructions
1. Lift the cabinet front off the chassis.
2. Remove the unit control knobs by pulling the knobs off
the extension shafts.
3. Remove the b-nut mounting the extensions to the hydronic escutcheon.
OR
INSTALLING THIS UNIT
,
PERSONAL INJURY OR DEATH
.
.
5. After removing the backing, carefully place the remote
escutcheon over the hydronic escutcheon. Ensure the
escutcheon is firmly in place, without any air bubbles.
6. In the event the extension shafts may be needed, after
reassembling the B-nut and the extension shafts, tape
the extension shafts to the control board cover.
7. Replace the cabinet front.
.
27
Page 28

ACCESSORY INST ALLA TIONS
Escutcheon - Remote
Description
This kit provides an attractive replacement escutcheon, allowing the removal of control knobs and graphics no longer
required when a wall thermostat is used to control the unit.
R
T
O
Z
F
O
M
N
E
O
C
Standard Escutcheon
THIS UNIT IS CONTROLLED BY
WALL MOUNTED THERMOSTAT
Low
Heat
High
Heat
Fan
Only
High
Cool
Off
Low
Cool
2. Grasp the cabinet front as shown.
3. Pull the bottom of the cabinet front away from the chassis until the retaining clips disengage.
Remote Escu tch eon
HIGH VOLTAGE
D
ISCONNECT ALL POWER BEFORE
SERVICING
M
ULTIPLE POWER SOURCES MAY BE PRESENT
F
AILURE TO DO SO MAY CAUSE PROPERTY
DAMAGE
Installation Instructions
1. Remove the two screws securing the front to the chassis. NOTE: Not all installations will use these screws.
OR
INSTALLING THIS UNIT
,
PERSONAL INJURY OR DEATH
Mounting Screws
Location
.
.
4. Lift the cabinet front off the chassis.
5. Remove the unit control knobs by pulling the knobs off
the control shafts.
Pull To Remove
Mode Switch Knob
Pull To Remove
Thermostat Knob
Escutcheon
.
6. Lifting the front edge of the escutcheon, slide the tabs at
the top of the escutcheon out of the retaining holes and
remove the escutcheon.
7. Replace the escutcheon with the one from this kit by
inserting the tabs at the top of the escutcheon into the
retaining holes and laying the escutcheon flat on the
control panel.
8. Replace the front by reversing steps 1 through 4.
9. Store the control knobs and escutcheon just removed
from the unit for reinstallation if the wall thermostat is no
longer used.
28
Page 29

ACCESSORY INST ALLA TIONS
Fuse Kit
ALL
WIRING MUST COMPLY WITH APPLICABLE
LOCAL AND NATIONAL CODES
LOCATION OF FUSED DISCONNECT SWITCH(ES
MUST COMPLY WITH ALL APPLICABLE CODES
F
AILURE TO FOLLOW THESE CODES COULD
RESULT IN OVERHEATING AND EQUIPMENT
FAILURE
.
. T
YPE AND
Fuse Holder Kit Installation (Without Subbase)
See page 27 for installation in a subbase.
BK-10
)
.
Fuse Holder Kit
Description
This optional fuse holder kit can be installed directly in the
chassis or in the optional subbase.
Fuse holder kits are available in 230/208 volt ratings. The
installer should supply time delay fuses at 15, 20, 25 or 30
amps in accordance with the “Maximum Overcurrent Protection” as listed on the unit nameplate. Fuses may be
purchased from the parts department.
Installation
The installation and servicing of the equipment referred to in
this booklet should be performed by qualified, experienced
technicians.
CAUTION
Fuseholder
Fuseholder
X X
Line 1 Heater Heater Line 2 Comp Fan
Electronic Board
RD-10
C
Capacitor
High
Fan
Rev.
Low
Valve
FH
Unit Electrical
Connector
Fuse Holder Diagram
Control Panel Installation
1. Remove front by rotating bottom outward and then lifting
up and out from chassis.
2. To gain access inside the control panel, after removing
the knobs and escutcheon, remove the two screws holding panel in position. Tilt control panel forward, being
careful not to pinch any wires.
3. As viewed from the front, remove both knockouts on the
control panel.
4. Insert two fuse holders from the front. The fuse holders
should be oriented so the quick-connect tabs are toward the center of the unit. Attach fuse holders using
the screws and nuts provided.
USE
COPPER CONDUCTORS
ELECTRICAL
TYPES
VANIC CORROSION, OVERHEATING AND RESUL
TANT EQUIPMENT FAILURE
CONNECTIONS
OF
CONDUCTORS MAY RESULT IN GAL
. THE
.
ONLY
FOR
USE OF OTHER
-
-
29
Page 30

ACCESSORY INST ALLA TIONS
Remove Two Screws
To Gain Access Inside
Control Panel
(One On Side Of Panel)
Fuse
Holder
Knockouts
2. Install the fuse holders using screws provided. The side
connector tab on the fuse holders should be towards
the left.
3. Connect a stripped BK-9 wire to the center of the quickconnect tab of the fuse holders. Wire nut the other end
of this wire to the black field connection wire (L2).
4. Connect the other stripped BK-9 wire to the quick-connect tab on the side of the same fuse holder. Wire nut
the other end to black subbase wire leading to receptacle.
Electrical
Receptacle
Fuseholder
BK-9
Control Panel
5. Remove both power cord leads, one lead from the capacitor and one from the electronic board.
6. Install one power cord lead on the center terminal of one
fuse holder.
7. Install the remaining power cord lead on the center terminal of the second fuse holder.
8. Connect BK-10 wire from the side terminal of one fuse
holder to the L2 terminal on the electronic board.
9. Connect RD-10 wire from the side terminal of the other
fuse holder to the common (C) terminal on the capacitor.
10. Tilt control panel back to original location, being careful
not to pinch any wires. Align the control panel with the
cover and screw panels into place with original screws.
Replace escutcheon and control knobs.
Fuse Holder Kit Installation (With Subbase)
See page 26 for installation in the control panel.
1. Remove both knockouts at the fuse holder location.
Fuseholder
Field Connection
Wiring
RD-9
Black
Red
Green
L2
L1
Fuse Holder Diagram
Subbase Installation
5. Connect the “stripped” RD-9 wire to the center quickconnect tab of the second fuse holder. Wire nut the
other end to the red field connection wire (L1).
6. Connect the other stripped RD-9 wire to the quick-connect tab on the side of the second fuse holder. Wire nut
other end to red subbase wire which leads to receptacle.
7. Insert time delay fuses into the fuse holders. Size all
fuses by the “Maximum Overcurrent Protection” shown
on the nameplate. Also refer to the serial plate on the
unit.
Fuse Holder
Knockouts
Leveling
Leg
Power Switch
Knockout
Subbase (Left Side)
30
Page 31

ACCESSORY INST ALLA TIONS
Hard Wire
Description
Hardwire Junction Box (Direct Wire Sub-Base)
The hardwire junction box kit is used to direct wire the unit
when it is not desirable to use the standard unit subbase or
the unit power cord. The junction box provides a protected
enclosure for electrical connections as required by some
electrical codes.
The hardwire junction box is intended to be mounted on the
floor or the adjacent wall.
The junction box is furnished with approximately 2-1/2 feet
of 1/2 inch flexible steel conduit and a metal box for securing the conduit to the unit cabinet at the incoming power
opening.
An optional 230/208V or 265V power switch assembly is
available for use with the hardwire junction box or subbase.
The switch provides a POWER ON/OFF function at the unit
as required by some electrical codes. A replacement junction box cover plate is provided with each switch kit. For
additional information, refer to the Power Switch Installation
Instructions.
Junction Box Kit Installation and Wiring Procedure
The installation and servicing of this equipment should be
performed by qualified, experienced technicians.
Electrical connections at the unit must be made after the
unit chassis is installed in the wall sleeve.
The installer must determine and supply the mounting components for attaching the junction box to the wall or floor.
CAUTION
USE
COPPER CONDUCTORS
ELECTRICAL
TYPES
VANIC CORROSION, OVERHEATING AND RESUL
TANT EQUIPMENT FAILURE
OF
CONNECTIONS
CONDUCTORS MAY RESULT IN GAL
ONLY
. THE
.
FOR
USE OF OTHER
-
-
ALL
WIRING MUST COMPLY WITH APPLICABLE
LOCAL
LOCATION
MUST COMPLY WITH ALL APPLICABLE CODES
F
RESULT
FAILURE
AND NATIONAL CODES
OF
FUSED DISCONNECT SWITCH(ES
AILURE TO FOLLOW THESE CODES COULD
IN
OVERHEATING AND EQUIPMENT
. T
YPE AND
.
)
.
1. Remove the cover plate from the junction box.
2. Mount the junction box to the wall or floor within 28
inches of the lower right corner of the wall sleeve.
Wall Sleeve
Ground Wire
With Eyelet
Terminal
Cover
Plate
28 Inches Max
Conduit
Power Leads
with Push
on Connectors
Metal Box
With Straight
Clamp
Mounting Hardwire Junction Box Kit
3. If a disconnect switch is to be used, make electrical
connections to it and mount the switch in the junction
box. Refer to the “Power Switch” Installation Instructions.
4. Remove control panel assembly by removing the two
screws holding control panel in place. Rotate panel forward.
5. Disconnect the power cord leads from all electrical connections including the ground wire.
6. Remove the power cord clamp and the power cord from
the unit.
7. For 230/208-volt units, remove and discard the white
lead from the wire assembly. For 265-volt units, remove
and discard the red lead from the wire assembly.
8. Remove the retaining ring from the threaded portion of
the straight conduit clamp. Insert the three wires into
the metal box through one of the two openings in the
box. Replace the hole cover grommet into the unused
hole to prevent objects from entering the box.
31
Page 32

ACCESSORY INST ALLA TIONS
9. Replace the retaining ring back on the conduit clamp
inside the metal box and tighten the ring securely.
10. Insert the three wires extending from the metal box into
the incoming power opening on the unit so that approximately 20 inches of the wires protrude through the opening.
11. Attach the metal box to the chassis with the two screws
provided.
12. Insert the wire tie into the 3/16 inch diameter hole located just above the incoming power opening. Tie all
wires together securely with the wire ties.
Control Panel
Base Pan
Junction Box
Metal Box Location
Right Side of
Chassis
Wire Tie
3/16 Inch
Diamenter
Hole
Electrical Supply
Wires
3. Connect the red lead to the common ( C ) terminal on
the capacitor.
4. Connect the ground wire to the partition panel where the
ground wire on the power cord was located. Use the
supplied green ground screw.
5. Connect the red lead in the wire assembly at the junction box to the red lead of the field power source.
6. Connect the black lead in the wire assembly at the junction box to the black lead of the field power source.
7. Connect the ground wire of the field power source to the
ground wire of the wire assembly at the junction box.
8. Install the junction box cover plate.
9. Reinstall the control panel assembly.
265 Volt Units
1. Remove and discard the red lead from the wire assembly.
2. Connect the black lead to the center terminal of the fuse
holder.
3. Connect the white lead to the common ( C ) terminal on
the capacitor.
4. Connect the ground wire to the partition panel where the
ground wire on the power cord was located. Use the
supplied green ground screw.
5. Connect the white lead of the wire assembly at the junction box to the white lead of the field power source.
6. Connect the black lead of the wire assembly at the junction box to the black lead of the field power source.
7. Connect the ground wire of the field power supply to the
ground wire of the wire assembly at the junction box.
8. Install the junction box cover plate.
9. Reinstall the control panel assembly.
Back of
Control Panel
Electrical Wiring Routing
208/230 Volt Units
1. Remove and discard the white lead from the wire assembly.
2. Connect the black lead to the line 2 terminal on the
control board.
32
Page 33

ACCESSORY INST ALLA TIONS
Hydronic Heat
Description
Where a central boiler is available, the Hydronic Kit can be
installed on the PTAC unit. This kit completely encloses all
plumbing and coils, but still allows easy access to controls.
In addition, the chassis can slide out for service without removing hydronic plumbing. Heating and cooling operations
are controlled by unit’s thermostat. Cooling operation is not
affected by the addition of the hydronic kit. Heat Pump models will operate on heat pump function down to the switchover
temperature before operating on hydronic heat. The electrical connections are plug-in type to assist in kit installation.
Freeze Protection
The hydronic kit has a factory installed freeze protection
thermostat which will allow a normally closed or normally
open water/steam valve to open when the thermostat senses
near freezing temperatures at the hot water or steam coil.
Once the temperature of the freeze thermostat rises above
58° F the water valve will return to normal mode operation.
Tools Required
1/4 Inch Electric Drill
1/8 Inch Diameter Drill Bit
Center Punch and Hammer
6 Foot Rule
Combination Square
1/4 Inch Nut Driver or Socket
5/16 Inch Nut Driver or Socket
Torch, Solder, Flux, etc.
Job Preparation
Before installing the hydronic kit, the following steps should
be complete:
1. Wall sleeve installed and completely sealed.
NOTE: The wall sleeve must be extending at least 3”
and no more than 3-1/8” past the finished interior wall in
order to properly install the hydronic kit.
2. Plumbing stub-outs complete.
3. Unit chassis uncrated but not installed and not yet con-
nected to electrical source.
4. A standard model chassis with an HTK3A or HTK4A kit
installed or a hydronic model chassis.
Installation
HIGH VOLTAGE
ISCONNECT ALL POWER BEFORE
D
SERVICING
ULTIPLE POWER SOURCES MAY BE PRESENT
M
AILURE TO DO SO MAY CAUSE PROPERTY
F
DAMAGE
Be sure to engage the services of a qualified water
treatment specialist to determine what water treatment, if any, is needed. The manufacturer will not
assume responsibility for equipment failures resulting from untreated or improperly treated water.
1. If the chassis is not a hydronic model chassis, remove
polymer front from chassis and discard. Install a HTK3A
or HTK4A kit as required.
2. Drill two 1/8” diameter holes on both sides of wall sleeve
as shown.
NOTE: If there is not enough room to drill holes from
the side then drill holes from inside the wall sleeve.
OR
INSTALLING THIS UNIT
,
PERSONAL INJURY OR DEATH
.
.
.
33
Page 34

ACCESSORY INST ALLA TIONS
V
Hydronic Heat Kit Application Data
Gal. Drop
per (psig) 200° F. EWT 180° F. EWT 200° F. EWT 180° F. EWT 200° F. EWT 180° F. EWT
Min. 2-Way Fan Speed Fan Speed Fan Speed Fan S peed Fan Speed Fan Speed
1.00 0.93 0.19 14910 13388 12639 11186 16945 14387 14257 12152 17858 15534 15049 13312
1.13 1.03 0.24 15216 13706 12898 11452 17360 14689 14607 12407 18276 15955 15401 13672
1.25 1.14 0.30 15500 13997 13139 11696 17745 14968 14930 12642 18666 16338 15729 14001
1.38 1.26 0.36 15762 14262 13361 11917 18099 15222 15228 12858 19025 16684 16032 14297
1.50 1.40 0.43 16003 14501 13565 12117 18423 15454 15501 13053 19356 16991 16311 14561
1.63 1.55 0.50 **16222 14714 13751 12295 18717 15661 15748 13228 19658 17261 16565 14792
1.75 1.71 0.58 16420 14900 13919 12450 18980 15845 15969 13384 19930 17494 16794 14991
1.88 1.89 0.66 16596 15061 14068 12584 19212 16006 16165 13519 20173 17689 16999 15158
2.00 2.10 0.76 16751 15195 14199 12696 **19268 16142 16212 13635 20387 17846 17179 15293
2.13 2.32 0.85 16884 15302 14312 12786 19586 16255 16479 13730 **20445 17965 17229 15395
2.25 2.57 0.96 16995 15384 14407 12854 19727 16345 16598 13806 20727 18047 17466 15465
2.38 2.84 1.07 17085 15439 14483 12900 19838 16410 16691 13861 20853 18091 17572 15503
2.50 3.14 1.18 17154 15467 14541 12924 19919 16452 16759 13897 20950 18110 17654 15508
2.63 3.48 1.30 17201 15470 14581 12926 19968 16471 16801 13912 21018 18125 17711 15520
2.75 3.85 1.43 17226 15505 14603 12956 19988 16580 16817 14004 21056 18140 17744 15545
** Based on ARI Rating Conditions of 70°F Entering Air Temp., 200°F Entering Water Temp and 180°F Leaving Water Temp. Max. Water Temperature
Pressure 7000 & 9000 BTUH Units 12000 BTUH Units 15000 BTUH Units
Coil
200°F. Max. Water Pressure - 200 Psig.
alve Hi Lo Hi Lo Hi Lo Hi Lo Hi Lo Hi Lo
Heating Capacity (Btu h )- Hot Water
34
Hydronic Heat Kit Application Data
Heating Capacity (Btuh) - Steam
Steam 7000 & 9000 BTUH Units 12000 BTUH Units 15000 BTUH Units
(psig) Fan Speed Fan Speed Fan Speed
Hi Low Hi Low Hi Low
2**
3
4
Maximum steam pressure 5 psig
**Based on ARI rating conditions of 70° F entering air temp. and 2 psig steam pressure
20,236 17,816 21,694 18,306 23,709 20,962
20,686 18,253 22,100 19,003 25,676 21,899
20,821 18,544 22,822 19,313 26,325 23,678
Water Valve Inlet/ Outlet Dimensions
Model Inlet Outlet
VW2WNOA 5/16" 5/16"
VW3WNOA 5/16" 5/16"
VW2WNCA 5/16" 5/16"
VW3WNCA 5/16" 5/16"
Steam Valve Inlet/ Outlet Dimensions
Model Inlet ( Inches) Outlet (Inches)
VS2WNOA 5/16" 5/16"
VS2WNCA 5/16" 5/16"
Page 35

ACCESSORY INST ALLA TIONS
r
r
r
Water Valve Pressure Drop
2-Way Valve 3-Way Valve Bypass 3-Way Valve
Wate
GPM (psig) GPM (psig) GPM (psig)
1.00 0.19 1.00 0.13 1.00 0.04
1.13 0.24 1.13 0.16 1.13 0.05
1.25 0.30 1.25 0.20 1.25 0.06
1.38 0.36 1.38 0.24 1.38 0.08
1.50 0.43 1.50 0.29 1.50 0.09
1.63 0.50 1.63 0.34 1.63 0.11
1.75 0.58 1.75 0.39 1.75 0.12
1.88 0.66 1.88 0.45 1.88 0.14
2.00 0.76 2.00 0.51 2.00 0.16
2.13 0.85 2.13 0.58 2.13 0.18
2.25 0.96 2.25 0.65 2.25 0.20
2.38 1.07 2.38 0.72 2.38 0.23
2.50 1.18 2.50 0.80 2.50 0.25
2.63 1.30 2.63 0.88 2.63 0.28
2.75 1.43 2.75 0.96 2.75 0.30
CV=2.3 CV=2.8 CV=5.0
Pressure Drop Wate
Pressure Drop Wate
Pressure Drop
Q = CV
Pd
Q = Flow in Gallons/Min
CV = Flow Coefficient of Valve
Pd = Pressure Drop (psig)
Dimensions of Complete Installation
3"
Top of Wal l Sleeve
10-13/16"
Bottom of Wall Sleeve
4-1/8"
e
v
e
e
l
S
l
l
a
W
Hydron ic Front
Toe Plate
0" - 3.0" Lo ng
PT AC Unit Wall Sleeve
5-1/2"
9-7/8"
Side View
Hydronic Air
Discharge
Unit Controls
Compartment
35
Top View
Page 36

ACCESSORY INST ALLA TIONS
Steam Plumbing Dimensions
(2 places)
3-1/2"
5-3/4"
1" x 1-1/2"
opening for piping
5-1/2"
1/2" I.D.
5/8" O.D.
5/8"
Steam Outlet
Connection
3-1/4"
1-7/8"
PTAC UNIT WALL SLEEVE
COIL
TOP VIEW OF C OIL LOCATION
(with t op grille and s heet metal r emoved)
1-1/2"
COIL
COIL
13-3/8"
1-1/2"
1-7/8"
3-1/4"
2-1/4 "
(2 places)
1" diameter
opening for piping
1/2" I.D.
5/8" O.D.
5/8"
Steam Inlet
Connection
Steam Outlet Connection
16-7/8"
16-3/4"
20-3/16"
COIL
1-1/2"
8-1/4"
Hydronic Air
Inlet
Steam Coil Position
2-1/8"
53"
FRONT VI EW
(unit with Hydronic Kit installed)
Steam Inlet Connection
COIL
1-1/2"
17-3/8"
Steam Trap (optional)
(
: Steam Trap may be
NOTE
installed on one or both
sides of Hyrdronic Unit)
SIDE VIEW SIDE VIEW
36
Page 37

ACCESSORY INST ALLA TIONS
Hot Water Plumbing Dimensions
5-1/2"
3-1/4"
3-3/8"
1-13/16"
1' 1-5/8"
1-13/16"
3-1/4"
5-11/18"
1"
1/2" I.D.
5/8" O .D.
1"
4-3/4"
2-3/4"
COIL
COIL
4' 5"
1-1/16"
1/2" I.D.
5/8" O.D.
2-1/8"
3-3/8"
1' 8-3/16"
1' 4-1/8"
0" TO 3"
Finished Floor
37
Page 38

ACCESSORY INST ALLA TIONS
Wall
3-1/4"
1/8" Hole s
2-1/4"
Indoor
Right
Side
Wall
Sleeve
Sleeve
1/8" Hole s
3-1/4"
5"
2-1/4"
Indoor
Left
Side
5. Remove the control knobs and metal escutcheon from
the control panel area of the chassis.
6. Remove the discharge screen from the chassis by removing the two screws holding the screen to the chassis.
7. Mount the transition to the chassis with supplied two 1/
2-inch #8 screws.
3. Unbox the hydronic kit and discard the packaging material. The cardboard packaging material should be recycled.
4. Mount the two support brackets to the bottom of the
hydronic top as shown with supplied four, 3/8-inch #8
screws.
Slide Brackets Before Tightening Screws
Rubber Splash
Shield
Move the brackets to the left so that screws are located
in right side of slot and tighten screws.
Transistion
8. Position the hydronic top with support brackets to the
wall sleeve and fasten the support brackets to the drilled
holes in the wall sleeve with supplied four 1/2-inch #10
screws.
38
Page 39

ACCESSORY INST ALLA TIONS
9. Place the chassis back into the wall sleeve and secure
chassis to wall sleeve. Be careful not to bind or pinch
the flexible shafts protruding from the bottom of the hydronic top assembly.
10. Place the ends of the flexible shafts protruding from the
hydronic top over the corresponding D shafts on the
chassis control board. Make sure the plastic inside the
flexible shaft fitting is mating with the flat surface of the
control board’s D shaft.
NOTE: The splash guard must be pushed against the
control panel.
Plastic
Insert
Skirt
2
"
-
D
2
8
6
-
3
"
/
4
"
Exterior
Wall
Hydronic
Front
Wall Sleeve
11. Measure the distance from the bottom of the chassis
basepan to the finished floor to determine how far to
extend the skirt below the metal front. If the distance is
less than two inches the skirt must be trimmed so the
skirt will not interfere with gasket or block inlet air on the
front.
W
A
L
L
Basepan
D
Between 0" to 3"
12. Mount the skirt to the metal front with four 3/8” #8 screws.
NOTE: Skirt is attached to front of top piece during shipping.
Hydronic Front
(Inside Surface)
S
k
i
r
t
3/8" #8 Screws
(2 On Each Side)
13. Remove the six screws from the top of the hydronic top.
Lift the hydronic top straight up and set aside along with
the six screws.
1/2" to 3-3/4"
Floor
39
Page 40

ACCESSORY INST ALLA TIONS
14. Position the wires from the freeze thermostat found on
the left side of the hydronic top so the wires slide through
the slot opening in the hydronic top.
Place all wires into the supplied round plastic grommet
through the slit in the grommet.
Information relating to U.L. approved valves and current
loads is shown on the label on the kit. In addition,
water and steam valve model numbers are listed in the
following table.
Water Valve
Model Description Position End Switch
VW2WNOA 2-Way Normally Open Yes
VW3WNOA 3-Way Normally Open Yes
VW2WNCA 2-Way Normally Closed Yes
VW3WNCA 3-Way Normally Closed Yes
Steam Valve
Model Description Position End Switch
VS2WNOA 2-Way Normally Open Yes
VS2WNCA 2-Way Normally Closed Yes
NOTE: WHEN HYDRONIC HEAT IS USED, DISREGARD THE MINIMUM CIRCUIT AMPACITY AND MAXIMUM
FUSE SIZE SHOWN ON THE AUXILIARY NAMEPLATE FOR FIELD INSTALLED HEATERS. USE VALVES
SHOWN ON THE MASTER UNIT NAMEPLATE.
ERIE MANUFACTURING CO. 654C0507EA01 654C0407EA01 UNIT VOLTAGE RATING 230/208 265
BARBER-COLMAN VA-1403-201 VA-9224-201 MAX. WATER TEMPERATURE 200° F
HONEYWELL V8043A
CAUTION: VOLTAGE RATING OF VALVE IS 24VAC AND DOES NOT CORRESPOND TO
THIS KIT MAY BE USED WITH ONE OF THE
FOLLOWING ELECTRIC CONTROL VALVES:
VOLTAGE RATING ON THE UNIT NAMEPLATE.
HOT WATER
654C0527EA01 654C0427EA01 FAN MOTOR AMPS .6 .6
654C0509EA01 MOTORIZED VALVE, WATTS 6.5 6.5
654C0529EA01
VA-1403-301 VA-9214-201 MAX. WATER PRESSURE 200 PSIG
VA-3403-201 MAX. STEAM PRESSURE 5.0 PSIG
V8043B V8043J
V8044A
STEAM
NOTE: WHEN HYDRONIC HEAT KIT IS
EMPLOYED, THE FOLLOWING LOADS
OPERATE CONCURRENTLY:
15. Snap the grommet into the hydronic top and pull the
wires forward to take out the slack in the wires.
16. Route the freeze thermostat wires through the u-clip on
the hydronic top assembly and down in front of the control panel. Snap the plastic male pin connector into the
plastic female pin connector located on the outside front
surface of the control panel.
17. Determine whether a 2-way or 3-way normally open or
normally closed valve is required. Also determine if an
end switch is required to control the circulating pump.
40
18. Remove the valve cover and connect the supplied valve
wire harness leads to the two leads for the valve motor
(not the end switch leads) with the supplied wire nuts.
The fiber washer and strain relief supplied with the valve
harness must be located in the valve motor enclosure
after assembly.
19. Replace the valve cover. Use the two remaining wire
nuts to connect the wires from the chassis wire harness to the flow valve harness. The BK24 wire from the
chassis harness connects to the BK49 wire of the valve
harness. For normally open valves, connect the YL13
wire from the chassis harness to the BK48 wire of the
valve harness. For normally closed valves connect the
BU21 wire from the chassis harness to the BK48 wire
of the valve harness. Cut either the YL13 or BU21 wire
that is not being used at the plastic male connector on
the control panel.
Two-Way Valve Installation
When installing two-way valves, the flow direction is from
end “B” as shown below.
Page 41

ACCESSORY INST ALLA TIONS
Control Cord/Plug
N.O. YL13
N.C. BU21
*
From
Heat
Coil
Motor
Return To
Water System
Wire Nuts
B
A
* Connect YL13 for Normally Open Valves.
Connect BU21 for Normally Closed Valves
20. Before soldering pipes to normally closed valves, manually open valve by slowly moving lever to retaining notch
and allow spring to secure lever in notch. The lever will
reset to the automatic position the first time the valve is
energized.
Three-Way Valve Installation
When installing three-way diverting valves, end “B” is
the supply to coil and end “A” is the by-pass end. The
inlet port is unmarked. Port markings “A” and “B” are
located on the bottom of the valve body.
22. The plumbing may enter from the left and/or right side of
the unit through the slots and holes that are supplied in
the hydronic top assembly. (See Plumbing Dimensions)
23. Hydronic water kits (HWK03) may have water entering
either the left or right side of the coil. Hydronic steam
kits (HVK03) can only have entering steam on the right
side of the coil. (See Plumbing Dimensions)
24. Make sure all piping is plumbed to the coil and system
has been bled of air. Using the existing six screws and
hydronic top from Step 13, place the top cover over the
coil deck assembly. Make sure the back flange of the
top cover fits inside the small vertical flange in the back
of the coil assembly.
Motor
End "B"
To Coil
(Normally
Closed)
* Connect YL13 for Normally Open Valves.
Connect BU21 for Normally Closed Valves.
B
Coil Assembly
Wire Nuts
A
Control Cord/Plug
N.O. YL13
N.C. BU21
*
Return
Prior to soldering the normally closed 3-way valve, open
both ports by slowly moving manual operating lever to
retaining notch until lever is secured by valve spring.
Flow valve and tubing is to be installed so that it does
not restrict removal of the chassis from the sleeve for
service.
21. Solder the flow valve and other necessary components
in line with the plumbing rising from the floor or wall.
The components should not be placed inside the hydronic top assembly.
Flange
Water
Piping
NOTE: A manual bleed valve is supplied with both the
Hydronic Water Kit and the Hydronic Steam Kit (HWK03
and HVK03). It is recommended that the installer install an automatic bleed valve for Hydronic Steam Kits
(HVK03) to eliminate frequent access to the manual
bleed valve for purging air from the steam system.
25. Place the hydronic front on the top assembly so the
flanges of the front fit tightly into the flanges of the top
assembly.
26. Check to ensure the inlet air filter is located inside of the
inlet grille between the inlet grille and the coil. The inlet
grille can be hinged open by unlatching the two top levers on the grille.
27. Attach the supplied ball knob to the control door using
the #10 machine screw supplied with the kit.
41
Page 42

ACCESSORY INST ALLA TIONS
Hydronic Transformer
Description
The hydronic transformer kit must be installed into a standard PTAC chassis to make the chassis operate electrically with the HWK03 and HVK03 hydronic kits. This kit is
not required on hydronic chassis (model number ending with
"HA"). Do not use this kit with heat pump chassis - consult
your Amana® brand sales representative for information.
HIGH VOLTAGE
ISCONNECT ALL POWER BEFORE
D
SERVICING
ULTIPLE POWER SOURCES MAY BE PRESENT
M
AILURE TO DO SO MAY CAUSE PROPERTY
F
DAMAGE
1. Remove front by rotating bottom outward and then lifting
up and out from chassis.
2. To gain access inside the control panel, after removing
the knobs and escutcheon, remove the two screws holding panel in position. Tilt control panel forward, being
careful not to pinch any wires.
3. Lift the control panel up so the control panel is free of its
hinges. Orient the control panel so there is easy access for mounting components to the control panel.
OR
INSTALLING THIS KIT
,
PERSONAL INJURY OR DEATH
Remove Two Screws
To Gain Access Inside
Control Panel (One On
Each Side Of Panel)
.
.
.
6"
4. Using the two #8 screws that are provided, screw the
transformer to the control panel in the transformer mounting holes provided in the panel.
5. Mount the relay in one of the three pairs of relay mounting holes in the control panel making sure that the
threaded stud is in the smaller hole and the metal tab is
in the larger hole. Screw the provided nut onto the
threaded stud from the opposite side of the control panel.
Cross
Knockout
Transformer
Mounting Holes
Relay Mounting
Holes
Transformer
Mounting Holes
6. Remove the cross shaped knockout from the control
panel. Insert the female wire connector into the cross
shaped hole from the side of the control panel where the
transformer and relay are mounted.
NOTE: If the cross knockout is not located in the control
panel, disconnect the terminals of the wire harness from
the relay and transformer. Route the wires through the
power cord opening in the basepan until about 6 to 8
inches of the harness protrudes from the opening. Reconnect the harness wire terminals to the relay and
transformer as follows:
Wire YL12 to Relay 1 terminal
Wires BU20, BU22 to Relay 3 terminal
Wire RD20 to Relay 5 terminal
Wire BK25 to one Transformer 24V terminal
Wire BK23 to other Transformer 24V terminal
7. (1) If the unit has an electric heater, remove the BR34
and BR35 heater wires from the control board and push
these wires through the mid partition panel so that the
wires will not be loose in the control panel area.
(2) If the unit has a 2 stage electric heater, disconnect the BR34, BR35, VT20, VT19, VT17, and VT18
heater wires from the control board. Remove the heater
relay and wires from chassis and discard . Push the
heater wires (BR34, BR35, and BR36) through the mid
partition panel so the wires will not be loose in the control panel area.
42
Page 43

ACCESSORY INST ALLA TIONS
8. Connect the PK30 and PK31 wires from the relay to
the heater terminal next to the Line 1 terminal and to
the heater terminal next to the Line 2 terminal respectively, on the control board.
9. (1) Remove the RD33 and Line 2 power cord (BK18 for
265 volt units) wires from the control board. Connect
the GY21 and GY22 wires from the transformer to the
Line 1 and Line 2 terminals, respectively. On the control board, reconnect the RD 33 and Line 2 power cord
(BK18 for 265 volt units) wires to the piggy back terminals of the GY21 and GY22 wires on the control board,
respectively.
(2) If the unit already has a power vent or power
door kit installed in the chassis, remove the WH7
wire from the Line 1 terminal on the control board and
connect the WH7 wire to the GY21 wire at the transformer.
10. Install the control panel back onto its hinges. Close the
control panel being careful not to pinch any wires. Reinstall the control panel cover and screw control panel
back into place.
11. See hydronic installation instructions to finish installing hydronic heat kit.
and, using both hands, bow door just enough for door
hinge pins to slide out of mating holes.
3. Install the new door assembly with the key lock by bowing the door with both hands and aligning the door hinge
pins with their mating holes in the front.
4. For further security, secure the front cover to the chassis with two 1/2 inch #8 sheet metal screws (see chassis installation).
Key Lock Kit
Keylock
Description
The Key Lock kit prevents tampering of the controls used
to set temperatures and heating or cooling functions.
CAUTION
PERSONAL RISK HAZARD
NDERWRITER’S LABORATORIES
U
F
OR INSTITUTIONAL USE ONLY WHERE SUPER
VISORY MONITORING IS AVAILABLE
MAY INCREASE THE RISK OF PERSONAL
USE
INJURY
Installation
The installation and servicing of the equipment referred to in
this booklet must be performed by a qualified, experienced
technician.
1. Remove front from unit by pulling bottom out and then
2. Remove existing door assembly by lifting door halfway
OR
PROPERTY DAMAGE
lifting upward.
, INC. L
. ANY
.
ISTED
-
OTHER
.
Door
Hinge Pins
(Each Side)
Mati ng H oles
(Each Side)
Front
43
Page 44

ACCESSORY INST ALLA TIONS
Power Disconnect Switch
Power Switch Kit Components
(Cover Plate Not Shown)
Description
230/208 and 265 Volt Power Switch Assemblies
An optional 230/208V or 265V power switch assembly kit
can be installed in a full-length subbase or in the junction
box of the Hard Wire Junction Box kit. The switch provides
a POWER ON/OFF function as required by some electrical
codes. A replacement junction box cover plate is provided
with each switch.
CAUTION
USE
COPPER CONDUCTORS
ELECTRICAL
TYPES
OF
CONNECTIONS
CONDUCTORS MAY RESULT IN GAL
VANIC CORROSION, OVERHEATING AND RESUL
TANT EQUIPMENT FAILURE
ALL
WIRING MUST COMPLY WITH APPLICABLE
LOCAL AND NATIONAL CODES
LOCATION OF FUSED DISCONNECT SWITCH(ES
MUST COMPLY WITH ALL APPLICABLE CODES
F
AILURE TO FOLLOW THESE CODES COULD
RESULT IN OVERHEATING AND EQUIPMENT
FAILURE
.
Power Switch Installation for Junction Box
NOTE: Refer to Hard Wire Assembly Kit Instructions for
mounting junction box. If the junction box is mounted
vertically, the switch must be installed so that the ON position
is up.
ONLY
. THE
.
. T
FOR
USE OF OTHER
-
-
YPE AND
)
.
HIGH VOLTAGE
D
ISCONNECT ALL POWER BEFORE
SERVICING
BASE
PRESENT
PROPERTY
DEATH
HE UNIT’S
T
DISCONNECT ALL POWER TO THE UNIT
44
OR
INSTALLING THE SUB
. M
ULTIPLE POWER SOURCES MAY BE
. F
AILURE TO DO SO MAY CAUSE
DAMAGE, PERSONAL INJURY OR
.
OFF
SWITCH DOES
NOT
230/208V Installation
1. Remove and discard the white lead of the hard wire assembly.
2. Connect the black lead of the hardwire assembly to one
terminal of the disconnect.
-
.
Ground Wire
(Connect to Power
Supply Ground Wire)
Switch
Mounting
Tab
Red Wire
Switch Terminal
(Connect to L2 of
Power Supply)
White Wire
(Remove & Discard)
Switch
Mounting
Tab
Black Wire
230/208V Disconnect
Switch
Switch Terminal
(Connect to L1 of
Power Supply)
Page 45

ACCESSORY INST ALLA TIONS
3. Connect the red lead of the hardwire assembly to the
switch terminal opposite the terminal where the black
lead was assembled in step 2.
4. Remove the knockout from the desired power entry point
on the junction box and route field supplied power wires
into the junction box.
5. Connect the red and black leads of the field power supply to the two unused terminals on the power switch.
6. Connect the ground wire of the field power supply to the
bare ground wire assembly.
7. Mount the switch on the tabs in the junction box and
install the switch cover plate provided with the power
switch kit.
265V Installation
1. Remove and discard the red lead of the wire assembly
2. Connect the black lead of the hard wire assembly to one
terminal of the disconnect.
3. Remove the knockout from the desired power entry point
on the junction box and run field supplied power wires
into the junction box.
4. Connect the black lead of the power supply to the remaining disconnect switch terminal.
5. Connect the ground wire of the field power supply to the
bare ground wire assembly.
6. Connect the white lead of the wire assembly to the Neutral lead of the power supply.
7. Mount the switch on the tabs in the junction box and
install the switch cover plate provided with the power
switch.
Power Switch Installation for Subbase
1. Remove the left and right subbase cover panels by removing screws holding them in place. Retain the screws.
2. Remove the rectangular knockout located in the center
of the recessed area on left cover panel.
3. Install the switch using the two bolts and nuts provided
so that the “ON” position of the switch is on the right.
Install ground lead (provided) between switch mounting
tab and mounting plate.
7. Insert the BLACK wire from the receptacle into the lower
right hole in the rear of the switch and tighten the screw.
Insert the BLACK power wire (field wiring) into the lower
left hole in the switch and tighten the screw.
8. Attach the ground field wire by connecting the green
wire on the disconnect to the ground terminal (screw)
on the back wall of the subbase high voltage section.
9. Replace the cover panels (with the switch installed) to
the subbase using the screws removed in step 1.
265V Wiring Procedure
4. Insert the BLACK wire from the receptacle into the lower
right hole in the rear of the switch and tighten the screw.
Insert the BLACK power wire (field wiring) into the lower
left hole in the switch and tighten the screw.
5. Connect the WHITE wire from the receptacle to the
WHITE power wire (field wiring) with the wire nut provided.
6. Attach the ground field wire by connecting the green
wire on the disconnect to the ground terminal screw on
the back wall of the subbase high voltage section.
7. Replace the cover panels (with the switch installed) on
the subbase using the screws removed in step 1.
Ground Wire
(Connect to Power
Supply Ground Wire)
265V
Disconnect S witch
Red Wire
(Remove and
Discard)
White Wire
(Connect to Neutral
of Power Sup p l y)
Switch
Mounting
Tab
Black Wire
Switch Terminal
(Connect to L1 of
Power Supply)
230/208V Wiring Procedure
4. Route the RED wire from the receptacle through the
barrier in the subbase using the hole provided.
5. Insert the RED wire from the receptacle into the upper
right hole in the rear of the switch and tighten the screw.
6. Route the BLACK wire from the receptacle through the
barrier in the subbase using the hole provided.
Left Subbase
Cover Panel
Screws
Right Subbase
Cover Panel
45
Page 46

ACCESSORY INST ALLA TIONS
Remote Temperature Sensor
The installation and servicing of the equipment referred to in
these instructions must be performed by qualified, experienced technicians.
Description
With control functions remaining at the unit, the remote temperature sensing feature is a unique accessory capable of
providing accurate sensing of room temperature from a central location, separate from the unit.
Remote Temperature Sensor
HIGH VOLTAGE
D
ISCONNECT ALL POWER BEFORE
SERVICING
M
ULTIPLE POWER SOURCES MAY BE PRESENT
AILURE TO DO SO MAY CAUSE PROPERTY
F
DAMAGE
OR
INSTALLING THIS UNIT
,
PERSONAL INJURY OR DEATH
.
.
.
Mounting Sensor
Loosen the screw in the lower right corner of the cover and
pull the decorative cover off the sensor base. Position the
sensor base on the wall, in the desired location, and mark
two mounting holes as shown. Pull the two sensor wires
(shielded, twisted pair wiring not required) through the opening in the sensor base and secure the sensor base to the
wall using wall anchors, if required. Obtain the wall anchors
locally. Be careful not to let the wires fall into the wall opening.
Wall
Sensor Wires
Through Wall
Opening
Wall
Anchor
Mounting
Hole
Wall
Anchor
Subbase
Terminal 3
Terminal 2
Mounting
Hole
Mounting
Screws (2)
Sensor Base Mounting
Installation
Locating the Temperature Sensor
For best performance results, the remote temperature sensor should be located approximately 5 feet above the floor
on an inside wall in an area with good air circulation. The
sensor should be mounted so that it is sensing the temperature of the room where the occupants will be spending most
of their time.
Do not install the sensor where it may be affected by the
following:
• Dead spots behind doors, in corners or under cabinets
• Hot or cold drafts from air ducts
• Radiant heat from the sun, appliances, or fireplaces
• Concealed pipes and chimneys
• Surfaces affected by a cold or heat source on side op-
posite the sensor.
46
Page 47

ACCESSORY INST ALLA TIONS
1. Remove the PTAC cabinet front to expose the control
panel area.
IMPORTANT NOTE: Disconnect power to the unit and/or
turn the Master Switch on the control board to OFF when
connecting or altering wiring to any terminal - failure to do so
may result in shorting the fuse or damaging the control board.
2. Remove the terminal strip cover by removing the screw
securing it to the control panel cover.
3. Set the Remote/Standard switch to the STANDARD
position.
4. Connect the two sensor wires running from the RC and
RS terminals on the PTAC Remote Thermostat terminal
strip to terminals 2 and 3 on the remote temperature
sensor base as shown.
5. Wire the sensor using standard 20 gage thermostat wire
(shielded, twisted pair wiring not required) with a maximum wire length of 50 ft.
NOTE: Shorting the thermostat wires to ground will cause
control board failure.
6. Replace the terminal strip cover and reinstall the cabinet front.
7. When power is reestablished to the unit, the remote
temperature sensor will automatically be activated. The
mode switch must be in the OFF position before electrical power is applied to the unit. If the mode switch is
not in the OFF position when electrical power is applied
to the unit, the random restart feature will activate causing a two to four minute start-up delay.
Thermostat
LINE 1 HEATER HEATER LINE 2 COMP F AN H IGH FAN LOW R-VALVE230V265V
ON / OFF
MASTER
SWITCH
FUSE
Mode Switch
Terminal Strip
Cover
Control Panel
REMOTE THERMOSTAT
AUXILIARY
CRGL
RC
Y/W1FD2FD1
W2 B GH
EH IN L S TF1 T F2
CRGW2Y\W1BRSFD
RS
OUTDOOR
COIL
INDOO R
COIL
INDOO R
ON / AUT O
FAN
CYCLE
Thermostat
AIR
ALL OFF
8
RMT/STD
THERMOSTAT
CONTROL
Remote/Standard
Control Switch
(Remote ←, Standard →)
Remote
Sensor
23
P6
BLUE
P5
RED
P3
BLACK
C
B
A
D
Wiring Schematic for Remote Temperature
Sensor
47
Page 48

ACCESSORY INST ALLA TIONS
Subbase
Description
The subbase may be installed on the wall sleeve before or
after installing the wall sleeve. The subbase is prewired.
Electrical connections can be made on the left side after the
access cover is removed. A grounding screw is provided.
NOTE: The wall sleeve must be installed a minimum of 3¼
inches or maximum of 5 inches above a finished floor and a
minimum of 2¾ inches from a finished wall.
B
C
Z
HIGH VOLTAGE
D
ISCONNECT ALL POWER BEFORE
,
SERVICING
SUBBASSE OR ANY EQUIPMENT OR
THE
CHANGING
POWER
DO SO
TO
PERSONAL INJURY OR DEATH
HE UNIT’S
T
DISCONNECT
IMPORTANT NOTE: To avoid equipment damage, use cop-
per conductors only.
NOTE: The installation and servicing of this equipment must
be performed by qualified, experienced technicians only.
1. Remove parts B and C from the subbase and join together using two metal screws provided. This assembly
now becomes the right front cover (Part Z) of the subbase.
INSTALLING OR CONNECTING
ANY EXISTING WIRING
SOURCES MAY BE PRESENT
MAY CAUSE PROPERTY DAMAGE
. M
.
OFF
SWITCH DOES
ALL POWER TO THE UNIT
NOT
ULTIPLE
. F
AILURE
ALWAYS
.
,
2. Position subbase under the front of the wall sleeve.
3. Align the back edge of the flange on cover A to front of
the wall sleeve flange.
NOTE: A properly installed subbase will extend 1-1/2
inches to the front of the wall sleeve. Do not mount
flush to the front of the wall sleeve.
4. Drill four
in subbase. Mount subbase to wall sleeve with four sheet
metal screws provided with kit.
5. Remove the left front cover from the subbase.
6. Position skirting on each side of wall sleeve to prevent
the entry of foreign materials. Trim skirting to desired
length. Attach skirting with four sheet metal screws
provided with kit.
7. Wire subbase for appropriate voltage. NOTE: The proper
subbase must be ordered to obtain the correct electrical receptacle.
8. After wiring is complete, mount covers A and Z to the
subbase with provided screws.
9. When installing optional accessories to the subbase,
refer to each installation instruction for that accessory.
1
/8 inch holes in wall sleeve to line up with holes
48
Page 49

ACCESSORY INST ALLA TIONS
Part/Location Identification
A Left Front Cover
B Right Front Panel
C Front Cord Panel
D Wall Sleeve Hole Location
E Skirting Hole Location
Z Right Front Cover Assembly
-- Leveling Legs (Not Shown)
Wall
Sleeve
Cover
Wiring
Access
D
E
3"
A
B
S
u
b
B
b
o
a
x
s
e
A
s
s
y
.
Low Voltage
Compartment
Z
E
C
D
"
4
/
3
-
1
1
49
Page 50

ACCESSORY INST ALLA TIONS
13-3/4"
Wall Sle eve
(Outdoor Side)
16-1/16"
3-1/4"
2-3/4"
Wall Sleeve
Inside Edge
Back of
Flange "A"
19-9/16"
1-3/8"
Ground
Screw Location
3-1/2"
Concentric
Knockouts In Rear
Front View
Receptacle
Provided
Inside Subbase
Accessory
13-1/2"
2-5/8"
2" Ma x. Adjustment
Left End View
G
L1
NEMA 6-20R
Receptacle
G
L1
NEMA 6-30R
Receptacle
L2
L2
Field Wiring
Line Voltage
L1 L2
BLK
G
RED
2"
G
W
L1 L2
NEMA 7-20R
Receptacle
G
L1
L2
NEMA 7-30R
Receptacle
4"
Concentric
Knockouts In Bottom
Top View
GRN
G
W
WHT
BLK
L1 L2
Field Wiring
Line Voltage
230/208 VAC Field Schematic
50
265 VAC Field Schematic
Wiring Diagram
Page 51

ACCESSORY INST ALLA TIONS
Remote Thermostat High Fan Kit
Description
When a wall mounted thermostat is used, the PTAC unit will
operate in low speed only. Following these instructions will
allow the PTAC unit to operate on high speed only. This kit
contains twenty labels, enough for ten units.
HIGH VOLTAGE
ISCONNECT ALL POWER BEFORE
D
SERVICING
ULTIPLE POWER SOURCES MAY BE PRESENT
M
AILURE TO DO SO MAY CAUSE PROPERTY
F
DAMAGE
1. Remove the two screws securing the front to the chassis. NOTE: Not all installations will use these screws.
secure front
2. Grasp the cabinet front as shown.
3. Pull the bottom of the cabinet front away from the chassis until the retaining clips disengage.
OR
INSTALLING THIS UNIT
,
PERSONAL INJURY OR DEATH
Holes to
.
.
.
4. Lift the cabinet front off the chassis.
5. Remove the unit control knobs by pulling the knobs off
the control shafts.
Control Panel
Pull To Remove
Mode Switch Knob
Pull To Remove
Thermostat Knob
6. Lifting the front edge of the escutcheon, slide the tabs at
the top of the escutcheon out of the retaining holes and
remove the escutcheon.
7. Remove the control panel cover by removing the two
screws holding the control panel cover in place. Tilt the
control panel forward to gain access to the wiring.
IMPORTANT NOTE: Disconnect power to the unit and/or
turn the Master Switch on the control board to OFF when
connecting or altering wiring to any terminal - failure to do so
may result in shorting the fuse or damaging the control board.
8. On the control board switch BK16 along with all other
wires on the “FAN HIGH” and RD17 and all other wires
on the “FAN LOW” 1/4 inch terminals.
Cove r Screws
Located on
Both Sides of
Control Panel
51
Page 52

ACCESSORY INST ALLA TIONS
ELECTRIC
HEATER
RD33
BR35BR34
LINE 1 HEATER HEATER LINE 2 COMP R-VALVE
BK18
FUSE
6
VT12
Unit Wiring As
Shipped From
The Factory
NOTE: If additional accessories have been added, the wiring
may differ from what is shown.
BK16
FAN
HIGH
FAN
MOTOR
RD17
FAN
LOW
BK19
REV
VALVE
SOLENOID
9. Replace control panel cover, escutcheon, and control
knobs.
10. Place one label supplied with this kit on the wiring
diagram supplied with the unit.
11. Place a second label on the sheet metal control cover
near the top left edge.
Label
Replacement
ELECTRIC
HEATER
RD33
BR35BR34
LINE 1 HEATER HEATER LINE 2 COMP R-VALVE
BK18
FUSE
6
VT12
BK16
FAN
HIGH
FAN
MOTOR
RD17
FAN
LOW
BK19
Unit Wiring
To Allow For
High Fan Speed
REV
VALVE
SOLENOID
12. Replace the wiring diagram and the front cover.
52
Page 53

ACCESSORY INST ALLA TIONS
Right Hand Subbase Conversion
Description
The right hand subbase cover is used when existing subbases are already installed on the wallsleeve and the subbase needs to be converted to a upgraded subbase. The
Right Hand Subbase Cover kit must be installed in order to
maintain proper clearances from the subbase to all PTAC
chassis manufactured after January 1, 1996.
NOTE: The right-hand subbase cover can only be used on
subbases manufactured prior to January 1, 1996 model subbases.
Installation
1. Remove the right hand subbase cover from the existing
subbase by removing the two screws holding the cover
in place. Save these screws for later use.
2. Unplug and remove the old PTAC chassis from the wall
sleeve.
3. Install the new PTAC chassis into the wallsleeve and
plug the PTAC power cord into the subbase power receptacle.
4. Place the right hand subbase cover supplied with this
kit on the subbase in the same location that the old
right hand cover was removed. Secure the right hand
subbase cover to the subbase using the screws removed
in Step 1.
Install
53
 Loading...