

Amana NDE2330AYW, NDE2330AZW, NDE5800AYW, NDE7800AYW, NDE7800AZW Owner’s Manual
...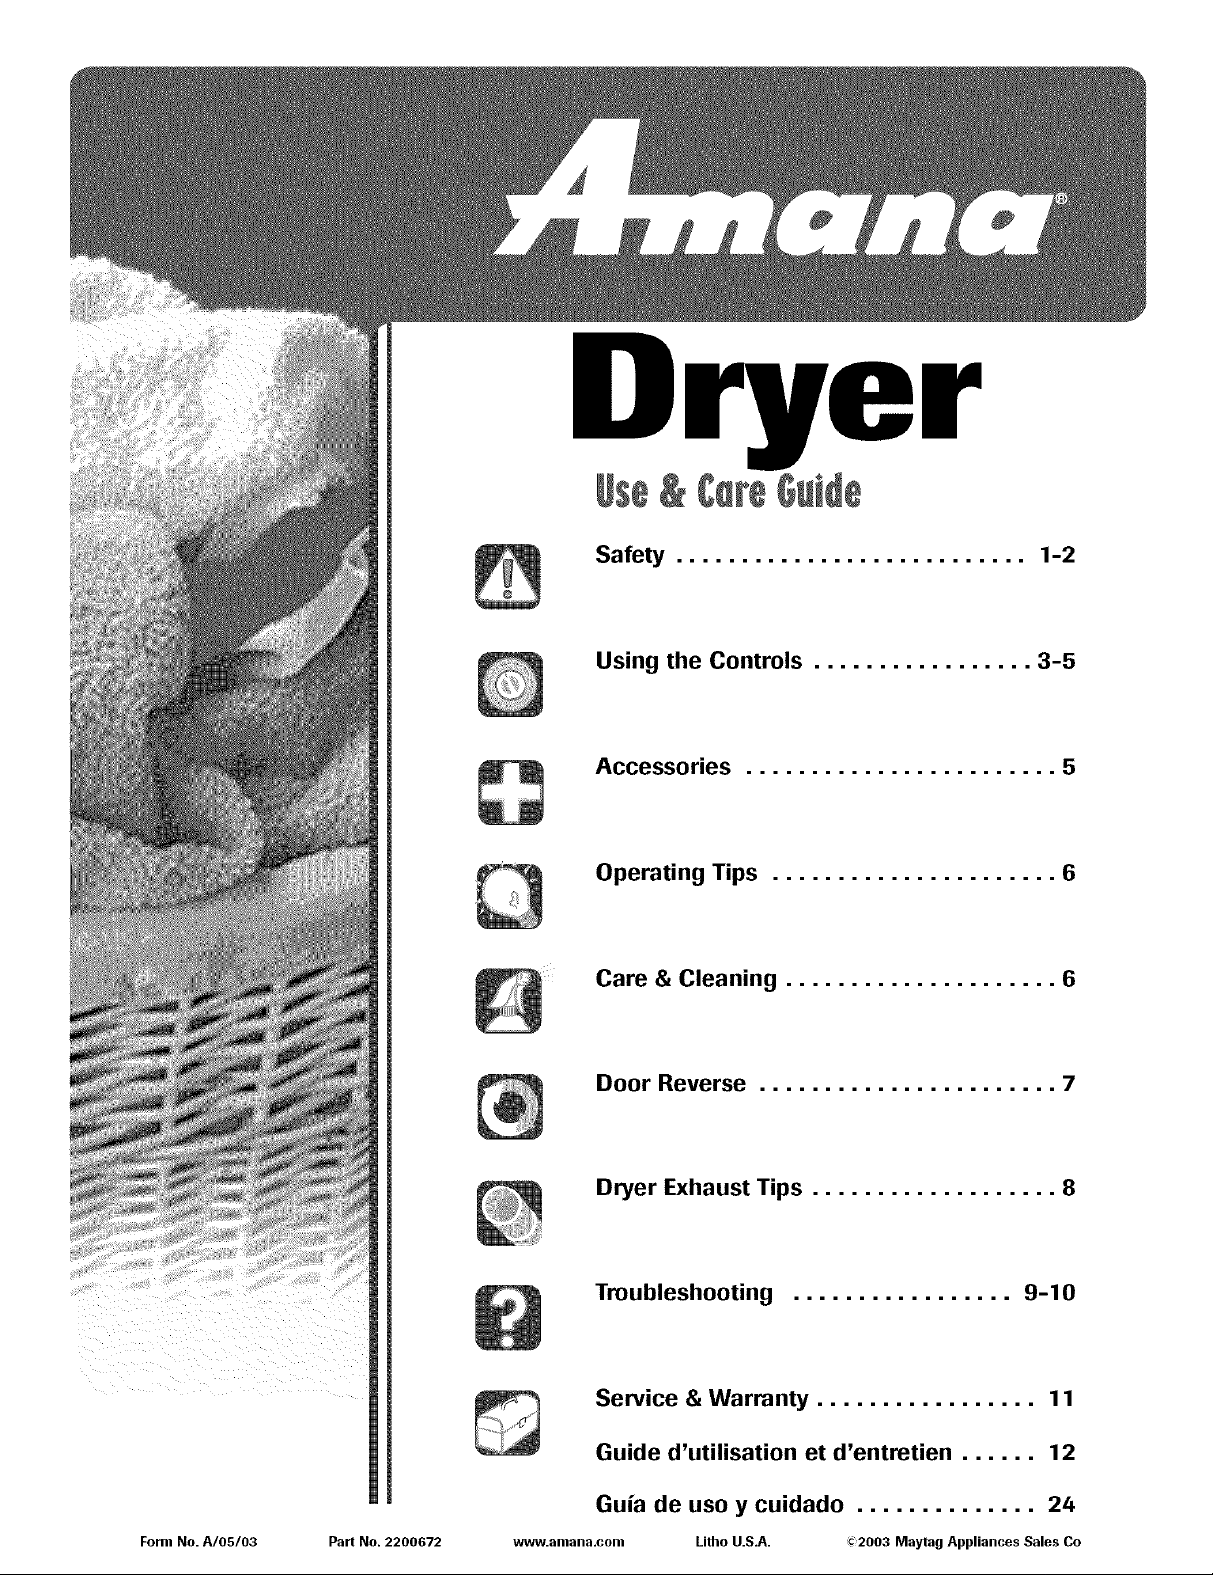
Dryer
Safety ........................... 1-2
Using the Controls ................. 3-5
Accessories ........................ 5
Operating Tips ...................... 6
Care & Cleaning ..................... 6
Form No. A/05/03 Part No. 2200672
Door Reverse ....................... 7
Dryer Exhaust Tips ................... 8
Troubleshooting ................. 9-10
Service & Warranty ................. 11
Guide d'utilisation et d'entretien ...... 12
Guia de uso y cuidado .............. 24
www.amana.com Litho U.S.A. _2003 Maytag Appliances Sales Co
5ofetv
What You Need to Know About
Safety Instructions
Warning and Important Safety Instructions appearing in
this manual are not meant to cover all possible
conditions and situations that may occur. Common
sense, caution and care must be exercised when
installing, maintaining or operating appliance.
Always contact your dealer, distributor, service agent or
manufacturer about problems or conditions you do not
understand.
Recognize Safety Symbols, Words,
Labels
1
5ofetv
.
Read all instructions before using the appliance.
2.
To avoid the possibility of fire or explosion:
a.
Do not dry items that have been previously
cleaned in, washed in, soaked in, or spotted
with gasoline, dry-cleaning solvents, other
flammable or explosive substances as they give
off vapors that could ignite or explode. Any
material on which you have used a cleaning
solvent, or which is saturated with flammable
liquids or solids, should not be placed in the
dryer, until all traces of these flammable liquids
or solids and their fumes have been removed.
There are many highly flammable items used in
homes, such as: acetone, denatured alcohol,
gasoline, kerosene, some liquid household
cleaners, some spot removers, turpentine,
waxes and wax removers.
Items containing foam rubber (may be labeled
latex foam} or similarly textured rubber-like
materials must not be dried on a heat setting.
Foam rubber materials when heated, can under
certain circumstances produce fire by
spontaneous combustion.
3. Do not allow children or pets to play on, in, or in
front of the appliance. Close supervision is
necessary when the appliance is used near
children and pet&
10. Clean the lint screen before or after each load.
11. Keep the area around the exhaust opening and
surrounding areas free from lint accumulation, dust
and dirt.
12.
The interior of the dryer and exhaust duct should be
cleaned periodically by qualified service personnel.
13.
This appliance must be properly grounded. Never
plug the appliance cord into a receptacle which is
not grounded adequately and in accordance with
local and national codes. See installation
instructions for grounding this appliance.
14. Do not sit on top of the clothes dryer.
Important Safety Notice
& Warning
The California Safe Drinking Water and Toxic
Enforcement Act of 1986 (Proposition 65) requires the
Governor of California to publish a list of substances
known to the State of California to cause cancer or
reproductive harm, and requires businesses to warn
customers of potential exposures to such substances.
Users of this appliance are hereby warned that the
burning of gas can result in low-level exposure to
some of the listed substances, including benzene,
formaldehyde, and soot, due primarily to the
incomplete combustion of natural gas or liquid
petroleum (LP} fuels. Exhaust ducts should be kept
free of obstructions and properly exhausted dryers will
minimize exposure.
4. Before the appliance is removed from service or
discarded, remove the door to the drying
compartment.
5. Do not reach into the appliance if the drum is moving.
6. Do not install or store this appliance where it will
be exposed to the weather.
Z Do not tamper with controls.
8,Do not repair or replace any part of the appliance
or attempt any servicing unless specifically
recommended in published user-repair instructions
that you understand and have the skills to carry out.
9. Do not use fabric softeners or products to eliminate
static unless recommended for dryer use by the
manufacturer of the fabric softener or product.
SAVE THESE WNSTRUOTJONS 2
Note
• Because of continuing product improvements,
Maytag reserves the right to change specifications
without notice. For complete details, see the
Installation Instructions packed with your product
before selecting cabinetry, making cutouts or
beginning installation.
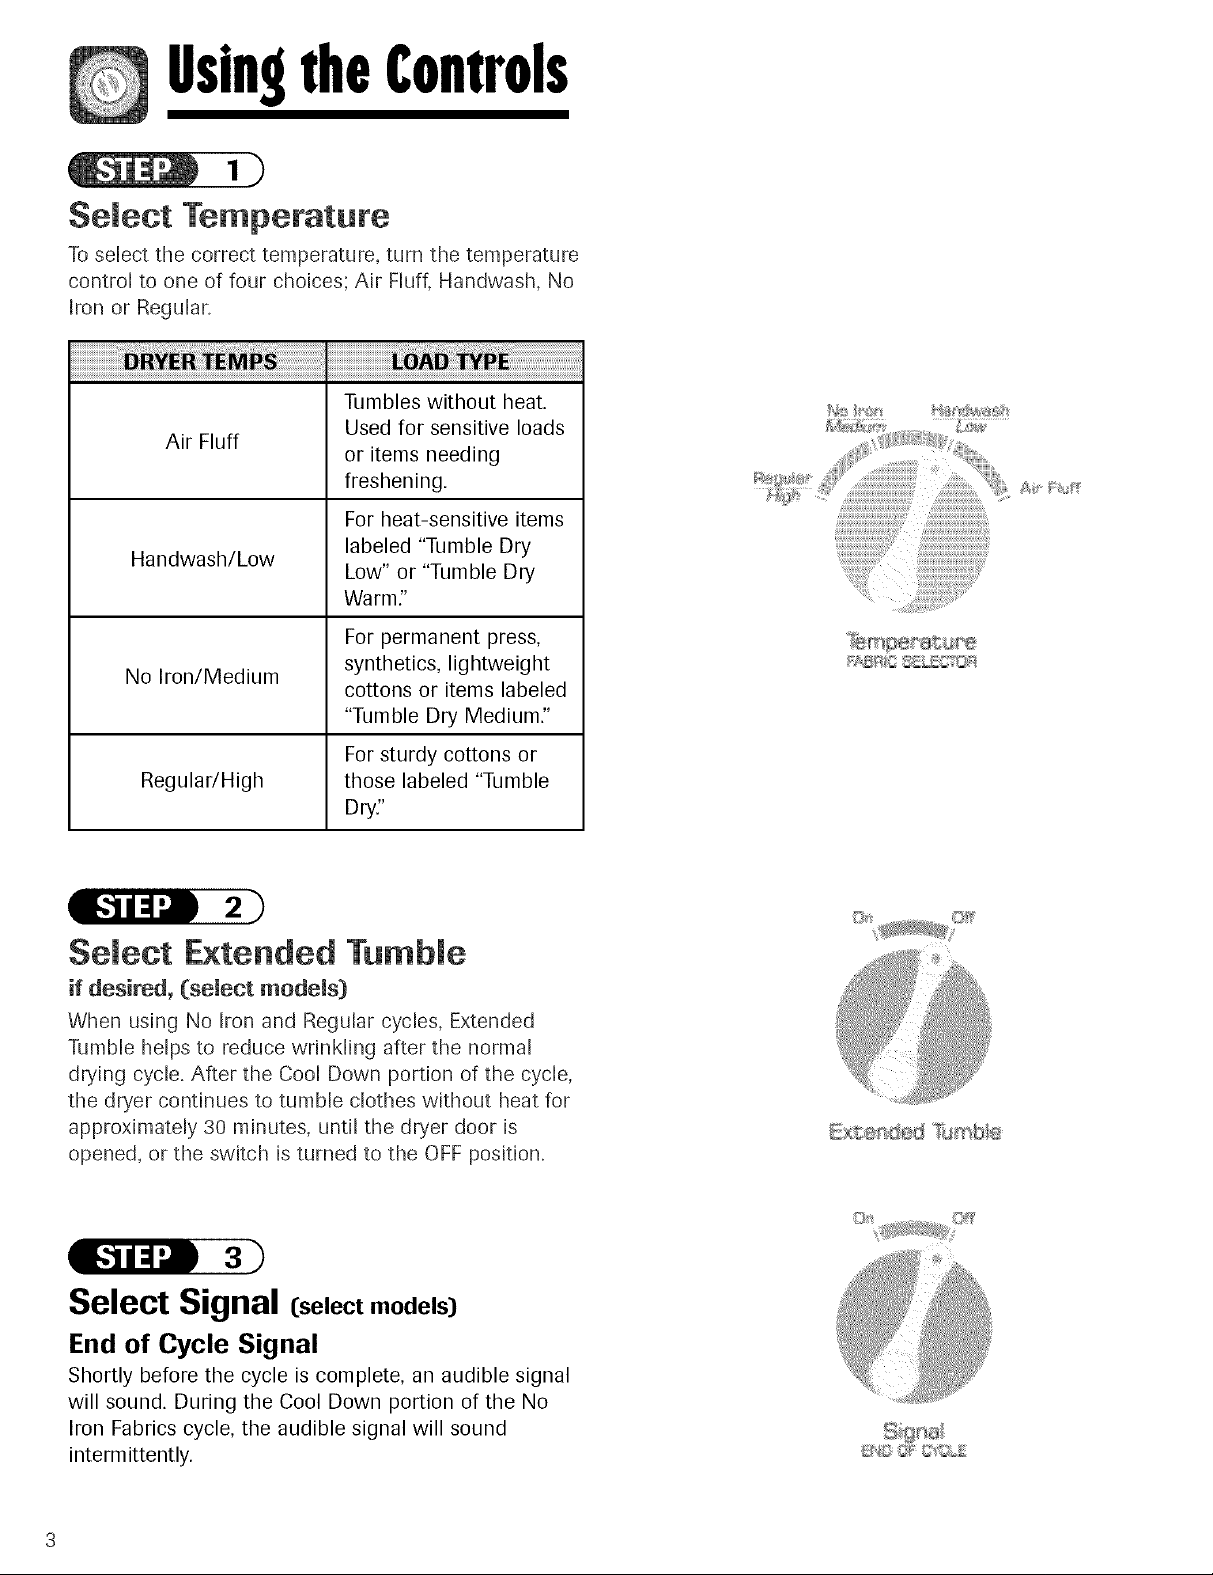
UsinglheConlrols
Semect Temperature
To select the correct temperature, turn the temperature
control to one of four choices; Air Fluff, Handwash, No
Iron or Regular.
Tumbles without heat.
Air Fluff
Handwash/Low
No Iron/Medium synthetics, lightweight
Used for sensitive loads
or items needing
freshening.
For heat-sensitive items
labeled "Tumble Dry
Low" or "Tumble Dry
Warm"
For permanent press,
cottons or items labeled
"Tumble Dry Medium."
Ai_¸_!_
For sturdy cottons or
Regular/High those labeled "Tumble
Dry"
Select Extended Tumble
if desired, (semect models)
When using No Wronand Regular cycles, Extended
Tumble helps to reduce wrinkling after the normal
drying cycle. After the Cool Down portion of the cycle,
the dryer continues to tumble clothes without heat for
approximately 30 minutes, until the dryer door is
opened, or the switch is turned to the OFF position.
Select
Signal [select models)
Ex ersged Tismb e
End of Cycle Signal
Shortly before the cycle is complete, an audible signal
will sound. During the Cool Down portion of the No
Iron Fabrics cycle, the audible signal will sound
intermittently.
©i__.....
UsingtheControls
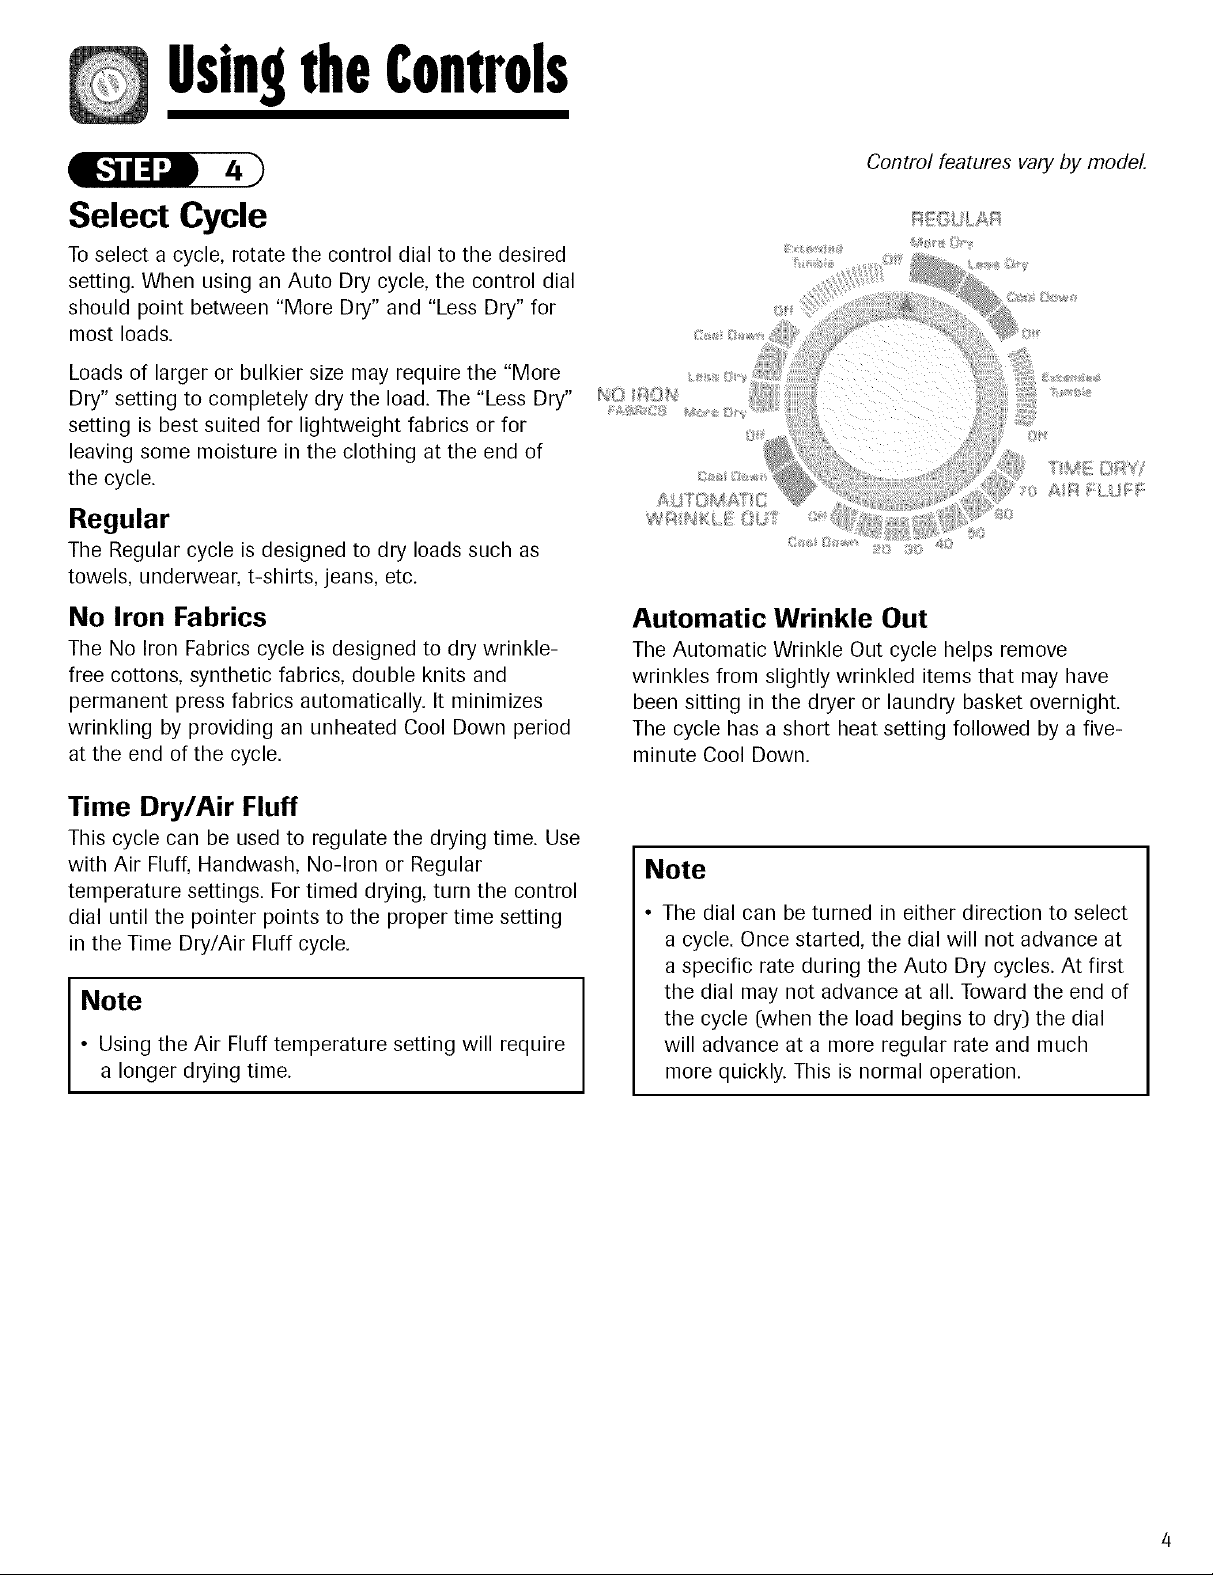
Select Cycle
To select a cycle, rotate the control dial to the desired
setting. When using an Auto Dry cycle, the control dial
should point between "More Dry" and "Less Dry" for
most loads.
Loads of larger or bulkier size may require the "More
Dry" setting to completely dry the load. The "Less Dry"
setting is best suited for lightweight fabrics or for
leaving some moisture in the clothing at the end of
the cycle.
Regular
The Regular cycle is designed to dry loads such as
towels, underwear, t-shirts, jeans, etc.
Control features vary by model
No Iron Fabrics
The No Iron Fabrics cycle is designed to dry wrinkle-
free cottons, synthetic fabrics, double knits and
permanent press fabrics automatically. It minimizes
wrinkling by providing an unheated Cool Down period
at the end of the cycle.
Time Dry/Air Fluff
This cycle can be used to regulate the drying time. Use
with Air Fluff, Handwash, No-Iron or Regular
temperature settings. For timed drying, turn the control
dial until the pointer points to the proper time setting
in the Time Dry/Air Fluff cycle.
Note
• Using the Air Fluff temperature setting will require
a longer drying time.
Automatic Wrinkle Out
The Automatic Wrinkle Out cycle helps remove
wrinkles from slightly wrinkled items that may have
been sitting in the dryer or laundry basket overnight.
The cycle has a short heat setting followed by a five-
minute Cool Down.
Note
• The dial can be turned in either direction to select
a cycle. Once started, the dial will not advance at
a specific rate during the Auto Dry cycles. At first
the dial may not advance at all. Toward the end of
the cycle (when the load begins to dry) the dial
will advance at a more regular rate and much
more quickly. This is normal operation.
UsingtheControls
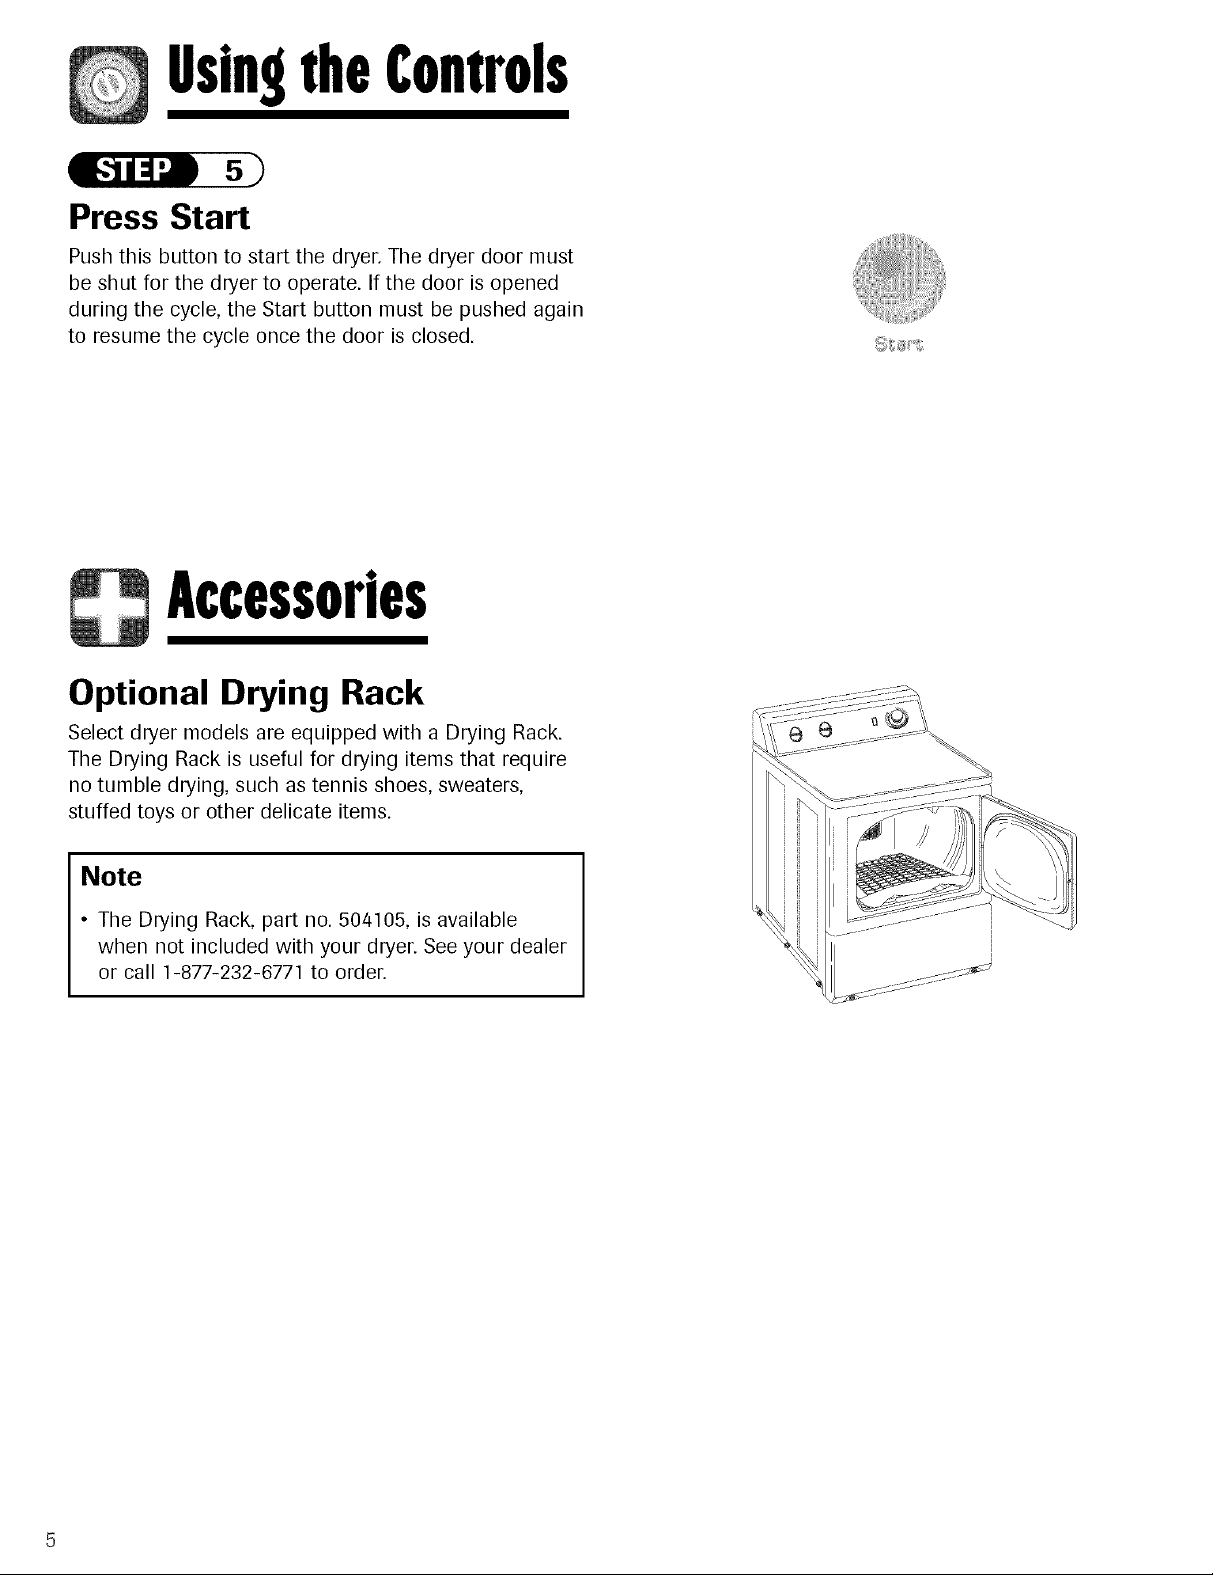
Press Start
Push this button to start the dryer. The dryer door must
be shut for the dryer to operate. If the door is opened
during the cycle, the Start button must be pushed again
to resume the cycle once the door is closed.
Accessories
Optional Drying Rack
Select dryer models are equipped with a Drying Rack.
The Drying Rack is useful for drying items that require
no tumble drying, such as tennis shoes, sweaters,
stuffed toys or other delicate items.
Note
• The Drying Rack, part no. 504105, is available
when not included with your dryer. See your dealer
or call 1-877-232-6771 to order.

Opermin9Tips
Clean the Lint Filter
• After each load.
• To shorten drying time.
• To operate more energy efficiently.
Note
• Do not operate the dryer without the linter filter in
place.
Load the Dryer Properly
• Place only one washload in the dryer at a time.
• Mixed loads of heavy and lightweight clothes will dry
differently. Lightweight clothes will dry, while heavy
clothes may be damp.
• Add one or more similar items to the dryer when only
one or two articles need drying. This improves the
tumbling action and drying efficiency.
• Overloading restricts tumbling action, resulting in
uneven drying as well as excessive wrinkling of some
fabrics.
• When drying large, bulky items such as a blanket or
comforter, it may be necessary to reposition the load
during the cycle to ensure even drying.
& Cleaning
Control Panel
Clean with a soft, damp cloth. Do not use abrasive
substances.
Tumbler
Remove any stains such as crayon, ink pen or fabric
dye from new items (such as towels or jeans) with an
all-purpose cleaner. Then tumble old towels or rags to
remove any excess stain or cleaning substance. Once
these steps are done, stains may still be visible, but
should not transfer to subsequent loads.
Cabinet
Wipe off any marks with soap and water. Use an
appliance wax once a year if desired.
Dryer Exhaust System
Inspect and clean once a year to maintain optimum
performance. The outside exhaust hood should be
cleaned more frequently to ensure proper operation.
(Refer to the Installation Instructions for more
information.)
DoorReverse
Reversing the Door
Follow these steps to reverse the door:
1. Remove four hinge-attaching screws.
2. Remove all nine screws from door and hinges.
3. Pull bottom of door liner out (f'0, then pull down
(B_),removing door liner from door panel.
4. Rotate door panel 180° as shown.
5. Remove door strike from door liner and reinstall on
opposite side.
6. Insert liner under flange on bottom of door (A_),
then push top of door liner into phce (B_).
7. Reinstall nine screws removed in Step 2.
8. Using screwdriver, remove two door plugs and
reinstall on opposite side of door opening.
9. Reinstall four hinge attaching screws removed in
Step 1.
B
B_
A
DryerExhoustTips
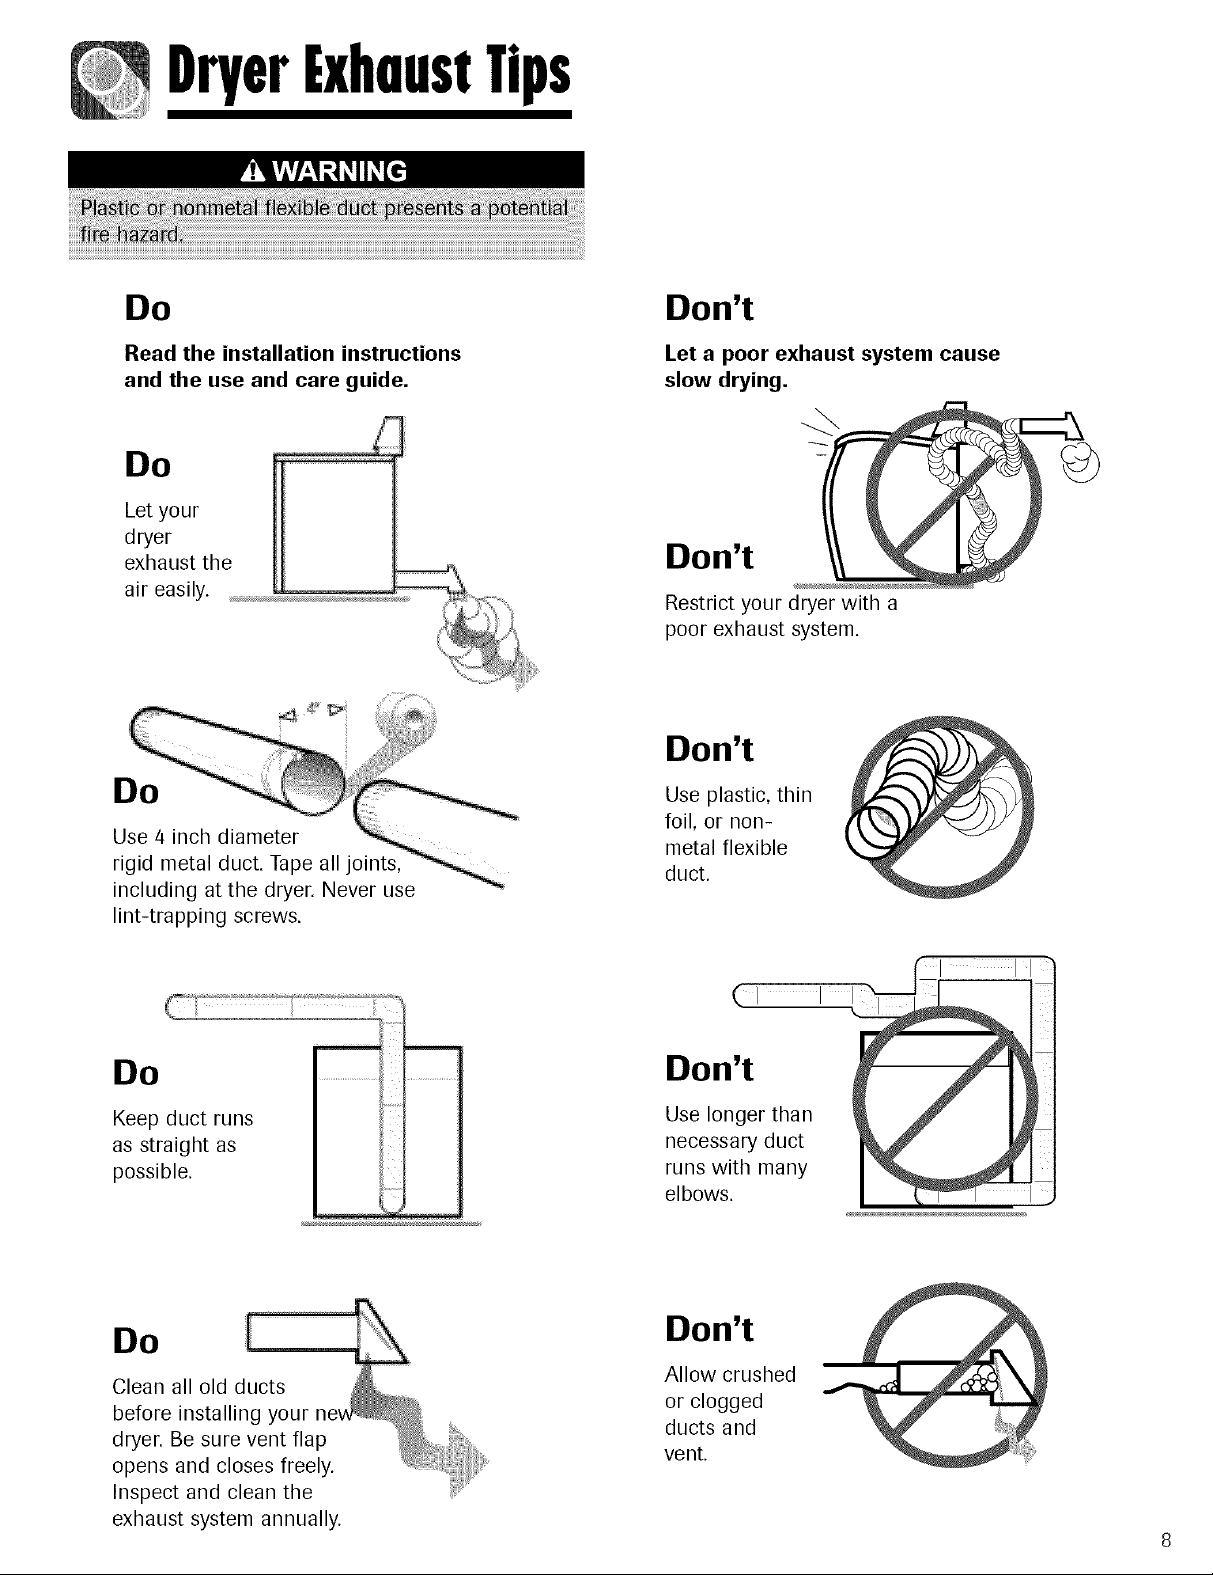
Do
Read the installation instructions
and the use and care guide.
Do
Let your
dryer
exhaust the
air easily.
including at the dryer. Never use
lint-trapping screws.
Don't
Let a poor exhaust system cause
slow drying.
Don't
Restrict your dryer with a
poor exhaust system.
Don't
Use plastic, thin
foil, or non-
metal flexible
duct.
Do
Keep duct runs
as straight as
possible.
Do
Clean all old ducts
before installing your
dryer. Be sure vent flap
opens and closes freely.
Inspect and clean the
exhaust system annually.
L
(I I I
Don't
Use longer than
necessary duct
runs with many
elbows.
Don't
Allow crushed
or clogged
ducts and
vent.
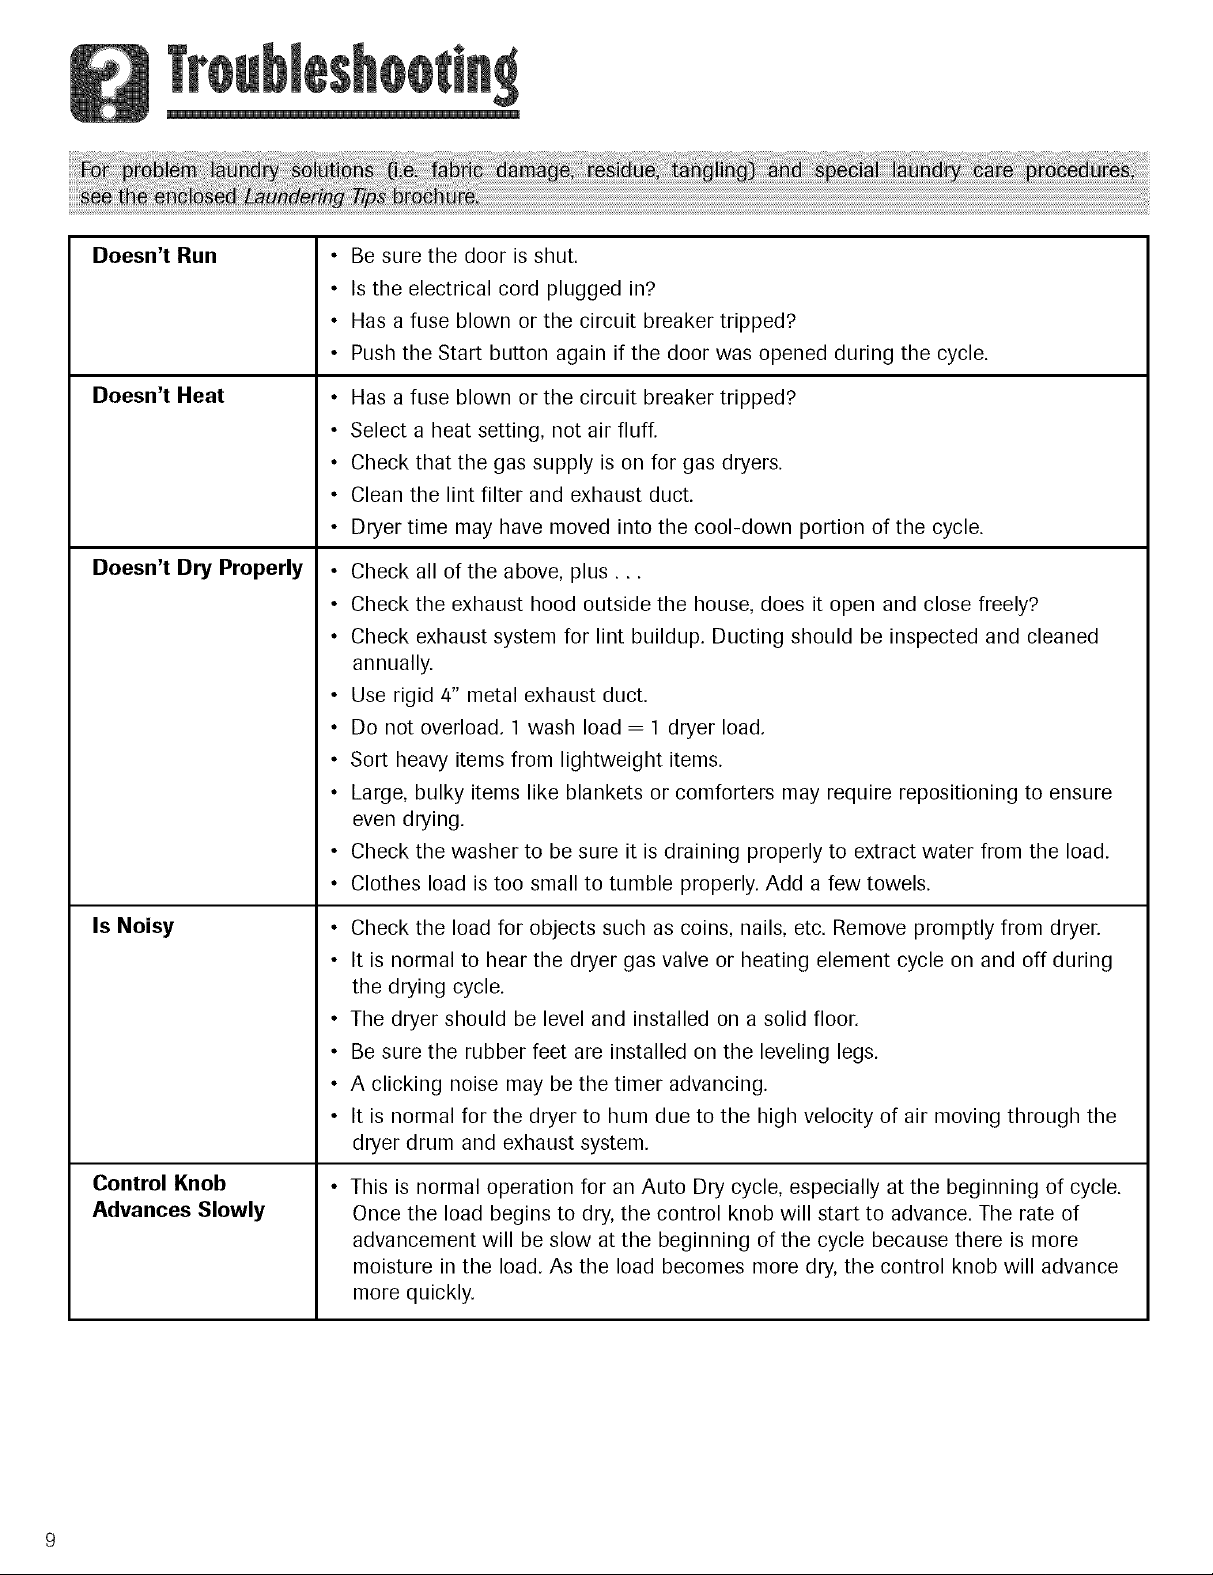
Doesn't Run
• Be sure the door is shut.
• Is the electrical cord plugged in?
• Has a fuse blown or the circuit breaker tripped?
• Push the Start button again if the door was opened during the cycle.
Doesn't Heat
Doesn't Dry Properly
Is Noisy
Has a fuse blown or the circuit breaker tripped?
Select a heat setting, not air fluff.
Check that the gas supply is on for gas dryers.
Clean the lint filter and exhaust duct.
Dryer time may have moved into the cool-down portion of the cycle.
Check all of the above, plus...
Check the exhaust hood outside the house, does it open and close freely?
Check exhaust system for lint buildup. Ducting should be inspected and cleaned
annually.
Use rigid 4" metal exhaust duct.
Do not overload. 1 wash load = 1 dryer load.
Sort heavy items from lightweight items.
Large, bulky items like blankets or comforters may require repositioning to ensure
even drying.
Check the washer to be sure it is draining properly to extract water from the load.
Clothes load is too small to tumble properly. Add a few towels.
Check the load for objects such as coins, nails, etc. Remove promptly from dryen
Itisnormal to hearthe dryergas valveor heatingelement cycleon and offduring
the dryingcycle.
The dryershould be leveland installedon a solidfloor.
Be surethe rubber feetareinstalledon the levelinglegs.
A clickingnoisemay be the timeradvancing.
Itisnormal forthe dryerto hum due to the highvelocityof airmoving through the
dryerdrum and exhaustsystem.
Control Knob
Advances Slowly
This is normal operation for an Auto Dry cycle, especially at the beginning of cycle.
Once the load begins to dry, the control knob will start to advance. The rate of
advancement will be slow at the beginning of the cycle because there is more
moisture in the load. As the load becomes more dry, the control knob will advance
more quickly.
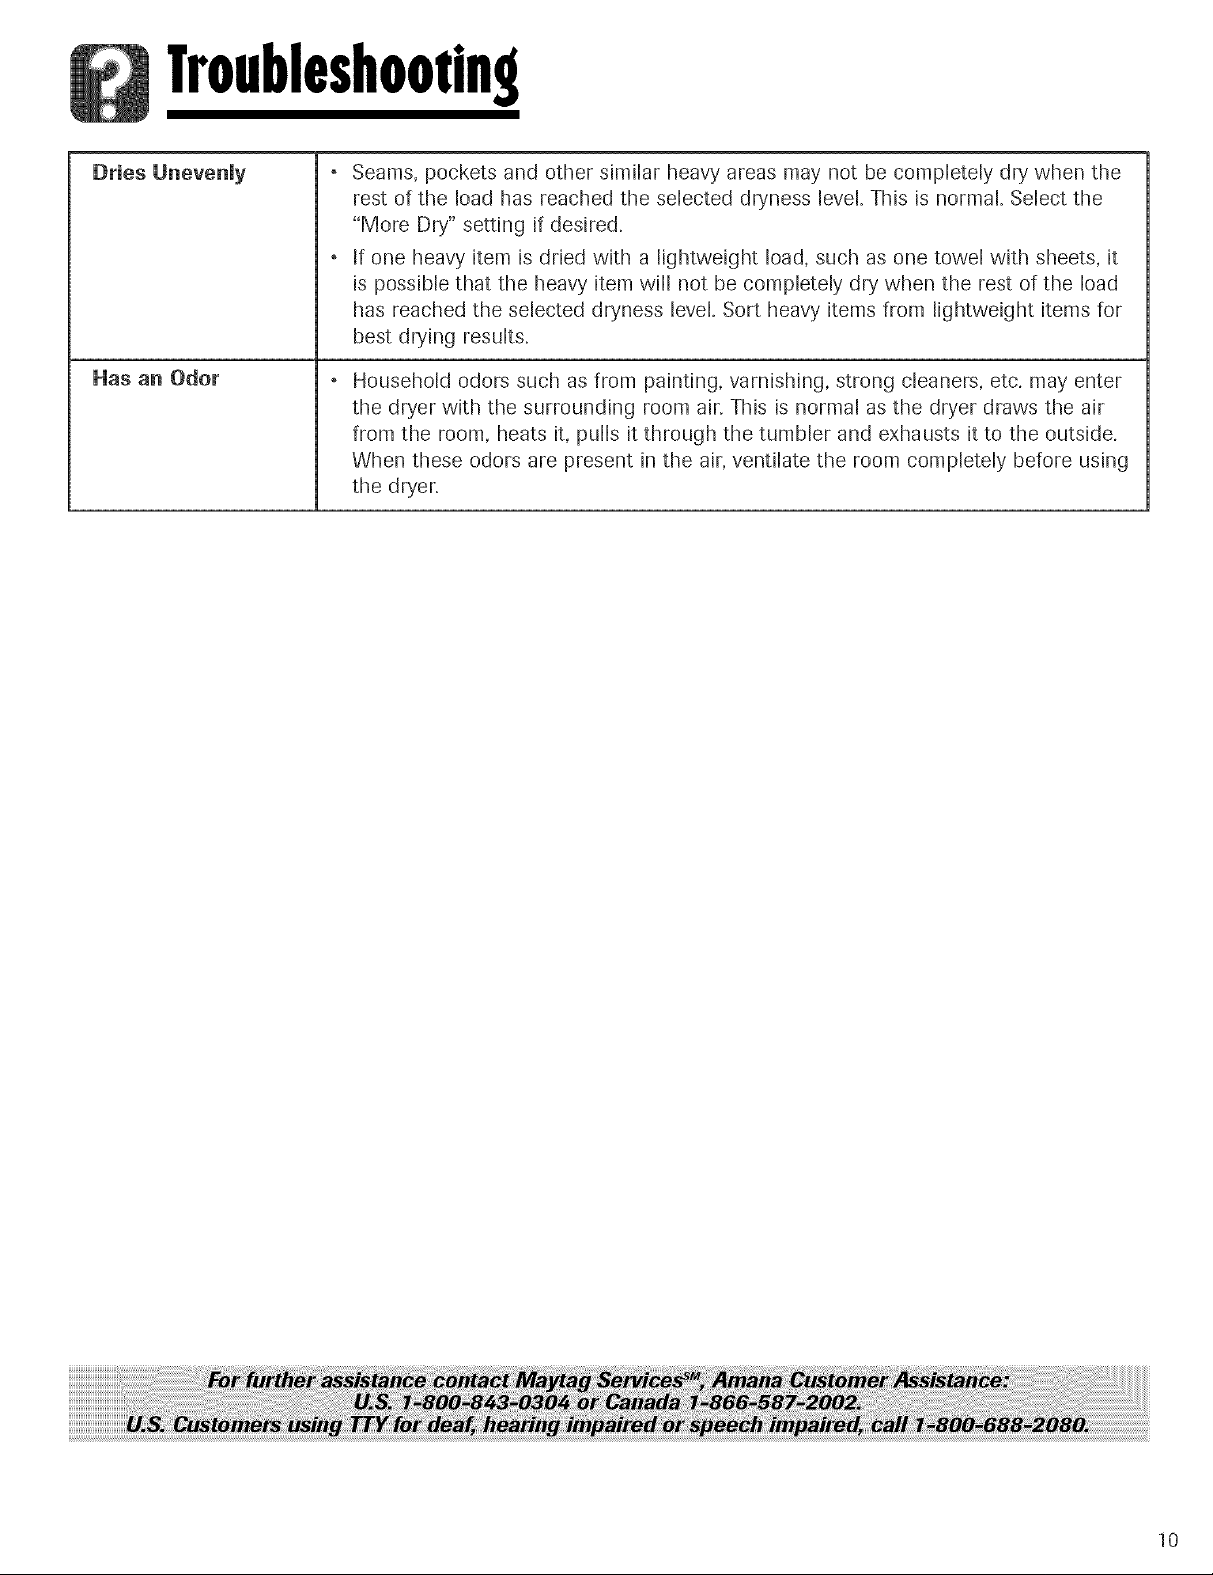
Troubleshooting
Dries Unevenly
Has an Odor
Seams, pockets and other similar heavy areas may not be completely dry when the
rest of the load has reached the selected dryness level. This is normal. Select the
"More Dry" setting if desired.
If one heavy item is dried with a lightweight load, such as one towel with sheets, it
is possible that the heavy item will not be completely dry when the rest of the load
has reached the selected dryness level. Sort heavy items from lightweight items for
best drying results.
Household odors such as from painting, varnishing, strong cleaners, etc. may enter
the dryer with the surrounding room air. This is normal as the dryer draws the air
from the room, heats it, pulls it through the tumbler and exhausts it to the outside.
When these odors are present in the air, ventilate the room completely before using
the dryer.
10
 Loading...