

Page 1

AUTOMATIC DRYER
OPERATING INSTRUCTIONS
ana
A BayHicon Company
Models LE2502
LG2512
FOR YOUR SAFETY
Do not store or use gasoline or other flammable vapors and liqu
vicinity of this or any other appliance.
FOR YOUR SAFETY
If you smell gas:
1. Open windows.
2. Don't touch electrical switches.
3. Extinguish any open flame.
4. Immediately call your gas supplier.
B83874-9
Amana Refrigeration, Inc.
Amana, Iowa 52204
Page 2
OPERATING INSTRUCTIONS
TO DRY CLOTHES
Please read instructions before using dryer. Before using dryer for the first time,
wash out the inside of the dryer cylinder with a sudsy cloth, then wipe dry. Install
this dryer according to the INSTALLATION INSTRUCTIONS. KEEP THESE
INSTRUCTIONS FOR FUTURE REFERENCE.
CLEAN LINT FILTER; Before each use.
1
LOAD DRYER: Open dryer door. Shake out laundry and place in dryer.
2
CLOSE DOOR: Dryer will not operate with the door open.
3
SELECT DRYING TEMPERATURE: The FABRIC SELECTOR controls the
4
drying temperature.
fABKic mccTOK
SELECT TIMER SETTING: In the cycle desired: Automatic Permanent Press,
Automatic Regular, Delicate, Fluff or Time cycle. These cycles control the
drying time.
AUTOMATIC
KCCULAR
COOi DOWN
20 30 *0
DAMP OAV
PMM KNO* ro tTMT
START DRYER: Push the timer knob in.
TO STOP DRYER AT ANY TIME; Open dryer door or turn timer knob to
OFF position.
TO RESTART DRYER: Close door, reset timer if necessary and push the
timer knob in. Amana dryers are designed so they will not operate if the
door is open.
-7-
Page 3

If your dryer has an adjustable end of cycle signal:
SET SIGNAL CONTROL: Slide selector "loud” (loudest sound) or to "off"
7
(no sound) or to any level in between. The signal will buzz for up to 5
minutes before the dryer stops. The signal will stop when the door is
opened, when the timer is advanced to OFF positions.
ABOUT YOUR AMANA DRYER
Depending on the model or dryer you have, it may or may not have all of
the following cycles or selections:
AUTOMATIC CYCLES
The AUTOMATIC REGULAR cycle is designed to dry large and average
size loads of similar weight fabrics. Uniformity of fabrics is important to
ensure that all items will dry in the same length of time. When properly set
for the load, the dryer will determine the exact length of drying time, shut
the heat off when the clothes are dry and tumble for approximately 5
minutes with no heat before stopping at the Off position.
THE TIMER KNOB WILL NOT ADVANCE WITH THE SAME
REGULARITY IN THE AUTOMATIC CYCLE AS IT DOES IN THE TIME
CYCLE. See "ABOUT YOUR AUTOMATIC CYCLES."
-8-
Page 4

LOAD TYPES FOR AUTOMATIC REGULAR CYCLE
NORMAL - For cottons such as cotton knits, corduroys, cotton work
clothes and mixed loads.
LESS DRY OR DELICATE - For medium and lightweight fabrics (not
permanent press) as in dresses, dress shirts and for delicate items.
These cycles have approximately 5 minute cool-down (no-heat) period at
the end of the cycle.
AUTOMATIC PERMANENT PRESS/KNITS- For permanent press, polyester
knits and other synthetics that are "no iron".
This cycle has a 10 minute cool-down (no-heaO period before the "COOL
'N TUMBLE." The signal will buzz as a reminder to remove the clothes. If
they are not removed at this time, the dryer will continue to tumble with
no heat for an additional 16 minutes. The signal will buzz approximately
every 4 minutes as a reminder.
-9-
Page 5

SUGGESTED DRYER SETTINGS
AUTOMATIC RECULAR/DELICATE CYCLES
LOAD TYPE
Heavy Cottons
Cotton Work Clothes
Cotton Knits
Terry Towels
Dresses & Dress
Shirts
Sheer & Very Light
weight Cottons, Items
Labeled "Dry With
Low Heat"
FABRIC SETTING
(Temperature)
Normal NORMAL
Normal
Permanent Press
Normal
Delicate DELICATE
AUTOMATIC PERMANENT
PRESS CYCLE
LOAD TYPE
Permanent Press
Polyester Knits
Heavy & Medium
Weight Synthetics
FABRIC SETTING
(Temperature)
Permanent Press
CYCLE
(Timer Setting)
NORMAL
LESS DRY
CYCLE
(Timer Setting)
AUTOMATIC
PERMANENT
PRESS
Lightweight, Delicates, Sheers & Items
Labeled "Dry With
Low Heat"
The suggested timer settings are approximate. Check garment care labels
for proper dryer setting. At first, set indicator toward center of drying zone.
You may find you will get better results for your loads by setting the
indicator to either side. Turn timer knob to a lower setting (clockwise) for
less drying, or to a higher setting (counterclockwise) for more drying.
IMPORTANT - The heat on the "DELICATE" setting is not sufficient to
remove wrinkles from permanent press.
-10-
Delicate
AUTOMATIC
PERMANENT
PRESS
Page 6

ABOUT YOUR AUTOMATIC CYCLES
The timer knob does not advance at an even pace in the automatic cycles
as it does in the time cycle.
For instance, you may notice the timer knob remains in the same
position for 15 minutes before it begins to move. THE TIMER IS NOT
MALFUNCTIONING. This only means it took 15 minutes for the load to
become dry enough to start advancing the timer knob.
The length of time it takes for the timer knob to begin advancing depends
on the type and size of load being dried. Depending on the model dryer
you have, it may or may not have all the following selections:
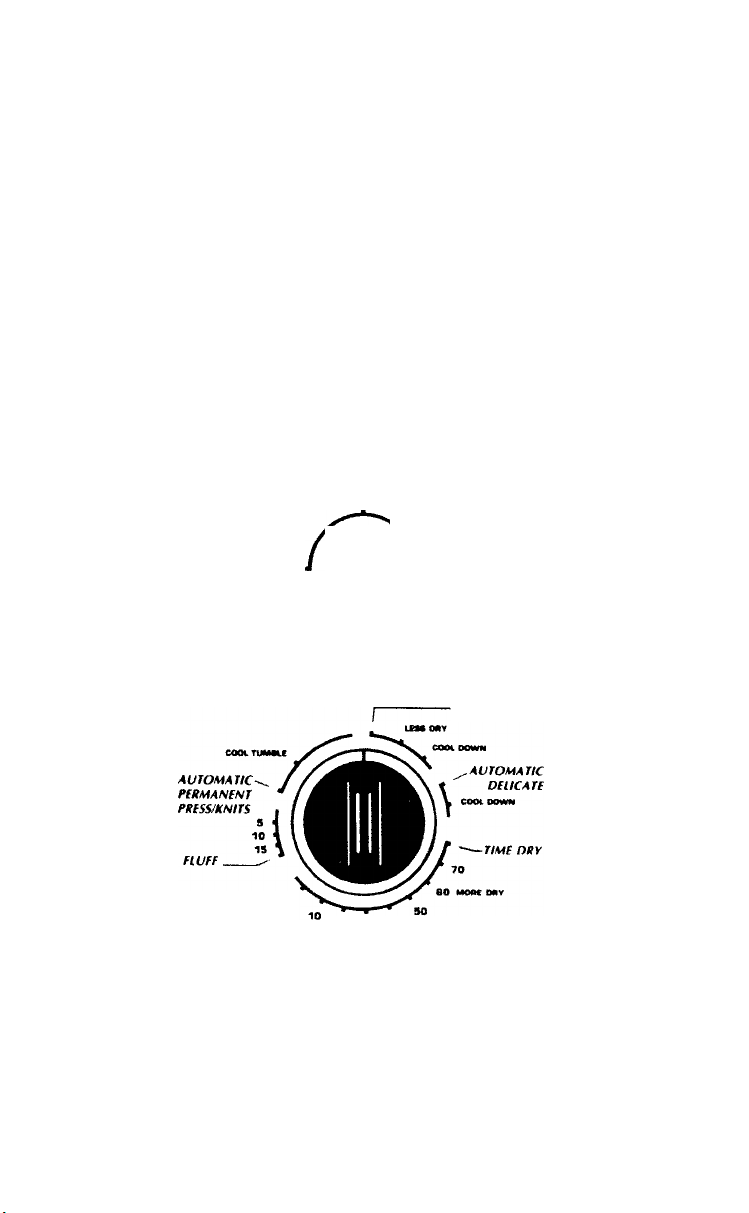
AUTOMATIC
KCCUIAK
nUFf
FLUFF
coot DOWN
coot DOWN
MMM KWM TO WTUtt
Mi«M KNoa TO iTMT
AUTOMATIC
OtUCATE
coot DOWN
AUTOMATIC
KfCUlAR
AUTOMATIC
DFUCATf
coot DOWN
AUTOMATIC REGULAR
- Use this setting for
cotton work clothes,
cotton sheets, dresses
and shirts.
AUTOMATIC DELICATE-
Use this cycle for sheer
and very lightweight
cottons and those items
labeled "Dry With
Low Heat." Turn the
DELICATE FABRIC
selector knob when
using the AUTOMATIC
DELICATE cycle.
-11-
Page 7

nvff
HUFF
coot DOWN
COOtruMMJ
coot OOWM
KMM K m o u TO oTuiT
«0 30 ^
DAMP DNV
PUPM KMOP TO «TAPT
'^TIMF DRY
70
%0 mom CWY
AUTOMATIC
PERMANENT PRESS/
KNITS - Use this setting
for permanent press,
polyester knits and heavy
and medium weight
synthetics. The "COOL
'N TUMBLE" portion of
the cycle tumbles the
load without heat for
approximately 16
minutes after the load
is dry. This helps to
minimize wrinkling.
COOL-DOWN
PERIODS - Each cycle
has a cool-down period
at the end of the cycle.
During that time, the
load is tumbled with no
heat. This helps reduce
wrinkling. Setting the
timer knob in a cool
down position will
result in the load being
tumbled with no heat.
TIME CYCLE
This cycle will operate the dryer for the number of minutes for which it is
set. Use for any load desired. Use for items you might want to remove
while still damp.
Turn the timer knob for the number of minutes required for drying. This
cycle has a 5 minute cool-down (no-heat) period. The dryer will not heat if
set for 5 minutes or less.
-12-
Page 8

SUGGESTED DRYER SETTINGS
LOAD TYPE FABRIC SETTING
(Temperature)
COTTONS
Heavyweight/
Average load Normal 4060
Mediumweight/
Average load Normal 35-45
Lightweight/
Average load or Delicate
The times suggested are approximate. Your loads, installation and drying
requirements will determine the setting you should use.
Normal
MINUTES
(Approximate)
15-30
FLUFF CYCLE
This is a "no heat" cycle that tumbles and circulates room temperature air
through the load for 20 minutes. Use for any items that should not be dried
with heat. Use also for fluffing shag rugs, bedspreads, pillows, blankets,
and other items.
Add dry towels to absorb moisture when drying plastic and rubber items in
this cycle.
There will always be no heat in the FLUFF cycle (timer dial) regardless of
the FABRIC setting chosen.
For longer periods, no-heat drying may also be used with the TIME or
other AUTOMATIC CYCLES. The dryer will automatically shut off at the
end of all cycles when the no-heat, "FLUFF" button on the FABRIC
selector is used.
DRYING RACK INSTRUCTIONS
Your drying rack is designed for drying washable articles, such as tennis
shoes, stuffed toys, etc., which you would prefer not to tumble dry.
-13-
Page 9

TO INSTALL DRYING RACKS
1. Open dryer loading door.
2. Place rack inside dryer cylinder, resting front legs of rack on loading
door opening.
3. Lower back of rack until rack rests above the two projections located in
the rear of the dryer cylinder.
NOTE: Rack doesn't have to be level from front to back when installed
in dryer.
CAUTION
Tlie back of the rack must rest above the two projections at the back of the
dryer cylirxjer. The inside of the dryer and rack can be damaged if the back of
the rack is installed below the projections. Don't let items hang below or over
the sides of the rack. Never tumble items while rack is inside the dryer.
After articles have been dried, remove rack from inside of dryer cylinder.
HELPS AND HINTS
A WARNING - To reduce the risk of fire, clothes which have traces
of any flammable substances such as cooking oil, machine oil,
flammable chemicals, thinner, etc. must not be put into the dryer.
REGULAR OR * UNTREATED CLOTHES
A properly sorted wash load is generally a dryer load. In both washing and
drying, the bulk or volume of clothes, rather than pounds, will determine the
load size. The dryer cylinder is large and is designed to dry a large or average
load at maximum efficiency.
DO NOT OVERLOAD THE DRYER - MAXIMUM LOAD: Dryer cylinder one half
full of wet clothes.
Loads consisting of several small pieces only such as knit shorts or diapers do not
tumble well and may require longer drying time which could result in excessive
wrinkling. Add several towels to aid tumbling. Large and small items together
make the best load for the dryer.
-14-
Page 10

For the most even drying, fabrics in a load should be of similar weight. If mixed
loads are dried, remove the lighter weight fabrics when they are dry. Avoid
overdrying to prevent harshness of fabrics, wrinkling and possible shrinkage.
Remove cotton sheets slightly damp, fold and smooth by hand for less wrinkling.
*Treated clothes are those items that will be labeled "FLAME RETARDANT,"
SCOTCFtGUARD™, etc. Follow the care labels on these garments for proper
washing and drying.
PERMANENT PRESS AND SYNTHETICS
These loads will require the following special treatment to get the best results
from their "no-iron" properties.
• Static electricity may cause garments of synthetic fibers (as in lingerie) to cling
together especially if they are overdried. The use of a liquid fabric softener in
the rinse water of the washer will soften clothes and reduce static electricity.
• Do not wash or dry clothes that shed lint in the same load with permanent
press or knit garments.
• Remove permanent press load immediately after dryer stops. If the permanent
press load is wrinkled, add a damp towel and operate the dryer for an
additional 10 minutes with heat and cool-down, remove load immediately.
-15-
 Loading...