

Amana GUID045CA30, GUID090CA30, GUID070CA30, GUID070CA40, GUID090CA50 Technical Information
...Page 1
C E R T I F I E D
Technical
Information
40" 80% Gas Furnaces
GUID
• Refer to Service Manual RS6600001 Rev. 1 for installa-
tion, operation, and troubleshooting information.
• All safety information must be followed as provided in
the Service Manual.
• Refer to the appropriate Parts Catalog for part number
information.
Model and Manufacturing
numbers listed on page 3.
G
I
S
E
N
D
C
D
E
E
R
I
F
T
I
&Air Conditionin gHeating
Built Better Than It Has To Be
This manual replaces RT6621004 Rev. 0 April 2000.
REV. 1 - Corrections made to manual, no new models added.
®
This manual is to be used by qualified HVAC technicians only. Amana
does not assume any responsibility for property damage or personal injury
due to improper service procedures performed by an unqualified person.
RT6621004
Revision 1
September 2000
Page 2
PRODUCT IDENTIFICATION
The model and manufacturing number are used for positive identification of component parts used in manufacturing.
When engineering and manufacturing changes take place where interchangeability of components are affected, the manufacturing number will change.
It is very important to use the model and manufacturing numbers at all times when requesting service or parts information.
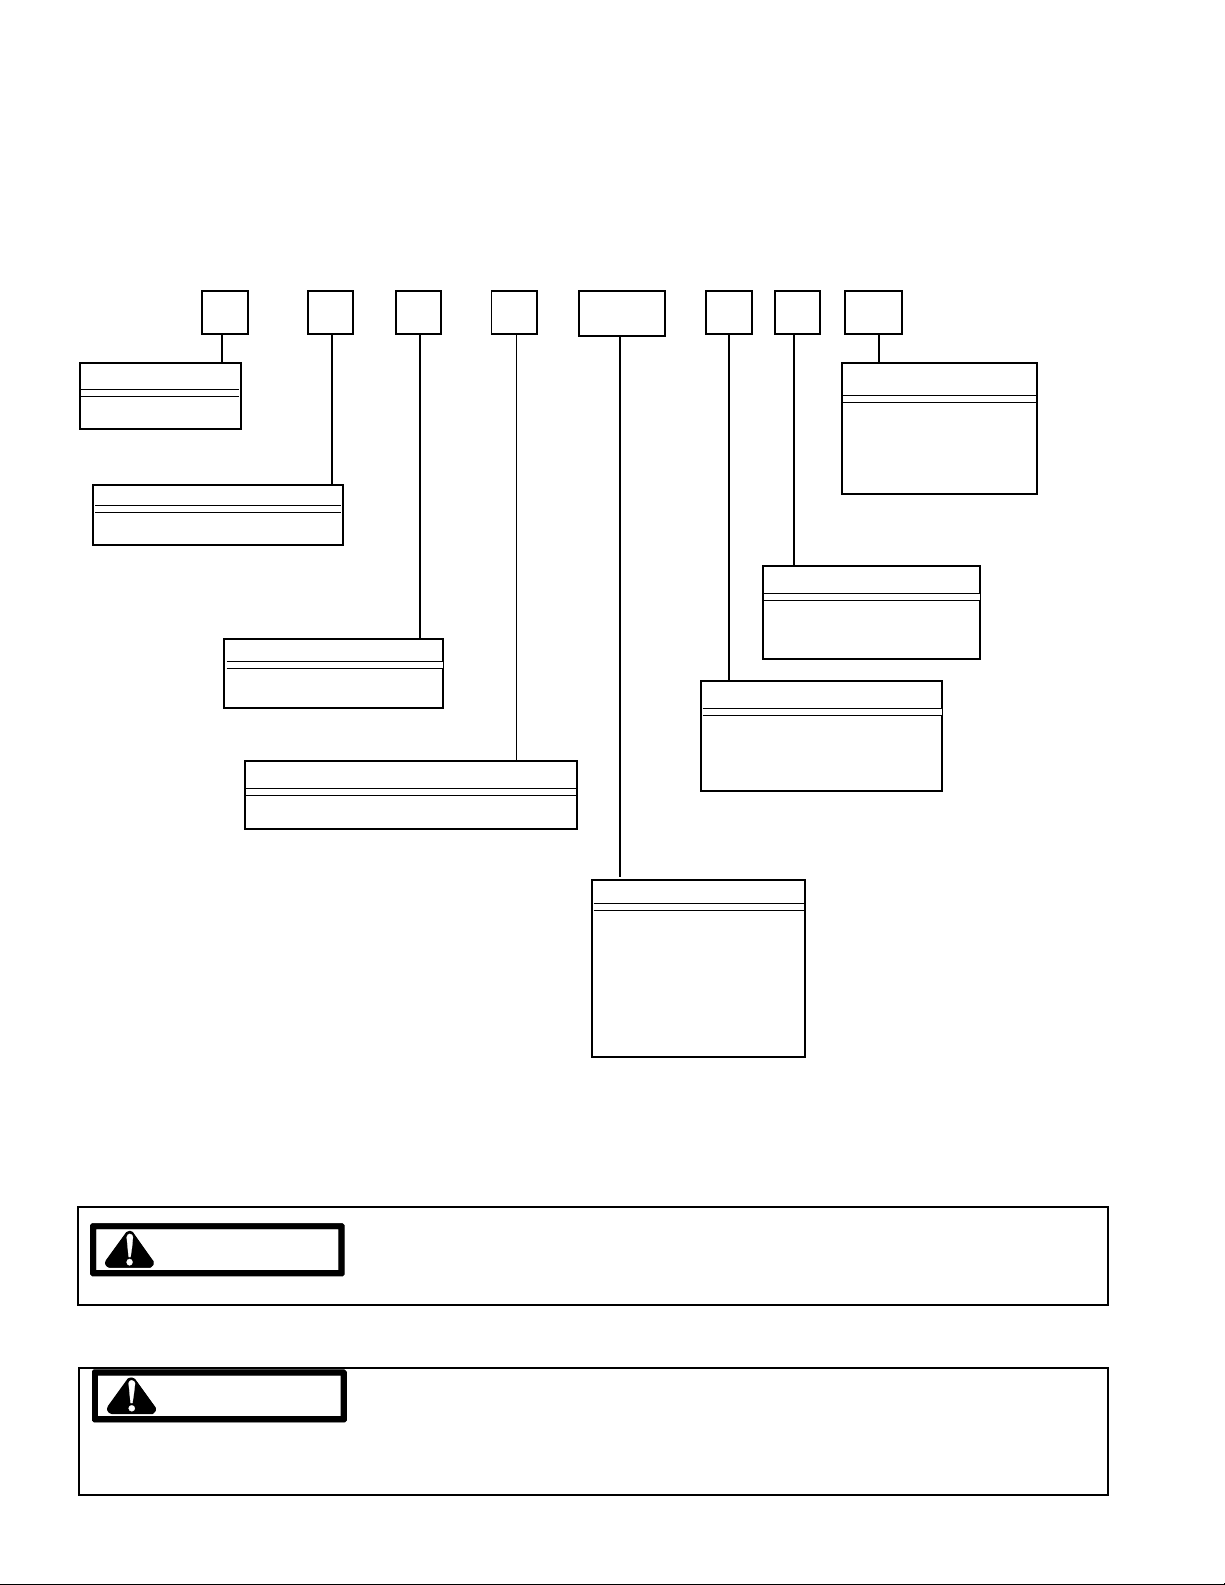
G U I D 045 C A 30
Product Type
G: Gas Furnace
Supply Type
U: Upflow/Horizontal
Furnace Type
I: Induced Draft (80%)
Model Family
D: Air Command 80 SV Category 1
Airflow Capability
30: 3.0 Tons
40: 4.0 Tons
50: 5.0 Tons
Additional Features *
A: Not NOx Certified
X: NOx Models
Design Series
C: Third Design Series
D: Fourth Design Series
Nominal Input
045: 45,000 Btuh
070: 70,000 Btuh
090: 90,000 Btuh
115: 115,000 Btuh
140: 140,000 Btuh
IF REPAIRS ARE ATTEMPTED BY UNQUALIFIED PERSONS, DANGEROUS
WARNING
WARNING
CAUTION
DURES. IF YOU PERFORM SERVICE ON YOUR OWN PRODUCT, YOU ASSUME RESPONSIBILITY FOR
ANY PERSONAL INJURY OR PROPERTY DAMAGE WHICH MAY RESULT.
CONDITIONS (SUCH AS EXPOSURE TO ELECTRICAL SHOCK) MAY RESULT. THIS MAY CAUSE SERIOUS INJURY OR DEATH.
AMANA WILL NOT BE RESPONSIBLE FOR ANY INJURY OR PROPERTY
DAMAGE ARISING FROM IMPROPER SERVICE OR SERVICE PROCE-
2 Rev. 1
Page 3

PRODUCT IDENTIFICATION
The model and manufacturing number are used for positive identification of component parts used in manufacturing.
When engineering and manufacturing changes take place where interchangeability of components are affected, the manufacturing number will change.
It is very important to use the model and manufacturing numbers at all times when requesting service or parts information.
MODEL M/N
GUID045CA30 P1212401F
GUID070CA30 P1212402F
GUID070CA40 P1212403F
GUID090CA30 P1212404F
GUID090CA50 P1212405F
GUID115CA50 P1212407F
GUID045CX30 P1212501F
GUID070CX30 P1212502F
GUID070CX40 P1212503F
GUID090CX30 P1212504F
GUID090CX50 P1212505F
GUID115CX50 P1212507F
GUID045CX30 P1220501F
GUID070CX30 P1220502F
GUID070CX40 P1220503F
GUID090CX30 P1220504F
GUID090CX50 P1220505F
GUID115CX50 P1220507F
GUID045CA30 P1220601F
GUID070CA30 P1220602F
GUID070CA40 P1220603F
GUID090CA30 P1220604F
GUID090CA50 P1220605F
GUID115CA50 P1220607F
MODEL M/N
GUID045DX30 P1227001F
GUID070DX30 P1227002F
GUID070DX40 P1227003F
GUID090DX50 P1227005F
GUID115DX50 P1227007F
GUID070DX40 P1227009F
GUID045CA30 P1229401F
GUID070CA30 P1229402F
GUID070CA40 P1229403F
GUID090CA30 P1229404F
GUID090CA50 P1229405F
GUID115CA50 P1229407F
GUID045CA30 P1229501F
GUID070CA30 P1229502F
GUID070CA40 P1229503F
GUID090CA30 P1229504F
GUID090CA50 P1229505F
GUID115CA50 P1229507F
GUID045CX30 P1229601F
GUID070CX30 P1229602F
GUID070CX40 P1229603F
GUID090CX30 P1229604F
GUID090CX50 P1229605F
GUID115CX50 P1229607F
GUID045DA30 P1226901F
GUID070DA30 P1226902F
GUID070DA40 P1226903F
GUID090DA30 P1226904F
GUID090DA50 P1226905F
GUID115DA50 P1226907F
GUID090DA50 P1226910F
GUID045CX30 P1229701F
GUID070CX30 P1229702F
GUID070CX40 P1229703F
GUID090CX50 P1229705F
3 Rev. 1
Page 4
PRODUCT DESIGN
General Operation
This GUID furnace is equipped with an electronic ignition
device to light the burners and an induced draft blower to
exhaust combustion products.
An interlock switch prevents furnace operation if the blower
door is not in place. Keep the blower access doors in place
except for inspection and maintenance.
This furnace is also equipped with a self-diagnosing electronic control module. In the event a furnace component is
not operating properly, the control module LED will flash on
and off in a factory-programmed sequence, depending on
the problem encountered. This light can be viewed through
the observation window in the blower access door. Refer to
the
Troubleshooting Chart
LED codes and
Control
section in the Service Instructions for an explana-
Abnormal Operation - Integrated Ignition
for further explanation of the
tion of the possible problem.
The rated heating capacity of the furnace should be greater
than or equal to the total heat loss of the area to be heated.
The total heat loss should be calculated by an approved
method or in accordance with “ASHRAE Guide” or “Manual
J-Load Calculations” published by the Air Conditioning Contractors of America.
*Obtain from: American National Standards Institute 1430
Broadway New York, NY 10018
Location Considerations
• The furnace should be as centralized as is practical
with respect to the air distribution system.
• Do not install the furnace directly on carpeting, tile,
or combustible material other than wood flooring.
• When suspending the furnace from rafters or joists,
use 3/8" threaded rod and 2” x 2” x 3/8” angle as
shown in the Installation and Service Instructions. The
length of the rod will depend on the application and
clearance necessary.
• When installed in a residential garage, the furnace
must be positioned so the burners and ignition source
are located not less than 18 inches (457 mm) above
the floor and protected from physical damage by vehicles.
Accessibility Clearances (Minimum)
MINIMUM CLEARANCES TO COMBUSTIBLE MATERIALS
(INCHES)
UPFLOW
FRONT
RIGHT
LEFT 0126
REAR 000
TOP 166
FLUE
FLOOR CCC
1
= 3 inch when us i ng Type B-1 vent is used.
2
= 1 inch when Type B-1 vent is used.
C = If placed on combustible floor, floor MUST be wood ONLY.
1
6
0612
2
6
HORIZONTAL
LEFT
Alcove Alcove
2
6
HORIZONTAL
RIGHT
2
6
36" at front is required for servicing or cleaning.
Note: In all cases accessibility clearance shall take prece-
dence over clearances from the enclosure where accessibility clearances are greater. All dimensions are given in
inches.
High Altitude Derate
When this furnace is installed at high altitude, the appropriate High Altitude orifice kit must be installed. This is required due to the natural reduction in the density of both the
gas fuel and combustion air as altitude increases. The kit
will provide the proper design certified input rate within the
specified altitude range.
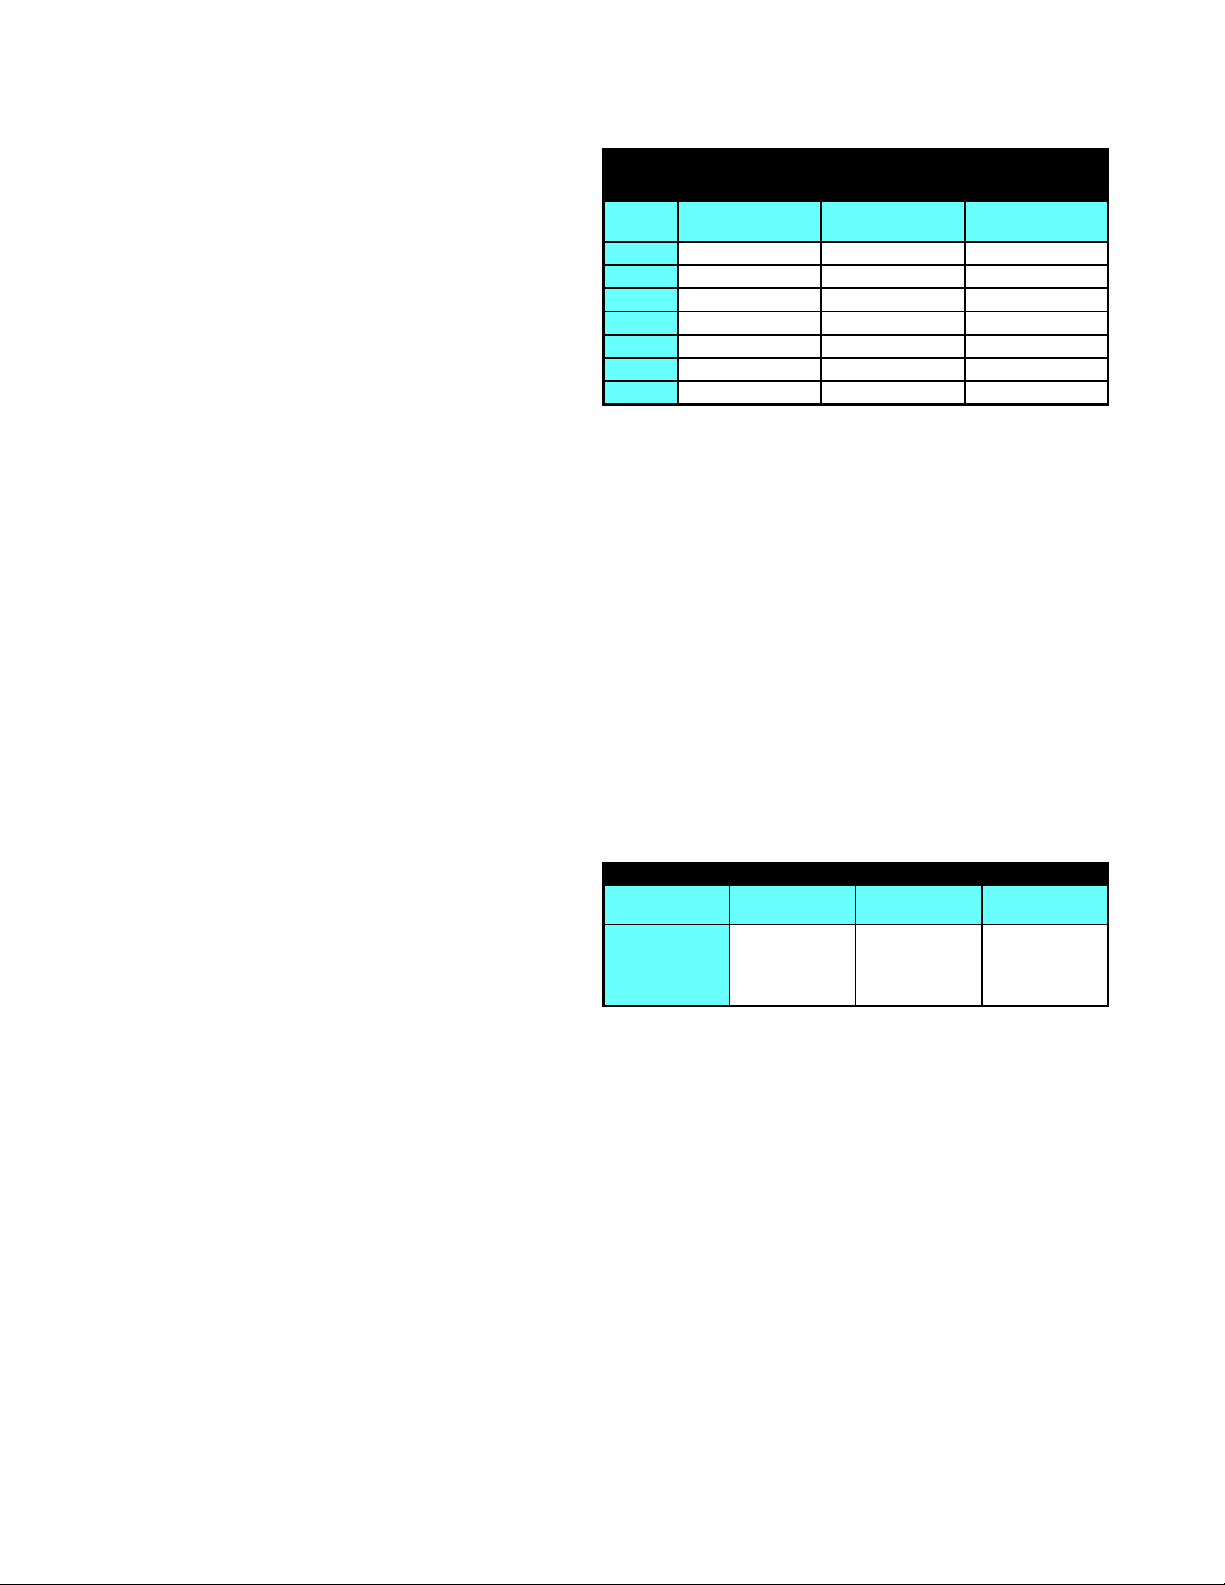
PROPANE AND HIGH ALTITUDE KITS
MODEL
NUMBER
GUID
0 to
6000 ft.
LPTK09
Propane
Conversion Kit
(#55 Orifice)
6001 to
11000 ft.
HANG07
High Altitude
Natural Gas Kit
(#45 Orifice)
6001 to
11000 ft.
HALP09
High Altitude
Propane Gas Kit
(#56 Orifices)
High altitude kits are purchased according to the installation altitude and usage of either natural or propane gas.
Refer to the chart above for a tabular listing of appropriate
altitude ranges and corresponding manufacturer’s high altitude Natural Gas and Propane Gas kits. For a tabular listing of appropriate altitude ranges and corresponding
manufacturer's High Altitude Pressure Switch kits, refer to
either the
this manual or the
Pressure Switch Trip Points & Usage Chart
Accessory Charts
in Service Instruc-
in
tions.
4 Rev. 1
Page 5
PRODUCT DIMENSIONS
UPFLOW
LEFT SIDE VIEW
3/4
SUPPLY
20 1/8
28 3/4
28
ELECTRICAL
HOLE "L OW
VOLTAGE"
GAS
SUPPLY
HOLE
KNOCK-OUT
FOR HORIZONTAL
4 3/4
ELECTRICAL
HOLE "HIGH
VOLTAGE"
VENTING
3/4
UPFLOW
FRONT VIEW
A
B
C
A Raytheon Co mpany
3/4
UPFLOW
RIGHT SIDE VIEW
4 5/8
1 3/4
SUPPLY
1 5/8
1 5/8
4 5/8
23
14
SIDE
KNOCK-OUT
23
BOTTOM
KNOCK-OUT
31 5/8
28 1/4
37 3/8
40
31
34 5/8
SIDE
KNOCK-OUT
D
BOTTOM
KNOCK-OUT
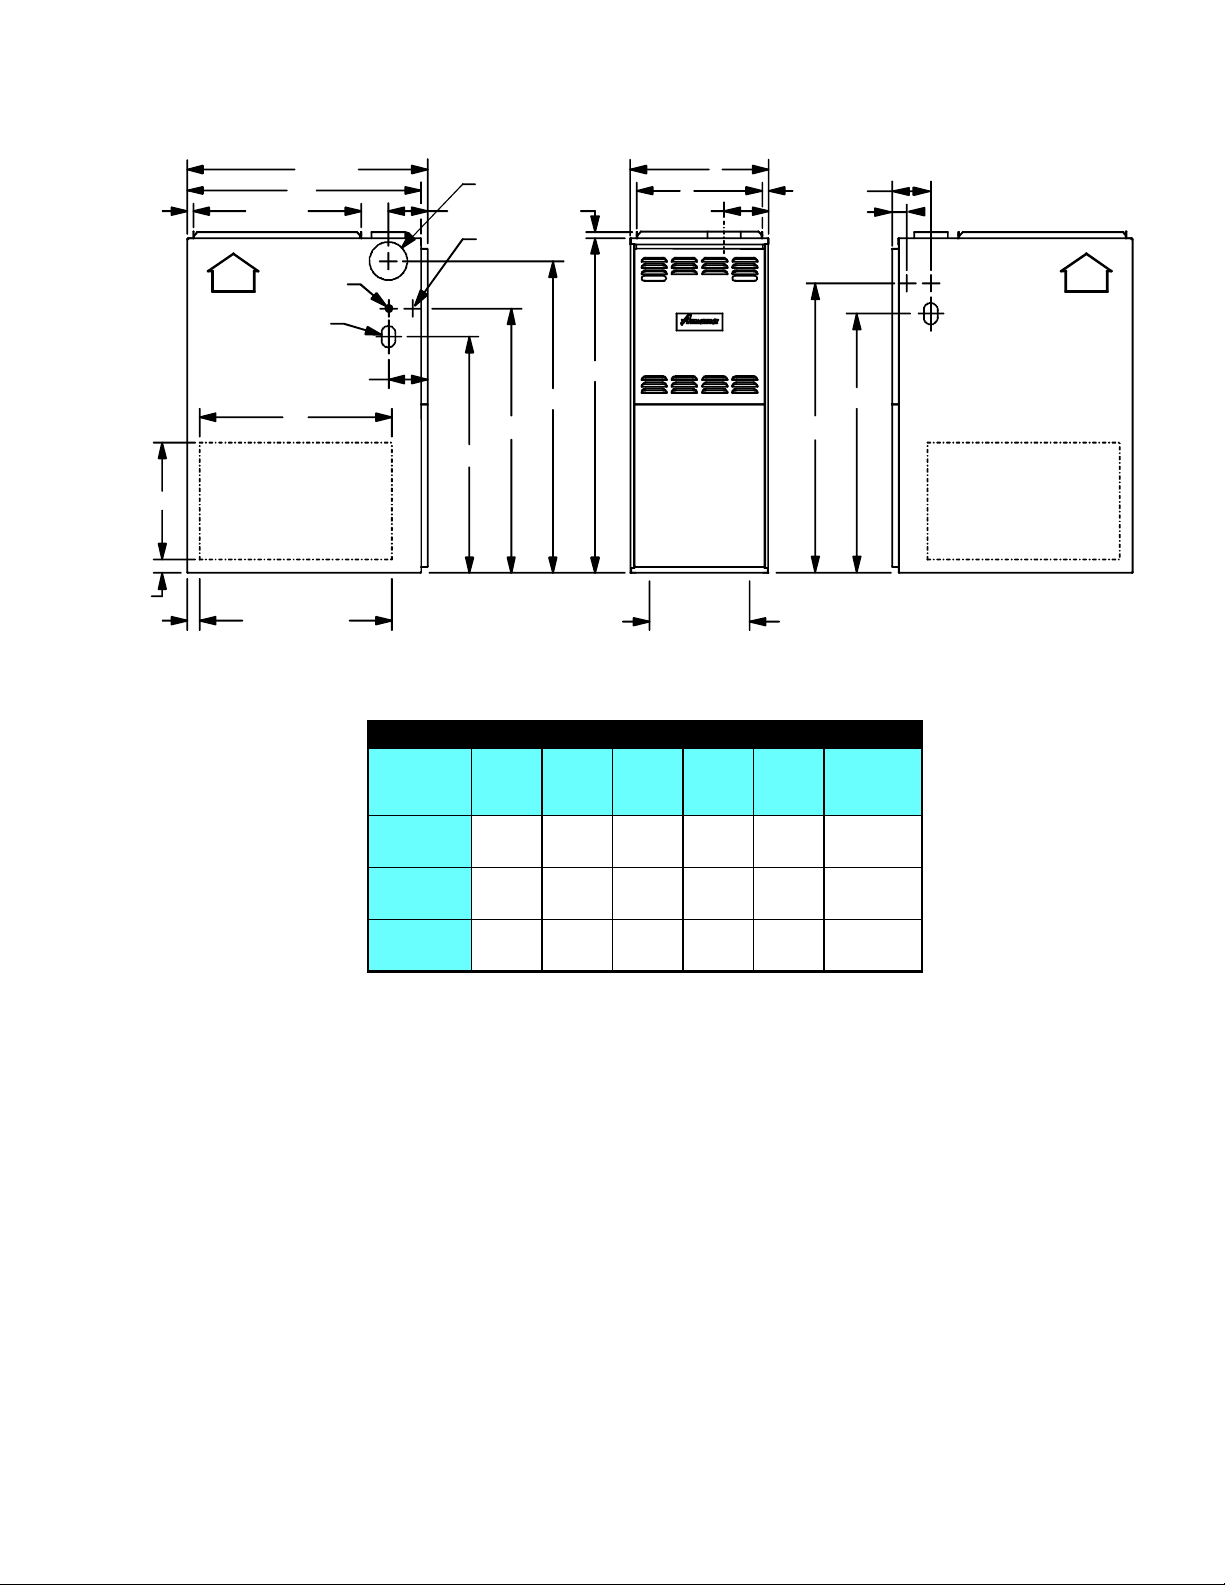
GUID DIMENSIONS
FURNACE
MODEL
GUID045
GUID070
ABCDE
16-1/2 15 5-1/4 12-5/8 4 4
Minimum
Vent
Diameter
GUID090 20-1/2 19 7-1/4 14-5/8 4 4
GUID115 24-1/2 23 9-1/4 18-5/8 4 5
All dimensions are in inches.
5 Rev. 1
Page 6
PRODUCT DESIGN
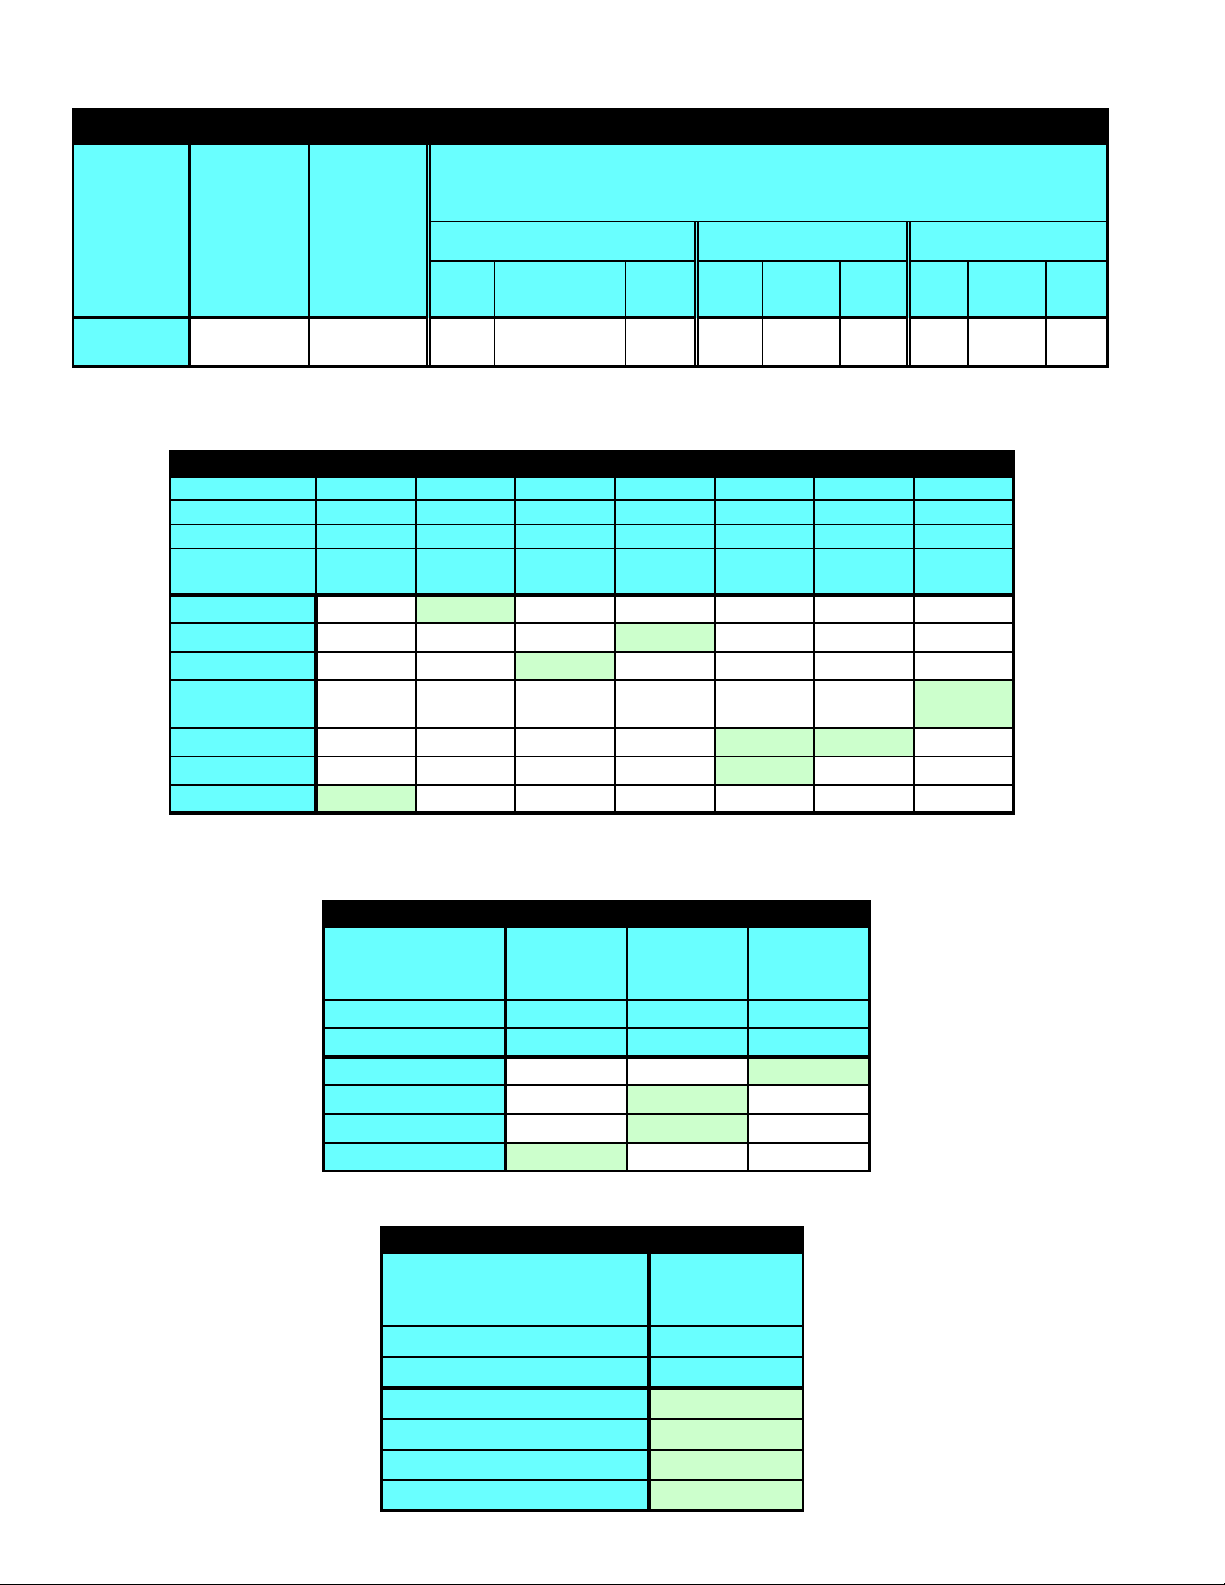
PRESSURE SWITCH TRIP POINTS AND USAGE CHART
MINIMUM
NEGATIVE
MODEL
GUID 10727920
Note: Replacement pressure switch number is listed below High Altitude Pressure Switch Kit number.
Note: All negative pressure readings are in inches of water column (" w.c.).
PRESSURE
WITH FLUE
NOT FIRING
TYPICAL SEA
LEVEL DATA
-0.85
MINIMUM
NEGATIVE
PRESSURE
WITH FLUE
FIRING
TYPICAL SEA
LEVEL DATA
TRIP
PRESSURE SWITCH
POINT
PRESSURE SWITCH TRIP POINTS AND USAGE
0 to 6000 ft. 6000 to 8500 ft. 8500 to 11000 ft.
(Prod.)
LABEL
COLOR
TRIP
POINT
ALTITUDE
HAC1PS11
10727915
T.O.D. PRIMARY LIMIT
Part Number 10728304 10728322 10728325 10728326 10728331 10728332 10728338
Open Setting °F 190 230 170 220 160 150 215
Style 2333333
Sleeve Colors
Yellow Orange Blue Black Tan Green
GUID045**30 1
GUID070**30
GUID070**40
1
1
GUID070**40
(10x8 Blo wer)
GUID090**30
GUID090**50
GUID115**50
1
1*1
1
HIGH
KIT
LABEL
COLOR
LT BLUE-0.60 -0.55 DK BLUE -0.50
TRIP
POINT
-0.41
1 Green
1 Yellow
1
HIGH
ALTITUDE
KIT
HAC1PS12
10727916
LABEL
COLOR
ORANGE
*1 = The GUID090**30 furnaces can also use primary limit part #10728332 (150°F) in pla ce of limit
part #10728331 (160°F).
ROLLOUT LIMIT SWITCHES
Part Number
10123509
or
10123528
10123510
or
10123529
10123511
or
10123530
Open Setting °F 275 300 250
Color
GUID045**30
GUID070**30/40
GUID090**30/50
GUID115**50
PINK GREEN LT PURPLE
1
1
1
1
AUXILIARY LIMIT SWITCHES
10123506
Part Number
or
10123525
Open Setting °F 160
Color Orange
GUID045**30
GUID070**30/40
GUID090**30/50
GUID115**50
1
1
1
1
6 Rev. 1
Page 7
PRODUCT DESIGN
Coil Matches:
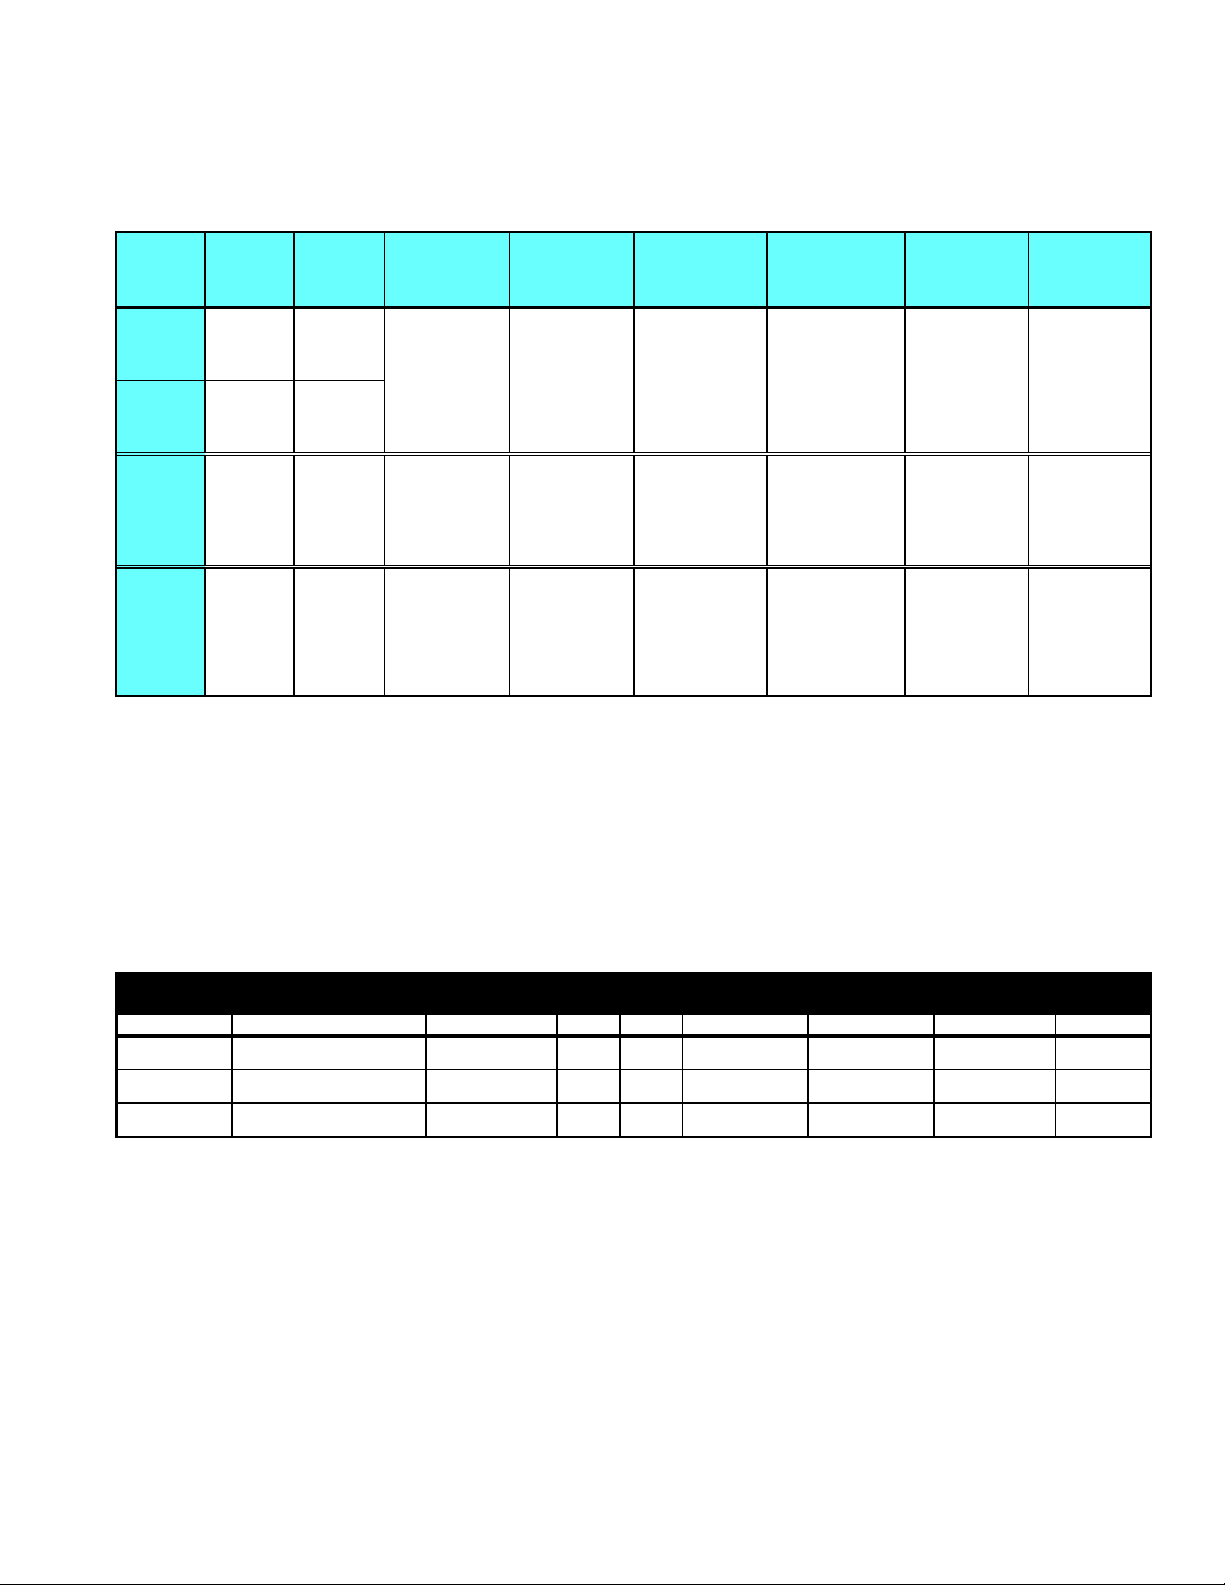
A large array of Amana coils are available for use with the GUID furnaces, in either upflow or horizontal applications. These
coils are available in both cased and uncased models, with or without a TXV expansion device. These 80% furnaces match
up with the existing Amana coils as shown in the chart below.
Btuh
Input
45,000 16 1/2" 1 1/2 - 3
70,000 16 1/2" 2 - 3 1/2
90,000 20 1/2" 2 1/2 - 4
115,000 24 1/2" 3 - 5
Cabinet
Width
Air Flow
(tons)
CAA_F*C
Cased
A-Coils
CCA18FCC
CCA24FCC
CCA30FCC
CCA36FCC
CCA42FCC
CCA30FDC
CCA36FDC
CCA42FDC
CCA48FCC
CCA36FKC
CCA48FDC
CCA54FCC
CCA57FCC
CCA60FCC
CCA_FSC
Uncased
A-Coils
CCA18FSC
CCA24FSC
CCA30FSC
CCA36FSC
CCA42FSC
CCA48FSC CHA42TCC CHA42TSC
CCA54FSC
CCA57FSC
CCA60FSC
CHA_TCC
Cased
TXV A-Coils
CHA18TCC
CHA24TCC
CHA30TCC
CHA36TCC
CHA48TCC
CHA54TCC
CHA57TCC
CHA60TCC
CHA_TSC
Uncased
TXV A-Coils
CHA18TSC
CHA24TSC
CHA30TSC
CHA36TSC
CHA48TSC
CHA54TSC
CHA57TSC
CHA60TSC
CCF_F*C
Horiz.
A-Coils
CCF24FCC
CCF30FCC
CCF36FCC
CCF24FDC
CCF36FDC
CCF42FCC
CCF48FCC
CCF48FDC
CCF60FCC
CHF_TCC
Horiz.
A-Coils
CHF18TCC
CHF24TCC
CHF30TCC
CHF36TCC
CHF42TCC
CHF48TCC
Thermostats:
The following Amana Thermostats are suggested for use with the GUID Furnace Models:
Thermostats
Thermostat Man/Auto Programmable Cool Heat Batt. Powered Batt. Bkup* Shape Color
1213401
1213402
1213408
Man. Changeover Yes
Man. Changeover No
Man. or Auto Changeover Yes
1 1 Yes No Rectangular White
1 1 Yes No Rectangular White
1 1 No Yes Rectangular White
7 Rev. 1
Page 8

FURNACE SPECIFICATIONS
GUID045CA30
MODEL
Btuh Input (US)
Output (US)
A.F.U.E.
Rated External Static (" w.c.)
Temperature Rise (°F)
Pressure Switch Trip Point (" w.c.)
Blower Wheel (D" x W")
Blower Horsepower
Blower Speeds
Max CFM @ 0.5 E.S.P.
Power Supply
Minimum Circuit Ampacity (MCA)
Maximum Overcu r r ent Device
Transformer (VA)
Heat Anticipator
Primary Limit Setting (°F)
Auxiliary Limit Setting (°F)
Rollout Limit Setting (°F)
Fan Delay On
Off Heating *
Off Cooling
Gas Supply Pressure (Natura l /Propane) ("w.c.)
Manifold Pressure (Natural/Propane) ("w.c.)
Orifice Size (Natural/Propane)
Number of Burners
Vent Connector Diameter (inches)
Shipping Weight (lbs.)
* Off Heating - This fan delay timing is adjustable (60, 90, 120 or 180 seconds), 90 seconds as shipped.
*150 = The GUID090**30 furnaces were ch anged from primary limit part #10728331 (160°F) to limit part #10728332 (150°F) per ECN60850 effective June 6, 2000.
GUID045CX30
GUID045DA30
GUID045DX30
46,000 69,000 69,000 92,000 92,000 115,000
36,800 55,200 55,200 73,600 73,600 92,000
80% 80% 80% 80% 80% 80%
.10 - .50 .12 - .50 .12 - .50 .15 - .50 .15 - .50 .20 - .50
35 - 65 35 - 65 35 - 65 40 - 70 40 - 70 40 - 70
-0.55 -0.55 -0.55 -0.55 -0.55 -0.55
9 x 8 9 x 8 10 x 6 10 x 8 10 x 8 10 x 9
1/3 1/3 1/2 1/2 3/4 3/4
444444
1200 1290 1529 1380 1975 1985
115-60-1 115-60-1 115-60-1 115-60-1 115-60-1 115-60-1
8.6 8.5 10.4 8.2 14.6 13.1
15 15 15 15 15 15
40 40 40 40 40 40
0.7 0.7 0.7 0.7 0.7 0.7
230 220 170 *150 160 190
160 160 160 160 160 160
250 300 300 300 300 275
30 secs. 30 secs. 30 secs. 30 secs. 30 secs. 30 secs.
90 secs. 90 secs. 90 secs. 90 secs. 90 secs. 90 secs.
45 secs. 45 secs. 45 secs. 45 secs. 45 secs. 45 secs.
11-Jul 11-Jul 11-Jul 11-Jul 11-Jul 11-Jul
3.5 / 10 3.5 / 10 3.5 / 10 3.5 / 10 3.5 / 10 3.5 / 10
#43 / #55 #43 / #55 #43 / #55 #43 / #55 #43 / #55 #43 / #55
233445
444444
140 151 152 169 178 194
GUID070CA30
GUID070CX30
GUID070DA30
GUID070DX30
GUID070CA40
GUID070CX40
GUID070DA40
GUID070DX40
GUID090CA30
GUID090CX30
GUID090DA30
GUID090CA50
GUID090CX50
GUID090DA50
GUID090DX50
GUID115CA50
GUID115CX50
GUID115DA50
GUID115DX50
1. These furnaces are manufactured for natural gas operation. Optional kits are available for conversion to propane operation.
2. For elevations above 2000 ft. the rating should be reduced by 4% for each 1000 ft. above sea level. The furnace must not
be derated, orifice changes should only be made if necessary for altitude.
3. The total heat loss from the structure as expressed in TOTAL BTU/HR must be calculated by the manufacturers
method or in accordance with the "A.S.H.R.A.E. GUIDE" or "MANUAL J-LOAD CALCULATIONS" published by the AIR
CONDITIONING CONTRACTORS OF AMERICA. The total heat loss calculated should be equal to or less than the
heating capacity. Output based on D.O.E. test procedures, steady state efficiency times output.
4. Minimum Circuit Ampacity calculated as: (1.25 x Circulator Blower Amps) + I.D. Blower Amps.
8 Rev. 1
Page 9

FURNACE SPECIFICATIONS
MODEL
Btuh Input (US)
Output (US)
A.F.U.E.
Rated External Static (" w.c.)
Temperature Rise (°F)
Pressure Switch Trip Point (" w.c.)
Blower Wheel (D" x W")
Blower Horsepower
Blower Speeds
Max CFM @ 0.5 E.S.P.
Power Supply
Minimum Circuit Ampacity (MCA)
Maximum Overcurrent Device
Transformer (VA)
Heat Anticipator
Primary Limit Setting (°F)
Auxiliary Limit Setting (°F)
Rollout Limit Setting (°F)
Fan Delay On
Off Heating *
Off Cooling
Gas Supply Pressure (Natural/Propane) (" w.c.)
Manifold Pressure (Natural/Propane) (" w.c.)
Orifice Size (Natural/Propane)
Number of Burners
Vent Connector Diameter (inches)
Shipping Weight (lbs.)
* Off Heating - This fan delay timing is adjustable (60, 90, 120 or 180 seconds), 90 seconds as shipped.
** Note: The two models above use 10x8 blower assembly instead of 10x6 to achieve a full 4 tons of airflow.
GUID070DA40 GUID070DX40
69,000 69,000
55,200 55,200
80% 80%
.12 - .50 .12 - .50
35 - 65 35 - 65
-0.55 -0.55
10 x 8 10 x 8
1/2 1/2
44
1529 1529
115-60-1 115-60-1
9.9 9.9
15 15
40 40
0.7 0.7
215 215
160 160
250 250
30 secs. 30 secs.
90 secs. 90 secs.
45 secs. 45 secs.
7 / 11 7 / 11
3.5 / 10 3.5 / 10
#43 / #55 #43 / #55
33
44
152 152
1. These furnaces are manufactured for natural gas operation. Optional kits are available for conversion to propane operation.
2. For elevations above 2000 ft. the rating should be reduced by 4% for each 1000 ft. above sea level. The furnace must not
be derated, orifice changes should only be made if necessary for altitude.
3. The total heat loss from the structure as expressed in TOTAL BTU/HR must be calculated by the manufacturers
method or in accordance with the "A.S.H.R.A.E. GUIDE" or "MANUAL J-LOAD CALCULATIONS" published by the AIR
CONDITIONING CONTRACTORS OF AMERICA. The total heat loss calculated should be equal to or less than the
heating capacity. Output based on D.O.E. test procedures, steady state efficiency times output.
4. Minimum Circuit Ampacity calculated as: (1.25 x Circulator Blower Amps) + I.D. Blower Amps.
9 Rev. 1
Page 10
BLOWER PERFORMANCE SPECIFICATIONS
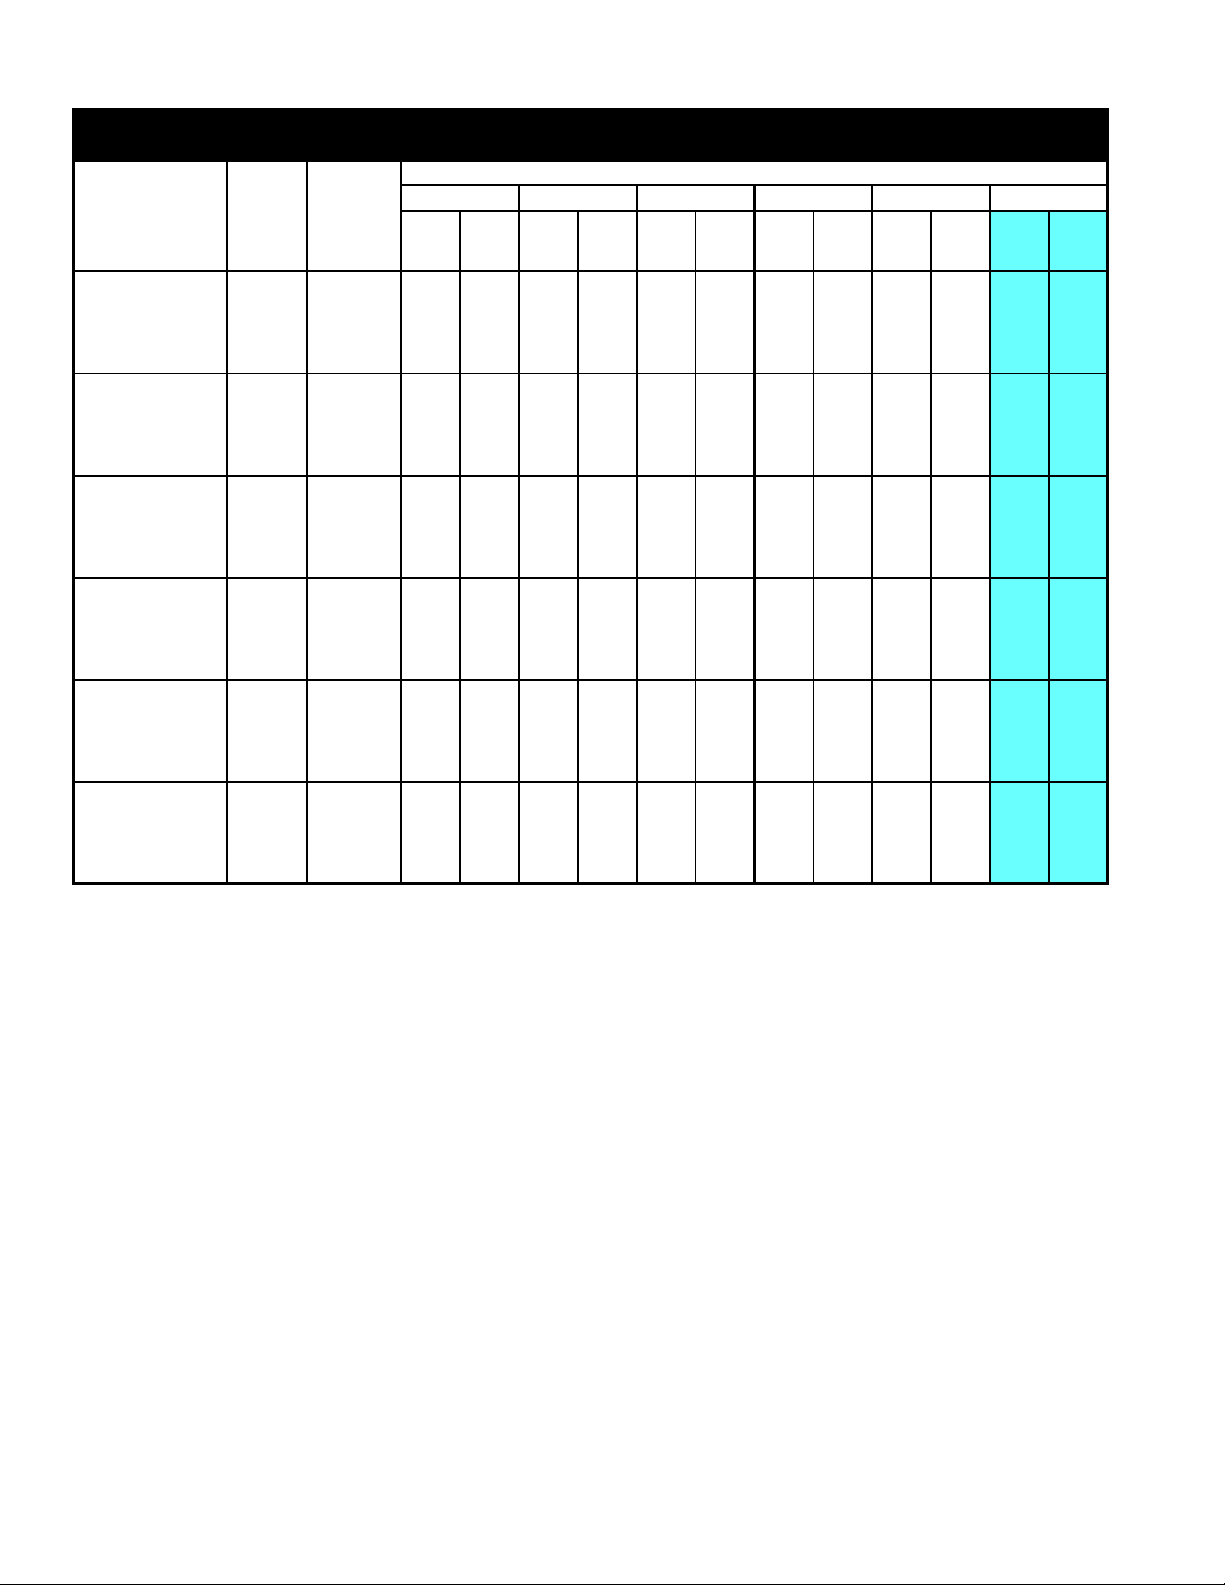
GUID Blower Performance
(CFM & Temperature Rise vs. External Static Pressure)
Model
Heating Speed
(
As Shipped
GUID045**30
(Low) MED-LO 2.0 935 36 910 37 885 39 845 40 790 43 710 48
GUID070**30
(Med-Lo) MED-LO 2.5 1090 47 1080 47 1055 48 1020 50 970 52 905 56
GUID070**40
(Low) MED-LO 3.0 1235 41 1200 42 1180 43 1140 44 1115 45 1050 48
GUID090**30
(High) MED-LO 2.0 920 --- 920 --- 900 --- 890 --- 850 --- 800 ---
GUID090**50
(Med-Lo) MED-LO 3.5 1320 52 1315 52 1315 52 1315 52 1280 53 1240 55
GUID115**50
(Med) MED-LO 4.0 1875 45 1840 46 1800 47 1735 49 1685 50 1600 53
MOTOR
SPEED
)
HIGH 3.0 1460 --- 1400 --- 1345 --- 1280 --- 1200 --- 1110 ---
MED 2.5 1200 --- 1150 --- 1100 --- 1050 --- 980 35 900 38
LOW 1.5 700 49 685 50 665 51 635 54 575 59 425 ---
HIGH 3.0 1555 - 1505 --- 1440 35 1365 37 1290 39 1180 43
MED 3.0 1325 38 1305 39 1250 41 1200 42 1140 44 1060 48
LOW 2.0 760 --- 750 --- 750 --- 735 --- 700 --- 645 ---
HIGH 3.5 1695 --- 1625 --- 1580 --- 1520 --- 1450 35 1365 37
MED 3.0 1485---145035140036135038129539123541
LOW 2.5 1095 46 1070 47 1050 48 1025 49 975 52 950 53
HIGH 3.5 163042156044155044146547138049127553
MED 3.0 1360 50 1325 51 1290 53 1215 56 1155 59 1070 64
LOW 1.5 770 --- 750 --- 740 --- 730 --- 690 --- 660 ---
HIGH 5.0 2250 --- 2185 --- 2120 --- 2030 --- 1975 --- 1885 ---
MED 4.0 1775 --- 1750 --- 1735 --- 1690 40 1650 41 1600 43
LOW 3.0 1180 58 1180 58 1175 58 1170 58 1140 60 1120 61
HIGH 5.0 233036224538216539206541198543188545
MED 5.0 2120 40 2070 41 2020 42 1940 44 1850 46 1775 48
LOW 3.0 1290 --- 1275 --- 1250 --- 1235 --- 1210 --- 1170 ---
TONS AC
@ 0.5"
ESP CFM Rise CFM Rise CFM Rise CFM Rise CFM Rise CFM Rise
0.1 0.2 0.3 0.4
External St atic Pressure (Inches Water Column)
0.5 0.6
1. CFM in chart is without filters(s). Filters do not ship with this furnace, but must be provided by the installer. If the
furnace requires two return filters, this chart assumes both filters are installed.
2. All furnaces ship as high speed cooling. Installer must adjust blower cooling speed as needed.
3. For most jobs, about 400 CFM per ton when cooling is desirable.
4. INSTALLATION IS TO BE ADJUSTED TO OBTAIN TEMPERATURE RISE WITHIN THE RANGE SPECIFIED ON
THE RATING PLATE.
5. The chart is for information only. For satisfactory operation, external static pressure must not exceed value shown
on rating plate. The shaded area indicates ranges in excess of maximum external static pressure allowed when
heating.
6 The dashed (---) areas indicate a temperature rise not recommended for this model.
7. The above chart is for U.S. furnaces installed at 0-2000 feet. At higher altitudes, a properly derated unit will have
approximately the same temperature rise at a particular CFM, while the ESP at that CFM will be lower.
10 Rev. 1
Page 11
BLOWER PERFORMANCE SPECIFICATIONS
(
)
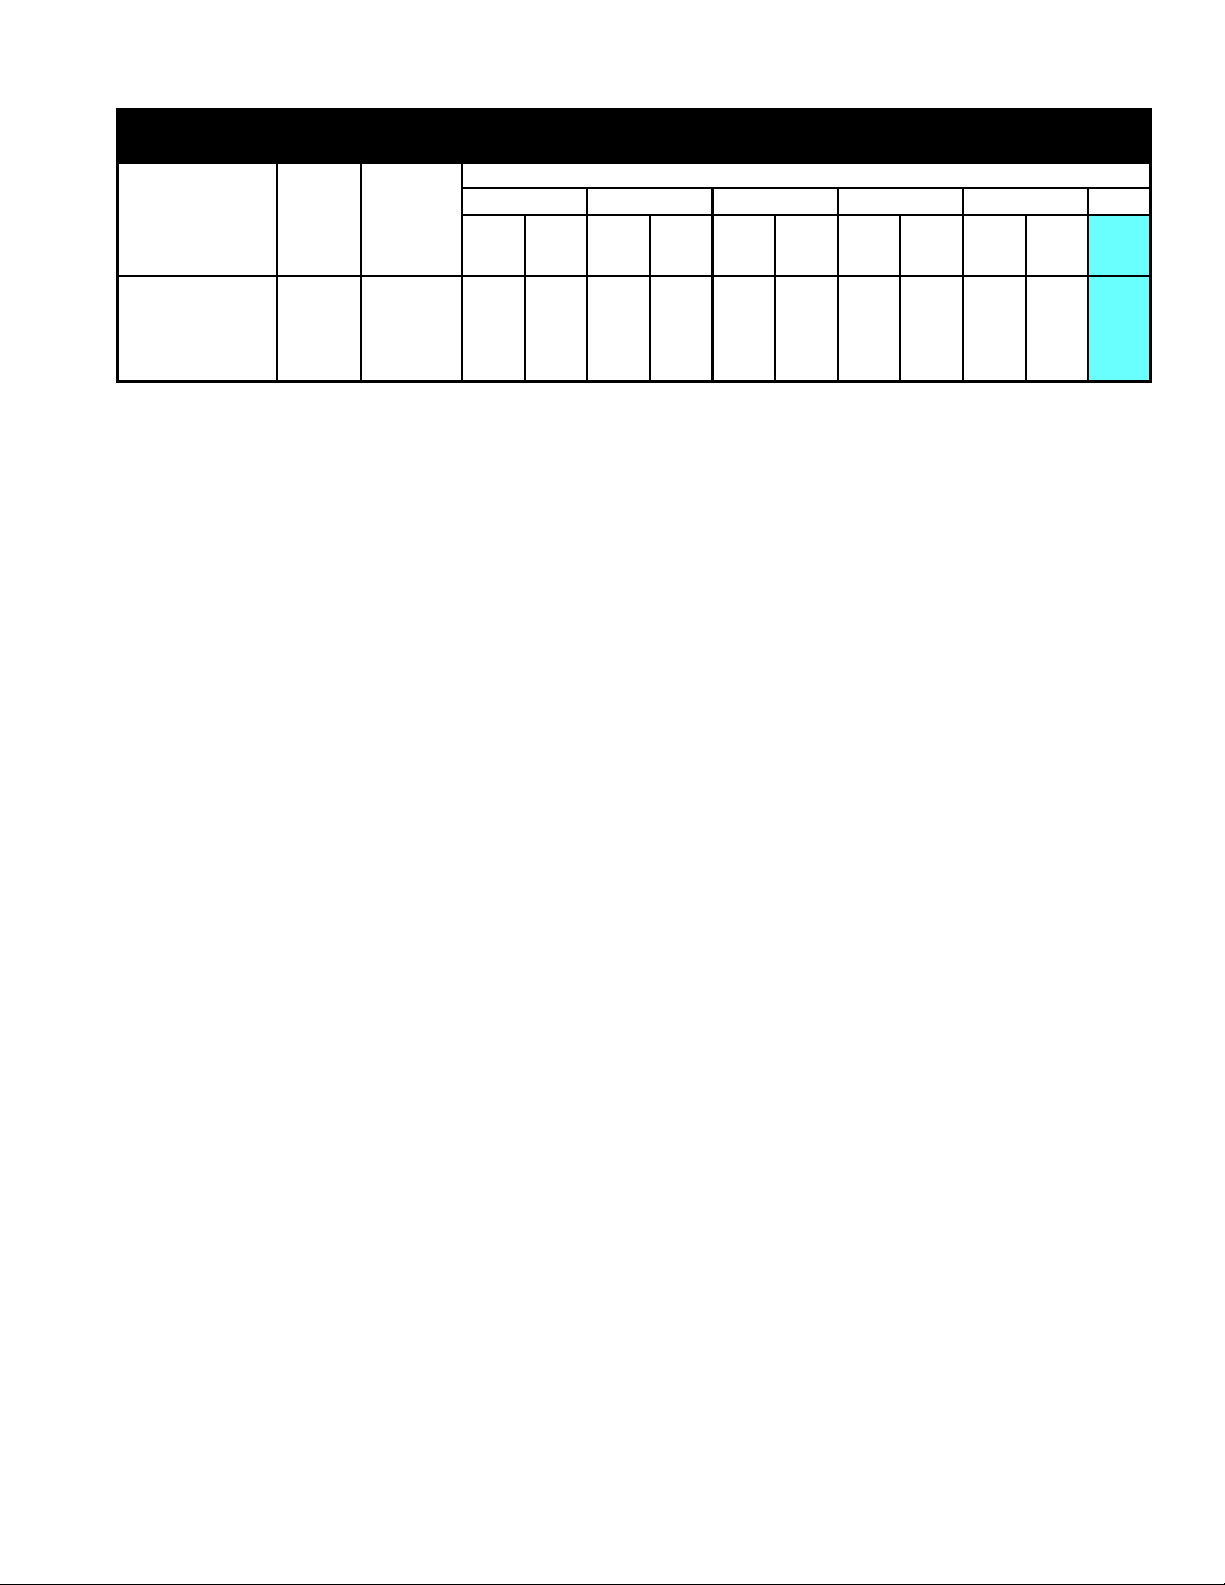
GUID070**40 Blower Performance
CFM & Temperature Rise vs. External Static Pressure
Model
MOTOR
Heating Speed
As Shipped
(
GUID070**40
(Med-Lo) MED-LO 2.5 1113 46 1096 47 1078 47 1067 48 1018 50 967
Note: The models listed in the above airflow table use 10x8 blower assembly instead of 10x6 to achieve a full 4 tons of airflow. Listed below are the model
numbers along with the manufacturing numbers of the two units using the 10x8 blower assembly.
GUID070DA40 P1226909F
GUID070DX40 P1227009F
SPEED
)
HIGH 4.0 1799 --- 1742 --- 1694 --- 1622 --- 1529 --- 1444
MED 3.5 1720 --- 1590 --- 1542 --- 1483 --- 1404 36 1330
LOW 2 967 53 954 54 941 54 913 56 885 58 826
TONS AC
@ 0.5" 0.1 0.2 0.3 0.4 0.5 0.6
ESP CFM Rise CFM Rise CFM Rise CFM Rise CFM Rise CFM
External Static Pressure, Inches Water Column
1. CFM in chart is without filters(s). Filters do not ship with this furnace, but must be provided by the installer. If the
furnace requires two return filters, this chart assumes both filters are installed.
2. All furnaces ship as high speed cooling. Installer must adjust blower cooling speed as needed.
3. For most jobs, about 400 CFM per ton when cooling is desirable.
4. INSTALLATION IS TO BE ADJUSTED TO OBTAIN TEMPERATURE RISE WITHIN THE RANGE SPECIFIED ON
THE RATING PLATE.
5. The chart is for information only. For satisfactory operation, external static pressure must not exceed value shown
on rating plate. The shaded area indicates ranges in excess of maximum external static pressure allowed when
heating.
6 The dashed (---) areas indicate a temperature rise not recommended for this model.
7. The above chart is for U.S. furnaces installed at 0-2000 feet. At higher altitudes, a properly derated unit will have
approximately the same temperature rise at a particular CFM, while the ESP at that CFM will be lower.
11 Rev. 1
Page 12
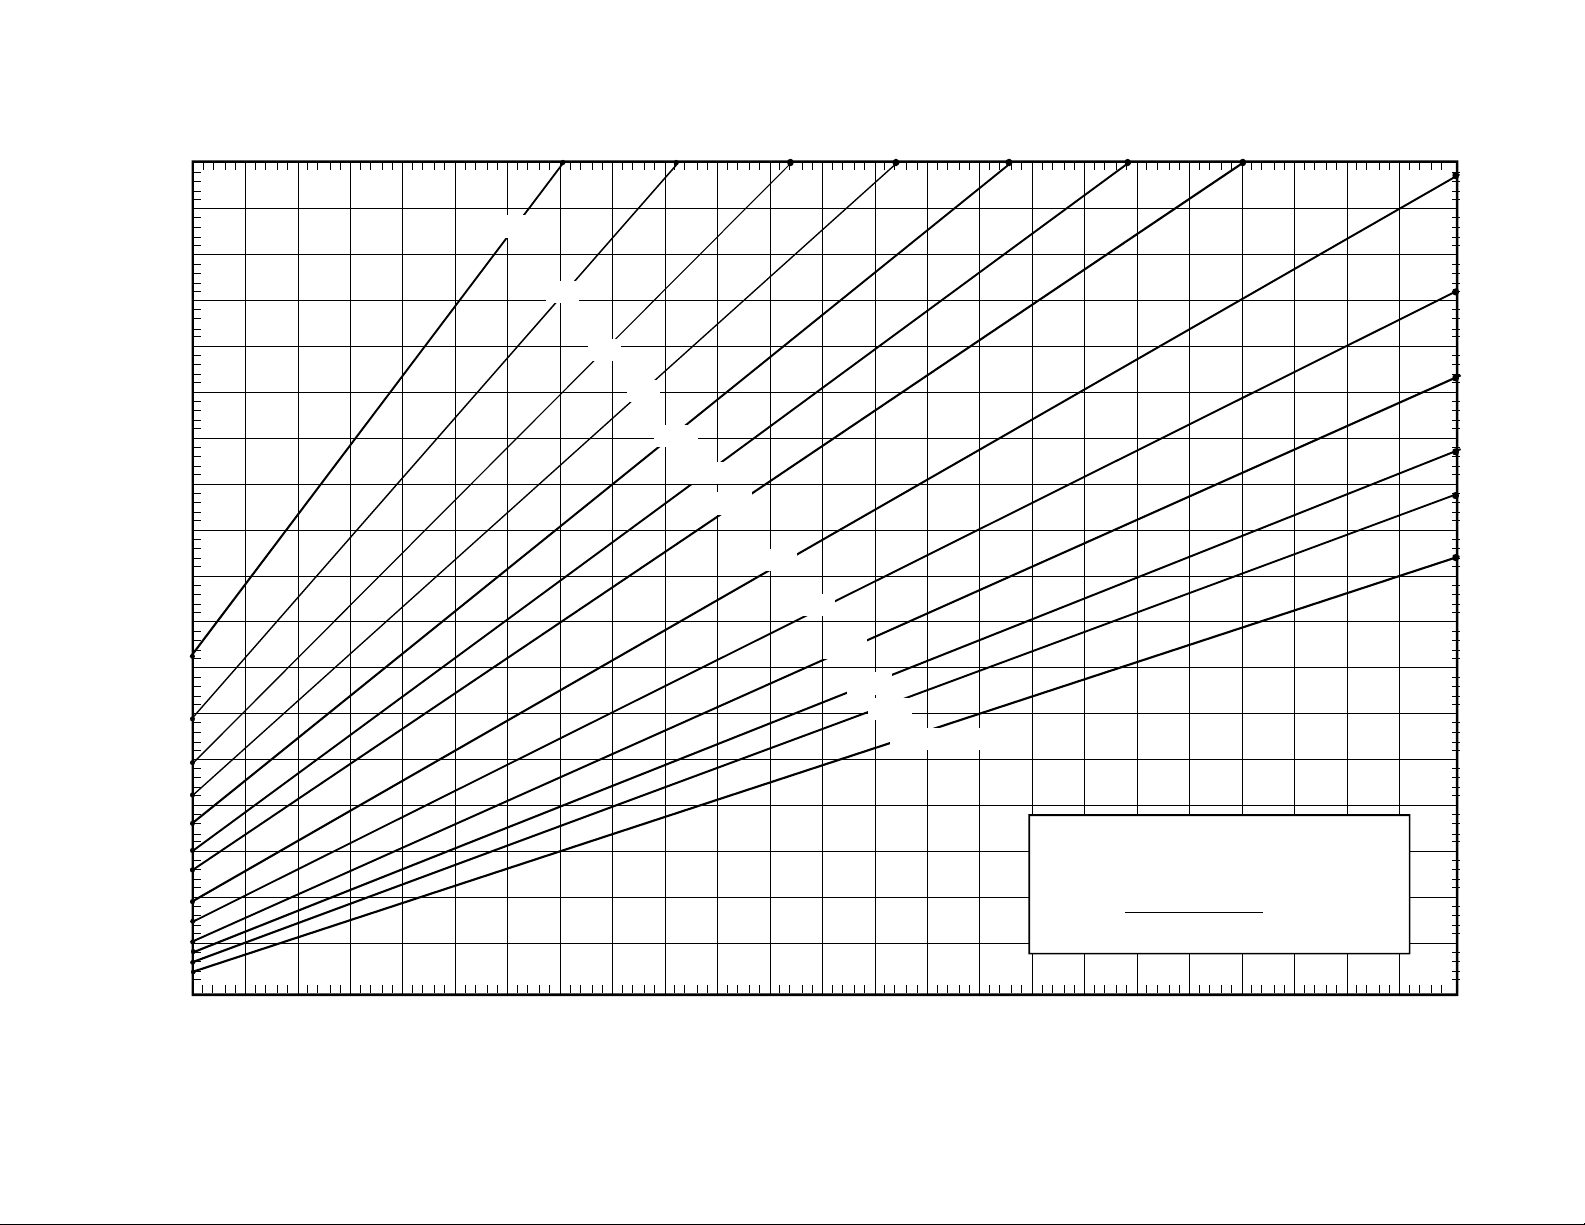
12 Rev. 1
BLOWER PERFORMANCE SPECIFICATIONS
BTU OUTPUT vs TEMPERATURE RISE CHART
100
600 CFM
90
700
TEMPERATURE RISE
80
70
60
50
40
30
20
800
900
1000
1100
1200
1400
1600
1800
2000
2200
2400 CFM
FORMULAS
BTU OUTPUT = CFM x 1.08 x RISE
RISE =
BTU OUTPUT
1.08
÷ CFM
10
30 40 50 60 70 80 90 110 120
100
OUTPUT BTU/HR x 1000
130 140 150
Page 13
THERMOSTAT
Y
CONNECTIONS
W
R
G
C
TERMINAL ORDER REARRANGED FOR CLARITY
E
E
H
H
L
A
A
U
U
I
C
C
M
M
N
E
N
H
N
H
H
E
O
E
O
O
U
T
U
T
T
GUID (See specific models above)
TRANSFORMER
PS
CAP
C
NO
SWITCH
L1
CONTROL
X
X
F
F
M
M
R
R
N
H
EUTRTHPSMVM
O
T
120 V
24 V
NO
C
NC
GV
DOOR
WARNING:DISCONNECT POWER BEFORE
SERVICING.WIRING TO UNIT MUST BE
PROPERLY POLARIZED AN D GROUNDED.
H
L
I
PRIMARY
RL
ACB
GND
** *
H
L
O
A
U
X
L
I
M
I
T
L
I
M
I
T
5
V
H
C
E
O
A
O
T
L
IGNITOR
FACTORY WIRED BLOWER MOTOR TO CONTROL CONNECTIONS
FURNACE MODEL
MANUFA CTURER'S
*
VARIABLE LETTER
GUI*,G CI*: 045*30,
070*40
GUI*,G CI*: 070*30,
090*50
GUI*,GCI*: 115*50 BU-23 4MED
GUI*,G CI*: 090*30,
115*40,140*50
HEATING BLOWER SPEED
*
SPEED
13 Rev. 1
P
P
A
A
R
R
K
K
HI
6
C
I
R
R
I
I
N
G
N
G
EUF
N
D
N
P
D
S
F
E
L
N
A
S
M
O
E
R
CB
MOTOR TO "HEAT"
GAS VALVE
(GV)
M
1
C
P
COMBUSTION
BLOWER
(CB)
115V
FIELD
CONNECT
2
3
FLAME
SENSOR
MOTOR
SPEEDS
L
I
N
E
N
E
U
N
RD-24LOW 4
OR-29MED LO W 4
BK-26 4
VT-14
PRIMARY LIMIT
BK
WH
L1
N
GND
ELECTRICAL BOX
COOLING
**
BLOWER SPEED
SEE
INSTALLATION
INSTRUCTIONS
TO DETERMINE
PROPER
COOLING
BLOWER SPEED.
LOW VOLTAGE FIELD
HI VOLTAGE FIELD
BR-27
AUX LIMIT
CONTROL
CONTROL
LIMIT
GN
WH
PRIMARY
ROLLOUT
LIMIT (RL)
WH-
23
IGNITOR
WARNING:DISCONNECT POWER
BEFORE SERVICING .WIRING TO
UNIT MUST BE PROPERLY
POLARIZED AND GROUNDED.
COLOR CODE
YL YELLOW
OR ORANGE
VT VIOLET
GN GREEN
BK BLACK
BR BROWN
WH WHITE
BU BLUE
GY GRAY
RD RED
LOW VOLTAGE
HI VOLTAGE
CAPACITOR
(CAP)
COM
NC
NO
BK-3
DOOR SWITCH (CLOSED
WHEN DOOR IN PLACE)
IMPORTANT:
READ BEFORE OPERATI NG OR SERVICING THIS UNIT.
1. SET HEAT ANTICIPAT OR ON ROOM THERMOSTAT AT 0.7 AMPS.
2. MANUFACTURER' S SPECIFIED REPLACEMENT PAR TS MUST BE USED WHEN SERVICING
3. IF ANY OF THE ORIGINAL WIRE AS SUPPLIED WITH THE FURNACE MUST BE
REPLACED, IT MUST BE REPLACED WITH WIRING MATERIAL HAVIN G A TE MPE RATURE RATING OF AT LEAST
105°C. USE COPPE R CONDUCTORS ONLY.
4. UNUSED BLOWER MOTO R LEADS MUST BE PLACED ON "PARK" TERM IN ALS OF CONTROL OR TAPED.
5 IF HEATING AND C O OLING BLOWER SPEEDS ARE NOT THE SAME DISCARD JUM PE R BEFORE CONNECTING
BLOWER LEADS.
6 DIAGNOSTIC LIGHT:STEADY=REPLACE CONTROL;1 FLASH=LOCKOUT;2 FLASHES=PS STUCK CLOSE;
3 FLASHES=PS STUCK OPEN;4 FLASHES=OPEN HIGH LIMIT SWI TC H; 5 FL ASHES=RED WIRE ON CONTROL
CONNECTOR OPEN
BR
CIRCUL.
BR
PRESSURE
SWITCH (PS)
GN
AIR
BLOWER
(ACB)
BR-21
GY-47
VT-20
YL-11
OR-16
BU-15
WH-33
RD-22
BU-36
VT-55
BK-6
BK-1
TRANSFORMER
#26 BK (HI)
#23 BU (MED)
#29 OR (MED LOW)
#24 RD (LOW)
WH
WH-2
LINE
LOAD
OR-3
BU-25
GY-25
115V FIELD
CONNECT
ELECTRONIC
AIR CLEANER
VT
-55
RD
-22
115V FIELD
CONNECT
HUMIDIFIER
BU-25
5
YL-11
BK-6
BK-1
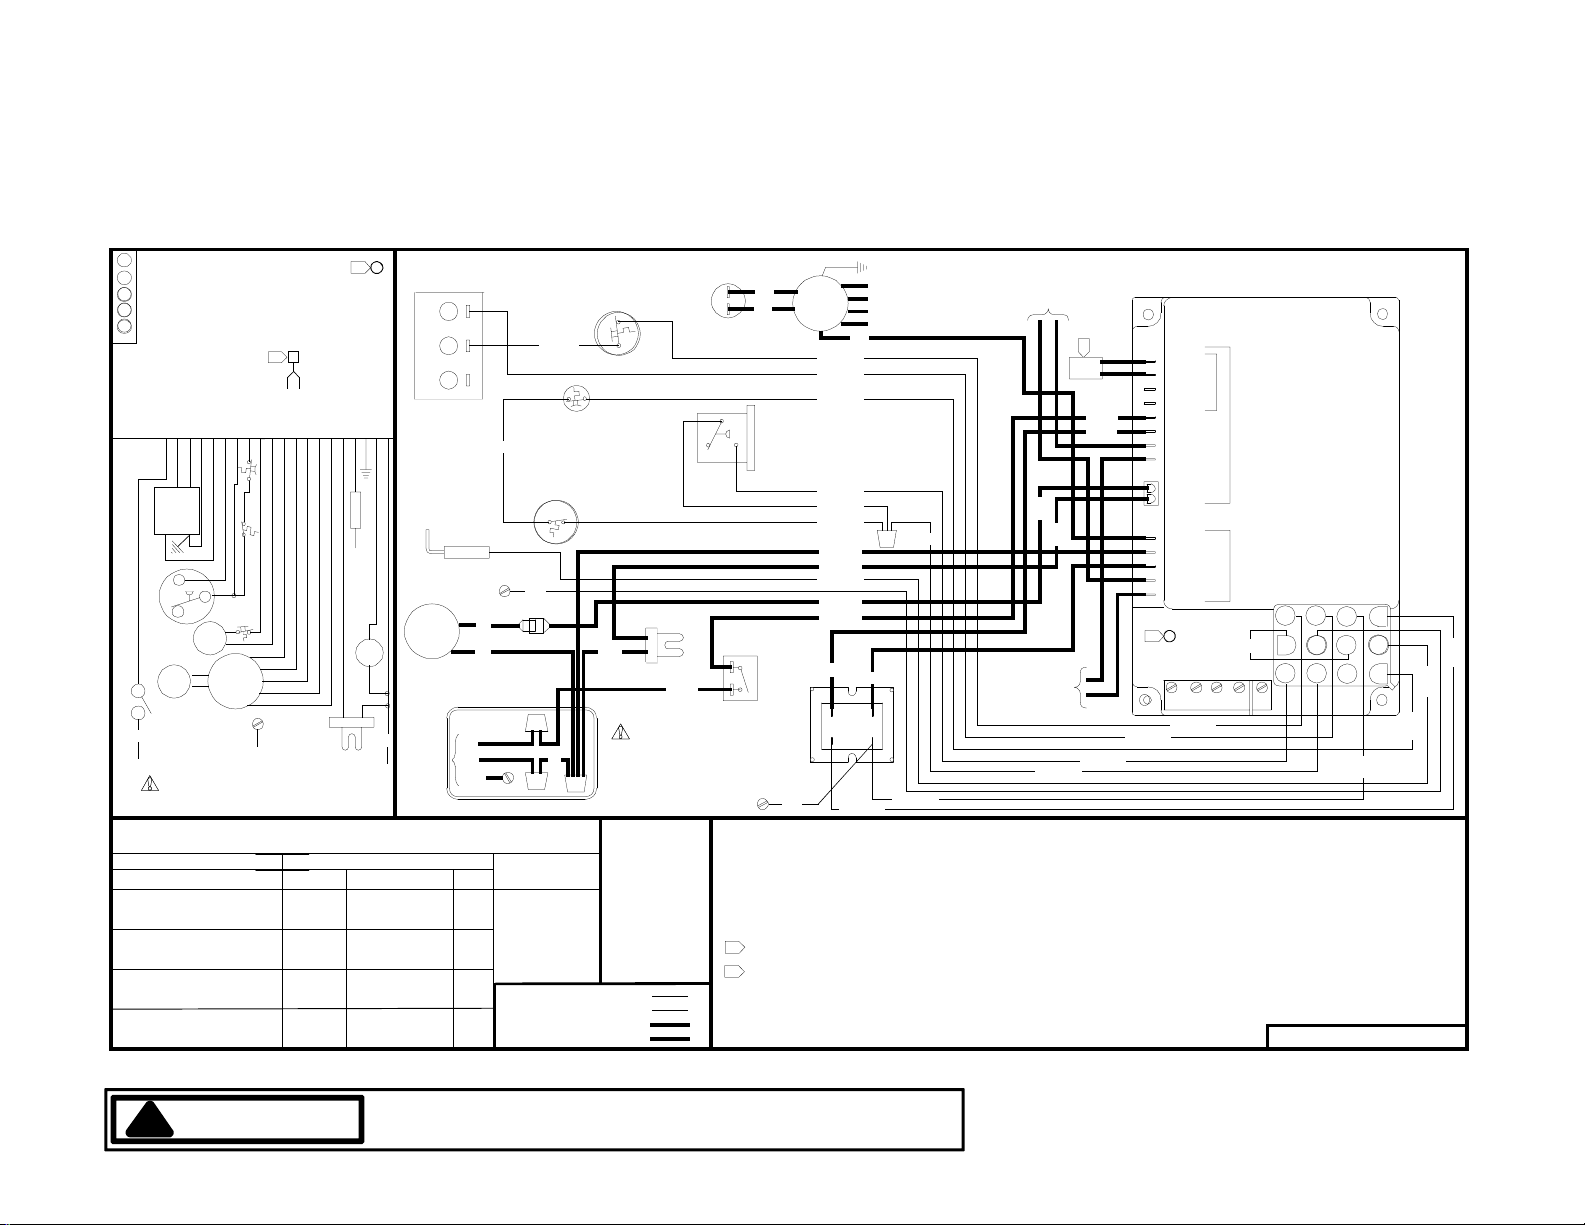
WIRING DIAGRAMS
**
*
6
GY-47
CIRCULATO R BLO WE R
COO
L
HEA
T
PAR
K
PAR
K
LIN
E
XFM
R
EAC
HUM
IND
IGN
CIR
LIN
E
XFM
R
EAC
HUM
THERMOSTAT
CONNECTIONS
WY
RGC
BR-21
HOT 120VAC
CONTROL
NEUTRAL 120VAC
PSRO2MV
12
RD-44
11 8 5 2
11072901 REV. 0
MV GND HLI
TH FP HLO
RO1TR
369
OR
14710
GY
-25
-3
BU
-36
VT
-20
WARNING
!
TO AVOID POSSIBLE ELECTRICAL SHOCK, PERSONAL INJURY,
OR DEATH, DISCONNECT THE POWER BEFORE SERVICING.
Page 14
14 Rev. 1
THERMOSTAT
Y
CONNECTIONS
W
R
G
C
TERMINAL ORDER REARRANGED FOR CLARITY
L
E
H
H
E
I
U
U
A
A
N
M
M
C
C
E
H
N
H
N
H
O
E
O
E
O
T
U
T
U
T
GUID (See specific models above)
120 V
TRANS-
FORMER
24 V
PS
C
NO
DOOR
SWITCH
L1
WARNING:DISCONNECT POWER BEFORE
SERVICING.WIRING TO UNIT MUST BE
PROPERLY POLARIZED AND GROUNDED.
FACTORY WIRED BLOWER MOTOR TO CONTROL CONNECTIONS
FURNACE MODEL
MANUFACTURER'S
*
VARIABLE LETTER
GUI*,GCI*: 045*30,
070*40
GUI*,GCI*: 070*30,
090*50
GUI*,GCI*: 115*50 BU-23 4MED
GUI*,GCI*: 090*30,
115*40,140*50
X
F
M
R
H
O
T
CAP
NO
NC
X
F
M
R
N
T
EUTHP
R
C
S
A
U
X
L
I
M
I
T
GV
CONTROL
**
H
H
LOMVM
L
I
L
I
M
I
T
ACB
GND
5
*
P
H
C
A
E
O
R
A
O
K
T
L
V
6
C
L
I
I
R
N
I
N
GNF
E
U
F
L
A
M
E
HI
E
R
G
N
I
0
N
E
N
1
D
P
U
D
S
E
N
S
O
R
CB
N
PRIMARY
RL
MOTOR TO "HEAT"
R
0
2
COMBUSTION
CONNECT
RD-24LOW 4
OR-29MED LOW 4
BK-26 4
P
A
R
K
IGNITOR
HEATING BLOWER SPEED
*
SPEED
GAS VA LVE
M
C
P
BLOWER
(CB)
115V
FIELD
(GV)
1
2
3
FLAME
SENSOR
BK
WH
L1
N
GND
ELECTRICAL BOX
MOTOR
SPEED S
PRIMARY
ROLLOUT
LIMIT (RL)
GY-47
BR-21
VT-14
PRIMARY LIMIT
CONTROL
LIMIT
BU-36
GN
**
COOLING
BLOWER SPEED
SEE
INSTALLATION
INSTRUCTIONS
TO DETERMINE
PROPER
COOLING
BLOWER SPEED.
LOW VOLTAGE FIELD
HI VOLTAGE FIELD
AUX LIMIT
CONTROL
BU-15
WH
LOW VOLTAGE
HI VOLTAGE
RD44
RD44
IGNITOR
WARNING:DISCONNECT POWER
BEFORE SERVICING.WIRIN G TO
UNIT MUST BE PROPERLY
POLA RI Z ED AN D GRO U N DED .
COLOR CODE
YL YELLOW
OR ORANGE
VT VIOLET
GN GREEN
BK BLACK
BR BROWN
WH WHITE
BU BLUE
GY GRAY
RD RED
CAPACITOR
(CAP)
COM
NC
OR-
DOOR SWITCH (CLOSED
WHEN DOOR IN PLACE)
NO
16
WH-23
RD-22
BK-3
IMPORTANT:
READ BEFORE OPERATING OR SERVICING THIS UNIT.
1. SET HEAT ANTICIPATOR ON ROOM THERMOS T AT AT 0.7 AMPS.
2. MANUFACTURER'S SPECIFIED REPLACEMENT PARTS MUST BE USED WHEN SERVICING.
3. IF ANY OF THE ORIGINAL WIRE AS SUPPLIED WITH THE FURN ACE MUS T BE
REPLACED, IT MUST BE REPLACED WITH WIRING MATERIAL HAVIN G A TEMPE RATURE RATING OF AT LEAST
105°C. USE COPPER CONDUCTORS ONLY.
4. UNUSED BLOWER MOTOR LEADS MUST BE PLACED ON "PARK" TERMINALS OF CONTROL OR TAPED.
5 IF HEATING AND COOLING BLOWER SPEEDS ARE NOT THE SAM E DIS CARD JUM PER BEFORE CONNECTING
BLOWER LEADS.
6 DIAGNOSTIC LIGHT:STEADY=R EPLACE CONTROL;1 FLASH=LOCKOUT;2 FLASHES=PS STUCK CLOSED;
3 FLASHES=PS STUCK OPEN;4 FLASHES=OPEN HIGH LIMIT SWI TCH; 5 FLASH E S=OP EN ROLLOUT CONTROL,
CONTINUOUS FLASHING=FLAME-NO CAL L F OR HEAT .
BR
BR
PRESSURE
SWITCH (PS)
AIR
CIRCUL.
BLOWER
(ACB)
BK-6
VT-20
YL-11
WH-33
VT-55
BK-1
LINE
TRANSFORMER
LOAD
OR-3
#26 BK (HI)
#23 BU (MED)
#29 OR (MED LOW)
#24 RD (LOW)
WH
WH-2
GY-25
BU25
115V FIELD
CONNECT
ELECTRONIC
AIR CLEANER
VT
-55
RD
-22
115V FIELD
CONNECT
HUMIDIFIER
5
BK-6
BK-1
YL-11
**
*
GY-47
L
T
K
K
E
R
E
R
6
THERMOSTAT
CONNECTIONS
RD-44
COO
HEA
PAR
PAR
LIN
XFM
EAC
HUM
IND
IGN
CIR
LIN
XFM
EAC
HUM
RGC
WY
CIRCULATOR BLOWER
HOT 120VAC
CONTROL
NEUTRAL 120VAC
12
11 8
RD-44
BR-21
BU-25
11094601 REV.03
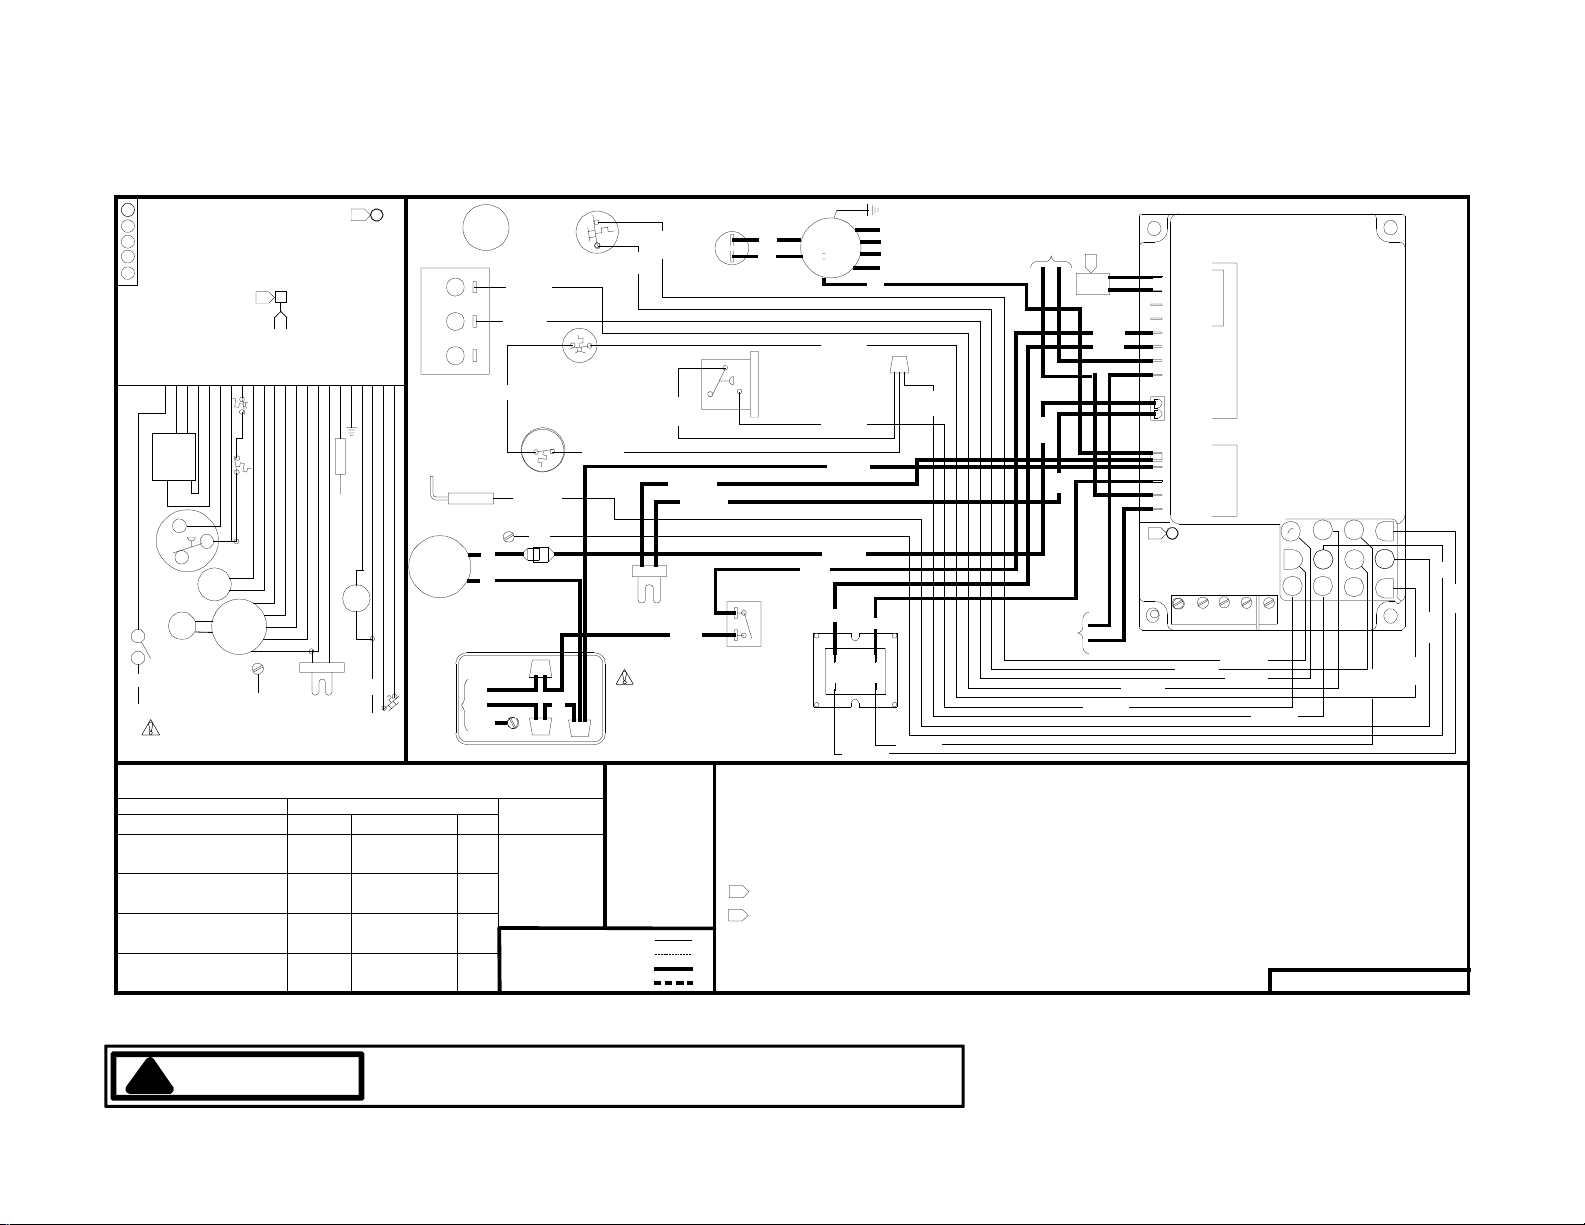
WIRING DIAGRAMS
MV GND HLI
PSRO2MV
710
TH FP HLO
RO1TR
69
3
2
5
4
GY
-25
GN
1
OR
-3
BU
-36
VT
-20
WARNING
!
TO AVOID POSSIBLE ELECTRICAL SHOCK, PERSONAL INJURY,
OR DEATH, DISCONNECT THE POWER BEFORE SERVICING.
Page 15
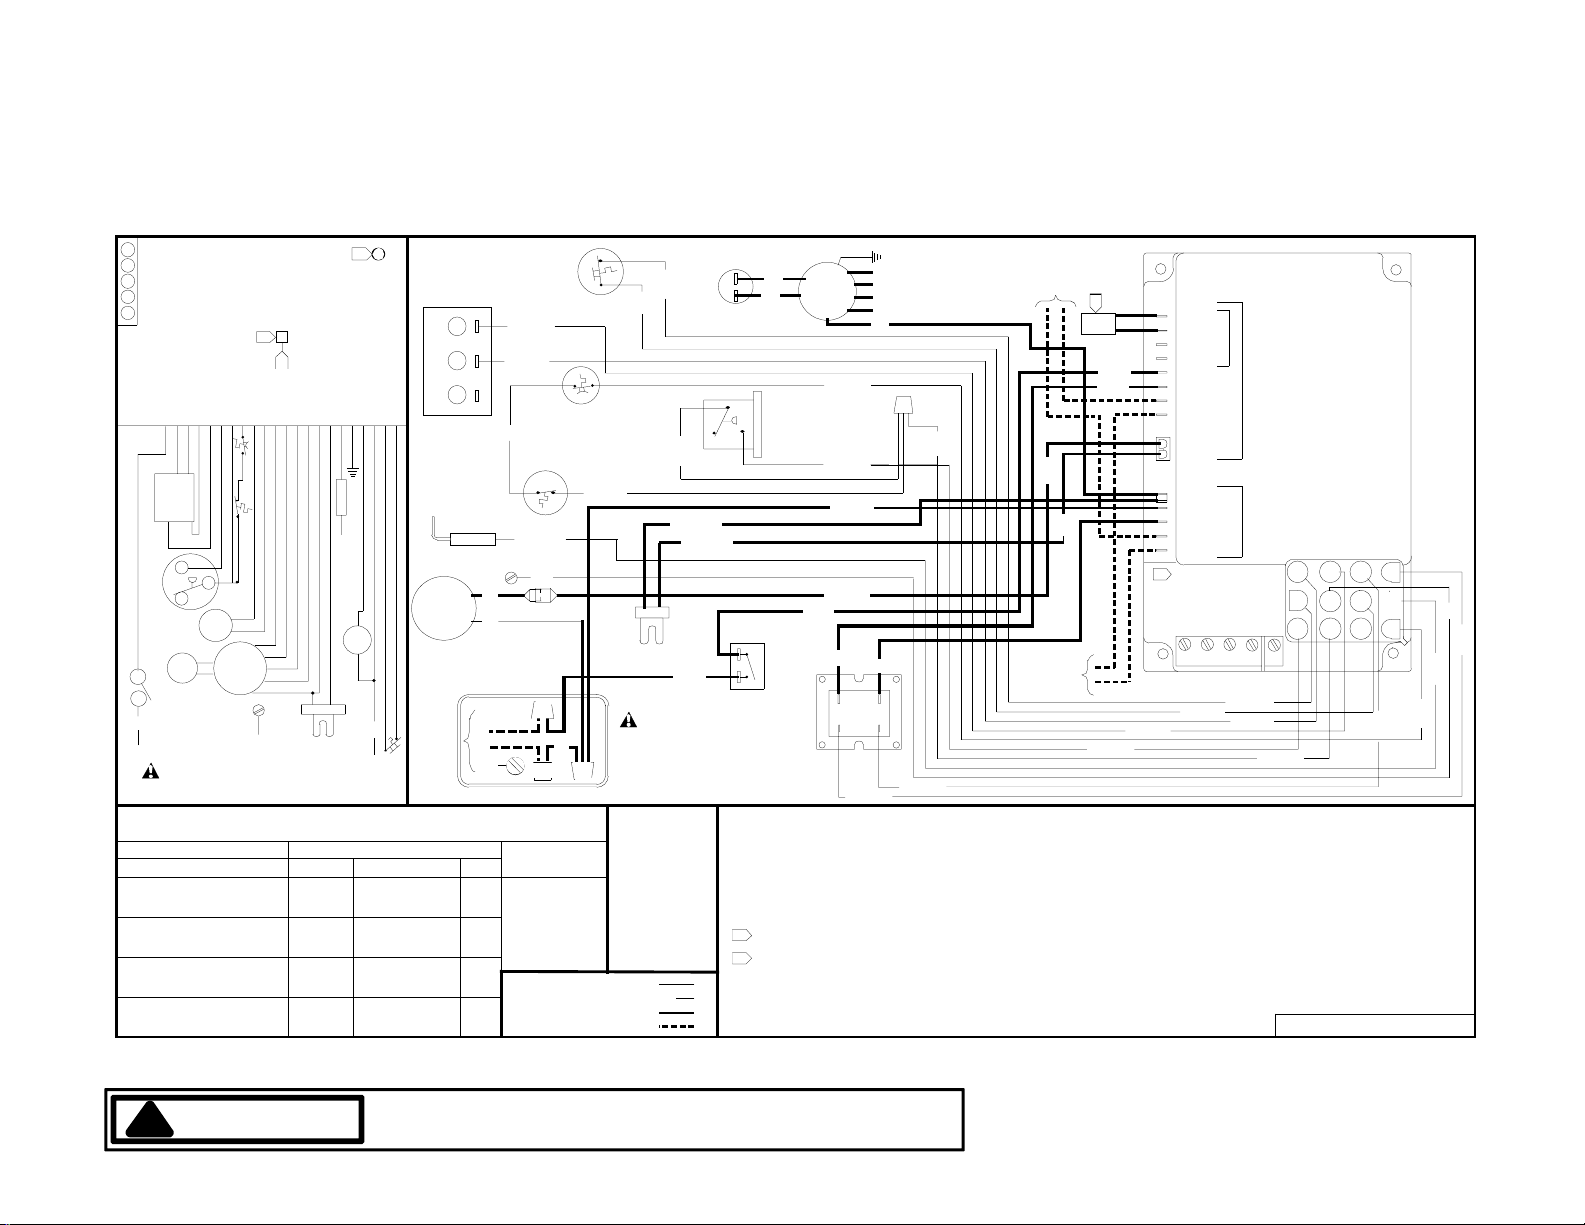
WIRING DIAGRAMS
THERMOSTAT
Y
CONNECTIONS
W
R
G
C
TERMINAL ORDER REARRANGED FOR CLARITY
L
H
H
E
E
I
U
U
A
A
N
M
M
C
C
E
H
N
H
N
H
O
E
O
E
O
T
U
T
U
T
GUID (See specific models above)
NO
L1
C
120 V
TRANS-
FORMER
24 V
PS
DOOR
SWITCH
CONTROL
X
X
F
F
M
M
R
R
H
N
H
T
L
P
T
E
O
R
I
S
H
U
T
A
U
X
L
I
M
I
T
NO
C
NC
GV
CAP ACB
GND
WARNING:DISCONNECT POWER BEFORE
SERVICING.WIRING TO UNIT MUST BE
PROPERLY POLARIZED AND GROUNDED.
5
* *
*
P
H
C
A
E
O
H
R
A
O
M
M
L
K
T
L
V
V
O
L
I
M
I
T
C
I
R
P
N
A
E
R
U
K
IGNITOR
6
L
I
N
E
R
G
I
N
I
0
N
F
G
E
N
1
D
P
N
U
D
F
S
L
E
A
N
M
S
E
O
R
CB
N
PRIMARY
RL
FACTORY WIRED BLOWER MOTOR TO CONTROL CONNECTIONS
FURNACE MODEL
MANUFACTURER'S
*
VARIABLE LETTER
GUI*,GCI*: 045*30,
070*40
GCI*:
GUI*,GCI*: 070*30,
090*50
070*40
GUI*:
GUI*,GCI*: 115*50 BU-23 4MED
GUI*,GCI*: 090*30,
115*40,140*50
HEATING BLOWER SPEED
*
MOTOR TO "HEAT"
SPEED
HI
GAS VALVE
(GV)
1
M
2
C
R
3
P
0
2
FLAME
SENSOR
COMBUSTION
BLOWER
(CB)
115V
FIELD
CONNECT
SPEEDS
RD-24LOW 4
OR-29MED LOW 4
BK-26 4
GY-47
BR-21
VT-14
BK
WH
L1
N
GND
ELECTRICAL BOX
* *
MOTOR
BLOWER SPEED
SEE
INSTALLATION
INSTRUCTIONS
TO DETERMINE
PROPER
COOLING
BLOWER SPEED.
PRIMARY
ROLLOUT
LIMIT (RL )
AUX LIMIT
CONTROL
PRIMARY LIMIT
CONTROL
LIMIT
BU-15
BU-36
GN
WH
COOLING
LOW VOLTAGE
LOW VOLTAGE FIELD
HI VOLTAGE
HI VOLTAGE FIELD
RD44
RD44
IGNITOR
WARNING:DISCONNECT POWER
BEFORE SERVICING.WIRING TO
UNIT MUST BE PROPERLY
POLARIZED AND GROUNDED.
COLOR CODE
YL YELLOW
OR ORANGE
VT VIOLET
GN GREEN
BK BLACK
BR BROWN
WH WHITE
BU BLUE
GY GRAY
RD RED
CAPACITOR
(CAP)
COM
NC
OR-
DOOR SWITCH (CLOSED
WHEN DOOR IN PLACE)
NO
16
WH-23
RD-22
BK-3
IMPORTANT:
READ BEFORE OPERATING OR SERVICING THIS UNIT.
1. SET HEAT ANTICIPATOR ON ROOM THERMOSTAT AT 0.7 AMPS.
2. MANUFACTURER'S SPECIFI ED REPLACEMENT PARTS MUST BE USED WHEN SERVICING.
3. IF ANY OF THE ORIGINAL WIRE AS SUPPLIED WITH THE FURNACE MUST BE
REPLACED, IT MUST BE REPLACED WITH WIRING MATERIAL HAVING A TEMPERATURE RATING OF AT LEAST
105C. USE COPPER CONDUCTORS ONLY.
4. UNUSED BLOWER MOTOR LEADS MUST BE PLACED ON "PARK" TERMINALS OF CONTROL OR TAPED.
5 IF HEATING AND COOLING BLOWER SPEEDS ARE NOT THE SAME DISCARD JUMPER BEFORE CONNECTING
BLOWER LEADS.
6 DIAGNOSTIC LIGHT:STEADY=REPLACE CONTROL;1 FLASH=LOCKOUT;2 FLASHES=PS STUCK CLOSED;
3 FLASHES=PS STUCK OPEN;4 FLASHES=OPEN HIGH LIMIT SWITCH;5 FLASHES=OPEN ROLLOUT CONTROL;
CONTINUOUS FLASHING=FLAME-NO CALL FOR HEAT.
BR
BR
PRESSURE
SWITCH (PS)
AIR
CIRCULATION
BLOWER
(ACB)
VT-20
YL-11
WH-33
VT-55
BK-6
BK-1
TRANSFORMER
#26 BK (HI)
#23 BU (MED)
#29 OR (MED LOW)
#24 RD (LOW)
WH
WH-2
LINE
LOAD
OR-3
GY-25
BU25
115V FIEL D
CONNECT
ELECTRONIC
AIR CLEANER
VT
-55
RD
-22
115V FIEL D
CONNECT
HUMIDIFIER
5
YL-11
BK-6
BK-1
* *
*
GY-47
T
K
K
E
R
E
R
6
HEA
PAR
PAR
LIN
XFM
EAC
HUM
IND
IGN
CIR
LIN
XFM
EAC
HUM
THERMOSTAT
CONNECTIONS
WY
RGC
RD-44
RD-44
BR-21
HOT 120VAC
NEU TRA L 120 VAC
CONTROL
PSRO2MV
12
11
BU-25
MV GND HLI
RO1TR
69
85
4710
TH FP HLO
3
2
GN
1
GY
-25
OR
-3
BU
-36
VT
-20
CIRCULAT OR BLOWER
COO
L
20242401 RE V. 0
15 Rev. 1
WARNING
!
TO AVOID POSSIBLE ELECTRICAL SHOCK, PERSONAL INJURY,
OR DEATH, DISCONNECT THE POWER BEFORE SERVICING.
Page 16
16 Rev. 1
C
7
6
5
4
3
2
1
BK BLACK
20255601 REV.00
RD RED
COLOR CODES:
GN GREEN
VT VIOLET
OR ORANGE
YL YELLOW
CONTINUOUS FLASH ES = UNAN TI CI PA T ED FLAM E PRESENT
7 FLASHES = LOW FLAME SENSE SIGNAL
5 FLASHE S = OPE N R O LLOU T LIMI T
4 FLASHES = OPEN PRIMARY OR AUXILIARY LIMIT
6 FLASHES =
115V AC POWER REVERSED OR POOR UNIT GROUND
GY GRAY
BU BLU E
WH WHITE
BR BRO WN
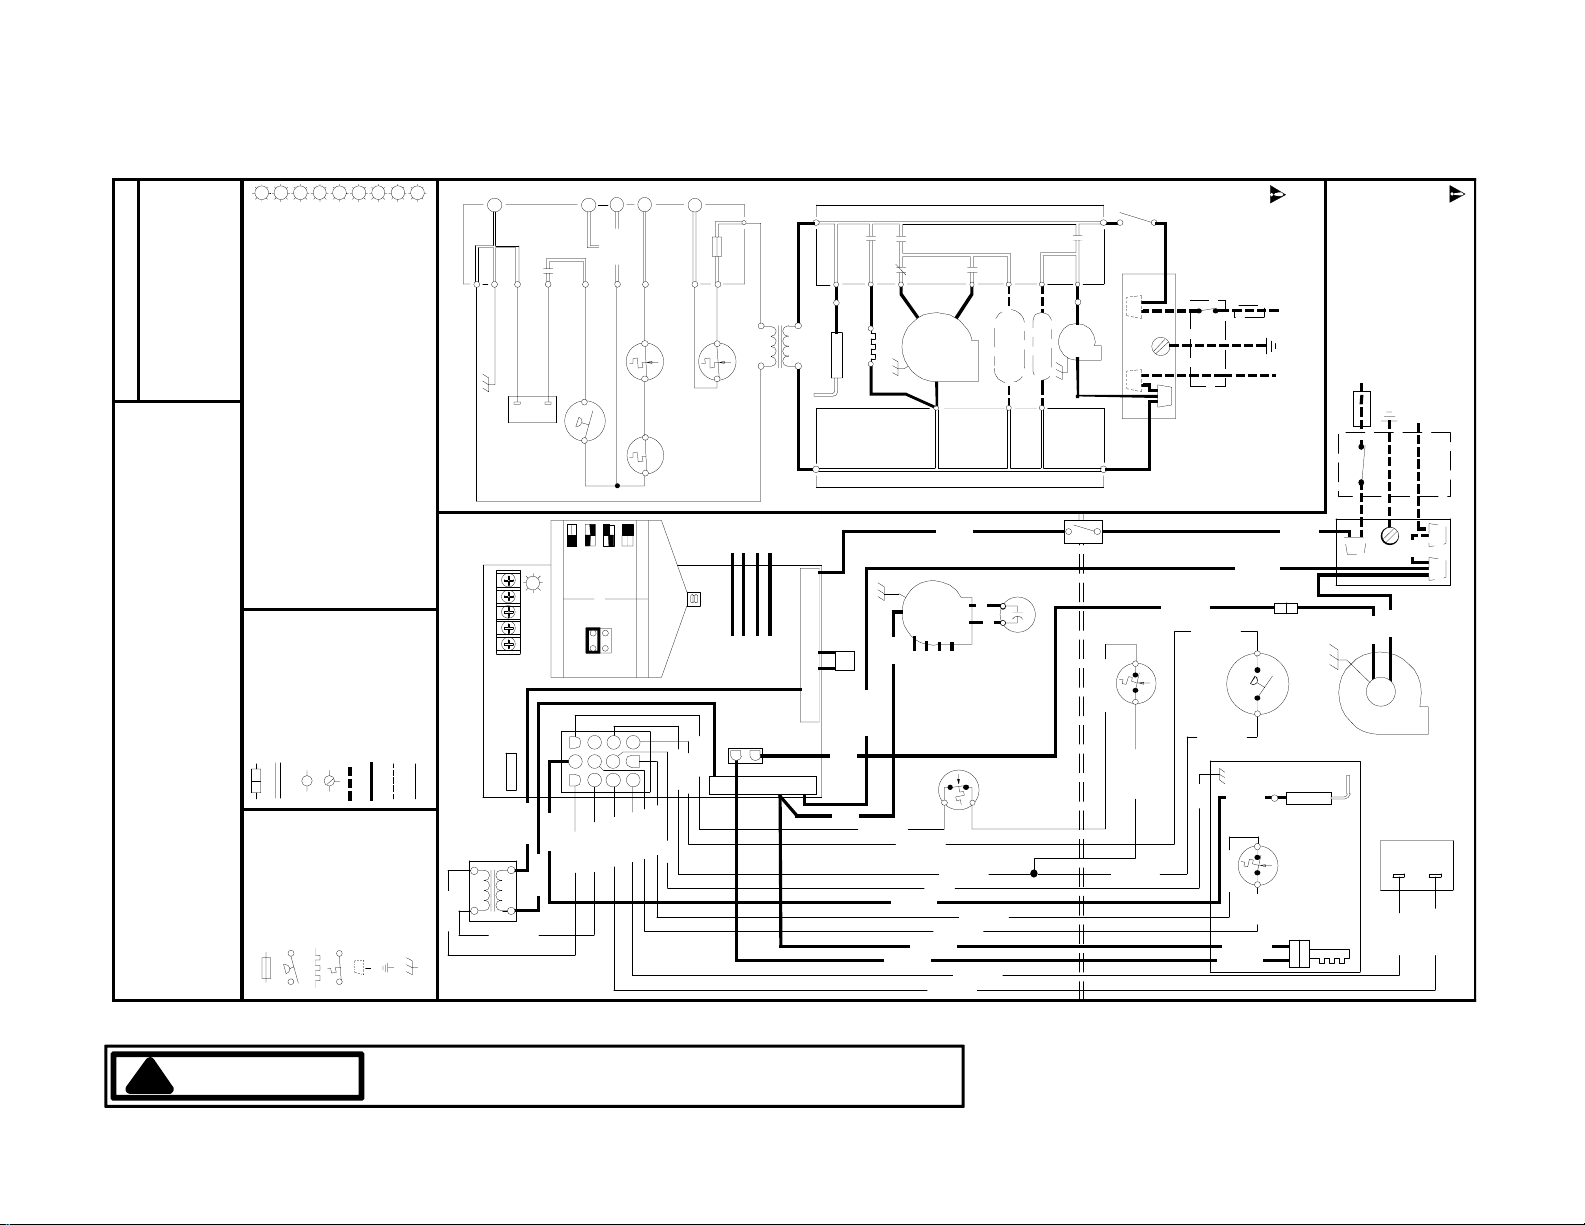
GUID (Models using WR50A55 Ignition Control)
5. UNIT MUST BE PERMANENTLY GROUNDED AND CONFORM TO N.E.C. AND LOCAL CODE S .
"PARK" TERMINALS OF INTEGRATED CONT RO L OR TA PED.
4. IF HEATING AN D COOL IN G BLO W ER SP EE D S ARE NOT T HE SAME DI SC A R D JU MPER
3. IF AN Y OF T HE ORIGIN AL W IRE AS SUPPL IED WITH THE FURNA CE MUST BE
2. MANUFACTURER'S SPECIFIED REPLACEMENT PARTS MUST BE USED WHEN SERVICING.
1. SET HE AT ANTICIPATOR ON RO O M T HERMOS TAT AT 0.7 AM PS.
BEFORE CONNECTING BLOW ER LEADS. UNUS ED BLOWER LEADS MUST BE PLA CED ON
NOTES:
RATING OF AT LEAST 105C. US E COPP ER CON DUCTO RS ONLY.
REPLACED, IT MUST BE REP LACE D WIT H WIRING MATERI AL HA VI NG A TEMPE RATURE
INTEGRATED CONTROL
INTERNAL TO
PLUG CONNECTION
SWITCH (PRESS.)
PROT. DEVICE
OVERCURREN T
HI VOLTAGE FIEL D
JUNCTION
TERMINAL
SWIT CH ( TEMP.)
IGNITER
0
STEADY ON = REPLACE CONTROL
3 FLASHES = PR ESSURE SW ITCH STU C K O PEN
2 FLASHES = PR ESSURE SW ITCH STU C K CL OSED
1 FLASH
= SYSTEM LOCKOUT (RETRIES/RECYCLES EXCEEDED)
LOW VOLTAGE FIELD
HI VOLTAGE (115 V)
LOW VOLTAG E (24V )
EQUIPMENT GND
FIELD SPLICE
FIELD GND
WIRING DIAGRAMS
AND GROUNDED.
POLARIZED
PROPERLY
MUST BE
WIRING TO UNIT
BEFO R E SERVICI NG .
24V THERMOSTAT CONNECTIONS
W
Y
C
INTEGR ATED CON TROL MO DULE
TR (6)
GND (8)
MVC (9)
GND
M1
VALVE
24V T HE RM O STAT
Y
CONNECTIONS
W
LED
R
G
C
G
MICRO
TO
PS (10)
MV (12)
P3
C2
GAS
SWITCH
*
AS SHIPPED FROM FACTORY
DIAGNOS TIC
HLI (7)
NO
PRES SU RE
C
ON
OFF
ON
ON
ON
OFF
OFF
OFF
180
120
90
60
*
OR
60
90
180
*
120
R
TH (3)
FUSE 3 A
HLO (1)
RO2 (1 1)
RO1 (5)
MANUAL RESET
LIMIT CO N TRO L
AUXILIARY
MANUAL RESET ROLLOUT
LIMIT CO N TRO L
AUTO RESET PRIMARY
LIMIT CO N TRO L
DIP SWITC HE S
OFF DELAY SELECTOR
BLOWER HEAT
(SECONDS)
PIN JUMPER
INTEGRATED
CONTROL
MODULE
HUM-H
HUM-N
XFMR-H
FP (2)
IGN
COOL-H
FL AM E SEN SOR
HOT SURFA C E
115 VA C
24 VA C
TRANSFORMER
40 VA
EAC-H
EAC-N
IGNITER
XFMR-N
FIELD CO NNNECTIO N S
ELECTRON IC AIR CLEA NER
115 V H UMID I FIER AN D
LINE -H
115 V AC HOT AND PAR K TERM INALS
GND
NOTE 4
SEE
COOL-H
WH
HEAT- H
XFMR-H
HEAT
COOL
CIRCULATION
BLOWER
INDOOR
AIR
CIR-N
CIRCULATION
BLOW ER
INDOOR
AIR
RD (LOW)
BK (HI)
BU (MED)
OR (MED LOW)
WH-33
10
7
4
1
24VAC
FUSE
3A
40 VA
TRANSFORMER
115 VAC
24 VAC
BK-1
BU-36
11
5
8
2
12
9
6
3
RD-44
RD-44
BR-21
GY-47
GY-25
OR-3
XFMR-N
VT-20
BU-25
YL-11
CIRC-N
GN
-55
VT
TERMINALS
115 V AC NEUT RAL
LIN E-N
WH
VT-20
YL-11
WH-2
GN
OR-3
GY-25
BU-36
WH-23
RD-22
INTEGR ATED CON TROL MO DULE
SWITCH
DOOR
HUM-H
EAC-H
HEAT- H
AIR CLEA NE R
ELECTRONIC
HUMIDIFIER
HUM-N
EAC-N
INTEGR ATED CON TROL MO DULE
LINE -H
IND
JUNCTIO N BOX
BLWR
ID
GND
LINE -N
BK-6
CAPACITOR
BR
BR
UNUSED MOTOR
LEAD S TO BE
PLAC ED ON
PARK TER M INALS
OR TAPED
VT-14
BURNER COMPARTMENT
BLOWER COMPARTMENT
AUXILIARY
MANUAL
RESET
LIMI T
BU-25
RD-44
RD-44
BR-21
GY-47
AUTO RESET PRIMARY
LIMIT CONTROL
BU-15
GN
OR-16
DISCONNECT POWER
WARNING:
PROTECTION DEVICE
WITH OVERCURRENT
POWER SUPPLY
TO 115 VAC/ 1Ø /60 HZ
POLARIZED AND GROUNDED.
TO UNIT MUST BE PRO PERLY
BEFORE SERVICING. WIRING
WARNING:DISCONNE CT POWE R
TO 115VAC/ 1Ø /60 HZ POWER SUPPLY WITH
OVERCURRE NT PROTECTION DEVICE
L
GND
N
DISCONN ECT
L
GND
N
DISCONNECT
BK-3
(OPEN WHEN DOOR OPEN)
DOOR SWITCH
WH-33
VT-55
YL-11
NO
PRES SU RE
SWITCH
GND
WH
BK
JUNCTION BOX
WH
INDUCED DRA FT
BLOWER
C
OR-16
GND
BU-36
MANUAL RESET
ROLLOUT LIMIT
CONTROL
RD-44
RD
-44
WH-23
RD-22
BURNER BOX
SENSOR
FLAME
C2
SURFACE
IGNITER
HOT
BR-21
GAS VALVE
P3
M1
GY-47
WARNING
!
TO AVOID POSSIBLE ELECTRICAL SHOCK, PERSONAL INJURY,
OR DEATH, DISCONNECT THE POWER BEFORE SERVICING.
Page 17
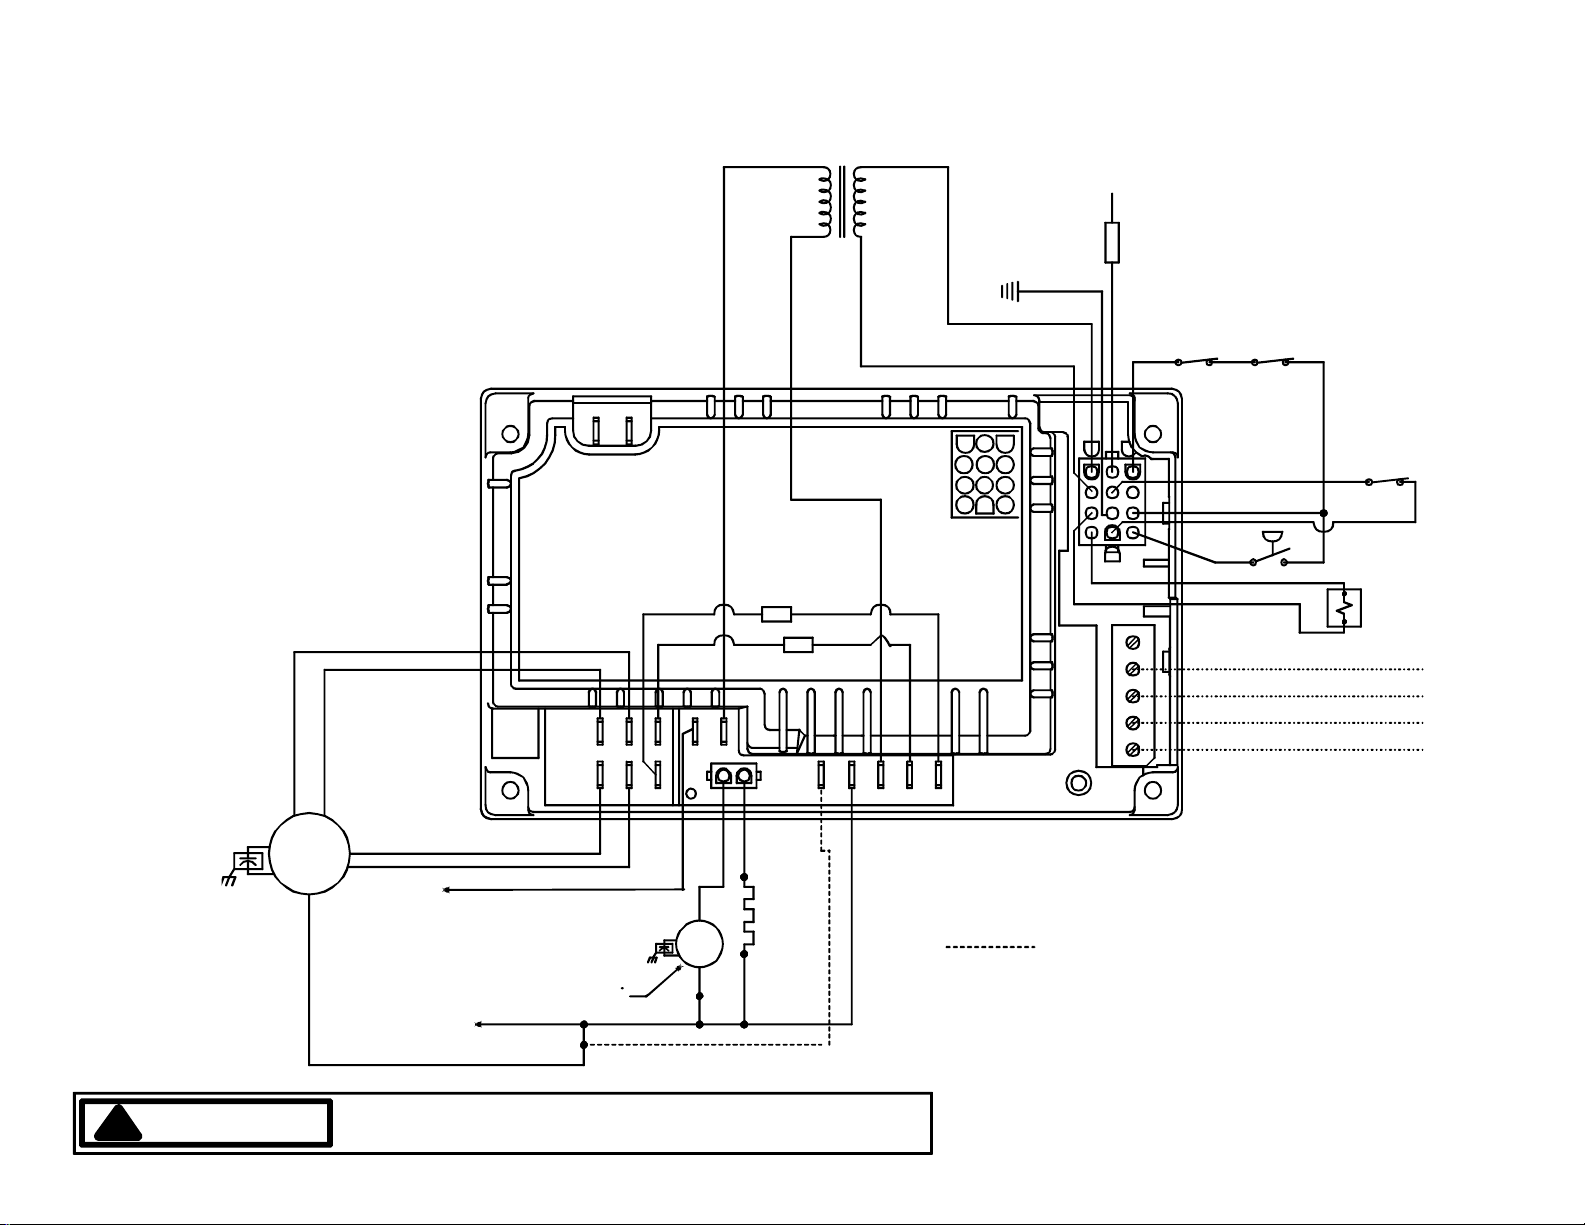
This schematic is for reference only. Not all wiring is as shown above, refer
to the appropriate wiring diagram for the unit being serviced.
TRANSFORMER
120V 24V
TR
GND
TH
FLAME
SENSOR
FP
HLO
PRIMARY
LIMIT
AUX
LIMIT
SCHEMA TICS
17 Rev. 1
HSI 1-1A INTEGRATED IGNITION CONTROL
GUID
COOL
HEAT
BLOWER
MOTOR
PARK
LINE
HOT
120 VAC
LINE
NEUTRAL
PARK
COMBUSTION
AIR BLOWER
ACB
LOW
ACB
COOL
PARK
ACB
HEAT
PARK
F+F-
TH H LO
EAC
HUM
LINE
120VAC
TX
CMB IGN
BLWR
HUMIDIFIER
ELECTRONIC
AIR CLEANER
FP
RO1PSTR
MV HL1GND
MV
RO2
MV
MV
N
N
HUMEACXFMRLINECI R
NNN
RO1
HL1
CN1
PS
C
G
R
W
Y
BLOWER (G)
24V POWER (R)
HEAT (W)
COOL (Y)
ROLLOUT
SWITCH
RO2
PRESSURE
SWITCH
GAS VALVE
IGNITOR
OPTIONAL
WARNING
!
TO AVOID POSSIBLE ELECTRICAL SHOCK, PERSONAL INJURY,
OR DEATH, DISCONNECT THE POWER BEFORE SERVICING.
Page 18
SCHEMA TICS
R
THERMOSTAT
G
W
COMPRESSOR
ROLLOUT
SWITCH
R
TH
RO1
RO2
24 VAC
XFMR
HOT
CONTACTOR
XFMR
NEU
TR
Y
COIL
C
YGW
GND
HLO
PS
MVC MV
HLI
AUX
LIMIT
HIGH
LIMIT
GAS
VALVE
PRESSURE
SWITCH
HUM
NEUHUM
HUMIDIFIER
INDUCER
ELECTRONIC
AIR CLEANER
IND
EAU
NEU
EAC
CIR
NEU
FUSE
18 Rev. 1
BLOWER
CIRCULATOR
HEAT COOL PARK PARK
LINE HOT
120 VAC
LINE NEU
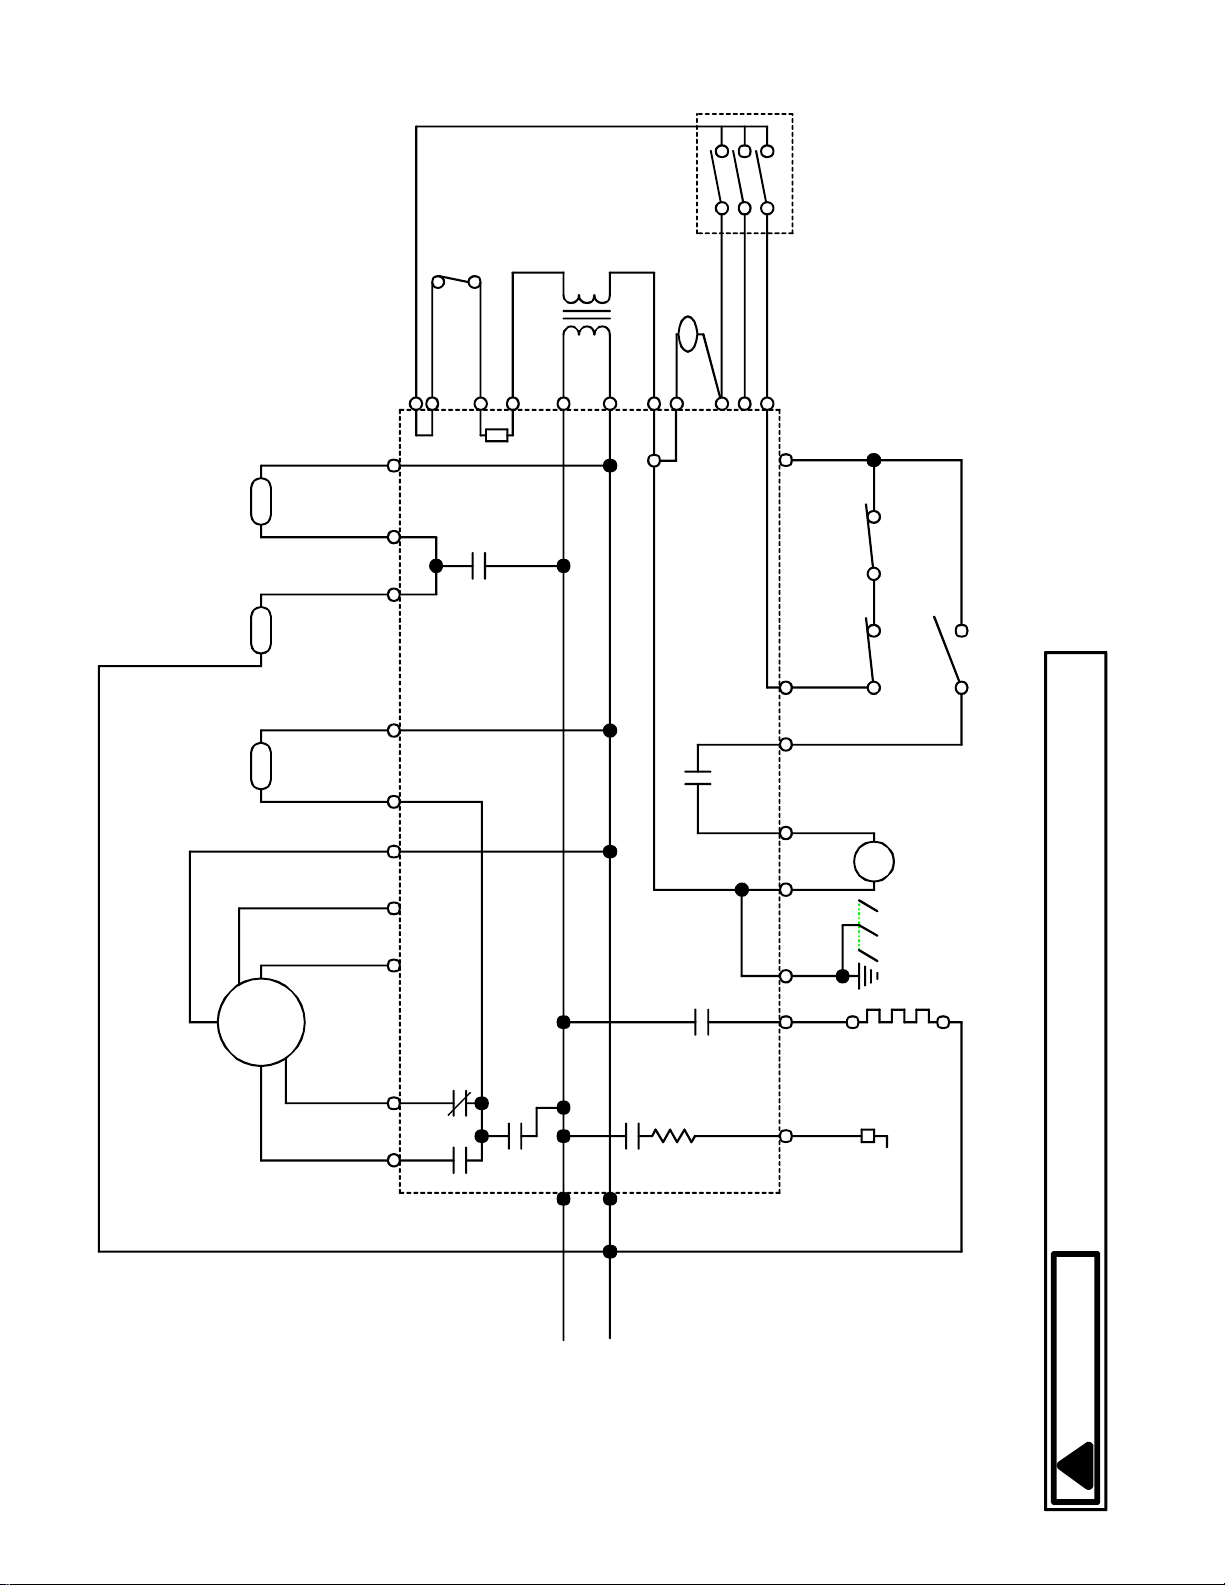
GUID
HSI-2 INTEGRATED IGNITION CONTROL
This schematic is for reference only. Not all wiring is as shown above, refer
to the appropriate wiring diagram for the unit being serviced.
IGN
FP
FLAME
IGNITER
SENSOR
PROBE
TO AVOID POSSIBLE ELECTRICAL SHOCK, PERSONAL INJURY,
OR DEATH, DISCONNECT THE POWER BEFORE SERVICING.
WARNING
!
Page 19
SCHEMA TICS
R
THERMOSTAT
G
W
COMPRESSOR
XFMR
CONTACTOR
NEU
TR
ROLLOUT
SWITCH
R
TH
RO1
RO2
XFMR
24 VAC
HOT
Y
COIL
C
YGW
JUMPER
PS
GND
HLI
HLO
MV MV
AUX
HIGH
LIMIT
LIMIT
GAS
VALVE
PRESSURE
SWITCH
HUM
NEU
EAU
CIR
IND
IND
NEU
EAC
NEU
K3
K8
FACTORY
FACTORY
JUMPER
K5
HUMIDIFIER
INDUCER
ELECTRONIC
AIR CLEANER
IGN
.0005
3M
120 VAC
LINE NEU
CIRCULATOR
BLOWER
K2
HEAT COOL PARK PARK
K1
LINE HOT
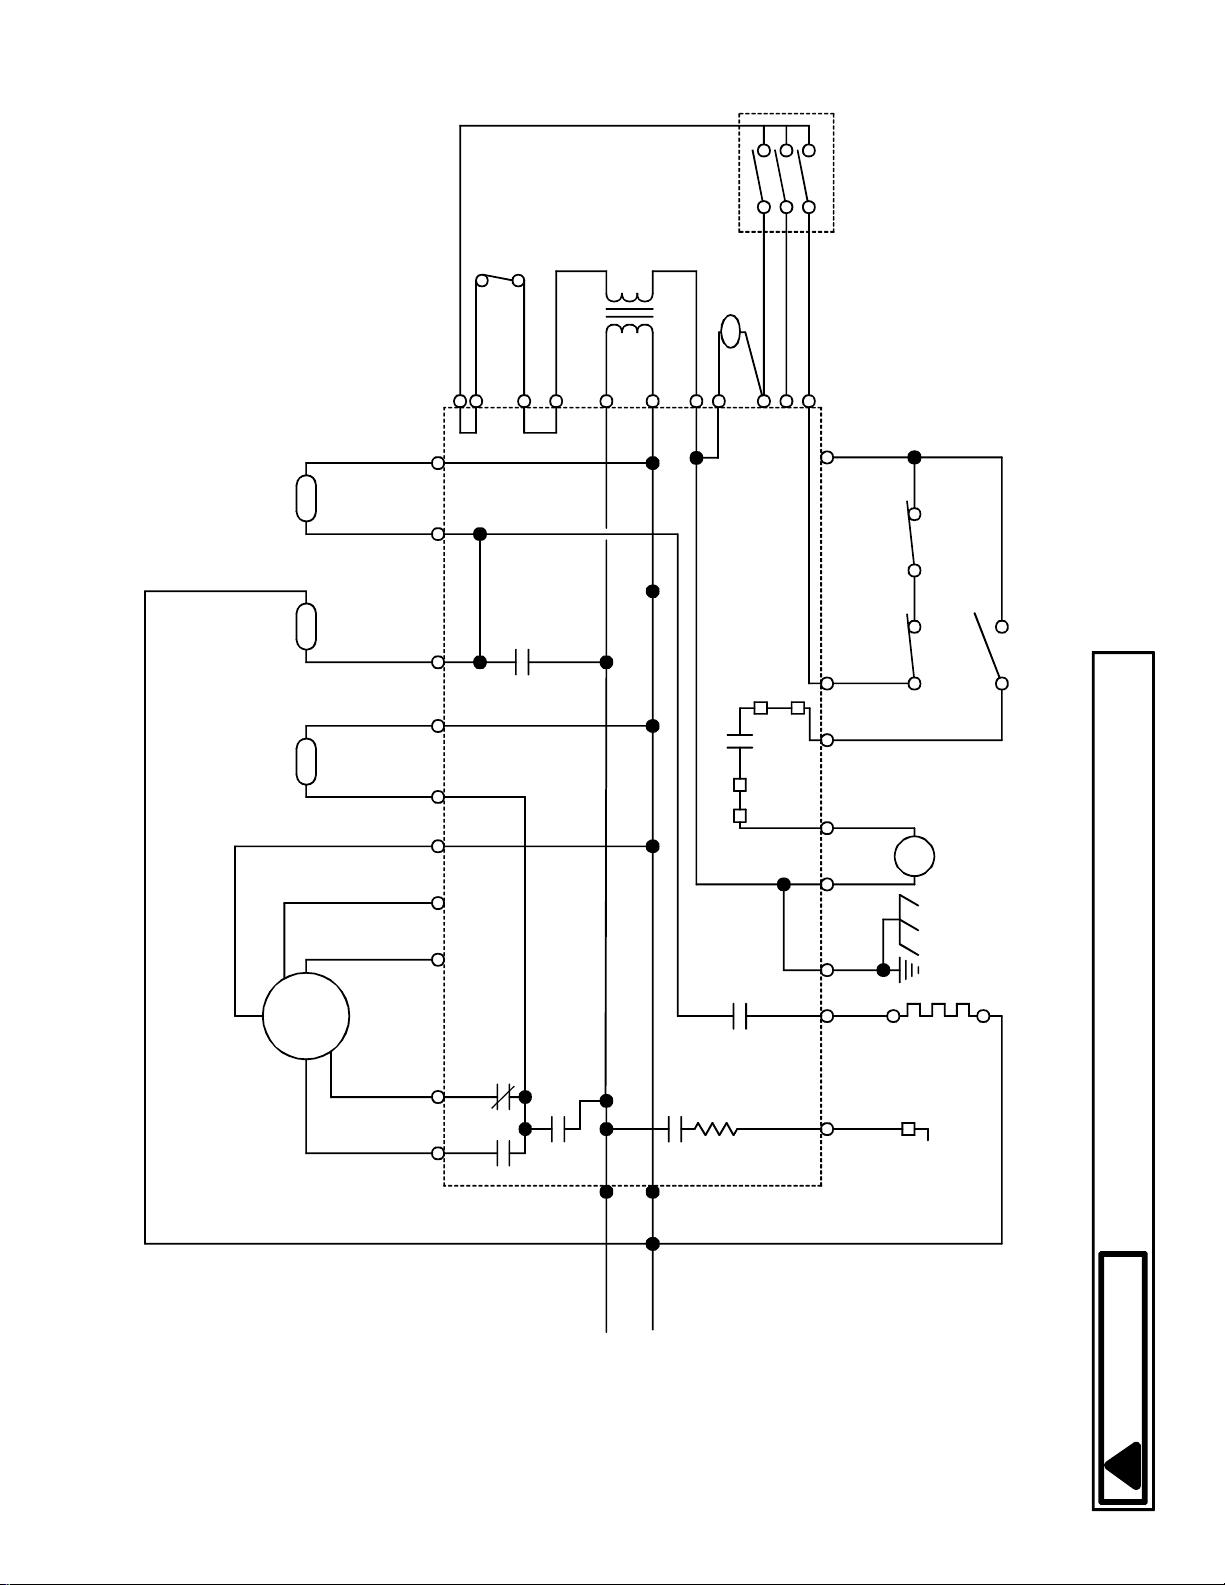
GUID
WR50A55 INTEGRATED IGNITION CONTROL
This schematic is for reference only. Not all wiring is as shown above, refer
to the appropriate wiring diagram for the unit being serviced.
FP
IGNITOR
FLAME
SENSOR
PROBE
TO AVOID POSSIBLE ELECTRICAL SHOCK, PERSONAL INJURY,
OR DEATH, DISCONNECT THE POWER BEFORE SERVICING.
WARNING
!
19 Rev. 1
 Loading...