

Page 1
Emectric Range - Coim
Care & Cleaning ............................................. 15-18
Self-Clean Oven
Cleaning Procedures
Maintenance ................................................... 19-20
Oven Window & Light
Troubleshootin 9 ............................................. 21-22
Warranty & Service .............................................. 23
Guide d'utilisation et
d'entretien ............................................................. 24
Gu_a de Uso y Cuidado ....................................... 50
Form No. B/11/04 Part No 8113P476-60 @2004 Maytag Appliances Sales Co. Litho USA
Page 2
Installer: Please leave this manual with this appfiance
Censumer: Please read and keep this manual for future
reference. Keep sales rece@t and/or canceled check as proof
of purchase.
Model Number
Serial Number
Date of Purchase
If you have questions, calk
Amana Customer Assistance
1-800-843-0304 USA
1-866-587-2002 Canada
1-800-688-2080 { U.S.TTYfor hearing or speech impaired}
(Mon.-Fri.. 8 am-8 pm EasternTime}
Internet: http:/iwww.amana.com
Inour continuing effort to improvethe quaiityand performance
of our cooking products, it may benecessaL_Lomake changes
to the appliance without revising this guide.
For setldce infermade_, see page 23.
To ensure proper and safe operation: Appliance must be
properly installed and grounded by a qualified technician.
Do not attempt to adjust, repair, service, or replace any part
of your appliance unless it is specifically recommended in
this guide. All other servicing should be referred to a
qualified servicer.
Always disconnect power to appliance before servicing.
tipping of the aplaliance from
be secured by a properly installed anti.tip
device.
Warning and Important Safety Instructions appearing in this
guide are not meant to cover all possible conditions and
situations that may occur. Common sense, caution, and care
must be exercised when installing,maintaining, or operating
the appliance.
Always contact the manufacturer about problems or
conditions you do not understand.
Recognize Safety Symboms, Words, Labe{s
WARNUNG _ Hazards or unsafe practices which COULD
resu!t in severe personal injury or death,
result in minor personal injury.
Read and follow aU instructions before using this
appliance to prevent the potential risk of fire, electric
shock, personal injury or damage to the appliance as a
result of improper usage of the appliance. Use appliance
only for its intended purpose as described in this guide.
To check if device isproperly installed, look underneath
range with a flashlight to make sure one of the rear leveling
legs is properly engaged in the bracket slot. The anti-tip
device secures the rear leveling legto the floor when
properly engaged. You should check this an_me the
range has been moved.
To Prevent Fire ot Smoke
Be sure a[[ packing materials are removed from the appli-
ance before operating it.
Keep area around appliance dear and free from combus-
tible materia[s. Flammable materials should not be stored in
an oven.
Many plastics are vulnerable to heat. Keep plastics away
from parts of the appliance that may become warm or hot.
To prevent grease fires, do not let cooking grease or other
flammabb materials accumulate in or near the appliance.
In Case of Fire
Use dry chemical or foam-type extinguisher or baking soda
to smother fire or flame. Never use water on a grease fire.
1_Turn off appliance to avoid spreading the flame.
2_ NFdER pick up or move a flaming pan.
3_Smother oven fire or flame by dosing the oven door.
Page 3
Child Safety
NEVER store itemsof interest to Children in cabinets above
an appiiance, Children climbing On the appliance o!:on the
appliance door to reach items could be sedousty injured.
NEVER leave children alone or unsupervised near the appli-
ance when it is in use or is still hot. Children should never be
allowed to sit or stand on any part of the appliance as they
could be injured or burned.
Children must be taught that the appliance and utensils in it
can be hot. Let hot utensils cool in a safe place, out of reach of
small children. Children should be taught that an appliance is
not a toy. Children should not be allowed to playwith controls
or other parts of the appliance.
About Your Appmianee
NEVER use an app!!ance as astep to reach cabinets above.
Misuse of appliance door, Such as Stepping, !eaning or
Sitting on the door', may resu!t in possible tipping d the
To prevent potential hazard to the user and damage to the
appliance, do not use appliance as a space heater to heat or
warm a room. Also, do not use the oven as a storage area for
food or cooking utensils.
Do not obstruct the flow of air by blocking the oven venL
DO NOT TOUCH HFATWNGELEMENTS OR INTERIORSUR-
FACESOF OVEN. Heating elements may be hot even though
they are dark in color. Interior surfaces of any oven become
hot enough to cause burns. During and after use, do not
touch, or let clothing or other flammable materials contact
heating elements or interior surfaces of oven until they have
had sufficient time to cool. Other surfaces of the appliance
may become hot enough to cause burns - among these
surfaces are: oven vent opening, surface near this opening,
oven door and window of oven door.
Do not touch a hot oven light bulb with a damp cloth as the
bulb could break. Should the bulb break, disconnect power to
the appliance before removing bulb to avoid electrical shock
N_ER use aluminum foil to cover an oven rack or oven
bottom. Misuse could result in risk of electric shock, fire, or
damage to the appliance. Usefoil only as directed in this
guide.
Cooking Safety
Never heat an unopened food container in the oven. Pressure
build-up may cause container to burst resulting in serious
personal injury or damage to the appliance.
Use dry, sturdy potholders. Damp potholders may cause burns
from steam. Dishtowels or other substitutes should never be
used as potholders because they can trail across hot elements
and ignite or get caught on appliance parts.
Wear proper apparel. Loose fitting or long hanging-sleeved
apparel should not beworn while cooking. Clothing may ignite
and cause burns if garment comes in contact with heating
elements.
Always place oven racks in the desired positions while oven is
cool. Slide oven rack outto add or remove food, using dry,
sturdy potholders. Always avoid reaching into the oven to add or
remove food. If a rack must be moved while hot, use a dry
potholder. Do not let potholder contact hot element in oven.
Use racks only in the oven in which they were shipped/pur-
chased.
Use care when opening the oven door. Let hot air or steam
escape before removing or replacing food.
PREPARED FOOD WARNING: Follow food manufacturer's
instructions. If aplastic frozen food container and!or its cover
distorts, warps, or is otherwise damaged during cooking,
immediately discard the food and its container. The food could
be contaminated.
Do not allow aluminum foil or meat probe to contact heating
element.
Always turn off allcontrols when cooking is completed.
Utensim Safety
Follow the manufacturer's directions when using oven cooking
bags.
This appliance has been tested for safe performance using
conventional cookware. Do not use any devices or accessories
that are not specifically recommended in this guide. Do not use
eyelid covers, stove top grills or add-on oven convection
systems.The use of devices or accessories that are not expressly
recommended in this guide can create serious safety hazards,
result in performance problems, and reduce the life of the
components of the appliance.
If pan issmaller than element, a portion of the element wiI[ be
exposed to direct contact and could ignite clothing or pothoider.
Only certain types of glass, glass/ceramic, ceramic, earthenware,
or other glazed utensils are suitable for cooktop or oven service
without breaking due to the sudden change intemperature.
Follow utensil manufacturer's instructions when using glass.
2
Page 4
Turnpanhandletowardcenterofcooktop,notoutintothe
roomoroveranothersurfaceelement.Thisreducestheriskof
burns,ignitionofflammablematerials,orspillageifpanis
accidendybumpedorreachedbysmallchildren.
Besureutensilislargeenoughtoproperlycontainfoodand
avoidboilovers.Pansizeisparticularlyimportantindeepfat
frying.Besurepanwillaccommodatethevolumeoffoodthat
istobeaddedaswellasthebubbleactionoffat.
Neverletapanboildryasthiscoulddamagetheutensiland
theappliance.
NEVER leave surface units unattended especially when using
high heat. An unattended boilover could cause smoking and a
greasy spillover can cause a fire.
This appliance is equipped with different size surface elements.
Select pans with flat bottoms large enough to cover element.
Fitting pan sizeto element will improve cooking efficiency.
CoimEmements
To prevent damage to removable heating elements, do not
immerse, soak or clean in a dishwasher or self-dean oven. A
damaged element could short resulting in afire or shock
hazard.
Make sure drip bowb are in place as absence of these bowls
during cooking could damage wiring.
ProtectEve Liners: Do not use aluminum foil to line surface
unit drip bowls or oven bottoms, except as suggested in the
manual. Improper installation of these liners may result in a risk
of electric shock or fire.
Deep Fat Fryers
Use extreme caution when moving the grease pan or dispos-
ing of hot grease. Allow grease to cool before attempting to
move pan.
Ventimating Hoods
Clean range hood and filters frequently to prevent grease or
other flammable materials from accumulating on hood or filter
and to avoid grease fires.
When flaming foods under the hood, turn the fan on.
Cmeaning Safety
Clean cooktop with caution. Turn off all controls and wait for
appliance partsto cool before touching or cleaning. Clean with
Save These instructions for Future Reference
caution.Usecaretoavoidsteamburnsifawetspongeorcloth
isusedtowipespillsonahotsurface.Somecleanerscan
producenoxiousfumesifappliedtoahotsurface.
CleanonlypaRRslistedinthisguide.
Se f-C ean Oven (select models)
Do notleaverac_, bro!ling pan,food or'co0king utensils,etc.
in the oven during the self.clean cycle.
Do not clean door gasket. The door gasket isessential for a
good seal Care should betaken not to rub, damage, or move
the gasket.
Do not use oven cleaners or oven liners of any kind in or around
any paRRof the self-clean oven.
Before self-cbaning the oven, remove broiler pan, oven racks
and other utensils, and wipe off excessive spillovers to prevent
excessive smoke or flare ups.
It is normal for the cooktop of the range to become hot during a
self-clean cycle.Therefore, touching the cooktop during aclean
cycle should be avoided.
important Safety Notice and
The California Safe Drinking Water and Toxic Enforcement Act
of 1986 (Proposition 65} requires the Governor of California to
publish a list of substances known to the State of California to
cause cancer or reproductive harm, and requires businesses to
warn customers of potential exposures to such substances.
Users of this appliance are hereby warned that when the oven is
engaged in the self-dean cycle, there may be some low-level
exposure to some of the listed substances, including carbon
monoxide. Exposure to these substances can be minimized by
properly venting the oven to the outdoors by opening the
windows and/or door in the room where the appliance is
located during the self-dean cycle.
UMPORTANT NOTICE REGARDUNG PET BURDS: Never keep
pet birds inthe kitchen or in rooms where the fumes from the
kitchen could reach. Birds have avery sensitive respiratory
system. Fumes released during an oven self-cbaning cycle may
be harmful or fatal to birds. Fumes released due to overheated
cooking oil, fat, margarine and overheated non-stick cookware
may be equally harmful
3
Page 5
Surface Controls
Use to turn on the surface elements. An hfhite choice of
heat settings is avaflabHefrom Low to High. The knobs can
be set on or between any of the settings.
Setting the Controls
1. Place pan on surface element.
2. Push in and turn the knob in either direction to the desired
heat setting.
° The control panel is marked to identify' which _
element the knob controls. For example, the
graphic
3. There is an dement "ON" indicator light on the control
panel When any surface control knob is turned on, the
light will turn on. The light will turn off when all the
surface dements are turned off.
4= After cooking, turn knob to OFF= Remove pan.
at right indicates left front dement. 0 0
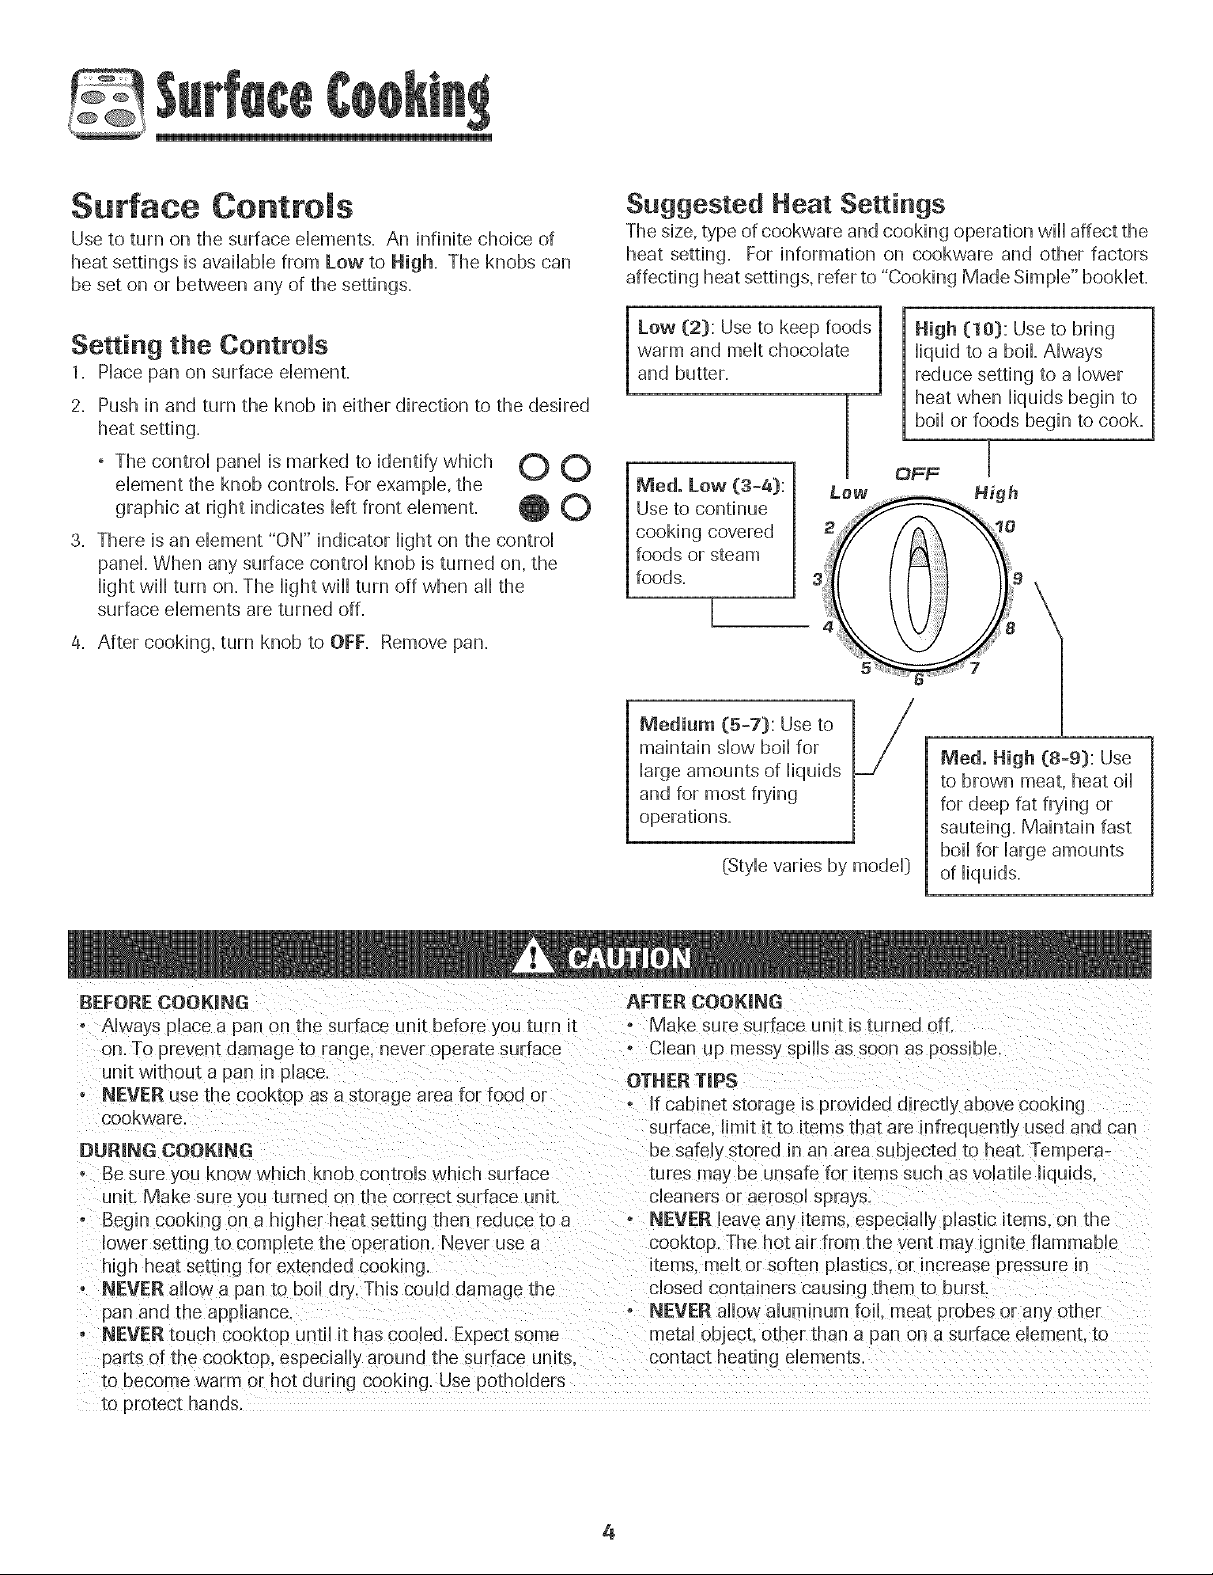
Suggested Heat Settings
The size,type of cookware and cooking operation will affect the
heat setting. For information on cookware and other factors
affecting heat settings, refer to "Cooking Made Simple" booklet.
High (10): Use to bring
warm and melt chocolate |
Low (2): Use to keep foods 1
and butter. |
Meal. Low (3°4):
Use to continue
cooking covered
foods or steam
foods.
Medium (5-7): Use to
maintain slow boil for
large amounts of liquids
and for most frying
operations.
(Style varies by model]
liquid to a boil. Always
reduce setting to a lower
heat when liquids begin to
boil or foods begin to cook.
OFF I
Medo High (8-9): Use
to brown meat, heat oil
for deep fat frying or
sauteing. Maintain fast
boil for large amounts
of liquids.
BEFORECOOK|NG AFTER COOKING
* Always place a pan on the surface unit before you turn it o Make sure suFfaceunit is turned off.
on. To prevent damage to rail .3e.never operate surface - Clean up messy spills as soon as possible.
unit without a pan in place.
o NEVER use the cooktop as a storage area for rood or
cookware
DURING COOKING
o Be sure you know which knob controls which surface
unit. Make sure you turned on the correct surface unit.
* Begin cooking on a higher heat setting then reduce to a
lower setting to complete the operation. Never use a
high heat setting for extended cooking.
o NEVER allow a pan to boil dry. This could damage the
pan and the appliance
o NEVER Louchcooktop until it has cooled. Expect some
parts of the cooktop, especially around the surface units.
te uecome warm or hot during cooking. Use potholders
to protect hands.
OTHERTiPS
° if cabinet storage msprovided directly above cooking
sur[ace. limit it to items that are infrequently used and can
be safely storee n an area subjected to heat. Tempera-
tures ma,_be unsafe for items such as volatile liquids,
cleaners or aerosol sprays.
• NEVER leave any items, especially plastic items, on the
cooktop. The hot air from the vent may ignite flammable
kems melt or soften plastics, or increase pressure in
closed containers causing them to burst
NEVER allow aluminum foil. meat probes or any other
metal object, other than a pan on a surface element, to
...............................
4
Page 6
@
Coi E ement Surface
° Cban cooktop after each use.
° Wipe acidic or sugary spills as soon as the cooktop
has coobd as these spills may discobr or etch the
porcelain.
To protect drip bowl finish:
° To bssen discobradon and crazing, avoid using high
heat for bng periods.
° Do not use oversized cookware. PansshouM not
extend more than 1-2 inches beyond the dement.
° When home canning or cooking with big pots, use
the Canning Ebment [Modal CE1}.Contact your
dealer for details or caii 1-877-232-6771 USA
or 1-800-688-8408 Canada to order.
, Clean frequently. (See page 17.}
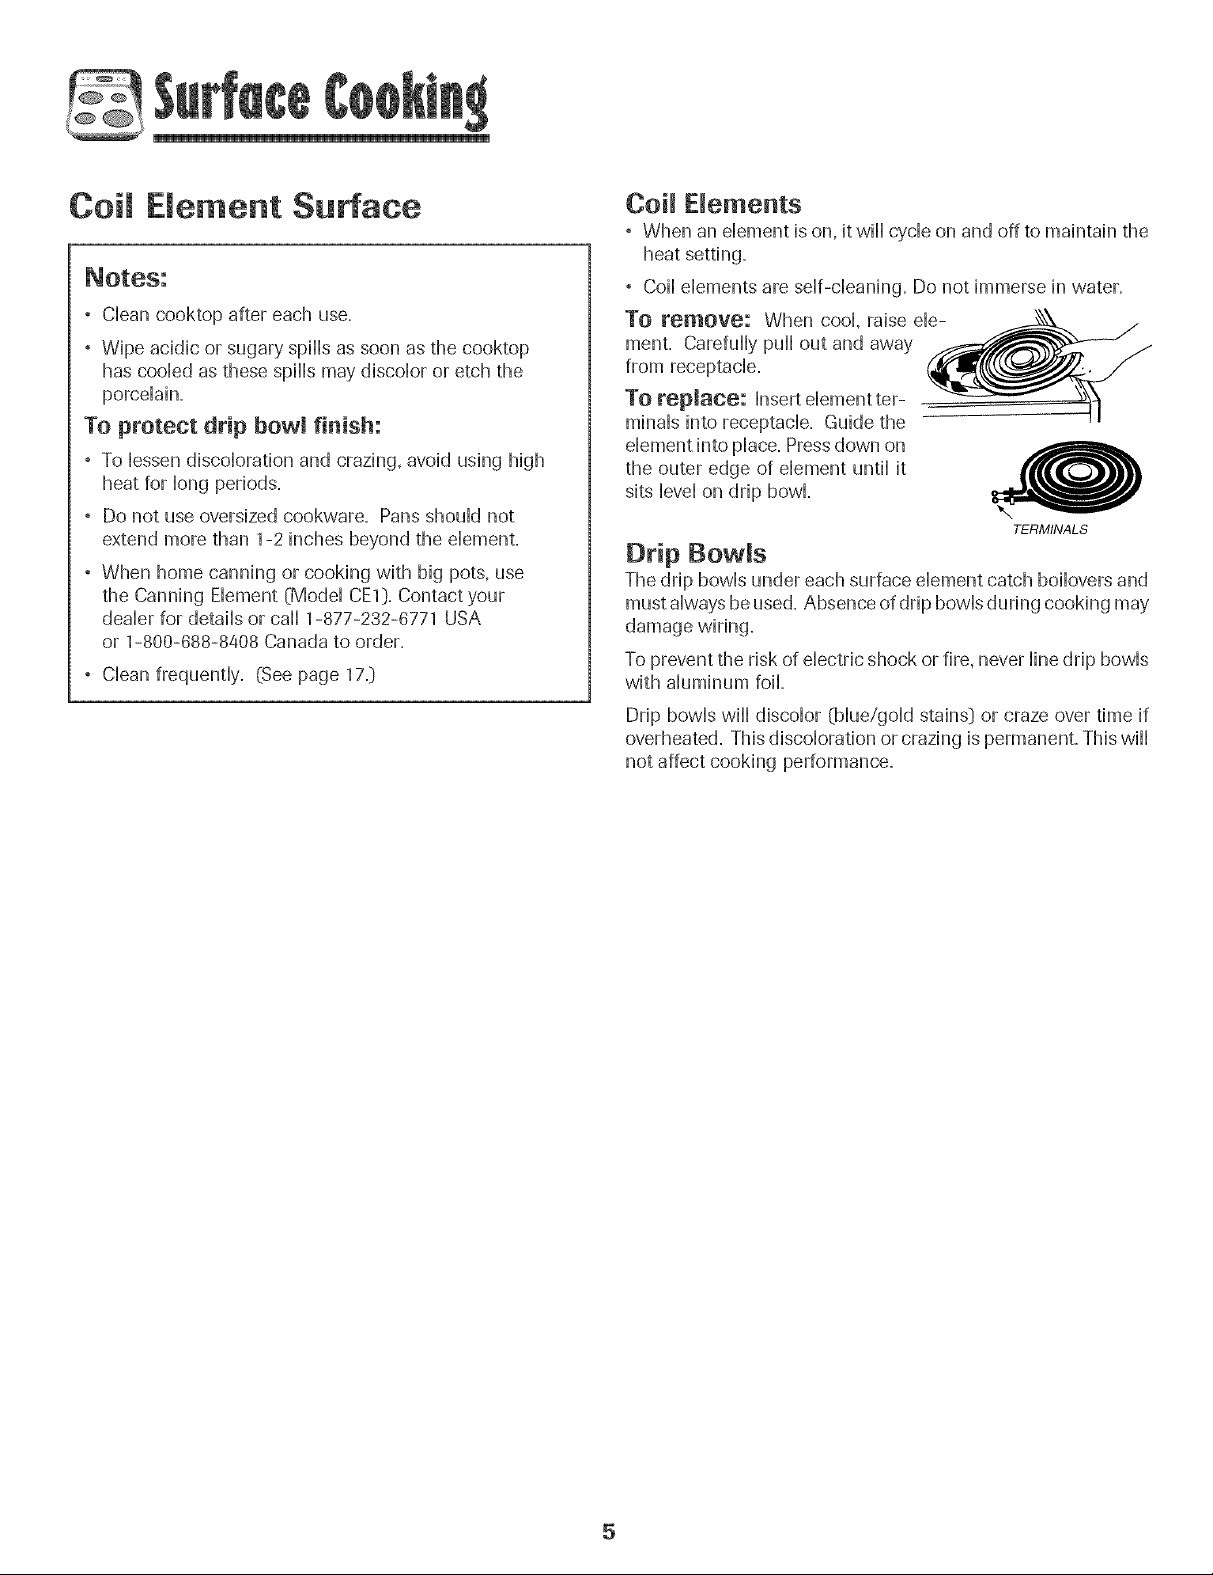
Coil Dements
, When an element is on, it will cycle on and off to maintain the
heat setting.
° Coil dements are self-cleaning. Do not immerse in water.
To remove: When cool, raise ele-
menL Carefully pull out and away
from receptacle.
To replace: Insert dement ter-
minals into receptacle. Guide the
dement into place. Pressdown on
the outer edge of element until it
sits level on drip bowl
TERMINALS
Drip BowRs
The drip bowls under each surface element catch boilovers and
mustalways be used. Absence of drip bowls during cooking may
damage wiring.
To prevent the risk of electric shock or fire, never line drip bowls
with aluminum foil
Drip bowls wiii discolor {blue/gold stains} or craze over time if
overheated. Thisdiscoloration orcrazing is permanent. This wiii
not affect cooking performance.
5
Page 7
@
Manual Clean Oven Control
(select models}
\
\
\
\
\
\
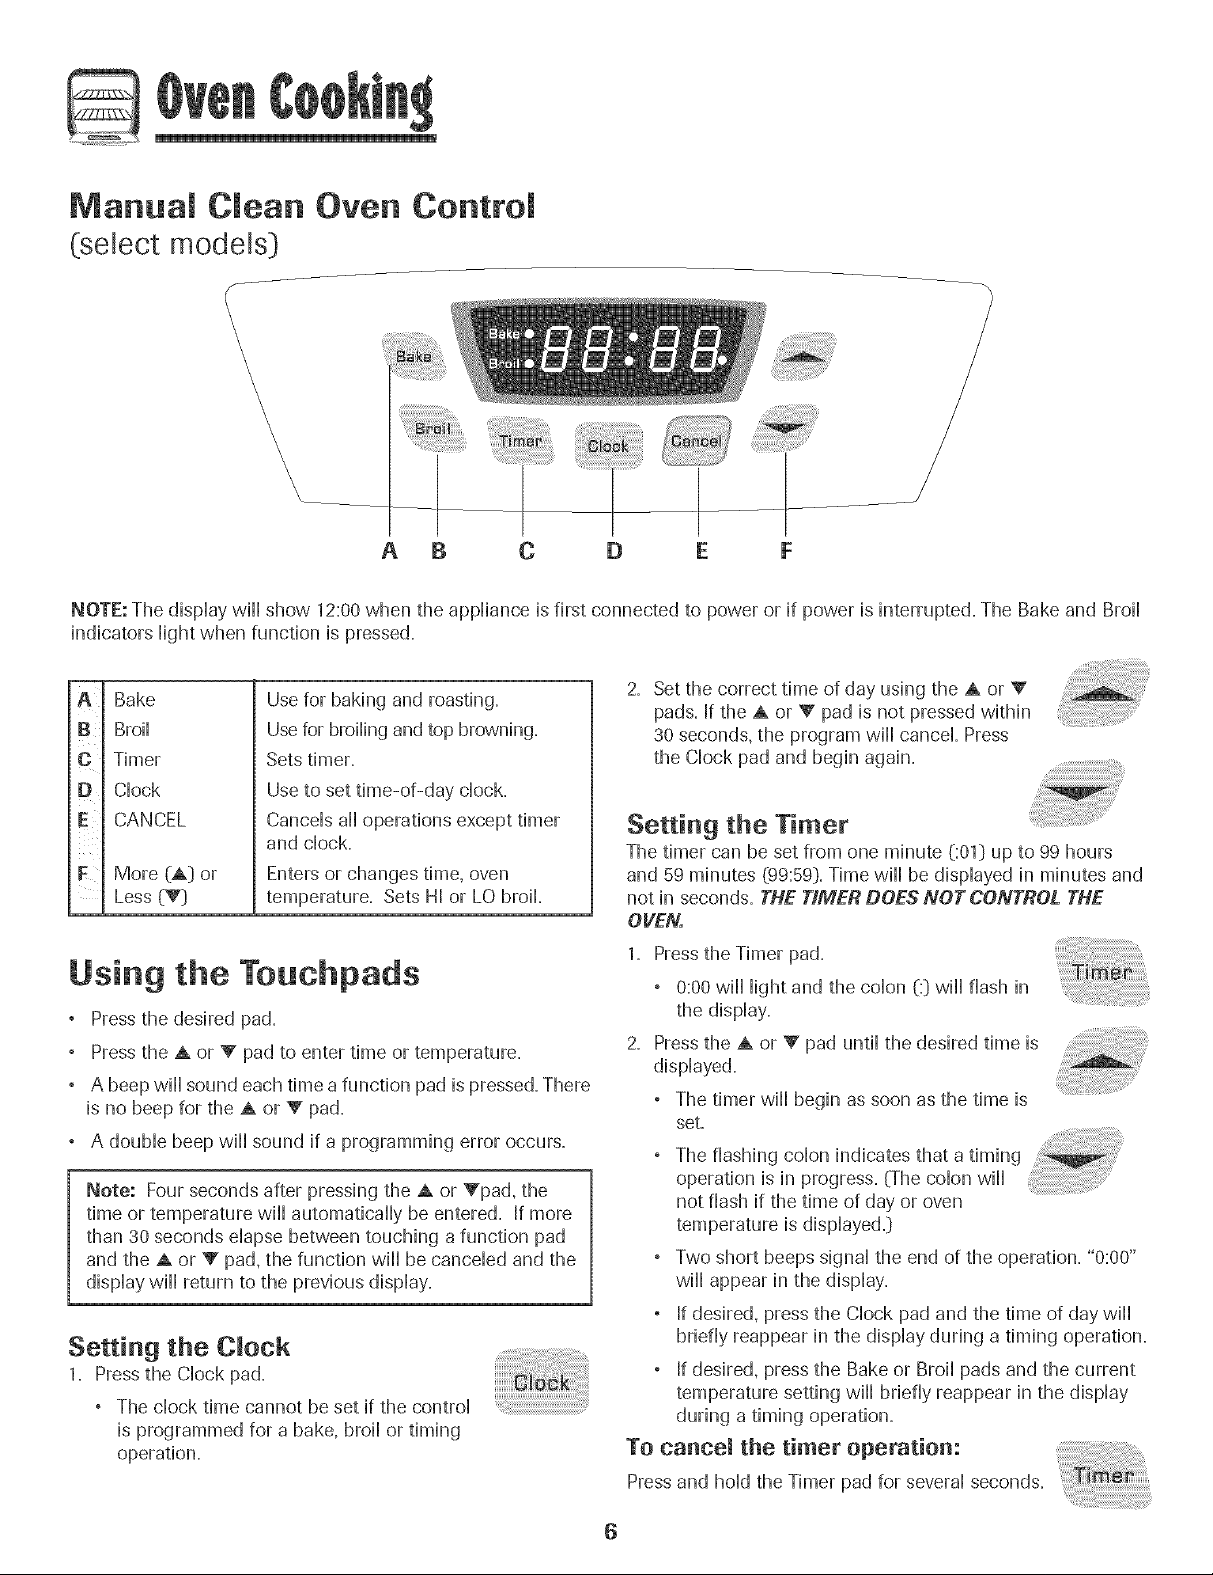
NOTE: The display will show 12:00 when the appliance is first connected to power or if power is interrupted. The Bake and Broil
indicators light when function is pressed.
A
D
E
F
Bake
Broil
Timer
Clock
CANCEL
Use for baking and roasting.
Use for broiling and top browning.
Sets timer.
Use to set time-of-day clock.
Cancels all operations except timer
and clock.
Enters or changes time, oven
temperature. Sets HI or LO broil
Using the Teuchpads
Pressthe desired pad=
Pressthe A or V"pad to enter time or temperature.
° A beep will sound each time a function pad ispressed. There
is no beep for the A or V pad=
, A double beep wiii sound if a programming error occurs.
Note: Four seconds after pressing the A or Vpad, the
time or temperature wiil automatically be entered. If more
than 30 seconds elapse between touching a function pad
and the A or V pad, the function wiil be canceled and the
display wiil return to the previous display.
Setting the Clock
1. Pressthe Clock pad.
° The clock time cannot be set if the control
is programmed for a bake, broil or timing
operation.
2. Set the correct time of day using the A or Y"
pads. If the A or V pad is not pressed within
30 seconds, the program will cancel Press
the Clock pad and begin again.
Setting the Timer
The timer can be set from one minute 001} up to 99 hours
and 59 minutes (99:59}. Time will be displayed in minutes and
not in seconds. THE TIMER DOES NOT CONTROL THE
OVEN.
1. Pressthe Timer pad.
° 0:00wiii iight and the coion (:} wiii flash in
the display.
2. Pressthe A or V" pad untii the desired time is
displayed.
° The timer wiii begin as soon as the time is
set.
" The flashing colon indicates that a timing
operation is in progress. (The colon wiii
not flash if the time of day or oven
temperature is displayed.}
° Two short beeps signal the end of the operation. "0:00"
wiii appear in the display.
If desired, pressthe Clock pad and the time of day wiii
briefly reappear in the display during a timing operation.
If desired, pressthe Bake or Broil pads and the current
temperature setting wiii briefly reappear in the display
during a timing operation.
To cancel the timer operation:
Press and hold the Timer pad for several seconds.
Page 8
Baking, Roasting and Broiling
For addKionaHbakhg, roasthg and broHhg thnes and tips, see
"Cooking Made Simple" booHeL
Setting the Controls For Baking or Roasting:
1= Press Bake pad=
, 000 wHHHightand the Bake indicator Hight
wHHflash in the dispHay.
, If you press the Bake pad and do not set an oven
temperature within 30seconds, the program wHH
automatically cancel and the time of day will reappear
in the display.
Press the A or V pad until the desired oven
temperature is displayed.
, The oven temperature can be set from
170° to 550° F.
350° will appear in the display when
either A or V" pad is pressed once.
Press and tap the A or V pad to change the oven
temperature by 5° increments or press and hold the
A or V pad to change the oven temperature by 10°
increments.
100° or the actual oven temperature, whichever is
higher, will appear in the display when the oven turns
on,
° The temperature in the display will increase in 5°
increments until preset temperature is reached. A single
beep will sound when the oven is preheated.
° Allow 10to 15 minutes for the oven to preheat.
° To recall preset temperature during preheat, press the
Bake pad. The temperature will be displayed for three
seconds.
3. Place food in the oven. Check food for alonenessat the
minimum cooking time.
4. At the end of cooking, press the Cancel pad
to turn the oven off and remove the food
from the oven.
° The oven features an automatic shut-off. If the oven is
left on for 12hours it will automatically turn off and 000
will appear in the display. Press the Cancel pad and the
time of day will reappear in the display.
Setting the ControJs For Broiling:
For best results, use pan designed for broiling.
1. Place broiler pan on recommended rack position. CSee
chart on page 13.]
2. Pressthe Broil pad.
, SEtwill light and the Broil indicator light
will flash in the display.
3. Pressthe A pad to select Hi (high] broil or
the V pad to set Lo (low] broil.
, Select Hi broil for normal broiling.
, Select Lo broil for low temperature
broiling to avoid excessive browning of
longer cooking foods like poultry,. ....
, If you do not select Hi or Lo Broil within 30 seconds, the
program will automatically cancel and the time of day
will reappear in the display.
4. Preheat broil element for three minutes. Broil with the oven
door open to the first stop position _about 4 inches].
5. After broiling, press Cancel to turn the oven
off and remove the broiler pan from the
oven. The current time of day will reappear
in the display.
° To change oven temperatare during cooking, press
the Bake pad, then press the A or V pad until the
desired temperature is displayed.
, To change oven temperature during preheat, press
the Bake pad twice, then pressthe A or V pad until
the desired temperature is displayed.
Page 9
Self-Clean Oven Control
(select models) a B
J
\
\
\
\
\
\
\
\
\
\
\
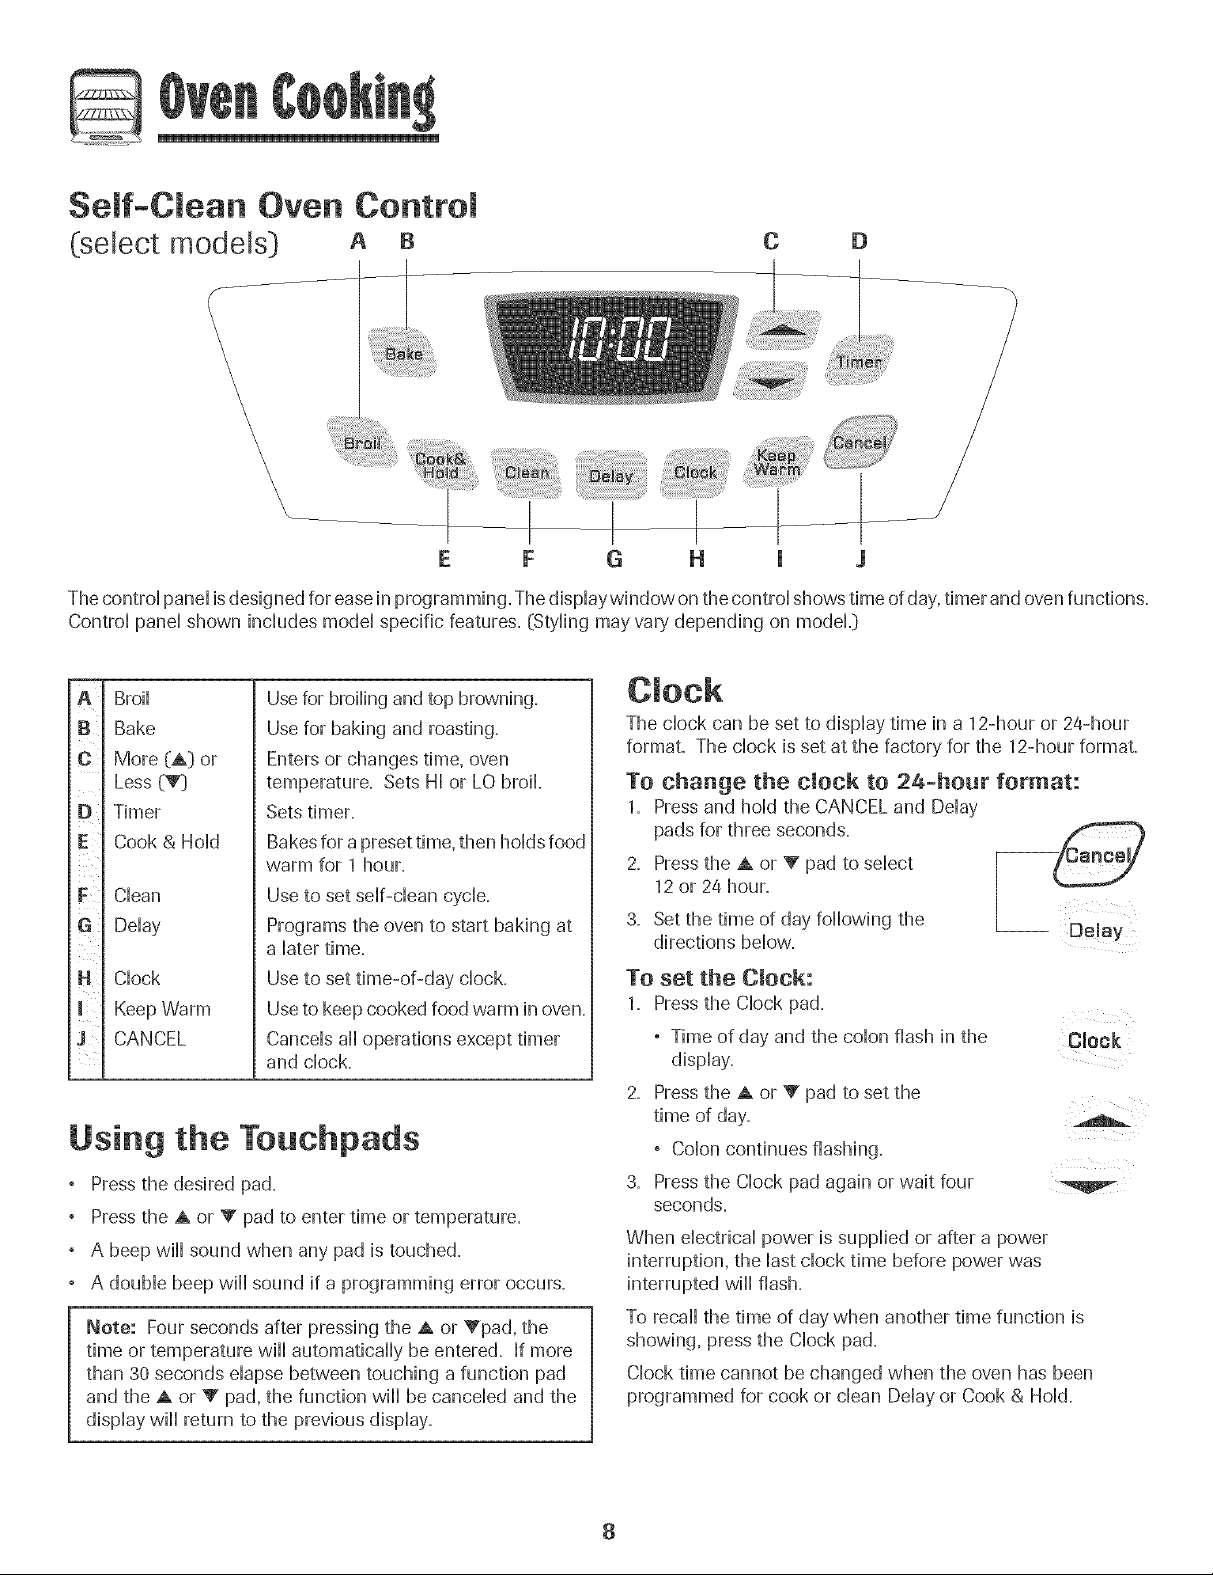
The controi pand isdesigned for ease in programming. Thedispiaywindow on the controi shows time ofday, timerand ovenfunctions.
Controi pand shown inciudes modal specific features. (Styiing may vary depending on modeL}
A
Broii
B
Bake
C
More (A) or
Less {V}
D
Timer
Cook & Hold
Clean
G!
Delay
Clock
Keep Warm
CANCEL
Using the Touchpads
Pressthe desired pad.
Pressthe A or V pad to enter time or temperature.
° A beep will sound when any pad is touched.
° A double beep wiii sound if a programming error occurs.
Note: Four seconds after pressing the A or Vpad, the
time or temperature will automatically be entered. If more
than 30 seconds elapse between touching a function pad
and the A or V pad, the function will be canceled and the
display will return to the previous display.
Use for broiling and top browning.
Use for baking and roasting.
Enters or changes time, oven
temperature. Sets HI or LO broil
Sets timer.
Bakes for a preset time, then holds food
warm for 1 hour.
Use to set self-clean cycle.
Programs the oven to start baking at
a later time.
Use to set time-of-day clock.
Use to keep cooked food warm in oven.
Cancels all operations except timer
and clock.
The clock can be set to display time in a 12-hour or 2a-hour
format. The clock is set at the factory for the 12-hour format.
To change the clock to 24-hour format:
1. Pressand hold the CANCEL and Delay
pads for three seconds.
2. Pressthe A or V" pad to select
12 or 2ahour.
Set the time of day following the -- Deiay
directions below.
To set the Clock:
1. Pressthe Clock pad.
° Time of day and the colon flash in the
display.
2. Pressthe A or V pad to set the
time of day.
° Colon continues flashing.
3. Pressthe Clock pad again or wait four
seconds.
When electrical power is supplied or after a power
interruption, the last clock time before power was
interrupted wiii flash.
To recall the time of day when another time function is
showing, press the Clock pad.
Clock time cannot be changed when the oven has been
programmed for cook or clean Delayor Cook & Hold.
C D
Clock
A
8
Page 10
To cancem the Clock display:
If you do not want the time of day to dispiay:
Press and hoid the CANCEL and CHockpads
for three seconds. The time of day wHi
disappear from the dispiay
When the chockdispiay is cancelled, press
the CHockpad to brbfiy dispiay the time
of day.
__ Cmock
To restore the Clock display:
Press and hoid the CANCEL and CHockpads for three sec-
onds. The time of day wHireappear in the dispiay.
The timer can be set from one minute (00:01} up to 99 hours
and 59 minutes @9:59}.
The timer can be used independently of any other oven
activity. It can also be set while another oven function is
operating.
The Timer does not control the oven. It only controls a
beeper.
To set the Timer:
1.
Press the Timer pad.
.0:00 lights in the display.
, The colon flashes in the display.
2. Press the A or V pad untii the
correct time appears in the display.
, The colon will continue to flash.
3. PressTimer pad again or wait four seconds.
, The colon continues flashing and the time begins
counting down.
, The last minute of the timer countdown wiii be displayed
aS seconds.
4. At the end of the set time, one long beep wiii sound.
Timer
To caneem the Timer:
1. Pressand hoid the Timer pad for three seconds.
OR
2. Press the Timer pad and set the time to 00:00.
Locking the Controms
The touchpad controls can be locked for safety',cleaning, or
to prevent unwanted use. They will not function when locked.
If the oven is currently in use, the controls cannot be locked.
The current time of day will remain in the display when the
controls are locked.
To lock:
Press and hold the CANCEL and Cook &
Hold pads for three seconds.
LOCKflashes in the display.
To unlock:
Press and hold the CANCEL and Cook & Hold pads for three
seconds.
LOCKdisappears from the display.
HoHd
Faumt Codes
BAKE or LOCK may flash rapidiy in the dispiay to aiert you if
there is an error or a problem. If BAKE or LOCK flash in the
display, press CANCEL pad. If BAKEor LOCK continue to
flash, disconnect power to the appliance. Wait a few minutes,
and then reconnect power. If the flashing still continues,
disconnect power to the appliance and call an authorized
servicer.
To set Bake:
1. Pressthe Bake pad. Bake
, BAKE will flash.
+ 000 wiii light in the display.
Select the oven temperature. The oven tempera-
ture can be set from 170° to 550°. Press or press
and hold the A or V" pads.
+ 350°wiii light when either pad is first pressed.
Press the A pad to increase the temperature,
Press the V pad to decrease the temperature,
3. Press Bake pad again or wait four seconds.
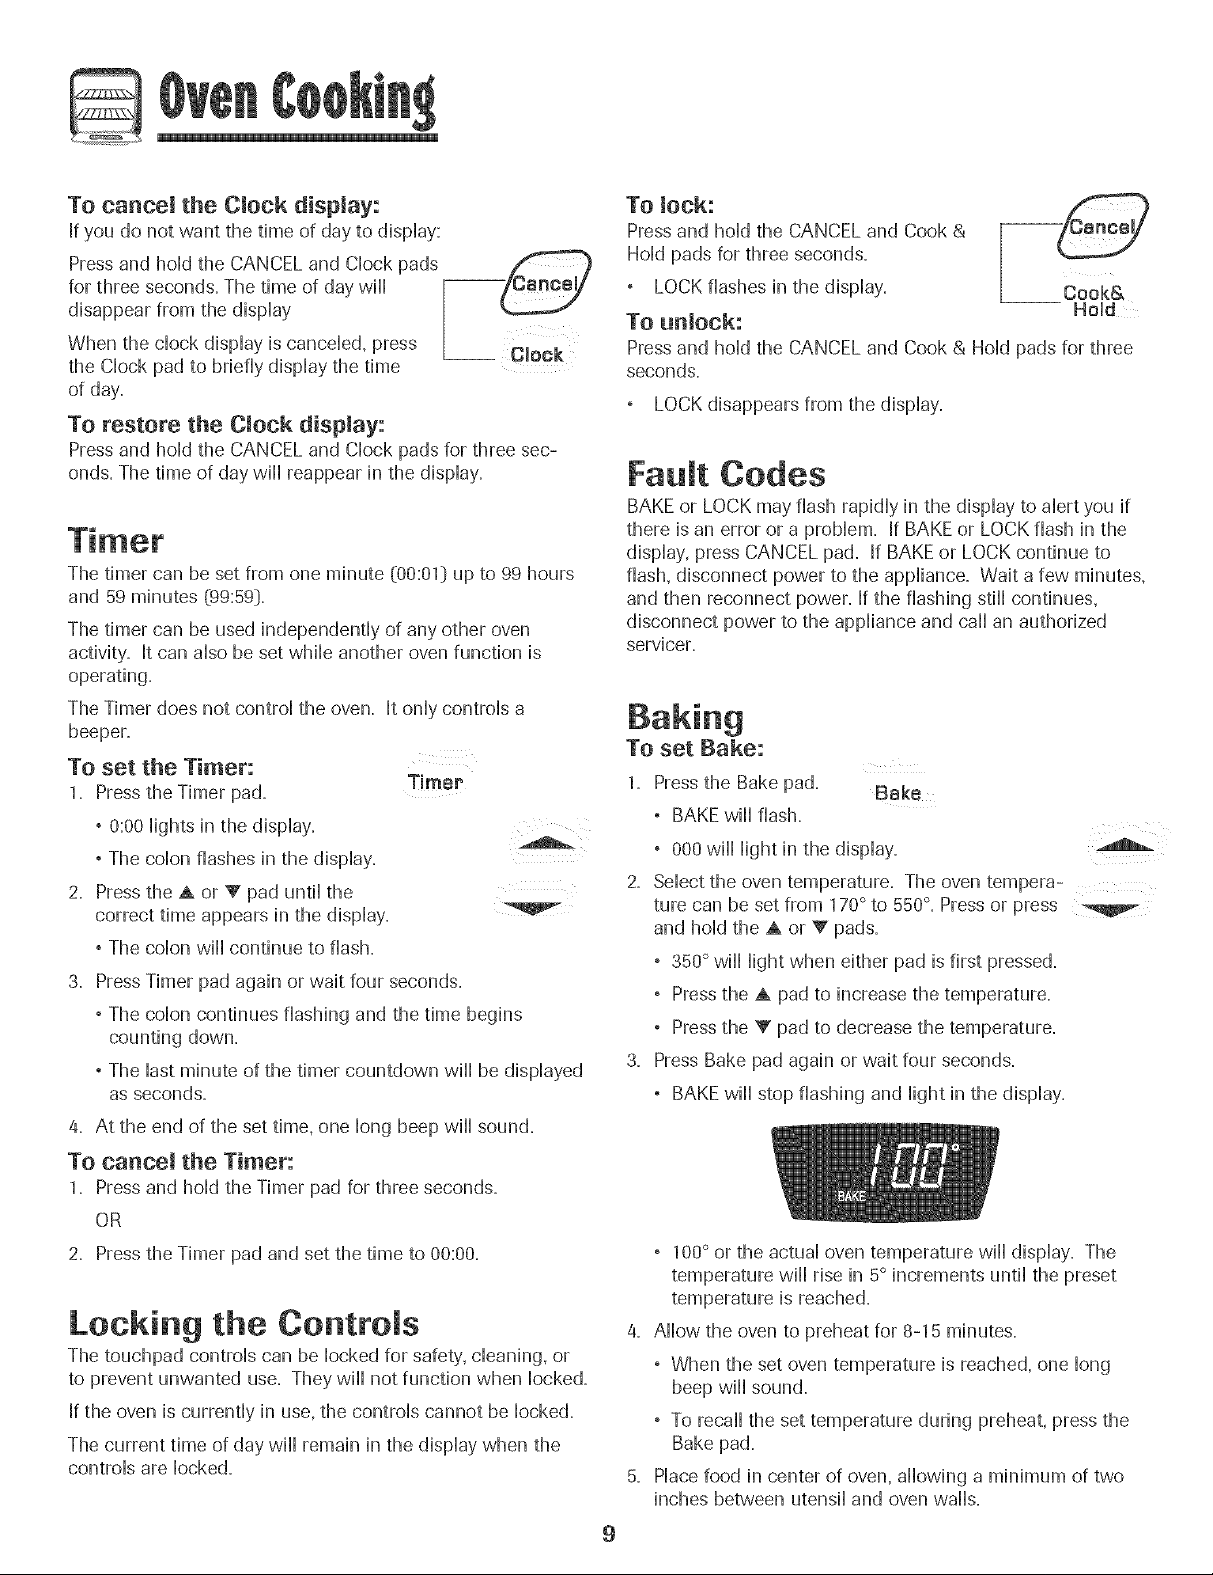
BAKE wiii stop flashing and light in the display.
, 100° or the actual oven temperature wiii display. The
temperature will rise in 5° increments until the preset
temperature is reached.
4. Allow the oven to preheat for 8-15 minutes.
, When the set oven temperature is reached, one long
beep will sound.
, To recall the set temperature during preheat, press the
Bake pad.
5. Place food in center of oven, allowing a minimum of two
inches beta/een utensil and oven walls.
9
Page 11
6. Checkcookingprogress.Cookbngerifneeded.
7. Whencookingisfinished,pressCANCEL.
8. Removefoodfromtheoven.
Baking Notes:
To change oven temperature daring cooking, press
the Bake pad, then press the A or V pad untii the
desired temperature is dispDyed.
To change oven temperature during preheat, press
the Bake pad twice, then press the A or V pad untii
the desired temperature is dispDyed.
If you forget to turn off the oven, it will automatically turn
off at the end of 12 hours. If you wish to deactivate this
feature, see page 12.
For additionai baking and roasting tips, see "Cooking
Made Simple" bookleL
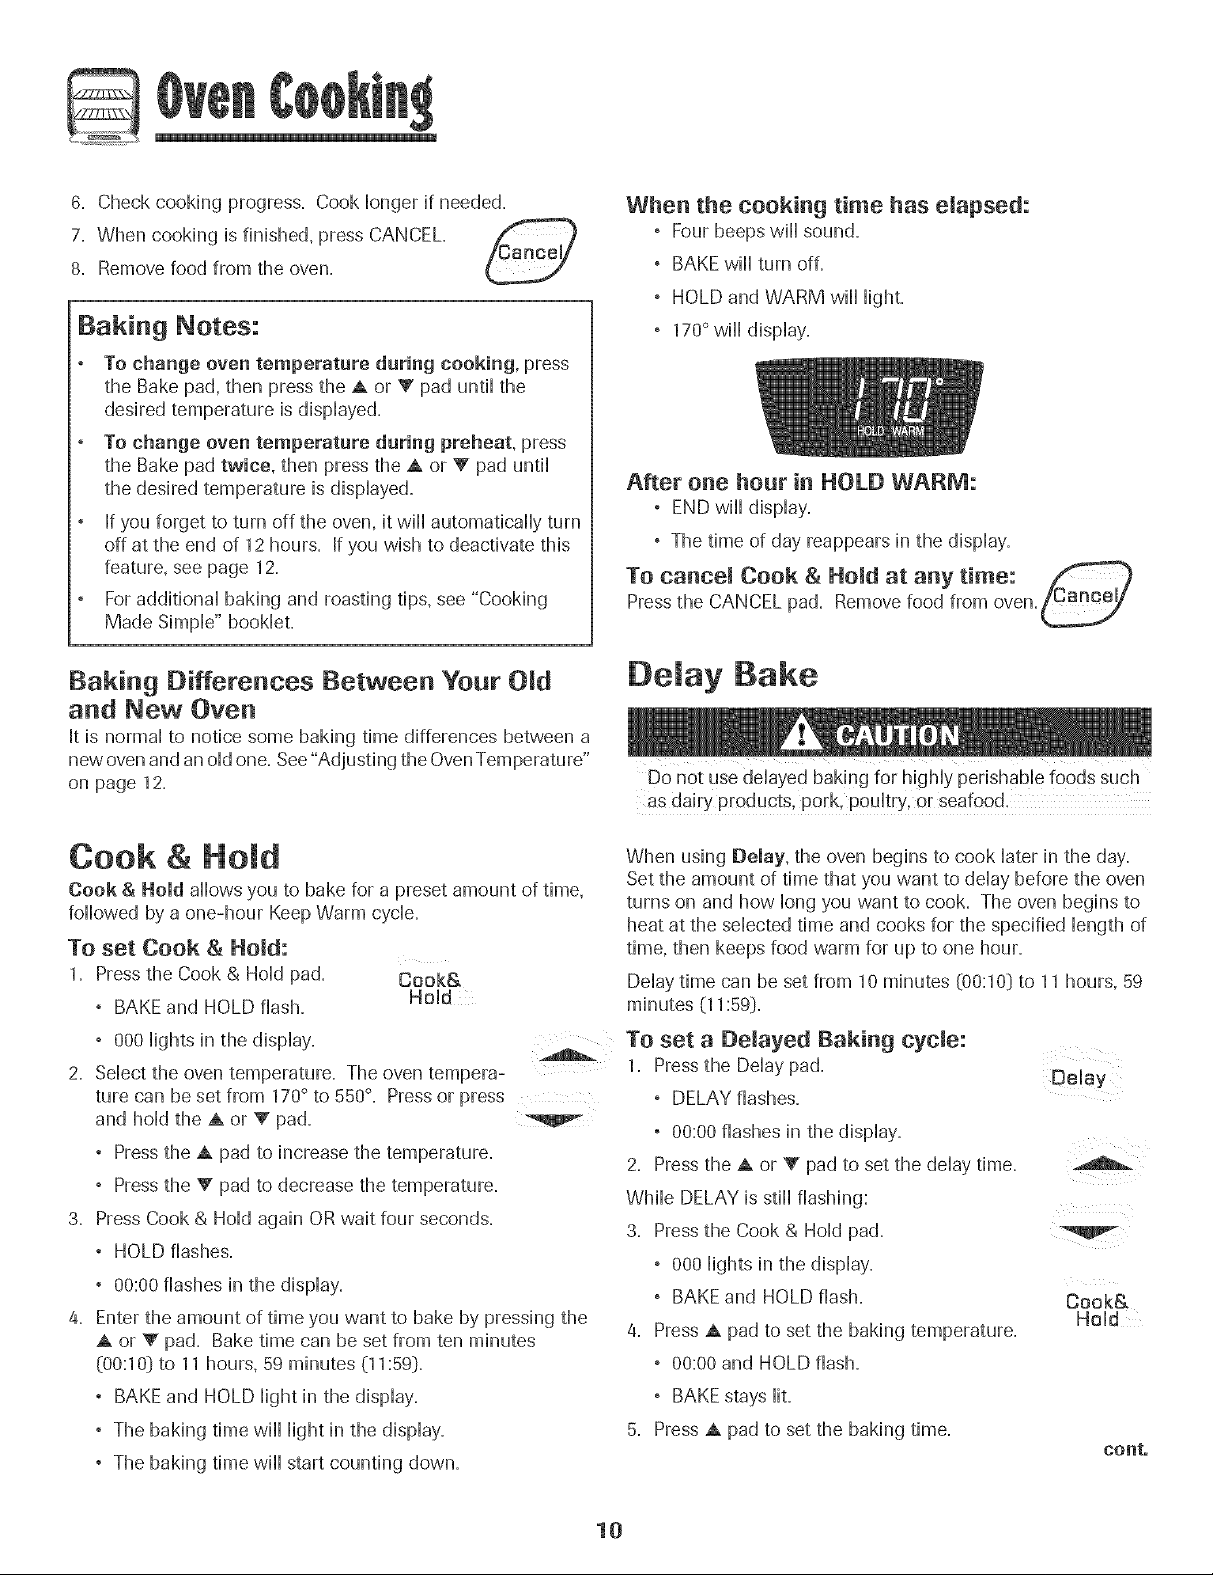
When the cooking time has elapsed:
° Four beeps wiii sound.
° BAKE will turn off.
° HOLD and WARM will light.
° 170°will display.
After one hour in HOLD WARM:
° END will display.
° The time of day reappears in the display.
To cancem Cook & Hemalat any time:
Press the CANCEL pad. Remove food from oven./L'dnu_y
Baking Differences Between Your O_d
and New Oven
It is norma] to notice some baking time differences between a
new ovenand an old one. See"Adjusting the OvenTemperature"
on page 12.
Cook & Hold
Cook & Hold allows you to bake for a preset amount of time,
followed by a one-hour Keep Warm cycle.
To set Cook & Hold:
1. Pressthe Cook & Hold pad. Cook&
, BAKE and HOLD flash. Hold
, 000 lights in the display.
2. Select the oven temperature. The oven tempera-
ture can be set from170° to 550°. Pressor press
and hold the A or V" pad.
, Press the A pad to increase the temperature.
, Press the Y pad to decrease the temperature.
3. Press Cook & Hold again OR wait four seconds.
° HOLD flashes.
° 00:00 flashes in the display.
4. Enter the amount of time you want to bake by pressing the
A or V pad. Bake time can be set from ten minutes
{00:10} to 11hours, 59 minutes {11:59}.
° BAKE and HOLD light in the display.
° The baking time wiii iight in the display.
° The baking time wiii start counting down.
A
De ay Bake
as dairy products, pork, poultry, or seafood,
When using Delay, the oven begins to cook later in the day.
Set the amount of time that you want to delay before the oven
turns on and how long you want to cook. The oven begins to
heat at the selected time and cooks for the specified length of
time, then keeps food warm for up to one hour.
Delay time can be set from 10minutes (00:10} to 11hours, 59
To set a Demayed Baking cycle:
1. Presstile Delay pad. Delay
° DELAY flashes.
° 00:00 flashes in the display.
2. Press the A or V pad to set the delay time.
While DELAY is still flashing:
3. Pressthe Cook & Hold pad.
° 000 lights in the display.
° BAKE and HOLD flash.
4. Press A pad to set the baking temperature.
° 00:00 and HOLD flash.
° BAKE stays lit.
5. Press A pad to set the baking time.
it
Cook&
Hold
conto
10
Page 12
@
° The Dday time, DELAY, BAKE and HOLD Hightin
the dispHay.
When the Delay time has expired:
° DELAY will turn off.
, Baking time isdispHayed.
° BAKE and HOLD are dispHayed.
To set a Delay when Cook & Hold has already
been programmed:
1. Pressthe DeHaypad.
° DELAY flashes.
, 00:00 appears
2. Press the A or V pad to set the
deHaytime.
° After four seconds, DELAY will
stay ]it to remind you that a delayed
cooking cycle has been set.
De!ay
When the Delay time has expired and the oven
starts:
, The baking time will be dispHayed.
, DELAY will turn off.
° BAKE and HOLD will remain Hit.
To eaneeh
Press the CANCEL pad.
° All timed and untimed cooking functions will be
canceled.
° The time of day will reappear in the display.
_otes:
Do not use delayed baking for items that require a
preheated oven, such as cakes, cookies, and breads.
Do not use delayed baking if oven is already hot.
Keep Warm
For safely keeping foods warm or for warming breads and
plates.
To set Keep Warm: Kaep
1. Pressthe Keep Warm pad. Warm
, WARM flashes.
,000 appears in the display.
Select the Keep Warm temperature. The
Keep Warm temperature can be set from
145° to 190°.Press or press and hold the A
or V pad.
,170 ° will light when either pad is first pressed.
, Pressthe A pad to increase the temperature.
, Pressthe V pad to decrease the temperature.
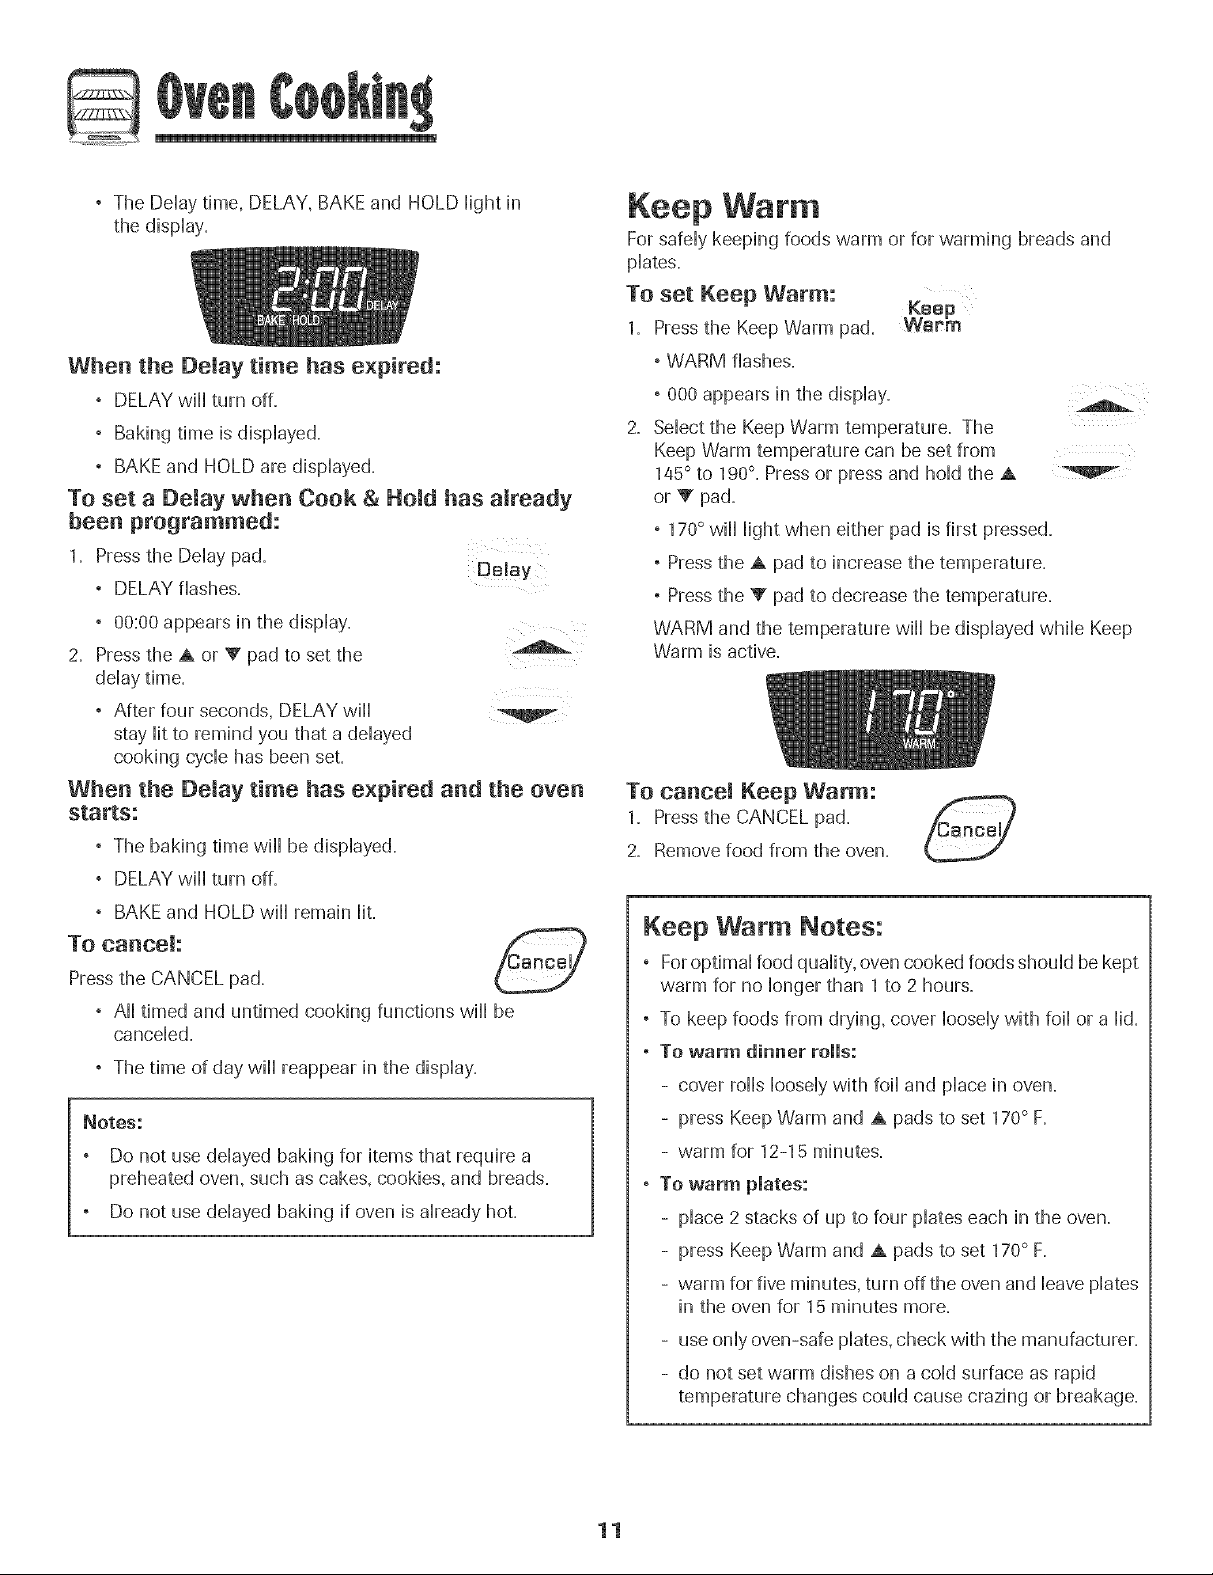
WARM and the temperature will be displayed while Keep
Warm is active.
To canoe! Keep Warm:
1. Pressthe CANCEL pad. _.P_anc_/
2. Remove food from the oven.
Keep Warm Notes:
° For optimal food quality',oven cooked foods should bekept
warm for no longer than 1to 2 hours.
° To keep foods from drying, cover looselywith foil or a lid.
. To warm dinner roils:
- cover rolls loosely with foil and place in oven.
- press Keep Warm and A pads to set 170° F.
- warm for 12-15 minutes.
, To warm plates:
- place 2 stacks of up to four plates each in the oven.
- press Keep Warm and A pads to set 170° F.
- warm for five minutes, turn off the oven and leave plates
in the oven for 15 minutes more.
11
- use only oven-safe plates, check with the manufacturer.
- do not set warm dishes on a cold surface as rapid
temperature changes could cause crazing or breakage.
Page 13
@
Automatic Shut-Off/Sabbath
Mode
The oven will automatically turn off after 12hours if you
accidentally Heaveit on= This safety feature can be turned off=
TO cancel the 12-hour shut-off and run the
oven continuously for 72 hours:
1. Set the oven to bake (see page 9]=
2= Press and hoHdthe CHockpad for five seconds=
° SAb wifl be dispHayedand flash for five seconds.
, SAb wifl then be dispHayedcontinuously until turned off
or until the 72-hour time limit is reached.
, BAKEwill also be displayed if a bake cycle is in use
while the oven is in Sabbath Mode.
All other functions EXCEPTBAKE (Timer, KeepWarm,
Clean, etc.:)are locked out during the Sabbath Mode.
To cancel Bake when in Sabbath Mode:
, BAKEwill turn off in the display.
Press CANCEL.
° No beeps will sound.
To cancel the Sabbath Mode:
1. Pressthe Clock pad for five seconds.
OR
2. After 72 hours, the Sabbath Mode will end.
, SAb will flash for five seconds.
Clock
Clock
Adjusting the Oven Temperature
Oven temperatures are carefully tested for accuracy at the
factory. It is normal to notice some baking or browning
differences between a new oven and an old one= As ranges
get older, the oven temperature can shift.
You may adjust the oven temperature if you think the oven is
not baking or browning correctly. To decide how much to
change the temperature, set the temperature 25° higher or
lower than your recipe recommends, then bake. The results
of the "test" should give you an idea of how much to adjust
the temperature.
To adjust the oven temperature:
1. PressBake. Bake
2. Enter 550° by pressing the A pad.
3. Pressand hold the Bake pad for several
seconds or until 0° appears in the display.
If the oven temperature was previously adjusted, the
change will be displayed. Forexample, if the oven tem-
perature was reduced by 15° the display will show "-15 °''-
4. Pressthe A or V pad to adjust the temperature.
Eachtime a pad is pressed, the temperature changes by
5°- The oven temperature can be increased or decreased
by 5° to 35°-
5. The time of day will automatically reappear in the display.
You do not need to readjust the oven temperature if there
is a power failure or interruption. Broiling and cleaning
temperatures cannot be adjusted.
, The time of day will return to the display.
Sabbath Mode Notes:
, Sabbath Mode can be turned on at any time with or
without the oven on.
° Sabbath Mode cannot be turned on if the touchpads are
locked out or when the door is locked.
, If the oven is baking when Sabbath Mode is set, "BAKE"
will go out at the end of the baking cycle. There will be
no audible beeps.
, When the Sabbath Mode is started, no preheat beep will
sound.
, All prompts, messages and beeps are deactivated when
Sabbath Mode is active.
, Pressing CANCELwill cancel a Bake cycle, however the
control will stay in the Sabbath Mode.
, If power fails, the oven will power up in Sabbath Mode with
72 hours remaining and no cycle active.
12
Page 14
G
To set Broih
1. Pressthe Broil pad. Broil
° BROILflashes.
° SET is dispHayed.
2. Pressthe A pad to set HIbroil or press the V pad to set
LO broil.
° HI or LO wflHbe dispHayed.
° Sdect HI broil (550° F)for normal broiling. Sdect
LO broil (450° F:)for How-temperature broiling of Honger
cooking foods such as pouHtry.
3. After four seconds, the oven wflHstart.
° BROILwflHremain Hit.
4. For optimum browning, preheat broil dement for 3-4
minutes before adding food.
5. PHacefood in the oven. Leave oven door open about four
inches (the first stop:).
0. Turn meat once about halfway through cooking.
7. When food is cooked, press the CANCEL pad.
Remove food and broiler pan from the oven.
, The time of day will reappear in the
display.
BroH Notes:
, Forbest results when broiling, use a pan designed for
broiling.
, Expect broil times to increase and browning to be
slightly lighter if appliance is installed on a 208-volt
circuit.
HI is used for most broiling. Use LObroil when broiling
longer cooking foods. The lower temperature allows
food to cook to the well done stage without excessive
browning.
Broil times may be longer when the lower broflinc
temperature is selected.
Foradditional broiling tips and temperatures, refer to the
"Cooking Made SimpW' booklet.
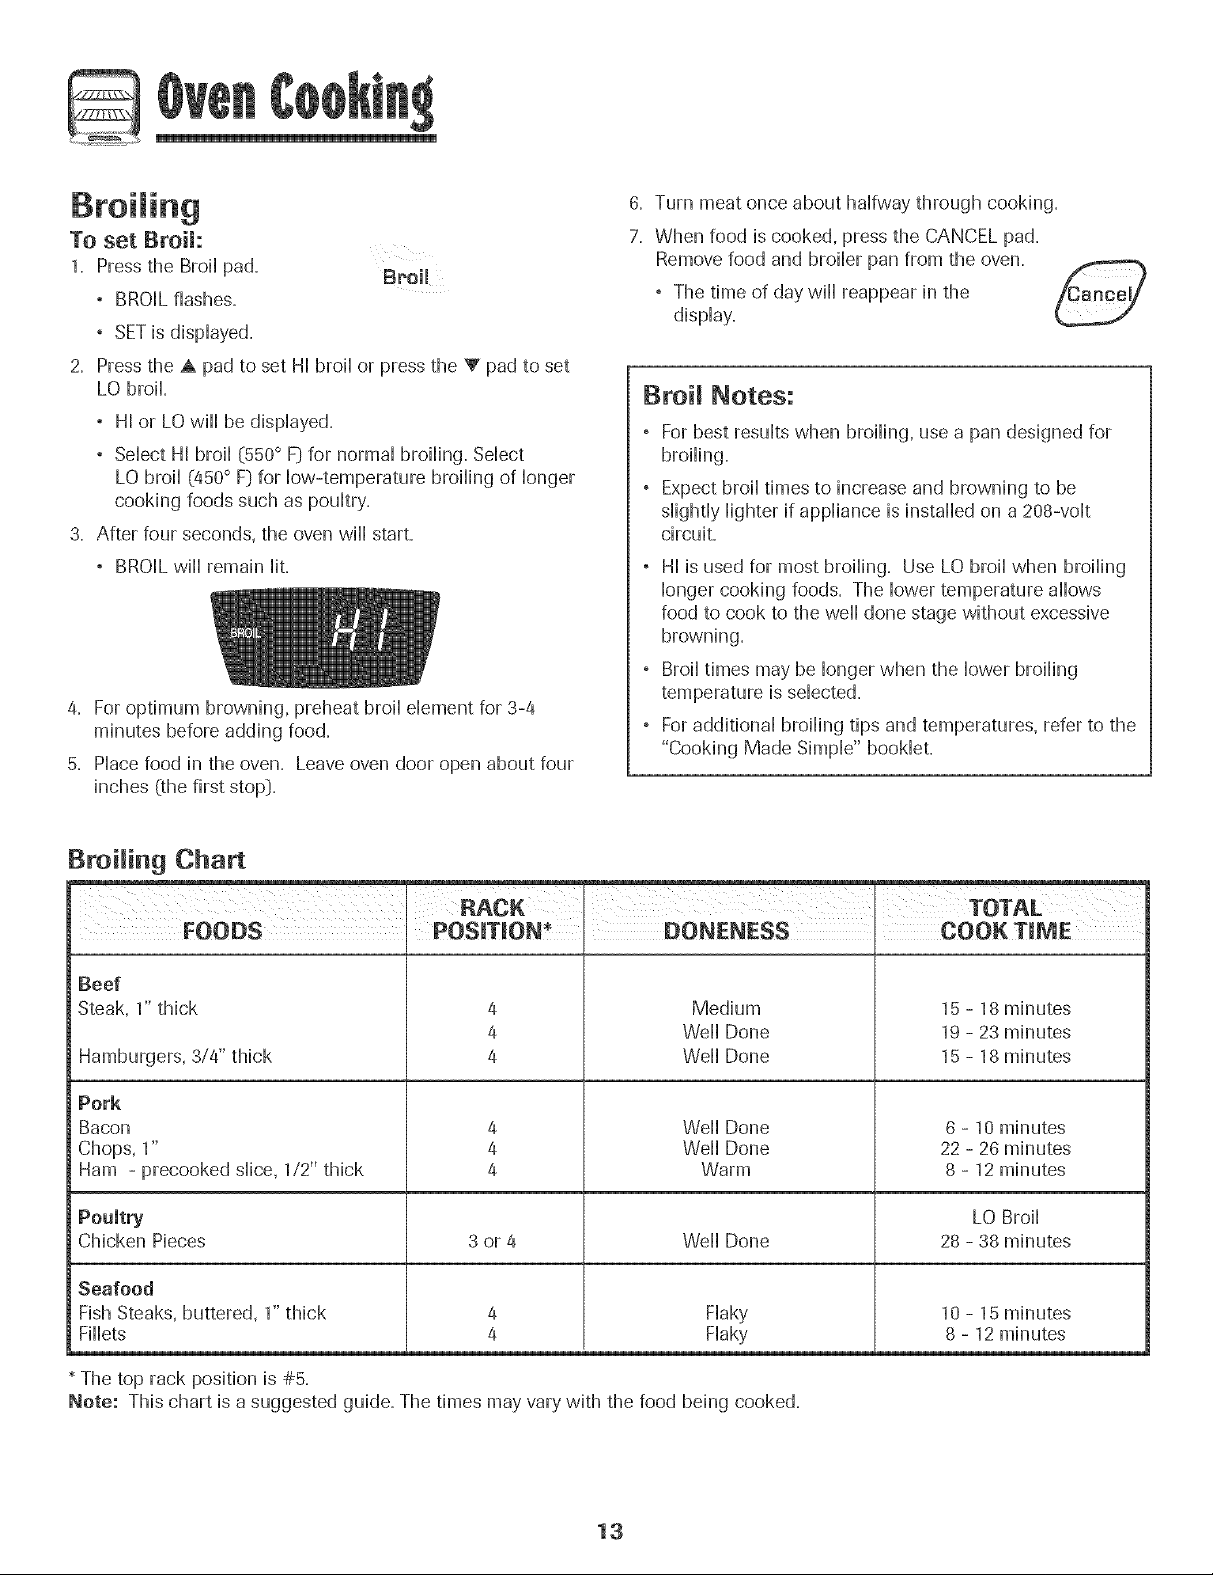
Broiling Chart
I I
FOODS POS_TION _ COOK TIME
Beef
Steak, 1"thick
Hamburgers, 3/4" thick
Pork
Bacon
Chops, 1"
Ham - precooked slice, 1/2" thick
Poamtry
Chicken Pieces
Seafood
Fish Steaks, buttered, 1"thick
Fillets
The top rack position is #5.
Note: This chart is asuggested guide. The times may vary with the food being cooked.
4
4
4
4
4
4
3 or 4 Well Done 28 - 38 minutes
Medium
Well Done
Well Done
Well Done
Well Done
Warm
Flaky
Flaky
15 - 18 minutes
19 - 23 minutes
15 - 18 minutes
0 - 10 minutes
22 - 20 minutes
8 - 12 minutes
LO Broil
10 - 15 minutes
8 - 12 minutes
13
Page 15
Oven Vent
When the oven is inase, the area near the vent may become
hot enoagh to caase barns. Never block the vent opening.
OVEN VENT
Be sure the drip bow[ in the vent location
has a hole in the center. Do not cover
the drip bow[ with aluminum foiL
Press the Oven Light switch on the control parle[ to
Oven Light
turn the oven light on and off.
Oven Bottom Lig.t
Protect oven bottom against spi[[overs, especially acidic or
sugary spills, as they may discolor the porcelain enamel Use
the correct pan size to avoid spi[[overs and boi[overs=Do not
place atensiis or amaminam foil directly on the oven
bottom.
OVEN VENT
OPENING
Oven
To replace:
1. Place rack on the rack support hi the oven
2. Tilt the front end up slightly. Slide rack back until it dears
the lock-stop position.
3. Lower front and slide back into the oven.
Do not cover an entire rack with amaminam foil or place foil
on the oven bottom. Raking resaits will be affected and
damage may occar to the oven bottom.
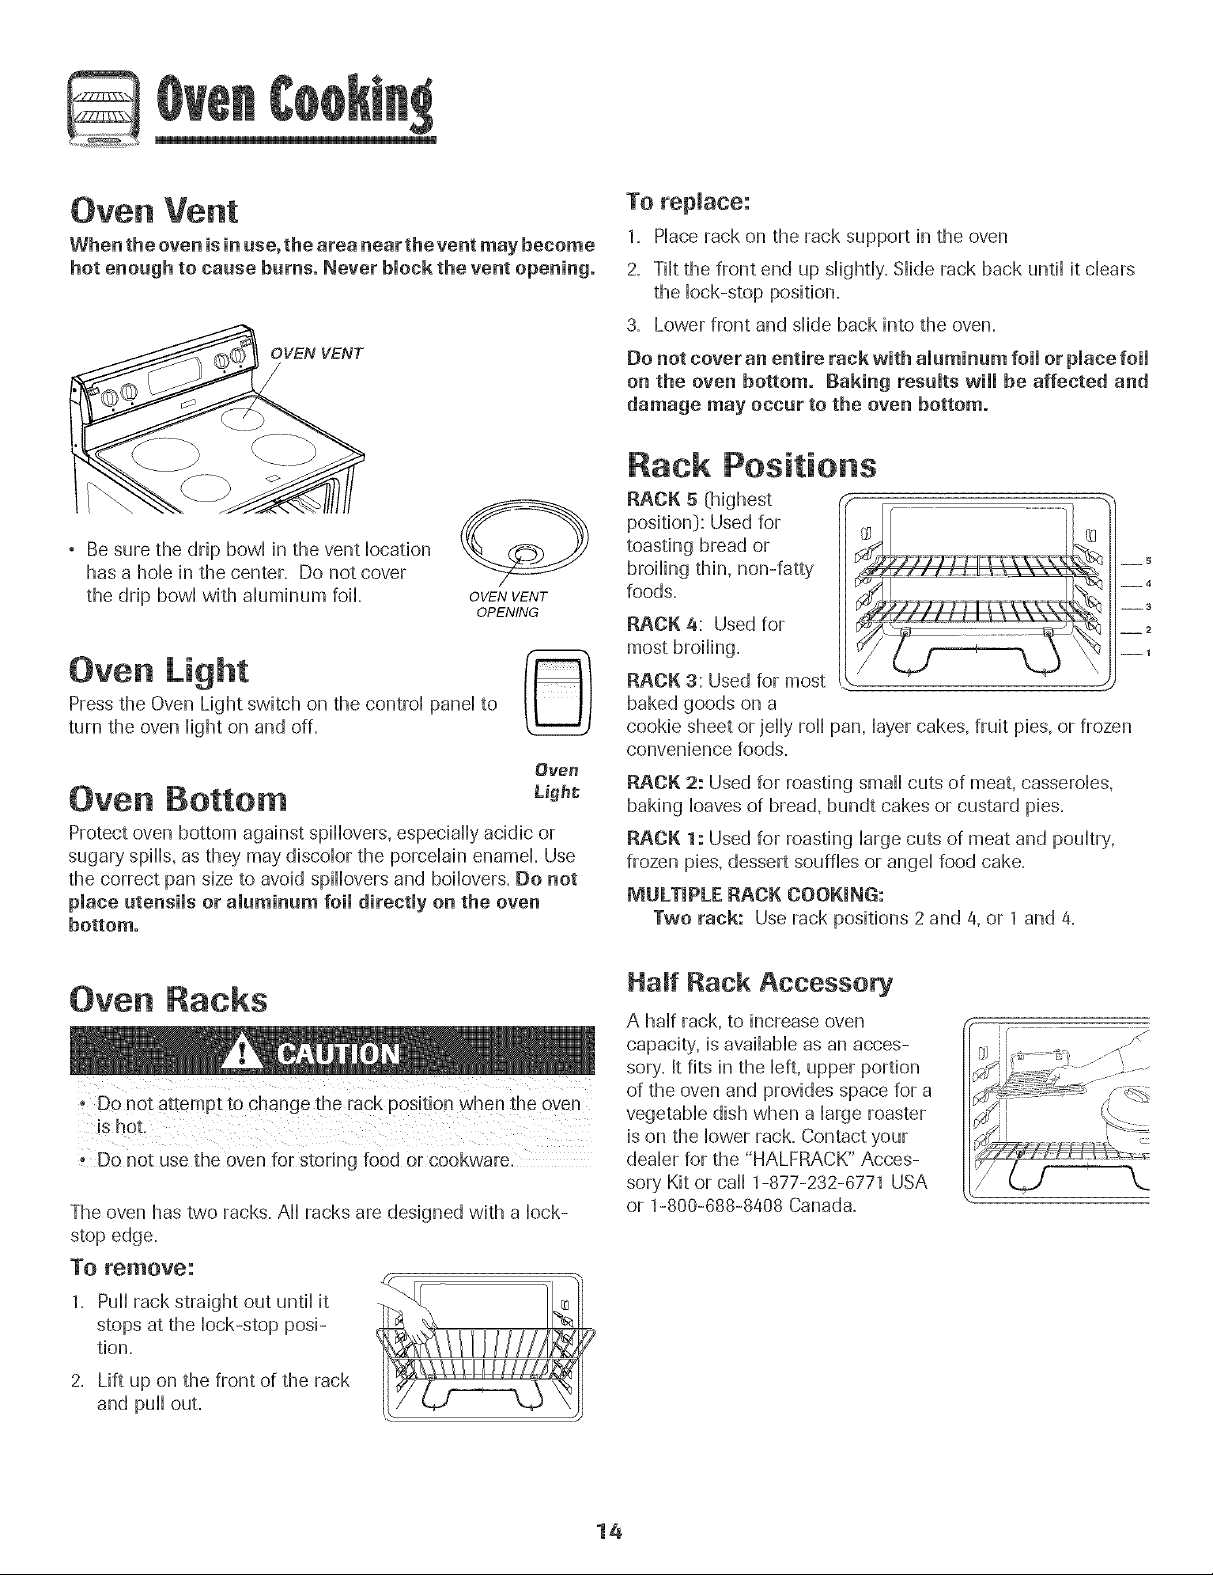
Rack Positions
RACK 5 _highest
positionD: Used for
toasting bread or
broiling thin, non-fatty
foods.
RACK 4: Used for
most broiling.
RACK 3: Used for most
baked goods on a
cookie sheet or jelly ro[[ pan, layer cakes, fruit pies, or frozen
convenience foods.
RACK 2: Used for roasting small cuts of meat, casseroles,
baking loaves of bread, bundt cakes or custard pies.
RACK 1: Used for roasting large cuts of meat and pougry,
frozen pies, dessert souffles or angel food cake.
MULTIPLE RACK COOKING:
Two rack: Use rack positions 2and 4, or 1 and 4.
5
__4
--3
__2
--1
Oven Racks
" DOnot attempt to change the rack pos!ti0n when the oven
is h0t.
. Do not usethe oven for storing food or cookware.
The oven has two racks. A[[ racks are designed with a lock-
stop edge.
To remove:
1, Pu[[ rack straight out until it
stops at the lock-stop posi-
tion.
2, Lift up on the front of the rack
and pu[[ out,
Hair Rack Accessory
A hag rack, to increase oven
capacity', is available as an acces-
sory. It fits in the [eft, upper portion
of the oven and provides space for a
vegetable dish when a large roaster
is on the lower rack. Contact your
dealer for the "HALFRACK" Acces-
sory Kit or ca[[ 1-877-232-8771 USA
or 1-800-888-8408 Canada.
14
Page 16
Se f-C ean Oven (seEect modeEs}
Note: For manuai dean oven, see page 18. 1
o It is normal for parts of the range to become hot duripg a
self-clean cycle.
• To prevent personal injury and damage to the oven door
do not attempt to open door when "LOCK" is displayed.
o Avoid touching cooktop_ door. window or oven vent area
Do not use commercial oven cleaners on the oven finish
or around any part of the oven. They wiii damage the
finish or parts.
6. Wipe up sugary and acidic spiHovers such as sweet
potatoes, tomato, or milk-based sauces. Porcelain enamel
is acid-resbtant, not acid-proofi The porceiain finish may
discoior if acidic spills are not wiped up before a seif-cban
cycb.
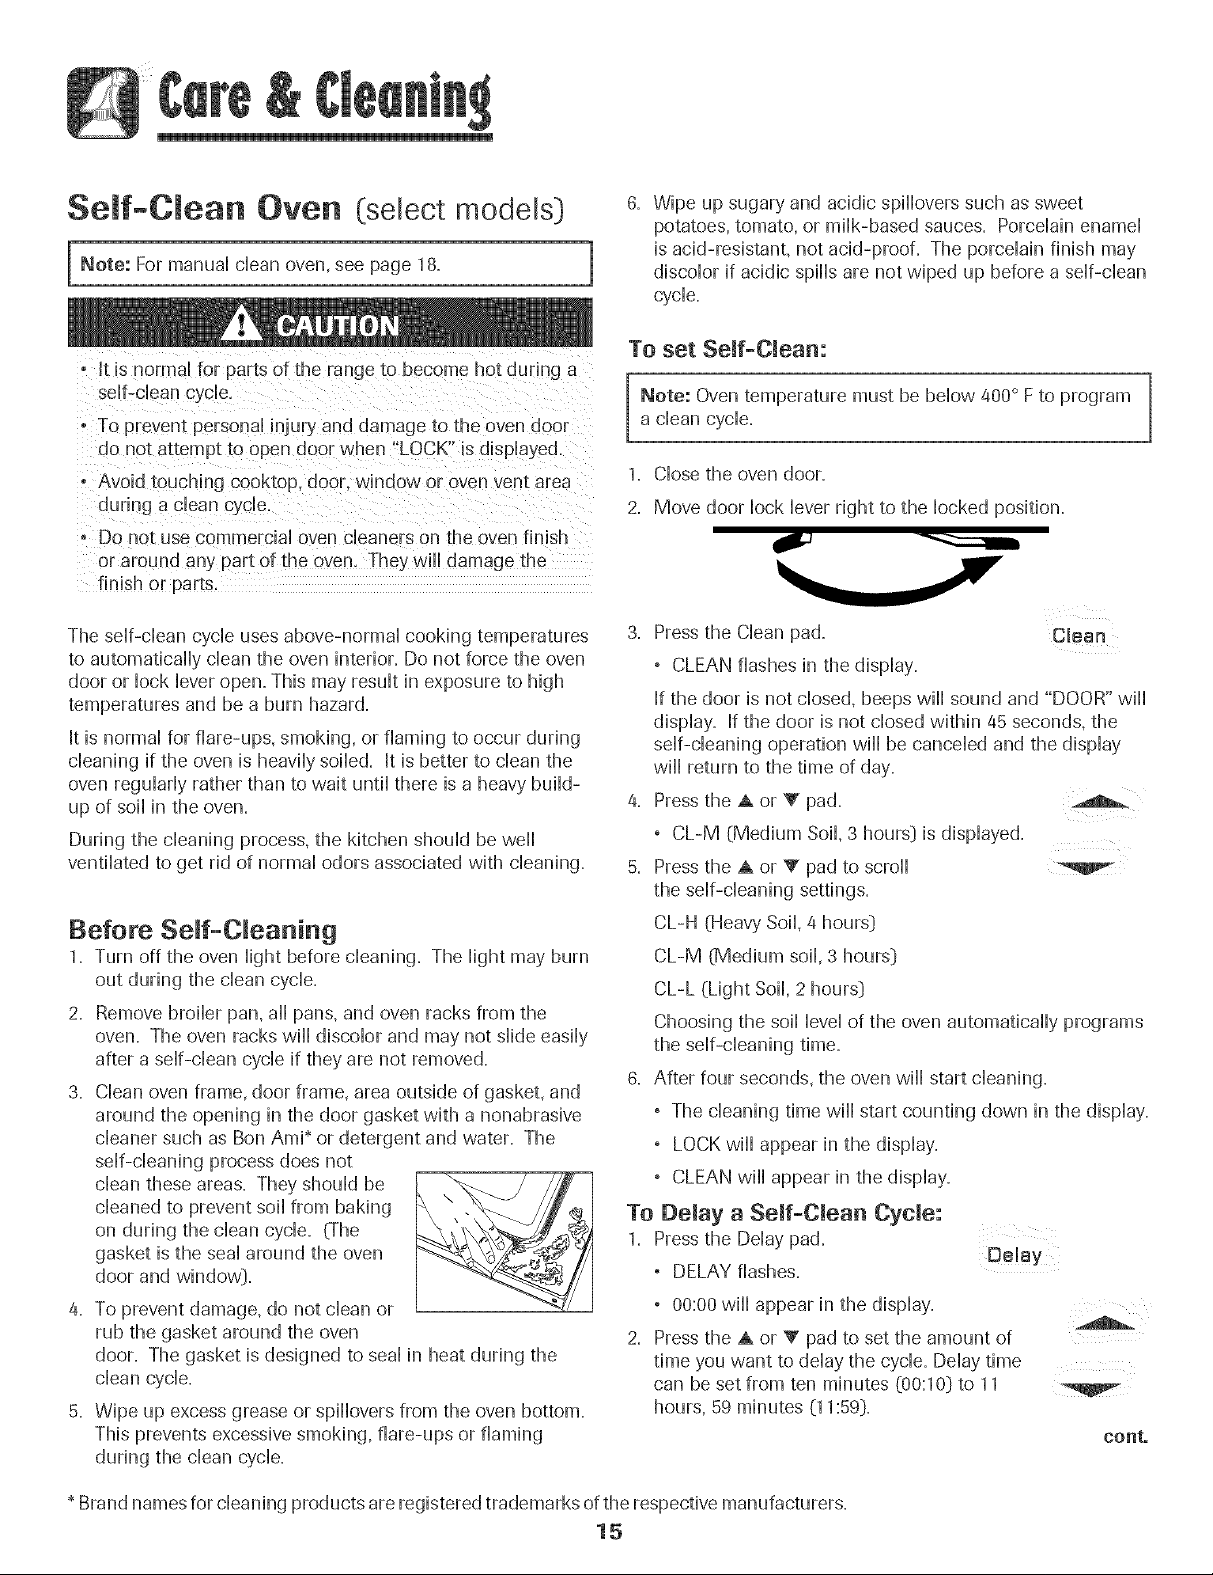
To set Self-Clean:
Note: Oven temperature must be below 400° Fto program
a clean cycle.
1. Closethe oven door.
2. Move door lock lever right to the locked position.
The self-clean cycle uses above-normal cooking temperatures
to automatically clean the oven nterior. Do not force the oven
door or lock lever open. This mayresult in exposure to high
temperatures and be a burn hazard.
It is normal for flare-ups, smoking, or flaming to occur during
cleaning if the oven is heavily soiled. It is better to clean the
oven regularly rather than to wait until there isa heavy build-
up of soii in the oven.
During the cleaning process, the kitchen should be well
ventilated to get rid of normal odors associated with cleaning.
Before Seff-C eaning
1. Turn off the oven light before cbaning. The light may burn
2. Remove broiler pan, all pans, and oven racks from the
oven. The oven racks wiii discolor and may not slide easily
after a self-clean cycle if they are not removed.
3. Clean oven frame, door frame, area outside of gasket, and
around the opening in the door gasket with a nonabrasive
cleaner such as Bon Ami* or detergent and water. The
self-cleaning process does not
clean these areas. They should be
cleaned to prevent soil from baking
on during the clean cycle. (The
gasket is the seal around the oven
door and window}.
4. To prevent damage, do not clean or
rub the gasket around the oven
door. The gasket is designed to seal in heat during the
clean cycle.
5. Wipe up excess grease or spillovers from the oven bottom.
This prevents excessive smoking, flare-ups or flaming
during the clean cycle.
3. Press the Clean pad. Clean
° CLEAN flashes in the display.
If the door is not closed, beeps wiii sound and "DOOR" wiii
display. If the door is not closed within 45 seconds, the
self-cleaning operation wiii be canceled and the display
will return to the time of day.
4. Press the A or Y pad.
° CL-M (Medium Soil, 3 hours} is displayed.
5. Press the A or _' pad to scroll
the self-cleaning settings.
CL-H (Heavy Soil, 4 hours}
CL-M @ledium soil, 3 hours}
CL-L (Light Soil, 2hours}
Choosing the soil level of the oven automatically programs
the self-cleaning time.
6. After four seconds, the oven wiii start cleaning.
° The cleaning time wiii start counting down in the display.
° LOCK wiii appear in the display.
° CLEAN wiii appear in the display.
To Delay a Self-Omean Cycle:
1. Pressthe Delay pad. Delay
° DELAY flashes.
, 00:00 wiii appear in the display.
Press the A or V pad to set the amount of
time you want to delay the cycle. Delay time
can be set from ten minutes @0:10} to 11
hours, 59 minutes (11:59}.
eoeto
* Brand names for cleaning products areregistered trademarks of the respective manufacturers.
15
Page 17
3. PresstheCleanpad.
, CLEANwillflash. CMean
PresstheAorY pad.
, CL-M(MediumSoil,3hours]
isdisplayed.
PresstheAorV padtoscrollthroughthe
stir-cleaningsettings.
CL-H(HeavySoil,4hours]
CL-M(Mediumsoil,3hours]
CL-L(LightSoil,2hours]
Choosingthesoilleveloftheovenautomaticallyprograms
theself-cbaningtime.
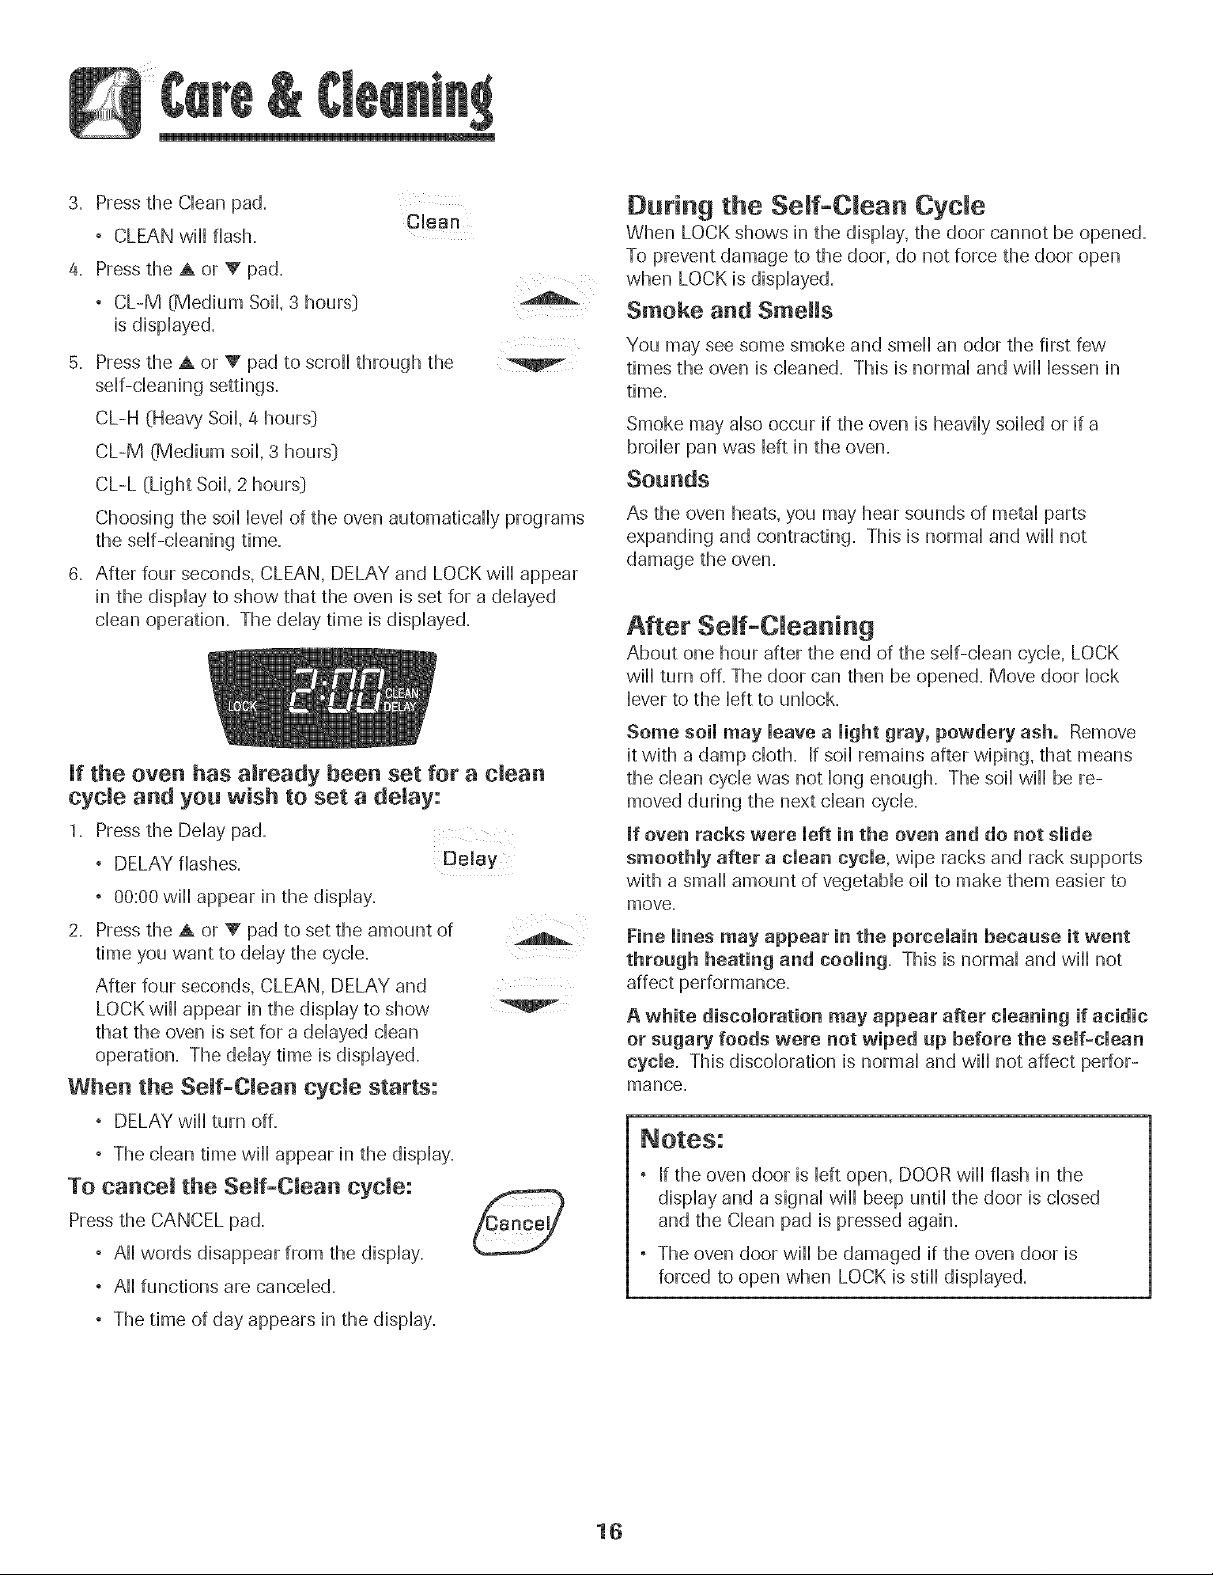
6. Afterfourseconds,CLEAN,DELAYandLOCKwillappear
inthedisplaytoshowthattheovenissetforadelayed
cleanoperation.Thedelaytimeisdisplayed.
If the oven has already been set for a clean
cycle and you wish to set a delay:
1. Pressthe Delay pad.
, DELAY flashes. Delay
, 00:00 will appear in the display.
2. Press the A or _' pad to set the amount of
time you want to delay the cycle.
After four seconds, CLEAN, DELAY and
LOCKwill appear in the display to show
that the oven is set for adelayed clean
operation. The delay time is displayed.
When the Self-Clean cycle starLs:
, DELAY will turn off.
During the Seff-C_ean Cycle
When LOCK shows in the display, the door cannot be opened.
To prevent damage to the door, do not force the door open
when LOCK is displayed.
Smoke and Sme!ms
You may see some smoke and smell an odor the first few
times the oven is cleaned. This is normal and will lessen in
time.
Smoke may also occur if the oven is heavily soiled or if a
broiler pan was left in the oven.
Sounds
As the oven heats,you may hear sounds of metal parts
expanding and contracting. This is normal and will not
damage the oven.
After Seff-Cmeaning
About one hour after the end of the self-clean cycle, LOCK
will turn off. The door can then be opened. Move door lock
lever to the left to unlock.
Some soil may leave a light gray, powdery ash. Remove
it with a damp cloth. If soft remains after wiping, that means
the clean cycle was not long enough. The soft will be re-
moved during the next clean cycle.
mfoven racks were left in the oven and do not slide
smoothly after a clean cycle, wipe racks and rack supports
with a small amount of vegetable oil to make them easier to
move.
Fine lines may appear in the porcelain because it went
through heating and cooling. This is normal and wiii not
affect performance.
A white discoloration may appear after cleaning if acidic
or sugary foods were not wiped up before the self-clean
cycle. This discoloration is normal and will not affect perfor-
mance.
, The clean time will appear in the display.
To cancel the Self-Clean cycle:
Press the CANCEL pad.
, All words disappear from the display.
, All functions are canceled.
° The time of day appears in the display.
° If the oven door is left open, DOOR wiii flash in the
display and a signal will beep until the door is closed
and the Clean pad is pressed again.
° The oven door will be damaged if the oven door is
forced to open when LOCK is still displayed.
16
Page 18
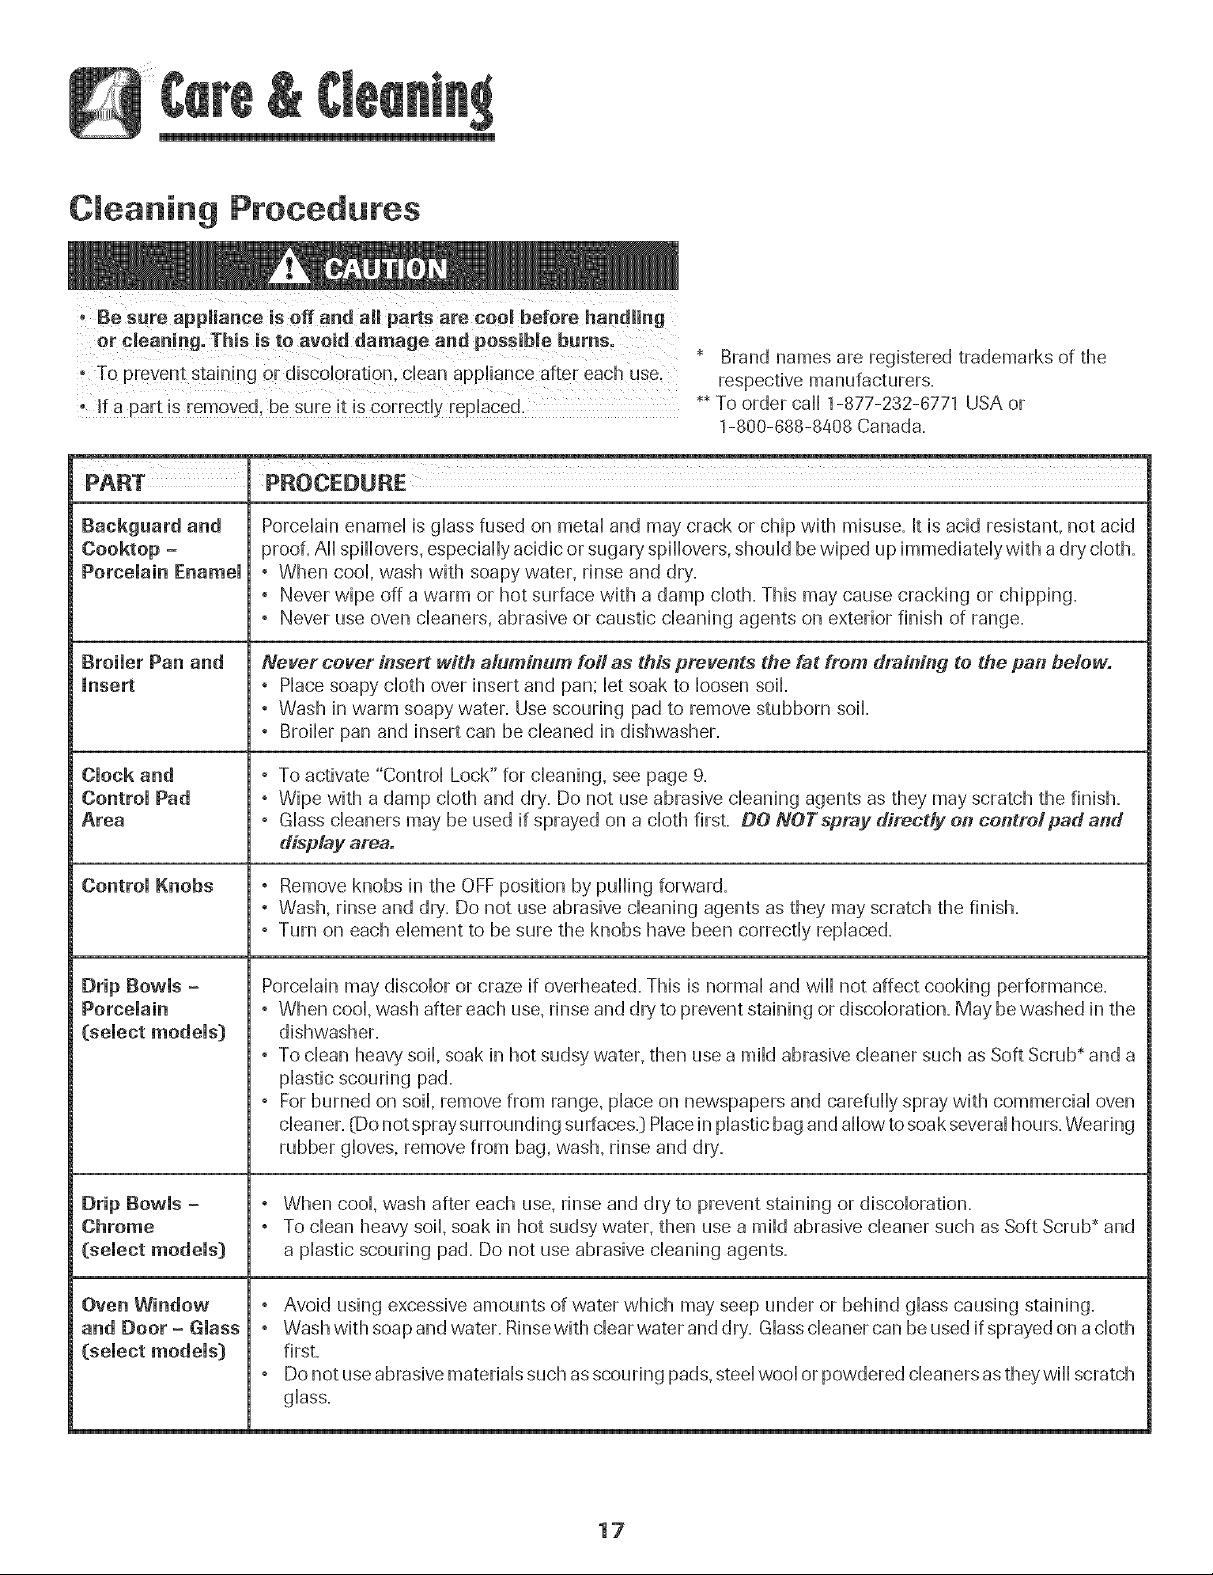
Cleaning Procedures
PROCEDURE
Porcelain enamel is glass fused on metal and may crack or chip with misuse. Itis acid resistant, not acid
Cooktop -
Porcelain Enamel
proof. All spillovers, especially acidic or sugar}, spillovers, should bewiped up immediately with a dry cloth.
, When cool, wash with soapy water, rinse and dry.
, Never wipe off a warm or hot surface with a damp cloth. This may cause cracking or chipping.
, Never use oven cleaners, abrasive or caustic cleaning agents on exterior finish of range.
Brand names are registered trademarks of the
respective manufacturers.
** To order caii 1-877-232-6771 USA or
1-800-688-8408 Canada.
Broiler Pan and
insert
Clock and
Control Pad
Area
Control Knobs
Drip Bowls -
Porcelain
(select models}
Drip Bowls =
Chrome
(select models}
Never cover insert with aluminum foil as this prevents the fat from draining to the pan below.
° Place soapy cloth over insert and pan; let soak to loosen soil=
° Wash in warm soapywater. Usescouring pad to remove stubborn soil
, Broiler pan and insert can be cleaned in dishwasher.
° To activate "Control Lock" for cleaning, see page 9.
° Wipe with adamp cloth and dry. Do not use abrasive cleaning agents as they mayscratch the finish.
° Glass cleaners may be used if sprayed on a cloth first. DO NOTspray directly on controlpad and
display area.
° Remove knobs in the OFF position by pulling forward.
, Wash, rinse and dry. Do not use abrasive cleaning agents as they may scratch the finish.
, Turn on each dement to be sure the knobs have been correctly replaced.
Porcelain may discolor or craze if overheated. This is normal and wiii not affect cooking performance.
, When cool, wash after each use, rinse and dr}, to prevent staining or discoloration. May bewashed in the
dishwasher.
° To clean heavy soil, soak in hot sudsy water, then usea mild abrasive cleaner such as Soft Scrub* and a
plastic scouring pad.
° For burned on soil, remove from range, place on newspapers and carefully spray with commercial oven
cleaner. {Do not spray surrounding surfaces.} Placein plastic bagand allow tosoak several hours. Wearing
rubber gloves, remove from bag, wash, rinse and dr},.
, When cool, wash after each use, rinse and dry to prevent staining or discoloration.
° To clean heavy soil, soak in hot sudsy water, then use a mild abrasive cleaner such as Soft Scrub* and
a plastic scouring pad. Do not use abrasive cleaning agents.
Oven Window
and Door - Glass
(select models}
, Avoid using excessive amounts of water which may seep under or behind glass causing staining.
° Wash with soap and water. Rinsewith clear water anddry. Glasscleaner can be used ifsprayed on a cloth
first.
° Do not useabrasive materials such asscouring pads,steel wool orpowdered cleaners as they wiii scratch
glass.
17
Page 19

PART PROCEDURE
Oven mnterior Self-Cleam
, Follow hstmctions on page 15-18 to set a seLf-cLeancycle.
Manual Clean:
° CHeanfrequentHyusing mind abrasive cleaners and a pHasticpad.
, Do not use metallic scouring pads because they win scratch the surface.
° When using commerciaHoven cleaners follow the manufacturer's instructions.
, Wipe up acidic spills (tomato or milk based foods:)as soon as possible with soap and water. If the spill
is not wiped up, it may discolor the porcelain.
To make cleaning easier, remove the oven door, if desired. (See Maintenance section on
page 19.)
Oven Racks , Clean with soapy water.
, Remove stubborn soil with cleansing powder or soap-filled scouring pad. Rinse and dr},.
, Racks will permanently discolor and may not slide smoothly if left in the oven during a self-clean
operation. If this occurs, wipe the rack edge and rack support with a small amount of vegetable oil to
restore ease of movement, then wipe off excess oil.
Stainless Steel , DO NOT USEANY CLEANING PRODUCT CONTAINING CHLORINE BLEACH.
(select models) ° OO NOT USEABRASIVE OR ORANGE CLEANERS.
° ALWAYS WIPE WITH THE ORAIN WHEN CLEANING.
. Daily Cleaning/LigM Soil -- Wipe with one ofthe following - soapy water, white vinegar/water sohtion,
Formula 409 Glass and Surface Cleaner* or a similar glass cleaner - using a sponge or soft cloth. Rinse
and dry. To polish and help prevent fingerprints, follow with Stainless Steel Magic Spray (Part No.
20000008)**.
° Moderate/Heavy Soil -- Wipe with one of the following - BenAmi, Smart Cleanser, or Soft Scrub* -
using adamp sponge or soft cloth. Rinseand dry'.Stubborn soils may be removed with a damp multi-
purpose Scotch-Brite* pad; rub evenly with the grain. Rinse and dr},.To restore lusterand remove streaks,
follow with Stainless Steel Magic Spray_,
, Discoloration -- Using a damp sponge or soft cloth, wipe with CameoStainless Steel Cleaner*. Rinse
immediately and dry,.To remove streaks and restore luster, follow with Stainless Steel Magic Spray_,
Storage Drawer, ° When cool, wash with warm soapy water, rinse and dry'. Never wipe awarm or hot surface with a damp
Door Handle, Side cloth as this may damage the surface and may cause a steam burn.
Panels, Oven ° For stubborn soil,use mildly abrasive cleaning agents such as baking soda paste or Ben AmL* Do not use
Door (select abrasive, caustic or harsh cleaning agents such as steel wool pads or oven cleaners. These products will
models) - Painted scratch or permanently damage the surface.
Enamel NOTE: Use a dry towel or cloth to wipe up spills, especially acidic or sugary spills. Surface may
discolor or dull if soil is not immediately removed. This is especially important for white surfaces.
* Brand names for cleaning products are registered trademarks of the respective manufacturers.
** To order direct, call 1-877-232-8771 USA or 1-800-888-8408 Canada.
18
Page 20
Oven Door
Oven Window
To protect the oven door window:
o Do net place excessiveweight on or stand on an open
oven door. This could cause the range to tip over. break
Do not attempt to open or close door or operate oven until
door is properly replaced.
Never place fingers between hinge and front oven frame.
Hinge arms are spnng mounted. If accidentally hit. the
hinge will slam shut against oven frame and could injure
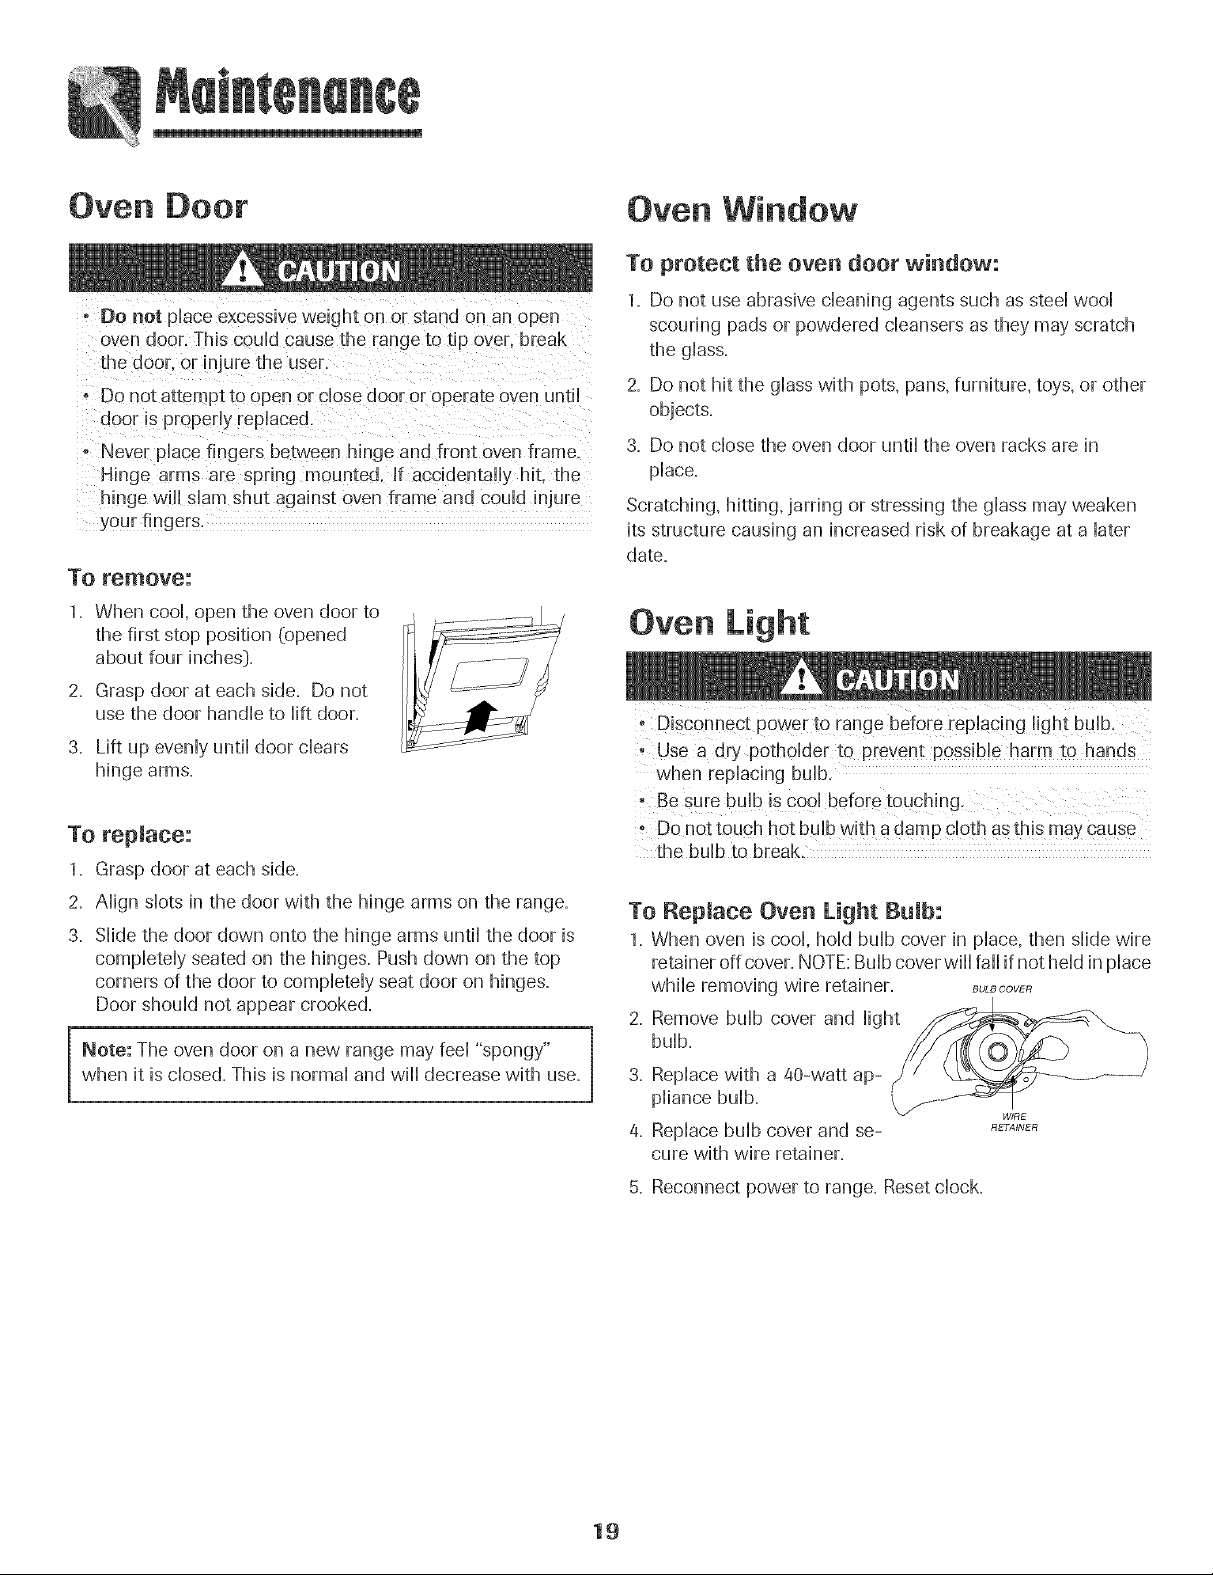
To remove:
1. When cool, open the oven door to
the first stop position (opened
about four inches}.
2. Grasp door at each side. Do not
use the door handle to lift door.
3. Lift up evenly until door clears
hinge arms.
To repJace:
1. Grasp door at each side.
2. Align slots in the door with the hinge arms on the range.
3. Slide the door down onto the hinge arms until the door is
completely seated on the hinges. Push down on the top
corners of the door to completely seat door on hinges.
Door should not appear crooked.
Note: The oven door on a new range mayfeel "spongy"
when it is closed. This is normal and will decrease with use.
1. Do not use abrasive cleaning agents such as steel wool
scouring pads or powdered cleansers as they may scratch
the glass.
2. Do not hit the glass with pots, pans, furniture, toys, or other
objects.
3. Do not close the oven door until the oven racks are in
place.
Scratching, hitting, jarring or stressing the glass may weaken
its structure causing an increased risk of breakage at a later
date.
i Disconnect p0wei to range be[0re replacing l!#ht bu"b.
when replacing bulb,
o Do not touch hot bulb with adamp cloth asthis maycause
the bulb to break.
To Replace Oven Light Bulb:
1. When oven is cool, hold bulb cover in place, then slkJewire
retahler off cover. NOTE:Bulb coverwill fall if not hem in place
while removing wire retainer. BULSOOVER
2. Remove bulb cover and light
bulb.
3. Replace with a @-watt ap-
pliance bulb.
4. Replace bulb cover and se-
cure with wire retainer.
RETAINER
5. Reconnect power to range. Reset clock.
19
Page 21
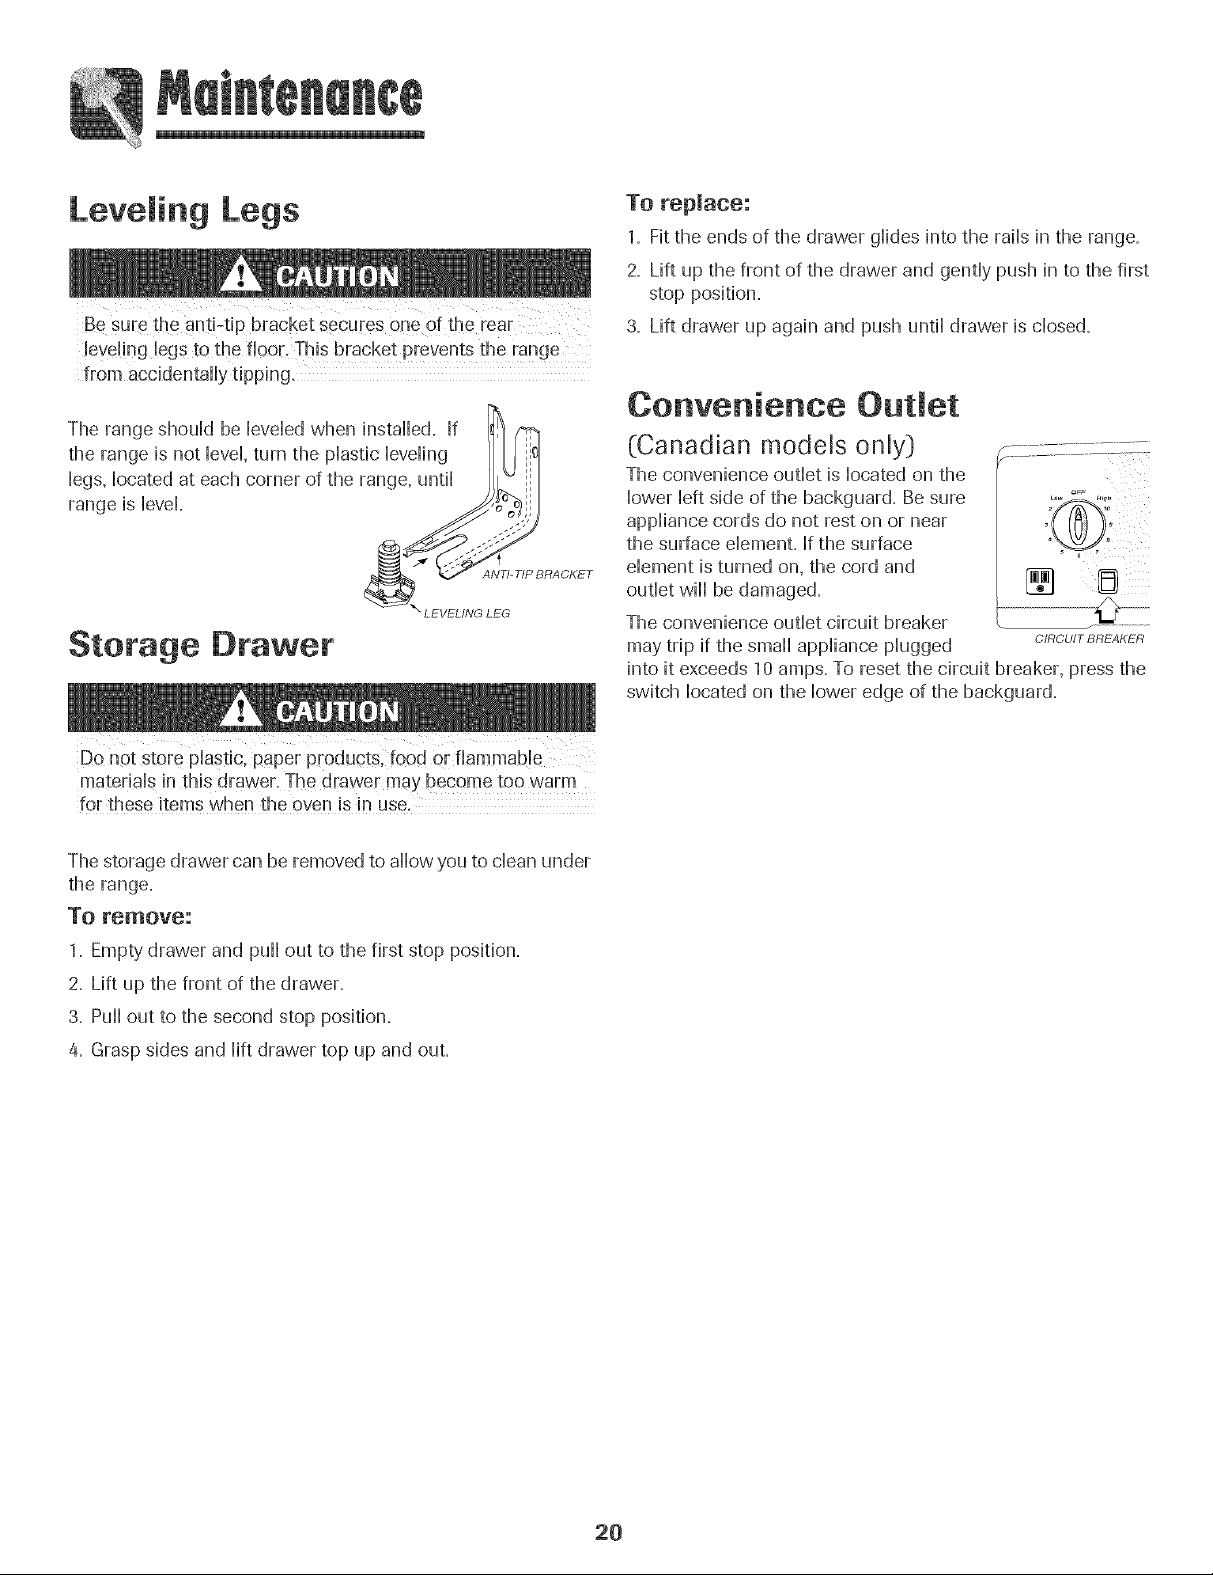
Leveling Legs
Be sure the anti-tip bracket secures one of the rear
from accidentafly tipping,
To replace:
1. Fit the ends of the drawer glides into the rails in the range.
2. Lift up the front of the drawer and gently push in to the first
stop position.
3. Lift drawer up again and push until drawer is closed.
Convenience Outlet
Storage [}rawer
Do not store phstic, paper products, food or flammab!e
materials in this drawer. The drawer may become too warm
for these items when the oven is in use.
The storage drawer can be removed to allow you to clean under
the range.
To remove:
1. Empty drawer and pull out to the first stop position.
2. Lift up the front of the drawer.
3. Puffout to the second stop position.
4. Grasp sides and lift drawer top up and out.
(Canadian models only}
The convenience outlet is located on the
lower left side of the backguard. Besure
appliance cords do not rest on or near
the surface dement. If the surface
dement is turned on, the cord and
outlet will be damaged.
The convenience outlet circuit breaker
may trip if the small appliance plugged
into it exceeds 10 amps. To reset the circuit breaker, press the
switch located on the lower edge of the backguard.
f ...................................
................................. q
CIRCUIT BREAKER
2O
Page 22
PROBLEM SOLUTION
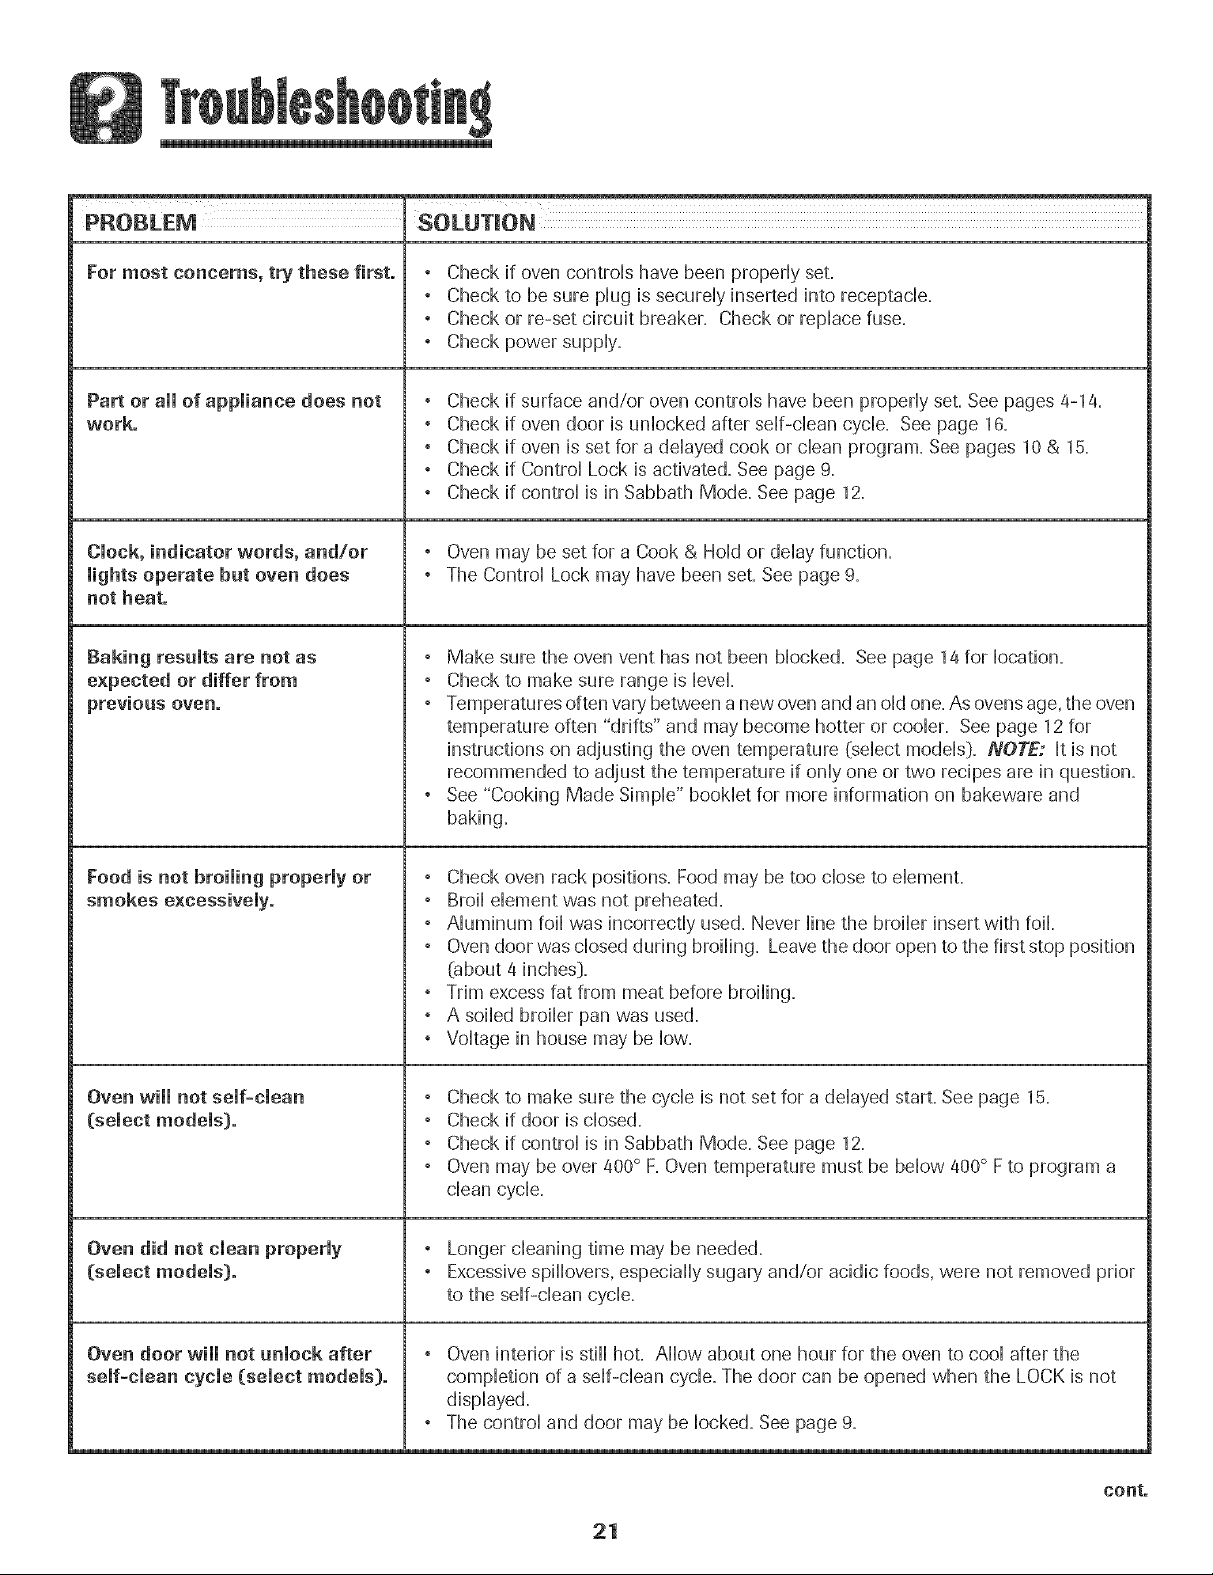
For most concerns, try these first. , Check if oven controb have been properiy set.
° Check to be sure piug is secumiy inserted into receptacle.
° Check or re-set circuit breaker. Check or repiace fuse.
, Check power suppiy.
Part or atomof appmiance does not
work.
Clock, indicator words, and/or
lights operate but oven does
not heat.
Baking resumts are not as
expected or differ from
previous oven.
Food is not broiming properly or
smokes excessively.
° Check if surface and/or oven controb have been properiy set. See pages 4-14=
° Check if oven door is unbcked after serif-dean cycb. See page 16.
° Check if oven is set for a ddayed cook or clean program. See pages 10& 15.
° Check if Control Lock is activated=See page 9.
° Check if control is in Sabbath Mode. See page 12.
° Oven may be set for a Cook & Hold or delay function.
° The Control Lock may have been set. See page 9.
° Make sure the oven vent has not been blocked. See page 14 for location.
° Check to make sure range is level=
° Temperatures often var},'between anew oven and an old one.As ovens age,the oven
temperature often "drifts" and may become hotter or cooler= See page 12for
instructions on adjusting the oven temperature (select models[). NOTE: It is not
recommended to adjust the temperature if only one or two recipes are in question.
° See "Cooking Made Simple" booklet for more information on bakeware and
baking.
° Check oven rack positions. Food may be too close to dement.
, Broil dement was not preheated.
° Aluminum foil was incorrectly used. Never line the broiler insert with foil.
° Oven door was closed during broiling. Leavethe door open to the first stop position
@bout 4 inches}.
, Trim excess fat from meat before broiling.
° A soiled broiler pan was used.
, Voltage in house may be low.
Oven wimmnot semf-cmean
(select models).
Oven did not cmeanproperly
(semect modems).
Oven door will not unlock after
self-clean cycle (select models).
, Check to make sure the cycle is not set for a delayed start. See page 15.
° Check if door is closed.
° Check if control is in Sabbath Mode. See page 12.
° Oven may be over 400° F.Oven temperature must be below 400° Fto program a
clean cycle.
° Longer cleaning time may be needed.
° Excessivespillovers, especially sugar},and/or acidic foods, were not removed prior
to the self-clean cycle.
, Oven interior is still hot. Allow about one hour for the oven to cool after the
completion of a self-clean cycle. The door can be opened when the LOCK is not
displayed.
° The control and door may be locked. See page 9.
cont.
21
Page 23
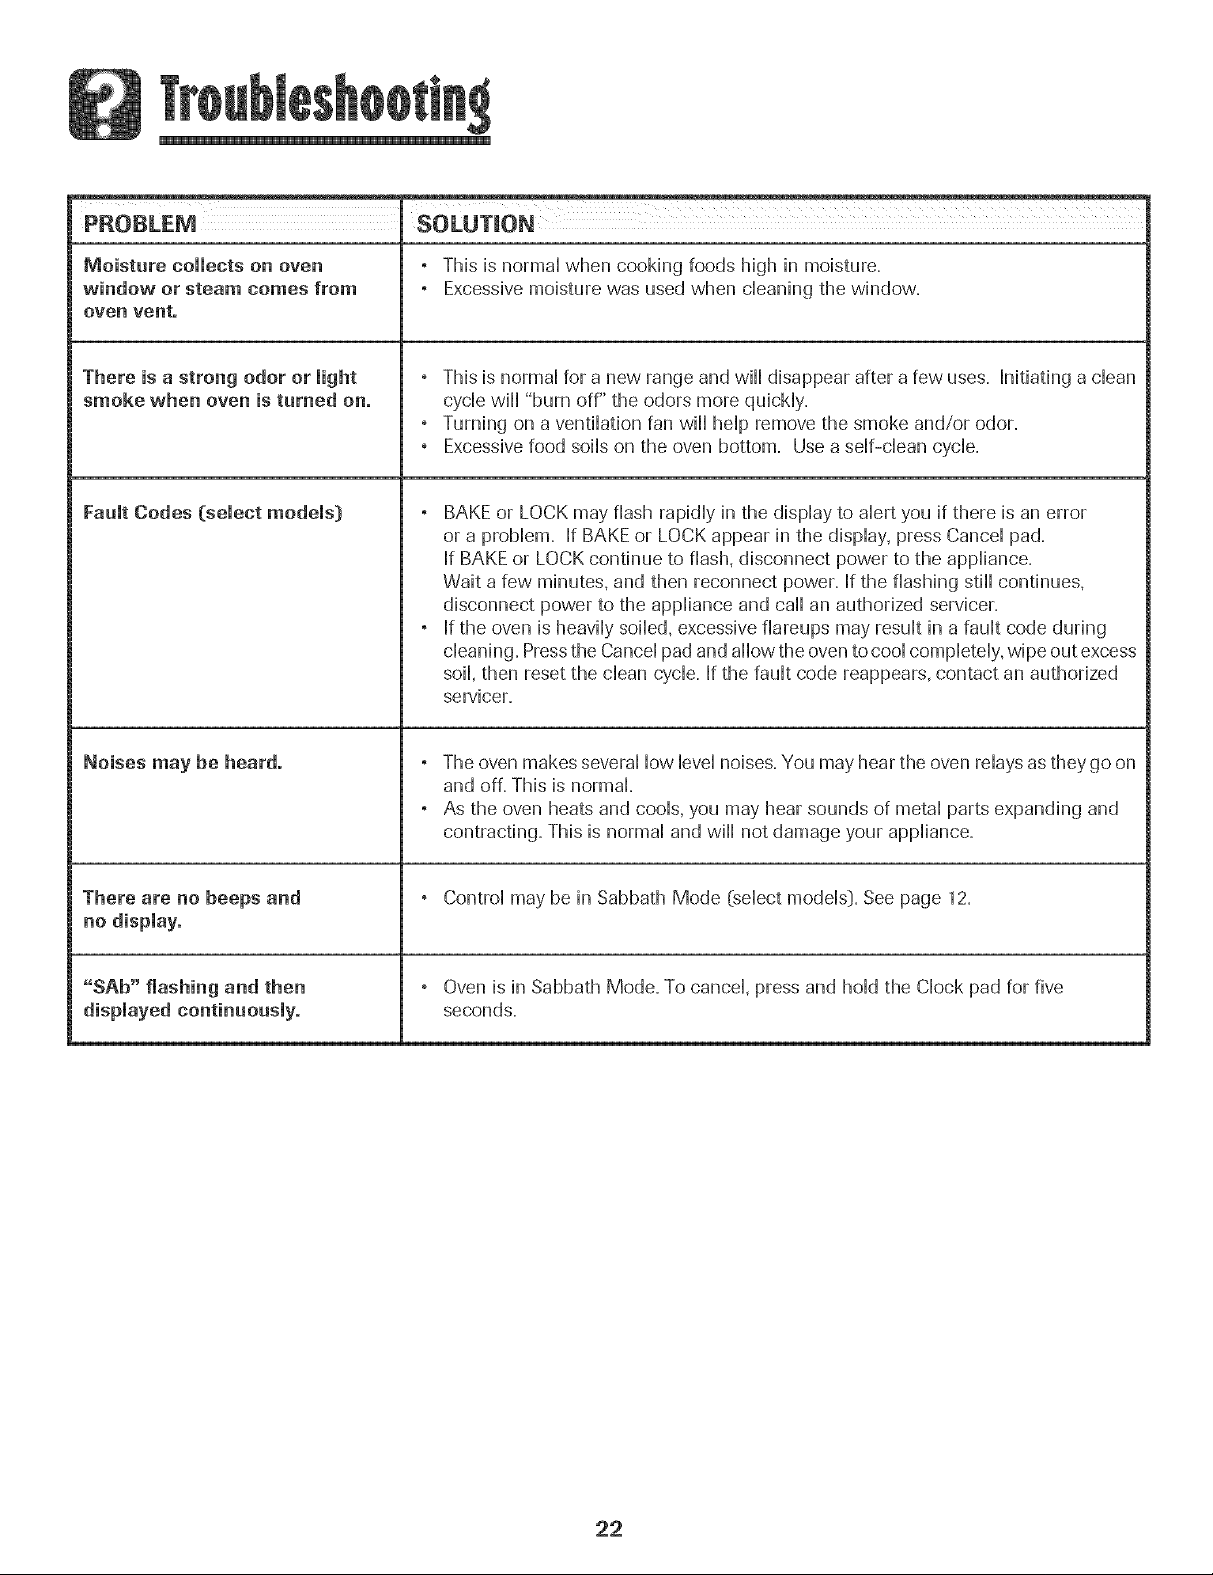
Moisture collects on oven
window or steam comes from
oven vent.
° This is normaHwhen cooking foods high in moisture.
° Excessivemoisture was used when cHeaningthe window.
There is a strong odor or light
smoke when oven is turned on.
Fault Codes (select models)
Noises may be heard.
There are no beeps and
no dispiayo
° This is normal for a new range and will disappear after a few uses. Initiating a clean
cycle will "burn off" the odors more quickly.
° Turning on a ventilation fan will help remove the smoke and/or odor.
° Excessivefood soils on the oven bottom. Use aself-clean cycle.
° BAKE or LOCKmay flash rapidly in the display to alert you if there is an error
or a problem. If BAKE or LOCK appear in the display, press Cancel pad.
If BAKE or LOCK continue to flash, disconnect power to the appliance.
Wait a few minutes, and then reconnect power. If the flashing still continues,
disconnect power to the appliance and call an authorized servicer.
° If the oven is heavily soiled, excessive fiareups may result in afault code during
cleaning. Pressthe Cancel pad and allow the oven to cool completely, wipe out excess
soil, then reset the clean cycle. Ifthe fault code reappears, contact an authorized
servicer.
° The oven makes several low level noises. You may hear the oven relays as they go on
and off. This is normal.
° As the oven heats and cools, you may hear sounds of metal parts expanding and
contracting. This is normal and will not damage your appliance.
° Control may be in Sabbath Mode (select models:).See page 12.
"SAb" flashing and then
displayed continuousiyo
° Oven is in Sabbath Mode. To cancel, press and hold the Clock pad for five
seconds.
22
Page 24

Fuji One Year Warranty =
Parts and Labor
For erie (1) year from the original
retail purchase date. any part which
hils in normal home use wHUbe
repaired or repBced free of charge.
Canadian Residents
The above warranties only cover an
appliance installed in Canada that has
been certified or listed by ap propriate
test agencies for compliance to a
National Standard of Canada unless
the appliance was brought into
Canada due to transter of residence
from the Upited States to Canada.
Limited Warranty Outside the
United States and Canada -
Parts Only
For one (1} yea from the date of
original retai purchase, any part which
fails in normal home use will be
repaired or rephced free of charge fo[
the part itself, with the owner paying
aii other costs, including labor, mib-
age, transportation, trip charge and
diagnostic chart ge, if required.
The spedfb warranties expressed
above are the ONLY warranties
prodded by me manutacturef: These
wa#antles g_veyou specific legal tights.
and you may also have other rights
which vary fi'om state to state.
What is Not Covered By These
1. Conditions and damages resulting from any of the following:
a. Improper installation, delivery, or maintenance.
b. Any repair, modification, alteration, or adjustment not authorized by
the manufacturer or an authorized servicer.
c. Misuse, abuse, accidents, or unreasonable use.
d. Incorrect electric current, voltage, or supply.
e. Improper setting of any control
2. Warranties are void if the original serial numbers have been removed, altered,
or cannot be readily determined.
3. Light bulbs.
4. Products purchased for commercial or industrial use.
5. The cost of service or service caii to:
a. Correct installation errors.
b. Instruct the user on the proper use of the product.
c. Transport the appliance to the servicer.
6. Consequential or incidental damages sustained by any person as a result of
any breach of these warranties. Some states do not allow the exclusion or
limitation of consequential or incidental damages, so the above exclusion may
not apply.
If You Need Service
® Call the dealer from whom your appliance was purchased or call Maytag
Services sM,Amana Customer Assistance at 1-800-843-0304 U.S.A. or
1-866-587-2002 Canada to locate an authorized servicer.
® Be sure to retain proof of purchase to verify warrant}/' status. Refer to
WARRANTY for further information on owner's responsibilities for warranty
service.
o If the dealer or service company cannot resolve the problem, write to Maytag
Services sM,Attn: CAIR _ Center, P.O. Box 2370, Cleveland, TN 37320-2370, or
caii 1-800-843-0304 UoSoAoor 1-866-587-2002 Canada.
U.S.customers using TTY for deaf, hearing impaired or speech impaired, caii
1-800-688-2080.
User's guides, service manuals and parts information are available from
Maytag Servicess_a,Amana Customer Assistance.
When writing or calling about a service problem, please include:
a. Your name, address and telephone number;
b. Model number and serial number;
c. Name and address of your dealer or servicer;
d. A clear description of the problem you are having;
e. Proof of purchase {sales receipt}.
23
Page 25

instructions de s6curit6
importantes ........................................................... 25-28
Cuisson sur masurface ........................................ 29-30
Commandes
EH6mentsspiraH6s
Cuisson darts le four ........................................... 31-40
Commandes du four _ nettoyage manuel
HorHoge Cuisson courante
Minuterie Grill
Commandes du four _ autonettoyage
HorHoge Cuisson courante diff6r6
Minuterie Maintien au chaud
Cuisson courante Gril
Cuisson et maintien Grilles du four
Nettoyage ..............................................................41-44
Four autonettoyant
M6thodes de nettoyage
Entretien ................................................................. 45-46
Hublot du four
Lampe du four
Recherche des pannes .......................................47-48
Garantie et service aprSs-vente ..............................49
Guia de Use y Cuidado ..............................................50
Page 26

Installateur : Laissezceguide avecI'apparefi.
Consommateur:Veuillezlife le guideet le conserverpouJ
consultationult_rieure.Conservezlafactured'achat ou e cheaue
enca_ssecommepreuvede I'achat
Num6rode mod_Le
Num_rode s6rie
Da[ed'achat
Sivousavezdesquesbons,veuflleznousappeEer:
Service a la cfient#Jede Amana
1-800-843-0304 aux E.-U,
1-866-587-2002 au Canada
(lundi au vendredi=8 h_ 20h.heurede I'Est]
[nternet:http://www.amana.com
Dans[ecadrede nosprattquesd'am61iorationcons[an[eoe [a
quallt6etde [a performancede nos produltsde cuisson ues
modificationsde i'appareilqu_nesent pasmentionn6esdansce
guide on[ pu 6treintroduites.
Repertez_veus _ la page 49 peurplusd'infermatierls
cencemant te sePJiceapres-vente.
que pourrait susciter une uti[isation incorrecte de ['appareiL
Utfliser Fapparefl uniquement pour les fonctions prevues,
decrites dans ce guide,
Pour une utilisation adequate et en s_eurit_, fl faut que
I'apparefl soit convenablement installe par un technicien
qudifie, et relic a h terre,
Ne pas regler, reparer ni remplacer un composant, a moins que
ceh nesoit specifiquement recommande dans ce guide, Toute
autre reparation doit etre effectuee par un technicien qudifie,
Toujours debrancher [apparefl avant d'y faire de [entretien,
,, TOIJTECUI$1NIERE PEUT
BASCULER ETPROVOQUER DES
INSTALLER LA BRIDE
ANTiBA$CULEMENT FOURNIE
Les instructions de securite importantes et les paragraphes
_avertissement >_de ce guide ne sent pas destines a couvrir
toutes les conditions et situations qui pourraient se presenter.
II faut faire preuve de ben sens, de prudence et de soin lots de
I'instdlation, de I'entretien ou du fonctionnement de I'apparefl.
Toujours prendre contact avec le fabricant dans le cas de
problemes ou de conditions qui ne seraient pas comprises.
Reconna_tre les 6tiquettes, paragraphes
et symboles sur la s6curit6
POURRAIENTrdsulteren de graves b!essures ou mSme !a
mort.
risque de basc_!eme_t de !,appateil _ !,occasie_
d'_ne _tilisatie_ a_ermale eu d'_n chargement
excessif de la perle d_ four, il fa_t q_e la bride
a_tibasc_leme_t seit ce_ve_ableme_t i_stall_e.
Utfliser une lampe torche pour determiner si la bride antibascu-
lement est convenablement installee sous la cuisiniere. L'un des
pieds arriere de reglage de Faplomb doit etre convenablement
engage dans la fente de la bride. Lorsque la cuisiniere est con-
venablement cdee, la bride antibasculement immobflise le pied
arriere centre lesol. Verifier la parfaite immobflisation de la
cuisiniere par la bride apres ehaque dephcement de la
culsmlere.
Po r vitet i ce die des
dommages de
S'assurer que tous[es materiaux de conditionnement sent
retires de [apparefl avant de le mettre en marche.
Garder les materiaux combustibles bien eloignes de I'apparefl.
Ne pas ranger de materiaux inflammables dans un four.
De nombreux types de plastique sent affectes par lachdeur.
Garder les plastiques eloignes des pieces de I'apparefl pouvant
devenir chaudes.
POURRAtENTresulter en des blessures mineures.
Life toutes les instructions avant d'utiliser cet appareii;
observer toutes les instructions pour eliminer les risques
d'incendie, choc electrique, dommages materiels et corporels
Pour empecher qu'un feu de graisse ne se declare, eviter toute
accumulation de graisse ou autres matieres inflammables
dans I'apparefl ou au voisinage.
25
Page 27

En cas d'incendie
Ne jamais utfliser d'eau pour 6teindre de la graisse
enflammee. Utfliser du bicarbonate de soude ou un extincteur
poudre chimique ou a mousse pour etouffer les flammes.
1. Interrompre I'alimentation 61ectriquede Fapparefl pour
minimiser la propagation des flammes.
2. NE JAB/JAmSsaisir ou d@lacer un ustensfle de cuisine
enflamme.
3. Fermer la porte du four pour 6touffer les flammes du four.
S6cutit pour les enfants
parefl des articles auxquds Jesenfants peuvent s'int@essen
pour atte[ndre un objet, pourrait se blessergravement.
NE JAMAIS laisser des enfants seuls ou sans supervision
Iorsque I'apparefl est en service ou encore chaud, Ne jamais
laisser un enfant s'asseoir ou se tenir sur une partie qudconque
de Fappareil, II pourrait se blesser ou se br01er,
II est important d'enseigner aux enfants que Fappareflet les
ustensfles places dedans peuvent 6tre chauds, Laisser refroidir
les ustensfles en un lieu s0r, hors d'atteinte des enfants, II est
important d'enseigner aux enfants qu'un apparefl mdnager n'est
pas un jouet, et qu'fls ne doivent toucher aucune commande ou
autre composant de Fapparefl,
Familiarisation avec l'appareil
NE JAMAJS uti!iser un apparei! cemme escabeau pour
atteindre les armoires se trouvant au-dessus, Le mauvais
empl0i de porte d apparei! comme par exemp!e en tant
qu'escabeau, le fait de s'appuyer ou de s'asseoir surJa POrte,
peuvent entra!ner !e renversement de I'appare!!, casser Ja
porte et gravement blesser.
Ne pas utiliser cet appareil pour chauffer ou pour garder
chaude une piece, sinon des dommages ai'appareii pourraient
s'ensuivre et cela pourrait 6tre dangereux pour I'utilisateur.
Aussi, ne pas utiiiser ie four pour ranger des aliments ou des
ustensiles de cuisine.
Ne pas bloquer ou obstruer 1'6ventdu four.
NEJAMAIS TOUCHERLES ELEMENTSCHAUFFANTSNI LES
PAROISINTERIEURESDU FOUR,Les eldments chauffants
peuvent 6tre brQlants meme s'ils ne sont plus rouges. Les
surfaces intdrieures du four peuvent atteindre une temperature
suffisamment dlevee pour infliger des br01ures.Pendant et
apres usage, ne pas toucher les elements chauffants ni les
parois intdrieures du four et 6viter leur contact avec des
vetements ou autres matdriaux inflammables avant qu'fls
n'aient eu le temps de refroidir suffisamment. D'autres surfaces
peuvent egdement atteindre une temperature suffisamment
6levee pour bn31er:le ouverture d'dvent et le surface
avoisinante, ainsi que le porte et le hublot de four.
Ne pas toucher Fampoule du four bn31anteavec un chiffon
humide car elle pourrait se briser. Si tel est le cas, debrancher
Fapparefl avant de retirer Fampoule pour eviter une decharge
electrique.
NE JAI_AIS gamir la sole du four ou une grille du four avec
de la feuflle d'duminium. Ceci pourrait susciter un risque de
decharge electrique ou d'incendie, ou une deterioration de
Fapparefl. Utfliser de la feuflle d'duminium uniquement selon
les instructions de ce guide.
Cuisson et s6cutit6
NE JAMAIS faire chauffer un recipient non ouvert dans le
four, L'accumuiation de pression dans ie recipient pourrait
provoquer son eclatement et de graves dommages matdriels
ou corporeis,
Utiliser des maniques robustes et seches, Desmaniques
humides peuvent provoquer ia formation de vapeur brQiante,
Ne jamais utiliser un torchon a vaisselle ou autre article textile
la place de maniques; un tel article pourrait trainer sur un
element et s'enflammer, ou accrocher un ustensile ou un
composant de i'appareii,
Porter un vetement approprid, @iter de porter des vetements
amples ou a Iongues manches pendant I'utilisation de
I'appareil, lls peuvent prendre feu si le vetement entre en
contact avec un el6ment de cuisson brQlant,
Placer toujours les grilles a la position appropriee dans le four
Iorsque le four est froid. Faire coulisser la grille vers Fextdrieur
avant d'ajouter ou enlever un plat; utfliser pour cela une
manique robuste et seche. @iter d'introduire la main darts le
four pour y placer ou retirer un plat. S'fl est necessaire de
deplacer unegrille Iorsqu'elle est chaude, utfliser une manique
seche. Ne pas toucher un element chaud avec une manique.
N'utfliser les grilles que darts le four darts lequel elles ont dte
achetees/expediees.
26
Page 28

Ouvrir toujours la porte du four tres prudemment. Laisser Fair
chaud ou la vapeur s'echapper avant de retirer ou d'introduire
un plat.
AVERTISSEMENT - METS PREPARES : Respecter les
instructions du fabricant. Si le contenant ou le couvercle en
plastique d'un mets surgele se ddorme ou est endommage
durant la cuisson, jeter immediatement le recipient et son
contenu. Les aliments pourraient etre contamines.
Ne pas permettre le contact de papier d'aluminium ou de la
sonde a viande avec les elements chauffants.
Toujours eteindre toutes les commandes une lois lacuisson
terminee.
Ustensiles et s cutit
Appliquer les instructions du fabricant Iors de Femploi d'un
sachet pour cuisson au four.
La securite de fonctionnement de cet appareil a ere testee
I'aide d'ustensiles decuisine traditionnels. Ne pas utiliser un
ustensile ou accessoire qui n'est pas specifiquement
recommande darts ce guide. Ne pas utiliser de couvre-
element, gril place sur la table de cuisson ou systeme de
convection additionnel. L'utilisation d'un dispositif ou
accessoire qui n'est pas expressement recommande darts ce
guide peut degrader la securite de [appareil ou sa perfor-
mance, ou reduire la Iongevite des composants.
Si un ustensile est plus petit que I'element utilise, une partie
de I'element chauffant est exposee et peut provoquer
I'infiammation d'un vetement ou des maniques.
Seuls certains materiaux enverre, vitroceramique, ceramique,
gres, ou certains ustensiles vitrifies/emailles peuvent etre
utilises sur la table de cuisson ou darts le four sans risque de
bris sous I'effet du choc thermique. Observer les instructions
du fabricant Iors de I'utilisation d'un ustensile enverre.
Veiller a ne jamais laisser le contenu liquide d'un ustensile
s'evaporer completement; I'ustensile et [appareil pourraient
subir des dommages,
Table de cuisson
NE JAMAIS laisser un element de surface allume sans
surveillance, particulierement avec chauffage eleve.Le
debordement du contenu de I'ustensile pourrait provoquer la
generation de fumee abondante et [inflammation de la
graisse.
Cet appareil comporte des elements chauffants de differentes
tailles. Utiliser toujours un ustensile a fond plat, de taille
suffisante pour qu'il puisse recouvrir completement I'element.
Pour optimiser I'efficacite, choisir un ustensile de meme taille
que I'element.
1
Elements spirales
Pour eviter de deteriorer leselements chauffants amovibles, ne
pas les immerger / tremper / nettoyer darts un hve-vaisselle,
ou darts un four autonettoyant. Un element chauffant
endommage pourrait provoquer un court-circuit suscitant un
incendie ou un choc electrique.
Veiller ace que la cuvette de recuperation soit toujours en
place Iors de I'utilisation de I'element; I'absence de la cuvette
de recuperation Iors d'une cuisson peut faire subir des
dommages au cQbhge.
Garnitures de protection : Ne pas garnir les cuvettes de
recuperation sous les elements ou lefond du four avec de la
feuille d'duminium, saul Iorsque ceci est suggere darts le
guide. La mise en place d'un tel garnissage peut susciter un
risque de choc electrique ou d'incendie.
Orienter lapoignee de chaque ustensile vers le centre de la
table de cuisson et non vers I'exterieur ou vers un autre
element; ceci reduira le risque de brOlure, inflammation de
matiere inflammable ou renversement Curtjeune enfant
pourrait saisir et renverser un ustensile dont le manche est
oriente vers I'exterieuO.
Veiller a utiliser un ustensile de taille suffisante pour que le
contenu ne risque pas de deborder. Ceciest particulierement
important pour un ustensile rempli d'huile de friture. Verifier
que la taille de I'ustensile est suffisante pour qu'il puisse
recevoir les produits alimentaires a cuire, et absorber
I'augmentation de volume suscitee par I'ebullition de la
graisse.
Exercer une prudence extreme Iors du deplacement du
recipient de graisse ou Iors de I'elimination de graisse chaude.
Laisser la graisse refroidir avant de deplacer [ustensile.
Hottes d'e×traction
Nettoyer frequemment les filtres et la hotte de lacuisiniere
pour empecher la graisse ou d'autres produits inflammables
de s'accumuler sur les filtres ou la hotte en provoquant des
feux de graisse.
Pour fiamber des aliments sous la hotte, mettre le ventilateur
en marche.
27
Page 29

Nettoyage et securit
Nettoyer prudemment la table de cuisson, Arreter routes les
commandes et attendre le refroidissement de tous les
composants avant de les toucher ou d'entreprendre le
nettoyage, Nettoyer I'appareil avec precaution, Travailler
prudemment pour eviter des brQlures par lavapeur en cas
d'utilisation d'un chiffon ou d'une eponge humide lots de
I'elimination d'un produit renverse sur une surface chaude,
Certains produits de nettoyage peuvent generer des vapeurs
nocives Iorsqu'on les applique sur une surface chaude,
Nettoyer uniquement les pieces mentionnees darts ce guide,
Four autenetteyant
(certains modeles)
16chefritedans le four lots de I'autonettoyage,
Ne pas nettoyer lejoint de porte; lejoint joue un r01eessentiel
quant aI'etancheite, Ne pas frotter, endommager ou deplacer
le joint,
Ne pas utiliser de produits de nettoyage pour four ou enduits
de four, darts le four autonettoyant ou sur les zones voisines,
Avant d'executer une operation d'autonettoyage, retirer la
lechefrite, lesgrilles du four et lesautres ustensiles, et eliminer
par essuyage tout exces de residus renverses pour eviter la
formation de fumee ou I'infiammation de ces residus,
II est normal que la surface de cuisson devienne chaude
durant une operation d'autonettoyage; par consequent, eviter
de toucher lasurface de cuisson durant I'autonettoyage,
Avertissement et avis
important pour la s6curit6
La Ioi cdifomienne _Safe Drinking Water and Toxic Enforce-
ment Act >>de 1986Cproposition65:)stipule la publication par
le gouvemeur de la Californie d'une liste de substances que
I'etat de Californie considere comme cancerigenes ou
dangereuses pour lesysteme reproducteur, et impose aux
entreprises commercides Fobligation designaler aleurs
clients les risques d'exposition a de telles substances,
Nous informons les utilisateurs de cet appareil que lots d'une
operation d'autonettoyage, ils peuvent etre exposes a une
faible concentration de certaines substances figurant darts la
liste mentionnee ci-dessus, dont le monoxyde de carbone,
Pour minimiser [exposition, veiller ace que la piece o_ se
trouve le four soit convenablement aeree durant une operation
d'autonettoyage par I'ouverture d'une fenetre ou d'une porte,
AViS IMPORTANT - OiSEAU× FAMiLIERS : Lesoiseaux ont
un systeme respiratoire tres sensible, Ne pas garder un oiseau
familier darts la cuisine ou darts une piece ou il pourrait etre
expose aux fumees, Lesfumees emises durant une operation
d'autonettoyage peuvent etre dangereuses ou mortelles pour
un oiseau, de meme que les fumees emises lots du chauffage
excessif de graisse, huile, margarine, et du chauffage excessif
dans un ustensile a revetement antiadhesif,
Conserver ces instructions pout consultation ult6tieute
28
Page 30

@
Boutons de commande
PermettentI'utJIisationdes616mentschauffants desurface,avecune
progressioncontinuede la puissanceentreIesreglagesextremes
Low (Bas]etHigh (Clever+On peut regierun bouton_ toute
positionentrecesdeuxextremes+
RegJage des commandes
1+ PlacerI'ustensilesur 1'element+
2. Enfonceret faire tournerIe bouton jusqu'_ lapositiondesiree
(rotationclansunsensou clansI'autre}.
• Desmarquessur Ietableau de commande
identifientI'elementcommandepar chaquebouton.
Parexemple,legraphique_ droiteindique
I'elementavant/gauche.
3. IIy a un temoin hmineux pour leselementssur le tableaude
commande.LorsqueI'un desboutonsde commanded'un
elementde surfaceestalimente,le temoins'illumine.Letemoin
s'eteintdesqu'oninterromptI'alimentationde 1'61ement.
4. Apresunecuisson,ramenerJebouton_ lapositionOFF(Arret}.
RetirerJ'ustensile.
OO
@0
Suggestions pour Je regJage
On doit choisirla puissancede chauffageen fonctionde divers
facteurs :tailIe,type deI'ustensileet operation decuisson+Pour
rinformationconcemantlesustensileset autresfacteursaffectantla
puissancede chauffagea utiliser,se reporterb labrochureLa
cuissonsimplifiee+
Low (Bas) (2) : Pourfusion
de chocoIatou beurre,ou Ie
maintiende latemperature
d'un mets.
Meal.Low (Moyen
has) {S-a] : Pour
continuer la cuisson
de mets encasse-
rolesfermeespar
couvercleou pour
cuire_ Javapeun
!
Medium [Moyen] (5-7} :
Pourle maintiende
['ebullitionlente d'une
grande quantit6de [iquide
ou pour [ap[upartdes
operationsdefriture.
Low
/
High (Elev+) (10) : Pour
['ebullitiond'un liquide.On doit
toujours reduire[apuissancede
chauffagedesque [atempera-
ture d'ebul[itionestatteinteou
que ['alimentcommence_ cuire.
OFF i
(Lestylepeut
varierselon[e
modele]
Meal. High (Moyen 6iev_}
(:8+9]:Pourrissolertes
viandes,chaufferI'huiie
[grandefriture ou aliments
sautes}et pourIemaintien
de rebullition rapided'une
grandequantit6de Jiquide.
AVANTLA CWSSON
o Placertoujours I'ustensHesurI'e+ementavantd'alimenter - Sassurerque Ielementes_arr+te.
J'element.Pourev+terquelacu_mme+enesub_ssedesdommages, + El+minerdesque possibletousles residusde renversemen_e_
nejamaisfaire fonctionnerun elementdesurfacesansy placer
un ustenslle.
• NEJAMAIS ut+liserlatablede cu+ssoncommeJleude remisage
d'alimentsou d'ustensi+es.
DURANTLA CUISSON
. Vei]]er_ bien connaftrela correspondanceentreles boutonsde
commandeet les elements.Veiile[ _commander!'a++mentat_on
de I'elernen[vouJu.
o Commencerlacusson avecune puissancede chauffage
super_eure,puisreduirela pu+ssancede chauffagepour
poursuivrelacuisson.Nejamaisutiliser unepuissancede
chauffageeleveepour unecuissonprolongde.
. NEJA_AIS iaisserlecontenu d'un ustensiles'evapors+
compl_:ement;cec+pourrait falresubir aes dommages
i'ustensileet_ I'appare+L
o NE,IAMAIS toucher +atablede cuissonavantqu'ellesesoil
compi_[emen[refroidie.Certameszonesdela +ablede culsson+
particulierementauvoisJnagedeseidmentsde sudace,peuven[
devenirtres chaudesdurantune cuisson.Utiliser desmaniques.
APRE$ LACUISSON
project+ons.
NJTRES CONSEILS
- S'iJ} a unearmoirede rangementdirectementau+dessusdela
tablede culsson,on nedolt y placerque desal[icies peu
fiequemmentutllJsdset qu+peuvent_treexposesb la chaJeur.La
chaieurCruiseparis culsinterepourraitsusciterun p+oblemepour
desarticles commeiiquidesvoJatiis,produitsde ne[[oyagee[
flaconsd'aerosol.
+ NE_AP_AISImsserd'art+c+esur latable decu+sson.
paKiculierementd'art+cleen plastique.L'airchaudqui s'echappe
pal I'eventdu four pourrait provoquer]'inflammationd'un ar[Jcle
inflammable,faJrefondre/amo!l+run articleen plastique,ou
provoquerune augmentationdepressionprovoquantI'eclatement
J'unrecipientferme.
- NEJA_AIS laisserde lafeu+lied'aJuminium,unesonde
thermometdque8vmndeou unoujetmetalliqueautre qu'un
ustenmtedecu_ssonsurfatable de cuisson entrerencontact
avecun _l_mentchauffant.
29
Page 31

1
El .ments de la table de
Remarques :
EI6ments spiral6s
o Lorsqu'un6!6mentestutiIis6,il estaliment6par intermittencepour
le maintiende lapuissancedechauffaged6sir6e.
®
Leselementsspiral6ssont autonettoyants.Nepas lesimmerger
dansde [eau.
• Nettoyerlatable decuissonapr6s chaqueutiIisation.
• Essuyertout produit renvers6acideou sucr6sur latable de
cuisson,pour 6viterune attaquechimiqueou un changement
de couleurde 1'6mail
Pour prot6ger la finition des cuvettes de
r_cup6ration :
• Pourdiminuerla d6colorationet iefendiIlement,6viterd'utiliser
une puissancede chauffage61ev6ependantune p6riode
prolongee.
• NepasutiIiserun ustensiIedetrop grandetaille.L'ustensiIene
devraitpasd6borderde plusde 2,5cm -5 cm (1- 2 pouces}
au-del_de lap6ripheriede I'616ment.
• Lorsde RJtiIisationde grossesmarmites,parexemplepour la
preparationde conserves,utiliserI'6!6mentsp6ciaIcongupour
la pr6parationde conserves0nod6IeCE1}.Prendrecontact
avecle d6taiIIantpourobtenirdesdetails,ou composerle
1-877-232-6771auxE.-U.ou le1-800-688-8408au Canada
pour passercommande.
• Nettoyer%quemment. (Voirpage43.}
[}6pOSe : SouleverI'616ment
refroidi.Tirerprudemmentpour
extraireI'616mentdu blocde
connexion.
Mise en place : IntroduireIes
homesde rel6mentclansIaprise.
Guiderpour laraiseen place.
Abaisser1'61ementpour le placer
d'ap[omben appuisur [acuvettede r6cup6rat[on. 80RtVES
Cuvettes de r6cup6ration
Lescuvettesde r6cup6rationsouschaque616mentde surface
recueillentiesalimentsqui ont d6borde.IIfaut touiours lesutiliser.
L'absencede cuvettesde recuperationpendantlacuissonpeut
endommagerlesills 61ectriques.
Pourne pasintroduire unrisquede choc 61ectrique,ou d'incendie,
nejamaisgarnir lescuvettesde recup6rationde feuilled'aluminium.
Lescuvettesde r6cup6rationvontsed6colorer(tachesbieues/
dor6es}ou sefendiller_ laIonguesi eIIessontsurchauff6es.La
decolorationou le fendilIementsont permanents,maisn'affectent
pasla performancede cuisson.
3O
Page 32

Commandes du four nettoyage manuel (certains modeles]
\
\
\
\
\
B C
REMARQUE: L'afficheurindique 12:00IorsqueI'appareilest branch6la premierelois ou encasde pannede couranLLestemoinshmineux
de cuissoncouranteetde cuissonau grils'alhment IorsqueI'onappuiesur latouchede fonctioncorrespondante,
Cuissoncourante
B
Broil
c
Minuterie
D
Horloge
ANNULER
F¸
Plus(A] ou
Moins (_']
S'utilisepourla cuissoncouranteet le
r6tissage,
S'utilisepourIacuissonau gr[I etle
rissolagesur partiesup6rieure,
Programmelaminuterie,
S'utilisepourprogrammerI'heureduiour,
Annuletouteslesop6rationssaufminuterie
et horloge,
S'utilisepourentrer ouchangerladur6e,la
temp6raturedu four,Etablitle gril
temperature#lev#eou basse,
Utilisation des touches
• Appuyersurla touched_sir6e,
• AppuyersurA (Plus+]ou V (Moins-] pourentrer ladur6e ou la
temp6rature,
• Unbip retentitIorsqueI'on appuiesur unetouche de fonction,II
n'ya pasde hippour la touche A ou V,
• Undoublehip retentitencasd'erreur deprogrammation,
2, Mettre _ I'heure8 I'aidedes touches_ ou V, S[
I'onn'appuiepas surcestouchesen moinsde 30
secondes,Ieprogrammeest annuI#,Appuyersur la
touche Clocket recommenceL
Programmatio de la mi terie
La minuteriepeut#treprogramm#edeune minute [:01] jusqu'_99
heureset 59minutes(99:59],Ladur6e seraaffich_e en minuteset
non ensecondes,LA MINUTERtENECO_MA_DE PAS LEFOUR.
1, Appuyersur la toucheTimer(Minuterie],
• 0:00s'ailumeet lesdeuxpoints (:]clignotent
I'afficheur,
2, Appuyersur _ ou V iusqu'_ce que la durSe
d6sirSesoitaffichSe,
Laminuteriecommence_ d@compterdes qu_
dur@ea@t_progmmm@e,
o Lesdeuxpointsqui clignotent indiquentqu'un
d@compteest encours,(Lesdeuxpoints ne
clignotentpassi I'heureou JatempSraturedu
four sont affich_es,]
Deuxhipscourtssignalentla fin de I'op_ration,0:00parait
J'afficheur,
Remarque : Quatresecondesaprasavoirappuy6sur lestouches
A ou V, ladur6e ou latemp6ratureserontautomatiquement
entr6es,Siplusde 30secondess'6coulententrela pressionsur
une touchede fonctionet sur les touches,& ou W, lafonction
seraannul#eet I'afficheurreviendra_ I'affichageprecedent,
R g age de I'hoHoge
1, Appuyersur la toucheClock (Horloge],
• L'horlogenepeutpas#trer#gl6esi lefour est
d_j_programm8pour uneop8rationde cuisson
courante,degril ou uneopSrationminut#e,
• Si I'on veut, appuyer sur Ia touche Clock et I'heule dujour
r_apparaft briSvement _ I'afficheur pendant une operation
minut_e.
• SiFonveut,appuyersur IestouchesBakeou Broil etle reglage
de tempSratureactueller_apparaitbriSvement_ I'affichage
pendantune opSrationminutee,
Ana_latioa de la mia_terie :
Appuyersur latoucheTimeret la maintenirainsi
pendantplusieurssecondes,
31
Page 33

Cuisson courante, rStissage et
cumsson au gril
Pourobtenir desconseilset desdureesdecuissoncourante,de
rOtissageet de cuissonau gril,se reporter_ la brochureLa cuisson
simplifiee=
Programmation des commandes pour une cuisson
courante ou un retissage :
1= Appuyersur latouche Bake(Cuissoncourante)=
o 000s'allumeet Ietemoin lumineuxdecuisson
couranteclignote_ I'afficheur=
o Si I'onappuiesur latouche Bake,sansprogrammerune
temperaturedu fourdansles30secondessuivantes,le
programmeest automatiquementannuIeet rheuredu iour
reapparait_ ['afficheur.
2. Appuyersur latouche A (Plus+)ou V (Moins)
jusqu'8ceque latemperaturedesireedu four so
affichee.
o Latemperaturepeut etre programmeede 75
285°C (170_550°F).
o 350°parait_ I'afficheurIorsqueI'on appuie
unefois sur latouche ,L ou V=
o Appuyer_ plusieursreprisessurIatouche A ou V pour
changerlatemperaturedu four parintervallesde3 °C
(5°F)ou appuyersur la touche A ou V en maintenantIa
pression,pourchangerlatemperaturedu four parintervalles
de 6 °C (10°F).
o 100°ou la temperaturereelIedu four,seIonlaquefleestIaplus
elevee,parait_ I'afficheurIorsquelefour semet enmarche.
o Latemperature_ I'afficheuraugmentepar intervallesde3 °C
(5°F),jusqu'_ceque latemperatureprepmgrammeesoit
atteinte.Unseulhip retentitIorsquelefour est en coursde
prechauffage.
o Laisserle four prechaufferpendant 10_ 15minutes.
o PourrappeierlatemperaturepreprogrammeependantIe
prechauffage,appuyersur latouche Bake.Latemperaturesera
afficheependanttrois secondes.
o Pour changer matemperature du four pendant maeuisson,
appuyersur Bake,puissur la toucheA ou T jusqu'_ce quela
temperaturedesireesoit affichee.
o Pour changer matemperature du four morsdu
preehauffage,appuyerdeuxlois sur latouche Bake,puissur
la touche ,L ou T jusqu'_ ceque latemperaturedesireesoit
affichee.
3,
PlacerIa nourrituredansle four.VerifierI'avancementde la
cuisson_ Iadureeminimaledecuisson.
4.
Lorsquela cuissonestterminee,appuyersurJatoucheCance!
(Annulet)pour eteindre Iefour, puisretirer lanourrituredu four.
o Lefour secaracterisepar unarretautomatique.S'ilest laisse
en marchependant12heures,il s'arretera
automatiquementet 000paraitra8 J'afficheur.
AppuyersurIatoucheCanceletI'heure
reapparaitra_I'affJcheur.
Programmatio_ des co_a_des po_r la
e_isso_ a_ gril :
Pourde meiHeursresu[tats,uti[iser['ustensi[eprevupour cegenrede
cuisson=
1. PlacerIaIechefrite_ lapositionde grille recommandee.(Voirle
tableaude Iapage39.)
2. Appuyersur latouche Broil (Gril).
• SEts'aliumeette temoin lumineuxde cuissonau
gril clignote a I'afficheur.
3. Appuyersur latouche A pourchoisir ungril
temperatureHi (Elevee)ousur IatoucheV (M_
pour choisirun gril _ temperatureLo (Basse).
• Choisirle reglageHi pour ungril normal.
• Choisirle reglageLo pourun gril
temperaturebasse,afin d'eviterun rissolage
excessifdesalimentsnecessitantdesdurees
decuissonplusIongues,commela volaille.
• SiI'on nechoisit pas le reglageHi ou Lo en moinsde30
secondes,leprogrammeseraautomatiquementannuleet
I'heurereapparaitra_I'afficheur.
4. PrechaufferI'elementdegril pendanttrois minutes.Fairecuire au
griI; Iaisserla porte dufour ouverte_ lapremierebutee(environ
10cm [4 po]).
5. Apres legril, appuyersurCancelpoureteindreIe
four, puis retirer IaIechefritedu four. L'heuredu
jour reapparait_ I'afficheur.
32
Page 34

@
Commandos du four autonettoyage (certains modetes]
A B C D
A
qril
B ¸
Cuissoncourante
[)
Minuterie
Cuissonet
iiii
maJntien
t:
Nettoyage
G
D6marrage
differ6
H
Horloge
Maintienau
chaud
J
ANNULER
S'utilisepourlacuissonau grilet lerissolage
surpartiesup6rieure.
S'utilisepourlacuissoncouranteet le
r0tissage.
S'utilisepourentrerouchangerladur6e,la
temperaturedufour.Etablitle gril
tetr}peratureELEVEEouBASSE.
Programmelaminuterie.
Pourcuirependantunedureepr_6tablie,avec
maintienauchaudpendantuneheure.
S'utiiisepourprogrammerlecycle
d'autonettoyage.
Programmelefourpourd6buterunecuisson
plustar&
S'utJlJsepourprogrammerI'heuredujour.
S'utilisepourmaintenirauchauddansle four
lesalimentscuits.
Annuletouteslesop6rationssaufminuterieet
horloge.
Remarqae : Quatresecondesapr_savoirappuy_sur les
touches_ ou _, la durQeou latempQraturesera
automatiquemententr6e.Siplus de 30secondess'_coulententre
la pressionsur unetouche defonctionet cellesurla touche
ou V, lafonctionseraannul8eetI'afficheurreviendra
I'affichageprecedent.
L'hor[ogepout_treprogramm_epour afficher[a dur_edansun
formatde 12ou 24 heures+L'ho[Iogeest programmeeenusinepour
un format de 12heures+
Cha_geme_t de l'horloge _ _ format de 24 he_res :
1+ AppuyersurlostouchesCANCEL
(ANNULER)et Delay(Demarragediffere]
etmaintenirJapressionpendanttrois
secondes+
Appuyersur _ ou T pour programmer
un format de 12ou 24 heures.
3. ProgrammerI'heureen suivantlesinstructions
donn6esci-dessous.
UtiJisatio# des to ches
o Appuyersur Iatouche d_sir6e+
o Appuyersur _ (Plus]ou _' (Moins)pour entrerla dur6eou la
temperature+
o Un hip retentitJorsquei'on appuiesurune touche.
o Un double hip retentit en casd'erreurde programmation+
R_glage de l'horloge :
1+ Appuyersurla toucheClock(Horloge)+
o L'heuredu jour etdeuxpointsc%notent
I'afficheur+
Appuyersur _ ou V pourprogrammerI'heure
dujOUL
o Lesdeuxpointscontinuent _clignoter.
Appuyer_ nouveausur latouche Clockou attendre
quatresecondes+
33
OJock
s_ite oo,
Page 35

©
LorsqueIe courant61ectriquearriveou apr_sune interruptionde
courant,la derniSreheureavantFinterruptionde courantva
clignoter=
PourrappelerFheureduiour Iorsqu'uneautrefonctionde dur6e
s'affJche,appuyersur Iatouche CIocL
L'heurede I'hodogenepeut 6tre chang6eIorsquele foura 6t6
programm6pour une cuissonou un nettoyagediff6r6 ou pour la
fonctionde cuissonet maintien=
Annulation de l'affichage de l'heure :
Si I'onne d6sire pasI'affichagede J'heuredujour :
Appuyersur lestouchesCANCEL(ANNULER)et
Clock(Horloge)et les maintenirainsi pendant
trois secondes=L'heuredu jour disparakde
['afficheur.
LorsqueI'affichagede I'heureest annuI6,
appuyersur Ia touche Clockpour afficher
bri6vementI'heuredu iour.
__ Clock
R6affichage de l'heure :
Appuyersur Iestouches CANCELet Clocket les maintenirainsi
pendanttrois secondes=L'heuredu iourrSapparatt&I'afficheur=
La minuterie peut 6tre programm6e de une minute (00:01} jusqu'&
99 heures et 59 minutes (99:59}.
La minuterie peut 6tre utilis6e ind6pendamment de toute autre
activit6 du four=Elle peut 6tre aussi programmee alors qu'une autre
fonction du four est en cours d'utilisation.
La minuterienecommandepasJefour.Ellenesert qu'&6mettredes
bips.
Programmation de la minuterie :
1. Appuyersur Ia toucheTimer (Minuterie).
• 0:00s'alhme _ I'afficheur.
• Lesdeuxpointsclignotent.
2. Appuyersurla toucheA ou 'V' jusqu'_ ceque
I'heurejusteparaisse_ I'afficheur.
• Lesdeuxpointscontinuent_ clignoter.
3. Appuyer_ nouveausurlatouche Timerou
attendrequatresecondes.
• Lesdeuxpointscontinuent_ clignoteret le d6comptede la
dur_ecommence.
Timer
A
Annulation de la minuterie :
1. Appuyersur JatoucheTimeret la maintenirainsipendant trois
secondes.
OU
2. Appuyersurla toucheTimeret r6glerI'heure_ 00:00.
Verrouillage des commandes
Lestouches peuvent6tre verrouilI6espour des raisonsdes6curit6,
nettoyageou pourempSchertoute utilisationnon souhait6e=Ellesne
pourront6treutiliseessi ellessontverrouJll6es.
Si lefour esten cours d'utiJisation,lescommandesnepeuvent6tre
verrouJll_es.
L'heureactuelIedujour restera_ I'afficheurIorsquelescommandes
serontverrouillees.
Verrouillage :
Appuyersur lestouchesCANCELet Cook&
Hold (Cuissonet maintien}et lesmaintenirainsi
pendanttrois secondes=
o Le mot LOCK(VERROUILLAGE]clignote
J'afficheur.
-- Hold
Deverro_illage :
Appuyersur lestouchesCANCELet Cook& Holdet Jesmaintenir
ainsipendanttrois secondes.
o Le mot LOCKdisparaitde I'afficheur.
Codes d'a o aJie
LesrootsBAKE(CUISSONCOURANTE]ou LOCK0,!ERROUILLAGE]
peuventclignoter rapidement_ I'afficheurpour prSveniren cas
d'erreurou de problSme=Si te! est lecas,appuyersur Iatouche
CANCEL=Si les rootsBAKEouLOCKcontinuent_ ciignoter,
debrancherI'appareiL#_tendrequelquesminutes,puis rebrancher
I'appareiLSiI'un des rootscontinue_ clignoter,d_brancherI'appareil
et prendrecontactavecun reparateurautoris_=
Cook&
• Laderni_reminutedu d6compteseraaffich6esousformede
secondes=
4. A la fin de ladur6e programm6e,un hiplong retentit.
34
Page 36
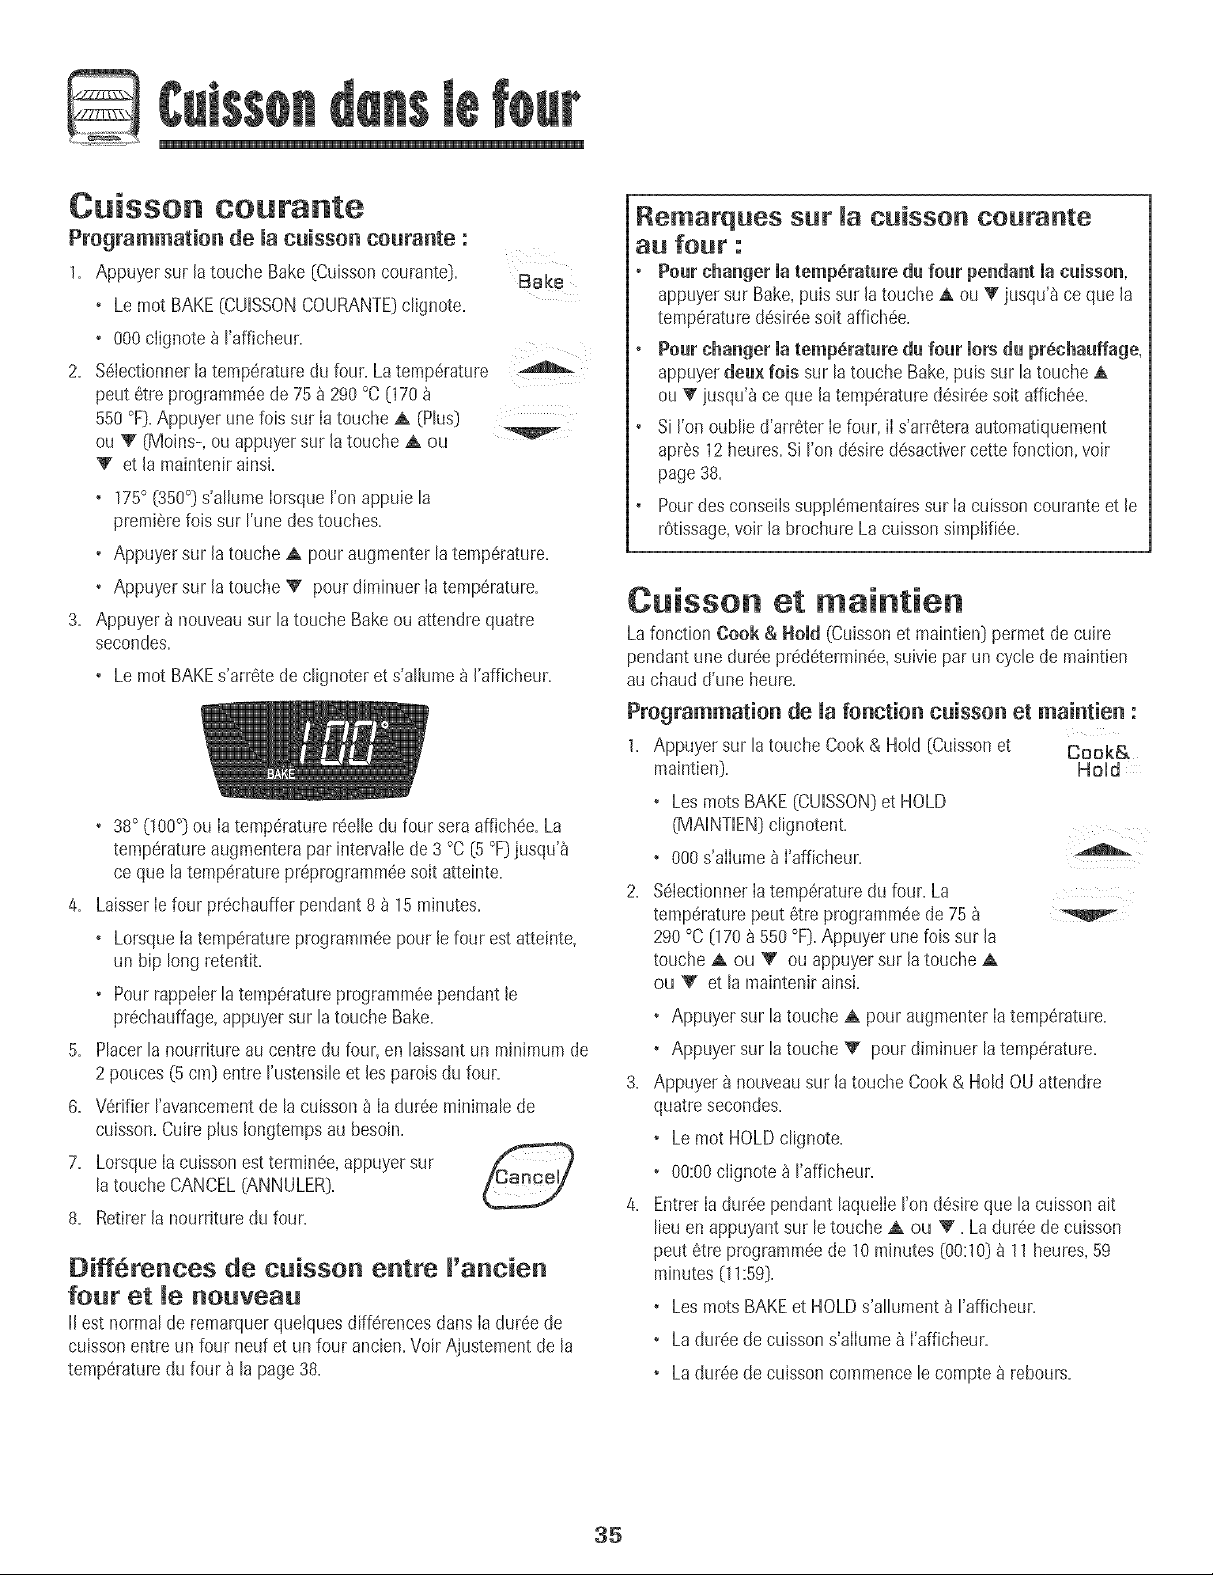
D
Cuisson courante
Pregrammatien de macuisson ceurante :
1. Appuyersur la touche Bake(Cuissoncourante}.
• Lemot BAKE(CDISSONCOURANTE)c@note.
• 000clignote_ I'afficheur.
2. %bctionner latemperaturedu four.Latemperature
peut6treprogramme de75 a 290°C070
550°F}.Appuyerunefob surIatoucheA (Plus)
ou V (Moins-,ou appuyersur latouche A ou
_' et la maintenirainsi.
• 175° (350°) s'allumeIorsqueron @pub la
premierefoissur I'unedestouches.
• AppuyersurlatoucheA pouraugmenterla temperature.
• AppuyersurlatoucheV pour diminuerIa temperature.
3. Appuyer_ nouveausurlatouche Bakeou attendrequatre
secondes.
• Lemot BAKEs'arretede clignoteret s'allume_ I'afficheur.
• 38° (100°}ou Ia temperaturer@lb dufourseraaffich@. La
temperatureaugmenterapar intervalb de 3 °C {5°F}jusqu'a
ceque latemperaturepr@rogramm@soit atteinte.
4. LaisserIefour pr@hauffer pendant8 _15minutes.
• LorsqueIatemperatureprogramme pour Jefour est atteinte,
un hip long retentit.
• Pourrappelerla temperatureprogramme pendant le
pr@hauffage,appuyersurla touche Bake.
5. Placerlanourritureau centredu four,en laissantun minimumde
2 pouces(5 cm} entre rustensib et Jesparoisdu four. 3.
6. Verifierravancementde lacuissml_ Ia dureeminimalede
cuisson.Cuireplus Iongtempsaubesoin.
7. LorsqueIacuissonest terrain@,appuyersur ___=,)
latouche CANCEL(ANNULEB).
8. Retirerla nourrituredu four. 4.
Differences de cuisson entre I'ancien
four et le nouveau
II est normalde remarquerquetquesdifferencesdartsIadur@ de
cuissonentre un four neufet un fourancien.VoirAjustementde la
temperaturedu four_ la page38.
Remarques sur _a cuisson courante
all fOUr :
• Pour changermatemperature du four pendant macuisson,
appuyersur Bake,puis sur latouche A ou _"jusqu'a ce quela
temperature@sir@ soit affich@.
• Pour changer matemperature dufour morsdu pr_chauffage,
appuyerdeu× lois surla toucheBake,pub sur la toucheA
ou_' iusqu'_ceque latemperaturedesireesoit affich@.
• Si I'onoublied'arreterIefour,iI s'arreteraautomatiquement
apres12heures.SiI'ondesired@activercette fonction,voir
page38.
Pourdesconseilssuppl@_entairessur Iacuissoncouranteet le
r6tissage,voirlabrochureLacuissonsimpli%e.
C isso et maintien
Lafonction Cook & Hold (Cubsonetmaintien}permet decuire
pendantunedur@ predetermine, suivieparun cycb de maintien
au chaud d'uneheure.
Progra_atio_ de la fo_ctie_ c_isse_ et _ai_tie_ :
1. Appuyersur la toucheCook& Hold [Cuissonet Cook&
maintien). Hold
•Les rootsBAKE(CUiSSON)et HOLD
(MAiNTiEN)clignotent.
• 000s'alIumea I'afficheur.
2.
%lectionner Iatemperature du four. La
temperature peut etre programme de 75
290 °C 070 a 550 °F}. Appuyer une lois sur la
touche _ ou V ou appuyer sur la touche
ou _ et la maintenir ainsi.
• Appuyersurla touche_ pour augmenterIatemperature.
• Appuyersurla toucheV pourdiminuerlatemperature.
Appuyer8 nouveausur latouche Cook& HoldOU attendre
quatresecondes.
• Lemot HOLDclignote.
• 00:00ciignote_ I'afficheur.
EntrerIadur6e pendantlaquetle!'ondesireque laculssonait
lieuen appuyantsur letoucheA ou V. Laduree decuisson
peut etreprograrnpa@de 10minutes (00:10}a 11heures,59
minutes(11:59}.
• LosrootsBAKEetHOLDs'allument _I'afficheur.
• Ladur@ decuissons'alIumea I'afficheur.
• Ladureede cuissoncommencele comptea rebours.
A
35
Page 37

©
Lorsque la dur6e de cuissou s'est 6coul6e :
• O,uatre bips retentissenL
• Lemot BAKEs'6teint.
• LosrootsHOLDet WARM(CHAUD}s'allument.
• 75° (170°} parait _ rafficheur.
Apr_s uue heure de MAINTIEN AU CHAUD :
• Lemot End(Fin]s'affiche.
• L'heuredujour r6apparait_ rafficheur.
Auuulatiou de la fouctiou cuissou et maiutieu _ tout
momeut :
Appuyersur Ia touche CANCEL(ANNULER}.Retirerla _Cancel/
nourrituredu four.
Cuisson courante diff6r6e
Ne pasUti!iseEla cuissondiff6r6epour desdenr6estr6s
p6rissablescomme!esproduits !a!tiers,lep0rc, lavo!ailleou !es
fruits de met.
Avec lafonction diff6r6e, lefour se met_ cuire plus tard dansla
]ournee.ProgrammerIadur6e d'attented6sir6eavantque lefour ne
se mottoen marcheetIadur6ede cuissond6sir@e.Lefour com-
mence_}_chauffera rheure s61ectionn6eetcuit pour Iadur6e
specifiee,puisgarde la nourritureauchaud pendant une heure.
La dur6e d'attente peut 6tre programm6e de 10 minutes (00:10]
11 heures, 59 minutes (11:59}.
Programmatiou d'uu cycle de cuissou couraute
diffSr6e :
1. Appuyersur [atouche Delay(D6marragediff6r6]. Delay
• Lemot DELAY(ATTENTE}clignote.
• 00:00clignote_ I'afficheur.
2. Appuyersur JatoucheA (Plus]ou V {Moins]
pour programmerJadur6ed'attente.
AIorsque lemot DELAYclignotetoujours :
3. Appuyersur latouche Cook& Hold (Cuissonet
maintien).
• 000s'allume_ J'afficheur.
• LosrootsBAKE(CUISSONCOLIRANTE}et HOLD
(MAINTIEN}clignotent.
Cook&
Hold
4. Appuyersur ,A pour programmerlatemperaturede cuisson.
• 00:00etle mot HOLDclignotent.
• Lemot BAKEresteallure6.
5. Appuyersur ,A pour programmerladur6ede cuisson.
• Ladur6ed'attente,lesrootsDELAY,BAKEet HOLDs'allument
I'afficheur.
Lorsque la dur6e d'atteute s'est 8coulee :
• Lemot DELAYs'6teint,
• Ladur6ede cuissonestaffichee.
•Les rootsBAKEet HOLDsont affiches.
Pour programmer uu temps d'atteute lorsque
la fouctiou cuissou et maiutieu a dS]_ 8tO
programm6e :
1. Appuyersur JatoucheDelay(D6marragediff6r6).
• Lemot DELAY[ATTENTE]clignote.
• 00:00paraita J'afficheur.
2. AppuyersurIa touche,A ou V pour
programmerIadur(!ed'attente.
• Apr6squatresecondes,Iemot DELAYreste
allure6pour rappelerqu'uncyclede cuisson
diff6r6ea 6t_ programm6.
De!ay
A
Lorsque la dur_e d'atteute s'est _coul_e et que le
four se met eu marche :
• Ladur6ede cuissonseraaffich_e.
• Lemot DELAYs'6teint.
o LesrootsBAKEet HOLDrestentallum6s.
Auuulatiou :
Appuyersur latouche CANCEL[ANNULER}.
• Touteslesfonctionsde cuissonminut6eet
non minut_eserontannulees.
• L'heuredu jour r6apparait_ rafficheur.
_em_q_Gs :
NepasutiliserIa cuissondiff_r_epour desarticlesqui
n6cessitentquelefour soit pre',chauff6,commelesg_teaux,
lospetitsbiscuitset los pains.
NepasutiliserIe cycle de cuissonet maintiendiff6r6s sile
four est d6j_chaud.
36
Page 38
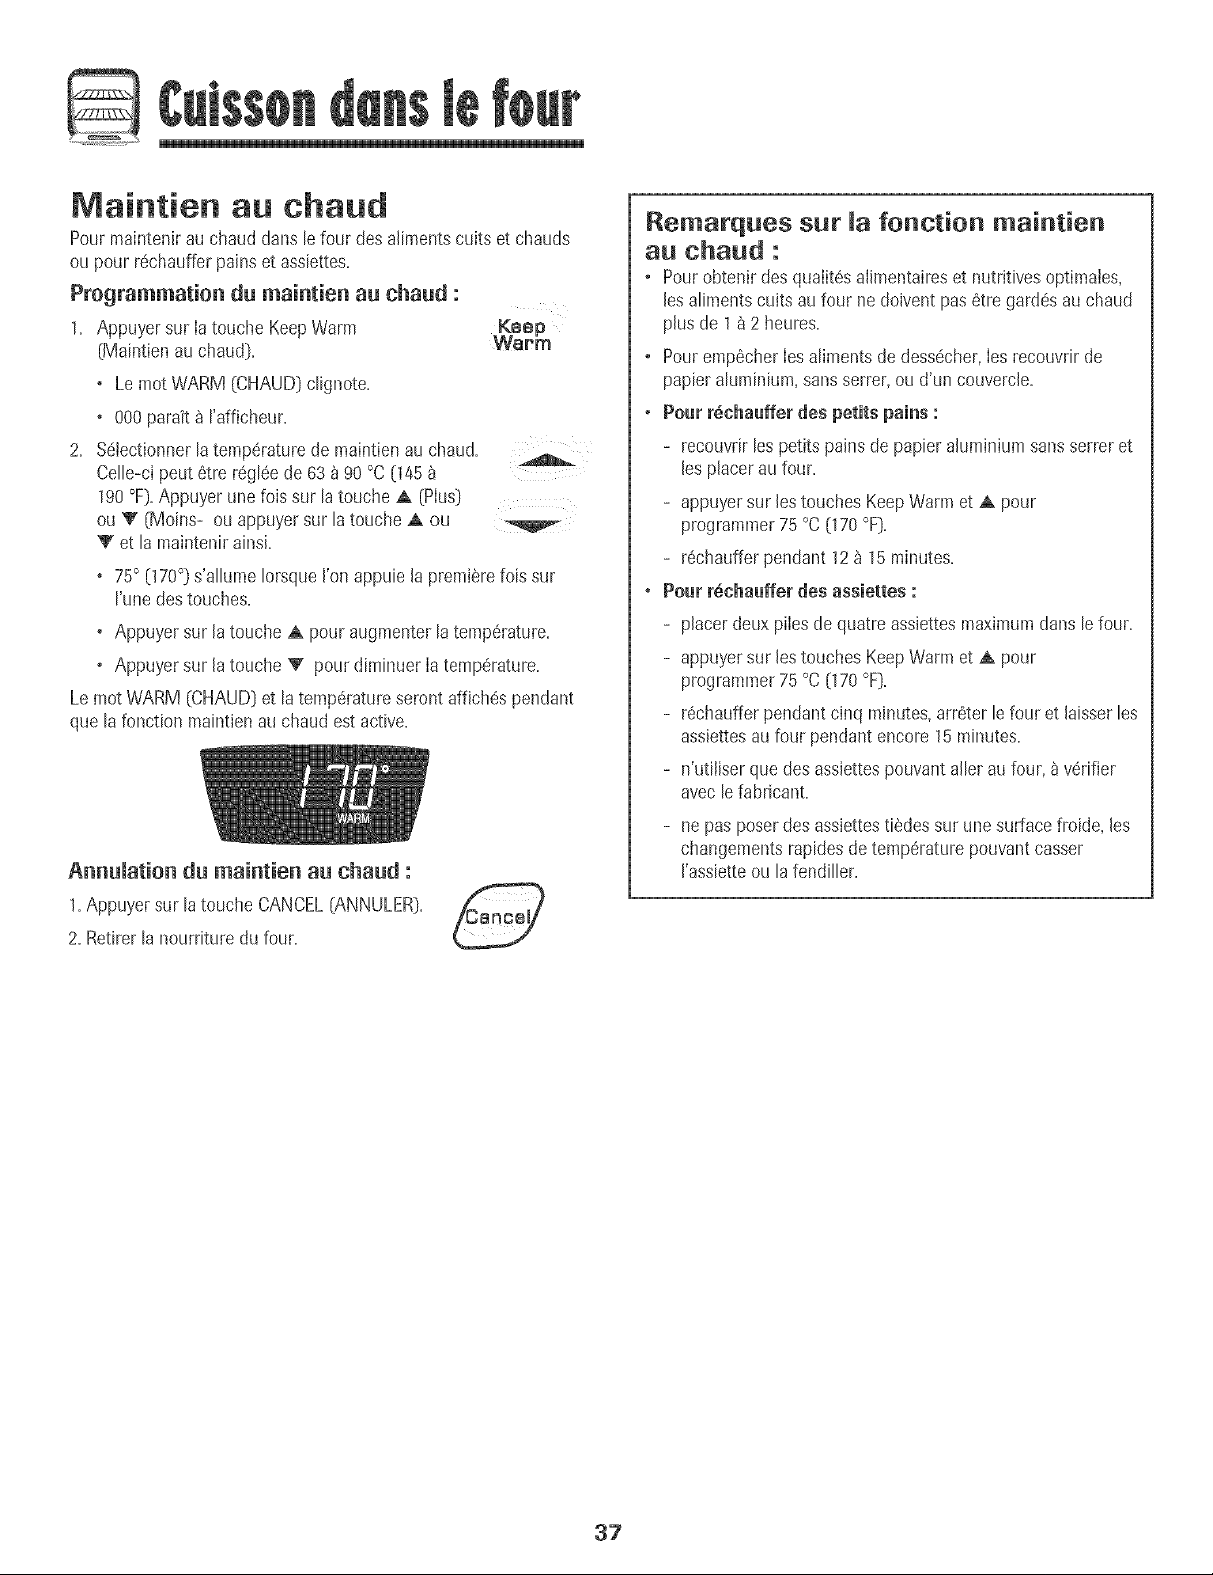
Q
Maintien au chaud
Pourmaintenirauchaud(Jarls[efourdesalimentscults etchauds
ou pour r6chaufferpains et assiettes.
Programmation du maintien au chaud :
1. Appuyersur [atouche KeepWarm
{Maintienau chaud}.
° Le motWARM {CHAUD}ctignote.
° 000parait_ rafficheur.
2. %lect[onner tatemp6raturede maintienau chaud.
Celle-cipeut 6trer6gl6ede 63_90 °C {145
190°F}.Appuyerune foissurla toucheA {Plus}
ou V {Moins- ouappuyersur latouche A ou
_' et la maintenirainsL
75° {170°} s'allumeIorsqueI'on appuiela premierefoissur
I'unedestouches.
• Appuyersur JatoucheA pour augmenterlatemp6rature.
• Appuyersur JatoucheV pour diminuer Iatemperature.
Lemot WARM(CHAUD}et latemp6ratureserontaffich@spendant
que lafonction maintienauchaudest active.
Keep
Werm
Remarques sur Ja fonction maintien
au chaud :
• Pourobtenirdesqualit6salimentaireset nutritivesoptimales,
lesalimentscuits au four ne doiventpas6tre gard6s auchaud
plusde 1a 2heures.
° Pouremp6cherIesalimentsde dess6cher,Iesrecouvrirde
papieraluminium,sansserrer,ou d'un couvercle.
• Pourr_chauffer des petits pains :
- recouvdrlespetits painsde papierahminium sansserreret
lesplaceraufour.
- appuyersur les touchesKeepWarmet A pour
programmer75 °C{170°F}.
- r6chaufferpendant 12_ 15minutes.
• Pourr6chauffer des assiettes :
- placerdeuxpilesde quatre assiettesmaximumclanslefour.
- appuyersur [estouchesKeepWarmet A pour
programmer75 °C{170°F}.
- r6chaufferpendant cinq minutes,arr6ter lefour et laisserles
assiettesaufour pendantencore 15minutes.
- n'utiliserque desassiettespouvanta[lerau four, av6rifier
avec[efabricant.
Annumation du maintien an chaud :
1.Appuyersur latouche CANCEL{ANNULER}. P_ancem)
2.Retirerla nourrituredu four.
- ne pas poserdesassiettestildes surunesurface froide,[es
changementsrapidesdetemp6raturepouvantcasser
['assietteoula fendiller.
37
Page 39

Arr t automatique/Mode
Lefour s'arr6teautomatiquementapres12heuress'il a 6tO
accidentellementlaisseen marche=Cettecaract_ristiquedes6curit_
poutetrearret6e=
Pour annuler l'arr_t 12 heures et faire fonctionner me
four en continu pendant 72 heures :
1= Programmerlefour pour une cuissoncourante(voir page35].
2= Appuyersurla toucheClock (Horloge]et la
maintenirainsipendantcinqsecondes= Clock
• SAbseraaffiche et clignoterapendant
cinqsecondes=
• SAbseraensuiteaffich_en continujusqu'b cequ'on rarr6te
oujusqu'_ ce quela dureelimite de 72heuressoit atteinte=
• Lemot BAKE[CUISSONCOURANTE]seraaussiaffichesi un
cyciede cuissoncouranteesten coursalorsque lefour est en
modesabbat.
ToutesIesautresfonctions (Minuterie,Maintien auchaud,
Nettoyage,etc=]sont verrouill6es,SAUFBAKE,pendantle mode
sabbat=
Annulation de la cuisson courante alors que le four
est en mode sabbat :
Appuyersur CANCEL(ANNULER].
• Lemot BAKEs'6teint_ rafficheur.
, Aucun hip sonorene retentit.
Annulation du mode sabbat :
1=Appuyersurla toucheClockpendantcinq secondes=
OU
2. Apres72 heures,lemodesabbatsetermine.
• SAbclignote pendantcinq secondes.
• L'heuredu iour revient& I'afficheur.
Clock
Ajustement de la temp6rature
du four
La pr6cisiondes temperaturesdu foura _t6soigneusementverifi6e
I'usine=lIest normalde remarquerquelquesdiff6rencesdansla
cuissonentre un four neufet un four ancien=Aufur et _ mesureque
Iescuisinieressontmoinsneuves,latemp6raturedu four peutvarlet=
II estpossibled'ajuster latemp6raturedu four si I'onpenseque Ie
four necuit pasoune rissolepas correctement=Pourdecider de
I'ajustement_ apporter,r6gIerle four_ unetemp6raturede 15°C
(25 °F]pius6teveeou plusbassoque la temp6ratureindiqu6edarts
larecette,puisfairecuire Iapr6paration=Lesr6suItatsdu <_test >>de
cuissondoiventdonner uneid6edu nomb_ede degr6sduquel Ia
temp6raturedoit 6tre aiust6e=
Ajustement de la temperature du four :
1. Appuyersur Ia toucheBake(Cuissoncourante}.
2. Entrer285 °C(550°F}en appuyantsurla touche,A
(Plus}.
3= Appuyersurla toucheBakeetIa maintenirainsi
pendantplusieurssecondesoujusqu'aceque 0°
paraissea I'afficheur.
Si la temperaturedufour a 6t6prec6demmentajust_e,Ie
changementseraaffich6.Parexemple,si la temperaturedu four
a (!t_ r_duitede 8 °C 05 °F},I'afficheurindiquera-8 (-15}.
4. AppuyersurIa touche,_ (PIEs}ou_' (Moins}pour ajusterla
temperature=
A chaque lois que I'onappuiesur unetouche,latemp6rature
changede3 °C(5 °F}=Latemp#latule du four peutetre
augment6eou diminu#e de3 _20 °C(5a 35°F}=
5. L'heuredu iour r6apparaitautomatiquementa I'afficheur.
IIn'estpasn#cessairedereaiusterIatemp6raturedu fouren cas
de panneou d'interruptionde courant=Lestemp6raturesde
cuissonau gril et de nettoyagene peuvent6treaiust6es=
Bake
Remarques sur le mode sabbat :
• Lemodesabbatpeut etre misen marche_tout moment,que
lefoursoit enmarcheou non.
• Lemodesabbatne poutpas#tm misen marchesi Ies
commandessontverrouill_esou laporteverrouilI6e.
• Sile four esten mode cuissonIorsquelemodesabbatest
programm6,lemot BAKE(CUISSONCOURANTE]s'6teint a la
fin du cycle decuisson.IIn'yaura aucunsignal sonoreaudible.
o Lorsquele modesabbata demarre,aucunhip depr6chauffage
ne retentit.
o Tous Iesmessageset lesbipssontdSsactivSsIorsquelemode
sabbatestactiE
o Si I'onappuiesur [atouche CANCEL,un cyclede cuisson
couranteaufour sera annuIe=Cependant,[eprogrammateur
resteraen mode sabbat=
o Apr6s unepannede courant,lefour revienten modesabbatavec
72 heuresrestantesetaucun cycleactif.
38
Page 40

Cuisson au grim
Programmation de la cuisson au grim:
1. Appuyersur [atouche Broil (Gri[).
o Le mot BROIL(GRIL}ciignote. Broil
o Le motSETG/AUDER)estaffiche.
2. Appuyersur latouche A (Plus(}pourprogrammerungril
temp6rature6iev@ou sur latouche V (MoJns}pourprogram-
merun griI _temp@aturebasse.
o Les mots HI (ELEVEE)ouLO (BASSE}serontaffich@.
o %bctionner HIbroil (GriI_temp@ature6by@) (290°C
[550°F])pour un griI normal S_bctionnerLO broil(Gril
temperaturebass@(230°C [450°F]}pour ungrii _temp@a-
ture inf_rbure d'aliments_cuissonplus Ionguecommela
volaille.
3. Apr6s quatresecondes,Iefour semeten mar@e.
o Le mot BROILresteallum6.
4. Pourun risso[agemaximum,pr@hauffer['6[6mentdegri[
pendanttrois ou quatre minutesavantd'aiouterla nourrJture.
5. PlacerIanourrituredanslefour. Laisserla porte dufour ouverte
d'environ10cm (4 po)_remi_re but@).
6. Retournerlaviandeunelois a la moiti6de Iaduraede cuisson.
7. LorsqueI'alimentest cuR,appuyersur Iatouche
CANCEL(ANNULER).Retirerla nourritureet la
I@hefrJtedu four.
o Uheure du jour r@pparak_ I'afficheur.
Remarques sur Uacuisson au grH :
o Pourde meilburs r@ultatsIorsdu griI,seservird'un ustensile
pr6vupour ce typede cuisson.
o Pr@oirdesdur@s decuissonaugriI piusIongueset un
rissolageI6g@ementmoinsdot6 si I'appareilfonctionnesurun
circuit de 208voIts.
o LegriI au reglageHi £1ev@estutilis6 pour la majorit6des
op@ationsdecuissonau gdLUtiliserIegriI au r6glageLO
(Bas}pour lacuissonde metsdevantcuireplusIongtemps,
afin de bur permettred'6tre biencurs sansrissoIageexcessiL
o Lesdur@sde cuissonau grilpeuvent6treplusIonguesavec
une temp6raturede gril inf@ieure.
o Pourdestemp6raturesetdesconseibsuppl6mentairessur Ia
cuissonaugriI,se reportera la brochure Lacuissonsimplifi@.
TabUeaude cuisson au grH
__ ,'_'_,
POS_TION DEGRE DE TEMPS DE CUISSON
AUMENTS DES GR_LLES_
B_uf
Bifteck, 2,5 cm (1 po] d'@aisseur
Hamburgers,2 cm (3/4po) d'@aisseur
Pore
Bacon
COtelettes,2,5 cm (1 po}
Jambon - pr6-cuit tranche de 1,3 cm 0/2 po]
4
4
4
4
4
4
Voiaiiie
Pouieten morceaux
3ou4
Fruits de mer
Damesde poisson,beurr6es,2,5cm (1 po] d'@aisseur
FJletes
4
4
Grillesup6rieurea Japositionn°5
Remarq_e : Cetableaun'estqu'un guide de suggestions.Les dur@s peuventvarier selon J'aliment_ cuire.
CUISSON
Cuissonmoyenne
Bbn cuit
Biencuit
Bien cur
Bien cur
Ti6de
Bien cuit
La chair se detache
La chair se d6tache
TOTAL (MINUTES}
15 - 18 minutes
19 - 23 minutes
15 - 18 minutes
6 - 10 minutes
22 - 26 minutes
8 - 12 minutes
LO Broil-
GrJl_ temperature basse
28 - 38 minutes
10 - 15 minutes
8 - 12 minutes
3g
Page 41

D
1
Event du four
Lorsque mefour est atimis_,mazone voisine de m'_ventpeuvent
devenir suffisament chauds pour provoquer des br_leurs,Ne
jamais obstruer m'oaverturede m'@ent.
• V6rifier que la cuvette de r@up6rationplac@
souscot6t6mentcomporteuntroucentral.Nepas OUVERTURE
gamirlacuvettede r@up6rationavecdelafeuille CENTRALEDELA
d'aluminium. CUVETTEDE
Rf-°CUPERATION
Eclairage du four
Appuyersur le commutateurd'@lairagedu four situ6sur
letabbau decommandepour allumerou 6teindrela
lampe.
©
Oven
Light
Sole du four
ProtegerIasoledesproduits renvers6s,en particulieracidesou
sucr6s,ceux-cipouvantd6coloreri'6mailvitrifi6. Utiliserdes
ustensilesde la bonnedimensionpour@iterque bs produitsnese
renversentou passentpar-dessusi'ustensileen bouillant.Ne pas
placer d'ustensiles ou de feuiiie d'amuminiamdirectement sur
la somedu four,
R6installation :
1. Placerla grilIe surles supportsclansle four.
2. Soubver16g6rementI'avanLFaireglisserla grilIeversI'arriere
au-deB de la positionde calage.
3. Abaisserlagrilb et lafaireglisserdansle four.
Ne pas recouvrir la totamit6d'une grille avec de ia feuiiie
d'aiuminium, nigamir lefonddu fouravec de iafeuiiie d'aiuminium.
Cecimodifierait losrSsumtatsdecaisson aufour, etmefond dufour
pourrait subir des dommages,
Positions des grilles
Grille 5 {positionIapIus
haute}:Pourcuisson
br@eau griI- pain grill6
ou alimentsminces
contenantpeu degraisse.
Grille 4 : Pour[apiupart
descuissonsau griL
Grille 3 : Pour[ap[upart
descuissonsde
p_tisseries sur une t61ea biscuits - g_teaux a etages, tartes aux
fruits, lets surgel6s.
Grille 2 : PourrOtissagede piecesde viande,lets en sauce,cuisson
depain,g_teau16gerencouronne(baba}ou entremets.
Grille I : Pourle rOtissagede grossespiecesdeviandeouvolailb,
tartessurgel6es,souffl6sou g_iteauxdes anges.
CUISSONSURP[USIEURS GRILLES:
J}eu× grilles: Placer bs grilles aux positions 2 et 4 ou 1et 4.
__5
__4
--3
__2
--1
Grilles du four
° Ne pas rangerde nourritumou d'ustens!!edanslefour.
Le four comportedeux grilles avec,pourchacune,un dispositifde
calage.
E×traction :
1. TirerIa grille en Iignedroite
iusqu'_cequ'elles'arr6te_ la
positionde calage.
2. Soubver B griIle_ I'avantpour
pouvoirI'extraire.
Oemi-grille
Unedemi-griIIe estdisponibleen
accessoire.Elleaugmentela capacitedu
four et s'accroche_gauche,_ lapartie
sup@deure.Elleestutile pour Iacuisson
d'un platde legumesIorsqu'ungros rOti
setrouvesur la grilb inferieure.Prendre
contactavecle revendeurpourde-
manderI'accessoireHALFRACK(demi-
grille}ou pourcommander,composerle
1-800-688-8@8.
40
Page 42

Four autonettoyant
(certains modeles)
Remarque : Pour[a nettoyagemanuaivoir[epage44.
o h _stnormal quecertalnespieces dela cuisinieredev[ennem
tr_s chaudesIorsd'un cyclede nettoyage.
o Pourewterde',OUSbiesseret d'endommagerlapore dufour
rfessayezpasd'ouvrir ia portequand{_LOCK
0JERROUULLAGE)estaffichd.
o Eviterde toucher iasurfacede cuisson,ia porte,ie hub[otet la
zonede J'6ventdu four Iorsd'un cycled'autonettoyage
o Ne pasutiliser denet-toyan[pour four decommercesur Jefini
du four ou surtout autrecomposantdu four. Celaabfmeraitle
fini ou les composantsdu four.
5.
Eliminerles r6sidusde graisseou de produits renvers6ssur la
soIeavant le nettoyage.Ceciemp6chela formationdeflammes
ou defum6e durantle nettoyage.
G.
Essuyerlesr6sidussucr6setacides,commeIespatatesdouces,
Iatomateou lessauces_ basede lait. Laporcelainevitri%e
poss_deunecertainer6sistanceauxcompos6sacides,maisqui
n'estpas Iimit6e.EIIepeut sed6coIorersi les residusacidesou
sucresne sontpasenlev6savantdecommencerI'autonettoyage.
Programmation de l'autonettoyage :
de 205°C[400°F}pour programmerun cycled'autonettoyage.
[ Remarque : La temp6raturedu four dolt 6tresitu_een dessous
].
Fermer[aportedu four.
2.
Placer[amanettede verrouiJJagea[a positiondeverrouillage.
L'autonettoyageutilisedes temp6raturessup6rieures_cellesde Ia
cuissonnormaiepour nettoyerautomatiquement['int6rieurdu four.
Neforcezpas[a portedu four ni[e levierde verrouiiiagepour[es
ouvdr.Cecipeut provoquerune expositiona des temp6ratures
6[ev6es,et doncpr6senterun risquede br8lure.
Si lefour esttr6s sale,il estnormalqu'on observelaformationde
fum6eou defiammesdurant [enettoyage.Nettoyerlefour
interva[[esr6guliersplutOtqued'attendreune accumulation
importantede r6sidus.
Durant Ie processusd'autonettoyage,i!convient de biena6rer la
cuisinepour 61iminerlesodeursnormalement6raisesdurant le
nettoyage.
3. AppuyersurJatoucheClean[Nettoyage}.
• Lemot CLEAN[NETTOYAGE}clignotea J'afficheur. Clean
Si Ia porte n'estpasferm6e,deships retentissentet Iemot DOOR
{PORTE}parak_ rafficheur.Si la porte n'estpasferm6edartsles
45 secondes,[operationd'autonettoyageestannul6eet
I'afficheurrevient_ I'heuredu ]our.
4. AppuyersurJatoucheA [Plus}ou V [Moins}.
• CL-M {Nettoyage-salet6moyenne,3 heures}
est affich6.
5. AppuyersurIa toucheA ou V pour voirddiler
lesdiff6rents r6glagesdeI'autonettoyage.
CL-tq(Nettoyage- saiet@@paisse,4 heures}
Avant I'auto ettoyage
1. Eteindrela lampe du fouravant lenettoyage.Celle-cipourraiten
effetgriIIer.
2. Enleverla lechefrite,tous Iesplatset tesgrillesdu four. LesgriIIes
risquentdese decoloreret de neplusglisseraussibienapr6sun
cycled'autonettoyagesion ne Iesenl6vepas.
3.
Nettoyerle cadre du four, Iecadrede laporte {zoneaI'ext_rieur
dujoint} et autourde I'ouverturedartsIejoint de laporte,a I'aide
d'un produitde nettoyagenonabrasifcommeBonAmi_ou d'eau
additionn6eded_tergent.Le processus
d'autonettoyagenenettoie pasces
i \
zones.EIIesdoivent8tre nettoy_espour
emp6cherla saletede s%cruster
pendantle cyclede nettoyage.(Lejoint
assure1'6tanch6it6autour de laporte et
du hublot du four.}
4. Pouremp6chertout dommage,nepasnettoyer ni frotter lejoint
qui setrouve autourde Ia porte du four. Cejoint estco%u pour
6viterlespertesde chaleurpendantlecycled'autonettoyage.
_Lesnomsde marquedes produitsde nettoyagesont des marquesd6pos6esdesdiff6rentsfabricants.
CL-M [Nettoyage- salet6moyenne,3heures}
CL-L [Nettoyage- salet616g6re,2 heures}
Lechoixdu niveaudesalet6du four programme
automatiquementladur@educycled'autonettoya%
6. Apr@squatresecondes,lefourcommencelenettoya%
• Ladur6ede nettoyagecommenceJed@compte_ I'afficheur.
• Lemot LOCK07ERROUILLAGE}parait_ rafficheur.
o Lemot CLEANparait_ J'afficheur.
D_arrage diff_r_ d'_ cycle d'a_te_etteyage :
1. Appuyersur la toucheDelay{D6marragediff6r6}.
• Lemot DELAY{ATTENTE}clignote. De!ay
• 00:00parait_ I'afficheur.
41
s_ite ooo
Page 43

2. Appuyersur[a toucheA (Plus]ou V [Moins) pour
programmerladur6e d'attenteavantque ne
commencetecycle.Ladur6e d'attentepeut 6tre
r6gI6e,de 10minutes[00:10)_ 11heures,59
minutes[11:59].
Pendant le cycle d'autonettoyage
Lorsquele mot LOCKparait_ I'afficheur,la portene peut 6tre
ouverte.Pour6viterd'endommagerla porte,ne pasla forcerpour
I'ouvrirIorsquele motLOCKest affich6.
Fum6e et odeurs
3. Appuyersur latouche Clean(Nettoyage].
. Le mot CLEAN(NETTOYAGE]va clignoter. Clean
4. Appuyersur latouche A ou V.
CL-M (Nettoyage- salet6moyenne,3 heures]
estaffich6.
Appuyersur latouche A ou V pourvoir ddiler
Jesdiff6rentsr6gJagesde I'autonettoyage.
CL-H (Nettoyage- salet66paisse,4 heures]
CL-M (Nettoyage- salet6moyenne,3heures]
CL-L(Nettoyage- salet6J6g_re,2 heures]
Le choixdu niveaude satet6du four programme
automatiquementIadur6edu cycled'autonettoyage.
AprSsquatresecondes,IesrootsCLEAN(NETTOYAGE],DELAY
(ATTENTE]et LOCK(VERROUILLAGE]paraissent_ I'afficheur
pour indiquerque lefour estprogramm6pourune op6rationde
nettoyagediff6r6.Letemps d'attente parait_ I'afficheur.
Si le four a dej_ ete programme pour uu cycle de
uettoyage et que l'ou desire etablir uu delai :
1. Appuyersur la touche Delay(D6marragedgf6r6].
+ Lemot DELAY(ATTENTE]clignote. De!my
+ 00:00paratt_ I'afficheur.
2. AppuyersurIa toucheA ou V pour programmer ................................
la dur6ed6sir6edeI'attenteavantque ned6butele
cycle.
Apr6squatresecondes,lesrootsCLEAN,DELAY
etLOCKparaissent_ I'afficheurpour indiquer
queIefour estprogramm6pour une op6rationde nettoyage
diff6r6.Letempsd'attenteparait _ I'afficheur.
Lorsque le cycle d'autouettoyage d6bute :
+ Lemot DELAYs'6teint.
+ Ladur6ede nettoyageparait _ I'afficheur.
La premierefois o_ lefour est nettoy6,ilpeut y avoir production
d'odeuret de fum6e+Ceciest normalet dispara_tra_ [usage+
Si lefour esttr6s saleou s+la Iechefritea6t6laiss6eclansle four,il
peuty avoirproductionde fum6e.
Bruits
PendantqueIefour chauffe,iIpeut seproduiredes bruitsde m6taI
en dilatationou encontraction.Ceciest normalet n'indique pasque
lefour s'abime.
Aprbs le cycle d'a_tonettoyage
Environuneheureapresla fin du cycle,le motLOCKs'6teint.#,ce
moment,laporte peut _treouverte.Pousserlamanettede laporte
versla gauchepour d_verrouiller.
Lasalet_ pe_t avoir la+ss__ r_s+_ gr+spo_re_×. L'enlever
avecun Nngehumide.S'ii restede lasaiete,cetaindiqueque le cycle
de nettoyagen'apas6t6assezlong.Cettesalet_restantesera
enle%eau pmchaincycled'autonettoyage.
S+mesgr+llesont 8t8 maiss_es_ m'int_riearda roar pendant me
cyemed'aato_ettoyage et q_'emmesgmisse_troams_r me_rs
s_pports, les enduire,ainsique lessupports,d'unefine couche
d'huilev_getale+
De fi_es iig_es pervert apparaitre da_s ia porceiai_e parce
q_'elle asBbi chale_r et refroidisseme_t. Ceciestnormalet
n'affecterapasla performance.
U_e d_coloratio_ Ma_che peut apparaitre apr_s me_ettoyage
si des aliments acides o_ s_cr_s _'o_t pas _t_ e_mev_.savast
q_e _e eomme_ce m'a_to_ettoyageoLad_colorationestnormale
et n'affecterapasla performancedu four+
Rematq_es :
• Si Ia portedu four n'estpas ferrule, Iemot DOOR[PORTE]
clignote_ I'afficheuret lefour #metdeshipsjusqu'_ ceque la
portesoitferm6eet que I'onappuie_ nouveausur Clean
(Nettoyage]+
• Laportedu four setrouveraendommag#esiton forceson
ouverturealorsque le mot LOCK(VERROUILLAGE]est encore
affich_.
Auuulatiou du cycle d'autouettoyage :
Appuyersur Iatouche CANCEL[ANNULER).
• Tousles rootsdisparaissentdeI'afficheur.
+ ToutesIesfonctionssont annuI6es.
+ L'heuredu jour parait_ I'afficheur.
42
Page 44

M6thodes de nettoyage
* Avantroute manipulation ou operation de nettoyage, v_rifier que
I'appareil est arr_t_ et que teus les compesants sent freids, afin
d'_viter des dommages ou des br_lures.
, Poureviter laformation de_acrlesouun changementde couLeur,nettoyer
o Aprestout d_montagedecomposan1:s,veillera effectuerun remontage
correct.
PIECES NET[OYAGE
Les noms de marque sent des maroues
deuosees desdifferents fabricants,
"" Pour commander directement, comooser
e 1-877-232-677" aux E,-U,eL e
1-800-688-8408 au Canada.
Dosseret et table
de euisson -
Emaimvitrifi_
[_ehefrite et sa Ne jamaisceuvdr lagri#e depapier d'aluminium; cela emp_ehe la graisse de cooler dai_sla tbcheMte.
Zone de la console
de commandeet
Boutons de , Placerchaquebouton_ Iapositiond'ARRCT,et retirerchaqueboutonen letirant=
cemmande , Laver,rinceretfairesecher=Nepasutiliserunagentde nettoyageabrasifsusceptibIede rayerIafinition=
Cuvettes de
r6cup_ration =
L'emailvitrifieestduverrelieau metalparfusion.IIpeutsefissurerous'ecaillerencasde mauvaiseutilisation.II est
resistantauxacides,maispastotalementinattaquablepar lesacides.Touslesproduitsrenverses,enparticulier
acidesou sucres,doivent6treessuyesimmediatementavecun Iingesec.
, Unelois la piecerefroidie,Ialaveravecde[eausavonneuse,rinceret secher.
, Nejamaisessuyerunesurfacetilde ouchaudeavecun lingehumide.Cecipourraitlafissurerou I'ecaiIIer.
, NejamaisutiIiserdenettoyantspourfour,d'agentsde nettoyagecaustiquesou abrasifssur lefini exterieurde la
cuisiniSre.
• Recouvririalechefriteetsa grilled'un lingesavonneux;iaisseragirpourdetacheriesresidus=
, Laveravecdereausavonneuseti6de.Utiliseruntampon_ recurerpoureliminerlessouillurestenaces.
, Onpeutplacerlesdeuxcomposantsde la18chefriteclansun lave-vaisselle.
, Pourutiliserla fonctionVerrouillagedescommandespour Ie nettoyage,voir page34=
, Essuyeravecun linge humide,puisfairesecher=Nepasutiliserun agentde nettoyageabrasifsusceptiblederayerla
finition=
, Onpeututiliserunproduitde nettoyageduverre,pulverised'abordsurun chiffon=NEPASprejeter le preduit
directerne1_tsur les touches de cemmande ou sur FafHcheur.
, FairefonctionnerbriSvementchaqueelementpourverifierque leboutona etecorrectementreinstaiIe=
L'emailpeutsedecolorerousefendilJers'i!estsurchauffe.Ceciestnormalet n'affectepaslesperformancesde cuisson.
, Unefois lescuvettesde recuperationrefroidies,leslaverapr@schaqueutilisation,iesrinceret Iessecherpoureviter
lestachesou ladeceleration.Lescuvettesderecuperationpeuvent6treIaveesenIave-vaisselJe.
, PoureJiminerIesgrossessouillures,fairetremperdansde I'eausavonneusechaude,puisutJJiserunproduitde
nettoyagepeu abrasifcommeSoftScrub_et untampon_ recurerenplastique.
, EncasdesaleteincrusteedansIescuvettesderecuperation,lesretirerde Ia cuisini@re,lesposersurdesfeuilles
de papierjournaletIespulveriserdoucementde nettoyantcommercialpourfour.[Ne paspulveriserdeproduit
surlessurfacesavoisinantes.]Mettrelescuvettesderecuperationdansunsacen pJastiqueet laisserleproduit
agir plusieursheures.Porterdesgantsen caoutchoucpourretirer lescuvettesde recuperationdu sac,Javerles
cuvettes,Jesrinceret lessecher.
Cuvettesde
chrome
• Apr6sle refroidissement,laverapr6schaqueutilisation,rinceret fairesecherpour@iterlaformationdetachesou un
changementde couleur.
• Poureliminerdegrossessouillures,fairetremperdansdereausavonneusechaudepuisutiliserunproduitdenettoyage
peuabrasifcommeSoftScrub*et untampon_ recureren plastique.Nepasutiliserun produitde nettoyageabrasit
43
Page 45

dU fOUr en verre
Int6rieur du four
NE_OYAGE
• Eviterd'utilisertrop d'eau,qui risqueraitdes'infiltrersousou derriereleverreet detacher.
• LaverbI'eauet ausavon.RinceravecdeI'eaupropreet s6cher.Unproduitde nettoyagedu verrepeut6treutilise
en levaporisantd'abordsurun linge.
• Nepasutiliserde produitsabrasifscommetamponsb recurer,lained'acierou produitde nettoyageen poudrequi
risqueraientde rayerleverre.
• Ex6cuterlesinstructions pr6sent6esauxpages41-42pour I'autonettoyagedu four.
Netteyage manual:
• Nettoyer%quemment avecun tamponde plastiqueet un produitde nettoyagemoyennementabrasif.
• Nepasutiliser untampon _recurermetallique,quiformeraitdes rayuressur lasurface.
• Lorsde remploi d'unproduit commercialde nettoyagedefour,appliquerIesinstructionsdu fabricant.
• Eliminerdesquepossiblelesproduitsacidesrenvers6s(produitsb basedehit oudetomate)aveceauetsavon;ces
produitspeuventfaire changerlacouleurde 1'6maillots d'uncontact prolong6.
Pourfacimitermenettoyage, oil pnutenmevermaportedu four, (Voirla sectionEntretien,page45.)
Grilles du four
(terrains mod_les)
Tireir de remisage,
poign6ede porte,
porte du four
(certains mod_les)
panneau×lat6rau×-
• Nettoyeravecde I'eausavonneuse.
• Eliminerlessouillurestenacesavecune poudrede nettoyageou untampon _ r6curersavonneux.Rinceret faire
secher.
• Si lesgrillessentlaiss6esdartsIefour pendant Iecycled'autonettoyage,ellessed6colorentet peLwentneplus tres
bienglisser.Sicetaseproduit,enduirele borddesgrillesetlesupportdesgrillesd'unefinecouched'huileveg6tale,
puisessuyerI'exc6dent.
° AlEPASUT/LISERDE PRODUffS DE NETTOYAGECONTENANTDU JAVELLISANT.
, NEPASUTIUSER DE NETTOYANTS_ ORANGE_ OUARRASIES.
• TOUJOURSESSUYERDANS LESENSDELA TEXTUREDE L'ACtERLORSDU NETTOYAGE.
• Nettoyage joumumier/sumet6m_g_re- EssuyeravecI'un desproduitssuivants:eausavonneuse,vinaigreblanc/
eau,produit de nettoyagepourverreetsurfaceFormula409_ou un produitsemblablepour verre- avecun linge
soupleet une6ponge.Rinceretsecher.Pourpoliretenteverlesmarquesdedoigts,fairesuiwe parunevaporisation
de Magic Spraypouracierinoxydable[piece n° 20000008)*_-
• Salet_.med6r_e/_paisse - EssuyeravecI'undesproduitssuivants: BenAmi,SmartCleanserouSoftScrub_-
raide d'un lingesoupleou d'uneepongehumide.Rinceretsecher.Lestachesrebe!lespeuventetreenleveesavec
untamponmulti-usagesScotch-Brite_humidi%.FrotteruniformementdansIesensdum6taLRincerets_cher.Pour
redonnerdu lustreet retirerIesrayures,fairesuivrepar unevaporisationdeMagic Spraypour acierinoxydable_-
, O_celeratien - A I'aided'une epongehumidi%e oud'un Iingesouple,essuyerbI'aidedu nettoyantCameo
pour acier inoxydable_-Rincerimm6diatementets_cher.Pourenlever les marqueset redonnerdu lustre,faire
suiwe parune vaporisationde MagicSpraypour acier inoxydable_-
° Unefois lespi6cesrefroidies,laver_ I'eausavonneusetiede,rinceret s6cher.Nejamais essuyerune surfacetiede
ou chaudeavecun linge humide,ceci pouvantendommagerlasurface et entrainer unebr0Iurepar Iavapeur.
• Pourlestaches rebelles,utiliserdesagentsde nettoyageIeg6rementabrasifscommela p_teau bicarbonatede
soudeou BenAmR Nepasutiliserd'agentsde nettoyageabrasifs,caustiquesou6nergiquescommelesnettoyants
pourfour ou lestamponsen Iained'acier.Cesproduits raieraientou endommageraientde fa_onpermanentela
surface.
REMARQUE:UtiHserun#ngeeu un terchen secpeur essuyer lespreduitsrenvem6s, surtout s'itssent acides
eu sucr_.s.La s_fface portrait se d_celerer ell se ternff sf/asa/et_ n'_tait pas fmm_dfatement enlev_e.Ced
est paFdculf_rement impet_ant dans le cas de surfaces blanches°
_Lesnomsde marquesentdes marquesd6poseesdesdiff6rentsfabricants.
_ Pourcommanderdirectement,composerle 1-877-232-6771aux E.-U.ou le 1-800-688-8408au Canada.
Page 46

Porte du four
- Ne pasgnmper sur laportedu four ouverte,ou luiimposerune
chargeexcesswe.Cecipourraitprovoquerun basculementdela
culsm_ere._ebrisde [aporteou oesbIessurespourla personne
eoncem6e.
, Ne pastenter douvrir ouformer la porte ou d'utiiiser[efour
avantque [aporte altete convenabiementrdJnstall6e.
• NejamaJsplacer los doigtsentrela charni_reet le cadt_avant
au four. Losbrasde charmeresont mont6ssur ressort Une
charnierepourrait se reformerbrutaiemen[con[rele cadredu
four etprovoquerde serieusesblessures
Hub[or du four
Pour prot_ger [e hub[or de [a porte du four :
1. Nepasutiliser deproduitsnettoyantsabrasifscommedes
tampons_ r6cureren lained'acier ou desproduitsde nettoyage
en poudrequi rJsqueraientde foyer[e verre.
2. Ne pas heurter[e hubiotenverre avecun ustensJ[e,unarticle de
mobiIier,unjouet,etc.
3. Ne pasformer [aportedu four avantque losgrillesne soienten
placedons[efour.
Touted6gradationdu hubiotde verre- rayure,choc,tension,etc. -
poutaffaiblir sa structureet augmenter[e risquede bris_ unedate
ult6rJeure.
Depose de la porte:
1. Apr6s lerefmidissementdu four, ouvrirIa
porte- positionde cuissonau gril (porte
entmuverted'environ 10cm [4 pouces]].
2. Saisirlaporte dechaquecot& Ne pas
utiliserla poign6ede portepour [a
soulever,
3. Souleveruniform6mentpour d6gager[a porte descharni6res.
1. Saisir[aporte dechaque c6t&
2. Alignerlosfentesavec[esbrasde charniSresur[a cuisini@re.
3. Fairedescendrelaportepour lapositionnercorrectementsur los
charni@res.Poussersur losanglessup6rieursde [aporte pour
['enfoncercompi@tementsur [escharni@res.I[faut que [aporte
soit parfaitementd'aplomb.
[afermeture de la porte dufourd'une cuisiniSreneuve;ceciest
[ Remarque : Onpout percevoirune certaine<_6[asticit6>>lots de
normal;cot effet disparaitprogressivement.
La pe du four
" D@rancheriacu sini_redur6sea_j61ectriqueavantde remplager
Iampoule.
• Utiliser une maniques_cho pour prot_ger los mains [orsdu
remplacementdeI'ampoule.
, Nepastoucher 'ampoue avart qu'e e sesot refrod e
, Ne,pastoucher I'ampoulechaudeavecunlincgehumJde;lechoc
therrniquepourrait la bnser.
Pour remplacer l'ampoule du four :
1, Apres Ie refroidissement du four, CABOCHON
maintenir Ie cabochon tout en
enlevant lapiece m6taliiquequi
[a maintient en place.
RtuMARQUE : Le cabochon
tombera si on ne le maintient
pasen place. (ti:_mdtaflique)
2. Enlever [e cabochon et
['ampoule.
3. Installerune ampoulede 40watts pourappareil m6nager.
4. R@_sta[lerle cabochonet lefi[ m_talliquede retenue.
5. Retab[irI'a[h_entationde[acuisiniSre.R6gierdenouveauI'hor[oge.
RESSORTDE RETEHUE
45
Page 47

Pieds de r6glage de l+aplemb
Vdrif!eFque !abrideantibascu!ementagr+ppeconvenabbment
fun despie@arr+6rede r6glagede i'aplomb,pour quela
cu!siniS[enePUiSSebascu!eraccidente[lement.
R6installation :
1. Positionnerles extr6mit@des glissi6resdanslesrails_ ['int6rieur
de la cuisini_re.
2. SouleverI'avantdutiroir et pousserdoucementiusqu'_[a
position de [aprerni@ebut6e.
3. Souiever_ nouveaule tiroir et lepousseren placepour lefermer.
La cuisini6redoit 6tre d'aplombune fois install@.Si _ /_
elIene rest pas,tourner Iespiedsde r6glagede I
I'apbmb enplastique,_ chacundes anglesde Ia I v
cuisini_re,jusqu'_ ceque ceHe-cisoitd'apbm b__.,,,_
_,,., . ANTIBASCUL£MENT
PIEDDEREGLAGE
DEL'APLOMB
Tireir de remisage
Nepasremiserdansletiroir de remisagedesarticlesen
pBstique ou papier,ou despro@its a!imentairesoumat6riaux
inflammables.Lestemp6mtures_ I:int6rieurdu tiroir peuvent
devenirtrop _lev6espources articlesIorsque [efour est encours
d'utilisation.
Letiroir de remisagepeut6tre enlev6pour pouw_irnettoyersous[a
cuisini6re.
D6pose :
1. Viderle tiroir et Ietirer jusqu'_ lapositionde la premierebut6e.
2. SouIeverI'avantdu tiroir.
Prise de eourant auxi[iaire
(modeles canadiens seulement}
La prisede courantauxiIiaireestsitu@en bas/_gauchedu
dosseret.Veilbr _ ceque Ie cordon d'aiimentationde I'appareiI
utilise nereposepas surun 616mentde Ia
tablede cuissonou _ proximit6;[araiseen
marchede ['6[6mentchauffantferait subir
desdommagesaucordond'alimentationet _ ..........
,o
Unapparei[suscitantune demandede
courantde plusde 10A provoquera _ _}
['ouverturedu disjoncteurqui prot6ge [a "1_
prisedecourant auxi[iaire.Pourr@rmer[e .................................................
disjoncteur,appuyersur le commutateur DISJONCTEUR
situesur le bordinf6rbur du dosseret.
3. Tirer [etiroir jusqu'a Iapositionde [adeuxi@Tlebut@.
4. Saisir[escot@et sou[ever[etiroir pourpouvoir[eretirer.
46
Page 48

PROBLEME SOLUTION
Pour mapmupartdes probmemes oV6rifierque lescommandesdufo_Jrsontcorrectementr6gI6es,
observSs, essayer d'abord rues oV6rifier si Iefiche estbien inser6edansla prise.
solutions possibles, _ droite, o Inspecter/rearmerIedisjoncteur.Inspecter/remplacerlesfusibles.
o ContrOlerta sourced'atimentationetectrique,
Non=fonctionnement de m'appareim-
totamou partiem.
L'hormogeou ruesmampesfonetionnent,
ruesroots paraissent_ m'afficheur,
mais le four neehauffe pas.
R_suJtats de cuisson au four
cliff, rents des attentes ou de ceux qui
soar produits par mefour ant_rieur.
R6sumtatsineerrects morsdema
cuisson augrim,ou _mission
excessive de fum_e.
o Determinersi loscommandosdeselementsdesurfaceet/ou du foursont convenablement
reglees.Voirpages29et 40,
o Determinersi la porte dufour s'estdeverrouilleeapresuneoperationd'autonettoyage,
Voir pages42,
o Determinersi le four estregle pourune cuissondiffereeou un nettoyagediffere.Voir pages
36 et 41,
oVerifiersi ieverroui!lagedescommandosesten marche.Voir page34,
oVerifiersi lacommandoest en modesabbat.Voirpage38,
oLescommandessont peut-6treprogramm6espourunefonction de cuissonet maintienou
ded6marragediff6r6,
oLafonction deverrouillagedescommandesestpeut-6tre activ6e,Voirpage34,
o Determinersi I'eventdu fourest obstrue,Voirsonemplacementpage40,
oS'assurerque lacuisiniereestd'aplomb,
o Les reglagesdetempdraturevarientsouvententreun four neufet lefour qu'il remplace,On
observesouventune d6rivedu r6glagedetemp6ratured'unfour _ mesurequ'il vieillit; il pout
devenirplus chaud ou moinschaud,Voir page38 lesinstructionsd'ajustementde la
temperaturedu four(certainsmod61es},REMARQUE:IIn'estpasutile demodifier lereglage
detemperaturesi lavariationn'affectequ'uneou deuxrecettes,
o Pourd'autresinformationsausujet dela cuissonau four,voir labrochure La cuisson
simplifi6e.
o DeterminerIapositiondesgrilles.Losalimentspeuventetre trop prSsde I'elementdu griL
o t_lementdu griI pas prechauffe.
o Utilisationincorrectedefeuilled'aluminium.Nejamaisgarnir lagrille delechefriteavecde la
feuille d'aluminium.
o Portedu four ferm6edurant Iacuissonau griLLaisserla portedu four entrouverted'environ
10cm [4pouces)- premierebutee.
o EnleverI'exc6sdegraissesur Iapi6ce de viandeavantla cuissonau griL
o Utilisationd'une 18chefritesouillee.
o Latensionelectriquede la maisonest peut-etre basse.
Jmpossibimit_d'autonettoyage du
four (terrains modSmes).
[e four ne se nettoie pas
correetement (certains mod_mes:}o
La porte du four ne se dSverrouille
pas aprSs m'autonettoyage
(certains modules),
o DdterminerqueI'appareiIn'a pas6tOprogrammepourun autonettoyagediffere.Voir page41,
oV6rifierque laporte estferm6e.
oV6rifiersi Iacommandoest en modesabbat.Voir page38.
o Lefourest peut-6tre_ unetemp6raturesup6rieure_205 °C_400°F).Latemperaturedu four
doit8tre inferieure_ 205°C (400°F)pour pouvoirprogrammeruncycled'autonettoyage.
o Un tempsde nettoyagepluslong pout6tre ndcessaire.
o Onn'apaselimin8avantI'operationd'autonettoyagelosaccumulationsexcessivesde residus,
particulierementlesrSsidusd'alimentsacidesousucres.
o L'h_tSrieurdu four estencore chaud.Attendreenvironune heureapres Fachevementdela
p6rioded'autonettoyage.IIestpossibled'ouvrirlaporte aprSsladisparitiondu messageLOCK
[VERROLHLLAGE)sur I'afficheur.
o Loscommandesetla portesont peut-etreverrouillSes.Voir page34.
suite
47
Page 49

PROBLEME SOLUTION
Accumulation d'humidit6 sur me o Ceciest normaldurant Iacuissond'alimentscontenantbeaucoupd'eau=
humorou vapeursortant de l'_venL o Utilisationexcessived'humidit6 Iorsdu nettoyagedu hublot.
Emission d'une forte odeur ou de
fum6emorsdemaraiseenmarcm e
du four°
®
Ceciest normalpour unecuisini6reneuve;ceteffet disparaitapr_squelquesutilisations.
L'ex#cutiond'un programmed'autonettoyagepermettrade fairedisparakrecette odeurplus
rapidement.
Fairefonctionner leventilateurpour 6vacuerIafum#eou rodeur.
Presenced'uneaccumulationde r#sidusalimentairessur lefond du four. Ex6cuterune
op6rationd'autonettoyage.
Codes d'unomaiie
o LesrootsBAKEouLOCKpeuventclignoterrapidement8 I'afficheurpourpr6venird'uneerreur
ou d'un probleme.Sile motBAKEou LOCKparait_ I'afficheur,appuyersur Iatouche Cancel
(Annule0. Si Ie mot BAKEou LOCKcontinue_ c@noter,d6brancherI'appareiLAttendre
quelquesminutes,puis rebrancherI'appareiLSile mot continue_ c@noter, d6brancher
I'appareiIetprendrecontact avecun r6parateurautoris6.
o Sile four esttr_ssale,IesflammSchespeuventproduireun coded'anomalieaucoursducycle
d'autonettoyage.AppuyersurlatoucheCanceletlaisserIefourrefroidircompl_tement,essuyer
lasalet6enexcespuisreprogrammerrautonettoyage.Silecoded'anomalier6apparait,prendre
contactavecun r6parateurautoris6.
Des bruits se font entendreo
®
Le four fait plusieurs bruits faibles. II est possible d'entendre les relais du four qui se mettent
en marche et s'arr6tent. Ceci est normal.
®
AIors que le four ser6chauffe et serefroidit, il est possible d'entendre des bruits correspondant
la dilatation et 8 la contraction des pieces m6talliques. Ceci est normal et n'endommage pas
I'appareiL
_mn'yu ni hip ni affichageo o Le commandeestpeut-6treen modesabbat (certainsmodules).Voirpage38.
reste ammum_.
o Lefour estenmode sabbat.PourannuIer,appuyersurla toucheClocket maintener-[a
enfonc6ependantcinqsecondes.
48
Page 50

Garantie eemplbte d'une ann6e -
Pieces e| main-d'oeuvre
Durantune p_riode d'un (1) an a
compterde ia date de I'achatinitial au
detail,tou[e piece qui ser_vdleraa
ddectueusedartsdesconditionsnormales
d'usagemenagerserarepareeou
rempJaceegratultement.
Residents canadiens
Lesgarantiesci-dessuscouvren[un
appareilinstall6au Canada.seuJements'Jl
a et6 agr_6par lesagencesdetest
habflitees(verificationde la conformit6
une normenatlonaEeduCanada),sauf si
I'appare[Ia6td introduit auCanada
!'occasiond'un changementde residence
desEtats-Unisvers leCanada
Garantie limitee hers des Etats-
Unis et du Canada - Pieces
seulement
Pendantun [1)an a compterde ladatede
I'achatinitial audetail,toute piece qul se
revdlera_tdefec[ueusedansdes conditions
normalesd'usagemenagerserarepareeou
rempiacdegratuitement(pieceseuiementj:
le proprietaireaevraassumer[ousles
autresfrais,ycomprisfraJsde maln-
d'(_uvre,dedeplacement,detransport,de
kilornetrageetde diagnostic=le cas
echeant.
Les gatanties sp4cifiques tbrrnul4es ci-
dessussent/es SEULES que /e fa'bricant
accorde. Cesgarandes vous conf_re de,_
droitsjuridiqL 9ssp_cifiques et vou_ oouvez
eqa/ementjouir d'autres drotts, variables
d'un _tat b/'autre, d'une province a une
au[re.
Ne sent pas couverts par ces garanties
1= Lesdommagesouderangementsdus_:
a.Miseen service,Iivraisonouentretieneffectuesincorrectement.
b.Toutereparation,modification,alterationettout reglagenonautorJsespar le
fabricantou parun prestatairede serviceapres-venteagree.
c.Accidents,mauvaiseutilisationou usageabusifou deraisonnable.
d.Atimentation6tectrique[tension,intensJte)incorrecte.
e.Reglageincorrectd'unecommande.
2. Lesgarantiesnepeuvent6tre honoreessi lesnumerosde serJed'origine ontete
enleves,modifiesou nesent pas facilementlisibles.
3. Ampoules.
4. Appareilsachetesauxfins d'usagecommercialou industrieL
5. Lesfrais devisited'un prestatairedeserviceou de serviceapres-venteencouruspour
lesraisonssuJvantes:
a.Correctiond'erreursde raiseen service.
b.Initiationde I'utilisateur_I'emploide rappareiL
c.Transportde I'appareiIauxIocauxdu prestatairedeservice.
6. Dommagessecondairesou indirectssubispar toute personnesuite au non-respectde
cesgaranties.Certainsetatsou provincesne permettentpasI'exclusionou Ialimitation
desdommagessecondairesouindirects;par consequentleslimitationsou exclusions
ci-dessuspeuventne pass'appliquer_ votrecas.
Si J'intervention d'un r parateur est
• ContacterIedetaiilantchezqui I'appareiJa 6t6achet6,ou contacterMaytag ServicesSM/
service_ la clientelede Amanaau 1-800-843-0304aux [_.-U.ou1-866-587-2002au
Canada,pourobtenir Iescoordonneesd'uneagencede serviceagre6e.
• VeilIera conserverIafactured'achatpouriustifier de lavalidit6de lagarantie.Pour
d'autres informationsence qui concerneIesresponsabilit6sdu proprietairea I'egard
du servicesousgarantie,voir letexte deIaGARANTIE.
• Si le detaillantou ragencede serviceapres-ventene peutr6soudrele probleme,6crire
MaytagServicessM,attention:CAIR Centel,P.O.Box2370,Cleveland,TN37320-
2370ou t_Jephonerau 1_8_0_8b,3_03(}_aa× E._LIooa 1_866_587_2@02a_ Canada.
• Lesguidesd'utilisation,lesmanuelsde serviceet lesrenseignementssurIespieces
sent disponiblesaupresde MaytagServicess_,service_ Jaclientelede Amana=
Lorsdetout contactconcemant unprobJeme,fournir ['informationsuivante:
a=Nora,adresseet num_rode telephonedu client;
b=Numerodemodeleet numerodeserie de I'appareil;
c=Noraet adressedu detaiIIantou deI'agencede service;
d=Descriptionclairedu probIemeobserve;
e=Preuved'achat [facturede vente[}=
49
Page 51

Estufa E[ ctrica con E[ementos Tubu[ares
Instrucciones Importantes
sobre Seguridad .......................................................51-54
Cocinando en [a Estufa ........................................... 55-56
Controies
E[ementos Tubu[ares
Cocinando en e[ Homo ........................................... 57-66
Controles del Homo de Limpieza Manual
Re[o Hornear
Temporizador Asar
Controles del Homo Autolimpiante
Re[oj Horneado Diferido
Temporizador Mantener Ca[iente
Horneado Asar
CocdOn y Mantener Parri[[as de[ Homo
Cuidado y Limpieza ................................................. 67-70
Horno Auto[impiante
Procedimientos de Limpieza
Mantenimiento ......................................................... 71-72
Ventana de[ Homo
Luz de[ Homo
Loca[izaci6n y Soluci(_n
de Averias ..................................................................73-74
Garantia y Servicio ......................................................... 75
Page 52

Instalador: Perfavor dejees[agufajunto con el
ebctrodom@tico.
Oonsumider:Perfavorleay conservees[agum parareferencla
futura Conserveel recibode compray!o el chequecanceiaao
comecomprobantedecompra.
N_imerode Modeio
NOnlerode Serie
FechadeCompm
S[tiene preguntas.Ilamea:
MaytagCustomerAssistance
1-800-843-0304en EE.UL.
1-866-587-2002en Canadd
(LunesaViernes.8:00a.m.a 8:00p.m.Heradel Este}
Internet:http://www.amana.com
Ennues[rocontinue afdnde mejorarla calidadyrend[m[emode
nuestroselectrodom@ticos,puedeque seanecesanomodificar
elelectrodomeshcosin actualizarestagu[a.
Pareinfermad6n sebre set,fide, Ferpbdina 75.
come resuitado de su use inapropiado, Utiiice este
eiectrodomdstico soiamente para e[ prop6sito que ha side
destinado segOn se describe en esta guia,
Para asegurar funeionamiento eorreeto y segure: El
ebctrodomestico debe ser instaBdo debidamente y puesto a
tierra per un t@nico calificado, No intente ajustar, reparar,
prestar servicio o reemplazar ninguna pieza de este producto
a menos que sea especificamente recomendado en esta guia,
Todas Bs reparaciones deben ser redizadas per un t@nico
calificado,
Siempre desenchufe el ebctrodom6stico antes de efectuar
alguna reparaci6n,
" TODAS LAS ESTUFAS SE PUEDEN
Lasadvertencias e instrucciones importantes sobre seguridad
que aparecen en esta guia no est_in destinadas a cubrir todas
Bs posibbs circunstancias y situaciones que puedan ocurrir,
Se debe ejercer sentido comun, precauci6n y cuidado cuando
instab, realice mantenimiento o haga funcionar el artefacto,
Siempre p6ngase en contacto con el fabricante si surgen
probbmas o situaciones que usted no comprenda,
Reconozca Rossimbolos, advertencias,
etiquetas de seguridad
ADVEflTENCIA ° Peligro o practicas no seguras que
PODRIAN causar bsi6n personal grave o mortal,
ADVEflTENGIA: Para redueir el desge de weleo de!
electredem6stiee a eausa de use anermal e debide
a pese e×eesive en la puerta del heine, es necesarie
dispositiW antivuelco debidamente instaladol
Para verificar si el dispositivo est,1debidamente instalado, mire
debajo de iaestufa con una iinterna para asegurarse de que
uno de los tornillos niveladores traseros estd debidamente
enganchado en la ranura del soporte, El dispositivo antivuelco
asegura el tornillo nivelador trasero al piso cuando est,1
debidamente enganchado, Esto debe verificarse eada vez
que la estufa sea movida,
Para Evitar un lncendio o
Da o Causado per emHumo
Asegurese de que todos los materiabs de empaque hayan
side quitados del homo antes de poneflo en funcionamiento,
No coloque materiabs combustibles cerca del
ebctrodomestico, No se deben guardar en el homo
materiabs inflamabbs,
PP,EGAUGm0N_ Pe!igms e pr_cticas no seguras que
PODRIAN causar lesi@ personal menos grave,
Lea y siga todas las instrueciones antes de usar este
electrodom6stico para evitar el riesgo potencial de incendio,
cheque el@trice, bsi6n personal o daSo al ebctrodom6stico
Muchos pl_sticos son afectados por el calor, Mantenga los
pl_isticos alejados de las piezas del electrodomdstico que se
pueden entibiar o calentar,
Para evitar incendios de grasa, no permita la acumulaci6n de
grasa de cocinar o de otros materiales inflamables en el horns
o en su cercania,
51
Page 53

En Case de lncendio
Use un extintor con producto quimbo seco o deI tipo espuma o
bicarbonato para apagar eI incendio o las llamas, Nunca use
agua en un incendio de grasa,
1, Apague eI homo para evitar que la llama se disperse,
2, NUNCA bvante o mueva una sarten en llamas,
3, Apague eI fuego o la Ihma deI homo cerrando la puerta deI
homo,
Segutidad para los Ni os
para a!canzar 10sart[cubs pueden les!0narse gravemente.
NUNCA deje a los ni_iossolos o sin supervisi6n cuando ei
homo este en uso o cuando est6 caiiente, Nunca permita que
los niSos sesienten o se paren en ninguna pieza del
eiectrodom6stico pues se pueden iesionar o quemar,
NO TOQUE LOS ELEMENTOSCALEFACTORESNI LAS
SUPERFICIESINTERIORESDEL HORNO, Los eiementos
calefactores pueden estar calientes aOncuando su color sea
obscuro, Las superficies interiores de cuaiquier homo se
calientan Io suficiente como para causar quemaduras, Du-
rante y despu6s dei uso, no toque ni permita que ias ropas u
otros materiales inflamables entren en contacto con los
eiementos caiefactores o ias superficies interiores dei homo
hasta que no se hayan enfriado, Otras superficies dei
electrodomestico pueden estar Io suficientemente calientes
para causar quemaduras - entre estas superficies est_inla
abertura dei respiradero dei homo y ia superficie cerca deesta
abertura, ia puerta dei homo y ia ventana de ia puerta dei
homo,
No toque un foco caliente del homo con un paso huJmedo
pues se puede quebrar, Si eifoco se quiebra, desenchufe ei
eiectrodomestico antes de sacar ei foco para evitar sufrir un
choque ei6ctrico,
NUNCA use papei de aiuminio para cubrir ias parriiias dei
homo ni ei panel inferior dei homo, Ei uso incorrecto puede
resuitar en un riesgo de choque ei6ctrico, incendio o da_ioai
electrodom6stico, Use papel de aluminio solamente como se
indica en esta guia,
Se ies debe ense_iara los ni_iosque ei eiectrodomestico y los
utensilios que est_n en el pueden estar calientes, Deje enfriar
los utensilios calientes en un lugar seguro, fuera del alcance
de los ni_ios, Seies debe ensdiar a los ni_ios que un
eiectrodom6stico no es un juguete y que no deben jugar con
los controles u otras piezasdel artefacto,
lnstrucciones Generales
NUNCA use un eiectrodom6stico como un peidaSo para
alcanzar los armanos superiores, El uso incorrecto de la
puerta del eiectrodom6stico tale como pisar sobre ella.
apoyarse o sentarse en la puerta puede resultar en que el
electrodom6stico sevuelque, se rompa la puerta y se
causen lesiones graves,
Para evitar posibles riesgos para el usuario y ddio al
electrodomestico, no use este producto como una estufa para
calentar o entibiar una habitaci6n, Adem_s no use el homo
como un lugar para guardar alimentos o utensilios de cocina,
No obstruya la circulaci6n del aire bloqueando el respiradero
dei homo,
Seguridad al Cocinat
Nunca caiiente un contenedor de aiimento cerrado en ei
homo, La acumuiaci6n de presi6n puede reventar ei
contenedor causando una lesi6n personal grave o daSo al
electrodom6stico,
Use tomaollas secos y gruesos, Los tomaollas huJmedos
pueden causar quemaduras por vapor, No se deben usar
toallas de secar los platos ni otros sustitutos envez de los
tomaollas porque pueden pasar sobre los elementos calientes
y encenderse o pueden quedar atrapados en ias piezas dei
electrodom6stico,
Use vestimentas apropiadas, Las ropas sueitas o ropas con
mangas largas sueltas no se deben usar cuando se est,1
cocinando, La ropa se puede prender fuego y causar
quemaduras si entra en contacto con los elementos
calefactores,
Siempre coioque ias parriiias dei homo en ias posiciones
deseadas cuando el homo este frio, Deslice la parrilla del
homo hacia afuera para agregar o retirar alimentos usando
tomaollas secos y gruesos, Siempre evite colocar o retirar
alimentos del homo sin sacar la parrilla hacia afuera, Si una
parrilla debe ser movida cuando este caliente, use un
tomaollas seco, No deje que el tomaolla entre en contacto
con el elemento caliente del homo,
52
Page 54

UselasparriiBssoiamenteeneIhomoenquefueron
enviadas/compradas.
TengacuidadocuandoabralapuertadeIhomo.Primerodeje
quesdgaeIaireovaporcaiienteantesdesacarovoivera
coIocareIdimentoeneIhomo.
ADVERTENCiA SOBRE ALiMENTOS PREPARADOS: Siga
las instrucdones deI fabricante deI dimento, Si uncontenedor
de dimento congeBdo de pi4sdco y/o su tapa se deforma,
comba o de otra manera se da_ia durante la cocd6n,
inmediatamente descarte e] aiimento y su contenedor, E]
aiimento puede estar contaminado,
No permita que e] pape] de aiuminio o ]a sonda de ]acame
toque eI ebmento cabfactor,
Sbmpre apague todos los controbs cuando haya terminado
de cocinar,
Segutidad sobre el Use
de UtensiJios
Siga las instrucciones del fabricante cuando use bobas para
cocinar en el homo.
El rendimiento y funcionamiento seguro de este
ebctrodom6stico ha sido comprobado usando utensilios de
cocina tradicionabs. No use ningLin dispositivo o accesorio
que no haya sido espedficamente recomendado en esta guia.
No use cubiertas, rejilBs superiores de la estufa o sistemas de
convecci6n para homos. El uso de dispositivos o accesorios
que no sean expresamente recomendados en esta guia puede
crear peligros graves de seguridad, afectar el rendimiento y
reducir la vida Litilde los componentes de este
ebctrodom6stico.
Si e[ utensiiio es mas pequeffo que e[ ebmento, una porci6n
del elemento quedar4 expuesta y puede encender la ropa o un
tomaollas,
Solamente ciertos tipos de utensilios de vidrio, vidrio ceramico,
cer4mica, gres u otros utensilios vidriados son convenientes
para cocinar en la superficie o en el homo sin quebrarse
debido al repentino cambio de temperatura. Siga las
instrucciones del fabricante del utensilio cuando use vidrio.
Gire los mangos de los utensiiios hacia e[ centro de [a
cubierta, no hacia la habitaci6n ni sobre otro elemento
superior, Esto reduce el riesgo de quemaduras, encendido de
materiabs infiamabbs o derrames si el utensilio es tocado
accidentalmente o alcanzado por ni_iospequeffos,
Asegurese de que el utensilio sea Io suficientemente grande
como para contener en forma debida los alimentos y evitar
derrames, Eltamaffo es particularmente importante cuando se
utilizan freidoras, Asegurese deque el utensilio tiene
capacidad para ei voiumen de aiimentos que se va a agregar
ai iguai que para ia formaci6n de burbujas de ia grasa,
Nunca deje que un utensilio hierva hasta quedar seco pues
esto puede da_iarel utensilio y la estufa,
NUNCA deje los elementos superiores sin supervisi6n,
especialmente cuando estd usando los ajustes de calor altos,
Un derrame que no reciba la debida atenci6n puede causar
humo y un derrame de grasa puede causar un incendio,
Este electrodom6stico tiene diferentes tama_iosde elementos
superiores, Seleccione utensilios que tengan bases planas Io
suficientemente grandes para cubrir el elemento, La relaci6n
adecuada entre el utensilio y el elemento mejorar4 la
eficiencia al cocinar,
EJementos TubuJares
Para evitar ddio a los elementos calefactores removibles, no
los sumerja, remoje ni lave en un lavavajillas o en un homo
autoiimpiante, Un eiemento ddiado puede producir un
cortocircuito resuitando en un incendio o riesgo de choque
ei6ctrico,
AsegOrese de que los platillos protectores esten en su lugar
pues la ausencia de estos durante la cocci6n )uede da_ar el
aiambrado,
Fortes Protectores: No use papel de aluminio para forrar los
piatiiios protectores o ia parte inferior dei homo, excepto como
se sugiera en ia guia. La instaiaci6n incorrecta de estos forros
puede resuitar en un riesgo de choque ei6ctrico o incendio.
OJJas Freidoras
Use extremo cuidado cuando mueva la olla con aceite o
descarte la grasa caliente, Deje que lagrasa se enfrie antes
de intentar mover ia oiia,
Campanas de VentiJaci6n
Limpie con frecuencia ia campana y los fiitros a fin de evitar
que se acumuie en eiios grasa u otros materiaies infiamabies y
para evitar incendios de grasa,
Cuando prepare alimentos flameados debajo de la campana,
encienda el ventilador,
53
Page 55

Seguridad en la Li pieza
Limpie con cuidado la cubierta, Apague todos los controles y
espere que se enfrien las piezas del electrodom6stico antes de
tocarlas o limpiarlas, Limpie con cuidado, Tenga cuidado
para evitar quemaduras de vapor si usa una esponja o un
patio mojado para iimpiar derrames en una superficie caiiente,
Aigunos iimpiadores pueden producir vapores nocivos cuando
se aplican en una superficie caliente,
Limpie solamente las piezas indicadas en esta guia,
Homo Automi piante
(modebs selectos}
c0cina, etc:e n e! horno durante e! cid0 de aut0[impieza:
No iimpie iajunta de ia puerta, La junta de ia puerta es
esencial para obtener un sellado hermetico, Se debe tener
cuidado de no frotar, da_iar ni mover lajunta,
No use limpiadores de homo ni forros de homo de ningun tipo
alrededor ni en ninguna parte del homo autolimpiante,
Antes de iniciar el ciclo de autolimpieza del homo, retire la
asadera, las parrillas del homo y otros utensilios y limpie
cualquier derrame para evitar humo excesivo o llamaradas,
Esnormal que la cubierta de la estufa se caliente durante el
ciclo de autolimpieza, Por Io tanto, se debe evitar tocar la
cubierta durante un cicio de autolimpieza,
Aviso y Adverteneia
lmportante Sobre Seguridad
La Propuesta 65de la Ley de 1986del Estado de California
Sobre Seguridad y Contaminaci6n del Agua Potable {Califor-
nia Safe Drinking Water and Toxic Enforcement Act of 1986}
exige que ei Gobernador de California publique una lista de
las sustancias que segOn el estado de California causan
cancer o da_o al sistema reproductivo y exige que las
empresas advbrtan a sus dbntes sobre la exposici6n
potencial a tabs sustancias,
Se advierte alos usuarios de este eiectrodom6stico que
cuando el homo est_ funcionando en el ciclo de autolimpieza,
puede haber exposici6n de bajo nivei a aigunas de ias
sustancias indicadas en la lista, incluyendo mon6xido de
carbono, La exposici6n aestas sustancias puede ser reducida
a un minimo ventiiando ei homo ai exterior en forma
adecuada, abriendo las ventanas y/o la puerta en la habitaci6n
en donde esta ubicado ei eiectrodomestico durante ei cicio de
autolimpieza,
AVISO IMPORTANTE RESPECTOA LOS PAJAROS
DOMESTmCOS:
Nunca mantenga los p_jaros en ia cocina oen ias
habitaciones donde puedan llegar los humos de la cocina, Los
p_jaros tienen un sistema respiratorio muy sensitivo, Los
humos producidos durante el cicio de autolimpieza del homo
pueden ser perjudiciaies o mortaies para los p_jaros, Los
humos que despide el aceite de cocina recalentado, la grasa,
margarina y los utensilios antiadherentes recalentados
tambi6n pueden set perjudiciales,
Conserve estas instrucciones para referencia futura
54
Page 56

Centroles Superieres
Useestoscontrolesparaencenderlos elementossupedores.Se
dlsponede una selecci6ninfinitade ajustesde calordes@ 'low'
(Bajo}hasta'Nigh' (Alto}. Lasperillaspuedencolocarseen
cualquierade estosajusteso entreelias.
Programaci6n de los Controles
1. Coloquee!utensiliosabreel elementosuperior.
2. Oprimay gire Ia perillaen cualquierdirecci6nhastael ajustede
calordeseado.
+ Enet paneldecontro!seencuentramarcadocual O O
elementocontroiacadaperilIa. Parejemplo,el
dibujoa laderechaindicael elementodelantero _ t,_
izquierdo.
3.
Enel paneldecontrol hayuna luzindicadoradel elemento.
Cuandoseenciendealgunade lasperillasde control,Iahz se
ilumina. La Iuzseapagar_cuandotodos loselementos
superioresseapaguen.
4.
Despu@decocinarcoioqueIa perilla en la posiciOn'OFF'
{apagado}.Retireel utensilio.
Ajustes de Calor Sugeridos
EltamafTo,%0 de utensilioy Iacocci@afectardnel ajustedel calor.
ParainformaciOnsabre los utensiliosy otrosfactoresque afectanlos
ajustesdel calor,consulteel folleto"La CocinaF_cil".
'l:ow' (Bajo}(2}: Seutiliza
paramantenerlosalimentos
calientesy derretir chocolatey
mantequilIa.
'led. low +
{MedianoBajo}
(3-8}: Usepara
continuar
cocinando
alimentos
tapadoso para
cocinaralvapor.
[
'Medium' {Median@(5-
7): Usadoparamantener
un hen/or lento para
grandescantidadesde
Ifquidoy paraIa mayorfa
de las frituras.
{Elestilodel controlvarfaseg0nel modelo}
'Nigh' {Alto} (10): Seusapara
hacerhen/it un Ifquido. Siempre
reduzcael ajustea uncalorm_s
bajocuandolosIfquidos
comiencena herviro cuando los
aiimentoscomiencena
cooinarse.
Nigh
/+
7
1
(MedianoAlto}
(8-9): Seusa
}ara dorar
carne,calentar
aceiteparafrefr
en una Sal_n
hondao para
saltear.
Tambi6npara
mantenerun
hen/orr@ido
)ara cantidades
grandesde
Ifquidos.
@FF
ANTESDE COCmNAR I}ESPtlES DE COCINAR
• 8Lempre coloque un utensfllO en e! elemento superior antes de , Asegt]rese de que los elemen_os supenores esten apagauos.
encenderlo.Paraev+tarua_s a laestufa,nuncaenciendaun
elemen_osuperiorsintenet un u[ensiliosabre61,
, NI.INCA Jse lacublertade laestufa comaun _reapara guardar
alimentosc utensilios,
IVflENTRASCOCINA
+Asegtiresedesabercure penllacontrolacadaelemento, iAIgunas[empera-[uraspuedenno ser segurasparaartfcuJostales
Asegtiresedehaberencendidoel elememocorrec+o, coma Ifquidosvolatiles.I+mpiadoresa rocmdoresen aerosol.
• Comlenceacocmaren unajustede caloralto luegoreduzcaa un +NNNCA ueje nlngtTnartfculo,especlalmentea+tfculosde plastico+
ajustemasbajo paracompletar lacocci6n. Nunca useun ajuste sabrela cubLertade laestufa. Elairecalienteprovenientedel
de calor alto paracocinar8uran[e unt_empoprolonga_o.
+NtJNOApermitaqueuna alia hiervahastasecarse. Estopodrfa
da+3arlaalia _el electrodom@tico.
+NIJNOAtoque lasuperficie dela es[ufahastaque nose haya
enfnado,Esposiblequealgunas areasde lasuperficie,
especialmentealrededordelos elementos,seentibieno calien[en
mientrasest,1cocinando, Usetomaollasparapro[egersus
rnanos.
oLimp_ecualquLerderrame[an promo comaseap0sible
OTROSCONSEJOS
, Siexistenarmariosdirecmmen[esabrela cubier_ade laestufa
coloqueeneliasartfculosde usapocofrecuenteque puedanser
_juardadoscon seguridaden unareaque estar_sujetaal calor,
respiraderopuedeencender los artfculosinflamables,derretiro
ablandarlosplasticoso aumentarla presiOnen loscon_eneuores
cerradoshacidndolosrevenmr,
• NIJNCApermitaqueel papelde aiuminic, lostermOmetrosde came
ocualqu+erotro obieto demetal,a e×cepciOnde una alia sabreun
e_emen[osuperior,tongacomac_oconloselementoscalefactores,
55
Page 57

Superfieie de los
E e entes Tubu ares
• LimpieIacubierta de taestufadespu6sde cadauso.
• Limpielosderrames4cidoso azucaradostanprontocomo ta
cubiertasehayaenfriadopuesestosderramespueden
descoJoraro marcartaporcelana.
Para proteger eJacabado de Jos pJatiJJos
protectores:
• A fin de reducirIadescotoraci6ny fisurassuperficiaJes,evite
usarcalor alto por per[odosdetiempo prolongados.
• Nouseutensiliosdemasiadograndes. LosutensiJiosno
debenextenderse2,5- 5 cm (1 - 2 pulgadas)m4sall_ del
elemento.
• Cuandoprepareconservaso cocineconollasgrandes,usee!
ElementoparaOllasde Conservas[ModetoCE1).POngaseen
contactoconsudistdbuidor paraobtenerdeta!leso Ilameal
1-877-232-6771en EE.-UU.o al 1-800-688-8408en Canad_
parahacerun pedido.
• UmpieJosconfrecuencia. [Ver p_gina69.)
EJementos TubuJares
Cuandoun elementoseenciende,pasapor ciclosde encendidoy
apagadopara mantenerel ajustede calorseJeccionado.
Loselementostubularessonautoth_piables.No los sumeriaen
agua.
Par8 sacar: Cuandoest_frio,
levanteel elemento.
Cuidadosamentetire de61hacia
afueray s_quelodel recept_culo.
Para voJvera coJoGar: Inserte
losterminalesdeJelementoenla
toma.Gu[eelelementohastaque
quedeen su lugar. Oprimahaciaabajoen e[
bordeexteriorde[elementohastadejar[o
niveJadosobreel piatilloprotector.
TERfVflNAL£S
PJatiHos Protectores
LosplatiJlosprotectoresdebajode carlaelementosuperior recogen
losderramesy debenser usadossiempre. Sino usanlos platillos
pmtectorescuandoest6cocinandosepuededaSarel cableado.
Paraevitarel riesgode choqueel6ctricoo deun incendio,nunca
forre losplatillosprotectorescon papelde aluminio.
Losplatillos protectoressedescolorar4n(manchasazules/doradas)o
adquirir_nfisurasconel tiempo,si se sobrecalientan. Esta
descoloraci6nofisurassonpermanentes.Estono afectala eficacia
al cocinar.
56
Page 58

Q
Contromes de[ Homo de Limpieza Marmua[
(modelos selectos)
\
\
\
\
\
\
\
\
\
\
NOTA:Elindicadorvisualdespliega12:00cuandose conectael electrodom6sticoporprimeravezo si seinterrumpeel suministroeI6ctrico.
Laslucesindicadoras'Bake'y 'Broil'sedespiiegancuandose activa lafunciOncorrespondiente.
A
8
C
'Timer'_Temporizado0
D
'Clock'(Reloi:)
E
'CANCEL'[CanceIa0
F
Seusapara hornearyasar.
Seusaparaasara [a parri[[ay dorarlos
a[imentos.
Programae[ tempodzador.
Seusaparaprogramar[a horade[dia.
Canceiatodas[asfuncionesa excepciOn
de[temporizadory de[ reioj.
Seusanparaseleccionarocambiare[
tiempoy [atemperaturade[homo.
Se[eccionalosaiustesdeasado'Hi'(Alto}
o 'LO' {Baio).
Use de [as Tee[as
° Optima [a tecIa deseada.
° Optima [a tec[a ,A o 'V para se[eccionar el tiempo o [a
temperatura.
• Se escuchar_ una seiial sonora cada vez que oprima una teda. No
se escuchar_ una sepal sonora cuando se opriman lasteclas ,A o
• Seescuchar_ndosse_alessonorassi ocurre un error enla
programaciOn.
Nora: Cuatrosegundosdespu6sde oprimir [atecla A o V, el
tiempoo [atemperaturaquese despliegaseprogramar_
autom_ticamente.Sitranscurrenm_sde 30segundosdespu6sde
haberoprimidounatecIade funci6ny [atecla ,A o V, [afunciOn
ser_canceIaday el indicadorvisualw_Iver_a[ despIiegueanterior.
Programaci6n de[ Re[oj
1. Oprima[atecla 'Clock'.
, Lahorade[reIojno sepuedeprogramarsi el
control ha sidoprogramadoparahornearo asar
o para usarel temporizador.
2. Pmgrame[ahoracorrectade[d[ausando[astecl_
,A o V. Si[a tecia A o V noseoprimeen 30
segundos,[aprogramaciOnde[retoiser4canceJada.
Optima [atecJa'Clock'paracomenzarde nuevo.
Programaei6n de[ Temporizador
Eltemporizadorpuedeserprogramadodeun minuto(:01)hasta99
horasy 59 minutos(99:59D.Eltiemposedespiegar_enminutosy no
ensegundos.ELTEMPORIZADORNO CONTROLAELHORNO.
1= Optima latecIa'Timer'=
, Enel indicadorvisual despIegar_0:00y losdos
puntos [:) desteliar_nenel indicadorvisual
2. Optimalateda A o V hastaquese despliegu(
tiempodeseado.
, EItemporizadorcomenzar_afuncionarcuan(
seprogrameel tiempo.
, Los dos puntosdesteIlantesindicanqueun
conteodel temporizadorest_en progreso.
(Losdos puntosno desteIIansi el indicadorvisual muestrala
hora deld[ao [atemperaturadel holno.)
, A[ final del tiempoprogramado,seescucharandosse_ales
sonoras.ElindicadorvisualdespIegar8"0:00".
, Si as[Iodesea,optimala tecIa'Clock' duranteel
funcionamientode[temporizadorparadespiegarbrevemente
[a horade[d[a.
, Si asi[odesea,oprima[atec[a'Bake'o 'Broil'duranteel
funcionamientode[temporizadorparadesplegarblevemente
el ajusteactualde temperatura.
Para cancelar el temporizador:
Optimay mantengaoprimidalatecIa 'Timer'durantevariossegundos.
57
Page 59

.............+'4I'7__......
Homeado, Asado y Asado
a maParrilla
Paraobtenermayorinformaci6nsobrelostiemposy Iassugerencias
de horneado,asadoy asadoa taparritta+consulteel felteto"La
CocinaF_cil".
Setting the Controls For Baking or Roasting:
1+ OprimaIatecla 'Bake'.
+ '000'sedesplegar_y laIuzindicadora'Bake'
destellar_enel indicadorvisual+
+ Si oprimelatecla 'Bake'y no programalatemperaturaen 30
segundos,eIprogramasecancelar_autom_t+camentey la
heradel dfase desplegaranuevamenteen elindicadorvisual.
2. OptimaIatecla A o V hastaque latemperaturadeseadase
despliegueenel indicadorvisual.
+ Latemperaturadel homopuedeserprogram
de75° a 285° C 070° a 550°F).
+ '175°, (350°)se desplegardcuandooptima la
tecla A o V per primeravez.
+ Optimalatecla A o V repetidamentepara
cambiarlatemperaturaen incrementosde
3° C(5° F),u oprima[ay mant6ngaiaoprimidaparacambiar[a
temperaturaen incrementosde6° C(10°F).
• Enel indicadorvisualse desplegar_38° (100°) ola
temperaturareai deIhomosiesque essuperiora 38° C
(100° F)cuandose enciendeeIhomo.
+ Latemperaturaaumentar_en incrementosde3°C (5° F)hasta
Ilegara Iatemperatura programada.Cuandoel bornesehaya
precalentado,se escuchar_una se_alsonora.
+ Espereaque ethomo se precalientedurante 10-15minutes.
+ ParaverificarIatemperaturaprogramadaduranteel
precalentamientodel borne,optima latecla 'Bake'.La
temperaturase desplegar_durantetres segundos.
+ Para cambiar matemperatara demhomo durante em
procesode cocei6n, optimaIatecla 'Bake',Iuegooprima
A o V hastaquese desplieguelatemperaturadeseada.
+ Paraeambiar matemperatura demhomo durante 'Preheat',
oprimados veces la tecla'Bake',luegooptima A o V hasta
quesedesplieguelatemperaturadeseada.
Coloqueelalimentoeten homo.Verifiqueetprogresode la
cocciOncuandohayatranscurridoel tiempo m[nimo
recomendado.
Att6rmino de la cocci6n,oprimaIa tecla 'Cancel'
paraapagareI borney retireel alimentodeIborne.
, Elhomocuentacon una funciOnde apagadoautom_tico.Si se
deja encendidodurante12betas,eI borne seapagar_
autom_ticamenteyel indicadorvisualdesplegar_'000'.Optima
la tecla 'Cancery la heradeldfasedesplegar_nuevamenteen
el indicadorvisual.
Ajuste de los Controles para Asar a la Parrilla:
Paraobtenermejoresresultados,useun utensiliodise_ado
especialmenteparaasara laparrilla.
!. ColoqueIaasaderadeasara IaparrilIaen la posiciOn
recomendada.(Verlatablaen lapSgina65.)
2. Oprimalatecla 'Broil'.
, 'SEt'se despiegar_y IaIuzindicadora'Broir
destelIar_eneIindicadorvisual
3. Oprimalatecla A parapmgramareI asadoen
ajuste'HI' (alto)o V parael ajuste'LO'(bajo).
+ Seleccioneel ajuste'HI' (alto)paraasadoa la
parrilla nolmal.
+ Seleccioneel ajuste'LO' (bajo)paraasadoa
la parriila a bajastemperaturasparaevitare!
doradoexcesivoenalimentosque requieren
mayorestiemposdecocci6n talescome la carnede ave.
, Sinoseleccionaun ajustedeAsado ('HI' o 'LO')en30
segundos,elprogramase cancelar_iautom_ticamentey Iahera
del d[a se desplegar_nuevamenteenel indicadorvisual.
4. PrecalienteeIelementode asara Iaparrilla durante3 minutes.
DejeIa puerta abierta hastaelprimertope,aproximadamente
10cm (4pulgadas].
5. Cuandoterminede asara la parrilla,oprimaIa
tecla 'Cancei'paraapagarel hornoy retireeI
utens+liodel borne.La herade!dFavolver_a
desplegarseenel indicadorvisual
58
Page 60

Controles del Homo Autolimpiante (modelos selectos)
A B C D
+
E F G
Elpane[de controlhasido disefiadoparasu f_cii programaciOn.Elindicadorvisualen et panelde controlmuestrala horadel dFa,el
temponzadory tasfuncionesde[ horno.Etpanelde control mostradoarriba inc[uye[ascaracterFsticasespedficasdot modelo. "Etestitodel
paneldecontrol varFaseg0nel modeloy
H 1 J
'Broil'{Asara
la Parrilla)
ii_il
'Bake'(Hornea0
O
(M_iso lVlenos-}
'Timer'gemporizado0
D
E¸
'Cook& Hold'(Cocckin
yMantenerCaliente}
FI
'Clean'(Limpieza}
G
+Delay'(Diferido)
+Clock'(Reloj)
H
'KeepWarm'
(MantenerCaliente)
J
'CANCEL'(CANCELAR)
Seusaparaasaralapmrillaydorarlos
alimentos.
Seusaparahorneary asar.
Programao cambialahera,la
temperaturadelhomo.Programaasara
laparrilla'HI'o'LO'.
Programae!temporizador.
Seusaparahornearduranteuntiempo
seleccionado,luegomantienee!alimento
calienteduranteunahera.
Seusaparaprogramarunciclode
autolimpieza.
Programael homoparacomenzara
homearo limpiarseaunaheraposterior.
Seusaparaprograraarlahoradeldia.
Seusaparamantenercalienteenet
homoelalimentococinado.
Cancetatodaslasfuncionesaexcepci6n
dottemporizadory etreloj.
Use de masTec as
• Optimalatecla deseada.
• OptimaA o V' paraprogramarel tiempoo latemperatura.
+ Seescuchar_unasei_alsonora cadavezqueoprima unatecla.
+ Seescuchar_ndosse_alessonorassi ocurreun erroren la
programaciOn.
Nora: Cuatrosegundosdespu_sde haberoprimidolatecla A o
_' eltiempoo latemperaturaser_ autom_ticamenteprogramada.
Si transcurrenm_sde 30segundosdespu6sde haberoprimido
unatecla defunci6n y antesdeoprimir lasteciasA o V, Ia
funci6n ser_ canceladay elindicadorvisualvolver_al despliegue
anterior.
'C_ook' (Reloj)
Elre!ojpuedeserajustadoparadesplegarla horaya seaen formato
de 12horaso 24 horas.El relojha sidoprogramadoen laf_brica
parael formatode 12horas.
Para cambiar el remoja formate de 24 betas:
1. Oprimay mantengaoprimidasIasteclas
'CANCEL'y'Delay'durantetres segundos.
2. OptimaA o V paraprogramareI
formatode 12horaso 24 horas.
3. ProgrameIahoradel dia siguiendo las
instruccionesindicadasabajo.
Programaci6n demRemoj:
1, Optimala tecla 'Clock',
• Lahorade[dia ydos puntosdestei[anen el
indicador.
2. OptimaA o V'paraprogramarlahora delalia.
• Losdospuntoscontint_andestellando.
3. Oprimala tecla'Clock'nuevamenteoespere
cuatrosegundos.
-- De!ay
Clock
A
59
cont,
Page 61

@
Cuandose conectaenergiae!6ctricaal homoo despu6sdeuna
interrupci6nde laenerg[aet6ctrica,Ialikima horadel relojpreviaa
la interrupciOndestellar_enel indicador.
Paradesplegarla horadeIdia cuandoel indicadorest6 mostrando
otrafunciOndetiempo,oprima latech 'Clock'.
La horadel relojno puedeset cambiadacuandoel hornohayasido
programaticpara'DelayCook','DelayClean'o 'Cook& Hold'.
Para cancemar emdespmiegue demremoj:
Si nodeseaque el indicadorvisualmuestre la
horadel d[a:
Oprimay mantengaoprimida Iasteclas
'CANCEL'y'Clock' durantetres segundos.La
horadel diadesaparecer4delindicador.
Cuandose canceJael desplieguedeJreloj,
oprJmaJatecla 'Clock' paradesplegarbrevementeIa horadel d[a.
-- Clock
Para restaurar emdespmiegue demremej:
Oprimay mantengaoprJmidaIasteclas'CANCEL'y 'Clock'durante
tres segundos.Lahoradel d[areaparecer4en el indicador.
'Timer' (Temporizador)
Eltemporizadorpuedeserpmgramadode un minuto (00:01)hasta
99 horasy59 minutos(99:59).
Eltemporizadorpuedeserusadoindependientementedecualquier
otraactMdaddel horno.Adem_spuedeserpmgramadocuandootra
funciOndel homo est6en funcionamiento.
Eltemporizadornocontrolael horno,solamentecontrolauna serial
SO[_or8.
Para programar el temporizador:
I. Optimalatec[a'Timer' {Temporizador). Timer
+ '0:00'seiluminaen elindicadorvisual.
• Losdospuntosdestellar_n.
2. OprimaIatecla A o _' hastaque eltiempo
correctoaparezcaenel indicadorvisual
+ Losdospuntoscontimiandestellando.
3. Oprimanuevamentelatecla 'Timer'o esperecuatrosegundos.
• Losdospuntoscontintian destellandoy comienzalacuenta
regresivadeltiempo.
+ El_iltimominutode Ia cuentaregresivadel temporizadorse
desplegar_ensegundos.
4. A! final deltiempo programatic,seescuchar_una serialsonora
larga.
Para cancemar emtemporizador:
1. Optimay mantengaoprimidala tecla'Timer'durantetres
segundos.
U
2. Optimalatecla 'Timer'y coloque lahora a00:00.
B oqueo de Contromes
Eltecladopuedenserbloqueadosparaseguridad,Iimpiezaoevitar
el uso no autorizado.Loscontrolesno funcionar_ncuandoest6n
bloqueados.
Siel hornoest_en uso,loscontrolespuedenbloquearse.
La horaactualdel aliapermanecer_enel indicadorcuandolos
controlesest6nbloqueados.
Para bmoquear:
Oprimay mantengaoprimidaslasteclas
'CANCEL'y'Cook& Hold'durantetres
segundos.
'LOCK'destellaenel indicadorvisual. Cook&
-- Hold
Para desbmoquear:
Opr+may mantengaoprimidaslasteclas'CANCEL'y 'Cook& Hold'
durantetres segundos.
'LOCK'desaparecedel indicador visual
C6digos de Errotes
'BAKE'o 'LOCK'puedendestellarr4pidamenteparaadvert+deque
hayun error o unprobiema.Si'BAKE'o 'LOCK'desteilanen el
indicadorvisuaJ,optima le tecla 'CANCEL'.Si'BAKE'o 'LOCK'
continOandestellando,desconectelacorrienteel6ctrica del
artefacto.Espereunospocosminutosyvuelvaa conectarla
corrienteel6ctrica.Si IaspalabrasaOncontinOandestellando,
desconecteIacornenteel6ctricadel artefactoy Ilamea unt6cnico
de servicioautorizado.
6O
Page 62

'Bake' (Horneado)
Para programar 'Bake' (Homeade):
1. Oprimalatecla 'Bake'.
+ 'BAKE'destellar&
+ '000'destetlar_enel indicadorvisual.
Bake
Diferenc+as de_ homeado entre su homo
antiguo y st+ homo nuevo
Esnormal observaralgunasdiferenciasenel tiempode horneadode
suhomo antiguoy su homo nuevo.Vea"Ajustede laTemperatura
del Horno"en la p%ina 64.
2. SeteccioneIatemperaturadel horno.La
temperaturadel homo puedeser programadade
75°a 285°C 070°a 550° F}.Oprimau oprimay
mantengaoprimidalatecla A o _'.
+ Cuandocualquierade estasdosteclasseoprimepot
prJmeravez,175° (350°] se ituminar&
+ Optima la tecla A para aumentar la temperatura.
+ Optimalatecla V paradisminuirla temperatura.
3. OptimaJatecla 'Bake' nuevamenteo esperecuatrosegundos.
+ 'BAKE'dejar_de destellary se ihminar_ enel indicadorvisual.
+ 38° (100°}o Iatemperaturaactualdel hornosedesplegar&
Latemperaturase elevar_en incrementosde3° (5°} hastaque
se alcancelatemperaturaprogramada.
4. Espereaque elhomo se precalientedurante 8-15minutos.
+ Cuandoe+homoIleguea Ia temperaturaprogramadase
escuchar_unasepal sonoraIarga.
+ ParavedficarIatemperaturaprogramadaduranteel
precalentamientodel horno,oprimalatecla 'Bake'.
5. Coloqueel alimentoen elcentrodel horno,dejandoun m[nimode
dospulgadasentreel utensilioy Iasparedesdel horno.
6. Venfiqueel progresode IacocciOncuandohayatranscurridoel
tiempo minimorecomendado.Contimiela cocci6nsi es necesario.
7. AIt6rmino deIa cocciOn,optimala tecla 'CANCEL'.
8. Retireel alimentodel horno.
Notas sobre Hemeado:
+ Para cambiar matemperatura demhomo durante em
proceso de cocci6n,oprimaIatecla'Bake',Iuego oprima A o
V"hastaque sedespliegueIatemperaturadeseada.
+ Para cambiar matemperatura demhomo durante 'Preheat',
optima dos veces la tecla'Bake',luegooprimaA o V hasta
que se desplieguelatemperaturadeseada.
+ Siolvidaapagarel homo,seapagar_autom_ticamente
despu_sde transcurrir 12horas.Si deseadesactivaresta
caracter[stica,yea lap_gina64.
+ Parasugerenciasadicionalessobrehomeadoyasado,consulte
el folleto "LaCocinaF_cil".
'Cook & Hemal' (Coccion y
Mantener Caliente)
'Cook & Hold' Ie permitehorneardurante unacantidad
determinadadetiempo,seguidode unciclo 'KeepWarm'de una
hora.
Para programar 'Cook & Homd':
1.
Optima latecla 'Cook& Hold'.
+ 'BAKE'y'HOLD'destellan.
+ '000'se ihmina en el indicadorvisual.
Seleccionelaternperaturadothorno.La
temperaturadel hornopuedeser programadade
75°a 285°C (170°a 550° F].Optimau optima y
mantengaopdmidalatecla A o 'V.
• Oprimalatecla A para aumentarla temperatura.
• Oprimalatecla V"para disminuirla temperatura.
3. Opdmalatecla 'Cook& Hold'nuevamenteoesperecuatro
segundos.
• 'HOLD'destella.
• '00:00'destelIaenel indicadorvisual
4. ProgrameIacantidadde tiempo durantelacuaI usteddesea
homearoprimiendo Iatecla A o V, E+t+empode horneado
puede programarsedesde10minutos [00:10]hasta11horas+
59 minutos [11:59].
• 'BAKE'y'HOLD'se iluminanen elindicadorvisual
• Eltiempo dehorneadoseiluminar_enel ind+cadorvisual.
• Comenzar_lacuenta regresivadel tiempode horneado.
Cuande haya expirade emtiempe de cecci6m
+ Seescuchar_ncuatro seSalessonoras.
• 'BAKE'seapagar&
• 'HOLD'y 'WARM'seiluminar_n.
+ Enel indicadorsedesplegar_75° [170°].
Cook&
Hold
61
Page 63

Q
Despubs de una hora en 'HOLD WARM' (Mantener
Caliente):
. 'End' se desplegar&
. La hora del dfa volver_ a desplegarse en el indicador visual
Para caacelar 'Cook & Hold' ea cualquier momento:
Oprimala tecla 'CANCEL'.Retireel alimentodel homo. i_ancey_
'[)e ay Bake' (HorneadoDifeddo)
Nousehorneadodiferido paraalimentosde cortaduraci0ntales
comoproductosI_icteos,cerdo,came deave o mariscos.
Cuandousa 'Delay', el horno comienzaacocinarm4stardeen el
d[a.ProgrameIacantidaddetiempo que usteddeseadiferir antes
de queseenciendael homo y cu_ntotiempo deseacocinarel
alimento.Elhomocomienzaa calentaren la horaseleccionaday
cocinaduranteeItiempoespecificado,y hego mantieneelalimento
calienteduranteuna hora.
Eltiempodiferido puedeprogramarsede 10minutos(00:10}hasta
11horas,59 minutos(11:59}.
Cuando el tiempo diferido ha expirado:
. 'DELAY'se apagar&
. SedespiiegaeItiempode horneado.
. Sedespliegan'BAKE'y 'HOLD'.
Para programar un tiempo diferido cuando ya se ha
programatic 'Cook & Hold':
1. Optimalatecla 'Delay'. Delay
. 'DELAY'destella.
. '00:00'se despliegaen el indicadorvisual.
2. Optimalatecla _&o _' para programareltiempo
diferido.
. Despu6sde cuatrosegundos,'DELAY'
permanecer_iiluminadopara recordariequese
ha programadoun ciclo de horneadodiferido.
Cuando ha expirado el tiempo diferido y el homo
comienza a funcionar:
, Sedesplegar_el tiempo de horneado.
. 'DELAY'se apagar&
. 'BAKE'y 'HOLD'permanecer_nihminados.
Para cancelar:
Para programar un cicio de horneado diferido:
1. Oprimalatecia 'Delay'.
. 'DELAY'destelh. DSIBy
, '00:00'destellaen el indicadorvisual.
2. OprimaIatecla A o V para programar
el tiempo diferido.
Cuando'DELAY'est6todaviadestellando:
3. Oprimalatecla 'Cook& Hold'.
. '000'se ihmina en eIindicadorvisual
. 'BAKE'y 'HOLD'destellan. Hold
4. OprimaA para programarlatemperaturade
horneado.
. '00:00'y'HOLD' destelhn.
. 'BAKE'permaneceihminado.
5. OprimaA para programareltiempo dehorneado.
. Enel indicadorvisuaiseihminan 'DELAY','BAKE',y 'HOLD'.
Optima latecla 'CANCEL'.
, Todaslasfuncionesde horneadocontrohdaso
no pot e[temporizadorser_ncanceladas.
. La horadel d[aw_lver_adesplegarseen eI indicadorvisual
Notas:
. Nouse horneadodiferido para losart[culosque necesitan
precalentamientodelhomo,tal como pasteles,galletasy panes.
• Nousehorneadodiferido si el hornoyaest_caliente.
Cook&
62
Page 64

Keep Warm' (Mantener Caliente]
Paramantenercatientesen formaseguraalimentoscalienteso para
calentarpanesyphtos.
Para pregramar 'Keep Warm':
1. Optimalatecia 'KeepWarm'. Warm
• 'WARM'destella.
• '000'se despliegaenet indicadorvisuai.
2. SeleccioneIatemperaturade 'KeepWarm'.La
temperaturapara 'KeepWarm'puedeset
programadade63°a 90°C 045 °a 190° F}.
Oprimau oprimay mantengaoprimida la tecla
Ao_',
• Cuandocuaiquieradeestasdostechs seoprime
por primeravez,75° (170°] seiiuminar&
• Optimalatecla A paraaumentarlatemperatura.
• Optimalatecla V paradisminuirla temperatura.
'WARM'y Iatemperaturasedesplegar_nen el indicadorcuando
el ciclo'KeepWarm'est6activo.
Keep
Notas sobre +Keep Warm':
o ParamantenerIacalidad6ptimade losal+mentos,los
alimentascocinadosen elhornodebenset mantenidos
calientespor no m_sde 1a 2horas.
o Paraevitarque losalimentossesequen,cOblaloslevemente
con papelde aluminioo unatapa.
o Para camentarpaneeiHos:
- cubra Ievementelospanecillosconpapelde ahminio y
colOquelosenel homo.
- optima Iasteclas'KeepWarm'y A para programar
75°C (170° F].
- calientedurante 12a 15minutos.
+ Para camemarplates:
- coloque2 pilasdecuatro platoscarlaunaen el homo.
- optima Iastecias'KeepWarm'y A para programar
75°C (170° F].
- caliente los platosdurantecinco minutas,apagueel homoy
deje los piatosen elhornodurante 15minutosm_s.
- usesolamenteplatosresistentesal horno,verifiqueconel
fabricante.
- nocoloquelosplatoscalientessobreuna superficiefria
puesel cambior_pidode temperaturapuedecausarfisuras
superficialeso rotura.
Para cancemar 'Keep Warm':
1. Optimalatecla 'CANCEL'.
2. Retireel aHmentode[ homo.
63
Page 65

Q
Ciette Autom tico/Modo Ajuste de la Tempetatuta del
Elhomo seapagar_autom_ticamentedespu6sde 12horassi usted
Iodeja accidentaimenteencendido. Estacaracteffsticadeseguridad
puedeset desactivada.
Para cancemar emcierre autem_tice de 12 betas y
dejar que el home funciene centinuamente durante
72 heras:
1. Programeel homo para hornear(verp%ina 61}..................
2. Oprimay mantengaoprimidala tecla'Clock'durante O!eok
cinco segundos.
o 'SAb'sedesplegar_y destelIar_durantecincosegundos.
o 'SAb'sedesplegar_continuamentehastaquese desactiveo
hastaque transcurraeI limitede 72 horas.
o 'BAKE'tambi_nsedesplegaraisJseest_ usandoun ciclo de
horneadocuandoel homo est_en ModoSab_tico.
Todaslasotrasfunciones EXCEPTO'BAKE'('Timer','KeepWarm',
'Clean',etc0est_nbloqueadasduranteel Modo SabStico.
Para cancemar 'Bake' cuande emMode Sab_tice est_
active:
Oprima'CANCEL',
o 'BAKE'seapagar8en el indicadorvisual,
o No se oir_ ningunaserialsonora.
Para cancemar emIVledo Sab_tice:
1. Oprimalatecla 'Clock'durante cinco segundos..................
0
2. Despu6sde 72horas,el Modo Sab_ticoterminar_.
o 'SAb'destellar8durantecinco segundos.
o Lahora del dia reaparecer_en el indicadorvisual
La exactitudde lastemperaturasdeJhomo es cuidadosamente
probadaen Iaf4brica. Esnormalnotaralgunadiferenciaentrela
temperaturade horneadoentreun horno nuevoy un hornoantiguo.
ConeJcorrerdel tiempo,Iatemperaturadel horno puedecambiar.
UstedpuedeaiustarIatemperaturadel homosi consideraque su
homo noest4 horneandoodorandoenforma correcta. Paradecidir
cu4ntodebecambiarIatemperatura,programelatemperaturadeI
homoa 15° C _25° F) masalta o m4sbaiaque latemperatura
indicadaen susrecetas,luegohornee. Los resultadosde la
"prueba"puedendarleuna ideade cu4ntoaiustarJatemperatura.
Ajuste de matemperatura demhome:
1. Oprima'Bake'. Bake
2. Programe285° (550°) oprimiendoIatecla A
3. Optimay mantengaoprimida la tecia'Bake'durante
variossegundoso hastaque O° aparezcaenel
indicadorvisual
Si Ia temperaturadel homo hasido previamenteaiustada,el
cambioaparecer_enet indicadorvisual Poreiemplo,si Ia
temperaturadel hornofue reducidaen 8° C (15°F}el indicador
mostrarai- 8° (-15°}.
Optima latecla A o V paraajustar latemperatura.
Cadavezquese oprimeuna tecla,latemperaturacambiaen3° C
(5° F}. Latemperaturadet homo puedeser aumentadao
disminuidaen 3°a 20° C(5° a35° F}.
Lahoradel d[areaparecer_autom_ticapaenteenel indicador
visual
Nonecesitarea}ustarlatemperaturadet hornosi hayuna falla o
interrupci6nde energ[ae!6ctrica. Lastemperaturasdeasar a la
parrilla y limpiezano puedenset a}ustadas.
Notas Sobte eUMode Sab tico:
• ElModoSab_iticopuedeseractivadoen cualquiermomento,
est6o noel hornoencendido.
• ElModoSabdticonosepuedeactivar si lasteclasest_n
bloqueadasocuandola puertaestdbloqueada.
• Sie!horno estdhorneandocuandoseprogramael Modo
Sab_tico,'BAKE'seapagar_al final del ciclode horneado.No
seemitir_nserialessonoras.
• CuandocomienzaelModo Sab_tico,nose epaitir_lasepal
sonorade precalentamiento.
o Cuandoel ModoSabSticoest8activo,todos losavisos,
mensajesyse_alessonorasest_ndesactivados.
o Siopdmela tecla'CANCEL'secancelar8un ciclo'Bake',sin
embargoel control permanecer_enModoSab_tico.
o Sifalla Iacorrienteelectrica,cuandovueIvaIaenergiael horno
seactivar_enModo Sab_ticocon72 horasrestantesy ningOn
ciclo activo.
64
Page 66

Q
'Broiming' (Asar a [a Pardila)
Para programar 'Broil':
1. Optima[a tech 'Broil'+
o 'BROHL'destella. BPoil
o 'SET'sedespliegaenel indicador.
2. Opdmala tectaA paraprogramarasara [aparrilla 'HH'u optima
[atecta V paraprogramarasarlaparriila 'LO'.
o Enel indicadorvisualsedesplegar_'HH'o 'LO'.
o Seleccione'HHbroil' 285° C(550° F)paraasadoa laparriila
normal. Seleccione'LObroil' 230°C [450° F)paraasar ala
parrillacontemperaturabajaalimentosque debenser
cocinadospor m_stiempo,tal como [acame de ave.
3. Despu6sde cuatrosegundos,elhomo comenzar_afuncionar.
o 'BROHL'continuar_i[uminado.
4. Paraun dorado6ptimo,precaiientee[elementode asara [a
parri[ladurante 3 a 4 minutosantesde co[ocare[aIimento.
5. Co[oquee[ aIimentoen e[ homo. Deje[apuertaabierta
aproximadamente10cm (cuatropuigadas](el primertope].
6. D6vueita ala carneuna vezaproximadamentea mitadde la
cocciOn.
7. Cuandoel alimentoest6cocinado,optima [atecJa
'CANCEL'.RetireeJalimentoy Jaasaderade[homo.
o La horade[diavoiver_adesplegarseene[
indicadorvisual.
Notas Sebre Asado a [a ParriHa:
o Paramejoresresultadoscuandoasea laparriIIa,useuna
asaderadise_adaparaasara [aparriila.
o Los tiemposde asara [aparriIIaaumentar_ny el doradoser_
m_scIaros[se instalaelelectrodomesticoen un circuito de
208w_Itios.
o 'Hi' se usapara [amayoffade [osasadosa [a parriIla.Use'LO
broil' cuandoasea lapardIIaaIimentosque necesitancocci6n
proiongada. Latemperaturainferiorpermiteque e[aIimento
secocine hastaquedarbien asadosindorarsedemasiado.
o Los tiemposde asadoa laparriIIapuedenserm_s[argos
cuandoseseIeccionalatemperaturam_sbajadeasara la
parri[la.
o Parasugerenciasytemperaturasadiciona[essobreasara [a
parr[Ha,consu[tee[ fo[[eto"LaCocinaF_ci["+
Tab[a de Asar a [a Parr[Ha
POS[CiON DE
ALIMENTOS
Came de Res
Biftec, 2,5 cm 0"]
Hamburguesas,1,9cm (3/4"] degrosor
Came de Cerdo
Tocino
Chuietas,2,5cm [1"]
Jam6n- Rebanadasprecocidas,1,3cm [1/2"] de grosor
Came de Ave
Presasdepo[[o 3 o 4 Bienasado
[V[aHSCOS
B[stecsdepescado,con mantequi[[a,2,5cm [1"]de grosor
Filetesdepescado
Laposici6nde [aparri[[asuperiores#5
Nora: Estatab[aes solo una gu[a+Lostiempospuedenvariarcon e[%0 de a[imentoqueseest4cocinando+
4 A medioasar 15- 18m[nutos
4 Bienasado 19- 23mJnutos
4 Bienasado 15- 18mJnutos
4
4
4
4
4
TERM[NO DE T[EMPO TOTAL DE
COCCWON COCC[ON (M[NUTOS)
Bienasado
Bienasado
Tibio
Desmenuzado
Desmenuzado
8 - 10minutos
22- 26minutos
8 - 12minutos
'LO Broil'
28- 38minutos
10- 15mJnutos
8 - 12minutos
65
Page 67

Respiradero de[ Homo
Cuandoemhomoest6 en uso, em_reacercademrespiraderopuede
sentirse caiiente bastante pot causa quemaraso Nunca bioquee
maabe_urademrespiradero.
RESPIRADEROOELHORNO
o Asegt_resede que e! platillo protector en la
ubicaci6ndelresp[raderotengaunagujeroen el
centro=Nocubraelplatilloprotectorcon papelde ABERTURADEL
ahminio= DELHORNO
'Oven Light' (Luz del Homo) (_Optimae[ interruptorde la hz de[ hornoen el panelde
control paraencendery apagarla hz del homo.
Panel inferior de[ Homo ug.
Protejae[ panelinferiordel homo contmderrames,especiaImente
azucaradoso acidicos,puespuedendescoiorarla porcelana
esmaitad&Useel utens[l[odetamaSocorrectoa fin deevitar
derrames.No comoqueutensiiios ni papeide amuminio
directamente en maparte inferiordemhomo°
RESPIRADERO
Oven
Para reinstamar [a parrimma:
1= Co[oque[aparriila ene[soportede [aparrilia enel homo.
2= hlcIine[evementehaciaarribael extremodeIantero;desIice[a
parriIIahaciaatr_shastaque pasesobrelostopesde enganche=
3= Baieelfrente de [aparriilay desIiceIahaciaadentrode[homo.
Nocubrauna parrimmacompmetacon papemdeamuminioni comoque
papemde amuminioen maparteinferiordemhomo. Se afectar_n mos
resumtadosdemhomeado y se paede da_ar maparte inferior dem
homo.
Posiciones de [a Parri[[a
PARR&LA5 ([aposiciOn --
m_saita}:Se usapara
tostarpan o asara [a
parriiIaaiimentos --'
deigadosno grasosos= -- _
PARR&LA4: Seusa para ___
la mayoriade losasadosa
[aparri[[a= --_
PARR[LLA3: Seusapara
hornearaiimentosen una
bandeiade hornearga[[etasoun moldepara ro[[ode merme[ada,
parapasteIes,paysdefrutaso a[imentosconge[ados.
PARRiLLA 2: Seusaparaasarcortesde camepequeffos,caceroias,
hornearbaguetasde pan,pasteIesenmoIdesdetubo o flanes.
PARRiLLA 1: Seusaparaasar pedazosgrandesde camey came
de ave,paysconge[ados,sufl6sde postreo pastelesesponiosos.
--3
HORNEADOCONVAR[AS PARRILLAS:
Parriffas de[ Homo
Dos parriiias:Use[asposiciones2y 4, o 1y4=
Media ParrH[a
Sed[spone,comoaccesor[o,de unamedia
parri[[aparaaumentar[a capac[dadde[
homo. Seinsta[aen [asecc[Onsuperior
_ No use e[ homo paraguardaralimentosn! utens[[!os, de[[ado[zqu[erdodeihornoy ofrece
espac[oparaunaplatode verduras
E[hornot[ene dos parri[[as=Todas[asparr[Hast[enenun bordecon
tope de enganche.
Para retirar [a parrimma:
1. Tirede [aparriIIaderechohacia
afuerahastaquesedetengaen
[aposiciOnde[tope de
enganche.
2. Levantee[frente de[aparriiiay
tire de [a parrii[a haciaafuera.
cuandosehacolocadouna asadera
grandeen [aparri[[ainferior. POngaseen
contactoconsudistribuidor paraobtener
e[accesorio"HALFF@,CK"o parasoIicitar, --
[lamea[1-877-232-6771.
66
Page 68

Homo Automimpiante
(modelos selectos)
Nora: Parala limpiezamanual,ver p%ina 70.
Esnormal que laspLezasde[homosecalientenduranteel ciclc,
de autol_mpLeza
Afin deev+taruna lesiOnpersonaly dai_oa[apuertadel horno.
no trate de abrir [apuerEacuandoest6desplegadaiapaiabra
'LOCK" (Bloqueada).
Evitetocar la cub_erta,la puerta,laventanao el _readel
resp+rademdel homoduranteun clclodeHmp+eza.
No uselimpiadoresde hornos comercialesene_acabadodel
homo ni a+rededorde ningunapiezadel homopuespuede
da_are+acabadoo lasp+ezas.
Elcic[ode autolimpiezausatemperaturassuperioresa [as
temperaturasnormalesde cocci6npara limpiarautom_ticamenteel
interiordel horno.Nofuerce Iapuertadethorno nila palancade
bloqueoparaabrirla.Estopuedecausarexposici6nalas
temperaturasaltasy constituir un desgode quemadurasnormales
para limpiarautom_ticamentetodoel interiordel homo.
Esnormalque ocurranIlamaradas,humoo llamasdurantela limpieza
si el homo est_demasiadosucio.Esmejor IimpiareIhomo
regularmenteenvezde esperarhastaquese hayaacumulado
demasiadasuciedad.
Duranteel procesode Iimpieza,la cocinadebeestarbien ventilada
para eliminarlosolores normalesasociadosconla limpieza.
Antes de Autol+mpieza
1. ApagueIaIuzde! homoantesde la Iimpieza.La luz del horno
puedefundirse duranteel ciclode Iimpieza.
2. Retirelaasadera,todoslosutensiliosy las parrilIasdel horno.Las
parrillasde! homo se descolorar_ny no sedeslizar_nf_cilmente
despu6sde unciclo de autolimpiezas+nosonretiradasdeIhomo.
3. LimpieeI marcodel homo,el marcode Iapuerta,el _reafuerade
lajunta de lapuertay alrededorde laaberturaen Iajunta de la
puerta,con un agentede Iimpiezanoabrasivotal como'Bon
Ami'+o con detergentey agua.El
procesode autolimpiezano Iimpia
estasdreas. EIIasdebenser limpiadas
paraevitarque Iasuciedadsehornee
duranteel ciclo de autolimpieza.(La
junta esel sello alrededordela puerta
y ventanadel horno.)
4. ParaevitardaSonoIimpie ni frote Ia
junta situadaalrededorde lapuertadeÁhomo.Lajunta est_
diseSadaparasellar herm6ticamenteel calor durante el ciclo de
[impieza.
Limpieel excesode grasao derramesdela parteinferior deI
homo. Estoevita humoexcesivoo Ilamaradasduranteel ciclo de
limpieza.
LimpieIosderramesazucaradoso_cidostalescomo papadulce
(camote),tomatesosalsasa basede leche.Laporcelana
esmaltadaesresistenteal _cidopero noa pruebade _cidos. Et
acabadode porcelanapuededescolorarsesilosderrames_cidos
o azucaradosnoson limpiadosantesde un ciclode autolimpieza.
Para programar 'Self-Clean' (Autolimpieza):
Nora: Latemperaturadel hornodebeserinferiora 205°C
(400° F}para programarun ciclode Iimpieza.
].
Cierrela puertadel horno.
2.
MuevaIapalancade bloqueode la puertaa laderechaa la
posiciOnbloqueada.
OprimaIa tecla 'Clean'. Clean
+ 'CLEAN'destellaenel indicadorvisual.
SiIapuertano secierra,seoir_n se_alessonorasy lapalabra
'DOOR'sedespiegar_enel indicadorvisual Si Iapuertano se
cierradentrode45 segundos,laoperaciOnde autolimpiezaser_
canceladay elindicador volver_a desplegarla horadel dia.
4. Optimala teclaA o V.
• Sedespliega'CL-M (SuciedadMediana,
3 horas}.
5. OprimaIatecla A o T paradesplazarlos
ajustesde autolimpieza.
'CL-H'(SuciedadIntensa,4horas]
'CL-M' (SuciedadMediana,3 horas)
'CL-L' (SuciedadLeve,2 horas)
AIseleccionarelnivelde suciedadde! homose programa
autom_ticamenteeltiempode Iimpieza.
6. Despu6sde cuatrosegundos,el homocomenzar_a Iimpiar.
• EItiempode limpiezacomenzar_lacuenta regresivaen el
indicador.
+ 'LOCK'sedesplegar_enel indicadorvisual.
+ 'CLEAN'sedesplegar_en el indicadorvisual.
Para diferir un ciclo de antolimpieza:
1. Optimala tecla 'Delay'.
+ 'DELAY'destetla.
'00:00'sedesplegardenel indicadorvisual
cent°
+Loshombresde losproductosson marcasregistradasde susrespectivosfabricantes.
67
Page 69

!
2+ Oprima[atecia A o V paraprogramar [acantidad
detiempo queusted deseadifedr e[cicio+El
tiempo diferido puedeserprogramadode 10
minutos(00:10)a11horas,59 minutos(11:59).
3. OprimaIatec[a'Clean'.
• 'CLEAN'deste[tar_i.
4. OprJma[atecia ,A o T.
+ 'CL-M' [SuciedadMediana,3 horas)se
desptiegaenet ind+cador.
5. Opr+ma[atecIaA o V paradesplazartosajustes
deautoiimpieza.
'CL-H'[SuciedadHntensa,4 horas)
'CL-M' (SuciedadMediana,3horas]
'CL-L' (SuciedadLeve,2 horas]
At seteccionaretnivetde suciedadde!homo se programa
autom_ticamenteel tiempo de limpieza.
6,
Despu6sdecuatrosegundos,'CLEAN','DELAY'y 'LOCK'se
desplegarSnen el indicadorvisualparaindicarque el homo est_
programadoparaun ciclo de [impiezadiferido+Eltiempodlferido
tambiensedespliegaen elindlcadorvisual+
O[earl
v
S[ emhomo ya ha side programado para un cicmode
iimpieza y usted desea programar un tiempo
diferide:
1+ Oprima[atecia 'Delay'+ Delay
+ 'DELAY'deste[ia+
+ '00:00'se desplegar_ene[indicadorvisual
2+ Oprima[atecia A o V paraprogramar lacantidadde tiempo
queusteddeseadiferir e[ ciclo+
Despu6sdecaatrosegundos,'CLEAN','DELAY'y 'LOCK'se
desplegar_nen e+indicadorvisualparaindicarque elhorno est_
programadoparaun ciclo de limpiezadifeddo+Eltiempodiferido
tambi_nsedespliegaen elindicadorvisual.
Cuando comienza el tide de autoiimpieza:
+ 'DELAY'seapagar&
• Eltiempode [[mpiezasedesplegar_ene[indicadorvisual
Para canceiar ei cicio de autoiimpieza:
Oprima[a tec[a 'CANCEL'.
+ Elindicadorvisualquedaen blanco+
• Todas[asfuncionesson canceladas+
Durante e_ Cido de Auto_impieza
Cuandoaparece'LOCK'eneI indicador,Ia puertano sepuedeabrir+
Paraevitardaiio a la puerta,nofuerce [apuertapara abdrlacuando
[apalabra'LOCK'est_desplegadaenel indicadorvisual+
Humo y OJores
Ustedpuedevet humoy sentirolor Iasprimerasvecesque el homo
eslimpiado+Estoesnormaly disminuir_conel tiempo+
Tambienpuedehaberhumo si e[homo est_demasiadosucio o sise
ha dejadounaasaderaenel homo+
Sonidos
A medidaque el hornosecalienta,ustedpuedeoir sonidosde
piezasmet_licasquese expandenycontraen+Estoes normaly no
dahar_el homo+
Despu6s de_ Cido de Auto_impieza
Aproximadamenteunahora despu6sdeIfin del ciclode limpieza,
'LOCK'desaparecer& Lapuertaahorapuedeset abierta+Mueva[a
palancade bloqueode [apuerta a la izquierdaparadesbioquearia+
Amgunasuciedad puede quedar como una mereceniza gris ripe
pomvo.Retirelacon un paho hhmedo+SiIa sueiedadpermanece
despuesde Iimpiarla,significaque e!ciclode Iimpiezano rueIo
saficientementelargo. Lasuciedadser_eliminadaduranteel
proximocic[ode limpieza+
Si masparriHas demhomo fueron dejadas enel homo y no se
deamizansuavemente despu6s de un c+cmode mimpieza,[impie
[asparrillasy lossoportesde lasparr+Hascon una pequefiacantidad
de acekevegeta[para hacerlasdeslizarconm_sfacilidad+
Pueden aparecer m+neasdemgadasen maporcemanaampasar pot
c+cmosde camentamientoyenfriamiento. Estoes normaly no
afectar_eI rendimiento+
Una descolomci6n bla_ca pue_e aparecer despuSs _el title
de mimpiezasi mosamime_tos_cidos o azucarados _o fuero_
re+rap+ado+a_tes demcicmodeautomimpieza.EstadescoloraciOnes
normaly no afectar_el rend+miento+
+ Si sedejaabiertala puertadel homo,Ia palabra'DOOR'
destellar_enel indicadorvisualy se escuchar_una serial
sonorahastaque lapuertaseacerraday latecla'Clean'sea
oprimidanuevamente.
+ Lapuerta del homosedaiiar_ sise fuerzaparaabrirla cuando
la palabra'LOCK'contin0adesplegadaen el indicador.
• Lahora deldia se desp[iegaenel [ndicadorvisual
68
Page 70

Procedi ientos de Limpieza
fr_as antes de tocarie o limpiarlo. De este medQse evitar_n da_os y
posibles quemaduras, _ Los hombresdelosprod_Jctossonmarcas
, pars evitarmanchasodec0!oraci6nIimp!eel homodespu6Sde cadsuse.
• Siseretiraalguna pieza,aseg6resedeque sea reinstaladaen forrnacorrecta: EEUU=o 1-800-688-8408en Canad&
P_EZA PROCED_M_ENTO DE LI_,_P_EZA
registradasdesusrespectivosfabricantes=
_ Parshacer pedidos,Ilameal 1-877-232-6771en
Protector Trasere
y Cabier!.a -
Porcelana
Esmaitada
Bandeja de Asar
e Inselto
Area dei Reiojy
de masTeeias
de Control
Periiiasde
Control
Pmatimmos
Pretectores,
Percelana
(medelos
selectos)
Laporcelanaesmaltadaesvidriofundidoen metaly puedeagrietalseopicarsesinose usacorrectamente.Esresistentea
los_cidos,noapruebade_cidos.Todoslosderrames,especialmentelosderramesazucaradosoaddicosdebenset limpiados
inmediatamenteconunpatioseco.
° Cuandoseenfr[e,laveconaguajabonosa,enjuaguey seque.
° Nurlcalimpieu[lasuperficietibia ocalienteconun paiiohOmedo.Estopuedecausaragrietamientoo picaduras.
• Nuncauselimpiadoresdehomo,agentesde limpiezaabrasivoso c_usticosenel acabadoexteriorde laestufa.
Nunca cubra el insetto cell pape/ de a/umirdeplies esto evita que /agFasaseeseurm a & bandejainferior.
• Coloqueunpahoenjabonadosobreelinsertoy labandeja;dejeremojarpars soltarlasuciedad=
• Laveenaguajabonosatibia.Useunaesponjadefregarparsquitarlasuciedadpersistente.
• La bandejade asaryel insertopuedensetlavadosenel lavavajillas.
° Paraactivar'ControlLock'[BIoqueodeloscontroles}paralalimpieza,ver pdgina60.
° Limpieconun pa_ohOmedoyseque.Nouseagentesdelimpiezaabrasivospuespuedenrayarlasuperficie.
° SepuedenusarlimpiavidriossiserocFanenel paiioprimero.NO rode directamente ell e/palleL
° Retirelasperillascuandoest_nenla posiciOn'OFF'tir_ndolashaciaadelante.
° Lave,enjuagueyseque.Nouseagentesdelimpiezaabrasivospuespuedenrayarlasuperficie.
° Enciendacadsquernadorparsasegurarsedequelasperillashayansidocorrectarnentereinstaladas.
Laporcelanapuededescolorarseo adquirirfisurassuperficialessisesobrecalienta.Estoesnormaly no afectardel
rendimientodeh cocciOn.
• Ouandoest_nfrfos,lavedespu_sde cadsuso,enjuaguey sequepars evitarmanchasy deco!oraciOn.Puedenlavarseen
e!lavavajillas.
• Parslimpiarsuciedadexcesiva,remojeenaguacalienteconjabOn,luegouse un limpiadorabrasivosuavetal comoSoft
Scrub_y unaesponjadefregar depldstico.
° Parasuciedadquemada,retireel phtillo delaestufa,co!OquelosobreperiOdicosy rode cuidadosamentecon limpiador
de homo comerciaL(Norode lassuperficiesadyacentes.}Ooloqueenunabolsade pl_isticoydeje remojardurante
variashoras.Useguantesde gomaparssacarlodela bolsa,lave,enjuagueyseque.
Pmatimmos
Protectores,
cromo
(modelos
selectos}
Ventana y
Puerla dem
Homo=Vidrio
(medemos
selectos}
• Ouandoest_nfrfos,lavedespu6sde cadauso,enjuaguey sequepars evitarmanchasy decoloraciOn.
• Paralimpiarsuciedadexcesiva,remojeen aguacalienteconjabOn,luegouseun limpiadorabrasivosuavetalcomoSoft
Scrub* yuna esponjadefregarde pl_stico. No useagentesdelimpiezaabrasivos.
• Eviteusa!cantidadesexcesivasde aguapuespuedeescurrirsedebajoodetrdsdelvidriocausandomanchas=
• LaveconaguayjabOn. Enjuaguecon agualimpiayseque. Ellimpiadordevidriopuedeusarsesiserods en unpaiio
primero.
° Nousematerialesabrasivostalescomoesponjasderestregar,limpiadoresen polvoo esponjasdelanadeaceropues
puedenrayarelvidrio.
69
Page 71
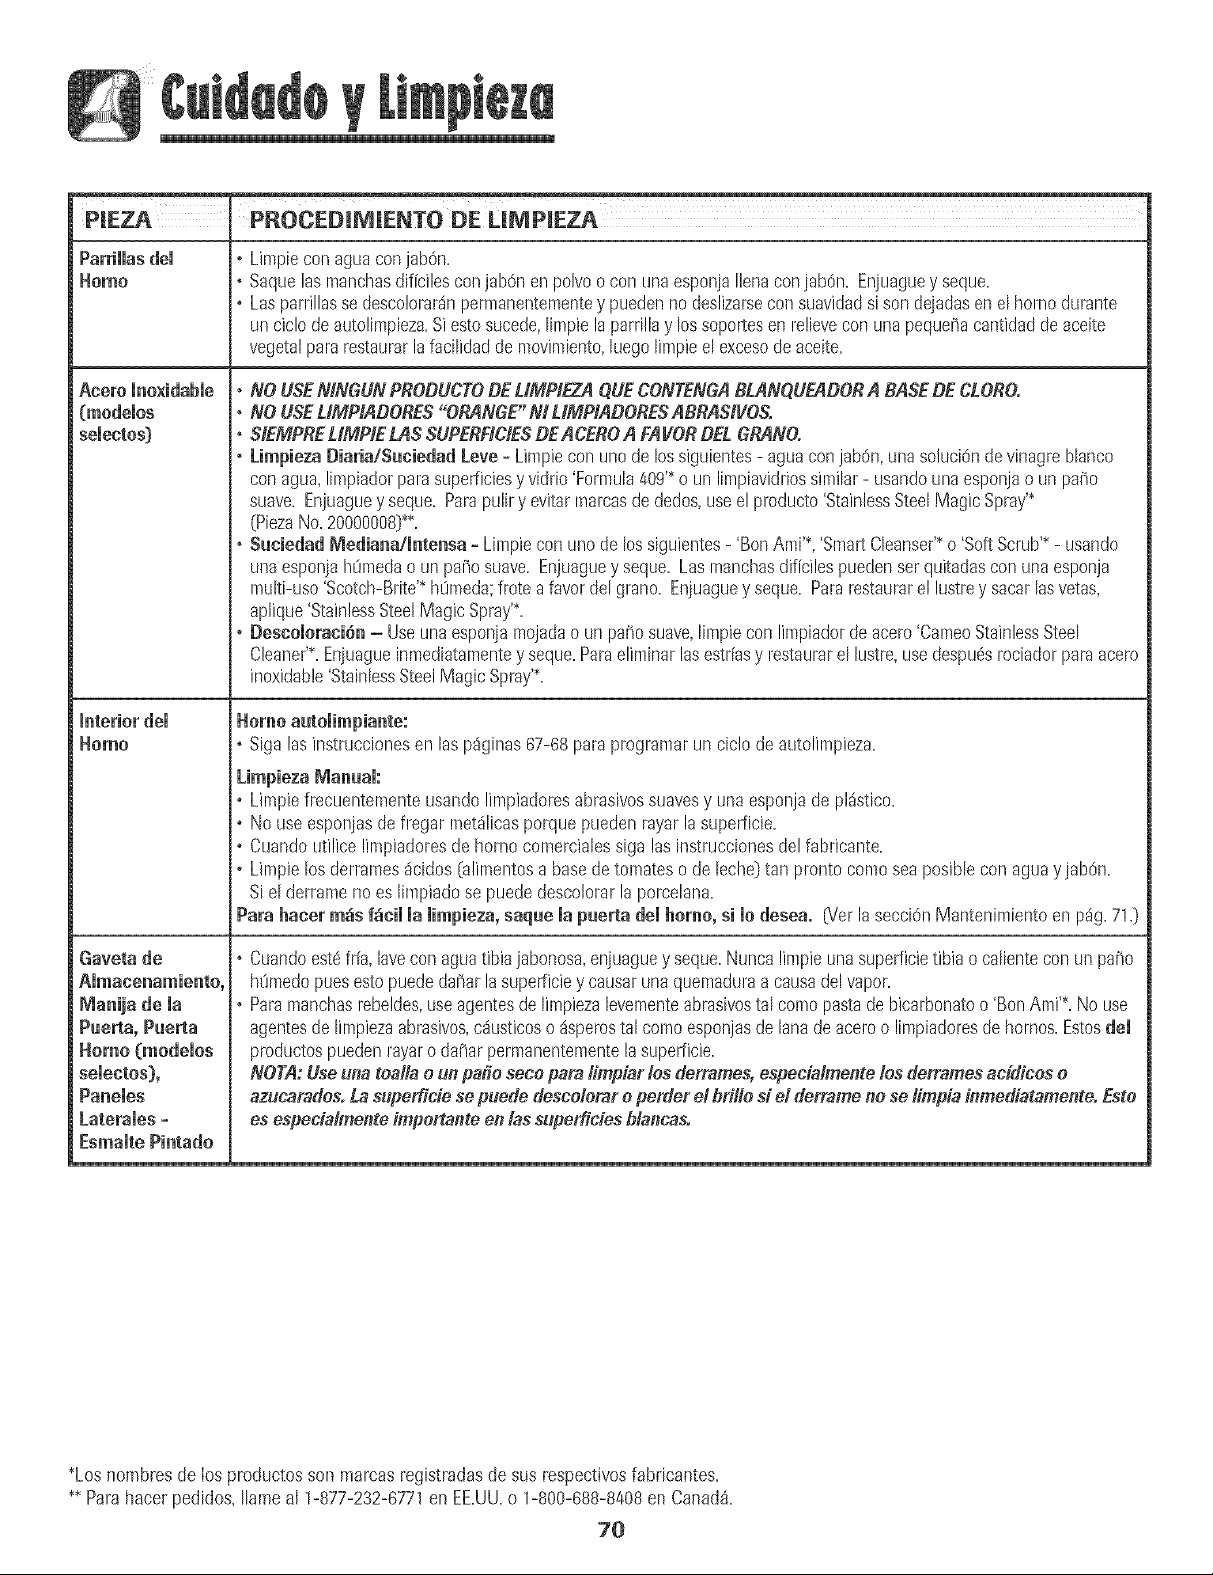
P_EZA PROCED_MIENTO DE UMP_EZA
Parriiiasdei • LJmpiecon aguaconjab6n.
Homo ,, Saquelasmanchasdiffcilesconjab6nenpolvoocon unaesponjaliensconjabOn.Enjuaguey seque.
,° Lasparrillassedesco!orar_npermanenternenteypuedenno deslizarseconsuavidadsi sondejadasenel homodurante
unciclode autolimpieza.Siestosucede,limpielaparrillaylossoportesen relieveconunapequeflacantidaddeaceite
vegetalparsrestaurarlafacilidadde movimiento,luegolimpieelexcesode aceite.
Acero mno×idabme
(modemos
semectos)
Gaveta de
AJmacenamiento,
Manija de la
Puerta, Puerta
Homo (modeios
selectos},
Paneles
LateraJes -
EsmaJte Pintado
* NO USENiNGONPRODUCTODELIMPIEZAQUECONTENGABLANQUEADOBA BASEDECLOBO.
,, NO USEUMPIADORES"ORANGE"NILIMPIADOBESABBASIVOS.
,* SIEMPREMMPIELASSUPERFICIESDEACEROAFAVOROELGRANO.
,, Limpieza Diaria/Suciedad Leve- Limpieconunode lossiguientes- aguaconjabOn,unasohciOndevinagrebhnco
conagua,limpiadorparasuperficiesyvidrio'Formula409'*oun limpiavidriossimihr - usandounaesponjaoun patio
suave.Enjuagueyseque.Parspuliry evitarmarcasdededos,useelproducto'StainlessSteelMagicSpray'*
(PiezaNo.20000008}**.
,, Suciedad Mediana/intensa =Limpieconuric delossiguientes- 'BonAmi'*,'SmartCleanser'*o 'SoftScrub'*- usando
unaesponjahOmedao un patiosuave.Enjuagueyseque.Lasmanchasdificilespuedenserquitadasconunaesponja
multi-uso'Scotch-Brite'*htimeda;froteafavordel grano.Enjuaguey seque.Parsrestaurarel lustrey sacarlasvetas,
aplique'StainlessSteelMagicSpray'*.
,, Descoieraci6n - Useunaesponjamojadaoun patiosuave,limpiecon limpiadorde acero'CameoStainlessSteel
Cleaner'*.Enjuagueinmediatamentey seque.Parseliminarlasestr[asy restaurarel lustre,usedespu_srociadorparsacero
inoxidable'StainlessSteelMagicSpray'*.
HerneautoJimpiante:
,, Siga lasinstmccionesenlasp_ginas67-68parsprogramaruncic!ode autolimpieza.
Limpieza lVianual:
,, Lhnpiefrecuentementeusandolimpiadoresabrasivossuavesy unaesponjadepl_stico=
,, Nouseesponjasde fregar met_licasporquepuedenrayarlasuperficie.
,, Cuandoutilicelimpiadoresde homocomercialessiga las instruccionesdelfabricante.
,, Limpielosderrames_cidos{alimentosabasedetomateso deleche}tan prontocomoseaposibleconaguayjabOn.
Si el derramenoeslimpiadosepuededescolorarlaporcelana.
Parshater m_s f_cil la limpieza,saque lapue_!.adel berne,si ledesea. 6ier lasecci('_nMantenimientoenpdg.71.}
Cuandoest6fria,laveconaguatibiajabonosa,enjuaguey seque.Nuncalimpieunasuperficietibiao calienteconunpatio
hOmedopuesestopuededaiiarlasuperficieycausarunaquemaduraacausadelvapor.
i°
Parsmanchasrebeldes,useagentesdelimpiezalevementeabrasivostal comopastadebicarbonatoo 'BonAmi'*.No use
agentesdelimpiezaabrasivos,c_usticoso_sperostal comoesponjasde lanadeaceroo limpiadoresdehornos.Estosdel
productospuedenrayaro daflarpermanentementelasuperficie.
NOTA:Useuna toal/a our! parle sece para /impiarlos derrame& especiatmente los derramesaddices e
azucaradesoLa superfide se puede descelerar operder el brille si el derrame no se /impiainmediatamente.Este
es especialme_lteimpertartte ell lassuperficies b/ar_cas.
*Loshombresde losproductosson mamasregistradasdesus respectivosfabricantes.
** Parshacerpedidos,Ilameai 1-877-232-6771en EE.UU.o 1-800-688-8408en Canada.
70
Page 72

Puerta del Homo
• No eoJoque peso exceslvo mse pare en Japuerta del horno.
Esto podria hacer volcar la estufa, quebrar [a puerto a lesiona_
al usuano.
o No mteh[eaorir ocerrarla puertani hacerfuncionarel homo
hastaque lapuertono hasidedebidamentereempJazada.
• Nuncacoloquelosdodosentre la bmagray el marcouemmero
del hornc Los brazesde articulaci6nson montadosa rosette.
SJse golpeaaccLdentaJmentelabisagrase cerrarai
bruscamentecontrael marcodel homoy puede lesionarsus
dodos.
Ventana del Homo
Para proteger la ventana de la puerto del homo:
1. Nouseagentesde limpiezaabrasivestalescomaesponjasde
restregarde lanade aceroo limpiadoresenpolvopuespueden
rayarelvidrio.
2. No golpeeelvidrio con alias,sartenes,muebles,juguetesu otros
objetos.
3. No cierre Iapuerta deI homo hastaque losparriilasdel hornono
est6nen suhgar.
AIgolpear,rayar,hacervibrar oesforzaretvidrio puede debilitarsu
estructuracausandoun mayorriesgode roturaen unafecha
posterior.
Para sacsr:
1.Cuandoest6if[a, abraia puertode! bornehastaia posiciOntope
de asara laparrilla [abiertaaproximadamente10cm (cuatro
pulgadas}].
2.Sujetela puertadecoda lade. No use [a _:x:_£_ ....
manijade ia puerto para levantarla, ll_//----///
3.Levanteuniformementehastaque iapuerta
sesalgade losbrazesde articulaci6n.
Para volver a colocar:
I.Sujete la puerto de coda lado.
2. AJineelas ranuras de la puerta con los brazes de articulaciOn de la
estufa.
3,Deslicela puertohacialosbrazesde articulacFmhastaqueest6
completamenteasentadaen Iasbisagras, Empujehaciaabajolos
esquinassuperJoresde lapuertoparaasentariacompletamenteen
lasbisagras, Lapuertono debequedartorcida,
%sponjosa"cuandosecierra, Estoesnormaly disminuir4con el
[ Nora: La puertodei borneen unaestufanuevapuedesentirse
usa.
Luz del Homo
, Desconecte laenerg[aa la estufaantesde reemplazare!face.
; Use un toma0!!asSeco para evitar P0Sibledafio aSusman0s
Cuando est6reemplazandoe!f0c0.
; Asegdresede queel face est6fifo aBteSdetecailol
; Notoqueei face CaiienteConun patio hOmedopuesestopuede
quebrare!face,
Para reemplazar el foco del homo:
1.Cuandoel hornoest6if[o, sujetela tapa de la bombilIaensuhgar,
luego desliceel ret6n de alambrefuerade [acubierta. NOTA: La
cubierta de la bombilla secaerd si no es
sujetaensu[ugarcuandoest4sacando CL,IBIERTADEL
et ret6nde alambre, f:oco
2.Saque [a cubierta del face y e[
face.
3.Coloque un face de 40 watts
para electrodom6sticos. \
4.Vuelvaacolocarlacubiertadela RETEAIDEALAMBRE
bombilIayaseg0relaconelret6n
de alambre.
5.Vuelvaa enchufarla estufa.Vuelvaa colocarla heracorrecta.
71
Page 73

Tomillos Niveladeres
Verif!queque e[soporteantivueJcoest_asegurandoa[piso uno
delost0rrfi!!0s[!ivelado_estraseros. Estesoporteev[taque [a
estufa sevueJqueaccidentalmente_
Para voJver a coJooar:
1= hlsertelos extremosde lascorrederasde la gavetaenJosrJeles
de la estufa=
2= LevanteIapartedetanterade Ia gavetay suavementeempOjela
hastaJaprimeraposiciOndetope.
3. LevanteIagavetanuevamentey empOjelahastaque quede
completamentecerrada.
La estufadebeset niveJadacuandose instala=Si Ia II]]F'q
estufano est4nivelada,gire lostorniHosniveladores I[[I q
de pI_sticoubicadosen cadaesquinade la estufa ][_
hastaquequedenivelada. _,_
,_ . - ;;000%" -
_,_ ANTIVUELCO
TORNILLO NIVELADOR
Gaveta de Almacenamiento
Nogaardepmductos depapelo de pJ4stico,alJmen[osn
materialesinfiamablesen _s[aga_eta.Lagave[apuede
cale"ltarsedemasiadoparaestosarticuloscuandoseestausando
e!horno.
La gavetade almacenamientopuedeset retiradaparaque usted
puedalimpiardebaiode la estufa=
Para sacar:
1=Vade lagavetaydesJicelahaciaafuerahastaJaprimeraposicF_n
detope.
2= Levantela partedelanterade la gaveta=
3= TirelahastaIasegundaposJciOndetope.
4= SujeteJosladosy JevanteJagavetapararet[rarla=
Tomaeorriente para
EJeetrodo stieos Peque os
(Modelos Canadiensessolamente])
Eltomacorrienteparaelectrodom@sticospequeiiosest4ubicadoen
el Iado inferior izquierdodel protectortrasero.Aseg/iresede que los
cordoneseI6ctricosno descansensobre los
elementossuperioresocercade elIos. Siel
elementosuperiorest4encendido,el cord6n
yel eJectrodom6sticopuedendaiiarse.
EldisyuntordeItomacorrientepara
electrodom6sticospequeBospuede
dispararsesi el artefactopequeiio
enchufadoen 61esde m4sde 10amps.
Parareporterel disyuntor,opnmae!
interruptorsituadoen elborde inferiordel
protectortrasero.
..............................................s ................................
'DISYUNTOR'
72
Page 74

PROBLEMA SOLUC_GN
ii ii ii ii ii ii ii ii ii ii ii ii ii ii ii ii ii ii ii
Para la mayor_ade mosproblemas, • Revisesi IoscontrolesdeJhomoest4ndebidamenteajustados.
verifiqueprimero Josiguienteo • Verifiquesiel enchufeest_firmementeinsertadoenel tomacorriente.
• Verifiqueo vuelvaa reponereldisyuntor.Verifiqueo reemplaceelfusible.
• Verifiqueel suministrode energiaelectrica.
Todala estafa opar!.ede ella no • Revisesila superficiey/oloscontrolesdelhomoest4ndebidamenteaiustados.Vet p4ginas
funcionao 55y 66.
• Verifiquesi lapuertadel homoseha desbloqueadodespu6sdelcicJodeautolimpieza.Ver
p4gina68.
• Revisesiel homoest4ajustadoparahomeadodiferidoo programadelimpieza.Verp_ginas62
y 68.
• Verifiquesi 'Control Lock'(Bloqueode Control)est_activado.Vetp4g.60.
• Verifiquesi el controlest_en ModeSab4tico.Verp4g.64.
F:Ireloj, las palabras en el indicador • Elhornopuedeestarprogramadoparaunafunci6n de'Cook& Hold'o unafunci6ndiferida.
visualy/o las lacesfuncionan pete • PuedeestaractJvadalacaracter[sticade bloqueodeloscontroiesdelhomo.(Verp4g.60.)
el homo no se caiienta.
Los resultados del homeado no • Aseg0resede queel respJraderodel hornonoestebtoqueado.Vetp4gina66parala ubicaciOn.
son come se esperaban o son • Verifiqueparaasegurarsede queIaestufaest4nivelada.
diferentes a losdemhomo anterior. • Lastemperaturasa menudovar[anentreun homonuevoy line antigua. A medidaquepasa
eltiempo,latemperaturadel hornocambiaypuedehacersem_scalienteo m4sfr[a. Ver
p_gina64 paralasinstruccionescomaajustarIatemperaturadeIhomo (modelosselectos).
NOTA:NoserecomiendaajustarJatemperaturasihatenidoproblemasconsolounaodosrecetas.
• Consulteelfolleto"LaCocinaF4cil"paramayorinformaciOnsobrelosutensiJiosde hornear.
Los aiimentos no se asan a ia • VerifiqueIasposJcionesde lasparriiJasdelhomo.Elalimentopuedeestarmuycercadel
parrimmaenforma debida o sale elemento.
demasiado humo° • Elelementode asar nofue precalentado.
• Elpapelde ahmhio se us6de maneraincorrecta. Nuncaforre elinsertodel asadorconpapel
deaiuminio.
• LapuertadeIhomoestabacerradamientrasseasabaa la parrilla. Deje lapuertaabiertaen la
primeraposici6n (alrededorde 10cm [4 puJgadas]].
• Recorteelexcesodegrasade la cameantesde ponerlaaasara laparrilla.
• Se us0unaasaderasucia.
• Elvoltaiedel hogarpuedeser bale.
Emhomo no se automimpia • Verifiqueparaasegurarsede queel ciclono eat8aiustadoparaun comienzodiferido.Ver
(modelos selectos), pdgina68=
• VerJfiquesi lapuertaest4cerrada.
• Verifiquesi e! controlest4en ModeSab4tico.Verp4g.64.
• Elbornepuedeestara m_sde 205°C (400°F). Latemperaturadel hornodebeserinferior a
205°C (400°F)paraprogramarunciclo delimpieza.
El homo no se limpi6 enforma • Puedeque seanecesariountiempode [impiezam4slargo.
debida (modeios seiectos). • Losderrarnesexcesivos,especiaJmentedeafimentosazucaradosy/o 4cidosnofueron Jimpiados
antesdelciclo deautofimpieza.
La paerta demborne no se • Elinteriordel homotodav[aest_caliente. Dejequepaseaproximadamenteunaheraparaque
desbloqaea despa_s del ciclo el hornose enfr[eantesdequesecompleteunciclo deautolimpieza.Lapuertapuedeset
de automimpieza[modemossemectos)o abiertacuandodesaparezcaIapalabra'LOCK'deJindicadorvisual.
• Elcontroly la puertapuedenestarbloqueadas.Verp_ig.60.
73
Page 75

PROSLEMA SOLUC_ON
$e junta humedad en maventana , Estoesnormalcuandose cocinanalimentosconalto contenidode humedad.
demhomo o samevapor per , Seus0 humedadexcesJvacuandose limpi6laventana.
emrespiraderodemhomo.
Hay un omorfuerte o humomere ° Estoesnormalen unaestufa nuevaydesaparecer_despu6sde unos pocosuses.
euando se enciende emhomo, AI iniciar un ciclo deautolimpiezase "quemar4n"losoloresm4s r4pidamente.
o Siseenciendeel ventihdor ayudar_aeliminarel humoy/o el clot.
o Haysuciedadexcesivadealimentosenelpanelinferiordelhomo. UseunciclodeautolimpJeza.
C6digosde Erreres ,
$e esnuchan ruidoso
No se escucbun sei_ales sonoras
y el indicador visual no se activa.
'$Ab' destemmay muegose
despmiega nontinuamenteo
'BAKE'o'LOCK'puedendestellarr4pidamenteenel indicador paraavisarleque hayun error
o un problema.Si'BAKE'o'LOCK'aparecenenelindicadorvisual,oprimaIa tecla'CANCEL'.
Si'BAKE'o'LOCK'continOandestellando,desconecteJaenerg[ael6ctricaalelectrodom@stico.
Espereunospocosminutesyvuelvaareconectarlaenerg[ael6ctrica.Sicontimiandestellando,
desconectelaenerg[ael6ctricadeIelectrodom6sticoyIlameal t6cnJcodesewJcioautodzado.
Siel borneest4demasiadosucio,puedenocurrirdemasiadasIlamaradasIocualresuJtar4en
un c6digodeerrorduranteIaIimpieza.Oprimalatecla'CANCEL'y dejequeel homose enfr[e
completamente,limpieeJexcesode suciedadyluegovuelvaa programarel ciclode JimpJeza.
Siel c6digode error reaparece,Ilamea un t6cnJcoautorizado.
° Elhornoemitevariessonidosbajos. Ustedpuedeoir losrelesdel hornocuandoseencienden
yseapagan.Estoes normal.
o A medidaqueel bornesecalJentayse enfria,ustedpuededr sonidosdepiezasmet41icasque
seexpandeny contraen. Estoes normaly no da_ar4su electrodomestico.
° Elhomo puedeestaren ModeSab_tico(modelosselectos}. Ver p4g.64.
o Elhomoest4enmodesab4tico.Paraanularel modesab_tico,optimay mantengaoprJmidala
tecla 'Clock'(Reloj}durantecincosegundos.
74
Page 76

I
Garant_aCompleta de Un A_e =Piezas
y Maria de Obra
Dumntew1 (1} al_odes@lafechaanginal de
compraal par menor:serepararao reemplazar4
gratuJtamentecuaJquierp_ezaquefa!Jedurantesu
usanormaleneJhogar.
Residentes Canadienses
Lasgarant[a_antedatescubrensolamen[e
aquelloselectrodomesticosinstaiadosen Canad4
quebansido certificadoso aprobadospar las
agenciasdeprueDascorrespondientespara
cumpJimientoconJaNormaNacionalde Canad4a
menosqueel electrodomdsticohayasidotra[doa
Canad4desdelosEEUU.debidoa un cammode
restdencla.
Garantia Limitada Fuera de los
Estados Unides y Canad_ - Piezas
SoJamente
Duranceun (lJ aFiodesdeJafechadecompra
originalal par menor,cualquierplezaquetaJle
duranteusanorma_en el hogarserareempJazaaa
o reparadagratultamen[een )que respec[aa La
pJezayel propietariodeber_pagartodoslosa_ros
cos[asinciuyendomariadeobra.kiJometraje_
mJJlaje,transporte,costadelvlajey costadel
dJagn0sttco,sifuesenecesario
Lasgarantfasespecfficasexpresadasamenormeme
sot;/asUMCAS garantfasprovistaspar d
fabricante.EstascJarantLas/eotorcjanderechos
legalesespecfficosy ustedpuedetenetadem4s
OtYOSdeYeCt?osquevaffande unestadoa otto,
Lo que No Cubten Estas Gatantm'as:
1. Situacionesy da_osresultantesde cuaJquierade lassiguienteseventualidades:
a. InstalaciOn,entregao mantenimientoinapropiados.
b. CualquierreparaciOn,modificaciOn,alteraciOno ajustenoautorJzadopar
el fabricanteo parun centrode servicioautorizado.
c. Mal usa,abuso,accidenteso usairrazonable.
d. CorrJenteel6ctrica,voltajeo suministroincorrecto.
e. ProgramaciOnincorrectade cualquierade loscontroles.
2. Lasgarantiasquedan nulassi losm_merosdeserieoriginaleshan side retirados,
alteradoso nosonf4cilmente legibles.
3. Focos.
4. Productoscompradosparausacomercialo industrial.
5. Elcostadel servJcioo Jlamadadeserviciopara:
a. Corregirerroresde instalaci6n.
b. Instruiral usuariosabreei usacorrectodeI artefacto.
c. Transportedei artefactoalestablecimientodeservicio.
6. LosdaBosconsecuenteso incidentalessufddospar cualquierpersonacoma
resultadode cualquier incumplimientode estasgarantias.Enalgunosestadosno
se permiteIaexclusi6no limitaciOnde losdaBosconsecuenteso incidentales,par
Jotanto laexcJusi6nanteriorpuedeque no seapJiqueensu caso.
Si Necesita Setvicio
o LlameaIdistribuidor dondecomp_ su electrodom_sticoo llamea Maytag
ServicessM,Servicioa los ClientesAmanaIlamandoal 1-800-843-0304en EE.UU.o
al 1-866-587-2002en Canad4.paraubicara unt6cnicoautodzado.
• Aseg0resedeconservarelcomprobantede compraparavenficarelestadode la
garant[a. ConsulteIasecci6nsabreIaGARANTIAparamayorinformaciOnsabreJas
responsabiiidadesde! propietariopararecibJrserviciobajoIagarant[a.
• Siel distribuidoro la compaB[ade serviciono puedenresolvere!problema,escriba
a Maytag ServicessM,Attn: CAIR_ Center,P.O.Box2370,Cleveland,TN37320-2370
o Ilameal l-8ee-g43-e308 en FEUUoo ai 1-866-587-2002 en Canad4.
• Lasgu[asdel usuario,manualesde servicioe informaci6nsabreJaspiezaspueden
solicRarsea Maytag ServicessM,Servicioa los ClientesAmana.
CuandoIlameo escribaacercade unprobJemade servJcio,perfavor incluyaJa
siguienteinformaciOn.
a.Su hombre,direcciOnyn_imerodeteldono;
b.NOmerodemodeloy nLimerode serJe;
c. NombreydirecciOndesu distribuidoro t6cnicode servicio;
d.Unadescripci6nclara delproblemaqueest4experimentando;
e.Comprobantedecompra0_ecibodecompra).
Form No B/11/04 Part No. 8113P476-60 _:;2004 Maytag Appliances Sales Co. Litho U.S.A
c
 Loading...