

Amana ADB2500AWB37, ADB2500AWB46, ADB2500AWQ40, ADB2500AWS37, ADB2500AWS46 Owner’s Manual
...Page 1
Dishwasher
Safety ............................... 1
What Can and
Cannot Be Washed ................... 2
Operating Tips ........................ 3
@
Loading .......................... 4-5
Dishwasher Use ..................... 6
Cycles, Options and Lights ......... 7-10
Care and Cleaning .................. 11
Troubleshooting ................. 12-14
Warranty and Service ............... 15
Guide d'utilisation et d'entretien ...... 16
Guia de Uso y Cuidado ............... 32
Part No. 6 920184 A www.amana.com _2005 Maytag Appliances Sales Co. Lithe U.S.A.
Page 2

What You Need to Know About
Safety Instructions
Warning and Important Safety Instructions appearing in this
manual are not meant to cover all possible conditions and
situations that may occur. Common sense, caution and care
must be exercised when installing, maintaining or operating
the dishwasher.
Always contact your manufacturer about problems or
conditions you do not understand.
Recognize Safety Symbols, Words, Labels
Important Safety Instructions
Products with a _ label have been listed with
Underwriter's Laboratories, Inc. - those with a CSA tag have
been listed with Canadian Standards Association.
Nevertheless, as with any other equipment using electricity
and moving parts, there is a potential hazard.
l. Read all instructions before using the dishwasher.
2. Use the dishwasher only for its intended function.
3. Disconnect electrical power to dishwasher before
attempting to service.
4. To avoid electrical shock hazard, the sides and back
must be enclosed and the front panels must be
attached before electrical power is applied to the
dishwasher. Refer to the installation instructions for
proper grounding procedures.
5. Connect to a properly rated, protected and sized
power supply circuit to avoid electrical overload.
6. Children should never be permitted to operate, or play
in, with, or around this dishwasher.
Z To reduce the risk of injurywhen loading itemsto be
washed, sharp or pointed items should be located with
the handles up. Also, loadsharp items sothey are not
likely to damage the door seal.
8. Do not touch the heating element on the bottom of
the tub during or at the completion of a cycle. It will
be hot.
9. Use only detergents and rinse additives designed for a
residential automatic dishwashen Never use soap,
laundry detergent, or hand washing detergent in your
dishwasher. Keep these products out of reach of
children.
10. Do not sit, stand on or abuse the door or dish racks of
the dishwasher.
l l. Under certain conditions, hydrogen gas may be
produced in a hot water system that has not been
used for two weeks or more. Hydrogen gas is
explosive. If the hot water system has not been used
for such a period, turn on all hot water faucets and let
the water flow from each for several nfinutes. This will
release any accumulated hydrogen gas. As the gas is
flammable, do not smoke or use an open flame during
this process.
12. Do not wash plastic items unless marked "dishwasher
safe" or the equivalent. For plastic items not so
marked, check the manufacturer's recommendations.
13. Do not tamperwith controls.
14. To prevent accidental child entrapment and
suffocation risks, always remove the door to the
washing compartment when removing an old
dishwasher from service or discarding it.
15. Use caution when unloading the dishwasher. Dishes
will be hot if unloaded shortly after a cycle has
completed.
16. Certified residential dishwashers are not intended for
licensed food establishments.
17 To avoid water, mold or mildew damage to your home,
inlet and drain hose connections should be checked
periodically for leaks.
Save These Instructions
for Future Reference
1
Page 3
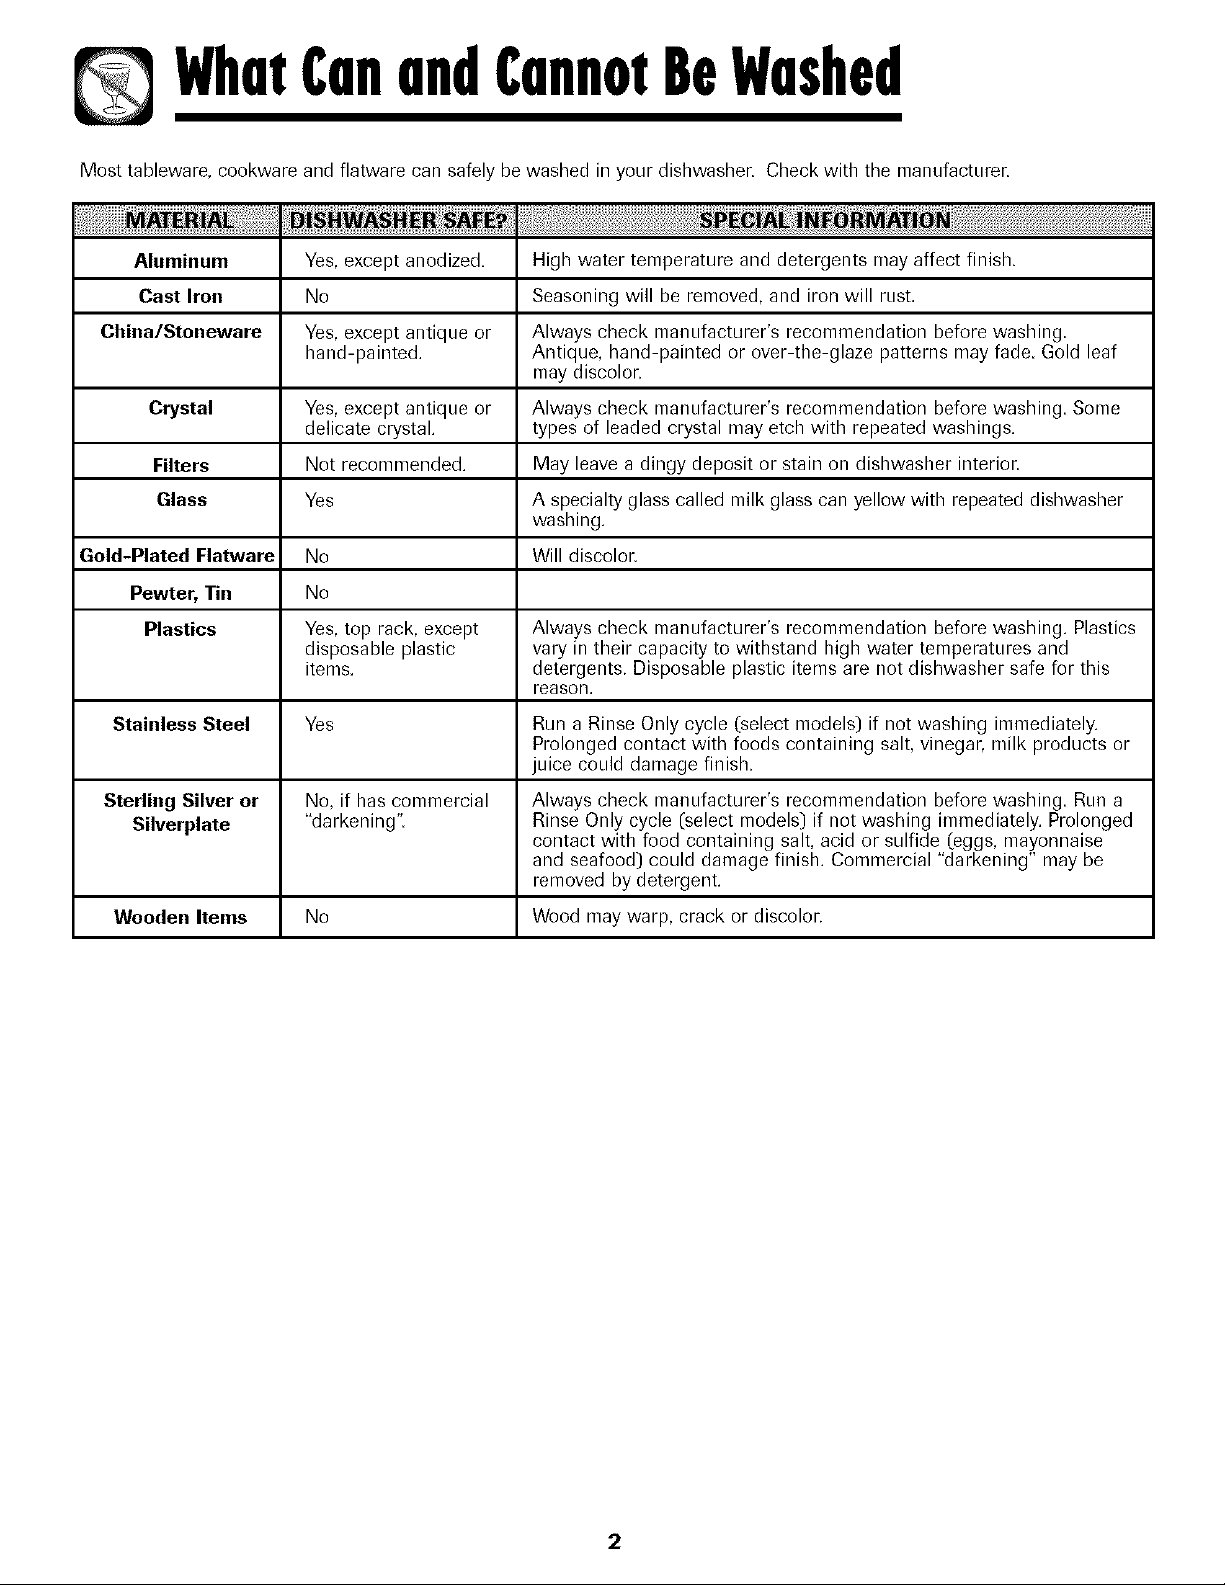
WhatCanandCannotBeWashed
Most tableware, cookware and flatware can safely be washed in your dishwasher. Check with the manufacturer.
Aluminum Yes, except anodized. High water temperature and detergents may affect finish.
Cast Iron No Seasoning will be removed, and iron will rust.
China/Stoneware Yes, except antique or Always check manufacturer's recommendation before washing.
hand-painted. Antique, hand-painted or over-the-glaze patterns may fade. Gold leaf
Crystal Yes, except antique or Always check manufacturer's recommendation before washing. Some
delicate crystal, types of leaded crystal may etch with repeated washings.
Filters Not recommended. May leave a dingy deposit or stain on dishwasher interior.
Glass Yes A specialty glass called milk glass can yellow with repeated dishwasher
Gold-Plated Flatware No Will discolor.
Pewter, Tin No
Plastics Yes, top rack, except Always check manufacturer's recommendation before washing. Plastics
disposable plastic vary in their capacity to withstand high water temperatures and
items, detergents. Disposable plastic items are not dishwasher safe for this
may discolor.
washing.
reason.
Stainless Steel Yes Run a Rinse Only cycle (select models) if not washing immediately.
Prolonged contact with foods containing salt, vinegar, milk products or
juice could damage finish.
Sterling Silver or No, if has commercial Always check manufacturer's recommendation before washing. Run a
Silverplate "darkening". Rinse Only cycle (select models) if not washing immediately. Prolonged
Wooden Items No Wood may warp, crack or discolor.
contact with food containing salt, acid or sulfide (eggs, mayonnaise
and seafood] could damage finish. Commercial "darkening" may be
removed by detergent.
2
Page 4

Oper0tin9Tips
Before You Start
• Don't prerinse. Simply scrape off any bones or
large food particles.
• If connected to a food waste disposer, make certain
tile disposer is empty before starting the
dishwasher.
3,
To cancel a running cycle, press the
START/Cancel pad once. The dishwasher will
drain, then shut off. To turn the dishwasher off
without draining, press the START/Cancel pad
twice. To prevent unplanned cycle or option
changes, these selections are "locked in" after 1
minute.
• Scrape off tomato-based food soils [see page 11).
• Remove certain foods such as mustard,
mayonnaise, lemon juice, vinegar, salt or dressings
from stainless steel flatware as soon as possible.
These foods may cause rusting and pitting if allowed
to remain in contact with the surface for an extended
period of time.
Starting the Dishwasher
1. After loading the dishwasher and adding detergent,
select the desired cycle and options by pressing
the pads. The indicator lights for the selected cycle
and options will illuminate. To cancel an option
press the pad again.
2. To start a cycle, close the door until it latches then
press the START/Cancel pad once. After a pause,
the fill will begin. The display countdown (select
models) will flash until START/Cancel is pressed.
Note
• If START/Cancel is not pressed within 30
seconds of choosing your cycle, the dishwasher
will turn off.
The dishwasher remembers your last cycle so you
do not have to reset the cycle each time. To start
the dishwasher using the same cycle and options
selected on the previous wash, just press the
START/Cancel pad.
Note
• If a cycle pad is pressed after the controls have
been "locked in", the light above the current cycle
will flash three times.
Adding a Forgotten Item
For best cleaning, the forgotten item should be added
early in the cycle.
1. Grasp door handle and unlatch door without
opening completely. All lights will flash to indicate
that the cycle is suspended.
2. Wait for the water circulation to stop.
3. Open the door and add the item.
4. Close and latch the door. Lights will stop flashing
when the door is properly shut. After a slight delay,
the cycle resumes automatically at the point of
interruption.
Notes
• If the door is opened during a running cycle,
there may be up to a 30 second delay before the
dishwasher restarts after closing the door.
• Extended interruption of the wash cycle is not
recommended.
3
Page 5
Loadin9
General Recommendations
(Rack features vary by model)
• Items can be centered behind a single tine or loaded
at an angle to maximize space.
• Avoid blocking or preventing the spray arms from
spinning freely. Do not allow items to extend beyond
the racks.
• Face soiled surfaces toward the center of the
dishwasher.
For best dishwashing results follow these guidelines to
determine the best arrangement for your items.
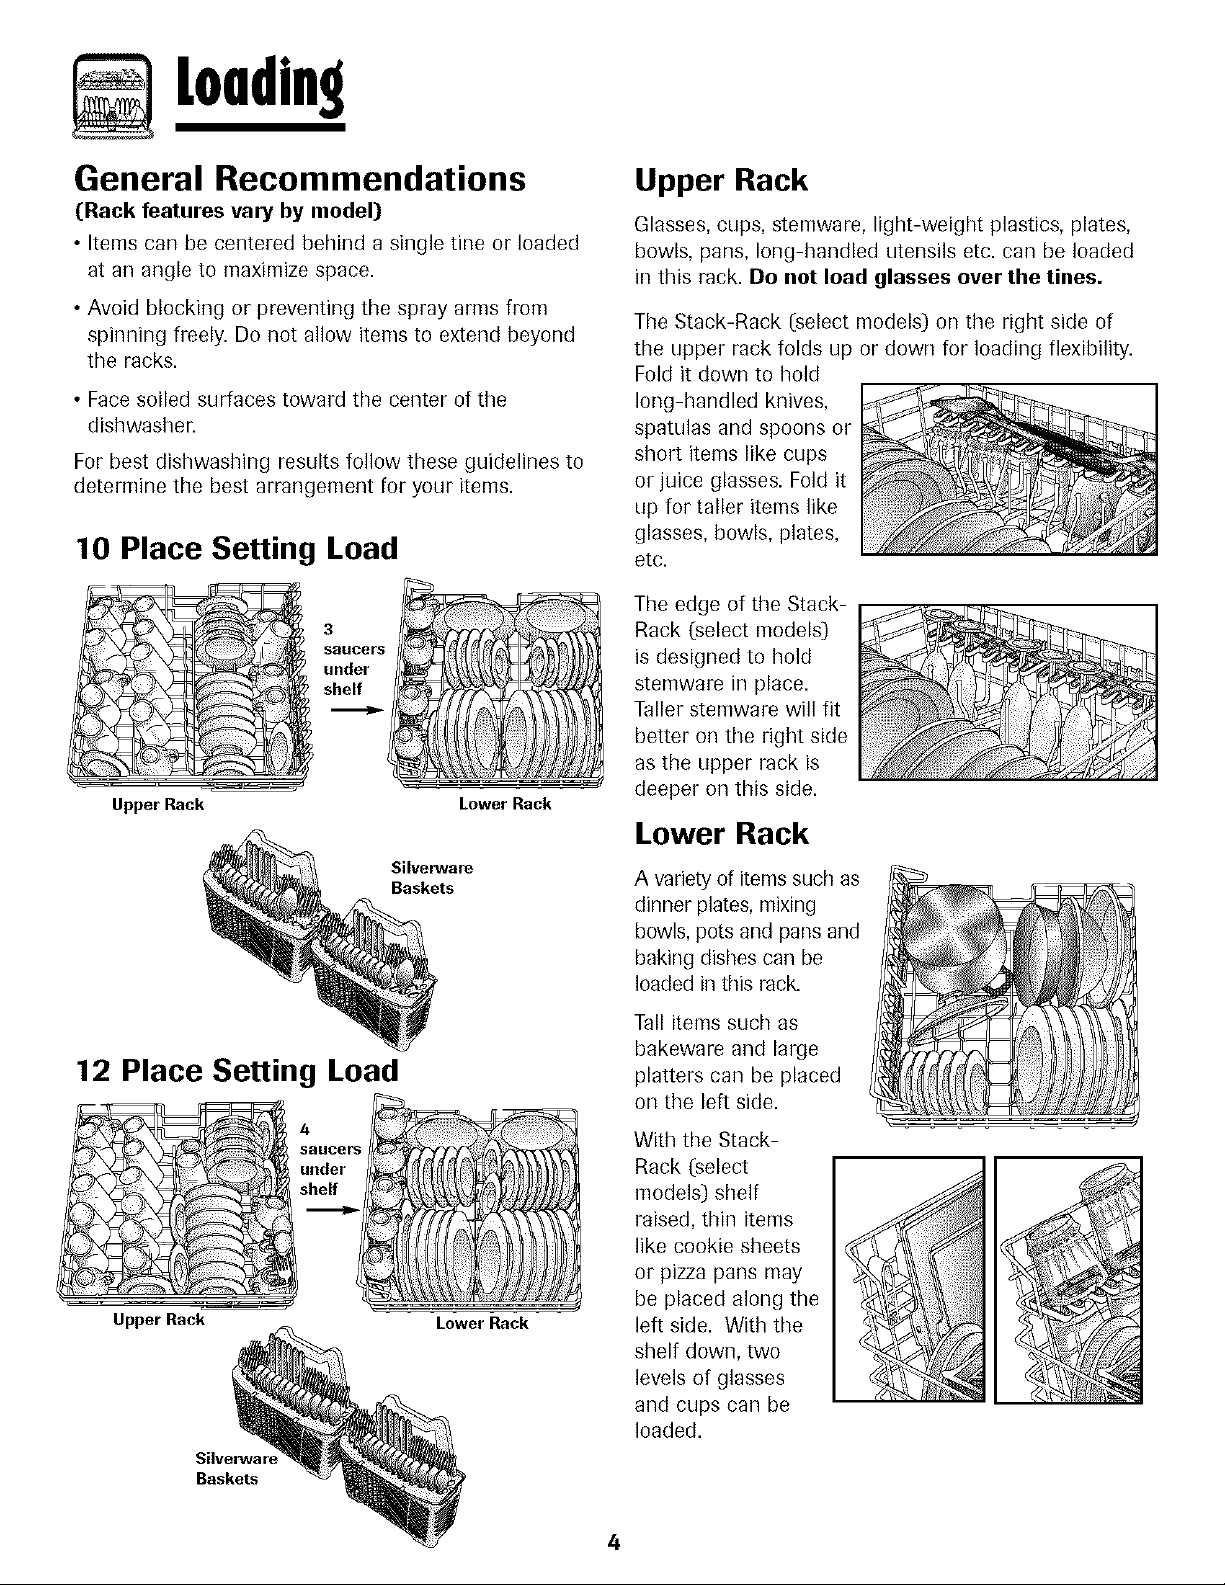
10 Place Setting Load
3
saucer
under
shelf
UpperRack
Silverware
Baskets
Lower Rack
Upper Rack
Glasses, cups, stemware, light-weight plastics, plates,
bowls, pans, long-handled utensils etc. can be loaded
in this rack. Do not load glasses over the titles.
The Stack-Rack (select models) on the right side of
the upper rack folds up or down for loading flexibility.
Fold it down to hold
long-handled knives,
spatulas and spoons or
short items like cups
or juice glasses. Fold it
up for taller items like
glasses, bowls, plates,
etc.
The edge of the Stack-
Rack (select models)
is designed to hold
stemware in place.
Taller stemware will fit
better on the right side
as the upper rack is
deeper on this side.
Lower Rack
A variety of items such as
dinner plates, mixing
bowls, pots and pans and
baking dishes can be
loaded in this rack.
12 Place Setting Load
Upper Rack
Silverwa=
Baskets
Lower Rack
Tall items such as
bakeware and large
platters can be placed
on the left side.
With the Stack-
Rack (select
models) shelf
raised, thin items
like cookie sheets
or pizza pans may
be placed along the
left side. With the
shelf down, two
levels of glasses
and cups can be
loaded.
4
Page 6
Loadin9
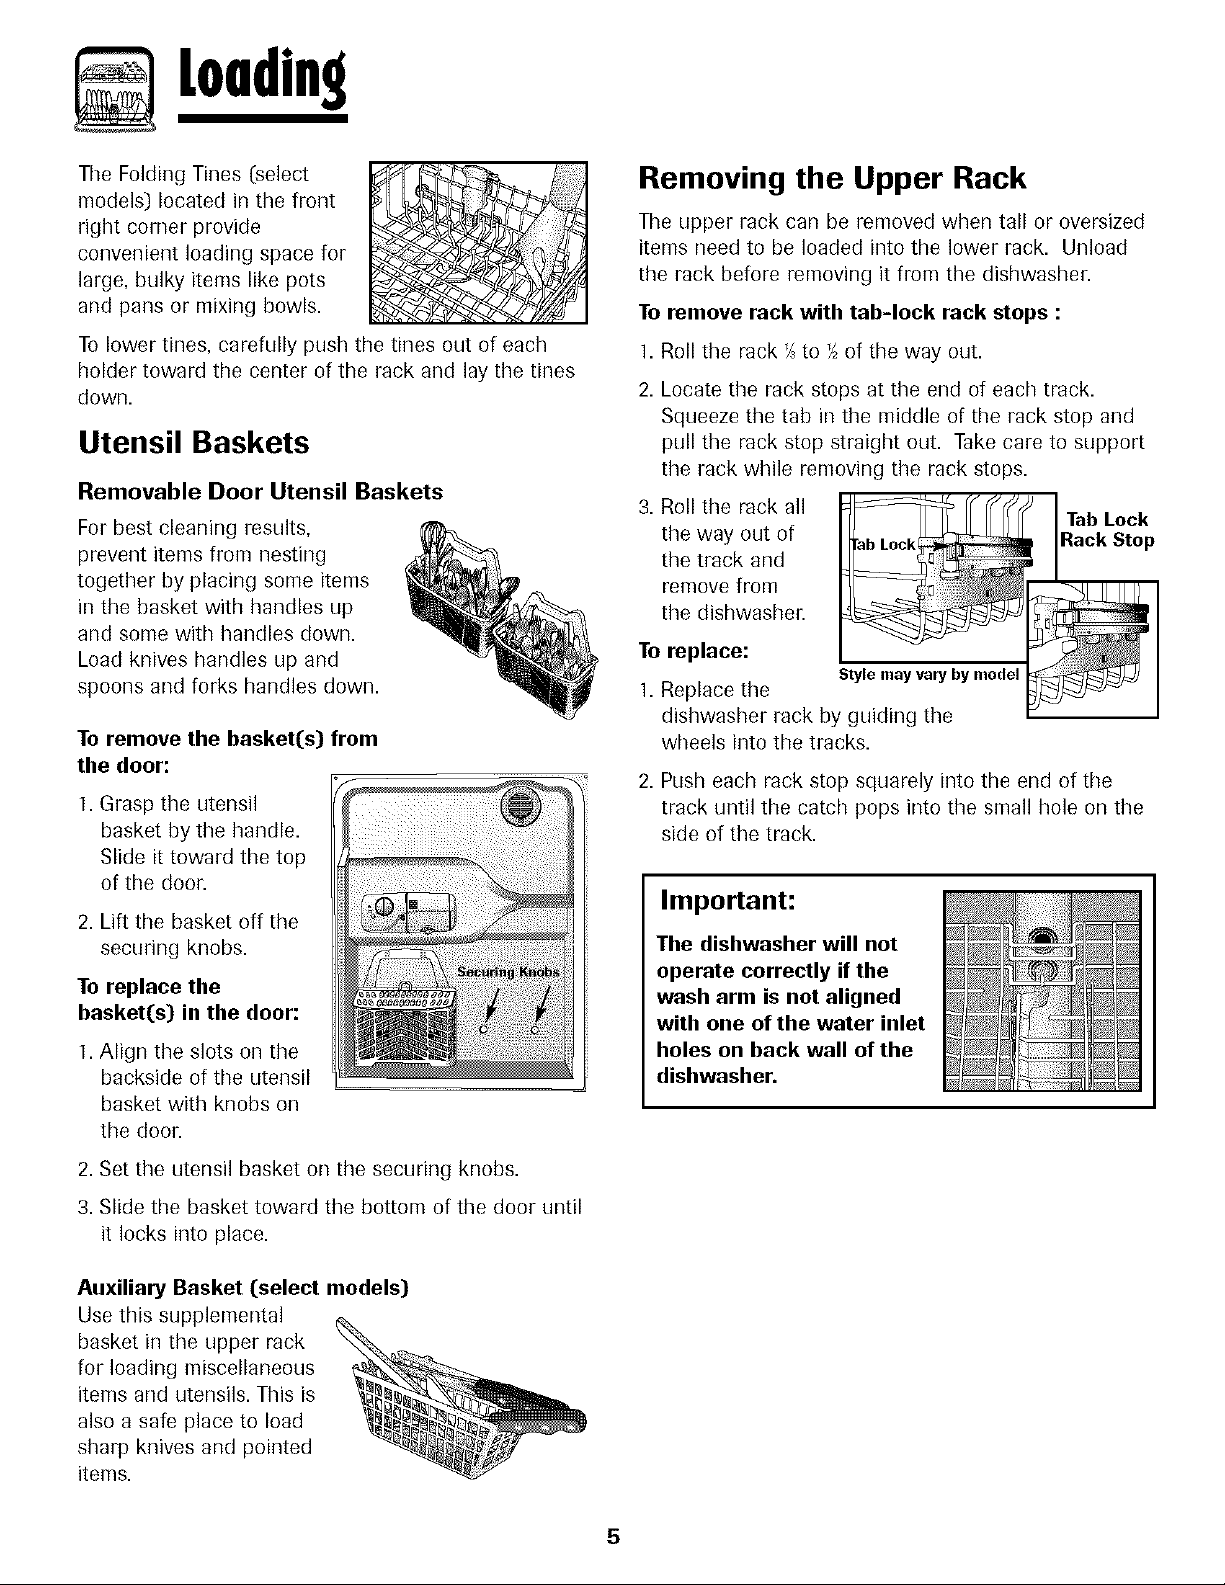
The Folding Tines I[select
models) located in the front
right corner provide
convenient loading space for
large, bulky items like pots
and pans or mixing bowls.
To lower tines, carefully push the tines out of each
holder toward the center of the rack and lay the tines
down.
Utensil Baskets
Removable Door Utensil Baskets
For best cleaning results,
prevent items from nesting
together by placing some items
in the basket with handles up
and some with handles down.
Load knives handles up and
spoons and forks handles down.
To remove the basketCs) from
the door:
]. Grasp the utensil
basket by the handle.
Slide it toward the top
of the door.
2. Lift the basket off the
securing knobs.
To replace the
basketCs) in the door:
]. Align the slots on the
backside of the utensil
basket with knobs on
the door.
Removing the Upper Rack
The upper rack can be removed when tall or oversized
items need to be loaded into the lower rack. Unload
the rack before removing it from the dishwasher.
To remove rack with tab-lock rack stops :
1. Roll the rack '_to ½of the way out.
2. Locate the rack stops at the end of each track.
Squeeze the tab in the middle of the rack stop and
pull the rack stop straight out. Take care to support
the rack while removing the rack stops.
3. Roll the rack all
the way out of
the track arid
remove from
the dishwasher.
To replace:
Style may vary by model
1. Replace the
dishwasher rack by guiding the
wheels into the tracks.
2. Push each rack stop squarely into the end of the
track until the catch pops into the small hole on the
side of the track.
Important:
The dishwasher will not
operate correctly if the
wash arm is not aligned
with one of the water inlet
holes on back wall of the
dishwasher.
Tab Lock
Rack Stop
2. Set the utensil basket on the securing knobs.
3. Slide the basket toward the bottom of the door until
it locks into place.
Auxiliary Basket (select models)
Use this supplemental
basket in the upper rack
for loading miscellaneous
items and utensils. This is
also a safe place to load
sharp knives and pointed
items.
5
Page 7

DishwasherUse
Hot Water
For optimal cleaning and drying results, hot water
is necessary. The incoming water temperature
should be 120 ° F C49° C) to properly activate the
detergent and melt greasy food soils.
To check the incoming water temperature, turn on the
hot water faucet nearest the dishwasher and let it run
into a glass in the sink. Place a candy thermometer in
the glass and check the temperature once it has
stopped rising.
Detergent
Use a detergent designed specifically for use in an
automatic dishwasher Be sure it is fresh. Store
granular detergent in a cool, dry place (not under the
sink).
Recommended Amount
Too little detergent results in poor cleaning, hard water
filming!spotting and poor drying. Too much detergent
can cause permanent etching/cloudiness.
Suds can cause the dishwasher to overflow. Measure
the detergent carefully and use only detergents
designed for use in a dishwasher. Less detergent is
needed in soft water. Try another brand of detergent if
sudsing continues.
The amount of detergent to use is determined by the
hardness of the water and soil level of the load. Refer
to the following chart for detergent usage
recommendations.
softener may be necessary to improve water
quality, detergent effectiveness, and protect the
dishwasher parts from the damage that hard
water can cause.
Add recommended arr_ount of detergent to each clip
as shown and close the detergent lid.
Do not use detergent with the Rinse Only cycle (select
models). Leave the detergent lid open when runnirlg
the Rinse Only cycle (select models).
Rinse Aid
Regular use of a rinse aid improves drying,
reduces spotting and filming, and reduces
moisture left on the dishwasher interior.
An automatic rinse aid dispenser is located next to the
detergent clip.
The window next to the dispenser cap indicates when
the rinse aid reservoir needs to be refilled. When the
level of rinse aid is below the indicator marks and the
window is nearly clear, it is time to refill the dispenser.
Check the dispenser monthly.
Soft (0-4 gpg) Normal Soil 4 tsp 6 tsp
Medium (5-9 gpg) Light Soil 4 tsp 6 tsp
Hard (10-12 gpg) All Levels 5 tsp 8 tsp
*Your local water utility or state university extension service can tell
you the degree of water hardness in your area.
In extremely hard water conditions (13 grains per
gallon or more*), it is difficult to achieve good
results with any dishwasher. A mechanical water
Light Soil 2 tsp 6 tsp
Heavy Soil 4 tsp 7 tsp
Normal Soil /4tsp 6 tsp
Heavy Soil 5 tsp 7 tsp
To add rinse aid to the
dispenser, turn the cap
counterclockwise to open.
Remove the cap and pour
liquid rinse aid into the
opening. The amount of
rinse aid dispensed during
the cycle is adjustable by moving the lever inside the
reservoir area. For most water conditions use the
manufacturer recommended setting of "2". Adjust it Lipto
the "MAX" setting for hard water. Set the lever anywhere
between these amounts as needed to get the best results.
Replace the cap and turn it clockwise to close.
6
Page 8

Cvcles,OptionsandLights
Cycles
Choose the cycle that best describes your dishload by pressing the corresponding touchpad. (See page 3,
Operating Tips, for how to begin the cycle).
Heavy Wash Long cycle for heavy food soils. 132 2 washes!3 rinses
Medium cycle for average food
Normal Wash soils. The turbidity sensor is 97-117 1-2 washes*/I-2 rinses*
active with this cycle.
Quick Wash Short cycle for light food soils. 82 I wash/2 rinses
Designed to select the number
Auto Wash of water fills best suited for tile
(select models) turbidity sensor is active with
Rinse Only Rinses dishes being held until 9 I rinse
(select models) there is a full load.
soil level of each load. The 94-128 1-2 washes*i2-3 rinses*
this cycle.
* Number of fills will varydependingon the soil levelof each load.
Notes
Depending on inital water temperature, time may be added to tile cycle to reach the proper temperature.
Cycle times shown in the numerical display (select models) will increase or decrease, based on each load's soil
level, water temperature and selected options.
Only the following certified cycles have been designed to meet NSF requirements (NSF/ANS1184 Residential
DishwasheO for sanitization: Auto Wash (select models), Heavy Wash, Normal Wash and Quick Wash.
7
Page 9
Cycles,OptionsandLights
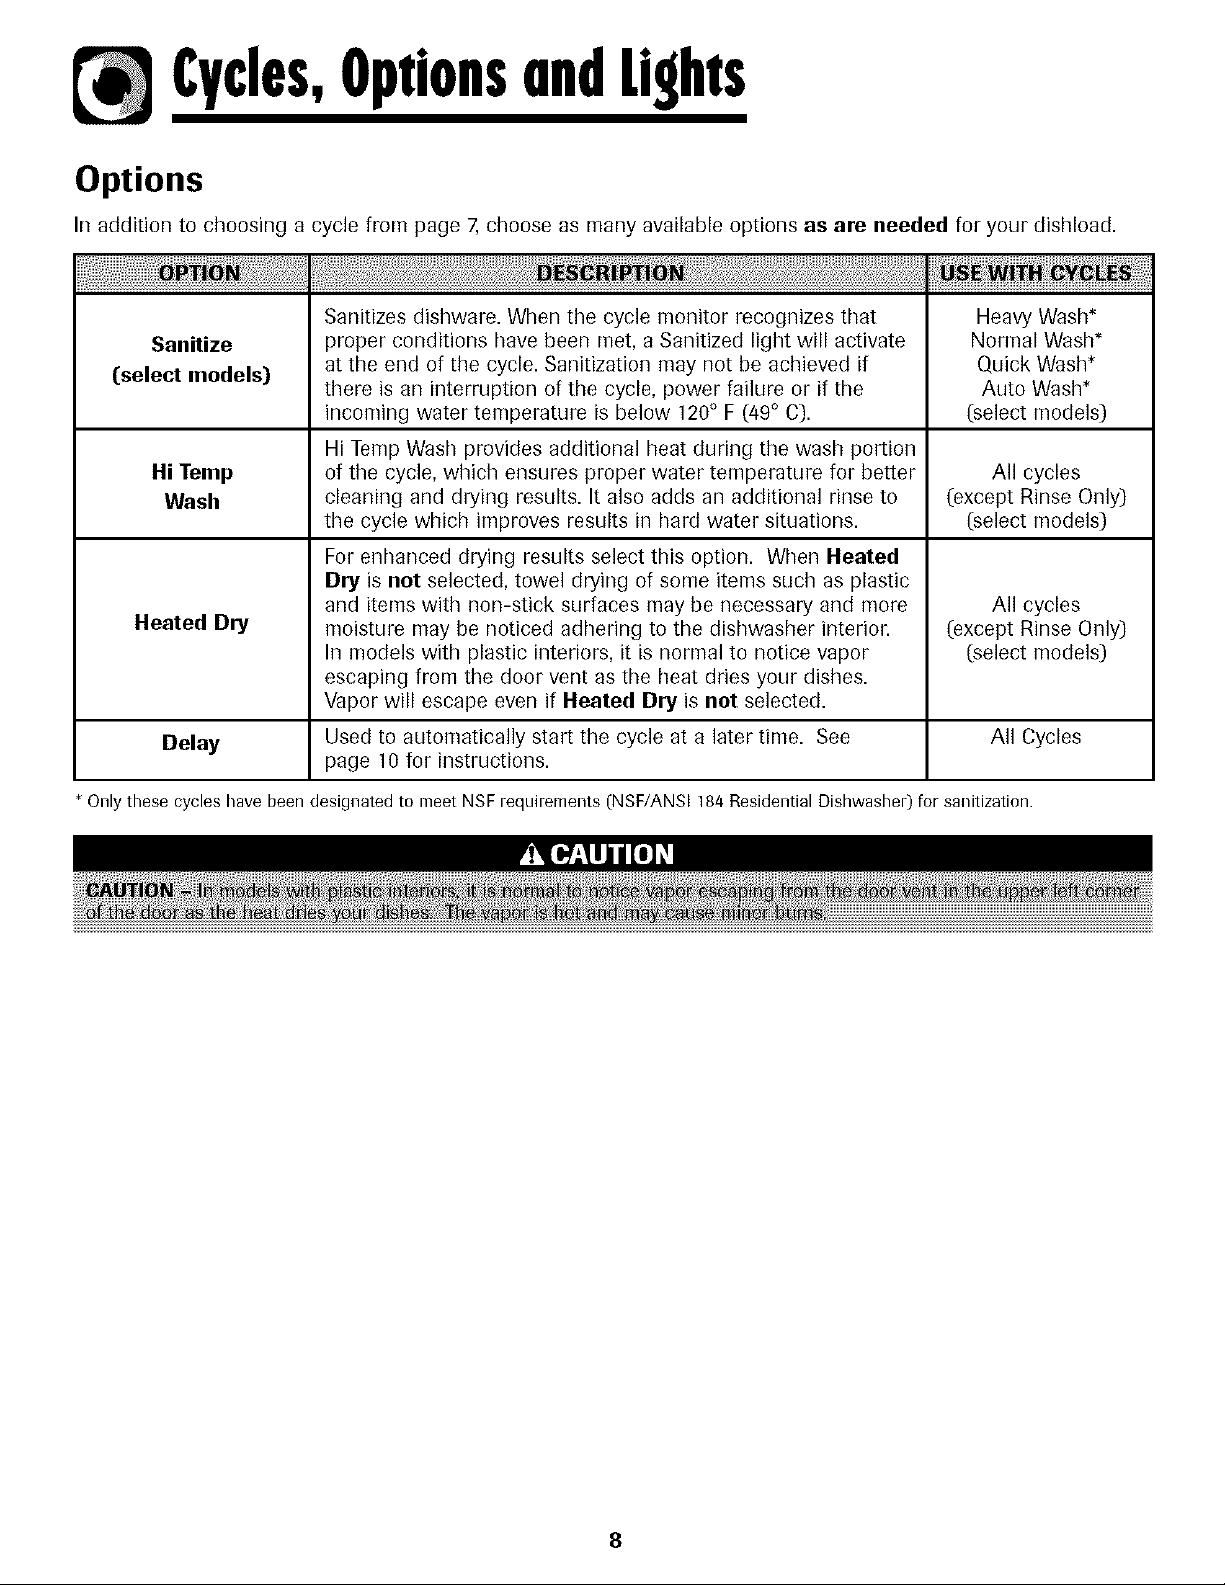
Options
In addition to choosing a cycle from page 7, choose as many available options as are needed for your dishload.
Sanitizes dishware. When the cycle monitor recognizes that Heavy Wash*
Sanitize
(select models)
Hi Temp
Wash
Heated Dry
proper conditions have been met, a Sanitized light will activate Normal Wash*
at the end of the cycle. Sanitization may riot be achieved if O,uick Wash*
there is an interruption of the cycle, power failure or if the Auto Wash*
incoming water temperature is below 120° F (49° C). (:select models)
Hi Temp Wash provides additional heat during the wash portion
of the cycle, which ensures proper water temperature for better All cycles
cleaning and drying results. It also adds an additional rinse to (:except Rinse Only)
the cycle which improves results in hard water situations. (:select models)
For enhanced drying results select this option. When Heated
Dry is net selected, towel drying of some items such as plastic
and items with non-stick surfaces may be necessary and more
moisture may be noticed adhering to the dishwasher interior.
In models with plastic interiors, it is normal to notice vapor
escaping from the door vent as the heat dries your dishes.
Vapor will escape even if Heated Dry is not selected.
All cycles
(:except Rinse Only)
(select models)
Delay
Onlythese cycleshavebeendesignatedte meet NSFrequirements(NSF/ANSI184ResidentialDishwasher)for sanitization.
Used to automatically start the cycle at a later time. See All Cycles
page 10 for instructions.
8
Page 10

Cvcles,OptionsandLights
Lights/Display (select models)
Time Remaining Display Shows approximate minutes remaining in a cycle. The symbol "2H" will appear when cycle time
(select models) is greater than 99 minutes. Cycle times shown in the numerical display (select models) will
Clean Illuminates at the end of the cycle and remains lit until the door has been open for 30 seconds
(select models) continuously,
Drying Illuminates during the entire dry period and goes out when the cycle is completed.
(select models)
Washing Illuminates during all rinse and wash portions of tile cycles.
(select models)
Heating Delay Illuminates when cycle is being extended to heat the water.
(select models)
Sanitized Illuminates at the end of the cycle when conditions have been met to achieve sanitization. The
(select models) light will remain lit until the door has been open for 30 seconds continuously.
On Illuminates during all rinse, wash and dry portions of the cycle and goes out when the cycle is
Notes
increase or decrease, based on each load's soil level, water temperature and selected options.
completed.
• When Sanitize (select models) is selected, cycles are monitored to assure sanitization. The Sanitized light will not
activate if sanitization requirements are not met. This could happen if the cycle is interrupted, power failure occurs or
incoming water temperature is below 120° F (49° F).
• The Clean and Sanitized indicator lights (select models)will not relight after a power failure until after the next cycle is run.
9
Page 11

Cvcles,OptionsandLights
Delay
The Delay option can be used to automatically start
the cycle at a later time to reduce daytime heat
buildup in the home or to take advantage of reduced
energy costs if available in your area. This option is
also useful for conserving hot water at times of high
household usage (showers, laundry].
To set up a Delay:
1. Select the appropriate cycle and options for the
load. Close the door
2. Press the Delay pad until the desired amount of
Delay time is selected.
3. The Delay indicator and the count down display
(select models] will flash until the START/Cancel
pad is pressed.
4. As soon as the START/Cancel pad is pressed, the
flashing will stop and the Delay time will begin
counting down. The Delay indicator will remain lit
until the Delay time has counted down.
5. The cycle will automatically start as soon as the
Delay time expires.
Note
Control Lock ([select models)
The control touchpads can be locked to prevent
unwanted use. If this feature is activated between
cycles, the dishwasher cannot be operated until the
controls are unlocked. If desired, the controls can be
locked after a cycle or Delay has started.
Setting the Control Lock:
1. Press the Heated Dry pad for three seconds.
2. An indicator light next to the lock graphic will
illuminate when the controls are locked.
To Cancel:
1. Press the Heated Dry pad for three seconds.
2. The indicator light will go ofL
Notes
• If a cycle or option pad is pressed after the
controls have been locked, the indicator light next
to the lock graphic will flash five times. On
selected models with a countdown display, the
display will flash an "L" simultaneously with the
lock indicatoR
• This option does not lock the door, only the
dishwasher controls.
• If 30 seconds elapse between setting the cycle
and options and pressing the START/Cancel
pad, the dishwasher will turn off.
To cancel a Delay:
When the Delay is counting down, press the Delay pad
again. The indicator light will go out and the cycle will
start or resume immediately.
To cancel a Delay and the cycle:
• Press START/Cancel once to drain and turn off the
dishwasher.
Or
• Press START/Cancel twice to turn dishwasher off
without draining.
10
Page 12

CareandCleanin
General Recommendations
• The dishwasher interior is normally self-cleaning.
Periodically check the bottom of the dishwasher tub
to see if any large particles remain.
• Wipe the edge of the inner door liner to remove any
food soil splashes which occurred during loading.
• When cleaning stainless steel, always wipe with the
grain. Never use products containing chlorine bleach
or citric acid.
Standard Exterior Lightto moderate Soft damp cloth and liquid spray cleaner. Do Not
Stainless Steel Exterior
(select models)
Daily cleaning and light soil
• The color from some tomato-based food soils may
occasionally adhere to various conlponents of the
dishwasher interior, causing temporary discoloration.
To minimize this:
• Remove excess tomato-based food soils from
dishes, before loading.
• Run the Heavy Wash cycle when washing loads
containing tomato-based food soils.
• Use a dishwasher detergent that contains chlorine
to better fight staining.
use abrasive powders or cleaning pads.
Soft cloth or sponge and one of the following:
• Mild detergent and water
• A solution of white vinegar and water
• Formula 409 Glass and Surface Cleaner*, or
similar multi-surface cleaner.
• Do Not use products containing chlorine bleach
or citric acid.
Follow with rinse and dry.
Moderate to heavy soil
Streaks or fingerprints!restore shine
Discoloration
Interior Light to moderate
Discoloration, or tomato-based stain
*Brand names are trademarks of the respective manufacturer.
**Call 1-877-232-6771 USA or 1-800-688-8/408 Canada to order.
Storage/Moving
Fill detergent clip with a fresh-scented dishwasher
detergent or baking soda and select the Normal Wash
cycle. Allow the dishwasher to complete the cycle. Then
turn the water supply off and drain the dishwasher. To
drain, press the START/Cancel pad once to activate
Soft cloth or damp sponge and Bon Ami*. Follow
with rinse and dry.
Soft cloth and Stainless Steel Magic Spray**.
Soft cloth or damp sponge and Cameo Stainless
Steel Cleaner*. Rinse immediately and dry.
Soft cloth or damp sponge.
Switch dishwasher detergent to chlorine-based
product.
the dishwasher. Press START/Cancel again to activate
the drain. Operate the drain twice to ensure most of
the water is removed. Last, disconnect the electrical
supply and prop open the door.
When turning the water supply to the home off, the
water shut off at the dishwasher must be turned off also.
11
Page 13

Troubleshooting
CHECK THESE POINTS TO HELP SAVE YOU TIME AND MONEY•
Dishwasher will not fill
Dishwasher will not drain/
water in tab bottom
Dishwasher adds water at • This is normal. The sensor (select models) in the pump must stay submerged so a
end of cycle short fill of water is added after the cycle's last drain.
Detergent cap is not empty • Check that the cycle is completed.
Dishwasher seems noisy
• Pressthe START/Cancel pad to start the dishwasher.
• Besure door is latched securely.
• Besure the water is turned on.
• Check that the pad is properly selected for a cycle.
• Check your home's circuit breaker or fuse box.
• Check inlet hose for a kink.
• Check water valve inlet for sediment and clean if necessary.
• If hooked up to a food waste disposer, be sure the knock-out is removed from the
disposer inlet.
• Check for food obstruction in tile drain or disposer.
• Check drain hose for a kink.
• Check your home's circuit breaker or fuse box.
• Check that the cycle is completed.
• Besure dispenser is not blocked.
• Usefresh detergent stored in a cool, dry place.
A water valve hiss during fill is normal.
Water circulation sounds are normal.
A thumping sound may be a wash arm bumping an item that is extending beyond
the racks. Readjust load to avoid obstructing wash arm.
Chopping or grinding sounds may be heard as the internal chopper blade chops hard
items like fruit seeds, nuts, etc.
Humming during the drain is normal.
A snap noise is the detergent cup lid hitting the door liner when the dishwasher door
is opened at the end of the cycle. This is normal.
Proper installation affects the noise level.
Cycle takes too long (Heating • Hi Temp Wash or Sanitize (select models) has been selected and the cycle is
Delay light [select models] extended to heat water.
stays on)
Dishwasher has an odor
Dishwasherleaks
*Brand names are trademarks of the re.<
• Check to see that the incoming water temperature is 120° F (49° C).
Run dishes being held in the dishwasher through a Rinse Only cycle (select models).
Many dishwashers have a "new" smell when first installed. This will dissipate with
use.
Dishwasher may not be draining properly. (See "Dishwasher Will Not Drain" section.]
Fora strong odor, place baking soda in both sides of the detergent cup. Select Quick
Wash cycle and allow the water to circulate for about 10 minutes. Interrupt the cycle
by unlatching the door and let it stand overnight. Restart the dishwasher by latching
the door and allow it to complete the cycle. Another alternative is to use a dishwasher
cleaning product such as Jet-Dry Dishwasher Cleaner*.
• Check that the dishwasher is level. (Refer to the Installation Instructions).
• Suds can cause the dishwasher to overflow. Measure the detergent carefully and use
only detergents designed for use in a dishwasher. Less detergent is needed in soft
water. Try another brand of detergent if sudsing continues.
• Follow directions closely on how to add aforgotten item (pg. 3).
• To avoid rinse aid leaking from the dispenser, be sure the lid is securely attached.
]ective manufacturen Cont.
12
Page 14
Troubleshooting
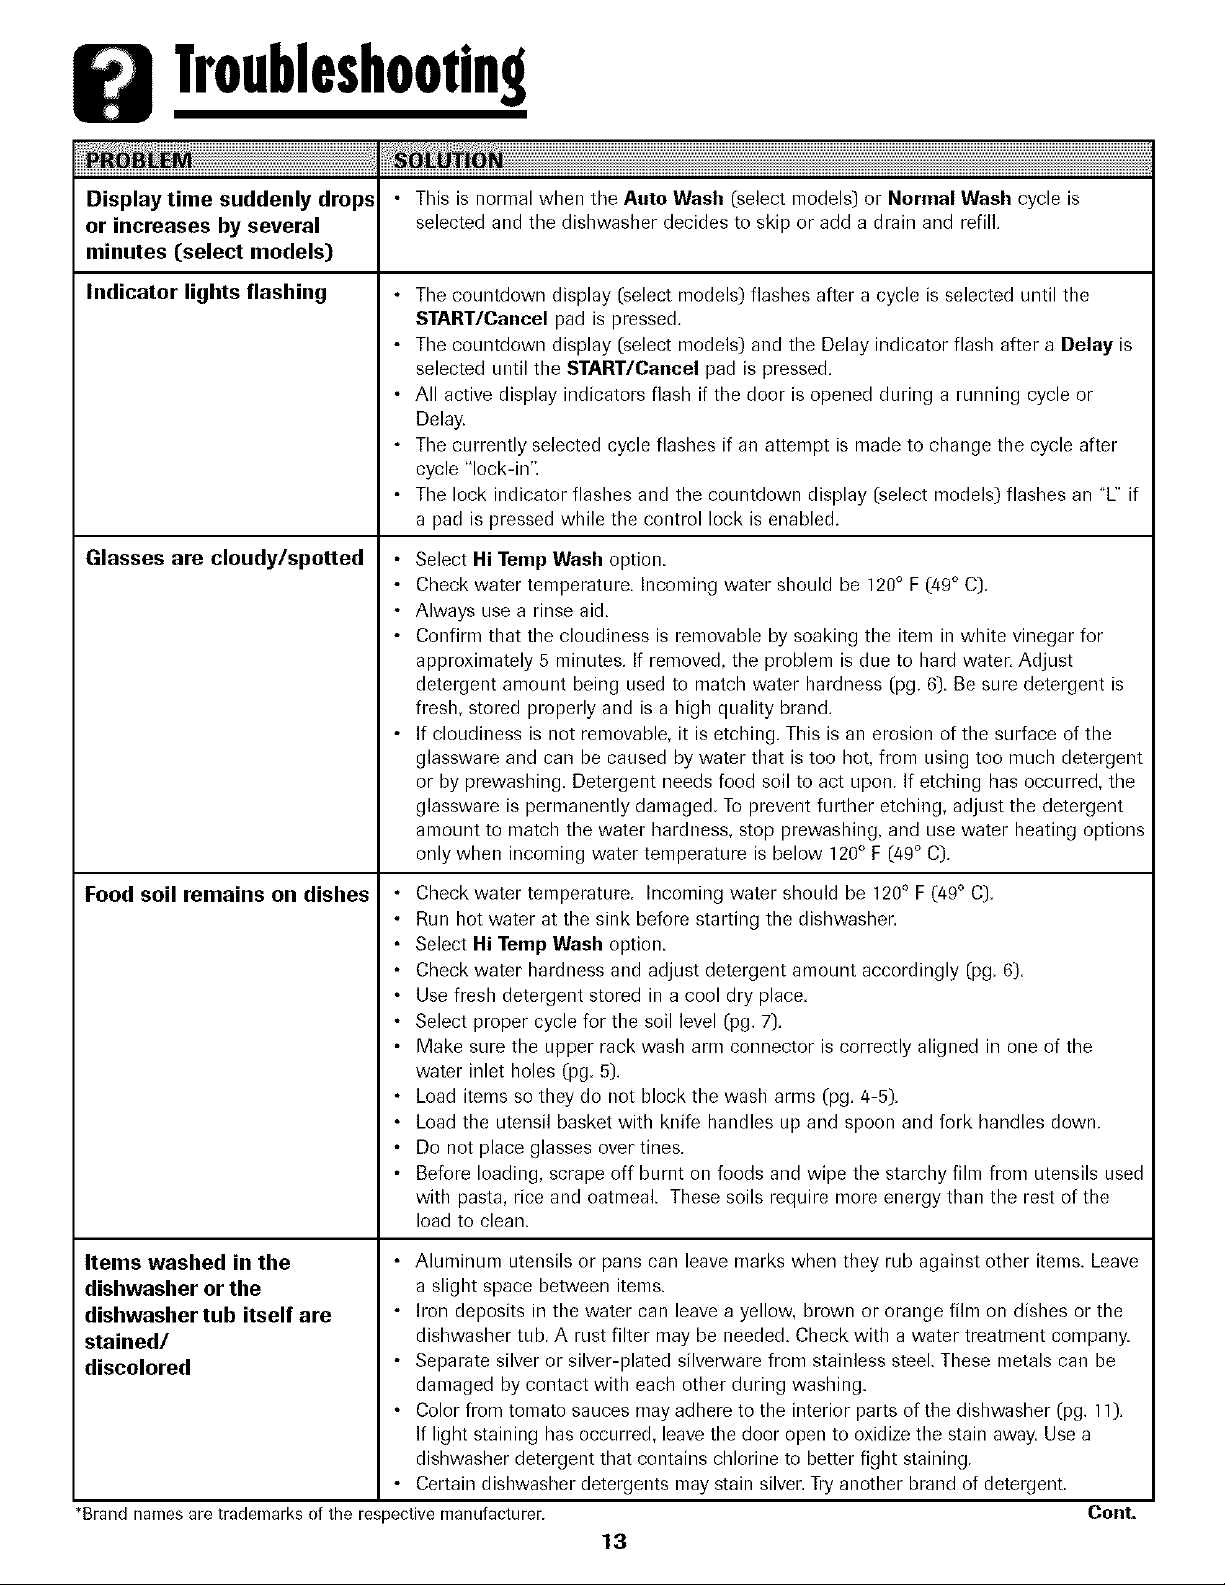
Display time suddenly drops • This is normal when the Auto Wash (select models) or Normal Wash cycle is
or increases by several selected and the dishwasher decides to skip or add a drain and refill.
minutes (select models)
Indicator lights flashing • The countdown display (select models) flashes after a cycle is selected until the
START/Cancel pad is pressed.
• The countdown display (select models) and the Delay indicator flash after a Delay is
selected until the START/Cancel pad is pressed.
• All active display indicators flash if the door is opened during a running cycle or
Delay.
• The currently selected cycle flashes if an attempt is made to change the cycle after
cycle "lock-in".
• The lock indicator flashes and the countdown display (select models) flashes an "L" if
a pad is pressed while the control lock is enabled.
Glasses are cloudy/spotted • Select Hi Temp Wash option.
• Check water temperature. Incoming water should be 120° F (49° C)
• Always use a rinse aid.
• Confirm that the cloudiness is removable by soaking the item in white vinegar for
approximately 5 minutes. If removed, the problem is due to hard water. Adjust
detergent amount being used to match water hardness (pg. 6). Be sure detergent is
fresh, stored properly and is a high quality brand.
• If cloudiness is not removable, it is etching. This is an erosion of the surface of the
glassware and can be caused by water that is too hot, from using too much detergent
or by prewashing. Detergent needs food soil to act upon. If etching has occurred, the
glassware is permanently damaged. To prevent further etching, adjust the detergent
amount to match the water hardness, stop prewashing, and use water heating options
only when incoming water temperature is below 120° F (49° C).
Food soil remains on dishes • Check water temperature. Incoming water should be 120° F (49* C).
• Run hot water at the sink before starting the dishwasher.
• Select Hi Temp Wash option.
• Check water hardness and adjust detergent amount accordingly (pg. 6).
• Usefresh detergent stored in a cool dry place.
• Select proper cycle for the soil level (pg. 7).
• Make sure the upper rack wash arm connector is correctly aligned in one of the
water inlet holes (pg. 5).
• Load items so they do not block the wash arms (pg. 4-5).
• Load the utensil basket with knife handles up and spoon and fork handles down.
• Do not place glasses over tines.
• Before loading, scrape off burnt on foods and wipe the starchy film from utensils used
with pasta, rice and oatmeal. These soils require more energy than the rest of the
load to clean.
Items washed in the • Aluminum utensils or pans can leave marks when they rub against other items. Leave
dishwasher or the a slight space between items.
dishwasher tub itself are • Iron deposits in the water can leave a yellow, brown or orange film on dishes or the
stained/ dishwasher tub. A rust filter may be needed. Check with a water treatment company.
discolored • Separate silver or silver-plated silverware from stainless steel. These metals can be
damaged by contact with each other during washing.
• Color from tomato sauces may adhere to the interior parts of the dishwasher (pg. l1).
If light staining has occurred, leavethe door open to oxidize the stain away. Use a
dishwasher detergent that contains chlorine to better fight staining.
• Certain dishwasher detergents may stain silver. Tryanother brand of detergent.
*Brandnamesaretrademarksof the respectivemanufacturer.
13
Cont.
Page 15

Tr0ublesh00tin9
Items not properly dried/
moisture is present on the •
dishwasher interior after the •
dry cycle
Dishware is chipped
Sanitized light does not
illuminate at the end of the
cycle ([select models)
Be sure Heated Dry is selected.
Water droplets may form on the inner door as part of the drying process.
Use a rinse aid separate from the detergent like Jet Dry* or Cascade Rinse Aid*
regularly, to improve drying. Turn the rinse aid selector toward the MAX setting.
• Check water temperature. Incoming water should be 120° F (49° C).
• Select Sanitize and/or Hi Temp Wash (select models).
• Increase detergent amount to match water hardness (pg. 6).
• Load properly (pg. 4-5).
• Plastic and items with non-stick surfaces are difficult to dry because they have a
porous surface which tends to collect water droplets. Towel drying may be
necessary.
• Glasses and cups with concave bottoms hold water and require towel drying.
Locate these items on the more slanted side of the rack for improved results.
• Load dishes according to instructions so they do not strike each other (pg. 4-5).
• Washing fine antique china/crystal in the dishwasher is not recommended.
• Do not load glasses over the tines.
• Do not overload.
• Sanitize was not selected.
• Sanitization can only be achieved with the Auto Wash (select models), Heavy Wash,
Normal Wash or Quick Wash cycles.
• Sanitization may not be achieved if there is an interruption of the cycle, power
failure or if incoming water temperature is below 120° F (49° C).
*Brand names are trademarks of the respective manufacturer.
14
Page 16

Wurrum¥u,d Service
What is Not Covered By These Warranties
1. Conditions and damages resulting from any of the following:
a. Improper installation, delivery, or maintenance.
b. Any repair, modification, alteration, or adjustment not authorized by the
manufacturer or an authorized servicer.
c. Misuse, abuse, accidents, unreasonable use,or acts of God.
d. Incorrect electric current, voltage, electrical and!or gas supply.
e. Improper setting of any control.
2. Warranties are void if the original serial numbers have been removed, altered,
or cannot be readily determined.
3. Light bulbs, water filters and air filters.
4. Products purchased for commercial or industrial use.
5. The cost of service or service call to:
a. Correct installation errors. For products requiring ventilation, rigid metal
ducting must be used.
b. Instruct the user on the proper use of the product.
c. Transport the appliance to and from the servicen
6. Any food loss due to refrigerator or freezer product failures.
7 Expenses for travel and transportation for product service in remote locations.
8. Outside of the United States and Canada this warranty does not apply.
Contact your dealer to determine if another warranty applies.
...................................................................................................................................................................................................................................................................9. Consequential or incidental damages sustained by any person as a result of
CUSTOMER'S SOLE AND EXCLUSIVE
REMEDY UNDER THIS LIMITED
WARRANTY SHALL BE PRODUCT REPAIR
AS PROVIDED HEREIN. IMPLIED
WARRANTIES, INCLUDING WARRANTIES
OF MERCHANTABILITY OR FITNESS FOR
A PARTICULARPURPOSE,ARE LIMITED
TO ONE YEAR OR THE SHORTEST
PERIOD ALLOWED BY LAW. MAYTAG
CORPORATION SHALL NOT BE LIABLE
FOR INCIDENTAL OR CONSEQUENTIAL
DAMAGES. SOME STATESAND
PROVINCES DO NOTALLOW THE
EXCLUSION OR LIMITATION OF
INCIDENTAL ORCONSEQUENTIAL
DAMAGES, OR LIMITATIONS ON THE
DURATION OF IMPLIED WARRANTIES OF
MERCHANTABILITY OR FITNESS,SO
THESE EXCLUSIONS OR LIMITATIONS
MAY NOT APPLY TOYOU. THIS
WARRANTY GIVESYOU SPECIFICLEGAL
RIGHTS AND YOU MAY ALSO HAVE
OTHERRIGHTS,WHICH VARY STATETO
STATEOR PROVINCETO PROVINCE.
any breach of these warranties. Some states do not allow the exclusion or
limitation of consequential or incidental damages, so the above exclusion may
not apply.
If You Need Service
First see the Troubleshooting section inyour Use and Care Guide or call the
dealer from whom your appliance was purchased or call Maytag Services, LLC,
Customer Assistance at 1-800-688-9900 USA and 1-800-688-2002 Canadato
locate an authorized servicer.
Be sure to retain proof of purchase to verify warranty status. Refer to WARRANTY
for further information on owner's responsibilities for warranty service.
If the dealer or service company cannot resolve the problem, write to Maytag
Services, LLC,Attn: CAIR" Center, P.O.Box 2370,Cleveland,TN 37320-2370,or call
1-800-688-9900 USA and 1-800-688-2002 Canada. U.S.customers using
TTY for deaf,hearing impaired or speech impaired, call 1-800-688-2080.
User's guides, service manuals and parts information areavailable from Maytag
Services, LLC, Customer Assistance.
Notes: When writing or calling about a service problem, please include:
a. Your name, address and telephone number;
b. Model number and serial number;
c. Name and address of your dealer or servicer;
d. A clear description of the problem you are having;
e. Proof of purchase (sales receipt).
15
Page 17

@ P
Lave-vaisselle
S_curit_ ........................... 17
Articles lavables ou non
en lave-vaisselle ..................... 18
Conseils d'utilisation ................ 19
@
Chargement .................... 20-21
Utilisation du
lave-vaisselle ....................... 22
Cycles, options et
t_moins lumineux ................ 23-26
Entretien et nettoyage ............... 27
D_pannage ...................... 28-30
Garantie et service .................. 31
Guia de Use y Cuidado ............... 32
Page 18

Securit6
Ce que vous devez savoir sur
les instructions de s curti
Les instructions de securite importantes et les avertissements
paraissant dans ce guide ne sont pas destines _ couvrir toutes
les situations et conditions eventuelles qui peuvent se
presenter. II faut faire preuve de bon sens et de prudence Iors
de I'installation, de I'entretien ou de I'utilisation de I'appareil.
Prenez toujours contact avec votre fabricant, au sujet de
problemes ou conditions que vous ne comprenez pas.
Reconnaissez les etiquettes, phrases
ou symboles sur la securite
Instructions de s6curit6 importantes
Lesproduits portant une etiquette (_ ont et6 homologues
par Underwriter's Laboratories,Inc. - ceux portant une
etiquette CSAont ete homologues par la CanadianStandards
Association (CSA).Neanmoins,comme pour tout autre
eqLtipementutilisant 1'61ectricit6et des pieces mobiles,il y a un
danger potentiel.
Lire la totalit8 des instructions avant d'utiliser le lave-
1.
vaisselle.
2.
Utiliser le lave-vaisselle uniquement pour les
applications.
Debrancher le lave-vaisselle avant tout entretien.
3.
4.
Pour eviter tout risque de choc 61ectrique,les cotes et
I'arriere doivent etre fermes et le panneau avant doit
6tre fixe avant de brancher le lave-vaisselle. Se
reporter aux instructions d'installation pour les
methodes correctes de mise _ la terre.
5. Brancher le lave-vaisselle L1un circuit electrique
correctement protege, d'une puissance nominale
appropriee et avec fils de calibre adequat.
6. II ne faut jamais laisser les enfants utiliser ou jouer
dans, avec ou autour du lave-vaisselle.
7 Pour reduire le risque de blessure Iors du chargement
du lave-vaisselle, il faut placer les articles pointus ou
aiguises avec le manche vers le dessus. De meme,
Ioger les articles pointus pour qu'ils n'endommagent
pas le joint de la porte.
8. Ne pas toLmher _ I'element chauffant au bas de la
cuve durant ou b lafin d'un cycle car il est chaud.
9. N'utiliser que des detergents et des agents de ringage
congus pour un lave-vaisselle residentiel automatique.
Ne jamais utiliser de savon, de detergent lessiviel ou de
detergent de lavage _ la main dans votre lave-vaisselle.
Garder ces produits hors de portee des enfants.
10. Ne pas s'asseoir, se mettre debout ou maltraiter la
porte ou les paniers dLIlave-vaisselle.
11. Sous certaines conditions, de I'hydrogene peut seformer
dans an systeme d'eau chaude qui n'a pas ete utilise
pendant deux semaines ou plus.L'hydrog_neest un
ffaz explesif Si lesyst_med'eau chaude n'a pas ete
utilise pendant une telle periode, ouvrir tousles robinets
d'eau chaude et laisser couler I'eau pendant plusieurs
minutes. Ceci diminuera I'accumulation d'hydrogene.
Comme il s'agit d'un gaz inflammable, ne pas fumer ou
utiliser de flamme vive durant cette operation.
12. Ne pas laver d'articles en plastique ne portant pas
I'indication <<lavable en lave-vaisselle >).Pour des
articles en plastique sans indication, verifier les
recommandations du fabricant.
13. Ne pas circonvenir les commandes.
14. Pour eviter tout risque d'enfermement et!ou de
suffocation accidentelle d'un enfant, toujours enlever
la porte du compartiment de lavage Iorsque I'on
enl_ve an ancien lave-vaisselle ou qu'on lejette.
15. Faire preuve de prudence en dechargeant le lave-
vaisselle. La vaisselle peut 6tre chaude si elle est
dechargee peu de temps apres la fin d'un cycle.
16. Les lave-vaisselle_ usage residentielcertifi6 ne sont pas
congas pour les etablissements alimentaires
homologues.
17. Pour eviter que I'eauou la moisissurene deteriore votre
habitation, verifiez reguli_rement les raccordements
d'arriveed'eau et les tuyaux d'evacuation pour
d'eventuellesfuites.
Conserver ces instructions
17
Page 19

Articlesluvublesounonenluve-vuisselle
La plupart des articles de table et de cuisson ainsi que les couverts peuvent 6tre laves en s6curite dans le lave-vaisselle. Verifier avec le fabricanL
Aluminium Oui, sauf I'alunfinium anodis& De hautes temperatures et les detergents peuvent attaquer la finition,
Fonte Non Uappret serait enleve et le fer rouillerait,
Poreelaine/Gr_s Oui, sauf les pieces d'antiquite fines, les motifs peints a la main ou sur le vernis peuvent s'estomper. Les feuilles d'or
Cristal et le cristal delicat, cristal au plomb peuvent se corroder apres des lavages r@etes.
Filtres Non recommandes. Peuvent laisser un d@6t crasseux ou des taches a I'interieur du lave-vaisselle.
Verre Oui Un verre special appele {{verre laiteux >>peut jaunir par suite de lavages iepetes au
Couverts plaques or Non Se decolorent,
I_tain, fer blanc Non
Plastiqaes sauf les articles en plastique plastiques a resister aux hautes temperatures et aux detergents peut varier, Les
Aeier inoxydable Oui seulement) (certains modeles). Le contact prolonge avec la nourriture contenant du
Argenterie ou Non, s'il a subi un traitement sont pas laves immediatement, lancer un cycle Rinse Only [certains modeles). Le
argent sterling de _{noircissement >>. contact prolonge avec la nourriture contenant du sel, de I'acide ou des sulfures
Articles en bois Non Le bois peut se defonner, se fissurer ou se decolorer.
ou peintes a la main.
Oui, sauf les pieces d'antiquite Toujours verifier les recommandations du fabricant avant le lavage. Certains types de
Oui, sur panier superieur Toujours verifier les recommandations du fabricant avant le lavage. La capacite des
jeter, articles en plastique jetable ne sont pas lavables en lave-vaisselle.
Toujours verifier les recommandations du fabricant avant le lavage. Les porcelaines
peuvent se decolorer.
lave-vaisselle.
Si ces articles ne sont pas laves immediatement, lancer un cycle Rinse Only (Rin£age
seh du vinaigre, des produits laitiers ou du jus peut endomrnager la finition.
Toujours verifier les recommandations du fabricant avant le lavage. Si ces articles ne
(oeufs, mayonnaise ou fruits de met) peut endommager la finition. Le
<<noircissement >>commercial peut etre enleve par le detergent.
18
Page 20

Conseilsd'udlisadon
P,vant de commencer
• Ne pas prOrincer. II suffit de jeter os et gros
morceagx de nogrritgre.
• Si le lave-vaisselle est raccorde _ un broyeur
dechets, veiller _ ce que celui-ci soit vide avant
de mettre le lave-vaisselle en marche.
• Gratter les taches tenaces laiss_es par les
aliments _ base de tomate (voir page 27).
• E.liminer certains aliments (tels que moutarde,
mayonnaise, jus de citron, vinaigre, sel et
vinaigrettes) des articles en acier inoxydable
aussi rapidement que possible. Ces aliments
peuvent provoquer de la rouille et du piquage s'ils
restent en contact prolonge avec la surface.
Utilisation du lave-vaisselle
1. Apres avoir charge le lave-vaisselle et ajoute du
detergent, choisir le cycle et les options desires en
appuyant sur les touches. Les temoins lumineux
des options et cycles choisis s'allument. Pour
annulet une option, appuyer a nouveau sur la
touche.
3. Pour annuler un cycle en cours de fonctionnement,
appuyer une lois sur ]a touche START/Cancel. Le
lave-vaisselle procede _ une vidange puis s'arrete.
Pour arreter le lave-vaisselle sans qu'il ne commence
une vidange, appuyer deux lois sur la touche
START/Cancel. Pour empecher des changements
non prevus de cycle ou d'option, i] n'est plus
possible de changer ces selections apres I minute.
Remarque
• Si ron appuie sur une touche de cycle apres le
verrouillage des commandes, le temoin lumineux
situe au-dessus du cycle en cours clignote trois lois.
P,jout d'un article oublib
Pour de meilleurs resultats de nettoyage, I'article oublie
devra etre ajout@ au debut du cycle.
],
Saisir la poignee de porte et deverrouiller la porte
sans rouvrir completement. Tousles temoins
lumineux clignotent pour indiquer que le cycle est
interrompu.
2,
Attendre I'arret de la circulation d'eau.
2. Pour demarrer un cycle, fermer la porte jusqu'9 ce
qu'elle se verrouille, puis appuyer une lois sur la
touche START/Cancel (MISE EN MARCHE/
Annulation). A la suite d'une pause, le
remplissage commence. Le decompte de I'afficheur
(certains modeles) clignote jusqu'_ ce que ron
appuie sur START/Cancel.
Remarque
• Si I'on n'appuie [)as sur la touche START/Cancel
darts les 30 secondes suivant la selection du
cycle, le lave-vaisselle s'arrete.
Le lave-vaisselle se souvient du demier cycle choisi.
II n'est donc pas necessaire de reprogrammer le
cycle _ chaque lois. Pour mettre en marche le lave-
vaisselle avec le meme cycle et les memes options
que ceux choisis Iors du lavage precedent, il suffit
d'appuyer sur la touche START/Cancel.
3.
Ouvrir la porte et ajouter I'article.
4.
Fermer la porte et la verrouillen Les temoins
lumirleux cessent de clignoter Iorsque la porte est
correctement TerraCe.Apres un court instant, le cycle
reprend automatiquement au point ot:Ji] s'est arrete.
Remarques
• Si ]a porte est ouverte pendant le fonctionnement
d'un cycle, il peut y avoir jusqu'_ 30 secondes
d'attente avant que I'appareil ne se remette en
marche une fois la porte TerraCe.
• II n'est pas recommand_ d'interrompre le cycle de
lavage pendant une periode prolongee.
19
Page 21

Chargemem
Recommandations d'ordre
gbnbral
CLes caract_ristiques des paniers varient selon le
modble)
• Les articles peuvent _tre centr_s derriere une tige de
retenue ou charges en biais pour tirer le meilleur
parti possible de I'espace.
• I_viter de bloquer les bras gicleurs. Ne rien laisser
d@asser des paniers.
• Toumer les surfaces souill_es vers le centre du lave-
vaisselle.
Pour obtenir les meilleurs resultats de lavage, observer
les directives suivantes pour d_terminer la disposition
qui convient le mieux aux articles _ laver.
10 Couverts
Partier sup_rieut
Panier pour
ustensiles
Panier inf_rieur
Panier supbrieur
II peut recevoir verres, tasses, articles en plastique
I_ger, assiettes, bols, casseroles, ustensiles _ long
manche, etc. Ne pas placer les verres sur les tiges
de retenue.
I_'@tagereStack-Rack
(certains modeles) a la
droite du panier
sup@rieur, se releve ou
s'abaisse pour plus de
souplesse de
chargement. L'abaisser
pour retenir les couteaux, les spatules et les cuill_res
long manche ou les articles courts comme les tasses
et les verres _ jus. La relever pour Ioger les grands
articles comme les verres, les bols, les assiettes, etc.
Le bord de retagere Stack-Rack (certains modeles)
est congu pour retenir
les verres 9 pied en
place. II est preferable
de placer les verres
dont le pied est plus
long _ droite, car le
partier sup_rieur est
plus profond a cet
endroit.
Panier inf6rieur
12 Couverts
Partier sup_rieur
Panier pour
ustensiles
Quatre
Soucoupe
S SOBS
Panierinf_deur
II peut recevoir une vari_t_
d'articles, des assiettes
diner, des bols m_langeurs,
des casseroles et des plats.
De longs articles comme des
ustensiles de cuisine et des
grands plats de service
peuvent etre places sur le
c6t_ gauche.
L'_tag6re Stack-Rack
(certains modeles)
_tant relev6e, des
articles _troits
corr_me des plaques
biscuits ou _ pizza,
peuvent etre places
le long du cote
gauche. Avec
I'_tag_re abaiss_e,
on peut mettre des verres et des
tasses sur deux niveaux.
20
Page 22

Chargemem
Les Tiges pliables (certains
rnod_les) situ_es dans le coin
avant droit, foumissent un
espace pratique pour les
grands articles encombrants
comme les marmites ou bols
m_langeurs.
Pour abaisser les tiges, les pousser soigneusement
hors de chacun des supports et vers le centre du
panier pour les mettre 9 plat.
Paniers pour Ustensiles
Paniers de porte
amovibles pour ustensiles
Pour de meilleurs r_sultats de
lavage, evitez de laisser les
divers _l_ments se coller les
uns aux autres dans le panier.
Placez certains d'entre eux
manches vers le haut et les
autres manches vers le has. Mettez les couteaux
manches vers le haut, puis cuilleres et fourchettes
manches vers le bas.
Panier auxiliaire (certains modules)
Utiliser ce panier suppl_mentaire
darts le partier sup_rieur pour y
charger des articles et ustensiles
divers. Ce panier est _galement
un endroit stairpour charger les
couteaux affC_tes et les articles
pointus.
Desmontaje de la Rejilla Superior
Retirer un panier muni de buttes avec
languette de s_ret_ :
1. Tirez le panier vers vous du 1/3 _'_1/2.
2. Rep_rez les but@es au bout de chaque guide.
Appuyez sur les languettes de st'Jret@situ@es au
centre des buttes et retirez les buttes
completement et tout droit. Assurez-vous de
soutenir le partier au moment de retirer les buttes.
3. Remettez le Buttes
panier
compl6tement et
sortez-le du
lave-vaisselle.
avec
languette
de sdret_
Pour retirer le([s) panier([s) de la porte
1. Attrapez le panier
pour ustensiles par la
poign_e. Faites-le
glisser vers le haut de
la porte.
2. D_gagez le panier des
boutons de retenue en
le soulevant.
Pour remplacer le([s)
panier([s) de la porte
1. Alignez les fentes du
dos du partier avec les
boutons de la porte.
2. Placez le panier pour ustensiles sur les boutons de
retenue.
3. Faites glisser le panier vers le bas de la porte
jusqu'_ ce qu'il soit bloqu#,.
R_installation :
1. Remettez le
partier du
lave-vaisselle en faisant glisser les roulettes
darts les guides.
2. Ins_rez chacune des buttes au bout des guides
de fagon _ ce qu'elles p_n_trent darts les petits
trous situ_s sur les c6t_s des guides.
Le style peut varier
Importante :
L'appareil ne fonctionne
pas correctement si le
raccord du bras de lavage
du panier n'est pas align_
avec I'un des orifices
d'arriv_e d'eau _ I'arribre.
21
Page 23

Utilisationdulave-vaisselle
Eau chaude
Pour des r_sultats de nettoyage et de s_chage
optimaux, I'eau chaude est n_cessaire. La
temperature de reau d'arriv_e doit se trouver entre
49 °C [120 °F) pour activer correctement le d_tergent
et fake fondre la salet_ et la graisse.
Pour verifier la temperature de I'eau _ son arrivee, ouvrir le
robinet d'eau chaude le pills proche du
lave-vaisselle et faire couler reau dans un verre place
darts I'evier. Placer un thermometre 9 confiserie darts le
verre et verifier la temperature Linefois qu'elle s'est
stabilisee.
D tergent
Utiliser un detergent con£u specifiquement pour etre
utilise dans un lave-vaisselle automatique. S'assurer qu'il
n'est pas perime et s'il est en poudre, le ranger dans un
endroit sec et frais _as sous I'evie0.
Quantit_ recommand_e
Une trop faible quantite de detergent entrafnerait de
faibles resultats de lavage, un depot et I'apparition de
taches dus a I'eau dure et un sechage inefficace. Une trop
grande quantite de detergent peut causer un piquage et
un aspect teme permanent.
La mousse peut faire deborder le lave-vaisselle. Dosez
soigneusement le detergent et n'utilisez que des produits
specialement congus pour le lave-vaisselle. La quantite de
detergent dolt etre reduite en presence d'eau douce.
Essayez une autre marque de detergent si la quantite de
mousse reste excessive.
La quantite de detergent _ utiliser est determinee par la
durete de reau et le niveau de salete de la vaisselle. Se
rderer au tableau ci-dessous pour connaftre les
recommandations d'utilisation du detergent.
En cas d'eau extr_mement dure (13 grains par gallon
ou plus*), il est difficile d'atteindre de bons r_sultats
avec n'importe quel lave-vaisselle. Un adoucisseur
d'eau m_canique peut _tre n_cessaire pour
am_liorer la qualit# de reau et I'efficacit_ du
d#tergent et protOger les pi_ces du lave-vaisselle
contre les dommages provoqu_s par reau dure.
Ajouter la quantite recommandee de detergent dans
chaque tasse corr]me il est illustre et fermer le couvercle
du corr_partiment.
Ne pas utiliser de detergent avec le cycle Rinse Only
(Rin£;age seulemen0 (certains modeles). Laisser le
couvercle du distributeur de detergent ouvert Iors du cycle
Rinse Only (certains modeles).
Agent de ringage
12utilisation r_guli_re d'un agent de tin,rage am_liore
le s_chage, r_duit les taches et les d_p6ts de film
ainsi que I'humidit_ & I'int_rieur du lave-vaisselle.
Un distributeur automatique d'agent de rin£)agese trouve
cote du godet de detergent.
Le hublot 9 cOte du capuchon du distributeur indique
quand il est necessaire de remplir le reservoir d'agent de
fingage. Lorsque le niveau d'agent de rin£;age se trouve en
dessous de I'indicateur et que le hublot est presque
transparent, il est temps de remplir le distributeur. V_rifier
le distributeur tous les mois.
Leger 2 cuill_res 9 th6 6 cuill_res 9 th6
Douce (0-4 gpg) Normal 4 cuilleres '_th6 6 cuilleres '_th6
Intense 4 cuill_res _ th6 7 cuill_res _ th6
L6ger 4 cuillSres 9 th_ 6 cuillSres 9 th_
Moyenne (5-9 gpg) Normal 4 cuillSres 9 the 6 cuillSres 9 the
Intense 5 cuillSres 9 th_ 7 cuillSres 9 th_
Dure (10-12 gpg) Tousles 5 cuill_res 9 th6 8 cuill_res a th6
Niveaux
*Votre station locale d'approvisionnement en eau ou tout autre service
competent de votre province, pent vous donner le degr_ de duret_, de
I'eau dans votre region.
Pour ajouter de ragent de
ringage dans le distributeur, ....
toumer le capuchon vers la
gauche pour I'ouvri£ Enlever
le capuchon et verser
I'agent de rin9age dans
Ibuverture. La quantite
d'agent de ringage distribuee au cours du cycle peut etre
reglee en depla£ant le levier 9 I'interieur de la zone du
reservoin La plupart du temps, utiliser le reglage {{2 >>,
recommande par le fabricant. Regler _ la position {{MAX >>
pour une eau dure. Placer le levier n'importe oQ entre ces
deux rep_res pour obtenir les meilleurs resultats. Remettre
le capuchon et le tourner vers la droite pour le fermer.
22
Page 24

Cycles,optionsettemoinslumineux
Cycles
Choisir le cycle qui convient le mieux a la vaisselle en appuyant sur la touche correspondante. (Voir page 19,
Censeils d'utilisation, pour la mani_re de d_buter le cycle.)
Heavy Wash Cycle long pour vaisselle tr6s 132 2 lavages/3 ringages
(Lavage intense} sale.
Normal Wash Cycle moyen pour vaJssellenormale- 97-117 1-2 lavages*/1-2 ringages*
[Lavage normal} est actif avec ce cycle.
Quick Wash Cycle court pourvaisselle peu sale. 82 1 lavage!2 ringages
[Lavage rapide)
Auto Wash remplissages d'eau correspondant
([avage automatiqae) au mieux au niveau de salete de
(terrains modules) chaque charge. Le capteur de
Rinse Only Rince la vaisselle en attente de 9 1 rinqage
(Rincage seulement) prochaines charges.
(eertains mod_les)
Lehombrede remplissagesvaneselonle degr6de saletede chaquecharge.
ment sale. Le capteur de turbidit_
Conga pour choisJr le nombre de 94-128 1-2 lavages*i2-3 ringages*
turbidite est actif avec ce cycle.
Remarques
• Selon la temperature de I'eau, il pourra y avoir une augmentation de la duree du cycle pour amener ]'eau _ la
temperature souhaitee.
• Les durees de cycle indiquees dans I'affichage numerique (certains mod8les) augmentent ou dimimJent en fonction
du niveau de salete de chaque charge, de la temperature de ]'eau et des options selectionnees.
•Seuls les cycles certifies suivants ont ere con(;us pour r@ondre aux exigences d'assainissement NSF (NSF/ANSI 184 -
]ave-vaisse]leresidentiel) : Lavage automatique (certains modeles), Lavage intense, Lavage normal et Lavage rapide.
23
Page 25

Cycles,optionsettemoinslumineux
Options
En plus de choisir un cycle sur la page 23, choisir, parmi les options suivantes disponibles, toutes celles qui seront
n_eessaires selon la charge en cours.
Sanitize
(Lavage sanitaire)
(certains modOles)
Hi Temp Wash La fonction Hi Temp Wash fait en sorte que I'eau soit plus Tous les cycles (_sauf
Heated Dry
(S_chage avec
chaleuO
Delay L'option peut 6tre utilisee pout mettre le cycle automatiquement Tous les cycles
(D_marrage differS) en marche, plus tard. Voir les instructions _ la page 26.
Seulscescyclesont _t_ d6sign6spour r6pondreauxexigencesd'assainissementNSF(NSF/ ANSI 184- lave-vaisseller_sidentiel).
Assainissement de la vaisselle. Lorsque le contr61eur du cycle
reconnait que les bonnes conditions ont ete atteintes,
le t6moin lumineux Sanitized s'allume _ la fin du cycle. Le
lavage assainissant peut ne pas avoir lieu en cas d'interruption
du cycle, de panne de courant ou si la temperature d'arriv_e
d'eau est inferieure _ 49 °C (120 °F).
chaude au cours du cycle de lavage. La fonction High Temp Rinse Only [Rim;age
assure une temp6rature ideale pour des lavages et des sechages seulement])
optimaux. (certains models)
Pour de meilleurs resultats de sechage, selectionner cette option.
Lorsque Heated Dry n'esl pas choisi, il peut 8tre n6cessaire
de s_cher _ la main certains articles comme ceux en plastique
et ceux avec surface non adherente. Plus d'humidit_ peut aussi
rester sur rinterieur du lave-vaisselle. Dans les modeles avec
interieur en plastique, il est normal que de la vapeur s'Schappe de
1'6vent de la porte pendant que la chaleur s6che la vaisselle. De la
vapeur s'_chappera m_me si I'option Heated Dry n'est pas
s61ectionn6e.
Lavage intense*
Lavage normal*
Lavage rapide*
Lavage automatique*
(certains modeles)
Tousles cycles (sauf
Rinse Only) [certains
modeles]
24
Page 26

temoinslumineux
Cycles,options
T moins lumineux/affichage (certains mod_les)
Affichage de la la dur6e d'un cycle est sup6rieure 9 99 minutes. Lesdur_es de cycle apparaissant 9I'affichage
Dur_e restante numerique (certains modules) augmentent ou diminuent selon leniveau de salete de chaque charge, la
(certains modules) temperature de I'eau et les options choisies.
Clean (nettoyage) S'allume _ lafin du cycle et reste allum_ _ moins que la porte ne reste ouverte en continu pendant
(ceriains modhles) 30 secondes.
Drying (s6chage) S'allume durant teute la p6riode de s6chage et s'6teint une fois le cycle termin6.
(certains mod_les)
Washing (Lavage) S'allume duraet routes les portions de lavage et de ringage du cycle.
[certains modbles)
Heating delay S'allume Iorsque le cycle est prolong_ pour chauffer I'eau.
(chauffage suppl_mentaire)
[certains mod_les)
Sanitized S'allunle a la fin du cycle Iorsque toutes les conditions ont 6t6 respectees pour un lavage sanitaire. Le
(Lavage sanitaire) t_,moin lumineux reste allum_ _ moins que la porte ne reste ouverte en continu pendant 30 secondes.
[certains mod_les)
On (Sur) S'allume durant routes les portions de lavage, de ringage et de s_chage du cycle.
]ndique le nombre de minutes approxirnatif restantes dans un cycle. Le symbole {<2H _)apparaft Iorsque
Remarques
Lorsque Sanitize (Lavage sanitaire) est ehoisi, les eycles sent contr61_s pour s'assurer du lavage sanitaire Le t_moin
lurnineux Sanitized (Lavage Sanitaire) ne s'allume pas si les exigences du lavage sanitaire ne sent pas respect_es. Ceci
peut se produire si le cycle est interrompu, en cas de panne de courant ou d'arrivee d'eau _ une temperature inferieure
120 °F (49 °C).
Les temoies lumineux Clean (Nettoyage) et Sanitized (certains modSles) ne se r_allument pas _ la suite d'une panne de
courant et tant que le prochain cycle n'est pas en marche.
25
Page 27

Cycles,optionsettemoinslumineux
Delay CDemarmge differed
I_'option Delay peut _tre utilisde pour mettre le cycle
automatiquement en marche, plus tard, pour rCduire
I'accumulation de chaleur pendant la journde darts la
maison, ou pour b_n_ficier de coC]ts _nerg_tiques
r_duits, si ceci est disponible dans la region. Cette
option est aussi utile pour conserver I'eau chaude,
des p_riodes d'utilisation domestique elev_e (douches,
lessive).
R_glage d'un dOmarrage Diff_re :
1. S4,1ectionner le cycle et les options appropri4,es
pour la charge. Fermer la porte.
2. Appuyer sur la touche Delay et s_lectionner la
dur_e d'attente souhaitee.
3. Le t_moin lumineux Delay et I'affichage du compte
rebours (certains modules) clignoteront jusqu'a
ce que I'on appuie stir la touche START/Cancel
(MISE EN MARCHE/Annulation).
4. Une lois que I'on a appuy_ sur la touche
START/Cancel, le t_moin lumineux s'arr_te de
clignoter et le compte _ rebours commence. Le
tCmoin lumineux Delay restera allum_ jusqu'_'_ la fin
du compte 9 rebours.
5. Le cycle commencera automatk]uement
I'expiration du d_lai d'attente.
Remarque
• Si trente secondes s'_coulent entre un r_glage du
cycle et des options et une pression sur la touche
START/Cancel, le lave-vaisselle se mettra
I'arrCt.
Verrouillage de commandes
(certains mod_les)
Les touches de commande peuvent etre verrouill_es
pour emp_cher toute utilisation non autoris_e. Si cette
fonction est activ_e entre les cycles, le lave-vaisselle
ne peut pas _tre utilis_ jusqu'ao dCverrouillage des
corr]mandes. Au besoin, les corrm]andes peuvent _tre
verrouill_es apr_s le d_marrage d'un cycle ou d'un
d_part diff4,r_.
ROglage du verrouillage des commandes :
1. Appuyer sur la touche Heated Dry (S_chage
avec chaleur) pendant trois secondes.
2. Un t_moin lumineux situ_ _ cote de I'icOne de
verrouillage s'allume Iorsque les commandes sont
verrouill_es.
Annulation :
1. Appuyer sur la touche Heated Dry pendant trois
secondes.
2. Le t_moin lumineux s'_teint.
Remarques
• Si I'on appuie sur la touche d'un cycle ou d'une
option apr_s le verrouillage des cemmandes, le
t_moin lumineux situ_ _ cote de ricOne de
verrouillage clignotera cinq lois. Sur certains
modeles avec I'affichage du compte a rebours, tin
(_L _ clignote _ I'affichage en meme temps que le
t4,moin lumineux de verrouillage.
• Cette option ne verrouille pas la porte,
uniquement les corr_mandes du lave-vaisselle.
Annulation d'un d_marrage diffOr_ :
Lors du compte _ rebours, appuyer stir la touche
Delay de nouveau. Le t_moin lumineux s'_teindra et
le cycle commencera ou reprendra irrm_diatement.
Annulation d'un dOmarrage diff_r_ et d'un cycle :
• Appuyer une fois sur la touche START/Cancel pour
_vacuer I'eau et arreter le lave-vaisselle.
Ou
• Appuyer deux fois sur la touche START/Cancel pour
arr_ter le lave-vaisselle sans _vacuer I'eau.
26
Page 28

Entreflenetnettoyn e
Recommandations d'ordre gbn ral
• L'interieur du lave-vaisselle est normalement
autonettoyant. Verifier periodiquement le fond de la
cuve du lave-vaisselle pour voir si des residus
importants ne sent pas passes 8 travers le filtre.
• Nettoyer le bord de la doublure interieure de la porte
pour enlever routes los eclaboussures de nourriture qui
se seraient produites au cours du chargement.
• Toujours nettoyer dans le sons de la texture de I'acier
• La couleur de certains aliments 8 base de tomate peut
parfois adherer _ certains composants _ I'interieur du
lave-vaisselle et provoquer une deceleration temporaire.
Pour r_duire cet effet :
• Enlever I'exces d'aliments _ base de tomate, de la
vaisselle, avant de la mettre au lave-vaisselle.
• Utiliser le cycle Heavy Wash (Lavage intense] pour de la
vaisselle contenant des aliments _ base de tomate.
inoxydable. Ne pas utiliser de produits contenant du
javellisant ou de racide citrique.
• S'assurer d'utiliser un detergent pour lave-vaisselle qui
contient du chlore pour un meilleur detachage.
...........................iiiiiiiiiiiiiiiiiiiiiiiiiiiiiiiiiiE__iHHHHi""/iiiiiiiiiiiiiiiiiiiiiiiiiiiiiiii_iiiiiiiiiiiiiiiiiiiiiiiiiiiiiiiiiiiiiiiiiiiiiiiiiiiiiiiiiiiiiiiiiiiiii_iiiiiiiiii=ii_iiii...................iiiii_____iiiiiiiiiiiiii_iiiiiiiiii[iiiiiiiiiiiiiiiiiiiiiiiiiiiiiiiiiiii_iiiiiiiiiii_iiiiiiiiiiiiiiiiiiiiiiiiiiiiiiiiiiiiiiiiiiiiiiiiiiiiiiiiiiiiiiiiiii_iiiiii_iiiiiiiiiiiiiiiiiiiiiiiiiiiiiiiiiiiiiiiiiiiiiiiiiiiiiiiiiiiii_i=ii_"i_..................................................._ _______ ___ ____iiiiiiiiiiiiiiiiiiiiiiiiiiiiiiiiiiiiiiiiiiiiiiiiiiiiiiiM_iiiiiiiiiiiiiiiiiiiiiiiiiiiiiiiiiiiiii...........................................................................................................__________________________________________________________________________________________________________....
Ext_rieur standard Legere _ mod_r_,e Linge souple et humide et produit de nettoyage liquide
pulv_risen Ne/]as utiliser de poudres abrasives ou de
tampons de nettoyage.
Ext_rieur en acier
inoxydable
[certains mod_les)
Lavage quotidien et salete leg_re
Linge souple eu Sponge et un des produits suivants :
• Detergent doux et eau
• Solution de vinaigre blanc et d'eau
• Preduit de netteyage pour verre et surface fermule
409_ ou produit semblable multi-surfaces.
• Nepas utiliser de produits contenant du javellisant ou
de racide citrique.
Faire suivre par un rin£age et un sechage.
ModSree 9 importante
Tracesde doigt eli marques / brillant 9 restaurer
D_coloratien
Int_rieur Legere _ mod6ree
Deceleration eu taches a base de temate
%es noms de marque sent les marques de commerce des fabricants respectifs.
**Composer le 1-877-232-6771 I_.U.et 1-800-688-8408 au Canada pour une commande.
Linge souple ou @onge humidifiee et Ben Ami*. Faire
suivre par un rin£age et un s_!chage.
Linge souple et produit a pulvSriser Stainless Steel
Magic**.
Linge souple ou _,ponge humidifi_e et produit de
netteyage Cameo Stainless Steel Cleane¢'. Rincer
immediatement et sScher.
Linge souple ou eponge humide.
Passer du d_tergent pour lave-vaisselle a un produit
base de chlore.
Rangement/d placement
Remplir le godet de detergent avec un detergent
rafrafchissant pour lave-vaisselle ou du bicarbonate de
soude et selectionner le cycle Normal Wash (Lavage
normal), Attendre la fin du cycle du lave-vaisselle.
Former ensuite I'arrivee d'eau et laisser le lave-vaisselle
evacuer I'eau. Pour vidanger : appuyer sur la touche
START/Cancel (MISE EN MAROHE/Annulation) une
lois, pour mettre en marche le lave-vaisselle. Appuyer sur
cette touche de nouveau pour mettre en marche
revacuation. R@eter deux fois I'operation d'evacuation
pour s'assurer que la plus grande partie de I'eau a ere
evacuee. Enfin, debrancher le lave-vaisselle et ouvrir la
porte.
Lorsque ron coupe I'alimentation en eau de la maison, il
faut egalement couper I'alimentation en eau du lave-
vaisselle.
27
Page 29

D6pannage
VI RIFIER LES POINTS SUIVANTS POUR I CONOMISER TEMPS ET ARGENT•
Le lave-vaisselle ne se
remplit pas
Le lave-vaisselle n'_vacue • Si le lave-vaisselle est raccorde _ un broyeur 9 dechets, s'assurer que I'opercule
pas I'eau/Eau clans le has de defon_able a ere enleve de I'arrivee d'eau du broyeur.
la cove • Verifier qu'il n'y aaucune obstruction de nourriture dans le tuyau d'evacuation ou le broyeur.
Le lave-vaisselle ajoote de • C'est normal. Le capteur (certains modeles) de la pompe doit rester sous I'eau, un leger
I'eau & la fin do cycle remplissage d'eau est donc ajoute apres la derni6re evacuation du cycle.
Le godet _ d6tergent n'est • Verifier que le cycle est termin&
pas vide • S'assurer que le distributeur n'est pas bloqu&
Le lave-vaisselle semble
bruyant
• Appuyer sur START/Cancel [MISE EN MARCHE/Annulation) pour mettre le
lave-vaisselle en marche.
• S'assurer que la porte est correctement ferm6e.
• S'assurer que le robinet d'eau est ouvert.
• V6rifier que la touche est correctement s61ectionnee pour un cycle.
• Verifier les fusibles ou disjoncteurs de I'habitation.
• Verifier que le tuyau d'arrivee d'eau n'est pas entortill&
• Verifier qu'il n'y a pas de d@6t _ la soupape d'arrivee d'eau et la nettoyer si necessaire.
• Verifier que le tuyau d'evacuation n'est pas entortille.
• Verifier les fusibles ou disjoncteurs de I'habitation.
• Verifier que le cycle est termin&
• Utiliser un detergent non perime, entrepose dans un endroit frais et sec.
• II est normal d'entendre un sifflement de la soupape d'eau durant le remplissage.
• Des bruits de circulation d'eau sont normaux.
• Un bruit sourd peut etre un bras de lavage heurtant un article qui d@asse des paniers.
Redisposer la vaisselle pour qu'elle ne gene pas le bras de lavage.
• Des craquements et des grincements peuvent se faire entendre Iorsque la lame
interne du broyeur coupe des produits durs, comme des noyaux, des noix, etc.
• Un bourdonnement est normal au cours de [evacuation.
• Un bruit de claquement est normal Iorsque le couvercle du godet _ detergent frappe
la doublure de porte Iorsque la porte du lave-vaisselle est ouverte _ la fin du cycle.
• Une installation appropriee peut diminuer le niveau de bruit.
Cycle trop long (le t_moin
lumineox Chauffage
supplernentaire reste allom_
[certains rnodbles])
Le lave-vaisselle d_gage
ane odeor
Le lave-vaisselle fuit
*Les nomsde marquesent les marquesde commercedes fabricants respectifs Suite...
• Les touches Hi Temp Wash (Lavage & haute) ou Sanitize (Lavage sanitaire)
(certains mod61es) ont _t6 selectionn6es et le cycle est prolong6 pour chauffer I'eau.
• V6rifier que la temp@ature d'arrivee d'eau est de 4g °C (120°F).
• Lancer un cycle Rinse Only (Rin(_ageseulemen0 (certains mod61es) si on laisse de la
vaisselle dans le lave-vaisselle.
• De nombreux lave-vaisselle d6gagent une odeur de neuf Iorsqu'ils sont installes pour
la premiere fois. Cette odeur se dissipe avec I'utilisation.
• II se peut que le lave-vaisselle n'evacue pas I'eaucorrectement. (Voir la section <{Le
Lave-vaisselle n'6vacue pas I'eau >_.)
• En cas d'odeur forte, mettre du bicarbonate de soude des deux c6tes du godet de
detergent. S61ectionner Quick Wash (Lavage rapide) et laisser circuler I'eau
pendant environ 10 minutes. Interrompre le cycle en d6verrouillant la porte et en la
laissant ouverte pendant la nuit. Remettre le lave-vaisselle en marche en refermant la
porte et en le laissant terminer le cycle. On peut aussi utiliser un produit de nettoyage
de lave-vaisselle tel que le nettoyant Jet-Dry*.
• V@ifier que le lave-vaisselle est de niveau. (Se reporter aux instructions d'installation.)
• De la mousse peut d6border du lave-vaisselle. Mesurer soigneusement la quantit6 de
detergent et utiliser seulement des d6tergents congus pour lave-vaisselle. II faut moins
de detergent dans de I'eau douce. Si la mousse subsiste, essayer une autre marque.
• Suivre soigneusement le mode d'emploi concernant I'ajout d'un article oubli6 (page lg).
• Pour 6viter toute fuite d'agent de ringage du distributeur, s'assurer que le couvercle
est correctement ferme.
28
Page 30

Depanna e
La dur_e affich_e augmente ou * C'est normal Iorsqu'un cycle Auto Wash (Lavage automatique) (certains modeles)
diminue mpidement de plusieurs ou Nornlal Wash [Lavage normal) est selectionn6 et que le lave-vaisselle d6cide de
minutes (certains mod_les) passer ou d'ajouter une 6vacuation ou un remplissage.
Clignotement des t_moins
lumineux
Les verres sent ternes/tachet_s
• L'affichage du compte _ rebours (certains modeles) clignote apres la selection du
cycle et jusqu'_ ce que ron appuie sur la touche START/Cancel
(MISE EN MAROHE/Ammlation).
• L'affichagedu compte _ rebours (certains modeles) et le temoin lumineux de
demarrage differe clignotent apr6s la s61ectiond'Lme DELAY [dur_e de d_marrage)
diff6r6 et jusqu'_ ce que I'on appuie sur la touche START/Cancel.
• Tousles temoins lumineux actifs de raffichage clignotent si la porte est ouverte
pendant un cycle ou un d6marrage differe en cours.
• Le t6moin du cycle selectionn6 clignote si I'on essaie de modifier le cycle apr_s un
verrouillage des commandes.
• Le t6moin lumineux de verrouillage clignote et le corr/pte _ rebours (certains modules)
affiche un <<L}>si I'on appuie sur une touche quand les commandes sont verrouill6es.
• Selectionnez le Hi Temp Wash (Lavage & haute) temperature.
• V6rifier la temp6rature de I'eau. La temp6rature d'arriv6e d'eau doit se trouver entre
49 °C (120 °F].
• Toujours utiliser un agent de ringage.
• S'assurer que le depot terne peut 6tre. enleve en faisant tremper rarticle dans du vinaigre
blanc pendant environ 5 minutes. Si c'est le cas, le probl6me est dO_ de I'eau dure.
R6gler la quantit6 de detergent _ utiliser pour correspondre _ la duret6 de I'eau (page 22).
S'assurer que le detergent est non p6rim_, correctement rang6 et de haute qualit&
• Si on ne peut pas enlever la CoLmhe terne, cela 6tant le resultat d'une attaque
chimique. Une 6rosion de la surface du verre est peut-6tre causee par I'eau trop
chaude, par rutilisation d'une quantite excessive de d6tergent ou par LIn prelavage.
Pour agir, le detergent a besoin de salet& Si une attaque chimique se produit, le verre
est endommage en permanence. Pour eviter toute attaque future, ajuster la quantit6
de d6tergent pour qu'elle eorresponde 9 la duret6 de reau, arr6ter le pr61avage et
n'utiliser les options de chauffage de reau que Iorsque la temperature d'arrivee d'eau
est inferieure _ 49 °C (120 °F).
De la salet_ reste sur la
vaisselle
*Les norns de rnarque sont les marques de commerce des fabricants respectifs.
• V6rifier la temp6rature de I'eaLh La temperature d'arrivee d'eau doit se trouver entre
49 °C (120 °F).
• Laisser couler de reau chaude dans un _vier avant de mettre le lave-vaisselleen marche.
• S61ectionnez le Hi Temp Wash temperature.
• V6rifier la durete de reau et regler la quantit6 de dStergent en cons6quence (page 22).
• Utiliser un detergent non p_rime, rang8 dans LInendroit frais et sec.
• SSlectionner le cycle approprie au niveau de salet8 (page 23).
• S'assurer que le connecteur du bras de lavage du panier sup6rieur est correctement
aligne avec un des orifices d'arrivSe d'eau (page 21).
• Loger les articles pour qu'ils ne bloquent pas les bras du lave-vaisselle (pages 20-21)
• Dans le panier _ couverts, Ioger les couteaux avec le manche vers le haut et les
cuilDres et fourchettes avec le manche vers le bas.
• Ne pas placer les verres sur les tiges.
• Avant le chargement, nettoyer les residus de nourriture et le d@6t provenant de
I'utilisation des ustensiles avec des pates, du riz et de la farine d'avoine. II faut plus
d'6nergie pour nettoyer ce type de r6sidu que le reste de la charge.
Suite...
29
Page 31

Depannage
Les articles laves dans le
lave-vaisselle [ou la cuve du
lave-vaisselle elle-m_me) sont
tachbs/dbcolor_s
Articles incorrectement sbchbs/
presence d'humiditb & I'intbrieur
du lave-vaisselle aprbs le cycle
de s_chage
• Les ustensiles ou les marmites en aluminium peuvent laisser des marques Iorsqu'elles
touchent d'autres articles. Laisser un espace entre ces articles.
• Des depets de fer dans I'eau peuvent laisser un film jaune, orange ou brun sur la
vaisselle ou la cuve du lave-vaisselle. Un filtre peut etre necessaire. Verifier avec votre
compagnie d'approvisionnement en eau.
• S@arer I'argenterie ou I'argenterie plaquee de I'acier inoxydable. Ces metaux peuvent
etre endommages par contact avec I'un I'autre pendant le lavage.
• Les sauces _ base de tomate peuvent colorer la cuve (page 27). Si la tache est legere,
laisser la porte ouverte pour oxyder la tache. Utiliser un detergent qui contient du chlore
pour mieux combattre les taches.
• Certains detergents de lave-vaisselle peuvent tacher I'argent. Essayer une autre marque
de detergent.
• S'assurer que I'option Heated Dry (Sechage b chaud) est selectionnee.
• Des gouttes d'eau peuvent se former sur la porte interieure au cours du processus de
sechage.
• Utiliser regulierement un agent de ringage tel que Jet Dry* ou Cascade*. Pour
arr/eliorer le sechage, placer le selecteur d'agent de ringage b la position <{MAX _.
• Verifier la temperature de I'eau.La temperature d'arrivee d'eau doit se trouver entre
49 °C (120 °F).
• Selectionner roption Sanitize [Sanitaire) et/ou Hi Temp Wash (Lavage b haute)
(certains modeles).
• Augmenter la quantite de detergent pour correspondre L1la durete de I'eau (page 22).
• Loger les articles correctement (pages 20-21].
• Les articles en plastique et ceux _ surface non adh@ente sont difficiles _ secher parce
qu'ils comportent une surface poreuse qui tend _ conserver des gouttes d'eau. II
pourrait etre necessaire de les secher _ la main.
• Les verres et les tasses avec un fond concave retiennent I'eau et necessitent Lm
sechage _ la main. Placer ces articles sur le cete incline du panier pour ameliorer les
resultats.
Vaisselle bbr_ch_e
Le t_moin lumineux Sanitized
[Lavage sanitaire) ne
s'allume pas _ la fin du cycle
[certains modbles)
*Les noms de marque sont les marques de commerce des fabricants respectifs.
• Loger la vaisselle en fonction des instructions pour que les articles ne se touchent pas
(page 20-21].
• Le lavage de cristal ou de porcelaine fine darts le lave-vaisselle n'est pas recommande.
• Ne pas placer de verres sur les tiges.
• Ne pas surcharger le lave-vaisselle.
• L'option Sanitize n'a pas ete selectionnee.
• Le lavage sanitaire ne peut etre effectue uniquement qu'avec les cycles Auto Wash
(Lavage automatique) (certains modeles), Heavy Wash (Lavage intense), Normal Wash
(Lavage normal) ou Quick Wash (Lavage rapide).
• Le lavage assainissant peut ne pas avoir lieu en cas d'interruption du cycle, de panne
de courant ou si latemperature d'arrivee d'eau est inferieure _ 49 °C (120°F).
30
Page 32

Guru.tieetService
LESEULETUNIQUERECOURSDU CLIENTEN
VERTUDECETTEGARANTIELIMITEEESTLA
REPARATIONDU PRODUITCOMMEDt_CRITE
PRECt_DEMMENT.LESGARANTIES
IMPLICITES,Y COMPRISLESGARANTIESDE
QUALITEMARCHANDEOUD'ADAPTATIONA
UN USAGEPARTICULIER,SONTLIMITEESA
UN AN OU A LA Pt_RIODELA PLUSCOURTE
PERMISEPARLA LOLMAYTAGCORPORATION
NESERAPASTENUERESPONSABLEDES
DOMMAGESDIRECTSOU INDIRECTS.
CERTAINSETATSETCERTAINESPROVINCES
INTERDISENT[EXCLUSIONETLA LIMITATION
DESDOMMAGESDIRECTSOUINDIRECTS
AINSI QUELESLIMITATIONSSURLA DUREE
DESGARANTIESIMPLICITESDE QUALITE
MARCHANDEOUD'ADAPTATIONA UN
USAGEPARTICULIER.IL ESTDONCPOSSIBLE
QUECESLIMITATIONSNES'APPLIQUENTPAS
A VOUS.CETTEGARANTIEVOUSCONFERE
DESDROITSJURIDIQUESSPECIFIQUESETIL
SEPEUTQUEVOUSAYIEZD'AUTRESDROITS,
QUlVARIENTD'UNETAT[',L'AUTREOU D'UNE
PROVINCE,A,EAUTRE
Ne sont pas couverts par ces garanties
1. Lesproblemes et dommages resultant des situations suivantes :
a.Mise en service, livraison ou entretien effectues incorrectement.
b.Toute reparation, modification, alteration et tout reglage non autorises par le
fabricant ca par un prestataire de serviceapres-vente agree.
c. Mauvais emploi, emploi abusif, accidents, usage non raisonnable, ca
catastrophe naturelle.
d.Courant electrique, tension, alimentation electrique ou en gaz incorrects.
e.Reglage incorrect d'une commande.
2. Lesgaranties ne peuvent etre honorees si les numeros de serie d'origine ont
ete enleves, modifies oune sont pasfacilement lisibles.
3. Ampoules, filtres _ eau et filtres b air.
4. Les produits achetes b des fins commerciales ou industrielles.
5. Lesfrais ded@annage ou de visite pour :
a.Correction d'erreurs de miseen service. Pour les produits necessitant une
ventilation, un conduit metallique rigide doit etre utilis&
b.Initiation de I'utilisateur _ I'emploi de I'appareik
c. Transport de I'appareil chez le r@arateur et retour de I'appareil chez
I'utilisateur.
6. Tout aliment perdu en raison de pannes du rdrigerateur ou du congelateur.
7. D@enses de d@lacement et de transport pour la reparation du produit dans
des endroits eloignes.
8. Cette garantie n'est pasvalide _ I'exterieurdes Etats-Unis et du Canada.
Corr/muniquez avec votre detaillant pour savoir si une autre garantie
s'applique.
9. Dommages indirects ou accessoires subis par toute personne b la suite d'une
quelconque violation des garanties. Certains Etats ou provinces ne permettent
pas I'exclusion ou la limitation de responsabilite en ce qui
concerne les dommages directs ou indirects. L'exclusionci-dessus peut en
consequence ne pas s'appliquer _ votre cas.
Si vous avez besoin d'aide
Consultez d'abord la section sur le d@annage dans le manuel d'utilisation et
d'entretien, puis appelez le detaillant de qui vous avezachete votre appareil ou le
service _ la clientele de Maytag Services, LLC au 1-800-688-9900 aux Etats-Unis
et all 1-800-688-2002 all Canada pour savoir ot] troLrverun r@arateur autorise.
• Veillez b conserver lafacture d'achat pour justifier de la validite de la
garantie. Pour d'autres renseignements concernant les responsabilites du
proprietaire _ I'egard du service sous garantie, voir le texte de la GARANTIE.
• Si le detaillant ca I'agence de service apres-vente ne peut resoudre le
probleme, ecrivez b Maytag Services, LLC L1I'adresse suivante : CAIR"
Center, RO. Box 2370, Cleveland, TN 37320-2370 Etats-Unis, ca appelez au
1-800-688-9900 aux I_tats-Unis ou au 1-800-688-2002 au Canada.
• Les guides d'utilisation, les manuels de service et les renseignements sur
les pieces sont disponibles aupres du service _ la clientele de Maytag
Services, LLC.
Remarques : Veillez _ foumir I'infurmation suivante Iorsque vous communiquez
avec nous au sujet d'un probleme :
a. Vos nom, adresse et numero de tel@hone;
b, Numero de modele et numero de serie de rappareil;
c. Nom et adresse du detaillant avec la date I'appareil achete;
d, Description detaillee du probleme observe;
e. Preuve d'achat (facture de vente).
31
Page 33

Lavavajillas
Seguridad ......................... 33
Lo Que Puede y No Puede
ser Lavado .......................... 34
Sugerencias de
Funcionamiento ..................... 35
Carga del Lavavajillas ............ 36-37
@
Uso del Lavavajillas ................. 38
Ciclos, Opciones
y Luces ......................... 39-42
Cuidado y Limpieza ................. 43
Localizaci6n y Soluci6n
de Averias ...................... 44-46
GaranUa y
Servicio ................. Oltima P_gina
Page 34

Seguridad
Lo que necesita saber sobre
las instrucciones de seguridad
Lasadvertencias e instrucciones importantes sobre seguridad
que aparecen en este manual no est_n destinadas a cubrir
todas las posibles circunstancias y situaciones que puedae
ocurrir. Se debe ejercer sentido comt3n, precauciOn y cuidado
cuando instale, realice mantenimiento o haga funcionar el
lavavajillas.
Siempre pOngaseen contacto con su fabricante si surgen
problemas o situaciones que usted no comprenda.
Reconozca los Simbolos, Advertencias
y Etiquetas de Seguridad
Instrucciones Importantes de
Seguridad
1. Lea todas las instrucciones antes de usar el lavavajillas.
2. Use el lavavajillas solamente para la fueeiOn a que fue
destinado.
3. Desenchufe el lavavajillas antes de efectuar cualquier
reparaciOn.
4 Para evitar el peligro de choque elOctrico, los costados y
la parte trasera debe estar encerrada y los paneles
delanteros deben estar instalados antes de enchufar el
lavavajillas. Consulte las instruceiones de instalacidn para
los procedimientos apropiados de puesta a tierra.
5. A fin de evitar sobrecarga elOctrica, conecte el
lavavajillas a Lmcircuito de suministro elOctrico
debidamente protegido y de capacidad sufieiente.
6 No se debe permitir que los ni_os hagan funcionar o
jueguen en el lavavajillas o alrededor del mismo.
Z A fin de reducir el riesgo de sufrir una lesion cuando se
est_ cargando el lavavajillas, los art[eulos puntiagudos o
afilados deben colocarse con los mangos hacia arriba
Adem_s, coloque los art[culos afilados de modo que no
vayan a daiiar la junta de la puerta.
8. No toque el elemento calefactor que se encuentra en el
fondo de la tina durante o al tOrmieo de Lmcielo, pues
estard ealiente.
9 Use solamente detergentes y aditivos de enjuague
disefiados exclusivarnente para uso en lavavajillas
domesticos automdticos. Nunca use en el lavavajillasjab6n,
detergente para lavar ropa ni detergente de lavar a mano.
Mantenga estos produetos fuera del aleance de los ni_os.
10. No se siente, ni se pare o haga uso abusivo de la puerta
o de los soportes de los platos del lavavajillas
11 Bajo ciertas condieiones, se puede producir gas
hidrOgeno en un sistema de agua caliente que no ha
sido Lisadodurante dos semanas o rods.El hidrSffeno
es un gas explesive. Si el sistema del agua caliente no
ha sido usado durante tal per[odo, abra todas las Ilaves
del agua caliente y deje que el agua escurra durante
varios minutos para hacer salir el gas hidrOgeno
acumulado. Debido a que el gas es inflamable, no fume
ni LlSeuna llama abierta durante este proceso.
12. No lave art[culos de pl_stico a menos que estOn
marcados 'Yesistentes al lavavajillas" o algo similar. Para
los art[culos de pl_sticos que no estOn marcados,
verifique las recomendaciones del fabricante.
13. No altere los controles.
14. A fin de evitar los riesgos de que los nifios queden
atrapados o se afixien dentro del lavavajillas, siempre
retire la puerta del compartimiento del lavado cuando
descarte o ponga fuera de servicio un lavavajillas antiguo.
15. Tenga cuidado cuando este sacando la vajilla limpia del
lavavajillas. Los platos pueden estar calientes si Io hace
inmediatamente despuOs de haberse completado el ciclo.
16. Los lavavajillas de uso dom_stico no hart sido disefiados
para LISOen restaurantes.
17. Para evitar da_os causados por agua o moho, verifique
las conexiones de las mangueras de admisiOn y drenaje
con frecuencia para asegurarse de que no haya escapes.
Los productos que tienen la etiqueta (_ han sido
aprobados por Underwriter's Laboratones, Inc. - aquellos
que tienen la etiqueta de la CSA han sido aprobador por la
AsociaciOn de Normas Canadienses. Sin embargo, al igual
que con cualquier otro equipo que LISaelectricidad y piezas
m6viles, siempre existe LIeriesgo potencial.
Conserve estas Instrucciones
para Referencia Futura
33
Page 35

LoQuePuede¥noPuedeSerLovodo
La mayorfa de los servicios de mesa, utensilios de cocina y cubiertos pueden ser lavados en el lavavajillas.Consulte con elfabricante.
Aluminio
Hierro Fundido
Loza/Cer_imica
Cristal Si, excepto si es una Siempre siga las recomendaciones del fabricante antes de lavar.
Filtros No se recomienda. Pueden dejar un depOsito negruzco o manchar el interior del
Vidrio Si Un tipo de vidrio especial Ilamado 'vidrio lechoso' puede ponerse
Platos enchapados No Se descolorar_n.
en ore
Peltre, Esta_o No
PI;istieos Sf, en la rejilla Siempre siga la recomendaci6n del fabricante antes de lavan Los
Aeero Inoxidable Si Si no Io va a lavar inmediatamente, use un ciclo 'Rinse Only'
Plata de Ley o No, si tiene Siempre siga la recomendaci6n del fabricante antes de lavan Si
Metal Plateado "oscurecimiento" no Io va a lavar inmediatamerlte, use un ciclo 'Rinse Only'
Articulos de No La madera puede combarse, agrietarse o perder su colon
Madera
Si, excepto cuando es
aluminio anodizado.
No Se deterior4 el templado y el hierro se oxidar4.
Si, excepto si es una Siempre siga las recomendaciones del fabricante antes de lavar.
antig_Jedad o est4 Las antigiiedades pintadas a mano o los motivos en esmalte se
pintada a mano. descolorar_n. Los adomos en hoja de horo se descolorar4n.
anti-g[Jedad o cristal Algunos tipos de cristales emplomados pueden marcarse si se
delicado, lavan con frecuencia.
superior; excepto los pl4sticos varfan en su capacidad para soportar el agua caliente y
articulos de pl4stico los detergentes. Por esta razOn, los articulos de pl4stico
desechables, desechables no son resistentes al lavavajillas.
comercial. (modelos selectos). El contacto prolongado con alimentos que
El agua caliente y los detergentes pueden afectar el acabado.
lavavajillas.
arr_arillo si se lava continuamente en el lavavajillas.
(Enjuague Solamente) [modelos selectos). El contacto prolongado
con alimentos que contengan sal, vinagre, productos 14cteos o
jugos pueden da_iar el acabado.
contengan sal, 4cido o sulfuro 01uevos, mayonesa y mariscos)
pueden dai_ar el acabado. El "oscurecimiento "comercial puede
ser quitado con detergente.
34
Page 36

SuSerenciasdeFuncionamiento
Antes de Comenzar
• No enjuague los platos antes de colocarlos en el
lavavajillas. Solamente retire los huesos y los
restos de alimentos grandes.
• Si el lavavajillas est_ conectado a un triturador de
desperdicios, asegtirese de que el triturador est_
vacio antes de poner en marcha el lavavajillas.
• Limpie las manchas de alimentos a base de
tomates (ver p_gina 43).
• Retire los testes de ciertos alimentos (tales como
mostaza, mayonesa, jugo de lim6n, vinagre, sal o
aderezos) de los cubiertos de acero inoxidable tan
pronto como sea posible. Estos alimentos pueden
causar oxidaci0n y picaduras si se dejan en contacto
con la superficie por un perfodo de tiempo prolongado.
Funcionamiento del Lavavajillas
1. Despu_s de colocar los artfculos en el lavavajillas y
agregar el detergente, seleccione el ciclo y las
opciones deseadas oprimiendo las teclas
correspondientes. Se iluminar_n las luces
indicadoras del ciclo y de las opciones
seleccionadas. Para cancelar una opciOn, optima
nuevamente la tecla de la opciOn.
2. Para comenzar un ciclo, cierre la puerta con seguro
y luego oprima una vez la tecla 'START/Cancer
(PUESTA EN MARCHA/Cancelar). Despu_s de
una pausa, el lavavajillas se comenzar_ a Ilenar. La
cuenta regresiva desplegada (modelos selectos)
comenzar_ a destellar hasta que se optima
'START/Cancel'.
Nota
• Si no se oprime 'START/Cancel' dentro de 30
segundos de haber seleccionado el ciclo, el
lavavajillas se apagar&
3. Para cancelar un cicIo en curso, oprima una vez la
tecla 'START/Cancel'. El lavavajillas se desaguar_
y luego se apagar& Para apagar el lavavajillas sin
desagOe, oprima dos veces la tecla 'START/
Cancel'. Para evitar cambios inesperados de ciclo
o de opciones, estas selecciones quedan
"bloqueadas" despu_s de I minuto.
Nota
• Si se oprime una tecla despu_s que los controles
han sido 'bloqueados_ la luz situada sobre el ciclo
en curso destellar_ tres veces.
Come Agregar un Articulo
Olvidado
Para una mejor limpieza, el articulo olvidado debe ser
agregado a corrfienzos del ciclo.
1. Sujete la manija de la puerta y desenganchela sin
abrirla completamente. Todas las luces destellar_n
indicando que el ciclo se ha suspendido.
2. Espere que el agua termine de circular.
3. Abra la puerta y agregue el articulo.
4. Cierre bien la puerta. Las luces dejar_n de destellar
cuando la puerta est_ debidamente cerrada.
Despu_s de una leve demora, el ciclo se reanuda
autom_ticamente desde el punto de interrupciOn.
Notas
• Si se abre la puerta durante el funcionamiento
un ciclo, puede haber una demora de 30
segundos antes de que la lavadora reanude el
ciclo despu_s de que se cierra la puerta.
• No se recomienda la interrupci0n prolongada del
ciclo de lavado.
de
El lavavajillas recuerda el Oltimo ciclo usado, por Io
tanto no debe programar el ciclo cada vez. Para
poner en marcha el ]avavajillas usando el mismo
cic]o y las mismas opciones seleccionadas en un
lavado anterior, simplemente oprima la tecla
'START/Cancel'.
35
Page 37

CargadelLavavajillas
Recomendaciones Generales
([Las caracteristicas de las rejillas varian segtin el
modelo)
• Los artfculos pueden centrarse detrds de un soporte
o colocarse en _ngulo para aprovechar el espacio.
• Evite bloquear o impedir que los brazos rociadores
giren libremente. No deje que los articulos
sobresalgan de las rejillas.
• Dirija las superficies sucias de los articulos hacia el
centro del lavavajillas.
Para obtener mejores resultados con el lavado de la
vajilla, siga estas pautas para determinar cual es la
mejor distribuci6n de sus articulos.
Cubiertos para 10 Personas
ires
platillos
debajo del
estante
RejUla Superior Rejilla Inferior
Cestillas de
los Utensilios
Rejilla Superior
Los vasos, tazas, copas, pl9sticos livianos, platos,
tazones, ollas, utensilios de mangos largos, etc. no
deben ser colocados en esta rejilla. No coloque los
vasos sobre los soportes
El soporte 'Stack Rack'
Orlodelos selectos]
situado en el lado
derecho de la rejilla
superior puede
doblarse hacia arriba o
hacia abajo para
facilitar la carga de la vajilla. DOblelo hacia abajo para
acomodar los cuchillos de mango largo, esp9tulas y
cucharas o articulos cortos tales como tazas o vasos de
jugo. ColOquelo hacia arriba para articulos rods altos
tales como vasos, tazones, platos, etc.
El borde del soporte
'Stack Rack' (_modelos
selectos] ha sido
disdiado para sujetar
las copas en su hgar.
Las copas m_s altas
quedar_n mejor en el
lado derecho pues la
rejilla superior es m_s profunda en ese lado.
Cubiertos para 12 Personas
Cuatro
platillos
debajo del
estante
RejUla Superior
Cestillas €lc
los Utensilios
Rejilla Inferior
Rejilla Inferior
En esta rejilla se pueden
acomodar una variedad de
articulos tal como piatos de
servir, tazones, ollas y
cacerolas y bandejas de
homean
Los articulos altos, tales
como moldes de
hornear y bandejas
grandes, pueden ser
colocadas en el
costado izquierdo.
Con el soporte
'Stack-Rack'
(_modelos selectos)
levantado, se
pueden colocar
artfculos delgados como bandejas de hornear o
bandejas de pizzas a Io largo del costado izquierdo.
Con el soporte hacia abajo, se pueden acomodar dos
niveles de vasos y tazas.
36
Page 38

CargadelLavavajillas
Los Soportes Abatibles
0rlodelos selectos) situados
en la esquina delantera
derecha proveen espacio
conveniente para artfculos
grandes y voluminosos tales
cort]o ollas y cacerolas o
tazones grandes.
Para bajar los soportes abatibles, empuje cada soporte
hacia el centro de la rejilla dej_ndolos en posiciOn
plana.
Cestas de los Utensilios
Cestas de utensilios removibles de la puerta
Para obtener los mejores
resultados de la limpieza, evite
que los artfculos queden juntos
colocando algunos de ellos en la
cesta con las manijas hacia
arriba y otros con las manijas
hacia abajo. Coloque los
cuchillos con el mango hacia
arriba y las cucharas y tenedores
con los mangos hacia abajo.
Para sacar la(s) cesta(s) de la puerta
l.Sostenga la cesta de
utensilios por la manija.
Deslfcela hacia la parte
superior de la puerta.
2. Levante la cesta para
desengancharla de las
perillas de fijaciOn.
Para volver a instalar
la(s) cestaCs) en la
puerta
1. Alinee las rendijas en la parte trasera de la bandeja
de utensilios con las perillas en la puerta.
2. Asiente la cesta de utensilios en las perillas de
fijaciOn.
3. Deslice la cesta hacia la parte inferior de la puerta
hasta que encaje en su lugar.
Cesta Auxiliar [modelos selectos)
Use esta cesta adicional en la
rejilla superior para acomodar
articulos miscel_neos y
utensilios. Este tambi_n es un
lugar seguro para colocar
cuchillos afilados y artfculos
puntiagudos.
Desmontaje de la Rejilla Superior
La rejilla superior puede ser retirada cuando sea
necesario colocar articulos altos o de gran tama_o en
la rejilla inferior. Retire todos los articulos de la rejilla
antes de sacarla.
Pare retirar la rejilla con topes de bloqueo de
lengiieta (modelos selectos):
1.Saque la rejilla entre 1/3 y 1/2 de su extension.
2. Ubique los topes de la rejilla al final
de cada riel. Apriete la lengQeta en el medio del
tope y tire del tope de la rejilla derecho hacia
afuera. Tenga cuidado de apoyar la rejilla mientras
retira los topes.
3. Saque
corr_pletamente la
rejilla de sus rieles
y retirela del
lavavajillas.
Para volver a
instalar:
l. Vuelva a instalar la rejilla del
lavavajillas colocando las ruedas en
los rieles.
2. Empuje cada tope de la rejiila directamente
hacia adentro del extremo del riel hasta
que encaje en el agujero pequefio ubicado en el
costado del riel.
El estilo varla
Importante:
El lavavajillas no
funcionar_i en forma
debida si la conexiOn del
brazo rociador instalado
en la rejilla no est_i
alineada con uno de los
agujeros de entrada del
agua en la pared trasera del lavavajillas.
Rejilla mientras
retira los topes
37
Page 39

UsodelLavavajillas
Agua Caliente
Para una limpieza y secado 6primes, es necesario
usar agua caliente. La temperatura del agua de
entrada debe set entre 120°F (49°1:;) para activar
bien el detergente y derretir la suciedad de
alimentos grasosos.
Para verificar la temperatura del agua de entrada, abra
la Ilave del agua caliente m_s cercana al lavavajillas y
recoja agua en un vaso en el fregadero. Coloque un
term6metro en el vaso de agua y verifique la
temperatura cuando deje de subir.
Detergente
Use un detergente disefiado espedficamente para
lavavajillas autom_ticos. AsegQrese de que est_ fresco.
Guarde el detergente granulado en un lugar seco y frfo
(no debajo del ffegadero).
Cantidad Recomendada
Si se usa muy poco detergente se afecta la calidad de la
limpieza, quedan manchas y peliculas del agua dura y el
secado es deficiente. Si se usa demasiado detergente se
pueden causar rayaduras u opacidad permanente.
La espuma puede hacer que el agua se desborde del
lavavajillas. Mida el detergente cuidadosamerlte y s61o
utilice detergentes diseiiados para lavavajillas. Use
menos cantidad de detergente si usa agua suavizada. Si
el exceso de espuma persiste, pruebe usar otra marca
de detergente.
La cantidad de detergente que se debe usar depende
de la dureza del agua y del nivel de suciedad de la
vajilla. Consulte la tabla siguiente para las recomen-
daciones sobre uso del detergente.
Leve 2 cucharaditas 6 cucharaditas
Blanda (0-4 gpg) Normal /4cucharaditas 6 cucharaditas
Semiblanda Leve /4cucharaditas 6 cucharaditas
(5-9 gpg) Normal /4cucharaditas 6 cucharaditas
Dura (10-12 gpg) Todos los 5 cucharaditas 8 cucharaditas
%u compafifa de agua local o el servicio de extensVm de la universidad
estatal pueden informarle sobre el grado de dureza del agua en su _rea.
En los casos en que el agua es extremadamente
dura (13 granos por gal6n o m_s*), es dificil
Excesiva /4cucharaditas 7 cucharaditas
Excesiva 5 cucharaditas 7 cucharaditas
Niveles
Iograr buenos resultados con cualquier
lavavajillas que se use. Puede que sea necesario
usar un dispositivo mec_nico para ablandar el
agua a fin de mejorar la calidad del agua, la
eficaeia del detergente y proteger las piezas del
lavavajillas contra el dafio que puede causar el
agua dura.
Agregue la cantidad de detergente recomendada a
cada taza, como e muestra y cierre la tapa.
No use detergente con el ciclo 'Rinse Orfly' (Enjuague
Solamente) (modelos selectos). Deje abierta la tapa del
compartimiento del detergente cuando use el ciclo
'Rinse Only' (modelos selectos).
Aditivo de Enjuague
El use regular de un aditivo de enjuague mejom el
secado, reduce las manchas y peliculas y reduce la
humedad que queda en el interior del lavavajillas.
Junto al compartimiento del detergente se encuentra
un dispensador de aditivo de enjuague.
La ventanilla junto a la tapa del dispensador indica
cuando es necesario volver a Ilenar el dispensador.
Cuando el nivel del aditivo de enjuague est6 m_s abajo
de las marcas indicadoras y la ventanilla est_ casi
clara, es tiempo de volver a Ilenar el dispensador.
Revise el dispensador redes los meses.
Para agregar aditivo de
enjuague al dispensador,
gire la tapa a la izquierda
para abrirla. Retire la tapa y
vacie aditivo de enjuague
liquido en la abertura. La
cantidad de aditivo que
ser_ distribuida durante el
lavado puede ser ajustada moviendo la palanca
situada dentro de la cavidad. Por Io general use el
ajuste "2" recomendado pot la mayorfa de los
fabricantes. Aj(Bte]o a la marca "MAX" en los casos
de agua dura. Coloque la palanca entre cualquiera de
estas cantidades segQn sea necesario para obtener los
mejores resultados. WJelva a co]ocar la tapa y gfrela a
38
la derecha para cerrar]a.
Page 40

Ciclos,Opcionesy[uces
Ciclos
Seleccione el ciclo que describa mejor la carga del lavavajillas oprimiendo la tecla correspondiente. (Ver p_igina 35,
Sugerencias de Funcionamiento, para obtener las instrucciones como comenzar el ciclo).
'Heavy Wash' Este es un ciclo prolongado para 132 2 lavados/3 enjuagues
(Lavado Intenso) suciedad excesiva de la vajilla.
Este es un ciclo de mediaea 97-117 1-2 lavados*i1-2 enjuagues*
'Normal Wash' duracidn para suciedad normal de
(Lavado Normal) la vajilla. ElSensor de turbiedad
'Quick Wash' Este es LInciclo corto para 82 1 lavado/2 enjuagues
(Lavado R_pido) suciedad leve de la vajilla.
'Auto Wash' nOmero de Ilenados necesarios de
([Lavado Aatom_itica) acuerdo con el nivel de suciedad
(modelos selectos) de cada carga. ElSensor de
'Rinse Only' Enjuague de los platos que se est_n 9 1 enjuagues
(Enjuague Solamente) reservando para cuando haya una
(modelos selectos) carga completa.
est_ activo durante este ciclo.
Disefiado para seleccionar el 94-128 1-2 lavados*i2-3 enjuagues*
turbiedad est_ activo durante
este ciclo.
* El numerode Ilenadosdepender_del nivelde suciedadde losarticulos.
Notas
• Dependiendo de la temperatura delagua, puede que se agregue tiempo al ciclo para que el agua alcance la temperatura
apropiada.
• Los tiempos de los ciclos mostrados en los indicadores digitales (modelos selectos) aumentan o disminuyen,
dependiendo del nivel de suciedad de la vajilla, de la temperatura delagua y de las opciones seleccionadas.
• Solamente los ciclos certificados que se indican a continuaci6n ban sido dise_ados para cumplir las normas de la
NSF (NSF!ANSI 184 Lavavajillas DomSsticos) respecto a esterilizaci0n: 'Auto Wash' (modelos selectos), 'Heavy Wash',
'Normal Wash' y 'Quick Wash"
39
Page 41

Ciclos,OpcionesyLuces
Opciones de los Ciclos
Adem_s de seleccionar un ciclo de la p{igina 39, seleccione tantas de las opciones siguientes que est_n disponibles
con el ciclo seleccionado come sean necesarias de acuerdo con la carga del lavavajillas.
'Sanitize' CEsterilizar) Seleccione esta opci0n cuando lave cargas que tengan restos 'Normal Wash'
Cmodelos selectos) de alimentos diffciles de quitar. Dependiendo del ciclo que 'Quick Wash'
este usando, esta opci6n agrega calor y/o tiempo de lavado 'Auto Wash'
al ciclo de lavado. 0;_odelos selectos)
La funci0n 'Hi Temp' (]-emperatura altar) proporciona calor Todos los Ciclos
'Hi Temp Wash' adicional durante la etapa de lavado del ciclo y ayuda a _:excepto 'Rinse Only'
(Temperatura alia) mantener la temperatura adecuada del agua para asegurar Enjuague Solamente:)
mejores resultados de lavado y secado. (modelos selectos)
'Heated Dry'
CSecado Caliente)
'Delay' Pone en funcionamiento y detiene el lavavajillas. Ver pdgina 42 Todos los Ciclos
CLavado Diferido) Bajo para instrucciones.
*Solamenteestosciclos ban sidodesignadosen cumplimientode losrequerimientosde la NSF(NSF/ANS] 184LavavajillasDom_sticos)con
respectoa esterilizaci6n.
Seleccione esta opci0n para mejorar la eficiencia del secado.
Cuando no se selecciona 'Heated Dry' puede que sea necesario
secar con paiSos algunos articulos tal corr]o los articulos de
pl_stico con superficies antiadherentes y se observar_ que hay
m_s humedad en el interior del lavavajillas. En los modelos con
interiores de pl_stico, es normal observar que escapa vapor a
tray,s del respiradero de la puerta a medida que el calor seca
los platos. Saldr_ vapor aunque no se seleccione 'Heated Dry'.
'Heavy Wash'
Todos los Cic]os
(:excepto 'Rinse Only'_
(:modelos selectos)
40
Page 42

Ciclos,Opcionesy[uces
Luces/Indicador (modelos selectos)
Indicador de Muestra los mlnutos aproximados que faltan para el t6rmlno de un ciclo. El simbolo "2H" aparecer_
'Time Remaining' cuando el tiempo del ciclo sea superior a g9 minutos. Lostiempos de los ciclos mostrados en el indicador
(Tiempo Restante) num6rico (medelos selectos) aumentan o disminuyen, de acuerdo con el nivel de suciedad de cada carga,
(modelos seleetos) con la temperatura del agua y con las opciones seleccionadas.
Luz 'Clean' (Limpio) La luz se ilumina al final del ciclo y permanece iluminada hasta que la puerta penrlanece abierta durante
(modelos selectos) 30 segundos continues.
Luz 'Drying' (Seeado) La luz se ilumina durante todo el perfode de secado y se apaga cuando se completa el ciclo.
(modelos seleetos)
luz 'Washing' La luz se ilumina durante todas las porciones de enjuague y lavado del ciclo.
[Lavando]
(modelos selectos)
Luz 'Heating Delay' La ILIZse ilumina cuando se prolonga el ciclo para calentar el agua.
(Extension del ciclo per
ealientamiento] [modelos
selectos)
Luz 'Sanitized' La luz se ilumina al final del ciclo cuando se han eumplido los requerimientos para Iograr la esterilizaci6n.
(Esterilizado) La luz permanece iluminada hasta que la puerta permanece abierta durante 30 segundos continuos.
(modelos eelectos)
Notas
• Cuando se selecciona 'Sanitize' (Esterilizar) (medelosselectos), los ciclos son supervisados para asegurar la esterilizaci6n.
La luz 'Sanitized' (Esterilizado] no se activar4 si no se cumplen los requerimientos de esterilizaciSn. Esto puede suceder si
el ciclo es interrumpido, si ocurre una falla de energ[a el6ctrica o si la temperatura del agua de admisi6n es inferior a /49°
C 020 ° F).
• Las luces indicadoras 'Clean' y 'Sanitized'(modelos selectos) no se volver4n a iluminar despues de una falla de energ_a
el6ctrica hasta que no se ejecute el ciclo siguiente.
41
Page 43

Ciclos,OpcionesYLaces
'Delay' (Lavado Diferido)
La opci6n 'Delay' puede ser usada para comenzar
autom_ticamente el ciclo en una hora posterior a fin
de reducir la acumulaciCn de calor en el hogar
durante el dfa o para aprovechar los costos de energfa
reducidos, si est_n disponibles en su _rea. Esta opciOn
es tambi_n t3til para ahorro de agua caliente en las
horas de mayor uso en el hogar (duchas, lavado de
ropa).
Programaci6n de un lavado diferido:
1. Seleccione el ciclo apropiado y las opciones para el
lavado. Cierre la puerta.
2,
Oprima la tecla 'Delay' hasta seleccionar la
cantidad de tiempo deseada.
3.
El indicador 'Delay' y la cuenta regresiva (modelos
selectos) destellar_n hasta que se oprima la tecla
'START/Cancer (PUESTA EN MARCHA/
Cancelar).
4. Tan pronto como se oprime la tecla
'START/Cancer, el indicador dejar;_ de destellar y
comenzar_ la cuenta regresiva del tiempo diferido.
El indicador 'Delay' permanecer_ iluminado hasta
que expire el tiempo diferido.
5. El ciclo comenzar_ autom_ticamente tan pronto
como expire el tiempo diferido.
• Si pasan 30 segundos y no se oprime la tecla
I ota
'START/Cancel', el lavavajillas se apagar&
CancelaciCn de un lavado diferido:
Cuando se est_ desplegando la cuenta regresiva,
oprima nuevamente la tecla 'Delay'. La luz indicadora
se apagar_ y el ciclo comenzar_ o se reanudar_i
inmediatamente.
Opci6n 'Control Lock' (Bloqueo de
los Controles) (modelosselectos)
Las teclas de control pueden ser bloqueadas para
evitar el uso indeseado. Siesta caracteristica es
activada entre ciclos, no se podr_ hacer funcionar el
lavavajillas hasta que no se desbloqueen los controles.
Si se desea, los controles pueden ser bloqueados
despu_s de haber comenzado un ciclo o un lavado
diferido.
Programaci6n del Bloqueo de los Controles:
1. Oprima la tecla 'Heated Dry' (Secado Caliente)
durante tres segundos.
2. Se iluminar_ la luz indicadora que se encuentra
junto al icono de bloqueo cuando los controles
est_n bloqueados.
Para cancelar:
1. Oprima la tecla 'Heated Dry' durante tres
segundos.
2. La luz indicadora se apagar&
Notas
Si se oprime un ciclo o una opciOn despuCs de
que se han bloqueado los controles, la luz
indicadora que se encuentra junto al icono de
bloqueo destellar_ cinco veces. En los modelos
selectos que tienen indicador de cuenta
regresiva, el indicador mostrar_ una "L"
destellando simult_ineamente con el indicador de
bloqueo.
• Esta opci6n no bloquea la puerta, solamente
bloquea los controles del lavavajillas.
CancelaciCn de un lavado diferido y de un ciclo:
• Oprima 'START/Cancel' una vez para desaguar y
apagar el lavavajillas.
U
• Oprima 'START/Cancel' dos veces para apagar el
lavavajillas sin desagQe.
42
Page 44

CuidadoVLimpieza
Recomendaciones Generales
• El interior del lavavajillas por Io general se limpia por
si solo. Revise peri0dicamente el fondo de la tina del
lavavajillas para ver si hay partfculas grandes.
• Limpie el borde del forro interior de la puerta para
quitar cualquier salpicadura de alimentos que pueda
haber ocurrido cuando estaba cargando el lavavajillas.
• Cuando limpie acero inoxidable, siempre h_galo a
favor del grano. Nunca use productos que
contengan blanqueador a base de cloro o _cido
dtrico.
Exterior Eet_ndar Leve a moderada Pa_o ht]medo suave y limpiador fiquido en rociador. No
Limpieza diaria y suciedad leveExterior de Aeero
Inoxidable
(modelos selectos)
• El color de algunas manchas de alimentos a base de
tomate pueden ocasionalmente adherirse a los
diversos componentes del interior del lavavajillas,
causando descoloraciCn temporal.
Para ayudar a redueir este problema:
• Limpie el exceso de alimentos a base de tomate de
los platos antes de colocarlos en el lavavajillas.
• Use el ciclo 'Heavy Wash' (Lavado Intenso) cuando
lave articulos que contengan suciedad de alimentos
a base de tomate.
• Usar un detergente para lavavajillas que contenga
cloro para eliminar mejor las manchas.
use polvos abrasivos ni esponjas de limpieza.
Esponja o pafio suave y uno de Io siguiente:
• Detergente suave y agua
• Una solucidn a base de vinagre blanca y agua
• Limpiavidrios y limpiador de superficies 'Formula 409'*
oun limpiader de superficies similar.
• Ne use productos que contengan blanqueador a base
de clore o _cido citrico.
Enjuague y seque.
Suciedad moderada a suciedad excesiva Patio suave o esponja humeda y 'Ben Ami'*. Enjuague y
seque.
Vetas o marcas de dedos/restaurar el bri]lo Patio suave y limpiador 'Stainless Steel Magic Spray'**.
DescoloraciCn Parlesuave o espenja ht3meday limpiador 'Cameo
Stainless Steel Cleaner'*.Enjuague inmediatamente y seque,
Interior Leve a moderada PaSosuave o esponja hQmeda,
DescoloraciCn o mancha a base de tomate Cambie el detergente del lavavajillas por un producto a
base de cloro.
*Las nombres de los preductos son las marcas registradas de los respectivos fabricantes.
**Llame al 1-877-232-6771 USA o 1-800-688-8408 Canad_ para hacer pedidos,
Almacenamiento/Mudanza
Llene el compartimiento del detergente con un
detergente para lavavajillas de fragancia fresca o
bicarbonato de soda y seleccione el ciclo 'Normal
Wash' (Lavado Normal). Espere hasta que el
lavavajillas complete el ciclo. Luego cierre el sumirfistro
de agua y desagQe el lavavajillas. Para desaguar,
optima una vez la tecla 'START/Cancer (PUESTA EN
MARCHA/Cancelar) para activar el lavavajiilas.
Optima 'START/Cancer nuevamente para activar el
desagOe. DesagOe el ]avavajillas dos veces para
asegurarse de que haya salido toda el agua.
Finaimente, desenchufe el lavavajillas del suministro
electrico y deje la puerta abierta.
Cuando cierre el agua del hogar, tambi_n se debe
cerrar el agua hacia el lavavajillas.
43
Page 45

Locolizo©ion¥SolutiondeAverios
LEA ESTOS PUNTOS PARA AYUDARLE A AHORRAR TIEMPO Y DINERO.
El lavavajillas no se Ilena • Oprima la tecla 'START/Cancel' (PUESTA EN MAROHA/Cancelar) para ponerlo en
El lavavajillas no desagua/ • Si est_ conectado a LIetriturador de desechos de alimentos, aseg_rese de que se
queda agua en el fondo haya sacado el disco removible de la admisi6n del triturador.
El lavavajillas agrega agaa • Esto es normal. El sensor (modelos selectos] en la bomba debe permanecer sumergido
al FINAL del cielo per Io tanto se agrega LIepoco de agua despu6s del t31timodesag0e del ciclo.
Queda detergente en el • Verifique que se haya completado el ciclo.
dispensador • Asegt_tresede que el dispensador no est_ bloqueado.
El lavavajillas pareee raidoso " El ruido producido per la Ilave del agua durante el Ilenado es normal.
marcha.
• Cerci6rese de que la puerta este firmemente cerrada.
• Cerci6rese de que el agua est6 conectada.
• Verifique que se haya seleccionado la tecla correspondiente a un ciclo.
• Verifique el disyuntor o la caja de fusibles de su hogar.
• Verifique si la manguera de admisi6n est4 torcida.
• Verifique si hay sedimentos en la v41vulade entrada del agua y limpie si es necesario.
• Verifique si hay obstrucci6n de alimento en el desag0e o en el triturador.
• Verifique si la manguera de desag0e est_ torcida.
• Verifique el disyuntor o la caja de fusibles de su hogar.
• Verifique si el ciclo se ha completado.
• Use detergente fresco que ha estado guardado en un lugar seco y fresco.
• Los sonidos de la circulaci6n del agua son normales.
• Un sonido pesado puede ser uno de los brazes rociadores que est_ golpeando un
articulo que sobresale de las rejillas. Vuelva a acomodar los artfculos a fin de evitar
que obstruyan el braze rociador.
• Es posible que escuche ruidos de picado o rayado mientras la hoja interna de la
picadora corta elementos duros come las semillas de las frutas, nueces, etc.
• Un sonido come un murmullo durante el desag0e es normal.
• Un sonido brusco es la tapa del dep6sito del detergente que golpea el forro de la
puerta cuando se abre la puerta del lavavajillas al final del ciclo. Esto es normal.
• La instalaci6n correcta del lavavajillas afecta el nivel del ruido.
El ciclo es demasiado • Se ha seleccionado 'Hi Temp Wash' [Temperatara alta) o 'Sanitize' (Esterilizar)
prolongado [La luz 'Heating (modelos selectos] y el ciclo se ha prolongado para calentar el agua.
Delay' permanece ilaminada , Verifique para vet que la temperatura del agua de entrada sea 120°F (49°C).
[modelos seleetos])
El Lavavajillas tiene olor • Lave los articulos que est4n en el lavavajillas con un ciclo de 'Rinse Only' (Enjuague
Solamente) (modelos selectos).
• Muchos lavavajillas tienen olor a 'nLievo'cuando son reci6n instalados. Esto
disminuir_ con el tiempo.
• El lavavajillas no est_ desaguando en forma debida. (Vea la secci6n "El lavavajillas no
desagua".]
• Si el clot es fuerte coloque bicarbonate en ambos compartimientos del detergente.
Seleccione 'Quick Wash' (Lavado Rz_pido)y deje que el agua circule durante
10 minutes. Interrumpa el ciclo abriendo la puerta y dej4ndola asi hasta el otro d[a.
Vuelva a poner en marcha el lavavajillas cerrando firmemente la puerta y dejando que
se complete el ciclo. Otra alternativa es usar LIe producto de limpieza de lavavajillas tal
corr/o tJet-Dry Dishwasher Cleaner'*.
El lavavajillas tiene escapes • Verifique si el lavavajillas est4 nivelado. (Consulte las Instrucciones de Instalaci6n.]
• La espuma puede producir derrame en el lavavajillas. Mida el detergente
cuidadosamente y use solamente detergentes disehados para use en LIelavavajillas.
Se necesita menos detergente cuaedo el agua es blanda. Pruebe otra marca de
detergente si la espuma contint3a.
• Siga al pie dela letra las instrucciones sobre c6mo afiadir un articulo olvidado (p_gina35).
• Para evitar escape del agente de enjuague del dispensador, aseg[irese de que la tapa
este firmemente cerrada.
*Lasnombresde losproductosson lasmarcasregistradasde losrespectivosfabricantes.
44
Cont.
Page 46

tocalizaci6nySoluci6ndeAverias
La hora en el indicador digital
desciende repentinamente o
aumegta en varios minutes
(modelos selectos)
Luces indicadoras
destellando
Los vasos est_n nublados/
manchados
• Esto es normal cuando se selecciona el ciclo 'Auto Wash' (Lavado Autom_tica)
(modelos selectos) o 'Normal Wash' (Lavado Normal) y el lavavajillas decide
omitir o agregar Liedesag0e y Ilenado.
• La cuenta regresiva destellar_ en el indicador (modelos selectos) despuCs de haber
seleccionado un tiempo diferido hasta que se oprima la tecla 'START/Cancel'
(PUESTA EN MAROHA/Oancelar).
• El indicador de la cuenta regresiva (modelos selectos) y el indicador de 'Delay'
(lava@ diferido) destellar4n despu0s que se ha seleccionado un tiempo diferido
hasta que se oprima la tecla 'START/Cancel'.
• Toda la informaci6n en los indicadores destellar4 si la puerta se abre durante un
ciclo en curso oun tiempo diferido.
• El ciclo en curso seleccionado destellar_ si el consumidor intenta cambiar el ciclo
despuCs que el ciclo se ha "enclavado".
• El indicador de bloqueo destella y el indicador de la cuenta regresiva (modelos
selectos) destella una "L" si se oprime una tecla cuando el bloqueo de los controles
est_ activado.
• Seleccione la opciCn de 'Hi Temp Wash' (Lavado de temperatura alta).
• Verifique la temperatura del agua. La temperatura del agua de entrada debe ser de
120°F(49°C).
• Siempre use Lie aditivo de enjuague.
• Verifique si la nubosidad puede quitarse sumergiendo el articulo en vinagre blanco
duraete aproximadamente 5 minutos. Si desaparece, el problema se debe a que el
agua es dura. Ajuste la cantidad de detergente que est_ usando de acuerdo con la
dureza del agua (P4g. 38). AsegQrese de que el detergente sea fresco, est0
guardado de maeera apropiada yes de una marca de alta calidad.
• Si la nubosidad no puede quitarse, quiere decir que se ha producido erosiCn de la
superficie debido a que el agua est4 demasiado caliente, a que se us6 demasiado
detergente o pot haber sido prelavado. El detergente necesita restos de alimentos
sobre los cuales actuar. Si se ha producido erosiCn de la superficie, ajuste la
cantidad de detergente de acuerdo con la dureza del agua, no realice prelavados y
use las opciones de calentamiento del agua solamente cuando la temperatura del
agua de entrada sea inferior a 120°F(49°C).
Los platos quedan con
manchas de alimentos
*Las nombres de los productos son las marcas registradas de los respectivos fabricantes,
• Verifique la temperatura del agua. La temperatura del agua de entrada debe ser de
120°F[49°C).
• Deje correr el agua caliente en el fregadero antes de poner en marcha el lavavajillas.
• Seleccione la opciCn de 'Hi Temp Wash'.
• Verifique la dureza del agua y agregue la cantidad de detergente de acuerdo con
ello (P_g. 38).
• Use detergente fresco que ha estado guardado en un lugar fresco y seco.
• Seleccione el ciclo apropiado para el nivel de suciedad.
• Asegt3rese de que el conector del brazo rociador de la rejilla superior e intermedia
est6 correctamente alineado en uno de los agujeros de entrada del agua (P4g. 37).
• Coloque los articulos de modo que no bloqueen los brazos rociadores. (P_igs.36-37).
• Cargue la canastilla de los utensilios con los mangos de los cuchillos hacia arriba y los
mangos de lascucharas y tenedores hacia abajo a traves de las ranuras de lascubiertas.
• No coloque vasos sobre los soportes.
• Antes de cargar el lavavajillas, raspe los alimentos quemados de los platos y limpie
la pelfcula feculenta de los utensilios usados con fideos, arroz y harina de avena.
Estos residuos requieren m_s energia para limpiarlos que el resto de la vajilla.
45
Cont.
Page 47

Locolizo©ibn¥$oludondeAverius
Los articulos que se lavan
en el lavavajillas o la tina
del lavavajillas est_n
manchados o descoloridos
Los articulos no quedan
bien secos/hay humedad
en el interior de la tina
despu_s del ciclo de secado
• Losutensilios u ollas de aluminio pueden dejar marcas cuando rozan otros articulos.
Deje un pequefio espacio entre los artfculos.
• Los depSsitos de hierro que contiene el agua pueden dejar una pelicula amarilla,
marr6n o naranja en los platos o en la tina del lavavajillas. Puede que sea necesario
usar un filtro. Consulte con una compafifa de tratamiento de agua.
• Separe los artfculos de plata o plateados de los articulos de acero inoxidable. Estos
metales pueden dafiarse al tener contacto entre si durante el lavado.
• El color de las salsas de tomate puede adherirse ala tina (P_g. 43). Si ban ocurrido
maechas leves, deje la puerta abierta para oxidar la mancha y eliminarla. Usar un
detergente que contenga cloro para eliminar mejor las maechas.
• Ciertos detergentes de lavavajillas pueden manchar los articulos de plata. Use otra
marca de detergente.
• Asegt3rese de que se haya seleccionado la opciOn 'Heated Dry' (Secado Caliente).
• Se pueden formar gotas de agua en la puerta interior como parte del proceso de
secado.
• Use regularmente un aditivo de enjuague tal como Jet Dry'* o 'Cascade Rinse Aid'*
para mejorar el secado. Gire el selector del aditivo de enjuague ala posiciSn 'MAXt
• Verifique la temperatura del agua. La temperatura del agua de entrada debe ser de
12O°F(49°0].
• Seleccione 'Sanitize' [Esterilizar) o 'Hi femp Wash' [Lavade de temperatura alta).
• Aumente la cantidad de detergente de acuerdo con la dureza del agua (P_g. 38).
• Cargue debidamente el lavavajillas (P_gs.36-37).
• El pl_stico y los articulos con superficies antiadherentes son dificiles de secar pues
tienen superficies porosas que tienden a retener gotas de agua. Puede ser necesario
secarlas con un paffo.
• Los vasos, tazas, etc., con fondos c6ncavos retienen agua y deben ser secados con
toalla. Ubique estos artfculos en el lado m_s inclinado de la rejilla para obtener
mejores resultados.
Los platos se pican
La luz 'Sanitize' no se
ilumina al final del ciclo
(modelos selectos)
*Las hombres de los productos son las marcas registradas de los respectivos fabricantes.
• Acomode los platos siguiendo las instrucciones para que no se golpeen unos contra
otros (P_gs. 36-37).
• No se reconfienda lavar Ioza/cristal fino antiguo en el lavavajillas.
• No coloque los vasos sobre los soportes.
• No sobrecargue el lavavajillas.
• No se seleccion6 'Sanitize' (Esterilizar)
• La esterilizaci6n puede Ilevarse a cabo solamente con los ciclos _,LItOWash' (Lavado
Automatical (modelos selectos), 'Heavy Wash' (Lavado Intenso], 'Normal Wash'
(Lavado Normal), 'Quick Wash' (Lavado R_pido)
• La esterilizaci6n no puede Ilevarse a cabo si el ciclo se interrumpe, si hay una falla de
electricidad o si latemperatura del agua de entrada es inferior a 12O°F(49°C)
46
Page 48

GarantiaYServicio
LA UNICAY EXCLUSIVASOLUCIONPARAEL
CLIENTEBAJO ESTAGARANTJALIMITADAES
LA REPARACIONDEL PRODUCTOSEGONSE
INDICAAQU[ LAS GARANTiASIMPLiCITAS,
INCLUYENDOLASGARANTiASDE
COMERCIALIZACION0 DEAPTITUDPARAUN
PROPOSlTOENPARTICULARESTAN
LIMITADASAUN ANO 0 AL PERiODODE
TIEMPOMJNIMOPERMITIDOPORLA LEY.
MAYTAGCORPORATIONNOSERA
RESPONSABLEDE DANOSINCIDENTALES0
CONSECUENTES.ALGUNOSESTADOSY
PROVlNCIASNO PERMITENLA EXCLUSION0
LIMITACIONDEDAI_OSINCIDENTALES0
CONSECUENTES0 LA LIMITACIONDELA
DURACIONDE LAS GARANTIASIMPLiCITAS
DECOMERCIALIZACION0 APTITUD,PORLO
QUEESTASEXCLUSIONES0 LIMITACIONES
PUEDENNOAPLICARSEENSUCASO.ESTA
GARANT[ALEOTORGADERECHOSLEGALES
ESPECJFICOS.USTEDTAMBIENPUEDETENER
OTROSDERECHOSQUEVARiANDEUN
ESTADOA OTRO0 DEUNA PROVINCIAA
OTRA.
Lo que no cubren estas garantias
1.Situaciones y dafios resultantes de cualquiera de las siguientes
situaciones:
a. Instalaci6n, entrega o mantenimiento inapropiados.
b. Cualquier reparaci6n, modificaci6n, alteraci6n o ajuste no autorizados por
el fabricante o taller de servicio autorizado.
c. Mal uso, abuso, accidentes, uso no razonable o hechos fortuitos.
d. Corriente, voltaje, suministro el6ctrico o suministro de gas incorrectos.
e. Ajuste inadecuado de cualquier
2. Las garantias quedan nulas si los nOmeros de serie originales han sido
retirados, alterados o no se pueden determinar f_icilmente.
3. Bombillas, filtros de agua y filtros de aire.
4. Los productos comprados para uso comercial o industrial.
5. El costo del servicio o Ilamada de servicio para:
a. Corregir errores de instalaci6n. Para los productos que requieran
ventilaci6n, se deben usar conductos de metal rigido.
b. Instruir al usuario en el uso adecuado del producto.
c. Transporte del electrodomestico al establecimiento de servicio y de regreso.
6. Cualquier p6rdida de alimentos debido a fallas del refrigerador o
congelador.
7.Costos de viaje y transporte de servicio en _reas remotas.
8. Esta garant[a no se aplica fuera de los Estados Unidos y Canad& P6ngase en
contacto con su distribuidor para determinar si se aplica cualquier otra
garantfa.
9. Los dafios consecuentes o incidentales sufridos por cualquier persona como
resultado del incumplimiento de esta garantia. En algunos
estados no se permite la exclusi6n o limitaci6n de daiios consecuentes o
incidentales, por Io tanto la limitaci6n o exclusi6n anterior puede no aplicarse
en su caso.
Si necesita servicio
Primero revise la secci6n de Iocalizaci6n y soluci6n de averfas en su gufa de uso
y cuidado o Ilame al distribuidor donde adquiri6 el electrodom6stico. Tambien
puede Ilamar a Maytag Services, LLC,Atenci6n al cliente, al 1-800-688-9900 en
EEUU. y al 1-800-688-2002 en Canad_ para ubicar a un agente de servicio
calificado.
• Asegt3rese de conservar el comprobante de compra para verificar el estado de
la garantfa. Consulte la secci6n sobre la GARANTIA para mayor informaci6n
sobre las responsabilidades del propietario para obtener servicio bajo la
garantia.
• Si el distribuidor o la corr/paiiia de servicio no pueden resolver el problem&
escriba a Maytag Services, LLC, Attn: CAIR_ Center, RO. Box 2370, Cleveland,
TN 37320-2370 o Ilame al 1-800-688-9900 en EE.UU. y al
1-800-688-2002 en Canada.
• Lasgufas del propietario, manuales de servicio e informaci6n sobre las piezas
pueden solicitarse a Maytag Services,LLC,Atenci6n al cliente.
Notas: Cuando Ilame o escriba acerca de un problema de servicio, por
favor incluya la siguiente informacidn:
a. Su nombre, direcci6n y nt_mero de teldono;
b. Nt3mero de modelo y n[3mero de serie;
c. Nombre y direcci6n de su distribuidor o t_cnico de servicio;
d. Una descripci6n clara del problema que est4 experimentando;
e. Comprobante de compra (recibo de compra).
Part No. 6 920184 A www.amana.com _2005 Maytag Applianoes Sales Co. Lithe U.S.A.
 Loading...