

Page 1

10.5” / 11” / 12” Digital Photo Frame
models ADMPF110, ADMPF110F, ADMPF210, ADMPF210F, ADMPF311F, ADMPF312F
Instructional Manual
mnl M10015, M10057, M10039, M10058
M10053, M10063
Page 2

Table of Contents
Introduction ..............................................................................................................................................
Features ..................................................................................................................................................
Package Contents ...................................................................................................................................
Product Highlights ...................................................................................................................................
Remote Control Close-up ........................................................................................................................
Application ...............................................................................................................................................
Getting Started ........................................................................................................................................
Operations ...............................................................................................................................................
Set-Up ................................................................................................................................................
Selecting Which Media to Use ...........................................................................................................
Viewing Photos ...................................................................................................................................
Adjust Speed of Slideshow .................................................................................................................
Adjust Slide Transition Effect ..............................................................................................................
Listen to Music ...................................................................................................................................
Music Play Mode ................................................................................................................................
View Videos ........................................................................................................................................
Video Play Mode ................................................................................................................................
Copy Files Between Memory Cards / Internal Memory ......................................................................
Delete Files Between Memory Cards / Internal Memory ...................................................................
Change the Display Language ...........................................................................................................
Set the Date and Time ........................................................................................................................
Set the Alarm ......................................................................................................................................
Setup Power On / Off Timer ...............................................................................................................
Display Mode Setup ...........................................................................................................................
Color Setup ........................................................................................................................................
Technical Support ....................................................................................................................................
Radio and TV Interference Statement .....................................................................................................
Warranty ..................................................................................................................................................
04
05
06
07
10
11
12
12
12
13
14
15
16
17
18
19
20
21
22
23
24
25
26
27
28
29
30
31
Page 3

Introduction
More than just a digital photo frame, Aluratek raises the bar with its new Digital Lifestyle Device
(DLD). View hi-resolution pictures, music files, movies and home videos easily by inserting your
camera or camcorder’s digital media card or an USB thumb drive directly onto Aluratek’s (DLD).
Setup photo slideshows with background music with the touch of a button. Switch to video mode
and enjoy amazing video and audio quality. Browse and listen to all of your favorite music files. With
Aluratek’s new (DLD) share all your digital pictures, videos, and music files. Whether it is at work or
at home, let the fun begin!
In addition to making sure only quality materials are used for manufacturing, Aluratek® is also
dedicated to provide the best customer satisfaction and support.
The goal of Aluratek is to embody “Simple Elegance” in every product it designs, manufactures and sells.
The product focus of Aluratek is to bring simple yet elegant connectivity solutions to the consumers
to enhance their consumer electronics, communications and computing experience. Each product
is carefully designed with the consumer in mind. Each product is solution-driven to address the
need of the consumers and deliberately planned to provide the ultimate user experience.
Read this guide thoroughly and follow the installation and operation procedures carefully to prevent
any damage to the unit and / or any of the devices it connects to.
4
Page 4

Features
• Easy operation as most file formats are automatically recognized
• High quality wooden frame
• High quality built-in speakers
• Memory included (except 12” model)
• 10.5” / 11” / 12” TFT true color LCD
• Supports most memory card formats such as: CF / MS / SD / MMC / XD
• Supports various picture / video / audio formats such as: JPEG, MJPEG, AVI, WMA & MP3
• Connect your personal computer, memory card and USB hard drive / thumb drive to easily transfer
your favorite pictures, music, or videos with hi-speed USB 2.0
• Can be displayed either on a table top with the included stand or mounted on a wall
• Ease of operation and control with the included remote
Memory Card
There is no need to create a special folder on the memory card to be inserted to the digital picture
frame as all picture formats will be recognized by the frame. You just insert the memory card directly
from your digital camera into the frame and you can view all pictures / videos.
5
Page 5

Features cont.
USB Host / Device Functions
Any MP3 or USB mass storage device (formatted in FAT32) can be inserted into Type A USB port on
the digital picture frame. It will be shown as “USB-C” on the digital picture frame. You can access all
files on the device just like any other memory cards.
Package Contents
Your order has been carefully packaged and inspected. The following should be included in your package. Please inspect the contents of the package to ensure that you have received all items and that
nothing has been damaged. If you discover a problem, please contact us immediately for assistance.
• 10.5” / 11” / 12” Digital Photo Frame
• Remote Control
• USB 2.0 Cable (Type A to mini-B)
• Power Adapter
• Instructional Manual
• Warranty / Registration Card
6
Page 6
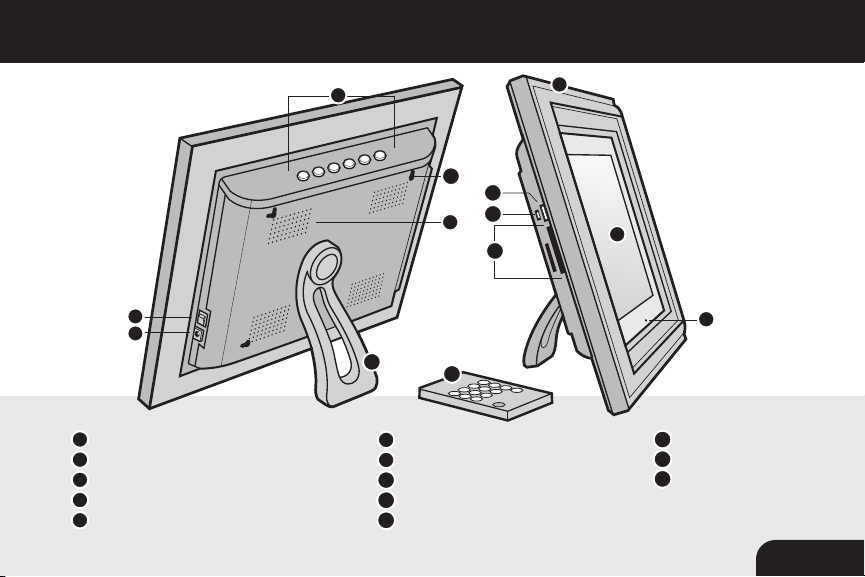
10.5” Digital Photo Frame Highlights
6
7
1
10.5” viewing area
2
Quality wood frame
3
Built-in speakers
4
Sensor
5
Menu selection buttons
5
12
8
9
3
10
11
6
7
8
9
10
13
Power on/off switch
Power adapter port
USB port
USB mini-B port
Memory card slots
2
1
4
11
Frame stand
12
Wall mount holes
13
Remote control
7
Page 7
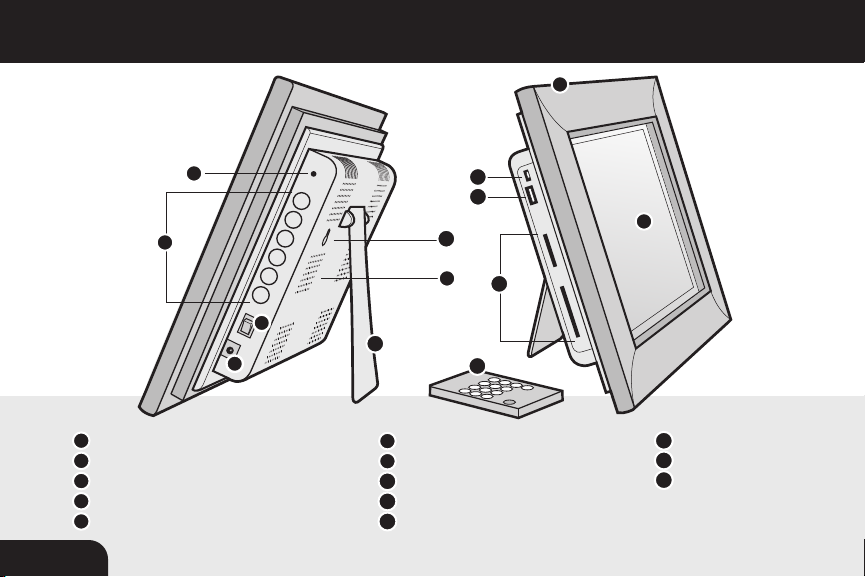
11” Digital Photo Frame Highlights
2
1
11” viewing area
2
Quality wood frame
3
Built-in speakers
4
LED
5
Menu selection buttons
8
4
5
6
11
7
6
Power on/off switch
7
Power adapter port
8
USB mini-B port
9
USB port
Memory card slots
10
8
9
12
3
10
13
1
11
Frame stand
12
Wall mount holes
13
Remote control
Page 8
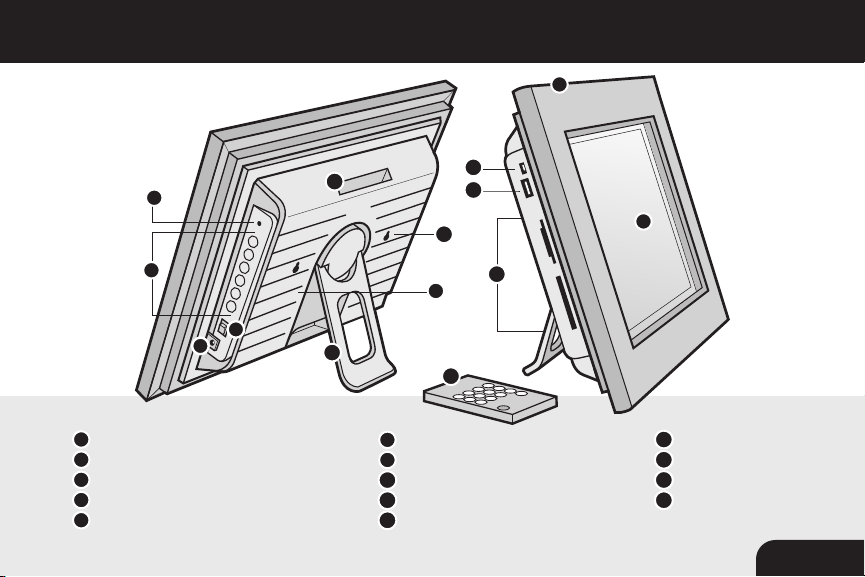
12” Digital Photo Frame Highlights
2
4
5
7
1
12” viewing area
2
Quality wood frame
3
Built-in speakers
4
LED
5
Menu selection buttons
14
6
11
6
Power on/off switch
7
Power adapter port
8
USB mini-B port
9
USB port
Memory card slots
10
8
9
12
10
3
13
1
11
Frame stand
12
Wall mount holes
13
Remote control
14
Remot control slot
9
Page 9

ON/OFF
MENUOSD
ENTERROTATE
ZOOM
SLIDE
SHOW
MODE
VOL
�
Remote Control Close-Up
3
5
6
9
11
1. Power On/Off
2. Volume + / Volume -
3. Mode - Select between photo, music and video modes
1
4. Menu - Returns to the previous menu
5. OSD - (On Screen Display)
6. Slide Show - Automatically places photos in slideshow format
2
7. Up, Down, Left, Right Arrows - Use arrow keys to navigate
your way throught various menus
4
8. Enter
9. Rotate - Rotates photo at 90 degree intervals
7
10. Stop
11. Zoom - Zoom in and out from photos and videos
8
12. Pause / Play
10
10
12
Page 10
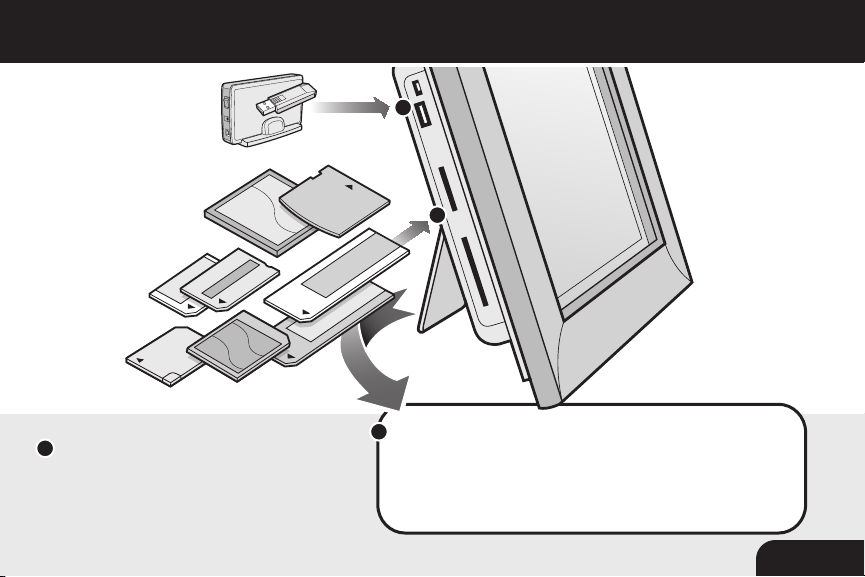
CF
SD/MMC/MS/XD
USB1
USB2
Application
A
Connect your USB hard
drive / thumb drive through
the unit’s USB port
- OR -
A
B
Insert any of the following memory cards:
B
Compact Flash (CF) Type I, II, Ultra, and Extreme;
Secure Digital (SD); MMC; RS-MMC*; Memory
Stick (MS); Memory Stick Pro; Memory Stick Duo*;
Memory Stick Pro Duo*; XD
*Adapter required
11
Page 11

Getting Started
Step 1:
Remove the protective film covering the LCD.
Step 2:
Remove the plastic insulator from the battery on the remote control.
Operations
Set-Up
STEP 1:
Plug the power adapter in then turn the power switch on.
STEP 2:
Please insert your memory card (SD, MMC, CF, MS or XD) at this time. You may also insert a USB
thumb / flash drive into the on-board USB 2.0 port which will be detected automatically. Slideshow will
start automatically when the card is inserted. (The slideshow will start from the internal memory if no
memory card is detected)
12
Page 12

Operations cont.
STEP 3, optional (only for 10.5” frames):
With the built-in memory feature, you may also transfer pictures, movies and/or music files directly
from your computer to your digital photo frame by attaching the included USB cable to your computers USB port. Once you connect the USB cable to the computer, you will see “PC Connected”
on your photo frame. The digital photo frame will appear as an external/removable drive on your
computer. You can find them when you double click on “My Computer” in Windows system. There
will be multiple drives as the card reader slots on the frame also show as an external drive. The
internal memory is usually the last one in the list. Simply drag and drop the photo, music, and/or
video files you would like to have stored on your digital photo frame at this time. You may add or
remove these files at any time by reattaching the frame to your computer’s USB port.
Note: You must disconnect the USB cable from your computer after transferring. You will not be
able to scroll with the remote while the USB connection is established.
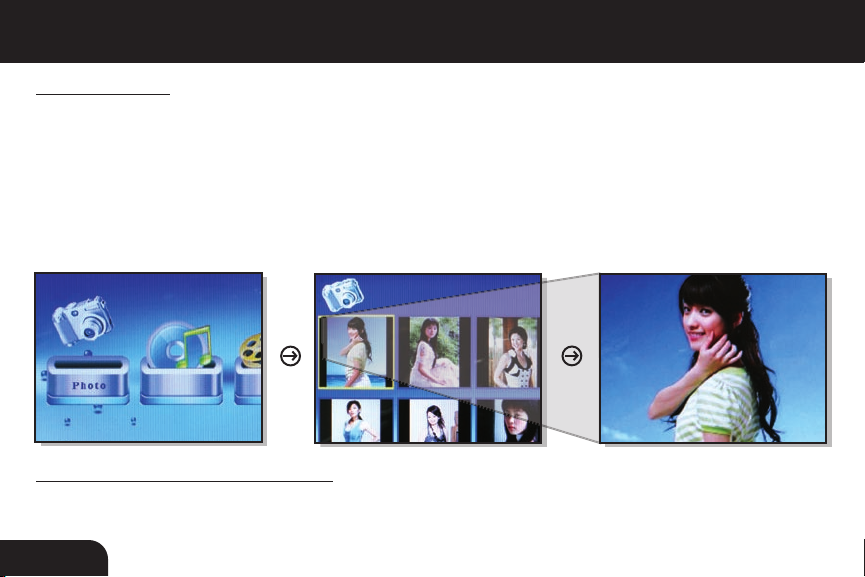
Selecting Which Media to View
Press the “Menu” button until you can view different types of media you have inserted into your
picture frame or the included memory in the main menu.
To create a custom slideshow with pictures in a particular order, please copy one picture at a time
to the memory card as the order is determined by the time stamp of the file when it is copied.
13
Page 13
Operations cont.
Viewing Photos
1. Select the “Photo” icon on the screen.
2. Select the photo you desire by using the up and down keys on your remote control.
3. Once you have selected your photo press “Enter”.
4. You may zoom in on your photos by pressing the “Zoom” button on the remote. You may also
reposition the photo using the up, down, left and right buttons on the remote once you zoom in
for detailed viewing. You may also rotate the picture by pressing the “Rotate” button on the remote.
5. You can also press the “OSD” button for more viewing options.
Special Functions for Viewing Photos
You may adjust your photo viewing options settings including: Speed interval for slideshow, and
multiple slide transition options by entering the “Setup” menu from the main menu.
14
Page 14
Operations cont.
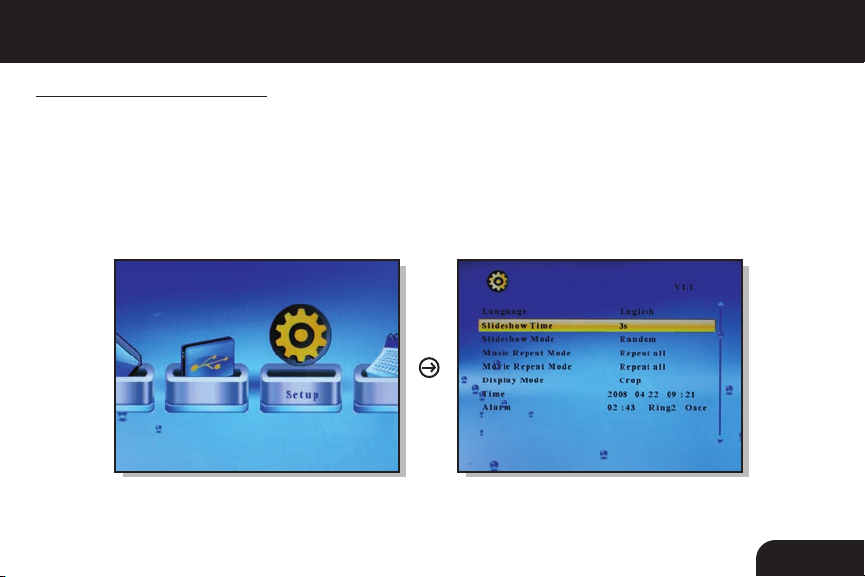
Adjust Speed of Slideshow
1. Select “Setup” and press “Enter” from the main menu.
2. Use the up or down key to select “Slideshow Time”.
3. Use the left or right key to select the time interval from 3sec to 1hour then press “Enter”.
4. Press “Menu” to return to the main menu.
15
Page 15
Operations cont.
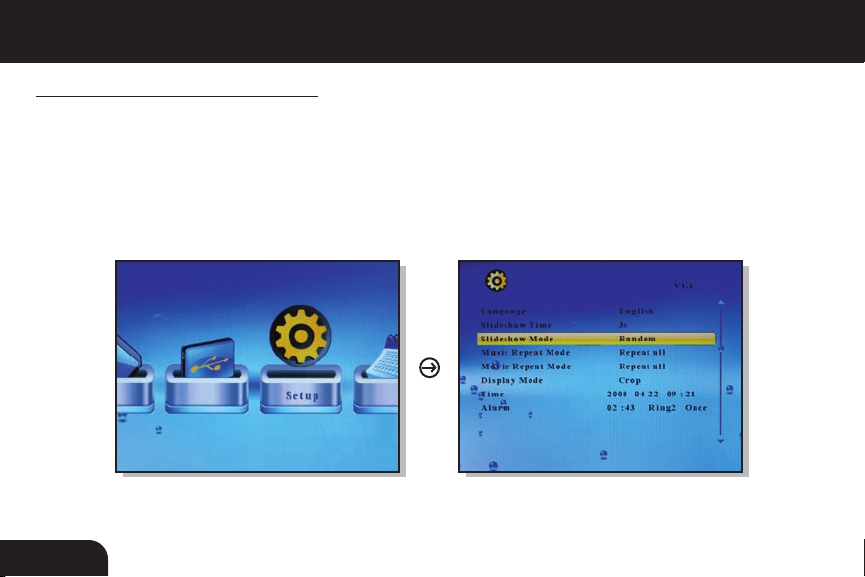
Adjust the Slide Transition Effect
1. Select “Setup” and press “Enter” from the main menu.
2. Use the up or down key to select “Slideshow Mode”.
3. Use the left or right key to select your desired slide transition effect then press “
4. Press “Menu” to return to the main menu.
16
Enter”.
Page 16
Operations cont.
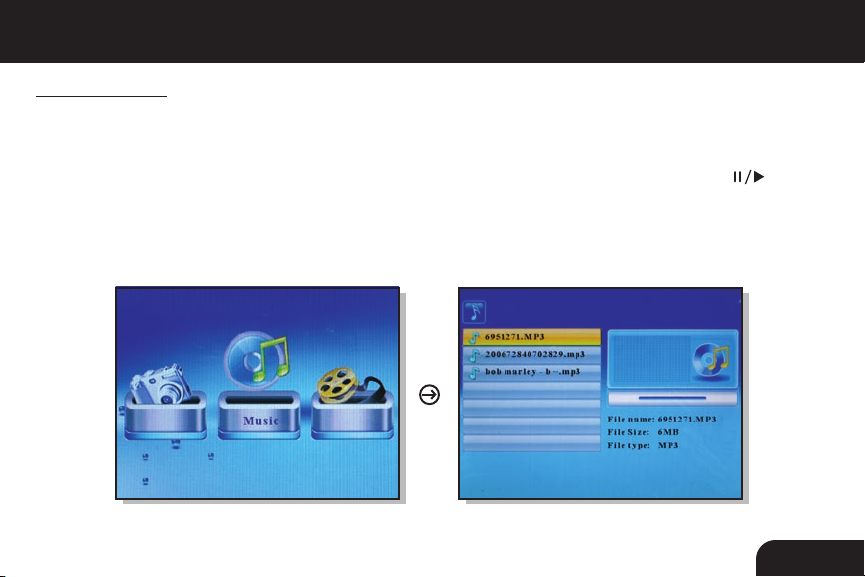
Listen to Music
1. Select the “Music” icon on the screen.
2. A list of MP3 files stored on your media will appear on the screen. Use the up and down keys on
the remote control to select the desired song then press “Enter”. You can press the “ ” to
pause / play.
3. The next song will play automatically on the song list. You may also select another song using
the up and down keys on your remote control.
17
Page 17
Operations cont.
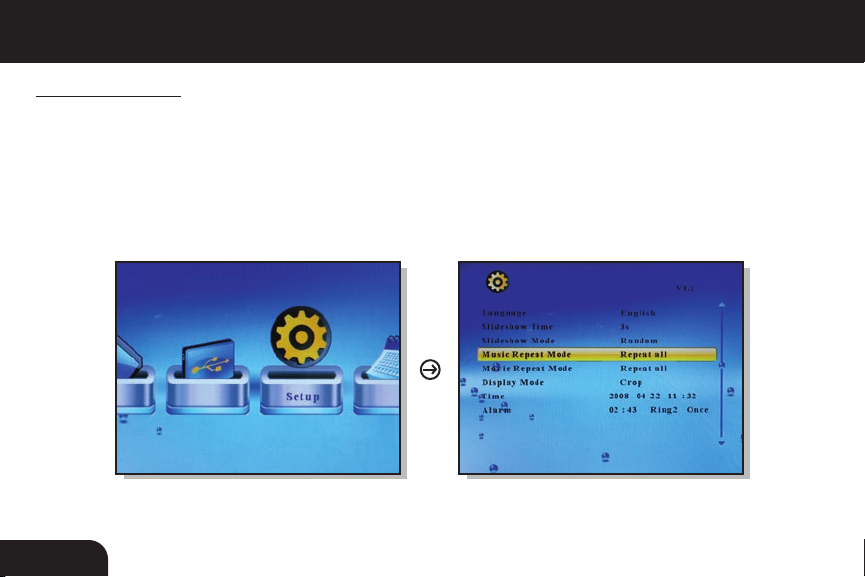
Music Play Mode
1. Select “Setup” and press “Enter” from the main menu.
2. Use the up or down key to select “Music Repeat Mode”.
3. Use the left or right key to select “Repeat One”, “Repeat All” or “Repeat Off” then press “Enter”.
4. Press “Menu” to return to the main menu.
18
Page 18
Operations cont.
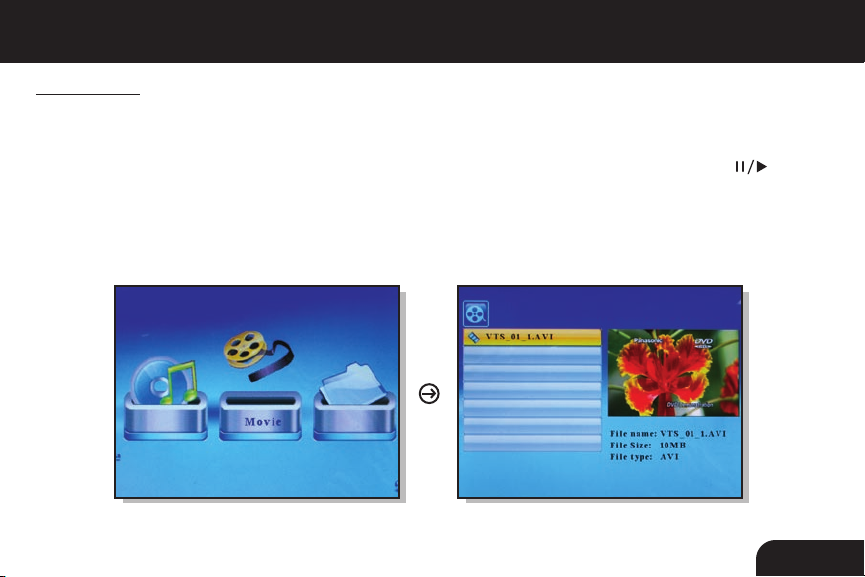
View Videos
1. Select the “Movie” icon on the screen.
2. A list of video files stored on your media will appear on the screen. Use the up and down keys on
the remote control to select the desired video then press “Enter”. You can press the “ ” to
pause / play.
3. You may zoom in on the video by pressing the “
4. The next video will play automatically on the list. You may also select another video using the up
and down keys on your remote control.
Zoom” button on the remote.
19
Page 19
Operations cont.
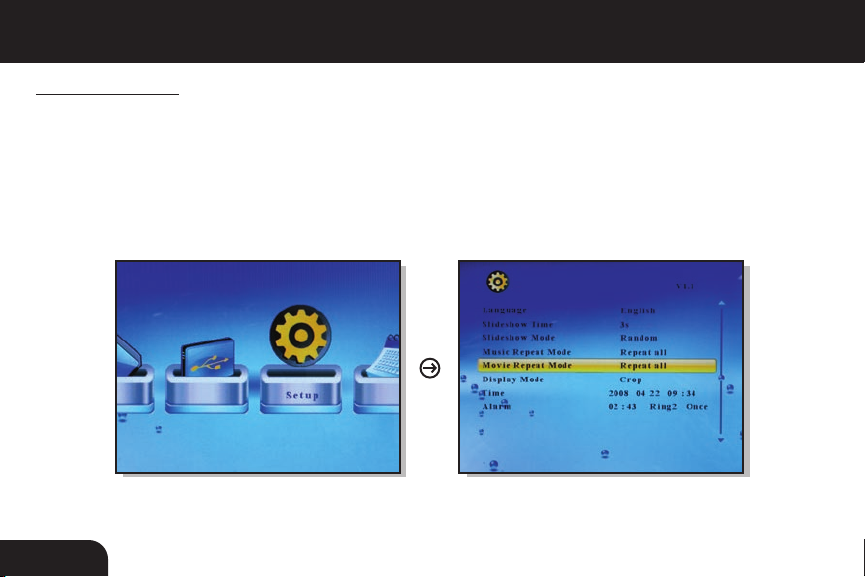
Video Play Mode
1. Select “Setup” and press “Enter” from the main menu.
2. Use the up or down key to select “Movie Repeat Mode”.
3. Use the left or right key to select “Repeat One”, “Repeat All” or “Repeat Off” then press “Enter”.
4. Press “Menu” to return to the main menu.
20
Page 20

Operations cont.
Copy Files Between Memory Cards / Internal Memory
1. Select the “File” icon on the screen.
2. Select the photo you want to copy using the up and down keys on your remote control and press
the “ ” key. You will see a next to the file name
3. Press the “OSD” button.
4. Select “Copy” and press “Enter” on the remote.
5. Select the memory card or internal memory that you want to copy to and press the “ ” key.
6. Press the “Enter” key to start copy
7. Press the “Enter” key when you see “Finish” to exit.
21
Page 21

Operations cont.
Delete Files From Memory Cards / Internal Memory
1. Select the “File” icon on the screen.
2. Select the photo you want to delete using the up and down keys on your remote control and
press the “ ” key. You will see a next to the file name.
3. Press the “OSD” button.
4. Select “Delete” and press “Enter” on the remote.
5. Select the “check mark” and press the “Enter” key to delete the file.
6. Press the “Enter” key when you see “Finished” to exit.
22
Page 22

Operations cont.
Change the Display Language
1. Select “Setup” and press “Enter” from the main menu.
2. Use the up or down key to select “Language”.
3. Use the left or right key to select the desired language then press “Enter”.
4. Press “Menu” to return to the main menu.
23
Page 23

Operations cont.
Set the Date and Time
1. Select “Setup” and press “Enter” from the main menu.
2. Use the up or down key to select “Time”.
3. Use the left or right key to select what you want to change and use the up or down key to
change to the correct value then press “Enter”.
4. Press “Menu” to return to the main menu.
24
Page 24

Operations cont.
Set the Alarm
1. Select “Setup” and press “Enter” from the main menu.
2. Use the up or down key to select “Alarm”.
3. Use the left or right key to select what you want to change and use the up or down key to change
to the correct value then press “Enter”. The 1st number is the hour follow by the minute. The next
item is ring tone selection, Ring1/Ring2. The last item is the alarm status “
4. Press “Menu” to return to the main menu.
off”, “once”, “every”.
25
Page 25

Operations cont.
Setup Power On / Off Timer:
1. Select “Setup” from the main menu and press “Enter” on the remote control.
2. Scroll to “Auto Power On” or “Auto Power Off” and press the “ ” button on the remote control.
3. Use the up or down key to set the time in 24H format.
4. Use the up or down key to select “On” and press “Enter”.
26
Page 26

Operations cont.
Display Mode Setup
1. Select “Setup” and press “Enter” from the main menu.
2. Use the up or down key to select “Display Mode”.
3. Use the left or right key to select “Cinema”, “Crop”, and “Stretch” then press “Enter”.
4. Press “Menu” to return to the main menu.
27
Page 27

Operations cont.
Color Setup:
1. Select “Setup” from the main menu and press “Enter” on the remote control.
2. Scroll to the desired option “Brightness”, “Contrast”, or “Saturation” and press the “ ” or “ ”
button on the remote control to select the desired level.
28
Page 28

Technical Support
If you need further assistance, please contact Aluratek support department prior to returning this device.
E-mail: support@aluratek.com
Web: www.aluratek.com/support
Local (Irvine, CA): 949-419-6504
Toll free:
1-866-580-1978
29
Page 29

Radio and TV Interference Statement
WARNING!!! This equipment has been tested and found to comply with the limits of a Class B
digital device, pursuant to part 15 of the FCC rules. These limits are designed to provide reasonable
protection against harmful interference in a residential installation
This equipment generates, uses and can radiate radio frequency energy and, if not installed and
used in accordance with the instruction, may cause harmful interference to radio communications.
However, there is no guarantee that interference will not occur in a particular installation. If this
equipment does cause harmful interference to radio or television reception, which can be determined by turning the equipment off and on, the user is encouraged to try to correct the interference
by whatever measures may be required to correct the interference.
30
Page 30

Warranty
Aluratek warrants this product against defect in material or workmanship for 120 Days from the
date of purchase.
This warranty becomes invalid if the factory-supplied serial number or “warranty void” sticker has
been removed or altered on the product.
This warranty does not cover:
A) Cosmetic damage or damage due to acts of God
B) Accident, misuse, abuse, negligence or modification of any part of the product.
C) Damage due to improper operation or maintenance, connection to improper equipment,
or attempted repair by anyone other than Aluratek.
D) Products sold AS IS or WITH FAULTS.
IN NO EVENT SHALL ALURATEK’S LIABILITY EXCEED THE PRICE PAID FOR THE PRODUCT
FROM DIRECT, INDIRECT, SPECIAL, INCIDENTAL, OR CONSEQUENTIAL DAMAGES RESULTING
FROM THE USE OF THE PRODUCT, IT’S ACCOMPANYING SOFTWARE, OR IT’S DOCUMENTATION.
Aluratek makes no warranty or representation, expressed, implied, or statutory, with respect to it’s
products, contents or use of this documentation and all accompanying software, and specifically
disclaims it’s quality, performance, merchantability, or fitness for any particular purpose. Aluratek
reserves the right to revise or update it’s product, software or documentation without obligation to
notify any individual or entity.
31
Page 31

aluratek.com
Aluratek, Inc. 12A Mauchly Irvine, CA 92618 sales@aluratek.com 949.419.6504 • office 949.419.6477 • fax
Page 32

Cadre de Photos Numérique de 10,5 po/11 po/12 po
Modèles ADMPF110, ADMPF110F, ADMPF210, ADMPF210F, ADMPF311F, ADMPF312F
Manuel d’instructions
mnl M10015, M10057, M10039, M10058
M10053, M10063
Page 33

Table des matières
Introduction ..............................................................................................................................................
Caractéristiques ......................................................................................................................................
Contenu ...................................................................................................................................................
Caractéristiques du cadre de photo numérique ......................................................................................
Description de la télécommande .............................................................................................................
Fonctionnement .......................................................................................................................................
Pour vous aider à démarrer .....................................................................................................................
Fonctionnement .......................................................................................................................................
Configuration ......................................................................................................................................
Sélection du média à visualiser ..........................................................................................................
Visualisation de photos ......................................................................................................................
Ajustement de la vitesse du diaporama ..............................................................................................
Ajustement de l’effet de transition de l’image .....................................................................................
Écoute de la musique .........................................................................................................................
Mode jouer musique ...........................................................................................................................
Visualisation de vidéos .......................................................................................................................
Mode répéta vidéo ..............................................................................................................................
Copie de fichiers entre les cartes mémoires / mémoire interne .........................................................
Effacer de fichiers entre les cartes mémoires / mémoire interne .......................................................
Changement du langage ....................................................................................................................
Configuration de la date et de l’heure ................................................................................................
Configuration de l’alarme ...................................................................................................................
Configuration la mise en marche et l’arrêt de la minuterie..................................................................
Configuration des displaymodus ........................................................................................................
Configuration des couleurs..................................................................................................................
Soutien techique ......................................................................................................................................
Énoncé d’interférence avec la réception radio et télévisée .....................................................................
Garantie ...................................................................................................................................................
04
05
06
07
10
11
12
12
12
13
14
15
16
17
18
19
20
21
22
23
24
25
26
27
28
29
30
31
Page 34

Introduction
Plus qu’un simple cadre de photo numérique, Aluratek rehausse la barre avec son nouvel appareil
Digital Lifestyle (DLD) [à vie numérique]. Visualisez des photos haute résolution, des fichiers musi
caux, des films et des vidéos maisons se fait facilement en insérant la carte numérique de votre ap
pareil photo ou de votre caméscope, ou votre clé USB directement dans l’appareil Alurateck (DLD).
Configurez des diaporamas avec une musique de fond, du simple bout des doigts. Passez en mode
vidéo et jouissez d’une qualité vidéo et audio exceptionnelle. Parcourez et écoutez votre musique
préférée. Grâce au nouvel appareil DLD d’Aluratek, partagez toutes vos photos numériques, vos
vidéos et vos fichiers musicaux. Que ce soit au travail ou à la maison, amusez-vous!
En plus de s’assurer d’utiliser que des matériaux de qualité pour la fabrication, Aluratek® s’engage
aussi à offrir la meilleure satisfaction aux clients, de même que le meilleur soutien.
Aluratek a pour objectif de donner forme à « l’élégance simple » pour chaque produit conçu,
fabriqué et vendu.
Les produits d’Aluratek sont conçus pour unir des solutions de connectivité simples et élégantes
aux clients de sorte à améliorer leur expérience électronique, de communication et informatique.
Chaque produit est fabriqué avec soin, tout en pensant au client. Chacun des produits est axé vers
la solution afin d’aborder les besoins des consommateurs et conçu pour offrir à l’utilisateur une
expérience ultime.
Veuille lire attentivement ce guide et suivez les procédures d’installation et d’opération afin de
prévenir tout dommage à l’appareil ou à tous les appareils qui y sont branchés.
-
4
-
Page 35

Caractéristiques
• Facile à utiliser puisque la majorité des formats de fichiers sont reconnus automatiquement
• Cadre en bois de haute qualité
• Haut-parleurs intégrés de haute qualité
• Carte mémoire incluse (à l’exception du modèle 12 po)
• Écran ACL TFT de 10,5 po/11 po/12 po
• Compatible avec la majorité des cartes mémoires, comme : CF / MS / SD / MMC / XD
• Compatible avec divers formats de photos, de fichiers vidéo et audio : JPEG, MJPEG, AVI, WMA & MP3
• Se branche à votre ordinateur personnel, carte mémoire et lecteur USB et facilite le transfert de vos
images, de votre musique ou de vos vidéos préférés avec un lecteur USB 2.0 haute vitesse
• Peut être posé sur une table à l’aide du support inclus ou fixé au mur
• Facile à utiliser, avec la télécommande incluse
Carte mémoire
Nul n’est nul nécessaire de créer un dossier spécifique sur la carte mémoire à insérer dans le cadre de
photo numérique, puisque le cadre reconnaîtra tous les formats de photo. Vous n’avez qu’à insérer la
carte mémoire de votre appareil photo numérique dans le cadre et vous pouvez visualiser toutes les
photos ou tous les vidéos.
5
Page 36

Caractéristiques (suite)
Fonctions du câble USB Host et de l’appareil
Tout appareil de stockage de masse MP3 ou USB peut être inséré dans le port USB A du cadre de photo
numérique. Il sera affiché sous “USB C” du cadre de photo numérique. Vous pouvez accéder à tous les
fichiers de l’appareil, à l’instar des autres cartes mémoires.
Contenu
Votre commande a été emballée et inspectée avec soin. Voici les articles contenus dans
l’emballage : Veuillez vérifier le contenu de l’emballage pour vous assurer que vous avez reçu tous
les articles, et qu’aucune pièce n’est endommagée. En cas de problèmes, veuillez communiquer
avec nous immédiatement.
• Cadre de photos numérique de 10,5 po/11 po/12 po
• Télécommande
• Câble USB 2.0 (Type A à Mini B)
• Adaptateur de courant
• Manuel d’instructions
• Carte de garantie et d’enregistrement
6
Page 37

Caractéristiques du cadre de photos numérique de 10,5 po
6
7
1
Zone d’affichage de 10,5
2
Cadre en bois de qualité
3
Haut-parleurs intégrés
4
Détecteur
5
Touches de sélection par menu
5
12
8
9
3
10
11
6
Touche de Mise en marche/Arrêt
7
Port d’adaptateur de courant
8
Port USB 1
9
Port USB 2 (mini-B)
Carte mémoire avec fentes
10
13
2
1
4
11
Support sur pied
12
Trous pour accrocher au mur
13
Télécommande
7
Page 38

Caractéristiques du cadre de photos numérique de 11 po
2
4
5
1
Zone d’affichage de 11
2
Cadre en bois de qualité
3
Haut-parleurs intégrés
4
DEL
5
Touches de sélection par menu
8
8
9
12
3
10
6
11
7
6
Touche de Mise en marche/Arrêt
7
Port d’adaptateur de courant
8
Port USB 2 (mini-B)
9
Port USB 1
Carte mémoire avec fentes
10
13
1
11
Support sur pied
12
Trous pour accrocher au mur
13
Télécommande
Page 39

Caractéristiques du cadre de photos numérique de 12 po
2
8
4
9
12
1
5
6
7
1
Zone d’affichage de 11
2
Cadre en bois de qualité
3
Haut-parleurs intégrés
4
DEL
5
Touches de sélection par menu
10
3
11
13
6
Touche de Mise en marche/Arrêt
7
Port d’adaptateur de courant
8
Port USB 2 (mini-B)
9
Port USB 1
Carte mémoire avec fentes
10
11
Support sur pied
12
Trous pour accrocher au mur
13
Télécommande
9
Page 40

ON/OFF
MENUOSD
ENTERROTATE
ZOOM
SLIDE
SHOW
MODE
VOL
�
Description de la télécommande
3
5
6
9
11
12
10
1. Power On/Off (Marche/Arrêt)
2. Volume + / Volume -
3. Mode - Choisissez entre les fonctions photo, musique, et vidéo
1
4. Menu - Retourner au menu precedent
5. OSD - (On Screen Display)
6. Slideshow [Diaporama] - Place automatiquement les photos
2
en format diaporama
7. Up, Down, Left, Right Arrows [Flèches Haut, Bas, Gauche,
4
Droite] - Utiliser les flèches pour parcourir les divers menus
8. Enter [Entrée]
7
9. Rotate [Tourner] - Tourner la photo à intervalles de 90 degrés
8
10. Stop [Arrêt]
11. Zoom - Zoom-in et out des photos et vidéos
10
12. Play / Pause [Jouer / Pause]
Page 41

CF
SD/MMC/MS/XD
USB1
USB2
Fonctionnement
A
Brancher votre disque dur
USB/clé USB dans le port
USB de l’appareil
- OU -
A
B
Insérer l’une des cartes mémoires suivantes:
B
Compact Flash (CF) Type I, II, Ultra, and Extreme;
Secure Digital (SD); MMC; RS-MMC*; Memory
Stick (MS); Memory Stick Pro; Memory Stick Duo*;
Memory Stick Pro Duo*; XD
*Adaptateur requis
11
Page 42

Pour vous aider à démarrer
Étape 1:
Enlever le film protecteur recouvrant l’affichage ACL.
Étape 2:
Enlever isolant en plastique de la batterie de la télécommande.
Fonctionnement
Configuration
Étape 1:
Brancher l’adaptateur de courant, puis mettre en marche. Un témoin DEL rouge apparaîtra lorsque
l’appareil sera en marche.
Étape 2:
Veuillez insérer maintenant votre carte mémoire (CF / MS / SD / MMC / XD)
une clé USB dans le port USB 2.0, lequel sera détecté automatiquement et apparaîtra à l’écran.
. Il est aussi possible d’insérer
12
Page 43

Fonctionnement (suite)
Étape 3, facultative (uniquement pour les cadres 10,5 po):
Grâce à la caractéristique de mémoire intégrée, vous pouvez aussi transférer des photos, des films
ou des fichiers de musique directement de votre ordinateur vers votre cadre de photo numérique
en branchant le câble USB inclus à votre port d’ordinateur USB. Après avoir branché le câble USB
à l’ordinateur, vous verrez apparaître “PC Connected” sur votre cadre de photo. Vous verrez que le
cadre de photo numérique apparaîtra à titre de lecteur externe/amovible sur votre ordinateur. Faire
glisser et déplacer la photo, la musique ou le fichier vidéo que vous désirez stocker sur votre cadre
de photo numérique. Vous pouvez en tout temps ajouter ou supprimer ces fichiers en le rebran
chant à votre port USB.
Remarque : Vous devez débrancher le câble USB de votre ordinateur après le transfert. Vous ne
serez pas en mesure d’effectuer un défilement avec la télécommande pendant l’établissement de
la connexion USB.
Sélection du média à visualiser
En appuyant sur la touche “Menu” [Menu], vous pouvez visualiser les différents types de médias
insérés dans votre cadre de photo ou la carte mémoire incluse.
Pour créer un diaporama personnalisé avec des images dans un ordre particulier, veuillez copier
une image à la fois sur la carte mémoire puisque l’ordre est déterminé par l’horodateur du fichier
quand il est copié.
-
13
Page 44

Fonctionnement (suite)
Visualisation de photos
1. Appuyer sur la touche “
2. Sélectionner la photo désirée en utilisant les fl èches de votre télécommande.
3. Après avoir sélectionné votre photo, appuyer sur “
4. Vous pouvez faire un zoom sur vos photos en appuyant sur “Zoom”. Il est aussi possible
de repositionner la photo à l’aide des fl èches vers le haut, bas, gauche, droite de la téléco
mande, après avec fait un zoom pour visualiser les détails.
5. Sélectionner le bouton “OSD” pour regardant plus des options.
Fonctions personnalisées pour la visualisation de photos
Il est possible d’ajuster les confi gurations d’options de visualisation de photo, notamment : Intervalle
de vitesse du diaporama, et sélection de photos.
Photo” de votre télécommande.
Enter” [Entrée].
14
Page 45

Fonctionnement (suite)
Ajustement de la vitesse du diaporama
1. Appuyer sur la touche “
2. Utiliser les flèches Haut ou Bas pour sélectionner la “Slideshow Time
3. Utiliser la touche ou pour entrer l’heure désirée et appuyer sur “Enter” [Entrée].
4. Appuyer sur “
Menu” [Menu] pour retourner au menu principal.
Setup” [Configuration], puis sur “Enter” [Entrée].
”.
15
Page 46

Fonctionnement (suite)
Ajustement de l’effet de transition de l’image
1. Sélectionner “Setup” [Configuration] depuis le menu principal et appuyer sur “Enter” [Entrée].
2. Sélectionner “Slideshow Mode”.
3. Utiliser les flèches Haut ou Bas pour sélectionner votre effet de transition d’image désiré, puis
appuyer sur “Enter” [Entrée].
4. Appuyer “
Menu” retourner au menu principal.
16
Page 47

Fonctionnement (suite)
Écoute de la musique
1. Sélectionner “Music” [Musique] l’icône sur l’écran.
2. Une liste de fichiers MP3 stockés sur votre lecteur apparaîtra à l’écran. Utiliser les flèches Haut
et Bas de la télécommande pour sélectionner la chanson désirée, puis appuyer sur “Enter
Vous pouvez appuyer “
3. La prochaine chanson jouera automatiquement depuis la liste de chansons. Vous pouvez aussi
sélectionner une autre chanson en utilisant les flèches Haut et Bas de votre télécommande.
” a Jouer / Pause.
” [Entrée].
17
Page 48

Fonctionnement (suite)
Mode jouer musique
1. Sélectionner “Setup” [Configuration] depuis le menu principal et appuyer sur “Enter” [Entrée].
2. Utiliser les flèches Haut ou Bas pour sélectionner la “
3. Utiliser la touche ou pour sélectionner la “Repeat All” ou “Repeat Off”, puis appuyer
sur “Enter” [Entrée].
4. Appuyer sur “
Menu” [Menu] pour retourner au menu principal.
Music Repeat Mode”.
18
Page 49

Fonctionnement (suite)
Visualisation de vidéos
1. Sélectionner “Movie” [Film] l’icône sur l’écran.
2. Une liste de fichiers vidéo stockés sur votre lecteur apparaîtra à l’écran. Utiliser les flèches Haut
et Bas de la télécommande pour sélectionner la chanson désirée, puis appuyer sur “Enter
Vous pouvez appuyer “
3. Vous pouvez faire un zoom sur vos vidéo en appuyant sur “
4. La prochaine vidéo jouera automatiquement depuis la liste de chansons. Vous pouvez aussi
sélectionner une autre vidéo en utilisant les flèches Haut et Bas de votre télécommande.
” a Jouer / Pause.
Zoom” [Zoom].
” [Entrée].
19
Page 50

Fonctionnement (suite)
Mode répéta vidéo
1. Sélectionner “Setup” [Configuration] depuis le menu principal et appuyer sur “Enter” [Entrée].
2. Utiliser les flèches Haut ou Bas pour sélectionner la “
3. Utiliser la touche ou pour sélectionner la “Repeat All” ou “Repeat Off”, puis appuyer
sur “Enter” [Entrée].
4. Appuyer sur “
Menu” [Menu] pour retourner au menu principal.
Movie Repeat Mode”.
20
Page 51

Fonctionnement (suite)
Copie de fichiers entre les cartes mémoires / mémoire interne
1. Sélectionner “File” à partir du menu.
2. Appuyez sur la touche de chaque fichier (MP3 ou photo) que vous désirez copier. Chaque
fichier sélectionné doit comprendre à la fin du nom de fichier.
3. Appuyer sur la touche “
4. Sélectionner “Copy” [Copier] et appuyer sur “Enter” [Entrée].
5. Sélectionner l’emplacement sur lequel vous désirez copier le fichier, puis appuyer sur .
6. Appuyer sur “
7. Appuyer sur “
Enter” [Entrée].
Enter” [Entrée] lorsque le transfert de fichier est complété.
OSD”.
21
Page 52

Fonctionnement (suite)
Effacer de fichiers entre les cartes mémoires / mémoire interne
1. Sélectionner “File” à partir du menu.
2. Appuyez sur la touche de chaque fichier (MP3 ou photo) que vous désirez copier. Chaque
fichier sélectionné doit comprendre à la fin du nom de fichier.
3. Appuyer sur la touche “
4. Sélectionner “Delete” [Supprimer] et appuyer sur “Enter” [Entrée].
5. Sélectionner et appuyer sur “Enter” [Entrée].
6. Appuyer sur
“Enter” [Entrée] lorsque le transfert de fichier est complété.
OSD”.
22
Page 53

Fonctionnement (suite)
Changement du langage
1. Sélectionner “Setup” [Configuration] depuis le menu principal et appuyer sur “Enter” [Entrée].
2. Utiliser les flèches Haut ou Bas pour sélectionner la “
3. Utiliser la touche ou pour entrer langue désirée et appuyer sur “Enter” [Entrée].
4. Appuyer sur “
Menu” [Menu] pour retourner au menu principal.
Language”.
23
Page 54

Fonctionnement (suite)
Configuration de la date et de l’heure
1. Sélectionner “Setup” [Configuration] depuis le menu principal et appuyer sur “Enter” [Entrée].
2. Utiliser les flèches Haut ou Bas pour sélectionner la “Time
3. Utiliser la touche ou pour entrer l’heure désirée et appuyer sur “Enter” [Entrée].
4. Appuyer sur “
Menu” [Menu] pour retourner au menu principal.
”.
24
Page 55

Fonctionnement (suite)
Configuration de l’alarme
1. Sélectionner “Setup” [Configuration] depuis le menu principal et appuyer sur “Enter” [Entrée].
2. Utiliser les flèches Haut ou Bas pour sélectionner la “
3. Utiliser la touche ou pour régler l’heure en format 24H et appuyer sur “Enter” [Entrée].
4. Appuyer sur “
Menu” [Menu] pour retourner au menu principal.
Alarm”.
25
Page 56

Fonctionnement (suite)
Configuration la mise en marche et l’arrêt de la minuterie
1. Sélectionner “Setup” [Configuration] depuis le menu principal et appuyer sur “Enter” [Entrée].
2. Faire défiler jusqu’à “
puis appuyer sur la touche
3. Vuillez utiliser la touche ou pour régler l’heure en format 24H et appuyer sur “
4. Utiliser la touche ou pour sélectionner la Mise en marche, puis appuyer sur “
Auto Power On” [Mise en marche] ou “Auto Power Off” [Mise en arrêt],
Enter” [Entrée].
Enter” [Entrée].
26
Page 57

Fonctionnement (suite)
Configuration des displaymodus
1. Sélectionner “Setup” [Configuration] depuis le menu principal et appuyer sur “Enter” [Entrée].
2. Utiliser les flèches Haut ou Bas pour sélectionner la “
3. Utiliser la touche left ou right pour sélectionner la “Cinema”, “Crop” ou “Stretch”, puis appuyer
sur “Enter” [Entrée].
4. Appuyer sur “
Menu” [Menu] pour retourner au menu principal.
Display Mode”.
27
Page 58

Fonctionnement (suite)
Configuration des couleurs
1. Sélectionner “Setup” [Configuration] depuis le menu principal et appuyer sur “Enter” [Entrée].
2. Faire défiler jusqu’aux options désirées.
3. Utiliser la touche ou pour entrer le niveau désiré.
28
Page 59

Support technique
Pour toutes autres questions, veuillez communiquer avec le service de soutien Aluratek avant de
retourner votre appareil.
Courriel: support@aluratek.com
Site Web: www.aluratek.com/support
Numéro local (Irvine, CA): 949-419-6504
Numéro sans frais: 1-866-580-1978
29
Page 60

Énoncé d’interférence avec la réception radio et télévisée
AVERTISSEMENT!!! Cet appareil a été testé et est conforme aux limites d’un appareil numérique de
Classe B, en vertu de la Section 15 des règles CFC. Ces limites ont été conçues pour assurer une
protection raisonnable contre de telles interférences néfastes dans une installation résidentielle.
Cet équipement génère, utilise et peut émettre de l’énergie de fréquence radio. S’il n’est pas cor
rectement installé et utilisé, il peut causer des interférences nuisibles dans les communications
radio. Toutefois, il est impossible de garantir que de telles interférences ne surviendront pas dans
une installation particulière. Si cet équipement cause des interférences nuisibles à la réception radio
ou télévisée, laquelle peut être déterminée en éteignant et allumant l’équipement, on suggère à
l’utilisateur d’essayer de corriger l’interférence par quelques mesures que ce soit afin d’éliminer les
interférences.
-
30
Page 61

Garantie
Aluratek garantit se produit contre les défauts de matériel et de fabrication pour une période de
120 jours, à compter de la date d’achat.
Cette garantie devient invalide si le numéro de série de l’entreprise ou l’étiquette « garantie annulée »
a été retirée ou modifiée sur le produit.
Cette garantie ne couvre pas :
A) Dommages de fabrication apparente ou dommages à la suite de cas imprévus
B) Accident, mauvaise utilisation, abus, négligence ou modification de toute pièce du produit.
C) Dommages résultant d’un fonctionnement ou entretien inadéquat, connexion à un équipement
inadéquat, ou tentative de réparation par une personne, autre que Aluratek.
D) Les produits sont venus TELS QUELS ou SANS DÉFAUT.
EN AUCUN CAS, LA RESPONSABILITÉ D’ALURATEK N’EXCÈDE LE PRIX PAYÉ POUR LE
PRODUIT À LA SUITE D’UN DOMMAGE DIRECT, INDIRECT, PARTICULIER OU CONSÉCUTIF
RÉSULTANT DE L’UTILISATION DU PRODUIT, DE SES LOGICIELS D’ACCOMPAGNEMENT OU
DE SA DOCUMENTATION.
Aluratek ne fait aucune déclaration et ne donne aucune garantie expresse, implicite ou légale
relative à ses produits, son contenu ou son utilisation de la documentation et de tous ses logiciels
d’accompagnement, et renonce spécifiquement à la qualité, au rendement, à la qualité marchande
et à la convenance. Aluratek se réserve le droit de réviser ou de mettre à jour son produit, logiciel ou
documentation sans l’obligation d’aviser tout individu ou entité.
31
Page 62

aluratek.com
Aluratek, Inc. 12A Mauchly Irvine, CA 92618 sales@aluratek.com 949.419.6504 • office 949.419.6477 • fax
 Loading...