

Page 1
1
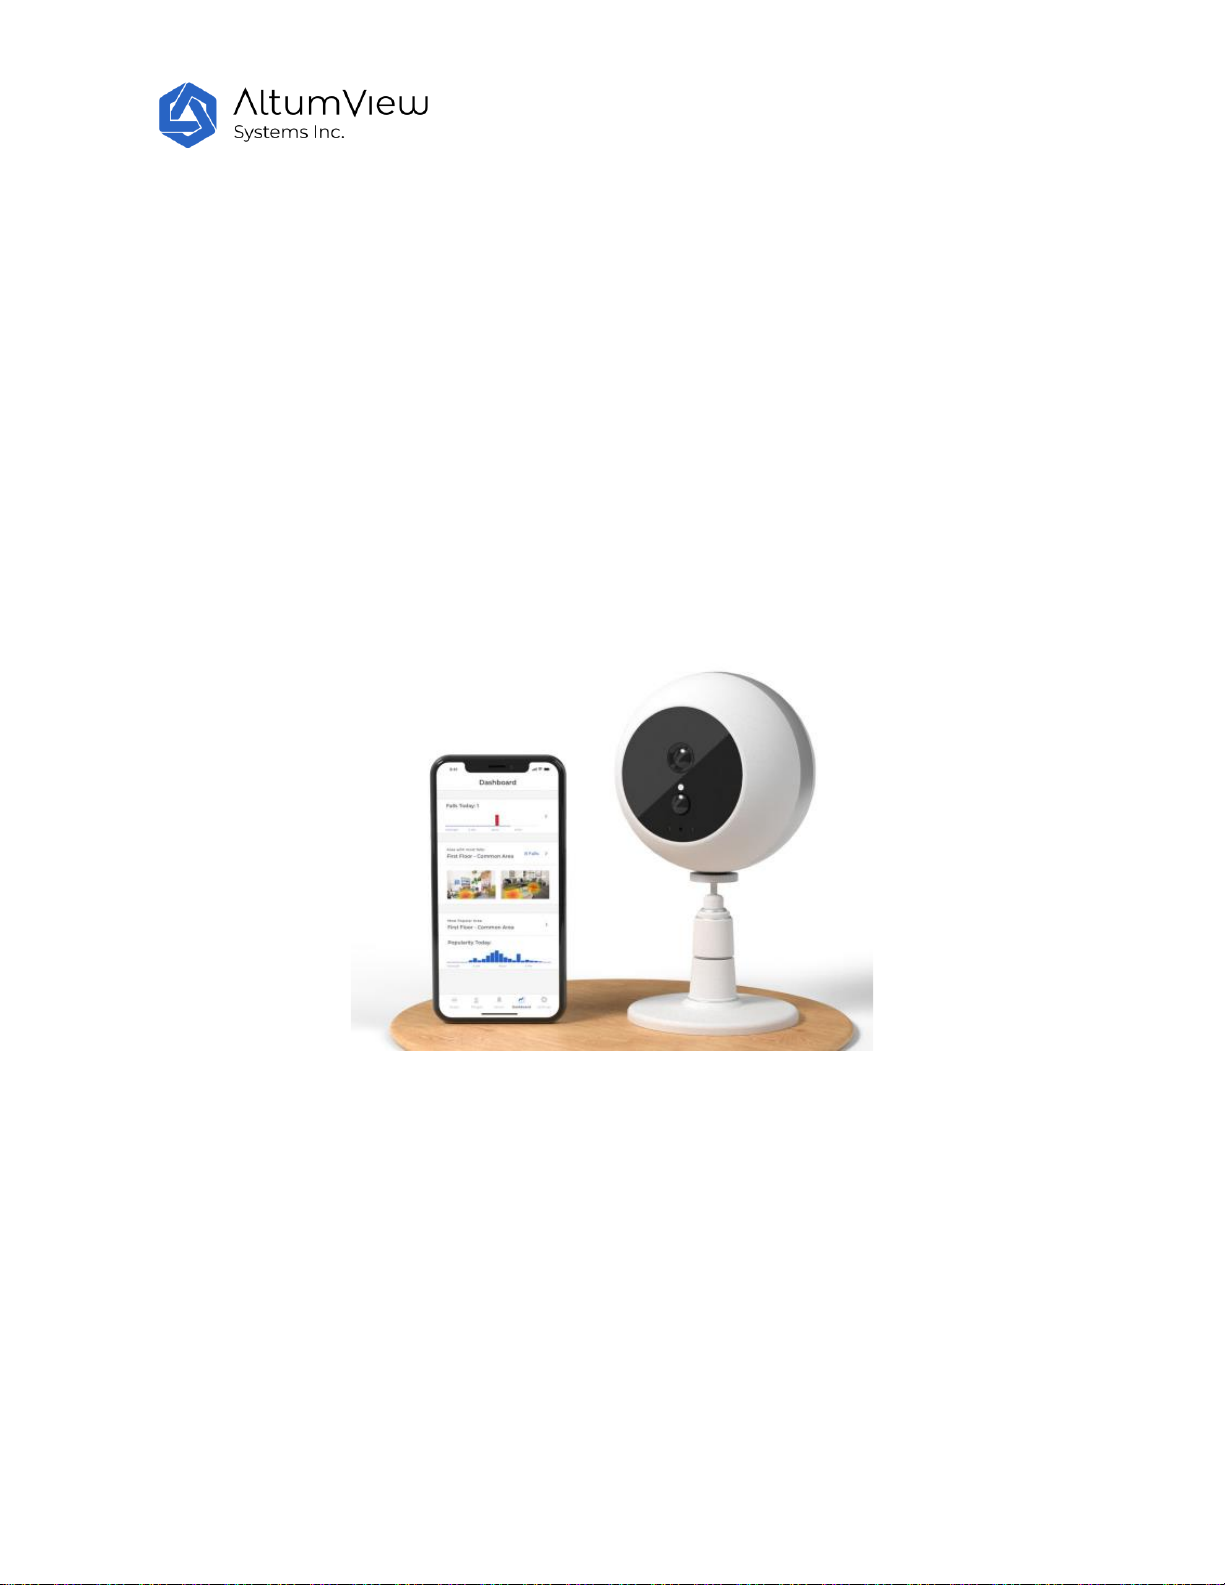
Cypress Smart Activity Sensor
User Manual
February 16, 2021
Page 2

2
Contents
Revision History 5
1. Installation and General Information 7
1.1 Installing iOS App from Apple App Store 7
1.2 Installing Android App 7
1.3 Installing the Visual Sensor 7
1.4 Technical Specifications 8
1.5 Disclaimers, Limitations and Known Issues 8
1.6 Troubleshooting 9
1.7 Technical Support 10
2. User Account Management 11
2.1. Signing Up 11
2.2 Login 13
3.Room Management 15
3.1 List of Rooms 15
3.2 Viewing Privacy 16
4.Device Management 17
4.1 Add a Device 17
4.1.1 Add a Device 17
4.1.2 Set Up WiFi 19
4.1.3 Upgrade Firmware 20
4.1.4 Calibration 21
4.1.5 Other Important Settings 23
4.2 Device Streaming and Setting 23
4.2.1 Rename Device 24
4.2.2 Refresh Display 24
4.2.3 Voice Call 24
4.2.4 Setup WiFi 24
4.2.5 Calibration 25
4.2.6 Region of Interest (ROI) 25
4.2.7 Restart 27
Page 3

3
4.2.8 Updating Firmware 27
4.2.9 Change Room 27
4.2.10 Remove Device 28
4.2.11 Delay Fall Alert 29
4.2.12 LED Green Light 29
4.2.13 Alert Sound 29
4.2.14 Hand Waving Detection 29
4.2.15 Hand-Waving Sensitivity 30
4.2.16 Advanced Settings 30
4.2.17 Flip Device View 30
4.2.18 Factory Reset 31
4.2.19 Configuring Night Vision 31
4.2.20 HDMI Output 32
4.2.21 People-Triggered Recording 32
4.2.22 Meanings of LED Colors 33
5.People Management 34
5.1. Manage Person Groups 34
5.2. Add Person 35
5.3 Person Information 37
6.Alerts 38
6.1 Alerts 38
6.2 Managing False Alarms 40
7.Fall Risk Assessment 42
7.1 Introduction 42
7.2 SD Card 42
7.3 Morse Fall Risk Assessment Scale 42
7.4 Gait Analysis 44
7.4.1 Room Setup 44
7.4.2 The Gait Test 45
7.5 Final Morse Fall Risk Scale 47
8.Dashboard 49
8.1 View Visits 49
9. Account Settings 51
Page 4

4
9.1 Profile 51
9.2 Push Notification Status 51
9.3 Duplicate Alert Prevention 51
9.4 Alert History 52
9.5 Invite Secondary User 52
9.6 App Version 53
9.7 Terms of Services 53
9.8 Log Out 53
9.9 Delete Account 53
9.10 Provide Feedback 54
10. Web Interface 55
10.1 People 56
10.2 Visits 57
10.3 Alerts 58
Page 5
5
Revision History
Date
Version
October 23, 2019
Firmware version: 0.6.225
App version: 1.4.6
November 11, 2019
Firmware version: 0.6.225
App version: 1.4.6
Minor revision
November 14, 2019
Firmware version: 0.6.227
App version: 1.5.0
November 16, 2019
Firmware version: 0.6.228
App version: 1.5.0
February 8, 2020
Rearranged chapter order
February 25, 2020
Firmware version: 0.7.242
App version: 1.7.9
April 5, 2020
Firmware version:US-0.7.248, CN-0.7.259, CA-0.7.262. App Version: 1.7.24
Changes:1.3, 1.5, 2.1, 3.2, 4.1, 4.2.5, 4.2.13, 4.2.14, 4.2.16, 5.2, 7.1
July 26, 2020
Firmware version: CA-0.8.268, CN-0.8.264, US-0.8.253 or later
App version: 2.2.18 or later
Main Changes:
New feature: Fall Risk Assessment (Chapter 7)
New feature: False Alert management (Sec. 6.2)
Merge Area and Zone into Room
Other changes to reduce false alarms
Improved streaming performance with lower delay and bandwidth
Restart and Factory Reset via Bluetooth
Turn on phone loud speaker in 2-way audio
Add 2-way audio server connection indicator
Add LED and alert chime toggles
Add waving detection sensitivity
Nov. 6, 2020
Firmware version: CA-0.8.274, CN-0.8.268, US-0.8.260
App version: 2.4.16
Main Changes:
New feature: Region of Interest (Chapter 4)
New feature: User Group (Chapter 5)
New feature: Web interface (Chapter 10)
The “Wandering Risk” flag is removed, which can be achieved by
defining a person group for people with wandering risk.
Display ROI map in the background.
Change floor map color.
Change to colorful stick figures.
Improved face recognition and tracking.
Improved IR light control.
Page 6
6
Improved Bluetooth connection.
Fixed support of Chinese WiFi names.
February 16, 2021
Firmware version: CA-0.9.280, CN-0.9.273, US-0.9.268
App version: 2.5.6
Main Changes:
Added person information and medical history page.
Added Visits page in the Dashboard.
Improved hand waving detection performance in night vision
mode.
Changed the default value of Delay Fall Alert to OFF, and the
default Viewing Privacy mode to Natural.
Page 7
7
1. Installation and General Information
1.1 Installing iOS App from Apple App Store
The iOS version of the Cypress App can be downloaded from AltumView website www.altumview.com
or www.altumview.ca, or by searching “Cypress Visual Sensor” in the Apple App Store, or using the
following link:
https://apps.apple.com/ca/app/cypress-visual-sensor/id1426892725
1.2 Installing Android App
The Android version of the Cypress App can be downloaded from the following links:
https://play.google.com/store/apps/details?id=com.altumview.app
http://altumview.ca/android.html
1.3 Installing the Visual Sensor
Install the Cypress visual sensor at a height of about 1.8-2.5 meters from the ground and tilt it down so
that it can monitor most of the floor in the room. Please avoid installation position with strong backlight.
Then power up and wait for about a minute until the LED starts to flash white, indicating that the sensor
is ready to be added to the system. See the following chapters for details.
Page 8

8
1.4 Technical Specifications
The key performances of the device under good lighting conditions are as follows (the
performance will be degraded in poor lighting conditions or night vision mode):
Fall Detection:
Best detection distance:< 6m
Max detection distance:10m
Waving Hand Detection:
Best detection distance::< 5m
Max detection distance:8m
Face Recognition:
Best recognition distance:< 5 m
Max recognition distance:8m
Two-Way Voice Call:
Best voice distance:< 5 m
Max voice distance:10m
1.5 Disclaimers, Limitations and Known Issues
Please note that as in any other Artificial Intelligence products, the algorithms of our products
are not perfect, although we are working hard to improve them constantly. By purchasing our
products and using our services, you agree to our terms and conditions as stated in our website
and in the App, including the disclaimers, limitations of our products and services, and
limitation of liability.. In particular, you agree that the device is not guaranteed to detect all
possible abnormal events that it is designed for, and is not guaranteed to collect all information
without any error. We cannot guarantee in any way that the device will prevent accidents,
death or personal injury to you or others, or prevent property damage, illegal entry, or undue
delay in any emergency service response from occurring, and we are not liable in any manner
Page 9

9
for any injury, loss or damage resulting therefrom. If you do not agree with these clauses, you
should not use our products.
The following is a list of known issues and limitations of our products. The list is by no mean
complete, and is updated frequently.
Not all emergencies such as falls and waving hand can be detected correctly, because the
performances can be affected by many factors, such as lighting, distance, angle, and
occlusion.
The activity statistics is not always correct, especially when the person being monitored is
on the bed and is covered by blanket.
The face tracking could have temporary error when multiple people’s motions cross over.
The performance of the product in night vision mode is generally worse than the day light
mode.
The voice call does not work when the user’s IP address is in IPV6 format. We are working
to resolve this.
1.6 Troubleshooting
If you could not receive the verification email after registering a new account, please check
if your email is spelled correctly, and also check the junk folder of your email account.
When setting up the sensor, the App needs to communicate with the sensor via Bluetooth.
Please turn on the Bluetooth of your mobile phone.
For security reason, only secure WiFi networks with WPA2-PSK protocol are supported.
Open, WEP, and WPA are not supported. See the Setup WiFi section in Chapter 4 for details.
When you try to add a sensor to your account, if you get an error message stating that the
sensor is not in the whitelist of the server, it means that the sensor is registered in a
different server from the server that your user account is registered. You need to register
your account in the correct server. Currently, three servers are available, in US, Canada, and
China. If you are in these countries, your sensor is default to your country’s server. If you
are in other countries, we will notify you which server to use when creating your account.
When you try to add a sensor to your account, if its status is shown as “Added”, it means
the sensor was already added in another account. This could happen if the previous user of
the sensor forgot to remove it from his/her account, or removed it when the sensor was
offline. See the Remove Device section in Chapter 4 for details.
Page 10

10
When upgrading the firmware, if the status shows “Upgrading…” for a long time, please
press the screen and pull down to reload the page and refresh the status.
After setting up the WiFi, floor calibration should be performed in order to use the fall
detection feature. Every time after the position or angle of the sensor is changed, the
calibration should be performed again, otherwise the fall detection will not work properly.
At any time, each Cypress visual sensor can only connect to one device or App via
Bluetooth. Sometimes if your Cypress App gets a Bluetooth-out-of-range error when trying
to connect to a Cypress sensor, please make sure the sensor is not currently connected to
other device or App via Bluetooth. Sometimes the other device could be your cell phone. To
check if this is the case, please go to the phone’s Settings > Bluetooth page. If the sensor is
connected in this page, please turn off the phone’s Bluetooth to stop the connection, then
turn on the Bluetooth, and connect to the sensor from the Cypress App again.
To test the various alert features of the system, please set the “Duplicate Alert Prevention”
in the Setting page to be “None”, such that every alert will be sent to the App. In addition,
please turn off the “Delay Fall Alert” in the sensor page, such that an alert will be sent
immediately after a fall is detected, without waiting for 30 seconds.
In order for the mobile App to receive the alerts, please turn on the notifications of the
Cypress App in the Setting page of your phone’s operating system.
If the App behaves unexpectedly or stops responding, please force kill the App, and then
restart it. If the sensor behaves unexpectedly or stops responding, please first restart the
sensor from the App. If the problem persists, please power down and power up the sensor.
In some extreme cases, factory reset might be needed. If Bluetooth connection with the
sensor is available, the factory reset can be done via the App. Otherwise a pin has to be
used to reset it via the reset hole in the back of the sensor. See the Reset and Factory Reset
sections in Chapter 4 for details.
1.7 Technical Support
If you have any technical questions, please contact us at [email protected].
Page 11
11
2. User Account Management
2.1. Signing Up
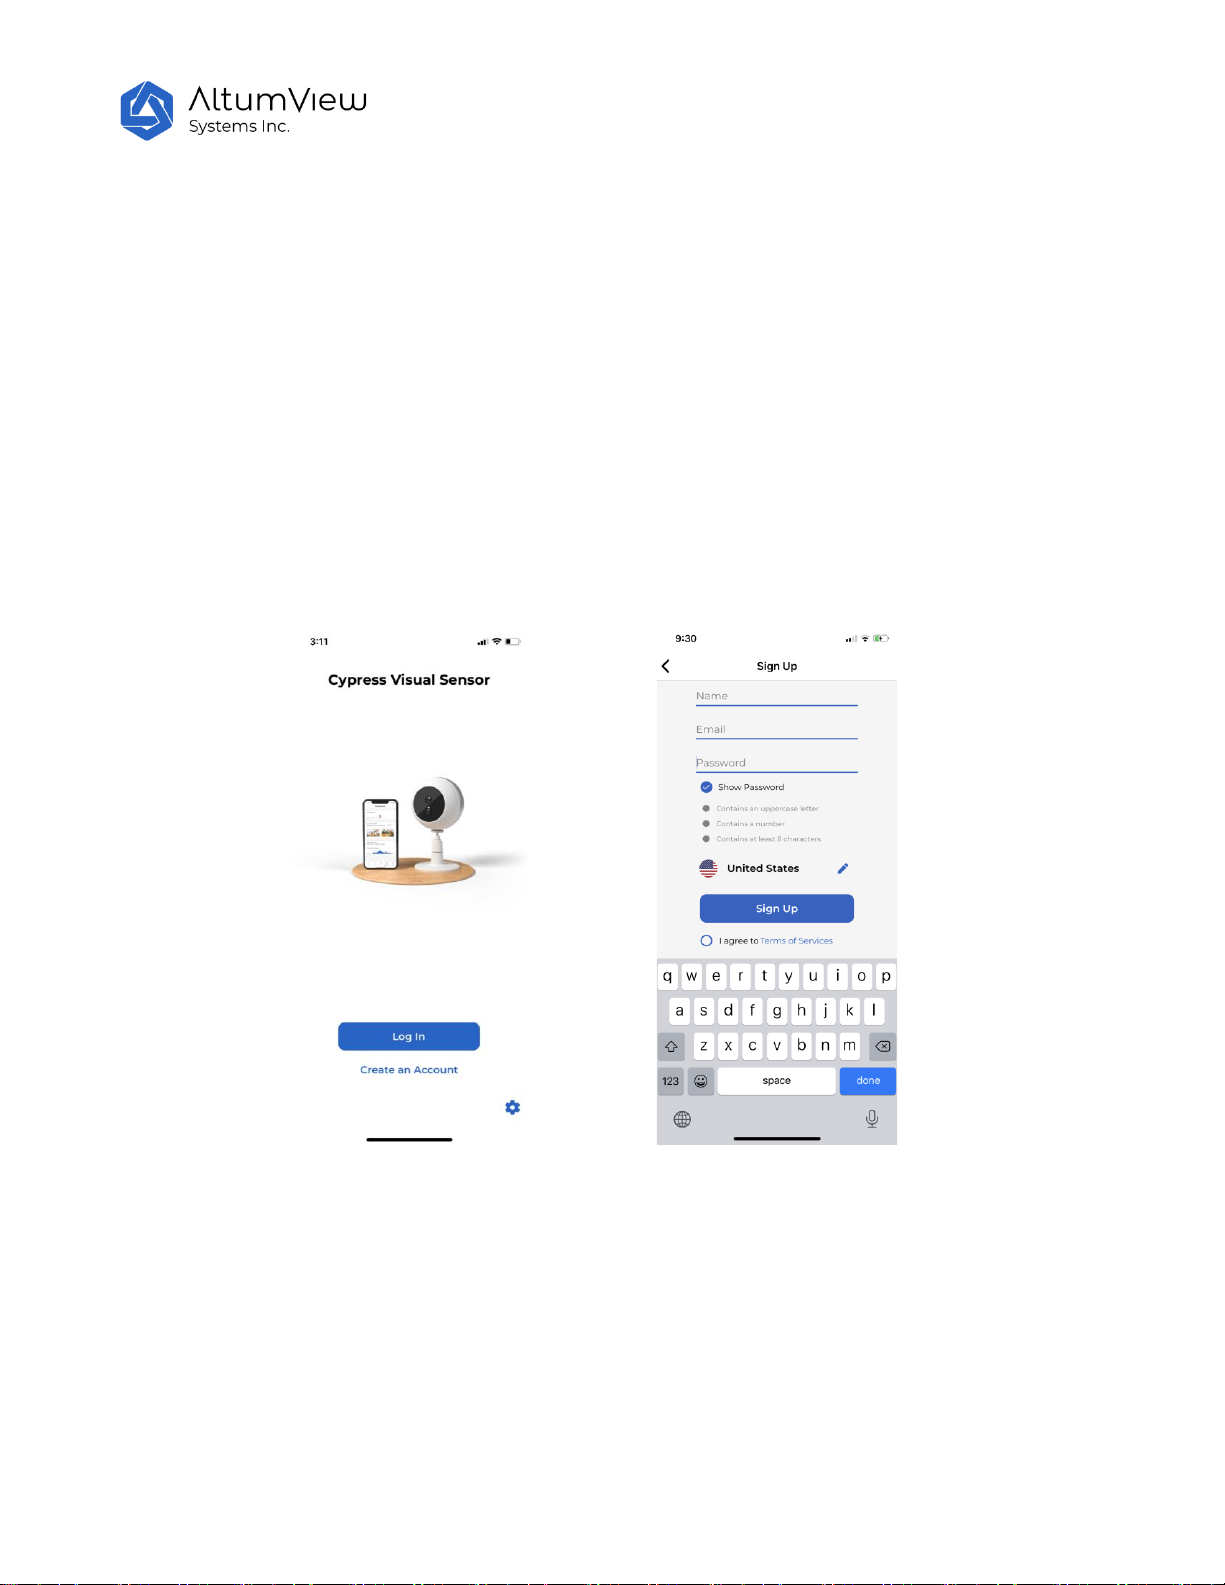
● Open the Cypress App, and tap the “Create an Account” in the front page.
● On the “Sign Up” page, tap the pencil icon to choose a server location. Currently there are three
servers: Canada, United States, and China. When a sensor is sold, its serial number is added to the
white list of one of our servers, based on the country of the customer.
● Fill in name, email, and password, and tap the “Sign Up” button. The email address and password
are required for future login. The password should have at least 8 characters and include at least
one upper case letter and one digit.
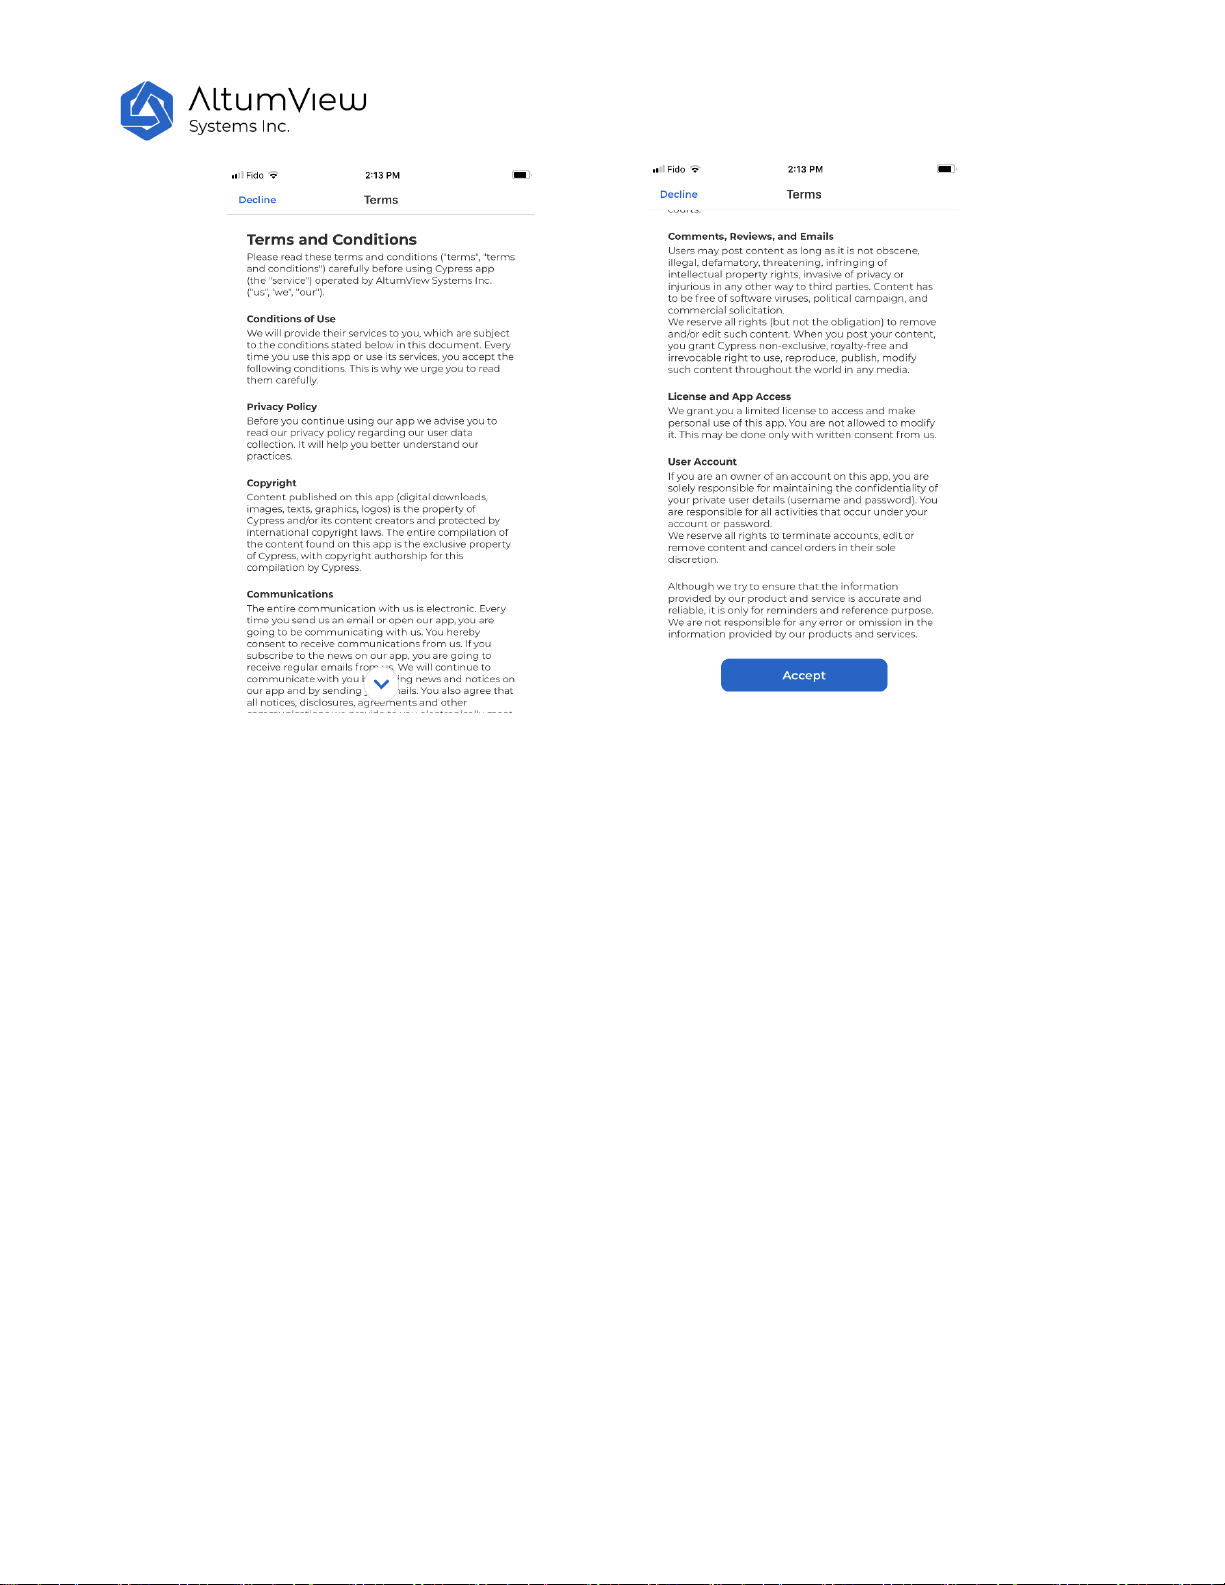
● In order to use this product, you need to accept our “Terms of Services” . Please click Terms of
Services and read it carefully. Use the drop-down button to see the entire document. If you accept
these terms of services, please tap the “Accept” button at the bottom of this page. The terms of
services can also be found in the Setting page of the App, or AltumView website.
Page 12
12
● After clicking Sign Up, you will receive a verification code through email from altumview.com. If you
could not get it after a few minutes, please make sure your email is spelled correctly, and check your
junk mail folder.
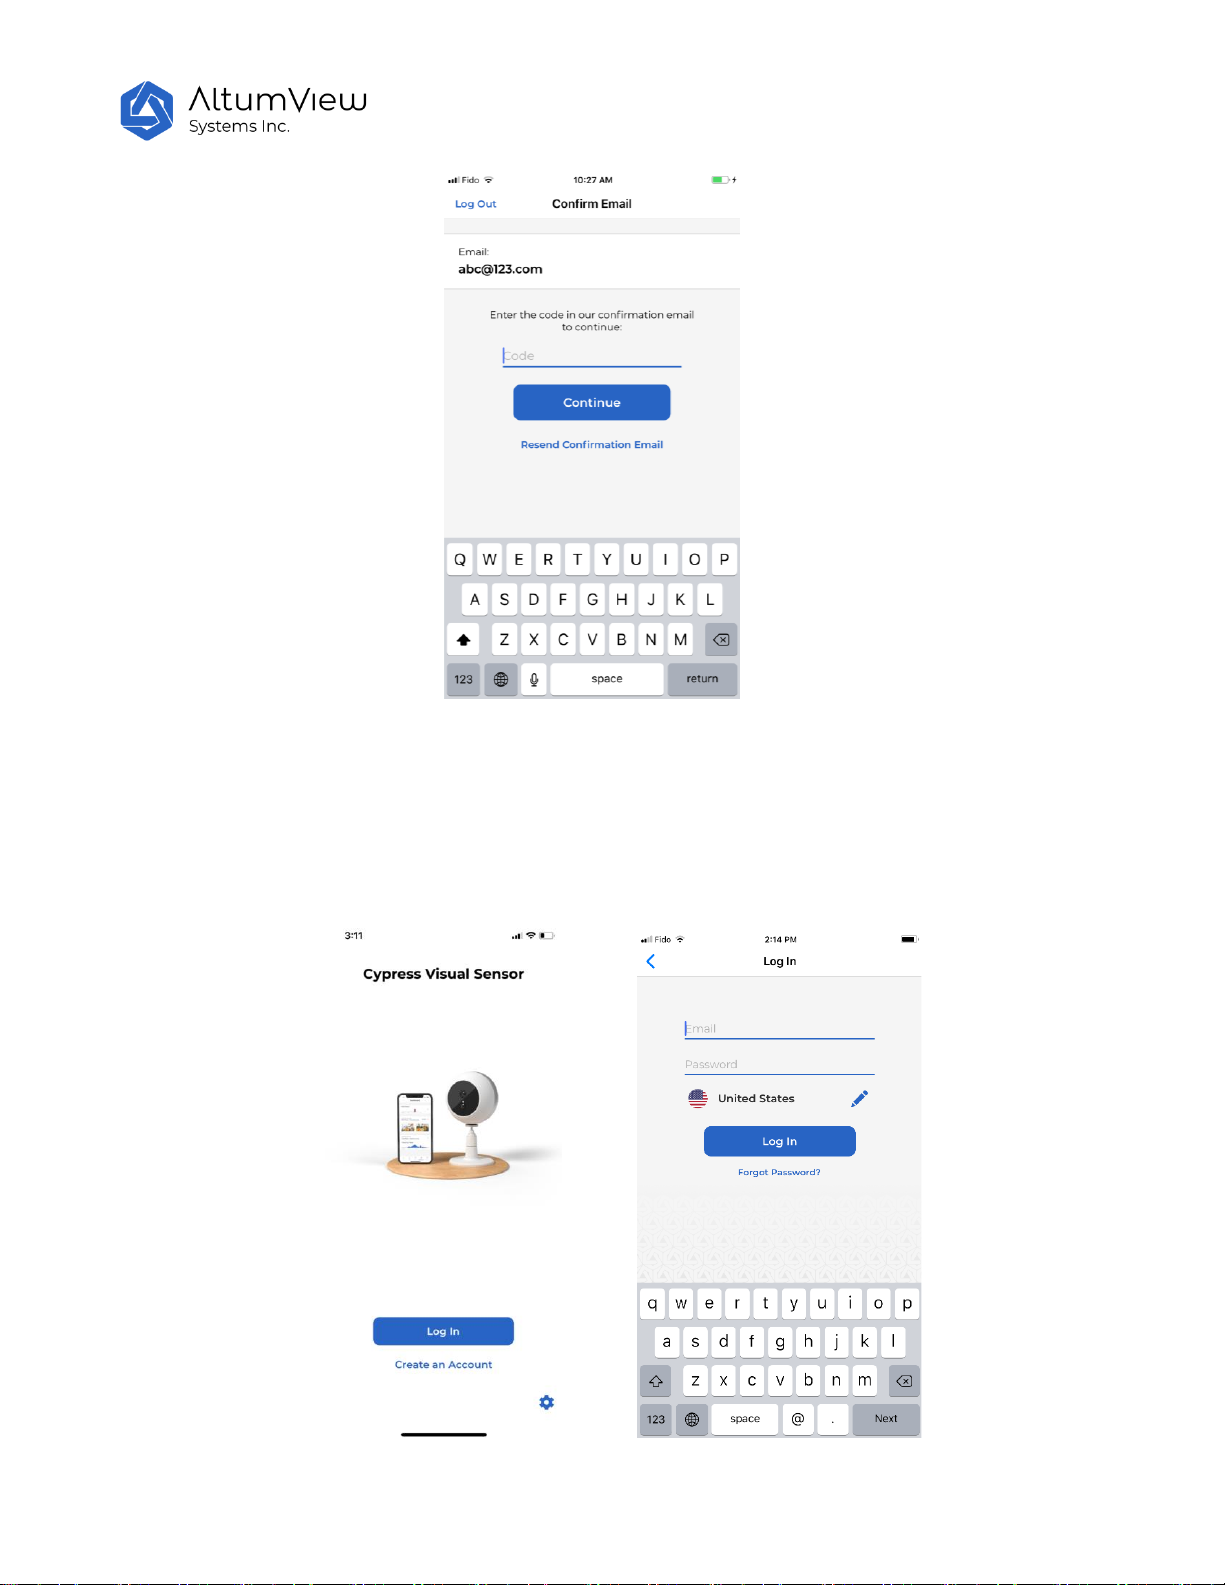
● Enter the verification code in the “Confirm Email” page, then tap “Continue” to enter your account.
Page 13
13
2.2 Login
● Tap the “Log in” button in the front page to open the Log In page, where you can log in to your
account using your email and password. You also need to specify the server for your sensor.
Page 14

14
● Retrieve password: If you have forgotten your password, you can tap on "Forgot Password?". In the
"Forgot Password" page, please fill in your registered email address in the "Email" field and the new
password will be sent to your registered email address.
● App version and Dark Mode: In the front page, tap the setting wheel icon in the lower-right corner
can display the App version and choose to use Dark Mode.
Page 15
15
3.Room Management
Cypress sensors can be added to the account and managed by tapping the Rooms icon at the lower left
corner of the screen. Each sensor must be added to a Room, and a Room can have up to 10 sensors. The
default maximum number of sensors in an account is 50. Please contact us if you need to increase the
maximum number of sensors.
Only the main user can change the setting of the room, such as adding, deleting, and renaming.
3.1 List of Rooms
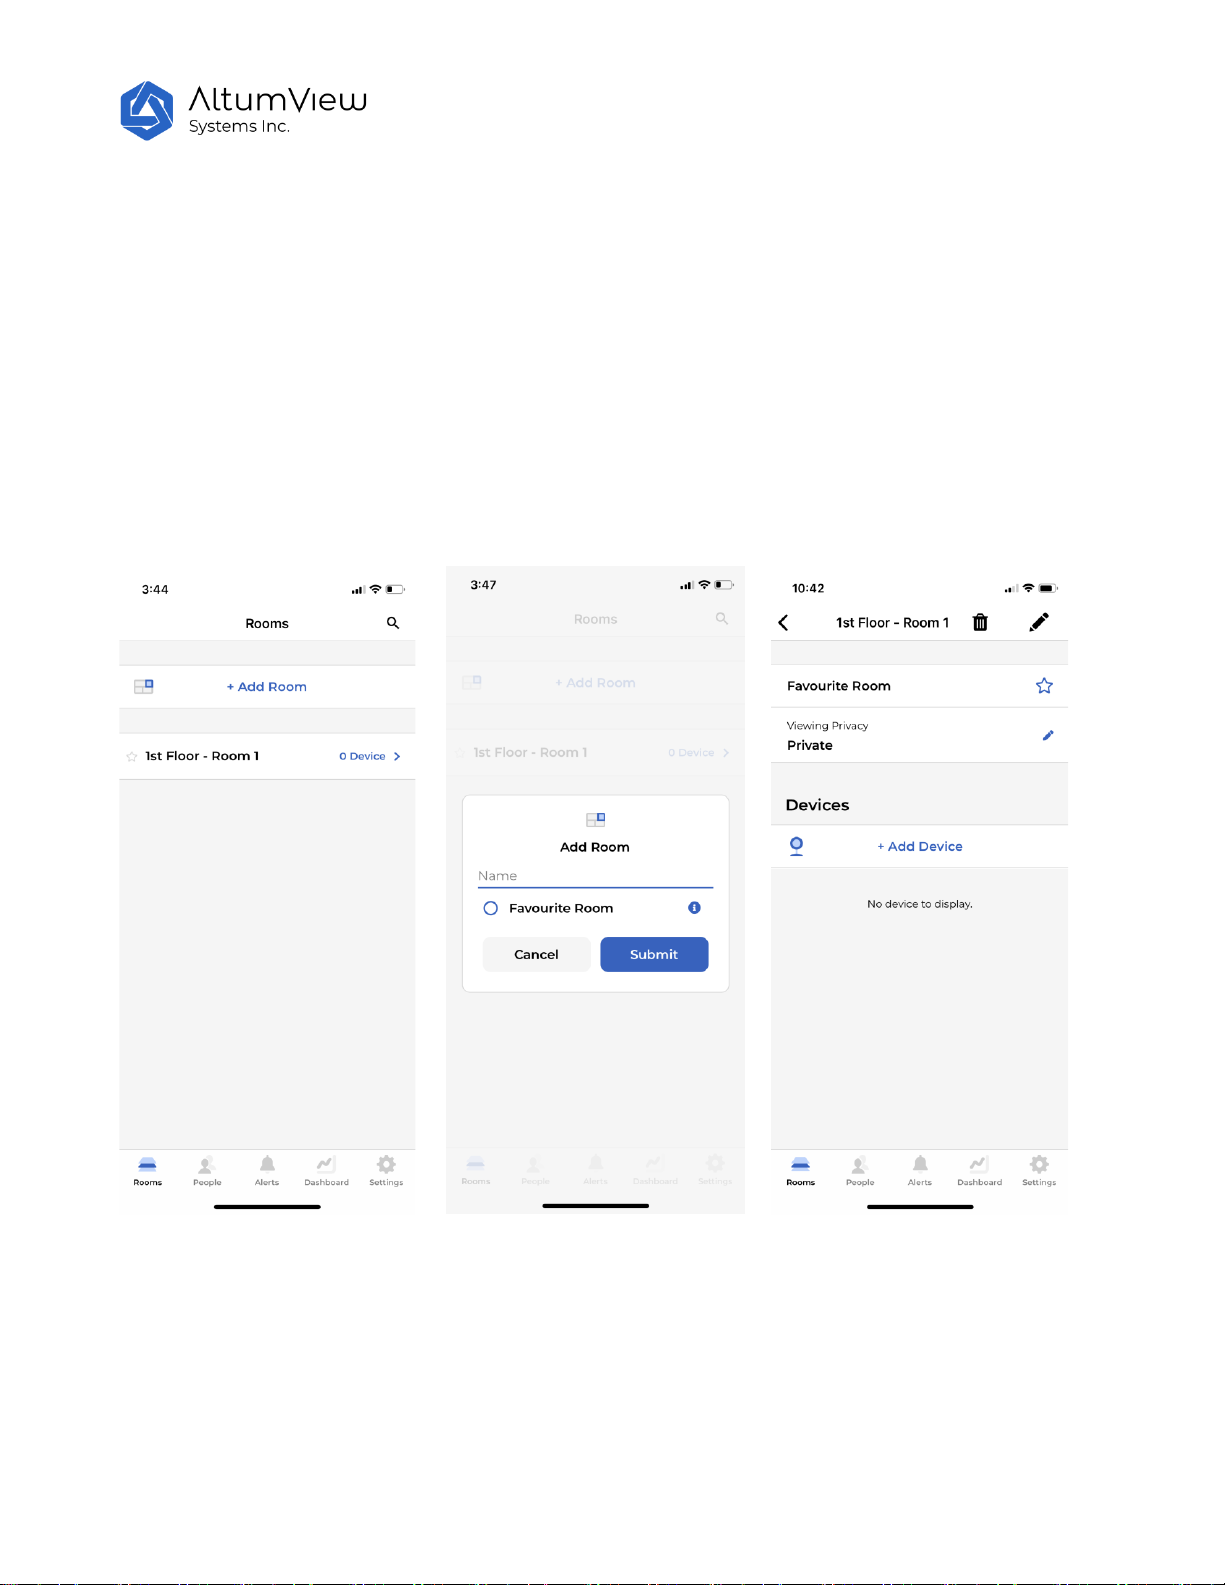
Tap on “Rooms” in the lower left corner of the screen to enter the Rooms page. This page lists all the rooms
managed by this account.
Users can create a new Room in the Rooms page by tapping the “+ Add Room” command in the Rooms
page. In the Add Room page, user can input the name of the new room, or check the “Favourite Room” flag
to label a room as favourite, which will keep it at the top of the room list in the Rooms page. Tap Submit will
create the new room.
If there are many rooms, users can search a room in the Rooms page by tapping the magnifier icon in the
upper right corner, and input a part of a room name to search it.
Page 16
16
In the Rooms page, there is a default Room called “1stFloor – Room 1”. Initially, the number of devices in
the Room is 0. Tap a room name in the Rooms page will go to the individual room page.
In the individual room page, users can tap “+ Add Device” to add a new device to the room, which will be
detailed in the next chapter. Users can also tap the garbage bin icon in the top to delete the room, tap the
pen icon in the top to rename the room, or tap the star icon next to “Favourite Room” to label the room as
favourite, as described above.
3.2 Viewing Privacy
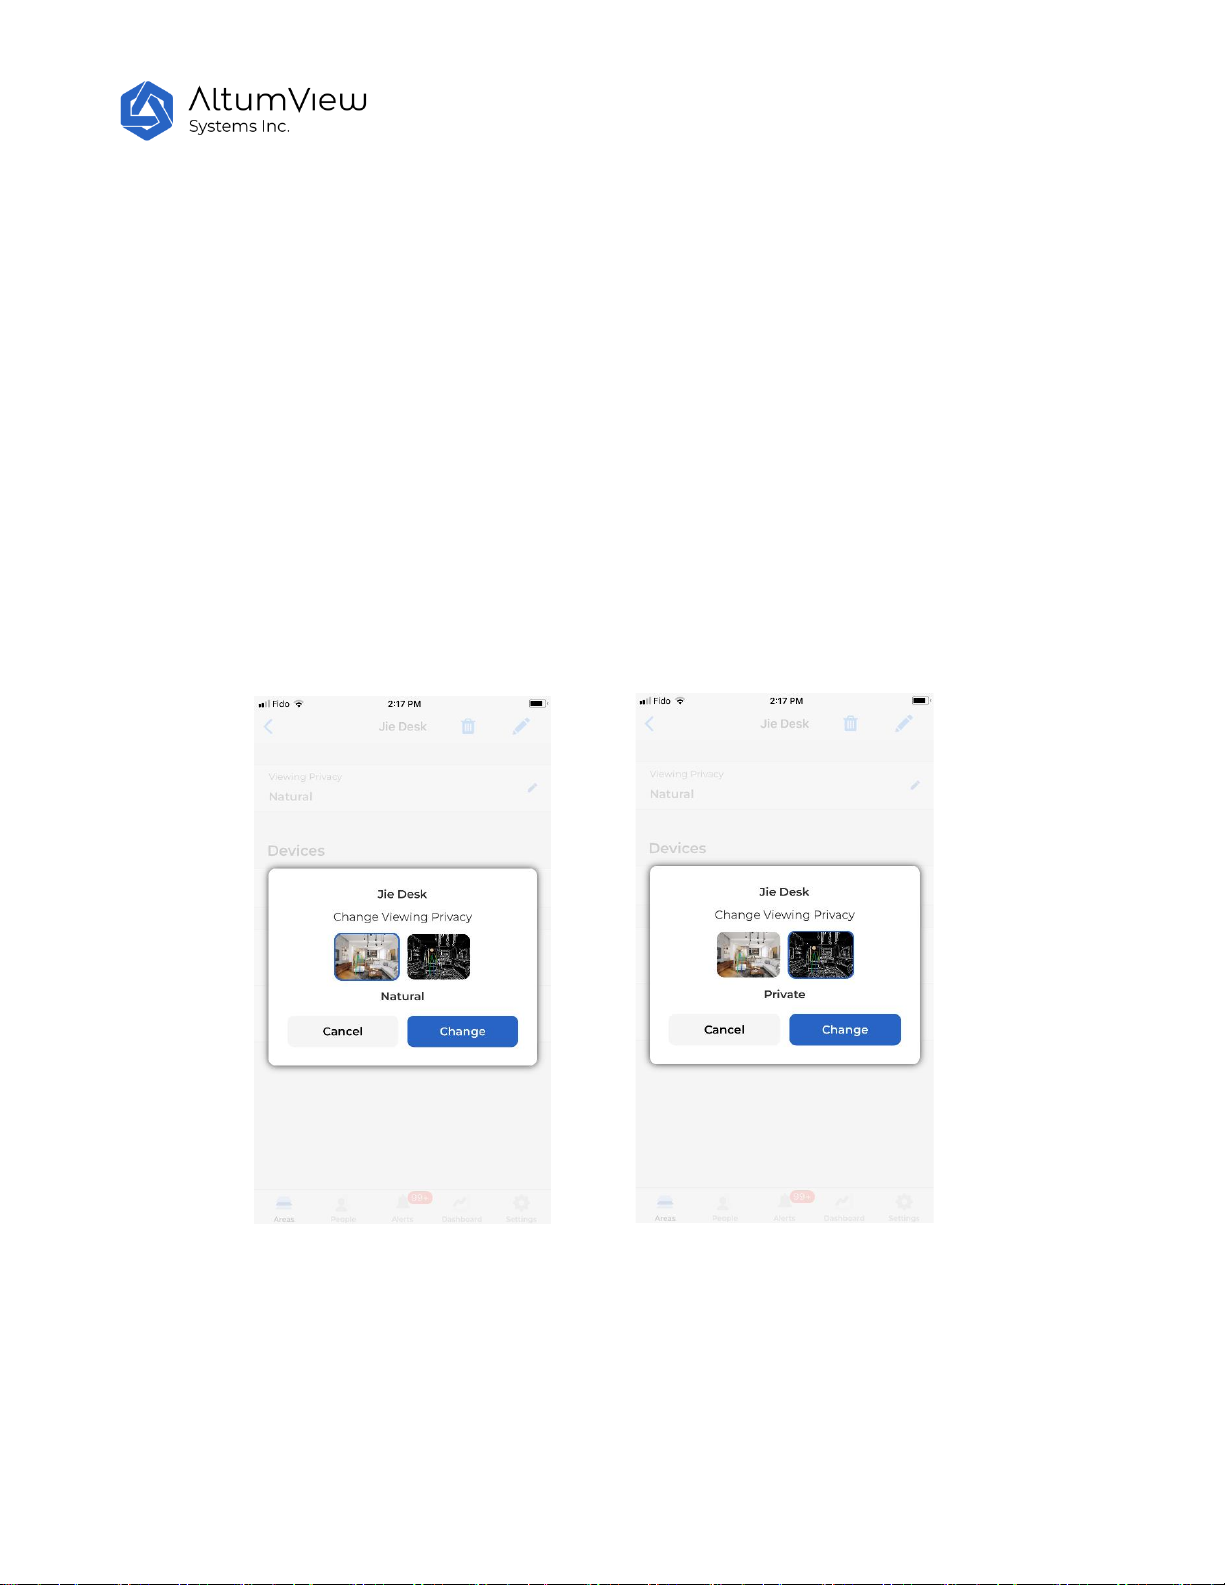
The background image of each room can be set to “Natural” (default) or "Private" mode. When set to
“Natural”, the original background will be shown during streaming and in the alert messages. When set to
“Private”, only the black/white edge information of the background is shown during streaming and in the
alert messages, as shown by the figures below.
When the viewing privacy of a Room is changed, to make the change effective, users have to re-calibrate all
the sensors in the Room to update the background.
Page 17
17
4.Device Management
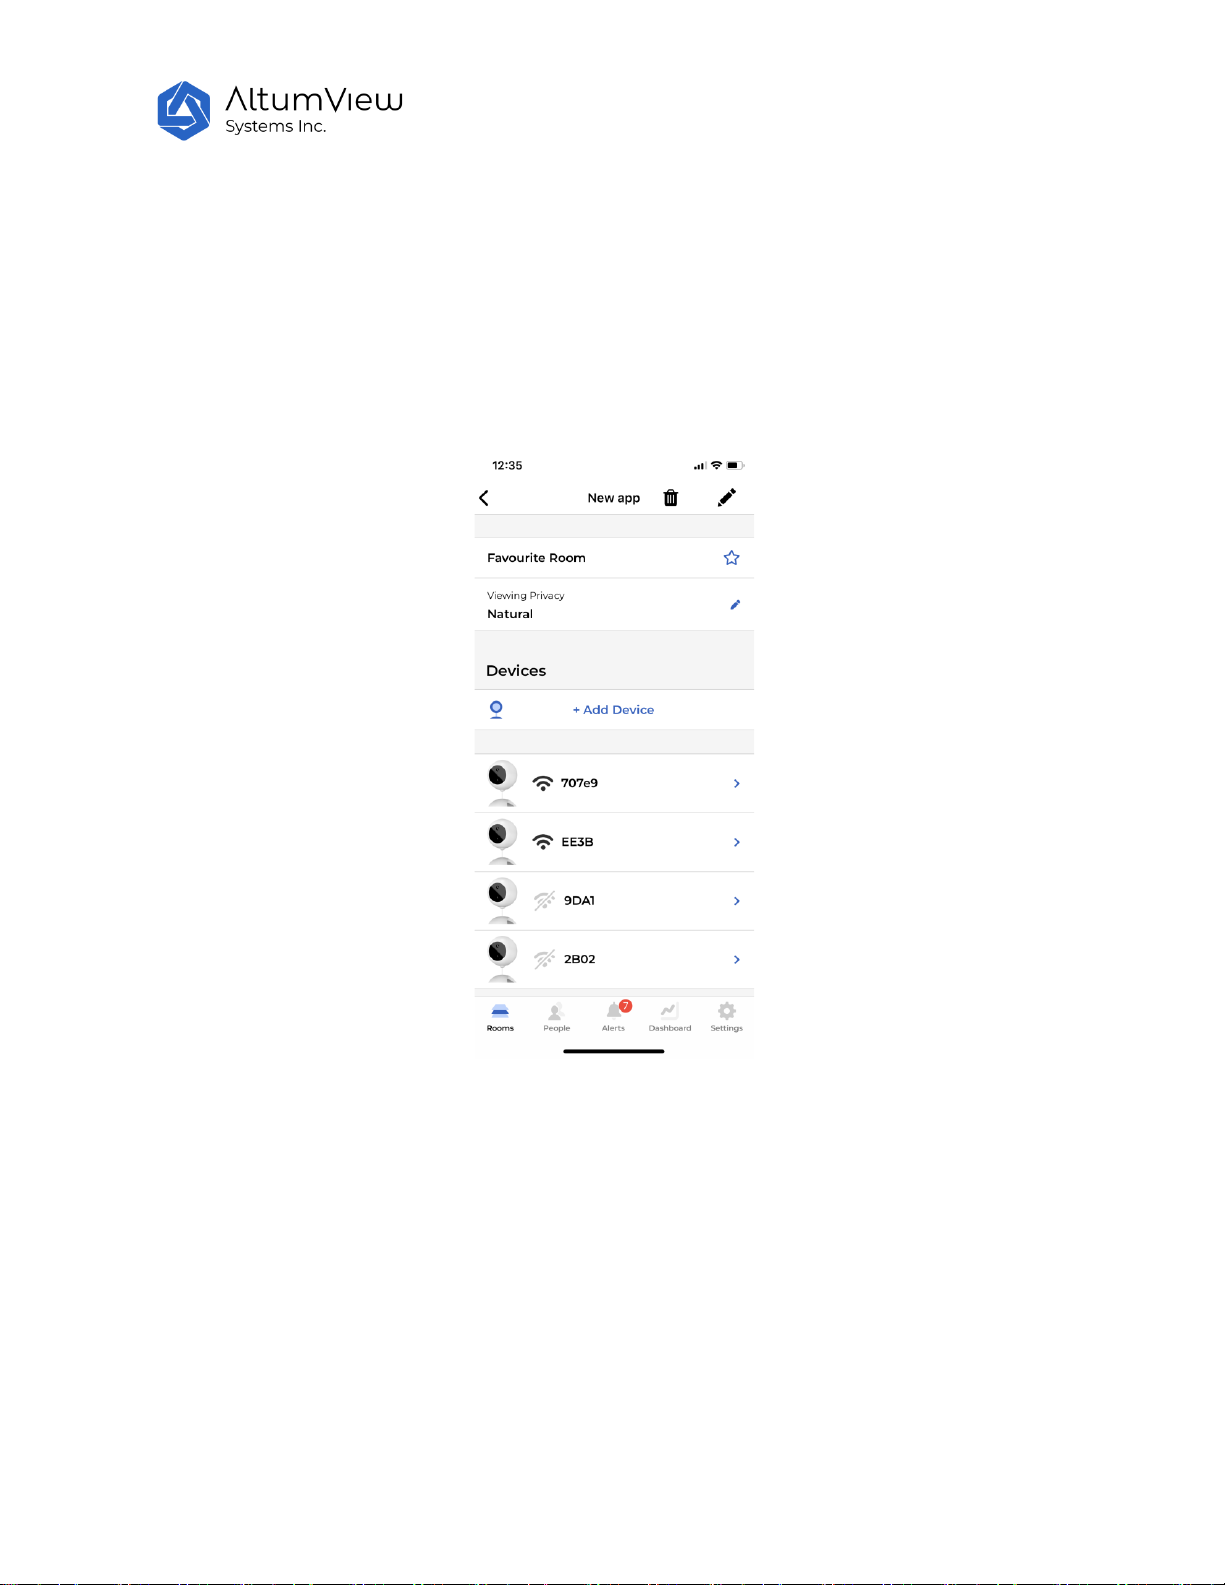
There can be up to 10 visual sensors in each room. The user can see all the sensors in a selected room,
as shown below. If the WiFi icon to the left of a sensor is black, it means the sensor is online. If the icon
is gray, the sensor is offline. To refresh the status, users can pull down the screen.
Only the administrator can manage the sensors, and other users can only view them.
4.1 Add a Device
This section describes the main steps to add a sensor to an account, before it can be used.
4.1.1 Add a Device
Cypress sensor must be added in a room before can be used. To add a device, the user must be within
10 meters of the sensor, and turn on the Bluetooth of the phone, in order for the Cypress App to
connect to the sensor via Bluetooth.
Page 18
18
Note that sometimes the sensor could be connected to the phone instead of the Cypress App. As a
result, the App will not be able to connect to the sensor, and user could get a Bluetooth-out-of-range
error message. To check if it is this case, user can go to the phone’s Settings > Bluetooth page. If the
sensor is connected in this page, user can turn off the Bluetooth to stop the connection, turn on the
Bluetooth again, and then try to connect to the sensor from the Cypress App again. Sometimes the
Bluetooth-out-of-range error message could be caused when the sensor is paired to another phone
nearby. In this case, the other phone needs to disconnect from the sensor from its Settings > Bluetooth
page.
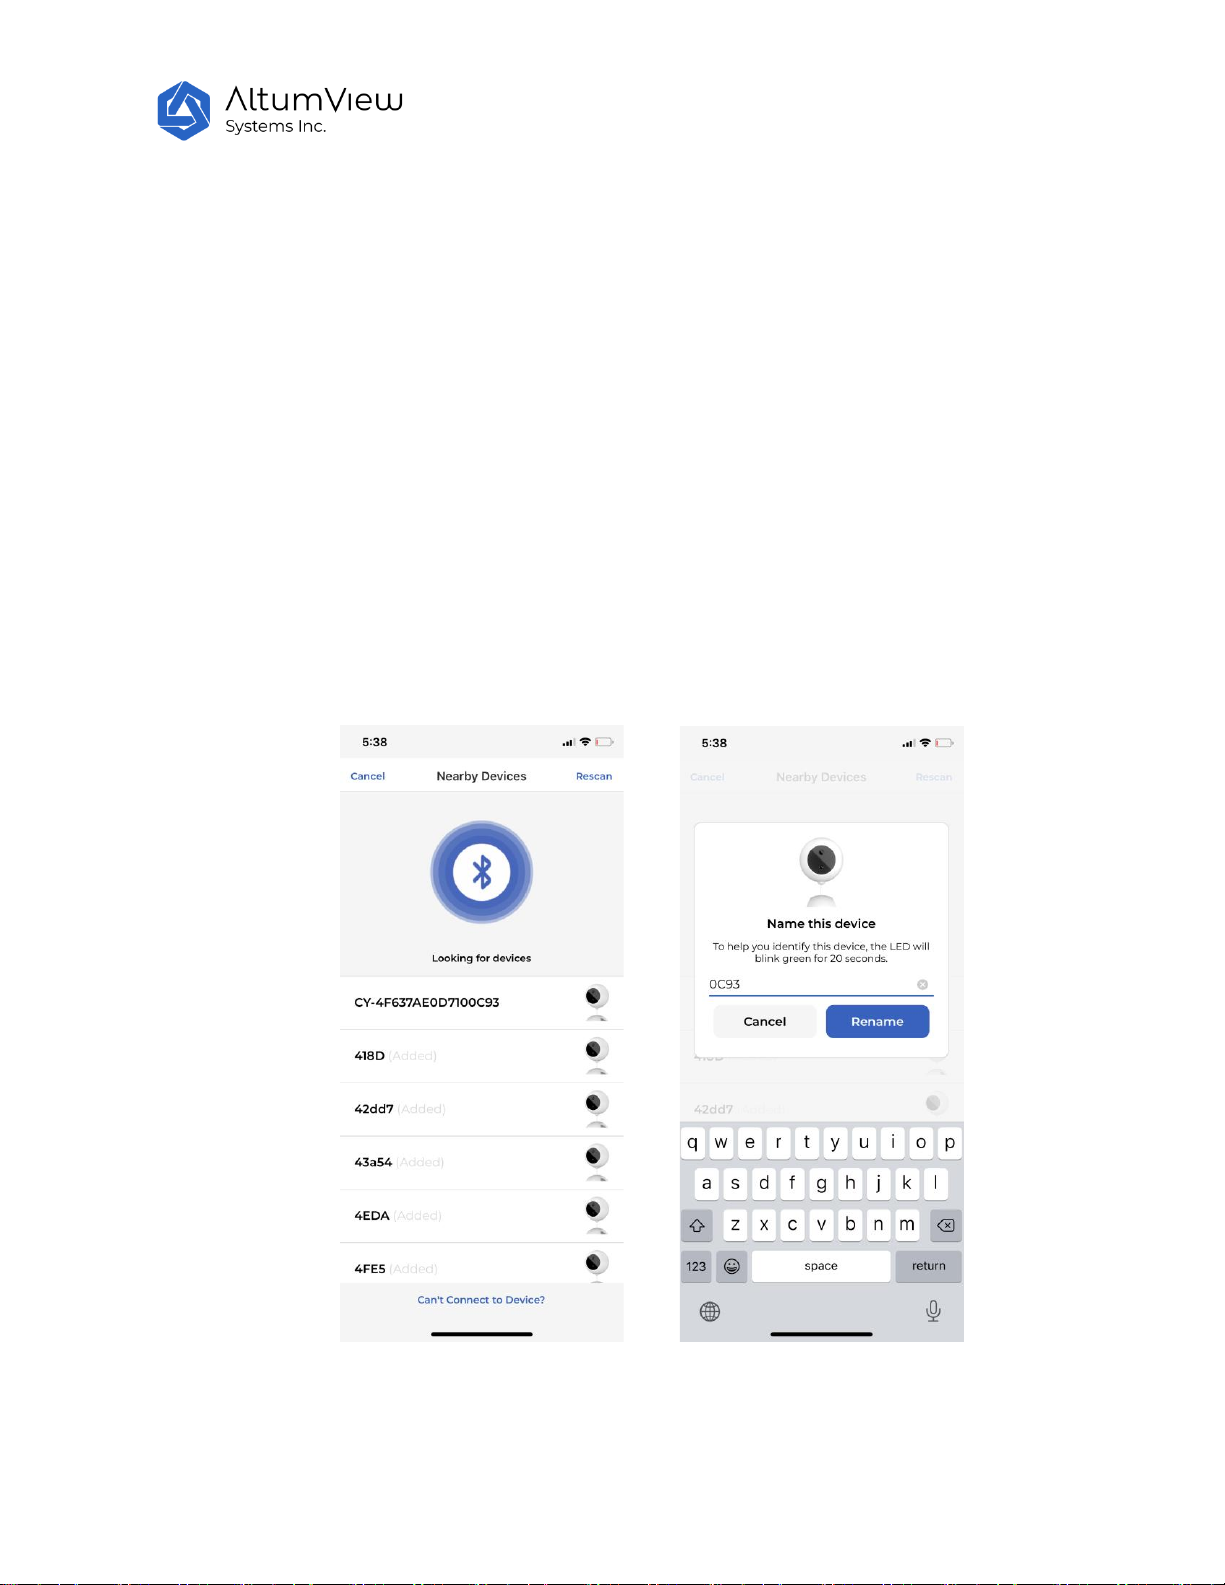
To add a device, tap the Rooms icon in the lower left corner, then select a room in the Rooms page. In
the individual room page, tap the “+Add Device”, a Nearby Devices page will be displayed, in which the
App will search and list all nearby devices, as shown below. Select the sensor to be added according to
its serial number. The LED of the selected sensor will flash green for 20 seconds. In the next page, name
the selected sensor to facilitate future management.
Users can only add sensors that have not been added by any user. A sensor can only be added to one
room. If a sensor has been added by other users, its status will be displayed as "Added”, and it cannot be
added to other rooms, unless it is removed from the original account.
Page 19

19
4.1.2 Set Up WiFi
After adding a sensor to a room, the App will set up the WiFi for the sensor. The sensor will first scan
and list available WIFI networks. A sound will be played during the scanning.
Note that for security reasons, in order to set up the WiFi, users must be within 10 meters of the sensor,
and turn on the Bluetooth of the phone.
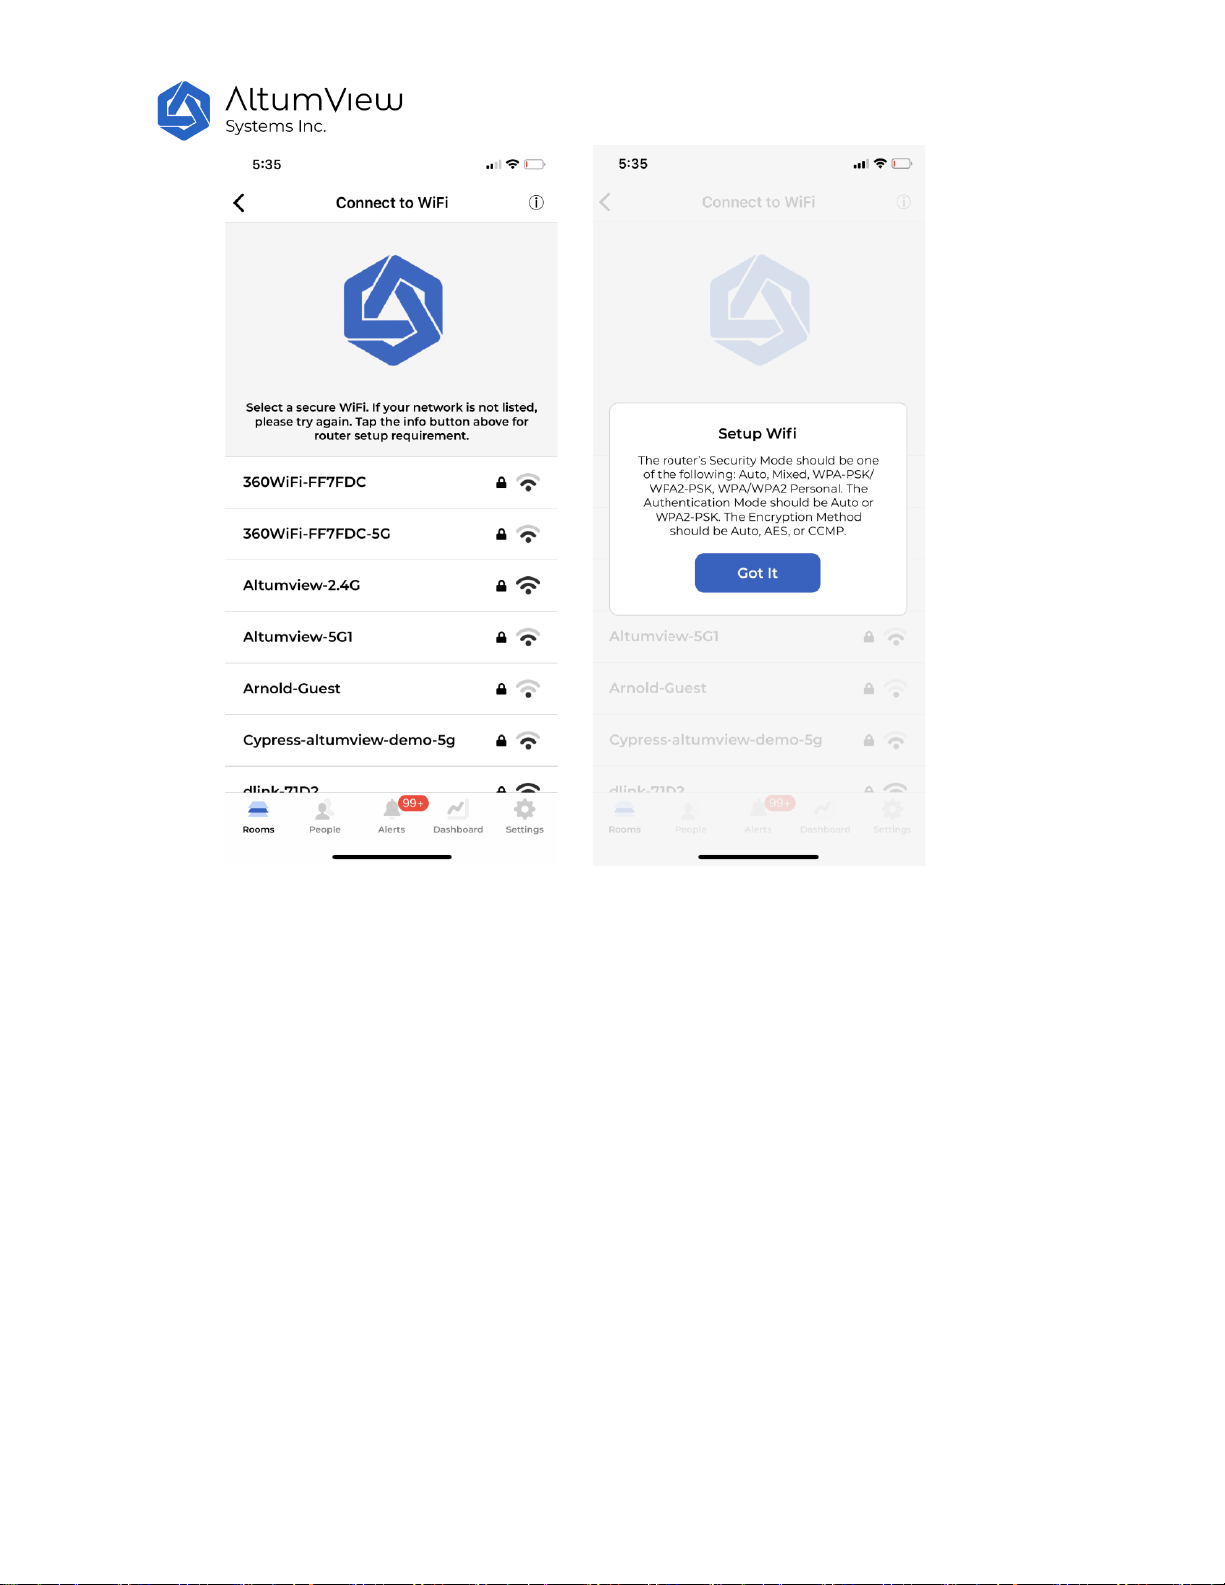
For the same reasons, only secure networks that support WPA2-PSK protocol are supported and listed
by the Cypress App. These networks need a password to access. Unsecure protocols such as Open, WEP,
and WPA are not supported. The WPA2 Enterprise protocol is also not supported yet, which requires
individual user name and password.
The supported router’s Security Mode should be one of the following (different vendors could use
different names): Auto, Mixed, WPA-PSK/WPA2-PSK, WPA/WPA2 Personal. The Authentication Mode of
the router should be Auto, Mixed, or WPA2-PSK, and the Encryption Method should be Auto, AES, or
CCMP. TKIP encryption is not recommended, since it is slower. This information is also listed by taping
the information icon in the Connect to WiFi page of the App, as shown in the figure below. In most
cases, the default configurations of most new routers should be supported by Cypress.
In the WiFi networks listed by the Cypress App, select the desired WiFi network and enter its password,
the LED on the sensor will first turn to red, then change to yellow and blue, and eventually shows a
steady green light. After that, this sensor will be successfully added to the account, and will appear in
the list of sensors in the selected room.
If your desired WiFi network is not shown in the list, you can rescan the networks for a few times,
especially when the WiFi signal is not strong. Please also make sure your WiFi network meets the
requirements above.
After a sensor is added into an account, the WiFi can be re-configured, as shown in Section 4.2.3.
Page 20
20
4.1.3 Upgrade Firmware
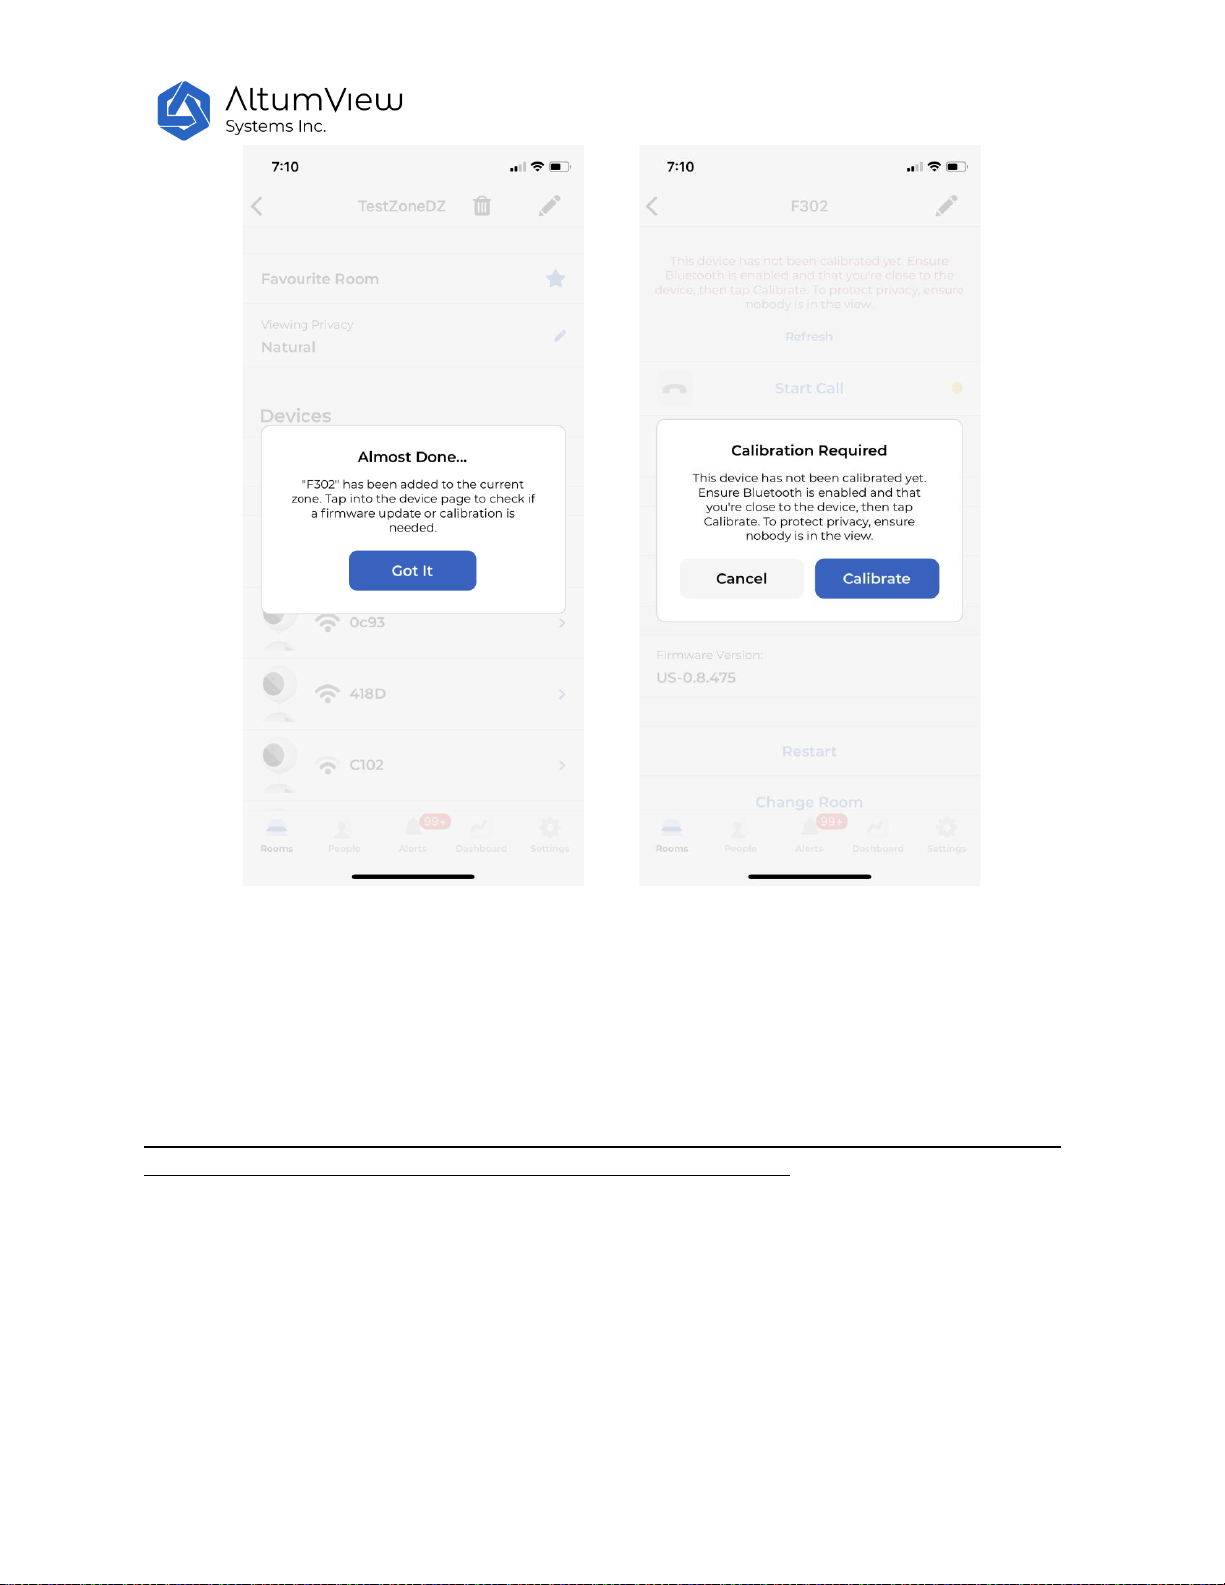
After adding a sensor to the system for the first time, the app will check the sensor's firmware version. If
the firmware is not the latest one, the app will ask the user to upgrade the sensor’s firmware before
performing any other operations, as shown by the figure shown. After the first use, users can check new
firmware version in the device page of the App, as shown in the Update Firmware section in Chapter 4.
Page 21
21
4.1.4 Calibration
After adding a sensor to the system for the first time, and after the firmware upgrade, the app will asks
the user to calibrate the sensor to detect the floor area in the room before it can be used for fall
detection, as shown in the figure above.
Note: The current algorithm only sends alert when falling to the ground is detected. Falling on couch
or bed is not considered dangerous and therefore will not trigger alert.
Make sure that no people are in the view of the sensor during the calibration, in order to protect
user’s privacy. After that, every time the position or angle of the sensor is changed, the calibration
should be done again manually.
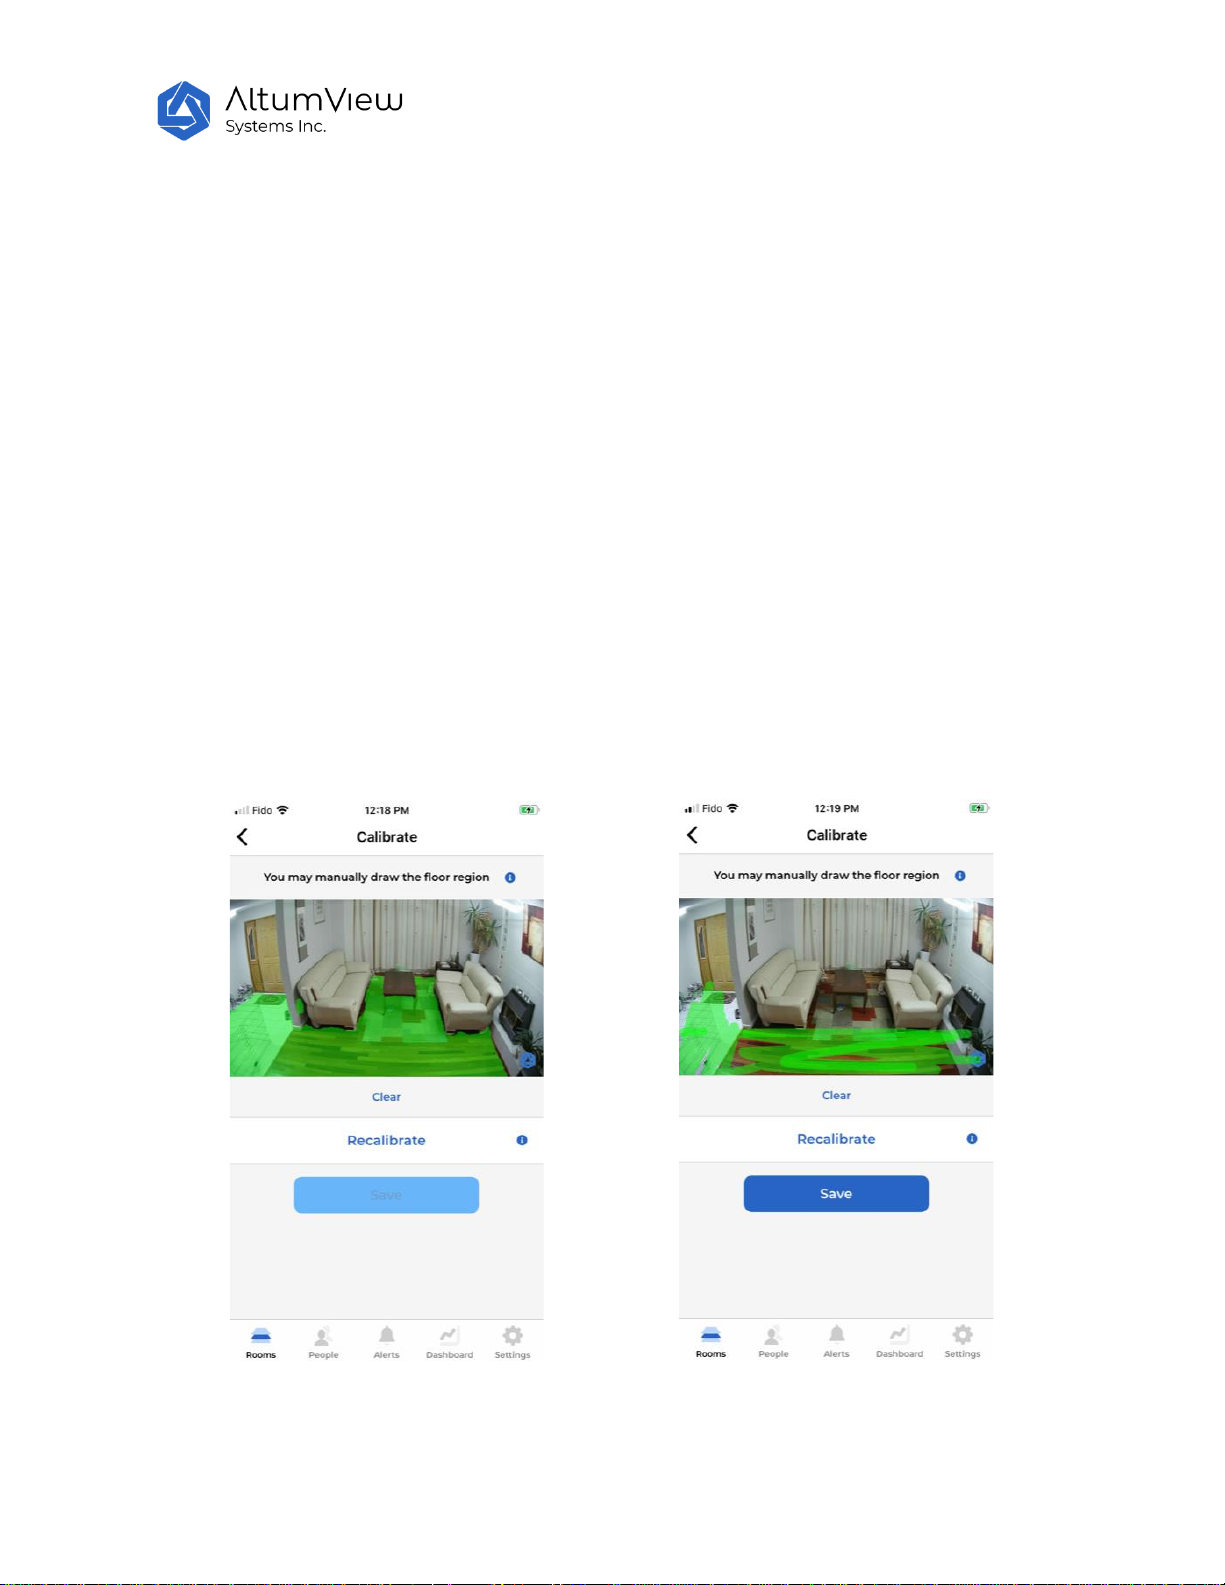
To do the calibration, tap the “Calibrate” command to enter the Calibrate page, as shown below. If the
sensor has not been calibrated, the sensor will automatically capture a background image and start to
detect the floor in it. If the sensor was calibrated before, the App will first display the previous
background image and floor map. To update the calibration for the current sensor position, tap the
Page 22
22
“Recalibrate”, the sensor will take a new background image and run the calibration algorithm to it,
which will take a few seconds. If the user is satisfied with the floor calibration result, tap the “Save”
button to save the result and exit the page.
Manual Calibration: Sometimes the auto calibration algorithm may mis-calibrate some non-floor areas
as floor, or miss some floor areas, which could cause false fall detection alarms or miss some falls. In this
case, users can do manual calibration. To do this, first tap the “Clear” command to clear the automatic
calibration result, and then use a finger to redraw and fill up the correct floor area on the screen, as
shown by the second image below. After that, tap the “Save” button to save the result.
Notes:
1. To protect privacy, make sure that no people are in the view of the sensor during the
calibration.
2. Users must be within Bluetooth range of the sensor (~10m) in order to do the auto-
calibration, because the background will be updated. In this case, please ensure that the
phone’s Bluetooth is turned on, and that no other phone is paired to the sensor.
3. Manual calibration can be done remotely, because the background is not updated.
4. Currently the sensor only sends alerts for falls where the upper body of a person is on the
ground. If a person falls but sits on the ground, the sensor may not send the fall detection
alert. To trigger the alert and get the help in this case, the user can either fall to the ground
completely, or face the sensor and wave a hand to trigger the waving detection alert, see Sec.
4.2.14.
Page 23

23
4.1.5 Other Important Settings
This completes the necessary steps to add a sensor to the account, and the basic features of the sensor
can be used, such as sticker figure streaming, fall detection and waving-hand detection. However, to use
other face recognition-related features, such as Region of Interest and statistics of daily activities, the
people information needs to be added to the system, as show in Chapter 5.
There are some important settings that affect the behaviors of the sensor, such as the following. Please
refer to the corresponding sections for details.
Flip Device View (Chapter 4)
Delay Fall Alert (Chapter 4)
Push Notification Status (Chapter 8)
Duplicate Alert Prevention (Chapter 8)
4.2 Device Streaming and Setting
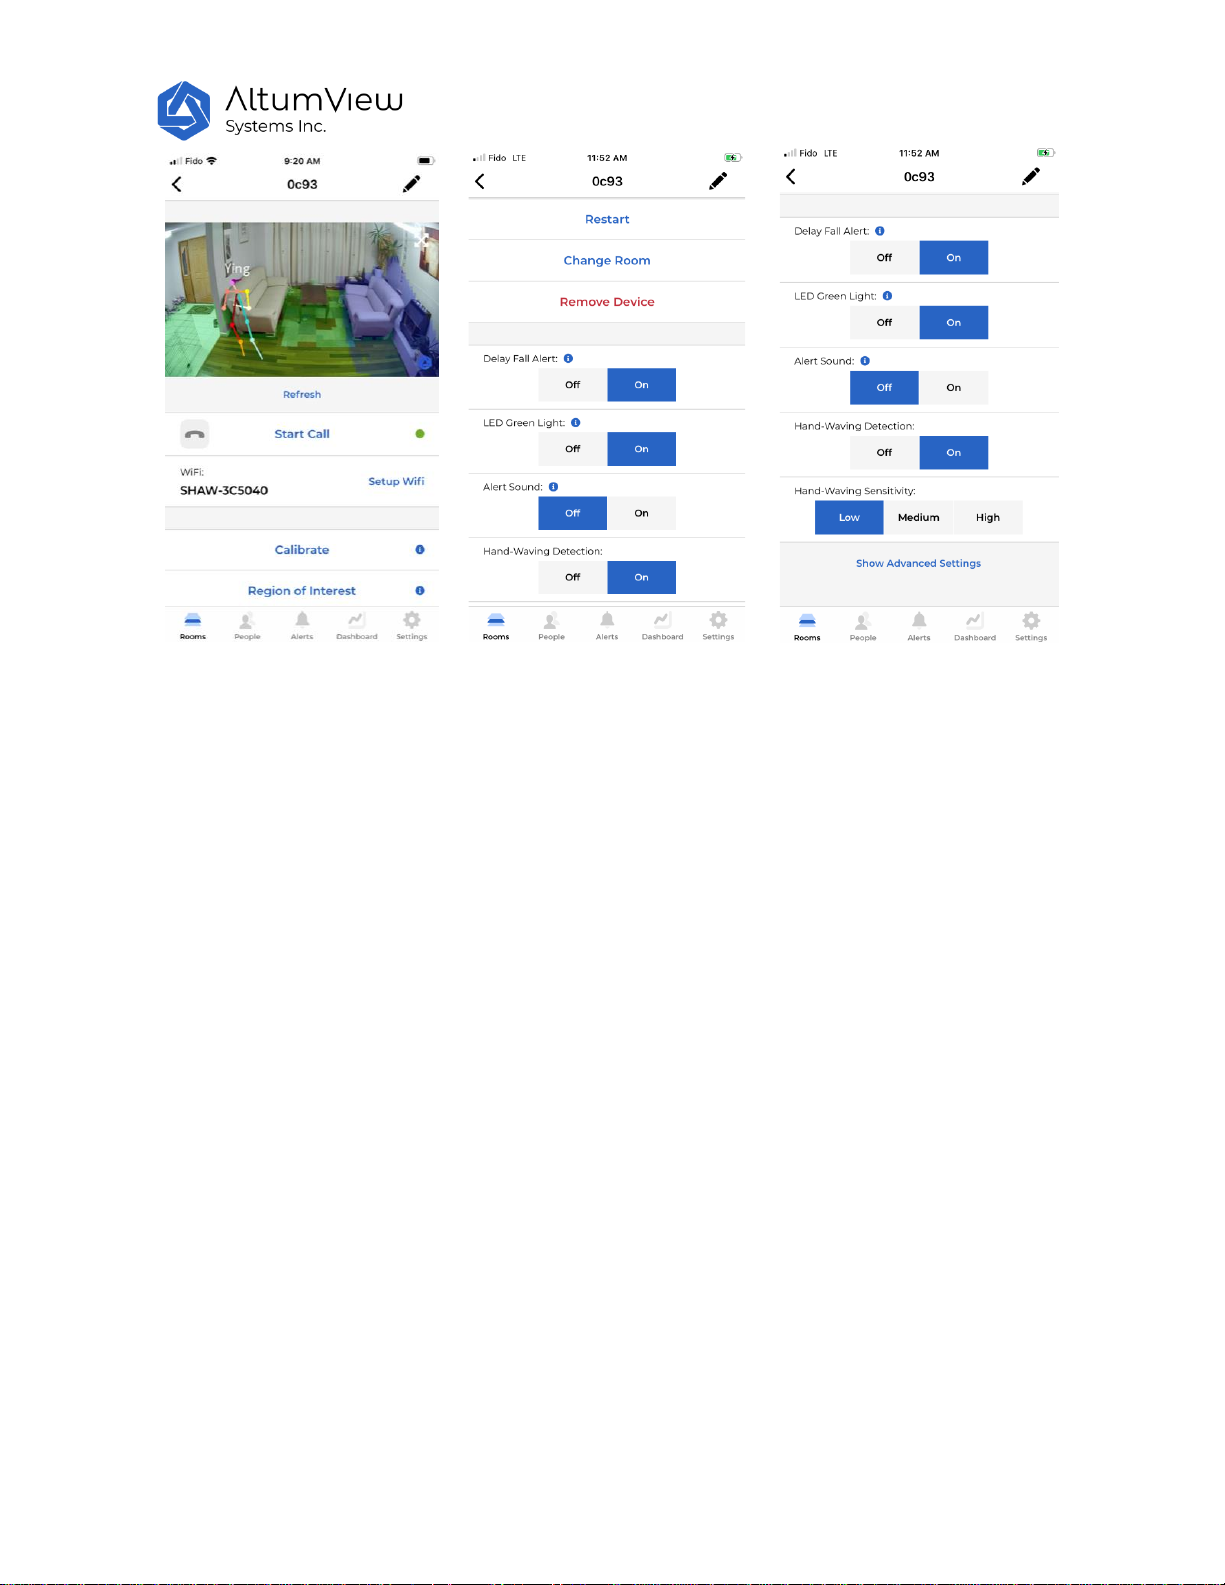
In the individual room page, tap on a sensor in the sensor list will enter the sensor's streaming and
setting page, as shown below. This page allows users to view the video stream from the sensor in real
time (people are rendered by stick-figure animation to protect privacy) and configure the device, such as
renaming device, refresh the display, start call, setting up WiFi, calibrating device, defining Region of
Interest, restarting device, updating device firmware, moving device to another room, and removing
device from system. Users can also access some advanced settings, such as serial number of the device,
flipping device view, turning on/off some other features. The details are explained below.
Page 24
24
4.2.1 Rename Device
To rename the visual sensor, tap the pen icon in the upper right corner of the sensor settings page, and
change the name of the sensor in the pop-up "Change Name" window.
4.2.2 Refresh Display
This command is used to refresh the background and stick figures in the streaming window, if they are
not displayed automatically.
4.2.3 Voice Call
Users can call a sensor via the "Start Call" button in the device page, or in an alert page (explained later).
After starting a call, users can start two-way voice communications via mobile APP and the sensor.
During the two-way call, the LED of the sensor will blink cyan to indicate a voice call session is going on.
4.2.4 Setup WiFi
Users can set up the WiFi by tapping the “Setup WiFi” command in the sensor page. When a sensor is
first added to an account, the app will automatically bring the user to the WiFi setup page. The usage is
already given in Sec. 4.1.2.
Page 25
25
4.2.5 Calibration
Users can calibrate the sensor by tapping the “Calibrate” command in the sensor page. When a sensor is
first added to an account, the app will automatically bring the user to the Calibrate page, after the WiFi
is set up successfully. The usage is already given in Sec. 4.1.4.
4.2.6 Region of Interest (ROI)
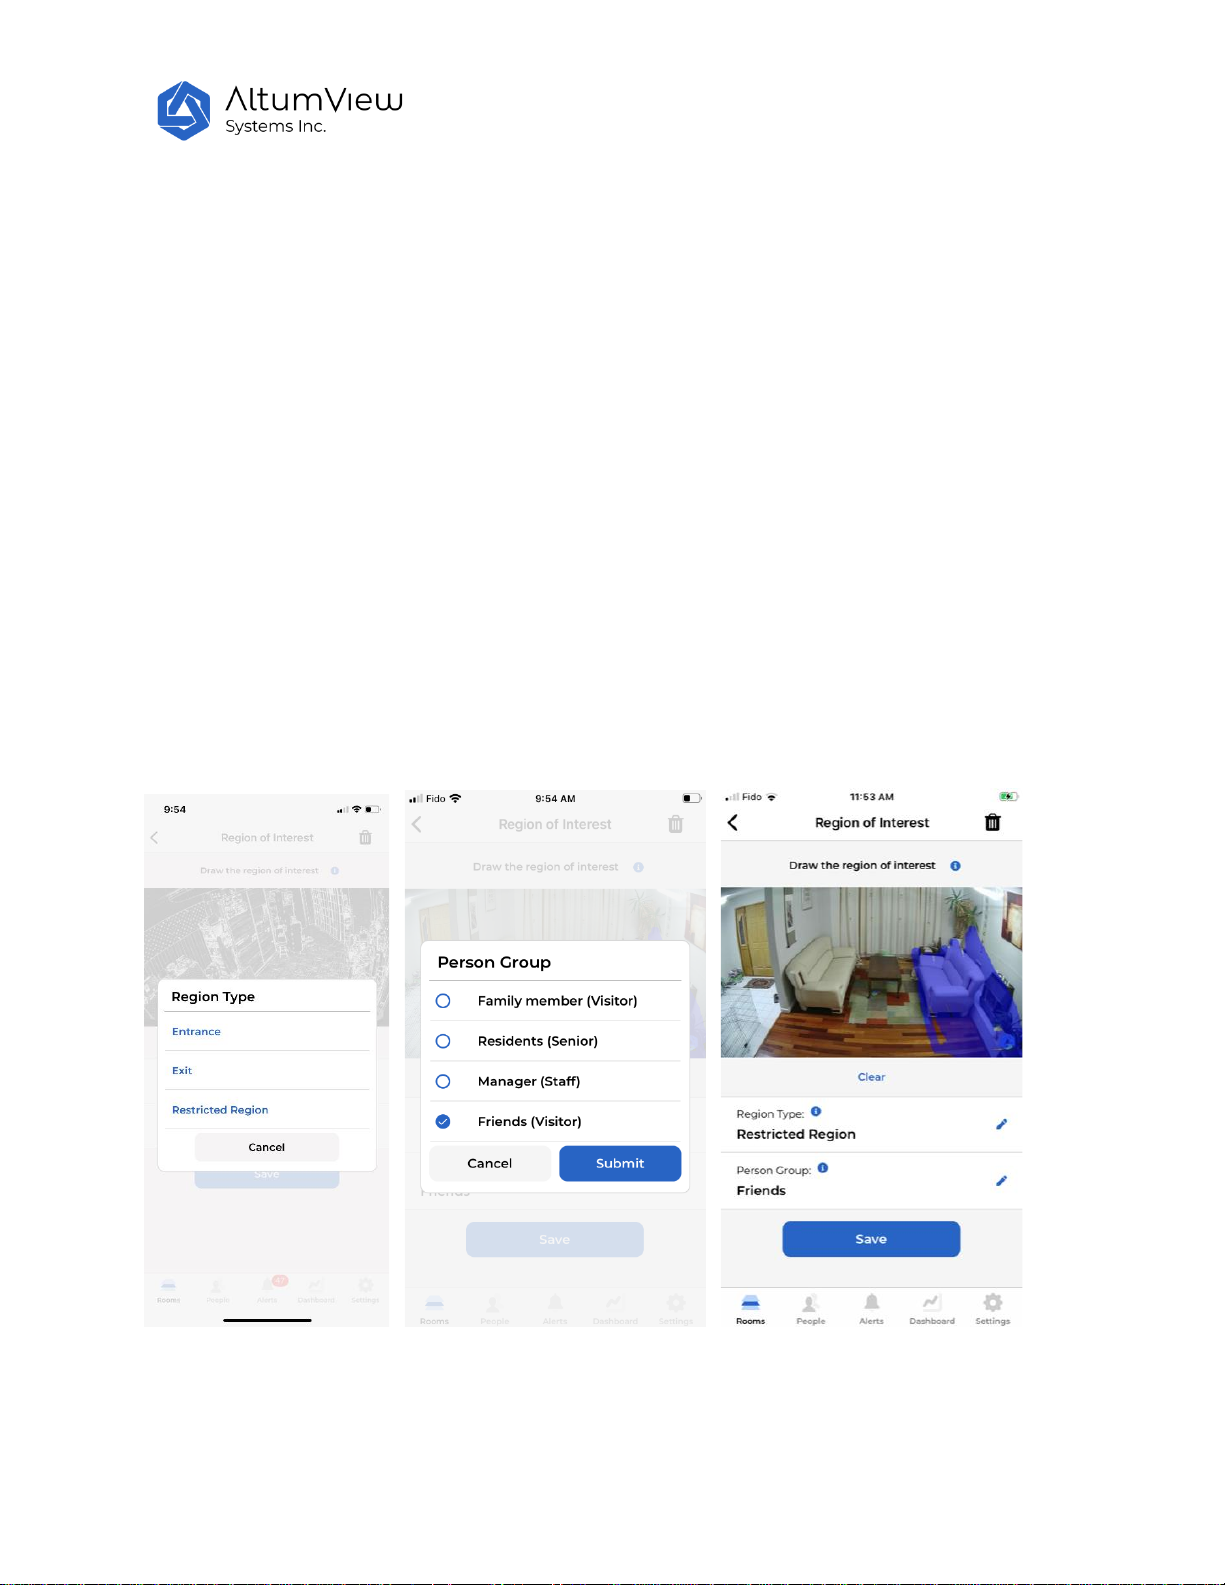
A region of interest (ROI) can be set in the device setting page. Currently three types of ROI are
supported:
Entrance
Exit
Restrict Region
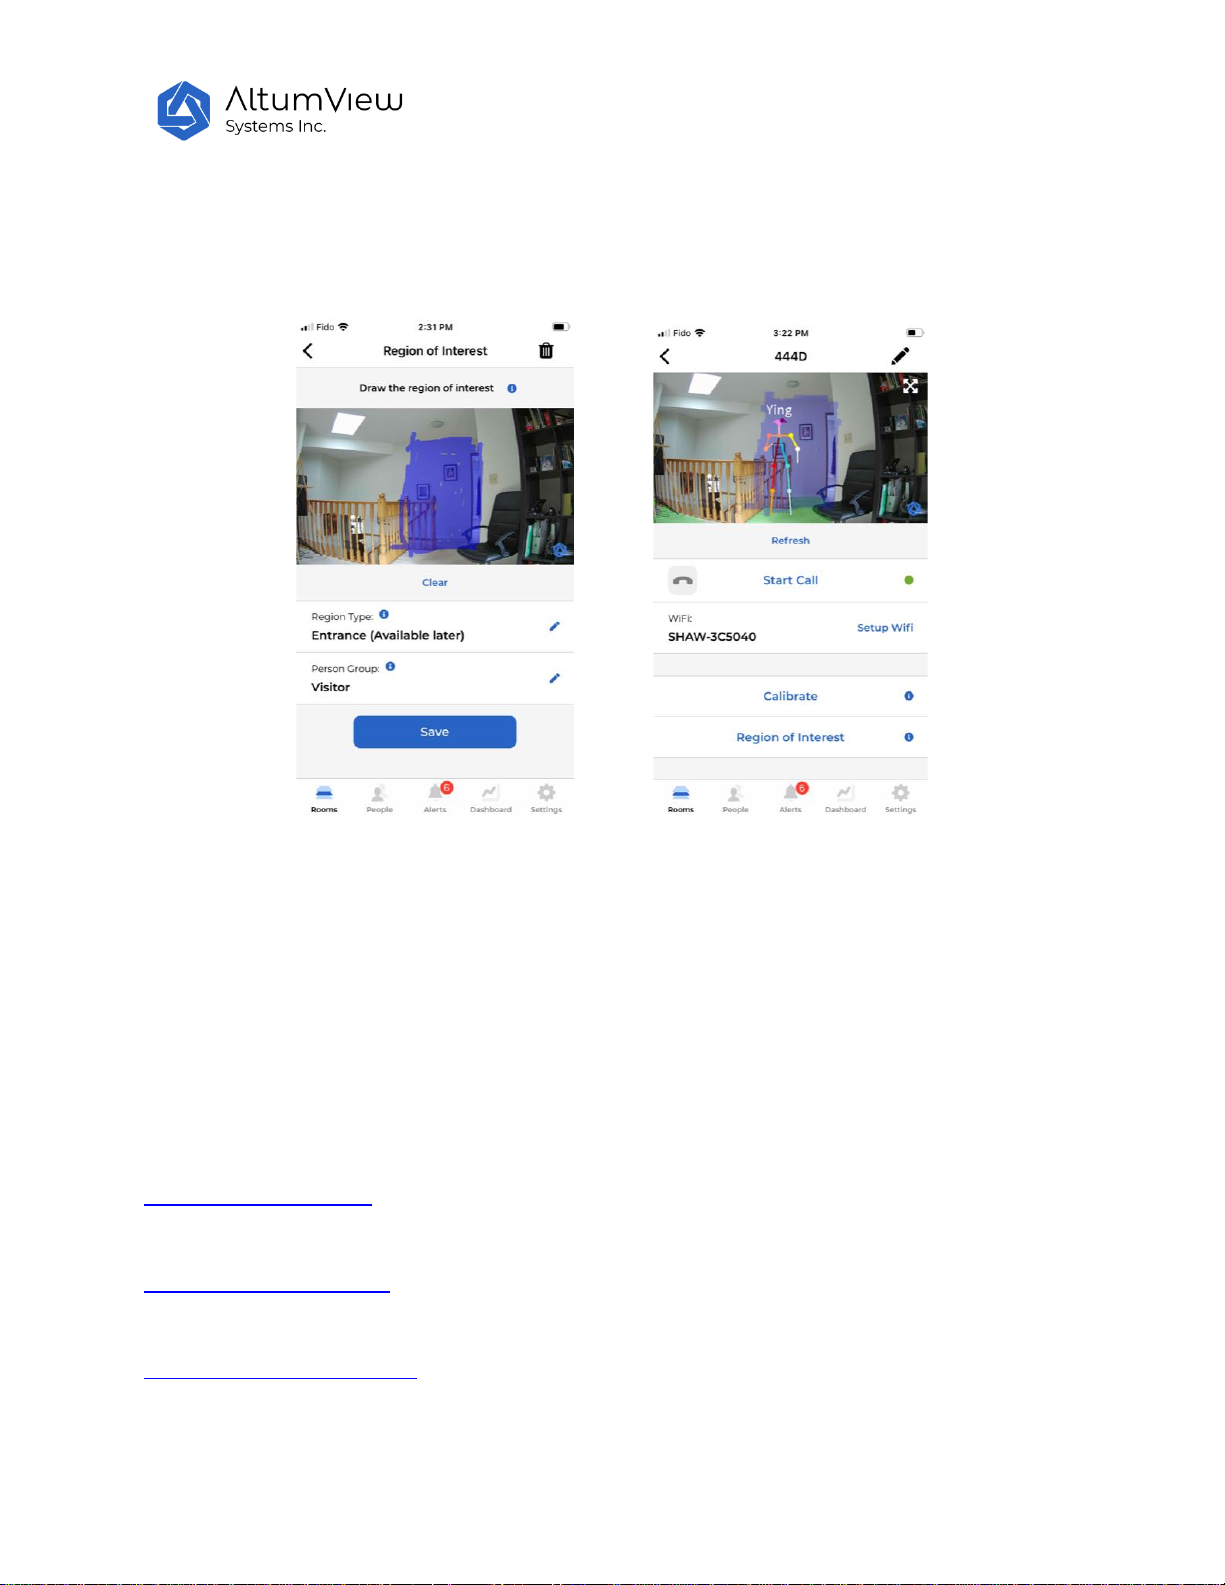
To use the ROI, users need to specify both the region types and person group (explained in Chapter 5).
To define the ROI, tap the "Region of Interest" button to go to the Region of Interest page, where users
need to choose the region type, people groups that will be monitored in the region, and draw and fill
the region of interest on the screen with finger and save it, as shown below. The ROI should be large
enough to cover the entire body of a person when the person enters the ROI. Users can tap the Clear
command to clear the region of interest.
Entrance and Exit
Page 26
26
If a ROI is defined as an Entrance, when a person in the selected person groups enter the entrance area
and the person’s face is recognized by the sensor, a check-in record will be generated. If a ROI is defined
as an Exit, when a person in the selected person groups enter the exit area and the person’s face is
recognized by the sensor, a check-out record will be generated. After the person is first recognized in
the entrance or exit region, no more records will be generated within 60 seconds for the same person.
The Entrance and Exit ROIs can be used by organizations to achieve contactless visitor management, or
attendance management system for employees.
The check-in and check-out records can be viewed and managed from the “View Visits” command in the
Dashboard page, as shown in Chapter 8.
The check-in and check-out records can also be viewed and managed by logging into the following web
interfaces using the same user account as the Cypress app. The details are described in Chapter 10.
User account in the Canada server:
https://app.altumview.ca
User account in the US server:
https://app.altumview.com
User account in the China server:
https://app.altumview.com.cn
Page 27

27
Restrict Region
If a ROI is defined as a Restrict Region, when a person in the specified person groups enter the region
and his/her face is recognized, an alert will be sent to the cloud and the app. If the person’s face is not
recognized in the restricted region but is recognized after the person leaves the region, but is still in the
same sensor’s view, the sensor can still send the alert.
After a restricted region alert is generated, no duplicated alert will be generated in 60 seconds.
One possible application of the Restricted Region is to monitor people with dementia. For example,
users can first define a Person Group called “Dementia”, then assign people with dementia to this
Person Group in their profile pages, and finally define a restricted region from the ROI page for the
Dementia person group. After that, any person in the Dementia group entering the restricted region will
trigger an alert.
4.2.7 Restart
Tapping “Restart” in the sensor setting page will restart or reboot the visual sensor. If the sensor is not
connected to any WiFi network, but is within Bluetooth range of the user’s phone, the Restart command
can still work.
4.2.8 Updating Firmware
When a new firmware is available, an "Update to..." command will appear below the “Firmware
Version” bar. Tap on the blue icon to upgrade the firmware. The sensor might need to reboot several
times during the upgrading. Make sure the sensor's power supply is not interrupted when updating
the firmware. If a power failure occurs during firmware update, the sensor might fail to start up and has
to be returned for repair due to update failure.
4.2.9 Change Room
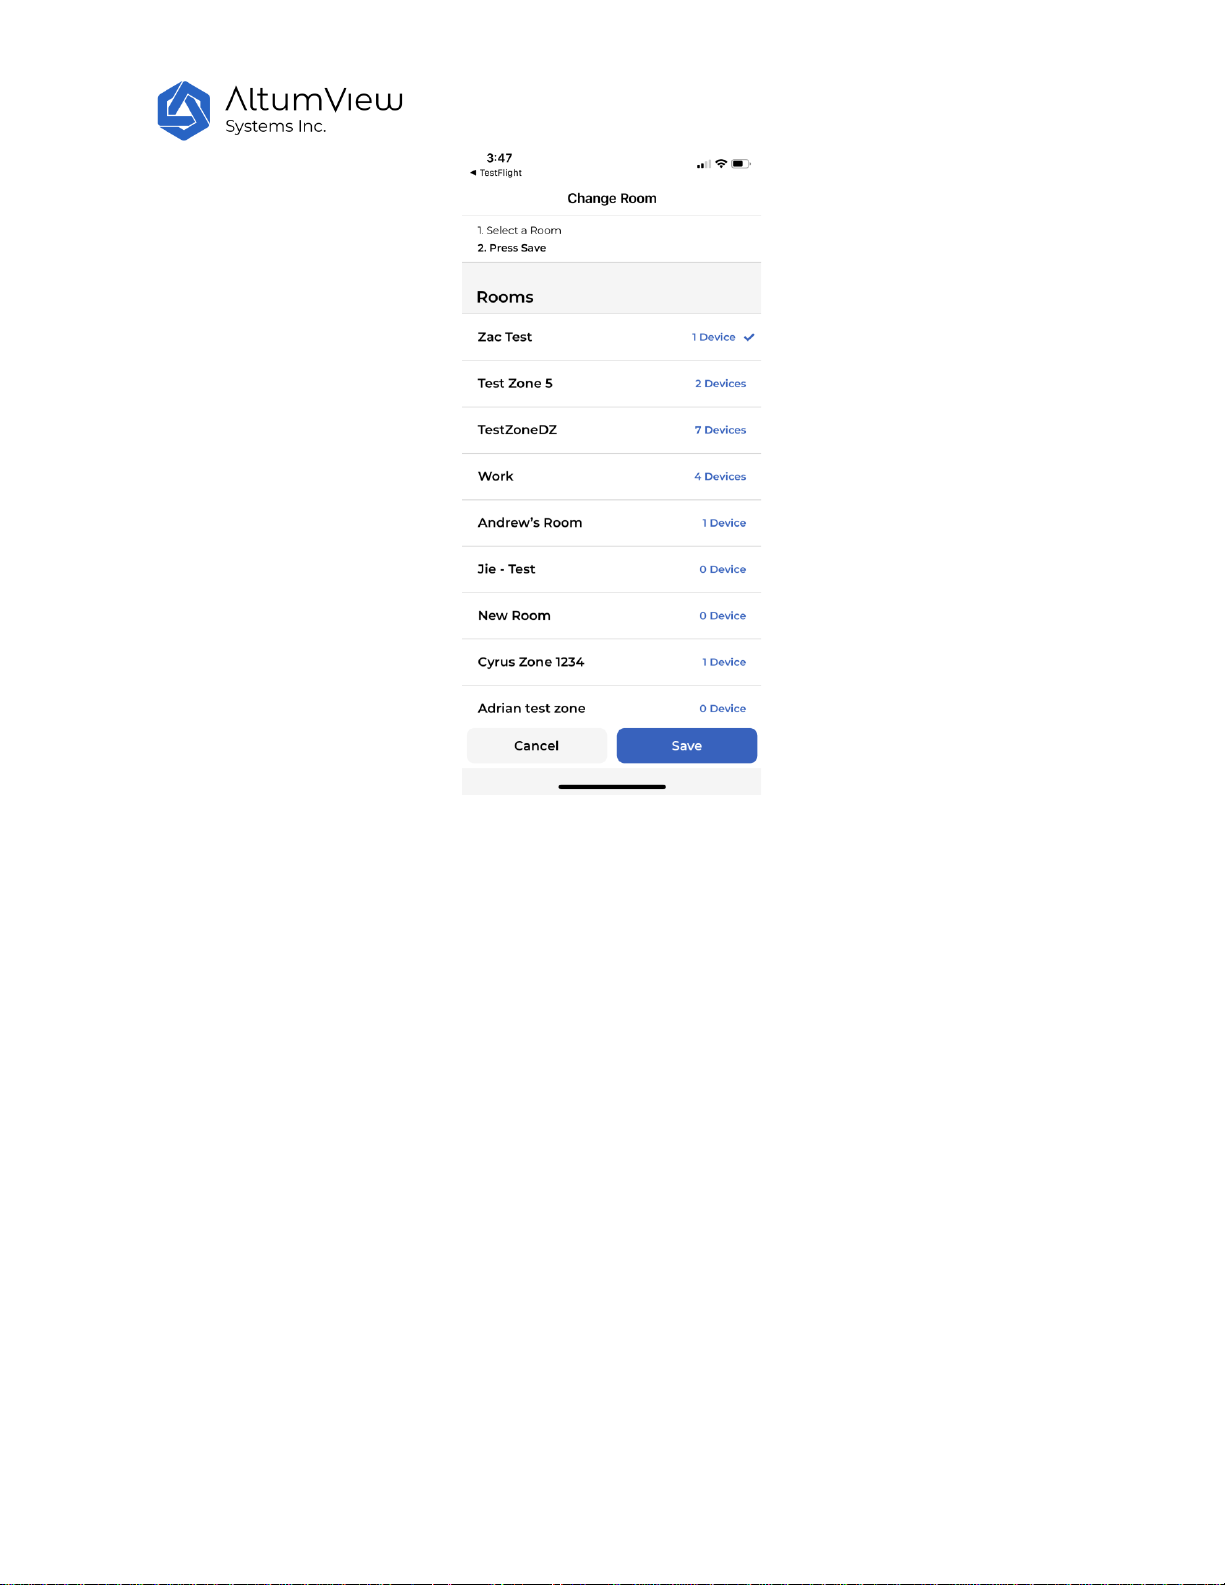
To move a visual sensor to another room, user can tap the “Change Room” command. In the next page,
select the desired new room in the list of rooms, and then tap Save. The sensor will be moved to the
new room, as shown below.
Page 28
28
4.2.10 Remove Device
For security reasons, each sensor can only be added to one account. If a sensor needs to be added to
another account, it must be removed from the previous account first. This can be done by tapping the
“Remove Device” command in the sensor page. It is strongly recommended to remove a device when it
is connected to the WiFi and the internet. In this case, after the “Remove Device” command is tapped,
the sensor will reboot to finish the removing step. Please wait about two minutes for the reboot to
complete before turning off the sensor.
If for some reasons a sensor has to be removed when it is offline (this could happen when the sensor
could not connect to the WiFi and internet, and could not communicate with the app either), the
following scenarios will happen:
1. If after the offline removal, the sensor is powered on within the coverage of the same WiFi network as
the network it was connected to before the removal, the sensor will automatically connect to the server
via the WiFi network, and the server will instruct the sensor to reboot to finish the removal process from
the previous account. After the reboot, the sensor is ready to be added to the new account (the LED will
turn into flashing white light).
Page 29

29
2. If after the offline removal, the sensor needs to be added to a new account that uses a different WiFi
network from the previous network, the sensor’s status will be displayed as “Added” when the app
scans for nearby devices. In this case, the sensor has to be manually factory reset before it can be added
to the new account, a firmware upgrade will be required after that, see 4.2.16 Factory Reset.
4.2.11 Delay Fall Alert
The “Delay Fall Alert” is a toggle switch. When “Delay Fall Alert” is ON, the Cypress visual sensor will
only send fall alert 30 seconds after a fall is detected. During this period, the LED in the senor will flash
RED, indicating that a fall is detected. After 30 seconds, if the person still falls on the ground, the LED will
turn to purple and a fall alert will be sent. If the person stands up within 30 seconds, the LED will turn off
and no alert will be sent.
If the “Delay Fall Alert” is OFF (default value), an alarm will be sent immediately when a fall is detected.
This is useful for demo or test purpose and is not recommended for practical use.
The change of “Delay Fall Alert” will restart the device to make it effective.
4.2.12 LED Green Light
This toggle controls if the sensor will display a steady green light when it is in the normal working
condition. It does not affect the sensor to use LED to indicate other special statuses.
4.2.13 Alert Sound
When the Alert Sound flag is On, the sensor will play a sound when sending an alert, otherwise it will not
play a sound when sending an alert.
4.2.14 Hand Waving Detection
“Hand Waving Detection” is a toggle switch to turn on or off the hand waving detection feature. When it
is turned on, a person can wave to the sensor to actively ask for help. The face of the person must be
detected by the sensor before an alert is sent out.
To trigger the hand waving alert, the person needs to face the sensor and constantly wave his/her hand
for some time (about 8 seconds in the default sensitivity, as described next), and the lower arm should
be higher than the upper arm. After detecting a waving hand, the LED of the sensor will first blink red
for a few seconds (5 seconds in the default sensitivity). If the hand is waving in most of time during this
period, the LED will turn to purple, and an alert will be generated to signal that someone is seeking help.
After a waving hand alert is generated, the sensor will not send the same alert in the next 15 seconds.
Page 30
30
4.2.15 Hand-Waving Sensitivity
The hand-waving sensitivity controls how easy to trigger the hand-waving alert. The default value is Low.
Changing the sensitivity to Medium or High will increase the sensitivity, and users will only need to wave
about 5 seconds to generate the alert. In addition, when the sensitivity is High, the lower arm does not
have to be higher than the upper arm. Note that increasing the sensitivity also increase the chance of
false alarm, which can be managed via the Manage False Alert page in Chapter 6.
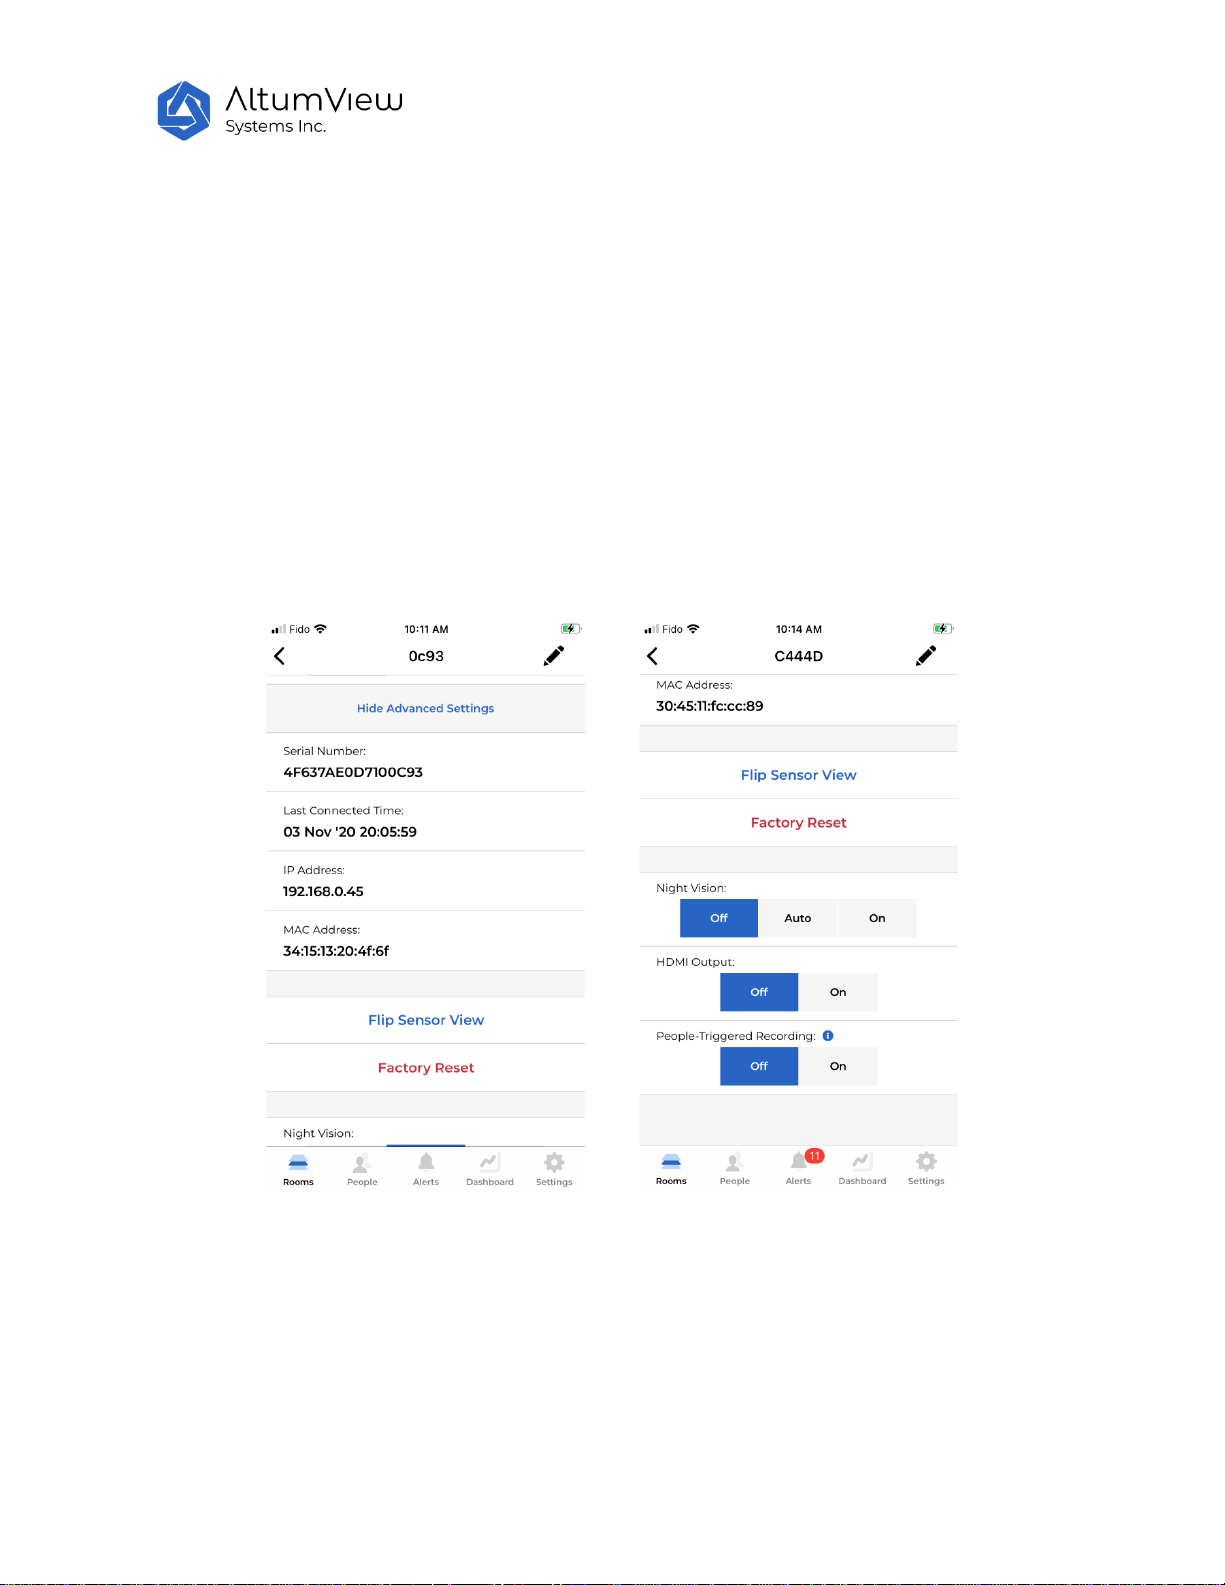
4.2.16 Advanced Settings
At the bottom of the device page, tap the “Show Advanced Settings” command will display further
information, as shown below, including serial number, last connect time, IP address, and MAC address,
and some toggle switches. After that, the command will change to “Hide Advanced Settings”. Tap this
will hide the advanced settings.
4.2.17 Flip Device View
The visual sensor’s view can be flipped if the device is installed upside-down in the ceiling. To do this,
tap the “Flip Device View” command in the sensor setting page. The device will restart to make the
choice effective.
Page 31
31
4.2.18 Factory Reset
In some rare cases, if the sensor fails to operate properly, a factory reset might be needed, which can be
done in the App or via the reset hole in the back of the sensor. After the factory reset, the sensor’s
firmware will revert to the initial version, all user data will be erased from the sensor, and the sensor will
be removed from the current account. The sensor might need several reboots during the factory reset.
Please do NOT unplug its power until the sensor is fully reset, and the LED becomes flashing white light.
It can then be added to an account, and then upgraded to the latest firmware.
If the sensor can be connected to the App via Bluetooth, users can perform the factory reset via the App
by selecting the Factory Reset command in the advanced setting of the sensor page. The sensor will
reboot twice, and the LED will change to solid white, flashing purple, solid white again, and finally
flashing white, signaling that it is ready to be added to an account. The reset process will usually take
about 2 minutes.
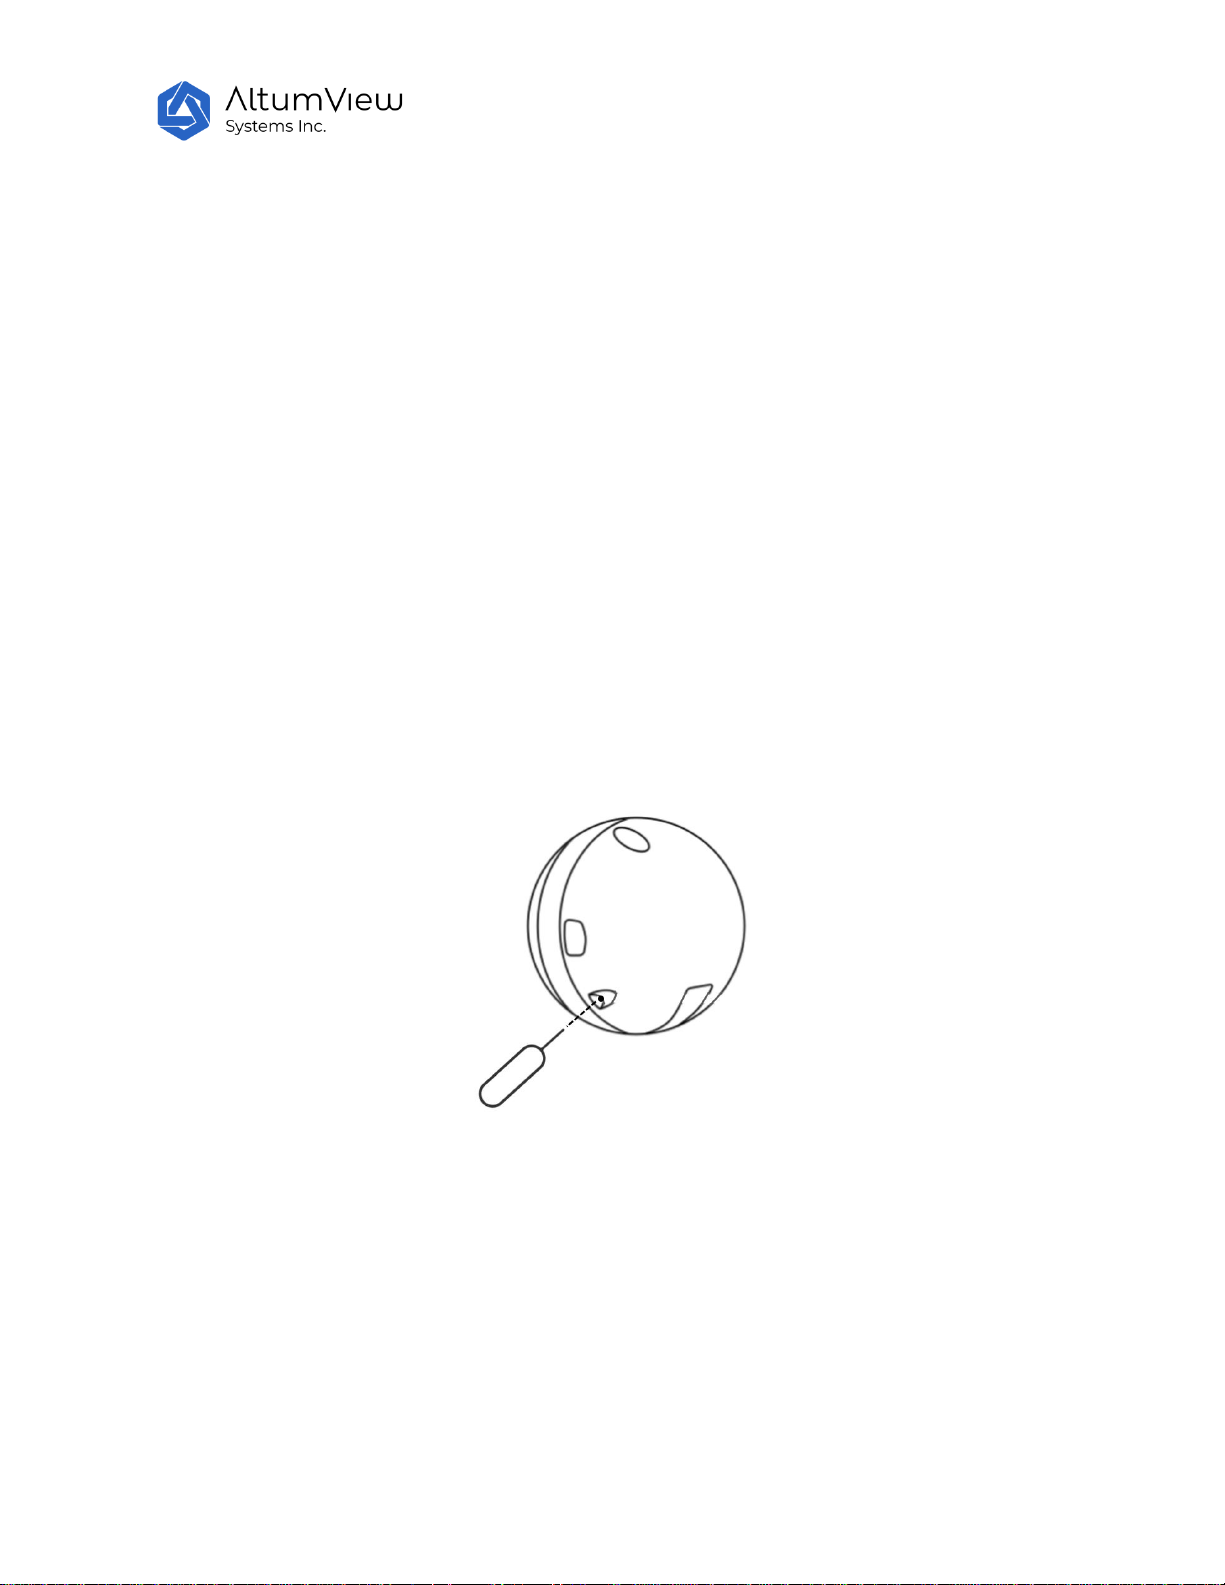
If the App cannot be connected to the sensor, a physical factory reset is needed. In the back of the
sensor, there is a reset hole next to the SD card slot, as shown below. Insert a pin into the hole (from
lower left to upper right direction, or 45 degree), gently press the reset button inside the sensor, and
hold it for about 8 seconds until the LED light becomes purple. After that, the sensor will reboot, and
eventually display a flashing white LED, signaling that it is ready to be added to an account.
4.2.19 Configuring Night Vision
In the Advanced Setting, there is a toggle switch to control the night vision feature, including turning on,
turning off, and using automatic mode.
Page 32
32
4.2.20 HDMI Output
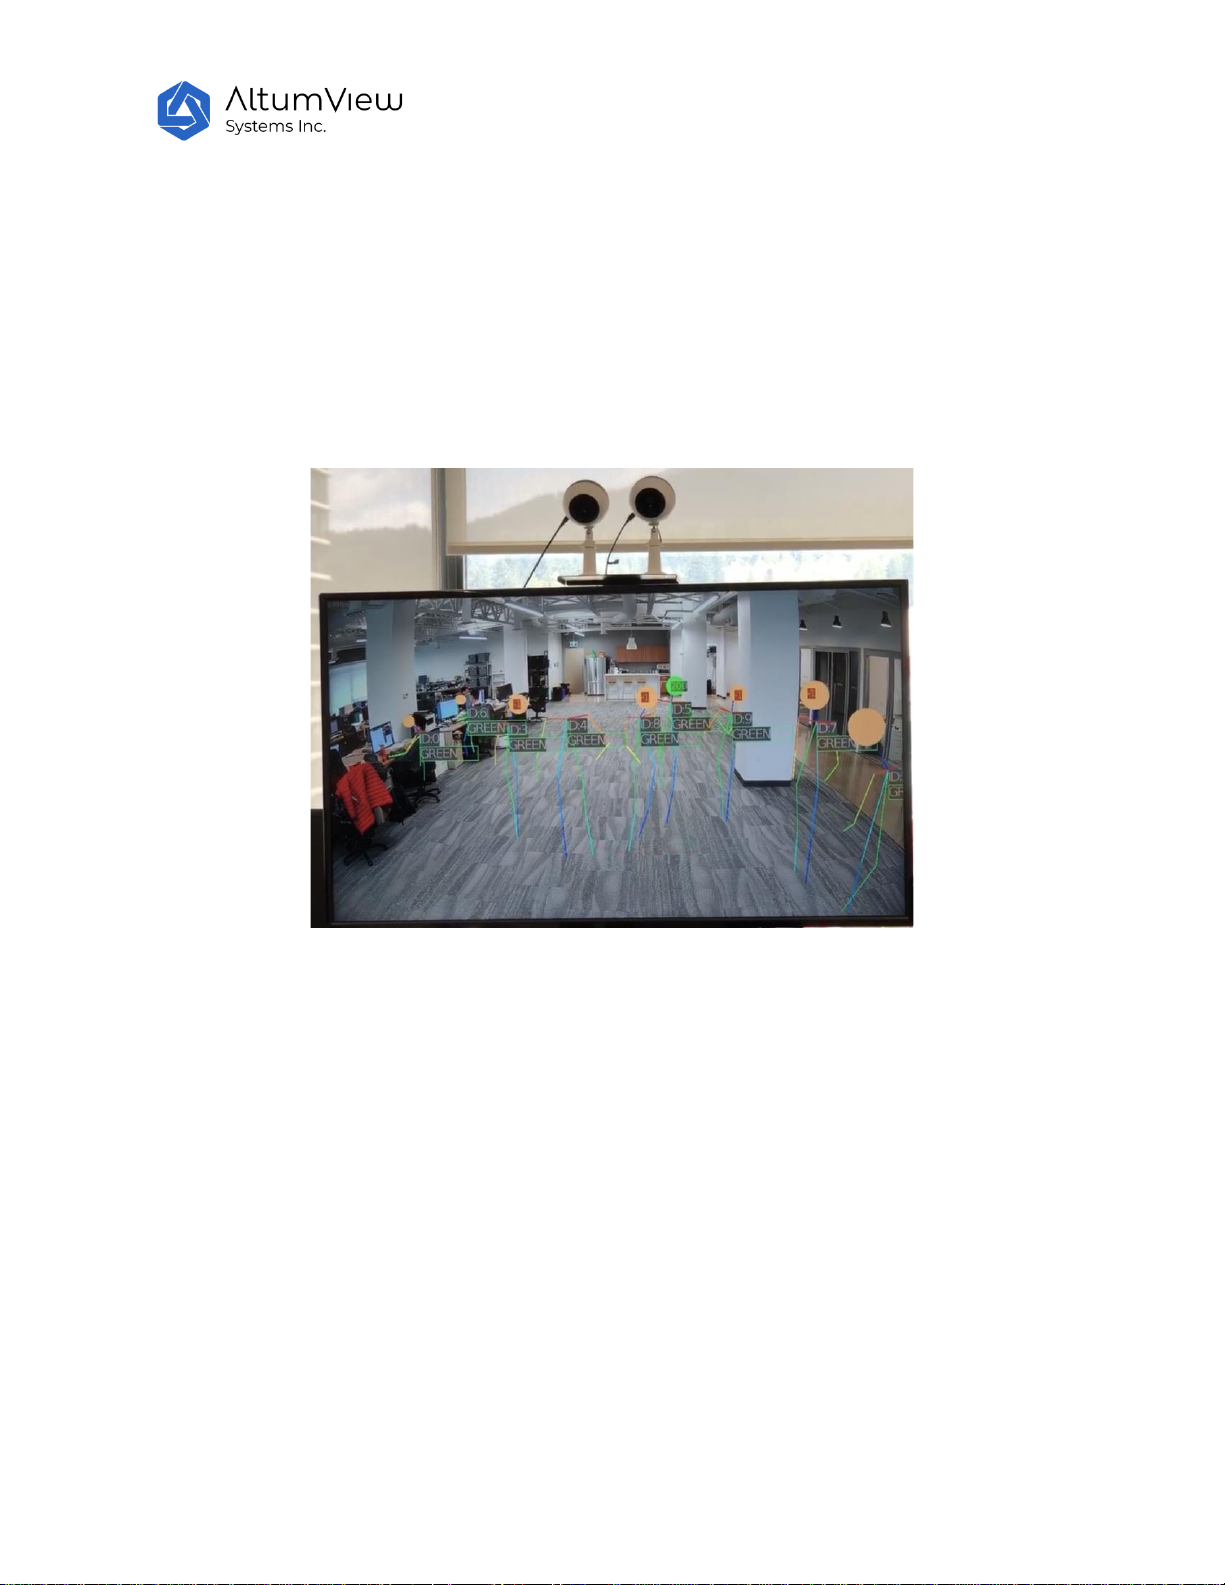
Some customized sensors have HDMI output, which can be used to display the background image and
stick figures on big screen TV. This is very useful for demo purpose.
For these sensors with HDMI output, the Advanced Setting includes a “HDMI Output” toggle switch,
which can be used to turn on or off the HDMI output port of the visual sensor. The default value is Off.
The change of “HDMI output” will restart the device to make the change effective.
The display device required by HDMI output is 1080P resolution and 60 frame/sec.
4.2.21 People-Triggered Recording
The Cypress visual sensor has a SD card slot. The supported format is: SDHC, FAT32 file system, up to
32GB, Class 10, UHS Level U1/U3.
In the Advanced Setting, there is a toggle switch to turn on and off people-triggered recording. When
the toggle is ON, whenever a person is detected by the sensor, a video clip will be saved to the SD card
of the sensor. If the toggle is OFF (default), a video clip is only saved in the SD card when an alert or
presumptive alert event is detected. If no SD card is inserted in the SD card slot, no video will be
recorded.
For privacy and security reasons, the videos in the SD card are not transmitted out of the sensor, and
can only be accessed by taking the card out of the sensor and copy the files to a computer.
Page 33

33
The videos saved in the SD card can be very useful to analyze the incidents so that future incidents can
be avoided, or as an evidence for legal purpose.
The videos in the SD card are encoded by the H.264 standard, and can be played by many video players
such as the VLC Player (https://www.videolan.org). The time stamp of the videos is in UTC time, a
successor to the Greenwich Mean Time (GMT).
The Fall Risk Assessment feature also uses the SD card to save the recorded videos. To protect user’s
privacy, the videos for Fall Risk Assessment are encrypted.
4.2.22 Meanings of LED Colors
Different LED colors indicate different statuses of the device, as summarized below.
● Steady white: Device is starting. Please wait
● Flashing white: Ready to access to the network
● Flashing green: Device is connecting to the phone App via Bluetooth
● Steady green: the sensor is in normal working condition
● Steady red: Connecting to Wi-Fi
● Flashing yellow:Connecting to server
● Steady yellow: Cannot connect to server
● Flashing cyan: An audio call is going on
● Blue:Communicating with the phone via Bluetooth or is downloading files from the server
● Purple: Restoring factory settings, or sending an alert
● Flashing red: 1) When Delay Fall Alert flag is ON, if a fall is detected, the sensor will flash red for
30 seconds before sending an alert. 2) If a waving hand is detected, the sensor will flash red for a
few seconds before sending the alert. 3) During the video recording in fall risk assessment, the
LED will also flash red. 4) Wrong Wi-Fi password is entered when the sensor is trying to connect
to a Wi-Fi
Page 34
34
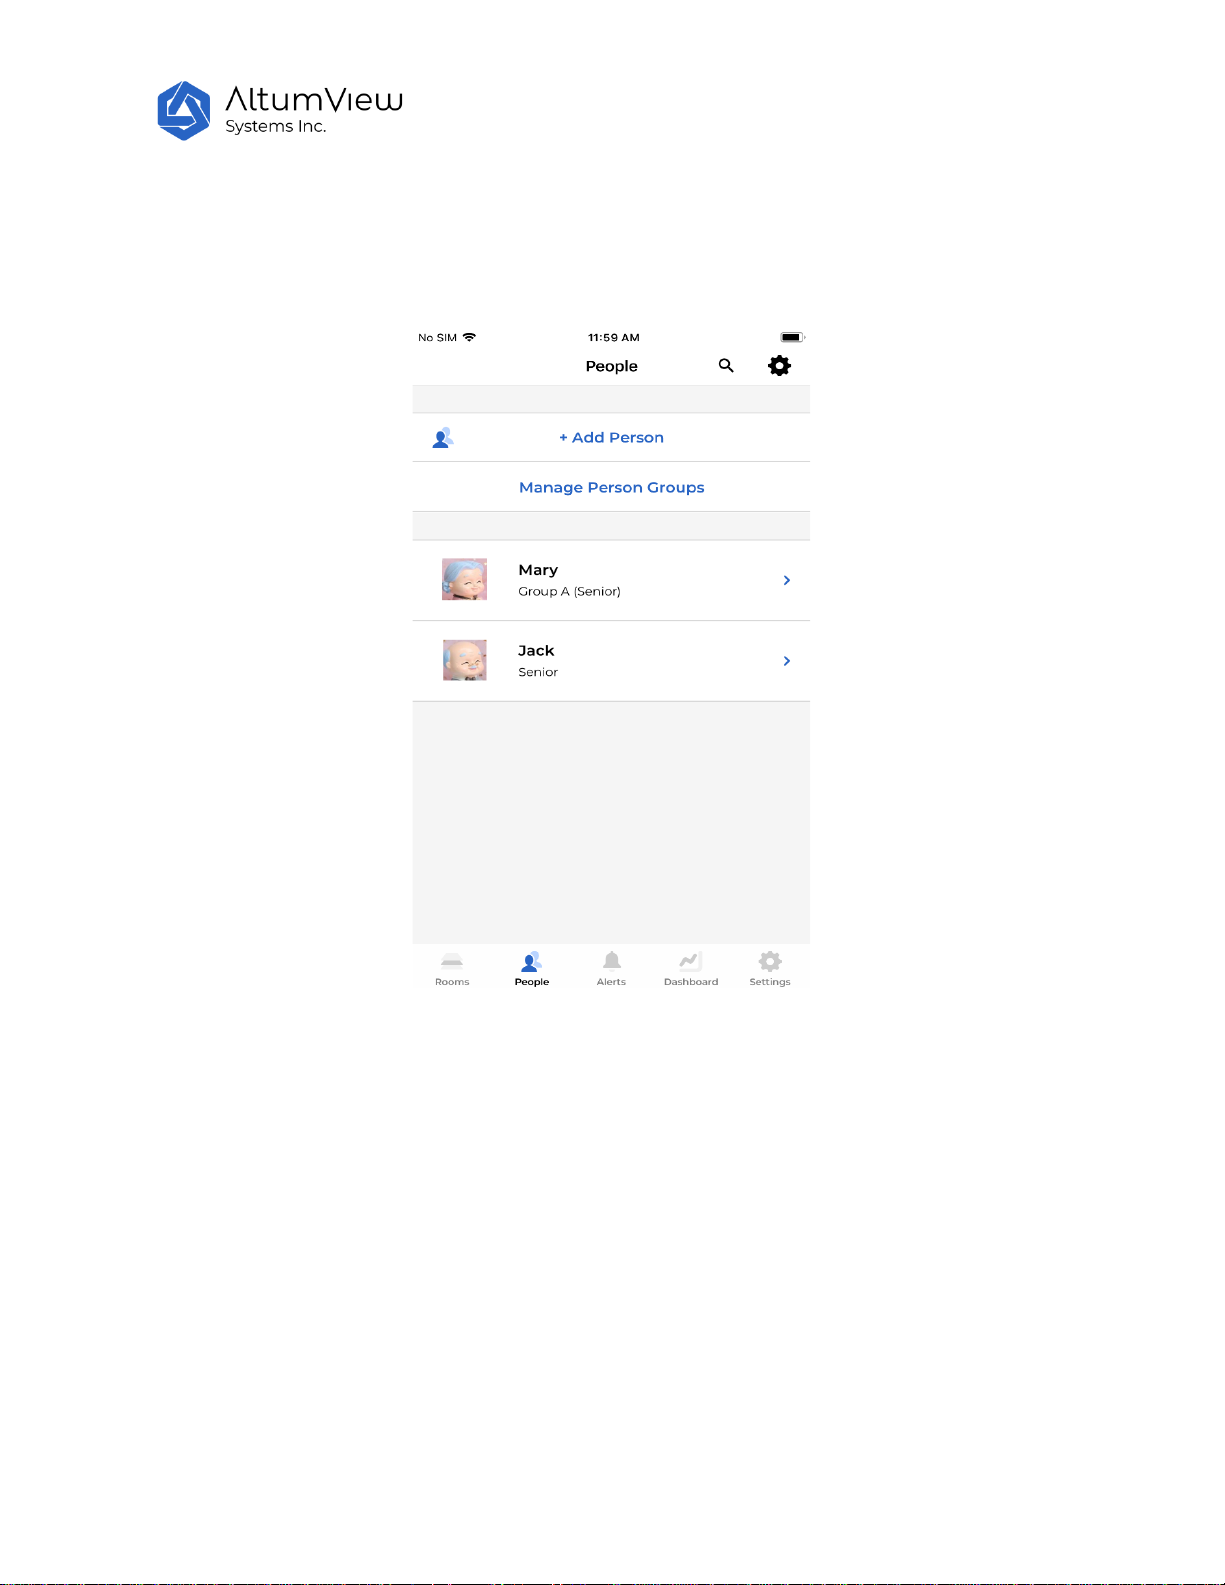
5.People Management
Tap on "People" at the bottom of the page to enter the "People" page. This page can define Person
Group, enter information of each person that needs to be monitored, and perform Fall Risk Assessment
(if this feature is enabled for the account) for a person.
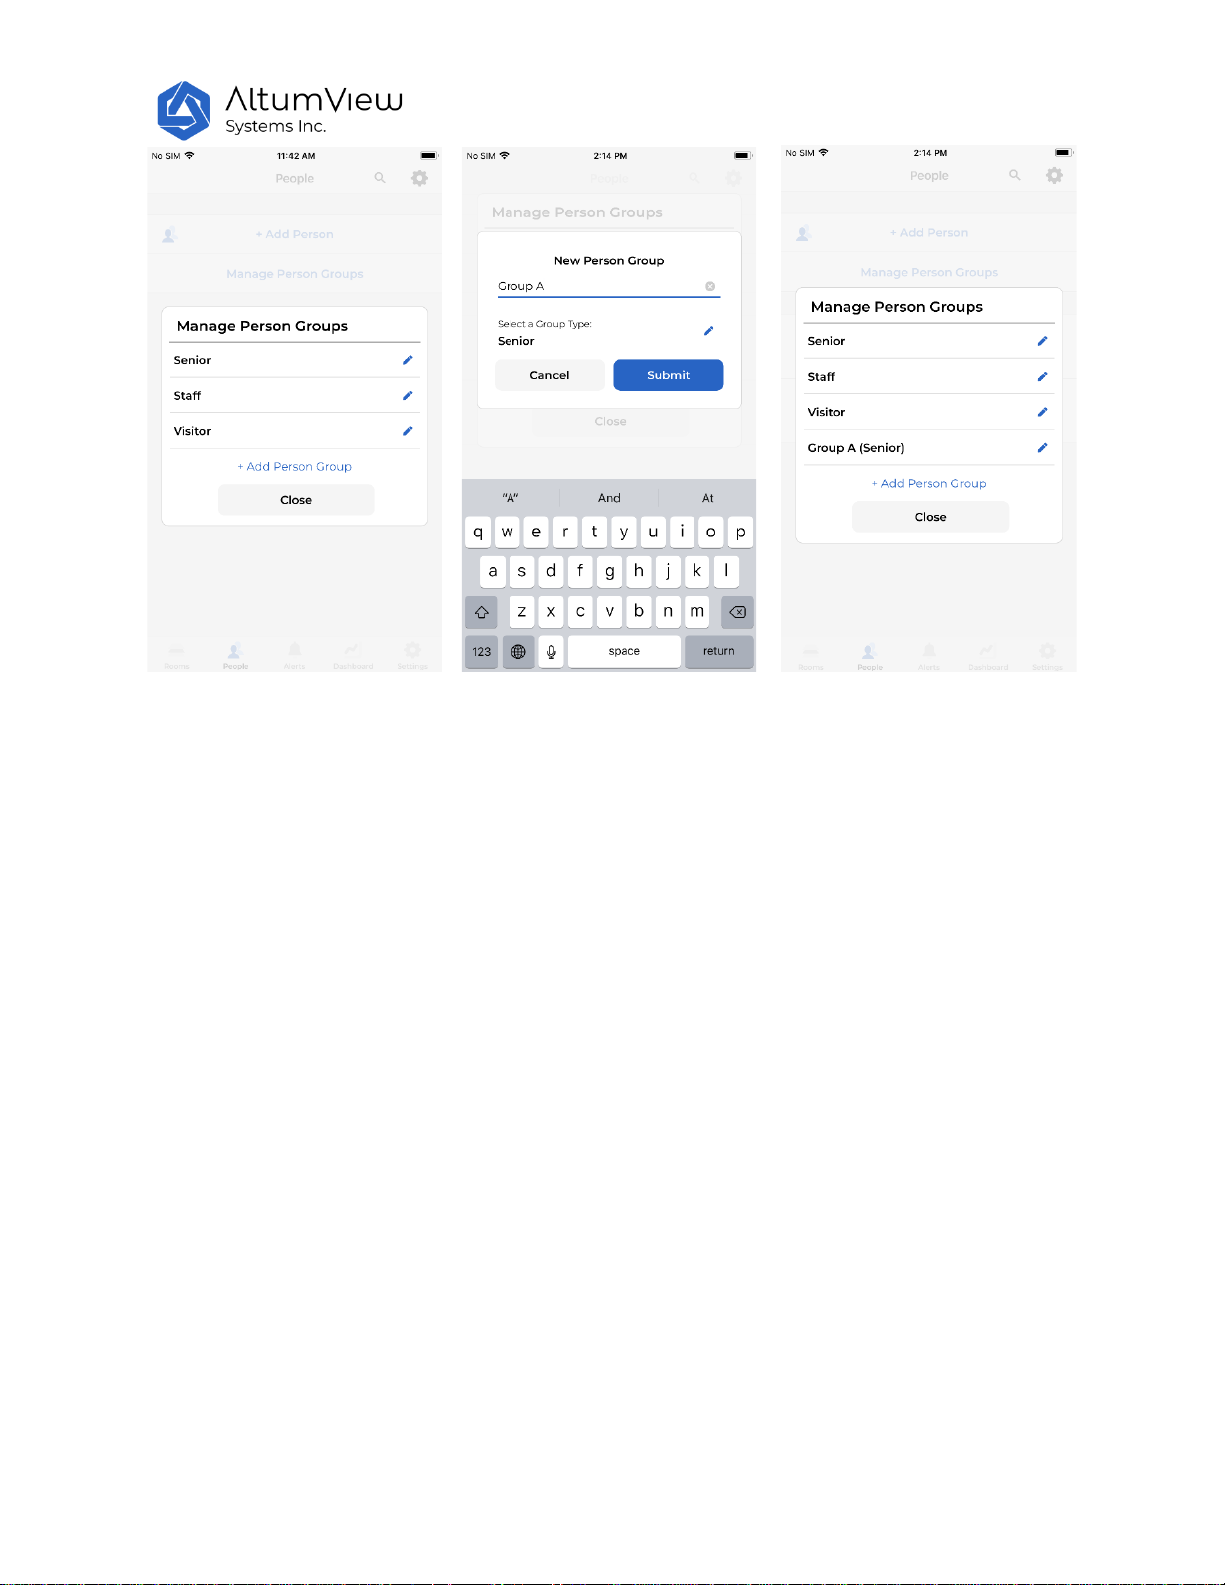
5.1. Manage Person Groups
To facilitate people management, the system allows users to define different Person Groups. Each
person must be assigned to a person group.
User can see all the existing person groups by tapping the “Manage Person Groups”. By default, three
person groups are pre-defined: Senior, Staff, and Visitor.
In the Manager Person Groups page, user can add a new person group by tapping the “+ Add Person
Group” command. In the New Person Group page, user can specify the name of the new person group
and the type of the person group. Currently, only three types are supported, namely Senior, Staff, and
Visitors. Each of the three pre-defined person groups belong to one of the three person group types.
Only the administrator can manage Person Group.
Page 35
35
5.2. Add Person
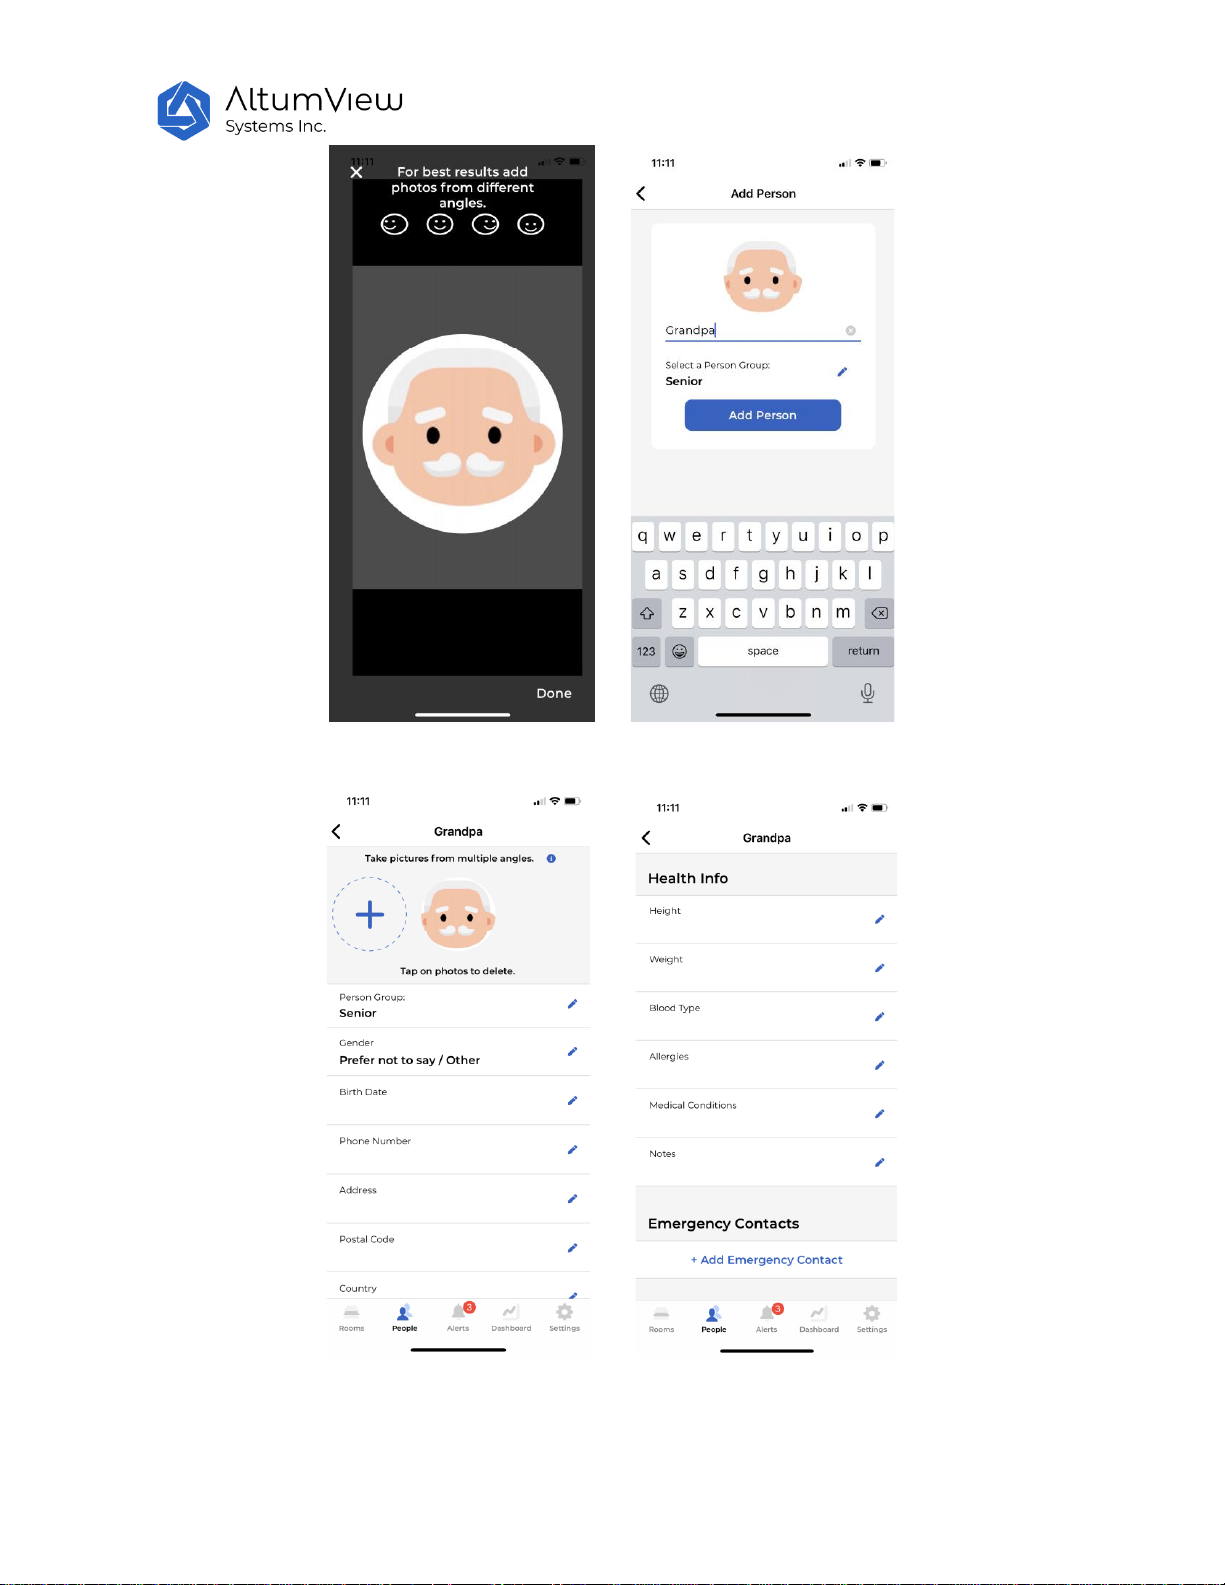
Only administrators can add new person. To add a person, tap on "+Add Person" at the top of the
“People” page. The App first needs to get a face image of the person from the camera or from the image
library, as shown by the figure below.
After getting a face image, the “Add Person” page will appear, where the user can input the name of the
person and assign this person to a person group, as shown below.
In the next page, users can add or delete photos for the person. In order to improve the face recognition
performance, it is recommended that each person provides four photos: front view, left and right 45degree side views, and 30 degree top-down view. Make sure the pictures are clear, and no other people
are in the view. To add a photo, users can tap on the “+” icon. To delete a photo, users can simply tap on
the photo, but everyone must have at least one photo. Only administrators can delete photos.
In this page, users can change the person’s group, and input the person’s detailed information, such as
age, gender, address, and phone number. For persons in the Senior group, users can also input the
health information and emergency contact.
Page 36
36
Page 37
37
5.3 Person Information
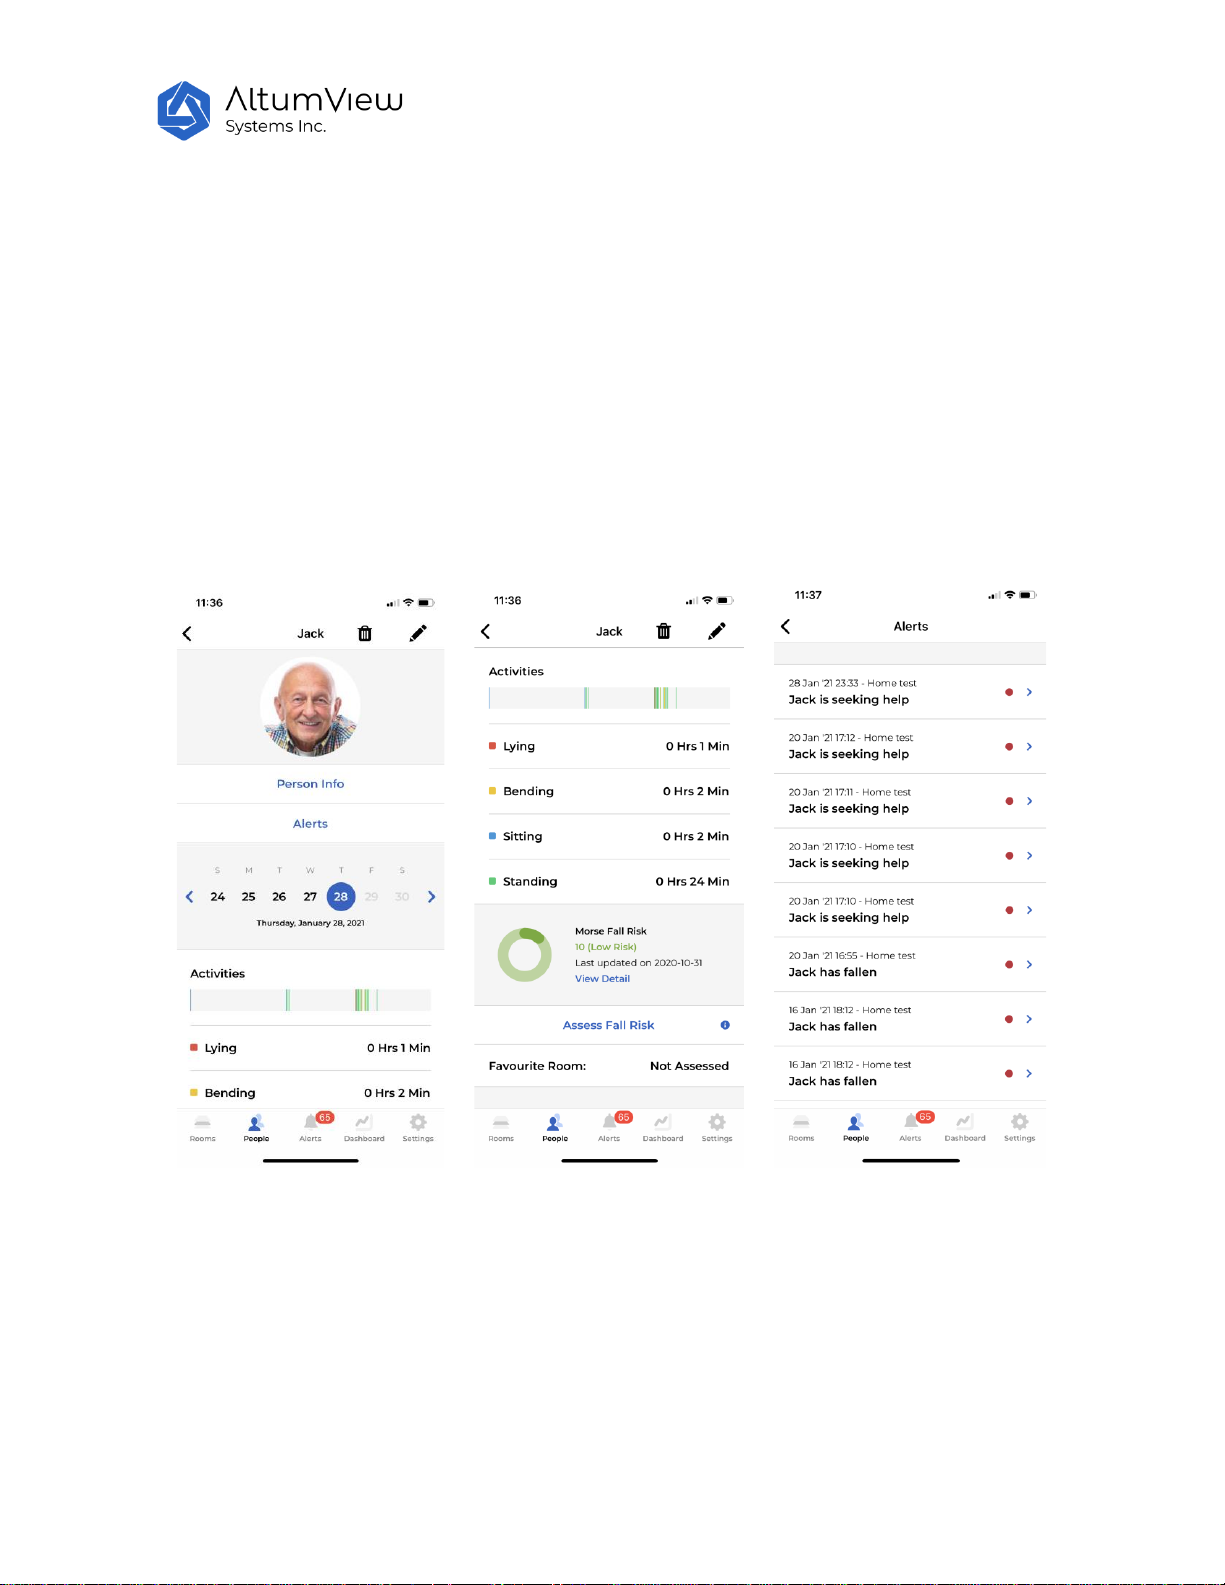
In the list of people, tap on a person will enter the person’s page as shown in the left figure below.
On the top of the person page, users can delete the person, or rename the person. All users can rename
a person, but only administrator can delete a person.
Tap on the “Person Info” command under the person’s photo will open the person information page as
shown above.
Tap on the “Alerts” command will enter a page that will list all the alerts of the person, as shown in the
third figure below. Tap on an alert record will see the details of that record, as shown in the next
chapter.
Users can select a day in the calendar to check the activity statistics of the person in that day, including
the time spent on different activities such as lying, bending, sitting, and standing.
In the people page, users can also perform Fall Risk Assessment, if it is enabled in the account, which will
be described in Chapter 7. The pervious fall risk assessment result will also be shown here, if any.
The page also displays the favorite room of the person and the number of times the person was
recognized in it on that day.
Page 38

38
6.Alerts
6.1 Alerts
When the device detects abnormal events such as falls, waving hands, and people with wandering risk
entering a restricted region, it will automatically send an alarm to the mobile APP via the cloud. If the
App is closed and notification is enabled, the phone will play a sound when the alert is received. If the
App is open, a pop-up window will be displayed.
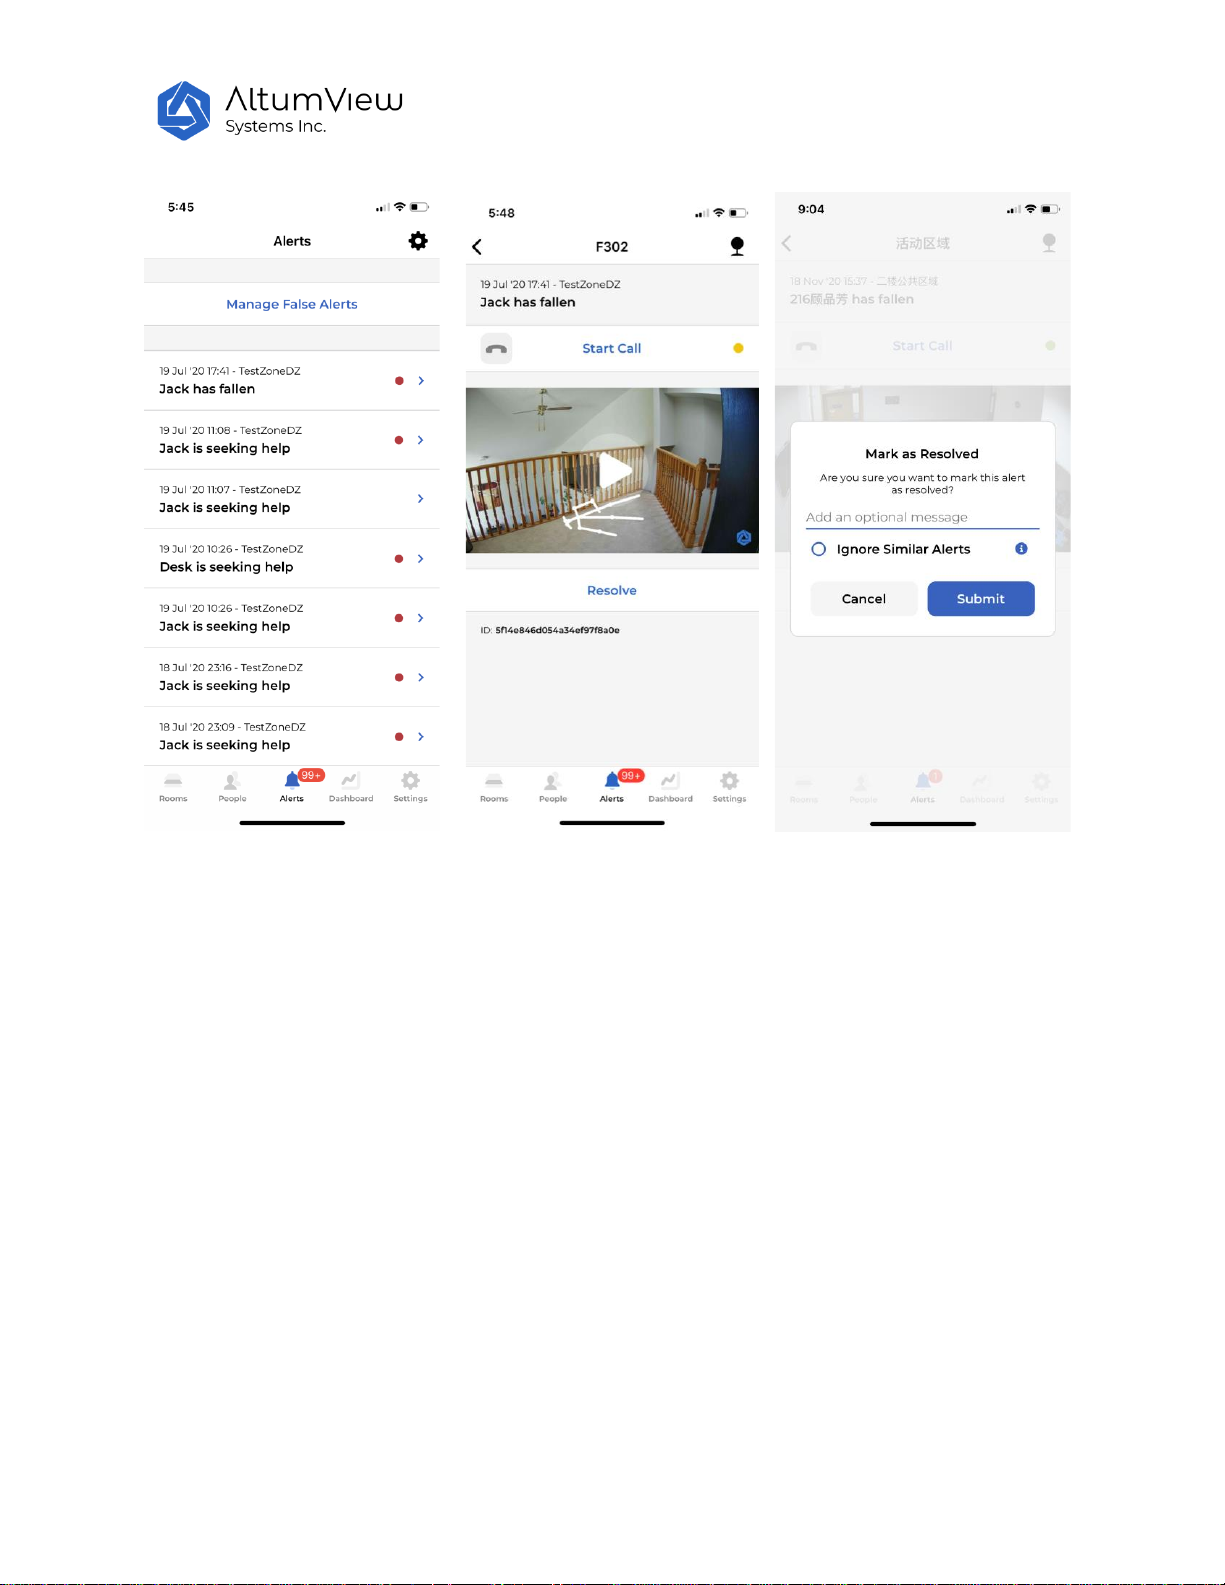
Tapping the Alerts button at the bottom of the page will show the list of all alerts. Each alert page will
show the time, room, and stick-figure animation of the corresponding event. Sometimes users need to
press and pull down the screen to refresh the list and display the latest alerts.
After an alert is received, users can use the Start Call command in the alert page to talk to the person, or
click the sensor icon in the upper right corner to go to the streaming page of the sensor directly, to
double check what is going on.
To resolve an alert, tap on the "Resolve" button. In the next Mark as Resolved page, users can enter
some descriptions of the event, choose to ignore similar alerts in the future (see
Section 6.2), and submit it. After this, the state of the event in the alert record will become "Resolved"
with the red dot removed.
Page 39
39
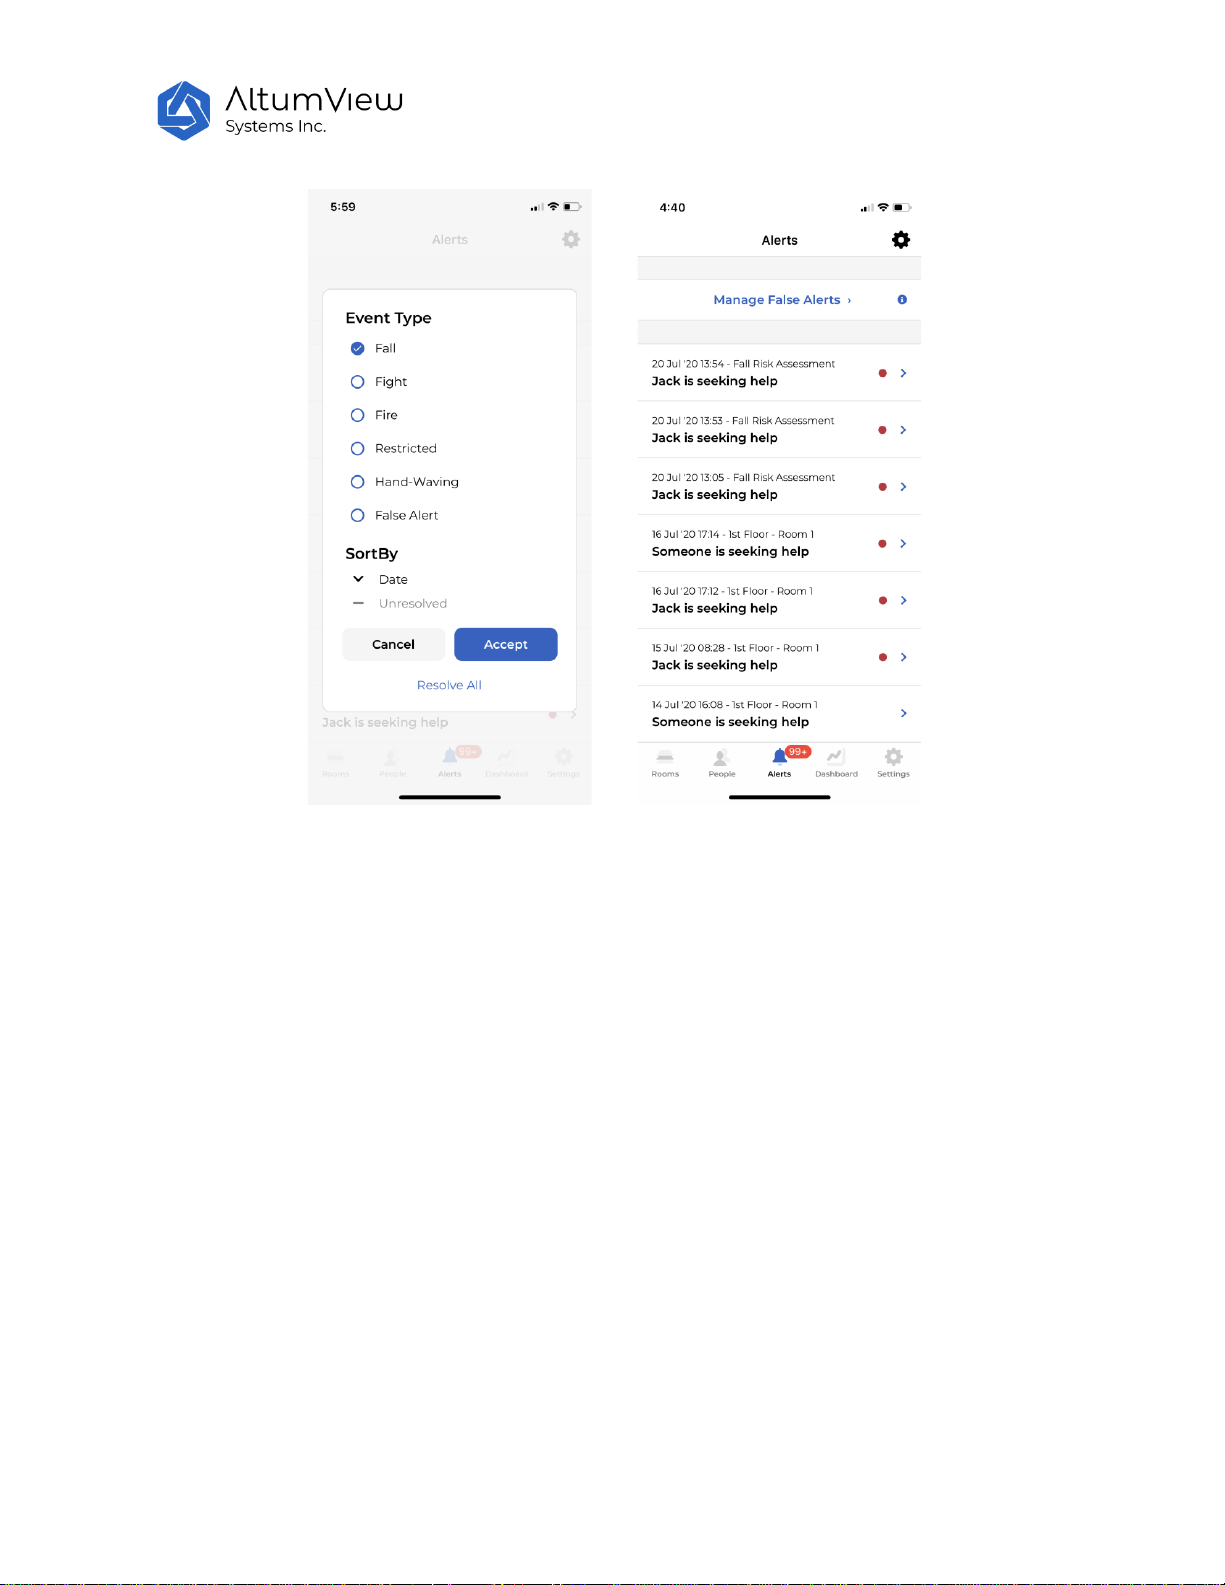
Tap on the Setting icon in the upper right corner of the alert list page, user can search and sort all alerts,
as shown by the first figure below. The second figure shows the results by only showing the fall alerts.
Tap the “Clear filters” button to clear the display of the sorting, and return to the full list.
Page 40
40
6.2 Managing False Alarms
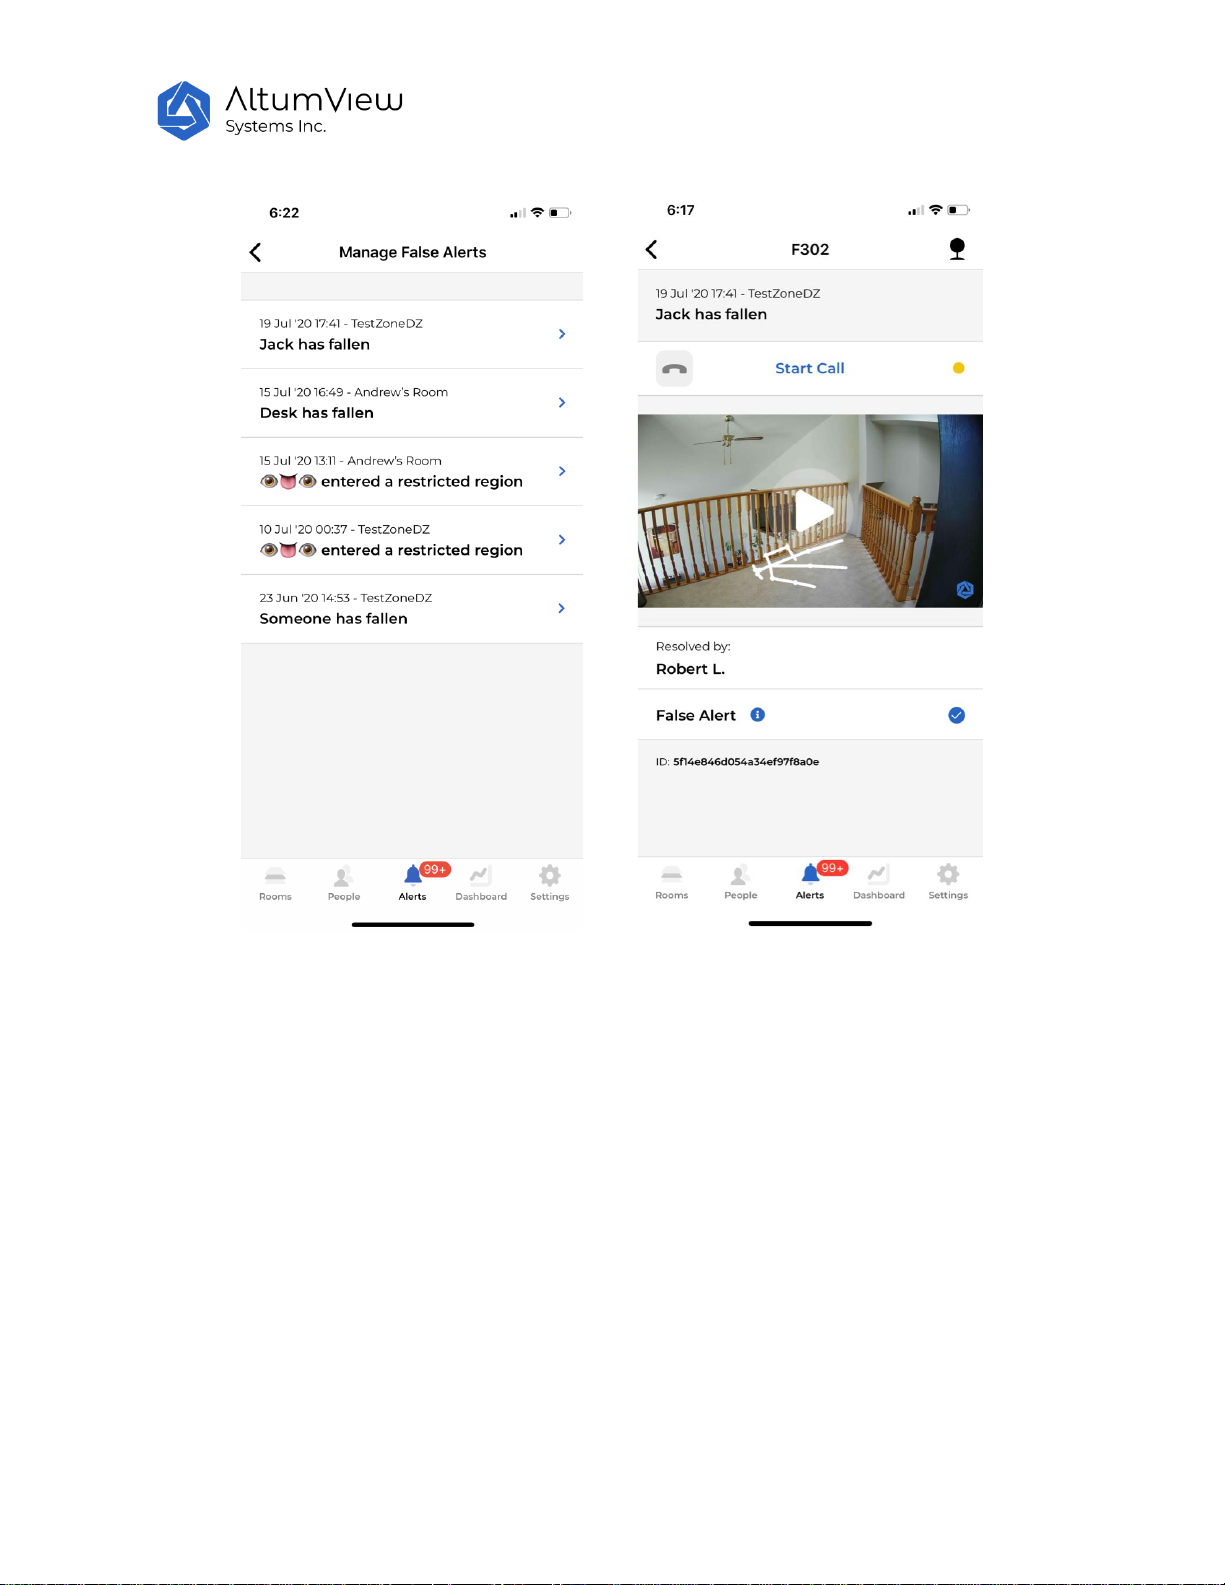
Sometimes the alerts generated by the sensor are false alarms. If one type of false alarm frequently
happens at the same location, users can choose the Ignore Similar Alerts option in the Mark as Resolved
page. After that, the server will not send the same type of alerts from the same location.
Alerts marked as false alarms this way will be moved to the Manage False Alerts page. Tap the Manage
False Alerts in the Alerts page will list all false alarms.
When the sensor’s position is changed, false alerts marked in its previous positions should be removed.
To do this, tap the alert, and uncheck the False Alarm flag in the alert detail page. The alert will be
moved back to the list of alerts in the Alerts page.
Page 41
41
Page 42

42
7.Fall Risk Assessment
7.1 Introduction
The Cypress visual sensor can also perform fall risk assessment (only available to some users). This
allows users to evaluate their fall risk regularly in long-term care facilities, community centres, or at
homes, without having to go to hospitals to do the test, and identify seniors with high fall risk earlier, so
that necessary interventions can be taken to reduce falls and the damages they could cause.
The method implemented by the Cypress visual sensor is the widely used Morse Fall Risk Assessment
Scale, which assign scores to the following six factors, and the total score is used to determine the fall
risk.
History of falling in the last 3 months
Secondary diagnosis
Ambulatory aid
IV or saline assistance
Mental illness
Gait quality
The method’s average sensitivity and specificity is over 80%, and interrater reliability is 0.96, meaning
repeated tests by different examiners are highly consistent. Therefore the method has been widely
adopted around the world.
7.2 SD Card
The SD card is required in the Cypress visual sensor to perform the fall risk assessment. If it is not
already inserted, please insert a SD card to the SD card slot in the back of the Cypress visual sensor and
reboot the sensor. The raw videos in the card will not be transmitted out of the sensor, and are
encrypted.
7.3 Morse Fall Risk Assessment Scale
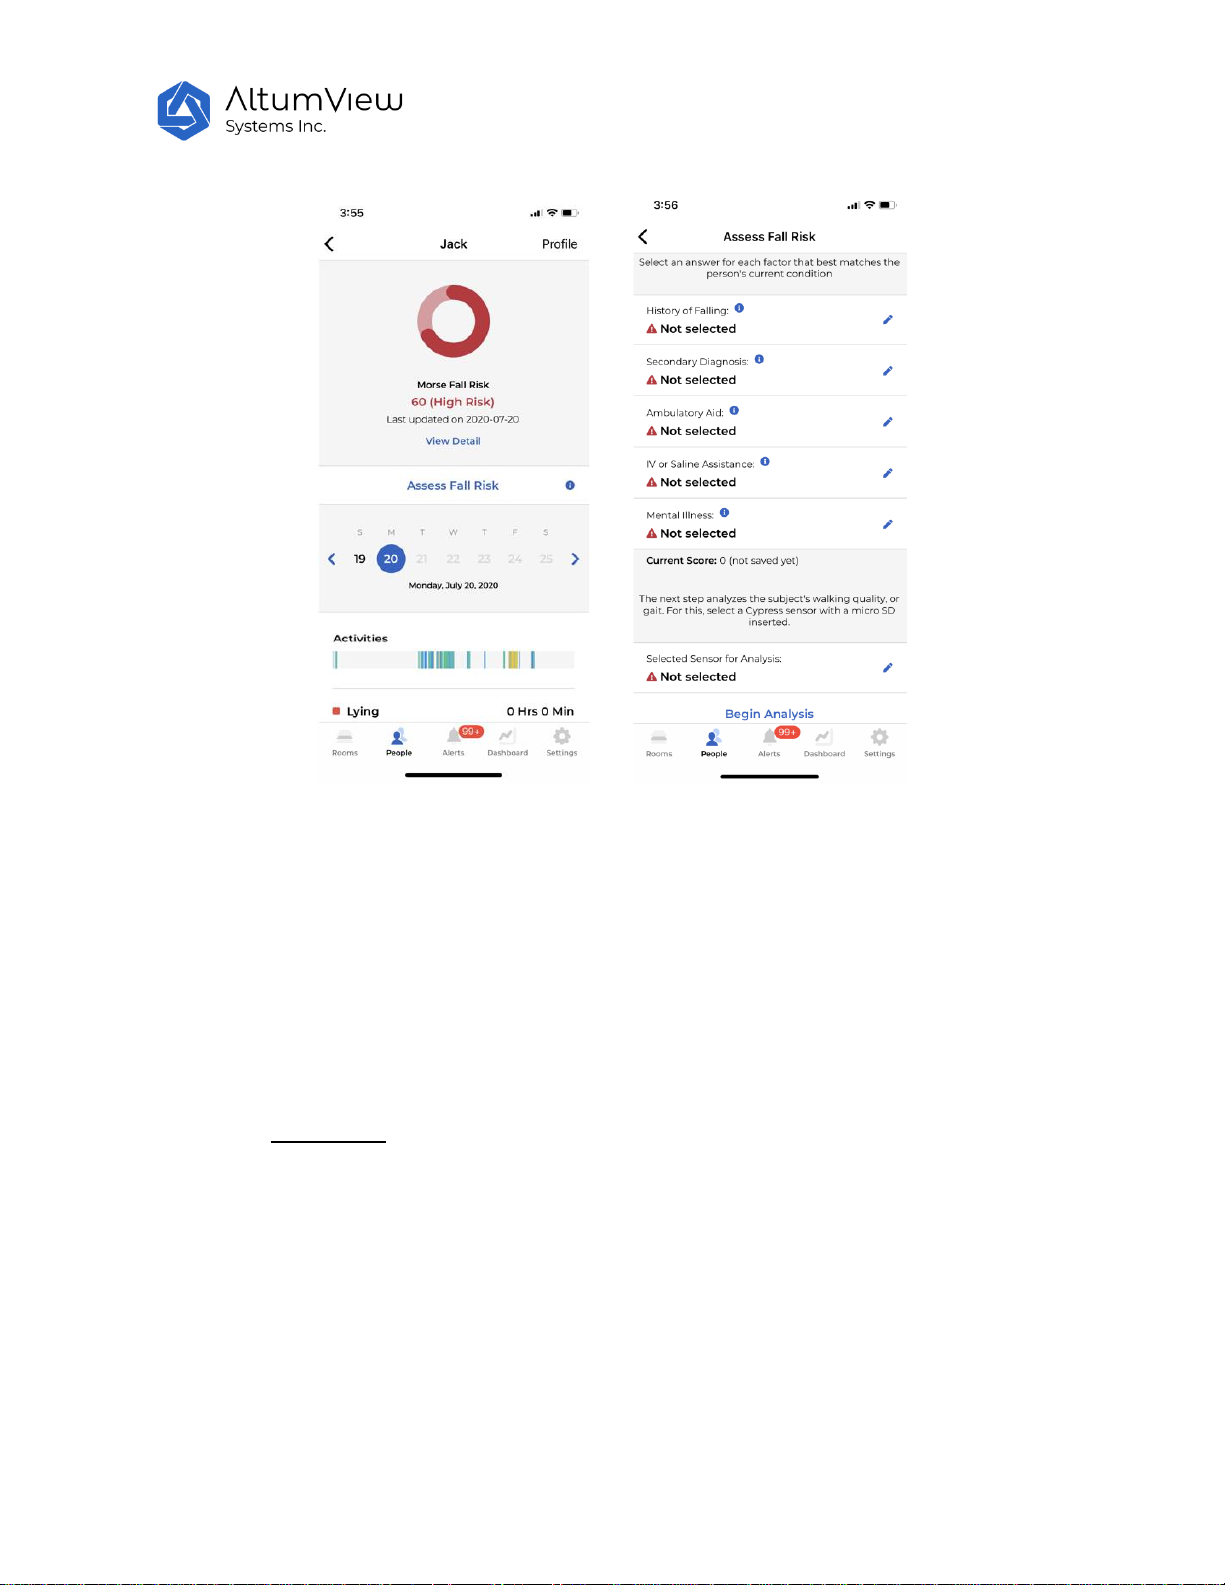
To perform fall risk assessment for a person, tap the Peoples icon in the bottom of the screen, and select
the person in the list of people. In the person’s individual page, tap the Assess Fall Risk button to go to
the Assess Fall Risk page, as shown below.
Page 43
43
In the Assess Fall Risk page, users first need to answer 5 questions about the health conditions of the
person being tested. The questions and rules of scores are as follows. These details can also be found in
the App by tapping the information icon next to each question.
1: History of falling in the last 3 months:
25: if the patient has immediate history of falls within the past 3 months.
0: Otherwise.
2: Secondary diagnosis:
15: If two or more medical diagnoses are listed on the patient’s record that may increase risk
for falls, considering factors such as illness/medication timing and side effects such as dizziness,
frequent urination, unsteadiness.
0: Otherwise.
3: Ambulatory aid:
0: If the patient walks without a walking aid (even if assisted by a nurse), uses a wheelchair,
or is on bed rest and does not get out of bed at all.
15: If the patient uses crutches, a cane, or a walker.
Page 44

44
30: If the patient walks clutching onto wall or furniture for support (e.g., needs help, but
does not ask or does not comply with order for bed rest).
4: IV or saline assistance:
20: if the patient has an intravenous apparatus or is attached to other medical equipment.
0: Otherwise.
5: Mental illness:
To test mental status, ask the patients “Are you able to go to the bathroom alone or do you need
assistance?”. The score will be
0: If the patient’s reply is consistent with the hospital/facility’s record.
15: If the patient’s response is not consistent with the record, or if the patient’s response is
unrealistic.
7.4 Gait Analysis
The last step of the Morse Fall Risk Scale is to assess the gait or walking quality of the person. Cypress
visual sensor performs this through the popular Timed Up & Go (TUG) test, which was initially designed
for seniors, but has also been found to be accurate for people with Parkinson's Disease, Alzheimers, hip
fracture, routine orthopaedic surgery, and other conditions. The method’s average sensitivity and
specificity is also over 80%, and interrater reliability is 0.98.
The gait analysis needs to use the micro SD card. If no SD card is inserted in the sensor, insert one and
reboot the sensor.
7.4.1 Room Setup
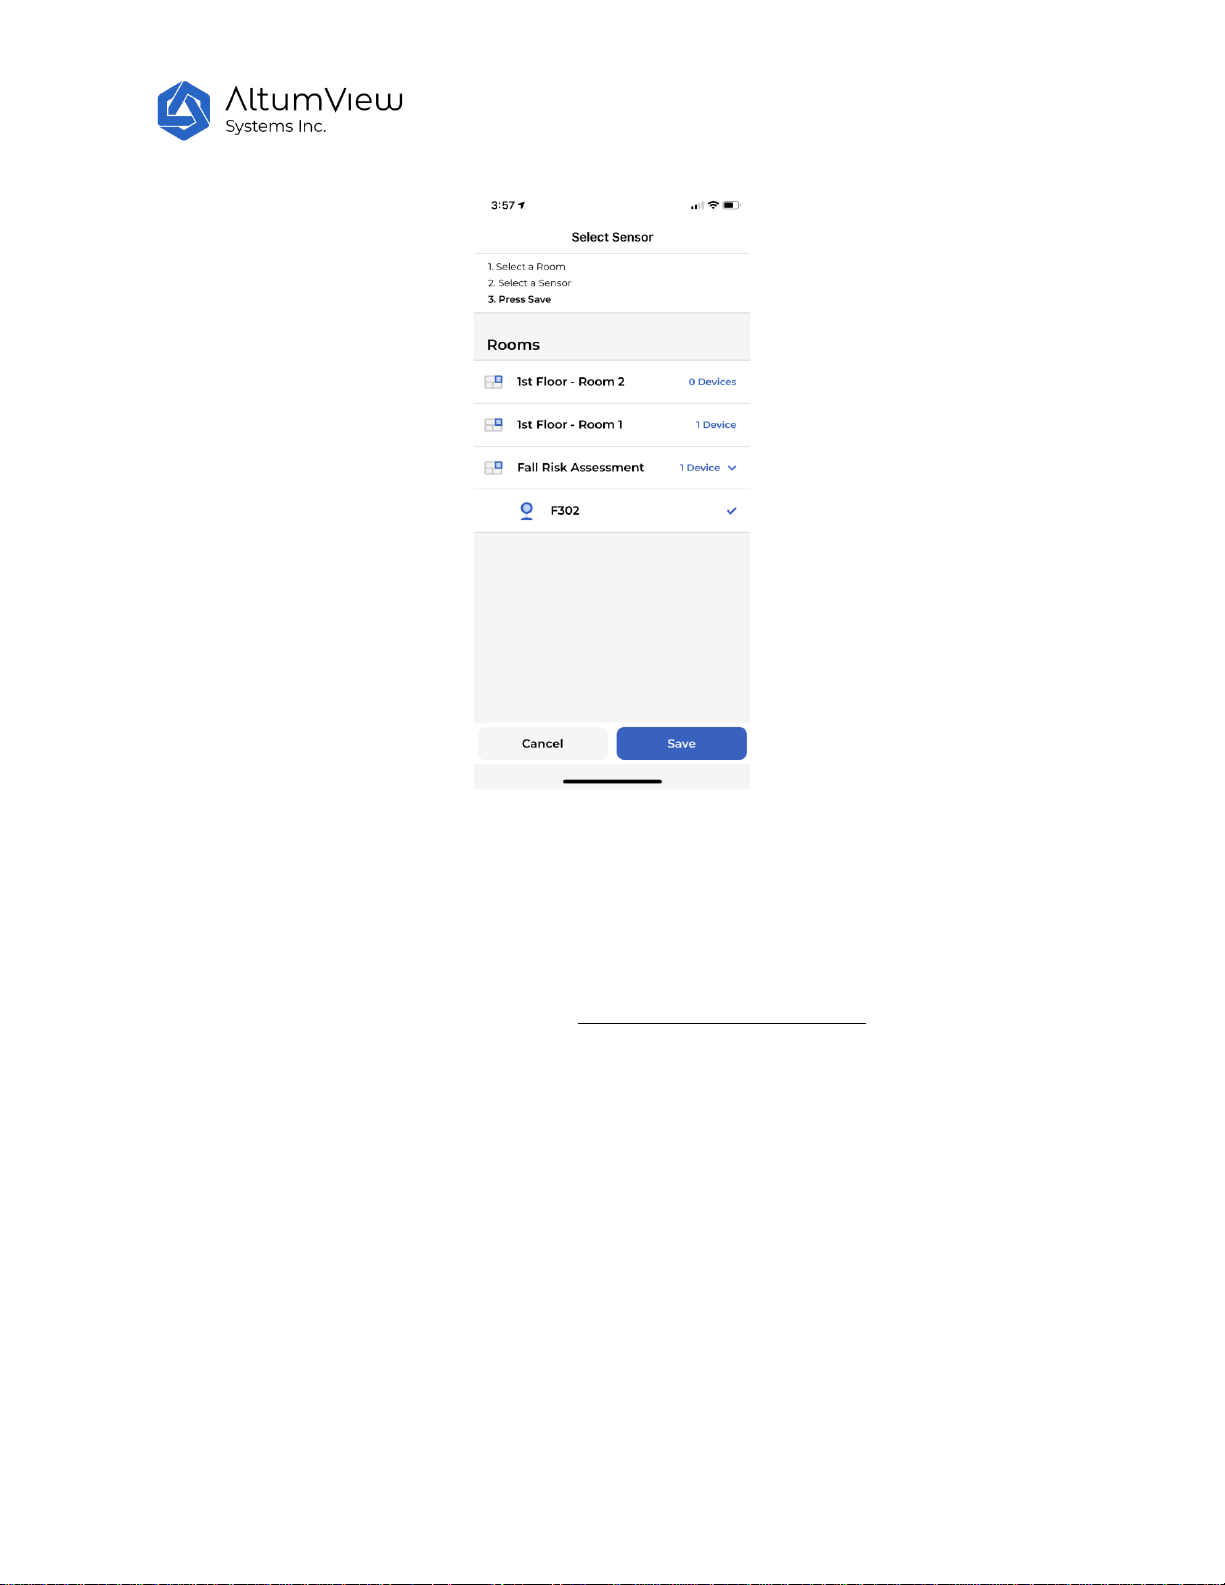
To do the gait analysis, users first need to select a room and a Cypress visual sensor in the room, as
shown by the following figure.
Page 45
45
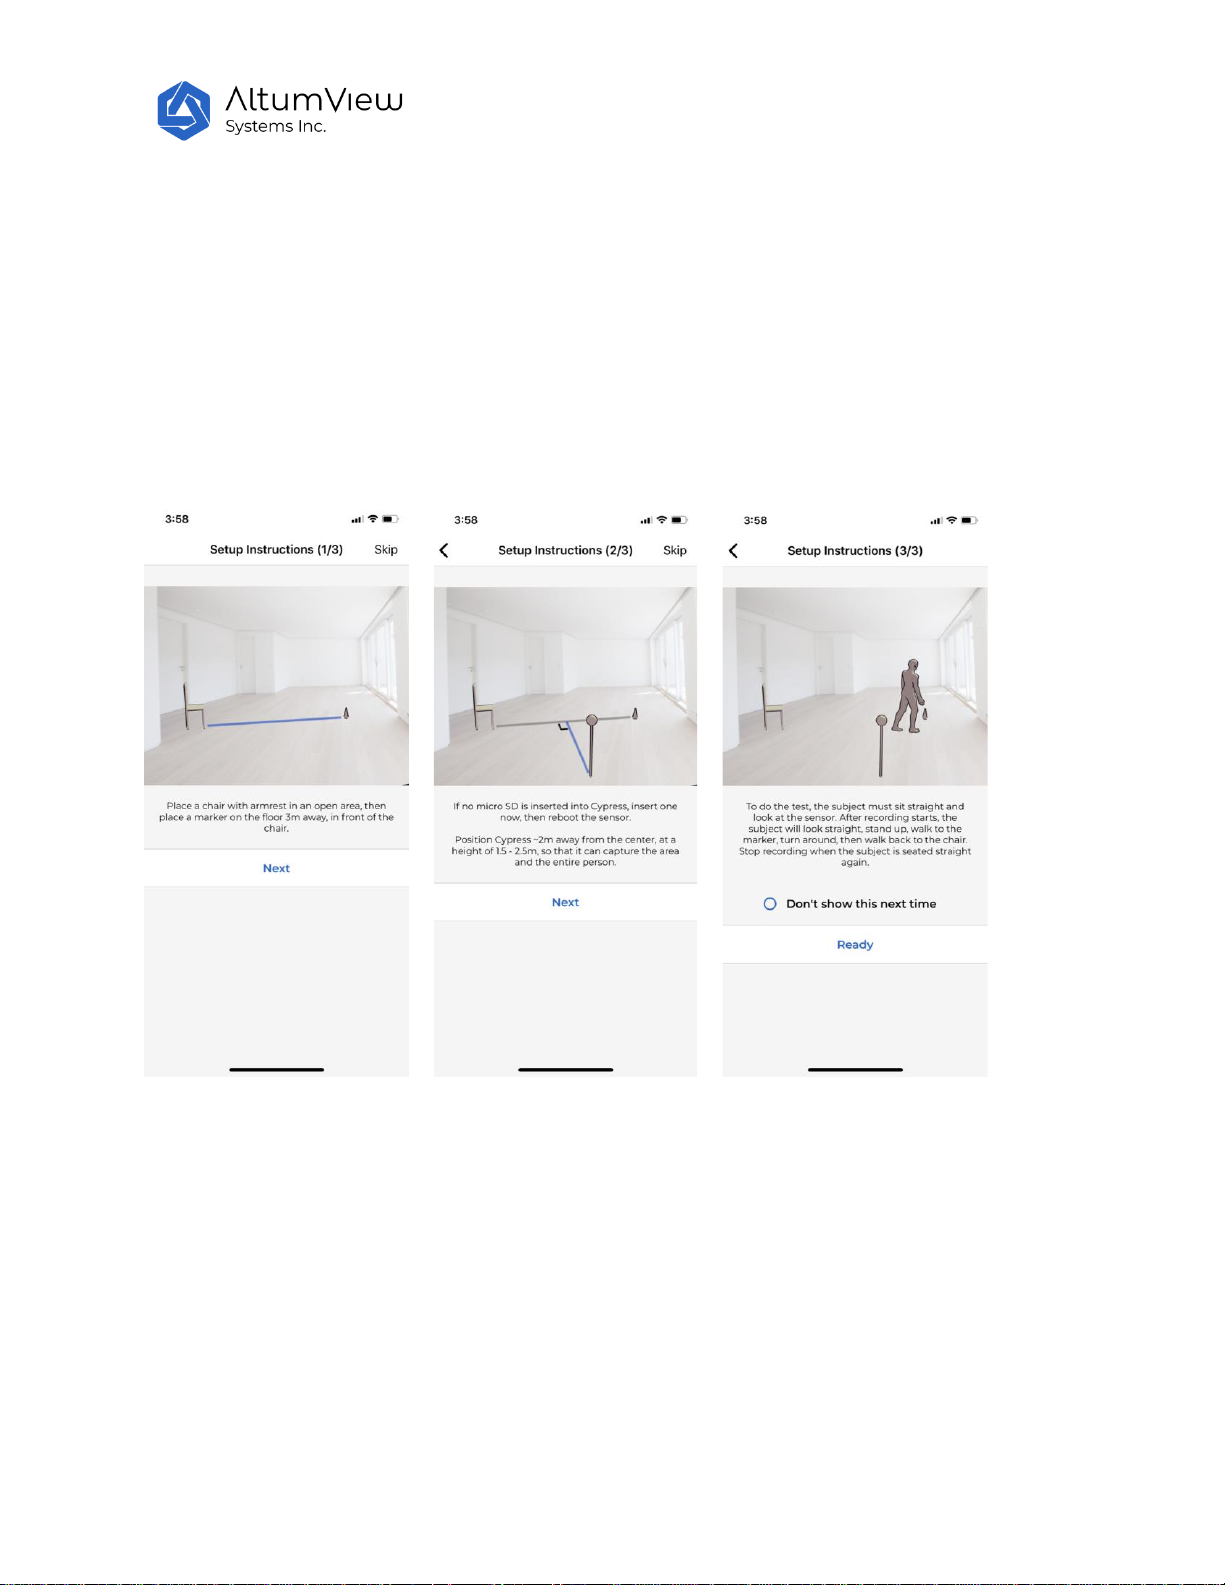
Place an armchair in the room.
Place a marker (such as a colored tape) 3m away on the floor in front of the chair.
Position the Cypress sensor about 2-3m away from the center of the line between the chair and the
marker, at a height of about 2-3m and a suitable angle, so that it can capture the entire area and the
person during the test.
The person can wear their regular footwear and can use a walking aid, if needed. If another person
needs to accompany the senior during the test, please make sure the other person does not stand
between the sensor and the senior during the test.
7.4.2 The Gait Test
The person will start from the sitting position in the chair, and place his/her back against the chair and
rest his/her arms on the chair’s arms.
First ask the person to look at the Cypress sensor, so that it can recognize the person’s face and display
his/her name in the App.
Tap the Start Recording button on the App, and the person will start to do the following. After the Start
Recording button is tapped, the sensor will record the video in the SD card during the test.
1: Stand up from the chair.
Page 46
46
2: Walk to the marker on the floor at a comfortable and safe speed.
3: Turn around.
4: Walk back to the chair.
5: Sit down again.
After the person sits back to the chair, tap the Finish Recording button in the App.
One practice walk is allowed. Three instruction pages are provided in the App, as shown below.
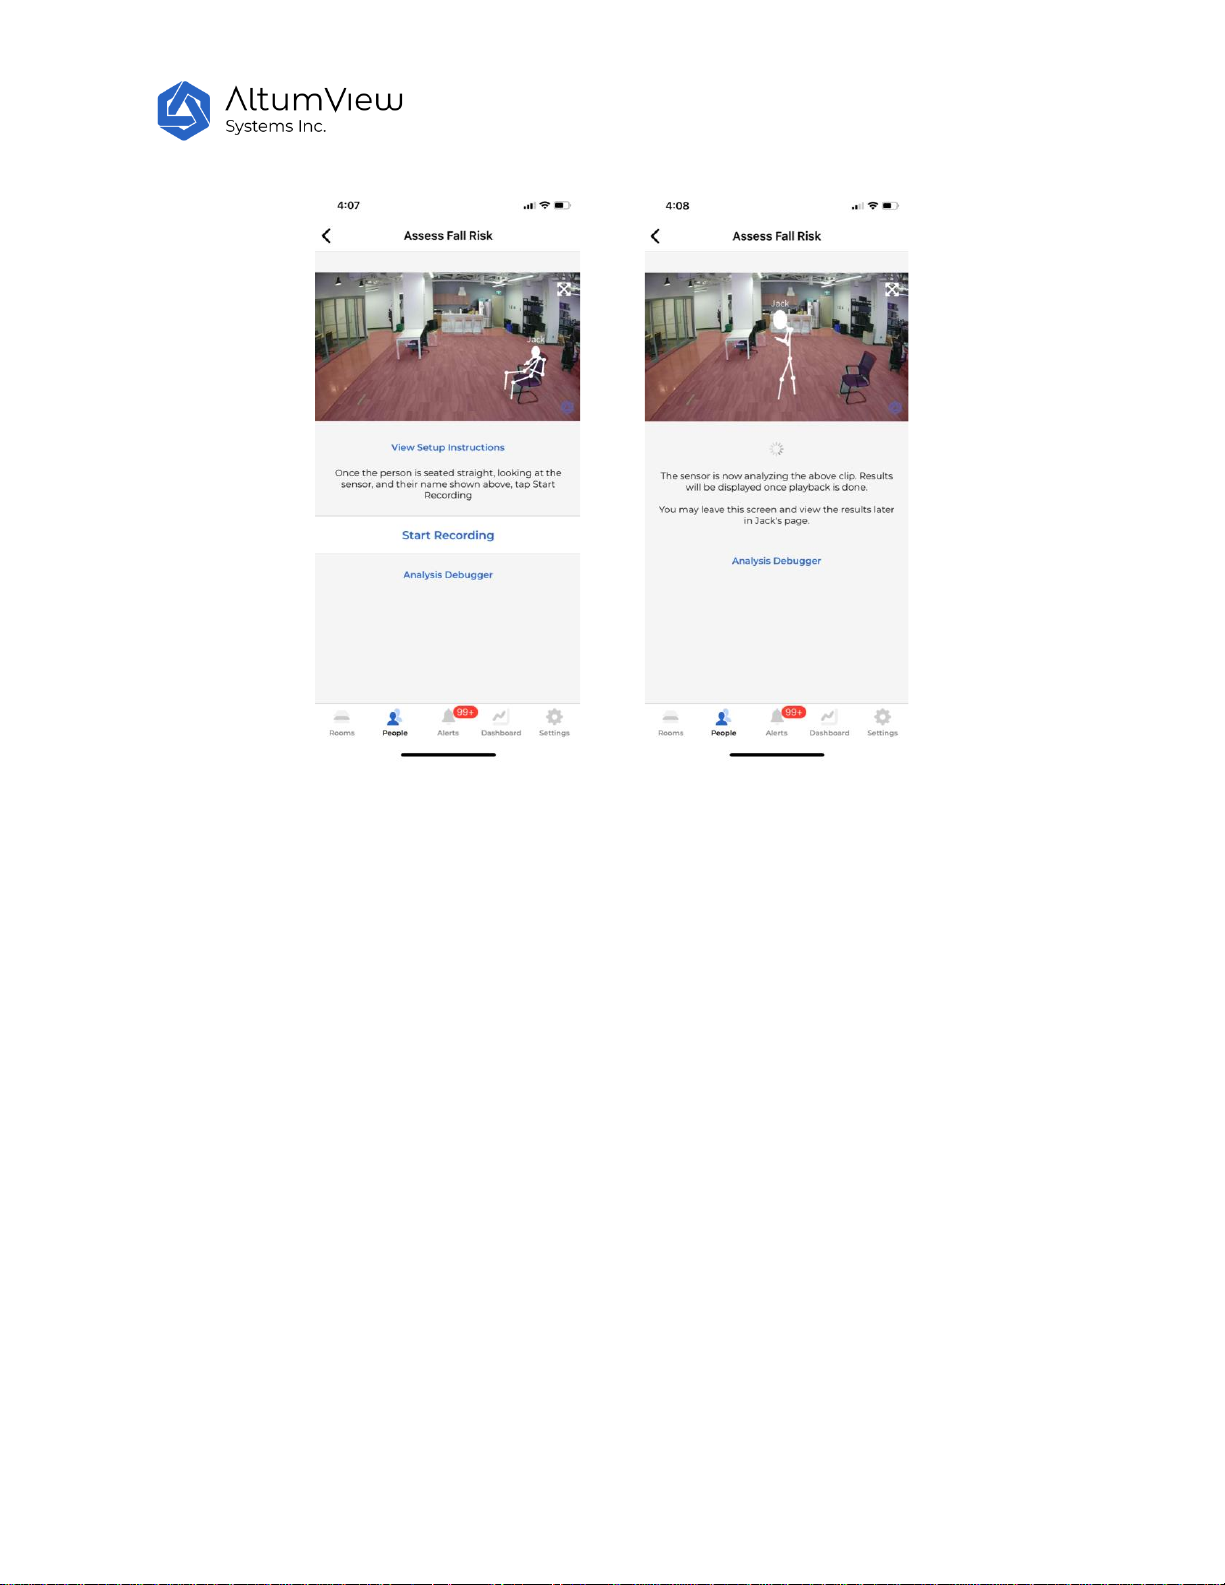
In the next page, tap the Start Analysis button to perform gait analysis, or tap Restart Recording to redo
the test.
After Start Analysis is tapped, the sensor will analyze the gait. The stick figure animation of the test will
be played back on the screen, as shown below. This will take about one minute. After the gait analysis is
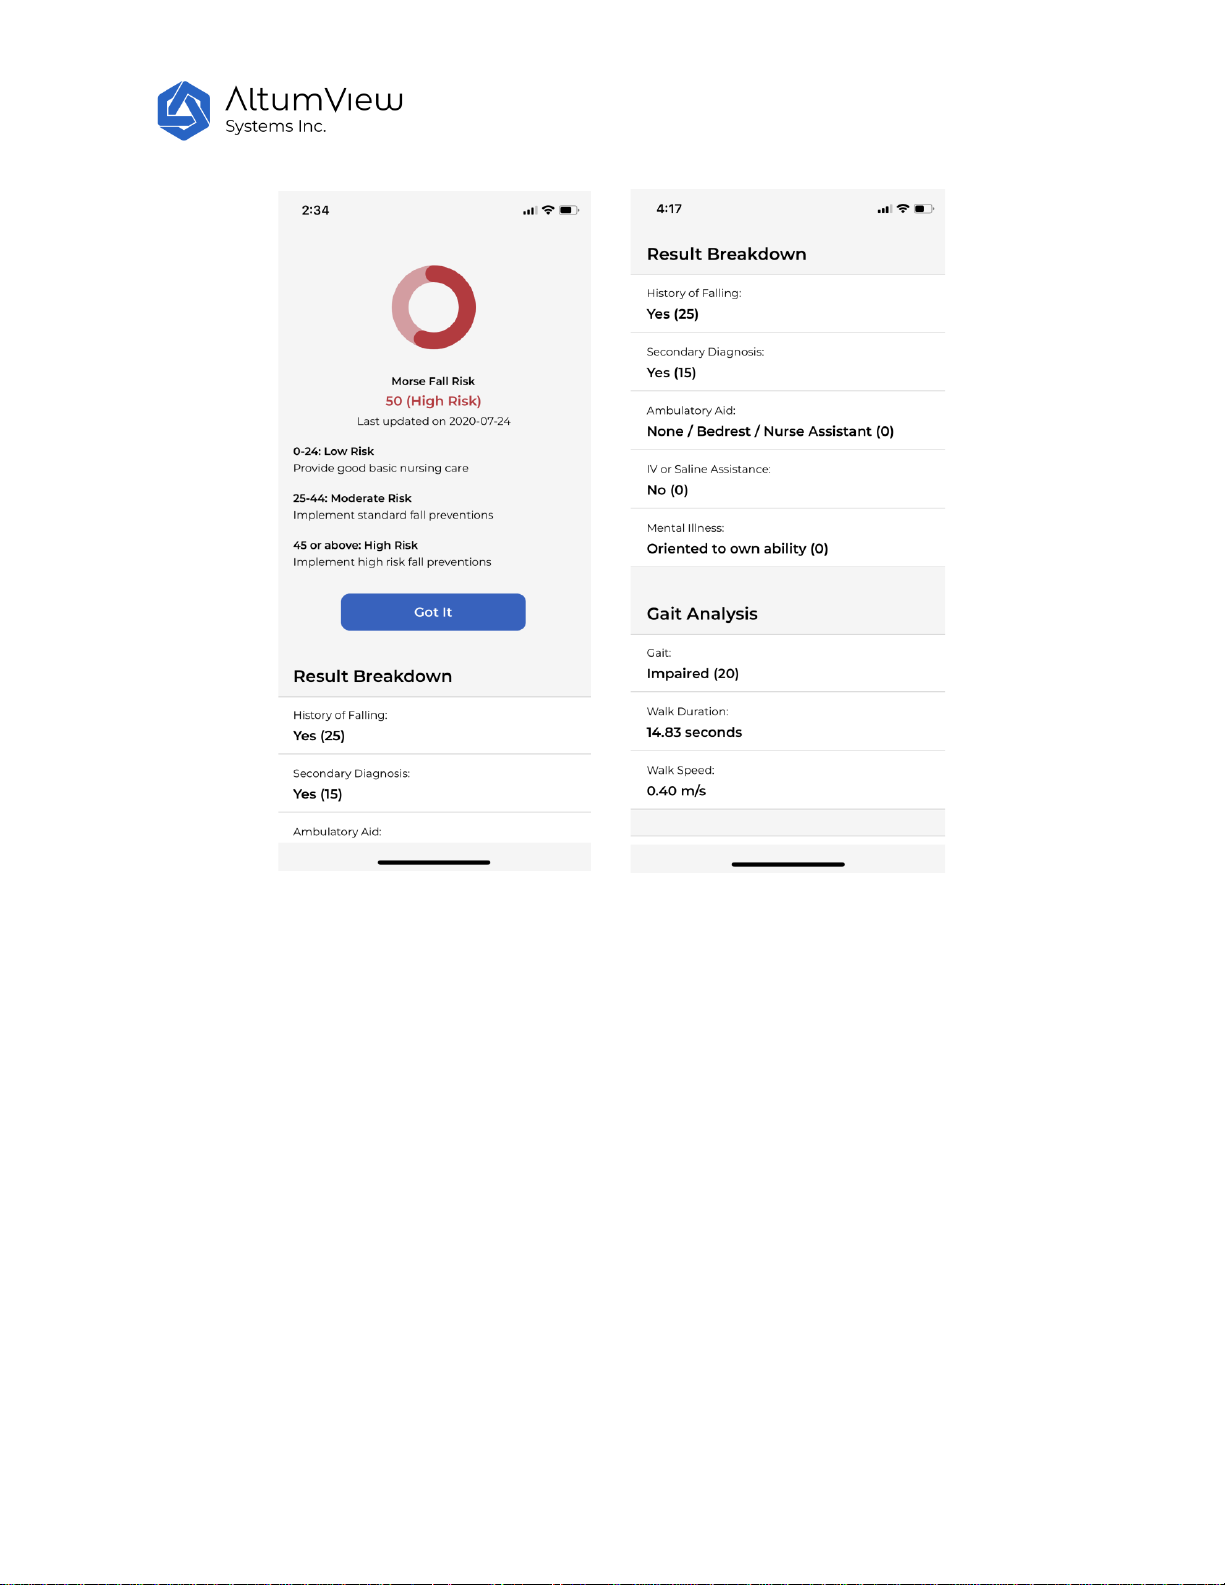
completed, the gait score and the total score of the Morse Fall risk Scale will be displayed in the App.
Page 47
47
Based on the person’s gait analysis, the sensor will give the person’s gait score as follows:
0: Normal gait (or if the person is always on bed rest or on wheelchair)
10: Weak gait
20: Impaired gait
7.5 Final Morse Fall Risk Scale
The final Morse fall risk scale classifies the total score from the six parts above into three categories:
Low Risk: 0-24
o Only need to provide good basic care
Moderate Risk: 25-44
o Need to implement standard fall prevention interventions
High Risk: >=45
o Need to implement high risk fall prevention interventions
Page 48
48
Page 49
49
8.Dashboard
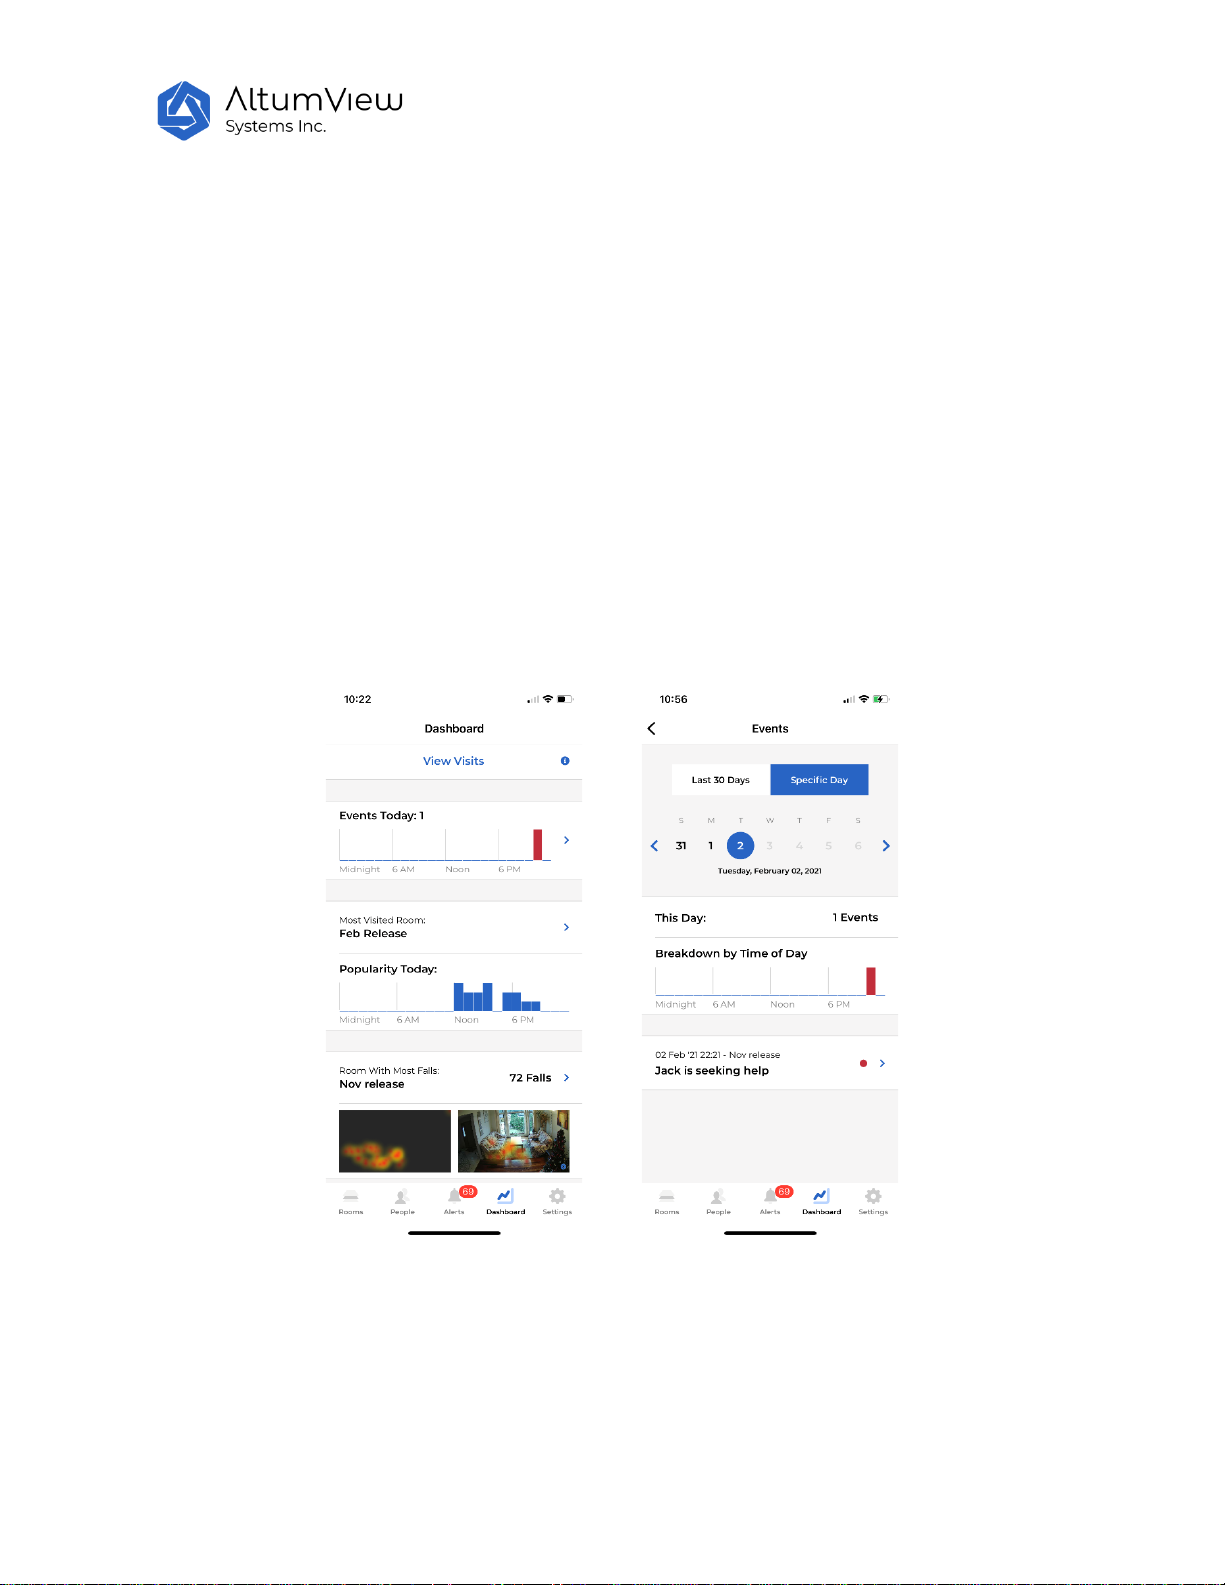
Tap on “Dashboard” in the menu at the bottom of the screen to view some statistics about this account,
as shown by the first figure below.
The dashboard page displays the total number of events and the time of each event. Tapping the events
part of the screen will the details of these events, as shown by the second figure below. In this page,
users can also check the records of other days or the total records of the last 30 days.
The dashboard page also displays the most visited room today. Tapping this part of the screen, users can
check the most visited room in other days or the last 30 days.
The bottom of the dashboard page shows the room with most falls, and the heat maps of the fall
locations.
8.1 View Visits
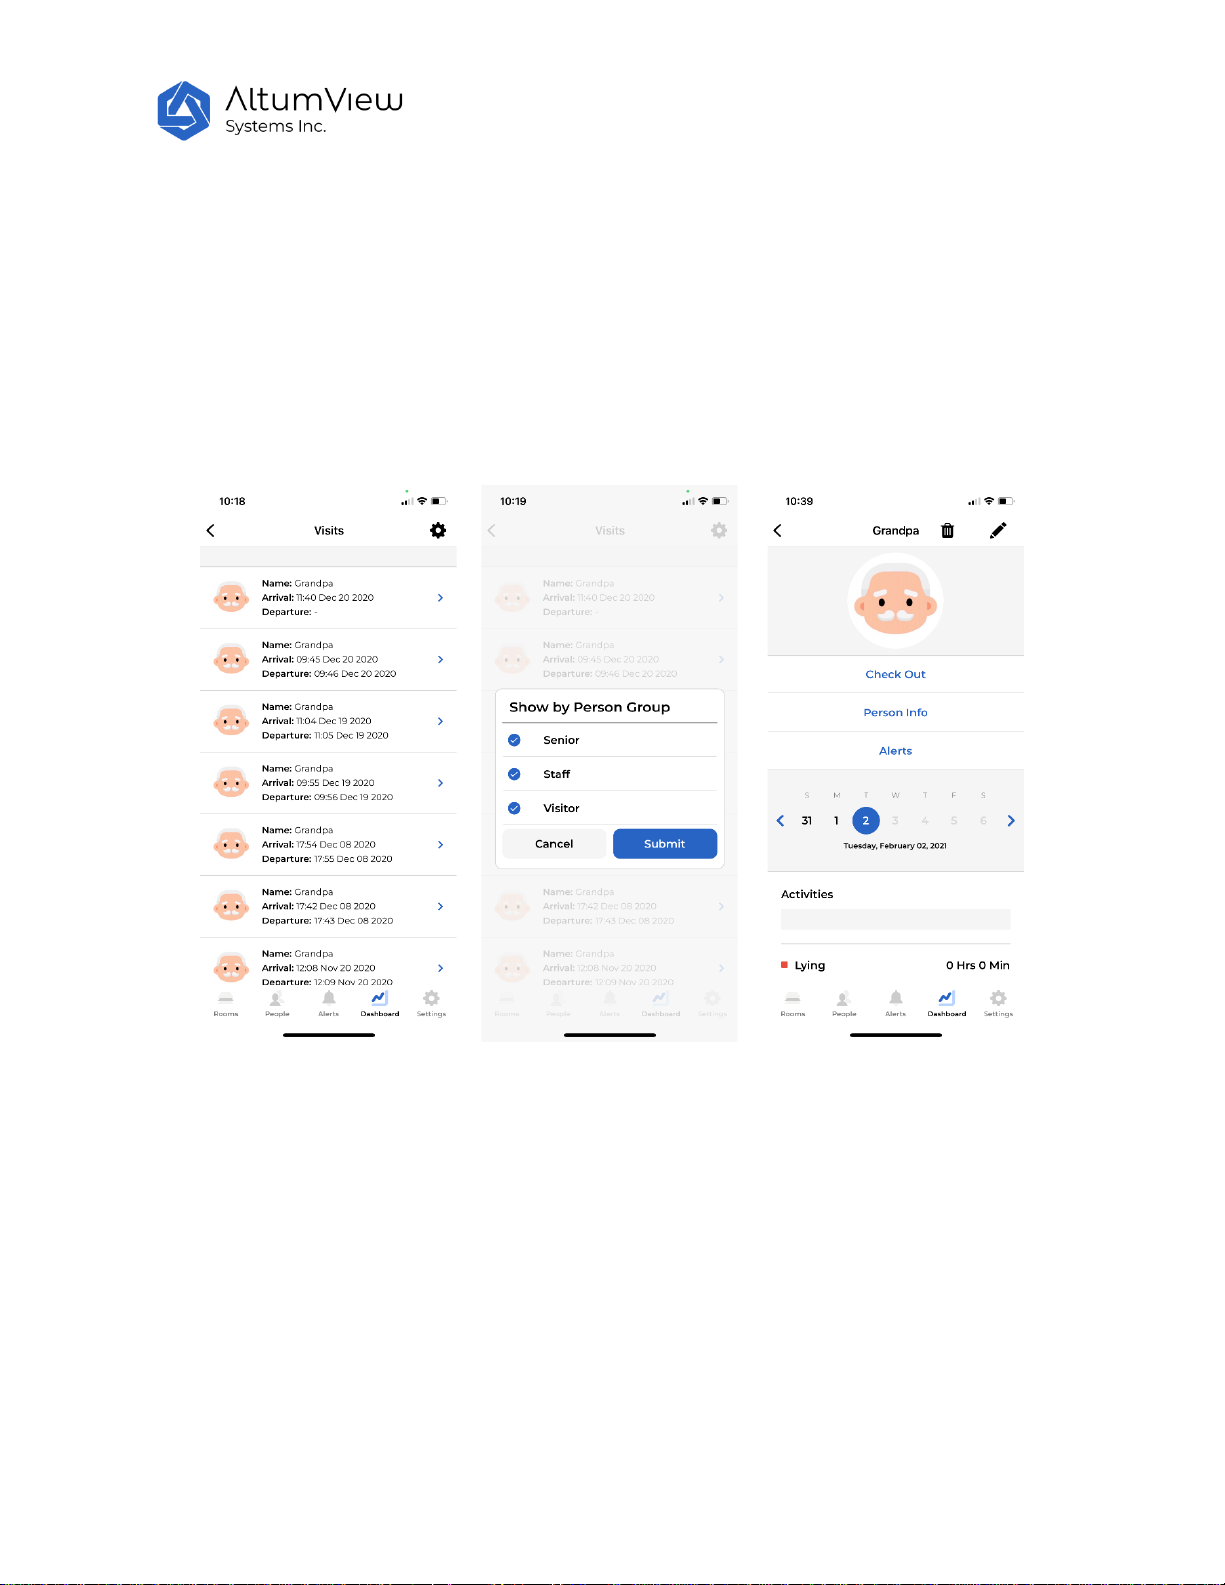
Tap on the “View Visits” command will enter the “Visits” page, which shows all the entrance and/or exit
records detected by sensors for which the entrance and/or exit are defined via the Region of Interest
page in Chapter 4.
Page 50
50
In the Visits page, tap on the setting icon in the upper right corner, users can select what person group’s
records to display, as shown by the figure below. The filtering can be removed by tapping “Clear Filters”.
From the Visits page, users can also manually check out a person, if his/her departure time was not
recorded for some reasons. This can be done by tapping a record whose departure time has not been
logged. In the next page, tap the “Check Out” command, as shown by the following figure, a pop up
window will show up for users to input the departure time of the person.
Page 51
51
9. Account Settings
Tap on "Settings" in the bottom right corner to enter the account setting page.
9.1 Profile
In the Profile section, the name, email address and password of a user can be changed.
9.2 Push Notification Status
Cypress visual sensor can detect abnormal events like falls and send alerts to user’s mobile device
immediately. However, to take full advantage of this feature, the user needs to enable the Cypress App
to receive such notifications via notification banner and sound at the System Setting of their device. This
can be turned on and off by the “Push Notification Status” command in the Cypress setting page.
9.3 Duplicate Alert Prevention
Page 52

52
The “Duplicate Alert Prevention” setting is used to prevent frequent alerts from a room. The value can
be changed by tapping the pencil icon to the right of “Duplicate Alert Prevention”. When the setting is
None, all alerts generated from the sensors in a room will be sent to the cloud and the App. When the
setting is not None, for example, 2 hours, only one possible alert will be generated in every 2 hours for
each room. This can reduce the false alarms. The default value of “Duplicate Alert Prevention” is
“None”.
Only the administrator can change the value of the “Duplicate Alert Prevention” setting.
9.4 Alert History
The mobile App can store 14 days of historical alert data.
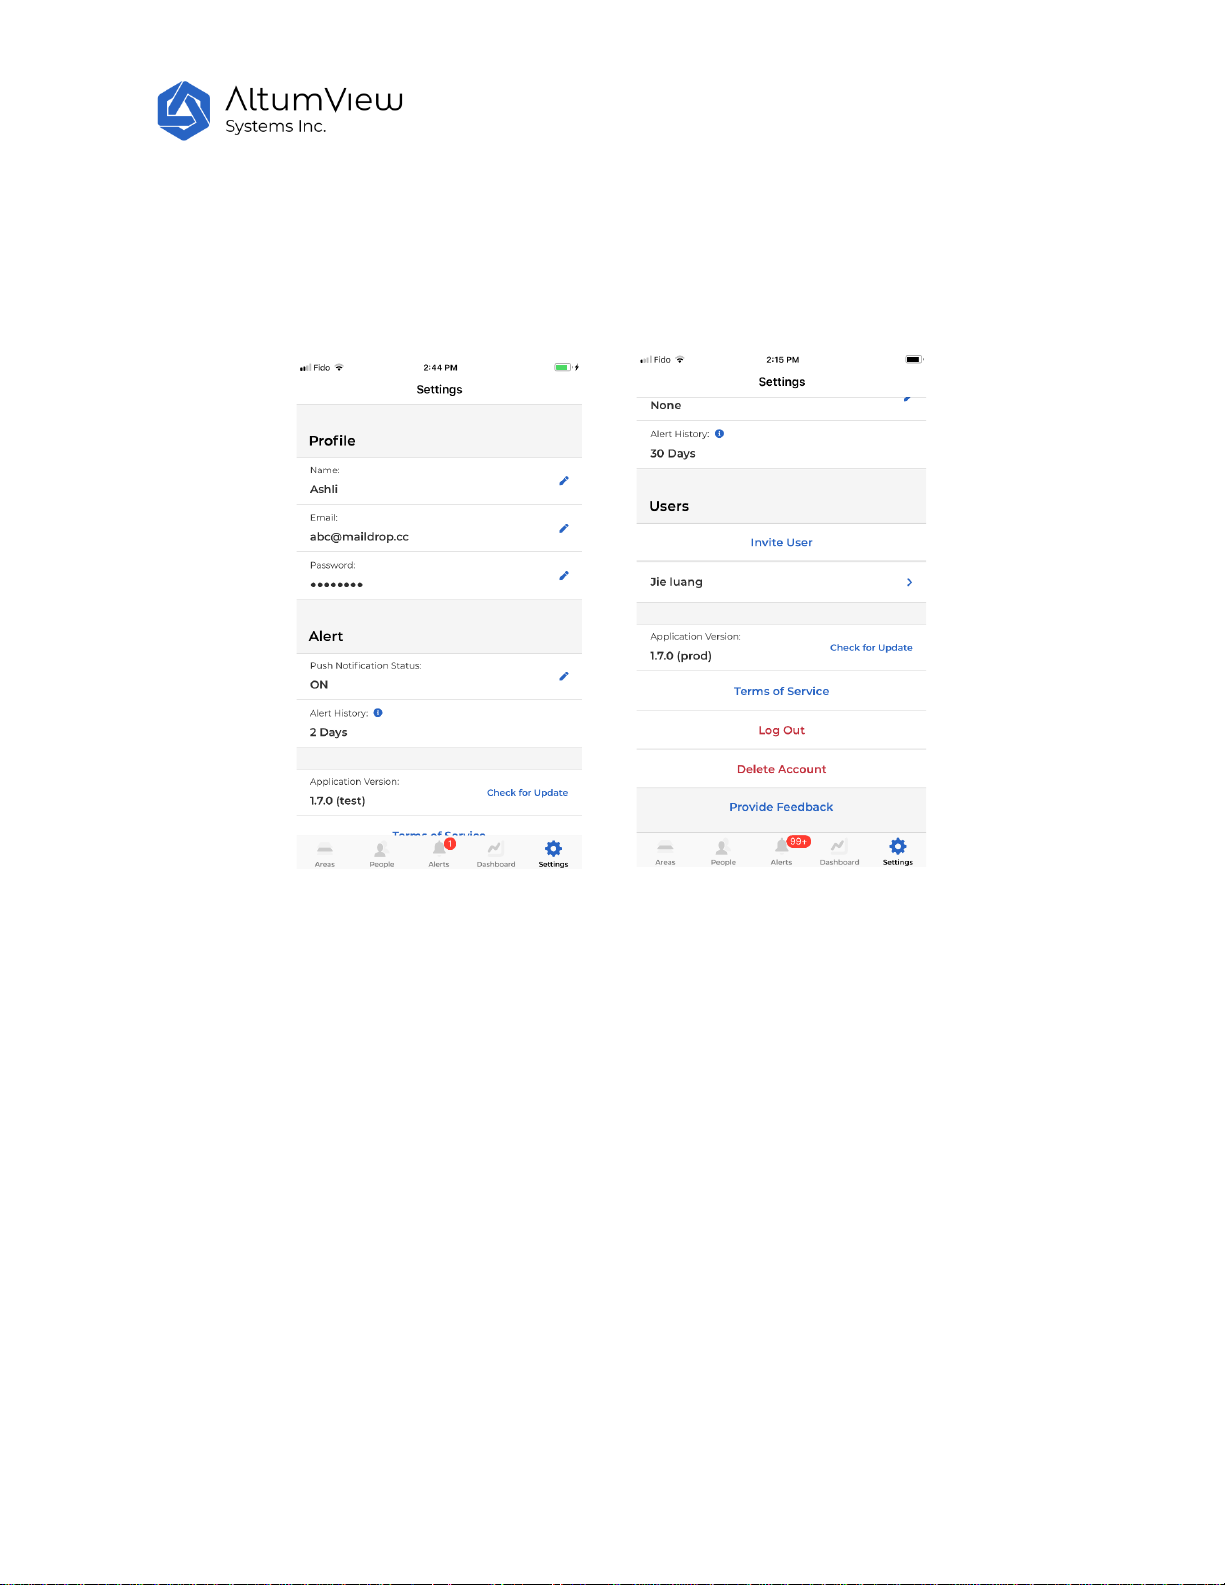
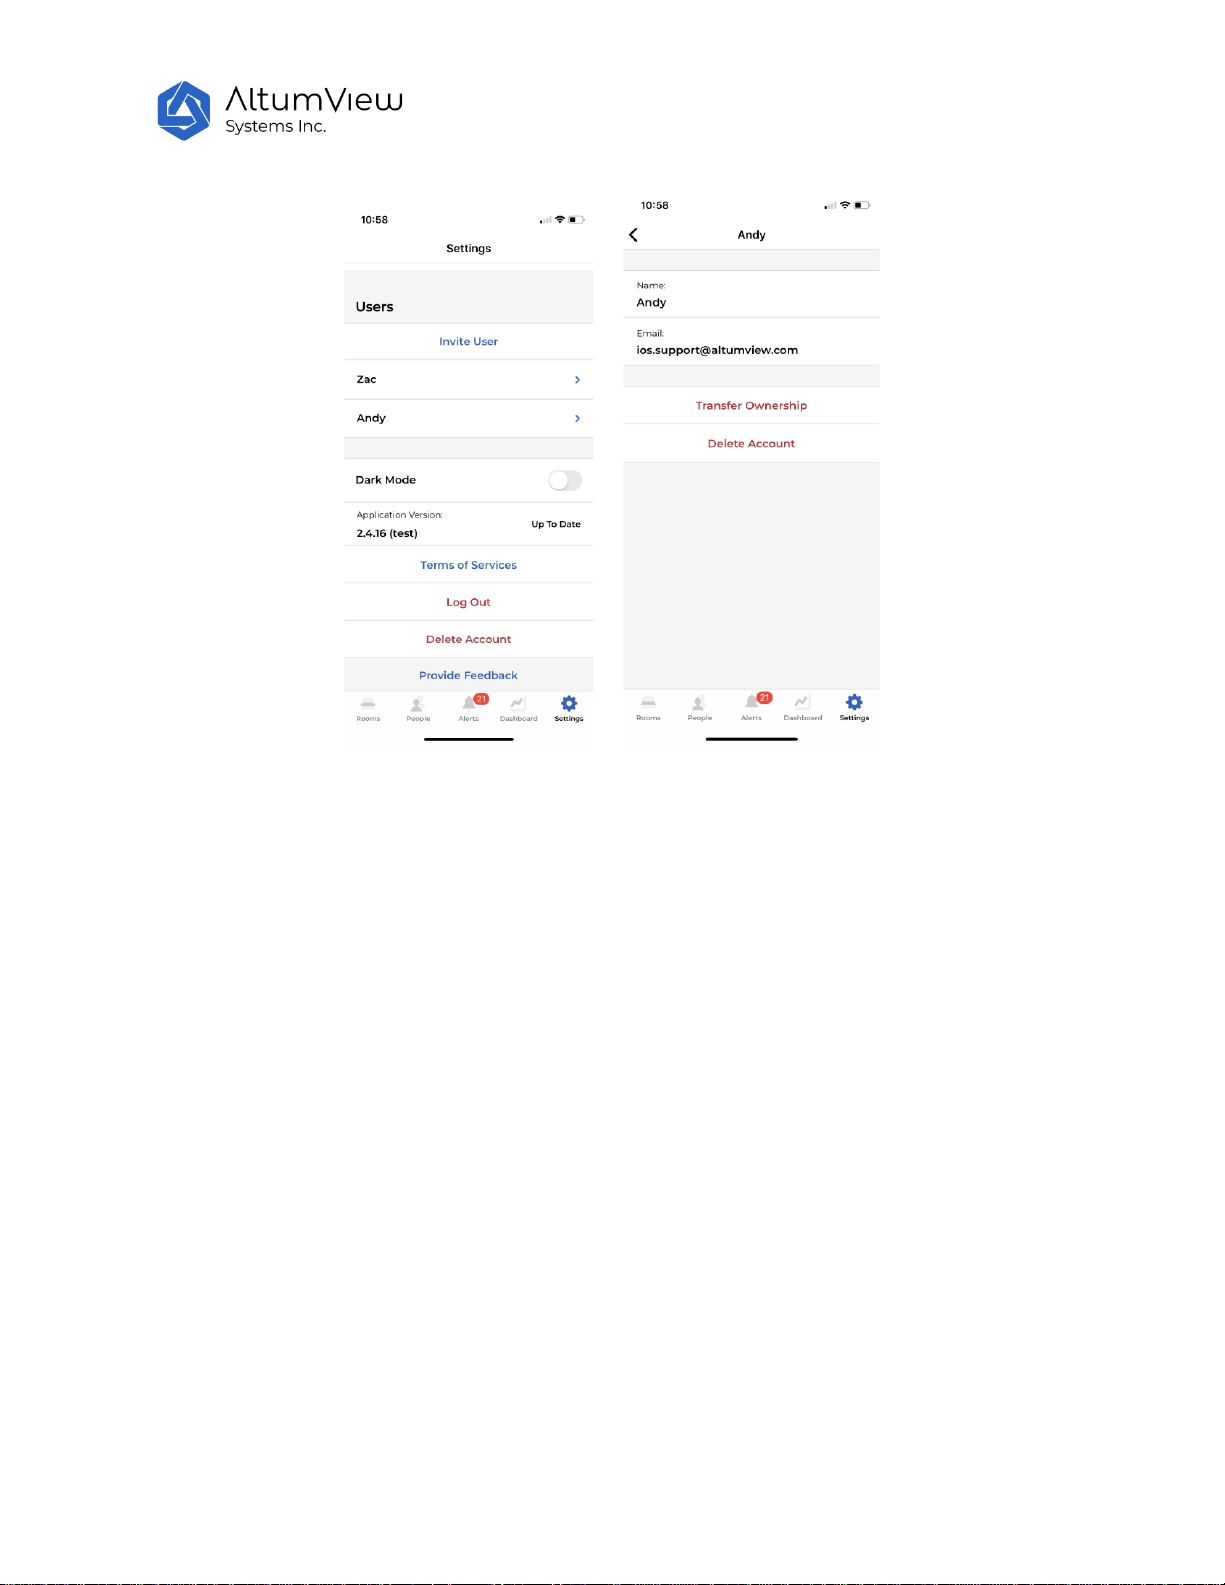
9.5 Invite Secondary User
Each account can invite some secondary users to the account. The secondary accounts can view the
sensors and some other information of the main under your account, but they cannot change the
settings of the account. The procedure to invite a secondary user is as follows.
● Tap “Invite User” on the “Settings” page.
● Fill in the email address of the invited user and tap "Submit" to send the invitation.
● The invited user's mailbox will receive an email from altumview.com with a registration code.
● The invited user will create a new account from the login page of the Cypress App using this
registration code. The new account will become a secondary account of the account that generates
the invitation.
● Only the administrator can invite secondary users.
All secondary accounts of an account are listed under the Invite User command in the setting page, as
shown below. Select a secondary account, in the next page, user can delete the invited account, or even
transfer the ownership of the account to the secondary account.
After a secondary user account is deleted, the email for that account can be used to create a new main
or secondary account, by following the corresponding instructions for creating new account.
Page 53
53
9.6 App Version
The mobile App version is displayed in this part.
User can tap the “Check for Update” command to find out if there is any newer version of the App.
9.7 Terms of Services
The Terms of Services can be obtained by tapping the “Terms of Services” in the Setting page.
9.8 Log Out
User can log out from the App by taping “Log Out” in the setting page.
9.9 Delete Account
By taping “Delete Account” in the setting page, users can delete all user accounts, reset all devices,
delete all people and photos, and erase all alert history.
Page 54

54
9.10 Provide Feedback
By taping “Provide Feedback” in the setting page, users can send feedback to us.
Page 55
55
10. Web Interface
In addition to the Cypress mobile app, the Cypress sensor system also comes with a web interface.
Currently the web interface is mainly designed to manage the entrance and exit records from the Region
of Interest. In the future, more features will be added to the web interface, for example, to display more
statistics and reports.
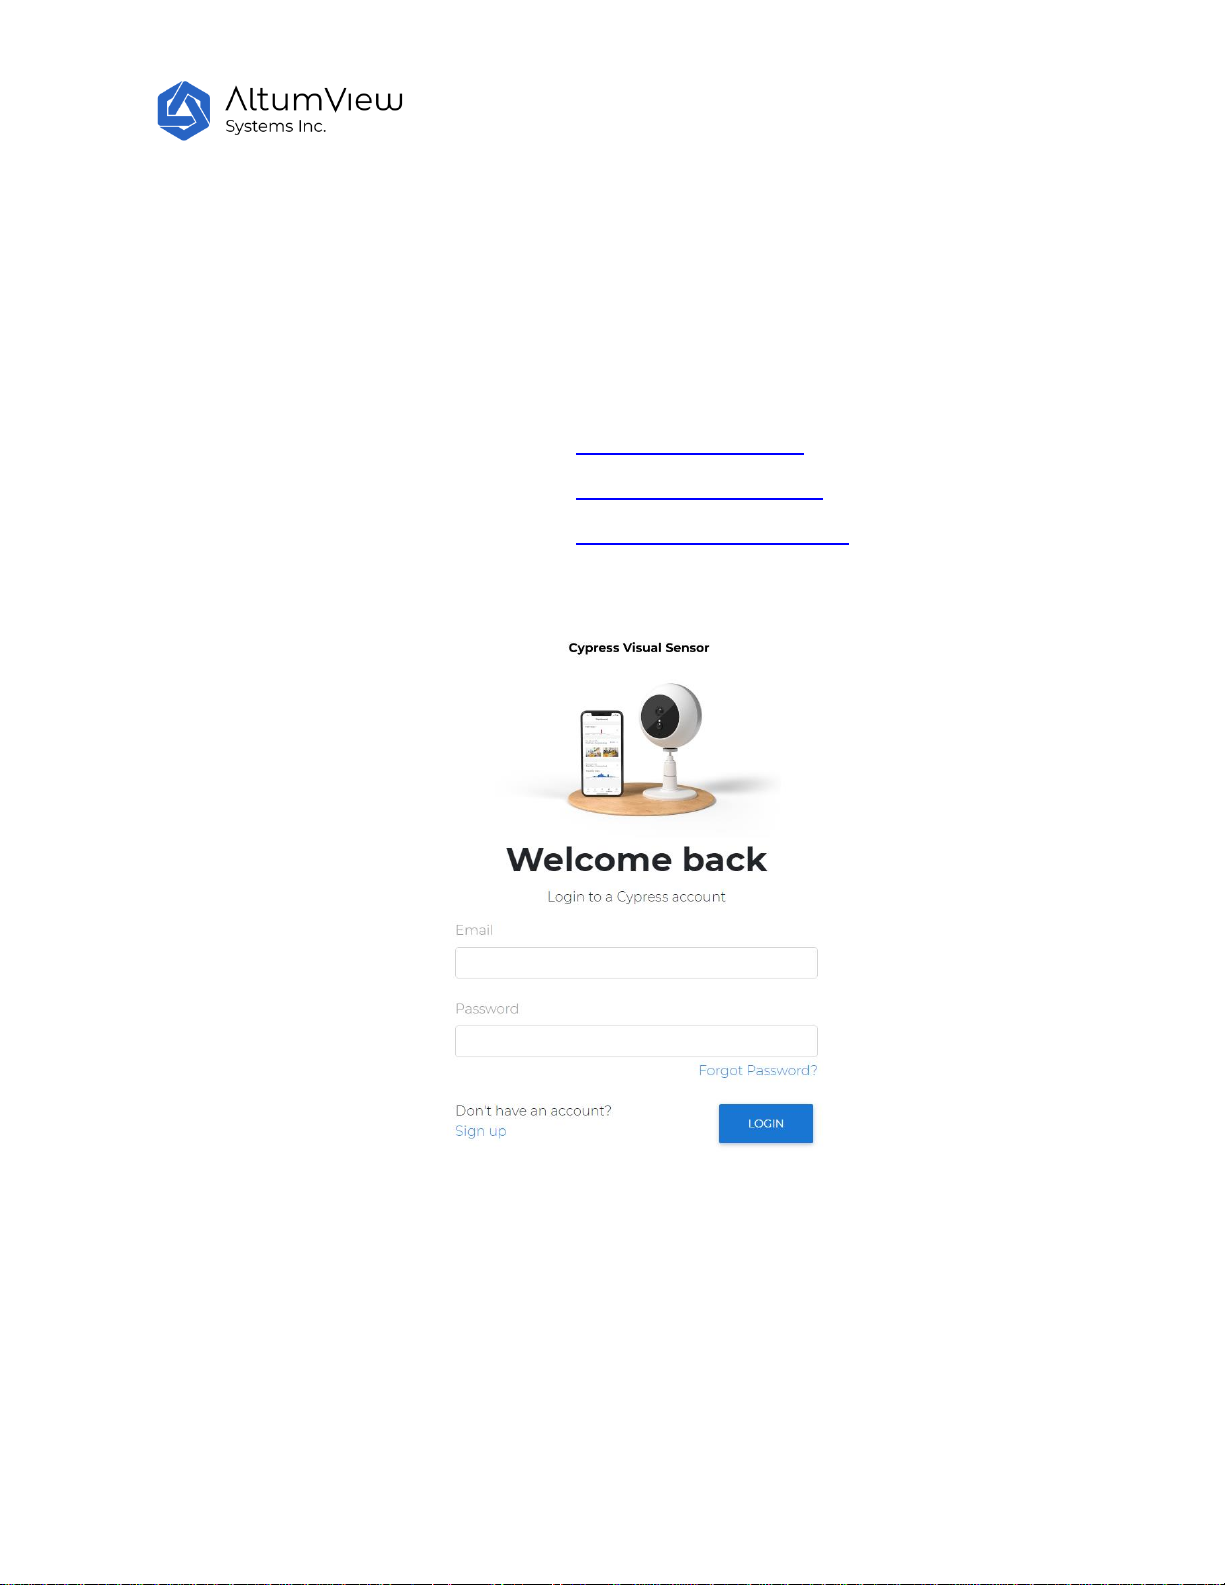
To access the web interface, log in to the following pages using your Cypress mobile app account:
For accounts created in the Canada server: https://app.altumview.ca
For accounts created in the US server: https://app.altumview.com
For accounts created in the China server: https://app.altumview.com.cn
You will see the following login page.
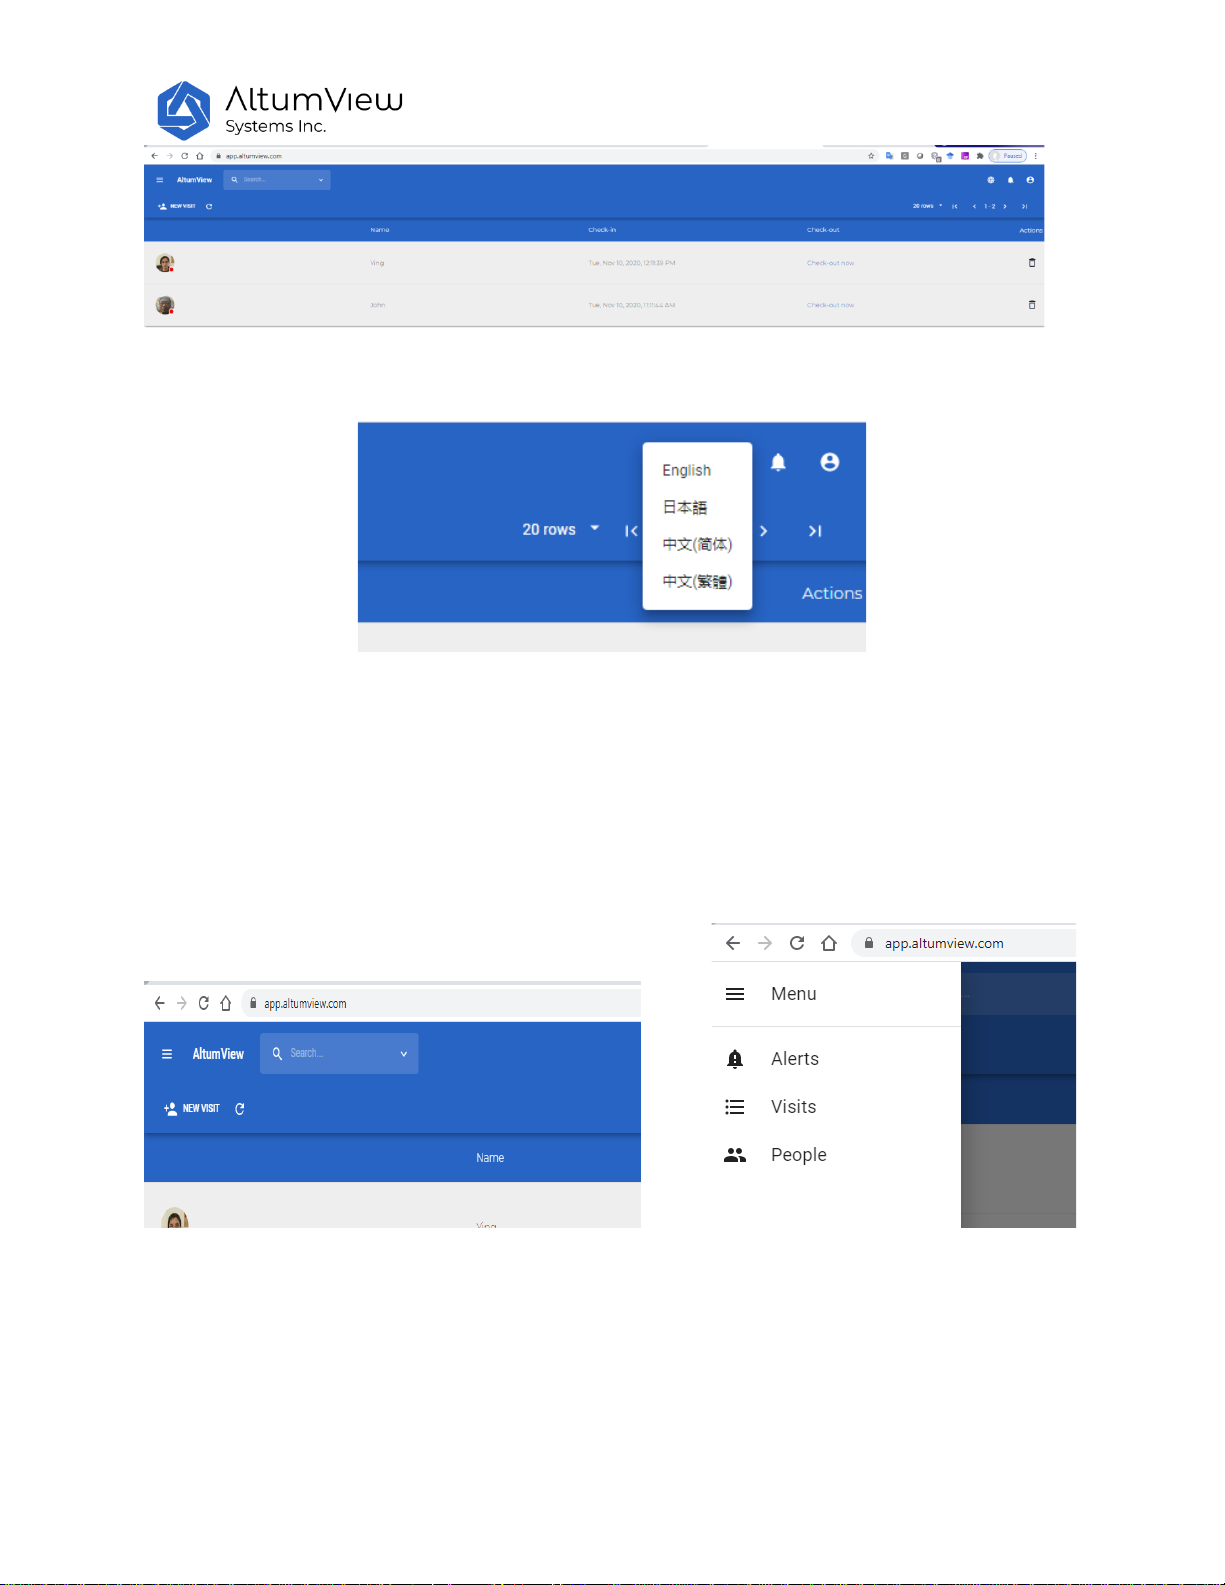
After login, the following page will be displayed.
Page 56
56
Users can select the language of the page by clicking the globe icon on the top right corner of the page.
Users can choose to show different feature by clicking the “Menu” icon on the top left corner of the
page. Currently, the menu includes three options:
Alerts: Display the alerts in the account
Visits: Display the entrance/exit records from the Region of Interests defined by some sensors in
the account
People: Manage people in the account
10.1 People
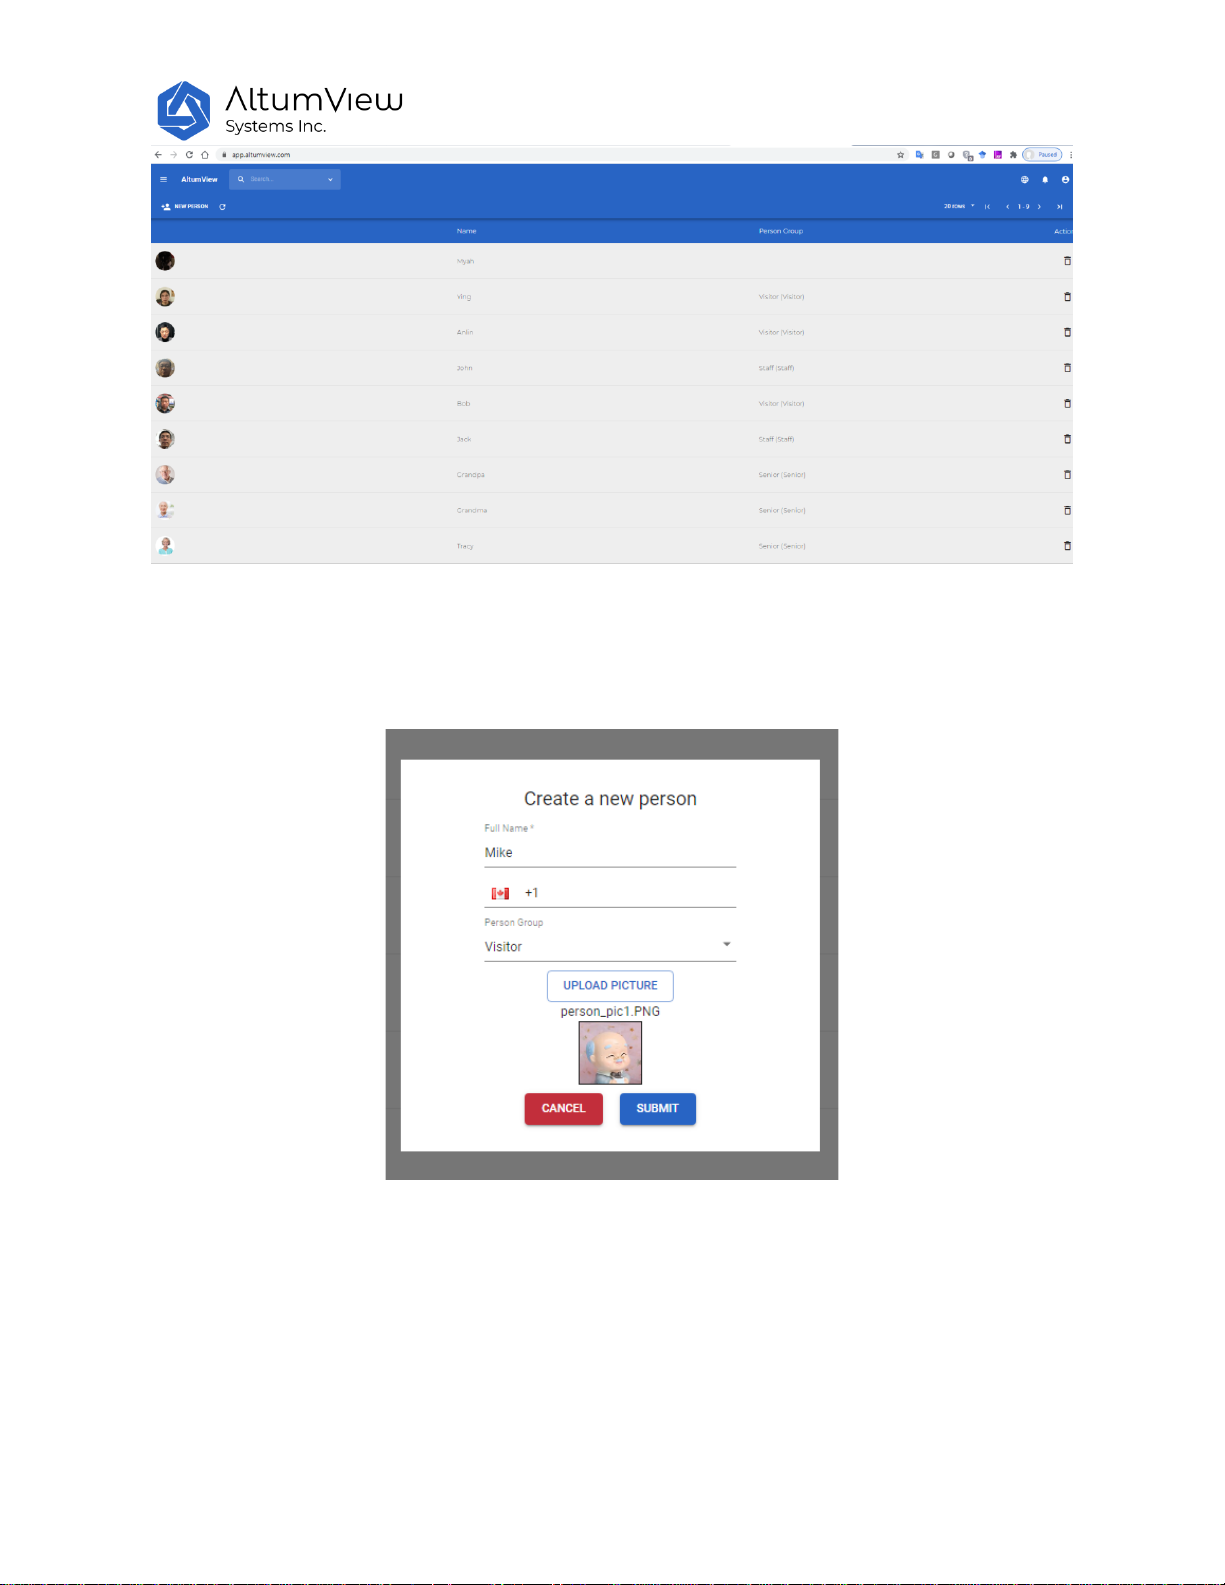
Click on the “People” in the menu will display all the people in the account. The list is the same as that in
the Cypress mobile app.
Page 57
57
Users can add new person here by clicking “New Person”. On the popup window “Create a new person”,
input new person’s name, person group, upload one picture, and click “SUBMIT” will create a new
person. This new person will also appear on the Cypress mobile app’s “People” list.
Users can also delete a person in the “People” page by clicking the garbage can icon at the right end of
the person’s record. The deleted person will also be deleted from the Cypress mobile app.
10.2 Visits
In the menu, click the Visits option will display all the entrance/exit records.
Page 58
58
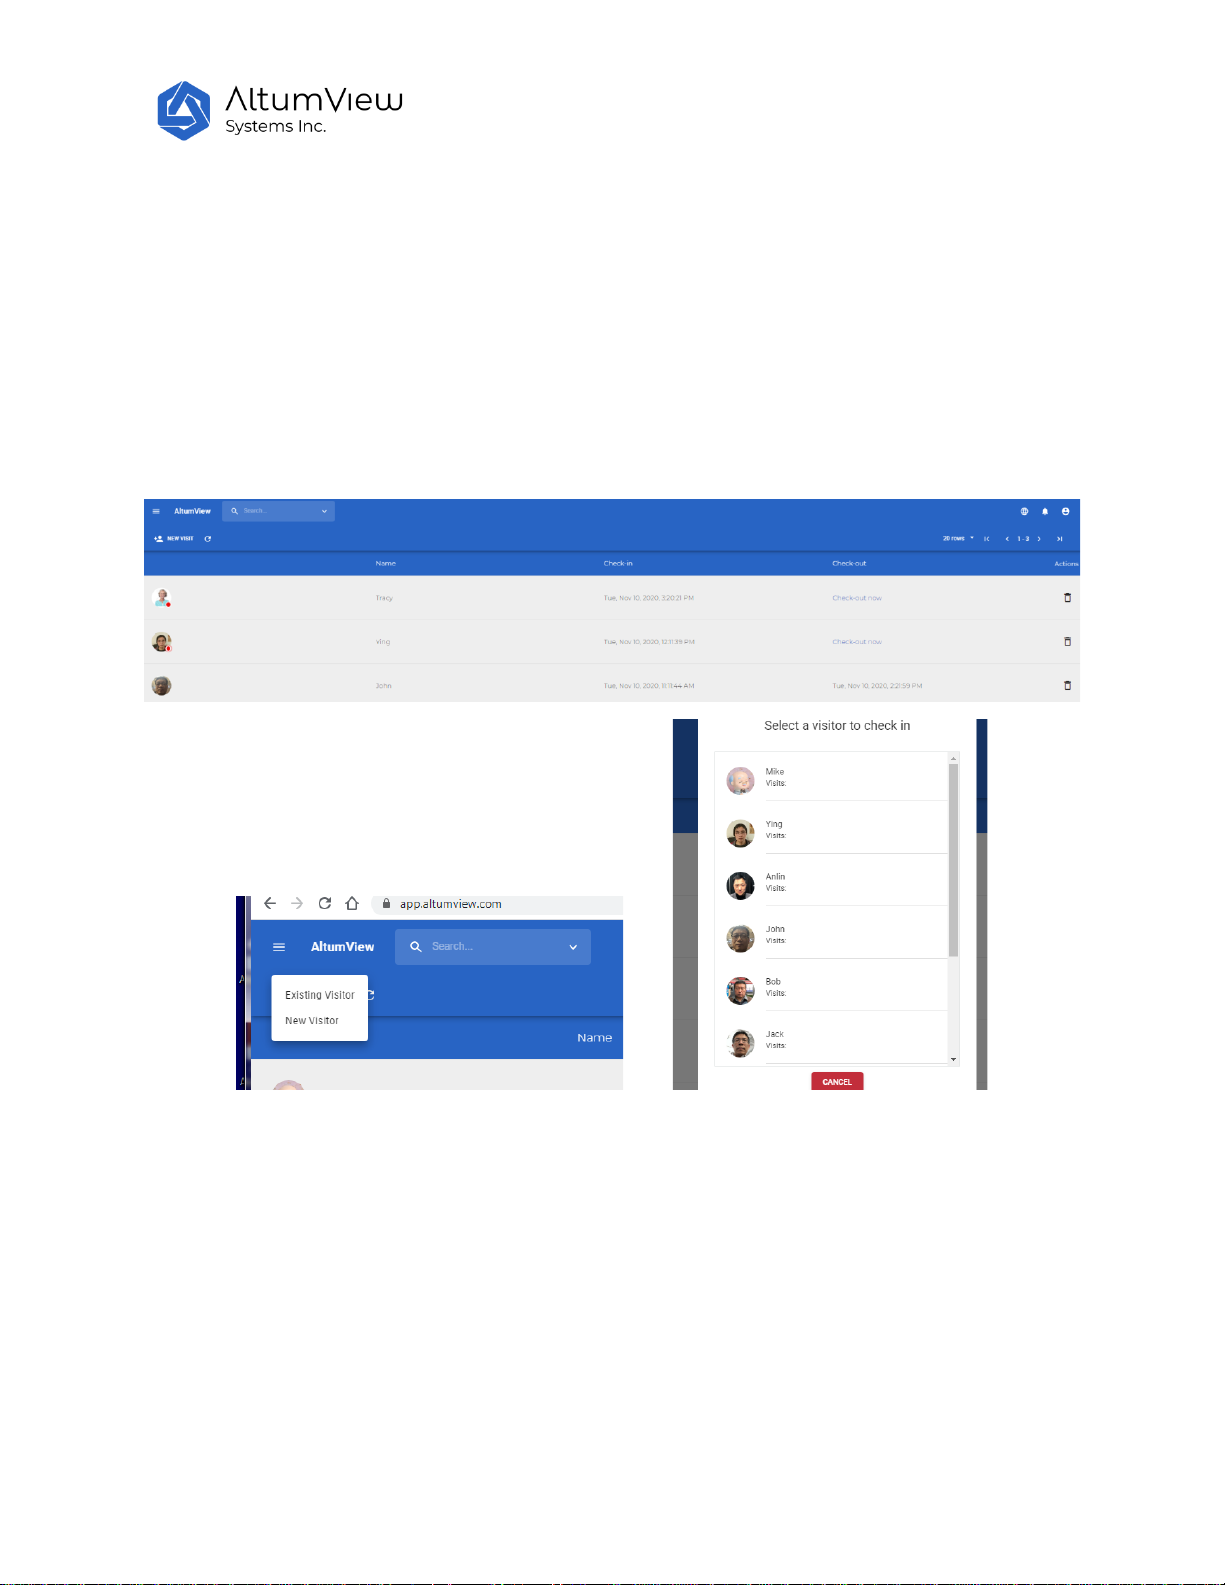
Each entrance/exit record includes a visitor’s name, photo, “Check-in” and “Check-out” time.
An entrance/exit record can be generated by sensors for which entrance/exit are defined via the ROI
page. If the person’s face can be recognized, the check-in and check-out time can be created
automatically by the Cypress sensor. A check-out record can only be created when this person’s status is
check-in.
Users can also manually create check-in and check-out records. To create a check-in record, user can
click on “New Visit” on the top right corner of the page, choose “Existing Visitor” if the person is already
in “People” list, click the person on the “Select a Visitor to Check in” list, a new check-in record is
created. The check-out time can be manually modified by clicking the “Check-out Now”.
If the person is not in the “People” list, click “New Visitor” to create a new person (see chapter 10.1), a
new person and this person’s check-in record are created.
User can also delete a record by clicking the garbage can on the right side of the record.
10.3 Alerts
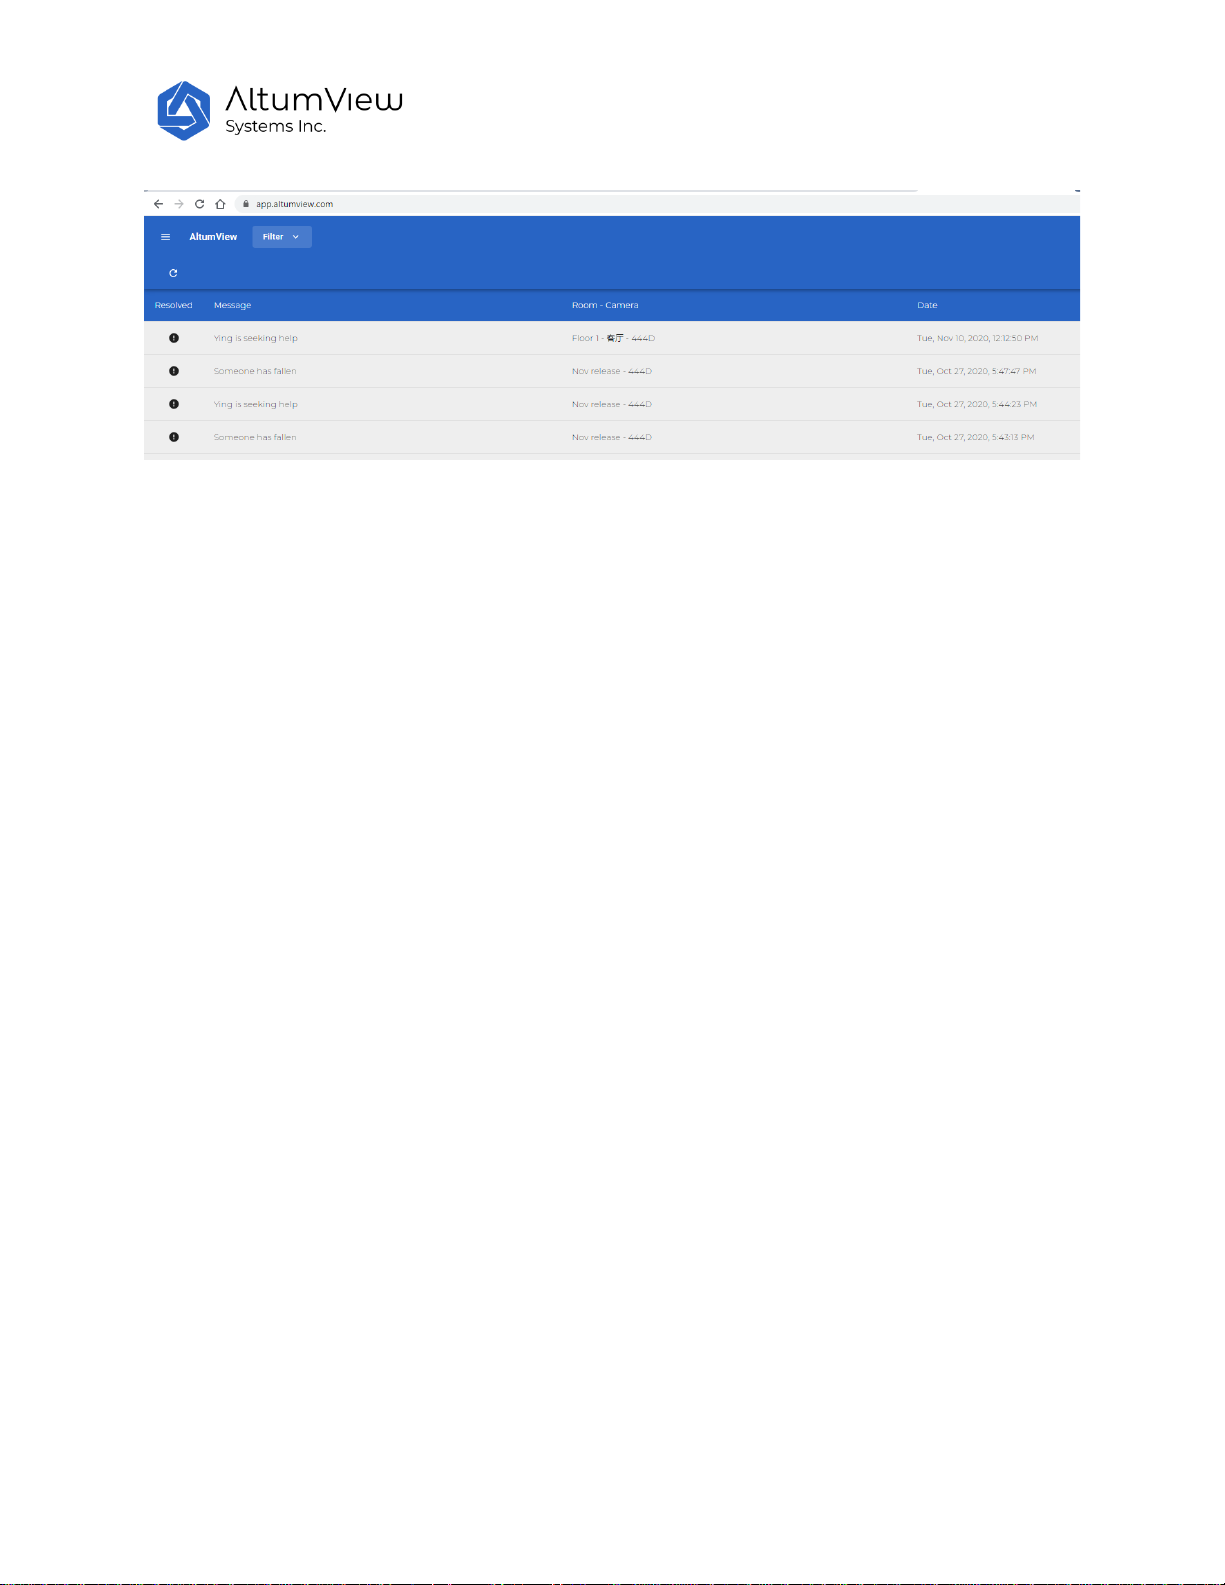
In the menu, click on the “Alert” option, or the bell icon on the top right corner of the web page, all the
alerts in the account will be listed. The alert list is the same as that shown in the Cypress mobile App.
Users can use the “filter” button on the top of the page to filter the alerts.
Page 59
59
 Loading...