

Page 1

52C3KSA -1
52C3KSA -2
IMPORTANT: For your own safety and that of others, please make
certain that everyone who uses the 52C3KSA-1/-2 high pressure
washer reads and understands these instructions thoroughly prior to
operation.
USA
Operator’s manual
1
Page 2

C3KSA-1
C3KSA-2
2
Page 3

IMPORTANT: Read this instruction manual
before you start up your high pressure washer
for the first time.
This machine is a high pressure washer producing a water jet under high pressure which is why
severe injuries can occur if the safety precautions
are not observed.
Therefore a complete understanding of the
contents of this instruction manual is required in
order to prevent injuries to yourself, objects and
persons nearby, and the machine itself.
Contents US
1.0 Survey of models....................................... 4
1.1 Model tag.............................................. 4
1.2 Technical data ...................................... 4
2.0 Instructions for use ................................... 5
Safety precautions and warnings
2.1 Unpacking............................................. 6
2.2 Startup .................................................. 6
2.3 General .................................................6
3.0 Installation.................................................. 8
3.1 Water connection ................................. 8
3.2 Power connection .................................8
3.3 High pressure connection..................... 8
3.4 Venting .................................................9
4.0 Operating instructions ............................ 10
4.1 Connections........................................ 10
1. High pressure hose - machine ....... 10
2. High pressure hose - outlet point ...10
3. Spray handle - accessories ............10
4. Detergents ......................................11
4.2 Starting-up ..........................................12
4.3 Operation - automatic start/stop......... 12
4.4 Spray lance, regulation of pressure
and water volume KSA-1.................... 13
4.5 Spray lance, regulation of pressure
and water volume KSA-2.................... 13
4.6 End of operation ................................. 14
4.7 Operating environment - installation .. 14
5.0 Applications and working methods ...... 15
5.1 Fields of application............................ 15
5.2 Working pressure ...............................15
5.3 Detergents ..........................................15
5.4 Working methods................................16
6.0 Maintenance ............................................. 17
6.1 Oil .......................................................17
6.2 Sludge container.................................17
6.3 Water filter .......................................... 17
6.4 Clearing the high pressure nozzle...... 17
7.0 Troubleshooting and correction............ 18
Designations US
(see illustrations on the front cover)
1. Electric cord
2. Connection of water and water filter
3. Start/stop switch
4. Oil level and filling
5. Pressure gauge
6. Outlet connection
7. Sludge container
8. Waste tray
9. Model tag
10. Water regulation valve
11. Bracket for wall fitting (KSA-1)
12. Vibration damper (KSA-2)
13. Drain plug
The environmental policy of ALTO
ALTO has made it a natural part of the concept
of the company to reduce the impact on our environment as much as possible. This plan is effected
through a constant development in all branches of
the company so that the greatest number of elements in our high pressure washers affects the
environment to a minimum.
This product too is characterized by the attitude
of ALTO towards our environment.
For the production of this high pressure washer
the latest production technique within a cleaner
technology has been applied. The consumption of
unnecessary subsidiary materials has been minimized and during the final test of the product the
test water is recycled.
3
Page 4
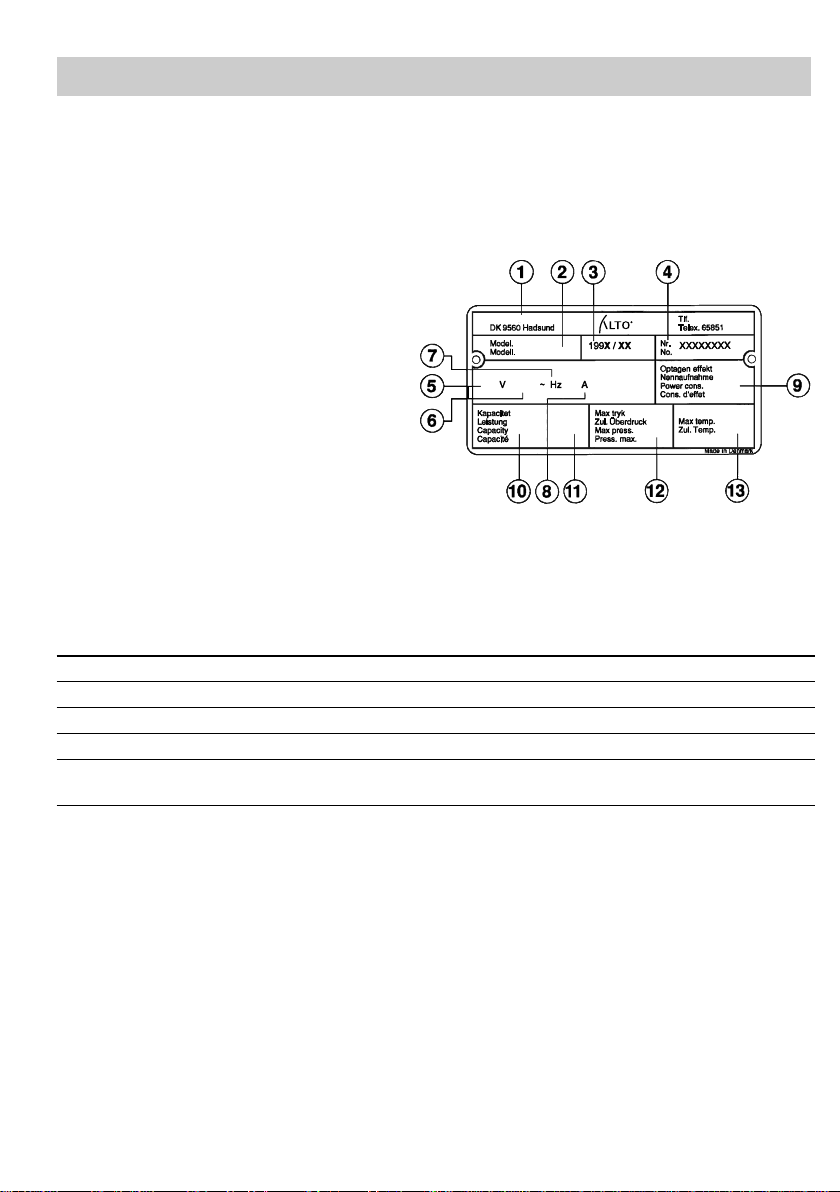
1.0 Survey of models US
1.1 Model tag
This ALTO high pressure washing system has the serial designation C3KSA. The system is available with
one and two pumps respectively. The designation appears from the text on the cabinet, ALTO 52C3KSA2 as an example, and the model tag (pos. 9) on the right side of the machine.
The tag provides the following details:
1. Manufacturer
2. Model designation
3. Production year and week
4. Serial number
5. Rated voltage
ALTO Danmark A/S
6. Electric coupling
7. Frequency
8. Power consumption (Amps)
9. Power absorption
10. Pump pressure
11. Capacity
12. Max. pressure
13. Max. temperature
1.2 Technical data
Model 52C3KSA-1 52C3KSA-2
Pump pressure
Water volume, min/max pressure gpm 5.6/4.8 11.2/9.6 (2-pump)
Water tank, capacity gal 1.5 1.5
Oil capacity qt 1 1
Spray lance:
Nozzle number, high/low pressure 06/30 06/30
1)
psi 2600 2600
2)
72 18 21 00
1)
33 ft. (3/8") high pressure hose and no pipeline.
2)
On C3KSA-2 systems it will be possible to use a COLORED spray lance. See section 4.5.
Sound pressure level LpA measured in accordance with ISO 11202 [DISTANCE 1m] [FULL LOAD]: 82
dB(A).
Data at 44 psi inlet pressure and 54°F inlet water.
We reserve the right to make alterations.
4
Page 5
2.0 Instructions for use Safety precautions and warnings US
Before starting your high pressure washer for the first time, we advise you to read through the following
sections: 2.0 Instructions for use and 3.0 Operating instructions and to follow all instructions to ensure
the protection of user, surroundings and machine.
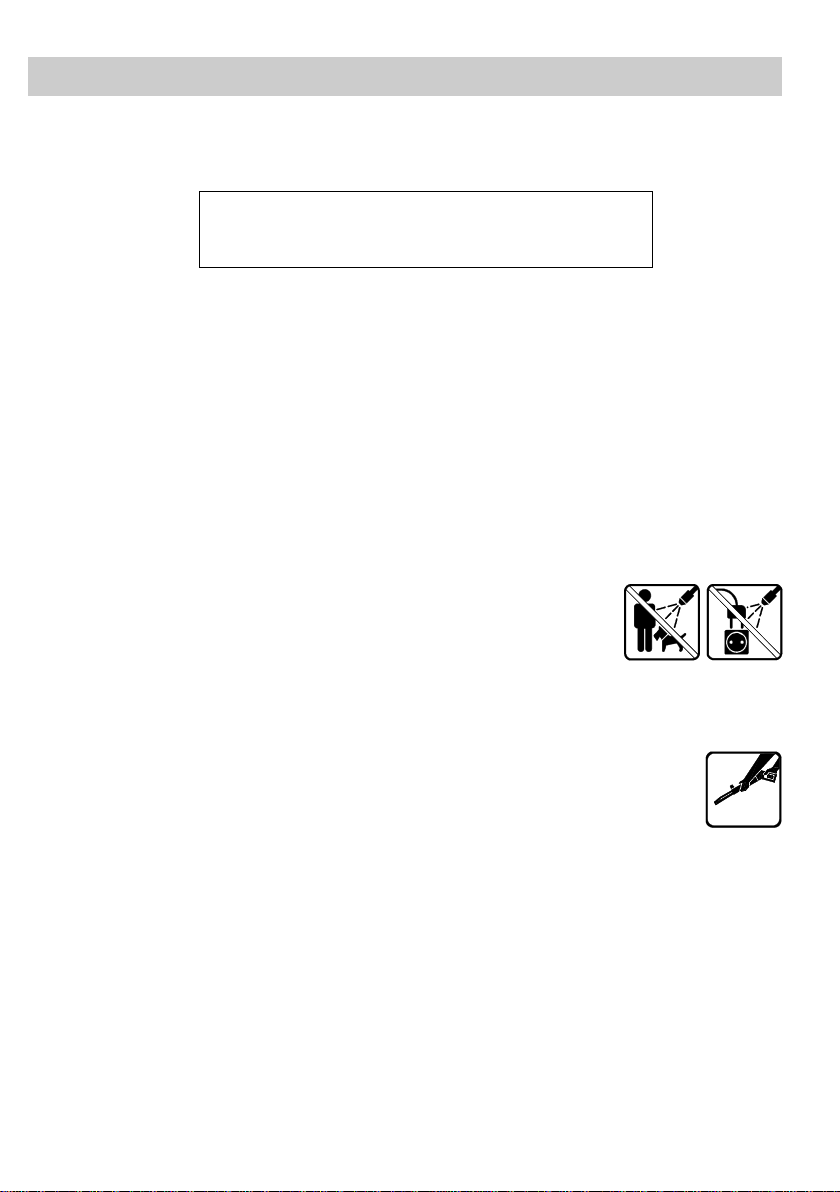
- WARNING -
Risk of Injection or Injury -
Do not Direct Discharge Stream at Persons
The high water pressure from a high pressure washer may cause personal injury or property damage if
the following „IMPORTANT SAFETY INSTRUCTIONS“ are not strictly observed.
IMPORTANT SAFETY INSTRUCTIONS
When using this product, basic precautions should always be followed, including the following:
z Read all of the instructions before using the product.
z To reduce the risk of injury, close supervision is necessary when the pressure washer is used near
children.
z Know how to stop the product. Be thoroughly familiar with all the controls.
z Stay alert - watch what you are doing.
z Do not operate the product when fatigued or under the influence of alcohol or drugs.
z Keep the operating area clear of all persons.
z Do not over-reach or stand on unstable support. Keep good footing and bal-
ance at all times.
z Follow the maintenance instructions specified in the manual.
z WARNING! Never direct the water jet towards people, pets, electric wiring, or
the machine itself.
z WARNING! Never try to clean clothes or footwear on yourself or other persons.
z Wear eye protection during operation.
z Never work barefoot or with sandals.
z WARNING! The operator and anyone in immediate vicinity of the cleaning site should
protect himself from being struck by debris dislodged during cleaning operations.
z Only trained personnel, familiar with this manual should operate the machine.
z The spray handle and lance are affected by thrust during operation - Always hold the spray
lance firmly with both hands.
z When the machine is not in use, the spray handle trigger should be locked.
z Activate the trigger only by hand. Never tie or wedge it open in any other way.
z Avoid damage to the high pressure hose (such as running over it with vehicles, squeezing, pulling,
knots/kinks etc.) and keep it away from oil and sharp or hot objects. Failure to protect the hose may
cause it to burst.
z Never detach the high pressure hose or the water inlet hose while the machine is in operation (risk of
scalding). Disconnect the power and the inlet water connection before detaching the high pressure
hose or the water inlet hose.
z Avoid damage to the power cord (such as running it with vehicles, squeezing, pulling, knots etc.) and
keep them away from sharp or hot objects.
z Never use the machine in an environment where there could be a danger of explosion.
z WARNING! The integrity of high pressure hoses, nozzles and connections are important for safety
when operating the machine. Only use the high pressure hoses, nozzles and connections prescribed
by ALTO.
- WARNING -
5
Page 6

Safety precautions and warnings US
z For safety reasons only use original ALTO accessories and spare parts. Otherwise the machine could
be damaged.
z In freezing conditions, never start the machine until it, and the hoses and accessories have thawed.
z The machine should not be covered during operation.
z The most efficient cleaning is obtained if you adjust the distance to the surface which is to be cleaned.
Thus you will also avoid damaging the surface.
SAVE THESE INSTRUCTIONS
2.1 Unpacking
Once the pressure washer has been taken out of the packaging, check that it is complete and without any
defects; if in doubt, the pressure washer should not be put into use and you should contact the nearest
ALTO service organization.
2.2 Startup
Check the power cord
The insulation of the power cord should be faultless and without any cracks.
Please contact a qualified electrician or the nearest ALTO distributor if it is not so.
Check the voltage
Check that the voltage stated on the model tag corresponds to your receptacle.
Power consumption, fuse/breakers
Check the power consumption stated on the model tag and check for correct fuse/breaker.
If these Instructions aren’t followed, it may be
dangerous to use your pressure washer.
- WARNING -
GROUNDING INSTRUCTIONS
This product must be grounded. If it should malfunction or break down, grounding provides a path of least
resistance for electrical current to reduce the risk of electric shock. This product is equipped with a cord
having an equipment-grounding conductor and a grounding plug. The plug must be plugged into an appropriate outlet that is properly installed and grounded in accordance with all local codes and ordinances.
DANGER - - Improper connection of the equipment-grounding conductor can result in a risk of electrocution. Check with a qualified electrician or service personnel if you are in doubt as to whether the outlet is
properly grounded. Do not modify the plug provided with the product - if it will not fit the outlet, have a
proper outlet installed by a qualified electrician. Do not use any type of adapter with this product.
WARNING - - To reduce the risk of electrocution, keep all connections dry and off the ground. Do not
touch the plug with wet hands.
2.3 General
z DO NOT clean asbestos-bearing surfaces with this machine, unless using special equipment in accor-
dance with appropriate regulations,
z Never touch plug and receptacle with wet hands.
z WARNING! This machine has been constructed for use with “normal” detergents. The use of aggressi-
ve detergents or chemicals may cause operating and safety problems.
6
Page 7

Safety precautions and warnings US
z When using detergents, the instructions should always be strictly observed.
z Always unplug the machine before cleaning or maintenance of the machine.
z Don’t use the machine if the power cord or important parts of the equipment are damaged - i.e.
safety devices, high pressure hoses, spray handles, cabinet.
z If the power cord is damaged, it should be replaced by a ALTO trained service technician or a quali-
fied electrician to avoid a hazardous situation.
z The owner and operator are obliged to observe any working environment or working safety regula-
tions concerning the operation of this high pressure washer.
SAVE THESE INSTRUCTIONS
7
Page 8
3.0 Installation US
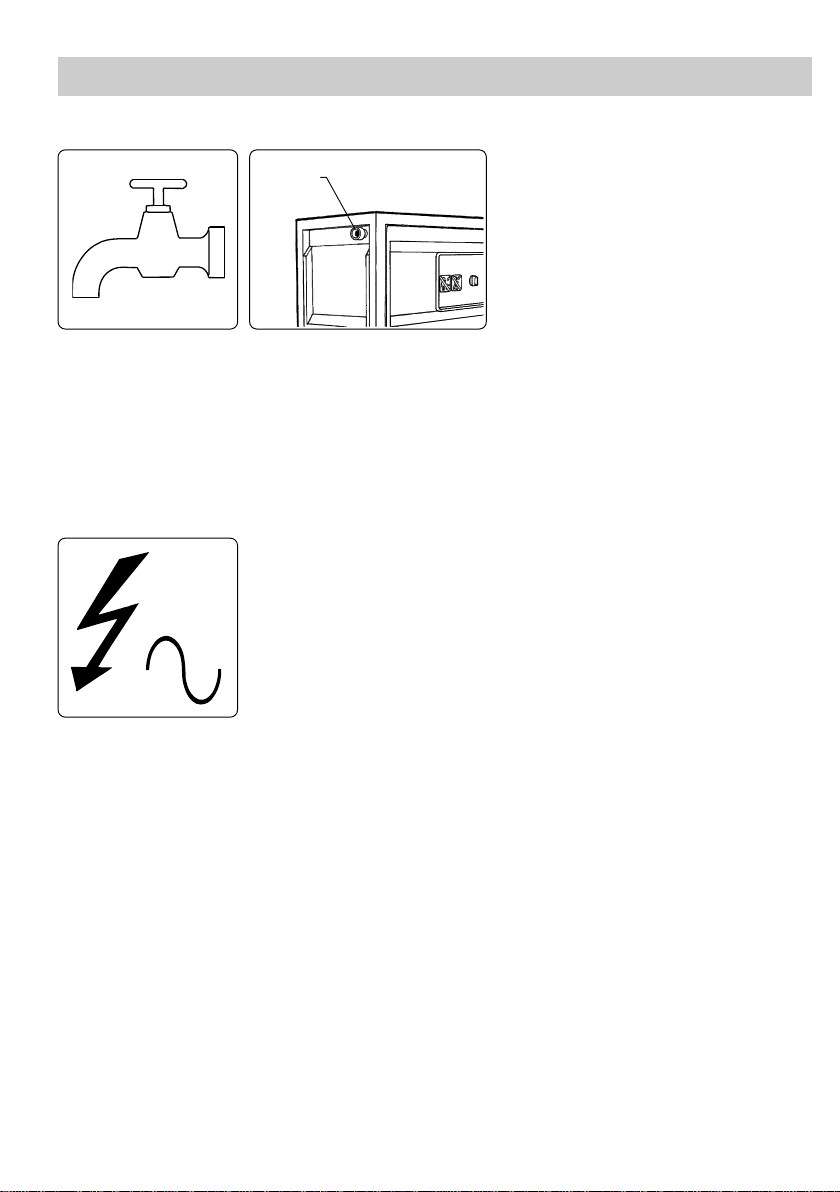
3.1 Water connection
The water connection is made through a flexible hose connected to the quick coupling on the water inlet
(1) of the machine. The connection can be made to a cold or hot water supply.(max. 160°F).
A shut-off cock should be mounted on the water supply near the machine.
The machine features a water tank and no further protection against return water into the supply is required.
If there is a risk of dirt, rust, or other impurities in the inlet water, a sand filter should be mounted before
the internal screen on the machine. (for further connection data see section 1.2 Technical data).
Flexible hose connection
Max. water pressure 218 psi
Max. 160°F
Inlet water shutoff cock required
Clean water inlet screen (1) at monthly
intervals
3.2 Mains power connection
Only connect to an approved receptacle with grounding conductor
Power disconnect switch near the machine
Connect the machine to an approved receptacle near the machine, so that it
will be possible to switch off power.
Check voltage, fuse, and cords according to section 2.1.
Power requirements can be found on the model tag(s) of the system.
KSA-1: The machine is delivered with an electric cord without plug. Any plug should be mounted by a
qualified electrician.
KSA-2: KSA 2 pump systems are intended to be permanently connected to fixed wiring and a separate
disconnect switch is recommended for each pump.
3.3 High pressure connection
IMPORTANT: When connecting to a pipeline always use a flexible hose connection from the outlet of the
machine (pos. 6) - order no. 6300843. Contact your ALTO distributor for further information.
KSA-1
The outlet of the machine can be connected to a pipeline with multiple outlet points, or a standard high
pressure hose can be connected directly to the outlet of the machine.
KSA-2
The system has especially been constructed for connection to a pipeline with multiple outlet points.
It is recommended you allow your ALTO distributor assist with the layout of the pipeline.
8
Page 9

Installation US
3.4 Venting
KSA-1
O
1
Turn to position „Start“
Start
In the case of newly installed systems, or if the pipeline and the pump have been drained in any other
way, the system should be vented by starting the pump and then let the water run freely at each outlet
point of the pipeline in turn.
When connecting the high pressure hose directly to the machine, the system should be vented by starting
the pump and activating the trigger of the spray handle without the spray lance attached.
Let the water run until all air has escaped from the pump (regular water flow).
KSA-2
In the case of newly installed systems, or if the pipeline and the pump have been drained in any other
way, the system should be vented as follows:
Activate spray handle/open outlet point
1+2
1+2
O
1. Start pump no. 1 and let the water run from an outlet point of the pipe-line.
When connecting a high pressure hose directly to the machine, activate
the trigger of the spray handle without the spray lance attached.
1
Let the water run until all air has escaped from the pump (regular water
flow).
2
O
2
2. Stop pump no. 1. Then start pump no. 2 and let the water run from an
outlet point of the pipeline. When connecting a high pressure hose directly
to the machine, activate the trigger of the spray handle without the spray
1
lance attached. Let the water run until all air has escaped from the pump
(regular water flow).
3. Vent the pipeline by starting a pump and letting the water run from each
outlet point (begin with the outlet farthest from the machine) until all air has
escaped from the system.
9
Page 10

4.0 Operating instructions US
4.1 Connections
1. High pressure hose - directly on the machine
The high pressure hose with imprinted max. working pressure and temperature should be attached to the
outlet connection of the machine (1) by the quick coupling (2).
IMPORTANT: Prior to detaching the high pressure hose, the machine should be stopped and the shut-off
cock closed. Then activate the trigger of the spray handle to relieve the high pressure hose of pressure.
Max. length of extension hose: 160 ft.
Only use ALTO high pressure hose
Danger of scalding!
Never dismount high pressure hoses at
water temperatures above 120°F
2. High pressure hose - to outlet point
Max. length of extension hose: 160 ft
In the case of a pipeline with fixed outlet points, a high pressure hose with imprinted working pressure and
temperature should be attached to the nipple of the high pressure cock (1) by the quick coupling (2). After
attachment, turn the handle of the high pressure cock (3) to open position.
IMPORTANT: Prior to detaching the high pressure hose, or when changing to another outlet point, the
high pressure cock should be fully closed. Then, activate the trigger of the spray handle to relieve the high
pressure hose of pressure.
Only use ALTO high pressure hose
Danger of scalding!
Never detach high pressure hoses at water
temperatures above 120°F
3. Spray handle - accessories
Clean nipple of any impurities before attaching the spray lance.
Pull and hold the blue quick coupling release (1) forward.
Insert the nipple of the spray lance (2) in the quick coupling and allow the release to return to the engaged
position.
„Tug“ the spray lance or accessory lance forward to ensure secure attachment, before starting the machine. Max. thrust of spray handle and lance - see section 1.2 Technical data.
10
Page 11

Operating instructions US
4. Detergents
If you want to apply detergents or disinfectants these can be metered through an accessory injector.
Below you will find various types of outlet points with injectors.
Outlet point with detachable injector
To be attached to the quick coupling of the high pressure cock.
To be used for dosing of low-foaming detergents or disinfectants.
Metering range 1-8%.
Outlet point with detachable foam injector
To be attached to the quick coupling of the high pressure cock.
To be used in conjunction with foam lance for application of high-foaming
detergents or disinfectants.
Metering range 1-5%.
Cleaning cart with foam injector and reel
To be attached to the quick coupling of the high pressure cock.
To be used in the same way as „Outlet point with detachable foam injector“.
Makes it possible to carry 4 spray lances, 2-6 gallon containers and 66 ft. of
high pressure hose.
Outlet point with built-in injector and
regulation of water volume (only KSA-2)
Fixed to the pipeline.
Allows the operator to regulate the discharge water volume from 2.4 gpm to
full volume, with or without the metering of detergents or disinfectants.
Metering range 1-12%.
11
Page 12

Operating instructions US
4.2 Starting
Check that the oil level in the oil reservoir(s) (2) is between the MIN. and MAX. markings. The inlet water
shut-off cock should be open.
NOTE: The system automatically stops after approx. 4 seconds if there is no water consumption. In the
event of a power failure or activation of the thermal switch (with subsequent cooling) the system can be
restarted from pos. 0.
C3KSA-1
O
1
Start
KSA-1: Turn the red start/stop knob (1) to position „Start“ (it’s spring-loaded and when released, it will
return to
position 1 = operation). Watch the pressure gauge (3) to see that pressure is being built up in the system
when activating the trigger of the spray handle, on which a spray lance set for high pressure is attached. If
pressure does not build, vent the machine as described in section 3.4 Venting.
C3KSA-2
O
1+2
KSA-2: Turn the red start/stop knob (1) to position 1, 2 or 1+2.
Ensure that pressure is building in the system by watching the pressure gauge (3). If pressure is not being
built, vent the machine as described in section 3.4 Venting.
1
2
Check oil level
Turn to „Start“ position
Check oil level
Turn to:
Position 1 = Pump no. 1 in operation
Position 2 = Pump no. 2 in operation
Position 1+2 = Pumps no. 1 & 2 in
operation
4.3 Operation - automatic start/stop
Always hold the spray lance with both
hands!
Always lock the trigger when the machine
Once started, the system will automatically re-start when the spray handle trigger (1) is activated. When
the trigger is released, the system automatically stops after approx. 4 seconds.
When the machine is not in use, the trigger should be locked by turning the safety knob (2) into position 0.
12
is not in operation.
Page 13

Operating instructions US
4.4 Double spray lance, regulation of pressure and water volume - KSA-1
Turn spray lance pressure reducing valve
(1):
Clockwise (B): high pressure
The spray lance employs a high pressure nozzle and a low pressure nozzle.
On KSA-1 pump systems the water volume is adjusted on the water regulation valve of the pump (2).
Counter clockwise (A): low pressure/
detergent application
High pressure mode
The max. working pressure of the machine is reached when the pressure reducing valve (1) is completely
closed (B), and the water regulation valve (2) is fully counter-clockwise. In this position only the high pressure nozzle is used - high pressure mode. The water volume is infinitely variable (2) between min. and
max. output. Reduced water volume = reduced pressure. With the trigger released, turn the water regulation valve (2) to adjust volume and pressure (clockwise = Lower volume and pressure). Minimum volume
results in a working pressure of 580 psi through the high pressure nozzle (only), and a water volume of
approx. 2.4 gpm. If you want more water volume, the valve (2) should be turned counter-clockwise until
the desired result is achieved. 1 turn provides change of approx. 725 psi.
Low pressure mode
When the reducing valve (1) is completely opened (A), the pressure will be fully reduced. The nozzle
pressure will be approx. 60 psi. In this position both spray nozzles are used - low pressure mode / possibility of dosing detergents.
4.5 Double spray lance, regulation of pressure - KSA-2
The spray lance features a high pressure nozzle and a low pressure nozzle. When the pressure reducing
valve (1) is completely closed (B) only the high pressure nozzle is used - high pressure mode. When the
reducing valve is open, (A) both nozzles are used - low pressure mode/applying detergents. The pressure
may be regulated between these positions.
MULTIPRESSURE
P PSI Q GPM CN
390 3.7 White 1
390 7.7 Black 2
720 3.7 Brown 1
770 7.3 Green 2
1160 3.7 Blue 1
1160 5.9 Red 2
1550 3.7 Orange 1
1550 5.7 Yellow 2
2200 3.7 Steel 1
Turn pressure reducing valve:
Clockwise (B): high pressure
Counter clockwise (A): low pressure/
addition of detergents
Regulation of pressure/water volume
When using special COLORED spray lances, the pressure and the water volume may be chosen for the
individual cleaning task. The table shows the pressure (P) of the nine different nozzles, the water volume
(Q), the color code (C) and the number of pumps (N) required to support operation of the individual lances. Contact your ALTO distributor for further information.
13
Page 14

4.6 End of operation
O
Start
1
KSA-1
O
Operating instructions US
Turn to position 0
Never detach the high pressue hose while
the machine is in operation = Position 1, 2
or 1+2.
Danger of scalding!
Never detach high pressure hoses at a
water temperature above 120°F
KSA-2
1+2
1
2
To stop the machine turn the red start/stop knob (1) to position 0.
Close the shut-off cock of the water inlet (pos. 2) and activate spray lance or high pressure cock to relieve
the pipeline / high pressure hose of pressure.
4.7 Operating environment - installation
0D[ ›)
0D[ LQ
0LQ
LQ
0LQ ›)
The system should be installed in a frost-free room. Pipelines and outlet points should also be protected.
It should be possible to drain outdoor outlet points if they are exposed to frost. Min. room temp. = 36°F.
Max. room temp. = 104°F.
IMPORTANT: Hoses, spray handle, lances and other accessories should always be thawed prior to use.
0LQ LQ
0D[
0LQ
›)
›)
14
Page 15

5.0 Applications and working methods US
5.1 Fields of application
The most important fields of application for this product are:
Agriculture Cleaning machinery, agricultural implements, stalls, equipment, and buildings
Transport Cleaning trucks, buses, cars etc.
Building and construction Cleaning vehicles, equipment, buildings etc.
Light industries Degreasing and cleaning of machines, production parts, and vehicles.
Service Cleaning vehicles, cleaning of walkways, patios, etc.
5.2 Working pressure
The high pressure system may be used with high or low pressure at your own option.
Low pressure Used for application of detergents and for rinsing.
High pressure Is used for cleaning/agitation.
Intermediate pressure As an example it may be used for the cleaning of surfaces, which will not
5.3 Detergents
As standard, the system is delivered without a detergent injector.
If you want to use detergents or disinfectants these should be added through an external injector (see
section 4.1.4).
The most efficient cleaning is reached with detergents in conjunction with the high pressure cleaning. For
that purpose ALTO can offer you a series of products specially developed for high pressure cleaning,
among other fields within
tolerate full pressure, i.e. soft surfaces.
Cleaning of vehicles, machines, stalls etc.
Degreasing Descaling
The products are water-based, and comply with the present requirements for easy biodegradability.
Contact your ALTO distributor for suggestions as to which product(s) will best meet your needs.
The method of application and the metering of the individual products can be found on product labels or
the data sheet.
Low-foaming detergents are applied through an injector and under low pressure. Switching to agitation
under high pressure is performed by turning the regulating knob on the double spray lance, or by attaching a high pressure spray lance if you are working with Foam application equipment.
For foam cleaning you will have to use a special foam lance and injector. Insert the injector pickup hose
into the foam detergent. Attach the foam lance to the spray handle and you are ready for foam application. After the foam application, open the by-pass valve ovnthe foam injector and replace the foam lance
with a spray lance.
15
Page 16

Applications and working methods US
General rules for addition of detergents
ALTO cleaning equipment can be used for all detergents and disinfectants, which are suitable for high
pressure cleaning according to the supplier. (The pH-value should be between 4 and 14). Acid and lye
should not be applied in a concentrated form.
Carefully observe the instructions and guidance of the supplier, as well as the rules concerning safety
clothing and drainage facilities.
Detergents, which are not specifically prescribed for use with high pressure cleaning equipment should
only be used if you are safe for the machine and the environment. Contact your ALTO distributor for
assistance if in doubt.
The use of ALTO detergents ensures that machines, accessories and detergents match, which will result
in the optimal solution of a cleaning task.
ALTO can offer you a wide range of efficient agents for cleaning. The products are formulated of substances which combine efficiency and environmental considerations at one and the same time.
5.4 Working methods
Your high pressure washer has been developed for cleaning according to the so-called »2-step method«.
However, your high pressure washer must be equipped with an external detergent injector (see accessories catalogue).
STEP 1 Application of detergent
STEP 2 High pressure cleaning/agitation
In practice the working process is determined by the actual task, but as a starting point, the following
method can be described for a job:
1. Apply detergent under low pressure to prevent aerosol and waste. (See Tip no.1, below) The concentration is chosen according to the job and the metering is done by the injector setting.
2. Allow contact time. Let the detergent act on the dirt/surface for a short time prior to pressure cleaning usually a few minutes. DON’T let the detergent dry on the surface.
3. High pressure cleaning. Agitate all surfaces under high pressure.
4. Rinse afterwards, if necessary, to make sure that residual impurities and chemical are removed from
the surface.
Optimum cleaning results will be achieved by following these 3 „Tips“:
Tip no. 1
When using a detergent, always apply it on a dry surface if possible. (If the surface is rinsed with water at
first, it may be difficult for it to absorb the detergent, and the result is a reduced effect of the detergent).
Tip no. 2
When applying a detergent on large vertical surfaces (i.e. the sides of a truck) apply from the bottom-up.
This will help prevent the detergent from running off the surface through grooves and dark streaks appearing on the surface while cleaning.
Tip no. 3
While high pressure cleaning, work so that the high pressure water does not run over dirty surfaces which
have not yet been cleaned. This will aid the detergent eventually applied on that surface.
16
Page 17

6.0 Maintenance US
A minimum of maintenance ensures prolonged and problem-free operation. It’s a good idea to make a
habit of the following:
Prior to attaching the water hose and the high pressure hose, the quick couplings should be rinsed to
remove dirt.
Prior to attaching the spray lance or other accessories to the spray handle, the machine should be
started and the quick coupling rinsed before insertion into the spray handle.
The machine should be mounted in a frost-free room. If the machine freezes, it must not be started
until it is thoroughly thawed, along with hoses and accessories.
NEVER START A FROZEN MACHINE.
6.1 Oil
The oil should be changed after each 1000 hours’ use.
Remove the cover of the oil reservoir (Pos. 4). Unscrew the drain plug (Pos. 13). Drain the oil and clean
the drain plug of impurities. Reinstall the plug and refill the pump with fresh oil through the oil reservoir.
Holds approx. 1 qt.
From ALTO the pump is filled with zincless hydraulic oil - ALTO Pump Oil 100. When refilling and changing the oil this or an oil with the following specifications should be used:
ISO no. 100
Viscosity index (VI) min. 130
Pour point below -30°C
6.2 Sludge container / waste tray
As for KSA-1 the used oil is caught in a sludge container (pos. 7), and as for KSA-2 it is caught in a waste
tray (pos. 8). The container/tray should be emptied before it is full; this oil must not be reused in the
pump.
PROTECT THE ENVIRONMENT
Waste oil and oil sludge must be removed and properly disposed of.
6.3 Inlet water screen
To prevent contaminants from entering the high pressure pump, a screen is fitted at the water inlet. Dependent on the purity of the water this screen will have to be cleaned at regular intervals.
The screen can be removed by first removing the inlet quick coupling (Pos. 2).
6.4 Clearing of high pressure nozzle
A clogged nozzle causes excessive pump pressure, and clearing is immediately required.
1. Stop the machine and detach the spray lance.
2. Clear the nozzle (a straightened paper clip will work).
IMPORTANT: ONLY clear the nozzle when the spray lance is detached
3. Flush the spray lance backwards with water.
4. If the pressure is still too high, repeat items 1-3.
17
Page 18

7.0 Troubleshooting and correction US
You have chosen the best quality and therefore deserve the best service. To avoid unnecessary disappointments, you should check the following before contacting the nearest ALTO service organisation:
Fault Cause Correction
Machine will not start A fuse has blown Change the fuse
Machine stops shortly Wrong supply voltage Check that the supply voltage corresponds
after the start to the specifications on the model tag
Fuses blow Supply is inadequate Correct the installation so it corresponds to
Working pressure KSA-1 Nozzle partly clogged Clear nozzle (see section 6.4)
too high
Power/plug not connected Connect power/plug
Thermal switch in motor Let the motor cool. Start the machine and
activated check that the working pressure is
not too high and that the mains voltage
corresponds to the specifications.
KSA-2 Thermal switch in water tank Let the water cool and check that the inlet
water temp does not exceed 160°F.
(see section 1.1).
Air in the system Vent the system (see section 3.4).
for the ampere the ampere consumption of the machine
consumption of the machine at a minimum. Change fuse.
Working pressure too low High pressure cock by outlet Close all high pressure cocks not in use.
Pressure fluctuating High pressure hoses too Detach high pressure extension hoses and
No working pressure Nozzle clogged Clear the nozzle (see sec. 6.4)
Water volume too KSA-1 Water regulation valve not Open water regulation valve completely.
low set properly Turn completely open in the direction of the
Should other malfunctions occur than those mentioned above, please contact your authorized ALTO
servicing distributor.
Customer services (US only): ALTO U.S. Inc. Phone: 877-322-2586 (Tech Support)
18
point not completely closed
KSA-1 Water regulation valve not Completely open the water regulation valve.
set at max pressure Turn in the direction of the indicator.
KSA-2 Wrong MULTIPRESSURE Check whether the total water volume of the
spray lance spray lances in use exceeds the capacity of
the system. If necessary, change to other
spray lances.
long (machine vibrates) retry. Extension hose
max. 160 ft. Avoid long extension hoses
with many couplings.
Air in the system Vent the system (see section 3.4)
Water inlet screen clogged Clean the screen (see section 6.3)
No inlet water Check that the shut-off cock of the water
supply is open. Check that the water supply
is adequate (see section 1.2).
High pressure cock of Close all high pressure cocks not in use.
outlet point is open
indicator.
KSA-2 Nozzle partly blocked Clear the nozzle (see section 6.4).
1500 N. Belcher Rd
Clearwater, FL 33765
Page 19

192223
Page 20

Page 21

Page 22

Page 23

Page 24

630 79 67 (00.10)
Printed in Denmark
24
Copyright © 2000-2001 ALTO Danmark A/S
ALTO Danmark A/S
Industrikvarteret
DK-9560 Hadsund
Tel.: +45 7218 2100
www.alto-online.com
 Loading...