

Page 1

AMERICAN-LINCOLN
TECHNOLOGY
772
Operator's
Alto
Manual
American-Lincoln
Beginning with
Serial No. 102569
READ THIS BOOK!
This book has important information for the use and safe operation of this machine. Failure
to read this book prior to operating or attempting any service or maintenance procedure to
your machine could result in injury to you or to other personnel; damage to the machine or to
other property could occur as well. you must have training in the operation of this machine
before using it. If you or your operator (s) cannot read English, have this manual explained
fully before attempting to operate this machine.
Si Ud. o sis operadores no pueden leer el Inglés, se hagen explicar este manual
completamente antes de tratar el manejo o servicio de esta máquina.
772
Scrubmobile
ISO 9001
U
®
L
#
FILE A2287
All directions given in this book are as seen from the operator's position at the rear of the machine.
For new books, write to: Alto U.S., Inc., 1100 Haskins Road, Bowling Green, Ohio 43402
Part No. 2-86-00173 1994 American-Lincoln Technology®
931030
Printed in the USA
Page 2

TABLE OF CONTENTS
MACHINE SPECIFICATIONS ........................................................................................................................... 1-5
MODEL H772 DIMENSIONS ............................................................................................................................. 1-10
SAFETY PRECAUTIONS .................................................................................................................................. 1-11
SAFETY DECALS ............................................................................................................................................. 1-12
MACHINE PREPARATION................................................................................................................................ 1-14
MACHINE SYSTEMS & CONTROLS ............................................................................................................... 1-15
FORD 3930 TRACTOR POWER UNIT..................................................................................................... 1-15
BRAKE CONTROLS ................................................................................................................................. 1-16
BRAKE PEDAL LOCK .............................................................................................................................. 1-16
PARKING BRAKE ..................................................................................................................................... 1-16
FOOT THROTTLE .................................................................................................................................... 1-16
DIFFERENTIAL LOCK .............................................................................................................................. 1-16
INDEPENDENT PTO CONTROL LEVER ................................................................................................. 1-16
8X2 TRANSMISSION GEARSHIFT LEVERS ........................................................................................... 1-17
CLUTCH.................................................................................................................................................... 1-17
BRUSH DRIVE AND CONTROL HYDRAULICS ....................................................................................... 1-17
SOLUTION TANKS ................................................................................................................................... 1-18
RECOVERY TANKS ................................................................................................................................. 1-18
VACUUM TURBINE .................................................................................................................................. 1-18
SOLUTION METERING SYSTEM ............................................................................................................ 1-18
SPLASH CONTROL SYSTEM .................................................................................................................. 1-18
SQUEEGEE CONTROL............................................................................................................................ 1-18
BRUSH DRIVE CONTROL ....................................................................................................................... 1-18
BRUSH DRIVE LOCK-UP......................................................................................................................... 1-18
RECOVERY SOLUTION LEVEL WARNING ............................................................................................ 1-18
TRACTOR CONTROLS AND INSTRUMENTS ................................................................................................. 1-19
LIGHT SWITCH ........................................................................................................................................ 1-19
KEY STARTER SWITCH .......................................................................................................................... 1-19
DIESEL ENGINE STOP CONTROL .......................................................................................................... 1-19
HAND THROTTLE .................................................................................................................................... 1-19
FUEL GAUGE ........................................................................................................................................... 1-19
TEMPERATURE GAUGE ......................................................................................................................... 1-19
WARNING LIGHTS................................................................................................................................... 1-19
HOUR METER .......................................................................................................................................... 1-19
TACHOMETER ......................................................................................................................................... 1-19
HORN BUTTON ........................................................................................................................................ 1-19
CAMEL RECYCLING SYSTEM CONTROL PANEL ......................................................................................... 1-20
CAMEL RECYCLING SYSTEM ON/OFF SWITCH .................................................................................. 1-20
SOLUTION HIGH WARNING LIGHT ........................................................................................................ 1-20
DETERGENT LOW WARNING LIGHT ..................................................................................................... 1-20
DETERGENT FLOW KNOB ..................................................................................................................... 1-20
THE SCRUBBING SYSTEM ............................................................................................................................ 1-21
THE BASIC SCRUBBING SYSTEM COMPONENTS .............................................................................. 1-21
THE STANDARD SCRUBBING SYSTEM - HOW IT WORKS ................................................................. 1-22
THE CAMEL SCRUBBING SYSTEM - HOW IT WORKS ......................................................................... 1-23
OPERATING INSTRUCTIONS .......................................................................................................................... 1-24
PRE-START CHECK-LIST ........................................................................................................................ 1-24
STARTING PROCEDURE-GASOLINE & LP ENGINES ......................................................................... 1-24
WARM WEATHER STARTING ................................................................................................................. 1-24
COLD WEATHER STARTING ................................................................................................................ 1-24
STARTING PROCEDURE-DIESEL ENGINES ......................................................................................... 1-25
WARM WEATHER STARTING ................................................................................................................. 1-25
COLD WEATHER STARTING ................................................................................................................ 1-25
COLD WEATHER STARTING AIDS ......................................................................................................... 1-25
THERMOSTAT .......................................................................................................................................... 1-25
COOLANT IMMERSION HEATER ............................................................................................................ 1-26
STARTING THE TRACTOR WITH JUMPER CABLES............................................................................. 1-25
STOPPING THE ENGINE ......................................................................................................................... 1-26
GASOLINE / LP ENGINES ....................................................................................................................... 1-26
DIESEL ENGINES .................................................................................................................................... 1-26
TO OPERATE THE TRANSMISSION ....................................................................................................... 1-27
TO DRIVE THE MACHINE........................................................................................................................ 1-27
TO OPERATE THE SCRUBBING EQUIPMENT....................................................................................... 1-27
American-Lincoln Technology 1-2
772 Operator’s Manual
Page 3

TABLE OF CONTENTS
TO OPERATE WHILE DOUBLE SCRUBBING ........................................................................................ 1-28
TO END THE SCRUBBING OPERATION ................................................................................................ 1-28
TO STOP THE ENGINE............................................................................................................................ 1-28
POST OPERATION INSTRUCTIONS - ENGINE STOPPED.................................................................... 1-29
TO CLEAN THE SOLUTION TANKS ...................................................................................................... 1-29
TO CLEAN THE RECOVERY TANK......................................................................................................... 1-29
TO OPERATE THE VACUUM WAND ...................................................................................................... 1-29
PUSHING OR TOWING ......................................................................................................................... 1-30
OPERATION ON GRADES ....................................................................................................................... 1-30
SERVICE INSTRUCTIONS ............................................................................................................................... 1-31
SERVICE CHART ..................................................................................................................................... 1-31
HELPFUL HINTS FOR CLEANING OPERATION .................................................................................... 1-33
BRUSH LOAD AND WEAR ...................................................................................................................... 1-34
SQUEEGEE TOOL FLOOR HEIGHT ADJUSTMENT ............................................................................... 1-34
SQUEEGEE TOOL LEVEL ADJUSTMENT .............................................................................................. 1-35
AUTOMATIC SQUEEGEE LIFT ADJUSTMENT ....................................................................................... 1-35
SQUEEGEE LIFT HEIGHT ADJUSTMENT .............................................................................................. 1-36
TURBINE BELT ADJUSTMENT ................................................................................................................ 1-36
SPLASH SKIRT ADJUSTMENT ................................................................................................................ 1-37
SERVICING THE RECOVERY TANK ....................................................................................................... 1-37
SERVICING THE SOLUTION TANK ........................................................................................................ 1-38
VACUUM RELIEF VALVE ......................................................................................................................... 1-38
CHECKING THE ENGINE OIL LEVEL ..................................................................................................... 1-39
CHANGING THE ENGINE OIL & FILTER ................................................................................................. 1-39
CHECKING THE ENGINE COOLING SYSTEM ....................................................................................... 1-40
CHECKING THE FUEL FILTER / SEDIMENT .......................................................................................... 1-40
SEPARATOR............................................................................................................................................. 1-40
SEDIMENT SEPARATOR ......................................................................................................................... 1-40
BLEEDING THE DIESEL FUEL SYSTEM ................................................................................................ 1-41
AIR CLEANER .......................................................................................................................................... 1-42
TRANSMISSION ....................................................................................................................................... 1-43
POWER STEERING HYDRAULICS ......................................................................................................... 1-44
HYDRAULIC LIFT SYSTEM (REAR AXLE) .............................................................................................. 1-45
HYDRAULIC OIL FILTER .......................................................................................................................... 1-45
LUBRICATION FITTINGS ......................................................................................................................... 1-45
ENGINE COOLING SYSTEM ................................................................................................................... 1-46
FAN BELT ADJUSTMENT ........................................................................................................................ 1-47
ALTERNATOR........................................................................................................................................... 1-47
REGULATOR (VOLTAGE) ........................................................................................................................ 1-47
BATTERY .................................................................................................................................................. 1-48
TIRES ..................................................................................................................................................... 1-48
FUEL INJECTION PUMP .......................................................................................................................... 1-48
BRAKE ADJUSTMENT ............................................................................................................................. 1-49
CLUTCH PEDAL ADJUSTMENT .............................................................................................................. 1-49
SPARK PLUGS ......................................................................................................................................... 1-50
DISTRIBUTOR POINTS............................................................................................................................ 1-50
VALVE CLEARANCES ............................................................................................................................. 1-50
FUEL INJECTORS .................................................................................................................................... 1-50
ENGINE SPEED ADJUSTMENT .............................................................................................................. 1-50
FRONT WHEEL BEARINGS .................................................................................................................... 1-50
STANDARD HARDWARE TORQUE VALUES ............................................................................................... 1-51
HYDRAULIC FITTING TORQUE CHART ....................................................................................................... 1-52
DECIMAL METRIC CONVERSION CHART ..................................................................................................... 1-53
TROUBLESHOOTING GUIDE - SCRUBBER SYSTEMS ............................................................................... 1-54
TROUBLESHOOTING GUIDE - HYDRAULIC SYSTEM ................................................................................. 1-55
TROUBLESHOOTING GUIDE - POWER STEERING SYSTEM ..................................................................... 1-56
TROUBLESHOOTING GUIDE - GASOLINE/DIESEL ENGINE SYSTEMS .................................................. 1-57
TROUBLESHOOTING GUIDE - LP ENGINES ............................................................................................... 1-58
TROUBLESHOOTING GUIDE - GENERAL ENGINE SYSTEM ...................................................................... 1-60
TROUBLESHOOTING GUIDE - CAMEL RECYCLING PUMP ........................................................................ 1-62
TROUBLESHOOTING GUIDE - CAMEL DETERGENT PUMP ........................................................................ 1-63
ELECTRICAL SCHEMATIC DIAGRAM .......................................................................................................... 1-64
ELECTRICAL CONNECTION DIAGRAM ......................................................................................................... 1-65
1-3 American-Lincoln Technology
772 Operator’s Manual
Page 4

TABLE OF CONTENTS
HYDRAULIC SCHEMATIC DIAGRAM - STANDARD MACHINE ..................................................................... 1-66
HYDRAULIC SCHEMATIC DIAGRAM -CAMEL MACHINE ............................................................................ 1-67
HARDWARE ABBREVIATIONS ........................................................................................................................ 1-68
ORDERING PARTS ........................................................................................................................................... 1-69
TABLE OF CONTENTS – CHAPTER 2 ............................................................................................................ 2-1
FRAME, BRACKETS & BUMPER ............................................................................................................ 2-2
BRUSH DRIVE ......................................................................................................................................... 2-4
BRUSH LIFT & SOLUTION CONTROL .................................................................................................... 2-6
TURBINE .................................................................................................................................................. 2-8
SQUEEGEE LIFT ...................................................................................................................................... 2-10
SQUEEGEE TOOL ................................................................................................................................... 2-12
SOLUTION TANK ..................................................................................................................................... 2-14
CAMEL SOLUTION TANK COMPONENTS ........................................................................................... 2-16
RECOVERY TANK.................................................................................................................................... 2-18
CAMEL RECOVERY TANK .................................................................................................................... 2-20
LIQUID PROPANE .................................................................................................................................... 2-22
EXHAUST SYSTEM .................................................................................................................................. 2-24
CAMEL RECYCLING SYSTEM ................................................................................................................ 2-26
HYDRAULICS (SCRUBBING SYSTEM) .................................................................................................. 2-28
CAMEL HYDRAULICS (SCRUBBING SYSTEM) ................................................................................... 2-30
ELECTRICAL ASSEMBLY ...................................................................................................................... 2-32
DECALS .................................................................................................................................................... 2-34
TABLE OF CONTENTS – CHAPTER 3 ............................................................................................................ 3-1
BRUSH OPTIONS .................................................................................................................................... 3-2
FOAM FILLED TIRES ............................................................................................................................... 3-3
FRONT BUMPER ..................................................................................................................................... 3-4
OVERHEAD GUARD ................................................................................................................................ 3-5
TURN SIGNAL OPTION ........................................................................................................................... 3-6
WARNING LIGHT OPTION ...................................................................................................................... 3-7
BRAKE LIGHT OPTION ............................................................................................................................ 3-8
CATALYTIC MUFFLER OPTION FOR GAS AND LP .............................................................................. 3-10
TRANSMISSION LOCK OUT ................................................................................................................... 3-11
VACUUM WAND ...................................................................................................................................... 3-12
INDEX ..................................................................................................................................................... 3-14
WARRANTY ..................................................................................................................................................... 3-17
American-Lincoln Technology 1-4
772 Operator’s Manual
Page 5

MACHINE SPECIFICATIONS
CLEANING PATH 72 inches
TRAVEL SPEED 1.3 - 14 MPH
TURNING RADIUS 117 inches
AISLE WIDTH FOR U-TURNS 20 Feet
DIMENSIONS
Length 138.50 inches
Width 93.3 inches
Height 66.5 Inches without Guard
WEIGHT 5800 lbs. Net
FRAME
Main frame assembly utilizes Ford 3930 Series industrial tractor as base component. All heavy-duty steel
construction.
POWER SOURCE
Available in gasoline, liquid propane (LP) or diesel power 45 P.T.O.-HP, 3-cylinder, liquid cooled, Ford 201
cu. in. industrial engine, electric start, Engine air filter, 17.3 gal. Fuel tank, LP model includes a 33 lb. tank
(ICC) and fittings, catalytic exhaust muffler to reduce emissions (Diesel model).
TRANSMISSION
8-speed forward, 2-speed reverse, manual high-low gear shift with foot operated clutch.
ELECTRICAL SYSTEM
12 volt, automotive type, with maintenance free battery.
HYDRAULIC SYSTEM
Heavy-duty Ford Tractor gear pump provides power to individually mounted brush drive motors. 2500 PSI
high pressure relief valve for squeegee and brush lift mechanisms.
SOLUTION TANKS
Two (2) 100 gallon capacity each, steel construction, one on each side, crossover allows filling from either
side, clean-out doors and oversize fill openings are standard.
RECOVERY TANK
One (1) 210 gallon capacity, steel construction, equipped with vacuum shut-off float activated when tank
reaches capacity. Clean-out doors anddump valves for easy draining.
VACUUM SYSTEM
Power provided by a regenerative air turbine, V-belt driven from the tractor PTO to 5,000 RPM.
SCRUBBING BRUSHES
Four (4) 18 inches diameter, disc type
Brushes are mounted to a 3/8" steel frame and are readily accessible. Hydraulic cylinder raises and lowers
brush assembly off ground level for travel and storage. Scrub brush discs are gimbals mounted to follow
irregular floor contours. One-piece or sectional brushes are available.
1-5 American-Lincoln Technology
772 Operator’s Manual
Page 6

MACHINE SPECIFICATIONS
OPTIONAL BRUSHES
Bassine
Straight wire
Nylon
Amerfil (.025)
Amerfil (.040)
Amerfil and wire (One-piece only)
Amergrit
Supergrit
Soft Nylon
Crimped wire scarifier (sectional only)
SQUEEGEE ASSEMBLY
Two (2) overlapping, independently suspended double-bladed, gum rubber. Swivel caster allows adjustment
up and down for optimum pick-up pressure. Provides maximum recovery from cracks and porous surfaces.
Squeegees lift automatically when unit goes into reverse direction.
STEERING
Hydrostatic power steering.
BRAKES
Mechanical wet discs on individual rear wheels, separate parking brakecontrol.
CONTROLS
Key start ignition Tachometer,
Alternator warning light Recovery tank level warning light
Headlights Horn button
Rear reflectors Brush and squeegee raise/lower levers
Engine hour meter, PTO lever
Brush drive control Solution metering control.
BEARINGS & LUBRICATION
All ball bearings on rotating shafts are lubricated for long life and sealed against dust and foreign material.
Grease fittings are provided to allow for proper lubrication at all necessary points.
TIRES
Front (2) 7.50 - 18 pneumatic rubber
Rear (2) 13.6 - 28 pneumatic rubber
FILTERS
One (1) engine and one (1) hydraulic oil filter trap particles down to 10 microns in size.
American-Lincoln Technology 1-6
772 Operator’s Manual
Page 7

MACHINE SPECIFICATIONS
FORD 3930 TRACTOR SPECIFICATIONS
CAPACITIES
Fuel Tank 17.3 US gals.
Cooling System 11.2 US qt.
Power Steering System 2.3 US qt.
Engine Crankcase
With Filter Change 7 US qt.
Without Filter Change 6 US qt.
Hydraulic Lift System
(Rear Axle)
With Ind. P.T.O. 12.0 US gal.
Transmission
8 x 2 3.2 US gal.
ENGINE
Bore 4.4 in.
Stroke 4.4 in.
Displacement 201 cu. in.
Compression Ratio
Diesel/Gasoline 16.3:1 / 7.75:1
Firing Order 1 - 2 - 3
Idle Speed(rpm) 600-850
Maximum Speed: No Load (rpm)2175
Rated (rpm) 2000
Low Idle 600-850
Valve Clearance
(Lash) Warm
Engine
Intake 0.014 in. - 0.016 in.
Exhaust 0.017 in. - 0.019 in.
LUBRICANTS
All Ford Tractor lubricants are specially blended from select base stocks and premium additives for long life
and trouble-free service. The use of these lubrications is recommended as follows:
Oils:
Transmission/Rear Axle/hydraulic Sump Ford M2C134-D/C
Power Steering Pump Ford M2C134-D/C
Engine Crankcase Ford M2C121-E
(see note below)
Grease:
Front Wheel Bearings and all Grease Fittings-M1C75-A/B or M1C137-B
NOTE: Engine Crankcase Oils
1) Viscosity grade selection for your climate:(see Figure 2)
1-7 American-Lincoln Technology
772 Operator’s Manual
Page 8

MACHINE SPECIFICATIONS
-25ºC
-10ºC
0ºC +32ºC
SAE 10W
SAE 10W-30
SAE 15W-40
SAE 30
-13ºF
P4840
OUTDOOR TEMPERATURES AND RANGES OF APPLICATION
In areas where prolonged periods of extreme temperatures are encountered, local lubricant practices are
acceptable, such as the use of SAE 5W, SAE 40 or SAE 50 grades of oil. These oils much be of API CD or
SF/CD Quality.
Engine crankcase oil drain intervals should be adjusted downward when diesel fuel sulfur content is above
0.5%. Consult your dealer for details of Engine Crankcase Oil Usage.
+14ºF +32ºF
+90ºF
COOLING SYSTEM
Type Pressurized liquid, re-circulating bypass
Water Pump
Type Centrifugal
Drive V-belt
Fan
Diameter 16 in.
Fan belt deflection 1/4 to 1/2 in. with 25 lbs. force applied midway between alternator and
crankshaft pulleys
Thermostat:
Starts to Open180° F
Fully Open203° F
Radiator Cap10 psi
ELECTRICAL SYSTEM
Alternator 12-volt
Output 55 amp. (STD)
Voltage Regulator Integral
Battery
Diesel Engine 107 amp. hour rating
Ground negative
Starting Motor positive engagement
Headlamp Sealed Beam Unit
(Std. Fenders) No. 4419
Headlamp (Opt. Flat Top Fenders)
Dual Beam (inner) Lamps No. 4460
Tail Lamp Bulb No. 1155
Flasher Warning Lamp Bulb No. 1156
Instruments and Warning
Light Bulb No. 1895
American-Lincoln Technology 1-8
772 Operator’s Manual
Page 9

MACHINE SPECIFICATIONS
IGNITION SYSTEM
Diesel
Type compression
Gasoline
Type spark
Method coil and distributor
Distributor Point Gap-Breaker 0.022-0.025 in.
Dwell Angle 35-38
Timing (at 600-700 rpm with vacuum line disconnected)
5 Deg. BTDC
Spark Plugs
Type Autolite AG5
Gap 0.023-0.027 in.
CLUTCH
w/Independent P.T.O. 13 in. single dry plate
Pedal Free Travel 1.1-1.6 In.
BRAKES
Type Mechanical, wet disc
Disc Diameter 8.0 in. O.D.,6.8 in. I.D.
No. Of Discs 3 Per Side
STEERING
Type Hydrostatic Power
Steering
Turns Lock-to-Lock 3.4
Pump
Type gear
FUEL SYSTEM
Carburetor (Gasoline):
Type Zenith
Injection Pump (Diesel)
Type Distributor
8 x 2 TRANSMISSION
ROAD SPEED IN MILES PER HOUR AND KILOMETERS PER HOUR
Gear 1450 RPM
1 1.2 MPH
2 1.51 MPH
3 2.65 MPH
4 3.60 MPH
5 4.31 MPH
6 5.38 MPH
7 4.46 MPH
8 12.85 MPH
R1 1.77 MPH
R2 6.20 MPH
Tire Size 13.6 x 28
Engine Speed
1-9 American-Lincoln Technology
772 Operator’s Manual
Page 10
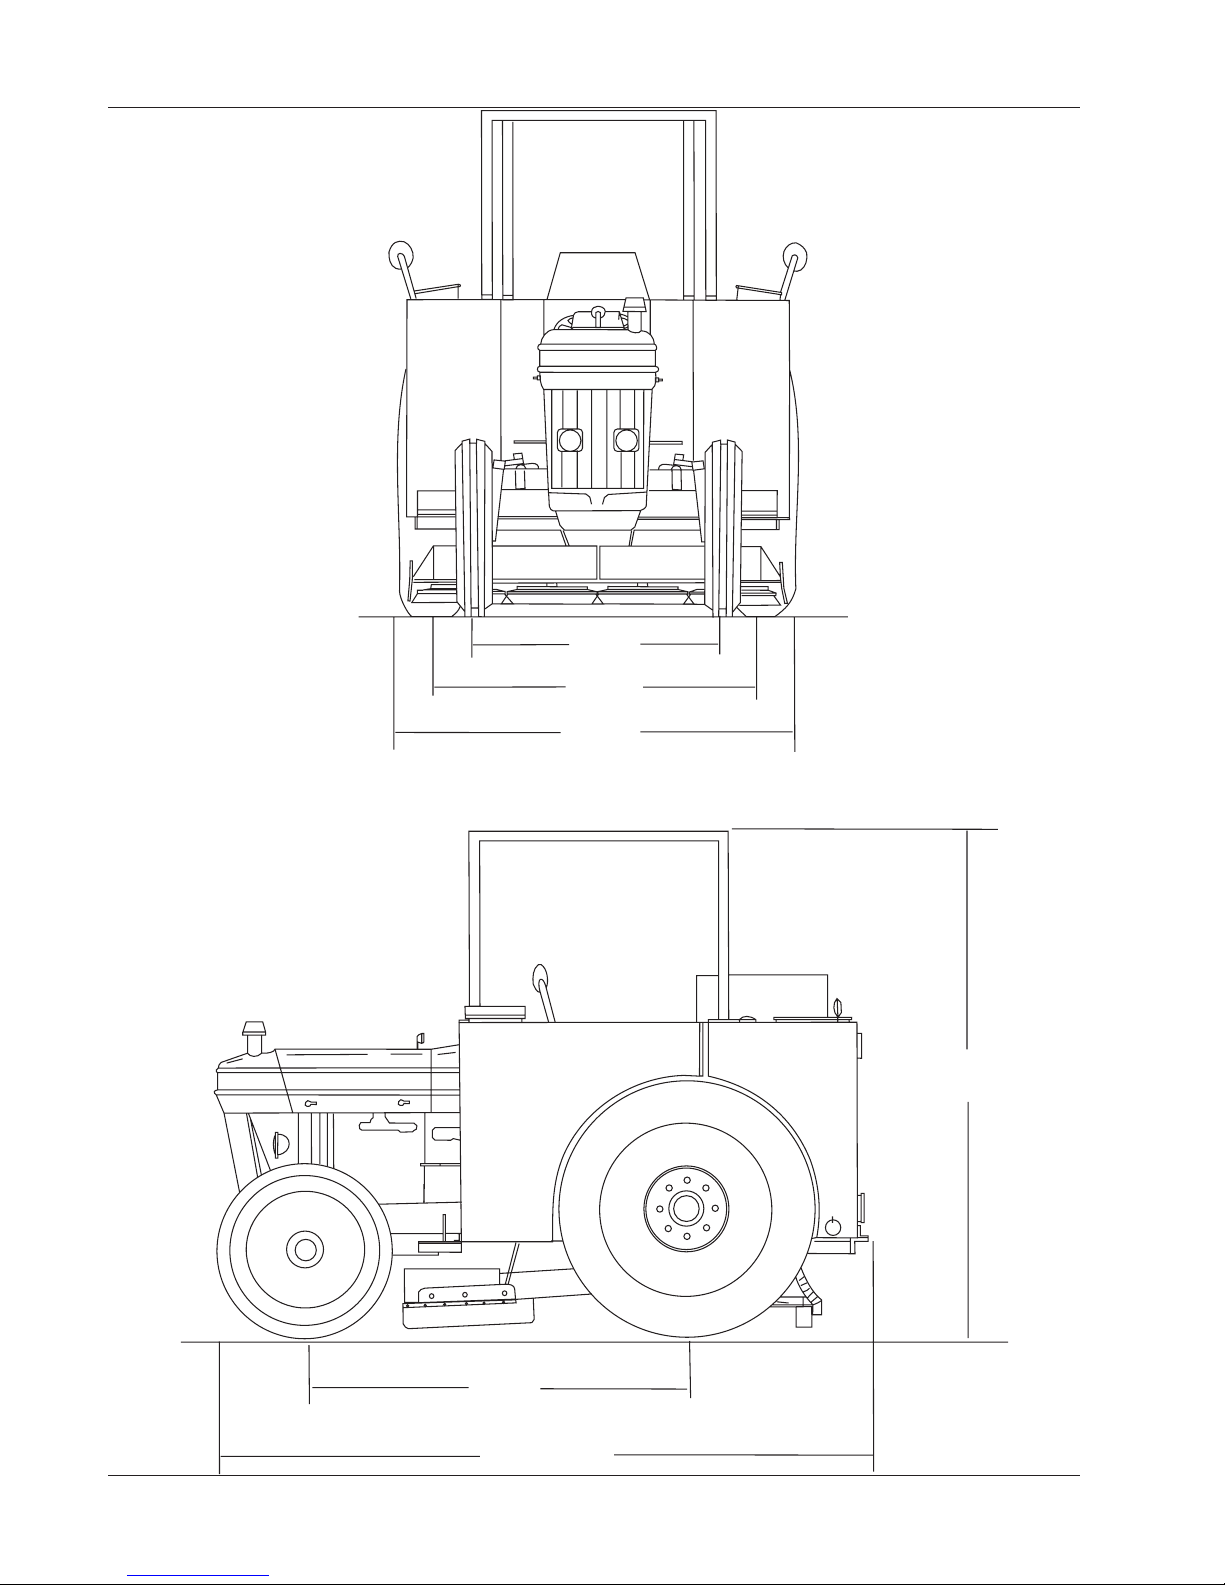
55.00
MACHINE DIMENSIONS
67.25
81.75
90.40
American-Lincoln Technology 1-10
772 Operator’s Manual
84.50
138.50
Page 11

SAFETY PRECAUTIONS
THE FOLLOWING STATEMENTS ARE USED THROUGHOUT THIS MANUAL AS INDICATED IN THEIR
DESCRIPTIONS:
DANGER
To warn of immediate hazards which will result in severe personal injury or death.
WARNING
To warn of hazards or unsafe practices which could result in severe personal injury or death.
CAUTION
To warn of hazards or unsafe practices which could result in minor personal injury.
ATTENTION
To warn of unsafe practices which could result in extensive equipment damage.
NOTE
To give important information or to warn of unsafe practices which could result in equipment damage.
The following information signals potentially dangerous conditions to the operator or equipment. Read this
manual carefully. Know when these conditions can exist. Then, take necessary steps to train machine operating personnel.
WARNING
Only enter and leave the machine from the right (curb) side using steps and handlebar provided.
Do not fill fuel tank with engine running. Do not smoke or use open flame near the fuel tank. Do not overfill LP
tank. Make sure fuel container and machine are electrically connected when refueling.
Lead acid batteries emit a highly explosive hydrogen gas that can be ignited by electrical arcing or by smoking.
Provide adequate ventilation system to properly expel discharged gases. Check exhaust system regularly for
leaks. Ensure that exhaust manifolds are secure and not warped.
Keep away from powerful vacuum fan suction at fan intake. Do not remove hose on fan intake housing while
running.
CAUTION
Avoid moving parts of the unit. Loose jackets, shirts or sleeves should not be permitted when working on
machine because of the danger of becoming caught in moving parts. Make sure all nuts and bolts are secure.
Keep shields and guards in position. If adjustments must be made while the unit is running, use extreme caution
around hot manifolds, moving parts, V-belts, etc. Disconnect positive battery terminal before removing instru-
ment panel.
Do not start machine unless you are in driver’s seat, with foot on brake pedal, or hand brake engaged, and
transmission in neutral position.
1-11 American-Lincoln Technology
772 Operator’s Manual
Page 12

SAFETY DECALS
THE FOLLOWING SAFETY DECALS ARE MOUNTED ON THE MACHINE. FIND AND NOTE THEIR LOCATION. REPLACE ALL SAFETY DECALS THAT ARE LOST OR ILLEGIBLE
CAUTION
FOR SAFETY, OBSERVE THE FOLLOWING WARNINGS. FAILURE TO COMPLY MAY CREATE A SERIOUS RISK OF
INJURY TO YOURSELF AND OTHERS. THIS MACHINE SHOULD NOT BE USED IN HAZARDOUS LOCATIONS
INCLUDING AREAS OF VOLATILE DUST OR VAPOR CONCENTRATIONS
1. Operators must be trained, Qualified and Understand the Operator’s Manual Before Starting.
2. Use caution when mounting and dismounting the machine particularly on wet surfaces.
3. Operate only from the designated operator’s position. Keep inside the body of the machine. Keep hands
and feet on the designated controls. Always operate in well Lighted areas.
4. Do not dump Hopper over an open pit or dock. Do not dump hopper when positioned on grade (Ramp).
Machine must be level (Horizontal).
5. The operator must exhibit extreme caution when negotiating, turning and traveling across grades or
ramps.
6. Start, stop, change directions, travel and brake smoothly. Slow down when turning. Avoid uneven surfaces
and loose materials.
7. Watch out for obstructions, especially overhead.
8. Carry no passengers on machine.
9. Set parking brake when leaving the machine. Chock (block) the wheels if the machine is to be parked on a
grade or ramp, or is to be worked on.
10. Never leave the operator’s seat with the engine running.
11. Report damage or faulty operation immediately. Do not operate the machine until repairs have been
WARNING
NO GASOLINE, COMBUSTIBLE OR FLAMMABLE MATERIAL IN THIS TANK USE DIESEL FUEL ONLY.
WARNING
1. NEVER FILL FUEL TANK WHILE ENGINE IS RUNNING
2. TO AVOID STATIC DISCHARGE, BE SURE FUEL CONTAINER AND MACHINE ARE GROUNDED
BEFORE POURING FUEL.
DO NOT FILL - LIQUID PROPANE ONLY
WARNING
ALWAYS SET PARKING BRAKE AND SHUT OFF ENGINE BEFORE LEAVING SEAT OF MACHINE.
WARNING
DO NOT REMOVE RADIATOR CAP WHILE ENGINE IS HOT. RADIATOR CORE MUST BE KEPT CLEAN TO PRE-
VENT OVERHEATING.
WARNING
KEEP HANDS AND CLOTHING AWAY FROM ROTATING FAN AND BELTS TO PREVENT SERIOUS INJURY
WARNING
START ENGINE ONLY FROM OPERATORS SEAT, IF SAFETY START SWITCH IS BY-PASSED, ENGINE CAN START
WITH TRANSMISSION IN GEAR.
DO NOT CONNECT OR SHORT ACROSS TERMINALS ON STARTER SOLENOID.
ATTACH BOOSTER CABLES AS SHOWN ON BATTERY DECAL.
STARTING IN GEAR CAUSING RUNAWAY, CAN RESULT IN SERIOUS INJURY.
American-Lincoln Technology 1-12
772 Operator’s Manual
Page 13

SAFETY DECALS
WARNING
BEFORE STARTING AND OPERATING:
-KNOW THE OPERATION AND SAFETY INSTRUCTIONS IN THE OPERATORS MANUAL,
AND ON THE TRACTOR.
-CLEAR THE AREA OF BYSTANDERS.
-LOCATE AND KNOW THE OPERATION OF ALL CONTROLS.
-FASTEN YOUR SEAT BELT.
START ENGINE ONLY FROM OPERATORS SEAT WITH TRANSMISSION IN NEUTRAL, P.T.O.DISENGAGED AND
HYDRAULIC CONTROLS IN LOWERED POSITION.
AVOID ACCIDENTAL CONTACT WITH THE GEARSHIFT LEVER WHILE THE ENGINE IS RUNNING. UNEXPECTED
TRACTOR MOVEMENT CAN RESULT.
SLOW DOWN ON TURNS, ROUGH GROUND AND SLOPES TO AVOID UPSET.
DO NOT PERMIT ANYONE BUT THE OPERATOR TO RIDE ON THE TRACTOR. THERE IS NO SAFE PLACE FOR
RIDERS.
LOCK BRAKES TOGETHER, USE WARNING LIGHT AND SMV EMBLEM WHILE DRIVING ON ROADS.
LOWER EQUIPMENT, PLACE GEAR SHIFT LEVERS IN NEUTRAL, STOP ENGINE AND APPLY PARKING BRAKE
BEFORE LEAVING TRACTOR SEAT.
FAILURE TO FOLLOW ANY OF THE INSTRUCTIONS ABOVE CAN CAUSE SERIOUS INJURY TO THE OPERATOR
OR OTHER PERSONS.
Replacement Materials Are Available From Your Local FORD New Holland Dealer or From:
FORD New Holland Service Publications - 500 Diller Ave. New Holland, Pa. 17557
WARNING
TO JUMP START
(Negative Grounded Battery)
1. SHEILD EYES.
2. CONNECT ONE END OF ONE CABLE TO POSITIVE [+] TERMINALS OF EACH BATTERY.
3. CONNECT ONE END OF OTHER CABLE TO NEGATIVE [ - ] TERMINAL OF GOOD BATTERY.
4. CONNECT OTHER END TO ENGINE BLOCK OF VEHICLE BEING STARTED. TO PREVENT
DAMAGE TO OTHER ELECTRICAL COMPONENTS ON VEHICLE BEING STARTED, MAKE
CERTAIN THAT ENGINE IS AT IDLE SPEED BEFORE DISCONNECTING JUMPER CABLES.
1-13 American-Lincoln Technology
772 Operator’s Manual
Page 14

Alto
MACHINE PREPARATION
772
American-Lincoln
P4330 FIGURE 3
MACHINE PREPARATION
YOUR AMER-CAN-LINCOLN 772 SCRUBMOBILE HAS BEEN SHIPPED COMPLETE, BUT DO NOT ATTEMPT TO OPERATE WITHOUT READING THE FOLLOWING INSTRUCTIONS.
1. Connect the squeegees.
2. Connect and tighten battery cables
3. Fill tank with appropriate fuel
WARNING
Never fill fuel tank while the engine is running. Always be sure the fuel dispenser and machine are electrically
connected before fueling. This can be easily done by providing an insulated wire (permanently attached to the
container) with battery clip on the other end.
4. Check engine crankcase oil level. Although properly lubricated at factory, check before starting engine.
No special break-in oil is used and recommended number of operating hours before the initial oil change is
50 hours. See lubrication and maintenance section of the Ford tractor manual.
5. Check radiator coolant level. Permanent type antifreeze is added at the factory to provide protection to
approximately -35ºF. To retain this protection level, always add ½ part water to ½ part anti-freeze.
6. In addition to regular service operations listed, the following items should be checked every 10 hours or
daily during the first 50 hours of operation.
-Transmission Oil Level
-Rear Axle Oil Level
-Rear Wheel Nuts for Tightness
American-Lincoln Technology 1-14
772 Operator’s Manual
Page 15

BRAKE PEDALS
MACHINE SYSTEMS & CONTROLS
RECOVERY SOLUTION
LEVEL WARNING
LIGHT
FORD TRACTOR
SQUEEGEE CONTROL
SOLUTION TANK
8 SPEED TRANSMISSION
SOLUTION TANK
BRUSH CONTROL
BRUSH DRIVE
CONTROL VALVE
RECOVERY
TANK
FORD 3930 TRACTOR POWER UNIT - Figure 4
The American-Lincoln H772 Scrubber utilizes a Ford Tractor Model 3930 as the power unit. The power unit
provides hydraulic power for the brush drive, squeegee and brush position functions. The independent Power
take off is used to drive the vacuum turbines.
This manual includes some pertinent Ford Tractor Operator’s Manual information for the 3930. Consult the
Ford 3930 Operator’s Manual for all other tractor related information. Parts for the 3930 power unit are
available from your local Ford New Holland Dealer.
Standard Features:
Tires:
SOLUTION CONTROL
SPLASH CONTROL
BRUSH DRIVE
PTO TURBINE DRIVE
CLUTCH
SQUEEGEE
TOOLS
P3982 FIGURE 4
-The Ford Tractor is equipped with an 8 x 2 speed mechanical foot clutch controlled transmission.
-The engine is governed at 1450-1500 RPM. Power take off is 435.
-Mechanical wet disc independently controlled brakes are provided for each rear wheel.
-Ford power steering is provided.
-Headlights and rear work light are provided.
-Differential lock for added traction (not used while scrubbing)
Pneumatic Type
Front 7.50 18 rim size
Rear 13.6 28 rim size
1-15 American-Lincoln Technology
772 Operator’s Manual
Page 16

MACHINE SYSTEMS & CONTROLS
P.T.O. CONTROL LEVER
PARKING BRAKE
BRAKE PEDAL HANDLE
BRAKE PEDAL LOCK
FOOT THROTTLE
P4232 FIGURE 5
BRAKE CONTROLS - Figure 5
The right brake pedal is used to brake the right rear wheel. The left pedal is used to brake the left rear wheel.
Depress both pedals simultaneously to stop the tractor.
BRAKE PEDAL LOCK - Figure 5
The brake pedal lock is used to lock the brake pedals together. Always lock the pedals together when the
tractor is operated at road speeds.
PARKING BRAKE - Figure 5
The parking brake handle is used to lock the brakes. Always apply the parking brake when the tractor is
parked.
To apply the brake:
1. Lock the parking brakes together with the brake pedal lock.
2. Pull up on the parking brake handle and turn it ¼ turn.
3. Depress both brake pedals.
To release the parking brake:
1. Turn the handle ¼ turn so the tabs will enter the slot in the handle guide.
2. Depress the brake pedals to release the ratchet.
3. Release he brake pedals.
FOOT THROTTLE - Figure 5
The foot throttle is used independently of the hand throttle to control the speed of the tractor. It is recommended that you use the foot throttle when driving on the highway.
IMPORTANT
When it is necessary to use the foot throttle, set the hand throttle to the idle position (fully forward).
DIFFERNTIAL LOCK - Figure 5 (not used for scrubbing)
The differential lock is used to lock the rear axle shafts together, providing additional traction in wet or loose
soil.
INDEPENDENT P.T.O. CONTROL LEVER - Figure 5
The P.T.O is “independent”, which means that is can be engaged or disengaged while the tractor is either
moving or stopped. To engage, move lever forward. Moving the lever fully in reverse will disengage the P.T.O.
and apply a P.T.O. brake. The brake will remain applied as long as the engine is running and the control lever
is rearward. When the engine is shut off, the brake will release so that the shaft can be turned by hand when
attaching equipment. On the H772 the P.T.O. is used to drive the vacuum turbine.
American-Lincoln Technology 1-16
772 Operator’s Manual
Page 17

MACHINE SYSTEMS & CONTROLS
8x2 SHIFT PATTERN
12 4
3
5
7R2
L
N
RI
8
N
6
N
H
CLUTCH PEDAL
HIGH-LOW SHIFT LEVER
P4234 FIGURE 6
8x2 TRANSMISSION GEARSHIFT LEVERS - Figure 6
The 8-speed transmission levers are used to select the appropriate gear for driving the machine. The transmission gear shift lever is the longer of the two levers and is used to select one of four forward speeds. The
High-Low shift lever is used to select either the High or Low range of forward and reverse gears. Placing the
lever in the forward position selects the low range. Always depress the clutch pedal before moving either of
the two levers.
A diagram of the shift pattern is provided directly below the Proof-Meter on the tractor.
See the chart on page 10 for gear and speed information.
CLUTCH - Figure 6
The foot-operated clutch pedal is used to engage/disengage the engine from the transmission while changing
gears and stopping. The pedal must be completely depressed, to stop forward travel of the tractor, or while
shifting gears.
BRUSH DRIVE & CONTROL HYDRAULICS
The transmission driven hydraulic pump, located in the differential housing, delivers 5.61 GPM at 1450 engine
RPM. Relief valve pressure is 2500 psi.
The rear axle differential and axle housings are used as the hydraulic reservoir. System capacity is 12 gal.
Pump pressure drives the four scrubbing brushes at 180 RPM at loads to 100 lbs. A directional spool valve
(see Figure 4) allows brush rotation in either direction.
The Ford Tractor hydraulic position control is used to raise and lower the squeegee independent of the
brushes.
The four 18" diameter disc brushes are raised and lowered independently with a separate directional valve
spool. A knob actuated lock-off valve is also provided to prevent leakdown when transporting long distances.
1-17 American-Lincoln Technology
772 Operator’s Manual
Page 18

MACHINE SYSTEMS & CONTROLS
SOLUTION TANKS
The machine is equipped with two, .125" thick tanks saddle mounted and interconnected. They may be filled
from wither side of the machine.
Each tank has an inlet filter screen to prevent contaminants from entering the metering valves.
Liquid cleaning compounds are added to the solution water in the tanks.
RECOVERY TANKS
The 210 gallon, .125" thick steel recovery tank is fitting with two pick up tubes and an air/water separation
system. Tank is fitted with clean out doors and drain valves.
P.T.O VACUUM TURBINE
One PTO belt driven turbine, at 5000 RPM, provides the air movement and water lift through the float manifold
system. The control lever is located below the brush drive valves and behind the solution control. To engage
the vacuum turbine move the lever forward.
SOLUTION METERING SYSTEM
The scrubbing solution is metered from the solution tanks by the “L” shaped lever control located in the left
side of the transmission housing above the clutch pedal (see Figure 4). Lift and position to start solution flow.
The solution is gravity fed to the center of the 4 scrubbing disc brushes. The maximum flow is 5gpm.
With brushes down solution lowering the lever stops flow. Solution flow also stop when brushes are raised
“full” up.
SPLASH CONTROL SYSTEM
The splash control system (see Figure 4) consists of flexible adjustable skirts as part of the brush drive
system. They provide containment of the shower few solution to a 72" path.
SQUEEGEE CONTROL
The squeegee control levels (see Figure 4) which are located at the driver’s right hand position, control the
squeegee position. The draft control lever is locked in one position at the factory near setting “2”. The other
lever is used to raise and lower the squeegees. Always position lever full “up” or full “down”.
With the squeegee is the full “down” position the squeegee will raise automatically when the manual transmission shift lever is moved to reverse gear position.
BRUSH DRIVE CONTROL
The two spool valve assembly at the operator’s left hand controls position and brush rotation. The handle
nearest to the operator controls the rotation of the brushes. Push forward or pull back to detented positions.
The other handle is pushed forward to lower the brushes to the floor and pull back to raise the brushes.
Always lower the brushes completely.
BRUSH DRIVE LOCK-UP
With brushes up for transporting or storage the small know controlled valve behind the brush raise-lower
handle can be closed by turning the knob clockwise until seated tightly.
RECOVERY SOLUTION LEVER WARNING
The red lens lamp (see Figure 4) flashes when the float controlled limit switch on the top of the recovery tank
is actuated by a water level 9" from the top of the tank. This indicates that the recovery tank needs to be
emptied.
American-Lincoln Technology 1-18
772 Operator’s Manual
Page 19

TRACTOR CONTROLS & INSTRUMENTS
- +
X100
15
10
25
20
5
0
ENGINE COOLANT
TEMPERATURE GAUGE
ENGINE OIL PRESSURE
WARNING LIGHT
HAND THROTTLE
FUEL GAUGE
ALTERNATOR
HOUR METER &
TACHOMETER
-+
WARNING LIGHT
AIR CLEANER
RESTRICTION
LIGHT SWITCH
WARNING LIGHT
HORN BUTTON
KEY STARTER SWITCH
DIESEL STOP CONTROL
P4230 FIGURE 7
LIGHT SWITCH - Figure 7
The light switch is a rocker ON/OFF switch. Depressing the rocker switch turns lights on or off.
KEY STARTER SWITCH - Figure 7
The key starter switch actuates the starter motor and the thermostat.
DIESEL ENGINE STOP CONTROL - Figure 7
Pull the stop control fully out to cut off the fuel supply to the injectors and stop the engine. The knob must be pushed fully in before
restarting the engine.
HAND THROTTLE - Figure 7
Pull the throttle down to increase engine rpm. Push the throttle up to decrease engine rpm.
FUEL GAUGE - Figure 7
The needle indicated the amount of fuel remaining in the tank.
TEMPERATURE GAUGE - Figure 7
The engine coolant temperature gauge indicates the temperature of the engine coolant. If the needle enters the red area of the gauge
while the engine is running, stop the engine and investigate the cause.
WARNING LIGHTS - Figure 7
When the key starter switch is turned “ON” the warning lights will come on. When the engine is running, the lights will go out as the
engine rpm is increased. If they do not go out:
Engine Oil Pressure Warning Light: Stop the engine immediately and investigate the cause. This indicates oil pressure only. The
operator must still check the crankcase from proper oil level.
Alternator Warning Light: It is an indication that the battery is not being charged. Investigate the cause as soon as possible, otherwise
the battery will become discharged.
Air Cleaner Restrict Warning Light: Illuminates when the air cleaner requires service and the engine is running. If the light illuminates
while the engine is running, stop the engine and service the air cleaner as described in the Ford Tractor maintenance section of this
manual.
HOUR METER - Figure 7
The hour meter indicated the time that the tractor has been operated, based on as average engine speed of 2055 rpm. Engine speeds
below 2055 rpm accumulate hours at a slower rate than clock hours. Engine speed above 2055 rpm build up hours faster than clock
hours. Use the hour meter as a guide to determine hourly service and maintenance intervals.
TACHOMETER - Figure 7
The tachometer indicates the engine rpm. Scrubber is operated at the full throttle (1450-1500rpm).
HORN BUTTON - Figure 7
The horn button is a momentary push button control located above the key switch.
1-19 American-Lincoln Technology
772 Operator’s Manual
Page 20

THE CAMEL RECYCLING SYSTEM CONTROL PANEL
DETERGENT FLOW
MIN
CB-1
RECYCLING
SYSTEM
OFF
ON
HIGH
SOLUTION
LOW
SOLUTION
C0431 FIGURE 8
THE CAMEL RECYCLING SYSTEM ON/OFF SWITCH - Figure 8
The Camel ON/OFF switch is used to turn the Camel Recycling System on and off.
SOLUTION HIGHT WARNING LIGHT - Figure 8
The solution high warning light will illuminate if the solution tank is too full of solution from the recycling system.
RECYCLING
LOW
DETERGENT
OFF
MAX
DETERGENT LOW WARNING LIGHT - Figure 8
The detergent low warning light will illuminate when the detergent tank is low, warning the operator to add
detergent.
DETERGENT FLOW KNOB - Figure 8
The detergent flow knob is a rotary control that regulates the detergent flow into the scrubbing solution. The
operator may choose from any detergent setting for light to heavy cleaning applications. The detergent light
will illuminate when the detergent tank is low, warning the operator to add detergent.
LOW SOLUTION WARNING LIGHT - Figure 8
The low solution warning light will illuminate when the solution tanks are low on solution. When this occurs
the recycling system switch should be turned on to begin recycling, which will fill the solution tanks.
RECYCLING LIGHT - Figure 8
The recycling light illuminates to indicate that the recycling system in on.
American-Lincoln Technology 1-20
772 Operator’s Manual
Page 21

THE BASIC SCRUBBING SYSTEM
D
C
A
B
B
HG
P3983 FIGURE 9
BASIC SCRUBBING SYSTEM COMPONENTS
A. Solution Feed Tubes D. Squeegee Tools G. Metering Valves
B. Solution Tubes E. Float Cage H. Scrub Brushes
C.Vacuum Tubes F. Recovery Tank
D
D
E
F
There are two scrubbing systems available for the 772 scrubmobile:
-Standard Scrubbing System (non-recycling)
-Camel Scrubbing System (with recovery to solution recycling)
Both Scrubbing Systems share the same basic components as shown in Figure 9.
1-21 American-Lincoln Technology
772 Operator’s Manual
Page 22

THE STANDARD SCRUBBING SYSTEM
SOLUTION
TANK
RECOVERY
TANK
FILTER
SCRUB
BRUSH
SQUEEGEE
FLOOR CONTACT
P4759
P4759 FIGURE 10
HOW IT WORKS
During the scrubbing process (Figures 9 &10), a solution of detergent and water from the solution tanks is fed
to the solution lines where it is disbursed to the floor through the four scrubbing brushes that aggressively work
to dislodge soilage.
As the machine moves forward, a high vacuum turbine system lifts dirty water and debris from floor surface,
through the squeegee tools and a recovery tank air/water separation system. A float switch in the tank activates a flashing light on the control panel when the water level in the tank becomes too high. Debris and
sludge settle to the bottom of the recovery tank.
American-Lincoln Technology 1-22
772 Operator’s Manual
Page 23

THE CAMEL SCRUBBING SYSTEM
DETERGENT
TANK
SOLUTION
TANK
SOLUTION
PUMP
RECOVERY
TANK
FILTER
FILTER
FLOW VALVE
ETERGENT
PUMP
SCRUB
SEPARATOR
BRUSH
SQUEEGEE
P4759a
FLOOR CONTACT
P4759a FIGURE 11
HOW IT WORKS
During the scrubbing process (Figures (9 & 11), filtered water from the solution tank is fed to the solution lines
where it combines with the detergent from the metering pumps. This mixture is then fed to the floor where four
disc scrubbing brushes aggressively work to dislodge soilage.
After scrubbing, the used dirty solution is vacuumed from the floor and discharged into the containment
chamber of the recovery tank. Once there a system of baffles helps to clarify the solution on its way to the
pumping chamber of the recovery tank. At intervals, a system of sensors activates the recycling pump which
sends filtered solution from the pumping chamber on its way to the centrifugal separator which aids in further
clarifying of the solution for re-use. In the separator, solids are removed and purged into the containment
chamber. The solids free solution is then fed up through the separator outlet and into the solution tank where it
is ready to be mixed with fresh, metered detergent to be used again as scrubbing solution.
1-23 American-Lincoln Technology
772 Operator’s Manual
Page 24

&
OPERATING INSTRUCTIONS
NOTE
A safety starter permits the starting motor to operate only when the
ELECTRICAL
EQUIPMENT OFF
ACCESSORIES ON
WARNING LIGHTS
INSTRUMENTS ON
THERMOSTAT
HEATER ON
STARTING
MOTOR ON
Always shift both levers to neutral before starting the engine. Never
attempt to start the engine while standing beside the tractor - Always sit
Do not crank the starting motor continuously for more than 30 seconds
P3850 FIGURE 13
PRE-START CHECKLIST
Before starting the machine perform the pre-start checklist:
-Check under the machine for leaks -Check engine coolant level
-Check hydraulic fluid level -Check fuel level gauge or LP tank gauge
-Check engine oil level -Check brake and controls for proper operation
-Check engine air filter -Open fuel shut off valve on fuel tanks.
STARTING PROCEDURE GASOLINE/LP ENGINE
Follow these steps to start the Gasoline/LP Engine:
Warm Weather Starting:
1. Depress the clutch pedal and move the shift levers to the neutral position.
2. Apply the parking brake.
3. Place the hydraulic control lever(s) in the neutral position.
4. Place the P.T.O. control lever in the disengaged position.
5. Open the hand throttle slightly.
6. Turn the key to its start position; when engine starts, release the key.
7. Check to ensure that all the warning lights go out indicating all tractor systems are properly functioning.
If the tractor fails to start, follow the instructions under “COLD WEATHER STARTING”
transmission high-low shift lever is in neutral.
CAUTION
in the seat.
IMPORTANT
to avoid starting motor failure.
Cold Weather Starting (Gasoline Engine):
1. Depress the clutch pedal and move the shift levers to the neutral position.
2. Apply the parking brake.
3. Place the hydraulic control lever(s) in the neutral position.
4. Place the P.T.O. control lever in the disengaged position.
5. Open the hand throttle slightly.
6. Pull the choke all the way out.
7. Turn the key to its start position; when engine starts, release the key.
8. Push the choke all the way in.
9. Check to ensure that all the warning lights go out indicating all tractor systems are properly functioning.
10. Run the engine at 1000rpm for 30 to 60 seconds before driving the tractor.
American-Lincoln Technology 1-24
772 Operator’s Manual
Page 25

OPERATING INSTRUCTIONS
STARTING PROCEDURE GASOLINE/LP ENGINE (cont.)
Cold Weather Starting (L/P Engines):
1. Depress the clutch pedal and move the shift levers to the neutral position.
2. Apply the parking brake.
3. Place the hydraulic control lever(s) in the neutral position.
4. Place the P.T.O. control lever in the disengaged position.
5. Open the hand throttle slightly and do not press the foot pedal.
6. Turn the key to its start position; when engine starts, release the key.
7. Check to ensure that all the warning lights go out indicating all tractor systems are properly functioning.
8. Run the engine at 1000 rpm for 30 to 60 seconds before driving the tractor.
If the engine fails to start, refer to the following instructions:
1. Momentarily depress the foot pedal to the floor.
2. Reposition the hand throttle to the fully closed position and start the engine.
STARTING PROCEDURE FOR THE DIESEL ENGINE
Follow these steps to start the diesel engine.
Warm Weather Starting:
1. Depress the clutch pedal and move the shift levers to the neutral position.
2. Apply the parking brake.
3. Place the hydraulic control lever(s) in the neutral position.
4. Place the P.T.O. control lever in the disengaged position.
5. Open the hand throttle halfway.
6. Turn the key to its start position; when engine starts, release the key.
7. Return the hand throttle to the idle position.
7. Check to ensure that all the warning lights go out indicating all tractor systems are properly functioning.
If the engine fails to start, follow the instructions under “Cold Weather Starting”.
Cold Weather Starting (Diesel Engines):
1. Depress the clutch pedal and move the shift levers to the neutral position.
2. Apply the parking brake.
3. Place the hydraulic control lever(s) in the neutral position.
4. Place the P.T.O. control lever in the disengaged position.
5. Open the hand throttle fully.
6. Turn the key to its start position; when engine starts, release the key.
7. After using the thermostat for 15 seconds turn the key start to the start position.
8. When the engine starts, return the throttle to the idle position and check to ensure all the warning lights
have been extinguished and the gauge readings are normal.
If the engine fails to start, repeat the foregoing procedure. If the engine still fails to start, wat 5 minutes for
battery to recover and repeat the procedure.
COLD WEATHER STARTING AIDS
WARNING
Ether starting aids are available for cold weather starting. Do not use ether in conjunction with thermostart.
Disconnect thermostat before using ether.
THERMOSTART:
The thermostart is available for all diesel tractors. The unit is effective in temperatures down to 0ºF. If colder
temperatures are encountered, a coolant immersion heater, described below, is recommended. The
thermostart element is installed in the air intake manifold. It introduces and ignites fuel in the manifold before it
enters the combustion chamber. The element is operated with the key starter switch. To start a cold engine
with the thermostart, follow the instructions in the diesel engine cold weather starting procedures.
1-25 American-Lincoln Technology
772 Operator’s Manual
Page 26

OPERATING INSTRUCTIONS
COOLANT IMMERSION HEATER (Accessory):
The coolant immersion heater consists of a heating element installed in the right side of the engine block. A
detachable cord is provided for plugging into an electrical outlet. The heater provides for easier starting by
warming the engine coolant and oil and is effective to -20ºF.
To operate the Heater:
1. Plug in the heater to a suitable 115-Volt outlet and leave for two hours before carrying out the cold weather
starting procedures.
2. Disconnect the heater from its power source and install the dust cover in the element.
The heater can be plugged in longer than two hours without damage but its effectiveness will not be increased.
When the heater is not in use, install the dust plug in the element.
STARTING THE TRACTOR WITH JUMPER CABLES:
Follow these instructions to start the engine with jumper cables.
If it is necessary to use jumper cables to start the engine, proceed with the following instructions. Connect one
end of the jumper cable to the tractor battery positive (+) terminal and the other to the auxiliary battery positive
(+) terminal. Connect one end of the other cable first to the auxiliary battery negative (-) terminal and the other
end to the tractor starter negative (-) terminal. Follow the starting procedures after the jumper cables are
connected.
Idle the engine and turn on all electrical equipment (lights, etc.), then disconnect the cables in reverse order of
the connective procedure above. This will help protect the alternator from damage due to extreme load
changes.
NOTE
Reversed battery polarity will damage the voltage regulator and alternator.
WARNING
Batteries contain sulfuric acid and produce explosive gases. Follow the instructions below to prevent personal
injury.
-Wear eye and skin protection
-Keep sparks and flames away
-Always have adequate ventilation while charging or using the battery
-Follow the battery manufacturer’s instruction which are shown on the battery
STOPPING THE ENGINE:
Follow these steps to stop the engine.
1. Reduce the engine speed to idle, then:
Gasoline Engines:
2. Turn the key starter switch, Figure 13, to the “OFF” position.
Diesel Engines:
2. Turn the key starter switch, Figure 13, to the “OFF” position, then pull the diesel stop control out and hold
until the engine stops.
NOTE
Failure to turn the key starter switch to the “OFF” position after the engine stops will result in the warning lights
remaining on, causing the battery to discharge.
American-Lincoln Technology 1-26
772 Operator’s Manual
Page 27

OPERATING INSTRUCTIONS
TO OPERATE THE TRANSMISSION
Follow these steps to operate the transmission.
When the high-low shift lever is in the low range, 1st, 2nd, 3rd, 4th, and (R1) gear ratios can be selected with the
gearshift lever. When the high-low lever is in the high range, 5th, 6th, 7th, 8th, and (R2) gear ratios can be
selected.
IMPORTANT
Avoid using the clutch pedal as a “footrest” (riding the clutch). Prolonged operation in this manner will cause
premature failure of the clutch components.
To change from one gear ratio to another, or to change ranges:
1. Depress the clutch pedal completely.
2. Bring the tractor to a complete stop.
3. Shift to the desired gear and/or range. (Do not attempt to change gears while the tractor is in motion).
WARNING
For your safety, always lock the brake pedals together when traveling at transport speeds. To lock the pedals
together, slide the lock pin across to engage in the hole in the underside of the right hand pedal.
TO DRIVE MACHINE (FOR TRANSPORT)
Follow these steps to drive (transport) the machine to the area to be cleaned.
1. Be sure the brushes and the squeegee are in the “up” position with all the other controls in the “OFF” po
sition. Rotate the knob on the brush drive lock-up valve clockwise to hold the scrub deck in the “up”
position.
2. Release the parking brake.
3. Transport may be done using either the foot throttle or the hand throttle. (For high speed transport, the
foot throttle is recommended).
4. Depress the clutch, select the proper gear for desired transport speed with the transmission lever(s),
slowly release the clutch pedal until the clutch is completely engaged.
5. To stop, depress the brakes, depress the clutch and reduce the throttle speed to idle.
6. Set the parking brake.
TO OPERATE THE SCRUBBING EQUIPMENT
Follow these steps to begin the cleaning operation.
1.Fill the solution tanks.
Standard machine: Mix the detergent and water to the proper ratio for the cleaning task at hand. (Follow
the detergent Mfgr’s recommended mixing ratio). Fill the tanks through the one or both of the fill doors
on top of the solution tanks.
Camel machine: Fill the detergent tank with straight detergent. Fill the solution tanks with straight water.
If there is no static water already on the area to be cleaned; the recovery tank can be filled also. This
will provide additional “scrub” time. When filling the Camel recovery tanks, take care not to fill the
center section of the tank. The left and right sides of the recovery tank can be filled to a maximum
of 2/3 full. Do not fill the center section of the recovery tank.
2. Transport the machine to the area to be scrubbed.
3. Release the brush deck by turning the “brush deck lock-up valve” counterclockwise. Lower the brush deck
by pushing the brush deck lift handle forward. The lever is located on the outbound side of the “brush
deck control valve” assembly (see Figure 4).
4. Increase tractor engine speed to full governed speed: 1450-1500 rpm.
5. Lower the squeegees to the floor by positioning the quadrant lever to the pulled back position. (The
squeegee will not lower until the transmission is placed in either 1st or 2nd gear).
6. Turn on the vacuum turbine by engaging the P.T.O. lever. Moving the lever to the forward position (see
Figure 5) does this. Once the P.T.O. lever is engaged, the vac turbine will come on when the squeegees
are lowered.
7. Check the squeegees for proper deflection of the squeegee rubber.
1-27 American-Lincoln Technology
772 Operator’s Manual
Page 28

OPERATING INSTRUCTIONS
TO OPERATE THE SCUBBING EQUIPMENT (cont.)
Follow these steps to operate the scrubbing equipment.
1. Engage the solution flow
Standard Machine: Lift the solution control lever located near the operator’s left foot (see Figure 4).
Camel Machine: Turn on the “Recycling System” switch and dial in the desired detergent flow (see Figure
8).
2. Engage brush rotation by moving the inboard lever on the brush control valve (see Figure 4). Placingthe
lever forward is for scrubbing while moving forward, and placing the lever backwards is for scrubbing while
moving in reverse (see double scrubbing operation)
3. Begin scrubbing
NOTE
To avoid leaving solution on the floor, stop solution flow 20' before turning or stopping.
TO OPERATE WHILE DOUBLE SCRUBBING
Follow these instructions to operate while double scrubbing.
When heavy soil build-up is present, additional chemical solution time and extra scrubbing may be desirable.
NOTE
This procedure can only be used if safety conditions are controlled for wet flooring.
-Do not lower the squeegee, and scrub in forward direction.
-Reverse the brush rotation and scrub backward over the area just scrubbed.
-Reverse the brush rotation, lower the squeegees and scrub entire are again. This time the squeegees will
remove all the dirty solution.
TO END THE SCRUBBING OPERATION
Follow these steps to stop the scrubbing operation.
Discontinue scrubbing whenever a “solution low”, “detergent low’, “high solution”, or “high recovery” light is
illuminated.
1. Shift transmission levers into neutral.
2. Reduce engine rpm to idle.
3. Apply parking brake.
4. Stop the solution flow
Standard & Camel Machine: Lift the “solution control lever” located near the operator’s
left foot (see Figure 4).
Camel Machine: Turn on the “Recycling System” switch and dial in desired detergent
flow (see Figure 8).
5. Stop the brush rotation by placing the “brush rotation control” lever in the center position.
6. Raise the brush deck by pulling the “brush deck lift control” lever backwards.
7. Raise the squeegee tools by pushing the “quadrant lever” all the way forward and down.
8. Stop the vacuum turbine by pulling the P.T.O. lever all the way back.
9. Transport the machine to appropriate are for Post Operation cleaning and service.
10. Shut down engine.
TO STOP THE ENGINE
Follow these steps to stop the engine.
1. Reduce the engine speed to idle, then:
Gasoline Engines:
2. Turn the key starter switch to the “OFF” position (see Figure 13).
Diesel Engines:
2. Turn the key starter switch to the “OFF” position (see Figure 13), then pull the diesel stop control out and
hold until the engine stops.
American-Lincoln Technology 1-28
772 Operator’s Manual
Page 29

OPERATING INSTRUCTIONS
POST-OPERATION INSTRUCTIONS - ENGINE STOPPED
Perform these steps after the machine has been shut down.
-Close the LPG fuel valve as required.
-Check for string or wire tangled on scrub brushes.
-Check scrub brushes for wear or damage.
-Check squeegees for wear, damage, or adjustment.
-Drain and clean recovery tanks.
-Clean the recovery tank’s screen and float.
-Check vacuum pipes and hoses for obstructions.
-Check the slash skirt for wear, damage, or adjustment.
-Check the outlet strainers in the solution tanks for contamination.
-Fill fuel tank
-Check for leaks
TO CLEAN THE SOLUTION TANKS
Follow these instructions to clean the solution tanks after every scrubbing cycle.
Standard Machine:
-Inspect, remove, and clean the solution inlet filter on the bottom of the LH & RH tanks.
-Flush the sediment accumulations from the floor of the tanks.
Camel Machine:
-Inspect, remove, and clean the solution inlet filter on the bottom of the LH & RH tanks.
-Dirt and sludge build-up can be flushed out the pipe plugs located at the rear of the tanks.
-Disconnect and clean the crossover hoses periodically or as often as needed depending on service
conditions.
TO CLEAN THE RECOVERY TANK
Follow these instructions to clean the recovery tank after every scrubbing cycle.
Standard & Camel Machines:
-Position a corner of the machine near a floor drain.
-Standard Machine - open a drain valve.
-Camel Machine - Release the drain hose, lower it to the drain and open the hose end plug
-Open all clean out doors. Use a hose and squeegee to remove the dirt and sludge from to bottom of
the tank.
-Remove the clean out caps located on top of the recovery tank. Inspect and flush the pickup tubes
and squeegee hoses.
TO OPERATE THE VACUUM WAND (Option)
The vacuum wand gives the machine the added flexibility of picking up spills not accessible by the machine. A
15' hose utilizes the machine vacuum system.
WARNING
Use the vacuum wand option only if the machine can be locates on level surface
TO OPERATE THE VACUUM WAND
1. Stop the engine and engage the machine parking brake
WARNING
Always engage the parking brake before operating the vacuum wand.
1-29 American-Lincoln Technology
772 Operator’s Manual
Page 30

OPERATING INSTRUCTIONS
TO OPERATE VACUUM WAND (cont.)
2. Remove wand and hose assembly from mounting clips on top of the tanks.
3. Push hose end unto 1.50" fitting located on the left hand squeegee assembly.
4. Position the LH squeegee valve to connect the pick up hose to the vacuum wand hose by moving flat lever
to the left to stop position.
5. Position the right hand squeegee valve lever to the left to close off the right hand pickup hose.
6. Start the engine.
7. Place throttle in the “full” rpm position.
8. When finished, shut off the engine.
9. Remove and store vacuum wand and hose.
10. Reposition squeegee hoses by moving both levers full right.
IMPORTANT
The pickup hose assembly can also be used as a sumping system. When the pickup hose is submerged continu-
ously the engine rpm must be reduces to 1000-rpm max. to prevent overload of the vacuum system drive belts.
PUSHING OR TOWING
The machine may be pushed or towed with transmission shift levers in neutral at speeds appropriate for safety.
OPERATION ON GRADES
The machine may be operated on grades up to 12º if the surface provides adequate traction.
WARNING
Always test wet surface traction part way up or part way down sloped area so that if slipping does occur, control
can be regained before reaching the bottom of the slope.
American-Lincoln Technology 1-30
772 Operator’s Manual
Page 31

SERVICE CHART
11
3,22
19 13
1
4
18
18
2,32
14
10
16
8
8
9
2,19,23
21
30
24,26,27
25,28,29
20
31
6,7 17 16
5
9
15
1-31 American-Lincoln Technology
FIGURE 15
772 Operator’s Manual
Page 32

SERVICE CHART
SERVICE CHART FOR 772 SCRUBMOBILE GAS/LP/ AND DIESEL
For service assistance, consult your factory authorized American-Lincoln dealer. For best performance,
replaced worn parts with genuine American-Lincoln parts.
EVERY 8 HOURS or DAILY operation check and clean/adjust if necessary:
1. Fuel level
2. Engine oil level
3. Radiator coolant level and radiator core
4. Water separator/Fuel filter Diesel
5. Power steering fluid oil level
6. Scrub brushes for wear or damage
7. All flaps for wear or damage
8. Recovery tank and pick up pipes
9. Vacuum manifold (through recovery tank access door)
10. Squeegees for wear or damage
(LUBRICATION AND MAINTEANCE)
EVERY 50 HOURS
11. Lubricate all grease fittings (see Ford 3930 tractor manual for reference)
12. Check battery electrolyte level
13. Check rear axle oil level
14. Check and adjust clutch free play
15. Check front and rear tires and lug nuts
Perform recommended Ford Tractor maintenance (see tractor manual)
EVERY 100 HOURS
16. Lubricate squeegee casters
17. Lubricate all moving joints (brush and squeegee lift)
18. Lubricate head lift (chain and sprockets)
19. Clean solution tank and filter screen
Perform recommended Ford Tractor maintenance (see tractor manual)
EVERY 300 HOURS
20. Change engine oil and filter
21. Change hydraulic system filter
22. Clean engine air filter element
23. Check transmission oil level
24. Remove all spark plugs - clean or replace LPG/Gas
25. Check distributor and points, service or replace LPG/Gas
26. Check and adjust foot brakes
27. Check and adjust belt tension
Perform recommended Ford Tractor maintenance (see tractor manual)
EVERY 600 HOURS
28. Change fuel filter/separator
29. Lubricate front wheel bearings
30. Replace engine air filter element
31. Check, clean, and lube starter motor pinion gear
32. Check and adjust valve tappet clearance.
Perform recommended Ford Tractor maintenance (see tractor manual)
EVERY 1200 HOURS or EVERY YEAR
33. Change rear axle oil
34. Change transmission oil
35. Check, clean, and adjust fuel injectors
36. Change power steering oil and filter
American-Lincoln Technology 1-32
772 Operator’s Manual
Page 33

HELPFUL HINTS FOR CLEANING OPERATION
SIDE AISLES
MAIN AISLE
P4134/0001
P4134 FIGURE 12
Do not turn the steering wheel sharply when the machine is in motion. The scrubber is very responsive to
movement of the steering wheel. Do not make sudden turns.
HELPFUL HINTS FOR CLEANING OPERATION
Follow these hints to get the best possible cleaning results:
-Scrub in straight paths, Do not bump posts. Do not scrape the sides of the machine
-Plan scrubbing in advance. Try to arrange long runs with minimum stopping and starting.
-Sweep heavily littered areas before scrubbing
-Allow a few inches of overlap on the scrub paths.
-Replace disc scrub brushes when bristles are worn down to ½”
-Replace squeegee rubbers when all usable edges have become rounded with wear, impairing the
wiping action
SIDE AISLES
WARNING
1-33 American-Lincoln Technology
772 Operator’s Manual
Page 34

SERVICE INSTRUCTIONS
OUNTERBALANCE
TRACTOR FOOT REST
SPRINGS
P4236
P4236 FIGURE 16
EVERY 1200 HOURS or EVERY TWO YEARS
37. Drain and flush radiator coolant system
BRUSH LOAD AND BRUSH WEAR
Factors affecting brush wear are type of bristle, bristle, area, and load on the bristles. See your authorized
distributor for the type of brush and bristle most suitable.
Brush load may be adjusted by adding or removing counterbalance springs (see Figure 16). The counterbalance springs are located between the solution tanks and the tractor footrest (see Figure 16). The load will vary
as follows:
No. Of Springs
0
1 per side
23per side
per side
Adding springs will decrease scrub brush load. Shorter brush life can be expected as the scrub brush load is
increased.
SQUEEGEE TOOL FLOOR HEIGHT ADJUSTMENT
The squeegee floor contact height for each squeegee tool may be varied by adjusting the threaded stem on
the caster wheels at the rear side of the squeegee tool assemblies (see Figure 17). Loosen the locking plate
(see Figure 17) and raise or lower the tool position by threading the caster stem up or down in the squeegee
frame threaded bracket.
Load Per Brush
100 lbs.
80 lbs.
60 lbs.
40 lbs.
Proper adjustment will flare the rubber approximately 5/16" on a smooth floor. On a rough or irregular floor
surface, more air leakage may occur at the squeegee pickup tool. If this occurs increased down pressure is
required.
American-Lincoln Technology 1-34
772 Operator’s Manual
Page 35

SERVICE INSTRUCTIONS
SPRING
CASTER
WHEEL
P4237 FIGURE 17
SQUEEGEE TOOL LEVEL ADJUSTMENT
Individual level adjustment at each squeegee is possible to bring flared squeegee ends to proper floor contact.
Loosening one locked adjustment screw and tightening the other causes the entire tool assembly to tip on the
pivot pin until the squeegee rubber is perpendicular (level) to the floor. Tighten the locking nuts after adjusting
the screw.
SPRING
SPOOL
P4239 FIGURE 18
LOCKING
PLATE
SPOOL
LEVER
AUTOMATIC SQUEEGEE LIFT ADJUSTMENT
With squeegee position control lever fully down, adjust Ford Tractor draft control linkage so that when the 4
speed shift lever is moved into reverse it actuates the valve that controls the squeegee lift.
Adjustment (see Figure 18):
To increase sensitivity to reverse gear position (squeegee not raising).
1. Remove spring spool lever from bracket. (Note position in bracket slot).
2. Rotate spring spool one turn counterclockwise (as viewed from rear of machine).
3. Replace spring spool lever. Position in bracket slot as before.
To decrease sensitivity (squeegee not lowering automatically)
1. Rotate spring spool clockwise one turn.
1-35 American-Lincoln Technology
772 Operator’s Manual
Page 36
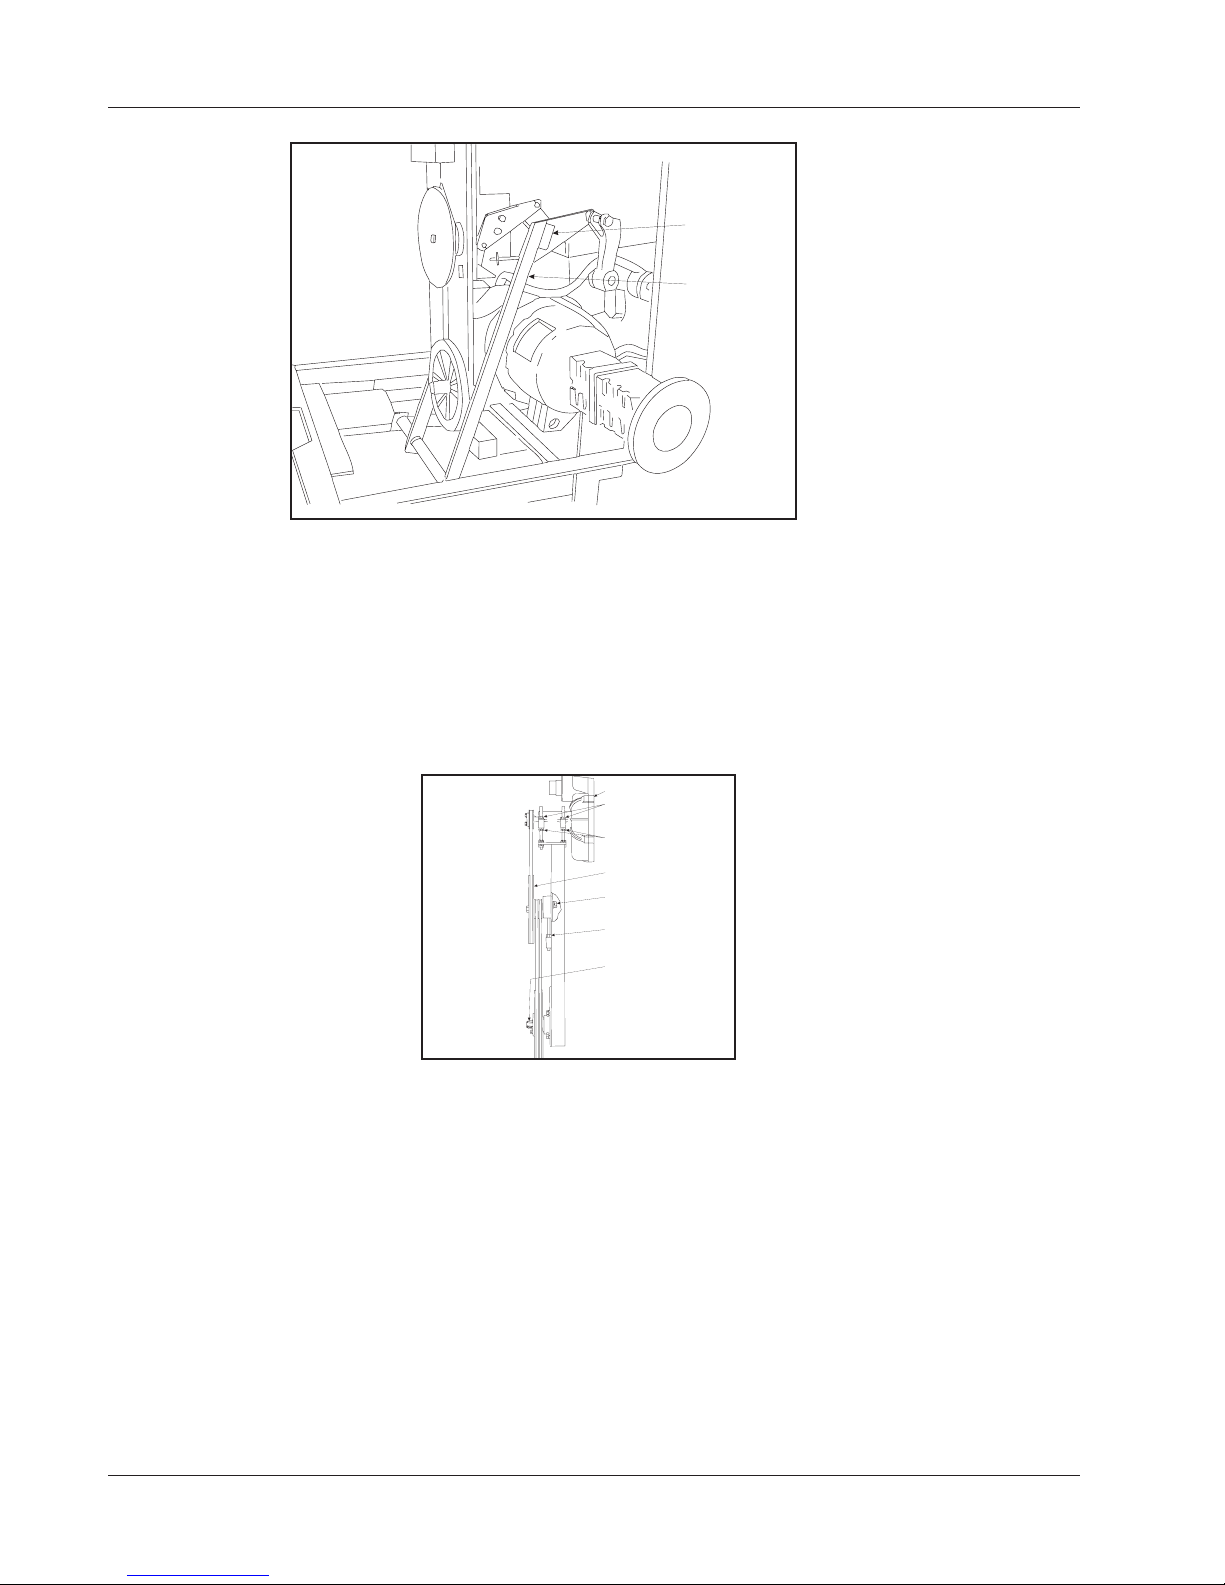
G
SERVICE INSTRUCTIONS
ADJUSTIN
BLOCKS
LIFT LINK
P4240 FIGURE 19
SQUEEGEE LIFT HEIGHT ADJUSTMENT
The height of the squeegee tools in the full up position is adjusted so that the right side squeegee tool assembly clears the stop bracket by .25" to .50" (see Figure 19).
To change the adjustment:
1. Place squeegee control lever in the full down position.
2. Loosen (2) two adjusting blocks (see Figure 19) clamped to squeegee lift arms.
To increase lift move the block(s) in arm slots closer to the lift link(s) (see Figure 19).
3. Tighten screw. Raise squeegee full up and check clearance with stop bracket.
ROTATION
UPPER
ADJUSTING
NUTS
LOWER
P4006
ADJUSTING
NUTS
INTERMEDIATE
PULLEY
LOCK SCREW
LOCK NUT
TRACTOR PTO
BELT "A"
BELT "B"
P4006 FIGURE 20
TURBINE BELT ADJUSTMENT
Do not tighten belt excessively after initial break in. New belts may be set up tight since initial run it (1st hour)
will “seat” the belt and give it the initial stretching under load required. Belt tension should be checked after
initial run in and periodically thereafter.
To adjust belt tension (see Figure 20):
1. Remove turbine cover.
2. Loosen the lock screw one turn.
3. Loosen upper adjusting nut on Rotron stud mounting.
4. Tighten lower adjusting nuts equally (1¼ turns at a time) to increase tension in belt “A”. Proper setting is
½” deflection of the belt with 25 lbs. of pressure at the midpoint between the two pulleys.
5. Check the tension of the “B” belts as above and adjust as necessary using the locknut provided
6. Secure intermediate pulley with lock screw.
American-Lincoln Technology 1-36
772 Operator’s Manual
Page 37

S
SERVICE INSTRUCTIONS
0.13
P4242 FIGURE 21
SPLASH SKIRT ADJUSTMENT
Adjust the right and left side skirts with brush wear to maintain floor clearance as shown in Figure 21.
CLEAN OUT CAPS
DRAIN
DOOR
MANIFOLD
& FLOAT
DRAIN
VALVES
P4243
DRAIN
VALVES
P4243 FIGURE 22
SERVICING THE RECOVERY TANK
When tank is full (9" from top), the red flasher light is activated, At a height of 8" from the top the float, which
is part of the manifold (see Figure 22), the vacuum air flow to the squeegees will shut off.
To drain:
Standard Scrubbing System: Position either rear corner of machine near a floor drain and open the drain
valve (see Figure 22).
Camel Scrubbing System: Position either rear corner of the machine near a floor drain. Release the drain
hose and lower it to the drain and open the hose end plug.
To clean:
To remove sludge after draining open all drain doors (see Figure 22), hose out tank interior to flush sludge into
area near drain. The float and the float cage should be flushed clean. Remove clean out caps and flush
pickup tubes in tank and squeegee hoses (see Figure 22)
Accumulations of sludge greater than 2" will tend to clog the drain valves and the drain hose.
1-37 American-Lincoln Technology
NOTE
772 Operator’s Manual
Page 38

SERVICING THE SOLUTION TANK
)
LOCK NUT
Standard Machine:
-Periodically remove and clean out the solution inlet filter from the left hand & right hand side tanks.
Camel Machine:
-Inspect, remove, and clean inlet filters on the bottom of the left hand and right had tanks
-Sediment on the floor of each tank should be flushed periodically (use pipe plug on rear of tanks)
-The crossover hoses should be disconnected and flushed periodically.
FILL DOOR
CLEAN
UT DOOR
SHUT
P4244
OFF VALVE
P4244 FIGURE 23
INLET FILTER
(INSIDE TANK
SERVICE INSTRUCTIONS
STEM
P4202
P4202 FIGURE 24
VACUUM RELIEF VALVE
The vacuum manifold inlet system is equipped with a factory adjusted relief valve that limits the vacuum
produced by the air turbine to 90" to 95" of water.
CAUTION
Continuous operation at vacuum pressures exceeding 95" of water will cause excessive heat in the turbine and
will cause turbine failure.
The relief valve is located under the turbine cover and is part of the air inlet system to the turbine.
To check the factory setting:
1. Remove the squeegee suction hoses from the recovery tank pickup hoses.
2. Cover one inlet pipe (must be airtight seal).
3. Run engine at governed rpm (1450).
4. Pace vacuum gauge on other inlet pipe and check reading.
To adjust the relief valve setting:
1. Hold the stem to keep it from turning.
2. Turn the lock nut clockwise to increase the setting.
3. Turn the lock nut counterclockwise to decrease the setting.
American-Lincoln Technology 1-38
772 Operator’s Manual
Page 39

SERVICE INSTRUCTIONS
P4245a1 FIGURE 25 P4245a2 FIGURE 26
CHECKING ENGINE OIL LEVEL
Check the engine oil level daily or every 10 hours.
To check the engine oil level:
Before checking the oil level, stop the engine and wait a short time for the oil to drain back into the oil pan.
1. Check the oil by means of the dipstick (see Figure 25, Item 2)
2. If necessary, remove the filter plug (see Figure 25, Item 1) and top off with fresh oil to the upper mark on
the dipstick. Do not overfill.
CHANGING ENGINE OIL & FILTER
Change the engine oil and filter every 300 hours under normal operating conditions and every 200 hours under
continuous full load conditions.
Oil and filter change interval adjustment based on diesel fuel sulfur content normal operation conditions.
% Sulfur
Content
0.5-1.0
1.1-1.3
To change the engine oil and filter:
1. With the engine off, but at normal operating temperature, remove the drain plug (see Figure 26, Item 2)
and drain the oil. Install the plug after the oil has drained.
2. Remove and discard the filter (see Figure 26, Item 1).
3. Coat the gasket on a new filter with a film of oil. Screw the filter into place until the gasket contacts its
mating surface, then turn the filter approximately ¾ of a turn by hand. Do not over tighten.
4. Add new oil of the type specified (see Ford Tractor operator’s manual, Section C for correct oil grade.)
5. Start the engine and check the filter for leaks.
6. Stop the engine and wait for a short time for the oil to drain into the oil pan and check oil level by means of
the dipstick.
7. Add clean oil as necessary to raise the oil level to the upper mark on the dipstick.
Change Interval
(Hours)
150
75
C2012
1-39 American-Lincoln Technology
772 Operator’s Manual
Page 40

SERVICE INSTRUCTIONS
P4245b1 FIGURE 27 P4245b2 FIGURE 28
CHECKING THE ENGINE COOLING SYSTEM
Under some operating conditions there is a tendency for the coolant to boil and be expelled out of the radiator
expansion chamber overflow tube (see Figure 27). Normally, this loss of coolant would be of little consequence, but repeated occurrences can lead to considerable loss of coolant and would be necessitate topping
off the radiator.
WARNING
If the engine has overheated, allow time for the engine to cool before attempting to open the radiator cap.
WARNING
The cooling system operates under pressure. It is dangerous to remove the cap while the engine is warm. To
open the radiator cap while the engine is warm, follow these instructions: use a thick rag and turn the cap to the
first stop and wait for the pressure to escape, then carefully remove the cap.
To check the radiator coolant level:
With the engine cool:
1. Remove the filter cap (see Figure 27, Item 1)
2. Check that the coolant is level with the bottom of the filter tube (see Figure 27, Item 2)
3. If necessary, fill the radiator to the bottom of the filter tube
It is recommended that a solution of 50% water and 50% anti-freeze be premixed with 5% inhibitor and kept
handy as a top off solution.
See the Ford 3930 operator’s manual for more information on coolant capacity, anti-freeze specifications,
clean water properties, and inhibitors.
IMPORTANT
It is essential that a Ford New Holland approved cap is used. If replacement of the original cap becomes neces-
sary, obtain a replacement for your Ford New Holland Dealer.
CHECKING THE FUEL FILTER/SEDIMENT SEPARATOR
Check the fuel filter/sediment separator daily. Water and/or sediment in the glass bowl of sediment separator
indicates the need to drain the bowl and replace the filter if needed (based on interval since the last filter
change).
To drain the sediment separator:
1. Turn the drain plugs counterclockwise (see Figure 28, Item 1) and allow the contaminated fuel to drain.
2. Close the drain plugs by turning clockwise. Check for leaks from the plugs after tightening.
American-Lincoln Technology 1-40
772 Operator’s Manual
Page 41

SERVICE INSTRUCTIONS
P4245c1 FIGURE 29 P4245c2 FIGURE 30
CHECKING THE FUEL FILTER/SEDIMENT SEPARATOR (cont.)
After draining the filter/separator, bleed the fuel injection system as outlined below.
WARNING
Do not use fuels or solvents in a confined area. Work in a well ventilated area.
To change the fuel filter:
1. Close the fuel tank shut off by turning in a clockwise direction.
2. Unscrew the central retaining bolts (see Figure 29, Item 1)
3. Remove the glass bowl (see Figure 29, Item 4)
4. Remove the filter element and filter bowl, discard element (see Figure 29, Items 2 & 3)
5. Using clean fuel, clean and rinse all removed parts
6. Install a new filter element and gaskets.
7. Reinstall the bowl
8. Open the shut off valve and bleed the fuel system
BLEEDING THE FUEL SYSTEM (DIESEL ENGINES ONLY)
After changing the fuel filter or other fuel system components it may be necessary to bleed the fuel system to
remove any air bubbles that may be present.
WARNING
Diesel fuel or hydraulic fluid escaping under pressure can penetrate skin causing injury. Do not use your hand to
find leaks. Use a piece of paper or cardboard as a tool to assist in finding leaks on a pressurized system.
To bleed the fuel system:
1, Loosen the filter bleed screw (see Figure 30, Item 1)
2. Observe the fuel as it escapes the bleed screw hole.
3. Once the fuel is free of air bubbles, retighten the filter bleed screw.
To bleed the injection pump:
1. Loosen the injection pump bleed screw (see Figure 31, Item )
2. Pull the engine stop control out.
3. Crank the engine until the fuel coming out of the bleed screw is free of air bubbles.
4. Tighten the bleed screw.
1-41 American-Lincoln Technology
772 Operator’s Manual
Page 42

SERVICE INSTRUCTIONS
P4245d1 FIGURE 31 P4245d2 FIGURE 32
SERVICEING THE AIR CLEANER
The air cleaner consists of an inner and an outer paper element and is located under the radiator cowling.
Periodically squeeze the end of the rubber dust collector (see Figure 32, Item 2). Inspect and replace if
necessary. Clean the air cleaner outer element (see Figure 32, Item 1) whenever the air restriction indicator
light on the instrument panel illuminates while the engine is running. If there is dust inside the outer element it
must be replaced.
IMPORTANT
Clean the outer element only when the restriction indicator light illuminates while the engine is running. Unnec-
essary and too frequent cleaning exposes the elements to handling damage, which could allow dust and dirt to
bypass the filtering process and cause engine, wear.
IMPORTANT
Compressed air, not to exceed 30 psi may be used for cleaning. Blow dust from the inside to the outside by
inserting the nozzle inside the element. Blow loose particles from the outside by holding the nozzle at least 6"
from the element.
IMPORTANT
Do not use water hotter than the hand can stand to wash the element, as the element will be damaged. Never
wash the element with fuel oil, gas, or solvent. Do not oil the element. Rinse the element with clean water from
the inside to the outside to thoroughly loosen all foreign material. Shake excess water from the element and
allow it to air dry.
IMPORTANT
Do not dry the element with compressed air, as the air will rupture a wet element.
To clean the air filter:
1. Remove the filter element as shown in Figure 32.
2. Check the rubber seal on the end of the element for adhesion. If it is loose, install a new element. A
loose, damaged, or missing seal will allow dust to enter the engine, causing severe engine wear.
3. Clean the element by tapping it against the palm of your hand. Do not beat the element against the tire or
a hard surface, as damage to the element will result.
4. Clean the inside of the canister with a damp, lint-free cloth, then reinstall the element.
5. Check and tighten all air induction before resuming operation.
American-Lincoln Technology 1-42
772 Operator’s Manual
Page 43

SERVICE INSTRUCTIONS
P4245e1 FIGURE 33 P4245e2 FIGURE 34
To wash the element:
Wash the dry air cleaner element to remove exhaust smoke or film or after five cleanings.
1. Remove the filter element as shown in Figure 32.
2. Inspect the seal on the end of the element for damage. IF the gasket is damaged or missing, install a new
element.
3. Agitate the element in warm water containing a small amount of non-sudsing detergent
4. Rinse the element with clean water from the inside to the outside to thoroughly loosen all foreign material.
5. Shake excess water from the element and allow to air dry.
6. After drying, check for damage by holding a light inside the element. If an even fine pattern of light is
seen, the element is clean and undamaged. Any large spots of light indicate damage, which requires that
the element be changed.
7. Wipe the canister free of dust, then install the element
8. Check and tighten all air induction connections before resuming operation.
To change the air filter element:
Change the air cleaner element annually, whenever inspection shows the element to be damaged, or after ten
cleanings, whichever occurs first.
To change the air filter element:
1. Remove the filter element as shown in Figure 32.
2. Wipe the inside of the filter canister free of dust.
3. Install the new element.
IMPORTANT
Do not remove or disturb the inner element. IF, after servicing or renewing the outer element, the air cleaner
restriction warning light still does not extinguish when the engine is running then the inner element requires
attention. Authorized Ford New Holland Dealer should only service the inner element.
SERVICING THE TRANSMISSION
To check the oil level:
Check the transmission oil level every 300 hours.
1. With the tractor standing level and the engine turned off, check the oil level by removing the dipstick (see
Figure 33, Item 2) from the right side of the transmission case.
2. If oil is low, remove the filter plug (see Figure 33, Item 1) and add new oil of the type specified to bring the
oil up to level on the dipstick. (See Ford operator’s manual for specific type oil to use.)
1-43 American-Lincoln Technology
772 Operator’s Manual
Page 44

SERVICE INSTRUCTIONS
P4245f1 FIGURE 35 P4245f2 FIGURE 36
To change the oil:
Change the transmission oil every 1200 hours.
1. With the transmission oil at normal operating temperature, drain and discard the oil by removing the
transmission drain plug (see Figure 34, Item 1). Install the plug after the oil has drained.
2. Remove the filter plug (Figure 33, Item 1) and fill the transmission with new oil of the type specified. (See
Ford operator’s manual for specific type recommended.)
SERVICING THE POWER STEERING HYDRAULICS
To check the oil level:
Check the power steering fluid daily and top off as necessary.
1. Unscrew the filter cap and check that the oil is level with the bottom of the filter neck (see Figre 35, Item
4). Top off as necessary.
To change the power steering filter and oil:
Change the power steering oil and filter every year or 1200 hours.
1. Disconnect the oil cooler pipes at the unions provided (see Figure 35, Item 3).
2. Remove the retaining bolt on the cooler and remove the cooler complete with piping (see Figure 35, Item
5).
3. Remove the central bolt (see Figure 35, Item 2) and ease the reservoir casing rearward. Catch the oil in a
suitable container.
4. Remove and discard the filter and oil ring (see Figure 36, Items 1 & 2)
5. Clean the pump with a clean lint-free cloth.
6. Install new filter and seal.
7. Assemble the reservoir casing to the pump ensuring that the breather is in line with the projecting lug on
the pump body (see Figure 35, Item 7).
8. Refit the oil cooler and pipework to the pump.
9. Fill the reservoir with new oil to the bottom of the filter neck. (See Ford operator’s manual for specific type
recommended.)
10. With the engine running, bleed the system by turning the steering wheel from stop to stop several times to
allow the sir in the system to escape.
11. Recheck the reservoir oil level and top off as necessary.
American-Lincoln Technology 1-44
772 Operator’s Manual
Page 45

SERVICE INSTRUCTIONS
P4245g1 FIGURE 37 P4245g2 FIGURE 38
SERVICING THE HYDRAULIC LIFT SYSTEM (REAR AXLE)
To check the lift system oil level:
Check the hydraulic system (rear axle) oil every 50 hours.
1. With the tractor standing level, all the hydraulic rams in the extended position, check that the oil is level
with the upper mark on the dipstick (see Figure 37, Item 1)
2. If it is low, remove the filter plug and add oil to bring the oil level up to the full mark on the dipstick (see
Figure 37, Item 2).
3. Install the filter plug.
To change the lift system oil:
Change the hydraulic lift system (rear axle) oil every 1200 hours. With the tractor standing level, the hydraulic
lift arms in the lowered positions and any external cylinders retracted,
1. Drain and discard the oil by removing the rear axle drain plug (see Figure 38, Item 1).
2. Install the plug after the oil has drained.
3. Remove the filter plug (see Figure 37, Item 2) and fill the rear axle with fresh oil of the type recommended.
4. Start the engine and fully raise the lift arms. Also extend any external hydraulic cylinders. Add oil as
required until full.
5. Install the filter plug.
To change the hydraulic lift oil filter:
Change the hydraulic lift oil filter every 300 hours (see Figure 39, Item 1).
1. Remove and properly dispose the old filter.
2. Lightly oil the replacement filter seal and tighten by hand. Do not over tighten.
LUBRICATION FITTINGS
The following lubrication points require the application of good quality grease every 50 hours. In extremely
dirty conditions, lubricate more often. See Ford 3930 operator’s manual for additional information on lubrication requirements and specific type of grease to use.
-Front Wheel Hubs
-Front Wheel Spindles
-Brake and Clutch Pedal Pivots
-Power Steering Cylinder Pivots
-Hydraulic Lift Linkage
1-45 American-Lincoln Technology
772 Operator’s Manual
Page 46

SERVICE INSTRUCTIONS
P4245h1 FIGURE 39 P4245h2 FIGURE 40
To drain and flush the engine cooling system:
With the engine cool, drain and refill the cooling system as follows:
Drain the radiator and engine block based on type of coolant used as indicated below.
Plain water - drain, flush, and refill every 6 months, add rust inhibitor
Permanent Antifreeze (regular Ethylene Glycol) - change every 12 months
Long-Life (Ford) Antifreeze - change every 24 months.
WARNING
The cooling system operates under pressure. It is dangerous to remove the radiator cap while the system is hot.
Always cover the cap with a thick cloth and turn the cap slowly to the first stop. Allow all pressure to escape
before removing the cap completely.
IMPORTANT
Alcohol-type antifreeze is not recommended. Do not mix alcohol-type solution with permanent or long-life types
of antifreeze.
IMPORTANT
If plain water is used, be sure to add rust inhibitor to prevent corrosion of the water pump seal.
To drain the system:
1. Remove the radiator cap and open the drain valve at the radiator (see Figure 40, item 1).
2. Open the drain valve at the engine block (see Figure 41, Item 1).
3. Allow the coolant to drain, then close the two drain valves and slowly refill the system.
4. Clean the radiator cap and seal. Install the cap.
5. Run the engine until normal operating temperature is reached, then stop the engine and check the coolant
level.
6. Add coolant as necessary.
IMPORTANT
Do not run engine when the cooling system is empty. Do not add cod water or cold antifreeze solution if the
engine is hot.
American-Lincoln Technology 1-46
772 Operator’s Manual
Page 47

SERVICE INSTRUCTIONS
P4245i1 FIGURE 41 P4245i2 FIGURE 42
To adjust the fan belt:
Check the condition and tension of the fan belt every 300 hours. If the belt is frayed or cracked, install a new
belt.
WARNING
Never attemp to loosen or tighten the alternator mounting bolts when the engine is running.
To adjust belt tension:
1. Loose the alternator mounting bolts (see Figure 42, Items 1 &2).
2. Pry the alternator away from the engine and tighten the mounting bolts.
3. Check belt deflection by applying 25 lbs. pressure on the fan belt between the alternator and crankshaft
pulleys. An old belt should deflect about ¾”. A new belt about ½”.
To service the alternator:
The alternator (see Figure 42) is belt driven by the fan belt from the engine crankshaft pulley. It is important
that belt slippage does not occur, otherwise the charging rate will be affe3cted. Other than belt adjustment, the
only maintenance required on the alternator is to periodically inspect the terminals and keep them clean and
tight. Also occasionally clean the alternator cooling fan.
IMPORTANT
Do not short the field terminal of the alternator to the ground.
Do not disconnect the voltage regulator while the alternator is running.
Do not remove the alternator without first disconnecting the negative battery cable.
When installing a battery make certain that positive cable is connected first and the negative cable is connected
to the ground. Reverse polarity will destroy the rectifier diodes in the alternator.
When using jumper cables to start your tractor, always connect the positive terminals of both batteries to each
other, and the negative terminals to each other.
To service the voltage regulator:
The voltage regulator is mounted behind the battery. The unit is sealed and cannot be adjusted. If replacement is required, consult your Ford Tractor Dealer.
1-47 American-Lincoln Technology
772 Operator’s Manual
Page 48

SERVICE INSTRUCTIONS
To service the battery:
Check the electrolyte level in the battery every 50 hours.
CAUTION
When the alternator is charging, an explosive gas is produced inside the battery. Always check the electrolyte
level with the engine stopped. DO not use an exposed flame and do not smoke when checking the battery.
To check the battery electrolyte level:
1. Clean the top of the battery and remove the vent plugs.
2. Check the electrolyte level. A properly filled battery will have liquid up to the rings on the inside of the fill
wells. In any case the electrolyte level should not be allowed a ¼” above the plates in the battery.
3. If the electrolyte level is low, add distill water. The level is correct when the liquid just covers the ring in the
filter wells, the top of the red shield, or ¼” abovce the plates, depending on the type of battery.
4. Install the vent plug after making sure the breathing holes are not blocked. At below freezing temperature,
be sure to run the engine for a period of time, after adding water, so the battery will charge and prevent
the water from freezing.
Keep the battery connections tight and free of corrosion. Use an ammonia or baking soda/water solution to
wash the outside surface and terminals of the battery. Make sure the solution does not enter the battery. After
cleaning, wash the battery with clear water. Protect the terminals from corrosion with a light application of
petroleum jelly.
In freezing temperatures, the battery must be maintained in a good state of charge. When a battery is discharged or run down, the electrolyte is weak and may freeze, damaging the case. If it becomes necessary to
add water (distilled), it should be done just before using the tractor so the charging will mix the water with the
electrolyte and prevent the water from freezing.
IMPORTANT
Keep distilled water in a clean, well covered, nonmetallic container.
When installing a battery, make certain the positive cable is connected first and the negative cable is connected
to the ground. Reverse polarity will destroy the rectifier diodes in the alternator.
When using jumper cables to start your tractor, always connect the positive terminals of both batteries to each
other, and the negative terminals to each other.
TIRE SERVICE INSTRUCTIONS
Check tire pressure every 50 hours.
Tire inflation pressure:
Front 40psi
Rear 25 psi
When checking the tire pressure, inspect the tire for damaged side walls and tread cute. Neglected damage
will lead to early tire failure.
To service the fuel injection pump:
Consult your Ford 3930 operator’s manual to determine if repairs or adjustments are required. If replacement
of the pump is necessary, consult the Ford 3930 operator’s manual.
American-Lincoln Technology 1-48
772 Operator’s Manual
Page 49
SERVICE INSTRUCTIONS
P4245j1 FIGURE 43 P4245j2 FIGURE 44
BRAKE ADJUSTMENT
If the brake pedal travel becomes excessive, or if the travel of one pedal is not equal to the other, adjust in the
following manner:
1. Disconnect the brake return spring on the right pedal allowing the pedal to drop.
2. Push the pedal down to take up any slack in the linkage.
3. Loosen the lock nut (see Figure 43, Item 2) next to the pull rod nut (see Figure 43, Item 1) and turn the pull
rod nut until the pedal is 1½” to 1¾” below the left pedal.
4. Tighten the lock nut.
5. Disconnect the brake return spring on the left pedal allowing the pedal to drop.
6. Push the pedal down to take up any slack in the linkage.
7. Loosen the lock nut (see Figure 43, Item 2) next to the pull rod nut (see Figure 43, Item 1) and turn the pull
rod nut until the left pedal is level with the right pedal.
8. Check for adjustment be engaging the brake pedal lock. The brake pedal lock should engage easily. if the
pedals are aligned. This will give even braking action, which is particularly important at road speeds.
9. Tighten the lock nut and install both brake pedal return springs.
10. Road test the tractor to make sure the braking action of both rear wheels is equal.
CLUTCH PEDAL ADJUSTMENT
To obtain maximum clutch life, it is essential that the clutch pedal free travel be checked every 50 hours to
maintain free travel at 1¼”. Free travel is the distance the pedal can be moved before resistance is met. If the
pedal free travel is excessive or insufficient, adjust as follow:
1. Loosen the clevis lock nut (see Figure 44, Item 1) and remove the cotter pin and clevis pin (see Figure 44,
Item 3).
2. Turn the clevis to increase or decrease the effective length of the operating rod until the correct pedal free
travel is obtained.
3. Install the clevis pin and secure with a new cotter pin and tighten the clevis lock nut.
4. Recheck the pedal free travel. Readjust if necessary.
1-49 American-Lincoln Technology
772 Operator’s Manual
Page 50

SERVICE INSTRUCTIONS
To change the spark plugs:
To maintain peak engine efficiency and performance, clean the spark plugs every 300 hours and install new
plugs every 600 hours.
To remove the spark plugs:
1. Gain access to the spark plugs by loosening the battery tray wing nut and swinging the battery out.
2. Remove the distributor-to-spark plug wire from the plugs.
3. Remove the high tension wires. Using a spark plug socket, remove the spark plugs and inspect for dam
aged insulators, fouling, and excessive electrode erosion. If serviceable, clean with sandblasting equip
ment.
4. Check the gap with a wire gauge. Adjust the gap to 0.023-0.027".
5. Install the plugs and tighten them to 26-30 lbs./ft.
6. Connect the wires and move the battery back into position.
TO CHANGE DISTRIBUTOR POINTS
Replace distributor points every 600 hours. See your Ford 3930 operator’s manual for detailed service instructions.
TO CHECK THE VALVE CLEARANCE (LASH)
Correct valve clearance is important for good engine performance. Check and adjust the valves every 300
hours. See the Ford 3930 tractor operator’s manual for instructions on setting valve clearance (Lash).
TO SERVICE THE FUEL INJECTORS
The injectors should be checked/cleaned every 600 hours. New injectors are available from your Ford Tractor
Dealer. Consult the Ford 3930 operator’s manual for detailed service instructions.
TO ADJUST THE ENGINE SPEED ADJUSTMENT
Engine speed is set at the factory at 1550-1600 maximum no load rpm. Low idle is set at the factory at 600850 rpm. See your Ford 3930 operator’s manual for adjustment instructions.
FRONT WHEEL BEARINGS
Front wheel bearings should be removed and packed every 600 hours. Refer to the Ford 3930 operator’s
manual for complete instructions on front wheel bearing service instructions.
American-Lincoln Technology 1-50
772 Operator’s Manual
Page 51

STANDARD HARDWARE TORQUE VALUES
SAE - Grade 5
C
14
27
39
86
15
28
44
68
98
135
239
387
579
Grade
5
Plated
Grade
8
Plated
FFF
15
28
43
108
17
31
49
76
110
153
267
-
-
C
-
-
-
130
22
40
63
95
138
191
338
545
818
-
-
-
151
24
44
70
108
155
216
378
-
-
410H
Stainless
C
18
33
47
114
19
34
55
85
-
-
-
-
-
20
35
54
132
22
39
62
95
-
-
-
-
-
Screw
Size
*6
*8
*10
*1/4
5/16
3/8
7/16
1/2
9/16
5/8
3/4
7/8
1
C = Coarse Thread
F = Fine Thread
* = Torque values for #6 through 1/4 are lb./in. All others are lb./ft.
Brass
5
9
13
32
6
10
16
-
-
-
-
-
-
SAE - Grade 8
Type
F&T
&BT
C
20
37
49
120
-
-
-
-
-
-
-
-
-
F
23
41
64
156
-
-
-
-
-
-
-
-
-
Type
B, AB
21
34
49
120
-
-
-
-
-
-
-
-
-
Decrease the torque by 20% when using thread lubricant
The torque tolerance is ± on torque values.
C2000/9905
1-51 American-Lincoln Technology
NOTE
772 Operator’s Manual
Page 52

HYDRAULIC FITTING TORQUE CHART
HYDRAULIC TAPERED O-RING FITTING
TORQUE CHART
TUBE
OD in.
0.25
0.38
0.50
0.62
0.75
1.00
SIZE
THREAD
SIZE
0.44"-20
0.56"-18
0.75"-16
0.88"-14
1.12"-12
1.31"-12
MINIMUM
TORQUE
6 ft./lbs.
13 ft./lbs.
20 ft./lbs.
25 ft./lbs.
45 ft./lbs.
60 ft./lbs.
NOTE
Do not use sealant on O-Ring threads.
HYDRAULIC TAPERED PIPE FITTING (NPT)
TORQUE CHART
MINIMUM
TORQUE
MAXIMUM
TORQUE
9 ft./lbs.
20 ft./lbs.
30 ft./lbs.
40 ft./lbs.
70 ft./lbs.
90 ft./lbs.
MAXIMUM
TORQUE
¼NPT
½NPT
¾NPT
TUBE
OD in.
0.25
0.38
0.50
0.62
0.75
1.00
10 ft./lbs.
25 ft./lbs.
50 ft./lbs.
NOTE
Ratings listed are when using teflon thread seal.
HYDRAULIC TAPERED SEAT (37º FLARE)
FITTING (JIC) TORQUE CHART
THREAD
SIZE
0.44"-20
0.56"-18
0.75"-16
0.88"-14
1.12"-12
1.31"-12
30 ft./lbs.
50 ft./lbs.
100 ft./lbs.
MAXIMUM
TORQUE
9 ft./lbs.
20 ft./lbs.
30 ft./lbs.
40 ft./lbs.
70 ft./lbs.
90 ft./lbs.
American-Lincoln Technology 1-52
772 Operator’s Manual
Page 53

FRACTION FRACTION
DECIMAL DECIMAL
MILLIMETER MILLIMETER
C-2001/9907
DECIMAL METRIC CONVERSION CHART
1-53 American-Lincoln Technology
772 Operator’s Manual
Page 54

TROUBLESHOOTING GUIDE - SCRUBBING SYSTEMS
TROUBLESHOOTING - SCRUBBING SYSTEMS
PROBLEM
Poor scrubbing action
Poor solution pick up
PROBABLE CAUSE
1. Worn scrubbing brushes
2. Incorrect method of operation
3. Wrong cleaning agent or mixture
4. Poor scrubbing distribution
5. Low engine rpm
6. Hydraulic system
7. Hydraulic Drive
1. Clogged suction hoses or pick up tools
2. Loose connections between suction hose &
squeegee or between manifold & turbine inlet.
REMEDY
1. Inspect brushes. If brushes are worn
to ½" or less, replace all 4 brushes
2. Check scrubbing procedure, brush
pressure, type of brush solution flow &
cleaning chemical used. For extreme
conditions double scrubbing may be
necessary.
3. Use A-L recommended materials.
4. Clean out distribution tube & metering
holes to brushes. Check feed hose &
clean if necessary. Check valve &
cable control system.
5. Check rpm.
6. See "hydraulic system" troubleshooting
7. Check motors to see if worn or
damaged.
1. Disconnect suction hose from
squeegee, flush squeegee & hoses.
2. Check all hose connections for
looseness or damage.
3. Vacuum turbine not operating
4. Vacuum float shut off
5. Power take off not engaged.
6. Drain valve or drain door leakage or not
properly closed.
Splash control 1. Brush drive splash skirts - more than 1/8"
Brush wear
from floor
2. Splash skirts worn
3. Too much solution being applied
1. Lift chain(s) not adjusted properly.
2. Brush housing sections binding with linkage
3. One or more counterbalance spring missing.
3. Check all air discharge at turbine muffler
Check for slipping or broken drive belt(s).
4. Excessive solution recovery, drain tank.
Excessive foam build up, change
cleaning chemical mixture.
5. Engage power take off
6. Close, repair, or replace.
1. Readjust to 1/8" clearance.
2. Replace & adjust
3. Shut off solution flow 5' to 10' before
making turns.
1. Inspect for slack with brushes down.
Adjust as necessary.
2. Check and repair.
3. Check and repair.
American-Lincoln Technology 1-54
772 Operator’s Manual
Page 55

TROUBLESHOOTING GUIDE - HYDRAULIC SYSTEM
TROUBLESHOOTING - HYDRAULIC SYSTEM
PROBLEM
Brushes not turning or
turning slowly (196 rpm
at 1450 engine rpm)
Brushes not lifting
Brushes not lowering 1. Lock off valve closed
1. Faulty relief valve(s)
2. Worn drive motor
3. Worn valve spool
4. Worn gear pump
5. Low engine rpm
6. Low sump oil level
7. Clogged pump inlet filter
1. Cylinder piston leakage
2. Valve spool leakage
3. Worn gear pump
4. Lock off valve closed.
PROBABLE CAUSE
SQUEEGEE CONTROL SYSTEM
REMEDY
1. Check relief valve pressure, should be
2500 psi.
2. Repair or replace
3.
Repair or replace
4.
Repair or replace
5. Check rpm.
6. Check and fill
7. Replace
1.
Repair or replace
2.
Repair or replace
3.
Repair or replace
4. Open valve
1. Open valve
PROBLEM
Failure to lift, control lever
full up
Failure to lift with shift
lever in reverse (control
lever up)
Failure to lower with shift
lever in forward gears
(control lever down)
PROBABLE CAUSE
1. Piston seals
2. O-ring seals
3. Relief valve in tractor
4. Internal linkage
5. Cross shaft seized
1. Linkage adjustment
1. Linkage adjustment
2. Control valve stuck in lift position
REMEDY
1.
Repair or replace
2. Repair or replace
3.
Repair or replace
4.
Repair or replace
5.
Repair or replace
1. Readjust - see automatic squeegee
lift adjustment in maintenance section.
1. Readjust automatic squeegee lift linkage
2. Repair or replace
1-55 American-Lincoln Technology
772 Operator’s Manual
Page 56

TROUBLESHOOTING GUIDE - POWER STEERING SYSTEM
TROUBLESHOOTING - POWER STEERING SYSTEM
PROBLEM
No steering or excessive
effort required to steer
Steering wanders
PROBABLE CAUSE
1. Incorrect oil level in reservoir
2. Air in system
3. Pump relief valve faulty
4. Worn pump
5. Leaking power cylinder
6. Damaged or binding rock shaft
7. Control valve worn or damaged
8. Broken or damaged steering column flange
and insulator assembly (hydrostatic steering)
9. Damaged or worn metering element
(hydrostatic steering)
1. Excessive play in steering linkage ball joints
2. Incorrect adjustment of rocker shaft free play
3. Excessive play in worm and nut assembly
REMEDY
1. Fill with the correct grade and quantity
of oil
2. Check for loose connections or damaged
tubing. Purge system of air.
3. Check system pressure
4. Inspect and repair
5.
Inspect and repair
6.
Inspect and repair
7.
Inspect and replace
8. Inspect and replace
9. Inspect and replace
Inspect and replace
1.
2. Check and adjust
3. Impact and replace
Front wheels surge when
steering
Noisy pump
4. Leaking power cylinder
5. Control valve spool sticking or worn
6. Weak or broken control valve return springs or
torsion bar.
7. Incorrect valve spool shimming adjustment
(hydrostatic steering)
8. Damaged or worn metering element
(hydrostatic steering)
1. Leaking power cylinder
2. Control valve spool sticking
3. Weak or broken control valve return springs or
torsion bar.
4. Damaged or worn metering element
(hydrostatic steering)
1. Incorrect oil level in reservoir
2. Air in system
3. Water in oil
4.
Inspect and repair
5.
Inspect and replace
6.
Inspect and repair
7. Check and adjust
8. Inspect and replace
1.
Inspect and repair
2.
Inspect and repair
3.
Inspect and repair
4. Inspect and replace
1. Fill with the correct grade and quantity
of oil.
2. Check for loose connections or damaged
tubing. Purge system of air.
3. Drain and renew the oil
American-Lincoln Technology 1-56
772 Operator’s Manual
Page 57

TROUBLESHOOTING GUIDE - GAS/DIESEL ENGINE SYSTEMS
PROBLEM
PROBABLE CAUSE
REMEDY
Engine does not develop
full power - Gas Engine
1. Clogged air cleaner
2. Improper governor linkage adjustment
3. Carburetor and choke out of adjustment
4. Low coil voltage
5. Improper breaker point dwell or gap
6. Faulty ignition timing
7. Improper valve lash adjustment
8. Worn or bent push rods
9. Burned, worn, or sticking valves
10. Improper valve timing
11. Blown or burned head gasket
12. Low cylinder compression
1. Clean or renew element
2. Check and reset
3.
4. Check and replace coil if necessary
5.
6.
7.
Check and reset
Check and reset
Check and reset
Check and reset
8. Check and replace
9. Check and replace
10. Check and reset
11. Check head flatness and fit new gasket
12. Replace piston rings or rebore/
resleeve as necessary.
Engine does not develop
full power - Diesel Engine
1. Clogged air cleaner
2. Fuel line obstructed
3. Faulty injectors
4. Low cylinder compression
5. Incorrect valve lash adjustments
6. Burnt, worn, or sticking valves
7. Blown head gasket
8. Incorrect fuel delivery
1. Clean or renew element
2. Clean
3. Clean and reset
4.
5. Check and reset
6. Replace valves and/or guides
Replace piston rings or rebore/
resleeve as necessary.
7. Check head flatness and fit new gaskets
8. Check injectors and pump
TROUBLESHOOTING - GAS/DIESEL ENGINE SYSTEMS
1-57 American-Lincoln Technology
772 Operator’s Manual
Page 58

TROUBLESHOOTING GUIDE - LP ENGINE SYSTEMS
TROUBLESHOOTING - LP ENGINES
PROBLEM
NOTE: ALWAYS CHECK THROUGH LP FUEL SYSTEM IN ORDER OF NUMERICAL SEQUENCE.
Will not start
Fuel tank
(1)
Fuel lines
(2)
PROBABLE CAUSE
1. Check fuel tank type and fuel supply
(vapor tank for vapor withdrawal system)
2. Be sure tank hand valve is open (always
open valve slowly). If hand valve is
opened too fast, shut-off valve in tank
will automatically shut off fuel supply. If
this happens, close the hand valve and
then reopen it slowly.
1. Check hoses, connections, leaks, etc.,
using soap bubble test method.
2. When changing LP fuel tanks, always be
sure fuel is getting into carburetor. Crank
engine briefly and push primer button
until vapor fumes are smelled or are
visible at carburetor or around air filter.
3. Check fuel tank and lines for frosting up.
To relieve frosting, open shut-off valve
slowly (¼ open). Start engine and idle
until warm. Then open tank valve
completely before loading the engine. If
frost forms on connection fittings, check
for fuel leakage, kinked lines, or
restriction at frost points.
REMEDY
Ignition System
(3)
Carburetor
(4)
4. Check fuel filter. Remove and clean it if
dirty filter is restricting fuel line. Check
quick-disconnect fitting at LP tank: if LP
tank is not properly sealed, no fuel will
flow through the line. A broken fuel line
or loose connection could cause the tank
shut-off valve to close.
1. Remove and check spark plugs to be
sure it is the correct type with proper gap.
2. Check ignition points and condenser
3. Check ignition coil.
4. Check ignition switch
]
5. Check wiring for loose connections or
wire breakage. Check battery terminals
for corrosion or loose ground cable.
Check for possible shorts in wiring.
6. Battery dead.
1. Always check carburetor for proper
settings before tampering with regulator
adjustment.
2. Flooded carburetor - Shut off LP tank
valve with ignition switch "on"; crank
engine through a few times. If engine
starts, then slowly open tank valve to
provide fuel flow through line. If engine
does not start, then choke engine and
use standard starting procedure.
American-Lincoln Technology 1-58
772 Operator’s Manual
Page 59

TROUBLESHOOTING GUIDE - LP ENGINE SYSTEMS
TROUBLESHOOTING - LP ENGINES
PROBLEM
NOTE: ALWAYS CHECK THROUGH LP FUEL SYSTEM IN ORDER OF NUMERICAL SEQUENCE.
Regulator
(5)
Engine
(6)
Runs unevenly & lacks
power
Fuel Tank
(1)
Fuel lines
(2)
PROBABLE CAUSE
1. Be sure carburetor is properly adjusted
before attempting to adjust regulator
settings. Be sure it is functioning
properly. In troubleshooting, be sure all
of the previous five check points have
been checked thoroughly before making
any adjustment to regulator.
1. Under ordinary circumstances, an engine
should start easily of the components
previously mentioned have been checked
through and properly adjusted. On an
older engine, if proper adjustment on
other components are correct, it is
possible that major repairs may be
required to the basic engine.
1. Out of fuel
2. Check fuel tank type and fuel supply
(liquid tank for liquid withdrawal system)
1. Broken fuel line or loose line connection
could cause tank internal shut-off valve to
close automatically and shut off the fuel
supply.
REMEDY
Stops during operation
Ignition System
(3)
Carburetor
(4)
Regulator
(5)
Fuel Tank
(1)
Ignition System
(2)
Carburetor
(3)
Regulator
(4)
1. Restricted air cleaner
2. Clean or replace filter element
1. Tank valve not opened sufficiently
2. Check fuel tank type and fuel supply
(liquid tank for liquid withdrawal system)
1. Check ignition for poor connections or
weak or worn ignition parts.
1. Check carburetor setting
2. Check ignition system
1. Could be improper setting. Allow too
rich or too lean mixture to carburetor.
Check and adjust only after checking
carburetor adjustment.
1-59 American-Lincoln Technology
772 Operator’s Manual
Page 60

TROUBLESHOOTING GUIDE - GENERAL ENGINE SYSTEMS
TROUBLESHOOTING - GENERAL ENGINE SYSTEMS
PROBLEM
Engine knocks
PROBABLE CAUSE
1. Diluted or thin oil
2. Insufficient oil supply
3. Low oil pressure
4. Excessive crankshaft end play
5. Flywheel or ring gear run-out excessive
6. Excessive connecting rod or main bearing
clearance
7. Bent or twisted connection rods
8. Crankshaft journals out of round
9. Excessive piston to cylinder bore cylinder
10. Excessive piston ring clearance
11. Broken rings
REMEDY
1. Drain and refill with specified oil and
replace filter. Ascertain cause of dilution
2. Check oil level and top up as necessary.
Overhaul or replace pump as necessary.
Check pump filter not clogged.
3. Overhaul pump or relief valve as
necessary.
4. Install new thrust bearing liner.
5. Skim flywheel or fit new ring gear
6. Install new bearing inserts and/or regrind
crankshaft
7. Replace connecting rods
8. Regrind crankshaft and fit undersize
bearing inserts.
9. Rebore/resleeve block and fit new pistons
10. Fit new pistons and rings.
11. Fit new rings. Check bore/pistons for
damage
Low oil pressure
Engine tends to keep firing
after fuel is shut off
12. Excessive piston pin clearance.
13. Piston pin retainer
14. Excessive camshaft end play
15. Imperfections on timing gear teeth
16. Excessive timing gear backlash
1. Engine oil low
2. Wrong grade of oil
3. Blocked oil pump sump screen
4. Oil pressure relief valve faulty
5. Oil pump drive shaft worn
6. Excessive oil pump rotor and assembly
clearance
7. Excessive main or connection rod bearing
clearances
1. Air cleaner dirty or restricted
12. Fit new piston pin and bush
13. Install new retainer. Check loose or
missing bore/pistons for damage.
14. Install new thrust plate
15. Renew timing gear
16. Renew timing gear
1. Top up, as necessary
2. Drain and refill with correct grade of oil
3. Clean pump screen
4. Fit new relief valve
5. Replace drive shaft
6. Overhaul pump shaft
7. Install new bearing inserts and/or
re-grind crankshaft
1. Clean or renew element
Excessive exhaust
smoke
1. Air cleaner dirty or restricted
2. Excessive fuel delivery
American-Lincoln Technology 1-60
772 Operator’s Manual
1. Clean
2. Overhaul injection pump/injectors
Page 61

TROUBLESHOOTING GUIDE - GENERAL ENGINE SYSTEMS
PROBLEM
PROBABLE CAUSE
REMEDY
Excessive oil consumption
1. Engine oil level too high
2. External oil leaks from engine
3. Worn valves, valve guides or seals
4. Head gasket not sealing
5. Oil loss past the pistons and rings
6. Oil cooler leak (if fitted)
1. Reduce oil level
2. Renew gaskets/seals, where necessary.
Check mating surfaces for damage or
distortion.
3. Replace
4. Renew gasket. Check head for damage
or distortion
5. Renew rings and/or rebore/resleeve
block as necessary
6. Repair/replace oil cooler assembly
TROUBLESHOOTING - GENERAL ENGINE SYSTEMS
Engine overheats 1. Hose connection leaking or collapsed
2. Radiator cap defective or not sealing
3. Radiator leakage
4. Improper fan belt adjustment
5. Radiator fins restricted
6. Faulty thermostat
7. Internal engine leakage
8. Water pump faulty
9. Exhaust gas leakage into cooling system
10. Coolant aeration
11. Cylinder head gasket improperly installed
12. Hot spot due to rust and scale or clogged
water jackets.
13. Obstruction to radiator air flow
14. Extended engine idling for long periods
15. Oil cooler tube blocked.
1. Tighten hose connection. Replace hose
if damaged
2. Replace radiator cap
3. Repair/replace radiator
4. Readjust fan belt
5. Clean with compressed air
6. Renew thermostat
7. Check for source of leakage. Renew part.
8. Overhaul water pump
9. Renew cylinder head gasket. Check head
for damage or distortion
10. Tighten all connections and check
coolant level is correct. Ensure head
gasket has not blown
11. Renew cylinder head gasket
12. Reverse flush entire cooling system
13. Remove the obstruction
14. Do not allow engine to idle
15. Clean
Oil pressure warning light
fails to operate
1. Bulb burnt out
2. Warning light pressure switch faulty
3. Warning light circuit faulty
1. Renew bulb
2. Renew pressure switch
3. Check and renew wiring
Water temp. gauge fails
to reach normal operating
temperature
1. Faulty temperature sender switch
2. Incorrect or faulty thermostat
3. Faulty water temperature gauge
1. Renew sender switch
2. Renew thermostat
3. Renew temperature gauge
1-61 American-Lincoln Technology
772 Operator’s Manual
Page 62

TROUBLESHOOTING GUIDE - CAMEL RECYCLING PUMP
TROUBLESHOOTING CHART - CAMEL RECYCLING PUMP
PROBLEM
Failure to pump
SUCTION
ROTOR
PORT
STATOR
DISCHARGE
PORT
PACKING
FLEXIBLE
JOINT
GLAND
PROBABLE CAUSE
1. Coupling slip
2. Stator torn
3. Wrong rotation
4. Threads in rotor or on shaft stripped
BALL
BEARING
REMEDY
1. Tighten set screw on coupling
2. Possible excessive pressure. Replace
stator, check pressure at discharge port.
Maximum pressure is 40 psi
3. Check for clockwise rotation when
facing shaft
4. Replace part, check for proper rotation
Pump Overhauls
Shaft leakage
Pump will not prime
Noise during operation
5. Excessive suction lift or vacuum
1. Excessive discharge pressure
2. Bearings worn
3. Broken flexible joints
4. Insufficient mounting
1. Leakage at startup
2. Persistent leakage
1. Air leak in suction side
1. Starved suction
2. Bearings worn
5. Check for obstructions inside intake line
1. Check discharge pressure. Maximum
pressure is 40 psi. Check for
obstructions at discharge port.
2. Replace parts, check alignment and
pressure at discharge ports (40 psi)
3. Replace part, check pressure at
discharge port
4. Check mounting to be sure pump is
securely mounted to base
1. Adjust packing
2. Packing rings and/or shaft keys may be
worn. Inspect and replace if necessary
1. Check all pipe connections at suction
side
1. Check fluid supply for obstructions in
supply line
2. Replace parts as required. Check
alignment and pressure at discharge
port (maximum pressure of 40 psi)
3. Broken flex joint
4. Insufficient mounting
American-Lincoln Technology 1-62
772 Operator’s Manual
3. Replace part and check pressure at
discharge port
4. Check mounting to be sure pump is
securely mounted
Page 63

TROUBLESHOOTING GUIDE - CAMEL DETERGENT PUMP
Motor fails to operate (engine running)
1. Poor electrical connection
2. Defective motor
Motor operates, but pump output is low or stopped
1. Restricted or blocked detergent lines
2. Excessive torque on tubing connectors (5.5 to 6.5 in/lbs. Max)
3. Poppet valves dirty
4. Air leak at intake side
5. Defective wiring or motor
1-63 American-Lincoln Technology
772 Operator’s Manual
Page 64

TO SAME TERMINAL
ON SARTER SOLENOID
AS (+) FROM BATTERY
CONNECT TO KEY SWITCH
TERMINAL #6 ON 3930
TRACTOR
ELECTRICAL SCHEMATIC DIAGRAM
WORK LIGHT
OPTIONS
RECYCLE
SYSTEM
CB 1
15 AMP.
BROWN
RECYCLE
FUSE #2
15 AMP.
FLASHER
FLASHER
BROWN
NEUTRAL SWITCH
(C)
SOL. ON LIMIT SWITCH
(C) (NC)
DETERGENT LOW SWITCH
SOLUTION HIGH SWITCH
BLUE
(NO)
SOL. LOW SW.
YEL.
INDICATOR
SWITCH
R1 10 OHM 100 WATT
GREEN
RED
FLASHING LIGHT
ROTATING LIGHT
RT. TURN SIGNAL
LT. TURN SIGNAL
BRAKE LIGHT
DETERGENT LOW LIGHT
SOLUTION HIGH LIGHT
OFF
FLOAT
(C)
5 AMP
C-1000
RECYCLE
SWITCH
American-Lincoln Technology 1-64
772 Operator’s Manual
BACK-UP ALARM
SWITCH
(NO)
HEATER SWITCH
HYD. SOLENOIDS
RECYCLE LIGHT
BACK-UP ALARM
HEATER FAN
Page 65

FU 1
HIGH
SOLUTION
ELECTRICAL CONNECTION DIAGRAM
STARTER ON 3930 TRACTOR
RED
BLK.
BRN.
RED
WHT.
RED
RED
RECOVERY FULL FLASHER
FU 1
GRN.
BRN.
HORN SWITCH
BRN.
3- WIRE HARNESS
RED
RED
YEL.
RED
BLK.
BLK.
WHT.
GRN.
RED
NEUTRAL SWITCH
HORN
RED
RECOVERY FULL LIGHT
WHT.
CONNECT TO KEY SWITCH
(NO)(C)
RED
TERM. #6 ON 3930 TRACTOR
BRN.
BRAKE LIGHT
BLK.
RECOVERY FULL
FLOAT SWITCH
BRN.
15 AMP.
CONNECT TO KEY SWITCH
TERM. #6 ON 3930 TRACTOR
RED
BLUE
(C)
BLK.
FLASHER
INDICATOR
SWITCH
YEL.YEL.
BLUE
BACK-UP ALARM SWITCH
RED
(NO)
5 AMP.
BLK.
RED
GRN.
RED
RED
HEATER SWITCH
BLK.
RED
RED
RED
WORK LIGHT
RED
BRN.
FU 2
TURN SIGNALS
RED
A
RED
A
BLK.
R
R
RED
BRN.
YEL.
LEFT
RIGHT
BACK-UP ALARM
BLK.
360 ROTATING LIGHT
R
BLK.
RED
BLK.
FLASHING LIGHT
HEATER
BLK.
R
RECYCLE SYSTEM
PANEL
10 0HM POT.
8A
8
5A
7
C1001
1-65 American-Lincoln Technology
5
5B
RECYCLE
SWITCH.
3A
9
4
6
4
5
3
1
2
3
2B
2A
2
RECYCLING HIGH
LOW
DETERGENT
SOLUTION
LOW
SOLUTION
CB 1.
RECYCLE
1
HARNESS.
10
6
772 Operator’s Manual
Page 66

HYDRAULIC SCHEMATIC DIAGRAM - STANDARD MACHINE
P4266/9310
7
11
2
3
5
6
8
4
9
1
13
12
10
HYDRAULIC SCHEMATIC
1. Rear Axle Oil Sump
2. Priority Valve
3. Quadrant Control Valve
4. Squeegee Lift Arm Cylinder
5. Flow Control Valve
6. Gear Pump
7. Micronic Inlet Filter
8. Relief Valve (2500 psi)
9. Brush Lift Cylinder
10. Flow Restrictor
11. Brush Drive Motor
12. Brush Lift Lock-off Valve
13. 2 Spool Control Valve (2500 psi Relief)
American-Lincoln Technology 1-66
772 Operator’s Manual
Page 67

HYDRAULIC SCHEMATIC DIAGRAM - CAMEL MACHINE
14
15
P4266/9310
11
7
3
2
5
6
8
4
9
1
13
12
10
HYDRAULIC SCHEMATIC
1. Rear Axle Oil Sump
2. Priority Valve
3. Quadrant Control Valve
4. Squeegee Lift Arm Cylinder
5. Flow Control Valve
6. Gear Pump
7. Micronic Inlet Filter
8. Relief Valve (2500 psi)
9. Brush Lift Cylinder
10. Flow Restrictor
11. Brush Drive Motor
12. Brush Lift Lock-off Valve
13. 2 Spool Control Valve (2500 psi Relief)
14. Recycling Pump Recycling Motor
15. Motor Control Valve
1-67 American-Lincoln Technology
772 Operator’s Manual
Page 68

HARDWARE ABBREVIATIONS
ABBREVIATIONS - SCREWS
ADJ
ADJ.SP
BHM
BHS
CAPT.SL
CAPT.WG
FHM
FIL.HM
HHC
HHM
HIHD
HSHC
HSFHC
KNH
MHHC
PHM
RHD
RHM
RHW
SHC
SHTB
SQ
TB
THM
WELD
WG
= Adjusting Screw
= Adjusting Plunger Screw
= Binding Head Machine Screw
= Button Head Socket Screw
= Captivated Slotted Screw
= Captivated Wing Screw
= Flat Head Machine Screw
= Filister Head Machine Screw
= Hexagon Head Cap Screw
= Hexagon Head Machine Screw
= 1/2 High Head Screw
= Hexagonal Socket Head Cap Screw
= Hexagonal Socket Flat Head Cap Screw
= Knurled Head Screw
= Metric Hexagon Head Cap Screw
= Pan Head Machine Screw
= Round Head Drive Screw
= Round Head Machine Screw
= Round Head Wood Screw
= Shiny Crown Cap Screw
= Shoulder Thumb Screw
= Square Head Screw
= Thumb Screw
= Truss Head Machine Screw
= Weld Stud
= Wing Screw
HS
S
SH
-KCP
-CP
-OP
-FDP
-HDP
-FP
-COP
C-2004
American-Lincoln Technology 1-68
772 Operator’s Manual
ABBREVIATIONS - SETSCREWS
= Hexagonal Socket Setscrew
= Slotted Setscrew
= Square Head Setscrew
= Knurled Cup Point Setscrew
= Cup Point Setscrew
= Oval Point Setscrew
= Full Dog Point Setscrew
= Half Dog Point Setscrew
= Flat Point Setscrew
= Cone Point Setscrew
Page 69

ORDERING PARTS
Parts may be ordered from American-Lincoln authorized distributors. Inspect the Alto U.S. serial plate
to avoid delays in filling you orders:
MODEL NO. SERIAL NO.
Manufactured By
American Lincoln Technology
Bowling Green, Ohio
®
1. Use the model number, catalog number, and serial number when ordering.
2. Give the part number, description, and quantity of parts needed.
3. Give shipping instructions for either freight, UPS, or parcel post.
Parts and supplies listed in this manual can be ordered from the following address:
Alto U.S., Inc.
Alto U.S., Inc.
Distributor
American Lincoln Technologies
1100 Haskins Road
Bowling Green, Ohio 43402
(800) 331-7692
1-69 American-Lincoln Technology
MACHINE CATALOG NUMBER
510-009 72" Gasoline Powered H-772G
510-010
510-011
72" LP Powered H-772LP
72" Diesel Powered H-772D
772 Operator’s Manual
Page 70

TABLE OF CONTENTS - CHAPTER 2
Frame, Brackets & Bumper ....................................................................................................................2-2
Brush Drive............................................................................................................................................. 2-4
Brush Lift & Solution Control...................................................................................................................2-6
Turbine ..................................................................................................................................................2-8
Squeegee Lift ......................................................................................................................................... 2-10
Squeegee Tool........................................................................................................................................ 2-12
Solution T ank..........................................................................................................................................2-14
Camel Solution Tank............................................................................................................................... 2-16
Recovery T ank........................................................................................................................................ 2-18
Camel Recovery Tank .......................................................................................................................... 2-20
Liquid Propane ....................................................................................................................................... 2-22
Exhaust System ..................................................................................................................................... 2-24
Camel RecyclingSystem.........................................................................................................................2-26
Hydraulics (Scrubbing System)............................................................................................................... 2-28
Camel Hydraulics (Scrubbing System) ................................................................................................. 2-30
Electrical Assembly................................................................................................................................. 2-32
Decals .................................................................................................................................................. 2-34
American-Lincoln Technology 2-1
772 Operator’s Manual
Page 71

FRAME BRACKETS & BUMPER - PARTS LIST
KEY NO. PART NUMBER DESCRIPTION QTY
1 7-42-05039 Link, Right Hand 1
2 7-42-05038 Link, Left Hand 1
3 2-00-02620 Screw , 5/8 - 11 x 1.500 HHC 6
4 2-00-02313 Lock Washer, Helical Spring 5/8 Med 24
5 2-00-00615 Nut, Hex 5/8 - 11 x .937 x .547 20
6 7-08-00459 Bracket, Frame Right Hand 1
7 7-08-00460 Bracket, Frame Left Hand 1
8 7-23-03095 U-Bolt, 5/8 - 18 x 5.000 x 7.000 1
9 7-27-07121 Frame, Crossmember 2
10 7-27-07178 Frame, Right Hand 1
1 1 7-27-07177 Frame, Left Hand 1
12 7-08-00858 Bracket, Stop 1
13 7-08-07001 Bumper 1
14 2-00-00241 Screw, ½ - 13 x 1¾Hex. Hd. 4
15 2-00-02312 Lock Washer, Helical Spring 1/2 Med 4
16 2-00-00596 Nut, Hex ½ - 13 x .750 x .437 4
17 2-00-02623 Screw, 5/8 - 11 x 2.750 HHC 14
18 2-00-01672 Nut, Hex Jam 5/8 - 11 x .937 x .375 2
19 8-89-05522 Plate 2
20 2-00-02603 Screw, 3/8 - 16 x 3.500 HHC 4
21 2-00-02360 Nut, Hex 3/8 - 16 x .562 x .328 8
22 2-00-02310 Lock Washer, Helical Spring 3/8 Med 4
23
24 7-08-00461 Bracket, Cylinder 1
25 2-00-02619 Screw, 1/2 - 20 x 4.500 HHC 1
26 2-00-00640 Nut, Hex Fiber Insert 1/2 - 20 1
27 2-00-00590 Nut, Hex 5/8 - 18 x .937 x .546 4
28 7-15-01032 Setscrew Collar, 2.250 x 1.500 x .750 2
29 2-00-03850 Screw, 3/4-10 x 1.50 HHC 2
30 2-00-00522 Washer - ¾ Lock 2
31 2-00-04288 Clamp - 1.00 I.D. 2
32 2-00-00205 Screw 1/4 - 20 x 1.00 HHC 4
33 2-00-00518 Washer lock 1/4 I.D. 4
34 2-00-00594 Nut 1/4-20 Hex Cap 2
35 7-58-05268 Plate - Cylinder Stop 2
36 2-00-03702 Washer, Flat - ¼ I.D. 2
*37 2-00-04699 Screw, 3/8-16 x 2¾ Hex. Hd. 2
Use 2-00-04699 for Camel Machines Only
P3967/0103
2-2 American-Lincoln T echnology
772 Operator’s Manual
Page 72

FRAME BRACKETS & BUMPER - EXPLODED VIEW
14
13
12
15
16
3
17
1
17
4
5
10
4
5
6
8
9
30
8
7
3
11
32
31
33
34
4
19
22
21
28
24
25
26
27
28
17
19
18
3
20,
37
21
2
29
American-Lincoln Technology 2-3
772 Operator’s Manual
Page 73

DRIVE BRUSH - P ARTS LIST
KEY NO. PART NUMBER DESCRIPTION QTY
1 7-16-07209 Cover, Brush Drive (R.H.) 1
2 7-16-07208 Cover, Brush Drive (L.H.) 1
3 2-00-00224 Screw, 5/16 - 18 x .500 HHC 2
4 2-00-00530 Lock Washer, Helical Spring 5/16 Med 14
5 7-23-03049 U-Bolt, 1/4 - 20 x 2.375 x 1 3/16 2
6 2-00-00518 Lock Washer, Helical Spring 1/4 Med 18
7 2-00-00589 Nut, Hex Jam 1/4 - 20 x .437 x .156 8
8 2-95-04268 Street Elbow, 90E 3/4 NPT 4
9 2-00-03585 Pipe Nipple, 3/4 NPT x 2.000 (Thd one end) 2
10 7-88-00018 Valve, Solution Feed 2
11 2-95-02541 Pipe Reducer Bushing, 3/4 NPT to 1/2 NPT 2
12 7-56-04028 Pipe Nipple, 1/2 NPT x 7.250 2
13 2-95-02537 Pipe Tee, 1/2 NPT 2
14 7-87-02084 Tubing 4
15 2-95-01547 Connector, 1/2 x 1/2 4
16 2-95-02534 Street Elbow, 90E 1/2 NPT 2
17 0782-135 Motor, Brush Drive 4
18 7-27-07088 Frame, Brush Drive (L.H.) 1
19 7-27-07087 Frame, Brush Drive (R.H.) 1
20 7-05-07145 Bar, Tie 1
21 8-15-01002 Setscrew Collar, 1.125 x .625 x .500 2
22 2-00-00266 Setscrew, 5/16 - 18 x .250 HS-KCP 2
23 2-00-02587 Screw, 1/4 - 20 x 1.250 HHC 8
24 2-00-04054 Flat Washer, .875 x .265 x .062 8
25 7-09-01062 Spacer, .500 x .257 .812 8
26 7-76-00089 Spring, Latch 8
27 7-41-00007 Latch, Brush 8
28 7-58-05182 Plate, Brush Mounting 4
29 2-00-00219 Screw, 1/4 - 20 x .500 HHC 6
30 7-33-09013 Hub, Drive 4
31 2-00-04663 Pin - ½ Dia. x 1.75 Roll 8
32 7-58-05181 Plate, Brush Disc Hub 4
33 2-00-00244 Screw, 1/4 - 20 x 1.000 HHC (Heat Treat) 8
34 7-03-04070 Arm, Brush Drive 4
35 2-00-00208 Screw, 5/6-18 x 1.000 HHC 4
36 2-00-00462 Flat Washer, .562 x .250 x .031 6
37 2-00-00241 Screw, 1/2 - 13 x 1.750 HHC 10
38 7-05-07144 Bar, Brush 1
39 2-00-00531 Lock Washer,Helical Spring 1/2 X.Heavy 2
40 2-00-00596 Nut, Hex 1/2 - 13 x .750 x .437 8
41 7-25-08001 Flap (R.H.) Shown 1
7-25-08002 Flap (L.H.) Not Shown 1
42 2-00-02706 Screw - ¼-20 x 1.00 HHM 24
43 2-00-00405 Flat Washer 2
44 2-00-00518 Lockwasher - ¼ Hel. 24
45 2-00-00594 Nut - ¼-20 Hex 24
46 2-00-02352 Nut - Hex ½-13 2
47 0720-069 Assy Drive Brush 4
*48 2-95-02518 ¾ NPT x 1 3/8 Close Nipple 2
*49 2-00-04675 ¾ NPT Tee 2
*50 2-00-04655 90º Elbow ¾ NPT to Barb 2
*51 7-13-07084 Hose Clamp 2
52 2-00-02312 Washer - ½ I.D. Hel. Med. 8
*Used on Camel Machines Only
P3968/0103
2-4 American-Lincoln T echnology
772 Operator’s Manual
Page 74

TO
DETERGENT
PUMPS
DRIVE BRUSH - EXPLODED VIEW
2
1
51
51
50
50
49
48
5
9
8
10
11
12
13
9
4
9
49
48
3
5
10
8
6
7
14
15
9
14
15
16
11
8
6
7
15
14
37
38
15
14
43
12
13
39
46
16
17
37
43
29
40
41
36
6
52
37
18
20
21
22
31
6
23
35
19
6
30
32
33
4
24
25
26
27
34
42
American-Lincoln Technology 2-5
772 Operator’s Manual
28
44
45
P3968/9308
Page 75

BRUSH LIFT & SOLUTION CONTROL - PARTS LIST
KEY NO. PART NUMBER DESCRIPTION QTY
1 7-17-05009 Cylinder , Hydraulic 1
2 7-05-07158 Bar , Brush Lift Cylinder 1
3 2-00-02692 Screw, 1/2 - 20 x 1.75 HHC 1
4 2-00-00640 Nut, Hex Fiber Insert 1/2 - 20 1
5 7-13-05056 Chain, Brush Lift 2
6 7-31-07013 Hanger , Brush Lift 2
7 2-00-00238 Screw, 7/16 - 14 x 1.250 HHC 3
8
9 2-00-01879 Lock Washer, Helical Spring 7/16 Heavy 6
10 8-76-05055 Sprocket, Idler 4
1 1 2-00-02692 Screw, 1/2 - 20 x 1.750 HHC 4
12 2-00-02312 Lock Washer , Helical Spring 1/2 Med 4
13 7-31-06047 Handle, Solution Control 1
14 7-08-00247-1 Bracket, Solution Positioning 1
15 2-00-00235 Screw, 3/8 - 16 x 1.750 HHC 1
16 7-76-00089 Spring 1
17 2-00-00402 Flat Washer, .750 x .390 x .093 2
18 2-00-02360 Nut, Hex 3/8 - 16 x .562 x .328 1
19 7-13-05053 Chain, Lever 2
20 7-17-00010 Crank, Solution Control 1
21 7-41-05064 Lever 2
22 2-00-00207 Screw, 5/16 - 18 x 1.250 HHC 4
23 2-00-00409 Flat Washer, .687 x .343 x .062 4
24 2-00-02341 Nut, Hex Hvy. Jam 5/16 - 18 x .562 x .203 8
25 2-00-00405 Washer Flat .063 X .531 X .094 8
26 2-00-02310 Washer Lock 3/8 H.S. 1
27 2-00-02306 Washer Lock 5/16 Int’l Tooth 5
28
29
30 7-08-00760 Bracket Sol. Limit Sw. Mtg. 1
31 2-00-05060 Screw 6-32 x 1.25 RHM 2
32 2-00-00455 #6 Flatwasher 2
33 2-00-01499 #6 Lockwasher 2
34 2-00-00624 Nut #6-32 MS 2
35 7-82-00009 Switch Ref.
36 7-35-00013 Insulator 1
37 7-08-00761 Bracket Sw. Contact 1
38 2-00-00049 Screw 10-24 x .50 HHC 2
39 2-00-00512 #10 Lockwasher Int. 2
40 2-00-00460 # 10 Flatwasher 2
41 2-00-00220 Screw 1/4-20 x .62 HHC 1
42 2-00-00641 Nut Hex 1/4-20 Fibre-Lock 1
43 2-00-01475 Roll Pin 1
P3969A/0103
2-6 American-Lincoln T echnology
772 Operator’s Manual
Page 76

BRUSH LIFT & SOLUTION CONTROL - EXPLODED VIEW
9
CAMEL
ONLY
30
41
42
7
7
11
12
10
25
43
13
35,36
38,39,40
37
15
17
23
26
16
17
18
13
22
19
24
CYL. MOUNT
TRANSMISSION
2
1
4
3
11
5
10
12
25
COVER
6
9
7
7
22
24
22
9
20
6
MACHINES
31,32
33,34
21
21
American-Lincoln Technology 2-7
772 Operator’s Manual
27
23
P3969A/9308
Page 77

TURBINE - PARTS LIST
KEY NO. PART NUMBER DESCRIPTION QTY
1 2-00-02310 3/8 Lockwasher 1
2 7-29-00082 Gasket - Manifold Long 2
3 2-00-01246 Nut, Hex Fiber Insert #10 - 24 1
4 7-29-00081 Gasket - Manifold Short 2
5 2-00-03702 Flat Washer 3
6 2-00-00672 Wing Nut, 1/4 - 20 2
7 2-00-00251 Screw, 1/4 - 20 x .500 HHC 3
8 7-16-07263 Turbine Inlet Cover 1
9 2-95-02554 Pipe Nipple, 2 NPT x 3 NPT (Thd. End) 2
10 2-00-02216 Hose Clamp, 1.562 - 2.500 2
11 7-33-02168 Hose Inlet 1
12 7-49-00035 Rotron Muffler 1
13 2-00-04814 V-Belt, 58.500 x .500 x .343 1
14 7-60-00135 Turbine Pulley 1
15 7-09-01116 Bushing, Flanged Split 2.=x 1.000 1
16 2-00-011 1 4 Bushing, Turbine Pulley 1
17 2-00-01471 Ring, Snap 2
18 7-23-03096 Screw, 5/8 - 18 x 3.250 (Special) 1
19 2-95-01654 Bearing 3
20 7-60-00134 Intermediate Drive Pulley 1
21 7-08-00474 Bushing, Pulley 4.13 x 2.875 x 2.500 1
22 2-00-04815 V-Belt, 68.000 x .500 x .343 2
23 7-60-00136 Pulley, 2 Groove (P.T.O.) 1
24 2-00-02312 Lock Washer, Helical Spring 1/2 Med 10
25 2-00-00596 Nut, Hex 1/2 - 13 x .750 x .437 17
26 7-80-05063 Screw, 1/2-13 UNF-2A Pulley Adjust 1
27 2-00-00408 Flat Washer, 1.312 x .656 x .093 1
28 7-33-09026 Pulley Adjust Block 1
29 0790-045 Suction Turbine 1
30
31 7-80-05062 Screw, Turbine Adjust 4
32 2-00-00518 Lock Washer, Helical Spring 1/4 Med 4
33 2-00-00251 Screw, 1/4 - 20 x .500 HHC 2
34 7-16-07259 Rotron Blower Cover 1
35 2-00-02620 Screw, 5/8 - 11 x 1.500 HHC 4
36 2-00-02313 Lock Washer, Helical Spring 5/8 Med 4
37 2-00-00225 Screw, 5/16 - 18 x 1.500 HHC 2
38 2-00-00585 Nut, Hex 5/16 - 18 x .500 x .265 4
39 2-00-00405 Flat Washer, 1.062 x .531 x .093 1
40 2-00-00240 Screw, 1/2 - 13 x 1.250 HHC 1
41 7-27-07125 Frame, Turbine Mount 1
42 2-00-00530 Lock Washer, Helical Spring 5/16 Med 2
43 2-95-04182 Nut, Hex Fiber Insert 3/8 - 16 2
44 7-11-00032 Cap, Spring 1
45 7-76-00052-1 Spring 1
46 2-00-00593 Nut, Hex 3/8-16 THD 1
47 2-00-00641 Nut, Hex Fiber Insert ¼ - 20 3
48 2-95-04689 Flat Washer, 2.000 x .406 x .162 1
49 2-00-04817 Eye Bolt, #10 - 24 x .320 x 2.000 1
50 7-66-00141 Rod - Valve Stem 1
51 7-26-04010 Float - (White) 1
52 7-10-04006 Cage - Float 1
53 2-00-00605 Nut, Hex MS #10 - 24 x .375 x .125 1
54 7-34-09013 Insulation 1
55 7-34-09014 Insulation 2
56 7-34-09012 Insulation 1
57 7-65-00030 Bushing, Key Retainer 1
58 2-00-01490 Screw 1/4- 20 x .875 2
7-26-04009 Float (Black - Optional) 1
P4002/0103
2-8 American-Lincoln T echnology
772 Operator’s Manual
Page 78

43
45
6
4
9
10
2
11
34
33
32
1
46
3
6
2
4
8
50
49
51
52
43
53
5
7
10
12
57
9
56
55
25
31
29
15
57
14
13
18
17
16
24
25
22
20
19
17
27
28
26
25
24
21
23
37
38
37
40
24
39
25
24
36
35
30
41
25
44
47
58
32
TURBINE - EXPLODED VIEW
American-Lincoln Technology 2-9
772 Operator’s Manual
Page 79

SQUEEGEE LIFT - P ARTS LIST
KEY NO. PART NUMBER DESCRIPTION QTY
1 7-15-01014 Setscrew Collar, 1.625 x 1.000 x .750 4
2 7-42-05080 Link 2
3 2-00-03057 Screw , 1/2 - 20 x 1.250 HSFHC 2
4 2-00-02354 Nut, Hex Hvy . Jam 1/2-20 x .875 x .296 2
5 2-00-00233 Screw , 3/8 - 16 x .750 HHC 4
6 2-00-02310 Lock Washer, Helical Spring 3/8 Med 4
7 2-00-00402 Flat Washer, 3/8 4
8 7-03-04095 Arm, Squeegee Lift 2
9 7-78-05010 Stop, Squeegee Adjustment 2
10 8-15-01003 Setscrew Collar, 1.250 x .750 x .562 6
1 1 8-55-08084 Pin 2
12 7-72-03025 Sleeve, Spring 1
13 7-76-00019 Spring 1
14 2-00-00207 Screw, 5/16 - 18 x 1.250 HHC 2
15 7-09-01057 Bushing 2
16 2-00-00530 Lock Washer , Helical Spring 5/16 Med 3
17 2-00-00585 Nut, Hex 5/16 - 18 x .500 x .265 5
18 2-00-00409 Flat Washer, 5/16 2
19 8-15-01016 Setscrew Collar, 1.000 x .500 x .437 2
20 7-41-05081 Lever , S pring S pool 1
21 7-42-05081 Link, Trans. Shift 1
22 7-78-05011 Stop, Flow Control 1
23 8-15-01002 Setscrew Collar, 1.125 x .625 x .500 2
24 7-08-02013 Bracket, Seat Mtg. 1
25 7-08-00458 Bracket 1
26 8-76-00041 Spring 2
27 2-95-01931 Setscrew - 5/16 - 18 4
28 2-00-00238 Screw, 7/16 - 14 x 1.25 HHC 3
29 2-00-03979 Washer, Flat 4
30 2-00-02311 Washer, Lock 2
31 2-00-00620 Nut, 7/16 - 14 Hex 2
32 2-00-00225 Screw, 5/16 - 18 x 1.500 1
33 7-31-06072 Handle Grip 1
P3973A/9309
2-10 American-Lincoln T echnology
772 Operator’s Manual
Page 80

29
SQUEEGEE LIFT - EXPLODED VIEW
28
16
17
13
15
17
18
16
14
12
19
18
20
30
31
EXISTING
19
25
4
21
24
28
23
23
5
6
7
11
10
8
9
3
26
2
22
17
27
32
1
16
P3973A/9309
American-Lincoln Technology 2-11
772 Operator’s Manual
Page 81

SQUEEGEE TOOL - PARTS LIST
KEY NO. PART NUMBER DESCRIPTION QTY
1 7-05-07005 Bar, Inner 2
2 7-77-00035 Squeegee, Inner 2
3 7-86-08009 T ool 2
4 7-77-00036 Squeegee, Outer 2
5 7-05-071 15 Bar , Outer 4
6 2-00-03702 Flat Washer 2
7 2-00-00498 Lock Washer, 1/4 Ext 40
8 2-00-02899 Screw, 1/4 - 20 x .750 RHM 36
9 2-00-02907 Screw , 1/4 - 20 x 1.250 RHM 4
10 2-00-00606 Nut, Hex 1/4 - 20 x .437 x .218 4
11 2-00-00530 Lock Washer, 5/16 2
12 2-00-00585 Nut, Hex 5/16 - 18 x .500 x .265 2
13 2-00-00207 Screw, 5/16 - 18 x 1.250 HHC 2
14 7-55-08060 Pin, Lock 2
15 7-42-05004 Link, Left Hand 1
16 7-42-05003 Link, Right Hand 1
17 2-00-00593 Nut, Hex Hy.Jam 3/8-16 x .687 x .234 4
18 2-00-00209 Screw, 3/8 - 16 x 1.250 HHC 4
19 2-00-02698 Screw, 1/2 - 20 x 3.500 HHC 2
20 2-00-00405 Flat Washer, 1.062 x .531 x .093 4
21 7-76-00016 Spring 2
22 7-23-03058 Nut, Hanger Rod 2
23 2-00-00640 Nut, Hex Fiber Insert 1/2 - 20 2
24 2-00-02313 Lock Washer, Helical Spring 5/8 2
25 2-00-02703 Screw, 5/8 - 18 x 1.500 HHC 2
26 7-55-08082 Rod 1
27 7-15-01014 Setscrew Collar, 1.625 x 1.000 x .750 4
28 2-95-01931 Setscrew, 5/16-18 x .312 HS-CP(Nylok) 4
29 9-01-03081 Plate, Locking 2
30 9-01-03080 Caster 2
31 2-00-02216 Hose Clamp, 1.562 - 2.500 4
32 7-33-02048-1 Hose 2
33 2-00-00104 Screw 1/4-20x1.00 RHM 2
P3974/9309
2-12 American-Lincoln T echnology
772 Operator’s Manual
Page 82

SQUEEGEE TOOL - EXPLODED VIEW
29
5
33
7
30
6
8
7
9
7
18
7
8
17
4
3
13
12
11
2
1
19
14
20
21
20
24
25
18
17
26
31
32
16
27
15
7
10
22
23
28
P3974/9309
American-Lincoln Technology 2-13
772 Operator’s Manual
Page 83

SOLUTION T ANK - PARTS LIST
KEY NO. PART NUMBER DESCRIPTION QTY
1 7-83-04149 R.H. Solution Tank 1
2 7-83-04089 L.H. Solution Tank 1
3 2-00-00405 Flatwasher, 1.063 x .531 x .094 8
4 2-00-02312 Washer,.50 Split 12
5 2-00-00239 Screw, HHC .50-13 x 1.000 4
6 7-08-00122 Bracket, Mirror 2
7 7-48-07001 Mirror 2
8 2-00-00220 Screw, 1/4 - 20 x .625 HHC 4
9 2-00-00518 Lock Washer, Helical Spring 4
10 2-00-00594 Nut, Fnsh. Hex. .25-20 4
1 1 2-00-02371 Nut, Hex Jam 1/2 - 13 x .750 x .312 2
12 2-00-02981 Screw, Set Hd. Cp. Course Thd. 2
13 7-56-05003 Pipe Nipple, 1 1/4 NPT x 2.812 (Thd. one end) 2
14 7-33-02072-1 Hose, Solution Tank Coupling 1
15 2-00-02216 Hose Clamp, 1.562 - 2.500 2
16 2-00-03583 Pipe Elbow, 90x 1 1/4 NPT 4
17 2-00-04263 Pipe Nipple, 1 1/4 NPT x 6.000 2
18 2-00-03861 Pipe Nipple, 1 1/4 NPT x 1.625 Close 2
19 2-00-00240 Screw, 1/2 - 13 x 1.250 HHC 6
20 2-00-00596 Nut, Hex 1/2 - 13 x .750 x .437 6
21 7-29-00016 Gasket, Cleanout Door Frame 2
22 7-27-07016 Frame, Cleanout Door 2
23 2-00-02790 Screw, #10 - 32 x .750 FHM Brass 16
24 7-29-00015 Gasket, Cleanout Door 2
25 7-19-08002 Door, Cleanout 2
26 7-55-08016 Pin, Cleanout Door Hinge 2
27 2-00-02325 Nut, #10 - 32 Hex Cap Ni. Pl. Brass 2
28 2-00-01475 Pin, .125-75 Elastic Stop Nut 4
29 7-80-05004 Stud, Cleanout Door Lock 4
30 2-00-00668 Wing Nut, .313-18 4
31 2-00-02475 Plug, .75 Pipe Galv. 1
32 7-24-04004 Filter, Inlet 2
33 2-00-03586 Pipe Nipple, 3/4 NPT x 2.000 Short 2
34 2-95-04268 Elbow, .75 90º S t. Galv. 2
35 7-88-00019 Gate Valve, ¾ 2
36 2-00-03585 Pipe Nipple, 3/4 NPT x 2.000 (Thd. one end) 2
37 7-33-02044 Water Feed Hose, 1" x 29" 2
38 2-00-03404 Hose Clamp, Witteck C24P 4
39 8-76-00041 Spring 4
40 7-08-00535 Bracket, Solution Tank L.H. 1
41 2-00-00522 Lock Washer, Helical Spring 3/4 6
42 2-00-03850 Screw, 3/4-10 x 1.500 HHC 6
43 7-08-00310 Bracket, Mounting Solution Tank L.H. 1
44 7-08-00311 Bracket, Mounting Solution TankR.H. 1
45 7-08-00778 Bracket, Solution TankR.H. 1
46 2-00-00209 Screw, HHC 3/8-16-1.25 2
47 2-00-00410 Flatwasher, 3/8 2
48 2-00-02310 Lockwasher, 3/8 2
49 2-00-02369 Nut, Hex 3/8-16 2
50 7-08-00779 Bracket 1
P4000/0103
2-14 American-Lincoln T echnology
772 Operator’s Manual
Page 84

SOLUTION TANK - EXPLODED VIEW
19
3
46
42
47
46
41
47
45
49
48
48
50
1
8
6
9
10
2
3
4
20
44
49
6
8
9
10
1
32
31
33
34
35
3
4
5
7
12
11
19
17
38
21
44
4
36
20
22
23
39
18
16
15
14
13
16
28
24
2424
28
41
42
17
16
36
15
27
26
38
29
29
25
19
21
33
34
34
35
35
36
38
30
30
29
43
40
42
30
41
28
4
20
37
37
28
23
22
24
25
27
26
P4000/9309
American-Lincoln Technology 2-15
772 Operator’s Manual
Page 85

CAMEL SOLUTION TANK - P ARTS LIST
KEY NO. PART NUMBER DESCRIPTION QTY
1 7-83-04148 R.H. Solution Tank 1
2 7-83-04141 L.H. Solution Tank 1
3 2-00-00405 Washer, PL 1.063 x .531 x .094 8
4 2-00-02312 Washer, .50NSplit 12
5 2-00-00239 Screw, HHC .50-13 x 1.000 4
6 7-08-00122 Bracket, Mirror 2
7 7-48-07001 Mirror (US Tool & MFG. Company 30 BROR) 2
8 2-00-00220 Screw, HHC .25-20 x .625 2
9 2-00-00518 Washer, Helical Spring ¼ Med. 4
10 2-00-00594 Nut, Fnsh. Hex .25-20 4
11 2-00-02371 Nut, Hex Jam .50-13 Stl. 2
12 2-00-02961 Screw, Set Sq. Hd. Cp. Coarse Thd. 2
13 7-56-05003 Nip, Spcl 4
14 7-33-02072-1 Hose, Cplg. Tank Solution 1
15 2-00-02216 Clamp, Hose (Ideal Corp. 5232) 4
16 2-00-03583 Elbow, Blk 90º 1.25 NPT 8
17 2-00-04263 Nipple, 1.25 x 6.00 2
18 2-00-03861 Nipple, Close Galv. 1.25 NPT 4
19 2-00-00240 Screw, .50-13 x 1.25 HHC 8
20 2-00-00596 Nut, ½-13 Hex. 8
21 7-29-00016 Gasket, Frame Cleanout Door 2
22 7-27-07016 Frame Cleanout Door 2
23 2-00-02750 Screw, #10-32 x .750 FHM Brass 16
24 7-29-00015 Gasket, Cleanout Door 2
25 7-19-08002 Door, Cleanout 2
26 7-55-08016 Pin, Hinge Cleanout Door 2
27 2-00-02325 Nut, #10-32 Hex Cap Ni. Pl. Brass 2
28 2-00-01475 Pin, .125-.75 Radial Locking 4
29 7-80-05004 Stud, Lock Cleanout Door 4
30 2-00-00668 Wingnut .313-18 4
31 2-00-05188 Plug, 2.00 NPT 2
32 7-24-04022 Strainer, Inlet 2
33 2-00-03586 Nipple, .75 NPT x 2.00 Pipe Galv Short 2
34 2-95-04268 Elbow, .75 NPT 90º St. Galv. 2
35 7-88-00019 Valve, .75 NPT Gate Brass 2
36 2-00-03585 Nipple, .75 NPT x 2.00 Galv. (Thd. One End) 2
37 7-33-02044 Hose, Feed Water 1 x 29 Single 2
38 2-00-03404 Clamp, Hose Witteck C24P 4
39 8-76-00041 Spring 4
40 7-08-00535 Bracket, Solution Tank (L.H.) 1
41 2-00-00522 Lockwasher, .75 Helical Spring 6
42 2-00-03850 Screw, .75-10 x 1.50 HHC 6
43 7-08-00310 Bracket, Mounting Solution L.H. 1
44 7-08-00311 Bracket, Mounting Solution R.H. 1
45 7-08-00778 Bracket, Solution Tank R.H. 1
46 7-82-00017 Float Switch 2
47 2-00-05035 Fitting, 90º Elbow 2
48 7-53-00125 Weldment, Recycle Panel 1
49 7-58-05252 Plate, Recycle Front 1
50 7-18-00190 Decal, Recycle Panel 1
51 2-00-03059 Screw, #10-24 x .375 THM 4
52 2-00-03061 Screw, #10-24 x .500 THM 4
53 2-00-00519 Lockwasher, #10 Helical Spring 1
54 8-09-01082 Bushing, Universal Ref.
55 0795-097 Harness, Camel 2
56 2-00-00221 Screw, .25-20 x .750 HHC 2
57 2-00-04602 Clamp 2
58 2-00-00518 Lockwasher, .25 HS Med. 2
59 2-00-00594 Nut, .25-20 Hex 1
60 7-33-02319 Hose, Solution Tank Coupling 1
61 2-00-04350 Pipe Nipple, 1.25 NPT x 8” Lg. 2
62 7-75-01152 Spacer, Mirror 1
63 2-00-01769 Screw, .25-20 x 1.75 HHC 2
64 2-00-00209 Screw, HHC 3/8-16 x 1.25 2
65 2-00-00410 Flatwasher 3/8 B.S. 2
66 2-00-02310 Lockwasher 3/8 2
67 2-00-02369 Nut, Hex 3/8-16 2
68 7-08-00779 Bracket 1
69 7-20-06011 Duct-Wire 2
P4000a/0011
2-16 American-Lincoln T echnology
772 Operator’s Manual
Page 86

44
67
19
3
3
4
20
66
48
65
65
42
41
45
64
64
68
67
1
6
7
9
10
2
47
46
28
23
27
22
41
42
8
26
21
19
29
43
33
34
35
36
34
35
36
40
25
24
4
20
28
42
30
41
30
29
2424
37
30
37
25
29
24
28
38
26
28
1
32
31
33
34
35
36
20
23
22
21
44
4
10
9
63
62
6
7
3
4
5
12
11
19
17
38
27
16
13
15
38
16
61
14
39
18
16
17
15
60
59
58
56
57
55
54
52
53
51
49
50
CAMEL SOLUTION TANK - EXPLODED VIEW
American-Lincoln Technology 2-17
772 Operator’s Manual
Page 87

RECOVERY TANK - PARTS LIST
KEY NO. PART NUMBER DESCRIPTION QTY
1 7-83-04055-1 T ank, Recovery 1
2 2-00-00240 Screw , 1/2 - 13 x 1.250 HHC 6
3 2-00-02312 Lock Washer, Helical Spring 1/2 Med 6
4 2-00-00596 Nut, Hex 1/2 - 13 x .750 x .437 6
5 7-88-00008 Gate Valve, 2 2
6 7-1 1-00014 Cap, Cleanout 2
7 7-63-04001 Reflector 2
8 2-00-00518 Lock Washer, Helical Spring 1/4 Med 4
9 2-00-00054 Screw, 1/4 - 20 x .500 RHM 4
10 7-29-00016 Gasket, Cleanout Door Frame 4
1 1 7-27-07016 Frame, Cleanout Door 4
12 2-00-02790 Screw, #10 - 32 x .750 FHM 32
13 7-19-08002 Door , Cleanout 4
14 7-29-00015 Gasket, Cleanout Door 4
15 7-55-08016 Pin, Cleanout Door Hinge 4
16 2-00-02325 Nut, Cap #10 - 32 x .410 x .375 4
17 7-80-05004 Stud, Cleanout Door Lock 8
18 2-00-01475 Radial Locking Spring Pin, .125 x .750 8
19 2-00-00668 Wing Nut, 5/16 - 18 8
20 8-09-01083 Connector, Bulkhead 1
21 0775-164 Switch, Dirty water warning 1
P4001/0011
2-18 American-Lincoln T echnology
772 Operator’s Manual
Page 88

16
15
14
13
18
19
12
17
9
8
7
2
6
6
5
5
20
21
3
4
11
10
1
FRAME (REF.)
P4001/0011
RECOVERY TANK - EXPLODED VIEW
American-Lincoln Technology 2-19
772 Operator’s Manual
Page 89

CAMEL RECOVER Y TANK - PARTS LIST
KEY NO. PART NUMBER DESCRIPTION QTY
1 7-83-04142 Tank, Recovery 1
2 2-00-00240 Screw, 1/2-13 X 1-1/4 Hex Hd 6
3 2-00-02312 Lockwasher, 1/2 6
4 2-00-00596 Nut, 1/2-13 Hex 6
5 2-00-00078 Screw, 1/4-20 X 5/8 Rhm 4
6 7-11-00014 Cap, Cleanout 2
7 7-63-04001 Reflector 2
8 2-00-00518 Lockwasher, 1/4 8
9 2-00-00054 Screw, 1/4-20 X 1/2 Rd Hd 4
10 7-29-00016 Gasket, Cleanout Door Frame 6
11 7-27-07016 Frame, Cleanout Door 6
12 2-00-02787 Screw, # 10-32 X 5/8 Fl Hd Brass 48
13 7-19-08002 Door, Cleanout 4
14 7-29-00015 Gasket, Cleanout Door 6
15 7-55-08016 Pin, Cleanout Door Hinge 6
16 2-00-02325 Nut, # 10-32 Hex Cap, Brass 6
16 7-80-05004 Stud, Cleanout Door Lock 12
18 2-00-01475 Pin, 1/8 X 3/4 Radial Lock 12
19 2-00-00668 Nut, 5/16-18 Wing 12
20 8-09-01083 Connector-bulkhead 1
21 0775-164 Switch-(dirty Water Warning) 1
31 7-19-08038 Lower Cleanout Door 2
32 7-29-00100 Gasket 2
33 7-25-02072 Weldment, Drain Fitting 2
34 2-00-00248 Screw, 1/4-20 X 3/4 Hhc 8
35 2-00-03702 Flatwasher, 1/4 8
36 2-00-04590 Washer, 1/4 Sealing 8
37 2-00-00501 Lockwasher, 1/4 Int. Tooth 8
38 2-00-00594 Nut, 1/4-20 Hex 8
39 2-00-02214 Hose Clamp 4
40 7-33-02291 Tank Drain Hose 2
41 7-25-02032 Fitting, Drain Hose 2
42 7-25-02033 Drain Hose Plug 2
43 2-00-00519 Lockwasher, #10 Hs 2
44 2-00-03059 Screw, #10-24 X 3/8 Thm 2
45 7-13-07135 Lower Clamp, Drain Hose 2
46 7-13-07134 Upper Claimp, Drain Hose 2
47 7-25-02034 Fitting, Separator Mtg. 1
48 7-25-02040 Fitting, Pipe To Hose 4
49 2-00-03407 Clamp 4
50 7-33-02155 Hose, Separator Inlet 1
51 7-33-02156 Hose, Separator Outlet 1
52 7-88-00030 Valve, Check (1/2 Npt) 1
53 2-00-04682 Nipple, Pipe 1/2 Npt X 2" Galv 1
54 2-95-02527 Elbow, Pipe 90 Deg. 1/2 Npt Galv 3
55 2-95-02517 Nipple, Pipe 1/2 Npt X 3 1/2" Galv 1
56 7-24-04036 Filter, Inline Separator 1
57 2-00-04579 U-bolt 2
58 2-00-04691 Lockwasher, 5/16 (stainless) 8
59 2-00-04692 Nut, 5/16-18 Hex (stainless) 8
60 7-56-05012 Fitting, Separator Purge 1
61 7-29-00122 Gasket, Separator 1
62 2-00-04693 Screw, 5/16-18 X 1.00 Hhcs (stainless) 4
63 7-25-02038 Fitting, 90 Deg. Pipe To Hose 3
64 2-00-02220 Clamp, Hose 3
65 7-24-04022 Strainer, Pump Inlet 4
66 7-25-02037 Fitting, Tee 3
67 7-25-02036 Fitting, Nipple 3
68 0775-203 Float Switch 1
69 8-09-01083 Float Switch Connector 1
P4001a/0011
2-20 American-Lincoln T echnology
772 Operator’s Manual
Page 90

13
CAMEL RECOVER Y TANK - EXPLODED VIEW
16
15
14
12
40
42
39
43
33
39
41
44
34
32
35
31
16
15
14
36
FRAME
18
19
5
8
10
11
12
17
7
46
45
2
11
10
6
1
6
21
1
69
8
9
68
20
65
47
66
37
38
18
17
19
3
4
64
63
64
63
67
66
64
American-Lincoln Technology 2-21
772 Operator’s Manual
57
56
57
54 58
55
59
58
54
61
62
48
59
60
49
49
51
48
54
53
52
48
49
50
49
48
P4001C/0011
Page 91

LIQUID PROPANE - PARTS LIST
KEY NO. PART NUMBER DESCRIPTION QTY
1 7- 11-04005 Regulator, Primary 1
2 7- 11-04006 Fuel Lock Filter 1
3 Throttle Body Assy. 1
4 Air Valve Assembly 1
5 Bracket 1
6 2-00-03407 Clamp 2
7 Vapor Hose 5/8 i.d. x 7.00 in. 1
8 Fitting, 90 Deg. 2
9 Fitting, 45 Deg. 1
10 Hose, Water 3/8 I.D. x 21.00 1
11 0769-009 Carburetor (Consists of Item 3 and4) 1
12
13 Steel Guard 20.00 In. Long 1
14 Hose, 5/16 I.D. Steel Braided 15.00 In. Long 1
15 Hose, Vacuum 1/4 I.D. x 6.00 Long 1
16 2-00-00520 Lockwasher, 3/8 Split 1
17 2-00-02360 Nut 3/8-16 Hex 2
18 Gasket 2
19 Hose, Water 3/8 I.D. x 8.00 Long 1
20 Fitting 2
21 2-00-03799 Screw, 3/8-16 x 1.50 Long 2
22 Fitting 1
23 7-88-00021 Relief Valve 1
24 Street Tee 1
25 8-25-02012 Fitting, 90 Deg. 2
26 2-00-00518 Lockwasher, 1/4 Split 4
27 2-00-00220 Screw, 1/4-20 x .63" Long 4
28 Fitting 1
29 2-00-03473 Female Coupling 1
30 7-33-02076 Hose, 5/16 I.D. Steel Braided 55.0 In. Long 1
31 7-08-00059 Bracket Tank 1
32 2-00-02953 Bushing 1
33 Fitting 1
34
35 8-83-04016 Tank, L/P (33.5 lbs.) 1
36
37 2-00-00233 Screw, 3/8-16 x 1.00 HHC 7
38 7-08-00656 Bracket, L/P Tank Mounting 1
39
40 2-00-00522 Lockwasher, 3/4 Split 2
41 2-00-03850 Screw, 3/4-10 x 1.50" Long 2
42 7-08-00533 Bracket, Support 2
43 2-00-02310 Lockwasher, 3/8 Split 7
44 2-00-02360 Nut, Hex 3/8-16 7
45 2-00-03850 Screw, 3/4 x 1.50" Long 2
46 2-00-00522 Lockwasher, 3/4 Split 2
47 7-08-00326 Bracket, Support 1
48 Fitting 4
49 Fitting 2
50 Fitting 2
51 0780-053 LP Gas Conversion Kit 1
P3978A/9310
2-22 American-Lincoln T echnology
772 Operator’s Manual
Page 92

37
37
30
29
35
31
35
LIQUID PROPANE - EXPLODED VIEW
48
10
50
TO WATER
PUMP
INTAKE
MANIFOLD
WATER
JACKET
43
44
43
44
47
37
42
43
44
45
46
32
20
48
19
16
17
2
21
18
20
48
40
41
38
18
37
22
1
9
8
14
13
48
6
5
26
27
7
6
8
33
15
23
24
25
28
15
49
25
4
3
14
49
TO LP
TANK
P3978A/9907
American-Lincoln Technology 2-23
772 Operator’s Manual
11
Page 93

EXHAUST SYSTEM - PARTS LIST
KEY NO. PART NUMBER DESCRIPTION QTY
1 2-00-04309 Muffler Clamp, 2.250 Tube 1
2 7-56-04049 Exhaust Pipe 1
3 7-13-07098 Muffler Clamp, 1.875 Tube 1
4 7-56-04041 Tailpipe 1
5 2-00-00209 Screw, 3/8-16 x 1.250 HHC 1
6 2-00-02310 Lockwasher, Helical Spring 3/8 Med. 1
7 7-31-07017 Hanger 1
8
9 7-13-07075 Muffler Clamp, 1.625 Tube 2
10 7-49-00028 Muffler - (Gas, LP, Only) 1
1 1 0778-042 Muffler - (Diesel) 1
12 7-34-09024 Sleeve, insulating 1
13
14 7-30-05068 Guard, Exh. Pipe & Muffler 1
15 2-00-00221 Screw, ¼-20 x ¾ 2
16 2-00-00518 Lockwasher, 1/4 S plit 2
17
18 7-16-07379 Button Plug 1
19 7-48-00031 Exhaust Manifold 1
20 7-23-00227 Exhaust Manifold Gasket 1
P4003/9310
2-24 American-Lincoln T echnology
772 Operator’s Manual
Page 94

EXHAUST SYSTEM - EXPLODED VIEW
18
19, 20
15,16
7
1
2
12
5,6
P4003/9907
American-Lincoln Technology 2-25
772 Operator’s Manual
3
9
4
14
9
10 or 11
Page 95

CAMEL RECYCLING SYSTEM - PARTS LIST
KEY NO. PART NUMBER DESCRIPTION QTY
1 7-83-04140 Solution Tank (R.H.) R ef
2 7-16-07352 Cover/guard 1
3 2-00-00054 Screw ¼-20x.500 RHM 5
4 2-00-00518 Lockwasher ¼ H.S. Med. 13
5 7-23-03095 U-bolt 5/8-18x5.00x7.00 2
6 7-08-00754 Pump Mount 1
7 2-00-00207 Screw 5/16-18x1.25 Lg. H.H.C. 3
8 2-00-00451 Washer, 5/16 3
9 2-00-00590 Nut 5/8-18 Hex. 4
10 2-00-02313 Lockwasher 5/8 H.S. Med. 4
11 2-00-00402 Washer, 3/8 2
12 2-00-02310 Lockwasher 3/8 H.S. Med. 2
13 2-00-02360 Nut 3/8-16 Hex 2
14 7-60-00164 Pulley - Hyd. Motor 1
15 2-00-04506 Screw 5/16-18x4.25 Fhm 4
16 2-00-05178 Belt 3v x 250 1
17 7-81-00181 Support - Hyd. Motor Mount 1
18 2-00-00530 Lockwasher 5/16 H.S. Med. 7
19 2-00-00585 Nut 5/16-18 Hex. 7
20 0782-128 Hydraulic Motor 1
21 7-60-00163 Pulley - Recycle Pump 1
22 2-00-03750 Bolt - Carriage 3/8-16 x 1.50 2
23 7-60-05007 Recycling Pump 1
24 7-25-02038 90 Deg. Barb Stem Elbow 3/4 Npt 3
25 2-00-02220 Hose Clamp .812-1.500 3
26 7-33-02295 Hose - Rec. To Pump 1
27 7-33-02096 Hose - Pump To Sepatr. 1
28 7-16-07354 Detergent Pump Cover 1
29 8-21-04031 Edging 4.50" 1
30 0795-097 Wire Harness Ref
31 2-00-00219 Screw ¼-20x.500 H.H.C. 8
32 7-11-00031 Filler Assembly 1
33 2-00-00830 Terminal 1
34 2-00-00068 Screw # 8-32x.625 RHM 6
35 7-83-04144 Soap Tank 1
36 7-87-02128 Tube 9.50" Lg. 2
37 7-13-07084 Hose Clamp 7
38 2-00-04654 90 Deg. Elbow 1/4 Npt To Barb 3
39 2-00-05360 Nipple ¼ Npt X 3.00" Lg. 1
40 2-00-05032 Reducer Coupling ¼-1/8 Npt 1
41 7-82-00017 Float Switch 1
42 2-00-05193 Nylon Fitting .38 Barb x ¼ NPT 2
43 7-87-02130 Tube 12.00" Lg. 1
44 7-87-02171 Tube To R.h. Brush Deck 1
45 7-87-02172 Tube To L.h. Brush Deck 1
46 7-60-05008 Pump-metering 2
47 2-00-00519 Lockwasher # 10 H.S. 6
48 2-00-02728 Screw # 10-32x.375 BHM 6
49 7-33-02297 Hose-sepatr To Soln. 1
50 2-00-01803 Washer 1.062x.328x.062 3
51 7-29-00215 Gasket-soap Tank 1
52 2-95-01930 Setscrew ¼-20x.375 HS-CP 3
53 2-00-00281 Setscrew # 8-32x2.50 HS-CP 1
54 2-00-04303 Screw ¼-20 x .375 HS-CP 3
55 2-00-00409 Flatwasher - .687 x .344 x .062-5 1
56 2-00-02341 Hex nut Jam 5/16-18 1
57 2-00-00410 Flatwasher 7/8 x 3/8 x 1/16 1
58 2-00-00644 Fibre Nut 5/16-18 1
C0501/0104
2-26 American-Lincoln T echnology
772 Operator’s Manual
Page 96

11
16
12
13
5
10
9
6
2
3
4
7
50
17
14
20
8
23
22
21
24
26
25
27
18
19
18
15
19
FROM
RECOVERY
CENTER
TANK
TO RECOVERY
R.H. SIDE TANK
SEPARATOR INLET
FROM RECOVERY
R.H. SIDE TANK
SEPARATOR OUTLET
39
40
41
48
47
31
4
24
49
25
46
31
4
45
29
30
28
37
42
32
38
1
35
34
33
51
36
37
37
44
42
43
C0501
37
38
37
36
53
52
58
57
52
56
54
55
CAMEL RECYCLING SYSTEM - EXPLODED VIEW
American-Lincoln Technology 2-27
772 Operator’s Manual
Page 97

HYDRAULICS (SCRUBBING SYSTEM) - PARTS LIST
KEY NO. PART NUMBER DESCRIPTION QTY
1 8-88-00024 Valve, Hyd. Control (Metro) 1
2 8-33-021 17 Hose, Control Valve to Cylinder 1
3 8-33-021 17 Hose, Control Valve to Cylinder 1
4 7-33-02165 Hose, Tractor Pump to Control Valve 1
5
6 8-33-02063 Hose, Control V alve to Scrub Brush Motor 1
7 7-33-02140 Hose, Scrub Brush Motor to Control V alve 1
8 7-33-02284 Hose, From Control V alve toT ractor Rear Axle Housing 1
9 7-33-02108 Hose, Scrub Brush Mtr to Scrub Brush Mtr 4
10 7-33-02106 Hose, Scrub Brush Motor 1
1 1 2-00-04826 37E JIC Str. Thd. 90E Elbow, 7/16-20 2
12 7-33-02170 Hose, Case Drain (Side) 2
13 2-00-04827 37E Str . Thd. Tee, 7/16 - 20 2
14
15
16 2-00-04234 37E JIC Str . Thd. Connector, 7/8-14 / ¾-16 1
17 2-00-04217 37E JIC Str . Thd. 90E Elbow, 7/8-14 / ¾-16 7
18 2-00-04242 37E JIC Bulkhead Union, ½ x 2.375 2
19 2-00-03407 Hose Clamp, .562 - 1.062 2
20 2-00-04613 Hose Fitting Barbed, F 37x Flare Swivel ¾-16 1
21
22
23* 7-31-06063 Handle 2
24* 2-00-04640 37E JIC Swivel Adapter, 9/16-18 / 3/8-18 6
25* 2-00-04628 Reducer Bushing, 1
26* 8-88-00023 V alve, Lockoff 1
27* 2-00-04477 37E JIC 90E Elbow M, 1/4-18 / 9/16-18 1
28* 2-00-04472 37E JIC 90E Elbow M, 3/8-18 / 9/16-18 1
29* 2-00-04547 37E JIC 90E Elbow M, 3/8-18 / 3/4-16 4
30* 2-00-04244 90E Swivel Nut Elbow, ½ 2
31 8-25-02034 37E JIC Restrictor, 3/8 1
32 2-00-04528 37E JIC Male Connector, 1/2-14 / 3/4-16 1
33 2-00-03170 Flat Washer, 1.500 x .750 x .125 4
34 7-81-00110 Support Valve Mtg. 1
35 7-23-03095 U-Bolt, 5/8-18 x 5.000 x 7.000 1
36 2-00-02313 Lock Washer , Helical Spring 5/8 Med 2
37 2-00-00590 Nut, Hex 5/8 - 18 x .937 x .546 2
38 2-00-02589 Screw, 1/4 - 20 x 2.00 HHC 2
39 2-00-00518 Lock Washer , Helical Spring 1/4 Med 2
40 2-00-00594 Nut, Hex 1/4 - 20 x .437 x .218 2
41 2-00-04721 Molding, Hydraulic Hose 2
*Part of 0760-274 V alve Assembly.
P3971/9309
2-28 American-Lincoln T echnology
772 Operator’s Manual
Page 98

CONTROL VALVE
40
39
38
HYDRAULICS (SCRUBBING SYSTEM) - EXPLODED VIEW
37
36
35 34
20
24
19
TRACTOR
REAR AXLE
HOUSING
19
29
32
2
27
26
25
31
3
BRUSH ROTATION CONTROL
BRUSH LIFT
CYLINDER CONTROL
CYLINDER
SCRUB BRUSH LIFT
24
24
28
29
24
23
6
4
8
30
7
1
TRACTOR
PRIORITY VALVE
18
33
BRUSH MOTORS
SCRUB
American-Lincoln Technology 2-29
772 Operator’s Manual
6
17
7
17
18
16
10
9
17
9
P3971/0011
Page 99

CAMEL HYDRAULICS (SCRUBBING SYSTEM) - PARTS LIST
KEY NO. PART NUMBER DESCRIPTION QTY
1 8-88-00024 Valve, Hyd. Control (metro) 1
2 8-33-02117 Hose, Control Valve To Cylinder 1
3 8-33-02217 Hose, Control Valve To Cylinder 1
4 7-33-02165 Hose, Tractor Pump To Control Valve 1
5 7-33-02284 Hose, Control Valve Return 1
6 8-33-02063 Hose, Control Valve To Scrub Brush Motor 1
7 7-33-02140 Hose, Scrub Brush Motor To Control Valve 1
8 8-33-02209 Hose, Ors 37 Deg. Jic 29.00" Lg. 1
9 7-33-02108 Hose, Scrub Brush Mtr To Scrub Brush Mtr 4
10 7-33-02106 Hose, Scrub Brush Motor Hydraulic Hose 1
11
12
13
14 7-33-02199 Hose, 13/16 Ors (1) 45 Deg. 67.00" Lg. 1
15 2-00-04928 Run Tee, 13/16 Ors # 8 1
16 2-00-04234 Fitting, Str. 1
17 2-00-04217 Fitting, 90º 7
18 2-00-04242 Fittingh, Bulkhead 2
19 2-00-03407 Clamp, Hose 2
20 2-00-04613 Fitting, Barb 1
21 2-00-04641 Pipe Nipple 3/8 Npt 1
22 2-00-05194 Pipe Connector 3/8 Npt 1
23 7-31-06063 Handle 2
24 2-00-04640 Fitting Str. Swivel 5
25 2-00-04628 Fitting, Str. 1
26 8-88-00023 Valve, Lockoff 1
27 2-00-04477 Fitting, 90º 1
28 2-00-04472 Fitting, 90º 1
29 2-00-04547 Fitting, 90º 3
30 2-00-04244 Fitting, 90º Swivel 2
31 8-25-02034 Fitting, Restrictor 1
32 2-00-04611 Fitting, Str. 1
33 2-00-03170 Washer, 3/4 Flat 4
34 7-81-00110 Support Valve Mtg. 1
35 7-23-03095 U-bolt 1
36 2-00-02313 Lockwasher, 5/8 2
37 2-00-00590 Nut, 5/8-18 2
38 2-00-02589 Screw, Hhc ¼-20 X 2.00 2
39 2-00-00518 Lockwasher, ¼ Split 12
40 2-00-00594 Nut, Hex ¼-20 6
41 8-65-00043 Retainer, Valve 1
42 2-00-00407 Flatwasher, ¼ 6
43 7-08-00756 Bracket, Valve Mount 1
44 2-00-04977 Fitting, St. 13/16-16 Ors To 9/16-16 Ors 1
45 8-33-02193 Hose, 113/16-16 Ors 18.00" Lg. 1
46 2-00-05046 Elbow, 90º Swivel Nut 13/16-16 Ors 1
47 2-00-04885 Elbow, 90º ¾-16 Sae X 13/16-16 Ors 3
48 7-88-00052 Valve, Motor Shut Off 1
49 2-00-05216 Screw, ¼-20 X 5.00 Hhc 2
50 7-56-05022 Pipe Fitting, 3/8 Npt 2
51 7-33-02298 Hose, 13/16-16 Ors Strt. 48.00" Lg. 1
52 2-00-04589 Street Elbow, 3/8 Npt 4
53 0782-128 Hydraulic Motor, Camel System Ref.
54 2-00-05195 Adapter, 13/16-16 Ors 3/8 Npt 2
55 2-00-02587 Screw, ¼-20 X 1.25 Hhc 2
P3971C/0011
2-30 American-Lincoln T echnology
772 Operator’s Manual
Page 100

CAMEL HYDRAULICS (SCRUBBING SYSTEM) - EXPLODED VIEW
CONTROL VALVE
40
39
38
37
36
35 34
24
29
20
24
TRACTOR
REAR AXLE
HOUSING
4
42
55
39
40
43
24
32
2
28
27
31
29
26
25
3
BRUSH ROTATION CONTROL
BRUSH LIFT
CYLINDER CONTROL
CYLINDER
SCRUB BRUSH LIFT
24
23
6
30
7
1
15
49
41
48
47
20
19
54
18
45
14
8
51
42
47
7
17
18
16
47
10
42
39
46
9
19
5
54
52
6
50
53
TRACTOR
PRIORITY VALVE
52
52
22
21
17
9
18
33
BRUSH MOTORS
SCRUB
17
P3971C/0011
American-Lincoln Technology 2-31
772 Operator’s Manual
40
 Loading...