

Page 1
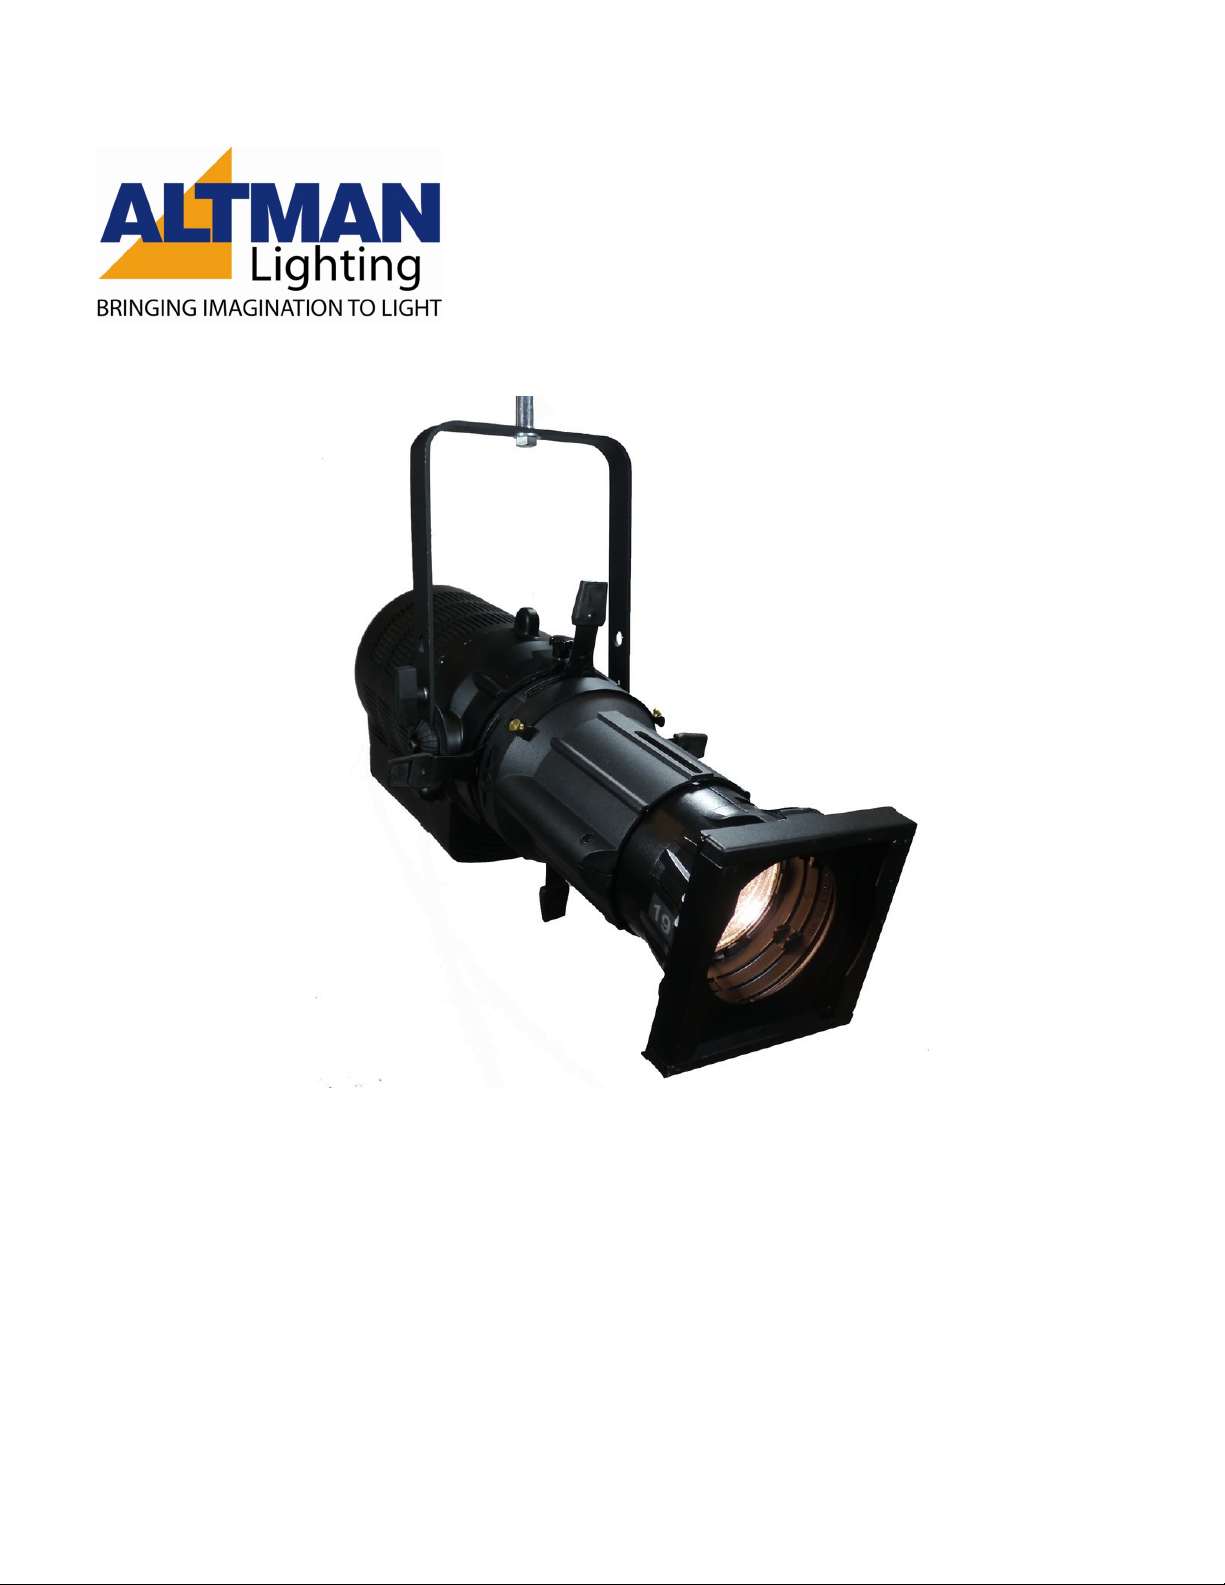
Phoenix
LED Profile Spot
Operation, Programming
and Safety Manual
Altman Lighting, Inc. 57 Alexander Street., Yonkers, NY 10701 1-800-4-ALTMAN
SPECIFICATIONS SUBJECT TO CHANGE WIT HOUT NOTICE. COPYRIGHT 2012© ALTMAN LIGHTIN G, INC/ ALL RIGHTS RESERVED
1/24/14 rev:C
1
Page 2

Table of Contents
Introduction & Safety Instructions & Information Page 3
Yok e & Sh ut te r A ss emb ly Page 4
Accessory Instructions: Page 5
Retaining Latch, Iris Slot, Pattern Projections & Shutters
Cleaning & Replacing Lenses Page 6
DMX Controls– Operation Menu & Controls Page 7
Player—Operation Menu & Control Page 8
Settings & Info— Operation Menu & Controls Page 9
Fixture Resolution 3000K, 5600K, RGBW Page 10
Fixture Resolution RGBA Page 11
General Maintenance & Troubleshooting Page 12
Altman Lighting, Inc. 57 Alexander Street., Yonkers, NY 10701 1-800-4-ALTMAN
SPECIFICATIONS SUBJECT TO CHANGE WIT HOUT NOTICE. COPYRIGHT 2012© ALTMAN LIGHTIN G, INC/ ALL RIGHTS RESERVED
1/24/14 rev:C
2
Page 3
Phoenix
Series
LED Profile Spot
INTRODUCTION
Congratulations on purchasing one of the finest
lighting instruments available today! Before
using your Phoenix LED Profile Spot, be sure to
read all of the instructions in this manual.
Input Voltage: 90~240V AC, 50/60Hz
Rated Power: 250W @220V
Beam Angle: 19°, 26°, 36° and 50°
Data Controls: DMX 512 and RDM control protocol
Additional Functions: Display fixture service time,
LCD back light time optional, Display auto reverse function
SAFETY INSTRUCTIONS
INSTRUCTIONS PERTAINING TO A RISK OF FIRE,
ELECTRICAL SHOCK, OR INJURY TO PERSONS FOR
SPECTRA SERIES LED LIGHTING FIXTURES.
WARNING! TO REDUCE THE RISK OF FIRE, ELECTRIC
SHOCK, OR INJURY TO PERSONS, FOLLOW THESE
IMPORTANT SAFETY INSTRUCTIONS:
1. Turn off, unplug power, and allow fixture to cool before
cleaning or servicing.
2. Ensure fixture is properly grounded.
3. Ensure that ventilation slots are not obstructed.
4. Do not look directly at lighted LEDs.
5. Keep away from flammable materials.
6. No user serviceable parts inside. Replace entire light
engine assembly if necessary.
7. Do not touch the LEDs at any time. Use a soft lint free
cloth the clean lens. Do not use solvents to clean. Use
cloth dampened with water. Allow to dry completely
before turning fixture on again.
8. Do not operate the unit with missing or damaged lens.
9. Do not expose unit to rain or use in damp or wet
locations.
10. Allowforadequateventilationwithaminimumof20”
from the adjacent surface.
11. Be sure the cooling fans are functioning properly and
no ventilation slots are blocked with debris.
12. Before installation, make sure the Voltage being used
is consistent with fixture requirements.
13. Maximum units to daisy chain power is no more than 4
fixtures.
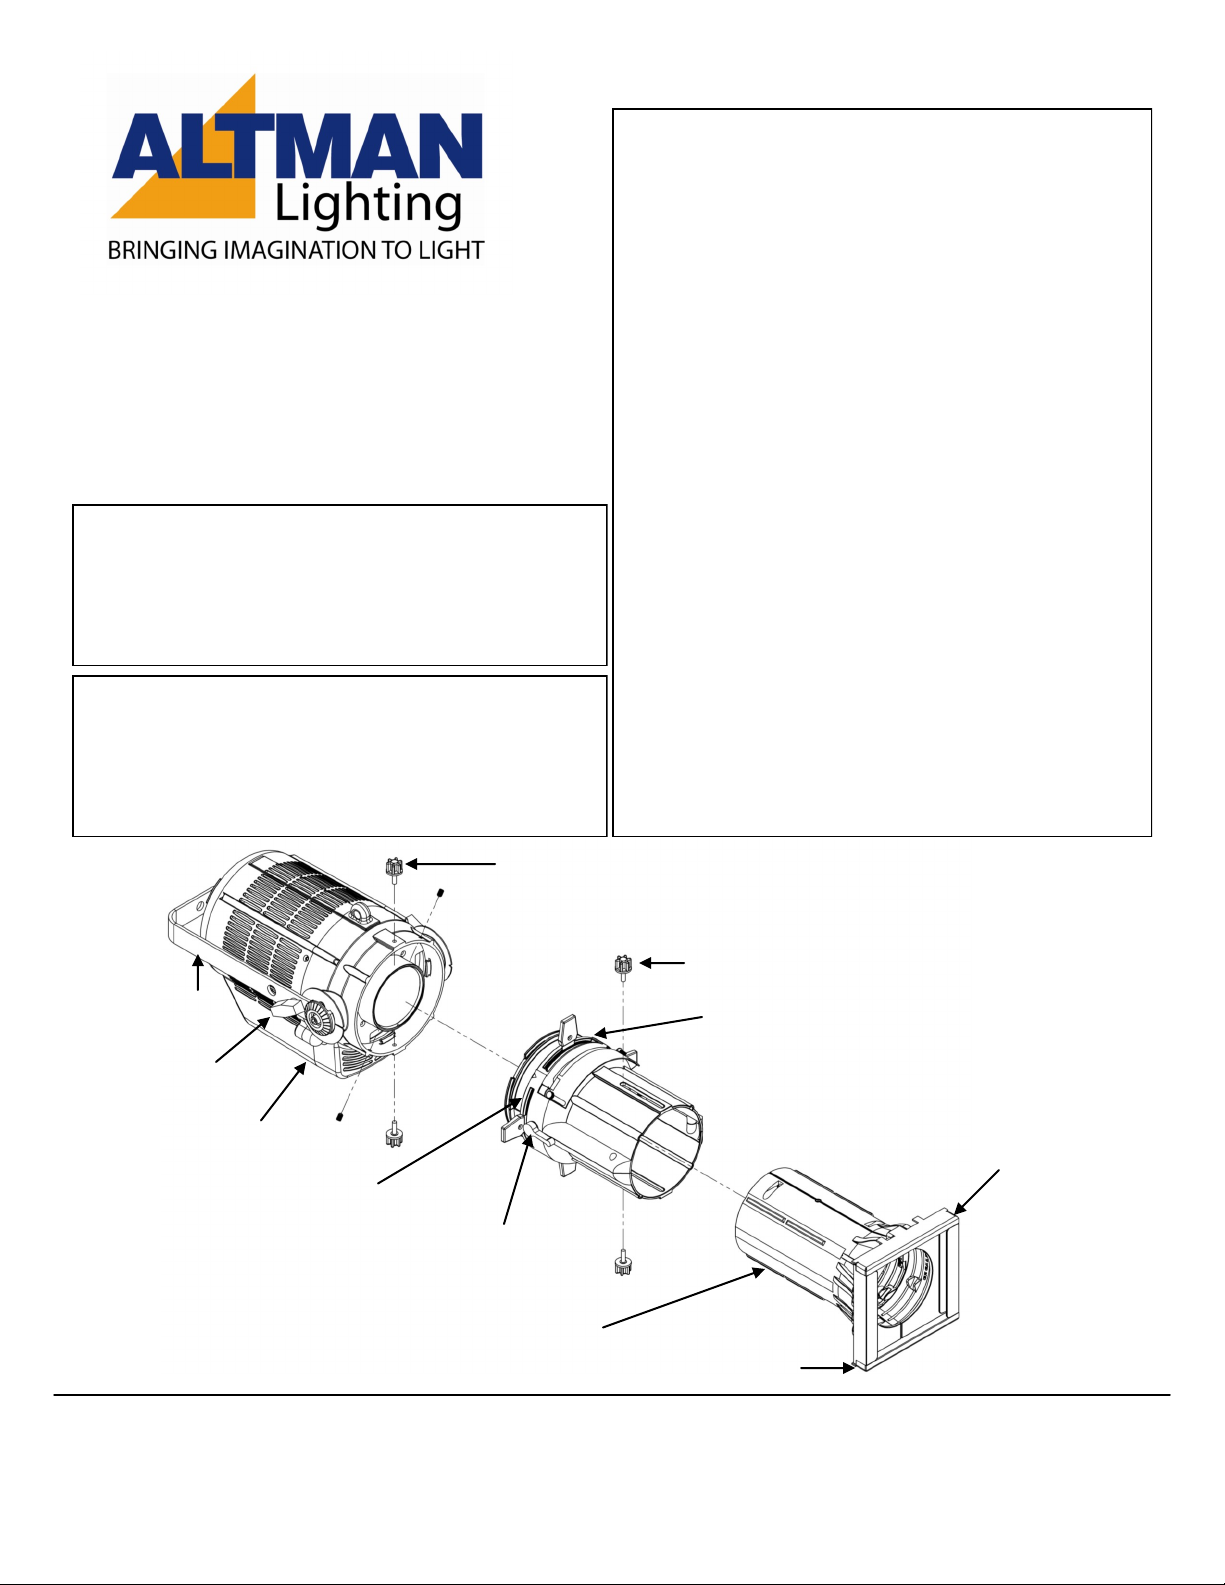
SHUTTER ASSEMBLY
ROTATION LOCKING KNOB
FOCUS LOCKING KNOB
YOKE
T-HANDLE (2)
LIGHT ENGINE ASSEMBLY
SHUTTER ASSEMBLY
SHUTTER LOCKING
LEVER
LENS TUBE
Altman Lighting, Inc. 57 Alexander Street., Yonkers, NY 10701 1-800-4-ALTMAN
SPECIFICATIONS SUBJECT TO CHANGE WIT HOUT NOTICE. COPYRIGHT 2012© ALTMAN LIGHTIN G, INC/ ALL RIGHTS RESERVED
1/24/14 rev:C
3
DROP IN IRIS SLOT
COLOR FRAME /
ACCESSORY COVER
COLOR FRAME /
ACCESSORY COVER
Page 4
Short Yoke
Position
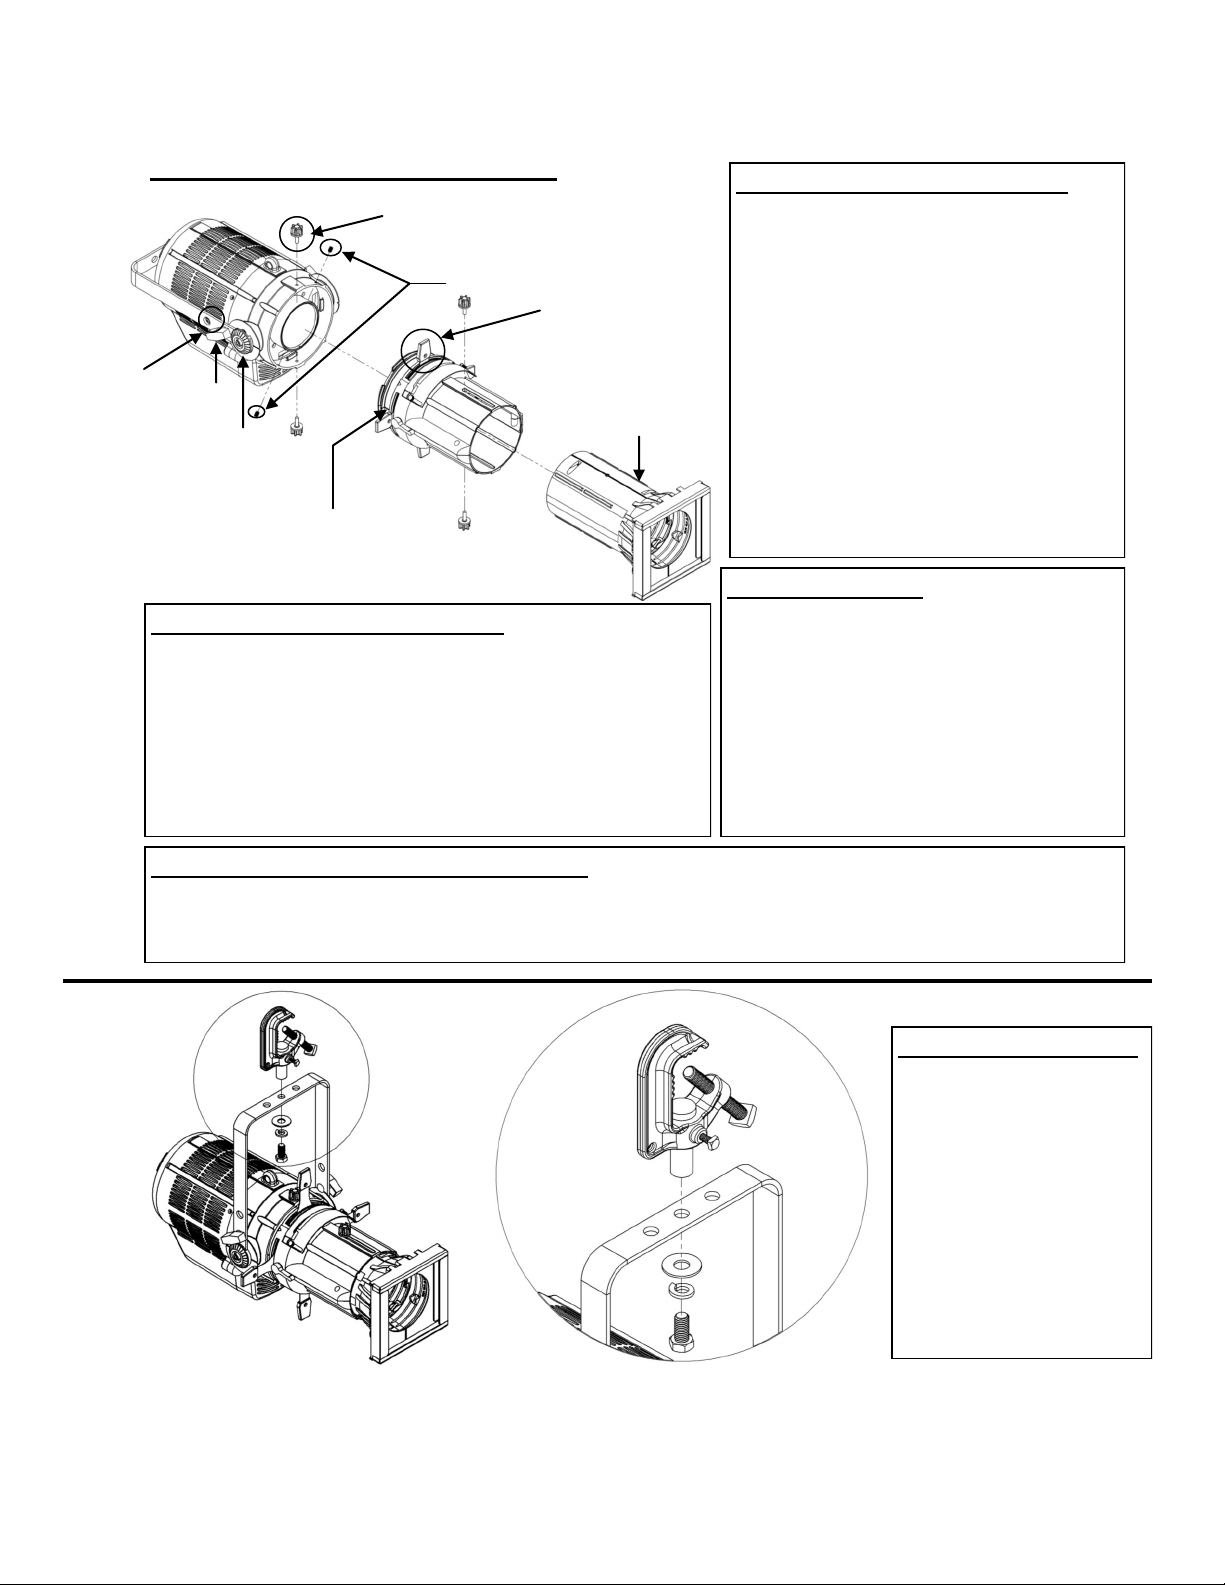
YOKE & SHUTTER ASSEMBLY
Shutter Rotation
Lock Knob
***Shutter Assembly Screw Guides
Shutter Handle
T-Handles
Yoke Bolts
Cup Washers
Pivot Covers
Shutter Assembly
ROTATING SHUTTER ASSEMBLY
1. Loosen shutter rotation lock knob on either side of
the fixture.
2. Rotate shutter assembly 360° in either direction.
3. Tighten shutter rotation lock knobs to secure shutter
assembly.
4. To lock the shutters in place, rotate the Shutter Lock
Lever until proper tension is applied to shutters.
Lens Tube
USING SHORT YOKE POSITION
1. Remove T-Handle and its
associated hardware.
2. Remove yoke bolts, cup washers
and pivot covers. Note: use a 1/4:
hex head wrench to remove yoke
bolts.
3. Stretch yoke and snap it into short
yoke position.
4. Replace pivot covers, cup washers
and yoke bolts.
5. Replace T-Handle into square
hole, keeping the washer between
handle and yoke.
ADJUSTING YOKE
1. With one hand on ring handle to
hold unit, loosen T-Handle.
2. Tilt unit to desired angle. Note: Reference angles have been ,molded
on the pivot cover to make adjustments easier and more precise.
3. Tighten T-Handle to secure fixture
in place.
***SHUTTER ASSEMBLY SCREW GUIDES
These two screws prevent the shutter assembly from coming off the light engine while rotating.
Only remove these screws when taking the light shutter assembly off of the light engine. After
replacing the shutter assembly, replace these two screws to avoid injuries.
INSTALLING C-CLAMP
The C-clamp is used to
mount the fixture to a
pipe hang position. The
C-clamp attaches to the
top of the yoke via the
1/2”boltprovidedwith
the C-clamp. Be sure to
keep the washer
between the bolt head
and the yoke.
Altman Lighting, Inc. 57 Alexander Street., Yonkers, NY 10701 1-800-4-ALTMAN
SPECIFICATIONS SUBJECT TO CHANGE WIT HOUT NOTICE. COPYRIGHT 2012© ALTMAN LIGHTIN G, INC/ ALL RIGHTS RESERVED
1/24/14 rev:C
4
Page 5
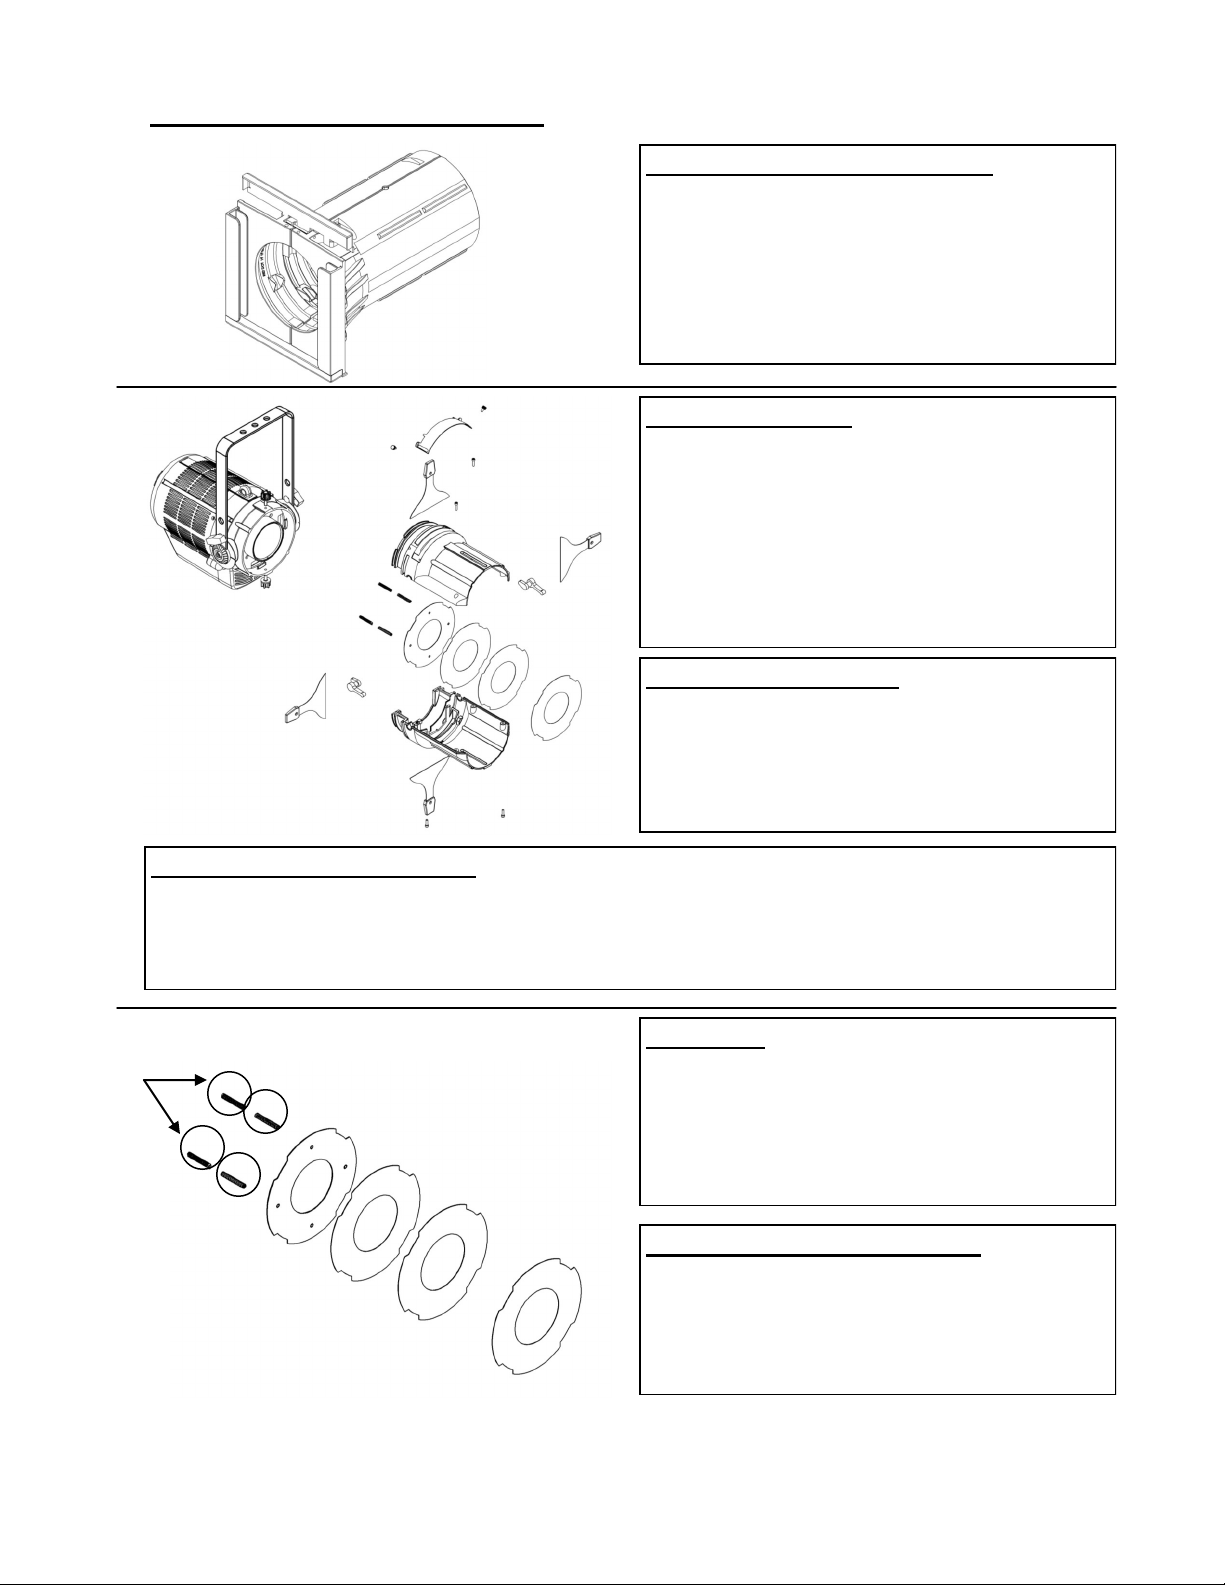
ACCESSORY INSTRUCTIONS
ACCESSORY RETAINING LATCH
This unique retaining hatch is designed for
positive locking and manual return.
1. Slide cover to right side.
2. Swing cover back.
3. Insert accessory.
4. Close cover. Make sure latch locks in
place.
DROP IN IRIS SLOT
This larger slot can accept either a drop-in iris
or a motorized pattern device (gobo rotator,
yo-yo etc). The slot has a retractable cover to
prevent light leak when not in use. When a
device is used, the cover should be closed to
the edge of the device placed in the slot.
When a drop-in iris is used, always place it so
the flat side is facing the shutters.
PATTERN PROJECTION
The pattern holder accepts standard ETC
Source 4 size pattern holders. The image of
the pattern can be rotated 360° in either
direction. The use of the donut will sharpen the
image.
SOFT FOCUS LENS ADAPTER Part #: PHX-SFLA (sold separately)
The soft focus lens adapter is a 5° luminate holographic lensing option to help diffuse the LED
array for a softer focus. The matte side of the diffusion should face the light source as the shiny
side should face the lens barrel. NOTE: Do not add metal gobos in the same pattern holder. The
heat build up will melt the diffusion material.
SHUTTERS
Plate Stud
Springs
1. The shutters are not removable without
dissembling the unit.
2. Care must be given to make sure each of
the four shutters stay in their proper
positions in between the shutter plates.
INSTALLING SHUTTER PLATES
1. Pressure Plate (completely flat): Install
such that the tabs are on the top and
bottom and sides.
2. Iris and spring plate. Install so that the (4)
Altman Lighting, Inc. 57 Alexander Street., Yonkers, NY 10701 1-800-4-ALTMAN
SPECIFICATIONS SUBJECT TO CHANGE WIT HOUT NOTICE. COPYRIGHT 2012© ALTMAN LIGHTIN G, INC/ ALL RIGHTS RESERVED
1/24/14 rev:C
5
studs face the back of the unit.
Page 6
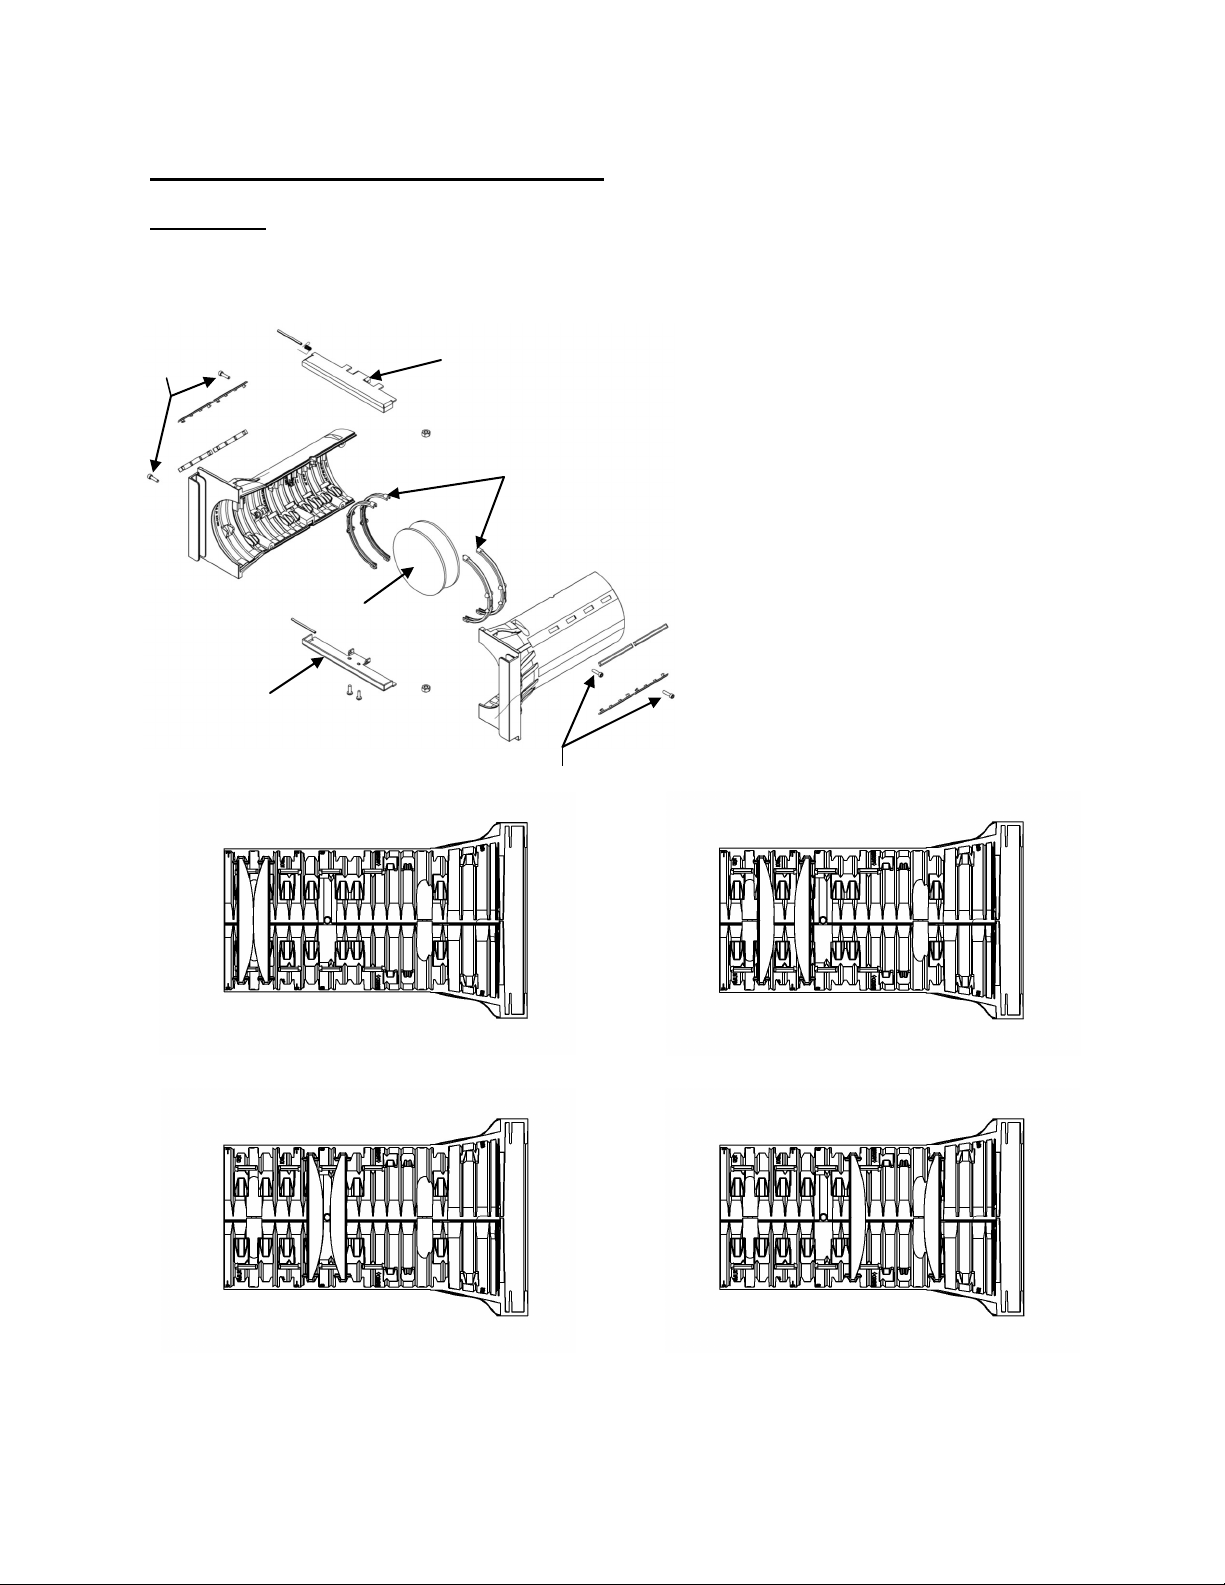
CLEANING / REPLACING LENSES
WARNING: Never use glass or window cleaner or any abrasive material to clean
a lens. These types of cleaners will stain the lens surface. Abrasive materials will
damage the surface of the lens.
Barrel Screws
Lower Accessory Cover
Lens
Top Latch Cover
Lens Retaining Rings
Barrel Screws
1. Remove focus lock knob, push in safety
pin and slide lens barrel out.
2. Place barrel on a surface so that the two
halves are oriented as the top and bottom.
3. Remove lower accessory cover with (2)
screws.
4. Remove latch cover with (2) screws.
5. Remove (4) barrel screws, one on each
side.
6. Carefully remove top half of the barrel.
7. Replace or clean lenses with mild soap
and water, and a clean, lint-fee cloth.
8. Replace top half of barrel, top latch cover,
bottom cover and re-install screws.
9. Slide lens barrel back into unit and replace
focus lock knobs.
50° (4.5 X 6)
26° (6 x 12) 19° (6 x 16)
Altman Lighting, Inc. 57 Alexander Street., Yonkers, NY 10701 1-800-4-ALTMAN
SPECIFICATIONS SUBJECT TO CHANGE WIT HOUT NOTICE. COPYRIGHT 2012© ALTMAN LIGHTIN G, INC/ ALL RIGHTS RESERVED
1/24/14 rev:C
6
36° (6 x 9)
Page 7
Operation Menu and Options
DMX Control
-DMX Address (1-512)
-DMX Resolution (8 Bit or 16 Bit)
-Master Channel (Off or On)
-Smoothing (Off or On)
-DMX Loss (Off, Hold Last Command, Preset)
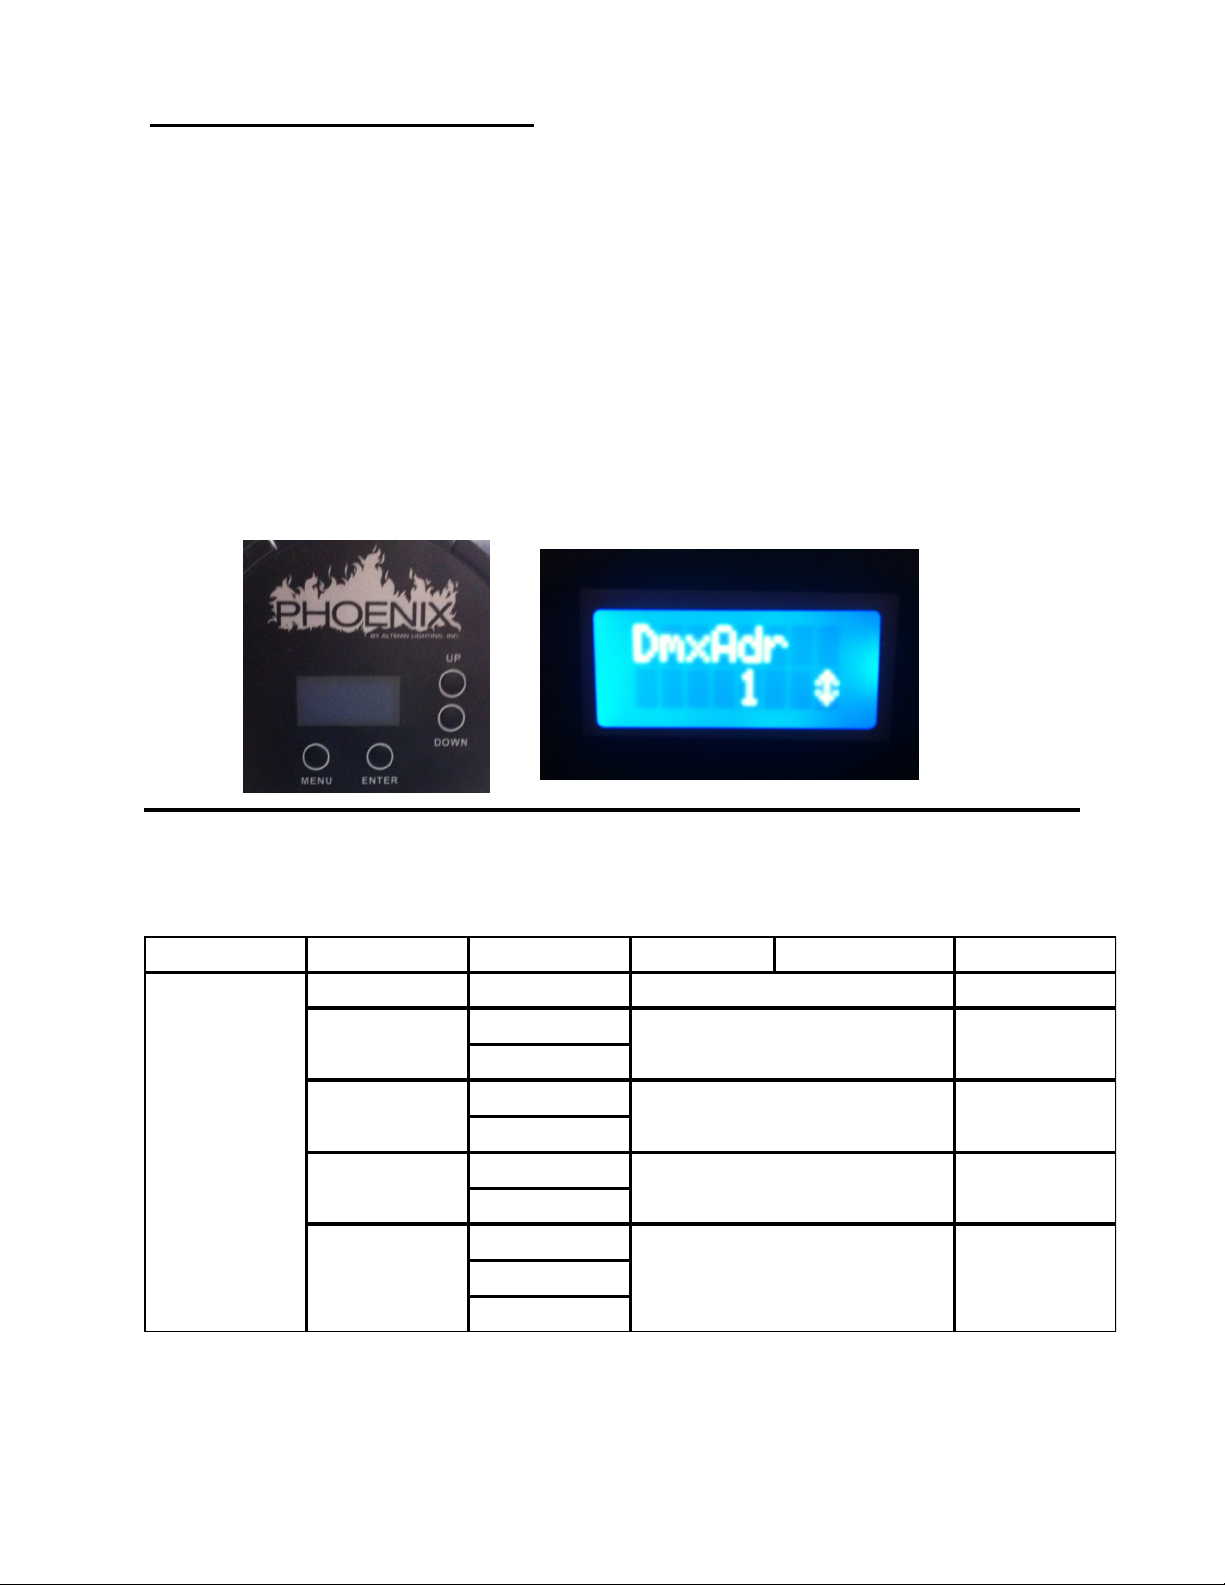
To address your fixture follow these steps:
1-Power the fixture and wait for the startup to complete. The screen will turn off.
2-PressENTERandyouwillsee“DMX Control”pressENTERagain.
3-Whenthescreenshows“DMXAdr1”pressENTERagain.Theupanddownarrowsshouldnow
be next to address 1. (See image 2 below)
4-Press the UP or DOWN buttons to scroll to your desired DMX address.
5-Press ENTER to confirm the address.
6-Press MENU to back out of the DMX address setting.
The up and
down arrows
must be next to
the number in
order to scroll to
your desired
DMX address.
The table below demonstrates the DMX Control Options you can choose from. By following the
same steps to address your fixture you can choose any of the following options from below.
Menu Category Control Type Option 1 Option 2 Option 3 Factory Default
DMX Address 1 to 512
DMX Resolution 8 Bit
001
8 Bit
Master Channel Off
DMX Control
Smoothing Off
DMX Loss off
Altman Lighting, Inc. 57 Alexander Street., Yonkers, NY 10701 1-800-4-ALTMAN
SPECIFICATIONS SUBJECT TO CHANGE WIT HOUT NOTICE. COPYRIGHT 2012© ALTMAN LIGHTIN G, INC/ ALL RIGHTS RESERVED
16 Bit
Off
On
On
On
Off
Hold Last Look
Preset (cue 1)
1/24/14 rev:C
7
Page 8
Operation Menu and Options
There is a player option in the menu where you can pre-program your fixture to play back up to 5
cues. The cues can run as short as 1 second or as long as 99 minutes. You can choose any of
the colors you desire within your cues to create any look you want. You also have the option of
putting a delay in between your cues. To program your cues follow the steps below.
Press ENTER to turn the screen on.
PressDOWNtogettothe“player”option.
PressENTERtocapturethe“playersetting”.
Press DOWN to turn the player one or off. In this case we will be turning the player on.
PressMENUoncetobackoutof“on/off”selection.
PressDOWNtogoto“EditPresets”.
PressENTERtogoto“EditCue1”.
Press UP or DOWN to select cue # you would like to edit. In this case we will start with
cue 1.
PressENTERtoselect“Cue1”.
PressEntertoselectifyouwanttoenabletheCueonoroff.Select“enable”.
Press MENU to back up one step.
Select the channel/color you desire for your first cue. For example select red press
ENTER.
PressUPandscrollto“255”forfullintensity.
Press ENTER to confirm.
Press MENU to back out of red selection.
(Repeat these same steps to edit the rest of your cues.)
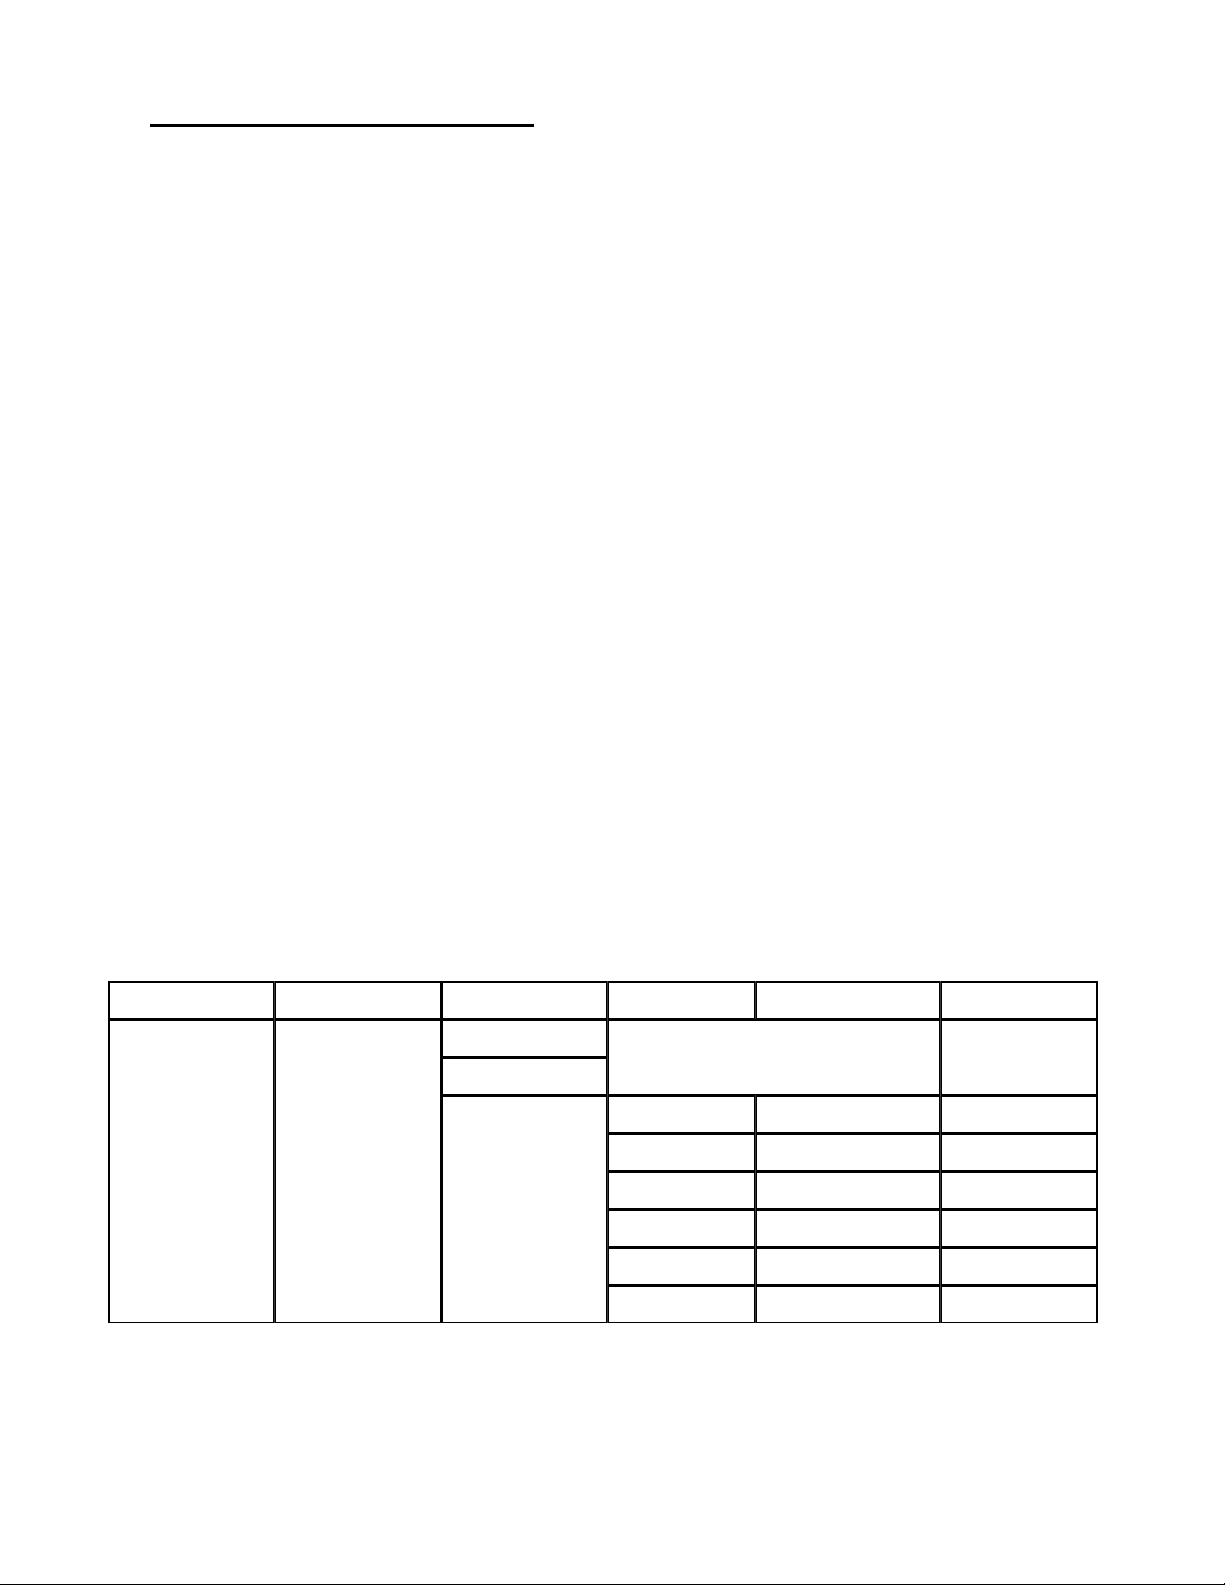
Spreadsheet for Menu categories for the player
Menu Category Control Type Option 1 Option 2 Option 3 Factory Default
PLAYER
Altman Lighting, Inc. 57 Alexander Street., Yonkers, NY 10701 1-800-4-ALTMAN
SPECIFICATIONS SUBJECT TO CHANGE WIT HOUT NOTICE. COPYRIGHT 2012© ALTMAN LIGHTIN G, INC/ ALL RIGHTS RESERVED
Player On
Off
On
Cue # 1
OR
Cue #2
OR
Cue #3
OR
Cue#4
OR
Cue # 5
On
Enable/Disable
Delay
Red
Green
Blue
White
1/24/14 rev:C
8
Off / On
1 sec to 99 min
0 to 255
0 to 255
0 to 255
0 to 255
On
2.0 seconds
255
0
0
0
Page 9
Operation Menu and Options
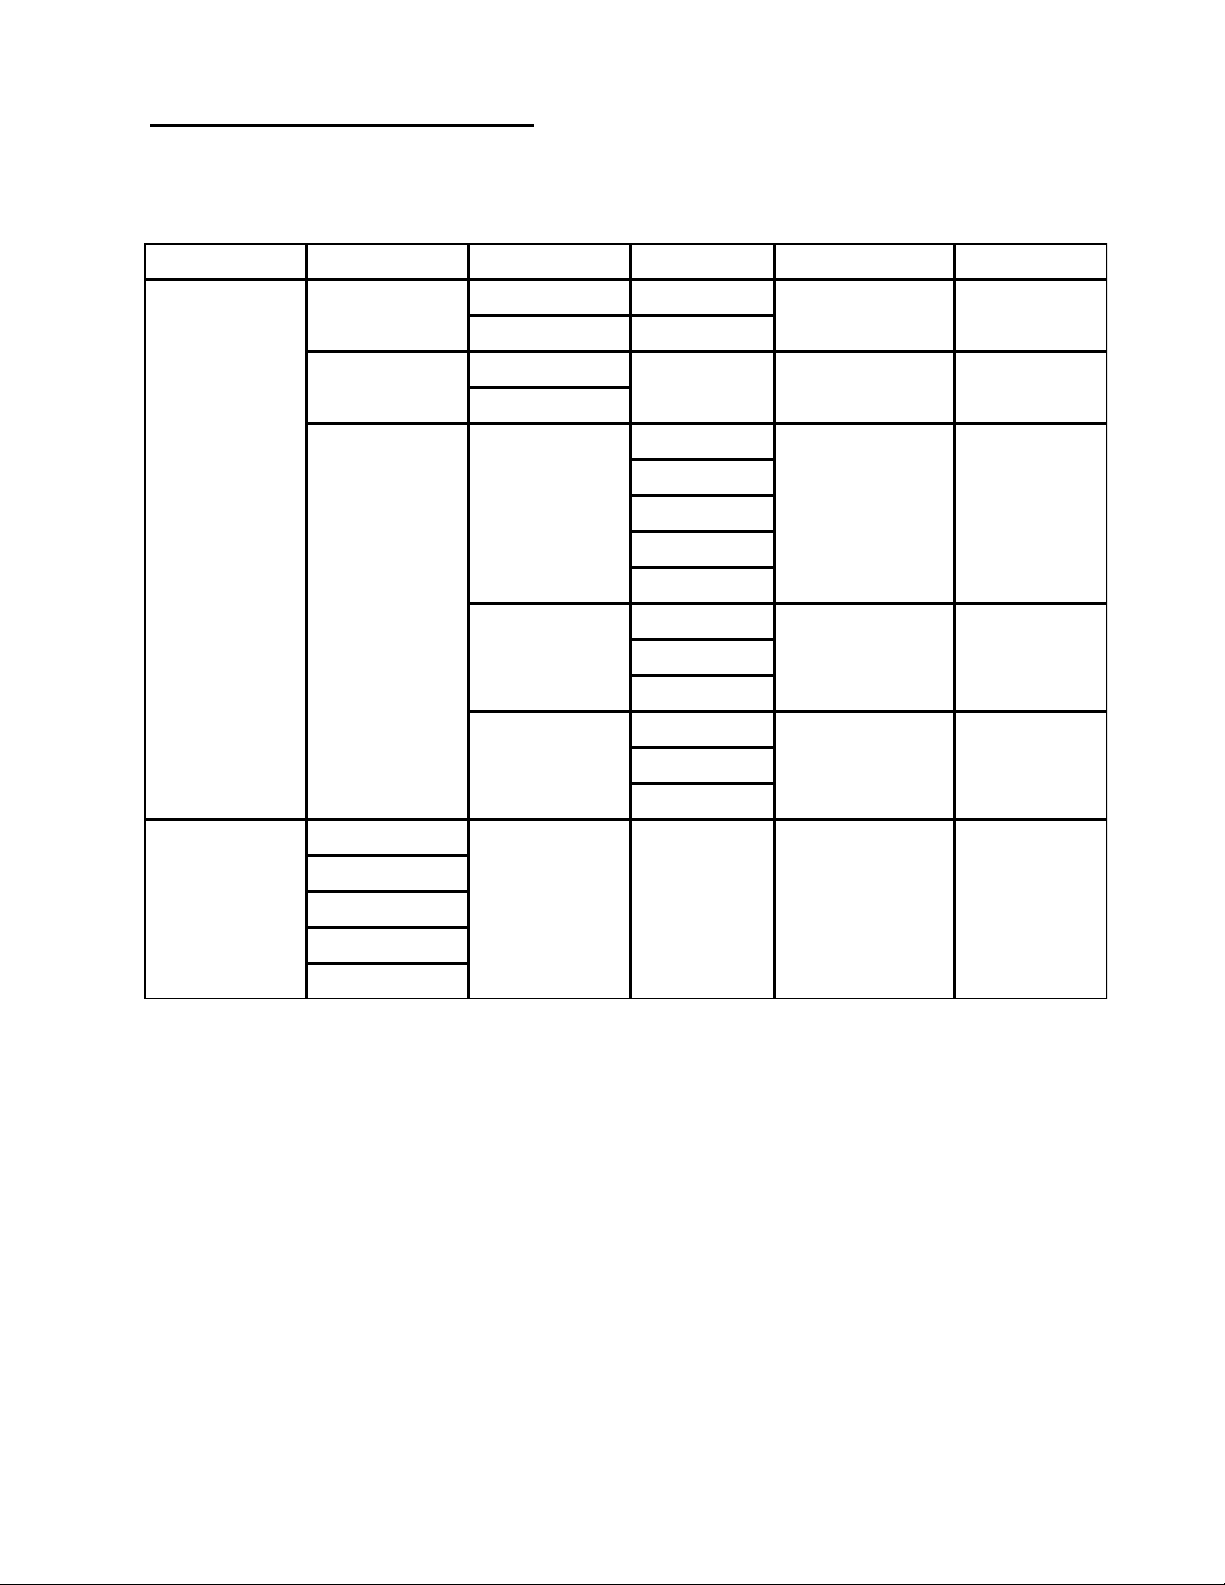
Menu Category Control Type Option 1 Option 2 Option 3 Factory Default
Settings
Info
Yes Factory Default
No
Fan Speed Fan Auto
Fan On
Display
Backlight
Screen Correction Normal/Upright
Dimming Curve Linear
LED Temperature
Run Time/Hours
Sure? Y
Sure? N
On
5 seconds
10 seconds
30 seconds
60 seconds
Flipped
Auto
Log
Square
No
AUTO
On
Normal/Upright
Square
Fixture Serial #
LED Serial #
Software Version
Altman Lighting, Inc. 57 Alexander Street., Yonkers, NY 10701 1-800-4-ALTMAN
SPECIFICATIONS SUBJECT TO CHANGE WIT HOUT NOTICE. COPYRIGHT 2012© ALTMAN LIGHTIN G, INC/ ALL RIGHTS RESERVED
1/24/14 rev:C
9
Page 10

Fixture Resolution & Configuration
Fixture Type: 250W 3000K & 5600K White
8 Bit (one DMX channel per color) this is normal resolution
Channel 1 White
16 Bit (two DMX channels per color) Coarse & Fine high resolution.
Channel 1 White Coarse
Channel 2 White Fine
Master Channel is selectable as ON or OFF and provides a Master Fade channel that dims all 4 colors proportion-
ally at the same time in order to maintain the color.
8 Bit (one DMX channel per color) this is normal resolution
Channel 1 White
Channel 2 Master
16 Bit (two DMX channels per color) Coarse & Fine high resolution.
Channel 1 White Coarse
Channel 2 White Fine
Channel 3 Master Coarse
Channel 4 Master Fine
Smoothing is selectable as ON or OFF and provides a smooth transition ramp from one level to another in a
similarwaytohowanincandescentlampbehaves.Thishelpstoeliminatethe“steppiness”associatedwith
LED fixtures that is caused by the instantaneous response of LEDs. Turning smoothing off allows the LEDs
to react instantly for strobe-like and lightning effects.
Fixture Type: 250W RGBW
8 Bit (one DMX channel per color) this is normal resolution
Channel 1 Red
Channel 2 Green
Channel 3 Blue
Channel 4 White
16 Bit (two DMX channels per color) Coarse & Fine high resolution.
Channel 1 Red Coarse Channel 5 Blue Coarse
Channel 2 Red Fine Channel 6 Blue Fine
Channel 3 Green Coarse Channel 7 White Coarse
Master Channel is selectable as ON or OFF and provides a Master Fade channel that dims all 4 colors proportion-
ally at the same time in order to maintain the color.
8 Bit (one DMX channel per color) this is normal resolution
Channel 1 Red Channel 4 White
Channel 2 Green Channel 5 Master
Channel 3 Blue
16 Bit (two DMX channels per color) Coarse & Fine high resolution.
Channel 1 Red Coarse Channel 6 Blue Fine
Channel 2 Red Fine Channel 7 White Coarse
Channel 3 Green Coarse Channel 8 White Fine
Channel 4 Green Fine Channel 9 Master Coarse
Channel 5 Blue Coarse Channel 10 Master Fine
Altman Lighting, Inc. 57 Alexander Street., Yonkers, NY 10701 1-800-4-ALTMAN
SPECIFICATIONS SUBJECT TO CHANGE WIT HOUT NOTICE. COPYRIGHT 2012© ALTMAN LIGHTIN G, INC/ ALL RIGHTS RESERVED
1/24/14 rev:C
10
Page 11

Fixture Resolution & Configuration
Fixture Type: 250W RGBA
8 Bit (one DMX channel per color) this is normal resolution
Channel 1 Red
Channel 2 Green
Channel 3 Blue
Channel 4 Amber
16 Bit (two DMX channels per color) Coarse & Fine high resolution.
Channel 1 Red Coarse Channel 5 Blue Coarse
Channel 2 Red Fine Channel 6 Blue Fine
Channel 3 Green Coarse Channel 7 Amber Coarse
Channel 4 Green Fine Channel 8 Amber Fine
Master Channel is selectable as ON or OFF and provides a Master Fade channel that dims all 4 colors
proportionally at the same time in order to maintain the color.
8 Bit (one DMX channel per color) this is normal resolution
Channel 1 Red Channel 4 Amber
Channel 2 Green Channel 5 Master
Channel 3 Blue
16 Bit (two DMX channels per color) Coarse & Fine high resolution.
Channel 1 Red Coarse Channel 6 Blue Fine
Channel 2 Red Fine Channel 7 Amber Coarse
Channel 3 Green Coarse Channel 8 Amber Fine
Channel 4 Green Fine Channel 9 Master Coarse
Channel 5 Blue Coarse Channel 10 Master Fine
Smoothing is selectable as ON or OFF and provides a smooth transition ramp from one level to
another in a similar way to how an incandescent lamp behaves. This helps to eliminate the
“steppiness”associatedwithLEDfixturesthatiscausedbytheinstantaneousresponseofLEDs.
Turning smoothing off allows the LEDs to react instantly for strobe-like and lightning effects.
Altman Lighting, Inc. 57 Alexander Street., Yonkers, NY 10701 1-800-4-ALTMAN
SPECIFICATIONS SUBJECT TO CHANGE WIT HOUT NOTICE. COPYRIGHT 2012© ALTMAN LIGHTIN G, INC/ ALL RIGHTS RESERVED
1/24/14 rev:C
11
Page 12

General Maintenance
In order to insure longevity of your fixture, regular cleaning is necessary. The lens and fan
must be cleaned periodically to allow proper function of the fixture. Do not use alcohol or any
other solvent with chemicals to clean the lens. When cleaning your lens, use a clean soft lint
free cloth with damp with water. Do not use any hard materials to wipe the lens. Maintenance
and cleaning of your fixture depends on the frequency of use and the environmental conditions
your fixture is kept in. Make sure the fan is kept free of lint and dust to allow proper air flow.
To avoid damage to the shell of your fixture do not use alcohol or other organic solvents.
Troubleshooting
Problem Action
Unable to start / Power Check the power line connection between the fixture and electric source.
Data Signal Problems
Fixture Power Intermittence
Intensity of the beam is dim
Imperfections in the beam Make sure the lens is clean and free of cracks
Beam distortion Make sure the lens is clean and free of cracks
Check DMX Address.
Check Data lines and make sure all cables are in good condition.
Check the termination points.
Check the fan and make sure there is no dust or debris is blocking the
Check the Lifetime of the LEDs, make sure the lenses are clean.
Altman Lighting, Inc. 57 Alexander Street., Yonkers, NY 10701 1-800-4-ALTMAN
SPECIFICATIONS SUBJECT TO CHANGE WIT HOUT NOTICE. COPYRIGHT 2012© ALTMAN LIGHTIN G, INC/ ALL RIGHTS RESERVED
1/24/14 rev:C
12
 Loading...