

Page 1
WARNING
Improper installation, adjustment,
alteration, service or maintenance
can cause injury or property
damage.
Read the installation, operation and
maintenance instructions thoroughly
before installing or servicing this
equipment.
DANGER
Failure to follow these
instructions could result in re
or explosion that could cause
property damage, personal injury
or death.
DANGER
DO NOT use gas grill for indoor
cooking or heating. TOXIC fumes
can accumulate and cause
asphyxiation. DO NOT use in or
on boats or recreational vehicles.
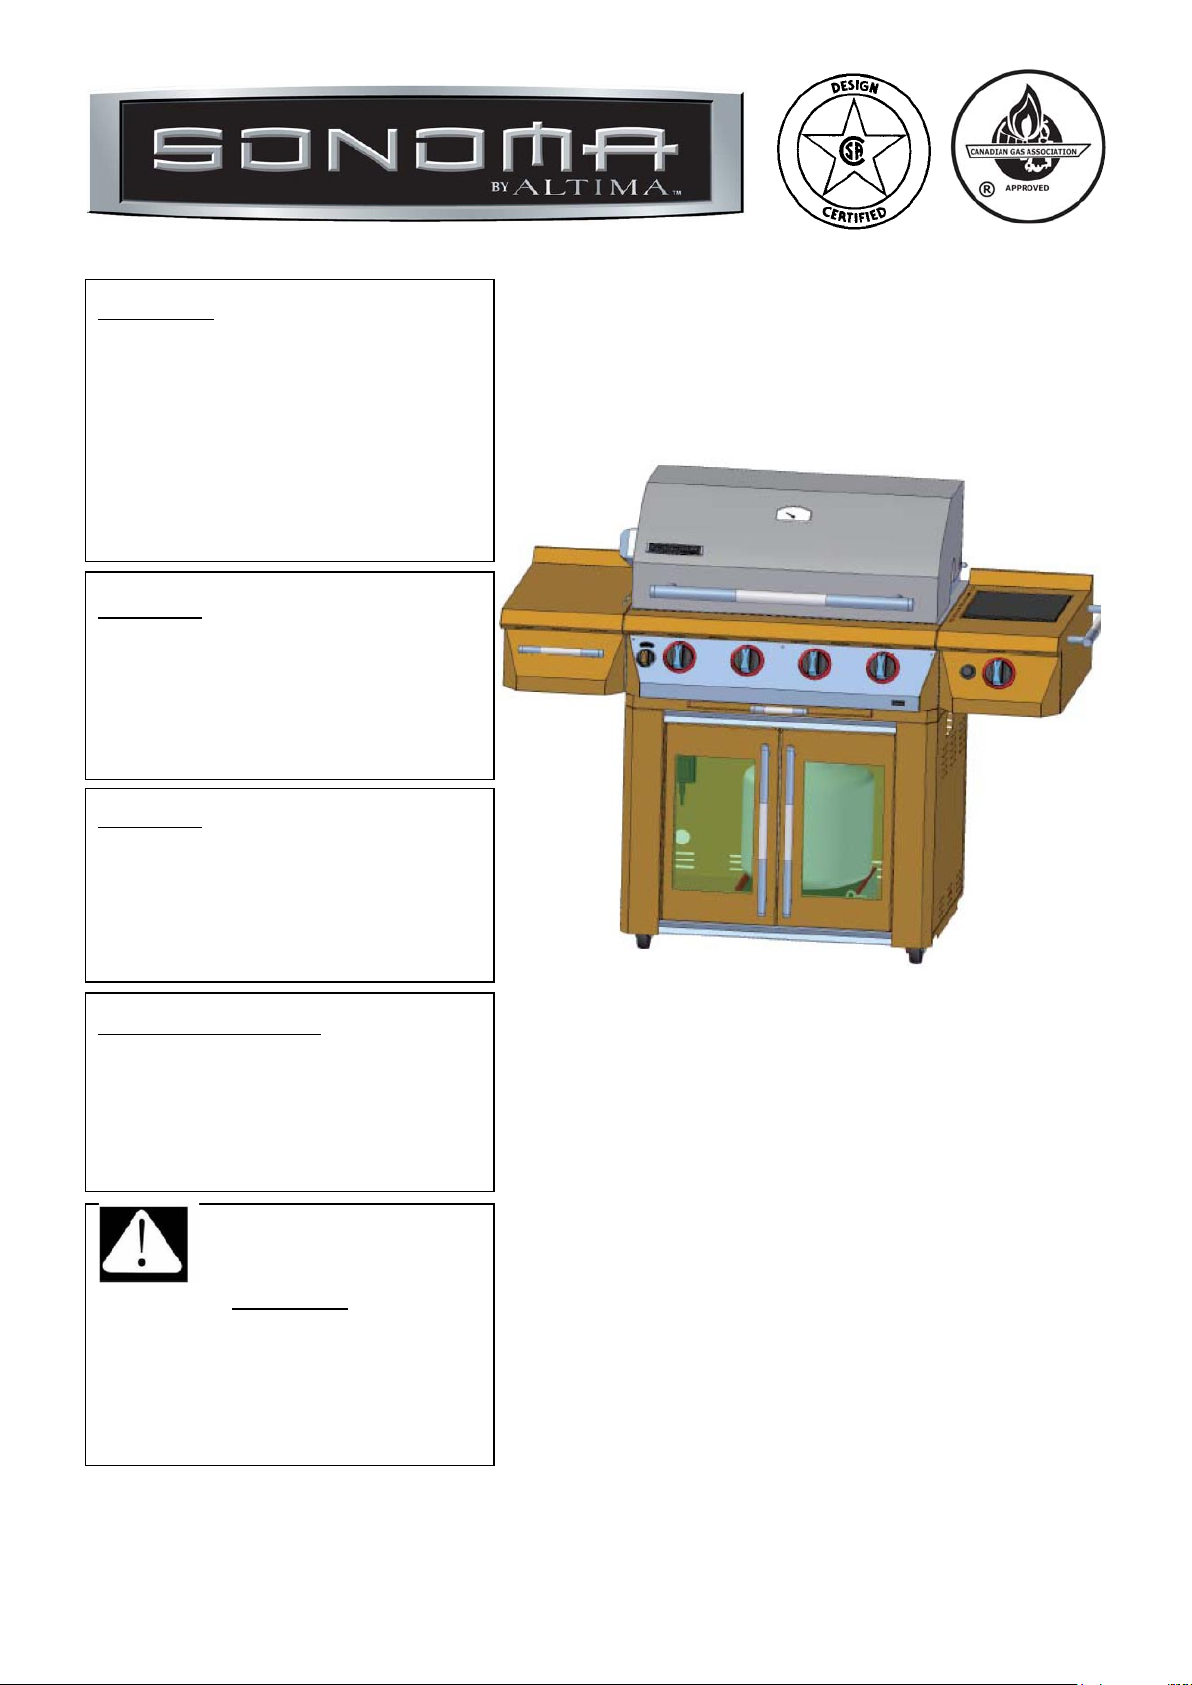
4-Burner LP Gas Grill
PF30LP
PROP 65 WARNING
Chemicals known to the State of
California to cause cancer, birth
defects or other reproductive
harm are created by the
combustion of propane.
WARNING
FOR YOUR SAFETY:
For Outdoor Use Only
(Outside any enclosure)
SAVE THESE INSTRUCTIONS FOR FUTURE
REFERENCE. IF YOU ARE ASSEMBLING THIS UNIT
FOR SOMEONE ELSE, GIVE THIS MANUAL TO HIM
OR HER TO SAVE FOR FUTURE REFERENCE.
FOR CUSTOMER SERVICE, EMAIL TO
[email protected] OR
CALL 1-800-229-5647 (TOLL-FREE) BETWEEN
8:00 AM AND 5:00 PM EASTERN TIME, MONDAY
THROUGH FRIDAY
Page 2

Grill Operation 1-2-3
Before Grilling.
Step 1 Keep your grill a safe distance away from your property. See page 3.
Step 2 Always Perform a Leak Test. See page 5.
Step 3 Keep children away from the grill.
During Grilling.
(To avoid tripping safety valves, please follow these instructions carefully!)
Step 1 First open lid and turn gas tank on slowly.
Step 2 Turn only one knob on at a time when lighting the grill.
Step 3 Use protective gloves when grill gets hot.
After Grilling.
Step 1 Burn grill for 10-15 minutes to burn off food residues.
Step 2 Wait until the grill is completely cooled before closing lid.
Step 3 Clean up grease build-up and cover your grill.
DANGER
WARNING
▲!
1. Do not store or use gasoline or other
ammable liquids or vapors in the vicinity
of this or any other appliance.
2. An LP cylinder not connected for use
shall not be stored in the vicinity of this
or any other appliance.
Always read and understand the WARNINGS and INSTRUCTION that are contained in this manual before
attempting to use this gas barbecue grill, to prevent possible bodily injury or property damage.
Always keep this manual convenient for future reference.
▲!
If you smell gas:
1. Shut off gas to the appliance.
2. Extinguish any open ame.
3. Open lid.
4. If odor continues, keep away from the
appliance and immediately call your gas
supplier or your re department.
PF30LP
Owner's Manual
2
Page 3

Table of Contents
For Your Safety....................................................................................................
Grill Features.......................................................................................................
Getting Started....................................................................................................
Grill Assembly.....................................................................................................
Grill Location......................................................................................................
Gas Requirements..............................................................................................
Pre-Operation Leak Testing...............................................................................
Lighting the Grill.................................................................................................
Using the Rotisserie Burner..............................................................................
Lighting the Side Burner....................................................................................
Grill Light Maintenance......................................................................................
Care and Maintenance.......................................................................................
4
6
7
8
12
13
15
16
17
18
19
20
Troubleshooting Guide......................................................................................
Replacement Part List ......................................................................................
Warranty Information.........................................................................................
11
24
27
PF30LP
Owner's Manual
3
Page 4

For Your Safety
Congratulations on your new barbecue grill purchase! You've made the right choice. In this manual, you will nd
assembly instructions, suggestions for grilling and helpful hints, as well as guidelines for the safe operations,
proper care and use of your grill. Our expert staff strives to provide you with an easy to assemble product.
Should you have any questions or problems with this product, please call our customer service department at
1-800-229-5647
NOTE: The use and installation of this product must conform to local codes. In the absence of local codes, use
the National Fuel Gas Code, ANSI Z223.1/NFPA54. Reference to Natural Gas and Propane Installation Code
CSA B 149 .1 or Propane Storage and Handling code B149.2
IMPORTANT NOTICE: READ ALL INSTRUCTIONS PRIOR TO ASSEMBLY AND USE
Safety First!
Read and understand all warnings and precautions prior to operating your grill.
WARNING
▲!
1. This grill is for outside use only. It should not be used in a building, garage or any other enclosed area.
2. The use of alcohol, prescription or non-prescription drugs may impair an individual’s ability to properly assemble or
safely operate this appliance.
3. Always open the grill lid carefully and slowly as heat and steam trapped within the grill could cause severe burns.
4. Always place your grill on a hard and level surface far away from combustible materials and structures. An asphalt
or blacktop surface may not be acceptable for this purpose.
5. Do not leave a lit grill unattended.
6. Keep children and pets away from the grill at all times.
7. This is not a tabletop grill. Do not place this grill on any type of tabletop surface.
8. Do not use the grill in high winds.
9. This grill must be used with propane gas only (propane gas cylinder not included).
10. Do not attempt to attach this grill to the self-contained propane system of a camper, trailer, motor home or house.
11. Do not use charcoal or lighter uid.
12. Do not use gasoline, kerosene or alcohol for lighting. The LP-gas supply cylinder must be constructed and marked
in accordance with the specications for propane gas cylinders of the U.S. Department of Transportation (DOT)
CFR 49.
13. This outdoor gas appliance is not intended to be installed in or on recreation vehicle s and/or boats.
14. Do not attempt to move the grill while it is lit.
15. Do not use the grill unless it is COMPLETELY assembled and all parts are securely fastened and tightened.
16. Keep combustible items and surfaces at least 24 inches away from the grill at all times. DO NOT use this gas grill
or any gas product under any overhead enclosure or near any unprotected combustible constructions.
17. Do not use in an explosive atmosphere. Keep grill are a clear and free from combustible materials, gasoline and
other ammable vapors and liquids.
18. Do not attempt to use or assemble with missing or damaged parts. Contact customer service for a replacement.
8:00 am - 5:00 pm (Eastern Time), Monday through Friday.
CAUTION-Prevention of Burns
▲!
1. To avoid burns, do not touch metal parts of the grill until they have completely cooled for at least 45 minutes or
unless you are wearing protective gear such as pot holders, protective gloves or mittens.
2. Do not alter the grill in any manner.
3. Clean and inspect the hose before each use. If there is evidence of abrasion, wear, cuts or leaks, the hose must
be replaced prior to operation. The replacement hose assembly should be in accordance with the manufacturer’s
specications .
4. Move gas hoses as far away as possible from hot surfaces and dripping hot grease.
5. Never keep a lled gas container in a hot car or car trunk. Heat will cause the gas pressure to increase, which could
open the relief valve and allow gas to escape.
PF30LP
Owner's Manual
4
Page 5
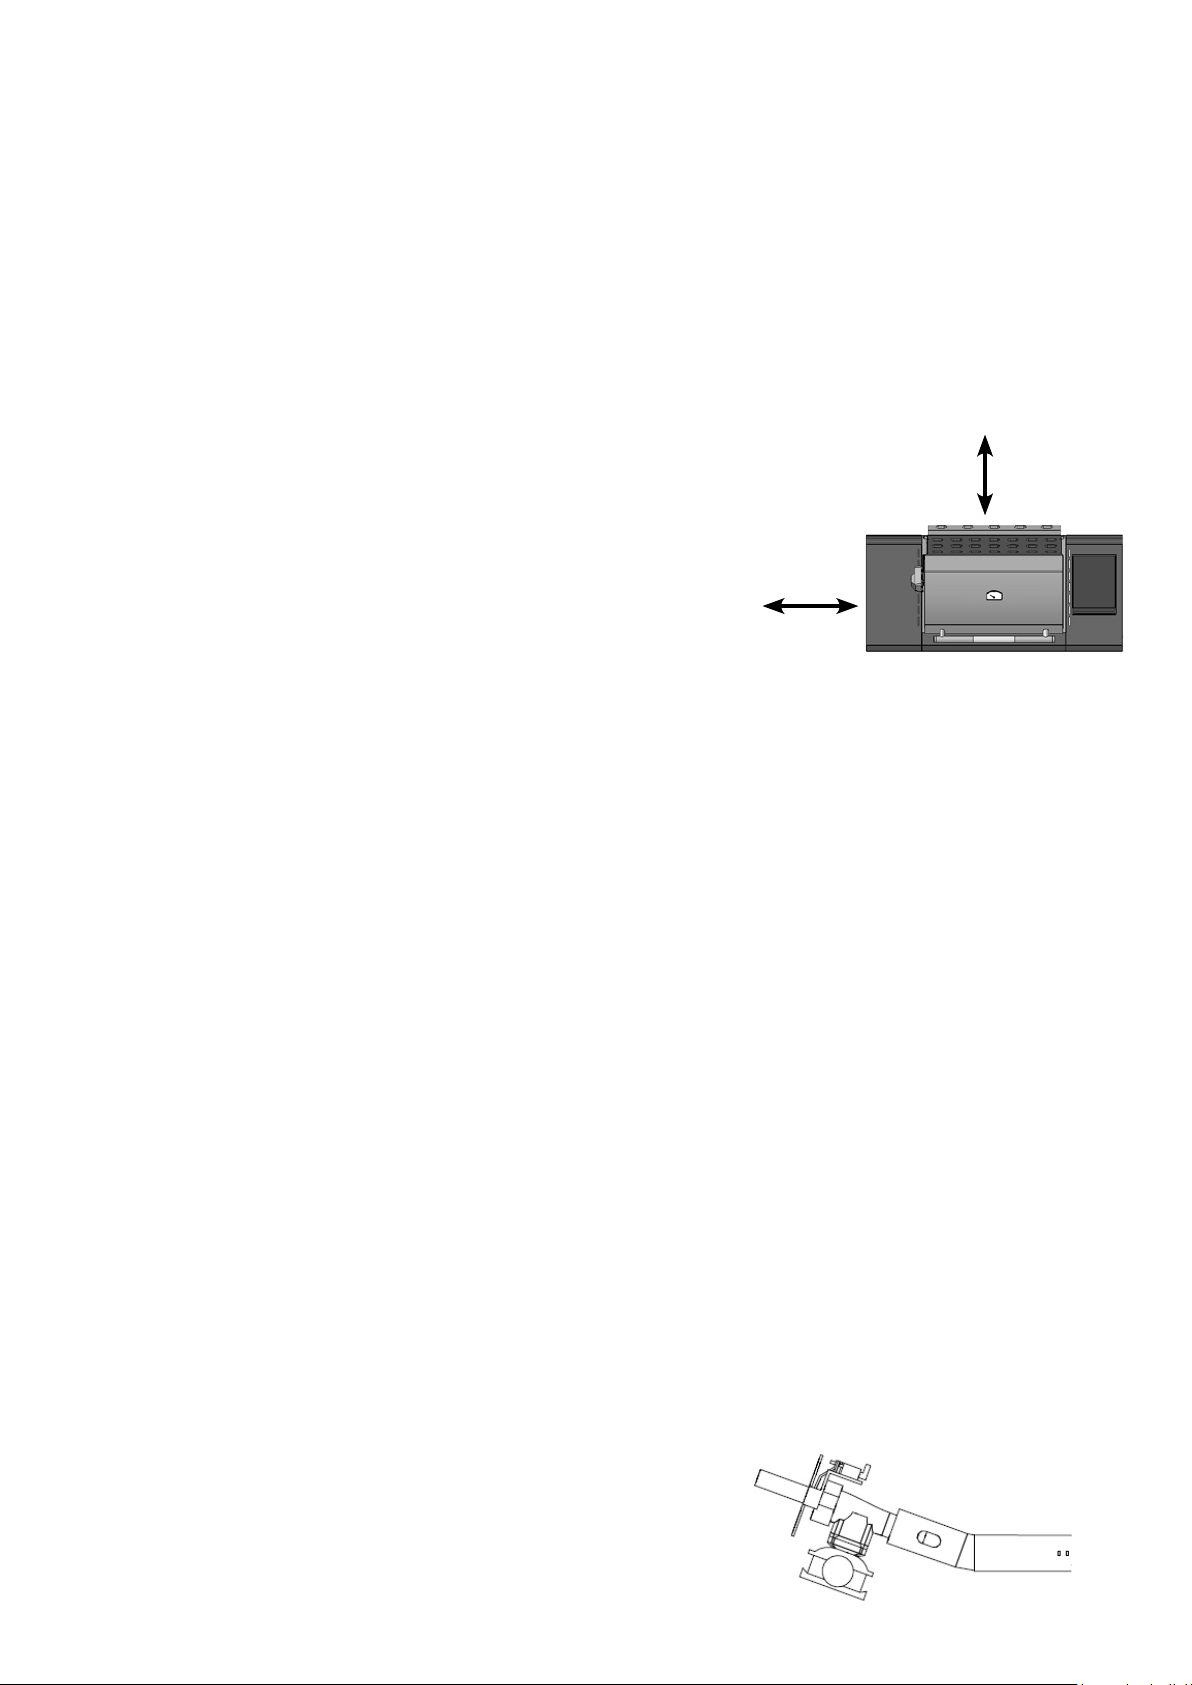
Safe Locations For Use Of This Outdoor Grill
DANGER
▲!
Never use this outdoor grill inside any building, garage, shed or breeze way, or inside any boat, trailer or recreational
vehicle, to prevent a possible re and to prevent the possibility of carbon monoxide poisoning or asphyxiation.
WARNING
▲!
Do not use this appliance under overhead combustible surface or covered area (e.g., awnings, umbrellas, porches or
gazeboes).
Always conrm that this grill is not positioned under the overhang of a house, a garage or other structure before lighting
it. An overhang will serve to deect are-ups and radiated heat into the structure itself, which could result in a re.
Always conrm that this grill is positioned more than 24 inches (61 cm) away
from any combustible materials or surface before lighting it, and that no
gasoline or other volatile substances are stored in the vicinity of this grill. (See
diagram to right).
The temperature of a grease re or of the radiated heat might otherwise be
sufcient to ignite nearby combustible or volatile substances.
Always locate this grill where there will be ample combustion and ventilation
air, but never position it in the direct path of a strong wind.
Never allow the grill to operate while unattended, to prevent uncontrolled grease res from erupting.
Never attempt to move this grill while it is in operation or while it is still hot, to prevent possible personal injury.
Never store or use gasoline or other ammable or volatile substances in the vicinity of this grill or in the vicinity of any
other heat generating appliance, because of the danger of starting a re.
Always conrm that the installation of this grill conforms with the requirements of all local codes or, in the absence of
applicable local codes, with either the National Fuel Gas Code, ANSI Z223. NFPA 54 or CAN/CGA-B149.2.
WARNING
▲!
Liquid propane (LP) gas is ammable and hazardous if handled improperly. Become aware of its characteristics before
using any propane product.
• Propane Characteristics: Flammable, explosive under pressure, heavier than air and settles in pools in low area.
• In its natural state, propane has no odor. For your safety, an odorant has been added.
• Contact with propane could cause freeze burns to the skin.
• This grill is shipped from the factory for propane gas use only.
• Never use a propane cylinder with a damaged body, valve, collar or footing.
• Dented or rusted propane cylinders may be hazardous and should be checked by your propane gas supplier.
24 Inches
24 Inches
CAUTION
▲!
• It is essential to keep the grill’s valve compartment, burners and circulating air passages clean.
• Inspect the grill before each use.
Step 1. Inspect all hoses and connections and make certain they are secure.
Step 2. Check and clean the burner tubes for insects and insect nests by removing the burner and inserting a bottle
brush cleaner into each tube to make sure the passage is clear.
*** A clogged tube can lead to a re beneath the grill. ***
Step 3. Ensure that the valve orice is pointing straight and completely inserted into the burner tube.
GENERAL INFORMATION
1. A propane gas cylinder is required for operation.
2. This gas grill is NOT intended for commercial use.
PF30LP
Valve Orice
Burner Tube
Owner's Manual
5
Page 6
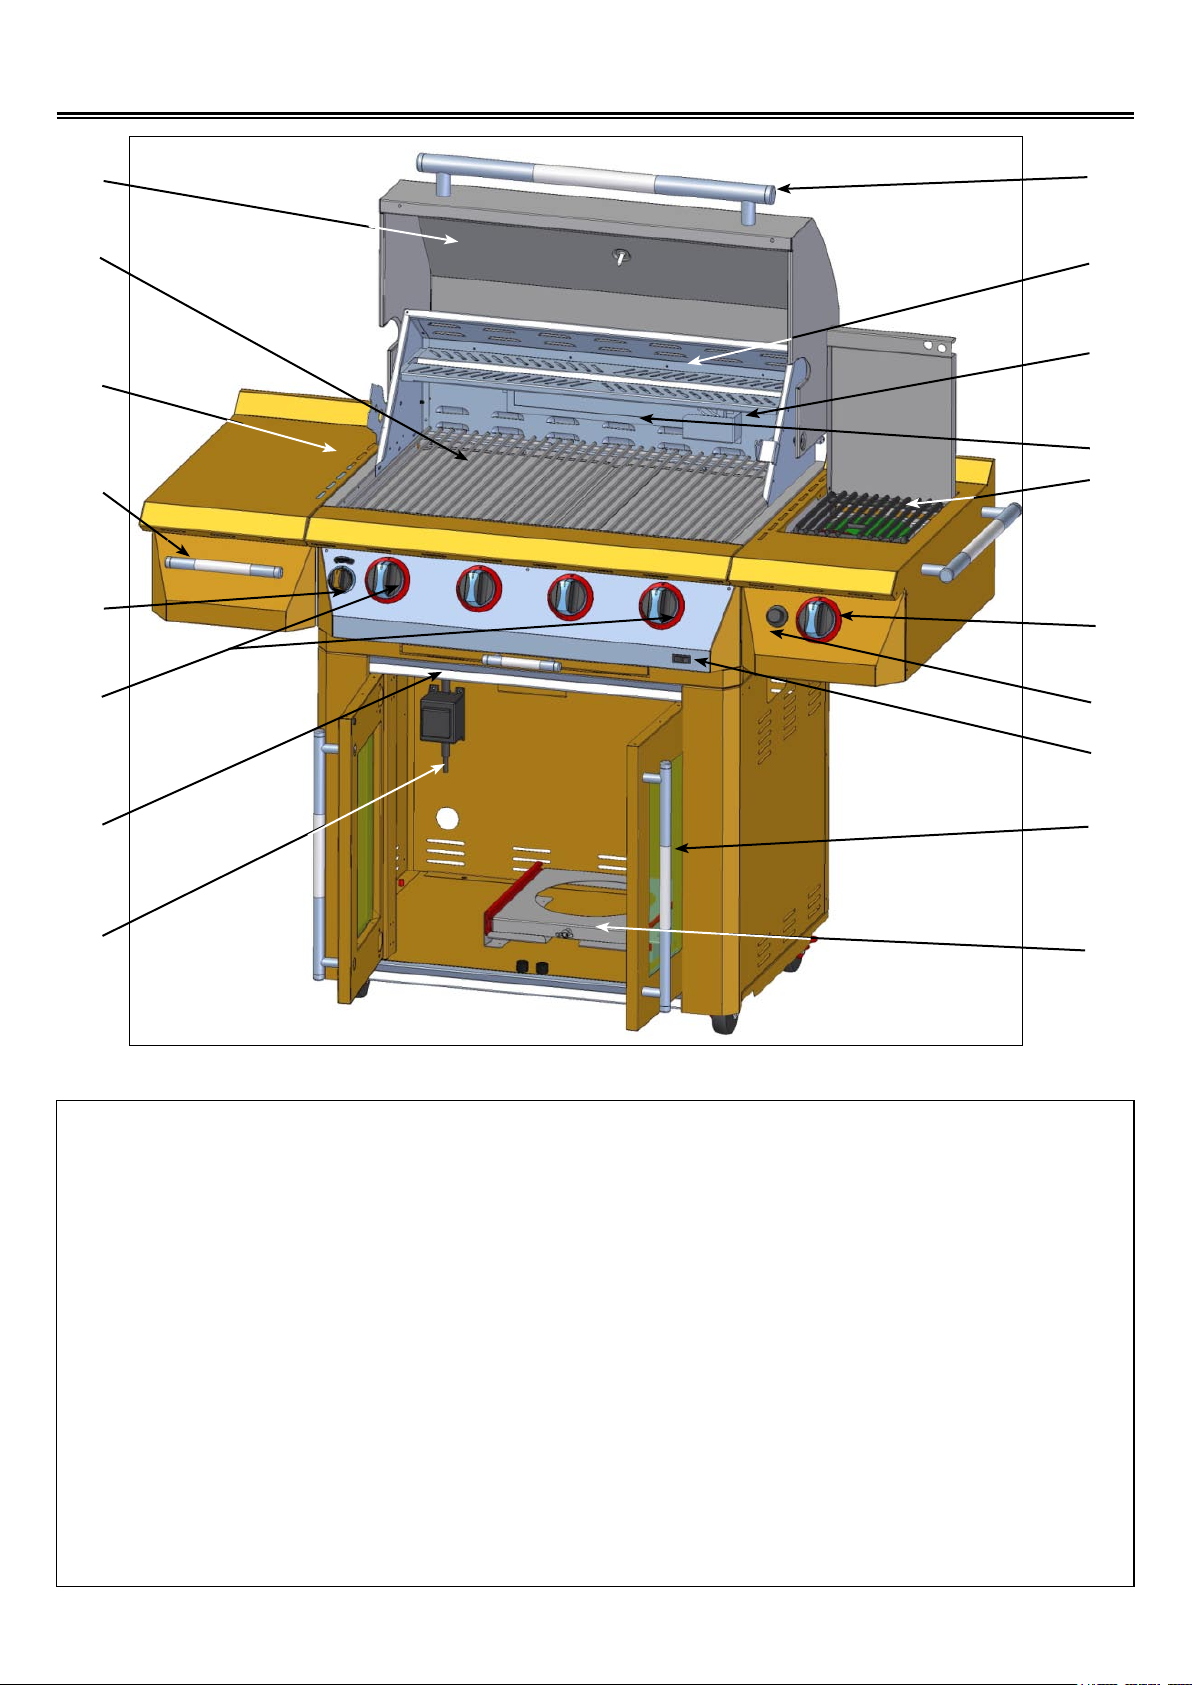
Grill Features
1
2
3
4
5
6
9
10
11
12
13
14
15
7
8
1. Roll top grill hood
2. Grilling/cooking surface
3. Side shelf
4. Storage drawer
5. Control knob: Rear infrared burner
16
17
18
10. Bread warming rack
11. Grill light
12. Rear Infrared burner
13. Side burner
14. Control Knob: Side burner
6. Control knobs: Main burners
7. Drip pan
8. Power transformer
9. Hood Handle
15. Push button igniter
16. Grill light switch
17. Cart with glass doors
18. Roll out LP tank tray
6
Page 7
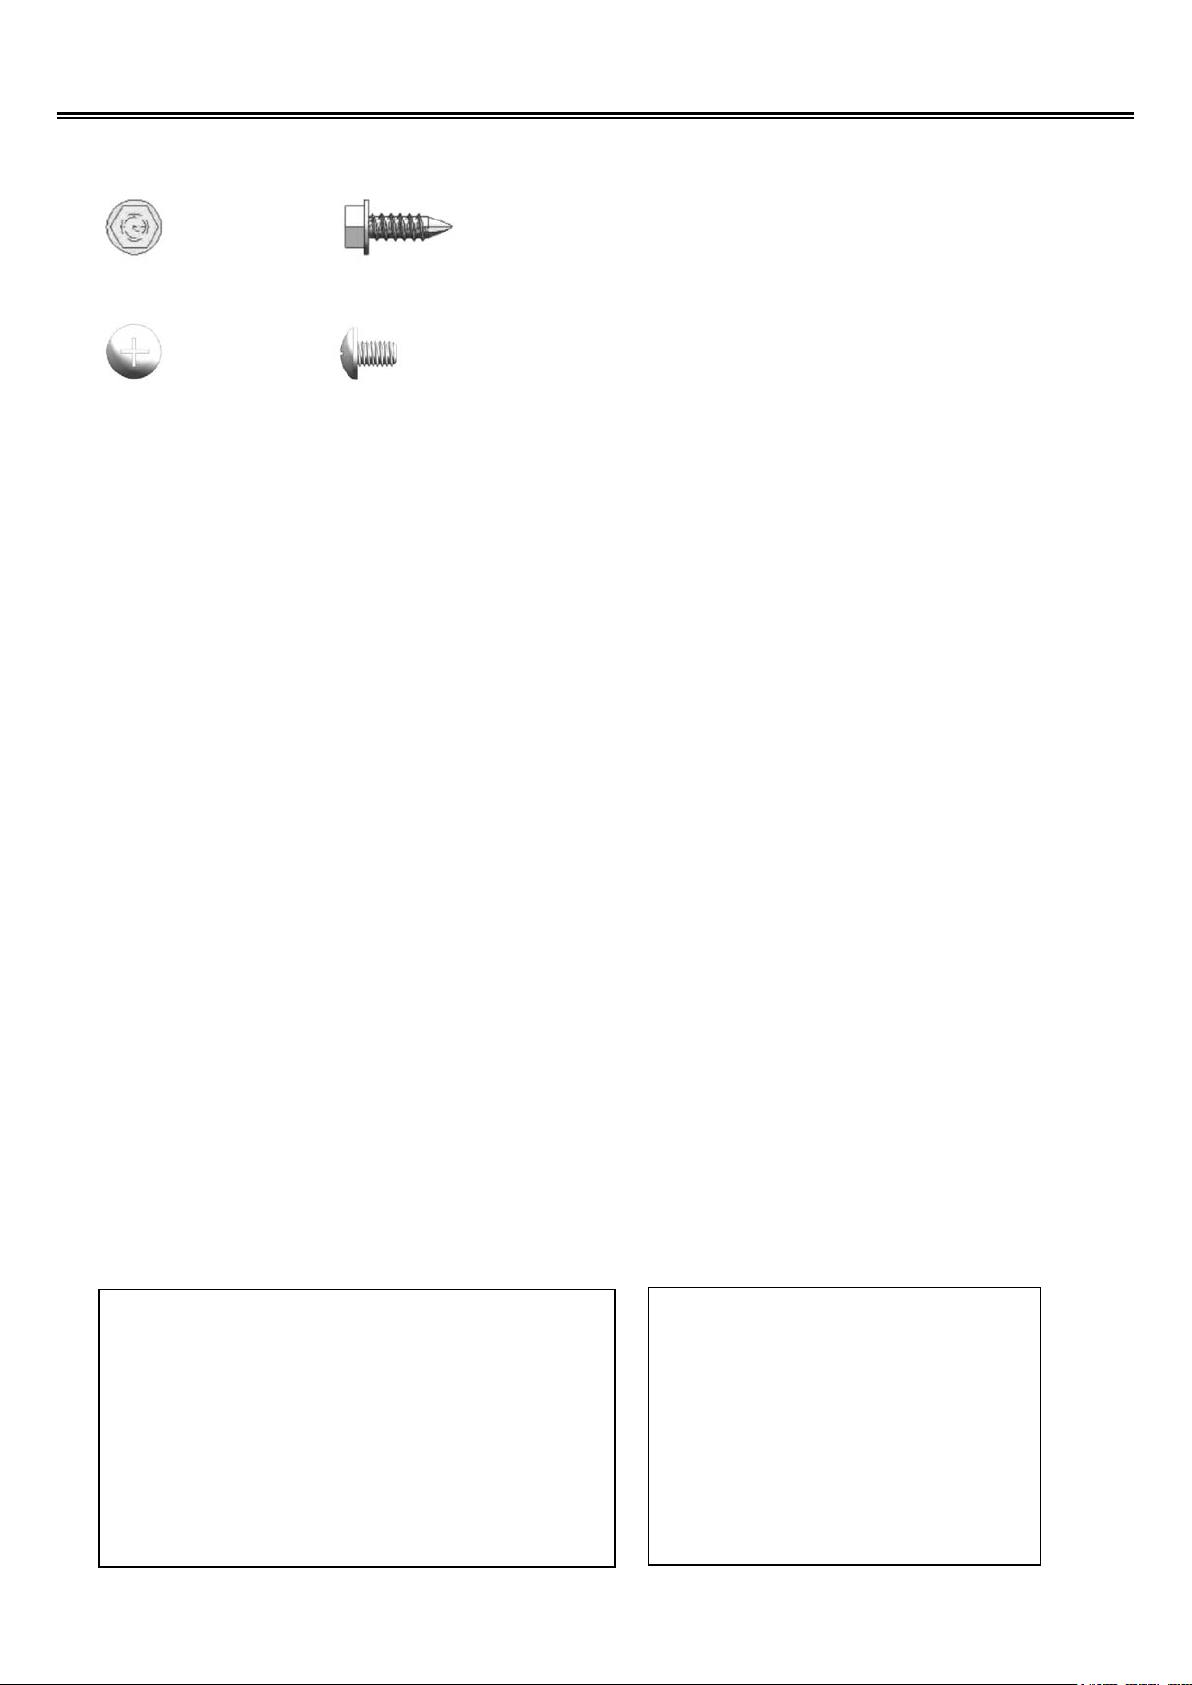
Getting Started
Self-tapping screw x 2
Phillips pan head screw x 2
Getting Started
1. Please follow the steps in the order that they are presented.
2. Assemble the grill where you plan to use it.
3. You may want to place an old towel or cloth at the assembly site to prevent nuts and bolts from
becoming lost.
4. Have a friend help. An assistant can make the assembly easier by holding the parts in place
while you fasten the nuts and bolts.
5. To be ready to barbecue immediately, have a L.P. gas cylinder lled by an authorized L.P. dealer
or cylinder exchange center.
Unpacking the Grill Parts
1. Remove and set aside all inner boxes and parts from the master carton.
2. Remove and set aside all wrapping paper and additional packaging from the parts.
3. Do not destroy carton or packing until your grill is completely assembled and operating to your
satisfaction.
Tools needed to assemble grill:
Phillips screwdriver
Adjustable wrench
1/2 in. wrench or socket
1/4 in. nut driver or socket
TOOLS NOT INCLUDED
WARNING
▲!
Failure to follow all Danger, Warnings,
and For Your Safety notices in this Grill
Guide may result in serious bodily injury
or death, fire or an explosion causing
damage to property.
DANGER
▲!
Perform a Gas Leak Test
explained later in this Grill
Guide before operating your
grill.
7
Page 8
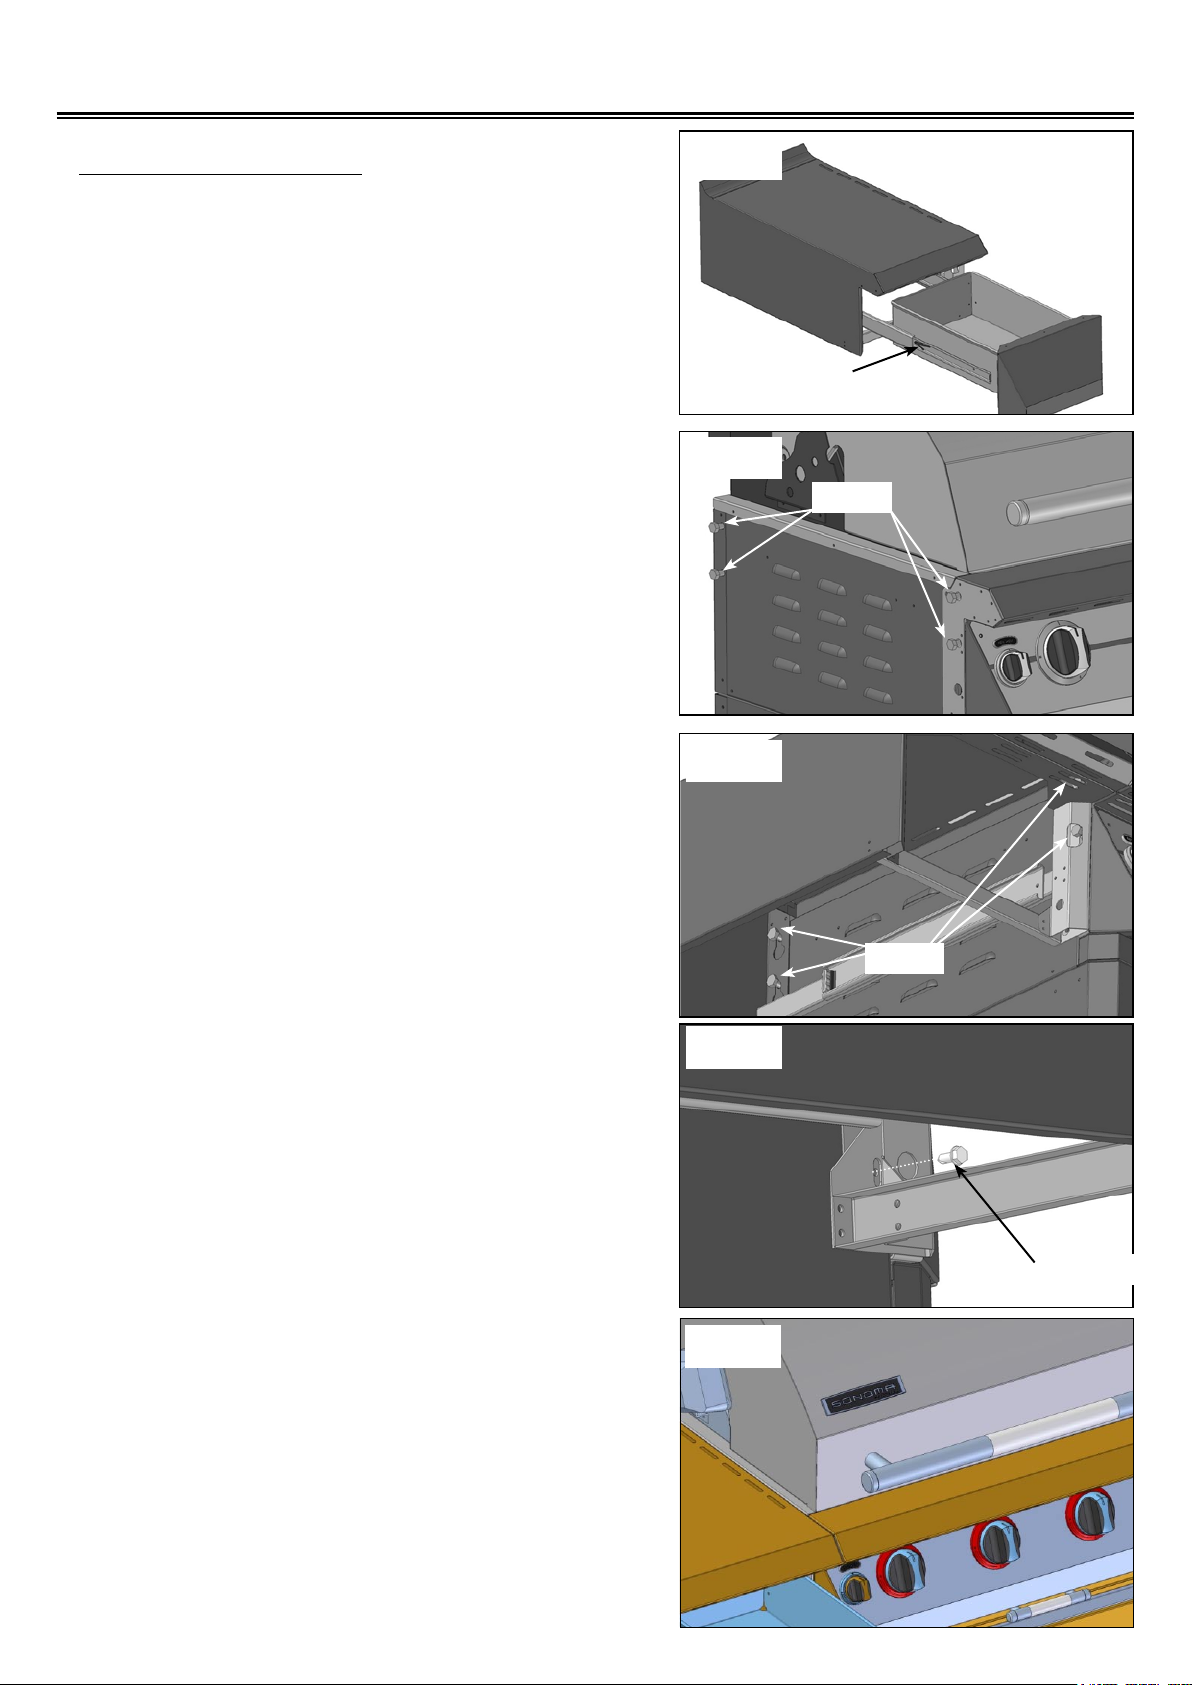
Grill Assembly
LEFT SHELF ASSEMBLY
1. Pull the drawer all the way out, and press the black
plastic drawer slide release levers to remove the
drawer. (See Fig. 1)
2. Loosen the four hex-head bolts on the side of the
grill approximately 1/4 in. (See Fig. 2)
Fig. 1
release lever
Fig. 2
Bolts
3. Attach the left shelf by inserting the four bolt heads
into the holes on the left shelf. Tighten the bolts
securely with a 1/2 in. wrench. (See Fig. 3)
4. Install a self-tapping screw through the slotted hole
on the front bottom of the side shelf to the left side
of the grill. (See Fig. 4)
Fig. 3
Bolts
Fig. 4
Self tapping screw
5. Re-install the drawer into the shelf. Be sure to line
up the drawer slides as you re-insert the drawer
back into the shelf. ( (See Fig. 5)
8
Fig. 5
Page 9
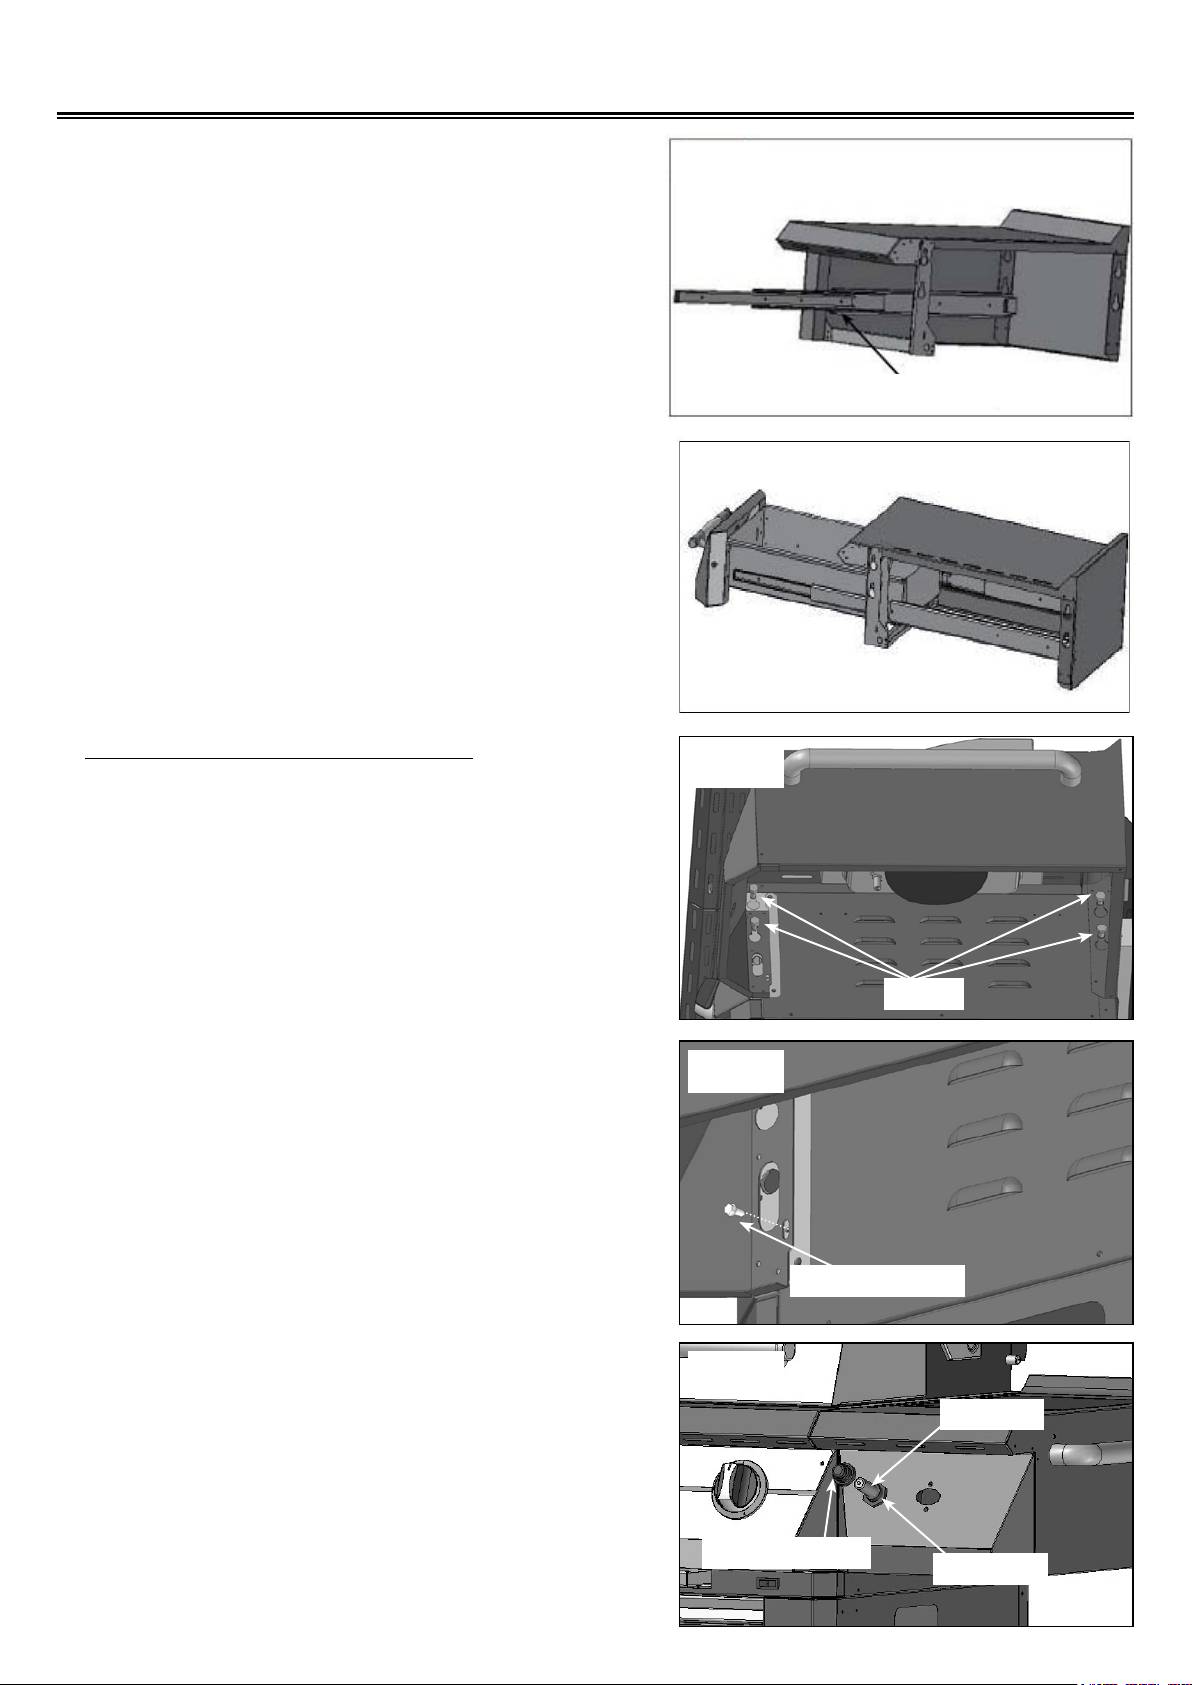
Grill Assembly
Tips:
to pull the inner slide way out of the track rst.
(See Fig. 5a)
Then you can re-insert the drawer back into the shelf
In order to insert the drawer correctly, you have
smoothly. (See Fig. 5b)
Fig. 5a
Inner slide way
Fig. 5b
SIDE BURNER PARTS ASSEMBLY
1. R emove side bu rner v alve as se mbly fr om
packaging. Feed the valve assembly through
the large cut out in the side of the cart. Loosen
the four hex-head bolts on the side of the grill by
approximately 1/4 in. Attach the side burner by
inserting the four bolt heads into the holes on the
side burner. Tighten the four bolts securely with a
1/2 in. wrench. (See Fig. 6)
2. Install a self-tapping screw through the slotted hole
on the front bottom of the side shelf to the right
side of the grill. (See Fig. 7)
Fig. 6
Bolts
Fig. 7
Self-tapping screw
3. Unscrew the push button igniter cap from the
igniter module. Insert the neck of the igniter module
through the open hole on the side burner shelf.
Use the plastic nut to secure it. Install the battery
with the positive side facing outward. Replace and
tighten the push button igniter cap. (See Fig. 8)
9
Fig. 8
Push button cap
AA battery
Plastic Nut
Page 10
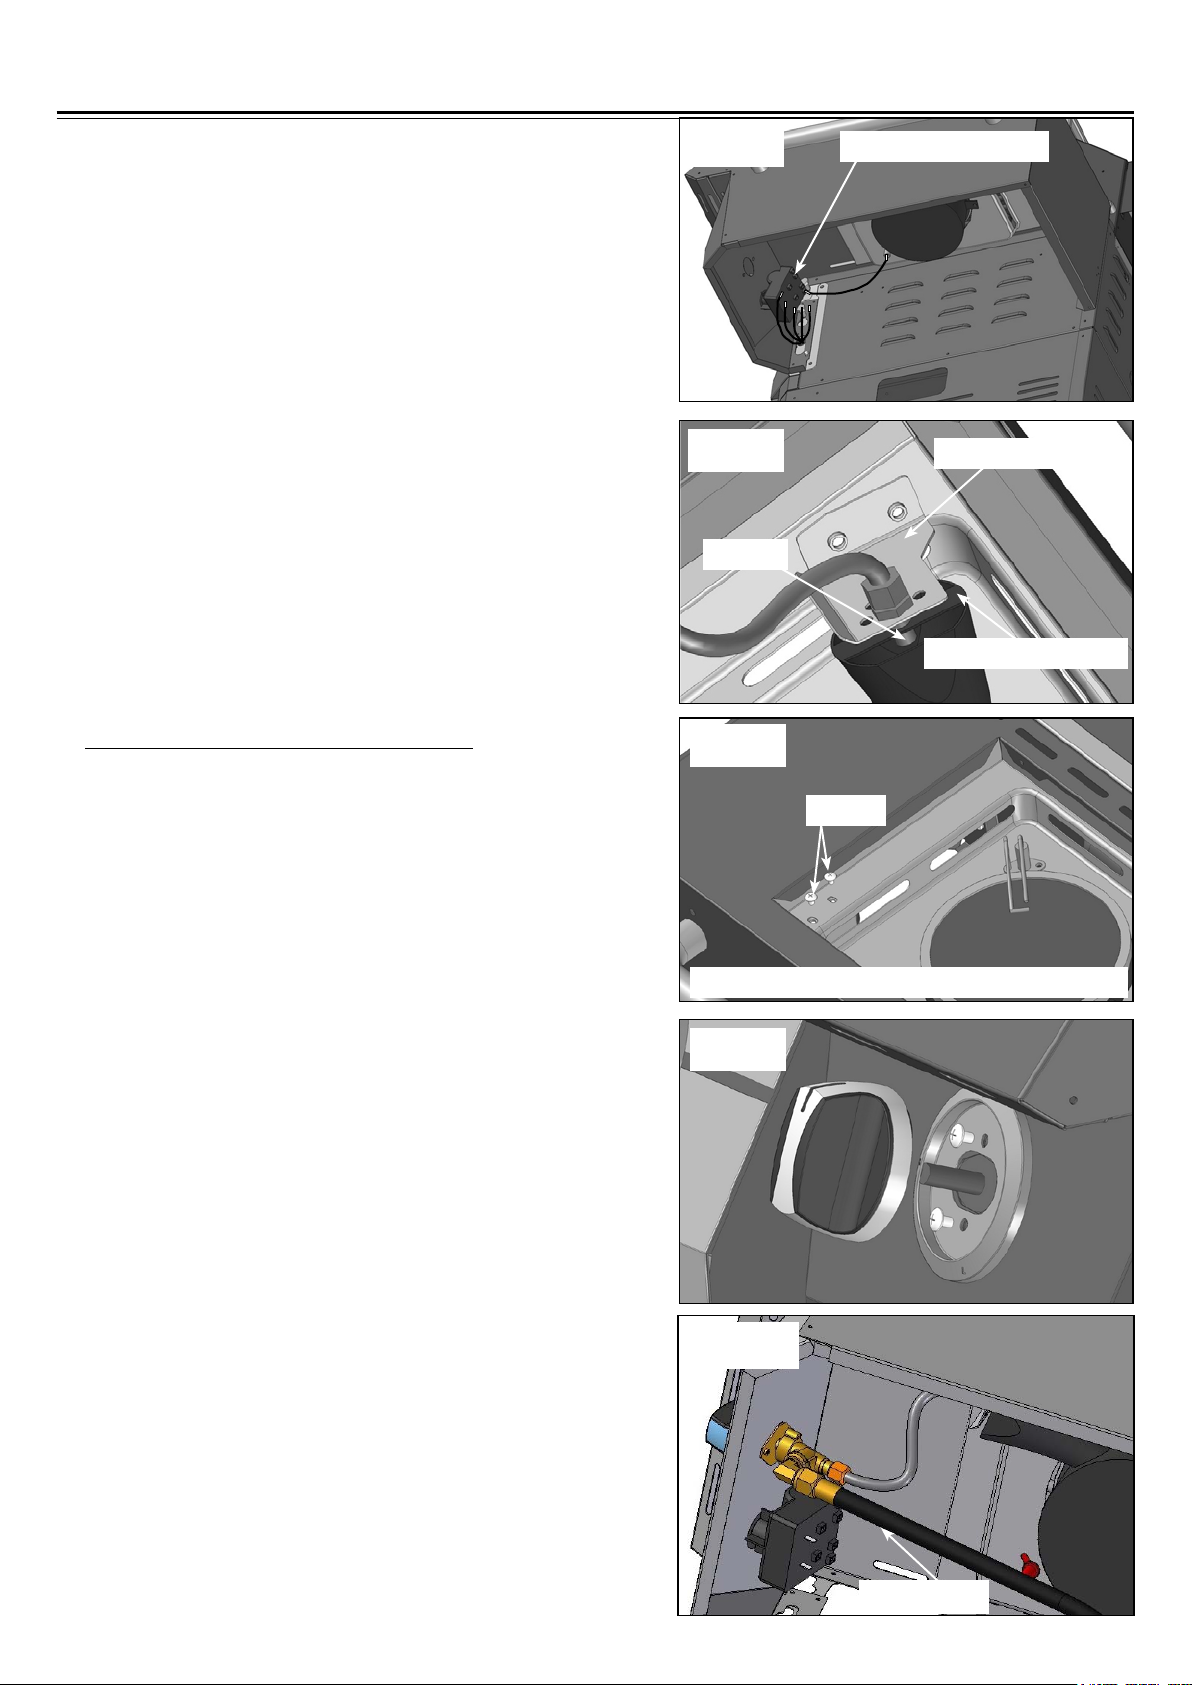
Grill Assembly
4. Connect loose igniter wires from the grill to the
open terminals of the igniter. (See Fig. 9)
Note: The igniter is designed in such a way that
it does not matter which terminal tab is used
when connecting igniter wires.
5. Remove the two Phillips pan head M5 x 10 screws
from the orifice bracket. Align the orifice into the
center of the side burner bracket. (See Fig. 10)
Fig. 9
Fig. 10
Orice
6 pole igniter module
Orice bracket
side burner bracket
SIDE BURNER PARTS ASSEMBLY
6. Use two screws removed in step 5 to secure the
orice backet on the side burner tray. (See Fig. 11)
Note: Add lock washer when installing the screws in
position.
7. Remove the two screws from the side burner valve
assembly. Slide the side burner valve stem through
the center hole in the front of the shelf. Insert one
valve screw through the bezel and into the side
burner valve and tighten. Next, install the second
valve screw through the bezel and tighten. Make
sure the bezel is installed with the "OFF" position
facing up. Install control knob, making sure to line
up the at side of the valve stem with the at side
of the knob stem. (See Fig. 12)
Fig. 11
Screws
Orice bracket underneath the side burner tray
Fig. 12
WARNING: When you install the side burner valve,
make sure the black tube is located under the
valve. (See Fig. 12a)
10
Fig. 12a
Black tube
Page 11
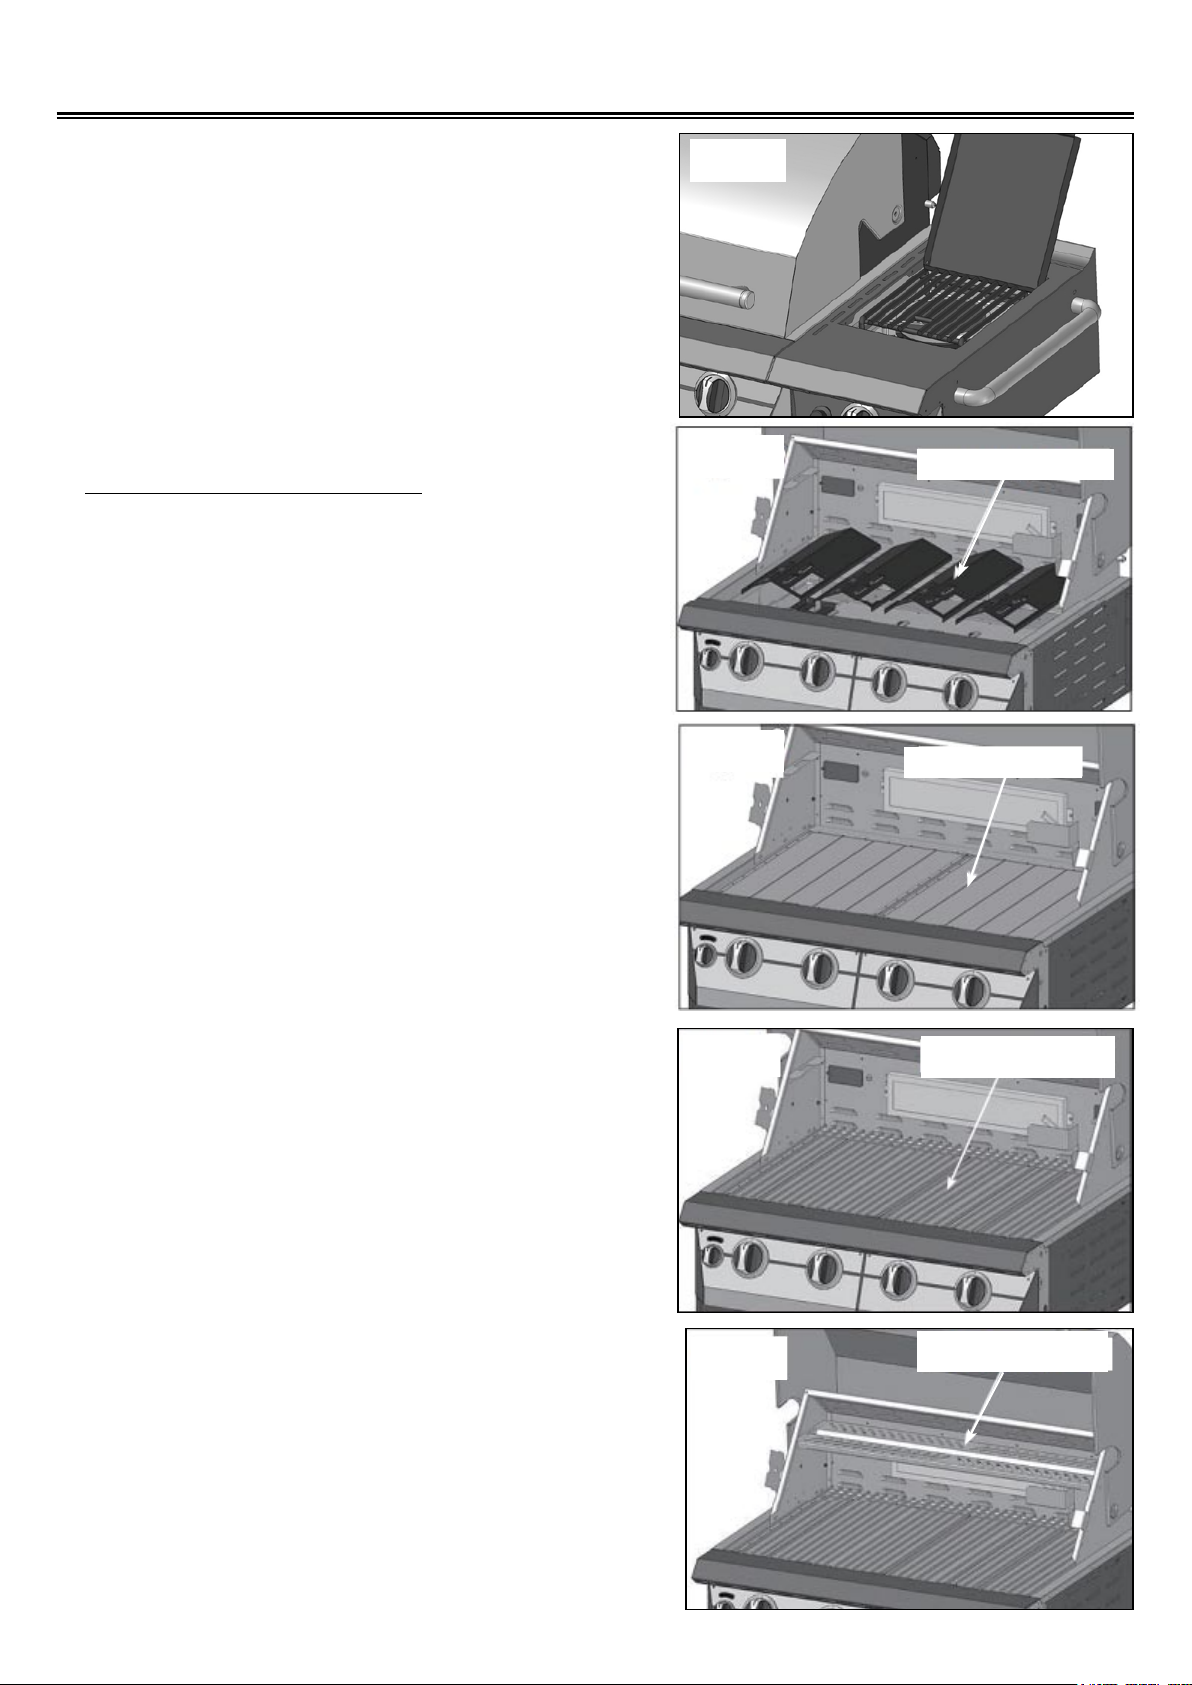
Grill Assembly
8. Place the side burner grate in position.
(See Fig. 13)
Note: Remove all the tape before using the grill.
Fig. 13
INTERIOR PARTS ASSEMBLY
1. Place the avor grids in position with slotted holes
facing the front of the grill. (See Fig. 14)
2. Place the anti-flare screen mesh in position.
(See Fig. 15)
In cooking devices, especially grills, a common
problem is that fats and oils that are exuded from
the material being cooked, drip onto the burner or
hot surfaces where they produce smoke or ames.
Where they drip onto cold surfaces they condense
to make an eyesore, or worse, they harbor bacteria
or fungi. We recommend to our customers an anti-
are screen in the case of the hazards mentioned
above.
Fig. 14
Fig. 15
Flavor grids
Anti-are screen
3.P l ace t h e main co oking grate s in po s ition .
(See Fig. 16)
4.Rest the bread warming rack on the brackets at the
sides of the hood support . (See Fig. 17)
Fig. 16
Fig. 17
Main cooking grates
Bread warming rack
11
Page 12
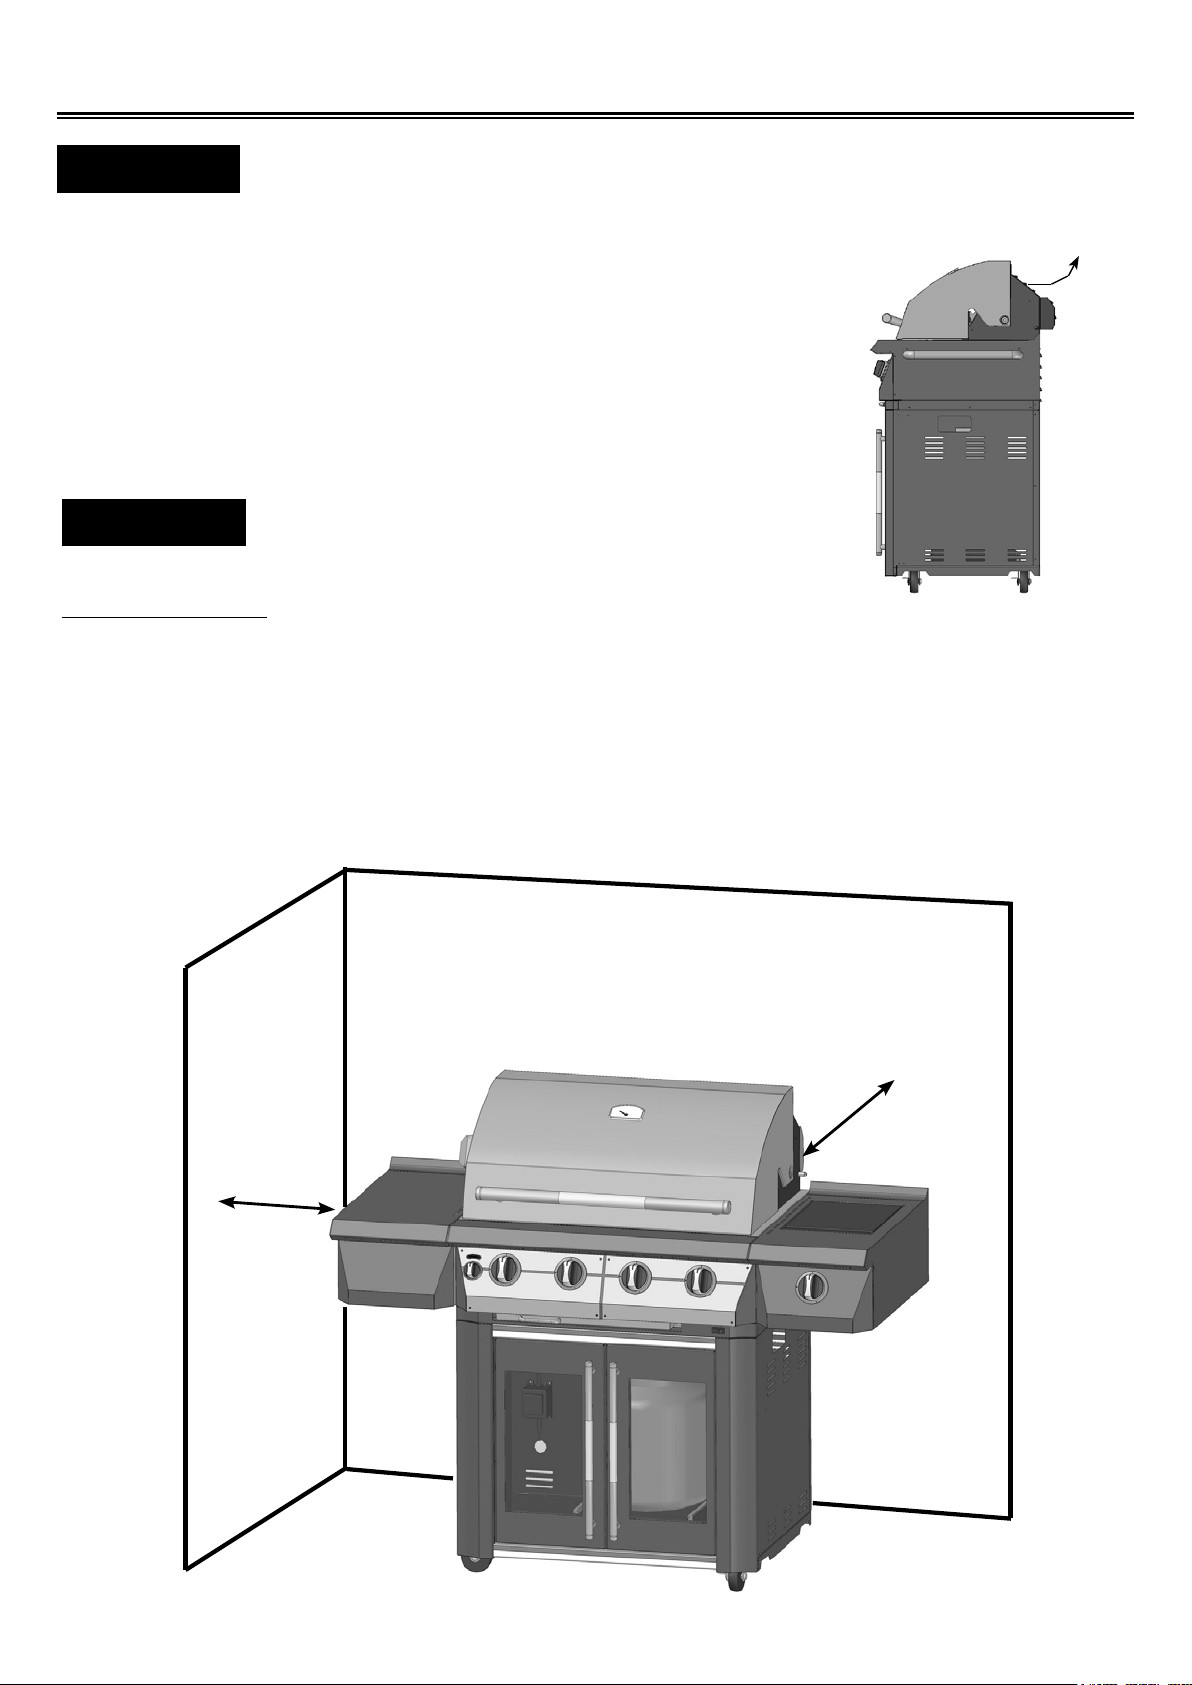
Grill Location
Do not use the grill in garages, breezeways, sheds or any enclosed area. Never operate the grill
!
WARNING
▲
NOTE: The grill will operate best if it is not facing directly into the wind.
Clearance to combustible construction - A minimum of 24 in. from the sides and back
must be maintained from the gas grill above and below the cooking surface to adjacent
vertical combustible construction.
Clearance to non-combustible construction - A minimum of 10 in. clearance from the back
of the grill to non-combustible construction is required for the lid to fully open.
Storage of an outdoor gas cooking appliance indoor is permissible only if the cylinder is
disconnected and removed from the appliance.
!
WARNING
▲
GENERAL RULES
Do not leave the grill unattended while cooking!
in enclosed areas as this could lead to a carbon monoxide buildup, which could result in injury or
death. Place the grill on a level surface. Avoid moving the grill while it is in operation.
Heat and smoke exhaust out of the back of the grill hood opening.
Make sure not to have the grill back facing your home or anything
that could be damaged by heat or smoke.
Heat &
Smoke
Exhaust
1. Make sure the grill has been leak tested and is properly located.
2. Light the grill burners using the instructions provided in this manual.
3. Turn the control knobs to desired temperature “High, Medium, or Low” and preheat the grill for 10 minutes before
cooking.
4. Adjust heat settings to meet your cooking needs for desired results.
5. Allow grill to cool down, wipe off any splatters or grease and clean the drip tray as needed.
6. Do not put a cover on the grill while it is still hot as it could start a re.
24 in. (61 cm)
24 in. (61 cm)
12
Page 13

Gas Requirements
GENERAL INFORMATION
Never attach an unregulated gas line to the appliance. Connection to
!
WARNING
▲
Verify the type of gas supply to be used, either Natural Gas (N.G.) or Liquid Propane (L.P.), and make
sure the serial plate agrees with that of the supply. Conversion kits are available separately for an
additional cost which will enable you to convert your grill from L.P. to N.G. or to convert your grill from
N.G. to L.P. Please see your local dealer for more information.
an unregulated gas line can cause excessive heat or re.
!
WARNING
▲
For natural gas installations, an installer must supply a gas shutoff valve that is easily accessible to
the grill. All installer supplied parts must conform to local codes, or in the absence of local codes,
with the National Electrical Code, ANSI/NFPA 70- 2002, and the National Fuel Gas Code, NFPA 542002/ANSI Z223.1-2002.
All pipe sealants must be an approved type and resistant to the actions of L.P. gases. Never use
pipe sealant on are ttings. All gas connections should be made by a competent qualied service
technician and in accordance with local codes and ordinances. In the absence of local codes, the
installation must comply with the National Fuel Gas Code, NFPA 54-2002/ANSI Z223.1-2002. Gas
conversions kits may be purchased separately. When ordering gas conversion kits, have the model
number, and the type of gas (N.G. or L.P.) used for your grill.
This grill and its individual shut off valve must be disconnected from the gas supply piping system
during any pressure testing of that system at test pressures in excess of 1/2 PSIG (3.5 kPa.).
This grill must be isolated from the gas supply piping system by closing its individual manual shut-off
valve during any pressure testing of the gas supply piping system at test pressures equal to or less
than 1/2 PSIG (3.5 kPa.).
Always have a qua l ified service technician pe rform difficu l t
conversions or modications.
The installation of this grill must conform with local codes, or in the absence of local codes, with
National Fuel Code, NFPA 54-2002/ANSI Z223.1a-2002.
Installation in Canada must be in accordance with the Standard CSA B149.1 or B149.2 (installation
code for gas burning appliances and equipment) and local codes.
13
Page 14
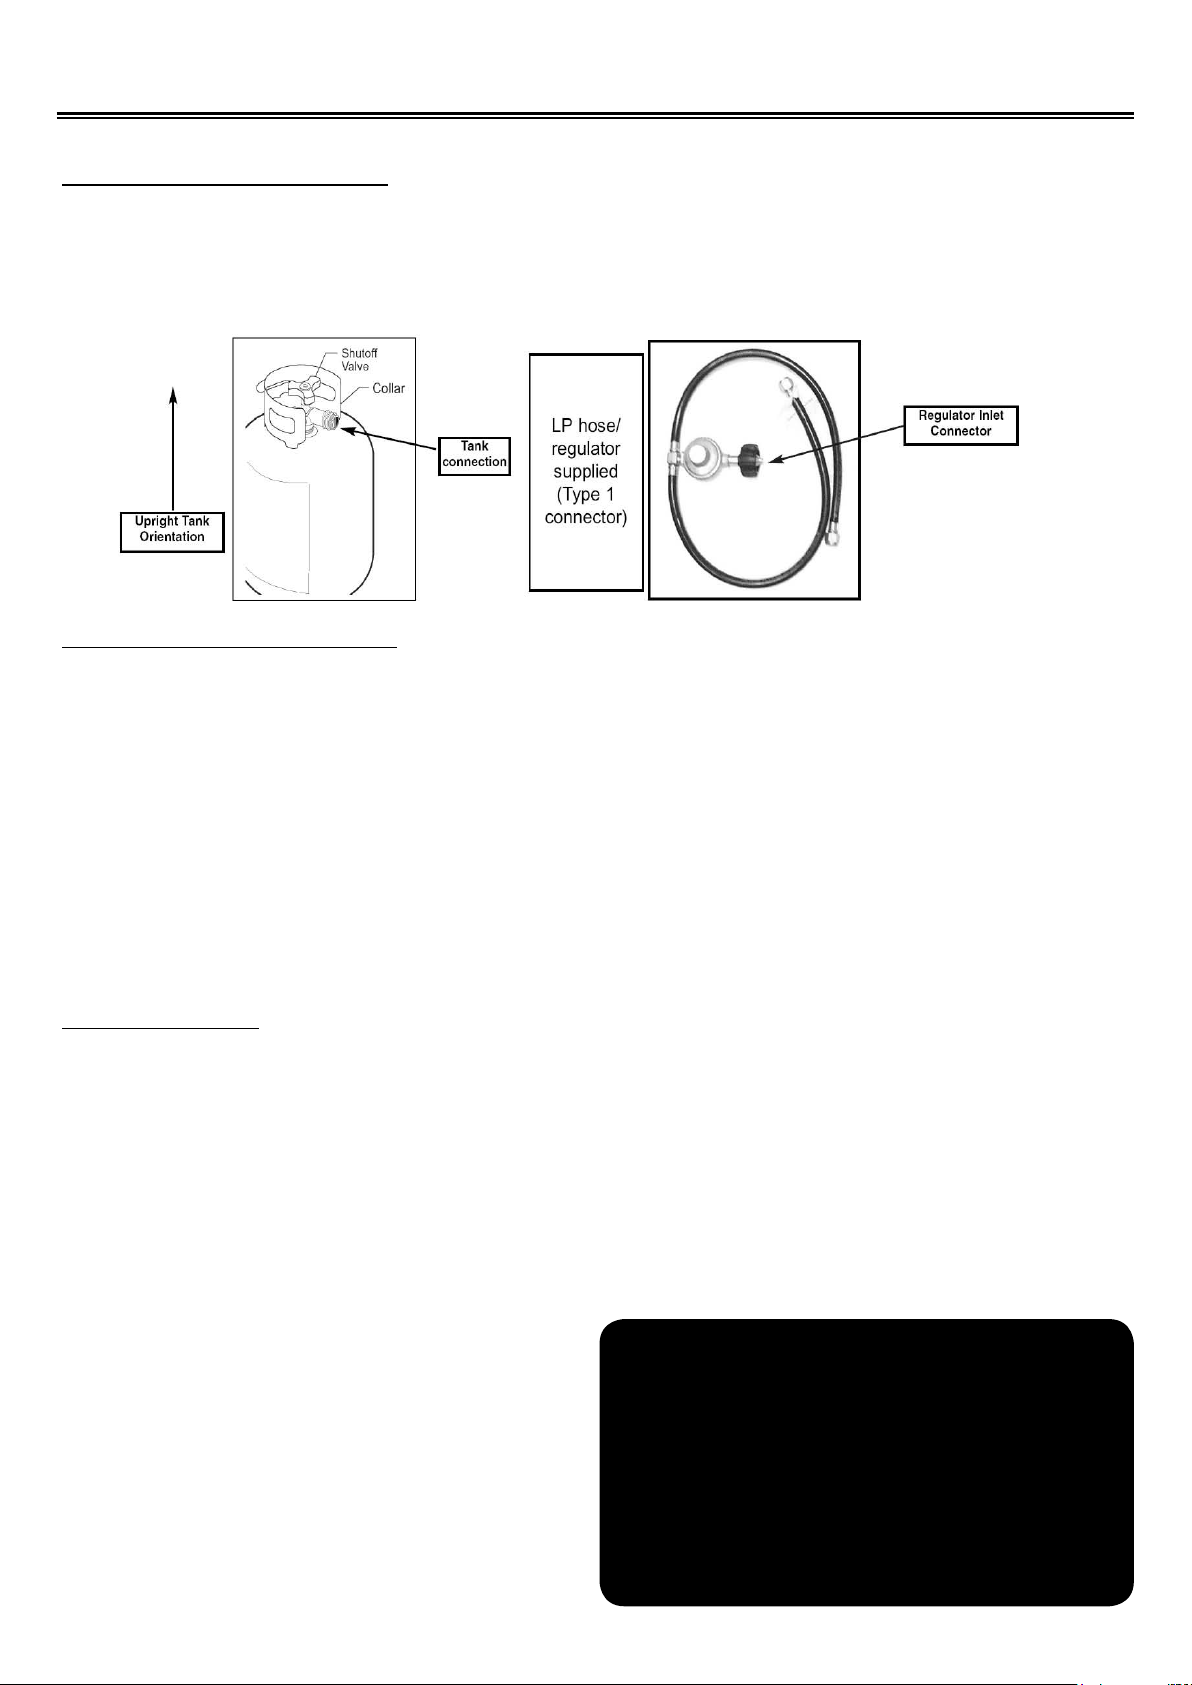
L.P. GAS INSTALLATION
Gas Requirements
Gas Grills that are set to operate with L.P. gas come with a high capacity hose and regulator assembly.
Use only the pressure regulator and hose assembly supplied with the grill or a replacement pressure
regulator and hose assemblies specied by the manufacturer).
directly to a standard 20 lb. L.P. cylinder. L.P. Cylinders are not included with the grill. L.P. Cylinders they can
be purchased separately at an independent dealer.
This assembly is designed to connect
(Note:
L.P. TANK INFORMATION
Never use a dented or rusted L.P. tank or cylinder with a damaged valve.
L.P. cylinders are equipped with an O.P.D (Overlling Prevention Device). The device shuts off the ow of gas
to a cylinder after 80% capacity is reached. This limits the potential for release of gas when the cylinder is
heated, averting a re or possible injury.
The L.P. cylinder must have a shutoff valve terminating in an L.P. gas supply cylinder outlet specified,
as applicable, for connection No. 510 in the standard for compressed gas cylinder valve outlet and inlet
connection ANSI/CGA-V-1. Do not store cylinders in a building, garage, or any other enclosed area. (The L.P.
cylinder must have an overll protection device, OPD, and a collar to protect the cylinder valve.)
The L.P. gas supply cylinder must be constructed and marked in accordance with the specications for L.P.
gas cylinders of the U.S. Department of Transportation (DOT) or the National Standard of Canada, CAN/
CAS-B339, “ Cylinders, Spheres and Tubes for the Transportation of Dangerous Goods and Commission.”
L.P. TANK USE
• When turning the L.P. tank on, make sure to open the valve SLOWLY two (2) complete turns to
ensure proper gas flow. Most gas tanks now come equipped with a leak detector mechanism
internal to the tank, when gas is allowed to escape rapidly it shuts off the gas supply. Opening the
valve rapidly may simulate a gas leak, causing the safety device to activate, restricting gas flow
causing low ames. Opening the valve slowly will ensure this safety feature is not falsely triggered.
• When not in use, gas supply cylinder valve is to be in the "OFF" position.
• Store the tank supply system upright to allow for vapor withdrawal.
• Inspect the regulator and hose assembly before each use of the grill. If there is excessive abrasion or wear
or if the hose is cut, replace it prior to the grill being used again.
• Store cylinder outdoors out of the reach of children
and do not store in a building, garage or any other
enclosed area.
• Only a qualified gas supplier should refill the L.P.
tank.
DO NOT store a spare L.P. gas cylinder under or near
the grill. Never ll the cylinder beyond 80% full.
!
WARNING
▲
• Place dust cap on cylinder valve outlet whenever
the cylinder is not in use. Install only the type of dust
cap on the cylinder valve outlet that is provided with
the cylinder valve. Other types of caps or plugs may
result in leakage of propane.
If this information is not followed exactly, a
re causing death or serious injury may occur.
14
Page 15

Pre-Operation Leak Testing
GENERAL INFORMATION
Although all gas connections on the grill are leak tested prior to shipment, a complete gas tightness
check must be performed at the installation site due to possible shifting during shipment, installation
or excessive pressure unknowingly being applied to the unit. Periodically check the whole system for
leaks and immediately check the system if the smell of gas is detected.
BEFORE TESTING
1. Do not smoke while leak testing.
2. Extinguish all open ames.
3. Never leak test with an open ame.
4. Mix a solution of equal parts mild detergent or liquid soap and water.
TESTING
1. Turn off the burner control knobs.
2. Turn the top knob of the fuel supply cylinder counter-clockwise (right to left) two (2) rotations to
open.
3. Apply the soap solution to connections of the fuel supply assembly. If no soap bubbles appear,
there is no gas leak. If bubbles form at the connections, a leak is detected. If a leak is detected,
immediately turn off the gas supply, tighten any leaking ttings, turn gas on, and repeat steps 1-3.
4. Turn off the knob on the fuel supply cylinder.
5. Turn on the burner control knobs for a moment to release the pressure in the hose, and turn the
control knobs back off.
6. Wash off soapy solution with cold water and towel dry.
Check all gas supply ttings before each use and each time the gas supply cylinder is connected to
the regulator. Have a qualied service technician leak test the grill any time a part of the gas system
is replaced.
Perform a leak test at least once a year whether or not the L.P. gas supply cylinder has been
disconnected.
!
WARNING
▲
When leak testing this appliance, make sure to test and tighten all loose connections,
including the side burner. A slight leak in the system can result in a low ame, or hazardous
condition. Most L.P. gas tanks now come equipped with a leak detector mechanism internal
to the tank, when gas is allowed to escape rapidly, it shuts off the gas supply. A leak may
signicantly reduce the gas ow making the grill difcult to light or causing low ames.
!
WARNING
▲
If you cannot stop a gas leak turn off the gas supply and call your local gas company or
the dealer you purchased the appliance from. If necessary, replace the faulty part with the
manufacturer’s recommended replacement part. A slight leak could cause a re.
15
Page 16
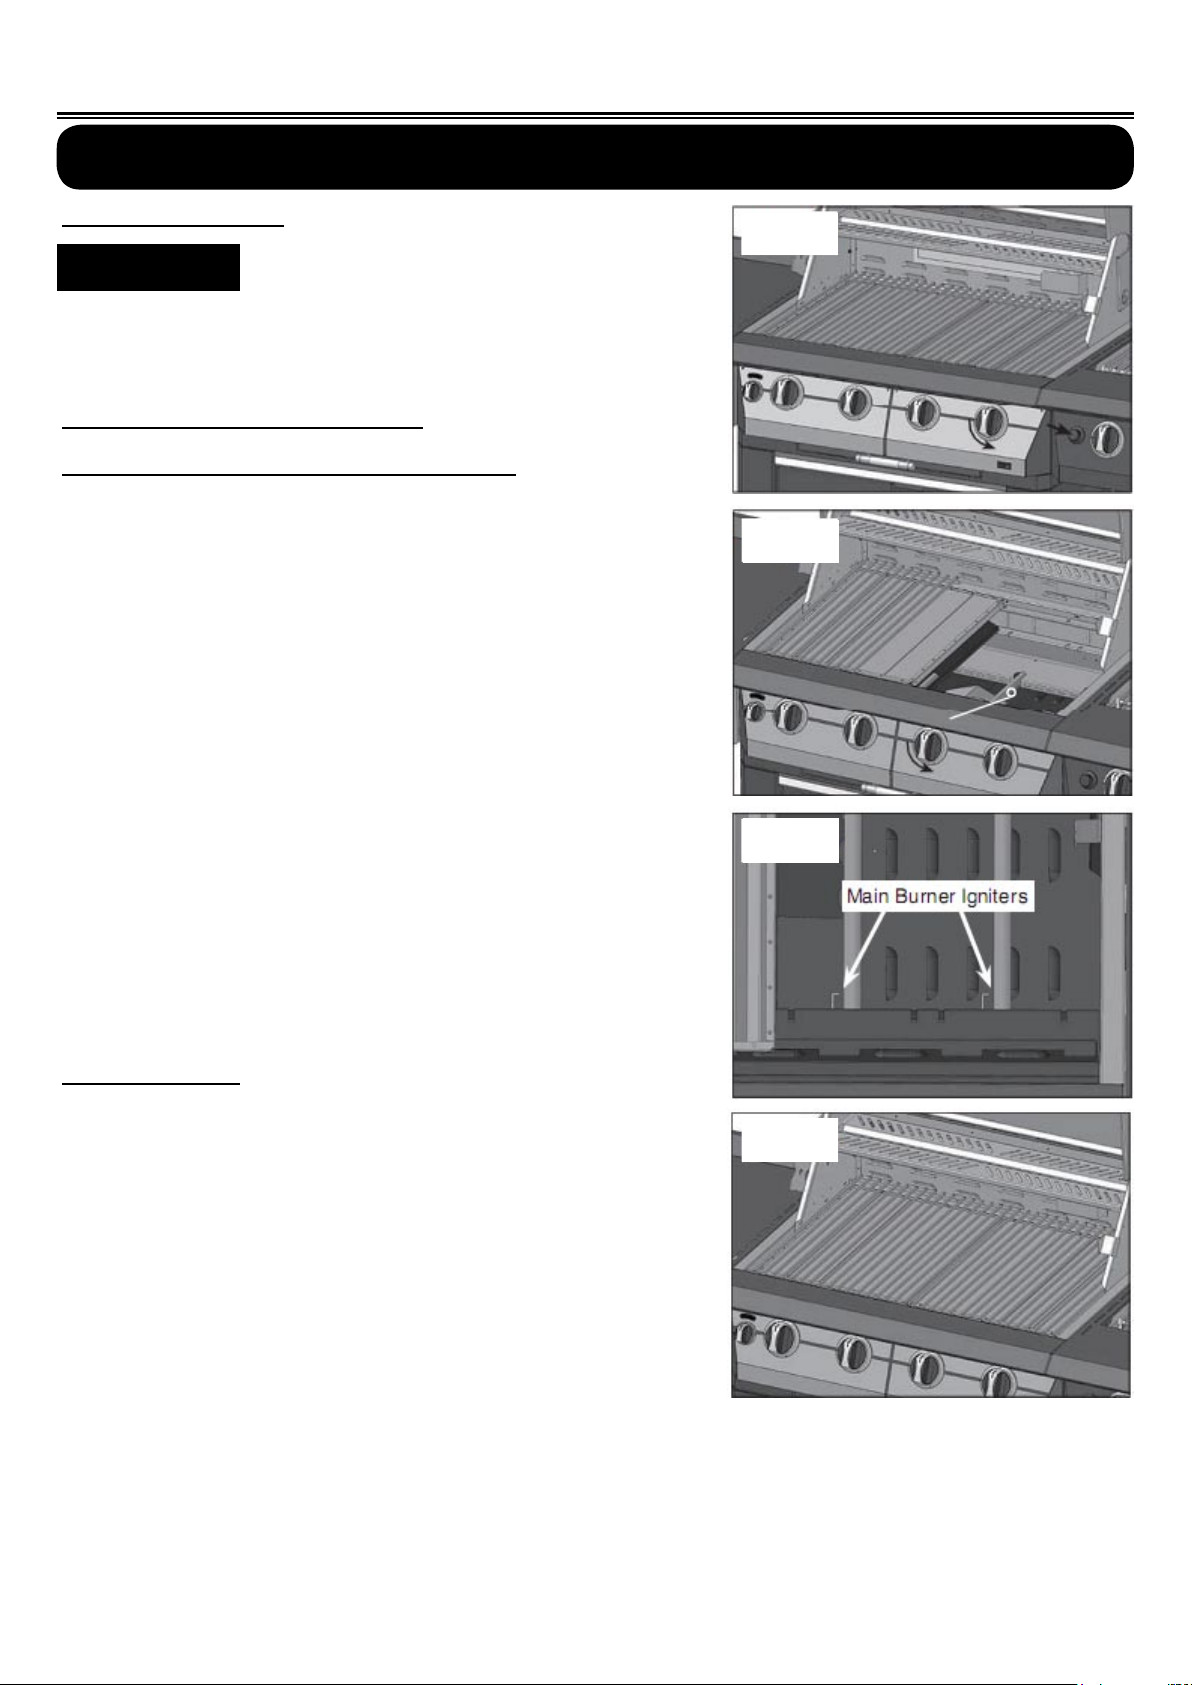
Lighting the Grill
Do not attempt to "Light" the grill if the odor of gas is present!!
BEFORE LIGHTING
!
WARNING
▲
• Check the gas supply line for cuts, wear or abrasion.
• Always keep your face and body as far away from the grill
as possible when lighting.
GRILL BURNER LIGHTING
Lighting the Grill with electronic igniter
1. Make sure all control knobs are in the "OFF" position.
2. Open the gas supply valve located on top of your L.P.
tank.
ATTENTION: When turning the L.P. tank on, make sure
to open the valve very SLOWLY two (2) complete turns
to ensure proper gas ow.
Important! Before Lighting:
Fig. 18
Fig. 19
3. Always open the hood before attempting to light.
4. Push and turn one of the control knobs counter-clockwise
to th e "HIGH" position and immediately press the
electronic igniter button. You will hear a snapping sound. It
may be necessary to hold the electronic starter button for
about 4 seconds. (See Fig. 19)
NOTE: If the burner does not light in 4 seconds, turn the
knob to the “OFF” position and wait 5 minutes before
trying again.
5. Repeat above steps to light remaining burners.
Match Lighting
If by chance the electronic igniter does not light the burner,
the burner may be lit with a match attached to the match
extender, located on the inside of the cart door.
Remove the main cooking grate, anti-flare screens flavor
grid. Keep your face as far away from the grill surface as
possible and pass the match extender to the ports of the
main burner tubes. Position the match near the burner ports
and push and turn the control knob counter-clockwise to the
"HIGH" position. After the burner has lit, turn the knob to the
"LOW" position and carefully place the flavor grid screen
and grate back in position. Then turn the control knob to the
desired setting. (See Fig. 20-22)
Fig. 20
Fig. 21
NOTE:
If the grill will not light after several attempts see the
troubleshooting section of this manual. Turn the control
knobs to the OFF position when not in use.
16
Page 17
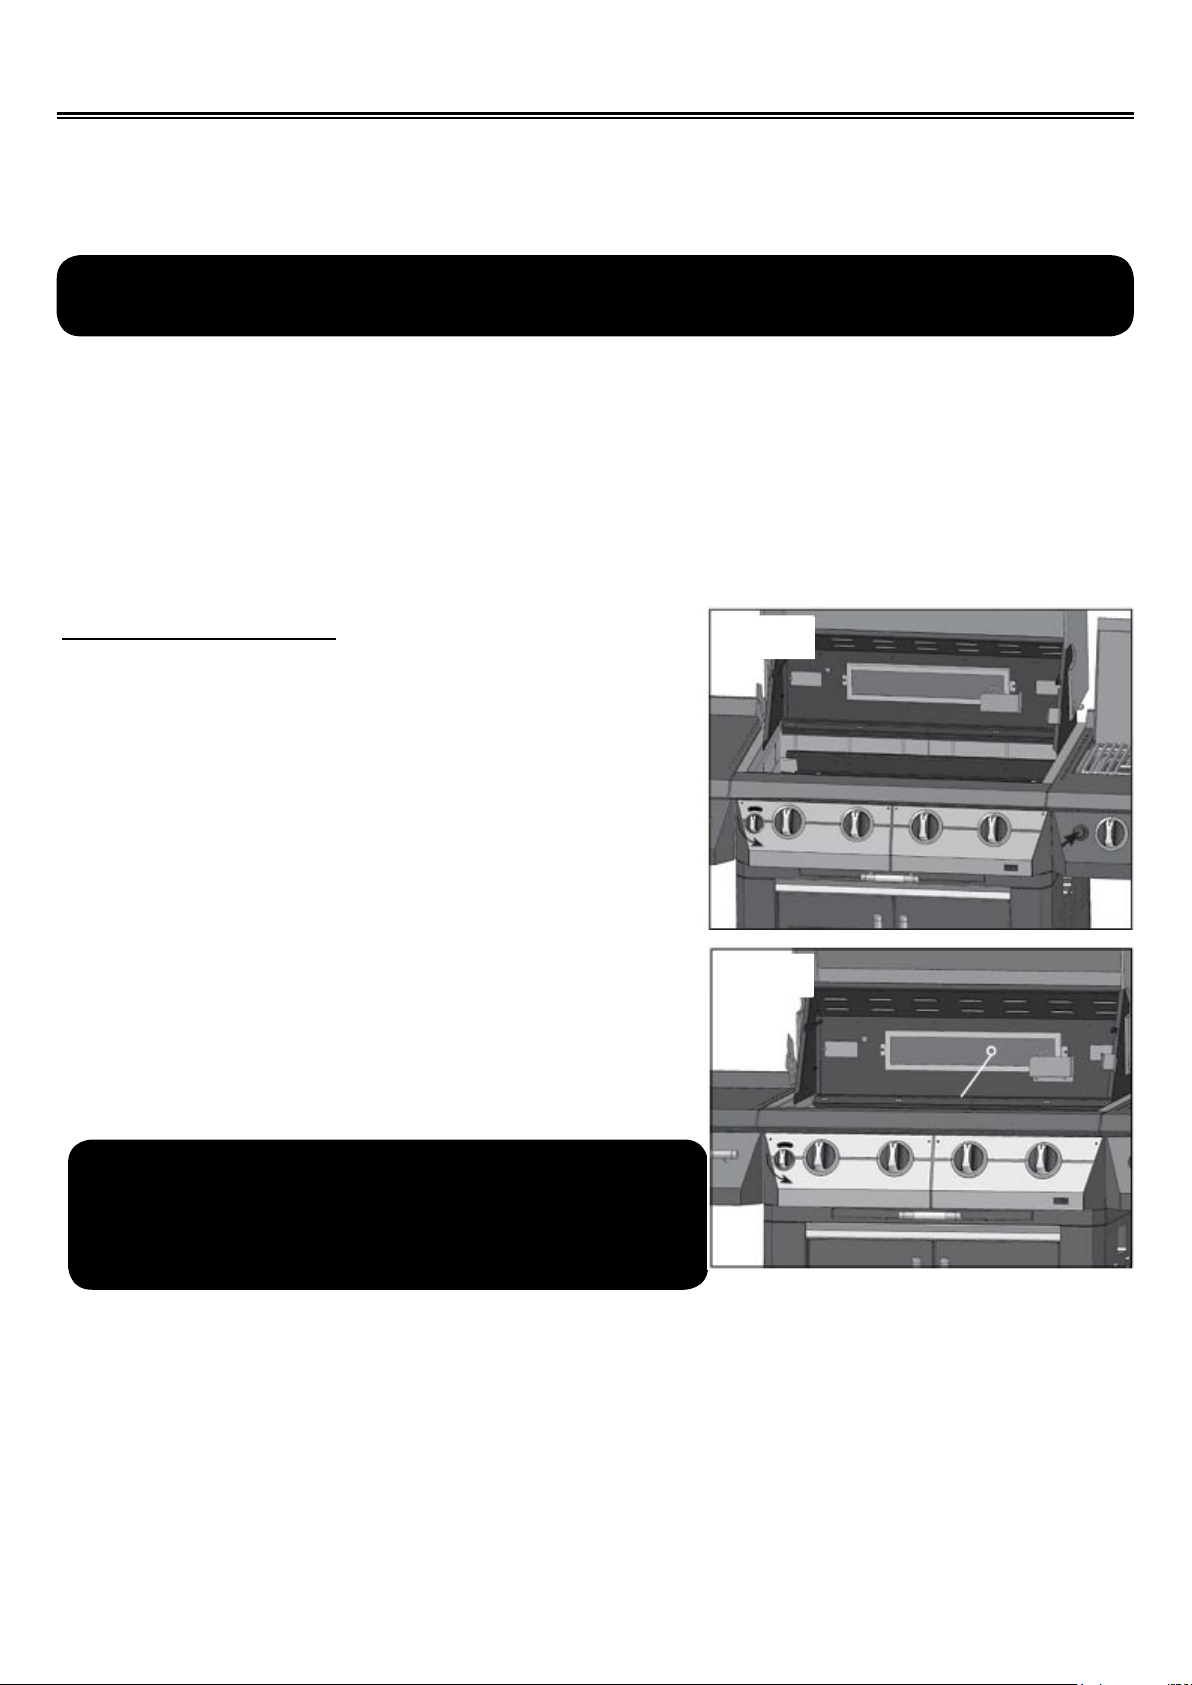
Using the Rotisserie Burner
The grill rotisserie system is designed to cook items from the back using infrared heat. The rotisserie
burner is an infrared type which provides intense searing radiant heat. Preferred by chefs over other
cooking methods, this intense heat sears in the natural juices and nutrients found in quality cuts of
meats.
Remove the warming rack from the grill when using the rotisserie to prevent
warping from the intense heat of the infrared unit.
NOTE: The rotisserie spit rod is centered between the grill hood and the burners. It may be
necessary to remove the grates, anti-are screen avor grids when cooking larger portions
of meat on the rotisserie. This is by design, since this configuration gives you the most
possible room above and below the rod for larger pieces of meat.
Once lit, the rotisserie burner will reach cooking temperature in 1 minute. The orange/red glow will
even out in about 5 minutes.
ROTISSERIE LIGHTING
Open the lid. Push and turn the control knob for the
rotisserie counter-clockwise to the “HIGH” position.
Continue push the knob and wait 5 seconds.
a snapping sound. If the burner does not light in 4 seconds,
turn the control knob to "OFF" and wait 5 minutes before
trying again. Once lit, turn the control knob to the desired
setting. (See Fig. 22)
If the igniter does not function, the burner can be lit by
holding a lit match to the burner while the control knob is
turned counter-clockwise to “HIGH”. (See Fig. 23)
NOTE: After the rst use the stainless steel around the
burner will darken. This is a normal reaction of premium
stainless steel due to heat and is not a defect. The
infrared panel will also darken after initial use. This is
also a normal occurrence.
NOTE: Do not operate the main burners
and infrared back burner at the same time.
!
▲
This can cause warping of the roll top grill
hood.
You’ll hear
Fig. 22
Fig. 23
17
Page 18
!
▲
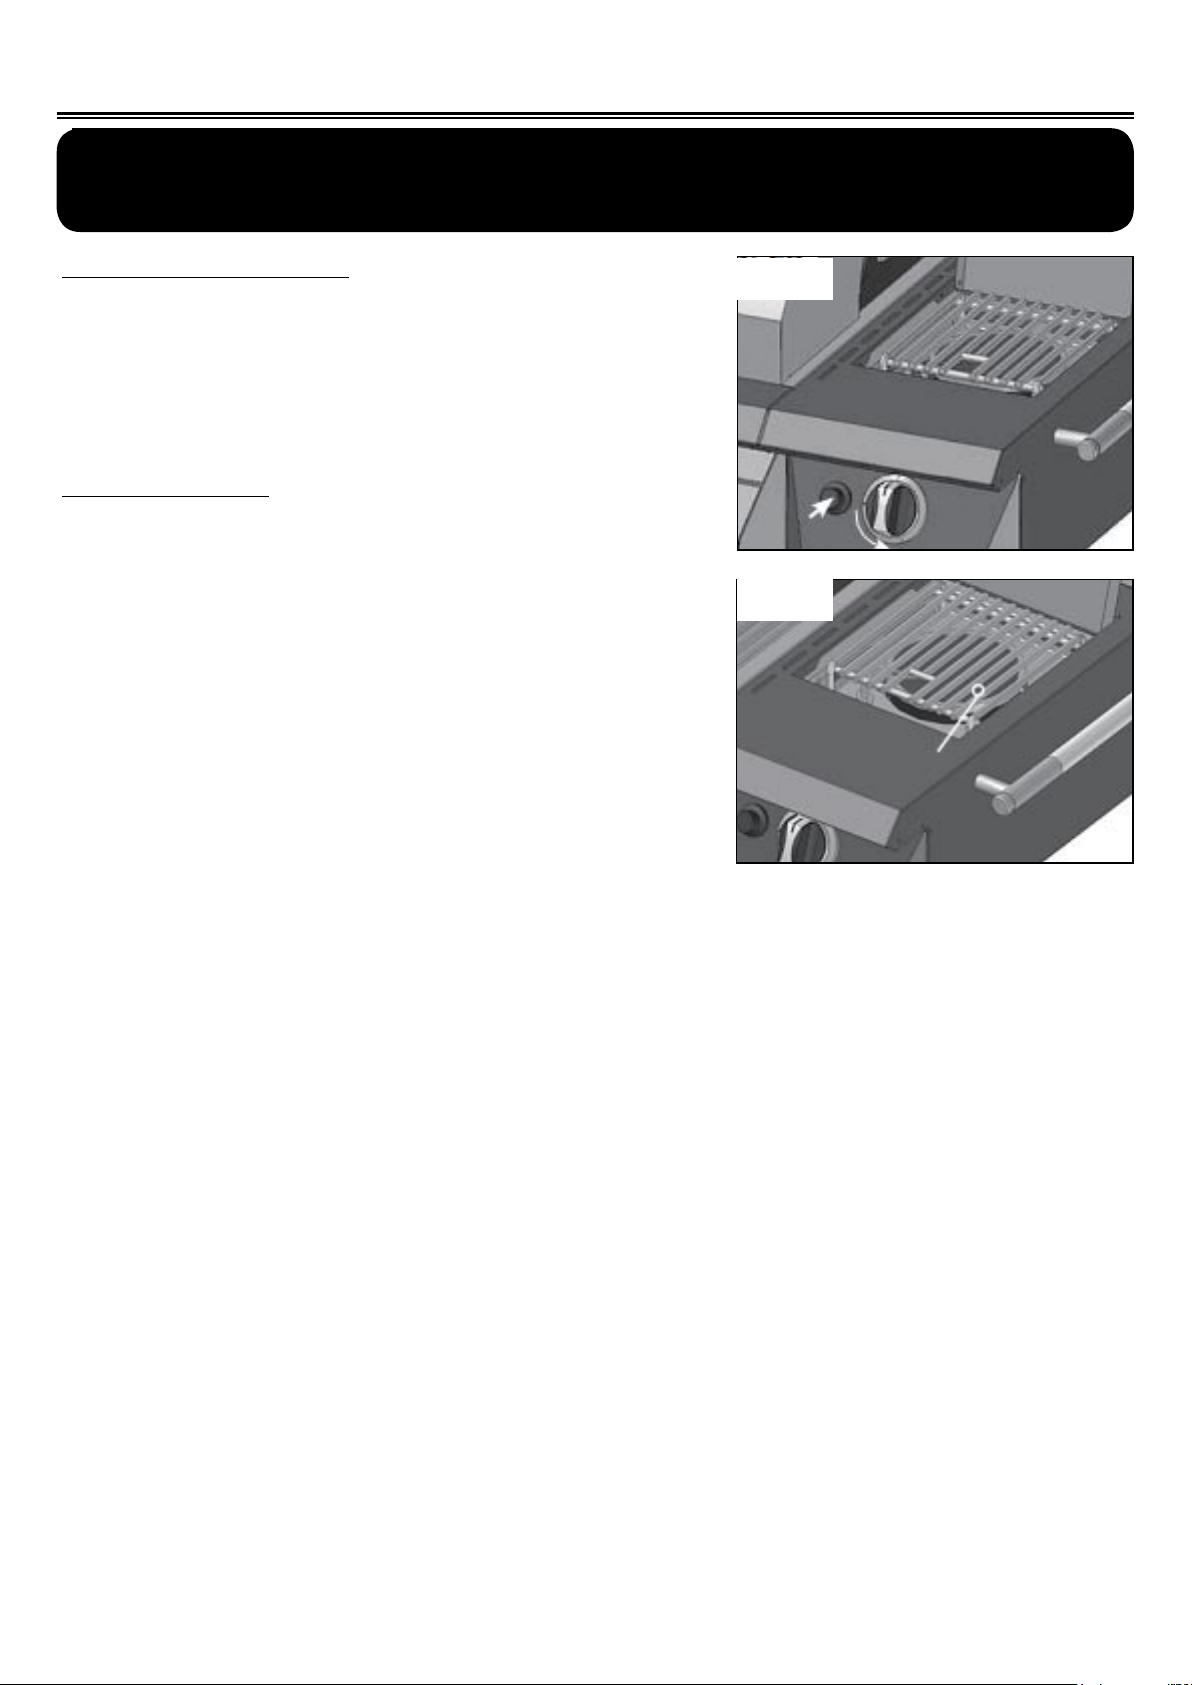
Lighting the Side Burner
Keep any electrical supply cords and the fuel supply away from any
heated surfaces.
SIDE BURNER LIGHTING
Push and turn the control knob to the "HIGH" position.
Conitnue pushing the knob. You’ll hear a snapping
sound. It may be necessary to hold the knob for about 4
seconds. If the burner does not light in 4 seconds, turn
the knob to the "OFF" position and wait 5 minutes before
trying again. (See Fig. 24)
MATCH LIGHTING
If by chance the electronic igniter does not light the
burner, the burner may be lit with a match. Attach the
match to the match extender, located inside the right cart
door.
Keep your face as far away from the grill surface as
possible and hold a match, attached to the match
extender, near the burner ports, then push and turn the
control knob counter-clockwise to the “HIGH” position.
Once lit, turn the control knob to the desired setting. (See
Fig. 25)
Fig. 24
Fig. 25
18
Page 19
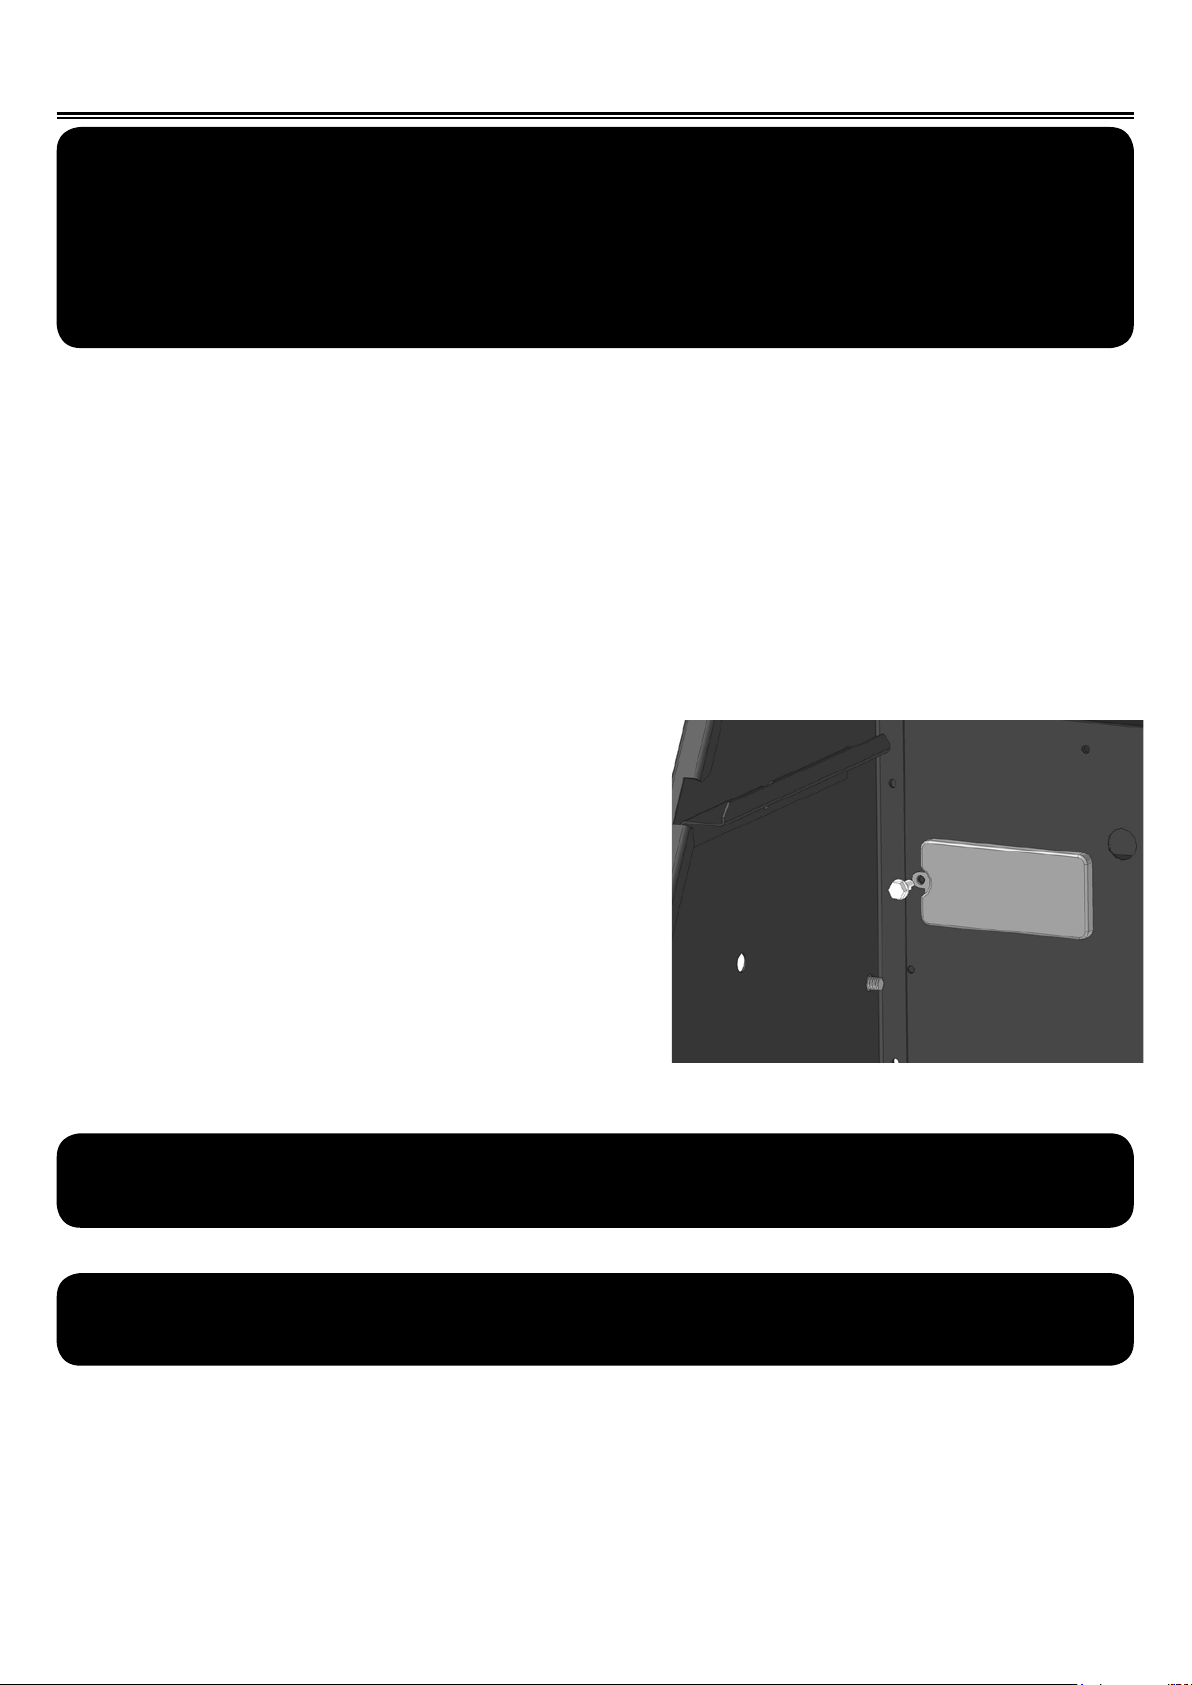
Grill Light Maintenance
!
WARNING Electrical Grounding Instructions
▲
This appliance (rotisserie motor) is equipped with a three-prong (grounding)
plug for your protection against shock hazard and should be plugged directly
into a properly grounded three-prong receptacle. Do not cut or remove the
grounding prong from this plug.
1. Feed electrical cord through access hole in back of the cart.
2. Plug into 3 prong GFCI protected outlet.
3. Turn on using light switch on front control panel.
4. Unplug electrical cord after use.
The light bulb in your grill will need to be replaced ocassionally.
light bulb supplied with the grill or a replacement lamp specified by the
manufacture.
Light bulb replacement instructions:
1. Unplug the light electrical cord.
2. Open the lid, remove the self-tapping screw holding
the glass cover in place.
3. Remove glass cover and light bulb.
4. Reinstall the new light bulb, glass cover and screw.
!
WARNING
▲
Always unplug light cord when not in use.
Only use the
!
WARNING
▲
Do Not use grill light in the rain.
19
Page 20
Care and Maintenance
IMPAIRED VENTILATION OF HOT AIR FROM GRILL -
In order for the burners to function
properly, hot air created by the burners must have a way to escape, the burners may become
deprived of oxygen, especially if the burner output is set at HIGH. This is the reason your grill
was designed with ventilation louvers. These design features give the hot air an escape route.
Accordingly, never operate your grill with very little or no open space at the cooking surface (the
cooking grids provide sufcient space). Also, never cover the ventilation louvers with foil or other
materials that prevent air ow. Specically, do not cover the entire surface with foil, a large pan, etc.
GENERAL MAINTENANCE
- Keep outdoor cooking gas appliance area clear and free from combustible materials, gasoline and
other ammable vapors and liquids.
- Do not obstruct the ow of combustion and ventilation air.
- Keep the ventilation openings of the cylinder enclosure free and clear from debris.
- Visually check the burners.
- Clean the anti-are screen with mild detergent to remove the bacteria or fungi. The fats and oils
also contain inorganic and organic acids which can cause corrosion on the sureface of the burner
components.
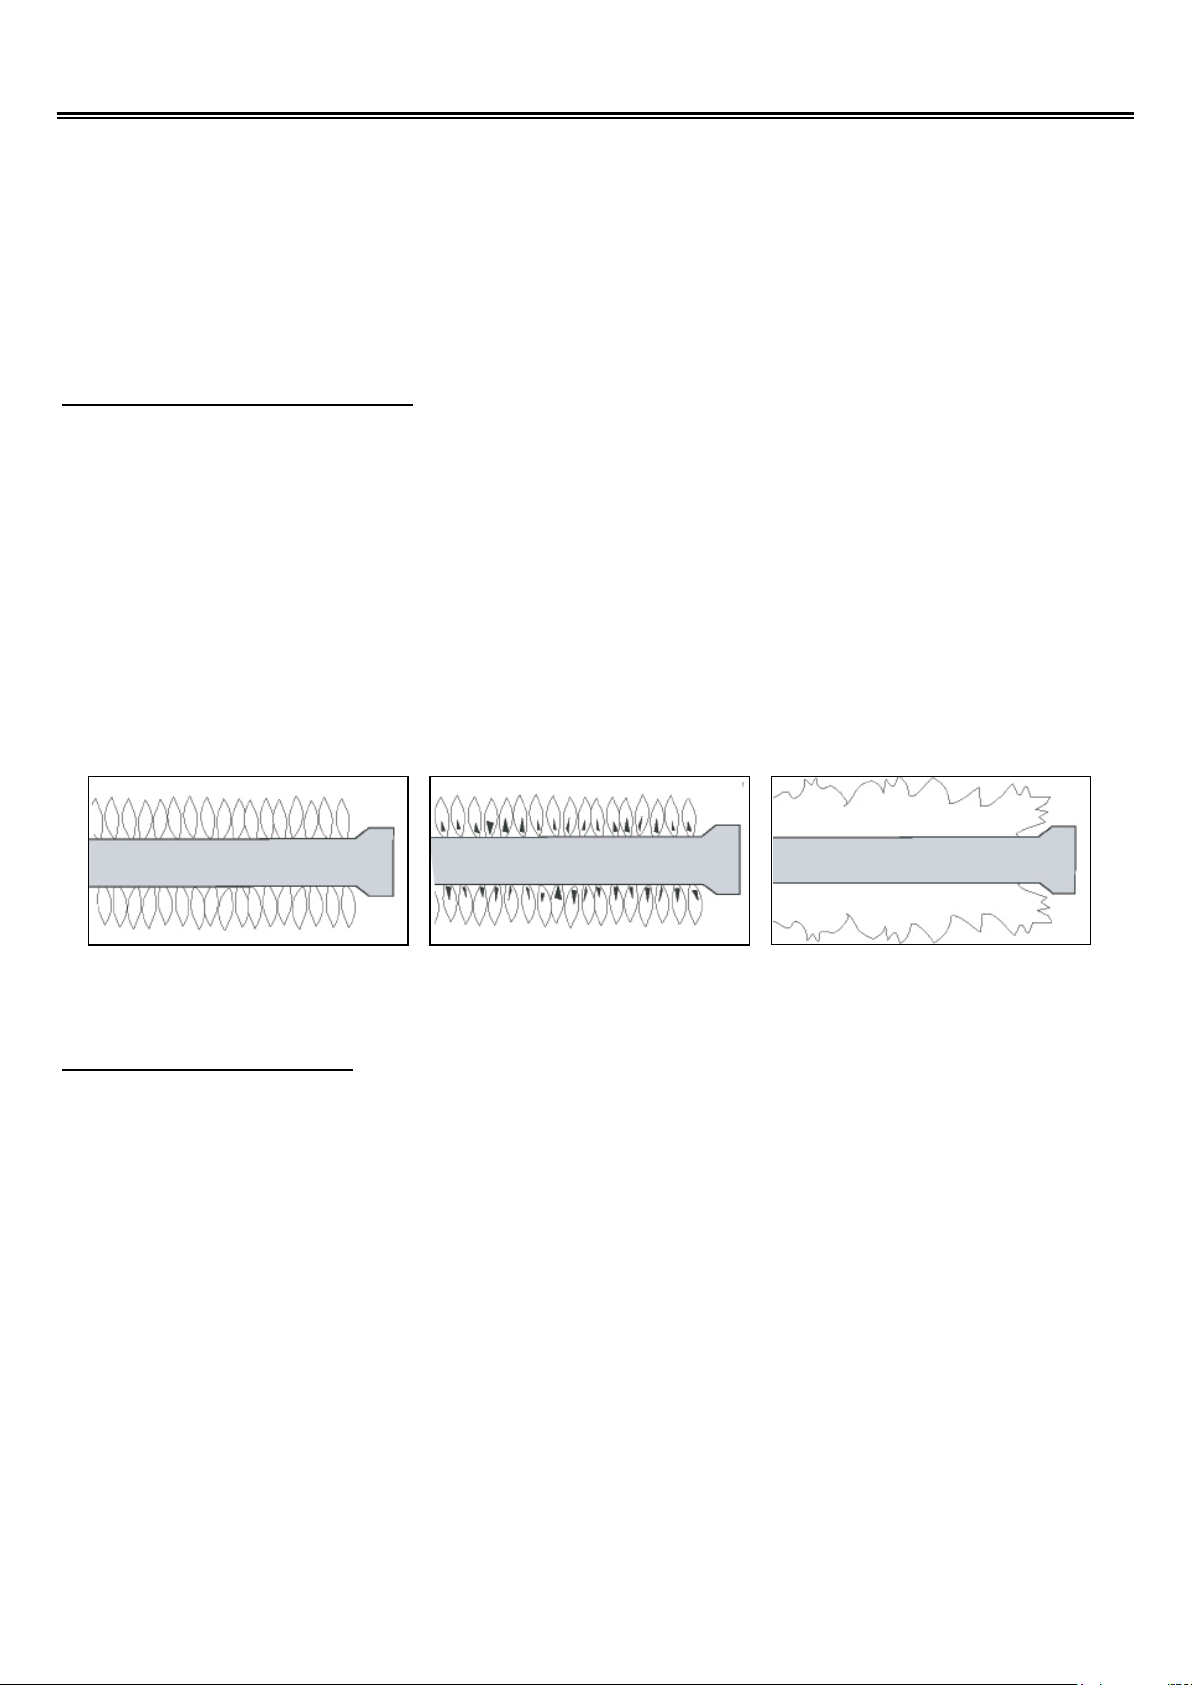
Normal: Soft blue ames
Out of Adjustment: Ha rd bl u e
ames- too much air
Poor Combustion: wavy, yellow
ames- too little air
GENERAL CLEANING
IMPORTANT: Before cleaning, make sure all controls are off and the grill is cool. Always follow label
instructions on cleaning products.
For routine cleaning, wash with soap and water using a soft cloth or sponge. Rinse with clean water
and dry at once with a soft, lint-free cloth to avoid spots and streaks.
To avoid scratching the surface, do not use steel wool to clean the grill.
Use the vinyl grill cover to protect nish from weather.
20
Page 21

Care and Maintenance
DRIP TRAY
Clean the drip tray periodically to prevent heavy buildup of debris.
NOTE: Allow the drip tray to cool before attempting to clean.
Important: Do not leave the grill outside during inclement weather unless it is covered. Rain
water can collect inside of the grill, the grill cart or the drip tray if left uncovered. If the drip
tray is not cleaned after use and the grill is left uncovered, the drip tray will ll with water
causing grease and water to spill into the grill cart. Clean and store the drip tray after every
use.
COOKING GRATES
The cooking grates can be cleaned immediately after cooking is completed and after turning off the
grill. Wear a barbecue mitt and scrub the cooking grates with a damp cloth. If the grill is allowed
to cool down, cleaning the grates will be easier if removed from the grill and cleaned with a mild
detergent.
STAINLESS STEEL
After initial use, areas of the grill may discolor from the intense heat given off by the burners, this is
normal.
Purchase a mild stainless steel cleaner and rub in the direction of the grain of the metal. Specks of
grease can gather on the surface of the stainless steel and bake on to the surface and give a worn
appearance. For removal, use a non-abrasive oven cleaner in conjunction with a stainless cleaner.
NOTE: Always scrub in the direction of the grain.
IGNITER ACCESS (UNDER SIDE BURNER SHELF)
To remove igniter, unscrew igniter push button and locking nut from front panel of the side burner
and igniter will fall out through the bottom.
PORCELAIN PARTS
Certain parts of your grill have a porcelain coating. Porcelain is a glass-based product, and is highly
durable to standard wear and tear. However, porcelain is sensitive to concussive blows, which can
create interlaced micro-fractures, or “spider-webs.” Please take care not to strike any porcelain
covered parts with solid objects, drop them, or create any other concussive blows. These interlaced
micro-fractures are common and may lead to minor chipping. Neither the chipping nor the interlaced
micro-fractures will adversely affect the performance of your grill, and are not covered under the
warranty for porcelain parts.
21
Page 22
Troubleshooting Guide
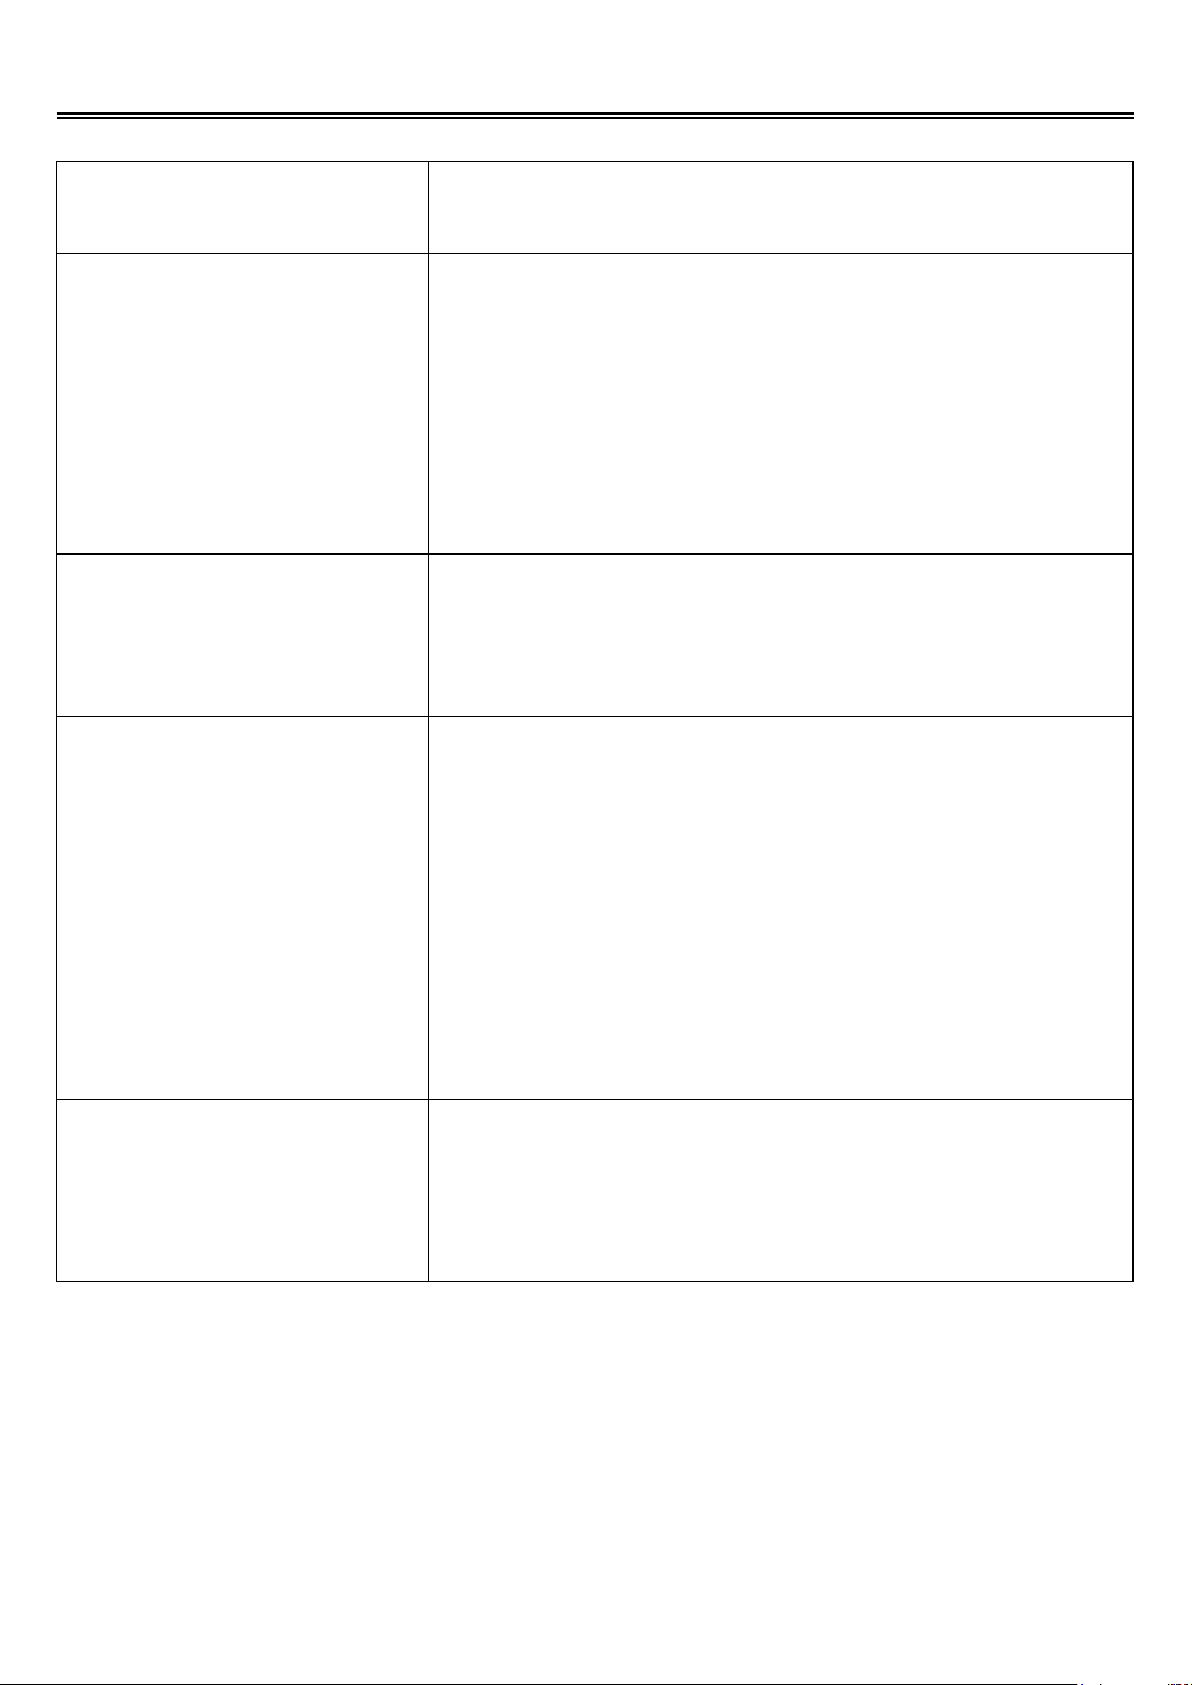
Problem Possible Solution
Grill will not light
Burner ame is yellow and
gas odor can be smelled
1. Push the igniter button and check for sparks.
2. If there is a spark, check to make sure gas is supplied to the
burner.
a. Purge the line of any trapped air.
b. Check to see if you can match-light the burner.
c. Check to see that the other burners operate.
d. Visually check the electrode and wire while pushing the
igniter button. If a spark occurs anywhere but the ignitor
trip, the ignitor must be replaced.
1. Check the burner inlet for obstruction, especially for spiders
and other insects.
2. Check the air shutter for proper adjustment.
3. Check for the source of gas leaks.
Excessive are-ups
Burner blows out
1. Hood up when grilling.
2. Keep knobs on low.
3. Turn one burner off if neccessary.
4. Post heat grill for 10-15 minutes, this will burn off drippings.
5. Use meats containing less fat.
6. Always grill chicken on low, meat side down for 20 minutes
and turn to skin side for another 20 minutes. Follow above
steps.
7. If are up continues, move meats to warming rack until ame
settles down.
8. Never spray water on gas ames - it will destroy your grill.
1. Check for any burner defects.
2. Check for proper burner installation.
3. Make certain the fuel mixture is not too lean.
4. Make sure the gas supply is sufcient.
5. See if the LP tank is empty.
22
Page 23
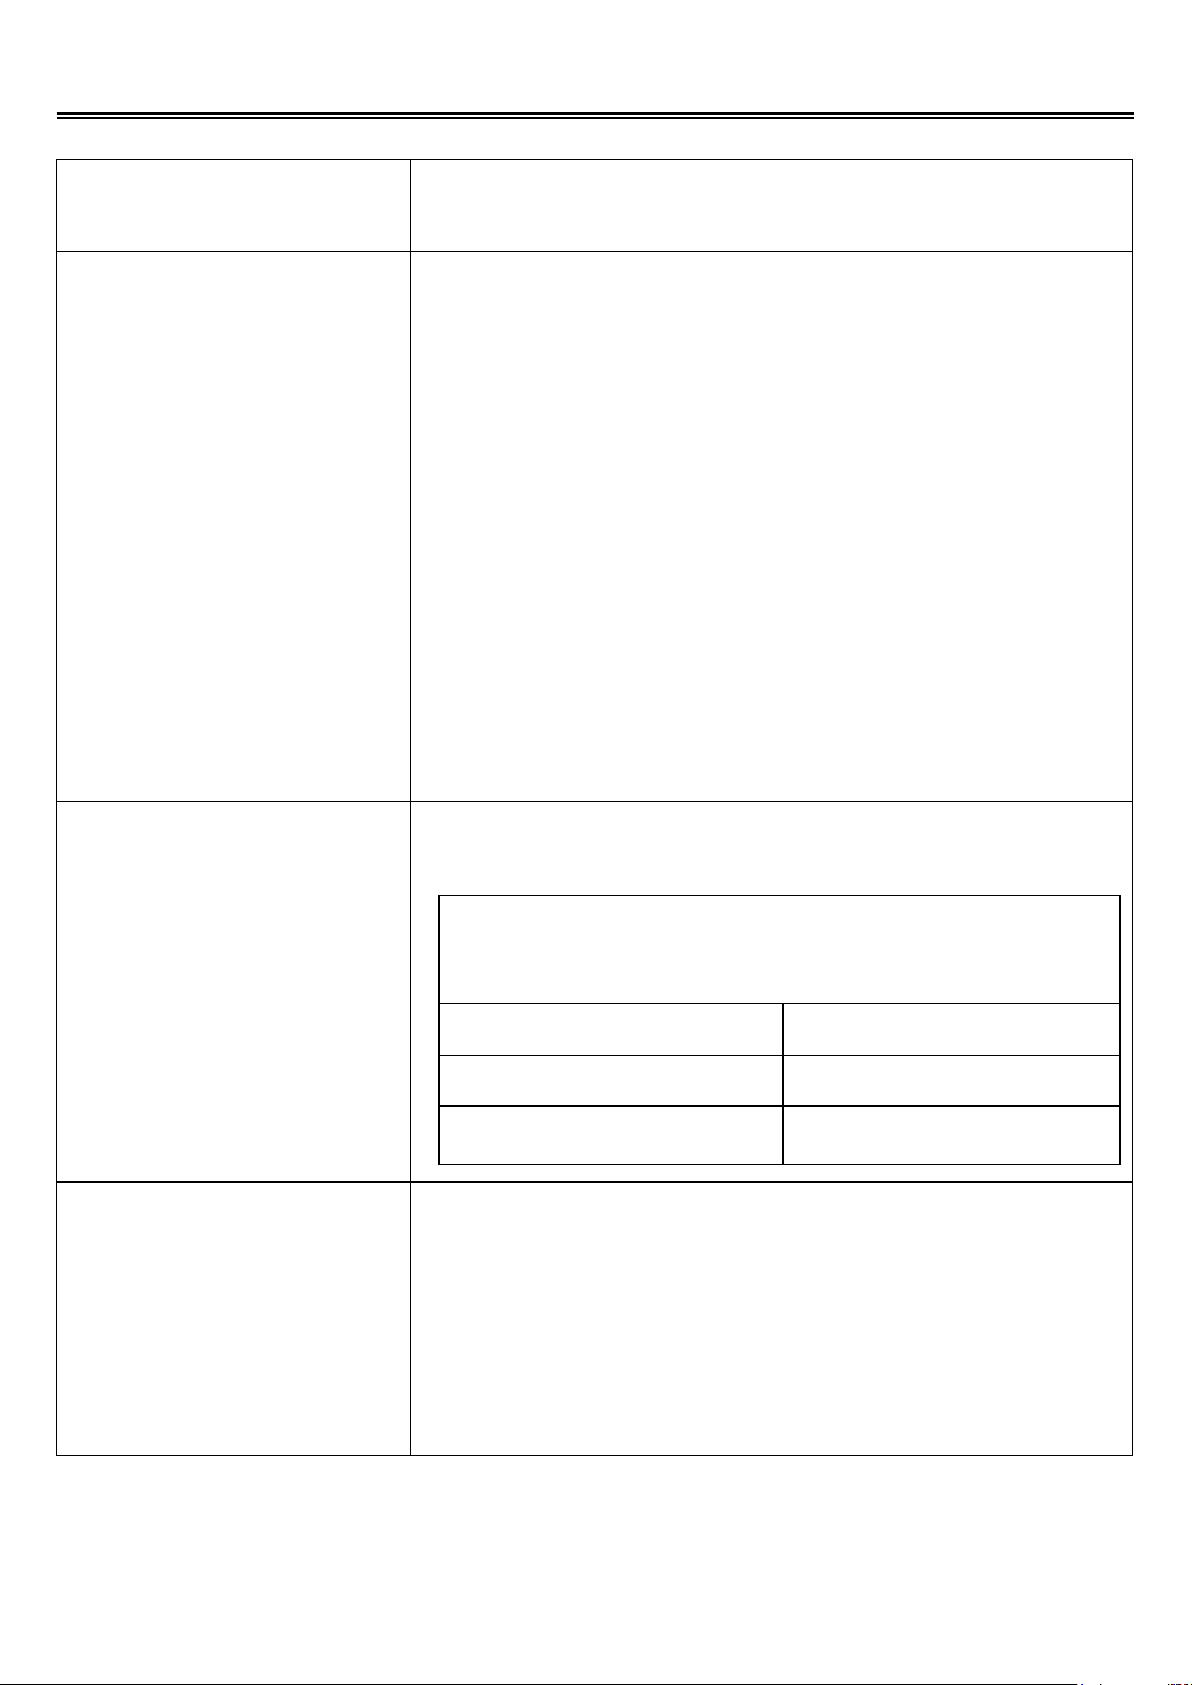
Problem Possible Solution
Low heat, LP gas
Troubleshooting Guide
The propane regulator assembly incorporates an excess flow
device designed to supply the grill with sufcient gas ow under
normal conditions, yet control excess gas ow.
Rapid changes in pressure can trgger the excess flow device,
providing a low flame and low temperature. If the tank valve is
turned open to allow gas flow while a burner valve is open, the
surge of pressure will cause the device to activate. The device will
remain closed until the pressure is equalized. This should occur
within 5 seconds.
To ensure this does not cause difculty in lighting the grill, follow
these instructions:
1. Make sure all burner valves are "OFF".
2. Open the tank valve and wait 5 seconds.
3. Light the burner one at a time following the lighting instructions.
Low heat, natural gas
Low heat generated with
knob in "HI" position
Gas pressure is affected by gas line and length of gas line from
house gas line. Follow the recommendations in the chart below.
From House to Grill
Distance Tubing Size
Up to 25 ft 3/8 in. diameter
26 ft - 50 ft 1/2 in. diameter
51ft -100 ft
1. Make certain the problem is isolated to only one burner. If it
appears so, clean the orice and the burner, clearing ports of
any obstruction.
2. Check for a bent or kinked fuel hose.
3. Make sure the air shutter is properly adjusted.
4. Check for proper gas supply and pressure.
5. Pre-heat the grill for full 15 minutes.
6. If using LP gas, check for an empty tank.
2/3 in. of run 3/4 in.
1/3 in. of run 1/2 in.
23
Page 24
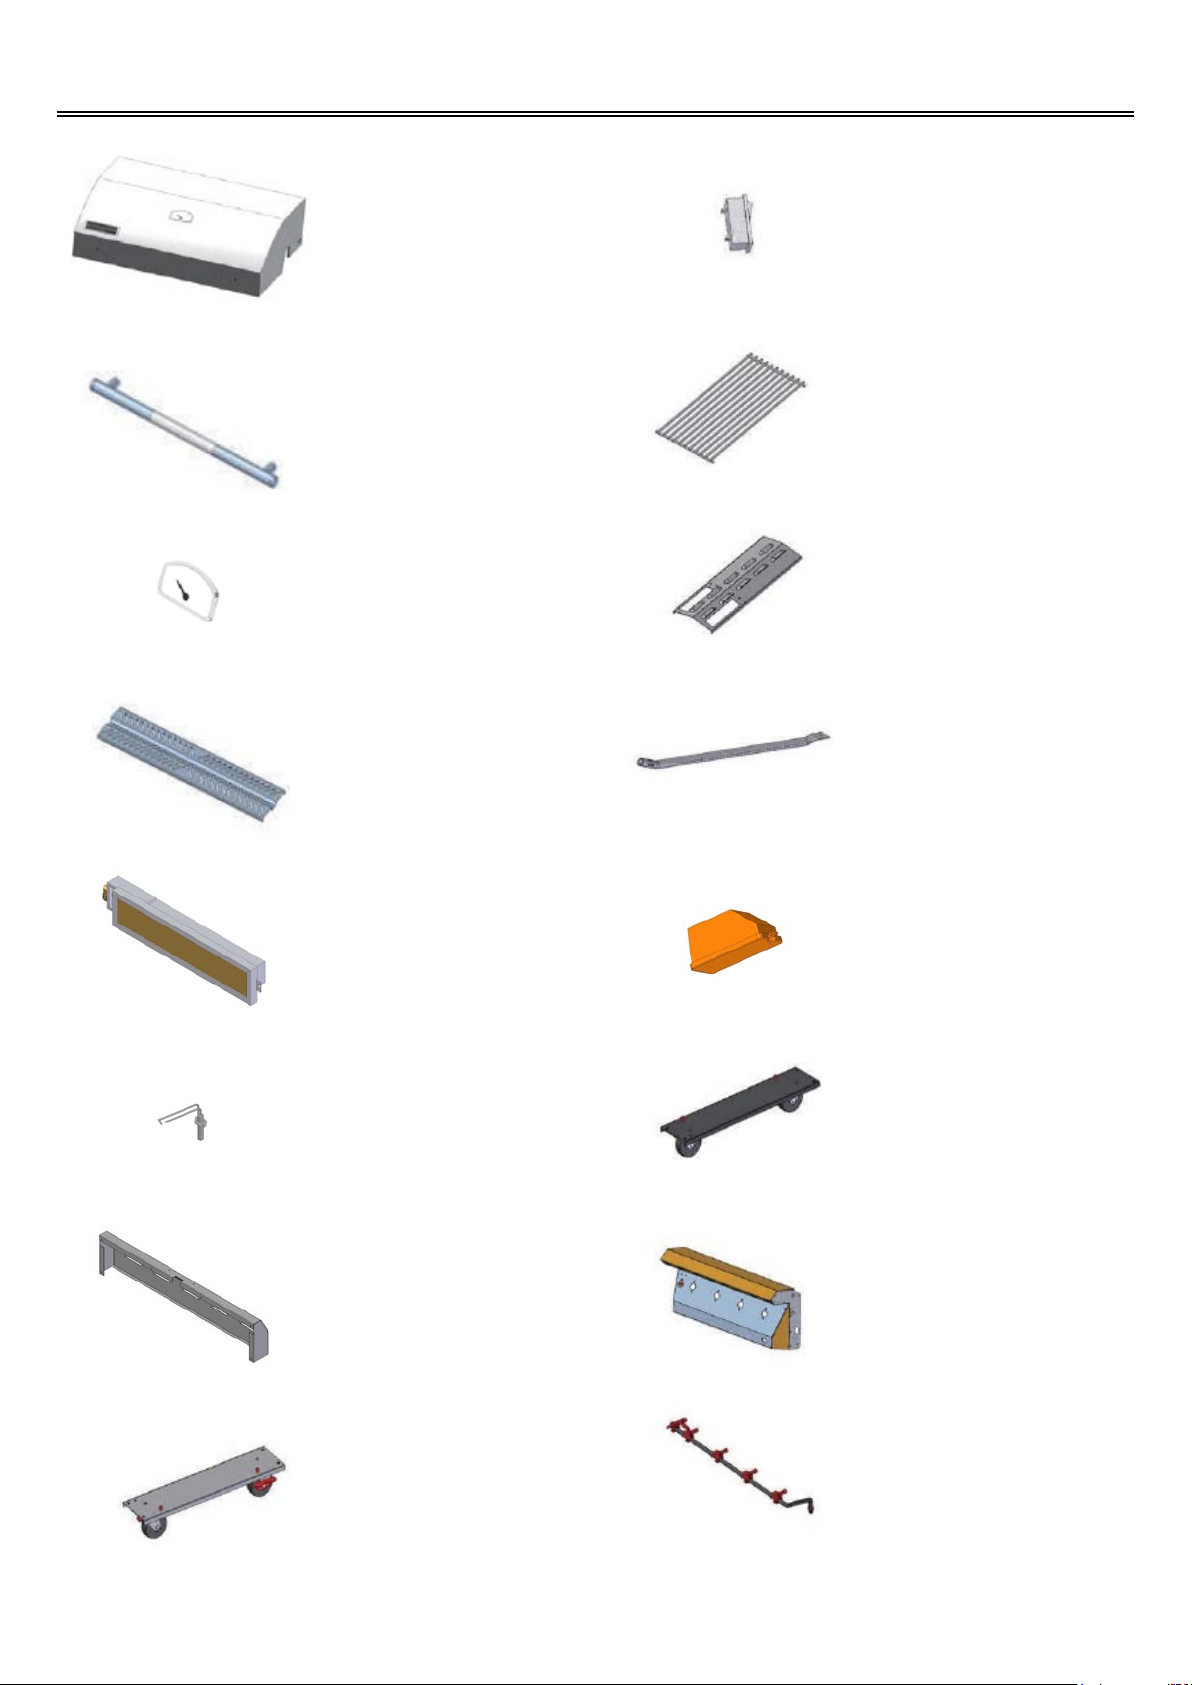
Replacement Part List
Hood Assembly Light Switch
SASBA00239A RCOZZ00462A
1 set 1 set
Hood Handle Assy. Main Cooking Grate
RCOZZ00479A RCOZZ00465A
1 set 1 set
Temp. Gauge Flavor Grid
RCOZZ00481A SBNMC00224A
1 pcs 1 set
Bread Warming Rack Main Burner Tube
SASBA00237A RCOAZ00044A
1 pcs 1 pcs
Back IR Burner Assy. Hoodlight
RCOZZ00055A RCOZZ00287A
1 set 1 pcs
Back IR Igniter Wheel Mount Right Assy.
RCOZZ00009A SASJB00159A
1 pcs 1 pcs
Back IR cover Front Face Assy.
SASBA00234A SASCD00388A
1 pcs 1 set
Wheel Mount Left Assy. Manifold & Valve Assy.
SASJB00158A RCOZZ00486A
1 pcs 1 set
24
Page 25
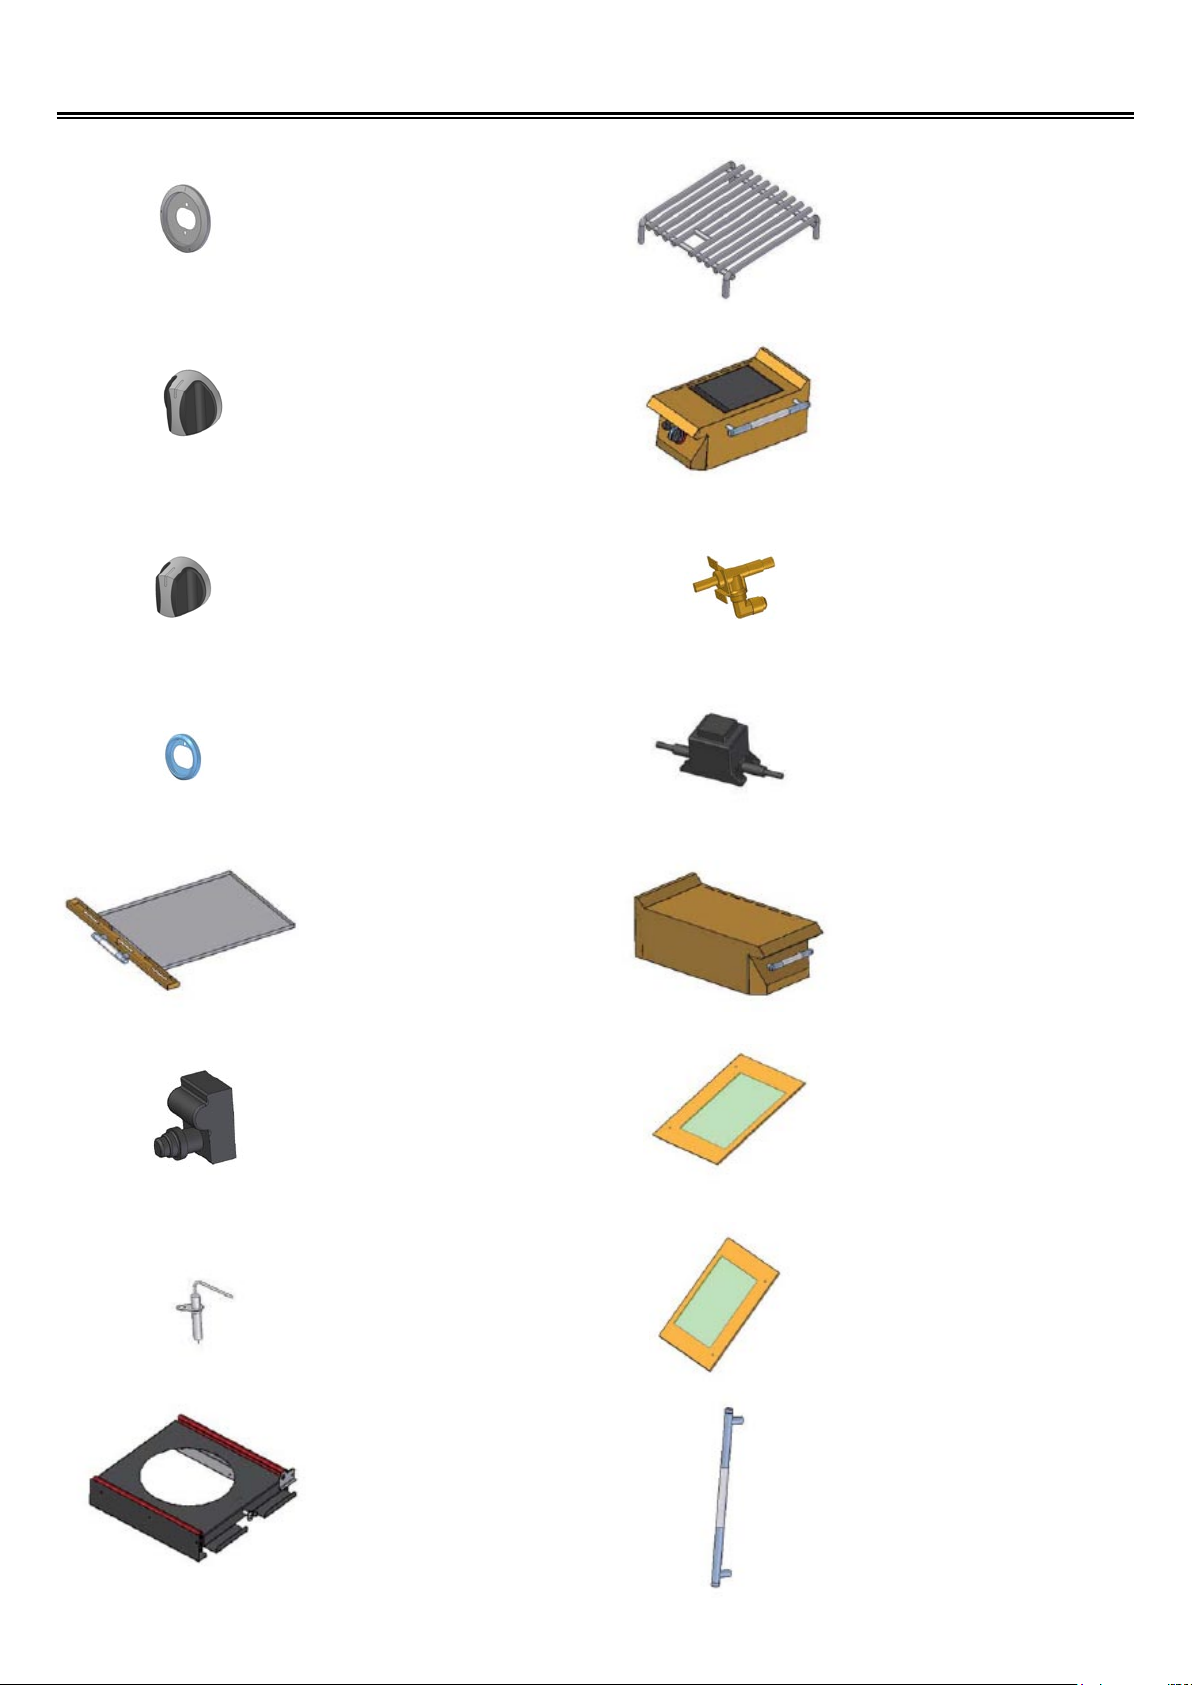
Replacement Part List
Large Bezel Side Burner Grate
RCOAG00003C RCOAZ00009A
1 pcs 1 pcs
Large Knob Side Burner Right Assy.
RCOFE00006B SASCD00377A
1 pcs 1 set
Small Knob Side Burner Valve
RCOFE00007B RCOZZ00487A
1 pcs 1 pcs
Small Bezel Transformer w/ Wire
RCOAG00004B RCOZZ00468B
1 pcs 1 set
Drip Pan Left Side Shelf
SWLBB00061A SASCD00368A
1 set 1 set
Igniter Module 6 poles Cart Door Left
RCOZZ00463A SBNCD00400A
1 pcs 1 set
Side Burner Casting Cart Door Right
RCOZZ00348A SBNCD00404A
1 pcs 1 set
Side Burner Brass Cap Cart Door Handle Assy.
SASCD00406A RCOZZ00480A
1 pcs 1 set
25
Page 26
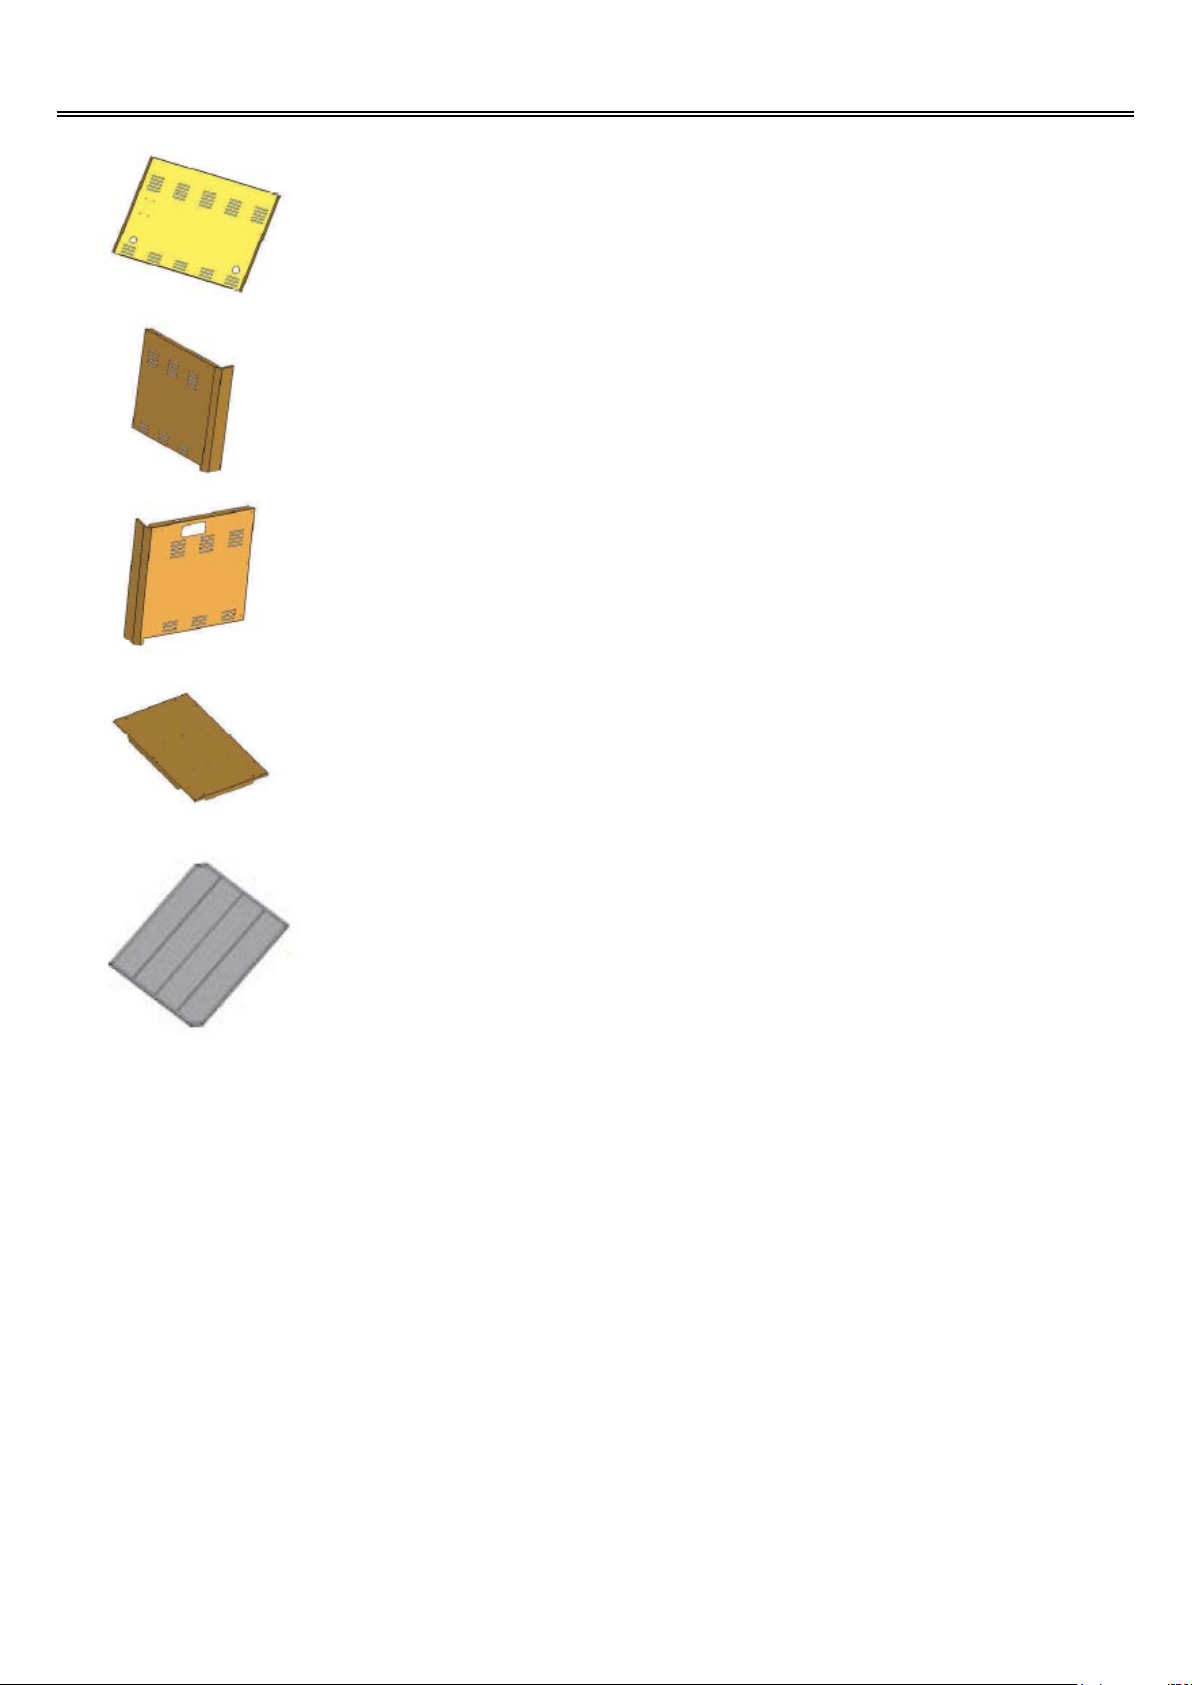
Replacement Part List
Cart Back
SBNCD00397A
1 set
Cart Side Left
SBNCD00393A
1 pcs
Cart Side Right
SBNCD00394A
1 pcs
Cart Base
SBNCD00392A
1 set
Tank Tray
RCOZZ00497A
1 set
Not Shown:
RCOZZ00083A Igniter Wire 1000
RCOZZ00213A Main Igniter w/ Wire 540
RCOZZ00313A Main Igniter w/ Wire 400
RCOZZ00215A Main Igniter w/ Wire 920
RCOZZ00214A Main Igniter w/ Wire 740
RCOZZ00209A Flex Line 7/16 FLR SST 201
RCOZZ00009A Back IR Igniter Wire
RCOZZ00117A NG Regulator
RCOZZ00398A Cart Mag Stop Galv
RCOZZ00020A "INFRARED" Logo
RCOZZ00502A "SONOMA" Logo
26
Page 27

LIMITED WARRANTY
Sure Heat Mfg warrants that for 2 years from the date of purchase, the stainless steel panels
will not break due to defects in material or workmanship. All other components of this grill
are warranted free from defects in material and workmanship for one year from the date of
purchase. Sure Heat Mfg. at its option, will repair or replace this product or any component
of the product found to be defective during the warranty period. Replacement will be made
with a new manufactured product or component. If the product is no longer available,
replacement may be made with a similar product of equal value. This warranty does not include
transportation or shipping costs of any kind. This is your exclusive warranty.
This warranty is valid for the original retail purchaser from the date of initial retail purchase
and is not transferable. Keep the original sales receipt. Proof of purchase is required to obtain
warranty parts.
This warranty does not cover normal wear of parts such as scratches and dents of the stainless
steel components or damage resulting from any of the following:
negligent use or misuse of the product, including exposing the product to chemicals or cleaning products not
•
approved by Sure Heat Mfg.
corrosion, rust or discoloring of any kind.
•
use or installation contrary to specied instructions and applicable building codes, including heating the product
•
to temperatures above its rated specications which can cause considerable warping
disassembly, including removal of the product from a built-in installation
•
damage resulting from accident, alteration, misuse, abuse, hostile environments, or improper installation
•
repair or alteration
•
acts of God, such as re, ood hurricanes, and tornadoes
•
gas cylinders, propane tanks or other fuel delivery systems, including connections to a household fuel supply
•
usage other than single-family household use such as commercial or industrial use
•
minor warping or discoloration of parts, which is normal and not a defect under this warranty
•
DO NOT RETURN THIS PRODUCT TO THE PLACE OF PURCHASE
If the Grill does not operate properly, rst thoroughly carry out the instructions provided with the
unit to ensure that the appliance is installed correctly and check the troubleshooting section in
the use and care manual.
We recommend you return the warranty registration card so that you can be contacted when
any questions of safety arise that could affect you. The return of the warranty registration card
is not a condition for warranty coverage.
Because of continuing product improvement these specications are subject to change without
notice.
If you have other questions or need replacement parts contact our
Customer Service Hotline at (800) 229-5647
27
 Loading...