

Page 1
IP 705 Phone
User Manual
™
01/2007 4290-0014-5.1
Page 2

WARNING!
Toll fraud is committed when individuals unlawfully gain access to
customer telecommunication systems. This is a criminal offense.
Currently, we do not know of any telecommunications system that is
immune to this type of criminal activity. AltiGen Communications, Inc.,
will not accept liability for any damages, including long distance charges,
which result from unauthorized and/or unlawful use. Although AltiGen
Communications, Inc., has designed security features into its products, it is
your sole responsibility to use the security features and to establish security
practices within your company, including training, security awareness, and
call auditing.
NOTICE
While every effort has been made to ensure accuracy, AltiGen
Communications, Inc., will not be liable for technical or editorial errors or
omissions contained within the documentation. The information contained
in this documentation is subject to change without notice.
This documentation may be used only in accordance with the terms of the
AltiGen Communications, Inc., License Agreement.
AltiGen Communications, Inc.
4555 Cushing Pkwy.
Fremont, CA 94538
Telephone: 510-252-9712
Fax: 510-252-9738
E-mail: [email protected]
Web site: www.altigen.com
TRADEMARKS
AltiGen, AltiServ, AltiWare, AltiSpan, AltiReach, AltiLink, AltiConsole,
AltiAdmin, IP 705, Zoomerang, IPTalk, AltiReport, and SuperQ are
trademarks or registered trademarks of AltiGen Communications, Inc.
All other brand names mentioned are trademarks or registered trademarks
of their respective manufacturers.
Copyright © AltiGen Communications, Inc., 2007. All rights reserved.
01/2007 4290-0014-5.1
Page 3

Contents
Contents . . . . . . . . . . . . . . . . . . . . . . . . . . . . . . . . . . . . . . . . . . . i
Warranty . . . . . . . . . . . . . . . . . . . . . . . . . . . . . . . . . . . . . . . . . .v
About This Manual . . . . . . . . . . . . . . . . . . . . . . . . . . . . . . . . . .1
CHAPTER 1
The IP 705 Phone . . . . . . . . . . . . . . . . . . . . . . . . . . . . . . . . . . .3
Hardware Items in the Package . . . . . . . . . . . . . . . . . . . . . . . . . . . . 8
Supported Telephony Features . . . . . . . . . . . . . . . . . . . . . . . . . . . . . 9
CHAPTER 2
Setting Up the IP 705 Phone . . . . . . . . . . . . . . . . . . . . . . . . .15
The Phone Startup Process . . . . . . . . . . . . . . . . . . . . . . . . . . . . . . . 16
To Use IP 705 in Power over Ethernet Mode . . . . . . . . . . . . . . . . 17
To Remove the PoE Module. . . . . . . . . . . . . . . . . . . . . . . . . . . . 17
Miscellaneous Operation Notes . . . . . . . . . . . . . . . . . . . . . . . . . . . 18
CHAPTER 3
Configuring the IP 705 Phone . . . . . . . . . . . . . . . . . . . . . . . .19
Phone Settings . . . . . . . . . . . . . . . . . . . . . . . . . . . . . . . . . . . . . . . . 19
System Settings . . . . . . . . . . . . . . . . . . . . . . . . . . . . . . . . . . . . . . . 20
Network Settings . . . . . . . . . . . . . . . . . . . . . . . . . . . . . . . . . . . . . . 21
Registration from the Phone’s Menu . . . . . . . . . . . . . . . . . . . . . . . 22
Configuring IP Settings . . . . . . . . . . . . . . . . . . . . . . . . . . . . . . . . . 22
Assigning a Local IP Address. . . . . . . . . . . . . . . . . . . . . . . . . . . 22
Assigning a TFTP Server . . . . . . . . . . . . . . . . . . . . . . . . . . . . . . 22
Updating Phone Firmware . . . . . . . . . . . . . . . . . . . . . . . . . . . . . . . 23
Configuring NAT . . . . . . . . . . . . . . . . . . . . . . . . . . . . . . . . . . . . . . 24
Enabling NAT. . . . . . . . . . . . . . . . . . . . . . . . . . . . . . . . . . . . . . . 24
Setting Ring Tones . . . . . . . . . . . . . . . . . . . . . . . . . . . . . . . . . . . . . 24
Distinctive Ringing Support . . . . . . . . . . . . . . . . . . . . . . . . . 25
IP 705 Manual i
Page 4

Workgroup Status Display . . . . . . . . . . . . . . . . . . . . . . . . . . . . . . . 25
CHAPTER 4
User Guide . . . . . . . . . . . . . . . . . . . . . . . . . . . . . . . . . . . . . . . .27
The LCD Screen . . . . . . . . . . . . . . . . . . . . . . . . . . . . . . . . . . . . . . 27
Basic Phone Operation . . . . . . . . . . . . . . . . . . . . . . . . . . . . . . . . . 28
Appendix A . . . . . . . . . . . . . . . . . . . . . . . . . . . . . . . . . . . . . . .35
Specifications . . . . . . . . . . . . . . . . . . . . . . . . . . . . . . . . . . . . . . . . . 35
Troubleshooting . . . . . . . . . . . . . . . . . . . . . . . . . . . . . . . . . . . . . . . 36
LCD Messages . . . . . . . . . . . . . . . . . . . . . . . . . . . . . . . . . . . . . . . . 38
Local Menu Configuration Messages . . . . . . . . . . . . . . . . . . . . 38
IP Phone Running Messages . . . . . . . . . . . . . . . . . . . . . . . . . . . 39
IP Phone Boot Messages . . . . . . . . . . . . . . . . . . . . . . . . . . . . . . 40
Glossary . . . . . . . . . . . . . . . . . . . . . . . . . . . . . . . . . . . . . . . . . .41
Index . . . . . . . . . . . . . . . . . . . . . . . . . . . . . . . . . . . . . . . . . . . . .47
ii IP 705 Manual
Page 5

NOTE
This equipment has been tested and found to comply with the limits for a
Class B digital device, pursuant to Part 15 of the FCC Rules. These limits
are designed to provide reasonable protection against harmful interference
in a residential installation. This equipment generates, uses and can radiate
radio frequency energy and, if not installed and used in accordance with the
instructions, may cause harmful interference to radio communications.
However, there is no guarantee that interference will not occur in a
particular installation. If this equipment does cause harmful interference to
radio or television reception, which can be determined by turning the
equipment off and on, the user is encouraged to try to correct the
interference by one or more of the following measures:
• Reorient or relocate the receiving antenna.
• Increase the separation between the equipment and receiver.
• Connect the equipment into an outlet on a circuit different from that to
which the receiver is connected.
• Consult the dealer or an experienced radio/TV technician for help.
Changes or modifications not expressly approved by the party responsible
for compliance could void the user’s authority to operate the equipment.
IP 705 Manual iii
Page 6

iv IP 705 Manual
Page 7

Warranty
What The Warranty Covers
AltiGen Communications warrants its hardware products to be free from defects in
material and workmanship during the warranty period. If a product proves to be
defective in material or workmanship during the warranty period, AltiGen
Communications will, at its sole option, repair, refund or replace the product with a
like product.
How Long the Warranty Is Effective
All AltiGen Communications products are warranted for one (1) year for all parts
from the date of the first end user purchase.
Whom the Warranty Protects
This warranty is valid only for the first end user purchaser.
What the Warranty Does Not Cover
1. Any product on which the serial number has been defaced, modified or
removed.
2. Damage, deterioration or malfunction resulting from:
a) Accident, misuse, neglect, fire, water, lightning, or other acts of nature,
unauthorized product modification, or failure to follow instructions
supplied with the product.
b) Repair or attempted repair by anyone not authorized by AltiGen
Communications.
c) Any damage of the product due to shipment.
d) Removal or installation of the product.
e) Causes external to the product, such as electric power fluctuations or
failure.
f) Use of supplies or parts not meeting AltiGen Communications’
specifications.
g) Normal wear and tear.
h) Any other cause which does not relate to a product defect.
3. Shipping, installation, set-up and removal service charges.
IP 705 Manual v
Page 8

How to Obtain Service
End user customers should contact your Authorized AltiGen Dealer for service.
Authorized AltiGen Dealers must follow the steps below for service:
1. Take or ship the product (shipment prepaid) to your AltiGen distributor or to
AltiGen Communications, Inc.
All materials being returned to AltiGen must have an associated RMA
number. RMA numbers are issued by AltiGen Customer Service and can be
obtained by calling 1-888-ALTIGEN (258-4436) or submit an online RMA
request via the AltiGen Partner Resource Center, at http://dealer.altigen.com.
AltiGen reserves the right to refuse return of any material that does not have
an RMA number. The RMA number shou ld be clearly marked on the outside
of the box in which the material is being returned. For example:
Attn.: RMA # 123
AltiGen Communications, Inc.
4555 Cushing Pkwy.
Fremont, CA 94538
Upon authorization of return, AltiGen will decide whether the
malfunctioning product will be repaired or replaced.
2. To obtain warranty service, you will be required to provide:
a) The date and proof of purchase
b) Serial number of the product
c) Your name and company name
d) Your shipping address
e) A description of the problem
3. For additional information contact your AltiGen Dealer or AltiGen
Communications, Inc.
Effect of State Law
This warranty gives you specific legal rights, and you may also have other rights
which vary from state to state. Some states do not allow limitations on implied
warranties and/or do not allow the exclusion of incidental or consequential
damages, so the above limitations and exclusions may not apply to you.
Sales Outside the U.S.A.
For AltiGen Communications products sold outside of the U.S.A., contact your
AltiGen Communications dealer for warranty information and services.
vi IP 705 Manual
Page 9

About This Manual
This manual describes how to get the Alti-IP 705 phone up and running on
a voice over IP (VoIP) network.
It provides information about how to set up, connect cables to, and
configure an IP 705 phone. It also provides information on how to
configure the network and IP settings.
How to use the phone is described in Chapter 4.
Related Documentation
• IP 705 Quick Reference Card covers basic end user phone features,
configuration from the IP phone, and AltiServ feature codes.
• The AltiWare Administration Manual provides detailed information
on configuring AltiGen IP phones in AltiWare Administrator.
IP 705 Manual 1
Page 10

2 IP 705 Manual
Page 11
C
HAPTER
1
The IP 705 Phone
The AltiGen IP 705 phone is a business telephone that provides voice
communication over an IP network.
The IP 705 provides functionality similar to traditional business phones,
including automatic redial, on-hook dialing, hands-free operation, 5
programmable keys, LCD display and headset port support.
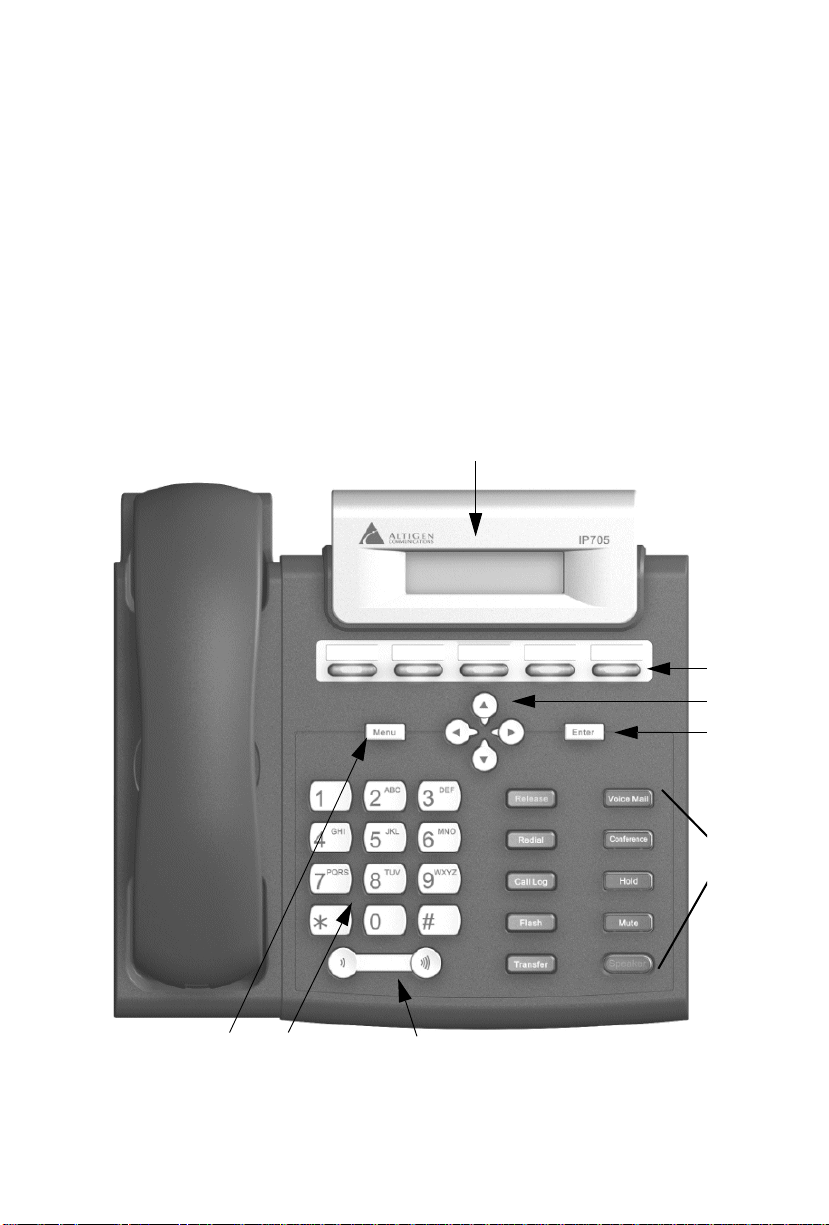
The main components of the phone are illustrated in the figures below and
described in the table that follows each figure.
1
2
3
4
17
Figure 1. IP 705 Phone, Top View
16
5 - 14
15
IP 705 Manual 3
Page 12

1 LCD Screen Displays features such as time, extension number,
caller ID, call waiting, line/call status and call
duration. Displays the phone’s menu.
2 Program-
mable Keys*
1-5
3 Navigation
buttons
4 Enter Confirms selections made in the LCD, including
5 Voice Mail* Lights when a message is waiting. Enters voice mail
6 Conference* Initiates a conference call, indic ate d by the button’s
7 Hold* Places a call on hold, indicated by the button’s
8 Mute Engages or disengages mute function.
5 programmable keys can be configured by the
system administrator in AltiWare Administrator as a
Busy Lamp Field (BLF) key, an AltiServ Feature
Code key, an Admin Defined # key, an EXT Speed
Dial key, a Line Park key, a Call Record key, a
User Defined # key, or a Headset key.
/buttons let you scroll through text on the LCD
screen.
button selects a menu item or setting.
button returns to previous configuration menu or
deletes the last digit input.
settings.
when pressed.
blinking light.
blinking light.
9 Speaker Enables or disables speaker.
10 Release Releases a call, exits from the menu, releases phone
from an active state.
11 Redial* Redials up to last 16 calls and up to 32 digits.
12 Call Log* Displays the caller IDs of up to 99 incoming calls.
Dials selected number.
4 IP 705 Manual
Page 13

The IP 705 Phone
13 Flash* For system feature codes that need a flash to
complete.
14 Transfer* Transfers a call.
15 Volume Adjusts volume of ringer, speaker, handset and
headset.
16 Dial Pad Functions like a dial pad on a traditional telephone
and is also used for inputting some settings that are
accessed through the phone’s menu.
17 Menu Displays the phone’s menu in the LCD screen.
Note: * Indicates a normal operating mode key feature, which is
available only after registering the IP 705 with the phone server
and logged in as an extension.
IP 705 Manual 5
Page 14
12 34
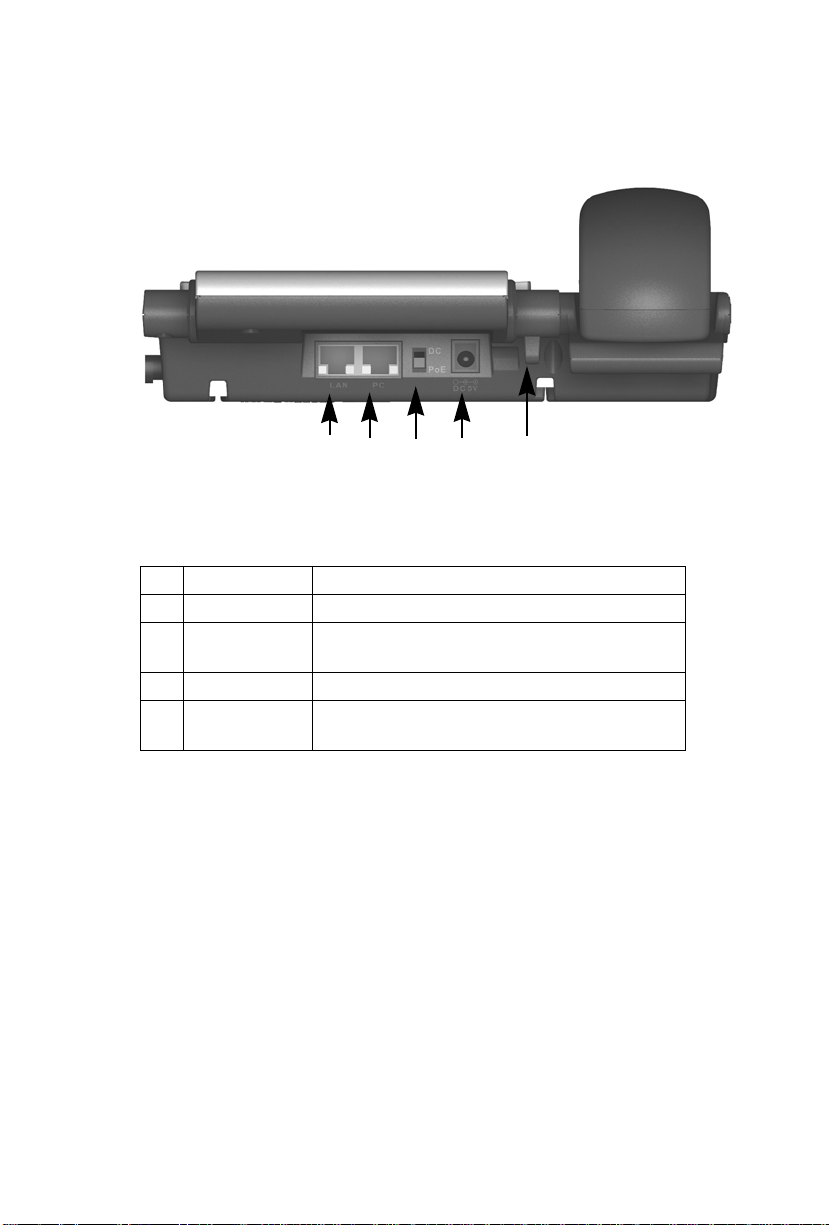
Figure 2. IP 705 Phone, Back View
1 LAN Port Connects to network (10/100 Base T)
2 PC Access Port Connects to a PC (10/100 Base T)
3 DC/PoE Switch Switches between DC power and power over
Ethernet
4 DC Port Connects to power outlet
5 Power Cable
Restraint
Secures the power cable, preventing it from
accidentally being pulled out
5
6 IP 705 Manual
Page 15
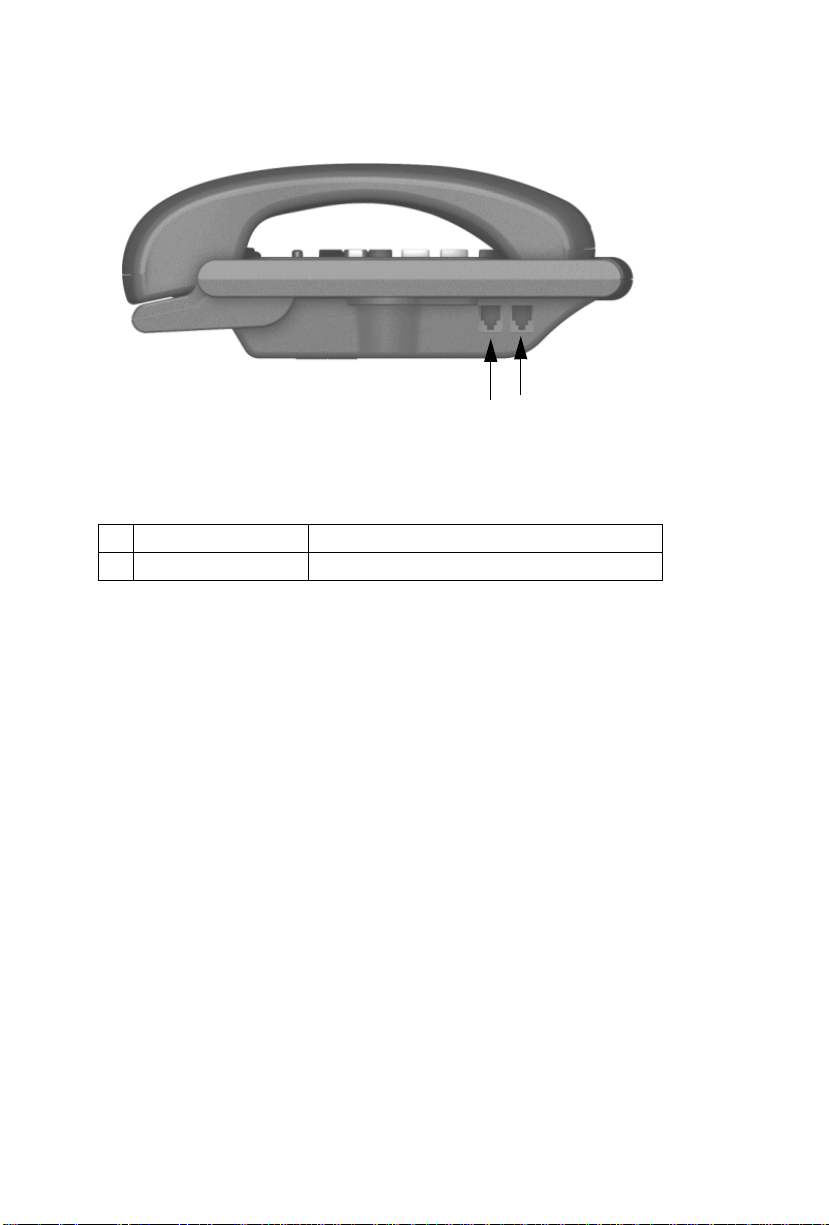
Figure 3. IP 705 Phone, Left View
1 Headset port Connects to an RJ-9 headset
2 Handset RJ-9 Port Connects to a handset
The IP 705 Phone
12
IP 705 Manual 7
Page 16
1
2
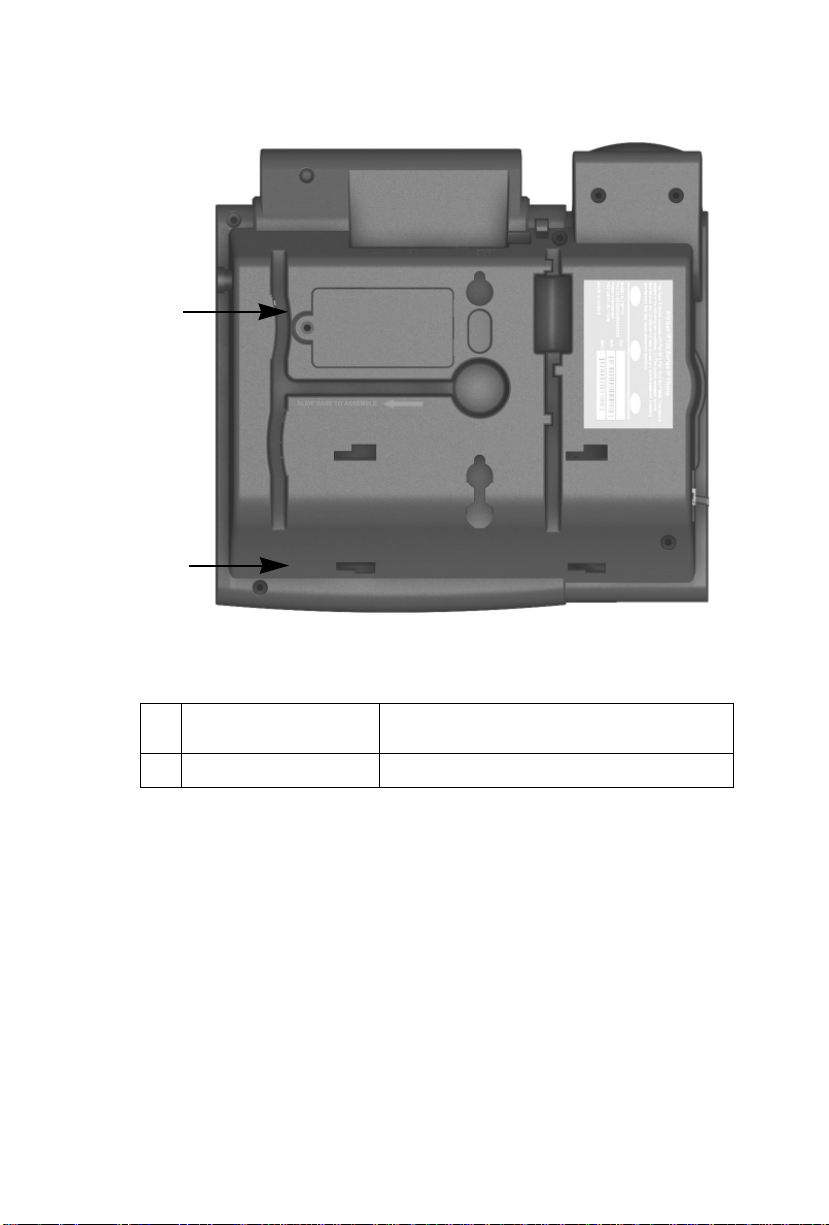
Figure 4. IP 705 Phone, Bottom View
1 PoE Module Cover Covers the optional Power over Ethernet
Module
2 Slots for the phone stand Two slots to insert the phone stand
Hardware Items in the Package
The following hardware items are included in this package:
• IP 705 set and stand
• Handset
• Handset cord
• AC adapter (Input: 100-240V; Output: DC 5V, 2A)
• Power cord
• Network cable
Optional item can be purchased separately:
• Power over Ethernet (PoE) module
8 IP 705 Manual
Page 17

The IP 705 Phone
Supported Telephony Features
The IP 705 provides a broad range of call handling and dialing features
directly on the phone and through the AltiWare system. The following table
lists the supported features, a brief description of each, and configuration
and use notes where applicable.
Feature Description Notes
Auto Answer When a call comes in, the
Auto Answer
Ring
Auto Answer
Dev [device]
IP phone will ring for a
specified number of
seconds, connect the call,
and automatically answer
through the speaker or
headset.
When Auto Answer is set
to Yes, specifies how
many seconds the IP
phone should ring before
the call is automatically
answered (1-20 seconds).
When Auto Answer is set
to Yes, specifies whether
the call should be
automatically answered
through the speaker or
headset.
• During ringing, the user can
manually pick up the call from
headset, handset or speaker.
IP 705 Manual 9
Page 18

Busy Lamp
Field (BLF)
Associates a
programmable key with
an extension that can be
automatically dialed when
selected; the key’s light
indicates that the
extension is busy and
blinks when ringing.
The BLF ring tone is
played only when the
phone is in idle state. It is
stopped when the
destination phone stops
ringing or the local phone
exits idle state.
When multiple BLF
extensions ring
simultaneously, the IP
phone will play the first
BLF extension ringer and
beep tones and ignore
other BLF extensions.
• Must be configured by the system
administrator.
• The BLF feature can be assigned
only to internal extension
numbers, not outside numbers.
• The feature is not available in
BASIC mode.
Call Log Shows the history of
incoming calls, up to 99.
Call Record Allows a programmable
key to be used for ondemand recording.
10 IP 705 Manual
• Pressing the Enter button will
dial the number displayed. If 20
seconds pass without any input,
the phone exits the Call Log.
• Must be enabled by the system
administrator.
• User presses the key to start
recording, presses the key again to
stop recording. There is no pause
function. When the call is
recording, the light is on.
• Recorded conversations can then
be played back through voice mail
or accessed at a centralized
location.
Page 19

The IP 705 Phone
Conference
button
Initiates a conference and
adds in other parties one at
a time.
• Single Call Waiting, Multiple
• The user who initiates the
Workgroup
Status
Flash button Signals PBX that special
Headset The system administrator
Displays the workgroup
status in the LCD.
instructions will follow.
can configure a key as a
Headset key. When
pressed, the user will be
able to activate the RJ-9
headset port.
• The system administrator
• This button is used as a hook
Call Waiting or Live Call
Waiting must be enabled for the
extension by the system
administrator or in AltiView/
AltiAgent in order to add incoming
calls to a conference.
conference call can select another
conference member’s call and drop
it from the conference by
disconnecting the call. The feature
is unavailable to all other
conference members, even when
the conference initiator hangs up.
configures which key will display
the workgroup status.
switch for headset ports.
Hold button Places an active call on
hold.
• When Multiple Call Waiting is
enabled at the extension, the user
can put multiple incoming calls on
hold and retrieve using the phone’s
/ buttons and Enter button.
• Pressing Hold while onhook will
retrieve the last hold call.
• Supports up to 9 hold calls.
IP 705 Manual 11
Page 20

Line Park A parked call line
appearance can be
assigned as a
programmable Line Park
key by the administrator.
When connected to a
caller, the call can be
parked by pressing the
Line Park key. If a call is
parked at a Line Park line,
the button’s light is on.
The call can be picked up
by pressing the Line Park
key.
• When configured by the
administrator, the IP phone can
play an audible beep or one of
several different ring tones when a
call is parked.
• When configured by the
administrator, an alternate way to
pick up a parked call is to use #51
<line number> if Line Park is not
assigned to a programmable key.
• The Line Park key’s light will be
lit and turns off when the parked
call is picked up, the caller hangs
up, or the call is routed to IVR/
Auto Attendant.
Mute button While on a call, mutes
Program
Keys
Redial button Redials a selected number
Release
button
Ring Tones You can select from one
conversation.
Lets you associate a
programmable key with a
speed dial number or
feature code directly from
the IP phone.
from the last16 numbers
dialed.
Releases a call from the
connected state. Deletes
characters entered on the
LCD. While onhook,
releases the phone from an
active state.
of several ring tones.
• If the system administrator has
allowed it, you can associate
certain programmable keys with a
speed dial number or feature code
from the IP phone menu.
• Pressing Enter dials the number
displayed.
• Redials up to 32 digits.
• When a new call comes in, the
phone will exit this menu and go to
ring state. If in this menu for longer
than 20 seconds without any input,
the phone exits this menu.
• Custom ring tones are not
supported.
Speaker
button
Enables use of speaker
phone.
12 IP 705 Manual
Page 21

The IP 705 Phone
Transfer
button
Voice Mail
button
Transfers an active call to
another number.
Enables access to voice
messages.
• This button cannot be used to
“flash” after being used to transfer
a call. To reconnect to a call after
using the Transfer button, use
thebutton or the Flash button.
• The VM count that appears in the
LCD reflects new messages
(previously heard messages are not
included).
IP 705 Manual 13
Page 22

14 IP 705 Manual
Page 23

C
HAPTER
Setting Up the IP 705 Phone
To set up the IP 705 phone, follow these instructions:
1. Gather network settings information (this information is needed to
configure the IP 705):
• AltiWare server IP address
• IP 705 phone’s IP address
This address is needed if your company does not use Dynamic Host
Configuration Protocol (DHCP), which automatically assigns IP
addresses to devices when they are connected to the network. The
phone’s IP address can be obtained from your system administrator.
2. Connect the IP 705:
a. Connect the phone to the LAN that AltiServ is on.
b. Connect the handset to the handset port.
c. Connect the power plug to the DC port.
Note: If you want to use Power over Ethernet, see “To Use IP 705
in Power over Ethernet Mode” on page 17.
2
3. Configure startup network settings. (To display the phone’s menu, as
required below, press the Menu button on the phone. Use the/
buttons to scroll the menus and settings in the LCD screen. Press the
Enter button to select a menu item or a setting.)
If you are using DHCP, ensure that DHCP is enabled on the IP 705
phone: Menu > NETWORK > ENABLE DHCP > Yes. (DHCP is
enabled by default.)
If your company does not use DHCP, disable DHCP on the IP 705
phone: Menu > NETWORK > ENABLE DHCP > No. In this case,
configure the following network settings on the IP 705 after setting up
the phone:
• Local IP address
• IP subnet mask
• Gateway IP address
IP 705 Manual 15
Page 24
4. Configure the AltiWare IP settings (see “Configuring IP Settings” on
page 22 for information about IP settings):
a. Menu > SYSTEM >Enter.
b. Select AW SERVER, and press Enter.
c. Enter the AltiWare server address, using the * key to input periods,
and press Enter.
5. Activate the IP 705 extension from the IP phone:
a. With the handset onhook, press #27, then the Enter button.
b. Enter the extension number and password when prompted.
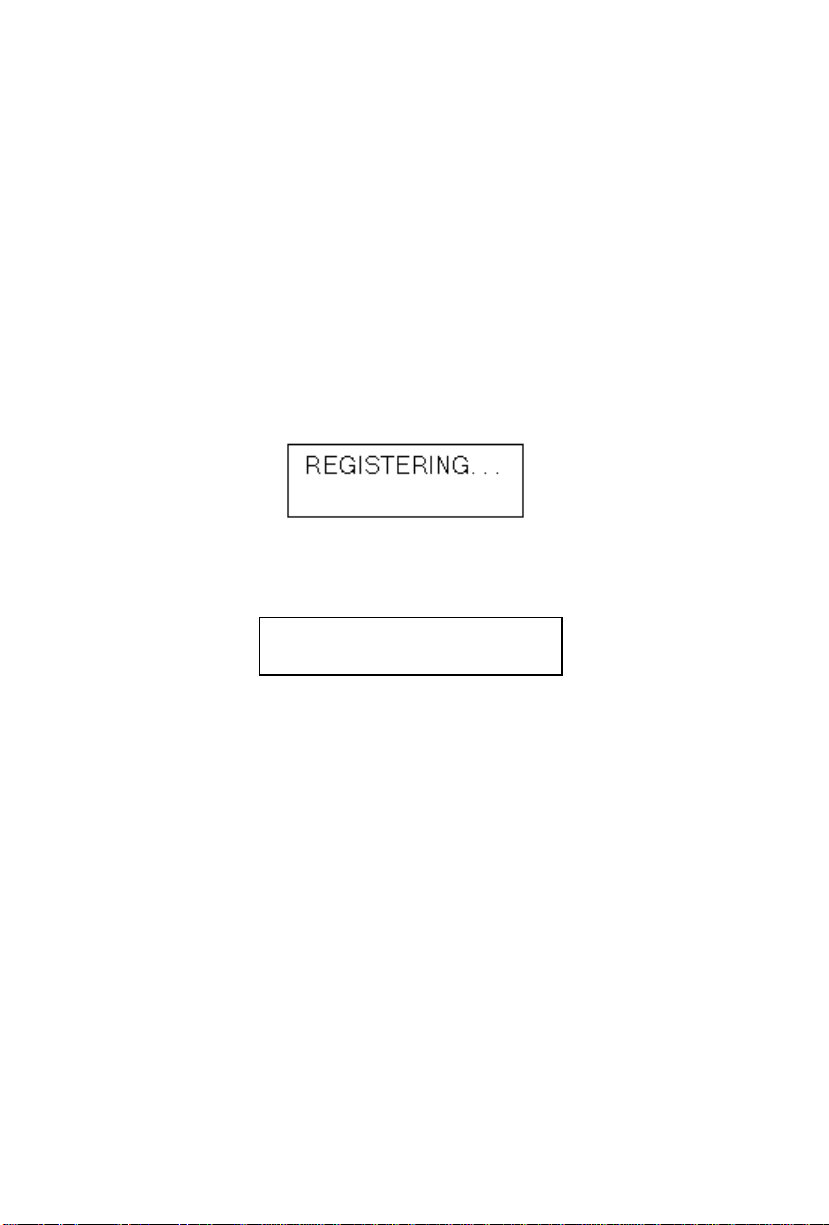
c. The phone will attempt to register, as shown in the LCD screen:
If the phone successfully passes through these stages, the phone
shows the date, time, and extension in the LCD screen and is now in
normal operating mode.
01/12 x300
If it doesn’t pass through these stages successfully, refer to
“Troubleshooting” on page 43.
The Phone Startup Process
After the IP 705 has power connected to it, the phone begins its automatic
booting process by cycling through these steps:
1. All LED lights will be on.
2. The LCD screen displays [ATGN BOOT] on the first line.
3. On the second line of the LCD screen, the following messages are
displayed in succession:
—CHECK MEMORY (RAM checking state)
—CHECK FW (Firmware checking state)
—INIT NETWORK
16 IP 705 Manual
Page 25
Setting Up the IP 705 Phone
—LOADING FW...
—LOADING NOW.
—Boot Done
—INITIALIZING
—Version xxxx.xxxx.xxxx
To Use IP 705 in Power over Ethernet Mode
1. Unplug the power cord.
2. Remove the screw on the PoE Module cover, and remove the cover.
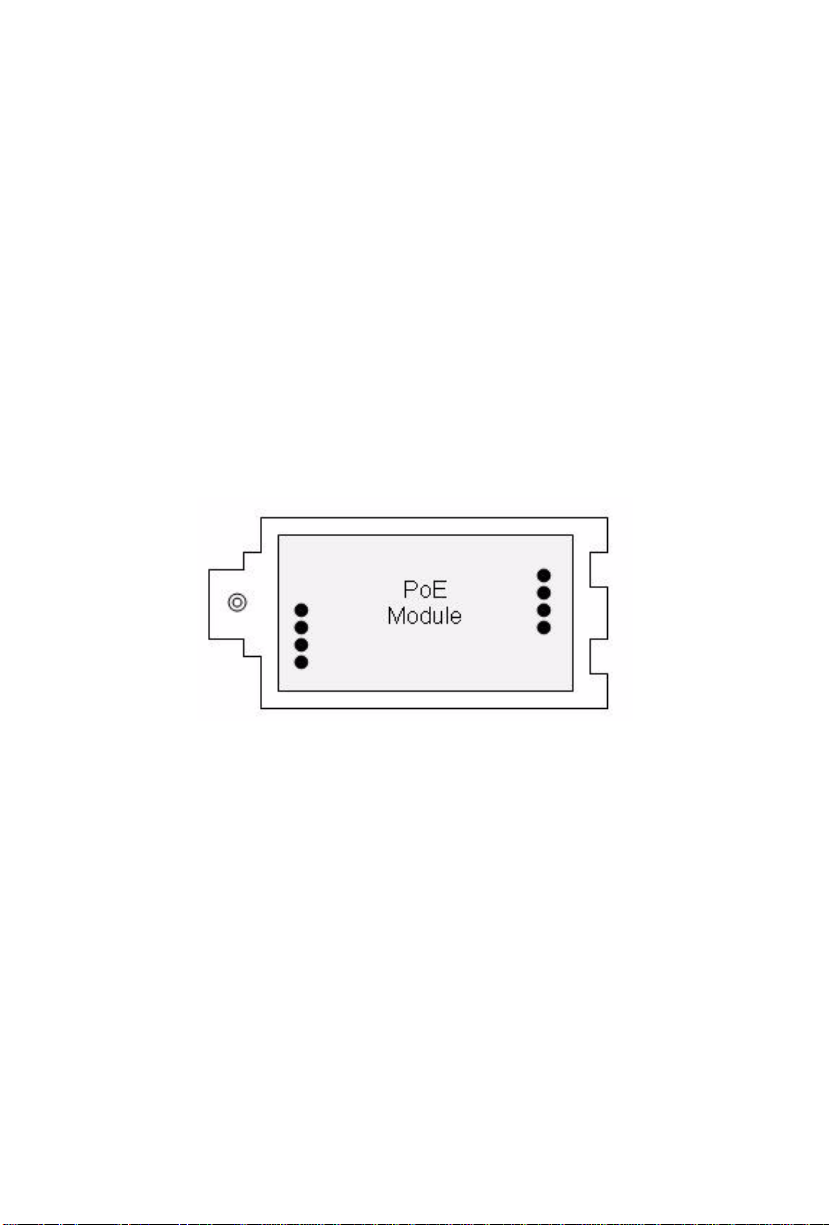
3. Plug in the PoE Module as illustrated below. The side with four pins
in the center faces the right side.
Left
4. Put the PoE module cover back, and tighten the screw.
5. Move the DC/PoE switch to the PoE position.
6. Connect the phone to an AltiGen-certified PoE-enabled switch.
Right
To Remove the PoE Module
1. Remove the screw on the PoE Module cover, and remove the cover.
2. Notice the “feet” on the two tabs located on the lower end of the
cover. Use these feet to lift the PoE module out of the compartment:
Holding the upper end of the cover, slip the cover into either the right
or left side of the module compartment, between the compartment
and the module, until the feet of the two tabs is under the module (the
inside of the cover should be facing toward the module).
3. Pull up to remove the module.
IP 705 Manual 17
Page 26

Miscellaneous Operation Notes
• Logging in and out—When using #26 and #27 to log out / log in, the
IP 705 must be onhook. Pressing the Speaker button and then using
#26 or #27 will not work.
• BASIC mode—If the IP 705 phone fails to register with AltiWare
during startup, the phone operates in Basic mode. When in Basic
mode, the IP phone’s LCD display shows (BASIC) IDLE.
No AltiWare switching features are available in this operating mode.
However, the phone user can enter a destination IP address followed
by #, and make an outgoing call through the IP network to reach
AltiWare or another IP 705 phone. Also, the IP phone can accept
incoming calls originating from AltiWare or another IP 705 phone.
If the IP phone’s local configuration is changed while in BASIC
mode, the changes are overridden by AltiWare Administrator
settings.
• Incoming call takes priority—If a call comes in while you are using
any phone menu or display (such as workgroup display or Call Log),
the phone will exit the menu and go to the ring state.
• Restoring default settings—To automatically restore the original
default settings for the IP 705 phone:
1. Press the Menu button.
2. Press * * 2, then press the Enter button.
• Rebooting the phone—To reboot the IP 705 phone, press * * 3, then
press the Enter button.
18 IP 705 Manual
Page 27

C
HAPTER
Configuring the IP 705 Phone
Phone, system, and network settings can be configured through the IP
phone’s menu. The phone can also be registered through this menu, if
necessary.
• To get to the menu, press the Menu button.
• / buttons scroll the menus and settings in the LCD screen.
• button selects a menu item or a setting.
• The Enter button also selects a menu item or a setting.
• button returns to the previous menu.
•Press the Release button to exit the menu.
The following tables describe each setting and the corresponding menu
path.
Important: Your IP 705 phone should be in normal operating mode
when you configure it. If your IP phone is in BASIC mode
(shown in the LCD display), your changes will be
overwritten by AltiWare Administrator settings when the
phone is successfully registered.
3
Phone Settings
Setting Menu Path Description
Extension
Number
Extension
Password
Program
Keys
Phone Setting >
Ext Number
Phone Setting >
Ext Password
Phone Setting >
Program Keys >
Program Key [#]
Sets the IP phone’s extension
number.
Sets the IP phone’s extension
password.
Sets the speed dial number or feature
code for a selected key.
IP 705 Manual 19
Page 28

Ring Tone Phone Setting >
Ring Tones
Sets the desired ring tone.
Ring
Download
Auto Answer Phone Setting >
Auto Answer
Ring
Auto Answer
Device
Phone Setting >
Ring Download
Auto Answer
Phone Setting >
Auto Ans Ring
Phone Setting >
Auto Ans Dev
Downloads ring tones from the
server.
Sets whether to enable automatic
answering.
Sets how many seconds the phone
should ring before it is automatically
answered. Appears on menu when
Auto Answer is set to Yes.
Sets whether speaker or headset is
the automatic answering device.
Appears on menu when Auto
Answer is set to Yes.
System Settings
Setting Menu Path Description
AltiWare
Server
Trunk
Access Code
System > AW Server Sets the AltiWare server’s IP
SYSTEM >
TRK ACCESS CODE
address.
Sets the digit required to enable a
user to return an outside call from the
Call Log.
Hour Offset System >
Hour Offset
TFTP Server System >
TFTP Server
Boot
Download
System >
Boot Download
20 IP 705 Manual
Sets the time offset from the
AltiWare server’s time.
Sets the TFTP server IP address for
updating firmware.
After firmware image upgrade, this
setting changes to No. Used mainly
for upgrading or troubleshooting. On
the next boot, the IP phone will
download the new firmware from the
TFTP server, if set to Yes.
Page 29

Configuring the IP 705 Phone
Emergency
Number
Emergency
Gateway
Version
Information
System >
Emergency Num
System >
Emergency GW
System >
Version Info
[Read only]
Sets the IP phone’s emergency
number. For the U.S., the emergency
number is 911.
Sets the IP phone’s emergency
gateway IP address
Displays the version number of the
IP phone.
Network Settings
Setting Menu Path Description
Enable DHCP Network >
Local
Address
Network
Mask
Enable DHCP
Network >
Local Address
Network >
Network Mask
Sets whether Dynamic Host
Configuration Protocol (DHCP) is
being used by the IP phone to retrieve
a new IP address upon boot up.
Sets the IP phone’s local address;
shows only if DHCP is disabled.
Sets the IP phone’s network mask;
shows only if DHCP is disabled.
Gateway Network >
Gateway
For H.323 version of phone firmware only:
Enable
GateKeeper
GateKeeper
Discovery
Enable NAT Network >
NAT Address Network >
Network >
Enable GK
Network >
GK Discovery
Enable NAT
NAT Address
Sets the default Gateway IP address.
Sets whether GateKeeper is enabled
or disabled.
Sets whether GateKeeper discovery is
enabled. IP phone will automatically
find GateKeeper. Shows only if
GateKeeper is enabled.
Sets whether NAT is enabled or
disabled.
Sets the NAT server’s public IP
address.
IP 705 Manual 21
Page 30

Registration from the Phone’s Menu
Under normal circumstances, the IP 705 phone registers itself
automatically. However, if registration failed for some reason (for
example, the server was not available), registration can be started again
from the IP 705 phone’s menu:
1. Press the Menu button.
2. Scroll to REGISTER.
3. Press the Enter button.
Configuring IP Settings
An IP address is a unique logical address that identifies each host computer
on a TCP/IP network. An IP address is a 32-bit number expressed as four
decimal numbers from 0 to 255, separated by periods.
Use these guidelines when manually entering the IP settings:
• Ensure the default gateway IP address is on the same subnet as the host
IP address. Check with your system administrator.
• When inputting IP addresses into the IP 705, use the * key to enter
periods. For example, 209.120.12.8 would be input as 209*120*12*8.
Assigning a Local IP Address
To assign an IP address, use the following steps:
1. Ensure that DHCP is disabled.
2. Press the Menu button, scroll to NETWORK, then press the Enter
button.
3. Scroll to LOCAL ADDRESS, and press Enter.
4. Use the keys on the dial pad to enter a new IP address, using the * key
to enter periods.
5. Press Enter.
Assigning a TFTP Server
The default TFTP Server is set to 0.0.0.0.
To assign the TFTP server, use the following steps:
22 IP 705 Manual
Page 31

Configuring the IP 705 Phone
1. Press the Menu button.
2. Use to select System, then press the Enter button.
3. Scroll to TFTP Server, and press Enter.
4. Use the keys on the dial pad to enter the new TFTP server address,
using the * key to enter periods, then press Enter.
Updating Phone Firmware
To update the phone firmware directly from the IP 705 phone, follow these
steps:
1. Press the Menu button.
2. Use the button to scroll to System, then press the Enter button.
3. Scroll to TFTP Server, then press Enter.
4. Enter the TFTP server address, using the * key to input periods.
5. The IP 705 will download the firmware from the TFTP server on the
next reboot.
6. Reboot by pressing * * 3 and the Enter button.
7. Once the IP phone is rebooted, all LED lights come on for a brief
time.
8. The LCD screen displays [BOOTING] on the first line.
9. On the second line of the LCD screen, the following messages are
displayed in succession:
—CHECK MEMORY (RAM checking state)
—CHECK FW (Firmware checking state)
—INIT NETWORK
—LOADING FW...
—LOADING NOW.
—Boot Done
—INITIALIZING
—Version xxxx.xxxx.xxxx
10. You may display the version of firmware at any time: Press the Menu
button, scroll to SYSTEM and press Enter, scroll to Version Info
and press Enter.
IP 705 Manual 23
Page 32

Configuring NAT
Note: This section is only for an IP 705 phone that is using an H.323
version of AltiGen phone firmware.
NAT (Network Address Translation) is the translation of an IP address
used within one network to a different IP address known within another
network. One network is designated as the inside network, the other is the
outside. The IP 705 can be enabled to support H.323 behind NAT. The IP
705 will be able to work behind a regular NAT router without any special
implementation for H.323.
Note: If more than one IP 705 phone sits behind NAT, a VPN tunnel is
required to connect between the NAT router and the corporate
router.
Enabling NAT
By default, NAT is not enabled. If you connect the IP 705 behind a NAT
router, you must enable NAT.
To enable NAT,
1. Press the Menu button.
2. Use the button to scroll to NETWORK, then press the Enter button.
3. Scroll to ENABLE NAT, and press Enter.
4. Press to select YES, and press Enter.
Setting Ring Tones
To set the ring tone:
1. Press the Menu button.
2. Select PHONE SETTING, then press the Enter button.
3. Scroll to RING TONES and press Enter.
4. Scroll to the desired ring tone and press Enter.
When new ring tones are added to the server, they can be downloaded from
the phone. To download ring tones:
1. Select PHONE SETTING and press Enter.
2. Select RING DOWNLOAD and press Enter.
24 IP 705 Manual
Page 33

Configuring the IP 705 Phone
3. Select YES and press Enter.
4. Reboot the phone by pressing * * 3 and the Enter button.
Note: Custom ring tones are not supported.
Distinctive Ringing Support
If the Distinctive Ring options are enabled by the system administrator,
you may have three different ring cadences that distinguish the types of
calls:
• Internal call = 1 ring
• External call = 2 rings
• Operator call = 3 rings
Workgroup Status Display
The AltiGen IP phone can be enabled to display workgroup status.
While the agent is in idle state, the first line in the LCD displays:
• QL = queue length: number of calls in queue (0~99)
• QT = current longest queue time (in minutes)
• WG = workgroup number (up to 4 digits)
The second line in the LCD displays one of the following agent states:
• LOUT - logout
• NRDY - not ready
• DND - do not disturb
• FWD - forwarding
Note: The area is blank if the agent is in any other state.
Figure 5. IP 705 Workgroup Display example
In the workgroup display example, QL5 indicates there are five calls in the queue,
QT12 indicates that one of the calls has been queued for 12 minutes, WG2000
indicates Workgroup 2000, NRDY indicates the agent is not ready.
IP 705 Manual 25
Page 34

When a call rings the agent or the when the agent is making an outgoing
call, the second line of the LCD is changed to Caller ID or dialed digits
display, and the first line stays the same. However, when more than one call
is outstanding, the first line shows the Call n/n display.
If the agent is a member of multiple workgroups, you can use / to view the
queue status of all workgroups the agent belongs to.
This feature can be enabled or disabled through the Display Workgroup Status
check box in the AltiGen IP Phone Configuration Page in AltiAdmin/ACM Admin,
26 IP 705 Manual
Page 35
C
HAPTER
4
User Guide
The LCD Screen
In normal operating mode, the phone’s LCD screen displays the time and
the extension number on the first line:
12:00 PM x555
MISSED xx DND
Other messages you may see:
MISSED xx - Number of calls missed.
xxVM - Indicates the number of new voice messages. Appears in place of
the extension number when there are voice messages.
If an activity code has been set on the phone, that code is displayed in place
of the extension number or voice mail count. Examples of activity codes
are MEETING, AWAY, TRAVEL.
DND or FWD - The extension has Do Not Disturb on or is set to forward
all calls.
Workgroup Status Display
When the IP 705 phone has been enabled to display workgroup status, and
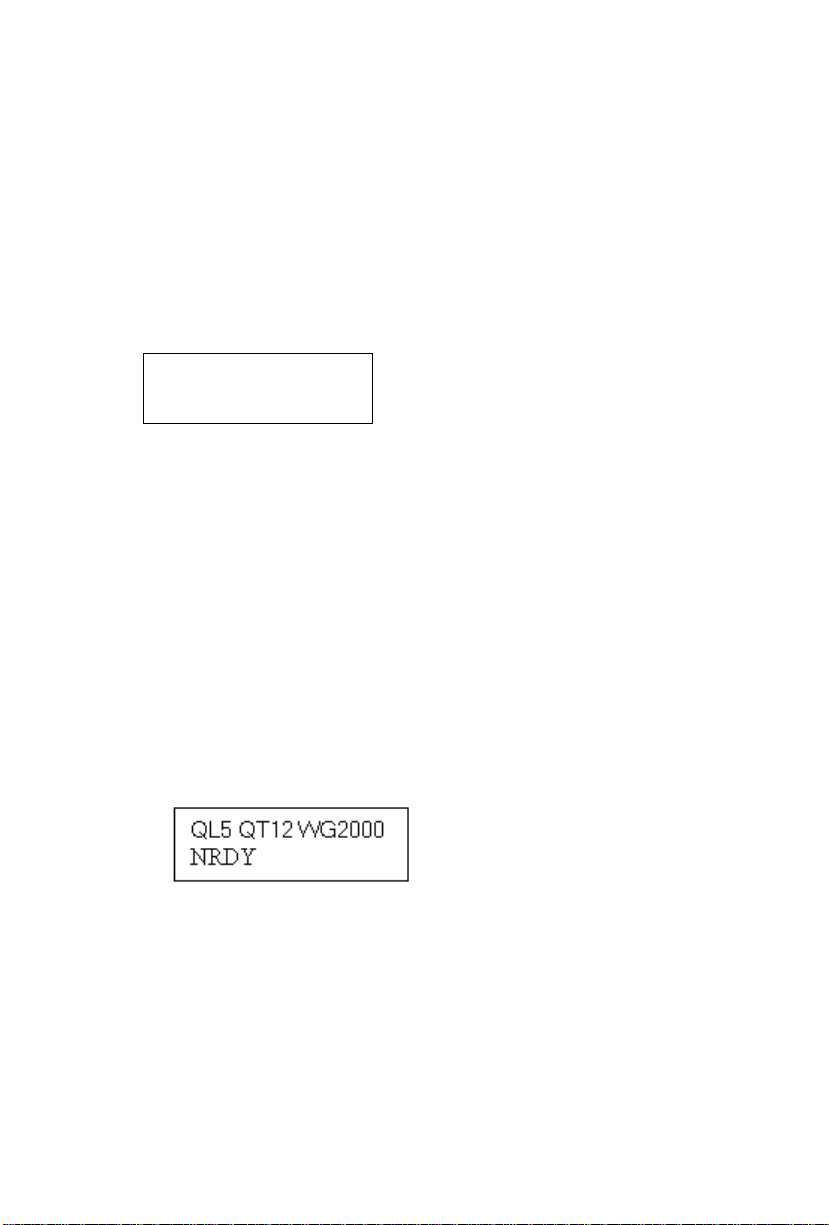
the agent is in idle state, the LCD displays the following:
Figure 6. IP 705 Workgroup Display example
• QL = number of workgroup queued calls (up to 99)
• QT = current longest queue time (in seconds)
• WG = last four digits of the workgroup number
The second line in the LCD displays one of the following agent states:
• LOUT - logout
• NRDY - not ready
IP 705 Manual 27
Page 36

• DND - do not disturb
• FWD - forwarding
The area is blank if the agent is in any other state.
When a call rings the agent or when the agent is making an outgoing call,
the second line of the LCD is changed to Caller ID or dialed digits display,
and the first line stays the same. However, when more than one call is
outstanding, the first line shows the Call n/n display.
Basic Phone Operation
* Indicates a normal operating mode phone feature, which is available only after
registering the IP 705 with the phone server and logging in as an extension.
FUNCTION KEY SEQUENCE
Auto Answer 1) Press the Menu button, select PHONE SETTING, then
Call Log* 1) With the phone onhook, press the Call Log button.
select AUTO ANSWER.
2) Use the / buttons to enable/disable Auto Answer mode,
and press Enter.
3) Select AUTO ANS RING from the menu.
4) Set the number of seconds to ring before auto answer (1-20),
and press Enter.
5) Select AUTO ANS DEV from the menu, then select from
speaker or headset as the Auto Answer device, and press
Enter.
2) Use the / buttons to scroll to the number you want.
3) Press the Enter button to dial the number.
The Call Log stores up to 99 incoming numbers.
28 IP 705 Manual
Page 37

Conference* To initiate a conference during a call:
1) Press the Conference button (this automatically selects a
new line and places the other party on hold).
2) Enter the target telephone number.
3) When the call connects, press the Conference button again
OR the button to cancel the conference and return to the
original party.
The number of parties allowed in a conference call depends on
the AltiServ system. In general, up to 6 parties are allowed.
To conference an incoming call when no conference is in
progress:
1) Connect to a caller.
2) Get incoming call whose Caller ID or Caller Name is
displayed on the LCD. Call waiting tone is played.
3) Press the Enter button to answer caller and place the
original caller on hold.
4) Press the Enter button to select the original hold call.
5) Press the Conference button to create a conference and join
both callers.
If a conference is already in progress, to conference an
incoming call:
1) Press the Enter button to answer the incoming call (all other
conference members remain in conference).
2) Press the Enter button and select one of the members in
conference (displays “ConfHold”), then press the
Conference button to join the incoming caller to the
conference.
The user who initiates the conference call can select another
conference member’s call and drop it from the conference.
To drop a conference member:
1) Use the / buttons to select the member to disconnect.
2) Press the button to disconnect this caller.
• This feature is not available to other conference
members, even when the conference initiator hangs up.
Configuration
Menu
• Press the Menu button to display the phone menu.
• Use the / buttons to scroll to the menu item you want.
• Use thebutton or Enter button to select a menu item or
setting.
• Use thebutton to return to the previous menu.
User Guide
IP 705 Manual 29
Page 38

Handset/
Headset/
Speaker
Hold* During a call:
Line Park During a call:
Mute While on a call with speaker, handset, or headset on:
Program Key 1) Press the Menu button.
Reboot 1) Press * * 3, then the Enter button
Redial Phone is onhook
To switch between handset, headset and speaker, the user can
go offhook, or press the appropriate programmable key if it is
configured for headset or press the Speaker button.
1) Press the Hold button to put the current call on hold and
make a new call.
To retrieve a single call on hold:
1) Press the Hold button.
To retrieve multiple calls on hold:
1) Use / to select a hold call to be retrieved.
2) Press the Enter button.
OR
1) Press the Hold button to retrieve the last hold call.
1) Press #51 and then enter the 2-digit Line Park line.
OR, press the Line Park key (if the administrator has
configured one). The Line Park key’s light will be lit and
turns off when the parked call is picked up, the caller hangs
up, or the call is routed to voice mail.
1) Press the Mute button.
2) To disengage mute, press the Mute button again.
2) Select PHONE SETTING, then PROGRAM KEYS, then the
desired program key.
3) Enter the appropriate digits for the speed dial number or
feature code.
1) Press the Redial button.
2) Use / to scroll to the desired entry. ( scrolls to previous
entry, scrolls to first entry.)
3) Press the Speaker button or raise handset.
• Redial up to last 16 calls.
• Redial up to 32 digits.
Release For a connected call:
1) Press the Release button to hang up the call.
Also, press the Release button to exit the menu.
30 IP 705 Manual
Page 39

User Guide
Restore
Default
Settings
Ring Tones 1) Press the Menu button.
Programmable Key*
• N/A
• BLF
• Feature
Code
• Admin
Defined #
• EXT
Speed Dial
• Line Park
• Call
Record
• User
Defined #
1) Press the Menu button.
2) Press * * 2, then the Enter button.
2) Select PHONE SETTING, and scroll to RING TONES.
3) Select a ring tone and press the Enter button.
1) Press the appropriate key (keys 1-5) to initiate one of the
following functions pre-assigned by the system
administrator: Busy Lamp Field, AltiServ Feature Code,
Admin Defined #, EXT Speed Dial, Line Park, Call Record,
User Defined #, Headset.
To configure a programmable key with Phone Setting
enabled:
a. Press the Menu button, select PHONE SETTING, and
press the Enter button.
b. Scroll to PROGRAM KEYS and press Enter.
c. Select the key to program, and press Enter.
d. Enter the appropriate digits for the speed dial number or
feature code, and press Enter.
The digits are automatically dialed when this function key is
pressed.
• Headset
Speaker To use the speakerphone:
1) Press the Speaker button.
2) To disconnect the call, press the Speaker button again.
Transfer* During a call:
1) Press the Transfer button, which places the call on hold.
2) Dial the number you want to transfer the call to.
3) Hang up if the party answers the call, or press Transfer
again to complete transferring.
4) If the party refuses the call, return to the original call by
pressing the button or the Flash button.
Voice Mail 1) Press the Voice Mail button.
2) Enter voice mail password.
• The Message Waiting light blinks when a voice mail
message is waiting.
• The LCD displays the new voice mail count (which includes
only unheard messages) when onhook.
IP 705 Manual 31
Page 40

Volume To adjust volume on handset/speakerphone/headset:
1) Depending on which volume you want to adjust, take the
phone offhook by lifting the handset, pressing the Speaker
button, or pressing the Headset button.
2) Press the Volume button. The device name and volume
level appear in the LCD.
3) Press the left side of the Volume button to decrease the
volume; press the right side to increase the volume.
To adjust ringer volume:
1) Leave the phone onhook.
2) Press the Volume button; a sample ring plays and the
volume level appears in the LCD.
3) Press the left side of the Volume button to decrease the
volume; press the right side to increase the volume.
* * Feature Codes
* * 2 . . . . . . . . . . . . . . . . . . . . . . . . . . . Restore default settings (when user is in the
* * 3 . . . . . . . . . . . . . . . . . . . . . . . . . . . Reboot
Configuration Menu)
AltiServ Feature Codes
## <pwd>. . . . . . . . . . . . . . . . . . . . . . . Log in to voice mail at your own station
### <ext> <pwd>. . . . . . . . . . . . . . . . . Log in to voice mail at another station
AltiGen Voice Mail System Quick Features
#11 . . . . . . . . . . . . . . . . . . . . . . . . . . . Greeting Menu
#28 . . . . . . . . . . . . . . . . . . . . . . . . . . . Password Menu
Making Calls
#34 . . . . . . . . . . . . . . . . . . . . . . . . . . . Dial By Name
#35 . . . . . . . . . . . . . . . . . . . . . . . . . . . Virtual Log In (Station Privilege Override)
#69 . . . . . . . . . . . . . . . . . . . . . . . . . . . Dial Last Caller
#77 . . . . . . . . . . . . . . . . . . . . . . . . . . . Station Speed Dial
#88 . . . . . . . . . . . . . . . . . . . . . . . . . . . System Speed Dial
#99 . . . . . . . . . . . . . . . . . . . . . . . . . . . Last Number Redial
#93 <ext> . . . . . . . . . . . . . . . . . . . . . . Intercom Call
Answering Calls
#29 <ext> . . . . . . . . . . . . . . . . . . . . . . Individual Call Pickup (a specific station)
#30 . . . . . . . . . . . . . . . . . . . . . . . . . . . System Call Pickup (any station ringing)
Flash button #31 . . . . . . . . . . . . . . . . . Personal Call Park
#31 <ext> . . . . . . . . . . . . . . . . . . . . . . Personal Call Park Pickup
Flash button #41 . . . . . . . . . . . . . . . . . System Call Park
#41 <loc. #>. . . . . . . . . . . . . . . . . . . . . System Call Park Pickup
#51 <line park line>. . . . . . . . . . . . . . . Line Park Pickup
#81 . . . . . . . . . . . . . . . . . . . . . . . . . . . Hands Free Intercom Mode
#82 . . . . . . . . . . . . . . . . . . . . . . . . . . . Hands Free Manual Answer Mode
Call Management
#26 . . . . . . . . . . . . . . . . . . . . . . . . . . . Station Log Out (Phone must be onhook)
1
Feature must be enabled by system administrator.
2
Feature available only on systems with Triton Analog Extension board or AltiGen IP phones.
1
2
32 IP 705 Manual
Page 41

User Guide
#27. . . . . . . . . . . . . . . . . . . . . . . . . . . . Station Log In (Phone must be onhook)
#32 <acct code> . . . . . . . . . . . . . . . . . Enter Account Code (before dialing)
Flash button #32 <acct code>. . . . . . . Enter Account Code (mid-call)
#33. . . . . . . . . . . . . . . . . . . . . . . . . . . . Do Not Disturb
#36. . . . . . . . . . . . . . . . . . . . . . . . . . . . Call Forwarding
#37. . . . . . . . . . . . . . . . . . . . . . . . . . . . Remote Call Forwarding
Other Features
#22. . . . . . . . . . . . . . . . . . . . . . . . . . . . Feature Status Check
#25. . . . . . . . . . . . . . . . . . . . . . . . . . . . Station Speed Dial Setup
#38. . . . . . . . . . . . . . . . . . . . . . . . . . . . Outside Call Blocking (operator only)
#39. . . . . . . . . . . . . . . . . . . . . . . . . . . . Operator Off-Line (operator only)
#44. . . . . . . . . . . . . . . . . . . . . . . . . . . . Overhead Paging
#45. . . . . . . . . . . . . . . . . . . . . . . . . . . . Overhead Paging by Trunk
#46. . . . . . . . . . . . . . . . . . . . . . . . . . . . Group Paging (for IP 705 phone users)
#55. . . . . . . . . . . . . . . . . . . . . . . . . . . . List Feature Tips
#73. . . . . . . . . . . . . . . . . . . . . . . . . . . . Silent System Call Park
#90. . . . . . . . . . . . . . . . . . . . . . . . . . . . Ready to receive workgroup calls
#91. . . . . . . . . . . . . . . . . . . . . . . . . . . . Not ready to receive workgroup calls
Flash button #40. . . . . . . . . . . . . . . . . Transfer to AltiGen Voice Mail System
Flash button # 15 <AA#>. . . . . . . . . . . Transfer to Auto Attendant
Flash button # # <ext> . . . . . . . . . . . . Transfer to a User’s Voice Mail
Flash button <ext> Flash button. . . . . Consultation
Dialing an IP Number Directly from the IP 705
To dial an IP number directly from the IP 705 phone set, enter the IP
address, using the * key to enter periods and followed by the # key.
Note: This works only when the IP 705 is operating in Basic mode.
If the IP 705 is configured for a public IP address, you can call other public
IP address devices. If the IP 705 is configured for a private IP address, you
can call other private IP address devices that you can “see” or that are on
your subnet.
IP 705 Manual 33
Page 42

34 IP 705 Manual
Page 43

Appendix A
Specifications
Network
Protocols
Call Control
Protocols
Audio
Standards
• H.323, SIP, RTP, RTCP, TFTP, TCP, UDP, DHCP, DNS, ARP,
ICMP, Telnet
• H.323, SIP
• Codec: ITU G.711 (PCM), two low bit rate (G.723.1 and G.729A
/ G.729AB)
• Acoustic Echo cancellation supporting high-quality
speakerphone
Keypad
Features &
Handset
• 12 standard dialing keys: 0-9, *, #
• 11 Feature keys: Redial, Call Log, Hang-up/Release, Hold, Mute,
Flash, Transfer, Conference, Speaker, Voicemail, Volume
control.
• 5 Function keys: can be set to N/A, Busy Lamp Field, AltiServ
feature code, speed dial, directory, line park, call recording,
phone setting, headset (Function key 5 only).
• Adjustable ringer/speaker/handset/headset volume control
LCD • 2 x 16 Character LCD Display
• Provide features such as time, calling party name, calling party
number, digits dialed, extension number, number of new voice
mails, DND/FWD, missed calls, and system information.
LED • Voice Mail, Conference, Hold, Mute, Speaker
• Message waiting indicator in Voice Mail button
LAN • 2 Standard 10/100 Base-T RJ-45 Ports: One for network to phone
connection, and one switch port for connection from phone to PC
IP 705 Manual 35
Page 44

Troubleshooting
Headset • Headset RJ-9 port
Important: Contact AltiGen for the most current list of certified
headsets.
The pin outlet for headset support is:
Pin 1 (Tx-), Pin 2 (Rx1), Pin 3 (Rx2), Pin 4 (Tx+)
Note: If using Plantronics H91N or H101N headsets, a separate
Plantronics cable should be used and must be ordered
separately (part # 27190-01) in order to plug in these
headsets to the headset port.
Dimensions • (HxWxD) 8.23 x 8.74 x 1.65 in (209 x 222 x 42 mm)
Power • External power, 5VDC, 1.5A
• PoE option
Troubleshooting
The following table provides help for the most common problems an end
user may encounter. For IP 705 phone questions or problems not listed
here, contact your AltiGen dealer.
Problem/Symptom Solution
AltiWare is unreachable
• Check to make sure the AltiWare IP address in the
IP phone is set up correctly.
• Check the IP 705 phone’s IP address, network mask
and default gateway.
• Check to make sure you can ping the IP 705 phone’s
address from AltiWare.
• Check to make sure the IP Phone Service is started
in AltiWare.
• Check AltiWare IP address in AltiAdmin IP Phone
Configuration menu.
Image update failed. If
setting Boot Download
to Yes, after the phone
reboots and if the setting
still says Yes, the boot
failed.
• Check the IP 705 phone’s IP address, network,
default gateway settings.
• Check the network connection.
• Check the TFTP server IP address and make sure the
TFTP server is running.
• PING from the TFTP server to the IP 705.
36 IP 705 Manual
Page 45

Appendix A
IP phone registered then
goes back to Basic mode
No IP Address
One way connection
Phone does not show
anything on LCD display
• Check network conn ectivity by pin gi ng fro m
AltiServ to the IP phone.
• Check if IP Phone Service is running.
• Check if there is a duplicate IP address by
unplugging the Ethernet cable on the IP phone, then
pinging the IP 705 phone’s IP address.
• Ask the system administrator to check the
extension’s IP address in AltiWare Administrator to
find out if another user is trying to log in using the
same extension number.
• Use #27 then Enter to log in again and see if the
problem persists.
• Check if DHCP is enabled. If YES, check network
connection. If NO, verify that your DHCP server is
correctly configured.
• Check if IP 705 phone’ s IP add ress is configured.
• Make sure firewall setting has all the TCP/UDP
ports required by AltiWare opened. See your system
administrator.
• If NAT is used, make sure NAT is enabled and NAT
address is set up correctly.
• Check the power source to be sure the IP 705 phone
is receiving power.
Poor voice quality
• A Layer 3 Managed Ethernet switch should be used,
rather than a hub or non-managed switch, in the
corporate LAN. Check with your system
administrator.
• G.711 provides better voice quality. Check with
your system administrator.
• If VoIP is set up over WAN, priority queuing should
be set on the WAN router.
• System administrator should make sure WAN QoS
is okay by pinging a few hundred packets from a
remote site and observing packet loss and network
latency.
• System administrator should adjust jitter buffer to
accommodate network latency.
IP 705 Manual 37
Page 46

LCD Messages
Register failed • Check to make sure the extension number and
extension password are set up properly and that the
system administrator enabled the IP extension.
• System administrator should make sure the IP Phone
Service is started in AltiWare.
• If an analog phone or other IP phone is already
logged on to the same extension, rebooting the IP
705 will not register the phone successfully. You
must press #27 on the IP phone to actively log on to
AltiServ. After the extension is logged on and
activated, the calls are redirected to this IP phone.
LCD Messages
Local Menu Configuration Messages
The following messages may be displayed in the LCD when accessing the
IP 705 phone’s menu:
Message Explanation
conf timeout! After 2 minutes inside the configuration menu, if no
conf exception! During configuration, an unknown exception occurred.
Saved! The changed configuration was saved into memory.
Write Fail! Error occurred when saving the changed options into
Wrong Ext Number! The inputted extension number is invalid.
Wrong input! User inputted an invalid value or string during
wrong password! User is trying to configure an invalid password from the
action is taken, the LCD will show this message and then
quit the menu.
flash ROM.
configuration.
phone menu.
38 IP 705 Manual
Page 47

Appendix A
IP Phone Running Messages
The following messages may be displayed in the LCD when running the
IP 705:
Message Definition
AW UNREACHABLE! Failed to connect to the AltiGen phone server. The user
Basic-Idle IP phone is operating in Basic mode.
DHCP FAIL! Although DHCP was enabled, the IP 705 was not able to
DUPLICATE IP! Another device configured with the same IP address as
INVALID IP!
INPUT AGAIN...
INVALID VAL! During register of IP extension, an invalid response
is trying to register the IP phone with an invalid IP
phone’s IP address or the AltiGen Phone Server's IP
address is invalid.
Or, the network connection is lost in offhook or connect
state.
Refer to “AltiWare is unreachable” section of
“Troubleshooting” on page 36.
Press #27 again to reactivate.
Check IP Phone Service
Verify extension is configured for dynamic.
receive the IP address from the DHCP server.
the IP phone is detected. The IP phone cannot function
correctly until this is corrected.
The inputted IP address is invalid.
(return value) returned from phone server.
NO IP ADDR! IP 705 cannot attach an IP address due to network
failure.
No Network! Phone has lost Ethernet connection.
REGISTER FAIL! Cannot register to the AltiGen phone server.
REGISTER OKAY! IP extension registered successfully.
IP 705 Manual 39
Page 48

LCD Messages
REGISTERING... User entered #27 to manually register the IP extension.
REMOVE OLD EXT. When #27 is entered, the extension/password
WRONG PASSWORD! Registration failed because of invalid extension
configuration in the IP phone is removed.
password.
IP Phone Boot Messages
The following messages may be displayed in the LCD when booting the
IP 705:
Message Definition
Boot Done The phone successfully booted.
CHECK FW Checking firmware.
CHECK MEMORY Checking memory.
INIT NETWORK Initializing network.
LOAD FAILED Failure to load the image into memory.
LOADING FW... Loading firmware.
LOADING NOW Loading firmware.
NETWORK FAILED. Network initialization failed.
TFTP FAIL! Failure downloading TFTP.
UPDATE FAILED. Firmware update failed.
UPDATE OK Firmware update successful.
update APP(S1) Appears when Boot Download is set to TRUE. The IP
705 will show this message when it is rebooted.
40 IP 705 Manual
Page 49

Glossary
A
ASCII - American Standard Code for Information Interchange.
B
Boot - to cause the computer to start executing instructions.
BPS - Bits Per Second. The number of bits transmitted per second.
C
configure - to determine and assign the equipment cabinet or chassis contents and
location of each card, as well as software parameters.
D
DHCP (Dynamic Host Configuration Protocol) - a protocol that lets network
administrators manage centrally and automate the assignment of Internet Protocol
(IP) addresses in an organization’s network.
DNS - Domain name system used to address translation to convert H.323 IDs,
URLs, or e-mail IDs to IP addresses. DNS is also used to assist in locating remote
gatekeepers and to reverse-map raw IP addresses to host names of administrative
domains.
Do Not Disturb (DND) - when this feature is selected, all incoming calls to the
user’s extension are denied. If the station has system forwarding instructions, the
calls will be automatically redirected to another extension, Attendant, or operator.
DTMF - Dual Tone Multi Frequency are the low and high frequency tones that
comprise touch tone signals.
DSP - Digital Signal Processor. A microprocessor with an architecture that is
particularly optimized to perform mathematical algorithms that manipulate digital
signals.
Dynamic IP Address - An IP address that is automatically assigned to a client
station in a TCP/IP network, typically by a DHCP server. Network devices that
serve multiple uses, such as server and printers, are usually assigned static IP
addresses.
Dual Tone Multi Frequency - see DTMF.
IP 705 Manual 41
Page 50

E
extension number - an arbitrary number of two to five digits that matches a station
to a particular user.
F
Firewall - a set of related programs, located at a network gateway server, that
protects the resources of a network from users of other networks.
FLASH - a sudden brief signal. Activated by pressing the Flash button, or by a
quick press and release of the receiver button (switch hook).
FXS - Foreign Exchange Subscriber. An analog interface for direct connection of a
telephone set to a digital multiplexer.
G
GMT - Greenwich Mean Time. Mean solar time of the meridian at Greenwich,
England, used as the basis for standard time throughout the world.
H
H.323 - An International Telecommunications Union (ITU-T) standard that
describes packet-based video, audio and data conferencing.
http or HTTP - Hypertext Transfer Protocol. The Internet protocol used to manage
communications between Web clients (browsers) and servers.
I
IMAP4 - Internet Message Access Protocol - Ve rsion 4.
IP Address - a 32-binary digit number that identifies each sender or receiver of
information that is sent in packets across the Internet.
ISP - Internet Service Provider.
J
jack - the mate for a plug. Used to connect two pieces of equipment together.
K
keyboard - system interface for communication. A group of numeric keys,
alphabetic keys, or function keys used for entering information in to a ter mina l and
into the system.
42 IP 705 Manual
Page 51

Glossary
L
Local address - an address used in a peripheral node or station in place of a network
address and transformed to or from a network address for delivery purposes.
Logoff - the procedure by which a user disconnects from a program or session.
Logon - the procedure by which a user begins a program or terminal session and
gains access to the AltiServ or Quantum system.
M
MHz - Megahertz.
ms - millisecond.
N
NAT (Network Address Translation) - translation of an Internet Protocol address
(IP address) used within one network to a different IP address known within another
network. One network is designated the inside network, the other is the outside.
network - A configuration of data processing and/or telecommunication devices
and software connected for information exchange.
network address - An identifier for a node, station, or unit of equipment in a
network.
network domain - a set of workstations and servers that share a security account
manager database and can be administered as a group. A user with an account in a
particular network domain can log onto and access his or her account from any
system in the domain.
network mask - also known as the subnet mask.
network server - networking software that responds to I/O or computes requests
from a client machine. Windows NT network servers can be implemented either as
server processes or as drivers.
O
offhook - refers to the phone when the receiver is not resting in the base.
One Number Access - a feature of AltiWare that allows users to create a list of
phone numbers that the system can use to track users and connect them with an
incoming call if they are not at their extension desk.
onhook - the term used to describe a telephone in the idle state or with the receiver
still resting in the base.
IP 705 Manual 43
Page 52

P
physical extension - is associated with a physical port and device. An extension is
created, by default, as a physical extension (as opposed to a virtual or workgroup
extension) unless there are no more physical ports available.
ping (Packet InterNet Groper) - a program used to test whether a particular
network destination on the Internet is online by repeatedly bouncing a signal off a
specified address.
port - a communication channel through which a client process commun icates with
a protected subsystem.
protocol - A set of rules and conventions by which two computers pass messages
across a network medium. Networking software generally implements multiple
levels of protocols layered one on top of the other.
Q
queue - a collection of calls waiting to be served. Queued calls in AltiWare are
handled on a first-in, first-out basis.
R
RAS - Remote Access Service.
RJ-11 - The common telephone jack. Usually wired with four wires, the red and
green signify the tip and ring circuits.
RJ-45 - A jack for data cables. Usually wired with eight wires.
router - protocol-dependent device that connects subnetworks together.
S
server - any computer whose function in a network is to provide user access to files,
printing, communication, and other services.
static IP address - a permanent IP address that is assigned to a node in a TCP/IP
network.
subnet mask - the method used for splitting IP networks into a series of subgroups,
or subnets. The mask is a binary pattern that is matched up with the IP address to
turn part of the host ID address field into a field for subnets.
System Speed Dialing - this feature allows the user to access a list of commonly
called phone numbers entered into the system by the administrator. The user presses
the SpeedDial button on the phone, selects a number from the list, and then dials by
pressing the Enter button.
44 IP 705 Manual
Page 53

Glossary
T
TCP/IP - Transmission Control Protocol/Internet Protocol. A full set of protocols
used on the Internet.
TDM - Time Division Multiplexing.
TFTP (Trivial File Transfer Protocol) - a version of the TCP/IP FTP protocol that
has no directory or password capability.
transfer - this feature redirects a call to another extension, the AltiGen Voice
Mail System
, or operator.
U
UDP (User Datagram Protocol) - a communications protocol that offers a limited
amount of service when messages are exchanged between computers in a network
that uses the Internet Protocol.
URL (Uniform Resource Locator) - the address that defines the route to a file on
the web or any other Internet facility.
user(s) - the person or persons accessing the features and functions of the AltiWare
product.
V
virtual extension - an extension not associated with a physical port that allows for
guest access to the AltiGen Voice Mail System features and telephone sharing
environments. Users of a virtual extension have to log in before accessing the
system features assigned to it.
VoIP - voice over Internet Protocol (IP). The technology used to transmit voice
conversations over a data network using
the Internet Protocol.
W
workgroup - telephones arranged in groups within a particular organizational
function (for example, marketing, sales, service, etc.). Each workgroup is assigned
a pilot number. When the pilot number is dialed, the system scans the list of
extensions comprising the workgroup and connects the call to the first available idle
extension number. If no extensions are available, the call is placed in that
workgroup’s queue.
workgroup pilot number - an extension designated to a workgroup that is not
associated with a physical port and may consist of up to 64 members. When the pilot
number is dialed, the call is distributed to the workgroup members.
IP 705 Manual 45
Page 54

46 IP 705 Manual
Page 55

Index
Index
A
activating IP phone extension 16
AltiWare Server, setting IP
address 20
assigning
a local IP address 22
a TFTP server 22
NAT 24
audio standards 35
auto answer 9
device 9
ring 9
B
BLF, configuring 10
Boot Download 20
Busy Lamp Field, configuring 10
C
call control protocols 35
Call Log button 4, 10
Call Record button, using 10
call record, configuring 10
Conference button, using 11
configuring
from IP phone menu 19
IP settings 22
NAT 24
D
DHCP, enabling/disabling 21
dial pad 5
dialing IP number 33
dimensions, IP 705 phone 36
display workgroup status 11
distinctive ring options 25
E
emergency gateway, setting 21
emergency number, setting 21
Enter button 4
extension
activating IP phone 16
number, setting 19
password, setting 19
F
features, list of 9
firmware, upgrading 20
Flash button 5
G
GateKeeper Discovery, enabling/
disabling 21
gatekeeper, enabling/disabling 21
gateway, setting IP address 21
H
handset port 7
hardware components 8
headset
port support 36
Headset button, using 11
headset port 7
Hold button, using 11
I
IP 705 phone
functions, list of 9
hardware components 8
illustration 3, 6, 7
overview 3
registering 22
specifications 35
IP address
assigning a local 22
inputting in LCD 22
IP number, dialing 33
IP settings, configuring 22
IP 705 Manual 47
Page 56

Index
K
keys, feature 35
L
LAN ports 35
LCD messages, explained 38, 39, 40
LCD screen 4, 27, 35
LED, in buttons 35
line park, configuring 12
local address, setting 21
logon, to extension in use 17
M
Menu button 5
message waiting light 4
Mute button 12
N
NAT
address, setting 21
assigning 24
configuring 24
enabling/disabling 21
navigation buttons 4
network
mask, setting 21
protocols 35
settings, configuring from
phone 21
P
password, setting extension 19
periods, inputting in LCD 22
phone operation 28
phone startup, verifying 16
PoE module 8
installing 17
removing 17
power over Ethernet
module 8
using 17
power, IP 705 phone 36
R
Redial button 12
registering IP phone 22
Release button 4, 12
ring tones, setting 12, 24
S
service, getting vi
setting up IP 705
locally 15
setup, IP 705 15
Speaker button 12
specifications 35
startup
verifying phone 16
system settings, configuring from
phone 20
T
TFTP server
assigning 22
setting IP address 20
time offset, setting 20
Transfer button 13
troubleshooting 36
U
using the phone 27
V
verifying phone startup process 16
version information 21
Voice Mail button 4, 13
W
warranty v
how to get service vi
workgroup queue status, configuring
display 11
workgroup queue status,
displaying 25
48 IP 705 Manual
 Loading...