

Page 1

MODEL
User's guide
Guía del usuario
22 0
Mode d'emploi
Guia do Usuário
Page 2
The lightning flash with arrowhead, within an equilateral triangle, is intended to alert the user to the presence of uninsulated “dangerous voltage” within the
product’s enclosure that may be of sufficient magnitude
to constitute a risk of electric shock to persons.
SAFETY INSTRUCTIONS
CAUTION
To prevent electric shock do not use this (polarized) plug with an
extension cord, receptacle or other outlet unless the blades can
be fully inserted to prevent blade exposure.
WARNING
TO REDUCE THE RISK OF FIRE OR ELECTRIC SHOCK, DO NOT
EXPOSE THIS APPLIANCE TO RAIN OR MOISTURE.
Caution: To prevent the risk of electric shock, do not
remove cover (or back). No user- serviceable parts
inside. Refer servicing to qualified service personnel.
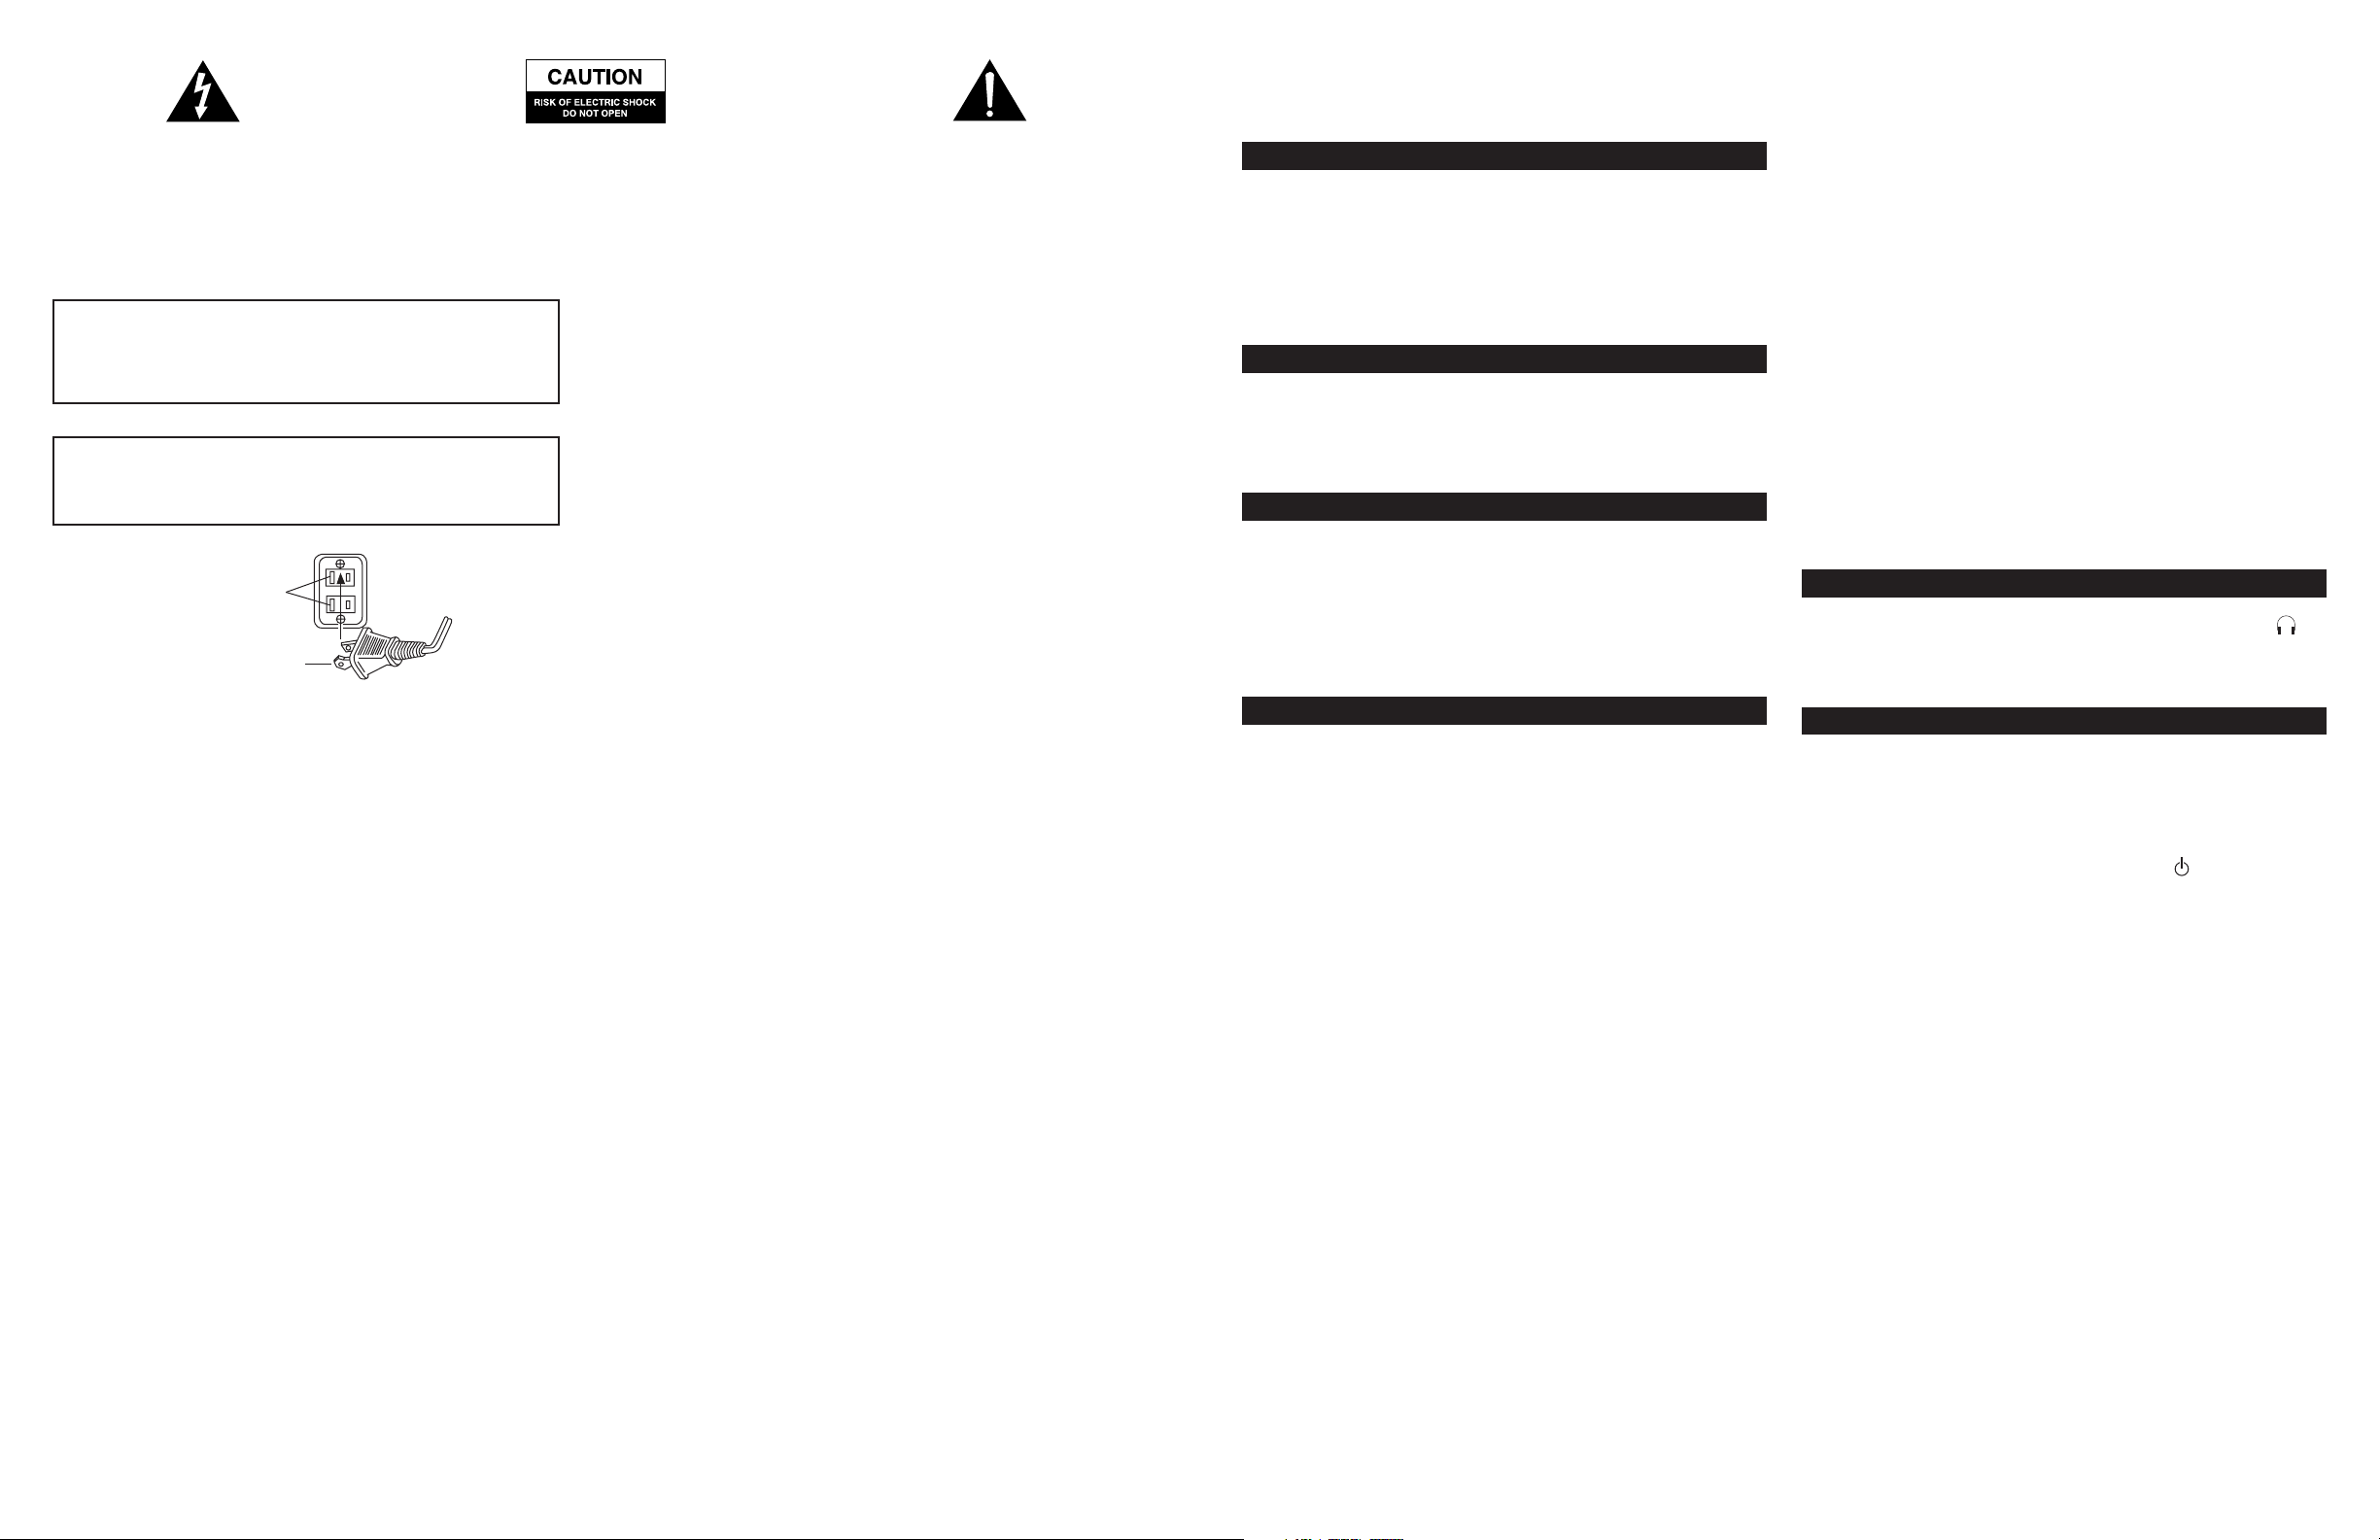
Connecting the Power Cord (AC Wall Socket)
Long slot is neutral
(ground) side.
Insert the wide blade
into the ground side slot.
Read Instructions — All the safety and operating instructions
should be read before the appliance is operated.
Retain Instructions — The operating instructions should be
retained for future reference.
Heed Warning — All warnings on the appliance and in the
operating instructions should be adhered to.
Follow Instructions — All operating and use instructions
should be followed.
Water and Moisture — The appliance should not be used near
water – for example, near a bathtub, washbowl, kitchen sink, laundry
tub, in a wet basement, or near a swimming pool, etc.
Outdoor Use — Warning: To reduce the risk of fire or electric
shock, do not expose this appliance to rain or moisture.
Location — The appliance should be installed in a stable location.
Ventilation — The appliance should be situated so that its
location or position does not interfere with its proper ventilation. For
example, the appliance should not be situated on a bed, sofa, rug, or
similar surface that may block the ventilation openings; or placed in a
built-in installation, such as a closed bookcase or cabinet that may
impede the flow of air through the ventilation openings.
Heat — The appliance should be situated away from heat sources
such as radiators, heat registers, stoves, or other appliances (including
amplifiers) that produce heat.
Power Sources — The appliance should be connected to a power
supply only of the type described in the operating instructions or as
marked on the appliance.
Power-Cord Protection — Power-supply cords should be
routed so that they are not likely to be walked on or pinched by items
placed upon or against them. Pay particular attention to cords at plugs,
convenience receptacles, and the point where they exit from the appliance.
Grounding or Polarization — The precautions that should
be taken so that the grounding or polarization means of an appliance
is not defeated.
The exclamation point within an equilateral triangle is
intended to alert the user to the presence of important
operating and maintenance (servicing) instructions in
the literature accompanying the appliance.
Cleaning — The appliance should be cleaned only with a polishing
cloth or a soft dry cloth. Never clean with furniture wax, benzene,
insecticides or other volatile liquids since they may corrode the cabinet.
Non-Use Periods — The power cord of the appliance should be
unplugged from the outlet when left unused for a long period of time.
Lightning Storms — Unplug the appliance during lightning
storms.
Object and Liquid Entry — Care should be taken so that
objects do not fall and liquids are not spilled into the enclosure
through openings.
Accessories — Only use attachments/accessories specified by the
mfg.
Damage Requiring Service — The appliance should be
serviced by qualified service personnel when:
• The power-supply cord or the plug has been damaged.
• Objects have fallen, or liquid has been spilled into the appliance.
• The appliance has been exposed to rain.
• The appliance does not appear to operate normally or exhibits
a marked change in performance.
• The appliance has been dropped or the enclosure damaged.
Servicing — The user should not attempt to service the appliance.
Servicing should be referred to qualified service personnel or returned
to the dealer or call the Altec Lansing service line for assistance.
One Year Limited Warranty
Altec Lansing Technologies, Inc. warrants to the end user that all of its
computer speaker systems are free from defects in material and
workmanship in the course of normal and reasonable use for a term of
one year from the date of purchase.
This warranty is the exclusive and only warranty in effect relative to
Altec Lansing computer speaker systems and any other warranties,
either expressed or implied, are invalid. Neither Altec Lansing
Technologies, Inc. nor any authorized Altec Lansing Technologies, Inc.
reseller is responsible for any incidental damages incurred in the use of
the speakers. (This limitation of incidental or consequential damage is
not applicable where prohibited.)
Altec Lansing Technologies, Inc. obligation under this warranty does
not apply to any defect, malfunction or failure as a result of misuse,
abuse, improper installation, use with faulty or improper equipment or
the use of the computer speaker systems with any equipment for
which they were not intended.
The terms of this warranty apply only to computer speaker systems
when such speakers are returned to the respective authorized Altec
Lansing Technologies, Inc. reseller where they were purchased.
Under the terms of this warranty, the original consumer purchaser has
certain legal rights and may have other rights, which vary worldwide.
2-Piece Amplified
220
WELCOME
Welcome to the extraordinary world of Altec Lansing high-fidelity
sound. The Altec Lansing 220 speaker system consists of two amplified
speakers especially enhanced for PC Audio experience.
With 10 watts of total system power, it delivers quality performance
from MP3 players, CD players, cassette players, DVD players, gaming
consoles, and other audio/video devices.
Box Contents
• 2 Satellites
• Manual
• QCC
Placing Speakers
SATELLITE SPEAKERS
Arrange the satellites to suit your listening tastes—from directly next
to the monitor to as far apart as the speaker cords allow.
Note: The satellite speakers are magnetically shielded and can be
placed close to video displays such as TVs and computer monitors
without distorting the image.
Making Connections
WARNING:
Do not insert the speaker system’s power plug into an AC outlet until
all connections are made. Also, turn off audio sources (i.e., your PC,
MP3 player, console game, etc.) before connecting their outputs to the
220’s inputs.
To ensure first-time operation as expected, please carefully follow the
connection sequences described below in the order indicated.
SATELLITE SPEAKERS
The satellite speakers must be connected to the audio device. The only
connection that needs to be made is the lime green 3.5mm stereo
audio cable—which is connected to the right satellite—into the audio
output on your audio device. After this connection is made, insert the
power plug located on the rear of the left satellite into an AC outlet.
You can now use your speakers.
INPUTS
Various connection schemes between your audio source device and the
220 are available. Determine if you’ll be setting up the speaker system
for PC audio/PC gaming, DVD playback, console gaming or with
portable audio sources (such as MP3 or portable CD players), then skip
to the section with that title.
PC AUDIO/PC GAMING/DVD PLAYBACK
All PC sound cards have audio outputs. Typically, the outputs will
be marked as “front output” and “rear output.” In some cases,
slightly different terminology may be used. The sound card’s
documentation should help you determine which outputs to use
with your speaker system.
1. Connect the lime green 3.5 mm stereo cable, which is connected to
the right satellite, into your sound card’s input labeled “FRONT,”
which is also lime green in color.
Speaker System
CONSOLE GAMING
(Requires the use of the AAC1 Y-adapter, which is not included. This
adapter can be purchased at www.alteclansing.com.)
Most console game systems feature dual-RCA outputs. Popular console
systems manufacturers include Sony™, Microsoft™, Nintendo™ and
Sega™. To connect your speakers, follow the steps below:
1. Make sure the power to your console gaming system is turned off.
2. The AAC1 Y-adapter has a lime green 3.5 mm stereo jack on one end
and two RCA jacks on the other—one red and one white.
3. Locate the red and white RCA plugs on the end of the cable connected
to the back of your console gaming system. Connect them to the
matching red and white RCA jacks on the AAC1 Y-adapter cable.
4. Locate the lime green 3.5 mm stereo plug, which is connected to the
right satellite.
5. Insert the lime green plug into the lime green jack on the
AAC1 Y-adapter cable.
PORTABLE AUDIO DEVICES (MP3, PORTABLE CD PLAYERS, ETC.)
1. Locate the lime green 3.5 mm stereo plug, which is connected to the
right satellite.
2. Insert the lime green plug into the headphone jack on your portable
audio device.
Headphones
To use headphones with the system, plug them into the labeled
jack on the front of the right satellite. When headphones are
connected, both satellites are muted.
Powering On
After all connections are made, plug the power cord located on the
rear of the left satellite, into an AC wall socket. The speaker system is
now ready to operate.
1. Turn on the audio source.
2. Turn on the Altec Lansing 220 speaker system by pushing the power
button located on the front of the right satellite . A green LED will
light next to the button when the power is on.
Note: To avoid hearing a popping sound when you turn on your Altec
Lansing speaker system, always turn on your audio source first.
MASTER VOLUME
The knob on the front of the right satellite is the master volume
control for the speaker system. Turn the knob clockwise to increase the
volume and counter-clockwise to decrease the volume.
2
3
Page 3
System Specifications
TROUBLESHOOTING TIPS
Total System Power: 10 Watts (5 Watts RMS)
Frequency Response: 70 Hz – 18 kHz
Signal to Noise Ratio @ 1 kHz input: >70 dB
Crossover Frequency: 150 Hz
System THD (distortion): < 0.15 % THD @ -10 dB full-
scale input voltage
Input Impedance: 10k ohms
SATELLITE AMPLIFIED SPEAKERS
Drivers (per satellite): One 3" full-range driver
TROUBLESHOOTING TIPS
The answers to most setup and performance questions can be found in
the Troubleshooting guide. You can also consult the FAQs in the
customer support section of our Web site at www.alteclansing.com. If
you still can’t find the information you need, please call our customer
service team for assistance before returning the speakers to your
retailer under their return policy.
Customer service is available 7 days a week for your convenience. Our
business hours are:
Monday to Friday: 8:00 a.m. to 12:00 midnight EST
Saturday & Sunday: 9:00 a.m. to 5:00 p.m. EST
1-800-ALTEC-88 (1-800-258-3288)
Email: csupport@alteclansing.com
For the most up-to-date information, be sure to check our Web site at
www.alteclansing.com.
© 2002 Altec Lansing Technologies, Inc.
Designed and engineered in the USA and manufactured in our ISO9002
certified factory. United States Patents 4429181 and 4625328 plus other
patents pending.
POWER REQUIREMENTS
USA/Canada/and applicable 120V AC @ 60 Hz 0.3A
Latin American countries:
Europe/United Kingdom; 230V AC @ 50 Hz 0.15A
applicable Asian countries;
Argentina, Chile and Uruguay:
ETL / cETL / CE / NOM / IRAM Approved
SYMPTOM POSSIBLE PROBLEM SOLUTION
No LEDs are lit.
No sound from
one or more
speakers.
Crackling sound
from speakers.
Sound is
distorted.
Radio
interference.
Power is not turned on.
AC cord is not connected to wall outlet.
Surge suppressor (if used) is not powered on.
Wall outlet not functioning.
Power isn’t turned on.
Volume setting is too low.
Audio cable is not connected to audio source.
Audio cable connected to wrong output on audio source
Problem with audio source.
Bad connection.
Volume control in Windows is set too high.
A problem with your audio source.
Volume level is set too high.
Windows volume control is set too high.
Sound source is distorted.
Too close to a radio tower.
Press Power button on the right speaker.
Check to see if the power on LED is illuminated on the right satellite. If not,
connect AC power.
If the satellite’s AC power cord is plugged into a surge protector, make sure
the surge protector is switched on.
Plug another device into the wall outlet (same jack) to verify the outlet is working.
Verify the satellite’s AC power cord is plugged into the wall outlet.
Verify the Power button has been pressed and the green LED is illuminated.
Turn the volume knob clockwise to raise the volume.
Check volume level on the computer sound card or alternate audio source
device and set at mid-level.
Connect audio cable to the audio source. Make sure the signal cables are
inserted firmly into the correct jacks.
Make sure the lime green 3.5 mm stereo cable is connected and fully inserted
in the “line-out” or “audio-out” jack on your sound card or other audio source.
Test the speakers on another audio source by removing the lime green 3.5 mm
cable from the audio source and connecting it to the “line-out” or headphone
jack of a different audio source (e.g., portable CD, cassette player or FM radio).
Check all cables. Make sure they are connected to “line-out” or “audio-out”
jack on your sound card or other audio source—and NOT “speaker-out.”
Check the Windows volume control and decrease if necessary.
Unplug the lime green 3.5 mm stereo cable from the audio source. Then plug it into
the headphone jack of an alternate source (e.g., Walkman, Discman or FM radio).
Decrease volume level.
Check the Windows volume and decrease if necessary.
.WAV and .MID files are often of poor quality; therefore distortion and noise are
easily noticed with high-powered speakers. Try a different audio source such as
a music CD.
Move your speakers to see if the interference goes away. You may be able to
purchase a shielded cable at your local electronics store.
4
5
Page 4

Le symbole figurant un éclair dans un triangle
équilatéral est destiné à attirer l’attention de l’utilisateur
sur la présence d’une “tension dangereuse” non isolée
pouvant être d’amplitude suffisante pour constituer un
risque d’électrocution.
CONSIGNES DE SÉCURITÉ
ATTENTION
Pour éviter tout risque d’électrocution, n’utilisez pas cette fiche
(polarisée) avec une rallonge électrique, une prise de courant ou
une autre sortie, si les lames ne peuvent pas être insérées
complètement, afin d’éviter qu’elles ne soient exposées.
AVERTISSEMENT : AFIN DE LIMITER LE RISQUE D’INCENDIE OU
D’ÉLECTROCUTION, N’EXPOSEZ PAS CET APPAREIL À LA PLUIE
OU À L’HUMIDITÉ.
Attention : Pour prévenir tout risque d’électrocution,
ne retirez pas le couvercle (ou le dos) de l’appareil. Il
ne se trouve à l’intérieur aucune pièce pouvant être
réparée par l’utilisateur. Confiez la réparation et
l’entretien à un personnel qualifié.
Connecting the Power Cord (AC Wall Socket)
La fente longue
correspond au côté
neutre (terre).
Insérez la lame la plus
large dans la borne côté
terre.
Lisez les Instructions — Vous devez lire toutes les consignes
de sécurité et le manuel d’utilisation avant de faire fonctionner
l’appareil.
Conservez les Instructions — Conservez le manuel
d’utilisation pour pouvoir vous y référer ultérieurement.
Tenez compte des Avertissements — Tous les avertissements
figurant sur l’appareil et dans les consignes d’utilisation doivent être
respectées.
Suivez les Instructions — Le manuel d’utilisation et toutes les
consignes d’utilisation doivent être suivis.
Eau et Humidité — N’utilisez pas l’appareil près d’une source
d’eau – par exemple, près d’une baignoire, d’un lavabo, d’un évier,
d’un bac à laver, dans un sous-sol humide ou près d’un piscine, etc.
Utilisation à l’extérieur — Avertissement : pour limiter le
risque d’incendie ou d’électrocution, n’exposez pas cet appareil à la
pluie ou à l’humidité.
Emplacement — L’appareil doit être installé sur une surface stable.
Aération — L’appareil doit être placé de manière à ce que son
emplacement ou sa position n’entravent pas son aération correcte.
Par exemple, l’appareil ne doit pas être placé sur un lit, un canapé, un
tapis ni sur une surface de type similaire, qui pourrait bloquer les
ouvertures d’aération; ou placé sur une installation encastrée,
notamment dans une bibliothèque fermée ou une armoire pouvant
empêcher la circulation de l’air à travers les orifices d’aération.
Chaleur — L’appareil doit être tenu éloigné de toute source de
chaleur et notamment des radiateurs, des bouches d’air chaud, des
fours ou des autres appareils (y compris les amplificateurs) produisant
de la chaleur.
Sources d’Alimentation — Brancher l'appareil uniquement à
une source d'alimentation du type mentionné dans le manuel
d'utilisation ou indiqué sur l'appareil lui-même.
Protection des Câbles d’alimentation — Veillez à ce que
les câbles d’alimentation ne se trouvent pas dans un lieu de passage ou
bloqués par d’autres objets. Veuillez prêter une attention toute
particulière aux câbles au niveau des fiches, des prises de courants et de
l’endroit duquel ils sortent de l’appareil.
Le point d’exclamation à l’intérieur d’un triangle
équilatéral est destiné à prévenir l’utilisateur qu’il
trouvera d’importantes instructions concernant
l’utilisation et la maintenance (entretien) dans la
documentation jointe à l’appareil.
Mise à la terre ou polarisation — Les précautions devant
être prises pour que les moyens de mise à la terre ou de polarisation
d’un appareil fonctionnent.
Nettoyage — L’appareil ne doit être nettoyé qu’à l’aide d’un
chiffon à lustrer ou d’un chiffon doux et sec. Ne le nettoyez jamais
avec de la cire pour meubles, du benzène, des insecticides ou d’autres
liquides volatiles qui pourraient attaquer le boîtier.
Périodes de non-utilisation — Le cordon d’alimentation de
l’appareil doit être débranché de la prise lorsque celui-ci n’est pas
utilisé pendant une longue période.
Orages — Débranchez l’appareil en cas d’orage.
Chutes d’objets et de liquide — Vous devez prendre garde à
ne pas faire tomber d’objets ou verser de liquide dans l’enveloppe de
protection par les ouvertures.
Accessoires —N’utilisez que les équipements/accessoires indiqués
dans le n° cat.fab.
Dommages nécessitant réparation — L’appareil doit être
réparé par le personnel qualifié lorsque :
• Le cordon d’alimentation ou la prise ont été endommagés.
• Des objets sont tombés ou du liquide a été renversé dans l’appareil.
•L’appareil a été exposé à la pluie.
•L’appareil ne semble pas fonctionner normalement ou donne des
signes de modification notoire de ses performances.
•L’appareil est tombé ou son boîtier a été endommagé.
Réparation — L’utilisateur ne doit pas tenter de réparer l’appareil.
Les réparations doivent être effectuées par le personnel qualifié,
l’appareil doit être retourné au distributeur ou vous devez appeler la
ligne téléphonique d’assistance Altec Lansing pour obtenir de l’aide.
Garantie Limitée à un An
Altec Lansing Technologies, Inc. garantit à l’utilisateur final que tous
ses systèmes d’enceintes pour ordinateur sont exempts de défauts
matériels et de fabrication dans le cadre d'une utilisation normale et
raisonnable, et cela pour une durée d'un an à compter de la date
d'achat.
Cette garantie est exclusive et tient lieu de seule garantie en vigueur
sur les systèmes d'enceintes Altec Lansing pour ordinateur. Aucune
autre garantie, explicite ou implicite, n’est valide. Ni Altec Lansing
Technologies, Inc. ni aucun revendeur Altec Lansing Technologies, Inc.
agréé ne pourra être tenu responsable de dommages accidentels
provoqués par l'utilisation des enceintes. (Cette limitation des
dommages accidentels ou consécutifs n’est pas applicable là où la loi
l’interdit.)
Les obligations de Altec Lansing Technologies, Inc. liées à cette
garantie ne s’appliquent pas aux défauts, dysfonctionnements ou
pannes résultant d’une mauvaise utilisation, d’une utilisation abusive,
d’une installation incorrecte, d’une utilisation avec du matériel
défectueux ou inapproprié ou d’une utilisation des systèmes
d’enceintes pour ordinateur avec des équipements pour lesquels elles
ne sont pas prévues.
Les conditions de la présente garantie s’appliquent uniquement si les
systèmes d’enceintes pour ordinateur sont retournés aux revendeurs
Altec Lansing Technologies, Inc. agréés auprès desquels ils ont été
achetés.
Cette garantie donne à l'acheteur initial des droits spécifiques et
n'exclut pas d'autres droits propres au pays dans lequel il réside.
6
‘enceintes
220
Système d’enceintes
Amplifié 2 pièces
BIENVENUE
Bienvenue dans le monde extraordinaire du son haute-fidélité Altec
Lansing. L'Altec Lansing 220 orateur(speaker) le système consiste en
deux orateurs(speakers) amplifiés augmentés pour le PC l'expérience
audio.
Grâce à une puissance totale du système de 10 watts, il offre des
performance de qualité pour les lecteurs MP3, les lecteurs CD, les
lecteurs de cassette, les lecteurs DVD, les consoles de jeu et les autres
installations audio/vidéo.
Contenu de l’emballage
• 2 Satellites
• Le manuel
• Garantie qualité
Installation des enceintes
ENCEINTES SATELLITES
Disposez les satellites en fonction de vos préférences d’écoute —
directement à côté du moniteur ou aussi loin que les cordons des
enceintes le permettent.
Remarque : Les enceintes satellites sont dotées d’un blindage
magnétique et peuvent être placées à proximité d’affichages vidéo et
notamment de télévisions et d’écrans d’ordinateurs sans déformer
l’image.
Branchements
AVERTISSEMENT :
N’insérez pas la prise électrique du système d’enceintes dans une sortie
CA avant d’avoir effectué tous les branchements. En outre, vous devez
éteindre les sources audio (c’est à dire votre PC, votre lecteur MP3,
votre console de jeux, etc.) avant de connecter leurs sorties aux
entrées du 220.
Pour assurer un fonctionnement satisfaisant dès la première utilisation,
veuillez suivre attentivement et dans l’ordre indiqué les différentes
étapes de connexion décrites ci-dessous.
ENCEINTES SATELLITES
Les enceintes satellite doivent être connectées au dispositif audio. La
seule connexion à effectuer est celle du câble audio stéréo vert clair de
3,5 mm —qui est branché au satellite de droite—dans la sortie audio
de votre dispositif audio. Une fois que vous avez effectué cette
connexion, insérez la prise de courant située au dos du satellite de
gauche dans une sortie CA. Vous pouvez maintenant utiliser vos
enceintes.
ENTRÉES
Il existe plusieurs schémas de connexion possibles entre votre dispositif
audio et le 220. Déterminez si vous allez installer le système d’enceinte
pour son PC/jeu PC, lecture DVD, jeux sur console ou sur des sources
audio portables (comme le MP3 ou les lecteurs CD portables), puis
passez à la section portant ce titre.
SON PC/JEUX SUR PC/LECTURE DVD
Toutes les cartes son PC sont dotées de sorties audio. En général, les
sortie portent l’indication “front output” (sortie avant) et “rear
output” (sortie arrière). Dans certains cas, une terminologie
légèrement différente peut être utilisée. La documentation
accompagnant la carte son doit vous aider à identifier les sorties à
utiliser avec votre système d’enceintes.
1. Branchez le câble stéréo vert clair de 3,5 mm, qui est connecté au
satellite de droite, sur l’entrée de votre carte son portant la mention
“FRONT,” (AVANT) qui est également de couleur vert clair.
JEUX SUR CONSOLE
(Requièrent l’utilisation de l’adaptateur en Y AAC1 non fourni. Vous
pouvez acheter cet adaptateur sur www.alteclansing.com.)
La plupart des systèmes de console de jeu sont dotés de doubles
sorties RCA. Parmi les fabricants de consoles les plus célèbres, on
trouve Sony™, Microsoft™, Nintendo™ et Sega™. Pour brancher vos
enceintes, suivez les étapes décrites ci-dessous :
1. Assurez-vous que l’alimentation de votre console de jeu est éteinte.
2. L’adaptateur en Y AAC1 est connecté à une prise jack stéréo vert
clair 3,5 mm à une extrémité, et à deux prises jack RCA à l’autre
extrémité—une rouge et une blanche.
3. Localisez les prises RCA rouge et blanche à l’extrémité du câble
connecté au dos de votre console de jeu. Branchez-les aux jacks rouge
et blanc correspondants sur le câble adaptateur en Y AAC1.
4. Localisez la prise stéréo vert clair 3,5 mm, qui est connectée au
satellite de droite.
5. Insérez la prise vert clair dans la prise jack vert clair sur le câble
adaptateur en Y AAC1.
DISPOSITIFS AUDIO PORTABLES (MP3, CD PORTABLE,
LECTEURS CD, ETC.)
1. Localisez la prise stéréo vert clair 3,5 mm qui est connectée au
satellite de droite.
2. Insérez la prise vert clair dans la prise jack du casque d’écoute sur
votre dispositif audio portable.
Casque d’écoute
Pour utiliser un casque d’écoute avec le système, branchez-le sur la
prise jack portant le symbole située sur la façace du satellite de
droite. Lorsque le casque d’écoute est connecté, les deux satellites
deviennent silencieux.
Mise sous tension
Une fois que toutes les connexions ont été effectuées, branchez le
cordon d’alimentation situé au dos du satellite de gauche dans une
prise murale CA. Le système d’enceintes est maintenant prêt à
fonctionner.
1. Allumez la source audio.
2. Allumez le système d’enceintes Altec Lansing 220 en appuyant sur le
bouton de mise en marche situé sur la façace du satellite de droite
Une DEL verte s’allumera près du bouton lorsque l’appareil sera sous
tension.
Remarque : Pour éviter d’entendre un son saturé lorsque vous allumez
votre système d’enceintes Altec Lansing, commencez toujours par
allumer votre source audio.
VOLUME GÉNÉRAL
Le bouton circulaire situé sur la façace du satellite de droite est le
réglage du volume général des enceintes. Tournez-le dans le sens des
aiguilles d’une montre pour augmenter le volume et dans le sens
inverse pour le baisser.
7
Page 5

Caractéristiques techniques
CONSEILS DE DÉPANNAGE
Puissance totale du système : 10 Watts (5 Watts RMS)
Réponse en fréquences : 70 Hz – 18 kHz
Rapport signal sur bruit
à l’entrée de 1 kHz : >70 dB
Fréquence de transition : 150 Hz
Taux d’harmonique (distortsion) : < 0,15 % taux d’harmonique à -10
dB tension d’entrée pleine échelle
Impédance d’entrée : 10k ohms
ENCEINTES SATELLITES AMPLIFIÉES
Amplificateurs (par satellite) : Un amplificateur pleine bande 3"
CONSEILS DE DÉPANNAGE
Vous trouverez les réponses à la plupart des questions relatives à
l’installation et aux performances dans le guide de Dépannage. Vous
pouvez également consulter les FAQ dans la section assistance clientèle
de notre site Internet à l’adresse www.alteclansing.com. Si vous ne
trouvez toujours pas les informations dont vous avez besoin, veuillez
appeler par téléphone notre équipe d’assistance à la clientèle pour
obtenir de l’aide avant de retourner les enceintes à votre détaillant,
conformément à ces conditions de retour.
Le service clientèle est joignable 7 jours sur 7 pour mieux vous servir.
Nous sommes ouverts :
du lundi au vendredi : de 8:00 à 12:00 minuit EST
samedi et dimanche : de 9:00 à 17:00 EST
1-800-ALTEC-88 (1-800-258-3288)
e-mail : csupport@alteclansing.com
Pour obtenir les informations les plus récentes, veuillez consulter notre
site Internet à l’adresse suivante : www.alteclansing.com.
© 2002 Altec Lansing Technologies, Inc.
Cet appareil a été conçu et ses plans réalisés aux États-Unis et a été
fabriqué dans notre usine autorisée ISO9002. Brevet des États-Unis
4429181 et 4625328 et d’autres brevets en cours.
PUISSANCE REQUISE
États-Unis/Canada/et où applicable 120V CA à 60 Hz 0.3A
Pays d’Amérique latine :
Europe/Royaume-Uni; 230V CA à 50 Hz 0.15A
Pays d’Asie où applicable;
Argentine, Chili et Uruguay :
Homologué ETL / cETL / CE / NOM / IRAM
SYMPTÖME CAUSE POSSIBLE SOLUTION
Aucune DEL
allumée.
Aucun son ne sort
de l’une ou des
deux enceintes.
Les enceintes
grésillent.
Le son est déformé.
L’appareil n’a pas été mis en marche.
Le cordon CA n’est pas branché à la prise murale.
Le parasustenteur (si utilisé) n’est pas allumé.
La prise murale ne fonctionne pas.
L’appareil n’a pas été mis en marche.
Le réglage du volume est trop bas.
Le câble audio n’est pas connecté à la source audio.
Le câble audio est connecté à la mauvaise sortie de la source
audio.
Problème au niveau de la source audio.
Mauvaise connexion.
Le contrôle du volume dans Windows est réglé trop haut.
Problème au niveau de votre source audio.
Le niveau du volume est trop haut.
Le contrôle du volume sur Windows est réglé trop haut.
Le son de la source est déformé.
Appuyez sur le bouton de mise sous tension sur l’enceinte de droite.
Vérifiez que la DEL de mise sous tension de l’enceinte de droite est bien
allumée. Sinon, branchez l’alimentation CA.
Si le cordon d’alimentation CA du satellite est branchée à un parasustenteur,
assurez-vous que celui-ci est bien allumé.
Branchez un autre appareil sur la prise murale (même jack) pour vérifier que cette
sortie fonctionne.
Vérifiez que le cordon d’alimentation CA du satellite est branché à la prise
murale.
Vérifiez que vous avez bien appuyé sur le bouton de mise sous tension et que
la DEL verte est allumée.
Tournez le bouton du volume dans le sens des aiguilles d’une montre pour
augmenter le volume.
Vérifiez le niveau du volume sur la carte son de l’ordinateur ou changez le
dispositif de la source audio et mettez-le à mi-niveau.
Connectez un câble audio à la source audio. Assurez-vous que les câbles
d’interface sont fermement insérés dans les prises jack appropriées.
Assurez-vous que le câble stéréo vert clair 3,5 mm est connecté et complètement
inséré dans la prise jack “line-out” (sort. ligne) ou “audio-out” (sortie audio) de
votre carte son ou d’une autre source audio.
Testez les enceintes sur une autre source audio en retirant le câble vert clair 3,5
mm de la source audio et en le branchant sur la “line-out” ou la prise jack du
casque d’écoute d’une autre source audio (par ex. CD portable, lecteur cassettes
ou radio FM).
Contrôlez tous les câbles. Assurez-vous qu’ils sont connectés à la prise jack
“line-out” ou “audio-out” de votre carte son ou d’une autre source audio —
et PAS à la “speaker-out.” (sortie enceinte).
Vérifiez le contrôle du volume sur Windows et baissez-le si nécessaire.
Débranchez le câble vert clair 3,5 mm de la source audio. Ensuite, branchez-le sur la
prise jack du casque d’écoute ou sur une autre source (par ex., Walkman, Discman
ou Radio FM).
Baissez le niveau du volume.
Vérifiez le volume sur Windows et baissez-le si nécessaire.
Les fichiers .WAV et .MID sont souvent de mauvaise qualité. Ainsi, la distorsion et
les bruits s’entendent facilement sur des enceintes haute puissance. Essayez une
autre source audio, comme un CD audio.
Interférence radio.
8
Trop près d’un pylône radio.
Déplacez vos enceintes pour voir si les interférences disparaissent. Vous pourrez
certainement acheter un câble blindé au magasin d’électronique proche de chez
vous.
9
Page 6

La figura de relámpago que termina en punta de flecha
y se encuentra dentro de un triángulo equilatero tiene
por finalidad alertar al usuario de la presencia de
“voltaje peligroso” sin aislamiento en el interior del
producto que podría tener potencia suficiente para
constituir riesgo de choque eléctrico para las personas.
Precaución: Para evitar el riesgo de choque
eléctrico, no retire la cubierta (o parte posterior). En
su interior hay piezas que no debe manipular el
usuario. Para realizar el mantenimiento acuda al
personal de servicio calificado.
INSTRUCCIONES DE SEGURIDAD
PRECAUCIÓN
Para evitar choques eléctricos no utilice este enchufe (polarizado)
con una extensión, receptáculo u otra toma de corriente a menos
que se pueda insertar completamente las cuchillas para evitar que
estas queden expuestas.
ADVERTENCIA
PARA REDUCIR EL RIESGO DE INCENDIO O CHOQUE ELÉCTRICO,
NO EXPONGA EL ARTEFACTO A LA LLUVIA O HUMEDAD.
Connecting the Power Cord (AC Wall Socket)
La ranura larga es el
lado neutro(de tierra).
Inserte la cuchilla ancha en
la ranura del lado de tierra.
Lea las instrucciones — Debe leer la totalidad de instrucciones
de seguridad y operación antes de operar el artefacto.
Conserve las instrucciones — Debe conservar las
instrucciones de operación para usarlas como referencia en el futuro.
Preste atención a las advertencias — Debe prestar
atención a todas las advertencias del artefacto y las instrucciones de
operación.
Siga las instrucciones — Debe seguir todas las instrucciones
de operación y uso.
Agua y humedad — No debe utilizar el artefacto cerca del agua –
por ejemplo, cerca de una bañera, lavamanos, lavaplatos, bateas, en un
sótano húmedo, o cerca de una piscina, etc.
Uso exterior — Advertencia: para reducir el riesgo de incendio o
choque eléctrico, no exponga este artefacto a la lluvia o humedad.
Ubicación — Debe ser instalado el artefacto en un lugar estable.
Ventilación — Debe situar el artefacto de manera que su
ubicación o posición no interfiera con la ventilación adecuada del
mismo. Por ejemplo, no debe colocar el artefacto sobre una cama, sofa,
alfombra u otra superficie similar que pueda bloquear las aberturas de
ventilación; ni colocarlo en una instalación empotrada, como un
estante o armario cerrado que pueda obstruir el flujo de aire a través
de las aberturas de ventilación.
Calor — Debe colocar el artefacto alejado de fuentes de calor como
radiadores, termorregistradores, hornos u otros aparatos que producen
calor (incluyendo amplificadores).
Fuentes de alimentación — Debe conectar el artefacto
únicamente a una fuente de alimentación que sea del tipo descrito en
las instrucciones de operación o que se encuentren indicados en el
mismo.
Protección del cordón de alimentación — Debe
colocar los cordones de suministro de alimentación de manera que sea
poco probable que los pisen o los prensen objetos sobre o contra ellos.
Preste particular atención a los cordones y enchufes, receptáculos
convenientes y el punto en el que salen del artefacto.
El signo de exclamación que se encuentra dentro de un
triángulo equilatero tiene por finalidad alertar al
usuario de la presencia de importantes intrucciones de
operación y mantenimiento (servicio) en la literatura
que viene incluida con el artefacto.
Conexión a tierra o polarización — Debe tomar
precauciones para no desconectar los medios de conexión a tierra o
polarización de otro artefacto.
Limpieza — Debe limpiar el artefacto solamente con un paño para
sacar brillo o un paño suave seco. No limpiar nunca con cera para
muebles, benceno, insecticidas u otros líquidos volátiles ya que podrían
corroer el gabinete.
Períodos sin uso — Debe desenchufar el cordón de alimentación
del artefacto de la toma de corriente cuando se vaya a dejar sin usar
por un período prolongado de tiempo.
Tormentas eléctricas — Desenchufe el artefacto durante las
tormentas eléctricas.
Ingreso de objetos y líquidos — Debe tener cuidado de no
dejar caer objetos ni derramar líquidos dentro del artefacto a través de
las aberturas.
Accesorios —Use solamente los dispositivos/accesorios
especificados por el fabricante.
Daños que requieren mantenimiento — El artefacto
debe recibir mantenimiento por el personal de servicio calificado en los
siguientes casos:
• Se ha dañado el cordón de alimentación o el enchufe.
• Han caido objetos o se ha derramado líquido dentro del artefacto.
•El artefacto ha sido expuesto a la lluvia.
•El artefacto parece no funcionar normalmente o muestra un cambio
notable en su rendimiento.
• Se ha dejado caer el artefacto o se ha dañado la cubierta.
Mantenimiento — El usuario no debe intentar darle
mantenimiento al artefacto. Para efectuar el mantenimiento debe
enviarse el artefacto al personal de mantenimiento calificado,
entregarlo al distribuidor o llamar a la línea de servicio de Altec
Lansing para solicitar ayuda.
Garantía limitada de un año
Altec Lansing Technologies, Inc. le garantiza al usuario final que la
totalidad de sus sistemas de parlantes para computadoras se encuentra
libre de defectos en material y mano de obra en el curso del uso
normal y razonable, por el período de un año contado a partir de la
fecha de compra.
Esta garantía es exclusiva y constituye la única garantía vigente
respecto a los sistemas de parlantes para computadora Altec Lansing,
y cualquier otra garantía, ya sea expresa o implícita carece de valor.
Altec Lansing Technologies, Inc. ni los distribuidores autorizados de
Altec Lansing Technologies, Inc. se responsabilizan por daños
incidentales incurridos en el uso de los parlantes. (Esta limitación de
daño incidental o consecuencial no es aplicable en los lugares en los
que se encuentra prohibido.)
La obligación de Altec Lansing Technologies, Inc. en virtud de esta
garantía no se aplica a los defectos, mal funcionamiento o falla que
resulte del mal uso, abuso, instalación inadecuada, uso con equipo
defectuoso o inadecuado o el uso de los sistemas de parlantes para
computadora con cualquier equipo para el que no hayan sido diseñados.
Los términos de esta garantía se aplican solamente a los sistemas de
parlantes para computadora al momento que dichos parlantes son
devueltos al distribuidor autorizado de Altec Lansing Technologies, Inc.
donde fueron adquiridos.
Bajo los términos de esta garantía, el comprador consumidor original
tiene ciertos derechos legales y podría tener otros derechos, que varían
según cada país.
10
Sistema de Parlantes
220
BIENVENIDA
Bienvenido al extraordinario mundo del sonido de alta-fidelidad de Altec
Lansing. El Altec Lansing 220 sistema de orador se compone de dos
oradores amplificados aumentados para la experiencia de la
audiofrecuencia de PC
Con una potencia de sistema total de 10 watts, brinda un rendimiento de
calidad para reproductores de MP3, CD, cassette, DVD, CONSOLAS DE
JUEGOS y otros dispositivos de audio/vídeo.
contenido del paquete
• 2 parlantes Satélite
• Manual
• QCC
colocar los parlantes
PARLANTES SATÉLITE
Ponga los parlantes satélite en la disposición que se adecúe a sus gustos
de audio, ya sea directamente, a los costados del monitor o tan alejados
como lo permita la longitud de los cables.
Nota: Los parlantes satélite cuentan con una coraza magnética que hace
posible su colocación cerca de salidas de vídeo tales como televisores y
monitores de computadora sin distorsionar la imagen.
conectar el sistema
ADVERTENCIA:
No inserte el enchufe de alimentación del sistema de parlantes en una
toma de corriente hasta no haber efectuado todas las conexiones.
Asimismo, apague todas las fuentes de audio (es decir, su PC, reproductor
de MP3, juego de consola, etc.) antes de conectar sus salidas en las
entradas del 220.
Para asegurar que la operación inicial se lleve a cabo de la manera
esperada, sírvase seguir cuidadosamente las secuencias de conexión que
se describen a continuación en el orden indicado.
PARLANTES SATÉLITE
Los parlantes satélite deben estar conectados al dispositivo de audio. La
única conexión que necesita realizar es la del cable de audio estereo de
3.5 mm color verde lima—que se encuentra conectado al parlante satélite
derecho—en la salida de audio de su dispositivo de audio. Una vez
realizada esta conexión, inserte el enchufe de alimentación que se
encuentra en la parte posterior del parlante satélite izquierdo en una
toma de corriente AC. Ahora puede utilizar sus parlantes.
ENTRADAS
Se encuentran disponibles varios esquemas de conexión entre su
dispositivo de fuente de audio y el 220. Determine si va a configurar el
sistema de parlantes para audio de PC/juegos para PC, reproducción de
DVD, juegos de consola o con fuentes de audio portátiles (como
reproductores de MP3 o reproductores portátiles de CD), y luego mire la
sección que contenga ese título.
REPRODUCCIÓN DE AUDIO DE PC/JUEGOS DE PC/DVD
Todas las tarjetas de sonido de PC tienen salidas de audio. Por lo general
las salidas se encontrarán marcadas como “front output” (salida frontal)
y “rear output” (salida posterior). En algunos casos, se podrá emplear
terminología levemente diferente. La documentación de la tarjeta de
sonido deberá ayudarle a determinar qué salidas emplear con su sistema
de parlantes.
1. Conecte el cable e-stereo de 3.5 mm color verde lima, que está
conectado al parlante satélite derecho, en la salida de su tarjeta de
sonido rotulada “FRONT,” (FRONTAL) que también es de color verde
lima.
Amplificados de 2 Piezas
JUEGOS DE CONSOLA
(Requiere el uso de un adaptador AAC1 Y, que no se incluye con el
equipo. Este adaptador se puede adquirir en www.alteclansing.com.)
La mayoría de sistemas de juegos de consola presentan salidas RCAdobles. Los fabricantes de sistemas de consola más populares incluyen
Sony™, Microsoft™, Nintendo™ y Sega™. Para conectar sus parlantes
siga los pasos que se detallan a continuación:
1. Asegúrese de que la potencia que va hacia su sistema de juegos de
consola se encuentra apagado.
2. El adaptador AAC1 Y posee una clavija stereo de 3.5 mm color verde
lima en un extremo y dos clavijas RCA en el otro—una roja y una
blanca.
3. Coloque los enchufes RCA rojo y blanco al extremo del cable conectado a
la parte posterior de su sistema de juegos de consola. Conéctelos en las
clavijas RCA roja y blanca del cable del adaptador AAC1 Y.
4. Ubique el enchufe estereo de 3.5 mm color verde lima, que se
encuentra conectado al parlante satélite derecho.
5. Coloque el enchufe verde lima en la clavija verde lima del cable del
adaptador AAC1 Y.
DISPOSITIVOS PORTÁTILES DE AUDIO (REPRODUCTORES DE
MP3, ARTEFACTOS PORTÁTILES DE AUDIO (MP3,
REPRODUCTORES DE CD PORTÁTILES, ETC).
1. Ubique el enchufe estereo de 3.5 mm verde lima, que está conectado
al parlante satélite derecho.
2. Coloque el enchufe verde lima en la clavija para audífonos de su
dispositivo de audio.
audifonos
Para utilizar audífonos con el sistema enchúfelos en la clavija rotulada
que se encuentra en la parte frontal del parlante satélite derecho.
Una vez que los audífonos se encuentran conectados, ambos parlantes
satélite se encuentran en modo silencio.
poner en función
Una vez realizadas todas las conexiones, enchufe el cable de alimentación
que se encuentra en la parte posterior del parlante satélite izquierdo, en
un receptáculo de AC de la pared. En este momento el sistema de
parlantes se encuentra listo para funcionar.
1. Encienda la fuente de audio.
2. Encienda el sistema de parlantes Altec Lansing 220 pulsando el botón
de encendido que se encuentra en la parte frontal del parlante satélite
derecho Una vez que el sistema esté encendido, se iluminará un
indicador LED verde que se encuentra al lado del botón de encendido.
Nota: Para evitar escuchar un sonido agudo cuando encienda su sistema
de parlantes Altec Lansing, siempre encienda primero su fuente de audio.
VOLUMEN MAESTRO
La perilla que se encuentra en la parte frontal del parlante satélite
derecho es el control de volumen maestro del sistema de parlantes. Gire
la perilla hacia la derecha para aumentar el volumen y hacia la izquierda
para disminuirlo.
11
Page 7

Especificaciones del sistema
CONSEJOS PARA LA SOLUCIÓN DE PROBLEMAS
Potencia total del sistema: 10 Vatios (5 Vatios RMS)
Frecuencia de respuesta: 70 Hz – 18 kHz
Proporción señal/ruido
@ 1 kHz de entrada: >70 dB
Frecuencia de transición: 150 Hz
THD del sistema : < 0.15 % THD @-10 dB voltaje de
entrada a fondo de escala
Impedancia de entrada: 10k ohmios
PARLANTES AMPLIFICADOS SATÉLITE
Controladores (por satélite):Un controlador de rango completo de 3"
CONSEJOS PARA LA SOLUCIÓN DE PROBLEMAS
Las respuestas a la mayoría de preguntas acerca de la configuración y
rendimiento se pueden encontrar en la guía de solución de problemas.
También puede consultar las FAQs (Preguntas frecuentes) en la sección
de soporte al cliente de nuestro sitio Web en www.alteclansing.com. Si
aún no puede encontrar la información que necesita, sírvase llamar a
nuestro equipo de servicio al cliente solicitando asistencia antes de
devolver los parlantes a su distribuidor en virtud de su política de
devolución.
Para su comodidad, el servicio al cliente está disponible los 7 días de la
semana. Nuestro horario de oficina es el siguiente:
De lunes a viernes: de 8:00 a.m. hasta las 12:00 de la medianoche EST
Sábado y domingo: de 9:00 a.m. hasta las 5:00 p.m. EST
1-800-ALTEC-88 (1-800-258-3288)
Email: csupport@alteclansing.com
Para obtener información más actualizada, asegúrese de visitar nuestro
sitio Web en www.alteclansing.com.
© 2002 Altec Lansing Technologies, Inc.
Diseñado y creado en los Estados Unidos de América y fabricado en
nuestra planta, que cuenta con la certificación de los estándares
ISO9002. Patentes de los Estados Unidos 4429181 y 4625328 además de
otras patentes pendientes de trámite.
REQUERIMIENTOS DE ALIMENTACIÓN
Estados Unidos/Canadá y l 120V AC @ 60 Hz 0.3A
os países latinoamericanos
pertinentes
Europa/Reino Unido países 230V AC @ 50 Hz 0.15A
asiáticos pertinentes;
Argentina, Chile y Uruguay:
Aprobado por: ETL / cETL / CE / NOM / IRAM
SÍNTOMA POSIBLE PROBLEMA SOLUCIÓN
Ningún
indicador LED se
encuentra
encendido.
Uno o más de
los parlantes no
emiten sonido
alguno.
Los parlantes
emiten un
sonido
crepitante.
Emite sonidos
distorsionados.
Hay
interferencia de
radio.
El sistema no está encendido.
El cordón de AC no se encuentra conectado a la
toma de la pared.
El supresor de picos (si se está utilizando
alguno) no se encuentra encendido.
La toma de la pared no funciona.
El sistema no está encendido.
El volumen está ajustado demasiado bajo.
El cable de audio no está conectado a la fuente
de audio.
El cable de audio está conectado a la salida de
fuente de audio equivocada.
Hay un problema con la fuente de audio.
Hay una conexión mala.
El control de volumen en Windows está
demasiado alto
Hay un problema con su fuente de audio.
El nivel de volumen está demasiado alto.
El control de volumen de Windows está
demasiado alto.
La fuente de sonido está distorsionada.
Está demasiado cerca a una torre de radio.
Pulse el botón de Encendido del parlante derecho.
Verifique si el LED de encendido del parlante satélite derecho está iluminado. Si no fuera
así, conecte la alimentación de AC.
Si el cordón de alimentación de AC del satélite está conectado a un supresor de picos,
asegúrese de que el supresor de picos esté encendido.
Conecte otro artefacto en la toma de la pared (misma clavija) para verificar si funciona.
Verifique si el cordón de alimentación AC del satélite está conectado a la toma de la
pared.
Verifique si ha presionado el botón de encendido y si el indicador LED verde está
iluminado.
Gire la perilla de volumen a la derecha para aumentar el volumen.
Verifique el nivel de volumen de la tarjeta de sonido o el dispositivo de fuente de sonido
de la computadora y ajústelo a un nivel medio.
Conecte el cable de audio a la fuente de audio. Asegúrese de que los cables de señal
estén firmemente insertados en las clavijas correctas.
Verifique que el cable estereo de 3.5 mm verde limón esté conectado y completamente
insertado en la clavija “line-out” (línea de salida) o “audio-out” (salida de audio de su
tarjeta de sonido u otra fuente de audio.
Pruebe los parlantes en otra fuente de audio retirando el cable de 3.5 mm de la fuente
de audio y conectando “line-out” o clavija de audífono de otra fuente de audio (por ej.
CD portátil, reproductor de cassette o radio FM).
Revise todos los cables. Asegúrese que estén conectados a la clavija “line-out” o “audioout” de su tarjeta de sonido u otra fuente de audio—y NO en “speaker-out.”
Revise el control de volumen de Windows volume y disminúyalo si es neceario.
Desconecte el cable estereo de 3.5 mm de la fuente de audio. Luego conéctelo a la clavija de
audífono de una fuente alterna (por ejemplo, Walkman, Discman o radio FM).
Disminuya el nivel de sonido.
Revise el volumen de Windows y disminuyalo si es necesario.
Los archivos en formato.WAV y .MID por lo general son de calidad deficiente; por lo tanto
con parlantes de alta potencia se distinguen fácilmente la distorsión y el ruido. Inténtelo
con otra fuente de audio como un CD de música.
Mueva sus parlantes para ver si la interferencia desaparece. Podría comprar un cable
blindado en la tienda de artículos de electrónica de su localidad.
12
13
Page 8

O flash luminoso com cabeça em seta, dentro de um
triângulo equilátero, tem o propósito de alertar o
usuário para a presença de ”voltagem perigosa” não
isolada dentro do invólucro do produto, a qual pode ser
de magnitude suficiente para constituir um risco de
choque elétrico a pessoas.
INSTRUÇÕES DE SEGURANÇA
CUIDADO
Para evitar choque elétrico, não use este plugue (polarizado) com
um cabo de extensão, receptáculo ou outra saída, a menos que as
facas da chave elétrica possam ser totalmente inseridas para evitar
a exposição das facas.
ADVERTÊNCIA
Para reduzir o risco de incêndio ou choque elétrico, não exponha
este equipamento à chuva ou umidade.
Cuidado: Para evitar o risco de choque elétrico, não
remova a cobertura (ou a traseira). Não há peças de
utilidade para o usuário, dentro. Encaminhe o
atendimento técnico para equipe de pessoal de
serviço qualificada.
A ranhura longa é lado
neutro (terra).
Inserir a faca larga dentro
da ranhura lateral de terra..
Leia as Instruções — Todas as instruções de segurança e operação
devem ser lidas antes que o equipamento seja operado.
Guarde as Instruções — As instruções de operação devem ser
guardadas para consulta futura.
Preste atenção às Advertências — Todas as advertências
constantes do equipamento e nas instruções de operação devem ser
cumpridas à risca.
Siga as Instruções — Todas as instruções de operação e uso devem
ser seguidas.
Água e Umidade — O equipamento não deve ser usado próximo à
água – por exemplo, perto de uma banheira, de pia de banheiro, de pia
de cozinha, de tanque de lavar roupa, em um piso molhado ou perto de
uma piscina, etc.
Uso ao Ar livre — Advertência: Para reduzir o risco de incêndio ou
choque elétrico, não exponha este equipamento à chuva ou umidade.
Localização — O equipamento deve ser instalado em um local
estável.
Ventilação — O equipamento deve estar situado de maneira que sua
localização ou posição não interfira com sua adequada ventilação. Por
exemplo, o equipamento não pode estar situado sobre uma cama, sofá,
tapete, ou superfície similar que bloqueie as aberturas de ventilação, ou
colocado em uma instalação embutida, tal como uma estante fechada ou
gabinete, que possa impedir o fluxo de ar através das aberturas de
ventilação.
Calor — O equipamento deve estar situado longe de fontes de calor,
tais como radiadores, registros de aquecimento, fogões, ou outros
dispositivos (incluindo amplificadores) que produzam calor.
Fontes de Energia — O equipamento deve ser conectado a um
suprimento de força apenas do tipo descrito nas instruções de operação
ou tal como marcado no equipamento.
Proteção do Cabo de Força — Os cabos de suprimento de
força devem ser roteados de maneira que não haja probabilidade de
serem pisados ou esmagados por objetos colocados sobre ou contra os
mesmos. Preste atenção especial aos cabos nos plugues, em receptáculos
de utilidades e no ponto onde os mesmos saem do equipamento.
Aterramento ou Polarização — Precauções devem ser
tomadas de forma que as medidas de aterramento ou polarização de um
equipamento não sejam anuladas.
O ponto de exclamação dentro do triângulo equilátero
tem o propósito de alertar o usuário para a presença
de instruções importantes de operação e manutenção
(atendimento técnico) na literatura que acompanha o
equipamento.
Limpeza — O equipamento deve ser limpo somente com um pano de
polimento ou um tecido seco e macio. Nunca limpe com cera para
móveis, benzina, inseticidas ou outros líquidos voláteis, uma vez que os
mesmos podem corroer o gabinete.
Períodos Sem Uso — O cabo de força do equipamento deve ser
desconectado da saída quando deixado sem uso por longo período de
tempo.
Tempestades de Raios — Desconecte o aparelho durante
tempestades com raios.
Entrada de Objeto e Líquido — Deve ser tomado cuidado para
que objetos não caiam e líquidos não sejam derramados dentro do
invólucro, através das aberturas.
Acessórios — Somente use acessórios de fixação especificados pela
Altec Lansing Technologies, Inc.
Danos que necessitem de Assistência Técnica —
O equipamento deve ser encaminhado à assistência técnica de pessoal
técnico qualificado de serviços, quando:
•O cabo de suprimento de força ou o plugue tenha sido danificado.
•Tenham caído objetos, ou líquidos tenham sido derramados dentro
do equipamento.
•O equipamento tenha sido exposto à chuva.
•O equipamento parece não operar normalmente ou exibe uma
mudança marcante no desempenho.
•O equipamento tenha sido derrubado ou o invólucro danificado.
Assistência Técnica — O usuário não deve tentar reparar o
equipamen-to. O Atendimento Técnico deve ser feito por pessoal técnico
qualifi-cado de serviço ou o equipamento devolvido ao Revendedor ou
ser feita chamada telefônica para a linha de serviços da Altec Lansing,
para assistência.
Garantia Limitada de Um Ano
A Altec Lansing Technologies, Inc. garante ao usuário final que todos os
seus sistemas de alto-falantes para computador estão livres de defeitos
de material e de manufatura, no decorrer de uso normal e razoável, pelo
espaço de tempo de um ano a partir da data de aquisição.
Esta garantia é a garantia única e exclusiva com efeito, relativa aos
sistemas de alto-falantes para computador da Altec Lansing, e quaisquer
outras garantias, sejam expressas ou implícitas, são inválidas. Nem a Altec
Lansing Technologies, Inc., nem qualquer Revendedor autorizado Altec
Lansing Technologies, Inc., é responsável por quaisquer danos incidentais
incorridos no uso dos alto-falantes. (Esta limitação de dano incidental ou
conseqüente não é aplicável onde proibida).
A obrigação da Altec Lansing Technologies, Inc., sob esta garantia, não se
aplica a qualquer defeito, mal funcionamento ou falha resultante de mal
uso, abuso, instalação imprópria, uso com equipamento defeituoso ou
impróprio ou o uso dos sistema de alto-falantes de computador com
qualquer equipamento para o qual não tenha sido previsto.
Os termos desta garantia aplicam-se somente aos sistemas de altofalantes de computador quando tais alto-falantes sejam devolvidos ao
respectivo Revendedor autorizado Altec Lansing Technologies, Inc., onde
foram adquiridos.
Sob os termos desta garantia, o comprador consumidor original tem
certos direitos legais e pode ter outros direitos, os quais variam conforme
o lugar do mundo.
14
Sistema de Alto-falantes
220
BEM-VINDO
Bem-vindo ao extraordinário mundo do som em alta fidelidade da
Altec Lansing. O Lansing de Altec 220 sistema de orador consiste em
dois oradores amplificados aumentados para experiência de áudio de
PC.
Com 10 watts de força total de sistema, ele propicia desempenho de
qualidade a aparelhos de MP3, aparelhos de CD, aparelhos de cassete,
aparelhos de DVD, consoles de jogos, e outros dispositivos de
áudio/vídeo.
Conteúdo da Caixa
• 2 Satélites
•Manual
• QCC
Coloando os Alto-falantes
Alto-falantes Satélites
Arrume os satélites para que se adaptem a seus gostos de ouvinte –
diretamente perto do monitor ou tão distantes quanto permita o
cabo do alto-falante.
Observação: Os alto-falantes satélites são magneticamente blindados e
podem ser colocados perto de telas de vídeo, tais como monitores de
TVs e computadores, sem distorcer a imagem.
Fazendo as Conexões
Advertência:
Não insira o plugue de força do sistema de alto-falantes em uma
saída AC até que sejam feitas todas as conexões. Da mesma forma,
desligue as fontes de áudio (isto é, seu PC, aparelho MP3, console de
jogos, etc.) antes de conectar suas saídas às entradas do 220.
Para assegurar que a operação da primeira vez seja como a esperada,
por favor, siga cuidadosamente as seqüências de conexão descritas
abaixo, na ordem indicada.
Alto-falantes Satélites
Os alto-falantes satélites devem ser conectados ao dispositivo de
áudio. A única conexão que precisa ser feita é a do plugue de áudio
estéreo de 3,5mm, verde-limão – a qual é conectada ao satélite
direito – dentro da saída de áudio, em seu dispositivo de áudio.
Depois que esta conexão for feita, insira o plugue de força alizado na
parte traseira do satélite esquerdo na saída AC. Você pode, agora,
usar seus alto-falantes.
Entradas
Estão disponíveis vários esquemas de conexão entre seu dispositivo
fonte de áudio e o 220. Determine se você estará ajustando o sistema
de alto-falantes para áudio PC/jogos de PC, aparelho de DVD, console
de jogos ou com fontes portáteis de áudio (tais como aparelhos MP3
ou de CD portáteis) e, então, vá para a seção com este título.
Áudio de PC/Jogos de PC/Reprodutor de DVD
Todos os cartões de som de PC têm saídas de áudio. As saídas estarão
marcadas, de forma característica, como ”front output” (saída
frontal) e ”rear output”(saída traseira). Em alguns casos, pode ser
usada terminologia ligeiramente diferente. A documentação do
cartão de som deve ajudá-lo a determinar quais as saídas a usar com
seu sistema de alto-falantes.
Amplificados de Duas Peças
1. Conecte o plugue estéreo de 3,5 mm, verde-limão, o qual está
conectado ao satélite direito, em sua entrada do cartão de som
rotulada como ”FRONT” (frontal), que também tem a cor verdelimão.
Console de Jogos
(Requer o uso de adaptador-Y AAC1, o qual não está incluso. Este
adaptador pode ser adquirido no endereço www.alteclansing.com.)
A maioria dos sistemas de consoles de jogos dispõe de saídas duplas
RCA. Fabricantes populares de sistemas de console incluem a Sony™,
Microsoft™, Nintendo™ e Sega™. Para conectar seus alto-falantes,
siga as etapas abaixo:
1. Certifique-se de que a força para seu sistema de console de jogos
esteja desligada.
2. O adaptador-Y AAC1 tem um plugue de pino estéreo, de 3,5mm,
verde-limão, em uma ponta, e dois plugues de pino RCA, na outra
– um vermelho e outro branco.
3. Localize os plugues vermelho e branco RCA na ponta do cabo
conectado à traseira de seu sistema de console de jogos. Conecteos
aos plugues de pino vermelho e branco RCA que combinam, no
cabo do adaptador-Y AAC1.
4. Localize o plugue estéreo de 3,5 mm, verde-limão, o qual está
conectado ao satélite direito.
5. Insira o plugue verde-limão dentro do plugue de pino verde-limão,
no cabo do adaptador-Y AAC1.
Dispositivos de Áudio Portáteis
(MP3, Aparelhos Portáteis de CD, etc.)
1. Localize o plugue estéreo de 3,5 mm, verde-limão, o qual está
conectado ao satélite direito.
2. Insira o plugue verde-limão no plugue de pino do fone de ouvido
em seu dispositivo portátil de áudio.
Fones de ouvido
Para usar fones de ouvido com o sistema, conecte-os no plugue de
pino rotulado na parte frontal do satélite direito. Quando os
fones de ouvido estiverem conectados, ambos os satélites ficarão
mudos.
Ligando
Depois que todas as conexões forem feitas, plugue o cabo de força
localizado na parte traseira do satélite no soquete de parede AC. O
sistema de alto-falantes está pronto, agora, para operar.
1. Ligue a fonte de áudio.
2. Ligue o sistema de alto-falantes Altec Lansing 220, apertando o
botão de força localizado na parte frontal do satélite direito .
Um LED verde vai se acender perto do botão, quando a força
estiver ligada.
Observação: Para evitar que seja ouvido um som com estalos, ao
ligar seu sistema de alto-falantes Altec Lansing, sempre ligue primeiro sua fonte de áudio.
VOLUME MESTRE
O botão na parte frontal do satélite direito é o controle mestre de
volume para o sistema de alto-falantes. Gire o botão em sentido
horário para aumentar o volume e em sentido anti-horário para
diminuir o volume.
15
Page 9

Especificações do Sistema
DIAGNÓSTICO DE FALHAS
Força Total do Sistema: 10 Watts (5 Watts RMS)
Resposta de Freqüência: 70 Hz – 18 kHz
Sinal para Proporção de Ruído @ 1 kHz: >70 dB
Freqüência Crossover: 150 Hz
Sistema THD (distorção): < 0.15 % THD @ -10 dB
Voltagem de entrada de
escala total
Impedância de Entrada: 10k ohms
ALTO-FALANTES AMPLIFICADOS SATÉLITES
Drivers (por satélite): Um drive de 3” de faixa total
DIAGNÓSTICO DE FALHAS
As respostas à maioria das perguntas de ajuste e desempenho podem
ser encontradas no guia de Diagnóstico de Falhas. Você também pode
consultar as FAQs (perguntas e respostas mais freqüentes) na seção de
suporte ao cliente em nosso site na WEB, no endereço
www.alteclansing.com. Se ainda não conseguir encontrar a informação
de que precisa, por favor, chame nossa equipe de assistência técnica ao
consumidor para assistência, antes de devolver os alto-falantes à loja,
amparado por nossa política de devolução.
O Serviço de Atendimento ao Consumidor está disponível 7 dias por
semana, para sua conveniência. Nosso horário comercial é:
Segunda a Sexta-feira: 8:00 às 24:00 horário local
Sábado & Domingo: 9:00 às 17:00 horário local
REQUISITOS DE FORÇA
Estados Unidos, Canadá e países
que se apliquem, na América Latina: 120V AC @ 60 Hz 0.3A
Europa, Reino Unido, países 230V AC @ 50 Hz 0.15A
que se apliquem na Ásia,
Argentina, Chile e Uruguai:
Aprovado por ETL/cETL/CE/NOM/IRAM
SINTOMA POSSÍVEL PROBLEMA SOLUÇÃO
Nenhum LED
aceso
Nenhum som
vem de um ou
mais altofalantes.
Som com
estalidos dos
alto-falantes
A força não está ligada.
O cabo AC não está conectado à tomada da parede.
Estabilizador (se usado) não está ligado.
A tomada da parede não está funcionando.
A força não está ligada.
Volume ajustado muito baixo.
O cabo de áudio não está conectado à fonte de áudio.
Cabo de áudio está conectado à saída errada na fonte de
áudio.
Problema com a fonte de áudio.
Conexão ruim.
Aperte o botão de Força no alto-falante direito.
Verifique para ver se o LED de força ligada está iluminado no satélite direito.
Se não, conecte a força AC.
Se o cabo de força AC do satélite estiver plugado em um estabilizador,
certifique-se de que o estabilizador esteja ligado.
Conecte outro aparelho na tomada da parede (mesmo plugue), para confirmar se
a tomada está funcionando.
Verifique se o cabo de força AC do satélite está conectado à tomada da
parede.
Verifique se o botão de Força foi pressionado e se o LED está iluminado.
Gire o botão de volume em sentido horário para aumentar o volume.
Verifique o nível de volume no cartão de som do computador ou alterne para
o dispositivo de áudio e ajuste em meio volume.
Conecte o cabo de áudio à fonte de áudio. Certifique-se de que os cabos de
sinal estão inseridos firmemente nos plugues de pino corretos.
Certifique-se de que o cabo estéreo de 3,5 mm, verde-limão, está conectado e
totalmente inserido no plugue de pino ”saída de linha” ou ”saída de áudio”
em seu cartão de som ou outra fonte de áudio.
Teste os alto-falantes em outra fonte de áudio, removendo o cabo de 3,5 mm,
verde-limão, da fonte de áudio e conectando-o ao plugue da ”saída de linha”
ou fone de ouvido de uma fonte de áudio diferente (p. ex., CD portátil,
aparelho cassete ou rádio FM).
Verifique todos os cabos. Certifique-se de que estão conectados nos plugues
de pino de ”saída de linha” ou ”saída de áudio” em seu cartão de som ou à
outra fonte de áudioæ e NÃO em ”saída de alto-falante.”
1-800-ALTEC-88 (1-800-258-3288)
E-mail: csupport@alteclansing.com
Para informação mais atualizada, certifique-se de verificar nosso site na
Web, no endereço www.alteclansing.com.
© 2002 Altec Lansing Technologies, Inc.
Projetado e construído nos Estados Unidos e manufaturado em nossa
fábrica certificada com o ISO9002. Patentes dos Estados Unidos
4429181 e 4625328, acrescidas de outras patentes pendentes.
O som está
distorcido.
Interferência de
Rádio
O controle de volume do Windows está ajustado muito
alto.
Um problema com sua fonte de áudio.
O nível de volume está ajustado muito alto.
O controle de volume do Windows está ajustado muito
alto.
A fonte de som está distorcida.
Muito próximo de uma torre de rádio.
Verifique o controle de volume do Windows e diminua, se necessário.
Desconecte o cabo estéreo de 3,5 mm, verde-limão, da fonte de áudio. Depois,
conecte-o ao plugue de pino do fone de ouvido de uma fonte alternativa (p.ex.,
Walkman, Discman ou rádio FM).
Diminua o nível do volume.
Verifique o volume do Windows e diminua, se necessário.
Arquivos .WAV e .MID são freqüentemente de qualidade pobre, por isso
distorções e ruídos são facilmente notados com alto-falantes de alta potência.
Tente uma fonte de áudio diferente, tal como um CD de música.
Mude os alto-falantes de lugar para ver se a interferência desaparece. Você
pode precisar comprar um cabo blindado na loja de eletrônicos local.
16
17
Page 10

Corporate Headquarters
Rte. 6 & 209, Milford, PA 18337-0277, USA
800-ALTEC-88 • 570-296-4434 • Fax 570-296-6887
Asia/Pacific
25 Canton Road, Tsim Sha Tsui, Kowloon, Hong Kong
(852) 2735-7331 • Fax (852) 2317-7937
H0019 REV10
 Loading...