

Page 1
Page 2

Contents
Introduction............................................................ 3
Technical Support .............................................................................................................. 4
Precautions ....................................................................................................................... 4
Specifications..................................................................................................................... 6
Package Content................................................................................................................ 7
Product Overview ...............................................................................................................8
1. Use as External USB HDD ......................................... 11
1.1 Insert Hard Disk ..............................................................................................11
1.2 Format Built-in HDD via USB...........................................................................12
1.2.1 Windows 98SE, ME..................................................................................................12
1.2.2 Windows 2000 .........................................................................................................14
1.2.3 Windows XP ............................................................................................................16
1.3 Copy Data via USB..........................................................................................18
1.3.1 Windows 98SE ........................................................................................................ 18
1.3.2 Windows ME............................................................................................................ 19
1.3.3 Windows 2000, XP ...................................................................................................20
1.3.4 Linux....................................................................................................................... 21
1.3.5 Mac ........................................................................................................................21
2. Connect to PC via Network ........................................ 23
2.1 Wired LAN Connection ................................................................................................23
2.2 Wireless LAN Connection ............................................................................................24
3. Shared File Playback (Stream)..................................... 29
3.1 Windows 98SE, ME..................................................................................................... 29
3.2 Windows 2000 ............................................................................................................31
3.3 Windows XP...............................................................................................................34
3.4 Windows Vista ............................................................................................................ 38
4. Use as Network Storage (NDAS)................................... 43
1
Page 3

5. Use USB Host ..................................................... 47
6. Connect to External AV Device.................................... 49
6.1 Connect Video Cable ...................................................................................................49
6.2 Connect Audio Cable ...................................................................................................50
7. Basic Setup ....................................................... 53
7.1 Video Setup ................................................................................................................53
7.2 Audio Setup ................................................................................................................55
7.3 Network Setup.............................................................................................................55
7.4 Wireless Setup ............................................................................................................58
7.5 Wireless Security Setup ...............................................................................................58
7.6 LED Setup ..................................................................................................................58
7.7 Photo View Setup ........................................................................................................59
7.8 Language Setup ..........................................................................................................59
7.9 Screen Ratio Setup......................................................................................................60
7.10 Auto Play Setup.........................................................................................................61
7.11) Internet (How to setup the Internet) .............................................................................62
7.12) i-RADIO...................................................................................................................63
7.13) SKIN .......................................................................................................................65
7.14) Others .....................................................................................................................67
8. How to Play(Remote Control)...................................... 69
8.1 Basic Screen Menu..........................................................................................69
8.1.1 Mode Selection .........................................................................................................69
8.1.2 File Selection............................................................................................................71
8.2 Play Video Files...............................................................................................73
8.3 Play DVD File...................................................................................................75
8.4 Play Audio File ................................................................................................77
8.5 Play Photo File ................................................................................................79
8.6 Make a Play List...............................................................................................81
9. Firmware Upgrade................................................. 83
2
Page 4

Introduction
MediaGate MG-350HD fully supports HD (High Definition) files that are really clear through HDTV (LCDTV, Normal TV) and can
stream the contents from a PC through wireless (802.11g) or wired LAN, and also has USB host that you can plug an external USB
storage.
z Wireless High Definition Multimedia Player
z The latest and powerful media decoding chip -Sigma Design EM8621 Chip
z Full HD file playback up to 1920 x 1080i
z NDAS (Network Direct Attached Storage) supporting file copy/delete with wireless/wired LAN
z IEEE 802.11g(54Mbps) 802.11b(11Mbps) wireless standard / 10/100Mbs wired LAN
z Wireless security - WEP(Wired Equivalent Privacy)
z Wireless Infrastructure and Ad-Hoc Mode
z External USB 2.0 storage via USB device connecting a computer
z Read an external USB storage or an optical drive via USB host connecting various external USB device
z DVD Manager - Playback of DVD File same as Original DVD title
z Video output - DVI, Component, S-Video and Composite
z Audio output – Stereo, Digital Coaxial & Optical 5.1 ch. Sound, DTS down mix to stereo
z Easy Firmware Upgrade
3
Page 5

Technical Support
Contact your local distributor in your country or
AL Tech, Inc. in Korea
www.airlinktek.com Tel 82-2-3011-9219 Fax 82-2-566-6186 E-mail sales@airlinktek.com
Precautions
Please read the followings carefully and refer to [Cautions] in the manual for proper use.
Copyright
Check the supported codec
Cautions for USB Device
Cautions for USB Host
Cautions when you insert a
HDD
Cautions when you use
Network connection
Cautions for the possibility of
Radio Waves Cross
Cautions for Multi I/O port * Make sure to use the supplied products only. Don’t connect a cellular phone charger or etc. We are not responsible for misusing
* We are not responsible for using illegal software, audio sources, video sources, etc and the users should take the legal
responsibility.
* MediaGate may not play all media files. Please check the codec type. Also it may not play or run improperly depending on file
character or circumstance.
* Connect the power adapter as well when you connect MediaGate to a PC.
MediaGate may not be connected if the USB cable is more than 3 meters (9.8 feet). Recommended length is 3 meters (9.8 feet)
If the USB cable is too long, the transfer speed and the connection may not be good.
We recommend you to use the supplied USB cable by our company.
If you connect this device to USB 1.1 Host Adapter, the speed is USB 1.1 (Max. 12Mbps), so we recommend you to connect to
USB2.0 for full speed of max. 480Mbps.
* The USB Host may not be matched with all USB storages. Please check the compatibility before you purchase or use the USB
storage.
* Only 3.5” IDE type HDD can be used.
Set the jumper of the HDD as “Master” mode and then insert it.
If the HDD supports “Single Mode” then set the HDD as “Single Mode”.
We recommend you to use more than 6GB HDD. In case of less than 6GB HDD, it may cause data loss.
In case of a new HDD, please do “Format” on a PC first and then insert it (For the detail, please refer to “1.2 Format Built-
in HDD via USB”.
* When you connect MediaGate to a PC using Windows for sharing function, it uses the supplied Windows Network Sharing
Function.
The sharing function may not be working properly depends on Windows Program Error or the user computer’s environment
which we are not responsible.
Data transfer through network connection may have data cut-off.
Data transfer through wireless network connection may have much more data cut-off depends on the environment.
* MediaGate may have the possibility of radio waves cross, so not recommend to use the service related to human safety.
4
Page 6

of this port and the defect due to other misusing.
Data Backup
Cautions for use in a car
* We strongly recommend you to back up the data to another safe media. We are not responsible for data damage or loss in built-
in HDD.
* Make sure to use the supplied car charger (optional) in a car.
Don’t use MediaGate during driving.
MediaGate may not work properly when the engine is stopped and it may cause battery discharge.
Using in a car may have video & audio noise.
Cautions for drop, shock * Do not drop the device. It may cause critical damage to the hard drive
Insert strange materials * Don’t insert steel materials (coin, etc) or other materials that may cause MediaGate defect.
Cautions for Disassemble &
Remodel
* Don’t try to disassemble or remodel MediaGate. It may cause malfunction
Cautions for stack up * Don’t stack another heavy material on MediaGate.
Cautions for exposure to water,
moisture, etc
* Don’t expose MediaGate to oil, water, dust, moisture or rain and wind.
If MediaGate is wet then power it off right away.
Cautions for heat * Keep MediaGate away from heated areas. Set it up in well-ventilated places.
Cautions for magnetic materials
* Keep all magnetic materials away from MediaGate. Magnetic materials such as speakers or magnets may erase or cause
damage to the data stored in the hard disk.
5
Page 7

Specifications
Product Name MediaGate MG-350 HD
Power 5V 1.5A /12V 1.5A
Weight 564g (without HDD & wireless antenna)
Dimension 57 x 150 x 185 mm (without wireless antenna)
Available OS
USB Device Device Port x 1ea, 480Mbps USB 2.0 (USB 1.1 compatible)
USB Host
Wired LAN 10/100 Mbps LAN (RJ-45) x 1ea, 100BaseTx:UTP/STP Category 5 LAN cable compatible
Wireless LAN 54Mbps IEEE802.11g, 5dBi detachable antenna x 1ea, SMA type connector
HDD Type 3.5”IDE HDD
HDD File System NTFS / FAT32
TV Type NTSC / PAL
Video Format
Audio Format MP3, OGG, WAV, WMA
Photo Format JPG/JPEG, PNG, BMP
Video Output
Audio Output
Multi I/O 24 pin standard connector (no use, this is only for additional specified device)
Working Temperature 0˚C ~ 60˚C
Working Humidity 10% ~ 50%
USB Device Compatible: Windows 98SE/ME/2000/XP, Mac OS 9.0 higher, Linux 2.4 higher
NDAS Compatible: Windows 2000, XP
Host Port x 1ea, 480Mbps USB 2.0 (USB 1.1 compatible)
Supporting to read USB devices like External USB HDD, ODD, Flash Drive, Card Reader
AVI : MS-MPEG4v3/XviD/WMV9 (Not support XviD which has GMC option applied)
WMV : WMV9
ASF : WMV9
MP4 : MPEG4 Video
DAT : MPEG1
VOB : MPEG2
MPG/MPEG : MPEG1/MPEG2
TP/TS/TRP : HD-MPEG2/SD-MPEG2
COMPOSITE
S-VIDEO
HD COMPONENT Y, Pb, Pr (480p, 720p, 1080i)
HD DVI (480p, 720p, 1080i, 1080p)
STEREO L-R
S/PDIF Digital Output ( Coaxial/Optical )
6
Page 8

Package Content
① MG-350 HD - 1ea
② Wireless Antenna -1ea
③ Stand(Cradle) – 1ea
④ Remote controller, battery – each 1ea
AV⑤ cable (composite + stereo cable) – 1ea
USB ⑥ cable (for connecting to PC) -1ea
⑦ Power adapter – 1ea
⑧ Setup CD (NDAS PC software, Windows 98 Driver) -1ea
⑨ User manual – 1ea
7
Page 9
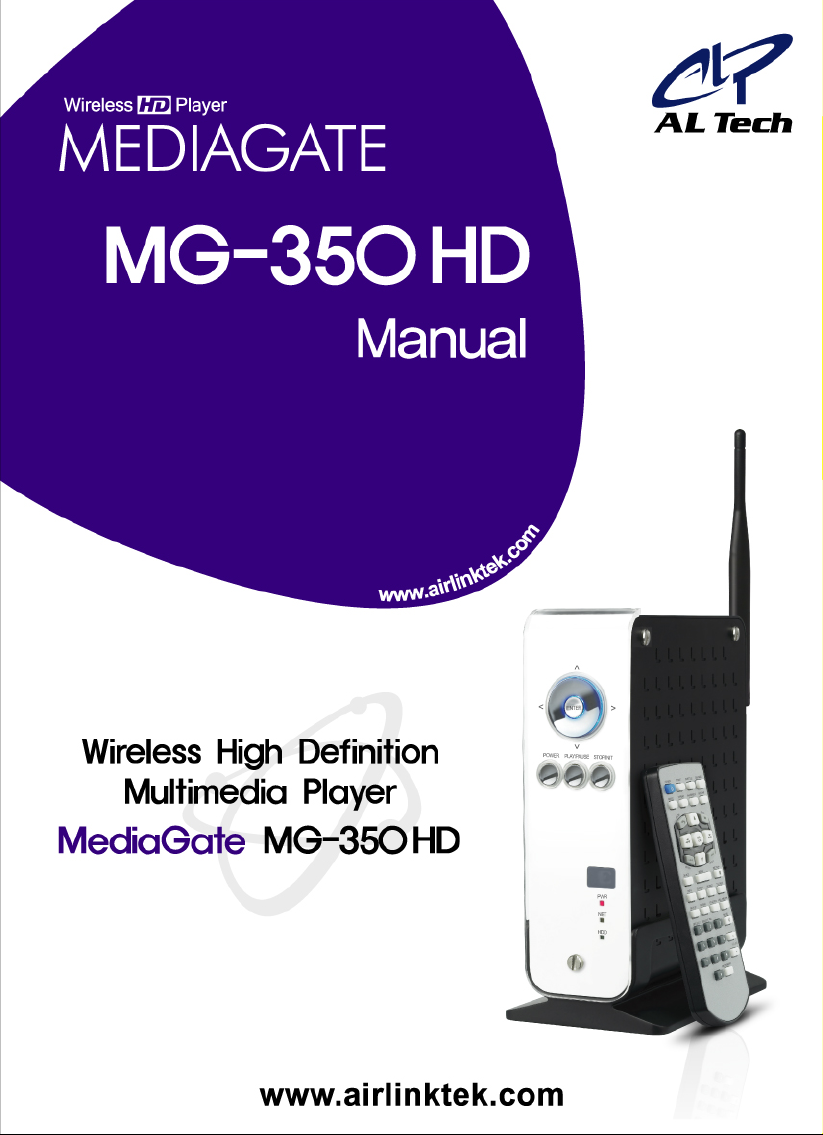
Product Overview
ENTER① Select or play a file
②△▽◁▷ Navigation Key, Up, Down, Left, Right
POWER③ Power On, Off
PLAY / P④ AUSE Play all files from selected file / Pause
Front View
STOP / INIT⑤ Stop / Return to Mode Selection Screen
IR ⑥ IR receiving area for remote signals
PWR⑦ Power LED
NET⑧ Network LED
HDD⑨ HDD LED
① ENTER
③ POWER
④ PLAY/PAUSE
< Front View >
② △▽◁ ▷
⑤ STOP/INIT
⑥ IR
⑦ PWR
⑧ NET
⑨ HDD
8
Page 10
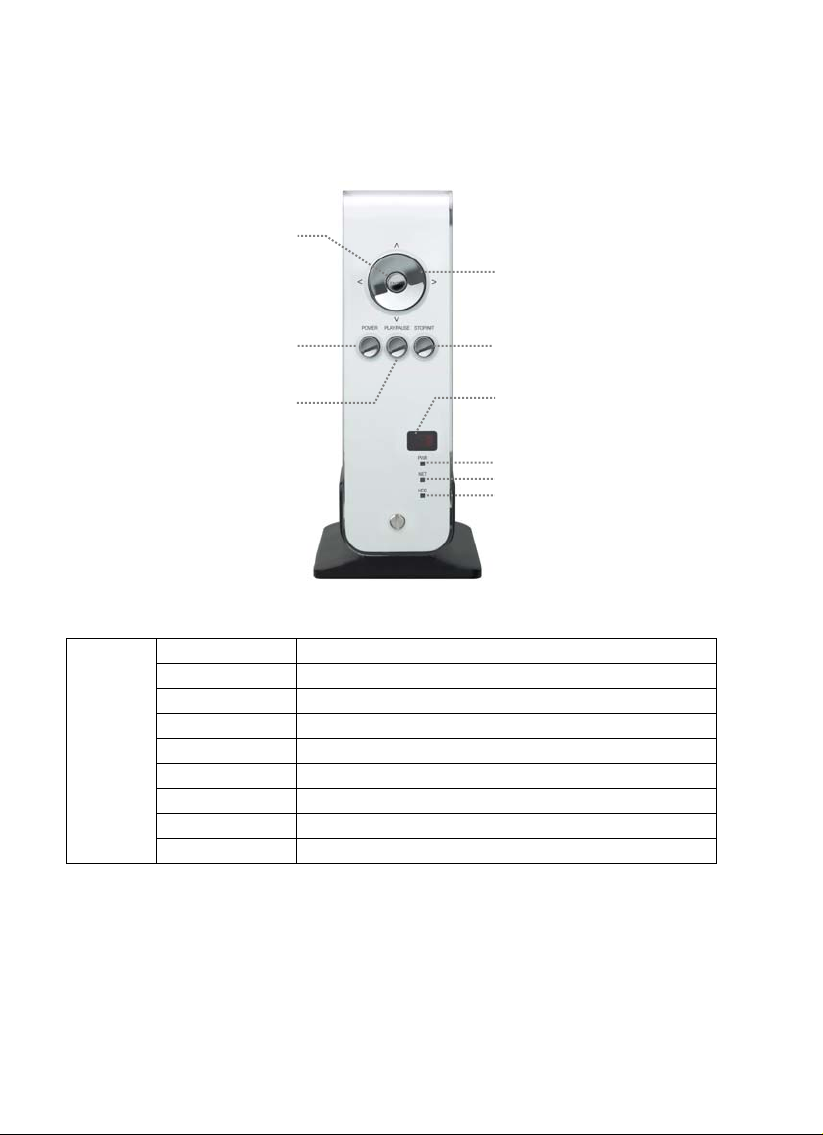
E
T
R
O
Back View
< Back View >
MULTI I/O①
USB DEVICC
②
⑩ ANT
OPTICAL⑪
CVBS⑫
STEREO L⑬ -R
MULTI I/O① 24 pin standard connector (no use, this is only for additional specified device)
USB DEVICE② Connect to a computer with USB cable
USB HOST③ Connect to an external USB device with USB cable
DVI④ Connect DVI cable for video output
S⑤ -VIDEO Connect S-Video cable for video output
COAXIAL ⑥ Connect Coaxial cable for 5.1 ch. Digital audio output
Y, PB, PR ⑦ Connect component Y, Pb, Pr cable for video output
LAN⑧ Connect LAN cable for wired networking
PWR ⑨ Connect power adapter
⑩ ANT Connect wireless antenna for wireless networking
⑪ OPTICAL Connect Optical cable for 5.1 ch. Digital audio output
CVBS⑫ Connect Composite cable for video output
STEREO L⑬ -R Connect Stereo cable for audio output
USB HOS
③
DVI④
COAX⑥ IAL
⑦
LAN⑧
PWR ⑨
S⑤-VIDE
Y, PB, P
9
Page 11

Use as External USB HDD
10
Page 12
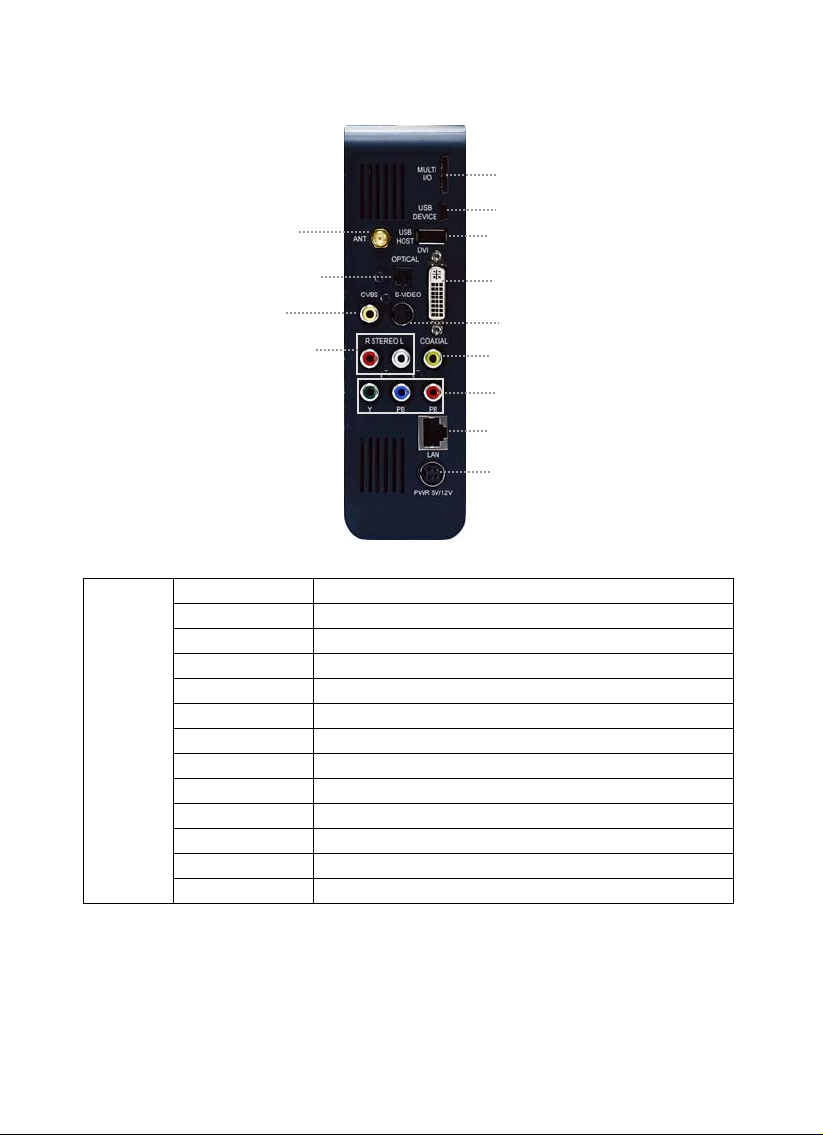
1. Use as External USB HDD
1.1 Insert Hard Disk
9 Use 3.5” IDE Hard Disk for Desktop.
9 Hard Disk should be “Master”. However, if the Hard Disk supports “Single” mode, you need to try to set “Single “mode.
① Unscrew 4 spot and open the side cover case with
pulling to the arrow direction
③ Close the side cover case with pulling to the arrow
direction.
② Connect Power and IDE connector to Hard Disk.
④ Finish assemble with screwing 4 spot,
11
Page 13
1.2 Format Built-in HDD via USB
If the built-in HDD is not formatted, PC can not detect the hard disk drive. If so, format the hard disk first referring to the following
guide. * If the hard disk drive is al
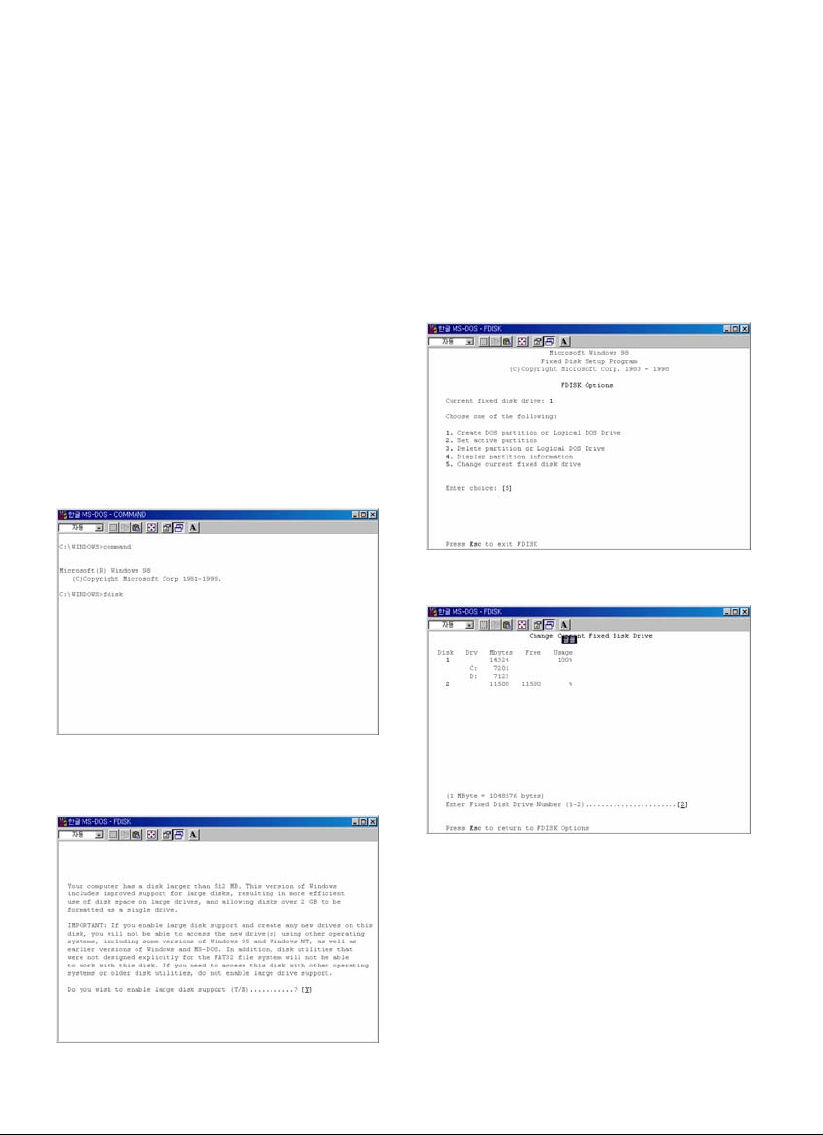
1.2.1 Windows 98SE, ME
1) Install Windows 98 Driver. Find the driver at Windows
98 CD>MediaGate MG-350HD>English>Windows 98
Driver Directory. After finishing installation, Connect MG-35
to PC via USB cable, and plug power cable of MG-350HD.
2) Select [Start→Program→Accessories→MS-DOS
Prompt] on Windows.
3) Type “fdisk” command at Command Prompt window
and press [Enter].
4) Type the “Y” at the “Do you wish to enable large disk
support (Y/N)” and press [Enter].
ready formatted, see “1.3 Copy Data via USB”.
5) Select “5. Chang current fixed disk drive” and press
[Enter].
6) Type the last Disk number in 0% usage.
7) Select “1. Create DOS partition or Logical DOS Drive”
and press [Enter].
12
Page 14

A
8) Select “ 1. Create Primary DOS Partition ” and press
[Enter].
9) Wait until finishing verifying the drive integrity.
fter finishing drive integrity verification, type “Y” at “Do
10)
you wish to use the maximum available size for a Primary
DOS Partition (Y/N)”.
11) Type the capacity or % which you want to use and press
[Enter].
12) Drive integrity verification will start again. After finishing
that, press [ESC] key when the “Primary DOS Partition
created, drive letters changed or added” message displays.
13) Press [ESC] key again. “ Shut down Windows before
restarting” message will be displayed. Press [ESC] key
finally for exiting FDISK.
13
Page 15
A
14) Type “ exit ” command at “ C:\WINDOWS> ” and press
[Enter] for returning to windows screen.
15) Unplug the MG-350HDand plug again. New volume will
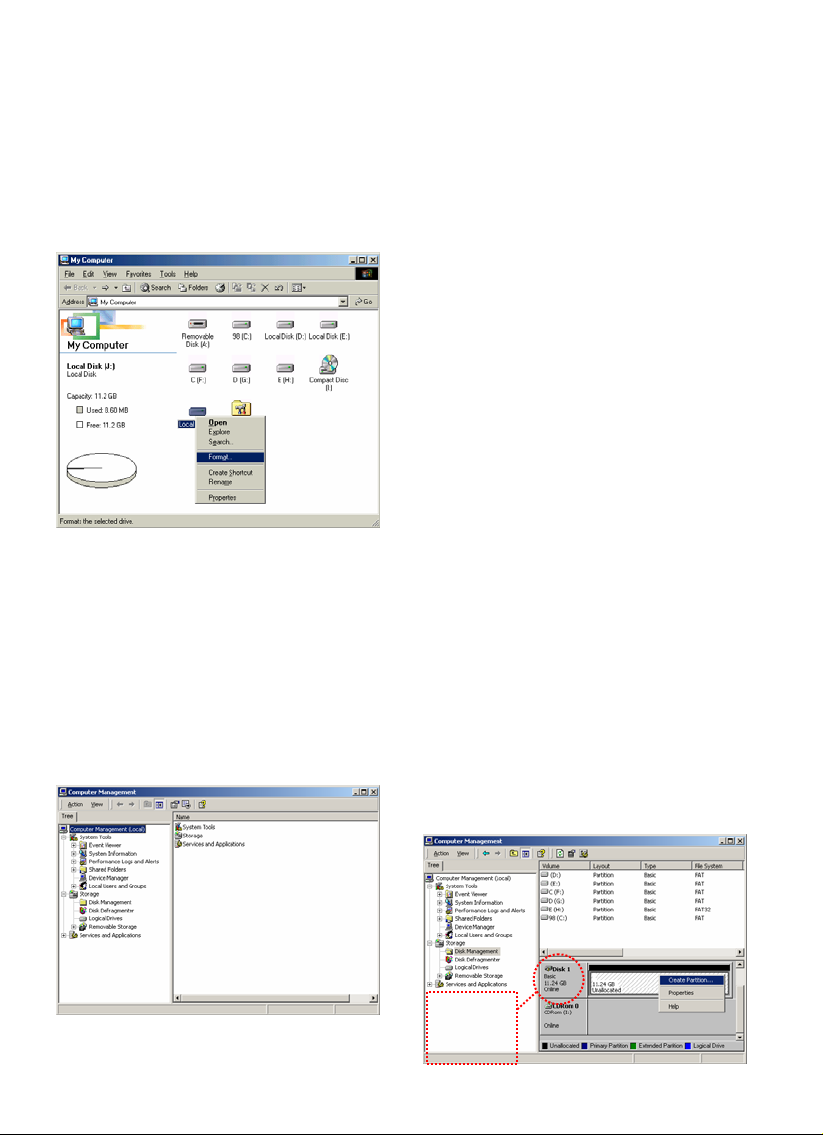
be appeared at [My Computer]. Click mouse right button at
the new volume and select [Format].
1.2.2 Windows 2000
1) Connect MG-350HD to PC via USB cable, and plug
power cable of MG-350HD.
2) Select [Start>Settings> Control Panel>
Tools>Computer Management>Disk Management] on
Windows.
dministrative
3) If the [Disk Signature and Upgrade Disk Wizard] is started,
click Next to progress for finishing the wizard. If this wizard
not started, right click the left area of unallocated drive at no.
4 figure, and start the wizard.
4) After finishing the [Disk Signature and Upgrade Disk
Wizard], Right-click the Unallocated Drive. And then, click
[Create Partition].
Right Click for
starting Disk
Wizard.
14
Page 16
A
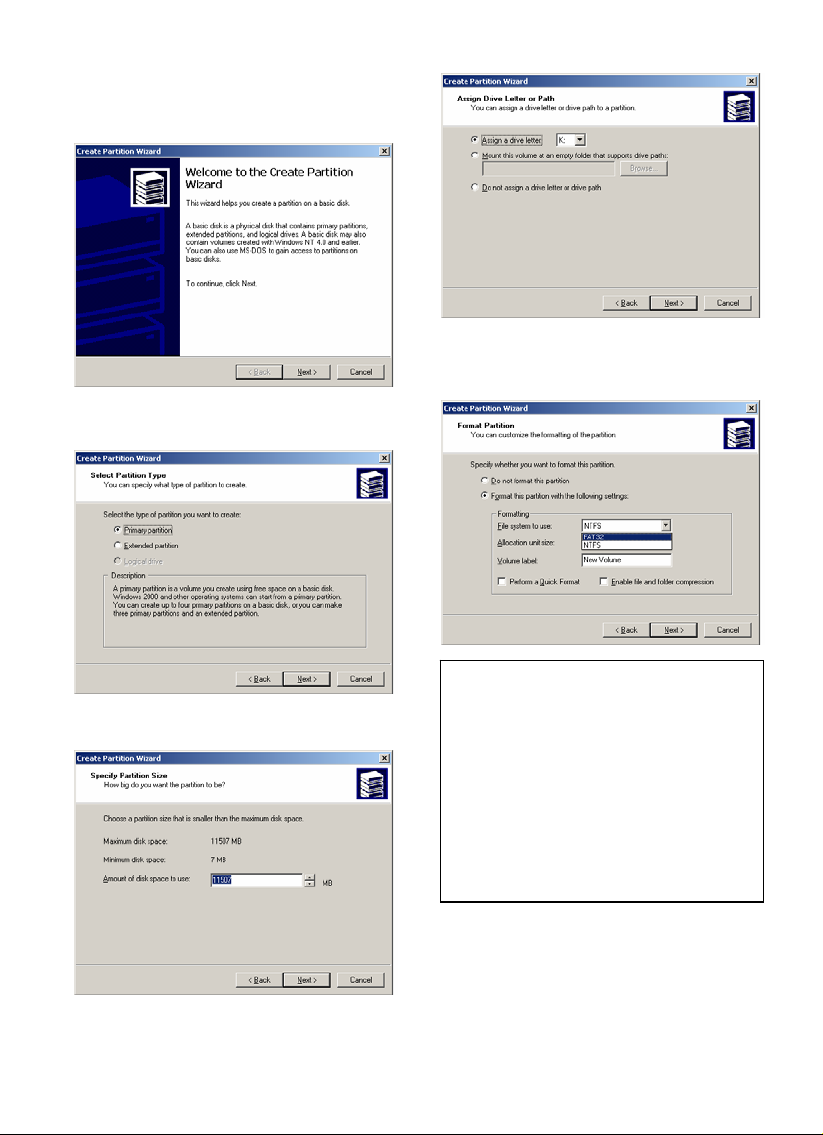
5) Click [Next] at the Create Partition Wizard Windows.
6) Check [Primary Partition] and click [Next].
7) Type number that you want to use and click [Next].
8) Assign a drive letter and click [Next].
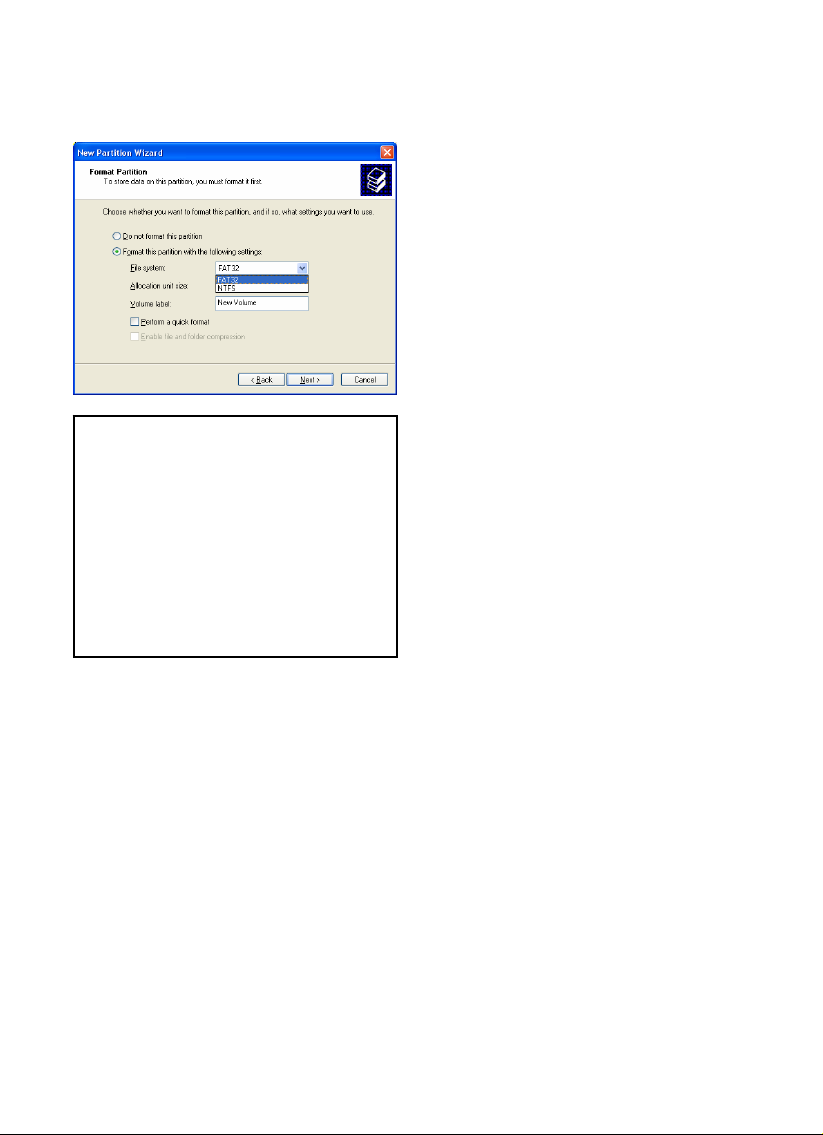
9) Choose FAT32 or NTFS at File system to use and click
[Next].
9 FAT 32 system is available on windows 98SE/ME/2000/XP,
but NTFS system is available on windows 2000/XP only.
9 If you choose FAT32 system on Windows 2000/XP, one drive
letter’s maximum size will be limited to 32GB. If you want to use
one drive letter of 32GB more, you have to format on windows
98SE/ME.
9 If you want to create two or more partition with one disk drive,
it will be recommended “Primary Partition”
fter finishing Wizard setup, formatting will be
10)
progressed automatically.
15
Page 17
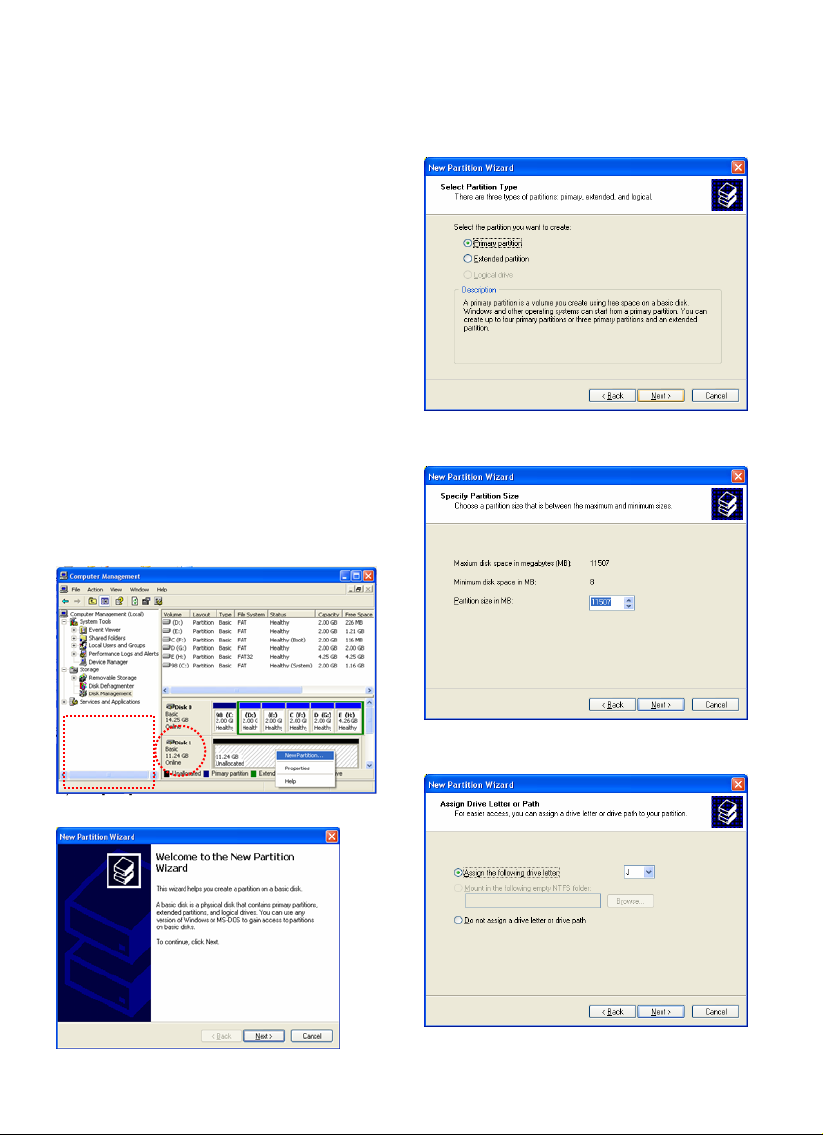
1.2.3 Windows XP 1.2.3 Windows XP
1) Connect MG-350HD to PC via USB cable, and plug
power cable of MG-350HD.
2) Click [Settings > Control Panel > Administrative Tools
Computer Management>Disk Management] on Windows.
If you can not find Administrative Tools at Control Panel,
click “ switch to classic view” in left –
screen.
3) If the [Disk Signature and Upgrade Disk Wizard] starts,
click [Next] to progress for finishing the wizard. If this wizard
not started, right click the marked left area of unallocated
drive at no 4. figure and start the wizard.
4) After finishing the [Disk Signature and Upgrade Disk
Wizard], Right-click the ‘Unallocated’
[Create Partition].
Right Click for
starting Disk
Wizard.
5) Click [Next] at the New Partition Wizard.
up corner on
Drive. And then, click
6) Check [Primary Partition] and click [Next].
>
7) Type number that you want to use and click [Next].
8) Assign a drive letter and click [Next].
16
Page 18
A
9) Choose FAT32 or NTFS at File system to use and click
[Next].
9 FAT 32 system is available on windows 98SE/ME/2000/XP,
but NTFS system is available on windows 2000/XP only.
9 If you choose FAT32 system on Windows 2000/XP, one drive
letter’s maximum size will be limited to 32GB. If you want to use
one drive letter of 32GB more, you have to format on windows
98SE/ME.
9 If you want to create two or more partition with one disk drive,
it will be recommended “Primary Partition”
fter finishing Wizard setup, formatting will be
10)
progressed automatically.
17
Page 19
1.3 Copy Data via USB
It is possible to use as a external USB hard disk drive in case of inserting hard disk into MG-350HD. You can copy data from your
PC to built-in HDD of MG-350HD via USB. It is possible to play media files at the hard disk on TV set.
* When connecting PC, you have to connect power cable of MG-350HD.
1.3.1 Windows 98SE
9First, you have to install Windows 98 Driver before connecting PC. Find the driver at Windows 98 driver CD>MediaGate MG-
350HD>English>Windows 98 Driver Directory. After finishing installation, Connect MG-350HD to PC via USB cable, and plug power cable of MG-
350HD.
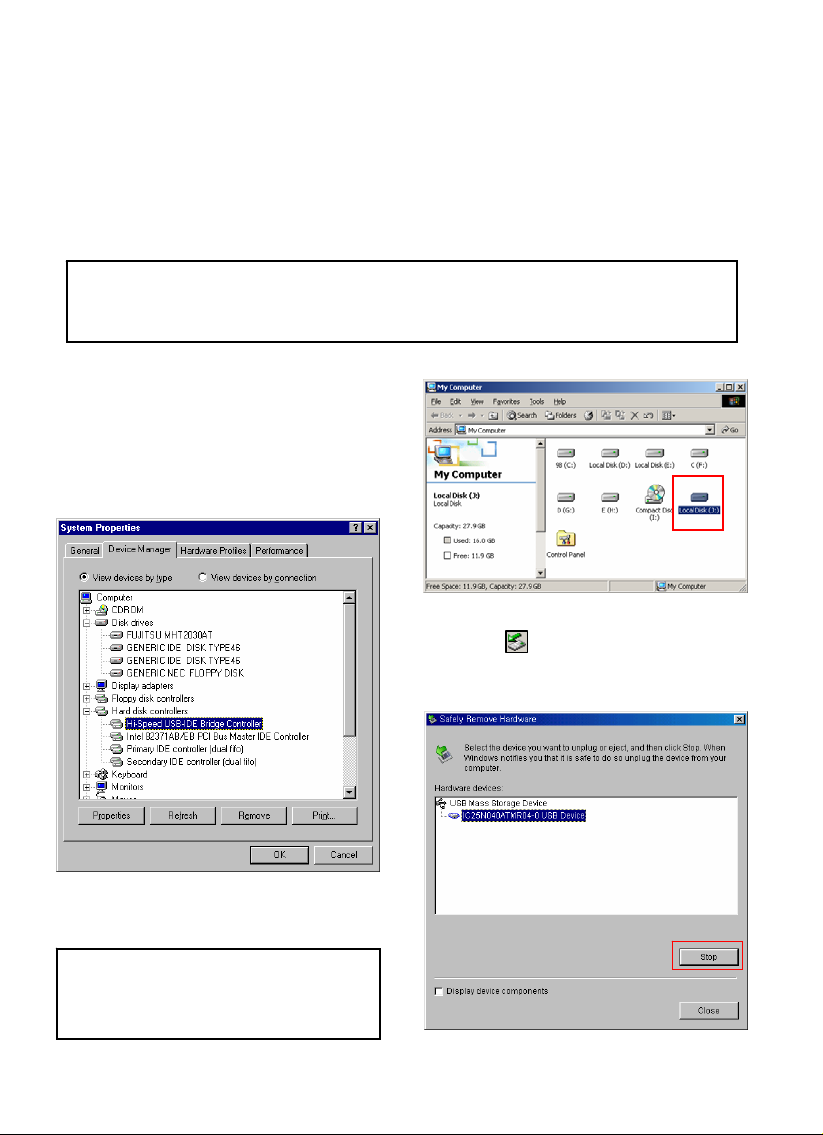
1) After installing the driver, connect mg-35 and plug power
cable. And then, check the driver installation at Windows
[Start > Settings>Control Panel > System > Device Manager
> Hard disk controllers > Hi-Speed USB-IDE Bridge
Controller].
2) Check ‘My Computer’ or ‘Explorer’, there should be a new
volume. You can copy any data to this volume.
9If a new volume is not be appeared, check HDD format or not,
and HDD file system. Windows 98SE only detect FAT32 file
system.
3) After copying data, remove MG-350HD
remove icon at Windows right-down corner. If you
don’t follow this procedure, data and MG-350HD may have
damage.
with using
18
Page 20
1.3.2 Windows ME
A
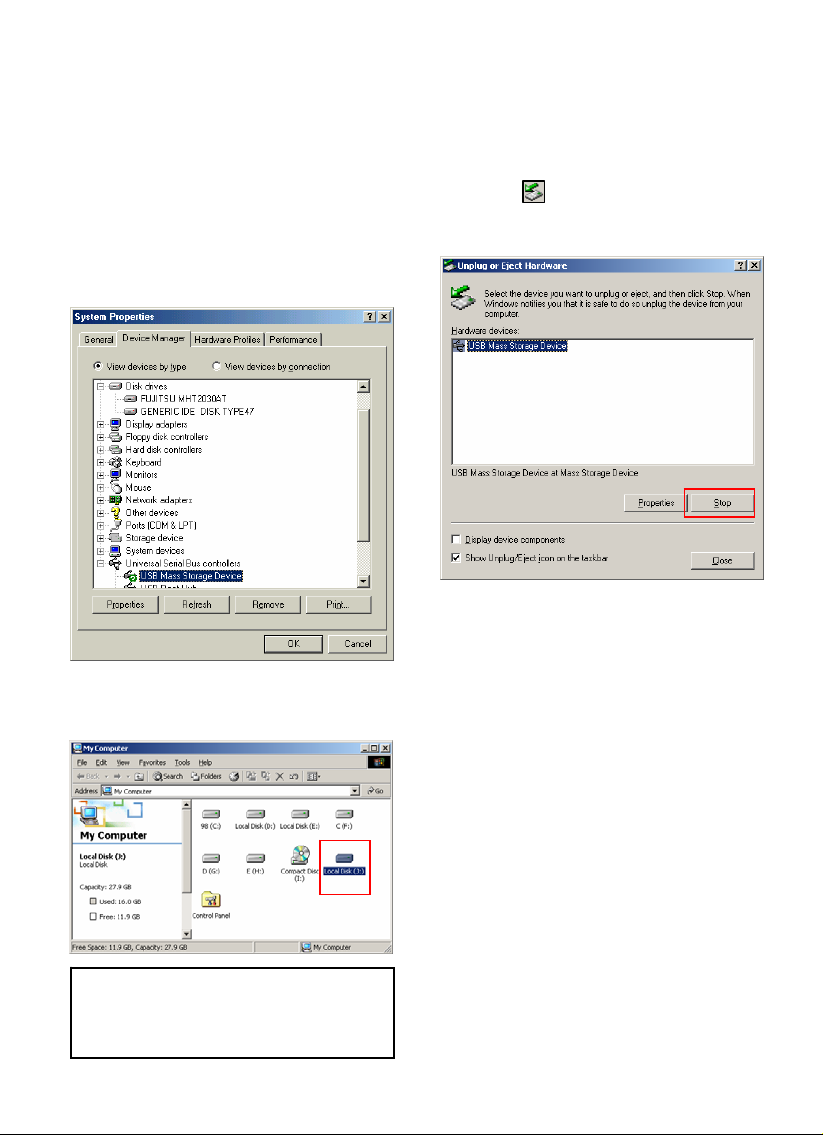
1) After connecting MG-350HD and plug power cable.
Windows itself will install driver automatically.
check the driver installation at Windows [Start > Settings >
Control Panel > (view all Control Panel options) > System >
Device Manager > Universal Serial Bus controllers > USB
Mass Storage Device]
2) Check ‘My Computer’ or ‘Explorer’, there should be a new
volume. You can copy any data to this volume.
9If a new volume is not be appeared, check HDD format or not,
and HDD file system. Windows ME only detect FAT32 file
system.
nd then,
3) After copying data, remove MG-350HD with using
remove icon at Windows right-down corner. If you
don’t follow this procedure, data and MG-350HD may have
damage.
19
Page 21
1.3.3 Windows 2000, XP 1.3.3 Windows 2000, XP
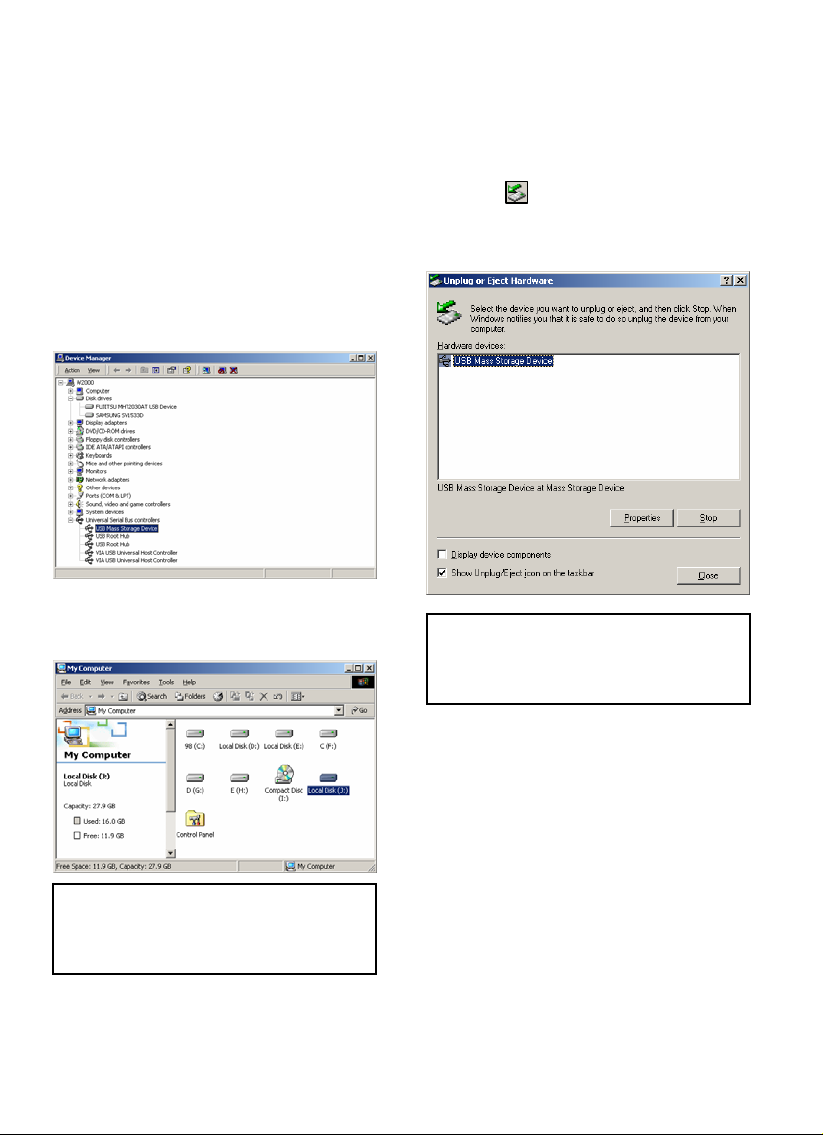
1) After connecting MG-350HD and plug power cable,
Windows itself will install driver automatically. And then,
check the driver installation at Windows [Start > Settings >
Control panel > (switch to classic View on Windows XP) >
system > Hardware > Device manager > Universal Serial
Bus controllers > USB Mass Storage Device ].
2) Check ‘My Computer’ or ‘Explorer’, there should be a new
volume. You can copy any data to this volume.
9If new volume is not be appeared, check HDD format or not.
W and HDD file system. Windows 2000, XP detect both FAT32
and NTFS file system.
3) After copying data, remove MG-350HD with using
remove icon at Windows right-down corner. If you
don’t follow this procedure, data and MG-350HD may have
damage.
9When you see ‘Non High-Speed USB Hub Message’
The message will be displayed On windows XP when you plug
MG-350HD into USB 1.1 spec. Host adapter.
20
Page 22

1.3.4 Linux
9It can be available on Linux 2.4 higher.
[Automatic Mount]
After booting, do log-in.
Connect MG-350HD -> Power On MG-350HD -> Check the detection with [fdisk] -> make Mount Pointer (ex. mediatest) at Folder
Mount(/mnt) -> Edit [/etc/fstab] -> add the following;
/dev/sda /mnt/mediatest vfat noauto, user 0 0 (in case of FAT32 HDD)
/dev/sda /mnt/mediatest ntfs noauto, user 0 0 (in case of NTFS HDD)
Do Log-in again.
9above example “sda” is assumed that the MG-350HD will be detected as “sda” on your system. If not, you have to write the drive name which is
detected as “USB Mass Storage”, not “sda”
[Manual Mount]
Connect MG-350HD -> Power On MG-350HD -> Check the detection with [fdisk] -> make Mount Pointer (ex. mediatest) at Folder
Mount(/mnt) -> Edit [/etc/fstab] -> add the following;
mount –t vfat /dev/sda /mnt/mediatest (in case of FAT32 HDD)
mount –t ntfs /dev/sda /mnt/mediatest (in case of FAT32 HDD)
9above example “sda” is assumed that the MG-350HD will be detected as “sda” on your system. If not, you have to write the drive name which is
detected as “USB Mass Storage”, not “sda”
[How to stop using]
Do [unmount] at Device Control.
1.3.5 Mac
9It can be available on Mac 9.0 higher.
No need to install the installation driver at Mac OS 9.x version and the MG-350HD will be detected automatically. If the MG-350HD is
detected correctly, an icon is appeared at a monitor.
When removing MG-350HD safely, drag the icon to a trash and unplug MG-350HD.
21
Page 23

Connect to PC via Network
22
Page 24
2. Connect to PC via Network
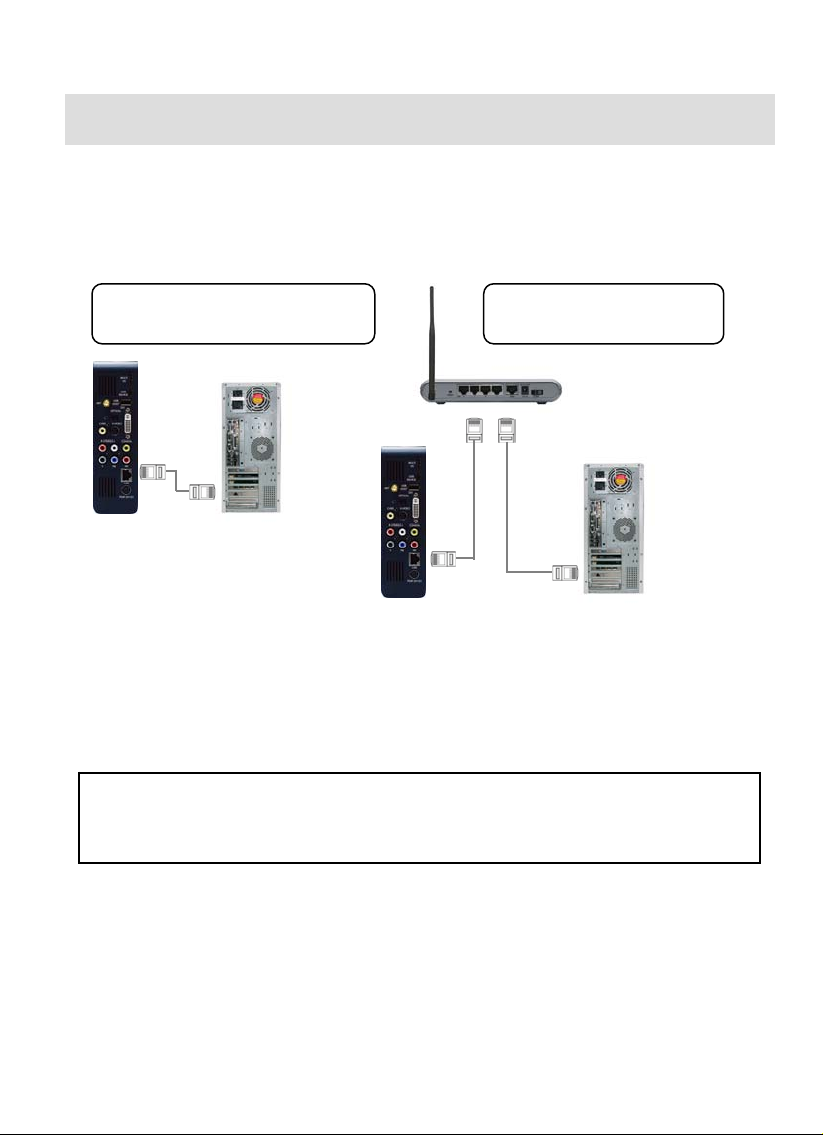
2.1 Wired LAN Connection
When connecting Computer to MG-35 directly When connecting with IP Router or Hub
Connect LAN cable to LAN port between MG-350HD
and PC. In this case, you have to use Cross LAN
cable type generally.
Connect LAN cable to LAN port between IP Router or Hub.
[TIP] If the computer’s LAN card was connected to
Internet line, you can mount additional LAN card to
your PC and connect that additional LAN card to MG-
350HD.
√ When you want to play shared multimedia files on network, refer to "3.Shared File Playback (Stream)".
√ If you want to use as Network Storage, refer to “4. Use as Network Storage (NDAS)”
In this case, you have to use Direct LAN Cable type generally.
23
Page 25
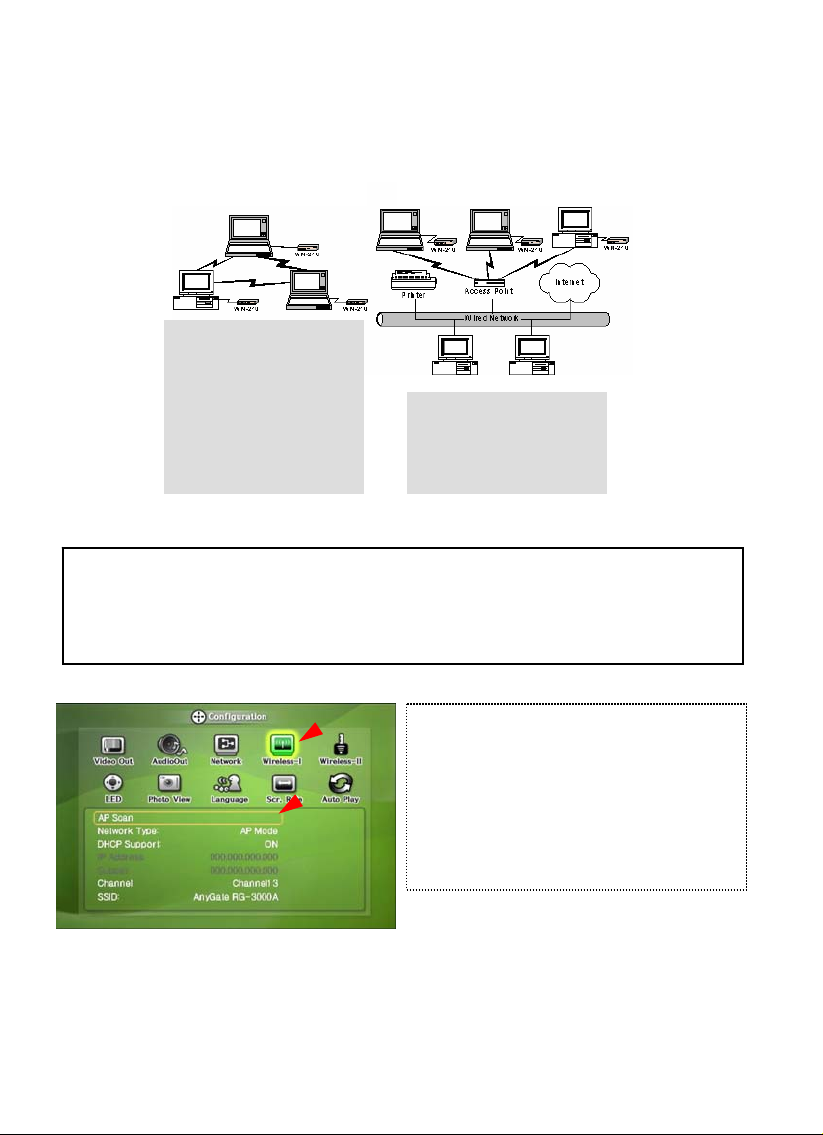
2.2 Wireless LAN Connection
MG-350HD supports two types of wireless structure-Infrastructure mode & Ad-Hoc mode.
√ Note
Wireless AP (Infrastructure Mode) or Wireless Adapter (Ad-Hoc Mode) is needed for wireless connection. IEEE 802.11g wireless standard is
recommended for better wireless environment. MG-350HD compatibles with IEEE 802.11g & b standard.
Ad-Hoc Mode
1:1 wireless LAN connection type
between wireless adapter and Mg-
350HD without wireless access point.
Infrastructure Mode
Wireless LAN connection type with
Wireless Access Point.
① Move to Setup screen with pressing [SETUP] button.
② Move to ‘Wireless-I’ Icon and press [OK[ button. Setup box will
be displayed under icon menu..
③ Move to ‘AP Scan’ and press [OK] button. Surrounded wireless
stations are detected and displayed.
24
Page 26

④ Select preferable one out of the scanned wireless stations.
*Wireless station information is displayed.
-SSID: Name of Wireless Station
-Connection Mode: AP Mode (to connect an AP)
: Ad-hoc Mode (to connect wireless adapter)
-Channel: Wireless channel used by wireless station
⑤ Information of wireless station will be displayed. Press [SETUP]
for saving configurations.
√ Note: When connecting Ad-Hoc Mode, manual setting of IP Address and Subnet mask will be needed.
Manual setting of IP address and Subnet mask of wireless adapter and MG-350HD will be needed. Disable DHCP and enter
“IP Address” and “Subnet mask”. IP address must be different between MG-350HD and wireless adapter, and also subnet
mask is to be same.
Ex) MG-350HD: IP Address(192.168.10.2) Subnet(255.255.255.0) ==> Wireless adapter: IP Address(192.168.10.3) Subnet
mask (255.255.255.0)
<MG-350HD IP manual settin g> <Wireless Adapter IP manual setting
25
Page 27

√ Note: When wireless icon is not activated or not connected to wireless station.
1. [Waiting or Rebooting] It might take some time to assign IP address from AP in case of AP Mode. So, wait for a while.
Otherwise, reboot AP and MG-350HD together.
2. [Manual Setting of IP address and Subnet mask] In case of AP Mode, disable DHCP support and do manual setting of IP
Address and subnet mask. At the time, each IP address is to be different and subnet mask is to be same.
Ex) AP: IP address(192.168.10.1) Subnet mask (255.255.255.0) ==> MG-350HD: IP address(192.168.10.2) Subnet mask(255.255.255.0)
<Manual Setting of IP address and subnet mask MG-350HD>
<Check IP address of AP
⑥ [WIRELESS] icon is activated. Run the icon, and the PC list on
the network is displayed. Access to the preferable PC you want.
26
Page 28

√ Note: When connecting to AP with WEP wireless security
If wireless station like AP or Adapter has WEP wireless security, you have to enter WEP key same as AP or wireless adapter.
It is possible to enter WEP key at “ W ireless-II” . Enable Securi ty Mode and
then enter WEP Key of AP or wireless adapter.
*How to enter=use direction key [UP] or [DOWN], or [Number]. After
finishing that, finally press [SETUP] for saving configurations.
27
Page 29

Shared File Playback (Stream)
28
Page 30

3. Shared File Playback (Stream)
After connecting LAN cable, you have to set network configurations of both Computer and MG-350HD.
*It is possible to assign IP address and Subnet Mask of MG-350HD as dynamic or static.
3.1 Windows 98SE, ME
1) Select a folder which you want to share. Right-click the
folder and click ‘sharing’ in pop-up menu.
2) Check ‘Shared as’ and write ‘Share Name’.
For example, “My Movie”
9Make sure to write ‘share name’ within 12 characters in
English.
9Recommend to check ‘Read Only’ at ‘Access Type’
9Do not write anything at ‘Passwords’
3) After that, the shared folder will be displayed as following
picture.
4) Move to [Control panel > Network], and double click
‘TCP/IP->LAN card’ that you want to use on your computer.
9 In order to see LAN Card name, move to [Control
Panel>System>Device Manager>Network adaptors].
5) Check ‘Specify an IP address’, and write ‘IP address’ &
‘Subnet mask’ that you want to use.
For example, IP address: 192.168.1.3 / Subnet mask:
255.255.255.0
29
Page 31

9If you have already been ‘obtained an IP address
automatically’ from DHCP Server or IP Router on your local
area network, you don’t need to write specific IP address
absolutely. Use ‘Obtain an IP address automatically’ or write IP
address & Subnet mask that DHCP Server or IP Router
provide.
6) Set the network configurations of MG-350HD.
9You have to connect MG-350HD to TV set for this setup.
See “6.1 Connect Video Cable”.
Press [SETUP] of remote control for moving
On that screen, select ‘DHCP Support Off’
address & Subnet mask.
For example,
IP Address: 192.168.1.2
Subnet mask: 255.255.255.0
to setup screen.
and write IP
After writing, press [SETUP] again for saving configurations.
9If you have already been provided dynamic IP address from
DHCP Server or IP Router on your local area network, you
don’t need to write static IP address absolutely. Use ‘DHCP
on’ or write IP address & Subnet mask that DHCP Server or
IP Router provide.
9Check ‘IP address obtained automatically’
When you use ‘DHCP On’, you can see the IP address on
information screen with pressing [INFO] button.
<MG-350HD’s IP Address>
30
Page 32

3.2 Windows 2000
1) Select a folder which you want to share. Right-click the
folder and click ‘Sharing’ in pop menu.
2) Check ‘Share this folder’ and write ‘share name’.
For example, “My Movie”
9Make sure to write ‘share name’ within 12 characters in
English.
3) Click ‘Permissions’ and check whether “Everyone”
account is or not. If not, add “Everyone” account.
9Recommend only to use ‘Read>Allow’ at Permissions.
4) After that, the shared folder will be displayed as following
picture.
5) Move to [Settings>Control Panel>Administrative
Tools>Computer management>Local Users and
Groups>Users], and double click ‘Guest’.
31
Page 33

6) Check ‘User cannot change password’ and ‘Password
never expires’.
7) Move to [Control Panel>Network and Dial-up
Connections], and select Properties of ‘Local Area
Connections’ by right click of mouse.
9If you see two or more ‘Local area connections’, select one
that you will use for connecting to MG-350HD.
8) Double click ‘Internet Protocol (TCP/IP)’ that you want to
use on your computer.
9) Check ‘Use the following IP address’, and write ‘IP
address’ & ‘Subnet mask’ that you want to use.
For example,
IP address: 192.168.1.3
Subnet mask: 255.255.255.0
9If you have already been ‘obtained an IP address
automatically’ from DHCP Server or IP Router on your local
area network, you don’t need to write specific IP address
absolutely. Use ‘Obtain an IP address automatically’ or write
IP address & Subnet mask that DHCP Server or IP Router
provide.
32
Page 34

6) Set the network configurations of MG-350HD.
9You have to connect MG-350HD to TV set for this setup.
See “6.1 Connect Video Cable”.
Press [SETUP] of remote control for moving to setup screen.
On that screen, select ‘DHCP Support Off’
address & Subnet mask.
For example,
IP Address: 192.168.1.2
Subnet mask: 255.255.255.0
After writing, press [SETUP] again for saving configurations.
9If you have already been provided dynamic IP address
from DHCP Server or IP Router on your local area
network, you don’t need to write static IP address
absolutely. Use ‘DHCP on’ or write IP address & Subnet
mask that DHCP Server or IP Router provide.
9Check ‘IP address obtained automatically’
When you use ‘DHCP On’, you can see the IP address
on information screen with pressing [INFO] button.
and write IP
`
<MG-350HD’s IP Address>
33
Page 35

3.3 Windows XP 3.3 Windows XP
1) Select a folder which you want to share. Right-click the
folder and click ‘Sharing and Security’ in pop menu.
2) Check ‘Share this folder on the network’ and write ‘Share
name’.
For example, “My Movie”
9Make sure to write ‘share name’ within 12 characters in
English.
3) After that, the shared folder will be displayed as following
picture.
4) Move to [Settings>Control Panel>Administrative
Tools>Computer management>Local Users and
Groups>Users], and double click ‘Guest’.
9This is for Windows XP Professional. Windows XP Home
users can’t see this figure. Go to next number 6).
9If you can’t find ‘Administrative Tools’ at Control Panel, click
“Switch to classic view” in left-up corner on screen.
5) Check ‘User cannot change password’ and ‘Password
never expires’.
>> See next page
34
Page 36

.
6) Move to [Control Panel>Network connections], and select
‘Local area connections’ properties by right click of mouse.
9If you can’t find ‘Administrative Tools’ at Control Panel, click
“Switch to classic view” in left-up corner on screen.
9If you see two or more ‘Local area connections’, select one
that you will use for connecting to MG-350HD.
7) Double click ‘Internet Protocol(TCP/IP)’ that you want to
use on your computer.
8) Check ‘Use the following IP address’, and write ‘IP
address’ & ‘Subnet mask’ that you want to use.
For example,
IP address: 192.168.1.3
Subnet mask: 255.255.255.0
35
Page 37

9If you have already been provided dynamic IP address from
DHCP Server or IP Router on your local area network, you don’t
need to write static IP address absolutely. Use ‘Obtain an IP
address automatically on’ or write IP address & Subnet mask
that DHCP Server or IP Router provide.
9) At above number 7) figure, click ‘Advanced’
‘Internet Connection Firewall’.
9If you use service pack 2, refer to the following figures.
Click ‘Settings’ at ‘Windows Firewall’
Tab. Disable
Check ‘Off’ and click ‘OK’
6) Set the network configurations of MG-350HD.
9You have to connect MG-350HD to TV set for this setup.
See “6.1 Connect Video Cable”.
Press [SETUP] of remote control for moving to setup screen.
On that screen, select ‘DHCP Support Off’
and write IP
address & Subnet mask.
For example,
IP Address: 192.168.1.2
Subnet mask: 255.255.255.0
36
Page 38

After writing, press [SETUP] again for saving configurations.
9If you have already been provided dynamic IP address
from DHCP Server or IP Router on your local area
network, you don’t need to write static IP address
absolutely. Use ‘DHCP on’ or write IP address & Subnet
mask that DHCP Server or IP Router provide.
9Check ‘IP address obtained automatically’
When you use ‘DHCP On’, you can see the IP address
on information screen with pressing [INFO] button.
<MG-350HD’s IP Address>
37
Page 39

3.4 Windows Vista
Before you do “folder sharing”, you need to set up 3 things for Network sharing.
1. Setup of User Accounts and Family safety
a. Click Start > Settings > Control Panel > Users Accounts and Family safety
b. Make sure the account is “Guest”.
c. If the “Guest” account is off, then switch it to “On”.
38
Page 40

2. Disable “Firewall”
a. Click Start > Setting > Control Panel > Security > Windows Firewall on / off
b. Click at ‘Off (not recommended)
39
Page 41

3. Setup of Network and Sharing Center
a. Click Start > Setting > Control Panel > Network and Internet > Network and Sharing Center
b. Select “Password Protected sharing” and select “Turn off password protected sharing”.
c. make a folder you want to share.
40
Page 42

d. You will get a popup “Choose people to share with” then select “Everyone (All users in this list) and press “Add” button.
e. After you register the user account, then click “Share” button.
41
Page 43

Use as Network Storage (NDAS)
42
Page 44

4. Use as Network Storage (NDAS)
√ Note
-Recommend to use 100Mbps LAN Card on PC on using wired LAN connection.
-Recommend to use IEEE 802.11g (54Mbps) wireless adapter or Access Point when using wireless LAN connection.
-NDAS function allows to transfer data to HDD in MG-350HD by wired or wireless LAN without setting data sharing works.
-Recommend Pentium III higher and 128MB RAM higher PC (System requirement)
-NDAS PC software works on Windows 2000/XP only. (Available OS)
-Please do not connect LAN Cable and USB Cable at the same time.
-If you do not want to use NDAS function, set NDAS option disable.
-Network environment and PC specification can affect NDAS function.
-Please open ‘My Computer’ and check if Hard Disk in MG-350HD is conceived as Hard Disk Drive of local network. (HDD in MG-350HD looks
like external Hard Disk Drive. C:, D:, E: or F: ) If you cannot see Hard Disk Drive, please turn off MG-350HD and turn on again. (Recognition can
take some time.)
-To remove NDAS function safely, please double click the icon in right bottom tray. (Just like removing external Hard Disk Drive.)
① Select “Network>NDAS Support” in setup screen.
Choose one between “WIRED” and “WIRELESS”. It is not possible
to use both “WIRED” and “WIRELESS” at the same time.
*In case of using “WIRELESS”, use Device ID of wireless LAN MAC
address when connecting to MG-350HD. (In case of using “WIRED”,
use Device ID of wired LAN MAC address)
② Install NDAS PC software on your PC. The software is located at
“MediaGate MG-350HD> English > NDAS software” on setup CD.
43
Page 45

③ NDAS icon is created at right-down corner on desktop windows.
Right click the icon and select Register New Device”
④ Write NDAS Device ID and Write Key. They are located on the
bottom of MG-350HD. Write your preferable name at NDAS Device
Name. Finish device registration procedure with clicking [Register].
⑤ Select Mount(Read/Write) and access to NDAS Device, i.e, MG-
350HD.
⑥ Select “Install the software automatically” and click [Next] button.
44
Page 46

⑦ Please check ‘My Computer’ if Hard Disk in MG-350HD is
conceived as Hard Disk Drive of local network. (HDD in MG-350HD
looks like external Hard Disk Drive. C:, D:, E: or F: )If you cannot see
Hard Disk Drive, please turn off MG-350HD and turn on again.
(Recognition can take some time.)
⑧ To remove NDAS function safely, please double click the icon
in right bottom tray. (just like removing external Hard Disk
Drive.)
45
Page 47

.
Use USB Host
46
Page 48

5. Use USB Host
√ Note: How to eject the tray of external USB ODD (Optical Disk Drive)
Stop playback and press number [3] button in order to eject the tray of external USB ODD. In addition, original DVD title with CSS Lock should not
be played when connecting with USB host, but it is possible to play other format like XviD.
√ Note
It shall not be compatible with any external USB device. There are so many external USB devices, and specific products should not be
compatible. We does not guarantee all kind of external USB devices.
Connect your external USB device to USB host port of MG-350HD.
USB icon shall be activated on file selection screen.
Selecting USB icon, and the files in USB device shall be displayed.
47
Page 49

Connect to External AV Device
48
Page 50

6. Connect to External AV Device
6.1 Connect Video Cable
MG-350HD supports 4 type of video output; “Composite, S-video, Component, DVI”. Use video connection that your TV supports.
Normally, TV supports composite video connection, and this package supplies composite video cable.
√ When you can not see normal screen after connecting video cable, check followings,
1. “TV “– Switch to Video Input Mode: Turn on TV, and switch to video input mode same as video connection. See TV user manual.
2. “MG-350HD” – Switch to Video Output Mode: Press [TV OUT] button repeatedly. Whenever press [TV OUT], video output signal is changed.
3. After you see normal screen, you have to save video configurations of MG-350HD .See “7.1 Video Setup”.
① Composite: Yellow RCA cable. (Supplied)
Yellow
(CVBS)
② S-Video: Black rounded cable (not supplied)
S-VIDEO
③ Component: Y, Pb, Pr component cable (not supplied)
Red
(Pr)
Blue
(Pb)
Green
(Y )
④ DVI : DVI Cable (not supplied)
Yellow
(CVBS)
Connect DVI Jack of TV DVI
Connect to Composite (CVBS)
Jack of TV
Red
(Pr)
Blue
(Pb)
Green
(Y )
Connect S-Video Jack
of TV
Connect Pr Jack of TV
Connect Pb Jack of TV
Connect Y Jack of TV
49
Page 51

6.2 Connect Audio Cable
MG-350HD supports 3 type of audio output; “Stereo, Coaxial, Optical”. Use audio connection that your TV or Audio set supports.
Normally, TV supports stereo audio connection, and this package supplies stereo audio cable.
9When you can not hear sound after connecting Optical or Coaxial Cable, you have to change audio setup of MG-350HD as Encoded Digital.
See “7.2 Audio Setup”
① Stereo: Red & White RCA Cable (supplied)
Red Red
(STEREO-R) (STEREO-R)
(STEREO-L) (STEREO-L)
White White
② Optical (): Optical Cable for Digital 5.1 ch. (not supplied)
OPTICAL ()
9Don’t connect optical and coaxial cable together at the same time.
③ Coaxial: Coaxial cable for Digital 5.1 ch. (not supplied)
COAXIAL
Connect coaxial jack of Amplifier
or Receiver.
Connect Stereo-R Jack
of TV.
Connect Stereo-L Jack
of TV.
Connect Optical Jack of Amplifier
or Receiver
50
Page 52

51
Page 53

Basic Setup
52
Page 54

7. Basic Setup
7.1 Video Setup
This is guide for setting video output of MG-350HD. You have to setup MG-350HD’s video output mode same as TV set’s video
input mode.
√ When you can not see normal screen after connecting video cable, check followings,
1. “TV “– Switch to Video Input Mode: Turn on TV, and switch to video input mode same as video connection. See TV user manual.
2. “MG-350HD” – Switch to Video Output Mode: Press [TV OUT] button repeatedly. Whenever press [TV OUT], video output signal is changed.
3. After you see normal screen, you have to save video configurations of MG-350HD .See “7.1 Video Setup”.
TV Video Input Mode MG-350HD Video Output Mode Connection Jack of TV, MG-350HD Video Cable Type
Normal Video
S-Video
Component 480i
Component
480p
720p
1080i
DVI
480p
720p
1080i
1080p
640x480
800x600
1024x768
1280x1024
1600x1200
D-Sub
480p
720p
“TV Output” = Composite Mode
“Composite Mode” = C/S-Video
“TV Output” = Composite Mode
”Composite Mode” = C/YPbPr
”TV Output” = Component Mode
”Component Mode” = Select one among 480p, 720p, and 1080i
same as TV input mode
”TV Output” = HD-DVI Mode
”HD-DVI Mode” = Select one among 480p, 720p, 1080i, 1080p,
640x480, 800x600, 1024x768, and 1280x1024, 1600x1200 same
as TV input mode
”TV Output” = HD-DVI RGB Mode
”HD-DVI RGB” = Select one among 480p, 720p, 1080i , and 1080p
same as TV input mode
CVBS or Composite Jack
(Generally Yellow Jack)
S-Video Jack S-Video Cable * Black rounded
Component 3 Jack
* Y(Green), Pb(Blue), Pr(Red)
DVI Jack DVI Cable
DVI jack of MG-350HD to D-Sub jack of
TV(Monitor)
Yellow RCA Cable
(Supplied)
Component Cable
* Y(Green), Pb(Blue), Pr(Red)
DVI to D-Sub gender
53
Page 55

1080i
1080p
9NTSC, PAL : Standard of TV Output. Select a proper one for using in your country.
< Setup Procedure >
① Turn on MG-350HD and press [SETUP] on Mode Selection
screen.
Move to ‘② Video Out’ icon and press [OK]. Setup box will be
displayed under icon menu.
③ Select a TV Out Mode and each detailed video output mode
according to the selected TV Out, and then press [OK].
Finally, press [SETUP] again for saving configuratio④ ns.
54
Page 56

7.2 Audio Setup
This is guide for setting audio output of MG-350HD. You can use Stereo or Digital 5.1 ch.
9Analogue/DCPM: Select when you connect the supplied audio cables (Red / White) to TV or Audio set directly.
9Encoded Digital: Select when you want to listen through 5.1Ch / DTS Dolby by connecting receiver (or amplifier) with Optical or Coaxial cable.
< Setup Procedure >
① Turn on MG-350HD and press [SETUP] on Mode Selection
screen.
Move to ‘② Audio Out’ icon and press [OK]. Setup box will be
displayed under icon menu.
③ Select Audio Out Mode out of Stereo or Encoded Digital.,
and then press [OK].
Finally, press [SETUP] again for saving configurations.④
7.3 Network Setup
It is possible to obtain IP address automatically from DHCP Server or IP Router, or set the specific IP address. Check your network
environments.
9Note
DHCP On: You can use this option when it is possible to obtain IP address automatically from DHCP Server or IP Router.
DHCP Off: When it is not possible to obtain IP address automatically or you connect to your PC directly without DHCP Server or IP Router, you
have to use this option. Just write IP address and Subnet mask.
55
Page 57

< ‘DHCP Support On’ Setup Procedure >
① Turn on MG-350HD and press [SETUP] on Mode Selection
screen.
< DHCP Support OFF Setup Procedure >
② Move to ‘Network’ icon and press [OK]. Setup box will be
displayed under icon menu.
③ Select ‘DHCP Support-ON’ and press [OK].
④ Finally, press [SETUP] again for saving configurations.
√ Check the obtained IP address
Press [INFO] on Mode Selection screen, and It is possible to
current obtained IP address from DHCP server.
56
Page 58

① Turn on MG-350HD and press [SETUP] on Mode Selection
screen.
② Move to ‘Network’ icon and press [OK]. Setup box will be
displayed under icon menu.
③ Select ‘DHCP Support-OFF’ and press [OK].
④ Move to ‘IP Address’, ‘Subnet’ and press [OK]. Input box will
be displayed and enter number with [Direction] button or
[Number] button. Finally, press [ENTER] for saving
configurations.
√ Check the obtained IP Address
Press [INFO] on Mode Selection screen, and It is possible to
current obtained IP address from DHCP server.
57
Page 59

7.4 Wireless Setup
Refer to "2. Connect to PC via Network > 2.2 Wireless LAN Connection”.
7.5 Wireless Security Setup
Refer to "2. Connect to PC via Network > 2.2 Wireless LAN Connection”.
7.6 LED Setup
It is possible to turn on or off a backlight LED of arrow button on the front side. When the LED disturbs you in night, turn off the LED.
① Turn on MG-350HD and press [SETUP] on Mode Selection
screen.
② Move to ‘Network’ icon and press [OK]. Setup box will be
displayed under icon menu.
③ Select one out of ‘ON’ or ‘OFF’ and press {OK}.
④ Finally, press [SETUP] again for saving configurations.
58
Page 60

7.7 Photo View Setup
When playing photo file, it is possible to enable or disable BGM and set the playback interval time of each photo files.
√ BGM, Music Slide Show
Make a 'music' folder (in a small letter not a capital letter at root directory) of built-in HDD and save MP3 files at the folder. If the HDD is divided into
two or more partitions, make a 'music' folder at first partition.
When you play one or all photo files, you can listen mp3 and see photo slide show together.
However, if there is just networking computer (not built-in HDD), you cannot listen mp3. MG-350HD just detect mp3 files at built-in HDD's music
folder. At that time, before playing photo files, set the Photo mode with pressing [PHOTO] button.
< Setup Procedure >
① Turn on MG-350HD and press [SETUP] on Mode Selection
screen.
② Move to ‘Network’ icon and press [OK]. Setup box will be
displayed under icon menu.
③ Select one out of ‘ON’ or ‘OFF’ and press {OK}.
④ Finally, press [SETUP] again for saving configurations.
*It is possible to set the slide show interval time.
7.8 Language Setup
It is possible to set the preferable language. This language setup option may not be supported. In addition, this language will be
applied on OSD Language, not subtitle.
59
Page 61

7.9 Screen Ratio Setup
This is guide for setting TV Type. You can use 4:3 Letter Box, 4:3 Pan Scan, and 16:9.
< Setup Procedure >
① Turn on MG-350HD and press [SETUP] on Mode Selection
screen.
② Move to ‘Scr. Rate’ icon and press [OK]. Setup box will be
displayed under icon menu.
③ Select one out of ‘4:3 Letter Box’, ‘4:3 PanScan’ or ’16:9’,
and press {OK}.
④ Finally, press [SETUP] again for saving configurations.
60
Page 62

7.10 Auto Play Setup
When this Auto Play function is On, MG-350HD play the file continuously form the time of being stopped.
< Setup Procedure >
① Turn on MG-350HD and press [SETUP] on Mode Selection
screen.
② Move to ‘Auto Play’ icon and press [OK]. Setup box will be
displayed under icon menu.
③ Select one out of ‘ON’ or ‘OFF’ and press {OK}.
④ Finally, press [SETUP] again for saving configurations.
61
Page 63

7.11) Internet (How to setup the Internet)
This is for how to connect MG-350HD to the Internet.
① After turn MG-350HD on, press [SETUP] button and go to
[SETUP] page.
② Go to the 2nd page and select [INTERNET] icon and press
[ENTER] button then you will get the above page.
③ By using arrow buttons, go to the bottom setup.
By using arrow & number keys, set the configuration and press
[ENTER] for saving of the configuration.
④ Press [SETUP] button for the saving of the configuration.
√ Check the Internet connection
Check the Internet connection certainly..
62
Page 64

7.12) i-RADIO
Refer fot the below how to set up the “i-Radio” on MG-350HD.
√ [Note]
It composes of Shoutcast , Inlive ( live broadcasting list scan ) and UserList. ( save pls, m3u files in “iradio “ folde.).
< How to setup >
① After turn MG-350HD on, press [SETUP] button and go to
[SETUP] page.
② Go to the 2nd page and select [i-RADIO] icon and press
[ENTER] button then you will get the above page.
③ By using arrow buttons, go to the bottom setup.
By using arrow & number keys, set the configuration and press
[ENTER] for saving of the configuration.
④ Press [SETUP] button for the saving of the configuration.
√ 서버 수
Shoutcast and Inlive has a plenty of server lists, so you
can limit the server number list with this function.
63
Page 65

< In case, select [Off] at the server list >
√ [Note]
After you made “iradio” folder at the root directory in the HDD of MG-350HD, it shows only the list saved in pls, m3u file.
① Press ◀ key at the main page, select “i-RADIO” icon and
press [ENTER] button.
< In case, select [ Shoutcast / Inlive ] at the server list >
① It shows the live broadcasting server list.
② It shows server lists saved in the “iradio” folder at the root
directory. Select a list and press [ENTER] button then it plays.
② After select a server, it shows the broadcasting lists and
press [ENTER] button then it plays.
64
Page 66

7.13) SKIN
With SKIN function, you can make your own GUI of MG-350HD.
√ [Note]
Save your own GUI or icon images in “skin1” folder at the root directory of MG-350HD.
< How to setup >
① After turn MG-350HD on, press [SETUP] button and go to
[SETUP] page.
√ SKIN Folder : you can make up to 10 (skin1,skin2…,skin10).
√ User Color File: If “colorx.txt” file is in the SKIN folder, it is showed as the user wants. If there is no color.txt file, then the
default color is showed.
√ Font color: Select the font color on the GUI (default : black)
√ Font color selected: Font color when it is selected (Default : White)
② Go to the 2nd page and select [SKIN] icon and press
[ENTER] button then you will get the above page.
③ By using arrow buttons, go to the bottom setup.
By using arrow & number keys, set the configuration and press
[ENTER] for saving of the configuration.
④ Press [SETUP] button for the saving of the configuration.
65
Page 67

① Make “skin1” folder and save “GUI” or “Images” in the folder
at the root directory in a HDD of MG-350HD
< How to setup >
② At Setup page of SKIN, select [ON] of [SKIN Support] and
select [SKIN folder]. Press [SETUP] button for saving the
configuration.
③ Now, you see the changed GUI.
If you can not see the font, then change the font color.
(Setup Page => SKIN=> Change Font Color)
√ For more detail information regarding SKIN, refer to www.airlinktek.com
④ As the above, it supports several font colors.
66
Page 68

7.14) Others
You can set up for 1) effect sound, 2) screensaver.
① After turn MG-350HD on, press [SETUP] button and go to
[SETUP] page.
< How to setup >
② Go to the 2nd page and select [ETC] icon and press
[ENTER] button then you will get the above page.
③ By using arrow buttons, go to the bottom setup.
By using arrow & number keys, set the configuration and press
[ENTER] for saving of the configuration.
④ Press [SETUP] button for the saving of the configuration.
67
Page 69

How to Play(Remote Control)
68
Page 70

8. How to Play(Remote Control)
8.1 Basic Screen Menu
8.1.1 Mode Selection
After turning on MG-350HD, you can see mode selection screen. In this screen, you can select HDD(built-in), USB(external USB
device), LAN(wired network), WIRELESS(wireless network)
You can select one out of them.
√ Note
HDD: Built-in HDD, USB: external USB device, LAN: wired network, WIRELESS: wireless network.
Each Mode icon is activated when connecting to each external device.
8.1.1.1 Built-in HDD or external USB device
Following example is in case of built-in HDD. External USB device is same as built-in HDD.
① [Mode Selection] Select ‘HDD’ icon and press [OK]. (In case
of external USB device, select ‘USB’ icon)
② Data of built-in HDD is displayed. In order to play, select a file
and press [OK].
69
Page 71

8.1.1.2 Wired & Wireless Network
Following example is in case of wired network. Wireless network is same as wired network.
① [Mode Selection] Select ‘LAN’ icon and press [OK]. (In case
of wireless network, select ‘WIRELESS’ icon,
√ Refresh Network PC
Press [STOP]. If so, network PC list is refreshed.
② [PC List on Network] PCs list is displayed on the network.
Press [OK] and access to the network PC.
③ Shard folder of PC is displayed. In order to play, select a file
and press [OK].
70
Page 72

8.1.2 File Selection
Select a file and press [OK] in order to play.
Function and Button Descriptions
Remote Control Function Descriptions
MENU Menu Icon
Menu Icon is displayed including ‘Play one, Play all and Play-list’. Press again
for returning file selection screen.
▲▼◀▶ Direction Key Direction key
PREV I◀◀ Move by page In case of t wo or more file list page, move to previous page.
NEXT I▶▶ Move by page In case of two or more file list page, move to next page.
SLOW ( )↖ Up directory Return to up directory.
DEVICE Mode Selection Return to HDD, USB, LAN, WIRELESS selection screen.
OK I▶ Playback Play a file.
SELECT
(Number 1)
SELECT ALL
(Number2)
Register a file
at Play-List
Register all files
At Play-List
Use when registering a file at Play-List. After selecting a file, move to
“[MENU]>Play-List”
Use when registering all files at Play-List. After selecting files, move to
“[MENU]>Play-List”
MOVIE Movie Mode Movie file is just displayed.
MUSIC Music Mode Music file is just displayed.
PHOTO Photo Mode
Photo file is just displayed.
*After pressing [PHOTO], you can use photo slide show.
71
Page 73

ALL MEDIA All Media Mode All media files are displayed including movie, music and photo.
INFO - Current information of MG-350HD is displayed.
When pressing this button, video output signal is changed repeatedly.
TV OUT Video Out Signal
Brt.CONT
Control luminosity,
color depth, brightness
SETUP - Move to setup screen.
√ Play All File, Play One File
Press [MENU] and move to 'Play Mode' icon. Two Play modes are available, when pressing [OK], change the mode "Play one>Play all". After
selecting one, press [MENU] again for saving configurations.
*Play One: Play the selected file and stop.
*Play All: Played the selected file and continue to play next all files at the directory including sub directory.
√ Refresh Network
Press [STOP], PCs list on the network or shared folder list are refreshed.
√ Jump to first or last page
There might to be two or more list pages in case of many files at directory. At the time, conveniently jump to first or last page.
*Jump to last page from first page: Move to [Up Directory] on the top of first page and press [▲] or [Previous].
*Jump to first page from last page: Move to the last file on last page and press [▼] or [Next]
√ See a long directory path
In case of Directory path information is longer than file information, press [Scr.SIZE].
(If you can not see normal screen, press this button repeatedly until returning
normal screen.
When pressing this button, 3 modes switch. After selecting
a mode, change settings with ▲▼ arrow buttons.
72
Page 74

8.2 Play Video Files
Select a file and press [OK].
When pressing [MENU] while playing a file, “Tool Box Menu” is
displayed. Tool Box allows using detailed playback function.
Function and Button Descriptions
리모컨 버튼 기능 설명
MENU Tool Box Tool Box is displayed. For returning to playback, press again.
Playback Play file.
OK II▶
NEXT I▶▶
PREV I◀◀
Pause
Playback
Next File
Playback
Previous File
Direction ▶▶▶ Fast Forw ard
When pressing while playing a file, pause the playback. For returning to
playback, press again.
Play a next file after a current playback file.
* Play mode must be in Play all in order to use this function.
Play a previous file after a current playback file.
* Play mode must be in Play all in order to use this function.
Whenever pressing this button, play speed is changed with 2x, 4x 8x, 16x, 32x
in forward.
Direction ◀◀◀ Rewind Whenever pressing this button, play speed is changed with 8x, 16x, 32x in
73
Page 75

backward.
SLOW Playback Slow Play slowly 1/2x, 1/4x, and 1/8x whenever pressing this button.
Move to a selected time of a file.
Enter your preferable playback time with [Number] and press [OK]., or use time
searching bar)
SEARCH
VOLUME +
Direction ▲
VOLUME -
Direction ▼
Jump to Preferable
Playback Time
Volume Up Volume up.
Volume Down Volume down.
MUTE Sound Off Mute the sound. In order to hear sound, press this button again.
Subtitle
Move & Size
Subtitle Sync.
SUBTITLE
BOOKMARK
Subtitle
Select or Hide
Subtitle
Language Select
Specific Playback
Time Memory
AUDIO Dual Audio
INFO Show File Information
Brt. CONT
Control luminosity,
color depth, brightness
It is possible to change subtitle size and location.
◀▶ arrow button changes size and ▼▲ arrow button changes location.
After doing, press [OK].
It is possible to set the subtitle sync. with ◀▶(one second) ▼▲(60 second)
when motion and subtitle sync is not matched.
The subtitle name same as video file is displayed on screen automatically.
However, it is possible to open the other preferable subtitle files or hide.
It is possible to switch each subtitle language when the subtitle is dual language
format, for example, including a local language and English.
* When selecting ‘Discriminating subtitle language’, first subtitle language will be
displayed.
Save specific playback time when pressing this button. If you want to see book
mark list, press [BOOKMARK] on file selection screen.
It is possible to switch each audio language when the audio format is dual-
audio, for example, including a local language and English.
Show the file information which is being played. In order to
hide the information, press this button again.
When pressing this button, 3 modes switch. After selecting
a mode, change settings with ▲▼ arrow buttons.
74
Page 76

8.3 Play DVD File
DVD manager function support to play DVD Ripping File same as original DVD.
Make a folder and then save all ripping files into the folder. After connecting TV (or Monitor), select VIDEO_TS.IFO file at the folder.
Make sure that all the ripping files including VIDEO_TS.IFO from one DVD title will be located at one folder.
√ Nolte
If you can not find VIDEO_TS.IFO file among all the ripping files from an original DVD title, DVD manager function will not work.
Function and Button Descriptions
Select ‘video_ts.ifo’ file and press [OK] button. Move to the folder including DVD ripping files
Remote Control Function Descriptions
AUDIO Dual Audio
SUBTITLE Select Subtitle Type Subtitle type will be changed whenever pressing this button.
Scr. SIZE Screen Size Screen size will be changed when press the button.
MENU Go to Menu Move to main menu while playing DVD.
SLOW Playback Slow Play slowly 1/2x, 1/4x, and 1/8x whenever pressing this button.
It is possible to switch each audio language when the audio format is dual-
audio, for example, including a local language and English.
75
Page 77

REPEAT Chapter, Title Repeat Set chapter, title repeat.
A-B REPEAT A-B repeat Set the A-B repeat.
TITLE Go to Title Menu Move to title menu while playing DVD.
ANGLE Angle Apply angle function.
INFO Show File Information
SEARCH
Brt. CONT
NEXT
I▶▶
PREV
I◀◀
FF ▶▶▶ Fast Forward
REW ◀◀◀ Rewind
OK II ▶
VOLUME +
Direction ▲
VOLUME -
Direction ▼
MUTE Sound Off Mute the sound. In order to hear sound, press this button again.
Jump to Preferable
Playback Time
Control luminosity,
color depth, brightness
Playback
Next Chapter
Playback
Previous Chapter
Playback Play ‘Video_ts.ifo’ file.
Pause
Volume Up Volume Up.
Volume Down Volume Down.
Show the file information which is being played. In order to
hide the information, press this button again.
Move to a selected time of a file.
(It is not possible to use time searching bar.)
When pressing this button, 3 modes switch. After selecting
a mode, change settings with ▲▼ arrow buttons.
Play a next chapter.
Play a previous chapter.
Whenever pressing this button, play speed is changed with 8x, 16x, 32x, 48x in
forward.
Whenever pressing this button, play speed is changed with 8x, 16x, 32x, 48x in
backward.
Pause playback, if pressing this button when a file is being
played. In order to play again, press this button again.
76
Page 78

8.4 Play Audio File
Select a file and press [OK].
When pressing [MENU] while playing a file, “Tool Box Menu” is
displayed. Tool Box allows using detailed playback function.
Function and Button Descriptions
Remote Control Function Descriptions
MENU Tool Box Tool Box is displayed. For returning to playback, press again.
Playback Play file.
OK I▶
NEXT I▶▶
PREV I◀◀
Pause
Playback
Next File
Playback
Previous File
FF ▶▶▶ Fast Forward
REW ◀◀◀ Rewind
When pressing while playing a file, pause the playback. For returning to
playback, press again.
Play a next file after a current playback file.
* Play mode must be in Play all in order to use this function.
Play a previous file after a current playback file.
* Play mode must be in Play all in order to use this function.
Whenever pressing this button, play speed is changed with 2x, 4x 8x, 16x, 32x
in forward.
Whenever pressing this button, play speed is changed with 8x, 16x, 32x in
backward.
SEARCH Jump to Preferable Move to a selected time of a file.
77
Page 79

Playback Time Enter your preferable playback time with [Number] and press [OK].
VOLUME +
Direction ▲
VOLUME -
Direction ▼
Volume Up
Volume Down
Volume Up.
*It is not possible to use this button when manual subtitle is displayed while playing audio file.
Volume Down.
*It is not possible to use this button when manual subtitle is displayed while playing audio file.
MUTE Sound Off Mute the sound. In order to hear sound, press this button again.
INFO Show File Information
Brt. CONT
Control luminosity,
color depth, brightness
Show the file information which is being played. In order to
hide the information, press this button again.
When pressing this button, 3 modes switch. After selecting
a mode, change settings with ▲▼ arrow buttons.
78
Page 80

8.5 Play Photo File
Select a file and press [OK].
When pressing [MENU] while playing a file, “Tool Box Menu” is
displayed. Tool Box allows using detailed playback function.
Function and Button Descriptions
Remote Control Function Descriptions
MENU Tool Box Tool Box is displayed. For returning to playback, press again.
Playback Play file.
OK I▶
NEXT I▶▶
PREV I◀◀
Pause
Playback
Next File
Playback
Previous File
INFO Show File Information
Brt. CONT
Control luminosity,
color depth, brightness
When pressing while playing a file, pause the playback. For returning to
playback, press again.
Play a next file after a current playback file.
* Play mode must be in Play all in order to use this function.
Play a previous file after a current playback file.
* Play mode must be in Play all in order to use this function.
Show the file information which is being played. In order to
hide the information, press this button again.
When pressing this button, 3 modes switch. After selecting
a mode, change settings with ▲▼ arrow buttons.
79
Page 81

√ Photo Slide Show
When play mode is set on ‘Play all(Default value)’, all photo files will be played continuously. So, It is possible to use as photo slide show.
√ Music Slide Show
Make a 'music' folder (in a small letter not a capital letter at root directory) of built-in HDD and save MP3 files at the folder. If the HDD is divided into
two or more partitions, make a 'music' folder at first partition.
When you play one or all photo files, you can listen mp3 and see photo slide show together.
However, if there is just networking computer (not built-in HDD), you cannot listen mp3. MG-350HD just detect mp3 files at built-in HDD's music
folder. At that time, before playing photo files, set the Photo mode with pressing [PHOTO] button.
√ Set the playback interval time
For more convenient photo slide show, it tis possible to set slide show’s interval time on your preferable time gab. Press [SETUP] for setting.
80
Page 82

8.6 Make a Play List
You can make your preferable play list for registering some files to play list.
√ Note
After rebooting MG-350HD, registered play list will be clear.
① Select your preferable file for registering with [SELECT] or
[SELECT ALL].
② After finishing registration, press [MENU] and select “Play
List”.
③ Play List screen is displayed.
-Play: Play the registered files.
-Cancel: Close the Play List screen.
-Move up, down: Change the file location..
-Shuffle: File location is mixed randomly.
-Delete: Delete the selected file..
-Delete all: Delete all the registered files.
81
Page 83

Firmware Upgrade
82
Page 84

9. Firmware Upgrade
Download a upgrade file from local distributor in your country or visit at
After connecting TV set, move to the upgrade file and press [OK]. Upgrade is progressed automatically.
After finishing upgrade, you can check firmware version on Setup screen. Press [SETUP] button.
* Current firmware version is displayed when pressing [INFO] button on file selecting screen.
* Firmware upgrade file is not concerned wherever the location is at external USB device, network connection PC. It is possible to
upgrade if you can access the upgrade file.
www.airlinktek.com.
83
 Loading...