

Page 1

FOR CAR USE ONLY/NUR FÜR AUTOMOBIL GEBRAUCH/POUR APPLICATION AUTOMOBILE/
PARA USO EN AUTOMÓVILES/SOLO PER L’UTILIZZO IN AUTOMOBILE/ENDAST FÖR BILBRUK
R
Powered Subwoofer
SWE-1000
• OWNER'S MANUAL
Please read before using this equipment.
• BEDIENUNGSANLEITUNG
Lesen Sie diese Bedienungsanleitung bitte vor Gebrauch des Gerätes.
• MODE D'EMPLOI
Veuillez lire avant d’utiliser cet appareil.
• MANUAL DE OPERACIÓN
Léalo antes de utilizar este equipo.
• ISTRUZIONI PER L’USO
Si prega di leggere prima di utilizzare il attrezzatura.
• ANVÄNDARHANDLEDNING
Innan du använder utrustningen bör du läsa igenom denna
användarhandledning.
EN
DE
FR
ES
ALPINE ELECTRONICS MARKETING, INC.
1-1-8 Nishi Gotanda,
Shinagawa-ku,
Tokyo 141-0031, Japan
Phone 03-5496-8231
ALPINE ELECTRONICS OF AMERICA, INC.
19145 Gramercy Place, Torrance,
California 90501, U.S.A.
Phone 1-800-ALPINE-1 (1-800-257-4631)
ALPINE ELECTRONICS OF CANADA, INC.
777 Supertest Road, Toronto,
Ontario M3J 2M9, Canada
Phone 1-800-ALPINE-1 (1-800-257-4631)
PERCETAKAN MEWAH PEK SDN. BHD.
39, JALAN PERUSAHAAN JELUTONG,
11600 PENANG, MALAYSIA
ALPINE ELECTRONICS OF AUSTRALIA PTY. LTD.
161-165 Princes Highway, Hallam
Victoria 3803, Australia
Phone 03-8787-1200
ALPINE ELECTRONICS GmbH
Frankfurter Ring 117,
80807 München, Germany
Phone 089-32 42 640
ALPINE ELECTRONICS OF U.K. LTD.
Fletchamstead Highway, Coventry CV4 9TW,
98, Rue de la Belle Etoile, Z.I. Paris Nord Il,
B.P. 50016, 95945 Roissy Charles de Gaulle
Alpine House
U.K.
Phone 0870-33 33 763
ALPINE ELECTRONICS FRANCE S.A.R.L.
(RCS PONTOISE B 338 101 280)
Cedex, France
Phone 01-48638989
ALPINE ITALIA S.p.A.
Viale C. Colombo 8, 20090 Trezzano
Sul Naviglio (MI), Italy
Phone 02-484781
ALPINE ELECTRONICS DE ESPAÑA, S.A.
Portal de Gamarra 36, Pabellón, 32
01013 Vitoria (Alava)-APDO 133, Spain
Phone 945-283588
ALPINE ELECTRONICS (BENELUX) GmbH
Leuvensesteenweg 510-B6,
1930 Zaventem, Belgium
Phone 02-725-13 15
Designed by ALPINE Japan
Printed in Malaysia (Y)
68-04123Z97-A
IT
IT
SE
SE
Page 2

WARNING
WARNING
This symbol means important instructions.
Failure to heed them can result in serious
injury or death.
DO NOT DISASSEMBLE OR ALTER.
Doing so may result in an accident, fire or electric shock.
KEEP SMALL OBJECTS SUCH AS BATTERIES OUT OF THE
REACH OF CHILDREN.
Swallowing them may result in serious injury. If swallowed,
consult a physician immediately.
USE THE CORRECT AMPERE RATING WHEN REPLACING
FUSES.
Failure to do so may result in fire or electric shock.
USE ONLY IN CARS WITH A 12 VOLT NEGATIVE GROUND.
(Check with your dealer if you are not sure.) Failure to do so may
result in fire, etc.
BEFORE WIRING, DISCONNECT THE CABLE FROM THE
NEGATIVE BATTERY TERMINAL.
Failure to do so may result in electric shock or injury due to
electrical shorts.
DO NOT SPLICE INTO ELECTRICAL CABLES.
Never cut away cable insulation to supply power to other
equipment. Doing so will exceed the current carrying capacity of
the wire and result in fire or electric shock.
DO NOT INSTALL IN LOCATIONS WHICH MIGHT HINDER
VEHICLE OPERATION, SUCH AS THE STEERING WHEEL
OR SHIFT LEVER.
Doing so may obstruct forward vision or hamper movement etc.
and results in serious accident.
DO NOT DAMAGE PIPE OR WIRING WHEN DRILLING
HOLES.
When drilling holes in the chassis for installation, take
precautions so as not to contact, damage or obstruct pipes, fuel
lines, tanks or electrical wiring. Failure to take such precautions
may result in fire.
DO NOT USE BOLTS OR NUTS IN THE BRAKE OR
STEERING SYSTEMS TO MAKE GROUND CONNECTIONS.
Bolts or nuts used for the brake or steering systems (or any other
safety-related system), or tanks should NEVER be used for
installations or ground connections. Using such parts could
disable control of the vehicle and cause fire etc.
DO NOT OPERATE ANY FUNCTION THAT TAKES YOUR
ATTENTION AWAY FROM SAFELY DRIVING YOUR
VEHICLE.
Any function that requires your prolonged attention should only
be performed after coming to a complete stop. Always stop the
vehicle in a safe location before performing these functions.
Failure to do so may result in an accident.
DO NOT INSTALL THE MONITOR NEAR THE PASSENGER
SEAT AIR BAG.
If the unit is not installed correctly the air bag may not function
correctly and when triggered the air bag may cause the monitor to
spring upwards causing an accident and injuries.
DO NOT ALLOW CABLES TO BECOME ENTANGLED IN
SURROUNDING OBJECTS.
Arrange wiring and cables in compliance with the manual to
prevent obstructions when driving. Cables or wiring that obstruct
or hang up on places such as the steering wheel, shift lever, brake
pedals, etc. can be extremely hazardous.
DO NOT BLOCK VENTS OR RADIATOR PANELS.
Doing so may cause heat to build up inside and may result in fire.
KEEP THE VOLUME AT A LEVEL WHERE YOU CAN STILL
HEAR OUTSIDE NOISES WHILE DRIVING.
Excessive volume levels that obscure sounds such as emergency
vehicle sirens or road warning signals (train crossings, etc.) can be
dangerous and may result in an accident. LISTENING AT LOUD
VOLUME LEVELS IN A CAR MAY ALSO CAUSE HEARING
DAMAGE.
USE THIS PRODUCT FOR MOBILE 12V APPLICATIONS.
Use for other than its designed application may result in fire,
electric shock or other injury.
MAKE THE CORRECT CONNECTIONS.
Failure to make the proper connections may result in fire or
product damage.
1-EN
Page 3

CAUTION
This symbol means important instructions.
Failure to heed them can result in injury or
material property damage.
HALT USE IMMEDIATELY IF A PROBLEM APPEARS.
Failure to do so may cause personal injury or damage to the
product. Return it to your authorized Alpine dealer or the nearest
Alpine Service Centre for repairing.
USE SPECIFIED ACCESSORY PARTS AND INSTALL THEM
SECURELY.
Be sure to use only the specified accessory parts. Use of other
than designated parts may damage this unit internally or may not
securely install the unit in place. This may cause parts to become
loose resulting in hazards or product failure.
DO NOT INSTALL IN LOCATIONS WITH HIGH MOISTURE
OR DUST.
Avoid installing the unit in locations with high incidence of
moisture or dust. Moisture or dust that penetrates into this unit
may result in product failure.
HAVE THE WIRING AND INSTALLATION DONE BY
EXPERTS.
The wiring and installation of this unit requires special technical
skill and experience. To ensure safety, always contact the dealer
where you purchased this product to have the work done.
ARRANGE THE WIRING SO IT IS NOT CRIMPED OR
PINCHED BY A SHARP METAL EDGE.
Route the cables and wiring away from moving parts (like the seat
rails) or sharp or pointed edges. This will prevent crimping and
damage to the wiring. If wiring passes through a hole in metal,
use a rubber grommet to prevent the wire’s insulation from being
cut by the metal edge of the hole.
2-EN
Page 4
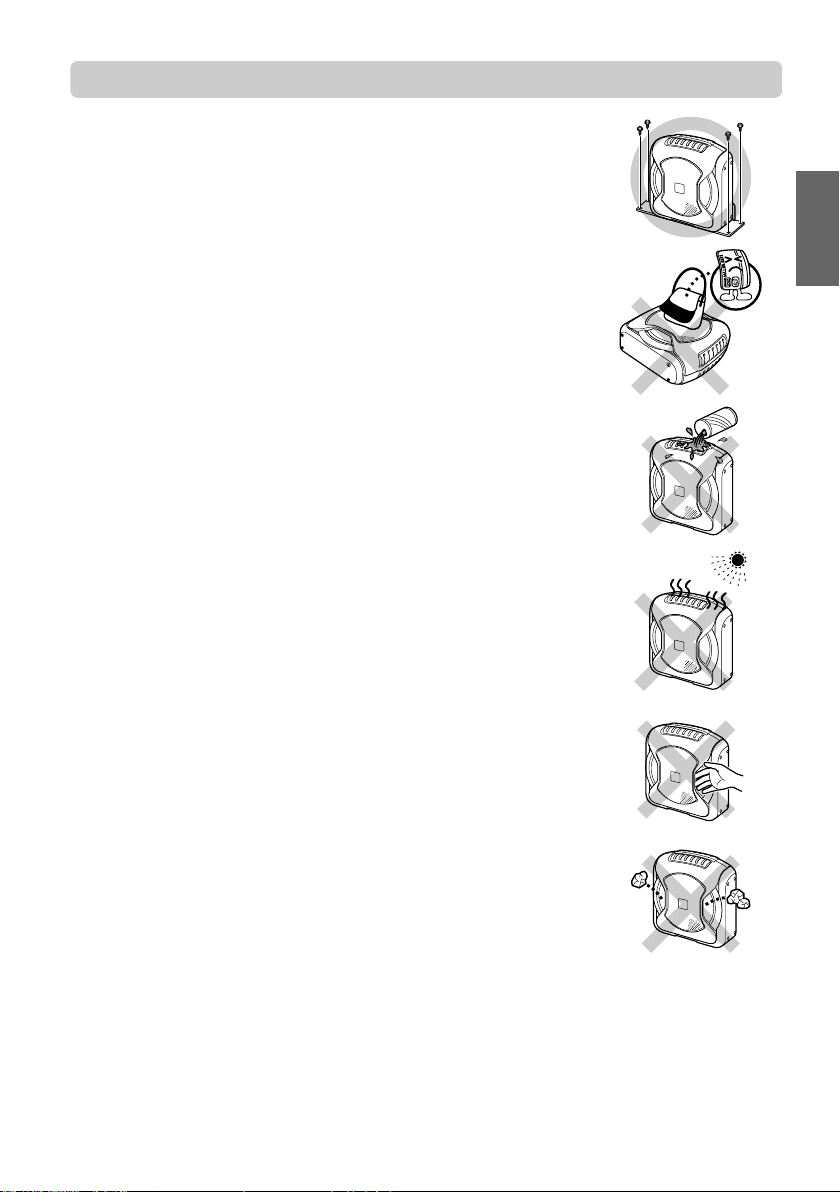
CAUTION IN USE
When installing, be sure to use the supplied brackets.
For safety, accessories are supplied to install the product. When installing, be
sure to use the supplied brackets to securely fix the product. For further
information, refer to "MOUNTING" (page 6).
Do not place magnetic strips, such as credit cards or store cards near
the product.
The product contains a strong magnet. Do not place your wallet or bags near it.
Data contained on the magnetic strips of credit/store cards may be damaged or
lost.
Do not place drinks/water close to the product.
Spilling any drink or water on the product may result in malfunction.
Especially during the summer, the temperature inside a vehicle may
become excessive. If this happens, use the product after decreasing the
temperature to a normal level in the vehicle.
For the protection, the product is designed to not sound automatically when you
use it in the high temperature. If no sound is output, wait until the temperature
decreases to a normal level in the vehicle, and then turn the head unit off and on
again. (if there is no remote turn-on lead on the head unit and the product is not
connected to the head unit, turn the ignition key off and on again.) Use this
product even when it happens. This is not a malfunction.
Do not lift the product by its opening.
Lifting the product opening may result in malfunction.
Do not insert any objects in the product.
Inserting objects in the product may result in malfunction.
3-EN
Page 5
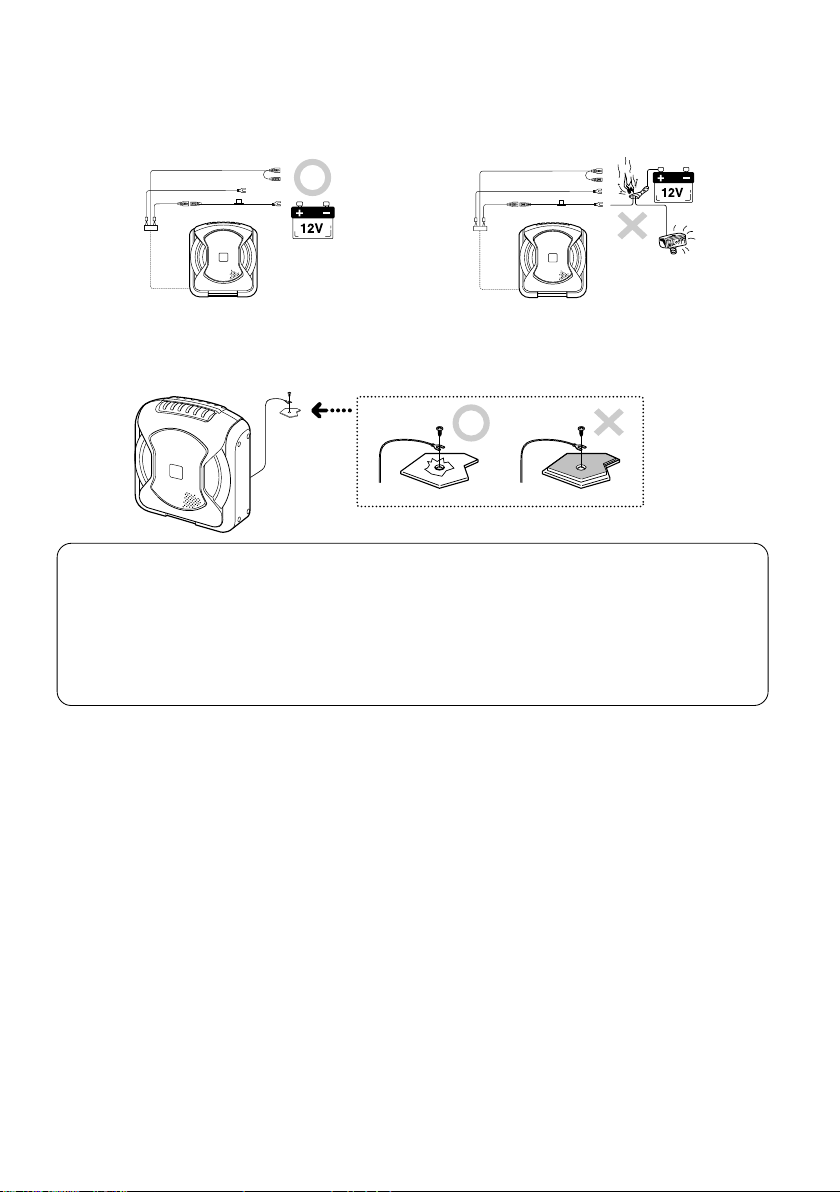
Be sure to use the supplied power extension cable (with 10 A fuse), and connect the cable directly
to the positive (+) post of the battery.
Be sure to use the supplied power extension cable, and connect the cable directly to the positive (+) post of
the battery. If a power cable is connected by dividing an existing power cable of the vehicle, low voltage may
result in poor product function; this power cable may result in heat, smoke or fire.
Securely connect a ground lead from the product to a bare metal part of a vehicle chassis.
Securely fasten using the screw. If connection is not securely made, the product may not function normally. For
a good chassis ground connection, remove any paint on the metal with a file.
DO NOT EXCEED THE INPUT LEVEL SPECIFIED FOR THIS PRODUCT.
If sound distortion or popping noise is output from the speaker, the input level to the speaker is excessively
increased. If the input level to the speaker remains excessive, its performance may result in deterioration or
cause damage to the speaker.
DAMAGE CAUSED BY EXCESSIVE INPUT LEVEL IS NOT COVERED BY THE WARRANTY.
If gain is adjusted to eliminate distortion at the output, maximum available, volume level may be insufficient. In
this case, place the product closer to the listener. Theoretically, halving the distance will result in 4 times the
volume.
DO NOT USE A MOBILE PHONE NEAR THE PRODUCT.
Use of a mobile phone may cause malfunction and noise.
4-EN
Page 6
SPECIFICATIONS
L MAX POWER OUTPUT ........................................................................................................................ 150W
L CROSSOVER ........................................................................................................... 50~125Hz (-12dB / oct)
L PHASE .............................................................................................................................................. 0°, 180°
L INPUT IMPEDANCE ......................................................................................................... 22k Ω (Line Input)
5.9k Ω (Speaker Input)
L POWER REQUIREMENT ...............................................................................DC 14.4V (11~16V allowable)
L EARTH TYPE ........................................................................................................................ Negative Earth
L DIMENSIONS ...................................................... 250mm (9-13/16") × 272mm (10-7/10") × 114mm (4-1/2")
L WEIGHT ................................................................................................................................................ 3.5kg
IN CASE OF DIFFICULTY
If you have a problem with the product, check the following items before taking for repair.
SYMPTOM
Unit is not functional
(for example, fuse is blown)
Power can be turned on but no sound
is output.
CAUSE
Head unit is not turned on.
Ground cable is not properly
connected.
Battery power cable is not
properly connected.
Fuse is blown.
Remote turn-on lead is not
properly connected.
RCA cable is not properly connected.
Speaker input lead is not properly
connected.
The gain is not at the correct level
for the system.
SOLUTION
Turn the head unit on.
Check the ground cable is
properly connected.
Check the battery power cable is
properly connected.
Replace the fuse with its specified
rating.
Check the remote turn-on lead is
properly connected.
Connect RCA cable to the
terminal properly.
Check the speaker input lead is
properly connected.
Adjust the gain setting to an
appropriate level for the system.
5-EN
Page 7

ACCESSORY LIST
Parts
Power Supply Connector
Battery extension lead
(5.5m) (216-1/2")
Speaker to RCA Converter Cable
(6m) (236-1/5")
RCA Cable (0.5m) (19-3/5")
Remote Control Cable
(6m) (236-1/5")
Velcro Fastener
Adhesive Pad
Qty.
1
1
2
1
1
1 set
1
Parts
Bracket (large)
Bracket (small)
Truss Screw (M5 × 8mm)
Flat Screw (M5 × 10mm)
Self-tapping Screw (M5 × 18mm)
Owner’s Manual
Qty.
1
2
4
4
4
1 set
1. MOUNTING
• Make sure there is sufficient length of the various cables for your desired subwoofer location.
• Certain products are incompatible with this subwoofer. Read the Owner's Manual of the product to be
used with the subwoofer, alongside this manual during mount.
1
Park the car in a safe, level place. Apply the handbrake and remove the key.
Determine where to install the subwoofer, and check that there is sufficient cable length.
2
Mount the subwoofer.
a Recommended Mounting Location
You can enjoy extended bass by mounting the subwoofer
in the rear baggage compartment of the vehicle.
a How to mount the Remote Control
• Attach the soft side of fastener to the base of the
remote control.
• Attach the rough side of fastener to the mounting
location (console box, etc.).
6-EN
Velcro
Fastener
(supplied)
Console box, etc.
Remote
Control
Protective
Paper
Page 8

a Mounting example
Vertical Mounting
<Vertical Mounting A>
Bracket (large)
(supplied)
1 Determine the mounting location in the vehicle.
2 Determine mounting method.
Select how to mount the subwoofer, vertical mounting
(A), or horizontal mounting (B).
3 Attach the supplied adhesive pad to the centre of the
base. (“Vertical Mounting A”*)
4 Attach the supplied bracket to the subwoofer using the
supplied screws.
5 Mark the screw mounting location in the vehicle.
6 Drill a hole (φ3.5mm) (1/8") for the screw.
7 Install the subwoofer in the vehicle using the supplied
screw.
Self-tapping
Screw (supplied)
* Peel off the protective paper.
Truss Screw
(supplied)
<Vertical Mounting B>
Bracket (large)
(supplied)
Truss Screw
(supplied)
○○○○○○○○○○○○○○○○○○○○○○○○○○○○○○○○○○○○○○○○○○○○○○○○○○○○○○○
Horizontal Mounting
Adhesive Pad
(supplied)
Bracket (small)
(supplied)
Self-tapping
Screw (supplied)
Self-tapping
Screw (supplied)
Bracket (large)
(supplied)
Bracket (large)
(supplied)
Flat Screw
(supplied)
* Mounting procedure the same as for vertical mounting.
7-EN
Page 9
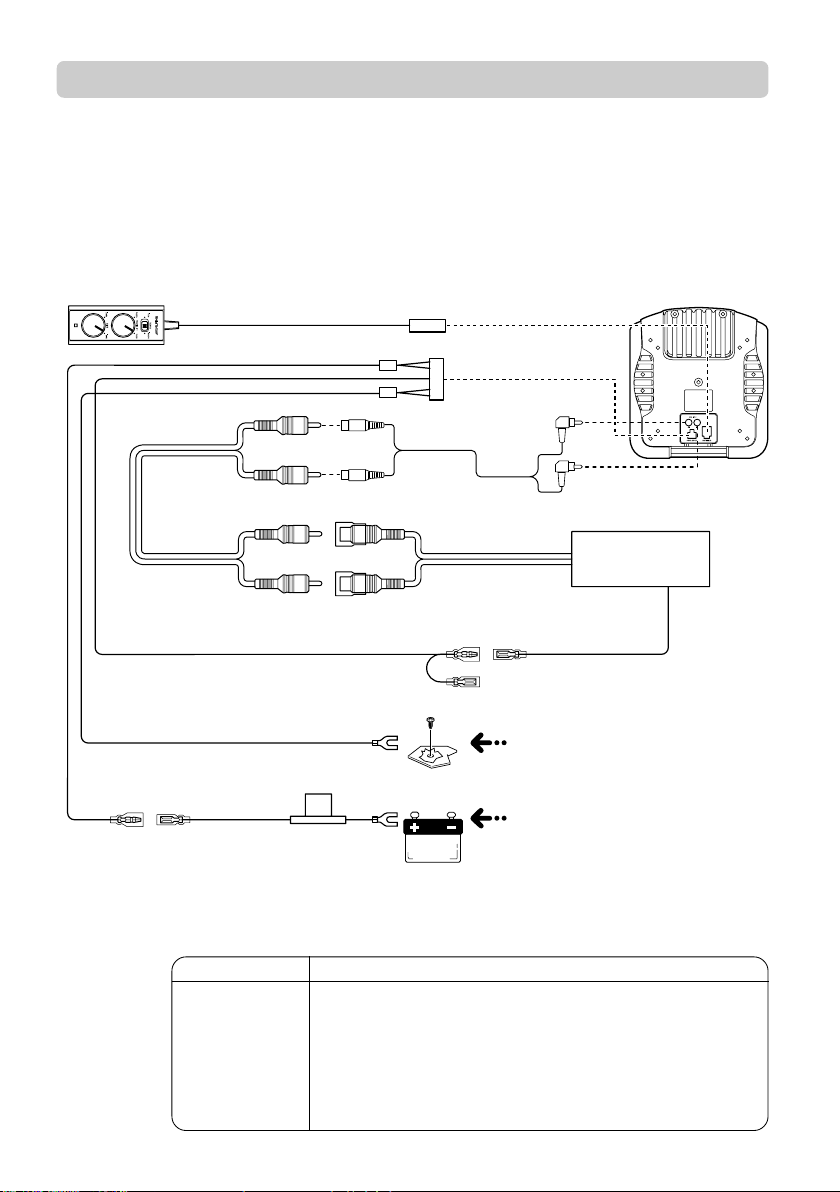
2. CONNECTION
1
Disconnect the cable from the negative terminal of the car battery.
2
Connect
a CONNECTIONS FOR RCA INPUT
L
RCA Cable
(sold separately)
Remote turn-on
lead
Ground lead Black
Yellow Yellow
Battery extension
lead
R
R
L
FUSE (10A)
Type of Lead
Remote turn-on
lead
Ground lead
Battery extension
Connect to the remote turn-on lead of the head unit.
• If your head unit does not have a remote turn-on lead, connect the
Connect securely to a bare metal spot of the chassis.
Connect directly to the positive (+) post of the battery.
lead
White
RCA Cable
Red
Pre-out
Blue/White
12V
White
Red
Head Unit
Remote turn-on
lead
Connect to the ACC line if the
head unit has no remote turn-on
lead.
Connect the ground lead securely and
safely to a metal spot of the chassis.
• Be sure to use the supplied extension
cable for connection to the positive (+)
post of the battery.
• DO NOT connect this lead to the head
unit.
• DO NOT modify this cable.
It may cause malfunction and damage to
the product.
Additional Information
ACC power lead to the unit. (Power is supplied to this lead when
the ignition key is set to the ACC position.)
8-EN
Page 10

cable for connection to the positive (+)
post of the battery.
unit.
It may cause malfunction and damage
Connect the ground lead securely
and safely to a metal spot of the chassis.
• Be sure to use the supplied extension
• DO NOT connect this lead to the head
12V
to the product.
• DO NOT modify this cable.
Additional Information
Black
(10A)
FUSE
Yellow
Battery extension lead
Ground lead
If your head unit does not have a remote turn-
on lead, connect the ACC power lead to the
Yellow
Blue/White
unit. (Power is supplied to this lead when the
ignition key is set to the ACC position.)
Remote turn-on
lead
Left speaker Output
Head Unit
Left speaker Output
Right speaker Output
Right speaker Output
Connect to either the front or rear speaker
output leads.
Note:
Subwoofer output will be affected by the
Red
White
fader settings of the head unit.
a CONNECTIONS FOR SPEAKER LEVEL INPUT
RCA Cable
Red
White
Red
White
Speaker to RCA
Speaker to RCA
Converter Cable
Converter Cable
Green
Type of Lead
Left Speaker
Green/Black
ACC power lead to the unit. (Power is supplied to this lead when
the ignition key is set to the ACC position.)
Connect to the remote turn-on lead of the head unit.
• If your head unit does not have a remote turn-on lead, connect the
Connect securely to a bare metal spot of the chassis.
Connect directly to the positive (+) post of the battery.
Remote turn-on
lead
Ground lead
Battery extension
lead
Right Speaker
Violet
Violet/Black
9-EN
Page 11

a This product cannot be used with cars fitted with a common negative speaker system.
NOTE
a To prevent external noise from entering the audio system:
• Locate the unit and route the leads at least 10 cm away from the car harness.
• Keep the battery power leads as far away from other leads as possible.
• Connect the ground lead securely and safely to a bare metal spot (remove the coating if neces-
sary) of the car chassis.
• If you add an optional noise suppressor, connect it as far away from the unit as possible. Your
Alpine Dealer carries various Alpine noise suppressors, contact them for further information.
• Your Alpine Dealer knows best about noise prevention measures so consult your dealer for
further information.
a Make all connections securely.
a Any unused connections should be insulated with electrical insulation tape.
a On cars fitted with computers and other such devices (e.g. head units with security code),
you may loose the memory when disconnecting the negative lead.
3. CHECK
1
Secure all loose cables.
2
Reconnect the negative lead to the battery terminal.
3
By switching on the head unit, verify that the subwoofer is working.
4
Check all electrical equipment (lights, indicators, horn, etc.) in the car is functional.
10-EN
Page 12
4. ADJUSTMENT
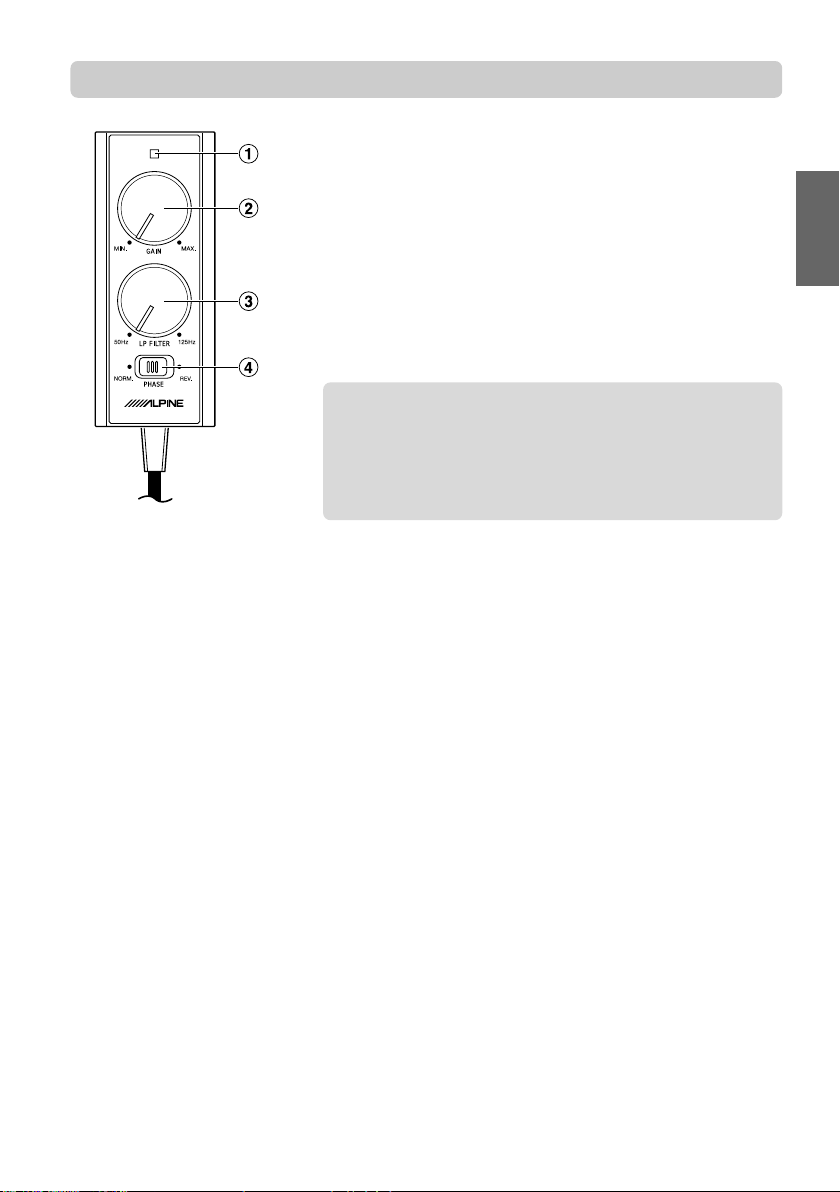
1 Power indicator: Lights when power is on.
2 Input sensitivity adjustment (GAIN):
3 Low pass filter frequency adjustment (LP FILTER):
4 Phase switch:
Adjusts volume (increase/decrease).
Decrease the volume by setting towards MIN.
Adjusts the centre frequency of the low pass filter.
Balance between speakers can be adjusted.
Adjusts the speaker phase.
Phase alignment between speakers can be adjusted. Phase can be
switched between norm phase (0° - NORM) and reverse phase (180° -
REV.).
CAUTION
1. Set the GAIN to MIN, PHASE to NORM, LP FILTER to CENTER before switching on the system.
2. Set the Bass/Treble adjustment to zero on the head unit. Set the volume to your average listening level. It
may help to use a music source that is familiar.
3. Next, gradually increase the gain level. Increase the level to the point where the sound of your system, as
a whole, is balanced. If the gain level is set too high, the subwoofer may begin to distort. Distortion may
also occur if the volume is set too high on the head unit. Check that the other speakers have not begun to
distort, before proceeding with the adjustment. If the entire speaker system in the car is distorting, reduce
the volume of the head unit.
4. Once the gain has been set, adjust the LP FILTER at a frequency which compliments your speaker
system.
5. Adjusting the LP FILTER will change the output volume of the subwoofer. Repeat procedures 3 and 4 until
the ideal setting is found.
6. The final adjustment is the PHASE of the subwoofer. While sitting in the driver’s seat and with music
playing, switch between NORM and REV. Select the setting which sounds better –The ideal PHASE
setting varies from car to car, depending on the location of the subwoofer and the acoustic characteristics
of the vehicle interior.
DO NOT EXCEED THE INPUT LEVEL SPECIFIED FOR
THIS PRODUCT.
If sound distortion or popping noise is output from the
speaker, the input level to the speaker is excessively
increased. If the input level to the speaker remains excessive,
its performance may result in deterioration or cause damage
to the speaker.
11-EN
Page 13

R
Car Audio and Navigation Systems
GERÄTE-PASS
AUDIO SYSTEME
Fahrzeugmarke: Typ:
Amtl. Kennzeichen:
Name des Halters:
Straße:
Wohnort:
Bitte füllen Sie diesen Pass vollständig aus und bewahren Sie ihn
außerhalb des Fahrzeugs auf:
Im Falle eines Diebstahls wird für Sie die Schadensabwicklung mit der
Versicherung einfacher, und Sie erleichtern der Polizei die Fahndung
nach den Tätern.
Page 14
Händlerstempel
Tips der Polizei:
[ Stellen Sie Ihr Fahrzeug stets gut sichtbar ab.
Verschließen Sie Türen, Fenster, Schiebedach und Kofferraum immer, auch bei nur kurzer Abwesenheit.
[
[ Lassen Sie keine Wertsachen sichtbar im Auto liegen.
[ Wird Ihr Fahrzeug aufgebrochen, wenden Sie sich sofort an die nächste Polizeidienststelle.
[ Belassen Sie Ihr Fahrzeug nach einem Aufbruch im Originalzustand.
[ Informieren Sie sich über technische Sicherungsmöglichkeiten bei einer kriminalpolizeilichen
Beratungsstelle.
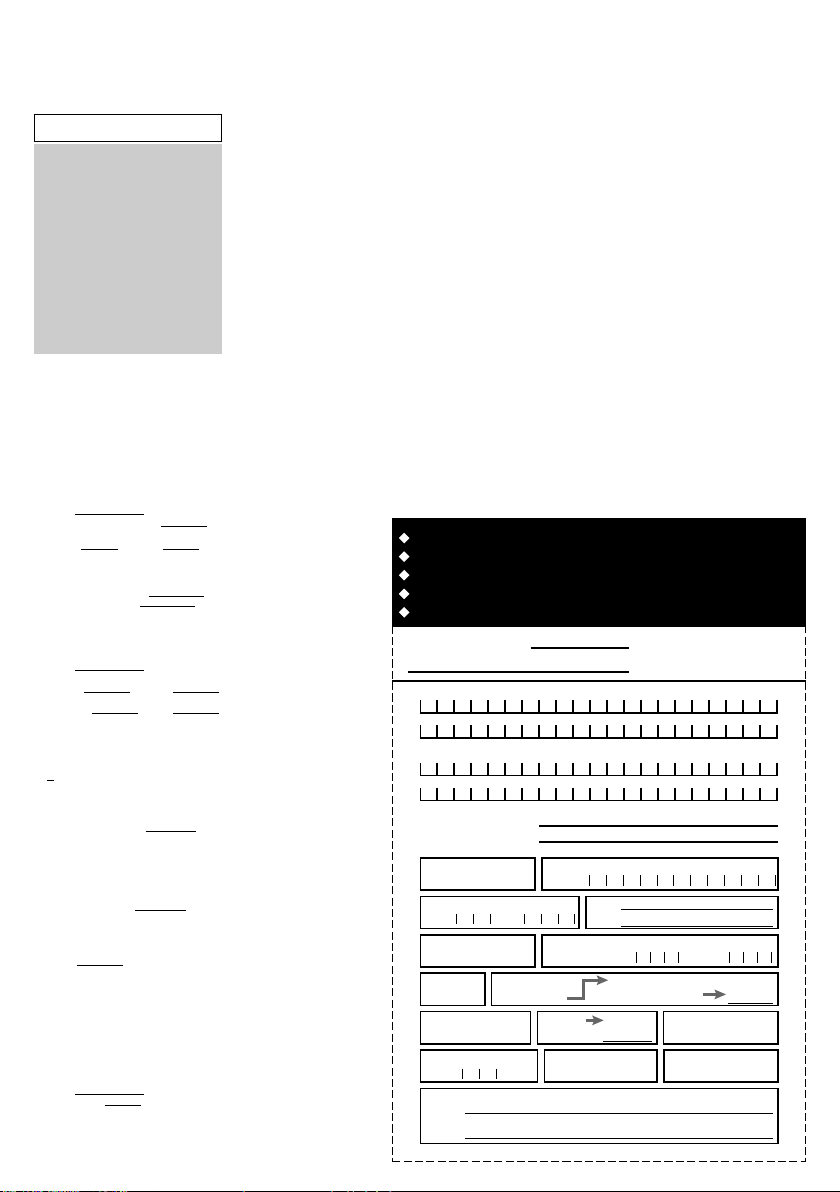
Gerät 1
Modell-Nr.:
Hersteller:
Seriennummer:
AL
Kaufdatum: Preis:
Page 15

Appendix
Product Information Card
English
Filling in this Product Information Card is
voluntary. If you fill in this card and send
it to Alpine, your data will be tabulated
into reference data for future Alpine
product development. In addition, in the
future you may receive information about
new products or Survey Mail requesting
additional opinions about Alpine products
or services. If you agree to the above
term, please sign your name in the
indicated space and return the card. Any
additional comments or inquiries may be
sent to : Person in charge of Customer
Service department Alpine Electronics
(Europe) GmbH.
Frankfurter Ring 117, 80807 München, Germany
Phone: +49-(0)89-32 42 640
Q1. PRODUCT PURCHASED
1. Cassette Player
2. CD Player
3. MD Player
4. DVD Player
5. CD Changer
6. Amplifier
7. Speaker
8. Subwoofer
9. Monitor Controller
10. Video Monitor
11. Navigation
12. Processor/Equalizer
13. CD/Video CD Changer
14. Other
Q2. MODEL NUMBER:
Q3. DATE OF PURCHASE:
Month: Year:
Q4. If navigation system, which
monitor?
1. Alpine → (Model No.)
2. Other → (Brand Name)
Q5. STORE TYPE WHERE
PURCHASED:
1. Car Audio Specialist
2. Audio/Video Store
3. Electronics/Appliance Store
4. Car Accessories Shop
5. Other
Q6. Type of vehicle in which this unit is
installed:
Make: Model:
Purchased Model
Year:
Q7. How was this vehicle purchased?
1. Purchase
2. Lease
Q8. Purpose of buying this unit?
1. Addition
2. Replacement
↓
• Previous brand replaced?
1. Factory installed
2. Alpine
3. Other → (Brand Name)
Q9. Have you purchased Alpine
products before?
1. First time
2. Two or More times
Q10.When you purchased this Alpine
unit, did you compare it with other
brand?
1. Yes → (Brand Name)
2. No.
Q11.GENDER
1. Male
2. Female
Q12.AGE
Q13.MARITAL STATUS
1. Single
2. Married
Q14.OCCUPATION
1. Company Owner/Self-employed/
Freelance
2. Manager
3. Company Employee
4. Civil Servant
5. Educator
6. Student
7. Other
Q15.Comments
Year:
Produkt-Informationskarte
Deutsch
Das Ausfüllen dieser Produktinformations-Karte
ist freiwillig. Sollten Sie diese Karte
vervollständigen, so werden die Daten für
zukünftige Produktentwicklungen von Alpine als
Referenzdaten herangezogen. Ebenso können Sie
in der Zukunft Informationen über neue Alpine
Produkte erhalten oder uns auch Ihre Meinung
über Alpine Produkte und Dienstleistungen im
Rahmen von Kunden-Befragungen mitteilen.
Stimmen Sie dem Kontakt durch Alpine zu, so
würden wir Sie bitten, in dem dafür vorgesehenen
Feld zu unterschreiben und die Karte kostenfrei
an uns zurückzuschicken. Zusätzliche
Kommentare und Meinungen können Sie gerne
an den zuständigen Kontakt im Kundendienst
Alpine Electronics (Europe) GmbH senden.
Frankfurter Ring 117, 80807 München, Germany
Phone: 089-32 42 640
Q1. gekauftes Gerät
1. Kassetten-Spieler
2. CD-Spieler
3. MD-Spieler
4. DVD-Spieler
5. CD-Wechsler
6. Verstärker
7. Lautsprecher
8. Subwoofer
9. Monitor-Controller
10. Video-Monitor
11. Navigationssystem
12. Prozessor/Equalizer
13. CD/Video-CD-Wechsler
14. andere
Q2. Modellnummer:
Q3. Kaufdatum:
Monat: Jahr:
Q4. Falls Navigationssystem:
Welcher Monitor?
1. Alpine → (Modellnr.)
2. Anderer Hersteller →
(Herstellername)
Q5. Art des Geschäfts, in dem Sie das
Gerät gekauft haben:
1. Spezialist für Auto-Audioanlagen
2. Audio/Video-Geschäft
3. Elektro-Geschäft
4. Autozubehör-Geschäft
5. Anderer Hersteller
Q6. Art des Fahrzeugs, in das das
Gerät installiert wurde:
Marke: Modell:
gekauft im
Jahr:
Q7. Wie haben Sie das Fahrzeug
gekauft?
1. Kauf
2. Leasing
Q8. Zweck des Kaufs dieses Geräts?
1. Zusätzlich
2. Austausch
↓
• Marke des ausgetauschten Geräts?
1. Serienmäßige Ausstattung
2. Alpine
3. Anderer Hersteller →
(Herstellername)
Q9. War dies das erste Mal, dass Sie
ein Alpine-Gerät gekauft haben?
1. Erstes Mal
2. Zweites Mal oder öfter
Q10.Haben Sie dieses Alpine-Gerät vor
dem Kauf mit Geräten anderer
Hersteller verglichen?
1. Ja → (Herstellername)
2. Nein
Q11.Geschlecht
1. Männlich
2. Weiblich
Q12.Alter
Q13.Familienstand
1. Ledig
2. Verheiratet
Q14.Beruf
1. Selbständige/Firmeninhaber/freiberuflich
Tätige
2. Leitende Angestellte
3. Sonstige Angestellte
4. Beamte
5. Schulbildung
6. Studium
7. Sonstige
Q15.Kommentar:
Baujahr:
Carte d’informations sur
le produit
Français
En remplissant volontairement cette fiche,
et en l’envoyant à Alpine, vous acceptez
que ces informations soient utilisées par
Alpine, dans le cadre de développement
de nouveaux produits. Par ailleurs, vous
autorisez Alpine à solliciter votre opinion
par mailing sur de nouveaux produits ou
services. Si vous acceptez les termes cidessus, veuillez signer cette carte à
l’endroit indiqué, et nous la retourner.
Tout autre commentaire ou demande doit
être adressé à l’attention de: Responsable
du service consommateur Alpine
Electronics (Europe) GmbH.
Frankfurter Ring 117, 80807 München, Germany
Phone: +49-(0)89-32 42 640
Q1. PRODUIT ACHETE
1. Lecteur de cassette
2. Lecteur de CD
3. Lecteur MD
4. Lecteur DVD
5. Changeur de CD
6. Amplificateur
7. Haut-parleur
8. Haut-parleur de graves
9. Station Multimedia
10. Moniteur Vidéo
11. Navigation
12. Processeur/Egaliseur
13. Changeur de CD/CD Vidéo
14. Autre
Q2. NUMERO DU MODELE:
Q3. DATE D’ACHAT:
Mois: Année:
Q4. Si c’est un système de navigation,
quel moniteur?
1. Alpine → (N° du modèle)
2. Autre → (Marque)
Q5. TYPE DE MAGASIN OU VOUS
AVEZ ACHETE LE PRODUIT:
1. Spécialiste autoradio
2. Magasin audio/vidéo
3. Magasin d’électronique/appareils
4. Magasin d’accessoires automobiles
5. Autre
Q6. Type de véhicule dans lequel cet
appareil est installé:
Marque: Modèle:
Année Année du
d’achat:
Q7. Comment avez-vous acheté ce
véhicule?
1. Achat
2. Location-bail
Q8.
Pourquoi avez-vous acheté cet
appareil?
1. Addition
2. Remplacement
↓
• Marque précédente remplacée?
1. Installée en usine
2. Alpine
3. Autre → (Marque)
Q9. Aviez-vous déjà acheté des
produits Alpine?
1. Première fois
2. Deux fois ou plus
Q10.Lorsque vous avez acheté ce
produit Alpine, l’avez-vous
comparé à une autre marque?
1. Oui → (Marque)
2. Non
Q11.SEXE
1. Masculin
2. Féminin
Q12.AGE
Q13.SITUATION DE FAMILLE
1. Célibataire
2. Marié
Q14.PROFESSION
1. Entrepreneur/Travailleur indépendant/
Free-lance
2. Directeur
3. Employé de bureau
4. Fonctionnaire
5. Educateur
6. Etudiant
7. Autre
Q15.Commentaires
modèle:
Tarjeta de información del
producto
Español
El envío de la información solicitada es
voluntario. Si Vd. nos la remite, será
utilizada de modo confidencial para el
desarrollo de futuros productos Alpine. Si
Vd. desea recibir información sobre
nuevos productos de nuestra gama,
indique su nombre en el espacio
designado y remítanos la tarjeta.
Cualquier solicitud adicional puede ser
enviada a : Persona responsable del
Servicio de Atención al Cliente de Alpine
Electronics (Europe) GmbH.
Frankfurter Ring 117, 80807 München, Germany
Phone: +49-(0)89-32 42 640
Q1. Producto Comprado
1. Radio/Cassette
2. Radio/CD
3. Reproductor de MD
4. Reproductor de DVD
5. Cambiador de CD
6. Amplificador
7. Altavoz
8. Subwoofer
9. Monitor de control
10. Monitor de video
11. Sistema de navegación
12. Procesador/Ecualizador
13. Cambiador de CD/Video CD
14. Otros
Q2. Número de modelo:
Q3. Fecha de compra:
Mes: Año:
Q4. En caso de sistema de
navegación, ¿qué monitor?
1. Alpine → (N° de modelo)
2. Otros
→
(Nombre de marca)
Q5. TIPO DE TIENDA DONDE
COMPRÓ:
1. Especialista en audio de automóviles
2. Tienda de audio/video
3. Tienda de electrónica/electrodomésticos
4. Tienda de accesorios automovilísticos
5. Otros
Q6. Tipo de vehiculo en que la unidad
está instalada:
Marca: Modelo:
Año de Año del
compra:
Q7. ¿Cómo fue comprado este
vehiculo?
1. compra
2. Leasing
Q8.
¿Propósito de comprar esta
unidad?
1. Mejora del sistema
2. Sustitución
↓
•¿Sustitución de marca anterior?
1. Instalado en la fábrica
2. Alpine
3.
Otros
→
Q9. ¿Ha comprado Vd. productos
Alpine anteriormente?
1. Primera vez
2. Dos o más veces
Q10.Cuando usted compró esta unidad
Alpine, ¿la comparó con otros
fabricantes?
1. Si → (Nombre de marca)
2. No
Q11.SEXO
1. Masculino
2. Femenino
Q12.Edad
Q13.Estado civil
1. Soltero
2. Casado
Q14.Ocupación
1. Propietario de empresa/Autónomo/
Profesional independiente
2. Gerente
3. Empleado de compañia
4. Empleado público
5. Profesor
6. Estudiante
7. Otros
Q15.Comentarios
modelo:
(Nombre de marca)
Page 16
Scheda informazioni
prodotto
Italiano
La compilazione di questa formulario è
volontaria. Se compilate questo formulario,
ritornandolo ad Alpine, i Vostri dati saranno
raccolti in un file di riferimento per lo sviluppo
dei nuovi prodotti Alpine. In aggiunta Voi potrete
ricevere in futuro informazioni riguardanti i nuovi
prodotti o la richiesta di una Vostra opinione
circa i prodotti o i servizi forniti da Alpine. Se
siete d’accordo, Vi preghiamo di ritornarci il
formulario completato negli appositi spazi con i
Vostri dati. In caso desideriate fornire altri
commenti o richiedere informazioni aggiuntive,
potete indirizzare il tutto a : Responsabile
dipartimento Servizio Clienti Alpine Electronics
(Europe) GmbH.
Frankfurter Ring 117, 80807 München, Germany
Phone: +49-(0)89-32 42 640
Q1. PRODOTTO ACQUISTATO
1. Lettore di cassette
2. Lettore CD
3. Lettore MD
4. Lettore DVD
5. CD Changer
6. Amplificatore
7. Altoparlante
8. Subwoofer
9. Radio Monitor
10. Monitor video
11. Sistema di navigazione
12. Processore/equalizzatore
13. Cambia CD/Video CD
14. Altro
Q2. NUMERO MODELLO:
Q3. DATA DI ACQUISTO:
Mese: Anno:
Q4. In caso di acquisto di un sistema di
navigazione, quale monitor
possiede?
1. Alpine → (No. Modello)
2. Altro → Nome marca
Q5. NEGOZIO DI ACQUISTO:
1. Specialista Car Stereo
2. Negozio di audio/video
3. Negozio di elettronica/elettrodomestici
4. Negozio accessori automobile
5. Altro
Q6. Tipo di veicolo posseduto:
Marca: Modello:
Anno Anno
acquisto:
Q7. Modalità acquisto
1. Acquisto
2. Leasing
Q8. Scopo acquisto
1. Aggiunta
2. Sostituzione
↓
• Marca sostituita
1. Installato di fabbrica
2. Alpine
3. Altro → (Nome marca)
Q9. Avevate già acquistato prodotti
Alpine?
1. No
2. Due o tre volte
Q10.Nell’acquistarlo, avete paragonato
questo prodotto ad un’altra marca?
1. Si → (Nome marca)
2. No
Q11.SESSO
1. Maschile
2. Femminile
Q12.ETÀ
Q13.STATO CIVILE
1. Celibe/nubile
2. Coniugato/coniugata
Q14.LAVORO
1. Proprietario di azienda/artigiano/libero
professionista
2. Manager
3. Impiegato
4. Impiegato statale
5. Insegnante
6. Studente
7. Altro
Q15.Commenti
modello:
I agree to the above stated terms of the Alpine Product Information Card.
Ich stimme dem Kontakt durch Alpine für Informations- und Befragungszwecke zu.
J’accepte les termes de cette carte d’information produit Alpine.
Estoy conforme con los términos de la tarjeta de información sobre producto de Alpine.
Accetto i termini della scheda informazioni prodotti Alpine.
(Date/Datum/Date/Fecha/Data)
(Signature/Unterschrift/Signature/Firma)
Name/Nom/Nombre/Nome
(First Name/Vorname/Prénom/Primer nomble/Nome)
(Surname/Familienname/Nom de famille/Apellido/Cognome)
Home Address/Privatanschrift/Adresse/Dirección/Indirizzo
(Street/Straße/Rue/Calle/Via) (Post Code/Postleitzahl/Code postal/Código postal/Codice postale)
(Town/City/Stadt/Ville/Ciudad/Città) (Country/Land/Pays/País/Paese)
Telephone Number:
E-Mail/Correo electrónico:
NO.
Q1
Other
Month Year
Q3
NO.
Q5
Other
Q7
NO.
NO.
Q9
Q12
Q15
Comments
Q2
NO.1. Model No.
Q4
NO.2. Brand Name
Make:
Q6
Purchased Year: ModelYear:
NO. Previous brand replaced. Brand Name
years old
1
2
Q10
NO.
Q13
1
2
NO.
Brand Name
Q8
1. 2. 3.
Q11
NO.
Q14
Model:
NO.
Other
Page 17
 Loading...