

Page 1
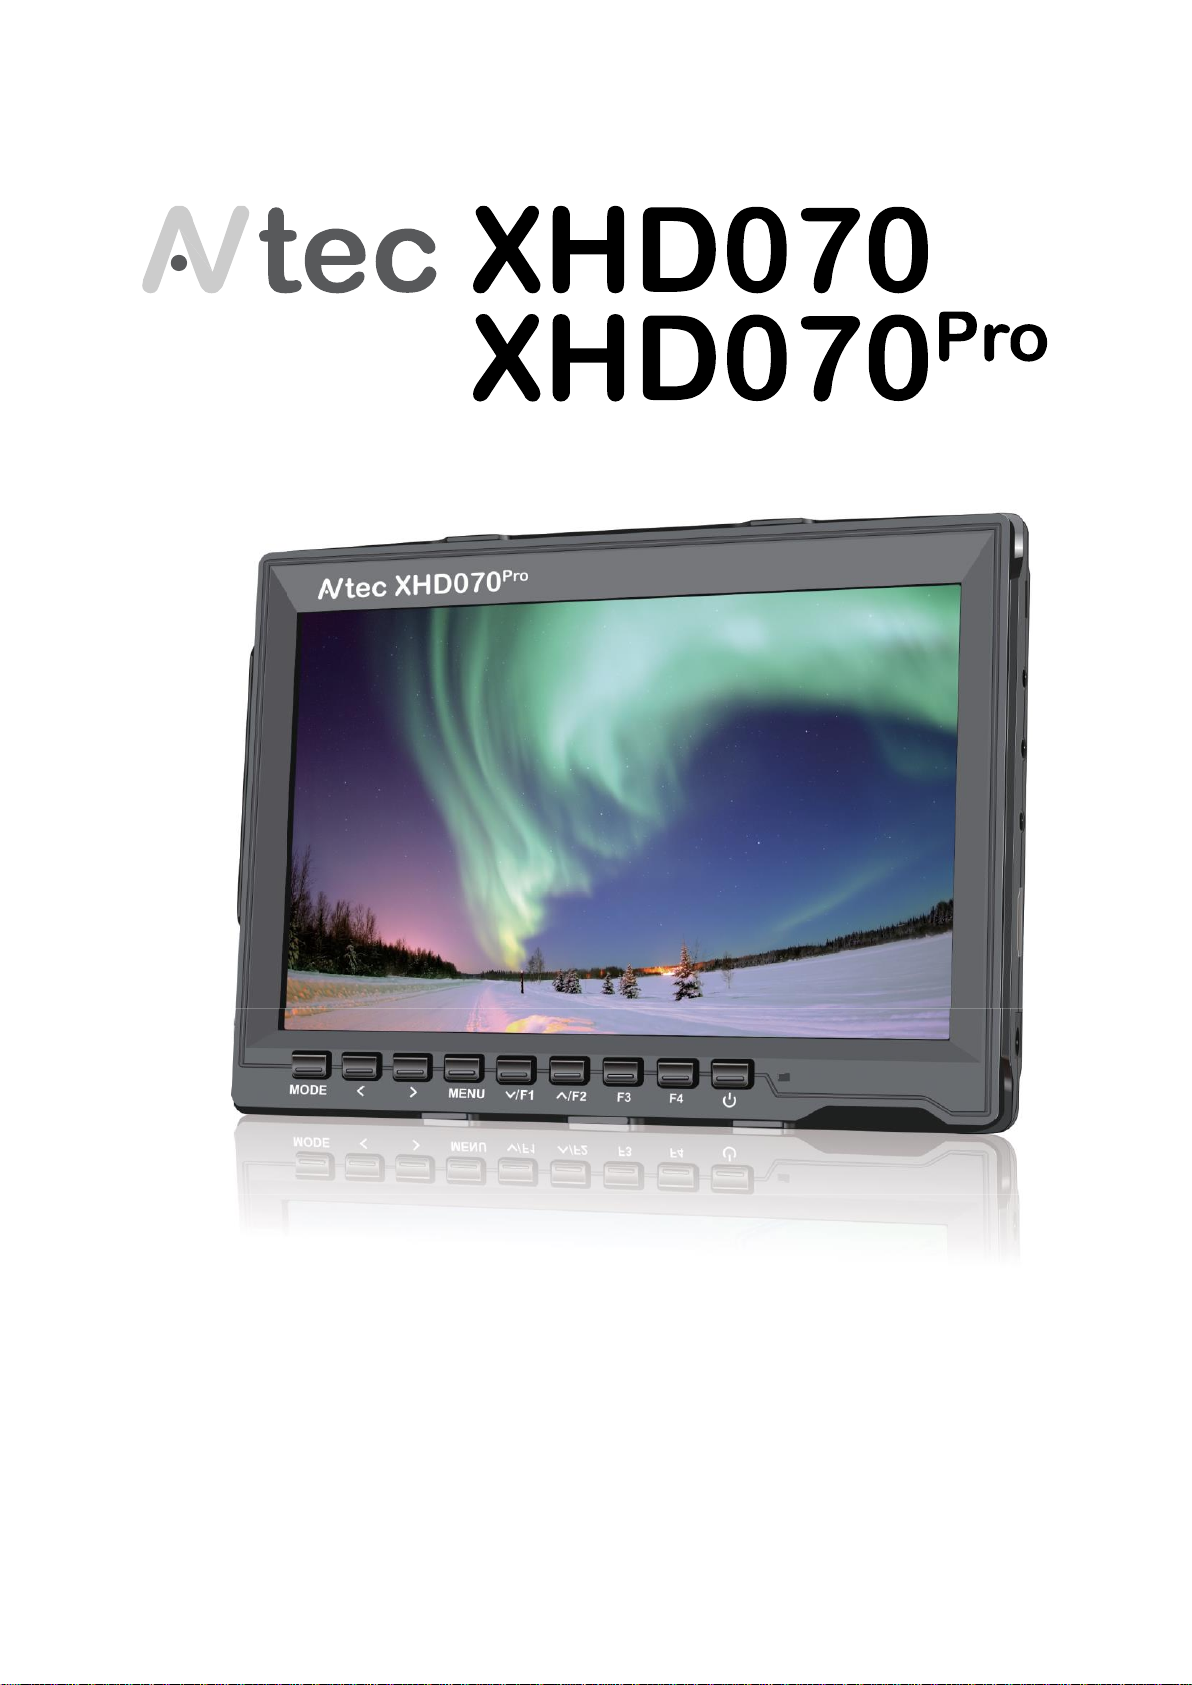
Operation Manual_V1.0
Page 2

Page 3
XHD070 & XHD070Pro
Important Safety Instructions
FCC (Federal Communications Commission)
This equipment has been tested and found to comply with the limits for class B digital device,
pursuant to part 15 of the FCC Rules.
These limits are designed to provide reasonable protection against harmful interface when the
equipment is operated in a commercial environment. This equipment generates, uses and can
radiate radio frequency energy and if not installed and used in accordance with the instruction
manual, may cause harmful interference to radio communications. Operation of this equipment in
a residential to correct the interference at his own expense
CAUTION: Change or modifications not expressly approved by the manufacturer responsible
for compliance could void the user’s authority to operate the equipment.
Operation Manual_V1.0
There are no user-serviceable components inside the device so please do not
take apart or repair the unit by yourself.
The device repair must be done by qualified specialists only.
Do not expose this product to direct sunlight, heat or humid conditions
WARNING! To avoid possible malfunctions the device must not be
exposed to rain or moisture. Prevent water or other liquids from
getting inside the device.
Do not use any damaged or leaking batteries and please replace the battery
immediately if its working life becomes significantly short
Keep away from strong light while using this product so as to obtain the
clearest and the most colorful picture.
Please use a sun shade outdoors if necessary.
Please use the supplied power sources.
Do not use chemical solutions to clean this unit. Simply wipe with a
clean soft cloth to remove fingerprints or smudges.
Please avoid heavy impact or drop on the ground.
AVtec LCD Monitors Page: 1/13
Page 4

XHD070 & XHD070Pro
Operation Manual_V1.0
1. Overview
Thank you for purchasing the AVtec XHD070(Pro) on-camera field monitor.
This 7” monitor is a great tool for focusing, composing, and viewing
images/video clips directly from your digital camera/video camera. It is
conveniently sized for easy transportation, and it is perfect for difficult
shooting situations. To obtain the best results with your new XHD070(Pro),
please take the time to read this manual.
2. Features
• Ultra Thin & lightweight 7” IPS Screen
• 1280x800 HD screen, PAL/NTSC color system
• Supports 1080i & 1080p
• Built-in speaker & integrated jack port for headphones
• Four assignable function buttons
• Firmware upgradable through USB
• AC/DC Adapter with EU, UK, US & AU plugs included
• Detachable sun hood attachment & foldable sun hood
• Focus Assist, Center Marker, Safe Frames, Check Field
• Image Freeze, Image Flip & Pixel-to-Pixel
• Histogram, Exposure (Zebras) & False Colors (XHD070Pro only)
AVtec LCD Monitors Page: 2/13
Page 5
XHD070 & XHD070Pro
Operation Manual_V1.0
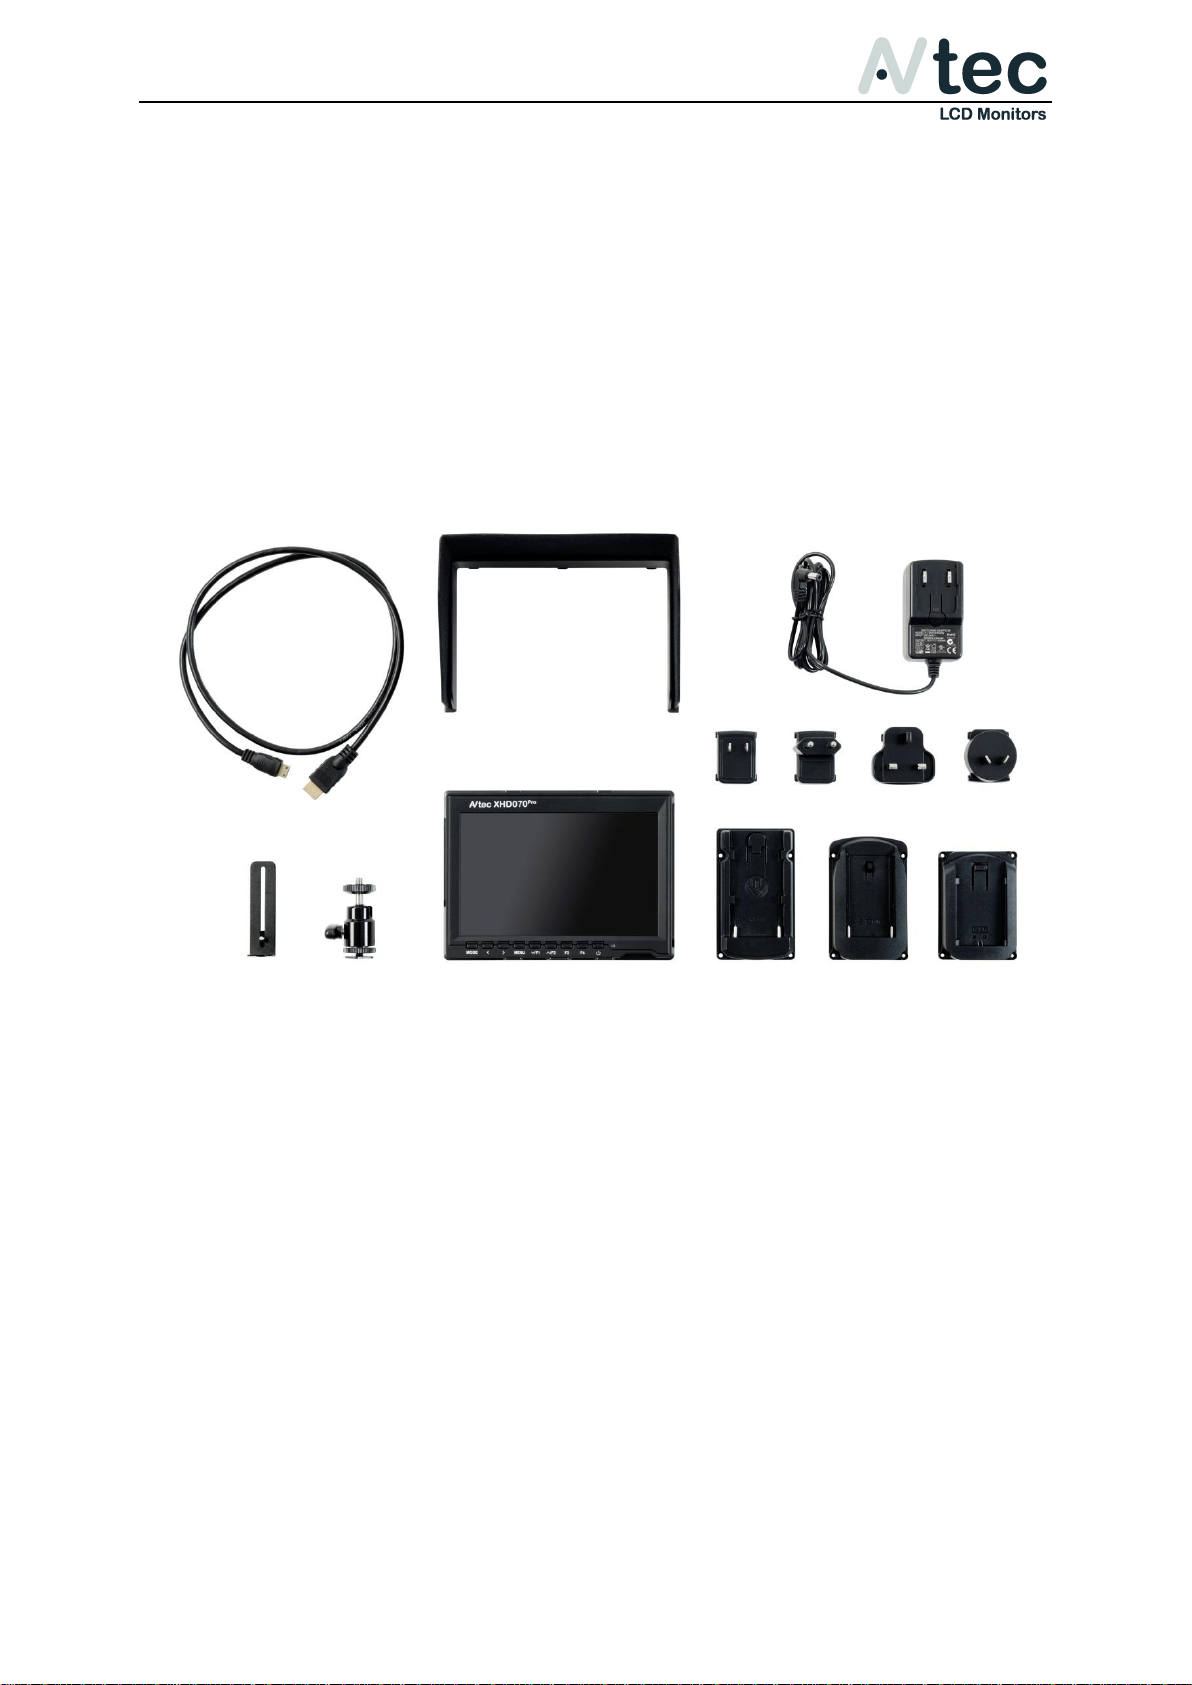
3. Included in this box
1x AVtec XHD070(Pro) On-Camera Field Monitor
3x Battery bracket for NP-F, BP-U & LP-E6 batteries
1x AC/DC Combi adapter with EU, US, UK & AU plugs
1x Sun hood attachment & detachable sun hood
1x Ball head with 1/4" camera screw
1x HDMI cable & HDMI plug lock
1x Operational manual
AVtec LCD Monitors Page: 3/13
Page 6
XHD070 & XHD070Pro
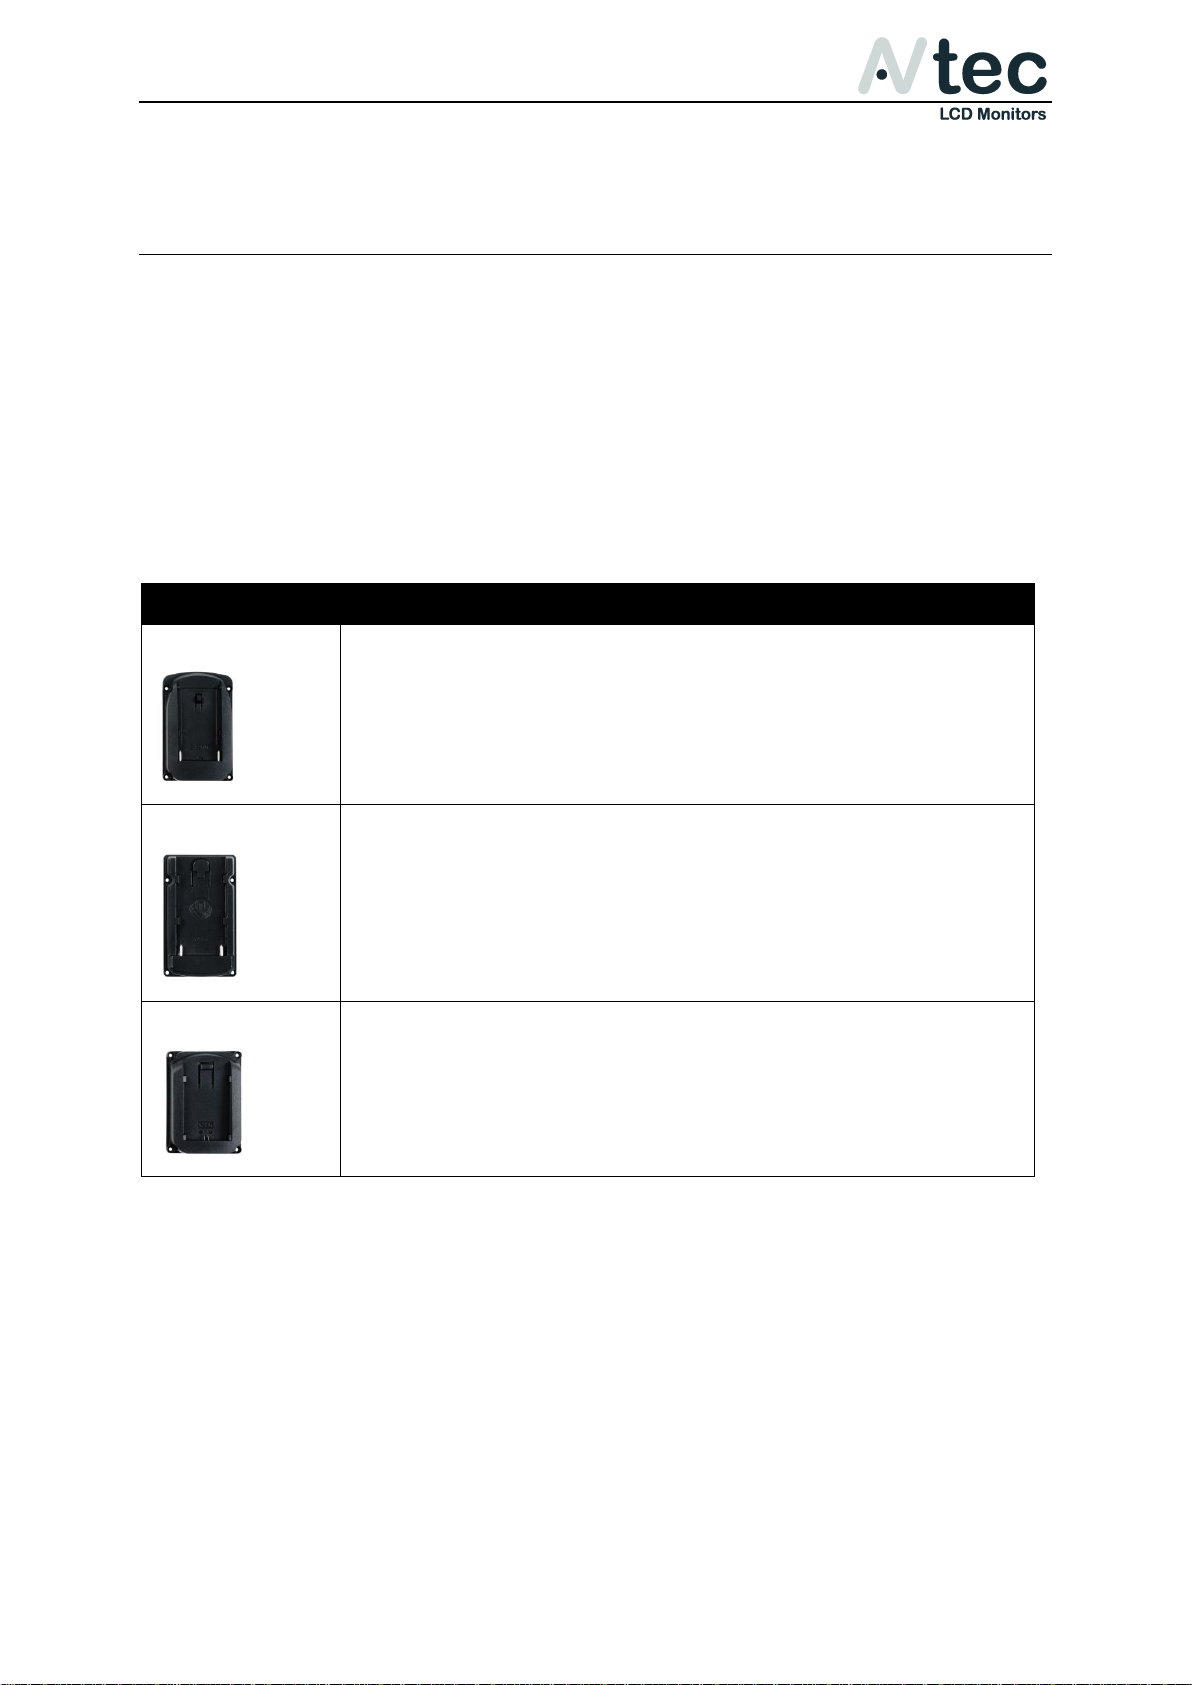
Item:
For use with:
NP-F bracket
Sony NP-F970, NP-F960, NP-F950, NP-F930, NP-F770, NPF750, NP-F730, NP-F570, NP-F550, NP-F530, NP-QM91D,
NP-QM91, NP-QM90D, NP-QM90, NP-QM71D, NP-QM71,
NP-QM70D, NP-QM70, NP-QM51D, NP-QM51, NP-FM71 &
NP-FM70 series.
BP-U bracket
Sony BP-U30, BP-U60 & BP-U90
LP-E6 bracket
Canon LP-E6
Operation Manual_V1.0
3.1 Battery brackets & AC/DC Adapter
Battery brackets
The battery bracket for Sony NP-F batteries is installed on the monitor.
You can easily change the battery bracket by unscrewing the 4 small screws
on the back of the battery bracket. Unplug the bracket connector from the
slot, plug in the connector of the bracket you would like to install and fasten
the 4 screws.
The following table will give you an idea which brackets you are able to use
for the Sony and Canon battery types.
NOTE: Please remove the battery from the bracket before changing the
battery bracket itself.
AVtec LCD Monitors Page: 4/13
Page 7
XHD070 & XHD070Pro
Operation Manual_V1.0
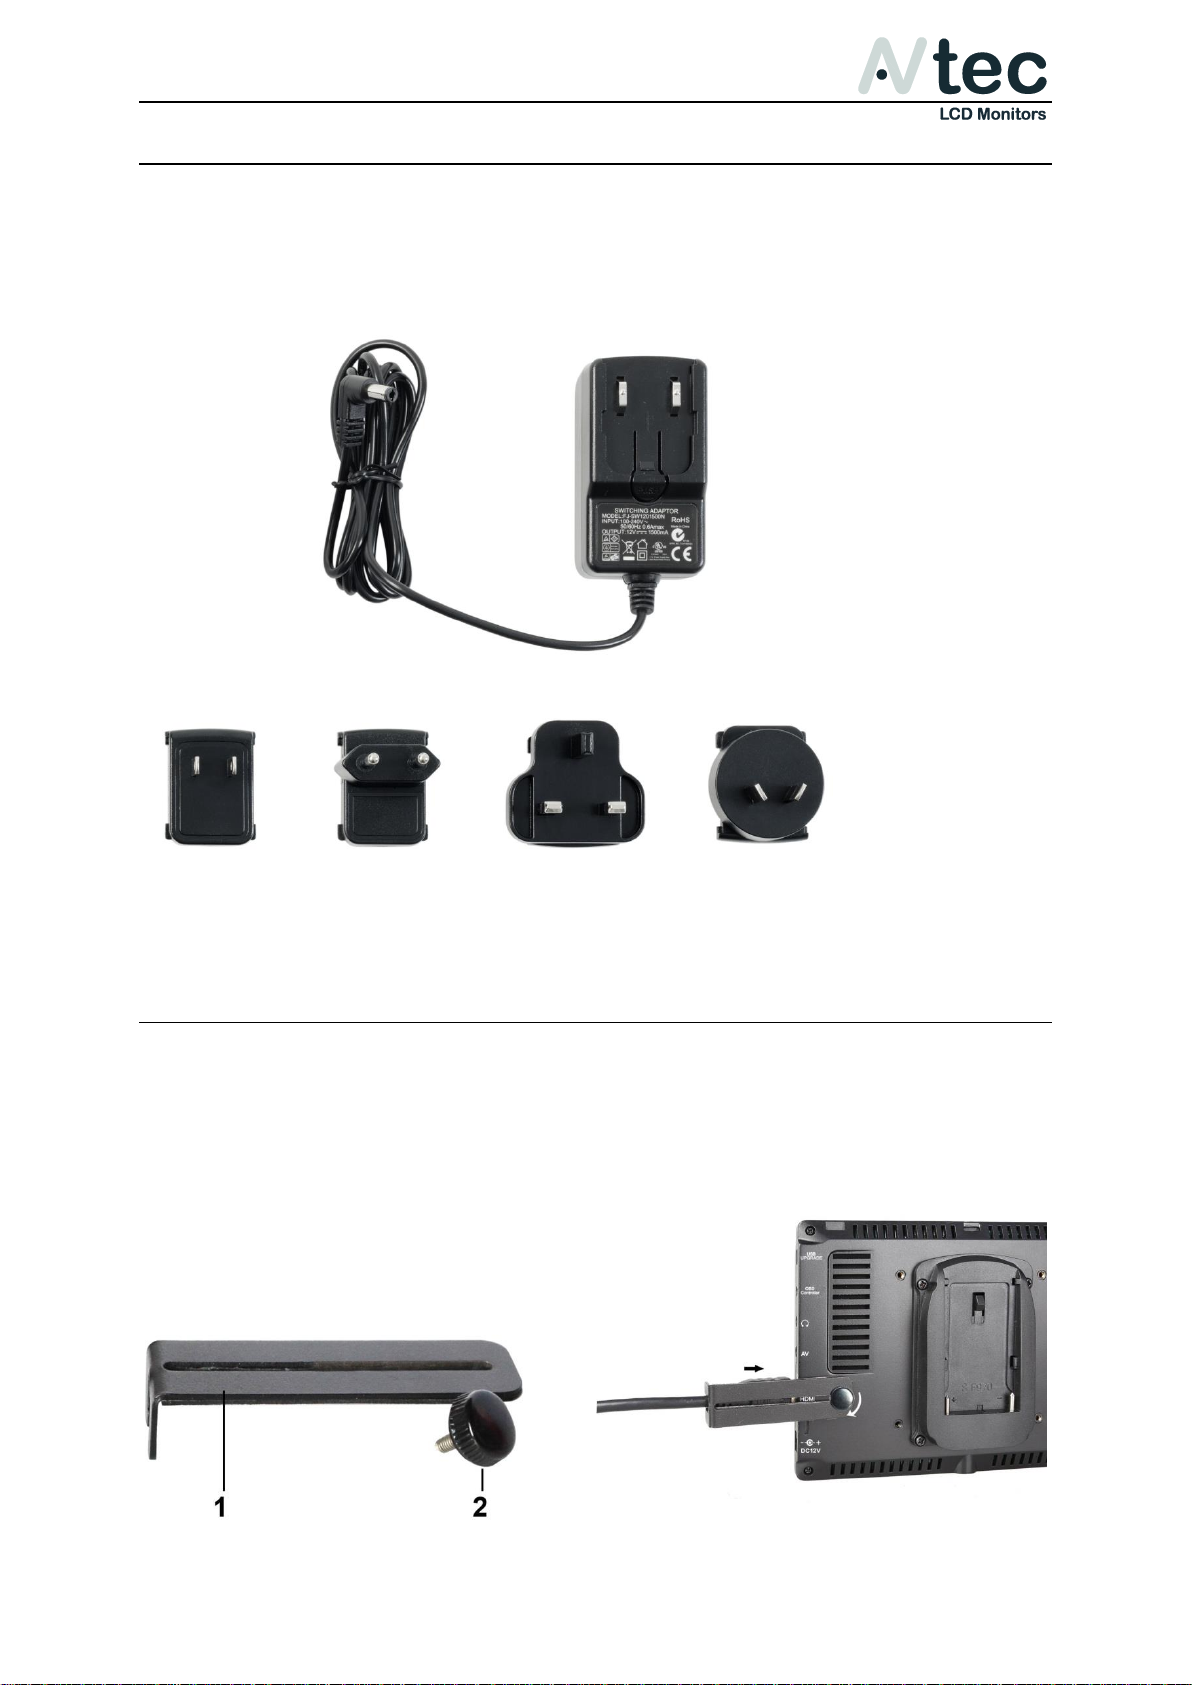
AC/DC Combi adapter
The supplied AC/DC combi adapter (100-240V~) supports AC or DC power
and uses wall, vehicle, or airplane power outlets to power your device. Four
power plugs are supplied for EU, US, UK and AU. Slide the selected plug on to
the adapter until you hear a soft click.
3.2 Other included accessories
HDMI plug lock
Use the HDMI locking plate to lock the plug of the HDMI cable, then put the
locking plate close to the monitor, and finally bolt the locking screw to lock
the plate with the monitor. As shown in the picture below (arrow direction).
1. HDMI plug lock
2. Locking Screw
AVtec LCD Monitors Page: 5/13
Page 8
XHD070 & XHD070Pro
Operation Manual_V1.0
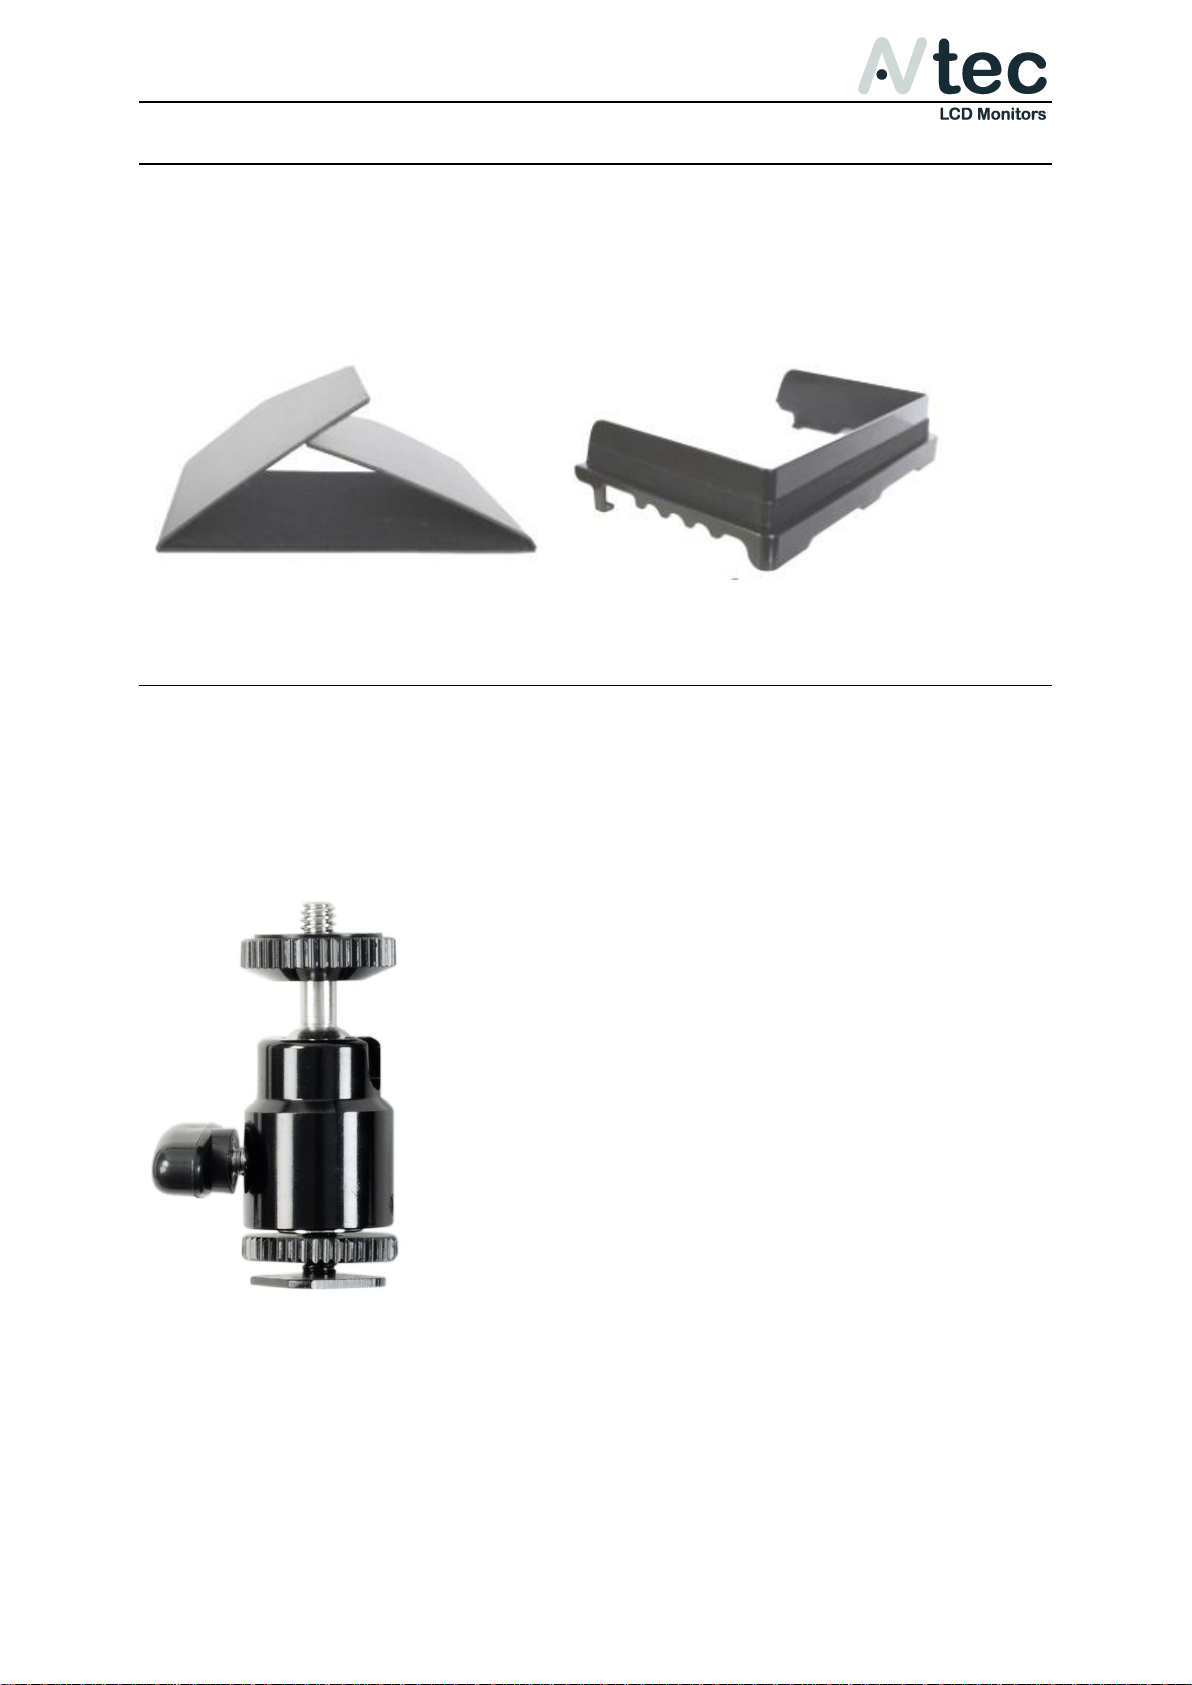
Sun hood
The firm but flexible plastic sun hood is designed to protect your screen and
reduces strong light reflection. It mounts to the monitor with a strong easy-oneasy-off construction with hook and loop fasteners.
Ball head
The ball and socket joint of the supplied ball head allows movement on all
axes at the same time and has a single locking screw for easy fixation to your
device. Slide the ball head into a hot shoe and fasten it by turning the wheel
on the bottom of the ball head to the right.
AVtec LCD Monitors Page: 6/13
Page 9
XHD070 & XHD070Pro
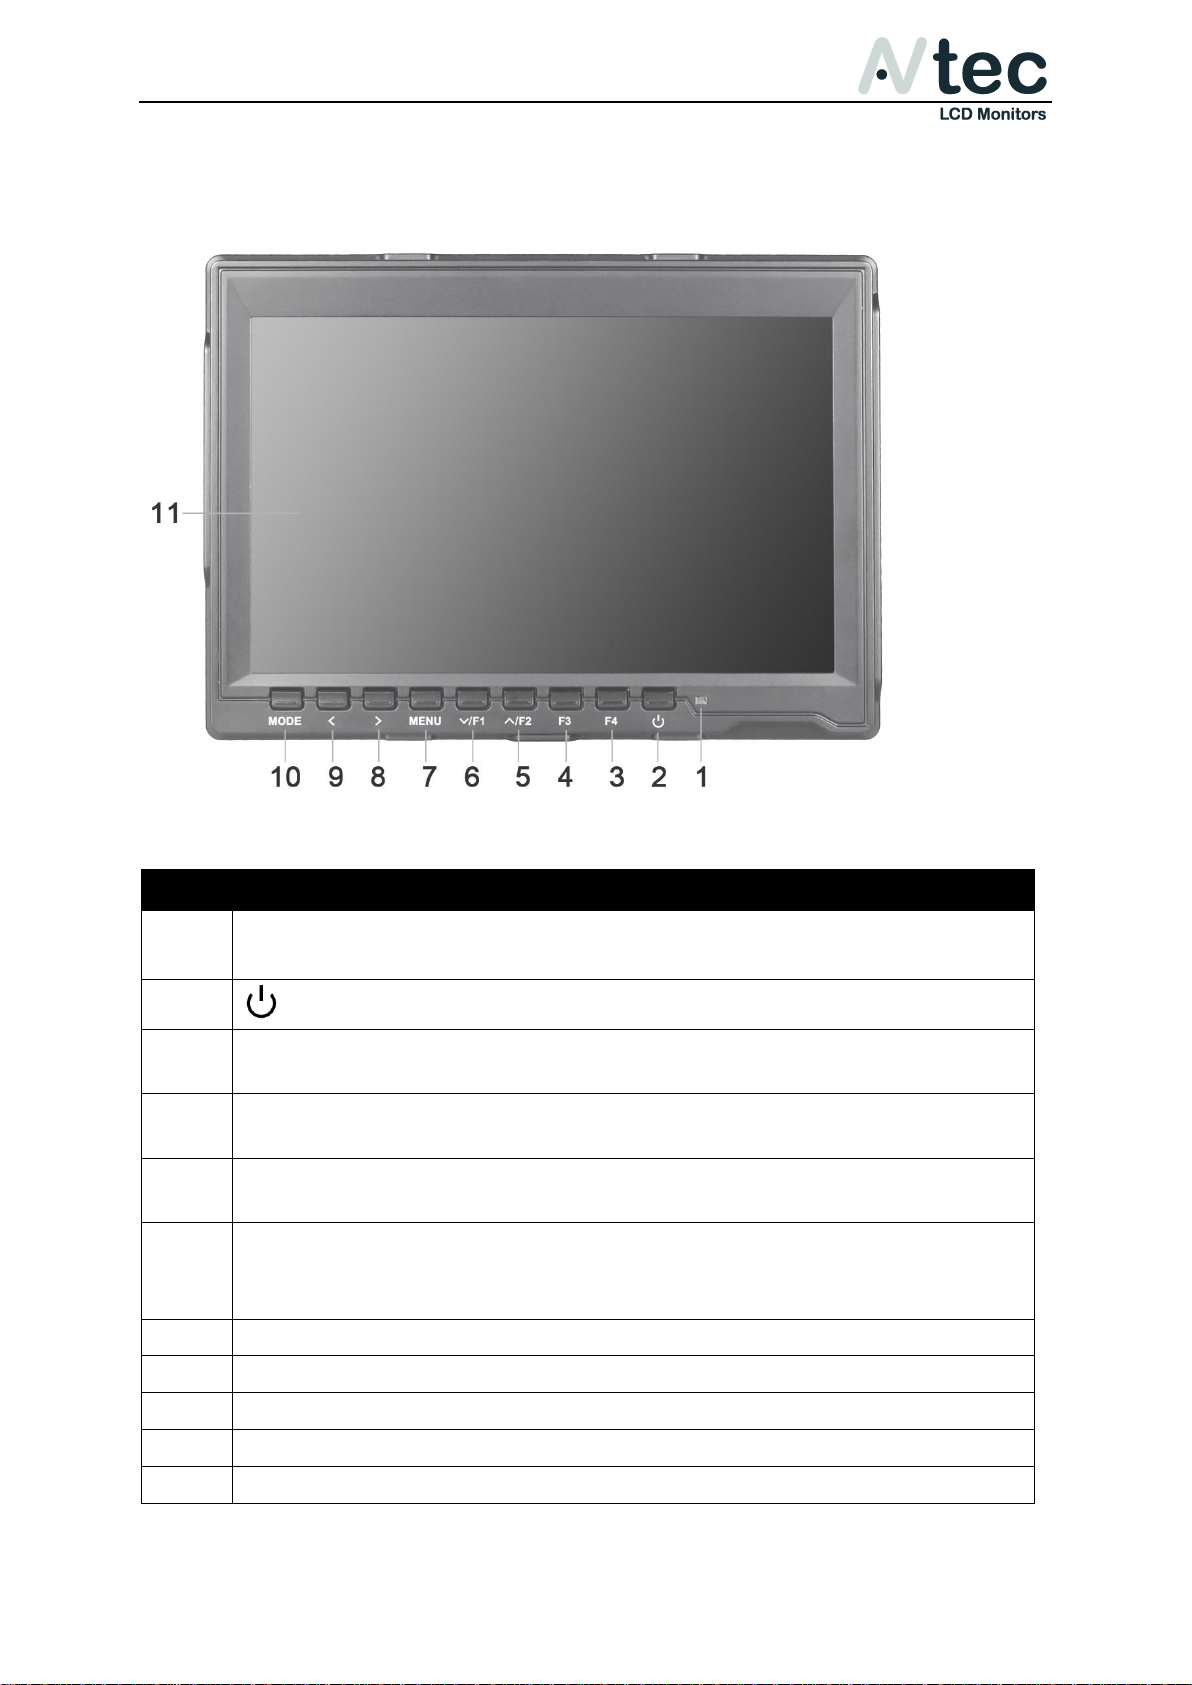
Item:
Description:
1
Power Indicator light
when power on/standby, it turns red; when signal in, it turns green.
2
Power on/off button
3
F4 Function button, enter secondary menu item F (self-defined
button), then self-define the function that user need
4
F3 Function button enter secondary menu item F (self-defined
button), then self-define the function that user need
5
▲/F2 Menu control button / F2: Function button to navigate into the
menu or when not in menu for use of function button
6
▼/F1 Menu control button / F1: Function button
to navigate into the menu or when not in menu for use of function
button
7
MENU To enter or exit the menu
8
► Volume up / increase the value of selected menu item
9
◄ Volume down / decrease the value of selected menu item
10
MODE To switch signal mode
11
IPS LCD 7.0” screen
Operation Manual_V1.0
4. Front panel & Controls
AVtec LCD Monitors Page: 7/13
Page 10
XHD070 & XHD070Pro
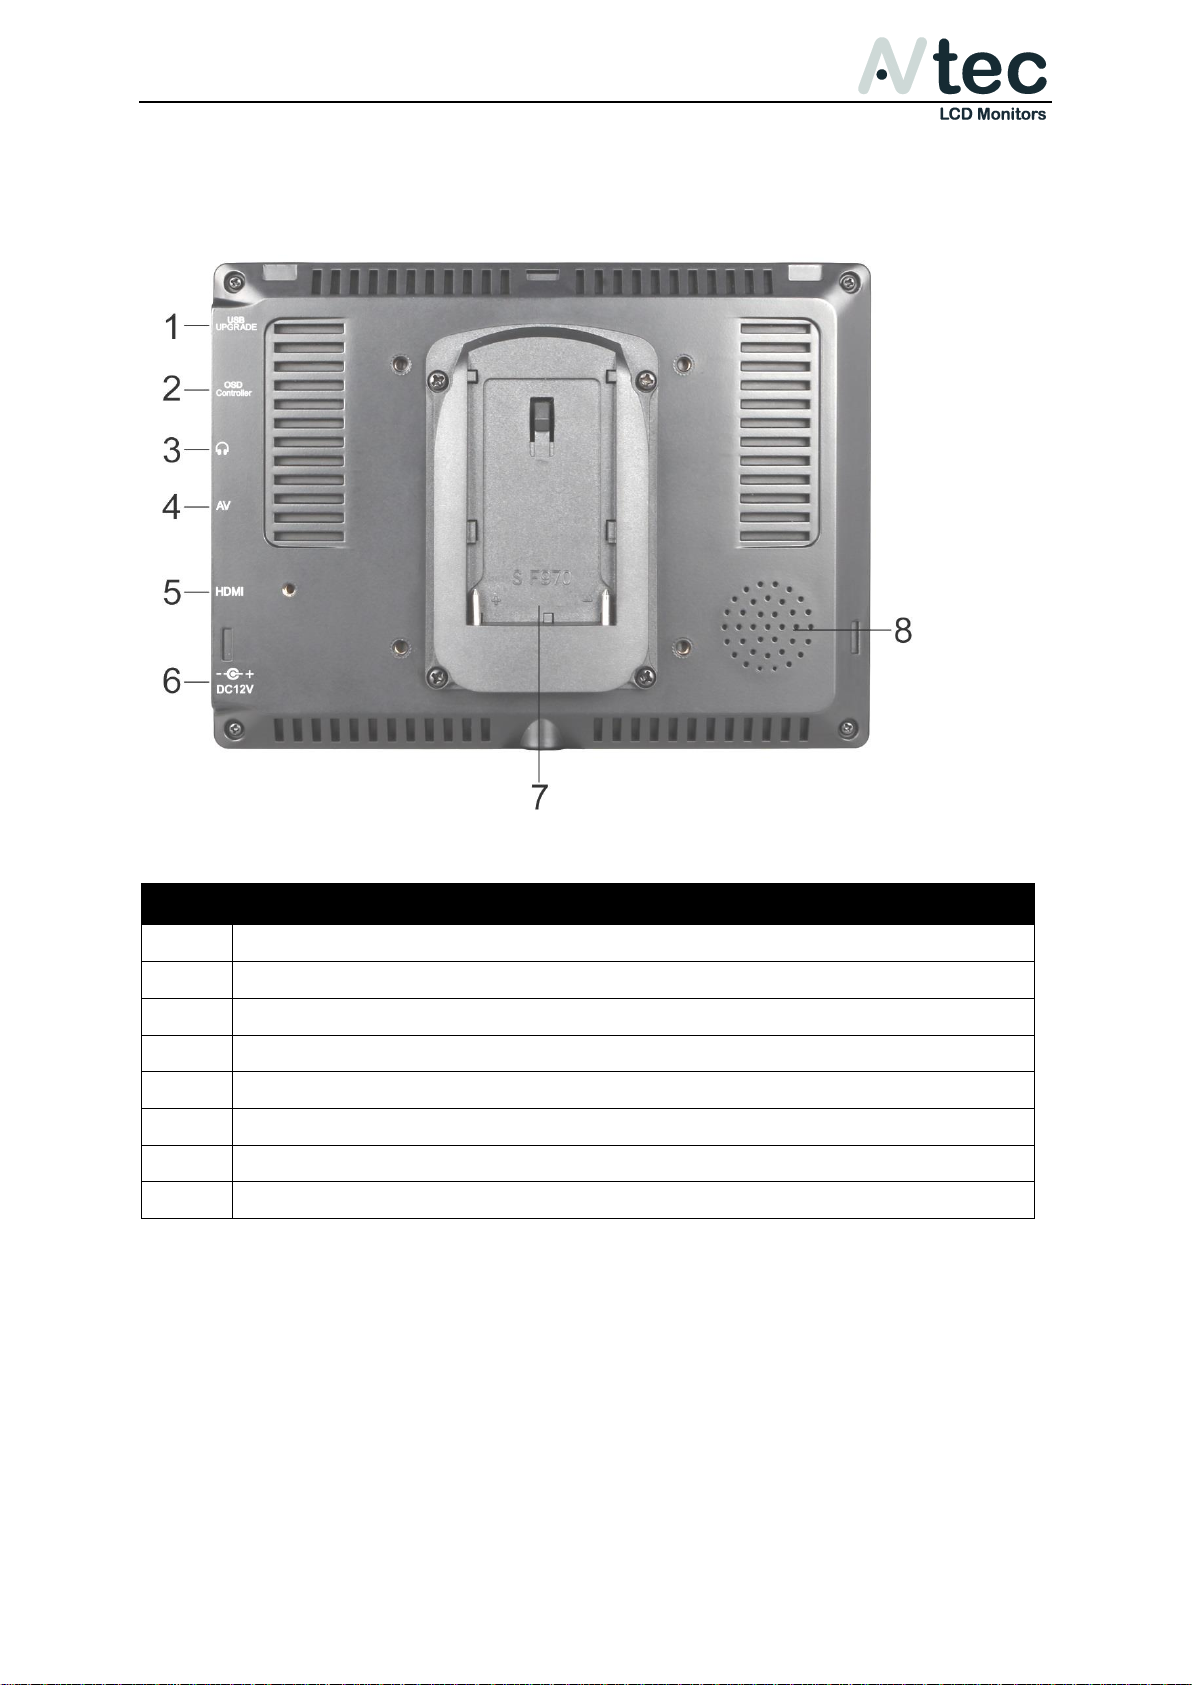
Item:
Description:
1
USB Upgrade port
2
OSD Controller port
3
Headphone Jack port
4
AV port
5
HDMI-in port (HDMI type A-connector)
6
DC Power input (12V)
7
Battery bracket
8
Built-in speaker
Operation Manual_V1.0
5. Rear panel
AVtec LCD Monitors Page: 8/13
Page 11
XHD070 & XHD070Pro
Menu item:
Description:
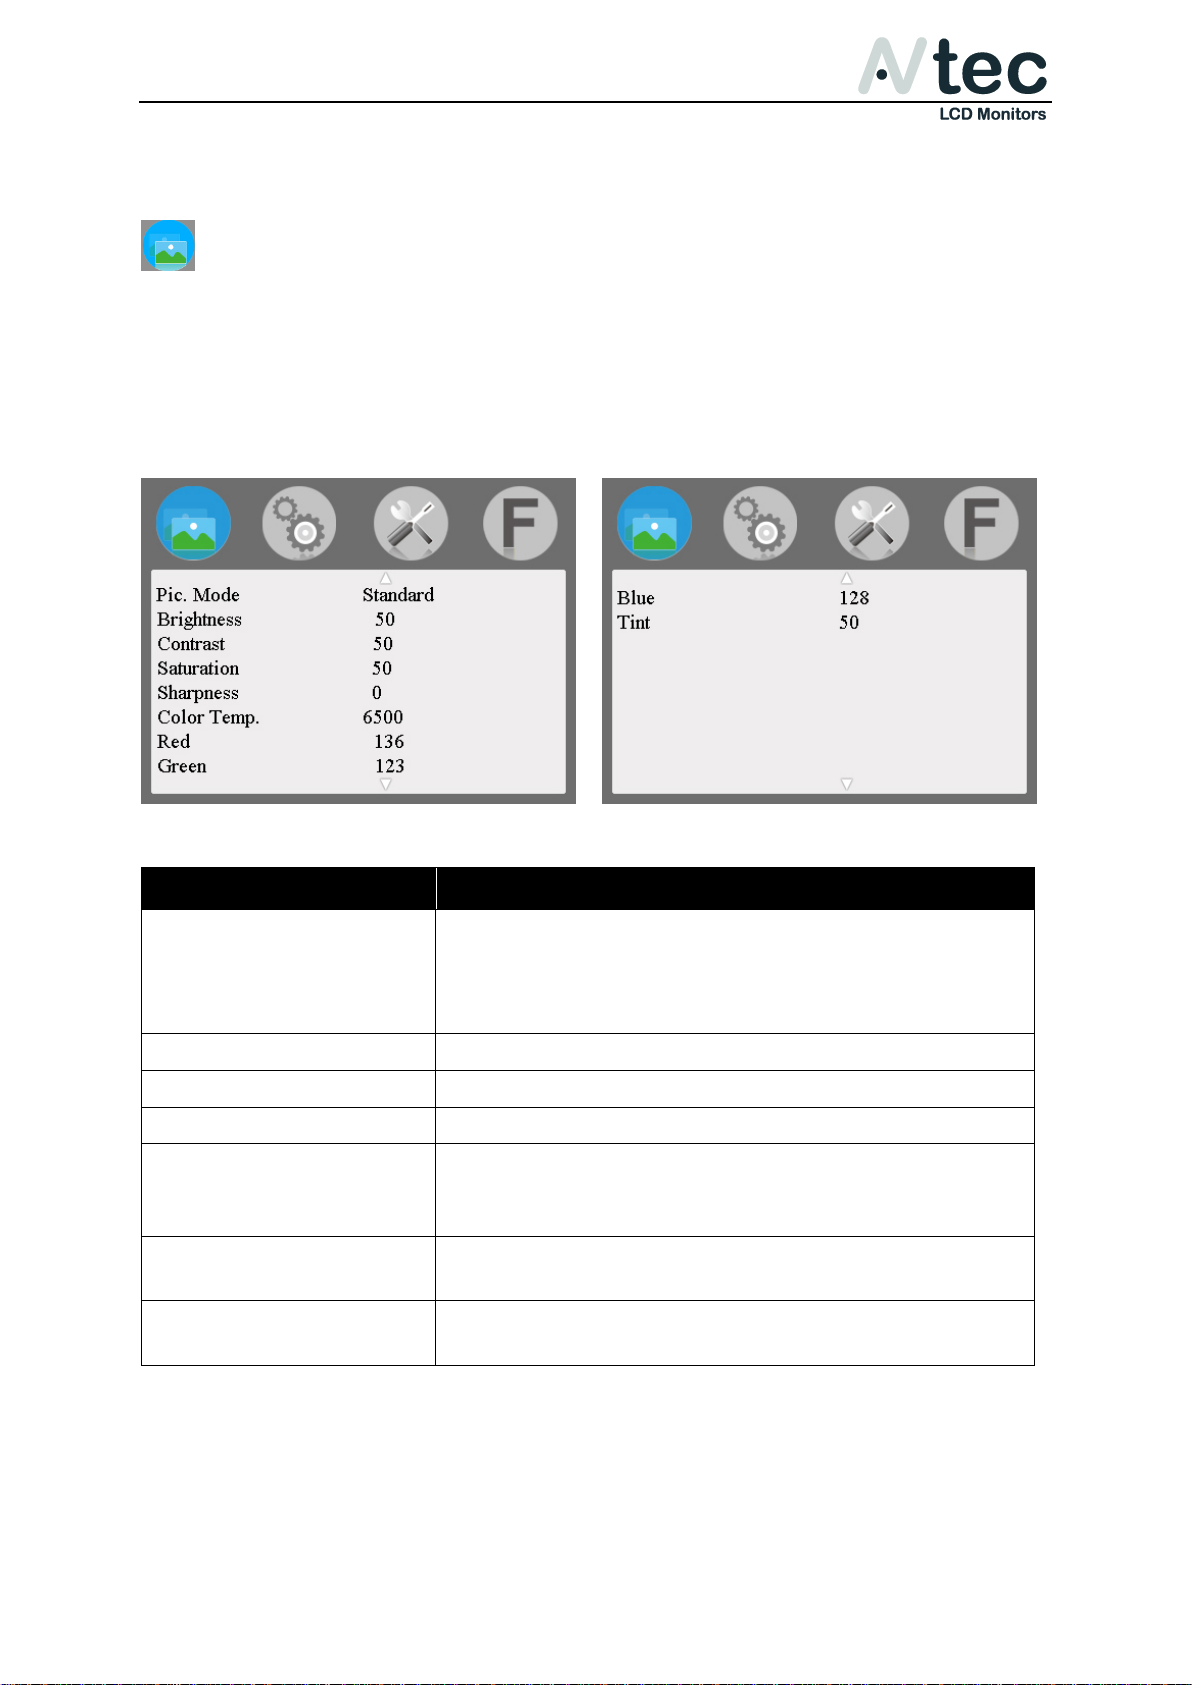
Pic. Mode
Standard, Dynamic, Mild, User
Select “user” to adjust the image of Brightness,
Contrast, Saturation, Sharpness” according to
the practical situation.
Brightness
To adjust the monitors brightness.
Contrast
To adjust the contrast.
Saturation
To adjust color concentration.
Sharpness
Also called “Resolution”, an indicator for the
image plane definition and image edge
sharpness.
Color Temp.
6500 K, 9300 K or User. The User option allows
you to adjust Red, Green & Blue.
Tint
On NTSC video mode, the image color tint
difference is adjusted by tint.
Operation Manual_V1.0
6. Menu instructions
Image Color menu
Use one of the ▼/F1 button to enter the Image Color menu. Press ▲/F2 or
▼/F1 to navigate through the settings. Once the desired setting is highlighted,
use the ◄ or ►buttons to navigate through the sub-menu functions. Press the
MENU button to activate the function.
AVtec LCD Monitors Page: 9/13
Page 12
XHD070 & XHD070Pro
Menu item:
Description:
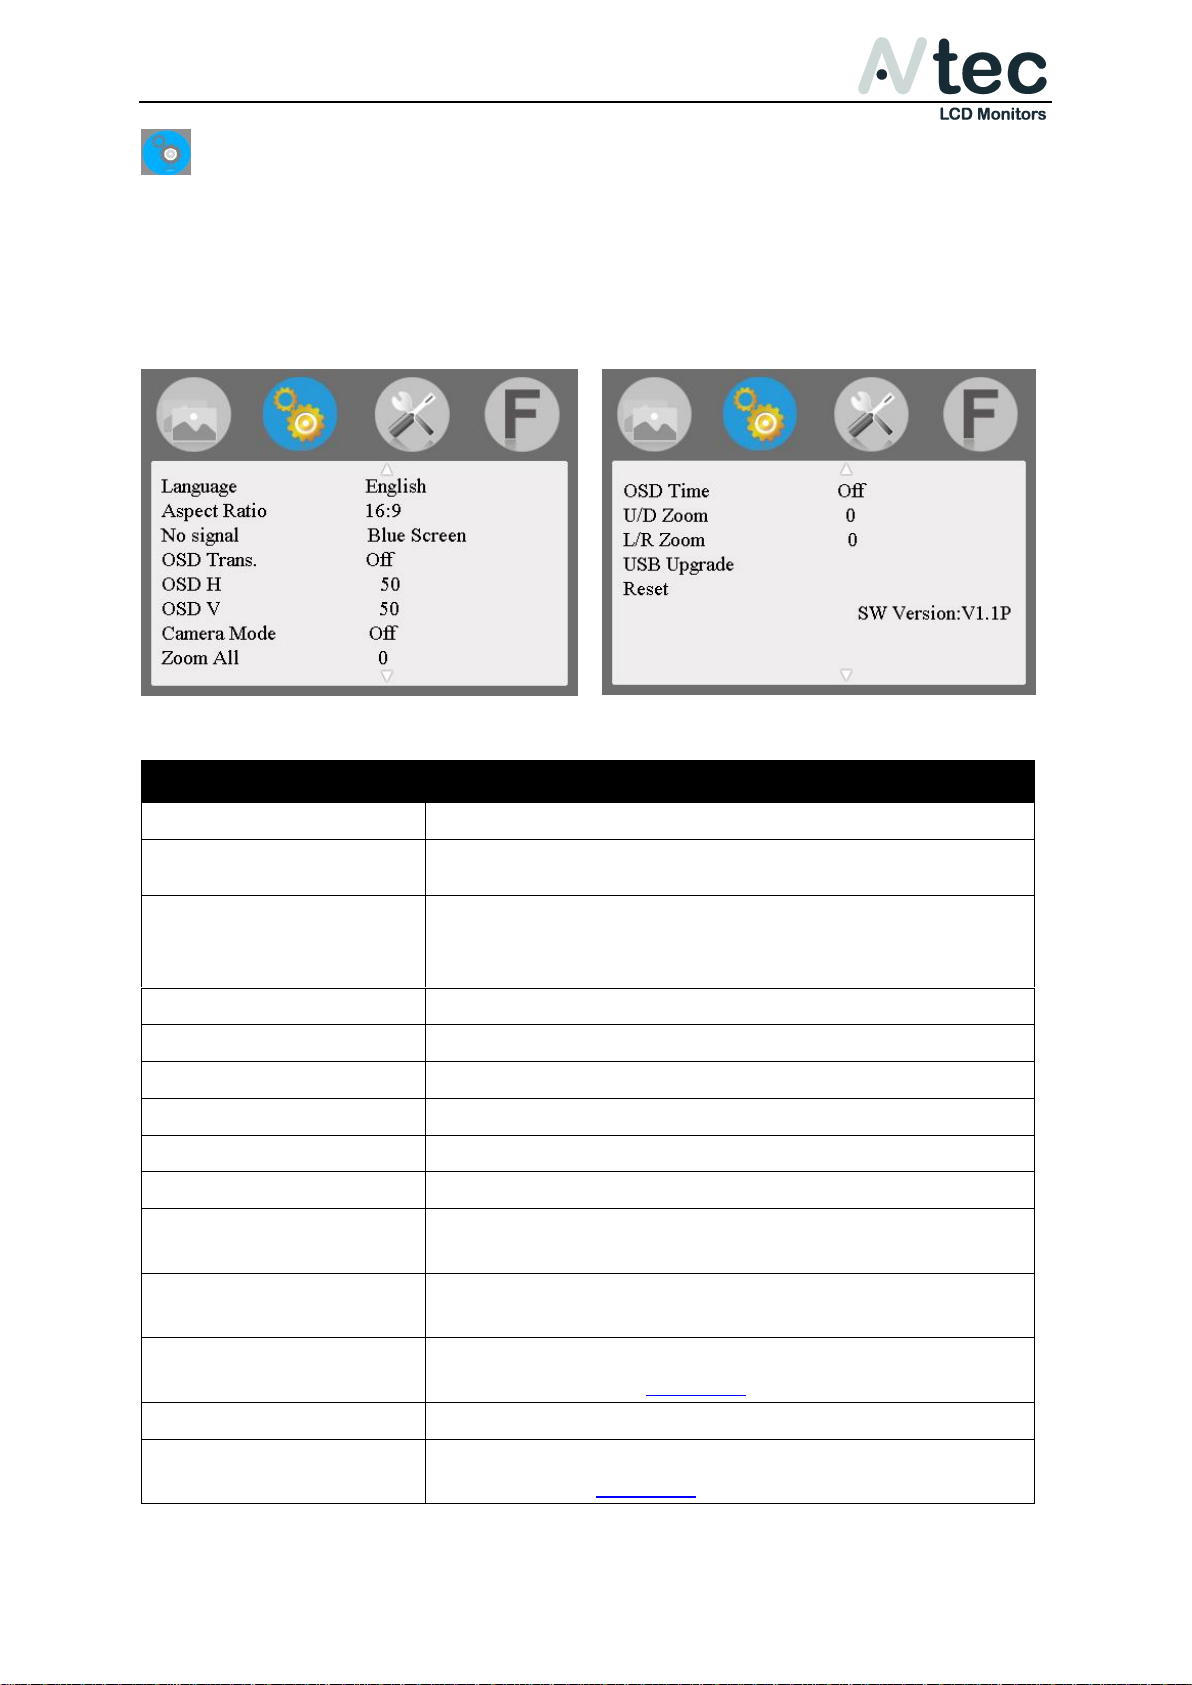
Language
To change the menu language.
Aspect Ratio
To change the display ratio to: Panorama,
Automatic, Just Scan, Zoom 1, Zoom 2, 16:9, 4:3.
No Signal
To select screen color when no signal. Black
(recommended), White, Red, Green Screen or
Blue.
OSD Trans.
Menu transparency. Low, Medium or High.
OSD H
To adjust the horizontal position of the menu.
OSD V
To adjust the vertical position of the menu.
Camera Mode
Mode for Canon (D)SLR cameras.
Zoom All
Image Zoom. Use ◄ or ► to zoom all.
OSD Time
Menu automatically hide feature.
U/D Zoom
Use ◄ or ►, to adjust the proportion of the image
Up and Down to Zoom In or Zoom Out.
L/R Zoom
Use ◄ or ►, to adjust the proportion of the image
Left and Right to Zoom In or Zoom Out.
USB Upgrade
To update the firmware via USB. Please check the
firmware page on AVtec.tv.
Reset
Restore factory settings.
SW Version
The current firmware installed on the monitor,
please check AVtec.tv for the latest firmware.
Operation Manual_V1.0
Settings menu
Use one of the ▼/F1 button to enter the Settings menu. Press ▲/F2 or ▼/F1 to
navigate through the settings. Once the desired setting is highlighted, use the
◄ or ►buttons to navigate through the sub-menu functions. Press the MENU
button to activate the function.
AVtec LCD Monitors Page: 10/13
Page 13
XHD070 & XHD070Pro
Menu Item:
Description:
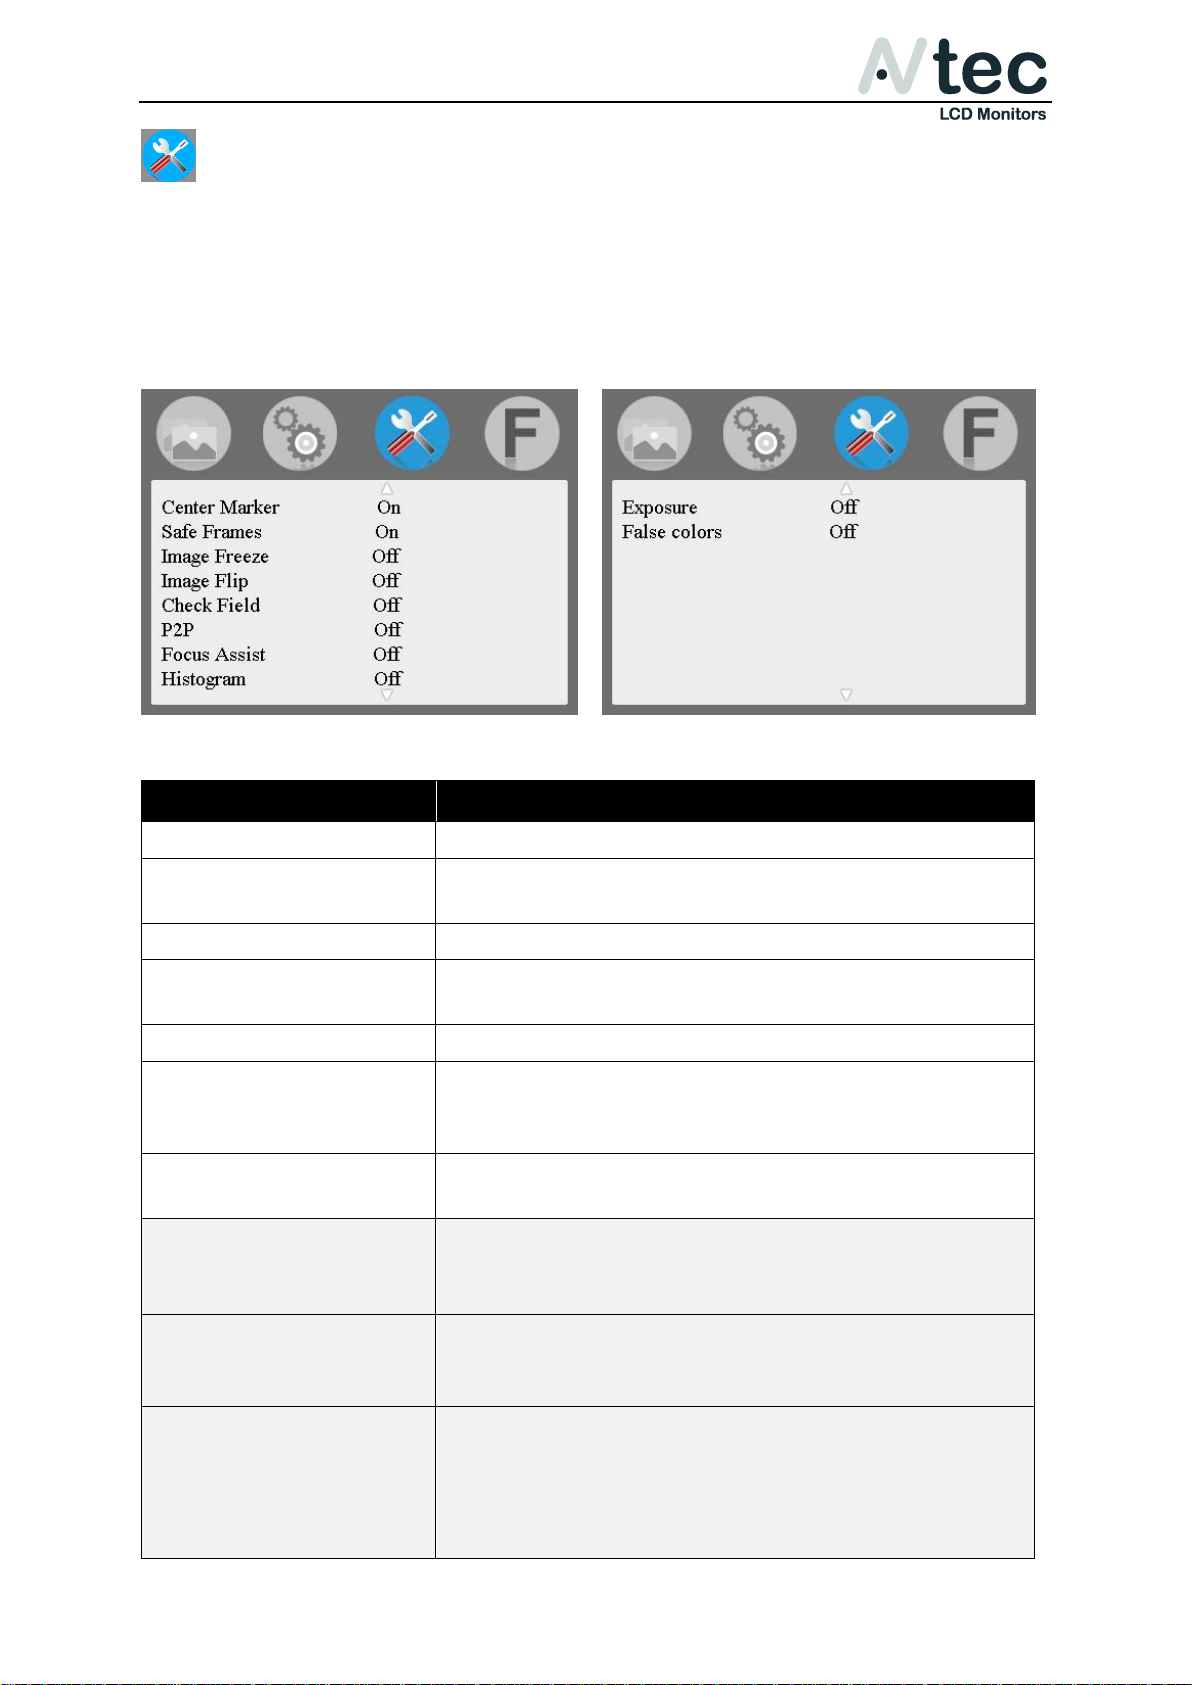
Center Marker
To set center mark (cross mark) display.
Safe Frames
To show screen markers; 96%, 93%, 90%, 85%,
80%, 2.35:1 or Off.
Image Freeze
Capture the current picture.
Image Flip
Flip the image, horizontally, vertically or in both
directions.
Check Field
Color overlay; Red, Green, Blue, Mono or Off.
P2P (Pixel-to-Pixel)
The display mode that made the resolution of the
image consistent with display of the physical
resolution.
Focus Assist
Turns on the Focus Assist function that makes it
easier to focus.
Histogram
Turns on the Histogram in the right corner of the
screen. To check the picture brightness.
(only available in XHD070Pro version)
Exposure (Zebras)
Turns on Exposure with red stripes to check what
is overexposed.
(only available in XHD070Pro version)
False Colors
Turns on False Colors to show scene lighting
levels. Red areas are overexposed, blue areas
are insufficient lighting, green areas are good
lighting levels.
(only available in XHD070Pro version)
Operation Manual_V1.0
Function menu
Use one of the ▼/F1 button to enter the Function menu. Press ▲/F2 or ▼/F1 to
navigate through the settings. Once the desired setting is highlighted, use the
◄ or ►buttons to navigate through the sub-menu functions. Press the MENU
button to activate the function.
AVtec LCD Monitors Page: 11/13
Page 14
XHD070 & XHD070Pro
Menu Item:
AVtec XHD070:
AVtec XHD070Pro:
Focus Assist V V
Center Marker
V
V
Safe Frame V V
Check Field V V
Camera Mode V V
Aspect Ratio V V
Image Flip V V
P2P (Pixel-to-Pixel)
V
V
Image Freeze V V
Histogram X V
Exposure (Zebras)
X
V
False Colors X V
Operation Manual_V1.0
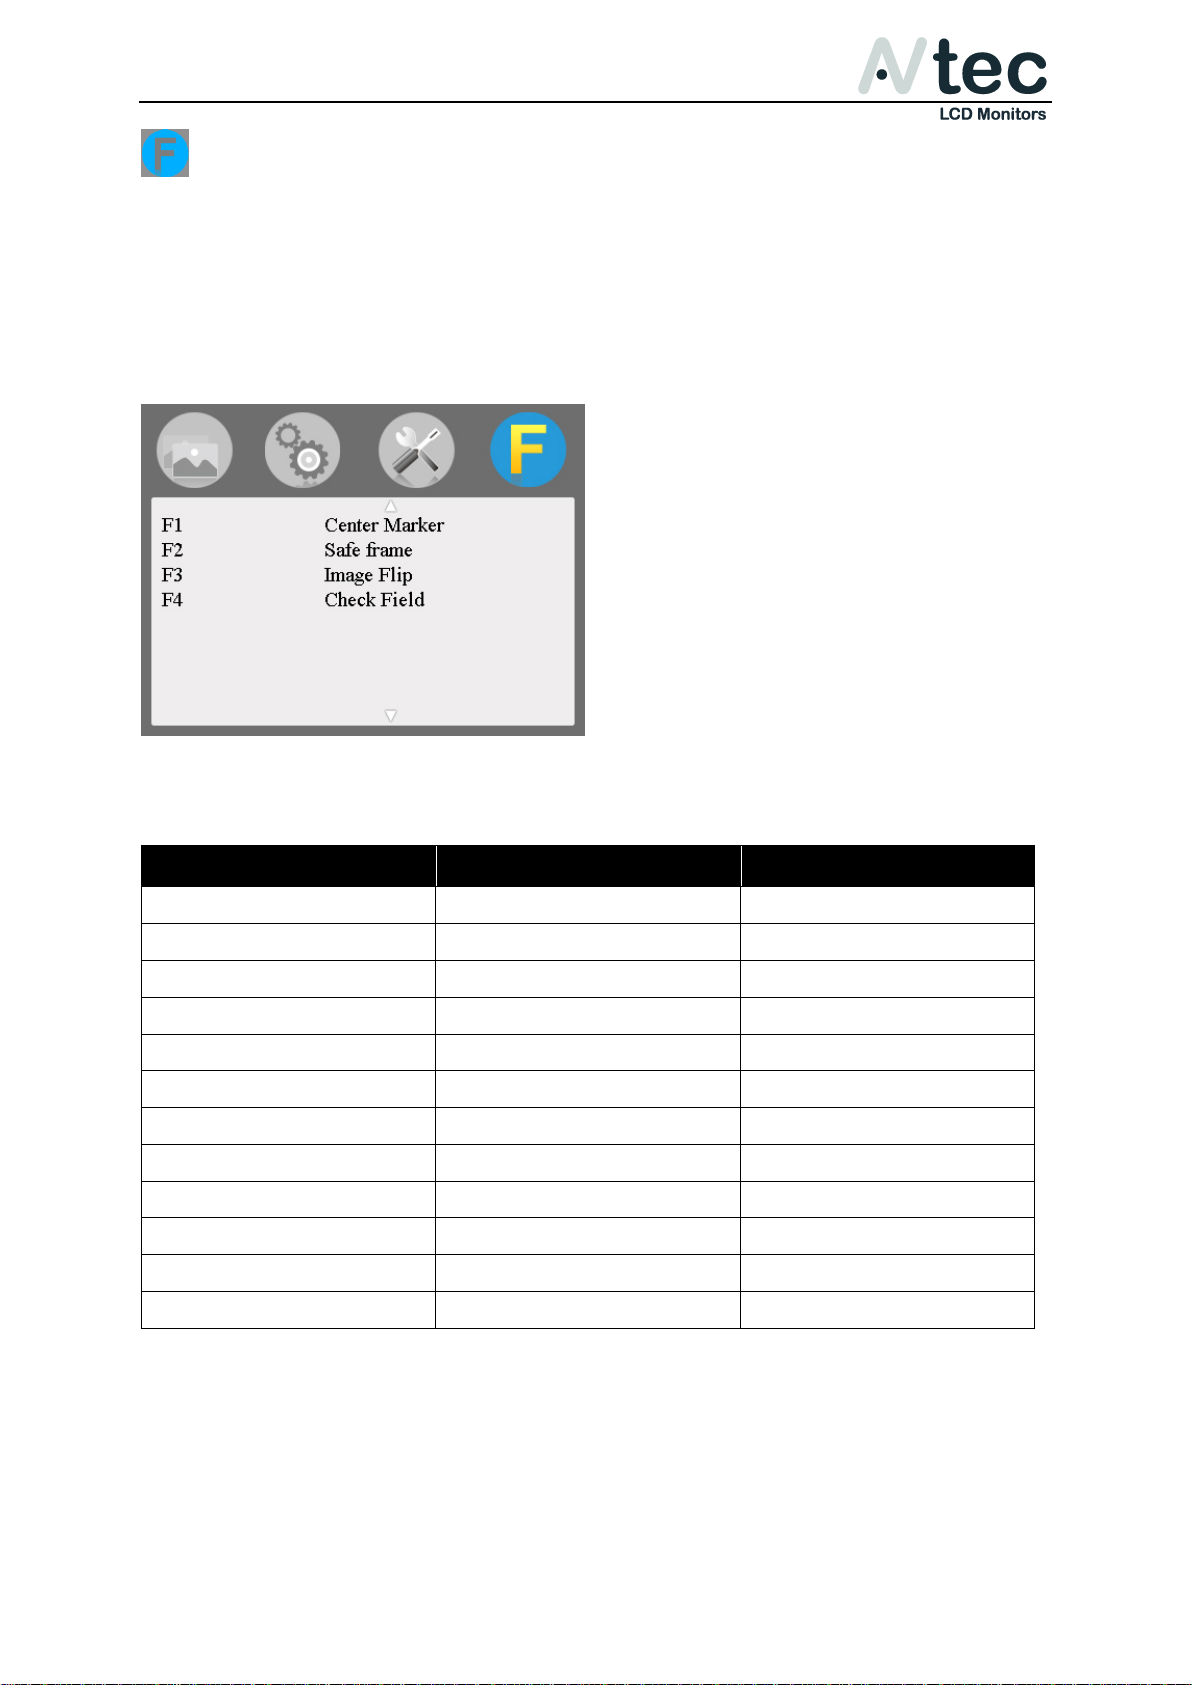
Function buttons menu
Use one of the ▼/F1 button to enter the Function buttons menu. Press ▲/F2 or
▼/F1 to navigate through the settings. Once the desired setting is highlighted,
use the ◄ or ►buttons to navigate through the sub-menu functions. Press the
MENU button to activate the function to save it under the specific function
button.
Assignable functions
AVtec LCD Monitors Page: 12/13
Page 15
XHD070 & XHD070Pro
Panel Size
IPS LCD 7.0 inch
Panel Type
IPS LCD
Resolution
1280x800 (3.072.000 Pixels)
Backlight
LED
Dot Pitch
0.11775(W) x 0.11775 (H)
Aspect Ratio
16:9
Brightness
400cd/m2
Contrast Ratio
800:1
Response Time
25ms
Viewing Angle
89°/89°(Left/Right) 89°/89°(Up/Down)
Input Signal
Video / Audio / HDMI
Video Color System
NTSC 3.58 / PAL 4.43
HDMI Support Format
480i /480p /576i /576p
720p (60/59.94/50/30/29/25/24/23.98)
1080i (60/59.94/50)
1080p (60/59.94/50/30/29.97/25 / 24/24fps
/23.98/23.98fps)
Headphone Output
Stereo 3.5mm
Input Voltage
DC:7.4~35V
Power Consumption
≦5W
Unit Size (LxWxH)
176 x 130 x 17 mm
6.93 x 5.12 x 0.67 inch
Unit Weight
400 g / 14.11 oz
Installation Method
1/4 inch bracket screw hole, can be easily
connected to the hot shoe mount, tripod fixed
installation
Working Temperature
-20°C~50°C / -4°F~122°F
Storage Temperature
-30°C~60°C / -22°F~140°F
Operation Manual_V1.0
7. Technical Specifications
AVtec LCD Monitors Page: 13/13
Page 16
http://www.AVtec.tv
 Loading...