

Page 1

OWNER’S MANUAL
CAR SUBWO O F E R
DEAF BONCE SERIES
DB-123 DB-153 DB-183
http://alphard.audio
Page 2

CONTENTS
1. Introduction.
2. Safety measures.
3. Connection methods.
4. Required design parameters.
5. Recommended use of the subwoofer.
6. Specifications.
7. Dimensions.
8. Complete set.
9. Information on warranty service and maintenance of Alphard
products.
10. Information on disposal of the electrical and electronic
equipment (for the European countries with separate waste
collection).
EN
2
Page 3
1. INTRODUTION
Thank you for purchasing this ALPHARD product! Alphard Sound Technology is committed to the creation of extremely
high-profile systems with no loss of quality.
To ensure proper use, please read through this manual before using this product. It is especially important that you read and
observe CAUTION’s in this manual. Please keep the manual in a safe and accessible place for future reference.
2. SAFETY MEASURES
1. Fasten the subwoofer properly when installing it in the vehicle. If the component is disconnected during driving, it may
cause serious damage to the occupants of the car or another vehicle.
2. Before installing the components, if possible store the product in the package in order to avoid inadvertent damage.
3. Be careful when installing and dismantling the subwoofer! Do not let the subwoofer drop to avoid damage of its moving
parts.
4. When working with instruments observe safety precautions.
5. Before the installation switch off the head unit and all other audio devices to avoid their damage.
6. Make sure that the location of the subwoofer does not violate the proper operation of mechanical and electrical devices of
the vehicle.
7. Do not install components in places exposed to water, excessive humidity, high or low temperature, dust or dirt.
ATTENTION!!! The product may be operated at +5 to +40 °C. In case of moisture condensation, allow the product to dry.
8. When drilling or cutting out holes in the body of the car, make sure that there are no cables or any other important
construction elements under a selected area or inside it.
9. When feeding back the speaker cables make sure that they are not in contact with sharp edges or moving mechanical
devices. Make sure that they are firmly secured and protected over the entire length.
10. The cross section of the speaker cables must be selected with respect to the length and applied power.
11. Never feed back the cables outside the car and near the moving parts of the car. This can lead to destruction of the
insulating layer, short circuit and inflammation.
12. To protect the cables use rubber gaskets if the wire passes through a hole in the plate, or other similar materials if it lies
close to the parts exposed to heat.
13. Possible commutation versions are presented on the following pages. Using the data from the table below, check the
minimum resistance of your amplifier specified by the manufacturer.
Attention! High sound pressure can damage your health. Please be responsible and practice safe sound.
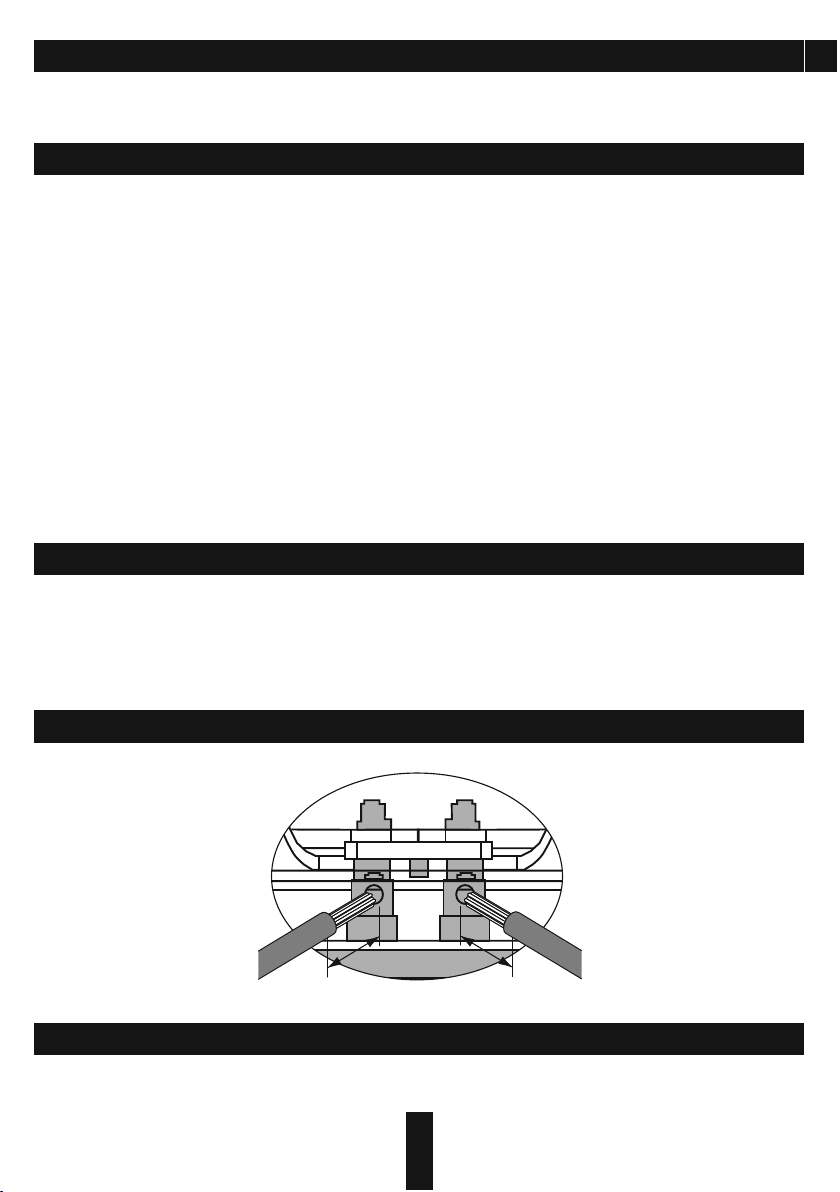
3. CONNECTION METHODS
You must connect both voice coils!
Possible commutation versions are presented on the following pages. Using the data from the
diagram below, check the minimum resistance and the connection specified by the
manufacturer. Do not expose the amplifier to loads below the predetermined value.
Use these formulas to calculate the resistance of various types of compounds.
EN
CONNECTION OF TERMINALS
10 mm 10 mm
SERIES CONNE C T I O N
Total resist a n c e = Ω S u b 1 + Ω S u b 2 + Ω Sub 3 ...
3
Page 4

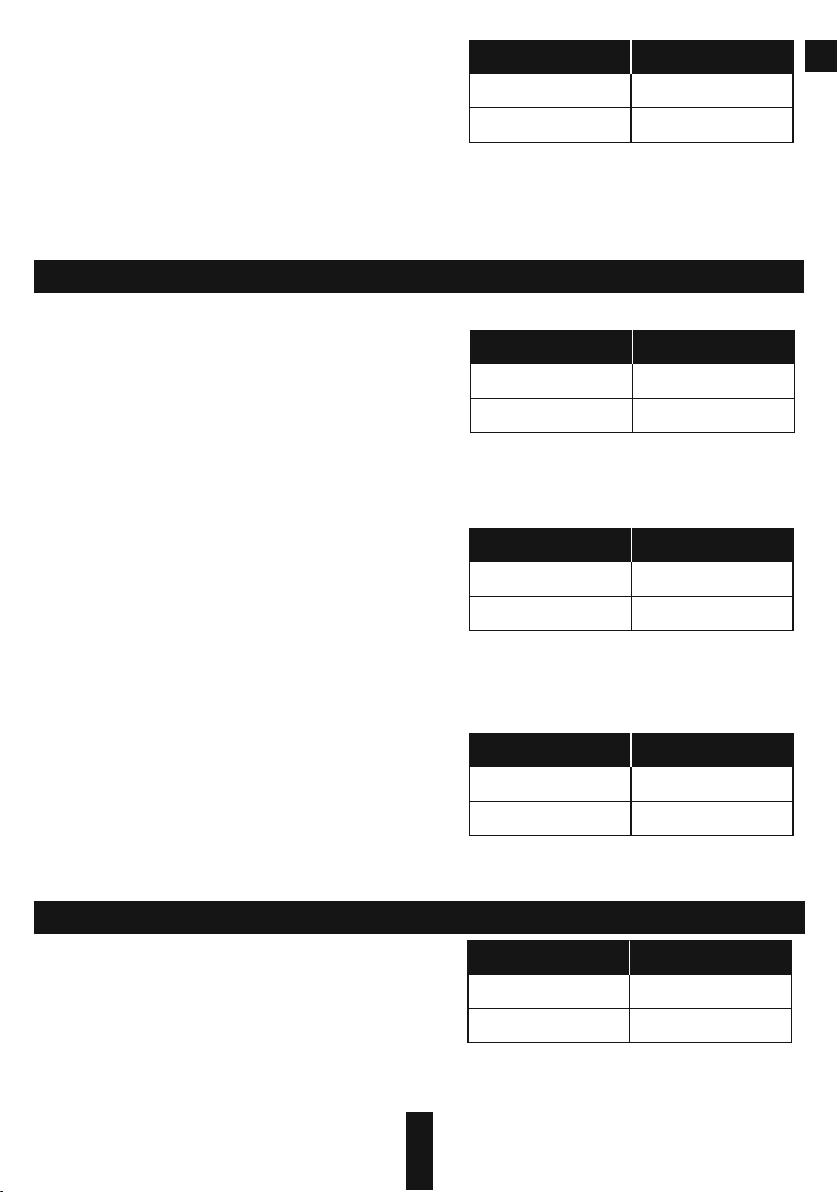
PA R A L L E L CONNECTION
1
Total resist a n c e =
SCHEMES OF ENA B L I N G T H E L O A D OF THE SUBWOOFER
VOICE COIL 1+1 , 2 + 2 O h m
The subwoofer has two voice coils.
ONE S UB WOO FE R, CO IL S IN SE RI ES.
1
Ω Sub 1 + Ω Sub 2 + ΩSub 3 . . .
1
...
1
...
2+21+1
EN
ONE S UB WOO FE R, PA RA LLE L CO ILS
SUB WO OFE R IN S ERI ES , PAR AL LEL C OI L S
Voice coil
1+1 Ohm
2+2 Ohm
Voice coil
1+1 Ohm
2+2 Ohm
Voice coil
1+1 Ohm
2+2 Ohm
Voice coil
Total impedance
2 Ohm
4 Ohm
Total impedance
0,5 Ohm
1 Ohm
Total impedance
1 Ohm
2 Ohm
Total impedance
1+1 Ohm
2+2 Ohm
1,5 Ohm
3 Ohm
3
Page 5
Voice coil
Total impedance
EN
SUB WO OFE R IN S ERI ES , COI LS I N SER IE S
1+1 Ohm
2+2 Ohm
Voice coil
1+1 Ohm
2+2 Ohm
Voice coil
1+1 Ohm
2+2 Ohm
2 Ohm
4 Ohm
Total impedance
4 Ohm
8 Ohm
Total impedance
6 Ohm
12 Ohm
PAR AL LEL S UB WOO FE R, CO IL S IN SE RI E S
Voice coil
1+1 Ohm
2+2 Ohm
Voice coil
1+1 Ohm
2+2 Ohm
Total impedance
8 Ohm
16 Ohm
Total impedance
1 Ohm
2 Ohm
5
Page 6

Voice coil
Total impedance
EN
PAR AL LEL S UB WOO FE R, PA RA LLE L CO I LS
1+1 Ohm
2+2 Ohm
Voice coil
1+1 Ohm
2+2 Ohm
Voice coil
1+1 Ohm
2+2 Ohm
0,66 Ohm
1,33 Ohm
Total impedance
0,5 Ohm
1 Ohm
Total impedance
0,25 Ohm
0,5 Ohm
Voice coil
1+1 Ohm
2+2 Ohm
Voice coil
1+1 Ohm
2+2 Ohm
Caution! High sound pressure can damage your health.
Please be responsible and practice safe sound.
6
Total impedance
0,16 Ohm
0,33 Ohm
Total impedance
0,125 Ohm
0, 5 Ohm2
Page 7

SELECTION OF THE CROSS SECTION OF THE SPEAKER CABLES
Use the table below to select the desired cross-section based on the length and the current consumption.
7-8
A.W.G
5
8
10
14
Size
mm²
16,8
8,37
5,26
2,08
Power consumption (W)
25 000
20 000
15 000
10 000
8000
6000
4000
2000
1000
500
250
100
0-1 1-2 2-3 3-4 4-5 5-6 6-7
Cable length (m)
4. REQUIRED DESIGN PARAMETERS
Bass reflex box
W*H*L = body volume
EN
Parameters/Model
The recommended amount of liters
Port area, cm²
Port length, cm.
Herz setting
DB-123 DB-153
55
200 300 450
70 65 70
35 32
100
DB-183
160
30
5. RECOMMENDED USE OF THE SUBWOOFER
The correct choice of the amplifier, its settings and design predetermines the lifetime of your subwoofer. You should select an
amplifier with a rated capacity below the rated power of the subwoofer. Proper coordination of the head unit (HU) with the
amplifier will provide a clean, undistorted signal fed to the subwoofer, which prevents overheating and failure of the voice coil.
Like any other speaker the subwoofer has moving and stationary parts. We strongly recommend that the moving parts of the
subwoofer should be warmed up at the beginning of operation. Be extra careful when warming up the parts. Warm up the
subwoofer using musical material for 40 hours on medium power. If, during operation at maximum volume you feel strange
smell, you should make the volume of the subwoofer low and cool the device down in a small volume.
Recommended settings of the amplifier and HU: Volume of H U should not exceed 80%. The amplifier sensitivity is 50%,
subsonic filter frequency (Subsonic) is 5 Hertz below the port settings. For example, if you configure the port at 30 Hertz, Subsonic
is should be 25 Hertz. The low pass filter LPF (the filter that cuts all frequencies above those set for the filter) 63-80 Hertz,
bassboost to 0.
7
Page 8

6. SPECIFICATIONS
EN
Model
Voice coil diameter
VC quantity
Cone
Magnet type
Voice coil wire
Surround
Power RMS
Power MAX
Size
Series
Type basket
Copper Clad Aluminium Wires Flat Wire
DВ-153DВ-123 DВ-183
3"3" 3"
2 pcs.2 pcs. 2 pcs.
PaperPaper Paper
FerriteFerrite Ferrite
FoamFoam Foam
1200 W1200 W 1300 W
2400 W2400 W 2600 W
15"12" 18"
Deaf BonceDeaf Bonce Deaf Bonce
MouldedMoulded Moulded
THIELE-SMALL PARAMETERS
Parameters
Xmax
Impedance
Re Ω
Fs Hz
Vas L
Qts
Spl (1 W / 1 m)
BL
This specified sensitivity is not directly connected with the sound pressure in the vehicle, and therefore
should not be used as the sole indicator for comparison with other subwoofers.
DВ-123 D1/D2
24
1+1/2+2 Ом
0,7+0,7/1,4+1,4
32
38,8
0,39
86
21,69
DВ-153 D1/D2
24
1+1/2+2 Ом
0,7+0,7/1,4+1,4
30
50,23
0,43
88
17,49
DВ-183 D1/D2
24
1+1/2+2 Ом
0,7+0,7/1,4+1,4
28
87,7
0,45
90
16,68
8
Page 9

7. Dimensions
EN9EN
DB-123D1
DB-123D2
DB-183D1
DB-183D2
Ø295
Ø206
Ø284
95
214
DB-153D1
DB-153D2
239.5
Ø465
Ø390
Ø206
Ø354
95
249
289
Ø228
Ø429
313.5
272
95
Page 10

8. COMPLETE SET
1. Subwoofer - 1 pcs.
2. Owner's Manual - 1 pcs.
3. Warranty - 1 pcs.
9. INFORMATION ON WARRANTY SERVICE AND MAINTENANCE
OF ALPHARD PRODUCTS.
Alphard products are warranted, under normal functioning conditions, for the period of time as set by the laws in
force, against defects concerning materials or their manufacturing. The warranty is valid from the date of purchase,
certified by receipt. The warranty is not valid if:
∙ the product is damaged by incidents, installations and/or improper use, or by any other causes not depending on
materials or manufacturing defects;
∙ the product is modified or tampered with by unauthorised people;
∙ its serial number has been altered or removed.
While the product is under warranty, defective parts will be repaired or replaced at the manufacturer's discretion. The
defective product, along with notification about it, must be returned to the dealer from which it was purchased together
with the warranty certificate duly filled in, . If the product is no longer under complete with the original packaging
warranty, it will be repaired at the current costs.
Alphard does not undertake any liability for damages due to transportation. Alphard does not take any responsibility
for: costs or loss of profit due to the impossibility to use the product, other accidental or consequential costs, expenses or
damages suffered by the customer. Warranty according to laws in force. For more information visit the Alphard website.
The manufacturer reserves the right to change design and specification without prior notice.
10. INFORMATION ON ELECTRICAL AND ELECTRONIC EQUIPMENT
WASTE (FOR THOSE EUROPEAN COUNTRIES WHICH ORGANIZE
THE SEPARATE COLLECTION OF WASTE)
Products which are marked with a wheeled bin with an X through it can not be disposed of together with ordinary
domestic waste. These electrical and electronic products must be recycled in proper facilities, capable of managing the
disposal of these products and components. In order to know where and how to deliver these products to the nearest
recycling/disposal site please contact your local municipal office. Recycling and disposing of waste in a proper way
contributes to the protection of the environment and to prevent harmful effects on health.
http://alphard.audio
Page 11

СОДЕРЖАНИЕ
1. Введение.
2. Меры предосторожности.
3. Способы подключения.
4. Параметры рекомендуемых оформлений.
5. Рекомендации по эксплуатации сабвуфера.
6. Технические характеристики.
7. Размеры.
8. Комплектация.
9. Информация по гарантийному и сервисному
обслуживанию продуктов .Alphard
10. Информация об утилизации электрического и
электронного оборудования (для европейских стран, в
которых организован раздельный сбор отходов).
RU
11
Page 12

1. ВВЕДЕНИЕ
Поздравляем Вас с приобретением автомобильных сабвуферов ALPHAR D серии Deaf Bonce. Компания Alphard Sound Technology
привержена идее создания экстремально громких систем, без потери качества.
Перед установкой компонентов, пожалуйста, внимательно ознакомьтесь со всеми инструкциями в данном руководстве. Данные
рекомендации помогут Вам избежать непреднамеренного повреждения компонентов.
2. МЕРЫ ПРЕДОСТОРОЖНОСТИ
1. Хорошо закрепляйте сабвуфер во время установки в автомобиле. Если компонент отсоединится во время
езды, он может нанести серьезные повреждения пассажирам автомобиля или другим автомобилям.
2. Перед установкой компонентов, во избежание непреднамеренного повреждения, по возможности храните
изделие в упаковке до начала установки.
3. Будьте осторожны при установке или демонтаже сабвуфера! Не допускайте падений сабвуфера,
повреждения его подвижных частей.
4. При работе с инструментами соблюдайте технику безопасности.
5. Перед началом установки во избежание повреждений выключите головное устройство и все прочие
устройства аудиосистемы.
6. Убедитесь в том, что выбранное Вами место установки сабвуфера не нарушает нормальную работу
механических и электрических устройств автомобиля.
7. Не устанавливайте компоненты там, где они могут подвергаться воздействию воды, излишней влажности,
высокой или низкой температуры, пыли или грязи. ВНИМАНИЕ!!! Разрешается эксплуатация изделия при
температуре от +5 до +40 С. В случае конденсации влаги, дайте изделию просохнуть.
8. При сверловки или вырезании отверстий в корпусе автомобиля, убедитесь, что под выбранной областью или
внутри нее нет кабелей или важных конструктивных элементов.
9. Прокладывая акустические провода убедитесь в том, что они не находятся в контакте с острыми краями или
движущимися механическими устройствами. Убедитесь в том, что они прочно закреплены и защищены по всей
длине.
10. Сечение акустических проводов необходимо выбирать исходя из длины и подаваемой мощности.
11. Никогда не протягивайте провода снаружи автомобиля, и возле двигающихся частей автомобиля. Это
может привести к разрушению изоляционного слоя, короткому замыканию и возгоранию.
12. Для защиты проводов используйте резиновые прокладки (если провод идет через отверстие в пластине)
или другие подобные материалы, если он пролегает рядом с частями, подверженными нагреву.
13. Различные примеры коммутаций приведены на следующих страницах. Используя данные таблицы ниже,
проверьте минимальное сопротивление, воспринимаемое вашим усилителем и указанное производителем.
Помните! Высокое звуковое давление может навредить вашему здоровью,
поэтому руководствуйтесь здравым смыслом и практикуйте безопасный звук.
3. СПОСОБЫ ПОДКЛЮЧЕНИЯ
Необходимо подключить обе звуковые катушки!
Различные примеры коммутаций приведены на следующих страницах. Используя
данные схемы ниже, проверьте минимальное сопротивление, подключение допустимое
производителем вашего усилителя. Ни в коем случае не подвергайте усилитель
нагрузкам ниже данного значения.
Используйте данные формулы для расчета сопротивления различных типов
соединений.
RU
ПОДКЛЮЧЕНИЕ ТЕРМИНАЛОВ
10 мм 10 мм
12
Page 13

ПОСЛЕДОВАТ Е Л Ь Н О Е С О Е Д ИНЕНИЕ
Полное сопро т и в л е н и е = Ω S ub 1 + Ω Sub 2 + Ω Sub 3 ...
ПАРАЛЛЕЛЬН О Е С О Е Д И Н Е Н ИЕ
RU
1
Полное сопро т и в л е н и е =
СХЕМА ВКЛЮЧЕ Н И Я Н А Г Р У З К И САБВУФЕРА
КАТУШКИ 1+1, 2 + 2 О м
Сабвуфер име е т д в е к а т у ш к и.
ОДИ Н СА БВУ ФЕ Р, КА ТУ ШКИ П ОС ЛЕД ОВ А ТЕ ЛЬ Н О
1
Ω Sub 1 + Ω Sub 2 + ΩSub 3 . . .
1
Звуковая катушка
1+1 Ом
2+2 Ом
ОДИ Н СА БВУ ФЕ Р, КА ТУ ШКИ П АР АЛЛ ЕЛ Ь НО
Звуковая катушка
1+1 Ом
...
1
...
2+21+1
Общий импеданс
2 Ом
4 Ом
Общий импеданс
0,5 Ом
2+2 Ом
САБ ВУ ФЕР Ы ПО СЛЕ ДО ВАТ ЕЛ ЬНО , КА Т УШ КИ П А РАЛ ЛЕЛ ЬН О
Звуковая катушка
1+1 Ом
2+2 Ом
13
1 Ом
Общий импеданс
1 Ом
2 Ом
Page 14

Звуковая катушка
Общий импеданс
RU
1+1 Ом
2+2 Ом
Звуковая катушка
1+1 Ом
2+2 Ом
САБ ВУ ФЕР Ы ПО СЛЕ ДО ВАТ ЕЛ ЬНО , КА Т УШ КИ П О СЛЕ ДОВ АТ ЕЛЬ НО
Звуковая катушка
1+1 Ом
2+2 Ом
1,5 Ом
3 Ом
Общий импеданс
2 Ом
4 Ом
Общий импеданс
4 Ом
8 Ом
Звуковая катушка
14
1+1 Ом
2+2 Ом
Звуковая катушка
1+1 Ом
2+2 Ом
Общий импеданс
6 Ом
12 Ом
Общий импеданс
8 Ом
16 Ом
Page 15

САБ ВУ ФЕР Ы ПА РАЛ ЛЕ ЛЬН О, К АТУ ШК И П ОС ЛЕ Д ОВА ТЕЛ ЬН О
RU
Звуковая катушка
Звуковая катушка
Звуковая катушка
САБ ВУ ФЕР Ы ПА РАЛ ЛЕ ЛЬН О, К АТУ ШК И П АР АЛ Л ЕЛЬ НО
1+1 Ом
2+2 Ом
1+1 Ом
2+2 Ом
1+1 Ом
2+2 Ом
Общий импеданс
1 Ом
2 Ом
Общий импеданс
0,66 Ом
1,33 Ом
Общий импеданс
0,5 Ом
1 Ом
15
Звуковая катушка
1+1 Ом
2+2 Ом
Звуковая катушка
1+1 Ом
2+2 Ом
Общий импеданс
0,25 Ом
0,5 Ом
Общий импеданс
0,16 Ом
0,33 Ом
Page 16

Звуковая катушка
Общий импеданс
RU
1+1 Ом
2+2 Ом
Помните! Высокое звуковое давление может навредить вашему здоровью, поэтому руководствуйтесь
здравым смыслом и практикуйте безопасный звук.
0,125 Ом
0,25 Ом
ВЫБОР СЕЧЕНИЯ АКУСТИЧЕСКИХ ПРОВОДОВ
Используйте таблицу ниже, выберите нужное сечение исходя из длинны и потребляемого тока.
7-8
A.W.G
5
8
10
14
Размер
мм²
16,8
8,37
5,26
2,08
25 000
20 000
15 000
10 000
8000
6000
4000
2000
1000
Потребляемая мощность (W)
500
250
100
0-1 1-2 2-3 3-4 4-5 5-6 6-7
Длина кабеля (м)
4. ПАРАМЕТРЫ РЕКОМЕНДУЕМЫХ ОФОРМЛЕНИЙ
Фазоинверторный корпус
Ш
Д
Ш*В*Д = объем корпуса
В
Параметры
Рекомендуемый объем л.
Площадь порта см²
Длина порта см.
Настройка Герц
DB-123 DB-153
55
200 300 450
70 65 70
35 32
100
16
DB-183
160
30
Page 17

5. РЕКОМЕНДАЦИИ ПО ЭКСПЛУАТАЦИИ САБВУФЕРОВ
От правильного выбора усилителя, настроек и оформления во многом зависит срок службы Вашего сабвуфера.
Необходимо выбирать усилитель с номинальной мощностью, не превышающей номинальную мощность сабвуфера.
Правильное согласование головного устройства (ГУ) с усилителем позволит получить чистый, неискаженный сигнал,
подаваемый на сабвуфер, что предотвратит перегрев и выход из строя звуковой катушки. Сабвуфер, как и любой
динамик, имеет подвижные и неподвижные части. В начале эксплуатации настоятельно рекомендуем «размять»
подвижные части сабвуфера. Внимательно отнеситесь к процессу разминки. Разминайте сабвуфер на музыкальном
материале в течение 40 часов на средних мощностях. Если во время эксплуатации на максимальной громкости Вы
почувствовали посторонний запах, необходимо уменьшить громкость и дать сабвуферу остыть на небольшой громкости.
Рекомендуемые настройки усилителя и ГУ: Громкость ГУ не более 80%. Чувствительность усилителя 50%, фильтр
инфранизких частот (Subsonic) на 5 Герц ниже настройки порта. К примеру, если настройка порта 30 Герц, Subsonic
необходимо выставить на 25 Герц. Фильтр низких частот LPF(Фильтр, который обрезает все частоты выше частоты
установки фильтра) 63-80 Герц, басбуст (bassboost) в 0.
6. ТЕХНИЧЕСКИЕ ХАРАКТЕРИСТИКИ
RU
Модель
Диаметр звуковой катушки
Количество звуковых катушек
Материал диффузора
Материал магнита
Материал намотки катушки
Материал подвеса
Мощность RMS
Мощность MAX
Размер
Серия
Тип корзины
Плоский Омедненный алюминий
DВ-153DВ-123 DВ-183
3"3" 3"
2 шт.2 шт. 2 шт.
БумагаБумага Бумага
ФерритФеррит Феррит
ПенаПена Пена
1200 Вт1200 Вт 1300 Вт
2400 Вт2400 Вт 2600 Вт
15"12" 18"
Deaf BonceDeaf Bonce Deaf Bonce
ЛитаяЛитая Литая
ПАРАМЕТРЫ ТИЛЯ-СМОЛЛА
Параметры
Xmax
Импеданс
Re Ω
Fs Hz
Vas L
Qts
Spl (1 Вт / 1 м)
BL
Указанная чувствительность прямо не связана со звуковым давлением, создаваемым в салоне
автомобиля, и поэтому не должна использоваться как единственный показатель для сравнения с
другими сабвуферами.
DВ-123 D1/D2
24
1+1/2+2 Ом
0,7+0,7/1,4+1,4
32
38,8
0,39
86
21,69
DВ-153 D1/D2
24
1+1/2+2 Ом
0,7+0,7/1,4+1,4
30
50,23
0,43
88
17,49
DВ-183 D1/D2
24
1+1/2+2 Ом
0,7+0,7/1,4+1,4
28
87,7
0,45
90
16,68
17
Page 18

7. РАЗМЕРЫ
RU18RU
DB-123D1
DB-123D2
DB-183D1
DB-183D2
Ø295
Ø206
Ø284
95
214
DB-153D1
DB-153D2
239.5
Ø465
Ø390
Ø206
Ø354
95
249
289
8. КОМПЛЕКТАЦИЯ
1. Сабвуфер - 1 шт.
2. Руководство пользователя - 1 шт.
3. Гарантийный талон - 1 шт.
313.5
272
95
Ø228
Ø429
Page 19

9. ИНФОРМАЦИЯ ПО ГАРАНТИЙНОМУ И СЕРВИСНОМУ
ОБСЛУЖИВАНИЮ ПРОДУКТОВ ALPHARD
Для обеспечения правильной эксплуатации оборудования внимательно прочитайте данное руководство перед
использованием. Особенно важно, чтобы Вы соблюдали все меры предосторожности, указанные в данном
руководстве. Пожалуйста, сохраните руководство в надежном и доступном месте.
Для каждого продукта ALPHARD гарантируется отсутствие дефектов материалов и изготовления при нормальном
использовании и обслуживании. Гарантия действительна с даты покупки, при наличии чека. Гарантия не действует в
следующих случаях:
∙ продукт поврежден в результате небрежного обращения, и/или неправильного использования, или любым
другим причинам, не зависящим от материалов или производственных дефектов;
∙ продукт был изменен или подделан посторонними людьми;
∙ его серийный номер был изменен или удален.
Пока продукт находится на гарантии, неисправные детали будут отремонтированы или заменены по усмотрению
компании-изготовителя. Некачественный товар должен быть возвращен дилеру, у которого он был приобретен
вместе с правильно заполненным гарантийным сертификатом. Если товар уже не на гарантии, он будет
отремонтирован за счет покупателя.
Alphard не несет никакой ответственности за повреждения вследствие транспортировки. Alphard не несет
ответственность за издержки или упущенную выгоду в связи с невозможностью использования продукта, другие
случайные или косвенные расходы, затраты или ущерб, понесенные заказчиком. Гарантии имеют силу согласно
действующего законодательства. Для получения дополнительной информации посетите сайт Alphard.
Производитель оставляет за собой право вносить изменения в конструкцию и спецификацию изделия без
предварительного уведомления.
10. ИНФОРМАЦИЯ ОБ УТИЛИЗАЦИИ ЭЛЕКТРИЧЕСКОГО И
ЭЛЕКТРОННОГО ОБОРУДОВАНИЯ (ДЛЯ ЕВРОПЕЙСКИХ СТРАН,
В КОТОРЫХ ОРГАНИЗОВАН РАЗДЕЛЬНЫЙ СБОР ОТХОДОВ)
Продукты с маркировкой “перечеркнутый крест-накрест мусорный контейнер на колесах” не допускается выбрасывать
вместе с обычными бытовыми отходами. Эти электрические и электронные продукты должны быть утилизированы в
специальных приемных пунктах, оснащенных средствами повторной переработки таких продуктов и компонентов. Для
получения информации о местоположении ближайшего приемного пункта утилизации/переработки отходов и правилах
доставки отходов в этот пункт, пожалуйста, обратитесь в местное муниципальное управление. Повторная переработка и
правильная утилизация отходов способствуют защите окружающей среды и предотвращают вредные воздействия на
здоровье.
19
Page 20

http://alphard.audio
 Loading...