

Page 1
CG-WLAPGMN
802.11b/g Wireless Access Point
User Manual
Page 2

Page 3

Contents
Regulatory Compliance............................................................................................... 2
1. Product Introduction................................................................................................ 3
1.1 Packing Content................................................................................ 3
1.2 Hardware Description..................................................................... 3
1.3 Features................................................................................................ 4
2. Hardware Installation............................................................................................... 5
2.1 Environment Requirements.......................................................... 5
2.2 Install the product............................................................................ 5
2.3 Connect to WLAN adapter............................................................. 6
3. Setting WLAN adapter.............................................................................................. 7
3.1 Setting up the Centrino in Win-XP(SP1) OS............................. 7
3.2 Setting up the Centrino in Win-XP(SP2) OS............................. 8
3.3 Setting up corega wireless adapter......................................... 10
4. Setting Utility Program......................................................................................... 11
Step1. Setting TCP/IP............................................................................. 11
Step2. Setting Web browser............................................................... 12
Step3. Setting Utility Program........................................................... 14
4.1 Status.................................................................................................. 15
4.2 Wizard (Quick Installation)......................................................... 15
4.3 Advanced.......................................................................................... 17
4.3.1 Configuration.......................................................... 17
4.3.2 Management.......................................................... 27
4.3.3 Maintenance........................................................... 28
4.4 Statistics............................................................................................ 30
4.5 Reboot............................................................................................... 30
5. FAQ............................................................................................................................... 31
6. Sepcification............................................................................................................. 34
WLAPGMN User Manual
11
Page 4

WLAPGMN User Manual
22
Regulatory Compliance
FCC Interference Statement
This device complies with Part 15 of FCC rule. Operation is subject to the following
two conditions:
• This device may not cause harmful interference.
• This device must accept any interference received, including interference that
may cause undesired operation.
This Broadband Wireless Router has been tested and found to comply with the
limits for a Class B digital device, pursuant to Part 15 of the FCC Rules. These limits
are designed to provide reasonable protection against harmful interference in
a residential installation. This equipment generates, uses, and can radiate radio
frequency energy and, if not installed and used according to the instructions, may
cause harmful interference to radio communications. However, there is no guarantee that interference will not occur in a particular installation.If this equipment
does cause harmful interference to radio or television reception, which is
found by turning the equipment off and on, the user is encouraged to try to correct the interference by one or more of the following measures:
• Reorient or relocate the receiving antenna.
• Increase the separation between the equipment or device.
• Connect the equipment to an outlet other than the receiver’s.
• Consult a dealer or an experienced radio/TV technician for assistance.
FCC Radiation Exposure Statement
This equipment complies with FCC radiation exposure limits set forth for an uncontrolled anvironment. This equipment should be
installed and operated with minimum distance 20cm between the radiator and
your body.
Page 5

333
1
Product Introduction
WLAPGMN User Manual
corega WLAPGMN is a high speed Wireless Access Point, which support
IEEE 802.11b/g standard with speed up to 108 Mbps provide higher data
rate and through is suitable for user who has high speed transmission
requirement. corega WLAPGMN supports enhanced security Functions
to protect your PCs from outside intruders. Its dual diversity antenna for
using in multi-path environment to enhance the transmission quality.
1.1 Packing Content
- Wireless 108 Mbps Access Point
- Power Adapter
- Ethernet Cable
- Product Stand
- Wall Mount Kits
- Manual
* Please verify the packing content the following items, if anything
loss or damage, please contact your local distributor.
1.2 Hardware Description
[Front Panel] [Back Panel]
4
5
1
2
3
6
7
33
Page 6

WLAPGMN User Manual
4
1. LAN LED (Green)
On: Connected
Blink: Transmitting or receiving data
OFF: Disconnected
2. WLAN LED (Green)
ON: Connected
Blink: Transmitting or receiving data
OFF: Disconnected
3. Power LED(Green) Indicate power configuration
4. Detachable Antenna Connector
5. LAN port
Be connected with PC or Hub
6. Init buttom
Press the buttom will recover to initial configuration
7. DC IN Socket Connect with power adapter
1.3 Features
• Compatible with IEEE 802.11b and 802.11g standard.
• Allows auto fallback data rate for reliability, optimized throughput
and transmission range
• Supports 64/128/152-bit WEP for security
• Support Super G mode (speed up to 108 Mbps) to provide the
higher data rate and throughput (Target throughput is 25M~32M)
• Web-based configuration and management
• Dual diversity antennas for the multi-path environment
• Supports enhanced security –WPA, WPA-PSK/EAP
• Supports Wireless Partition function
• Supports 10/100 Mbps Ethernet port
• Type approval compliant with USA, Japan, and Europe regulation
• Support WDS function (Wireless bridge (PtoP , PtoMP), AP repeater,
AP client)
Page 7
55
connect to Internet
Hub/Router
PC
LAN por t
Power Input
Power Adapter
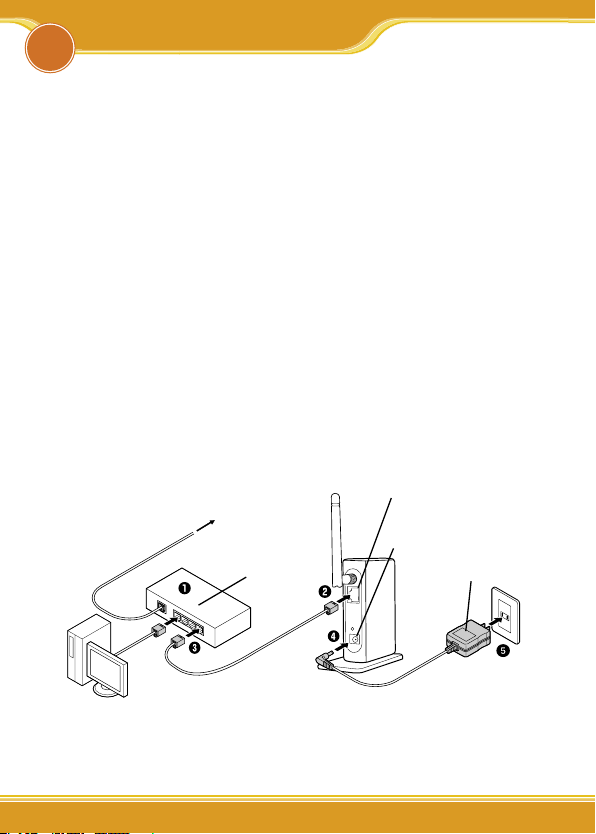
Hardware Installation
WLAPGMN User Manual
2
2.1 Environment Requirements
• A computer has configured TCP/IP
• An availabe RJ-45 port on an Ethernet Hub/Switch/Router/Modem
• A WLAN adapter which compliance with IEEE802.11g, IEEE802.11b, or
IEEE802.11 standard.
• Microsoft Internet Explorer 4.0 or Netscape Navigator 4.78 above
browser.
2.2 Install the product
(1) Prepare a hub/router which has connected with ADSL cable and PC.
(2) Insert the cable connector into the LAN port of WLAPGMN.
(3) Insert the other connctor of the cable into the Hub or Router’s LAN
port.
(4) Insert the power connector into WLAPGMN.
(5) Insert the power adapter into socket, meanwhile you will see the
Power and LAN LED blink.
5
Page 8
WLAPGMN User Manual
6
Hub/Switch
Internet
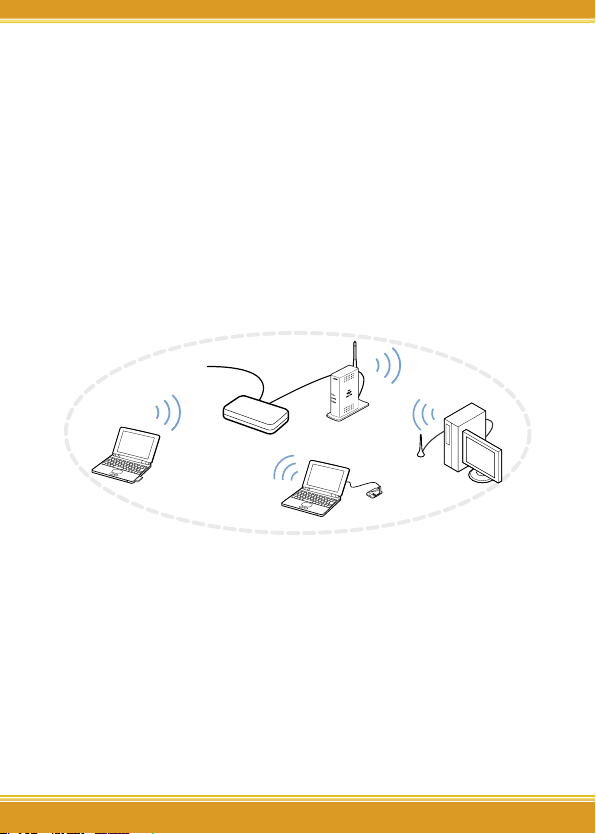
2.3 Connect to WLAN adapter
First at all, you have to prepare a WLAN adapter which has been installed
in computer, and verify the setting of the WLAN adapter are the same as
WLAPGMN, which default settings as below:
• Communication Mode: Infrastructure
• ESSID: corega
• Channel: 6
• WEP: OFF
• WPA: OFF
Page 9
77
Setting WLAN Adapter
WLAPGMN User Manual
3
This section lead you to configure the settings of wireless LAN adapters
installed in other computers to connect with WLAPGMN. There’re three
situations show as below:
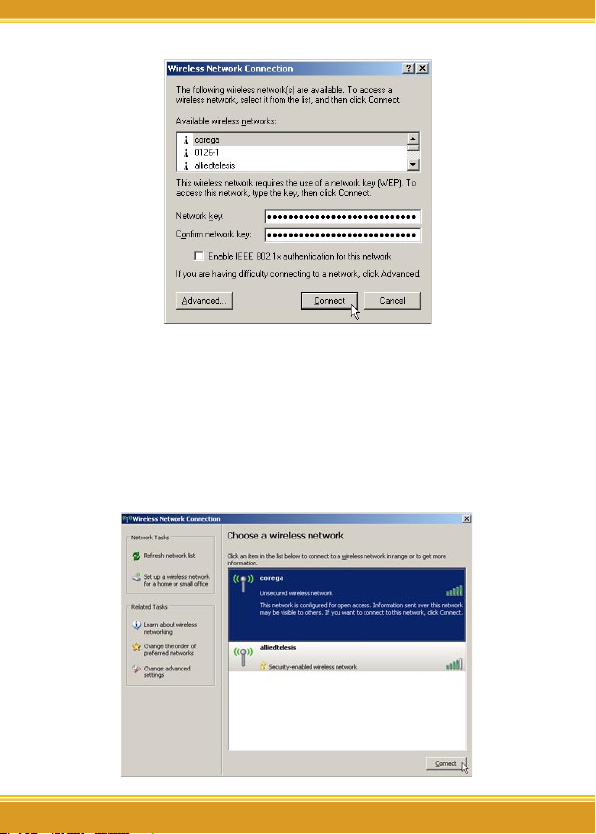
3.1 Setting up the Centrino in Win-XP(SP1) OS
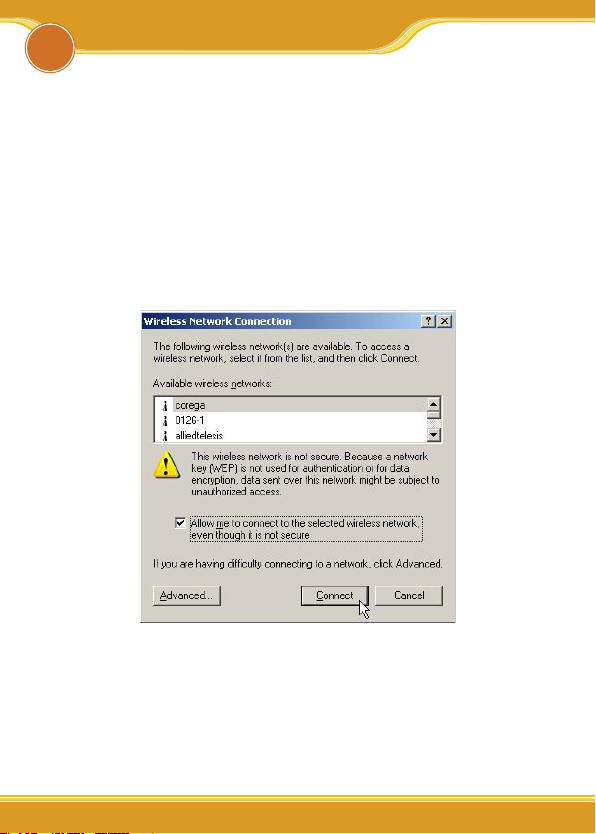
1. From the [Start Menu], select [Settings] -> [Control Panel]-> [Network]-> double click [Wireless network connection].
2. It will show up the [Wireless Network Connection] screen, select
[corega] in the listing of available wireless networks, => check [Allow
me to connect...] box => click [Connect].
* Note:
1. “corega” is the default ESSID of WLAPGMN, once ESSID in
WLAPGMN has been changed, the ESSID in WLAN adapter has
to be changed, too.
2. If the WLAPGMN has enabled security function, it will show
below screen, you have to type the key which is consistant with
WLAPGMN, => click [Connect].
7
Page 10
WLAPGMN User Manual
8
3. Setting completed, it is available to surf on internet through
WLAPGMN.
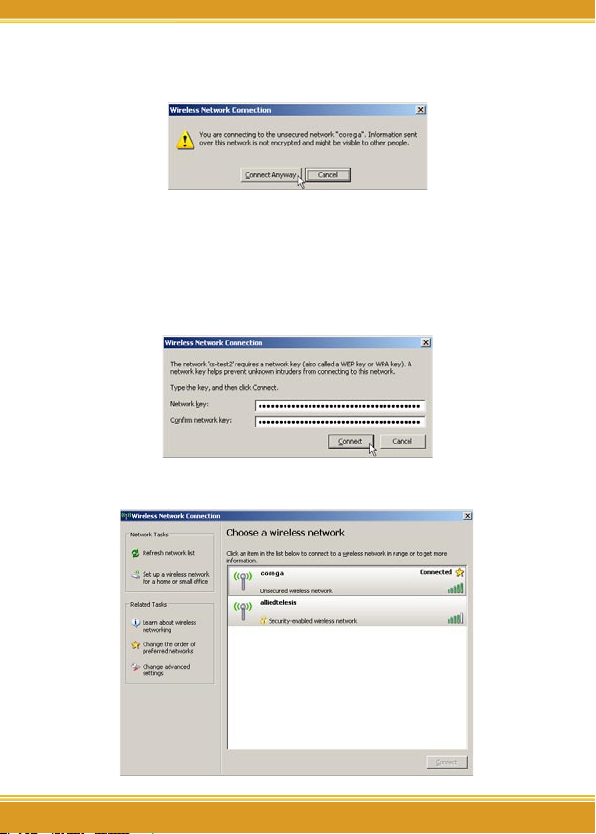
3.2 Setting up the Centrino in Win-XP(SP2) OS
1. From the [Start Menu], select [Settings] -> [Control Panel]-> [Network]->double click [Wireless network connection].
2. In following screen, please select [corega] in the listing of available
wireless networks, => click [Connect].
Page 11
9
WLAPGMN User Manual
3. If the WLAPGMN has not enable the security function, it will show up
below screen, click [Connect Anyway] to continue.
* Note:
1. “corega” is the default ESSID of WLAPGMN, once ESSID in
WLAPGMN has been changed, the ESSID in WLAN adapter has
to be changed, too.
2. If the WLAPGMN has enabled security function, it will show
below screen, you have to type the key which is consistant with
WLAPGMN, => click [Connect].
3. Setting completed, it is available to surf on internet through
WLAPGMN now.
9
Page 12
WLAPGMN User Manual
10
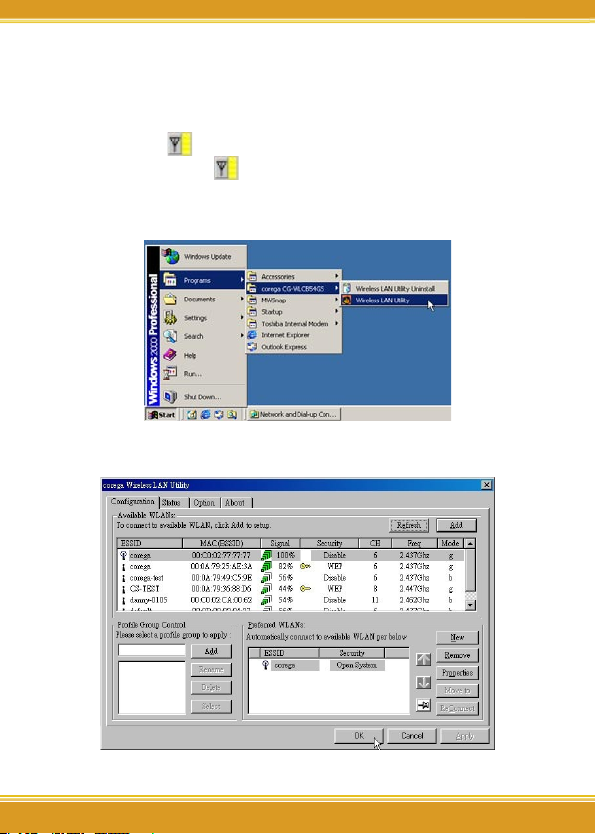
3.3 Setting up corega WLAN adapter
Following steps were taken corega WLCB54GS for instance:
1. Double click icon on system tray, and it will show up the utility
screen. If there’s no icon appears on system tray, please press
[Start] => [Programs]=>[corega CG-WLCB54GS]=> [Wireless LAN
Utility].
2. Please double click [corega] ESSID from [Available WLANs], then you’ll
see it will be added in [Preferred WLANs] listing.
3. Now click [OK] then available to surf on internet by WLAPGMN.
Page 13

1111
Setting Utility Program
WLAPGMN User Manual
4
This section take Windows XP for instance. Before starting, you have to
set up TCP/IP and web browser first. The steps as below:
Step1. Setting TCP/IP
1. From the [Start Menu], select [Settings] => select [Control
Panel]=>select [Network]=> select [Connections], => click and press
right button of the mouse, and select [properties].
2. In [General] tab, Please select [Internet Protocol (TCP/IP)]=> click
[Properties].
11
Page 14

WLAPGMN User Manual
12
3. Select both [Use the following IP address] and [Use the following DNS server addresses] (Recommended). Enter the IP address
between 192.168.1.1~192.168.254 range (except 192.168.1.230);
submask is 255.255.255.0=>click [Advanced].
4. Return back to [Local Area Connection Properties] screen => click
[OK] to close it.
Step2. Setting Web browser
1. Double click [Internet Explorer] (This section take IE6.0 for instance)=> click [tools], and select [Internet Options.].
Page 15

13
WLAPGMN User Manual
2. Click [Connections] tab=>select [LAN Settings].
3. Please uncheck the three items in below screen (don’t select anyone)=> click [OK].
Uncheck
these 3
items---->
13
Page 16

WLAPGMN User Manual
14
4. Please click [OK] to close the [Internet Options] screen.
Step3. Setting Utility Program
To make sure successful setting, please exit the virus and firewall program before setting the products. After setting completed, they can be
opened again.
1. Double click the web browser (this section take IE6.0 for instance).
2. Type “192.168.1.230” in the address tab =>press enter.
3. It shows up the prompt box, type “root” in [user name] tab, and keep
the [password] tab empty => click [OK].
Page 17

15
WLAPGMN User Manual
You are now in the utility program for setting, details as below:
4.1 Status
1. Select [Stauts], it will display all status for corega WLAPGMN.
4.2 Wizard (Quick Installation)
This section will lead you quick installation.
1. Select [Wizard] => Press [Next].
15
Page 18

WLAPGMN User Manual
16
2. You will see [SSID] and [Channel] in the following screen, you may
change it or not, but recommanded to change it to make sure the
security.
*Note: the default SSID(ESSID) is "corega", and default channel is 6.
3. Recommanded to click [Enable] from WEP setting screen, => select
[64Bits], [128Bits], or [152Bits]=> key in password in Key1 tab, =>
click [Next].
* Note:
1. Please enter 10 characters for 64Bit; 26 characters for 128Bit or
32 characters for 512Bit (number 0~9, and letters a~f).
2. You may aslo keep [Disable] default setting and click [Next] to
skip the step.
Page 19

17
WLAPGMN User Manual
4. Setting completed, please press [Reboot] for saving the changes.
5. It will show up Saving screen, few seconds later, it will return to
re-login prompt box.
6. Change the same ESSID for all WLAN adapters which connected to
WLAPGMN.
4.3 Advanced
4.3.1 Configuration
<IP Address>
1. Click[Advanced]->[Configuration]-[IP Address], once configure
completed, please click [Apply].
17
Page 20

WLAPGMN User Manual
18
Item Description
MAC Address Display corega WLAPGMN’s Mac address
Get IP From
IP Address Default is [192.168.1.230].
Subnet Mask Default is [255.255.255.0].
Default Gateway Default is [192.168.1.1].
There are 2 selections: Manual and DHCP
* Default is [Manual].
* Note: If any setting has been changed, you have to click [Reboot]-
>[Restart] to save the changes.
<WLAN Parameter Settings>
1. Click [Advanced]->[Configuration]-[WLAN Parameter Settings], when
configure completed, please click [Apply].
Item Description
ESSID Default is [corega].
SSID Broadcast
Frequency
Channel Default is [6].
DataRate
You may select [Enable] to hide your AP, or [Disable] to
open your AP.
Default is [2.437 GHz].
Display the DataRate between computer (WLAN adapter)
and WLAPGMN
Page 21

19
WLAPGMN User Manual
Beacon Interval
(20-1000)
DTIM (1-255) Default is [1], recommand don't change it.
Fragmentation
Length (256~2346)
RTS Length
(256~2346)
Transmit Power Default is [full].
Super Mode
Radio Wave Default is [On].
eXtended Range Default is [Disabled].
Default is [100], recommanded don't change it.
Enter even numbers.
Default is [2346], recommanded don't change it.
Default is [2346], recommanded don't change it.
If your Wireless LAN Card supports Super G Mode transmit
rate. You can use this function to increase wireless throughput. Default is [Disabled].
* Note: If any setting has been changed, you have to click [Reboot]-
>[Restart] to save the changes.
<Security Setttings>
A. Setting WEP
1. Click[Advanced]->[Configuration]->[Security Settings]->select
[Shared Key] from [Authentication] tab->setting [Key Table], once
configure completed, click [Apply].
19
Page 22

WLAPGMN User Manual
20
Item Specification
Authentication
Vaild Key Select one of default WEP Key groups First~Fourth.
First Key ~ Fourth Key
Once choosing WEP must select [Shared Key]; choosing
WPA will directly click [OK] to go next step.
* Default is [Open System].
Please enter 10 characters for 64Bit; 26 characters for
128Bit or 32 characters for 512Bit (number 0~9, and letters a~f).
* Note: If any setting has been changed, you have to click [Reboot]-
>[Restart] to save the changes.
B. Setting WPA
WPA uses TKIP (Temporal Key Integrity Protocol) to change the
temporal key every 10,000 packets (a packet is a kind of message
transmitted over a network.) This ensures much greater security than
the standard WEP security. There are two selections-[PSK] and [EAP] :
* [WPA-PSK] is suitable for home user.
1. Click[Advanced]->[Configuration]->[Security Settings]->select
[WPA] from [Authentication] tab-> click [Apply].
Page 23

21
WLAPGMN User Manual
2. Enter 9~63 characters in [PassPhrase]->select [Cipher Type], once
configure completed, click [Apply].
* Note:
1. Group Key Update Interval: enter a number to indicate the key
exchanged per minute.
2. If any setting has been changed, you have to click [Reboot]>[Restart] to save the changes.
*[WPA-EAP]: is suitable for enterprise with RADIUS server.
1. Click[Advanced]->[Configuration]->[Security Settings]->select
[WPA] from [Authentication] tab-> click [Apply].
21
Page 24

WLAPGMN User Manual
22
2. Enter 9~63 characters in [PassPhrase]->select [Cipher Type], setting
[Security Server Settings] table, once configure completed, click
[Apply].
* Note: If any setting has been changed, you have to click [Reboot]-
>[Restart] to save the changes.
<Access Control Settings>
1. Click[Advanced]->[Configuration]-[Access Control Settings], once
configure completed, click [Save].
Page 25

23
WLAPGMN User Manual
Item Description
Control
MAC Address
Disable: Disable the mac address filter function.
Accept:Only connect with the mac address which list the table.
Reject:Only conntect with the mac address which list the table.
Enter the mac address of the WLAN adapter which connected
with computer.(character of 0~9; A~F)
* Note: If any setting has been changed, you have to click [Reboot]-
>[Restart] to save the changes.
<AP Mode>
1. Access Point Mode
Click[Advanced]->[Configuration]-[AP Mode], once configure
completed, click [Apply].
* Note: If any setting has been changed, you have to click [Reboot]-
>[Restart] to save the changes.
23
Page 26

WLAPGMN User Manual
24
Hub/Switch
Internet
Hub/Switch
Internet
2. P to MP Bridge Mode: each one set the same channel, different
ESSID
Click[Advanced]->[Configuration]->[AP Mode]->[PtMP Bridge]-
>enter Mac Address in [Remote AP MAC Address], once configure
completed, click [Apply].
* Note: If any setting has been changed, you have to click [Reboot]-
>[Restart] to save the changes.
Page 27

25
WLAPGMN User Manual
Hub/Switch
Internet
LAN
Building
Building
3. Repeater Mode: each one set the same ESSID
Click[Advanced]->[Configuration]->[AP Mode]->[AP Repeater]>enter Mac Address in [Root AP MAC Address]->configure [Site
Survey], once configure completed, click [Apply].
* Note: If any setting has been changed, you have to click [Reboot]-
>[Restart] to save the changes.
4. Client Mode
Click[Advanced]->[Configuration]->[AP Mode]->[AP Client]-> enter
the Mac address->click [Apply].
25
Page 28

WLAPGMN User Manual
26
Hub/Switch
Internet
* Note: If any setting has been changed, you have to click [Reboot]-
>[Restart] to save the changes.
<WLAN Partition>
Click[Advanced]->[Configuration]->[WLAN Partition]->check the box,
once configure completed, click [Apply].
Page 29

27
WLAPGMN User Manual
* Note: If any setting has been changed, you have to click [Reboot]-
>[Restart] to save the changes.
<Device Information>
Click[Advanced]->[Configuration]->[Device Information]->setting
[System Name], once configure completed, click [Apply].
* Note: If any setting has been changed, you have to click [Reboot]-
>[Restart] to save the changes.
4.3.2 Management
<Administration>
Click [Advanced]->[Management]->[Administration], once configure
completed, click [Save].
*Notice:
1. If any setting has been changed, you have to click [Reboot]>[Restart] to save the changes.
2. Once forget the password, you may click [Maintenance]>[Restore System]=>[Restore] to return to default settings.
27
Page 30

WLAPGMN User Manual
28
<Misc>
Click[Advanced]->[Management]-[Misc], once configure completed,
click [Apply].
* Note: If any setting has been changed, you have to click [Reboot]-
>[Restart] to save the changes.
4.3.3 Maintenance
<Update Firmware>
Click[Advanced]->[Maintaince]->[Update Firmware]>[Browse]=>select the path of the firmware file , =>click [OK].
* Note: If any setting has been changed, you have to click [Reboot]-
>[Restart] to save the changes.
<Configuration File>
1. Update file: Click[Advanced]->[Maintaince]->[Configuration File]>[Browse]=>select the path of the file , =>click [OK].
2. Download configuration File, click second [OK].
* Note: If any setting has been changed, you have to click [Reboot]-
>[Restart] to save the changes.
<Restart System>
Page 31

29
WLAPGMN User Manual
1. Click [Advanced]->[Maintenance]->[Restart System]->all new settings will be saved.
2. It will show up the Saving screen, several seconds later, it will
return to re-login screen.
* Note:
• This function is the same as [Reboot].
• If any setting changes, please run this function to save and apply
the changes.
<Restore System>
1. Click[Advanced]->[Maintaince]->[Restore System]->system will
restore to Factory Default Settings.
2. It will show up the Saving screen, few seconds later, it will return to
to re-login screen.
* Note:
• Once you forget the password or want to return to initial status,
please run this function.
29
Page 32

WLAPGMN User Manual
30
4.4 Statistics
The screen displays the statistics of throughput.
4.5 Reboot
1. Click [Reboot]->click [Restart], all new settings will be saved.
2. It will show up the Saving screen, severl seconds later, it will return
to re-login screen.
* Note:
• This function is the same as [Advanced]->[Maintaince]->[Restart
System].
• If any setting changes, please run this function to save and apply
the changes.
Page 33

3131
FAQ
WLAPGMN User Manual
5
There are 2 ways for solving your problems:
(1) First, please see following “FAQ” to check your problem.
(2) Please go to http://www.corega-asia.com, click “Supports”=>select
“Online Customer Support”, => fill in the form, =>click “submit”. We’ll
reply you as soon as possible.
Q1. Can't open the utility program.
Ans:
1.Verify the computer has configured the TCP/IP, if yes, please verify
the setting is correct (Please refer to [4. Step1. Setting TCP/IP]).
2.Verify the WLAPGMN installation is correct. (Please refere to 2.
[Hardware Installation].)
3. Verify the wireless LAN adapter installation is correct. (Please refere
to the manual of wireless LAN adapter].)
4.Verify the process of Setting Utility Program is correct.(Please
refere chapter 4.)
5. Please verify the item [Proxy server] in web browser is unchecked: :
6. Uncheck the [Work offline] item in IE6.0, open IE 6.0 => click File
=> uncheck the [v Work Offline] item.
Q2. Computer installed wireless LAN adater can't connect to WLAPGMN.
Ans:
1. Keep the WLAPGMN far away from interference(ex:2.4GHz electric
equipment).
2. Shorten the distance between wireless device, and avoid the
barrier,s ex:cement or reinforced concrete wall.
3. Verify the setting of wireless LAN adapter is consistent with the
WLAPGMN.Ex: Infrastructure mode, ESSID, WEP Key, Channel,
Security(WEP/WPA) settings.
4. Verify all the devices(ex: Hub/Router/Modem) wired connected
with WLAPGMN are normal running.
Q3. How to improve the communication quality?
Ans:
1. Move the WLAPGMN away from RC/wood/flagstone/brick/anti-
31
Page 34

WLAPGMN User Manual
32
fire glass wall or door. It is to say to avoid the barriers between
WLAPGMN and Wireless LAN adapter.
2. Shorten the distance between WLAPGMN and WLAN adapters.
3. Adjust the antenna direction.
Q4. How to set/change the id and password for Utility Program?
Ans: In utility program, Click[Advanced]->[Management]>[Administration], Setting the id and password.
Q5. Forgot the Passowrd.
Ans: Recommanded to initial the product setting, which method
described as next question. Once you initial the product, all settings will
return to factory default settings.
Q6. How to resore to the default value?
A: There are 2 ways to restore:
<Press the [Init] button on main unit >
On the powering on status of WLAPGMN =>find the [Init] button on
the back of the main unit=>press it for 5 seconds around =>once the
[LAN] and [WLAN] LED are off, release it => few seconds later, you’ll
see [LAN] and [WLAN] LED blank =>system has been restored to
factory default settings.
<Restore by utility>
1. Click[Advanced]->[Maintaince]->[Restore System]->system will
restore to Factory Default Settings.
2. It will show up the Saving screen, severl seconds later, it will return
to to re-login screen.
Page 35

33
WLAPGMN User Manual
* Once you forget the password or want to return to initial status,
please run this function.
* Details please refer to [chapter 5. FAQ-Q6].
Q7. How to get the latest firmware?
Ans: Please go to http://www.corega-asia.com, =>click supports
>download >select “firmware”, =>select and click the model which you
want to upgrade. If you upgraded failure, you may restore the utility
system to factory default settings, please refer Q6.
Q8. How to check the network setting?
Ans: If you want to check the IP address and subnet mask or Mac
address, you may following steps:
<Windows Me/98/95>
(1) Press [Start] of the system tray => select [Perform].
(2) Enter "winipcfg" in the blank bar=>press [OK].
(3) Select the name of WLAN adapter, then it will show up the
information regarding the networking setting. If it display error
information, =>please press [Release], => Press [Update].
<Windows XP/2000 >
(1) Press [Start] -> [Programs]-> [Accessories]->[Command Prompt].
(2) Enter "ipconfig /all" => press[Enter], then you will see the
networking setting. If it display error information, please enter
"ipconfig /renew"=> press [Enter].
33
Page 36

WLAPGMN User Manual
34
6
Specification
Standard WLAN:IEEE802.11
LAN Interface 100BASE-TX/10BASE-T×1 RJ-45 port
Frequency Band 2.4~2.5 GHz
Transmission method DS-SS/OFDM
Modulation system IEEE 802.11b: DBPSK, DQPSK, CCK
Memory
Capacity
Transmission speed IEEE802.11g: 6/9/12/18/24/36/48/54/108 Mbps
Coverage Area - Indoors: Up to 100M (30M@54Mbps)
Channel 1~11 Channels for US/TW
Security WEP(64/128/152-bit), WPA-PSK/EAP, Mac address
Antenna Type Dipole antennas,2dBi gain, 2.4GHz
Power Specification Power requirements: DC 5V
Support OS Windows 95/98/Me/2000/XP(SP1)(SP2)
Support Application Microsoft Windows Messenger,MSN Messenger,Net
Environment Requirements
Operating Temperature:0~40˚C
Storage Temperature:-20~60˚C
Physical Specification
Dimension 29.5 (W) × 69.5 (D) × 104 (H) mm
Case Material Plastic
Weight 92.5 g (main unit)
Certification DGT, FCC
IEEE802.11b
IEEE802.11g
LAN: IEEE802.3
IEEE802.3u
IEEE802.3x
IEEE 802.11g: BPSK, QPSK, 16-QAM, 64-QAM, OFDM
4 MB Flash ROM
16 MB SDRAM
IEEE802.11b:1/2/5.5/11Mbps
- Outdoors: Up to 300M (60M@54Mbps)
* Environmental factors may adversely affect
wireless signal range
1~13 Channels for EU/UK/HK
filter, Wireless partition
Printed antennas, 0dBi gain, 2.4GHz
Current Consumption: 1070 mA (ave.)
Power Consumption: 5.35 W
Meeting,Yahoo!Messenger,
QuickTime Player,RealOnePlayer, Skype, ICQ
Humidity:<90% (non-condensing)
Humidity:<95% (non-condensing)
Page 37

3535
About corega K.K.
WLAPGMN User Manual
corega K.K. designs, develops and markets professional
networking products that address the specific needs
of small and medium enterprises and home user’s
easy-to-use, quality and reliable services of networking
solutions requirements.
Established in 1986, corega 100% founded by Allied Telesis Group in Yokohama, Japan. corega’s core products
consists of 10/100/1000 Ethernet products, Wireless
Networking Products(802.11 a/b/g series), broadband
access routers and other networking peripheral, such
as IP camera and PoE Adapter.
Thank you again for purchasing corega WLAPGMN
Wireless 108Mbps Access Point, Wish you would enjoy
the powerful and friendly corega connecting experience!!
35
Page 38

Federal Communication Commission Interference Statement
This equipment has been tested and found to comply with the limits for a
Class B digital device, pursuant to Part 15 of the FCC Rules. These limits
are designed to provide reasonable protection against harmful interference in
a residential installation. This equipment generates, uses and can radiate
radio frequency energy and, if not installed and used in accordance with the
instructions, may cause harmful interference to radio communications.
However, there is no guarantee that interference will not occur in a particular
installation. If this equipment does cause harmful interference to radio or
television reception, which can be determined by turning the equipment off
and on, the user is encouraged to try to correct the interference by one of the
following measures:
- Reorient or relocate the receiving antenna.
- Increase the separation between the equipment and receiver.
- Connect the equipment into an outlet on a circuit different from that
to which the receiver is connected.
- Consult the dealer or an experienced radio/TV technician for help.
This device complies with Part 15 of the FCC Rules. Operation is subject to
the following two conditions: (1) This device may not cause harmful
interference, and (2) this device must accept any interference received,
including interference that may cause undesired operation.
FCC Caution: Any changes or modifications not expressly approved by the
party responsible for compliance could void the user's authority to operate this
equipment.
IMPORTANT NOTE:
FCC Radiation Exposure Statement:
This equipment complies with FCC radiation exposure limits set forth for an
uncontrolled environment. End users must follow the specific operating
instructions for satisfying RF exposure compliance.
This transmitter must not be co-located or operating in conjunction with any
other antenna or transmitter.
IEEE 802.11b or 802.11g operation of this product in the U.S.A. is
firmware-limited to channels 1 through 11.
Page 39

www.corega-asia.com
corega Taiwan Inc.
7F., No. 10, Lane 345, YangGuang St. Nei-Hu
Chiu, Taipei City 114, Taiwan R.O.C.
TEL: +886-2-8751-9164 FAX: +886-2-8751-9174
PN: S30-UM8201-00 Rev.A
 Loading...