

Page 1

NEDERLANDS
Conceptronic C300Ri / C300RC / C300RU
Snelstart Handleiding
Hartelijk gefeliciteerd met de aanschaf van uw
In de bijgaande Snelstart handleiding wordt stap voor stap uitgelegd hoe u de Conceptronic
802.11N Wireless Netwerk Client kunt installeren.
In geval van problemen adviseren wij u onze support-site te bezoeken (ga naar:
www.conceptronic.net
vragen waar u waarschijnlijk de oplossing voor uw probleem kunt vinden.
Heeft u andere vragen over uw product die u niet op de website kunt vinden, neem dan
contact met ons op via e-mail: support@conceptronic.net
Voor meer informatie over Conceptronic producten kunt u terecht op de Conceptronic
website: www.conceptronic.net
De software configuratie beschreven in deze handleiding kan afwijken op uw computer. Dit is
afhankelijk van het besturingssysteem dat u gebruikt.
1. Inhoud van de verpakking
De volgende onderdelen dienen aanwezig te zijn in de verpakking van de Conceptronic
802.11N Client (afhankelijk van de aangeschafte 11N Client):
Conceptronic C300Ri
Of
Conceptronic C300RC
Of
Conceptronic C300RU
Conceptronic 802.11N Wireless Netwerk Client.
en klik op ‘Support’). Hier vindt u een database met veelgestelde
.
.
* Conceptronic 802.11N PCI kaart
* 3x Antenne
* Product CD-ROM
* Meertalige Snelstart Handleiding
* Conceptronic 802.11N PC kaart
* Product CD-ROM
* Meertalige Snelstart Handleiding
* Conceptronic 802.11N USB Adapter
* USB Verlengkabel
* Product CD-ROM
* Meertalige Snelstart Handleiding
1
Page 2

NEDERLANDS
2. Stuurprogramma & Software Installatie
Installeer eerst de stuurprogramma’s & software voordat u de kaart in de computer
Let op:
plaatst of de USB adapter op uw computer aansluit!
A. Plaats de CD-ROM in uw CD-ROM speler. Het Autorun Menu zal automatisch verschijnen.
Als het Autorun Menu niet getoond wordt, ga dan naar “Mijn Computer” en dubbelklik
op de CD-ROM speler om het Autorun Menu te starten.
B. Selecteer de optie “Install Drivers & Software” in het Autorun Menu.
De Setup Wizard zal getoond worden.
C. Klik op “Next” om door te gaan.
D. Wijzig de installatiemap voor de software met de knop “Browse”, of behoud de
standaard locatie. Klik op “Next” om door te gaan.
E. Wijzig de Start Menu map, of behoud de standaard locatie. Klik op “Next” om door te
gaan.
De Setup Wizard zal de stuurprogramma’s en de software installeren op uw computer.
Wacht tot de Setup Wizard klaar is met de installatie.
F. Als de installatie is voltooid kiest u voor “Yes, I Want to restart my computer now” en
klikt u op “Finish”.
Let op:
Als u de C300Ri (802.11N PCI kaart) heeft aangeschaft, kies dan voor “No, I want
Ga verder bij Hoofdstuk 3 voor de Hardware Installatie van de 802.11N Wireless Netwerk
Client.
to restart my computer later” en klik op “Finish”.
2
Page 3
NEDERLANDS
3. Hardware Installatie
Als de installatie van de stuurprogramma’s & software gereed is, kunt u beginnen met de
hardware installatie.
Conceptronic C300Ri – PCI kaart
A. Schakel uw computer uit en ontkoppel de stroomkabel.
B. Open de computer behuizing door de schroeven aan de achterzijde te verwijderen en
verwijder het zijpaneel.
C. Zoek een vrij PCI slot en verwijder de beschermplaat aan de achterzijde van de
computer behuizing.
D. Plaats de C300Ri voorzichtig in het vrije PCI slot en zet deze met een schroef vast aan
uw computer behuizing..
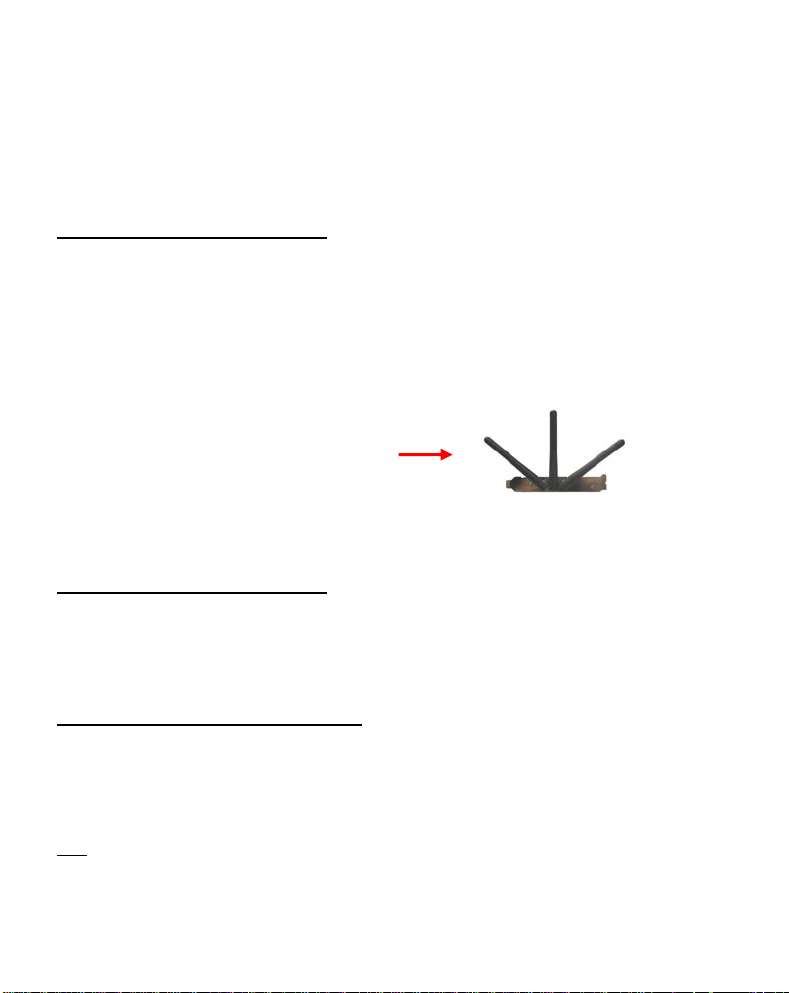
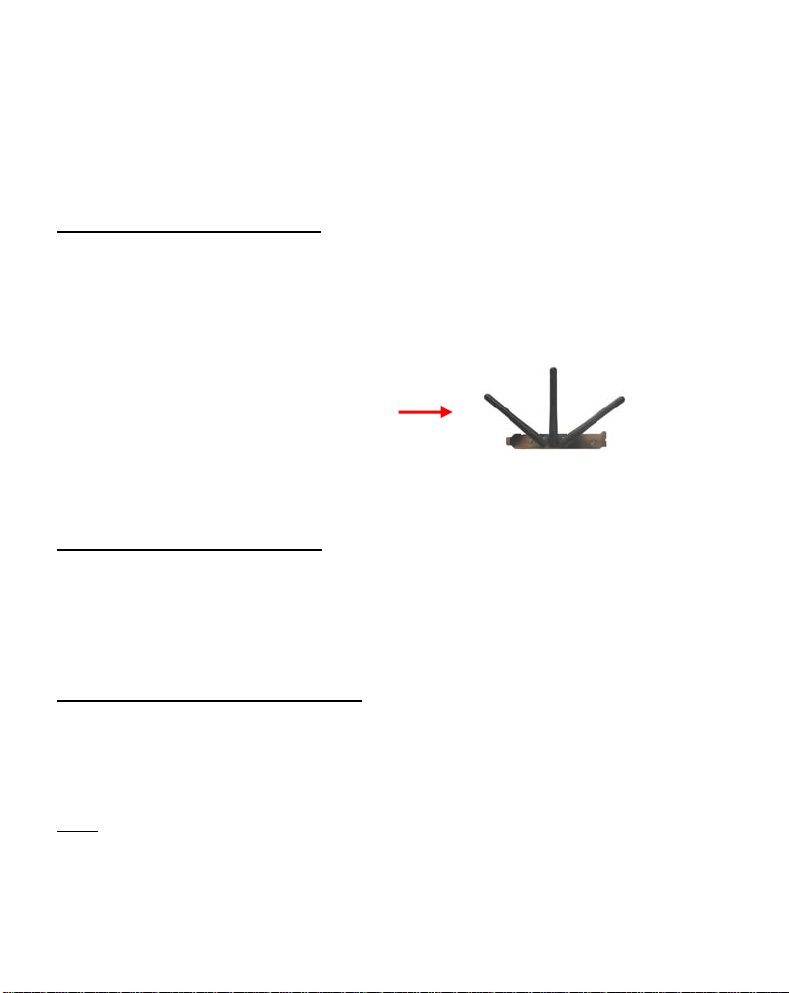
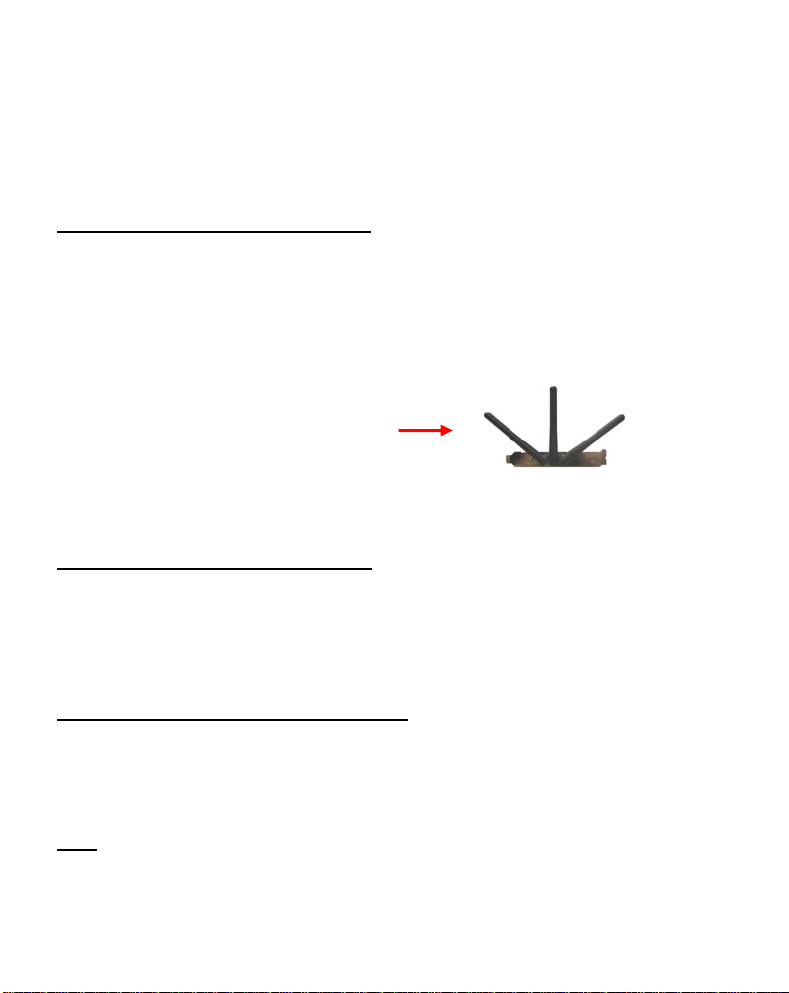
E. Sluit de computer behuizing en monteer de 3 antenne’s op de C300Ri.
Zet de antenne’s op de volgende positie:
F. Schakel uw computer in.
Windows zal automatisch nieuwe hardware detecteren en de stuurprogramma’s installeren.
Conceptronic C300RC – PC kaart
A. Nadat uw notebook opnieuw is opgestart, plaatst u de C300RC in een vrij PC kaartslot
van uw notebook.
Windows zal automatisch nieuwe hardware detecteren en de stuurprogramma’s installeren.
Conceptronic C300RU – USB Adapter
A. Nadat uw computer opnieuw is opgestart plaatst u de C300RU in een vrije USB poort van
uw computer.
Windows zal automatisch nieuwe hardware detecteren en de stuurprogramma’s installeren.
Tip:
Voor een beter signaalontvangst kunt u de USB verlengkabel gebruiken zodat u de
USB adapter kunt verplaatsen.
3
Page 4
NEDERLANDS
4. Verbinden met een draadloos netwerk
Als de hardware is geïnstalleerd is de Wireless Netwerk Client klaar voor gebruik. In uw
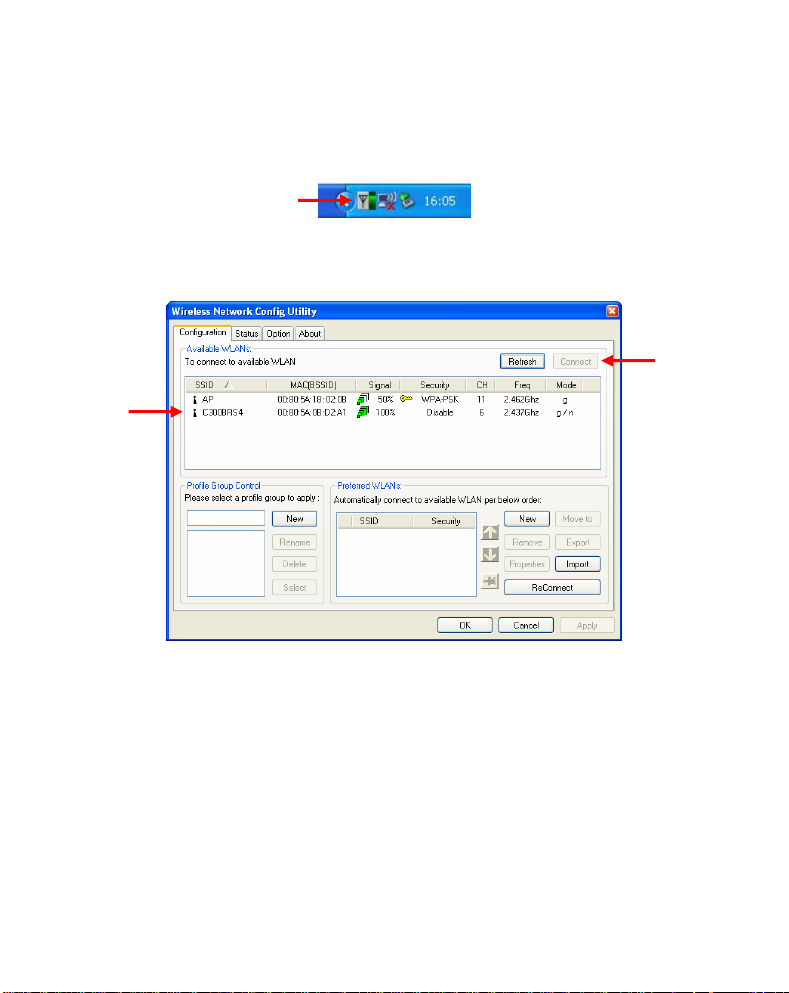
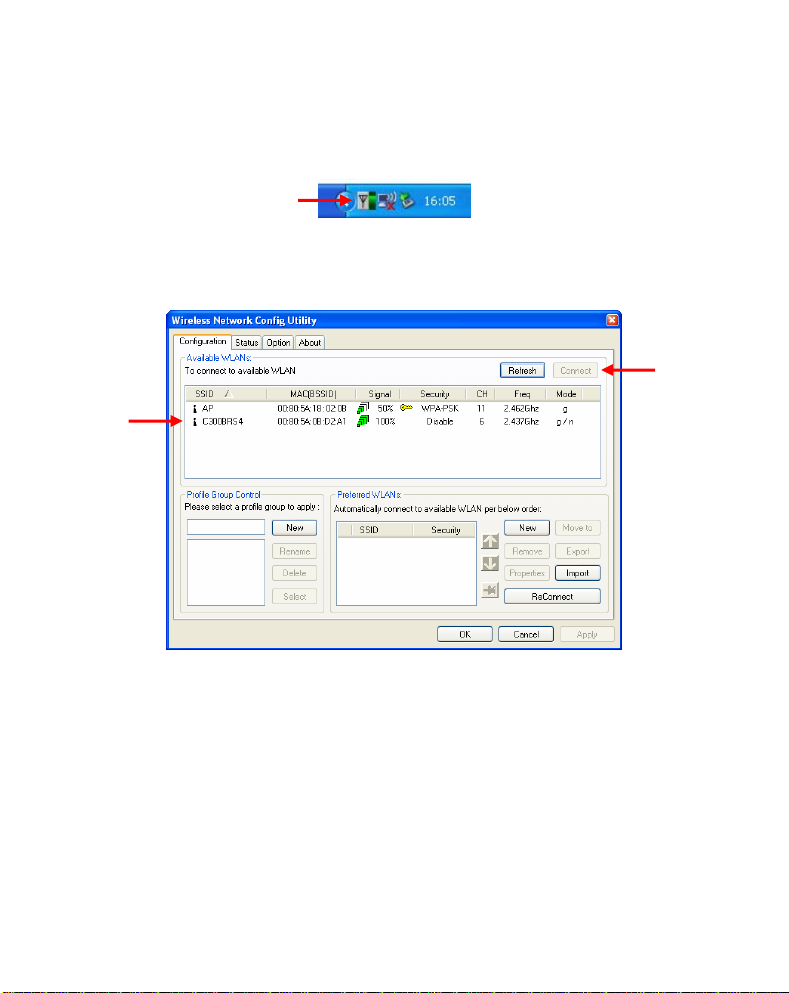
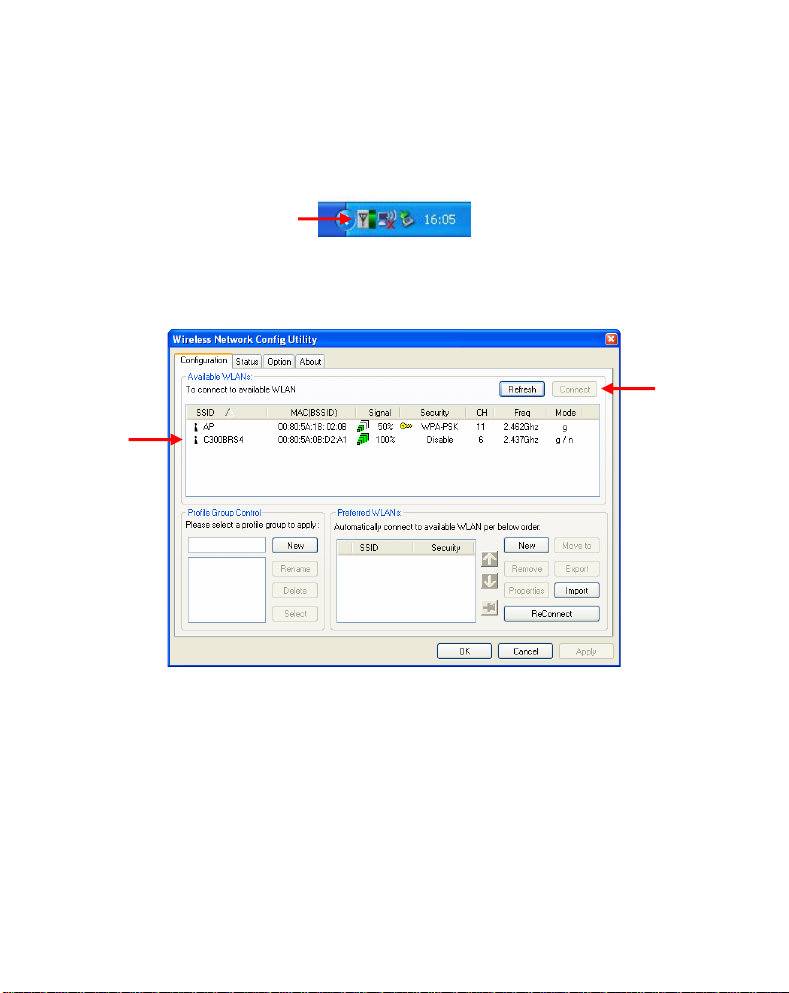
systeembalk zal een actieve Conceptronic Wireless Utility getoond worden:
A. Dubbelklik op het systeembalk icoon van de Conceptronic Wireless Utility.
De Conceptronic Wireless Utility zal op uw scherm getoond worden:
De Conceptronic Wireless Utility toont alle draadloze netwerken in de omgeving van uw
computer. Als uw draadloze netwerk niet getoond wordt, klik dan op “Refresh” om opnieuw
te scannen naar draadloze netwerken.
B. Klik op het netwerk waarmee u wilt verbinden en klik vervolgend op “Connect”.
De Wireless Utility zal een connectie-popup tonen, die afhankelijk van de ingestelde
beveiliging op uw netwerk, kan variëren.
4
Page 5
NEDERLANDS
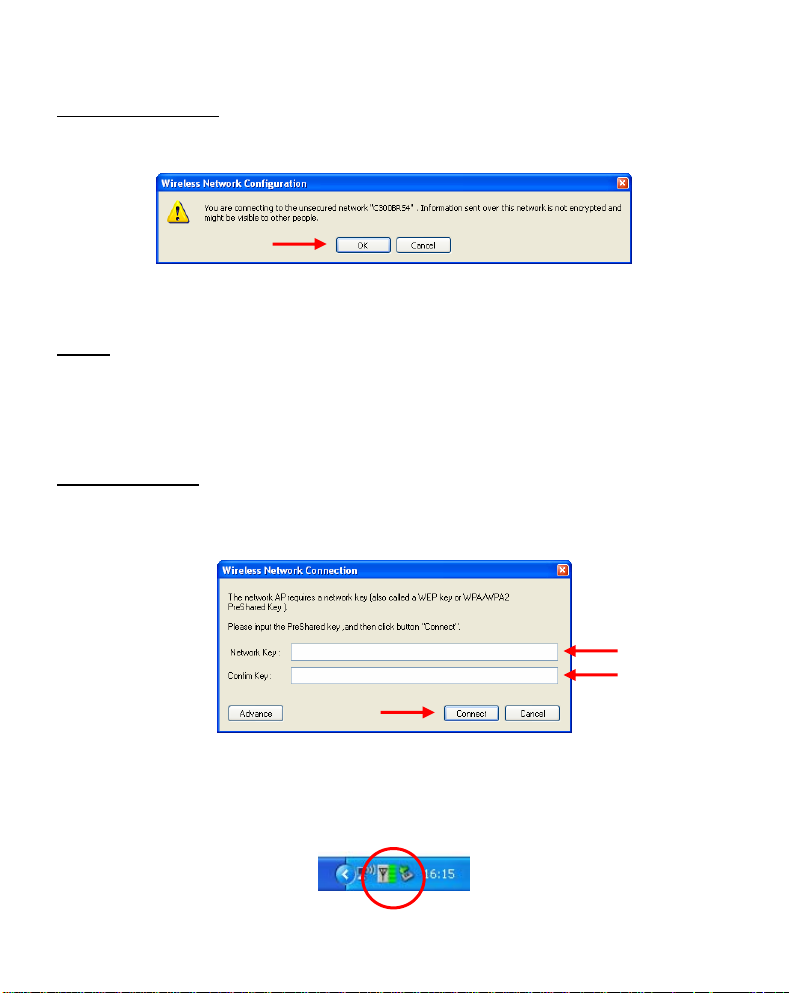
Onbeveiligd Netwerk:
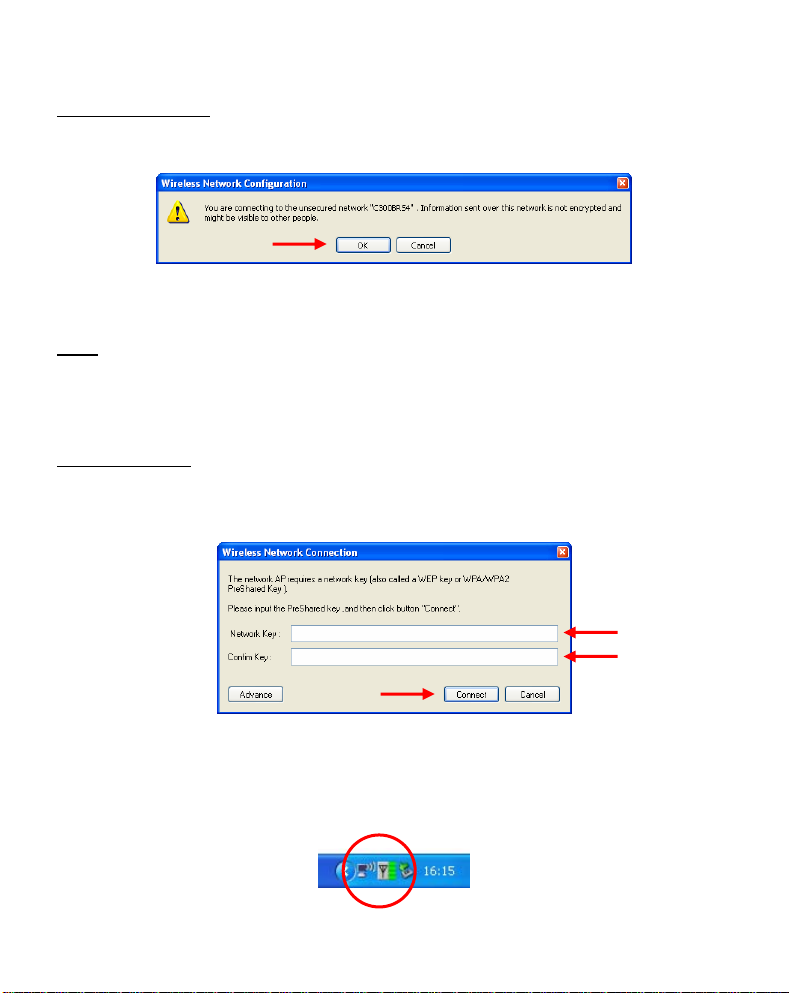
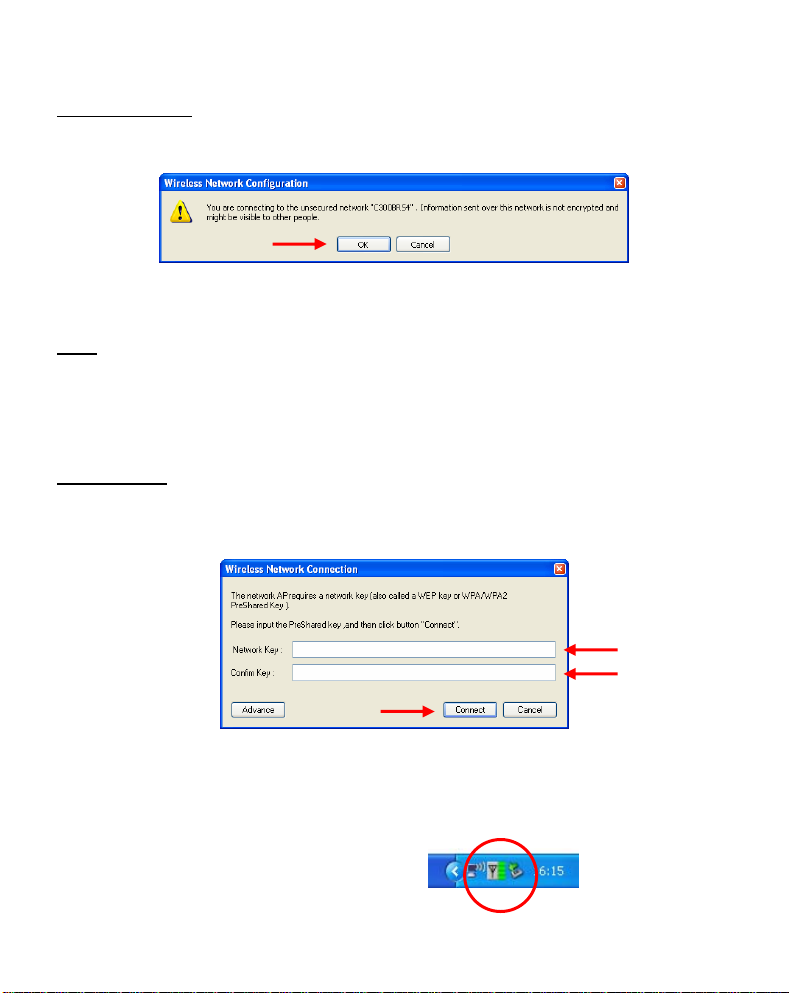
Als uw draadloze netwerk niet is beveiligd, zal de volgende popup getoond worden::
Klik op “OK” om te verbinden met het geselecteerde netwerk, of klik op “Cancel” om een
ander netwerk te kiezen.
Let op:
Als u met uw eigen netwerk probeert te verbinden en deze is niet beveiligd, raden
wij u aan om deze alsnog te beveiligen om ongewenste toegang tot uw netwerk te
voorkomen.
Zie de handleiding van uw Wireless Router/Access Point hoe u de beveiliging van
Beveiligd Netwerk:
Als uw netwerk is beveiligd, zal de Wireless Utility u vragen de encryptie sleutel of pass
phrase in te voeren, afhankelijk van de ingestelde beveiliging op uw draadloze netwerk:
Voer de encryptiesleutel of de pass phrase in bij het veld “Network Key” en herhaal dit bij
het veld “Confirm Field”. Klik op “Connect” om te verbinden met het geselecteerde
draadloze netwerk.
Als u bent verbonden met het draadloze netwerk zal de Wireless Utility de signaalsterkte
tonen in uw systeembalk:
uw netwerk kunt instellen.
5
Page 6
NEDERLANDS
5. Wi-Fi Protected Setup – WPS
De Conceptronic 802.11N Clients ondersteunen WPS (Wi-Fi Protected Setup). WPS is een
standaard om uw draadloze netwerk eenvoudig te beveiligen. Met WPS kunt u eenvoudig uw
draadloze netwerk beveiligen in een paar simpele stappen zonder kennis van verschillende
beveiligingsmogelijkheden.
Let op:
Om gebruik te kunnen maken van WPS dient u een Router/Access Point te hebben
Let op:
A. Dubbelklik op het systeembalk icoon van de Conceptronic Wireless Utility.
die beschikt over de WPS mogelijkheid.
De WPS mogelijkheid wordt (nog) niet ondersteund in het Windows Vista
stuurprogramma van uw Conceptronic 802.11N Client.
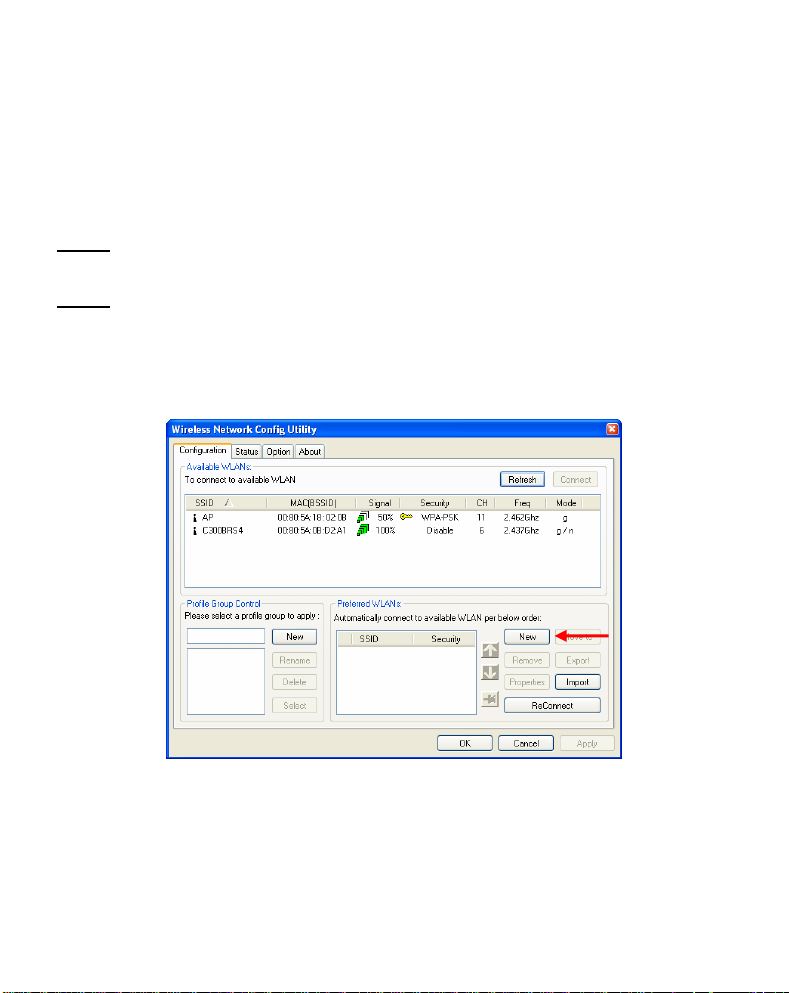
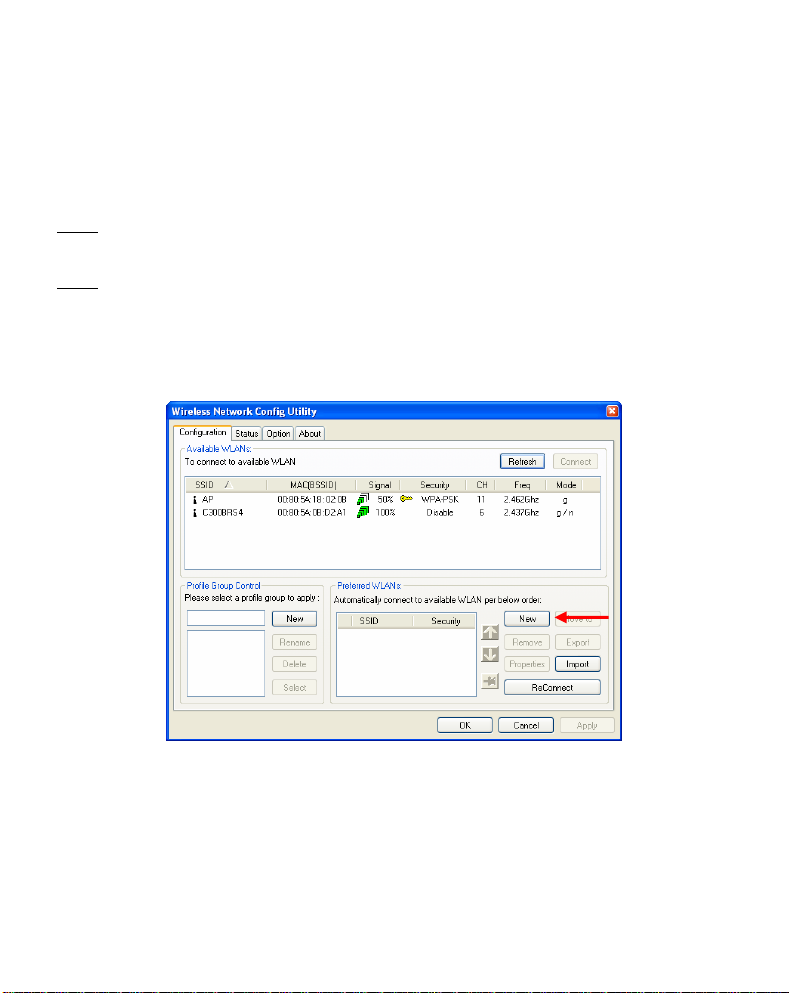
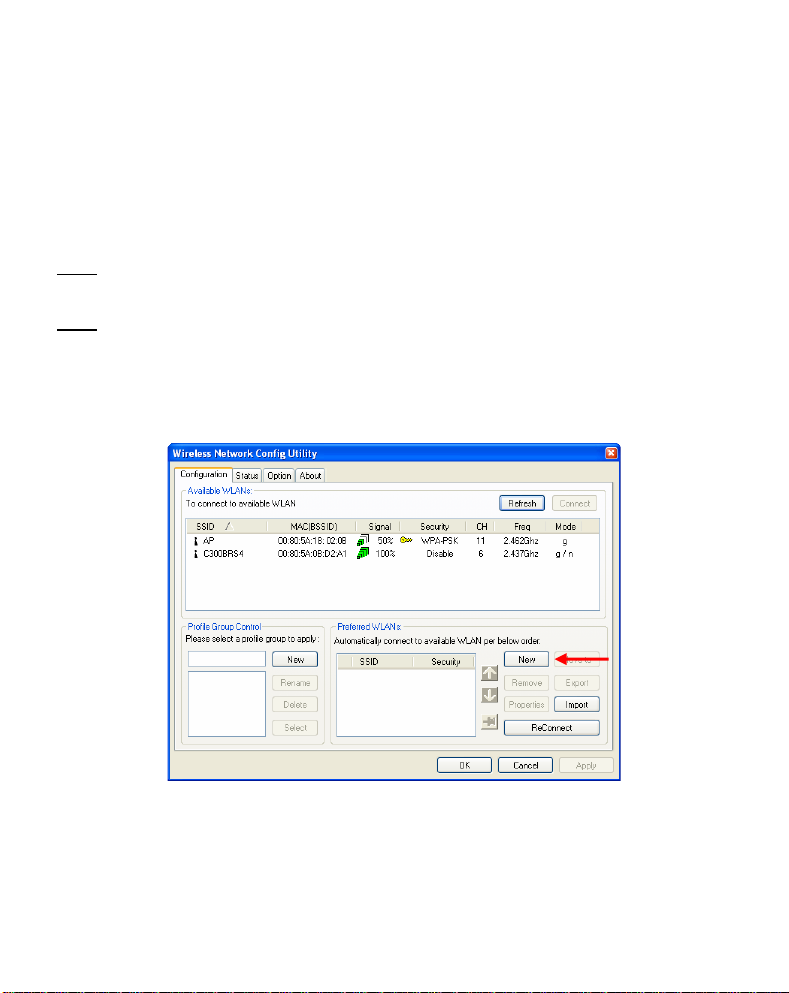
De Conceptronic Wireless Utility zal getoond worden op uw scherm:
B. Klik op de knop “New” in de Wireless Utility.
6
Page 7

NEDERLANDS
Let op:
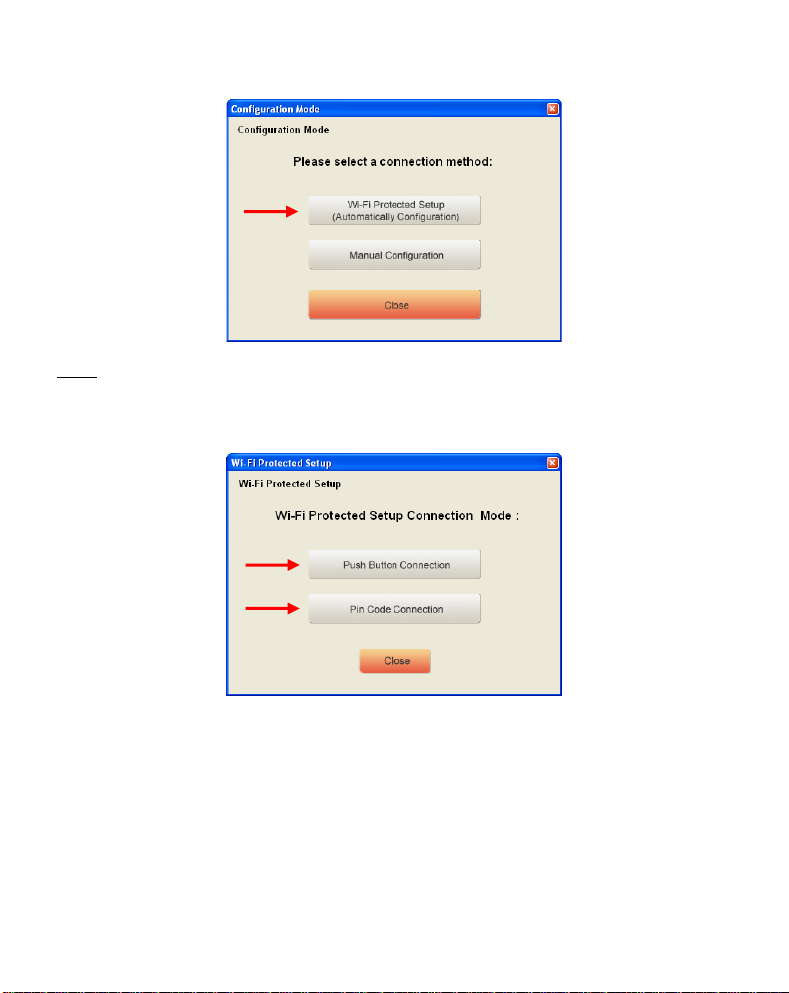
Als u gebruik maakt van Windows Vista zult u niet het “Configuration Mode”
C. Selecteer de optie “Wi-Fi Protected Setup”.
D. U kunt kiezen tussen de optie “Push Button” en “Pin Code”. Als uw Router/Access
scherm zien maar wordt u direct naar de “Manual Configuration” verwezen.
Point de Push-Button techniek ondersteund, kies dan voor “Push Button”. Kies anders
voor “Pin Code”.
7
Page 8

NEDERLANDS
5.1 WPS – Push Button
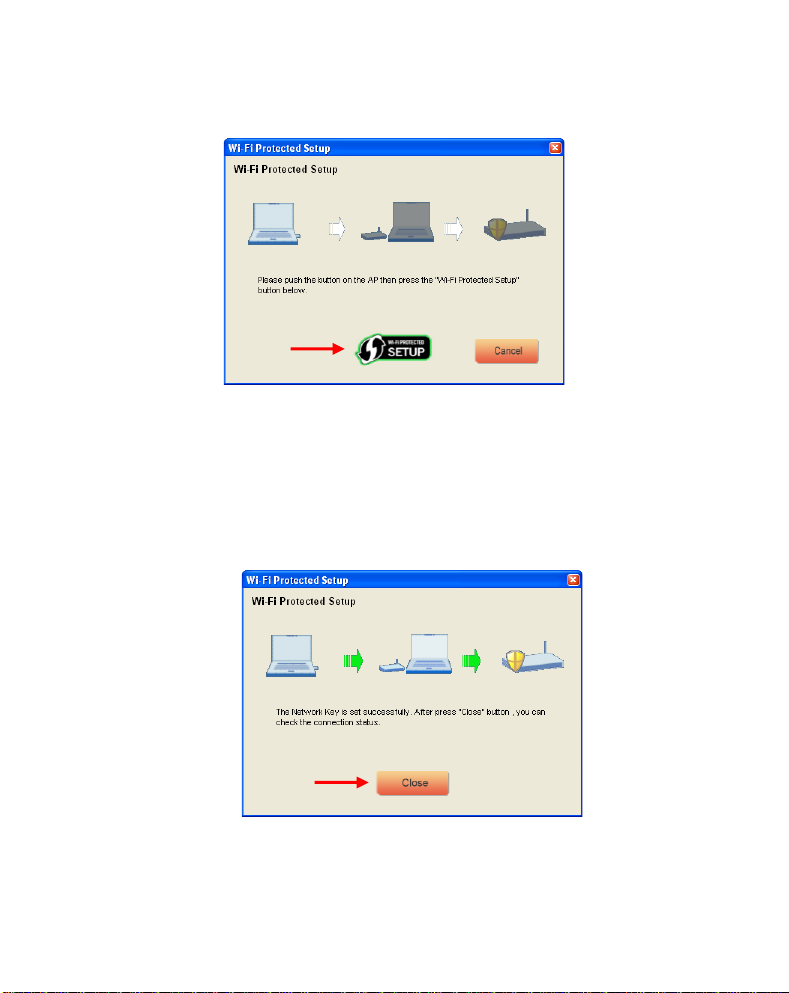
A. Druk op de WPS knop op uw Router of Access Point en klik op het “Wi-Fi Protected
Setup” logo op uw scherm.
De Wireless Utility zal zoeken naar actieve WPS netwerken in de omgeving en probeert
hiermee een verbinding te maken. Bij het maken van de verbinding zal de Router /
Access Point ook beveiligd worden als dit nog niet het geval is.
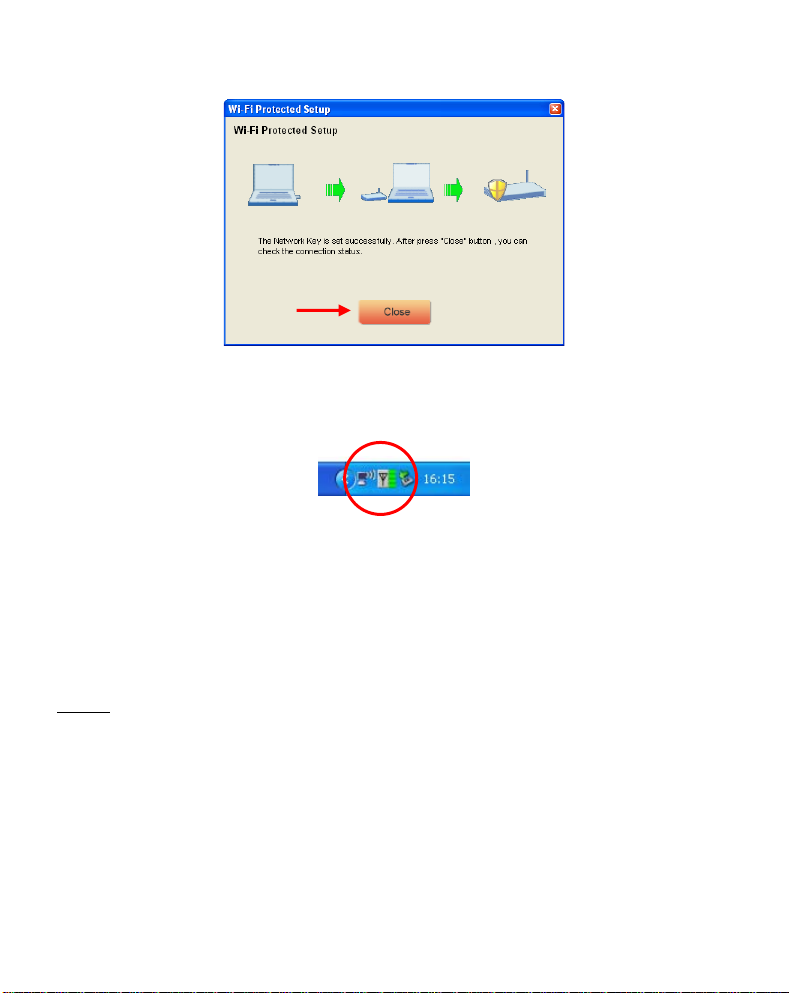
Wanneer de WPS verbinding is gelegd, krijgt u het volgende scherm te zien:
B. Klik op “Close” om de WPS Wizard af te sluiten.
8
Page 9

NEDERLANDS
5.2 WPS – Pin Code Connection
Wanneer uw Router of Access Point geen WPS knop heeft kunt u een WPS verbinding leggen
door middel van een Pin Code.
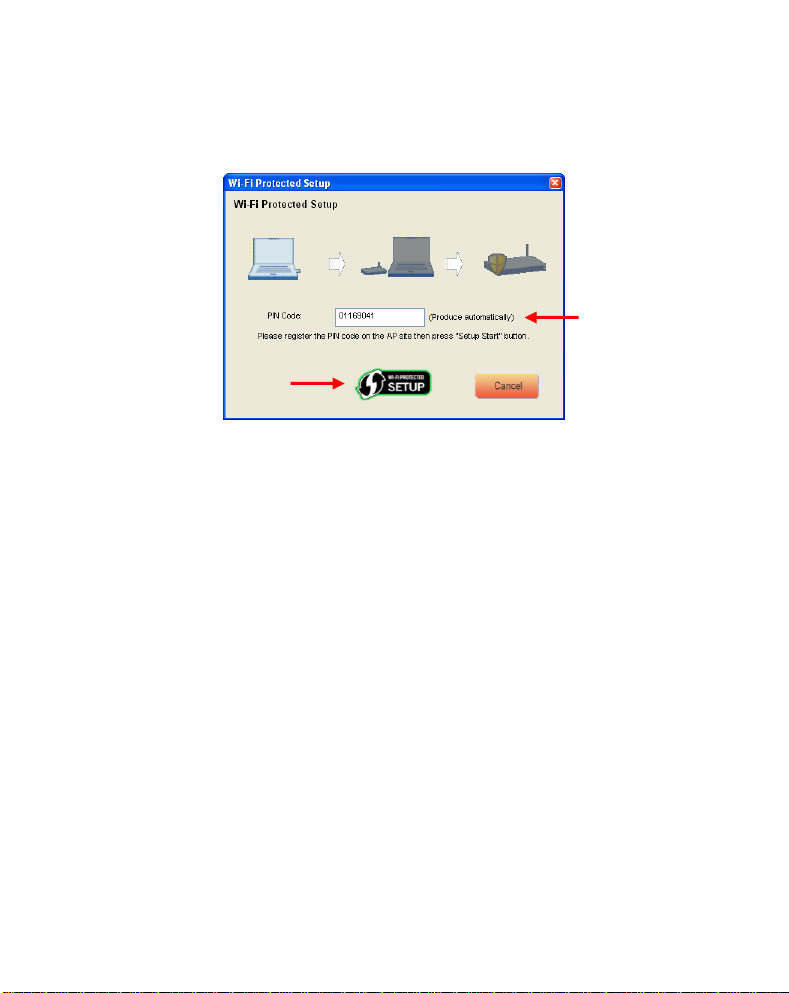
De WPS Wizard zal standaard een unieke Pin Code genereren welke gebruikt kan worden voor
uw verbinding.
A. Gebruik deze Pin Code in de configuratie van uw Router / Access Point om een
verbinding tot stand te brengen.
B. Wanneer uw Router / Access Point is ingesteld met de nieuwe Pin Code, klikt u op het
“Wi-Fi Protected Setup” logo op uw scherm.
De Wireless Utility zal zoeken naar actieve WPS netwerken in de omgeving en zal
proberen hiermee een verbinding te maken. Bij het maken van de verbinding zal de
Router / Access Point ook beveiligd worden als dit nog niet het geval is.
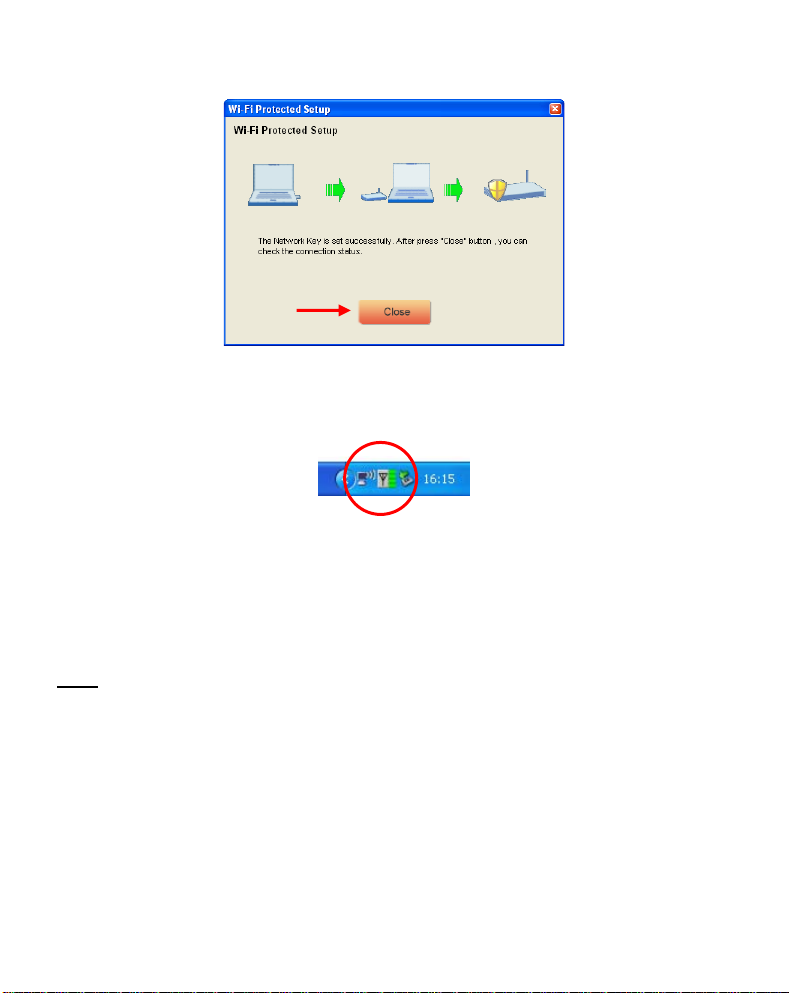
Wanneer de WPS verbinding is gelegd, krijgt u het volgende scherm te zien:
9
Page 10
NEDERLANDS
C. Klik op “Close” om de WPS Wizard te sluiten.
Als u bent verbonden met het draadloze netwerk zal de Wireless Utility de signaalsterkte
tonen in uw systeembalk:
Veel plezier met het gebruik van uw Conceptronic 802.11N
Wireless Client !
Let op:
De snelheid van uw 300Mbps draadloze netwerk kan variëren. Deze variabele
snelheid kan veroorzaakt worden door een aantal factoren, zoals:
- De afstand tussen de computer en de Router / Access Point.
- Andere netwerken in de omgeving die storen op uw signaal.
- De veiligheidsoptie van uw Router / Access Point om storing op andere actieve
netwerken te voorkomen.
- Andere actieve 2,4Ghz apparaten in uw omgeving, zoals Video zenders,
afstandsbedieningen, Bluetooth apparaten, etc.
10
Page 11

ENGLISH
Conceptronic C300Ri / C300RC / C300RU
Quick Installation Guide
Congratulations on the purchase of your
The enclosed Quick Installation Guide gives you a step-by-step explanation of how to install
the Conceptronic 802.11N Wireless Network Client on your computer.
When problems occur, we advise you to go to our support-site (go to www.conceptronic.net
and click ‘Support’. Here you will find the Frequently Asked Questions Database.
When you have other questions about your product and you cannot find it at our website,
contact us by e-mail: support@conceptronic.net
For more information about Conceptronic products, please visit the Conceptronic Web Site:
www.conceptronic.net
The Software installation as described below may be slightly different from the installation
on your computer. This depends on the Windows version you are using.
1. Package Contents
The following items are present in the package of the Conceptronic 802.11N Client:
(Depending on the bought 11N Client)
Conceptronic C300Ri
Or
Conceptronic C300RC
Or
Conceptronic C300RU
Conceptronic 802.11N Wireless Network Client.
* Conceptronic 802.11N PCI Card
* 3x Antenna
* Product CD-ROM
* Multi-language Quick Installation Guide
* Conceptronic 802.11N PC Card
* Product CD-ROM
* Multi-language Quick Installation Guide
* Conceptronic 802.11N USB Adapter
* USB Extension Cable
* Product CD-ROM
* Multi-language Quick Installation Guide
11
Page 12

ENGLISH
2. Drivers & Software Installation
Before you insert the card or connect the USB Adapter to your computer, you must
Note:
install the Drivers & Software!
A. Insert the CD-ROM in your CD-ROM Drive. The Autorun should appear automatically. If
the Autorun menu does not appear, navigate to “My Computer” and double-click on
the CD-ROM drive to start the Autorun menu.
B. Select the option “Install Drivers & Software” from the Autorun Menu.
The Setup Wizard will appear.
C. Click “Next” to continue.
D. Change the destination folder for the software with the “Browse” button, or keep
the default location. Click “Next” to continue.
E. Change the Start Menu folder, or keep the default folder. Click “Next” to continue.
The Setup Wizard will now install the drivers and software on your computer. Wait for
the Setup Wizard to finish the installation.
F. When the installation is finished, click “Yes, I Want to restart my computer now”
and click “Finish”.
Note:
If you have bought the C300Ri (802.11N PCI Card), select “No, I want to restart my
computer later” and click “Finish”.
Proceed to Chapter 3 for the Hardware Installation of your 802.11N Wireless Network Client.
12
Page 13
ENGLISH
3. Hardware Installation
When the software for your 802.11N Client is installed, you can proceed with the hardware
installation.
Conceptronic C300Ri – PCI Card
A. Turn off your computer and disconnect the computer from the AC outlet.
B. Open your computer case by removing the screws from the back and remove the panel.
C. Find a free PCI slot and remove the protective plate from your computer case.
D. Insert the C300Ri gently in a free PCI slot and fix it with a screw to your computer
casing.
E. Close your computer case and assemble the 3 antenna’s to the C300Ri.
Align the antennas like shown in the image below:
F. Turn on your computer.
Windows will detect new hardware and installs the drivers automatically.
Conceptronic C300RC – PC Card
A. After your computer is rebooted, insert the C300RC into a free PC Card slot of your
notebook.
Windows will detect new hardware and installs the drivers automatically.
Conceptronic C300RU – USB Adapter
A. After your computer is rebooted, insert the C300RU into a free USB slot on your
computer.
Windows will detect new hardware and installs the drivers automatically.
Note:
You can use the USB Extension cable to move the USB Adapter for better signal
reception.
13
Page 14
ENGLISH
4. Connect to a Wireless Network
When the hardware is installed by the computer, the Wireless Network Client is ready to use.
You will see an active Wireless Utility in your system tray:
A. Double-click on the system tray icon of the Conceptronic Utility.
The Conceptronic Wireless Utility will be shown like below:
The Conceptronic Wireless Utility will show all the wireless networks in the area of your
computer. If your wireless network is not shown, you can click “Refresh” to rescan for
networks.
B. Click on the network you want to connect to from the list with networks. Click
“Connect”.
The Wireless Utility will prompt you with a connection popup which can differ depending on
the configured security of your network.
14
Page 15
ENGLISH
Unsecured Network:
If your wireless network is unsecured, the Wireless Utility will give you a notification popup:
Click “OK” to connect to the selected network, or click “Cancel” to connect to another
network.
Note:
If you are connecting to your own network and it is unsecured, we advise you to add
security to your network to prevent unauthorized access to your network.
See the documentation of your Wireless Router/Access Point how to setup your
network security.
Secured Network:
If your wireless network is secured, the Wireless Utility will ask you for the encryption key or
pass phrase, depending on the configured security level of your wireless network:
Enter the encryption key or pass phrase in the “Network Key” field and confirm it in the
“Confirm Field”. Click “Connect” to connect to the selected wireless network.
When you are now connected to the wireless network, the Wireless Utility will indicate the
signal strength in your system tray:
15
Page 16
ENGLISH
5. Wireless Protected Setup – WPS
The Conceptronic 802.11N Clients support WPS (Wi-Fi Protected Setup). WPS is a standard to
easily secure your wireless network. With WPS you can protect your wireless network with
just a few easy steps without knowledge of different encryption options.
Note:
To use WPS with your 802.11N Client, you need to have a Router/Access Point which
supports WPS.
Note:
The WPS Feature is not (yet) supported by Windows Vista driver of your Conceptronic
802.11N Client.
A. Double-click on the Wireless Utility icon in your system tray.
The Wireless Utility will be shown on your desktop.
B. Click the “New” button in the Wireless Utility.
16
Page 17

ENGLISH
Note:
If you are using Windows Vista, you will not see the “Configuration Mode” screen and
you will be forwarded to the “Manual Configuration”.
C. Select the option “Wi-Fi Protected Setup”.
D. You can choose between the “Push Button” and the “Pin Code” connection. If your
Router/Access Point supports Push-Button, select the “Push Button” connection.
Otherwise, choose the “Pin Code” connection.
17
Page 18
ENGLISH
5.1 WPS – Push Button
A. Push the WPS Button on your Router or Access Point and click the “Wi-Fi Protected
Setup” logo in the screen.
The Wireless Utility will search for WPS enabled devices in the area and tries to
connect. During the connection, the router/accesspoint will also be secured if the
Router/Access Point is not yet secured.
When the WPS connection is established, you will see the following image:
B. Click “Close” to close the WPS Wizard.
18
Page 19
ENGLISH
5.2 WPS – Pin Code Connection
When your Router or Access Point does not have a push button, you can also connect with
WPS with a Pin Code.
By default, the WPS Wizard will generate a unique Pin Code which can be used for your
connection.
A. Use this Pin Code in the configuration of your router/accesspoint to establish a
connection.
B. When your router/accesspoint is set with the new Pin Code, click the “Wi-Fi Protected
Setup” logo in the screen.
The Wireless Utility will search for WPS enabled devices in the area and tries to
connect. During the connection, the Router/Access Point will also be secured if the
Router/Access Point is not yet secured.
When the WPS connection is established, you will see the following image:
19
Page 20
ENGLISH
C. Click “Close” to close the WPS Wizard.
When you are now connected to the wireless network, the Wireless Utility will indicate the
signal strength in your system tray:
Enjoy the use of the Conceptronic 802.11N Wireless Client !
Note:
The speed of your 300Mbps Wireless network can vary. This variable speed can be
caused by several factors, like:
- Distance between Client card and Router / Access Point.
- Other networks in the neighborhood disrupting your signal.
- Safety feature of your Router / Access Point to prevent disruption on other active
networks.
- Other active 2,4Ghz devices in your neighbourhood, like Video Senders, Remote
Controls, Bluetooth devices, etc.
20
Page 21

ESPAÑOL
C300Ri / C300RC / C300RU de Conceptronic
Guía de instalación rápida
Felicidades por la compra de su
Esta Guía de Instalación Rápida le orientará paso a paso sobre cómo instalar el cliente de red
inalámbrica 802.11N de Conceptronic en su ordenador.
En caso de surgir cualquier problema, visite nuestra página web de asistencia técnica (haga
clic en el apartado “Soporte” de www.conceptronic.net
Si tiene otras preguntas sobre nuestro producto que no encuentra en nuestro sitio web,
póngase en contacto con nosotros por correo electrónico: apoyo@conceptronic.net
Para más información sobre los productos de Conceptronic, visite el sitio web de
Conceptronic: www.conceptronic.net
La instalación de software tal como se describe a continuación puede ser algo diferente a la
instalación en su ordenador. Esto depende de la versión de Windows que utilice.
1. Contenido del paquete
cliente de red inalámbrica 802.11N de Conceptronic.
)
El paquete del cliente 802.11N de Conceptronic incluye los siguientes componentes:
(En función del cliente 11N adquirido)
C300Ri de Conceptronic
O
C300RC de Conceptronic
O
C300RU de Conceptronic
* Tarjeta PCI 802.11N de Conceptronic
* 3 antenas
* CD-ROM con los drivers
* Guía de instalación rápida multilingüe
* Tarjeta PC 802.11N de Conceptronic
* CD-ROM con los drivers
* Guía de instalación rápida multilingüe
* Adaptador USB 802.11N de Conceptronic
* Cable de extensión USB
* CD-ROM con los drivers
* Guía de instalación rápida multilingüe
21
Page 22

ESPAÑOL
2. Instalación del software y los drivers
Antes de introducir la tarjeta o de conectar el adaptador USB a su ordenador, debe
Nota:
instalar los drivers y el software.
A. Introduzca el CD-ROM en la unidad de CD-ROM. El menú Autorun deberá aparecer
automáticamente. Si el menú Autorun no aparece, vaya a “Mi PC” y haga doble clic
sobre la unidad de CD-ROM para iniciar el menú Autorun.
B. Seleccione la opción “Install Drivers & Software” (Instalar drivers y software) desde el
menú Autorun.
Aparecerá el asistente de configuración.
C. Haga clic en “Siguiente” para continuar.
D. Cambie la carpeta de destino para el software con el botón “Examinar”, o mantenga la
ubicación predefinida. Haga clic en “Siguiente” para continuar.
E. Cambie la carpeta del menú Inicio, o mantenga la carpeta predefinida. Haga clic en
“Siguiente” para continuar.
El asistente de configuración instalará los controladores y el software en su ordenador.
Espere a que el asistente de configuración finalice la instalación.
F. Cuando la instalación haya finalizado, haga clic en “Sí, quiero reiniciar mi ordenador
ahora” y haga clic en “Finalizar”.
Nota:
Si ha adquirido el C300Ri (tarjeta PCI 802.11N), seleccione “No, reiniciaré mi
ordenador más tarde” y haga clic en “Finalizar”.
Vaya al capítulo 3 para la instalación del hardware de su cliente de red inalámbrica 802.11N.
22
Page 23
ESPAÑOL
3. Instalación de hardware
Cuando el software de su cliente 802.11N esté instalado, prosiga con la instalación del
hardware.
C300Ri de Conceptronic - Tarjeta PCI
A. Apague su ordenador y desconecte el ordenador de la toma de corriente.
B. Abra la caja de su ordenador quitando los tornillos de la parte trasera y quite la
carcasa.
C. Busque una ranura PCI libre y quite la placa protectora de la caja de su ordenador.
D. Introduzca el C300Ri con cuidado en una ranura PCI libre y fíjelo con un tornillo a la
caja de su ordenador.
E. Cierre la caja de su ordenador y acople las tres antenas al C300Ri.
Sitúe las antenas como se muestra en la imagen:
F. Encienda el ordenador.
Windows detectará el nuevo hardware e instalará los drivers automáticamente.
C300RC de Conceptronic - Tarjeta PC
A. Después de que su ordenador se haya reiniciado, introduzca el C300RC en una ranura de
tarjeta PC libre de su ordenador portátil.
Windows detectará el nuevo hardware e instalará los controladores automáticamente.
C300RU de Conceptronic - Adaptador USB
A. Después de que su ordenador se haya reiniciado, inserte el C300RU en una ranura de
USB libre de su ordenador.
Windows detectará el nuevo hardware e instalará los drivers automáticamente.
Nota:
Puede utilizar el cable de extensión de USB para mover el adaptador USB y recibir
mejor la señal.
23
Page 24
ESPAÑOL
4. Conexión a una red inalámbrica
Cuando el hardware esté instalado en su ordenador, el cliente de red inalámbrica ya se
puede utilizar.
Verá la aplicación inalámbrica activa en la bandeja de sistema:
A. Haga doble clic en el icono de la bandeja de sistema de la aplicación de Conceptronic.
La aplicación inalámbrica de Conceptronic se mostrará como se indica a continuación:
La aplicación inalámbrica de Conceptronic mostrará todas las redes inalámbricas en el área
de su ordenador. Si su red inalámbrica no se muestra, haga clic en “Refresh” (Actualizar)
para volver a buscar las redes.
B. Haga clic en la red a la que quiera conectarse de la lista de redes. Haga clic en
“Conectar”.
La aplicación inalámbrica le mostrará una ventana de conexión que puede diferir en función
de la configuración de seguridad de su red.
24
Page 25
ESPAÑOL
Red desprotegida:
Si su red inalámbrica está desprotegida, la aplicación inalámbrica abrirá una ventana de
notificación:
Haga clic en “Aceptar” para conectarse a la red seleccionada, o haga clic en “Cancelar”
para conectarse a otra red.
Nota:
Si se está conectando a su propia red y ésta no está protegida, le aconsejamos que
aumente la seguridad de su red para evitar que terceros puedan acceder a ella sin
autorización.
Vea la documentación de su router inalámbrico / punto de acceso para informarse
sobre cómo configurar la seguridad de su red.
Red protegida:
Si su red inalámbrica está protegida, la aplicación inalámbrica le solicitará la clave de
cifrado o contraseña, en función del nivel de seguridad configurado de su red inalámbrica:
Introduzca la clave de cifrado o contraseña en el campo “Network Key” (Clave de red) y
confírmela en el “Confirm Field” (Campo de confirmación). Haga clic en “Conectar” para
conectarse a la red inalámbrica seleccionada.
Cuando ya esté conectado a la red inalámbrica, la aplicación inalámbrica le indicará la
potencia de la señal en la bandeja de sistema:
25
Page 26
ESPAÑOL
5. Wireless Protected Setup (WPS, configuración protegida
inalámbrica)
Los dispositivos clientes 802.11N de Conceptronic son compatibles con el WPS (configuración
protegida inalámbrica). WPS es un estándar para proteger fácilmente su red inalámbrica. Con
WPS podrá proteger su red inalámbrica son sólo unos pasos sencillos sin necesidad de tener
conocimiento de las diferentes opciones de cifrado.
Nota:
Para utilizar WPS con su cliente 802.11N, necesita un router / punto de acceso
compatible con WPS.
Nota:
La función WPS (todavía) no es compatible con el driver de Windows Vista de su
cliente 802.11N de Conceptronic.
A. Haga doble clic en el icono de la aplicación inalámbrica de la bandeja de sistema.
La aplicación inalámbrica se mostrará en su escritorio.
B. Haga clic en el botón “New” (Nuevo) de la aplicación inalámbrica.
26
Page 27
ESPAÑOL
Nota:
Si utiliza Windows Vista, no verá la pantalla “Configuration Mode” (Modo de
configuración) e irá directamente a “Manual Configuration” (Configuración manual).
C. Seleccione la opción “Wi-Fi Protected Setup” (Configuración protegida inalámbrica).
D. Puede seleccionar entre la conexión “Push Button” y “Pin Code”. Si su router / punto
de acceso es compatible con Push-Button, seleccione la conexión “Push Button”. Si no,
seleccione la conexión “Pin Code”.
27
Page 28

ESPAÑOL
5.1 WPS – Push Button
A. Pulse el botón WPS de su router o punto de acceso y haga clic en el logotipo “Wi-Fi
Protected Setup” de la pantalla.
La aplicación inalámbrica buscará dispositivos WPS activos en el área y tratará de
conectarse. Durante la conexión, el router o punto de acceso quedará protegido si
todavía no lo estaba.
Cuando la conexión WPS se haya establecido, verá la imagen siguiente:
B. Haga clic en “Cerrar” para cerrar el asistente de WPS.
28
Page 29

ESPAÑOL
5.2 WPS – Conexión Pin Code
Cuando su router o punto de acceso no tenga un Push Button, también se puede conectar con
WPS mediante un código pin.
Por defecto, el asistente de WPS generará un código pin único que puede utilizarse para la
conexión.
A. Utilice este código pin en la configuración de su router o punto de acceso para
B. Cuando su router / punto de acceso se haya fijado con el nuevo código pin, haga clic en
establecer una conexión.
el logotipo “Wi-Fi Protected Setup” de la pantalla.
La aplicación inalámbrica buscará dispositivos WPS activos en el área y tratará de
conectarse. Durante la conexión, el router o punto de acceso quedará protegido si
todavía no lo estaba.
Cuando la conexión WPS se haya establecido, verá la pantalla siguiente:
29
Page 30

ESPAÑOL
C. Haga clic en “Cerrar” para cerrar el asistente de WPS.
Cuando ya esté conectado a la red inalámbrica, la aplicación inalámbrica le indicará la
potencia de la señal en la bandeja de sistema:
¡Disfrute con el cliente 802.11N inalámbrico de Conceptronic!
La velocidad de su red inalámbrica de 300 Mbps puede variar. Esta variación en la
Nota:
velocidad puede deberse a varios factores, p. ej.:
- Distancia entre el cliente y el router o punto de acceso.
- Otras redes cercanas que alteren su señal.
- La función de seguridad de su router o punto de acceso para evitar interferencias
con otras redes activas.
- Otros dispositivos activos a 2,4 Ghz en las cercanías, como transmisores de vídeo,
mandos a distancia, dispositivos Bluetooth, etc.
30
Page 31

DEUTSCH
Conceptronic C300Ri / C300RC / C300RU
Schnellinstallationsanleitung
Wir gratulieren Ihnen zum Kauf Ihres
In beiliegender Schnellinstallationsanleitung wird Ihnen Schritt für Schritt gezeigt, wie der
Conceptronic 802.11N Wireless Network Client installiert werden muss.
Wenn Probleme auftreten sollten, besuchen Sie unsere Support-Seite (unter
www.conceptronic.net
Datenbank mit den häufig gestellten Fragen zur Verfügung.
Wenn Sie weitere Fragen zu Ihrem Produkt haben, die Sie auf unserer Webseite nicht
beantworten können, kontaktieren Sie uns per E-Mail: support@conceptronic.net
Detaillierte Informationen über Conceptronic Produkte finden Sie auf unserer Webseite:
www.conceptronic.net
Möglicherweise weicht die Softwareinstallation auf Ihrem Computer von der im Folgenden
beschriebenen etwas ab. Dies hängt vom Windows-Betriebssystem ab, das Sie verwenden.
1. Packungsinhalt
In der Verpackung des Conceptronic 802.11N Client ist Folgendes enthalten:
(Je nach erworbenem 11N Client-Modell)
Conceptronic C300Ri
oder
Conceptronic C300RC
oder
Conceptronic C300RU
Conceptronic 802.11N Wireless Network Client.
) und klicken Sie auf ‚Support’. Dort steht Ihnen unsere FAQ-
* Conceptronic 802.11N PCI-Karte
* 3x Antennen
* Produkt-CD-ROM
* Mehrsprachige Schnellinstallationsanleitung
* Conceptronic 802.11N PC-Karte
* Produkt-CD-ROM
* Mehrsprachige Schnellinstallationsanleitung
* Conceptronic 802.11N USB-Adapter
* USB-Verlängerungskabel
* Produkt-CD-ROM
* Mehrsprachige Schnellinstallationsanleitung
31
Page 32

DEUTSCH
2. Treiber- und Software-Installation
Hinweis:
A. Legen Sie die CD-ROM in Ihr CD-ROM-Laufwerk ein. Das Autorun-Menü sollte automatisch
Bevor Sie die Karte einführen oder den USB-Adapter an Ihren Computer
anschließen, müssen Sie die Treiber und die Software installieren!
starten. Wenn das Menü nicht erscheint, gehen Sie zu Ihrem „Arbeitsplatz“ und
doppelklicken Sie auf das CD-ROM-Laufwerk, um das Autorun-Menü zu starten.
B. Wählen Sie im Autorun-Menü die Option „Install Drivers & Software [Treiber und
Software installieren]“.
Es erscheint der Einrichtungsassistent.
C. Klicken Sie auf „Next [Weiter]“.
D. Wählen Sie über die Schaltfläche „Browse [Durchsuchen]“ einen Zielordner für die
Software oder speichern Sie diese im vorgegebenen Zielordner. Klicken Sie auf „Next
[Weiter]“.
E. Ändern Sie den Ordner für das Startmenü oder speichern Sie dieses im vorgegebenen
Ordner. Klicken Sie auf „Next [Weiter]“.
Damit installiert der Einrichtungsassistent die Treiber und die Software auf Ihrem
Computer. Warten Sie, bis der Einrichtungsassistent die Installation abgeschlossen hat.
F. Sobald die Installation abgeschlossen ist, wählen Sie „Yes, I want to restart my
computer now [Computer jetzt neu starten]” und klicken Sie auf Finish [Fertig
stellen].
32
Page 33

DEUTSCH
Hinweis:
Gehen Sie weiter zu Kapitel 3 für die Hardware-Installation Ihres 802.11N Wireless Network
Client.
Wenn Sie das Modell C300Ri (802.11N PC-Karte) erworben haben, wählen Sie „No, I
want to restart my computer later [Computer später neu starten]” und klicken Sie
auf „Finish [Fertigstellen]”.
33
Page 34

DEUTSCH
3. Installation der Hardware
Sobald die Software für Ihren 802.11N Client installiert wurde, können Sie mit der
Installation der Hardware beginnen.
Conceptronic C300Ri - PCI-Karte
A. Schalten Sie Ihren Computer aus und trennen Sie ihn von der Stromversorgung.
B. Öffnen Sie das Computergehäuse, indem Sie die Schrauben auf der Rückseite und das
Panel entfernen.
C. Entfernen Sie die Schutzabdeckung eines freien PCI-Steckplatzes.
D. Stecken Sie die C300Ri vorsichtig und ohne Gewalt in den PCI-Steckplatz ein und
befestigen Sie sie mit einer Schraube an Ihrem Computergehäuse.
E. Schließen Sie das Computergehäuse und montieren Sie die 3 Antennen des C300Ri.
Richten Sie die Antennen gemäß folgender Abbildung
aus:
F. Schalten Sie Ihren Computer ein.
Windows erkennt die neue Hardware und installiert automatisch die Treiber.
Conceptronic C300RC – PC-Karte
A. Nachdem Ihr Computer neu gestartet wurde, führen Sie die C300RC in einen freien PC-
Kartensteckplatz Ihres Notebooks ein.
Windows erkennt die neue Hardware und installiert automatisch die Treiber.
Conceptronic C300RU – USB-Adapter
A. Nachdem der Computer neu gestartet wurde, führen Sie den C300RU in einen freien
USB-Steckplatz Ihres Computers ein.
Windows erkennt die neue Hardware und installiert automatisch die Treiber.
Hinweis:
Sie können mithilfe des USB-Verlängerungskabels den USB-Adapter für einen
besseren Signalempfang umpositionieren.
34
Page 35

DEUTSCH
4. Anschluss an ein kabelloses Netzwerk
Sobald die Hardware auf dem Computer installiert ist, ist der Wireless Network Client
betriebsbereit.
Auf der Kontrollleiste wird ein aktives Wireless Utility angezeigt:
A. Doppelklicken Sie auf das Symbol des Conceptronic Utility in der Kontrollleiste.
Daraufhin erscheint die folgende Anzeige des Conceptronic Wireless Utility:
Das Conceptronic Wireless Utility zeigt alle drahtlosen Netzwerke in der Umgebung Ihres
Computers an. Wenn Ihr drahtloses Netzwerk nicht aufgeführt ist, können Sie durch Klicken
auf die Schaltfläche „Refresh [Aktualisieren]“ eine neue Suche nach Netzwerken starten.
B. Klicken Sie in der Liste der Netzwerke auf das Netzwerk, mit dem Sie sich verbinden
möchten. Klicken Sie auf „Connect [Verbinden]“
Es erscheint eine Meldung, die je nach konfigurierter Netzwerksicherheit unterschiedlich ist.
35
Page 36

DEUTSCH
Ungesichertes Netzwerk:
Wenn Ihr drahtloses Netzwerk nicht gesichert ist, zeigt das Wireless Utility eine
entsprechende Meldung an:
Klicken Sie auf „OK“, um die Verbindung zum gewünschten Netzwerk herzustellen oder
klicken Sie auf „Cancel [Abbrechen]“, wenn Sie sich mit einem anderen Netzwerk verbinden
möchten.
Hinweis:
Gesichertes Netzwerk:
Wenn Ihr drahtloses Netzwerk gesichert ist, werden Sie je nach konfiguriertem
Sicherheitslevel Ihres drahtlosen Netzwerks vom Wireless Utility zur Eingabe des
Verschlüsselungsschlüssels oder der Passphrase aufgefordert.
Geben Sie den Verschlüsselungsschlüssel oder die Passphrase im Feld „Network Key
[Netzwerkschlüssel]" ein und bestätigen Sie diesen/diese im Feld „Confirm Key [Schlüssel
bestätigen]". Klicken Sie auf „Connect [Verbinden]“, um sich mit dem ausgewählten
drahtlosen Netzwerk zu verbinden.
Wenn Sie sich mit Ihren eigenen Netzwerk verbinden und dieses nicht gesichert ist,
empfehlen wir Ihnen, Ihr Netzwerk zu sichern, um den unberechtigten Zugriff
darauf zu verhindern.
Lesen Sie bitte in der Dokumentation Ihres Wireless Routers/Access Points nach,
wie die Netzwerksicherheit eingerichtet werden muss.
36
Page 37

DEUTSCH
Sobald Sie mit dem drahtlosen Netzwerk verbunden sind, zeigt das Wireless Utility die
Signalstärke in der Kontrollleiste an:
5. Wireless Protected Setup – WPS
Die 802.11N Clients von Conceptronic unterstützen WPS (Wi-Fi Protected Setup = Wi-Figesicherte Einstellung). WPS ist ein Standard für die einfache Sicherung Ihres drahtlosen
Netzwerks. Mit WPS können Sie Ihr drahtloses Netzwerk mit nur wenigen einfachen Schritten
schützen, ohne die verschiedenen Verschlüsselungsoptionen kennen zu müssen.
Hinweis:
Hinweis:
A. Doppelklicken Sie auf das Wireless Utility-Symbol in der Kontrollleiste.
Um WPS mit Ihrem 802.11N Client verwenden zu können, müssen Sie einen
Router/Access Point haben, der WPS unterstützt.
Die WPS-Funktion wird vom Windows Vista-Treiber Ihres Conceptronic 802.11N
Clients (noch) nicht unterstützt.
Daraufhin öffnet sich das Wireless Utility auf Ihrem Desktop.
37
Page 38

DEUTSCH
B. Klicken Sie hier auf die Schaltfläche „New [Neu]“.
Hinweis:
C. Wählen Sie die Option „Wi-Fi Protected Setup [Wi-Fi geschützte Einstellung]”.
D. Sie haben die Wahl zwischen „Push Button Connection [Verbindung auf Knopfdruck]"
Wenn Sie Windows Vista haben, erscheint die „Configuration Mode
[Konfigurationsmodus]“-Anzeige nicht und Sie werden zur „Manual
Configuration [Manuelle Konfiguration]“ weitergeleitet.
und „Pin Code Connection [Verbindung mit PIN-Code]". Wenn Ihr Router/Access Point
‚Push Button’ unterstützt, wählen Sie die Option „Push Button Connection [Verbindung
auf Knopfdruck]“. Wenn nicht, wählen Sie die Option „Pin Code Connection
[Verbindung mit PIN-Code].
38
Page 39

DEUTSCH
5.1 WPS – Verbindung auf Knopfdruck
A. Drücken Sie den WPS-Knopf an Ihrem Router oder Access Point und klicken Sie auf das
Logo „Wi-Fi Protected Setup [Wi-fi geschützte Einstellung]“ auf dem Bildschirm.
Das Wireless Utility sucht nach WPS-fähigen Geräten in der Umgebung und versucht,
eine Verbindung herzustellen. Während die Verbindung hergestellt wird, ist der
Router/Access Point auch gesichert, wenn der Router/Access Point noch nicht gesichert
wurde.
Sobald die WPS-Verbindung hergestellt wurde, erscheint folgende Anzeige:
B. Klicken Sie auf „Close [Schließen]“, um den WPS-Einrichtungsassistenten zu schließen.
39
Page 40

DEUTSCH
5.2 WPS – Verbindung mit Pin-Code
Wenn Ihr Router oder Access Point keinen Knopf hat, können Sie sich auch mit einem PinCode mit WPS verbinden.
Standardmäßig erzeugt der WPS-Einrichtungsassistent einen einmaligen Pin-Code, der für
Ihre Verbindung verwendet werden kann.
A. Verwenden Sie diesen Pin-Code in der Konfiguration Ihre Routers/Access Points, um eine
Verbindung herzustellen.
B. Sobald Sie Ihren Router/Access Point mit dem neuen Pin-Code eingestellt haben, klicken
Sie auf das Logo „Wi-Fi Protected Setup [Wi-Fi-geschützte Einstellung] auf dem
Bildschirm.
Das Wireless Utility sucht nach WPS-fähigen Geräten in der Umgebung und versucht,
eine Verbindung herzustellen. Während die Verbindung hergestellt wird, ist der
Router/Access Point auch gesichert, wenn der Router/Access Point noch nicht gesichert
wurde.
Sobald die WPS-Verbindung hergestellt wurde, erscheint folgende Anzeige:
40
Page 41

DEUTSCH
C. Klicken Sie auf „Close [Schließen]“, um den WPS-Einrichtungsassistenten zu schließen.
Sobald Sie mit dem drahtlosen Netzwerk verbunden sind, zeigt das Wireless Utility die
Signalstärke in der Kontrollleiste an:
Viel Spaß mit Ihren Conceptronic 802.11N Wireless Client !
Hinweis:
Die Geschwindigkeit Ihres drahtlosen 300Mbps-Netzwerks kann variieren. Dies
kann verschiedene Ursachen haben. Zum Beispiel:
- Abstand zwischen der Client-Karte und dem Router / Access Point.
- Andere Netzwerke in der Umgebung stören Ihr Signal.
- Die Sicherheitsfunktion Ihres Routers / Access Points, die Störungen bei anderen
aktiven Netzwerken verhindert.
- Andere aktive 2,4Ghz-Geräte wie Video-Sender, Fernbedienungen, Bluetooth-
Geräte usw. in der Umgebung.
41
Page 42

FRANÇAIS
Conceptronic C300Ri / C300RC / C300RU
Guide d’installation rapide
Nous vous félicitons pour l’achat de ce dispositif pour poste
Le présent guide d’installation rapide vous explique étape par étape comment installer sur
votre ordinateur le dispositif pour poste client sur réseau sans fil 802.11N de Conceptronic.
En cas de problème, nous vous conseillons de consulter notre site web de support technique
(www.conceptronic.net
questions les plus fréquentes (FAQ).
Pour toute autre question au sujet de notre produit, ou si vous ne trouvez pas l’information
dont vous avez besoin sur notre site web, vous pouvez nous contacter par mail :
support@conceptronic.net
Pour de plus amples informations sur les produits Conceptronic, merci de visiter notre site
web : www.conceptronic.net
L’installation du logiciel décrite ci-dessous peut être légèrement différente à celle de votre
ordinateur. Tout dépend de la version de Windows que vous utilisez.
1. Contenu du paquet
Le paquet de ce dispositif pour poste client 802.11N de Conceptronic comprend les
éléments suivants (en fonction du modèle 11N acheté) :
Conceptronic C300Ri
ou
Conceptronic C300RC
ou
Conceptronic C300RU
client sur réseau sans fil 802.11N de Conceptronic
) et de cliquer sur « Support ». Vous y trouverez les réponses aux
* Carte PCI 802.11N de Conceptronic
* 3 antennes
* CD-ROM du produit
* Guide d’installation rapide multilingue
* Carte PC 802.11N de Conceptronic
* CD-ROM du produit
* Guide d’installation rapide multilingue
* Adaptateur USB 802.11N de Conceptronic
* Câble d’extension USB
* CD-ROM du produit
* Guide d’installation rapide multilingue
42
Page 43

FRANÇAIS
2. Installation des drivers et du logiciel
Remarque
A. Insérez le CD-ROM dans votre unité de CD-ROM. Le menu Autorun devrait apparaître
: Avant d’insérer la carte ou de connecter l’adaptateur USB à votre ordinateur,
vous devez installer les drivers et le logiciel !
automatiquement. Si ce n’est pas le cas, allez dans « Mon PC » et double-cliquez sur
l’unité de CD-ROM pour ouvrir le menu Autorun.
B. Choisissez l’option « Install Drivers & Software » (Installer drivers et logiciel) depuis
le menu Autorun.
L’assistant de configuration apparaîtra.
C. Cliquez sur « Next » (Suivant) pour continuer.
D. À l’aide de la touche « Parcourir », choisissez un autre dossier pour garder le software
ou conservez cet emplacement par défaut. Cliquez sur « Next » (Suivant) pour
continuer.
E. Choisissez un autre dossier pour le Menu de démarrage ou conservez cet emplacement
par défaut. Cliquez sur « Next » (Suivant) pour continuer.
L’assistant de configuration installera les drivers et le logiciel sur votre ordinateur.
Veuillez attendre que l’assistant ait terminé l’installation.
F. Lorsque l’installation sera terminée, cliquez sur « Yes, I Want to restart my computer
now » (Oui, je veux redémarrer mon ordinateur maintenant) et cliquez sur
« Finish ».
Remarque
: Si le dispositif est la carte C300Ri (carte PCI 802.11N), choisissez « No, I want to
restart my computer later » (Non, je veux redémarrer mon ordinateur plus
tard) et cliquez sur « Finish ».
43
Page 44

FRANÇAIS
Passez au Chapitre 3 pour l’installation du hardware Installation de votre dispositif pour
poste client sur réseau sans fil 802.11N.
3. Installation du hardware
Lorsque le logiciel de votre dispositif client 802.11N sera installé, vous pourrez alors installer
le hardware.
Carte PCI C300Ri de Conceptronic
A. Éteignez votre ordinateur et débranchez-le du courant.
B. Ouvrez la carcasse de votre ordinateur en retirant les vis de l’arrière et le panneau.
C. Choisissez un logement PCI disponible et retirez la plaque de protection de la structure
de votre ordinateur.
D. Insérez doucement la C300Ri dans le logement PCI disponible et fixez-la à l’aide d’une
vis à la structure de votre ordinateur.
E. Remonter la carcasse de votre ordinateur et montez les 3 antennes sur le C300Ri.
Orientez les antennes comme le montre l’image ci-dessous :
F. Allumez votre ordinateur.
Windows détectera le nouveau hardware et installera automatiquement les drivers.
Carte PC C300RC de Conceptronic
A. Lorsque votre ordinateur sera rallumé, insérez la carte C300RC dans un logement de
carte PC disponible de votre ordinateur portable.
Windows détectera le nouveau hardware et installera automatiquement les drivers.
Adaptateur USB C300RU de Conceptronic
A. Lorsque votre ordinateur sera rallumé, insérez la carte C300RU dans un logement USB
disponible de votre ordinateur.
Windows détectera le nouveau hardware et installera automatiquement les drivers.
Remarque
: vous pouvez utiliser le câble d’extension USB pour déplacer l’adaptateur USB et
obtenir ainsi un meilleur signal de réception.
44
Page 45

FRANÇAIS
4. Connexion à un réseau sans fil
Lorsque le hardware sera installé sur votre ordinateur, votre dispositif client pour réseau
sans fil sera prêt à l’emploi. Vous verrez apparaître le symbole activé de l’Application sans
fil (Wireless Utility) dans votre barre d’état :
A. Double-cliquez sur cette icône de la barre d’état.
L’Application sans fil de Conceptronic (Wireless Utility) fera apparaître l’écran suivant :
L’Application sans fil de Conceptronic (Wireless Utility) fera apparaître tous les réseaux sans
fil détectés par votre ordinateur. Si un réseau sans fil n’apparaît pas, vous pouvez cliquer sur
« Refresh » (Actualiser) pour scanner de nouveau les réseaux.
B. Cliquez sur le réseau auquel vous voulez vous connecter parmi la liste des réseaux
disponibles. Cliquer sur « Connect » (Connecter).
L’Application sans fil (Wireless Utility) vous fera apparaître un message qui peut être
différent selon le niveau de sécurité configuré de votre réseau.
45
Page 46

FRANÇAIS
Réseau non sécurisé:
Si vous réseau n’est pas sécurisé, l’Application sans fil (Wireless Utility) vous fera apparaître
l’écran suivant:
Cliquez sur « OK » pour vous connecter au réseau sélectionné ou sur « Cancel » (Annuler)
pour vous connecter à un autre réseau.
Remarque
Réseau sécurisé:
Si vous réseau est sécurisé, l’Application sans fil (Wireless Utility) vous demandera de saisir
votre code ou votre mot de passe, selon le niveau de sécurité défini, de votre réseau sans
fil :
Saisissez votre code ou votre mot de passe dans le champ « Network Key » (Code réseau) et
confirmez-le dans le champ « Confirm Field » (Champ de confirmation). Cliquez sur
« Connect » (Connecter) pour vous connecter au réseau sans fil sélectionné.
Lorsque vous serez connecté au réseau sans fil, l’Application sans fil (Wireless Utility) fera
apparaître le symbole de l’intensité du signal dans la barre d’état :
: si vous vous connectez à votre propre réseau et si ce dernier n’est pas sécurisé,
nous vous recommandons de le sécuriser pour éviter tout accès non autorisé à
votre réseau.
Consultez la documentation de votre router / point d’accès sans fil pour
configurer le niveau de sécurité de votre réseau.
46
Page 47

FRANÇAIS
5. WPS - Configuration sans fil protégée (Wireless Protected Setup)
Le dispositif pour poste client 802.11N de Conceptronic est compatible avec la norme WPS,
Wi-Fi Protected Setup (Configuration sans fil protégée). La WPS est une norme qui permet
de sécuriser facilement votre réseau sans fil. Grâce à la WPS, vous pouvez protéger votre
réseau sans fil à l’aide de simples opérations, sans avoir à utiliser de nombreuses
fonctionnalités de cryptage.
Remarque
Remarque
A. Double-cliquez sur l’icône de l’Application sans fil (Wireless Utility) se trouvant dans la
: pour utiliser la WPS avec votre dispositif client 802.11N, votre router / point
d’accès doit être compatible avec la norme WPS.
: les caractéristiques de la norme WPS ne sont pas (encore) compatibles avec le
driver de Windows Vista de votre dispositif pour poste client 802.11N. de
Conceptronic.
barre d’état.
L’Application sans fil (Wireless Utility) s’affichera à l’écran.
B. Cliquez sur la touche « New » (Nouveau) de l’Application sans fil (Wireless Utility).
47
Page 48

FRANÇAIS
Remarque
C. Sélectionnez l’option « Wi-Fi Protected Setup » (Configuration Wi-Fi protégée).
D. Vous avez le choix entre un mode de connexion « Push Button » (en appuyant sur une
: si vous utilisez Windows Vista, vous ne verrez à l’écran l’option « Configuration
Mode » (Mode de configuration) et le programme ira directement à « Manual
Configuration » (Configuration manuelle).
touche) et un mode de connexion « Pin Code » (en saisissant un code pin). Si votre
router / point d’accès est compatible avec le mode « Push Button », sélectionner le
mode « Push Button ». Sinon, choisissez le mode de connexion « Pin Code ».
48
Page 49

FRANÇAIS
5.1 WPS – Mode de connexion Push Button
A. Appuyez sur la touche WPS de votre router ou de votre point d’accès et cliquez sur le
logo « Wi-Fi Protected Setup » apparaissant à l’écran.
L’Application sans fil (Wireless Utility) recherchera les dispositifs disponibles
fonctionnant selon la norme WPS et essaiera de s’y connecter. Pendant la connexion, le
router / point d’accès sera également sécurisé s’il ne l’est pas encore.
Lorsque la connexion WPS sera établie, l’écran suivant apparaîtra :
B. Cliquez sur « Close » (Refermer) pour refermer l’assistant WPS.
49
Page 50

FRANÇAIS
5.2 WPS – Mode de connexion par Code Pin
Si votre router ou point d’accès ne dispose pas d’une touche « Push button », vous pouvez
également disposer d’une connexion WPS en saisissant un Code Pin.
Par défaut, l’assistant WPS aura créé un Code Pin unique que vous pourrez utiliser pour vous
connecter.
A. Utilisez ce Code Pin pour la configuration de votre router / point d’accès afin d’établir
la connexion.
B. Lorsque votre router / point d’accès est configuré avec le nouveau Code Pin, cliquez sur
le logo « Wi-Fi Protected Setup » apparaissant à l’écran.
L’Application sans fil (Wireless Utility) recherchera les dispositifs disponibles
fonctionnant selon la norme WPS et essaiera de s’y connecter. Pendant la connexion, le
router / point d’accès sera également sécurisé s’il ne l’est pas encore.
Lorsque la connexion WPS sera établie, l’écran suivant apparaîtra :
50
Page 51

FRANÇAIS
C. Cliquez sur « Close » (Refermer) pour refermer l’assistant WPS.
Lorsque vous serez connecté au réseau sans fil, l’Application sans fil (Wireless Utility) fera
apparaître le symbole de l’intensité du signal dans votre barre d’état :
Votre dispositif pour poste client sans fil 802.11N de
Conceptronic est maintenant prêt à fonctionner !
Remarque
: la vitesse de transmission de votre réseau sans fil de 300 Mbps peut varier. Cette
vitesse de transmission dépend de plusieurs facteurs qui sont, parmi d’autres :
- La distance entre la carte du poste client et le router / point d’accès.
- La présence d’autres réseaux à proximité pouvant interférer avec le signal.
- Les caractéristiques de sécurité de votre router / point d’accès visant à éviter
l’interférence avec d’autres réseaux activés.
- La présence d’autres dispositifs fonctionnant sur la fréquence de 2,4 Ghz comme
des émetteurs vidéo, des télécommandes, des dispositifs Bluetooth, etc.
51
Page 52

ITALIANO
Conceptronic C300Ri / C300RC / C300RU
Guida d’installazione rapida
Vi ringraziamo per aver acquistato
Questa guida d’installazione rapida spiega passo a passo come installare sul computer il
Client di rete wireless 802.11N di Conceptronic.
In caso di problemi, vi consigliamo di visitare il nostro sito di supporto (collegandovi su
www.conceptronic.net
FAQ (Risposte alle domande più frequenti).
In caso di domande di altro tipo riguardanti il prodotto, che non appaiono nel nostro sito
web, vi preghiamo di mettervi in contatto con noi attraverso l’indirizzo di posta elettronica:
support@conceptronic.net
Per ulteriori informazioni sui prodotti Conceptronic, potete visitare il sito web Conceptronic:
www.conceptronic.net
L’installazione del software così come viene descritta qui di seguito potrebbe essere
leggermente diversa da quella del computer utilizzato, poiché ciò dipenderà dalla versione di
Windows in uso.
1. Contenuto della confezione
La confezione contenente il Client 802.11N di Conceptronic è composta dai seguenti
elementi:
(a seconda dal Client 11N acquistato)
Conceptronic C300Ri
O
Conceptronic C300RC
O
Conceptronic C300RU
il Client di rete wireless Conceptronic 802.11N
e facendo fare clic su su “Support”), dove si trova il database delle
* Scheda PCI 802.11N di Conceptronic
* 3 antenne
* CD-ROM del prodotto
* Guida d’installazione rapida multilingue
* Scheda PC 802.11N di Conceptronic
* CD-ROM del prodotto
* Guida d’installazione rapida multilingue
* Adattatore USB 802.11N di Conceptronic
* Prolunga USB
* CD-ROM del prodotto
* Guida d’installazione rapida multilingue
52
Page 53

ITALIANO
2. Installazione dei driver e del software
Nota: prima di inserire la scheda o di collegare l’adattatore USB al computer, è necessario
installare i driver e il software!
A. Inserire il CD-ROM nell’apposita unità. Dovrebbe apparire direttamente il Menu di avvio
automatico. In caso contrario, aprire “Risorse del computer” e fare doppio fare clic su
sull’unità CD-ROM per aprire il Menu di avvio automatico.
B. Selezionare l’opzione “Install Drivers & Software” (Installa driver e software) dal Menu
di avvio automatico.
Apparirà il Programma di installazione assistita
C. Fare clic su “Next” (Avanti) per continuare.
D. Cambiare la cartella di destinazione del software utilizzando il pulsante “Sfoglia”, o
mantenere la destinazione di default. Fare clic su “Next” (Avanti) per continuare.
E. Cambiare la cartella del Menu di avvio, o mantenere la destinazione di default. Fare clic
su “Next” (Avanti) per continuare.
Il Programma di installazione assistita inizierà il processo di installazione dei driver e
del software sul computer. Attendere fino a quando il Programma di installazione
assistita avrà terminato.
F. Una volta finita l’installazione, fare clic su “Yes, I want to restart my computer now”
(Sì, riavvia il computer adesso) dopo di che fare clic su “Finish” (Fine).
Nota:
se avete acquistato un C300Ri (Scheda PCI 802.11N), selezionare “No, I want to
restart my computer later” (No, riavvia il computer più tardi) dopo di che fare clic
su “Finish”(Fine).
Passare al Capitolo 3 per l’installazione dell’hardware del Client di rete wireless 802.11N.
53
Page 54

ITALIANO
3. Installazione dell’hardware
Dopo aver installato il software del Client 802.11N, si può passare all’installazione
dell’hardware.
Conceptronic C300Ri – Scheda PCI
A. Spegnere il computer e scollegarlo dalla presa di corrente AC.
B. Aprire la struttura del computer togliendo le viti dalla parte posteriore ed estrarre il
pannello.
C. Localizzare uno slot PCI disponibile e togliere la placca di protezione dalla struttura del
computer.
D. Inserire delicatamente il C300Ri in uno slot PCI disponibile e fissarlo con una vite alla
struttura del computer.
E. Richiudere la struttura del computer e installare le tre antenne al C300Ri.
Allineare le tre antenne come da immagine qui in basso:
F. Accendere il computer.
Windows rileverà il nuovo hardware e ne installerà automaticamente i driver.
Conceptronic C300RC – Scheda PC
A. Dopo aver riavviato il computer, inserire il C300RC in uno slot per scheda PC disponibile
del Notebook.
Windows rileverà il nuovo hardware e ne installerà automaticamente i driver.
Conceptronic C300RU – Adattatore USB
A. Dopo aver riavviato il computer, inserire il C300RU in uno slot USB disponibile del
computer.
Windows rileverà il nuovo hardware e ne installerà automaticamente i driver.
Nota:
è possibile usare la prolunga USB per poter spostare l’adattatore USB in modo da
poter ottenere una migliore ricezione del segnale.
54
Page 55

ITALIANO
4. Connessione a una rete wireless
Una volta che il computer avrà installato l'hardware, il Client di rete wireless sarà pronto per
essere usato.
Apparirà un’Utilità Wireless nel vassoio di sistema:
A. Fare doppio clic sull’icona dell’Utilità Conceptronic posta nel vassoio di sistema.
L’Utilità Wireless di Conceptronic verrà mostrata come da immagine:
L’Utilità Wireless di Conceptronic mostrerà tutte le reti senza fili nell’area del computer. Se
la rete wireless usata non appare, si può fare clic su “Refresh” (Aggiorna) per realizzare di
nuovo la ricerca delle reti.
B. Fare clic sulla rete alla quale ci si desidera collegare fra quelle che appaiono
nell’elenco delle reti. Fare clic su “Connect” (Collega).
L’Utilità Wireless mostrerà una finestra di connessione che può essere diversa, a seconda del
tipo di configurazione di sicurezza della rete.
55
Page 56

ITALIANO
Rete priva di sicurezza:
Nel caso in cui la rete wireless non sia protetta mediante codifica, l’Utilità Wireless mostrerà
un messaggio di notifica:
Fare clic su “OK” per collegarsi alla rete selezionata, o fare clic su “Cancel” (Annulla) per
collegarsi a un’altra rete.
Nota:
se desiderate collegarvi alla vostra rete e questa non è protetta mediante codifica, è
consigliabile renderla sicura per evitarne un accesso non autorizzato.
Consultare la documentazione del Router/Access Point Wireless per sapere come
impostare i parametri di sicurezza della rete.
Rete protetta mediante codifica:
Nel caso in cui la rete wireless sia protetta mediante codifica, l’Utilità Wireless chiederà di
introdurre la chiave o la passphrase di codifica, a seconda del livello di sicurezza configurato
per la rete wireless:
Introdurre la chiave o la passphrase di codifica nel campo “Network Key” e confermarla nel
campo “Confirm Key”. Fare clic su “Connect” per collegarsi alla rete senza fili selezionata.
Una volta collegati alla rete wireless, l’Utilità Wireless indicherà la
potenza del segnale nel vassoio di sistema:
56
Page 57

ITALIANO
5. WPS (Wireless Protected Setup)
Il Client 802.11N di Conceptronic supporta la funzione WPS (Wi-Fi Protected Setup). Lo
standard WPS serve per proteggere facilmente la rete senza fili; basta seguire alcuni passi
senza avere grandi conoscenze delle diverse opzioni di codifica.
Nota:
per usare l’opzione WPS con il Client 802.11N, è necessario disporre di un
Router/Access Point che supporta lo standard WPS.
Nota:
la funzione WPS non è (ancora) supportata dal driver di Windows Vista del Client
802.11N di Conceptronic
A. Fare doppio clic sull’icona dell’Utilità Wireless posta nel vassoio di sistema.
Apparirà sul desktop l’Utilità Wireless.
B. Fare clic sul pulsante “New” (Nuovo) nell’Utilità Wireless.
57
Page 58

ITALIANO
Nota:
se si usa Windows Vista, non apparirà la videata relativa alla modalità di
configurazione (Configuration Mode) e al suo posto apparirà direttamente l’opzione
di configurazione manuale(Manual Configuration).
C. Selezionare l’opzione “Wi-Fi Protected Setup”.
D. È possibile scegliere fra la connessione mediante “Push Button” (Pulsante) o “Pin
Code” (Codice PIN). Se il Router/Access Point supporta la funzionalità di Push Button,
selezionare la connessione “Push Button”, altrimenti scegliere l’opzione “Pin Code”.
58
Page 59

ITALIANO
5.1 WPS – Connessione mediante Pulsante (Push Button)
A. Premere il pulsante WPS del Router o dell’Access Point dopo di che fare clic sul logo
“Wi-Fi Protected Setup” che appare sullo schermo.
L’Utilità Wireless cercherà i dispositivi WPS attivati nell’area e cercherà di collegarsi.
Durante la connessione, il Router/Access Point verrà protetto mediante codifica nel
caso in quest’ultimo non sia ancora protetto.
Dopo aver stabilito la connessione WPS, apparirà la seguente immagine:
B. Fare clic su “Close” (Chiudi) per chiudere il Programma di installazione assistita del
WPS.
59
Page 60

ITALIANO
5.2 WPS – Connessione mediante Codice PIN (Pin Code)
Nel caso in cui il Router o l’Access Point non disponga di un pulsante (Push button), è
comunque possibile collegarsi mediante WPS grazie a un codice PIN.
Per default, il Programma di installazione assistita del WPS genererà un codice PIN unico che
si può usare per la connessione.
A. Usare tale codice PIN nella configurazione del Router/Access Point per stabilire una
connessione.
B. Quando il Router/Access Point viene impostato con un nuovo codice PIN, fare clic sul
logo “Wi-Fi Protected Setup” che appare sullo schermo.
L’Utilità Wireless cercherà i dispositivi WPS attivati nell’area e cercherà di collegarsi.
Durante la connessione, il Router/Access Point verrà protetto mediante codifica nel
caso in quest’ultimo non sia ancora protetto.
Dopo aver stabilito la connessione WPS, apparirà la seguente immagine:
60
Page 61

ITALIANO
C. Fare clic su “Close” (Chiudi) per chiudere il Programma di installazione assistita del
WPS.
Una volta collegati alla rete wireless, l’Utilità Wireless indicherà la potenza del segnale nel
vassoio di sistema:
Ora potete usare il Client Wireless 802.11N di Conceptronic!
Nota:
la velocità della rete senza fili a 300 Mbps può variare, a causa di diversi fattori,
come ad esempio:
- Distanza fra la scheda del client e il Router / Access Point.
- Altre reti nelle vicinanze che interferisco con il segnale
- Caratteristica di sicurezza del Router / Access Point per evitare interruzioni su
altre reti attive.
- Altri dispositivi attivi da 2,4 Ghz nelle vicinanze, come Trasmettitori video,
Telecomandi, Dispositivi Bluetooth, ecc.
61
Page 62

PORTUGUÊS
Conceptronic C300Ri / C300RC / C300RU
Manual de Instalação Rápida
Parabéns pela compra do
O Manual de Instalação Rápida incluído fornece-lhe uma explicação passo a passo sobre como
instalar o Cliente de Rede Sem Fios 802.11N da Conceptronic no seu computador.
Quando tiver algum problema, aconselhamo-lo a consultar a nossa página de suporte (vá a
www.conceptronic.net
Perguntas Mais Frequentes.
Quando tiver outras questões sobre o seu produto e não encontrar resposta para elas na
nossa página, contacte-nos por e-mail: support@conceptronic.net
Para mais informações sobre os produtos da Conceptronic, visite a página web da
Conceptronic em: www.conceptronic.net
A instalação do software tal como se descreve a seguir pode ser ligeiramente diferente da
instalação no seu computador. Depende da versão do Windows que estiver a usar.
1. Conteúdo da Embalagem
Cliente de Rede Sem Fios 802.11N da Conceptronic.
) e clicar em ‘Support’ (Suporte). Aí vai encontrar a Base de Dados das
Existem os seguintes elementos na embalagem do Cliente 802.11N da Conceptronic:
(Dependendo do Cliente 11N adquirido)
Conceptronic C300Ri
Ou
Conceptronic C300RC
Ou
Conceptronic C300RU
* Placa PCI 802.11N da Conceptronic
* 3 Antenas
* CD-ROM do produto
* Guia de Instalação Rápida Multilingue
* Placa PC 802.11N da Conceptronic
* CD-ROM do produto
* Guia de Instalação Rápida Multilingue
* Adaptador USB 802.11N da Conceptronic
* Cabo de extensão USB
* CD-ROM do produto
* Guia de Instalação Rápida Multilingue
62
Page 63

PORTUGUÊS
2. Instalação dos controladores e do software
Antes de inserir a placa ou de ligar o Adaptador USB ao seu computador, tem de
Nota:
instalar os controladores e o software!
A. Coloque o CD-ROM na sua unidade de CD-ROM. O Menu de Execução Automática deverá
aparecer automaticamente. Se o menu de Execução automática não aparecer, vá a “My
Computer” (O Meu Computador) e faça um duplo clique na unidade de CD-ROM para
iniciar o menu de Execução Automática.
B. Seleccione a opção “Install Drivers & Software” (Instalar os Controladores e o
Software) no menu de Execução automática.
O Assistente de Configuração aparece.
C. Clique em “Next” (Seguinte) para continuar.
D. Altere a pasta de destino para o software com o botão “Browse” (Procurar), ou
mantenha a localização predefinida. Clique em “Next” (Seguinte) para continuar.
E. Altere o destino do Menu Iniciar ou mantenha a pasta predefinida. Clique em “Next”
(Seguinte) para continuar.
O Assistente de Configuração vai instalar agora os controladores e o software no seu
computador. Aguarde que o Assistente de Configuração termine a instalação.
F. Quando a instalação terminar, clique em “Yes, I Want to restart my computer now”
(Sim, quero reiniciar o meu computador agora) e clique em “Finish” (Terminar).
Nota:
Se tiver adquirido o C300Ri (Placa PCI 802.11N), seleccione “No, I want to restart my
computer later” (Não, prefiro reiniciar o meu computador mais tarde) e clique em
“Finish” (Terminar).
Passe para o Capítulo 3 para fazer a Instalação do Hardware do seu Cliente de Rede Sem Fios
802.11N.
63
Page 64

PORTUGUÊS
3. Instalação do hardware
Quando o software do seu Cliente 802.11N estiver instalado, pode passar à instalação do
hardware.
Conceptronic C300Ri – Placa PCI
A. Desligue o seu computador e desligue-o também da tomada de CA.
B. Abra a caixa do seu computador retirando os parafusos da parte de trás e retirando o
painel.
C. Procure uma ranhura PCI disponível e retire a chapa protectora da caixa do
computador.
D. Insira o C300Ri com cuidado na ranhura PCI disponível e prenda-o com um parafuso à
caixa do seu computador.
E. Feche a caixa do seu computador e monte as 3 antenas no C300Ri.
Alinhe as antenas tal como se mostra na imagem seguinte:
F. Ligue o seu computador.
O Windows vai detectar o novo hardware e instala os controladores automaticamente.
Conceptronic C300RC – Placa PC
A. Depois de reiniciar o seu computador, insira o C300RC numa ranhura de Placa PC
disponível do seu computador portátil.
O Windows vai detectar o novo hardware e instala os controladores automaticamente.
Conceptronic C300RU – Adaptador USB
A. Depois de reiniciar o seu computador, insira o C300RU numa ranhura USB disponível do
seu computador.
O Windows vai detectar o novo hardware e instala os controladores automaticamente.
Nota:
Pode usar o cabo de extensão USB para movimentar o Adaptador USB de modo a obter
uma melhor recepção de sinal.
64
Page 65

PORTUGUÊS
4. Ligação a uma rede sem fios
Quando o hardware estiver instalado no seu computador, o Cliente de Rede Sem Fios está
pronto a usar.
Vai ver um ícone de Utilitário Sem Fios na bandeja de sistema:
A. Faça um duplo clique no ícone do Utilitário Conceptronic da bandeja de sistema.
O Utilitário Sem Fios Conceptronic aparece da seguinte forma:
O Utilitário Sem Fios Conceptronic mostra todas as redes sem fios na área do seu
computador. Se a sua rede sem fios não aparecer, pode clicar em “Refresh” (Actualizar)
para voltar a procurar redes.
B. Clique na rede a que se quer ligar da lista de redes. Faça clique em “Connect” (Ligar).
O Utilitário Sem Fios apresenta-lhe uma janela de ligação que pode ser diferente
dependendo da segurança configurada na sua rede.
65
Page 66

PORTUGUÊS
Rede desprotegida:
Se a sua rede sem fios estiver desprotegida, o Utilitário Sem Fios mostra-lhe uma janela de
notificação:
Clique em “OK” para ligar à rede seleccionada ou clique em “Cancel” (Cancelar) para ligar a
outra rede.
Nota:
Se estiver a ligar à sua própria rede e esta estiver desprotegida, aconselhamo-lo a
proteger a sua rede para impedir acesso não autorizado à mesma.
Consulte a documentação do seu Router Sem Fios / Ponto de Acesso para configurar a
segurança da sua rede.
Rede protegida:
Se a sua rede sem fios estiver protegida, o Utilitário Sem Fios vai pedir-lhe a chave de
encriptação ou frase de segurança, dependendo do nível de segurança configurado para a sua
rede sem fios:
Introduza a chave de encriptação ou frase de segurança no campo “Network Key” (Chave de
rede) e confirme-a no campo “Confirm” (Confirmar). Clique em “Connect” (Ligar) para ligar
à rede sem fios seleccionada.
Quando já estiver ligado à rede sem fios, o Utilitário Sem Fios indicalhe a força de sinal na bandeja de sistema:
66
Page 67

PORTUGUÊS
5. Wireless Protected Setup – WPS
Os Clientes 802.11N da Conceptronic suportam a especificação WPS. O WPS é uma norma
para proteger facilmente a sua rede sem fios. Com o WPS pode proteger a sua rede sem fios
seguindo apenas alguns passos sem ter conhecimentos de várias opções de encriptação.
Nota:
Para usar o WPS com o seu Cliente 802.11N tem de ter um Router / Ponto de Acesso
que suporte a especificação WPS.
Nota:
A função de WPS (ainda) não é suportada pelo controlador do Windows Vista do seu
Cliente 802.11N da Conceptronic.
A. Faça um duplo clique no ícone do Utilitário Sem Fios na sua bandeja de sistema.
O Utilitário Sem Fios aparece no seu ambiente de trabalho.
B. Clique no botão “New” (Novo) do Utilitário Sem Fios.
67
Page 68

PORTUGUÊS
Nota:
Se estiver a usar o Windows Vista, não vai ver o ecrã de “Configuration Mode” (Modo
de configuração) e é reencaminhado para o ecrã de “Manual Configuration”
(Configuração Manual).
C. Seleccione a opção “Wi-Fi Protected Setup”.
D. Pode escolher entre a ligação de “Push Button” (Botão) e “Pin Code” (Código Pin). Se o
seu Router / Ponto de Acesso suportar o acesso por Botão, seleccione a ligação “Push
Button”. Caso contrário, seleccione a ligação “Pin Code”.
68
Page 69

PORTUGUÊS
5.1 WPS – Botão
A. Carregue no botão WPS do seu Router ou Ponto de Acesso e clique no logótipo “Wi-Fi
Protected Setup” no ecrã.
O Utilitário Sem Fios vai procurar dispositivos com WPS dentro da área e tentar
estabelecer a ligação. Durante a ligação, o router / ponto de acesso também vai ser
protegido no caso de ainda não ter sido.
Quando estabelecer a ligação WPS, vai poder ver a seguinte imagem:
B. Clique em “Close” (Terminar) para fechar o Assistente WPS.
69
Page 70

PORTUGUÊS
5.2 WPS – Ligação por Código Pin
Quando o seu Router ou Ponto de Acesso não tiver um botão, também pode ligar o WPS com
um Código Pin.
Por defeito, o Assistente WPS vai gerar um Código Pin único que pode ser usado para a sua
ligação.
A. Use este Código Pin na configuração do seu router / ponto de acesso para estabelecer
B. Quando o seu router/ponto de acesso estiver configurado com um Código Pin novo,
uma ligação.
clique no logótipo “Wi-Fi Protected Setup” no ecrã.
O Utilitário Sem Fios vai procurar dispositivos com WPS dentro da área e tentar
estabelecer a ligação. Durante a ligação, o Router / Ponto de Acesso também é
protegido no caso de ainda não ter sido.
Quando estabelecer a ligação WPS, vai poder ver a seguinte imagem:
70
Page 71

PORTUGUÊS
C. Clique em “Close” (Terminar) para fechar o Assistente WPS.
Quando já estiver ligado à rede sem fios, o Utilitário Sem Fios indica-lhe a força de sinal na
bandeja de sistema:
Divirta-se com o Cliente Sem Fios 802.11N da Conceptronic!
A velocidade da sua rede sem fios de 300 Mbps pode variar. Esta variação na
Nota:
velocidade pode dever-se a vários factores, como por exemplo:
- Distância entre a placa de Cliente e o Router / Ponto de Acesso.
- Outras redes nas proximidades que perturbem o seu sinal.
- Função de segurança do seu Router / Ponto de Acesso para prevenir perturbações
noutras redes activas.
- Outros dispositivos de 2,4 Ghz activos nas proximidades, como Emissores de Vídeo,
Comandos, dispositivos Bluetooth, etc.
71
Page 72

MAGYAR
Conceptronic C300Ri / C300RC / C300RU
Gyorstelepítési útmutató
Köszönjük, hogy a Conceptronic 802.11N
A mellékelt gyorstelepítési útmutató lépésről-lépésre elmagyarázza, miként kell a
Conceptronic 802.11N vezeték nélküli hálózati ügyfelét számítógépre telepítenie.
Ha probléma jelentkezne, azt tanácsoljuk, hogy keresse fel terméktámogatást nyújtó
webhelyünket (látogasson el a www.conceptronic.net
„Support”-ra. Itt található ugyanis a gyakran ismétlődő kérdések (GYIK) adatbázisa.
Ha a termékkel kapcsolatban további kérdése volna és arra választ webhelyünkön nem talál,
e-mailben is fordulhat hozzánk: support@conceptronic.net
A Conceptronic termékekkel kapcsolatos további tájékozódás végett látogasson el a
Conceptronic webhelyére: www.conceptronic.net
A szoftvernek az alábbiakban ismertetett telepítése kicsit eltérhet az adott számítógépen
történő telepítéstől. Mindez függ az éppen használt Windows-verziótól.
1. A csomag tartalma
A Conceptronic 802.11N típusú ügyfelét tartalmazó csomagban az alábbiak találhatók:
(A vásárolt 11N típusú ügyféltől függően)
Conceptronic C300Ri
vagy
Conceptronic C300RC
vagy
Conceptronic C300RU
vezeték nélküli hálózati ügyfelét választotta.
honlapra), majd ott kattintson a
* Conceptronic 802.11N PCI-kártya
* 3x antenna
* Termékismertető CD-ROM
* Többnyelvű gyorstelepítési útmutató
* Conceptronic 802.11N PC-kártya
* Termékismertető CD-ROM
* Többnyelvű gyorstelepítési útmutató
* Conceptronic 802.11N USB-adapter
* USB hosszabbító kábel
* Termékismertető CD-ROM
* Többnyelvű gyorstelepítési útmutató
72
Page 73

MAGYAR
2. Az illesztőprogramok és a szoftver telepítése
Megjegyzés:
A. Helyezze be a CD-ROM-ot a CD-ROM-meghajtóba. Az Autorunnak automatikusan meg
Mielőtt a kártyát behelyezné vagy az USB-adaptert a számítógéphez
csatlakoztatná, telepítenie kell az illesztőprogramokat és a szoftvert!
kell jelennie. Ha az Autorun menü nem jelenik meg, navigáljon a „My Computer”-hez,
és kattintson kétszer a CD-ROM-meghajtóra az Autorun menü elindításához.
B. Jelölje ki az „Install Drivers & Software” választási lehetőséget az Autorun menün.
A telepítővarázsló jelenik meg.
C. A folytatáshoz kattintson a „Next”-re.
D. Változtassa meg a szoftverhez tartozó célmappát a „Browse” gomb segítségével vagy
tartsa meg az alapértelmezett helyet. A folytatáshoz kattintson a „Next”-re.
E. Változtassa meg a Start Menu mappát, vagy tartsa meg az alapértelmezettet. A
folytatáshoz kattintson a „Next”-re.
Ezután a telepítővarázsló a számítógépre telepíti az illesztőprogramokat és a szoftvert.
Várjon, amíg a telepítővarázsló a telepítést be nem fejezte.
F. Amikor a telepítés befejeződött, kattintson a „Yes, I Want to restart my computer
now”-ra, majd kattintson a „Finish”-re.
Megjegyzés:
A 802.11N vezeték nélküli hálózati ügyfélhez tartozó hardver telepítéséhez lapozzon a 3.
fejezethez.
Ha C300Ri-t (802.11N PCI-kártya) vásárolt, jelölje ki a „No, I want to restart
my computer later”-t, majd kattintson a „Finish”-re.
73
Page 74

MAGYAR
3. Hardver telepítése
Ha a 802.11N ügyfélhez tartozó szoftvert már telepítette, akkor a hardver telepítésével
folytathatja.
Conceptronic C300Ri – PCI-kártya
A. Kapcsolja ki a számítógépet, majd húzza ki a számítógép dugóját a váltakozó áramú
falicsatlakozóból.
B. A hátlapon lévő csavarok eltávolításával nyissa fel a számítógép házát, majd vegye le a
panelt.
C. Keressen szabad PCI-bővítőhelyet, majd távolítsa el a védőlemezt a számítógép házáról.
D. Óvatosan helyezze be a C300Ri-t valamelyik PCI-bővítőhelyre, majd rögzítse csavar
segítségével a számítógép házára.
E. Zárja vissza a számítógép házát, majd szerelje fel a 3 antennát a C300Ri-re.
Az alábbi képen látható módon rendezze el az
antennákat:
F. Kapcsolja be a számítógépet.
A Windows az új hardvert automatikusan érzékeli, majd telepíti az illesztőprogramokat.
Conceptronic C300RC – PC-kártya
A. A számítógép újraindítása után helyezze be a C300RC-t notebookjának valamelyik
szabad PC-kártya-bővítőhelyére.
A Windows az új hardvert automatikusan érzékeli, majd telepíti az illesztőprogramokat.
Conceptronic C300RU – USB-adapter
A. A számítógép újraindítása után helyezze be a C300RU-t a számítógép valamelyik szabad
USB-bővítőhelyére.
A Windows az új hardvert automatikusan érzékeli, majd telepíti az illesztőprogramokat.
Megjegyzés:
adapter mozgatására.
A jobb jelvétel érdekében használhatja az USB hosszabbító kábelét az USB-
74
Page 75

MAGYAR
4. Csatlakoztatás vezeték nélküli hálózathoz
Ha a számítógép a hardvert már telepítette, a vezeték nélküli hálózati ügyfél használatkész.
Aktív, Wireless Utility (segédprogram a vezeték nélküli eszközhöz) jelenik meg a tálcán:
A. Kattintson kétszer a Conceptronic segédprogram tálcaikonjára.
A Conceptronic Wireless Utility segédprogramja a következőképpen néz ki:
A Conceptronic Wireless Utility segédprogramja megjelenít minden, vezeték nélküli
hálózatot a számítógép körzetében. Ha vezeték nélküli hálózat nem látható, a hálózatok
újbóli letapogatásához kattintson a 2Refresh”-re.
B. Kattintson a hálózatokat tartalmazó listán arra a hálózatra, amelyet csatlakoztatni
kíván. Majd kattintson a „Connect”-re.
A Wireless Utility segédprogram a csatlakoztatással kapcsolatos, előugró menüvel folytatja a
kérdezést, amely — a hálózat konfigurált biztonságától függően — máshogyan is kinézhet.
75
Page 76

MAGYAR
Nem biztonságos hálózat:
Ha vezeték nélküli hálózata nem biztonságos, a Wireless Utility segédprogram előugró
értesítést küld:
A kijelölt hálózathoz történő csatlakoztatás érdekében kattintson az „OK”
hálózathoz történő csatlakoztatás érdekében pedig kattintson a „Cancel”-re.
Megjegyzés:
Biztonságos hálózat:
Ha vezeték nélküli hálózata biztonságos, a Wireless Utility segédprogram — vezeték nélküli
hálózatának a konfigurált biztonsági szintjétől függően — kéri a titkosítási kulcsot vagy a
jelmondatot:
Írja be a titkosítási kulcsot vagy a jelmondatot a „Network Key” mezőre, majd erősítse meg
azt a „Confirm Field” mezőn. A kijelölt vezeték nélküli hálózathoz történő csatlakoztatás
érdekében kattintson a „Connect”-re.
Ha eszköze már csatlakoztatva van a vezeték nélküli hálózathoz, a
Wireless Utility segédprogram a tálcán jelzi a jelerősséget:
Ha éppen saját hálózatához csatlakozik, az pedig nem biztonságos, azt
tanácsoljuk, hogy — a hálózathoz való jogosulatlan hozzáférés megelőzésére
— hálózata számára biztonsági jellemzőről is gondoskodjon.
A hálózat biztonságának a beállításával kapcsolatban lásd a vezeték nélküli
útválasztó/elérési pont dokumentációját.
76
-ra, másik
Page 77

MAGYAR
5. Vezeték nélküli, védett konfiguráció— WPS
A Conceptronic 802.11N ügyfelei támogatják a WPS-t (Wi-Fi-vel védett konfiguráció). A WPS
egyfajta szabvány, amely a vezeték nélküli hálózat biztonságának könnyű kialakítására
szolgál. A WPS segítségével — különböző titkosítási opciók ismerete nélkül — csupán pár
könnyű lépés megtétele révén védeni tudja vezeték nélküli hálózatát.
Megjegyzés:
Megjegyzés:
A. Kattintson kétszer a Wireless Utility segédprogramjának ikonjára a tálcán.
Ahhoz, hogy a WPS-t a 802.11N ügyféllel együtt használhassa, olyan
útválasztót/elérési pontot kell alkalmaznia, amely a WPS-t támogatja.
A WPS-jellemzőt a Conceptronic 802.11N ügyfélnek a Windows Vista
illesztőprogramja (még) nem támogatja.
A Wireless Utility segédprogram megjelenik az asztalon.
B. A Wireless Utility segédprogramnál kattintson a „New” gombra.
77
Page 78

MAGYAR
Megjegyzés:
C. Jelölje ki a „Wi-Fi Protected Setup” választási lehetőséget.
D. Választhat a „Push Button” és a „Pin Code” csatlakoztatási lehetőség közül. Ha
Ha éppen Windows Vistát használ, nem fogja látni a „Configuration Mode”
képernyőt, hanem egyenesen átirányítódik a „Manual Configuration”-höz.
útválasztója/elérési pontja a nyomógombot támogatja, jelölje ki a „Push Button”
(nyomógombos) csatlakozási lehetőséget. Egyébként válassza a „Pin Code” (PIN-kódos)
csatlakoztatási lehetőséget.
78
Page 79

MAGYAR
5.1 WPS-nyomógomb
A. Nyomja meg a WPS-gombot az útválasztón vagy az elérési ponton, majd kattintson a
„Wi-Fi Protected Setup” logóra a képernyőn.
A Wireless Utility segédprogram megkeresi a WPS-sel engedélyezett eszközöket a
területen, majd megpróbál csatlakozni. A csatlakoztatás alatt az útválasztó/elérési
pont akkor is biztonságos, ha az útválasztó/elérési pont biztonsága egyébként még nincs
biztosítva.
Ha a WPS-csatlakozás már létrejött, az alábbi képet fogja látni:
B. A WPS varázsló bezárásához kattintson a „Close”-ra.
79
Page 80

MAGYAR
5.2 WPS – PIN-kóddal történő csatlakoztatás
Ha útválasztójának vagy elérési pontjának nincs nyomógombja, a WPS-t PIN-kód segítségével
is csatlakoztathatja.
Alapértelmezettként a WPS varázsló egyedi PIN-kódot generál, amely felhasználható a
csatlakoztatásra.
A. Csatlakozás kialakításához használja ezt a PIN-kódot az útválasztó/elérési pont
konfigurálása során.
B. Ha útválasztója/elérési pontja új PIN-kód segítségével lett beállítva, kattintson a „Wi-Fi
Protected Setup” logóra a képernyőn.
A Wireless Utility segédprogram megkeresi a WPS szempontjából engedélyezett
eszközöket az adott területen, majd megpróbálja őket csatlakoztatni. Csatlakoztatás
alatt az útválasztó/elérési pont akkor is biztonságos, ha az útválasztó/elérési pont
biztonsága egyébként még nincs biztosítva.
Ha a WPS-csatlakozás már létrejött, az alábbi kép látható:
80
Page 81

MAGYAR
C. A WPS varázsló bezárásához kattintson a „Close”-ra.
Ezután, ha a vezetékes hálózathoz csatlakozott már, a Wireless Utility segédprogram a tálcán
jelzi a jelerősséget:
Kívánjuk, hogy élvezze a Conceptronic 802.11N vezeték nélküli
ügyfelének használatát!
Megjegyzés:
A 300 Mb/s vezeték nélküli hálózat sebessége változhat. Ezt a változó
sebességet több tényező is előidézheti:
- Az ügyfélkártya és az útválasztó/elérési pont közötti távolság.
- A közelben lévő további hálózatok megszakíthatják a jelet.
- Az útválasztó/elérési pont biztonsági jellege az üzemzavarok megelőzésére szolgál
a többi aktív hálózat esetében.
- Más aktív, 2,4 GHz-es eszközök a közelben, például videoadók, távirányítók,
Bluetooth-eszközök stb.
81
Page 82

TÜRKÇE
Conceptronic C300Ri / C300RC / C300RU
Hızlı Kurulum Kılavuzu
Conceptronic 802.11N Kablosuz Ağ İstemcisini
Ekteki Hızlı Kurulum Kılavuzu, Conceptronic 802.11N Kablosuz Ağ İstemcisi kurulumunun
bilgisayarınıza adım adım nasıl yapılacağı konusunda bilgi vermektedir.
Problem ortaya çıktığında, destek sitemize gitmenizi (www.conceptronic.net
gidiniz ve ‘Destek’ sayfasını tıklayınız) tavsiye ederiz. Burada Sıkça Sorulan Sorular
Veritabanını bulacaksınız.
Ürününüz ile ilgili başka sorularınız olduğunda ve bunların yanıtını web sitemizde
bulamadığınız takdirde bize e-posta gönderin: support@conceptronic.net
Conceptronic ürünleri ile ilgili daha fazla bilgi için lütfen Conceptronic Web Sitesini ziyaret
edin: www.conceptronic.net
Aşağıda açıklanan yazılım yüklemesi bilgisayarınızdaki yüklemeden biraz daha farklı olabilir.
Bu durum kullandığınız Windows sürümüne bağlıdır.
1. Paket İçeriği
Conceptronic 802.11N İstemci paketinin içeriği aşağıdaki gibidir:
(Satın alınan 11N İstemcisine bağlı olarak)
Conceptronic C300Ri
Ya da
Conceptronic C300RC
Ya da
Conceptronic C300RU
Satın Aldığınız İçin Tebrikler.
adresine
* Conceptronic 802.11N PCI Kart
* 3x Anten
* Ürün CD-ROM’u
* Çok Dilli Hızlı Kurulum Kılavuzu
* Conceptronic 802.11N PC Kart
* Ürün CD-ROM’u
* Çok Dilli Hızlı Kurulum Kılavuzu
* Conceptronic 802.11N USB Adaptör
* USB Uzatma Kablosu
* Ürün CD-ROM’u
* Çok Dilli Hızlı Kurulum Kılavuzu
82
Page 83

TÜRKÇE
2. Sürücü ve Yazılım Kurulumu
Not:
Bilgisayarınıza kartı yerleştirmeden ya da USB Adaptörü bağlamadan önce Sürücüleri
ve Yazılımı kurmanız gerekmektedir!
A. CD-ROM’u CD-ROM Sürücüsüne yerleştirin. Otomatik çalıştırma menüsü ekrana
gelmelidir. Otomatik çalıştırma menüsü ekrana gelmezse “My Computer (Bilgisayarım)”
simgesinden CD-ROM sürücüsüne çift-tıklayarak Otomatik çalıştırma menüsünü çalıştırın.
B. Otomatik çalıştırma menüsünden “Install Drivers & Software (Sürücüleri ve Yazılımı
Kur)” seçeneğini seçin.
Kurulum Sihirbazı ekrana gelir.
C. Devam etmek için “Next (İleri)”ye tıklayın.
D. “Browse (Göz at)” düğmesinden yazılım için hedef klasörü değiştirin ya da varsayılan
klasörü kullanın. Devam etmek için “Next (İleri)”ye tıklayın.
E. Başlat Menüsü klasörünü değiştirin ya da varsayılan klasörü kullanı n. Devam etmek için
“Next (İleri)”ye tıklayın.
Kurulum Sihirbazı bilgisayarınıza sürücüleri ve yazılımı kuracaktır. Kurulum Sihirbazının
kurulumu bitirmesini bekleyin.
F. Kurulum bittiğinde “Yes, I Want to restart my computer now (Evet, bilgisayarımı
şimdi yeniden başlatmak istiyorum)” ve “Finish (Son)”u tıklayın.
Not:
Eğer C300Ri (802.11N PCI Kart) satın aldıysanız, “No, I want to restart my computer
later (Hayır, bilgisayarımı daha sonra yeniden başlatmak istiyorum”u seçin ve
“Finish (Son)”u tıklayın.
802.11N Kablosuz Ağ İstemcinizin Donanım Kurulumu için Bölüm 3’e ilerleyin.
83
Page 84

TÜRKÇE
3. Donanım Kurulumu
802.11N İstemcinizin yazılımı yüklendikten sonra kuruluma donanım kurulumu ile devam
edebilirsiniz.
Conceptronic C300Ri – PCI Kart
A. Bilgisayarınızı kapatın ve bilgisayarı şebeke prizinden çekerek bağlantısını kesin.
B. Bilgisayarın arkasındaki vidaları sökerek bilgisayar kasasını açın ve paneli çıkarın.
C. Boş bir PCI yuvası bulun ve bilgisayar kasasından koruyucu plakayı çıkarın.
D. C300Ri kartı yavaşça boş PCI yuvasına yerleştirin ve bir vida ile bilgisayar kasasına
sabitleyin.
E. Bilgisayar kasasını kapatın ve 3 adet anteni C300Ri kartına monte edin.
Antenleri resimde gösterildiği gibi hizalayın:
F. Bilgisayarınızı aç
Windows yeni donanımı algılayacak ve otomatik olarak sürücüleri yükleyecektir.
Conceptronic C300RC – PC Kart
A. Bilgisayarı yeniden başlattıktan sonra C300RC kartını dizüstü bilgisayarınızın boş bir PC
Kart yuvasına yerleştirin.
Windows, yeni donanımı algılayacak ve otomatik olarak sürücüleri yükleyecektir.
Conceptronic C300RU – USB Adaptör
A. Bilgisayarı yeniden başlattıktan sonra C300RU kartını bilgisayarınızın boş bir USB
yuvasına yerleştirin.
Windows, yeni donanımı algılayacak ve otomatik olarak sürücüleri yükleyecektir.
Not:
Daha iyi sinyal alımı için, USB Adaptörü hareket ettirmek üzere USB Uzatma
kablosunu kullanabilirsiniz.
ın.
84
Page 85

TÜRKÇE
4. Bir Kablosuz Ağa Bağlantı Kurma
Bilgisayar tarafından donanım kurulumu yapıldığında Kablosuz Ağ istemcisi kullanıma
hazırdır. Sistem tepsisinde aktif halde bir Kablosuz Hizmet Programı göreceksiniz:
A. Conceptronic Hizmet Programının sistem tepsisindeki simgesine çift-tıklayın.
Conceptronic Kablosuz Hizmet Programı aşağıdaki gibi ekrana gelecektir:
Conceptronic Kablosuz Hizmet Programı bilgisayarınızın bulunduğu alandaki tüm kablosuz
ağları gösterecektir. Kablosuz ağınız görüntülenmezse yeniden ağ taratmak için “Refresh
(Yenile)”yi tıklayabilirsiniz.
B. Ağ listesinden bağlanmak istediğiniz ağ üzerine tıklayın. “Connect (Bağlan)”a tıklayın.
Kablosuz Hizmet Programı tarafından ağınızın yapılandırılmış güvenliğine bağlı olarak farklılık
gösterebilen bir bağlantı penceresi açılacaktır.
85
Page 86

TÜRKÇE
Güvenli Olmayan Ağ:
Kablosuz ağınız güvenli değilse, Kablosuz Hizmet Programı tarafından bir uyarı mesajı
görüntülenecektir:
Seçilen ağa bağlanmak için “OK (TAMAM)”a tıklayın ya da başka bir ağa bağlanmak için
“Cancel (İptal)”e tıklayın.
Not:
Kendi ağınıza bağlanıyorsanız ve ağınız güvenli değilse, ağınıza yetkisiz erişimleri
önlemek üzere ağ güvenliği eklemenizi tavsiye ederiz.
Ağ güvenliği ayarları için Kablosuz Router (Yönlendirici)/Erişim Noktası
dokümantasyonuna bakınız.
Güvenli Ağ:
Kablosuz ağınız güvenli ise, kablosuz ağınızın yapılandırılmış güvenlik seviyesine bağlı olarak,
Kablosuz Hizmet Programı tarafından şifreleme anahtarı ya da şifre cümlesi sorulacaktır.
“Network Key (Ağ Anahtarı)” bölümüne şifreleme anahtarı ya da şifre cümlesini girin ve
“Confirm Field (Alanı Onayla)”ya şifreyi tekrar girin. Seçilen kablosuz ağa bağlanmak için
“Connect (Bağlan)”a tıklayın.
Kablosuz ağa bağlandığınızda Kablosuz Hizmet Programı tarafından
sistem tepsisinde sinyal şiddeti gösterilecektir:
86
Page 87

TÜRKÇE
5. Kablosuz Korumalı Kurulum - WPS
Conceptronic 802.11N İstemcileri WPS desteklidir (Kablosuz Korumalı Kurulum). WPS,
kablosuz ağınızın güvenliğini kolay bir şekilde sağlayan bir standarttır. WPS ile farklı
şifreleme seçeneklerini bilmeksizin birkaç kolay adımla kablosuz ağınızı koruyabilirsiniz.
Not:
802.11N İstemciniz ile WPS’i kullanmak için WPS destekli bir Router
(Yönlendirici)/Erişim Noktasına sahip olmanız gerekir.
Not:
WPS Özelliği Conceptronic 802.11N İstemcinin Windows Vista sürücüsü tarafından
(henüz) desteklenmemektedir.
A. Sistem tepsisindeki Kablosuz Hizmet (Wireless Utility ) Programı üzerine çift tıklayın.
Kablosuz Hizmet Programı masaüstünde açılacaktır.
B. Kablosuz Hizmet Programı penceresinde bulunan “New (Yeni)” düğmesine tıklayın.
87
Page 88

TÜRKÇE
Not:
Windows Vista kullanıyorsanız “Configuration Mode (Yapılandırma Modu)” ekranını
görmezsiniz ve “Manual Configuration (Manuel Yapılandırma)”ya yönlendirilirsiniz.
C. “Wi-Fi Protected Setup (Kablosuz Korumalı Kurulum)” seçeneğini seçin.
D. Push Button ve “Pin Code (Pin Kodu)” bağlantı arasında seçim yapabilirsiniz. Router
(Yönlendirici)/Erişim Noktanız Push Button destekli ise “Push Button” bağlantıyı seçin.
Aksi halde “Pin Code” bağlantıyı seçin.
88
Page 89

TÜRKÇE
5.1 WPS – Push Button
A. Router (Yönlendirici) ya da Erişim Noktası üzerindeki WPS Düğmesine basın ve ekranda
“Wi-Fi Protected Setup (Kablosuz Korumalı Kurulum)” logosuna tıklayın.
Kablosuz Hizmet Programı, bölgedeki WPS’i etkinleştirilmiş olan cihazları tarayacak ve
bağlanmaya çalışacaktır. Bağlantı sırasında Router (Yönlendirici)/Erişim Noktası henüz
güvenli değilse güvenli duruma da geçecektir.
WPS bağlantı gerçekleştiğinde aşağıdaki ekranı göreceksiniz:
B. WPS Sihirbazından çıkmak için “Close (Kapat)”a tıklayın.
89
Page 90

TÜRKÇE
5.2 WPS – Pin Kodlu Bağlantı
Router (Yönlendirici) ya da Erişim Noktanız bir push butonuna sahip değilse Pin Kodu ile de
WPS bağlantısı yapabilirsiniz.
Varsayılan olarak WPS Sihirbazı bağlantınız için kullanılabilen tek bir Pin Kodu üretir.
A. Bir bağlantı gerçekleştirmek için router (yönlendirici)/erişim noktası yapılandırmasında
bu Pin Kodunu kullanın.
B. Router (Yönlendirici)/erişim noktanız yeni bir Pin Kodu ile tanımlandığında ekrandaki
“Wi-Fi Protected Setup (Kablosuz Korumalı Kurulum)” logosuna tıklayın.
Kablosuz Hizmet Programı, bölgedeki WPS’i etkinleştirilmiş olan cihazları tarayacak ve
bağlanmaya çalışacaktır. Bağlantı sırasında Router (Yönlendirici)/Erişim Noktası henüz
güvenli değilse güvenli duruma da geçecektir.
WPS bağlantı gerçekleştiğinde aşağıdaki ekranı göreceksiniz:
90
Page 91

TÜRKÇE
C. WPS Sihirbazından çıkmak için “Close (Kapat)”a tıklayın.
Kablosuz ağa bağlandığınızda Kablosuz Hizmet Programı tarafından sistem tepsisinde sinyal
şiddeti gösterilecektir:
Conceptronic 802.11N Kablosuz İstemciyi
kullanmanın keyfini çıkarın !
300Mbps Kablosuz ağ hızınız değişiklik gösterebilir. Çeşitli faktörler nedeniyle bu hız
Not:
değeri değişebilir, bu faktörlere örnek olarak aşağıdakiler sıralanabilir:
- İstemci ve Router (Yönlendirici) / Erişim Noktası arasındaki mesafe.
- Sinyalinizi bozan çevredeki diğer ağlar.
- Diğer aktif ağlardaki bozulmayı önleyen Router (Yönlendirici) / Erişim Noktanıza ait
güvenlik özelliği.
- Görüntü aktarıcılar, Uzaktan kumandalar, Bluetooth cihazları gibi çevrede bulunan
diğer aktif 2.4GHz cihazlar.
91
Page 92

DECLARATION OF CE CONFORMITY
The manufacturer Conceptronic
Address Databankweg 7
3821 AL Amersfoort, the Netherlands
Hereby declares that the product
Type 300MBPS USB ADAPTER, 300MBPS WIRELESS PC-CARD, 300MBPS WIRELESS PCI CARD
Product C300RU, C300RC, C300Ri
Complies with following directives:
• 1999/5/EEC R&TTE directive:
Telecommunications Terminal Equipment and Satellite Earth Station
Equipment
• 89/336/EEC EMC directive:
Electromagnetic Compatibility
• 73/23/EEC Low Voltage Directive:
Electrical equipment designed for use within certain voltage limits
The following standards were consulted to assess conformity:
ETSI 300 328-2/2000, EN 301 489-17-2000, EN 301 489-1-2000, EN55022/9.98 Class B, EN
61000-3-2/3/4/1995, EN 50082-1/1994, EN 60950/1995
This product is for indoor use only. The purpose of this product is to send and receive data
through the ether. This is a class 2 product and the transmitted output power is less than
100mW.
The CE symbol confirms that this product conforms to the above named standards and
regulations.
This product is suitable for all EU countries.
For France, the output power is restricted if used outdoor and in the range 2454 to 2483,5
MHz.
For Italy, depending on the usage, a general authorization may be required.
Pour tous les pays de I'UE. Pour la France, pour une utilisationen extérieur, la puissance de
sortie est limitée dans la bande 2454 to 2483,5 MHz.Pertutti i paesi ell'EU.
Per I'Italia, secondo I'uso, un 'autorizzazione generale puô essere richiesta.
Place and date of issue: Amersfoort, May 9, 2007
Herman Looijen, Product Marketing Manager
92
Page 93

FCC Caution:
1.The device complies with Part 15 of the FCC rules. Operation is subject to the following
two conditions:
(1) This device may not cause harmful interference, and
(2) this device must accept any interference received, including interference that may
cause undesired operation.
2.This device and its antenna(s) must not be co-located or operating in conjunction with
any other antenna or transmitter.
3. Changes or modifications to this unit not expressly approved by the party responsible
for compliance could void the user authority to operate the equipment.
Page 94

FCC statement in User's Manual (for class B)
"Federal Communications Commission (FCC) Statement
This Equipment has been tested and found to comply with the limits for a class B digital
device, pursuant to Part 15 of the FCC rules. These limits are designed to provide reasonable
protection against harmful interference in a residential installation. This equipment ge nerates,
uses and can radiate radio frequency energy and, if not inst alled and used i n accordance with
the instructions, may cause harmful interference to radio communications. However, there is
no guarantee that interference will not occur in a particular installation. If this equipment
does cause harmful interference to radio or television reception, which can be determined by
turning the equipment off and on, the user is encouraged to try to correct the interference by
one or more of the following measures:
- Reorient or relocate the receiving antenna.
- Increase the separation bet ween the equipment and receiver.
- Connect the equipment into an outlet on a circuit different from that to which the receiver is
connected.
- Consult the dealer or an experienced radio/TV technician for help.
 Loading...