

Page 1

XPX Aurora Pro
Page 2

Alphacool International GmbH XPX Aurora Pro Deutsch
2
V.1.00-06.2020
Deutsch ................................................................................................................................................................................................................................................................................................................................................ 3
Sicherheitshinweise ....................................................................................................................................................................................................................................................................................................................... 3
Montagematerial ............................................................................................................................................................................................................................................................................................................................ 3
Technische Details ........................................................................................................................................................................................................................................................................................................................ 4
Montage XPX Aurora PRO ......................................................................................................................................................................................................................................................................................................... 9
aRGB Anschluss ...................................................................................................................................................................................................................................................................................................................... 14
English ................................................................................................................................................................................................................................................................................................................................................. 15
Safety Instructions ....................................................................................................................................................................................................................................................................................................................... 15
Assembly material ....................................................................................................................................................................................................................................................................................................................... 15
Technical details .......................................................................................................................................................................................................................................................................................................................... 16
Assembly XPX Aurora PRO ..................................................................................................................................................................................................................................................................................................... 21
aRGB Connection ................................................................................................................................................................................................................................................................................................................. 26
Français .............................................................................................................................................................................................................................................................................................................................................. 27
avis général de sécurité .............................................................................................................................................................................................................................................................................................................. 27
Matériel d’installation .................................................................................................................................................................................................................................................................................................................. 27
Détails techniques ....................................................................................................................................................................................................................................................................................................................... 28
Montage XPX Aurora PRO ....................................................................................................................................................................................................................................................................................................... 33
Connexion aRGB.................................................................................................................................................................................................................................................................................................................... 38
Page 3

Deutsch XPX Aurora Pro Alphacool International GmbH
3
Deutsch
Sicherheitshinweise
Lesen Sie die beiliegenden Sicherheitshinweise, bevor Sie mit der Installation beginnen.
Montagematerial
1x Set 2066 / 2011 Halterung
4x 2066 / 2011 Bolzen
1x Set TR4 / SP3 / STRX4 Halterung
4x TR4 / SP3 / sTRX4 Bolzen
1x Set 3647 Narrow Halterung
1x Set 3647 Square Halterung
4x 3647 Schrauben
4x Druckfedern
4x M4 Muttern
1x Wärmeleitpaste
Page 4

Alphacool International GmbH XPX Aurora Pro Deutsch
4
Technische Details
Kompatibilität
INTEL
AMD
LGA 2066, 2011-3, 3647-0 Narrow/Square
TR4, SP3, sTRX4
MAX. ANSCHLÜSSE: 24 mm
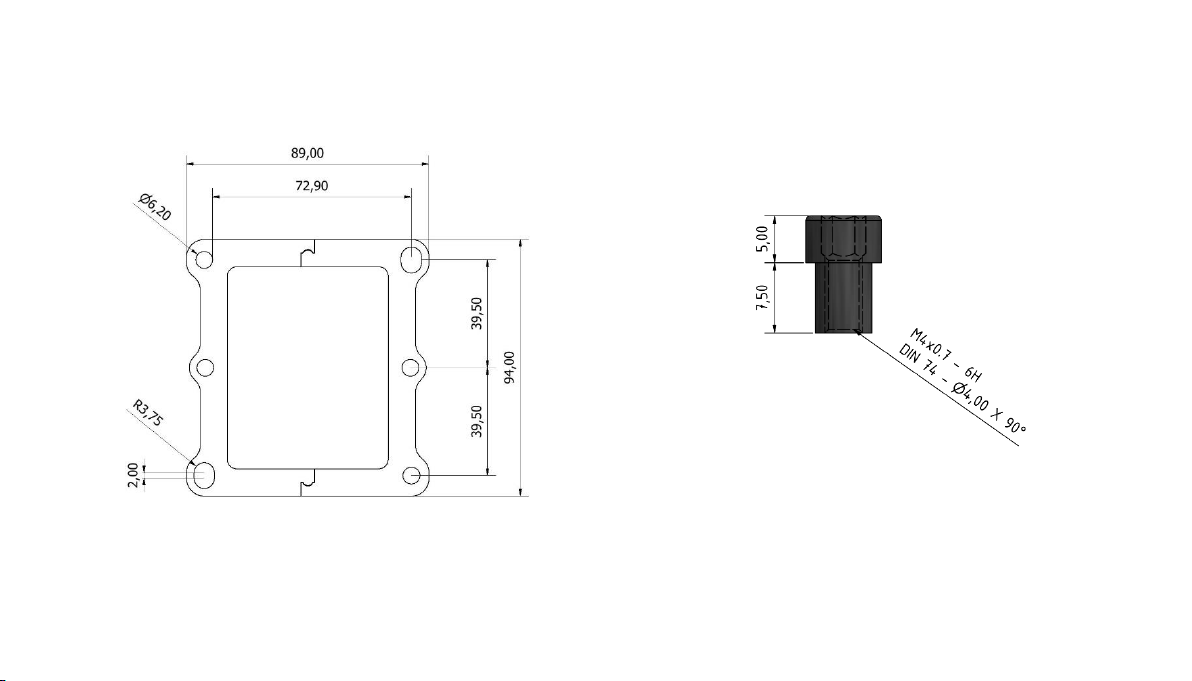
Dimensionen
[ Maße in mm]
XPX Aurora Pro
Page 5

Deutsch XPX Aurora Pro Alphacool International GmbH
5
INTEL LGA 2066 LGA 2011
Page 6
Alphacool International GmbH XPX Aurora Pro Deutsch
6
INTEL LGA 3647 Square
Page 7

Deutsch XPX Aurora Pro Alphacool International GmbH
7
INTEL LGA 3647 Narrow
Page 8

Alphacool International GmbH XPX Aurora Pro Deutsch
8
AMD TR4 / SP3 / STRX4
Page 9

Deutsch XPX Aurora Pro Alphacool International GmbH
9
Montage XPX Aurora PRO
Vorbereitung CPU Kühler
Entfernen sie die Schutzfolie auf dem Kühlerboden:
Wählen sie die passenden Anschlüsse aus. Kompatibel sind alle
Anschlüsse mit einem max. Durchmesser von 24 mm.
Page 10

Alphacool International GmbH XPX Aurora Pro Deutsch
10
Vorbereitung CPU
Nachdem sie ihren alten Kühler demontiert haben, reinigen sie zunächst die Hardware:
• Entfernen sie die Reste der Wärmeleitpaste von der CPU.
• Verwenden Sie ein Tuch oder Wattestäbchen als Hilfe. Isopropanol eignet sich zur Entfernung getrockneter wärmeleitender Paste.
• Tragen sie einen erbsengroßen Klecks Wärmeleitpaste auf die CPU auf.
• Verteilen sie die Paste mit Hilfe eines Plastikstreifens oder Ähnlichem zu einer gleichmäßigen, dünnen Schicht (< 0,5 mm Schichtdicke).
Page 11

Deutsch XPX Aurora Pro Alphacool International GmbH
11
Kein Werkzeug benutzen
nur handfest anziehen!
INTEL LGA 2066 und LGA 2011
Entsprechende Halterung wählen und zusammenstecken. Beide Halterungen werden Identisch montiert.
Sockelmontage
2066 / 2011 Bolzen in den Sockel eindrehen,
Kühler mit Halterung auf den Sockel setzen und
mit Druckfeder und Mutter fixieren.
4x M4 Muttern
4x Druckfedern
4x 2066 / 2011 Bolzen
Page 12

Alphacool International GmbH XPX Aurora Pro Deutsch
12
Kein Werkzeug benutzen
nur handfest anziehen!
4x 3647 Schrauben
INTEL LGA 3647 NARROW / SQUARE
Entsprechende Halterung wählen und zusammenstecken. Beide Halterungen werden Identisch montiert.
Sockelmontage
Kühler mit Halterung auf den Sockel setzen,
mit den 3647 Schrauben fixieren. Drehen sie zunächst
die Schrauben in den äußeren Ecken ein, anschließend die seitlichen Schrauben.
Page 13

Deutsch XPX Aurora Pro Alphacool International GmbH
13
Kein Werkzeug benutzen
nur handfest anziehen!
AMD TR4 / SP3 / STRX4
Entsprechende Halterung wählen und zusammenstecken. Beide Halterungen werden Identisch montiert.
Sockelmontage
TR4 / SP3 / sTRX4 Bolzen in den Sockel eindrehen,
Kühler mit Halterung auf den Sockel setzen und
mit den Druckfedern und Muttern fixieren.
4x M4 Muttern
4x Druckfedern
4x TR4 / SP3 / sTRX4 Bolzen
Page 14

Alphacool International GmbH XPX Aurora Pro Deutsch
14
aRGB Anschluss
Optional: Alphacool
Aurora Eiscontrol
(Art.-Nr. 15360)
SATA Power
Anschluss XPX Aurora Pro
Achten sie darauf, dass die aRGB
LEDs nicht mehr als 5V
Versorgungsspannung benötigen.
Bei einer Spannung von mehr als
5V werden die LEDs zerstört.
Page 15

English XPX Aurora Pro Alphacool International GmbH
15
English
Safety Instructions
Read the safety instructions before starting the installation.
Assembly material
1x set 2066 / 2011 Bracket
4x 2066 / 2011 Bolt
1x Set TR4 / SP3 / sTRX4 bracket
4x TR4 / SP3 / sTRX4 bolt
1x Set 3647 Narrow Bracket
1x Set 3647 Square Bracket
4x 3647 screws
4x pressure springs
4x M4 nuts
1x thermal paste
Page 16

Alphacool International GmbH XPX Aurora Pro English
16
Technical details
Compatibility
INTEL
AMD
LGA 2066, 2011-3, 3647-0 Narrow/Square
TR4, SP3, sTRX4
MAX. CONNECTIONS: 24 mm or smaller
Dimensions
[ Size in mm]
XPX Aurora Pro
Page 17

English XPX Aurora Pro Alphacool International GmbH
17
INTEL LGA 2066 LGA 2011
Page 18

Alphacool International GmbH XPX Aurora Pro English
18
INTEL LGA 3647 Square
Page 19

English XPX Aurora Pro Alphacool International GmbH
19
INTEL LGA 3647 Narrow
Page 20

Alphacool International GmbH XPX Aurora Pro English
20
AMD TR4 / SP3 / STRX4
Page 21

English XPX Aurora Pro Alphacool International GmbH
21
Assembly XPX Aurora PRO
Preparation of the CPU cooler
Remove the protective film on the base of the cooler:
Select the appropriate connection options, all of them are compatible
Connections with a maximum diameter of 24 mm.
Page 22

Alphacool International GmbH XPX Aurora Pro English
22
Preparation of the CPU
After disassembling your old cooler, first clean the hardware:
• Remove the remains of the thermal paste from the CPU.
• Use a cloth or cotton swabs to help. Isopropanol is suitable for removing dried heat-conducting paste.
• Apply a pea-sized blob of thermal paste to the CPU.
• Spread the paste with the aid of a plastic strip or similar to form an even, thin layer (< 0.5 mm layer thickness).
Page 23

English XPX Aurora Pro Alphacool International GmbH
23
Do not use tools
hand-tighten only!
INTEL LGA 2066 und LGA 2011
Select the appropriate holder and plug it together. Both holder are mounted identically.
Socket assembly
2066 / 2011 Screw the bolt into the base,
place the cooler with holder on the base and
fix with pressure spring and nut.
4x M4 nuts
4x pressure springs
4x 2066 / 2011 Bolt
Page 24

Alphacool International GmbH XPX Aurora Pro English
24
Do not use tools
hand-tighten only!
INTEL LGA 3647 NARROW / SQUARE
Select the appropriate holder and plug it together. Both holder are mounted identically.
Socket assembly
Place the cooler with the holder on the base,
fix it with the 3647 screws. First turn
the screws in the outer corners, then the lateral screws.
4x 3647 screws
Page 25

English XPX Aurora Pro Alphacool International GmbH
25
Do not use tools
hand-tighten only!
AMD TR4 / SP3 / STRX4
Select the appropriate holder and plug it together. Both holder are mounted identically.
Socket assembly
TR4 / SP3 / sTRX4 Screw the bolt into the base,
Place the cooler with holder on the base and
Fix with the pressure springs and nuts.
4x M4 nuts
4x pressure springs
4x TR4 / SP3 / sTRX4 bolt
Page 26

Alphacool International GmbH XPX Aurora Pro English
26
aRGB Connection
Optional: Alphacool
Aurora Eiscontrol
(item no. 15360)
SATA Power
Connection XPX Aurora Pro
Make sure that the aRGB LEDs do
not require more than 5V supply
voltage. A voltage of more than 5V
will destroy the LEDs.
Page 27

Français XPX Aurora Pro Alphacool International GmbH
27
Français
avis général de sécurité
Lisez les instructions de sécurité avant de commencer l‘installation.
Matériel d’installation
1x Kit support 2066 / 2011
4x boulons 2066 / 2011
1x Kit support TR4 / SP3 / sTRX4
4x boulons TR4 / SP3 / sTRX4
1x Kit support 3647 Narrow
1x Kit support 3647 Square
4x vis 3647
4x ressorts de pression
4x M4 écrous
1x pâte thermale
Page 28

Alphacool International GmbH XPX Aurora Pro Français
28
Détails techniques
Compatibilité
INTEL
AMD
LGA 2066, 2011-3, 3647-0 Narrow/Square
TR4, SP3, sTRX4
MAX. CONNEXIONS: 24 mm ou moins
Dimensions
[ Mesures en mm]
XPX Aurora Pro
Page 29

Français XPX Aurora Pro Alphacool International GmbH
29
INTEL LGA 2066 LGA 2011
Page 30

Alphacool International GmbH XPX Aurora Pro Français
30
INTEL LGA 3647 Square
Page 31

Français XPX Aurora Pro Alphacool International GmbH
31
INTEL LGA 3647 Narrow
Page 32

Alphacool International GmbH XPX Aurora Pro Français
32
AMD TR4 / SP3 / STRX4
Page 33

Français XPX Aurora Pro Alphacool International GmbH
33
Montage XPX Aurora PRO
Préparation CPU cooler
Enlever le film protecteur sur la base du radiateur:
Sélectionnez les options de connexion appropriées, elles sont toutes compatibles
Connexions d'un diamètre maximum de 24 mm.
Page 34

Alphacool International GmbH XPX Aurora Pro Français
34
Préparation CPU
Une fois que vous avez démonté votre ancienne glacière, nettoyez d'abord le matériel:
• Enlever les résidus du composé de transfert de chaleur de la CPU.
• Utilisez un chiffon ou des cotons-tiges pour vous aider. L'isopropanol est adapté pour éliminer la pâte thermoconductrice séchée
• Appliquer une goutte de pâte thermique de la taille d'un petit pois sur le CPU.
• Étendre la pâte à l'aide d'une bande de plastique ou d'un matériau similaire en une couche mince et uniforme (< 0,5 mm d'épaisseur).
Page 35

Français XPX Aurora Pro Alphacool International GmbH
35
Ne pas utiliser d'outils
serrer à la main seulement!
INTEL LGA 2066 und LGA 2011
Choisissez le support approprié et branchez-le. Les deux refroidisseurs sont montés de manière identique.
Installation de base
2066 / 2011 Vissez le boulon dans la base,
Placez la glacière avec son support sur le socle et
fixer avec un ressort de pression et un écrou.
4x M4 écrous
4x ressorts de pression
4x boulons 2066 / 2011
Page 36

Alphacool International GmbH XPX Aurora Pro Français
36
Ne pas utiliser d'outils
serrer à la main seulement!
INTEL LGA 3647 NARROW / SQUARE
Choisissez le support approprié et branchez-le. Les deux refroidisseurs sont montés de manière identique.
Installation de base
Placez la glacière avec le support sur la base,
le fixer avec les vis 3647. Premier tour
les vis dans les coins extérieurs, puis les vis latérale.
4x vis 3647
Page 37

Français XPX Aurora Pro Alphacool International GmbH
37
Ne pas utiliser d'outils
serrer à la main seulement!
AMD TR4 / SP3 / STRX4
Choisissez le support approprié et branchez-le. Les deux refroidisseurs sont montés de manière identique.
Sockelmontage
TR4 / SP3 / sTRX4 Vissez le boulon dans la base,
Placez la glacière avec son support sur le socle et
Fixer avec les ressorts de pression et les écrouss.
4x M4 écrous
4x ressorts de pression
4x boulons TR4 / SP3 / sTRX4
Page 38

Alphacool International GmbH XPX Aurora Pro Français
38
Connexion aRGB
Facultatif: Alphacool
Aurora Eiscontrol
(point n° 15360)
SATA Power
Connexion XPX Aurora
Assurez-vous que les LED aRGB
ne nécessitent pas une tension
d'alimentation supérieure à 5V.
Une tension de plus de 5V détruira
les LED.
Page 39

Français XPX Aurora Pro Alphacool International GmbH
39
Notizen / Notes / Notes:
Page 40

Alphacool International GmbH XPX Aurora Pro Français
40
Imprint:
Alphacool International GmbH
Marienberger Str. 1
38122 Braunschweig
Support: +49 (0) 531 28874 – 0
Fax: +49 (0) 531 28874 – 22
E-Mail: info@alphacool.com
General Managers: Andreas Rudnicki, Nathanael Draht, Fabian Noelte
WEEE-Reg.-Nr.: DE 544444
Trade Register: Amtsgericht Braunschweig HRB 202390
VAT.ID.Nr.: DE27058421
Tax number: 13/207/02047
 Loading...