

Page 1

EISBAER
Page 2

Page 3

Alphacool Eisbaer
Intel Socket 775 /1156 / 1155 / 1150 / 1151 / 1366 / 2011 / 2011-3 / 2066 / 604 / 771
AMD Socket 754 / 939 / AM2 / AM2+ / AM3 / AM3+ / AM4
Eisbaer 420
Eisbaer 280
Eisbaer 360
940 / C32 / G34
Eisbaer 240
[
RYZEN
]
/ FM1 / FM2 / FM2+ /
Narrow ILM is
available separately
EAN: 4250197125314
mounting kit
for 2011-3
Read the safety instructions before starting the installation.
Lesen Sie die Sicherheitshinweise, bevor Sie mit der Insatallation beginnen.
Lisez les instructions de sécurité avant de commencer l‘installation.
Eisbaer 140
Eisbaer 120
3
Page 4

mounting material - Montagematerial - Matériel de montage
PWM-adapter
version varies depending on the product you purchased
AMD
screws
Intel 2011 /
2011-3
screws
Intel 775 /
1156 / 1155 /
1150 / 1151 /
1366 / 604 /
771 screws
springs
Intel
backplate
AMD
bracket
4
washers
0.8 mm
washers
2.0 mm
nuts
Intel
bracket
thermal grease radiator screws
number varies depending on
the product you purchased
Page 5

functionality / technology - Funktionsweise/ Technologie - fonctionnalité / technologie
5
The cooler bottom is crossed with very ne cooling ns for optimal cooling performance.
The reservoir sits directly above, with its DC-LT 2600 Ultra Low Noise ceramic pump. An
opening for lling is located on top, making it easy to clean, re ll, and expand the system..
Der Kühlerboden ist durchzogen von sehr feinen Kühl nnen um eine optimale Kühlleistung
zu erreichen. Direkt darüber sitzt der Ausgleichsbehälter mit einer DC-LT 2600 Ultra low
noise Ceramic Pumpe. Eine Öffnung zum Befüllen be ndet sich auf der Oberseite. So kann
man leicht das System reinigen, neu befüllen und erweitern.
La base du refroidisseur contient beaucoup d’ailettes de refroidissement très nes a n
d’obtenir une performance de refroidissement optimale. Le réservoir avec une pompe
DC-LT 2600 ultra low noise en céramique se trouve directement au-dessus. Une ouverture
pour le remplissage se trouve dans la partie supérieure. Ainsi le système peut facilement être
nettoyé, rerempli et agrandi.
Alphacool DC-LT
Power consumption: 2,04W
Operating voltage: 7 - 13,5V
Flow rate: max. 60L/h
Pressure head at 12V: 0,80m
5
Page 6

functionality / technology - Funktionsweise/ Technologie - fonctionnalité / technologie
Full-copper radiator
The use of copper in all important areas, like the front chamber, the
cooling ns and also the corresponding channels, raises cooling
performance to a whole new level. This has been shown in many tests
by independent media.
Vollkupfer Radiator
Durch die Verwendung von Kupfer in allen wichtigen Bereichen, wie
der Vorkammer, den Kühl nnen und auch den dazugehörigen Kanälen,
wurde die Kühlleistung auf ein neues Niveau gehoben. Dies bestätigen
viele Tests von unabhängigen Medien.
Radiateur entièrement en cuivre
L’utilisation du cuivre dans toutes les parties importantes, comme la
préchambre, les ailettes et les canaux augmente la performance de
refroidissement d’une manière importante. Ceci a été con rmé par des
médias indépendantes.
6
Page 7

Schnellverschlusskupplung
functionality / technology - Funktionsweise/ Technologie - fonctionnalité / technologie
Quick release Fitting
The hoses are encased in anti-kink springs to prevent bending and the resulting blockage
of the water fl ow. The nylon safety quick-locking closure offers a quick and simple way to
expand the cooling loop. This gives you the highest degree of fl exibility.
Schnellverschlusskupplung
Die Schläuche sind mit Knickschutzfedern ummantelt um ein abknicken und damit ein
blockieren des Wasserlaufs zu verhindern. Der Sicherheitsschnellverschluss aus Nylon
bietet eine einfache und schnelle Möglichkeit den Kreislauf zu erweitern. So erreicht
man die höchstmögliche Flexibilität.
Raccord rapide
Les tuyaux sont entourés par des ressorts anti-pli pour éviter des plis et un blocage de
la circulation d’eau. Le ressort rapide de sécurité en nylon offre la possibilité d’agrandir le
système vite et facilement. Ainsi l’on obtient une fl exibilité maximale
7
Page 8

functionality / technology - Funktionsweise/ Technologie - fonctionnalité / technologie
Fans
The Eiswind fans were developed speci cally to t the requirements of
radiators, and can be controlled through a PWM connection. The corresponding cable is included so that all fans can be controlled simultaneously
over one connection. This way, the fans can be adjusted to your exact
speci cations.
Lüfter
Die Eiswind Lüfter wurden speziell für die Anforderungen von Radiatoren
angepasst und lassen sich über einen PWM-Anschluss regeln. Damit alle
Lüfter gleichzeitig über einen Anschluss geregelt werden können, liegt ein
entsprechendes Kabel bei. So lassen sich die Lüfter optimal nach eigenen
Wünschen regeln.
Ventilateurs
Les ventilateurs Eiswind (vent glacé) ont été adaptés spécialement pour
l’utilisation sur des radiateurs. Ils sont réglables par le connecteur PWM.
Un câble spécial est inclus a n de pouvoir régler tous les ventilateurs en
même temps. Ainsi les ventilateurs sont réglables selon les besoins
individuels.
8
Page 9

installation - Montage - montage
Intel 775 / 1156 / 1155 / 1150 / 1151 / 1366 / 604 / 771 10-11
Intel 2011 / 2011-3 / 2066 12-13
AMD 754 / 939 / AM2 / AM2+ / AM3 / AM3+ / FM1 / FM2 / FM2+ / 940 / C32 / G34 14-15
AMD AM4
[
RYZEN] 16-17
9
Page 10

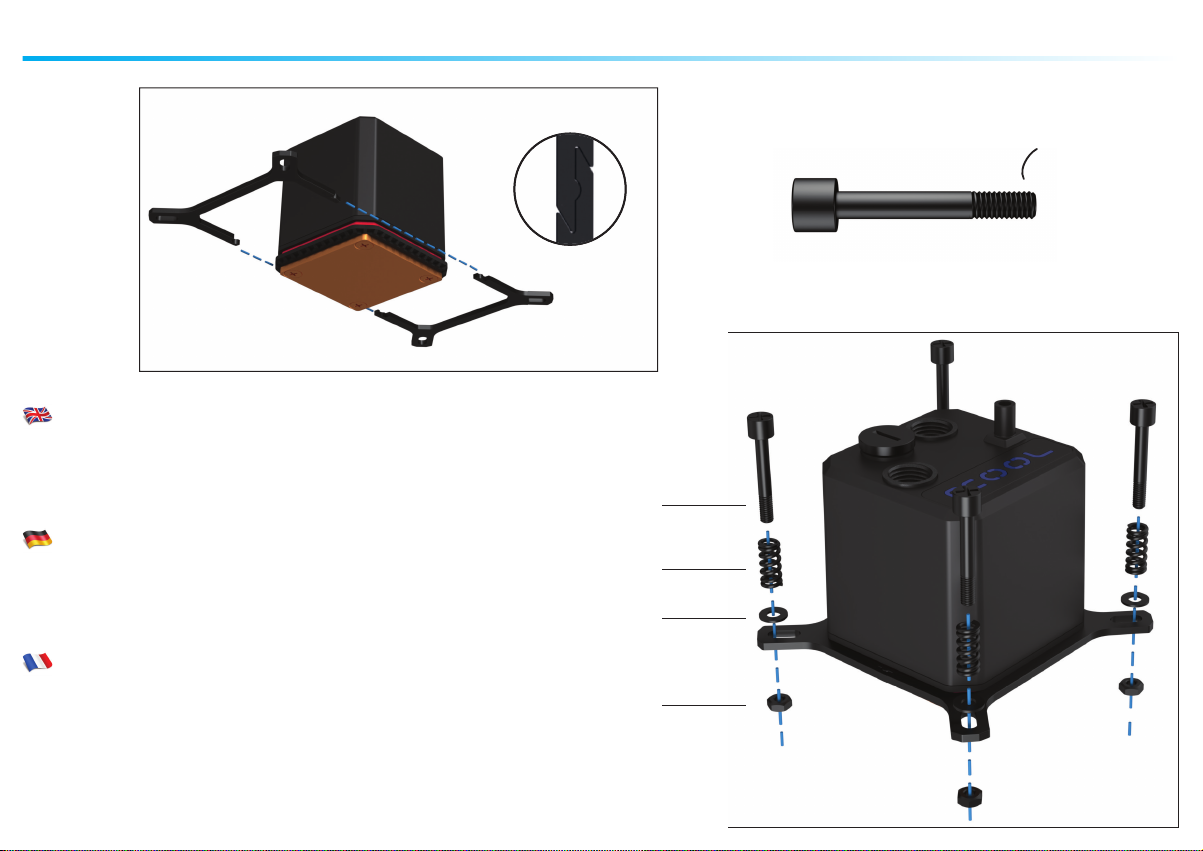
screw mounting - Schraubenmontage - montage de vis Intel
775
1
1156
1155
1150
1151
1366
604
771
Select corresponding bracket + screws
1. Plug bracket together
2. Place compression springs and washers onto screws + attach to
bracket with nuts
Passende Halterung + Schrauben wählen
1. Halterung zusammenstecken
2. Druckfedern und Unterlegscheiben auf Schrauben aufstecken +
mit Muttern an Halterung befestigen
M3M4
7,5
2
screw
spring
washer 0.8
Choisir support et vis
1. Assembler support
2. En ler ressorts et rondelles sur vis + xer avec des écrous sur
support
10
nut
Page 11
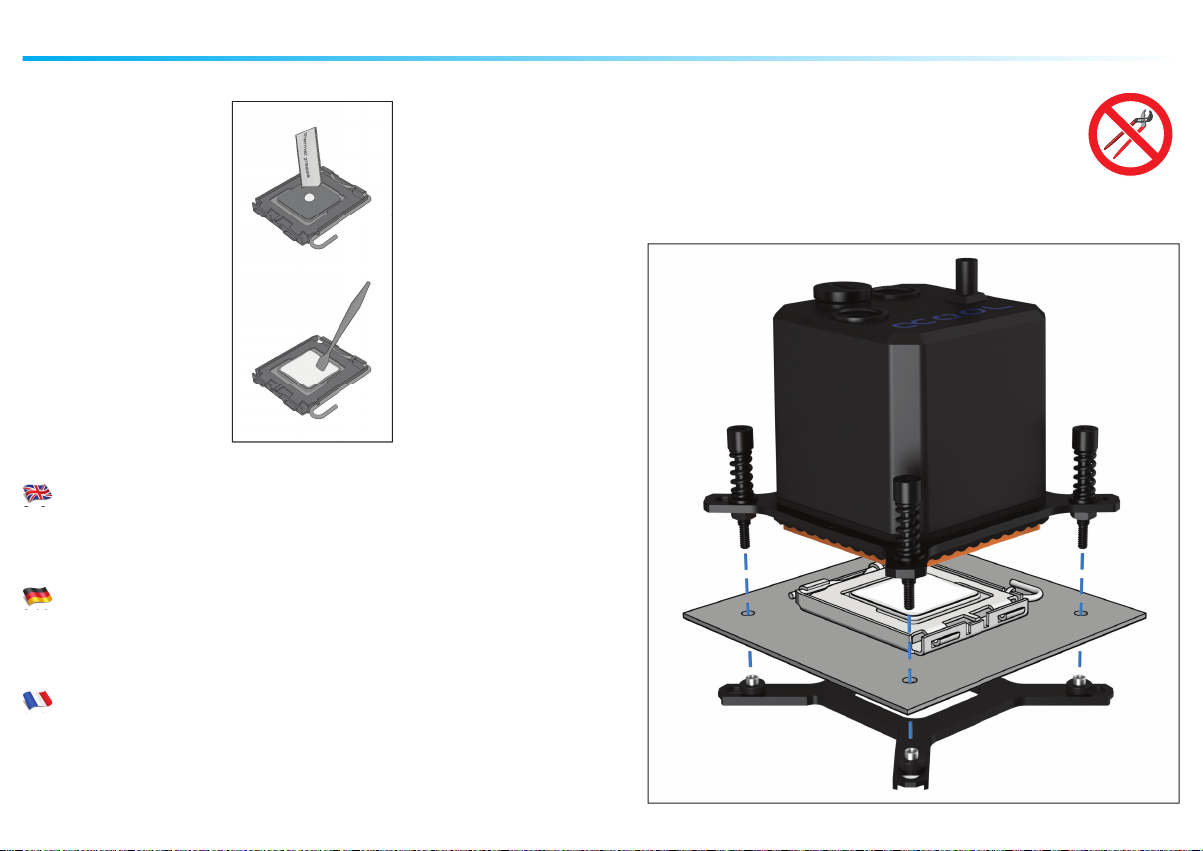
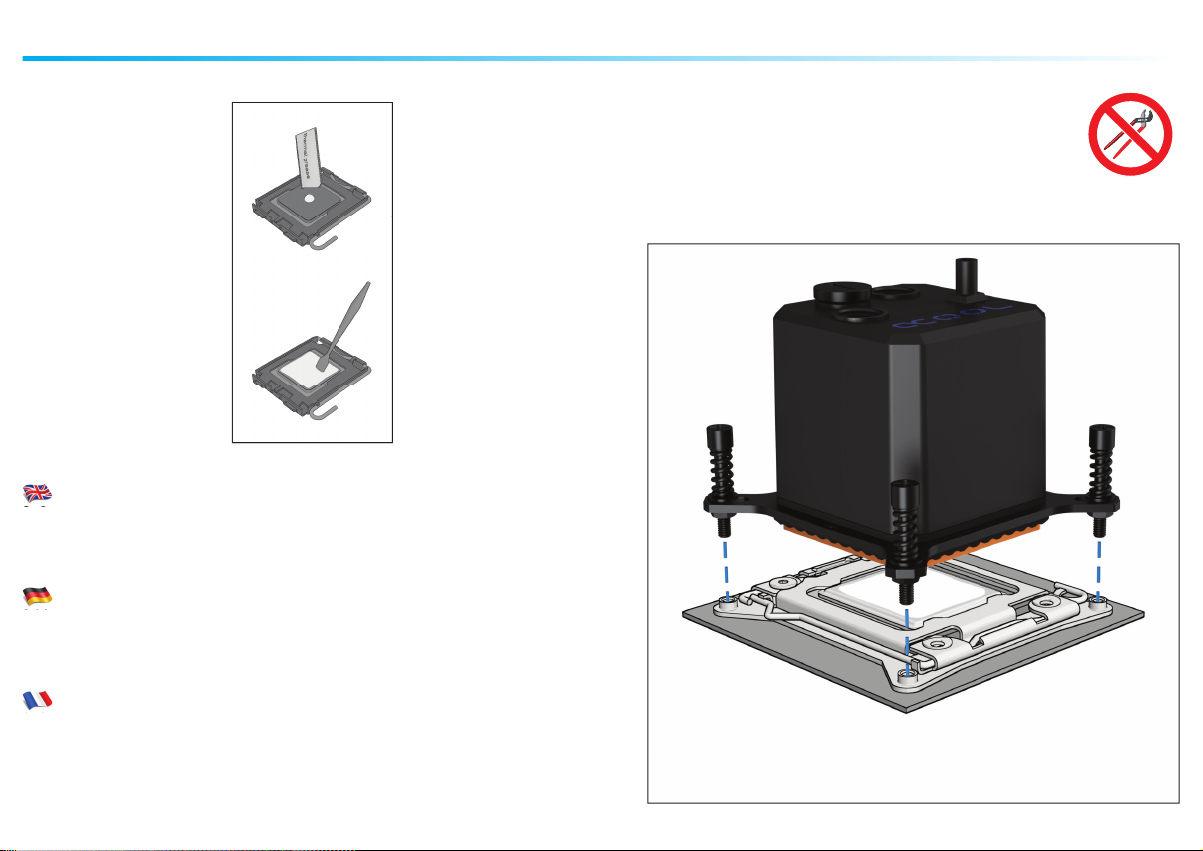
CPU mounting - CPU Montage - montage de CPU Intel
3
4
3. Spread thermal grease on the CPU (< 0,5mm coating thickness)
4. Mount the cooler – using the included backplate – onto the socket
Hand-tighten screws crosswise
3. Wärmeleitpaste auf CPU auftragen (< 0,5mm Schichtdicke)
4. Kühler - mit Hilfe der beiliegenden Backplate - am Sockel montieren
Schrauben kreuzweise, handfest anziehen
3. Appliquer la graisse thermique sur le CPU (< 0,5mm épaisseur)
4. Installer refroidisseur à socket à l’aide de plaque arrière incluse
Serrez les vis de manière croisé à la main
11
Page 12
screw mounting - Schraubenmontage - montage de vis Intel
2011
1
2011-3
2066
Select corresponding bracket + screws
1. Plug bracket together
2. Place compression springs and washers onto screws + attach to
bracket with nuts
Passende Halterung + Schrauben wählen
1. Halterung zusammenstecken
2. Druckfedern und Unterlegscheiben auf Schrauben aufstecken +
mit Muttern an Halterung befestigen
M4
2
screw
spring
washer 0.8
Choisir support et vis
1. Assembler support
2. En ler ressorts et rondelles sur vis + xer avec des écrous sur
support
12
nut
Page 13
CPU mounting - CPU Montage - montage de CPU Intel
3
4
3. Spread thermal grease on the CPU (< 0,5mm coating thickness)
4. Mount the cooler onto the socket
Hand-tighten screws crosswise
3. Wärmeleitpaste auf CPU auftragen (< 0,5mm Schichtdicke)
4. Kühler am Sockel montieren
Schrauben kreuzweise, handfest anziehen
3. Appliquer la graisse thermique sur le CPU (< 0,5mm épaisseur)
4. Installer refroidisseur à socket
Serrez les vis de manière croisé à la main
13
Page 14

screw mounting - Schraubenmontage - montage de vis AMD
754
1
939
AM2
AM2+
AM3
AM3+
FM1
FM2
FM2+
940
C32
G34
Select corresponding bracket + screws
1. Plug bracket together
2. Place compression springs and washers onto screws + attach to
bracket with nuts
Passende Halterung + Schrauben wählen
1. Halterung zusammenstecken
2. Druckfedern und Unterlegscheiben auf Schrauben aufstecken +
mit Muttern an Halterung befestigen
2
screw
spring
washer 0.8
nut
M4
UNC 6-32
10,5
Choisir support et vis
1. Assembler support
2. En ler ressorts et rondelles sur vis + xer avec des écrous sur
support
14
Page 15
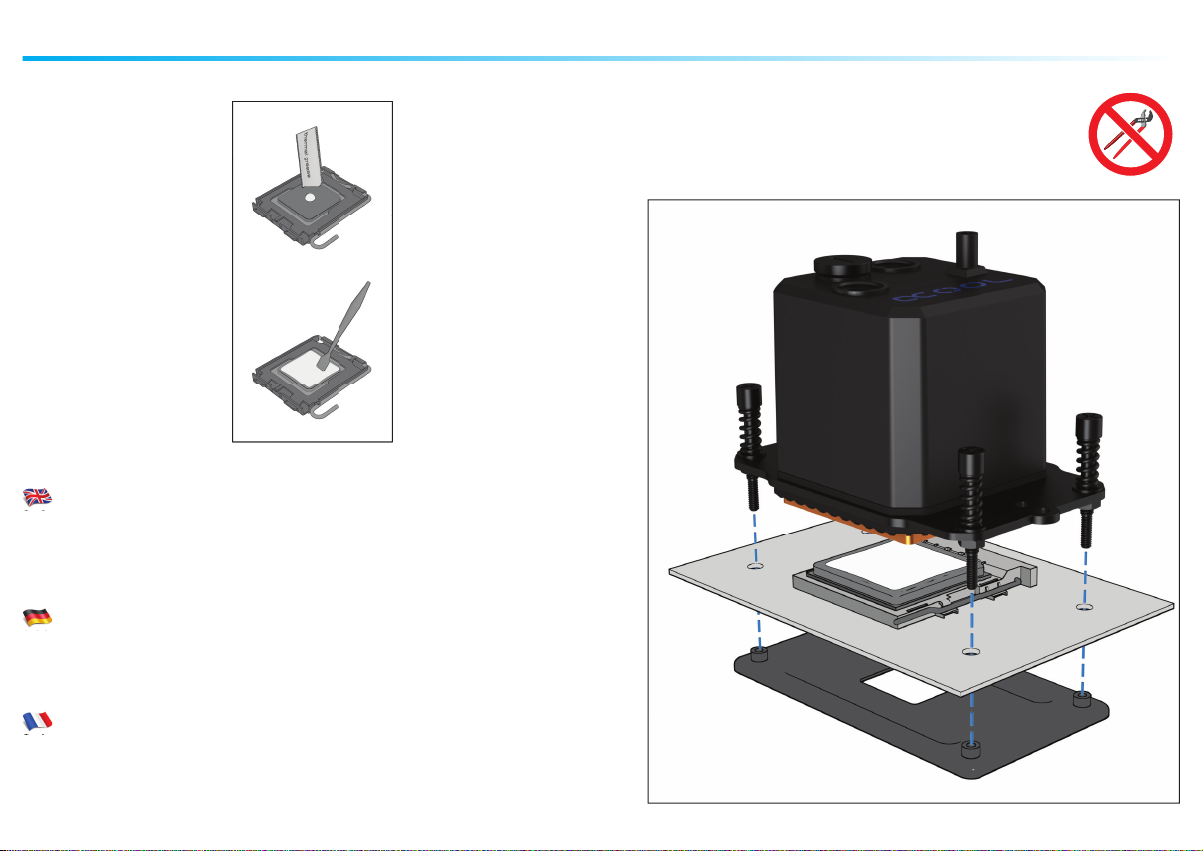
CPU mounting - CPU Montage - montage de CPU AMD
3
4
3. Spread thermal grease on the CPU (< 0,5mm coating thickness)
4. Mount the cooler – using the backplate (included with the motherboard) – onto
the socket
Hand-tighten screws crosswise
3. Wärmeleitpaste auf CPU auftragen (< 0,5mm Schichtdicke)
4. Kühler - mit Hilfe der Backplate (liegt dem Mainboard bei) - am Sockel montieren
Schrauben kreuzweise, handfest anziehen
3. Appliquer la graisse thermique sur le CPU (< 0,5mm épaisseur)
4. Installer refroidisseur à socket à l’aide de plaque arrière (incluse avec la carte
mère)
Serrez les vis de manière croisé à la main
15
Page 16

screw mounting - Schraubenmontage - montage de vis AMD
AM4
RYZEN
Select corresponding bracket + screws
1. Plug bracket together
2. Place compression springs and two different washers onto screws + attach to
mount with nuts
Passende Halterung + Schrauben wählen
1. Halterung zusammenstecken
2. Druckfedern und zwei verschiedene Unterlegscheiben auf Schrauben aufstecken +
mit Muttern an Halterung befestigen
Choisir support et vis
1. Assembler support
2. En ler ressorts et deux rondelles différentes sur vis + xer avec des écrous sur
support
1
2
screw
spring
washer 0.8
washer 2.0
nut
M4
UNC 6-32
10,5
16
Page 17

CPU mounting - CPU Montage - montage de CPU AMD
3
4
3. Spread thermal grease on the CPU (< 0,5mm coating thickness)
4. Mount the cooler – using the backplate (included with the motherboard) – onto
the socket
Hand-tighten screws crosswise
3. Wärmeleitpaste auf CPU auftragen (< 0,5mm Schichtdicke)
4. Kühler - mit Hilfe der Backplate (liegt dem Mainboard bei) - am Sockel montieren
Schrauben kreuzweise, handfest anziehen
3. Appliquer la graisse thermique sur le CPU (< 0,5mm épaisseur)
4. Installer refroidisseur à socket à l’aide de plaque arrière (incluse avec la carte
mère)
Serrez les vis de manière croisé à la main
17
Page 18

radiator mounting - Radiator Montage - montage de radiateur
1. Choose suitable place in your case
2. Mount the radiator with M3 screws
3. The direction of the fans can be selected
individually. We recommend to mount the fan so
that they blow out of the case. Make sure the fans
blow in the same direction in Push&Pull mode.
(See „Radiator Placement Tips“ p.14)
18
1. Passende Öffnung im Gehäuse wählen
2. Radiator mit M3 Schrauben montieren
3. Die Ausrichtung der Lüfter kann individuell
gewählt werden. Wir empfehlen, die Lüfter so zu
montieren, dass sie aus dem Gehäuse heraus
blasen. Achten Sie bei Push&Pull Betrieb darauf,
dass die Lüfter in die gleiche Richtung blasen.
(Siehe „Radiator Platzierungs Tipps“ S.14)
1. Sélectionner ouverture appropriée dans le boîtier
2. Installer le radiateur avec des vis M3
3. L‘orientation des ventilateurs peut être
sélectionné individuellement. Nous vous
recommandons de monter le ventilateur de sorte
qu‘ils souffl ent au dehors. Assurez-vous les
ventilateurs souffl ent dans la même direction durant
l‘opération du Push&Pull.
(voir „Conseils de radiateur placement“ p.14)
Page 19
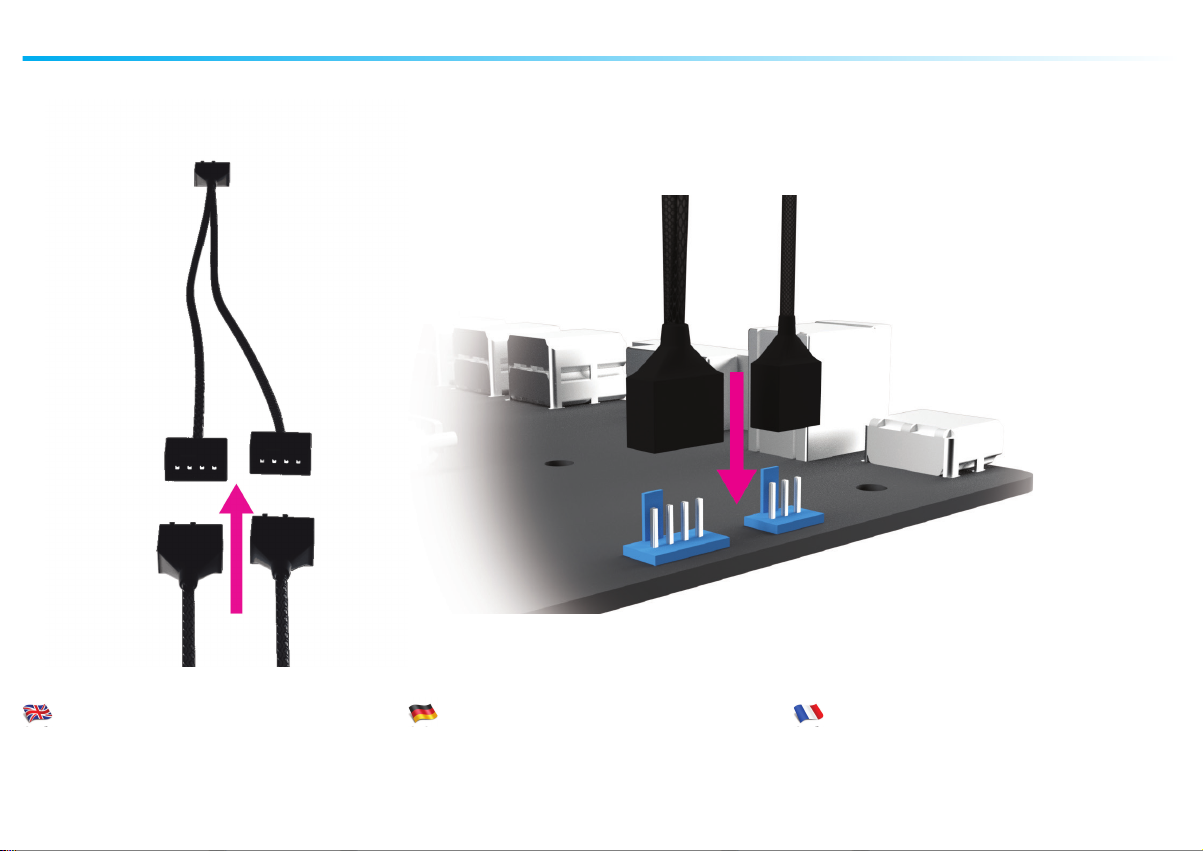
connecting fans & pump - Lüfter & Pumpe anschließen - brancher ventilateur & pompe
fan adapter pump
1. Connect fans with PWM adapter
2. Connect the fan + pump to mainboard
1. Lüfter mit PWM Adapter verbinden
2. Lüfter + Pumpe am Mainboard anschließen
1. Connecter les fans avec adaptateur PWM
2. Connecter les ventilateurs + pompe à
mainboard
19
Page 20

expanding with Eiswolf AiO - Erweitern mit Eiswolf AiO - expansion avec Eiswolf AiO
1. Switch off the PC
2. Loosen the quick release connector (attention, 1-2 drops of water may leak)
3. Insert graphics card with Eiswolf cooler
4. Link Eisbaer outlet (red) with Eiswolf inlet (blue)
5. Connect the radiators to a closed circuit
Always combine red with blue quick release parts
Further expansion possibilities: - Eisbaer Ready Radiators (pre-filled)
- Standard GPX Cooler with Eisbaer Extension
Set or Quick-Connect Extension Kit
1. PC ausschalten
2. Schnellverschluss lösen (beachten Sie, dass beim Lösen der Kupplungen, 1-2 Tropfen
Wasser austreten können)
3. Gra kkarte mit Eiswolf Kühlung einsetzen
4. Eisbaer Auslass (rot) mit Eiswolf Einlass (blau) verbinden
5. Radiatoren zu geschlossenem Kreislauf verbinden
Es werden immer rote mit blauen Schnellverschlussteilen gekoppelt
weitere Erweiterungsmöglichkeiten: - Eisbaer Ready Radiatoren (vorbefüllt)
- Standard GPX Kühler mit Eisbaer Extension Set
oder Quick-Connect Extension Kit
1. Arrêter l‘ordinateur
2. Desserrer verrouillage rapide (attention, 1-2 gouttes d‘eau peuvent fuite)
3. Insérez carte graphique avec Eiswolf refroidisseur
4. Combiner Eisbaer outlet (rouge) avec entrée Eiswolf (bleu)
5. Raccorder les radiateurs à un circuit fermé
Toujours combiner le rouge avec les parties bleues de dégagement rapide
Autres possibilités d'expansion: - Eisbaer Ready Radiateur (pré-rempli)
- Standard GPX refroidisseur avec Eisbaer Extension Set
ou Quick-Connect Extension Kit
20
Page 21

radiator placement tips - Radiator Platzierungs Tipps - Conseils de radiateur placement
21
Page 22

Page 23

Imprint:
Alphacool International GmbH
Marienberger Str. 1
38122 Braunschweig
Head Ofce: +49 (0) 531 28874 - 0
Fax: +49 (0) 531 28874 - 22
E-Mail: info@alphacool.com
General Manager: Fabian Noelte
WEEE-Reg.-Nr.: DE 54464644
Trade Register: Amtsgericht Braunschweig HRB 202390
VAT.ID.Nr.: DE27058421
Tax number: 13/207/02047
 Loading...