

Page 1
(PATENT PENDING)
Alpha Communications® and Alpha Media, Inc.
VisitorVerifier™ V.1.0 - Telephone Entry Style
Server/ Entry/ Master Manual
Alpha Communications®
42 Central Drive
Farmingdale, NY 11735-1202
Phone: 631-777-5500 Fax: 631-777-5599
Copyright© 2006-2007 Alpha Communications® All Rights Reserved.
VVSEMManual (09/07) Rev. 1
i
Page 2

LICENSE AGREEMENT
ALPHA MEDIA, INC. VISITORVERIFIER™, ALL VERSIONS, AND SOFTWARE RELATED COMPONENTS. END-USER LICENSE AGREEMENT FOR ALPHA
MEDIA, INC. SOFTWARE
IMPORTANT-READ CAREFULLY: This Alpha Media, Inc. End-User License Agreement ("EULA") is a legal agreement between you (either an individual or a
single entity) and Alpha Media, Inc. Corporation for the Alpha Media, Inc. software product(s) identified above which may include associated software
components, media, printed materials, and "online" or electronic documentation ("SOFTWARE PRODUCT"). By installing, copying, or otherwise using the
SOFTWARE PRODUCT, you agree to be bound by the terms of this EULA. If you do not agree to the terms of this EULA, do not install or use the SOFTWARE
PRODUCT.
The SOFTWARE PRODUCT is protected by copyright laws and international copyright treaties, as well as other intellectual property laws and treaties. The
SOFTWARE PRODUCT is licensed, not sold.
1. GRANT OF LICENSE. The SOFTWARE PRODUCT is licensed as follows:"
* Installation and Use. Alpha Media, Inc. grants you the right to install and use copies of the SOFTWARE PRODUCT on your computers running validly licensed
copies of the operating system for which the SOFTWARE PRODUCT was designed [e.g., Windows® 98; Windows NT®; Windows2000®; Windows2003
Server®; Windows Me®; Windows XP®]; Windows Vista®]."
* Backup Copies. You may also make copies of the SOFTWARE PRODUCT as may be necessary for backup and archival purposes.
* Components. Certain software components of the SOFTWARE PRODUCT are subject to the following additional provisions:
2. DESCRIPTION OF OTHER RIGHTS AND LIMITATIONS.
* Maintenance of Copyright Notices. You must not remove or alter any copyright notices on all copies of the SOFTWARE PRODUCT.
* Distribution. You may not distribute copies of the SOFTWARE PRODUCT to third parties.
* Prohibition on Reverse Engineering, Decompilation, and Disassembly. You may not reverse engineer, decompile, or disassemble the SOFTWARE
PRODUCT, except and only to the extent that such activity is expressly permitted by applicable law notwithstanding this limitation.
* Rental. You may not rent, lease, or lend the SOFTWARE PRODUCT.
* Transfer. You may permanently transfer all of your rights under this EULA, provided the reci pient agrees to the terms of this EULA.
* Support Services. Alpha Media, Inc. may provide you with support services related to the SOFTWARE PRODUCT ("Support Services"). Use of Support
Services is governed by the Alpha Media, Inc. polices and programs described in the user manual, in "on line" documentation and/or other Alpha Media, Inc.provided materials. Any supplemental software code provided to you as part of the Support Services shall be considered part of the SOFTWARE PRODUCT
and subject to the terms and conditions of this EULA. With respect to technical information you provide to Alpha Media, Inc. as part of the Support Services,
Alpha Media, Inc. may use such information for its business purposes, including for product support and development. Alpha Media, Inc. will not utilize such
technical information in a form that personally identifies you, without your
permission.
* Compliance with Applicable Laws. You must comply with all applicable laws regarding use of the SOFTWARE PRODUCT.
3. TERMINATION. Without prejudice to any other rights, Alpha Media, Inc. may terminate this EULA if you fail to comply with the terms and conditions of this
EULA. In such event, you must destroy all copies of the SOFTWARE PRODUCT.
4. COPYRIGHT. All title, including but not limited to copyrights, in and to the SOFTWARE PRODUCT and any copies thereof are owned by Alpha Media, Inc.
or its suppliers. All title and intellectual property rights in and to the content which may be accessed through use of the SOFTWARE PRODUCT is the property
of the respective content owner and may be protected by applicable copyright or other intellectual property laws and treaties. This EULA grants you no rights to
use such content. All rights not expressly granted are reserved by Alpha Media, Inc.
5. U.S. GOVERNMENT RESTRICTED RIGHTS. The SOFTWARE PRODUCT is provided with RESTRICTED RIGHTS. Use, duplication, or disclosure by the
Government is subject to restrictions as set forth in subparagraph (c)(1)(ii) of the Rights in Technical Data and Computer Software clause at DFARS 252.2277013 or subparagraphs (c)(1) and (2) of the Commercial Computer Software Restricted Rights at 48 CFR 52.227-19, as applicable. Manufacturer is Alpha
Media, Inc. 42 Central Drive, Farmingdale, NY 11735-1202.
6. EXPORT RESTRICTIONS. You agree that you will not export or re-export the SOFTWARE PRODUCT to any country, person, entity or end user subject to
U.S.A. export restrictions. Restricted countries currently include, but are not necessarily limited to Cuba, Iran, Iraq, Libya, North Korea, Sudan, and Syria. You
warrant and represent that neither the U.S.A. Bureau of Export Administration nor any other federal agency has suspended, revoked or denied your export
privileges.
7. NO WARRANTIES. Alpha Media, Inc. expressly disclaims any warranty for the SOFTWARE PRODUCT. THE SOFTWARE PRODUCT AND ANY
RELATED DOCUMENTATION IS PROVIDED "AS IS "WITHOUT WARRANTY OF ANY KIND, EITHER EXPRESS OR IMPLIED, INCLUDING, WITHOUT
LIMITATION, THE IMPLIED WARRANTIES OR MERCHANTABILITY, FITNESS FOR A PARTICULAR PURPOSE, OR NONINFRINGEMENT. THE ENTIRE
RISK ARISING OUT OF USE OR PERFORMANCE OF THE SOFTWARE PRODUCT REMAINS W ITH YOU. THIS SOFTWARE IS DISTRIBUTED ON A FREE
90-DAY TRIAL BASIS. IT IS THE CUSTOMER'S RESPONSIBILITY TO FULLY USE AND TEST THIS SOFTWARE, BEFORE PURCHASING, TO
DETERMINE IF THE SOFTWARE MEETS THE CUSTOMER'S NEEDS, AND PERFORMS TO THE CUSTOMERS 100% SATISFACTION. IF IN ANY WAY
THE SOFTWARE IS UNSATISFACTORY OR IS NON-FUNCTIONING, THE CUSTOMER SHALL NOT REGISTER OR PAY FOR THE SOFTWARE. ONCE
THE CUSTOMER REGISTERS OR PAYS FOR THE SOFTWARE, THE CUSTOMER HAS ACCEPTED THE SOFTW ARE 'AS-IS' AND WILL NOT BE
ENTITLED TO ANY REFUND OR COMPENSATION OF ANY KIND.
8. LIMITATION OF LIABILITY. To the maximum extent permitted by applicable law, in no event shall Alpha Media, Inc. or its suppliers be liable for any special,
incidental, indirect, or consequential damages whatsoever (including, without limitation, damages for loss of business profits, business interruption, loss of
business information, or any other pecuniary loss) arising out of the use of or inability to use the SOFTWARE PRODUCT or the provision of or failure to provide
Support Services, even if Alpha Media, Inc. has been advised of the possibility of such damages. In any case, Alpha Media, Inc.'s entire liability under any
provision of this EULA shall be limited to the replacement of any registered software that has been determined by Alpha Media Inc. to be defective. Because
some states and jurisdictions do not allow the exclusion or limitation of liability, the above limitation may not apply to you.
9. MISCELLANEOUS.
This EULA is governed by the laws of the State of New York, U.S.A.
Should you have any questions concerning this EULA, or if you desire to contact Alpha Media, Inc. for any reason, please contact the Alpha Media, Inc.
subsidiary serving your country, or write: Alpha Media, Inc., 42 Central Drive, Farmingdale, NY 11735-1202. You may contact us by
phone at 631-777-5500 or fax at 631-777-5599 or by email at info@alphamedia.net
ii
Page 3

CHAPTER 1
Introduction
1
System Requirements
- Server
2
System Requirements
– Entry or Remote Cameras
3
CHAPTER 2
-
4
The Server
4
The User ( Tenant/ Client)
6
The Master
6
The Entry
6
Remote Cameras
6
CHAPTER 3
-
7
T
he VisitorVerifier™ Encoder
- Description &
7
Camera Connections
- Description & Installation
8
CHAPTER 4
-
9
Installing VisitorVerifier™ Software
9
Network Setup
11
Server
- Initial Configuration
12
Server
- Entry Setup
12
Server
- Camera Setup
13
Remote Cam Configuration
13
Server
- User Setup
14
Entry
- Configuration
15
Entry
- Camera Setup
16
CHAPTER
5 -
17
Starting VisitorVerifier ™
17
Table of Contents
Server/ Entry/ Master Manual
for Telephone Entry Systems
VisitorVerifier™ Software Components
VisitorVerifier™ Hardware Components
Installation
iii
VisitorVerifier™ Setup & Configuration
VisitorVerifier™ User Manual
Page 4

Exiting VisitorVerifier ™
17
The VisitorVerifier ™ Main Screen
18
PinkNotes™
19
QwikCLIQ™
22
QwikCAM™
24
iv
Page 5

1
PLEASE NOTE
Introduction
Chapter
V
communications.
Over the years apartment buildings, commercial buildings, and residences have been
using intercom systems for convenience and security of their residents. Many of these systems
have been in these buildings for several years and do not benefit from the latest electronic
advances. Replacing an intercom system to update the available features is neither a small
undertaking or small expense.
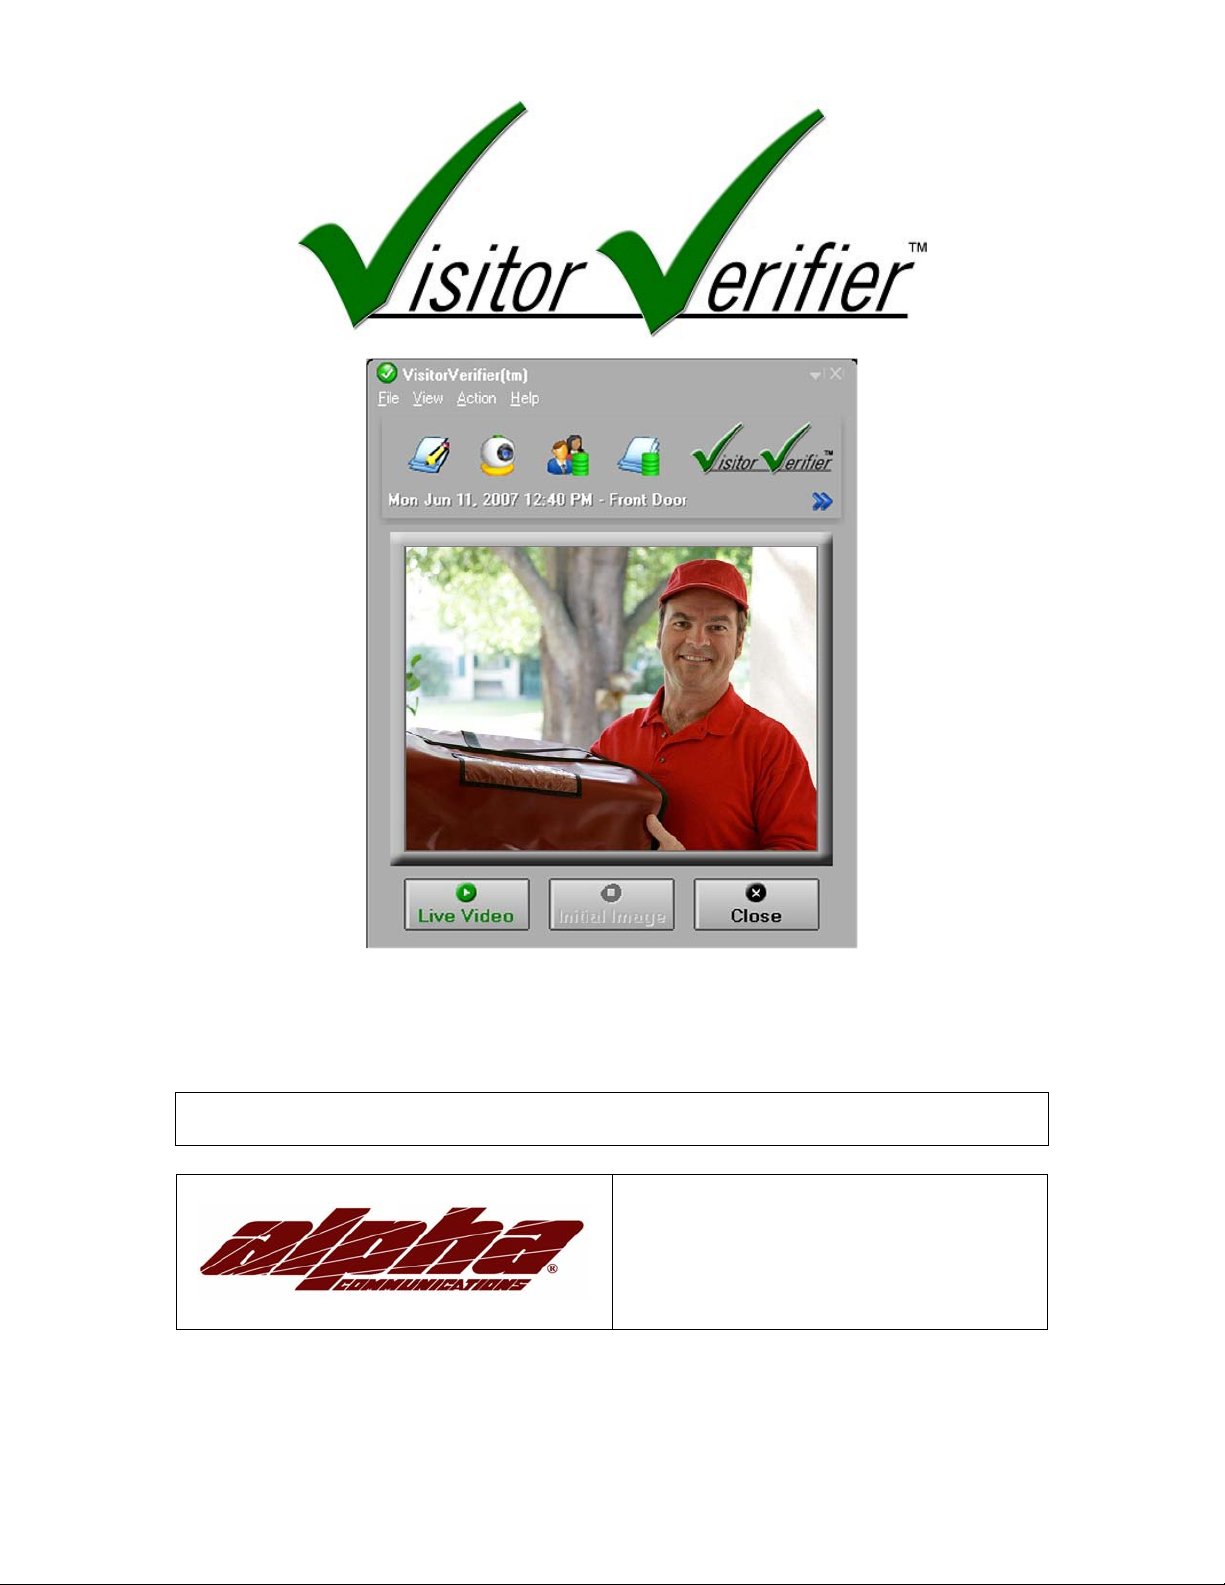
With VisitorVerifier™ you will be able to see who is at your entry on your
Windows compatible PC while communicating to them through your existing intercom. If
you are not available when a visitor calls, the date, time, and a still picture of your visitor will
be saved on screen for your reference and logged.
With additional equipment, cameras throughout your building/residence can be easily
viewed for your security and peace of mind.
VisitorVerifier™ also comes with a special integrated version of Alpha Media’s
PinkNotes® Instant Messaging Software which, in the case of apartment complexes, will
allow building management to send specific individual messages or group announcements,
and notifications to tenant apartments and other personnel that are equipped with
VisitorVerifier™ and connected to the server by local area network or the internet. Tenants
would also be able to send and receive real-time messages to/from specified building
personnel (i.e. Concierge, Parking Attendant, Maintenance) as well as other tenants if this
feature is enabled. Tenants are able to block messages from specific locations at their option.
Please check with local authorities to determine what restrictions, if any, may be applicable.
1
isitorVerifier™ answers today’s demands for increased security and
: In some jurisdictions there are laws regulating video camera recording.
Page 6

THIS MANUAL IS SPECIFICALLY FOR USE WITH TELEPHONE ENTRY SYSTEMS.
FOR INFORMATION REGARDING CONNECTION TO EXISTING HARDWIRED
INTERCOM SYSTEMS PLEASE CONTACT ALPHA COMMUNICATIONS FOR
2
Page 7

System Requirements
The following system requirements must be met to run the VisitorVerifier ™ Server
application correctly.
• A Windows compatible PC with hard drive, CD or DVD player
• Pentium 4 Processor or Higher
• Your operating system must be Windows 2000/XP/Windows 2003
Server/Vista
• 512 MB of RAM (minimum)
• A DSL or Cable modem 24/7 broadband internet connection
If Server machine will also be used as an Entry unit the following are required:
• USB or serial port for the VisitorVerifier ™ encoder interface
• One available USB port for each Entry camera connected
• USB Video Grabber for each Coax/non-digital CCTV type camera
Requirements for optional features:
• One available serial port or additional USB port with serial adapter (if relay
boards will be used).
• Additional equipment may be required for special customized applications.
Please contact Alpha Communications® for more information.
(Server)
IMPORTANT SYSTEM NOTES
To prevent conflicts between the VisitorVerifier ™ server and other installed software, it is
highly recommended that the computer be used exclusively for VisitorVerifier ™ and not
loaded with any additional software or used for any other purposes with the possible
exception of AlphaEntry™ (please check with Alpha Communications® regarding your
system configuration). In addition, system power management/hibernation options should be
disabled.
To ensure system reliability and longevity, please check that all hardware is installed and
configured as per manufacturer’s recommendations and all manufacturer’s distance
limitations and cabling requirements are observed.
When planning your installation, consider distance limitations, and potential electromagnetic
interference (EMI) sources.
As with any computer, it is recommended that a quality Battery back up/surge
3
Page 8

protector/power filter be used for all devices and components connected to 110VAC power.
This server contains the database of information for this system. Because of this, regular
backups should be performed to prevent permanent loss of data in the event of hardware
failure.
4
Page 9

System Requirements
The following system requirements must be met to run the VisitorVerifier ™ Entry
application correctly.
• A Windows compatible PC with hard drive, CD or DVD player
• Pentium 4 Processor or Higher
• Your operating system must be Windows 2000/ XP/ Windows 2003 Server/
Vista
• 512 MB of RAM (minimum)
• A DSL or Cable modem 24/7 broadband internet connection or local area
network to the VisitorVerifier ™ Server.
• One USB or serial port for the VisitorVerifier ™ encoder interface
• One USB port for each Entry camera connected
• USB Video Grabber for each Coax/non-digital CCTV type camera
Requirements for optional features:
• One available serial port or additional USB port with serial adapter (if relay
boards will be used).
• Additional equipment may be required for special customized applications.
Please contact Alpha Communications® for more information.
(Entry or Remote Camera)
IMPORTANT SYSTEM NOTES
A computer used at a VisitorVerifier ™ entrance should remain on at all times and system
power management/ hibernation options should be disabled. Please be aware that it is
possible that other programs being run on this computer may cause conflicts with
VisitorVerifier ™
To ensure system reliability and longevity, please check that all hardware is installed and
configured as per manufacturer’s recommendations and all manufacturer’s distance
limitations and cabling requirements are observed.
When planning your installation, consider distance limitations, and potential electromagnetic
interference (EMI) sources.
As with any computer, it is recommended that a quality Battery back up/surge
protector/power filter be used for all devices and components connected to 110VAC power.
5
Page 10
2
Chapter
Software Components
The Server
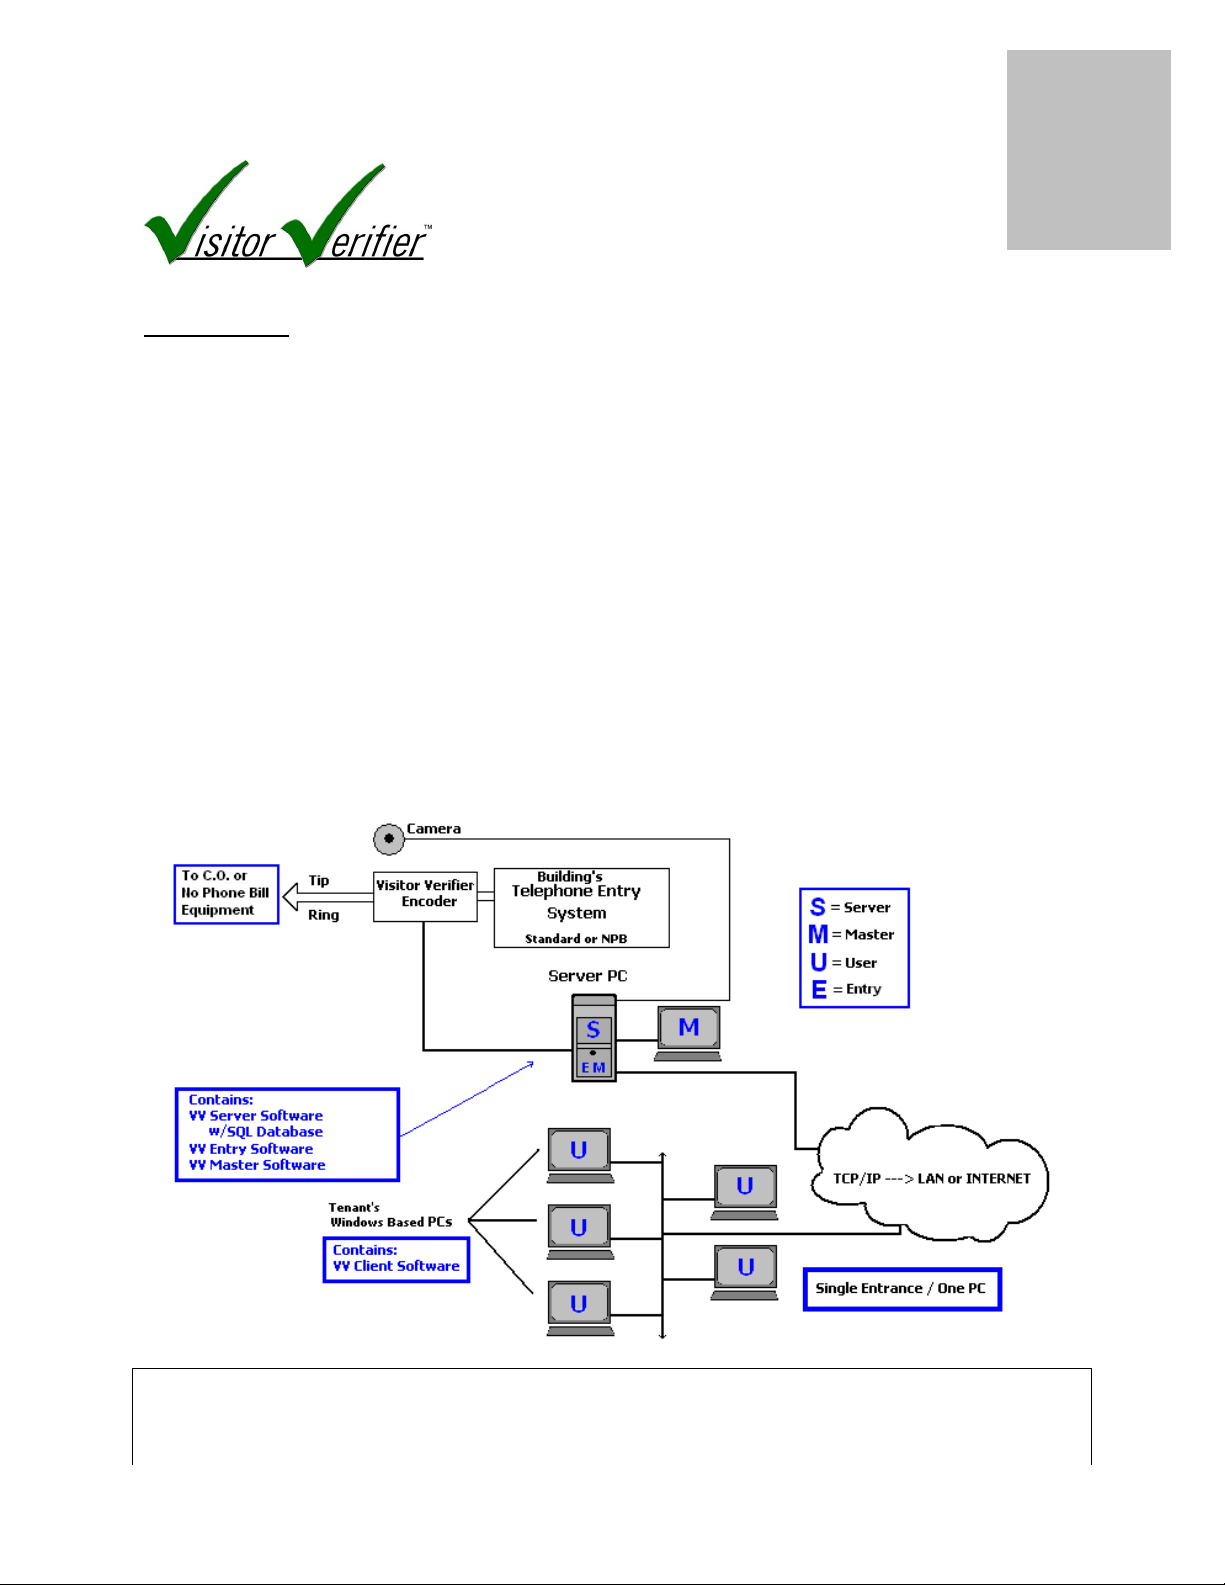
The server is a Windows based PC that is the central hub of your VisitorVerifier™
system. It contains the database of tenant's (a.k.a. client or user) information as well as
information on all entrances and masters.
When an entry is triggered, it is one of the jobs of the server to determine which
tenant is being called and correctly route the picture and necessary information to the
tenant's computer(s) through a local area network or internet connection. The server is also
in contact with the Alpha Media VisitorVerifier™ server which enables your system to
operate over the internet and keeps track of the necessary IP addresses on your network
needed for proper VisitorVerifier™ operation. The computer that is used for the server can
also have Entry, Remote Camera, Master, or User Software which is often the configuration
for small systems. The machine designated as the server for the system MUST have a full time
internet connection. The server can be connected to the building through the Internet from
another location, but onsite is preferable for optimum performance. Below is a diagram of a
basic single entrance system of this configuration.
This small building application contains a concierge station which is used as the
server, master, and entry computer. Note the list of software in each PC. The building has a
telephone entry system and uses one entrance camera. The concierge has the ability to instant
6
Page 11

message the tenants with PinkNotes® and the tenants can send PinkNotes® to the concierge
or other tenants on the system.
7
Page 12
The Software Components (continued)
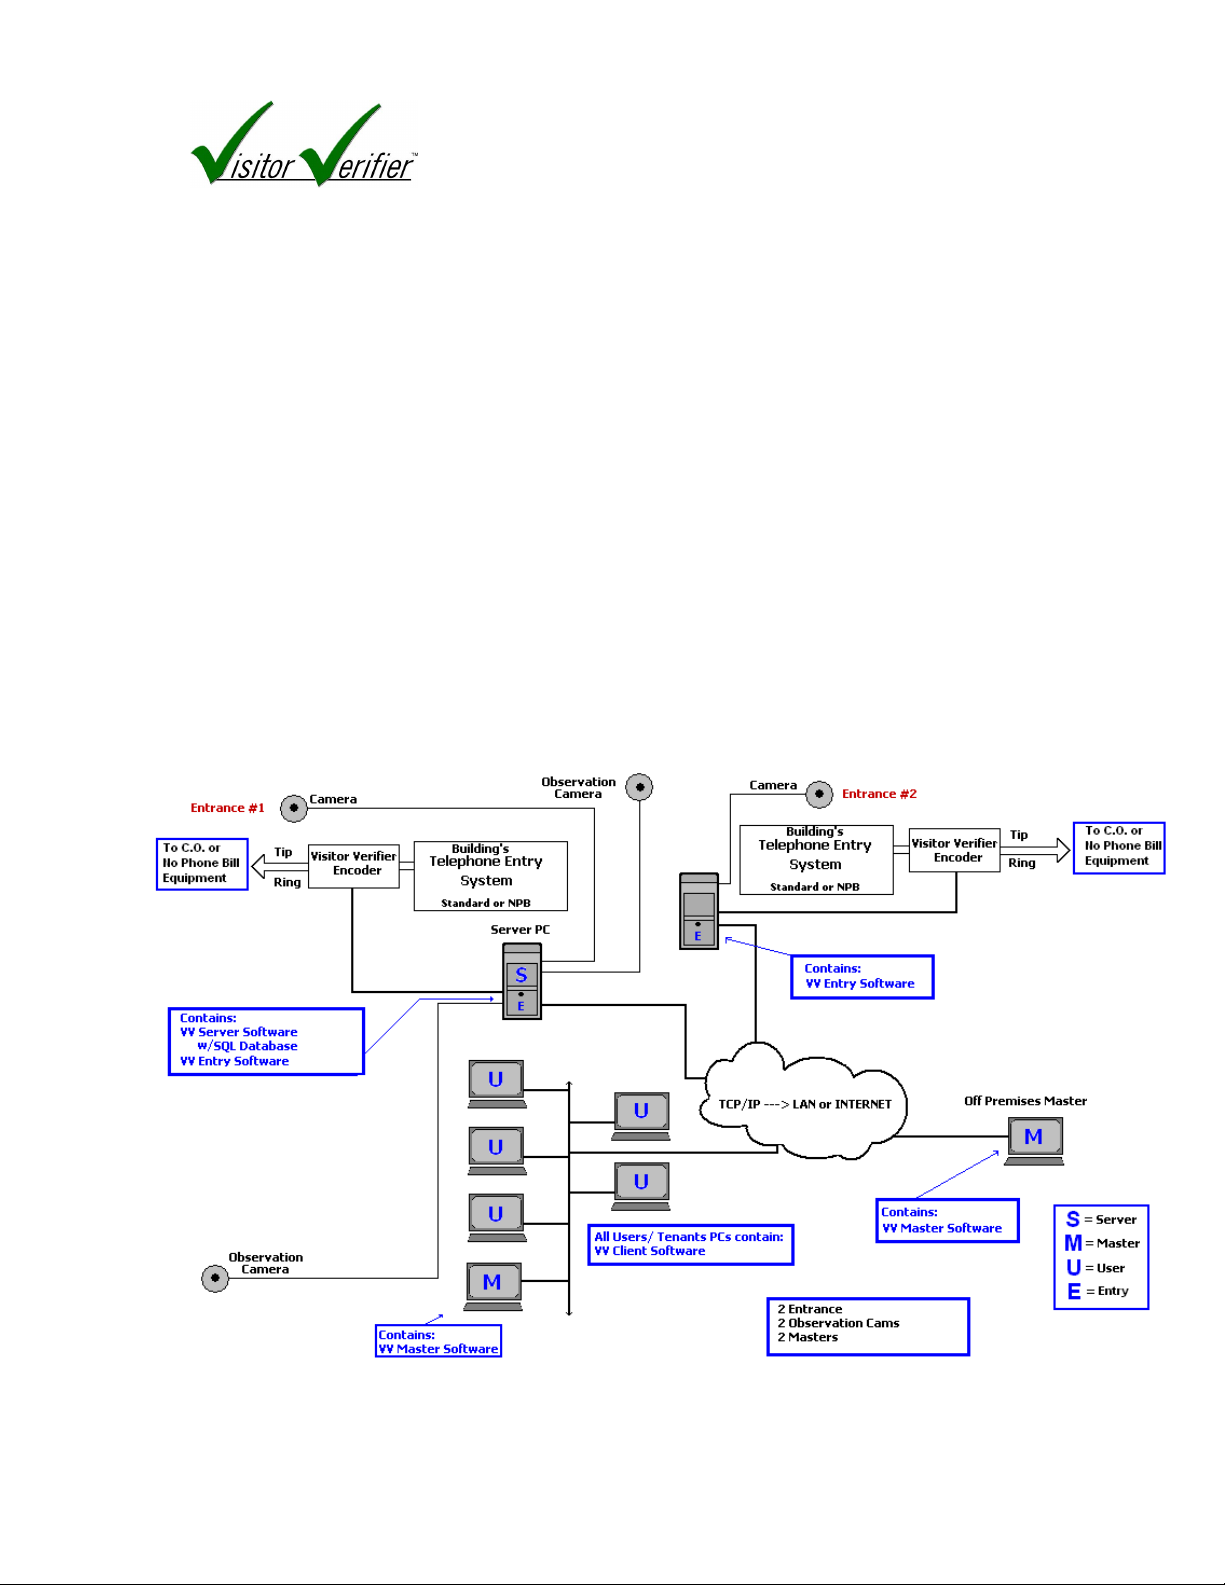
Because every building and its needs are different VisitorVerifier™ can be easily
configured to support:
A large number of tenants
Multiple Buildings
Multiple Master stations on or off premises
Multiple Entrances
Multiple Remote Cameras
The only limiting factors are the server’s processing speed and memory and the speed
of your internet connection.
Below is a diagram of a more complex system demonstrating two entrances, two
observation QwikCAM™ cams, and two master stations (one located off premises).
8
Page 13

The Software Components (continued)
User software
The Users (a.k.a. clients/tenants/residents) are Windows based PCs in the tenant
apartments that are NOT dedicated to VisitorVerifier™ alone. In addition to all the normal
things the tenants do with their computers, a small piece of software running in the
background will allow them to be connected to the server. When their apartment is called by
the existing intercom system, whether telephone entry or conventional intercom, the
VisitorVerifier™ pop-up box will display the calling entrance camera video.
The users also have the capability to receive and send IMs with PinkNotes® messages
to the master(s) which could be the concierge, building management, parking garage,
maintenance, or other building services, and to other users within their own apartment or in
another apartment in the same system if equipped.
If the building has additional building and/or suite cameras connected into the system,
the user can access these cameras through the QwikCam™ feature.
Master software
The Masters are also Windows based PCs and have all the features that are available to
the users. In addition, the Master can receive and send PinkNotes® to any apartment or any
other master on the system individually or by group. The master also has the ability to list the
apartments alphabetized by Name or Location.
Masters with Administrator level access can change information or system configuration
through any location that they are logged on to.
Entry software
Any Entry camera that is added to the system must be attached to a Windows based
PC that contains the Entry Software. Cameras are required to be either USB type (webcam
style) which would plug directly to an available USB port on the computer OR a
conventional coax type camera that requires an adapter from coax to USB (see hardware
component descriptions). An entry camera can be attached to any PC on the VisitorVerifier™
network. This computer should be ON at all times. If it is not on, the camera will not be
available to the system.
Remote Camera software
Any remote camera that is added to the system must be attached to a Windows based PC that
contains one copy of the Remote Cam Software for each camera unless it is connected
9
Page 14

directly to the server PC. Cameras are required to be either USB type (webcam style) which
would plug directly to an available USB port on the computer OR a conventional coax type
camera that requires an adapter from coax to USB (see hardware component descriptions).
An entry camera can be attached to any PC on the VisitorVerifier™ network. This computer
should be ON at all times. If it is not on, the camera will not be available to the system.
10
Page 15

The VisitorVerifier
™ encoder kit (VV100K)
3
Hardware Components
The VisitorVerifier™ Encoder
is comprised of two separate circuit boards.
The VV100D isolator circuit, and the
VVDTMF Encoder.
The encoder is required when
VisitorVerifier™ is used in conjunction with
a telephone entry based intercom system.
This device monitors the telephone entry
equipment to determine who the call is
being placed to so the video can be sent to
the proper computer location.
VV100K
Chapter
INSTALLATION PROCEDURE
1. Choose a suitable clean, dry place to mount the encoder boards. Try to mount them
in an area away from other power sources. Although they are resistant to EMI (
electrical interference) it is good practice to take this precaution. They may be
mounted to a non-conductive board or enclosed in a plastic case.
2. Locate the Tip and Ring wires coming from your existing telephone entry unit. If you
are using a standard dial type system, these are the wires that go to the telephone
company Central Office (aka. Dedicated phone line). If you are using a “No Phone
Bill” type system, these wires will be the wires going from the telephone entry unit to
the Relay cabinets.
3. These wires must be connected to the VV100D board using either the screw terminals
or the RJ-11 jacks, whichever is more convenient. There is no difference between any
of these connections, and the polarity of the tip and ring wires do not matter to the
boards, however, it is recommended that the polarity of the tip and ring of the
telephone entry system be observed as a precaution.
4. Connect the Serial Connector on the VVDTMF board to the computer with the entry
software using either a 9 pin serial to USB adapter cable ( to a Comm port with a USB
11
Page 16

connection) or a regular 9 pin serial cable to a Comm port with a standard 9 pin
connection.
5. Connect the SS12P power supply to the power jack on the VV100D board. Check
that the polarity is correct on the power wires between the two boards before
plugging in the SS12P.
12
Page 17

adapter
Coax to RCA female adapter
or equivalent
When using a “web cam” style camera (one that has a
Camera Inputs
Analog Camera Connection
When connecting a coax type security camera or a BNC output camera, you must convert
the analog signal of the video to a digital signal to send to the PC. This is done through a
“video grabber” or similar device. Use whatever adapters are required to connect to the
female RCA jack of the grabber input side, and connect the video grabber’s output side
through the attached USB connector to the computer with the Entry or Remote Camera
software installed. The video adapter may be comprised of several different components.
Some examples are shown below.
Dome type Camera w/
BNC female connection
BNC male to RCA female
(#CONN7398)
RCA cable ( male ends)
Video Grabber
Model# VV-USB2800D
Coax type Camera
(#CONN360)
RCA cable (male ends)
Video Grabber
Model# VV-USB2800D
Digital Camera Connection
USB connector ) this adapter is not required as the
camera is already sending data in digital format and can
be connected directly to the computer USB port.
Many web type cams can be easily adapted to work as a
13
Page 18

14
Page 19

4
Chapter
Installing
Before installing the VisitorVerifier™ Server software you need to register the building you
will be installing the software in. To register the building first go to our website
www.VisitorVerifier.com.
If you already have setup an account on the VisitorVerifier™ website, click on the "Account
Login" button on the top right side of the home page. If you do not have an account yet you will
need to apply for one.
If you are an Installer click on the "Apply Now" button under the Installer column. If you are a
Building Manager who is doing the installation for your own building click on the "Apply
Now" button under the Building Manager column.
Once you are logged into your account, in the left column click on the "Add New Building"
link to register the building. When you go to register the building you will need your
registration code. This code is located on the label on the back of the CD and the "Qwik Start"
sheet that you received in your VisitorVerifier™ kit.
When you have finished registering the building you will receive the account number for that
building to use during the installation of the Server and Entry software.
Software
CLIENT [vv100c.exe]
This component is found on the main disk and is to be installed in the end user computers
(Resident or Master)or in computers that are connected to additional cameras. They come with
their own installation procedure.
REMOTE CAMERA [vv100r.exe]
This component is found on the main disk and is to be installed in computers that are connected
to additional QwikCAM™ cameras.
15
Page 20

The server component is only
to be installed on one computer in the system. This
The entry component is to be installed on
any computer in the system where an
SERVER / ENTRY [vv100se.exe]
The two component programs on this installation disk are:
Server
is the computer that will control the operation of the complete
VisitorVerifier ™ system, and where the VisitorVerifier ™ database will reside.
Entry
entry cam and encoder kits will be connected.
To begin the installation of VisitorVerifier ™, please insert the CD into a CD-Rom drive.
The installation wizard will guide you through the process of installation.
Opening Screen End-User License Agreement Select Destination
Directory
Alpha Media, Inc. recommends that VisitorVerifier ™ is installed in the default
directory (C:\Program Files\VisitorVerifier \).
Select Components to Install Select Program Folder Start Copying Files
16
Page 21

After the files have been copied to the
choose and save in a safe place.
machine, if this is a Server installation, the
box to the right will pop up and ask you to
Please make note of the password you
Once the software has completed the installation process, click the “Finish” button to
close the installation program and begin the configuration.
17
Page 22

VisitorVerifier™ Network Setup
To allow residents to connect from their computers to the VisitorVerifier™ Server over the
Internet, you will need to configure the firewall/router that the VisitorVerifier™ Server is set
up behind. To set up the network so it can be accessed properly from the Internet you will
need to have access to go into your firewall/router settings. The firewall/router settings are
normally configured through a web browser. All firewall/routers are a little different so you
may want to find that manual before continuing.
In the firewall/router setup screen you will need to find the area that is normally called the
“port forwarding” setup. Basically what needs to be done is any traffic that comes into your
firewall/router on any of the ports that VisitorVerifier™ uses needs to be forwarded to the
local IP that you have your VisitorVerifier™ Server running on.
NOTE: VisitorVerifier™ uses 6 different port numbers, 1433 and 9105 through 9109. All of
these port numbers need to be forwarded.
For example, if the local IP address of your VisitorVerifier™ Server is "192.168.1.100", then in
your firewall/router settings you will need to specify that any incoming traffic on ports 9105
through 9109 be forwarded to "192.168.1.100".
IMPORTANT: the machine that the VisitorVerifier™ Server is located on may also have its
own personal firewall software on it for additional security. Many different types of anti-virus
packages have a software firewall in them that block any outside access to the computer.
Also, any versions of Microsoft Windows after XP have the Windows Firewall built into
them. To allow access to your machine you will need to configure the personal firewall
software to allow traffic for the VisitorVerifier™ Server to be allowed to enter that machine.
Normally these settings are listed in an area called “Exceptions” in the personal firewall
settings.
18
Page 23

NOTE: If you have installed both the Server softwa
re and the Entry software,
please configure the Server first.
Enter the Administrator’s password that you
Right Click on the VV
Server icon in your
This window shows all existing entries on
Enter your building account number which
SERVER Configuration
SERVER CONFIGURATION
The first time that the server is started, the following configuration windows will appear.
They are explained below.
you received during the online registration
process.
are using for system access.
SERVER Entry Setup
Windows tray. As illustrated to the right, a menu
will pop up. Left click on Entry Setup to
your system. To add a new entry click the
button at the bottom left and enter the
following information.
1. The Entry name
2. Check the Telephone Entry box
3. Enter the serial Comm port that this
entrance will be connected to on the
P.C.
To change any of this information for this or any other entries, click on the entry name on
the left and edit the entry information on the right. The changes will be automatically saved
19
Page 24

when the window is closed or another Entry is selected.
20
Page 25

This window displays all cameras
Right C
lick on the VV Server icon in your Windows
Before proceeding with camera configuration, The camera must be connected to the computer
SERVER Camera Setup
VisitorVerifier™ uses either “Entry cameras” which are associated with a specific Entry, or
building “QwikCAMs™” which are remote observation cameras that can be seen through the
VisitorVerifier™ by all Users.
All Entry Cams must be configured through the Entry configuration in the computer that
controls that specific Entry (see page 14).
All QwikCAMs™ are also configured on the computer they are attached to by the following
method.
REMOTE CAMERA CONFIGURATION for QwikCAM™ Cameras
(attached to the Server or another computer)
and the proper manufacturer’s device driver must be installed. In the case of CCTV type
cameras that use a Video Grabber interface, the device driver for the Video Grabber must be
tray. As illustrated to the right, a menu will pop up.
Left click on Camera Setup to continue.
connected to this computer.
To add a camera:
1. Enter the camera name or
location.
2. Select the camera used from the
drop down box which will show
all cameras on this computer.
3. Select the Video display format.
The recommended resolution is
320x240.
4. The picture should appear in the
bottom right of the window at
21
Page 26

The Camera Properties Button will open the
manufacturer’s camera control window to allow fine
adjustment of the particular camera while monitoring the
picture in the setup box. This window may change
22
Page 27

Right Click on the VV Server icon in your
SERVER User Setup
Windows tray. As illustrated to the right, a
menu will pop up. Left click on User Setup to
This screen is for registering all users on the system. Please enter a username, name and
location for each user. You can enter the user’s choice of password. This password will be
required by the user when they log into the system.
In the “Telephone Entry Phone Numbers” box, list all phone numbers or codes that, when
entered by a visitor, will send a popup to this user. The phone numbers can be added with
our without dashes or spaces as it will be automatically configured by the system to work
properly. If a 10 digit number is used ( area code + telephone number) VisitorVerifier™ will
add the 1 prefix automatically.
With No Phone Bill type systems, if the code begins with a # pound sign, the code entered in
the user record must include the # pound sign.
Please select a User Type. Default is a regular user but you can give this user master
capabilities. If this user will be a master, you can allow administrative access also by selecting
the appropriate button.
23
Page 28

Enter y
our building account number
Enter the Administrator’s password that
you are using for system access.
Right Click on the VV icon in your
Settings & Camera Setup
to continu
e.
If an Entry will be connected at this Server
If a photo is attached to the record, the photo will appear on the header of the
PinkNotes®that this user sends.
ENTRY CONFIGURATION
which you received during the online
registration process.
machine, either select an existing Entry name
from the drop down box, or click the New
Entry button to define a new Entry.
Windows tray. As illustrated to the right,
a menu will pop up. Left click on Entry
24
Page 29

The first Entry Setup
Tab
the interface will be
using.
The Entry Camera Tab is
The Camera Properties Button will open the
Entry Configuration procedure (continued)
requires you to name the
Entry (i.e. Front Lobby,
Garage Entry, etc.) or just
the building name if it is
only a one entry facility.
Check the radio button for
the entry type (default is
Telephone Entry)
Enter the COM Port that
used to configure the
camera you will be using at
this entry.
Select the camera to be
used from the drop down
box (the camera and it’s
necessary drivers/
hardware must already be
installed).
6. Determine which
available video setting
gives you the best
manufacturer’s camera control window to allow fine
adjustment of the particular camera while monitoring
the picture in the setup box. This window may change
25
Page 30

5
Operation
Starting the VisitorVerifier ™ Application
To start VisitorVerifier ™, Double Click on the VisitorVerifier icon on the desktop.
Chapter
Any current PinkNotes® will pop up on the screen and the VisitorVerifier™ icon will be
displayed in the system tray.
Exiting the VisitorVerifier ™ Application
To exit VisitorVerifier ™ , right click the VisitorVerifier™ icon in the system tray, then left
click on “Shut down VisitorVerifier™”
To restart VisitorVerifier ™, double click the desktop icon.
26
Page 31

Main Screen
When your suite is called, this screen will pop up on your computer screen and provide a live
video feed from the entry panel for one minute and after that will revert to the initial
snapshot taken when the button was pressed.
To continue the live feed at anytime, press the Live Video button.
To see the snapshot taken when the button was pressed, press the Initial Image button.
To close the pop up window, press the Close button.
27
Page 32

Using PinkNotes®
VisitorVerifier™ comes with PinkNotes® Instant Messaging Software to allow
communication between users on your VisitorVerifier™ system. Master to Master(s), Master
to User(s), User to Master(s) are allowed. As an example, in an apartment complex this would
enable Building management to send a PinkNote to a particular tenant, a group of tenants, or
all tenants that have VisitorVerifier™ and are on the same network. A tenant could send a
message to the Master in the Parking garage to have their car brought around or send a
message to the concierge’s Master to expect a delivery. The more you use PinkNotes® the
more uses you will have for this convenient program.
A Master location will have the Send Window above.
28
Page 33

The User Send window operates
Sending a PinkNote®
1. Type your message in the message box
2. Select who you wish to send it to by checking the appropriate box(es) in the list on the
left
3. Enter a subject line if you wish in the Subject window
4. Click the Send PinkNote green arrow at the top left and your message will be sent.
• A Master location has the ability to sort contacts by name or by location using the
radio buttons at the top of the User list.
• By clicking the box next to “Suites”, all suites will be selected.
• By clicking the box next to “Masters”, all masters will be selected.
• When selecting the Urgent check box, the message sent will sound a different tone
and will be marked “URGENT”
• When selecting the “Must Reply” check box, the message sent will be marked
“MUST REPLY” and cannot be deleted until a reply is returned.
• The colored dot next to a contact indicates status
A User location will have the Send Window above.
the same as the Master window
with a few differences:
• The User only can send
PinkNotes® to Users in
their own suite or to the
Masters.
• Contacts are listed in
alphabetical order only
29
Page 34

To send a Pi
nkNote® message at a later time, Click
Sending a PinkNote® at a Later Time
the Send PinkNote® Later icon and the box to the
left will pop up.
Click the preferred date on the calendar.
Select the preferred time by editing the time in the
box. Be sure the AM/PM toggle is set correctly.
When finished click OK button.
30
Page 35

The QwikCLIQ™ Feature
Many messages in PinkNotes® are often repeated such as “Please call a taxi, I will be
down in 10 minutes” , “Please have my Volvo ready at 7:30”, or perhaps “I am expecting a
Chinese Food delivery, please send them right up “. These frequently used messages can be
saved and recalled with a click of a button. This is done with the QwikCLIQ™ feature.
31
Page 36

Creating a QwikCLIQ™
1. Type your message in the message box
2. Select who you wish to send it to by checking the appropriate box(es) in the list on
the left
3. Enter a subject line if you wish in the Subject window
4. Click the “Save this PinkNote as a QwikCLIQ™” icon shown above
To View your QwikCLIQs, Click the QwikCLIQ™ tab at the bottom of the window.
To Send your QwikCLIQ™ Click on the button marked with your message.
The color of the QwikCLIQ Button indicates status of the receiving contact.
32
Page 37

To delete a QwikCLIQ™ right click on the message you wish to delete and
click delete on the pop-up menu.
33
Page 38

The QwikCAM™ Feature
To view QwikCAM™, Click on the QwikCAM™ icon
The QwikCAM™ feature allows you to view all available cameras on your VisitorVerifier™ network. All
entrances as well as all Observation cams will come up in this window as still shots.
To see a live picture from a cam, click on the cam you wish to see and a larger screen will open below.
The QwikCAM™ icon is available from the VisitorVerifier™ main pop-up window or the PinkNotes®
34
 Loading...