

Page 1
ALPHA -
mounted both lengthwis e and side by side. The individual rows of absorbers are connected on a Tichelmann
OKU SOLAR HEATING FOR SWIMMING POOLS
Instruction for installation an operating
Introduction
Solar heating for swimming pools with OKU-Absorbers normally will be operated with a direct circuit.
The water from the pool will be pumped dir ectly through the absorbers. You don´t have to interpose a
heat exchanger.
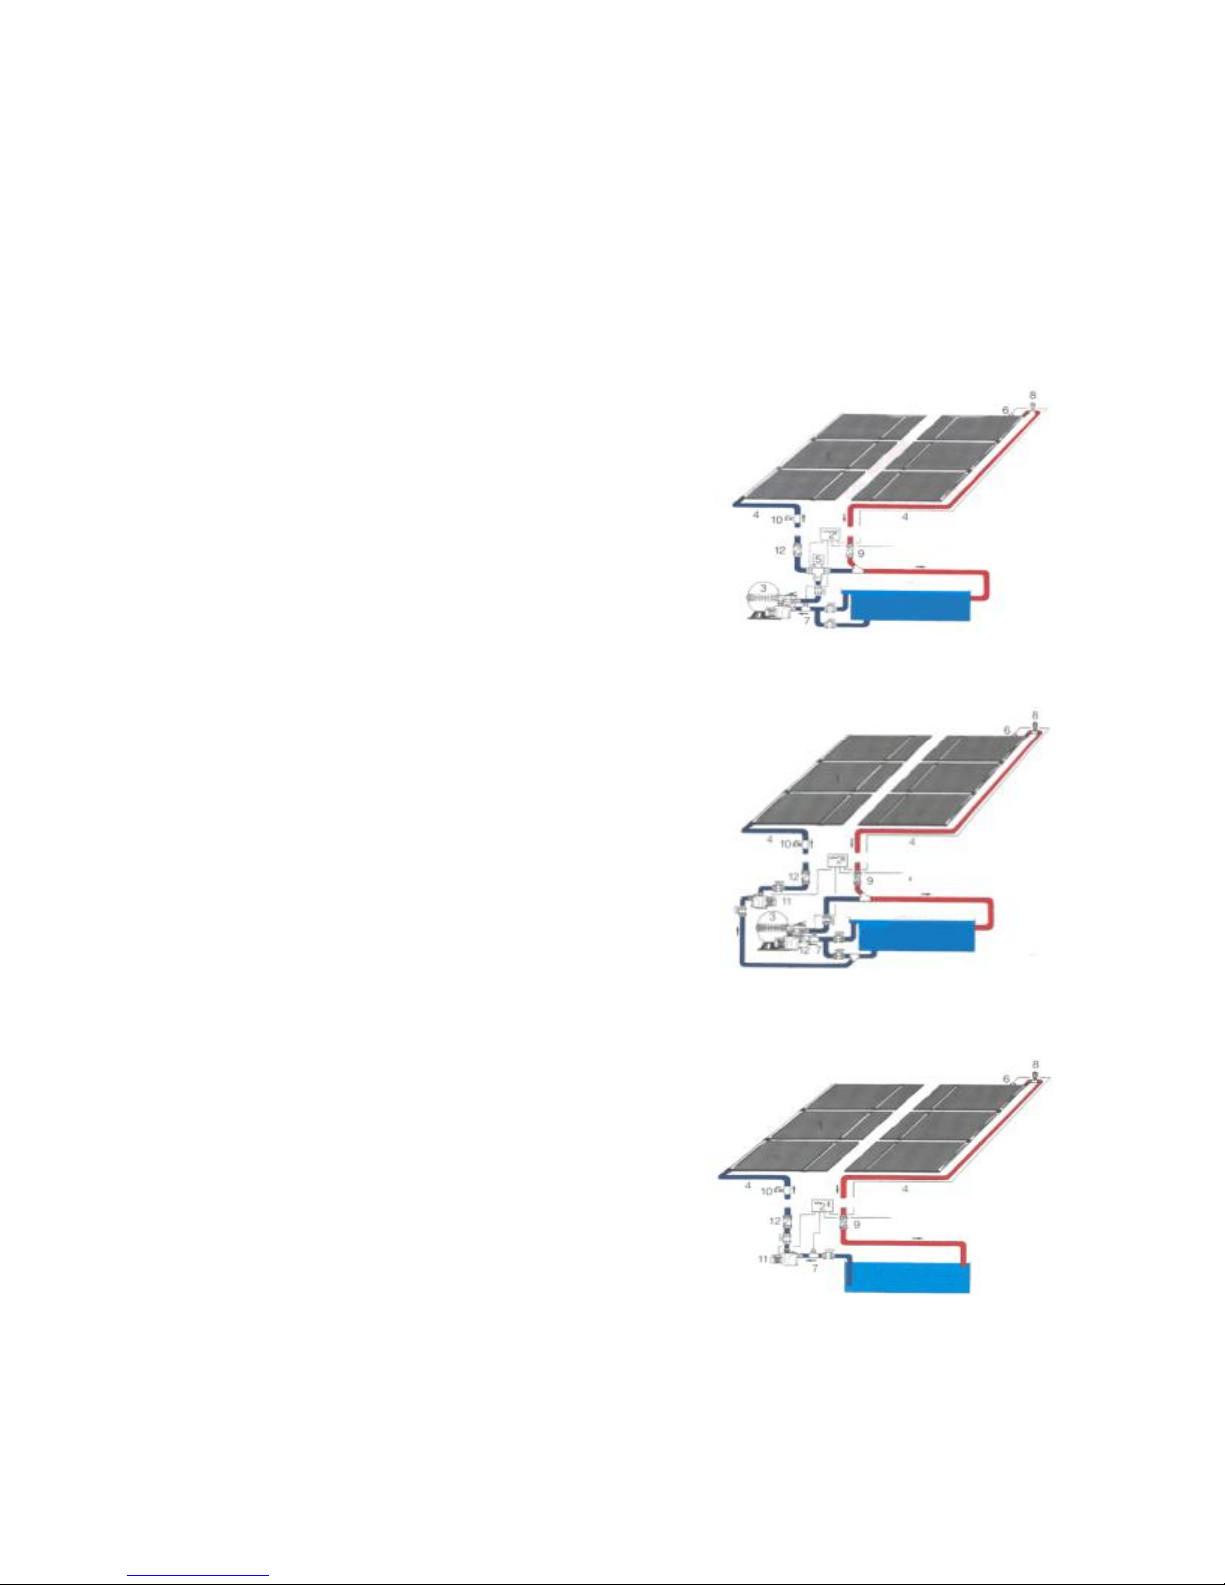
Different configurations of OKU swimming pool solar heat ing
1. Operation with filter pump via three-way motor ball valve w ith
difference-temperature regulat ion
This configuration can usually be selected if the absorbers are not to
be set up higher than 6 m abov e the surface of the water. The threeway motor ball valve is integrated into the pr essure line of the filter
installation. Because of the difference-temperature regulation the ball
valve is changed over when the absorber temperature is higher than
the temperature of the water of the swimming pool. The f ilter stream
is then pumped through the absorbers. The warmed water flows
back into the filter circuit by way of a Tee.
2. Operation with ow n pump an dif ference temperat ure regulat ion
integrated into the filter circuit
In many cases it may be sensible or even necessary to install a
separate pump for the solar heating. For example when the deliv ery
head from the water level to the absorber panel is more than 6 m.
The water is diverted from the filter installation by way of a Tee and
pumped through the absorbers by the auxiliary pump. This pump is
switched by the difference-temperature regulation to ensure that it
only runs to actually win energy. The filter and solar pump are
separately regulated. It is usually advisable to integrate non-return
valves in both the solar and the filter circuit.
3. Operation with ow n pump and dif ference-temperature regulat ion piping independent of filter circuit
This configuration is chosen when the f ilter piping is difficult of
access. The water is sucked out of the swimming pool by an
immersion pipe, pumped thr ough the absorbers, and the warmed
water is conducted back into the swimming pool. Her e too the
difference temperature regulation ens ures that the pump only r uns
to win energy. If the pump is mounted abov e the water level and the
delivery head is more than 5 m, a non-return valve should be
incorporated.
1) OKU-Absorber 5) Three-way motor ball valve 9) Stop cock (downdraft brake)
2) Difference-temperature regulation OE 1 6) Temperature sensor, absorbers 10) Drain cock
3) Filter installation 7) Temperature sensor, swimming pool 11) Pump for solar circuit
4) Solar circuit forward and return 8) Vent valve 12) Non-return valve
The water of the swimming pool c an flow through the oku absorbers in either direction, so they can be
principle (same routes for each row). It is not advisable to connect more than ten absorbers in series.
Page 2
We recommend to read the following instruction thoroughly before starting the installation an to mak e a plan of
NOTE:A FLEXIBLE HOSE IS NEEDED BETWEEN THE PUMP AND T HE FLOW/RETURN PIPING CONNECTIONS
how to connect the absorbers in case your arrangement of absorbers differs from the example s hown below.
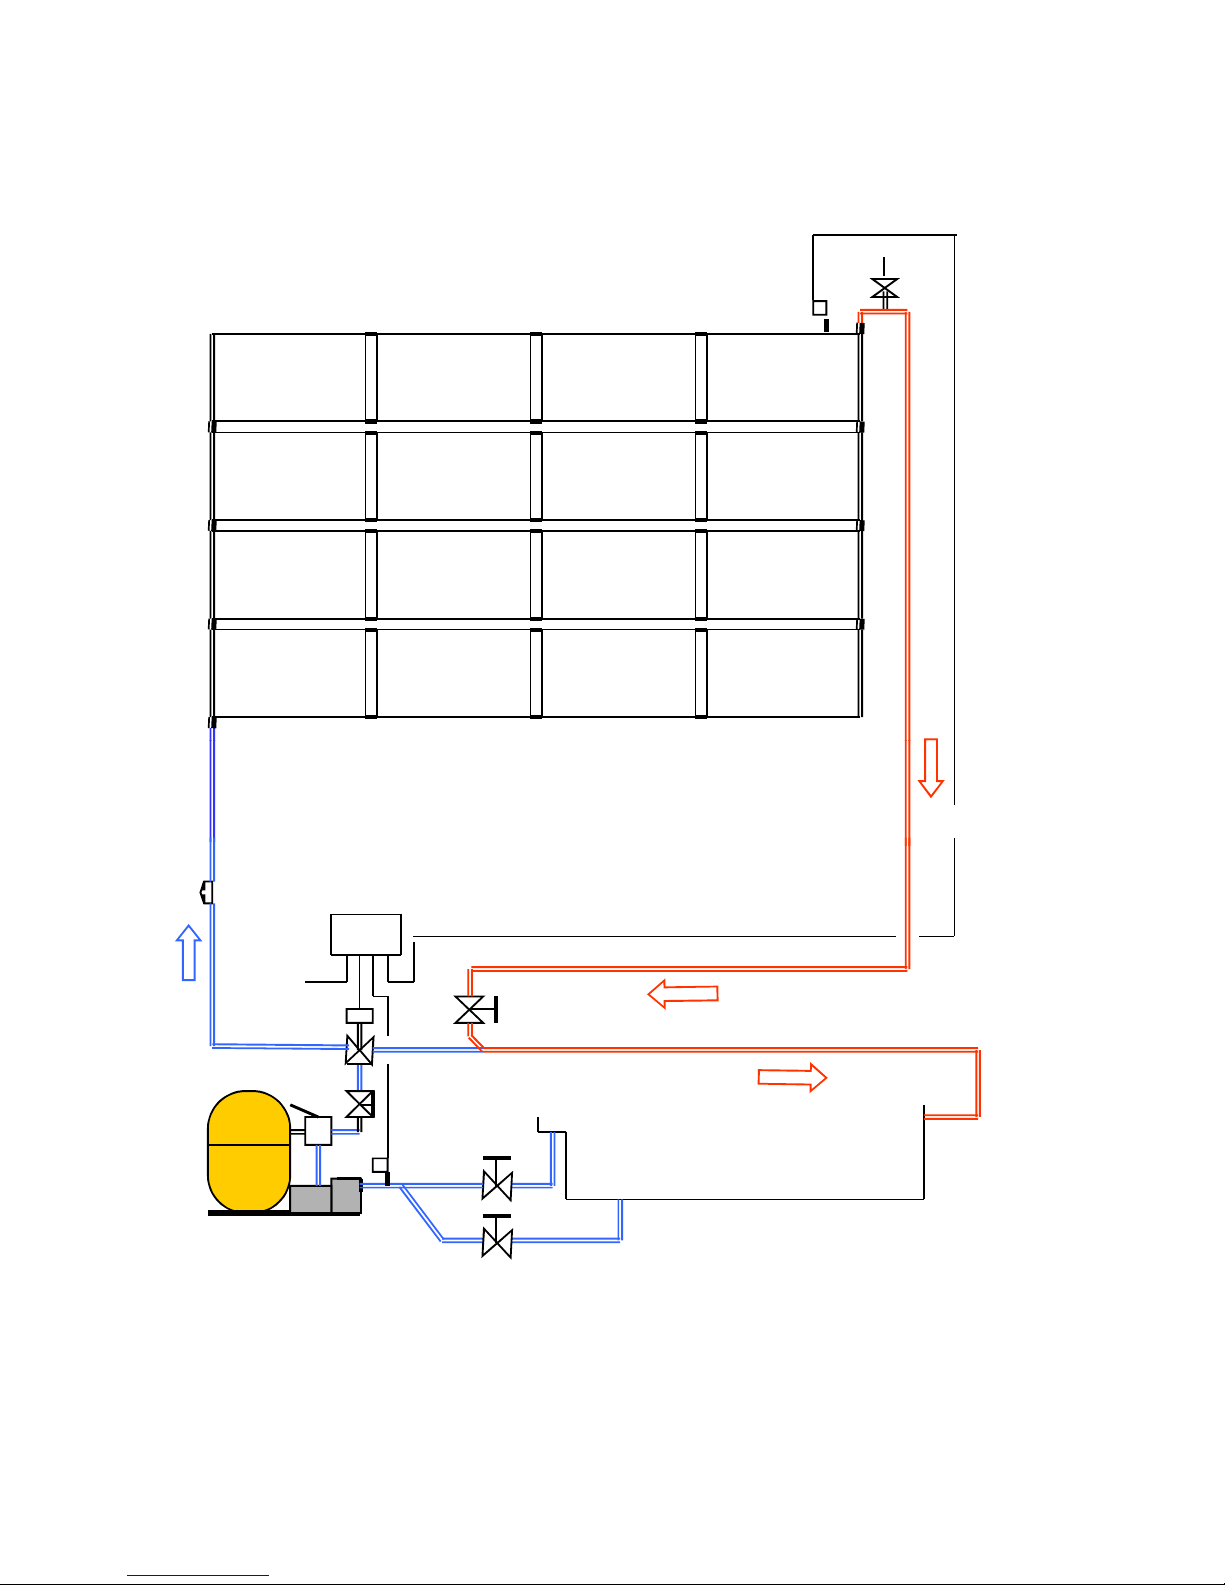
This example represents a system with 16 OKU abs orbers in 4 lines at 4 items. Depending on the s ize of your
swimming pool and the ar ea available for the absorbers numerous other schemes of installation are also
possible.
8
6
1000 1001 1001 1000
1000 1001 1001 1000
1000 1001 1001 1000
10
1000 1001 1001 1000
4
2
5
3
7
9
4
Operation with filter pump via three-way motor ball valve with difference-temperature regulation
1) OKU absorber 5) Three-way motor ball valve 9) Stop cock (downdraft brake)
2) Difference-temperature regulator OE 1 6) Temperature sensor, absorbers 10) Drain cock
3) Filter installation 7) Temperature sensor, swimming pool 11) Pump for solar circuit
4) Solar circuit forward and return 8) Vent valve 12) Non-return valve
USE ISO VALVE AFT ER SOLAR PUMP AS A FLOW RESTRICTOR..TURN 1/4 TURN OFF
This applies to BADU pump onl y check with Alpha Energy for c hanges
Page 3
Installation of the system
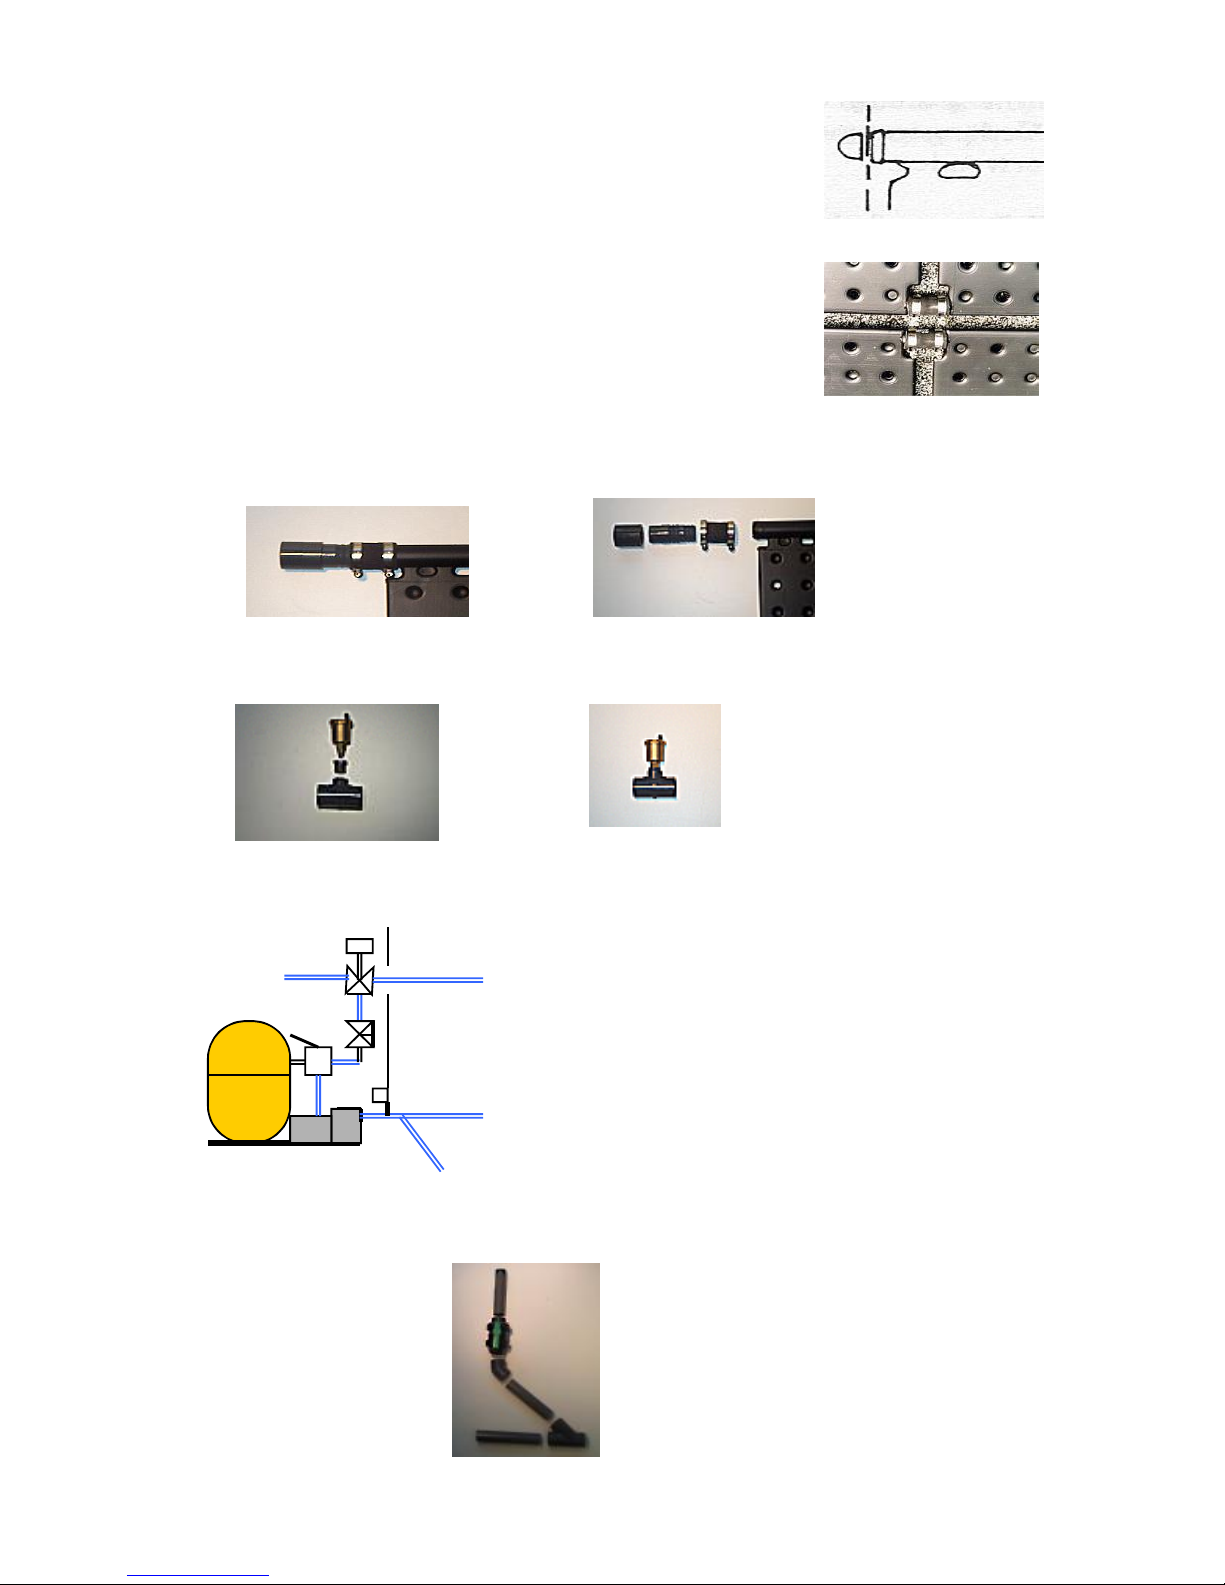
1. OKU-Absorbers are supplied with connecting pieces that are opened
diagonally. If further connections ar required to connect the absorbers in
series only the cap has to be cut off.
2. Place the OKU-Absorbers on the designated areas in the arrangement that is
desired and connect them with hose connections and hose saddles according with the
the scheme of connection. In case of steeper sloping roofs roof fastenings must be
carried out simultaneously to prevent absorbers from slipping away during
installation. It is recommended that you us e a TEK screw type fixing for fitting
the panel to the roof , a flat washer is needed under neath the TEK head and a
silicone washer is required between the bottom of the panel and the top of the roof to make water proofed.
3. To make circuit points for supply and return lines connect the 25mm PVC joiner into the hose fitting
and add it with the hos e coupling on the absorber. If you take a pipe dia. 25 mm or bigger you have to
glue a 25 x 40/50/65 PVC Inc reasing bush or valve socket to convert to another type of pipe.
4. Vent valve (8): The vent valve must be installed vertically. Glue in connection correspondingly
and screw in vent valve.
5. Install 3-way valve (5) behind filter pump (3).
5
to the absorbers back to the swimming pool
3
7
out of the swimming pool
The iso valve installed after the solar pump is to be used as a flow restrictor as well , turn the valve 1/4 turn off
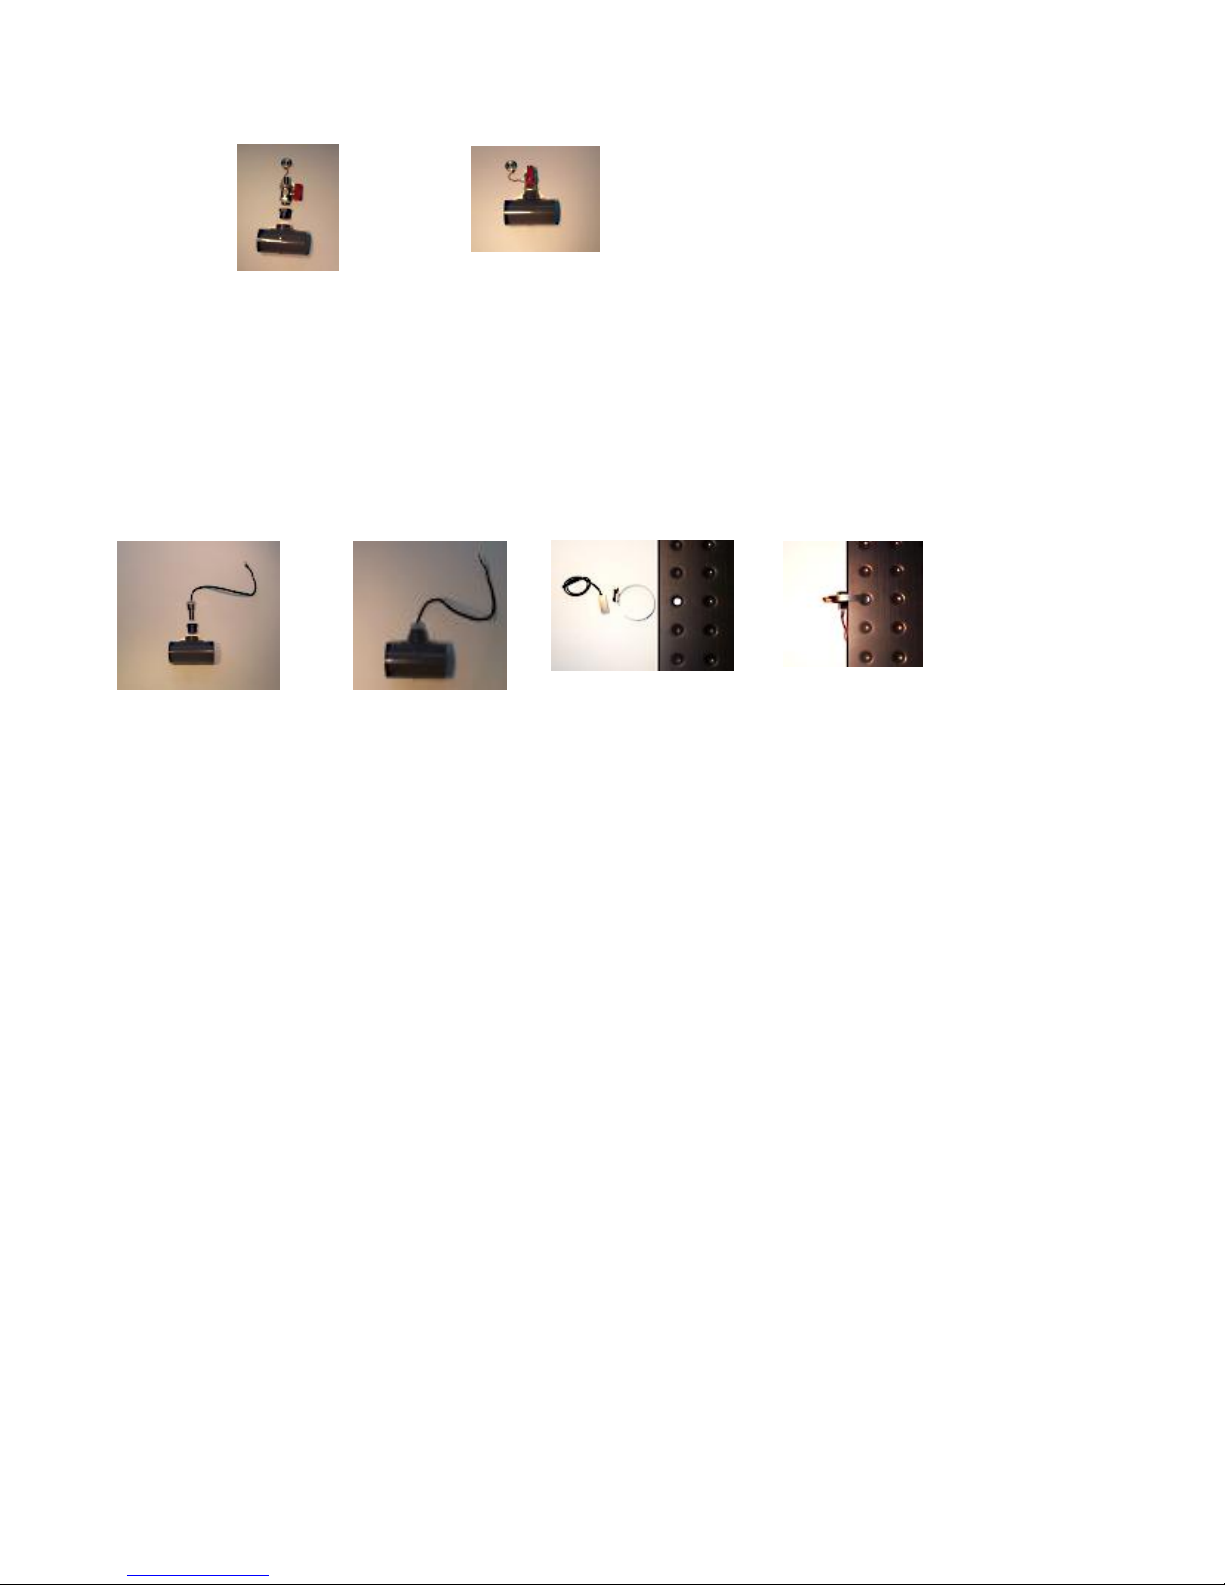
6. Put tee for collector forerun into pipe leading to the pool. Glue Stop c ock (9) - downdraft brake
into forerun pipe
Page 4
7. Construct and fix forerun and return travel of collector (4). If for winter a drain cook is needed
If you take a pump with mor e than 600 W charging rate or three-phase pumps, you have to install a
glue a reducing tee with reducing piece 1/2" for the drain cook.
8. Regulation: Please take a look at the instruction for installation and oper ating for the
difference-temperature regulation and the three-way motor ball valve respectively the pump.
Attention should be paid to the ac complishment of electrical installation. Swimming pools
systems have to be equipped with a ear th leakage circuit breaker.
Fasten collector sensor (6) to absorber with clamp. Glue r educing tee with nipple 1/2" f or swimming
pool sensor (7) into pipe coming from the pool and s crew in sensor. Fix the difference-temperature
regulator and fasten it like the wiring diagram.
Use wires with cross-section 2 x 1 mm² to lengthen sensor adaptors.
contactor.
Operating Inst ruction
To start the system adjust the difference temperature to approx. 3 or 4 °C and plac e the hand switch on
automatic. In systems working with filter pumps adjust the filter cycle to the hours of sunshine.
Installations with own pump works independent from the filter circuit.
If after a few minutes the system works still with air in it, close the stop cock (downdraft brake) a little until
the water escape at the intake nozzle is majority free of air. The stop cock now always stay this way.
Additionally you can close the cover cap of the vent valve.
Operating the system in w inter
OKU-Absorbers are frost resistant. Due to the pipes the system must be emptied in winter nevertheless.
Usually systems which emptied when they´re switched off, don´t need any precaution.
Advice to glue pvc pipes
Glue pvc pipes only if they´re absolutely dry. Water, condensates and humidity prevent a good connection.
Don´t glue under a Temperature of 5°C. The time f or drying is circa 24 hours, do not use it
with pressure before.
Clean ends and fittings with a cleaner. Glue both par ts the same way. Take a flat brush.
It´s important to disperse the glue lengthwis e from the inside to the outside.
Directly after apply the glue you have to plug ends and fittings together.
Take of the surplus glue. Clean the brush with cleaner.
Page 5
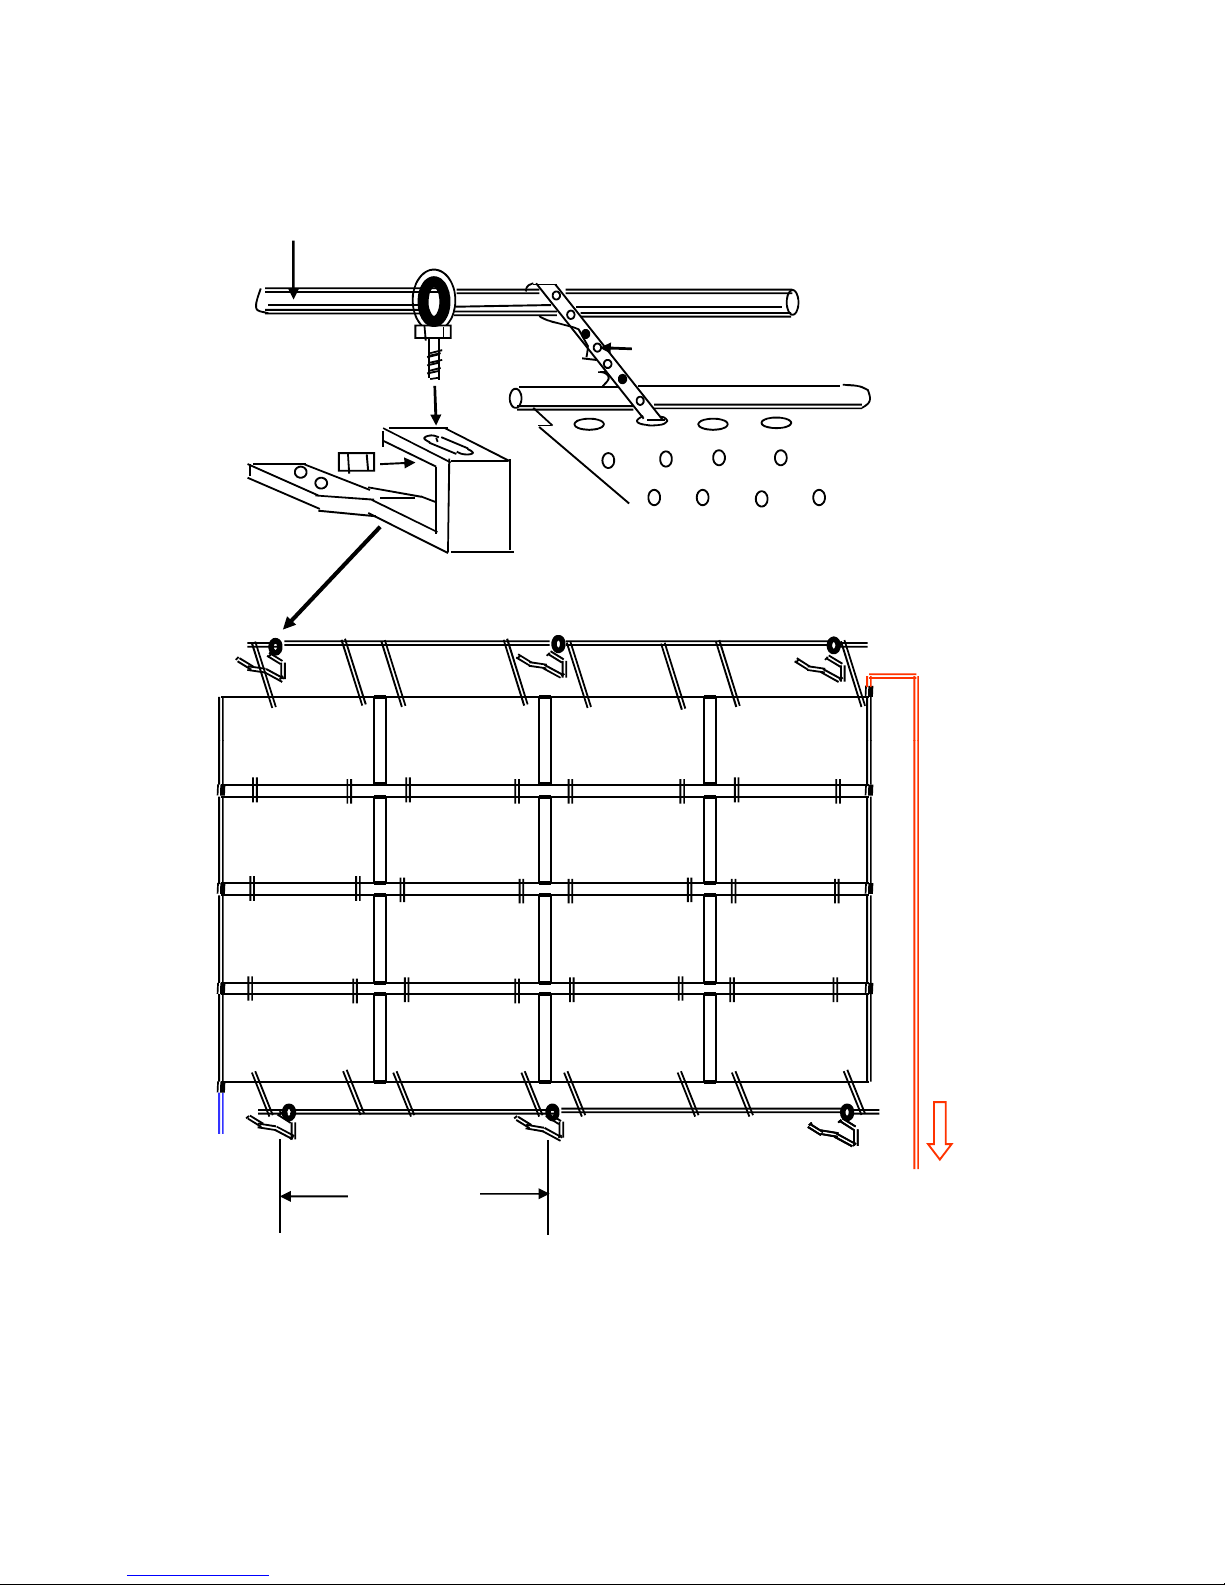
How to fasten on a pant iles tiled roof
1000 1001 1001 1000
1. Hook for pantiles tiled roof Art.N° 3212
2. Screw-in pipe clamp 1/2" zinc plated with a gum inlay Ar t.N° 3213
3. Perforated tape zinc plated 12 x 1 Art.N° 3210 with a screw 5 x 16 Art.N° 3211
4
2
3
1
4
1
3
2
3
1000 1001 1001 1000
1000 1001 1001 1000
1000 1001 1001 1000
2
1
3
4
1,5 - 3 m
Page 6
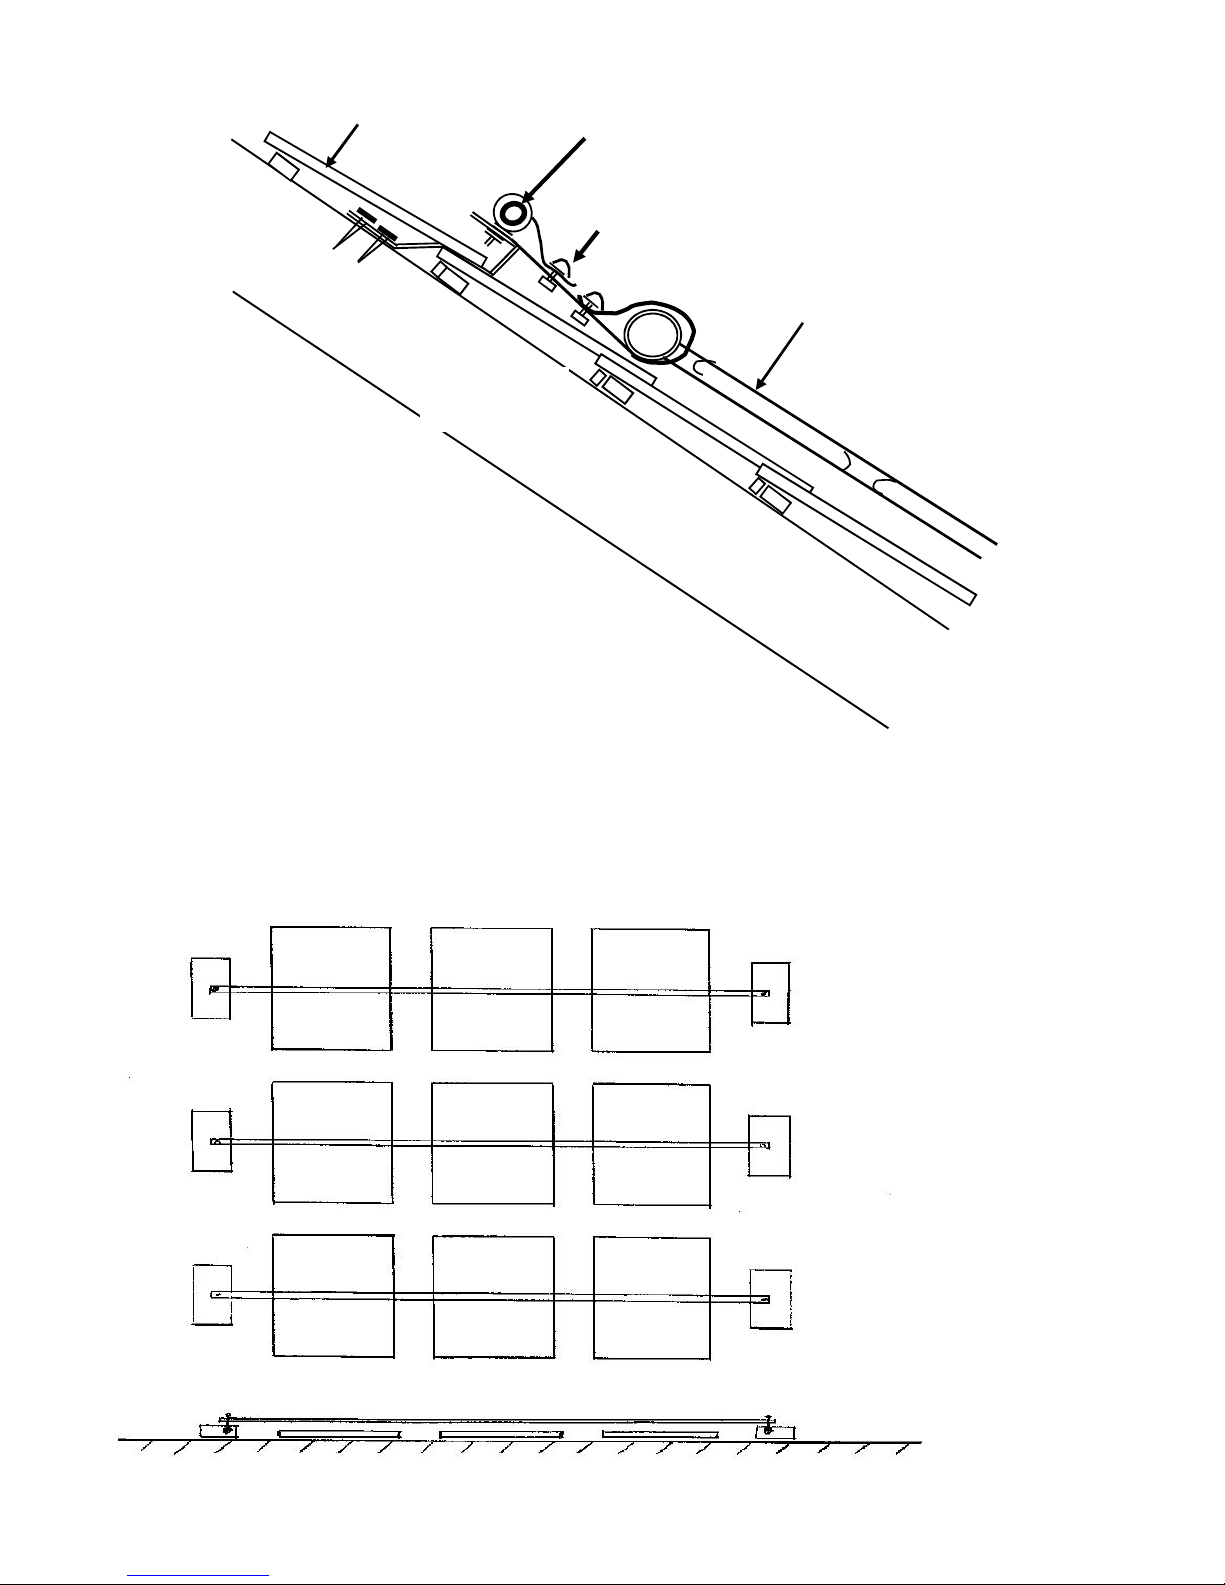
Pantiles
1
Rafter
4
2
3
OKU-Absorber Art. N° 1000
and Art. N° 1002
How to fasten on a f lat roof
On a flat roof you have to safe the OKU-Absorbers against the wind. Therefore you can stretch a wire rope
or a perlon-hurry against the absorber field at intervals of circa 2 m and anchor it on the edge of the roof.
You also can weigh the abs orbers down directly or you can fasten them with gar den-plates and U-profiles.
Take a look at the diagram below.
Page 7

How to fasten it on a sloping roof (slated roof or cement asbestos roof )
The fastening on a slated or cement asbestos roof is comparable with the fastening on a tiled roof.
But you have to screw-in the ring-screw through the roofing into the foundation. If you have a wooden
foundation screw it into the boar ding or battens. If you bore slate or cement asbestos you have to do
it without the slugging device to get around splitting the plates.
After screw-in the screw you have to seal it up with silicone or another sealing compound like this.
 Loading...