

Page 1

1
Notices for the use of phone
CAUTION! Please read carefully these instructions and follow
them, in the case of dangerous situations.
Driving safety: It is recommended not to use the phone while driving. However, if you
use it, turn on the Hands-free mode.
Turn off your phone while in an aircraft. Interference caused by mobile phones affects
aviation safety, and thus is illegal to use it on the plane. Please make sure that your
mobile phone is turned off when you are on the plane.
In hospital: When using the phone in a hospital must submit to the relevant rules
specified by the hospital. Any interference caused by medical equipment may affect the
performance of the phone.
Approved service: Only approved repair shops can repair mobile phones. If you open
the phone and try to fix it yourself you will void the warranty of the product.
Accessories and batteries: Only accessories and batteries approved by the producer
can be used.
Emergency calls: Make sure the phone is turned on and enabled if you wish to make
an emergency call, press the call key and confirm the location, explain what happened
and do not close the call.
The battery and charging the battery: It is recommended to fully charge before first use
of the device. Do not expose the battery to temperatures above 40 C. Do not dispose
the battery in fire or drop anywhere. Return defective batteries in special centers or to
the supplier center.
Warning: We take no responsibility for situations where the phone is used other than as
provided in the manual.
Our company reserves the right to make changes in the content of the manual without
making this public. These changes will be posted on the company website to the
product it amends.
The contents of this manual may be different from that in the product. In this last case
will be considered.
To avoid the problems that might occur with the service shops approved by Visual Fan
Ltd. (because Visual Fan reserves the right to stop the collaboration with any service
shop which was previously approved and mentioned in the warranty card on the date on
which the product batch was sold on the market), before taking a product to the service
shop, please check the updated list of approved service shops on Allview website at the
section: “Support & Service – Approved service”.
For more product details visit www.allviewmobile.com. Do not cover the antenna with
your hand or other objects Failure to comply resulting in connectivity issues and rapid
discharge of the battery.
All applications provided by third parties and installed in this device, may be modified
and/or stopped at any moment. Visual Fan Ltd will not be responsible in any way for
modifications of the services or content of these applications. Any request or question
regarding third party applications may be addressed to owners of these applications.
Page 2

2
3. Before using
Page 3
3
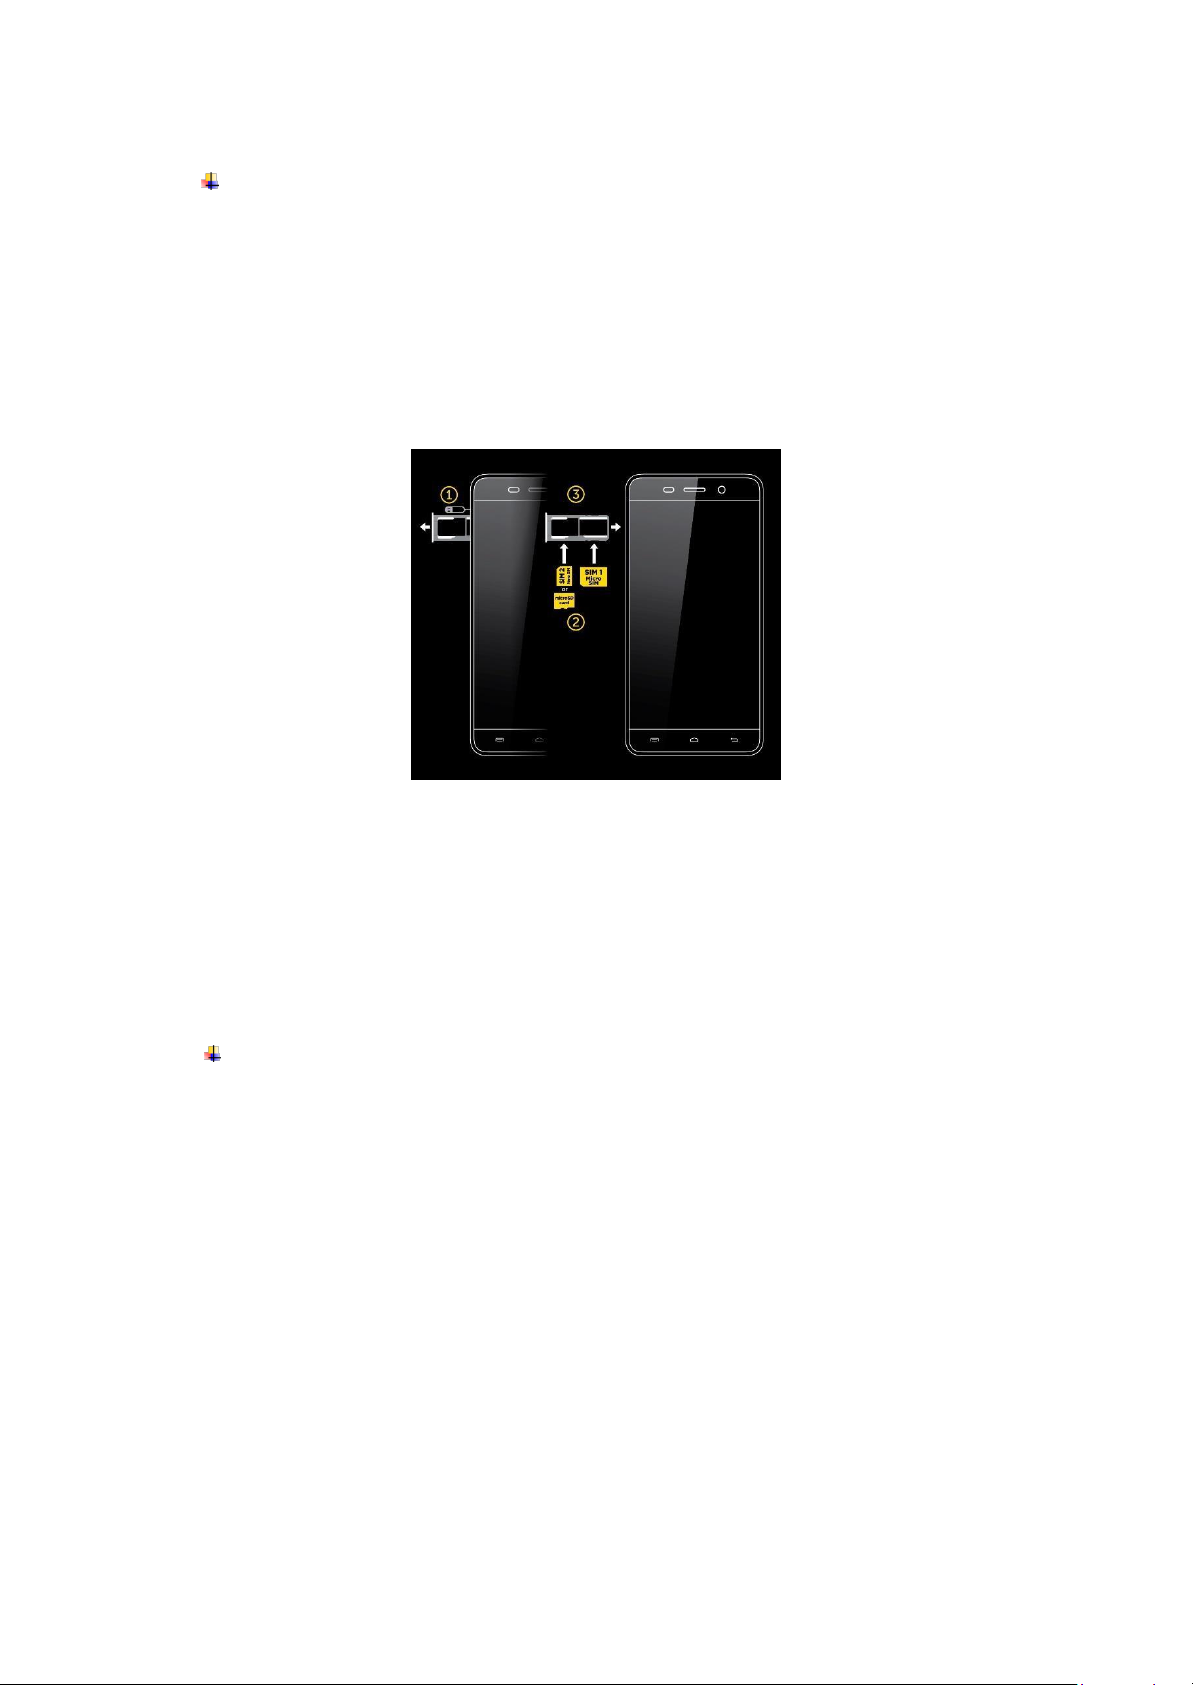
The phone is a Dual SIM mobile that allows you to use two mobile networks.
Insert Nano SIM/Micro SIM cards and SD card
1) Stick into the pin hole with eject tool, and then card tray will be out of phone.
2) Put Nano SIM/Micro SIM cards and SD card to card tray correctly.
Do not remove the cards while the device is transferring data. Doing so may cause
data to be lost or damage to the cards and device.
The Nano SIM/Micro SIM card and SD card are small parts. Please keep away from
Children to avoid swallowing the card by accident.
Please do not touch the metal surface of Nano SIM/Micro SIM and SD cards and keep
them away from electromagnetic field to avoid damaged data.
Charge the Battery
Charge the battery before using it. Connect the USB cable to the USB power adaptor, and
then plug the end of the USB cable into the USB Port.
Note:
This device equips with Micro USB, it can be positive and negative plugged in.
Please don't use other USB cable to plug in, otherwise the USB port will be damaged.
The battery of mobile phone is fixed. It cannot be removed.
Page 4
4
4. Getting started
Basic Function
Turn on the phone
Press and hold the power key for a while to turn on the phone.
Turn off the phone
Long press the power key until a menu shows. Choose “Power off’’ to turn off the
phone.
Restart the phone
Option 1: Long press the power key until a menu shows. Choose “Reboot’’ to restart
the phone.
Option 2: Long press the power key till 10 seconds to auto restart the phone.
Lock the screen
Option 1: Press the power key to turn off the screen and lock it
Option 3: The screen will auto lock if you don't use the phone for a while.
To set timer for auto lock go to Setting Display Sleep and select the time you want.
Unlock the screen
Press the power key, and then slide from down to top for unlocking.
Home screen
The Home screen is your starting point to access all the features on your phone. It displays
application icons, widgets, and other features. You can customize the Home screen with
different wallpaper and display the items you want.
Page 5
5
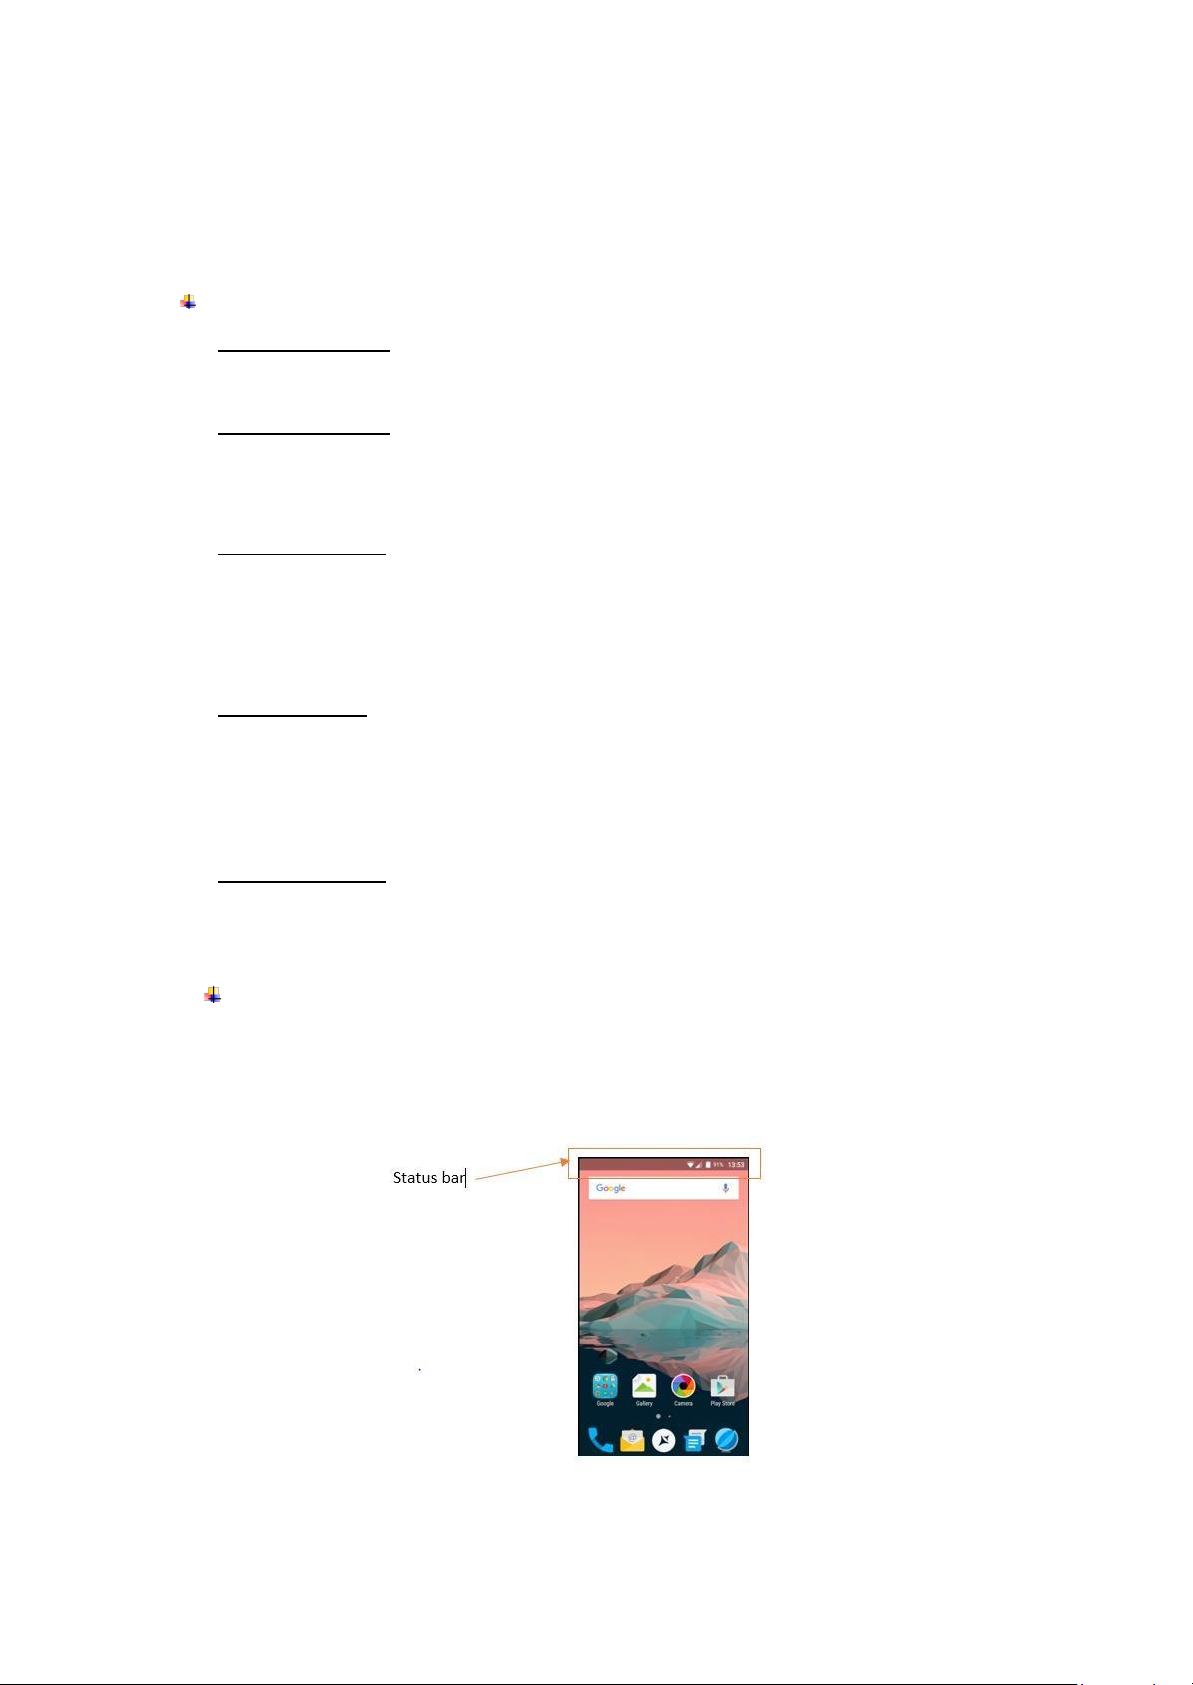
Status Bar
At the top of the screen, it displays the time, signal, battery information, and icons for
Notifications that you’ve received.
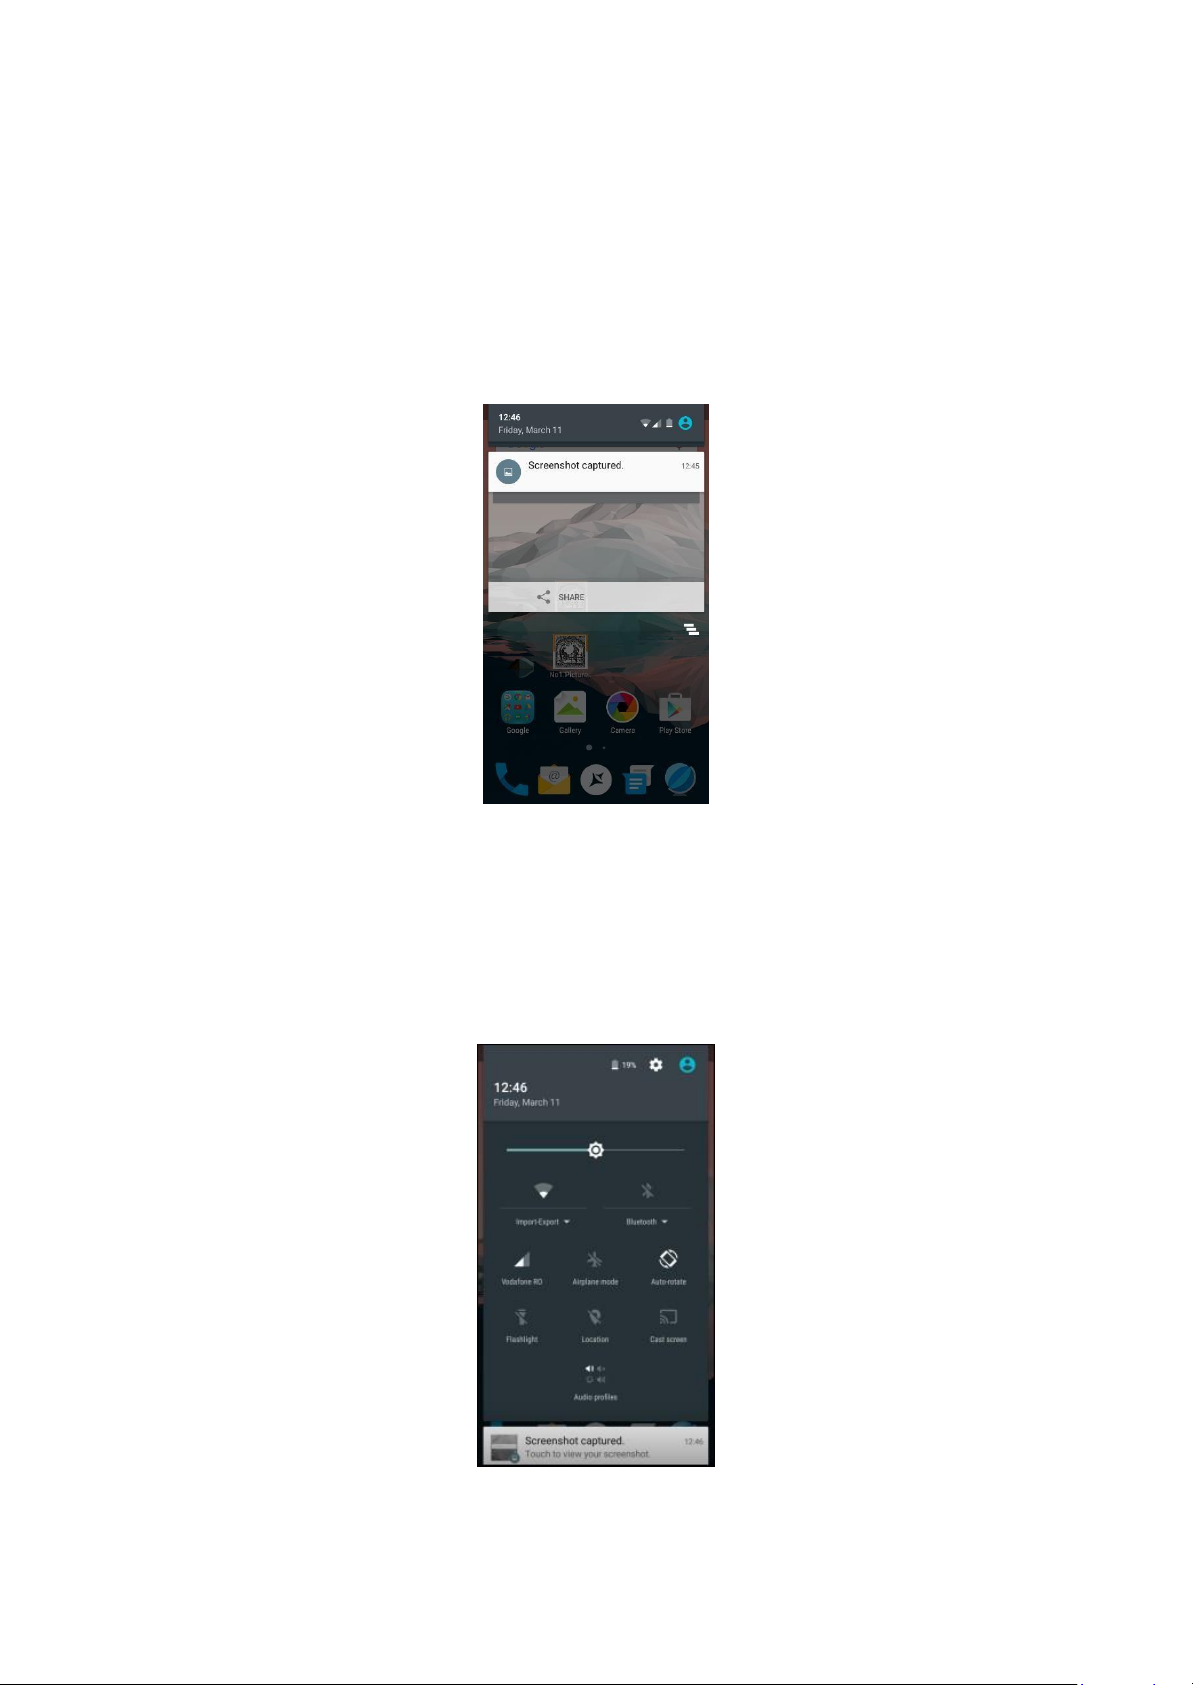
Notification Center
Swipe down from the top edge to see more detail of the new notification, such as
messaging, missed call,Wi-Fi network available etc.Tap the notification and drag to left
or right to delete it.
Control Center
Swipe down again from the top edge to open the control center. In the control center,
it’s a quick access to Torch, image projection etc. You can also adjust the brightness
and turn on/off Airplane mode, Wi-Fi, Data connection, Bluetooth, Location, Rotate
screen, Vibrate, Sound.
Page 6

6
Desktop Menu
Long press screen in home to open the desktop menu. You can change the Edit
desktop. It’s a quick access to Desktop Settings, System Settings and Widgets.
Move an application
Touch & hold the icon you want to move. Drag the icon to move or cross at the edge
of the screen to move into another screen. Or you can delete the icon from main
poage by dragging it to Delete option from the top of the screen
Uninstall an application
To uninstall an app follow Settings- Apps , select the one you need to uninstall and
confirm uninstalling,
Creating a folder
Drag an icon on the top of another one to create a folder. Open the folder and then tap
the folder name to rename it.
Touch screen
The way to control mobile phone is using your finger on touch icons, buttons, menu items,
the onscreen keyboard, and other items on the touch screen.
• Touch: To act on items on the screen, such as application and settings icons, to
type letters and symbols using the onscreen keyboard, or to press onscreen
buttons, you simply touch them with your finger.
• Touch & hold: Touch & hold an item on the screen by touching it and not lifting
your finger until an action occurs.
• Drag: Touch & hold an item for a moment and then, without lifting your finger,
move your finger on the screen until you reach the target position. You can drag
items on the Home screen to reposition them and you can drag to open the
Notification Center.
• Swipe or slide: To swipe or slide, quickly move your finger across the surface of
the screen, without pausing when you first touch (so you don’t drag an item
instead). For example, you slide the screen up or down to scroll a list, and in the
same way Calendar views you can swipe quickly across the screen to change the
range of time visible.
• Pinch: In some applications (Such as Maps and Gallery) you can zoom in and out
by placing finger and thumb on the screen at same time and pinching them out
together (to zoom out) or spreading them apart (to zoom in).
• Rotate the screen: On most screens, the orientation of the screen rotates with the
phone as you turn it from upright to its side and back again. You can turn this
feature on and off.
Page 7
7
5. Communication
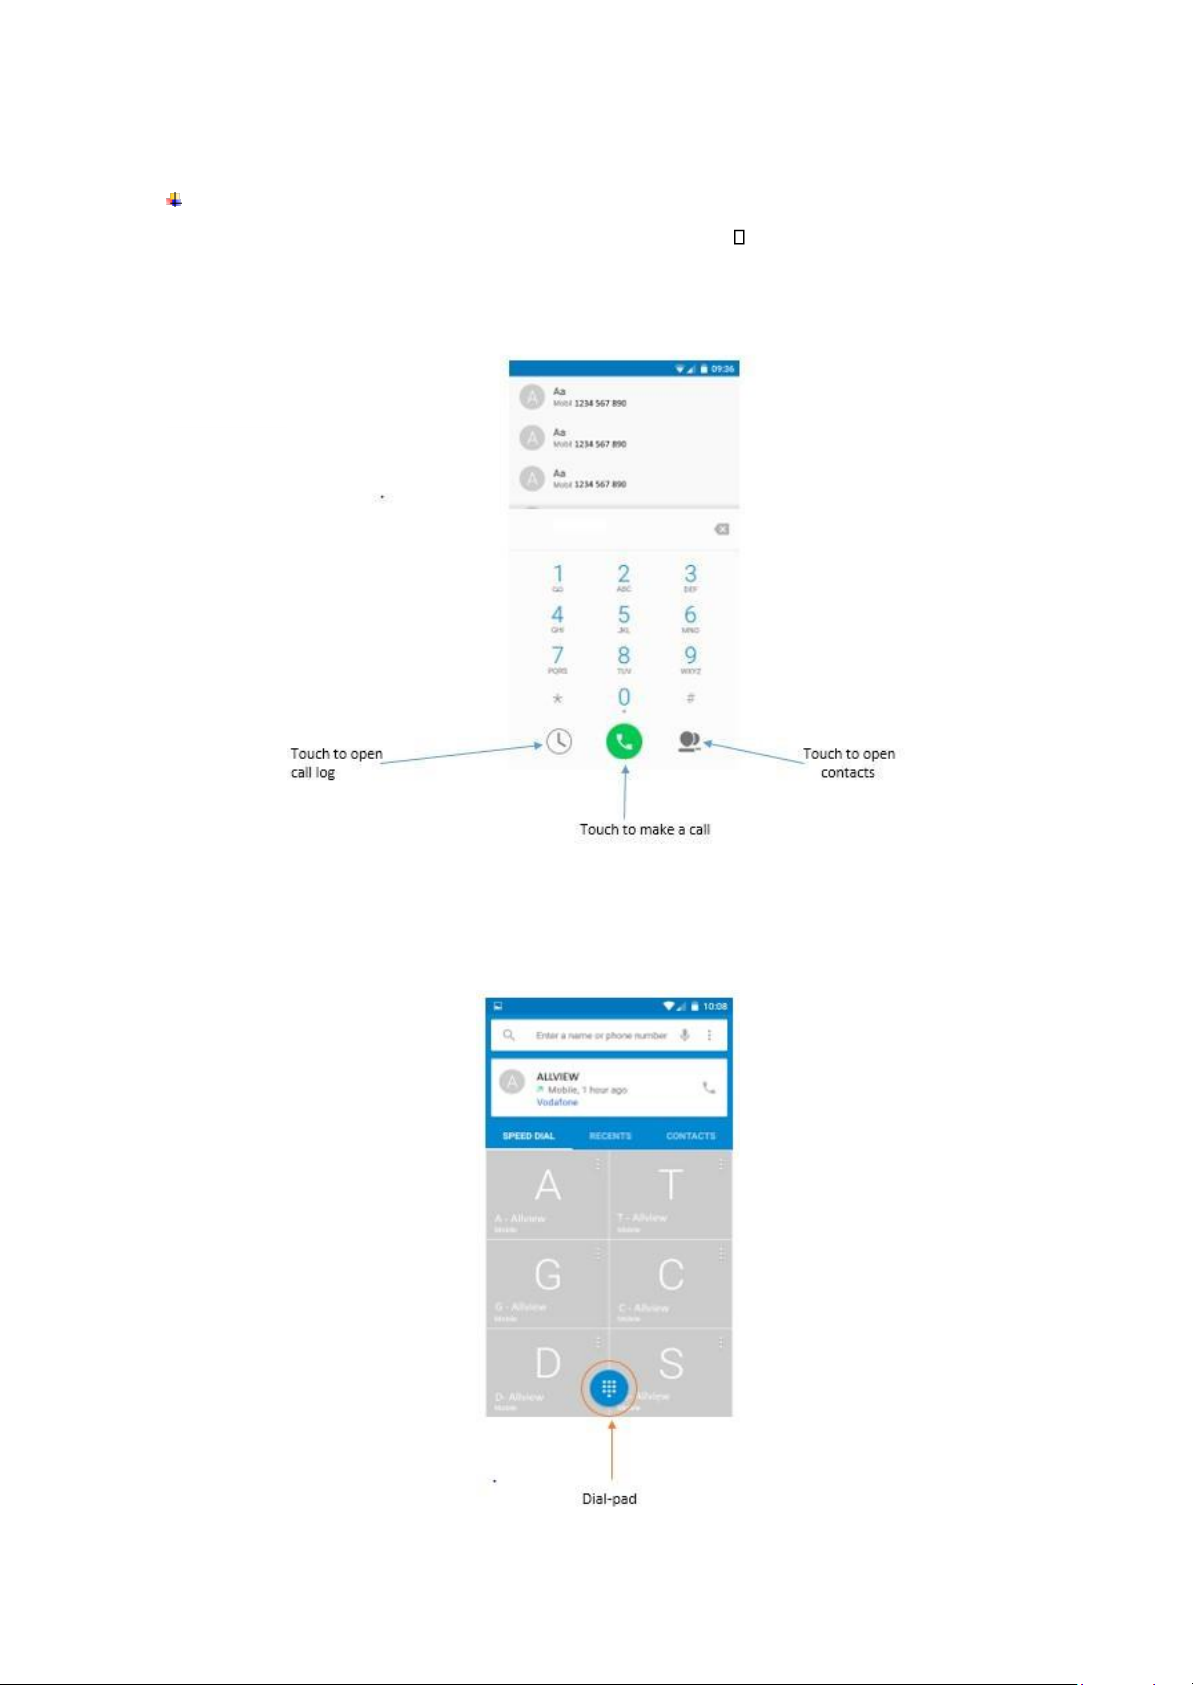
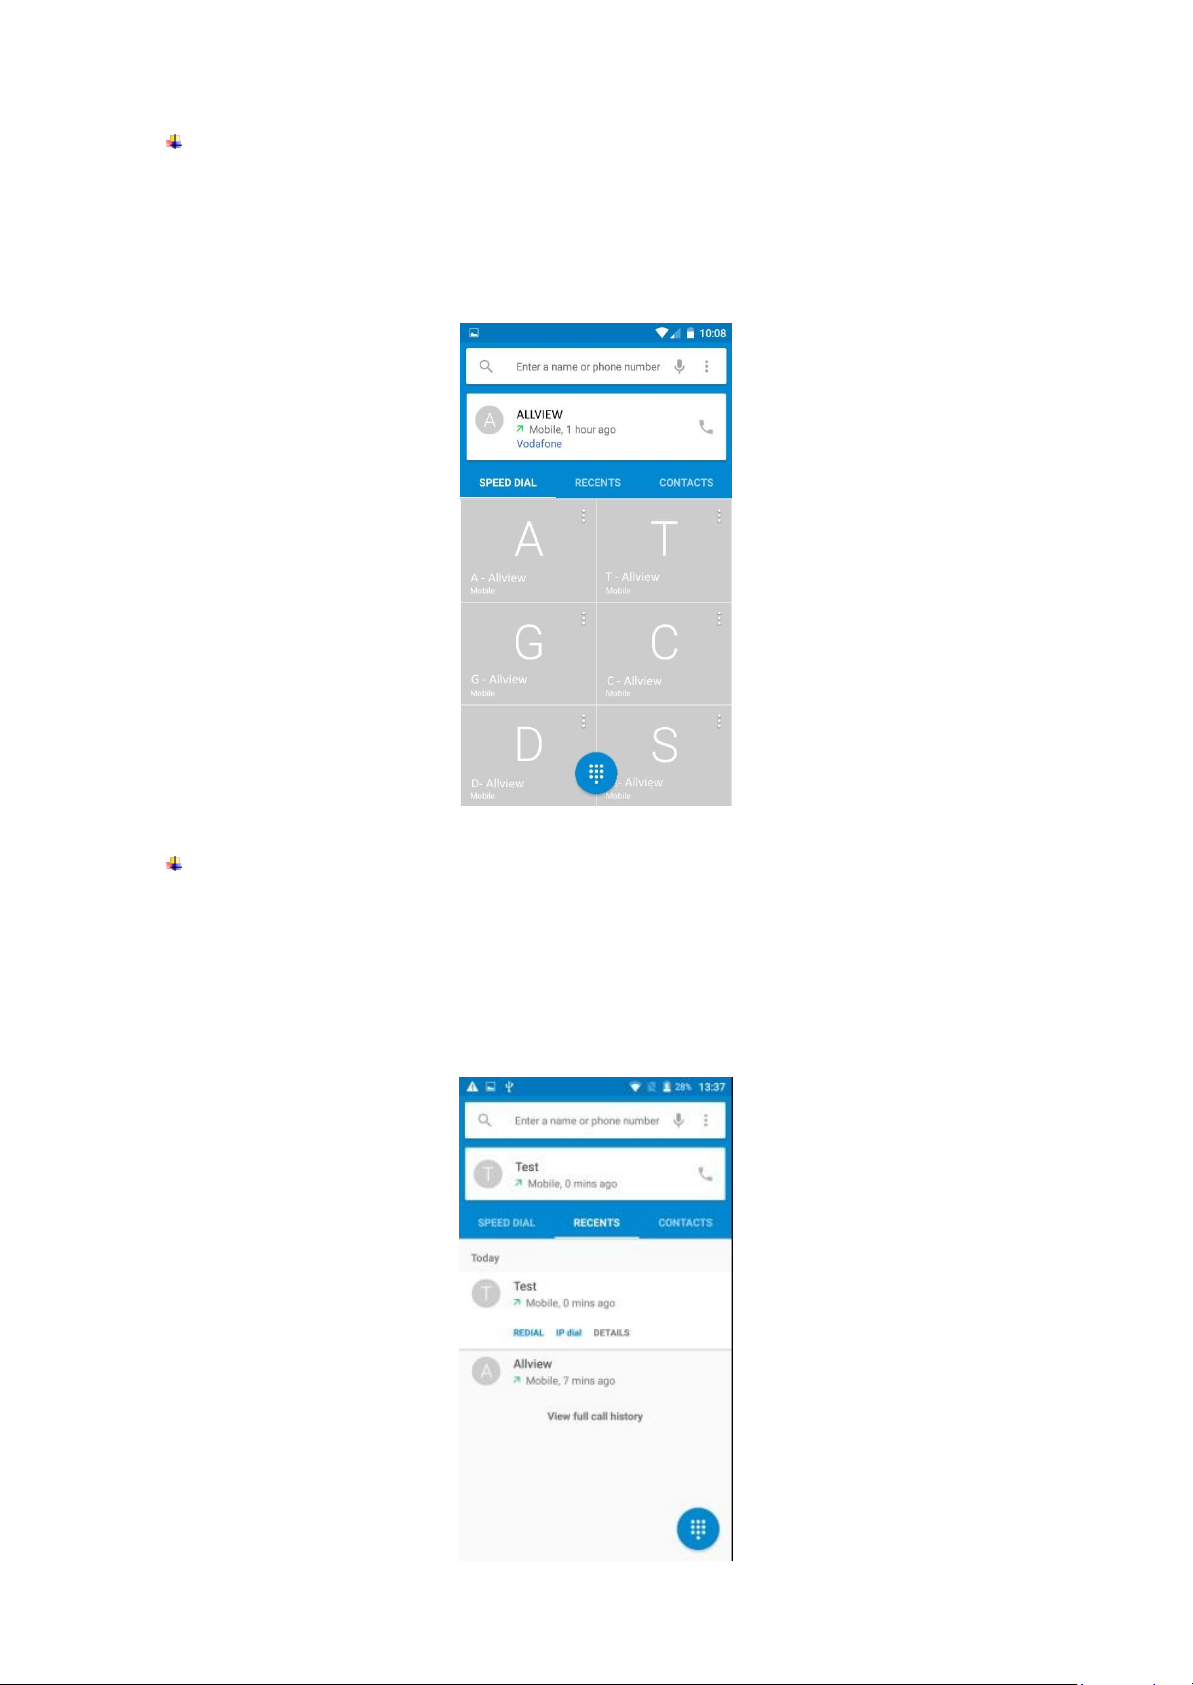
Make a call
• Touch the phone icon on the Home screen.
• Tap icon from bottom right corner
• Enter the phone number you want to dial.
• Touch the phone icon to dial the number that you entered.
NOTE! To reach the screen above, you need to tap the dial pad that appears on your screen on
any of the three available tabs Speed Dial, Recents or Contacts
Page 8
8
Make a call via Speed dial
• Tap to call
• The window will open on one of the three tabs on which you have lastly
searched
• Tap Speed Dial, in case a different tab is selected
• Then tap the desired Contact and dial
Make a call via Recents
• Tap to call
• The window will open on one of the three tabs on which you have lastly
searched
• Tap Recents, in case a different tab is selected
• Tap Redial
Page 9

9
Make a call via Contacts
• Tap to call
• The window will open on one of the three tabs on which you have lastly
searched
• Tap Contacts, in case a different tab is selected
• Tap the Contact you wish, a new window will opne-up and then tap the phon
icon
Ongoing call
• When in call, you have the option to switch to speaker, place on mute, show
dialer, hold a call and other option
• End the current call by taping to red button in middle bottom page
Incoming call
• Drag the Phone icon on the left to reject call
• Drag the Phone icon on the right to answer call
• Drag the Phone icon to UP to reject the call and send a message to caller
Note:
You can make an emergency call without SIM cards if the locations are
available for the network service. But you should not rely on it for
emergencies. It’s also depends on the local mobile network operator. For
more information, please contact with operator.
Page 10
10
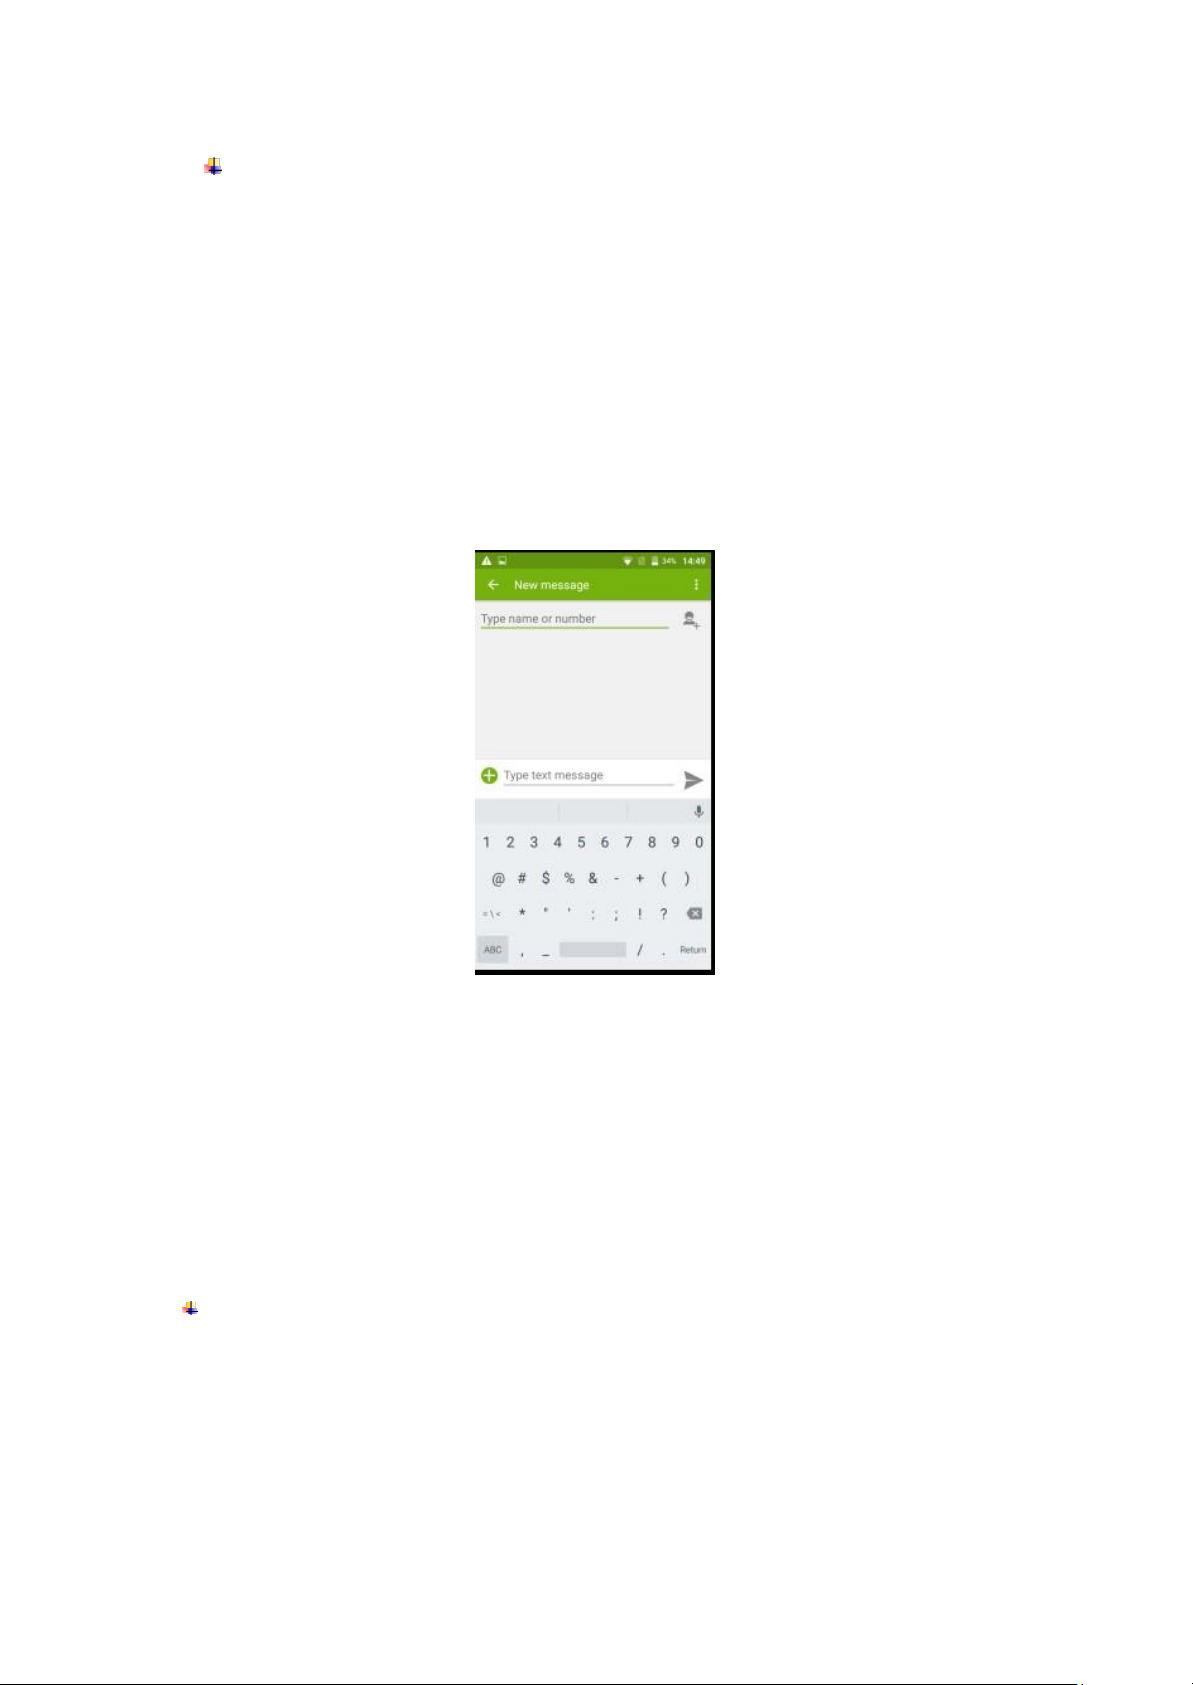
Send a message
You can use this phone to exchange text messages and multimedia messages with your
friends on their mobile phones. The messages come to and from the same contact or phone
number will be visible into a single conversation, so you can see your entire message
history with a person conveniently.
1.To create and send a new message follow the steps below:
2.Acces the app menu
3.Enter Messaging app
4.On the top right corner select option for new message
5.Enter the text
Note:
You can transform your SMS into an MMS by selecting the plus symbol and insert an image,
video or sounds into your text.
At the top of your screen, type in the phone number
To send the message, select the arrow symbol from the right panel of the screen
Contacts
Access the Contacts from menu applications.
Add new contact:
- Open Contacts from main menu;
- Tap the + symbol from the bottom-right side of the screen;
Page 11

11
- Select the memory where you will store: account or phone entry;
- Enter contact information;
- Finally, tap the back arrow from top-left corner;
Add new contact from call log:
- From the applications menu, open the Dialer;
-Change tab from Speed dial to Recents
- Tap the icon beside phone number you want to save;
- Tap the + symbol on the top right
-Select Create new contact
- Select the memory where you will store: account or phone entry;
- Enter contact information;
- Finally, tap the back arrow from top-left corner;
In order to discard contact information, tap top-right corner (3 dots icon) and select ‘Discard
changes’ and confirm
Import/Export contacts
You can import or export contacts between memories and accounts available, as follows:
- Open Contacts;
- Press the Options button and select Import / Export;
- Choose memory from which to copy contacts;
- Choose in which memory to copy the contacts;
- Select contacts to copy;
- Press the OK button;
Synchronize contacts with an account
Note:
If you don’t have an account, you can create one which is also necessary for the Google
PlayTM store.
You can synchronize the contacts of an account by following the next steps:
- Open the applications menu -> Settings -> Applications -> ACCOUNTS;
- Touch the already desired account; if you don’t have set, you can add a new one by
touching the button Add new account ;
- Tick the option Sync contact;
Page 12
12
Customize contacts with photo
Note:
The contacts from SIM card cannot be customized with photo.
To add a photo to one contacts follow the steps:
- Open Contacts;
- Touch the desired contact name;
- On the top-right of the screen touch the contact editing symbol;
- Touch the “Change” button to add image;
- Select the input method of image: Take photo or Choose photo .
6. Multimedia
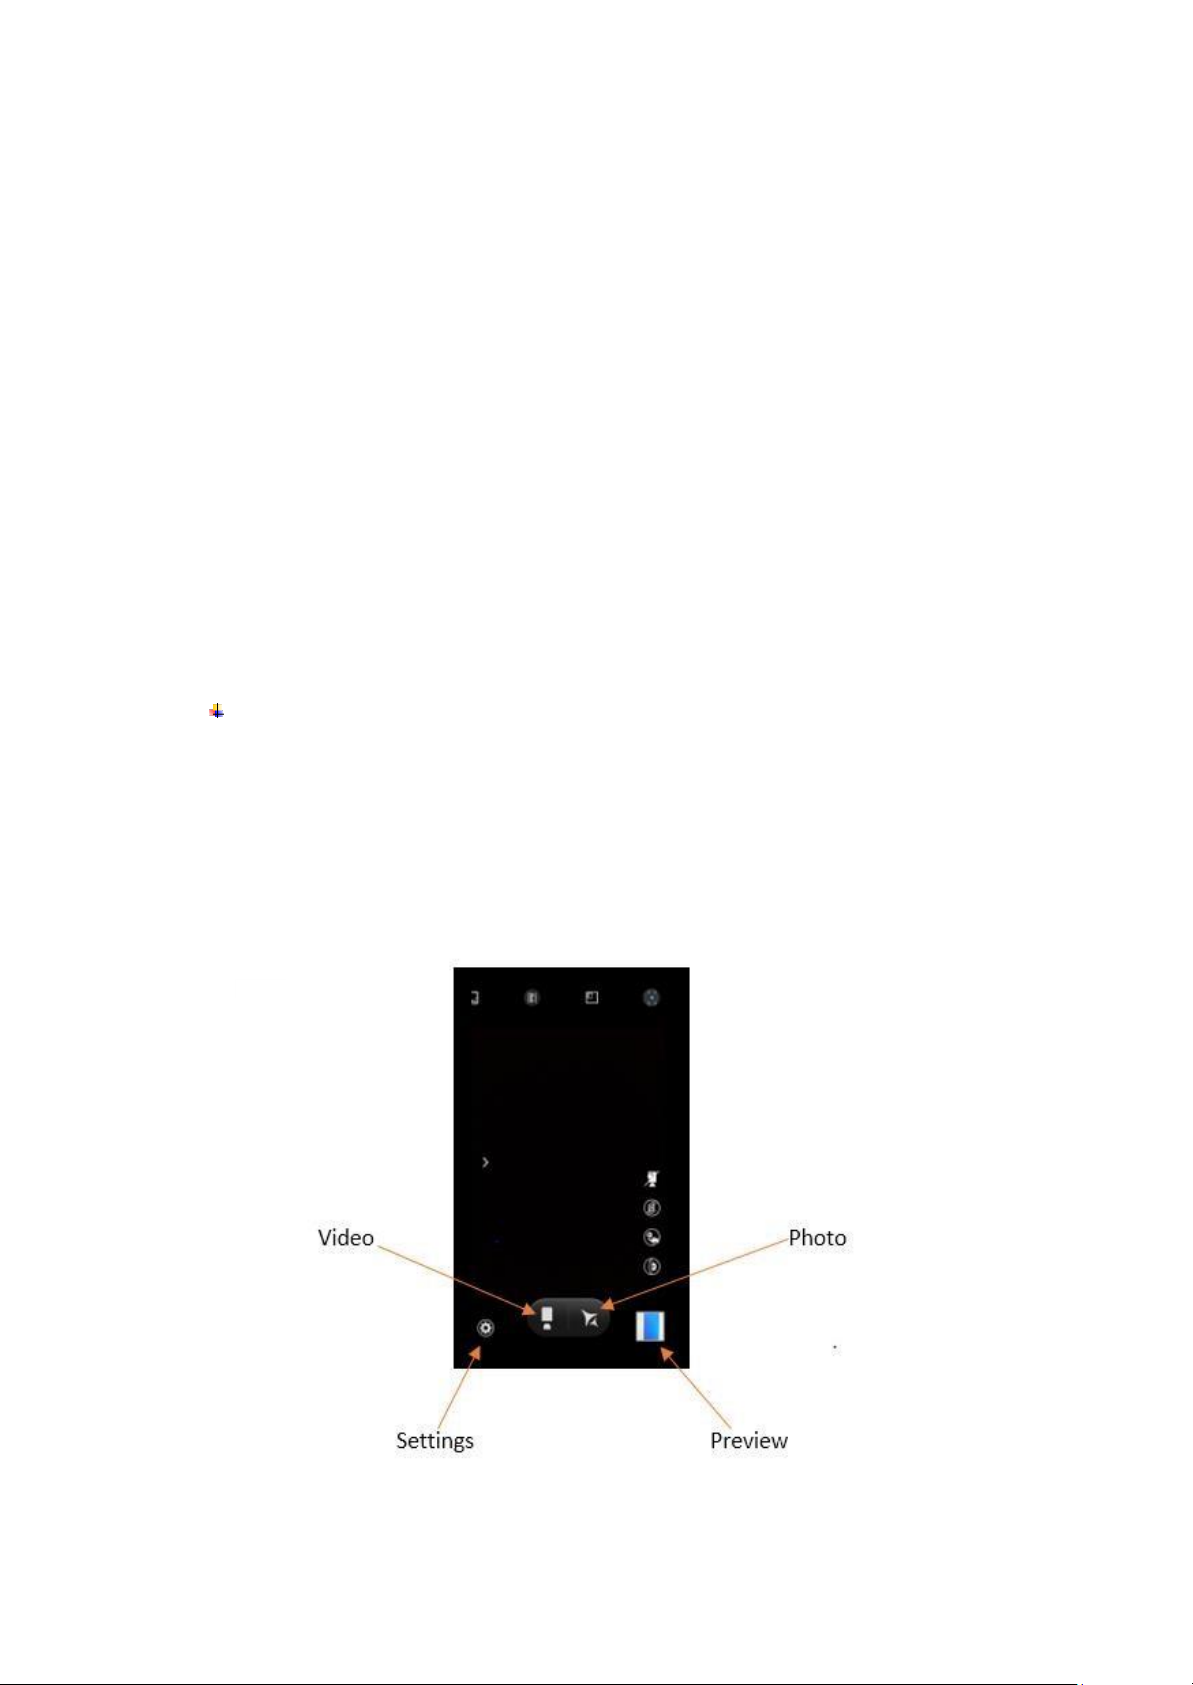
Camera
Camera is a combination of camera and camcorder that you use to shoot and share
pictures and videos. Tap the image on the camera screen where should focus on. You
can also change camera setting like transfer front and rear camera, adjust the exposure
on this screen.
N m
al M o d
e - T a k e a
pe r f
ect p h o t o.
Fa c e B e au t y M o d e ( option available only when using front camera)
- D I Y y our f
ace w i t h S m
oo t h e r , W h i t e n i n
g, S
limm
i
ng, E n l
arge
r .
Page 13

13
Drag the slider to adjust it.
Filter Mode - Multiple filters can select from Normal, Black board, Negative, Poster,
Mono, Fresh, Water, Sepia, Sweet,
• Multi angel view mode- allows you to take pictures from different angles
• Live Photo mode – will take picture recording movement after tapping the “Take
picture” button
• Motion Track Mode - will take several pictures(long press “Take picture” button)
HDR Mode - High-Dynamic Range mode will improve the light and the shadow effect
at the same time. For Rear camera only.
Panorama Mode - Press camera button and move the phone on one direction slowly.
For Rear camera only.
PIP mode – will take picture with both cameras.
• Tap video icon to switch it for video capturing mode.
• Adjust the quality and other settings if you wish or leave them on automatic mode.
• Point the lens to frame the scene where you want to start.
• Touch the Start Video icon. Camera starts shooting the video.
• Touch Stop video icon to stop shooting. An image from your most recent video is
displayed as a thumbnail at the bottom left.
Gallery
Touch the Gallery icon in the Launcher to view albums of your pictures and videos which
you’ve taken from camera. You may share the pictures and videos with your friends by
Messaging, Email, Bluetooth and so on.
Music
You can use Music player to organize and listen to music and other audio files that you
transfer to your phone from your computer.
Page 14

14
7. Connection & Settings
Your phone can connect to a variety of networks and devices, including mobile networks for
voice and data transmission, WLAN data networks, and Bluetooth devices, such as
headsets. You can also connect your phone to a computer, to transfer files from your phone
storage, and share your phone’s mobile data connection via USB or as a portable WLAN
hotspot.
Airplane mode
Option1: Settings-->Airplane mode to turn it on
Option2: Swipe down twice from the top edge to open control center--> tap Airplane
mode. Some locations like Airplane may require you to turn off your phone’s Cellular
network, WLAN, and Bluetooth wireless connections. You can turn off all these wireless
connections at once by placing your phone on Airplane mode.
Mobile Networks
When you assemble your phone with a SIM card from your wireless service provider,
your phone is configured to use your provider’s mobile networks for voice calls and for
transmitting data. Settings More Mobile Networks Network
Operators
The name of the wireless service provider you’re currently registered with is selected in
the list.
WiFi
WiFi is a wireless networking technology that can provide internet access at distance of
up to 100 meters, depending on the WiFi router and your surroundings. You
canconfigure t
he
WLAN as follow:
Set
ti n g s -- >
WiFi
, che c k WiFi
t o t urn i t
on.
Page 15

15
• Enter WiFi. The phone scans for available WiFi networks and displays the names of
those it finds. Secured networks are indicated with a Lock icon. The phone will auto
login to the network if you have previously connected.
• Touch a network to connect to it.
If the network is open, you are prompted to confirm that you want to connect to that
network by touching connect. If the network is secured, you’re prompted to enter a
password or other credentials.
Bluetooth
Bluetooth is a short-range wireless communications technology that devices can use to
exchange information over a distance of about 10 meters. The most common Bluetooth
devices are headphones for making calls or listening to music, hands-free kits for cars, and
other portable device, including laptops and cell phones.
To send a file
• Settings--> Bluetooth, check Bluetooth to turn it on.
• Enter File Explorer to select a file, Select More--> SHARE--> Bluetooth.
Page 16

16
• Touch Scan for devices, the phone will scan for and display the names of all available
Bluetooth devices in range.
• Touch the names of the other device in the list to pair them. After pairing the file will be
sent.
To receive a file
Settings--> Bluetooth, check Bluetooth to turn it on. Ensure your Bluetooth has been
connected within visibility time.
You can receive files from the devices which are paired with yours. The file you received
will be saved to the “Bluetooth” folder in the File Explorer.
To connect to a Hands-free device
• Turn on the Hands-free device, make it in a searchable state;
• Settings-->Bluetooth, Select “Search for devices”;
• After searching for the Hands-free device, Select it in the list to pair.
• After pairing, you can use the Hands-free device to listen to music, video and receive
call.
USB
You can connect the phone to your computer with a USB cable to transfer music, pictures,
and other files.
Turn on USB connection
1. Connect the phone to your computer with a USB cable.
2. Open the notification center and tap Connected as a media device to access files on
this device.
3. Other USB options can be chosen.
Charge only, connected as a USB for charging.
Camera, connected as a camera to browse photos on PC only.
Page 17
17
Note:
Do not disconnect the USB cable from the phone when you are transferring
files. Doing so may cause data loss or phone damage.
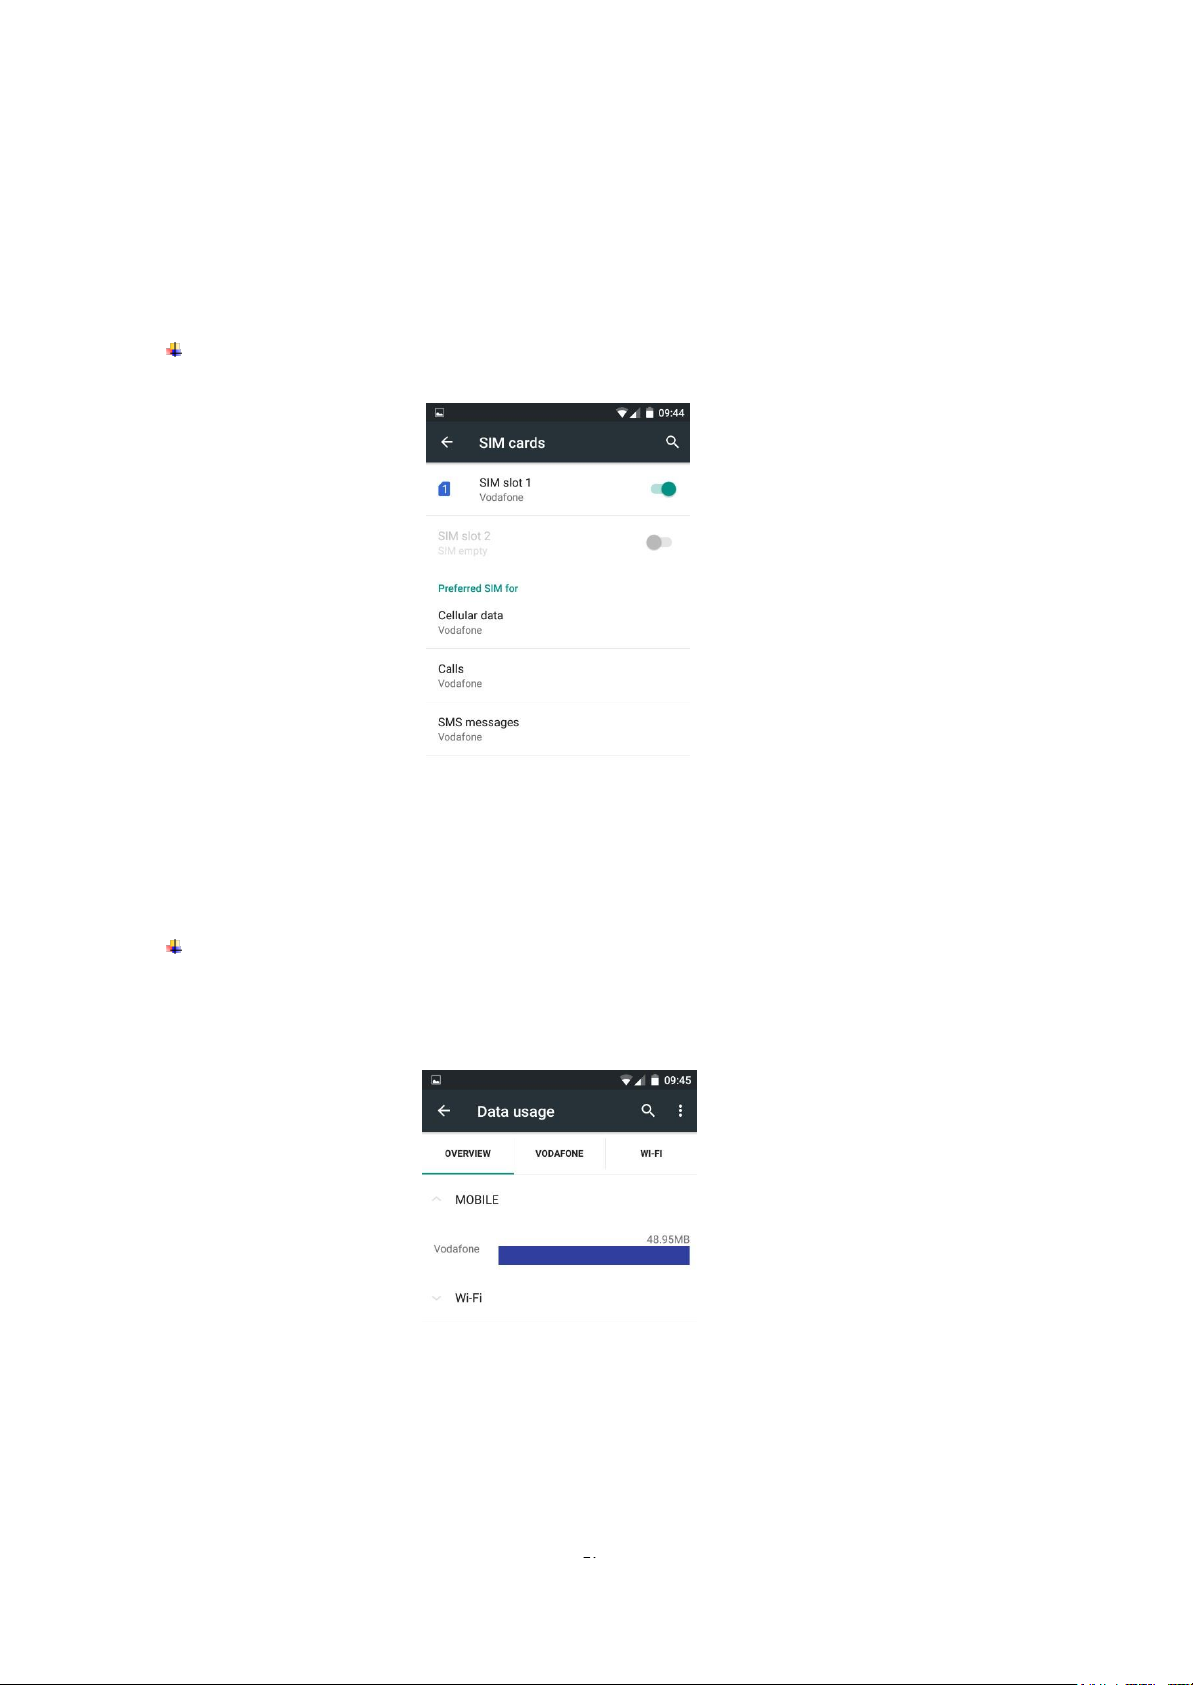
SIM Cards
You can change SIM options for Mobile data calls and SMS.
Data usage
You can preview data usage from mobile data and Wi-Fi, and you can set up data
usage limit.
Page 18
18
More
Find additional settings as:
Tethering&Portable Hotspot
VPN
Mobile networks
Display
Mira Vision: allows real time enhancement of picture quality. More tuning options are
available under Picture mode – User mode for advanced users.
Wallpaper: choose desired wallpaper from several locations
Brightness level – optimize brightness level for available light in adaptive brightness option
Sleep: set timer to lock screen after selected time of inactivity
Daydream: Set screen saver while the phone is docked and/or sleeping
Font size
Cast screen: Use to wirelessly stream content from your phone
Sound¬ification
This option allows you to set audio tones for incoming calls, e-mail alerts and SMS
notifications. Settings include: Vibration, Volume, Tone Audio, Reviews
Select General - Silent - Meeting - Outdoor profile by touching the right side circle.
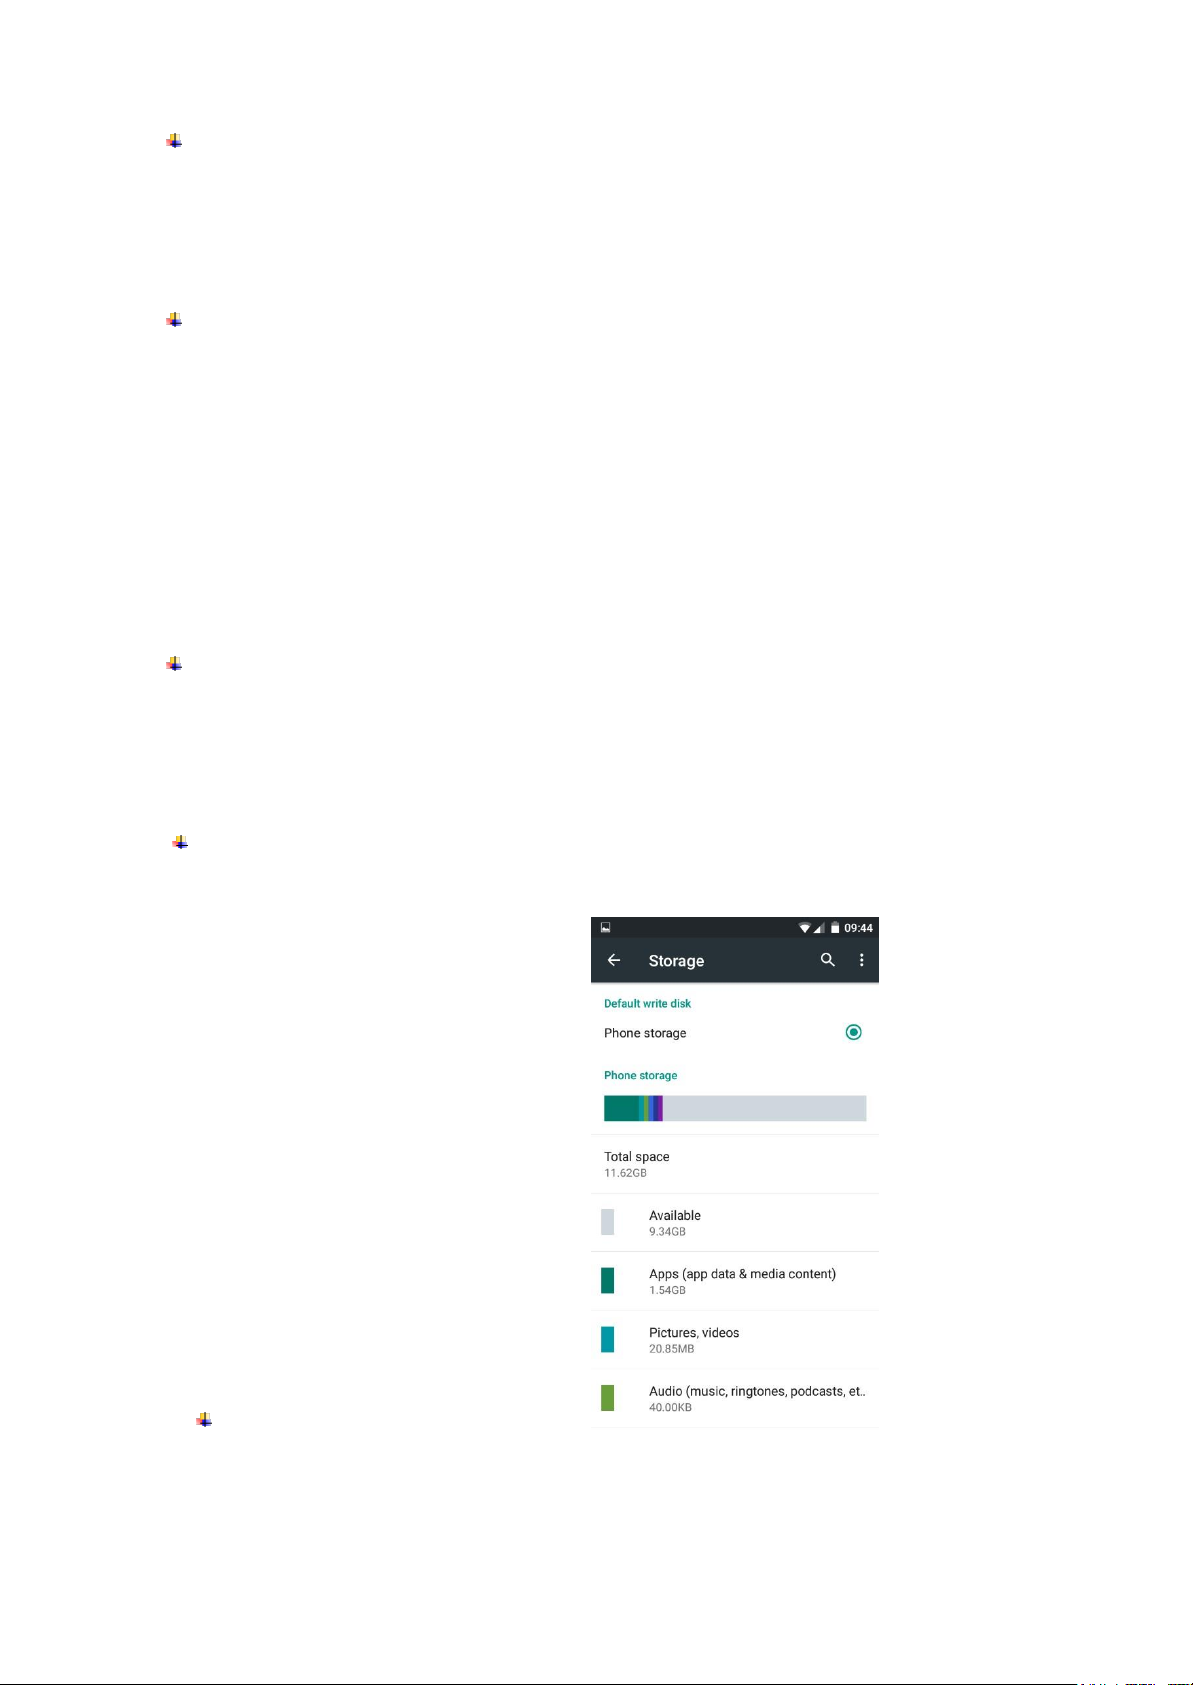
Storage
View SD Card and Phone Memory.
Uninstall or Format SD Card.
Battery
Displays information about the charging status and usage of the battery
Page 19

19
Apps
Shows the list of the installed and downloaded applications.
You can view which of them are installed on SD CARD or running.
Location
Access to my location: enable applications to use your location information.
GPS satellites: switch on/off the GPS receiver.
Google Location Service™: let applications to use the WiFi or mobile network connection
to get localization.
Security
1) Set up screen locks: you can choose none, swipe, pattern, PIN or password to unlock
the screen.
2) Encrypt phone: you can encrypt several personal information
3) Set up SIM card lock: enter 4-8 numbers PIN to set the lock of SIM.
If you enter 10 times wrong PUK code, the SIM card will be permanently locked.
4) Password visible: password visible when enter it
5) Select device administration: add or delete device manager.
6) Unknown sources: install apps from unknown sources
7) Trusted credentials: show the trusted credentials
8) Install from SD card: install the encrypted certificate from SD card.
Accounts
Add, manage and change synchronization options for the used accounts.
Languages and input
1) Selecting Language: includes all the languages available on the soft
2) Spell checker
3) Personal Dictionary: add words to custom dictionary or delete.
4) Input method : you can select Android™ keyboard or MultiLing keyboard input method.
5) Text to speech settings
6) Pointer speed
Page 20

20
Backup & reset
Backup my data: backup my settings and data of other applications.
Factory data reset: clear all data stored on the phone.
Date and Time
1) Automatic date & time: use date and time provided by network or by GPS
2) Automatic time zone: check to use network-provided time zone
3) Set Date / Set time: touch to set date / time.
4) Selecting time zone Select Time Zone according to where you are. 4) Use 24 hour
time format : ON/OFF 5) Select date format.
Note:
If the Automatic time zone is ON you will NOT BE ABLE to set the time zone manual.
Page 21

21
Note:
Please select Automatic date&time OFF in order to manually set date and time.
Schedule power on/off
You can set time of boot or shutdown the phone.
Accessibility
TalkBack & Speak Password: your device provides spoken feedback to help blind and low
Page 22
22
vision users
Shortcut to large font text for low vision users
Option to end call using power button
Switch on/off screen rotation
Adjusting speed of reaction of touch & hold
.
About phone
You can check the information about: phone status, legal informations, software version.
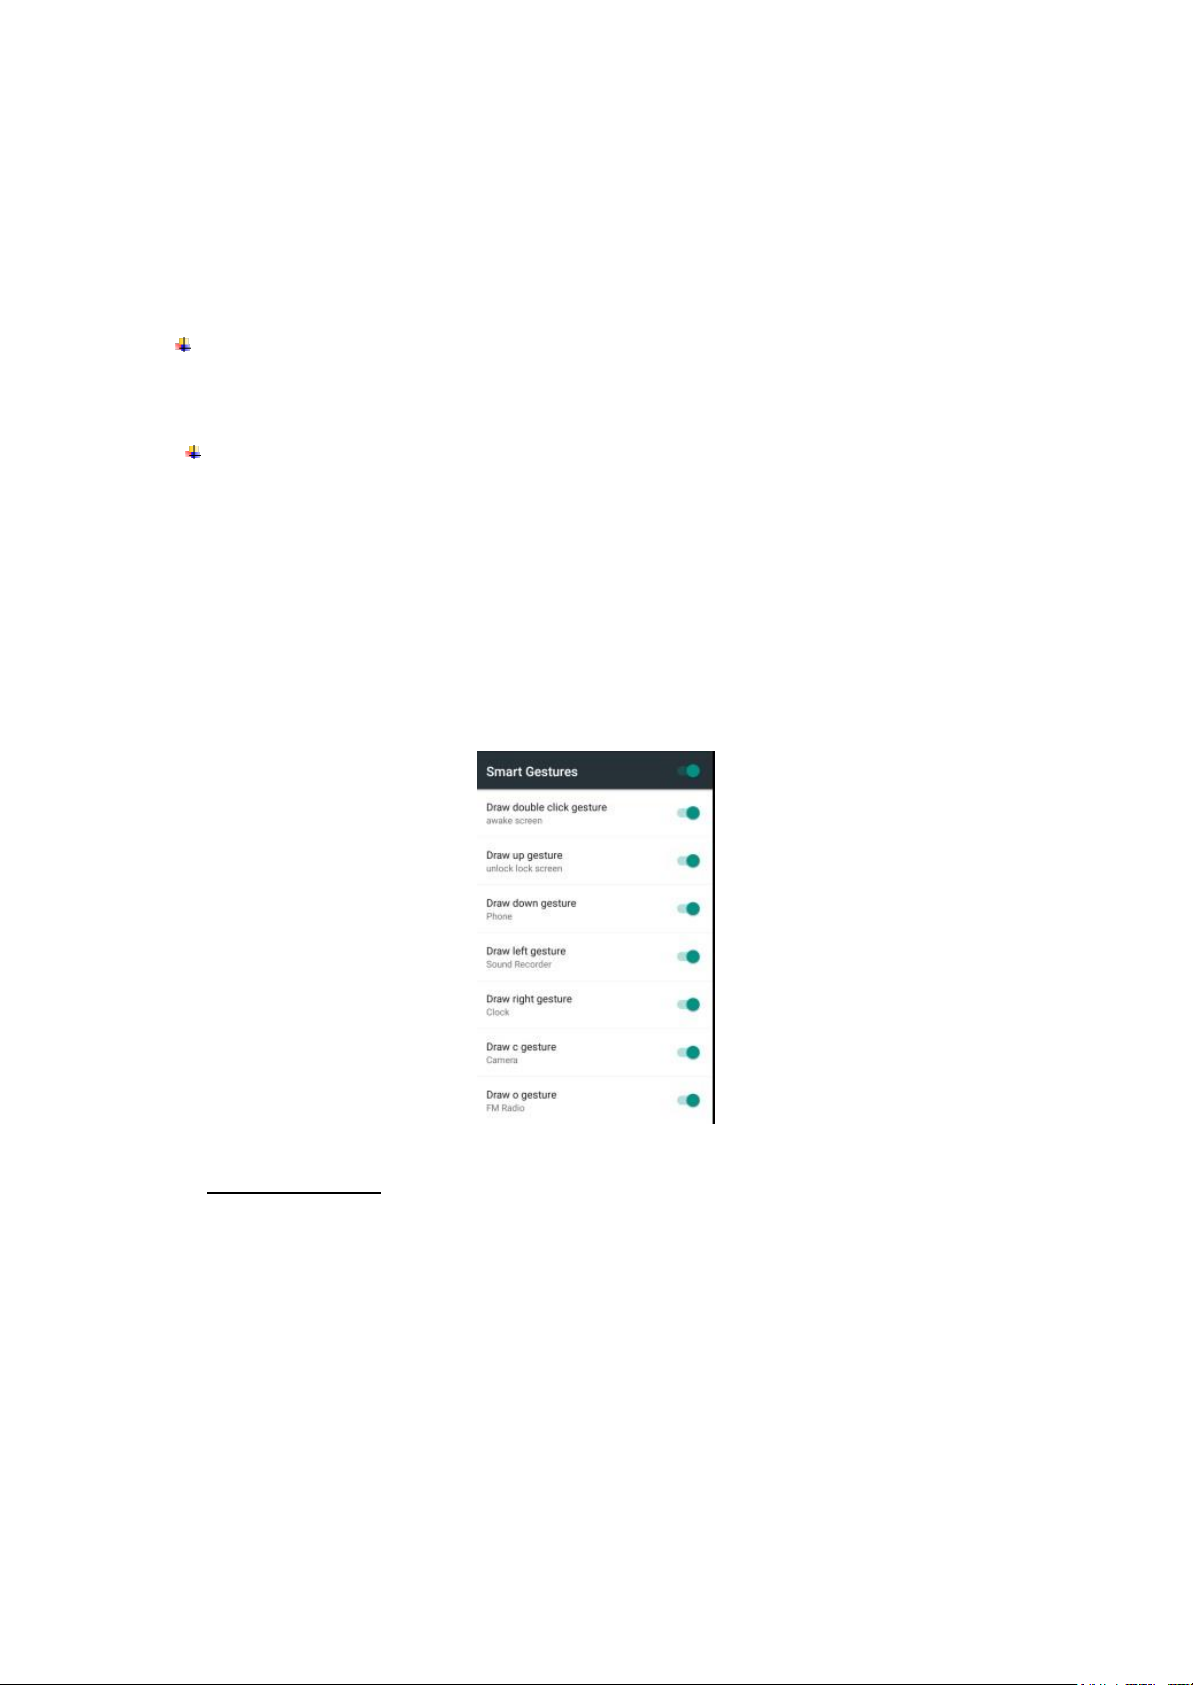
Smart gestures
Settings--> Smart gestures to turn it on.
The smart gestures system supports a variety of experience and control, through gesture
can be more convenient operation, some of the smart gesture functions will not work while
flip cover is closed.
Settings Smart gestures Select Smart gestures ON/OFF
Draw pattern to access menu quickly while phone is on sleep mode.
Double click wake
Settings Smart gestures Select Double click gesture
In sleep screen, quick double tapping can wake up the mobile phone.
Page 23
23
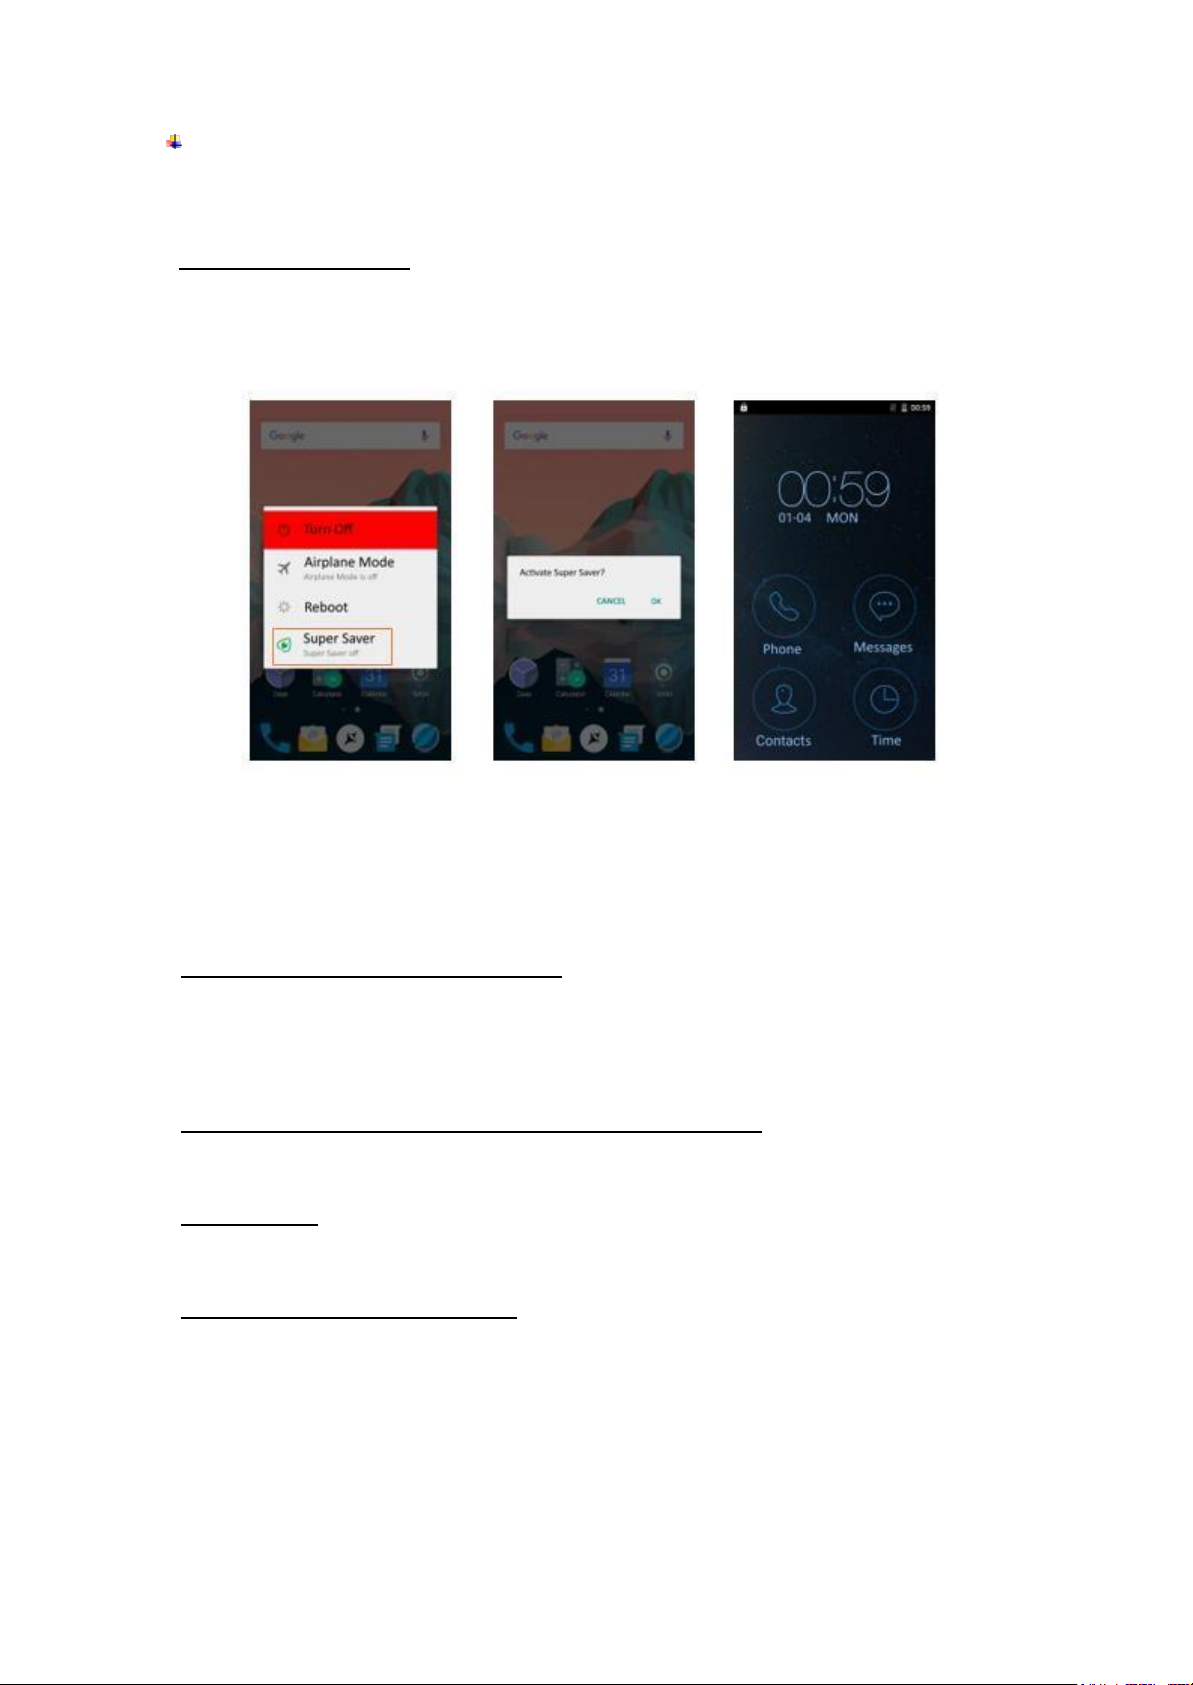
Super Saver mode
Super Saver Mode lets mobile phone enter the minimalist desktop to extend standby time.
But only phone, contacts, messaging and clock can be used during this time.
Access to extreme mode
1) Long press Power button – choose Super Saver mode and confirm
2) To exit Super Saver - Long press Power button choose Super Saver mode
and confirm exit
10. Warnings and notes
Operational Warnings
IMPORTANT INFORMATION ON SAFE AND EFFICIENT OPERATION. Read this
information before using your phone. For the safe and efficient operation of your phone,
observe these guidelines:
Potentially explosive at atmospheres: Turn off your phone when you are in any areas
with a potentially explosive atmosphere, such as fueling areas (gas or petrol stations, below
deck on boats), storage facilities for fuel or chemicals, blasting areas and areas near
electrical blasting caps, and areas where there are chemicals or particles (Such as metal
powders, grains, and dust) in the air.
Interference to medical and personal Electronic Devices: Most but not all electronic
equipment is shielded from RF signals and certain electronic equipment may not be
shielded against the RF signals from your phone.
Audio Safety: This phone is capable of producing loud noises which may damage your
hearing. When using the speaker phone feature, it is recommended that you place your
phone at a safe distance from your ear.
Other Medical Devices, hospitals: If you use any other personal medical device, consult
the manufacturer of your device to determine if it is adequately shielded from external RF
energy. Your physician may be able to assist you in obtaining this information. Turn your
phone OFF in health care facilities when any regulations posted in these areas instruct you
to do so. Hospitals or health care facilities may be using equipment that could be sensitive
to external RF energy.
Page 24

24
Product statement on handling and use: You alone are responsible for how you use your
phone and any consequences of its use. You must always switch off your phone wherever
the use of a phone is prohibited. Use of your phone is subject to safety measures designed
to protect users and their environment. Always treat your phone and its accessories with
care and keep it in a clean and dust-free place
Do not expose your phone or its accessories to open flames or lit tobacco products.
Do not expose your phone or its accessories to liquid, moisture, or high humidity.Do
not drop, throw, or try to bend your phone or its accessories
Do not use harsh chemicals, cleaning solvents, or aerosols to clean the device or its
accessories.
Do not attempt to disassemble your phone or its accessories; only authorized personnel
must do so.
Do not expose your phone or its accessories to extreme temperatures, minimum 32℉and
maximum 113℉(0℃ to 45℃).
Battery: Your phone includes an internal lithium-ion or lithium-ion polymer battery. Please
note that use of certain data applications can result in heavy battery use and may require
frequent battery charging. Any disposal of the phone or battery must comply with laws and
regulations pertaining to lithium-ion or lithium-ion polymer batteries.
Faulty and damaged products: Do not attempt to disassemble the phone or its accessory.
Only qualified personnel must service or repair the phone or its accessory. If your phone or
its accessory has been submerged in water, Punctured, or subjected to a severe fall, do
not use it until you have taken it to be checked at an authorized service center.
Page 25

25
CE 0700
DECLARATION OF CONFORMITY
Nr. 1401
We, S.C. Visual Fan S.R.L, with the social headquarters in Brasov, 61st Brazilor Street,
post code 500313 Romania, registered at the Register of Commerce Brasov under nr.
J08/818/2002, CUI RO14724950, as importer, ensure, guarantee and declare on own
responsibility according to Art. 4 HG nr.1.022/2002 regarding the products and services
regime, which could put in danger the life and health, security and labour protection, that
the ALLVIEW product X3 Soul Mini does not put in danger the life, safety of labour, does
cause adverse environmental impacts and is according to:
-The 2011/65/UE Directive regarding the usage restrictions of some dangerous substances
]n the electonic and electrical equipments.
-The Directive regarding the radio and telecommunications equipments R&TTE
1999/5/CEE (HG 88/2003)
-The Directive regarding the ensurance of low voltage equipment users 2014/35/CE and
73/32/CEE , modified by the92/31/CEEand 93/68/CEE (HG982/2007) Directive.
-The Directive regarding the electromagnetic compatibility 89/336/CEE, modified by the
92/31/CEE si 93/68/CEE (HG982/2007); RoHS Directive: EN50581:2012
-The safety requirements of the European Directive 2001/95/EC and of the EN
60065:2002/A12:2011 si EN 60950-1:2006/ A1:2010 /A11:2009/A12:2011 standards,
regarding the decibel level limit of the commercialized devices.
The product had been evaluated according to the following standards:
-Health: EN 50360:2001, EN 50361; EN 62209-1 : 2006
-Safety: EN 60950- 1: 2001 +A11:2004; EMC EN 301 489- 01 V1.6.1 (09-2005)
EN 301 489- 07 V1.3.1 (11-2005); EN 301 489- 17 V1.2.1 (08-2002) -
Radio spectrum:EN 301 511 V9.0.2 (03-2003);EN 300 328 V1.7.1 (10-2006)
The conformity assesment procedure was done according to the 1999/5/CEE Directive (of
the Annex II of HG nr. 88/2003) the documentation being at S.C. Visual Fan S.R.L.,
Brasov , 61st Brazilor Street, post code 500313 ,Romania at it will be put at disposal on
demand. The products conformity assesment procedure was fulfilled with the participation
of the following institutions: Phoenix Testlab GmbH
The product has the CE mark applied. The conformity declaration is available at
www.allviewmobile.com.
CE 0700
SAR 0,675W/kg COTUNA
GHEORGHE
Brasov
24.12.2015
Director
Page 26

26
SPECIFICATIONS
Page 27

27
Măsuri de siguranță
ATENȚIE! Vă rugăm citiți cu atenție instrucțiunile prezentate mai
jos și aplicați-le în cazul unor situații de urgență.
Siguranța în timpul condusului: Este recomandat a nu se folosi telefonul mobil
în timpul condusului. Dacă totusi trebuie să îl folosiți, întotdeauna activați opțiunea
‘Mâini libere’.
Închideți telefonul mobil dacă vă aflați în avion Interferențele cauzate de
telefoanele mobile afectează siguranța aviației, și, astfel, este ilegal să-l folosiți in
avion. Vă rugăm asigurați-vă că telefonul mobil este oprit atunci când sunteți în
avion.
În spital: Atunci când folosiți telefonul într-un spital, trebuie să vă supuneți
normelor relevante specificate de către spital. Orice interferență produsă de
echipamentul medical poate afecta funcționalitatea telefonului mobil.
Service-uri agreate: NUMAI service-urile agreate pot repara telefoanele mobile.
Dacă desfaceți telefonul si încercați să-l reparați singuri veți pierde garanția
produsului.
Accesorii și baterii: Numai accesoriile și bateriile aprobate de producător pot fi
folosite.
Apeluri de urgență: Asigurați-vă că telefonul este pornit și activat dacă doriți să
efectuați un Apel de Urgență la 112, apăsați tasta de apel și confirmați locația,
explicați ce s-a întamplat și nu închideți convorbirea.
Bateria și încarcarea bateriei: Se recomandă încărcarea completă a bateriei
înainte de prima utilizare a dispozitivului. Nu expuneți bateria la temperaturi mai
mari de +40C. Nu aruncați bateria in foc sau la întamplare. Returnați bateriile
defecte la furnizor sau la centrele speciale pentru colectarea bateriilor defecte.
ATENȚIE! Nu ne asumăm responsabilitatea pentru situațiile în care telefonul este
folosit în alt mod decât cel prevăzut în manual. Compania noastră își rezervă
dreptul de a aduce modificări în conținutul manualului fără a face public acest
lucru. Aceste modificări vor fi afișate pe site-ul companiei la produsul la care se
aduc modificări.
Conținutul acestui manual poate fi diferit de cel existent în produs. În acest caz
ultimul va fi luat în considerare.
Pentru a evita probleme ce pot sa apărea cu service-uri care nu mai sunt agreate
de S.C. Visual Fan S.R.L. (deoarece Visual Fan își rezervă dreptul de a înceta
colaborarea cu orice service colaborator agreat, existent pe certificatul de
garanție la data punerii în vânzare pe piată a lotului de produse), înainte de a
duce un produs în service vă rugăm să consultați lista actualizată, a service-urilor
agreate, existentă pe site-ul Allview la secțiunea “Suport&Service - Service
autorizat”. Pentru mai multe detalii despre produs accesați
www.allviewmobile.com
Nu acoperiți antena cu mâna sau alte obiecte, nerespectarea acestei indicații
ducând la probleme de conectivitate și descărcarea rapidă a bateriei.
Aplicațiile care însoțesc produsul, și sunt furnizate de terțe părți, pot fi oprite sau
întrerupte în orice moment. S.C. Visual Fan S.R.L. se dezice în mod explicit de
orice responsabilitate sau răspundere privind modificarea, oprirea ori
Page 28

28
suspendarea serviciilor/conținutului puse la dispoziție de către terțe părti prin
intermediul acestui dispozitiv. Întrebările sau alte solicitări legate de acest conținut
ori servicii se vor adresa direct furnizorilor proprietari ai acestora
3. Înaintea de utilizare
Page 29

29
Telefonul este Dual SIM și vă permite utilizarea a 2 SIM-uri ce pot fi din rețele mobile diferite.
Introduceți Nano SIM/Micro SIM și card-ul SD
1) Introduceți acul SIM în lăcașul din tăvița SIM, iar aceasta va ieși automat
2) Aplicați corect și conform lăcașului special destinat atât Nano SIM-ul /Micro SIM-ul cât
și card-ul SD
Nu retrageți card-urile în timpul unui transfer de date. Nerespectarea acestei
recomandări poate conduce la pierderea datelor sau la distrugerea card-urilor
Nano și Micro SIM-ul sunt componente de mici dimensiuni. Păstrați-le într-un loc sigur,
departe de accesul copiilor, pentru evitarea înghițirii accidentale a componentelor.
Nu atingeți suprafața de metal a Nano/Micro SIM-ului și a card-ului SD. Nu
expuneți la cîmpuri electromagnetice pentru a evita pierderea datelor.
Încărcarea bateriei
Încărcați bateria înainte de folosire. Conectați cablul USB la adaptorul de alimentare,
apoi capătul rămas conectați-l în port-ul USB.
Notă:
Acest dispozitiv este echipat cu Micro USB, iar cablul de alimentare necesită poziționare
corectă pentru conectare.
Page 30

30
NU folosiți alt cablu USB, decît cel destinat telefonului. Nerespectarea acestei instrucțiuni
poate afecta funcționalitatea corectă a port-ului USB.Please don't use other USB cable to
plug in, otherwise the USB port will be damaged.
Bateria telefonului mobil nu este detașabilă.
4. Utilizare
Funcții de bază
Pornirea telefonului
Tineți apăsat pentru câteva secunde butonul de Pornire al telefonului
Oprirea telefonului
Tineți apăsat același buton de Pornire al telefonului până va fi afișat un meniu.
Selectați Oprire pentru închiderea telefonului
Repornire
Opțiunea 1: Tineți apăsat mai multe secunde butonul de Pornire al telefonului până va
fi afișat un meniu. Selectați “Repornire’’ pentru a restarta telefonul
Opțiunea 2: Tineți apăsat cel puțin 10 secunde pentru o repornire automată a
telefonului.
Blocare ecran
Opțiunea 1: Apăsați butonul de Pornire al telefonului pentru blocarea ecranului
Opțiunea 2: Ecranul se va bloca automat după un anumit timp de inactivitate
Pentru setare timer de blocare automată mergeți la Setări – Afișaj – Inactivitate
Deblocare ecran
Apăsați butonul de Pornire al telefonului pentru blocarea ecranului, apoi glisați de jos în
sus.
Ecran principal
Ecranul principal este punctul de pornire spre toate functiile,aplicațiile si toate
caracteristicile telefonului . Vă puteți personaliza ecranul principal cu imaginile de fundal si
de ecran dorite.
Page 31

31
Bara de stare
În partea de sus a ecranului sunt afișate următoarele:ora, status semnal, nivel baterie și
notificările primite semnalizate prin diferite pictograme
Centru de notificări
Glisați de sus in jos pentru a afla mai multe informații referitoare la notificarea primită. Dacă
doriți să ștergeți, apăsați pe ea si glisați stânga sau dreapta.
Page 32

32
Centru de comandă
Glisați de sus în jos si se va deschide centrul de notificări, iar de aici, glisați încă o dată de
sus în jos pentru a deschide centrul de comandă. De aici, aveți acces imediat spre Lanternă,
proiectare imagine,ajustare luminozitate ecran, pornire/oprit mod avion,import-export
contacte, profiluri audio etc.
Meniu de ecran
Apăsați lung în pagina ecranului principal pentru accesarea meniului de ecran. Este o
cale rapidă de accesare Setări de ecran, Setări de sitem și Widget-uri.
Mutarea unei aplicații
Țineți apăsat pe pictograma dorită și trageți spre locația dorită(dacă locația se regăsește pe alt
ecran, trageți pictograma la marginea acestuia, iar ecranul se va schimba automat. Sau
puteti sterge pictograma de pe pagina principală trăgând pictograma cptre Opțiunea
”Șterge” din partea de sus a ecranului
Dezinstalarea unei aplicații
Pentru a dezinstala o aplicație este nevoie să mergeți în Setări ->Aplicații. Alegeți
servicul pe care doriți să-l dezinstalați, alegeți opțiunea “Dezinstalare” și confirmați.
Creare fișier
Trageți o pictogramă deasupra unei altei picotgrame si se va crea automat un nou
fișier ce le va conține pe amîndouă.Deschideți fișierul si apăsați pe titlu pentru a
redenumi fișierul.
Page 33

33
Touch screen
Funcția tactilă este modul de a utiliza toate funcțiile si pictogramele telefonului.
Apăsare: Pentru a selecta sau a accesa pictogramele sau aplicațiile din telefon,
cum ar fi setări, tastatură etc. Le atingeți cu vîrful degetului, pur și simplu.
Apăsare îndelungată: Apăsați lung și nu ridicați degetul de pe ecran până vă notifică pentru o acțiune.
Trage : Atingeți și mențineți un element pentru un moment și apoi , fără a ridica
degetul, deplasați degetul pe ecran , până când ajungeți la poziția dorită . Aveți
posibilitatea să glisați elemente pe ecranul inițial pentru a le repoziționa și aveți
posibilitatea să glisați pentru a deschide Centrul de notificare .
5. Comunicare
Apelare
Apasă pictograma de telefon din ecranul principal.
Apasă pictograma din colțul dreapta-jos
Introduceți numărul de telefon dorit
Apăsați butonul verde pentru apelare
Page 34

34
NOTĂ! Pentru accesarea ecranului de Apelare afișat mai sus, trebuie selectată tastatura
virtuală de apelare ce apare în toate cele trei ecrane discponibile Apelare rapidă, Recente
sau Contacte.
Apelare via Apelare rapidă
Apăsați pentru apelare
Ecranul se va deschide automat pe ultimul tab accesat ultima oară în
apelare
Selectati Apelare rapidă, în cazul în care un alt tab este selectat
Apăsați pe contactul dorit, apoi pe pictograma Telefon
Page 35

35
Apelare via Recente
Apăsați pentru apelare
Ecranul se va deschide automat pe ultimul tab accesat ultima oară în
apelare
Selectati Recente, în cazul în care un alt tab este selectat
Apăsați pe contactul dorit, apoi pe pictograma Telefon
Apelare via Contacte
Apăsați pentru apelare
Ecranul se va deschide automat pe ultimul tab accesat ultima oară
Alegeți Contacte, în cazul în care un alt tab este selectat
Se va deschide o fereastră nouă, păsați pe contactul dorit apoi pe
pictograma Telefon
Page 36

36
Apeluri în curs
În timpul unui apel în curs, aveți opțiunea de a comuta pe difuzor, pe mute,
de a plasa apelul în așteptare și multe alte opțiuni
Apelul se încheie apăsând butonul roșu din mijlocul ecranului
Apeluri primite
Apăsați și trageți spre stânga pentru a respinge apelul
Apăsați și trageți spre dreapta pentru acceptare apel
Apăsați și trageți în sus pentru a respinge un apel și a-i trimite apelantului
un mesaj
Notă
Puteți efectua apeluri de urgență fără a avea un card SIM introdus, numai dacă locația în care
va aflați se află în aria de acoperire a rețelelor mobile. Recomandat este să nu vă bazați pe
acest lucru în cazuri de urgență, depinde de asemena și de operatorul local de rețele mobile.
Pentru mai multe detalii, că rugăm să contactați opersatul dumneavoastră de rețele mobile.
Trimitere mesaje
Puteți folosi telefonul mobil pentru a primi/trimite mesaje text și multimedia către toți utilizatorii
de telefon moibil. Mesajele către/de la același număr de telefon mobil vor fi stocate ca și
conversație singulară pentru o vizualizare, a istoricului, mai eficientă.
Pentru a crea si trimite un mesaj SMS, vă rugăm urmăriți pașii enumerați mai jos:
Accesați meniul de aplicații;
Accesați aplicația Mesagerie;
Din partea dreaptă sus a ecranului apăsați butonul de mesaj nou;
Introduceți textul mesajului
Page 37

37
Notă
Puteți transforma mesajul in MMS apăsând simbolul plus și introducând conținut media:
imagini, sunete sau filme.
In câmpul superior tastați numărul de telefon sau numele destinatarului;
- Apăsați simbolul săgeată -> din partea dreaptă a câmpului de text pentru a trimite
mesajul.
Contacte
Accesați aplicația Contacte din meniul de aplicații.
Adăugare contact nou:
- Accesați aplicația Contacte din meniul de aplicații;
- Atingeți simbolul de adăugare + din partea dreapta-jos a ecranului;
- Alegeți memoria sau contul unde se va stoca intrarea;
- Introduceți datele contactului;
- La final, atingeți butonul Salvare.
Adăugare contact din jurnalul de apeluri:
- Din meniul de aplicații accesați aplicația Telefon;
- Atingeți numărul de telefon care doriți să îl salvați;
- Atingeți butonul Contact nou;
- Alegeți memoria sau contul unde se va stoca intrarea;
- Introduceți datele contactului;
- La final, atingeți butonul Salvare.
Import/export contacte
Puteți importa sau exporta contacte între memoriile sau conturile disponibile, astfel:
- Accesați Contacte;
- Apăsați butonul Opțiuni și selectați Importare/Exportare;
- Alegeți memoria din care se vor copia contacte;
- Alegeți memoria în care copiați contactele;
- Alegeți contactele de copiat;
- Apăsați butonul Copiere;
Sincronizare contacte cu un cont
Nota: Dacă nu aveți deja un cont creat, puteți crea un cont de utilizator Google necesar
accesării Google Play store.
Puteți sincroniza contactele unui cont, astfel:
- Accesați meniul de aplicații -> Setări ->Aplicații -> CONTURI;
- Atingeți contul dorit; dacă nu aveti un cont deja introdus, puteți introduce datele unui nou
cont apăsând butonul Adăugați un cont;.
- Bifați opțiunea Sincronizați contacte.
Personalizare contacte cu imagine proprie
Notă: Contactelor de pe memoria SIM nu li se pot asocia sonerii sau imagini proprii.
Pentru a asocia o imagine, procedați astfel:
- Deschideți meniul Contacte;
- Atingeți numele contactului dorit;
- Din colțul dreapta-sus al ecranului atingeți simbolul de editare contact;
- Atingeți simbolul contactului;
- Fotografiați sau alegeți o imagine din galerie pentru a fi asociată contactului.
Page 38

38
6. Multimedia
Camera
Camera is a combination of camera and camcorder that you use to shoot and share pictures
and videos. Tap the image on the camera screen where should focus on. You can also change
camera setting like transfer front and rear camera, adjust the exposure on this screen.
Camera foto este o combinație de aparat de fotografiat si cameră video, ce poate fi folosită
în oricare din aceste moduri, folosind atât camera principală, cât și cea frontală. Puteți ajusta
luminozitatea cadrului, apăsând pur și simplu pe ecran, în locul în care doriți să fie captată
lumina.
Page 39

39
Mod normal – Fotografii fără efecte speciale.
Estompare detalli portret (opțiunea este valabilă numai pentru camera frontală)
– netezește imperfecțiunile, ajustează si concentrează luminozitatea pe portretele
detectate.
Mutați cursorul sus-jos pe grila afișată în stînga paginii, pentru ajustare.
Mod – Pute’I selecta diferite filtre de imagine: Normal, Splendid, Elegants, Tare, Film,
Calm, Memorie,Tabla neagra, Negativ, Tabla alba, Poster, Mono, Proaspat, Apa, Sepia,
Sweet,
Mod vizualizare din mai multe unghiuri – permite fotografierea din mai multe
unghiuri si o vizualizare a acesteia din unghiurile capturate
Mod fotografiere live – va înregistra o fotografie timp de câteva secunde din
momentul butonului de fotografiere
Mod urmărire mișcare - va captura câteva cadre (prin apăsarea lungă a butonului
de fotografiere)
Mod HDR – Modul High-Dynamic Range va îmbunătați calitatea imaginii și efectul
umbrelor (opțiunea este valabilă numai pentru camera principală)
Mod Panoramă – Apăsați butonul de fotografiere și glisați telefonul de la stînga spre
dreapta (opțiunea este valabilă numai pentru camera principală)
Mod PIP – va captura imaginea cu ambele camere, atât frontală, cât și principală,
simultan.
Înregistrare video
pentru comutare mod video, apăsați butonul de cameră video
Aveți opțiunea de a modifica setările predefinite ale camerei, sau de a le comuta
pe automat.
Îndreptați camera spre punctul din care doriți să începeți
filmarea.
Apăsați pictograma Cameră video pentu a începe
înregistrarea.
Apăsați pictograma Cameră video pentu a începe înregistrarea. Un cadru din
conținutul filmării va fi afișat în colțul dreapta-jos al ecranului, ca și coperta de
filmare.
Galerie
Apăsați pictograma Galerie din meniul principal pentru a vizualiza fotografiile și înregistrările
realizate. Puteți împărtași toate imaginile sau înregistrările dorite via Mesaje, Email, Bluetooth
și multe altele.
Muzică
Puteți utiliza Music player-ul pentru a organiza și asculta piesele pe care le-ați
transferat din computer în telefon.
Page 40

40
7. Conexiuni și Setări
Telefonul dumneavoastră se poate conecta la o varietate de rețele și dispozitive, inclusiv rețele mobile de voce si
de transmisie date, rețele wireless și Blutetooth( cum ar fi căștile audio). De asemena , vă puteți conecta telefonul
la computer, pentru a face transfer de date, sau, dacă dispuneți de trafic suficient de WiFI, vă puteți transforma
telefonul în dispozitiv HotSpot.
Mod Avion
Opțiunea 1: Setări-->Mod Avion pentru activare
Opțiunea 2: Trageți de sus în jos de două ori pentru a deschide Centrul de comandă,
apoi apăsați pe pictograma Mod Avion. În unele locații, cum ar fi avionul, vă pot solicita
să opriți și datele mobile, internetul, și conexiunile Bluetooth. Toate acestea le puteți opri,
apăsând simplu pe Mod Avion.
Rețele mobile
Când introduceți card-ul SIM obținut de la furnizorul Dvs. de telefonie mobilă,
telefonul Dvs. se va configura automat pe rețeaua respectivă pentru apeluri de voce
si trafic de date.
Setări – Mai multe – Rețele mobile – Rețele operator
Numele furnizorului de servicii wireless îl veți regăsi în listă.
WiFi
WiFi este o tehnologie de trafic de rețea care poate furniza acces la internet la o distanță
de până la 100 metri, în funcție de router și obiectele din locația în care vă aflați, care
pot obtura semnalul. Puteți configura WiFi-ul astfel:
Page 41

41
Setări--> WiFi, verificați daca este pornit/oprit.
Accesați WiFi. Telefonul va scana automat tpate rețelele WiFi disponibile și le va afișa cu
numele cu care au fost salvate. Rețelele care sunt securizate cu parolă vor fi semnalizate cu
un lăcățel. De asemenea, se va conecta automat la ultima rețea wireless la care a fost
conectat.
Touch a network to connect to it. Apăsați pe un nume de rețea pentru a vă conecta la
ea. Dacă nu este securizată, veți fi atenționat că urmează să va conectați la o rețea, iar dacă
este securizată, vă va solicita parola.
Bluetooth
Bluetooth-ul este un alt tip de tehnologie wireless pe o distanță mult mai scurtă, în
comparație cu WiFi-ul, de până la 10 metri. Cele mai întâlnite dispozitive ce folosesc
Bluetooth sunt căștile audio, kit-ul Mâini libere și alte dispozitive portabile.
Trimitere fișier
Setări – Bluetooth, verificați dacă este pornit/oprit.
Accesați File Explorer pentru a selecta un fișier, apoi Mai Multe-->
SHARE--> Bluetooth.
Apăsați Scaneză pentru dispozitive, telefonul va scana automat și va afișa automat
toate dispozitivele Bluetooth disponibile din aria sa
Apăsați pe numele dorit pentru a asocia dispozitivele.
Page 42

42
Primire fișier
Setări – Bluetooth, , verificați dacă este pornit/oprit. Asigurați-vă ca Bluetooth-ul a fost
pornit înainte de scanare, pentru a putea fi vizualizat.
Puteți primi fișiere de pe dispozitive care au fost asociate în prealabil cu telefonul
dumneavoastră. Fișierele primite vor fi slavate automat ca dosar, sub numele de
“Bluetooth”, în File Explorer
Conectarea unui dispozitiv Mâini
libere
Porniți dispozitivul Mâini libere pentru a putea fi detectat la scanarea
telefonului;
Setări – Bluetooth, Selectați Scaneză pentru
dispozitive
După scanare, apăsați pe dispozitivul dorit
După asociere, puteți folosi dispozitivul Mâini libere pentru primire/efectuare apeluri,
muzică și înregistrări video.
USB
Pentru a transfera fișiere, conectați telefonul la computer prin intermediul cablului USB.
Porniți conexiunea USB
1. Conectați telefonul la computer prin intermediul cablului USB.
2. Deschide-ți centrul de notificări și apăsați Conectați ca dispozitiv media pentru a putea
accesa fișierele de pe acest dispozitiv
3. Puteți alege alege alte opțiuni USB
Numai încărcare, conectați ca USB strict pentru încărcare.
Camera, conectați pentru a naviga în Galerie.
Notă:
Nu deconectați dispozitivul în timpul unui transfer de date. Nerespectarea acestei
recomandări poate conduce la pierderea datelor sau afectarea bunei funcționalități a
telefonului.
Page 43

43
Card-uri SIM
Puteți schimba opțiunile card-urilor SIM pentru date mobile de voce si SMS.
Rata de utilizare a datelor
Aici puteți activa sau dezactiva traficul de date de pe telefon. Deasemena, puteți vizualiza un
grafic de stare al utilizării conexiunii de date și configura o limită de trafic.
Mai multe
Setări suplimentare, cum ar fi:
Tethering&Portable Hotspot
VPN
Rețele mobile
Page 44

44
Afișaj
Mira Vision: permite accesarea în timp real a calității imaginii . Mai multe opțiuni de tuning
sunt disponibile în modul Picture - Mod de utilizare pentru utilizatorii avansați .
Imagine de fundal : alege imaginea de fundal dorită din mai multe locații
Nivelul de luminozitate - optimizează nivelul de luminozitate pentru lumină disponibilă în
opțiunea de luminozitate adaptivă
Inactivitate: timp așteptare până la intrarea în modul stand-by;
Daydream: Setează imagine de fundal pentru modul stand-by sau când telefonul este
andocat.
Dimensiune font
Cast screen: Utilizați pentru a transmite în flux wireless conținut de pe telefon
Sunete & notificări
Această opțiune vă permite să setați tonuri audio pentru apelurile primite , e-mail alerte și
notificări SMS . Setările includ : Vibratii , Volum , Ton audio , Opinii Selectați General - Silent
- Întâlnire - profil în aer liber atingând cercul din partea dreaptă .
Memorie
Vizualizare memorie internă si card SD
Dezinstalare sau formatare card SD
Page 45

45
Acumulator
Afisare informatii despre starea de incarcare a bateriei si despre utilizarea acesteia
Aplicaţii
Afișează lista aplicațiilor instalate și descărcate . Aveți posibilitatea să vizualizați care dintre
ele sunt instalate pe un card SD sau de rulare .
Servicii de localizare
Acces la locatie: permite aplicatiilor sa utilizeze informatii despre locatie.
Sateliti GPS: activare/dezactivare utilizare sateliti GPS
Google Location Service™: permite trimiterea datelor anonime de localizare. Permiteti
utilizarea datelor din resurse ca retele WiFi sau mobile pentru a determina locatia
aproximativa.
Securitate
Blocarea ecranului. Puteti alege una din metodele: Fara, Glisare, Model, PIN, Parola.
Info proprietar: afisati date prestabilite in ecranul de blocare.
Activati blocarea cardului SIM.
Parole vizibile: afisare parole in timp ce introduceti.
Administratori dispozitiv.
Surse necunoscute: bifati pentru a permite instalarea aplicatiilor din surse necunoscute.
Acreditari de incredere.
Instalati de pe cardul SD
Conturi
Gestionare conturi si setari de sincronizare.
Limba şi metoda de introducere
1. Selectarea Limba: Include toate limbile de pe telefon
2. Verificator ortografic
Page 46

46
3. Dictionar personalizat: adăugare sau stergere cuvinte la dicţionarul particularizat.
4. Metoda de introducere: selectati modelul de tastatura dorit
5. Setari individuale tastaturi
6. Setari cautare vocala
Copie de rezerva si reset
Puteti crea o copie de rezerva a datelor sau puteti efectua o resetare a telefonului la
setarile de fabrica.
Data si ora
1. Automat: utilizaţi data şi ora oferite de reţea sau de modulul GPS.
2. Fus orar automat: bifati pentru a configura automat fusul orar.
3. Setare data: glisati ziua/luna/anul pentru a seta data.
4. Setare ora: glisati ora/minutul/Am/Pm pentru a seta ora.
5. Selectare fus orar: electaţi fusul orar în funcţie de locatia în care vă aflaţi. Pentru
Romania, selectati “GMT+02:00”.
6. Folosiţi formatul 24 ore: pornit/oprit.
7. Selectare format data: există 3 tipuri de formate, puteţi alege de la: luna-zi-an, zi-lună-
an şi an-lună-zi, printre care an-lună-zi este setarea implicită.
Notă:
Dacă este activată opțiunea de setare Automată fus orar, nu veți putea selecta manual
niciun fus orar
Page 47

47
Notă:
Selectați ‘OFF’ la setarea ‘Automată dată&oră’ pentru a putea seta manual data și ora.
Planificare pornire/oprire
Puteţi seta timpul de pornire sau oprire automata a telefonului.
Accesibilitate
Parola TalkBack & Speak : dispozitivul oferă feedback pentru a ajuta utilizatorii nevăzători și
cu vedere redusă
Acces rapid la textul de font mare pentru utilizatorii de vizibilitate redusă
Opțiunea de a termina apel utilizând butonul de alimentare
Pornirea / oprirea ecran rotație
Viteza de reglare a reacției de atingere și menținere
Despre telefon
Puteți verifica informațiile cu privire la : starea de telefon , informatii juridice , versiunea
software .
Gesturi inteligente
Pentru a porni.Setări - > Gesturi inteligente,
Sistemul gesturi inteligente suportă o varietate mai mare de experiență și de control ,
simplifică unele operațiuni.Acestea nu vor funcționa dacă coperta de la husa de protecție
este închisă.
Setări - > Gesturi inteligente Selectați Gesturi inteligente PORNIT/OPRIT
Desenați modelul pentru a accesa meniul rapid în timp ce telefonul este în modul de repaus
Page 48

48
Trezire prin dublu-click
Setări - > Gesturi inteligente Selectați Gest cu dublu-click
Mod extrem
Modul extrem permite telefonului mobil să intre în mod de lucru minimalist pentru a prelungi
procentul bateriei.Pot fi folosite în mod extrem doar telefonul, contactele, mesajele și ceasul
Accesare mod extrem
1) Apăsare lungă pe Buton pornire – alegeți Mod extrem și salvați
2)Pentru ieșire Mod extrem - Apăsare lungă pe Buton pornire – alegeți Mod extrem
și salvați
Page 49

49
10. Avertismente și note
Avertismente operaționale
INFORMAȚII IMPORTANTE PRIVIND SIGURANȚA ȘI UTILIZARE EFICIENTĂ . Citiți aceste
informații înainte de a utiliza telefonul . Pentru funcționarea sigură și eficientă a telefonului , respectați
aceste instrucțiuni :
Potențial exploziv la atmosfere : Opriți telefonul când vă aflați în orice zone cu atmosferă
potențial explozivă , cum ar fi zonele de alimentare ( stații de benzină sau motorină, sub
puntea navelor ) , instalațiile de depozitare pentru combustibil sau substanțe chimice , în zone
de sablare și zonele din apropierea amorselor electrice și în zone în care există substanțe
chimice sau particule (cum ar fi pulberile metalice , granule și pulberi ) în aer .
Interferențe cu dispozitivele electronice medicale și personale : Cele mai multe , dar nu
toate echipamentele electronice sunt protejate împotriva semnalelor RF, astfel s-ar putea ca
anumite echipamente electronice să nu fie protejate față de semnalele RF ale telefonului
.Siguranță audio: Acest telefon este posibil să producă zgomote puternice care pot afecta
auzul . Atunci când utilizați opțiunea speaker a telefonului , este recomandat să așezați
telefonul la o distanță sigură de ureche .
Alte dispozitive medicale , spitale :
Dacă folosiți orice alt dispozitiv medical personal , consultați producătorul dispozitivului pentru
a determina dacă acesta este ecranat împotriva frecvențelor radio externe . Medicul
dumneavoastră poate fi în măsură să vă ajute în obținerea acestor informații . Opriți-vă
telefonul în unitățile de îngrijire a sănătății , atunci când regulamentul afișat indică acest lucru
. Spitalele sau unitățile sanitare pot folosi echipamente care ar putea fi sensibile la semnalele
RF .
Declarație privind manipularea produsului și utilizare :
Numai Dvs. sunteți responsabil pentru modul în care utilizați telefonul și pentru consecințele
utilizării acestuia . Trebuie să vă opriți întotdeauna telefonul ori de câte ori este interzisă
utilizarea acestuia . Folosirea telefonului se supune unor măsuri de siguranță menite să
protejeze utilizatorii și mediul lor . Folosiți întotdeauna telefonul și accesoriile sale cu grijă și
păstrați-le într -un loc curat și fără praf
Nu expuneți telefonul sau accesoriile sale la flacără deschisă sau produse din tutun aprinse
Nu introduceți telefonul sau accesoriile în lichide.Nu le expuneți la umiditate
Nu picurați , aruncați , sau încercați să îndoiți telefonul sau accesoriile sale
Nu se vor folosi produse chimice concentrate , solvenți de curățare sau aerosoli pentru a
curăța dispozitivul sau accesoriile sale .
Nu încercați să demontați telefonul sau accesoriile sale ; numai personalul autorizat trebuie
să facă acest lucru .
Nu expuneți telefonul sau accesoriile sale la temperaturi extreme , minim 32 ℉ și maxim 113
℉ ( 0 ℃ la 45 ℃ ) .
Baterie : Telefonul include un litiu -ion sau litiu - ion polimer intern . Vă rugăm să rețineți că
utilizarea anumitor aplicații de date poate avea ca rezultat utilizarea ridicată a bateriei și poate
necesita o încărcare frecventă bateriei . Orice eliminare a telefonului sau a bateriei trebuie să
respecte legile și reglementările referitoare la litiu -ion sau baterii litiu-ion polimer
Produse defecte și deteriorate :Nu încercați să demontați telefonul sau accesoriile acestuia
. Numai personalul calificat trebuie să repare sau service telefonul sau accesoriile acestuia .
Dacă telefonul sau accesoriile sale au fost scufundate în apă , găurite sau supuse unei căderi
grave , nu -l folosiți până când nu a fost insoectat de un centru de service autorizat .
Page 50

50
CE 0700
DECLARATIE DE CONFORMITATE
Nr. 1401
Noi S.C.Visual Fan S.R.L, cu sediul social in Brasov, Str. Brazilor nr.61, CP 500313
Romania, inregistrata la Reg. Com. Brasov sub nr. J08/818/2002, CUI RO14724950, in
calitate de importator, asiguram, garantam si declaram pe proprie raspundere, conform
prevederilor art. 4 HG nr.1.022/2002 privind regimul produselor si serviciilor, care pot pune
in pericol viata si sanatatea, securitatea si protectia muncii ca, produsul X3 Soul Mini marca
ALLVIEW, nu pune in pericol viata, sanatatea, securitatea muncii, nu produce impact
negativ asupra mediului si este in conformitate cu:
-Directiva nr. 2011/65/UE privind restrictiile de utilizare a anumitor substante periculoase in
echipamentele electrice si electronice.
-Directiva privind echipamente radio si de telecomunicatii R&TTE 1999/5/CEE (HG 88/2003)
-Directiva privind asigurarea utilizatorilor de echipamente de joasa tensiune 2014/35/CE si
73/32/CEE , modificata de Directiva 92/31/CEE si 93/68/CEE (HG982/2007)
-Directiva cu privire la compatibilitatea electromagnetica 89/336/CEE, modificate de
Directiva 92/31/CEE si 93/68/CEE (HG982/2007); RoHS: EN50581:2012
-Cerintele de siguranta ale Directivei Europene 2001/95/EC si a standardelor EN
60065:2002/A12:2011 si EN 60950-1:2006/ A1:2010 /A11:2009/A12:2011, referitor la
nivelul de decibeli emis de aparatele comercializate.
Produsul a fost evaluat conform urmatoarelor standarde:
-Sanatate: EN 50360:2001, EN 50361; EN 62209-1 : 2006
-Siguranta : EN 60950- 1 : 2001 +A11:2004; EMC EN 301 489- 01 V1.6.1 (09-2005)
EN 301 489- 07 V1.3.1 (11-2005); EN 301 489- 17 V1.2.1 (08-2002)
-Spectru radio: EN 301 511 V9.0.2 (03-2003);EN 300 328 V1.7.1 (10-2006)
Procedura de evaluare a conformitatii a fost efectuata in conformitate cu Directiva
1999/5/CEE ( Anexei II a HG nr. 88/2003), documentatia fiind depozitata la S.C. Visual Fan
S.R.L., Brasov str. Brazilor nr.61, CP 500313 ,Romania si va fi pusa la dispozitie la cerere.
Procedura de evaluare a conformităţii produsului a fost îndeplinită cu participarea
următoarelor organisme: Phoenix Testlab GmbH
Produsul are aplicat marcajul CE. Declaratia de conformitate este disponibila la adresa
www.allviewmobile.com.
CE 0700 Director
SAR 0,675W/kg COTUNA GHEORGHE
Brasov
24.12.2015
Page 51

51
SPECIFICAȚII TEHNICE
General
Limba
RO, EN, DE, HU, NL, PL etc.
Retea
2G: 850/900/1800/1900 MHz
3G: UMTS 900/2100 MHz
4G: FDD 800/1800/2600 MHz
TDD 2600 MHz
MicroSim (SIM1)
Da
NanoSim (SIM2)
Da
Dimensiuni
Dimensiuni
142,6 x 69,5x7,2 mm
Greutate
129g
Display
Rezolutie
5" 1280x720px HD IPS LCD
Touchscreen
Touchscreen capacitiv multitouch ONCELL, 2.5D, Full
Lamination
Panda Glass
Da
Caracteristici
Sistem de operare
Android 5.1, Lollipop
Procesor
Cortex®-A53 64-bit 1,3GHz Quad-Core
Procesor grafic
Mali T720
GPS
Da
AGPS
Da
Memorie flash
16 GB
Memorie RAM
1 GB
MicroSD
< 128 GB Mod single SIM
Widget
Da
Multitasking
Da
Radio FM
Da
Sunet
Jack 3.5 mm
Da
Difuzor
Da
Video
Redare
FullHD 1080p
Redare internet
FullHD 1080p
Camera
Rezolutie camera
13 MP AF / 5 MP
Inregistrare video
FullHD 1080p 30fps
Touchfocus
Da
Face detection
Da
High Dynamic Range(HDR)
Da
Face beauty
Da
Geotagging
Da
Date
4G
Downlink 150Mbps, Uplink 50Mbps
3G
HSDPA 21,1Mbps/HSUPA 5.76Mbps
EDGE
Da Class 10
GPRS
Da Class 12
Bluetooth
V4.0 - A2DP & EDR
WLAN
WiFi 802.11 b/g/n 5 GHz
WiFi Direct
Da
USB
Da MicroUSB 2.0
Senzori
Accelerometru
Da
Senzor de proximitate
Da
Senzor de lumina
Da
Compas
Da
Internet
Retele de socializare
Da
E-mail
Da
Aplicatii
Da
Hotspot
Tethering Wifi / Bluetooth / USB
Acumulator
Capacitate
Li-Pol 2350 mAh
Tip incarcator
DC 5V, 1000mA
Timp asteptare
< 235 h
Timp convorbire
< 720 min
Continut pachet
Telefon, manual de utilizare, certificat de garantie, alimentator, cablu de date USB, blister, Bitdefender
Flyer
Română (ro)
Google, Android, Google Play şi alte mărci sunt mărci comerciale deţinute de Google Inc.
Page 52

52
Útmutató a használathoz
FONTOS! Olvassuk el az alábbi egyszerű útmutatót. Az itt leírtak
be nem tartása veszélyekkel járhat, vagy törvénysértéshez
vezethet.
Biztonságos vezetés: Nem ajánlott a készülék használata az autóban. Ha mégis
telefonálnia kell, használjon headsetet, kihangosítót, vagy kihangosítás funkciót.
Kapcsolja ki repülőgépen a készüléket. Interferenciát okoz a készülék, mely
veszélyezteti a repülés biztonságát. Kérjük, győződjön meg róla, hogy repülőgépen
kikapcsolja a készüléket.
Kórházban, illetve orvosi berendezések, közelében kapcsolja ki a készüléket, és egyéb
a használatot korlátozó helyeken tartsunk be minden utasítást A készülék
működésében problémát okozhat orvosi műszerek közelében az okozott interferencia.
Hivatalos szerviz: Csak hivatalos partner végezheti a termék javítását. Nem hivatalos
szerviz által történő javítás garancia vesztéssel jár.
Tartozékok és akkumulátor: kizárólag a gyártó által jóváhagyott akkumulátorokat, töltőt
es tartozékokat használjon.
Segélyhívás: Kapcsolja be a telefont es tárcsázza be a segélyhívó számot, adja meg a
helyet, és ne tegye le a készüléket, kövesse a kapott utasításokat.
Akkumulátor es ennek feltöltése: Ajánlott az akkumulátor/termék teljes feltöltése
mielőtt a telefont használjuk. Ne használjuk több mint +40 C hőmérsékleten. Ne
dobjuk az akkumulátort/termék a tűzre vagy tiltott helyre. A használt
akkumulátorokat/termék mindig vigyük vissza egy kijelölt gyűjtőhelyre.
Figyelem: Nem vállalunk felelősséget a telefon nem megfelelő használata eseten. A
használati utasításban leírtak eltérhetnek a terméktől, illetve a szolgáltatoktól kapott
szoftverektől, és előzetes értesítés nélkül megváltozhatnak. A felhasználói útmutató
legújabb verziójáért látogasson el a weboldalunkra.
A jelen kézikönyv tartalma különbözhet a terméktől. Esetleges problémák elkerülése
érdekében, tájékozódjon a honlapon a legfrissebb szervizpartnerek elérhetőségi iránt,
mivel a Visual Fan Kft fenntartja a jogot a garanciális szerviz előzetes bejelentés nélküli
cseréjére.
További részletekért látogasson el www.allviewmobile.com/hu/ weboldalra.
Ne takarja le az antennát a kezével, vagy más tárggyal, mert ez kapcsolódási
problémákat eredményezhet.
Minden harmadik fél által készített alkalmazás módosítható, vagy leállítható. A Visual
Fan Kft. nem vállal felelősséget semmilyen módon ezen alkalmazások módosításából
fakadó következményekért vagy az alkalmazások tartalmáért. A vonatkozó kérdésekkel
forduljon az alkalmazások tulajdonosai fele.
Page 53

53
3. Első használat előtt
Page 54

54
A készülék a Dual SIM technológiának köszönhetően egyszerre két SIM kártya használatára
nyújt lehetősége.
Helyezze be a Nano SIM/Micro SIM kártyákat és a memóriakártyát
3) Szúrja bele a csomagban lévő tű alakú segédeszközt a SIM kártya foglalat melletti lyukba, a
foglalat kiugrik.
4) Helyezze be a Nano SIM/Micro SIM kártyát és a memóriakártyát a megfelelő pozícióba
a tálcába.
Ne távolítsa el a kártyákat adatátvitel közben, mert ez adatvesztéssel járhat.
A Nano SIM/Micro SIM kártya és a memóriakártya kis alkatrészek. Tartsa távol
gyermekeitől, mert kis méretük miatt könnyen le tudják nyelni.
Ne érjen hozzá közvetlenül a kártyák érintkezőihez, és tartsa távol elektromágneses
tértől, hogy meggátolja az adatok károsodását.
Akkumulátor töltése
Első használat előtt töltse fel a készüléket. Csatlakoztassa az USB kábelt az adapterbe,
majd a készülékbe.
Megjegyzés:
A készülék Micro USB, csatlakozóval van ellátva, mely szabványnak kétféle verziója
van. Kérjük csak a készülékhez csomagolt USB kábelt használja.
A készülék akkumulátorát nem lehet eltávolítani Ne távolítsa el a kártyákat adatátvitel
közben, mert ez adatvesztéssel járhat
Page 55

55
4. Első lépések
Alap funkciók
Készülék bekapcsolása
Nyomja meg hosszan a bekapcsoló gombot, amíg a képernyő be nem kapcsol.
Készülék kikapcsolása
Nyomja meg hosszan a bekapcsoló gombot, amíg a menü fel nem tűnik. Válassza a
kikapcsolás opciót.
A készülék újraindítása
1 Opció: Nyomja meg hosszan a bekapcsoló gombot, amíg a menü fel nem tűnik.
Válassza az újraindítás opciót.
2 Opció: Nyomja meg hosszan a bekapcsoló gombot, kb. 10 másodpercig, amíg a
készülék újraindul.
Készülék lezárása
1 Opció: Nyomja meg a bekapcsoló gombot képernyő kikapcsolásához.
2 Opció: A készülék automatikusan lezárja magát, ha tétlen állapotban van egy bizonyos
ideig.
Az időtartam hosszát az alábbi menüben állíthatja be: Beállítások Kijelző Alvó
állapot – és válassza ki az időt
Képernyő feloldása
Nyomja meg a bekapcsoló gombot, majd lentről felfelé húzza a képernyőt.
Kezdőképernyő
A kezdőképernyő lehetőséget biztosít, hogy egyszerűen elérjen minden funkciót.
Alkalmazás ikonokat, képernyő alkalmazásokat tartalmaz. Személyre szabhatja a
képernyőt, az Ön által gyakran használt alkalmazásoknak adhat helyet, megváltoztathatja
a háttérképet.
Page 56

56
Értesítési Sáv
A képernyő tetején található, itt találja az időt, a mobilhálózat jelet, az akkumulátor
töltöttségét. Itt jelennek meg az üzenetek, értesítések is.
Értesítési központ
Húzza le fentről lefelé az értesítési sávot. Itt találja az olvasatlan üzeneteket, nem
fogadott hívásokat, Wi-Fi hálózatokról információt. Törölheti az értesítést, ha balra,
vagy jobbra húzza el.
Vezérlő központ
Húzza le még egyszer ujját a képernyőn a központ előhívásához, Számos beállítást
eszközölhet innen, gyorsan, úgy, mint a lámpa, a Wi-Fi kapcsolat, Bluetooth, GPS
vevő, repülőgép üzemmód, rezgés és hangerő stb.
Page 57

57
Főképernyő menü
Hosszan nyomva a képernyőn belép a képernyő menübe. Innen gyorsan elérhető a
rendszer eszközöket, a képernyő beállításokat és a képernyő alkalmazásokat.
Alkalmazások mozgatása
Nyomja meg és tartsa nyomva az alkalmazást melyet mozgatni szeretne. A
képernyő széle felé mozgatva átteheti egy másik képernyőre, vagy a fenti ikonra
húzva törölheti az alkalmazást.
Alkalmazás törlése
A Beállítások / Alkalmazások opcióban tudja a kívánt alkalmazást letelepíteni.
Mappa létrehozása
Húzzon egy alkalmazást a másik fölé, így egy mappát hozhat éltre, melyben kis
helyen több ikont tárolhat.
Érintőképernyő
A készüléket a képernyő érintésével vezérelheti, ikonok, gombok, menük és képernyő
billentyűzet segítségével.
• Érintés: az alkalmazások, billentyűzet, gombok, menük használatához
egyszerűen érintse meg őket.
• Nyomva tartás: Érintsen meg és tartson nyomva egy elemet a képernyőn, amíg
az aktuális művelet meg nem kezdődik.
• Húzás: Nyomjon meg és tartson nyomva egy elemet anélkül, hogy felemelné az
ujját. Húzza az ikont a kívánt helyre, majd emelje fel az ujját.
• Csúsztatás: húzza az ujját a képernyőn, folytonosan, jobbra, balra fel és le
csősztatással különböző funkciókat hívhat elő, attól függően, hogy melyik
alkalmazásban van éppen.
• Csípés: (pl. Térkép, vagy Album) a két ujjával a képernyőt megérintve zárja
össze ujjait, ez általában a nagyítás parancsnak felel meg.
• Képernyő elforgatása: A legtöbb alkalmazás elfordul, ha készülékét elforgatja, a
beállítások menüben aktiválhatja, vagy tilthatja le az automatikus képernyő forgatást.
Page 58

58
5. Kommunikáció
Hívás kezdeményezése
• Érintse meg a telefon ikont a kezdőképernyőn.
• Érintse meg a jobb alsó sarokban lévő ikont
• Adja meg a hívni kívánt telefonszámot
• Nyomja meg még egyszer a telefon gombot a hívás indításához.
Figyelem! Ehhez a képernyőhöz akkor jut, ha megnyomja a képernyőn lévő tárcsázót, vagy
egyiket az alábbi három opció közül Gyorstárcsázás, Előzmények vagy Személyek.
Page 59

59
Gyorshívás
• Nyomja meg a híváshoz
• A felugró ablak az előző három kereséssel nyílik meg
• Nyomja meg a Gyorstárcsázó fület, ha másik lap van kiválasztva
• Válassza ki a személyt és tárcsázzon
Hívás az előzményekből
• Nyomja meg a híváshoz
• A felugró ablak az előző három kereséssel nyílik meg
• Nyomja meg az Előzmények gombot, ha másik fülön tartózkodik
• Nyomja meg az újratárcsázást
Page 60

60
Hívás a Telefonkönyvből
• Nyomja meg a híváshoz
• A felugró ablak az előző három kereséssel nyílik meg
• Nyomja meg az Előzmények gombot, ha másik fülön tartózkodik
• NYomja meg bármelyik Névjegyet, egy új ablak ugril fel, majd nyomja meg
a telefon gombot.
Folyamatban lévő hívás
- hívás közben bekapcsolhatja a kihangosítást, elnémíthatja a mikrofont, tarthatja a hívást
- A piros gomb megnyomásával fejezheti be a hívást
Bejövő hívás
- A zöld gombbal felveheti a hívást
- A piros gombbal elutasíthatja a hívást
- Húzza felfelé a képernyőt, hogy elutasítsa a hívást, és üzenetet küldjön a hívó
félnek
Megjegyzés:
SIM kártya behelyezése nélkül vészhívást tud indítani, melyek az adott
mobilhálózatok szolgáltatói által preferáltak, kérjük, kérdésével forduljon mobil
szolgáltatójához.
Page 61

61
Üzenet küldése
A készülékkel szöveges, vagy multimédia üzenetet küldhet ismerőseinek. Az egy
feladótól érkezett, vagy neki küldött zenetek egy folyamban, egymás után, mint
egy beszélgetés nézhető vissza.
Üzenet küldéséhez kövese az alábbi utasításokat::
1. Lépjen be az Üzenetek alkalmazásba
2. A jobb felső gomb megnyomása után az üzenetek Beállításaihoz jut
Megjegyzés:
Gépelje be az üzenetet – a plusz gomb megnyomásával képet, vagy egyéb tartalmat adhat
az üzenethez.
Az üzenet küldéséhez nyomja meg a jobb oldalon lévő nyilat.
Névjegyek
Lépjen be a Személyek alkalmazásba a névjegyek megtekintéséhez.
Új névjegy létrehozása:
- Készenléti állapotban nyissa meg az alkalmazáslistát, majd válassza a + ikont;
- Válassza ki a mentés helyét, és írja be az adatokat
- A név mentéséhez válassza a Ment lehetőséget.
Page 62

62
Névjegy létrehozása a Híváselőzményekből:
- Készenléti állapotban nyissa meg a tárcsázó alkalmazást;
- Váltson az Előzmények fülre;
- Nyomja meg a „+” ikont a jobb felső sarokban
- Válassza az Új névjegy létrehozása lehetőséget;
- Válasszon tárhelyet
- Írja be az adatokat
- válassza a Ment lehetőséget. vagy lépjen Vissza a vázlat elvetéséhez
Névjegy import/exportálás
A különböző tárhelyek között névjegyeket tudunk importálni/exportálni a következő
lépésekkel:
- Névjegyek – Opciók Import/exportálás
- Válassza ki a tárhelyet, ahonnan átmásolja az adatokat, majd azt, ahova átmásolja
- Válassza ki a névjegyeket es nyomja meg a Másolás gombot;
Fiókok es szinkronizálás
Megjegyzés:
Az automatikus szinkronizálási funkció beállításainak és a szinkronizáláshoz használt
fiókok kezelésének módosítása. Amennyiben még nem rendelkezik Google fiókkal, kérjük,
hozzon létre egyet.
Egy már meglévő fiókjából szinkronizálhatja a névjegyeit, egyéb adatait az alábbi
menüben:
- Beállítások - Alkalmazások - FIÓKOK
- Érintse meg a szinkronizálni kívánt fiókot, amennyiben nincs fiók felvéve, nyomja meg a fiók
hozzáadása gombot.
- Nyomja meg a névjegyek szinkronizálása gombot
Page 63

63
Fotó hozzáadása a névjegyekhez
Megjegyzés:
A SIM kártyán lévő névjegyekhez nem adhat fényképet.
Névjegyhez csatolásához az alábbi lépéseket kövesse::
- Nyissa meg a Névjegyzéket
- Válassza ki a kívánt névjegyet
- A jobb felső sarokban nyomja meg a szerkesztés gombot
- Nyomja meg a „Csere” gombot a kép hozzáadásához
- Válassza ki a módot (fénykép készítése, vagy választás az albumból) .
6. Multimédia
Kamera
Fénykép és videó rögzítésére, és azok megosztására szolgál. A képernyőn válassza ki
képkészítés előtt a kép fókuszpontját, ujjának érintésével. Használhatja az előlapi, vagy a
hátoldali kamerát is.
Page 64

64
.
- Normál mód – készítse el a tökéletes képet
- Gyönyörű portré (Face Beauty) – az előlapi kamerát használva lehetősége van előre
mentett beállítások használatára, melytől arcképei még szebbek lesznek
- Szűrők: legtöbb népszerű szűrő megtalálható alapértelmezettként a kamera
programban (negatív, poszter, szépia, friss stb.)
- Készíthet több szemszögből is képet (multi angel view mode)
- Élő fénykép – egy mozdulatot rögzíthet
- Nyomkövető üzemmód – képsorozatot készíthet
- HDR üzemmód – rossz látási viszonyok közt használja ezt az opciót
- Panoráma – készítsen széles tájképeket, kompromisszumok nélkül
- PIP üzemmód – mindkét kamerával egyszerre készíthet képet
Videó rögzítése
• Nyomja meg a videó kamera ikont, hogy átváltson
• Válassza az auto üzemmódot, vagy állítsa be többek közt a rögzítés minőségét kézzel
• A képernyőn nyomja meg az indításhoz, majd nyomja meg még egyszer a leállításhoz a felvevő
gombot
.
Album
Nyomja meg az Album ikont. Itt találhatja a készüléken tárolt, és a kamera által
készített képeket, külön mappákba rendezve. Könnyedén megoszthatja innen
képeit, küldheti e-mailben, üzenetben, vagy Bluetooth adatátvitel segítségével..
Zene
Használja a zenelejátszó programot, hogy telefonján tárolt zeneszámait hallgassa.
Page 65

65
7. Kapcsolódás, és beállítások
A készülék számos adatátviteli opciót kínál. Kapcsolódhat mobil és Wi-Fi hálózatokhoz,
kapcsolódhat a számítógépéhez, Bluetooth kiegészítőkhöz, mobil adatkapcsolatát pedig
kiterjesztheti hotspotként USB kábel segítségével.
Repülőgép üzemmód
Opció 1: Beállítások - Repülőgép üzemmód
Opció 2: Húzza le kétszer a képernyőt, nyomja meg a Repülőgép ikont. Egyes helyeken
tilos a mobil készülékek használata, mert a vezeték nélküli hálózati kapcsolat zavart
okozhat, a WiFi, a GSM és a Bluetooth adatkapcsolatokat egyszerűen letilthatja a
repülőgép üzemmód aktiválásával.
Mobil Hálózatok
Amikor SIM kártyát helyez a készülékbe, a szolgáltatója automatikusan konfigurálja az
eszközt. A Beállítások / Mobil hálózatok / További / Hálózat menüben további
információt talál!
Szolgáltatók
Az aktuális mobil szolgáltatója van kiválasztva, a szolgáltatók listájában..
WiFi
A WiFi egy vezeték nélküli adatátviteli megoldás, melynek hatótávolsága akár 100
méter is lehet. Az alábbiakban találja a WiFi beállításának lehetőségeit
Page 66

66
Beállítások --> WiFi – ellenőrizze, hogy be van kapcsolva
• A WiFi menübe való belépés után megtalálhatja az elérhető hálózatokat. Amennyiben
egy hálózat nem publikus, úgy mellette egy ikont fog látni. A készülék automatikusan
kapcoslódik az elérhető ingyenes hálózatokhoz.
• Érintsen meg egy hálózatot a csatlakozáshoz.
Amennyiben a hálózat jelszóval védett, úgy csatlakozás közben a készülék kérni
fogja a hálózati jelszót.
Bluetooth
A Bluetooth egy rövid hatótávú adatátviteli megoldás, mely segítségével 10 méteren belüli
eszközökkel, pl. headset, kommunikálhat. Használhatja tartozékok kapcsolatán kívül
adatátvitelre is. Két telefon között, vagy számítógépe és készüléke közt küldhet, vagy
fogadhat egyszerűen adatokat.
Fájl küldése
• Beállítások --> Bluetooth, ellenőrizze, hogy be van kapcsolva.
• Lépjen be az Intézőbe egy fájl kiválasztásához, majd További opciók - Megosztás -Bluetooth.
Page 67

67
• Nyomja meg az eszköz keresése gombot, a listába szedve találja a közeli BT eszközöket
• Nyomja meg az eszköz nevét, melyhez kapcsolódni kíván, a párosítás után a fájl küldésre kerül.
Fájl fogadása
Beállítások --> Bluetooth, ellenőrizze, hogy be van kapcsolva. Ellenőrizze, hogy a BT
kapcsolat ideje nem járt le (általában két perc után lekapcsol).
Fogadhat fájlt az összes olyan eszköztől, melyekkel előzetesen párosodott. A fogadott fájl
a Bluetooth mappába kerül mentésre.
Tartozék csatlakoztatása:
• Kapcsolja be a tartozékot, állítsa párosítás módba (ellenőrizze a tartozék utasítását)
• Beállítások - Bluetooth - „Új eszköz keresése”
• Válassza ki a listából a tartozékot
• A párosítás után készen áll a használatra.
USB
Számítógéphez csatlakoztathatja készülékét USB kábel segítségével. Ezután adatokat
fogadhat, vagy küldhet.
USB kapcsolat létrehozása
1. Csatlakoztassa a telefont a számítógéphez az USB kábel segítségével
2. Nyissa meg az értesítési központot és válassza a Csatlakoztatás média
eszközként opciót (Connected as Media device)
3. Más USB opciók is elérhetőek – választhat csak töltés funkciót
Megjegyzés: adatátvitel közben ne húzza le az eszközt a kábelről, mert
adatvesztéssel járhat.
Megjegyzés:
Adatátvitel közben ne húzza le az eszközt a kábelről, mert adatvesztéssel
járhat.
Page 68

68
SIM Kártyák
Y Beállíthatja a SIM opciókat a Mobil adat hívások, és szöveges üzenetekhez.
Adathasználat
Megtekintheti a mobil adatforgalmának mennyiségét, részleteit. Beállíthat korlátot.
Továbbiak
További beállítások:
Internetmegosztás
VPN
Mobilhálózatok
Page 69

69
Kijelző
Mira Vision: valós idejű képminőség javítás. További beállításokra is van lehetőség haladó
felhasználók részére.
Háttérkép: válassza ki a használni kívánt háttérképet
Fényerő – optimalizálhatja a képernyő háttérvilágítását, vagy automatikusra állítva a
környezeti viszonyokhoz alkalmazkodik
Alvó mód: tétlen képernyő kikapcsolását határozhatja meg
Képernyőkímélő (Daydream): képernyőkímélő beállítása
Betű méret
Cast screen: tartalom vezeték nélküli továbbítása egy másik eszközre
Hangok és értesítések
Bejövő hívásaihoz állíthat be csengőhangot, megadhat külön értesítései hangokat üzenet
érkezéséhez, email fogadásához. Választhat rezgés, vagy hangjelzés közt.
Általános, Néma, Kültéri vagy Találkozó előre meghatározott beállításokat (profilokat) is
használhat.
Tárhely
Készülék és a memóriakártya tartalmának megtekintése.
SD kártya formázása.
Akkumulátor
Az akkumulátor és a töltés információi
Page 70

70
Alkalmazások
A telepített, és letöltött alkalmazások listája. Megtekintheti, melyik fut az adott pillanatban,
mely programok vannak a memóriakártyára telepítve.
Saját pozíció
- Hozzájárulás helyadatokhoz: Hely lekérésének engedélyezése az alkalmazásokban.
- GPS vevő be- és kikapcsolása
- Google Location Service™ engedélyezi az alkalmazásoknak a Wi-Fi és mobilhálózatok
alapján történő helymeghatározást.
Biztonság
- Képernyőzár beállítása: Képernyő lezárása mintával, PIN kóddal vagy jelszóval.
- SIM-kártya zárolásának beállítása, 4-8 számjegyű PIN kód, melyet a SIM kártyához
kapott szolgáltatójától
- Jelszavak: Jelszó megjelenítése gépeléskor
- Eszközfelügyelet: Adminisztrátor eszközkezelők hozzáadása es eltávolítása
- Ismeretlen forrásból származó alkalmazások telepítése
- Engedélyezett tanúsítványok listája
- Telepítés SD kártyáról: Titkosított tanúsítványok telepítése az SD kártyáról
Fiókok
Vegyen fel új fiókot, szinkronizálja, és kezelje ebben a menüben.
Nyelv es billentyűzet:
1) A készülék szoftverének nyelve
2) Nyelvhelyesség ellenőrző
3) Sajátszótár: adjon hozzá új szavakat
4) Beviteli mód: Android TM vagy többnyelvű billentyűzet
5) Beszédfelismerés
6) Mutató sebessége
Page 71

71
Gyári adatok visszaállítása
Biztonsági mentés készítése az adatokról, és beállításokról.
Gyári adatok visszaállítása: összes adat törlése.
Dátum es idő
5) Automatikus idő és dátum: a GPS vagy a GSM szolgáltató által meghatározott
alapbeállítás
6) Automatikus időzóna: idő beállítása az adott időzóna alapján
7) Dátum és idő beállítása
8) Időzóna kiválasztása
9) 24 órás idő formátum
10) Dátum formátum.
Megjegyzés:
Amennyiben az automatikus időzóna üzemd aktív, az órát nem fogja tudni kézzel állítani!.
Page 72

72
Megjegyzés:
Kérjük kapcsolja ki az automatikus időzóna funkciót az idő kézi beállításához.
Időzített bekapcsolás
A telefon automatikusan ki- es bekapcsolását tudjuk beállítani.
Page 73

73
Kisegítő lehetőségek
Felolvasás: a készülék segítséget nyújt gyengén látók számára, egyes szövegek,
jelszavak felolvasásával.
Parancsikon nagy betűméretre váltáshoz, csökkent látóképességű felhasználók
részére.
Bekapcsoló gombbal fogadhat hívást
Képernyő elforgatás be/kikapcsolása
Hosszú nyomva tartás idejének beállítása
.
A telefonról
Telefon információk: jogi információk, szoftver verzió, készülék IMEI szám.
Okos mozdulatok
Beállítások --> Kézmozdulatok (Smart Gestures).
A kézmozdulat vezérlés számos, a használatot megkönnyítő opciót tartalmaz. Egyes
funkciók nem működnek, ha a készülék tokjának fedele rá van hajtva a készülékre.
Beállítások --> Smart gestures --> Smart gestures BE/KI
Rajzoljon egy mintát a kikapcsolt állapotú képernyőn, és lépjen egyből a kívánt menübe /
alkalmazásba.
Ébresztés két koppintással
Beállítások --> Smart gestures --> Ébresztés két koppintással (Select Double
click gesture)
A képernyő kikapcsolt állapotában kettőt koppintva máris használhatja az eszközt.
Page 74

74
Energiatakarékos üzemmód
A Super Saver Mode leegyszerűsített kezelőfelülettel meghosszabbítja az üzemidőt. Ilyen
esetben a névjegyzéket a telefon és üzenet funkciót, valamint az órát használhatja.
Extrém üzemmód
1) Nyomja hosszan a bekapcsoló gombot – válassza a SUPER SAVER /
energiatakarékos üzemmódot.
2) Kilépéshez nyomja újra hosszan a bekapcsoló gombot, majd válassza a Super
Saver üzemmódot.
10. Biztonsági előírások
Figyelmeztetés a használathoz
FONTOS INFORMÁCIÓ A HELYES ÉS BIZTONSÁGOS HASZNÁLATRÓL Kérjük,
használat előtt olvassa el, majd kövesse az itt leírtakat a biztonságos használathoz:
Robbanás veszély: kapcsolja ki a készüléket robbanásveszélyes helyeken, pl. benzinkutak
közelében, vegyi tárolók, nagyfeszültségű elektromos berendezések, robbanó anyagok
közvetlen környezetében.
Interferencia orvosi eszközökkel: A legtöbb elektronikai eszköz fel van szerelve egy
bizonyos védelemmel az RF sugárzás ellen, de ne kockáztasson, kórházban, pace maker
közelében kapcsolja ki a készülékét! Amennyiben orvosi eszközt használ, lépjen
kapcsolatba orvosával, és győződjön meg arról, hogy a telefonkészülék nem befolyásolja az
orvosi eszköz működését.
Biztonságos zenehallgatás: a készülék szélsőséges esetben halláskárosodást okozhat,
kérjük, ne hallgassa huzamosabb ideig hangosan a készüléken tárolt zenéket.
Page 75

75
Használati figyelmeztetés: Csak a felhasználó felelős egyedül, hogy hogyan használja a
készüléket, és az ebből fakadó következményekért is.
Kapcsolja ki minden olyan helyen a készüléket, ahol a használata tilos. Használja tekintettel
léve a környezetére, és mások biztonságára. Mindig óvja eszközét, és tartozékait a
sérülésektől, szennyeződésektől.
Ne tegye ki sem az eszközt sem a tartozékokat nyílt lángnak, ne merítse folyadékba, ne
érintkezzen vízzel. Ne dobálja a készüléket, ne próbálja hajlítgatni.
Ne használjon erő vegyszereket a készülék tisztításához.
Ne próbálja meg szétszerelni az eszközt, ezt minden esetben csak hivatalos szerviz
végezheti.
Tartsa készülékét az alábbi hőmérsékletek között: 0℃ és 45℃.
Akkumulátor: A készüléke egy beépített lithium-ion vagy lithium-ion polymer
akkumulátorral rendelkezik. Egyes bonyolult alkalmazások működése során az akkumulátor
melegedhet. A használt akkumulátor, vagy készülék elhelyezése minden esetben a helyi
jogszabályok, előírások útmutatásai alapján kell, hogy történjen.
Hibás vagy sérült termékek: Ne próbálja meg szétszerelni, megjavítani a készüléket, vagy
tartozékait. Ezt bízza minden esetben a hivatalos szervizre. Amennyiben a készülék víz alá
merült, megsérült, nagyot esett, ne használja az eszközt, míg hivatalos szerviz nem látta.
Page 76

76
Director
CE 0700
MEGFELELŐSSÉGI NYILATKOZAT
No.1401.
Mi, az SC Visual Fan SRL, székhely Brassó, 61. Brazilor Street, irányítószám 500313
Románia, a Brassói Kereskedelmi Kamarában az alábbi hivatkozással: J08 / 818/2002,
CUI RO14724950, mint importőr, egyedül, saját felelősségünkre kijelentjük, hogy a
termék, amelyre e nyilatkozat vonatkozik, megfelel a rádió berendezésekről és a távközlő
végberendezésekről, valamint a. 4 HG nr.1.022 / 2002 villamos biztonságtechnikai és
elektromágneses összeférhetőségi követelményeket tartalmazó szabványoknak. Az
ALLVIEW X3 Soul Mini márkájú mobiltelefon nem veszélyezteti az életet, a
munkabiztonságot es az egészséget, nem termel negatív hatást a természetre es megfelel
a következő Irányelveknek:
-2011/65/EU kapcsolatos korlátozására használt egyes anyagok elektromos és
elektronikus berendezések.
- Rádió es telekommunikációs irányelvek - R&TTE 1999/5/CEE (HG 88/303)
- Felhasználói biztosias az alacsony feszültséget illetően 73/32/CEE, módosítva a
93/68/CEE (HG457/2003) irányelvvel.
- elektromágneses kompatibilitásról szóló 89/336/CEE irányelv, módosítva a 92/31/CEE es
93/68/CEE (HG982/2007); RoHS irányelv: EN50581: 2012
-A Biztonsági követelményeket az Európai szóló 2001/95 / EK irányelv és az EN 60065:
2002 / A12: 2011 és EN 60950-1: 2006 / A1: 2010 / A11: 2009 / A12: 2011 a kibocsájtott
decibel szinttel kapcsolatosan.
A termék értékelhető a következő szabványok szerint:
- Egészségvédelem: EN 50360: 2001, EN 50361; EN 62209-1: 2006
- Biztonsági: EN 60950- 1: 2001 + A11: 2004; EMC EN 301 489- 01 V1.6.1 (09-2005)
EN 301 489- 07 V1.3.1 (11-2005); EN 301 489- 17 V1.2.1 (08-2002)
- Rádió: EN 301 511 V9.0.2 (03-2003); EN 300 328 v1.7.1 (10-2006)
A megfelelőséget az eljárásoknak megfelelően végeztük a 1999/5 / CEE irányelv (a II HG
hsz. 88/2003) e dokumentációt a SC Visual Fan SRL, Brassó, 61. Brazilor Street,
irányítószám 500313, Románia címen lehet kikérni. A termékek megfelelőségének
méréseit az alábbi külső partner végezte: Phoenix Testlab GmbH
A termék a CE jelzése. A megfelelőségi nyilatkozat elérhető a www.allviewmobile.com
honlapon.
CE 0700
SAR 0,675W/kg COTUNA GHEORGHE
Brasov
24.12.2015
Page 77

77
MÚSZAKI JELLEMZŐK
Általános
Nyelv
Magyar, Romanian, English, German, Spanish,
Hungarian, French, Dutch, Russian, Italian etc.
Hálózat
2G:850/900/1800/1900MHz
3G: UMTS 900/2100MHz
4G: FDD: 800/1800/2600MHz
TDD: 2600MHz
Dual sim
Yes
Microsim
SIM1
Nanosim
SIM2
Méretek
Méret
142,6 x 69,5x7,2 mm
Súly
129g
Kijelző
Típus
5" HD IPS LCD 1280x720px
Érintőképernyő
Kapacitív multitouch ONCELL Full Lamination 2,5D
Megerősíített üveg
Igen
Tulajdonságok
OS
Android™ 5.1 Lollipop
CPU
Cortex®-A53 64-bit 1,3GHz Quad-Core
GPU
Mali T720
GPS
Igen
AGPS
Igen
Belső tárhely
16GB
RAM memória
1GB
Micro SD
Igen, max 128GB single sim módban
Elérhető színek
Szürke / Arany / Ezüst
Alkalmazások
Bitdefender,Selfcare
Kamera
Fő kamera felbontás
13MP Autofókusz Samsung3L2
Előlapi kamera felbontás
5MP
Videó felvétel
FullHD 1080p 30fps
High Dynamic Range(HDR)
Igen
Led vaku
Igen
Adatátvitel
4G
Le 150Mbps, Fel 50Mbps
3G
HSDPA 21,1Mbps/HSUPA 5.76Mbps
EDGE
Igen Class 10
GPRS
Igen Class 12
Bluetooth
Class 4.0, A2DP, EDR
WLAN
Wi-Fi 802.11 b/g/n 5GHz
Wi-Fi Direct
Igen
USB
Igen 2.0, micro USB
Internet
Közösségi média
Igen
E-mail
Igen
Alkalmazások
Igen
Hotspot
Wi-Fi internet megosztás
Hotspot
USB internet megosztás
Hotspot
Bluetooth internet megosztás
Akkumulátor
Kapacitás
Li-Pol 2350mAh
Töltés
DC 5V, 1000mA
Készenléti idő
akár 235 óra
Beszélgetési idő
akár 720 perc
Csomag tartalma
Készülék, leírás, garanciajegy, töltő, USB adatkábel,képernyővédő fólia, SIM tű, füllhallgató
A Google, Android, Google Play és más márkajelzések a Google Inc. tulajdonát képezik.
 Loading...