

Page 1
Viva C1004
User manual 3
Manual de utilizare 11
Page 2
EN
RO
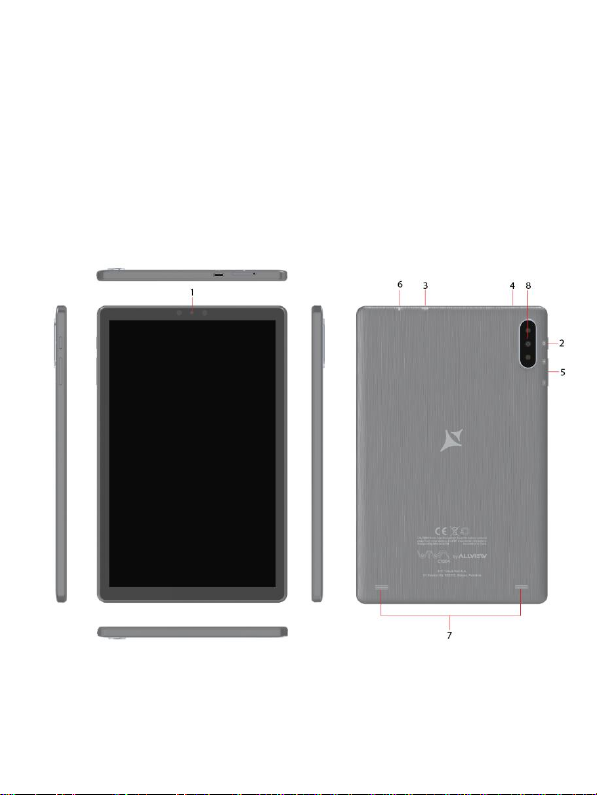
1 Front camera
2 Power button
3 Type C USB plug
4 Microphone
5 Volume button
6 MicroSD slot
7 Speaker
8 Back camera
1 Camera fata
2 Buton pornire
3 Mufa USB tip C
4 Microfon
5 Buton volum
6 Slot Micro SD
7 Difuzor
8 Cameră spate
Page 3

3 En
User manual
Allview Viva C1004
Foreword
Thank you for purchasing our product.
These operational guidelines for the user are to ensure you a quick and convenient
use. Read the instructions carefully before use.
There will be no separate notice in the case of any change in the content of this
text.
This company will continue to provide new functions for the development of the
product and there will be no separate modification in case of any change in the
product’s performance and functions. While this unit is used as a mobile hard disk,
this company will not be held liable for the security of the files saved
on the disk.
If the actual setup and the application methods are not identical to those as set forth
in this manual, please access the latest product information from the company's
website.
Basic
Operations
Power on
In the shutdown state, long press the Power button.
Power off
In the power on state, long press the Power key 3 seconds, then, from the pop-up
device options, select "Power off" for shut down.
Sleep
Under normal operating conditions, short press the power button to put into
standby. Now, the screen will close. Short press the power button again to resume
the normal mode. You can set the device to automatically enter in sleep mode
after a desired time of non-operation.
Power reset
If you experience a slow operation of the device in normal use, you can shut down
and power on again to reset the operating system.
Screen time out
If you do not touch the player within the set time, and do no activate it from the
button, the screen will be automatically turned off.
In any state, short press Power button for activation; Then slide the lock upwards
to the green spot, which will give access to the upper interface.
Page 4

4 En
If it is necessary to deactivate the screen timeout function, you can set the
[Screen timeout] option under [Display] function into "Never".
Using the Micro SD card
After this unit is connected to the computer, you will find two moving disks. The
first one is the built-in memory disk for this unit and the other is the disk for the
MicroSD card. If no card is inserted, the second disk cannot be opened. This unit
supports the extension of the MicroSD card from 128MB to 128GB.
Inserting and Unmounting the Micro SD card
Inserting:
Put the Micro SD card face up (side with words), and slightly force the card into
the socket of the card, i.e. connecting the unit. Under this state, you can play the
content in the Micro SD card.
Unmounting:
Slightly push the Micro SD, and it will bounce by a section, and then you can take
it out.
Caution:
Please perform inserting and unmounting operations when power is off!
Otherwise, it will lead to the loss or damage of the files within the unit! If no card is
inserted, the device will be unable to perform read and write operations for the
disk notes of the later removable disk (Micro SD card).
Battery:
High capacity Polymer battery is used for this unit.
The available duration of the battery power depends on volume, types of playing
files and operation of batteries. The player can be set up by the user as "user
define power off time" or "display setup" to save batteries.
Charging:
This unit can be recharged by USB port, and you can also use DC Charger:
- take out the DC charger, plug it into the wall outlet with AC 220V, then plug in the
charging jack into the device USB plug.
Warnings for charging:
A new battery may be empty and not charged before you get the device.
If the device is not used for a long time, it is better to charge it to full capacity
every 2 or 3 months during storage.
The power adapter is a key component of the portable player, which plays a
crucial role in keeping the portable player’s normal work and protecting your
security, when using the player. A long-term customer survey and after-sales
service practice shows that the malfunction of the portable player, in many cases
was caused by using inappropriate accessories, in particular the power adapter.
Using a substandard power adapter will considerably shorten the life of the
portable player, the voltage instability will seriously affect the normal work of the
portable player and bring permanent damage to the player’s performance and
reliability. Using a substandard power adapter will also reduce the sound quality of
Page 5
5 En
the players and shut down the player when you use it. In addition, using a
substandard power adapter will cause combustion and explosion which will
disserve the safety of the consumers.
Return to main interface
In any interface, touch icon " " to access the main interface.
Return to upper interface or menu
In any interface, touch icon " ", click the " " key to access the upper
interface or menu. You can also short press the " " key for that.
Points for Attention
Do not use the player in exceptionally cold or hot, dusty, damp or dry
environments;
Do not drop the player while using it.
Please charge your battery when:
A. Battery power icon shows an empty icon;
B. The system automatically shuts down and the power is soon off when you
switch on the unit once again;
C. There is no response if you operate on any key;
Please do not disconnect power abruptly when the player is being formatted or in
the process of uploading or downloading. Otherwise it may lead to errors in the
program;
When this unit is used as a mobile disk, the user shall store or export files in the
proper file management operation method. Any improper operation method may
lead to the loss of files, for which this Company will not be held liable;
Please do not disassemble this unit by yourself. If there is any issue, please
contact the dealer;
There will be no separate notice in the case of any change in the functions and
performance of this product;
To avoid the problems that might occur with the service shops approved by Visual
Fan Ltd. (because Visual Fan reserves the right to stop the collaboration with any
service shop which was previously approved and mentioned in the warranty card
on the date on which the product batch was sold on the market), before taking a
product to the service shop, please check the updated list of approved service
shops on Allview website at the section: “Support&Service – Approved service”.
Warning: We take no responsibility for situations where the device is used other
than as provided in the manual.
Our company reserves the right to make changes in the content of the manual
without making this public.
These changes will be posted on the company website to the product it amends.
Also, we are not responsible for any printing errors. The contents of this manual
may be different from that in the product. In this last case will be considered.
Page 6

6 En
Do not cover the antenna with your hand or other objects. Failure to comply
results in connectivity issues and rapid discharge of the battery.
All applications provided by third parties and installed on this device may
be modified and/or stopped at any moment. Visual Fan Ltd will not be
responsible in any way for modifications of the services or content of these
applications. Any request or question regarding third party applications may
be addressed to owners of these applications.
For more product details visit www.allviewmobile.com.
Due to the used enclosure material, the product shall only be connected to a USB
interface of version 2.0 or higher. The connection to a so called power USB is
prohibited.
The adapter shall be installed near the equipment and shall be easily accessible.
It is recommended that the device is kept at a minimum of 25mm away from any
body part.
Do not use the device in an environment with too high or too low temperature,
never expose it under strong sunshine or in a too wet environment.
The maximum operating ambient temperature of the equipment is 40℃
CAUTION! RISK OF EXPLOSION IF BATTERY IS REPLACED WITH AN
INCORRECT TYPE. DISPOSE OF USED BATTERIES ACCORDING TO THE
INSTRUCTIONS
This device has been tested and meets applicable limits for Radio Frequency (RF)
exposure. Specific Absorption Rate (SAR) refers to the rate at which the body
absorbs RF energy. SAR limits are 16 Watts per kilogram (over a volum e
containing a mass of 1 gram of tissue) in countries that follow the United States
FCC limit and 2.0 W/kg (averaged over 10 grams of tissue) in countries that follow
the European Council limit. Tests for SAR are conducted using standard
operating positions, with the device transmitting at its highest certified power level,
in all tested frequency bands. To reduce exposure to RF energy,
use a
hands-free
accessory or other similar options to keep this device away from your head and
body. Carry this device at least 25 mm away from your body to ensure exposure
levels remain at or below the as-tested levels. Choose the belt clips, holsters, or
other similar body-worn accessories which do not contain metalic components
to support operation in this manner. Cases with metal parts may change the RF
performance of the device, including its compliance with RF exposure guidelines,
in a manner that has not been tested or certified, and the use such accessories
should be avoided.
For your safety, it is recommended that, during charging, you don’t keep the device
near your body, and that you d o n o t place it on an inflammable stand. We
recommend that, during nighttime, you put the device away, at a minimal distance
of meter.
Page 7

7 En
Settings
In the main menu, select the "Settings" option to be able to access the System
Settings folder. Directly click to get into the set options interface.
Description of functions:
WiFi
Wi-Fi: Open/close the wireless connection
Data usage
Display data usage
Sound setting
Volumes: set the notification, the media and the alarm clock volume.
Default notification: click to open notifications settings menu.
Touch sounds: if checked, pressing the touch screen will make a sound
Display settings
Brightness: adjust brightness of the screen.
Wallpaper: you can choose wallpaper from.
Sleep: Setting screensaver standby time.
When the device is in stand-by the Wi-Fi function will be deactivated to save
battery.
Font size: set the font size
Storage
Check the PMP memory and available storage.
Battery
Shows information about battery status and usage
Apps
Here you can view and manage the installed applications
Accounts and sync
Information and sync settings for your user accounts.
Location services
Contains settings for activation or deactivation of the localization options.
Security
Screen lock: set screen lock method: slide, pattern, PIN, password.
Make passwords visible: if marked you may see the letters typed in the password
box.
Language & input
Set language and area, input method etc.
Backup & reset
Can backup and restore the device settings and data
Date & time
Set the date, time, time zone and time display format
Page 8

8 En
Accessibility
Options for screen rotation, text magnifier, password spelling etc.
Developer options
Settings and options for Android™ developers.
About device
Check the device software version and other information.
Connect to the
computer
This device can be connected to a PC through the USB cable, by which the data
is copied or deleted. The specific procedure is as follows.
1. Connect the device through the USB cable to the PC's USB port and you will
get the notification "USB already connected".
2. Click "USB already connected" notice options, and choose the "open USB
storage devices", and you can manage the files from the memory of your device.
Factory data
reset
If this device has a bug, or third party software installed to run this device is
unusual, choose the recovery factory Settings, remove the third party software,
and restore the state out by default. Go to "Settings"- "Privacy ", select "Factory
data reset" item, confirm, and it will remove all the data.
Common
troubleshooting
What is the APK file? What is the connection between the APK file and Android
PMP?
A: APK is the abbreviation of Android Package. APK files can be installed and
executed directly into the Android system of the device.
How do I get the APK application?
A: You can download via PC-side installation, you can also download and install it
on Google Play.
Why is the WIFI connection breaking?
A: If the "screen time" option is set, when the player is in standby for a certain
amount of time, the WIFI function will be closed, for battery purposes; When you
reactivate it, the WIFI function takes about 5 seconds to resume automatic
connection.
Why some downloaded APK programs do not work properly?
A: The hardware and software of the Android system have certain requirements.
Some APK programs have not been tested to see if they meet those requirements.
If you download an untested APK program, it might not operate as it should and it
Page 9

9 En
also might damage the device.
Why doesn’t the device show the charging state?
A: When the battery is extremely low, you need to use a DC charger. It must
charge at least half an hour to show charging status.
Why doesn’t the gravity sensor work?
A: This device has a gravity sensor, so that the screen can switch. However,
some applications do not support the gravity induction function. Thus, when this
type of application is activated, the device cannot perform the screen switching.
Device can't boot
1) Check the battery level
2) After checking the battery, reconnect the ac adapter
3) If after charging it is still unable to boot, please contact our customer service
I can’t hear the sound in the headset
1) Please check that the volume is not set to 0
2) Please check whether the headphones are connected
Device charging shows abnormalities
1) Please confirm that the use of the equipment complies with the charger of the
device charger requirements
2) If charging through USB, please do not connect to computers lead USB
interface
Why some downloaded videos cannot be played?
This device is compatible with formats of video files from the internet but due
to
the
fact that video formats may vary, there is a possibility not to be compatible with
some of them. In these cases, it is recommended to use the PC and some video
conversion software to get to a compatible format.
Page 10
10 En
EU DECLARATION OF CONFORMITY
No. 1663
We, S.C. Visual Fan S.A., with the headquarters in Brasov, 61, Brazilor St.,
CP 500313 Romania, registered at the Trade Commerce Brasov under no.
J08/818/2002, CUI RO14724950, as the manufacturer, assure, guarantee and
declare on our own responsibility, according to the provisions from article 4 HG no.
325/2017, regarding the regime of the products and services, which can be harmful
for life and health, that the product Viva C1004 from ALLVIEW, does not jeopardize
the life, health and labor protection, does not produce a negative impact over the
environment and is in accordance with:
- Directive no. 2011/65/UE, modified by 2014/8/UE regarding the usage restrictions
of certain dangerous substances in electric and electronic equipment
- Directive regarding the radio equipment RED 2014/53/EU (HG 740/2016)
- Directive 2014/35/UE regarding the assurance of users of low voltage equipment
- Directive regarding the electromagnetic compatibility EMC 2014/30/EU (HG
487/2016)
- The safety requests of the European Directive 2001/95/EC and the EN
60065:2002/A12:2011 and EN 60950-1:2006/ A1:2010 /A11:2009/A12:2011
standards, regarding the level of decibels emitted by the sold appliances.
The product has been assessed according to the following standards:
- Health and safety: EN 62479-1:2010; EN 50322-2:2013; EN 50360:2017; EN
50566:2017; EN 62209-1:2016; EN 62209-2:2010; EN 62479:2010.
- EMC: EN 301 489-1 V2.2.0; EN 301 489-17 V3.2.0; EN 301 489-19 V2.1.0; EN
301 489-52 V1.1.0; EN 55032:2015; EN 55035:2017.
- Radio spectrum: EN 301 511 V12.5.1; EN 301 908-1 V11.1.1; EN 301 908-2
V11.1.2; EN 303 345 V1.1.7; EN 300 328-1 V2.1.1; EN 303 413 V1.1.1.
The evaluation procedure of the conformity was made according to Directive
2014/53/EU, the documentation being stored at S.C. Visual Fan S.A., Brasov, 61,
Brazilor St., CP 500313, Romania and will be offered at request.
The product has the CE mark on it.
The declaration of conformity is available at www.allviewmobile.com
Brasov Director
Gheorghe Cotuna
Date: 15.04.2022
Page 11

11 Ro
Manual de utilizare
Allview Viva C1004
Prefata
Multumim pentru ca ati cumparat produsul.
Cititi acest manual al utilizatorului pentru a va asigura o utilizare rapida si facila.
Acest dispozitiv este un player portabil de cea mai inalta calitate care vine cu o
serie remarcabila de functii. Nu vor exista notificari separate in cazul unor
schimbari de continut ale acestui text.
Aceasta companie va continua sa furnizeze noi functii pentru dezvoltarea
produsului, si nu vor exista schimbari separate in cazul unei modificari de
performanta sau de functii. Cat timp acest aparat este folosit ca mediu de
stocare mobil, aceasta companie nu este raspunzatoare pentru siguranta
fisierelor salvate pe disc.
In cazul in care configurarile reale si metodele de aplicare nu sunt identice cu
cele prezentate in continuare in acest manual, va rugam sa accesati site-ul
companiei pentru ultimele informatii despre produs.
Operatii de
baza
Pornire
Apasati lung butonul Pornire/Oprire.
Oprire
In modul de functionare, tineti apasata tasta Pornire/Oprire pentru 3 secunde,
apoi selectati „Oprire dispozitiv” din meniul afisat pentru a opri dispozitivul.
Stand-by
In conditiile normale de operare, apasati scurt butonul Pornire/Oprire, iar
ecranul se va inchide. Apasati scurt butonul Pornire/Oprire din nou pentru a
reveni in modul normal de utilizare. Tableta poate intra automat in modul standby dupa o anumita perioada de inactivitate.
Resetare
Daca in procesul de utilizare dispozitivul se blocheaza, se poate efectua o
repornire fortata prin apasarea butonului Reset sau prin apasarea, timp de 10
secunde, a butonului Pornire/Oprire.
Page 12

12 Ro
Inchidere automata ecran
Daca nu folositi dispozitivul in timpul prestabilit, ecranul se va opri in mod
automat.
In orice stare, apasati scurt butonul Pornire/Oprire pentru activare, apoi glisati
simbolul de deblocare pentru a accesa interfata precedenta.
Daca este necesara dezactivarea functiei de inchidere automata a ecranului,
o puteti configura din Setari -> Afisare -> Inactivitate ecran
Utilizarea unui card Micro SD
Dupa ce dispozitivul a fost conectat la calculator, veti gasi doua spatii de
stocare. Primul reprezinta memoria integrata si celalalt este cardul Micro SD.
Daca nu exista un card introdus, al doilea spatiu nu va putea fi accesat. Acest
aparat suporta carduri Micro SD cu capacitati cuprinse intre 128MB si 128GB.
Inserarea si extragerea unui card Micro SD
Inserarea cardului:
Tineti cardul Micro SD conform simbolului inscriptionat pe carcasa tabletei si
inserati-l cu grija in locas. Acum puteti accesa continutul cardului Micro SD.
Extragerea cardului:
Impingeti usor cardul Micro SD in interior, apoi eliberati, dupa care il puteti
scoate.
Precautii:
Efectuati actiunile de inserare si de extragere a cardului cat timp aparatul este
oprit! Altfel, riscati pierderea sau distrugerea datelor stocate! Daca nu exista
un card introdus, calculatorul nu va putea efectua operatii de scriere sau de
citire de pe dispozitivul mobil (Micro SD card).
Bateria:
Dispozitivul foloseste o baterie Litiu-Polimer de mare capacitate.
Durata de pastrare a energiei depinde atat de marimea si tipul fisierelor
accesate, cat si de operatiile efectuate pe dispozitiv. Aparatul poate fi configurat
de catre utilizator in meniul Setari -> Afisare pentru a salva energie. Incarcarea:
Dispozitivul poate fi reincarcat prin cablul USB sau folosind alimentatorul.
Conectati alimentatorul la priza de curent alternativ 220V, apoi introduceti
mufa alimentatorului in portul USB al dispozitivului.
Avertismente la incarcare:
O baterie noua poate sa nu fie incarcata inainte sa fie introdusa in dispozitiv.
Daca aparatul nu este folosit pentru o perioada lunga de timp, se recomanda o
incarcare completa la fiecare doua sau trei luni in timpul inactivitatii.
Alimentatorul este un dispozitiv cheie al aparatului portabil, care joaca un rol
crucial in pastrarea parametrilor optimi de functionare si in protejarea personala
in timpul utilizarii. Un studiu indelungat, realizat cu ajutorul clientilor si al
departamentelor de service arata ca, in majoritatea cazurilor, defectele
Page 13
13 Ro
dispozitivului portabil au fost cauzate de folosirea accesoriilor
necorespunzatoare, in special a alimentatorului.
Utilizarea alimentatoarelor neadecvate va micsora simtitor durata de utilizare
a aparatului, instabilitatea tensiunii va afecta serios functionarea normala si va
cauza defecte permanente dispozitivului si performantelor acestuia.
Nefolosirea unui alimentator adecvat va reduce, de asemenea, calitatea audio
a aparatului, si va duce la oprirea acestuia in timpul utilizarii. In plus, exista
posibilitatea exploziei sau a arderii aparatului, punand in pericol siguranta
utilizatorului.
Revenire la interfata principala.
Din orice interfata, atingeti pictograma " " pentru a accesa interfata
principala.
Revenire la interfata precedenta
Din orice interfata, atingeti pictograma " "pentru a reveni la meniul sau
interfata anterioara.
De luat in considerare
Nu folositi dispozitivul intr-un mediu excesiv de rece sau de cald, prafuit, umed
sau uscat; Nu lasati dispozitivul sa cada in timpul utilizarii;
Reincarcati bateria cand:
- Pictograma de baterie indica o baterie goala;
- Sistemul de operare se opreste automat si se inchide imediat dupa ce
incercati o repornire;
- Nu exista niciun raspuns la apasarea unui buton;
Nu deconectati alimentatorul brusc, in timp ce dispozitivul este formatat sau in
timpul unui proces de incarcare sau descarcare. Altfel riscati o eroare in
program. Cand dispozitivul este folosit ca mediu de stocare mobil, utilizatorul
trebuie sa stocheze fisierele prin metode adecvate de gestionare a datelor.
Orice metoda improprie poate duce la pierderea fisierelor, pentru care aceasta
companie nu se face raspunzatoare.
Nu demontati dispozitivul. Daca exista probleme, contactati furnizorul;
Nu vor exista notificari ulterioare in cazul modificarii functiilor sau
performantelor acestui produs; Pentru a evita probleme care pot sa apara cu
service-uri care nu mai sunt agreate de SC Visual Fan SRL (deoarece Visual
Fan isi rezerva dreptul de a inceta colaborarea cu orice service colaborator
agreat, existent pe certificatul de garantie la data punerii in vanzare pe piata a
lotului de produse), inainte de a duce un produs in service va rugam sa
consultati lista actualizata a service-urilor agreate, existenta pe siteul Allview
la sectiunea "Suport&service-service autorizat”.
Page 14

14 Ro
Atentie: Nu ne asumam responsabilitatea pentru situatiile in care dispozitivul
este folosit in alt mod decat cel prevazut in manual.
Compania noastra isi rezerva dreptul de a aduce modificari in continutul
manualului fara a face public acest lucru. Aceste modificari vor fi afisate pe
site-ul companiei la produsul la care se aduc modificari. De asemenea, nu ne
asumăm răspunderea pentru eventualele erori de tipar.
Continutul acestui manual poate fi diferit de cel existent in produs. In acest caz
ultimul va fi luat in considerare.
Nu acoperiti antena cu mana sau alte obiecte, nerespectarea acestei indicatii
ducand la probleme de conectivitate si descarcarea rapida a
bateriei.
Aplicatiile
care insotesc produsul si sunt furnizate de terte parti pot fi oprite sau
intrerupte in orice moment. S.C. Visual Fan S.A. se dezice in mod explicit de
orice responsabilitate sau raspundere privind modificarea, oprirea ori
suspendarea serviciilor/continutului puse la dispozitie de catre terte parti prin
intermediul acestui dispozitiv. Intrebarile sau alte solicitari legate de acest
continut ori servicii se vor adresa direct furnizorilor propietari ai acestora.
Pentru mai multe detalii despre produs accesati www.allview.ro.
Din cauza materialului utilizat, produsul trebuie să fie conectat numai la un
USB cu versiunea 2.0 sau mai mare. Alimentarea la oricare alt tip de USB este
interzisă. Este recomandat ca dispozitivul sa fie tinut la cel putin 25 mm de
partile corpului.
Nu utilizați tableta într-un mediu cu temperatură prea mare sau prea mică.
Nu expuneți niciodată tableta la lumină solară directă sau într-un mediu cu
umiditate ridicată. Temperatura ambientală maximă de funcționare a
echipamentului este de 40 ℃
ATENȚIE ! RISC DE EXPLOZIE DACĂ BATERIA ESTE ÎNLOCUITĂ CU UN
TIP INCORECT. ELIMINAȚI BATERIILE UZATE ÎN CONFORMITATE CU
INSTRUCȚIUNILE !
Acest dispozitiv a fost testat și îndeplinește limitele aplicabile pentru
radiofrecvență (RF). Rata specifică de absorbție (SAR) se referă la rata la care
organismul absoarbe energia RF. Limitele SAR sunt de 1,6 w/kg (peste un
volum ce conține o masă de 1 gram de țesut) în țările care urmează limita
Statele Unite ale Americii FCC și 2,0 W / kg (în medie pe 10 grame de țesut),
în țările în care urmează Consiliul cu privire limită a Uniunii Europene. Testele
pentru SAR sunt efectuate folosind poziții de operare standard, cu dispozitivul
transmițând la cel mai înalt nivel de putere, în toate benzile de frecvență
testate. Pentru a reduce expunerea la energie RF, utilizați un accesoriu pentru
mâini libere sau altă opțiune similară pentru a menține dispozitivul la distanță
de cap și corp.
Transportați acest dispozitiv la cel puțin 25 mm distanța de corp pentru
a menține nivelul de expunere la sau sub nivelurile testate.
Page 15

15 Ro
Optați pentru accesorii ce nu conțin parți metalice pentru a nu sprijini
funcționarea in acest mod. Cele cu piese metalice pot modifica performanța
RF a dispozitivului, inclusiv conformitatea acestuia cu liniile directoare de
expunere la RF, într-un mod care nu a fost testat sau certificat, si trebuie evitata
utilizarea unor astfel de accesorii.
Pentru siguranța dvs. este recomandat ca în timpul încărcării să nu țineți
dispozitivul în apropierea corpului si să îl plasați pe un suport neinflamabil. Va
recomandăm ca pe timpul nopții să puneți dispozitivul la o distantă de minim 1
metru de dumneavoastră.
Setari
Din meniul principal, selectati optiunea "Setari" pentru a accesa directorul de
configurari al sistemului.
Descrierea functiilor:
WiFi
Wi-Fi: Porneste/opreste conexiunea wireless;
Utilizare conexiune de date
Afiseaza informatii despre utilizarea conexiunilor de date.
Setari de sunet
Volum: Reglare volum pentru notificari, alarma si continut media;
Notificari implicite: click pentru a afisa meniul de configurare a notificarilor;
Sunete la atingere: daca este bifat, la atingerea ecranului se va auzi un sunet;
Sunet la blocarea ecranului: daca este bifat, la blocare/deblocare se va auzi
un sunet.
Setari ecran
Luminozitate: Reglare luminozitate ecran;
Imagine de fundal: puteti alege imaginea de fundal;
Sleep: Activare/Dezactivare inchidere automata. Cand dispozitivul se afla in
mod stand-by, functia WIFI va fi dezactivata pentru economie de energie;
Dimensiune font: Configurarea dimensiunii scrisului;
Stocare
Verificati memoria disponibila pentru stocare.
Acumulator
Afiseaza date despre starea de incarcare.
Aplicatii
Afisarea si gestionarea aplicatiilor instalate.
Conturi si sincronizare
Date si setari de sincronizare pentru conturile dumneavoastra de utilizator.
Page 16

16 Ro
Servicii de localizare
Contine setari pentru activarea sau dezactivarea localizarii automate prin
conexiunea Wifi.
Securitate
Blocare ecran: Configurare modalitate de blocare: glisare, dupa model, PIN
sau parola.
Parola vizibila: Daca este bifat, se afiseaza caracterele tastate in spatiul de
introducere al parolei.
Limba si introducere
Schimbarea limbii, a zonei si metodei de introducere a textului etc.
Copie de rezerva si resetare
Se poate realiza o copie de rezerva si reveni la setari anterioare, se pot reseta
contoarele de date.
Ora si data
Reglare data, ora, fus orar si format de afisare a ceasului.
Accesibilitate
Optiuni de marire a textului, activare rotire ecran, rostire parole etc.
Optiuni dezvoltator
Contine setari si optiuni pentru dezvoltatorii de software Android ™.
Despre dispozitiv
Verificare versiune de software si alte informatii.
Conectarea la PC
Acest dispozitiv se poate conecta la calculator prin intermediul cablului USB
pentru operatii de copiere, stergere si mutare a datelo r. Procedura este
urmatoarea:
1. Conectati produsul la calculator prin intermediul cablului USB. Va aparea
notificarea "USB conectat".
2. Click pe notificarea "USB conectat", si selectati "deschidere dispozitiv USB",
apoi de pe calculator puteti gestiona fisierele din memoria produsului
dumneavoastra.
Revenire la setarile de fabrica
Daca sistemul de operare sau aplicatiile instalate nu mai functioneaza
corespunzator, stergeti aplicatiile din meniul "Setari" si reveniti la setarile de
fabrica.
Din meniul "Setari" - "Privat", selectati "Resetare din fabrica", confirmati, si
stergeti toate datele.
Page 17

17 Ro
Rezolvarea problemelor
uzuale
Ce este fisierul APK? Care este legatura dintre el si Android?
R: APK este prescurtarea de la Android Package, adica pachet de instalare
Android. Fisierele APK pot fi executate si instalate direct din sistemul de
operare Android al produsului.
Cum se obtine aplicatia APK?
R: Aplicatiile se pot descarca si instala de pe calculator sau în Google Play .
De ce se intrerupe conexiunea WiFi?
R: Daca timpul de inactivitate pentru oprirea ecranului este setat, functia WiFi
se va dezactiva dupa depasirea timpului respectiv pentru a economisi energie.
Dupa revenirea din stand-by, conexiunea WiFi se va relua in aprox. 5 secunde.
De ce unele aplicatii APK nu functioneaza corespunzator?
R: Multe aplicatii sunt propuse si puse la dispozitie de dezvoltatori, fara a
efectua in prealabil teste de compatibilitate cu sistemele de operare si
configuratia hardware a diferitelor modele de produse, deci pot exista aplicatii
APK care nu sunt in totalitate compatibile cu aparatul dumneavoastra.
De ce nu se afiseaza starea de incarcare?
R: Atunci cand nivelul de incarcare al bateriei este redus, este nevoie ca
alimentatorul sa fie conectat timp de 30 de minute sau mai mult pentru ca
starea de incarcare sa fie afisata.
De ce nu functioneaza mereu senzorul de gravitatie?
R: Acest aparat are incorporat un senzor gravitational utilizat pentru rotirea
ecranului, iar unele aplicatii nu sunt proiectate sa implementeze aceasta
functie.
Aparatul nu porneste.
R: 1. Verificati nivelul de incarcare al bateriei.
2. Conectati alimentatorul si verificati din nou.
3. Daca dupa incarcare dispozitivul nu porneste, contactati furnizorul.
Nu se aude nimic in casti.
R : 1. Verificati ca nivelul volumului sa nu fie 0.
2. Verificati conectarea corecta a castilor.
Incarcarea aparatului este defectuoasa.
R :1. Asigurati-va ca folositi un echipament de incarcare ce respecta
specificatiile alimentatorului standard al dispozitivului.
2. Nu folositi alimentatoare USB.
De ce unele filme descarcate nu sunt redate corect?
R : Acest dispozitiv este compatibil cu formatele fisierelor video de pe internet.
Insa, din cauza faptului ca formatele video disponibile difera foarte mult,
playerul poate fi incompatibil cu unele dintre acestea. In asemenea cazuri, se
recomanda folosirea calculatorului si a unui program de conversie video
pentru a converti fisierul video intr-un format compatibil.
Page 18
DECLARATIE UE DE CONFORMITATE
No. 1663
Noi, S.C. Visual Fan S.A., cu sediul social în Brasov, Str. Brazilor nr.61,
500313, România, înregistrată la Reg. Com. Brasov sub nr. J08/818/2002, CUI
RO14724950, în calitate de producator, asigurăm, garantăm și declarăm pe
proprie răspundere, conform prevederilor art. 4 HG nr. 325/2017 privind regimul
produselor și serviciilor, care pot pune în pericol viața și sănătatea, că produsul
Viva C1004 marca ALLVIEW, nu pune în pericol viata, sănătatea, securitatea
muncii, nu produce impact negativ asupra mediului și este în conformitate cu:
- Directiva nr. 2011/65/UE modificată de 2014/8/UE privind restricțiile de utilizare
a anumitor substanțe periculoase în echipamentele electrice și electronice.
- Directiva privind echipamente radio RED 2014/53/EU (HG 740/2016)
- Directiva 2014/35/UE privind asigurarea utilizatorilor de echipamente de joasă
tensiune
- Directiva cu privire la compatibilitatea electromagnetică EMC 2014/30/EU (HG
487/2016)
-Cerințele de siguranță ale Directivei Europene 2001/95/EC și a standardelor EN
60065:2002/A12:2011 si EN 60950-1:2006/ A1:2010 /A11:2009/A12:2011,
referitor la nivelul de decibeli emis de aparatele comercializate.
Produsul a fost evaluat conform următoarelor standarde:
- Sănătate si siguranta: EN 62479-1:2010; EN 50322-2:2013; EN 50360:2017;
EN 50566:2017; EN 62209-1:2016; EN 62209-2:2010; EN 62479:2010.
- EMC: EN 301 489-1 V2.2.0; EN 301 489-17 V3.2.0; EN 301 489-19 V2.1.0; EN
301 489-52 V1.1.0; EN 55032:2015; EN 55035:2017.
- Spectru radio: EN 301 511 V12.5.1; EN 301 908-1 V11.1.1; EN 301 908-2
V11.1.2; EN 303 345 V1.1.7; EN 300 328-1 V2.1.1; EN 303 413 V1.1.1;
Procedura de evaluare a conformității a fost efectuată în conformitate cu
Directiva 2014/53/EU, documentația fiind depozitată la S.C. Visual Fan S.A.,
Brasov str. Brazilor nr.61, CP 500313, România și va fi pusă la dispoziție la
cerere.
Produsul are aplicat marcajul CE.
Declarația de conformitate este disponibilă la adresa www.allview.ro
Brasov Director
Gheorghe Cotuna
Data: 15.04.2022
18 Ro
Page 19
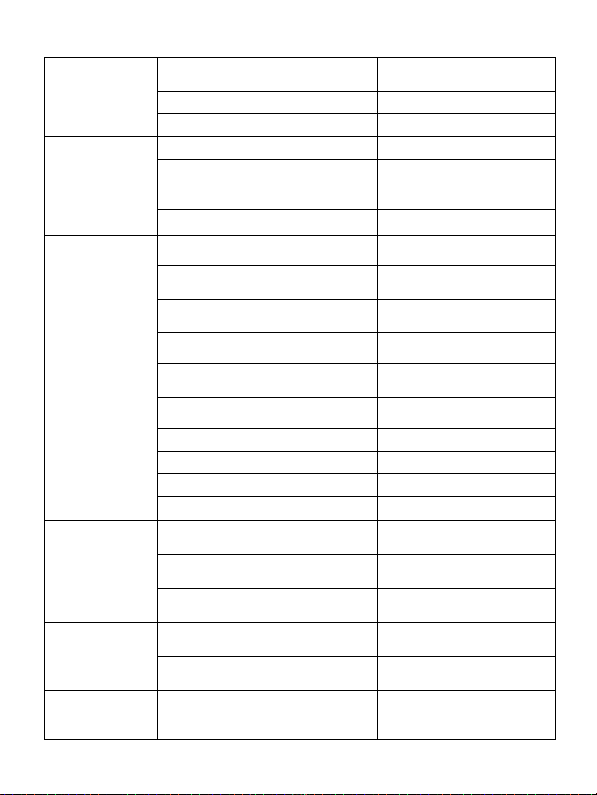
SPECIFICATIONS / SPECIFICATII
General /
General
Language / Limba
EN, BG, DE, ES, HU, PL,
RO, a.s.o.
Dimensions / Dimensiuni
243x156x9.5mm
Weight / Greutate
483g
Display /
Display
Resolution / Rezolutie
1280x800px
Touchscreen / Ecran tactil
Capacitive touchscreen
multitouch / Ecran multi-tactil
capacitiv
Type / Tip
10.1" IPS
Characteristics
/ Caracteristici
Operating system / Sistem de
operare
Android™11
Processor / Procesor
Cortex®-A53 Quad-Core (64
bit) 4 x 2.0 GHz
Graphic processor / Procesor grafic
ARM MALI G52
Flash memory / Memorie flash
16GB
RAM memory / Memorie RAM
3GB
Micro SD
<128GB (card not included /
card neinclus)
Multitasking / Multitasking
Yes / Da
Widget / Widget
Yes / Da
GPS
Yes / Da
AGPS
Yes / Da
Sound / Sunet
Alert type / Tip alerta
Ringtone / sunet
Microphone / Microfone
Yes / Da, Dual
Speaker / Difuzor
Yes / Da, Stereo
Video / Video
Render / Redare
FHD 1080p
Internet render / Redare de pe
internet
FHD 1080p
Camera resolution / Rezolutie
camera
5MP / 2MP
Page 20
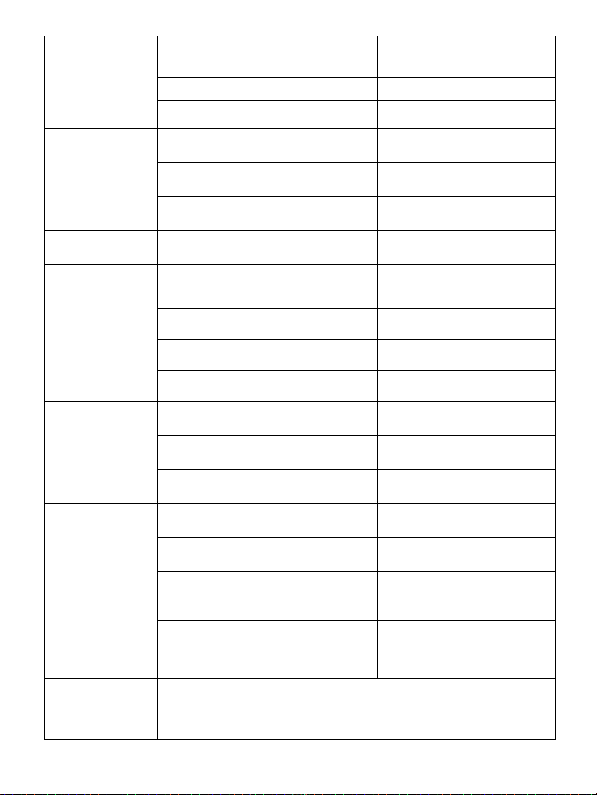
Video recording / Inregistrare video
FHD 1080p
LED flash
Yes / Da
Geotagging
Yes / Da
Connections /
Conexiuni
WLAN
WiFi 802.11 a/b/g/n/ac
Bluetooth
5.0
USB
Yes / Da, Type C
Sensors /
Senzori
Accelerometer / Accelerometru
Yes / Da
Internet
Social networking / Retele de
socializare
Yes / Da
E-mail
Yes / Da
Applications / Aplicatii
Yes / Da
Hotspot
Tethering WiFi / Bluetooth
Battery /
Acumulator
Capacity / Capacitate
Li-Polymer 5000 mAh
Running time / Timp utilizare
<500min
Standby / Timp asteptare
<500h
Charger/
alimentator
Charger type / Tip incarcator
DC 5V, 2A
Output power/ Putere Iesire
10W
Average efficiency in active mode/
Randament mediu în mod activ
0.745
Absorbed power in a no load regime/
Puterea absorbită în regim fără
sarcină
0.1W
Box content /
Continut pachet
Tablet, user manual, warranty card, power adapter, USB data Cable /
Tableta, manual utilizare, certificat garantie, alimentator, cablu de date
USB
Page 21
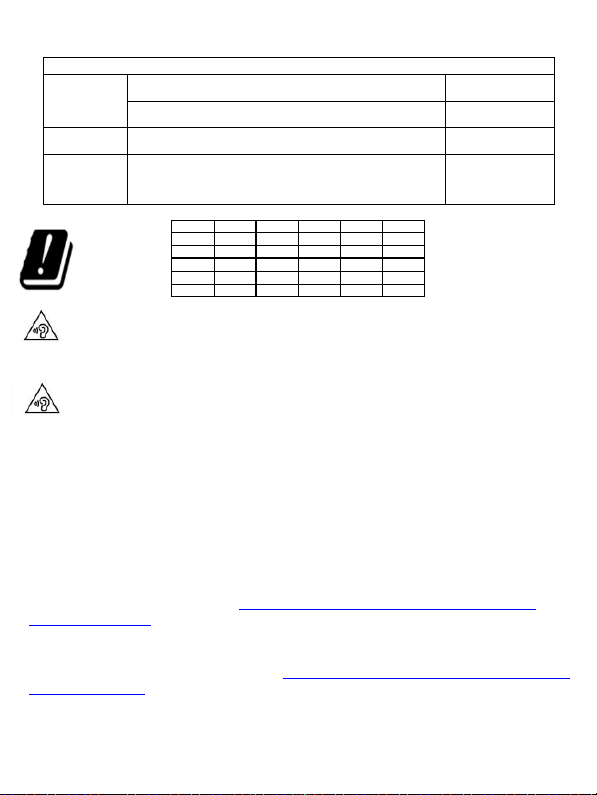
Model: Viva C1004
WLAN
Frequency / Frecvență (MHz): 2412~2472
13.24 dBm
Frequency / Frecvență (MHz): 5150~5350
13.99 dBm
BT
Frequency / Frecvență (MHz): 2402~2480
3.55 dBm
SAR
The highest SAR limit stated in the international
guidelines is / Valoarea maximă SAR acceptata
conform normelor internaționale este 2.0W/kg
0.477 W/kg
Excessive sound pressure from earphones and headphones can cause
hearing loss. To prevent possible hearing damage, do not listen at high
volume levels for long periods. The device is restricted to indoor use only
when operating in the 5150 to 5350MHz frequency range.
Presiunea de sunet excesivă de la căști poate cauza pierderea auzului.
Pentru a preveni posibilele probleme de auz, nu ascultați la niveluri ridicate de
volum pe perioade îndelungate. Dispozitivul este restricționat doar pentru
utilizarea în interiorul locuinței, atunci când funcționează în raza de frecvență
dintre 5150 și 5350 MHz.
English (en)
Android and Google Play are trademarks of Google LLC.
Romanian (ro)
Android și Google Play sunt mărci comerciale deţinute de Google LLC.
Information on the availability of spare parts and software related to the product
can be found in the following link: https://www.allviewmobile.com/spare-parts-and-
software-availability
Informatii privind disponibilitatea pieselor de schimb si a softurilor aferente
produsului se regasesc in urmatorul link: https://www.allview.ro/disponibilitate-piese-de-
schimb-si-software
AT
BA
BE
BG
CH
CY
CZ
DE
DK
EE
EL
ES
FI
FR
GR
HR
HU
IE
IS
IT
LT
LU
LV
ME
MK
MT
NL
NO
PL
PT
RO
SE
SI
SK
TR
UK
 Loading...