

Page 1

32” LED TV Soundbar
MODEL: 32ATC5000-H-SB
USER MANUAL /
MANUAL DE UTILIZARE
Page 2

1
TABLE OF CONTENTS
GETTING STARTED
SAFETY INSTRUCTIONS...................................................................................................2
FEATURES..........................................................................................................................4
GENERAL PARTS...............................................................................................................4
REMOTE CONTROL...........................................................................................................6
REMOTE CONTROL PREPARATION.................................................................................9
BASIC CONNECTION........................................................................................................10
OPERATIONS
BASIC OPERATIONS.........................................................................................................15
MAIN MENU........................................................................................................................22
FIRST TIME INSTALLATION……..………………….……………………………………..……22
DTV MODE..........................................................................................................................23
ATV AND OTHER MODES..................................................................................................36
PC MODE............................................................................................................................36
FOR REFERENCE
MAINTENANCE..................................................................................................................37
WALL MOUNTING………………………………………………………………………….........37
STAND INSTALLATION………………………………………………………………………….38
SPECIFICATIONS..............................................................................................................40
TROUBLESHOOTING........................................................................................................41
Page 3
2
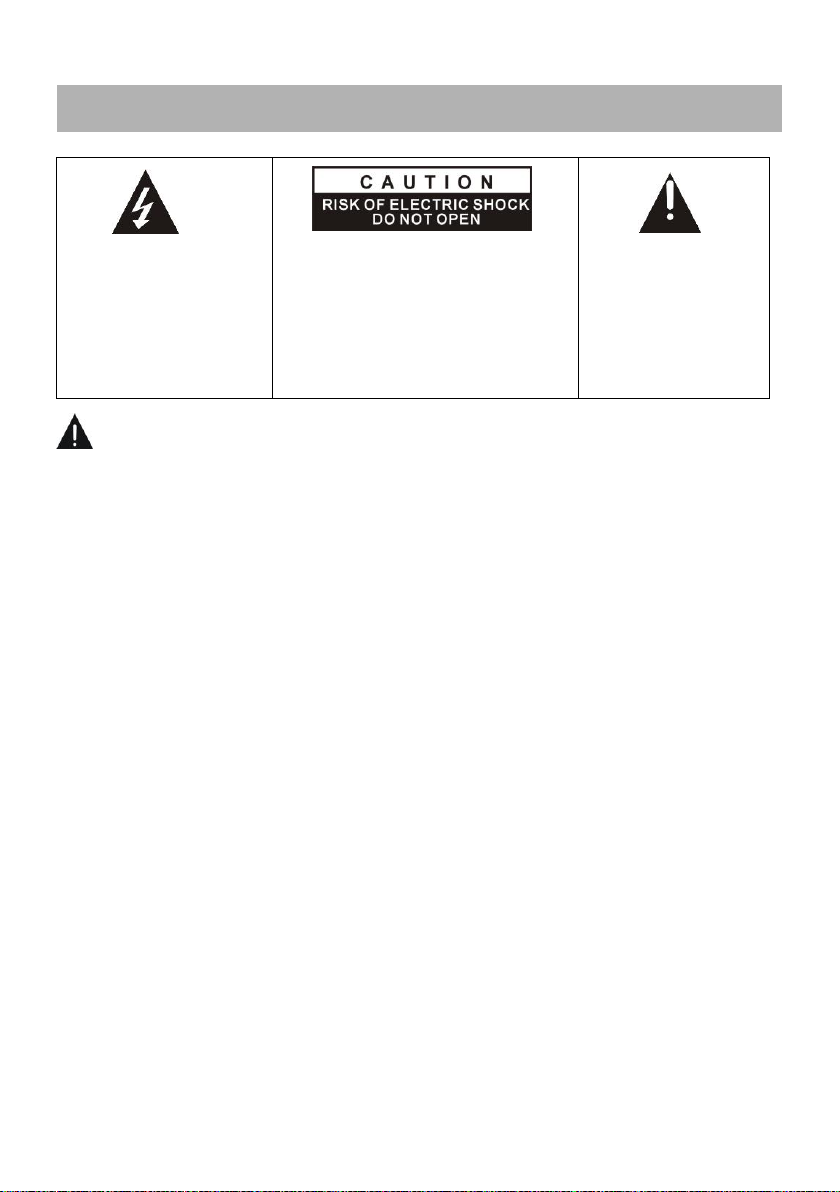
The lightning flash and
arrow head within the
triangle is a warning
sign alerting you of
“dangerous voltage”
inside the product.
CAUTION: TO REDUCE THE RISK
OF ELECTRIC SHOCK. DO NOT
REMOVE COVER (OR BACK).
NO USER SERVICEABLE PARTS
INSIDE. REFER SERVICING TO
QUALIFIED SERVICE PERSONNEL.
The exclamation
point within the
triangle is a warning
sign alerting you of
important
instructions
accompanying the
product.
SAFETY INSTRUCTIONS
SAFETY INSTRUCTIONS
WARNING – TO REDUCE THE RISK OF FIRE, ELECTRIC SHOCK, OR
SERIOUS PERSONAL INJURY:
● In order to avoid any hazard, if the cord is damaged, it must be repaired by the
manufacturer, the authorized service unit or qualified personnel.
● The cord should always be easily accessible.
● In order to prevent fires, electric shocks or injuries, DO NOT INSERT THE POWER
CABLE, THE SOCKET OR THE DEVICE in water or other liquids and do not place
objects with water on the surface of the device.
● Do not block the ventilation holes, in order to avoid overheating the device.
● Leave a minimum distance of 10 cm around the unit to ensure sufficient ventilation.
● Naked flame sources, such as candles, should not be placed near the device.
● The device is intended for use only in a temperate climate.
● Do not place the product on/near radiators, heat registers, stoves, or any other hot
surfaces.
● Clean the product only as recommended by the manufacturer (see “Maintenance”
section from the user guide). Unplug the power plug from the wall outlet before cleaning.
● Unplug the power plug from the wall outlet if it is unused for an extended period.
● Do not spill liquids and do not insert objects in the device.
● Operate the product only with the supplied power cord. Place power cords so they are
not walked on or pinched by items placed upon or against them, paying particular
attention to plugs, convenience receptacles, and the point where the power cord exits the
product.
● If you’re using a network connector or an extension cord to disconnect the device, the
disconnecting device shall have easy access.
● Do not operate this product under the following conditions:
- When the power-supply cord or plug is damaged.
- If liquid has been spilled or objects have been inserted into the product.
- If the product has been exposed to rain or water.
Page 4

3
- If the product does not operate properly or it is not used according to the instructions.
To avoid possible hearing damage, do not listen at
high audio volume for long periods of time.
- If the product has been dropped or damaged in any way.
● Do not attempt to repair the product. Any intervention on the device must be made by the
authorized service unit.
● Do not overload wall outlets or the extension cords.
● Connect this product to a power outlet which has grounding.
CAUTION - TO REDUCE THE RISK OR PERSONAL INJURY OR
PRODUCT DAMAGE:
● This product is intended solely for non-commercial, non-industrial use as a television. Do
not use this product for any other purpose.
● Do not subject the product to violent shocks, extreme temperatures, or lengthy periods of
direct sunlight exposure.
● Keep the product away from magnetic objects, engines and transformers.
● Do not use outdoors, in bad weather.
● Do not use the TV while driving. It is dangerous and illegal in some areas.
BATTERY HANDLING AND USAGE:
● CAUTION: Danger of explosion if the batteries are incorrectly placed or not replaced by
the same type or equivalent.
● The batteries should not be exposed to excessive heat such as sunshine, fire or a similar
source.
● Different types of batteries, new and used batteries, should not be mixed.
● The batteries must be installed according to the polarity.
● If the battery is worn, it must be removed from the product.
● The battery must be safely disposed. Always use the collection bins provided (check with
your provider) to protect the environment.
● Keep batteries away from children and pets. Only adults should handle batteries.
● Follow the battery safety and usage instructions.
INSTRUCTIONS REGARDING RECYCLING
According to the European Directive 2002/96/EC on electrical and electronic waste
exploitation (WEEE) and to Directive 2008/112/CE of the European Parliament and Council
from December 16, 2008, the old household electrical appliances must not be disposed of
in the normal municipal solid waste stream.
Old appliances must be collected separately in order to optimize the recovery and recycling
rhythm for their components, and in order to prevent the possible negative impact on human
health and the environment. The crossed out “wheeled bin” symbol should be on all
products of this type in order to remind the people that they have the obligation to contact
the local authorities or the selling points and ask for information regarding the adequate
places of disposal of old electrical appliances.
Page 5
4
FEATURES
GENERAL PARTS
32" LED Display
This unit has a built-in LED display to provide a clear image and low radiation.
Hotel Mode
Auto TV Scanning
Digital Broadcasting Reception
TV Guide Function
TELETEXT Function (Europe)
USB Multimedia Playback
Multi-Language On Screen Display
Complete Control from Remote
HDMI, SCART, YPBPR, AV, VGA, PC AUDIO and CI Card Inputs
EARPHONES and COAXIAL Output
Recording Function
TIME SHIFT Function
Detachable Stand Holder
External Antenna Jack
Built-in Speakers
MAIN UNIT
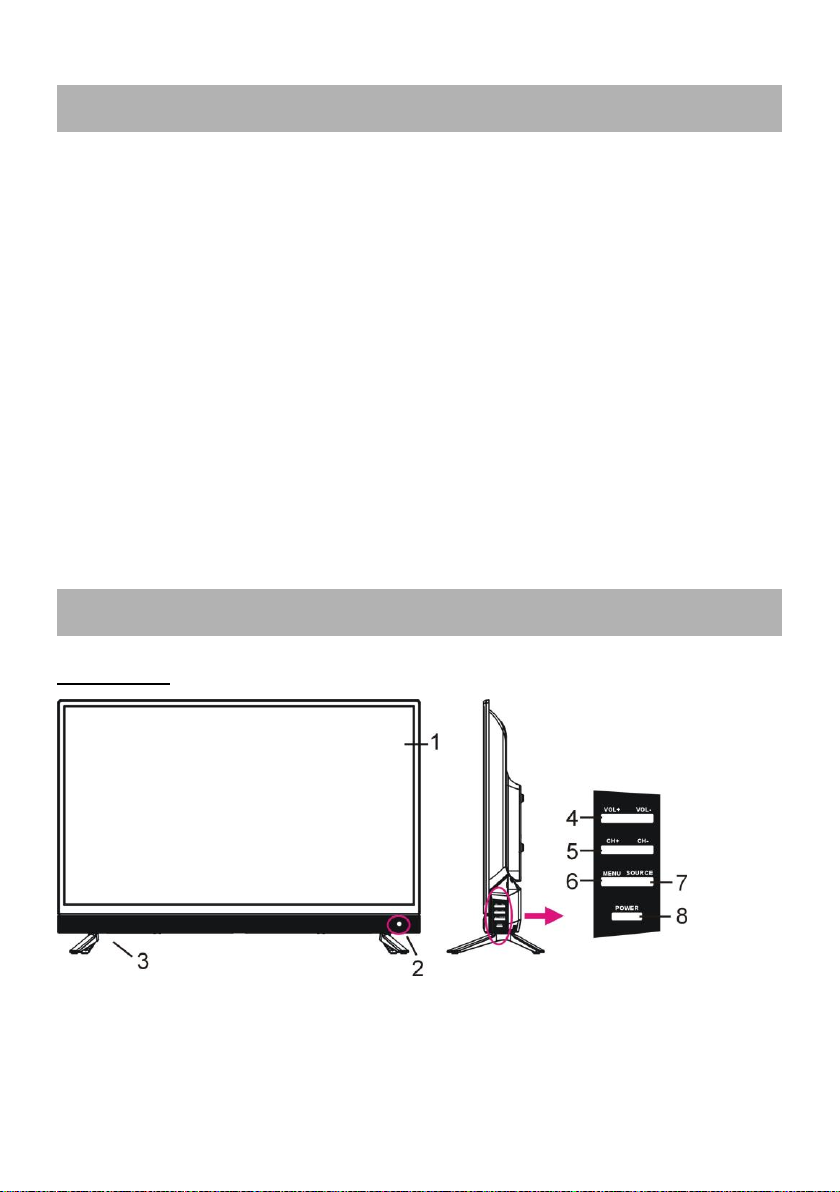
1. LED display screen
2. Sensor / Power indicator - In standby mode the indicator light will display a red color, and
when the TV is on, the indicator light will display a blue color.
3. Stand holder
Page 6
5
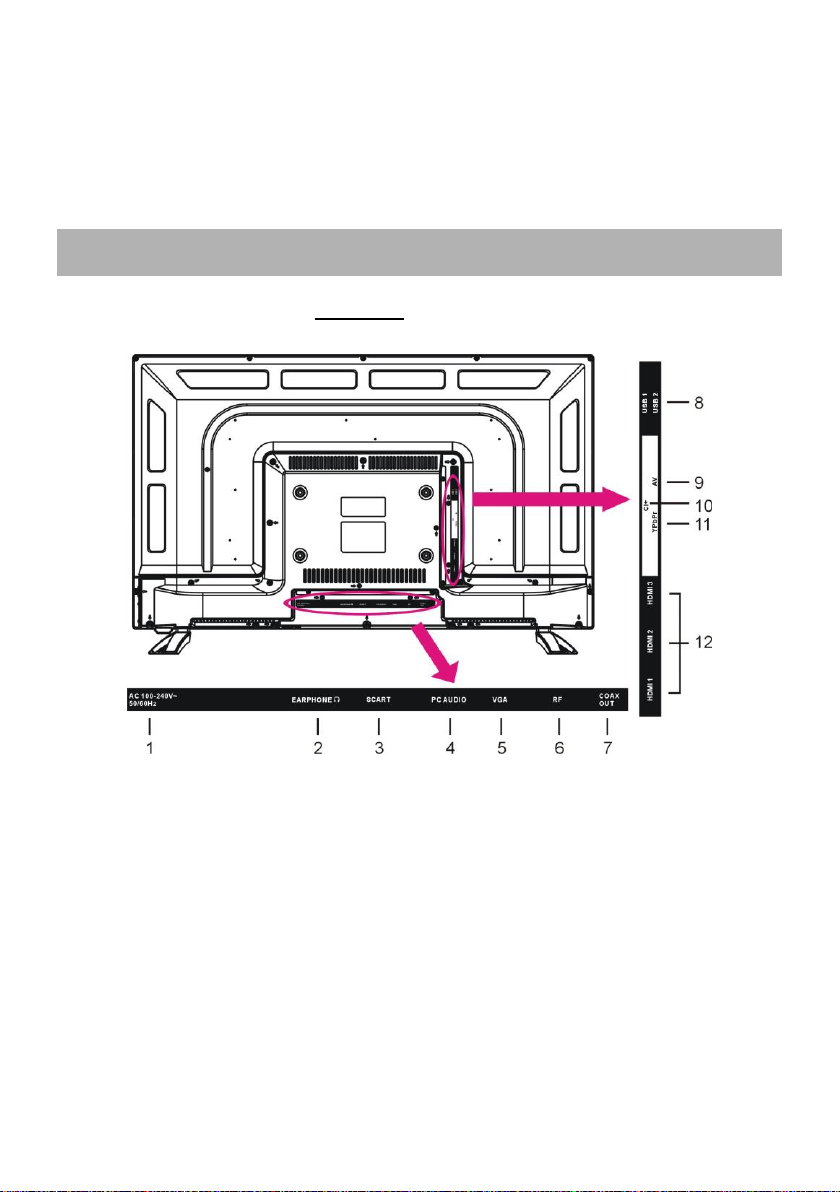
4. VOL +/- button - To increase/decrease the volume level or to move left/right in the menu.
GENERAL PARTS
Back View
5. CH +/- button - To select next/previous channel or move up/down in the menu.
6. MENU button - To enter menu setting page.
7. SOURCE button - To select the input source.
8. POWER button - To turn ON/OFF the TV
1. AC Power cord
2. EARPHONE output terminal
3. SCART input terminal
4. PC AUDIO input terminal
5. VGA input terminal
6. RF input terminal- To connect the external antenna.
7. COAXIAL output terminal
8. USB input terminal
9. Mini AV input terminal
10. CI+ Slot
11. Mini YPbPr input terminal
12. HDMI input terminal
Page 7
6
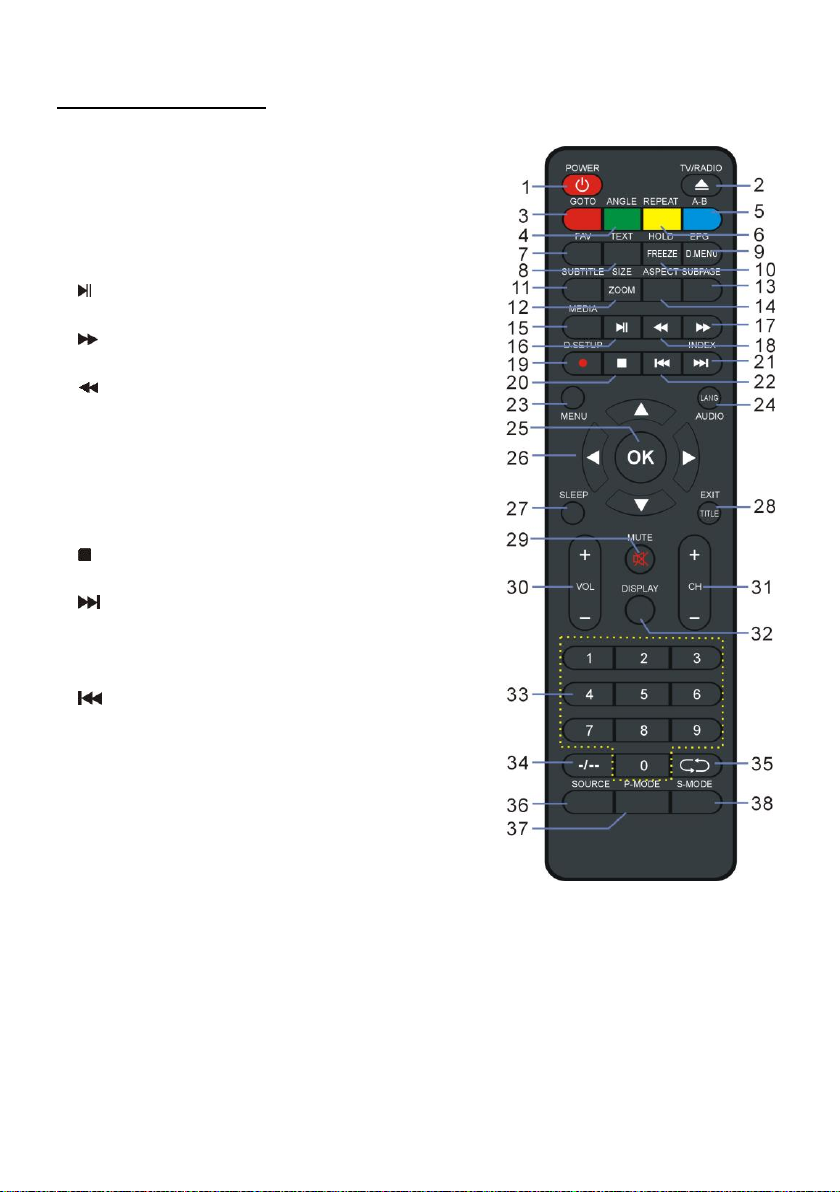
REMOTE CONTROL
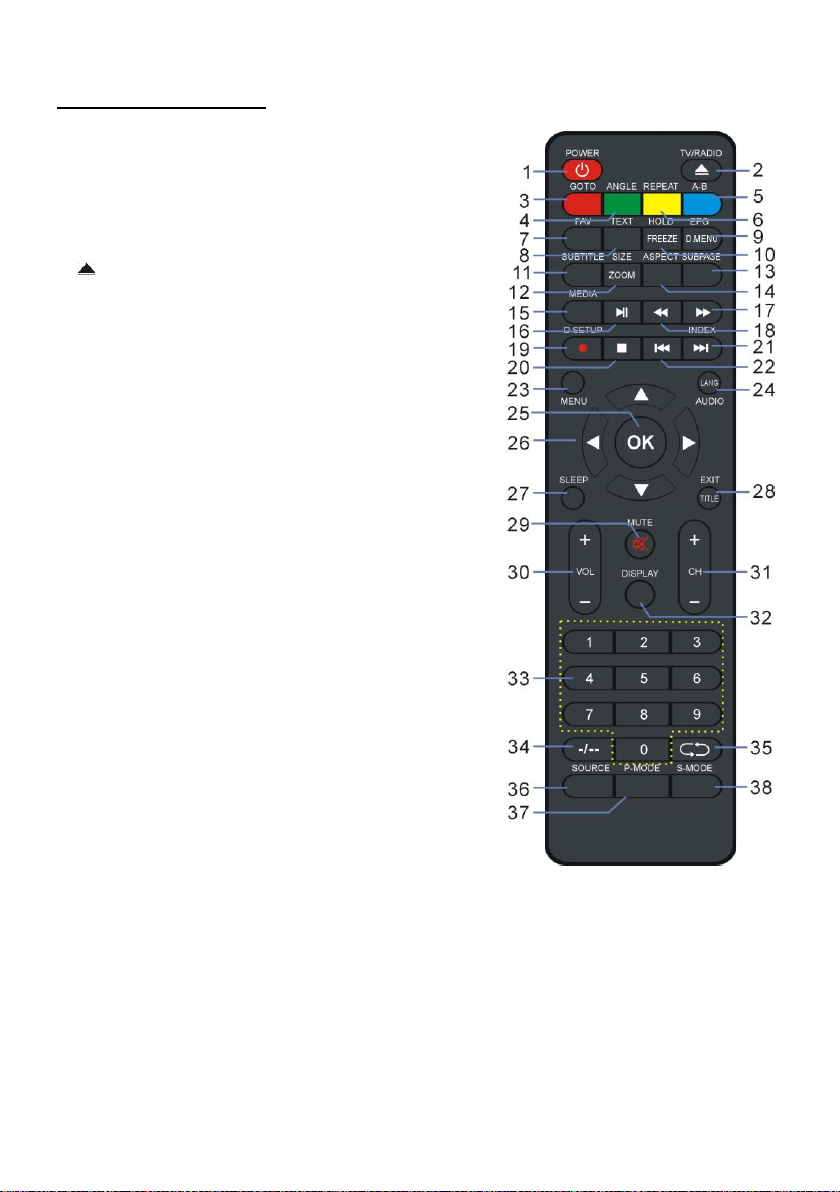
1 POWER
Set the unit in standby mode; press it again to
switch it on.
2 TV/RADIO (DTV)
Switch the unit between TV and Radio.
(DVD)
Insert/eject an available disc.
3 RED button (TV)
GOTO (DVD)
Start playing from a certain point.
4 GREEN button (TV)
ANGLE (DVD)
Change the viewing angle, if available.
5 BLUE button (TV)
A-B (DVD)
Repeat playing between A and B.
6 YELLOW button (TV)
REPEAT (DVD)
Change repeat mode.
7 FAV
Display the favorite channels list.
8 TEXT
Display the available Teletext.
9 EPG (DTV)
Display electronic program guide.
D.MENU (DVD)
Display the main disc menu.
10 HOLD
Hold the Teletext.
FREEZE
Hold the picture.
11 SUBTITLE
Enable/disable subtitles.
12 SIZE (TV)
Switch Teletext size.
ZOOM (DVD)
Shrink/enlarge the picture.
Page 8
7
REMOTE CONTROL
13 SUBPAGE
Enter Teletext sub-page.
14 ASPECT
Press it repeatedly to select desired screen size.
15 MEDIA
Enter Media (USB) mode directly.
16
Start/pause playing.
17
Move fast forward.
18
Move fast backward.
19 ● (DTV)
Start recording when watching available digital
programs.
D.SETUP (DVD)
Call out the setup menu.
20
Stop playing.
21
Play the next file.
INDEX (DTV)
Display the record list or Teletext index.
22
Play the previous file.
23 MENU
Access the main menu or return to previous menu.
24 AUDIO (TV)
Switch the available sound.
LANG (DVD)
Switch the available soundtrack language.
25 OK
Confirm selection.
26 ▲/▼/◄/►
Navigation buttons
27 SLEEP
Set desired sleep time.
Page 9
8
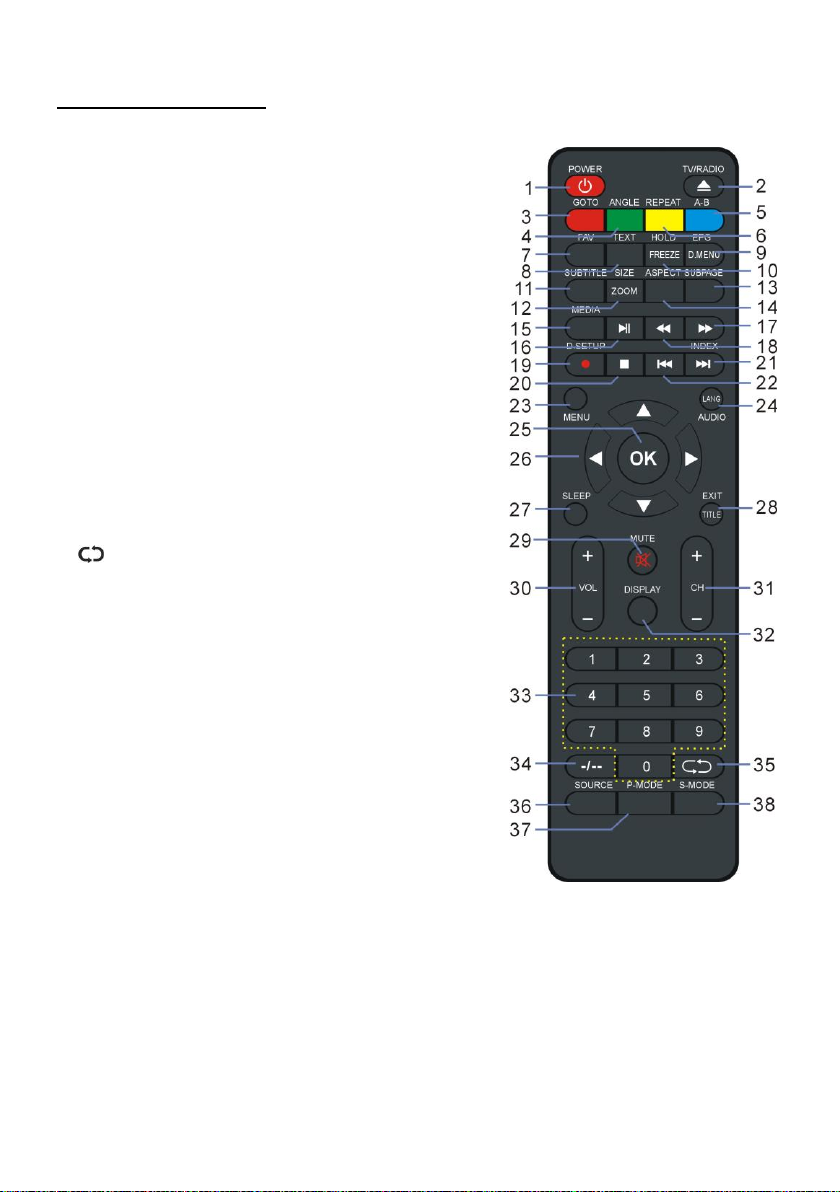
REMOTE CONTROL
28 EXIT (TV)
Exit the menu page.
TITLE (DVD)
Display the title menu.
29 MUTE
Mute the sound.
30 VOL +/-
Increase/decrease the volume level.
31 CH +/-
Play the next/previous channel.
32 DISPLAY
Display the available program information.
33 Number buttons (0-9)
Input the number information, such as channel
number and so on.
34 -/--
Switch the digit when watching TV programs.
35
Return to previous channel.
36 SOURCE
Select desired input source.
37 P-MODE
Switch the picture mode.
38 S-MODE
Switch the sound mode.
NOTE: Functions marked with “DVD” are available
only when your TV has installed a DVD player.
Page 10
9
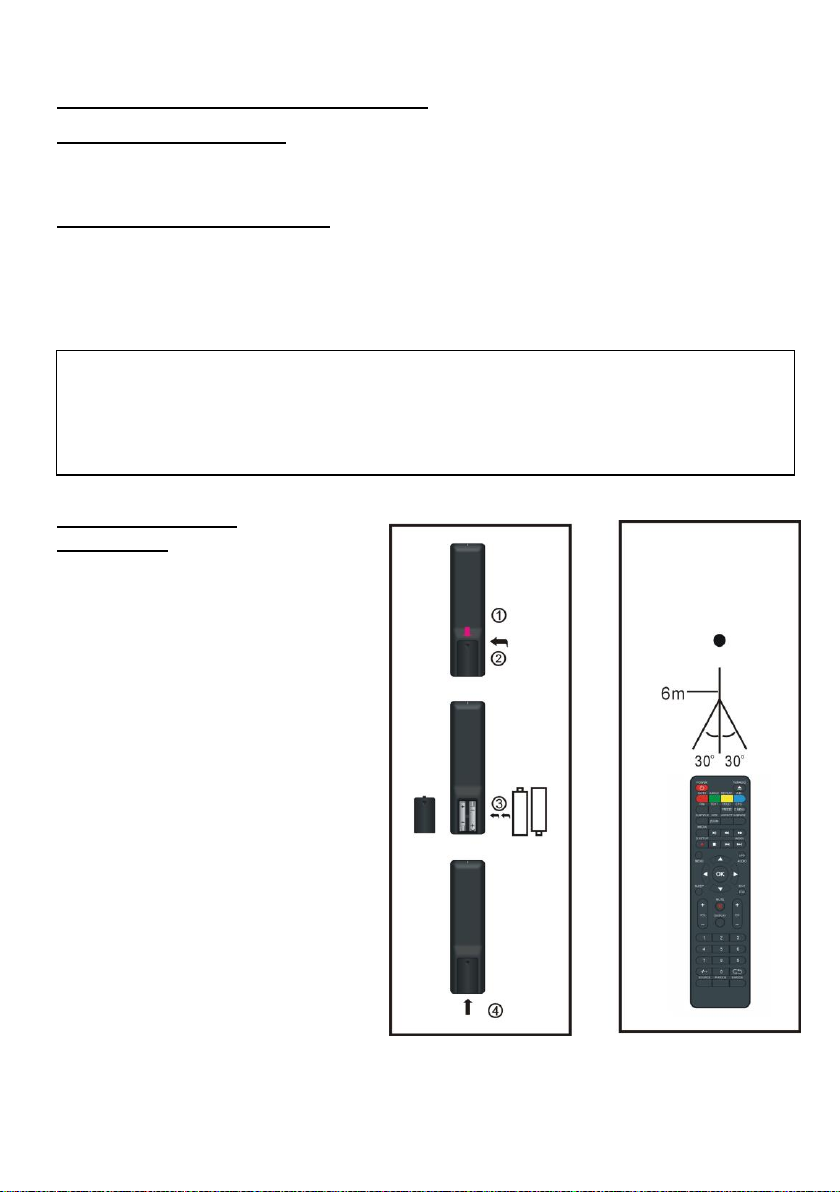
REMOTE CONTROL PREPARATION
Fig1 Fig2
Remote Control
Sensor
Push
Open
Press
BATTERY INSTALLATION
Install the batteries as in the following pictures. Be sure the + and – terminals are
positioned as indicated in the battery compartment (Fig1).
SERVICE LIFE OF BATTERIES
- The batteries normally last for six months although this depends on how often the
remote control is used.
- If the remote control fails to work even when it is operated near the TV, replace the
batteries.
- Use size AAA batteries.
NOTE:
● Do not drop, step on or hit the remote control. This may damage the parts of the
remote and lead to malfunction.
● If the remote control is not going to be used for a long time, remove the batteries.
REMOTE CONTROL
OPERATION
Use the remote control from no more
than 6m from the TV’s sensor and
maximum in a 60°angle (Fig2).
Notes:
- The operating distance may vary
according to the brightness of the
room.
- Do not point bright light at the TV
sensor.
- Do not place objects between the
remote control and the TV sensor.
- Do not use this remote control while
simultaneously operating the remote
control of any other device.
Page 11
10
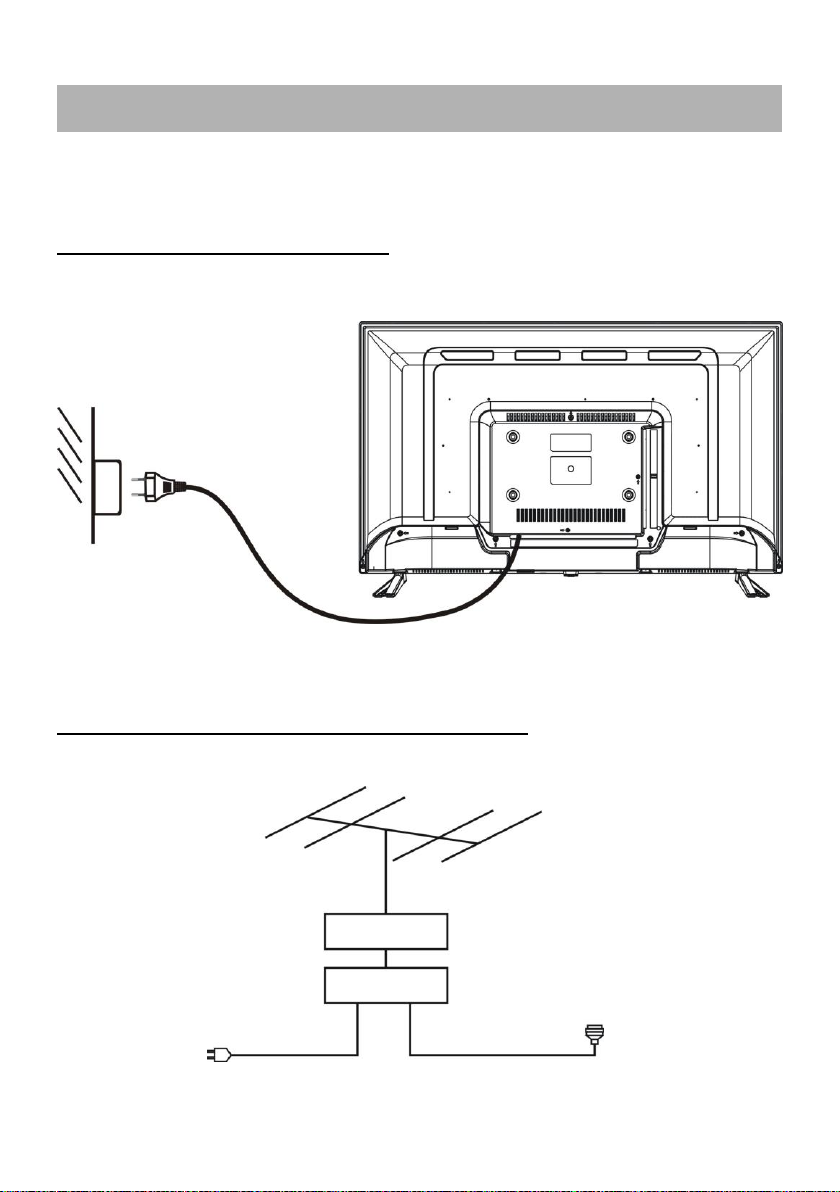
BASIC CONNECTIONS
Antenna
Outdoor
antenna
amplifier
Indoor
antenna
amplifier
Power plug
of antenna
amplifier
75 OHM
antenna
plug
To socket
● Ensure that all the cables are disconnected from the main unit before connecting to the
socket.
● Carefully read the instructions before connecting the device to other equipment.
CONNECTION TO THE SOCKET
CONNECTION TO THE EXTERNAL ANTENNA
Connect the external antenna to the RF output in order to receive TV programs.
Page 12
11
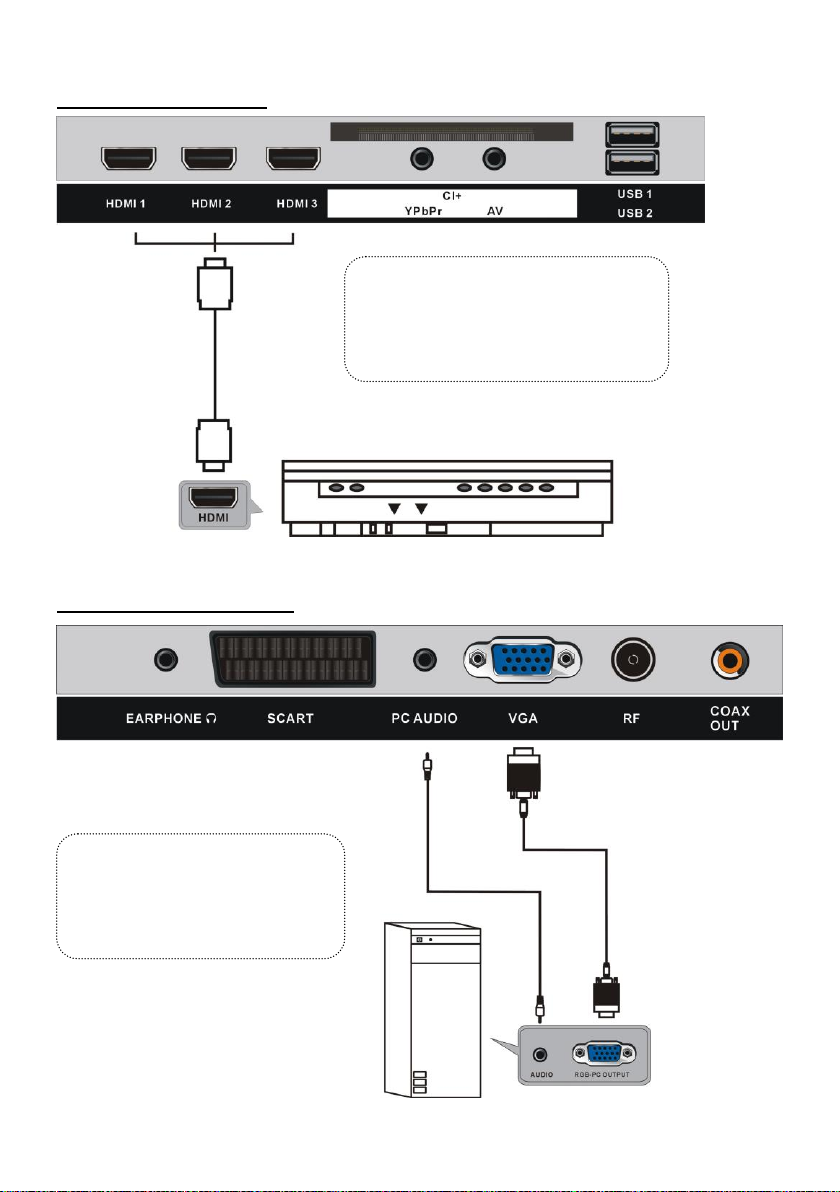
HDMI CONNECTION
HDMI cable
(Not included)
Use HDMI cable to connect the unit
with other devices to receive
high-definition multimedia signal.
Back of DVD/VCR
Back of PC
Use VGA cable to connect the unit to
a PC, and use this product as a
monitor.
VGA cable
(Not included)
Audio cable
(Not included)
PC/VGA CONNECTION
Page 13
12
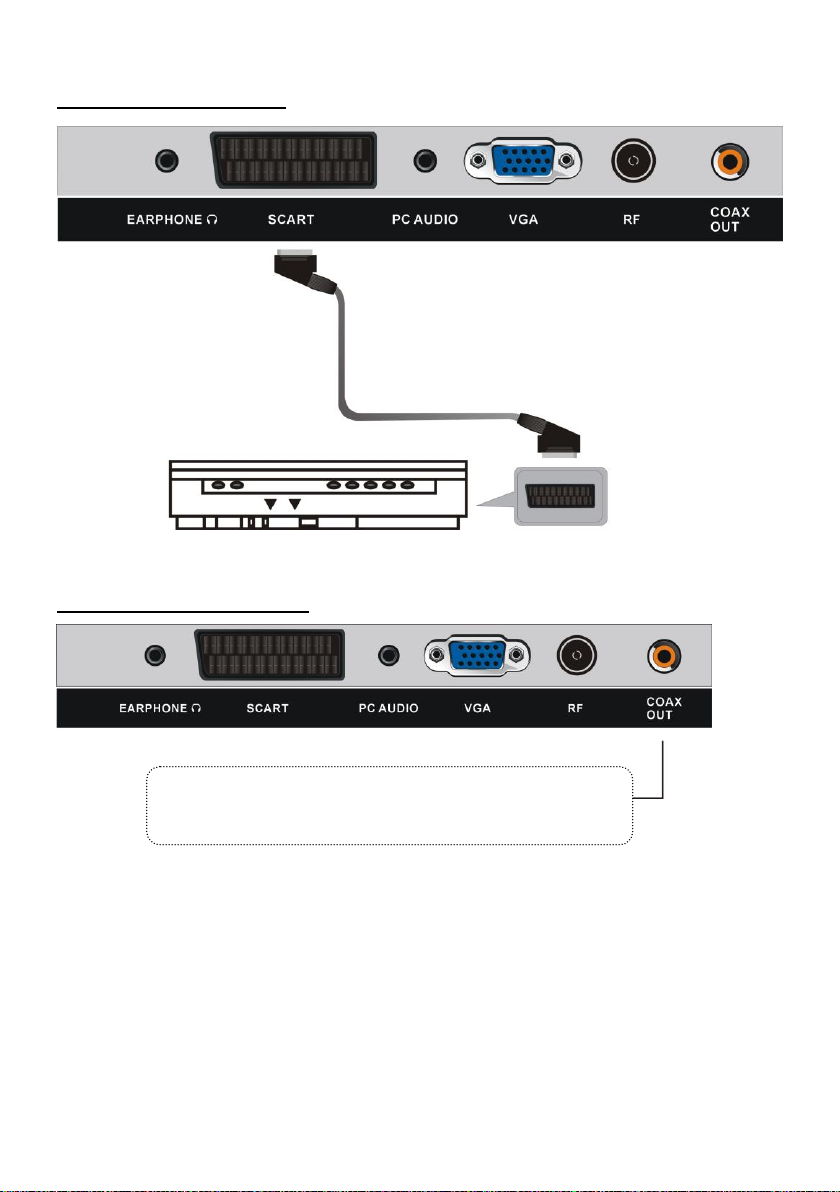
SCART CONNECTION
Back of DVD/VCR
SCART cable
(Not included)
Use coaxial cable (not included) to connect the unit with an
amplifier or other audio decoding devices.
COAXIAL CONNECTION
Page 14
13
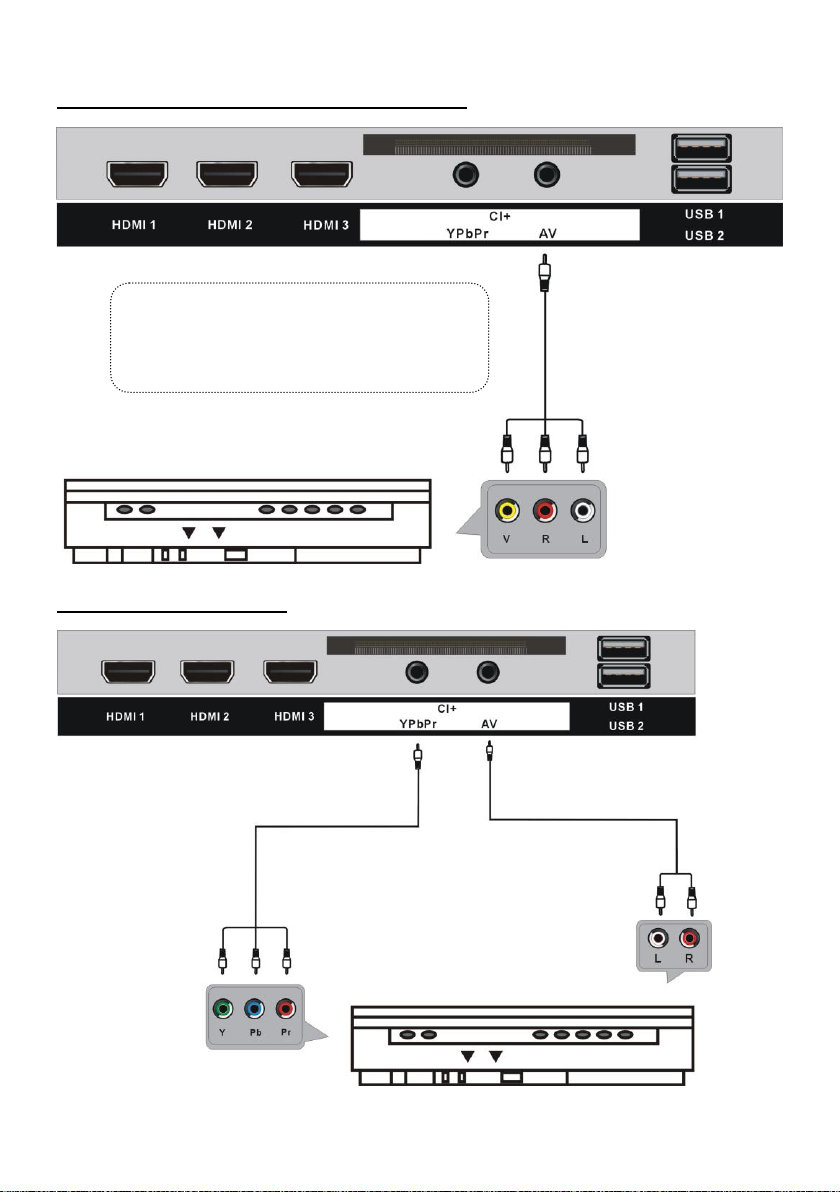
AV (COMPOSITE VIDEO) CONNECTION
Back of DVD/VCR
Back of DVD/VCR
For basic connection, use the composite Audio
L/R (white/red) and CVBS (yellow) cable to
connect the unit with other devices.
AV cable
(Not included)
AUDIO L/R connections of the AV cable
(Not included)
YPbPr cable
(Not included)
YPBPR CONNECTION
Page 15
14
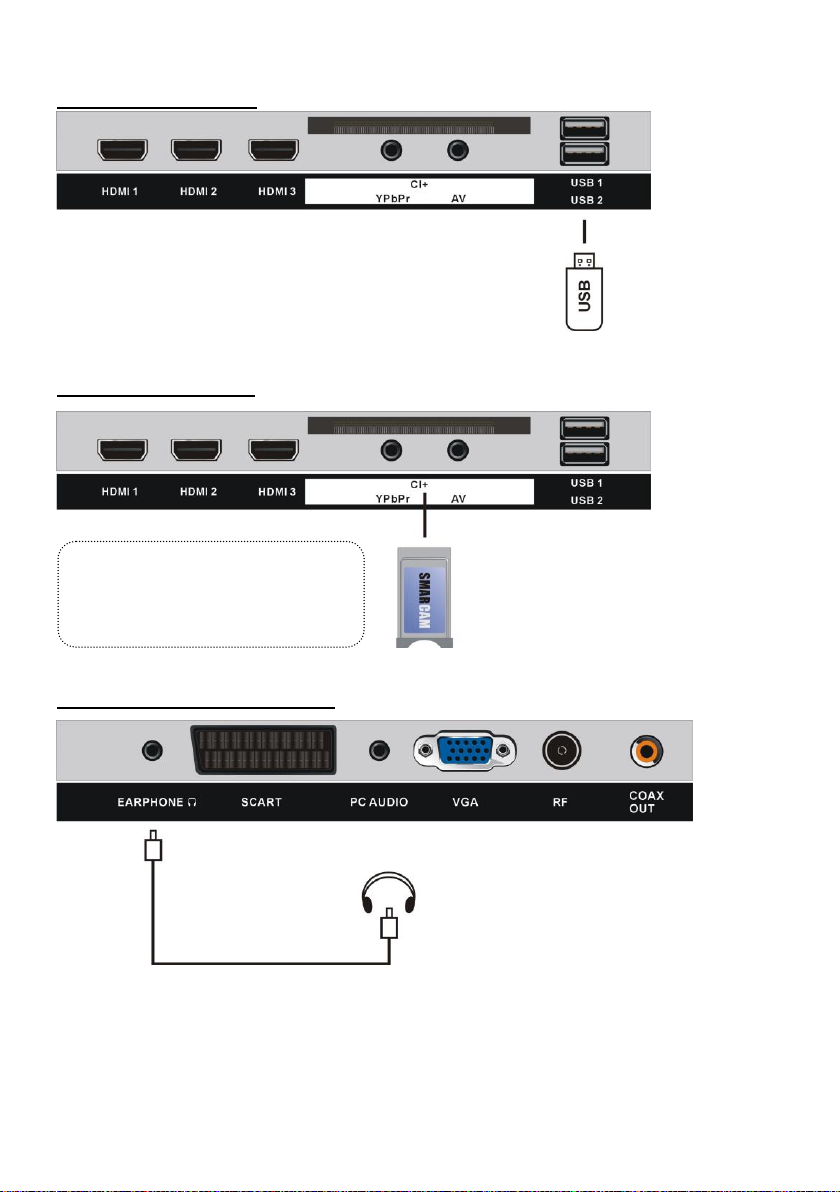
USB CONNECTION
Insert your CI card (Conditional
Access Module) to watch encrypted
digital channels. (Not included)
Earphone cable
(Not included)
USB Memory Device
(Not included)
INSERT A CI CARD
EARPHONE CONNECTION
MAKE SURE ALL THE EQUIPMENT AND THE POWER PLUG ARE
CONNECTED PROPERLY AND THE UNIT IS SET IN A CORRECT
MODE BEFORE ANY KIND OF OPERATION.
Page 16
15
BASIC OPERATIONS
- Press the POWER button on the unit or remote control to power ON the unit (indicator will
glow blue); press it again to power OFF (standby mode) the unit (indicator will glow red).
- Press SOURCE button on the unit or remote control to set the unit in DTV or ATV mode.
- Certain actions require inserting a password. For more information, see chpt. Lock.
SELECT DESIRED PROGRAM
1. Press CH+ button to play next channel.
2. Press CH- button to play previous channel.
3. Press number buttons on remote control directly to select desired program.
NOTE: Press -/-- button repeatedly to change the digits.
VOLUME CONTROL
- Press VOL+ or VOL- to adjust the level of current volume.
Available range: 0-100.
MUTE CONTROL
- Press MUTE button to mute the sound, press it again to turn on the sound.
SOURCE SETTING
- Press the SOURCE button to display the sources list
- Press the UP or DOWN navigation buttons to select the desired input source, and then
press the OK button to confirm.
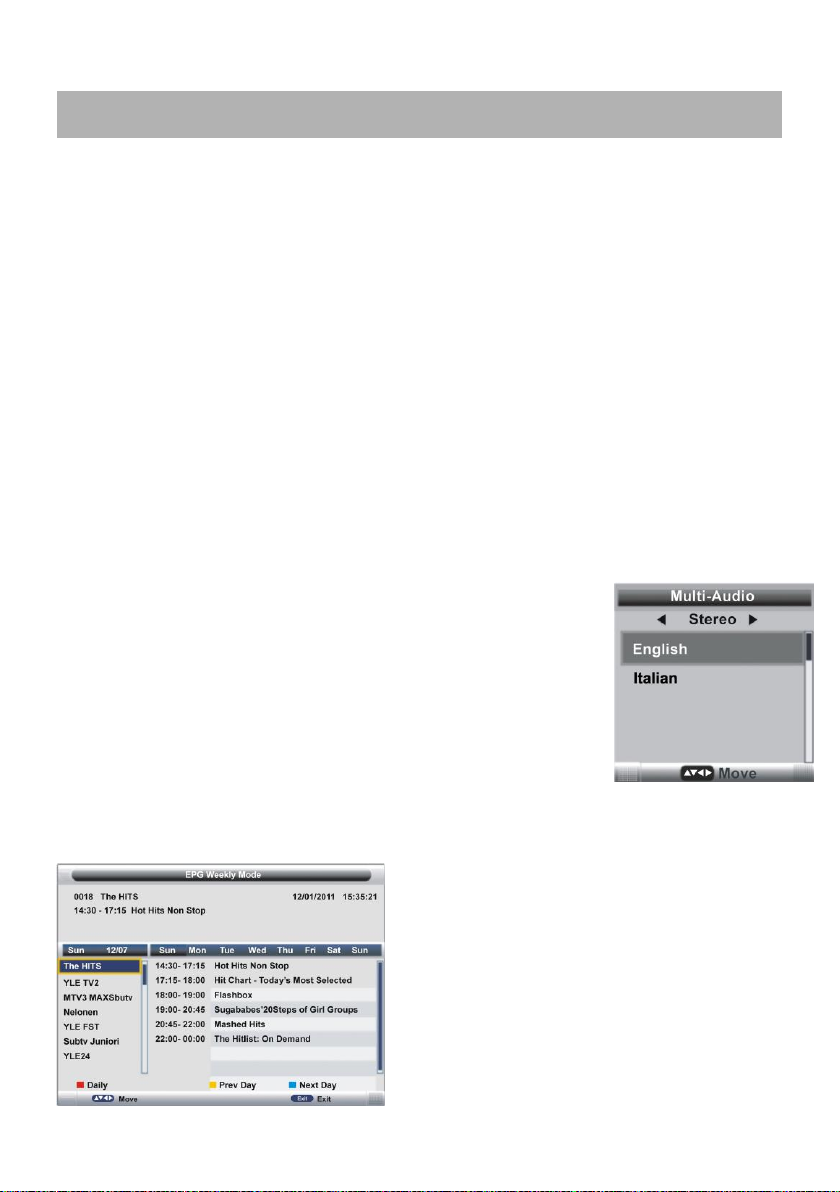
MULTI-AUDIO SETTING
- Press the AUDIO button on the remote control to select the desired
audio language.
- Press the LEFT/RIGHT buttons to select the desired audio type.
- Press the UP/DOWN buttons to select the desired audio language.
NOTE: To enable this function, make sure that the channel you are
viewing supports multi-audio languages.
INFORMATION DISPLAY
- Press the DISPLAY button on the remote control to display
information of the current program.
TV GUIDE (FOR DTV MODE ONLY)
- Press the EPG button on the remote control to access the Channel Guide.
Page 17
16
- Press UP/DOWN buttons to select preferred channel.
- Press LEFT/RIGHT buttons to switch between the left and right column.
- Press the RED button to switch between weekly mode and daily mode.
- Press the YELLOW button to display the TV guide of previous day.
- Press the BLUE button to display the TV guide of next day.
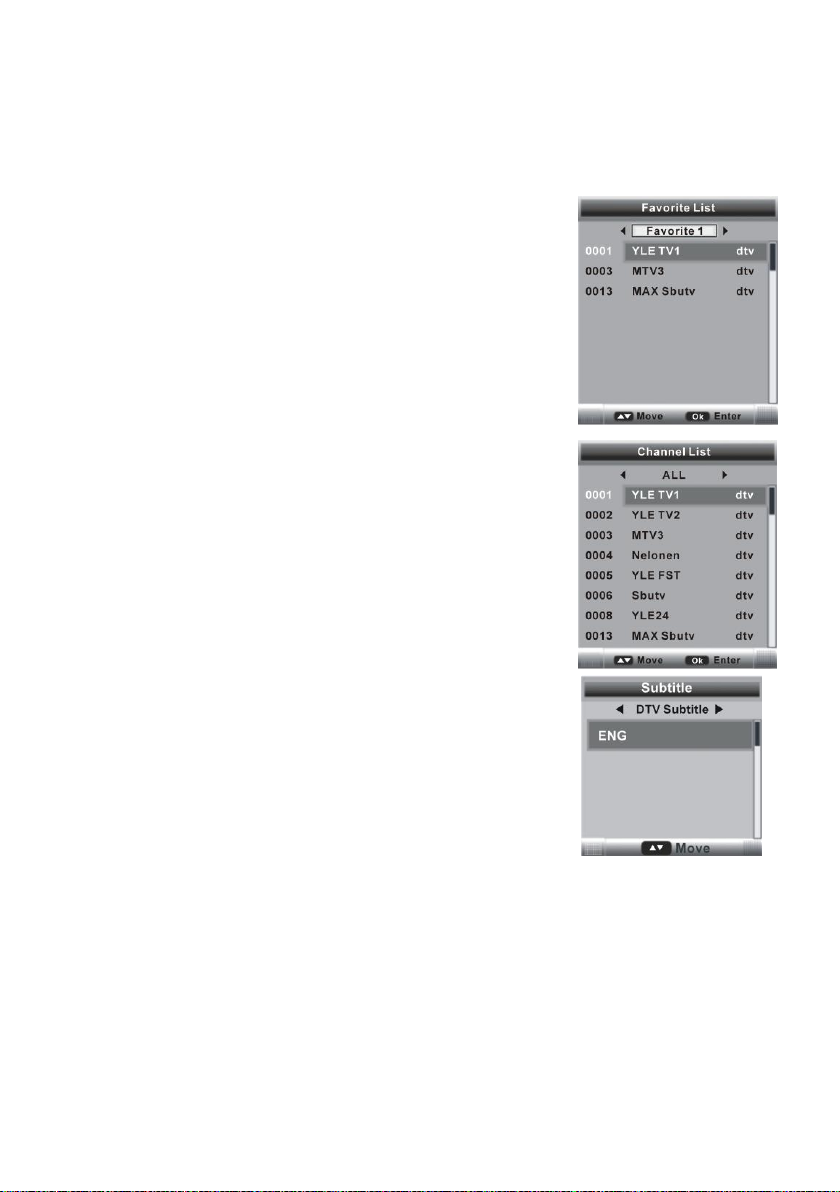
FAVORITE LIST
When viewing an available channel, press the FAV button on to
add it to the FAVORITE CHANNELS List.
- Press UP/DOWN buttons to select preferred channel.
- Press LEFT/RIGHT buttons to select the desired list of favorite
channels.
- Press the OK button to confirm selection.
Note: To remove a channel from the Favorite List, please see
chapter 3.2 “Favorite Management”.
QUICK SELECT
When viewing an available channel, press the OK button from
the remote control to display the channel list.
- Press UP or DOWN buttons to select the preferred channel.
- Press the OK button to confirm selection.
TELETEXT
- Press the TEXT button on the remote control to display the
available teletext information and press it again to stop
displaying the information.
TV/RADIO (FOR DTV MODE ONLY)
- Press the TV/RADIO button on the remote control to switch the
unit between TV and RADIO mode.
SUBTITLE
- Press the SUBTITLE button on remote control to enter the Subtitle menu page.
- Press the LEFT/RIGHT buttons to select preferred option.
- Press the UP/DOWN buttons to select the desired subtitle.
- Press the OK button to confirm selection.
Note: To enable this function, make sure that the channel you are viewing supports the
multi-subtitle option.
Page 18
17
RECORDER (FOR DTV MODE ONLY)
- Insert your USB memory device into USB slot first.
When watching a digital program:
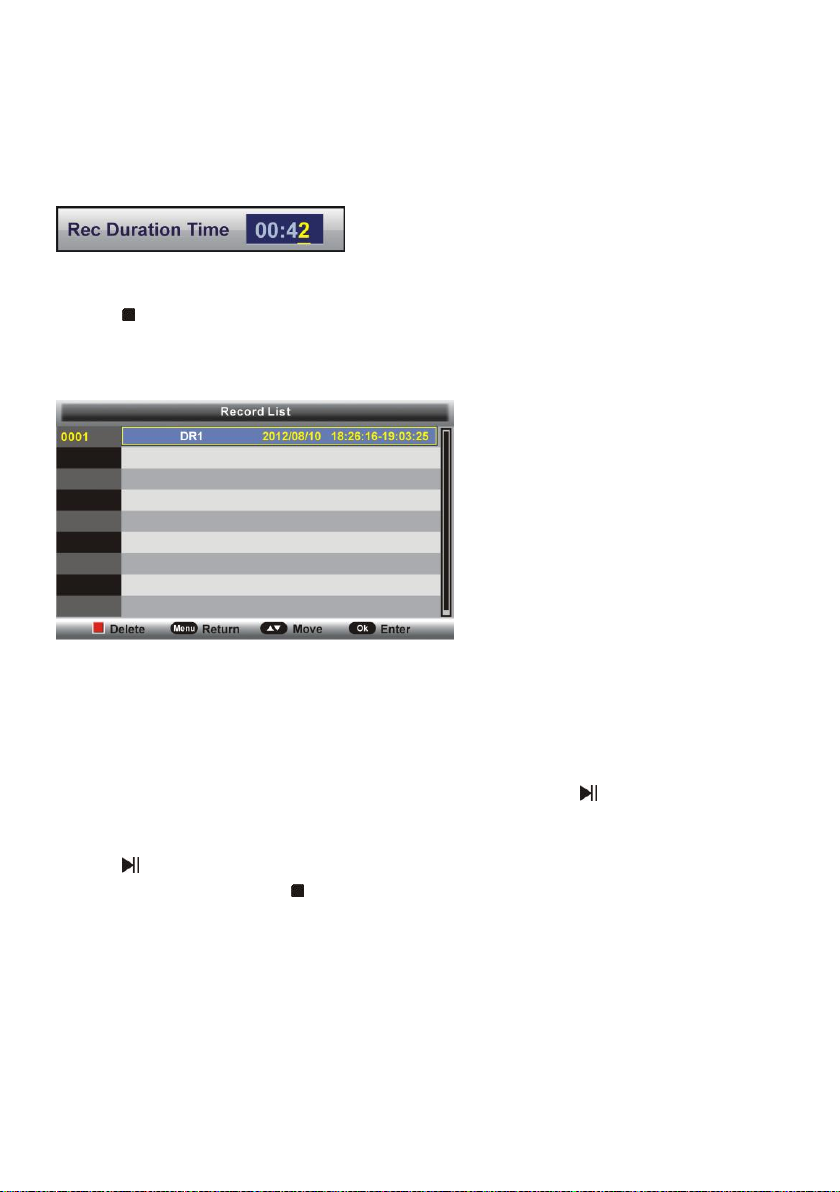
- Press ● button on the remote control to start recording immediately and press it again to
display the following menu.
- Use the LEFT/RIGHT navigation buttons to move the cursor; use the number buttons to
input your desired value and press OK button to confirm.
- Press button on the remote control, and select YES to stop; select CANCEL to dismiss
selection and close the window.
To watch recorded programs:
- Press the INDEX button on the remote control to display the Record List menu.
- Press the UP/DOWN navigation buttons to select the recorded files and press the OK
button to start playback.
TIME SHIFT (FOR DTV MODE ONLY)
- Insert your USB memory device into USB slot first.
When watching a digital program:
-If you don’t want to miss any programs when you’re gone, press button on the remote
control to access the TIME SHIFT mode; press OK to activate the feature; select NO to hide
the window.
- Press button again to enable TIME SHIFT function.
- To stop TIME SHIFT, press on the remote control and a confirmation window will be
displayed. Select YES to exit TIME SHIFT mode and select NO to close the window.
MEDIA PLAYBACK
- Press SOURCE button on the remote control to set the unit in MEDIA mode.
- Insert a USB memory device into USB slot before the following operations.
- Press UP/DOWN/LEFT/RIGHT buttons to move the cursor.
- Press EXIT button to return to media menu page.
Page 19
18
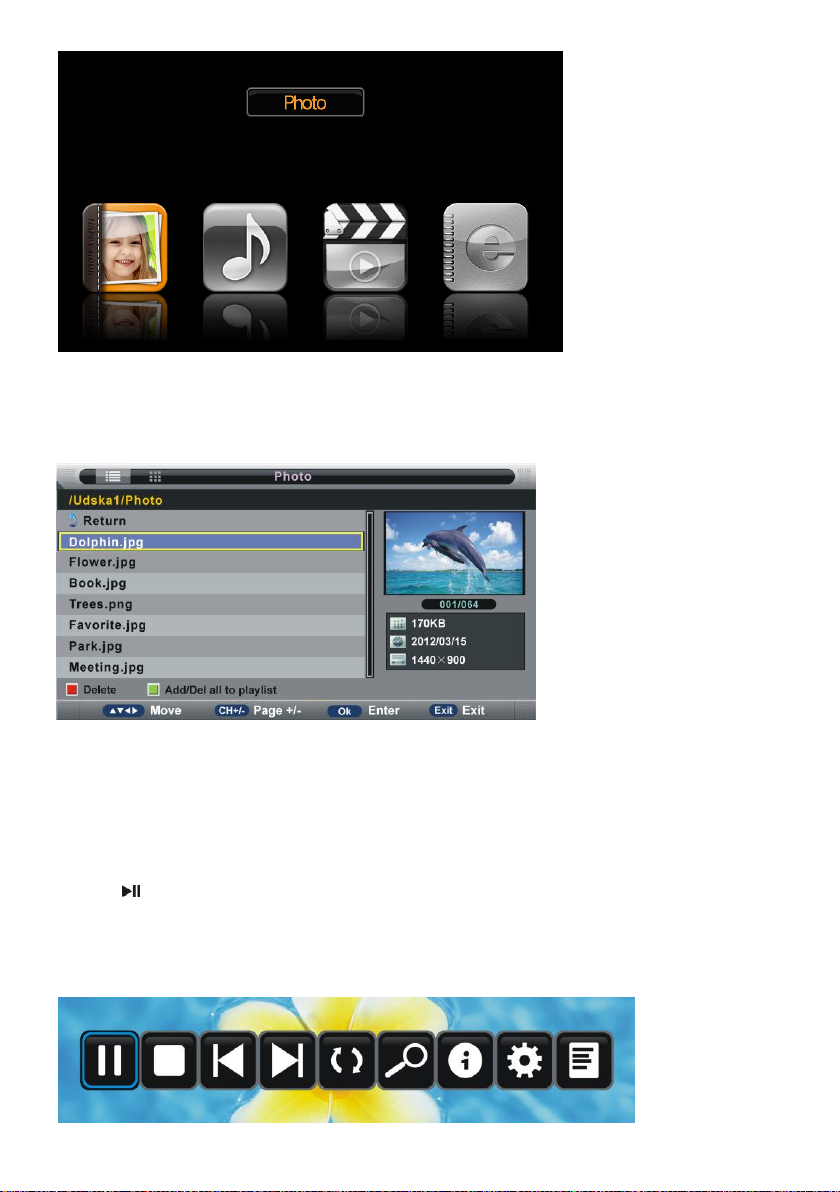
1. PHOTOS
- Press LEFT/RIGHT navigation buttons to select PHOTOS in the main menu and press OK
for confirmation.
NOTE: When selecting a Photo file, press EXIT button to move the cursor to TITLE and
then press RIGHT to view files in thumbnail mode.
- Use navigation buttons to select the preferred file.
- Press the RED button to delete the selected file.
- Press the GREEN button to add/remove all the files from the playlist.
- Press OK button to add/remove highlighted file from playlist.
- Press button to start playing.
During photo normal playing:
- Press OK button on remote control to display the tool bar; press EXIT button to hide it.
- Press LEFT/RIGHT navigation button to select the preferred option in the tool bar and
press OK to confirm selection/enter a submenu.
Page 20
19
- Press button to play or pause playing.
- Press button to stop playing.
- Press button to play previous file.
- Press button to play next file.
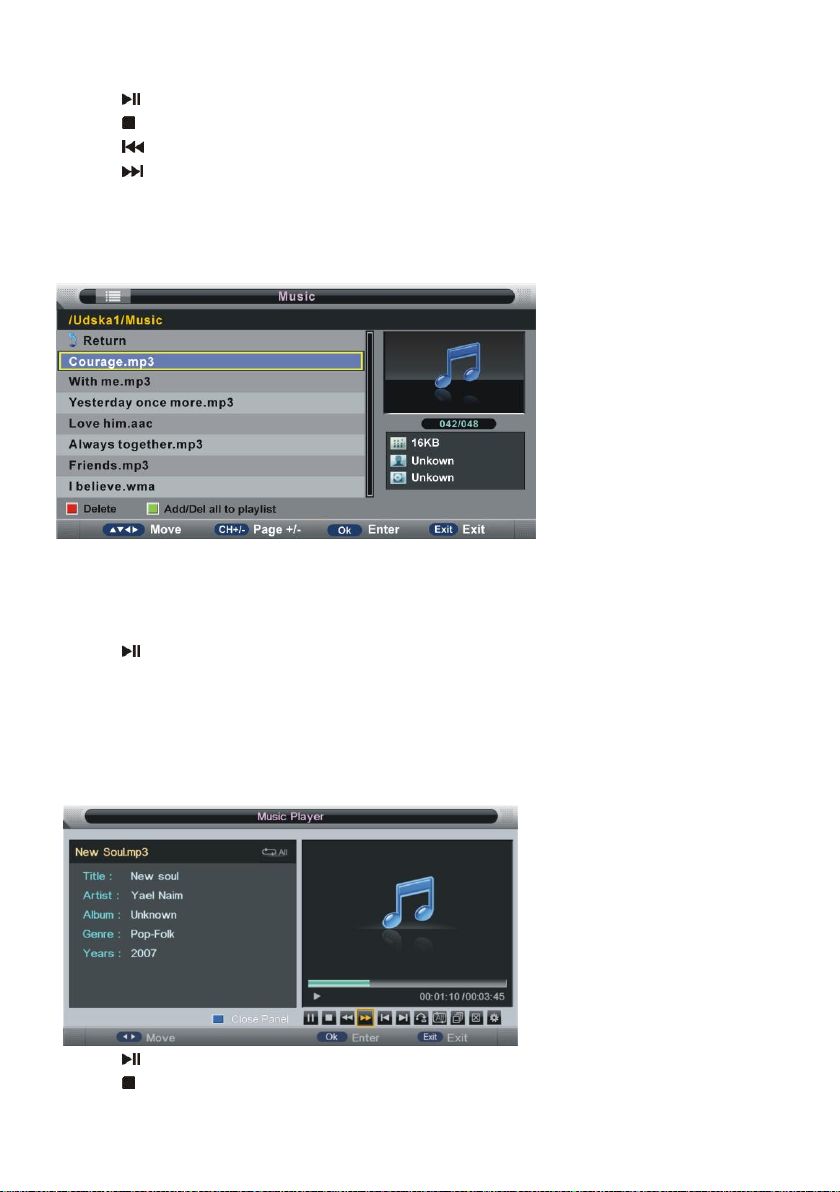
2. MUSIC
- Press the LEFT/RIGHT buttons to select MUSIC in the main menu and press OK for
confirmation.
- Use navigation buttons to select preferred file.
- Press the RED button to delete selected file.
- Press the GREEN button to add/remove all the files from the playlist.
- Press OK button to add/remove highlighted file from the playlist.
- Press button to start playing.
During music normal playing:
- Press the OK button from the remote control to display the toolbar; press EXIT to hide it.
- Press LEFT/RIGHT buttons to select preferred option in the toolbar and press OK button
to confirm selection/enter a submenu.
- Press the BLUE button to hide the on-screen display; press any button on the remote
control to display it again.
- Press button to play or pause.
- Press button to stop playing.
Page 21
20
- Press button to move fast backward.
- Press button to move fast forward.
- Press button to play previous file.
- Press button to play next file.
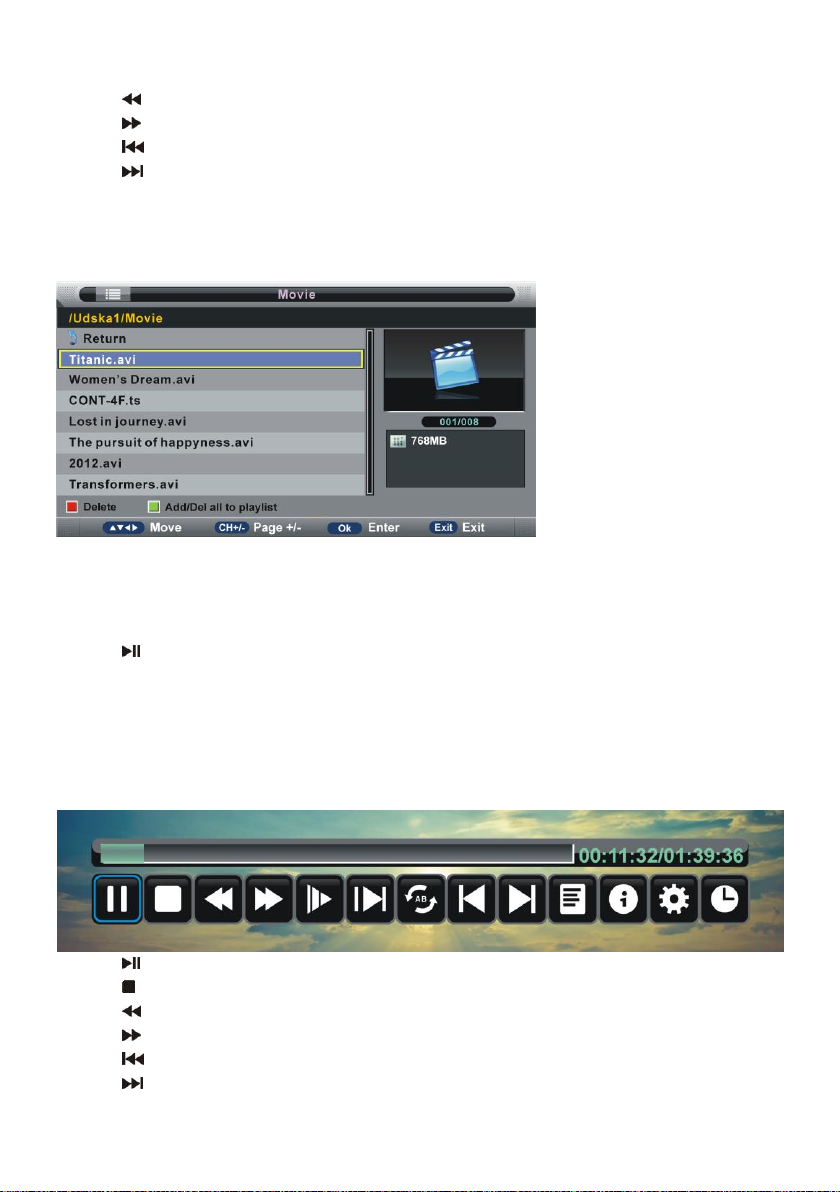
3. MOVIE
- Press LEFT/RIGHT navigation button to select MOVIE in the main menu and press OK to
confirm.
- Use navigation buttons to select preferred file.
- Press the RED button to delete the selected file.
- Press the GREEN button to add/remove all the files from the playlist.
- Press the OK button to add/remove highlighted file from the playlist.
- Press button to start playing.
During movie normal playing:
- Press OK button on remote control to display the tool bar; press EXIT button to hide it.
- Press LEFT/RIGHT buttons to select preferred option from the toolbar and press the OK
button to confirm selection/enter a submenu.
- Press the BLUE button to close the on-screen display; press any button on remote control
to display it again.
- Press button to play or pause playing.
- Press button to stop playing.
- Press button to move fast backward.
- Press button to move fast forward.
- Press button to play previous file.
- Press button to play next file.
Page 22
21
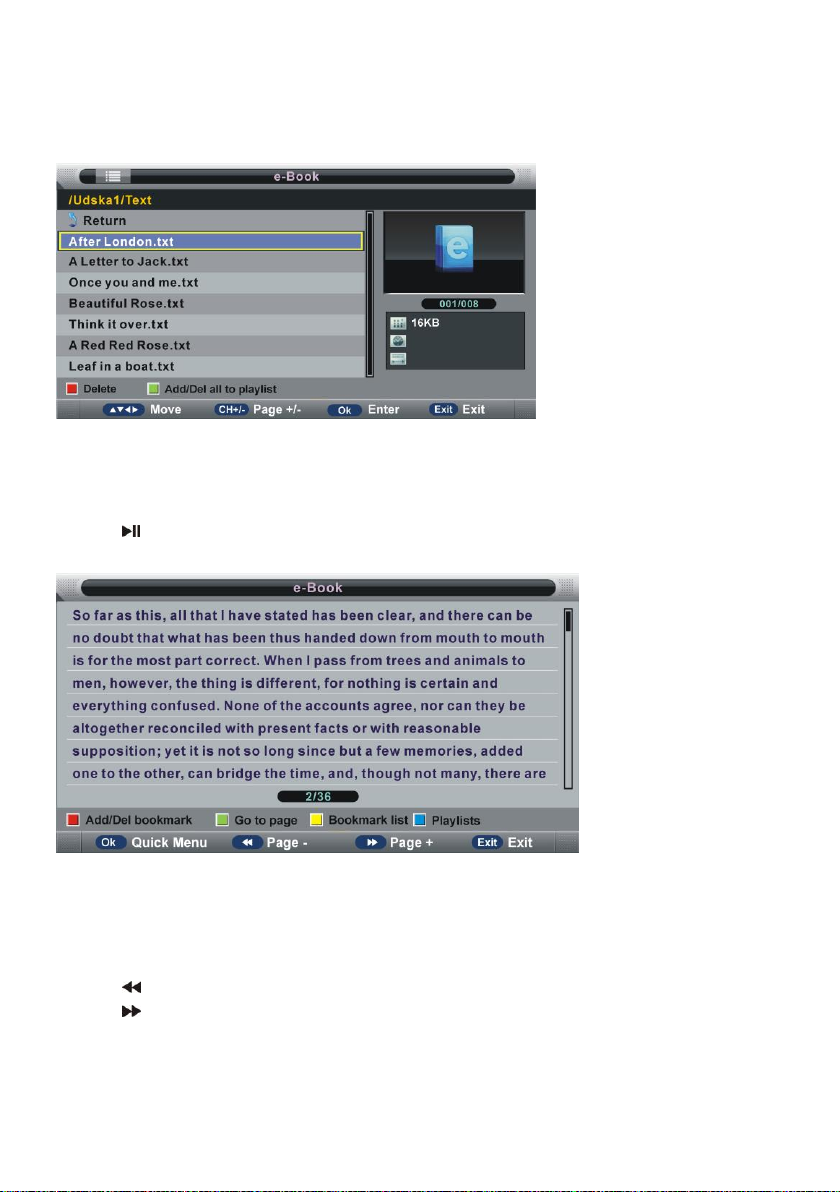
4. e-Book
- Press LEFT/RIGHT navigation buttons to select e-Book in the main menu and press OK to
confirm.
- Use the navigation buttons to select preferred file.
- Press the RED button to delete the selected file.
- Press the GREEN button to add/remove all the files from the playlist.
- Press OK button to add/remove highlighted file from the playlist.
- Press button to start playing.
During e-book normal playing:
- Press the RED button to add/remove current page from Bookmark List.
- Press the GREEN button to enter into the GOTO mode. Input valid number and press OK
button to enter desired page directly.
- Press the YELLOW button to display the Bookmark list.
- Press the BLUE button to display the play list.
- Press button to play previous page.
- Press button to play next page.
NOTE: To play your multimedia files, make sure you have selected the correct icon in the
MEDIA PLAYBACK menu. That is to say, you can only play Photo files in PHOTO item,
Music files in MUSIC item and so on.
Page 23
22
MAIN MENU
● The unit contains different setting modes. Once the initial programming is entered, it will
remain as such until changed. This way, the unit can always be operated under the same
conditions.
● The settings will remain as such until they are changed by the user, even if the TV enters
in standby mode.
Common procedure for initial settings
- Press the MENU button to display the main menu.
- Press LEFT or RIGHT buttons to select the submenus.
- Press OK or RIGHT buttons to access the submenu pages.
- Press UP or DOWN buttons to select the preferred options.
- Press LEFT or RIGHT buttons to adjust the value.
- Press OK button to confirm selection.
- Press MENU button to return to previous menu page.
- Press EXIT button to exit the main menu.
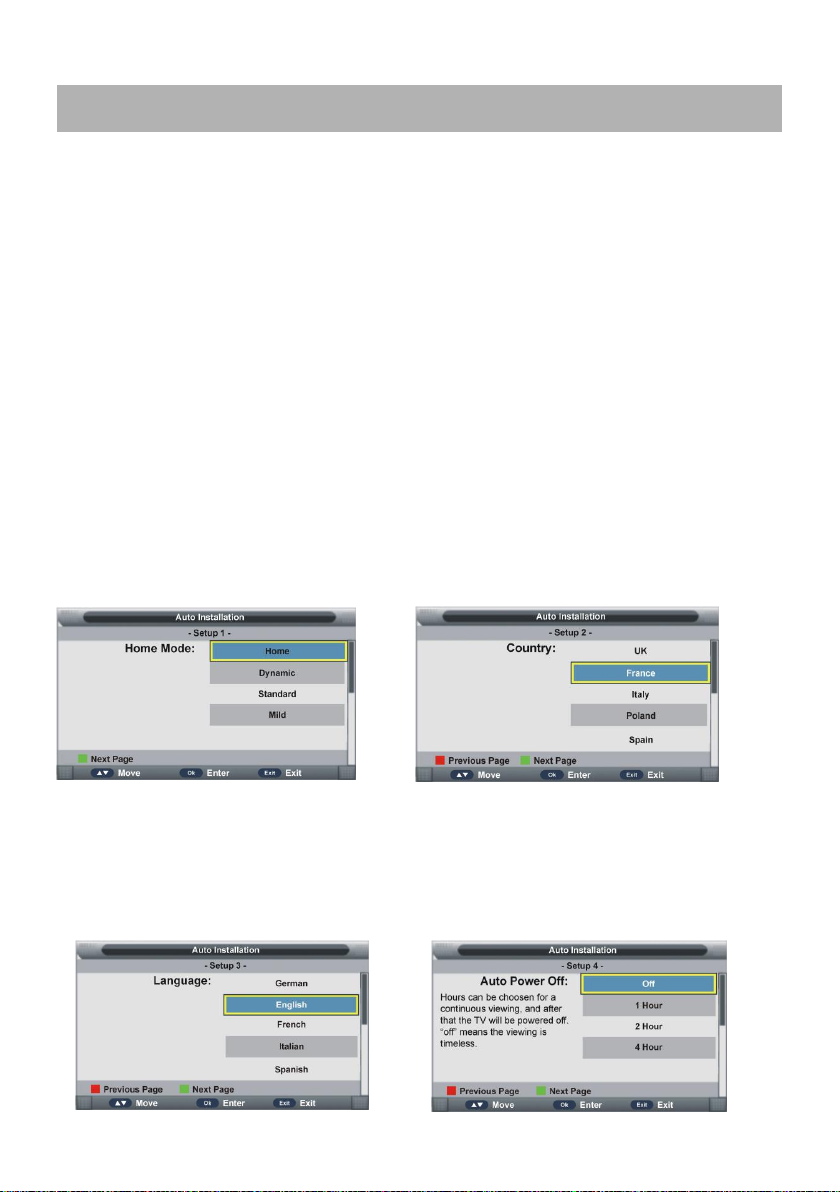
First Time Installation
- Connect to the power source and turn on the TV and the following menu will appear on the
screen:
Setup 1
- Press UP/DOWN buttons to select the desired image mode.
- Press OK to confirm and move to the next step.
Setup 2
- Press UP/DOWN buttons to select the country.
- Press OK to confirm and move to the next step.
Page 24
23
Setup 3
- Press UP/DOWN buttons to select the language.
- Press OK to confirm and move to the next step.
Setup 4
- Press UP/DOWN navigation button to select the auto off timer.
- Press OK to confirm and move to the next step.
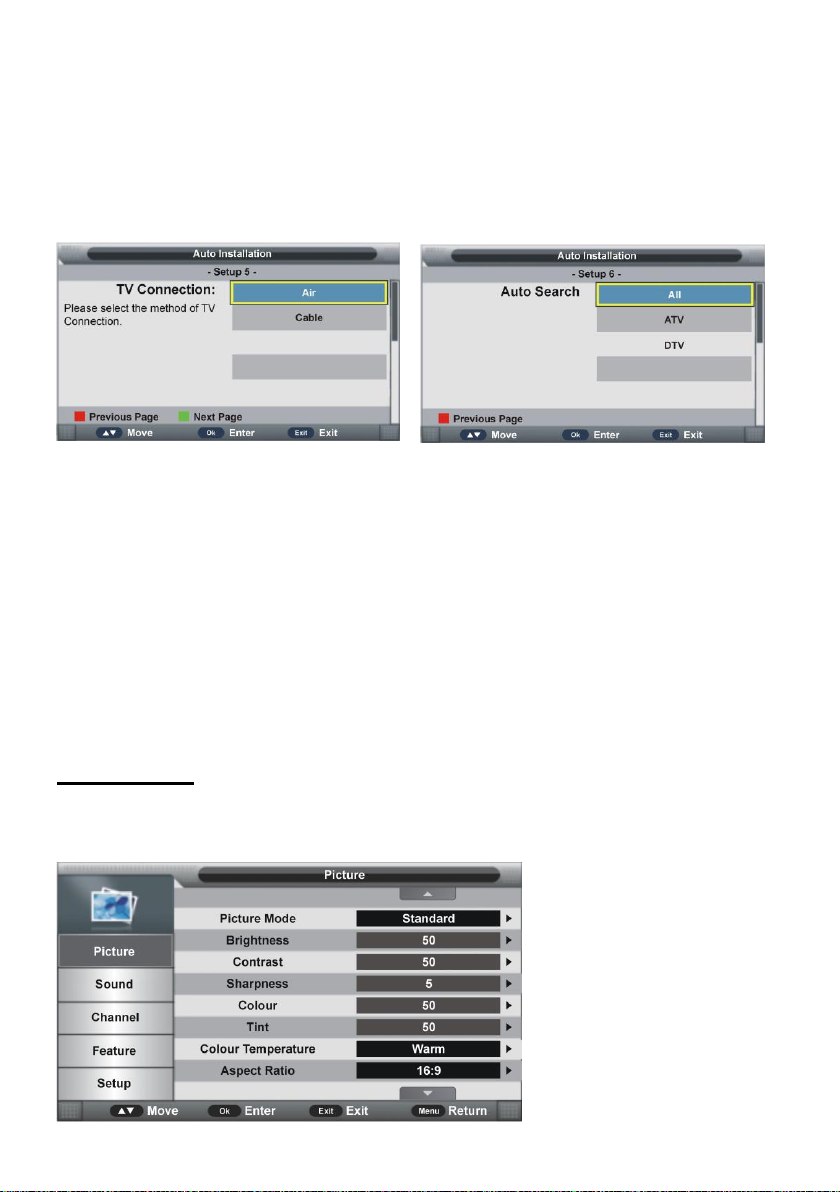
Setup 5
- Press UP/DOWN navigation button to select desired connection type.
- Press OK to confirm and move to the next step.
Setup 6
- Press UP/DOWN navigation button to select desired searching type.
- Press OK button to confirm and start auto channel search.
NOTE:
- To skip ATV or DTV tuning, press the MENU button and a window will be displayed; Press
OK to skip configuration; Press NO to hide the window.
- To stop the search, press EXIT and a window will be displayed; Press OK to skip
configuration; Press NO to hide the window.
DTV MODE
- Press the SOURCE button to switch the TV in DTV mode.
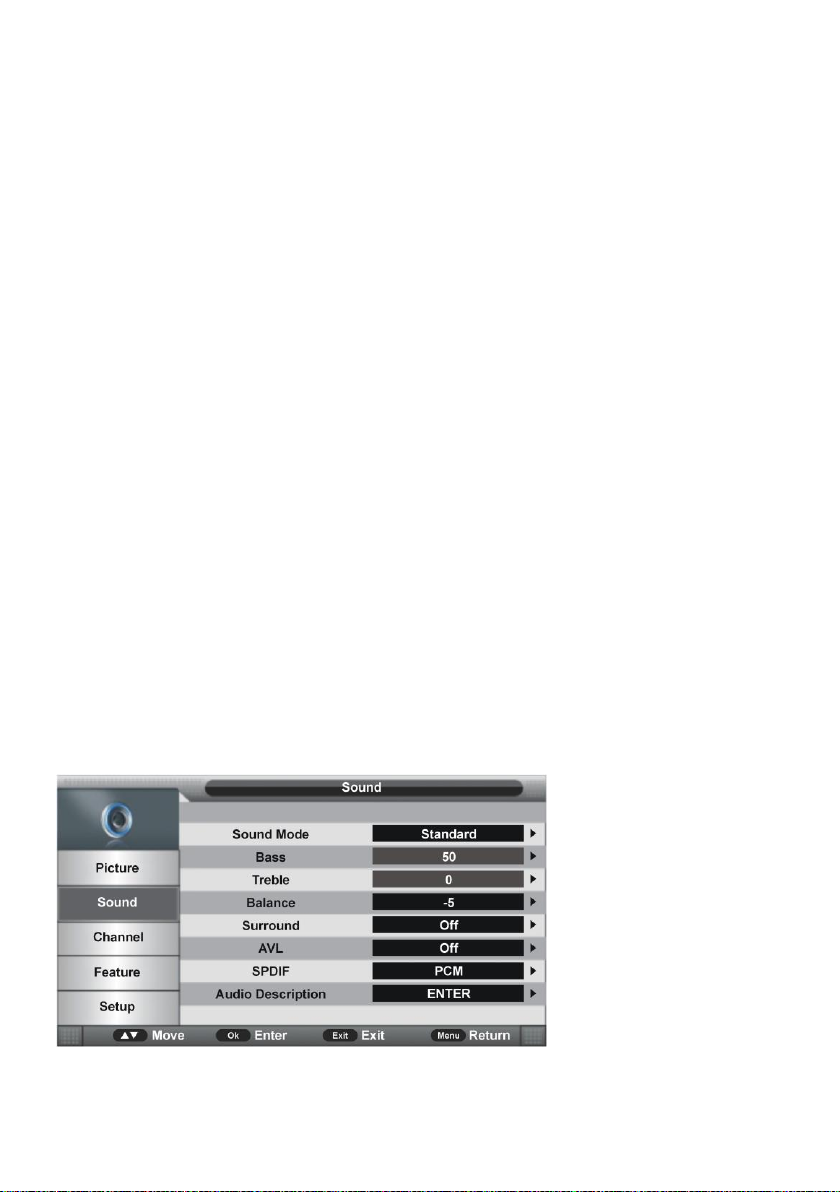
1. Picture
Page 25
24
1.1 Picture Mode
Available options: Standard, Mild, User, Dynamic.
1.2 Brightness
The brightness value of picture can be adjusted from 0-100.
1.3 Contrast
The contrast value of picture can be adjusted from 0-100.
1.4 Sharpness
The sharpness value of picture can be adjusted from 0-100.
1.5 Colour
The colour saturation value of the picture can be adjusted from 0-100.
NOTE: The values of Brightness, Contrast, Sharpness, and Colour are adjustable only in
User picture mode.
1.6 Tint
This item is used to adjust the tone of color from 0-100 in NTSC mode.
1.7 Colour Temperature
This setting is used to adjust the optimum colour temperature.
Available options: Standard, Cool, Warm.
1.8 Aspect Ratio
- Press the OK or RIGHT navigation buttons to access the submenu and press the
UP/DOWN navigation buttons to select the preferred option.
Available options: Auto, 4:3, 16:9, Zoom1, Zoom2.
NOTE: The ASPECT button is functional only if the TV has signal. The available video size
may be different in according to the input source.
1.9 Noise Reduction
This item is used to eliminate the image noise to gain better image effect.
Available options: Off, Low, Middle, High
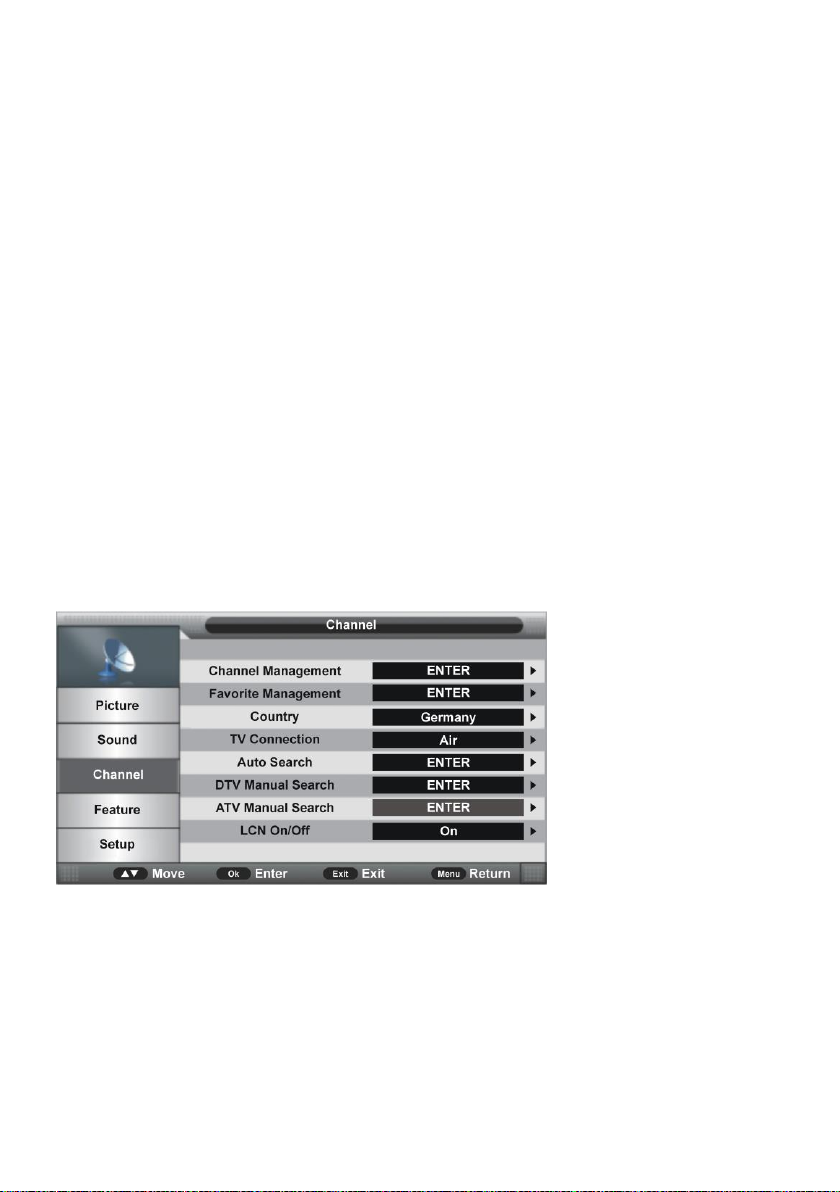
2. SOUND
Page 26
25
2.1 Sound Mode
Available options: Standard, Movie, Music, Speech, User.
2.2 Bass
This feature is used to adjust the level of low-pitched sounds from 0-100.
2.3 Treble
This feature is used to adjust the level of high-pitched sounds from 0-100.
NOTE: The value of Bass and Treble is adjustable only in User sound mode.
2.4 Balance
This feature is used to adjust the audio output between left and right speaker from 0-100.
2.5 AVL (Auto Volume Level)
This feature is used to turn on/off AVL function.
2.6 SPDIF
This feature is used to select desired SPDIF audio output type.
Available options: Off, PCM, Auto.
2.7 Audio Description
This feature is used to turn on/off the Audio Description function for Visually Impaired users.
It can assist them to understand certain scenes or actions through the narration.
NOTE: Audio Description function works only when you are viewing programs that contain
related narration information.
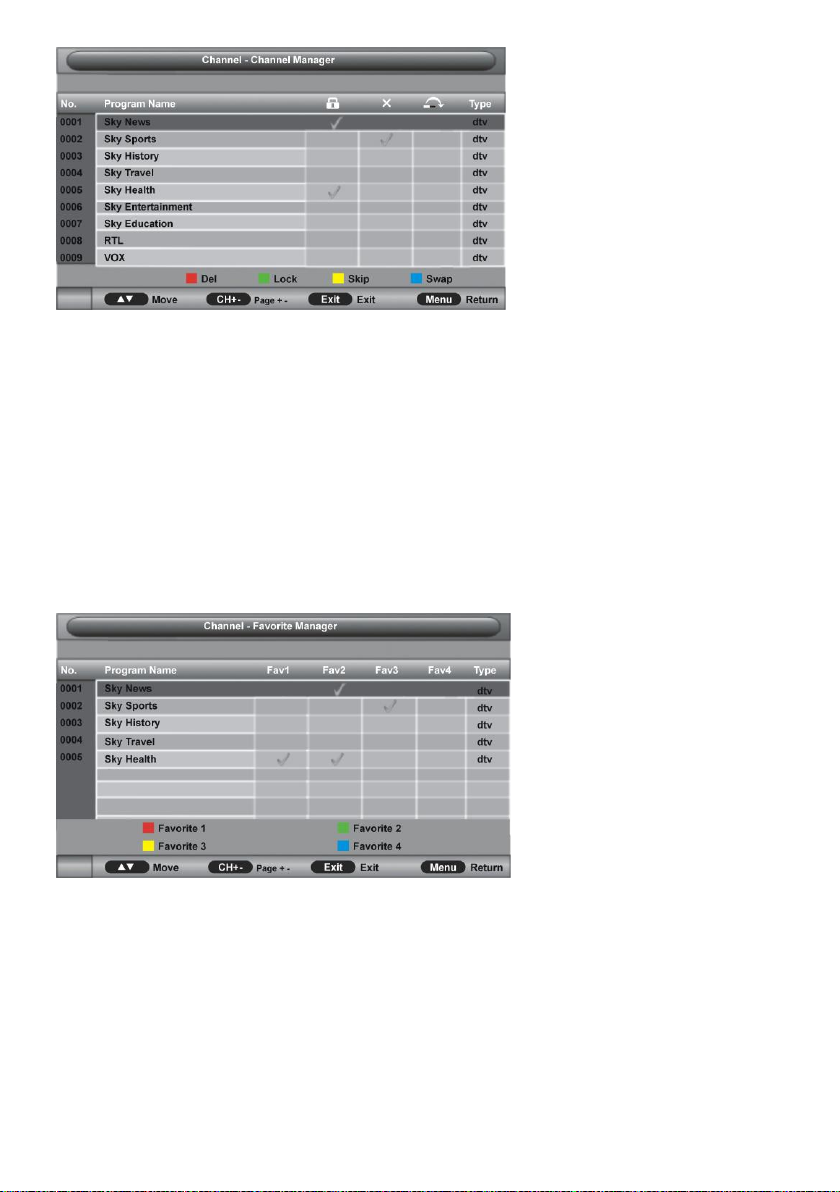
3. Channel
3.1 Channel Management
- Press UP/DOWN navigation buttons to select this item and press OK or RIGHT navigation
buttons to enter the submenu.
Page 27
26
- Press UP/DOWN navigation to select preferred program.
a) Press the RED button on the remote control and use number buttons to input the
password. Then press the RED button to add/remove a marking of the highlighted program.
After that, press the OK button to display a window. Select OK to delete it; select Cancel to
cancel this operation.
b) Press the GREEN button on the remote control and use number buttons to input the
password. Then, press the GREEN button to lock/unlock a program.
c) Press the YELLOW button on the remote control to add/remove the skip mark.
d) Press the BLUE button on the remote control to enter MOVE mode. Then use UP/DOWN
navigation buttons to select the preferred position and press the OK button to move it.
3.2 Favorite Management
- Press the UP/DOWN buttons to select preferred program.
a) Press the RED button on the remote control to add highlighted channel to Favorite 1 list.
b) Press the GREEN button on the remote control to add highlighted channel to Favorite 2
list.
c) Press the YELLOW button on the remote control to add highlighted channel to Favorite 3
list.
d) Press the BLUE button on the remote control to add highlighted channel to Favorite 4 list.
Page 28
27
3.3 Country
This item is used to select the country.
3.4 TV Connection
This item is used to select the connection type of your TV.
Available options: Air, Cable.
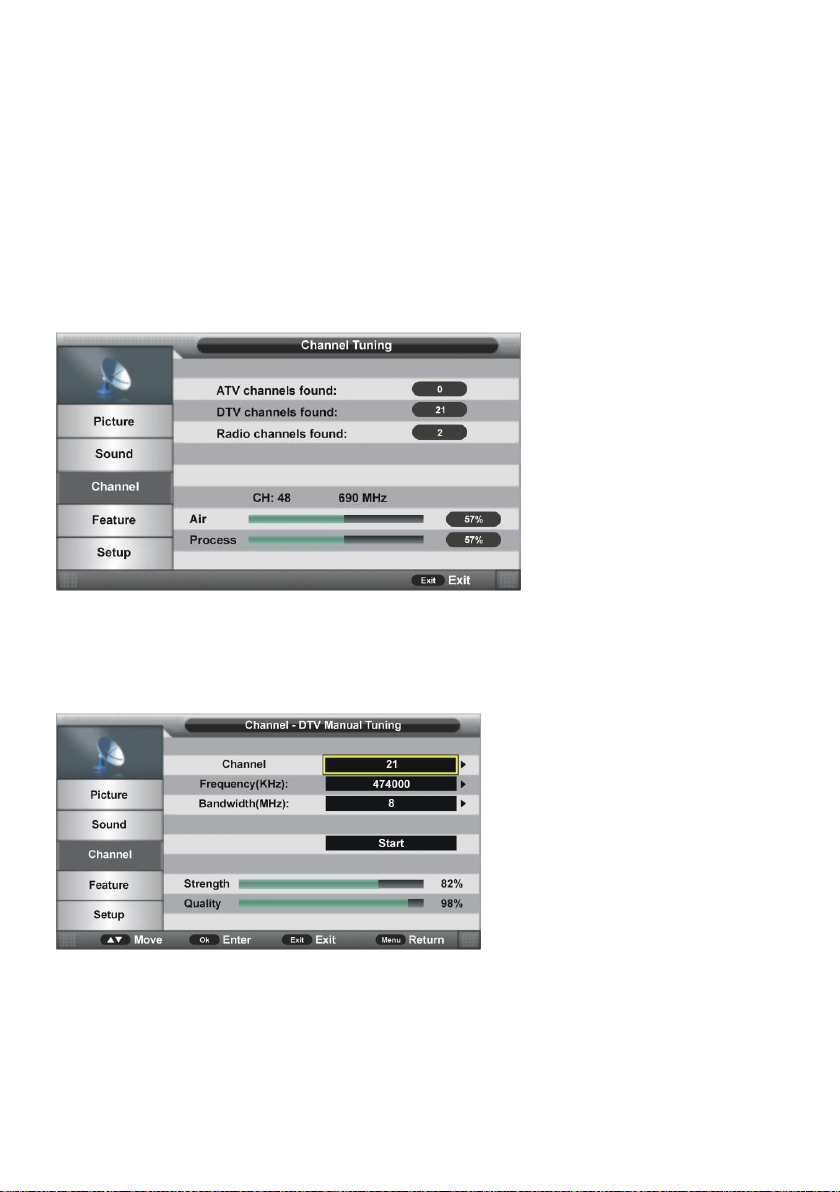
3.5 Auto Search
- Press UP/DOWN navigation buttons to select this item and press OK or RIGHT navigation
button to enter the submenu.
- Then press UP/DOWN navigation button to select All, DTV or ATV and press OK or RIGHT
buttons to confirm. Select OK to start auto searching; select Cancel to cancel this operation.
To exit auto tuning, press MENU or EXIT and select OK.
3.6 Digital Manual Search
When TV Connection is Air:
3.61 Channel
- Press the OK or RIGHT buttons to enter the submenu and press the UP/DOWN navigation
buttons to select the preferred program
3.62 Frequency (KHz)
- Press the OK or RIGHT navigation buttons to enter the submenu.
- Press the LEFT/RIGHT navigation buttons to move the cursor; Press the number buttons
Page 29
28
on the remote control to input desired value.
3.63 Bandwidth (MHz)
- Press the OK or RIGHT navigation buttons to enter submenu and press the UP/DOWN
navigation buttons to select preferred bandwidth.
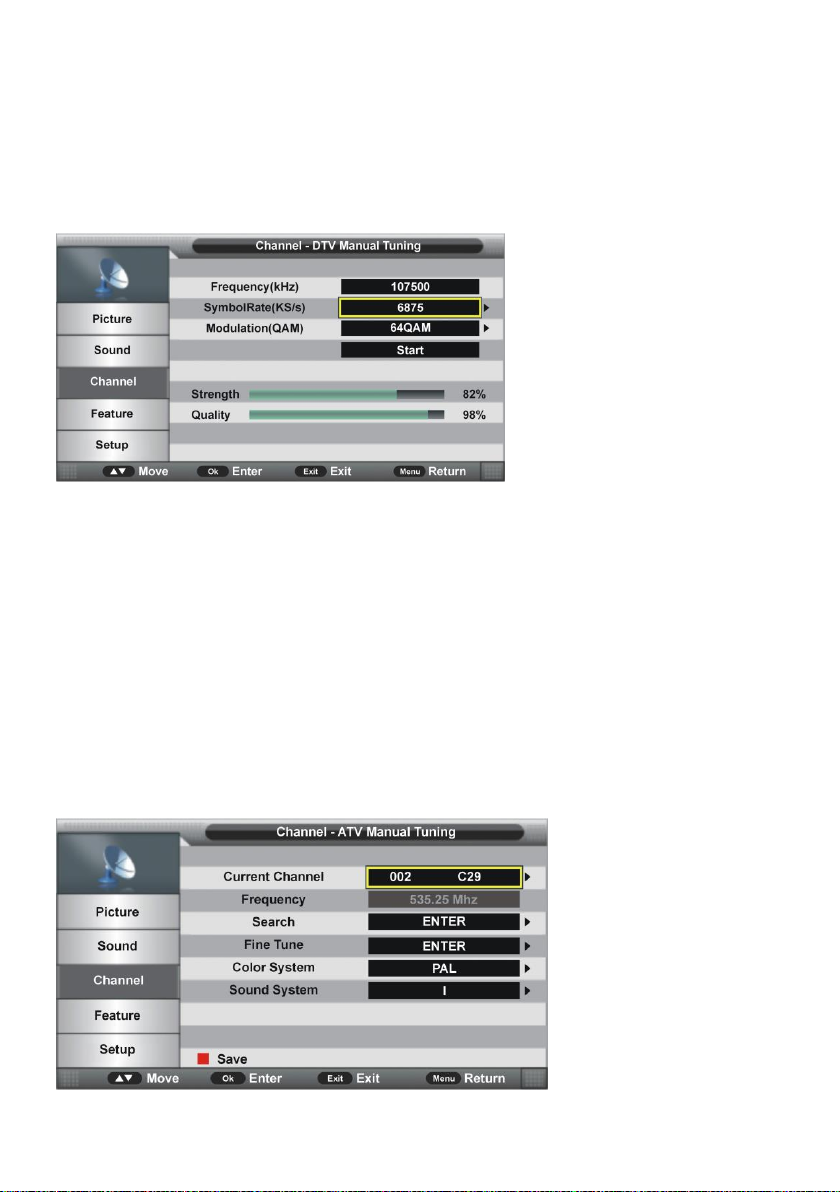
When TV Connection is Cable:
3.64 Frequency (kHz)
This item is not user adjustable.
3.65 Symbol Rate (KS/s)
- Press OK or RIGHT navigation buttons to enter the submenu.
- Press LEFT/RIGHT navigation button to move the cursor; press number buttons on
remote control to input desired value.
3.66 Modulation (QAM)
- Press OK or RIGHT navigation buttons to enter the submenu and press UP/DOWN
navigation buttons to select the preferred modulation.
Once the settings of part 3.64 to part 3.66 are finished, select Start in the menu and press
OK to start searching.
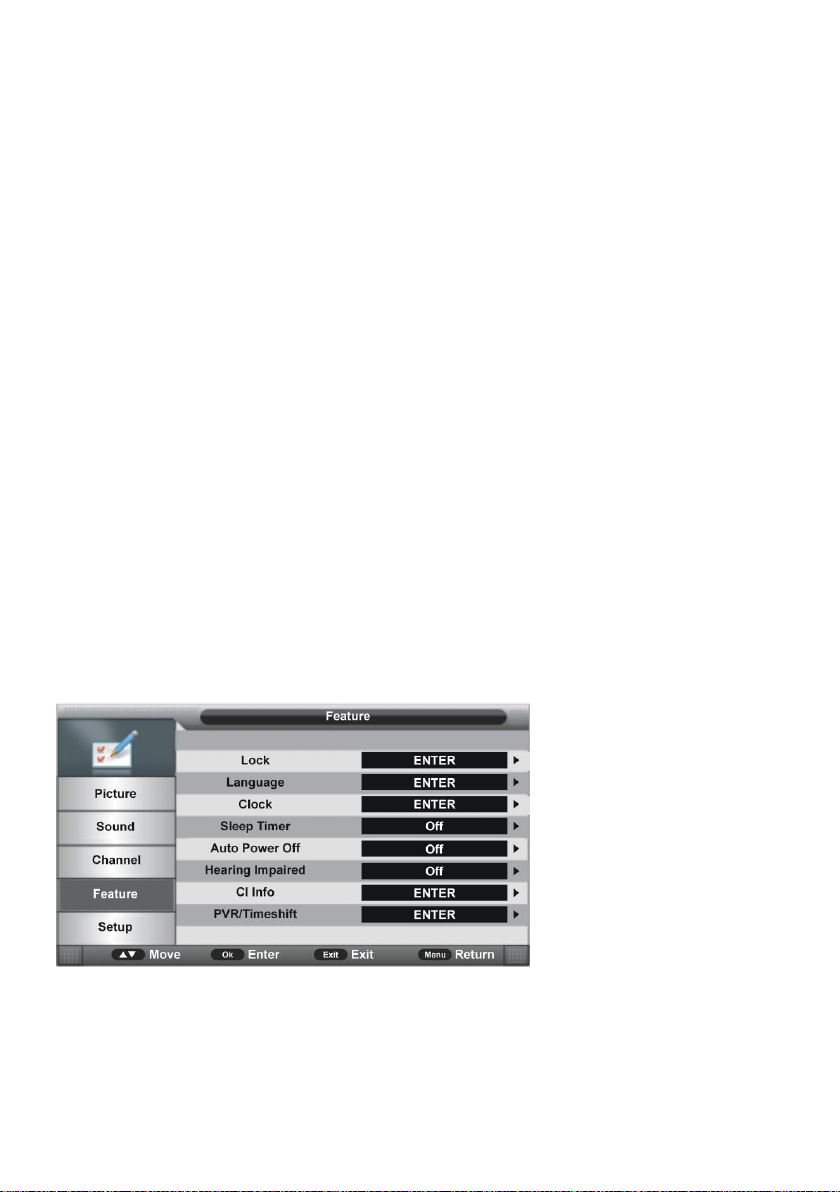
3.7 ATV Manual Search (for ATV input source only)
Page 30
29
3.71 Current Channel
- Press the OK or RIGHT navigation buttons to enter the submenu and press the UP/DOWN
navigation buttons to select preferred program.
3.72 Frequency
This item is not user adjustable.
3.73 Search
This item is used to start searching.
3.74 Fine Tune
- Press the OK or RIGHT navigation buttons to enter the submenu and press the
LEFT/RIGHT navigation buttons to fine tune it.
3.75 Color System
- Press the OK or RIGHT navigation buttons to enter the submenu and press UP/DOWN
navigation button to select preferred color system.
Available options: Auto, PAL, SECAM.
3.76 Sound System
- Press the OK or RIGHT navigation buttons to enter the submenu and press UP/DOWN
navigation button to select preferred sound system.
Available options: BG, DK, I, L, L’.
NOTE: The Sound System options may vary due to different Color System settings.
3.8 LCN On/Off
This item is used to turn on/off LCN (Logic Channel Number).
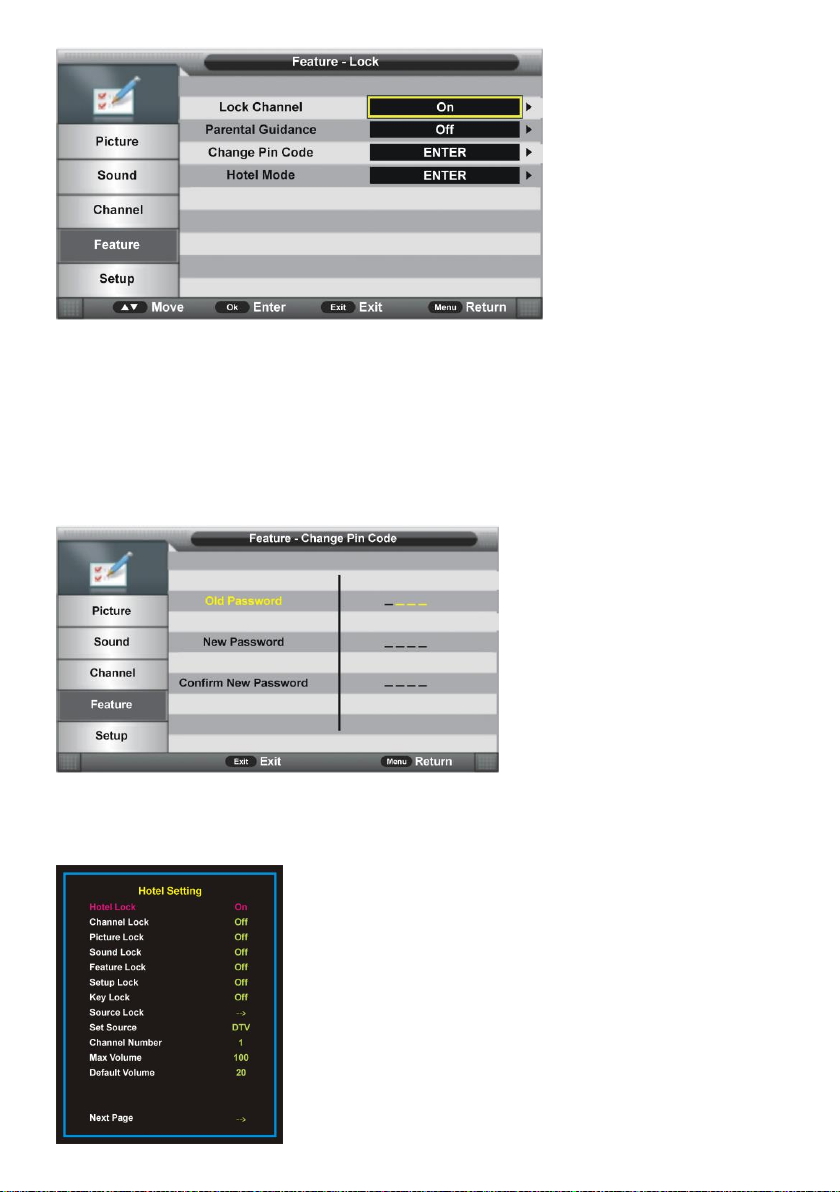
4. Feature
4.1 Lock
- Press OK or RIGHT navigation buttons to enter the submenu.
- Input the factory default password “0000” using number buttons on the remote control.
NOTE: You can use the universal password “8899” if forget the factory password.
- Press UP/DOWN navigation button to select preferred item.
Page 31
30
4.11 Lock Channel
This item is used to turn on/off Lock Channel function.
4.12 Parental Guidance
- Press OK or RIGHT navigation buttons to enter the submenu and press UP/DOWN
navigation button to select preferred option.
Available options: Off, 3 to 18.
4.13 Change Pin Code
- Press OK or RIGHT to enter the submenu.
- Input the Old Password, New Password, and Confirm New Password in turn. After that,
this unit will save the new password automatically.
4.14 Hotel Mode
- Press OK or RIGHT navigation button to enter submenu.
- Press UP/DOWN buttons to select desired item.
- Press LEFT/RIGHT buttons to adjust the value.
- Press OK or RIGHT buttons to enter submenu.
- Press MENU to return to previous page.
Tip: We strongly advise that you use Hotel Mode only in
hotels and you should just ignore it if take this TV for home
use only.
Page 32
31
Hotel Lock: Turn on/off Hotel Lock.
Channel Lock: Turn on/off Channel menu lock.
Picture Lock: Turn on/off Picture menu lock.
Sound Lock: Turn on/off Sound menu lock.
Feature Lock: Turn on/off Feature menu lock.
Setup Lock: Turn on/off Setup menu lock.
Key Lock: Turn on/off Key Lock.
Source Lock: Turn on/off the lock of all available sources.
Set Source: Select desired source.
Channel Number: Select desired channel.
Max Volume: Set the maximum volume.
Default Volume: Set the default volume.
Clear Lock: Clear above settings.
DataBase Export: Export database to other devices.
DataBase Import: Import database from other devices.
4.2 Language
- Press OK or RIGHT buttons to enter the submenu. Then select preferred OSD menu
language, subtitle language, audio language, and DTV/ATV TELETEXT language using
navigation buttons.
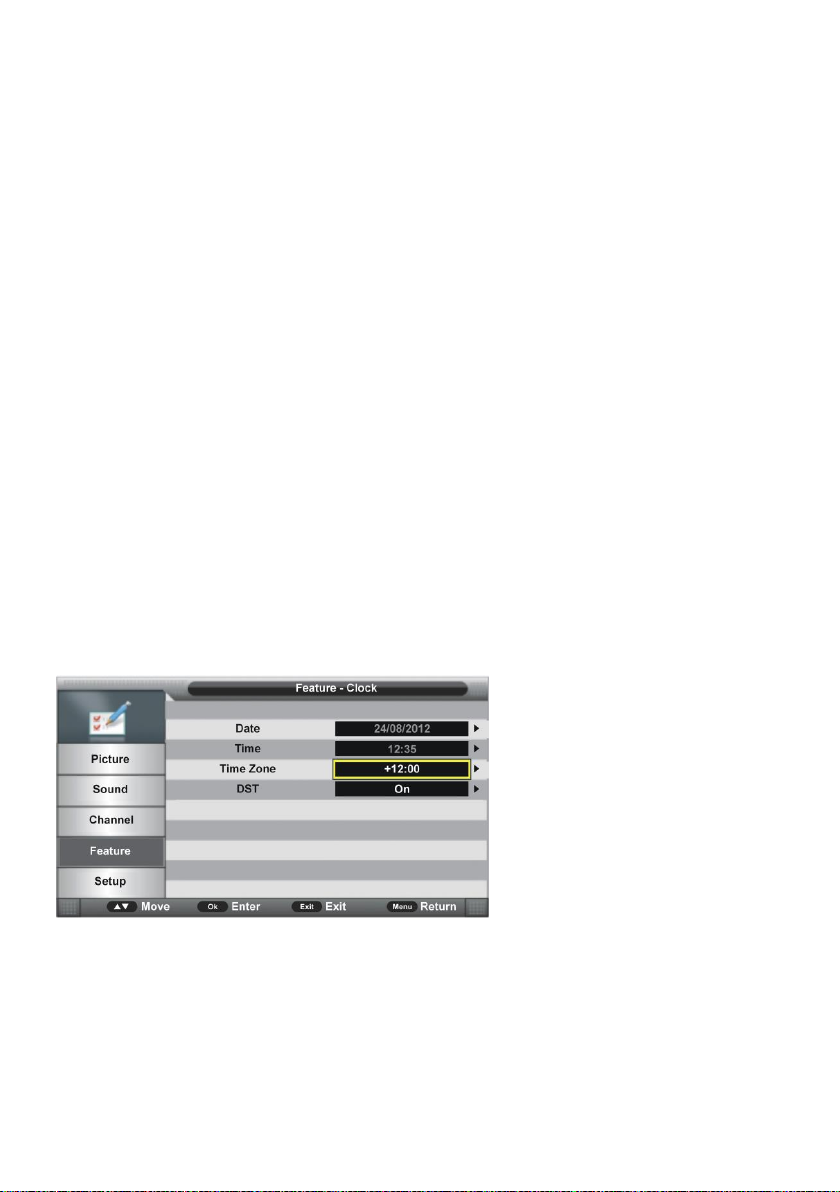
4.3 Clock
- Press OK or RIGHT buttons to enter the submenu.
- Press UP/DOWN buttons to select preferred item.
4.31 Date
When auto searching is done, this unit will get the date from the signal and save it
automatically.
4.32 Time
When auto searching is done, this unit will get the time from the signal and save it
automatically.
Page 33
32
4.33 Time Zone
- Press OK or RIGHT buttons to enter the submenu and press UP/DOWN navigation button
to select the preferred option.
4.34 DST (Daylight Saving Time)
This item is used to turn on/off DST function.
4.4 Sleep Timer
This item is used to set the automatic sleep time in standby mode.
Available options: Off, 10 Min, 20 Min, 30 Min, 60 Min, 90 Min, 120 Min, 180 Min, 240 Min.
4.5 Auto Power Off
This item is used to set the Auto Power Off time.
Available options: Off, 1 Hour, 2 Hours, 4 Hours.
4.6 Audio Description
This item is used to turn on/off Audio Description function for visually impaired users. This
function can assist them to know a certain scene or action through narration, instead of
seeing the image.
NOTE: This function works only on programs that contain related narrative information.
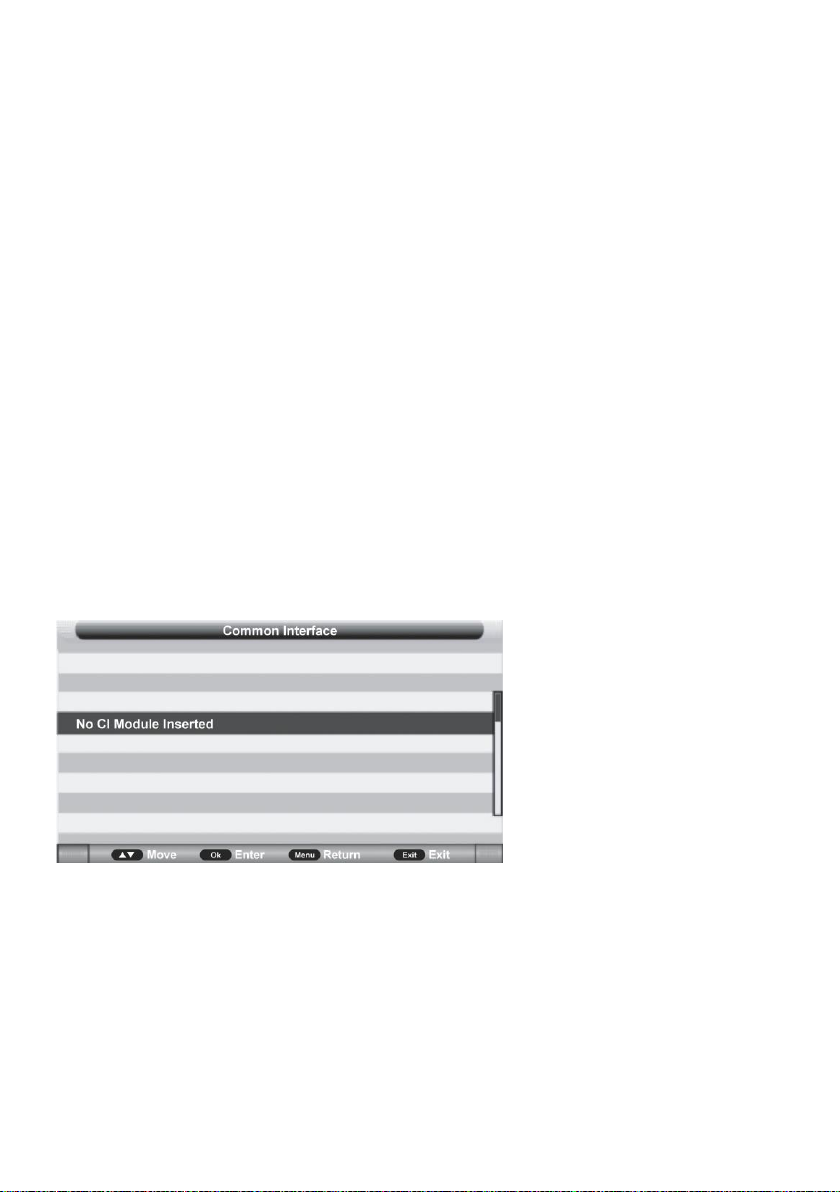
4.7 CI Info
This item is used to display the CI information.
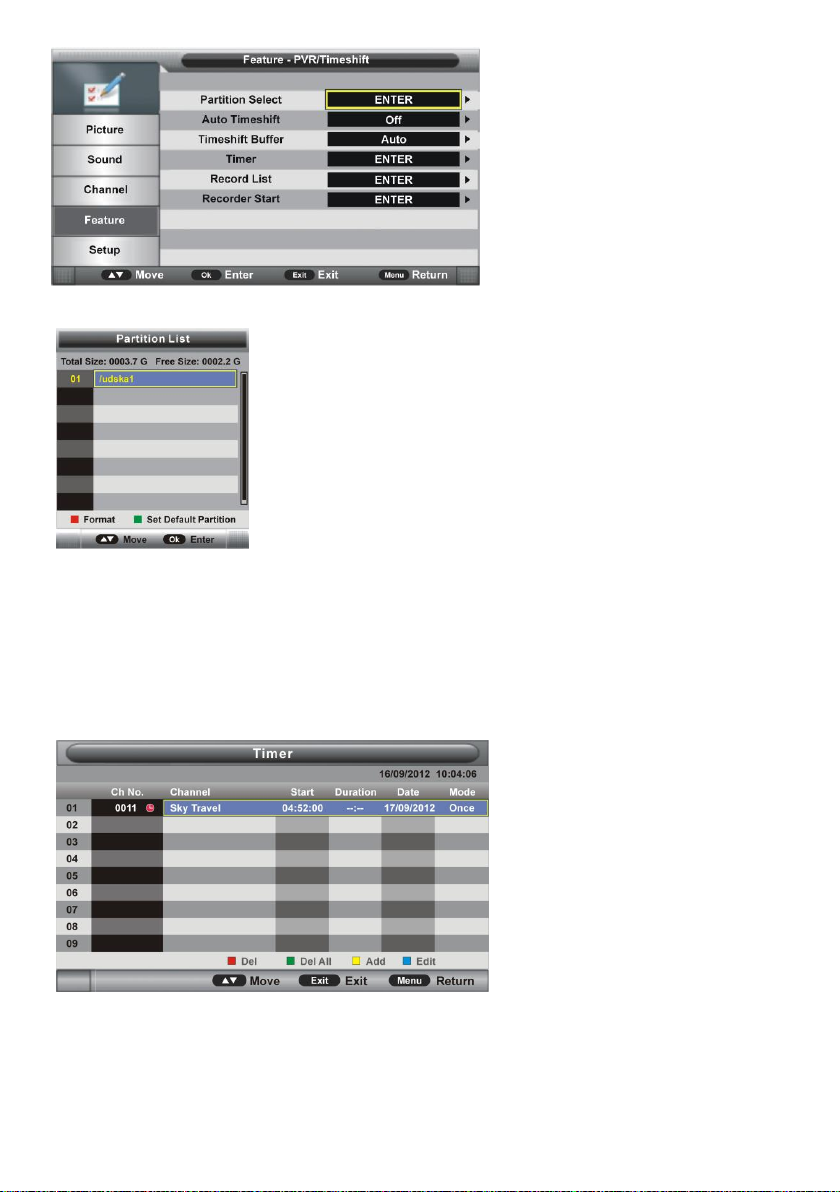
4.8 PVR/Timeshift
- Press OK or RIGHT buttons to enter the submenu.
- Press UP/DOWN navigation button to select the preferred item.
Page 34
33
4.81 Partition Select
- Press OK or RIGHT navigation buttons to enter the submenu.
- Press the RED button, then select OK to format your USB
memory device.
- Press the GREEN button to set the default partition.
4.82 Auto Timeshift
This item is used to turn on/off Auto Timeshift function.
4.83 Timeshift Buffer
This item is used to select the desired time shift buffer duration.
Available options: Auto, 30Mins, 1hr, 2hr.
4.84 Timer
- Press the OK or RIGHT navigation buttons to enter the submenu.
- Press the RED button on remote control to delete the highlighted option.
- Press the GREEN button on remote control to delete all options.
- Press the BLUE button on remote control to enter the Edit page.
- Press the YELLOW button on remote control to enter the Add page.
Page 35
34
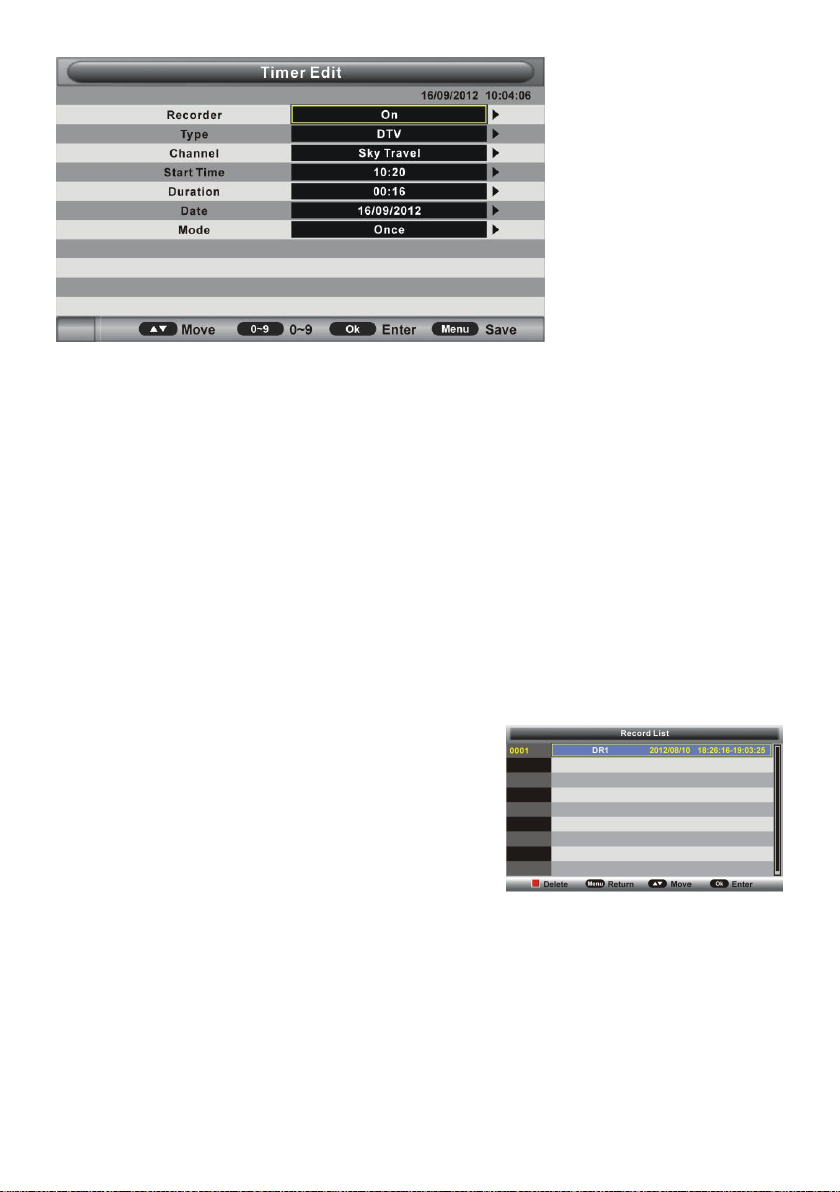
Recorder: Turn on/off Recorder.
Type: Select your recording type: DTV, Radio.
Channel: Select a channel you want to record.
Start Time: Set the recording start time.
Duration: Set the recording duration.
Date: Set the date of recording.
Mode: Set the recording mode.
NOTE: To change the numerical display of the items above, press OK to enter it and then
use LEFT/RIGHT navigation buttons to move the cursor; Use number buttons to input your
desired value and press OK button to confirm your setting.
4.85 Record List
- Press OK or RIGHT navigation button to enter the submenu.
- Press UP/DOWN navigation button to select
recorded files and press OK to start playback.
4.86 Recorder Start
This item is used to start recording when watching an
available digital program.
NOTE: Before recording, insert your USB memory
device into USB slot 1 first.
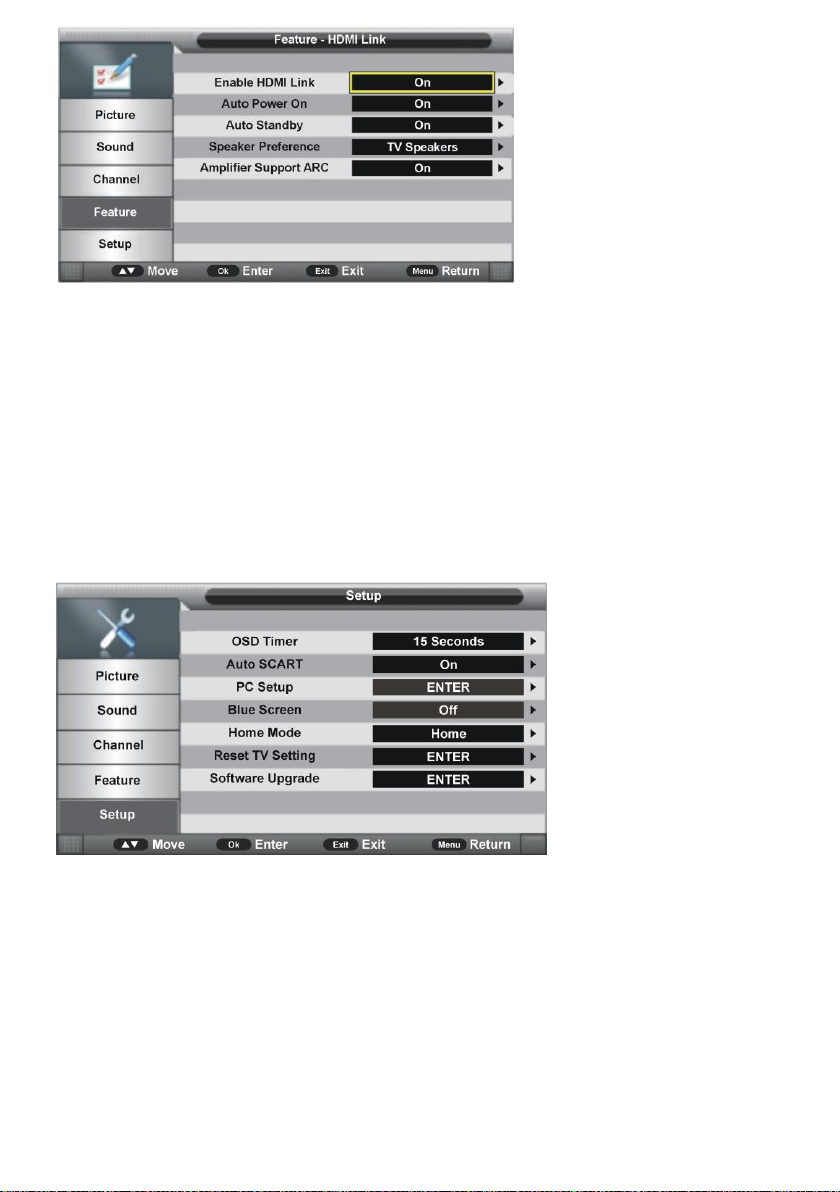
4.9 HDMI Link
- Press the OK or RIGHT navigation buttons to enter the submenu.
- Press the UP/DOWN navigation buttons to select preferred item.
Page 36
35
To use “HDMI Link” function:
- Make sure the HDMI device (amplifiers, etc.) is connected correctly and HDMI device must
support HDMI CEC (Consumer Electronics Control).
- Press the SOURCE button on the remote control to select HDMI as input source.
Enable HDMI Link: turn on/off HDMI Link.
Auto Power on: turn on/off Auto Power On function.
Auto Standby: turn on/off Auto Standby function.
Speaker Preference: select TV Speakers or Amplifier as a preference.
Amplifier Support ARC (HDMI 3): turn on/off ARC function.
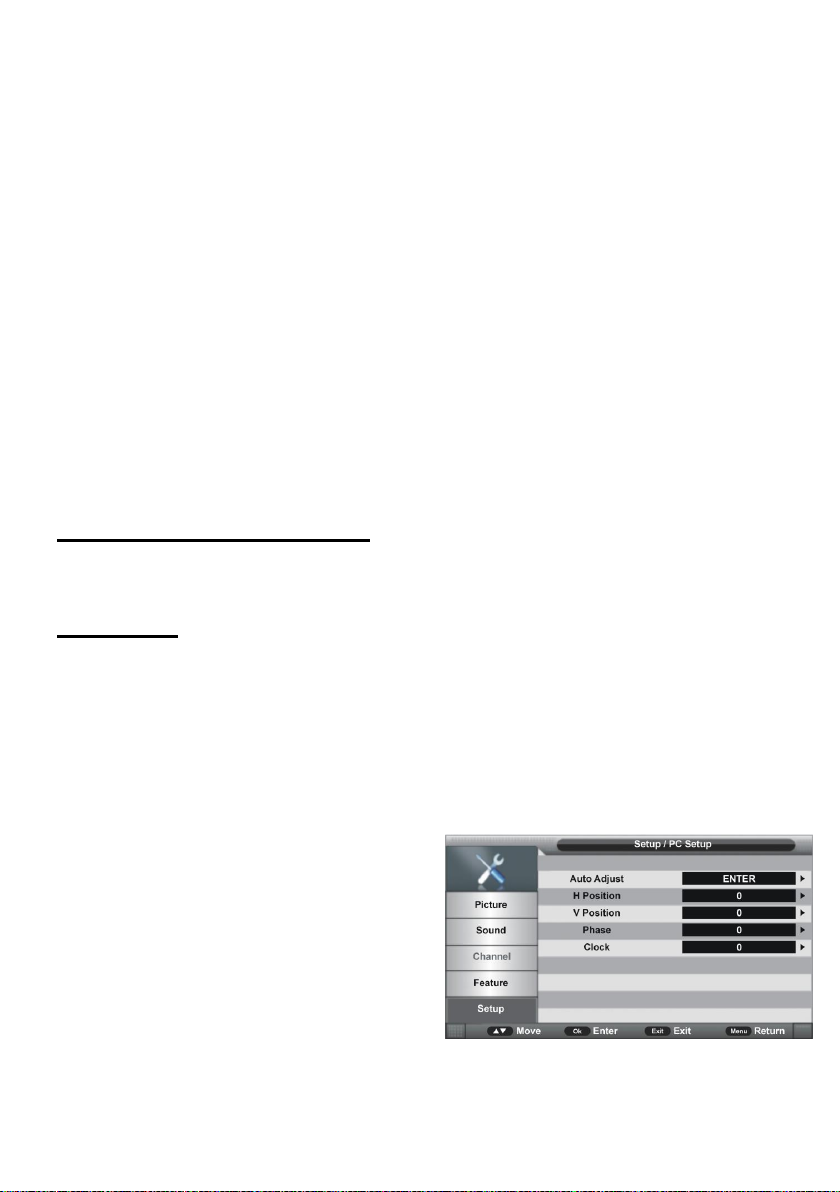
5. Setup
5.1 OSD Display
- Press OK or RIGHT buttons to enter the submenu and press UP/DOWN buttons to select
the preferred option.
Available options: 5/10/15/20/25/30 seconds and never.
5.2 Auto SCART
This item is used to turn on/off Auto SCART function. If Auto SCART is on, you can view the
programs by SCART automatically when the SCART cable is connected.
Page 37
36
5.3 PC Setup (for PC input source only)
This item is adjustable only with PC input signal.
5.4 Blue Screen
This item is used to turn on/off blue background function. The screen background will turn
blue at very weak or no signal condition, if Blue Screen is ON.
NOTE: This item is not adjustable in DTV mode.
5.5 Home Mode
This item is used to select desired picture mode.
Available options: Home, Dynamic, Standard, Mild.
5.6 Reset TV Setting
This item is used to reset to factory default settings.
5.7 Software Upgrade
This item is used to upgrade the TV software through USB memory device.
ATV AND OTHER MODES
- Press the SOURCE button on the remote control to select the desired input source.
- For these modes, please refer to the menu operations of DTV mode.
PC MODE
- Connect a personal computer to this unit.
- Power on your computer and this unit.
- Press the SOURCE button on the remote control to select PC input source.
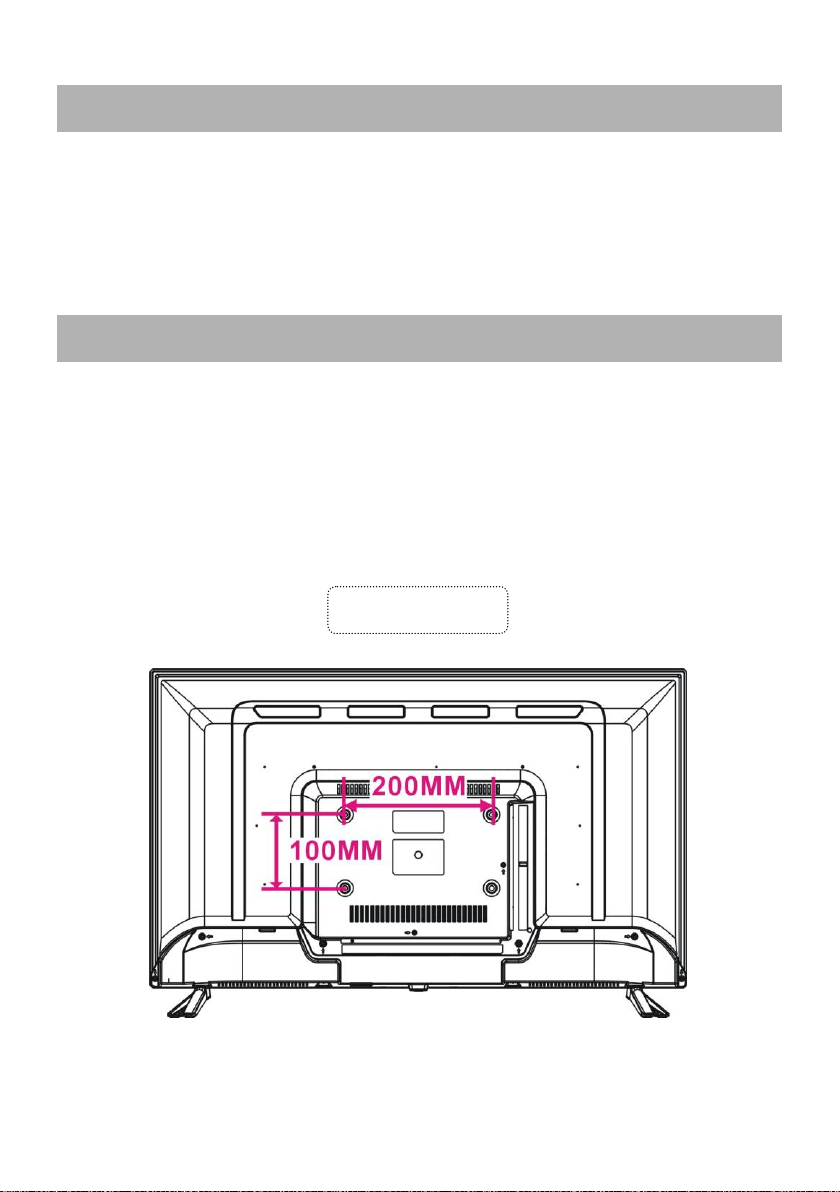
- Press MENU to display the main menu. Select Setup using UP/DOWN buttons. Then
press the OK or RIGHT buttons to enter the submenu.
- Select PC Setup.
- Press UP/DOWN navigation button to select the preferred item.
- Press OK or RIGHT to enter submenu. Press LEFT/RIGHT to adjust the value.
1. Auto Adjust - This item is used to adjust the
PC screen automatically.
2. H Position - This item is used to adjust the
value of the horizontal position.
3. V Position - This item is used to adjust the
value of the vertical position.
4. Phase - This item is used to adjust the
picture displayed on the TV.
5. Clock - This item is used to adjust the
signals transfer speed.
NOTE: For other menus, please refer to the menu operations of DTV mode
Page 38
37
MAINTENANCE
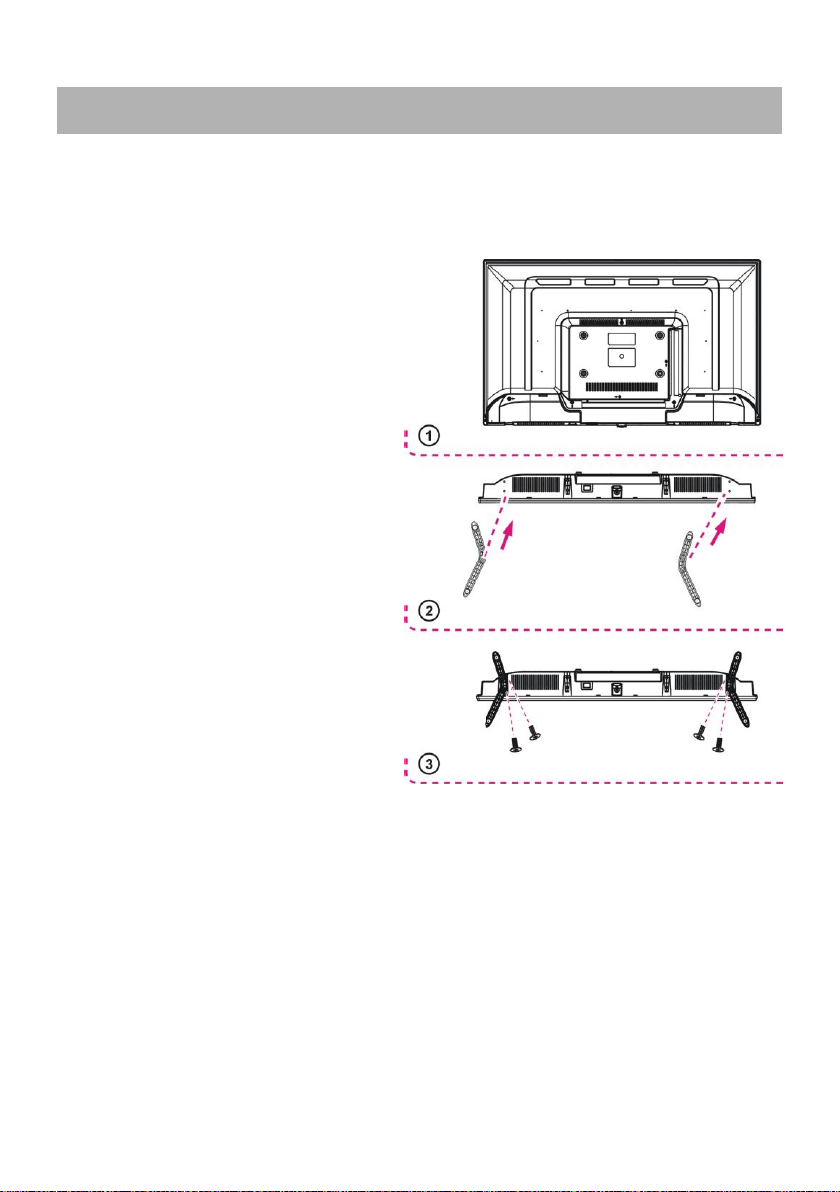
WALL MOUNTING
Back of your TV
● Be sure to press the POWER button to set the TV in Standby mode and disconnect the
power plug before cleaning the TV.
● Never use alcohol, benzene, thinner, cleaning fluid or other chemicals. Do not use
compressed air to remove dust.
● Wipe the TV with a dry, soft cloth. The scratches present on the display are not subject
to the warranty certificate.
● Contact a professional for assistance when wall mounting your TV. We are not
responsible for any damage to the product or injury to yourself, if you mount the TV on your
own.
● Do not wall mount the TV while it is turned on. It may cause personal injury due to
electric shock.
● Use standard M6*10mm screws (4 pieces) to mount this TV.
● We recommend the use of VESA compatible TV stands (mm): 200x100
Page 39
38
STAND INSTALLATION
Your TV may be packed with the Stand separately. Before using this TV, please carry out
the Stand Installation according to the instructions below.
Step 1
Place the TV faced down on a soft cloth
or cushion to prevent the display from
being damaged.
Step 2
Align the Stand with the TV bottom and
then force the end of stand until the TV is
fully seated on the stand.
Step 3
Tighten the included screws with a screw
driver.
NOTES:
- Unplug the power plug first when
installing or removing the TV Stand.
- To avoid any damage to this TV, contact
one or more partners for assistance when
installing or removing the TV stand.
Page 40

39
DECLARATION OF CONFORMITY
No. 1567
We, S.C. Visual Fan S.R.L., with the headquarters in Brasov, 61, Brazilor St., CP 500313
Romania, registered at the Trade Commerce Brasov under no. J08/818/2002, CUI RO14724950, as
the importer, assure, guarantee and declare on our own responsibility, according to the provisions from
article 4 HG no. 325/2017, regarding the regime of the products and services, which can be harmful for
life and health, security and labor protection, that the product 32ATC5000-H-SB from ALLVIEW, does
not jeopardize the life, health and labor protection, does not produce a negative impact over the
environment and is in accordance with:
- Directive no. 2011/65/UE, modified by 2014/8/UE regarding the usage restrictions of certain
dangerous substances in electric and electronic equipment
- Directive regarding the radio and telecommunication equipment RED 2014/53/CEE (HG
487/2016)
- Directive 2014/35/UE regarding the assurance of users of low voltage equipment
- Directive regarding the electromagnetic compatibility 89/336/CEE, modified by Directive
92/31/CEE and 93/68/CEE (HG982/2007); RoHS: EN50581:2012; 2014/30/EU(HG 487/2016)
- The safety requests of the European Directive 2001/95/EC and the EN 60065:2002/A12:2011 and
EN 60950-1:2006/ A1:2010 /A11:2009/A12:2011 standards, regarding the level of decibels
emitted by the sold appliances.
The product has been assessed according to the following standards:
Health: 2014/35/EU; EN 50360:2001+A1:2012, EN 50361; EN 62209-1 : 2006
Safety: 2014/35/EU; EN 60950- 1: 2001 +A11:2004; EMC EN 301 489- 01 V1.6.1 (09-2005)
EN 301 489- 07 V1.3.1 (11-2005); EN 301 489- 17 V1.2.1 (08-2002)
Radio spectrum: 2014/35/EU; EN 300 328 V1.7.1 (10-2006)
The evaluation procedure of the conformity was made according to Directive 2014/53/CEE, the
documentation being stored at S.C. Visual Fan S.R.L., Brasov, 61, Brazilor St., CP 500313, Romania
and will be offered at request. The product has the CE mark on it.
The declaration of conformity is available at https://www.allviewmobile.com/index.php/products/tv.html .
Brasov Director
04.01.2019 Cotuna Gheorghe
Page 41
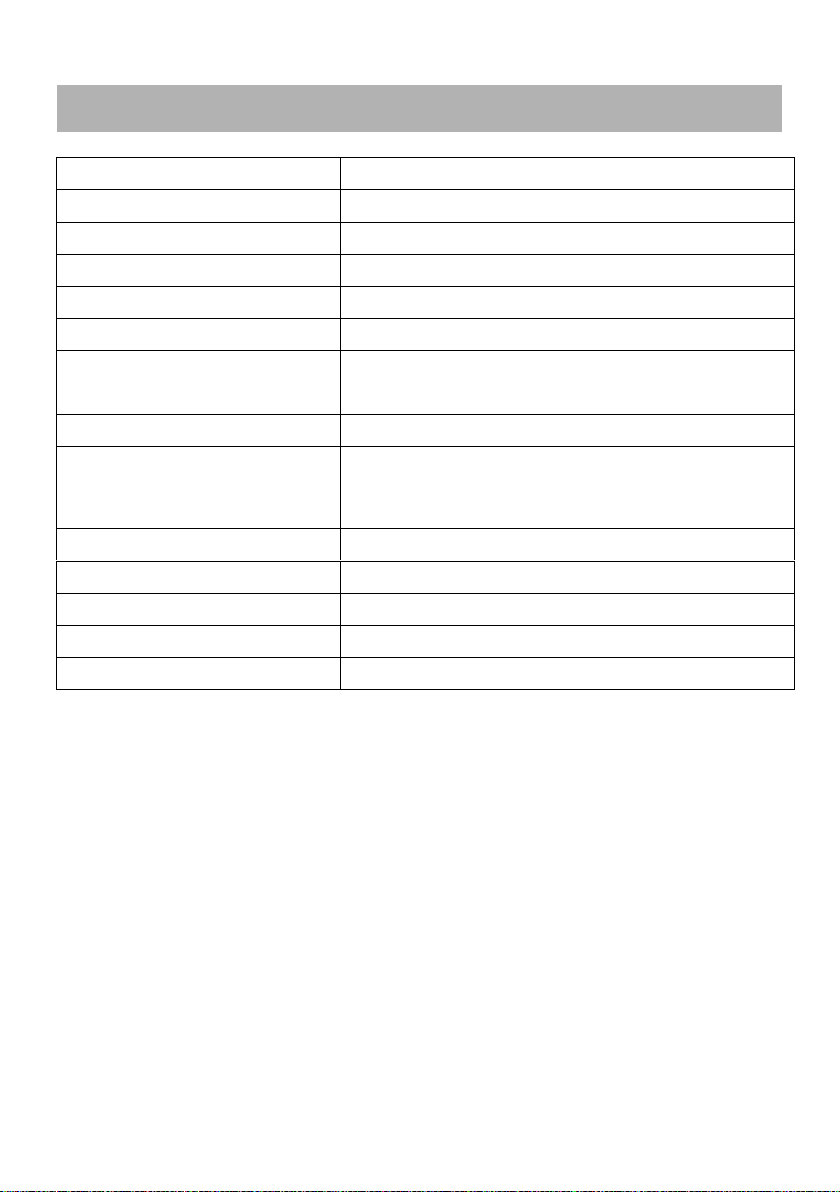
40
Display Device
81 cm LED TV
Resolution
1366 x 768 HD
Contrast Ratio
800:1
Aspect Ratio
16:9
Color System
PAL / SECAM
Sound System
BG / DK / I
Inputs
1 x RF, 1x PC Audio, 3 x HDMI, 1 x YPbPr, 2 x
USB, 1 x Scart, 1 x AV IN, 1x VGA, 1 x CI+
Outputs
1xJack 3.5mm, Coaxial
USB Multimedia Playback
Format
Movie, Music, Photo, Text (according to their format)
Power Source
AC 100-240V, 50/60Hz
Power Consumption
<60W
Operation Temperature
-5℃ to +45℃
Dimensions (with stand) / mm
732 (W)×196(D)×512(H)
Weight
Approx. 4.2 kg
SPECIFICATIONS
Note: Specifications are subject to change without notice.
Page 42
41
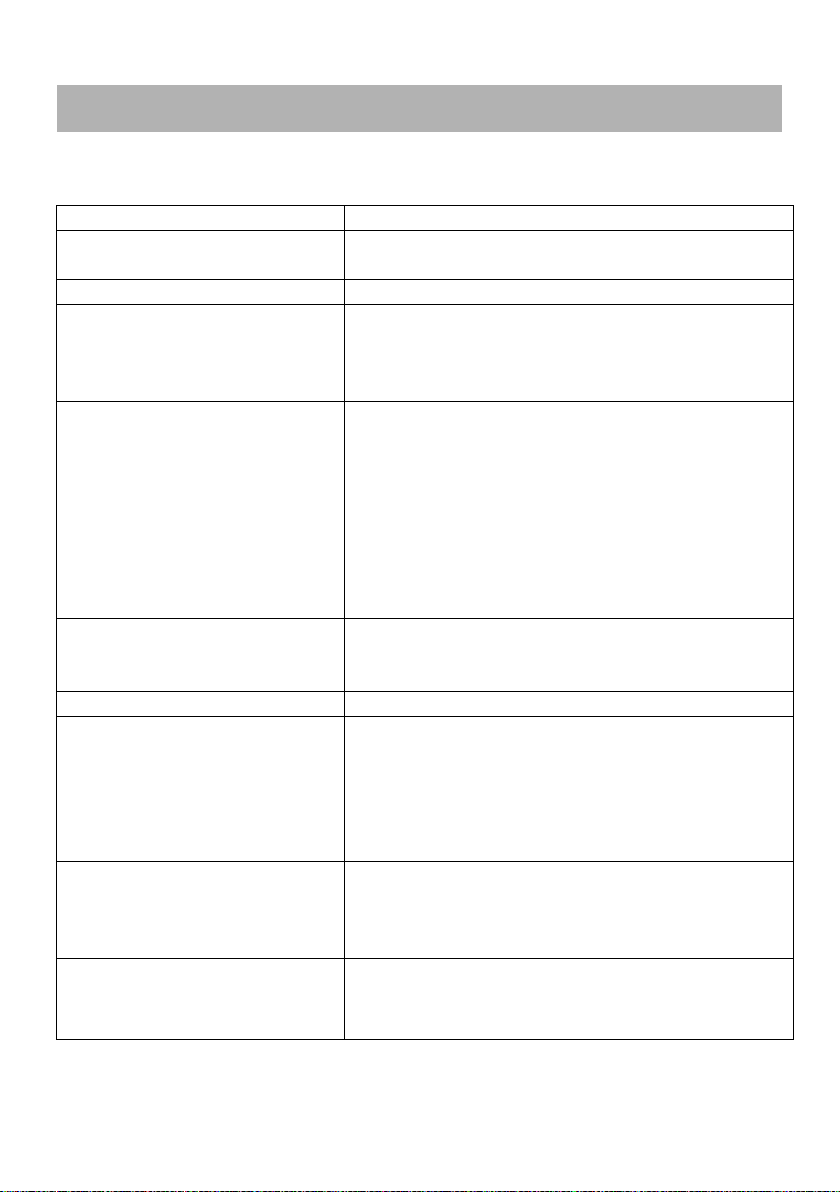
Symptom
Solution
No power.
Ensure that the power plug is inserted into the power
outlet.
No image.
Ensure that the equipment is connected properly.
● No sound.
● Distorted sound.
● Ensure that the equipment is connected properly.
● Ensure that the input setting for the TV and stereo
system are correct.
● Adjust the volume by pressing VOL+/VOL- buttons.
Non-operational remote control
● Check that the batteries are correctly installed.
● The batteries are empty: Replace them with new
ones.
● Point the remote control at the TV sensor and try it
again.
● Operate the remote control unit at a distance of no
more than 6m from the TV sensor.
● Remove the obstacles between the remote control
and the TV sensor.
No key operation (from the main
unit and/or the remote control) is
effective.
Disconnect the power plug and then reconnect it. (The
player may not be operating properly due to lightning,
static electricity or some other factors.)
Symptom(TV)
Solution
No or poor image.
● Adjust antenna or use an external antenna.
● Relocate the unit near a window (if inside a building).
● Move units that cause interference away from this
product.
● Do Auto Tuning again.
● Try another channel.
No or poor sound.
● Check the audio settings.
● Press MUTE button on remote control to cancel
mute function.
● Unplug the headphones.
Noise or other interference
●Electronic equipment near the unit is causing
interface.
●Relocate the unit or move the equipment.
GENERAL TROUBLESHOOTING
Check the following points before assuming malfunctions of this unit:
Page 43

42
CUPRINS
NOTIUNI DE BAZA
INSTRUCTIUNI DE SIGURANTA...........................................................................................43
CARACTERISTICI..................................................................................................................45
DESCRIEREA UNITATII CENTRALE................................................................................................45
TELECOMANDA.....................................................................................................................47
PREGATIREA TELECOMENZII..............................................................................................50
CONEXIUNI DE BAZA...........................................................................................................51
OPERATIUNI
OPERATIUNI DE BAZA.........................................................................................................56
MENIU PRINCIPAL................................................................................................................63
PRIMA INSTALARE……..………………….……………………………..……………………..…64
MOD DTV...............................................................................................................................65
MOD ATV SI ALTE MODURI..................................................................................................78
MOD PC.................................................................................................................................78
RECOMANDARI
INTRETINERE.......................................................................................................................79
MONTAREA PE PERETE……………………………………………………………………........79
MONTAREA PE STAND……………………………………………………………………..……..80
SPECIFICATII........................................................................................................................82
PROBLEME SI REZOLVARI..............................................................................................................83
Page 44
43
INSTRUCTIUNI DE SIGURANTA
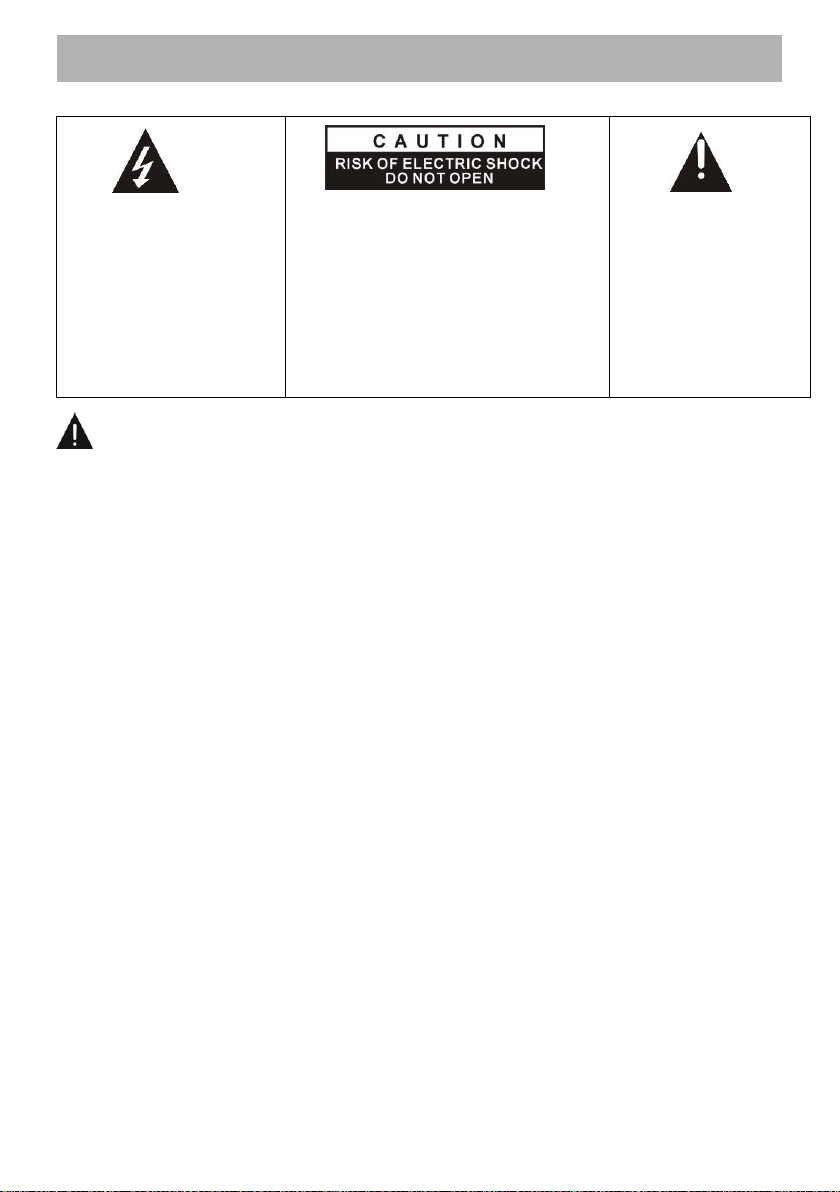
Simbolul fulgerului, o
sageata in interiorul unui
triunghi are menirea de a
alerta cu privire la
prezenta voltajului ridicat
care poate cauza
electrosocuri
ATENTIONARE: PENTRU A REDUCE
RISCUL DE ELECTROCUTARE NU
INDEPARTATI CAPACUL SPATE. IN
INTERIOR SE AFLA COMPONENTE LA
CARE NU AR TREBUI SA UMBLATI
DUMNEAVOASTRA. PENTRU ORICE
PROBLEMA DE SERVICE ,
CONTACTATI PERSONALUL
CALIFICAT AL UNITATII SERVICE
ACREDITATE
Semnul exclamarii in
interiorul unui
triunghi are menirea
de a avertiza
utilizatorul cu privire
la existenta
instructiunilor de
utilizare care insotesc
produsul la livrare
INSTRUCTIUNI DE SIGURANTA
ATENTIONARE: PENTRU A REDUCE RISCUL DE PRODUCERE A UNUI
INCENDIU, ELECTROCUTARE SAU RANIRE:
● Pentru a evita producerea de accidente, daca este deteriorat cablul de alimentare, trebuie
inlocuit de producator, unitatea service autorizata sau personal calificat.
● Cablul de alimentare trebuie sa fie usor accesibil.
● Pentru a preveni producerea de incendii, electrosocuri sau ranirea persoanelor, NU
INTRODUCETI CABLUL DE ALIMENTARE, PRIZA SAU APARATUL in apa sau alte lichide,
nu asezati obiecte cu apa pe suprafata aparatului.
● Nu obturati gaurile de aerisire pentru a evita supraincalzirea aparatului.
● Lasati un spatiu de minim 10 cm in jurul aparatului pentru a permite ventilarea.
● Nu amplasati surse de flacara deschisa, cum ar fi lumanari, in apropierea aparatului.
● Aparatul este destinat folosirii in zonele cu climat temperat.
● Nu asezati aparatul langa sau pe arzatoare electrice sau cu gaz, plite, sobe sau langa /pe
suprafete incinse.
● Curatati produsul doar cum a fost recomandat de producator (vezi sectiunea “Intretinere” din
manual). Deconectati cablul de alimentare de la priza inainte de curatare
● Daca nu veti folosi aparatul o perioada mai lunga de timp deconectati-l de la priza.
● Nu varsati lichide si nu introduceti obiecte in aparat.
● Folositi aparatul doar cu cablul de alimentare furnizat. Asezati cablurile de alimentare astfel
încât sa nu fie posibil ca acestea să fie calcate sau ciupite de obiectele așezate pe acestea,
acordând o atenție deosebită conectorilor, prizelor și punctului în care cablul de alimentare
iese din aparat.
● In cazul in care folositi un conector de retea sau prelungitor pentru a deconecta aparatul,
accesul la dispozitivul de deconectare trebuie sa fie facil.
● Nu utilizati produsul in urmatoarele conditii:
- Daca este deteriorat cablul de alimentare sau ștecherul.
- Daca in interiorul aparatului au patruns obiecte sau lichide.
- Daca produsul a fost expus la ploaie sau apa.
Page 45

44
- Daca produsul nu functioneaza corespunzator sau nu este folosit conform instructiunilor
Pentru a evita posibilele deteriorări ale auzului, nu ascultați la
un volum ridicat pentru perioade lungi de timp.
de utilizare.
- Daca produsul a suferit un soc mecanic sau a fost deteriorat in orice fel.
● Nu incercati sa reparati singuri aparatul. Orice interventie asupra aparatului trebuie efectuata
de unitatea service autorizata.
● Nu supraîncărcați prizele de perete sau cablurile prelungitoare.
● Conectati aparatul la o priza de alimentare prevazuta cu impamantare.
ATENTIONARE – PENTRU A REDUCE RISCUL DE RANIRE SAU DETERIORAREA
PRODUSULUI:
● Acest produs este destinat exclusiv utilizării non-comerciale, non-industriale, ca televizor. Nu
utilizați acest produs în niciun alt scop.
● Nu supuneți produsul la șocuri, temperaturi extreme sau perioade lungi de expunere in
lumina directă a soarelui.
● Pastrati produsul departe de obiecte magnetice, motoare si transformatoare.
● Nu utilizați în aer liber în condiții nefavorabile.
● Nu folosiți televizorul în timp ce conduceti. Acest lucru este periculos și este ilegal în anumite
zone.
MANIPULAREA ȘI UTILIZAREA BATERIILOR:
● ATENȚIE: Pericol de explozie dacă bateriile nu sunt montate corect sau nu sunt înlocuite cu
același tip sau echivalent.
● Bateriile nu trebuie expuse la căldură excesivă, cum ar fi soarele, foc sau altele similare.
● Nu trebuie amestecate diferite tipuri de baterii, baterii noi și uzate.
● Bateriile trebuie instalate în funcție de polaritate.
● Dacă bateria este uzată, trebuie scoasă din produs.
● Bateriile trebuie aruncate în siguranță. Utilizați întotdeauna cutiile de colectare furnizate
(consultați distribuitorul) pentru a proteja mediul.
● Nu lăsați bateriile la indemana copiilor și animalelor de companie. Doar adulții ar trebui să
manipuleze bateriile.
● Respectați instrucțiunile privind siguranța și utilizarea bateriilor.
INSTRUCTIUNI PRIVIND RECICLAREA
Potrivit Directivei Europene 2002/96/EC asupra exploatarii deseurilor de aparatura electrica si
electronica (WEEE) și a Directivei 2008/112/CE a Parlamentului European și a Consiliului din
16 decembrie 2008, dispozitivele electrice casnice nu trebuie sa faca parte din sistemul normal
de depozitare a deseurilor solide urbane.
Dispozitivele invechite trebuie colectate separat pentru a optimiza ritmul de recuperare si
reciclare a materialelor componente si pentru a preveni efectele negative posibile asupra
sanatatii umane si asupra mediului inconjurator. Simbolul containerului cu o cruce in diagonala
deasupra ar trebui sa existe pe toate produsele de acest fel pentru a reaminti oamenilor ca au
obligatia sa contacteze autoritatile locale sau punctele de vanzare si sa ceara informatii despre
locurile adecvate unde sa depoziteze dispozitivele electrice invechite.
Page 46
45
ECRAN LED 32"
CARACTERISTICI
DESCRIEREA UNITATII CENTRALE
Acest aparat este prevazut cu ecran LED pentru furnizarea unei imagini clare si cu emisii de radiatii
scazute.
Mod Hotel
Scanare Automata a Programelor
Receptia Programelor Digitale
Functie Ghid TV
Functie TELETEXT (Europa)
Redare USB Multimedia
Afișarea Pe Ecran În Mai Multe Limbi
Control Complet din Telecomanda
Intrari HDMI, SCART, YPBPR, AV, VGA, PC AUDIO si Card CI.
Iesire CASTI si COAXIAL
Functie Inregistrare
Functie TIME SHIFT
Suport Montare Detasabil - Picioare
Mufa Antena Externa
Difuzoare Incorporate
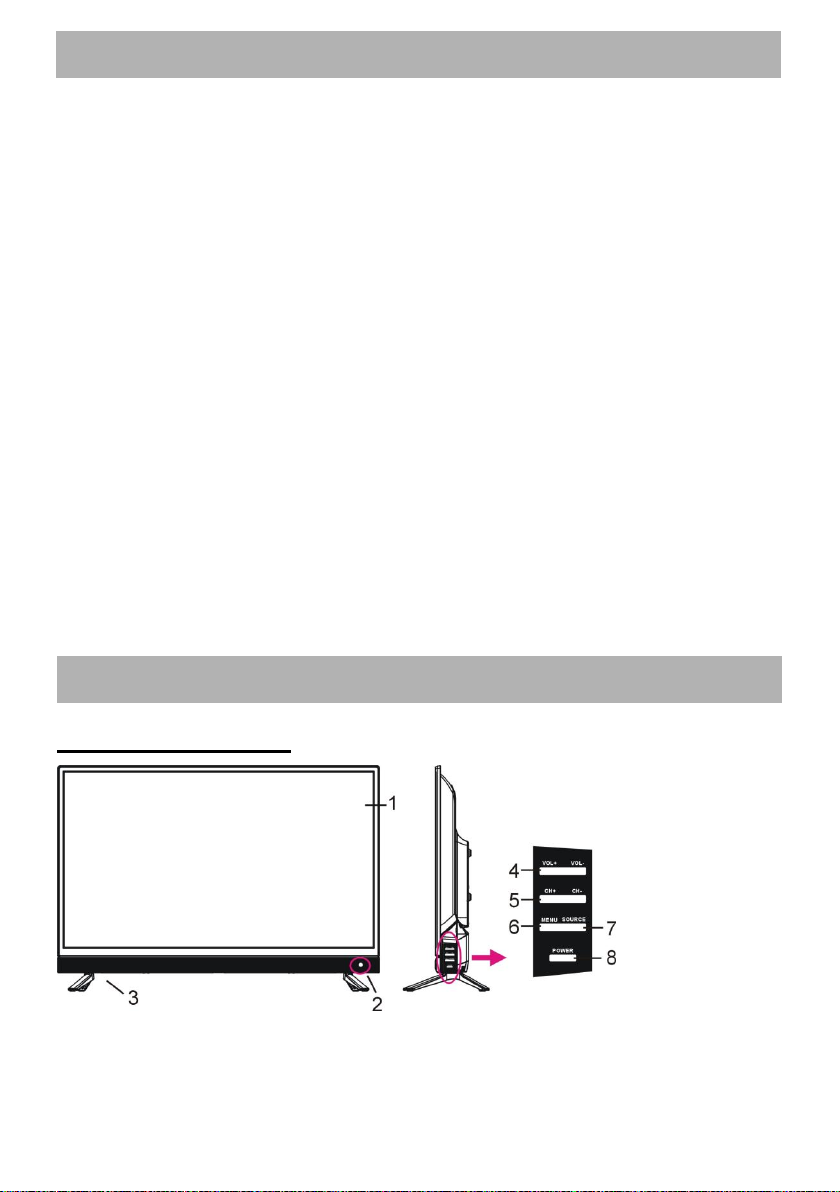
UNITATEA CENTRALA
1. ECRAN LED
2. Senzor/Indicator stare – in modul standby LED-ul indicator va afisa culoarea rosie si cand
televizorul este pornit va afisa culoarea albastru.
Page 47
46
3. Picior.
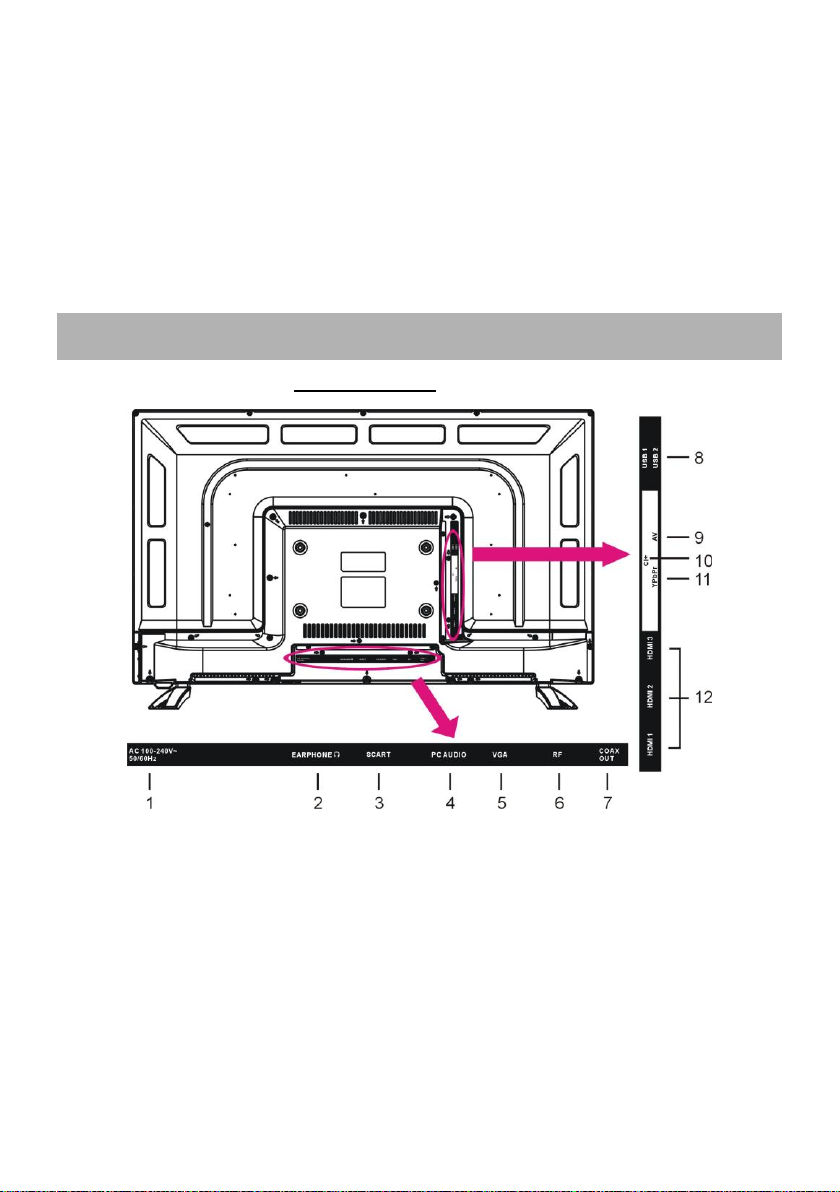
DESCRIEREA UNITATII CENTRALE
Vedere din spate
4.Buton VOL+/- - Pentru a creste/descreste nivelul de sunet sau pentru a naviga
stanga/dreapta in meniu.
5.Buton CH+/- - Pentru a selecta canalul urmator/anterior sau a naviga sus/jos in meniu
6.Buton MENU –P entru a accesa meniul principal.
7.Buton SOURCE – Pentru a selecta sursa de semnal.
8.Buton POWER – Pentru a porni/opri televizorul.
1. Cablu alimentare
2. Iesire CASTI
3. Intrare SCART
4. Intrare PC AUDIO
5. Intrare VGA
6. Intrare HDMI
7. Iesire COAXIAL
8. Slot CI+
9. Intrare Mini AV
10. Intrare Mini YPbPr
11. Intrare USB
12. Intrare Antena RF – Pentru conectarea antenei externe
Page 48
47
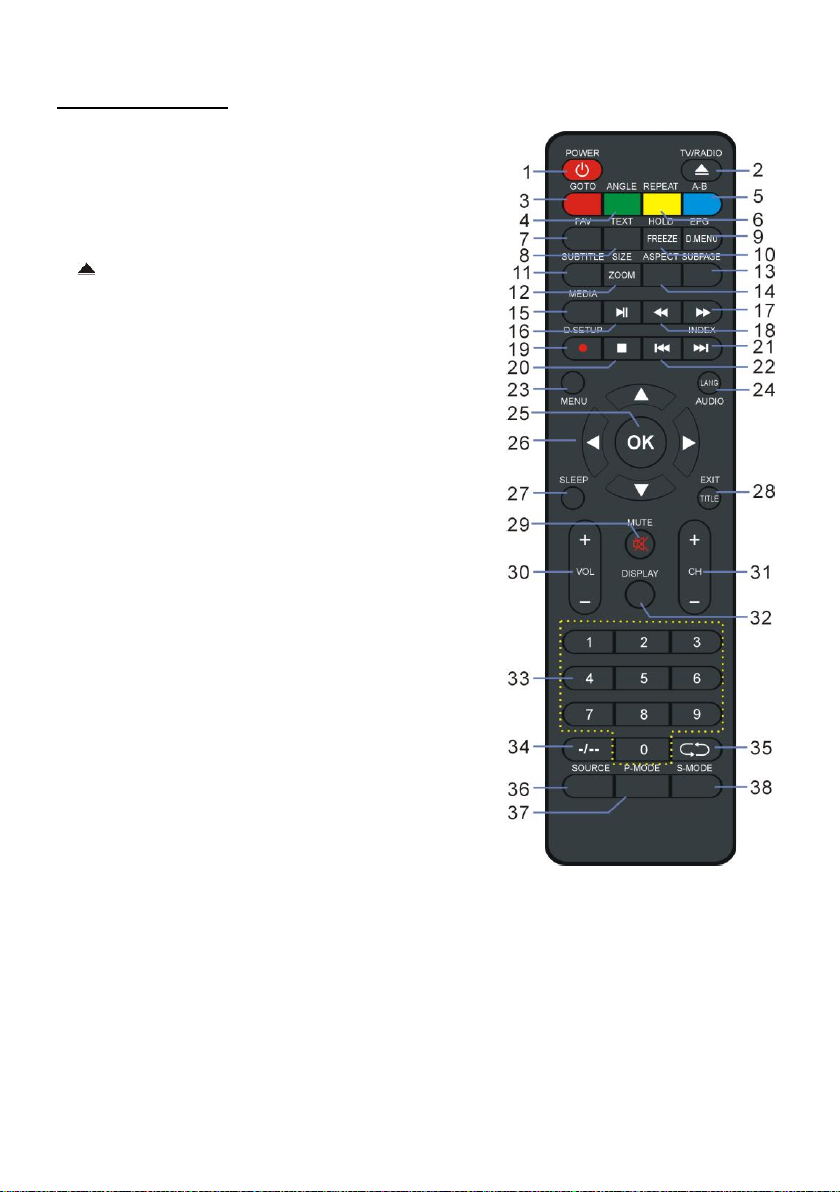
TELECOMANDA
1. POWER
Setați unitatea în modul de așteptare; apăsați din
nou pentru a-l porni.
2. TV/RADIO (DTV)
Mutați unitatea între televizor și radio.
(DVD)
Încărcați / scoateți un disc disponibil.
3. Buton ROSU (TV)
GOTO (DVD)
Începeți vizionarea dintr-un anumit punct.
4. Butonul VERDE (TV)
ANGLE (DVD)
Schimbați unghiul de vizionare, dacă este
disponibil.
5. Butonul ALBASTRU (TV)
A-B (DVD)
Repetați redarea între A și B.
6. Butonul GALBEN (TV)
REPEAT (DVD)
Modificați modul repetare.
7. FAV
Afișați lista canalelor preferate.
8. TEXT
Afișați teletextul disponibil.
9. EPG (DTV)
Afișați ghidul de programe electronice.
D.MENU (DVD)
Afișați meniul principal al discului.
10. HOLD
Țineți teletextul.
FREEZE
Țineți imaginea.
11. SUBTITLE
Activează / dezactivează subtitrările.
12. SIZE (TV)
Schimbați dimensiunea teletextului.
ZOOM (DVD)
Micșorați / măriți imaginea.
Page 49
48
TELECOMANDA
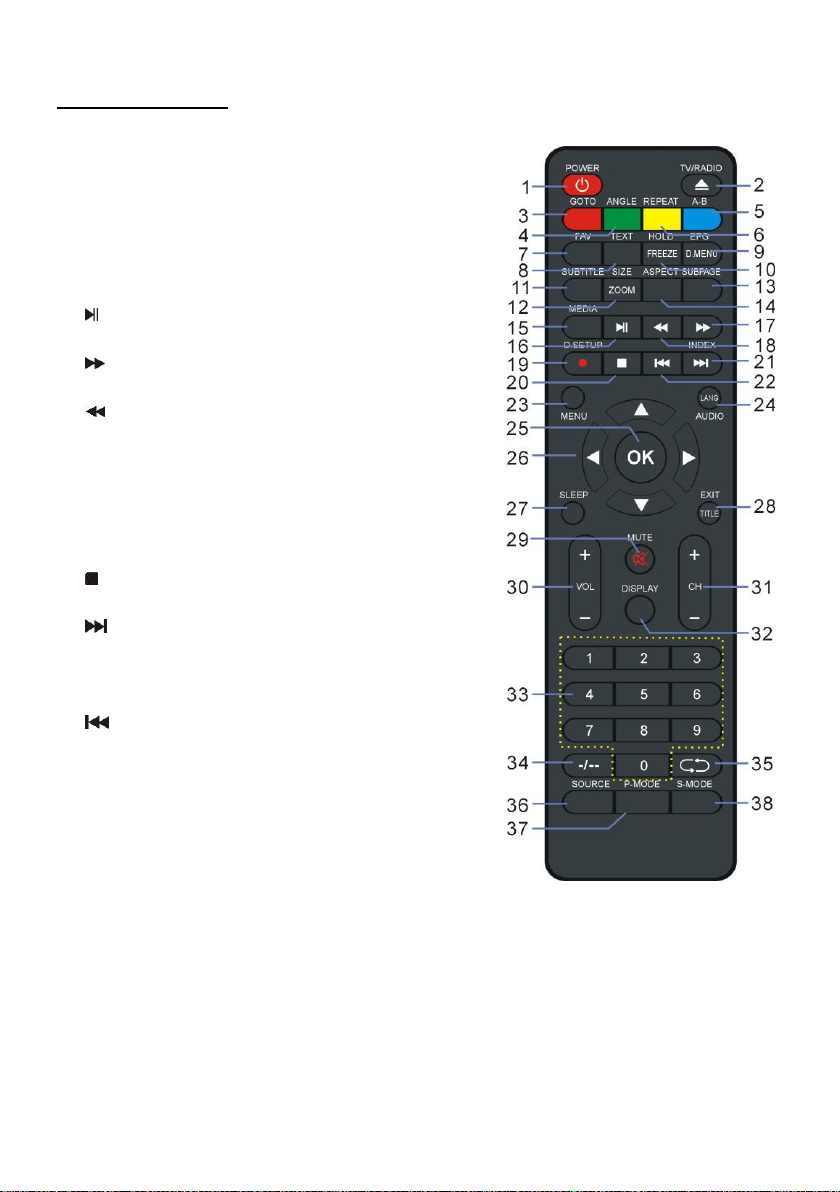
13. SUBPAGE
Introduceți sub-pagina Teletext.
14. ASPECT
Apăsați repetat pentru a selecta dimensiunea
dorită a ecranului.
15. MEDIA
Introduceți direct modul Media (USB).
16.
Porniți / întrerupeți redarea.
17.
Deplasați rapid înainte.
18.
Deplasați rapid înapoi.
19. ● (DTV)
Porniți înregistrarea când vizionați programe
digitale disponibile.
D.SETUP (DVD)
Accesați meniul de configurare.
20.
Opriti redarea.
21.
Redați fișierul următor.
INDEX (DTV)
Afișați lista de înregistrări sau indexul Teletext.
22.
Redați fișierul anterior.
23. MENU
Apelați meniul principal sau reveniți la meniul
anterior.
24. AUDIO (TV)
Schimbați sunetul disponibil.
LANG (DVD)
Schimbați limba disponibilă pentru melodiile sonore.
25. OK
Confirmați selecția.
26. ▲/▼/◄/►
Butoane de navigare
27. SLEEP
Setați timpul de somn dorit.
Page 50
49
TELECOMANDA
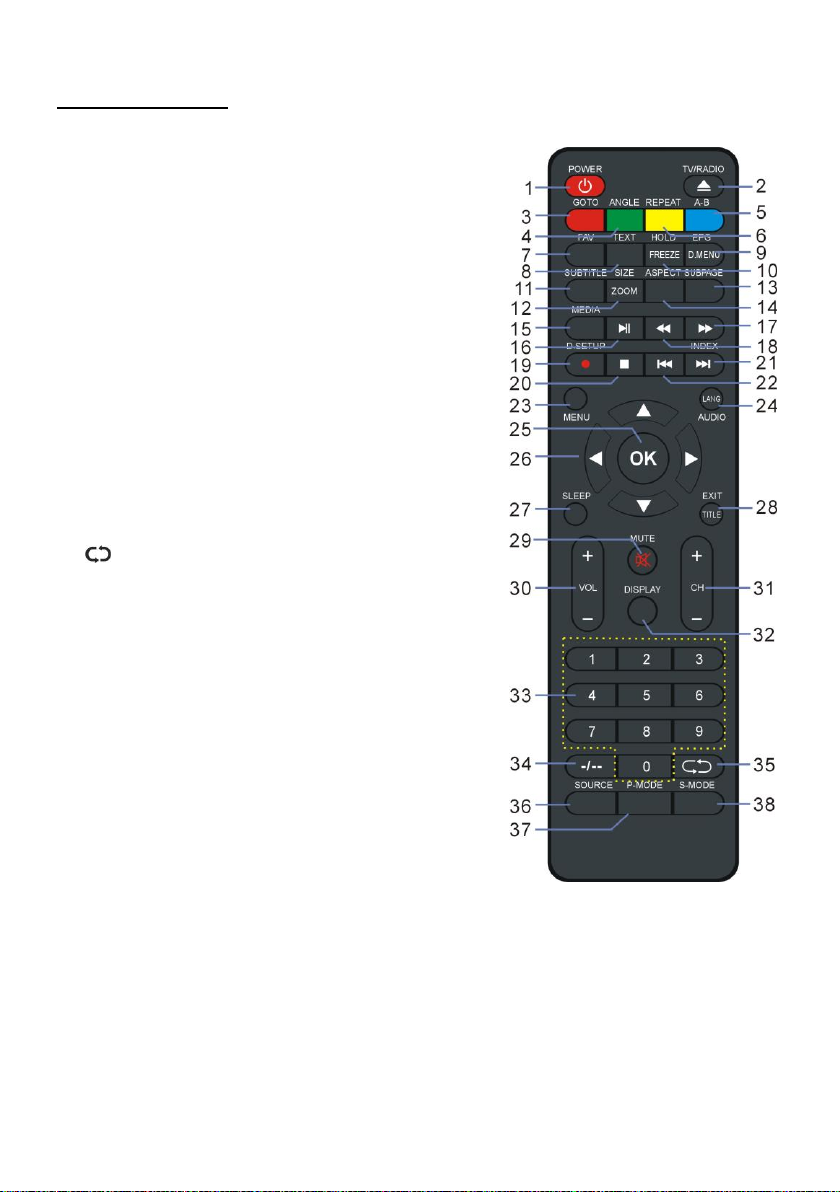
28. EXIT (TV)
Ieșiți din pagina de meniu.
TITLE (DVD)
Afișați meniul titlului.
29. MUTE
Dezactivați sunetul.
30. VOL +/-
Măriți / micșorați nivelul volumului.
31. CH +/-
Redați programul următor / anterior.
32. DISPLAY
Afișați informațiile disponibile despre program.
33. Butoane numerice (0-9)
Introduceți informațiile despre număr, cum ar fi
numărul canalului și așa mai departe.
34. -/--
Schimbați cifra când vizionați programe TV.
35.
Reveniți la canalul anterior.
36. SOURCE
Selectați sursa de intrare dorită.
37. P-MODE
Schimbați modul imagine.
38. S-MODE
Schimbați modul de sunet.
NOTA: Funcțiile marcate cu "DVD" sunt disponibile
numai când televizorul dvs. are instalat un DVD player.
Page 51
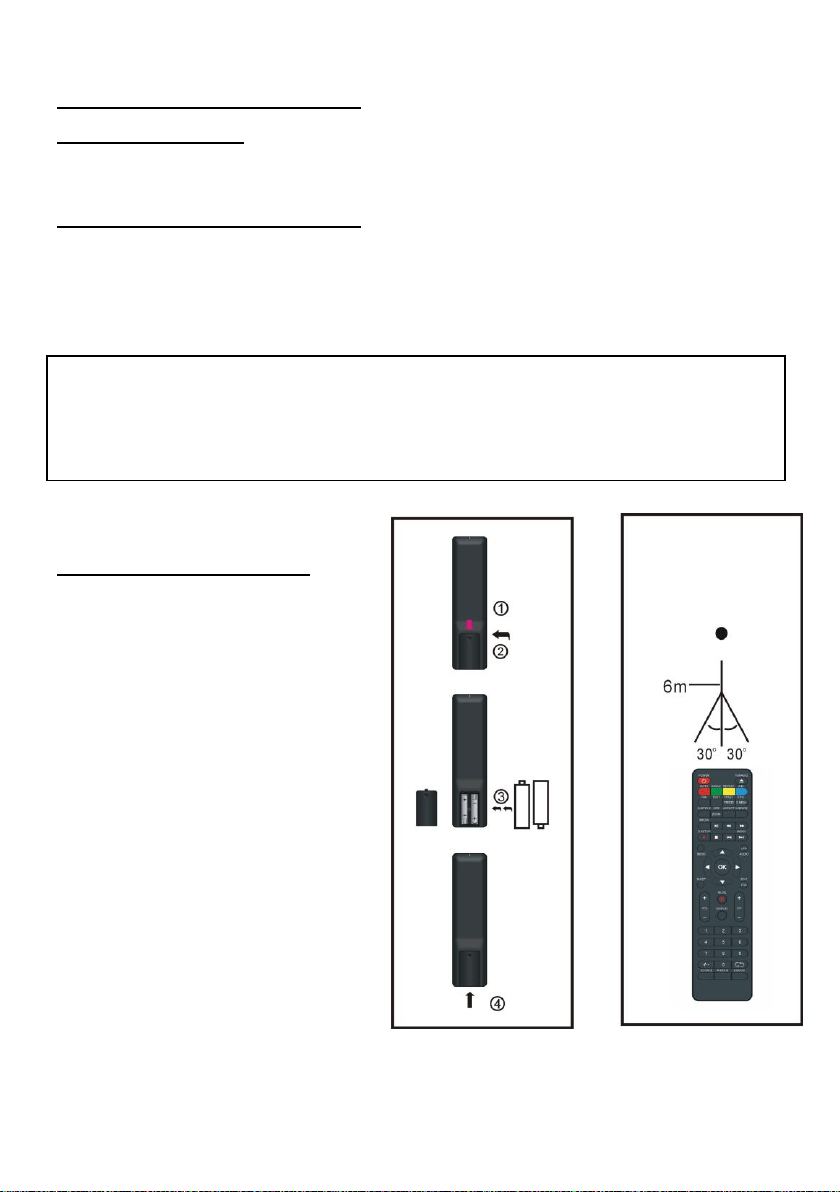
50
PREGATIRE TELECOMANDA
Fig1 Fig2
Senzor
Telecomanda
Deschideti
Apasati
Apasati
INSTALARE BATERII
Instalati bateriile conform imaginilor de mai jos. Asigurati-va ca bornele + si - sunt
pozitionate conform indicatiilor din interiorul compartimentului bateriilor (Fig1).
DURATA DE VIATA A BATERIILOR
- In mod normal, durata de viata a bateriilor este de aproximativ 6 luni. Totusi durata de viata
depinde de frecventa de utilizare a telecomenzii.
- In cazul in care telecomanda nu functioneaza nici cand este in apropierea televizorului,
inlocuiti bateriile.
- Folositi baterii AAA.
Nota:
● Nu scapati, calcati sau loviti telecomanda.
Acestea pot cauza deteriorarea componentelor telecomenzii si defectarea acesteia.
● Daca telecomanda nu va fi folosita pentru o perioada lunga de timp, scoateti bateriile
OPERAREA TELECOMENZII
Utilizati telecomanda de la o distanta
de maxim 6m de senzorul televizorului
si intr-un unghi de maxim 60°. (Fig2).
Note:
- Distanta de operare poate varia in
functie de conditiile de iluminare din
incapere.
- Nu indreptati surse puternice de
lumina catre senzorul TV.
- Nu plasati obiecte intre telecomanda
si senzorul televizorului.
- Nu folositi telecomanda simultan cu o
alta telecomanda a unui alt dispozitiv.
Page 52
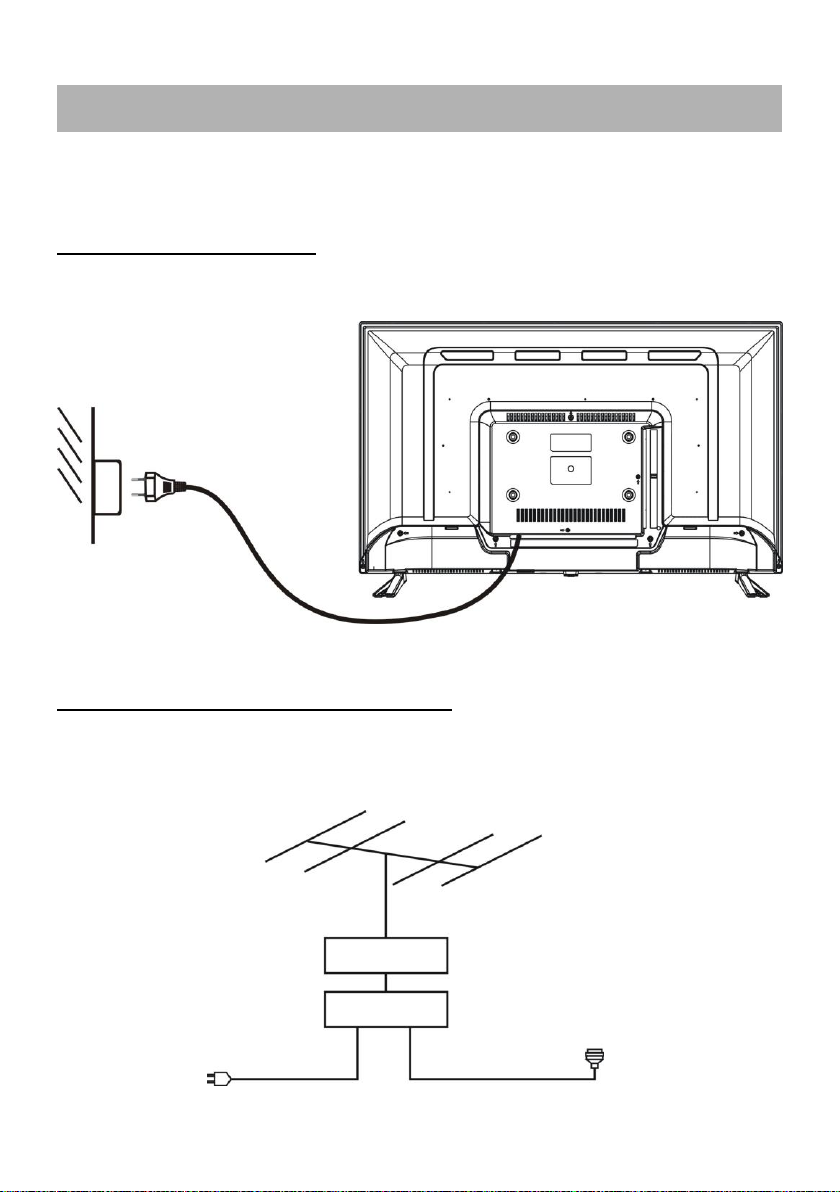
51
CONEXIUNI DE BAZA
Antena
Amplificator
exterior antena
Amplificator
interior
Cablu
alimentare
amplificator
interior
Cablu
antena
75 OHM
Catre priza
● Asigurati-va ca toate cablurile sunt conectate de la unitatea principala inainte de
conectarea la priza.
● Cititi cu atentie instructiunile inainte de a realiza conexiuni cu alte echipamente.
CONECTAREA LA PRIZA
CONECTAREA LA ANTENA EXTERNA
Conectati antena externa la mufa RF pentru receptionarea programelor TV
Page 53
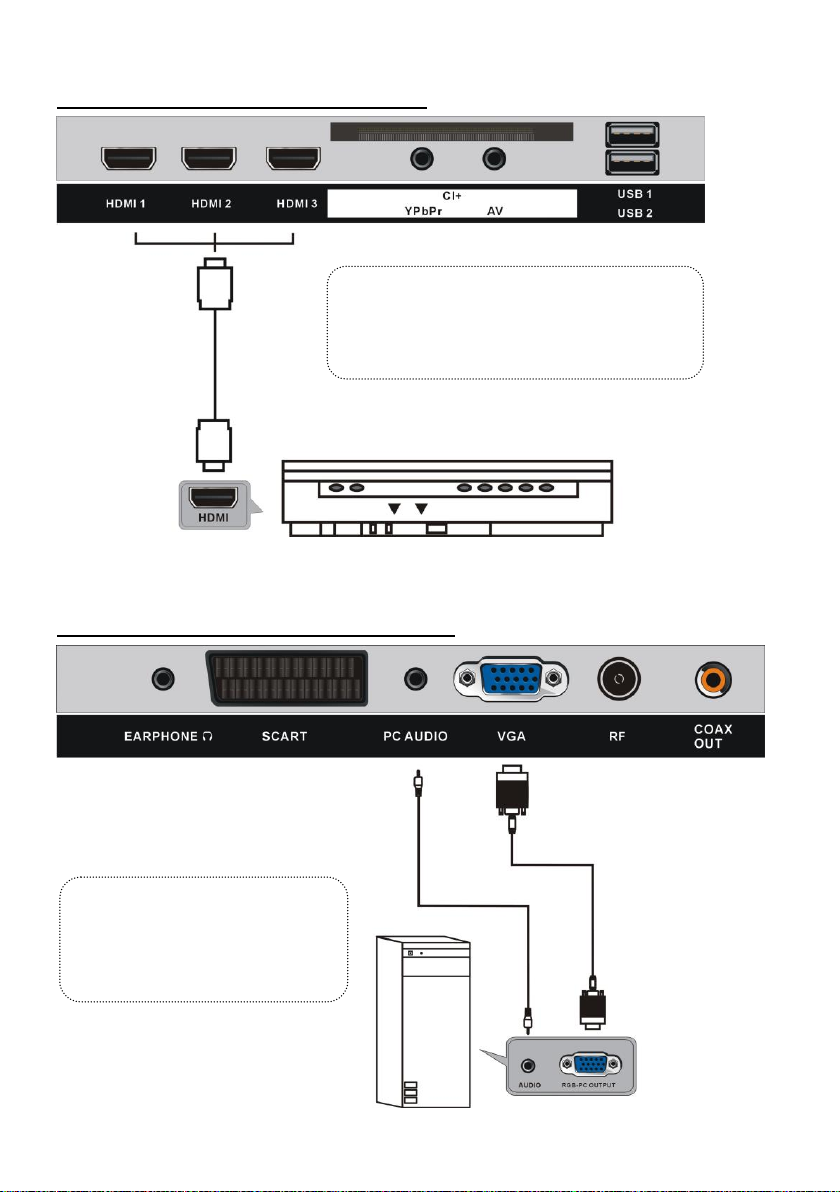
52
CONECTAREA PRIN CABLUL HDMI
Cablu HDMI
(Nu este inclus)
Folositi cablul HDMI pentru conexiunea cu
alte dispozitive pentru receptionarea
continutului multimedia de inalta rezolutie.
Vedere spate DVD/VCR
Vedere spate PC
Folositi cablul VGA pentru
conectarea PC la Televizor si
folosirea acestuia ca monitor.
Cablu VGA
(Nu este inclus)
Cablu Audio
(Nu este inclus)
CONECTAREA PRIN CABLUL PC/VGA
Page 54
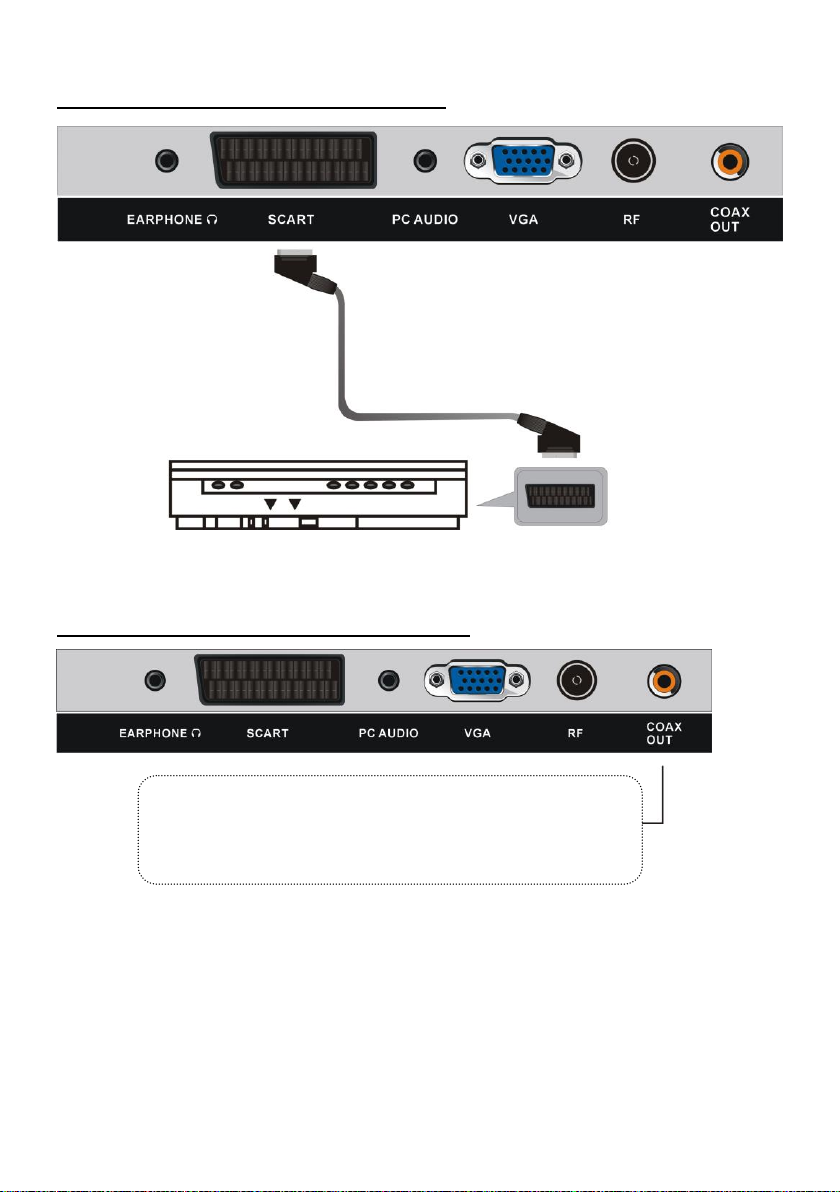
53
CONECTAREA PRIN CABLUL SCART
Vedere spate DVD/VCR
Cablu SCART
(Nu este inclus)
Folositi cablul coaxial pentru conectarea unitatii cu un
amplificator extern sau alt dispozitiv de decodare audio.
(Cablul coaxial nu este inclus.)
CONECTAREA PRIN CABLUL COAXIAL
Page 55
54
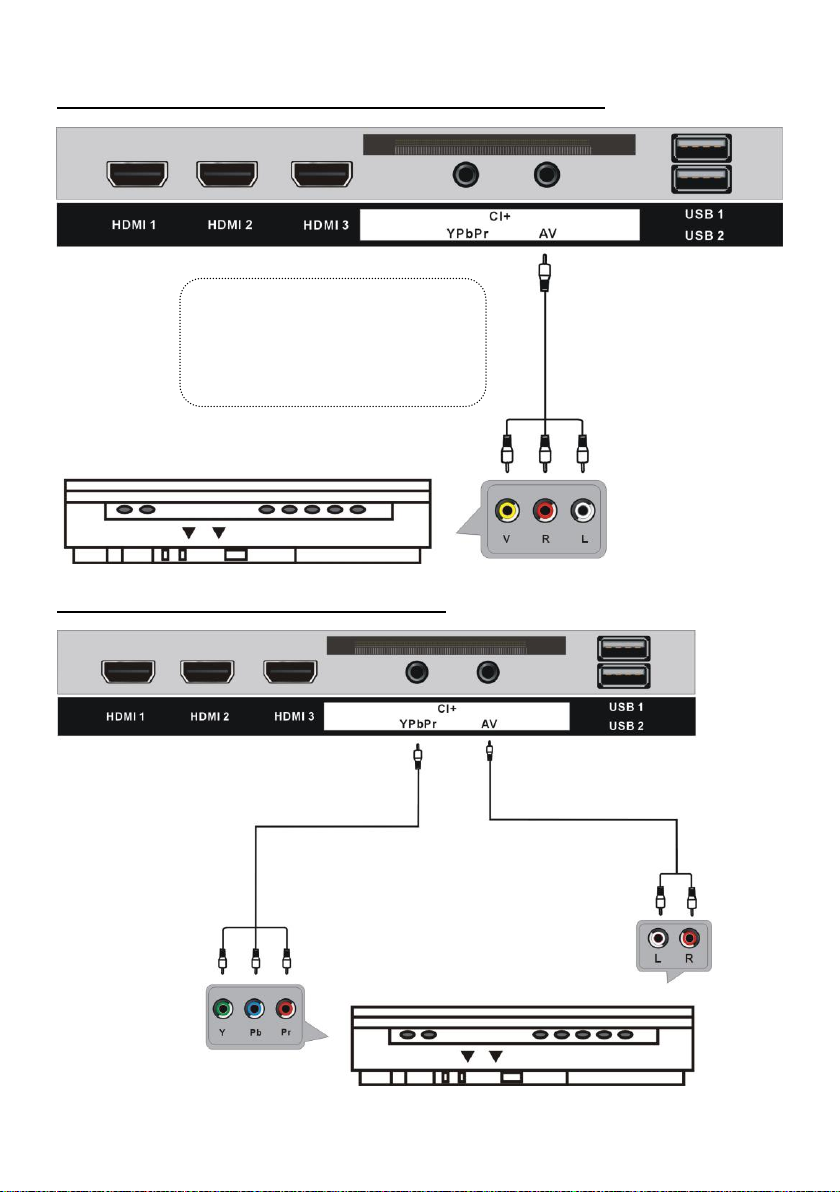
CONEXIUNEA PRIN CABLUL AV (VIDEO COMPOSIT)
Cablu YPbPr
(Nu este inclus)
Vedere spate DVD/VCR
Pentru conectare folositi cablul
compozit Audio L/R (alb/rosu) si
CVBS (galben) pentru conectarea TV
cu alte dispozitive
Cablu AV
(Nu este inclus)
Vedere spate DVD/VCR
Conexiunile Audio L/R al cablului AV
(Nu este inclus)
CONECTAREA PRIN CABLUL YPBPR
Page 56
55
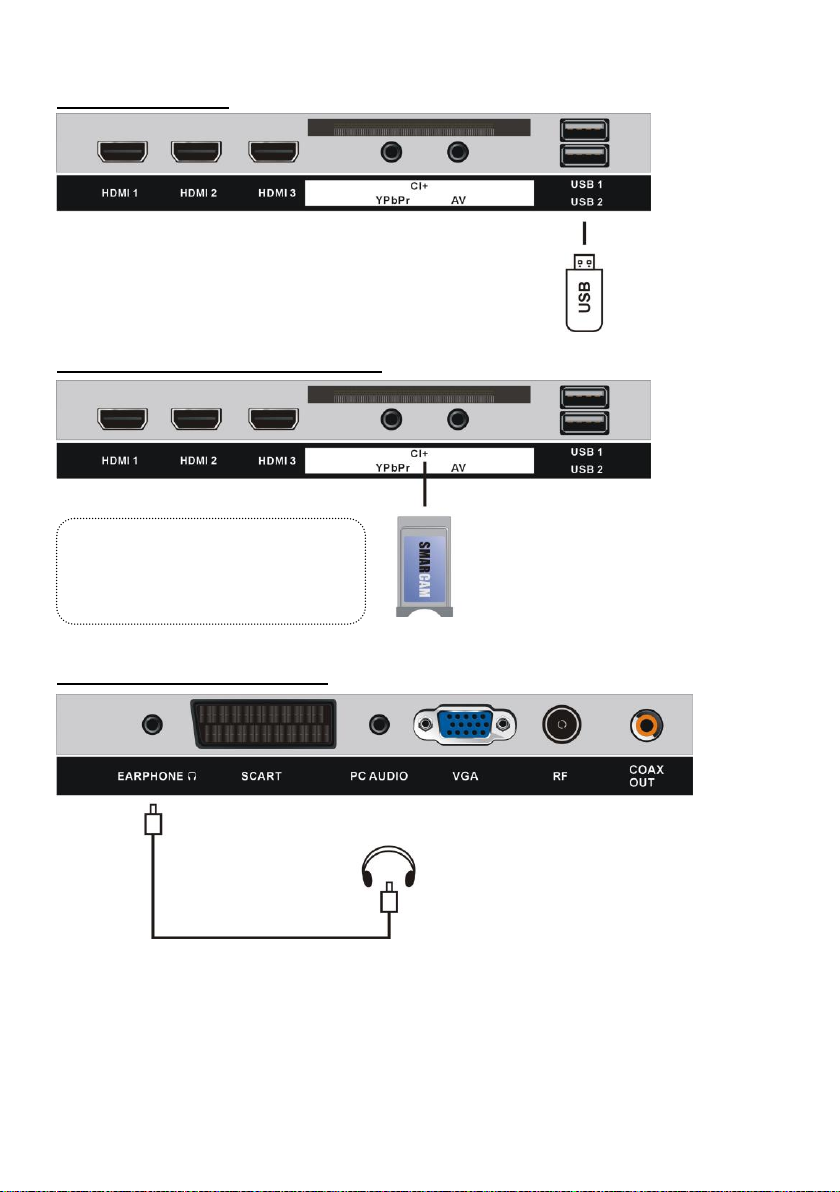
Conectarea USB
Introduceti cardul CI (Conditional
Access Module) Pentru a putea
viziona canalele digitale encriptate.
Cablu CASTI
(Nu este inclus)
(Nu este inclus)
Dispozitiv de stocare USB
(Nu este inclus)
INTRODUCEREA CARDULUI CI
CONECTAREA CASTILOR
ASIGURAȚI-VĂ CĂ TOATE ECHIPAMENTELE ȘI CABLUL DE ALIMENTARE
SUNT CONECTATE IN MOD CORESPUNZĂTOR ȘI TELEVIZORUL ESTE
SETAT ÎN MOD CORECT ÎNAINTE DE EFECTUAREA ORICAROR
OPERATIUNI.
Page 57
56
- Apasati butonul POWER de pe TV sau telecomanda pentru a porni televizorul (led-ul
OPERATIUNI DE BAZA
indicator se va aprinde albastru); apasati din nou pentru a opri TV-ul (mod Standby)
televizorul (led-ul indicator se va aprinde rosu).
- Apasati butonul SOURCE de pe TV sau telecomanda pentru a comuta televizorul in modul
DTV sau ATV.
- Anumite actiuni necesita introducerea unei parole despre care gasiti informatii la cap.
Blocare.
SELECTAREA PROGRAMULUI DORIT
1. Apasati butonul CH+ pentru a viziona programul urmator.
2. Apasati butonul CH- pentru a viziona programul anterior
3. Apasati butoanele numerice de pe telecomanda pentru a selecta direct programul dorit.
Nota: Apasati butonul -/-- in mod repetat pentru a modifica nr. de digiti.
CONTROL VOLUM
- Apasati VOL+ sau VOL- pentru a regra nivelul volumului.
Plaja disponibila: 0-100.
MOD MUT
- Apasati butonul MUTE pentru a dezactiva sunetul, apasati-l din nou pentru a activa
sunetul.
SETARI SURSA
- Apasati butonul SOURCE pentru a afisa lista de surse.
- Apasati butoanele directionale SUS sau JOS pentru a selecta
sursa de semnal dorita, si apoi apasati OK pentru confirmare.
SETARI MULTIAUDIO
- Apasati butonul AUDIO de pe telecomanda in mod repetat
pentru a selecta limba audio dorita
- Apasati STANGA/DREAPTA pentru a selecta tipul audio dorit
- Apasati SUS/JOS pentru a selecta limba audio dorita
Nota: Aceasta functie este disponibila doar pe canalele care
suporta functia multiaudio.
AFISARE INFORMATII
- Apasati butonul DISPLAY de pe telecomanda pentru a afisa informatii despre canalul
curent.
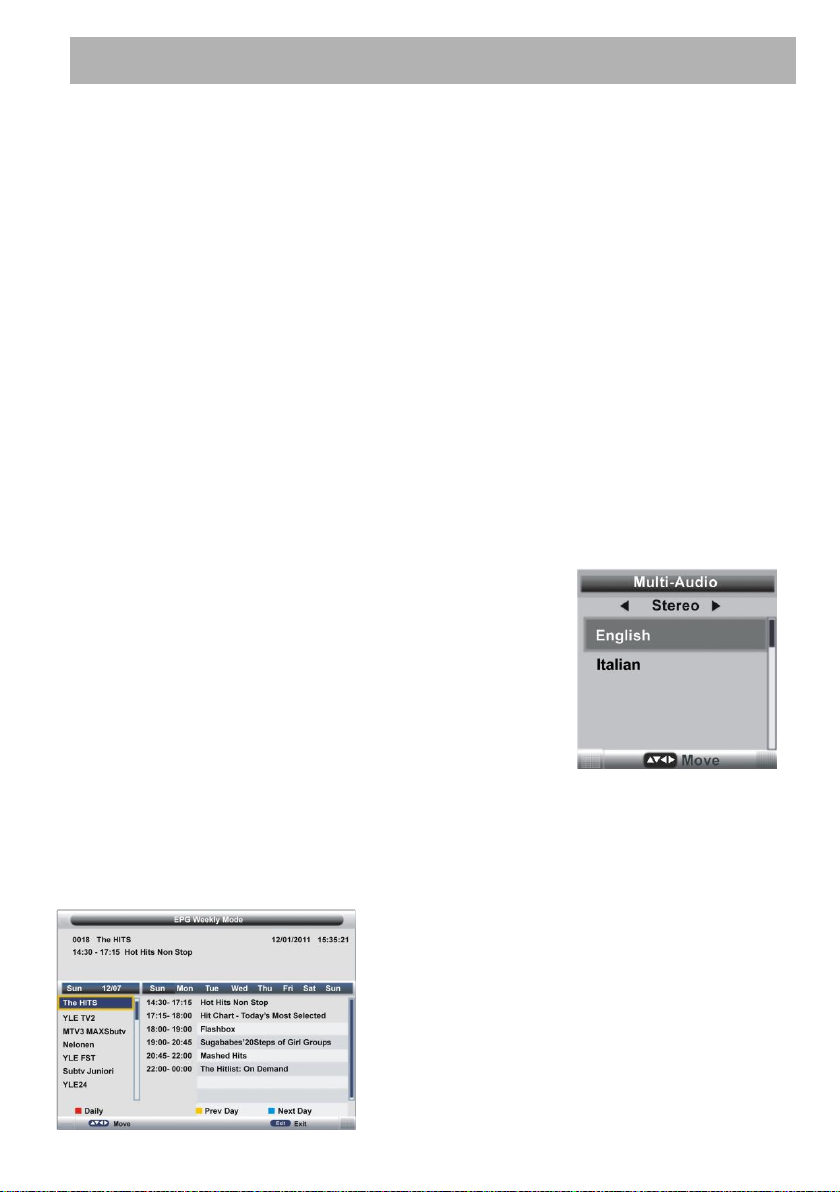
GHID PROGRAME (DOAR IN MODUL DTV)
- Apasati butonul EPG de pe telecomanda pentru a accesa Ghidul de PROGRAME.
Page 58
57
- Apasati butoanele SUS/JOS pentru a selecta canalul dorit
- Apasati butoanele STANGA/DREAPTA pentru a comuta intre coloana din stanga si cea din
dreapta
- Apasati butonul ROSU pentru a comuta intre modul saptamanal si zilnic.
- Apasati butonul GALBEN pentru a vizualiza ghidul pentru ziua anterioara.
- Apasati butonul ALBASTRU pentru a vizualiza ghidul pentru ziua urmatoare.
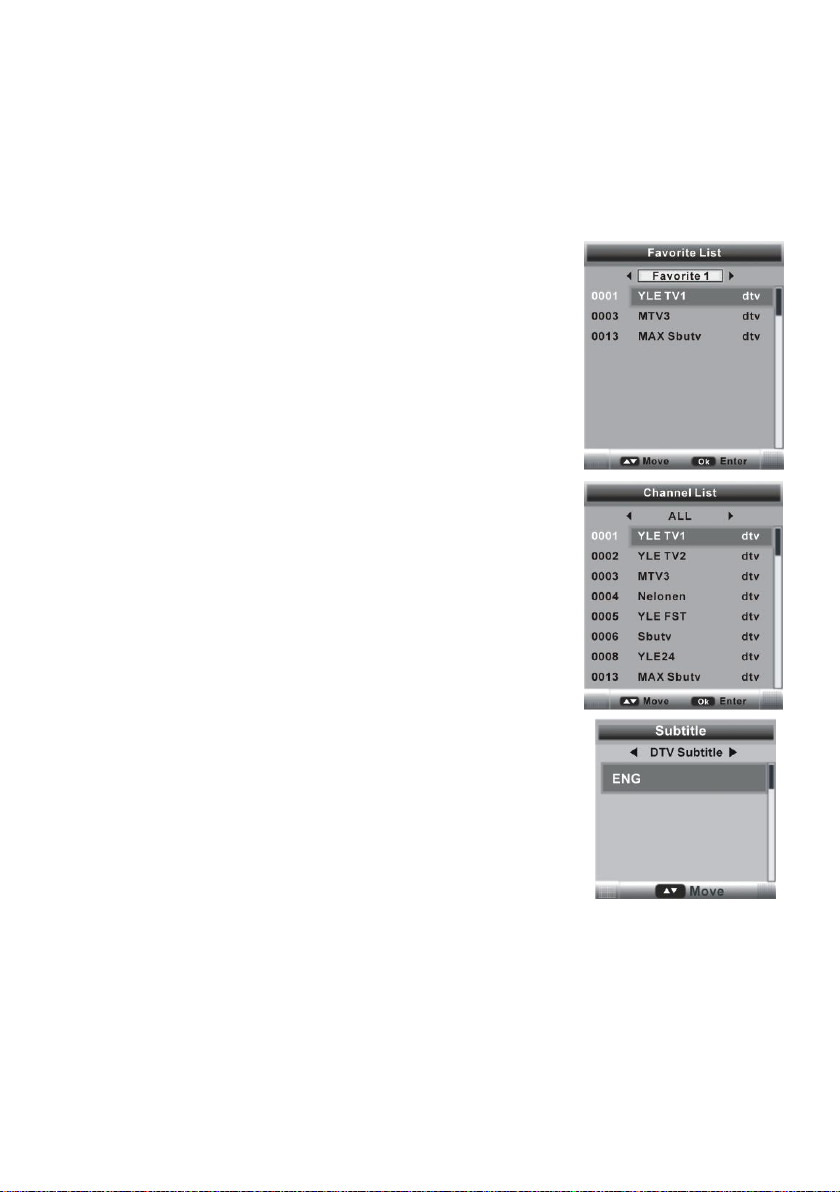
LISTA CANALE FAVORITE
In timpul vizualizarii unui program, apasati butonul FAV pentru
a-l adauga in lista de CANALE FAVORITE.
- Apasati butoanele /SUS/JOS pentru a selecta canalul dorit.
- Apasati butoanele STANGA/DREAPTA pentru a selecta lista
de canale favorite dorita
- Apasati butonul OK pentru a confirma selectia.
Nota: Pentru a elimina un canal din lista de favorite, vezi
capitolul 3.2 “Management Favorite”
SELECTIE RAPIDA
In timpul vizualizarii unui canal, apasati butonul OK de pe
telecomanda pentru a afisa lista de programe.
- Apasati butoanele SUS sau JOS pentru a selecta programul
preferat
- Apasati butonul OK pentru a confirma selectia
TELETEXT
- Apasati butonul TEXT pentru a afisa informatiile teletext si
apasati-l in mod repetat pentru a opri afisarea informatiilor.
TV/RADIO (DOAR IN MODUL DTV)
- Apasati butonul TV/RADIO de pe telecomanda pentru a comuta
intre modurile TV si RADIO
SUBTITRARE
- Apasati butonul SUBTITLE de pe telecomanda pentru a accesa meniul Subtitrare.
- Apasati butoanele STANGA/DREAPTA pentru a selecta optiunea dorita
- Apasati butoanele SUS/JOS pentru a selecta subtitrarea dorita.
- Apasati butonul OK pentru a confirma selectia
Nota: Pentru a activa aceasta optiune asigurati-va ca programul vizionat suporta optiunea
multi-subtitrare.
Page 59
58
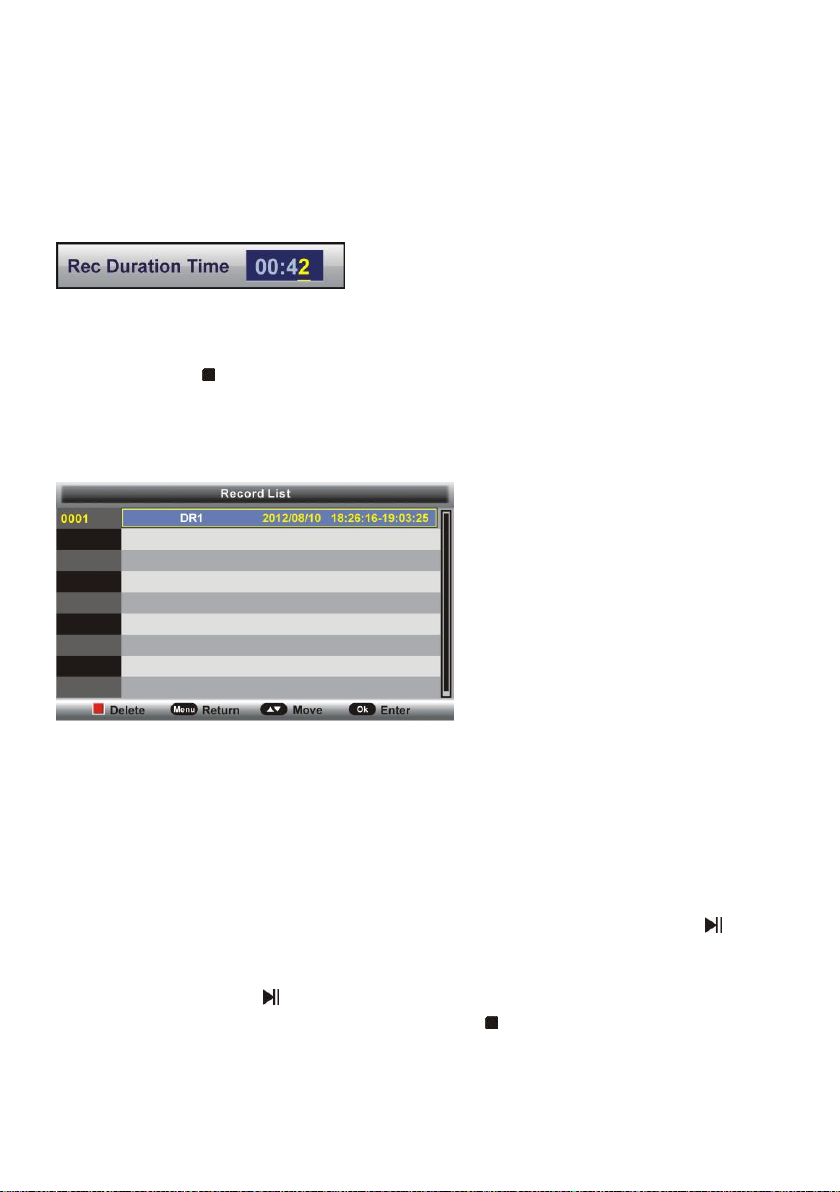
INREGISTRARE (DOAR IN MODUL DTV)
- Introduceti in prealabil Stick-ul USB in portul USB al televizorului.
In timpul vizionarii unui program digital:
- Apasati butonul ● de pe telecomanda pentru a porni imediat, daca apasati din nou
butonul REC va aparea urmatorul meniu.
- Folositi tastele STANGA/DREAPTA pentru a muta cursorul, folositi tastele numerice pentru
a introduce valoarea dorita si apasati OK pentru confirmare.
- Apasati butonul de pe telecomanda, si selectati DA pentru a opri; Selectati RENUNTA
pentru a anula selectia si a inchide fereastra.
Pentru a viziona programele inregistrate:
- Apasati butonul INDEX de pe telecomanda pentru a afisa pagina de setari PVR.
- Apoi apasati butoanele SUS/JOS pentru a selecta fisierele inregistrate si apasati OK
pentru a porni redarea.
TIME SHIFT (DOAR IN MODUL DTV)
- Introduceti in prealabil Stick-ul USB in portul USB al televizorului.
In timpul vizionarii unui program digital:
-Daca doriti sa nu ratati nicio emisiune cat sunteti plecat, apasati butonul de pe
telecomanda pentru a accesa modul TIME SHIFT; apasati OK pentru a activa functia;
selectati NU pentru a ascunde fereastra.
- Apasati din nou butonul pentru a activa functia TIME SHIFT.
- Pentru a opri functia TIME SHIFT, apasati butonul de pe telecomanda si va fi afisata
fereastra de confirmare. Selectati DA pentru a iesi din modul TIME SHIFT sau selectati NU
pentru a inchide fereastra.
Page 60
59
REDARE MEDIA
- Apasati butonul SOURCE de pe telecomanda pentru a comuta televizorul in modul Media.
- Introduceti in prealabil Stick-ul USB in portul USB al televizorului.
- Apasati butoanele SUS/JOS/STANGA/DREAPTA pentru a muta.
- Apasati butonul EXIT pentru a reveni la pagina de meniu media.
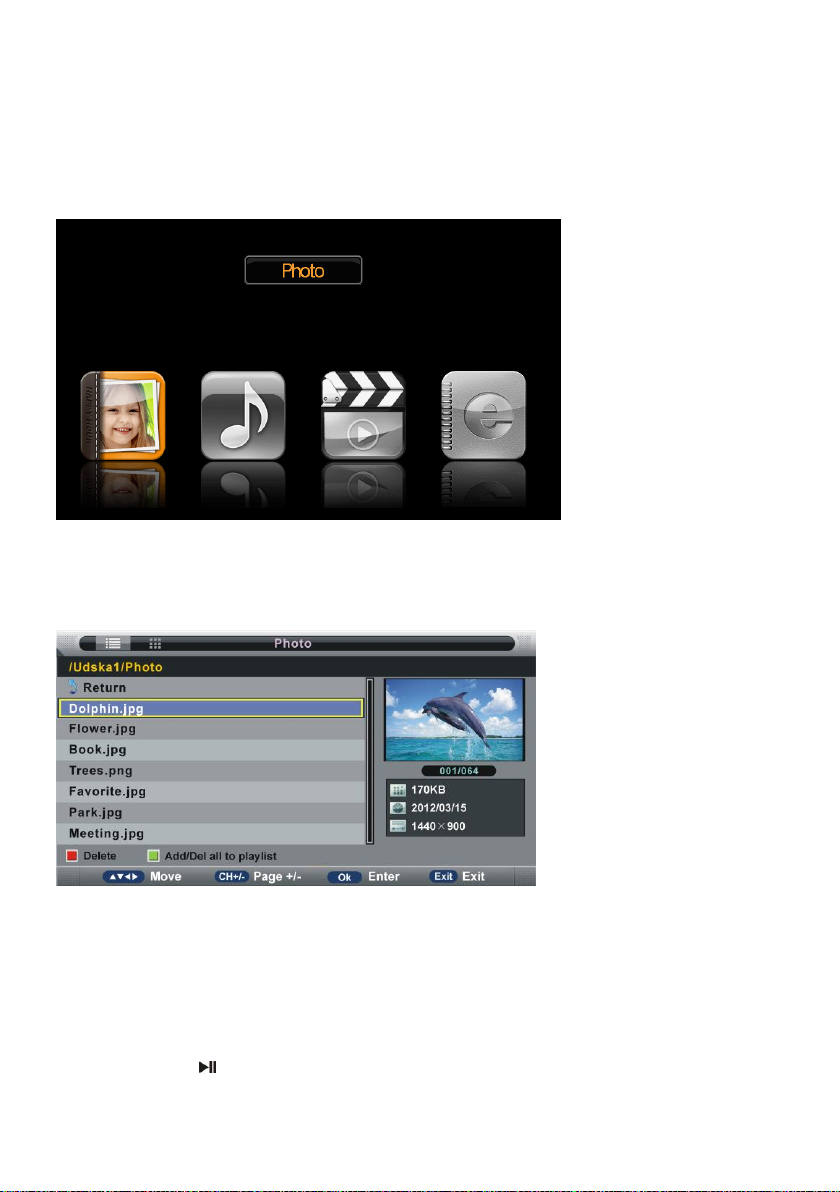
1. POZE
- Apasati butoanele STANGA/DREAPTA pentru a selecta POZE in meniu si apoi apasati OK
pentru confirmare.
NOTA: Cand selectati o fila Foto, apasati EXIT pentru a muta cursorul pe TITLU si apoi
apasati DREAPTA pentru a vizualiza filele in mod fereastra.
- Folositi butoanele directionale pentru a selecta fisierul dorit.
- Apasati butonul ROSU pentru a sterge fila evidentiata.
- Apasati butonul VERDE pentru a adauga/elimina toate filele in /din playlist
- Apasati OK pentru a adauga/elimina fila evidentiata in playlist.
- Apasati butonul pentru a incepe redarea.
Page 61
60
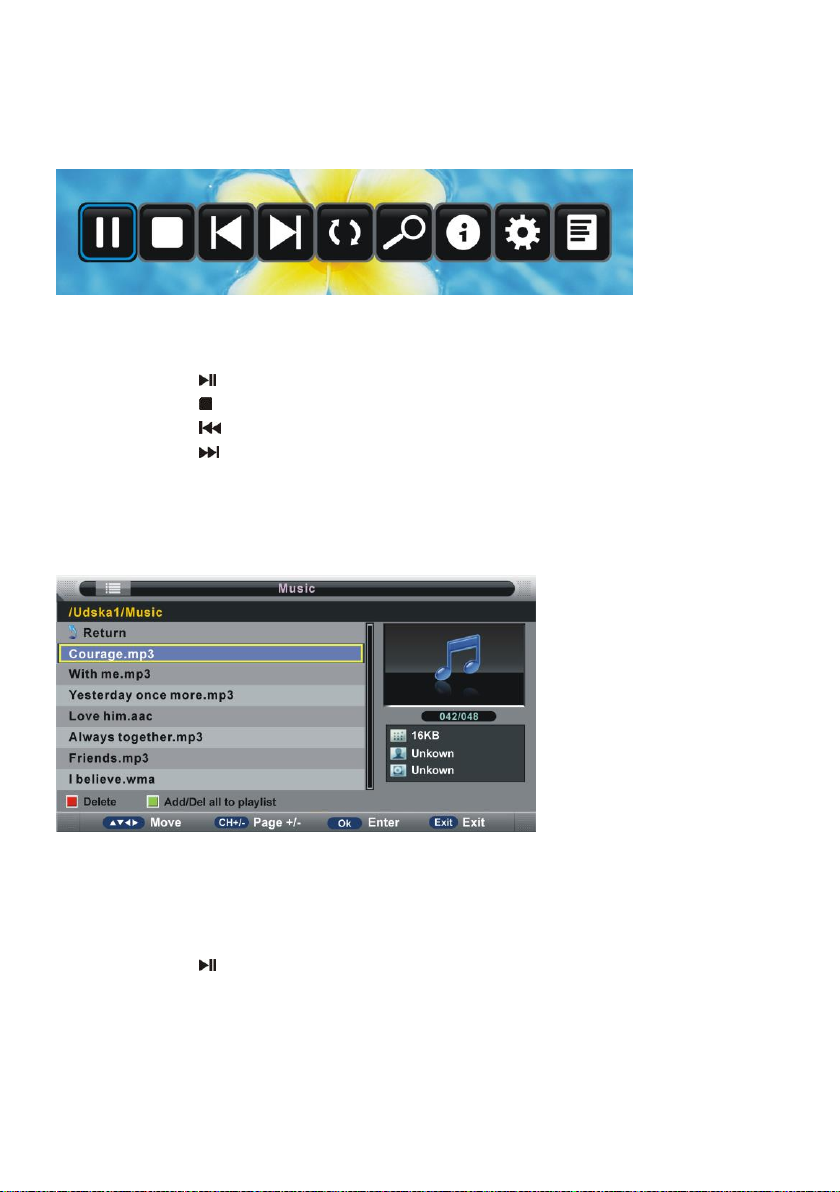
In timpul vizualizarii pozelor:
- Apasati butonul OK de pe telecomanda pentru a afisa bara de unelte, apasati EXIT pentru
a o ascunde
- Apasati butoanele STANGA/DREAPTA pentru a selecta optiunea dorita din bara de unelte
si apasati OK pentru a confirma selectia sau a accesa un submeniu.
- Apasati butonul pentru a porni/ingheta redarea .
- Apasati butonul pentru a opri redarea.
- Apasati butonul pentru a reda fila anterioara
- Apasati butonul pentru a reda fila urmatoare.
2. Muzica
- Apasati butoanele STANGA/DREAPTA pentru a selecta MUZICA in meniu si apoi apasati
OK pentru confirmare.
- Folositi butoanele directionale pentru a selecta fisierul dorit.
- Apasati butonul ROSU pentru a sterge fila evidentiata.
- Apasati butonul VERDE pentru a adauga/elimina toate filele in /din playlist
- Apasati OK pentru a adauga/elimina fila evidentiata in playlist.
- Apasati butonul pentru a incepe redarea.
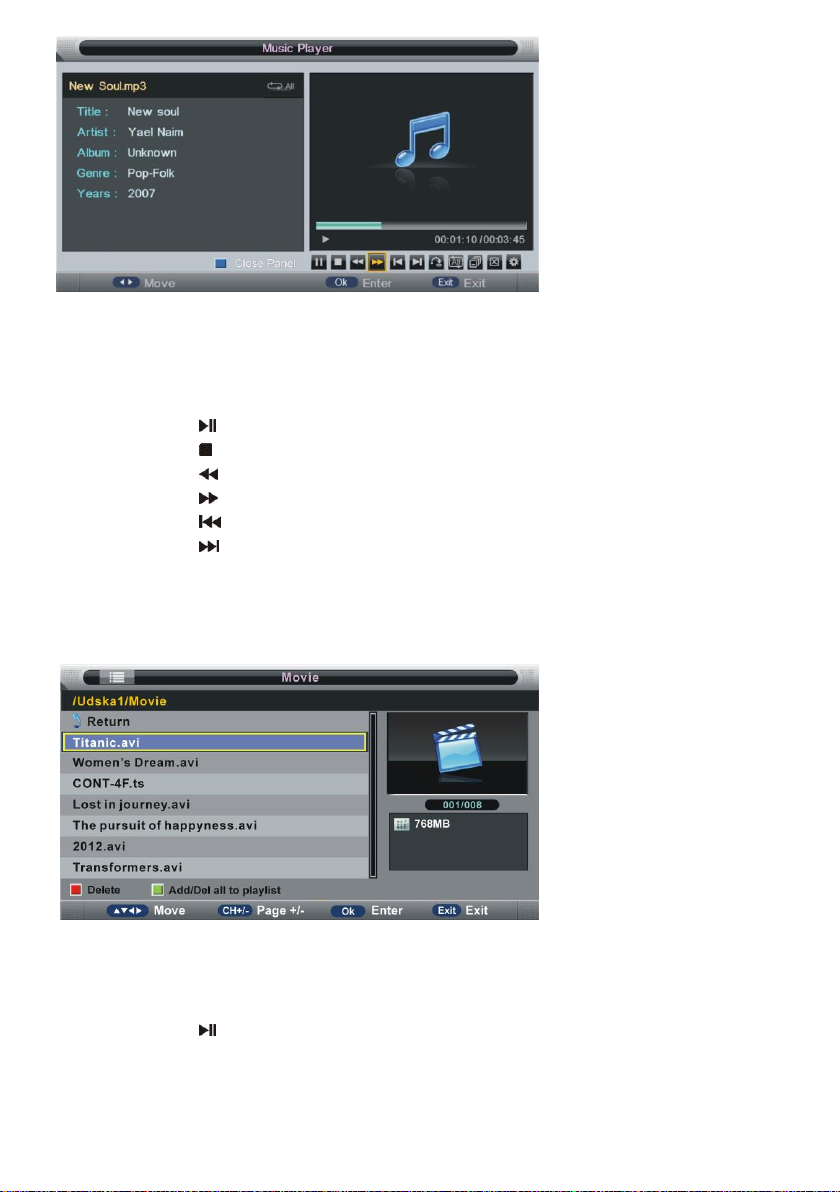
In timpul redarii audio:
- Apasati butonul OK de pe telecomanda pentru a afisa bara de unelte, apasati EXIT pentru
a o ascunde
Page 62
61
- Apasati butoanele STANGA/DREAPTA pentru a selecta optiunea dorita din bara de unelte
si apasati OK pentru a confirma selectia sau a accesa un submeniu.
- Apasati butonul ALBASTRU pentru a ascunde OSD, apasati orice buton de pe
telecomanda pentru a afisa OSD.
- Apasati butonul pentru a porni/ingheta redarea .
- Apasati butonul pentru a opri redarea.
- Apasati butonul pentru a derula rapid inapoi.
- Apasati butonul pentru a derula rapid inainte.
- Apasati butonul pentru a reda fila anterioara
- Apasati butonul pentru a reda fila urmatoare.
3. FILM
- Apasati butoanele STANGA/DREAPTA pentru a selecta FILM in meniu si apoi apasati OK
pentru confirmare.
- Folositi butoanele directionale pentru a selecta fisierul dorit.
- Apasati butonul ROSU pentru a sterge fila evidentiata.
- Apasati butonul VERDE pentru a adauga/elimina toate filele in /din playlist
- Apasati OK pentru a adauga/elimina fila evidentiata in playlist.
- Apasati butonul pentru a incepe redarea.
Page 63
62
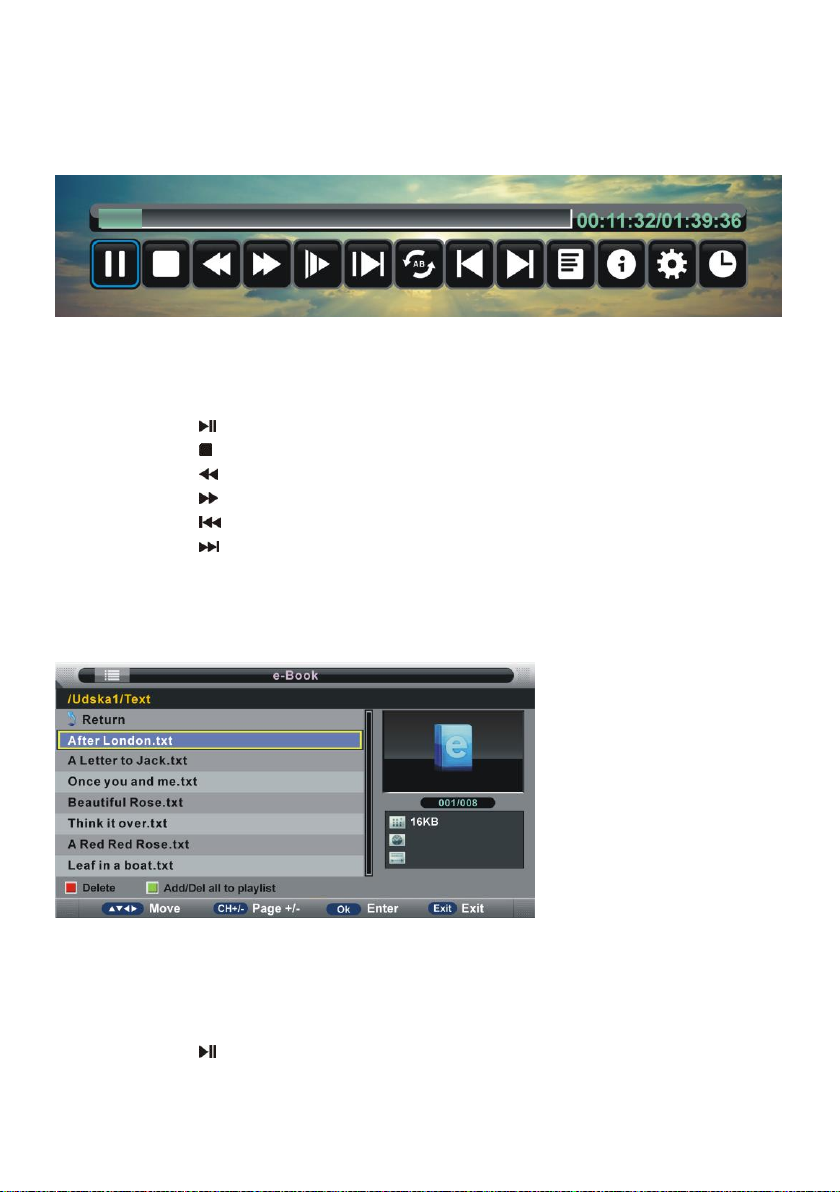
In timpul redarii audio:
- Apasati butonul OK de pe telecomanda pentru a afisa bara de unelte, apasati EXIT pentru
a o ascunde
- Apasati butoanele STANGA/DREAPTA pentru a selecta optiunea dorita din bara de unelte
si apasati OK pentru a confirma selectia sau a accesa un submeniu.
- Apasati butonul ALBASTRU pentru a ascunde OSD, apasati orice buton de pe
telecomanda pentru a afisa OSD.
- Apasati butonul pentru a porni/ingheta redarea .
- Apasati butonul pentru a opri redarea.
- Apasati butonul pentru a derula rapid inapoi.
- Apasati butonul pentru a derula rapid inainte.
- Apasati butonul pentru a reda fila anterioara
- Apasati butonul pentru a reda fila urmatoare.
4. e-Book
- Apasati butoanele STANGA/DREAPTA pentru a selecta FILM in meniu si apoi apasati OK
pentru confirmare.
- Folositi butoanele directionale pentru a selecta fisierul dorit.
- Apasati butonul ROSU pentru a sterge fila evidentiata.
- Apasati butonul VERDE pentru a adauga/elimina toate filele in /din playlist
- Apasati OK pentru a adauga/elimina fila evidentiata in playlist.
- Apasati butonul pentru a incepe redarea.
Page 64
63
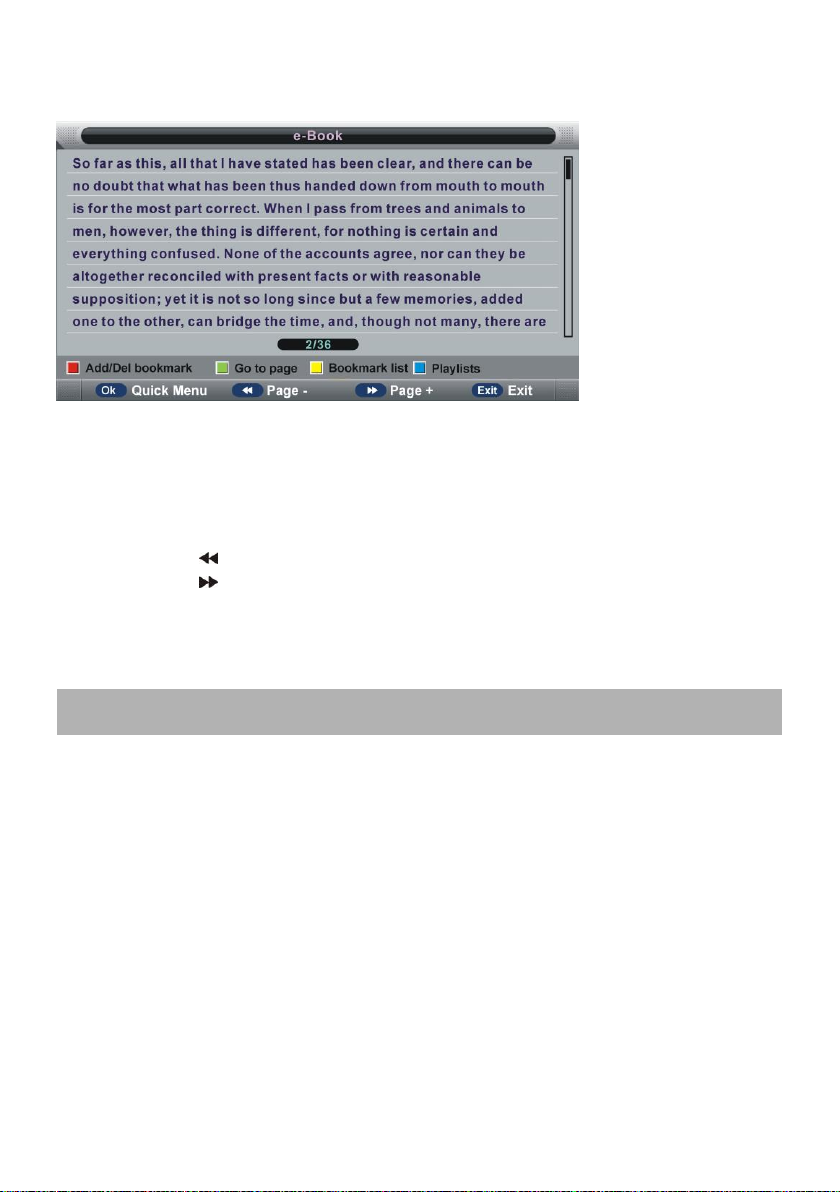
In timpul redarii audio:
MENIUL PRINCIPAL
- Apasati butonul ROSU pentru a adauga/elimina pagina curenta in/din lista de semne de
carte.
- Apasati butonul VERDE pentru a intra in modul MERGI LA. Introduceti o valoare valida si
apasati OK pentru a accesa direct pagina dorita.
- Apasati butonul GALBEN pentru a accesa lista de semne de carte.
- Apasati butonul ALBASTRU pentru a afisa playlist-ul.
- Apasati butonul pentru a reda pagina anterioara.
- Apasati butonul pentru a reda pagina urmatoare.
NOTA: Pentru a reda fisierele multimedia, asigurati-va ca ati selectat optiunea corecta in
meniul MEDIA PLAYBACK. Puteti vizualiza doar Poze in meniul POZE, doar fisiere audio in
meniul MUZICA si asa mai departe.
● Televizorul contine moduri de setari diferite. Imediat ce setarea initiala este realizata,
ramane in memorie pana cand este modificata. In acest fel televizorul va opera mereu in
aceleasi conditii.
● Setarile raman in memoria televizorului pana cand acestea sunt modificate de utilizator
chiar daca televizorul intra in modul Standby.
Procedura comuna pentru setarile initiale
- Apasati butonul MENU pentru a afisa meniul principal.
- Apasati butoanele STANGA sau DREAPTA pentru a selecta submeniurile.
- Apasati butoanele OK sau DREAPTA pentru a accesa paginile submeniurilor.
- Apasati butoanele SUS sau JOS pentru a selecta optiunile dorite.
- Apasati butoanele STANGA sau DREAPTA pentru a modifica valoarea.
- Apasati OK pentru a confirma selectia.
- Apasati butonul MENU pentru a reveni la meniul anterior.
- Apasati butonul EXIT pentru a iesi din meniul principal.
Page 65
64
Prima Instalare
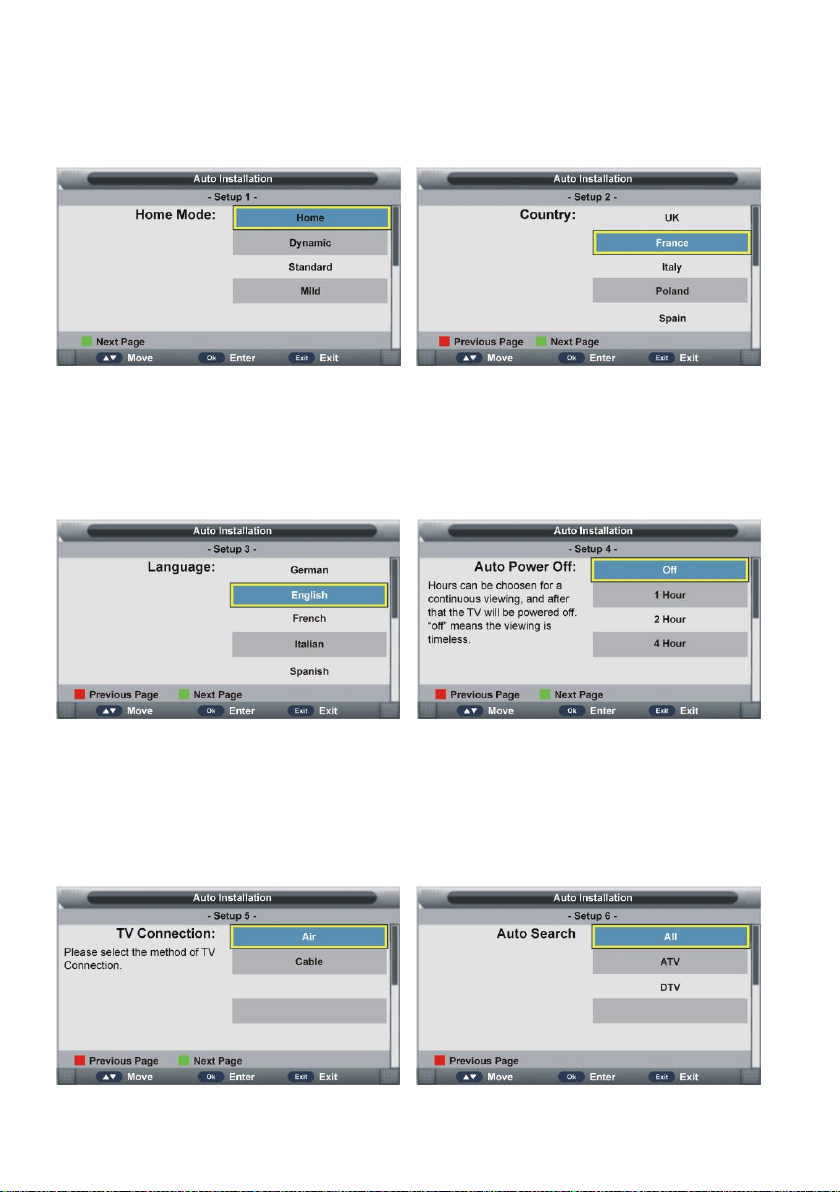
- Conectati aparatul la priza si porniti televizorul, pe ecran va aparea urmatorul meniu:
Setare 1
- Apasati tastele SUS/JOS pentru a selecta modul imagine dorit.
- Apasati OK pentru a confirma si a trece la pasul urmator.
Setare 2
- Apasati tastele SUS/JOS pentru a selecta tara.
- Apasati OK pentru a confirma si a trece la pasul urmator.
Setare 3
- Apasati tastele SUS/JOS pentru a selecta limba.
- Apasati OK pentru a confirma si a trece la pasul urmator.
Setare 4
- Apasati tastele SUS/JOS pentru a selecta timpul de oprire automata.
- Apasati OK pentru a confirma si a trece la pasul urmator.
Page 66
65
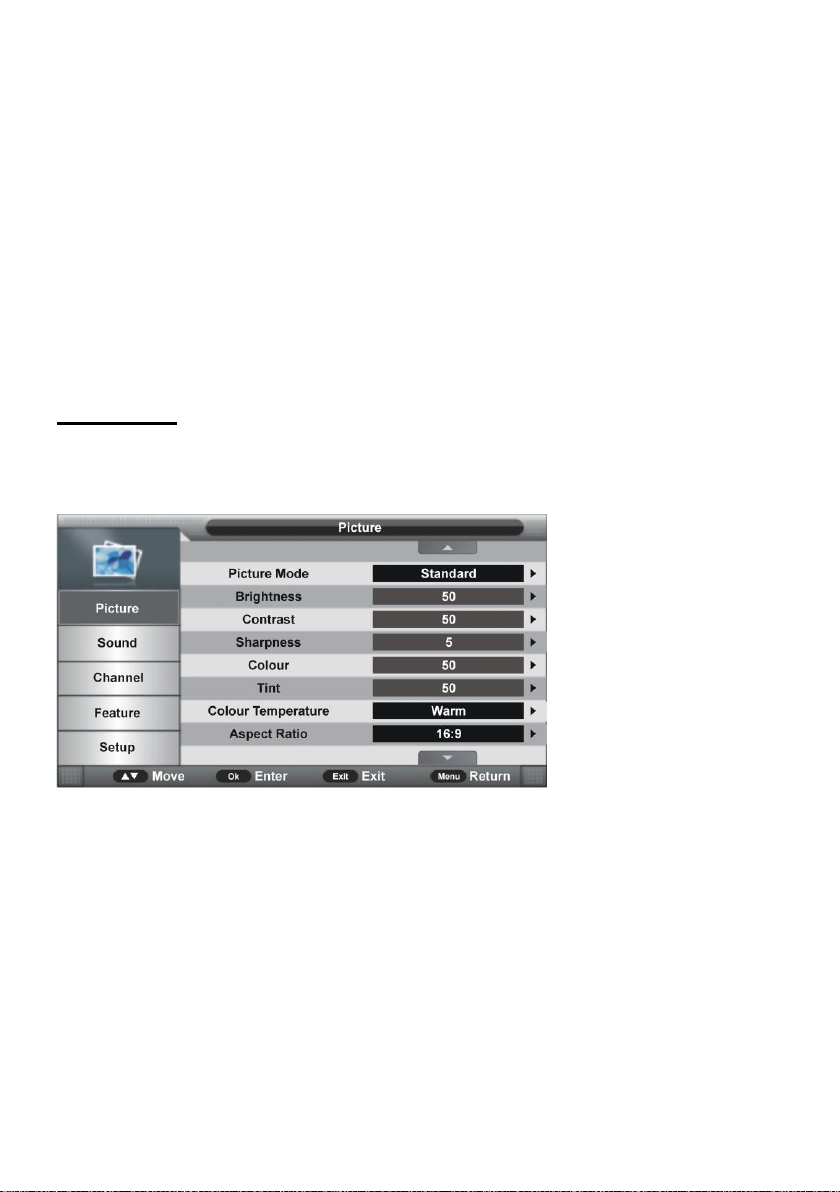
Setare 5
- Apasati tastele SUS/JOS pentru a selecta tipul de conexiune dorit.
- Apasati OK pentru a confirma si a trece la pasul urmator.
Setare 6
- Apasati tastele SUS/JOS pentru a selecta tipul de cautare a programelor.
- Apasati OK pentru a confirma si incepe cautarea automata a programelor.
NOTA:
- Pentru a sari peste cautarea ATV sau DTV, apasati MENU si va fi afisata o fereastra;
Apasati OK pentru a sari configurarea, apasati NU pentru ascunde fereastra.
- Pentru a opri cautarea, apasati EXIT si va fi afisata o fereastra; Apasati OK pentru a sari
configurarea, apasati NU pentru ascunde fereastra.
MOD DTV
- Apasati butonul SOURCE pentru a comuta TV-ul in modul DTV.
1. Imagine
1.1 Mod Imagine
Optiuni disponibile: Standard, Mild, Personal, Dynamic.
1.2 Luminozitate
Valoarea luminozitatii poate fi ajustata de la 0 la 100.
1.3 Contrast
Valoarea contrastului poate fi ajustata de la 0 la 100.
1.4 Acuitate
Valoarea acuitatii poate fi ajustata de la 0 la 100.
1.5 Saturatie
Valoarea saturatiei de culoare a imaginii poate fi ajustata de la 0 la100.
Nota: Valoarea Luminozitatii, Contrastului, Acuitatii sau Saturatiei poate fi modificata, doar
in modul imagine Personal.
Page 67
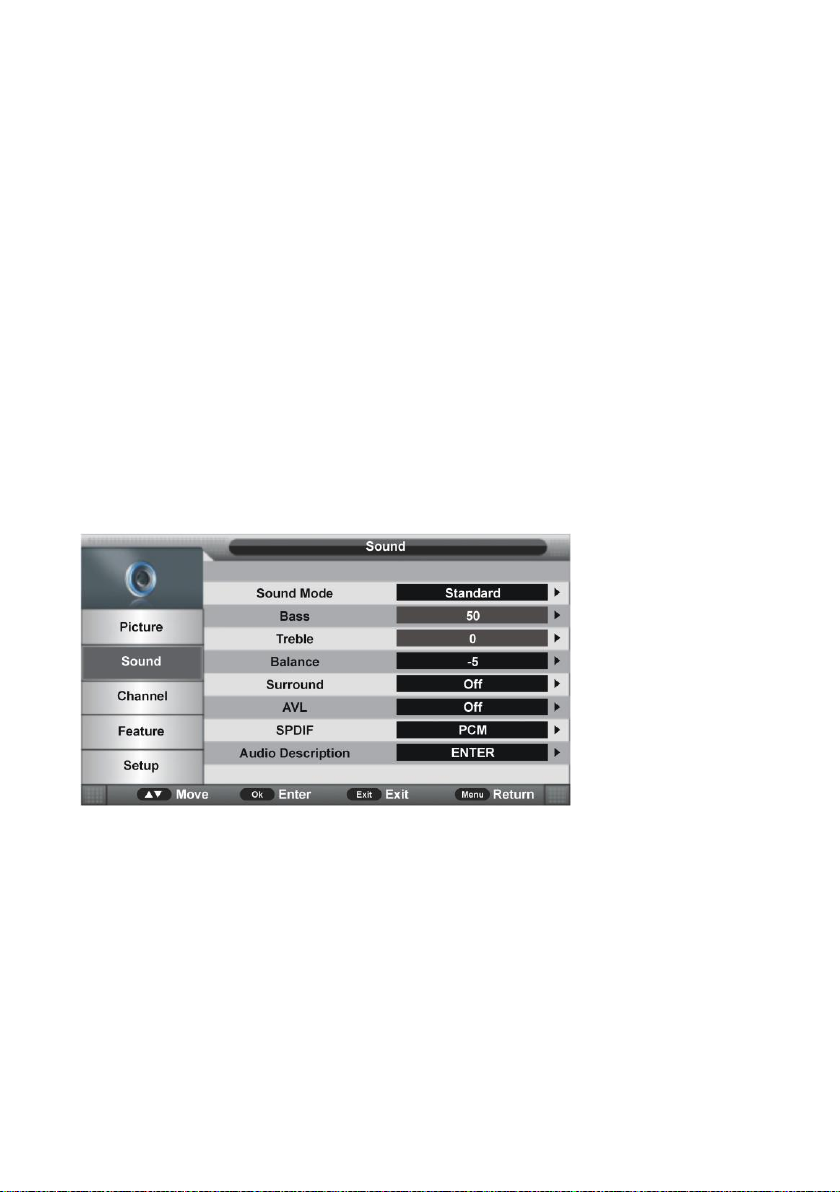
66
1.6 Nuanta
Acesta setare este folosita pentru ajustarea tonului de culoare de la 0 la 100 in modul
NTSC.
1.7 Temperatura de Culoare
Acesta setare este folosita pentru ajustarea temperaturii de culoare.
Optiuni disponibile: Standard, Rece, Cald.
1.8 Aspect Ratio
Apasati butoanele OK sau DREAPTA pentru a accesa submeniul si apasati SUS/JOS
pentru a selecta optiunea dorita.
Optiuni disponibile: Auto, 4:3, 16:9, Zoom1, Zoom2.
Nota: Butonul ASPECT este functional doar daca TV-ul are semnal. Dimensiunile de
imagine pot fi diferite in functie de sursa de semnal.
1.9 Noise Reduction
Acesta setare este folosita pentru a elimina zgomotul de imagine si a obtine o imagine mai
buna
Optiuni disponibile: Oprit, Slab, Mediu, Puternic.
2. Sunet
2.1 Mod Sunet
Optiuni disponibile: Standard, Muzica, Personal, Voce, Film.
2.2 Joase
Acesta setare este folosita pentru ajustarea valorii sunetelor joase de la 0 la 100
2.3 Inalte
Acesta setare este folosita pentru ajustarea valorii sunetelor inalte de la 0 la 100.
Nota: Valoarea sunetelor Inalte sau Joase poate fi modificata doar in modul de sunet
Personal.
2.4 Balans
Acesta setare este folosita pentru ajustarea balansului audio intre difuzoarele din stanga si
dreapta. Setare posibila de la 0 la 100.
Page 68
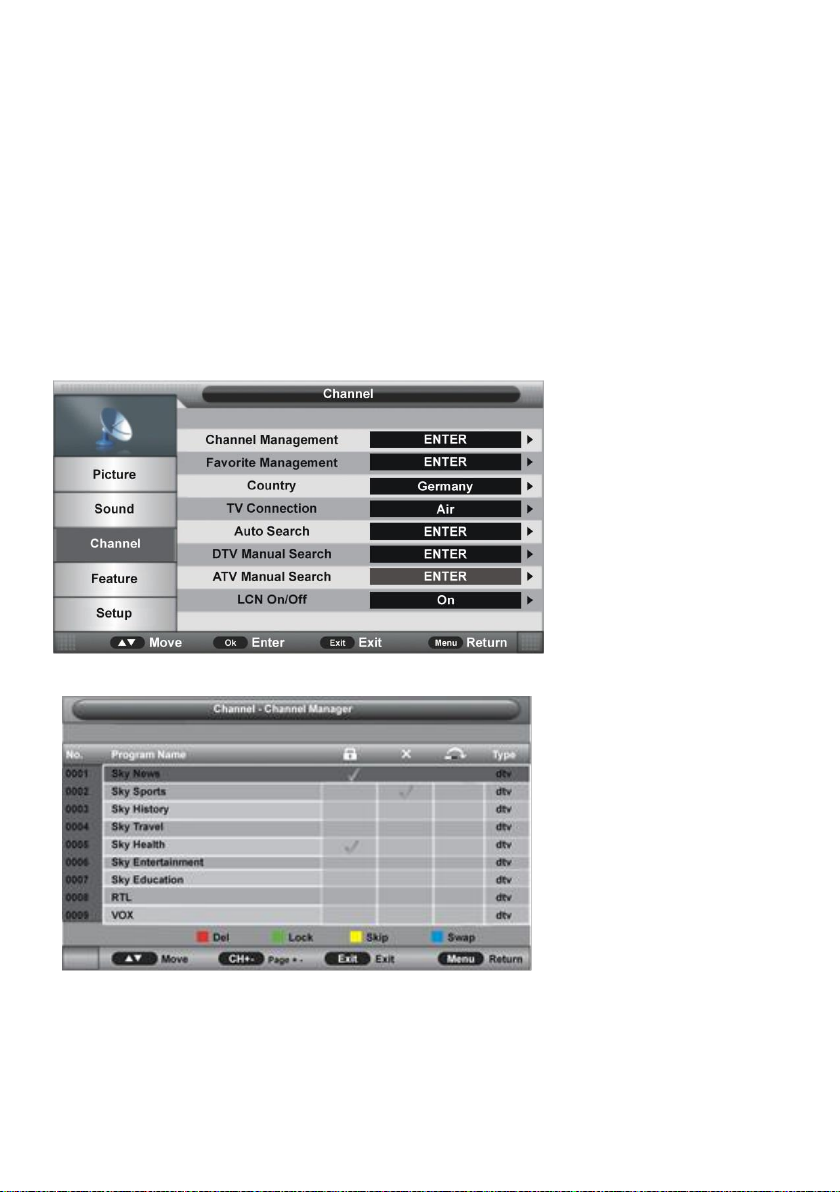
67
2.5 AVL (Nivel Audio Automat)
Acesta setare este folosita pentru activarea/dezactivarea functiei AVL.
2.6 SPDIF
Acesta setare este folosita pentru selectarea tipului de iesire audio SPDIF.
Optiuni disponibile: Oprit, PCM, Auto.
2.7 Descriere Audio
- Pentru a Activa/Dezactiva modul Descriere Audio Pentru utilizatorii cu handicap de vedere,
modul Descriere Audio ii poate ajuta sa inteleaga anumite scene sa actiuni cu ajutorul
nararii, si nu vazand imaginea.
Nota: Acest mod este disponibil doar pe programele care contin informatii narate.
3. Canal
3.1 Managementul canalelor
- Apasati butoanele SUS/JOS pentru a selecta acest element și apăsați butonul de navigare
OK sau DREAPTA pentru a intra în submeniu.
- Apasati butoanele SUS/JOS pentru a selecta programul preferat.
a) Apăsați butonul ROSU de pe telecomandă și utilizați butoanele numerice pentru a
introduce parola. Apoi apăsați butonul ROSU pentru a adăuga/elimina marcarea
Page 69
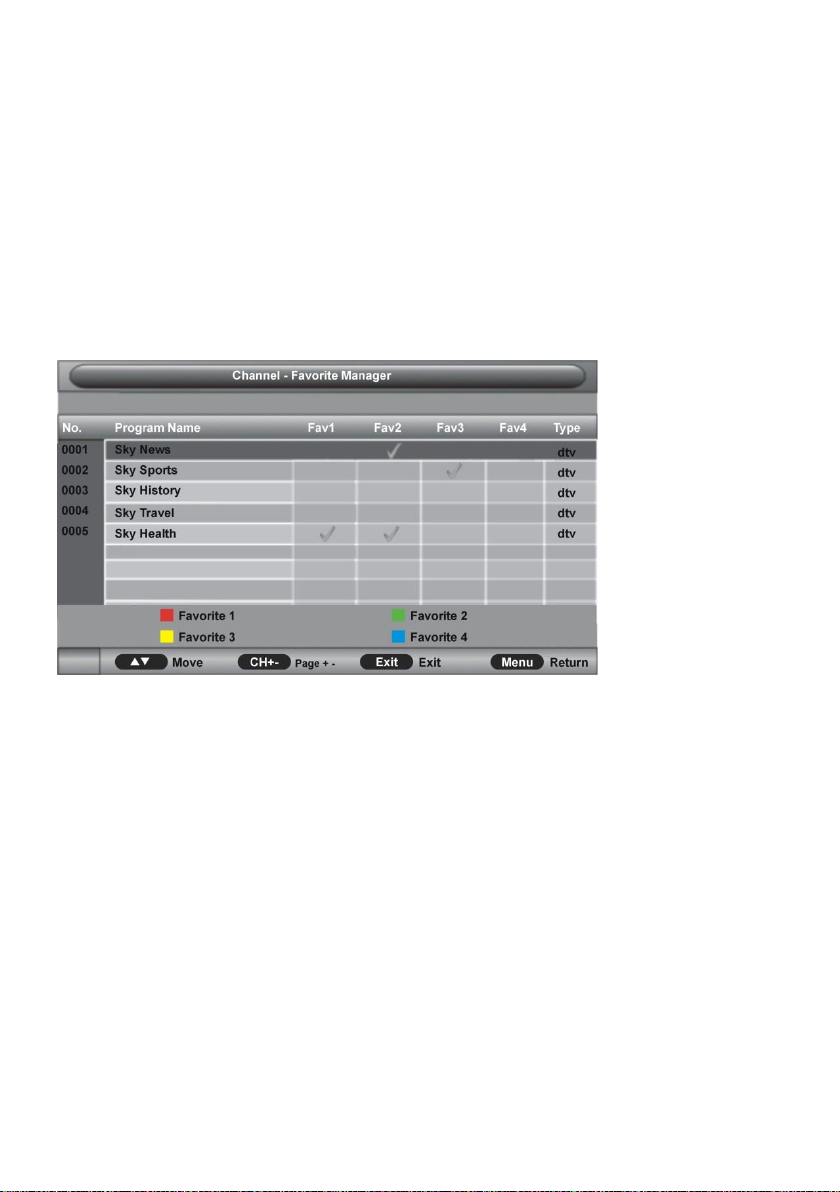
68
programului evidențiat. După aceea, apăsați butonul OK pentru a afisa o fereastra. Selectați
OK pentru a o șterge; Selectați Anulare pentru a anula această operație.
b) Apăsați butonul VERDE de la telecomandă și utilizați butoanele numerice pentru a
introduce parola. Apoi apăsați butonul VERDE pentru a bloca / debloca un program.
c) Apăsați butonul GALBEN de pe telecomandă pentru a adăuga / elimina marcajul de
ignorare.
d) Apăsați butonul ALBASTRU de pe telecomandă pentru a intra în modul MOVE. Apoi
folosiți butoanele SUS / JOS pentru a selecta poziția preferată și apăsați butonul OK pentru
a-l muta.
3.2 Managementul programe favorite
- Apăsați butoanele SUS / JOS pentru a selecta programul preferat.
a) Apăsați butonul ROSU din telecomandă pentru a adăuga canalul evidențiat în lista
Favorite 1.
b) Apăsați butonul VERDE de pe telecomandă pentru a adăuga canalul evidențiat în lista
Favorite 2.
c) Apăsați butonul GALBEN de pe telecomandă pentru a adăuga canalul evidențiat în lista
Favorite 3.
d) Apăsați butonul ALBASTRU de pe telecomandă pentru a adăuga canalul evidențiat în
lista Favorite 4.
3.3 Țara
Acest element este utilizat pentru a selecta țara în care locuiți.
3.4 Conexiune TV
Acest element este utilizat pentru a selecta tipul de conexiune al televizorului.
Opțiuni disponibile: Terestru, Cablu.
3.5 Cautare Automata
- Apăsați butoanele SUS / JOS pentru a selecta acest element și apăsați butonul de navigare
OK sau DREAPTA pentru a intra în submeniu.
Page 70
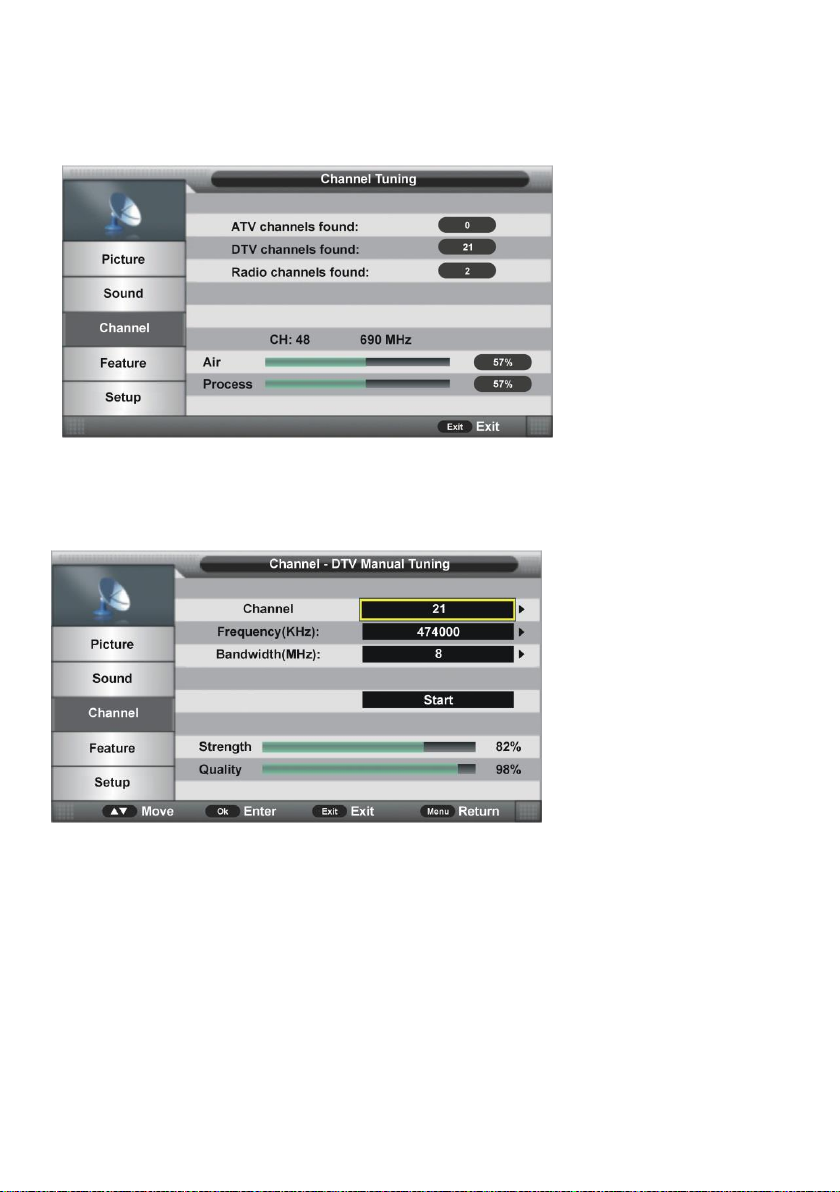
69
- Apoi apăsați butonul SUS / JOS pentru a selecta toate, DTV sau ATV - uri și apăsați butonul
de navigare OK sau DREAPTA pentru a confirma. Selectați OK pentru a începe căutarea
automată; Selectați Anulare pentru a anula această operație.
Pentru a anula cautarea automată, apăsați butonul MENIU sau EXIT și selectați OK.
3.6 Căutarea manuală digitală
Când conexiunea TV este „Terestra”:
3.61 Canal
- Apăsați butonul OK sau DREAPTA pentru a intra în submeniu și apăsați butonul de
navigare SUS/JOS pentru a selecta programul preferat
3.62 Frecventa (KHz)
- Apăsați butonul OK sau DREAPTA pentru a intra în submeniu.
- Apăsați butonul de navigare STÂNGA / DREAPTA pentru a muta cursorul; Apăsați
butoanele numerice de pe telecomandă pentru a introduce valoarea dorită.
3.63 Lățimea de bandă (MHz)
- Apăsați butonul OK sau DREAPTA pentru a intra în submeniu și apăsați butonul de
navigare SUS/JOS pentru a selecta lățimea de bandă preferată.
Page 71
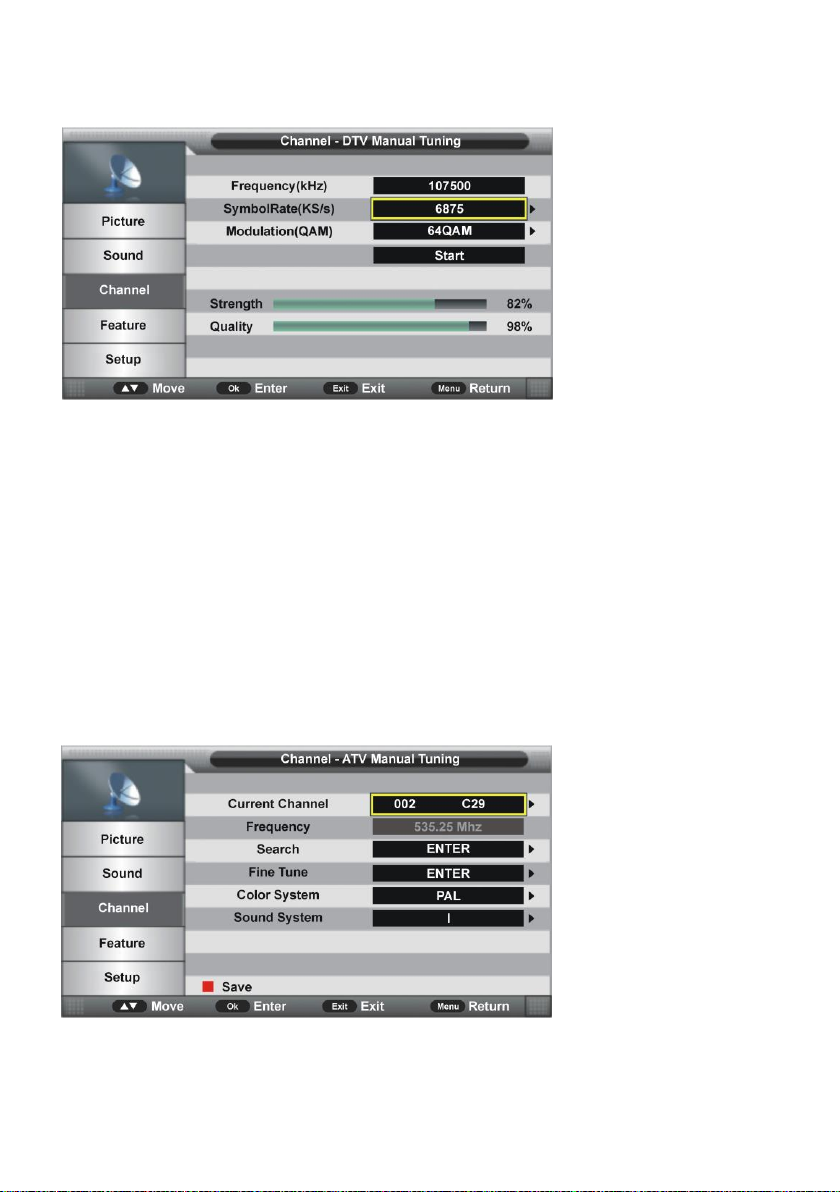
70
Când conexiunea TV este prin cablu:
3.64 Frecventa (KHz)
Acest element nu este reglabil de utilizator.
3.65 Rata Simboluri (KS / s)
- Apăsați butonul OK sau DREAPTA pentru a intra în submeniu.
- Apăsați butonul de navigare STÂNGA / DREAPTA pentru a muta cursorul; Apăsați
butoanele numerice de pe telecomandă pentru a introduce valoarea dorită.
3.66 Modularea (QAM)
- Apăsați butonul OK sau DREAPTA pentru a intra în submeniu și apăsați butonul de
navigare SUS/JOS pentru a selecta modulația preferată.
După finalizarea setărilor din partea 3.64 la partea 3.66, selectați Start din meniu și apăsați
butonul OK pentru a începe căutarea.
3.7 ATV Cautare Manuala (pentru sursa de intrare ATV)
3.71 Canal curent
- Apăsați butonul OK sau DREAPTA pentru a intra în submeniu și apăsați butonul de
navigare SUS/JOS pentru a selecta programul preferat.
Page 72
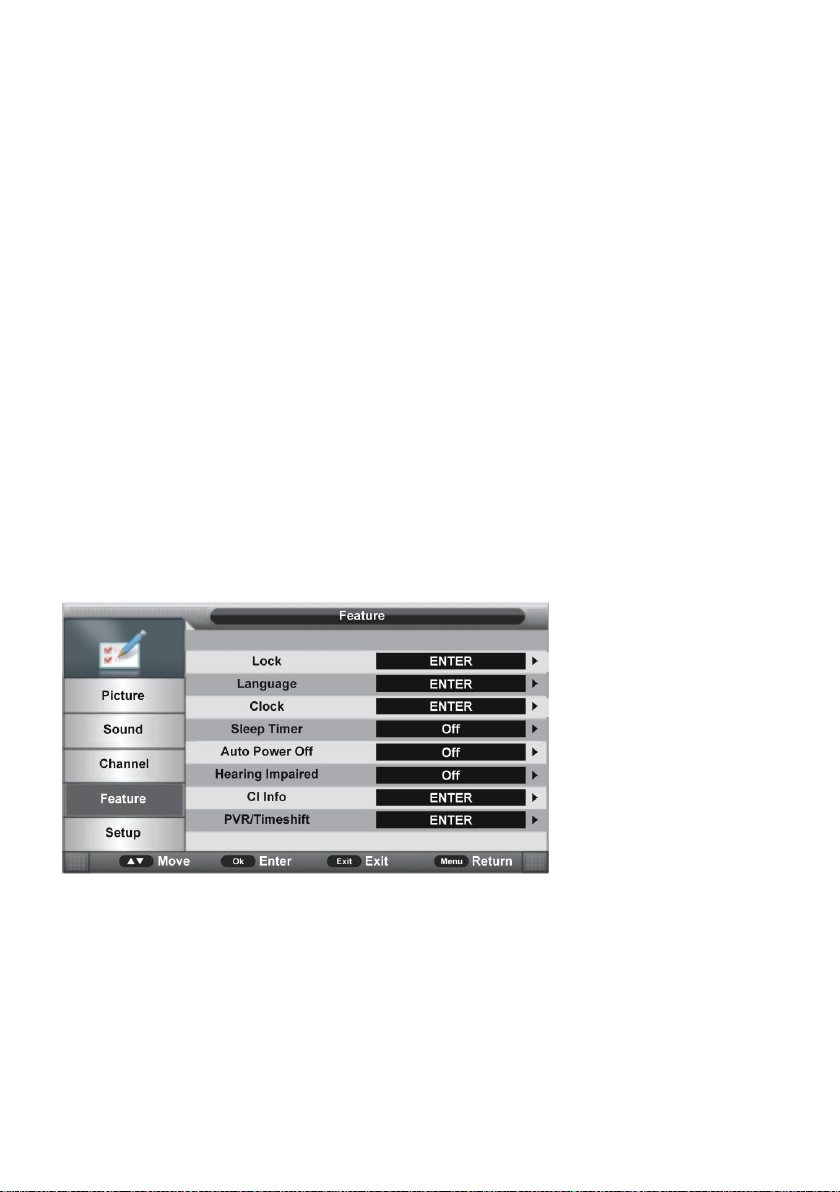
71
3.72 Frecvența
Acest element nu este reglabil de utilizator.
3.73 Căutare
Acest element este folosit pentru a începe căutarea.
3.74 Reglaj Fin
- Apăsați butonul OK sau DREAPTA pentru a intra în submeniu și apăsați butonul de
navigare STÂNGA / DREAPTA pentru a regla fin.
3.75 Sistem de culoare
- Apăsați butonul OK sau DREAPTA pentru a intra în submeniu și apăsați butonul de
navigare SUS/JOS pentru a selecta sistemul de culoare preferat.
Opțiuni disponibile: Auto, PAL, SECAM.
3.76 Sistem de sunet
- Apăsați butonul OK sau DREAPTA pentru a intra în submeniu și apăsați butonul de
navigare SUS/JOS pentru a selecta sistemul de sunet preferat.
Opțiuni disponibile: BG, DK, I, L, L '.
NOTĂ: Opțiunile sistemului de sunet pot varia în funcție de diferitele setări ale sistemului de
culoare.
3.8 LCN On / Off
Acest element este folosit pentru a activa / dezactiva LCN (Număr logic canal).
4. Caracteristici
4.1 Blocare
- Apăsați butonul OK sau DREAPTA pentru a intra în submeniu.
- Introduceți parola implicită din fabrică „0000“ cu ajutorul butoanelor numerice de pe
telecomandă.
NOTĂ: Puteți utiliza parola universală „8899“ în cazul în care uitați parola.
- Apăsați butonul de navigare SUS/JOS pentru a selecta elementul preferat.
Page 73
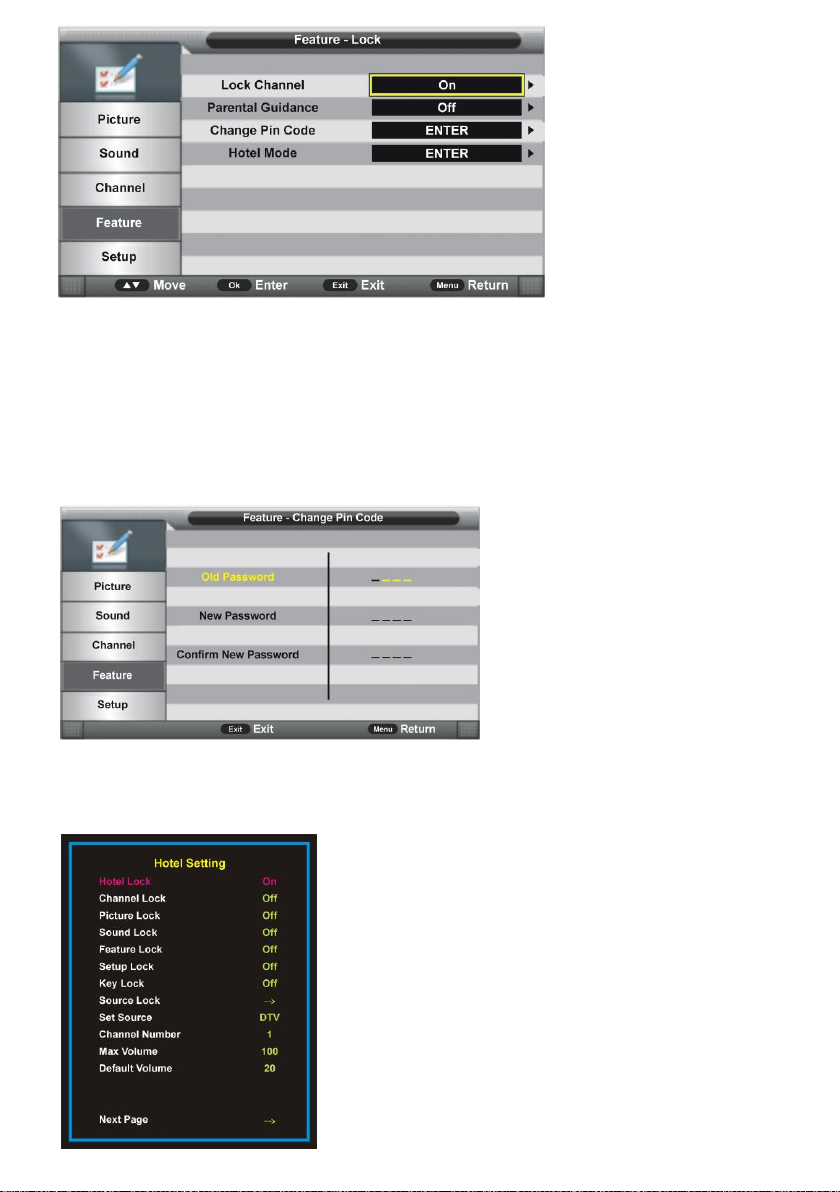
72
4.11 Blocare canal
Acest element este folosit pentru a activa / dezactiva funcția Blocare canal.
4.12 Ghidare Parentala
- Apăsați butonul OK sau DREAPTA pentru a intra în submeniu și apăsați butonul de
navigare SUS/JOS pentru a selecta opțiunea preferată.
Opțiuni disponibile: Oprit, 3-18.
4.13 Modificați codul PIN
- Apăsați butonul OK sau DREAPTA pentru a intra în submeniu.
- Introduceți parola veche, parola nouă și confirmați parola nouă. După aceasta, TV-ul va
salva automat noua parolă.
4.14 Mod Hotel
- Apăsați butonul OK sau DREAPTA pentru a intra în
submeniu.
- Apăsați butonul de navigare SUS/JOS pentru a selecta
elementul dorit.
- Apăsați butonul STÂNGA / DREAPTA pentru a regla
valoarea.
- Apăsați butonul OK sau DREAPTA pentru a intra în
submeniu.
- Apăsați butonul MENU pentru a reveni la pagina
anterioară.
Page 74
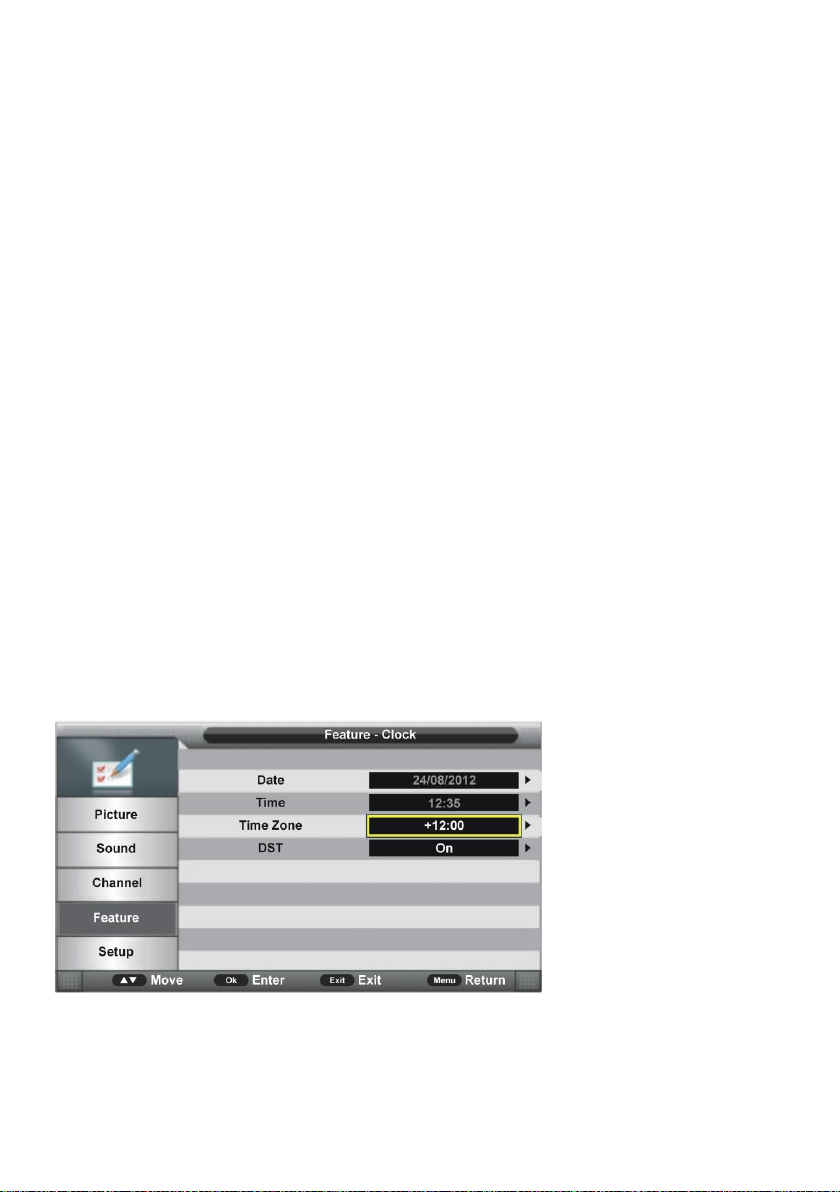
73
Sfat: Vă recomandăm cu tărie să utilizați Modul Hotel doar în hoteluri și să- l ignorați dacă
luați acest televizor numai pentru uz casnic.
Hotel Lock: Activați / dezactivați modul Hotel Lock.
Blocare Canal: Pornire / Oprire blocare meniu canale.
Blocare Imagine: Pornire / Oprire blocare meniu Imagine.
Blocare Sunet: Pornire / Oprire blocare meniu de sunet.
Blocare Caracteristici: Pornire / Oprire blocare meniu caracteristici.
Blocarea setărilor: Activează / dezactivează blocarea meniului Setare.
Blocare taste: Pornire / Oprire Blocare taste.
Blocare Surse: Activare / dezactivare blocare surse disponibile.
Setare Sursă: Selectați sursa dorită.
Număr canale: Selectați canalul dorit.
Volum maxim: Setați volumul maxim.
Volum Implicit: Setați volumul implicit.
Stergere Blocare: Ștergeți setările de mai sus.
Export DataBase: export baza de date către alte dispozitive.
Import DataBase: Import baze de date de la alte dispozitive.
4.2 Limba
- Apăsați butonul OK sau DREAPTA pentru a intra în submeniu. Apoi selectați cu ajutorul
butoanelor de navigare limba preferată pentru meniul OSD, limba de subtitrare, limbă audio,
și limba DTV / ATV /TELETEXT.
4.3 Ceas
- Apăsați butonul OK sau DREAPTA pentru a intra în submeniu.
- Apăsați butonul de navigare SUS/JOS pentru a selecta elementul preferat.
4.31 Data
Când se efectuează căutarea automată, această unitate va primi data de la sursa de semnal
și va salva automat.
Page 75
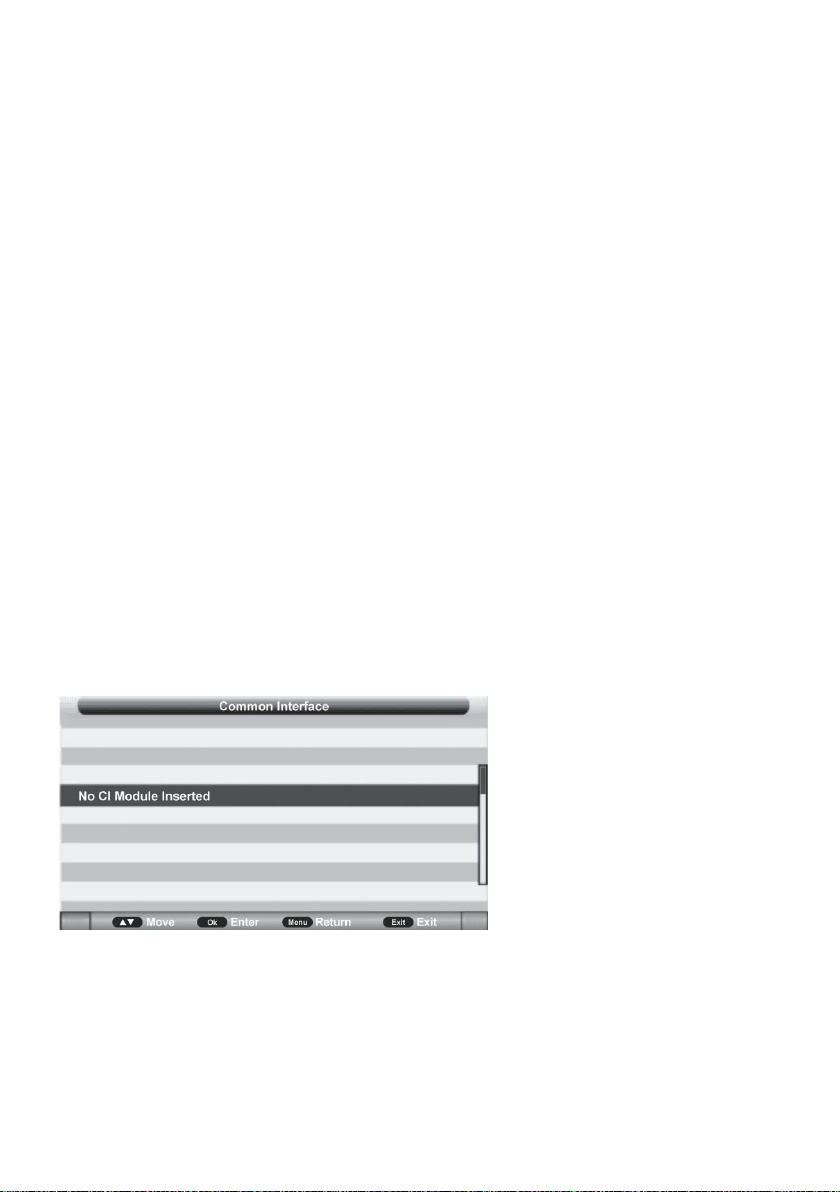
74
4.32 Ora
Când se efectuează căutarea automată, această unitate va primi ora de la sursa de semnal
și va salva automat.
4.33 Fus orar
- Apăsați butonul OK sau DREAPTA pentru a intra în submeniu și apăsați butonul de
navigare SUS/JOS pentru a selecta opțiunea preferată.
4.34 DST (ora de vară)
Acest element este folosit pentru a activa / dezactiva funcția DST.
4.4 Oprire programata
Acest element este folosit pentru a seta oprirea programata.
Opțiuni disponibile: Oprit, 10 Min, 20 Min, 30 Min, 60 Min, 90 Min, 120 Min, 180 Min, 240 Min.
4.5 Oprirea automată
Acest element este utilizat pentru a seta timpul de oprire automată.
Opțiuni disponibile: Oprit, 1 oră, 2 ore, 4 ore.
4.6 Descriere Audio
- Pentru a Activa/Dezactiva modul Descriere Audio Pentru utilizatorii cu handicap de vedere,
modul Descriere Audio ii poate ajuta sa inteleaga anumite scene sau actiuni cu ajutorul
nararii, si nu vazand imaginea. Nota: Acest mod este disponibil doar pe programele care
contin informatii narate.
4.7 Info CI
Acest element este folosit pentru a afișa informațiile CI.
4.8 PVR / Timeshift
- Apăsați butonul OK sau DREAPTA pentru a intra în submeniu.
- Apăsați butonul de navigare SUS/JOS pentru a selecta elementul preferat.
Page 76
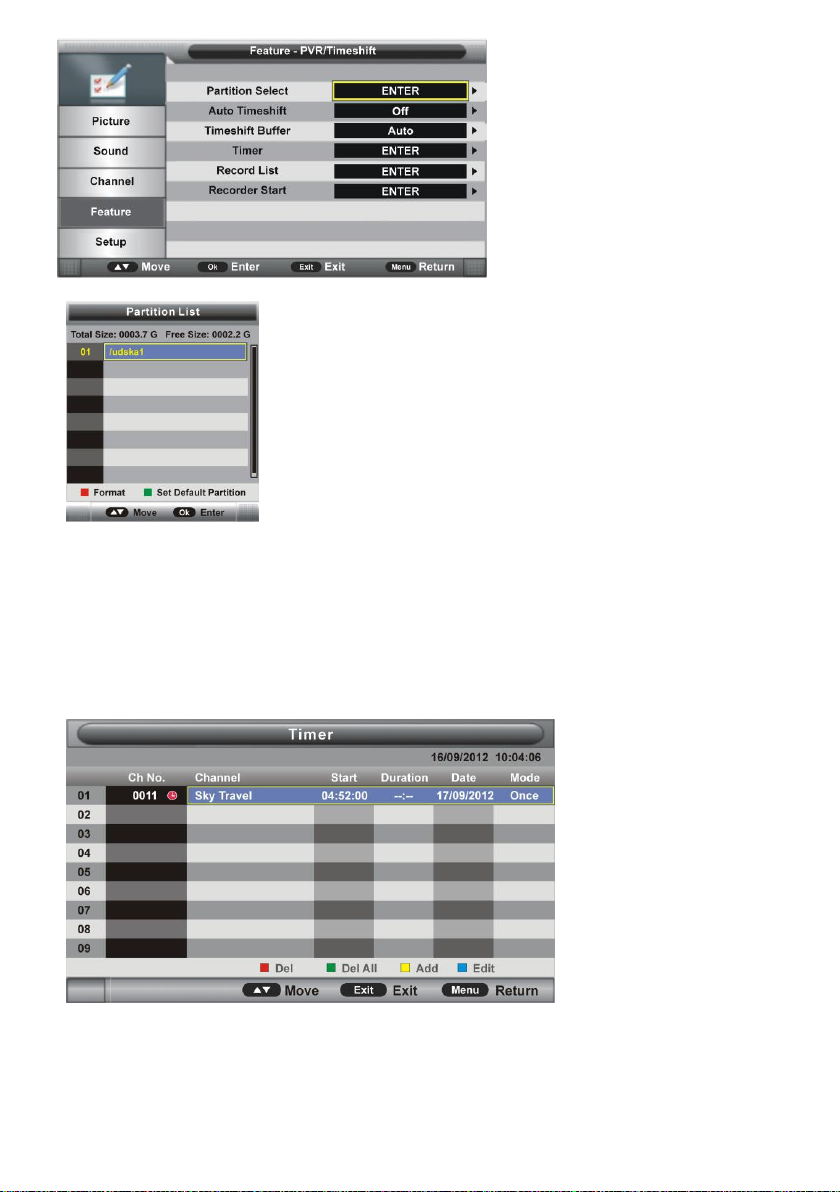
75
4.81 Selectare partiție
- Apăsați butonul OK sau DREAPTA pentru a intra în submeniu.
- Apăsați butonul ROSU și apoi selectați OK pentru a formata
dispozitivul de memorie USB.
- Apăsați butonul VERDE pentru a seta partiția implicită.
4.82 Timeshift automat
Acest element este folosit pentru a activa / dezactiva funcția Auto Timeshift.
4.83 Timeshift Buffer
Acest element este folosit pentru a selecta durata dorită a buffer-ului
Opțiuni disponibile: Auto, 30 Min, 1 oră, 2 ore.
4.84 Timer
- Apăsați butonul OK sau DREAPTA pentru a intra în submeniu.
- Apăsați butonul ROȘU de pe telecomandă pentru a șterge opțiunea evidențiată.
- Apăsați butonul VERDE de la telecomandă pentru a șterge toate optiunile.
- Apăsați butonul BLUE de pe telecomandă pentru a intra în pagina Editare.
Page 77
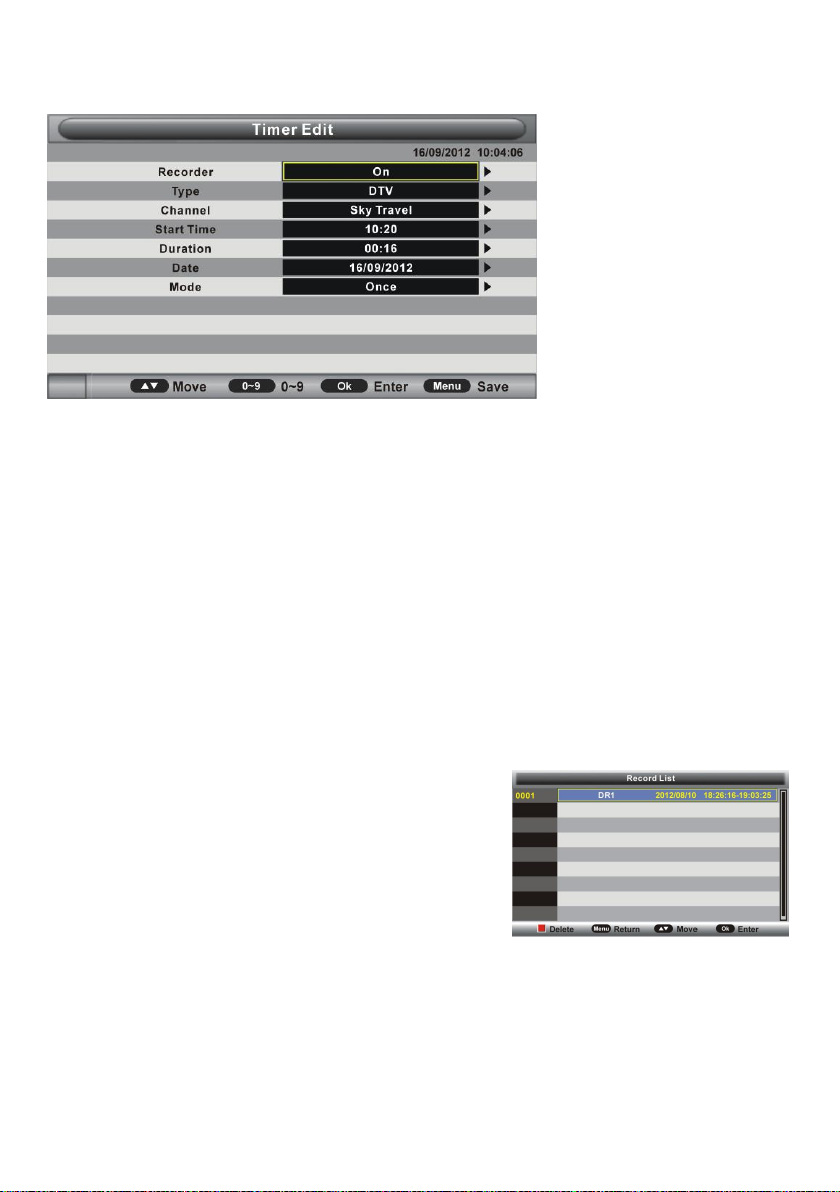
76
- Apăsați butonul GALBEN din telecomandă pentru a accesa pagina Adăugare.
Recorder: Pornire / Oprire Inregistrare.
Tip: Selectați tipul de înregistrare: DTV, Radio.
Canal: Selectați un canal pe care doriți să înregistrați.
Ora de începere: Setați ora de începere înregistrare.
Durată: Setați durata de înregistrare.
Data: Setați data înregistrării.
Mod: Setați modul de înregistrare.
NOTĂ: Pentru a schimba afișajul numeric al elementelor de mai sus, apăsați butonul OK
pentru a introduce și apoi butonul STÂNGA / DREAPTA de navigare pentru a muta cursorul;
Utilizați butoanele numerice pentru a introduce valoarea dorită și apăsați butonul OK pentru
a confirma setarea.
4.85 Lista de înregistrări
- Apăsați butonul OK sau DREAPTA pentru a intra în submeniu.
- Apăsați butonul de navigare SUS/JOS pentru a
selecta fișierele înregistrate și apăsați butonul OK
pentru a începe redarea.
4.86 Începerea înregistrării
Acest element este folosit pentru a începe înregistrarea
când vizionați un program digital disponibil.
NOTĂ: Înainte de a înregistra, introduceți dispozitivul
de memorie USB în slotul USB 1.
4.9 HDMI Link
- Apăsați butonul OK sau DREAPTA pentru a intra în submeniu.
- Apăsați butonul de navigare SUS/JOS pentru a selecta elementul preferat.
Page 78
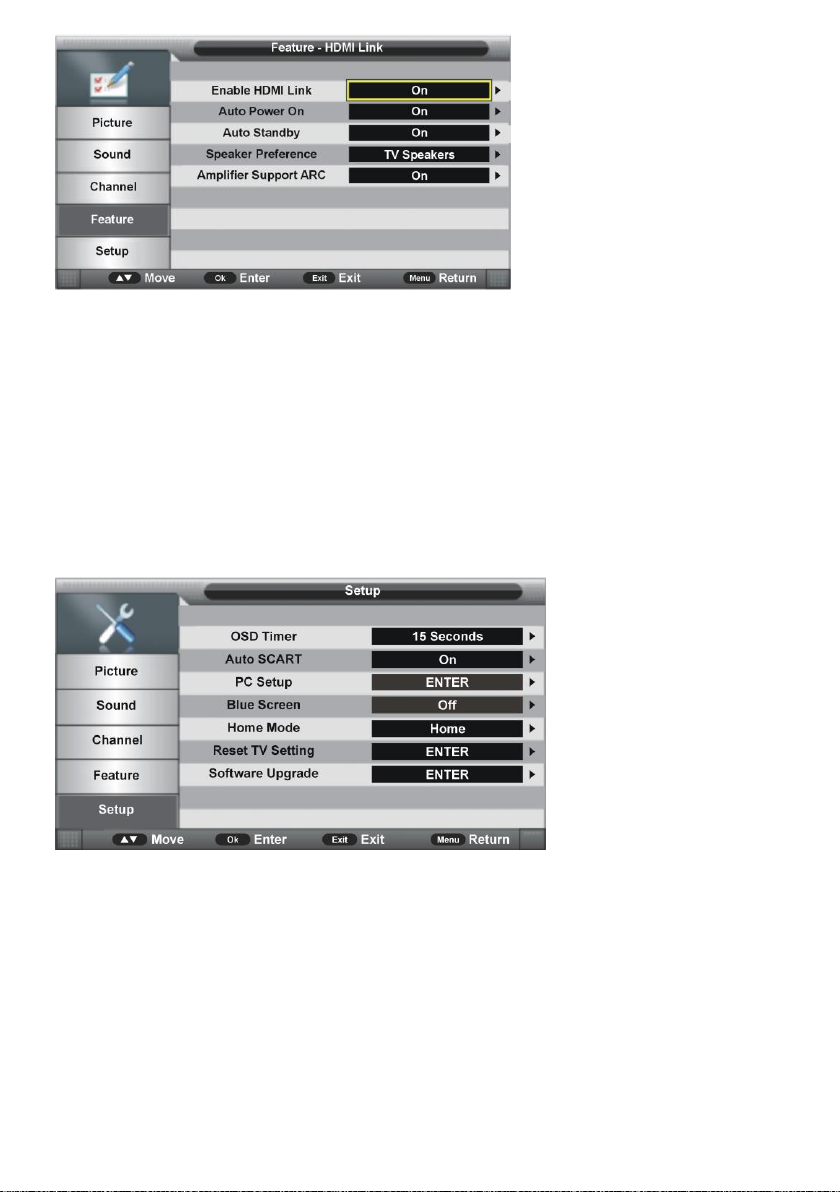
77
Pentru a utiliza Funcția „HDMI Link“:
- Asigurați-vă că dispozitivul HDMI (amplificatoare, etc.) este conectat corect și dispozitivul
HDMI trebuie să accepte HDMI CEC (Consumer Electronics Control).
- Apăsați butonul SOURCE de pe telecomandă pentru a selecta HDMI ca sursa de intrare.
Activează HDMI Link: activeaza / dezactiveaza HDMI Link.
Auto Power On: activeaza / dezactiveaza Auto Power On funcția.
Auto Standby: activați funcția de pornire / oprire automată.
Iesire audio: Selectați Difuzoare TV sau Amplificator ca preferință.
Amplificator Suport ARC (HDMI 3): activeaza / dezactiveaza funcția AR C.
5. Configurare
5.1 Afisare OSD
- Apăsați butonul OK sau DREAPTA pentru a intra în submeniu și apăsați butonul de
navigare SUS/JOS pentru a selecta opțiunea preferată.
Opțiuni disponibile: 5/10/15 / 20/25/30 de secunde și niciodată.
5.2 Auto SCART
Acest element este folosit pentru a activa / dezactiva funcția Auto SCART. Dacă este activat
modul Auto SCART, puteți vizualiza programele automat prin SCART când este conectat
cablul SCART.
Page 79
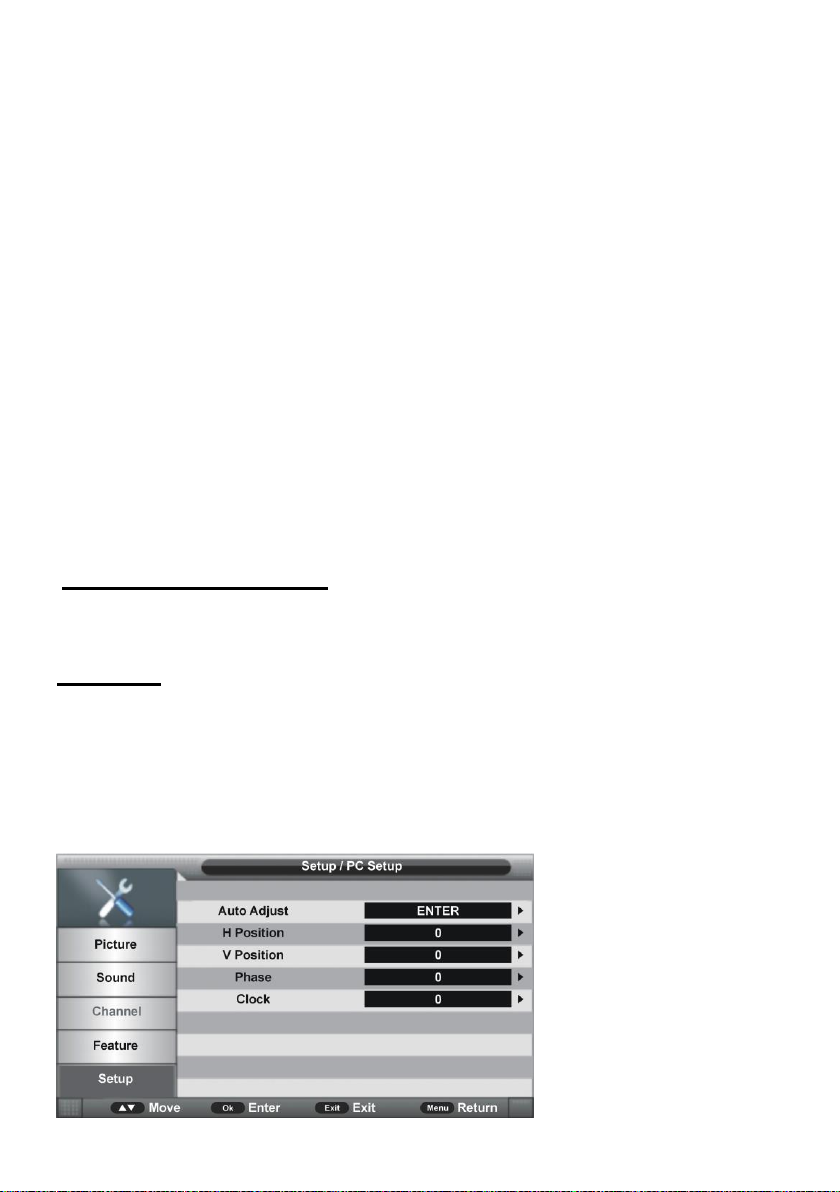
78
5.3 Configurarea PC-ului (numai pentru sursa de intrare PC)
Acest element este reglabil numai cu semnalul de intrare PC.
5.4 Ecran albastru
Acest element este folosit pentru a activa / dezactiva funcția de fundal albastru. Fundalul
ecranului va deveni albastru la stare foarte slabă sau niciun semnal, în cazul în care ecranul
albastru este PORNIT.
NOTĂ: Acest element nu este reglabil în modul DTV.
5.5 Modul Acasă
Acest element este utilizat pentru a selecta modul imagine dorit.
Opțiuni disponibile: Acasă, Dinamic, Standard, Usor.
5.6 Resetați setarea TV
Acest element este utilizat pentru a reveni la setările implicite din fabrică.
5.7 Actualizarea software-ului
Acest element este utilizat pentru a actualiza software-ul TV prin intermediul dispozitivului de
memorie USB.
ATV ȘI ALTE MODURI
- Apăsați butonul SOURCE de telecomandă pentru a selecta sursa de intrare dorită.
- Pentru aceste moduri, vă rugăm să consultati manualul pentru modul DTV.
MOD PC
- Conectați un calculator personal la acest aparat.
- Porniți computerul și TV-ul.
- Apăsați butonul SOURCE de telecomandă pentru a selecta sursa de intrare PC.
- Apăsați butonul MENU pentru a afișa meniul principal. Selectați Configurare utilizând
butonul de navigare SUS/JOS. Apoi apăsați OK sau DREAPTA butonul de navigare pentru a
intra în submeniu.
- Selectați PC Setup.
Page 80
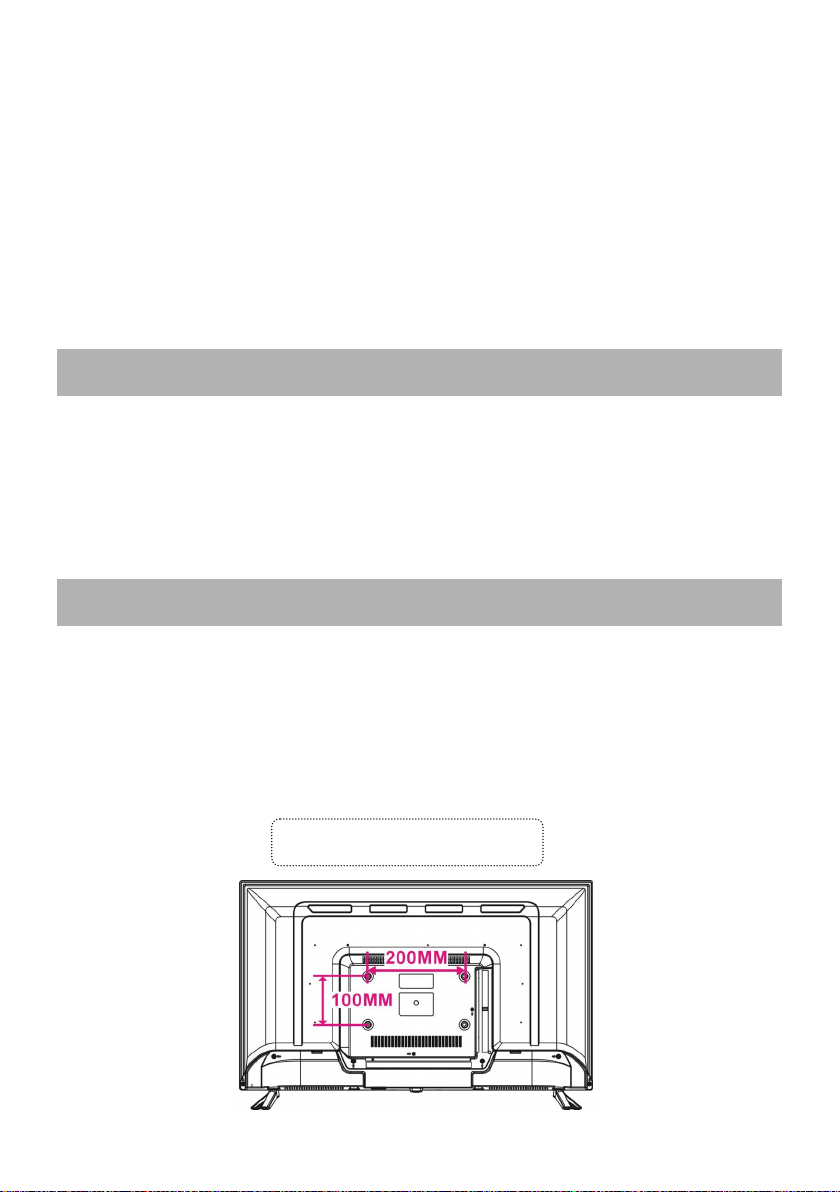
79
- Apăsați butonul de navigare SUS/JOS pentru a selecta elementul preferat.
INTRETINERE
MONTAREA PE PERETE
Vedere din spate a TV-ului
- Apăsați butonul OK sau DREAPTA pentru a intra în submeniu. Apăsați butonul de navigare
LEFT / RIGHT pentru a regla valoarea.
1. Reglarea automată - Acest element este folosit pentru a ajusta ecranul PC - ului
automat.
2. Poziția H - Acest element este utilizat pentru ajusta pozitia orizontala.
3. Poziția V - Acest element este folosit pentru a ajusta pozitia verticală.
4. Faza - Acest element este folosit pentru a ajusta imaginea emisa catre televizor.
5. Ceas - Acest element este utilizat pentru a regla viteza de transfer de semnale.
NOTĂ: Pentru alte meniuri, vă rugăm să consultați operațiunile modului DTV.
●Asigurați-vă că apăsați butonul POWER pentru a seta TV-ul în modul Standby și
deconectați ștecharul înainte de a curata TV-ul.
●Nu folosiți niciodată alcool, benzen, diluant, lichid de curățare sau alte substanțe chimice.
Nu utilizați aer comprimat pentru a îndepărta praful.
● Ștergeți TV-ul cu o cârpă uscată și moale, zgarieturile prezente pe display nu fac
obiectul garantiei .
●Contactați un profesionist pentru asistență atunci când montați televizorul pe perete. Nu
suntem responsabili pentru eventuale deteriorări ale produsului sau vătămări suferite de
dvs. dacă montați televizorul pe cont propriu.
●Nu montați televizorul pe perete în timp ce televizorul este pornit. Poate cauza vătămări
corporale datorate șocurilor electrice.
●Pentru montarea acestui televizor folosiți șuruburi standard M6 * 10mm (4 bucăți).
●Se recomanda utilizarea suporturilor TV compatibile VESA (mm):200X100
Page 81
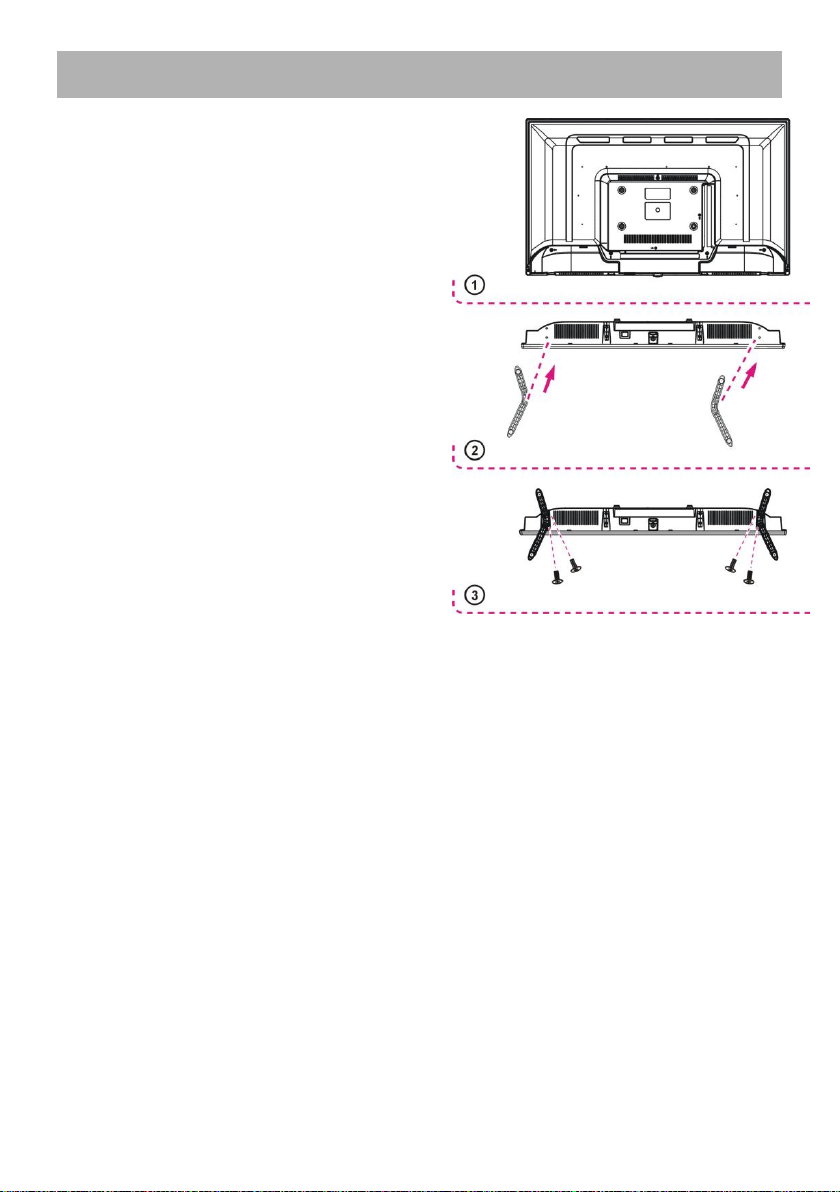
80
MONTAREA STANDULUI
Este posibil ca televizorul dvs. să fie ambalat cu
Standul separat. Înainte de a utiliza acest
televizor, vă rugăm să efectuați Montarea
Standului conform instrucțiunilor de mai jos.
Pasul 1 - Plasați televizorul cu fața în jos pe o
cârpă sau o pernă moale pentru a preveni
deteriorarea ecranului.
Pasul 2 - Aliniați Standul cu baza televizorului
și apoi forțați capătul suportului până când
televizorul este așezat complet pe suport.
Pasul 3 - Strângeți șuruburile incluse cu o
șurubelniță.
NOTE:
- Deconectați mai întâi cablul de alimentare de
la priza atunci când instalați sau scoateți
suportul televizorului.
- Pentru a evita deteriorarea acestui televizor,
contactați unul sau mai mulți parteneri pentru
asistență la instalarea sau scoaterea suportului televizorului.
Page 82

81
DECLARATIE DE CONFORMITATE
No 1567
Noi S.C.Visual Fan S.R.L, cu sediul social in Brasov, Str. Brazilor nr.61, CP 500313 Romania,
inregistrata la Reg. Com. Brasov sub nr. J08/818/2002, CUI RO14724950, in calitate de importator,
asiguram, garantam si declaram pe proprie raspundere, conform prevederilor art. 4 HG nr. 325/2017
privind regimul produselor si serviciilor, care pot pune in pericol viata si sanatatea, securitatea si
protectia muncii, ca produsul 32ATC5000-H-SB marca ALLVIEW, nu pune în pericol viata, sanatatea,
securitatea muncii, nu produce impact negativ asupra mediului si este in conformitate cu:
- Directiva nr. 2011/65/UE modificata de 2014/8/UE privind restrictiile de utilizare a anumitor substante
periculoase in echipamentele electrice si electronice.
-Directiva privind echipamente radio si de telecomunicatii RED 2014/53/CEE (HG 487/2016)
- Directiva 2014/35/UE privind asigurarea utilizatorilor de echipamente de joasa tensiune
- Directiva cu privire la compatibilitatea electromagnetica 89/336/CEE, modificate de Directiva
92/31/CEE si 93/68/CEE (HG982/2007); RoHS: EN50581:2012; 2014/30/EU(HG 487/2016)
-Cerintele de siguranta ale Directivei Europene 2001/95/EC si a standardelor EN
60065:2002/A12:2011 si EN 60950-1:2006/ A1:2010 /A11:2009/A12:2011, referitor la nivelul de
decibeli emis de aparatele comercializate.
Produsul a fost evaluat conform urmatoarelor standarde:
-Sanatate: 2014/35/EU;EN 50360:2001+A1:2012, EN 50361; EN 62209-1 : 2006
-Siguranta: 2014/35/EU; EN 60950- 1 : 2001 +A11:2004; EMC EN 301 489- 01 V1.6.1 (09-2005)
EN 301 489- 07 V1.3.1 (11-2005); EN 301 489- 17 V1.2.1 (08-2002)
-Spectru radio: 2014/35/EU; EN 300 328 V1.7.1 (10-2006)
Procedura de evaluare a conformitatii a fost efectuata in conformitate cu Directiva 2014/53/CEE,
documentatia fiind depozitata la S.C. Visual Fan S.R.L., Brasov str. Brazilor nr.61, CP 500313,
Romania si va fi pusa la dispozitie la cerere. Produsul are aplicat marcajul CE. Declaratia de
conformitate este disponibila la adresa www.allviewmobile.com.
Brasov Director
04.01.2019 Cotuna Gheorghe
Page 83
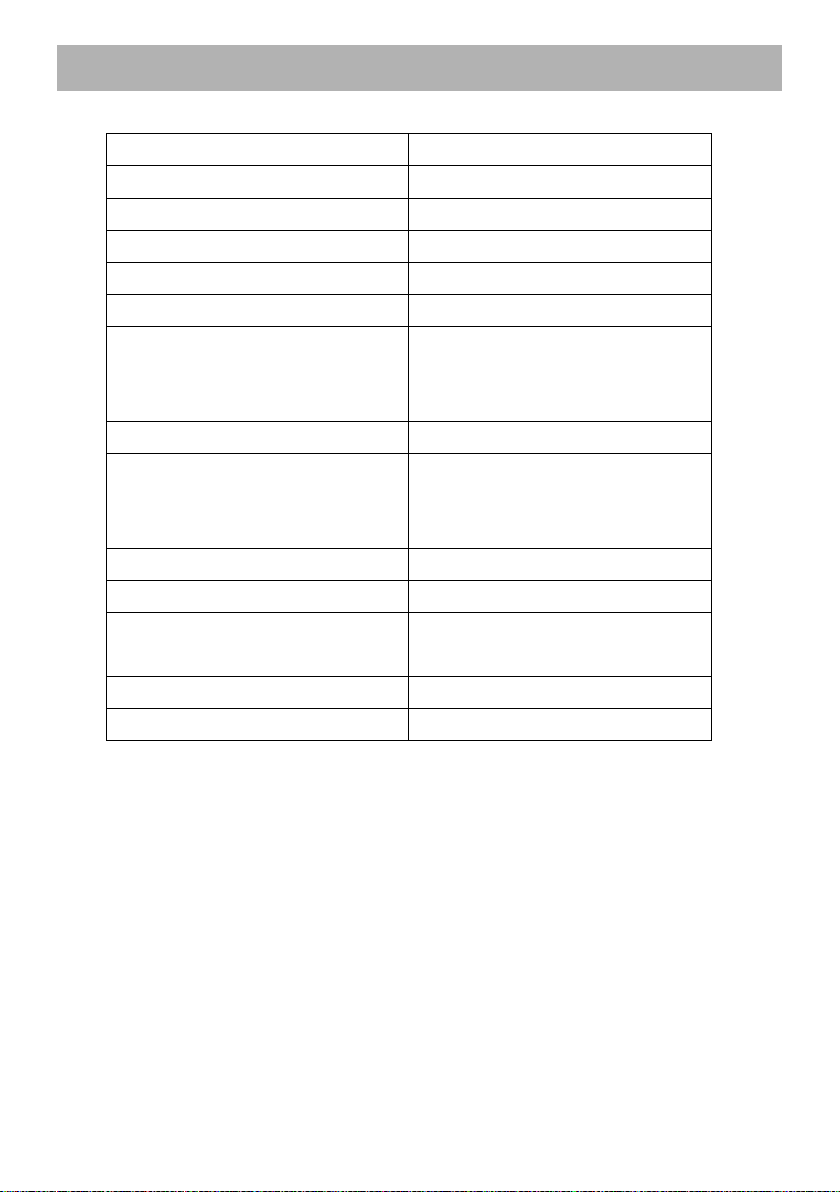
82
Ecran
81 cm LED TV SMART
Rezolutie
1366 x 768 HD
Raport de contrast
800:1
Format ecran
16:9
Sistem culoare
PAL / SECAM
Sistem sunet
BG / DK / I
Intrari
1 x RF, 1x PC Audio, 3 x HDMI,
1 x YPbPr, 2 x USB, 1 x Scart,
1 x AV IN, 1x VGA, 1 x CI+
Iesiri
1 x Jack 3.5mm, Coaxial
USB - formate multimedia
redate
Film, muzica, poze, text (vor
putea fi rulate in functie de
formatul lor)
Alimentare
AC 100-240 V, 50/60 Hz
Consum
<60W
Temperatura de operare
-5 grade Celsius -> + 45 grade
Celsius
Dimensiuni (cu stand) / mm
732(W)×196(D)×512(H)
Greutate
~4.2 kg
SPECIFICAȚII
Nota: Specificațiile pot suferi modificari fara notificare.
Page 84
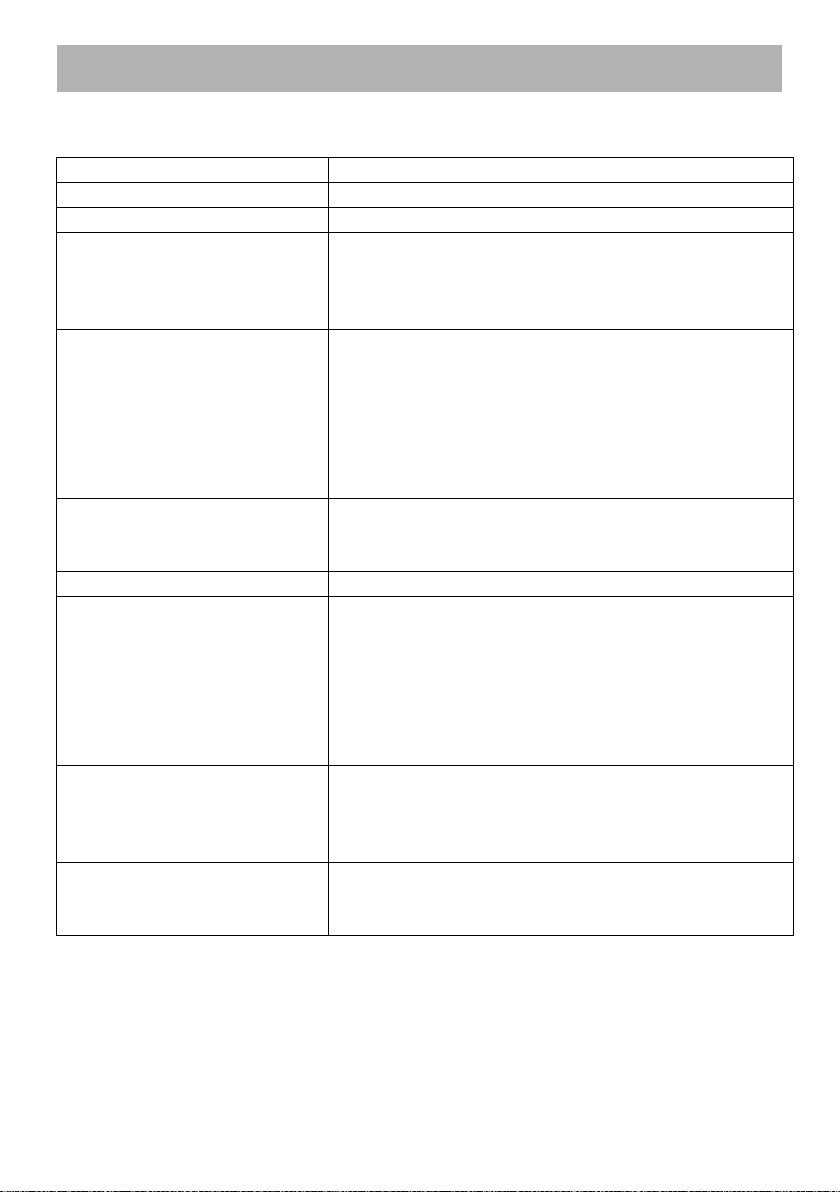
83
Defectiune
Solutie Posibila
TV nu se alimenteaza
Asigurati-va ca ati introdus ștecherul in priza
Fara imagine
Asigurati-va ca aparatul este conectat corespunzator
● Fara sunet.
● Sunet distorsionat.
● Asigurati-va ca aparatul este conectat corespunzator.
● Asigurati-va ca setarile pentru TV si sistemul audio sunt
corecte.
● Ajustati volumul apasand tastele VOL+/VOL-.
Telecomanda nu este
operationala
● Verificati daca bateriile sunt instalate corect.
● Bateriile sunt descarcate: Inlocuiti bateriile
● Indreptati telecomanda spre senzorul TV.
● Utilizati telecomanda de la o distanta mai mica de 6 m
de senzorul TV.
● Indepartati obstacolele dintre telecomanda si senzorul
TV.
Nu funcționează nicio operație
(de la unitatea principală și / sau
de la telecomandă).
Deconectați fișa de alimentare și apoi reconectați-o. (Este
posibil ca aparatul să nu funcționeze corespunzător din
cauza fulgerului, electricității statice sau a altor factori.)
Defectiune (TV)
Solutie Posibila
Fara imagine sau calitate slaba a
imaginii.
● Reglați antena sau utilizați o antenă externă.
● Repoziționați aparatul în apropierea unei ferestre (în
cazul în care se afla interiorul unei clădiri).
● Mutați unitățile care cauzează interferențe de langa
aparat.
● Realizați o noua cautare automata.
● Încercați un alt canal.
Fara sunet sau calitate slaba a
sunetului.
● Verificați setările audio.
● Apăsați butonul MUTE de pe telecomandă pentru a
anula funcția mut.
● Deconectați căștile.
Zgomot sau alte interferente
● Echipamentele electronice din apropierea unității
provoacă interferente.
● Relocati TV-ul sau mutați echipamentul.
PROBLEME SI REZOLVARI
Verificati urmatoarele puncte inainte de a considera ca televizorul este defect:
 Loading...