

Page 1

USER GUIDE
PRE, POWER, INT AND MONO ONE
Page 1
Page 2

Page 2
...a part of AVM-TEC
Page 3

Content
Foreword .............................................................4
Introduction .........................................................4
About this manual ............................................ 4
Turning the Hifi setup on and off* ................ 4
General information ......................................... 5
Getting started .................................................... 6
Unpacking the box ............................................ 6
Specifications .................................................... 6
Pre One ...................................................... 6
Power One ................................................ 6
Int One ....................................................... 6
Using the touch display ....................................7
How to connect an Alluxity product .............7
Power save mode ..............................................7
How to change a broken fuse ........................ 8
Icon Explanation .................................................. 9
The User Interface .............................................10
The Pre/Int One ................................................10
Main Interface .........................................10
Setup Interface ........................................11
The Power One .................................................12
Main Interface .........................................12
How to change Input and Output .......................13
Warranty and replacing parts ...........................14
LIMITED WARRANTY .......................................14
How to get warranty service ........................14
Miscellaneous ...................................................14
Demo equipment .............................................15
WARRANTOR .....................................................15
Replacing parts ................................................15
Warranty outside Denmark ..........................16
Disclaimers .......................................................16
Safety and handling information .......................16
Important safety information .......................16
Handling .............................................................16
Repairing ............................................................16
Page 3
Page 4

Foreword
First of all, thank you for choosing an Alluxity product.
The Alluxity products are built to be very user-friendly and very modern. One of the main focuses has
been making a product that the High-end industry has not seen before, but still being faithful to the ‘old’
techniques; so basically mixing the old school with the new school.
Introduction
About this manual
This is the Alluxity amplifier manual, which covers all of the basics, describes how to connect your
Alluxity product, how to handle it, how to use it and etc. Although some operations are self-explanatory,
we strongly suggest you read this manual before using the products to avoid damaging the unit or yourself.
The manual is designed to be as helpful as possible, and if there is something we have not explained clearly
enough, please let us know.
Turning the Hifi setup on and off*
Always turn on your products beginning from the source:
CD player / Music server > Pre-amplifier > Power-amplifier
Always turn off your products in reverse order:
Power-amplifier > Pre-amplifier > CD player / Music server
*Doing otherwise may cause harm to your equipment.
Page 4
Page 5

General information
There are a few things you should know about the product to prevent damaging it:
• The products are heavy, so be very careful when moving it around. We suggest that you are always 2
people lifting any of the Alluxity products, to prevent dropping it and cause harm to the unit and yourself.
• When any of the Alluxity products have been running for more than 10 minutes, the input and output
selections are saved as the default.
• Pressing the touch display too hard will damage it, and leave a darker area. This damage to the products
is not covered by warranty. We suggest that you use the tip of your finger and/or a bit of your nail.
• The surface is painted with powder coat which is strong paint that is highly scratch and break resistant.
If a sharp object hits the surface this can leave a mark that sometimes can be removed with a wet cloth,
but warranty does not cover any damage done by chemical use.
Page 5
Page 6

Getting started
Unpacking the box
After you have opened the top of the box and gently removed the protecting foam from the top and
from the sides, you can now really gently take out the amplifier.*
*To prevent dropping the product or injuring yourself when lifting an Alluxity product, please do not under
any circumstances lift any Alluxity products yourself. Always be at least two people to lift the product.
Specifications
Pre One
Inputs : Total of 5 – 2x Unbalanced RCA and 3x Balanced XLR
Outputs : Total of 3 – 1 x RCA, 1 x XLR and a Bypass out (RCA)
Dimensions: 43.5 x 10.5 x 31.5 cm / 7.1 x 4.1 x 12.4 inch
Weight : 14,0 Kg / 30 Pounds
Power One
Inputs : 2 – 1 x RCA and 1x XLR
Dimensions: 43.5 x 10.5 x 48 cm / 7.1 x 4.1 x 18.9 inch
Weight : 31.0 Kg / 83.0 Pounds
Int One
Inputs : Total of 5 – 3x Unbalanced RCA and 2x Balanced XLR
Dimensions: 43.5 x 10.5 x 31.5 cm / 17.1 x 4.1 x 12.4 inch
Weight : 17.5 Kg / 38.5 Pounds
Page 6
Page 7
Using the touch display
All the Alluxity products uses a 5 inch, 800 x 480 pixels resistive touch display, which means that the
display does not react as well to a finger touch as your average touch mobile phone. This means that you
will have to press gently on the display with the tip of your finger and/or with you fingernail.
Pressing too hard in the display will cause damage to it.
If you experience that there is no reaction from the touch display, do not increase the pressure,
but contact the nearest Alluxity cooperating partner.
How to connect an Alluxity product
When connecting an amplifier it’s very important not to switch around input and output.
Doing so will cause harm to the product.
To connect your Pre One properly, make sure that you take the left and right output from your
source and connect it to the same left and right input on the Pre One.
Right
Left
The inputs must be either left and right RCA 1 or 2, XLR 1, 2 or 3.
Red
White
Now connect either the RCA or the XLR outputs from the preamplifier to the equal input on the poweramplifier
(RCA RCA, XLR XLR).
Power save mode
It’s important to note that the Power save mode does not turn off the Alluxity Pre and Power One. The
Power save mode simply puts the amplifiers in a mode where is uses less power, but either warm up the
amplifiers and/or keep the amplifiers warm and ready. In the Int One, all power is cut to the soundboards.
Page 7
Page 8
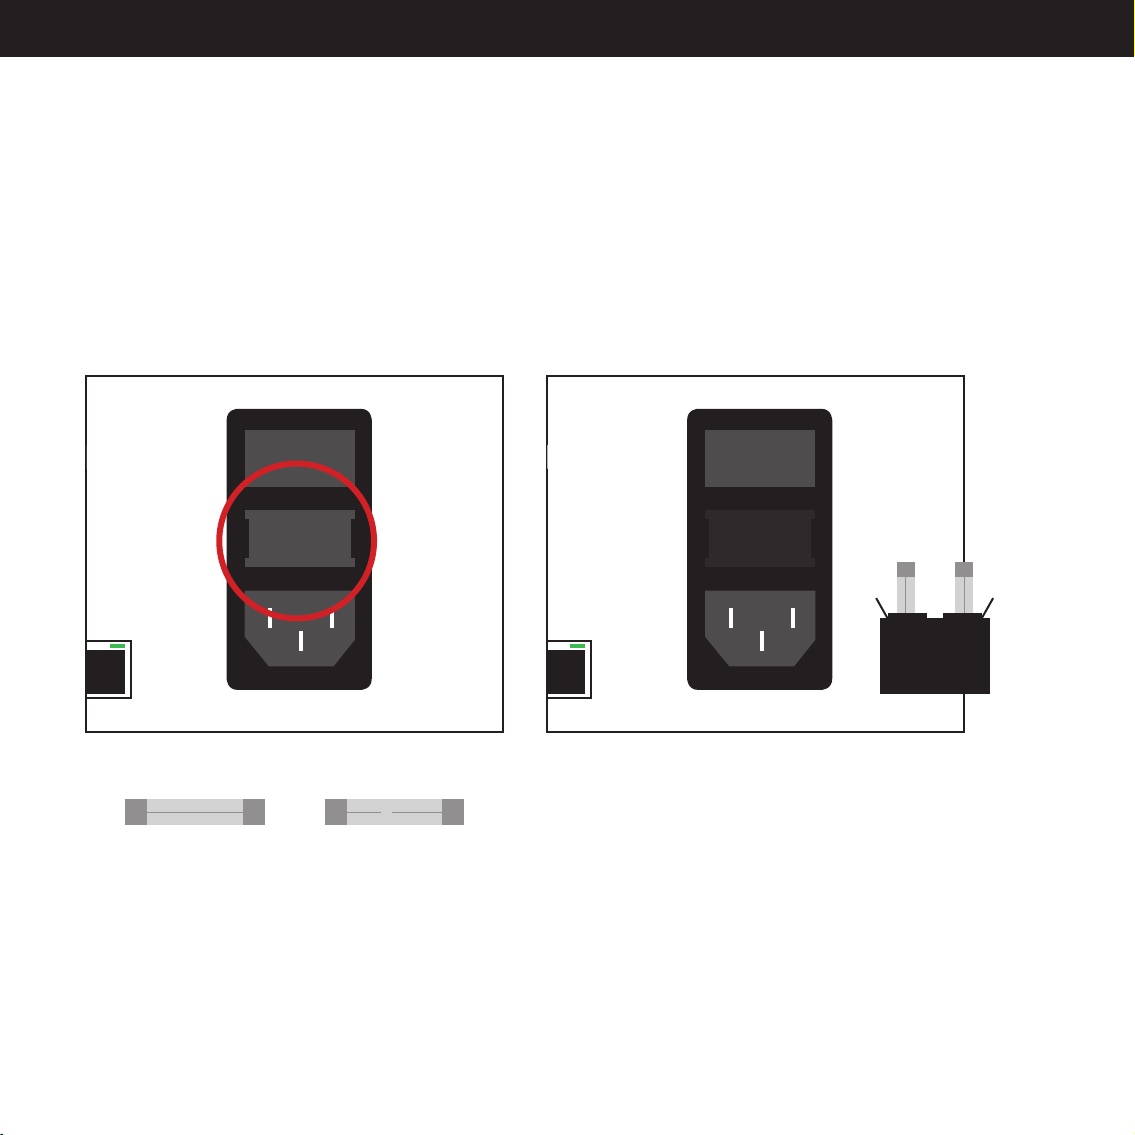
How to change a broken fuse
If a fuse is broken then gently remove the little cap in the Power Inlet and replace the fuse,
as shown in the picture below.
Pre One : 230V = 0.5A and 115V = 1A
Power One : 230V = 6.3A and 115V = 10A
EC
O I
Good Broken
O I
EC
Page 8
Page 9
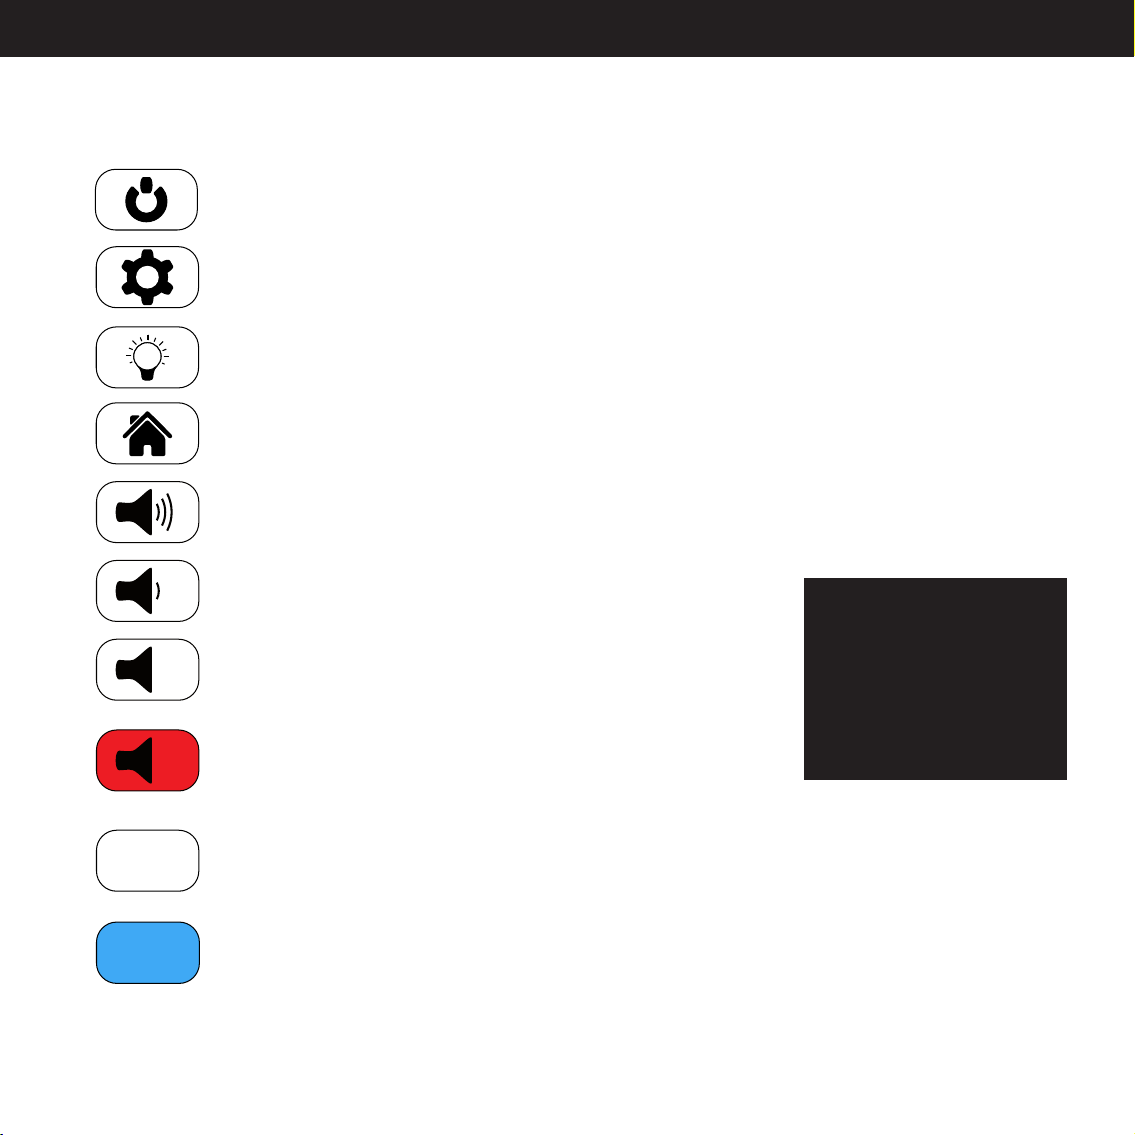
Icon Explanation
Standby button.
This puts the amplifier into and out of Standby mode.
Setup button.
Pressing this button will give you access to the Setup Interface.
Brightness button.
Adjusts the brightness level on the display.
Home button.
This button is used to go from the Setup Interface to the Main Interface.
Volume Up button.
Pressing this will increase the volume.
Volume Down button.
Pressing this will decrease the volume.
Mute button.
Pressing this will mute the amplifier.
Unmute button.
Pressing this will unmute the amplifier.
This icon is only showed when the amplifier is muted.
*The XLR button is
used in this User Guide
because it’s the default
Output channel, when
you turn on your
amplifier for the first
time.
XLR-inactivated button.*
XLR
Pressing this will activate either the XLR output or the XLR Input 1-3,
depending on the location of the button.
XLR-activated button.
XLR
This icon is showing which of your channels is active.
Page 9
Page 10
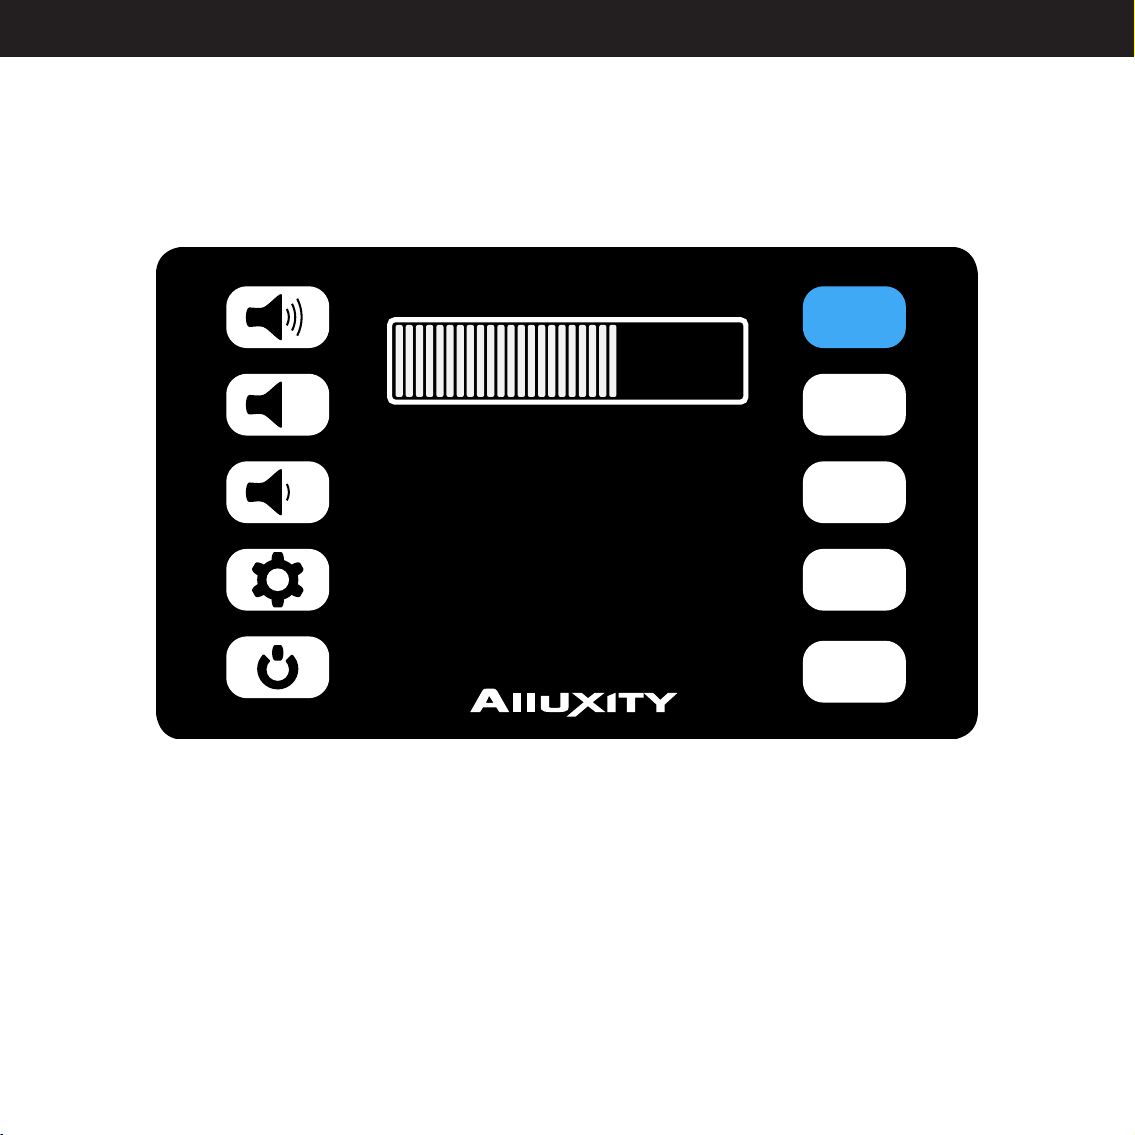
The User Interface
RCA 1
RCA 2
XLR 1
XLR 2
XLR 3
-13.5
The Pre/Int One
Main Interface
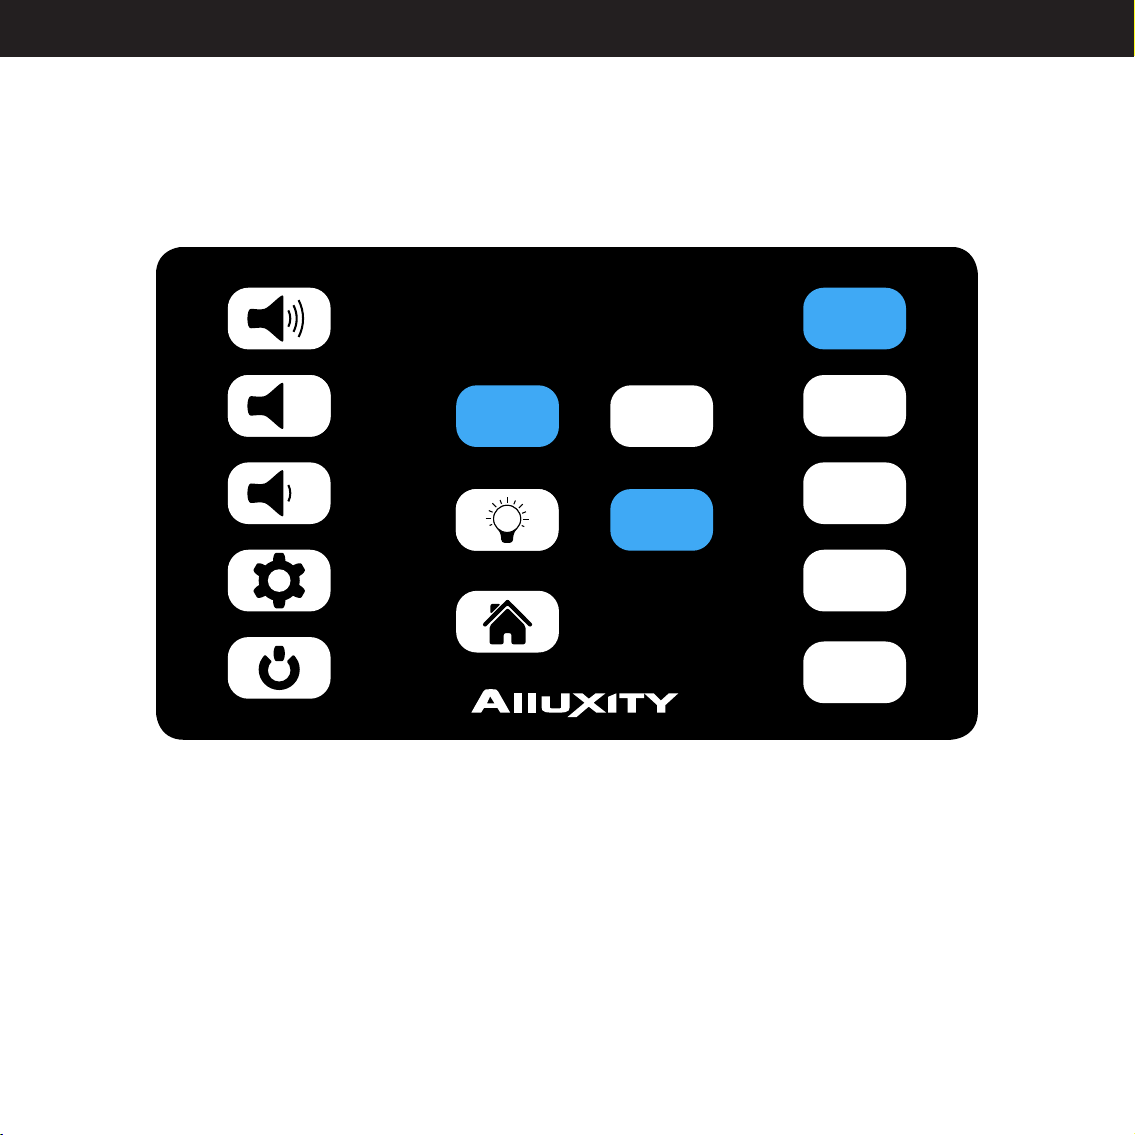
The Main Interface has a variety of options:
•VolumeUp
•Mute/Unmute
•VolumeDown
•Setup(seeSetupInterfaceformoreinformation)(notincludedinIntOne,Brightnessiconinstead)
•Powersavemode
•TheVolume
•ThedifferentInputsfromRCA1-2toXLR1-3(RCA1-3andXLR1-2onIntOne)
Page 10
Page 11
Setup Interface
RCA 2
XLR 1
XLR 2
XLR 3
RCA 1
Output
RCA
XLR
The Pre One
Main Interface
The Setup Interface provides you with the options of changing:
•Output(XLRorRCA)
•Brightnesslevel
To turn off the background light of the touchscreen, press the Brightness icon for 1.5 seconds and wait 5
seconds for the screen to turn off. To turn the screen on again press anywhere on the screen.
Page 11
Page 12
The User Interface
RCA
XLR
XLR
The Power-amp One
Main Interface
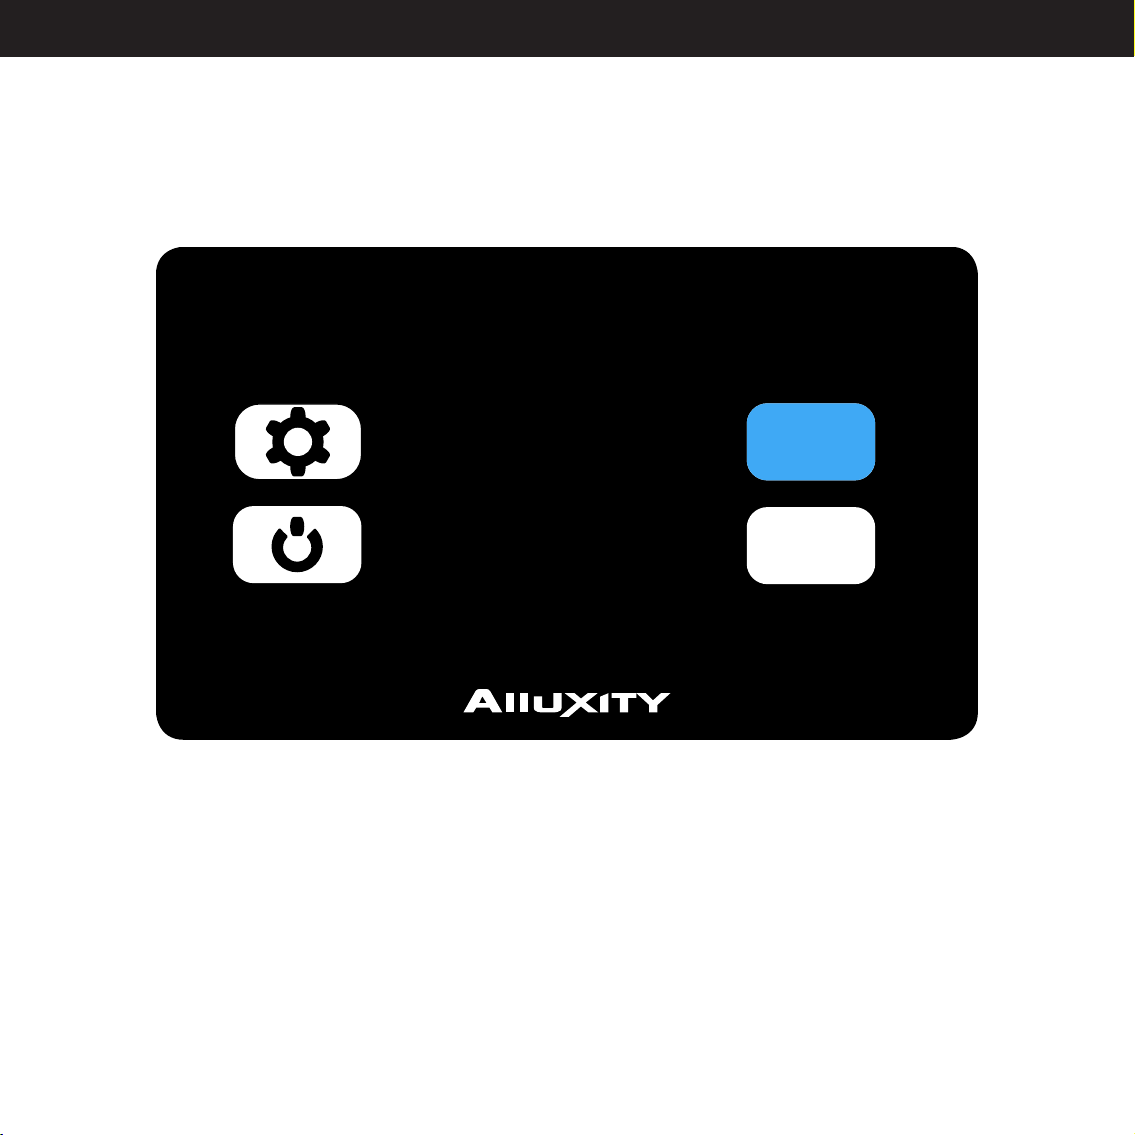
The Power-amp One Main Interface provides you with the options:
•ChangeInput
•Brightness
•Powersavemode
To turn off the background light of the touchscreen, press the Brightness icon for 1.5 seconds and wait 5
seconds for the screen to turn off. To turn the screen on again press anywhere on the screen.
Page 12
Page 13

How to change Input and Output
How to change Input and Output
You change the input and output different places:
Pre-amp One
The 5 different inputs are all located on the Main Interface and on the right side. Here you have:
•RCA1
•RCA2
•XLR1
•XLR2
•XLR3
These are input 1-5.
To change the input, simply press gently on the button on the screen so it will turn green.
The green color shows that this is the active input.
To change the output, press the Setup button (the mechanical wheel), and select between
the XLR and the RCA output.
Power-amp One
The power amplifier only uses inputs and only haves 2 different inputs, the XLR and the RCA.
To change the input, simply press gently on the button until it turns green.
Page 13
Page 14

Warranty and replacing parts
LIMITED WARRANTY
The warranty covers manufacturing defects in components, material and workmanships, for two (2) years
to the first end-user buyer or no later than three (3) years from the date of shipment to the authorized Alluxity cooperating partner, whichever comes first.
If the products has been used or handled other than in accordance with the instructions in the manual, has
been abused, misused, damaged by accident, neglected, got a transport damage, or has got a defect due
to being repaired or tampered with by anyone who is not authorized to do so, the warranty does not apply.
Damage or cosmetic defects are equally not warranted as the above situations.
How to get warranty service
If you as a customer experience problems with any of the Alluxity products, you will have to turn off the
equipment instantly, pack it in the original box and ship it to the local cooperating partner, with a photocopy
of the original purchase receipt.
The receipt must clearly list model, serial number, and date of purchase, name and address of the purchaser and authorized dealer, and the price paid by the purchaser.
Miscellaneous
Any implied warranties relating to the above product shall be limited to the duration of this warranty. The
warranty does not extend to any incidental or consequential costs or damages to the purchaser. Some
countries do not allow limitation on how long an implied warranty lasts or exclusion or limitation of incidental or consequential damages, so the above limitations or exclusions may not apply to you. This warranty
gives you specific legal rights, and you may also have other rights which vary from country to country.
Page 14
Page 15

Demo equipment
Equipment used by an authorized cooperating partner for demonstration purposes is warranted to be free
of manufacturing defects in materials and workmanship for a period of two (2) years from the date of
shipment to the authorized cooperating partner. After the first year, demo equipment needing warranty
service must be packed in its original box and returned to AVM-TEC by the cooperating partner at his or hers
sole expense. AVM-TEC will pay return freight of its choice. A returned product must be accompanied by a
written description of the defect on an ALLUXITY RETURNED GOODS AUTHORIZATION form. Dealer-owned
demonstration equipment sold at retail within two (2) years of date from shipment to the dealer is warranted to the first retail customer to be free of manufacturing defects in materials and workmanship for
the duration of the two (2) Year Limited Warranty remaining (as measured from the date of shipment of the
equipment to the Alluxity partner. In the event warranty service is needed under these conditions, the owner
of the equipment must provide a copy of his purchase receipt, fulfilling the requirements described in “How
to get warranty” just above.
WARRANTOR
Inquiries regarding the above Limited Warranty may be sent to the following
Address:
AVM-TEC
Dueoddevej 6C
DK7400 Herning
Denmark
Att.: Alexander Vitus Mogensen
Replacing parts
If an owner of an Alluxity product experience problems that can only be fixed by replacing an electronic
part inside the product, the owner can always have this part replaced by an authorized Alluxity cooperating
partner, even if the warranty has expired. If the warranty has expired, there will be a specific price on the
replacement unit, depending on which unit that will be needed to be changed.
Page 15
Page 16

Warranty outside Denmark
AVM-TEC has authorized distribution in many countries in the world. In each country, the authorized importing retailer or distributor has accepted the responsibility for warranty of products sold by that retailer or
distributor. Warranty service should normally be obtained from the importing retailer or distributor from
whom purchased your product. In the unlikely event of service required beyond the capabilities of the
importer, Alluxity will fulfill the conditions of the warranty. Such products must be returned at the owner’s
expense to the Alluxity factory, together with a photocopy of the bill of sale for that product, a detailed
description of the problem, and any other information necessary return shipment. In many cases the retailer
you purchased the product from, will handle this for you.
Disclaimers
Alluxity reserves the right product without obligation to purchasers of previously manufactured products
and to change the prices or specifications of any product without notice or obligation to any person.
Alluxity reserves the right not to cover any damage done by mishandling or misusing Alluxity products in
accordance to this manual.
Page 16
Page 17
Safety and handling information
Important safety information
WARNING: Failure to follow these safety instructions could result in fire, damage to the product, to
other property, or injuries to yourself or other. Please read all the safety information below before
connecting any of the Alluxity products.
Handling
Handle your Alluxity products with care. The products are milled out of one piece of aluminum and contains heavy transformers and electronic. The amplifiers or other properties can be damaged if the product
is dropped. If possible, always have two people to lift the products to avoid dropping the unit, or hurting
yourself. Do not connect the products wrongly as this can cause damage to the unit and/or to the other
equipment which are connected. The Standby function does not turn off the amplifier, but only puts it in
power save mode. You should always turn off the amplifiers by using the power switch on the back, before
connecting any cables or moving the amplifiers.
Repairing
Do not under any circumstances open any of the Alluxity products yourself; this is reserved for the local
Alluxity cooperating partner. The Alluxity products have been constructed so it’s easy to replace any part
inside the amplifiers, but you should under no circumstances open any of the Alluxity products. If doing so,
any type of warranty will be lost, and it can cause injury to the products and yourself.
Page 17
Page 18

www.alluxity.dk
 Loading...