

Page 1
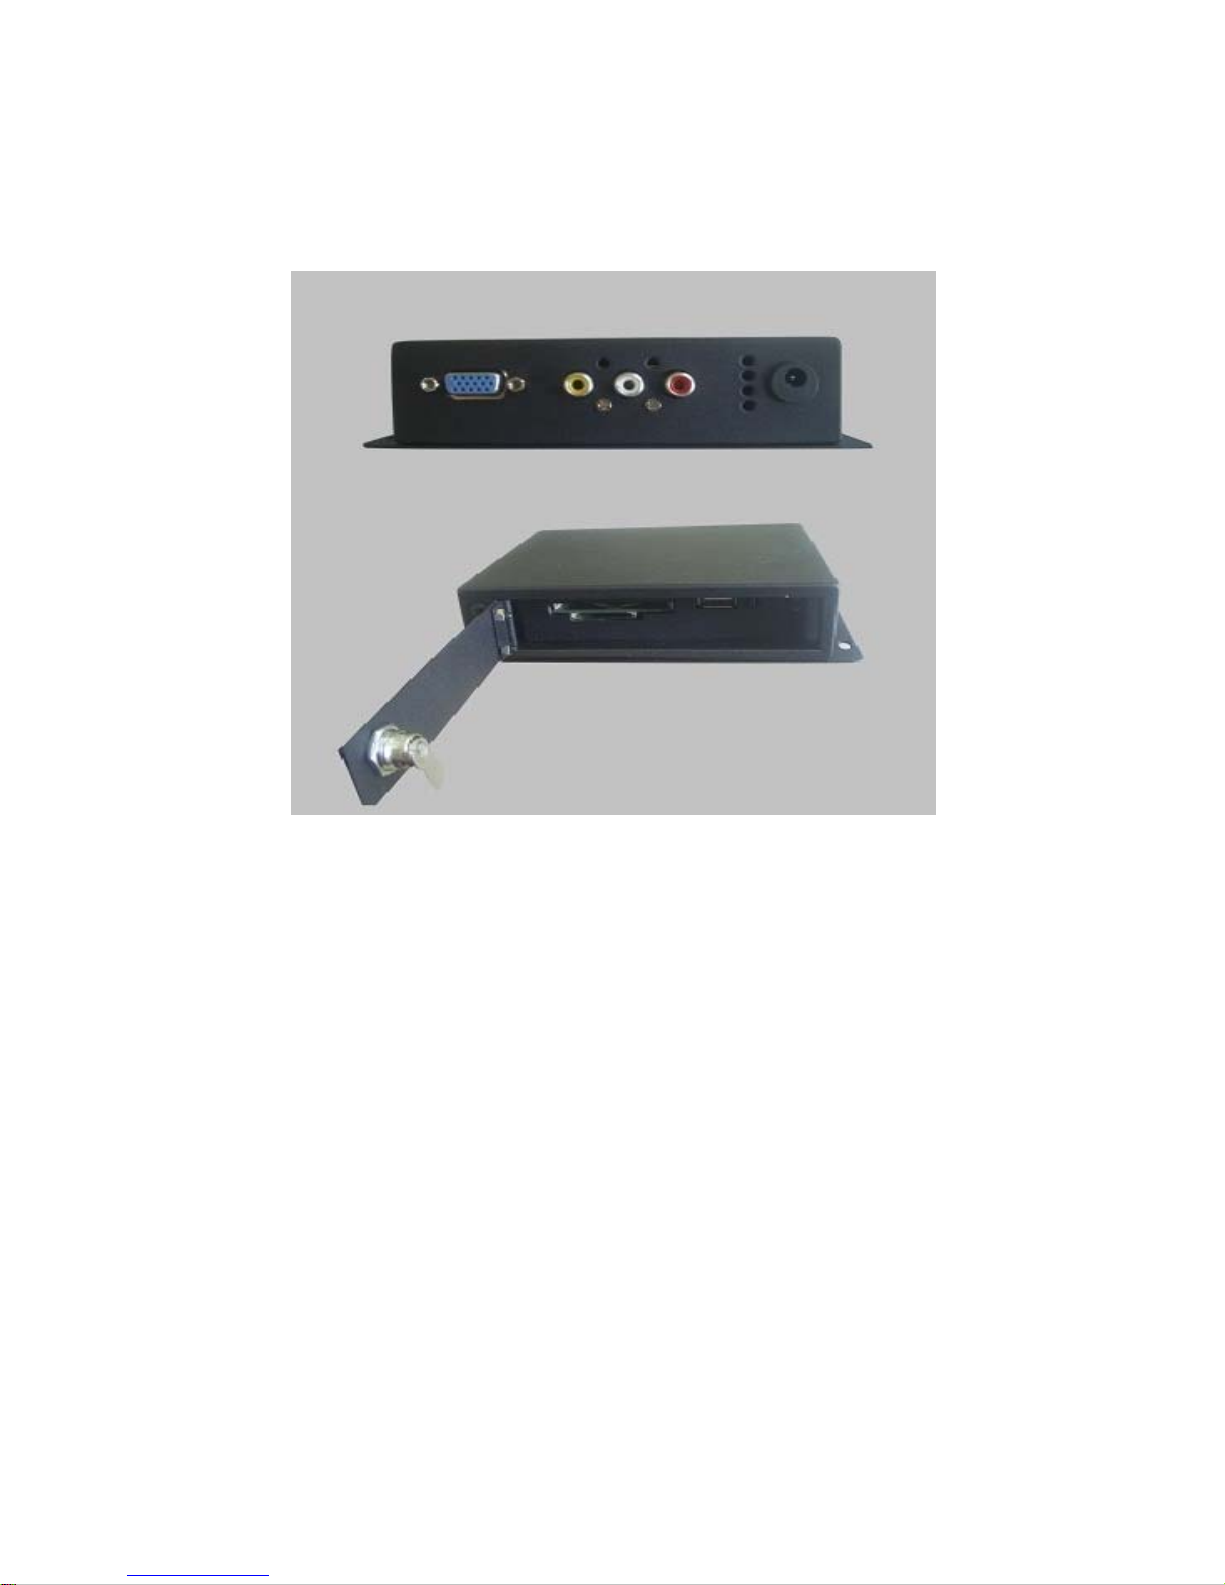
PP02 Advanced Media Player
User’s Manual
z Use powerful decode chip, support VGA(480P) and CVBS(480P) output, and support super
VGA(720P) (optional)output and YPbPr(720P) output(optional).
z With wide voltage (6V-18V)input power supply.
z USB2.0 port, support USB update function.
z Support hot plug of CF, SD and USB.
z Support screen rotation, can be displayed in portrait mode.
z Photos slide show, and with background music, with 14 transition modes, the interval time can be
changed to 3 sec, 5 sec, 10 sec, 15 sec, 20 sec and 25 sec.
z Support MP4(AVI: DIVX/XVID), MPEG2(DVD: VOB/MPG2), MPEG1(VCD: DAT/MPG1), MP3、and
JPG formats.
z Support on/off timer, can setup 6 timers every day. With clock display and calendar functions.
z Support time volume, can be setup 6 set of time volume every day.
z Interruption memory function and advertisement insertion function.
z Support scrolling subtitle, and can be setup to match screen rotation.
z Can create playing record file automatically.
z With brand show.
z Can setup CF card key, can be locked by IR.
Page 2

z MENU AND SETUP:
1. Function table and Factory settings:
Below is function table, follow 1.6 operation can return to factory settings.
Remark: Factory settings are default initial value, careful with this command!
No. MENU FACTORY SETTINGS OPTIONS
1 GENERAL SETUP
1.1 OSD LANG ENGLISH ENGLISH/CHINESE
1.2 USB MODE AUTO AUTO/HOST/SLAVE
1.4 AUTO PLAY ON ON/OFF
1.5 REPEAT MODE FOLDER ONE/FOLDER/ALL
1.6 DEFAULT RESET
2 VIDEO SETUP
2.1 VIDEO DISPLAY VGA+CVBS VGA+CVBS/SVGA(720P)/YPbPr(720P)
2.2 TV DISPLAY NOMAL/PS NOMAL/PS, NORMAL/LD、WIDE/HDTV
2.3 TV SETUP NTSC AUTO/NTSC/PAL
2.4 MSLIDE SHOW OFF ON/OFF
2.5 TRANSITION RANDOM FULL SCR. … RANDOM(14 transition modes)
2.6 INT. TIME 10 S 3 S/5 S/10 S/15 S/20 S/30 S
3 TIME SETUP
3.1 TIME DISPLAY ON ON/OFF
3.2 CLOCK SET CLOCK/TIMER (Can setup 6 timers maximum every day)
3.3 TIME VOL TIME VOL (Can setup 6 time volume maximum every day)
4 ROLL SETUP
4.1 ON/OFF ON ON/OFF
4.2 SPEED NORMAL SLOW/NORMAL/FAST
4.3 FONT SIZE SMALL SAMLL/MEDIUM/BIG
4.4 BACK COLOR TRANS TRANS/GREY/YELLOW/RED/BLACK/WHITE
4.5 FRONT COLOR WHITE BLUE/YELLOW/RED/BLACK/WHITE
5 CUSTOM SETUP
5.1 RESUME PLAY OFF ON/OFF
5.2 FREQUENCY 30 S 10 S/20 S/30 S/40 S
5.3 PLAY TIME 10 MINUTES 5 MINUTES/10 MINUTES /15 MINUTES /20 MINUTES
5.4 SCR ROTATE HORI HORI/ROT +90/ROT -90
5.5 RECORD FILE OFF ON/OFF
5.6 BRAND SHOW OFF ON/OFF
5.7 BRAND POS TOP LEFT TOP LEFT/TOP RIGHT
5.8 CF KEY OFF ON/OFF
5.9 REMOTE LOCK OFF ON/OFF
6.0 SET REMOTE KEY CHANGE REMOTE KEY
Page 3
2. MENU and operations:
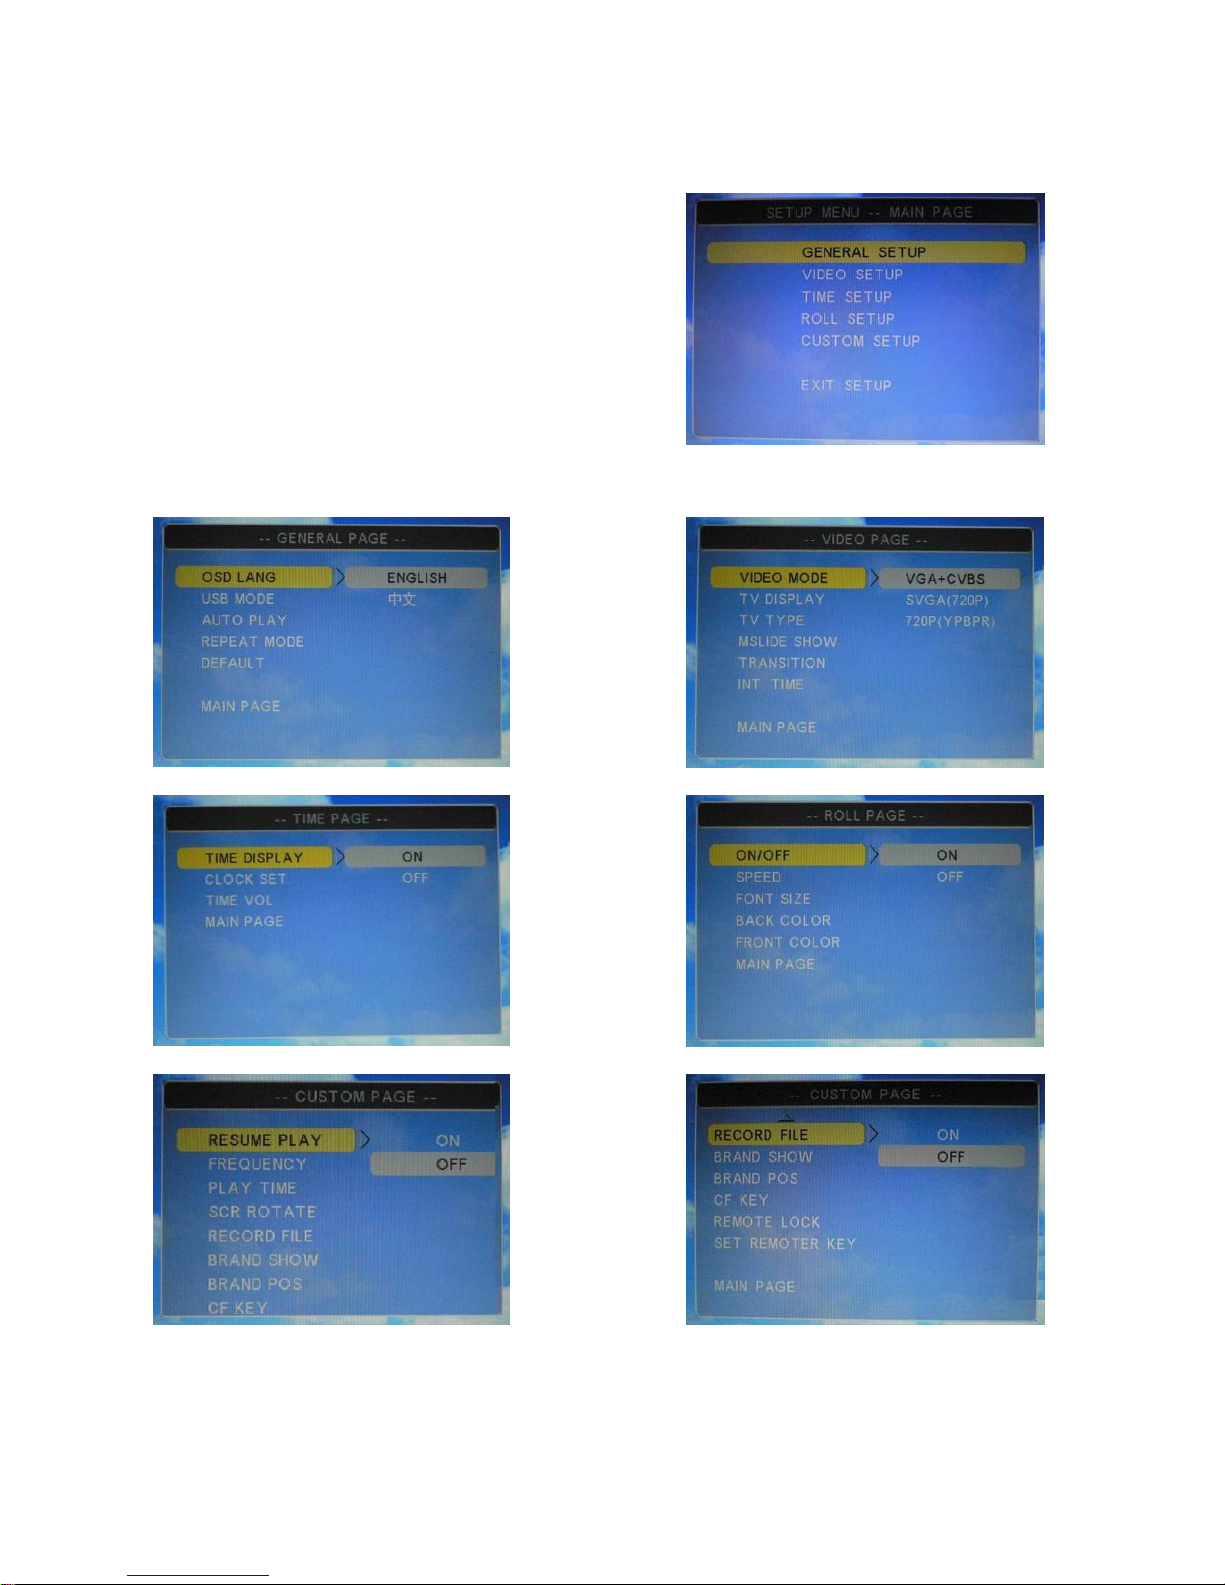
2.1 SETUP MENU
Push SETUP button of remote control to access MAIN
PAGE.
2.2 Submenu
There are 5 submenus in MAIN PAGE, GENERAL SETUP,
VIDEO SETUP, TIME SETUP, ROLL SETUP and
CUSTOM SETUP. Push ↑, ↓, ←, → and ENTER button to
choose and access submenu.
2.3 Optional settings
If you want to change default settings of submenu, push ↑, ↓, ←, → and ENTER button to choose
Page 4

submenu item. There is individual setup interface on CLOCK SET and TIME VOL. Push Setup button of
remote control to exit menu after setup.
3. Setup of main functions
3.1 VIDEO MODE
There are VGA+CVBS, SVGA(720P) and YPbPr(720P) video outputs in this VIDEO MODE. Push Video
button of remote control to switch video output.
Remark: User should select correct video output to match input of LCD controller board. If the video put
is not correct, push Video button of remote control to switch other video outputs.
3.2 TV DISPLAY
The only setting is NTSC in VGA, SVGA or YPbPr outputs, because frequency will be out of range in
other TV system. There are NTSC, PAL or AUTO in CVBS connection.
3.3 MSLIDE SHOW
It is “picture + background music” playing function. Pictures and background music files should be saved
in root directory of flash card. If the first file is picture in filename sequencing, access “picture +
background music” playing directly. If the first file is music in filename sequencing, access music playing
first, then access to “picture + background music” playing.
3.4 CLOCK SET
3.4.1 Clock setup
Push ↓ button to choose CLOCK SET in TIME SETUP
menu, push Enter button to access CLOCK SET interface.
Push → or ← button to move month, day and year, input
0—9 to change month, day and year, push Enter button to
save change and move to clock setup. Push → or ←
button to move and input 0—9 to change clock, then push
Enter button to finish setup.
3.4.2 Timer setup
Support 6 ON/OFF timers every day.
3.4.2.1 Day ON/OFF setup
After clock setup, access week setup interface
automatically. Push → or ← button to move and push ↑, ↓
button to change day ON/OFF of every week. If set ON,
the player will be power on in the day every week. If set
OFF, the player will be power off in the day every week. It
is a main OF/OFF to change day ON/OFF working status.
Page 5
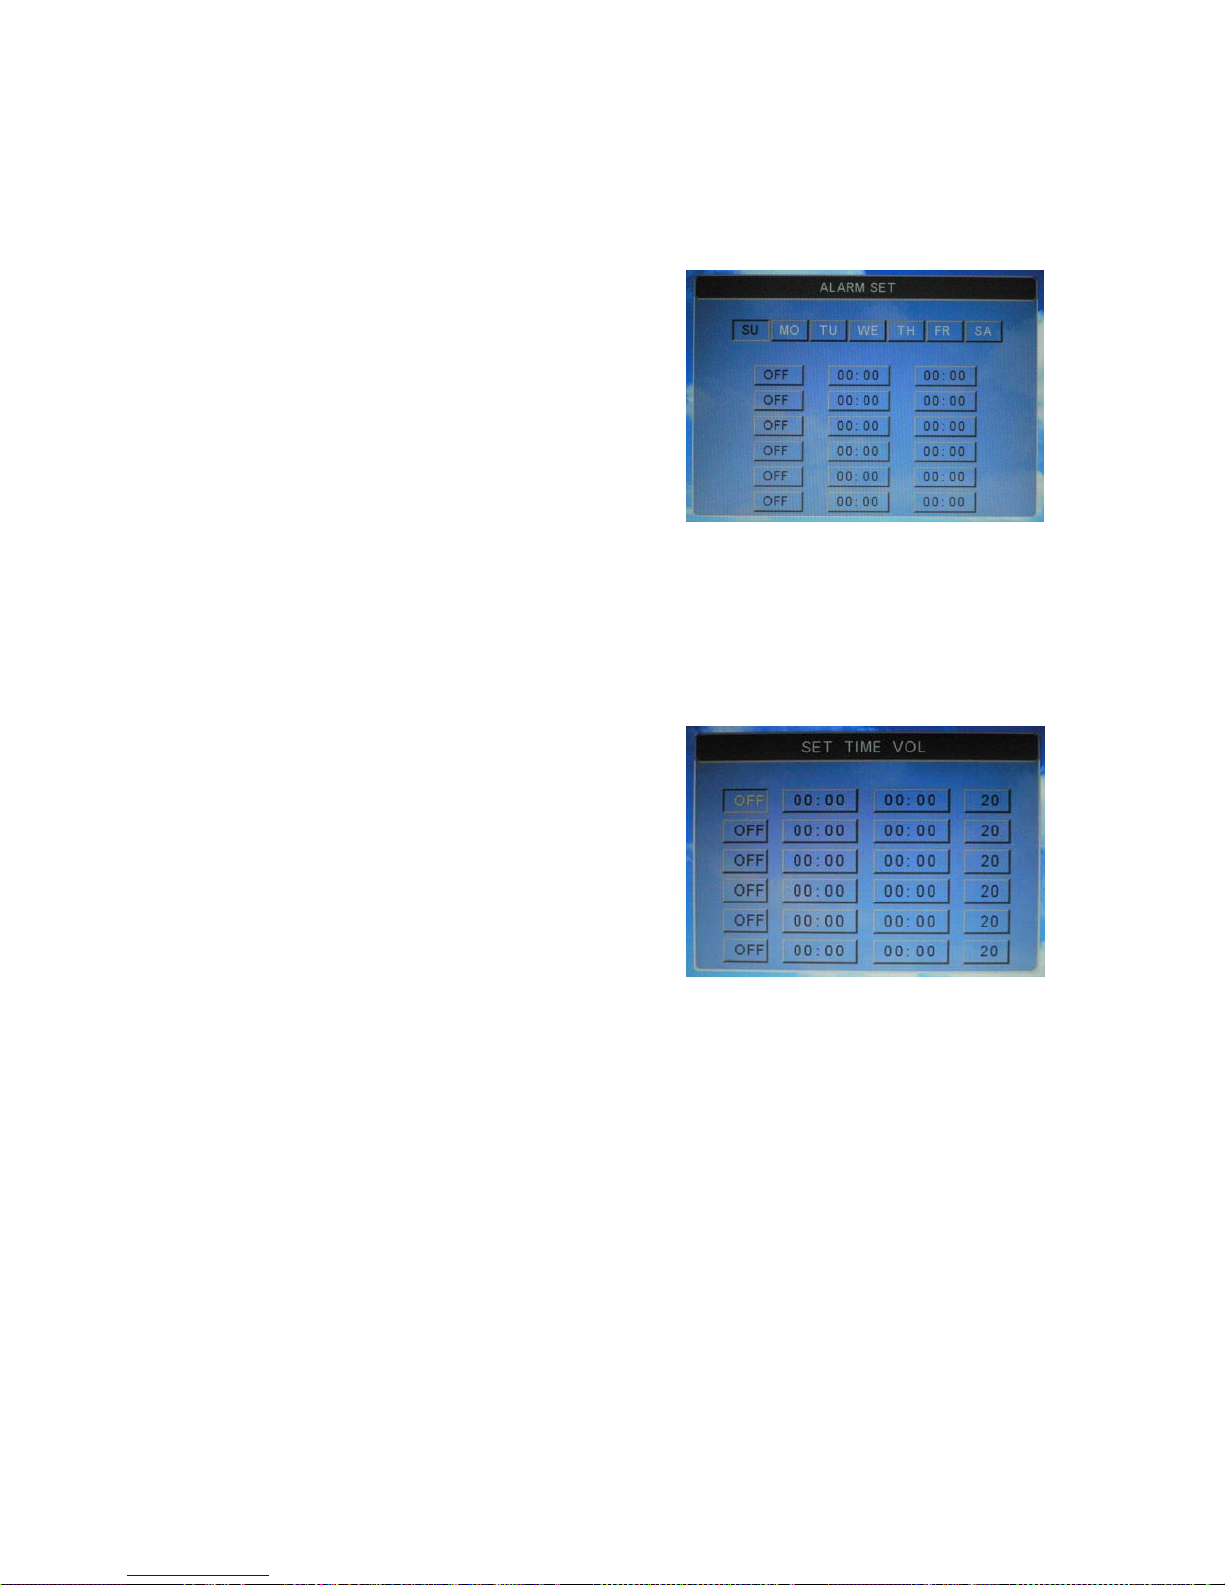
3.4.2.2 Setup of 6 ON/OFF timers
After day ON/OFF setup, Push ↑ button move to day button, push Enter button to access interface of 6
ON/OFF timers.
The first row is ON/OFF timer status, the second row is ON time, the third row is OFF time.
Push ↑, ↓, ←, → button to move, push Enter button to
change ON/OFF status and time, input 0—9 to change
time and push Setup to finish setup.
After setup of ON/OFF timers, move to day button and
push Setup button to return to CLOCK SET menu, then
push Setup button to exit CLOCK SET.
Remark:
A. If setup time is not in 6 set of power-ON time interval or
if power on time is not in 6 set of power-ON time interval, the player will be power off 1 minute later, then
power on automatically in next ON time.
B. ON time must be earlier than OFF time. The longest timer interval is 00:01 – 23:59. One set of
ON/OFF timer interval must be in same day.
3.5 TIME VOL
Access TIME VOL interface, there are 4 rows. the first row
is ON/OFF status, the second row is ON time, the third
row is OFF time, The four row is volume. The default
volume is 20, the volume can be changed in 0—32 range.
Push ↑, ↓, ←, → button to move, push Enter button to
change ON/OFF status, time and volume, input 0—9 to
change time and volume, push Setup button to save setup.
Push Setup button to exit SET TIME VOL after setup.
3.6 ROLL SETUP
The scrolling subtitle is txt file, can be created by computer Notepad and named SCROLL.txt. The
content is 2000 bytes in maximum. Copy SCROLL.txt to CF/SD/U disk, access ROLL SETUP and set
ON. The subtitle will be showed in playing.
3.7 FREQUENCY and PLAY TIME
3.7.1 Interrupt memory function: Playing will start from breakup position once power on again. RESUME
PLAY of CUSTOM SETUP should be set ON first. The memory frequency can be selected from 10 S, 20
S, 30 S and 40 S, the default memory frequency is 30 second.
3.7.2 Advertisement insertion function: The advertisement files will be inserted in movie playing. The
interval time can be selected from 5 MIN, 10 MIN, 15 MIN and MIN. The default setting of PLAY TIME is
Page 6

10 MIN. Access GENERAL SETUP first and select FOLDER of REPEAT MODE, Create folder in flash
card and named CADxx(such as, CAD01, CAD02 … CAD10), copy insertion files to these folders. The
insertion files of CADxx folder will be inserted in playing of root files one folder by one folder.
3.8 SCR ROTATE
The system OSD can be switched to portrait display mode. Access CUSTOM SETUP and move to SCR
ROTATE, select ROT +90 or ROT -90 to switch portrait display mode. Menu and subtitle will be changed
to portrait display mode. Users have to arrange portrait video/photo files if using SCR ROTATE function.
3.9 RECORD FILE
The record file will be created automatically in playing, named log.txt in CF/SD/U-disk. There is exact
playing time of each file in log.txt, so it will make management easier.
3.10 BRAND SHOW
The filename of brand must be named to TAIBIAO.LOG, the size must be100 x 32 pixels. The brand
must be in 256 color, index mode, BMP format, and must use ESS256_FULL.act as palette.
Brand making: Open picture in Photoshop, change size to 100 x 32 pixels, access Image – Mode –
Index color – Actions palette – Custom – Load – ESS256_FULL.act, then save file to BMP format,
change filename to TAIBIAO.LOG.
The default brand position is top left, can be changed to top right position in BRAND POS.
3.11 CF KEY
Support CF key, ON/OFF is optional status. Default setting is OFF. In ON mode, user has to input
password to play new content after update. The default password is 123456789.
3.12 REMOTE LOCK
Support remote lock, ON/OFF is optional status. Default setting is OFF. In ON mode, the player can be
controlled freely within 2 minutes, user has to input 6 bit password to control player 2 minutes later. The
default password is 666666, which can be changed to other password.
Page 7
3TH
c 3Cctr
R
B12
3t456
7 89S
111
1
111
111
2
.13 USB M
O
U
s
e
c
l
o
e
o
t
n
t
o
s
o
b
n
V
r
h
u
u
m
a
p
o
x
O
:
o
p
a
a
x
x
p
p
e
H
n
a
n
o
s
m
c
t
o
p
u
a
8
8
b
n
←
e
u
a
7
K
b
u
d
g
F
r
c
e
o
w
r
t
s
t
g
a
a
D
u
m
a
E
m
G
p
t
m
u
o
a
e
.
F
u
V
d
h
a
i
i
c
m
p
e
y
K
here are A
OST is ho
an be conn
DE
TO, HOST
t mode, su
cted with c
nd SLAVE
port U-disk
mputer dire
odes. The
playing (plu
tly, like card
efault settin
and play)
reader, upd
is AUTO
nd U-disk
te content
ode.
pdate. SLA
f CF/SD car
E is slave
from com
ode,
uter.
.14 U-disk
reate nonb
ontrol to st
hen new m
estart.
EMOTE
elow is butt
) Power: Po
) File: Push
) Disp: In s
ime, and ca
) Mode: Op
) : Opti
) : Stop
) : Fast
: Fast
) Setup: In
) Return: In
D card and
0) Zoom: Z
1) Direction
2) Volume
3) CH+: pre
4) Enter: E
5) Video: Vi
(480I), S
6) Menu: B
7) Time: S
interface
8) Audio: A
9) Mute: m
0) 0 –9: nu
wer switch.
Rewind in 2
forward in 2
vious file C
deo switchi
ightness, co
opy
ank COPY.t
p playing, a
dia files will
CONTR
n definition
File button t
op status,
close displ
ions of repe
ns of pause
playing and
top status,
stop status,
U-disk are a
om in/out pi
Buttons: ↑u
uttons: V-/r
ter button.
GA (720P)
ortcut butt
directly.
dio channel
te.
ber buttons
t in compu
nd then put
be copied t
L
check file
ush Disp b
y.
t one, repe
and play.
go to filelist.
, 4x, 6x or
, 4x, 6x or
ush Setup
push Retur
ll or any two
cture.
, ↓ down,
duce volum
-: next file
g button, p
nd YPbPr(
trast, color
n of CLOC
switching
, which are
er, copy it t
in U-disk. C
CF card o
roperties in
tton to che
t folder, rep
x.
x.
utton to go t
button to s
put in playe
left, → righ
, V+/add vo
t this button
20P) signal
and tone adj
SET. In s
utton.
sed for time
o U-disk wit
card or S
SD card a
stop status,
k playing ti
at all and c
SETUP M
itch flash
.
.
lume.
to switch V
.
ustment.
op status,
r, clock inpu
h new medi
card will b
tomatically.
can delete a
e and rem
ncel repeat
NU.
emory If C
A (4 80P) +
ush Time b
and shortc
files. Pus
formatted
Put out U-d
nd rename f
aining
card,
CVBS
utton to ac
t button of p
■ key of r
utomaticall
sk after cop
le.
ess CLOC
laying files.
mote
, and
y and
SET
 Loading...