

Page 1
BRI User Manual
www.allo.com
Version 2.0
1
Page 2

BRI User Manual
. All rights reserved.
No part of this publication may be copied, distributed, transmitted, transcribed, stored in a
retrieval system, or translated into
This document has been prepared for use by professional and properly
trained personnel, and the customer assumes full responsibility when using it.
The information in this document is Confidential to
and this document are intended solely for the addressee. Use of this document by anyone else for
any other purpose is unauthorized. If you are not the inten
distribution of this information is prohibited and unlawful.
Information in this document is subject to change without notice and should not be construed as a
allo.com.
against errors. It may appear in this document and disclaims any implied warranty of
merchantability or fitness for a particular purpose.
any human or computer language without the prior written
and is legally privileged. The information
ded recipient, any disclosure, copying, or
s not assume any responsibility or make any warranty
Copy Right
Copyright ©2014 Allo
permission of Allo.com.
Proprietary Rights
Disclaimer
Allo
commitment on the part of
And doe
www.allo.com
Version 2.0
2
Page 3

BRI User Manual
features. It serves as a means to describe the user interface and how to use it to accomplish
common tasks. This manual also describes the underlying assumptions and users make the
In this manual, certain words are represented in different fonts, typefaces, sizes, and weights. This
highlighting is systematic; different words are represented in the same style
inclusion in a specific category. Additionally, this document has different strategies to draw User
attention to certain pieces of information. In order of how critical the information is to your
system, these items are marked as a note,
Icon
indicates the name of the menu items, options, dialog boxes, windows and
with underline is used to indicate cross
Numbered Paragraphs
to be carried out. Text in paragraphs without numbering represents ordinary information.
The Courier font indicates a command sequence, file type, URL, Folder/File name
application and explains how to work and use it major
references and hyperlinks.
Numbered paragraphs are used to indicate tasks that need
About this manual
This manual describes the Allo
underlying data model.
Document Conventions
product
to indicate their
tip, important, caution, or warning.
Purpose
Note
Bold
functions.
The color blue
e.g. www.allo.com
Tip/Best Practice
Important
Caution
Warning
-
-
www.allo.com
Version 2.0
3
Page 4

BRI User Manual
Every effort has been made to ensure the accuracy of the document. If you have comments,
questions, or ideas regarding the document contact online support:
http://support.allo.com
Support Information
www.allo.com
Version 2.0
4
Page 5

BRI User Manual
................................
................................
................................
................................
................................
................................
................................
................................
................................
Protocol Standard Supported
................................
1.3.3 General Hardware Specifications
2. Getting Started With BRI Gateway
................................
................................
................................
................................
................................
................................
................................
Contents
................................
................................
................................
................................
.............................
................................
................................
................................
................................
................................
.......................
................................
................................
...........................
................................
................................
................................
................................
................................
..............................
................................
Contents
About this manual
................................
...................3
Document Conventions
Support Information
1. Product Introduction
1.1Overview
1.2 Equipment Structure
1.2.1 Rear View
1.2.2 Front View
1.3 Functions and Features
1.3.1
1.3.2 System Functions
2.1 Hardware Installation
................................
................................
................................
................................................................
................................
................................
................................
................................
................................................................
................................
................................
................................................................
................................
...........3
................4
...................7
7
.........8
........................8
......................9
...10
10
..........10
.................10
12
......12
2.2 Accessing the WEB GUI
3. Setting up Features
3.1 System Dash Board
3.2 Setup
3.3 Trunks
3.3.1 SIP Trunks
www.allo.com
................................................................
................................................................
................................
................................
................................
................................
Version 2.0
....13
...................14
..........14
15
15
.....................15
5
Page 6

BRI User Manual
................................
................................
................................
................................
................................
................................
................................
................................
................................
................................
................................
................................
................................
................................
................................
................................
................................
................................
................................
................................
................................
................................
10. Frequently Asked Questions (FAQs)
................................
................................
................................
................................
................................
................................
................................
................................
................................
................................
...........................
........................
................................
.......................
................................
................................
................................
................................
................................
...........................
................................
................................
...........................
................................
.......................
................................
................................
3.3.2 BRI Trunks
3.4 Calling Groups
3.5 Call Routing Rules
3.6 Time-based Routing
4. Advanced Settings
4.1 ISDN BRI Settings
4.2 SIP Global Settings
5. System................................
5.1 Network
5.2 Date/Time
6. Tools................................
6.1 Diagnostics
................................
................................
................................
................................
................................
................................
................................
................................
................................................................
................................................................
................................
................................................................
.....................18
..................19
............21
.........23
.....................26
.............26
...........28
.......31
31
33
..........34
34
6.2 Backup/Restore
6.3 Upgrade Firmware
7. Status ................................
7.1 Call Reports
7.2 SIP Trunk Status
7.3 BRI Span
7.4 Current Calls
7.5 Network Status
8. Apply Changes
9. Administrator Options
11. Appendix
................................
................................
................................
................................
................................
................................................................
................................
................................
................................................................
................................
................................................................
................................................................
...............35
...........36
........38
......................38
...............39
40
....................41
................41
42
..............43
44
.46
12. Glossary & Acronyms
www.allo.com
................................
Version 2.0
..............47
6
Page 7

BRI User Manual
Introduction
BRI gateway aimed to target at small and medium offices and operators, and used to help
enterprises to realize the evolution from the traditional PBX to voice IP. On the one hand, it
supports BRI protocol and adopts standard TE/NT trunk interface to realiz
PBX. On the other hand, adopt standard SIP protocol docking with various soft switches to ensure
PSTN seamless access to IP voice network, and achieving VoIP. aGB4 supports intelligent multiple
trunk routing technology, makes the
over between multiple trunk routing makes the network have high
It has good call processing ability, and provides one or two T1/E1 interface. It is able t
handle a variety voice decoding. It supports the rich GUI configuration, the user can easily set and
maintenance the system. Mainly includes the following kinds of model:
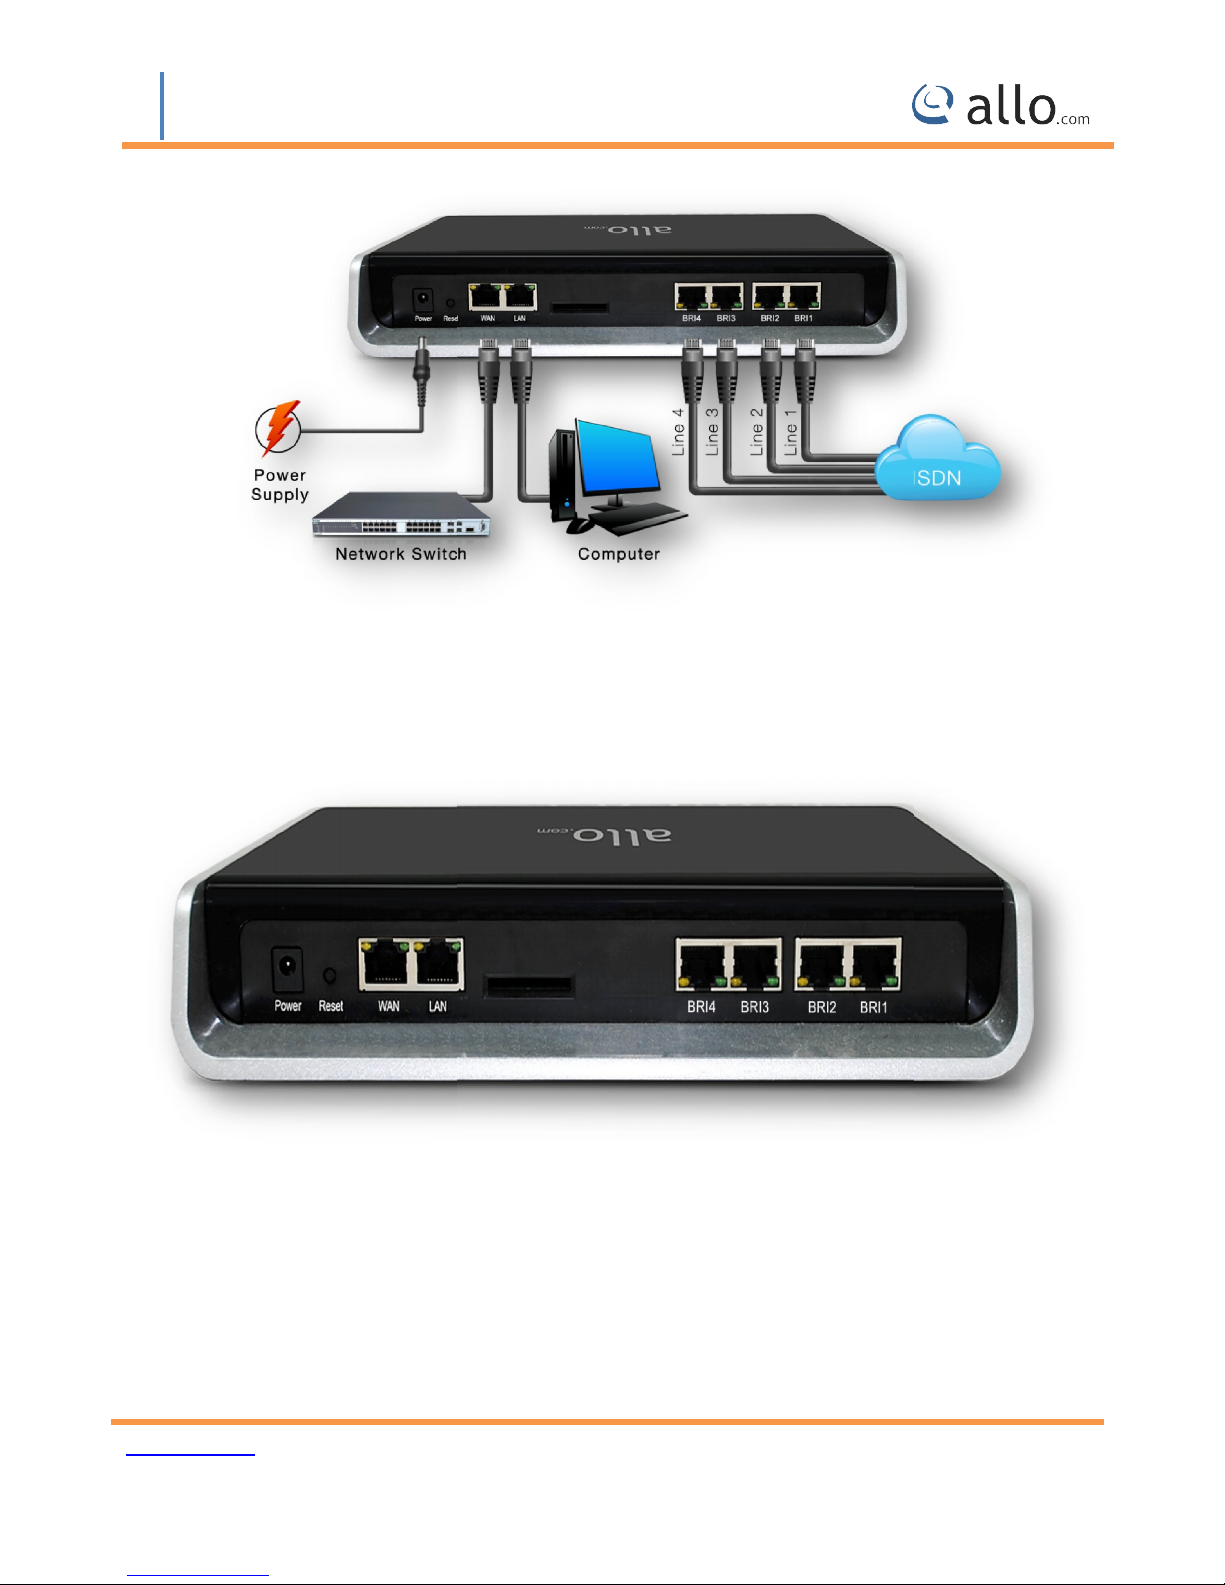
A typical network diagram shows the function of aGB4 as
Introduction
e docking with traditional
operator easy to manage trunk routing by price optimum rule,
1. Product
1.1Overview
and the automatic switchreliability.
aGB4- 4 Spans BRI Gateway
o
below.
www.allo.com
Version 2.0
7
Page 8
BRI User Manual
1.2 Equipment Structure
Figure 1: Overview of Product
1.2.1 Rear View
Figure 2: Rear View
www.allo.com
Version 2.0
8
Page 9
BRI User Manual
Connect the power adapter, 12VDC, 3.5A
TE/NT ports with line port side LED indicator (Orange when line seized)
Standard 10/100BASE
10/100BASE
Login IP address is 192.168.113.2
Reset button for factory default.
TX Ethernet Interface for LAN. Default Web GUI
Interface
Power
BRI 1 & BRI 2
WAN
Management
Console (LAN)
Reset
1.2.2 Front View
Standard
Description
-TX Ethernet Interface for WAN
-
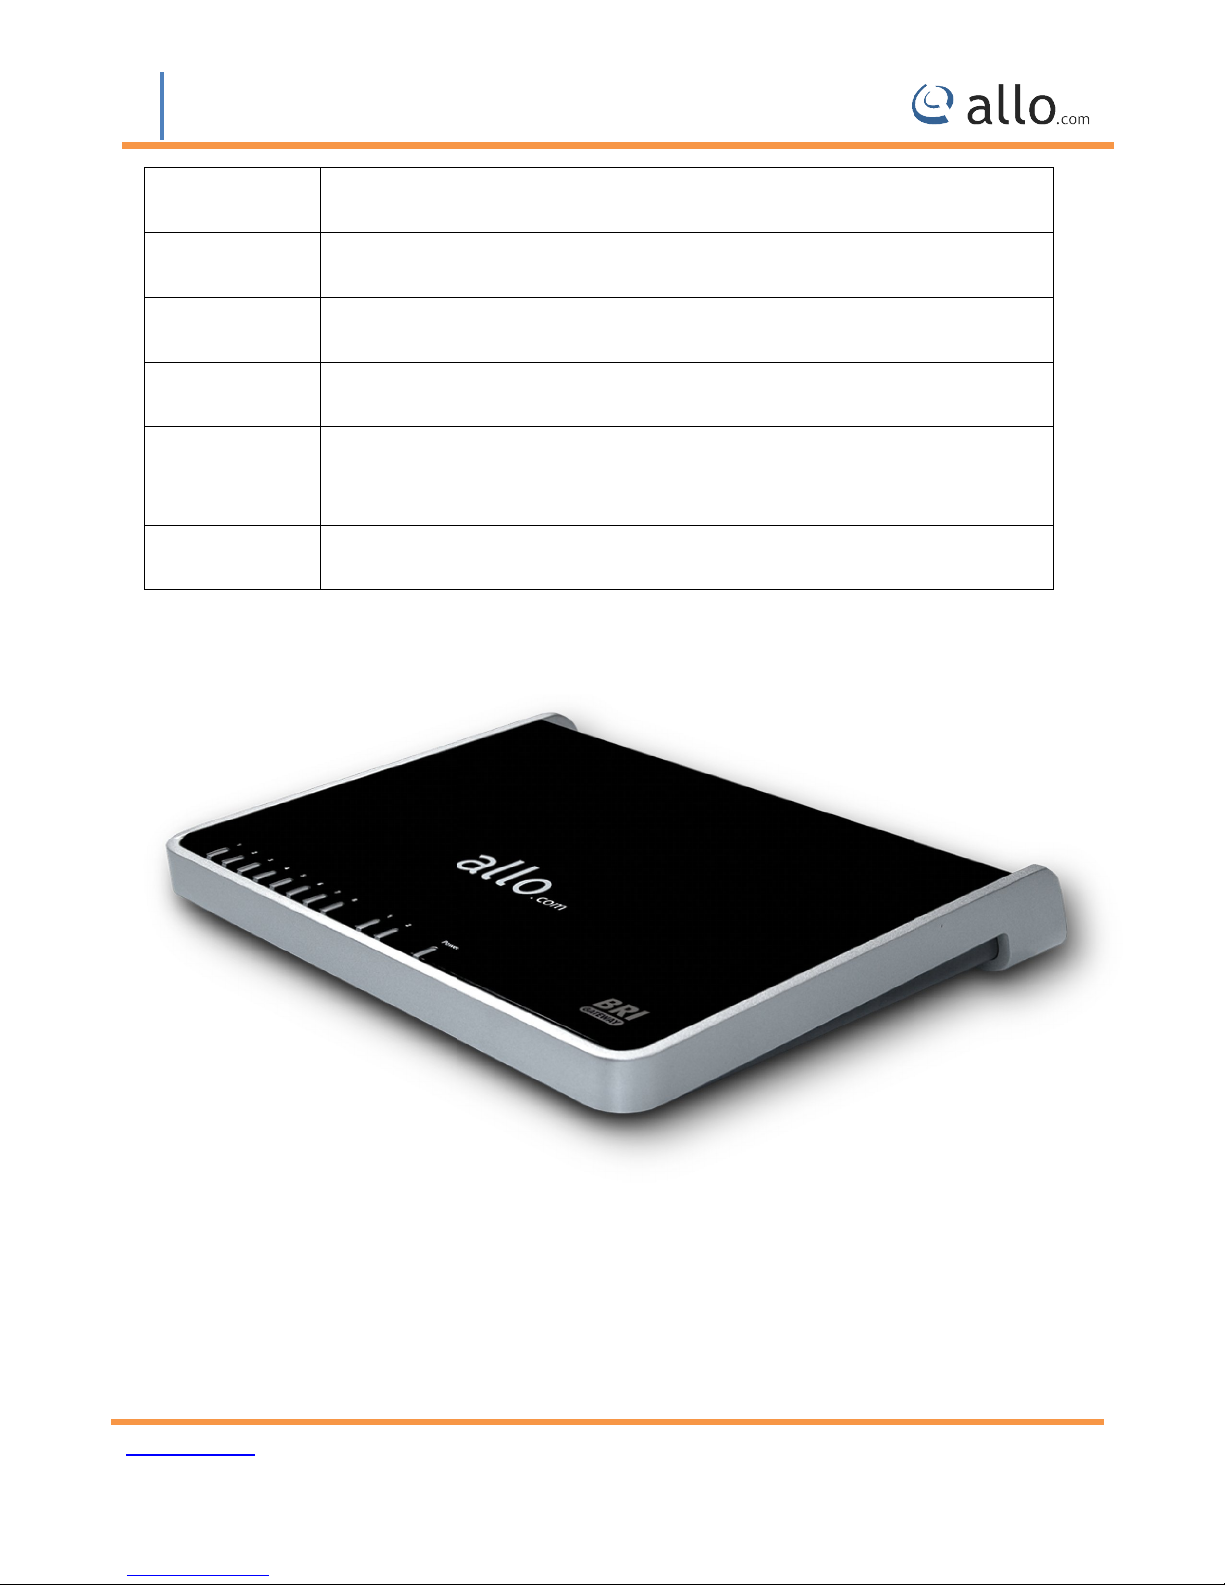
Figure 3: Front View
www.allo.com
Version 2.0
9
Page 10

BRI User Manual
Supported
Standard SIP V2 protocol
E1/T1 BRI protocol
NAT Traversing (STUN)
Hypertext Transfer Protocol (HTTP)
Domain Name System (DNS) & Dynamic host configuration protocol (DHCP)
Law/U
ancellation: Up to 128msec echo tail length
DTMF mode: RFC 2833, SIP INFO and INBAND
Digit manipulation
Integrated SIP registrar
Early Media Support
Call Detail Records (CDR)
HTTP configuration
Firmware upgrade by Web
ecification
Power supply: 12VDC, 3.5A
Temperature: 0~40 deg(operational),
Humidity: 10%~90%, no condensation
Max power consumption: 25W
1.3 Functions and Features
1.3.1 Protocol Standard
ITU-T G.711A-
1.3.2 System Functions
Echo C
STUN support
-Law, G.729AB, G.722
1.3.3 General Hardware Sp
s
-20~70 deg(storage)
www.allo.com
Version 2.0
10
Page 11

BRI User Manual
Dimension (mm):
Net Weight: 1.4 kg
If the BRI Gateway was purchased from a Distributor/reseller, please contact the company where the
device was purchased for replacement, repair or refund. If the device was purchased directly from
contact our Technical Support Te
before the product is returned. Allo.com reserves the right to remedy warranty policy without prior
Use the power adapter provided with the ALLO BRI Gateway. Do not use a different power
adapter as this may damage the device. This type of damage is not covered under warranty.
am for a RMA (Return Materials Authorization) number
WARRANTY
Hardware Warranty: 1 year
allo.com,
notification.
250mm (W) x 220mm (L) x 43mm(H)
www.allo.com
Version 2.0
11
Page 12
BRI User Manual
Getting Started With BRI Gateway
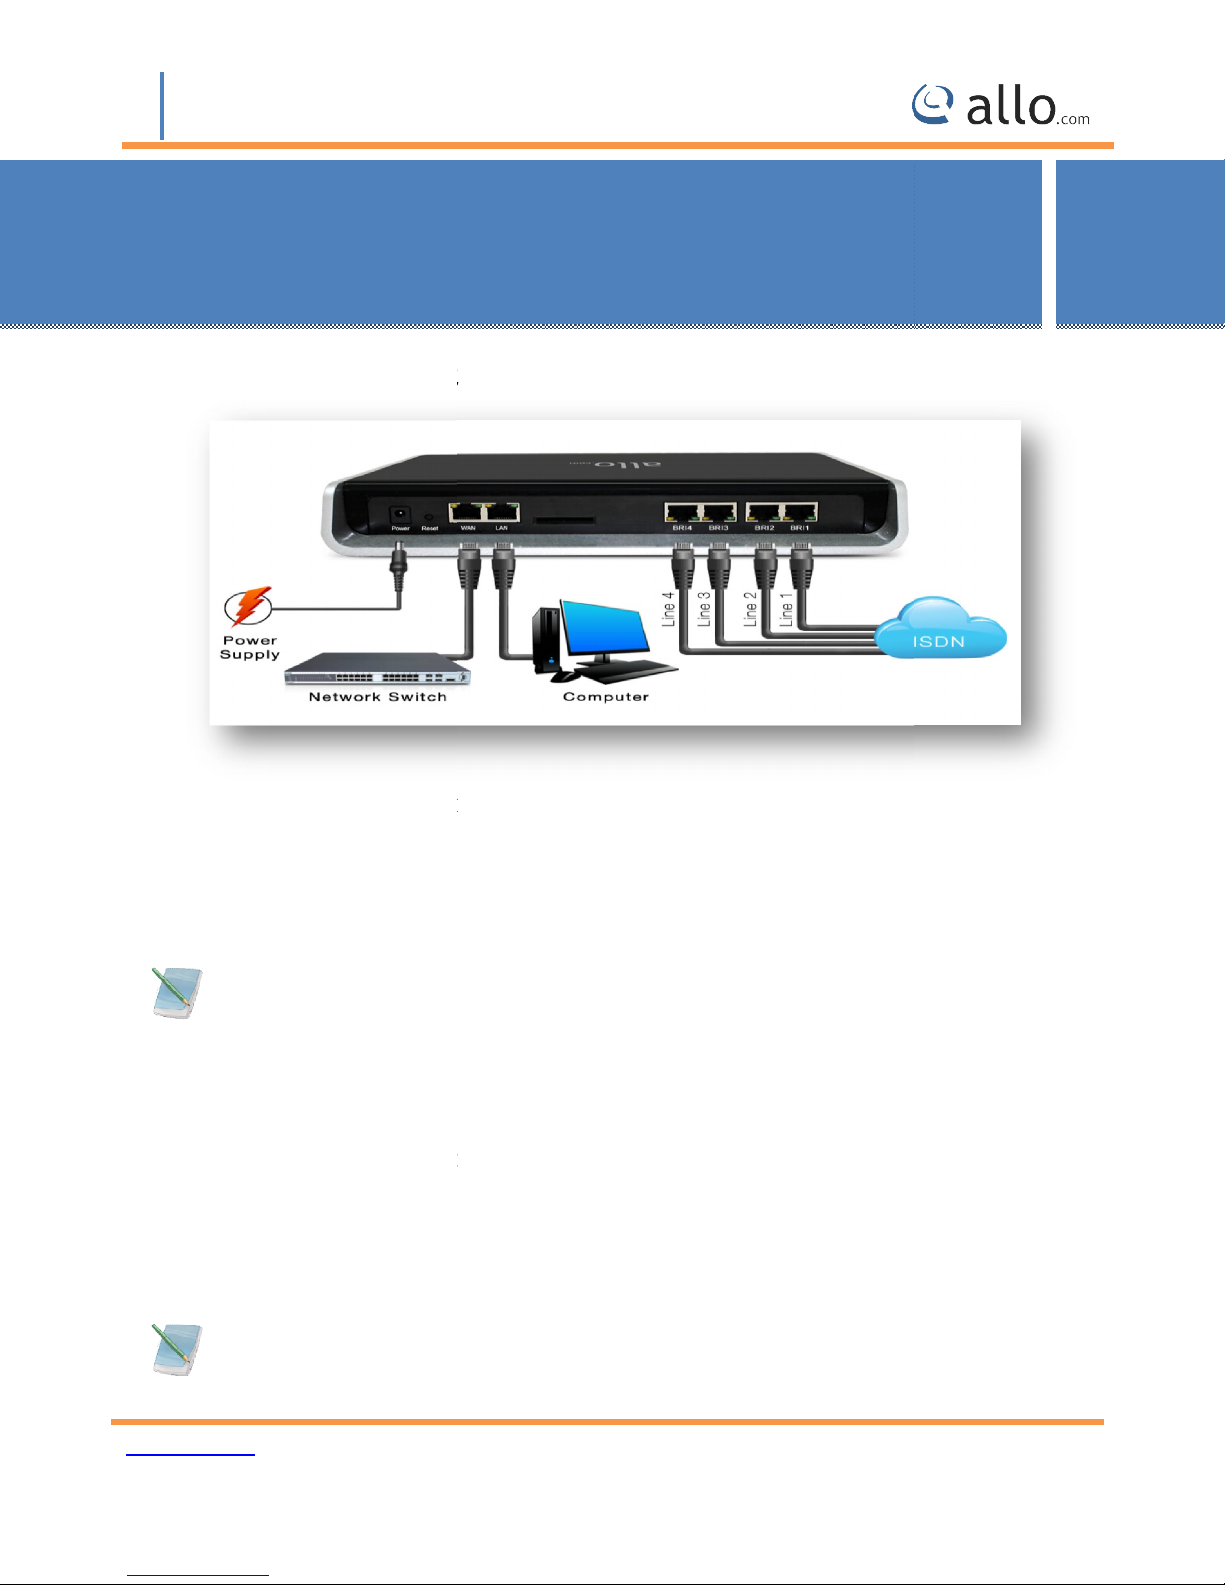
Figure
: Plug one end of the RJ45 Ethernet cable into your Network switch & other end into the
through Ethernet cable to connect between the unit & Router/Switch.
4
end to the ISDN BRI service provider socket.
Insert the Power Adaptor output connector into the “Power” port of the BRI Gateway &
apter to any available AC p
The BRI Gateway will power up, and automatically co
ure in the
ntil the unit is completely booted up and make sure that LED2 is green
Getting Started
Figure
4 spans) of the BRI Gateway & other
ct itself to your netw
2.
2.1 Hardware Installation
Step 1
WAN port of the BRI Gateway.
Use Straight-
Step 2: Plug one end of the RJ
Step 3:
Plug in the Power Ad
Step 4:
(which you can later config
Wait u
4: Getting Started With BRI Gateway
5 cable into the BRI ports (1-
ower outlet.
nne
SETTINGS > Network Settings section)
ork via DHCP
www.allo.com
Version 2.0
12
Page 13
BRI User Manual
BRI Gateway WEB GUI can be accessed either through WAN or Management Console. Steps
to Access the GUI during the initial setup through Management Interface (LAN):
Make the setup as described in Hardware setup section, Lets
Management Interface (LAN). Connect the RJ 45 cable to LAN port of Gateway & Ethernet port of
Change the Network setting of the PC in manual mode (i.e. Static IP mode). Assign the IP
address to the PC in the range o
and gateway & DNS as 192.168.113.1.
Launch the web browser and enter the URL
f BRI Gateway’s Graphical Interface.
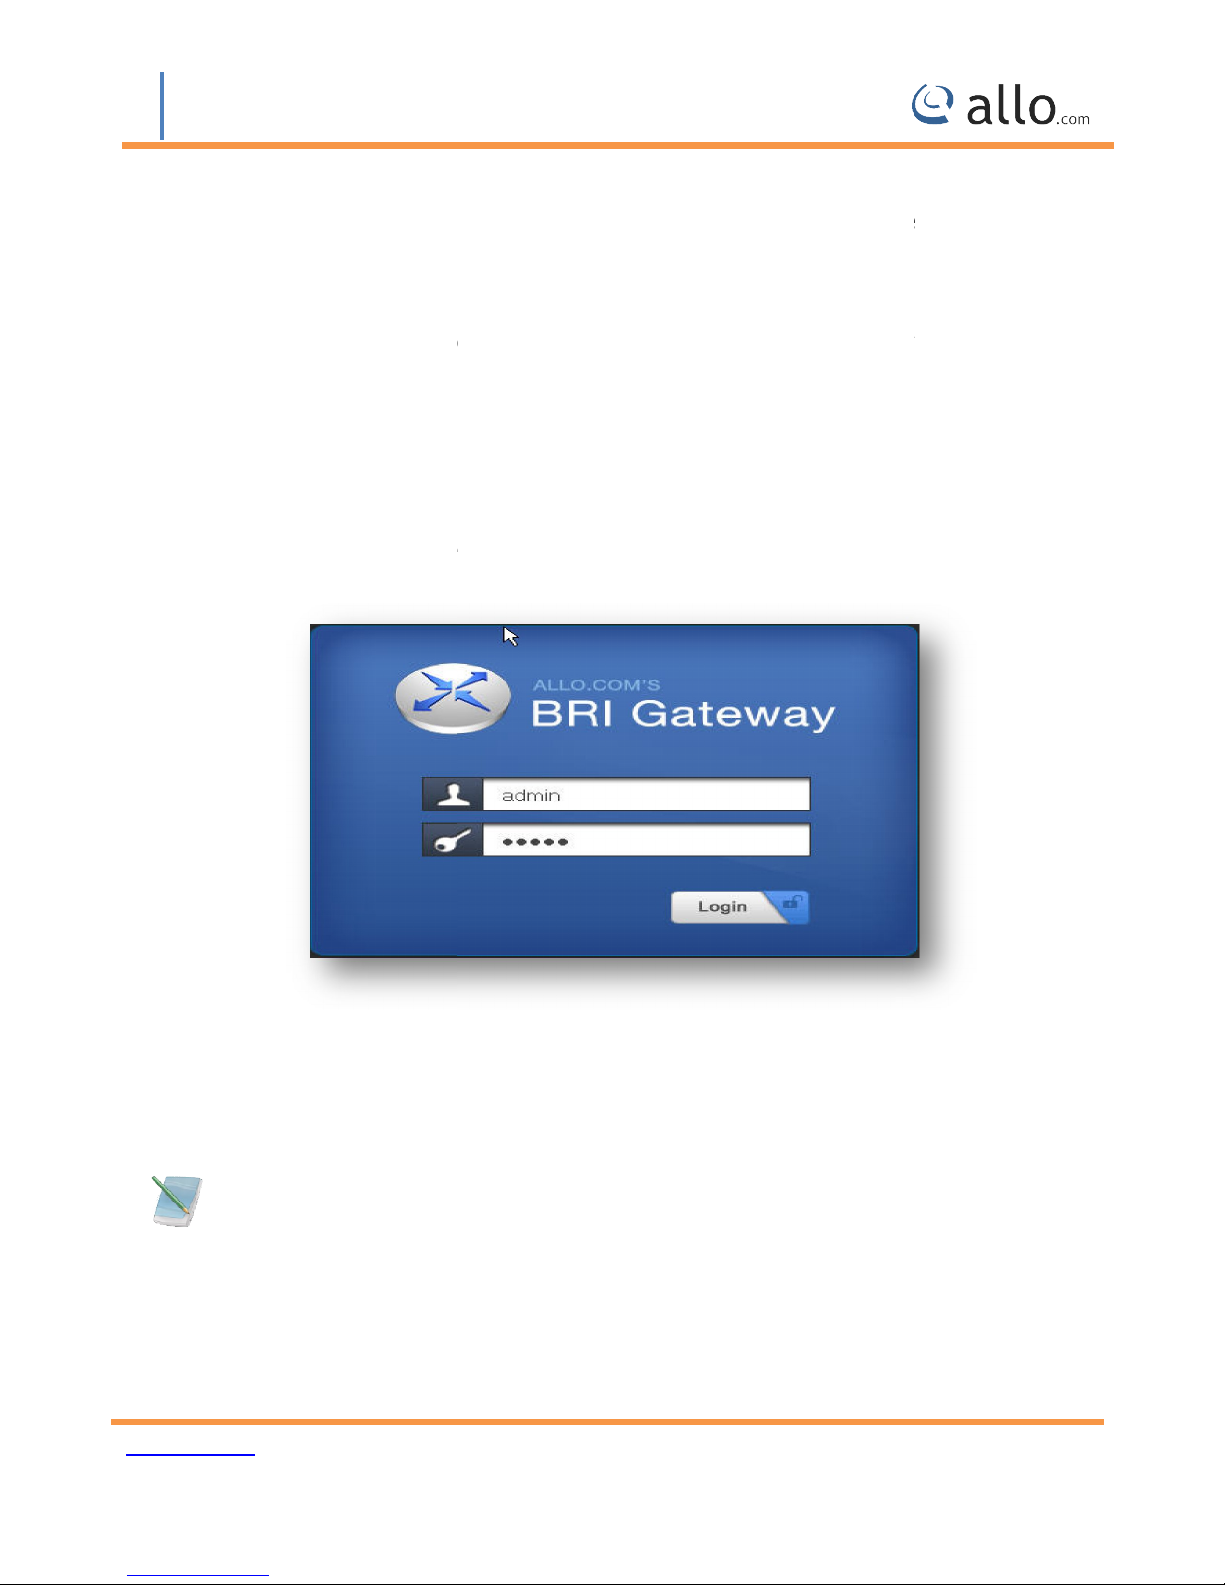
Figure
Login using the default username & password (Default: Username: admin; Password:
admin). Successful login takes you to the Dashboard page. O
dashboard, this will be used to access the GUI from the WAN interface.
Recommended web browser to access GUI is Mozilla Firefox.
If your Local network is not enabled with DHCP server, configure the WAN port IP address
SETTINGS > Network Settings
access the WebGUI through
f 192.168.113.xxx (E.g:192.168.113.10), net mask as 255.255.255.0
(Default LAN IP address)
bserve the WAN IP address on the
section as per your requirement.
2.2 Accessing the WEB GUI
Step 1:
the PC
Step 2:
Step 3:
to open the login page o
Step 4:
http://192.168.113.2
5: BRI Gateway's Graphical Interface
Step 5:
manually in the
www.allo.com
Version 2.0
13
Page 14
BRI User Manual
Features
working with BRI Gateway is simple. In order to run this application
appropriately the following settings are to be configured.
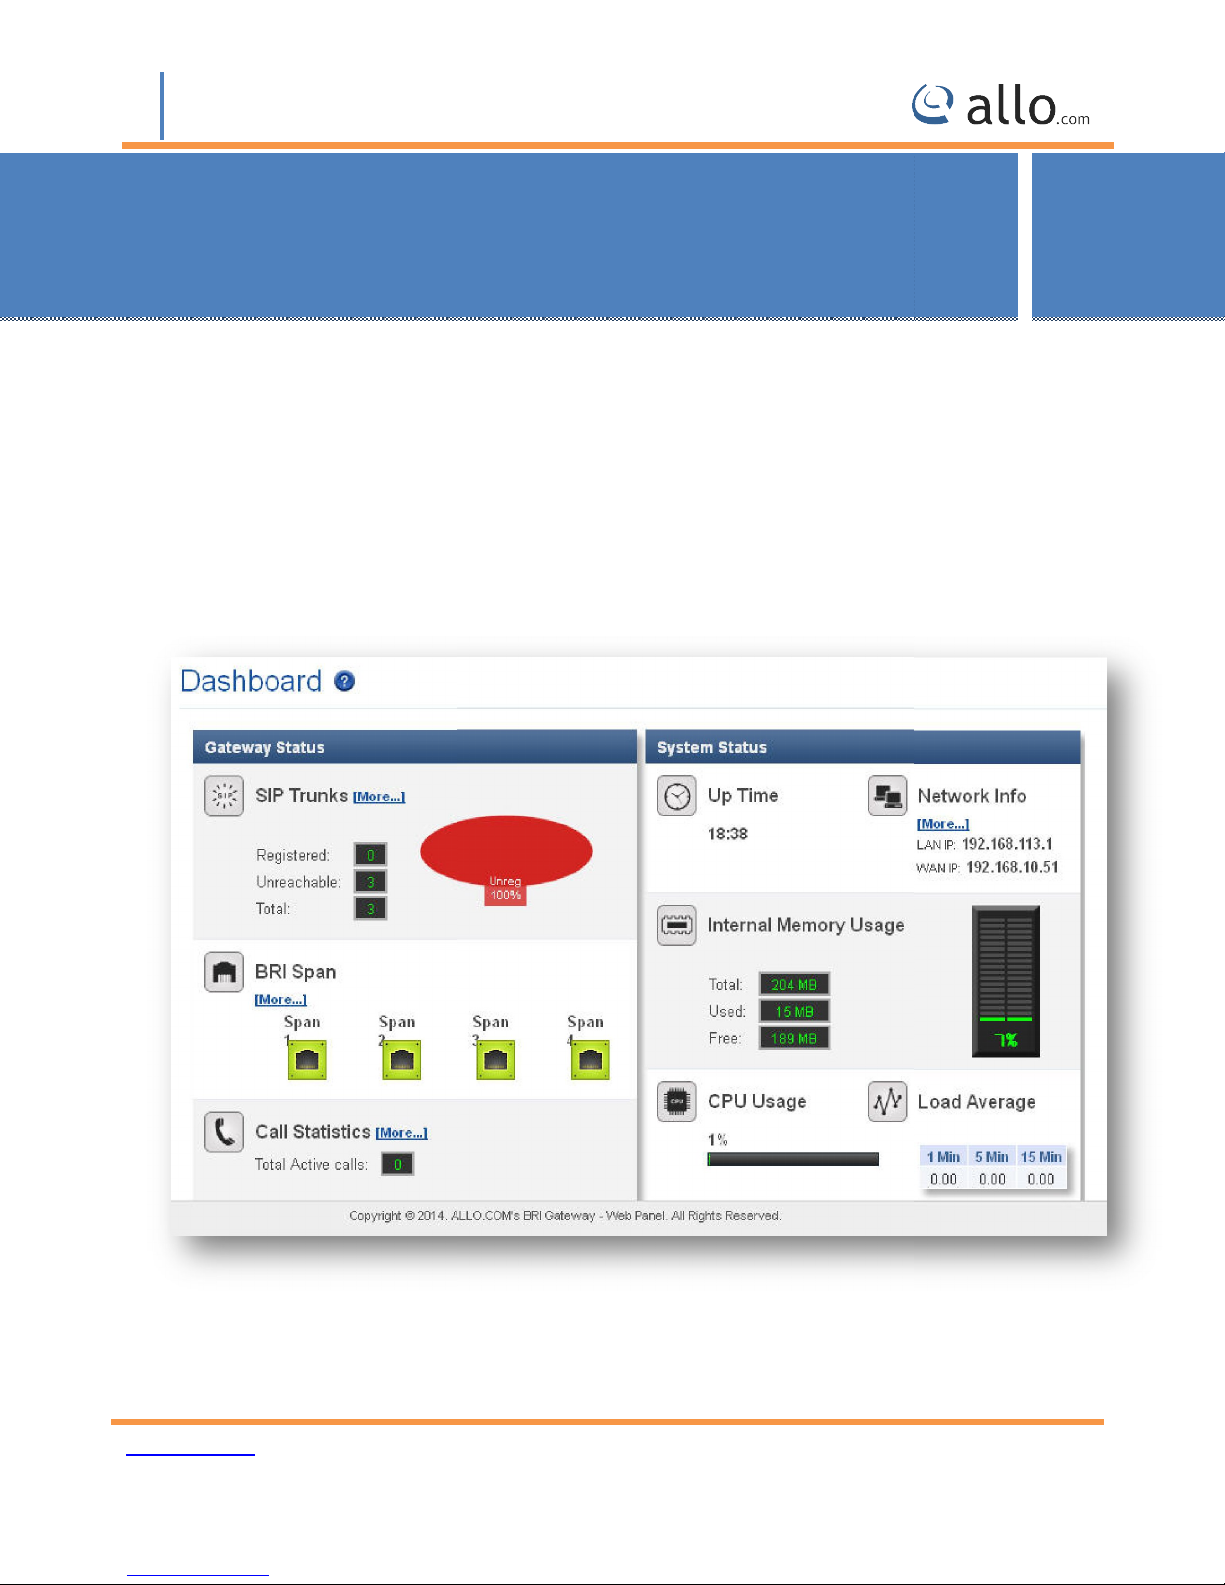
RI Gateway Dash Board summarizes the gateway status with a graphical display. Detailed status of
idual entity is available under the Status Tab or it can be directly accessed.
Setting up Features
3. Setting up
Setting up your browser for
3.1 System Dash Board
B
an indiv
Figure 6: System Dashboard
www.allo.com
Version 2.0
14
Page 15
BRI User Manual
This section consists of all Trunks, calling groups, call routing rules and time based routing, it
all the description to be followed while creating a new process in the BRI Gateway.
bind between
SIP Trunks provides the interface to any SIP companion such as VoIP service provide
server or SIP clients. Add different types of interfaces, and configure the signaling & media settings
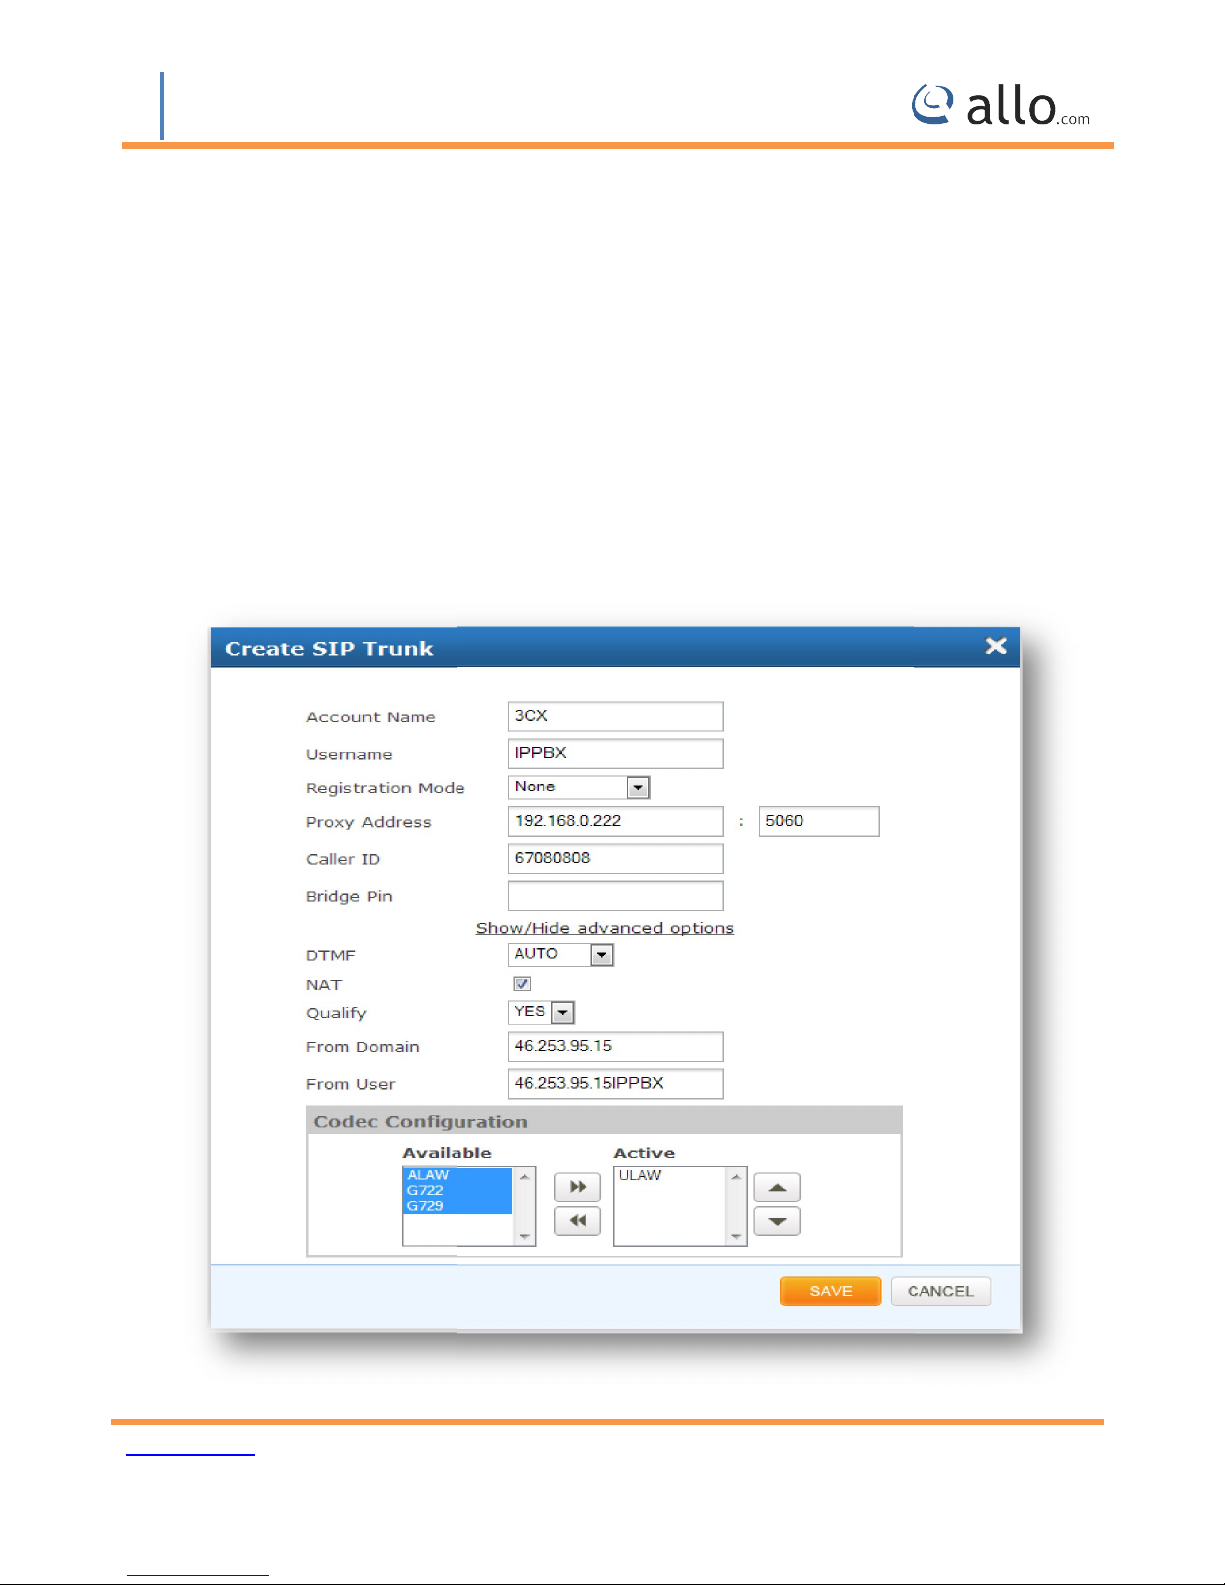
SETUP > SIP Trunk > Add New
: This is where you setup your SIP Trunks
3.2 Setup
also explains
3.3 Trunks
It helps to make the calls and
3.3.1 SIP Trunks
for each trunk.
Navigation through
the two devices.
r, any SIP
Figure 7: Create SIP Trunk
www.allo.com
Version 2.0
15
Page 16

BRI User Manual
Descriptive name for the SIP Trunk for user's reference.
Username of endpoint (e.g.: IPPBX) will use to authenticate with the gateway.
Whether the endpoint will register to this gateway or this
Registration, IP Address peering of the Gateway & Endpoint
Endpoint (IPPBX or VoIP Service Provider) register with the Gateway
Gateway register to the End point (IPPBX or the VoIP S
Enable, if Authentication is required by the End point (VOIP Service Provider or
A username to use only for registration.
Password to authenticate inbound or outbound registrations or calls.
IP address or hostname with port of the endpoint (VOIP Service Provider or IPPBX)
where the calls will be diverted. Default port no.:
IP address or hostname with port of the outbound proxy server. This
ensures that all the SIP packets are sent via specified proxy. Specifying the port is not mandatory.
e.g.: 192.168.0.222:5062 OR 192.168.0.222
Registration to the End point (VOIP Service Provider or IPPBX) is required.
IP address or hostname with port of the Registrar server where gateway must
register to. Specifying the port is not mandatory. Default port no.:
168.0.222:5062 OR 192.168.0.222
You can set a PIN for outgoing calls on SIP trunk, thus you will set one more level of
security. Leave it blank for unsecured mode.
Set default DTMF mode for sending DTMF digits. Options:
sent along with audio (requires 64
sent as SIP INFO messages
sent as RTP packets
gateway will register
ervice Provider)
Account Name:
Username:
Registration Mode:
to the endpoint.
a) None: any
b) To Gateway:
c) From Gateway:
Authentication:
IPPBX)
Auth. Username:
Password:
Proxy Address:
5060
Outbound Proxy Address:
Default port no.: 5060
Register: Enable, if
Registrar Address:
e.g.: 192.
Bridge PIN:
Advanced Options
DTMF:
· INBAND –
· INFO –
· RFC2833 –
5060
Kbit codec - alaw, ulaw)
www.allo.com
Version 2.0
16
Page 17

BRI User Manual
System automatic selects the mode.
Enable it, to address NAT
configuring NAT settings under SIP Global Settings is required) Default:
Choose the available Codecs and set priority in the order in whic
should prefer to send and receive audio.
It is a server related SIP parameter
Domain for which trunk is configured
User name of the trunk
Add SIP Trunk
Create a SIP user account for below registration methods.
None: IP peer trunking
From Gateway: Gateway is registering to PBX or VoIP service provider
To Gateway: Endpoint ( PBX extension or VOIP service provider account )
registering to G/W
Enter the PBX or VoIP service provider IP address for registration mode “ From Gateway or
Click authentication, if it is required
Click registration and add registrar address
Create and APPLY CHANGES.
Make Sure to click the APPLY
/deleting any Trunk. The APPLY CHANGES tab turns Orange if some changes are
related issue for SIP & media sessions for this trunk. (Note:
disabled
Supported codecs are alaw, ulaw, G.729, G.722
CHANGES button in the top navigation bar, after
· AUTO –
Default: AUTO
NAT:
-
Codec Configuration:
QualifyFrom DomainFrom User-
Procedure
1) Click on the
2)
3) Registration Mode:
4)
None”
5)
6)
7)
h gateway
adding/editing
made and not saved.
www.allo.com
Version 2.0
17
Page 18
BRI User Manual
w you to make calls using your BRI line.
Connect your ISDN BRI line to the ports of the BRI Gateway
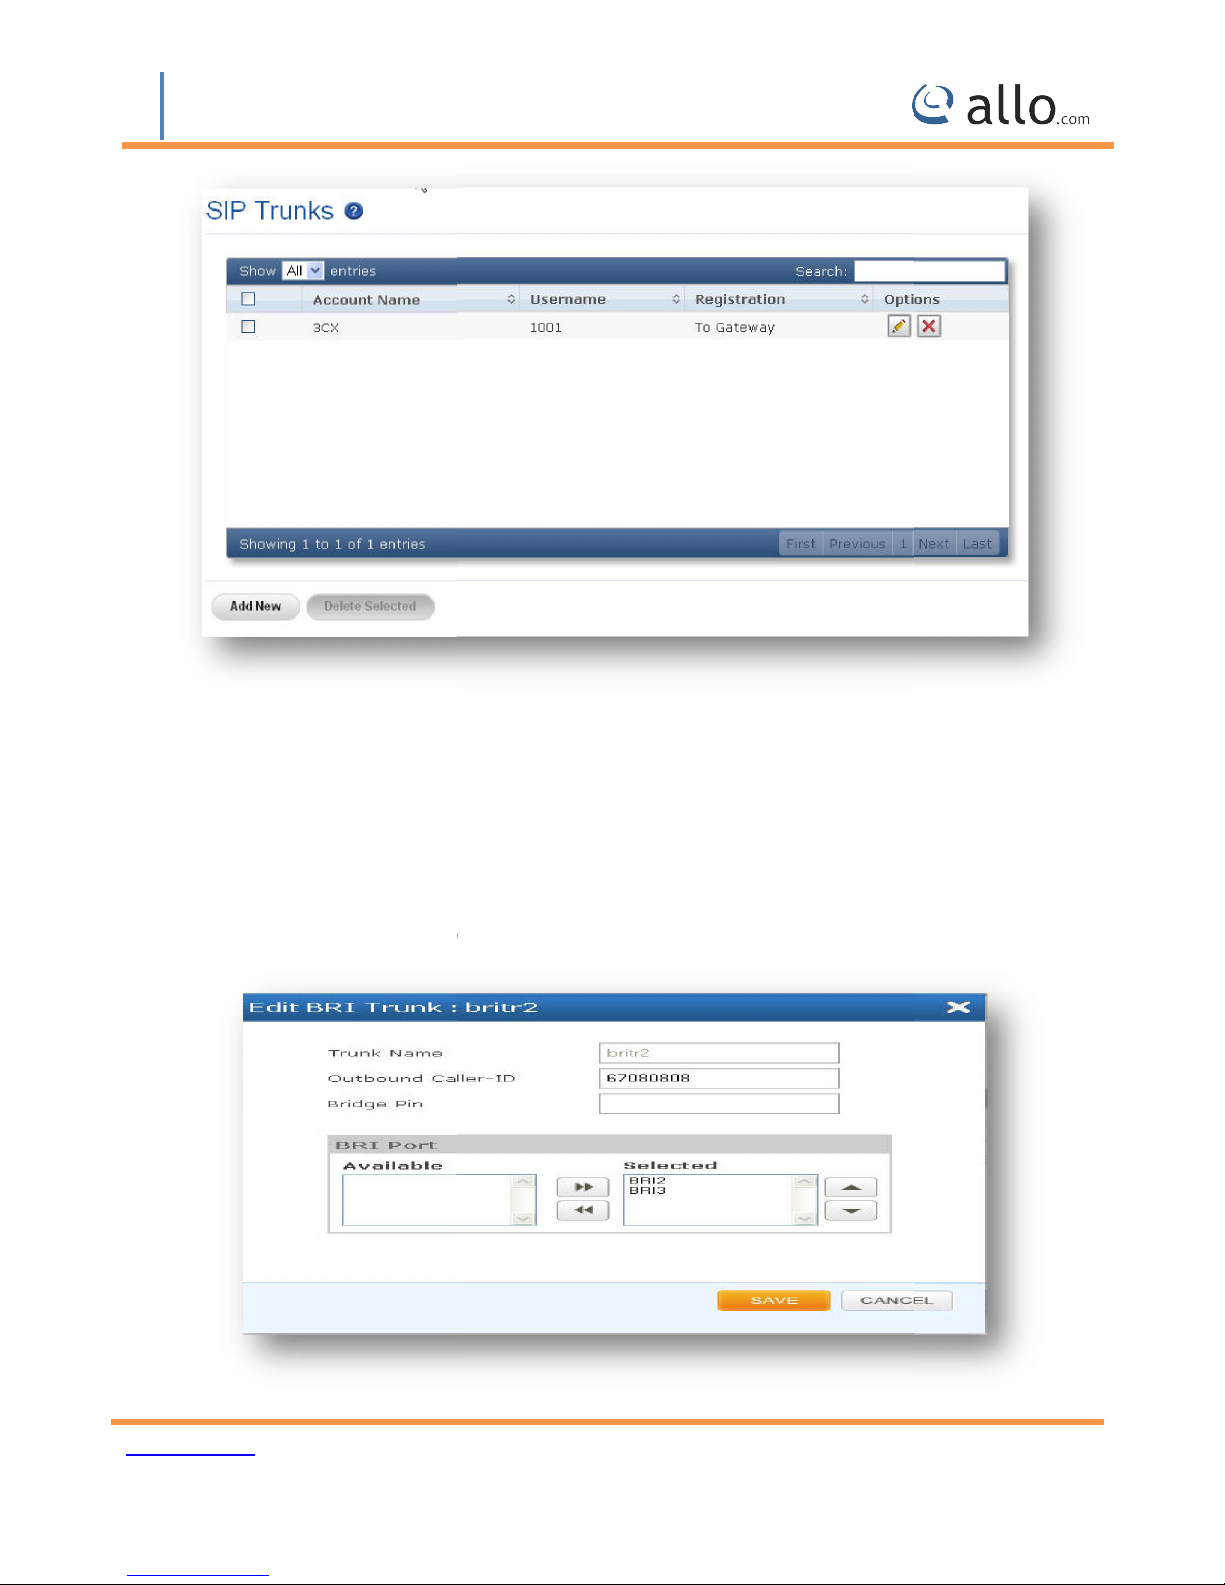
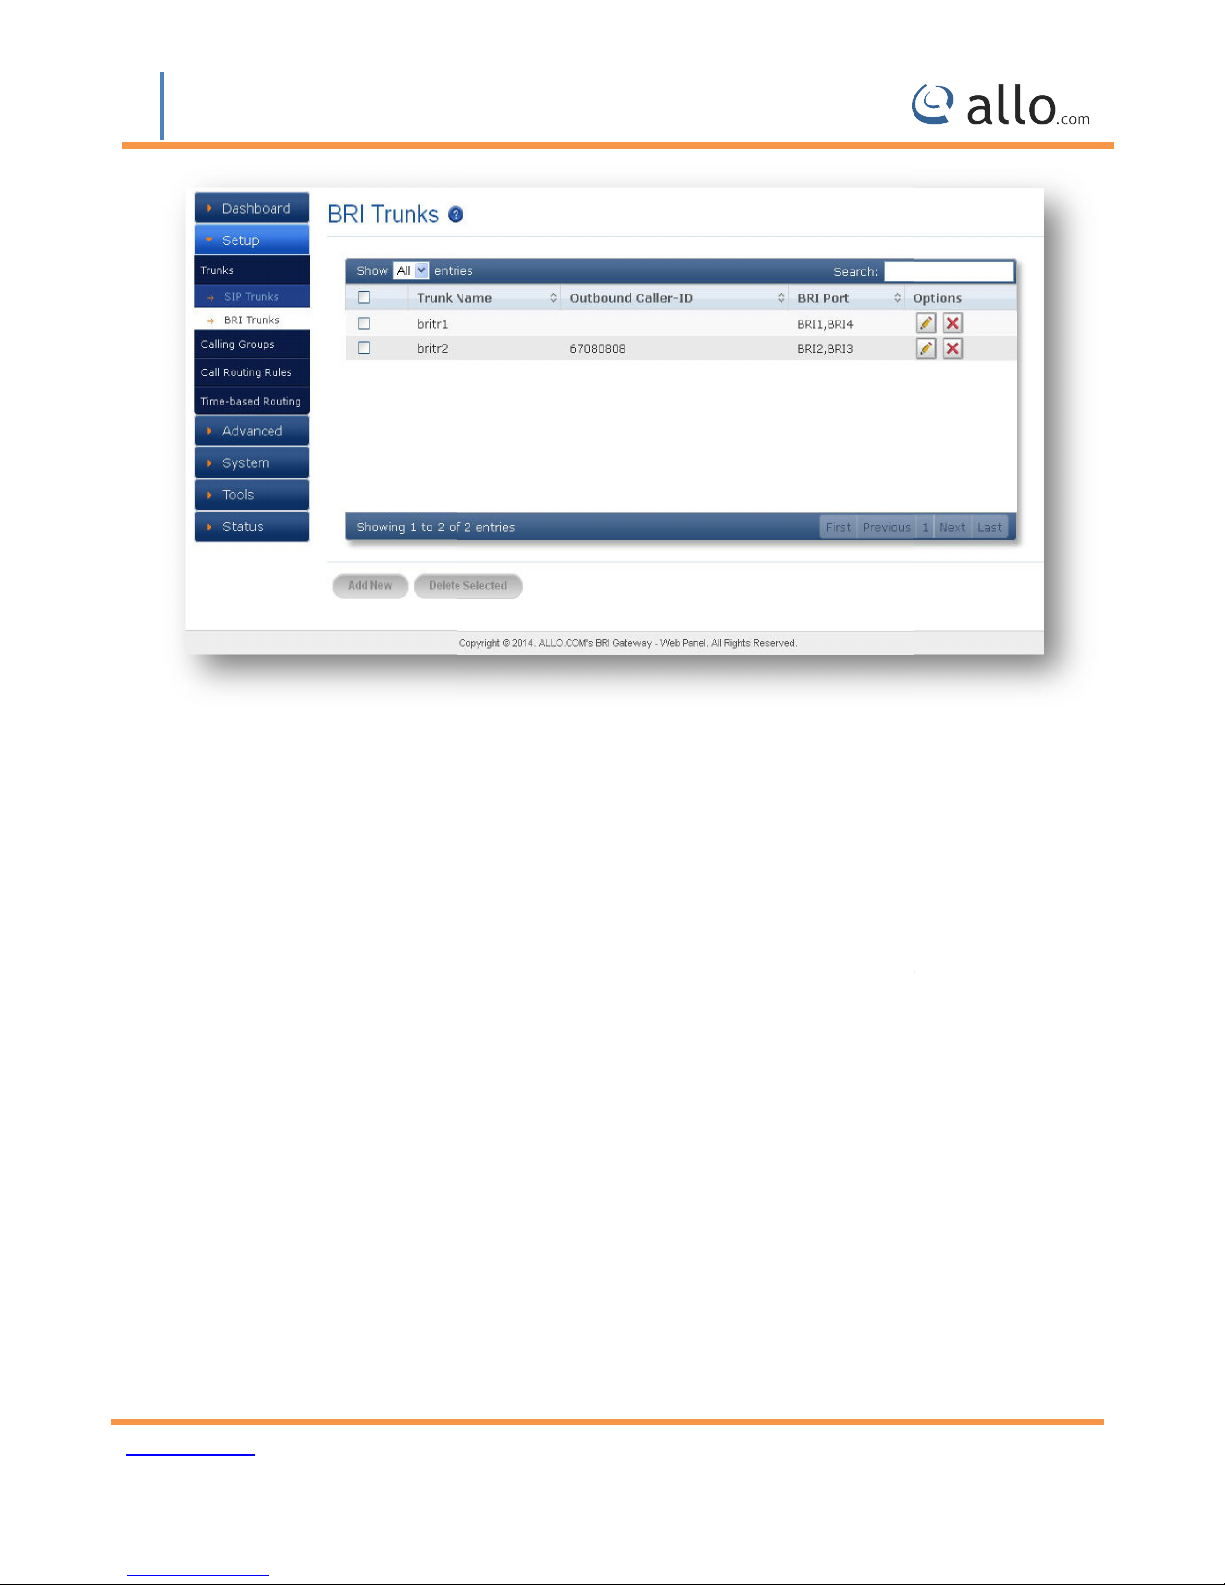
SETUP >> ISDN BRI Trunks
Enter Name your Trunk (Office Line 1 for example), Outbound Caller ID
Add New
Figure 8: SIP Trunks Result
3.3.2 BRI Trunks
ISDN BRI Trunks will allo
1.
2. Click on the
3.
link in the GUI, then select
Figure 9: Edit BRI Trunk Name
www.allo.com
Version 2.0
18
Page 19
BRI User Manual
APPLY CHANGES
SETUP > Calling Groups
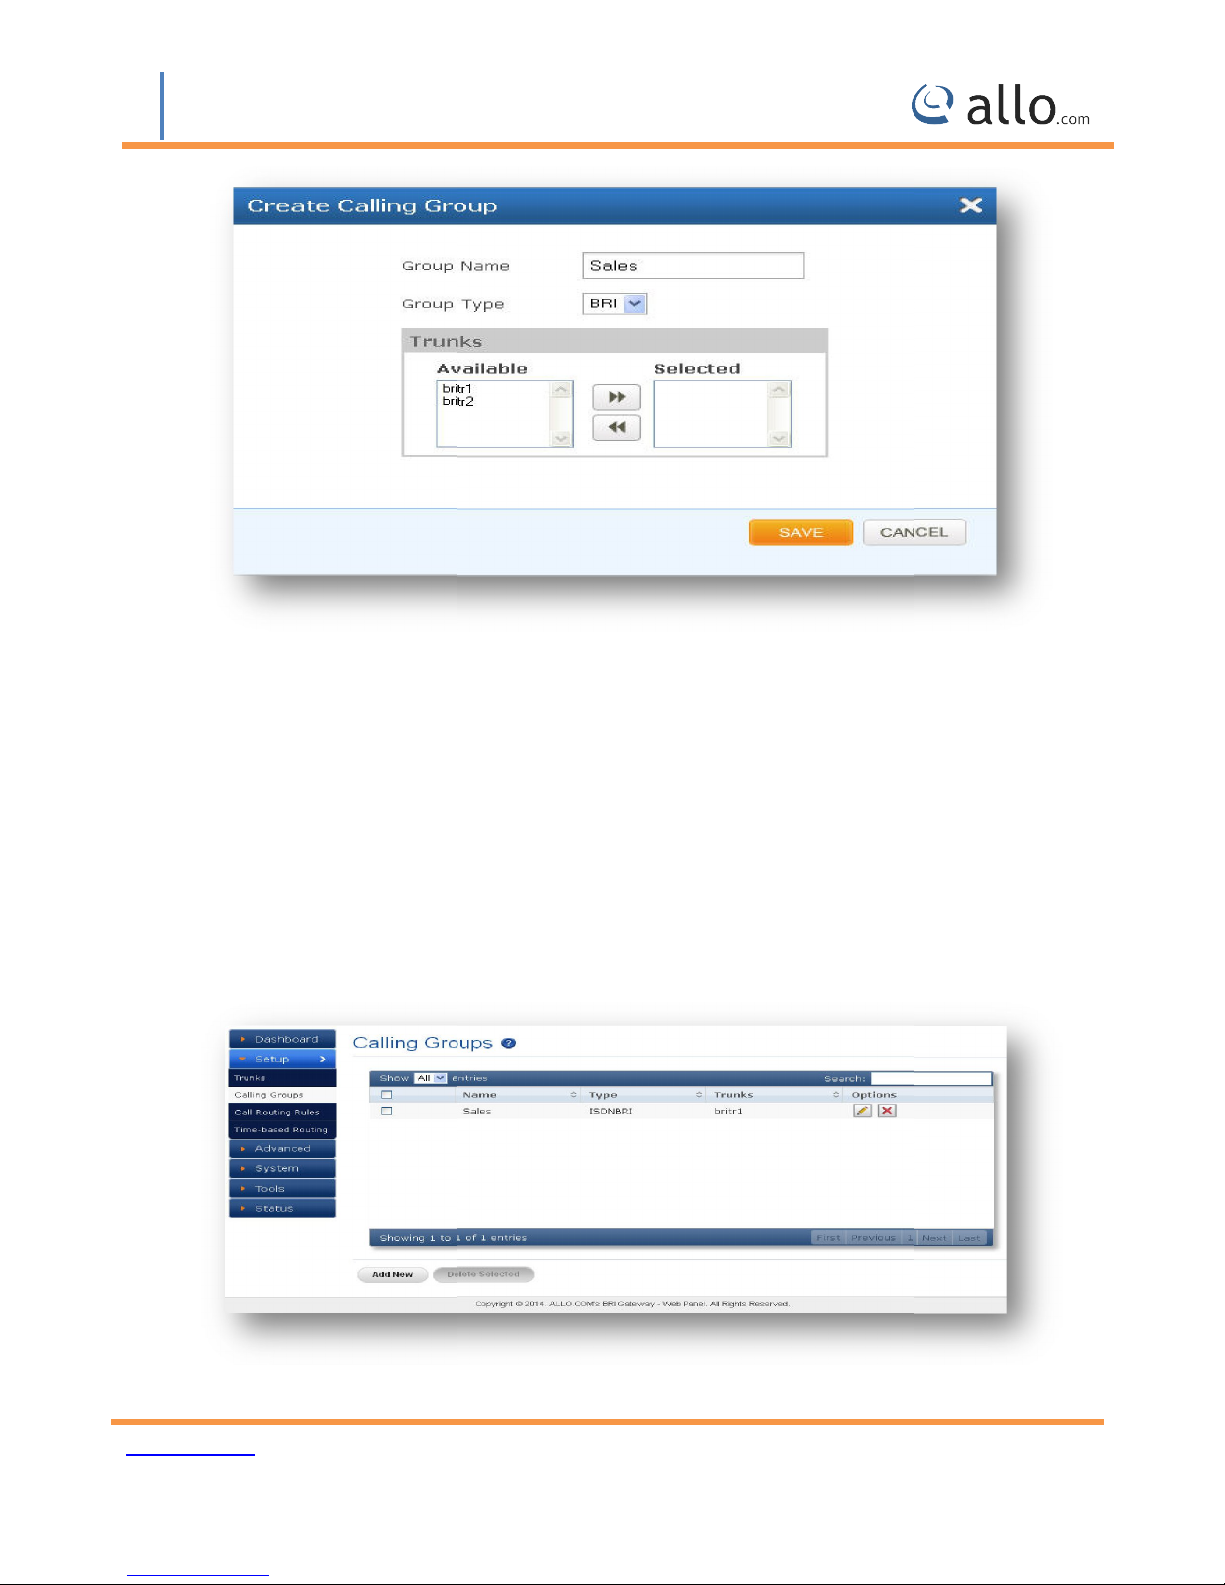
You can create the Calling groups by selecting available trunks with two types : BRI trunk groups
A calling group allows a group of trunks to be addressed when creating a call routing rule. Multiple
groups can be created with different combination of trunk
” button to update the configuration changes
you setup your Trunk Calling groups
s, but of the same type (SIP & B
Click on “Save”, followed by “
3.4 Calling Groups
Navigation:
and SIP trunk groups.
Figure 10: BRI Trunks
: This is where
RI).
www.allo.com
Version 2.0
19
Page 20
BRI User Manual
Descriptive name for the Calling Groups for user's reference.
You can select group type as SIP or PRI Trunk. For e.g.: If you select Group Type as SIP,
SIP trunks will be listed in available Table.
Depending upon the Group Type you have selected, available trunks can be moved to
“Selected” column, to be listed under this Calling Group.
create a calling group.
Figure 11: Create Calling Group
Group Name:
Group Type:
Trunks:
Click on the “Save” to
Figure 12: Calling Groups Result
www.allo.com
Version 2.0
20
Page 21
BRI User Manual
Routing Rules
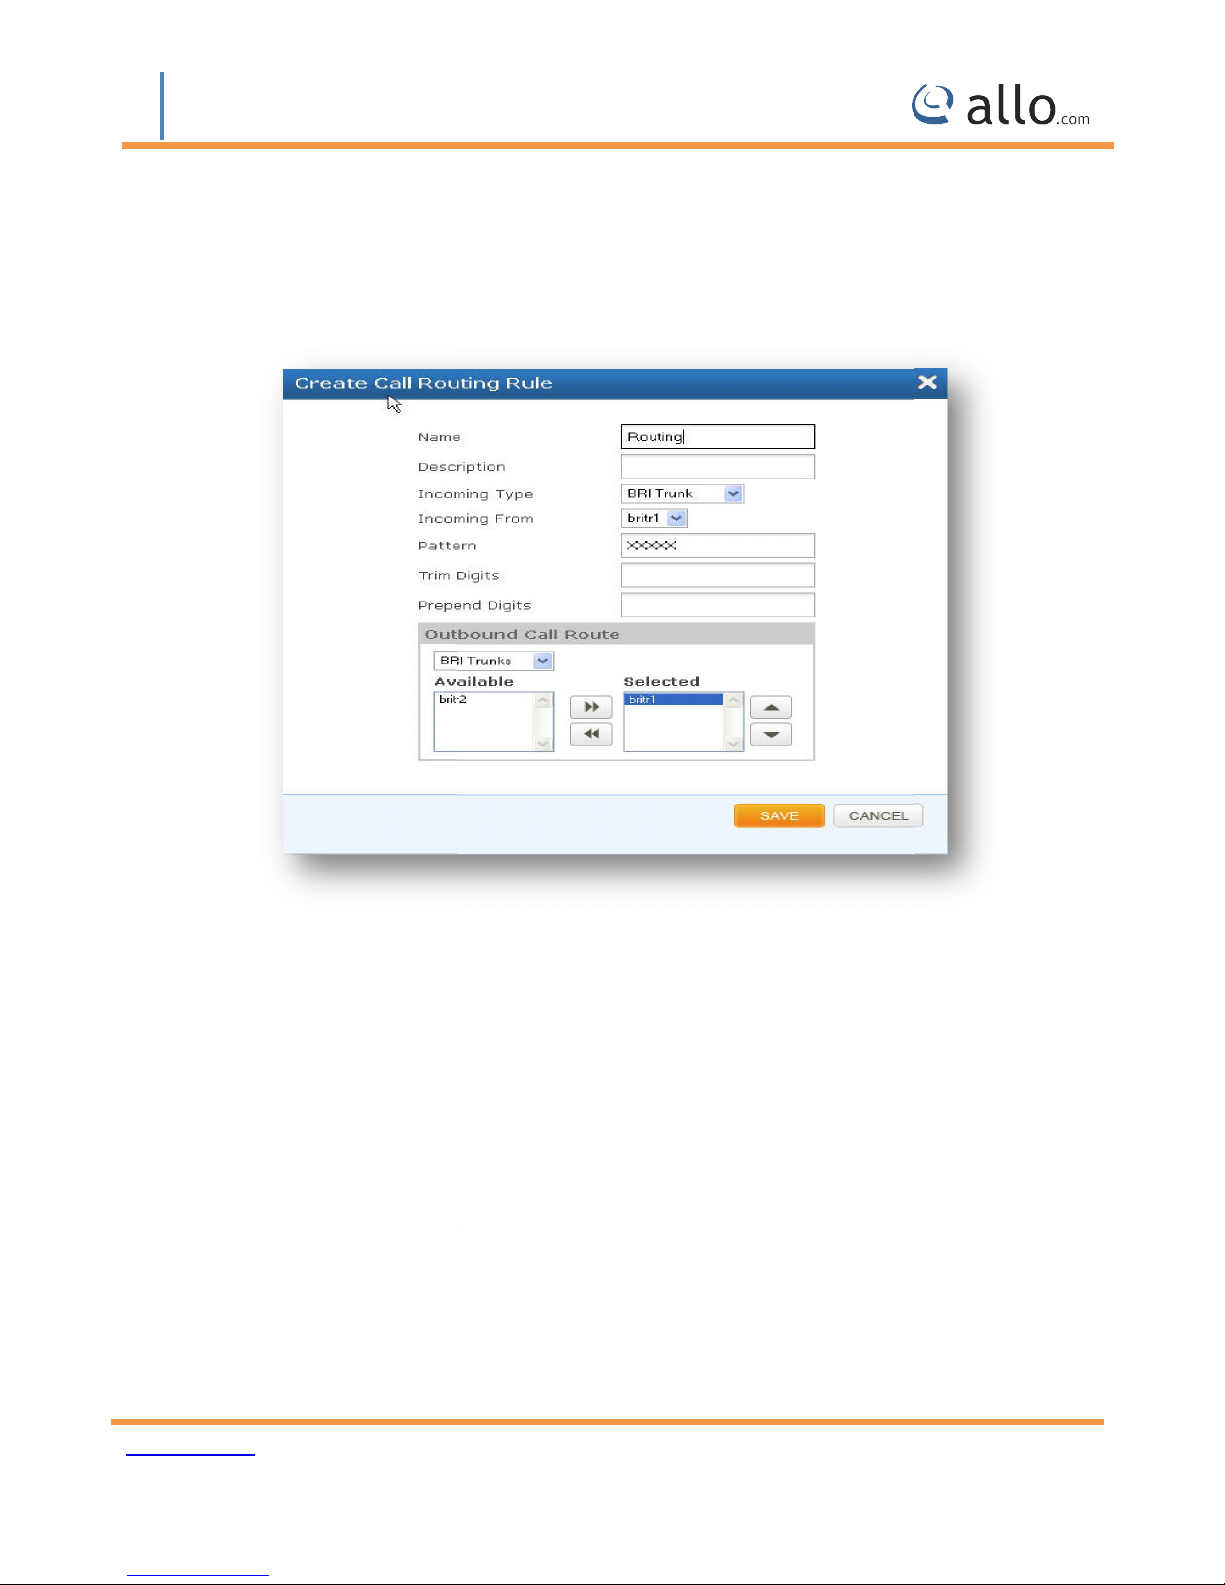
A call routing rule determines how a call is handled based upon certain characteristics such as
dialed number, inbound trunk, DID, etc.
Click Add Call Routing Rule
Add incoming or outgoing rules for BRI and SIP
Descriptive name for the Call routing rule for user's reference.
Provide the description for the Call routing rule. (Optional)
Specify how the gateway should match incoming calls. The gateway can
match on PRI Trunk, SIP Trunk or Calling Group.
Specify the available trunk or calling group for the selected Incoming
Depending on the number you dial, the BRI
Select proper “Incoming type” and proper trunk name “Incoming from”
gateway will select the configured BRI/SIP
3.5 Call Routing Rules
Navigate through Setup > Call
.
1.
2.
Name:
Description:
Incoming Type:
Incoming From:
3.
Trunk.
4.
www.allo.com
Type.
Figure 13: create Call Routing Rule
Version 2.0
21
Page 22
BRI User Manual
9] matches any digit or letter in the brackets
z] matches any lower case letter
letter
. Wildcard, matches one or more characters
! Wildcard matches zero or more characters immedi
: Allows the user to specify the number of digits that will be stripped from the dialed
number. For Ex: If you configure the pattern as 9X. And you want to strip 9 then you should
the user to specify the digits which are pretended before placing the call via
trunk. Ex: If dialed number is 8789763010 and if you want to prepend 44 as a country code then
mention in prepend digits field as 44
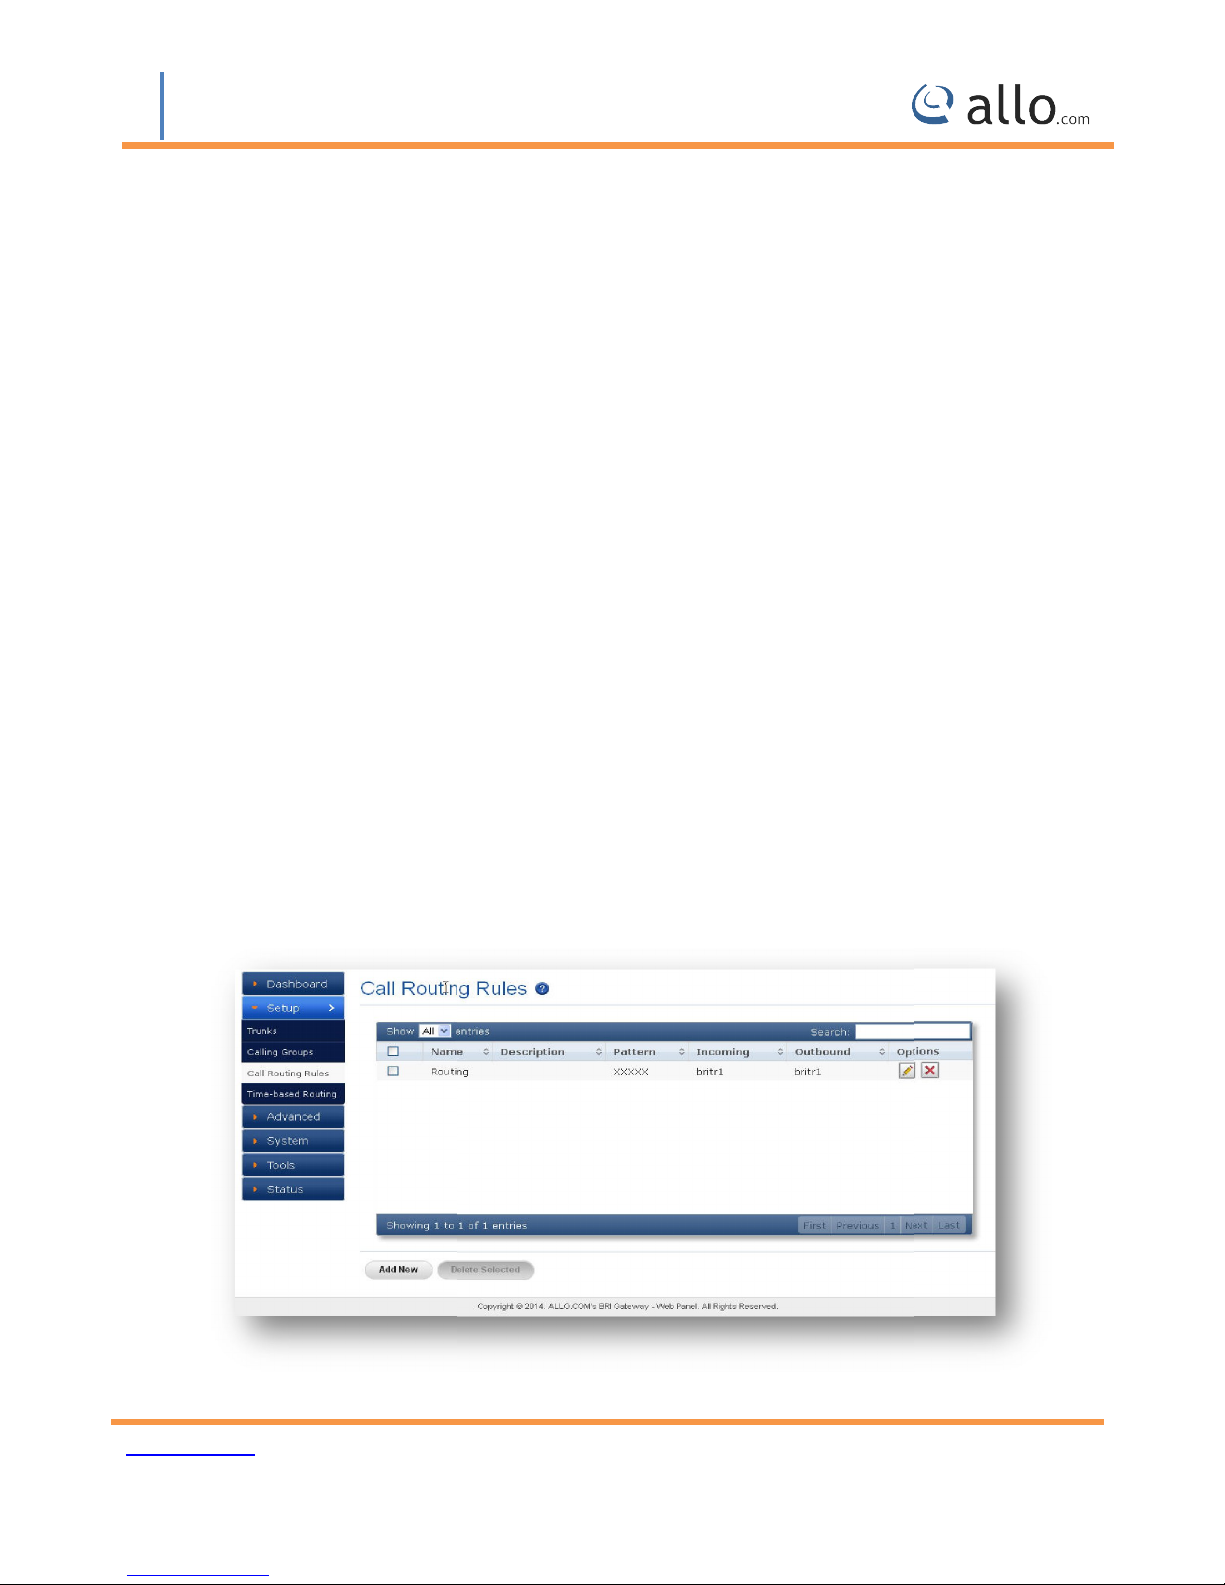
: Select proper SIP tru
destinations calls are going. And Move particular trunks form “Available Trunk” table to “Trunk
nk or BRI trunk or Time route Group, where the
Dial Pattern:
X matches any digit from 0-9
Z matches any digit from 1-9
N matches any digit from 2-9
[1237(in this example, 1, 2, 3, 7, 8, 9)
[a[A-Z] matches any UPPER case
Trim Digits
mention Trim Digits field as 1
ately.
Prepend Digits: Allows
Outbound Call Route
Sequence” table”
Figure 14: Call Routing Rules Result
www.allo.com
Version 2.0
22
Page 23
BRI User Manual
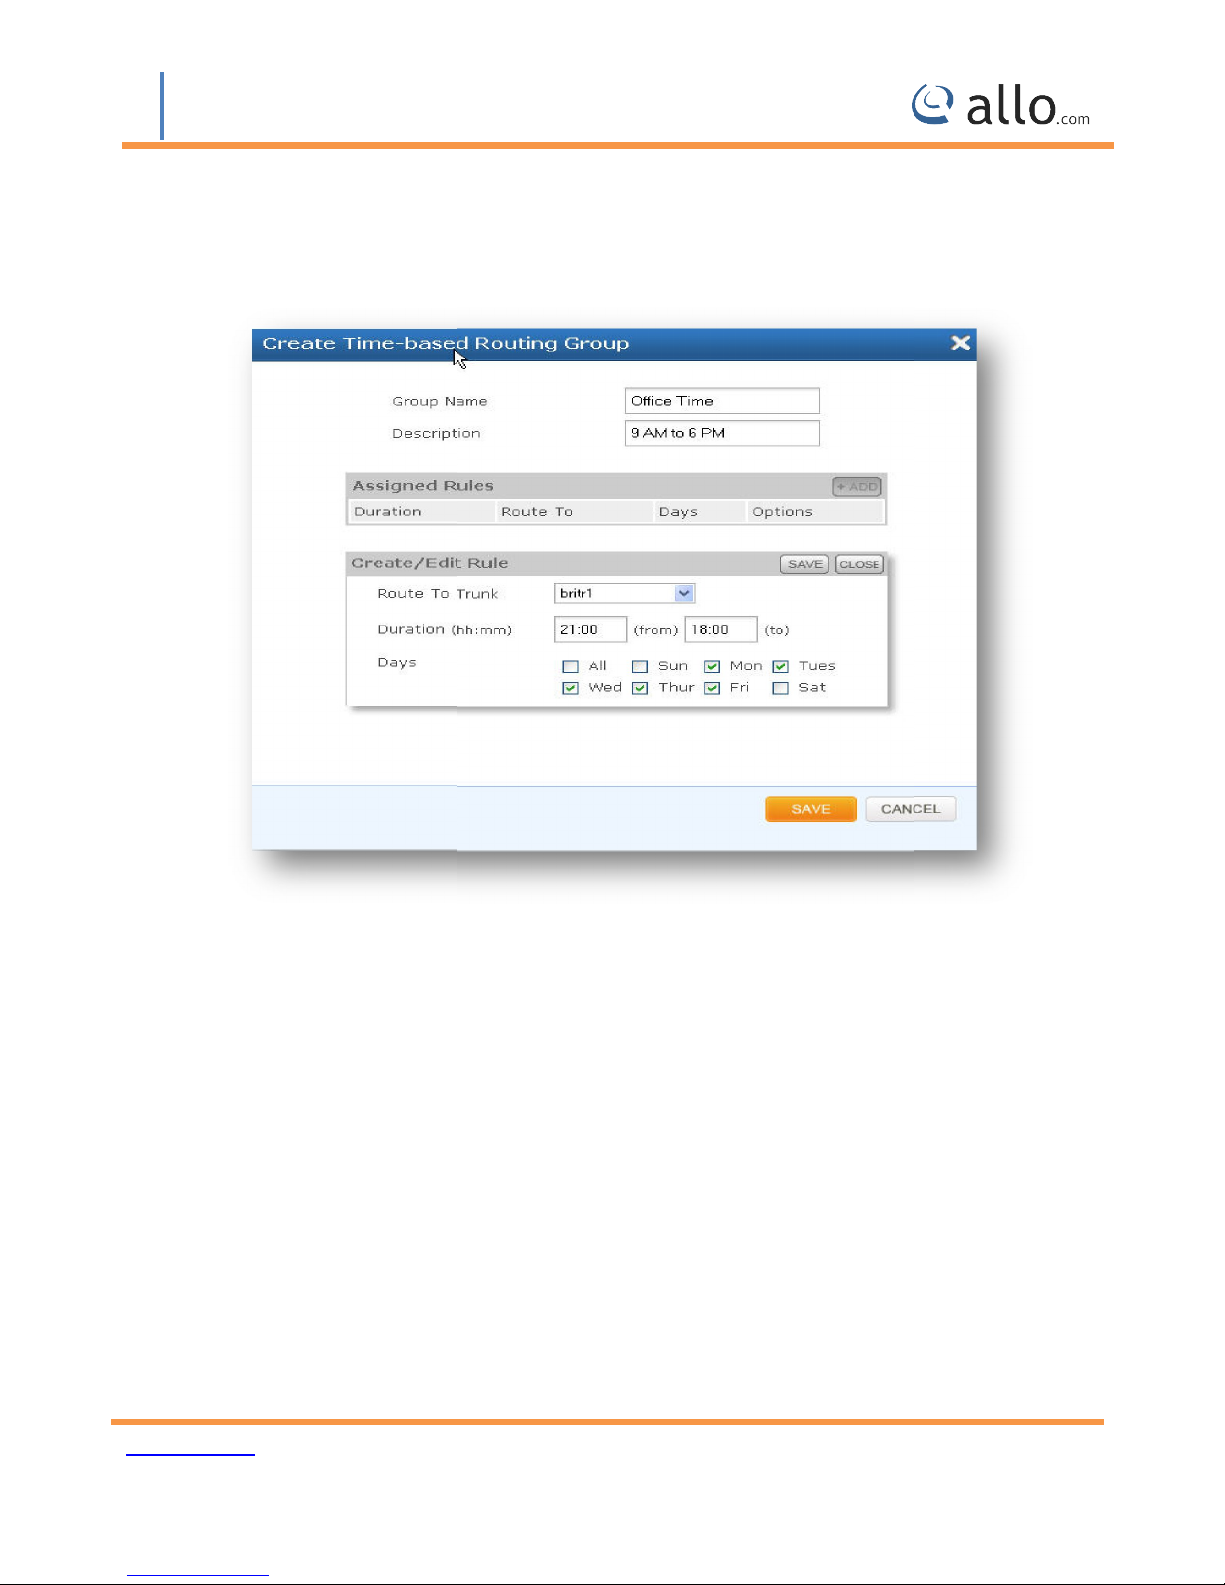
SETUP > Time
Figure
: Provide the rule name. It should be unique compared to IVR and
: Provide the proper description for the Time based routing rule.
: Configuring the route to trunk is setting the destination. The destination for any
to the respective trunks.
let you enter the time range to take the call through the trunk mentioned in the
: This field allows the calls to the trunk mentioned in the route to trunk field on mentioned
hand side BRI Gateway menu, we reach
3.6 Time-based Routing
By clicking on the
this section:
-based Routing on the left-
Group Name
Description
Route to Trunk
inbound call is
Duration: This field
route to trunk field.
Days
days.
www.allo.com
15: Create Time-based Routing Group
Version 2.0
Voice file name.
23
Page 24
BRI User Manual
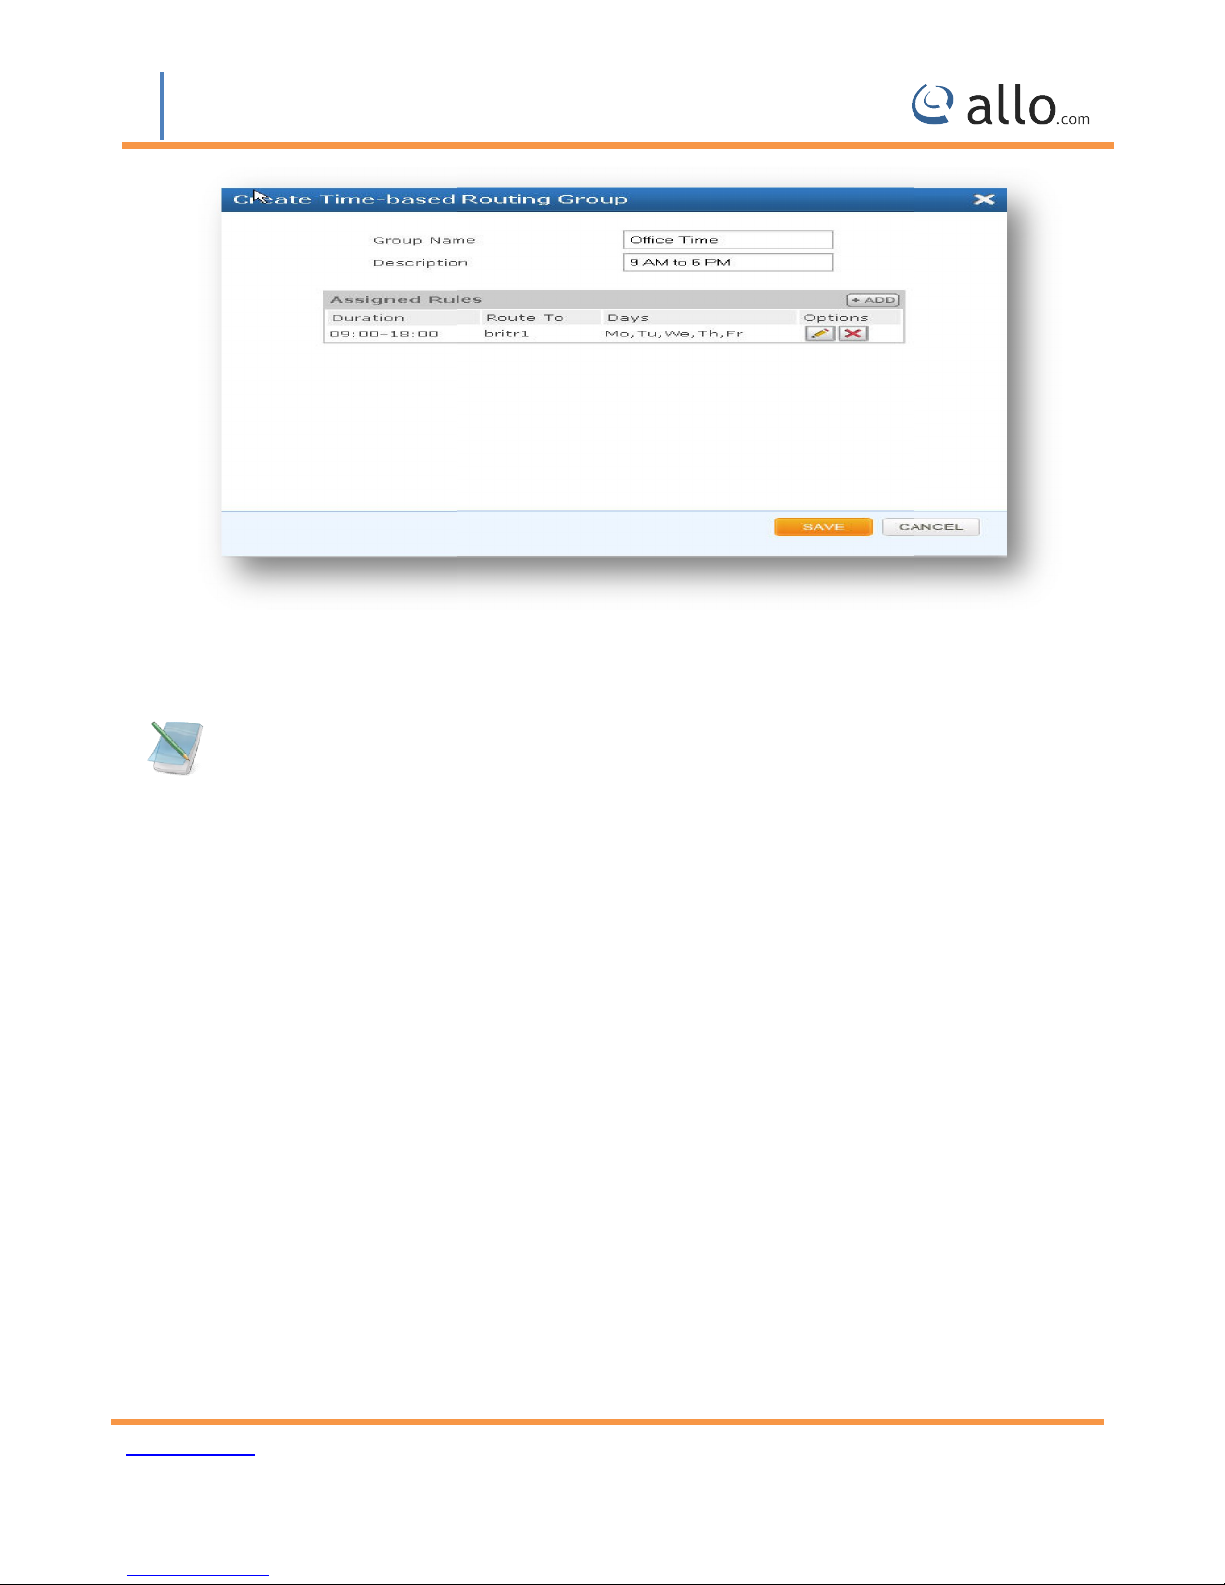
Figure
” to save the rule followed by
APPLY CHANGES
Make sure that the current date and time are configured correctly under SYSTEM>
based Routing Groups Result
on the main time group to save the time
16: Assigned Rules in Time based Routing Group
Click on the “Save
routing group. Then click “
Date/Time.
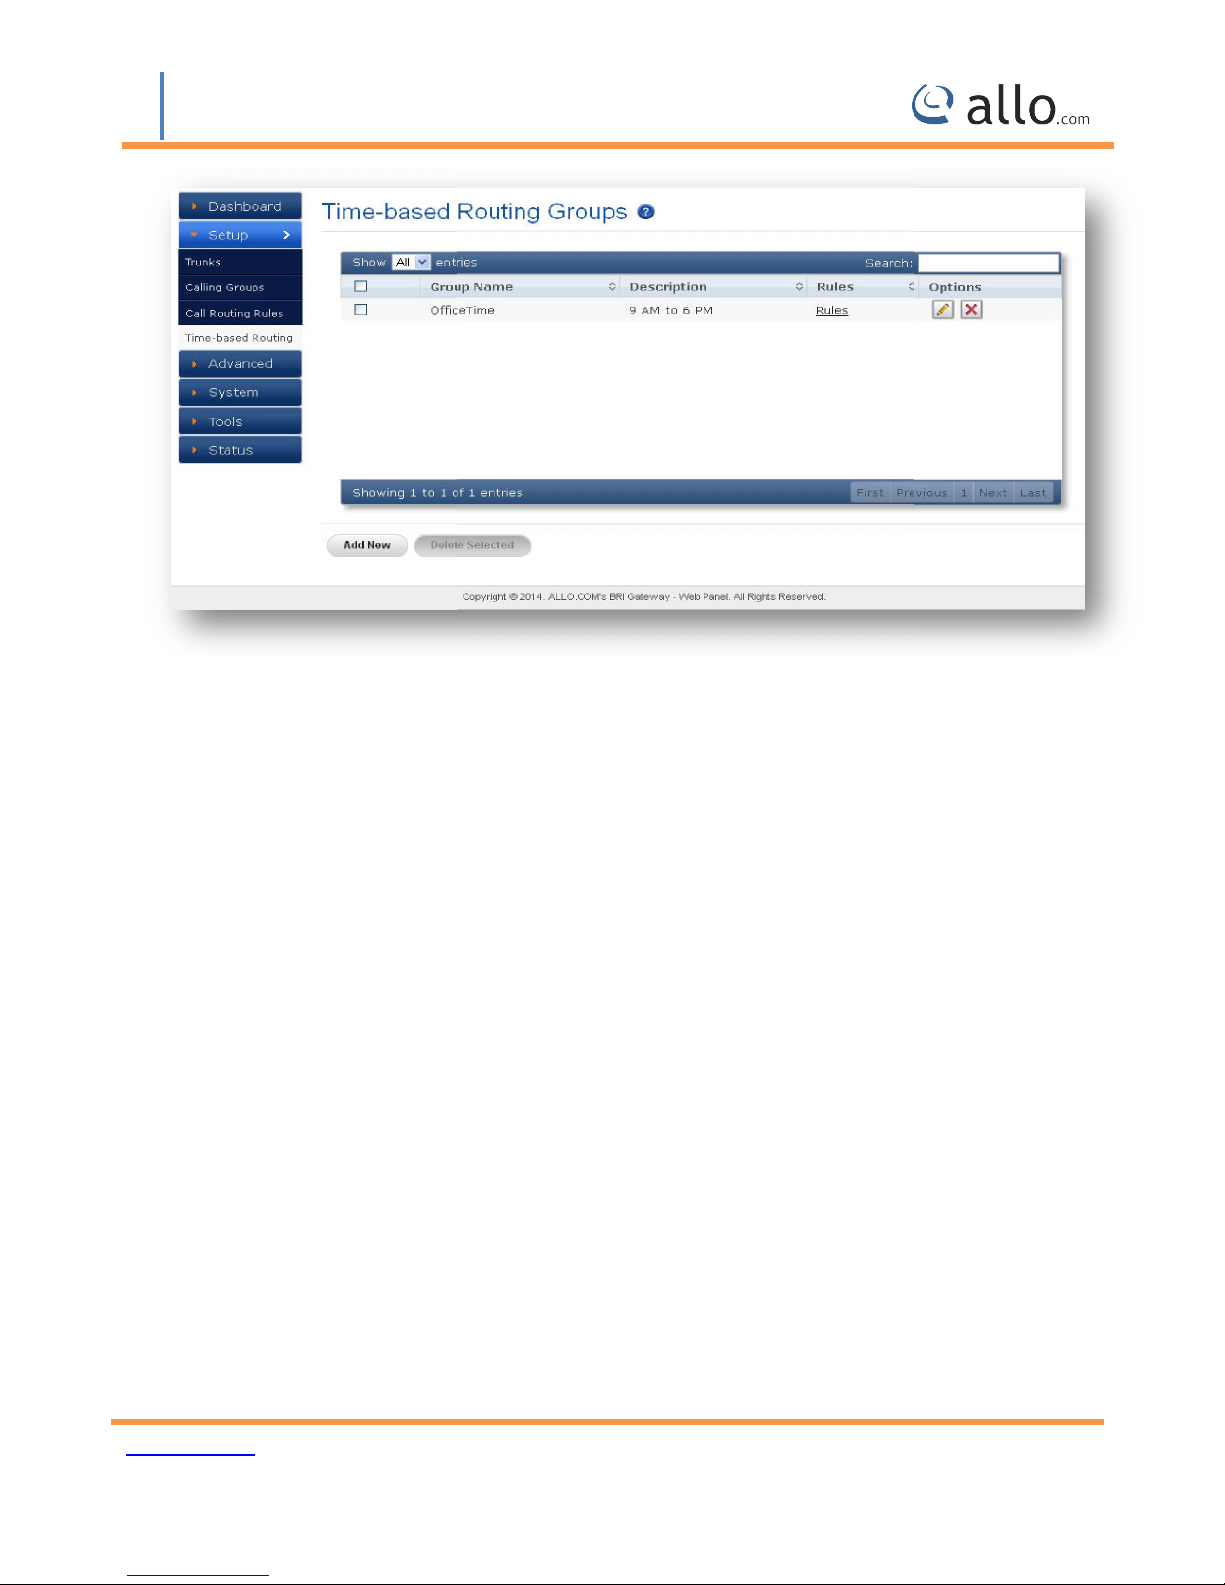
Figure 17 shows the Time-
“Save”
” to reload the configurations.
www.allo.com
Version 2.0
24
Page 25
BRI User Manual
Figure
17: Time-based Routing Groups Result
www.allo.com
Version 2.0
25
Page 26
BRI User Manual
This chapter consists of all the advanced settings. Some of the important settings of the BRI
ides the ability to modify the B
signaling, switch type, etc with respect to the service provider or any other companion.
ISDN B
Set TE or NT as per your Service provider.
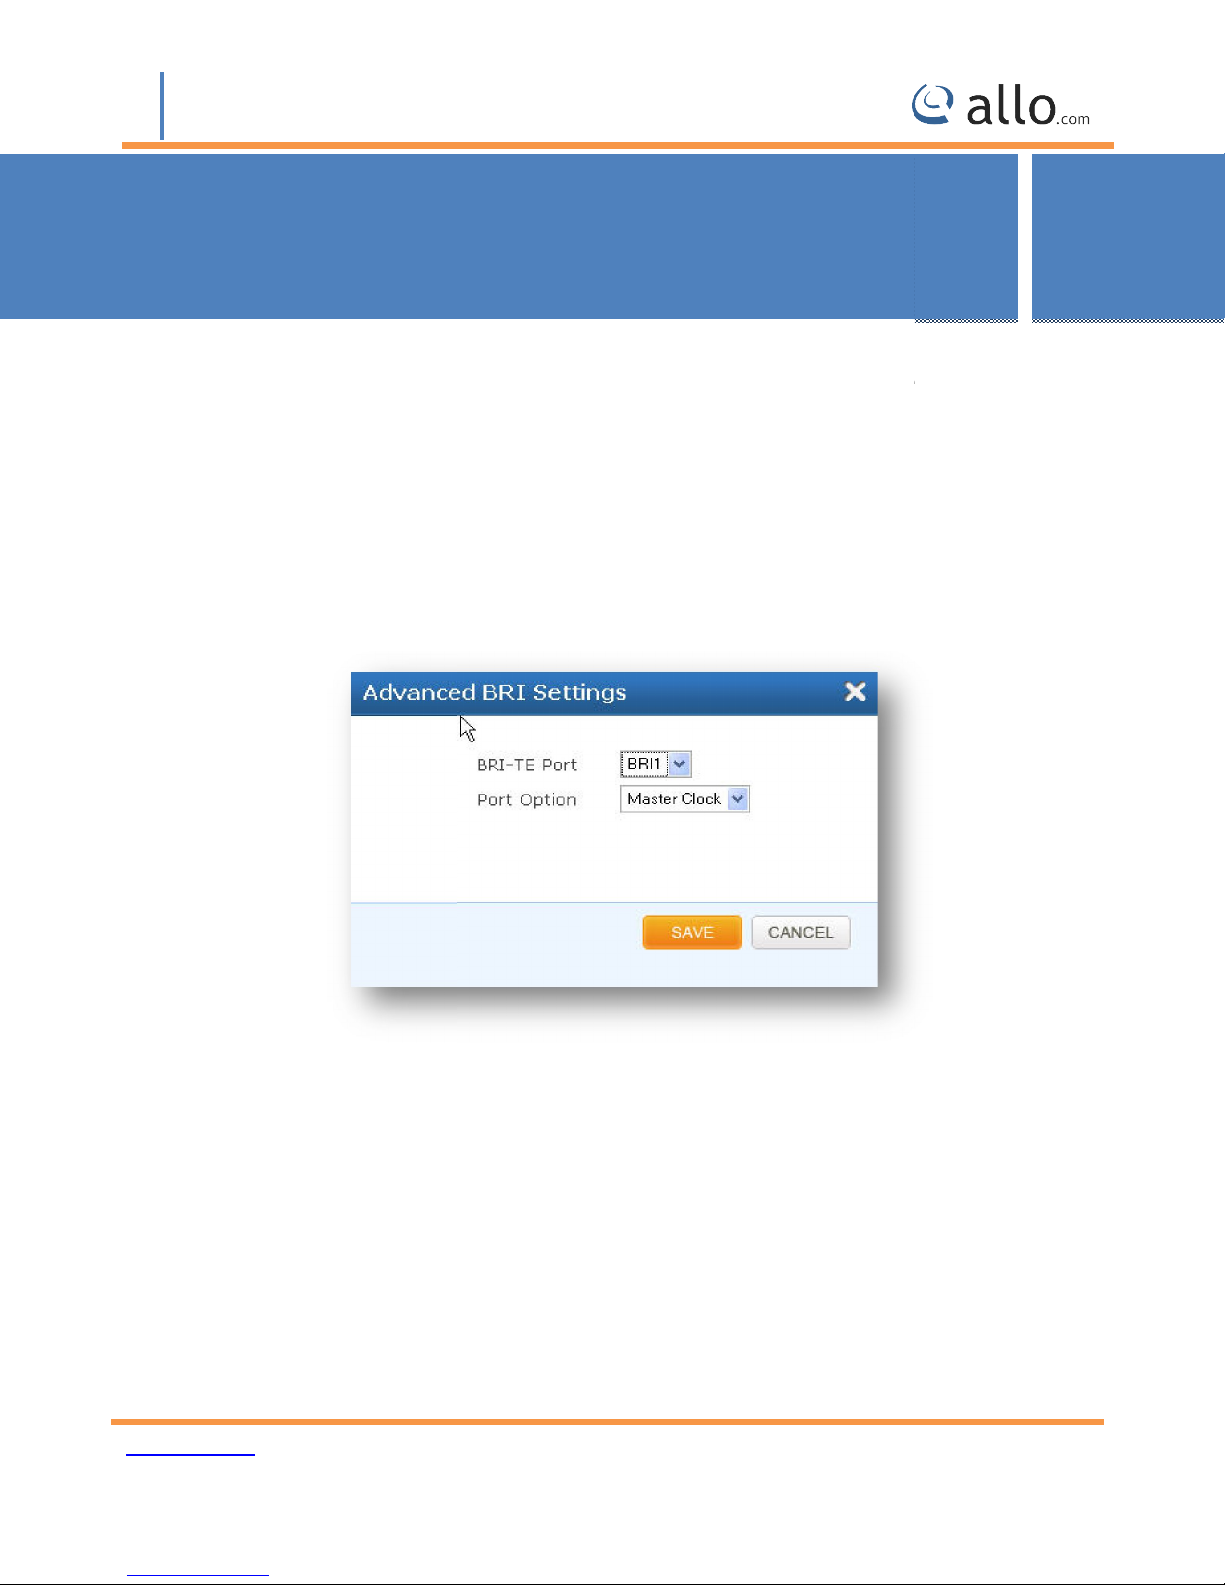
Following are the steps to set an advanced BRI Settings:
Click on the advanced option
TE Port and choose the port option
button to update the details entered.
Advanced Settings
RI settings depending on the carrier (T1/E1),
4. Advanced Settings
Gateway are explained below.
4.1 ISDN BRI Settings
This section prov
Navigate through Advanced >
BRI SPAN TYPE:
RI Settings
Figure 18: Advanced BRI Settings
Enter the BRI-
Click SAVE
www.allo.com
Version 2.0
26
Page 27
BRI User Manual
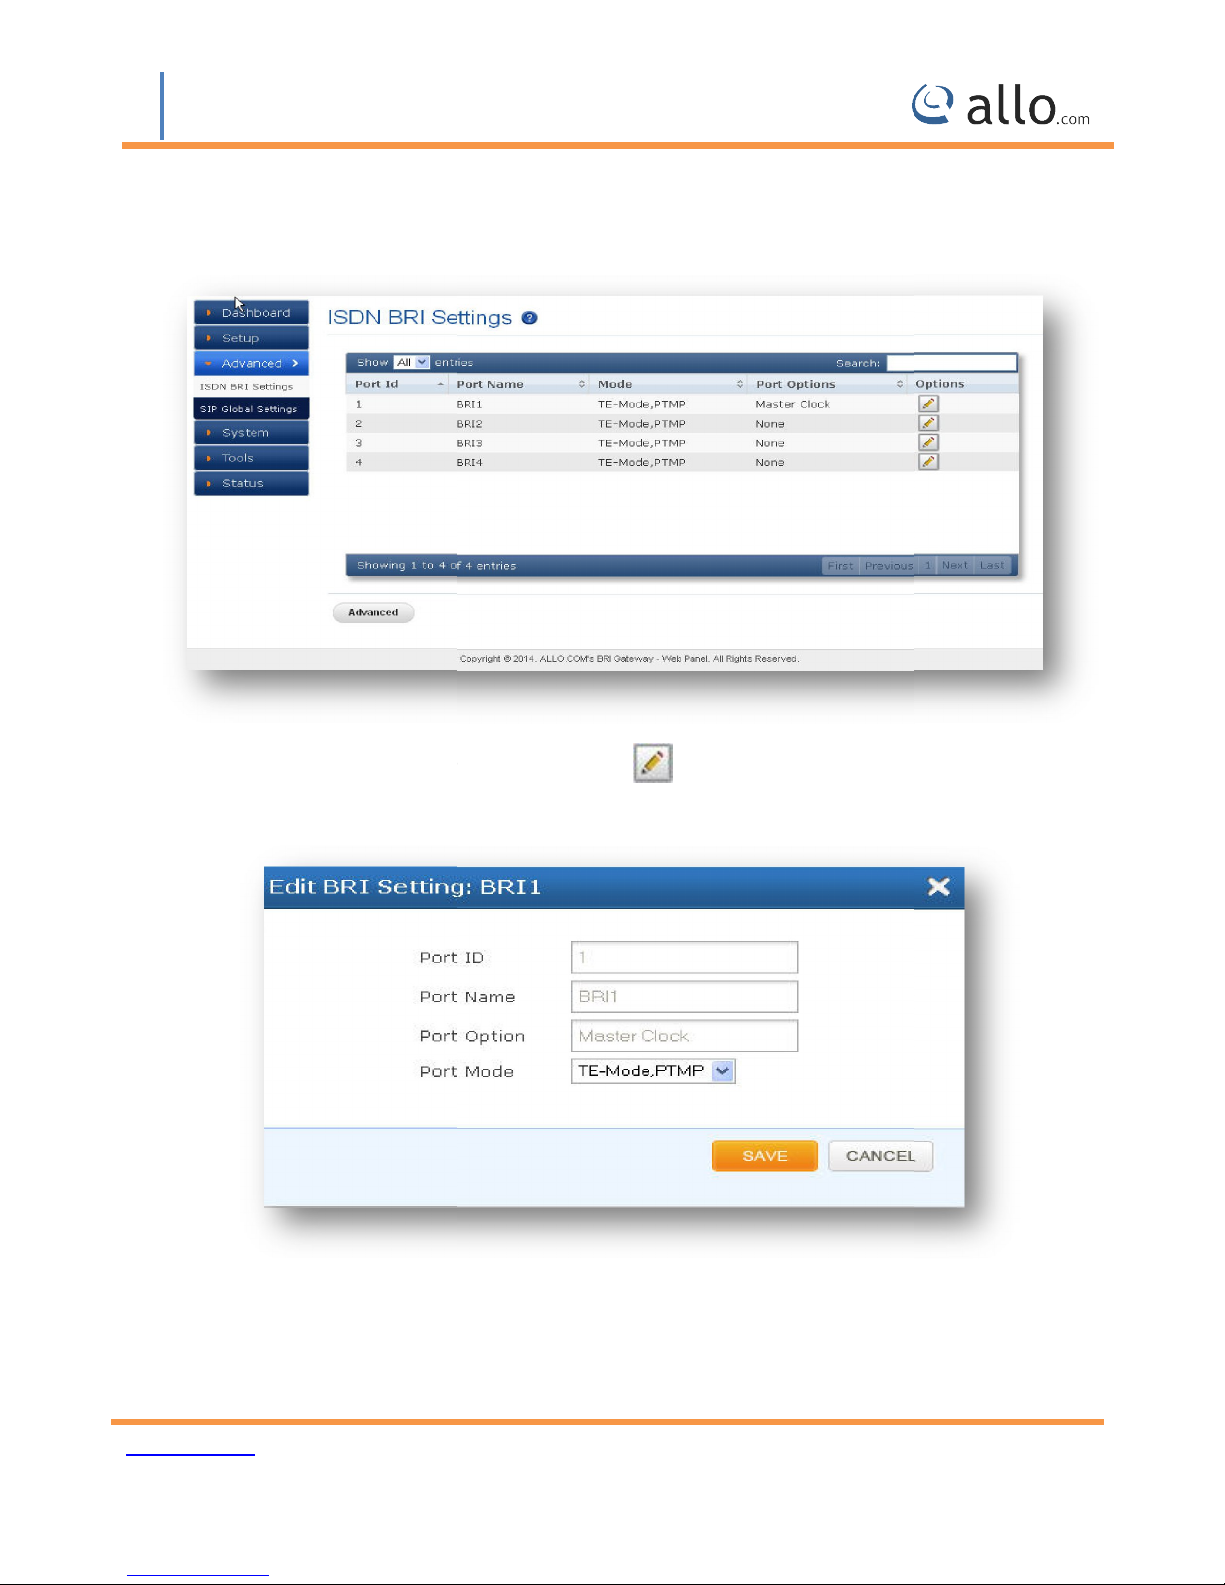
ISDN BRI settings
By default BRI settings are configured.
your Service providers Signaling parameters.
To Edit BRI Setting enter the following details
Name of for the port assigned while configuring the BRI trunks.
You can keep this port as “Master clock” or “None”
can edit and modify as per
Figure 19 shows the
results
Figure 19: ISDN BRI Settings
By using Edit button, you
Figure 20: Edit BRI Setting
Port ID: Number of the PORT
Port Name:
Port Option:
www.allo.com
Version 2.0
27
Page 28
BRI User Manual
Mode, PTMP and TE mode PTP will work when the ISDN BRI line is connected to BRI
Mode, PTP can be configured when gateway is connecting to ISDN
button, followed by “
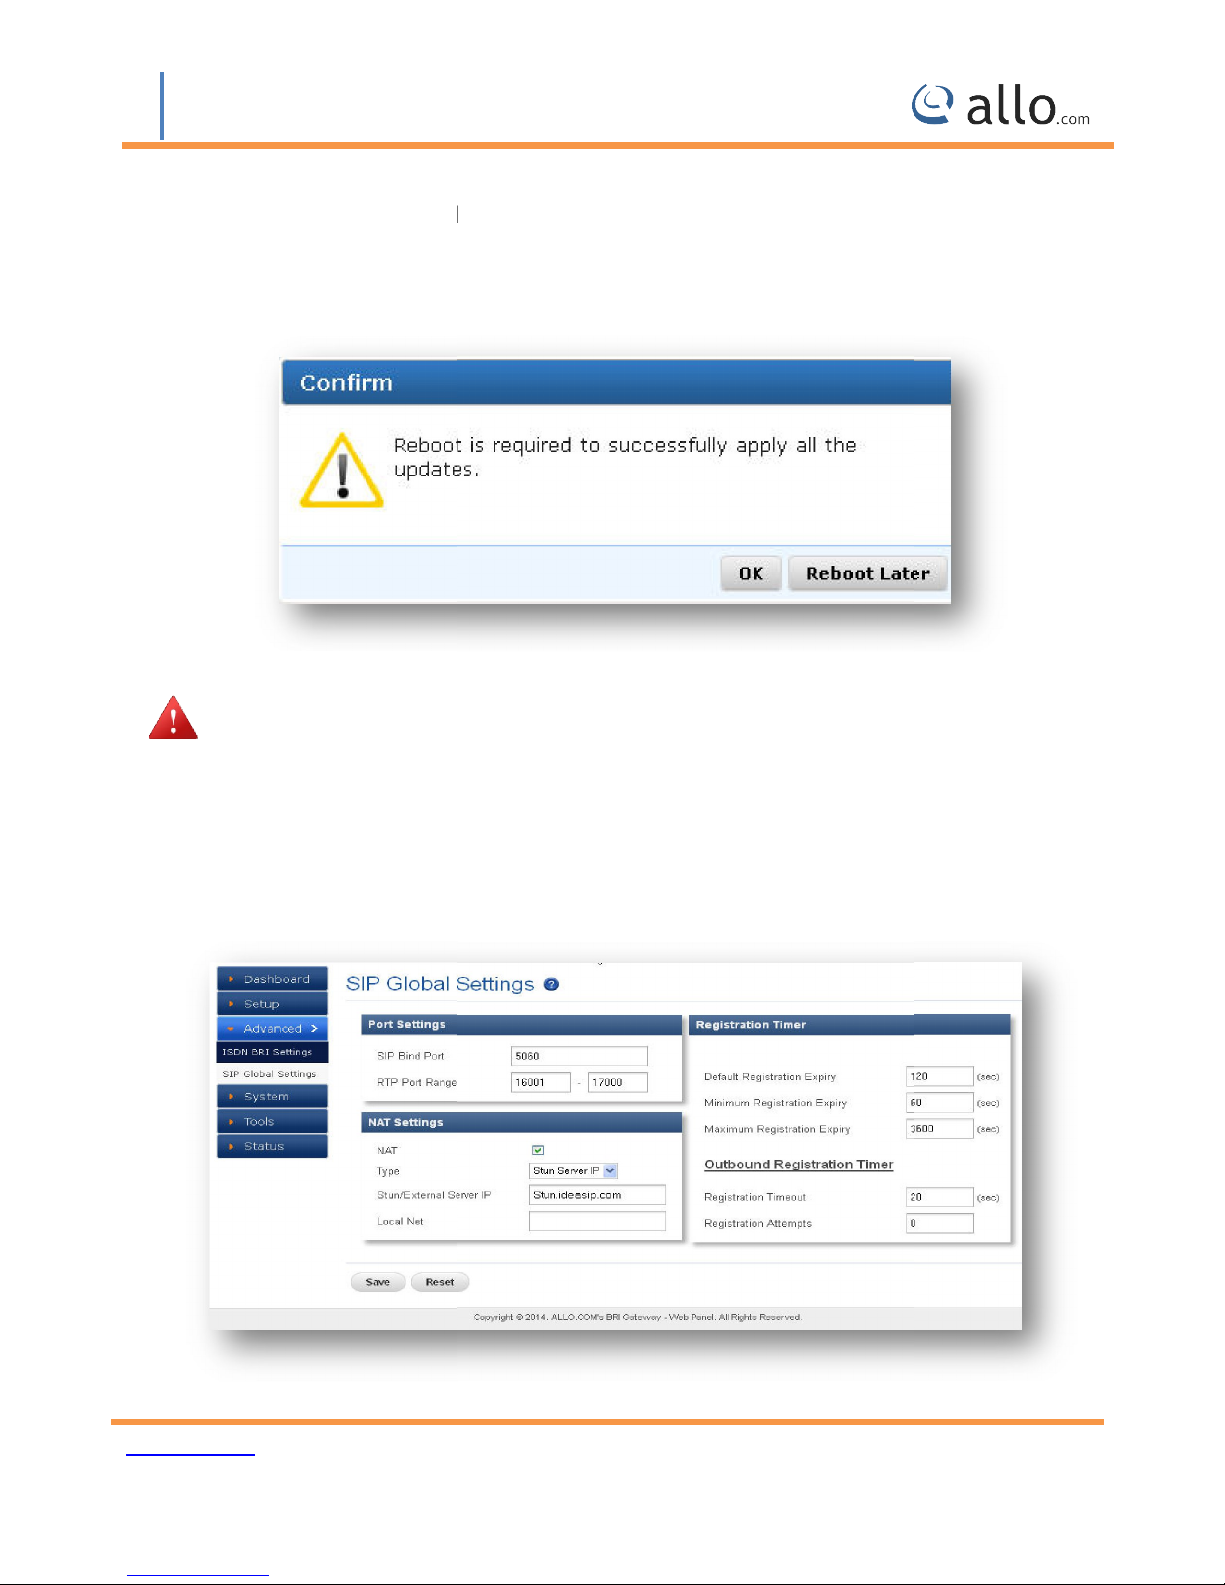
Reboot is required to successfully apply all the updates.
SIP Global Settings
SIP Global settings apply to all VoIP traffic.
” button to update t
Port Mode: TEports. NT-Mode, PTMP and NTphone/PBX.
Click on “SAVE “
changes.
APPLY CHANGES
Figure 21: Conform Reboot
he configuration
4.2 SIP Global Settings
Navigate through Advanced >
Figure 22: SIP Global Settings
www.allo.com
Version 2.0
28
Page 29

BRI User Manual
Enter the below details to create SIP Global Settings
: The local listening UDP port for SIP messages.
: BRI Gateway will start listening for media transfer on ports
range of port numbers to be used for RTP traffic.
dynamic range of ports on your NAT Router. When the BRI
NAT is configured to do port forwarding with above mentioned port range
NAT option is checked, when the BRI Gateway is behind the
Stun Server IP or External IP. Default:
: If the BRI Gateway is behind a non
to allow BRI Gateway to reliably communicate via IP through the router. Enter a STUN
server IP address or domain name in the STUN Server field. For a list of public STUN servers, please
info.org/wiki/view/STUN
Enter the NAT Traversal IP address i.e. Public IP Address of your internet, to
communicate with Public Network when BRI Gateway is behind the NAT. This IP address will
substitute in all outgoing SIP messages
local network of the B
the same network. E.g.: 192.168.2.0/255.255.255.0
This value of registration expiry will be default for sending the
registration message to a server. Gateway will send registration request with registration expiry
timer. It will register with server. It should send another registration request before t
Default duration (in seconds) of incoming/outgoing registrations. Default:
It chooses a port on which to listen for SIP
16001 to 17000
Router/Firewall
may be necessary to
RI gateway allows it to identify the hosts falling within
120 sec
Port settings
SIP Port
UDP traffic. By default 5060
RTP Port Range
Make sure you configure this
behind a NAT and the
for UDP ports.
NAT Settings:
NAT:
Stun Server IP
use STUN
Refer to: http://www.voip-
External IP:
. The
Gateway is
. Select either
disabled
-symmetric NAT router, it
instead of Local IP address.
Local Net: Entering the
Registration Timer:
Default Registration Expiry:
time.
www.allo.com
Version 2.0
he expiry
29
Page 30

BRI User Manual
This the minimum expiry the device can support.
allows minimum duration (in seconds) of registrations. Default:
allows maximum duration (in seconds) of incoming registrations. Default:
If the any client sends registration request with expiry time in the range
time of the gateway, then gateway will accept it and sends and response without changing the
expiry timer other wise gateway will overwrite it.
This is the time interval to send the
Number of registration retries. If it is “0” then it is infinite.
Number of registration attempts before giving up with registrar (Outbound Registrations only).
“button, followed by “
This is the maximum expiry the device can support.
3600 sec
of Min and Max expiry
registration requests.
” button to update the configuration
Minimum Registration Expiry:
Maximum Registration expiry:
Outbound Registration Timer:
Registration Timeout:
Registration Attempts:
Default: 0 (never give up)
And the Gateway
60 Sec
The Gateway
Default: 20 sec
Click on “APPLY
changes.
APPLY CHANGES
www.allo.com
Version 2.0
30
Page 31
BRI User Manual
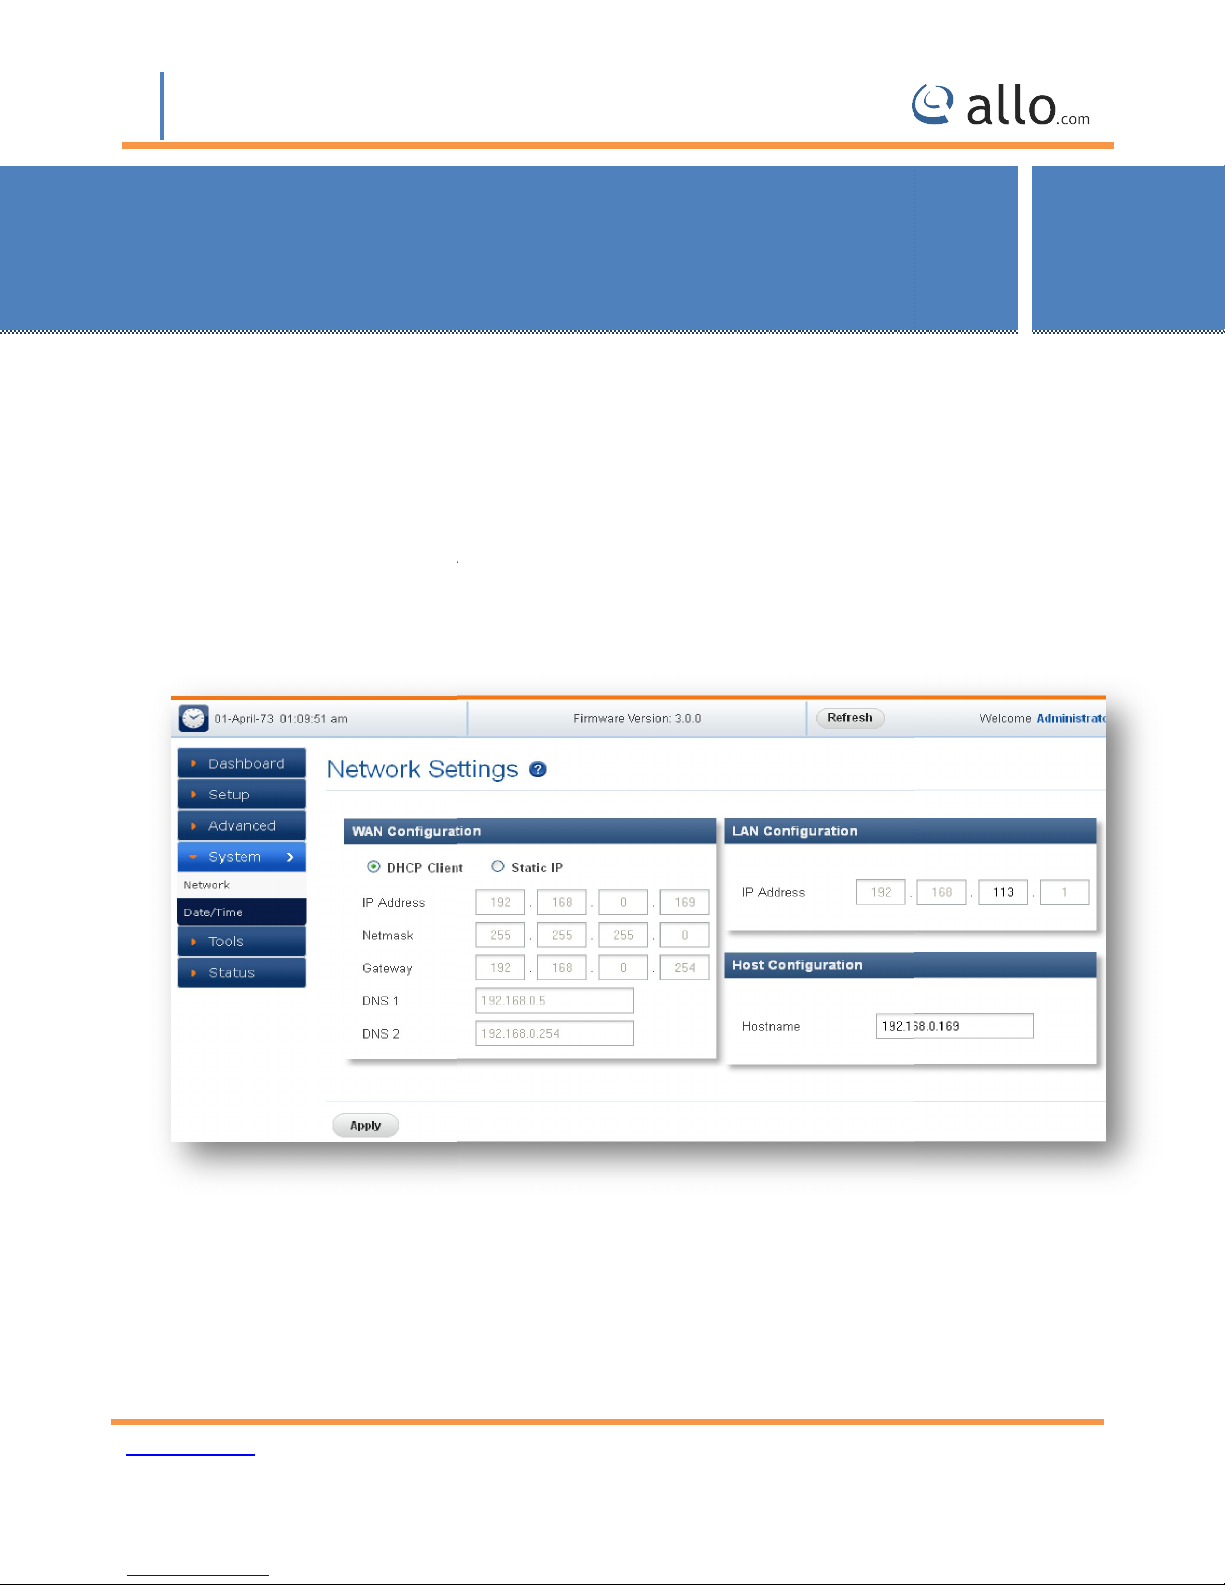
This section consists of Network, Date/time configuration settings of the BRI Gateway are
The Networking Setting sub menu allows users to configure the LAN
Server settings, as well as the WAN
> Network
: Are the Internet settings of your BRI Gateway.
: when enabled and a DHCP server is available, the BRI Gateway will auto configure
If DHCP is not available, select “
he IP address corresponding to your WAN configuration*
side IP address and DHCP
side settings like IP address of the WAN port.
on the top navigation of the BRI
”, and fill in the Network Configuration
5. System
explained below.
5.1 Network
System
-
-
By clicking on the SYSTEM
reach this section:
Settings
Figure 23: Network Setting
Gateway menu, we
WAN Configuration
DHCP
itself.
IP Address: T
www.allo.com
Static
Version 2.0
31
Page 32
BRI User Manual
he Net mask corresponding to your WAN configuration*
he IP address corresponding to yo
he IP address corresponding to a DNS server*
DCHP mode isn’t recommended WAN side. Or trouble may arise when SIP Trunk (From
Gateway) need to change registration server address caused by revised IP.
management port. B
network for configuration. It is always recommended to connect back
connected to LAN network & if IP series clash is found,
Use this setting in the event that you want to use the BRI Gateway as your network router.
: It is a Base IP Addr
8.113
WAN port IP and LAN Port IP Address should not be in the same network Segment. Please
do not change the LAN Port IP Address.
Recommended that, mention the IP address of the BRI gateway in Hostname field.
particular details and click on Apply button.
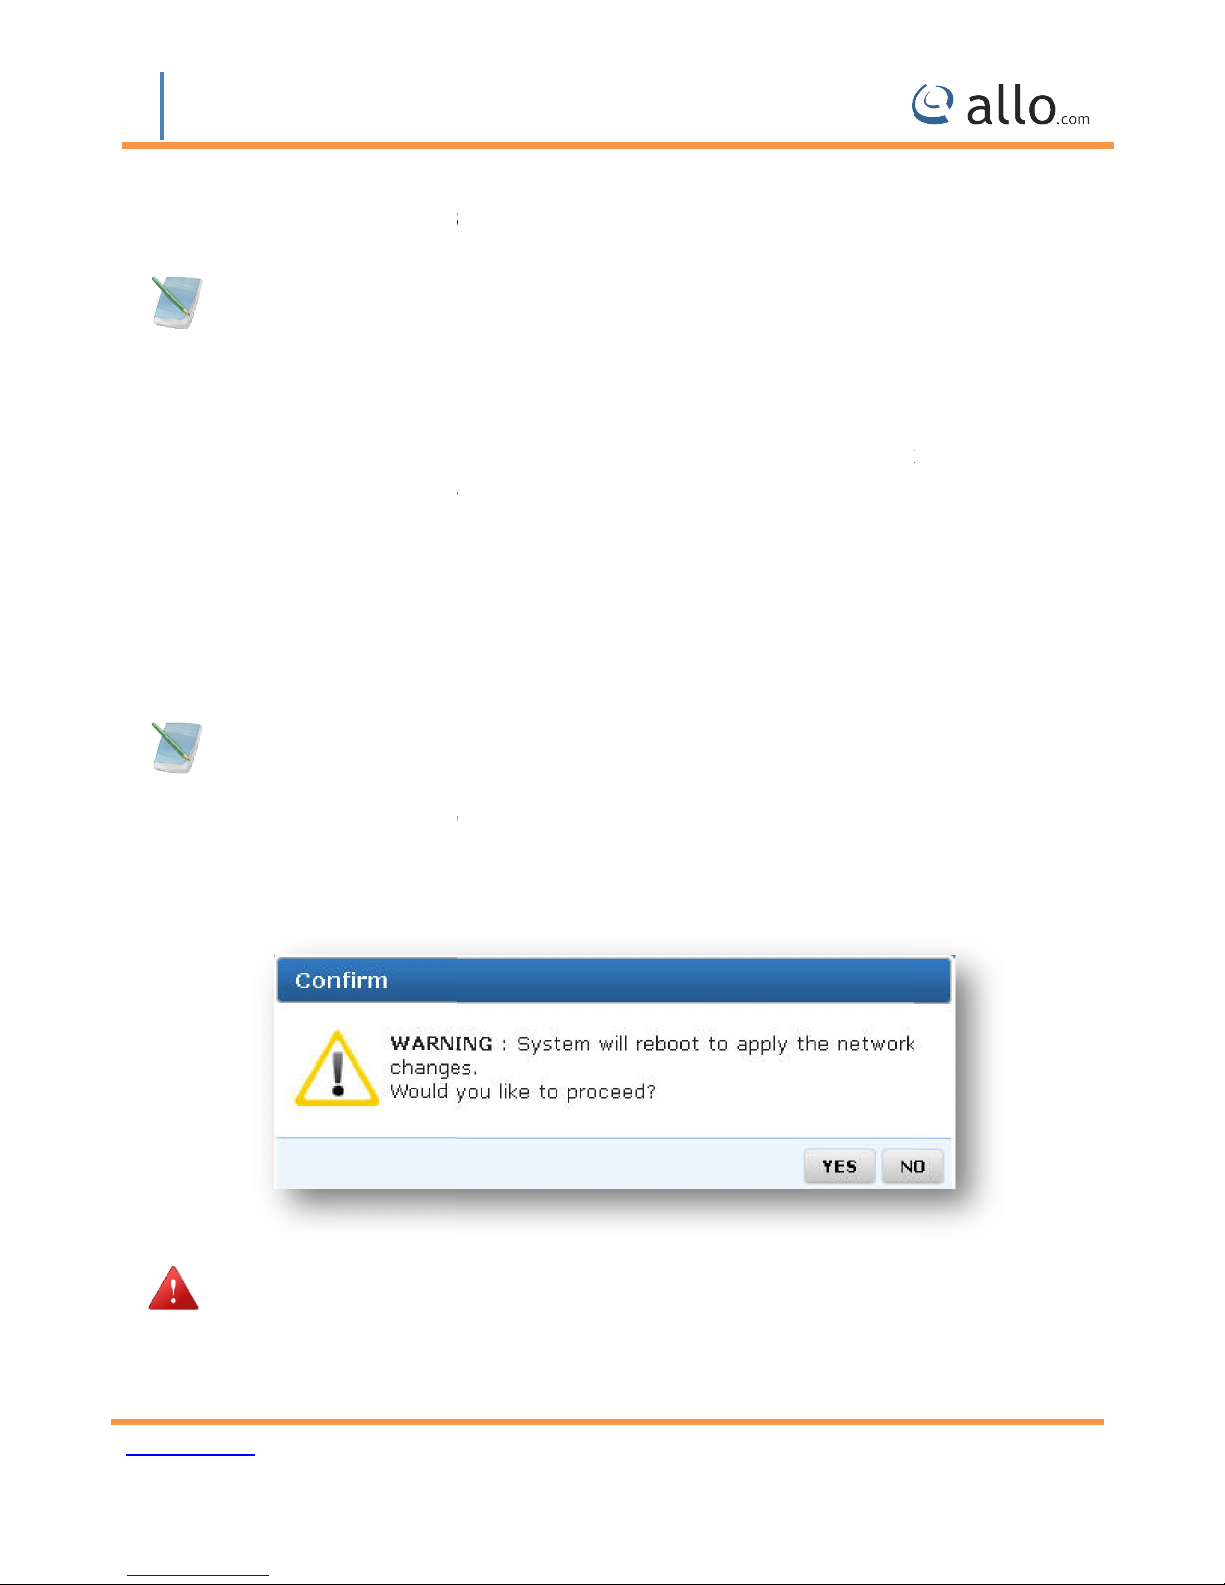
System will reboot to apply the network changes.
back to a PC or to a LAN
back to a PC. In case,
s as a gat
through:192.168.113.2)
Net mask: T
Gateway: T
DNS 1: T
LAN Configuration:
LAN Port is a
1. IP Address
Default value is 192.16
ur Gateway*
RI Gateway can be connected back-to-
it can be changed here.
ess of a LAN Port, which function
.1 ( You can log in Web GUI
-to-
eway for its LAN.
Hostname:
Enter the
Figure 24: Reboot Warning message
www.allo.com
Version 2.0
32
Page 33
BRI User Manual
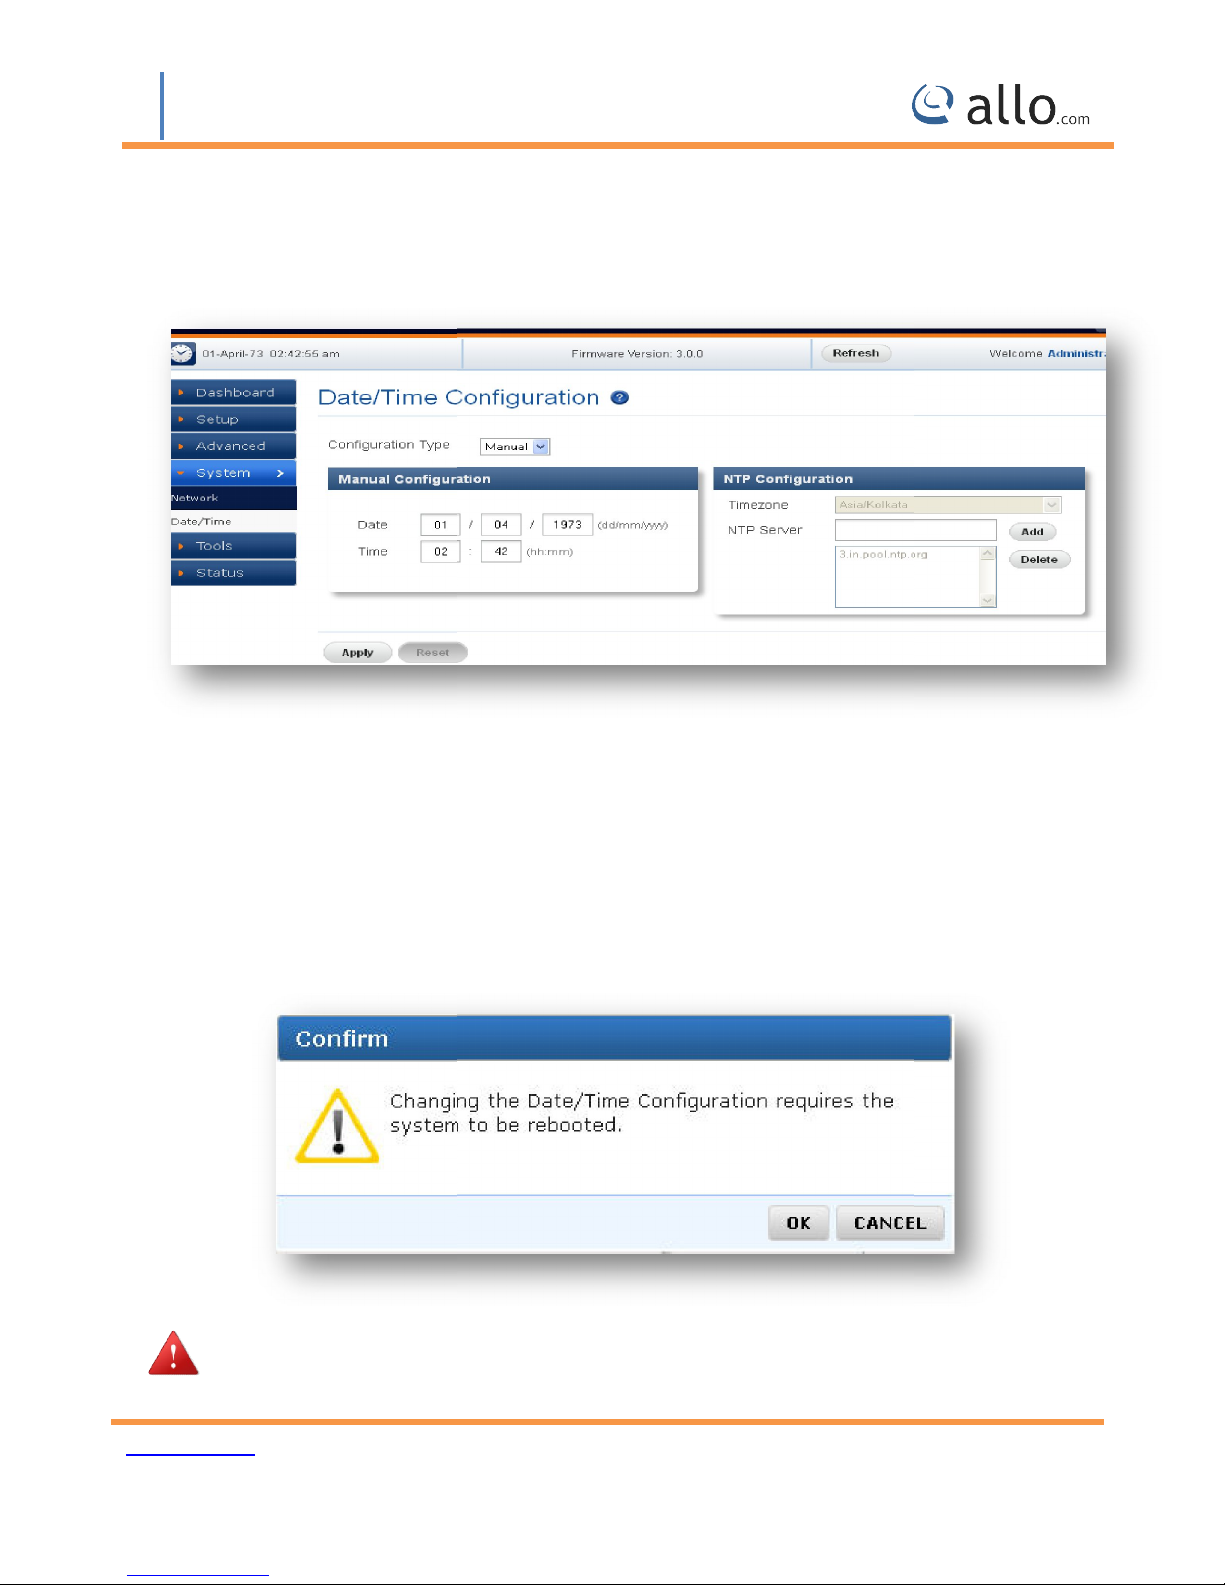
Date/Time Configuration
Gateway menu, we reach this section:
Select the correct time zone for the location where the BRI Gateway is installed using
Input the proper date and time.
URI or IP address of the NTP (Network Time Protocol) server, which will be used
by the phone to synchronize the date and time. For Eg: pool.ntp.org
on, followed by “
Figure
Changing the Date/Time Configuration requires the system to be rebooted.
link on the top navigation of the BRI
” button to update the configuration
5.2 Date/Time
By clicking on the SYSTEM >
Time Zone:
the Time Zone dropdown box.
Manual Configuration:
NTP Configuration:
Figure 25: Date/Time Configuration
Click on “APPLY “butt
changes.
www.allo.com
APPLY CHANGES
26: Conform Date/Time Configuration changes
Version 2.0
33
Page 34
BRI User Manual
various tools which are used in the BRI Gateway are
Diagnostics
alyze the functionality of the B
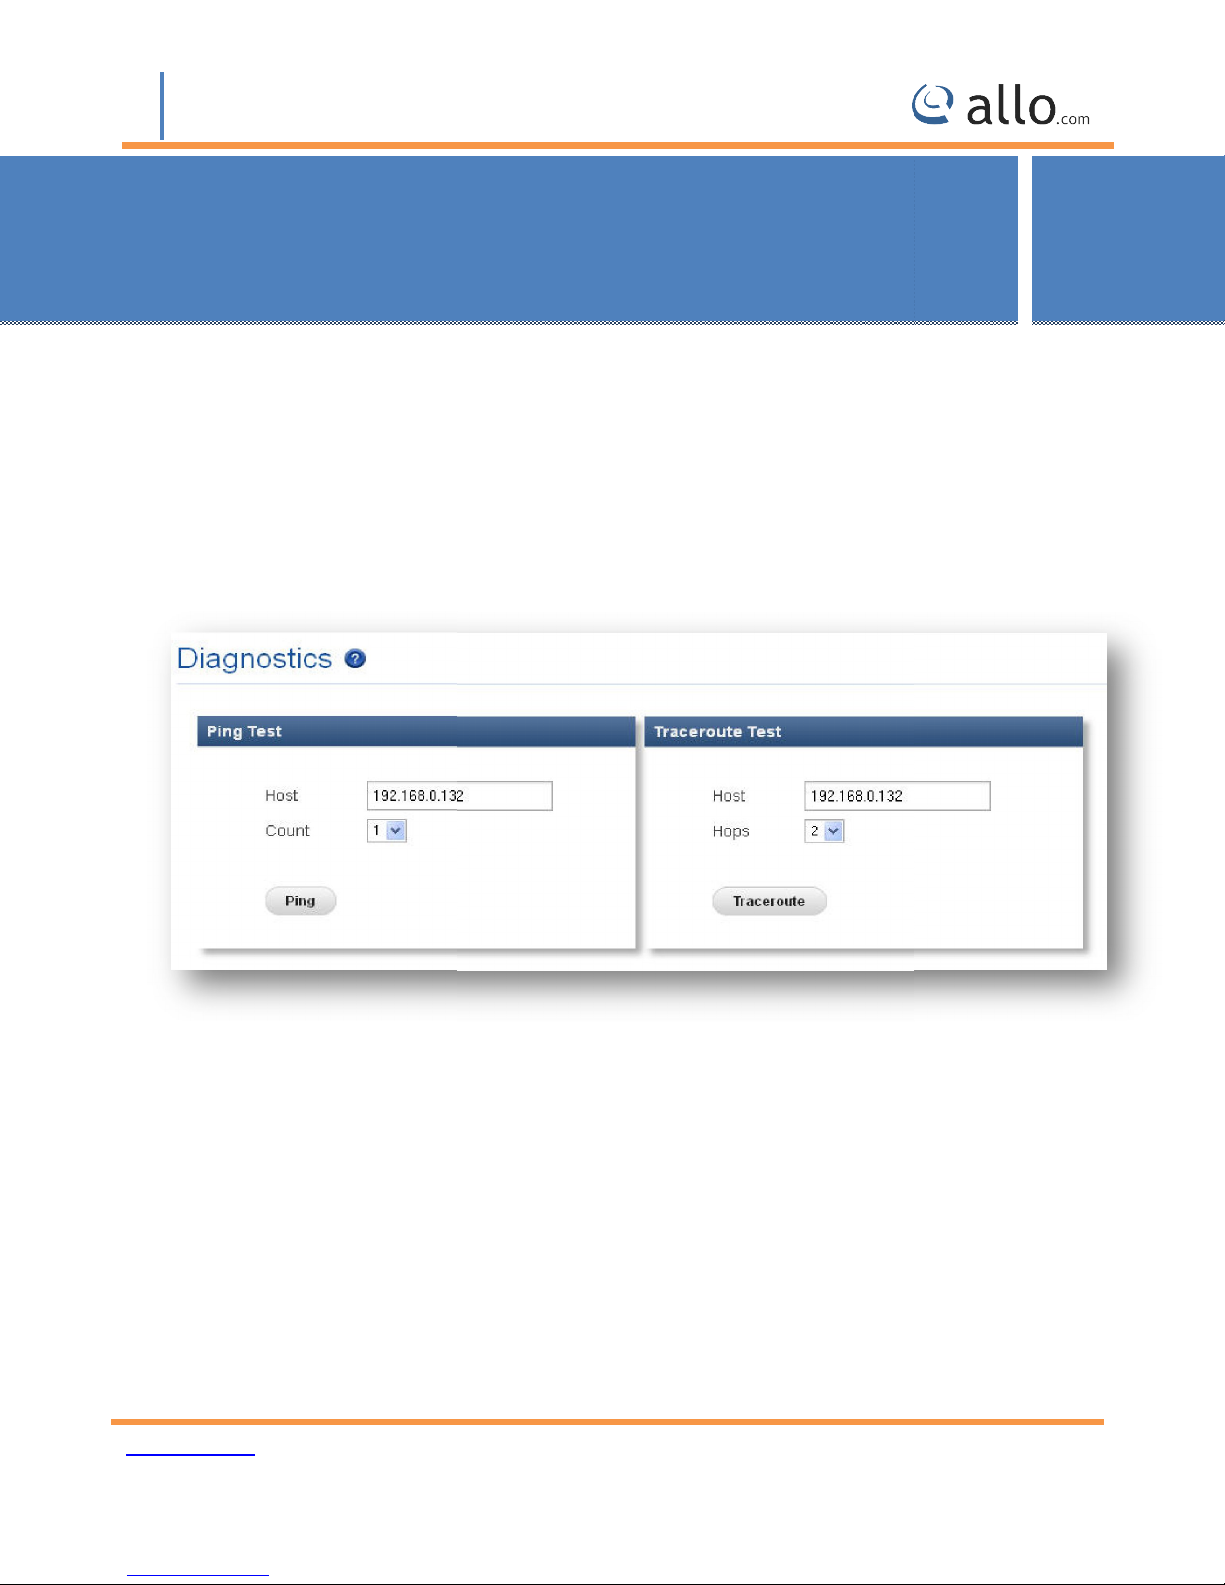
Enter the Host address and choose the number of counts
Click on Ping button and followed by trace route button.
explained below.
RI Gateway with some of these diagnostic tools provided.
6. Tools
This chapter consists of
6.1 Diagnostics
Navigation through Tools >
An
Tools
Figure 27: Diagnostics
www.allo.com
Version 2.0
34
Page 35
BRI User Manual
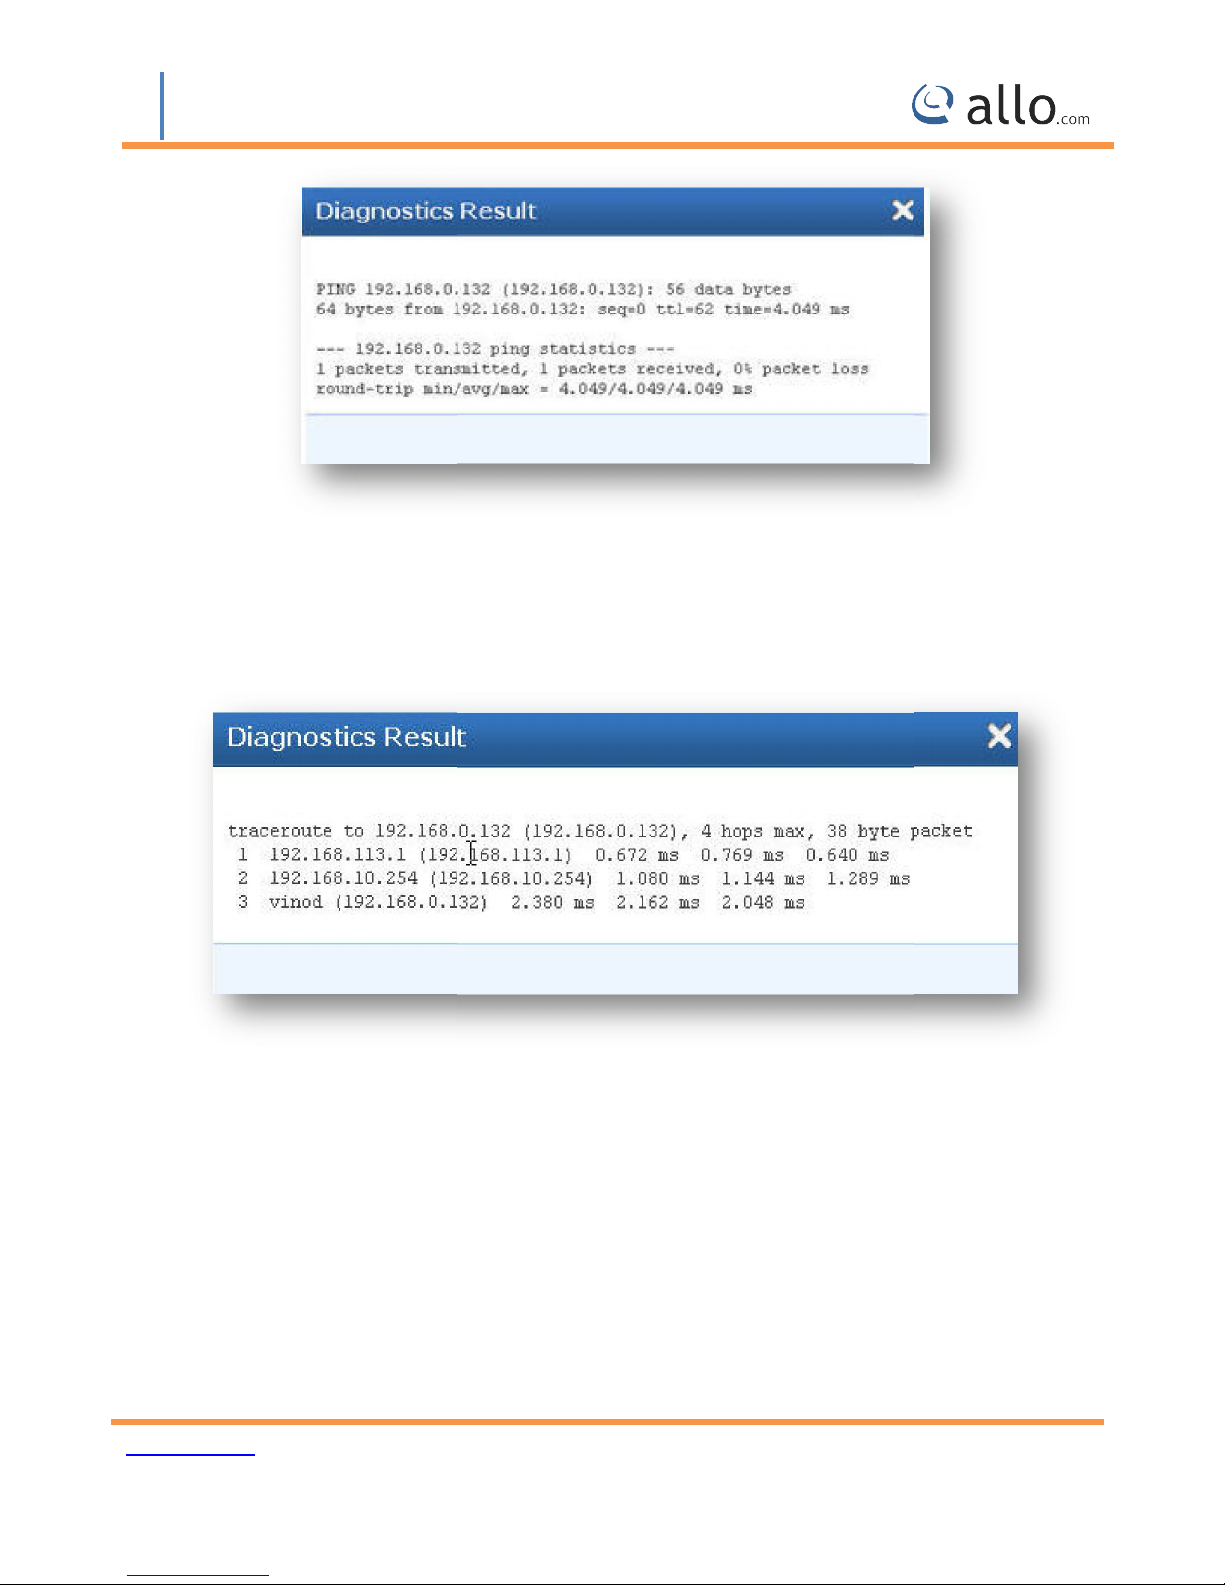
It is used to check the packet loss and latency time from your SIP end client like IP
Phone/ FXS gateways to check the quality of your network connections. Enter the
IP Phone in your LAN and enter “PING
It is used to determine the route taken by packets across an IP network.
Backup/Restore
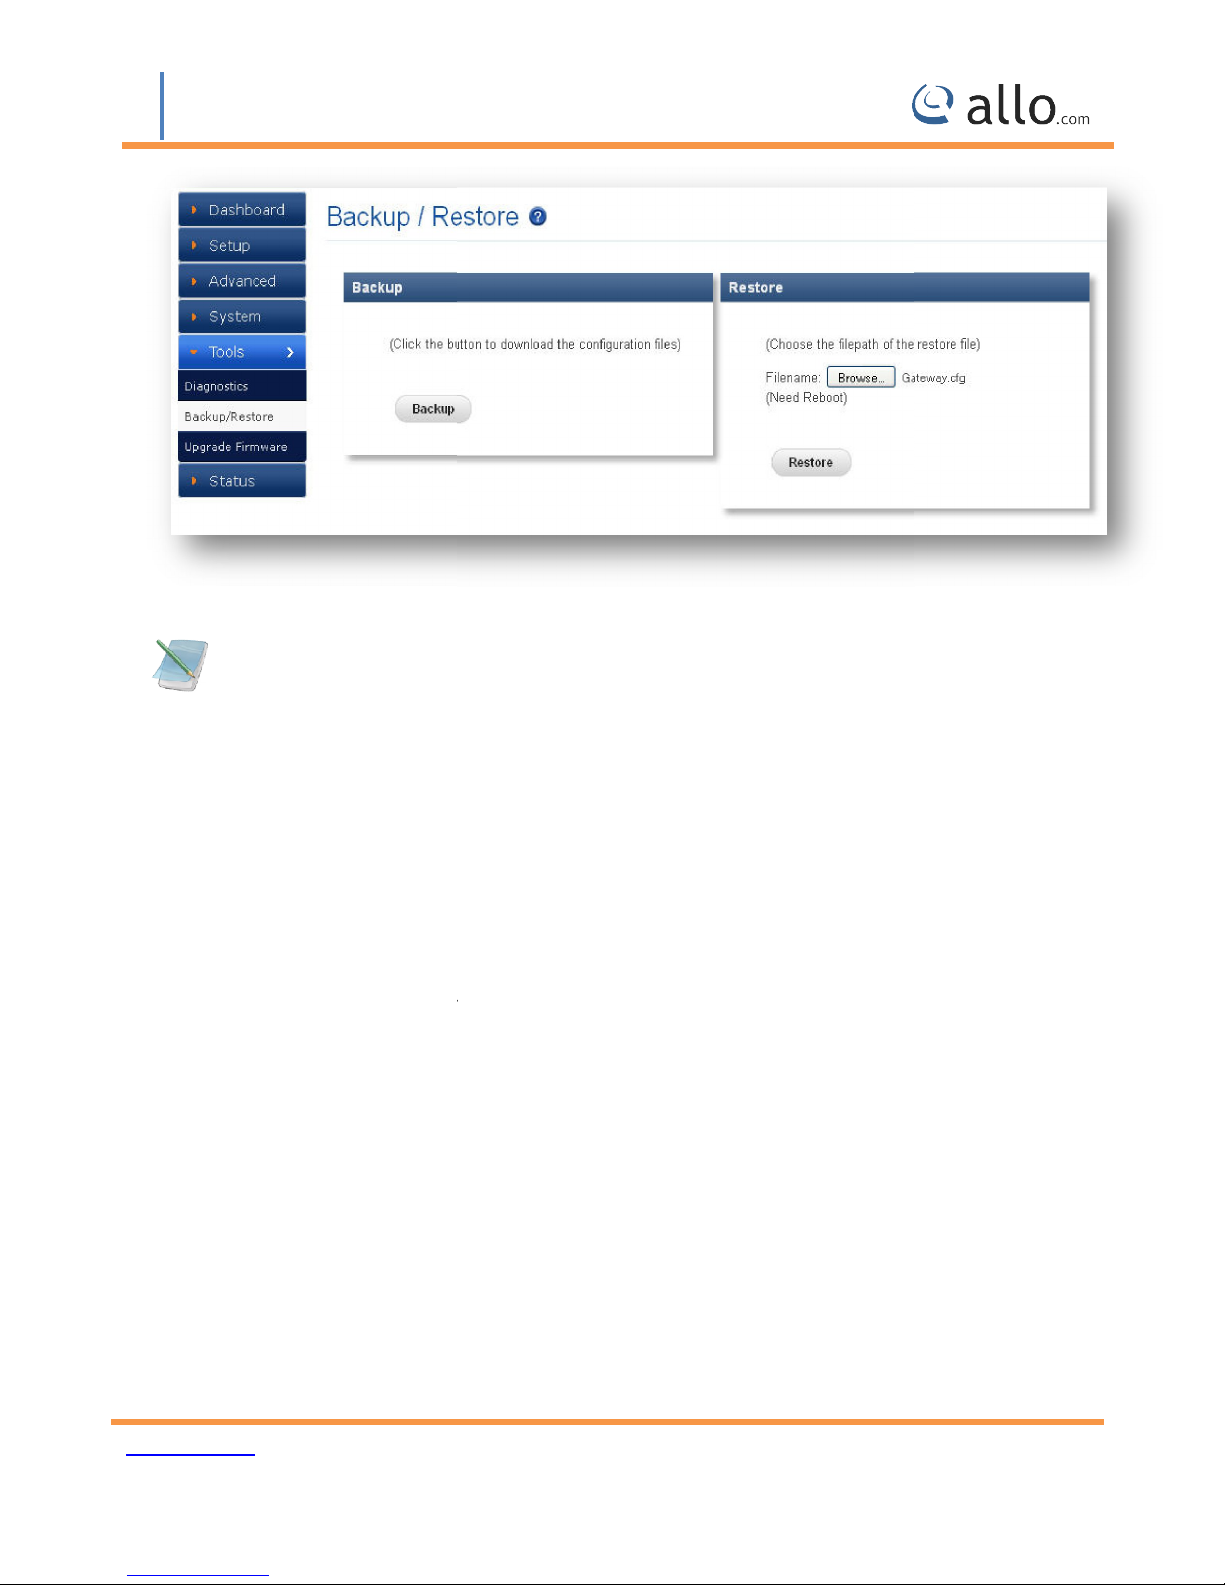
Allow you to take the back up of the System configurations & save it to the local PC.
Restoring from a new upload or backup file will destroy all current configurations and
All calls
o like this:
back up or Restore
will be dropped and all current configurations will be destroyed.
Ping Test:
Trace route Test:
Figure 28: Diagnostics Ping Result
IP address of the
” Button, it will display similar t
Figure 29: Trace Route Test
6.2 Backup/Restore
Navigation: Tools >
Configurations.
Back Up:
Restore:
require a system reboot.
www.allo.com
: Here you can
Version 2.0
the BRI Gateway
35
Page 36
BRI User Manual
Administrator password will not be restored so you should still use same credentials as
Upgrade Firmware
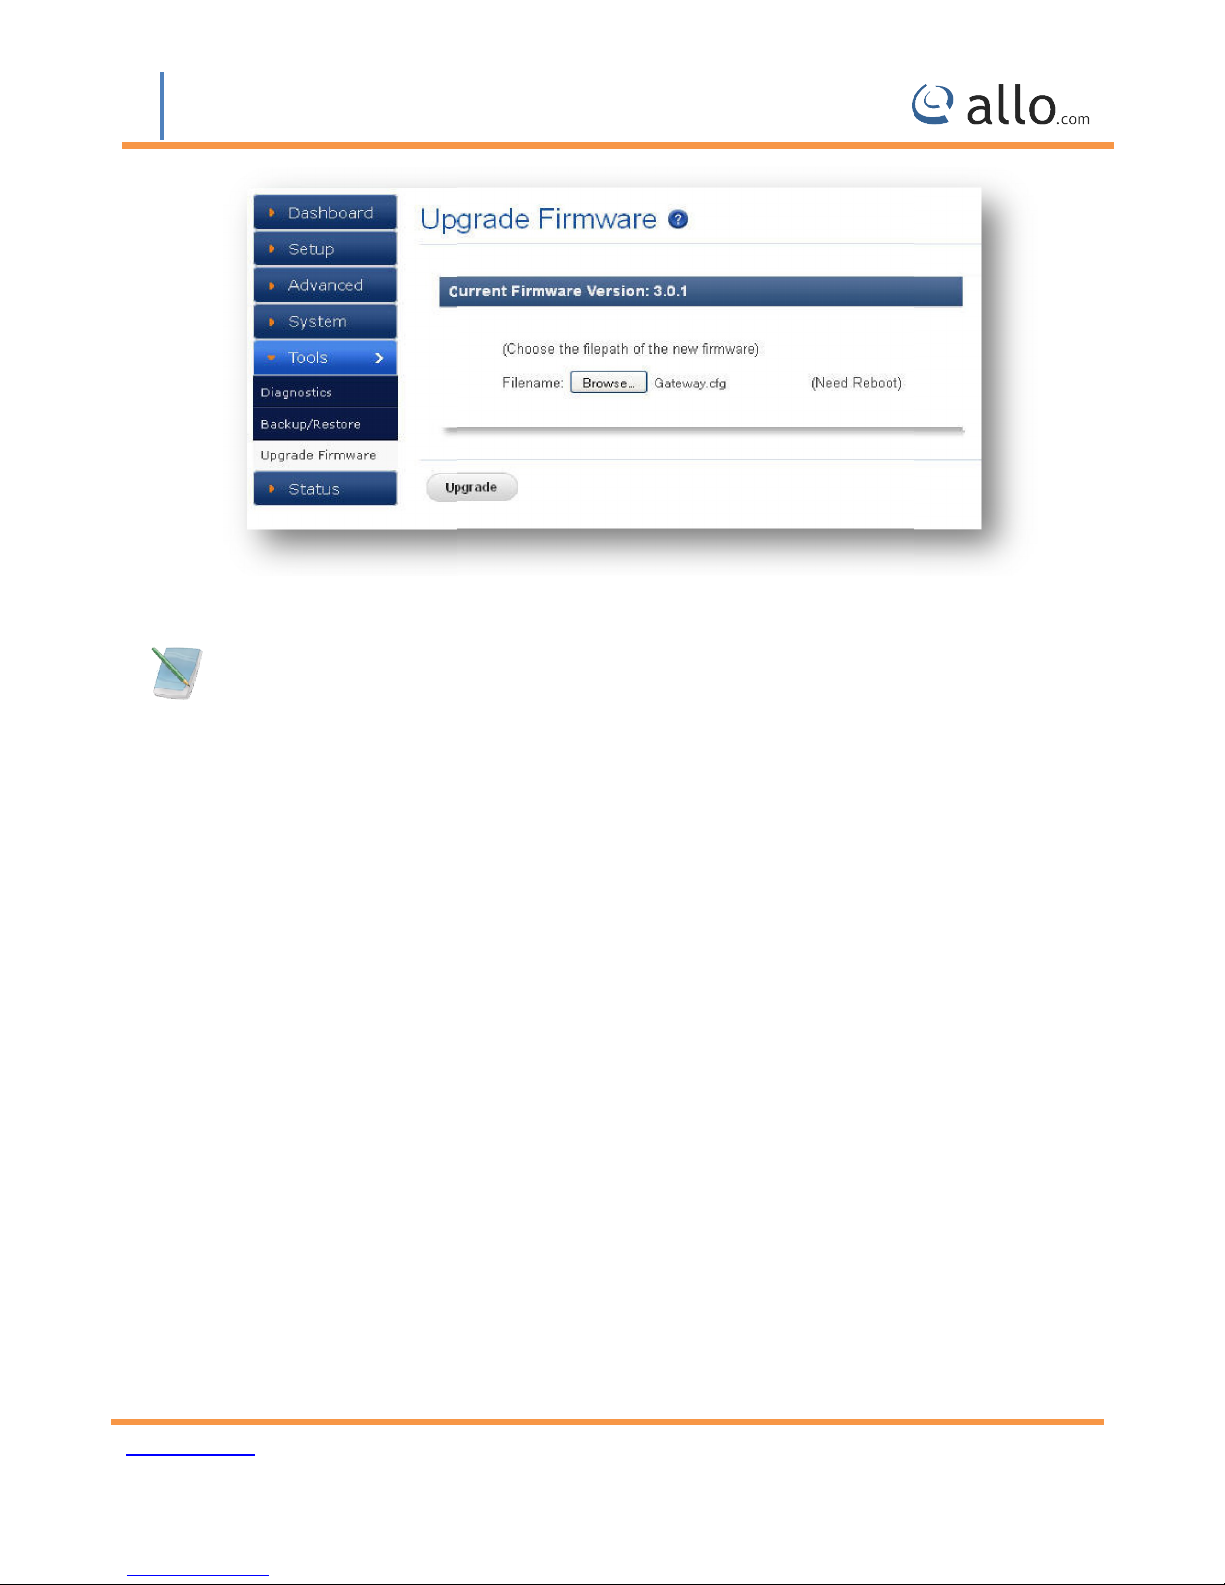
The Firmware Upgrade page allows you to update the BRI Gateway with the latest release
available, which can contain key updates, added functionalities and bug fixes. When a new release
save to your local PC. Then, browse for the file, and click the Upload
button. Now your BRI Gateway will display a Progress Screen and will prompt you when your BRI
Gateway is about to reboot. Let your BRI Gateway reboot, and wait for the green LED’s to c
Figure 30: Backup/Restore
before restoration.
6.3 Upgrade Firmware
Navigate through Tools >
is available, download it and
back on.
ome
www.allo.com
Version 2.0
36
Page 37
BRI User Manual
During Firmware upgrade there should not be any power or network disturbances, which
may leads to BRI Gateway Board faulty.
Figure 31: Upgrade Firmware
www.allo.com
Version 2.0
37
Page 38
BRI User Manual
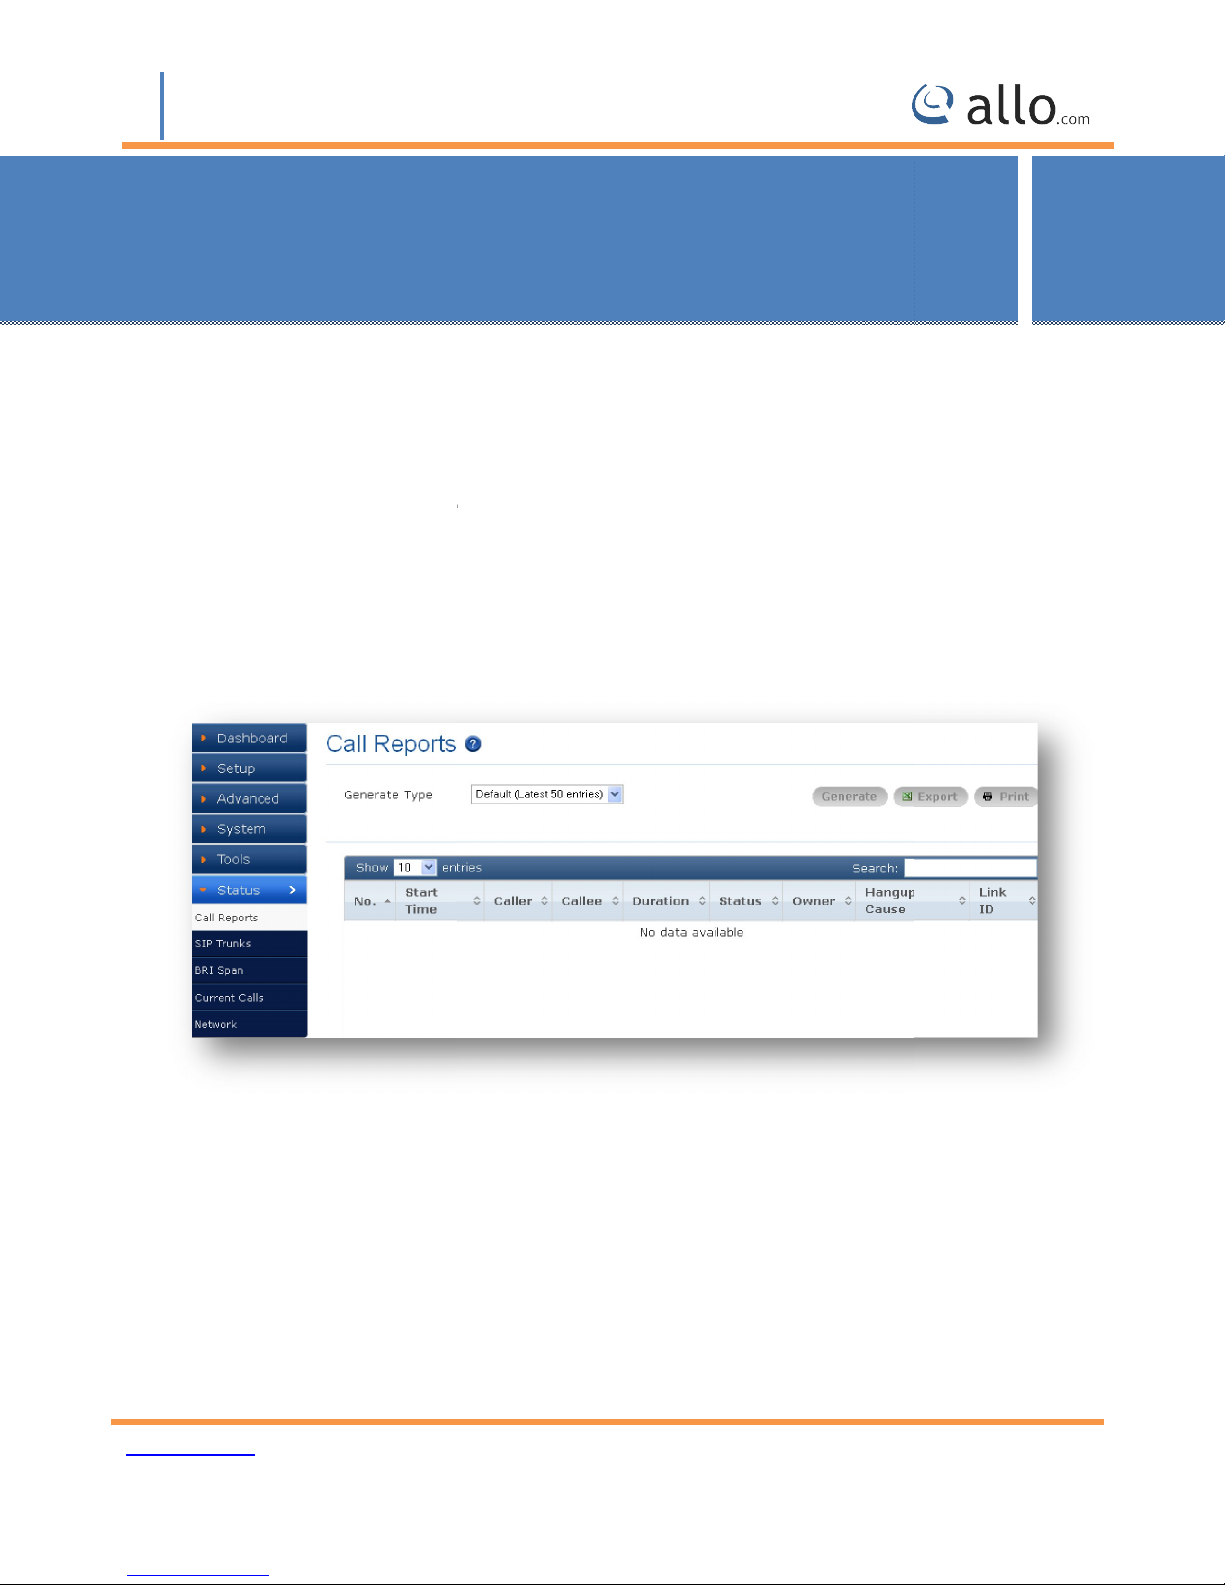
generates the various status of the BRI Gateway are explained below.
> CALL REPORTS
displays a detailed list of calls pass through the
date range, CDR count, latest 50 entries or all entries. Generated report can also be
exported to local PC as CSV file or directed to a printer.
To create a new Report, select the Extension Range or Date range, and click the
button. A list with call details will display in the Call Reports section.
You can either export to your local PC or BRI Call reports.
at which something is supposed to begin
Source Number (It displays the name and telephone number of a caller, which appear on a
display as the call is being received.)
Destination Number (the person who is called by the caller)
this is where you can generate Call Reports
RI Gateway. The list can be
7. Status
This section
7.1 Call Reports
Navigate through STATUS
Status
It
based on
B
Figure 32: Call Reports
generated on the
Start time: The time
Caller:
Callee:
www.allo.com
Version 2.0
“Generate” Report
38
Page 39
BRI User Manual
t calculates the conversation time of a call.
It shows the status of the call like answered or failed.
The reason of call disconnection.
It is associated with a particular conversation.
SIP Trunks
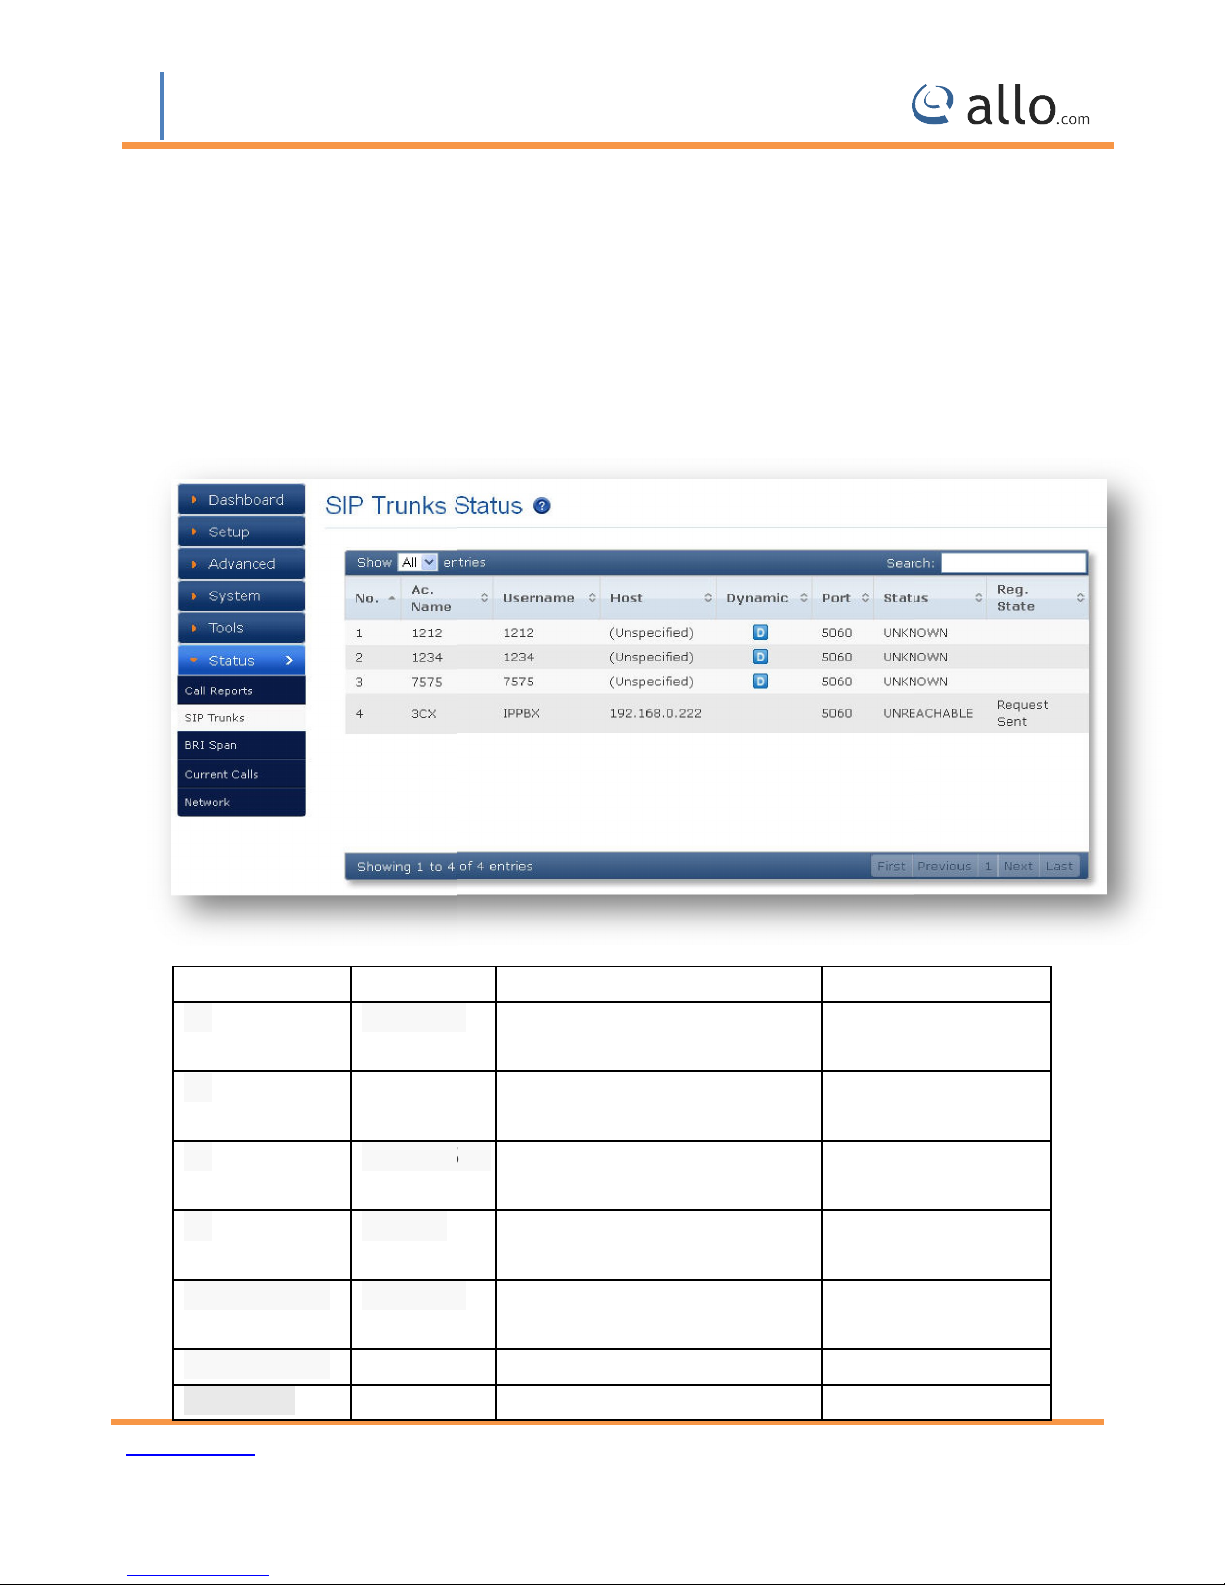
SIP Trunk Status page displays detailed status of ea
Reg. State
Registered
Request Sent
Registered
this is where you can find the status of SIP Trunk Status.
ch SIP trunks available on the B
Configured, Registered &
Configured & Reachable, but no
Configured, but Host not
Check Registrar Address
Configured & reachable, but
Check Authentication
Configured, Registered, but not
Check Proxy Address
Check Proxy Address
Client not registered
Duration: I
Status:
Hangup cause:
Link ID:
7.2 SIP Trunk Status
Navigation through Status >
RI Gateway.
Status
OK
OK -
OK
OK Rejected
UNREACHABLE
UNREACHABLE -
UNKNOWN -
www.allo.com
Figure 33: SIP Trunk Status
Description
reachable
Registration
responding or unreachable
Registration failure
reachable
Configured, but not reachable
Not Registered
Version 2.0
-
-
39
Page 40
BRI User Manual
Host IP is obtained dynamically on registration.
BRI Span
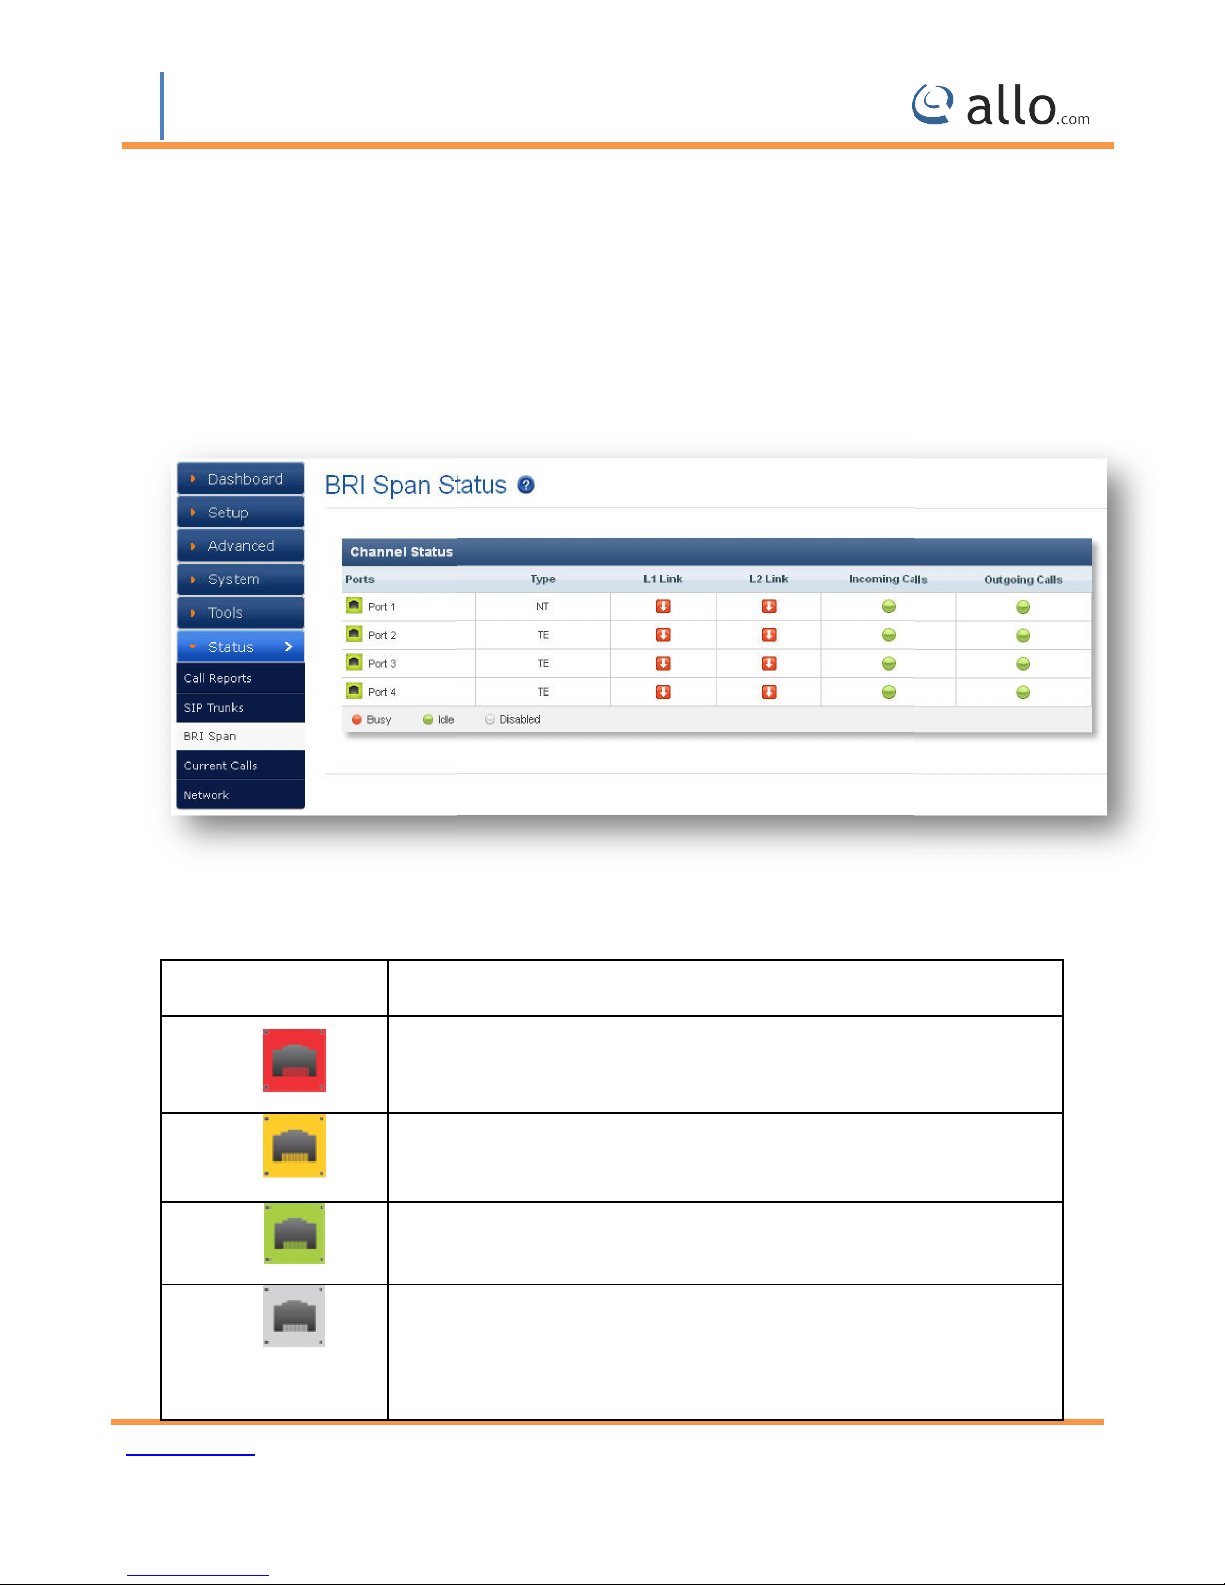
RI Span Status page displays detailed status of each E1/T1 Port with individual channel inf
Description
Appliance is not seeing far end, circuit is not up, or cable is bad.
Appliance is synchronizing or is receiving a yellow alarm from the far
RI Link is Active.
T1/E1 driver is not initialized or device undetected.
sync with the far end.
Dynamic:
7.3 BRI Span
Navigate through Status >
B
available on the BRI Gateway.
o,
Figure 34: BRI Span Status
E1/T1 Port Status
www.allo.com
end.
B
Appliance is in-
Version 2.0
40
Page 41
BRI User Manual
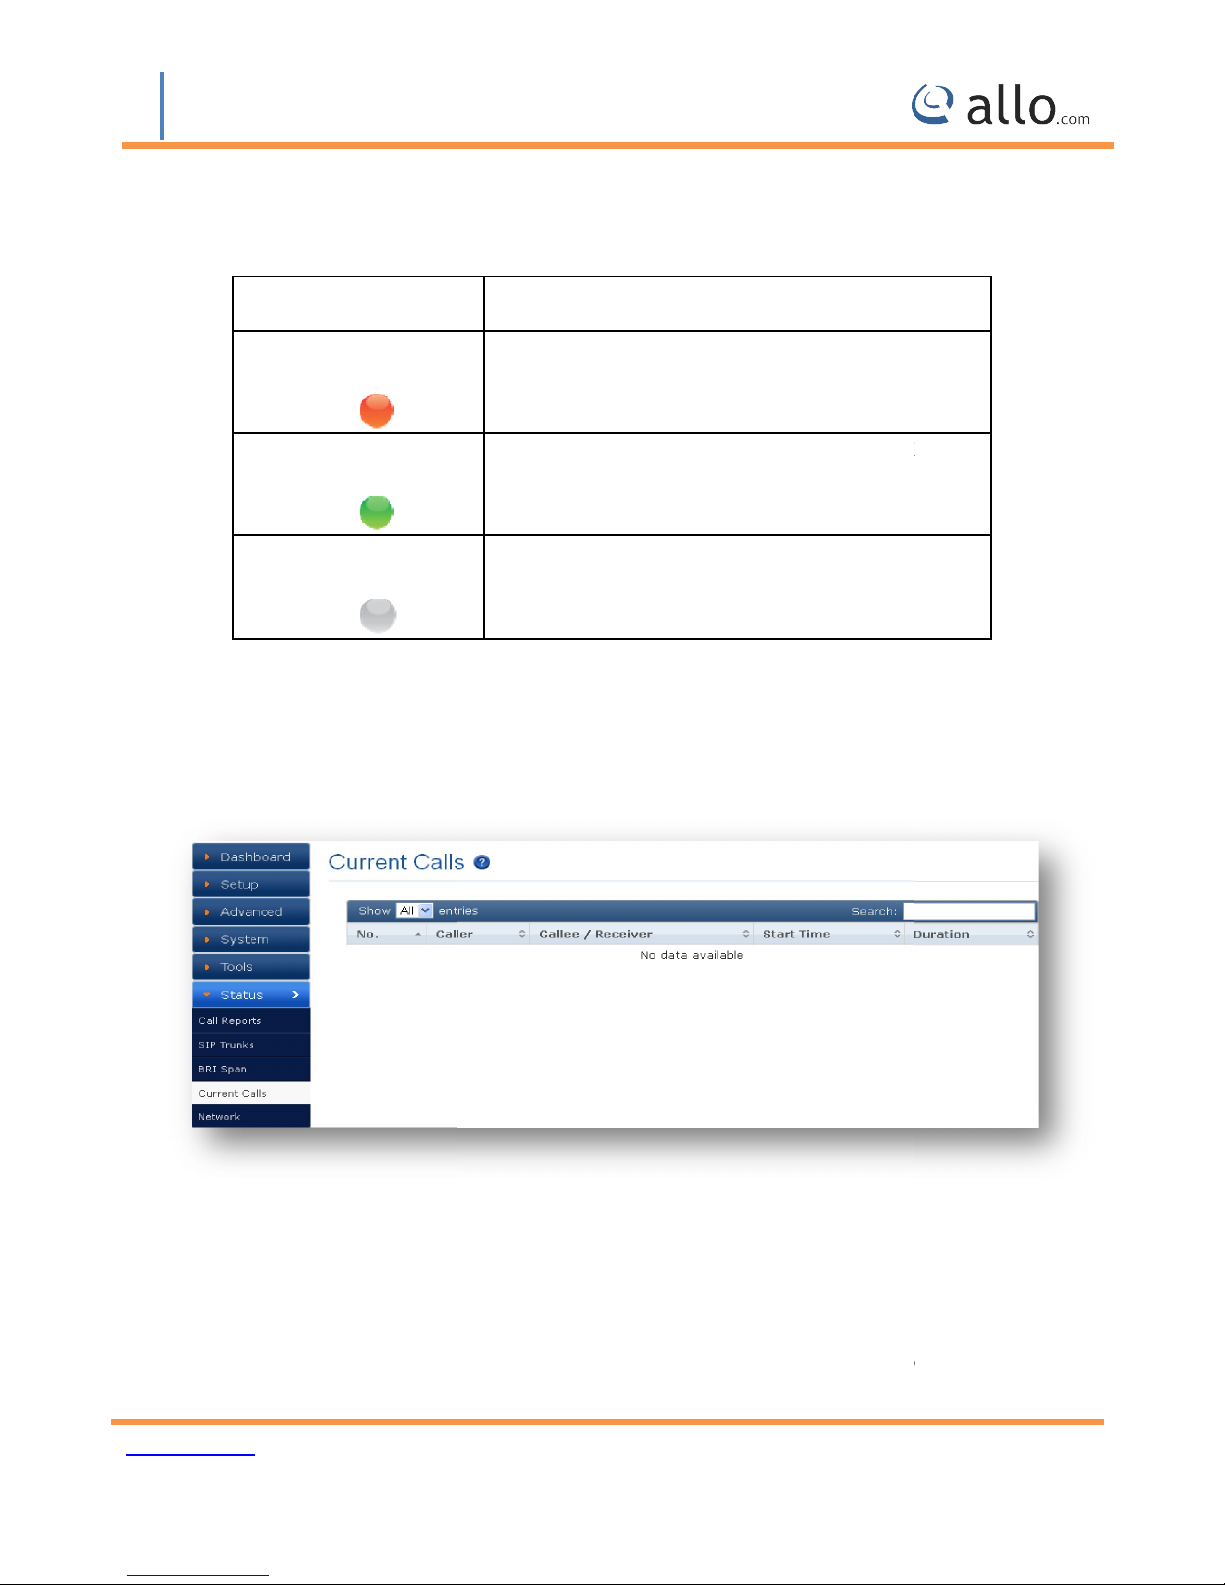
Here you can see the status of the E1/T1 Port and Channel Status.
STATUS > Current Calls:
Current Calls page displays detailed status of the real time calls available on
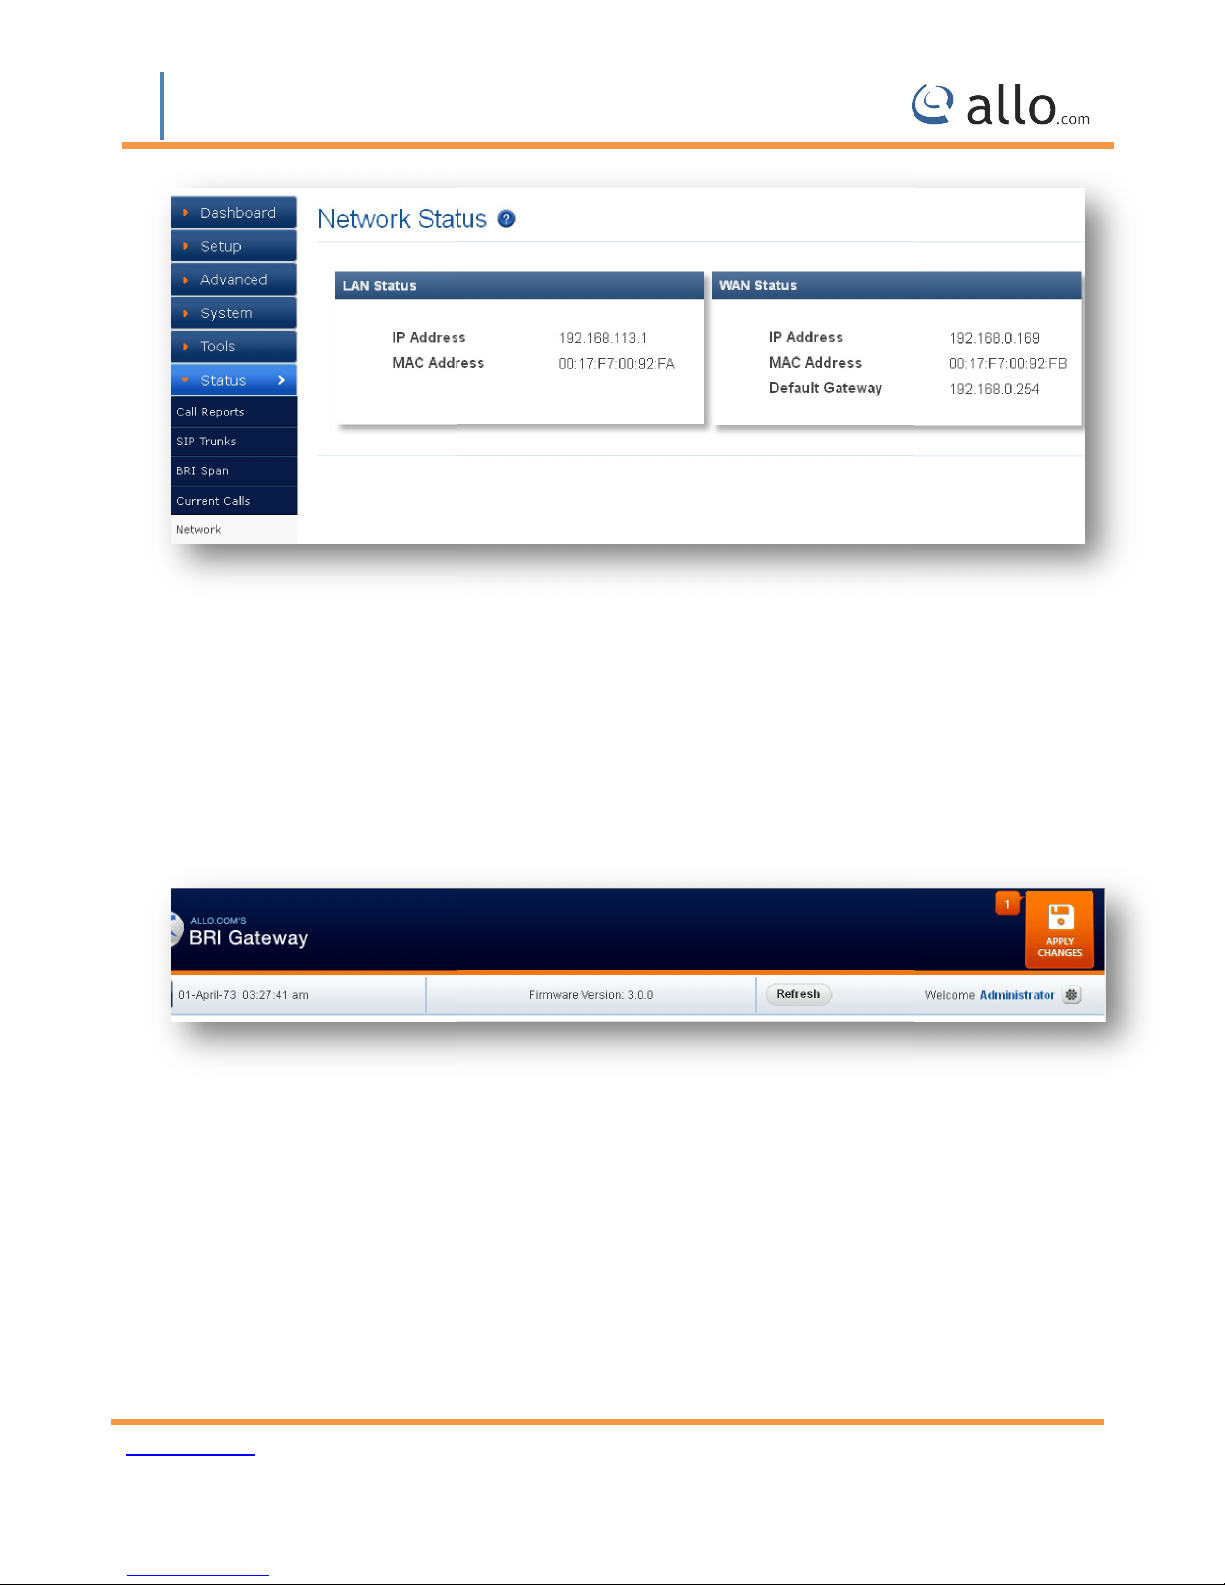
STATUS > Network Status:
Network Status page displays detailed status o
make calls
BRI
This is where you can find the LAN and WAN
f the network configuration on B
Channel Status
7.4 Current Calls
Navigation:
Description
Channel is Busy
Channel is Idle and ready to receive or
Channel is not active
This is where you can find the active calls
Gateway.
Figure 35: Current Calls
7.5 Network Status
Navigation:
MAC Addresses.
www.allo.com
Version 2.0
IP address and
RI Gateway.
41
Page 42
BRI User Manual
This is the button which you must press after adding / editing / deleting configurations such as
Figure 36: Network Status
8. Apply Changes
Navigation: APPLY CHANGES
Extensions, SIP Trunk, and ISDN
BRI Settings etc
Figure 37: BRI Gateway Apply Changes
www.allo.com
Version 2.0
42
Page 43
BRI User Manual
Administrator Options
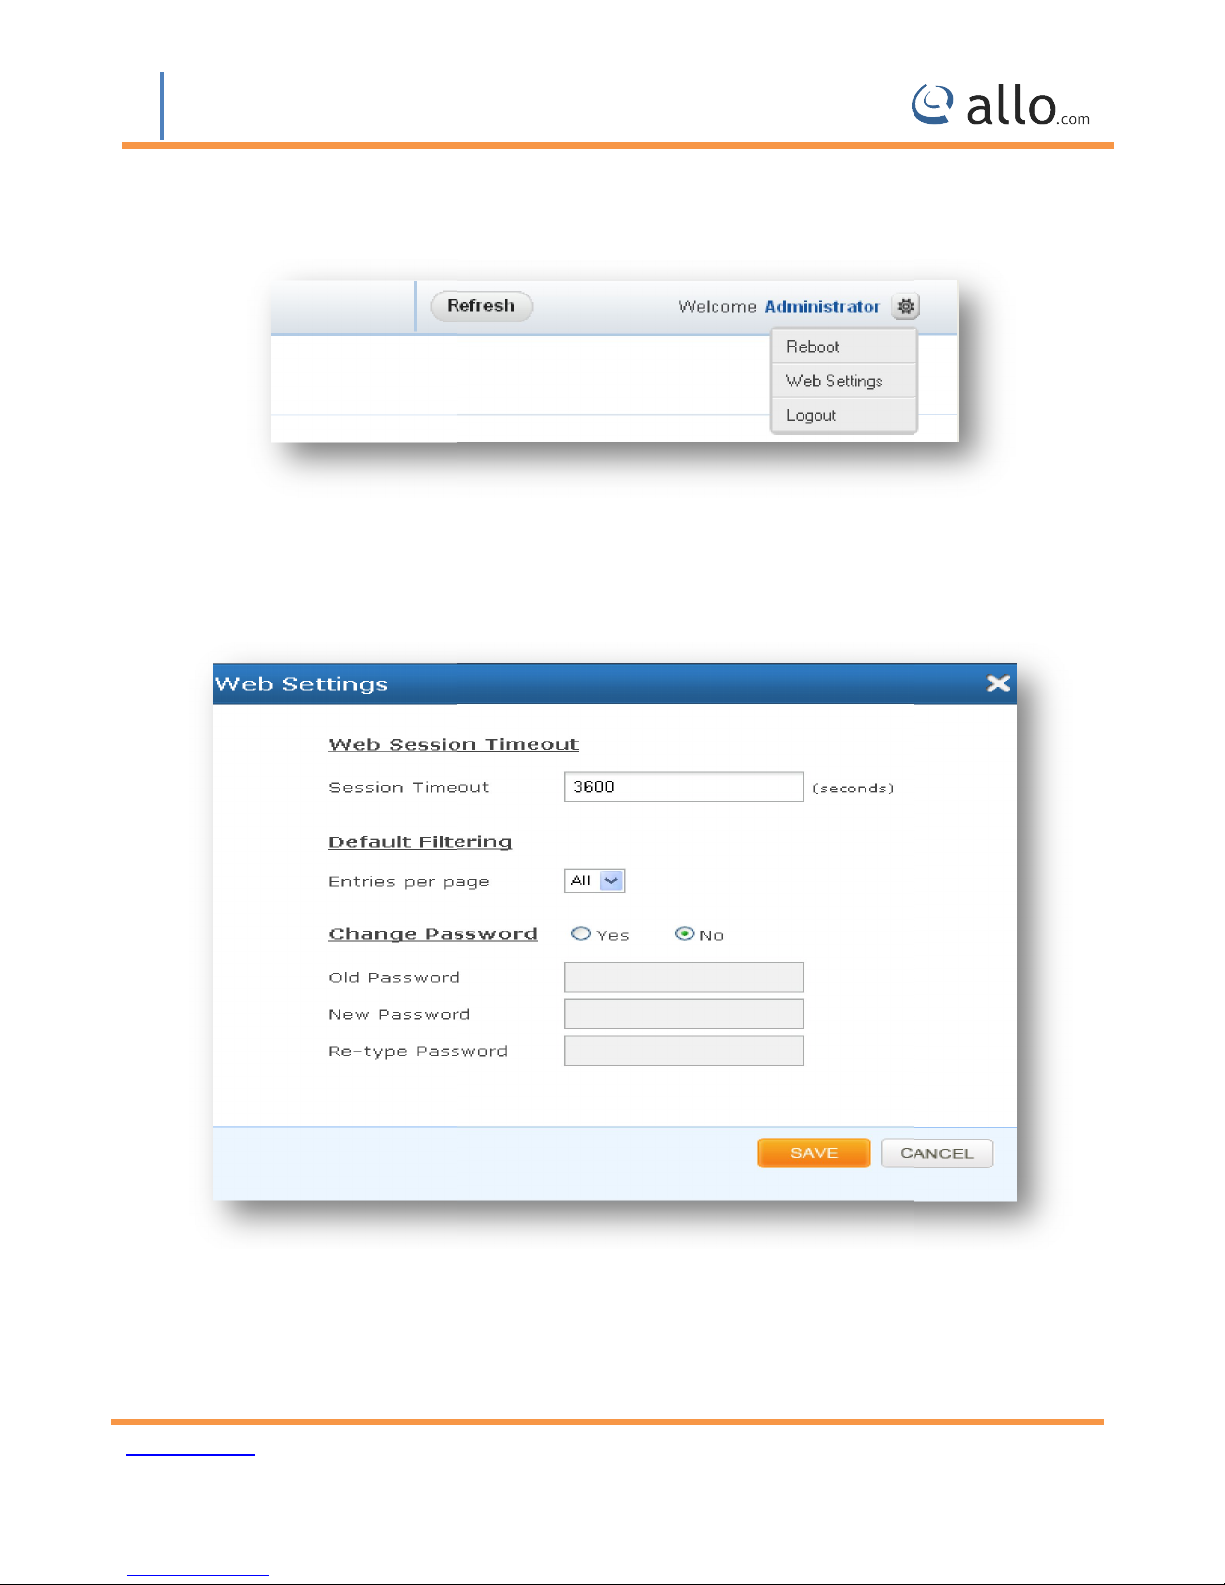
You can restart the device by selecting Reboot option. It will restart all the applications
change the administrator password Settings
button, followed by “
It will take you out of the web interface.
” button to update the configuration
9.
Reboot:
Web Settings: Here you can
Figure 38: Administrator options
Figure 39: Web Settings
Click on “SAVE “
APPLY CHANGES
changes.
Logout:
www.allo.com
Version 2.0
43
Page 44

BRI User Manual
Asked Questions (FAQs)
1. How to access GUI and find IP address of BRI gateway?
Connect a RJ45 cable from LAN port of the G/W to your PC directly
network configuration as 192.168.113.xxx series
Connect WAN port of G/W to your network switch
Open 192.168.113.2 in a browser
Homepage will show you the WAN IP address of the device
Access the G/W using the WAN IP from your network.
fferent ways you can connect BRI gateway with IPPBX?
“Add SIP trunk” tab in BRI gateway provides you three modes of connection, which creates the
connection between gateway and IPPBX
Registration Mode is “From Gateway”: Gateway is sending registration
Registration Mode is “To Gateway”: Gateway is receiving registration request from any IPPBX (as a
Registration Mode is “None”: It’s an IP PEER trunk between gateway and IPPBX.
t are all the call routing rules is available for different routing patterns?
Incoming type: Source of the call, from where the call is coming in the gateway.
1) If you want to accept incoming call which has only 4 digits dialed, then write pattern as XXXX
request to the IPPBX or any
10. Frequently
Follow the below steps
Set the PC
FAQs
2. What are all the di
VoIP service provider.
SIP trunk in IPPBX)
3. Wha
form 0 to 9)
(X is
www.allo.com
Version 2.0
44
Page 45

BRI User Manual
2) If you want to accept incoming call with any number of digits, then write X. (. is wild card which
3) If dialed number is 65654008, and if you want to prepend 99 to dialed number, then put 99 in
field and dialed number when it reaches destination trunk will be 9965654008.
4) If dialed number is 65654008, and if you want to strip 2 digits from the dialed number, then put
2 in trim digits field and dialed number when it reached destination trunk wi
4. In Reboot gateway when did you connect /changes the BRI lines to ports?
You can connect the lines to the BRI ports either in TE or NT mode. Whenever you connect lines at
first time then reboot the gateway by power off and power on to make t
And, if you are switching lines from one port to another port, then you have to reboot gateway to
ll be 654008
he ports active.
accepts any length of number)
prepend
make the ports to work.
www.allo.com
Version 2.0
45
Page 46
BRI User Manual
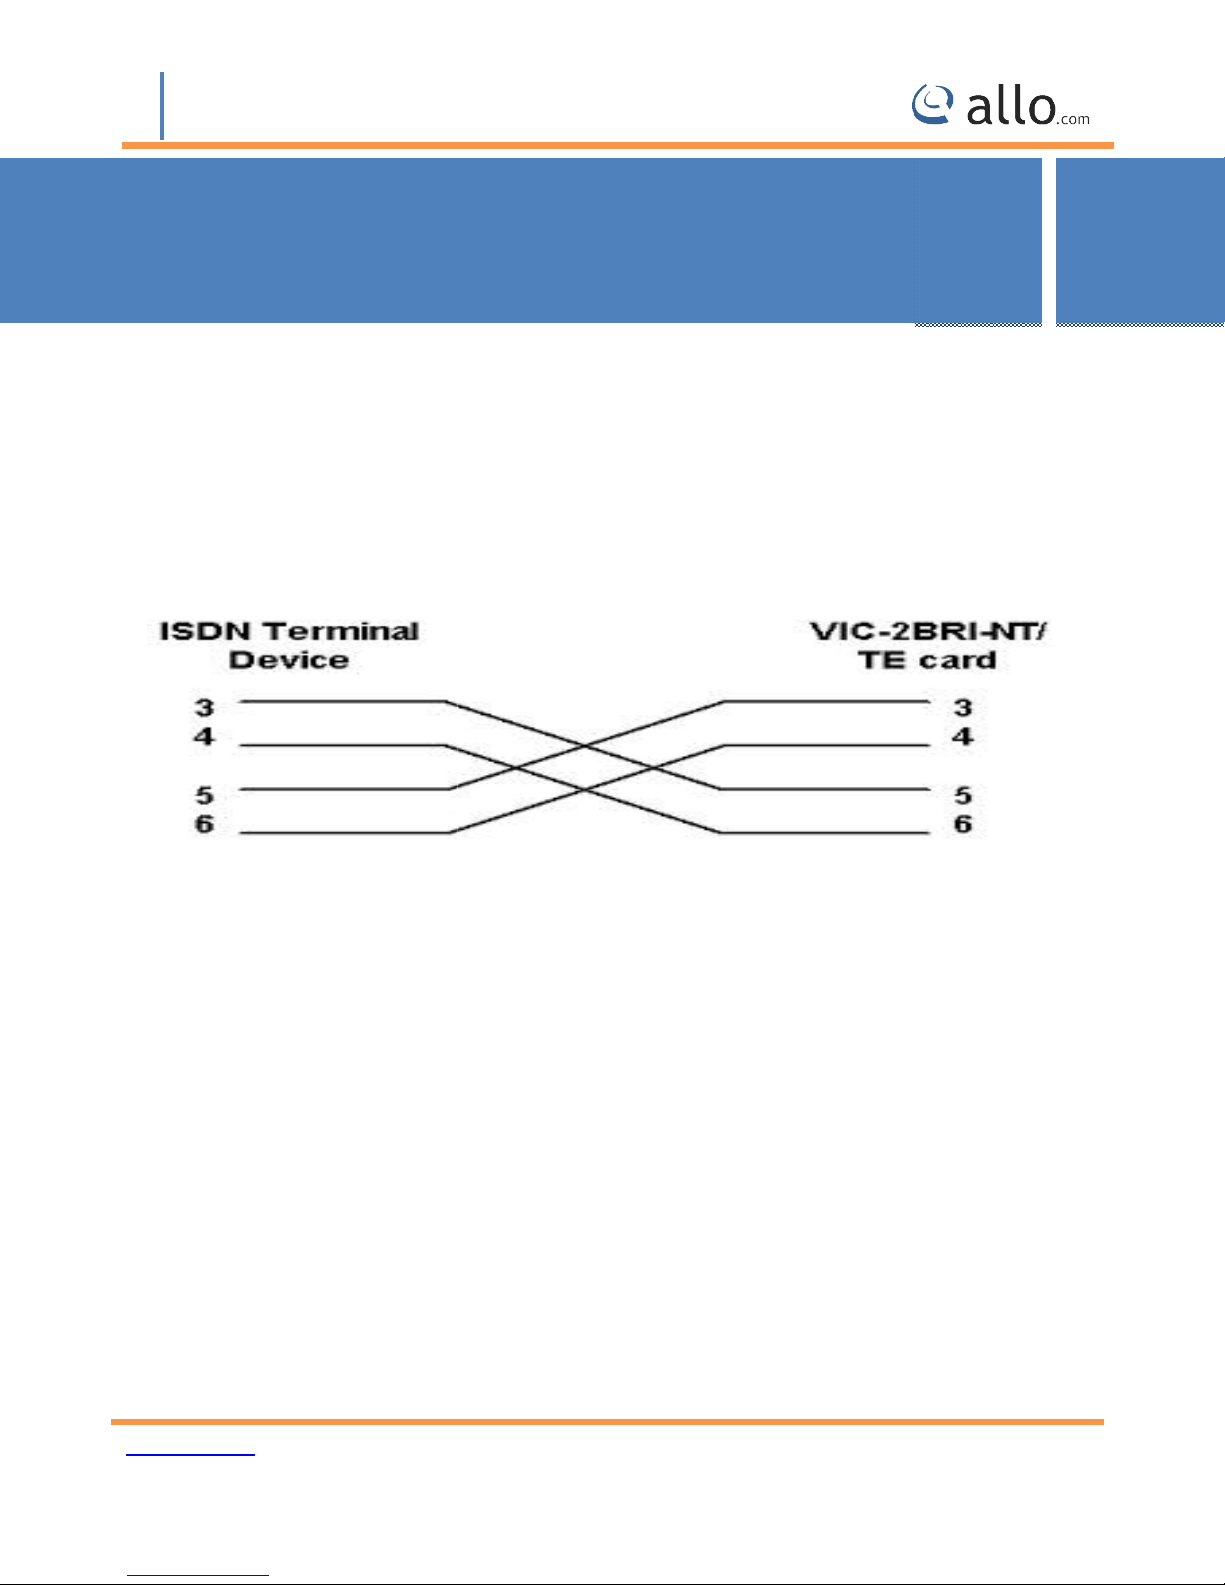
All RJ45 (8P8C) ports labeled T1/E1 on the Gateway
commonly referred to as RJ48 when used for telecommunication. The pin assignments are
pin. RJ45 jacks are also
11. Appendix
Pin Assignments:
identified in below table.
Appendix
Series appliance are 8-
www.allo.com
Version 2.0
46
Page 47

BRI User Manual
12. Glossary & Acronyms
Definition
A voice grade channel of 64 kbps. The worldwide standard speed for
Digitizing voice conversation using PCM (Pulse Code Modulation).
Dual Tone Multi
The European equivalent of
Mbps, up to 32 channels (DS0s).
The European equivalent of North American T3, transmits data at 34.368
Mbps, up to 512 channels (DS0s). Equivalent to 16 E1 lines.
Unwanted
Data transmission in two directions simultaneously.
Initiates and sends ringing voltage. Phones are connected to FXS ports.
A recommendation by the Telecommunication Standardization
T) for an algorithm designed to transmit and receive ulaw PCM voice and A
law at a digital bit rate of 64 kbps.
A recommendation by the Telecommunication Standardization Sector (ITU
T) for an algorithm designed to transmit and receive
A recommendation by the Telecommunication Standardization Sector (ITU
T) for an algorithm designed to transmit and receive audio at 8 Kbps
oriented synchronous data link
International Organization for Standardization (ISO).
A free speech codec used for voice over IP. It is designed for narrow band
speech with a payload bit rate of 13.33 kbps (frame length =
kbps (frame length = 20ms).
A smaller version of a phone company’s large central switching office.
Glossary
button or touch tone dialing
North American T1, transmits data at 2.048
audio at 6.3 kbps or 5.3
layer protocol developed by the
& Acronyms
Term
DS0 Digital Signal,
Level 0
DTMF
E1
E3
EMI Electromagnetic
Interference
Full duplex
FXS Foreign
Exchange Station
G.711
G.723.1
-Frequency Push-
electrical noise.
Sector (ITU-
-
-
kbps.
G.729a
HDLC High-Level
Data Link Control
ILBC Internet Low
Bit rate Codec
PBX Private Branch
www.allo.com
A bit-
Version 2.0
-
30ms) and 15.2
47
Page 48

BRI User Manual
Definition
Example: Asterisk.
network of the world's public circuit
Originally a network of fixed
now almost entirely digital
communications link that connects a single device to another single
device, such as a rem
Basic Rate Interface
A communications network which uses telephones to establish
between two points. Also referred to as the dial network.
A connection where data is broadcast between more than two endpoints.
A connection restricted to two endpoints.
pin jack
machines in residential and business settings to PBX or the local telephone
8P8C, un
Predominantly used in LAN and uses
8P8C modular connector type for T1 and ISDN termination over twisted
pair. While RJ45 and RJ48 use the same connector, they differ in their
wiring. RJ48 is commonly seen on T1 lines and uses Shielded Twisted Pair
An IETF standard for setting up sessions between one or more clients. It is
currently the leading signaling protocol for Voice over IP, gradually replacing
A dedicated digital carrier facility which
(DS0s) and transmits data at 1.544 Mbps. Commonly used to carry traffic to
and from Private business networks and ISPs.
Technology used for transmitting voice traffic over a data network
Internet Protocol.
switched telephone networks.
line analog telephone systems, the PSTN is
includes mobile as well as fixed telephones.
typically used for connecting telephones, modems, and fax
keyed modular connector type for Ethernet over twisted pair.
Unshielded Twisted Pair cable.
transmits up to 24 voice channels
Term
Exchange
POTS Plain Old
It’s a
Telephone Service
PPP Point-to-Point
Type of
Protocol
BRI
PSTN Public
Switched Telephone
Network
PTMP Point-toMultipoint
PTP Point-to-Point
RJ11 A six-
CO.
-
-
that
ote terminal to a host computer.
connections
RJ45
RJ48
SIP Session Initiation
Protocol
T1
VoIP Voice over
Internet Protocol
-
cable.
H.323.
using the
www.allo.com
Version 2.0
48
Page 49

BRI User Manual
EXPERIENCING THE ALLO BRI Gateways:
www.allo.com
releases, additional features, FAQs, documentation and news on new products.
If you have purchased our products through a
them directly for immediate support.
Our technical support Engineers are ready to answer all of your queries. Kindly submit a
depth s
Asterisk is a Registered Trademark of Digium, Inc.
date updates on firmware
Certified Partner or Reseller, please contact
Please visit our website:
ticket online to receive in-
*
to receive the most up- to-
Allo
trouble
upport.
www.allo.com
Version 2.0
49
Page 50

BRI User Manual
www.allo.com
Version 2.0
50
 Loading...