

Assembly Instructions (English)
ASSEMBLY INSTRUCTION FOR
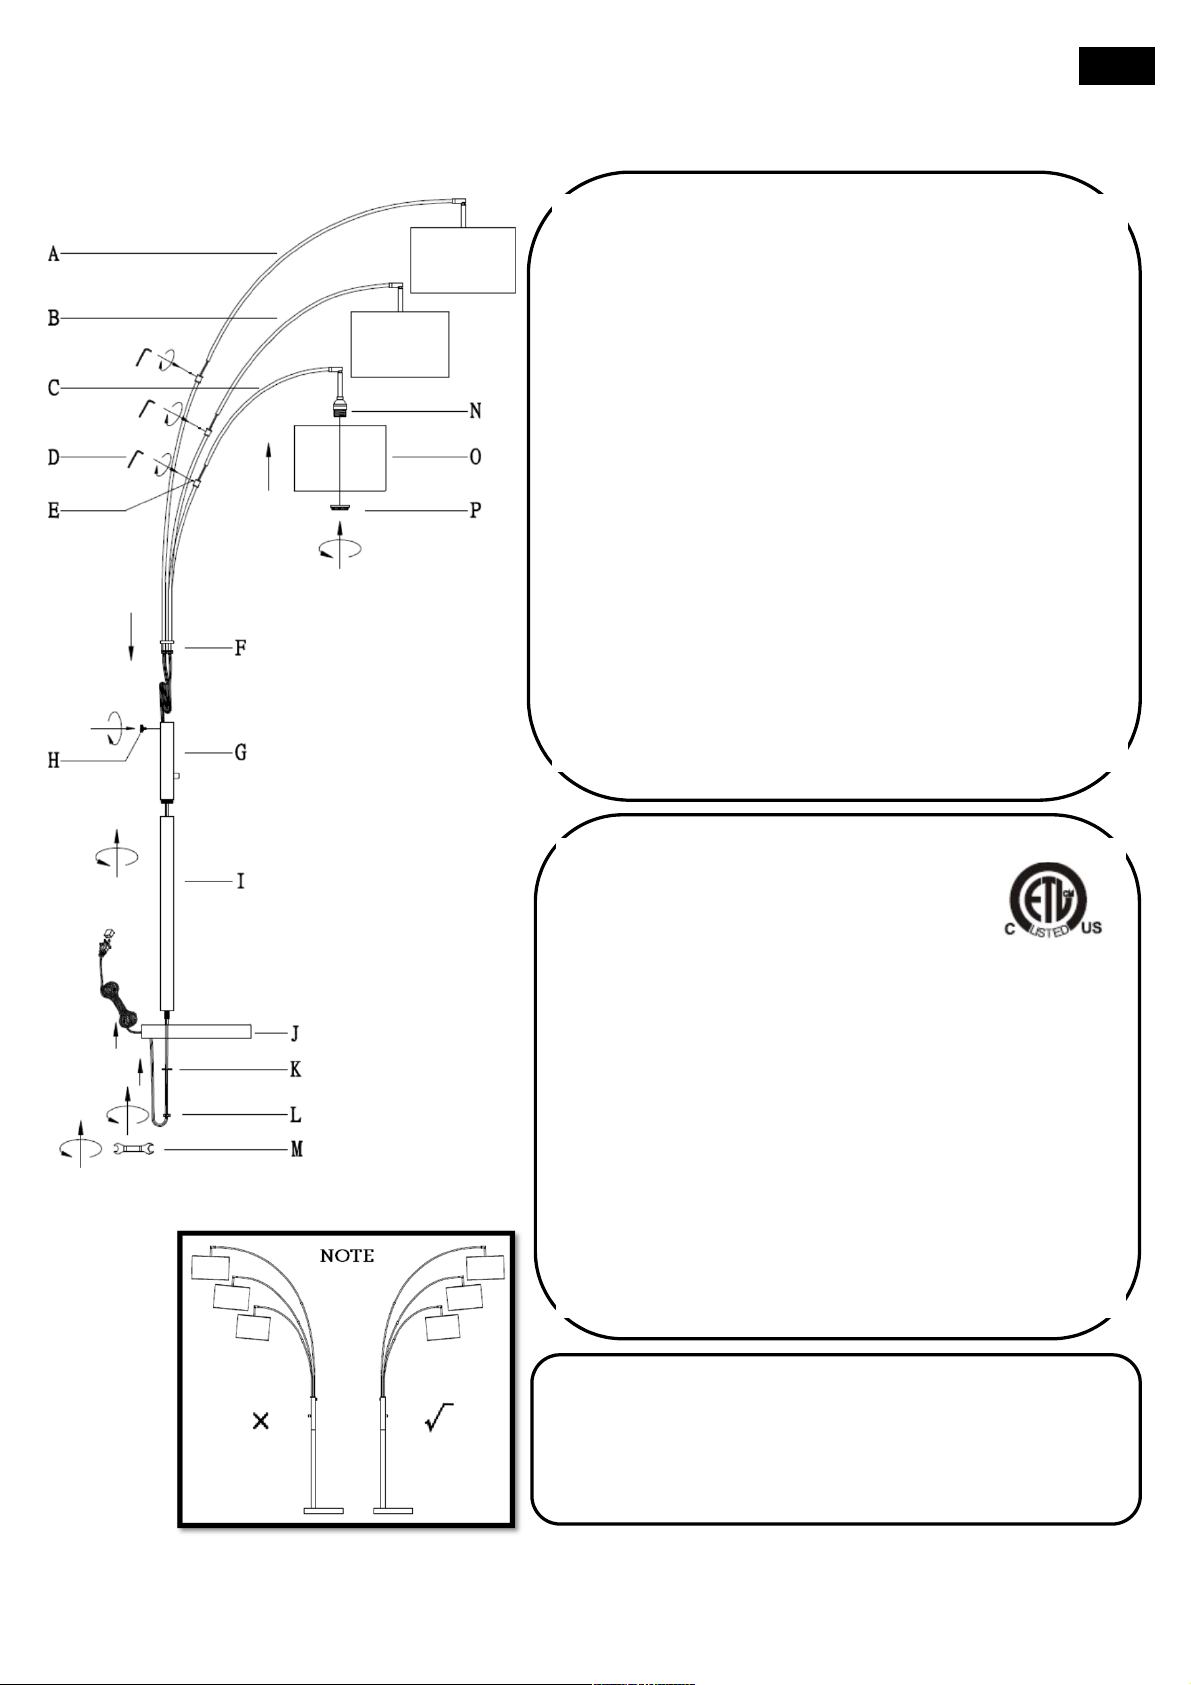
3 Arm Arc Lamp
1. Insert the curved tube (A), (B) ,(C) into part (F), then
tighten it using hex screw (E) with allen wrench (D).
You may need to pull any excess cord gently through the
poles so that these two parts fit.
2. Fold the excess cord and insert into tube (G).
3. Place part (F) into tube (G), then tighten it with screw (H) .
Note: The Arc lamp should face forward in the same
direction as the switch, with the cord coming out of the
back of the base.
4. Screw tube (G) and (I) together until tight
5. Insert tube (I) to base (J) & washer (K), then tighten it with
nut (L) using wrench (M). You may need to pull any excess
cord gently through the poles so that these two parts fit.
1.0
6. Place shade (O) onto socket (N) and tighten it with socket
ring (P).
GENERAL PRODUCT INFORMATION:
This product is suitable
for dry locations only.
---------------------------------------------------------------
IMPORTANT SAFETY INSTRUCTIONS:
This portable lamp has a polarized plug as a feature to reduce the
risk of electric shock (one blade is larger than the other). This
plug will fit in a polarized outlet only one way. If the plug does
not fit fully in the outlet, reverse the plug. If it still does not fit,
contact a qualified electrician.Do not use with an extension cord
unless the plug can be fully inserted. DO NOT ALTER THE
PLUG .
---------------------------------------------------BULB TYPE : Use only with maximum of 3*60 watt
incandescent bulbs or 3*13W CFL bulbs. (bulbs not included)
Must use all incandescent or all CFL bulbs.
PARTS DIAGRAM
(3)* HEX screw (E) (1)* Allen Wrench (D)
(1) * Screw (H) (1)* Washer (K)
(1)* Nut (L) (1)* Wrench(M)
(3)* Socket ring(P)

INSTRUCCIÓN DE ASAMBLEA PARA
Lámpara de arco de 3 brazos
1. Inserte el tubo curvado (a), (b), (c) en la parte (f), después
apriételo usando el tornillo del maleficio (e) con la llave Allen
(d).Usted puede necesitar tirar de cualquier exceso de cordón
suavemente a través de los polos de modo que estas dos piezas
quepan.
2. Doblar exceso del cordón y del parte movible al tubo (G).
3. Ponga la parte (f) en el (G) del tubo, después apriétela con el
tornillo (h).
Nota: La lámpara de arco sea delantera con la misma
dirección que el interruptor, con el cordón saliendo de la
parte posterior de la base.
4. Atornille el (G) del tubo y (i) el toghether hasta que
firmemente.
5. El tubo de parte movible (i) a la base (j) y la lavadora (k),
entonces lo aprietan con la nuez (l) por la llave (m). Usted puede
necesitar tirar de cualquier exceso de cordón suavemente a
través de los polos de modo que estas dos piezas quepan.
1.0
6. Coloque la sombra (o) sobre el zócalo (n) y apriétela con el
anillo del zócalo (p).
INFORMACION GENERAL DEL PRODUCTO:
Este producto es adecuado sólo
para lugares secos.
---------------------------------------------------------------
INSTRUCCIONES IMPORTANTES DE SEGURIDAD:Esta
lámpara portátil tiene un enchufe polarizado (una paleta es más ancha
que la otra), función de seguridad que reduce el riesgo de una descarga
eléctrica. Este enchufe encajará en un tomacorriente polarizado en un
sólo sentido. Si el enchufe no entra completamente en el tomacorriente,
invierta el enchufe. Si aún así no encaja, llame a un electricista
calificado. Nunca use un cable de extensión a menos que el enchufe
pueda insertarse por completo. NO MODIFICAR EL ENCHUFE.
-------------------------------------------------------
BULBOSO: Utilice solamente con el máximo de los bulbos
incandescentes del vatio 3*60 o de los bulbos de 3*13W CFL.
(bulbos no incluidos) debe utilizar todos los todos los de CFL
bulbos incandescentes o.
DIAGRAMA DE LAS PIEZAS
(3)* Tornillo del HEX (E) (1)* Llave Allen (D)
(1) * Tornillo del HEX (H) (1)* Lavadora (K)
(1)* Nuez (L) (1)* Llave (M)
(3)* Anillo del zócalo(P)
 Loading...