

Allied Telesis AT-2915, AT-AT-2970, AT-2801FX, AT-2916T, AT-AT-2971 Installation Manual
...Page 1

Network
Adapter Cards
®
AT-2400 Series
AT-2450/AT-2451 Series
AT-2500/AT-2501 Series
AT-2700/AT-2701 Series
AT-2745/AT-2746 Series
AT-2801FX Series
AT-2915 Series
AT-2916T Series
AT-2930 Series
◆
Installation
Guide
BOOK I
FOR WINDOWS 95, 98, 2000, ME, NT, AND XP
OPERATING SYSTEMS
AT-AT-2970/2971 Series
PN 613-50241-00 Rev F
Page 2

Copyright © 2004 Allied Telesyn, Inc.
All rights reserved. No part of this publication may be reproduced without prior written permission from Allied Telesyn, Inc.
Windows 95, Windows 98, Windows 2000, Windows Me, Windows NT and Windows XP are either registered trademarks or
trademarks of Microsoft Corporation in the United States and/or other countries.
Netscape and the Netscape N and Ship's Wheel logos are registered trademarks of Netscape Communications Corporation in the
U.S. and other countries. Netscape Navigator is also a trademark of Netscape Communications Corporation and may be registered
outside the U.S.
All other product names, company names, logos or other designations mentioned herein are trademarks or registered trademarks
of their respective owners.
Allied Telesyn, Inc. reserves the right to make changes in specifications and other information contained in this document without
prior written notice. The information provided herein is subject to change without notice. In no event shall Allied Telesyn, Inc. be
liable for any incidental, special, indirect, or consequential damages whatsoever, including but not limited to lost profits, arising
out of or related to this manual or the information contained herein, even if Allied Telesyn, Inc. has been advised of, known, or
should have known, the possibility of such damages.
Page 3

Electrical Safety and Emission
Compliance Statement
Standards: This product meets the following standards
U.S. Federal Communications Commission
Declaration Of Conformity
Manufacture Name: Allied Telesyn, Inc.
Manufacture Address: 960 Stewart Drive, Suite B
Sunnyvale, CA 94085 USA
Manufacture Telephone: 408-730-0950
Declares that the product: Network Adapter Cards
Model Numbers: AT-2400T, AT-2400BT, AT-2450FTX, AT-2451FTX, AT-2500, AT-2501, AT-2500TX,
This product complies with FCC Part 15B, Class B Limits:
This device complies with part 15 of the FCC Rules. Operation is subject to the following two conditions: (1) This device must not
cause harmful interference, and (2) this device must accept any interference received, including interference that may cause
undesired operation.
Radiated Energy
Note: This equipment has been tested and found to comply with the limits for a Class B digital device pursuant to Part 15 of FCC
Rules. These limits are designed to provide reasonable protection against harmful interference in a residential installation. This
equipment generates, uses and can radiate radio frequency energy and, if not installed and used in accordance with
instructions, may cause harmful interference to radio or television reception, which can be determined by turning the
equipment off and on. The user is encouraged to try to correct the interference by one or more of the following measures:
- Reorient or relocate the receiving antenna.
- Increase the separation between the equipment and the receiver.
- Connect the equipment into an outlet on a circuit different from that to which the receiver is connected.
- Consult the dealer or an experienced radio/TV technician for help.
Changes and modifications not expressly approved by the manufacturer or registrant of this equipment can void your authority
to operate this equipment under Federal Communications Commission rules.
AT-2700TX, AT-2700FX, AT-2700FTX, AT-2701FTX, AT-2701FX, AT-2746FX,
AT-2745FX, AT-2801FX, AT-2915T, AT-2916T, AT-2930T, AT-2930SX, AT-2970SX,
AT-2970SX/2, AT-2970T, AT-2970T/2, AT-2971T, AT-2971SX
This Class B digital apparatus meets all requirements of the Canadian Interference-Causing Equipment Regulations.
Cet appareil numérique de la classe B respecte toutes les exigences du Règlement sur le matériel brouilleur du Canada.
RFI Emission EN55022 Class B, EN61000-3-2, EN61000-3-3
Warning: In a domestic environment this product may cause radio interference in which case the user may be required to take
adequate measures.
Immunity EN55024
Electrical Safety EN60950, UL 1950 (UL/cUL)
Laser EN60825
2
Industry Canada
1
3
4
5
3
Page 4

Electrical Safety and Emission Compliance Statement
Important: Appendix A contains translated safety statements for installing this equipment. When you see the
A for the translated safety statement in your language.
Wichtig: Anhang A enthält übersetzte Sicherheitshinweise für die Installation dieses Geräts. Wenn Sie
Anhang A den übersetzten Sicherheitshinweis in Ihrer Sprache nach.
Vigtigt: Tillæg A indeholder oversatte sikkerhedsadvarsler, der vedrører installation af dette udstyr. Når De ser symbolet
De slå op i tillæg A og finde de oversatte sikkerhedsadvarsler i Deres eget sprog.
Belangrijk: Appendix A bevat vertaalde veiligheidsopmerkingen voor het installeren van deze apparatuur. Wanneer u de
raadpleeg Appendix A voor vertaalde veiligheidsinstructies in uw taal.
Important: L'annexe A contient les instructions de sécurité relatives à l'installation de cet équipement. Lorsque vous voyez le
symbole
Tärkeää: Liite A sisältää tämän laitteen asentamiseen liittyvät käännetyt turvaohjeet. Kun näet
turvaohjetta liitteestä A.
Importante: l’Appendice A contiene avvisi di sicurezza tradotti per l’installazione di questa apparecchiatura. Il simbolo
di consultare l’Appendice A per l’avviso di sicurezza nella propria lingua.
Viktig: Tillegg A inneholder oversatt sikkerhetsinformasjon for installering av dette utstyret. Når du ser
for å finne den oversatte sikkerhetsinformasjonen på ønsket språk.
Importante: O Anexo A contém advertências de segurança traduzidas para instalar este equipamento. Quando vir o símbolo
leia a advertência de segurança traduzida no seu idioma no Anexo A.
Importante: El Apéndice A contiene mensajes de seguridad traducidos para la instalación de este equipo. Cuando vea el símbolo
, reportez-vous à l'annexe A pour consulter la traduction de ces instructions dans votre langue.
-symbolin, katso käännettyä
, go to Appendix
sehen, schlagen Sie in
, skal
ziet,
, indica
, åpner du til Tillegg A
,
, vaya al Apéndice A para ver el mensaje de seguridad traducido a su idioma.
Obs! Bilaga A innehåller översatta säkerhetsmeddelanden avseende installationen av denna utrustning. När du ser
till Bilaga A för att läsa det översatta säkerhetsmeddelandet på ditt språk.
, skall du gå
4
Page 5

Table of Contents
Electrical Safety and Emission Compliance Statement .....................................................................................................................3
Preface ......................................................................................................................................................................................................................7
Purpose of this Guide ...........................................................................................................................................................................................7
How This Guide is Organized .............................................................................................................................................................................8
Document Conventions ......................................................................................................................................................................................9
Where to Find Related Guides ..................... .. ........................... .. .. .. ........................... .. .. ..................................................................................10
Contacting Allied Telesyn .................................................................................................................................................................................11
Online Support..............................................................................................................................................................................................11
E-mail and Telephone Support ...............................................................................................................................................................11
Returning Products............................................ .. .. ........................... .. ........................... .. ............................................................................11
For Sales or Corporate Information.......................................................................................................................................................11
Obtaining Management Software Updates .......................................................................................................................................11
Tell Us What You Think...............................................................................................................................................................................11
Chapter 1
Installing the Network Adapter Card .......................................................................................................................................................13
Verifying Package Contents....... ........................... .. ........................... .. ........................... ..........................................................................13
Reviewing Safety Precautions .........................................................................................................................................................................14
Installing a Network Adapter Card ................................................................................................................................................................15
Installing an AT-2801FX.............................................................................................................................................................................17
Chapter 2
AT-Setup for Windows 98, 2000, Me, or XP ...........................................................................................................................................19
Overview .................................................................................................................................................................................................................19
AT-Setup Guidelines ...........................................................................................................................................................................................21
Running AT-Setup ................................................................................................................................................................................................22
Running AT-Setup to Complete Driver Installation .................................................................................................................................27
Chapter 3
Manually Installing a Network Adapter Driver ...................................................................................................................................29
Installation Guidelines ........................................................................................................................................................................................30
Creating a Driver Installation Disk ..................................................................................................................................................................31
Windows 95 ............................................................................................................................................................................................................34
Windows 98 ............................................................................................................................................................................................................36
Windows Me ..........................................................................................................................................................................................................40
Windows 2000 and XP ......... .. ........................... .. .. .. .. ........................... .. ........................... ..................................................................................42
Windows NT 4.0 ....................................................................................................................................................................................................48
5
Page 6

Table of Contents
Chapter 4
Updating a Network Adapter Driver .......................................................................................................................................................55
Manually Updating a Driver for Windows 98, 2000, Me, or XP ...........................................................................................................56
Chapter 5
Removing a Network Adapter Driver ......................................................................................................................................................67
Windows 95, 98, or Me ......................................................................................................................................................................................68
Windows 2000 or XP ..........................................................................................................................................................................................72
Windows NT 4.0 ...................................................................................................................................................................................................75
Chapter 6
AT-Stat ....................................................................................................................................................................................................................79
Overview ................ .......... ........... .......... .......... ........... .......... ........ ........... .......... ........... ...........................................................................................79
System Requirements................................................................................................................................................................................81
Installing AT-Stat ..................................................................................................................................................................................................82
Removing AT-Stat ...............................................................................................................................................................................................86
Chapter 7
VLAN ........................................................................................................................................................................................................................89
Overview ................ .......... ........... .......... .......... ........... .......... ........ ........... .......... ........... ...........................................................................................90
Installing an ATMUX VLAN Driver ..................................................................................................................................................................91
Adding an Additional VLAN ................. .. .. ... .. .. .. .. .. .. .. .. ........................... .. .. .. .. .. ... .. .. .. .......................................................................................98
Removing a VLAN ..............................................................................................................................................................................................102
Removing the Allied Telesyn Multi-VLAN Support Protocol .............................................................................................................104
Chapter 8
Troubleshooting ..............................................................................................................................................................................................107
Running Diagnostics ........................................................................................................................................................................................108
For the AT-24xx, AT-25xx, AT-27xx, AT-2915,and AT-2930 Series............................................................................................108
For the AT-2801FX.....................................................................................................................................................................................109
For the AT-2916T, AT-2970, and AT-2971 Series ............................................................................................................................110
Chapter 9
AT-2916T, AT-2970, and AT-2971 VLAN and Link Aggregation ..............................................................................................121
Overview ................ .......... ........... .......... .......... ........... .......... ........ ........... .......... ........... .........................................................................................122
Required Files.................. .. ........................... ...............................................................................................................................................123
Installing the Adapter ......................................................................................................................................................................................124
Independent use of Dual Link Ports ...........................................................................................................................................................125
Virtual LAN (VLAN) Support ...........................................................................................................................................................................126
Link Aggregation (LAGG) Support ..............................................................................................................................................................127
Driver Options ............... .. ... .. .. ........................... .. ........................... ........................... .. .......................................................................................128
Chapter 10
AT-2916T and AT-297x Advanced Features .......................................................................................................................................129
High Performance ..............................................................................................................
...............................................................................130
Jumbo Frames.......... ......................... .. .. ......................... .. .. ... ........................ ... .. .........................................................................................130
TCP, UDP, and IP Checksum Calculation .......... .. .. ........................... .. .. ... .. ........................... .. .. ..........................................................130
Dynamic Interrupt Moderation ............................. .. .. .. ........................... ... .......................... .................................................................130
Advanced Power Management/Wake-on-LAN ......................................................................................................................................131
Reliability ..............................................................................................................................................................................................................132
Link Aggregation.......................................................................................................................................................................................132
Redundant Switch Failover....................................................................................................................................................................133
PCI Hot Plug.................................................................................................................................................................................................133
Parity...............................................................................................................................................................................................................134
Sensors...........................................................................................................................................................................................................134
6
Page 7

Network Adapter Card Installation Guide - Book I
Appendix A
Translated Safety and Emission Information ...................................................................................................................................135
7
Page 8

Page 9

Preface
This installation guide contains instructions on how to install an Allied
Telesyn adapter card in your computer and how to load the adapter
driver. This guide also explains the AT-Setup program which simplifies
the task of installing or updating an adapter driver.
Purpose of this Guide
This guide is intended for anyone who needs to install or update a
network adapter card or driver on their PC-compatible system.
7
Page 10

Preface
How This Guide is Organized
This guide contains the following chapters and appendix:
Chapter 1, Installing the Network Adapter Card, describes how to install
an adapter card into your computer.
Chapter 2, AT-Setup for Windows 98, 2000, Me, or XP, contains
instructions on how install an adapter driver using AT-Setup.
Chapter 3, Manually Installing a Network Adapter Driver, contains the
procedures for manually installing a network adapter driver on a
PC-compatible system.
Chapter 4, Updating a Network Adapter Driver, contains the procedures
for manually updating an adapter driver.
Chapter 5, Removing a Network Adapter Driver, contains the procedures
for removing a network adapter driver from your systems.
Chapter 6, AT-Stat, contains instructions on how to install and remove
the AT-Stat utility.
Chapter 7, VLAN, contains instructions on how to install and remove
VLANs.
Chapter 8, Troubleshooting, contains instructions for running the
diagnostics program and guidelines for troubleshooting.
Chapter 9, AT-2916T, AT-2970, and AT-2971 VLAN and Link Aggregation,
contains information and instructions for installing and using VLAN and
Link Aggregation.
Appendix A, Translated Safety and Emission Information
, contains
multi-language translations of the safety and emission statements in this
guide.
8
Page 11

Document Conventions
This guide uses several conventions that you should become familiar
with before you begin to install the product.
Note
Notes provide additional information.
Warning
Warnings inform you that performing or omitting a specific action
may result in bodily injury.
Caution
Cautions inform you that performing or omitting a specific action
may result in equipment damage or loss of data.
Network Adapter Card Installation Guide
9
Page 12

Preface
Where to Find Related Guides
The Allied Telesyn web site at www.alliedtelesyn.com offers you an easy
way to access the most recent documentation, software updates, and
technical information for all of our products. The documents provided
on our web site are available as PDF files.
10
Page 13

Network Adapter Card Installation Guide
Contacting Allied Telesyn
This section provides Allied Telesyn contact information for technical
support as well as sales or corporate information.
Online Support You can request technical support online by accessing the Allied Telesyn
Knowledge Base from the following web site at
www.kb.alliedtelesyn.com. You can use the Knowledge Base to submit
questions to our technical support staff and review answers to
previously asked questions.
E-mail and
Telephone
Support
Returning
Products
For Sales or
Corporate
Information
Obtaining
Management
Software
Updates
For Technical Support via e-mail or telephone, refer to the “Support &
Services” section of the Allied Telesyn web site at
www.alliedtelesyn.com.
Products for return or repair must first be assigned a Return Materials
Authorization (RMA) number. A product sent to Allied Telesyn without a
RMA number will be returned to the sender at the sender’s expense.
To obtain a RMA number, contact Allied Telesyn’s Technical Support at
our web site at www.alliedtelesyn.com
You can contact Allied Telesyn for sales or corporate information at our
web site at www.alliedtelesyn.com. To find the contact information for
your country, select “Contact Us” then “Worldwide Contacts”.
New releases of management software for our managed products can
be downloaded from either of the following Internet sites:
❑ Allied Telesyn web site: www.alliedtelesyn.com
❑ Allied Telesyn FTP server: ftp://ftp.alliedtelesyn.com
If you would prefer to download new software from the Allied Telesyn
FTP server from your workstation’s command prompt, you will need FTP
client software and you will be asked to log in to the server. Enter
‘anonymous’ as the user name and your e-mail address for the password.
Tell Us What
You Think
If you have any comments or suggestions on how we might improve this
or other Allied Telesyn documents, please fill out the General Enquiry
Form online. This form can be accessed by selecting “Contact Us” from
www.alliedtelesyn.com.
11
Page 14

Page 15

Chapter 1
Installing the Network Adapter
Card
This chapter contains instructions for installing the following Allied
Telesyn network adapter cards:
❑ AT-2400 Series
❑ AT-2450/AT-2451 Series
❑ AT-2500/AT-2501 Series
Verifying
Package
Contents
❑ AT-2700/AT-2701 Series
❑ AT-2745/AT-2746 Series
❑ AT-2801FX Series
❑ AT-2915 Series
❑ AT-2916T Series
❑ AT-2930 Series
❑ AT-2970/AT-2971 Series
Make sure the following items are included in your package. If any item
is missing or damaged, contact your Allied Telesyn sales representative
for assistance.
❑ Allied Telesyn Network Adapter Card
❑ CardAssistant CD
❑ Wake-on-LAN cable (AT-2450, AT-2451, AT-2500, AT-2501,
AT-2700, and AT-2701 Series only)
❑ Low Profile Bracket (AT-2451FTXv2, AT-2701FTXv2, AT-2701FXv2,
AT-2916T Series only)
13
Page 16

Installing the Network Adapter Card
Reviewing Safety Precautions
Please review the following safety precautions before you install the
network adapter card.
Warning
This is a “Class 1 LED product”. 6
Warning
Do not stare into the laser beam. (AT-2450FT, AT-2450FL, AT-2451FTX,
AT-2700FX, AT-2701, AT-2971SX Series only) 7
Warning
Lightning Danger: Do not work on this equipment or cables during
periods of lightning activity. 8
Caution
Operating Temperature: This product is designed for a maximum
ambient temperature of 40 degrees C. 9
Caution
All Countries: Install this product in accordance with local and
National Electric Codes. 10
14
Page 17
Installing a Network Adapter Card
This section explains how to install a network adapter card in most PCcompatible computers.
Note
If you are installing an AT-2801FX PCMCIA card, refer to Installing an
AT-2801FX on page 17.
To install the adapter card, perform the following procedure:
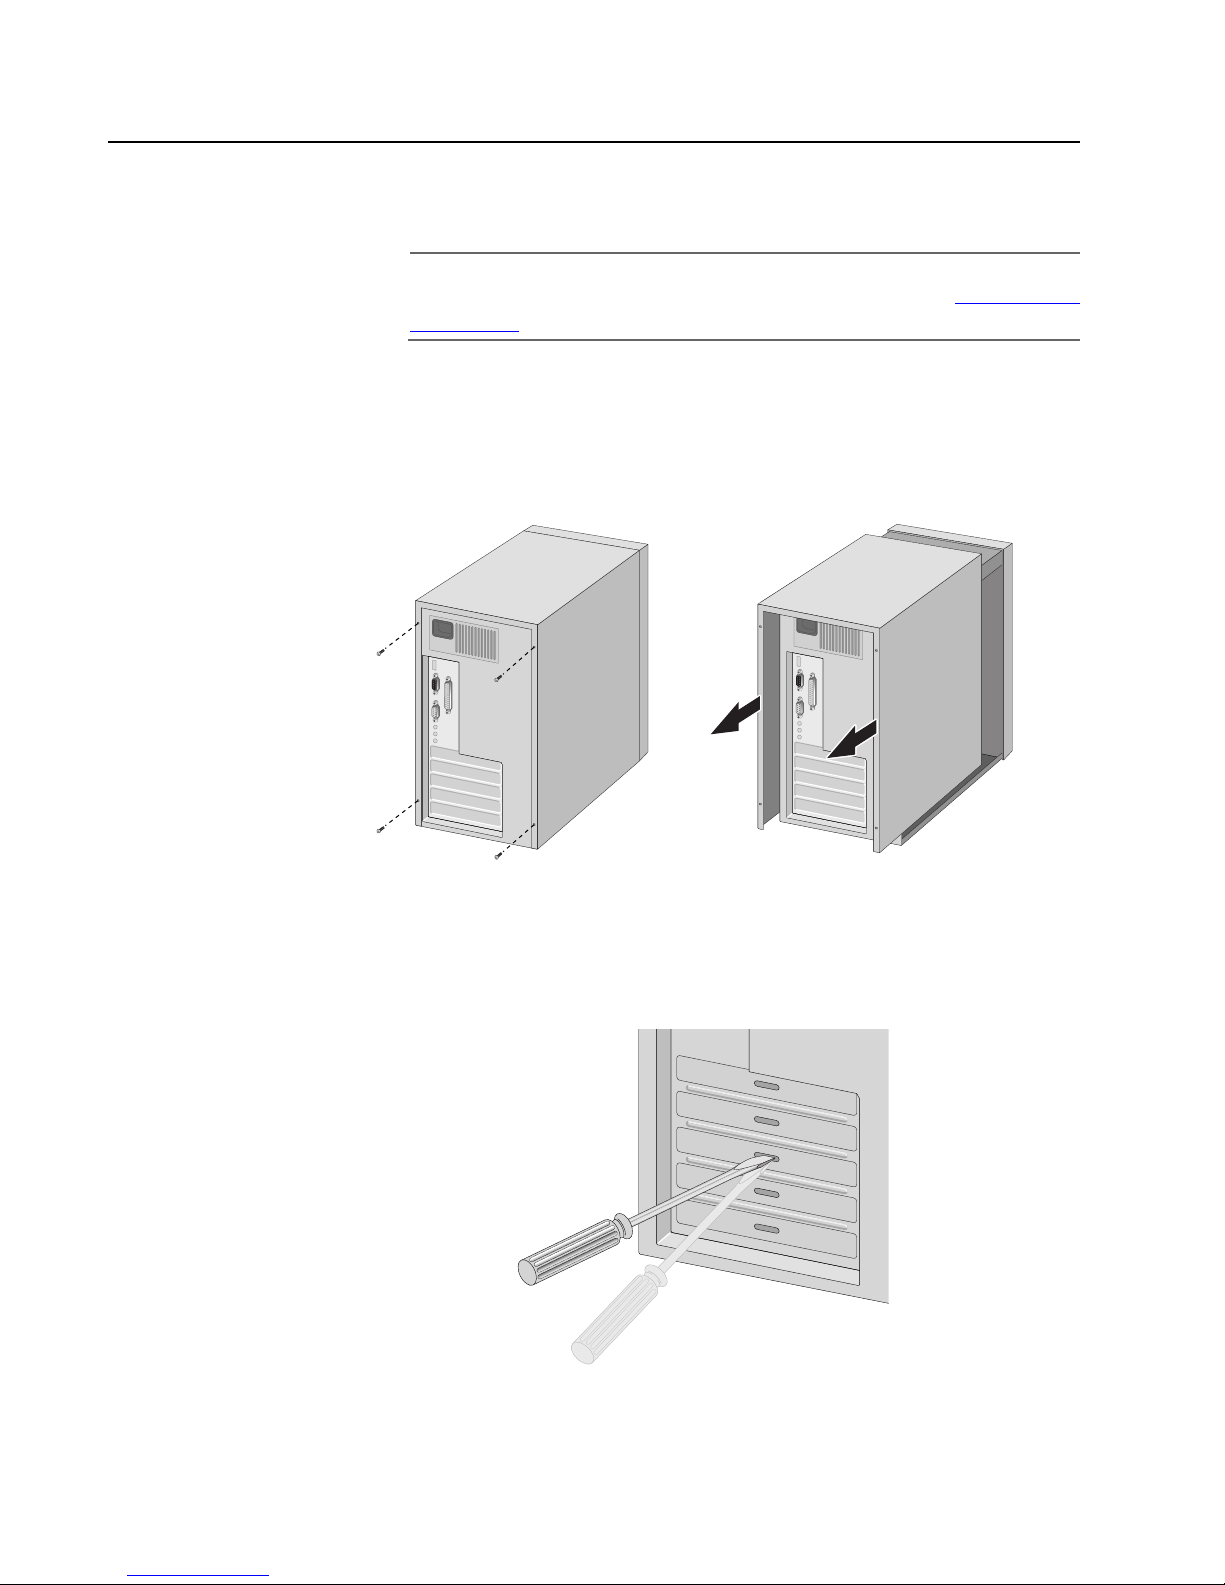
1. Shutdown your PC and disconnect the power cord from the outlet.
2. Remove the PC’s cover by removing the screws from the chassis and
gently sliding off the cover. See Figure 1.
Network Adapter Card Installation Guide - Book I
Figure 1 Removing the PC Cover
3. Select an empty, non-shared PCI slot and remove the faceplate.
Keep the faceplate in a safe place. You may need it for future use.
See Figure 2.
Figure 2 Removing the Faceplate From PCI Slot
15
Page 18

Installing the Network Adapter Card
Note
If you cannot locate or know how to find an PCI slot, refer to the
documentation that came with your PC.
4. Remove the network adapter card from the shipping package and
store the packaging material in a safe location.
Caution
Wear a grounding device and observe electrostatic discharge
precautions when installing the network adapter card in a PC.
Failure to observe this caution could result in damage to the adapter
card.
5. Gently insert the network adapter card into the PCI slot. Make sure
the card is securely seated.
Figure 3 Inserting the Network Adapter Card
6. Secure the network adapter card to the chassis with a Phillips-head
screw, not provided.
Figure 4 Securing the Adapter Card
16
Page 19

Network Adapter Card Installation Guide - Book I
7. For the AT-2450, AT-2500, or AT-2700 Series adapters, to use the
adapter card’s Wake-on-LAN feature in your computer using an
Advanced Configuration and Power Interface (ACPI), you must
connect the Wake-on-LAN cable to the Wake-on-LAN connector on
the adapter card and to the Wake-on-LAN connector on the
motherboard of the computer. For the location of the Wake-on-LAN
connector on the motherboard, refer to the documentation that
came with your computer.
The AT-2501, AT-2451F, AT-2701, AT-2915, AT-2916T, AT-2930, and
AT-2971 do not require the optional external Wake-on-LAN cable.
These devices are PCI 2.2 compliant and can use the PCI 2.2 BUS for
Wake-on-LAN features.
8. Replace the PC’s cover and secure it with the screws removed in
Step 2.
9. Connect the adapter card to the network by connecting the
appropriate data cable.
Installing an
AT-2801FX
10. Power ON the PC.
You are now ready to install the network adapter driver. You can install a
network adapter driver by performing either of the following
procedures: Running AT-Setup on page 22 or Manually Installing a
Network Adapter Driver on page 29.
The AT-2801FX is a CardBus PC Card that must be inserted into a
CardBus slot. If you are unable to insert an AT-2801FX into your PC, it
may not support a CardBus device. If you are unsure if your computer
will support a CardBus interface, contact your PC manufacturer to
determine if your computer supports CardBus Type II devices.
17
Page 20

Page 21

Chapter 2
AT-Setup for Windows 98, 2000,
Me, or XP
This chapter contains the instructions for:
❑ Running AT-Setup on page 22
❑ Running AT-Setup to Complete Driver Installation on page 27
Before running AT-Setup, be sure to read AT-Setup Guidelines on page
21.
Overview
Allied Telesyn has created a special program called AT-Setup to simplify
the installation of your network adapter card and driver. This program
automatically installs, updates, or corrects the adapter driver on your
computer.
You can run AT-Setup either before or after you install the adapter card.
Running AT-Setup before installing the adapter card will pre-load the
appropriate driver.
If you install an adapter card in your system before running AT-Setup,
your operating system may attempt to install an adapter driver
automatically. This will depend on your Windows operating system and
which Allied Telesyn adapter card you are installing. Microsoft’s New
Hardware Installation Wizard will prompt you to install the appropriate
driver for the adapter card. You can either instruct the installation wizard
to the proper location or cancel and perform AT-Setup without
removing the adapter card.
You can also use AT-Setup to correct problems during installation. If an
error message occurs, simply run AT-Setup again. This will allow
AT-Setup to scan your operating system and fix any known issues.
19
Page 22

AT-Setup for Windows 98, 2000, Me, or XP
AT-Setup is located on the CardAssistant CD included with the network
adapter card or it can be downloaded from our web site at
www.alliedtelesyn.com. AT-Setup can only be used to install an adapter
driver on a system running Windows 98, 2000, Me, or XP.
To automatically install an adapter driver, refer to Running AT-Setup on
page 22. To manually install an adapter driver, refer to Manually
Installing a Network Adapter Driver on page 29.
If you are installing an adapter card in an operating system other than
Windows 98, 2000, Me, or XP, refer to the Network Adapter Card
Installation Guide - Book II. This guide is located on the CardAssistant
CD or it can be downloaded from www.alliedtelesyn.com.
Note
If you are updating an adapter driver, refer to Updating a Network
Adapter Driver on page 55.
20
Page 23

AT-Setup Guidelines
Before running AT-Setup, review the following guidelines:
Network Adapter Card Installation Guide - Book I
❑ The AT-Setup program is designed for Windows 98, 2000, Me, and
XP operating systems only. You cannot use this program to install
an adapter driver on any other type of operating system.
❑ If you are installing multiple network adapter cards in a Windows
98, 2000, Me, or XP operating system, you must install a separate
adapter driver for each adapter card. You can either run AT-Setup
for each adapter card you are installing or you can manually install
the adapter drivers. Refer to Running AT-Setup on page 22 or
Manually Installing a Network Adapter Driver on page 29.
❑ If the computer in which you are installing the adapter card does
not have a CD-ROM drive, you must create a driver installation
disk to install the adapter driver. Refer to Creating a Driver
Installation Disk on page 31 for instructions.
❑ Allied Telesyn network adapter cards are PCI-compliant. The
adapter card’s operating parameters, such as interrupt level and
memory range, are set automatically by the computer so that they
do not conflict with other devices in your computer. Do not
change any of the operating parameters of an adapter card
without a full understanding of the parameters’ functions.
❑ Allied Telesyn adapter cards are auto-negotiation compliant for
both speed (for dual-speed adapter cards) and duplex mode on
the twisted pair port. This means that the adapter card will
automatically set the speed and duplex mode of the port to
match the speed and duplex mode of the end-node (for example,
an Ethernet hub or switch) to which the adapter port is
connected. The fiber optic port is not auto-negotiation compliant,
so it must be manually configured for both speed and duplex
mode.
21
Page 24

AT-Setup for Windows 98, 2000, Me, or XP
Running AT-Setup
To run AT-Setup to install a new driver, perform the following procedure:
1. Insert the CardAssistant CD into your CD-ROM drive. If you are using
a driver installation disk, proceed to Step 7.
Note
For instructions on how to create a driver installation disk, refer to
Creating a Driver Installation Disk on page 31.
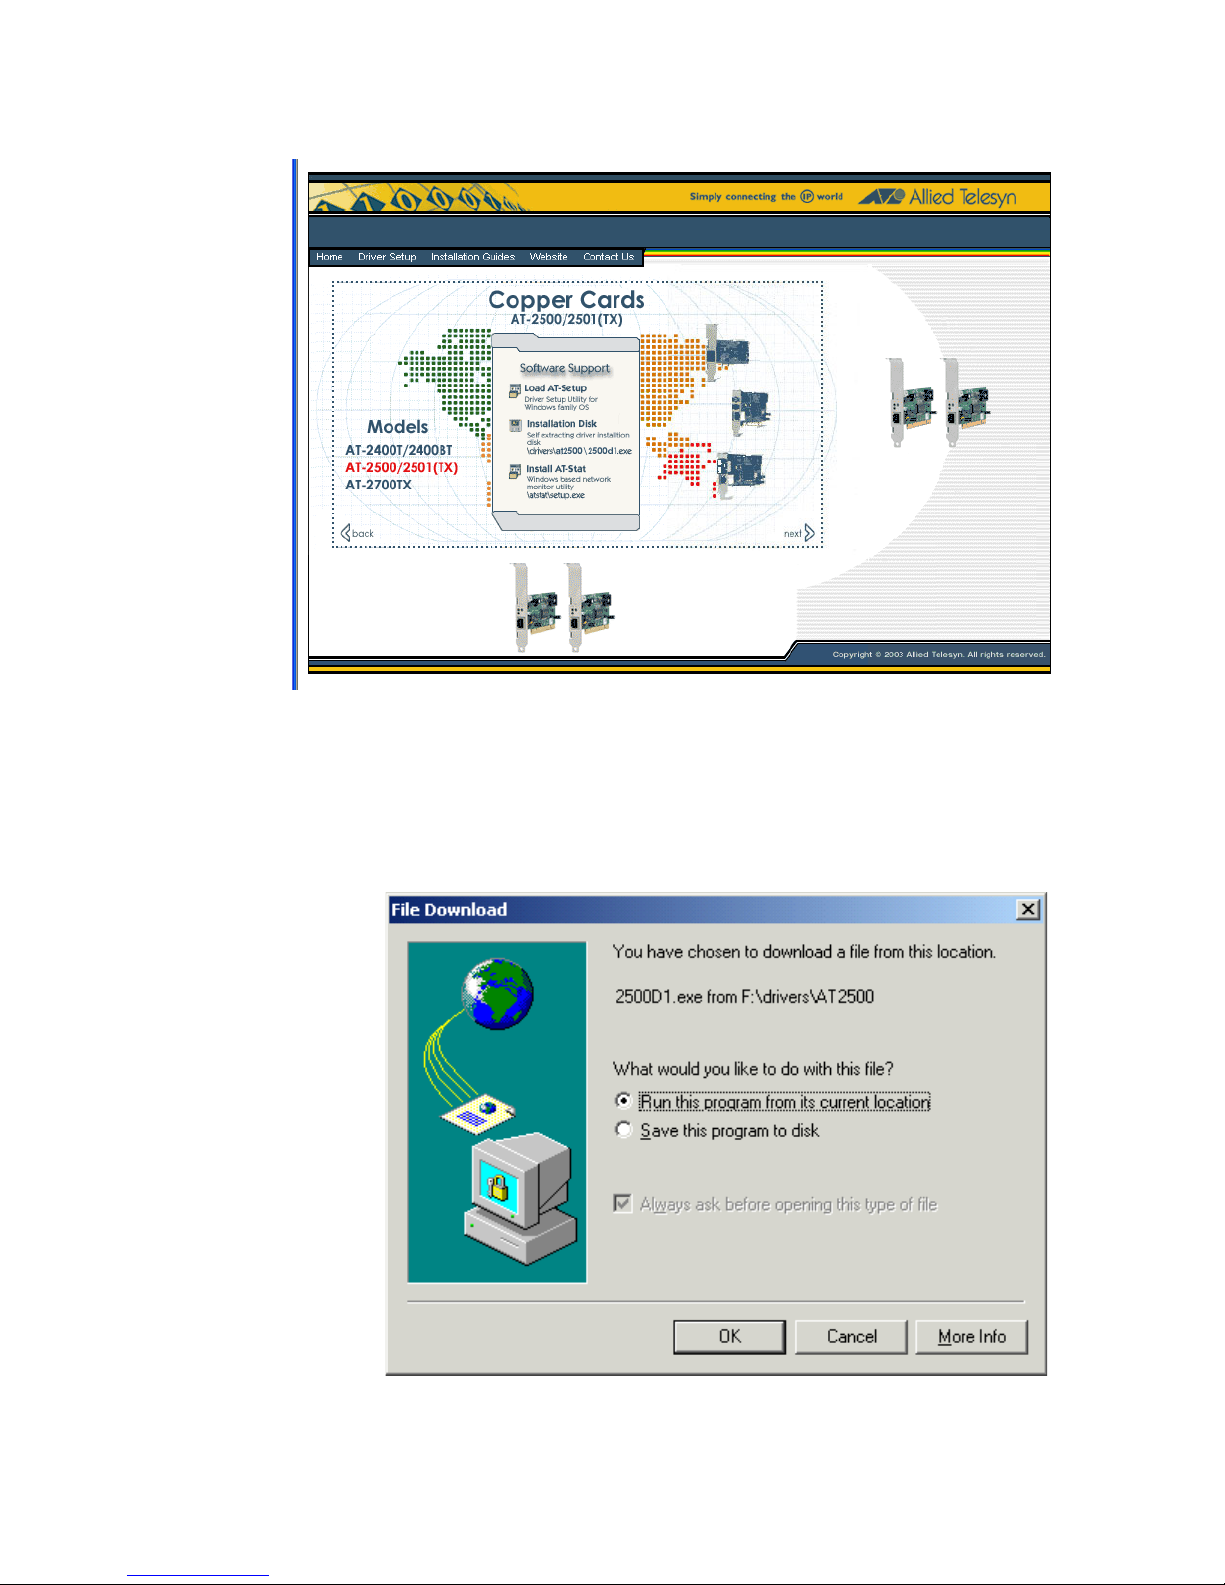
The CardAssistant Main Menu shown in Figure 5 is displayed. If this
menu is not displayed, double-click on the My Computer icon, then
double-click on the Allied Telesyn CD-ROM icon.
2. From the Driver Setup drop-down menu, select the adapter card
that you purchased.
22
Figure 5 CardAssistant CD Main Menu
Page 25

Network Adapter Card Installation Guide - Book I
A window similar to Figure 6 is displayed.
Figure 6 Network Adapter Card Window
3. Under Software Support, select Load AT-Setup.
The window shown in Figure 7 is displayed.
Figure 7 AT-Setup Prep Window
23
Page 26

AT-Setup for Windows 98, 2000, Me, or XP
4. Select Run this program from its current location, then OK.
This launches the AT-Setup program and displays the window
shown in Figure 8.
Figure 8 Security Warning Window
5. Proceed to Step 7.
6. If you are installing an Allied Telesyn network adapter card from a
driver installation disk, perform the steps below.
a. Insert the driver installation disk into the floppy drive.
b. Select Start from the Window’s toolbar.
c. Select Run.
The window shown in Figure 9 is displayed.
24
Figure 9 Run Window
Page 27

Network Adapter Card Installation Guide - Book I
d. In the Open field, type: A:\atsetup.
Where ‘A’ is the letter name of the floppy drive.
e. Select OK.
This launches the AT-Setup program and displays the window shown in
Figure 10.
f. Proceed to Step 7.
7. Select Yes.
Figure 10 Security Warning Window
25
Page 28

AT-Setup for Windows 98, 2000, Me, or XP
The window shown in Figure 11 is displayed.
Figure 11 Welcome to AT-Setup Window
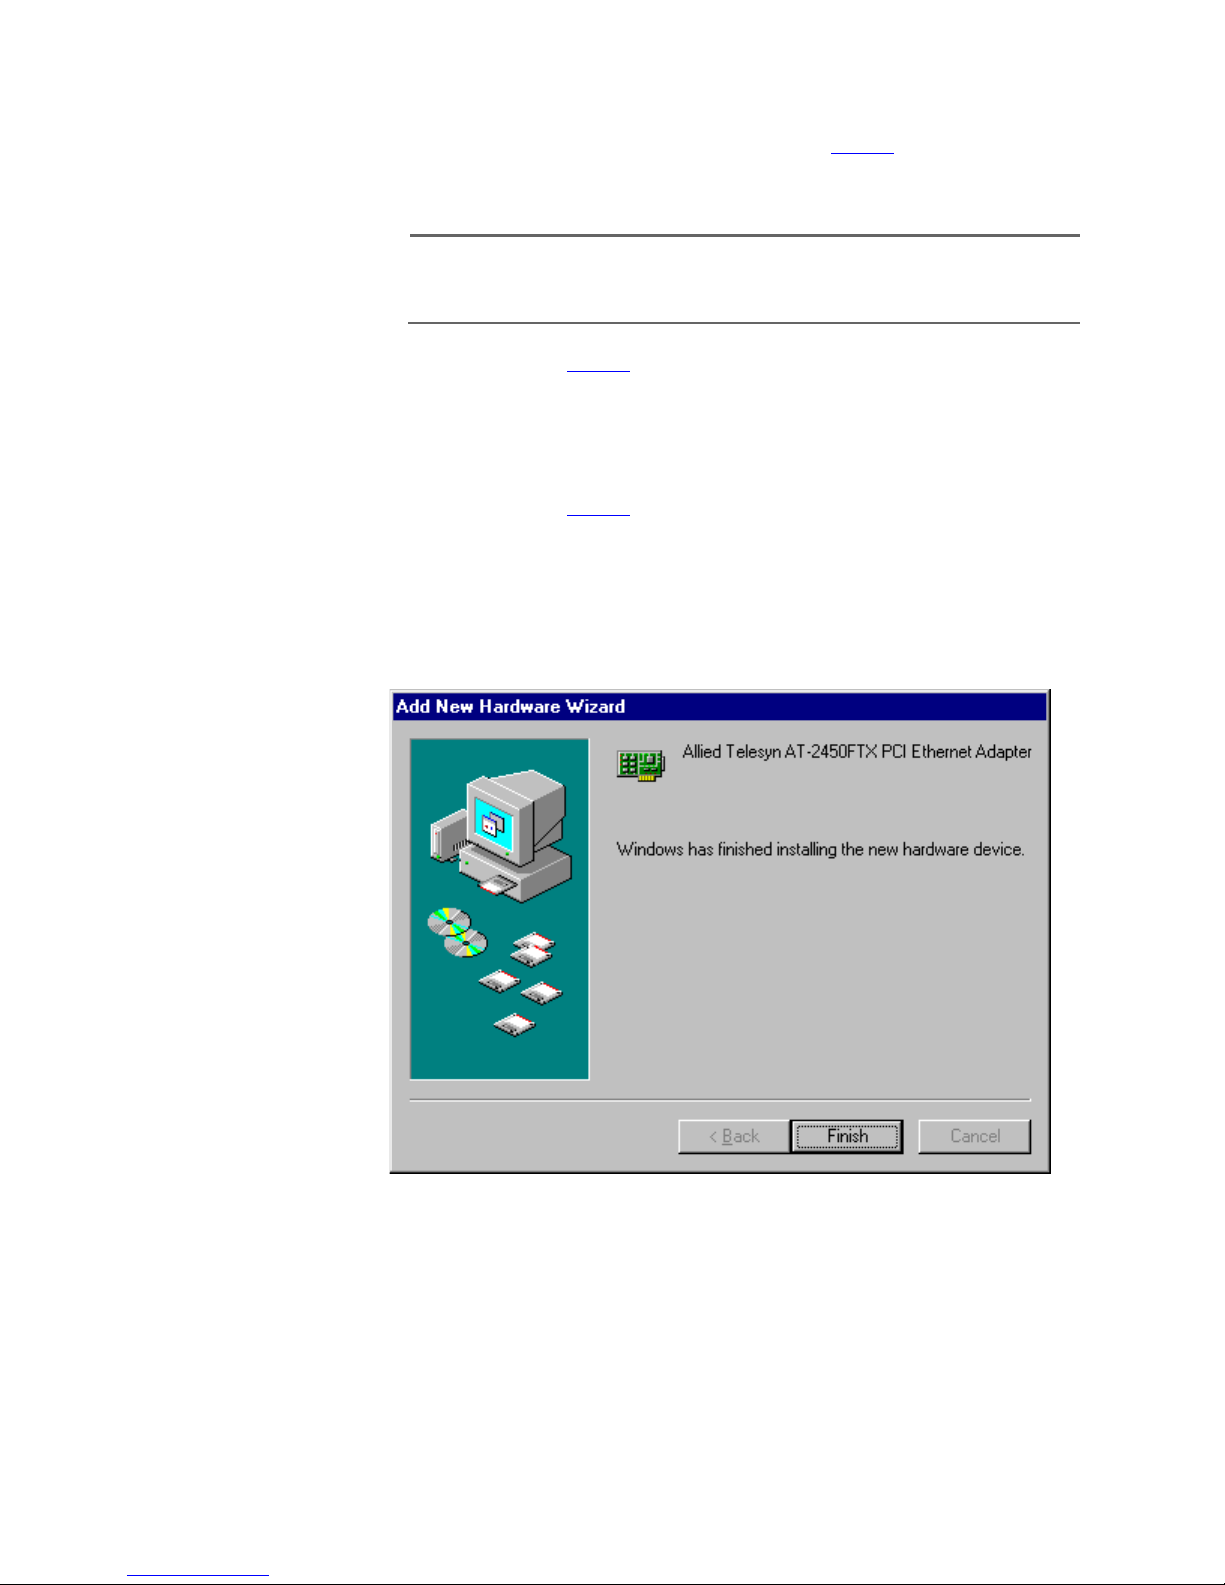
8. Select OK.
When AT-Setup has finished installing the driver, it displays the
prompt shown in Figure 12.
Figure 12 Shut Down Prompt
9. Select Yes and perform the following procedure:
a. Power OFF your computer.
b. Refer to Installing a Network Adapter Card
on page 15 for
instructions.
c. Power ON your computer.
The network adapter card and driver are now ready for network
operations.
26
Page 29

Network Adapter Card Installation Guide - Book I
Running AT-Setup to Complete Driver Installation
If you were unable to complete the installation of the adapter driver or if
an error occurred during installation, run AT-Setup again. AT-Setup will
scan your operating system and correct any known problems. Refer to
Running AT-Setup on page 22 for instructions.
27
Page 30

Page 31

Chapter 3
Manually Installing a Network
Adapter Driver
This chapter contains procedures for manually installing a network
adapter driver on a PC-compatible system. The chapter provides the
procedure for each of the following Windows operating systems.
Windows 95 on page 34
Windows 98 on page 36
Windows Me on page 40
Windows 2000 and XP on page 42
Windows NT 4.0 on page 48
This chapter also contains the procedure for Creating a Driver
Installation Disk on page 31.
29
Page 32

Manually Installing a Network Adapter Driver
Installation Guidelines
Please review the following guidelines before you begin to manually
install a network adapter driver on your computer:
If your computer is running Windows 98, 2000, Me, or XP and has
a CD-ROM drive, you can run AT-Setup to automatically install an
adapter driver. This program is included on the CardAssistant CD.
For instructions, refer to AT-Setup for Windows 98, 2000, Me, or XP
on page 19.
If you are installing multiple network adapter cards in a Windows
98, 2000, Me, or XP operating system, you must install a separate
adapter driver for each adapter card. You can either run AT-Setup
for each adapter card you are installing or you can manually install
the adapter drivers. Refer to Running AT-Setup on page 22 or
Manually Installing a Network Adapter Driver on page 29.
If the computer in which you are installing the adapter card does
not have a CD-ROM drive, you must create a driver installation
disk to install the adapter driver. Refer to Creating a Driver
Installation Disk on page 31 for instructions.
Allied Telesyn adapter cards are PCI-compliant. The adapter card’s
operating parameters, such as interrupt level and memory range,
are set automatically by the computer so that they do not conflict
with other devices in your computer. Do not change any of the
operating parameters of a adapter card without a full
understanding of the parameters’ functions.
Allied Telesyn adapter cards are auto-negotiation compliant for
both speed (for dual-speed adapter cards) and duplex mode on
the twisted pair port. This means that the adapter card will
automatically set the speed and duplex mode of the port to
match the speed and duplex mode of the end-node (for example,
an Ethernet hub or switch) to which the adapter port is
connected. The fiber optic port is not auto-negotiation compliant,
so it must be manually configured for both speed and duplex
mode.
30
Page 33

Creating a Driver Installation Disk
If the computer in which you are installing the adapter card does not
have a CD-ROM drive, you will need to create a driver installation disk to
install the adapter driver.
To create a driver installation disk, locate a computer with both a
CD-ROM and floppy drive, then perform the following procedure:
1. Make sure your computer is turned ON and the Windows operating
system is running.
2. Insert the CardAssistant CD into the CD-ROM drive.
The CardAssistant Main Menu shown in Figure 13 is displayed. If this
menu is not displayed, double-click on the My Computer icon, then
double-click on the Allied Telesyn CD-ROM icon.
Network Adapter Installation Guide - Book I
3. From the Driver Setup drop-down menu, select the adapter card
that you purchased.
Figure 13 CardAssistant CD Main Menu
31
Page 34
Manually Installing a Network Adapter Driver
A window similar to Figure 14 is displayed.
Figure 14 Network Adapter Card Window
4. Insert a blank, formatted floppy disk into the floppy drive.
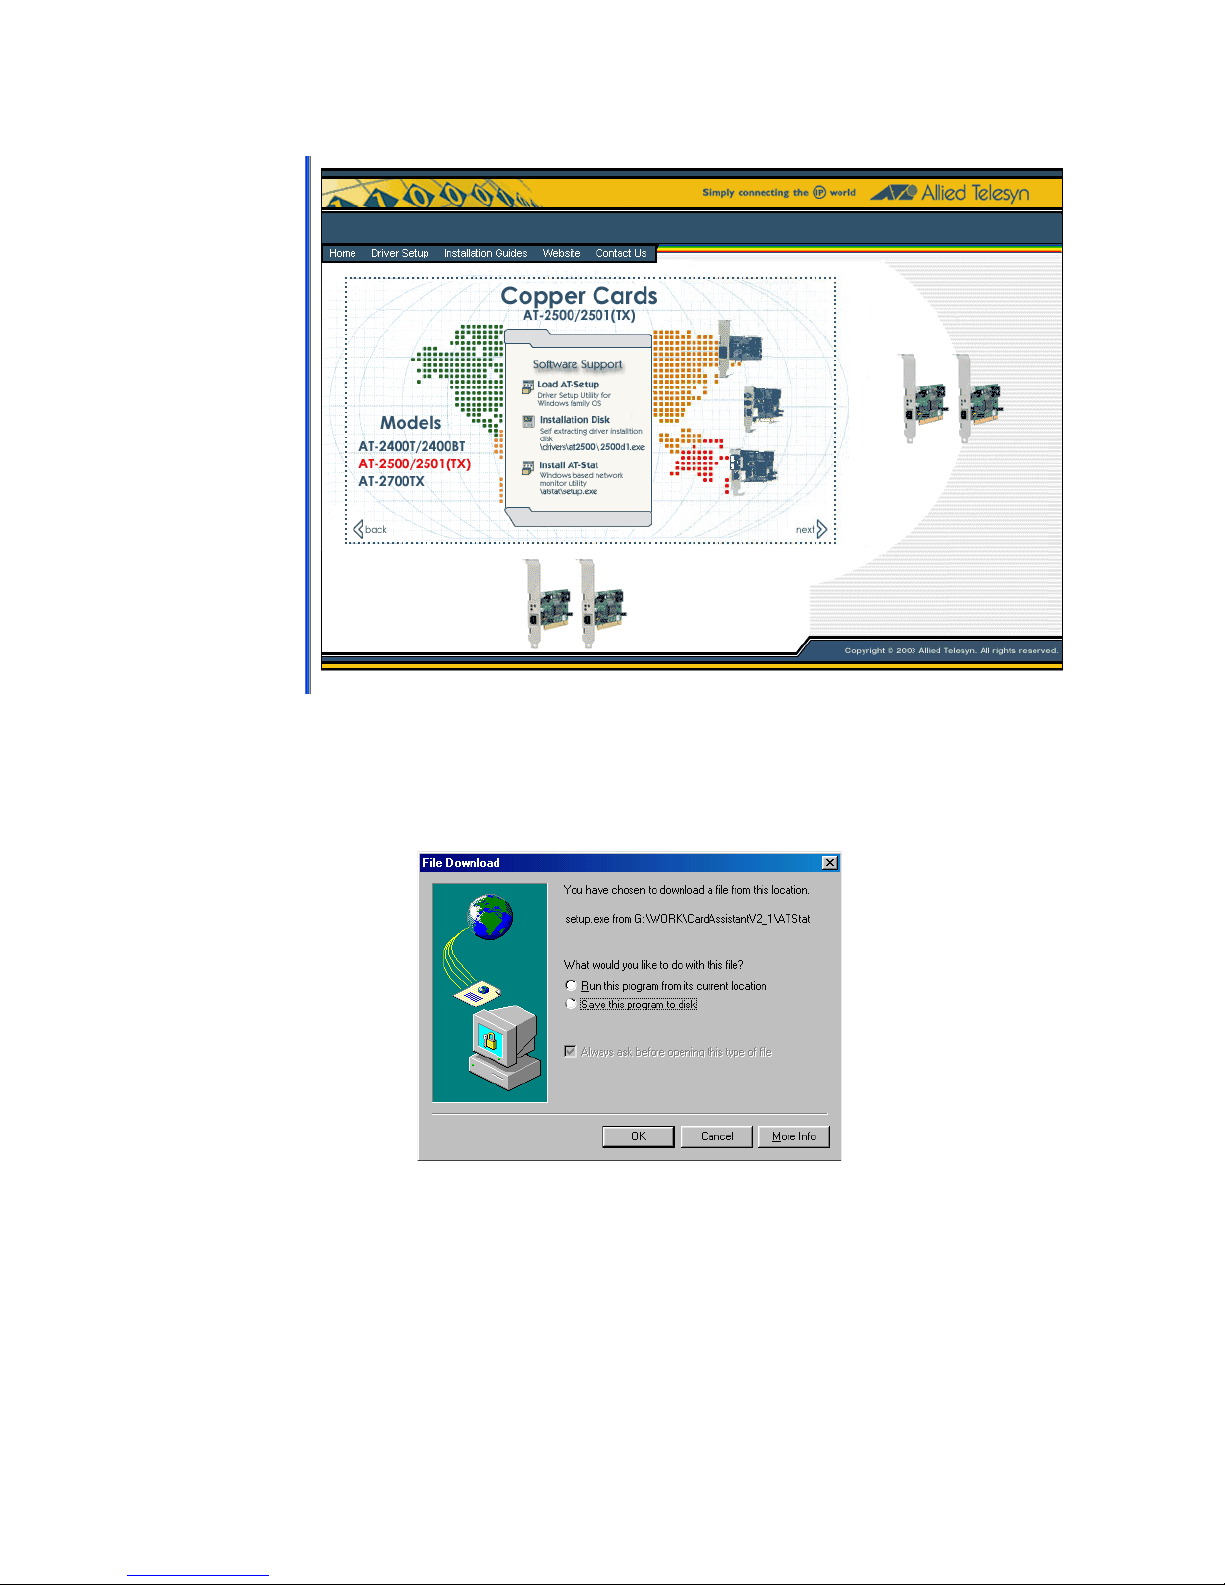
5. Under Software Support, select Installation Disk.
The window shown in Figure 15 is displayed.
32
Figure 15 File Download Window
Page 35

Network Adapter Installation Guide - Book I
6. Select Run this program from its current location, then OK.
The window shown in Figure 16 is displayed.
Figure 16 CardAssistant - InstallShield Wizard Window
7. Specify the floppy drive containing the blank disk.
8. Select Next. The appropriate adapter drivers and the AT-Setup
utility are saved to the floppy disk.
The driver installation disk has been created.
9. Continue the installation process by performing the appropriate
procedure for your operating system.
33
Page 36

Manually Installing a Network Adapter Driver
Windows 95
This section contains the procedure for manually installing a network
adapter driver in a Window 95 operating system. The AT-2801, AT-2915,
AT-2916T, AT-2930, AT-2970, and AT-2971 Series Adapters are not
supported by Windows 95.
1. Shutdown Windows 95 and power OFF the computer.
2. Install the network adapter card. Refer to Installing the Network
3. Power ON the computer.
Note
Please review the Installation Guidelines on page 30 before
performing the following procedure.
Adapter Card on page 13 and the documentation that came with
your computer for instructions.
Note
You should have the Windows 95 CD or floppy disk(s) available. You
may be prompted to copy support files for networking.
Windows 95 will search the computer for any new hardware. Once it
detects a new adapter card, it will display a prompt notifying you
that it has found a new adapter card and that the adapter driver
needs to be installed.
4. Insert the CardAssistant CD or the driver installation disk into the
appropriate drive.
Note
If you are using the CardAssistant CD and your computer launches
the web browser, close or minimize the web browser window.
5. Type in the letter name and path to the adapter driver, then select
Return.
For example, if you are installing an adapter driver for an AT-2500
Series adapter and the CD is mapped to drive D, you would enter:
D:\drivers\at2500.
34
Page 37

Network Adapter Installation Guide - Book I
Where ‘D’ is the letter name of the CardAssistant CD and
‘\drivers\at2500‘ is the location of the adapter driver to be installed.
The adapter driver locations on the CardAssistant CD are:
Adapter Card Driver Location
AT-2400T, AT-2400BT \drivers\at2400
AT-2500TX, AT-2501TX \drivers\at2500
AT-2450FTX, AT-2451FTX,
\drivers\at24_27
AT-2700TX, AT-2700FX,
AT-2701FX, AT-2746FX,
AT-2700FTX, AT-2701FTX,
AT-2745FX
If you are using a driver installation disk, you would enter: A:\. The
adapter driver is stored in the root directory on the disk.
6. When prompted, insert the Windows 95 Installation CD or disk.
7. Reboot the computer when prompted.
The network adapter card and driver are now ready for network
operations.
35
Page 38

Manually Installing a Network Adapter Driver
Windows 98
This section contains the procedure for manually installing a network
adapter driver in a Windows 98 operating system. The AT-2801,
AT-2916T, AT-2970 and AT-2971 Series Adapters do not support
Windows 98.
1. Shutdown Windows 98 and power OFF your computer.
2. Install the network adapter card. Refer to Installing the Network
3. Power ON the computer.
Note
Please review the Installation Guidelines on page 30 before
performing the following procedure.
Adapter Card on page 13 and the documentation that came with
your computer for instructions.
The Microsoft Installation Wizard displays the window shown in
Figure 17, notifying you that it has detected a new adapter card in
the computer.
4. Select Next.
36
Figure 17 Add New Hardware Wizard Window (1 of 3)
Page 39

Network Adapter Installation Guide - Book I
The window shown in Figure 18 is displayed.
Figure 18 Add New Hardware Wizard Window (2 of 3)
5. Select Search for the best driver for your device
(Recommended).
6. Select Next.
The window shown in Figure 19 is displayed.
Figure 19 Add New Hardware Wizard Window (3 of 3)
37
Page 40

Manually Installing a Network Adapter Driver
7. If you are using the CardAssistant CD, do the following. If you are
using a driver installation disk, proceed to Step 8.
a. Insert the CardAssistant CD into the CD-ROM drive.
Note
If your computer launches the web browser when you insert the
CD, minimize or close the web browser window.
b. Select CD-ROM drive.
c. Click on Specify a location, if not already selected.
d. In the Specify a Location field, enter the drive letter and path to
the adapter driver. The adapter driver locations on the
CardAssistant CD are:
Adapter Card Driver Location
AT-2400T, AT-2400BT \drivers\at2400
AT-2500TX, AT-2501TX \drivers\at2500
AT-2450FTX, AT-2451FTX,
\drivers\at24_27
AT-2700TX, AT-2700FX,
AT-2701FX, AT-2746FX,
AT-2700FTX, AT-2701FTX,
AT-2745FX
AT-2915T, AT-2930 \drivers\at29xx
For example if you are installing an adapter driver for an
AT-2500 Series adapter and the CD is mapped to drive D, you
would enter: D:\drivers\at2500
e. Click Next.
f. Proceed to Step 9
.
8. If you are using a driver installation disk, do the following:
a. Insert the driver installation disk into the floppy disk drive.
b. Select Floppy disk drives.
c. Select Specify a location, if not already selected.
d. In the Specify a Location field, enter A:\. The adapter driver is
38
stored in the root directory on the disk.
Page 41

Network Adapter Installation Guide - Book I
e. Click Next.
f. Proceed to the next step.
9. Reboot the computer when prompted.
The network adapter card and driver are ready for network operations.
39
Page 42

Manually Installing a Network Adapter Driver
Windows Me
This section contains the procedure for manually installing a network
adapter driver in a Windows Me operating system. The AT-2801,
AT-2916, AT-2970 and AT-2971 Series Adapters do not support Windows
Me.
1. Shutdown Windows Me and power OFF your computer.
2. Install the network adapter card. Refer to Installing the Network
3. Power ON the computer.
Note
Please review the Installation Guidelines on page 30 before
performing the following procedure.
Adapter Card on page 13 and the documentation that came with
your computer for instructions.
The Microsoft Installation Wizard displays the window shown in
Figure 20, notifying you that it has detected a new adapter card in
the computer.
4. Select Automatic search for a better driver (Recommended).
40
Figure 20 Add New Hardware (1 of 2)
Page 43
Network Adapter Installation Guide - Book I
5. If you are using the CardAssistant CD, do the following. If you are
using a driver installation disk, proceed to Step 6.
a. Insert the CardAssistant CD into the CD-ROM drive.
Note
If you computer launches the web browser when you insert the CD,
minimize or close the web browser window.
b. Proceed to Step 7.
6. If you are using a driver installation disk, do the following:
a. Insert the driver installation disk into the floppy drive.
b. Proceed to Step 7.
7. Select Next.
Windows Me searches for the new adapter driver and automatically
installs it onto your computer. After the installation is complete, the
window shown in Figure 21 is displayed.
8. Select Finish.
9. Reboot the computer when prompted.
The network adapter card and driver are ready for network operations.
Figure 21 Add New Hardware (2 of 2)
41
Page 44

Manually Installing a Network Adapter Driver
Windows 2000 and XP
This section contains the procedure for manually installing a network
adapter driver in a Windows 2000 or XP operating system.
Note
You should review the Installation Guidelines
performing the following procedure.
1. Shutdown Windows 2000 or XP and power OFF your computer.
2. Install the network adapter card. Refer to Installing the Network
Adapter Card on page 13 and the documentation that came with
your computer for instructions.
3. Power ON the computer.
The Found New Hardware Wizard displays the window shown in
Figure 22, notifying you that it has detected a new adapter card in
your computer.
on page 30 before
42
Figure 22 Found New Hardware Wizard Window (1 of 5)
Page 45

4. Select Next.
The window shown in Figure 23 is displayed.
Network Adapter Installation Guide - Book I
Figure 23 Found New Hardware Wizard Window (2 of 5)
5. Select Search for a suitable driver for my device (recommended).
6. Select Next.
43
Page 46

Manually Installing a Network Adapter Driver
The window shown in Figure 24 is displayed.
Figure 24 Found New Hardware Wizard Window (3 of 5)
7. If you are using the CardAssistant CD, do the following. If you are
using a driver installation disk, proceed to Step 8.
a. Insert the CardAssistant CD into the CD-ROM drive.
Note
If you computer launches the web browser when you insert the CD,
minimize or close the web browser window.
b. Select CD-ROM drives.
c. Select Specify a location.
d. Select Next.
44
Page 47

Network Adapter Installation Guide - Book I
e. In the Specify a Location field, enter the drive letter and path to
the adapter driver. The driver locations on the CardAssistant CD
are:
Adapter Card Driver Location
AT-2400T, AT-2400BT \drivers\at2400
AT-2500TX, AT-2501TX \drivers\at2500
AT-2450FTX, AT-2451FTX,
\drivers\at24_27
AT-2700TX, AT-2700FX,
AT-2701FX, AT-2746FX,
AT-2700FTX, AT-2701FTX,
AT-2745FX
AT-2801FX \drivers\at2801
AT-2915T, AT-2930 \drivers\at29xx
AT-2916T, AT-2970SX,
\drivers\at2971_16
AT-2970SX/2, AT-2970T,
AT-2970T/2, AT-2971T,
AT-2971SX
For example, if you are installing an adapter driver for an
AT-2500 Series adapter and the CD is mapped to drive D, you
would enter: D:\drivers\at2500.
The Found New Hardware Wizard starts to search for the
appropriate adapter driver file. After an adapter driver has been
found, the window shown in Figure 25 is displayed.
Figure 25 Found New Hardware Wizard Window (4 of 5)
45
Page 48

Manually Installing a Network Adapter Driver
8. If you are using a driver installation disk, do the following:
9. Select Next.
f. Proceed to Step 9.
a. Insert the driver installation disk into the floppy disk drive.
b. Select Floppy disk drives.
c. Select Specify a location.
d. Select Next.
e. In the Specify a Location field, enter A:\. The adapter driver is
stored in the root directory on the disk.
The Found New Hardware Wizard starts to search for the
appropriate adapter driver file. After an adapter driver has been
found, the window shown in Figure 25 is displayed.
f. Proceed to Step 9.
The window in Figure 26 is displayed.
Figure 26 Digital Signature Not Found Window
10. Select Yes.
46
Page 49

Network Adapter Installation Guide - Book I
The window shown in Figure 27 is displayed.
Figure 27 Found New Hardware Wizard Window (5 of 5)
11. Select Finish.
12. Reboot your computer when prompted.
The network adapter card and driver are ready for network operations.
47
Page 50
Manually Installing a Network Adapter Driver
Windows NT 4.0
This section contains the procedure for manually installing a network
adapter driver in a Windows NT 4.0 operating system. The AT-2801FX,
AT-2916T, AT-2970, and AT-2971 Series Adapters are currently not
available for Windows NT 4.0. Please check Allied Telesyn’s website at
www.alliedtelesyn.com for updates.
1. Shutdown Windows NT and power OFF the computer.
2. Install the network adapter card. Refer to Installing the Network
3. Power ON the computer.
Note
You should review the Installation Guidelines on page 30 before
performing the following procedure.
Adapter Card on page 13 and the documentation that came with
your computer for instructions.
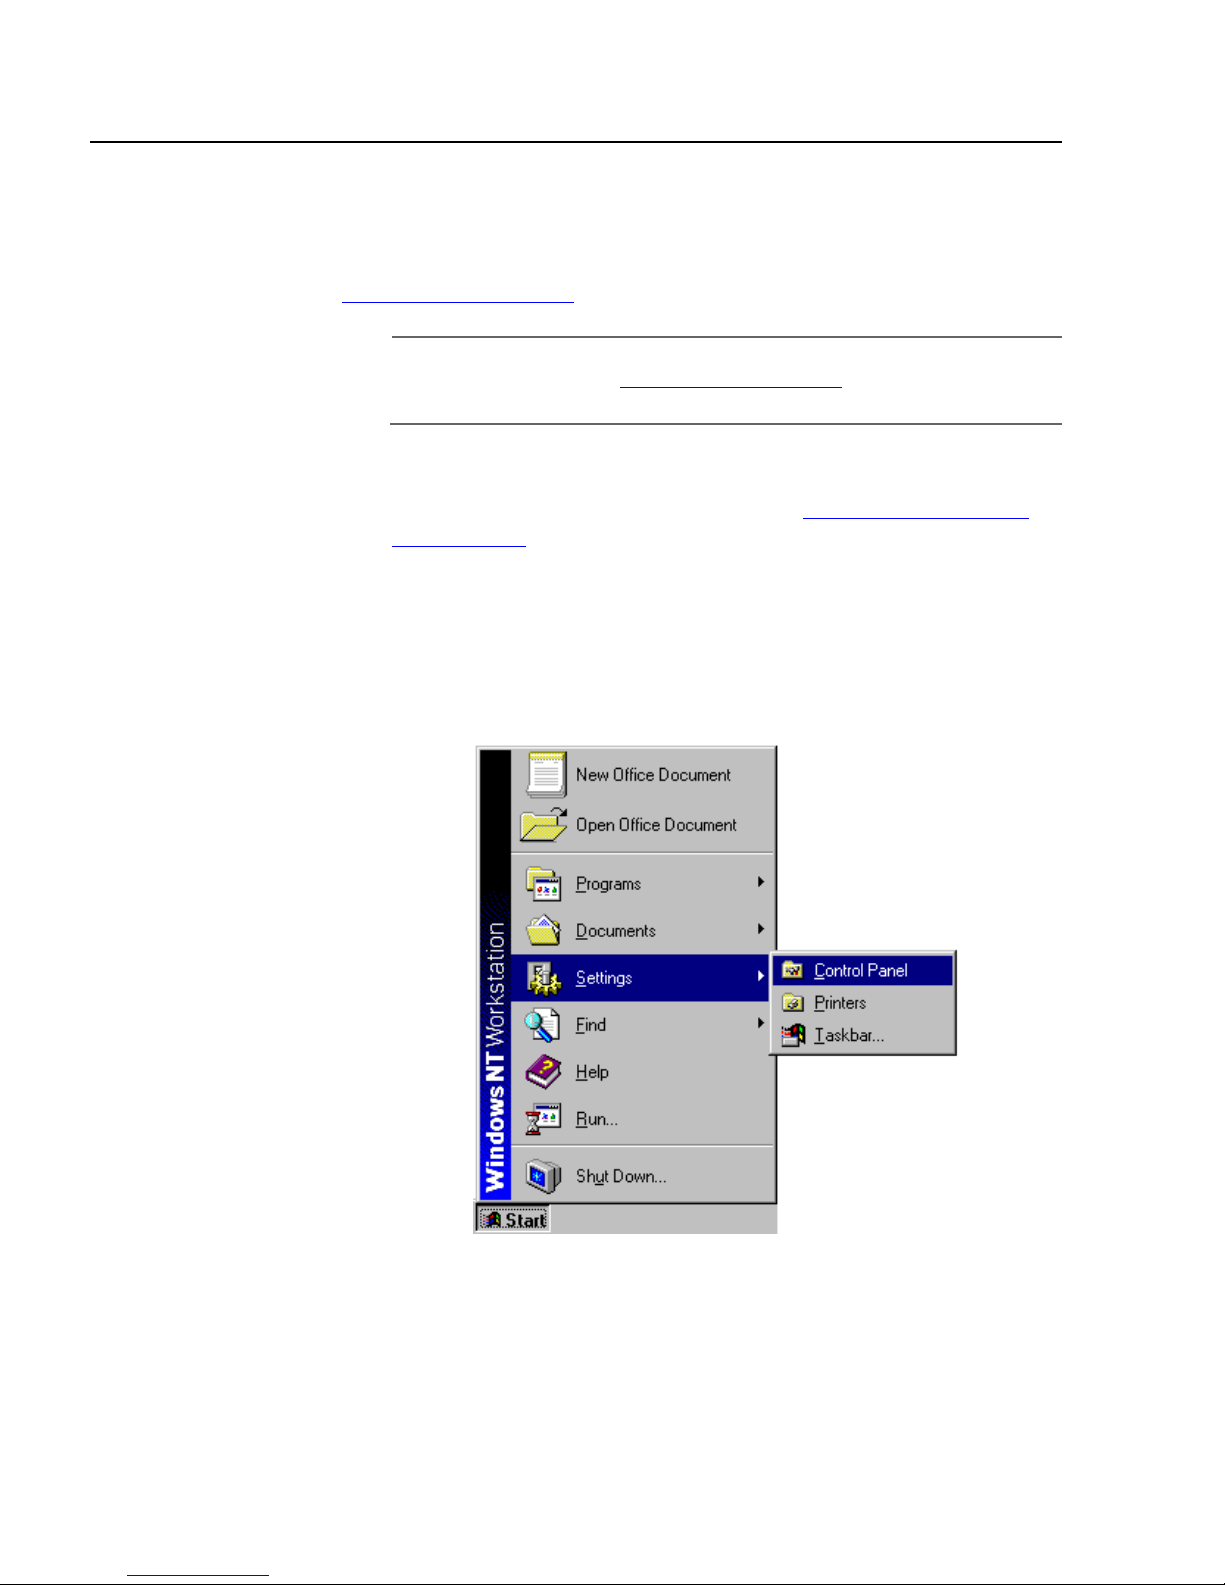
4. From the desktop, click Start.
5. Select Settings, then select Control Panel, as shown in Figure 28.
48
Figure 28 Start Menu
Page 51

Network Adapter Installation Guide - Book I
The window shown in Figure 29 is displayed.
Figure 29 Control Panel Window
6. Double-click on the Network icon.
49
Page 52

Manually Installing a Network Adapter Driver
The window shown in Figure 30 is displayed.
Figure 30 Network Window
7. Select the Adapters tab.
50
Page 53

Network Adapter Installation Guide - Book I
The window shown in Figure 31 is displayed.
8. Select Add.
Figure 31 Adapters Tab Window
51
Page 54

Manually Installing a Network Adapter Driver
The window shown in Figure 32 is displayed.
Figure 32 Select Network Adapter Window
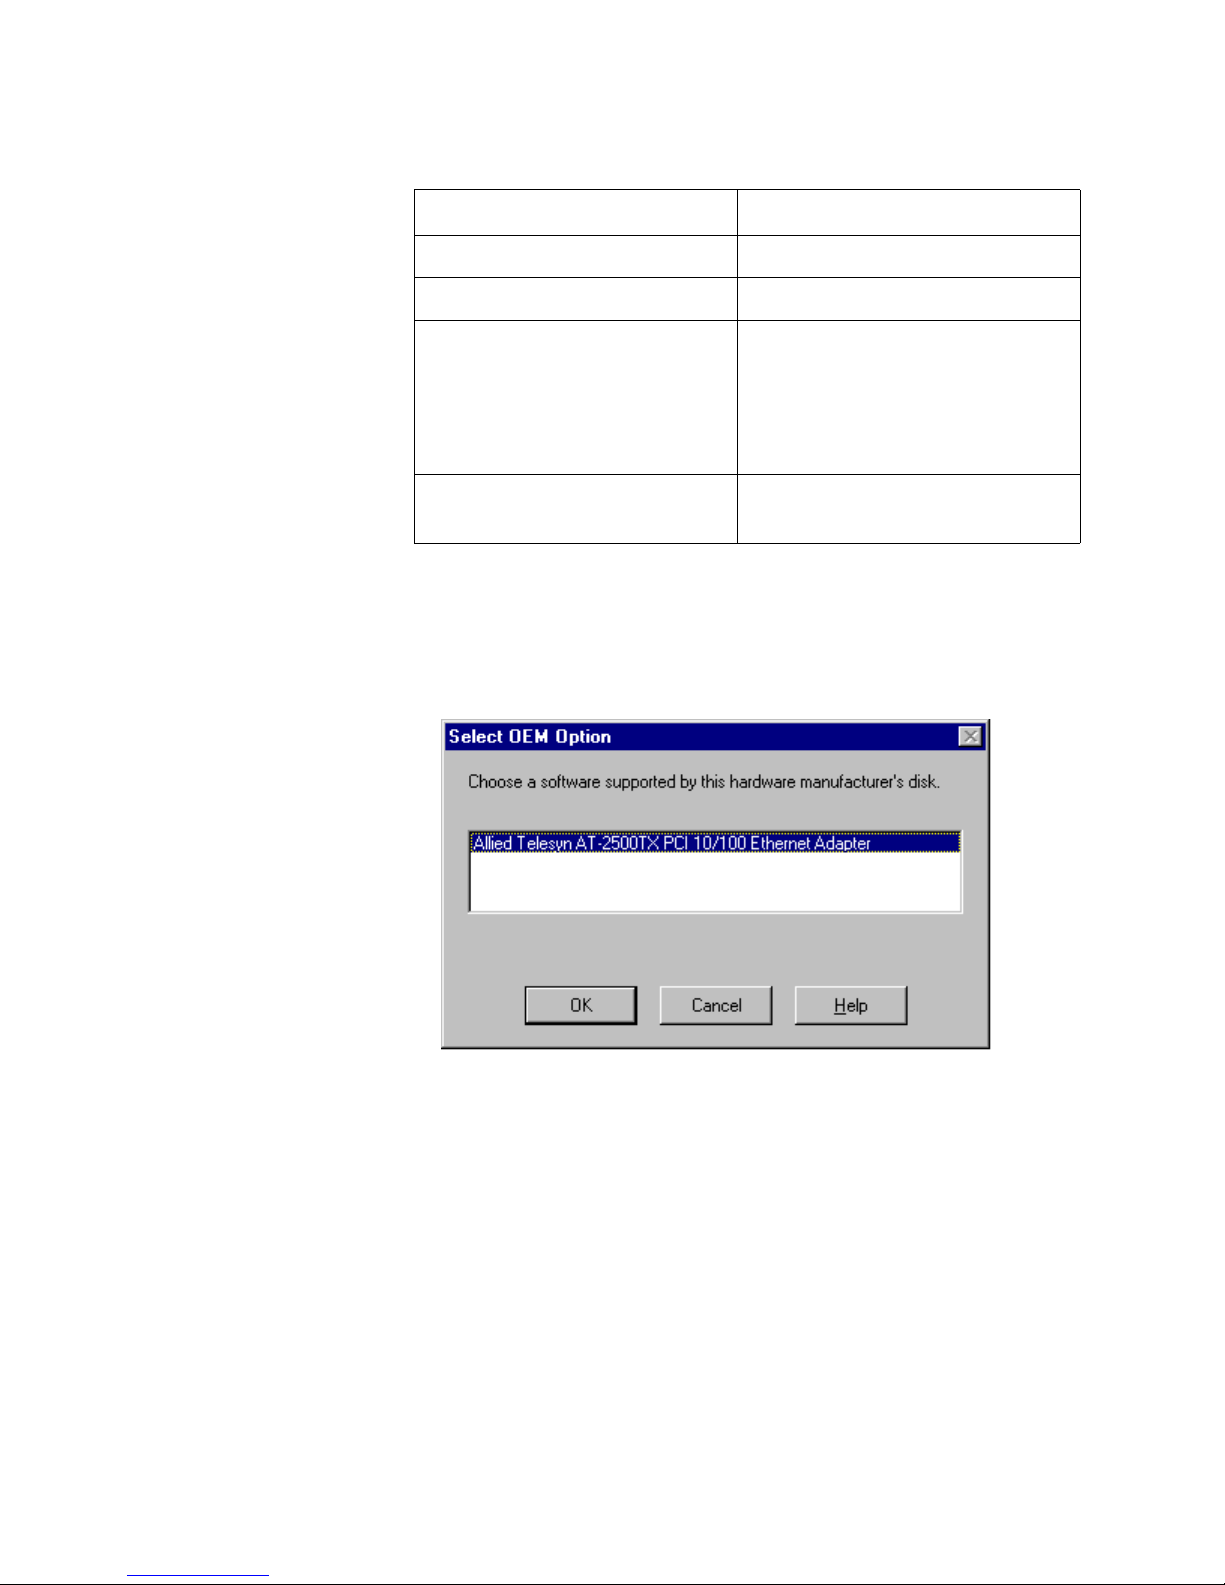
9. Select Have Disk.
The window shown in Figure 33 is displayed.
Figure 33 Insert Disk Window
10. Insert the CardAssistant CD or the driver installation disk into the
appropriate drive.
Note
If you are using the CardAssistant CD and your computer launches
the web browser, close or minimize the web browser window.
52
Page 55
Network Adapter Installation Guide - Book I
11. If you are using the CardAssistant CD, the location of the adapter
drivers are:
Adapter Card Driver Location
AT-2400T, AT-2400BT \drivers\at2400
AT-2500TX, AT-2501TX \drivers\at2500
AT-2450FTX, AT-2451FTX,
\drivers\at24_27
AT-2700TX, AT-2700FX,
AT-2701FX, AT-2746FX,
AT-2700FTX, AT-2701FTX,
AT-2745FX
AT-2915T, AT-2930T,
\drivers\at29xx
AT-2930SX
If you are using a driver installation disk, the adapter driver is in the
root directory. For example, if the driver installation disk is in drive A,
you would enter A:\.
The window shown in Figure 34 is displayed.
12. Select the appropriate Allied Telesyn network adapter card.
13. Select OK.
Figure 34 Select OEM Option Window
53
Page 56

Manually Installing a Network Adapter Driver
The window shown in Figure 35 is displayed.
Figure 35 Adapters Tab Window
14. Verify that the correct Allied Telesyn network adapter card that you
purchased appears in the list, then select OK.
Note
Windows NT 4.0 will prompt you to configure the protocols that
you will be using for network communications.
15. Restart your computer when prompted.
The network adapter card and driver are ready for network operations.
54
Page 57

Chapter 4
Updating a Network Adapter
Driver
This chapter contains the following instructions:
❑ Manually Updating a Driver for Windows 98, 2000, Me, or XP on
page 56
55
Page 58
Updating a Network Adapter Driver
Manually Updating a Driver for Windows 98, 2000, Me, or XP
You can use either the CardAssistant CD or a driver installation disk to
manually update an adapter driver. To create a driver installation disk,
refer to Creating a Driver Installation Disk on page 31 for instructions.
Note
You should have the Windows Installation CD or floppy disk(s)
available. You may be prompted to copy support files for
networking.
To update a driver, perform the following procedure:
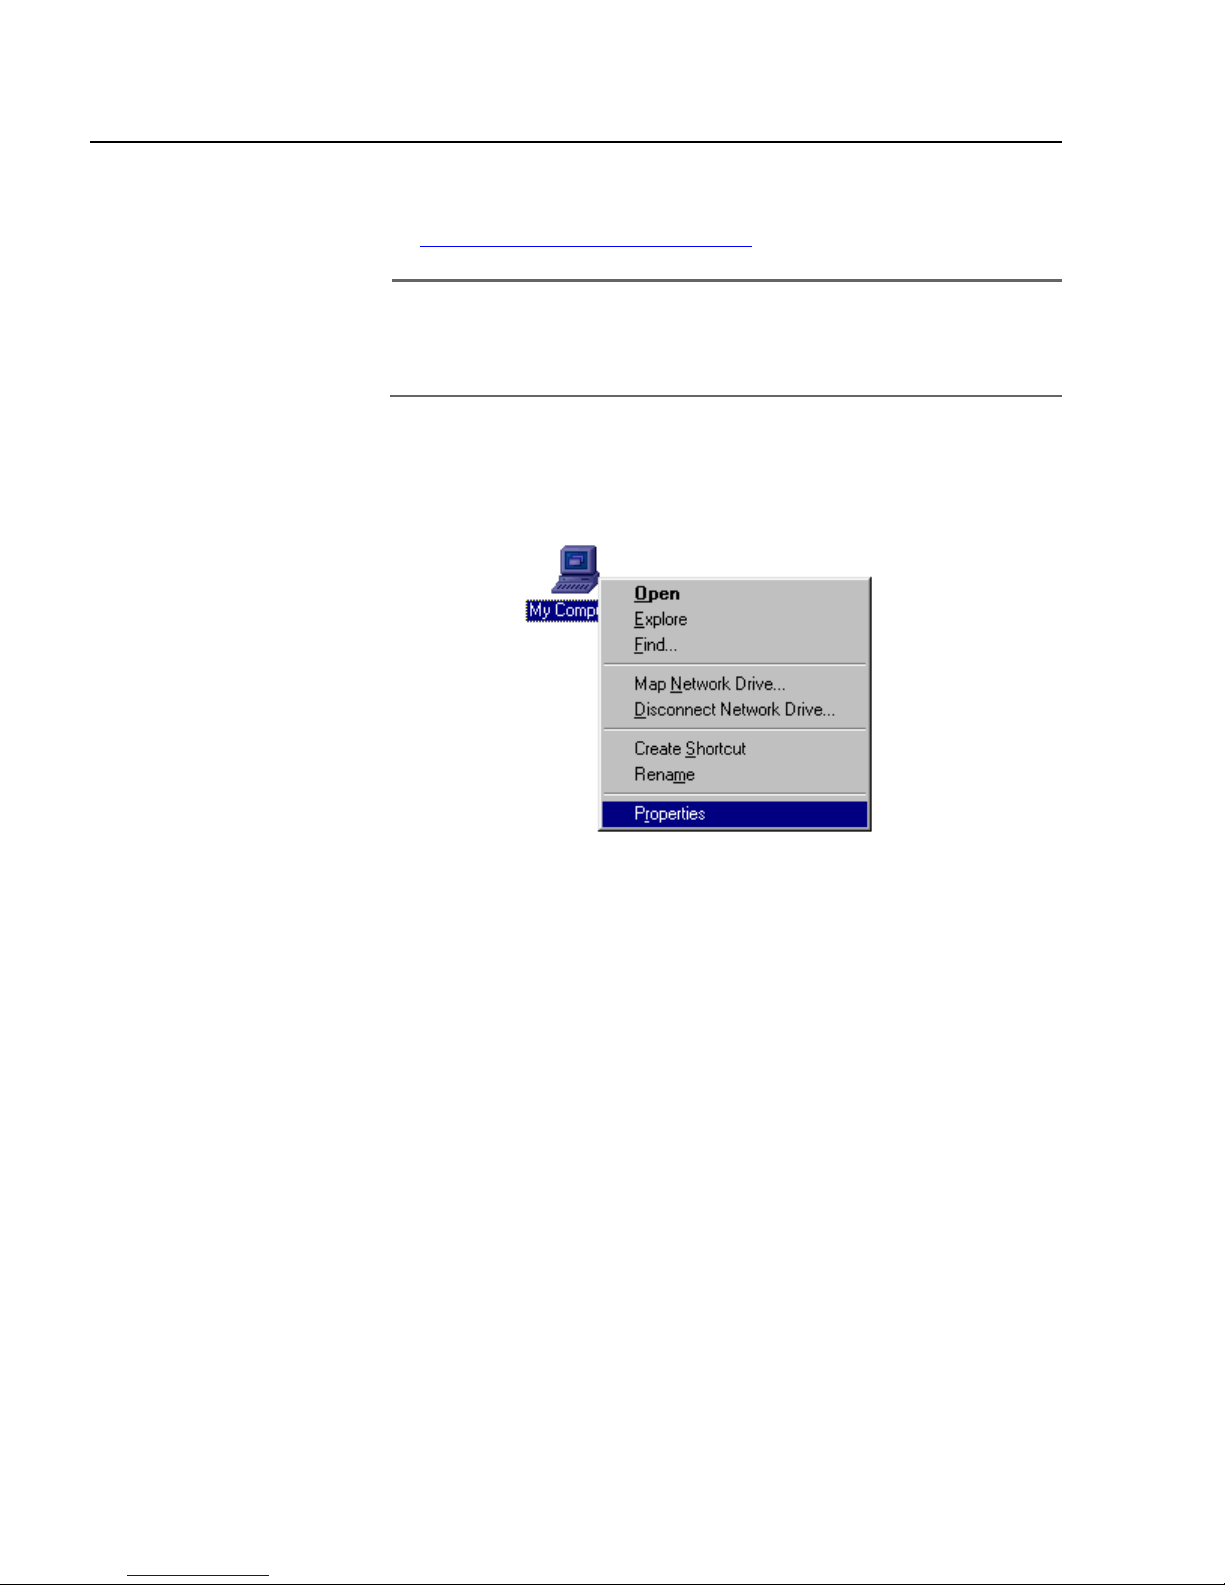
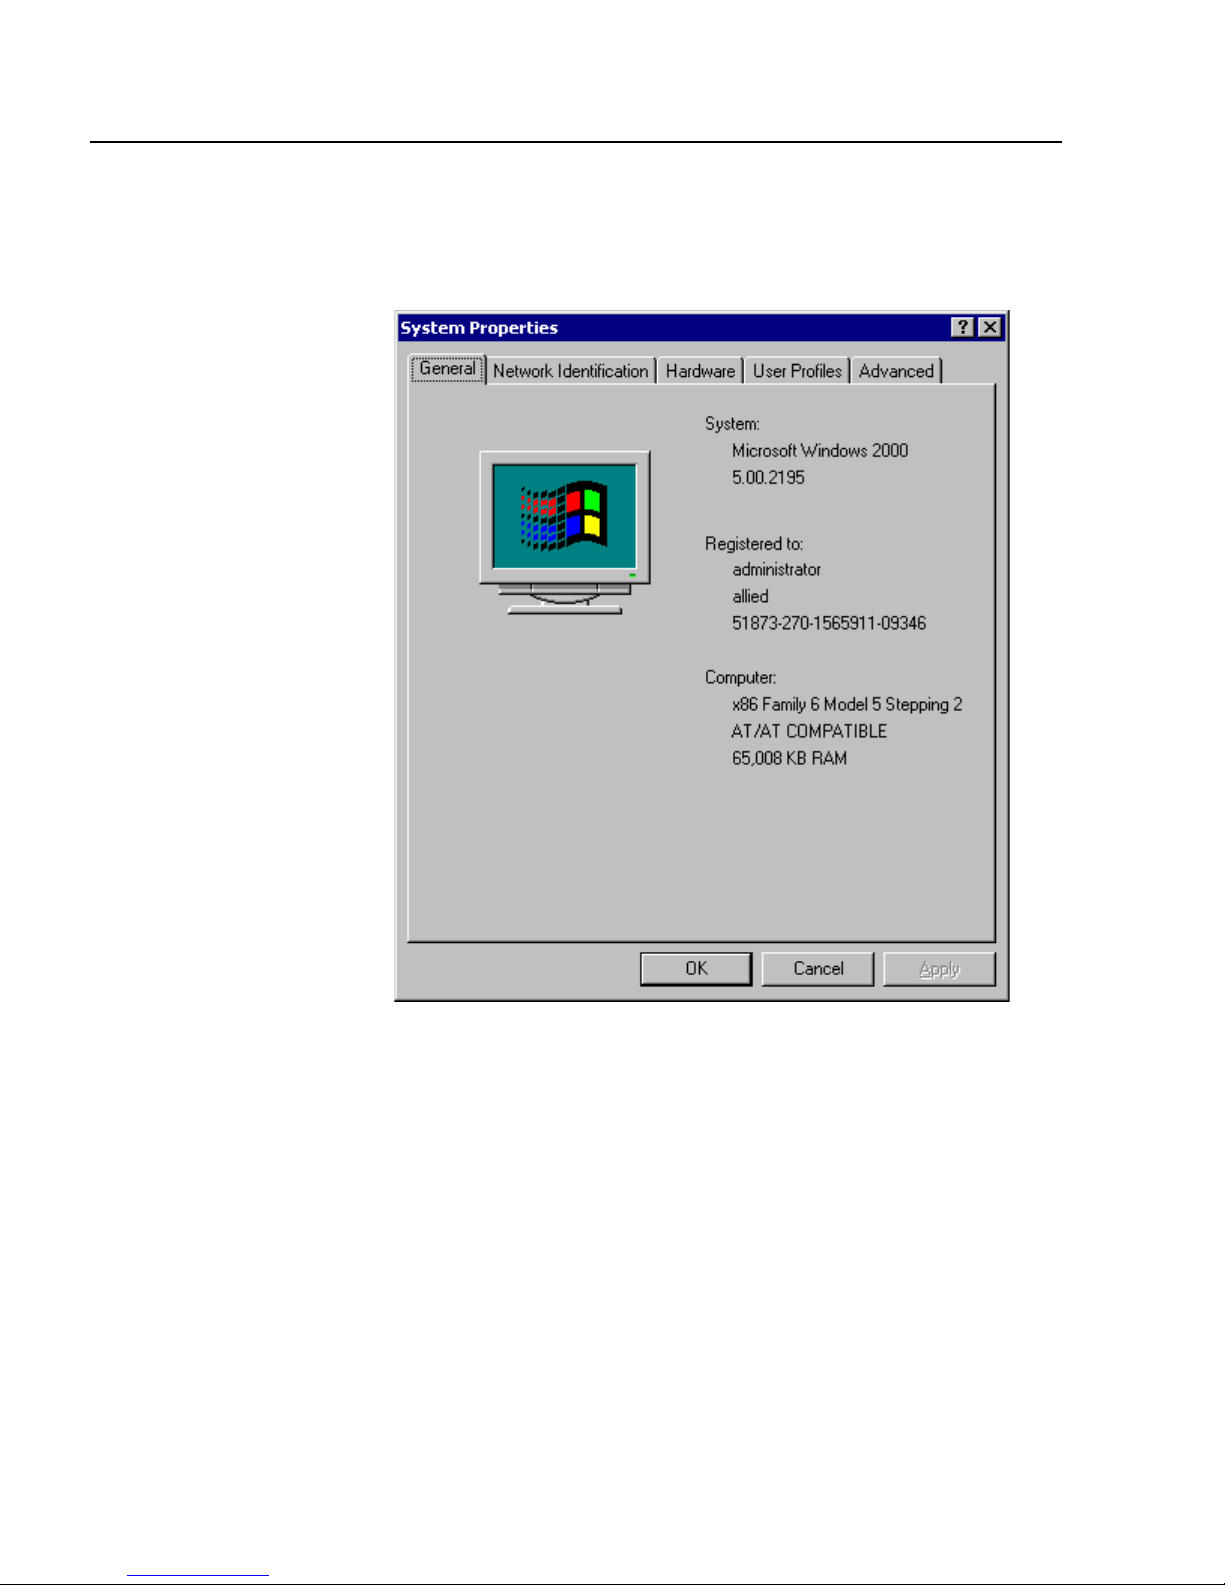
1. From the desktop, right-click the My Computer icon and select
Properties from the menu, as shown in Figure 36.
Figure 36 My Computer Icon and Menu
56
Page 59
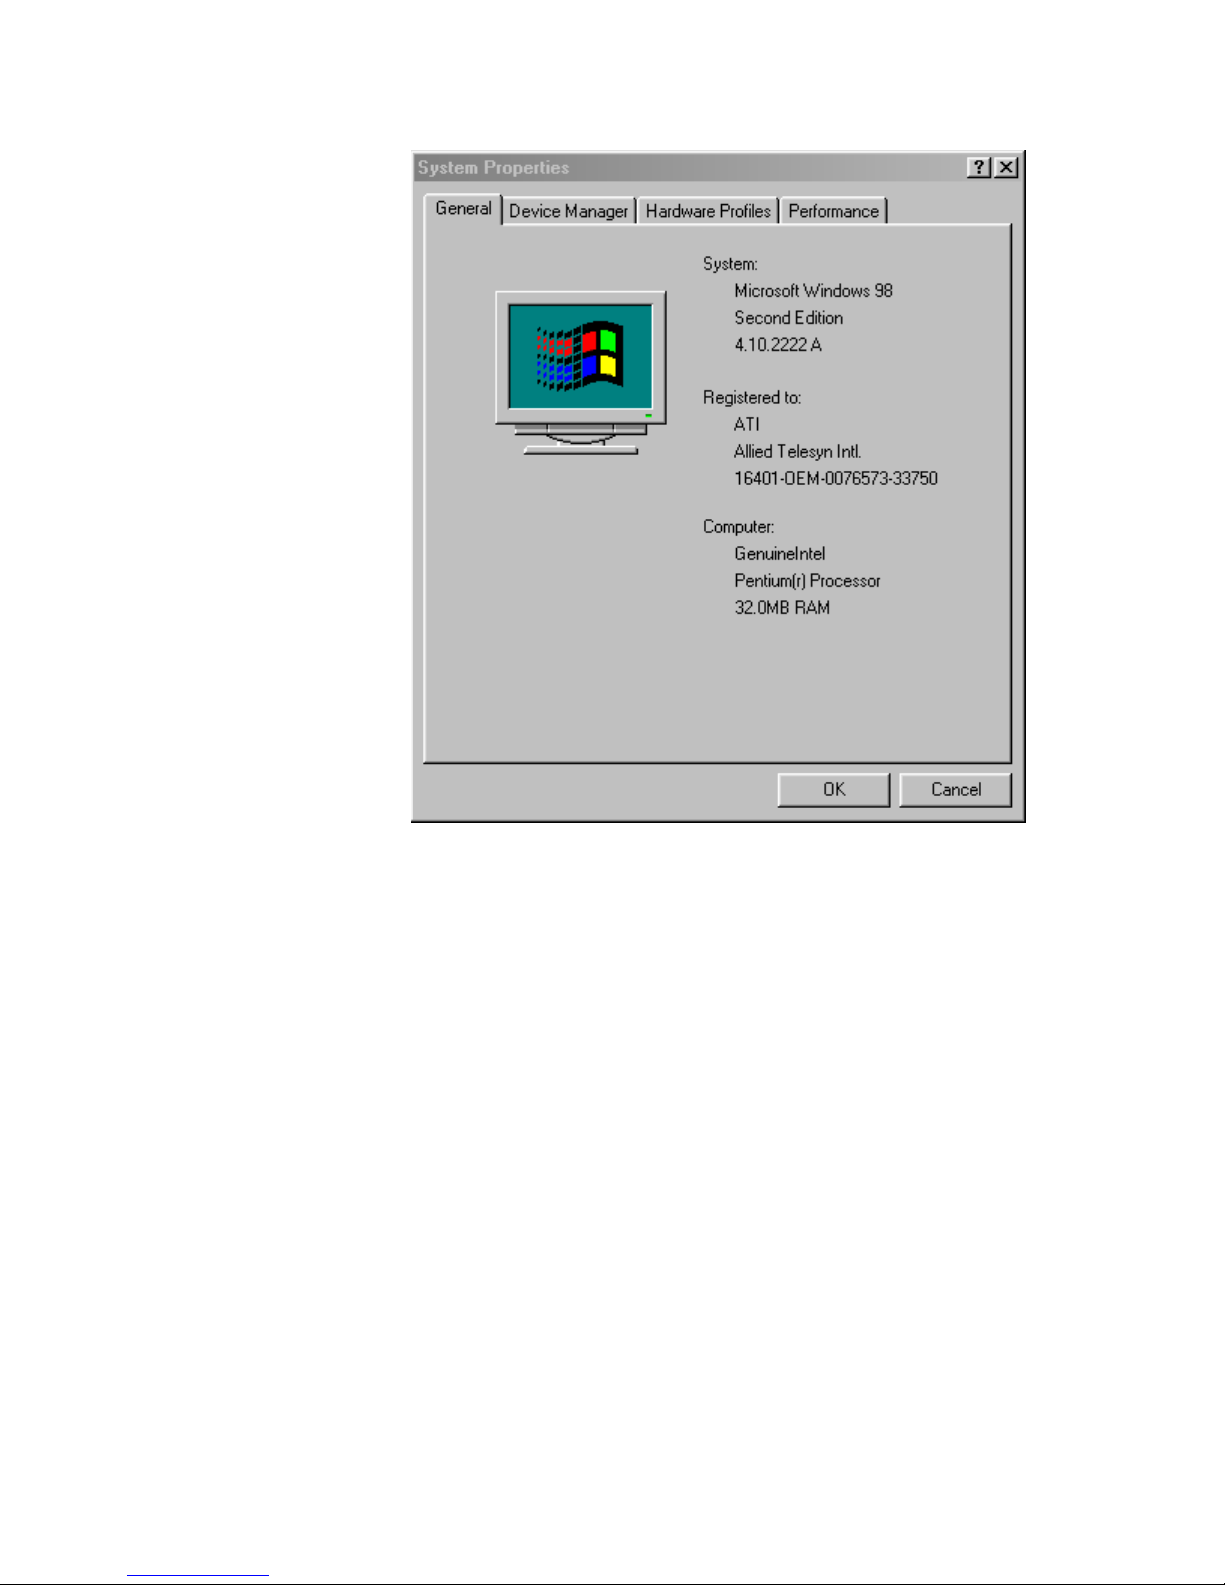
Network Adapter Card Installation Guide - Book I
The window shown in Figure 37 is displayed.
Figure 37 System Properties Window
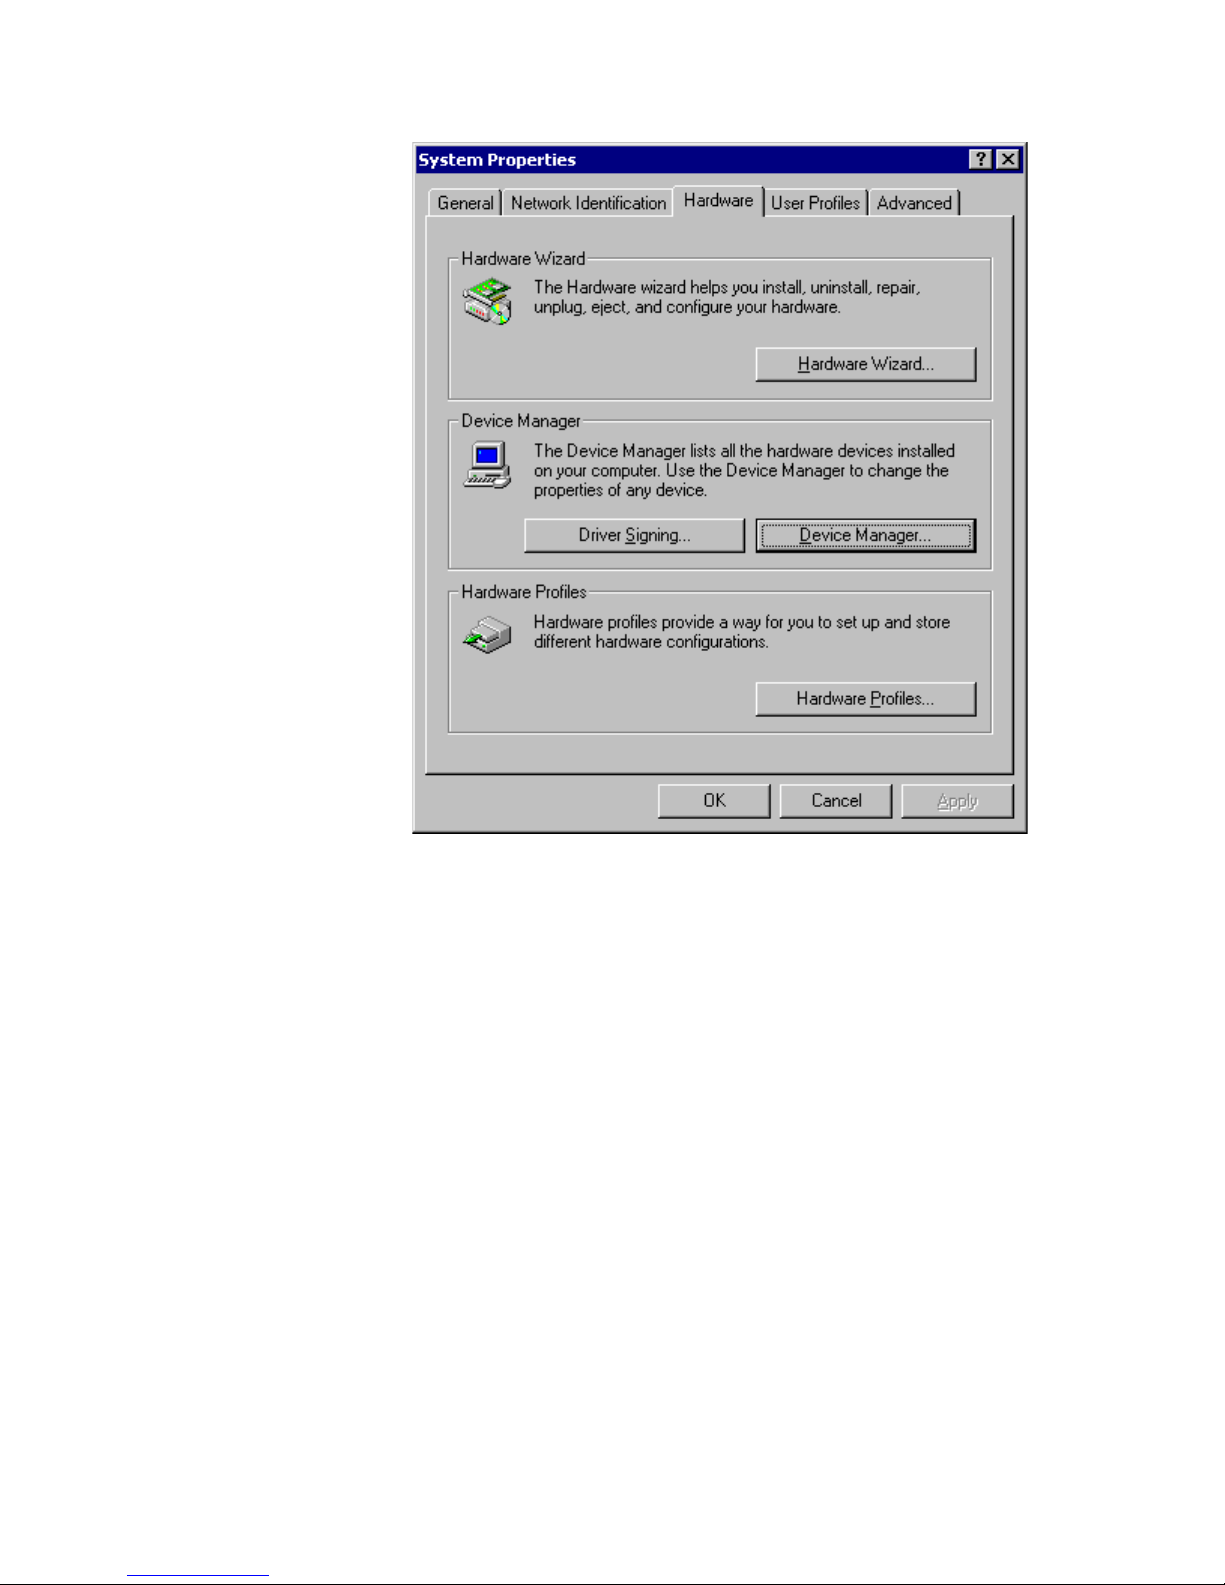
2. Select the Device Manager tab.
57
Page 60
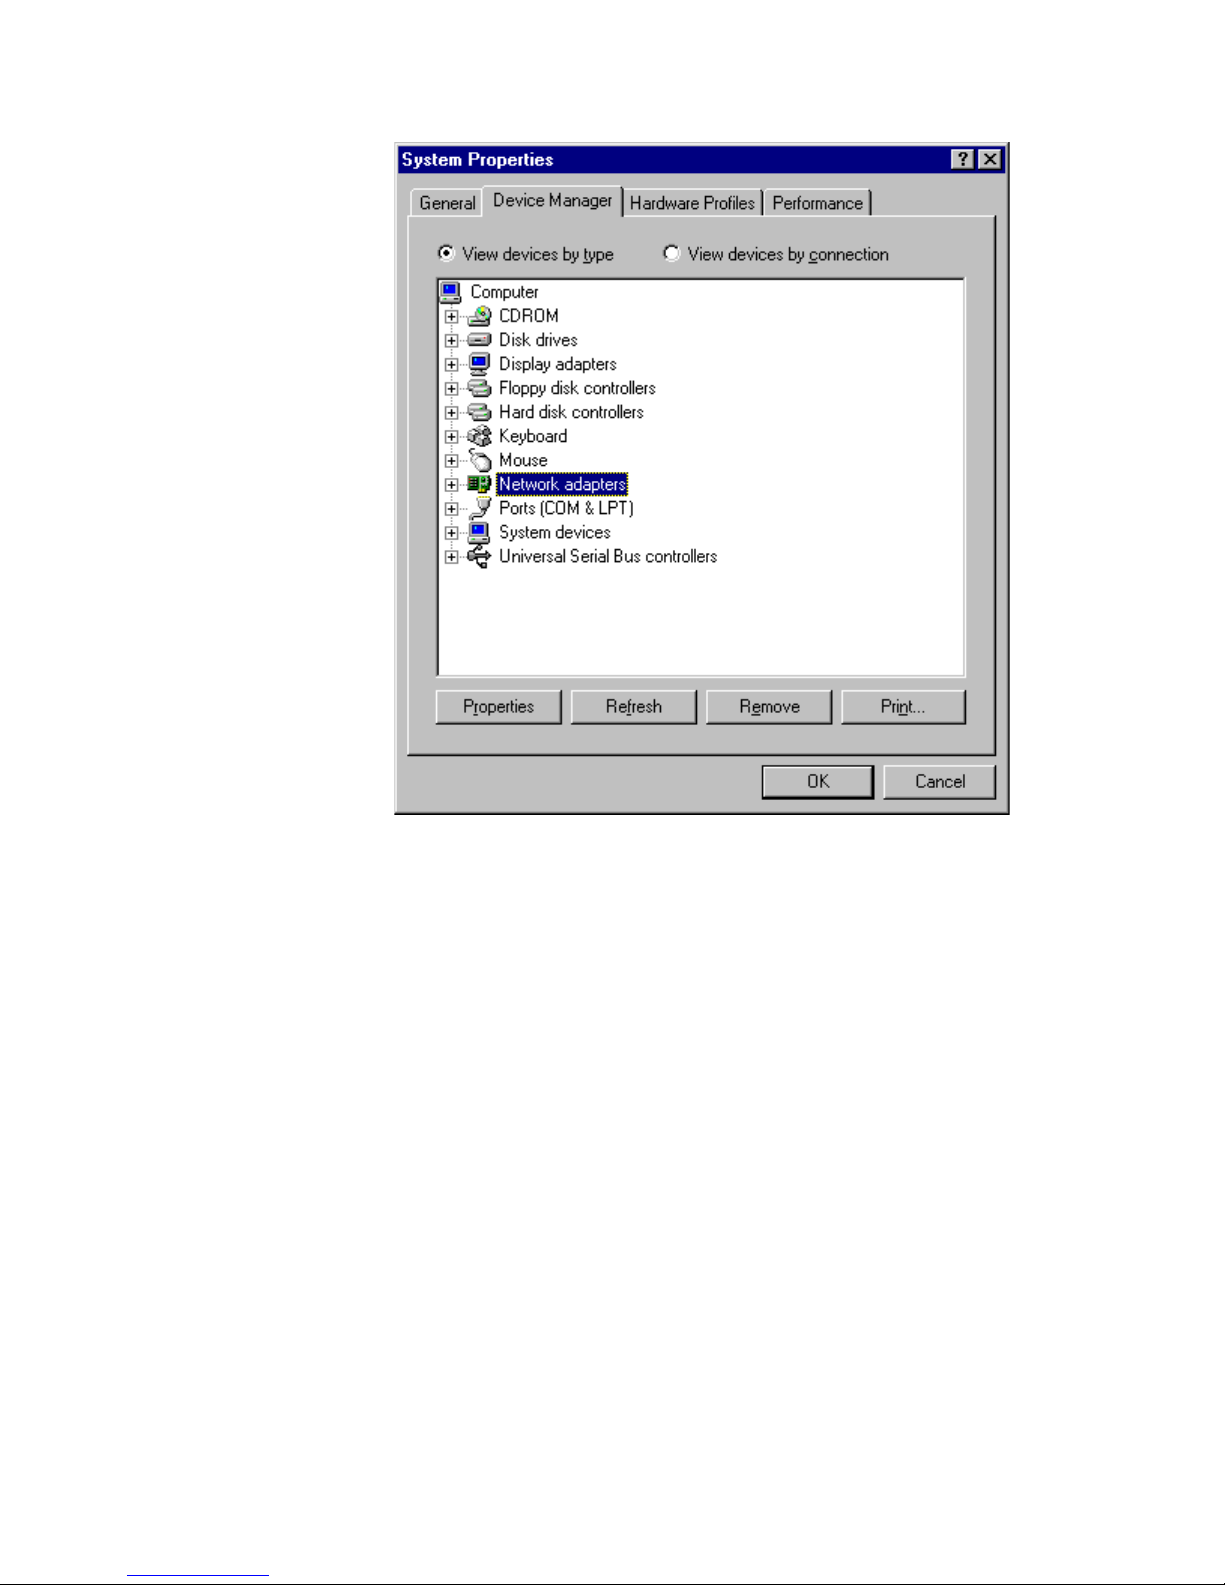
Updating a Network Adapter Driver
The window shown in Figure 39 is displayed.
Figure 38 Device Manager Tab Window
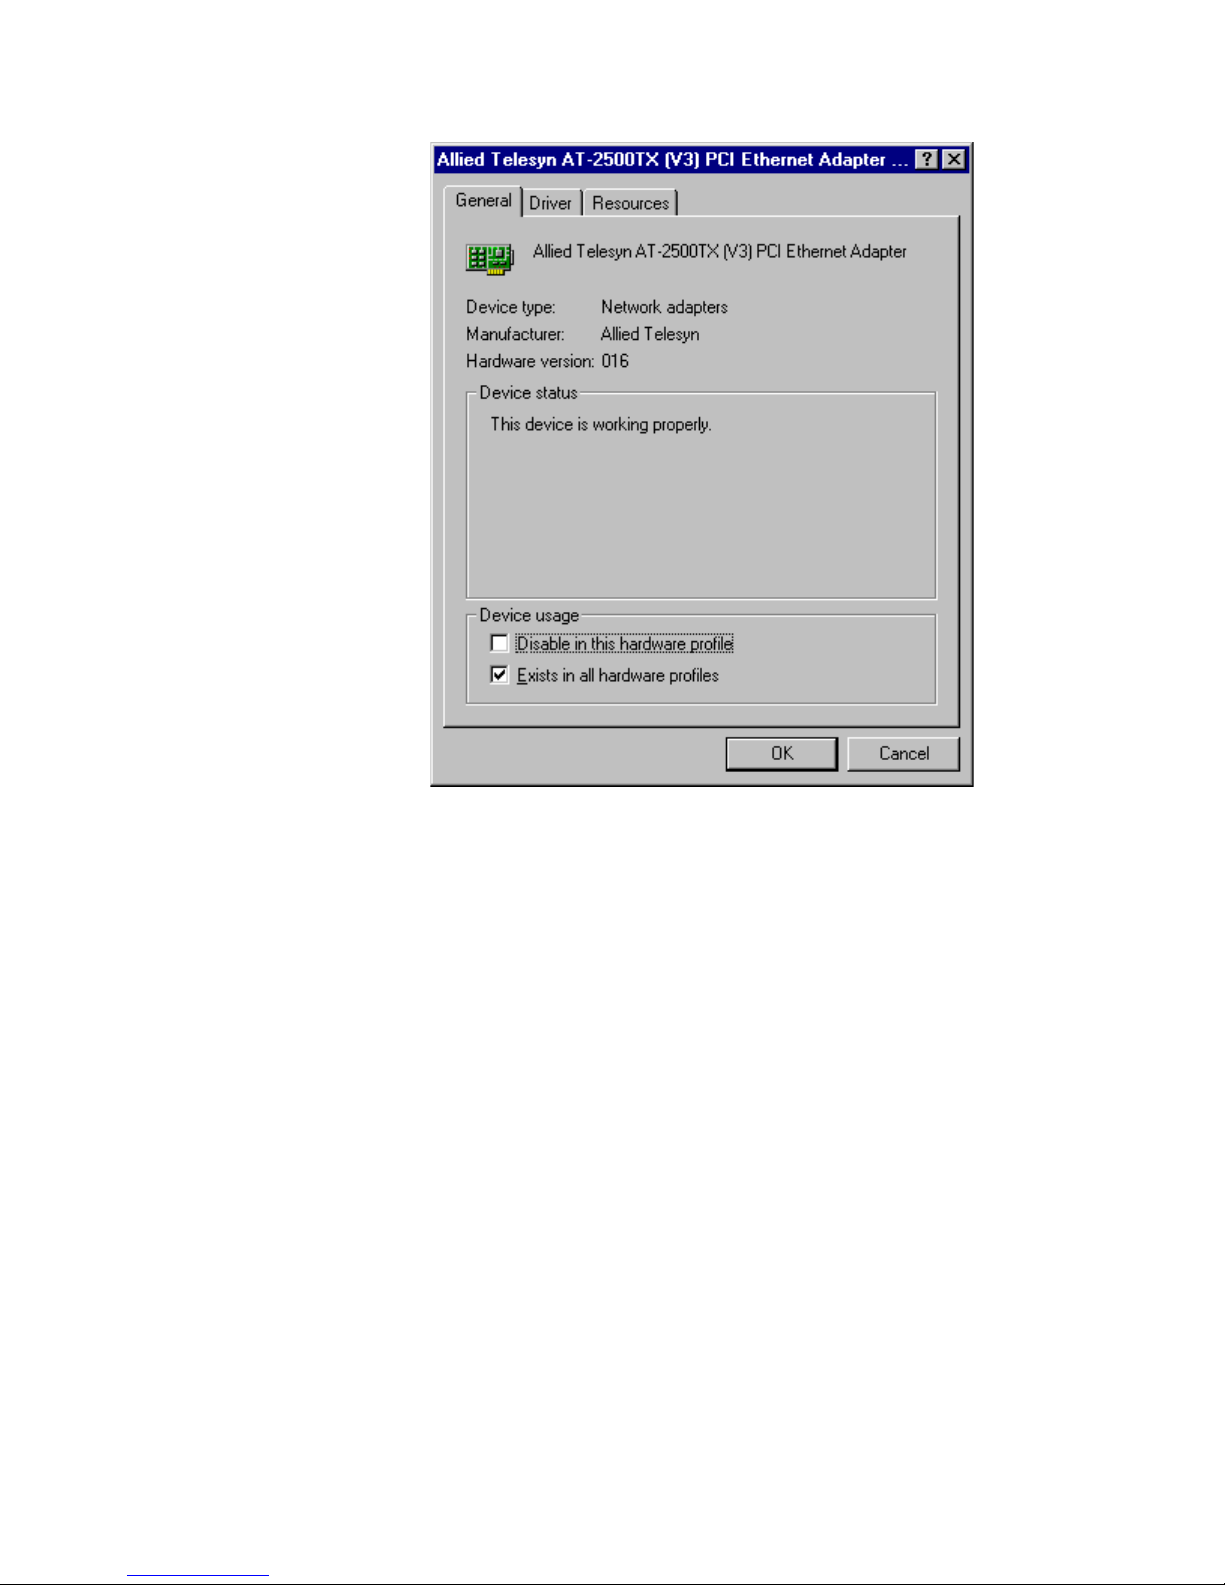
3. Double-click on Network adapters.
58
Page 61

Network Adapter Card Installation Guide - Book I
4. Select the correct Allied Telesyn network adapter, then select
Properties.
Figure 39 Selecting the Network Adapter Card
59
Page 62
Updating a Network Adapter Driver
A window similar to Figure 40 is displayed.
Figure 40 Properties Window
5. Select the Driver tab.
60
Page 63

Network Adapter Card Installation Guide - Book I
The window shown in Figure 41 is displayed.
Figure 41 Device Manager Tab Window
6. Select Update Driver.
61
Page 64

Updating a Network Adapter Driver
The window shown in Figure 42 is displayed.
Figure 42 Update Device Driver Wizard Window (1 of 4)
7. Select Next.
The window shown in Figure 43 is displayed.
8. Select Search for a better driver than the one your device is
using now. (Recommended).
62
Figure 43 Update Device Driver Wizard (2 of 4)
Page 65

9. Select Next.
The window shown in Figure 44 is displayed.
Network Adapter Card Installation Guide - Book I
Figure 44 Update Device Driver Window (3 of 4)
10. If you are using the CardAssistant CD, do the following. If you are
using a driver installation disk, proceed to Step 11.
a. Insert the CardAssistant CD into the CD-ROM drive.
Note
If your computer launches the web browser when you insert the CD,
minimize or close the web browser window.
b. Select CD-ROM drive.
c. Select Specify a location, if not already selected.
d. In the Specify a Location field, enter the drive letter and path to
the adapter driver. The adapter driver locations on the
CardAssistant CD are:
Adapter Card Driver Location
AT-2400T, AT-2400BT \drivers\at2400
AT-2500, AT-2500TX,
AT-2501
\drivers\at2500
63
Page 66

Updating a Network Adapter Driver
AT-2450FTX, AT-2451FTX,
\drivers\at24_27
AT-2700TX, AT-2700FX,
AT-2701FX, AT-2746FX,
AT-2700FTX, AT-2701FTX,
AT-2745FX
AT-2801FX \drivers\at2801
AT-2915T, AT-2930T,
\drivers\at29xx
AT-2930SX
AT-2916T, AT-2970SX,
\drivers\at2971_16
AT-2970SX/2, AT-2970T,
AT-2970T/2, AT-2971T,
AT-2971SX
For example, if you are updating an adapter driver for an AT-2500
Series adapter and the CD is mapped to drive D, you would enter:
D:\drivers\at2500
e. Proceed to Step 12.
11. If you are using a driver installation disk, do the following:
a. Insert the driver installation disk into the floppy disk drive.
b. Select Floppy disk drives.
c. Select Specify a location, if not already selected.
d. In the Specify a Location field, enter A:\. The adapter driver is
stored in the root directory on the disk.
e. Proceed to the next step.
12. Select Next.
64
Page 67

Network Adapter Card Installation Guide - Book I
Windows starts to search for the appropriate adapter driver file.
After an adapter driver has been found, the window shown in Figure
45 is displayed.
Figure 45 Update Device Driver Wizard (4 of 4)
13. Select Next.
14. When prompted, insert the Windows Installation CD or disk.
The window shown in Figure 46 is displayed.
Figure 46 Update Device Driver Wizard Window
65
Page 68

Updating a Network Adapter Driver
15. Select Finish.
The network adapter card and driver are ready for network operations.
66
Page 69

Chapter 5
Removing a Network Adapter
Driver
This chapter contains the procedures for removing a network adapter
driver from the following operating systems:
Windows 95, 98, or Me on page 68
Windows 2000 or XP on page 72
Windows NT 4.0 on page 75
67
Page 70

Removing a Network Adapter Driver
Windows 95, 98, or Me
This section contains the procedure for removing a network adapter
driver from a Windows 95, 98, or Me operating system.
Note
Do not remove the network adapter card from the system until
after you have performed this procedure. The adapter driver
cannot be uninstalled if the network adapter card has been
removed from the computer.
1. From the desktop, right-click the My Computer icon, then select
Properties from the menu, as shown in Figure 47.
Figure 47 My Computer Icon and Menu
68
Page 71

Network Adapter Installation Guide - Book I
The System Properties window shown in Figure 48 is displayed.
Figure 48 System Properties Window
2. Select the Device Manager tab.
69
Page 72

Removing a Network Adapter Driver
The window in Figure 49 is displayed.
Figure 49 Device Manager Tab Window
3. Double-click Network adapters to display a list of the adapter cards
installed in your computer.
4. Select the Allied Telesyn network adapter card whose driver you
want removed.
5. Select Remove.
70
Page 73

Network Adapter Installation Guide - Book I
The warning shown in Figure 50 is displayed.
Figure 50 Confirm Device Removal Window
6. Select OK.
After the network adapter driver has been removed, the window in
Figure 51 is displayed.
Figure 51 System Settings Change Window
7. Select No.
Note
If you select Yes, Windows will attempt to reload the driver.
8. Shutdown Windows 95, 98 or Me and power OFF your computer.
9. Remove the network adapter card from the computer. For
instructions on removing the network adapter card, refer to the
documentation that came with your computer.
10. Power ON your computer.
The network adapter card and driver have now been removed from your
computer.
71
Page 74
Removing a Network Adapter Driver
Windows 2000 or XP
This section contains the procedure for removing a network adapter
driver from a Windows 2000 or XP operating system.
1. From the desktop, right-click My Computer, then select Properties.
The window shown in Figure 52 is displayed.
2. Select the Hardware tab.
72
Figure 52 Properties Window
Page 75
Network Adapter Installation Guide - Book I
The window shown in Figure 53 is displayed.
Figure 53 Hardware Tab Window
3. Select Device Manager.
73
Page 76

Removing a Network Adapter Driver
The window shown in Figure 54 is displayed.
Figure 54 Device Manager Window
4. Double-click Network Adapters to display a list of the adapter
cards installed in your computer.
5. Right-click the Allied Telesyn adapter card whose driver you want to
remove.
6. Select Remove.
7. When prompted, select OK.
8. Shutdown Windows 2000 or XP and power OFF your computer.
9. Remove the network adapter card from the computer. For
instructions on removing the network adapter card, refer to the
documentation that came with your computer.
10. Power ON your computer.
The network adapter card and driver have now been removed from your
computer.
74
Page 77

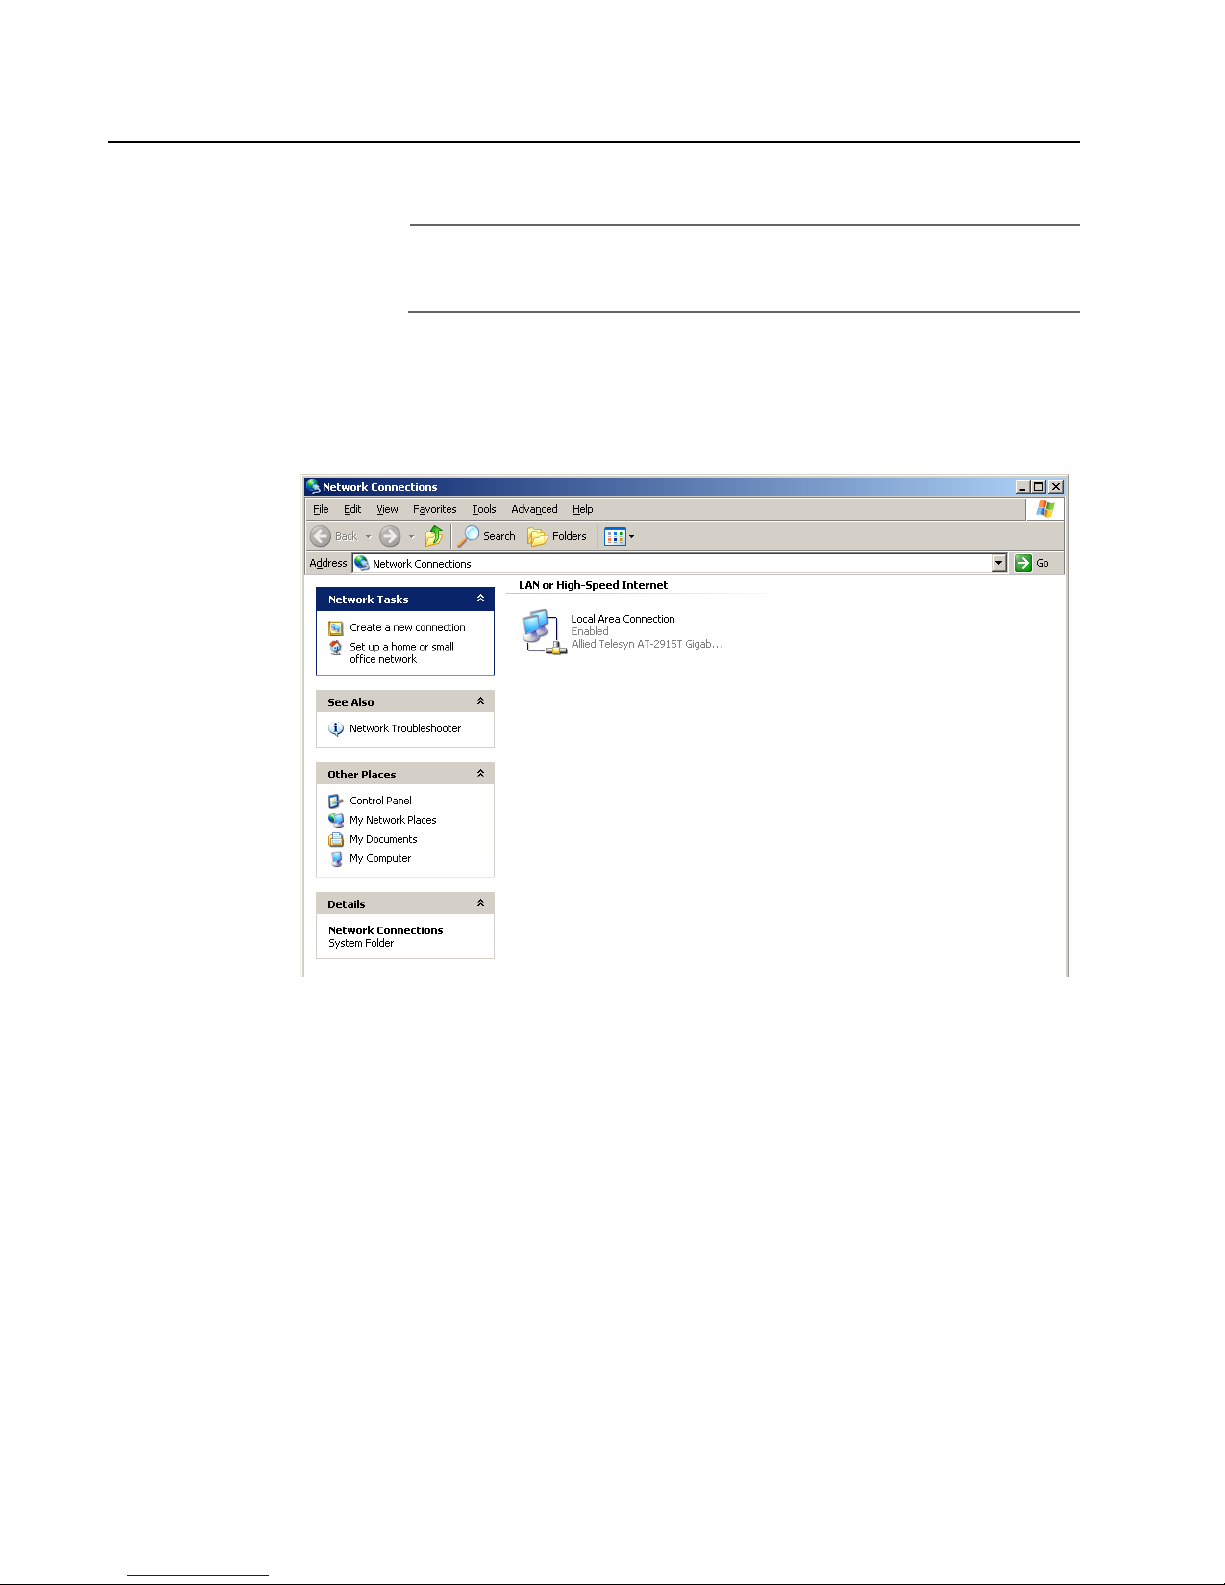
Windows NT 4.0
Network Adapter Installation Guide - Book I
This section contains the procedure for removing a network adapter
driver from a Windows NT 4.0 operating system.
1. From the desktop, right-click the Network Neighborhood icon,
then select Properties from the menu, as shown in Figure 55.
Figure 55 Network Neighborhood Icon and Menu
75
Page 78

Removing a Network Adapter Driver
The window shown in Figure 56 is displayed.
Figure 56 Network Window
2. Select the Adapters tab.
76
Page 79

Network Adapter Installation Guide - Book I
The window shown in Figure 57 is displayed.
Figure 57 Adapters Tab Window
3. Select the Allied Telesyn network adapter card whose driver you
want to remove.
4. Select Remove.
5. If prompted, select Yes to confirm that you want to remove the
adapter driver.
The Adapters Tab Window is once again displayed. The icon for the
adapter card is removed from the network adapter list.
6. Select OK.
7. If prompted to restart the computer, select No.
Note
If you select Yes, Windows NT 4.0 will attempt to reload the adapter
driver.
8. Shutdown Window NT 4.0 and power OFF your computer.
77
Page 80

Removing a Network Adapter Driver
9. Remove the network adapter card from your computer. For
instructions on removing the adapter card, refer to the
documentation that came with your computer.
10. Power ON your computer.
The network adapter card and driver have now been removed from your
computer.
78
Page 81

Chapter 6
t
AT-Stat
Overview
This chapter contains the instructions for:
❑ Installing AT-Stat on page 82
❑ Removing AT-Stat on page 86
General
Host name
Domain
TCP/IP
Hardware
AT-Stat is an Allied Telesyn utility designed for Windows 2000 and XP.
This program provides Ethernet statistics for the Allied Telesyn network
adapter card and driver installed on your computer.
Figure 58 illustrates the menu structure for AT-Stat. Refer to Table 1 on
page 80 for a description of these features.
AT-Stat Main Menu
Statistics NetCheck Suppor
LinksGeneral
Transmit errors
Receiver errors
Host/Drive/UNC Path
Ping
Throughput
Figure 58 AT-Stat Menu Tree
79
Page 82

AT-Stat
Table 1 describes the features and functions for AT-Stat.
Table 1 AT-Stat Menu Features
Tab Function
General
Host name
Domain
TCP/IP
Hardware
Statistics
General
Transmit Errors
Receiver Errors
NetCheck
Host/Drive/UNC
Path
Displays the name of the host server.
Displays the name of the domain.
Displays the IP address, subnet mask, gateway
address, DHCP, MAC address, WINS and DNS.
Displays the hardware status, IRQ, I/O and memory
range.
Displays the connection and line speed. Also
shows packets sent and received.
Displays total transmit errors and collisions.
Displays total received errors, buffer, and
alignment information.
This field will determine which device the Ping or
Throughput test will communicate with. For Ping,
insert an IP address of a remote IP device, for
example, 10.10.10.10. For the Throughput test
enter a network driver letter, for example ‘F:\’ for
Universal Naming Convention (UNC) for example,
‘\\<computername>\drive’.
Ping
Throughput
Support
Links
80
Displays sent, received, and timeout pings. Also
allows you to start or stop pings or set it to
continuous ping mode.
Displays the average sent and received
throughputs. You can also start or stop the
throughput test.
Provides active URL links to Allied Telesyn’s home
page, technical support, and our networking
products page.
Page 83

Network Adapter Card Installation Guide - Book I
System
Requirements
To run AT-Stat, your system must be operating in either Windows 2000
or XP and have an Allied Telesyn network adapter card and driver
installed.
81
Page 84

AT-Stat
Installing AT-Stat
To install AT-Stat, perform the following procedure:
Note
The adapter driver for an AT-2450, AT-2451, AT-2500, AT-2501,
AT-2700, or AT-2701 Series network adapter card must be updated
to obtain custom statistics. Otherwise, only generic statistics are
available. To update an adapter driver, refer to Updating a Network
Adapter Driver on page 55.
1. Insert the CardAssistant CD into the CD-ROM drive.
The CardAssistant Main Menu shown in Figure 59 is displayed. If this
menu is not displayed, double-click on the My Computer icon, then
double-click on the Allied Telesyn CD-ROM icon.
2. From the Driver Setup drop-down menu, select the adapter card
that you purchased.
82
Figure 59 CardAssistant CD Main Menu
Page 85
Network Adapter Card Installation Guide - Book I
A window similar to Figure 60 is displayed.
Figure 60 Network Adapter Card Window
3. Under Software Support, select Install AT-Stat.
The window shown in Figure 61 is displayed.
.
Figure 61 File Download Window
4. Click on Run this program from its current location, then select
OK.
83
Page 86

AT-Stat
The window shown in Figure 62 is displayed.
Figure 62 Security Warning Window
5. Select Yes.
The InstallShield Wizard, shown in Figure 63, prepares to install
AT-Stat.
84
Figure 63 InstallShield Wizard Window
Page 87

Network Adapter Card Installation Guide - Book I
When the InstallShield Wizard finishes preparing the installation,
the window shown in Figure 64 is displayed.
Figure 64 AT-Stat Setup Window
6. Select Next.
When the Setup program has finished installing AT-Stat on your
system, the window shown Figure 65 is displayed.
Figure 65 AT-Stat Setup Complete Window
7. Select Finish.
AT-Stat is ready for use.
85
Page 88

AT-Stat
Removing AT-Stat
This section contains the procedure for removing AT-Stat from your
Windows 2000 or XP operating system.
1. From the desktop, select Start.
2. Select Settings, then Control Panel. The window shown in Figure
66 is displayed.
86
Figure 66 Control Panel Window
3. Double-click on Add/Remove Programs.
Page 89

Network Adapter Card Installation Guide - Book I
The window shown in Figure 67 is displayed.
Figure 67 Add/Remove Programs Window
4. Select AT-Stat from the list.
5. Select Change/Remove.
The window shown in Figure 68 is displayed.
Figure 68 InstallShield Wizard Welcome Window
6. Select Remove, then Next.
87
Page 90

AT-Stat
The Confirm Uninstall window shown in Figure 69 is displayed.
Figure 69 Confirm Uninstall Window
7. Select OK.
The InstallShield Wizard will begin to remove AT-Stat from your
system. When complete, the window shown in Figure 70 is
displayed.
Figure 70 AT-Stat Setup Maintenance Complete Window
8. Select Finish.
AT-Stat has been removed from your system.
88
Page 91

Chapter 7
VLAN
This chapter contains the following sections:
❑ Installing an ATMUX VLAN Driver on page 91
❑ Adding an Additional VLAN on page 98
❑ Removing a VLAN on page 102
❑ Removing the Allied Telesyn Multi-VLAN Support Protocol on
page 104
89
Page 92

VLAN
Overview
Allied Telesyn’s ATMUX protocol driver allows you to configure virtual
LANS (VLANS) for the AT-2450FTX, AT-2451 Series, AT-2700/AT-2701
Series, AT-2745/AT-2746 Series, AT-2915, and AT-2930 Network
Adapters. Allied Telesyn’s ATMUX driver is based upon the 802.1Q
standard, a special 4-byte tag inserted into every Ethernet frame.
Note
ATMUX does not currently support the AT-2801, AT-2916T, AT-2970,
and AT-2971 Series Adapters.
With VLANs you can logically group end-nodes that consist of clients
and servers that reside in a common broadcast domain without any
router hops. The benefit of this is an isolated broadcast domain with no
physical limitations within your switch fabric.
This can be a great benefit as employees move, business restructure, and
technologies merge. By offering a flexible structure VLANS can reduce
performance bottlenecks that occur when traditional routers cannot
meet fast growing demand.
Note
Before installing the VLAN protocol driver the latest driver Windows
2000/XP Ndis 5 driver (version 4.1.10) must be installed in the
operating system.
To properly configure the ATMUX VLAN protocol driver, the VLAN ID and
IP Subnet that the network adapter card will be participating in are
required. The system administrator should be able to provide the
configuration details.
90
Page 93
Installing an ATMUX VLAN Driver
To install an ATMUX driver, perform the following procedure:
Note
ATMUX does not currently support the AT-2801, AT-2916T, AT-2970,
and AT-2971 Series Adapters.
1. From the desktop, right-click the My Network Places icon and
select Properties from the menu.
The window shown in Figure 71 is displayed.
Network Adapter Card Installation Guide - Book I
2. Right-click on the appropriate local area connection then select
Properties.
Figure 71 Network Connections Window
91
Page 94
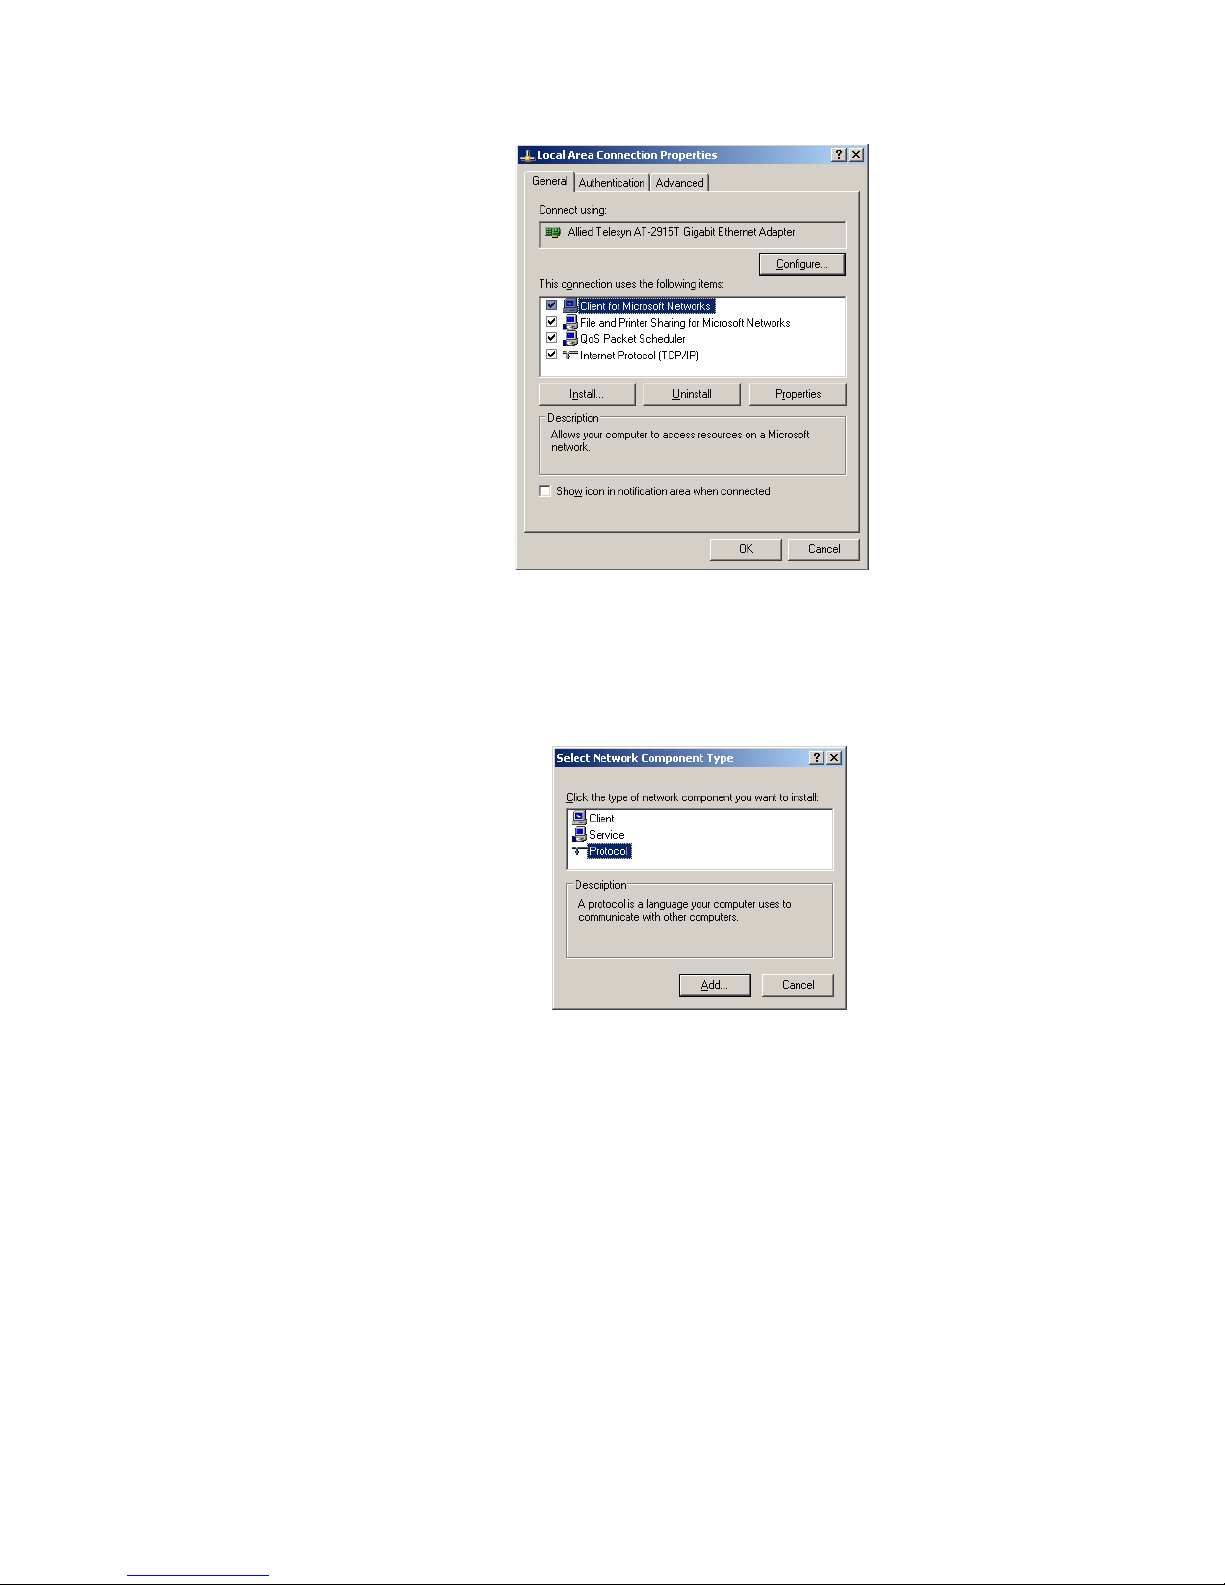
VLAN
The window shown in Figure 72 is displayed.
Figure 72 Local Area Connection Properties Window
3. Select Install.
The window shown in Figure 73 is displayed.
Figure 73 Select Network Component Type Window
4. Select Protocol then select Add.
92
Page 95
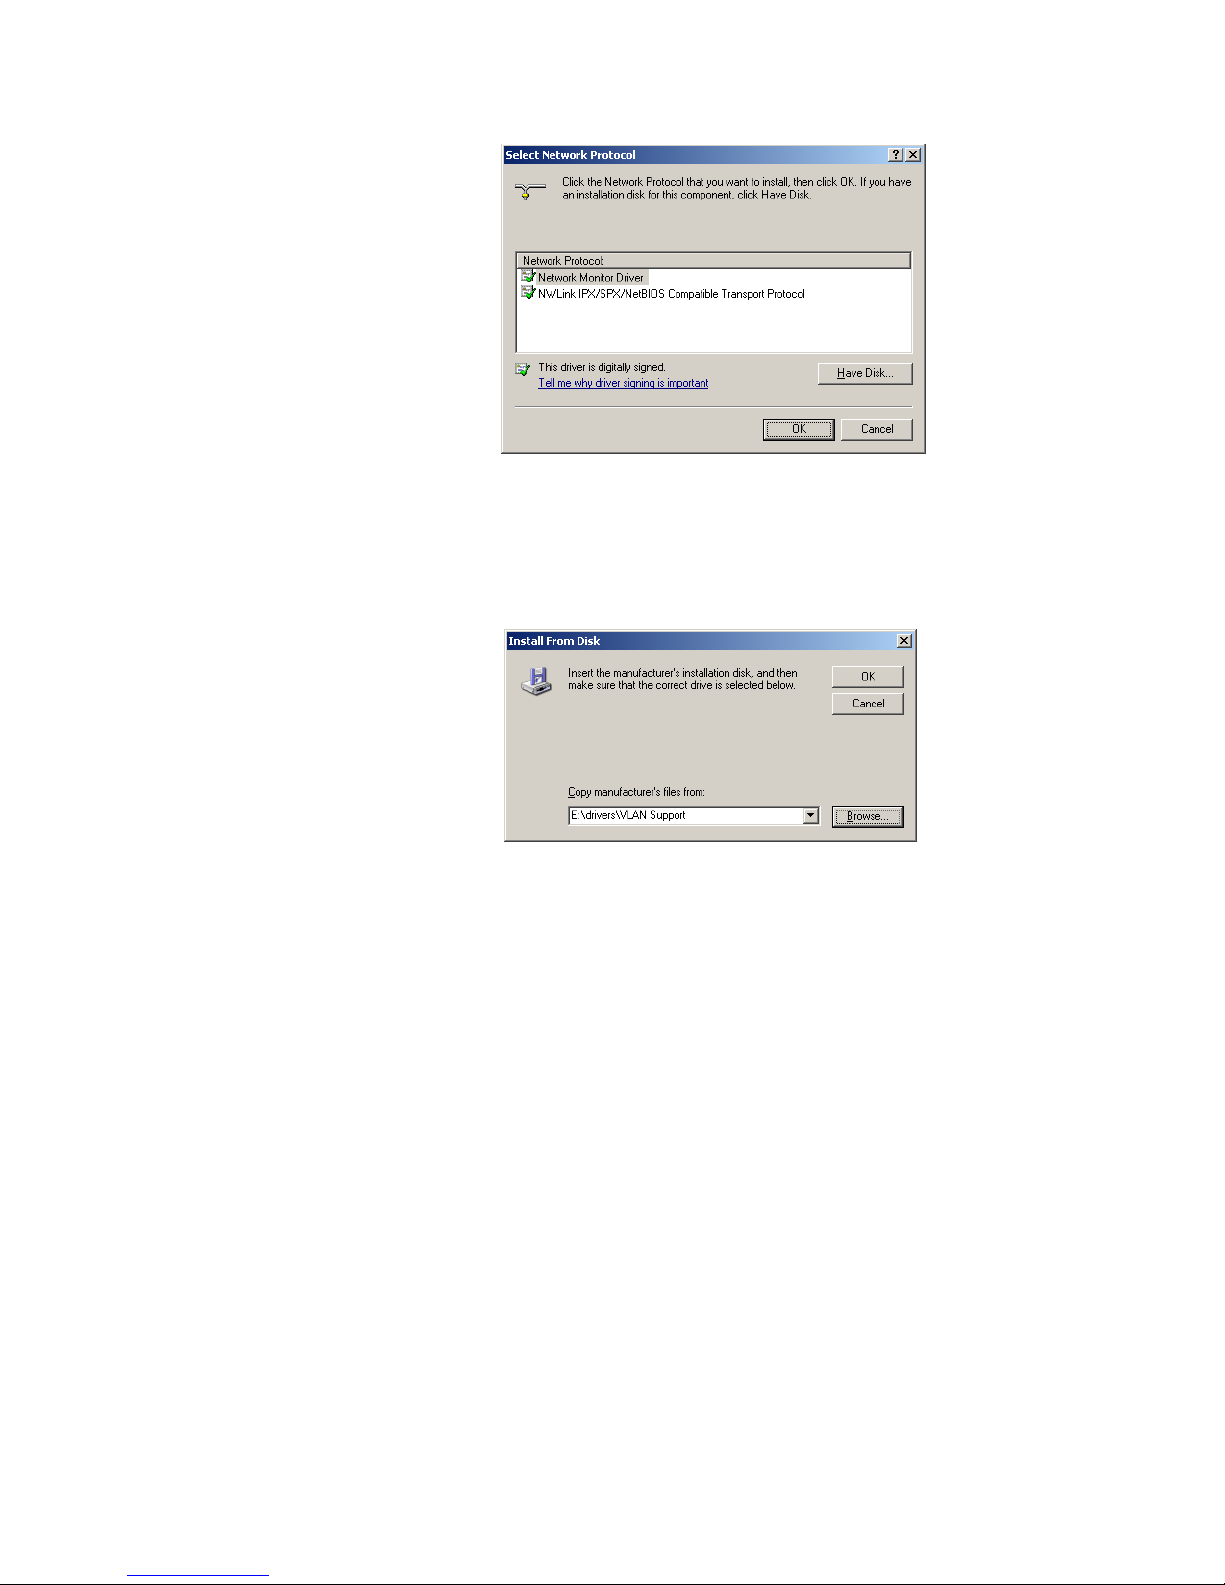
The window in Figure 74 is displayed.
Figure 74 Select Network Protocol Window
5. Select Have Disk.
The window in Figure 75 is displayed.
Network Adapter Card Installation Guide - Book I
Figure 75 Install From Disk Window
6. Select Browse. The ATMUX install file is located at:
<CD-ROM Drive>:/drivers/VLAN Support.
7. Select OK.
93
Page 96

VLAN
The window shown in Figure 76 is displayed.
Figure 76 Select Network Protocol Window
The Allied Telesyn Multi-VLAN Support Protocol is now displayed in
the Select Network Protocol window.
Note
The statement This Driver Not Digitally Signed and the Windows
logo error messages that may pop up during installation, can be
ignored. Allied Telesyn is in the process of digitally signing ATMUX
driver but was unable to complete the process before release of this
installation guide.
8. Select OK.
The window shown in Figure 77 is displayed.
Figure 77 Local Area Connection Properties Window
94
Page 97

Network Adapter Card Installation Guide - Book I
The ATMUX driver is now shown in the Local Area Connection
Properties window.
9. Select Allied Telesyn Multi-Vlan Support Protocol then select
Properties.
Then window shown in Figure 78 is displayed.
Figure 78 VLAN Setup Window
10. The default VLAN ID is 0. To change the VLAN ID, select Set ID.
The window shown inFigure 79 is displayed.
Figure 79 Set VLAN ID Window
11. Select or enter the correct VLAN ID. This VLAN ID is determined by
the system administrator; please contact the administrator for the
correct VLAN information. For this example, we will set the VLAN ID
to 1 then select OK.
95
Page 98

VLAN
The window shown in Figure 80 is displayed.
Figure 80 Network Connections Window
There are now two Local Area Connections options; one for the
network adapter and the other for the VLAN connection.
12. Right-click Local Area Connection then select Properties.
The window shown in Figure 81 is displayed.
You will notice that the properties for the Local Area Connection has
only one Allied Telesyn Multi-VLAN Support Protocol. The other
protocols are disabled. The disabled protocols are options for the
Local Area Connection 2.
96
Figure 81 Local Area Connection Properties Window
Page 99

Network Adapter Card Installation Guide - Book I
13. Select OK.
14. From the Network Connections window, select Local Connection 2
then select Properties.
The window shown in Figure 82 is displayed.
Figure 82 Local Area Connection 2 Properties Window
From the Local Area Connection 2 Properties window you can
configure network properties, e.g. Internet Properties (TCP/IP).
Note
For proper VLAN communications is important that the switch
fabric is configured properly for VLAN tagged packets.
97
Page 100

VLAN
Adding an Additional VLAN
To add an additional VLAN, perform the following procedure:
1. From the desktop, right-click the My Network Places icon and
select Properties from the menu.
The window shown in Figure 83 is displayed.
Figure 83 Network Connections Window
2. Right-click Local Area Connections then select Properties.
98
 Loading...