

Page 1

AlliedWareTM OS
How To |
Create a VPN between an Allied Telesis and a
SonicWALL Router, with NAT-T
Today’s network managers often need to incorporate other vendors’ equipment into their
networks, as companies change and grow. To support this challenge, Allied Telesis routers are
designed to inter-operate with a wide range of equipment.
This How To Note details one of the inter-operation solutions from Allied Telesis: creating
virtual private networks between Allied Telesis and SonicWALL routers. It shows you how to
configure a VPN between a local Allied Telesis router and a remote SonicWALL router, stepby-step. On the Allied Telesis router, it uses the Site-To-Site VPN wizard for the VPN
configuration.
The wizard runs on selected AR400 Allied Telesis routers from the router’s web-based GUI
(graphical user interface). It asks you to enter a few details and from those it configures the
following settings:
z encryption to protect traffic over the VPN
z ISAKMP with a pre-shared key to manage the VPN
z the firewall, to protect the LANs and to allow traffic to use the VPN
z Network Address Translation (NAT), so that you can access the Internet from the private
LAN through a single public IP address. This Internet access does not interfere with the
VPN solution
z (in this example) NAT-Traversal because one end of the VPN tunnel is behind a separate
NAT device
C613-16098-00 REV E
www.alliedtelesis.com
Page 2

What information will you find in this document?
This How To Note begins with the following information:
z "Related How To Notes" on page 2
z "Which products and software version does it apply to?" on page 2
Then it describes the configuration, in the following sections:
z "The network" on page 3
z "How to configure the Allied Telesis router" on page 4
z "How to configure the SonicWALL router" on page 12
z "How to test the tunnel" on page 29
z "How to use the CLI instead of the GUI" on page 30
Related How To Notes
Allied Telesis offers How To Notes with a wide range of VPN solutions, from quick and
simple solutions for connecting home and remote offices, to advanced multi-feature setups.
Notes also describe how to create a VPN between an Allied Telesis router and equipment
from a number of other vendors.
For a complete list of VPN How To Notes, see the Overview of VPN Solutions in How To Notes
in the How To Library at www.alliedtelesis.com/resources/literature/howto.aspx.
Which products and software version does it apply to?
The VPN wizard is available on the following Allied Telesis routers, running Software Version
1
or later:
2.9.
z AR4
z AR440S, AR44
You can use the command line to set up an equivalent configuration on AR700 and other
AR400 Series routers. See "How to use the CLI instead of the GUI" on page 30 for the
necessary commands.
We created this example with a SonicWALL TZ
SonicOS Standard does not support NAT-T draft 3, so this solution requires SonicOS
Enhanced.
The screenshots in this Note are from an Internet Explorer 6.0 browser running on
Windows XP.
1
5S
1
S, AR442S
1
70, running SonicOS Enhanced 2.5.1.1-65e.
Page 2 | AlliedWare™ OS How To Note: VPNs with SonicWALL routers
Page 3
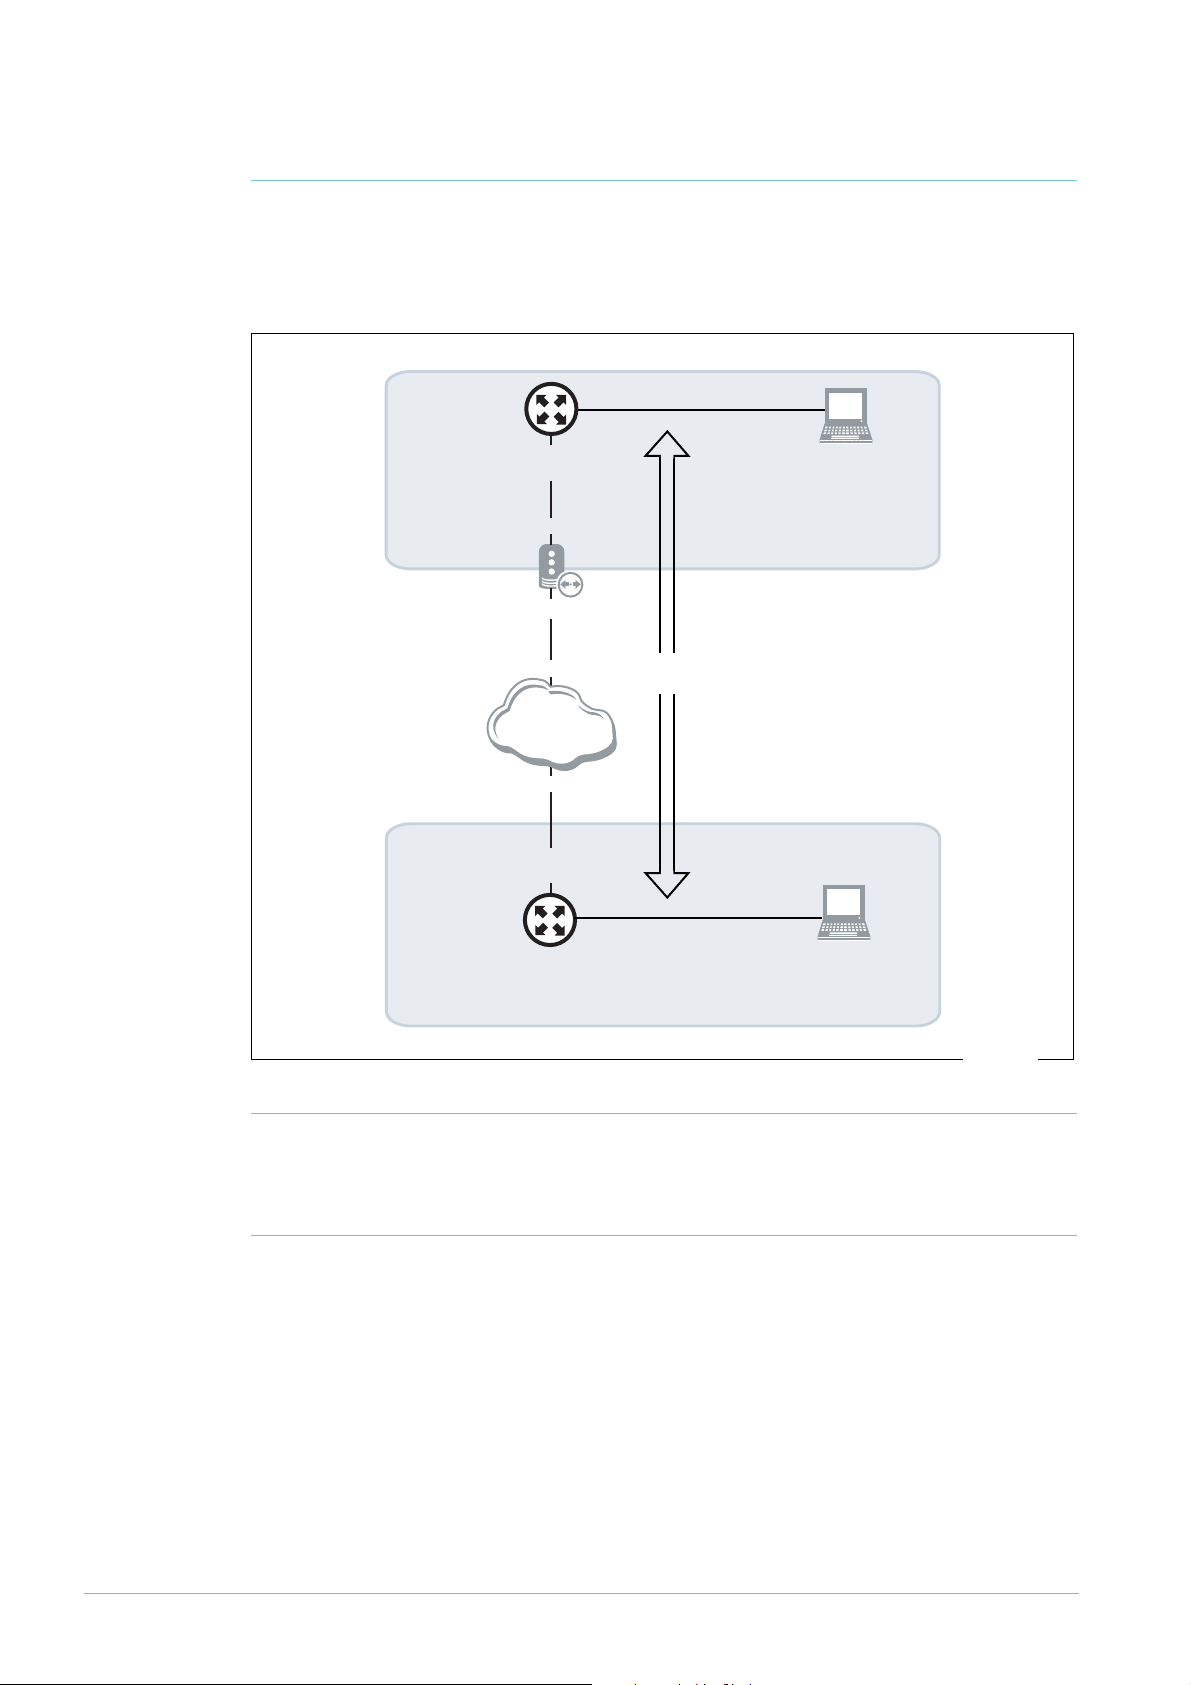
The network
vlan1:
192.168.1.1
eth0:
192.168.254.1/30
Allied Telesis
router
192.168.254.2/30
100.100.100.1/30
NAT device
SonicWALL
router
Internet
WAN:
200.200.200.1/30
workstation:
192.168.1.100 by
automatic address
assignment
VLAN:
192.168.2.1
workstation:
192.168.2.100 by
automatic address
assignment
VPN
tunnel
200.200.200.2/30
100.100.100.2/30
at-sonic.eps
This example illustrates a NAT-T solution, which you need when one or both of the routers
are behind a NAT device such as some xDSL and cable modems. In this example, an Allied
Te l e s i s A R 4
their interfaces and addresses.
1
5S router is behind a NAT device. The following diagram shows the LANs and
Initiating the
tunnel from
either end
Note: You can still use this example if you have no NAT device between the Allied Telesis
router and the Internet, or if you have a NAT device between the SonicWALL router and the
Internet, with slight alterations. See "Appendix: Using this example if you don’t have a NAT
device in the same position" on page 31 for details.
In this example, you can only initiate the tunnel from the Allied Telesis end, not the
SonicWALL end. If you want to let the SonicWALL initiate the VPN too, you have to
configure your NAT device to allow it. To do this, set up pinholes (allow rules) on the NAT
device to allow through UDP traffic on ports 500 and 4500.
Page 3 | AlliedWare™ OS How To Note: VPNs with SonicWALL routers
Page 4

How to configure the Allied Telesis router
Before you
start
1. Install and configure the NAT device.
2. Access the router via its GUI.
3. Customise the router and set up vlan
1
always uses vlan
interface is configured on vlan
as the local LAN for the VPN connection, so you must make sure an IP
1
1
as the LAN interface. The site-to-site VPN wizard
before running the wizard.
4. Create a security officer. If you use the Basic Setup wizard to customise the router, this
creates one security officer, with a username of “secoff”.
5. Set up the WAN interface. This example uses a fixed IP address on the WAN interface—
modify it to use an appropriate interface for your network.
The router setup of steps 2-5 is described in How To Use the Allied Telesis GUI to Customise the
Router and Set Up An Internet Connection, which is available from www.alliedtelesis.com/
resources/literature/howto.aspx.
In this example, the Allied Telesis router has the following settings:
Interface Address Mask
Allied Telesis router LAN vlan
Allied Telesis router WAN eth0
Remote site’s WAN settings 200.200.200.
Remote site’s LAN settings
11
92.168.1.
1
92.168.254.
1
92.168.2.
1
1
1
1
255.255.255.0
255.255.255.252
255.255.255.0
The NAT device has the following settings:
Interface Address Mask
Private interface (towards the router) eth
Public interface (towards the Internet) eth0
11
92.168.254.2 255.255.255.252
1
00.100.100.
1
255.255.255.252
Page 4 | AlliedWare™ OS How To Note: VPNs with SonicWALL routers
Page 5
Create the
VPN tunnel
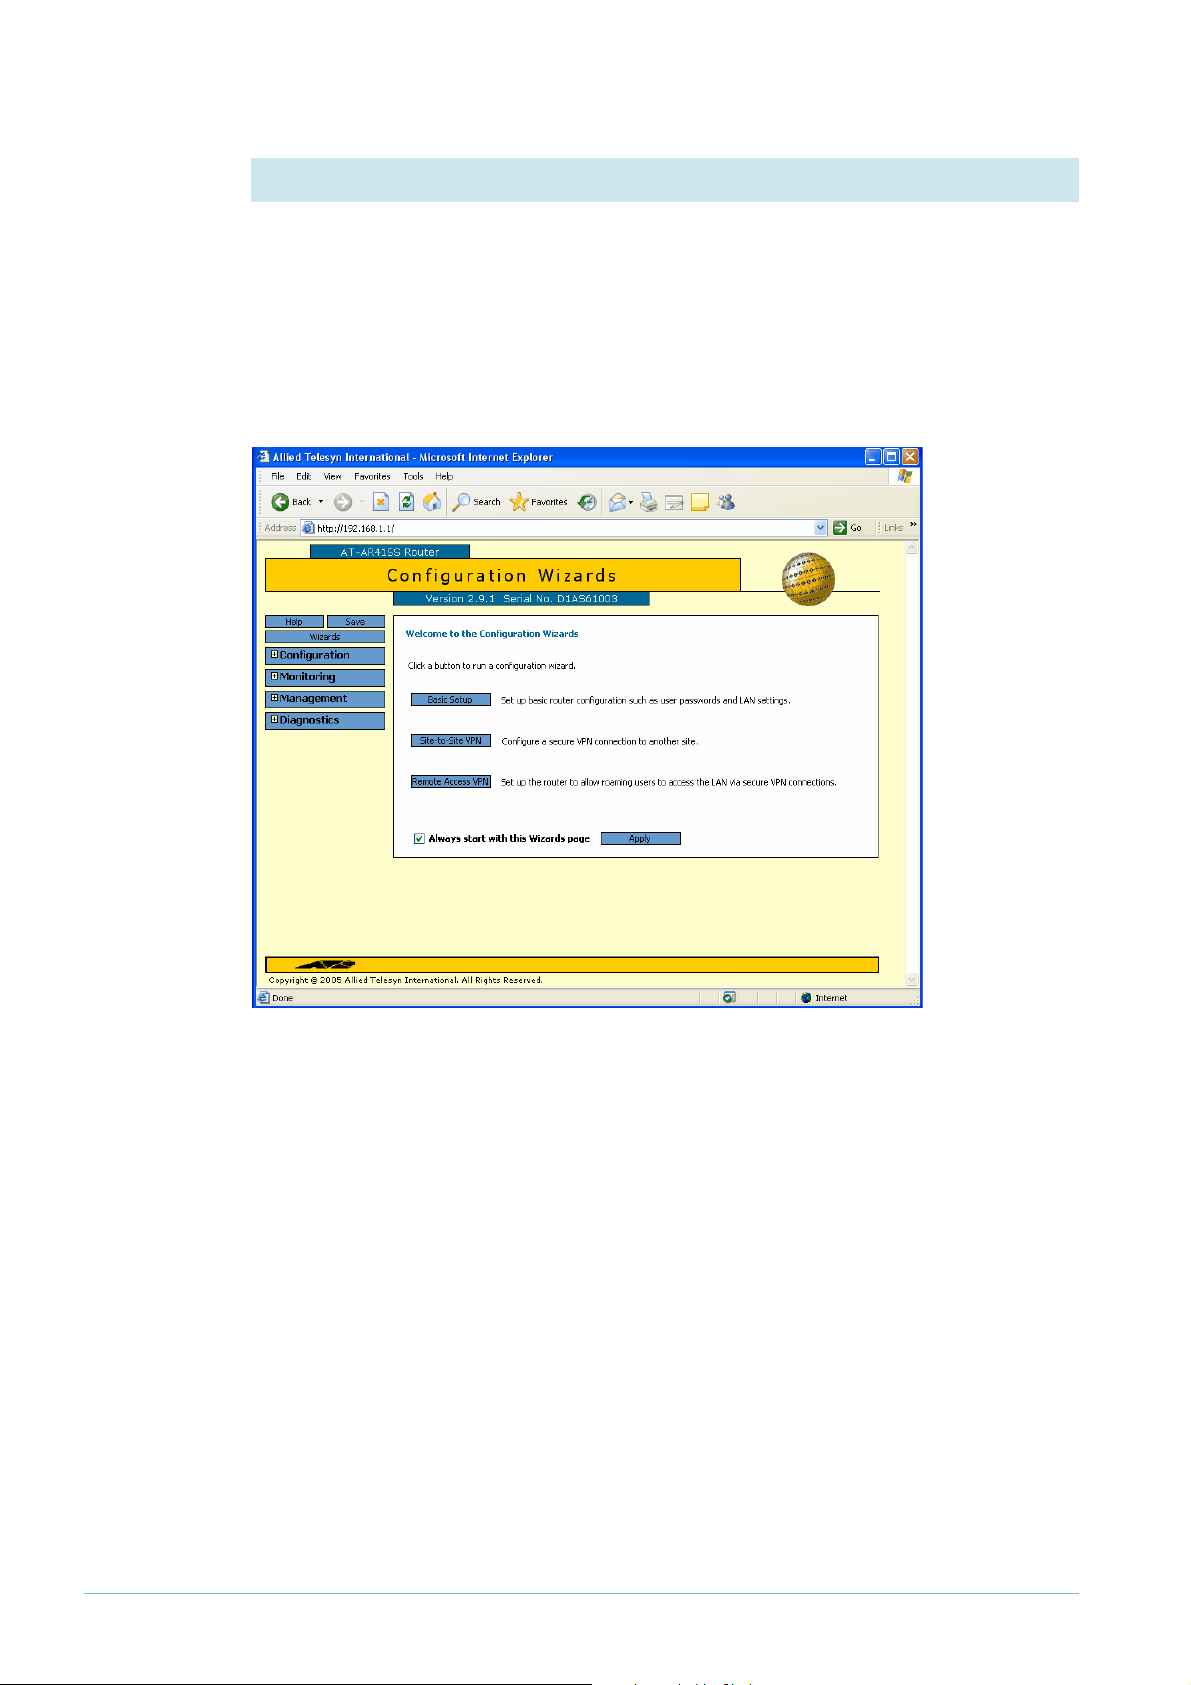
1. Open the Configuration Wizards page
Log in as either the manager or the security officer. If you log in as the manager, the router
changes to secure mode when you finish the VPN wizard and at that stage prompts you to
log in again as the security officer.
The Site-To-Site VPN wizard is one of the options on the Configuration Wizards page. Make
sure your browser’s pop-up blocker is disabled—the wizard needs to open pop-ups. If you
access the Internet through a proxy server, make sure your browser bypasses the proxy for
this address.
The GUI opens at this page the first time you configure your router. After initial configuration
it may open at the System Status page instead. If so, click on the Wizards button in the lefthand menu to open the Configuration Wizards page.
Page 5 | AlliedWare™ OS How To Note: VPNs with SonicWALL routers
Page 6
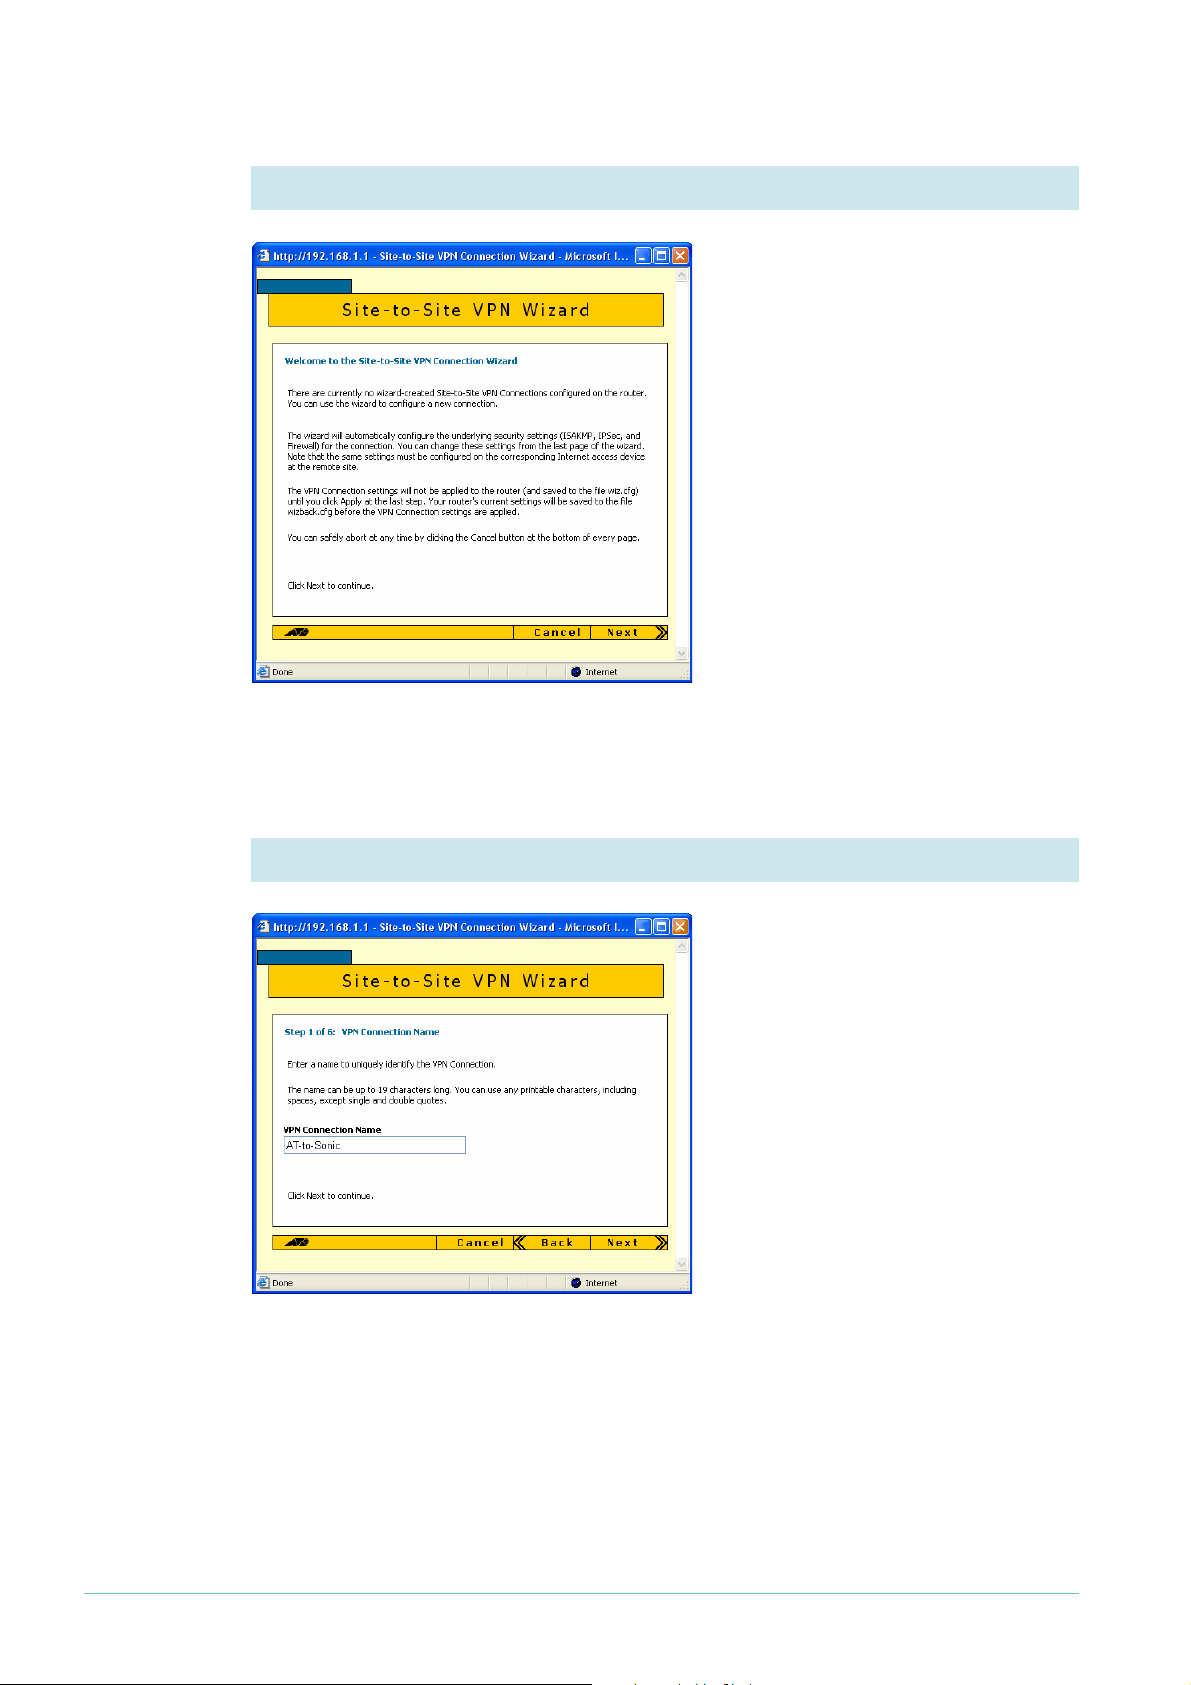
2. Start the Site-to-Site VPN wizard
Click on the Site-to-Site VPN button.
The wizard starts by displaying a
welcome message.
Click the Next button.
3. Name the VPN connection
Enter an appropriate VPN connection
name.
Click the Next button. If you have
multiple possible WAN interfaces
configured on the router, the wizard
next lets you select the appropriate
interface. In this example there is only
one WAN interface, so the wizard
selects it automatically and moves
directly to the remote site settings.
Page 6 | AlliedWare™ OS How To Note: VPNs with SonicWALL routers
Page 7
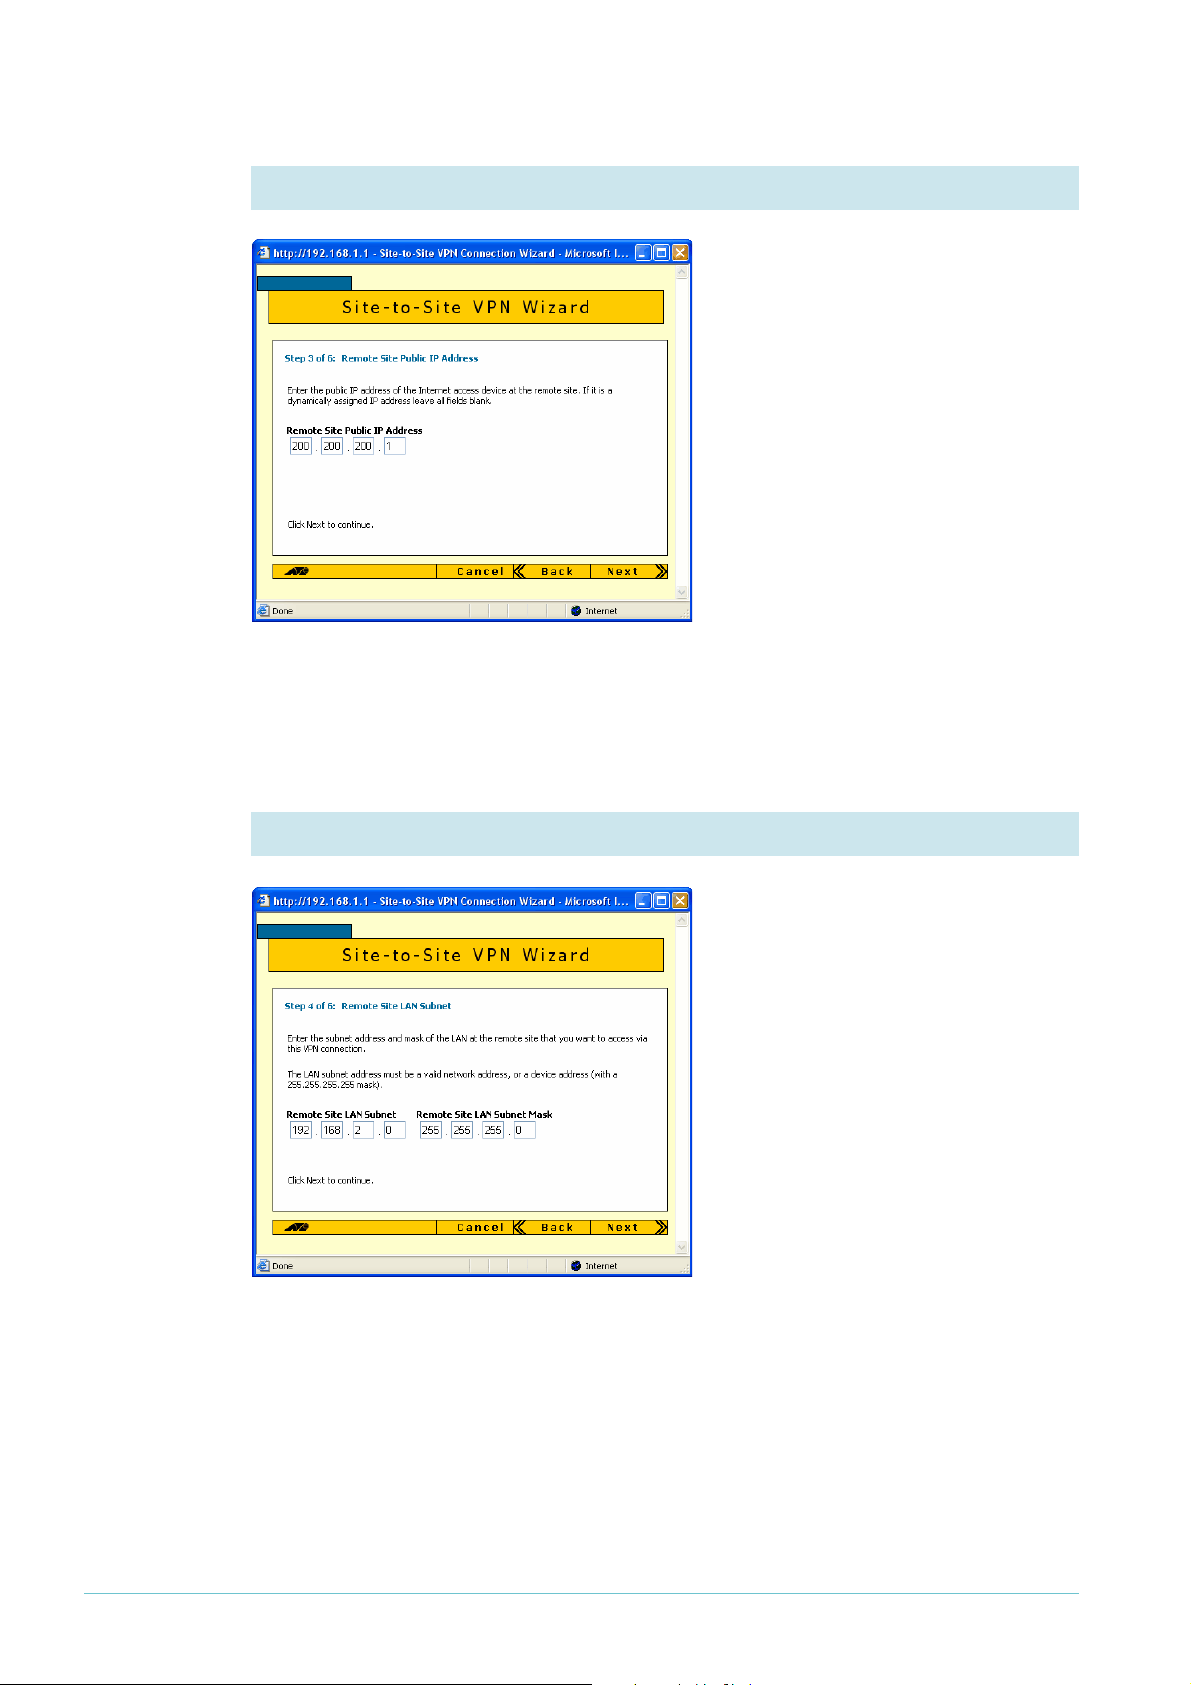
4. Enter the remote site’s WAN IP address
Enter the public IP address of the other
end of the tunnel. In this example, this
is 200.200.200.
address of the SonicWALL WAN
interface.
Note that you can use the Tab key to
move between fields when entering the
address, but should not use the . key
(the period).
Click the Next button.
1
, which is the IP
5. Enter the remote site’s LAN IP address
Enter the SonicWALL router’s LAN
subnet address and mask. In this
example, this is
of 255.255.255.0.
Click the Next button.
1
92.168.2.0 and a mask
Page 7 | AlliedWare™ OS How To Note: VPNs with SonicWALL routers
Page 8
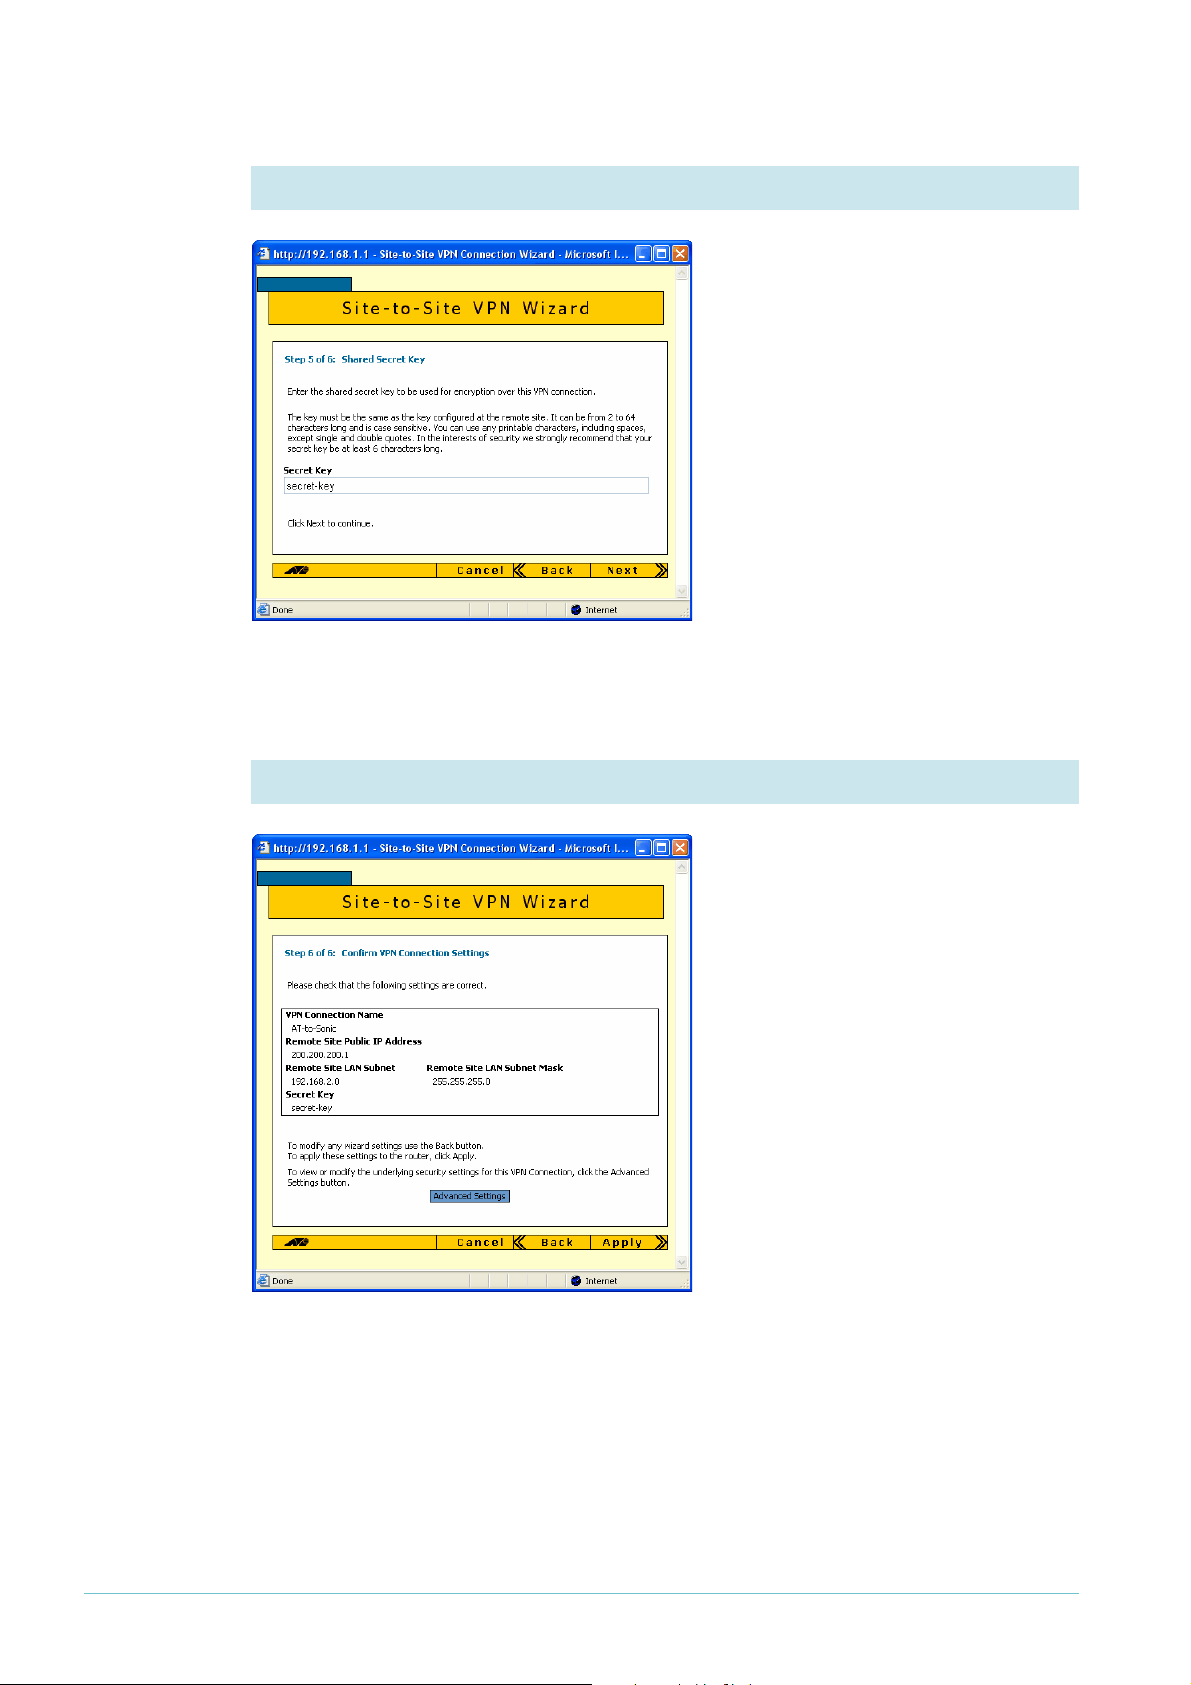
6. Enter the shared secret key
Enter the secret key, which is an
alphanumeric string between 2 and 64
characters long. Both routers must use
the same secret key. On the
SonicWALL router, this is the Site-toSite Policy’s preshared key.
Click the Next button.
7. Check the settings
Check the summary. If necessary, use
the wizard’s Back button to return and
correct any settings you want to
change.
Once you are happy with the settings,
click the Advanced Settings button to
modify Peer ID settings.
Page 8 | AlliedWare™ OS How To Note: VPNs with SonicWALL routers
Page 9
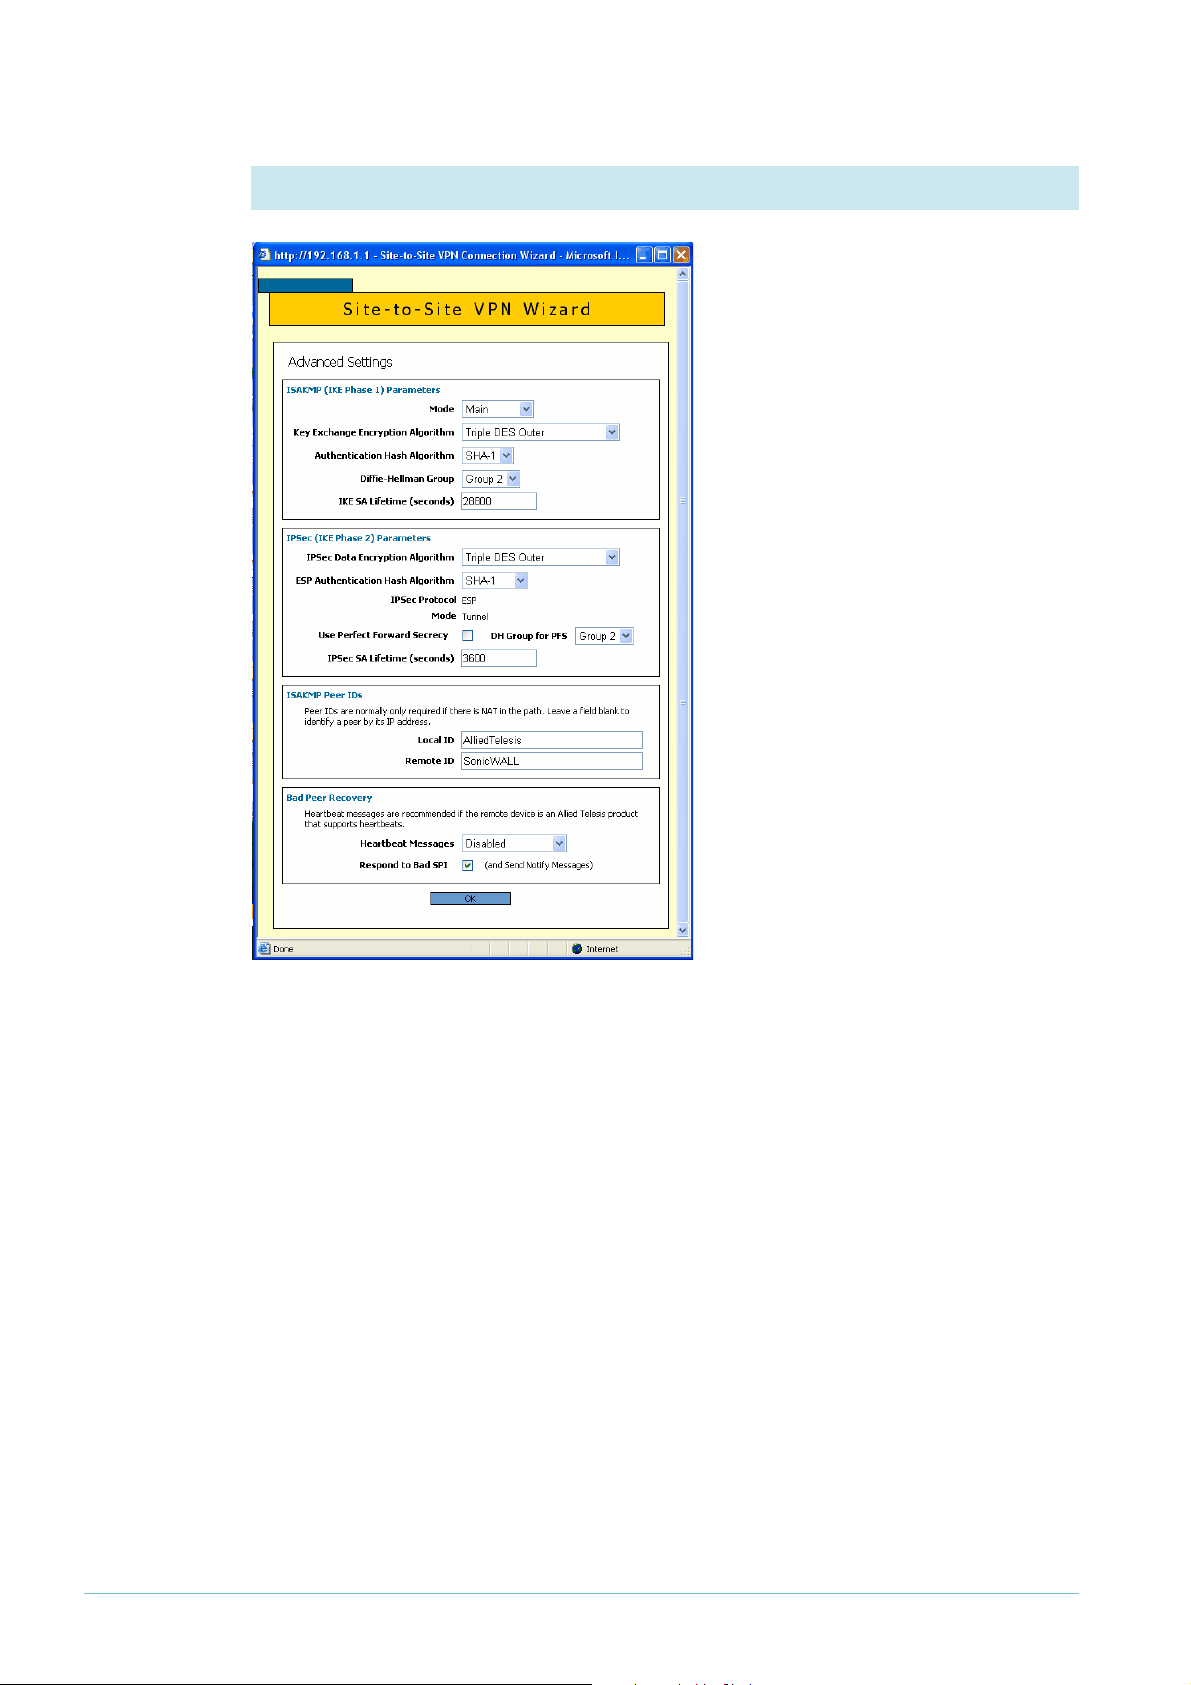
8. Specify Peer IDs
Peer IDs enable the routers to identify
each other when they exchange secret
key information. By default, the Peer
IDs are the router IP addresses. This
does not work when one (or both)
routers are behind a separate NAT
device, because the NAT device
changes the IP addresses.
Towards the bottom of the Advanced
Settings page, enter a local ID (to
identify this router) and a remote ID
(to identify the router at the other end
of the link). It does not matter what
text you use as the IDs, so long as each
ID is different.
Then click the OK button.
Page 9 | AlliedWare™ OS How To Note: VPNs with SonicWALL routers
Page 10

9. Check the settings again
Check the summary. It now includes
the Peer ID settings. If necessary,
correct any settings you want to
change.
When all the settings are correct, click
the Apply button.
Security
officer
10. Finish the wizard
If you are logged in as the security
officer, the GUI displays a completion
message. Click the Finish button to
finish the Wizard and save the VPN
settings.
Page 10 | AlliedWare™ OS How To Note: VPNs with SonicWALL routers
Page 11
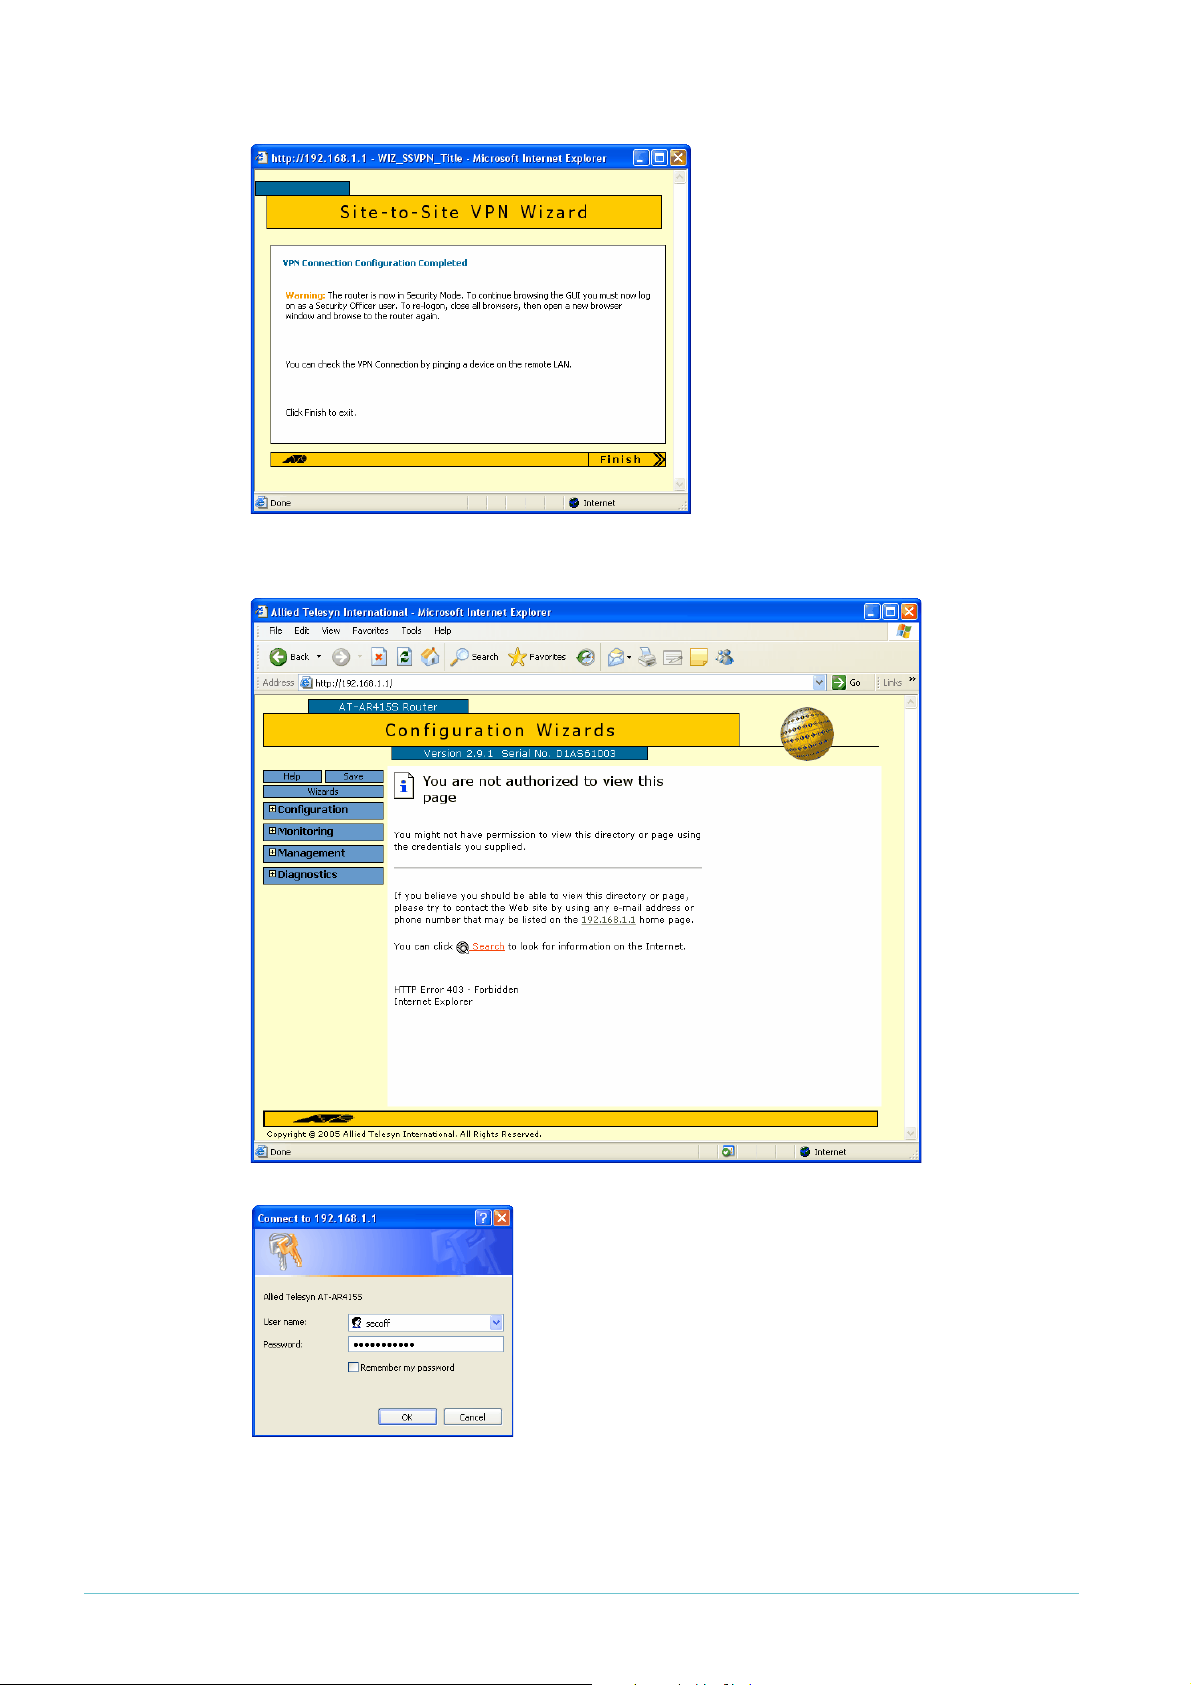
Manager If you are logged in as manager, the
GUI displays a message to warn you
that you will need to close your
browser and re-login as a security
officer (see below) once you have
finished the wizard.
Click the Finish button to finish the
Wizard and save the VPN settings.
The browser now indicates that you no longer have permission to view the GUI.
The router configuration is now complete. If required, you
can log in to the router again for further configuration or
monitoring. To do this, close your browser, open it again,
and browse to the router’s IP address.
If you used the Basic Setup wizard to configure the LAN
settings, the router will have one security officer, with a
username of “secoff”.
Login as the security officer.
Page 11 | AlliedWare™ OS How To Note: VPNs with SonicWALL routers
Page 12

How to configure the SonicWALL router
To configure the SonicWALL router, perform the steps in the following sections:
1. "Access the Router" on page 12
2. "Customise the router and set up the network" on page 15
3. "Define the LAN subnet of the peer" on page 20
4. "Create the VPN" on page 23
5. "Set the VPN IKE IDs and use Main Mode" on page 27
Access the Router
By default, SonicWALL TZ 170 routers start up with a LAN interface IP address of
1
92.168.168.168 and mask of 255.255.255.0.
Resetting to
factory
defaults
If you have difficulty accessing your SonicWALL, you may need to reset it to its factory
defaults. To do this:
1
1. Give your PC an address in the subnet
2. Power up the SonicWALL.
3. Press the Reset button—the pinhole button beside the console port—until the “test” light
on the front flashes orange. This puts the router in SafeMode.
4. Connect the PC's NIC to any of the SonicWALL LAN ports and browse to
1
92.168.168.168.
5. Make sure any pop-up blocker is disabled for that address.
6. Click on the button that allows you to boot up with “Current firmware with Factory
Default Settings”
7. Wait for the GUI to re-display the login screen. If it has not done so after about a minute,
refresh your browser to force the GUI to refresh.
8. Log in using the factory defaults of:
username: admin
password: password
92.168.168.0 (but not 192.168.168.168).
1. Connect a PC to the router
Select a standalone PC to configure the router from—a PC that is not connected into any
existing LAN.
Connect a NIC card on the PC to any of the router’s LAN ports.
2. Set the PC’s IP address
Give your PC an address in the 192.168.168.0 subnet.
Page 12 | AlliedWare™ OS How To Note: VPNs with SonicWALL routers
Page 13

3. Browse to the router’s management GUI
Browse to
you access the Internet through a proxy server, set your browser to bypass the proxy for this
address.
The login dialog box opens.
1
92.168.168.168. If you are using a pop-up blocker, disable it for this address. If
4. Log on
The defaults are
username: admin
password: password
Page 13 | AlliedWare™ OS How To Note: VPNs with SonicWALL routers
Page 14

The first time you
configure your router,
the GUI opens at the
Configuration Wizard
page.
After initial configuration, when you browse to the SonicWALL it may open at the System >
Status page instead of the Configuration Wizard page.
Click on the Wizards button in the left-hand menu to open the Configuration Wizard page.
Page 14 | AlliedWare™ OS How To Note: VPNs with SonicWALL routers
Page 15
Customise the router and set up the network
The following steps use the Setup wizard to begin configuring your router.
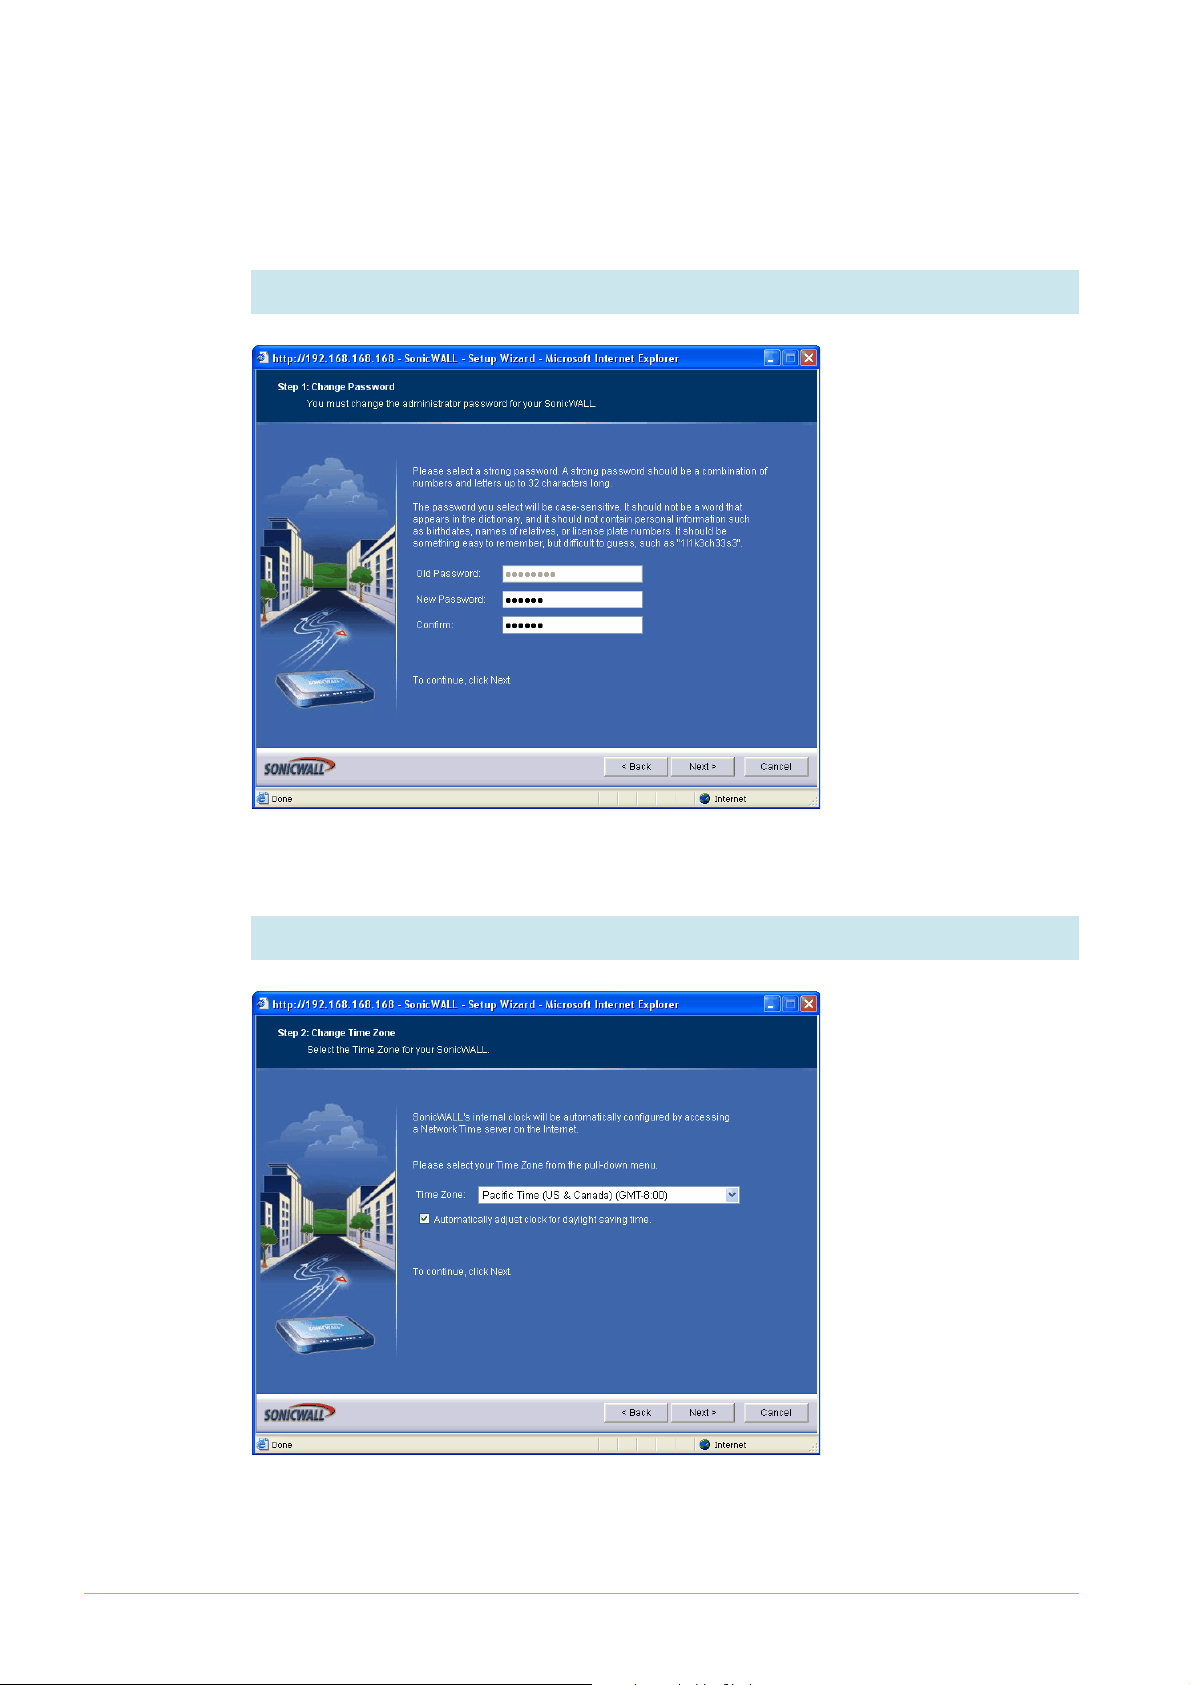
1. Change the administrator password
The first action in the
Setup wizard is to enter
a suitable password for
access to the GUI.
Click the Next button.
2. Set the time zone
Select your time zone,
and set the router to
automatically adjust for
summer time.
Click the Next button.
Page 15 | AlliedWare™ OS How To Note: VPNs with SonicWALL routers
Page 16
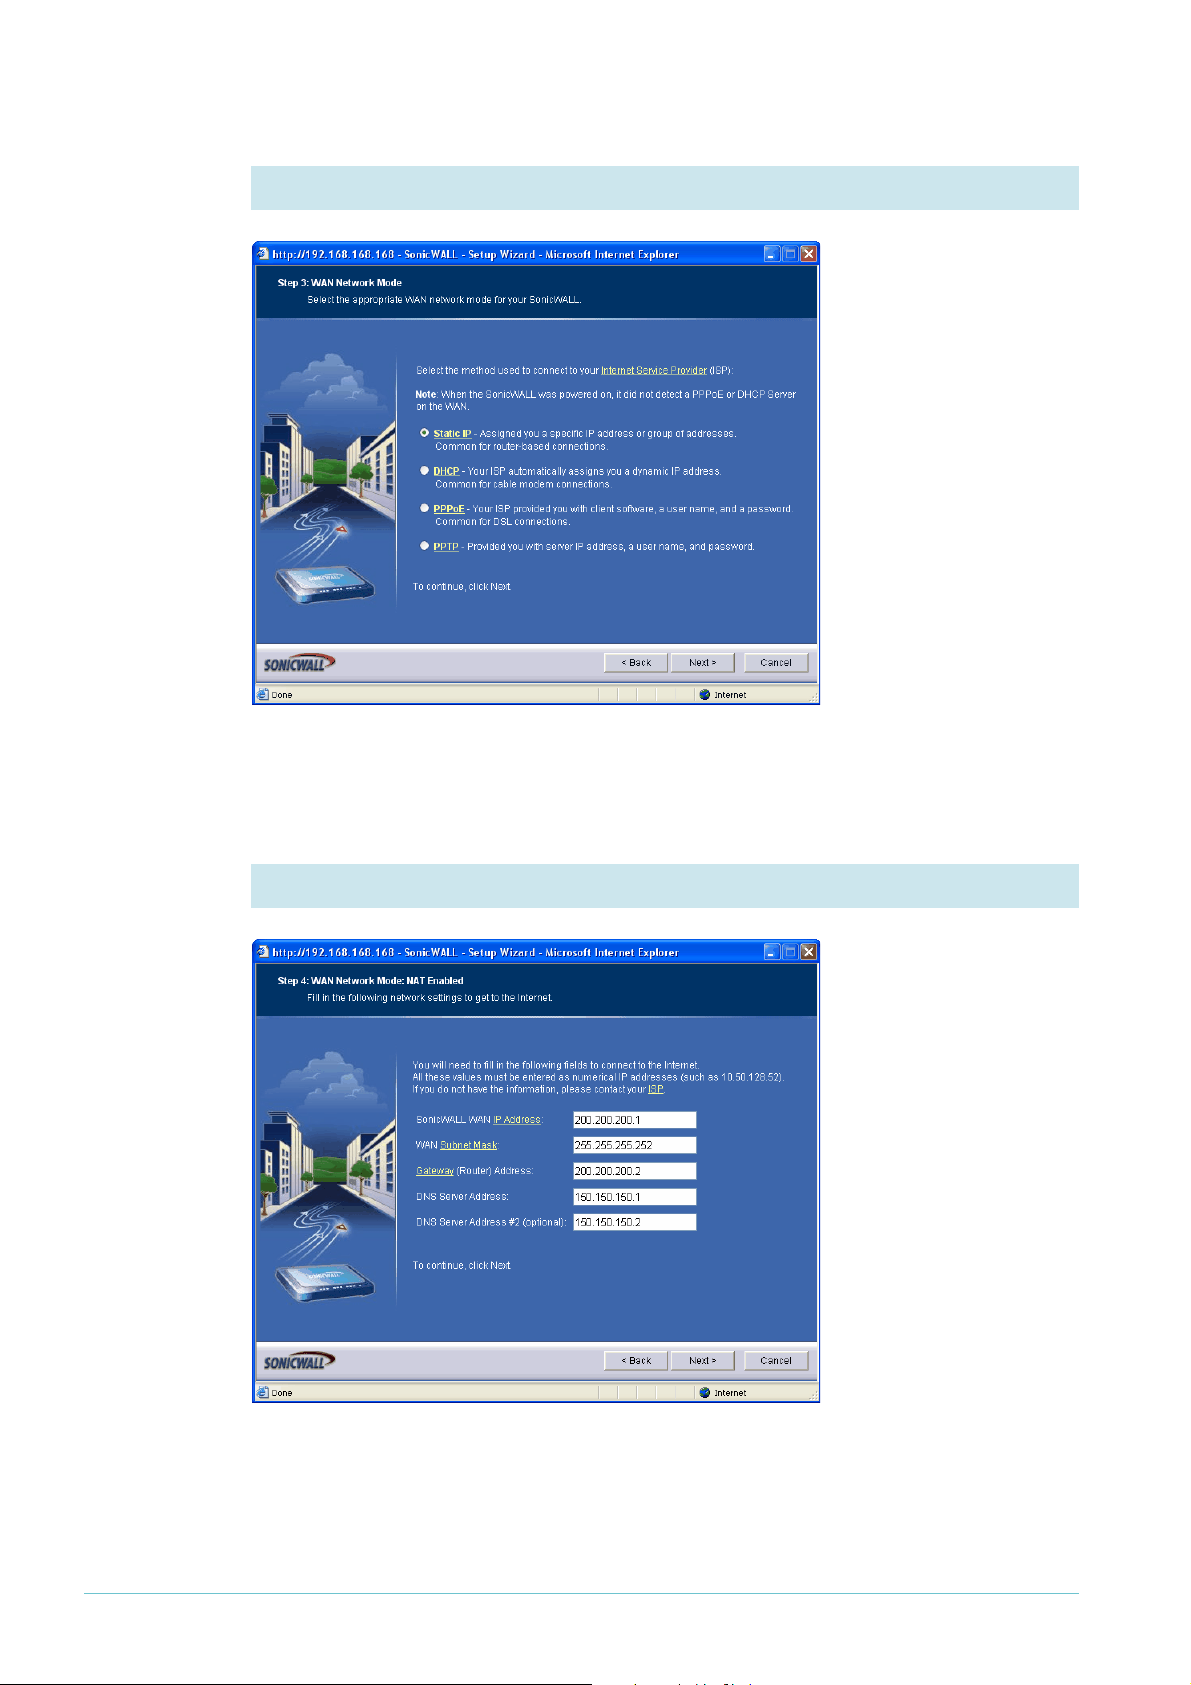
3. Choose the type of WAN address
In this example, the
SonicWALL router has a
permanent fixed IP
address, so select the
Static IP option.
Then click the Next
button.
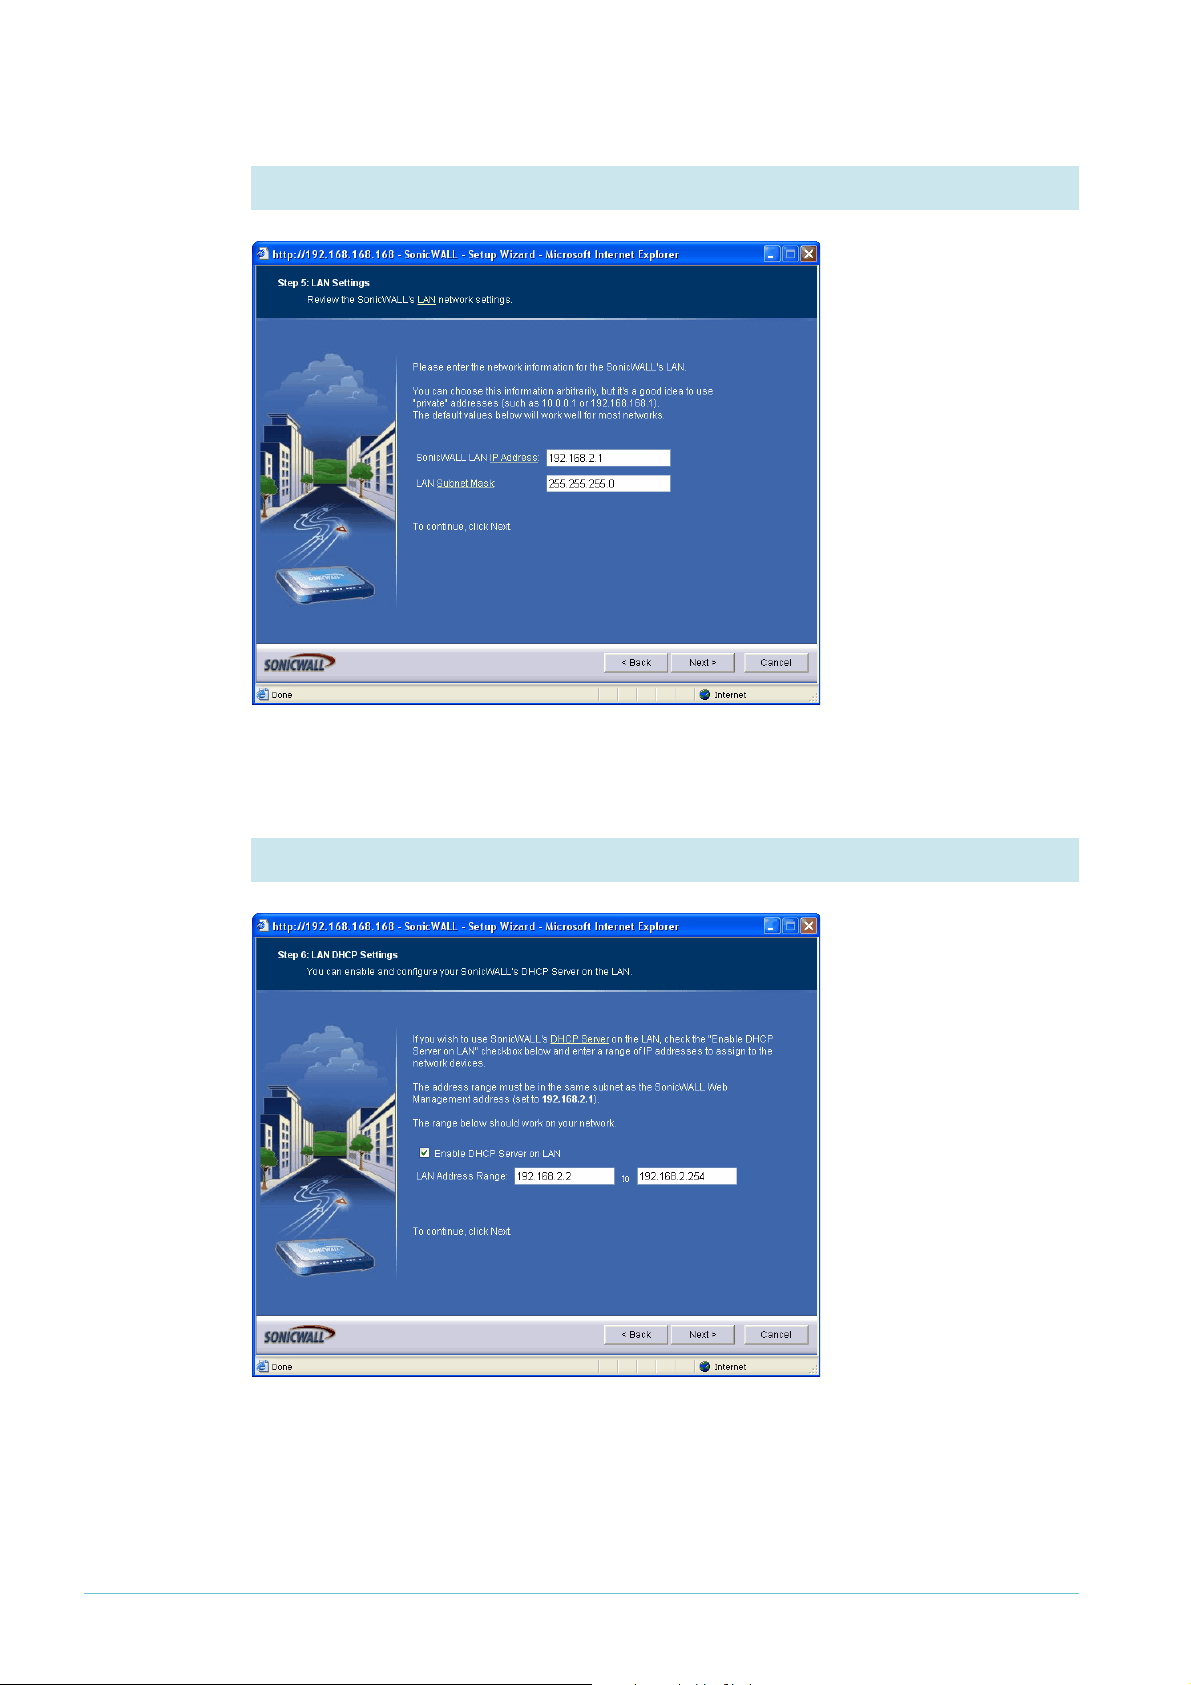
4. Enter the WAN settings
Enter the WAN
interface’s IP address and
mask. For Gateway,
enter the ISP’s address
(see "The network" on
page 3). For DNS Server
Address, enter the
address of the DNS
server that your router
will access.
Then click the Next
button.
Page 16 | AlliedWare™ OS How To Note: VPNs with SonicWALL routers
Page 17
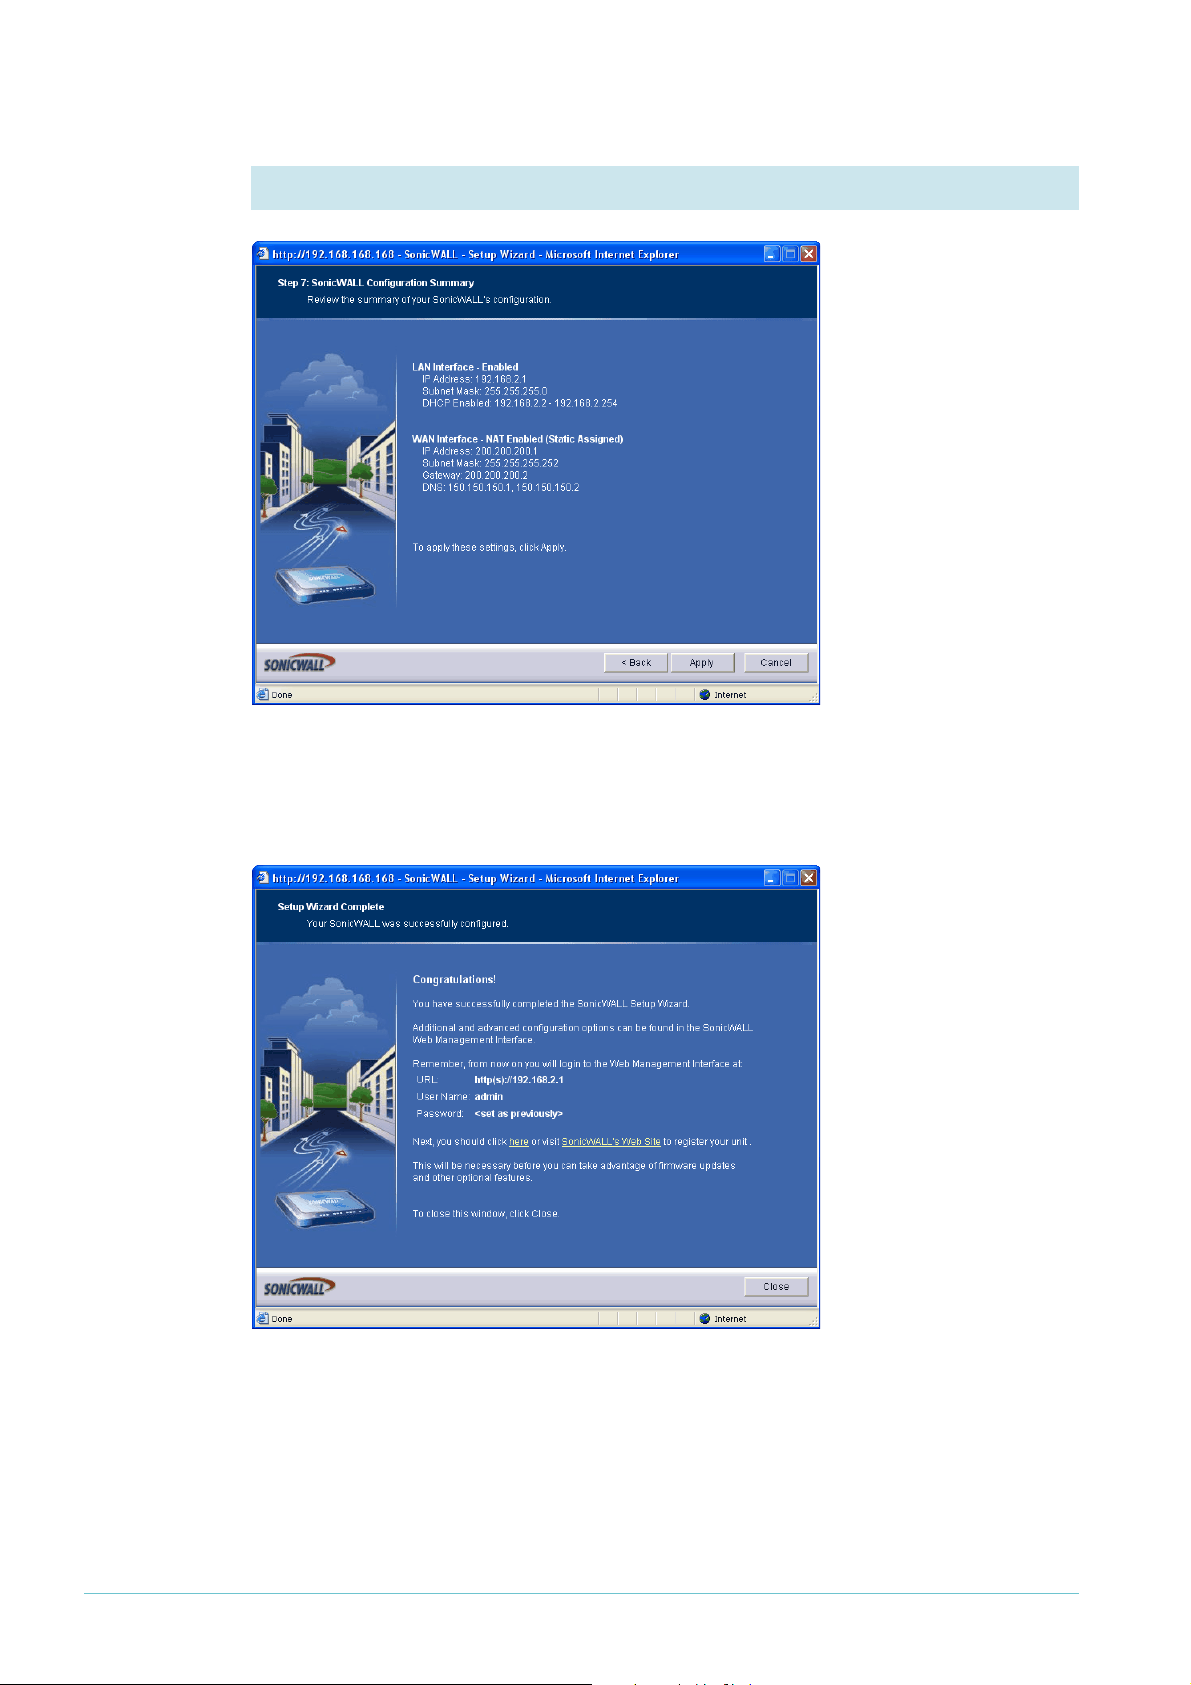
5. Enter the LAN address
Enter the IP address and
mask of the
SonicWALL’s interface
to the LAN.
Then click the Next
button.
6. Set up the DHCP server
In this step, you can set
up the DHCP server on
this router to service
the office LAN you
intend to connect to.
Check that the wizard
has chosen an
appropriate range of
addresses.
Then click the Next
button.
Page 17 | AlliedWare™ OS How To Note: VPNs with SonicWALL routers
Page 18
7. Check the settings
Check the summary. If
necessary, use the Back
button to return and
correct any settings you
want to change.
When all the settings are
correct, click the Apply
button. The wizard
displays a message of
congratulations.
Click the Close button.
Page 18 | AlliedWare™ OS How To Note: VPNs with SonicWALL routers
Page 19

8. Log in again
If you changed the router’s LAN IP address, you need to change the PC’s address. If you
turned on the router’s DHCP server, set the PC to obtain its address automatically.
Otherwise, give the PC an address in the new subnet. You may need to restart the
SonicWALL router to force it to assign an IP address to the PC.
Browse to the router’s new address and log in. The GUI displays the System > Status page.
Page 19 | AlliedWare™ OS How To Note: VPNs with SonicWALL routers
Page 20
Define the LAN subnet of the peer
Before you can configure the VPN, you need to create an address “object”. The address
object defines the LAN subnet of the VPN peer router—in this example, the Allied Telesis
router. There is no wizard for creating the address object, so the following steps use the
Network pages instead.
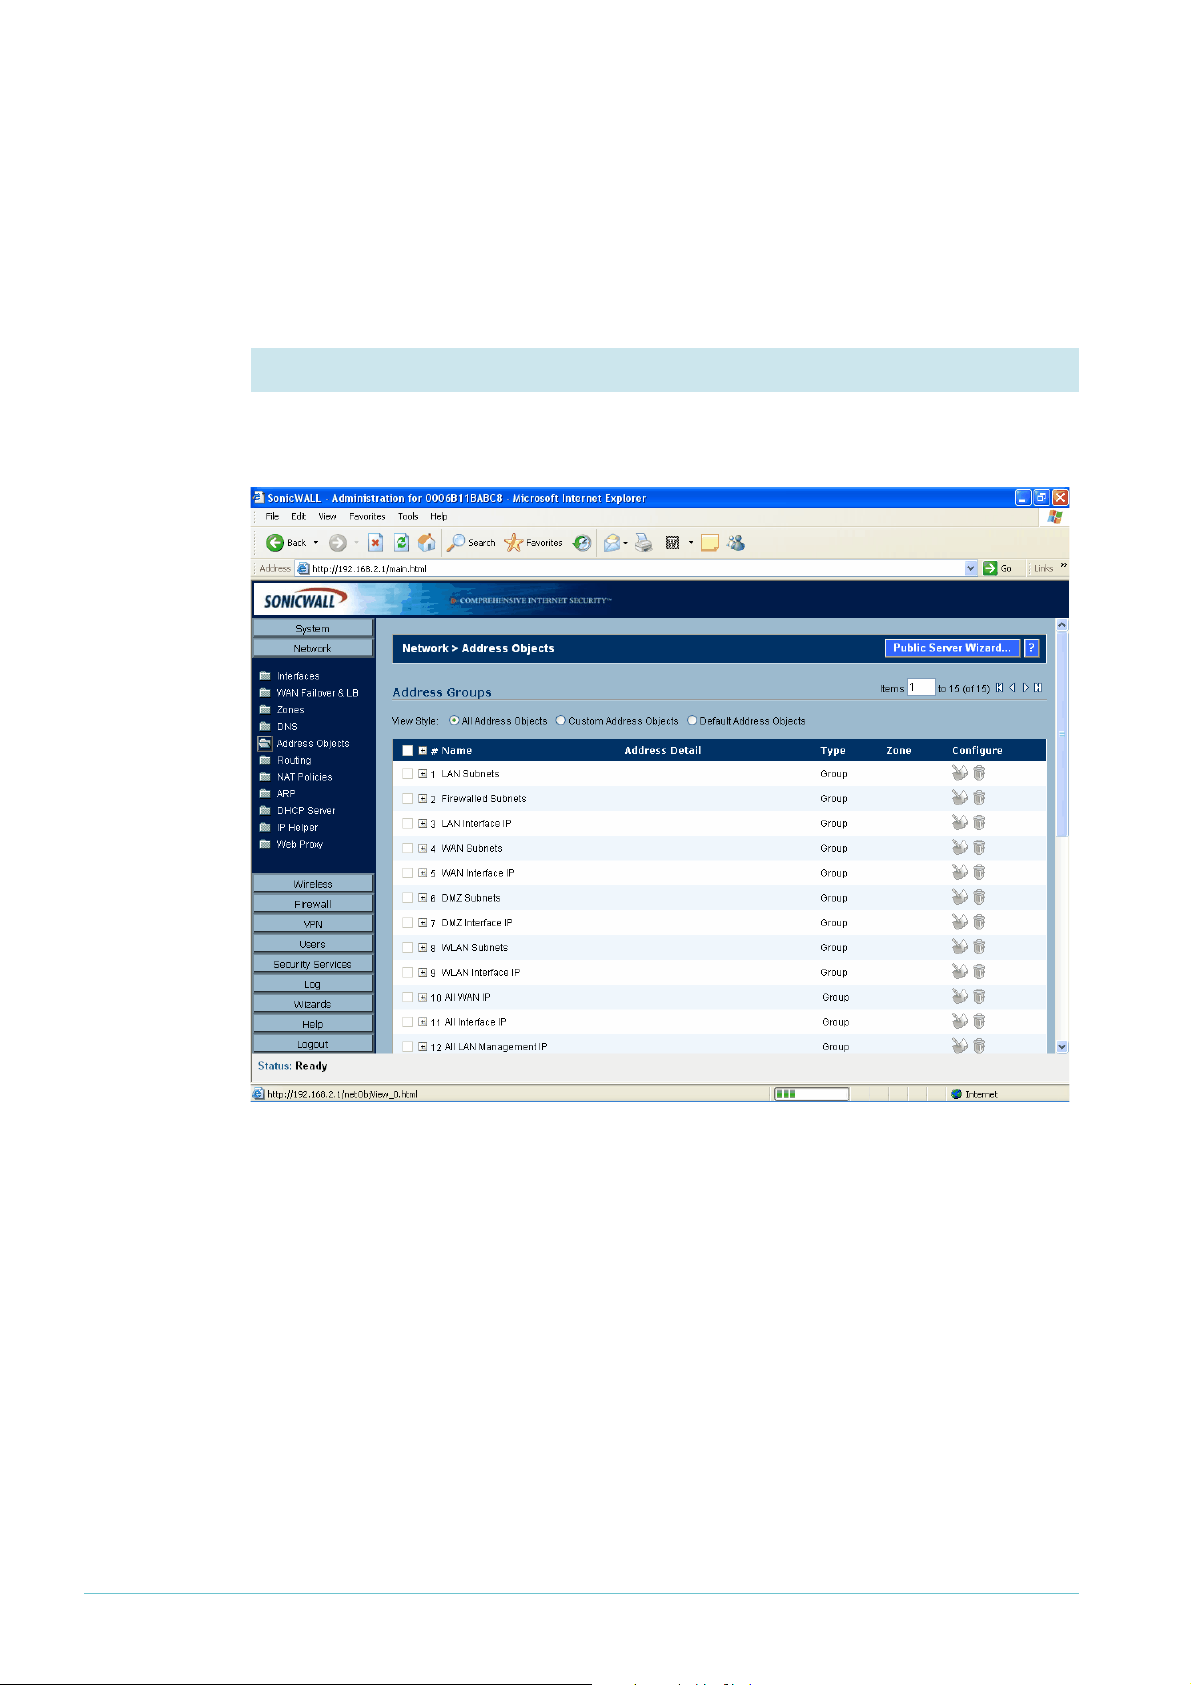
1. Open the Address Objects summary
In the left-hand menu of the System > Status page, select Network, then Address Objects.
The GUI displays a list of all the existing address objects.
Page 20 | AlliedWare™ OS How To Note: VPNs with SonicWALL routers
Page 21
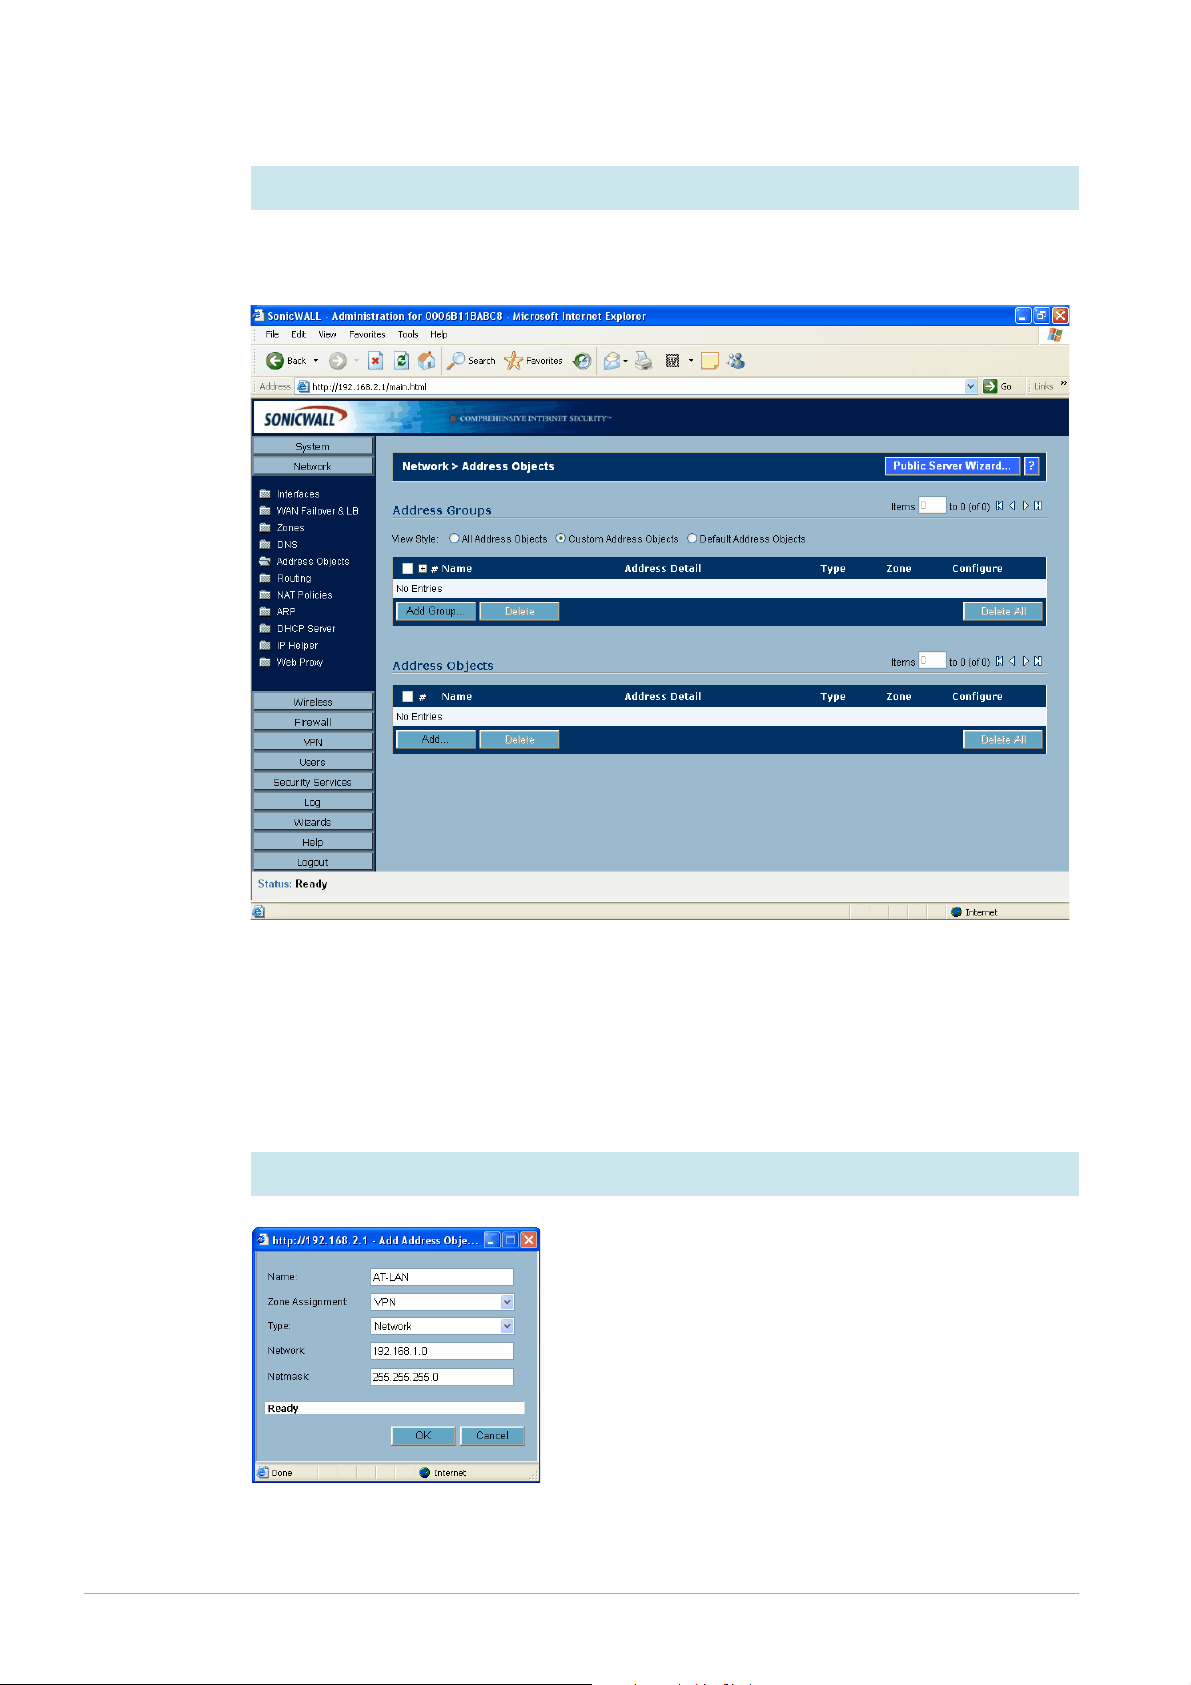
2. Open the Custom Address Objects summary
Select the “Custom Address Objects” view style, which displays lists of Address Groups and
Address Objects.
There will be no custom address objects defined yet, so both the Address Groups and
Address Objects lists are empty. In Address Objects (the bottom section of the window),
click the Add button.
3. Define the address object
Enter the address object settings: the appropriate
network (see "The network" on page 3), and other
settings as shown in the following screenshot. The
address object describes the LAN that is connected to
the Allied Telesis router.
Click the OK button to display the Custom Address
Objects summary page again.
Page 21 | AlliedWare™ OS How To Note: VPNs with SonicWALL routers
Page 22

4. Check the settings
Check that the object is correct. If you need to change the object, click on the icon of a note
and pencil at the right of the object’s entry.
Page 22 | AlliedWare™ OS How To Note: VPNs with SonicWALL routers
Page 23

Create the VPN
The following steps use the VPN wizard to create the SonicWALL end of the VPN.
1. Return to the Configuration Wizards page
Click on the Wizards
button in the left-hand
menu to open the
Configuration Wizard
page, then select the
VPN wizard.
Click the Next button.
2. Start the Site-to-Site VPN wizard
Select the Site-to-Site
option.
Click the Next button.
Page 23 | AlliedWare™ OS How To Note: VPNs with SonicWALL routers
Page 24

3. Create the Site-to-Site policy
Name the policy. Enter
the pre-shared key,
which must be the same
as the Allied Telesis
router’s secret key. Enter
the remote peer
address, which is the
SonicWALL-facing side
of the NAT device in this
example (see "The
network" on page 3).
Click the Next button.
4. Select the networks for each end of the LAN
For the local
(SonicWALL) end, select
Firewalled Subnets. For
the destination (Allied
Telesis) end, select the
address object that you
created in "Define the
LAN subnet of the
peer" on page 20.
Click the Next button.
Page 24 | AlliedWare™ OS How To Note: VPNs with SonicWALL routers
Page 25

5. Specify security settings
You do not need to
modify the default
security settings.
Click the Next button.
6. Check the settings
Check the summary. If
necessary, use the Back
button to return and
correct any settings you
want to change.
When all the settings are
correct, click the Apply
button.
Page 25 | AlliedWare™ OS How To Note: VPNs with SonicWALL routers
Page 26

The GUI displays the VPN > Settings page.
The wizard displays a
message of
congratulations.
Click the Close button.
Page 26 | AlliedWare™ OS How To Note: VPNs with SonicWALL routers
Page 27
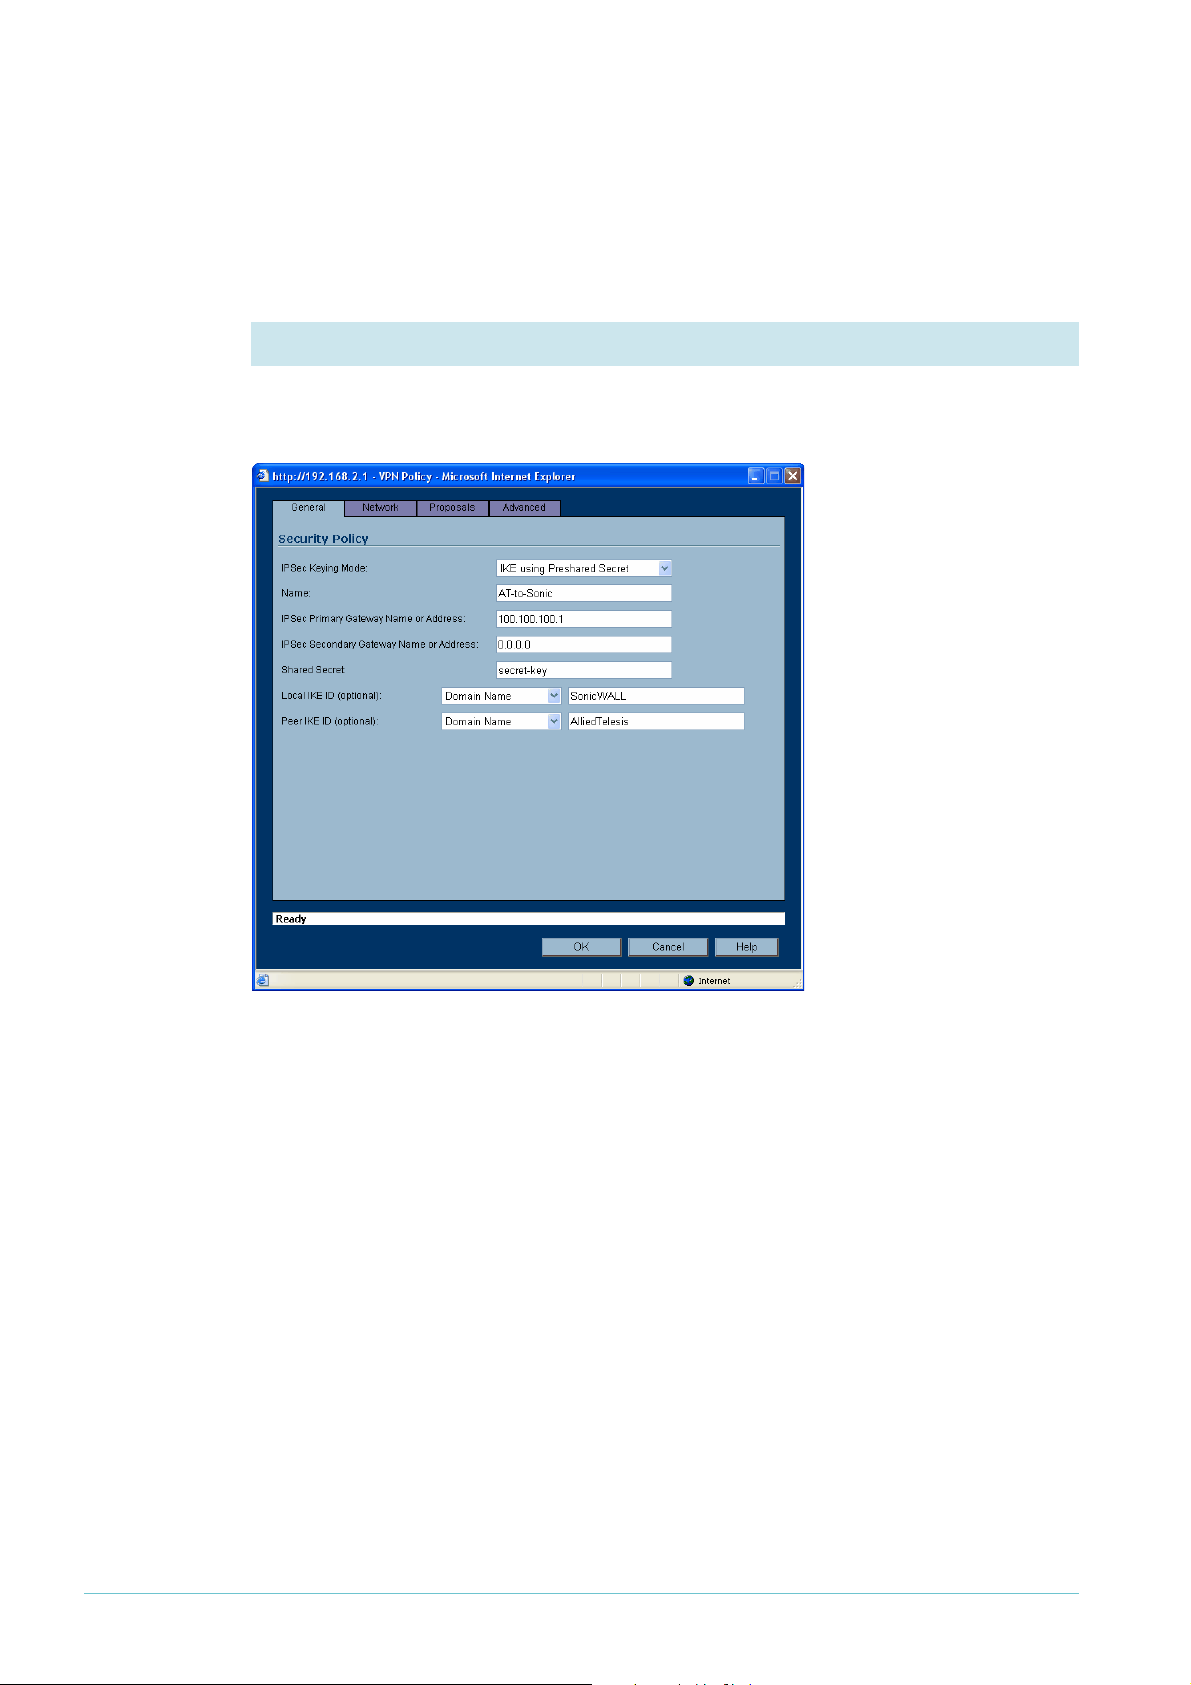
Set the VPN IKE IDs and use Main Mode
Solutions with a NAT device in the tunnel path need to have IKE IDs specified. For all
solutions, we recommend using Main mode instead of the default Aggressive mode. This
section describes how to set both of these.
1. Specify the Local and Peer IKE IDs
On the VPN > Settings page, click on the icon of a note and pencil at the right of the
AlliedTelesis policy’s entry. The VPN policy dialog box opens.
On the General tab, enter
the Local and Peer IKE
IDs. Select “type” of
Domain Name. The values
do not have to be real
domain names, but must
match the values on your
Allied Telesis router
(remember that “local” on
the SonicWALL is
“remote” on the Allied
Telesis, and so on).
Page 27 | AlliedWare™ OS How To Note: VPNs with SonicWALL routers
Page 28

2. Specify IKE Main Mode
Click on the Proposals tab.
Set Exchange to Main
Mode. This is the
preferred mode because it
is more secure.
We also recommend that
you change the lifetime for
the IPsec (Phase2)
Proposal to 3600 seconds,
to match the Allied Telesis
router.
Click OK.
3. If necessary, restart the router
You may find that you need to restart the router to allow all changes to take effect. To do
this, select System > Restart from the left-hand menu.
Page 28 | AlliedWare™ OS How To Note: VPNs with SonicWALL routers
Page 29

How to test the tunnel
There are several options for testing the tunnel. If these checks show that your tunnel is not
working, see the How To Note H ow To Tr ou b le sh oo t A Vi r t ual Private Network (VPN).
1. Check the tunnel status
On the SonicWALL router’s VPN > Settings page, look for a green dot in the VPN policy
entry, and for an entry in the “Currently Active VPN Tunnels” section.
2. Ping the SonicWALL LAN
From the PC attached to the Allied Telesis router, ping the PC attached to the SonicWALL
router, or the SonicWALL router’s LAN address.
Note that when a NAT device is in the VPN path you can only initiate the tunnel from the
router behind the NAT device, unless you create a suitable pinhole on the NAT device. In
this example, that means you cannot ping from the SonicWALL end of the tunnel to the
Allied Telesis end (unless you first ping in the other direction).
Page 29 | AlliedWare™ OS How To Note: VPNs with SonicWALL routers
Page 30

How to use the CLI instead of the GUI
This section gives an example of the Allied Telesis CLI commands that you need to enter for
the IP, firewall, IPsec and ISAKMP aspects of this configuration.
# IP configuration
enable ip
add ip int=vlan1 ip=192.168.1.1
add ip int=eth0 ip=192.168.254.1 mask=255.255.255.252
add ip rou=0.0.0.0 mask=0.0.0.0 int=eth0 next=192.168.254.2
# Firewall configuration
enable firewall
create firewall policy=guilan
enable firewall policy=guilan icmp_f=ping
add firewall policy=guilan int=vlan1 type=private
add firewall policy=guilan int=eth0 type=public
add firewall poli=guilan nat=enhanced int=vlan1 gblint=eth0
add firewall poli=guilan rule=1 action=allow int=eth0 protocol=udp port=500
ip=192.168.254.1 gblip=192.168.254.1 gblport=500
add firewall poli=guilan rule=2 action=allow int=eth0 protocol=udp port=4500
ip=192.168.254.1 gblip=192.168.254.1 gblport=4500
add firewall poli=guilan rule=3 action=nonat int=eth0 protocol=ALL
encap=ipsec
add firewall poli=guilan rule=4 action=nonat int=vlan1 protocol=ALL
ip=192.168.1.1-192.168.1.254
set firewall poli=guilan rule=4 remote=192.168.2.1-192.168.2.254
# IPSEC configuration
create ipsec saspec=0 key=isakmp protocol=esp encalg=3desouter hashalg=sha
set ipsec saspec=0 antireplay=true
create ipsec bundle=0 key=isakmp string="0" expirysec=3600
create ipsec policy=eth0allowISAKMP int=eth0 action=permit
set ipsec policy=eth0allowISAKMP lport=500 transportprotocol=UDP
create ipsec policy=eth0allowISAKMPF int=eth0 action=permit
set ipsec policy=eth0allowISAKMPF lport=4500
create ipsec policy=wiz_AT-to-Sonic int=eth0 action=ipsec key=isakmp bundle=0
peer=200.200.200.1 isakmp=wiz_AT-to-Sonic
set ipsec policy=wiz_AT-to-Sonic laddress=192.168.1.0 lmask=255.255.255.0
raddress=192.168.2.0 rmask=255.255.255.0
set ipsec policy=wiz_AT-to-Sonic respondbadspi=TRUE
create ipsec policy=eth0allow int=eth0 action=permit
enable ipsec
# ISAKMP configuration
create isakmp policy=wiz_AT-to-Sonic peer=200.200.200.1 encalg=3desouter
key=0 natt=true
set isakmp policy=wiz_AT-to-Sonic expirysec=28800 group=2
set isakmp policy=wiz_AT-to-Sonic sendd=true sendn=true
set isakmp policy=wiz_AT-to-Sonic localid="AlliedTelesis" remotei="SonicWALL"
enable isakmp
Page 30 | AlliedWare™ OS How To Note: VPNs with SonicWALL routers
Page 31

USA Headquar ters | 19800 Nor th Cr eek Parkwa y | Suite 100 | Bothell | WA 98011 | USA | T: +1 800 424 4284 | F: +1 425 481 3895
Eur opean Headquar ters | Via Motta 24 | 6830 Chiasso | Switzerland | T: +41 91 69769.00 | F: +41 91 69769.11
Asia-Pacific Headquar ters | 11 T ai Seng Link | Singapor e | 534182 | T: +65 6383 3832 | F: +65 6383 3830
www .alliedtelesis.com
© 2008 Allied Te l esis,
Inc. All rights reser ved. Information in this document is subject to change without notice.
All company names, logos,and product designs that are tr ademarks or registered trademarks are the proper ty of their respective owners.
Allied Telesis is a trademark or registered trademark of Allied Telesis, Inc. in the United States and other countries.
Appendix: Using this example if you don’t have a NAT device in the same position
You can still use this example if you have no NAT device between the Allied Telesis router
and the Internet, or if you have a NAT device between the SonicWALL router and the
Internet. Simply change the peer addresses that you enter into the wizards, in the following
ways:
If you have... in the Allied Telesis VPN
wizard, for Remote Site
Public IP Address, enter...
no NAT devices in the path of the VPN the SonicWALL router’s public-
side address
the SonicWALL router behind a NAT
device instead of the Allied Telesis router
both routers behind a NAT device the public-side address of the
the NAT device’s public-side
address
NAT device in front of the
SonicWALL router
in the SonicWALL VPN
wizard, for Remote Peer IP
Address, enter...
the Allied Telesis router’s publicside address
the Allied Telesis router’s publicside address
the public-side address of the
NAT device in front of the Allied
Telesis router
C613-16098-00 REV E
 Loading...